

Page 1

WavePort
User's Manual
High-Speed Portable Data Acquisition Systems
the smart approach to instrumentation ™
IOtech, Inc.
25971 Cannon Road
Cleveland, OH 44146-1833
Phone: (440) 439-4091
Fax: (440) 439-4093
E-mail (Product Information): sales@iotech.com
E-mail (Technical Support): productsupport@iotech.com
Internet: www.iotech.com
WavePort
High-Speed Portable Data Acquisition Systems
p/n
User's Manual
1036-0901
Rev.
3.0
© 2000 by IOtech, Inc.
September 2000
Printed in the United States of America
Page 2

Page 3

Warranty Information
Your IOtech warranty is as stated on the product warranty card. You may contact IOtech by phone,
fax machine, or e-mail in regard to warranty-related issues.
Phone: (440) 439-4091, fax: (440) 439-4093, e-mail: sales@iotech.com
Limitation of Liability
IOtech, Inc. cannot be held liable for any damages resulting from the use or misuse of this product.
Copyright, Trademark, and Licensing Notice
All IOtech documentation, software, and hardware are copyright with all rights reserved. No part of this product may be
copied, reproduced or transmitted by any mechanical, photographic, electronic, or other method without IOtech’s prior
written consent. IOtech product names are trademarked; other product names, as applicable, are trademarks of their
respective holders. All supplied IOtech software (including miscellaneous support files, drivers, and sample programs)
may only be used on one installation. You may make archival backup copies.
FCC Statement
IOtech devices emit radio frequency energy in levels compliant with Federal Communications Commission rules (Part 15)
for Class A devices. If necessary, refer to the FCC booklet How To Identify and Resolve Radio-TV Interference Problems
(stock # 004-000-00345-4) which is available from the U.S. Government Printing Office, Washington, D.C. 20402.
CE Notice
Many IOtech products carry the CE marker indicating they comply with the safety and emissions standards of the
European Community. As applicable, we ship these products with a Declaration of Conformity stating which
specifications and operating conditions apply.
Warnings, Cautions, Notes, and Tips
Refer all service to qualified personnel. This caution symbol warns of possible personal injury or equipment damage
under noted conditions. Follow all safety standards of professional practice and the recommendations in this manual.
Using this equipment in ways other than described in this manual can present serious safety hazards or cause equipment
damage.
This warning symbol is used in this manual or on the equipment to warn of possible injury or death from electrical
shock under noted conditions.
This ESD caution symbol urges proper handling of equipment or components sensitive to damage from electrostatic
discharge. Proper handling guidelines include the use of grounded anti-static mats and wrist straps, ESD-protective
bags and cartons, and related procedures.
This symbol indicates the message is important, but is not of a Warning or Caution category. These notes can be of
great benefit to the user, and should be read.
In this manual, the book symbol always precedes the words “Reference Note.” This type of note identifies the location
of additional information that may prove helpful. References may be made to other chapters or other documentation.
Tips provide advice that may save time during a procedure, or help to clarify an issue. Tips may include additional
reference.
Specifications and Calibration
Specifications are subject to change without notice. Significant changes will be addressed in an addendum or revision to
the manual. As applicable, IOtech calibrates its hardware to published specifications. Periodic hardware calibration is
not covered under the warranty and must be performed by qualified personnel as specified in this manual. Improper
calibration procedures may void the warranty.
Quality Notice
IOtech has maintained ISO 9001 certification since 1996. Prior to shipment, we thoroughly test our products and
review our documentation to assure the highest quality in all aspects. In a spirit of continuous improvement, IOtech
welcomes your suggestions.
03-10-00
Page 4

Page 5
Manual Layout
This manual pertains to setup and operation of a WavePort data acquisition system.
The material is organized as follows:
Chapter 1: Unpacking and Inspecting your WavePort Package
Chapter 2: An Introduction to WavePort
Chapter 3: System Setup
Chapter 4: Hardware and Operation Reference
Chapter 5: Software, An Introduction
Chapter 6: WaveView
Chapter 7: DIAdem - the PC Workshop, Quick Start and User’s Guide
Chapter 8: Troubleshooting
Chapter 9: Maintenance, Service, and Part Replacement
Chapter 10: Specifications
Appendix A: Using Accelerometers
Appendix B: WBK20A PCMCIA Option, Setup Notes
Glossary
WARNING
WARNING
WARNINGWARNING
The Notebook Power receptacle is “LIVE” whenever WavePort is plugged into a live AC power source.
The Module Power Switch can not be used to turn this receptacle “Off.”
WavePort contains no user serviceable components. Do not remove WavePort’s cover plate.
Lethal voltages are present which could cause serious injury or death.
CAUTION
CAUTION
CAUTIONCAUTION
Using this equipment in ways other than described in this manual can cause personal injury or
equipment damage. Pay special attention to all cautions and warnings.
Reference Note:
Additional information (not available at the time of publication), can be found in ReadMe files,
or in supplemental documentation.
WavePort User’s Manual
09-29-00
i
Page 6

Table of Contents
1 – Unpacking and Inspecting your WavePort Package ….. 1-1
2 – An Introduction to WavePort
What is WavePort?......2-1
What Types of I/O Signals Apply to WavePort?….. 2-2
3 – System Setup
Choosing a Notebook PC …… 3-1
Attaching the Notebook to WavePort …… 3-1
Connecting the Communication Cable and Notebook Power Cable …… 3-4
Connecting the WavePort to Power…… 3-5
Installing Software …… 3-5
Using the Daq Configuration Applet to Check Connections…… 3-6
A Guide to Using the Daq Configuration Applet …… 3-7
4 – Hardware and Operation Reference
WavePort/PE Devices …… 4-1
Overview ……4-2
Basic Operation ……4-3
Signal Aspects ……4-5
WavePort/PE16 ……4-5
WavePort/PE8 …… 4-6
WavePort/V Devices …… 4-8
Overview……4-8
Basic Operation ……4-9
Signal Aspects ……4-10
Ground Connections ……4-11
DB25F “Digital I/O, External Clock, TTL Trigger” Connection ……4-12
Programmable Features ……4-12
Triggers ……4-13
Pulse Trigger ……4-13
Digital-Pattern Trigger ……4-14
Multi-channel Triggering ……4-14
External Clock and Counter-Timer ……4-15
Power Aspects ……4-16
Power Module Operation ……4-18
Charging ……4-19
Fuse Replacement …… 4-19
Factory-Installed Option Cards (for WaveBook and WBK10A-based modules) …… 4-20
WBK11A – Simultaneous Sample and Hold Card……4-20
WBK12A and WBK13A Programmable Low-Pass Filter Cards ……4-21
WavePort’s Fan ……4-22
5 – Software, An Introduction ….. 5-1
6 – WaveView…… 6-1
Software Setup Notice for WavePort… 6-1
Introduction…… 6-2
Software Startup & Sample Acquisition…… 6-2
Startup WaveView…… 6-2
Configure Channels…… 6-4
Configure Acquisition…… 6-5
Collect Data…… 6-6
Store Data [and View File Data], Option…… 6-7
WaveView Configuration Main Window…… 6-7
Data Conversion…… 6-12
ii WavePort User’s Manual
Page 7

Acquisition Configuration…… 6-13
General Information ….. 6-13
Trigger Types ….. 6-14
External Clock and Counter-Timer …… 6-15
Digital Pattern Trigger…… 6-16
Pulse Trigger …… 6-17
WaveView Scope Window…… 6-18
WaveView Direct-To-Disk Window… 6-21
7 – DIAdem
Preface …… 7-2
DIAdem Quick Start…… 7-3
Installing DIAdem …… 7-3
Launching DIAdem from an Acquisition Program …… 7-3
Using DIAdem with ChartView …… 7-5
Where to go from here …… 7-9
DIAdem-VIEW Help Files ……7-9
“Examples” Help Files …… 7-10
DIAdem - the PC Workshop …… 7-13
The Overall Design …… 7-13
DIAdem Help …… 7-18
Options …… 7-19
DIAdem DATA: Loading and Saving Data …… 7-23
The Data Area …… 7-23
Copying, Pasting, and Deleting Data Channels …… 7-25
Saving and Opening Data Sets …… 7-26
DIAdem VIEW: Viewing, Measuring & Editing Data …… 7-27
Viewing Data as Graphs …… 7-28
Using the Cursor Position to Measure a Graph …… 7-29
How to Copy or Delete a Graph …… 7-32
Using Zoom, Scrolling, & Screen Partition …… 7-33
8 – Troubleshooting …… 8-1
Electrostatic Discharge (ESD), Handling Notice…… 8-1
ReadMe Files and the Install CD-ROM …… 8-1
Driver Support…… 8-2
Connection Problems…… 8-2
32-Bit WaveView Issues…… 8-2
Windows NT V3.51…… 8-3
Windows 95/98/2000 Problems…… 8-3
Resource Settings…… 8-3
Parallel Port Setup…… 8-3
Customer Assistance …… 8-5
9 – Maintenance, Service, and Part Replacement …… 9-1
General Maintenance......9-1
Fan Filter: Cleaning and Replacement ….. 9-2
What Type of Environment is WavePort Intended for? …..9-3
How Should WavePort be Transported? …… 9-3
Should I Calibrate the WavePort? ……9-4
How do I get Replacement Parts or Service? …..9-4
10 - Specifications
Appendix A – Using Accelerometers …… A-1
Appendix B – WBK20A PCMCIA Option, Setup Notes …… B-1
Glossary
WavePort User’s Manual
09-29-00
iii
Page 8

iv WavePort User’s Manual
Page 9
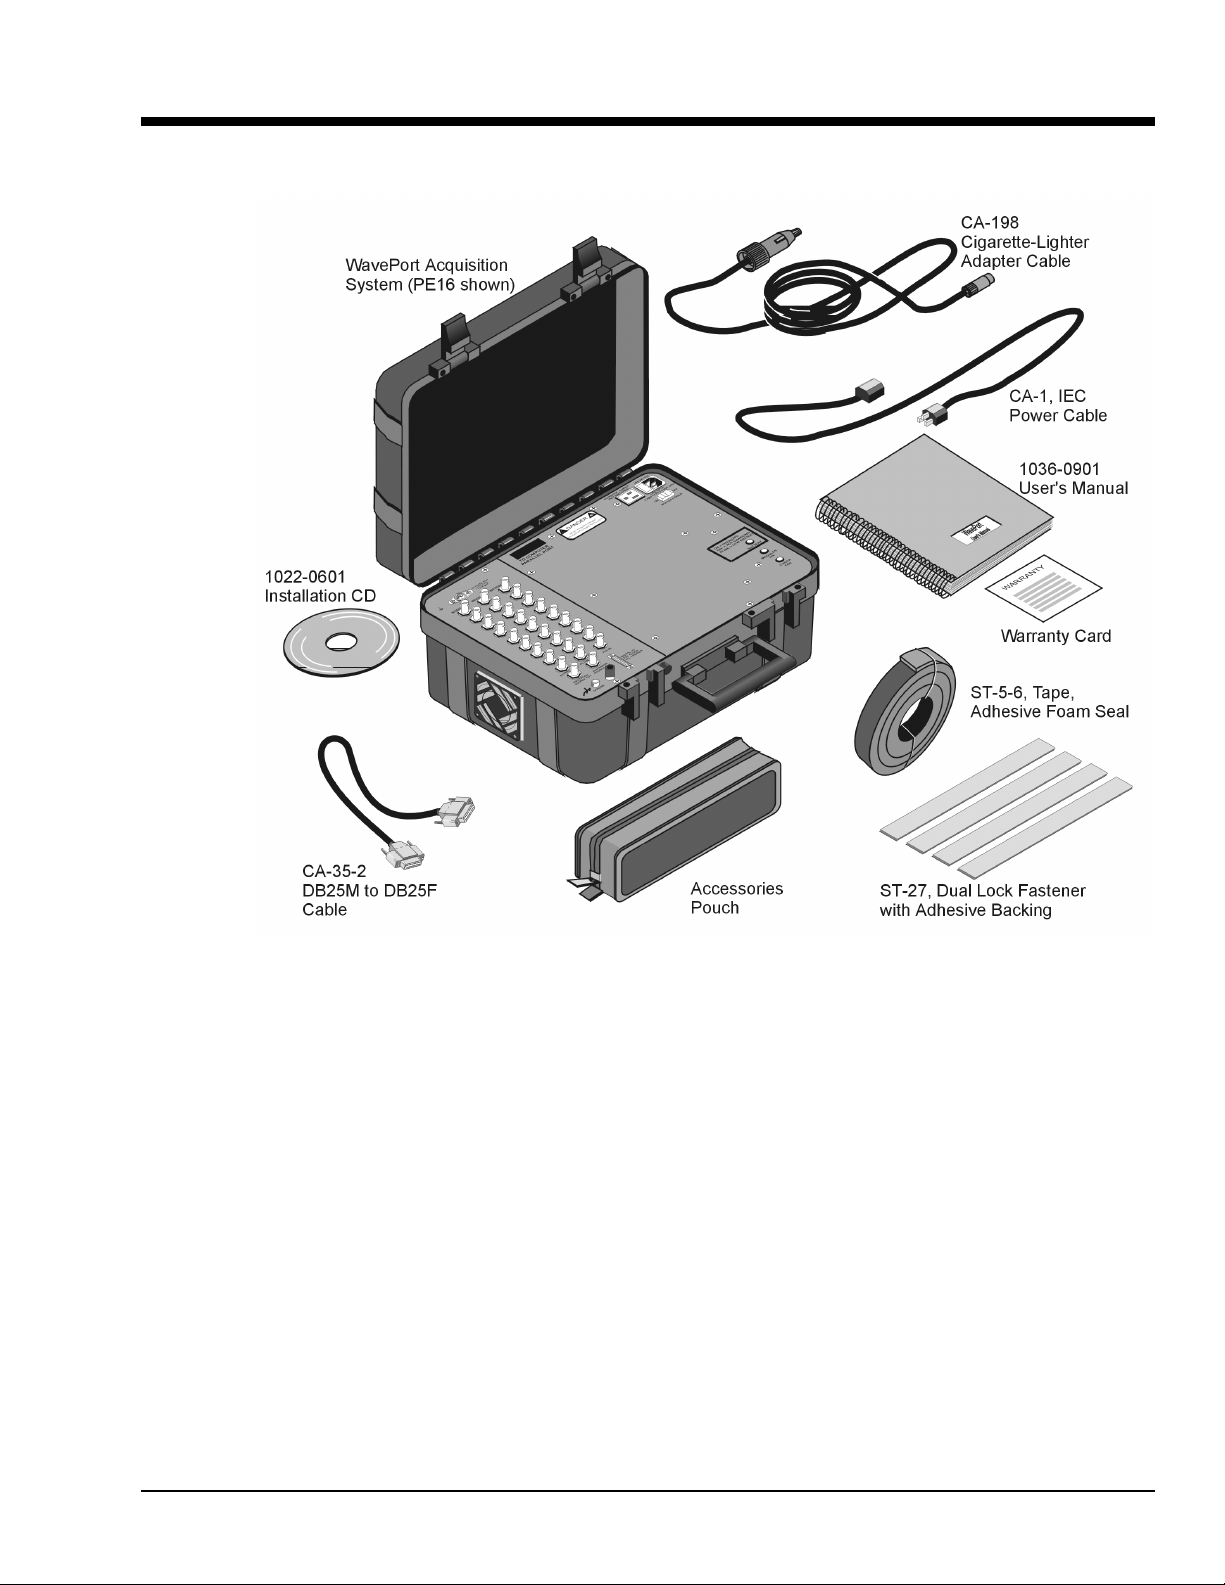
Unpacking and Inspecting your WavePort Package 1
A typical WavePort package consists of the items depicted in the above figure. For reason of clarity,
packaging materials are not shown. Note that the WavePort/PE8 (not illustrated) has two rows of BNC
connectors instead of three, as depicted for the PE16 represented in the above figure. The WavePort/V
series (/V8, /V16, /V24) BNC connectors and signal channels are discussed in chapters 2 and 4.
Your order was carefully inspected prior to shipment. When you receive your order, carefully unpack all
items from the shipping carton and check for physical signs of damage that may have occurred during
shipment. Promptly report any damage to the shipping agent and the factory. Retain all shipping materials
in case the unit needs returned.
If you ordered any accessories, e.g., the WBK20A option, check the package to ensure the additional items
are included.
Report any problems to your sales agent.
At this point in time, do not be concerned with the purpose of each item that was included with your
shipment. Chapter 3, System Setup identifies the role of each item, when the purpose is not obvious.
WavePort User’s Manual
WavePort/PE, Standard Package
09-29-00
Unpacking 1-1
Page 10

1-2 Unpacking
09-29-00
WavePort User’s Manual
Page 11
An Introduction to WavePorts 2
What are WavePorts?......2-1
What Types of I/O Signals Apply ?….. 2-2
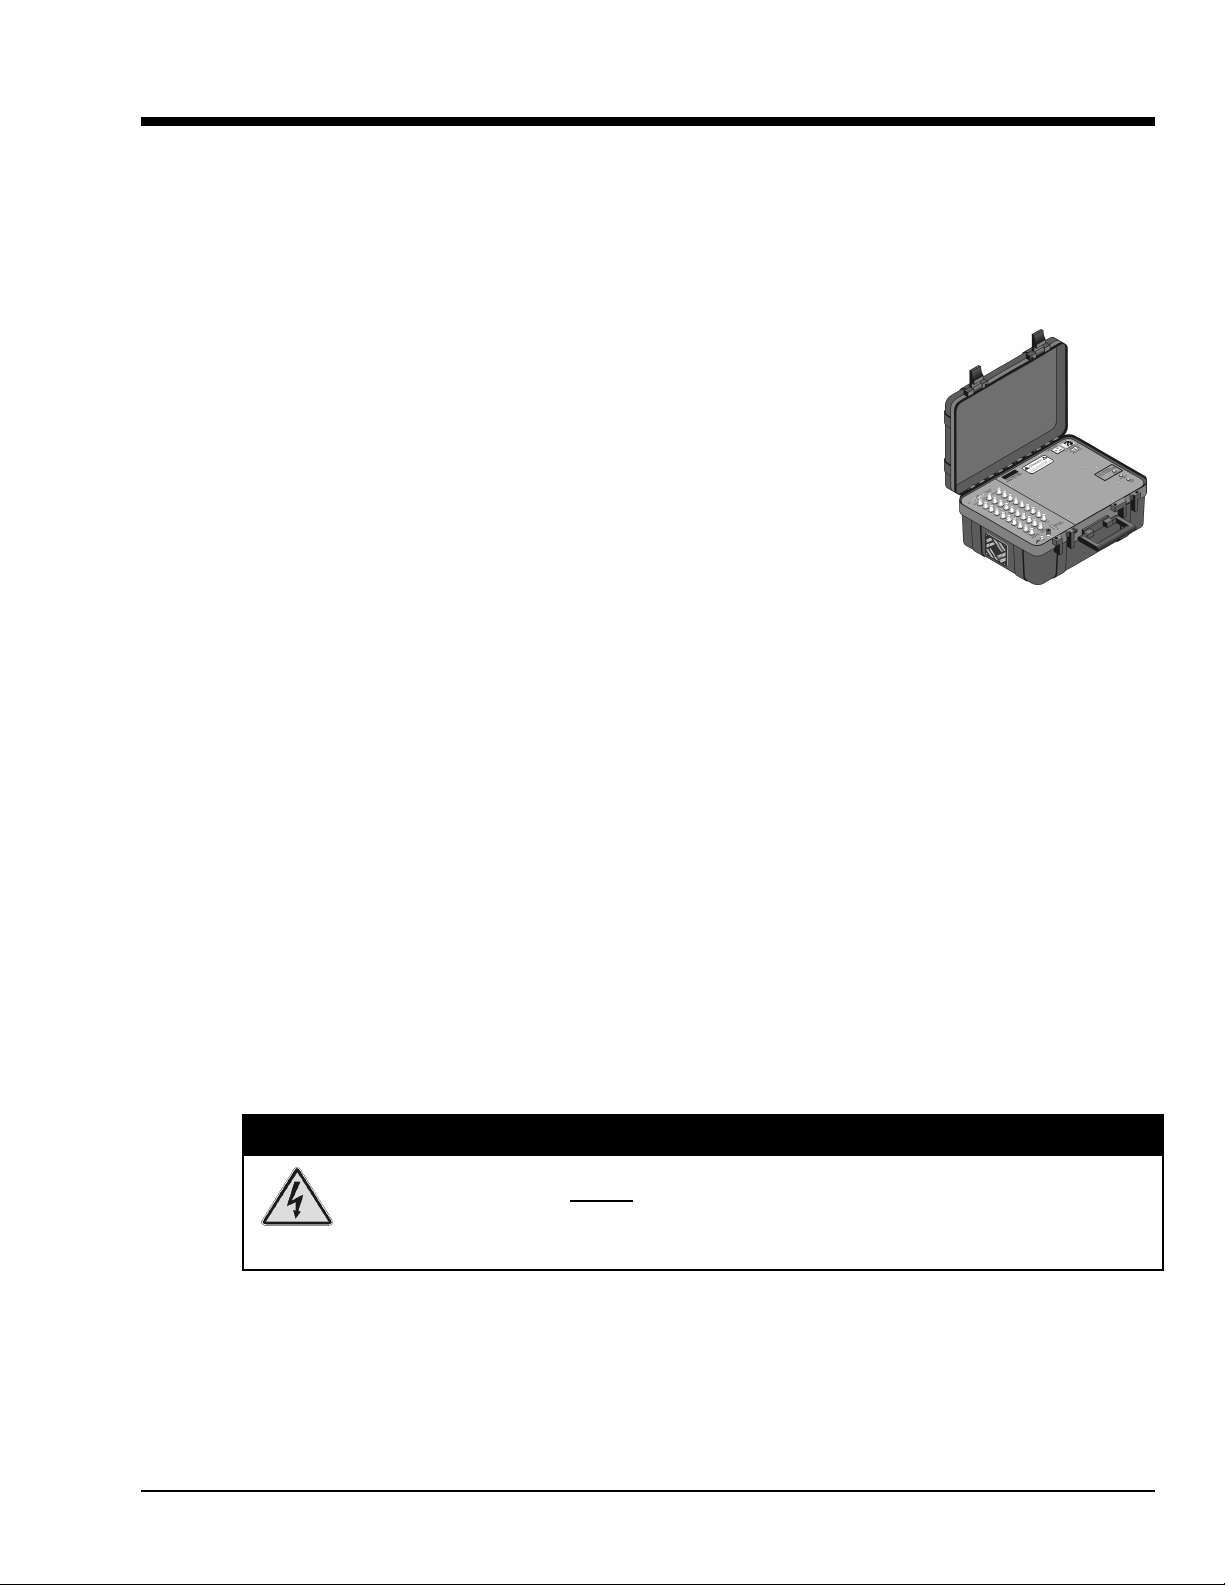
What are WavePorts ?
WavePorts are high-speed, portable data acquisition systems housed in a rugged
case. At present there are two distinct WavePort product lines; these are the
WavePort/PE (piezoelectric) and WavePort/V (voltage) models.
WavePort/PE
excitation through BNC connectors; and are ideal for applications pertaining to
vibration, rotating machinery, and acoustic measurements.
WavePort/PEs measurement capabilities are as follows:
• WavePort/PE8 - up to eight channels of voltages within ±10V and
up to 8 channels of ICP® transducer excitation (PE8)
• WavePort/PE16 - up to eight channels of voltages within ±10V and
up to 16 channels of ICP® transducer excitation
Illustrations of the BNC sections [for both PE16 and PE8 units] are featured on the
following pages.
The unit’s portability makes it an excellent choice for engineers and technicians on
the go. WavePort can be powered from a standard AC outlet, an external DC
source, or its own internal batteries.
WavePort/V
The “V” series offers 8, 16, or 24 channels through BNC connectors.
WavePort/V measurement capabilities are as follows:
• WavePort/V8 - up to eight channels of voltages within ±10V
• WavePort/V16 - up to sixteen channels of voltages within ±10V
• WavePort/V24 - up to twenty-four channels of voltages within ±10V
Illustrations of the BNC sections [for both PE and V units] are featured on the following pages.
devices are pre-configured to measure voltages and transducer
Dimensions:
470 mm wide, 369 mm
deep, 191 mm high
(18.5” x 14.5” x 7.5”)
Weight (excluding cables):
13 kg (28 lbs.)
devices provide a convenient acquisition package for general-purpose voltage measurements.
WavePorts can be powered from a standard AC outlet, an external DC source, or from internal batteries.
Their portability makes each an excellent choice for engineers and technicians on the go.
WavePort User’s Manual
WARNING
WARNING
WARNINGWARNING
The Notebook Power receptacle is “LIVE” whenever WavePort is plugged into a live AC power source.
The Module Power Switch
WavePort contains no user serviceable components. Do not remove WavePort’s cover plate.
Lethal voltages are present which could cause serious injury or death.
09-29-00
cannot
be used to turn this receptacle “Off.”
An Introduction to W avePort 2-1
Page 12
What Types of I/O Signals Apply ?
The following pages contain descriptions of signal panels for WavePort/PE and WavePort/V devices. Brief
descriptions of signal types are included with each panel
More detailed information regarding signals and connections is provided in chapter 4.
Power-Related Items
2-2 An Introduction to W avePort
09-29-00
WavePort User’s Manual
Page 13
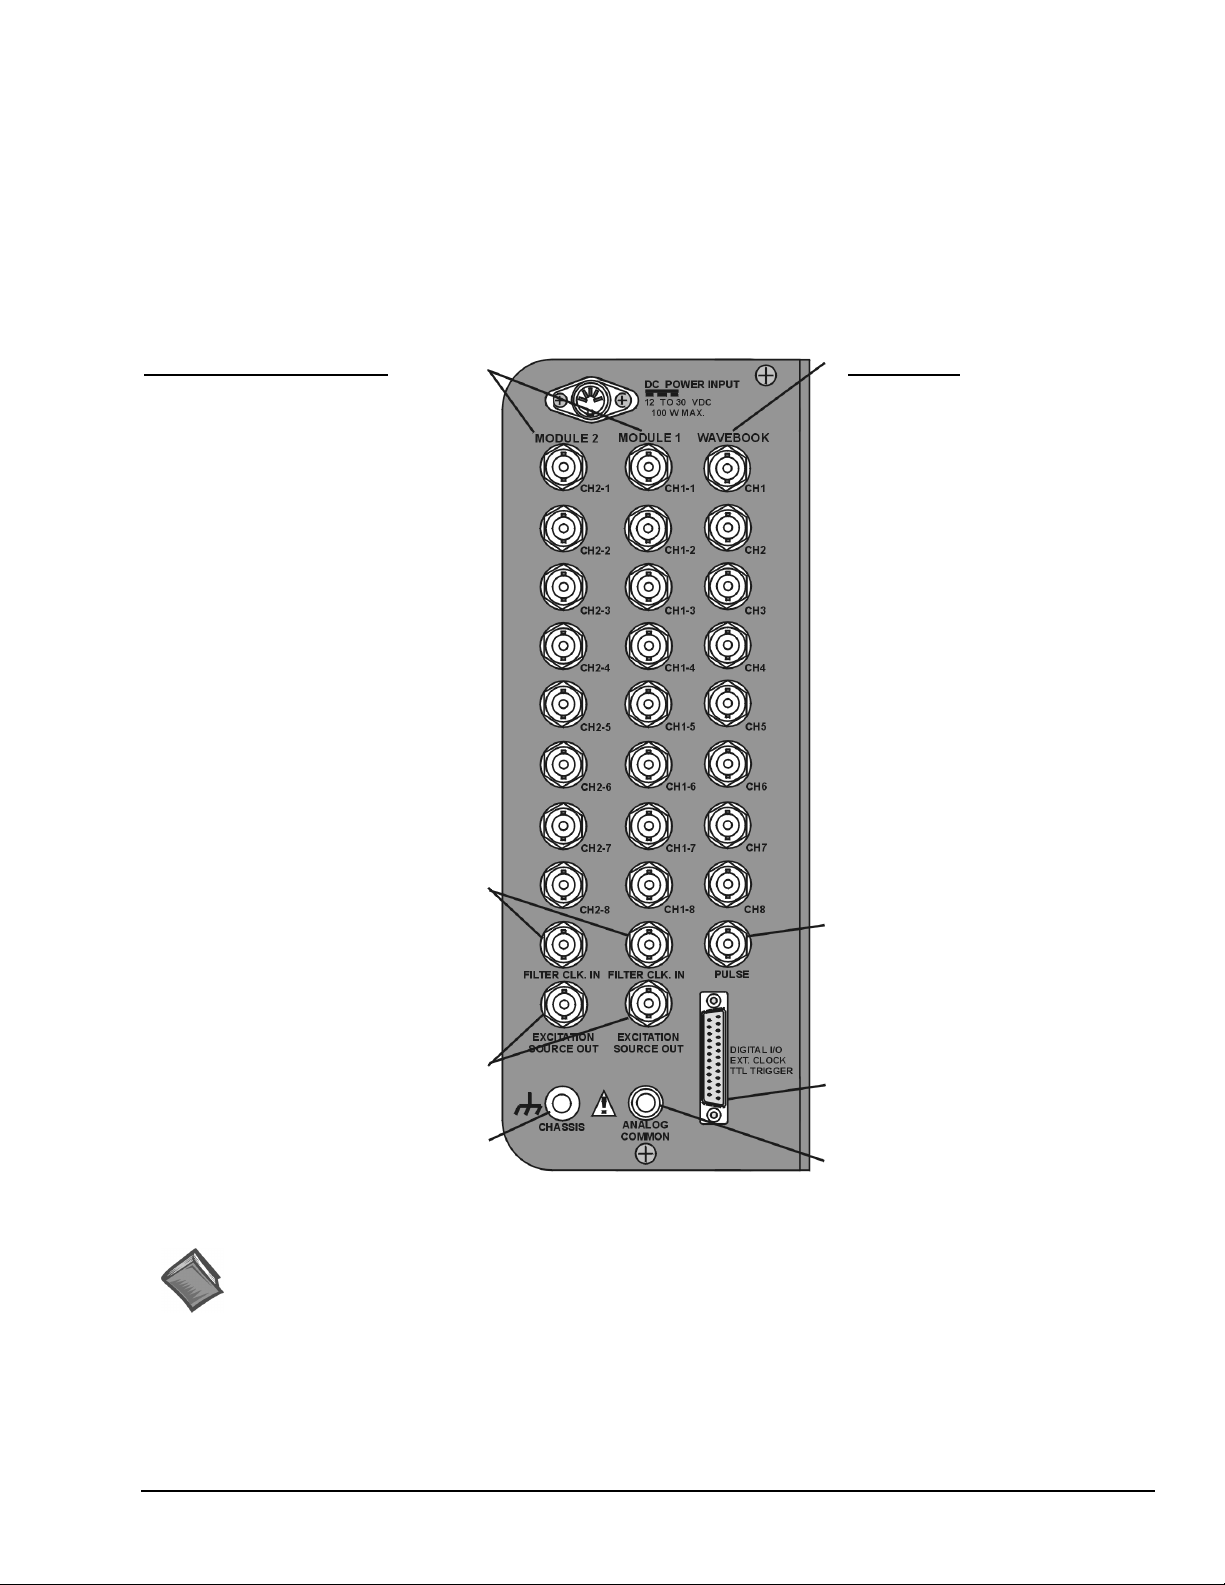
WavePort/PE16
WavePort/PE16 can measure up to eight channels of voltages within ±10V; and up to 16 channels of ICP® transducer
excitation.
The unit receives its channel-input signals through three columns of eight BNC connectors (24 channel inputs total). The
columns are labeled MODULE 2, MODULE 1, and WAVEBOOK. In addition to the channel-input BNCs, WAVEBOOK
contains a BNC for PULSE Trigger Input, and the two MODULEs include BNCs for filter clock input (FILTER CLK. IN),
and EXCITATION SOURCE OUT (see following figure).
The signal panel includes a DB25 connector for DIGITAL I/O, EXT CLOCK (external clock), and TTL TRIGGER.
Connection nodes for CHASSIS (ground) and ANALOG COMMON are also provided. An illustration follows.
Module 1 and Module 2
Dynamic Signal Conditioning
CH1-1 through CH1-8 and
CH2-1 through CH2-8, respectively
• Gain Ranges:
x1, 2, 5, 10, 20, 50, 100, and 200
• Input Ranges:
5V, 2.5V, 1V,
500 mV, 250 mV,
100 mV, 50 mV,
and 25 mV peak
AC-Coupled Only
BNC shells are analog common.
See Chapter 6, WaveView and
Chapter 10, Specifications for
additional information.
Filter Clock In
WaveBook
Analog Inputs
CH1 through CH8, Analog Inputs via
BNC Connectors.
• 16 bit resolution
•
Software selectable for unipolar or
bipolar operation
• Unipolar Ranges
0 to +10V
0 to + 4V
0 to +2V
• Bipolar Ranges
±10V, ±5V, ±2V, ±1V
• Maximum Overvoltage: +/-30 VDC
DC-Coupled Only,
Fully Differential
See Chapter 6, WaveView and
Chapter 10, Specifications for additional
information.
Pulse Trigger Input
•
Input Signal Range: ±5V
• Input Characteristics: 75 Ω
•
Input Protection: ±10V max.
• Minimum Pulse Width: 100 ns
•
Maximum Pulse Width: 0.8 sec
•
Latency: 300 ns
Excitation Source Out
Reference Notes:
Additional information regarding WavePort signal connections appears elsewhere in this manual.
•
• Chapter 6, WaveView, includes information regarding channel configuration.
•
• Chapter 10 provides device specifications.
WavePort User’s Manual
Digital I/O
External Clock
Chassis Ground
WavePort/PE16 Signal Panel
Chapter 4, Hardware and Operation Reference, includes details regarding signal connections.
Chapter 9 contains maintenance, intended environment, and transportation information.
09-29-00
TTL Trigger
Analog Common
An Introduction to W avePort 2-3
Page 14
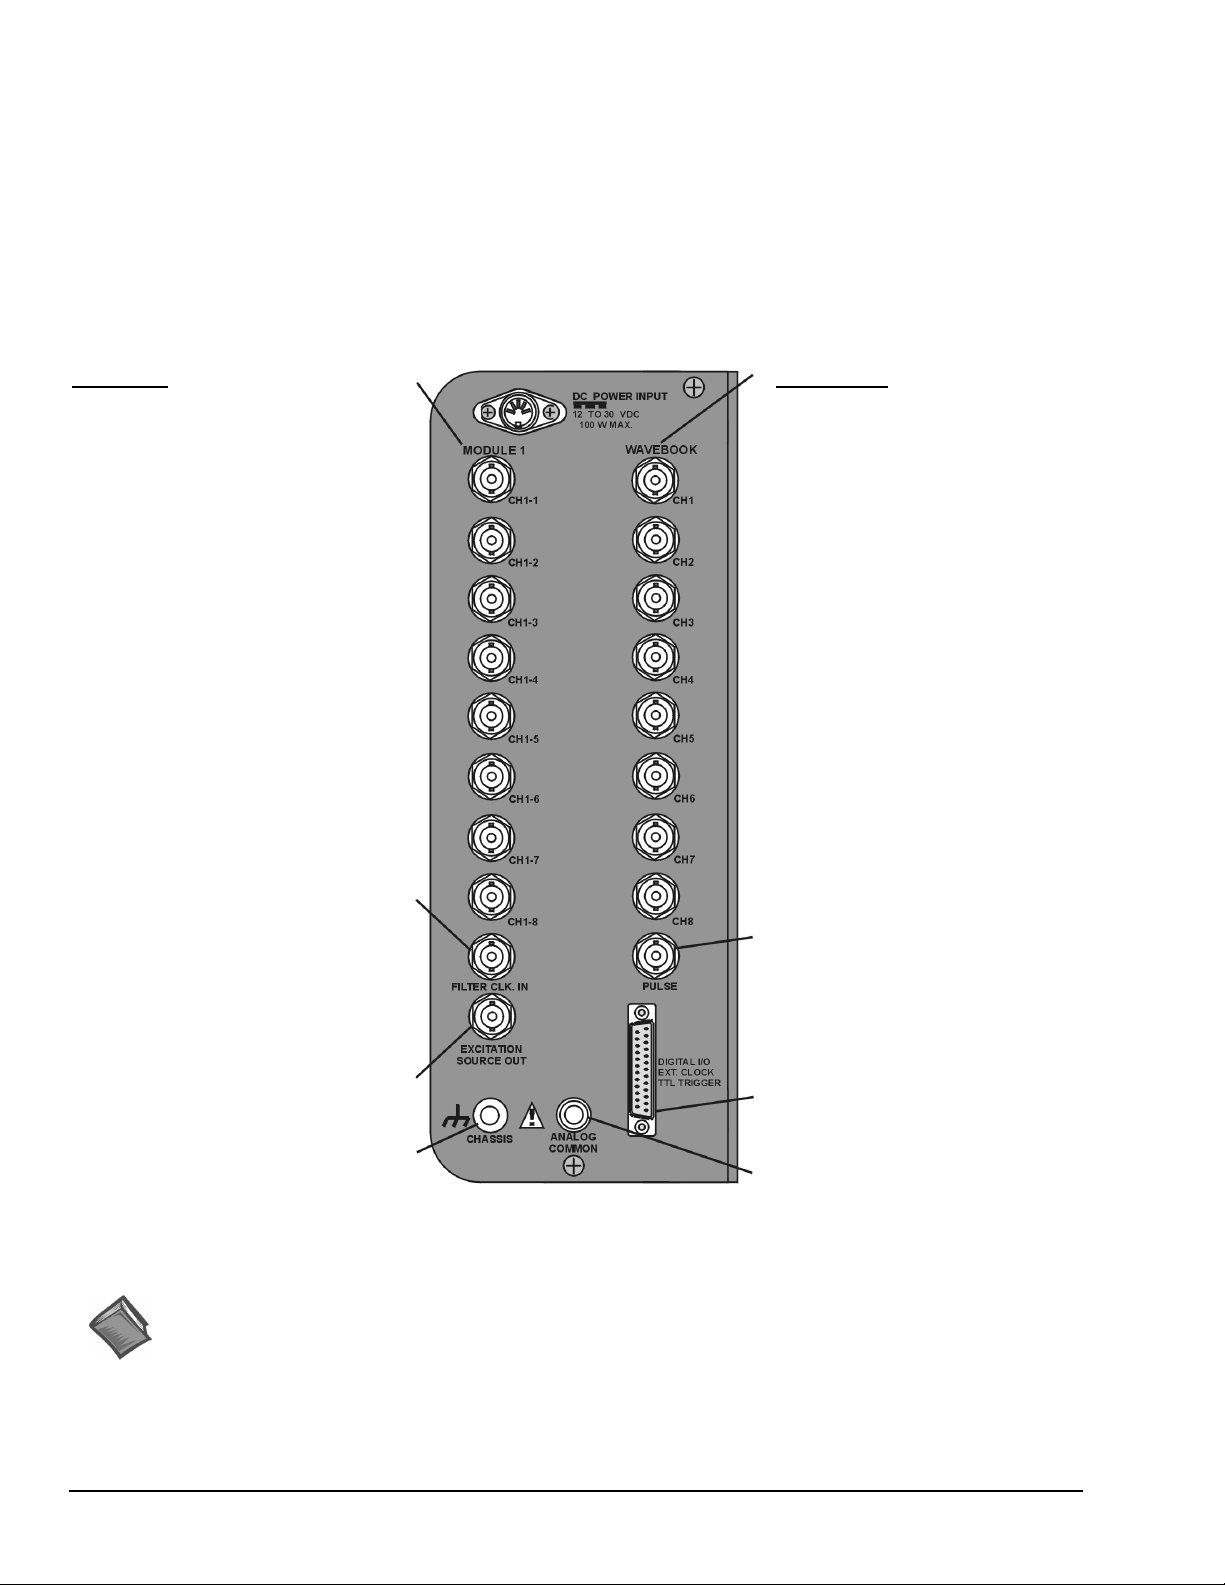
WavePort/PE8
WavePort/PE8 can measure up to eight channels of voltages within ±10V; and up to 8 channels of ICP® transducer excitation.
The unit receives its channel-input signals through two columns of eight BNC connectors (16 channel inputs total). The
columns are labeled MODULE 1 and WAVEBOOK. In addition to the channel-input BNCs, WAVEBOOK contains a BNC
for PULSE Trigger Input, and MODULE 1 include one BNCs for filter clock input (FILTER CLK. IN), and another BNC for
EXCITATION SOURCE OUT (see following figure).
The signal panel includes a DB25 connector for DIGITAL I/O, EXT CLOCK (external clock), and TTL TRIGGER.
Connection nodes for CHASSIS (ground) and ANALOG COMMON are also provided.
Module 1
Dynamic Signal Conditioning
CH1-1 through CH1-8
• Gain Ranges:
x1, 2, 5, 10, 20, 50, 100, and 200
• Input Ranges:
5V, 2.5V, 1V,
500 mV, 250 mV,
100 mV, 50 mV,
and 25 mV peak
AC-Coupled Only,
BNC shells are analog common.
See Chapter 6, WaveView and
Chapter 10, Specifications for
additional information.
Filter Clock In
WaveBook
Analog Inputs
CH1 through CH8, Analog Inputs via
BNC Connectors.
• 16 bit resolution
•
Software selectable for unipolar or
bipolar operation
• Unipolar Ranges
0 to +10V
0 to + 4V
0 to +2V
• Bipolar Ranges
±10V, ±5V, ±2V, ±1V
• Maximum Overvoltage: ±30 VDC
DC-Coupled Only,
Fully Differential
See Chapter 6, WaveView and
Chapter 10, Specifications for
additional information.
Pulse Trigger Input
•
Input Signal Range: ±5V
• Input Characteristics: 75 Ω
•
Input Protection: ±10V max.
• Minimum Pulse Width: 100 ns
•
Maximum Pulse Width: 0.8 sec
•
Latency: 300 ns
Excitation Source Out
Chassis Ground
Reference Notes:
Additional information regarding WavePort signal connections appears elsewhere in this manual.
•
Chapter 4, Hardware and Operation Reference, includes details regarding signal connections.
•
Chapter 6, WaveView, includes information regarding channel configuration.
•
Chapter 9 contains maintenance, intended environment, and transportation information.
•
Chapter 10 provides device specifications.
2-4 An Introduction to W avePort
WavePort/PE8 Signal Panel
09-29-00
Digital I/O
External Clock
TTL Trigger
Analog Common
WavePort User’s Manual
Page 15
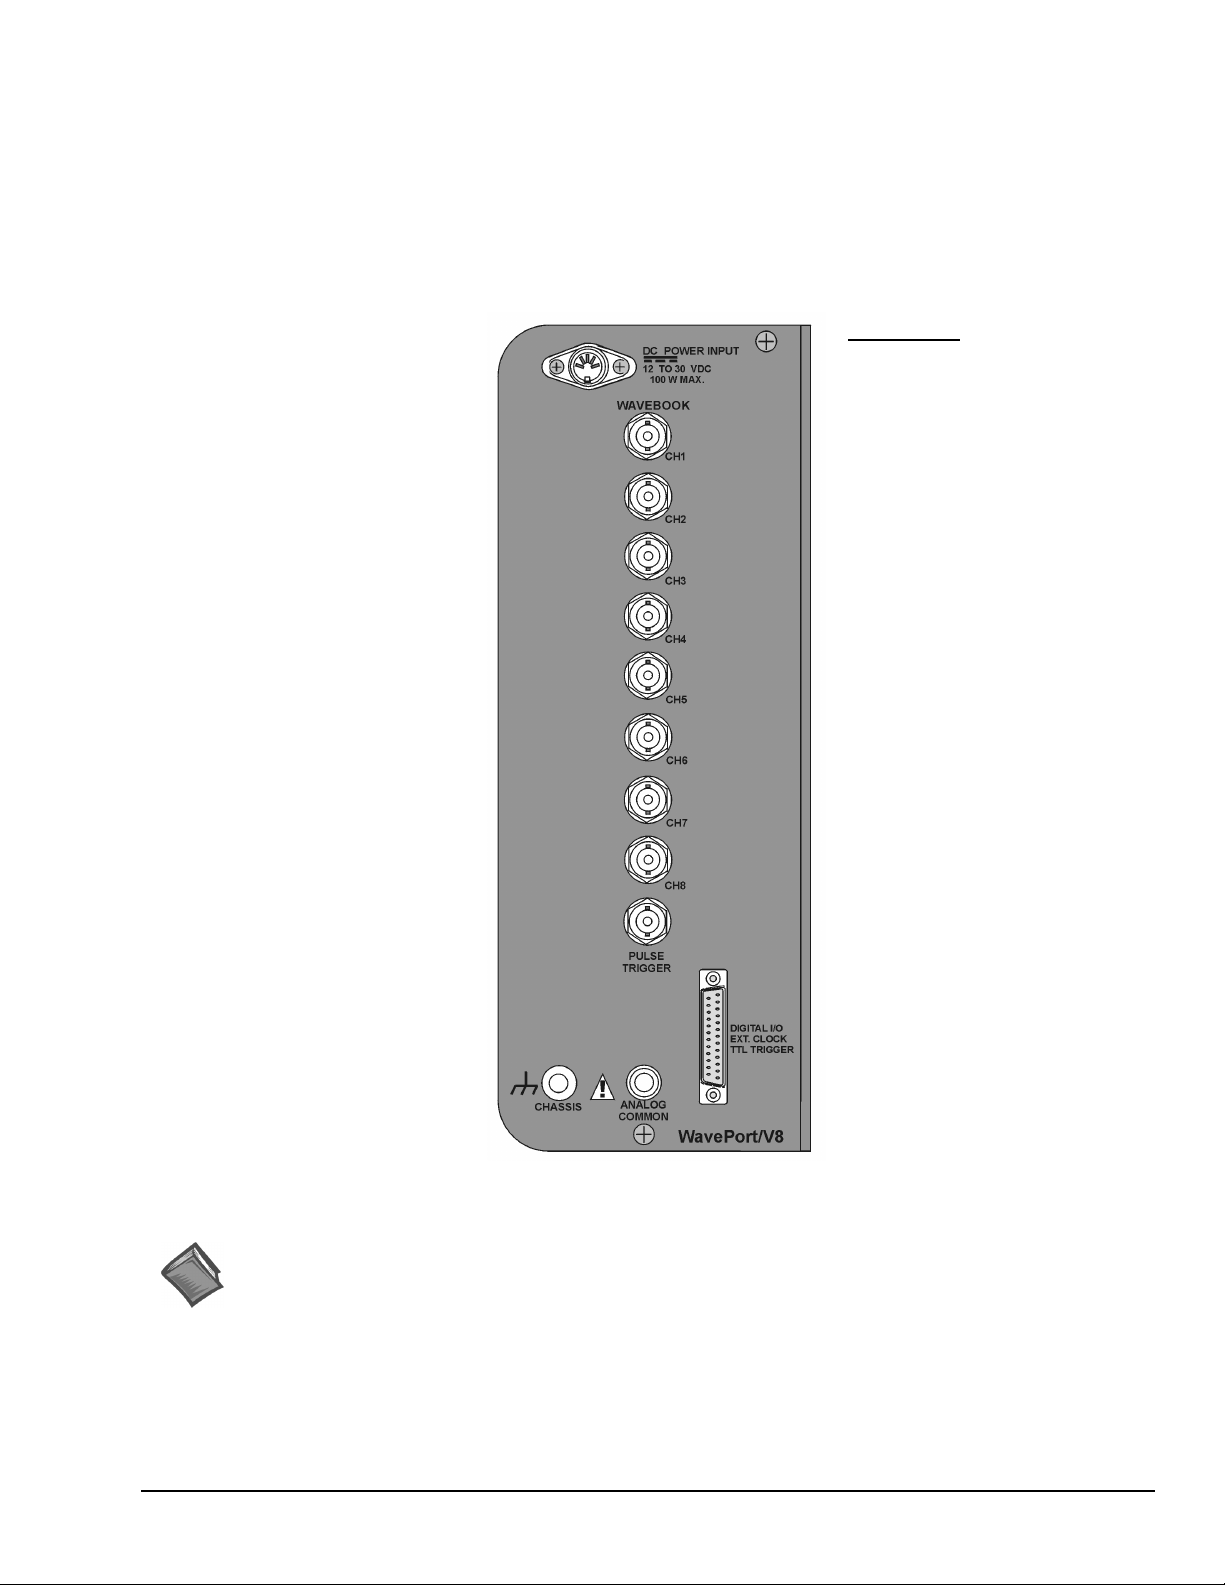
WavePort/V8
WavePort/V8 can measure up to eight channels of voltages within ±10V.
The unit receives its channel-input signals through eight BNC connectors. In addition to the channel-input BNCs, there is one
BNC for PULSE Trigger Input (see following figure).
The signal panel includes a DB25 connector for DIGITAL I/O, EXT CLOCK (external clock), and TTL TRIGGER.
Connection nodes for CHASSIS (ground) and ANALOG COMMON are also provided.
WaveBook
Analog Inputs
CH1 through CH8, Analog Inputs via
BNC Connectors.
•
16 bit resolution
• Software selectable for unipolar or
bipolar operation
• Unipolar Ranges
0 to +10V
0 to + 4V
0 to +2V
• Bipolar Ranges
±10V, ±5V, ±2V, ±1V
•
Maximum Overvoltage: ±30 VDC
See Chapter 6, WaveView and
Chapter 10, Specifications for
additional information that includes
ranges available with WBK11A,
WBK12A, and WBK13A factoryinstalled options.
DC-Coupled Only,
Fully Differential
Pulse Trigger Input
• Input Signal Range: ±5V
• Input Characteristics: 75 Ω
•
Input Protection: ±10V max.
• Minimum Pulse Width: 100 ns
• Maximum Pulse Width: 0.8 sec
• Latency: 300 ns
Reference Notes:
Additional information regarding WavePort signal connections appears elsewhere in this manual.
•
• Chapter 6, WaveView, includes information regarding channel configuration.
•
• Chapter 10 provides device specifications.
WavePort User’s Manual
Digital I/O
External Clock
TTL Trigger
Analog Common
WavePort/V8 Signal Panel
Chapter 4, Hardware and Operation Reference, includes details regarding signal connections.
Chapter 9 contains maintenance, intended environment, and transportation information.
09-29-00
An Introduction to W avePort 2-5
Page 16
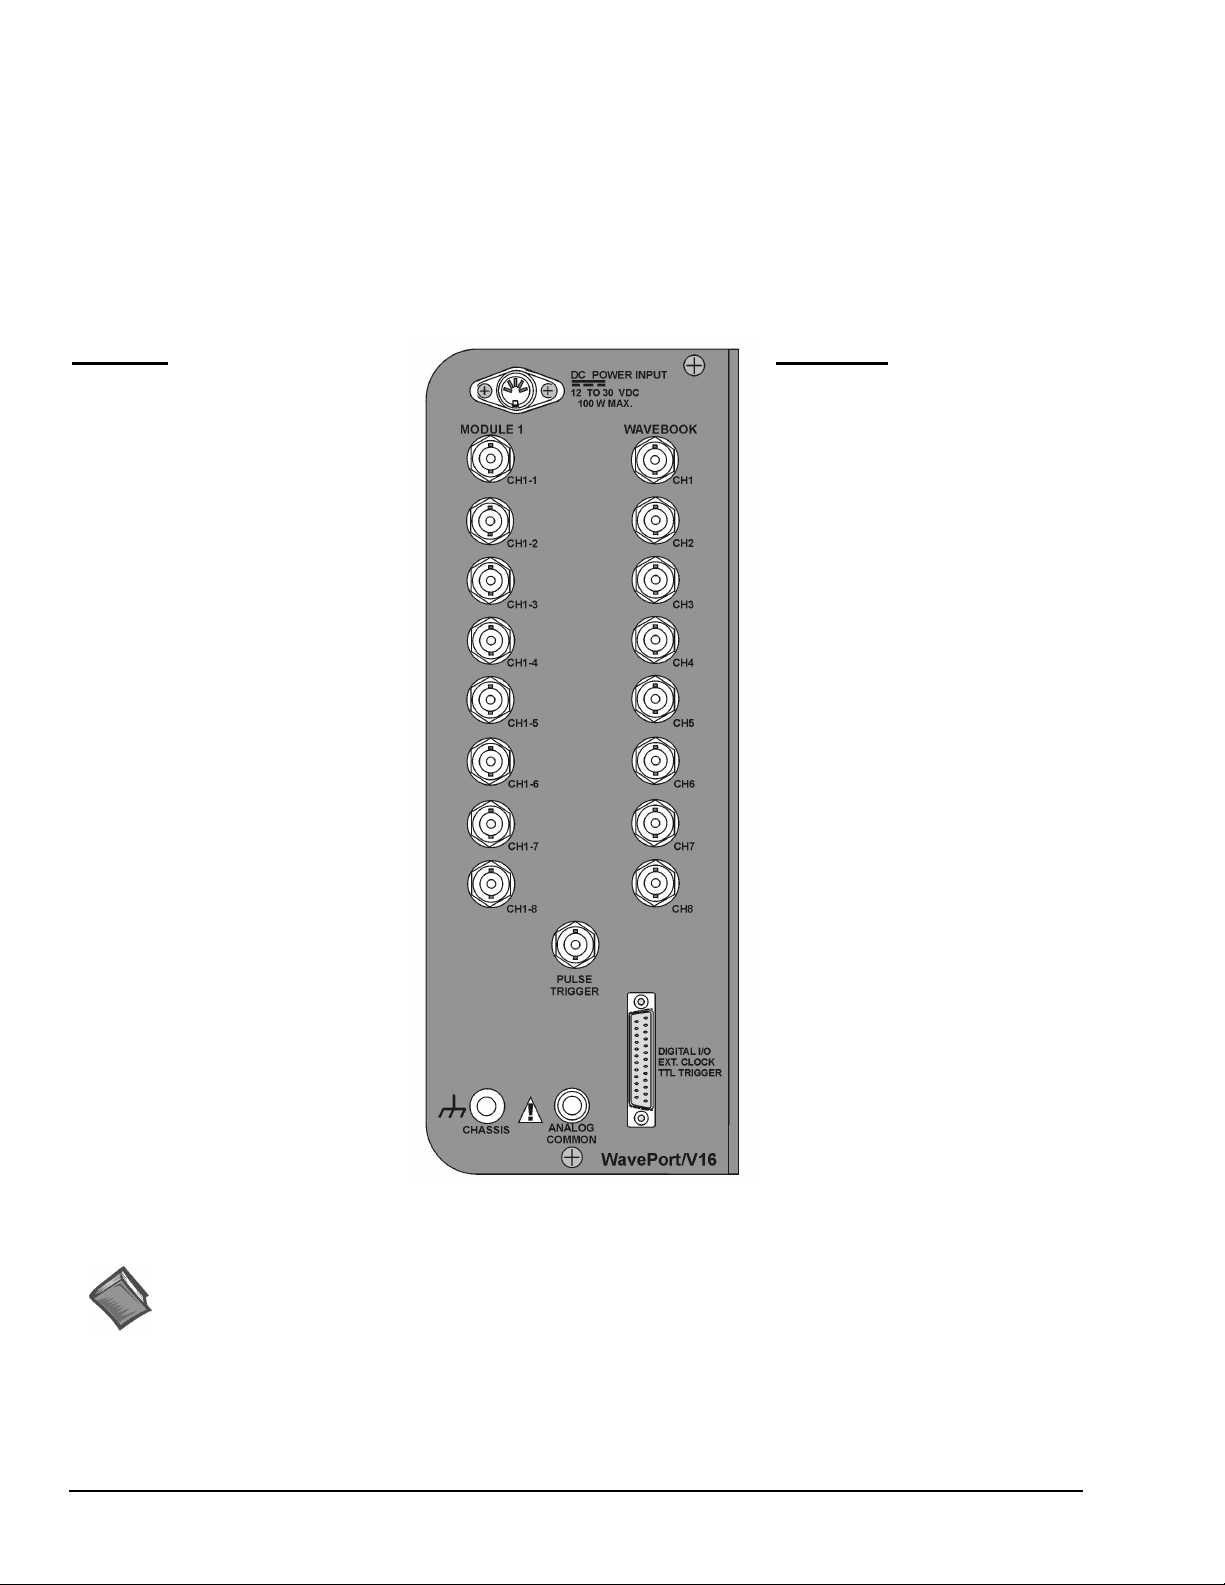
WavePort/V16
WavePort/V16 can measure up to sixteen channels of voltages within ±10V.
The unit receives its channel-input signals through two columns of eight BNC connectors (16 channel inputs total). The
columns are labeled MODULE 1 and WAVEBOOK. In addition to the channel-input BNCs, WAVEBOOK contains a BNC
for PULSE Trigger Input (see following figure).
The signal panel includes a DB25 connector for DIGITAL I/O, EXT CLOCK (external clock), and TTL TRIGGER.
Connection nodes for CHASSIS (ground) and ANALOG COMMON are also provided.
Module 1
Analog Inputs
CH1-1 through CH1-8, Analog Inputs
via BNC Connectors.
•
16 bit resolution
•
Software selectable for unipolar or
bipolar operation
• Unipolar Ranges
0 to +10V
0 to + 5V
0 t0 + 2V
0 to +1V
• Bipolar Ranges
±10V, ±5V, ±2V, ±1V, ±0.5V
• Maximum Overvoltage: ±30 VDC
DC-Coupled Only,
Fully Differential
See Chapter 6, WaveView and
Chapter 10, Specifications for
additional information that includes
ranges available with WBK11A,
WBK12A, and WBK13A factoryinstalled options.
WaveBook
Analog Inputs
CH1 through CH8, Analog Inputs via
BNC Connectors.
•
16 bit resolution
•
Software selectable for unipolar or
bipolar operation
• Unipolar Ranges
0 to +10V
0 to + 4V
0 to +2V
• Bipolar Ranges
±10V, ±5V, ±2V, ±1V
•
Maximum Overvoltage: ±30 VDC
DC-Coupled Only,
Fully Differential
See Chapter 6, WaveView and
Chapter 10, Specifications for
additional information.
Pulse Trigger Input
• Input Signal Range: ±5V
•
Input Characteristics: 75 Ω
• Input Protection: ±10V max.
•
Minimum Pulse Width: 100 ns
•
Maximum Pulse Width: 0.8 sec
•
Latency: 300 ns
Reference Notes:
Additional information regarding WavePort signal connections appears elsewhere in this manual.
• Chapter 4, Hardware and Operation Reference, includes details regarding signal connections.
•
Chapter 6, WaveView, includes information regarding channel configuration.
• Chapter 9 contains maintenance, intended environment, and transportation information.
•
Chapter 10 provides device specifications.
2-6 An Introduction to W avePort
WavePort/V16 Signal Panel
09-29-00
Digital I/O
External Clock
TTL Trigger
Analog Common
WavePort User’s Manual
Page 17
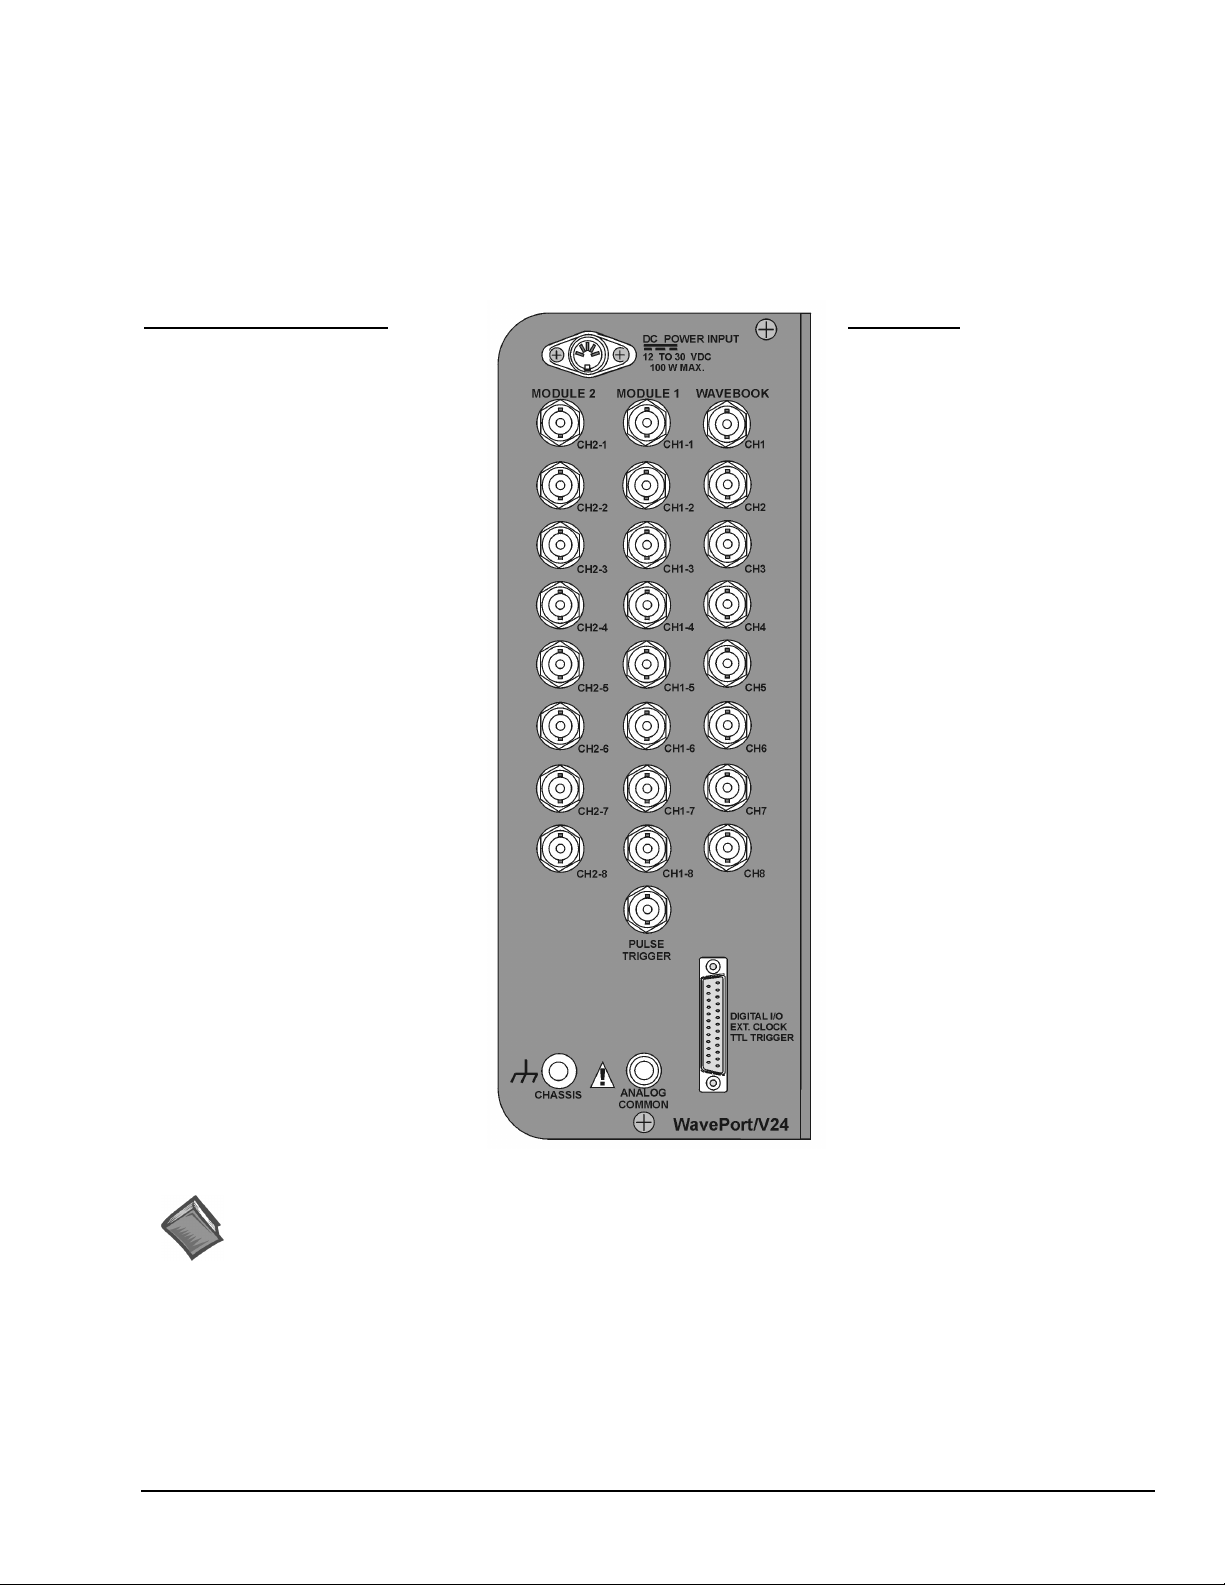
WavePort/V24
WavePort/V24 can measure up to 24 channels of voltages within ±10V.
The unit receives its channel-input signals through three columns of eight BNC connectors (24 channel inputs total). The
columns are labeled [from left to right] MODULE 2, MODULE 1, and WAVEBOOK. In addition to the channel-input
BNCs, WAVEBOOK contains a BNC for PULSE Trigger Input (see following figure).
The signal panel includes a DB25 connector for DIGITAL I/O, EXT CLOCK (external clock), and TTL TRIGGER.
Connection nodes for CHASSIS (ground) and ANALOG COMMON are also provided.
Module 1 and Module 2
Analog Inputs
CH1-1 through CH1-8, and
CH2-1 through CH2-8, respectively.
•
16 bit resolution
• Software selectable for unipolar or
bipolar operation
• Unipolar Ranges
0 to +10V
0 to + 5V
0 t0 + 2V
0 to +1V
• Bipolar Ranges
±10V, ±5V, ±2V, ±1V, ±0.5V
• Maximum Overvoltage: ±30 VDC
DC-Coupled Only,
Fully Differential
See Chapter 6, WaveView and
Chapter 10, Specifications for
additional information that includes
ranges available with WBK11A,
WBK12A, and WBK13A factoryinstalled options.
WaveBook
Analog Inputs
CH1 through CH8, Analog Inputs via
BNC Connectors.
•
16 bit resolution
• Software selectable for unipolar or
bipolar operation
• Unipolar Ranges
0 to +10V
0 to + 4V
0 to +2V
• Bipolar Ranges
±10V, ±5V, ±2V, ±1V
•
Maximum Overvoltage: ±30 VDC
DC-Coupled Only,
Fully Differential
Pulse Trigger Input
• Input Signal Range: ±5V
• Input Characteristics: 75 Ω
•
Input Protection: ±10V max.
• Minimum Pulse Width: 100 ns
• Maximum Pulse Width: 0.8 sec
•
Latency: 300 ns
Reference Notes:
Additional information regarding WavePort signal connections appears elsewhere in this manual.
• Chapter 4, Hardware and Operation Reference, includes details regarding signal connections.
•
• Chapter 9 contains maintenance, intended environment, and transportation information.
•
WavePort User’s Manual
Digital I/O
External Clock
TTL Trigger
Analog Common
WavePort/V24 Signal Panel
Chapter 6, WaveView, includes information regarding channel configuration.
Chapter 10 provides device specifications.
09-29-00
An Introduction to W avePort 2-7
Page 18

2-8 An Introduction to W avePort
09-29-00
WavePort User’s Manual
Page 19
System Setup
1. Choosing a Notebook PC …… 3-1
2. Attaching the Notebook to WavePort …… 3-1
3. Connecting the Communication Cable and Notebook Power Cable …… 3-4
4. Connecting the WavePort to Power…… 3-5
5. Installing Software …… 3-5
6. Using the Daq Configuration Applet to Check Connections…… 3-6
A Guide to Using the Daq Configuration Applet …… 3-7
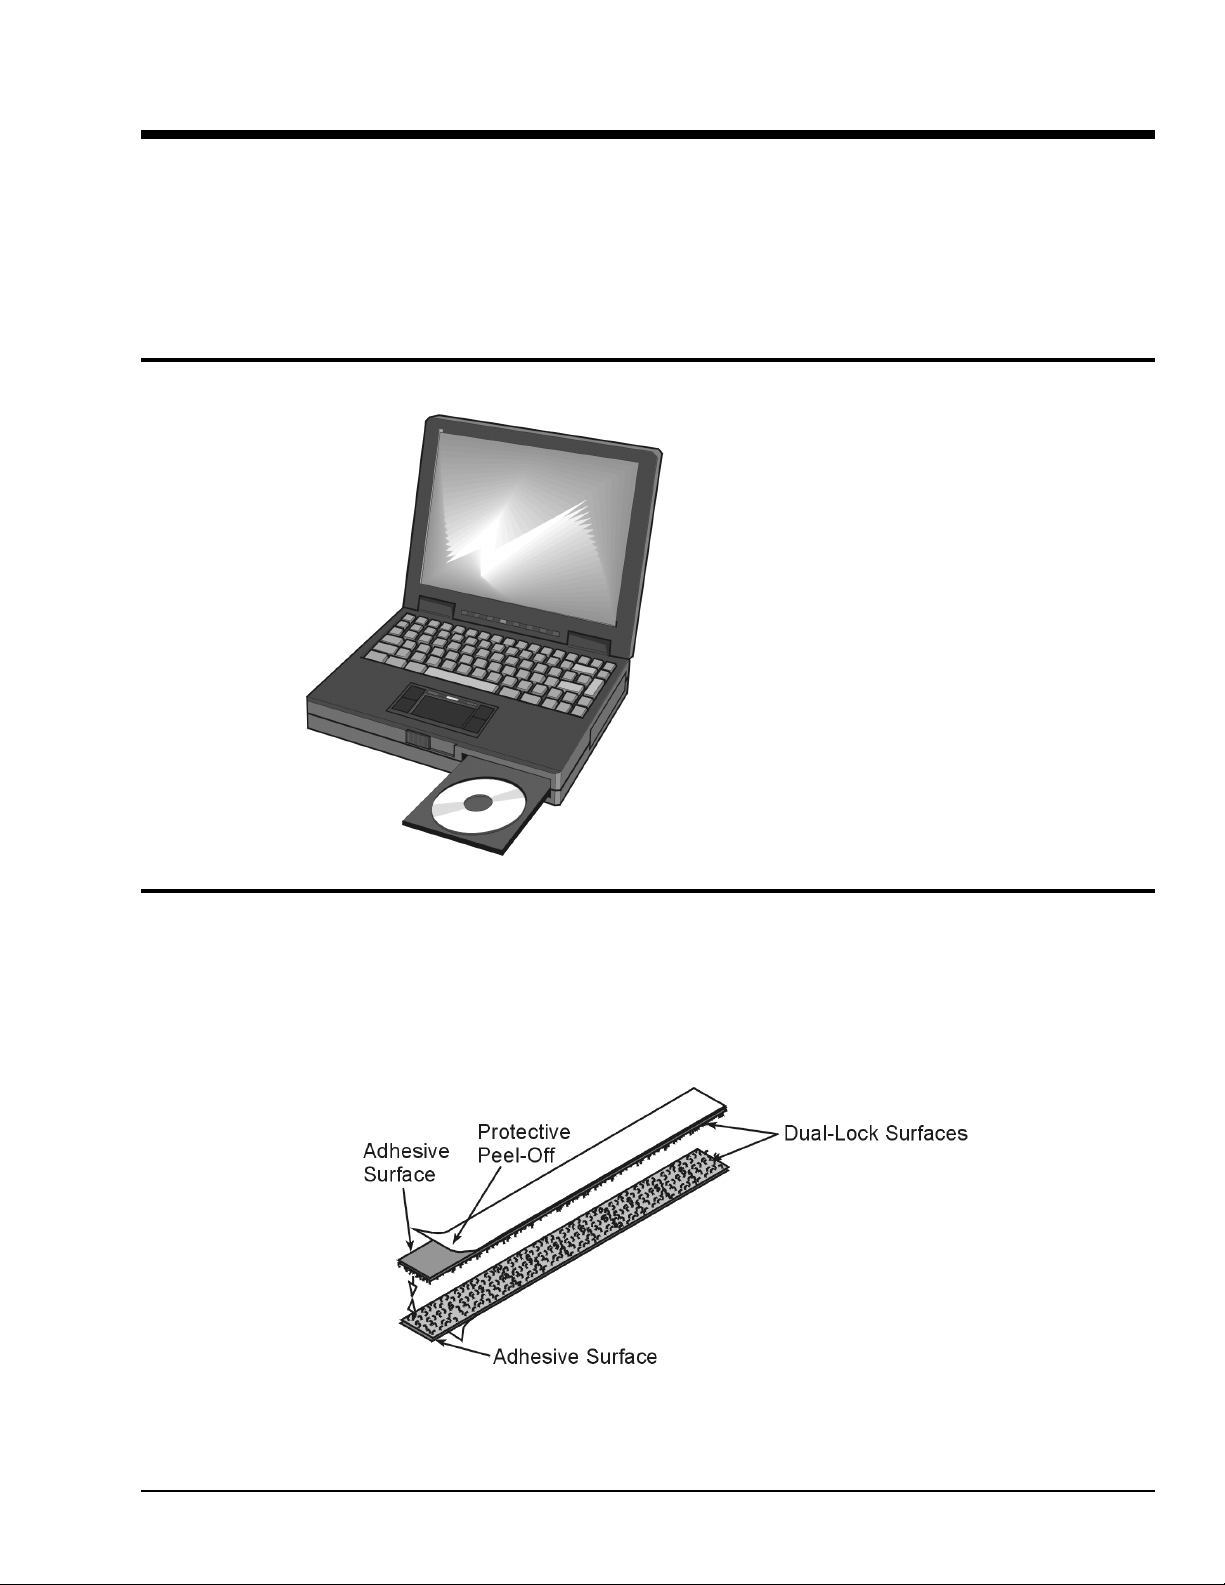
1. Choosing a Notebook PC
A Notebook PC provides a means of communicating
with WavePort’s acquisition hardware.
The Notebook you choose must meet the following
requirements:
• Maximum Height (when closed): 1.5” (38 mm)
• Maximum Length: 12.75” (323 mm)
• Maximum Width: 10.19” (259 mm)
• 16MB Ram (32MB Ram recommended)
• Pentium
• 10 MB of Available Disk Space
• Windows Operating System
•
EPP (Enhanced Parallel Port) –
•
Power Consumption: Not to exceed 50 Watts
®
90 Processor (or equivalent)
(Windows95/98/NT or 2000)
Optional, but recommended
3
2. Attaching the Notebook to WavePort
You can use the included Dual-Lock Fasteners (ST-27) to hold your Notebook PC firmly to WavePort’s
cover plate.
Prior to attaching the strips, verify that WavePort’s cover plate and the bottom of the Notebook are clean.
Isopropyl Alcohol swabs, or commonly available “rubbing alcohol” with clean, lint-free rags can be used to
achieve a clean mounting surface.
WavePort User’s Manual
06-14-00
System Setup 3-1
Page 20
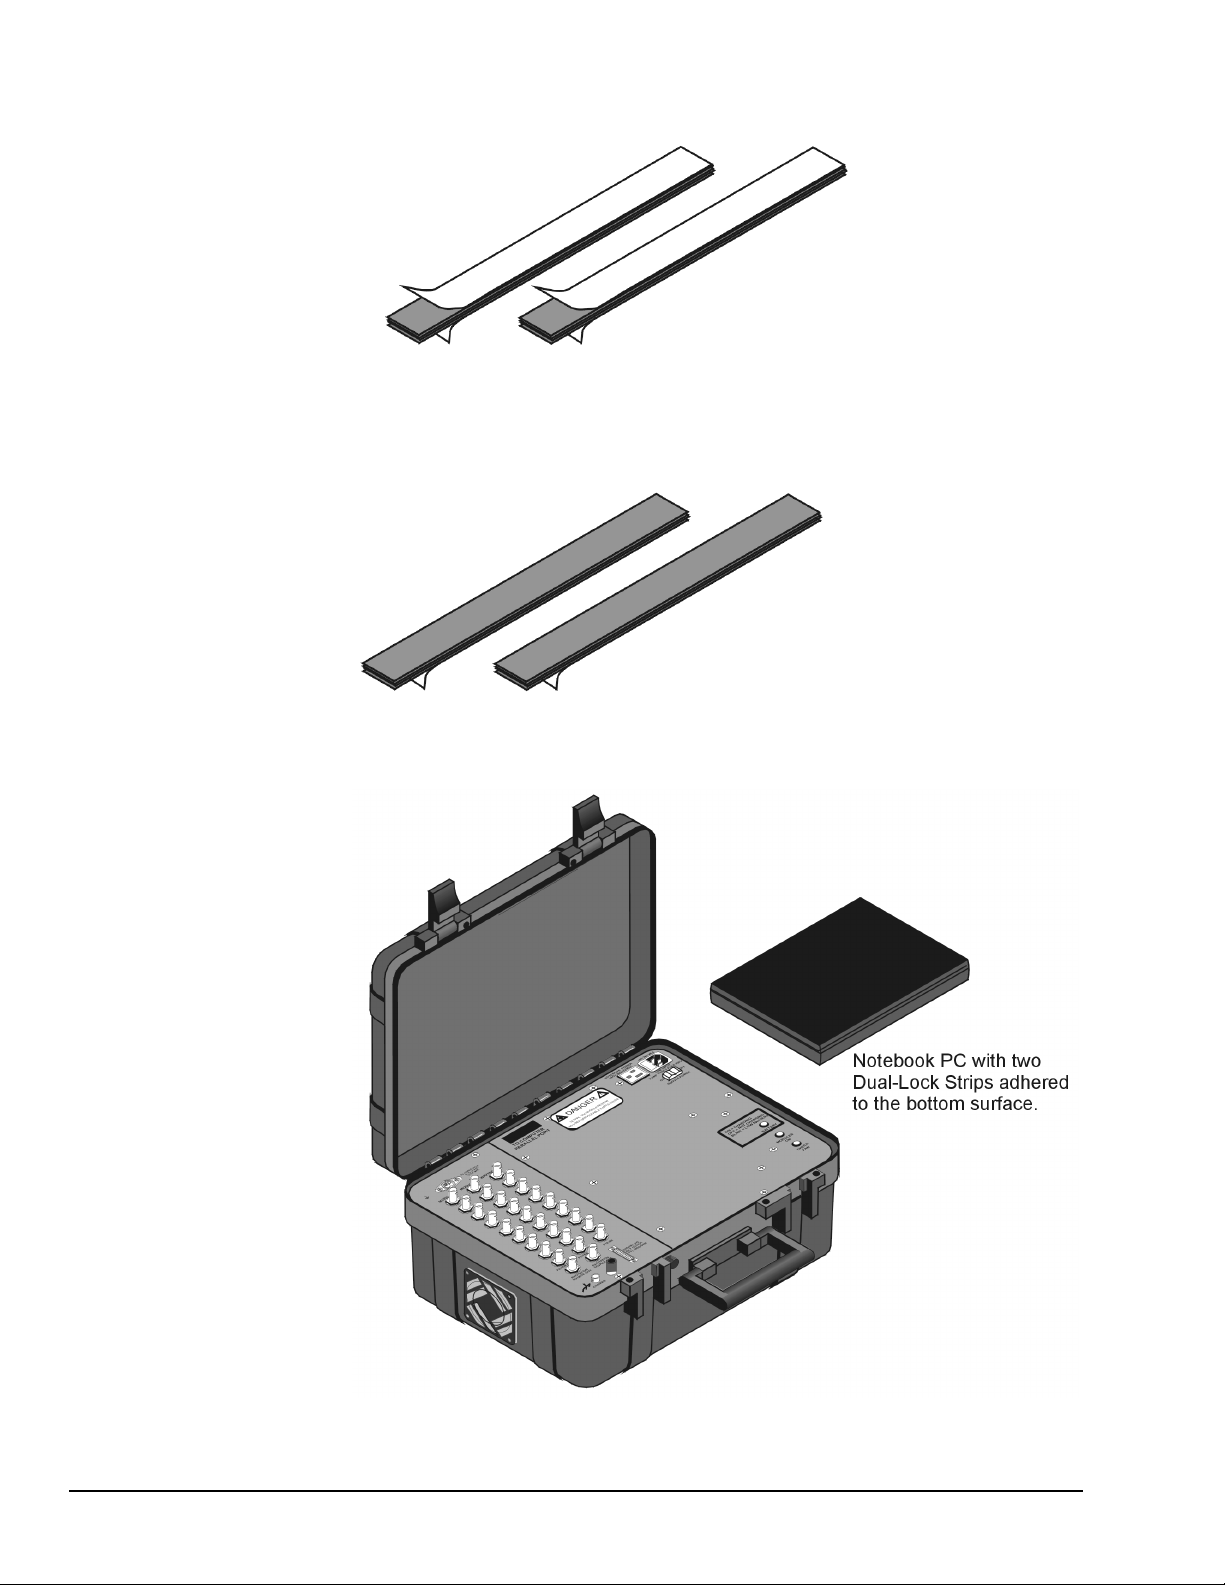
Use the following technique to ensure proper alignment of the strips.
(1) Make two mounting strips that consist of mated Dual-Lock surfaces, such that the
outer surfaces of the strips are the “adhesive” sides of the strips. Note that these
adhesive edges are initially covered with protective “peel-off” paper.
(2) Trim the strips to fit the bottom surface of your Notebook PC, as needed.
(3) Remove the protective “peel-off” paper and attach the two strips to the bottom surface
of the Notebook PC.
3-2 System Setup
(4) Remove the lower protective “peel-off” and position the Notebook PC onto
WavePort’s cover plate.
06-14-00
WavePort User’s Manual
Page 21
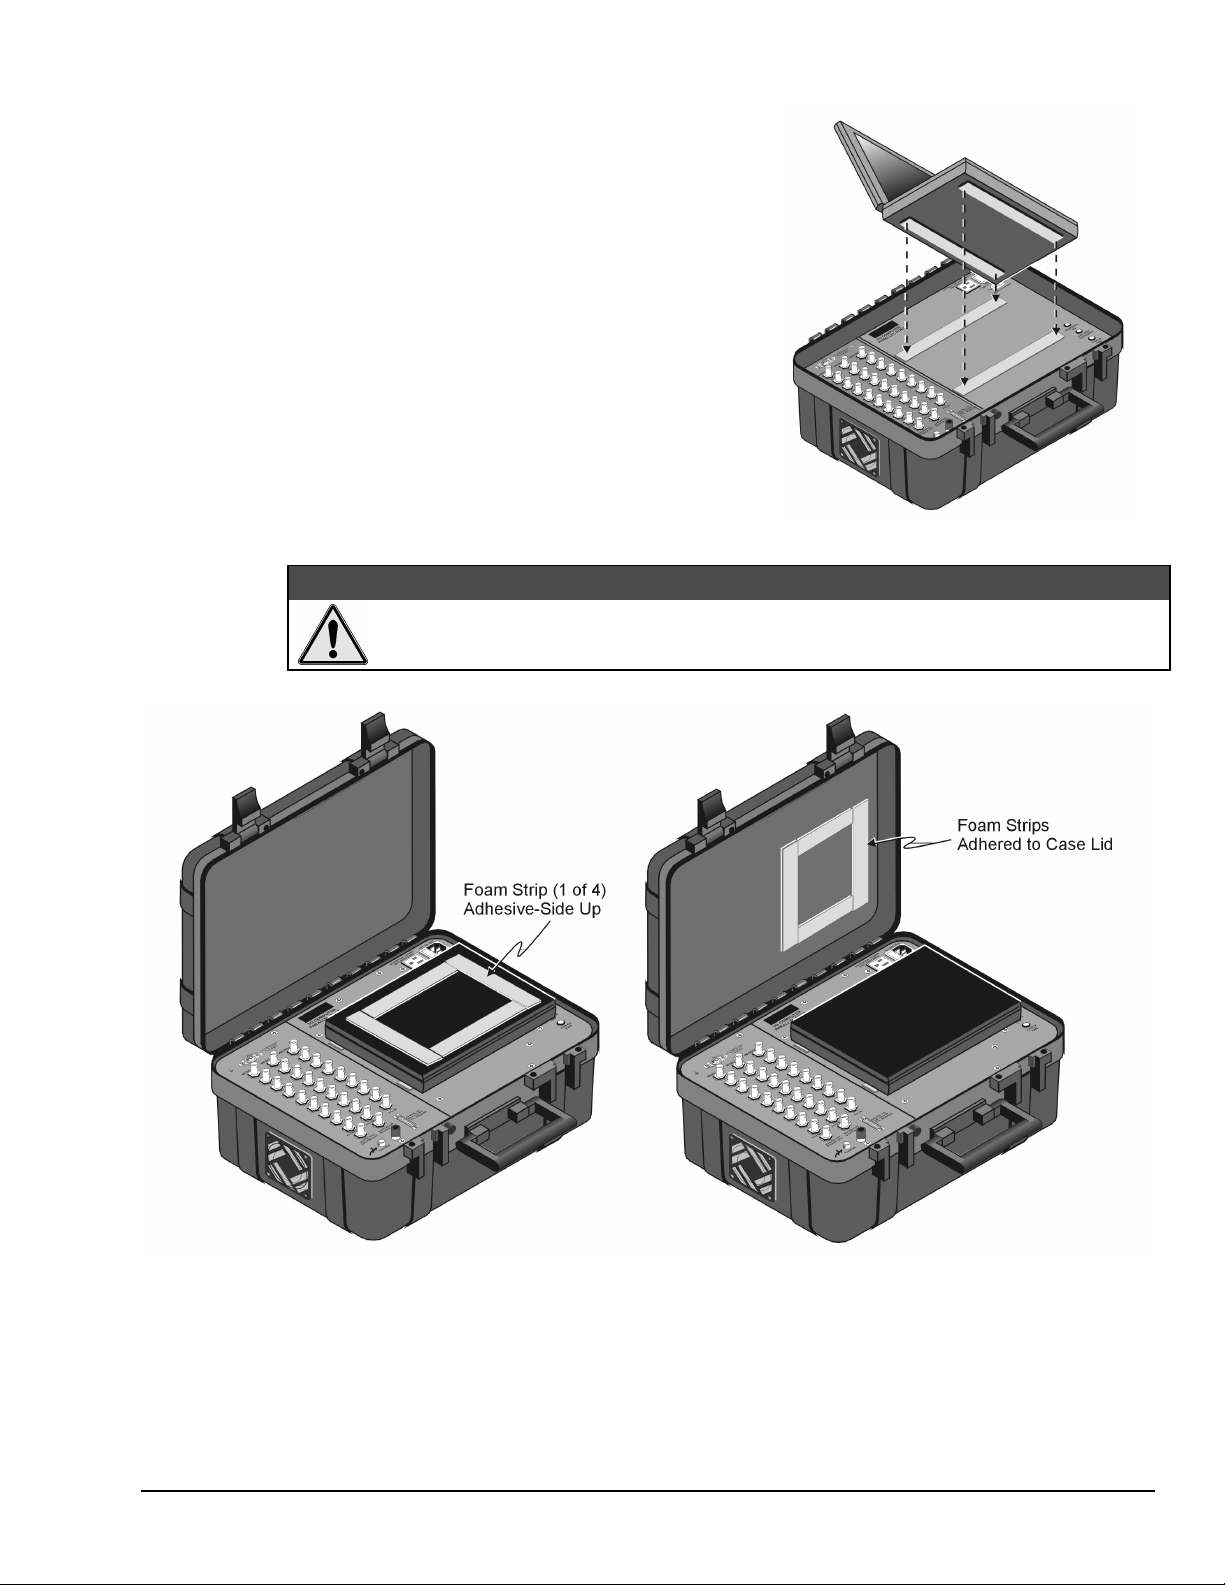
(5) Push firmly down on the Notebook to ensure the
adhesive makes good contact. The Notebook should
now be adequately secured to WavePort’s cover plate.
The Notebook PC can now be easily removed from
WavePort, and easily re-attached.
After securing the Notebook PC to the cover plate
you should add four foam strips to the inside of
WavePort’s hinged lid. Cut the strips as needed to
form a rectangle on the Notebook’s cover (see the
figure following the Caution).
CAUTION
CAUTION
CAUTIONCAUTION
Forcing WavePort’s cover to close on a Notebook PC that exceeds the height restriction
of 1.5” (38 mm) is likely to result in damage to the Notebook PC.
How to use foam strips (part no. ST-5-6) to pad your Notebook PC.
1. Verify that the Notebook PC does not exceed a height (when the PC is closed) of 1.5 inches (38 mm). Notebook’s
exceeding this dimension can be damaged when closing WavePort’s cover.
2. Place four foam strips on the cover of the Notebook PC. The adhesive-side faces the WavePort’s hinged cover.
3. Fully close, then reopen WavePort’s cover.
4. Verify that the foam strips are attached firmly to WavePort’s cover.
WavePort User’s Manual
06-14-00
System Setup 3-3
Page 22
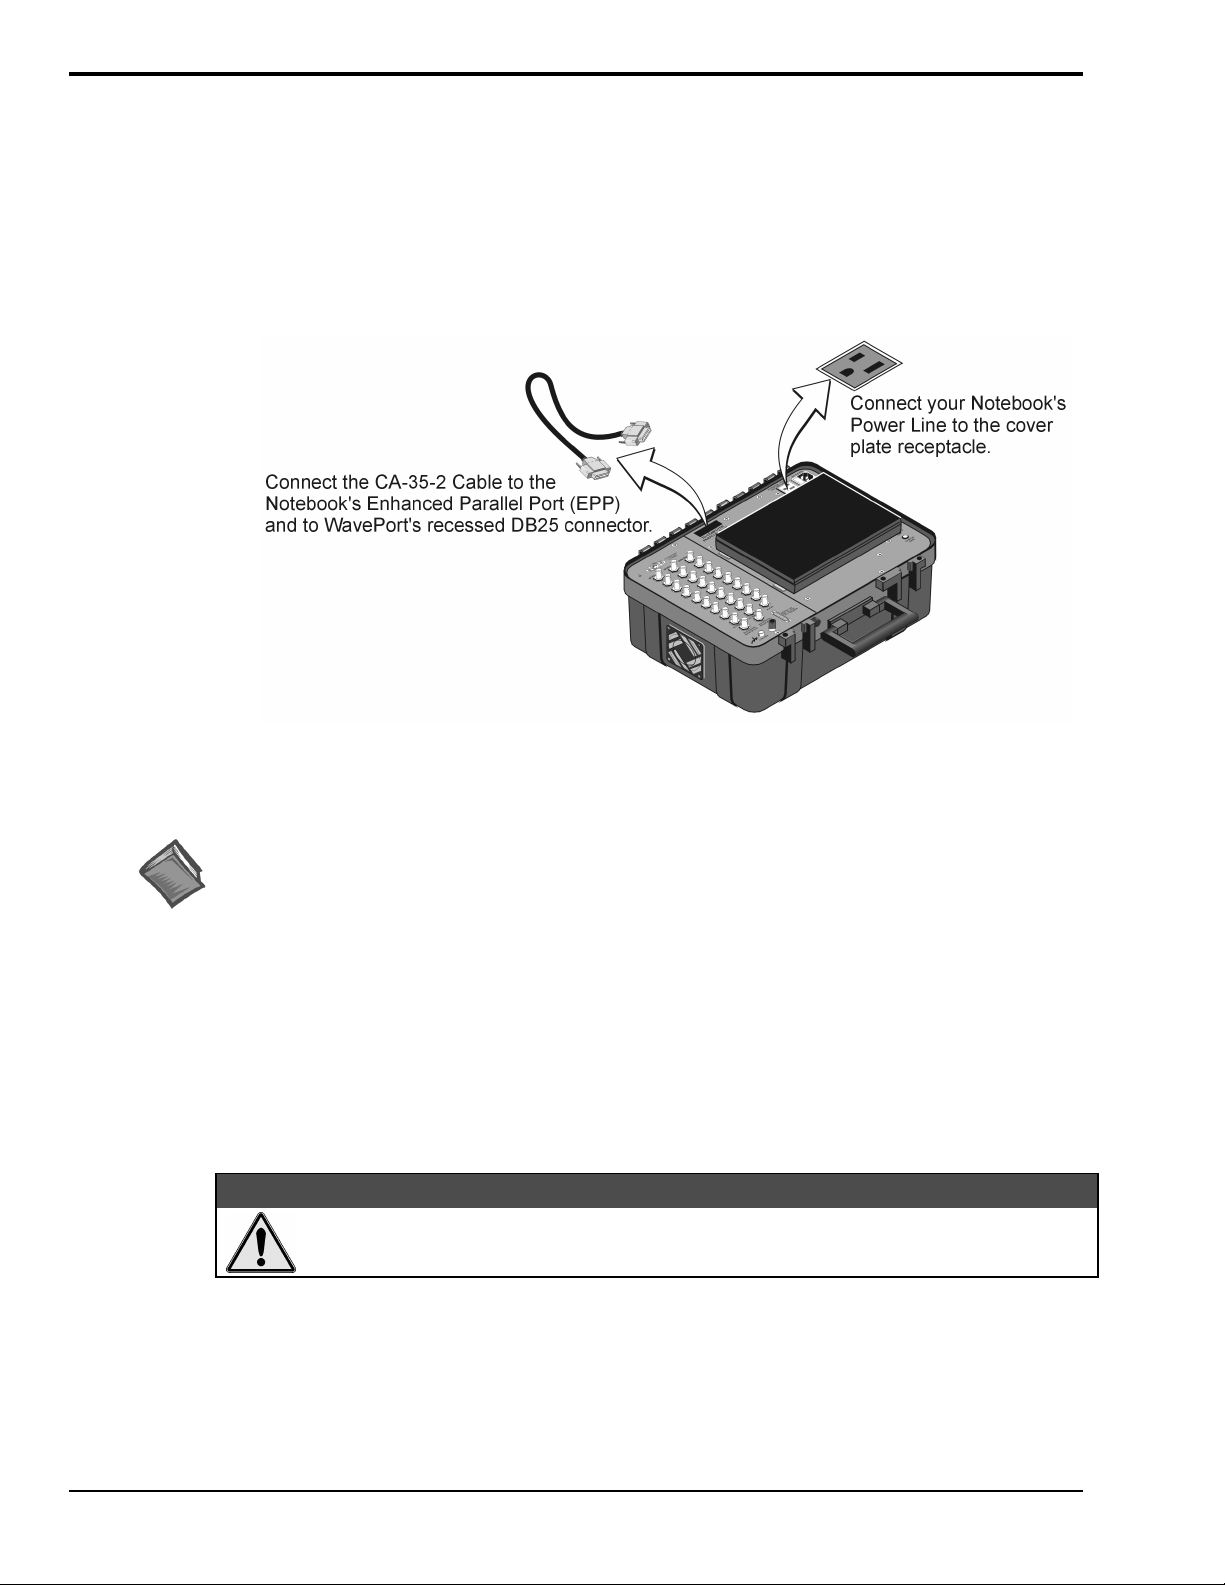
3. Connecting the Communication Cable and Notebook Power Cable
WavePort’s communication line connects to a host PC through a 25 pin (male connector) located in a
recess on WavePort’s cover plate. The connector is labeled “TO COMPUTER PARALLEL PORT.”
WavePort communicates with a Notebook through the PC’s enhanced parallel port (EPP). An
alternative is to use a WBK20A PCMCIA/EPP interface-card in conjunction with the Notebook’s
PC-Card port. This option is discussed in Appendix B.
Connecting the Notebook PC to WavePort
Reference Note:
An optional WBK20A PCMCIA/EPP interface-card can be used instead of the CA-35-2 cable.
WBK20A connects to the Notebook’s PC-Card port. This PC-Card option is discussed in Appendix B.
Connect the Notebook’s power line to the Notebook Power receptacle located on WavePort’s cover plate.
This receptacle is “live” whenever WavePort has AC line power connected to a live source. The position of
WavePort’s Module Power switch has no bearing on the Notebook Power receptacle.
The Notebook can be powered from the Notebook Power Receptacle [non-switched] as long as
LINE INPUT power is supplied to the WavePort (as discussed in the following section). Do not plug
anything into the Notebook Power Receptacle that exceeds a power rating of 50 Watts, as this could
overload the WavePort.
CAUTION
CAUTION
CAUTIONCAUTION
Do not plug anything into the Notebook Power Receptacle that exceeds a power rating of
50 Watts. Such action could result in overloading the WavePort and blowing a fuse.
3-4 System Setup
06-14-00
WavePort User’s Manual
Page 23
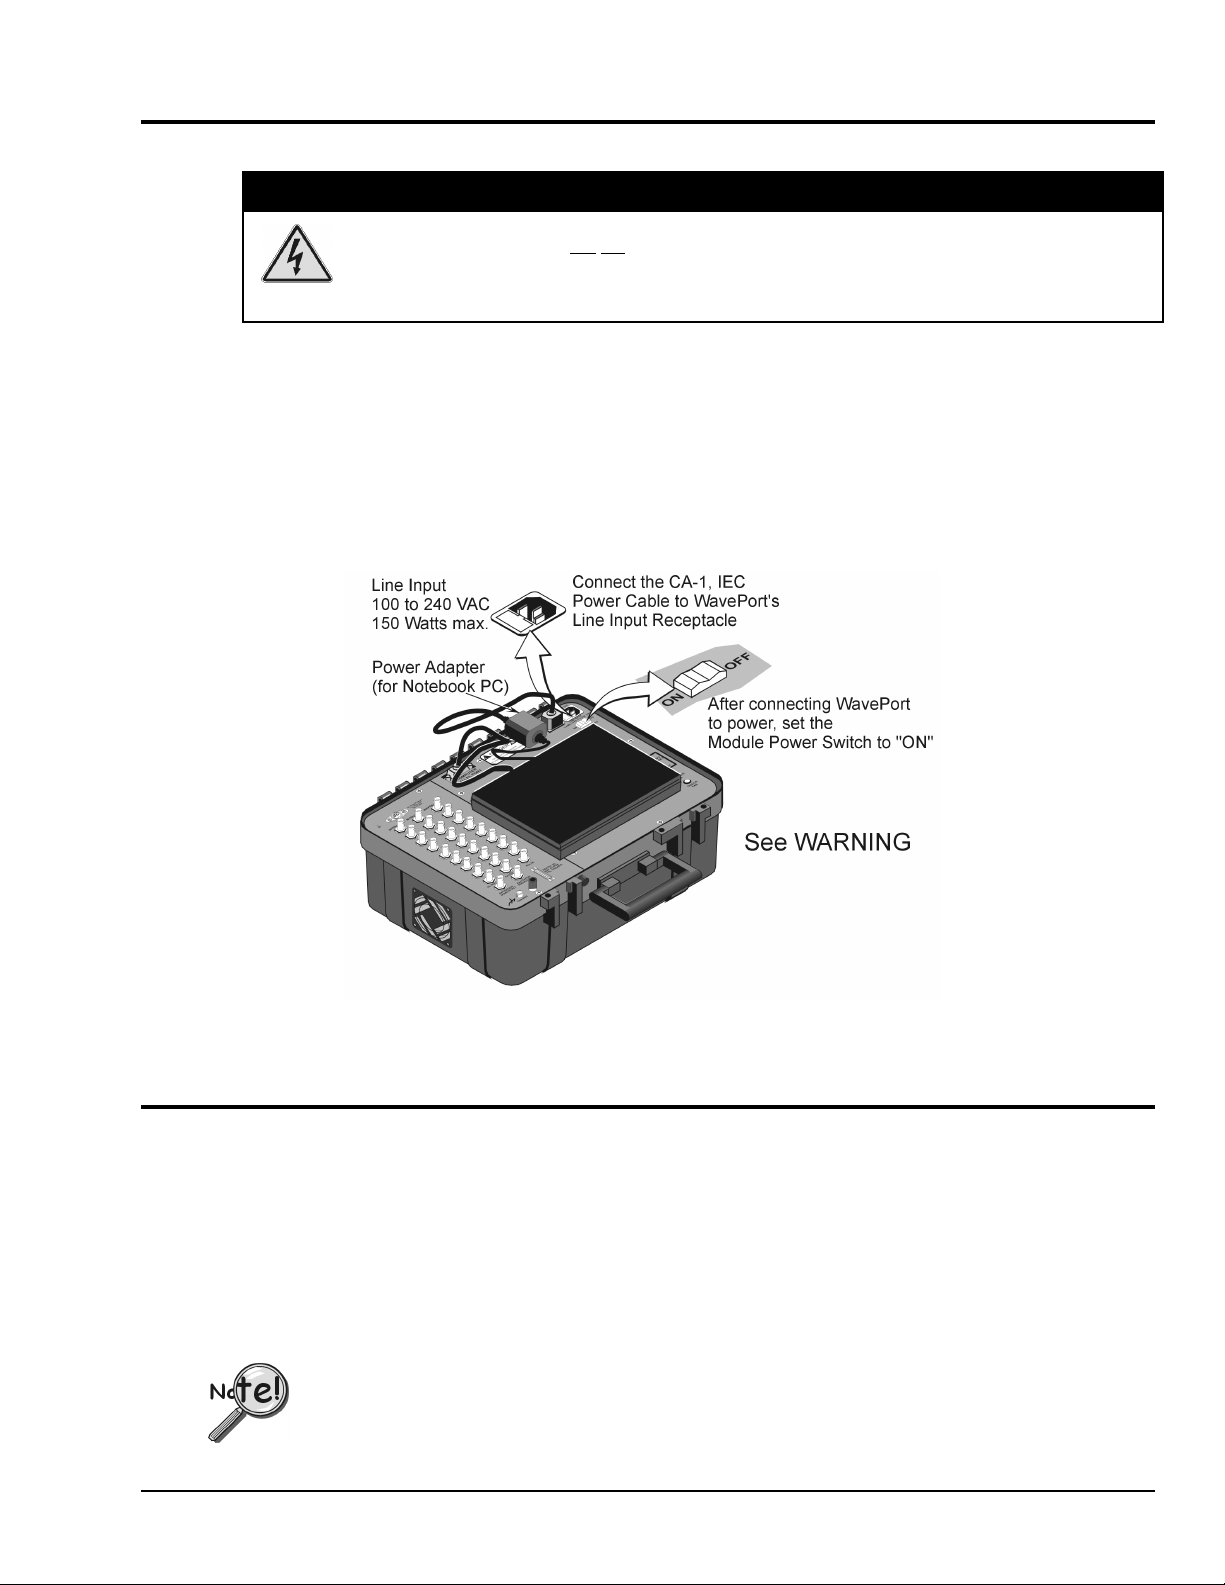
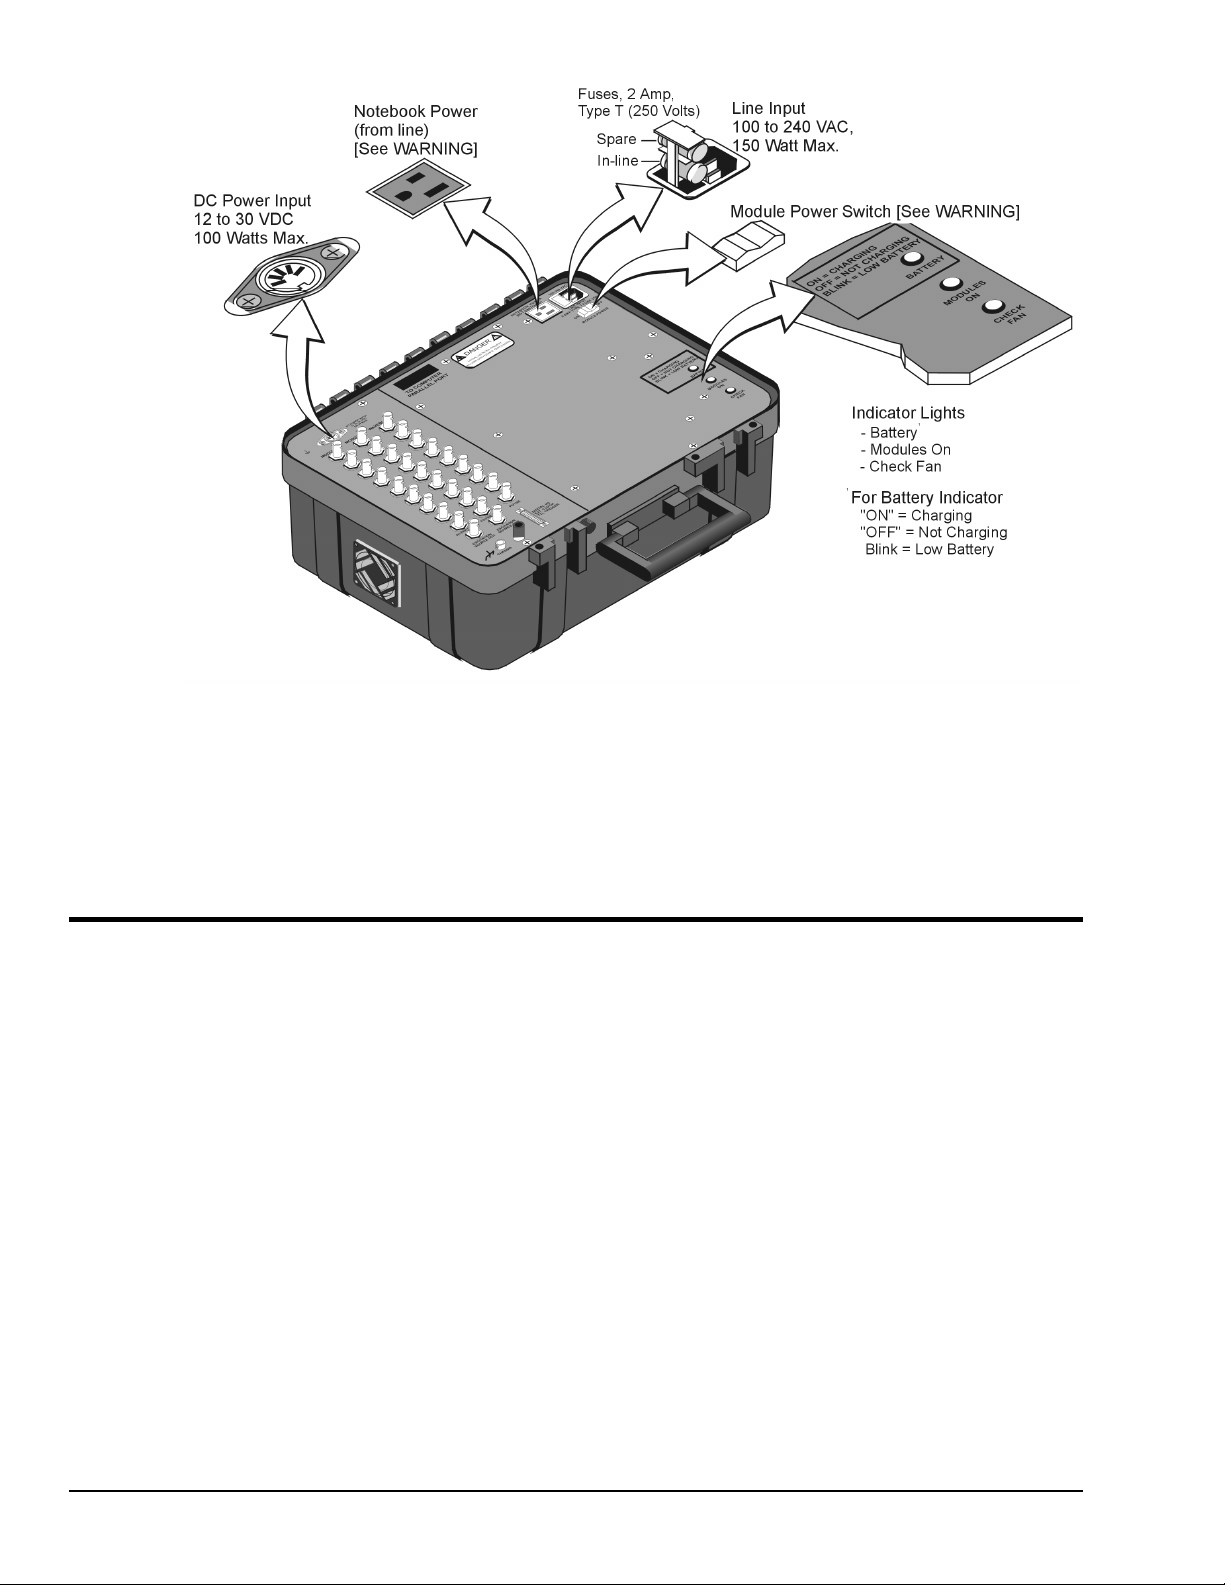
4. Connecting the WavePort to Power
The Notebook Power receptacle is “LIVE” whenever WavePort is plugged into a live AC power source.
The Module Power Switch can not
WavePort contains no user serviceable components. Do not remove WavePort’s cover plate.
Lethal voltages are present which could cause serious injury or death.
Although WavePort can be powered from external DC or internal batteries, we are only concerned at this point
with powering the system via 100 to 240 VAC through its Line Input receptacle.
Simply connect the female-end of power cable CA-1, IEC to WavePort’s Line Input receptacle, and connect the
male-end of the cable to an appropriate 100 to 240 VAC power supply.
After cable CA-1 is connected to both WavePort and the AC power supply, turn the Module Power Switch to
“ON.”
Note that DC power supplies are discussed in the following chapter entitled, Hardware and Operation Reference.
be used to turn this receptacle “Off.”
WARNING
WARNING
WARNINGWARNING
Line Input (VAC) Receptacle and Module Power Switch
5. Installing Software
Software that can be used with WavePort includes WaveView, DIAdem, DASYlab, and LabVIEW. Programmers can
create customized programs using DaqX Applications Program Interface (API) commands. Chapter 5 provides a brief
synopsis of the software options.
For your initial setup of WavePort we recommend that you only install the following, per the steps provided below.
Ρ WaveBook Support 32-bit (Includes WaveView)
Ρ Acrobat Reader
Ρ DIAdem Post Acquisition Data Analysis Program
Remove any previous-installed versions of WaveBook software before installing a newer version.
WavePort User’s Manual
06-14-00
System Setup 3-5
Page 24

Install software according to the following
procedure.
1. Close all other programs. Insert CD-ROM and
wait for Notebook PC to auto-access the CD.
2. On the Master Setup Screen check:
Ρ WaveBook Support 32-bit
Ρ Acrobat Reader
Ρ DIAdem Post Acquisition Data Analysis
Program. Note that DIAdem is detailed in
Chapter 7.
3. Follow the on-screen dialog boxes to complete
the installation.
Master Setup Screen
6. Using the Configuration Applet to Check Connections
After software installation you should verify that proper communication exists between the WavePort and your
Notebook. You can use the Daq Configuration applet to test this aspect of hardware performance. Note that the applet
is automatically installed in the Windows Control Panel during installation of the WaveBook program group.
The Daq Configuration applet tests the capabilities of the PC parallel port (or WBK20/21 interface), then estimates the
maximum performance, using both standard and enhanced protocols. In addition, the test verifies WavePort is
connected and ready for operation.
Reference Note:
A section entitled, A Guide to Using the Daq Configuration Applet, begins on the following page. The section
includes detailed information regarding the Daq Configuration applet and includes screen shots.
To run the WavePort test program:
1. Ensure WavePort is connected to the Notebook PC.
2. Verify both the Notebook and WavePort are powered.
3. Double-click on the Daq Configuration applet (in the Windows Control Panel).
4. Select the WaveBook device.
5. Click on Properties.
6. Click on the Resource Test button (within the Test Hardware tab).
The program performs several tests on the Notebook and WavePort and displays the results. Once communication
between the Notebook and WavePort has been established you can start WaveView and collect data.
3-6 System Setup
06-14-00
WavePort User’s Manual
Page 25
A Guide to Using the Daq Configuration Applet
The Daq Configuration applet, designed for 32-bit Windows 9x/2000/NT systems, is located in the
Windows Control Panel. It allows you to add or remove a device and change configuration settings.
The included test utility provides feedback on the validity of current configuration settings, as well as
performance summaries.
Device Inventory Dialog Box
Run the applet by double-clicking on the Daq Configuration icon in the Windows Control Panel.
The Device Inventory dialog box will open, displaying all currently configured devices. Displayed devices
show their name and an icon to identify the device type. If no devices are currently configured, no devices
will appear in this field.
The four buttons across the bottom of the dialog box are used as follows:
• Properties: Current configuration settings for a device can be changed by first bringing up the
corresponding Properties dialog box. Open the Properties dialog box by double-clicking on the device
icon or selecting the device and then clicking on the Properties button.
• Add Device: The Add Device button is
used to add a device configuration
whenever a new device is added to the
system. Failure to perform this step will
prevent applications from properly
accessing the device. Clicking on the Add
Device button will open the Select Device
Type dialog box.
• Remove: The Remove button is used to
remove a device from the configuration.
A device may be removed if it is no
longer installed, or if the device
configuration no longer applies.
Note: If a device is removed, applications
may no longer access the device.
However, the device can be
re-configured at any time using the
Add Device function described above.
• Close: The Close button may be used at
any time to exit the Daq Configuration
applet.
Daq Configuration - Device Inventory Dialog Box
WavePort User’s Manual
06-14-00
System Setup 3-7
Page 26
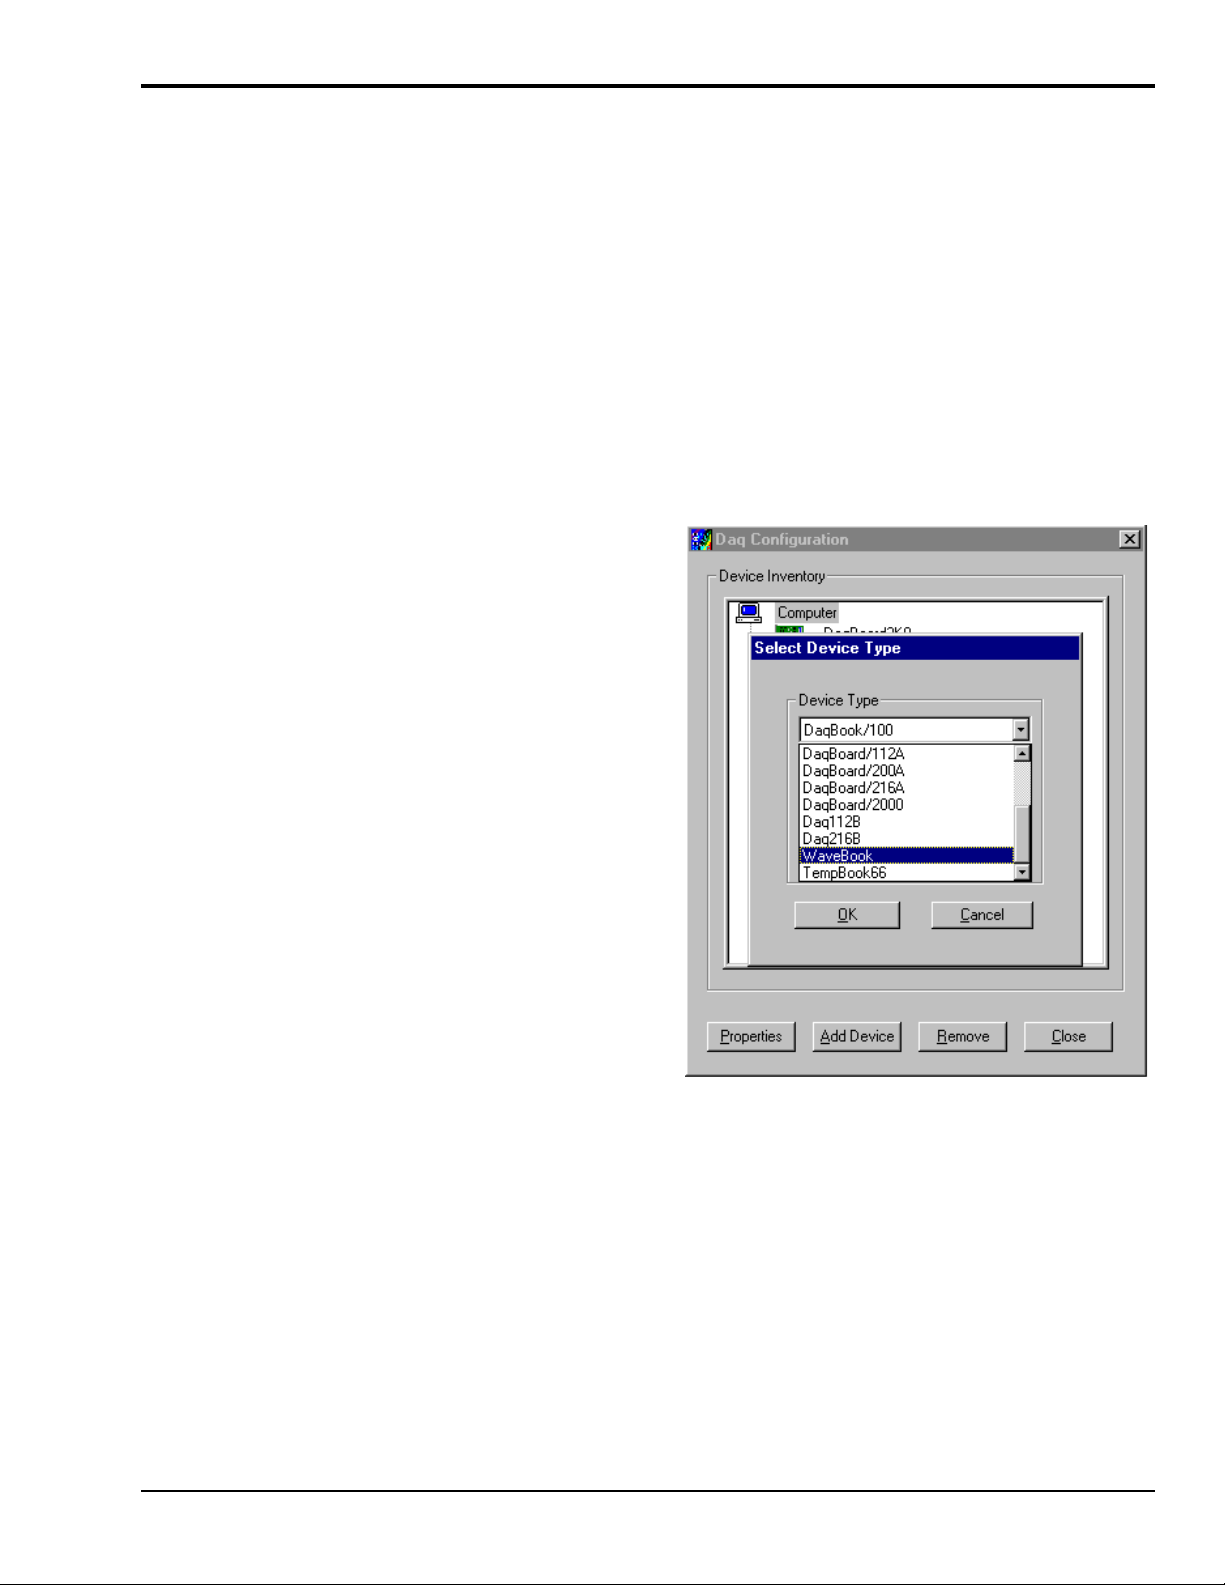
Select Device Type Dialog Box
This dialog box opens when the Add Device
button of the Device Inventory dialog box is
selected.
The device type you select for configuring will
appear in the main edit box. Clicking on the
OK button will then open the Properties dialog
box (following figure).
Note: As there is no specific “WavePort”
device to select, choose “WaveBook”
(see figure at right).
Daq Configuration - Select Device Type Dialog Box
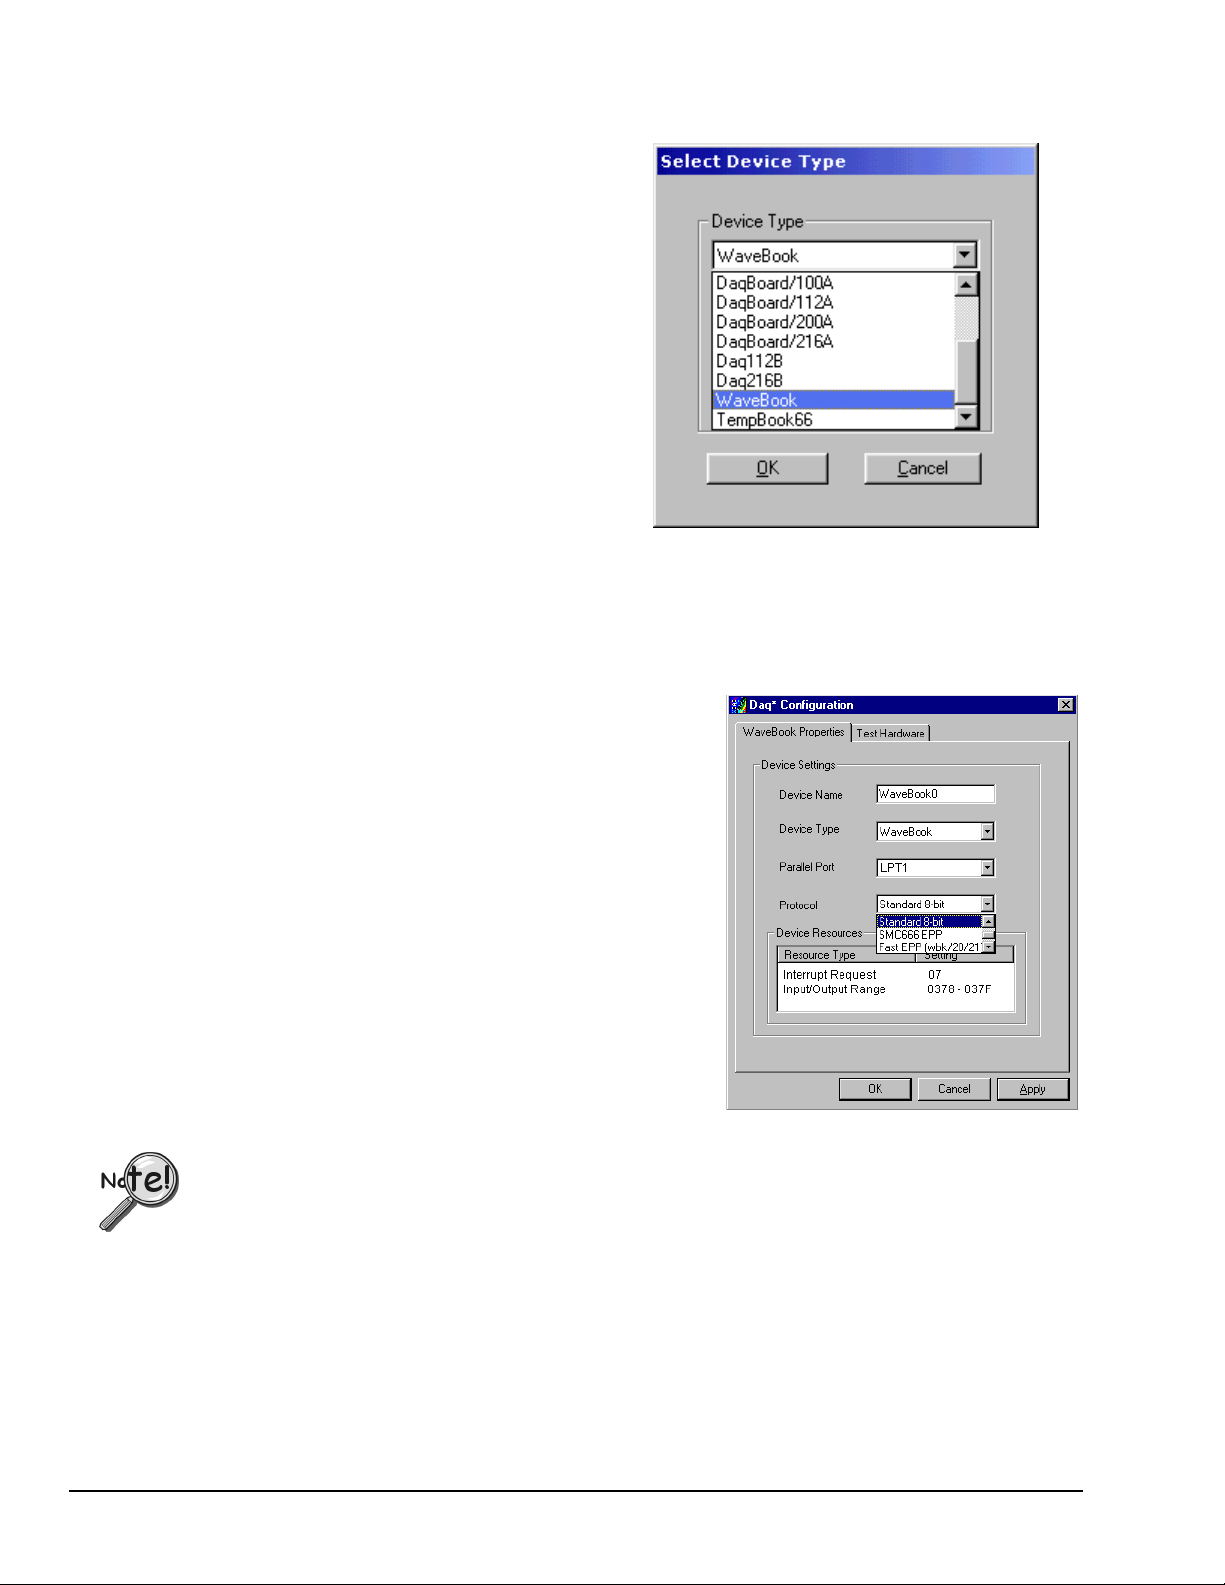
Properties Dialog Box
This dialog box opens when the Properties button of the Device Inventory dialog box is selected, or when
the OK button of the Select Device Type dialog box is selected. It displays the properties for the WaveBook
device with the default configuration settings. The fields include:
• Device Name: The Device Name field is displayed with
the default device name. As shown, this field can be
changed to any descriptive name as desired. This
device name is the name to be used with the
daqOpen
function to open the device. This name will also be
displayed in the device lists for opening the device in
the WaveView and WaveCal applications.
• Device Type: The Device Type field indicates the
device type that was initially selected. However, it can
be changed here if necessary.
• Parallel Port: The Parallel Port field is used to set the
parallel port for communicating with the WaveBook.
• Protocol: The Protocol field is used to set the parallel
port protocol for communicating with the WaveBook.
Depending on your system, not all protocols may be
available. (See following Note).
Daq Configuration - Properties Dialog Box
In regard to Protocol – If you are using a WBK20A you must select “Fast EPP (wbk/20/21)” to achieve
the best performance. WBK20A is discussed in Appendix B.
• Device Resources: The Device Resources field lists settings for various resources, among them
Interrupt Request, Input/Output Range, and Direct Memory Access.
3-8 System Setup
• OK: Click on the OK button to store the configuration and exit the current dialog box.
• Cancel: Click on the Cancel button to exit the current dialog box without storing any changes.
• Apply: Click on the Apply button to store the configuration; or click the Test Hardware tab.
• Test Hardware: Click on the Test Hardware tab to test the current stored configuration for the device.
This selection will open the Test Hardware dialog box.
06-14-00
WavePort User’s Manual
Page 27
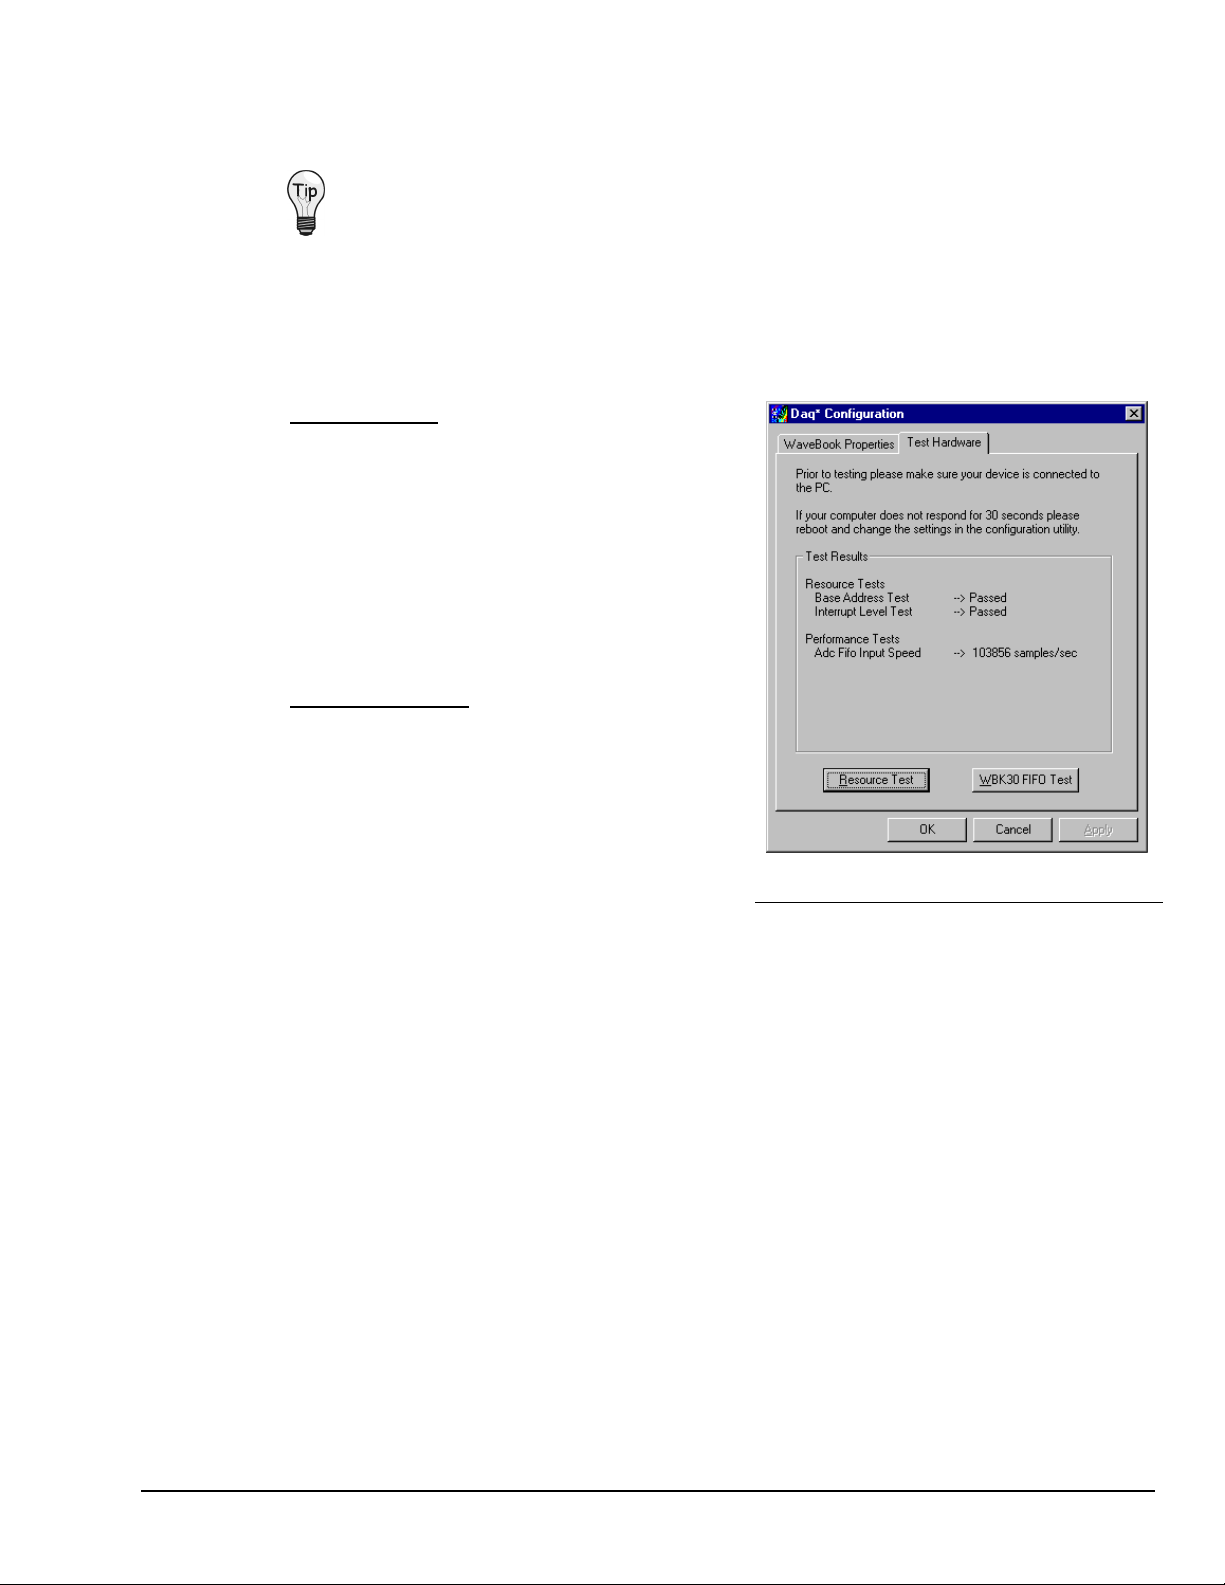
Test Hardware Dialog Box
Before testing WaveBook, make sure the device has been properly installed and powered-on. Make sure
the parallel port cable is firmly in place on both the WaveBook and the proper LPT port in the computer.
When testing WaveBook, if the unit does not respond within 30 seconds perform the
following steps:
1) reboot the system
2) upon power-up, re-open the Daq Configuration applet
3) select another configuration setting
4) reinitiate the test
To test the currently stored configuration for the WaveBook device, click the Test button. Results should be
displayed in a few seconds. The test results have two components: Resource Tests and Performance Tests.
Resource Tests. The resource tests are intended to
test system capability for the current device
configuration. Resource tests are pass/fail. Test failure
may indicate a lack of availability of the resource, or a
possible resource conflict.
Base Address Test. This resource test checks the base
address for the selected parallel port. Failure of this test
may indicate that the parallel port is not properly
configured within the system. See relevant operating
system and computer manufacturer’s documentation to
correct the problem.
Performance Tests. These types of tests are intended
to check various WaveBook functions, using the current
device configuration. Performance tests provide
quantitative results for each supported functional group.
Test results represent maximum rates the various
operations can be performed. The rates depend on the
selected parallel port protocol, and vary according to
port hardware capabilities.
Daq Configuration - Test Hardware Dialog Box
WBK30 FIFO Test. This performance test checks the data-storing capabilities of the optional,
WBK30 memory card.
When the test is completed successfully, the Daq Configuration Test Dialog Box indicates a passed
condition.
“Passed” messages indicate you can exit the test program and run your application.
WavePort User’s Manual
06-14-00
System Setup 3-9
Page 28

3-10 System Setup
06-14-00
WavePort User’s Manual
Page 29

Hardware and Operation Reference 4
WavePort/PE Devices …… 4-1
Overview ……4-2
Basic Operation ……4-3
Signal Aspects ……4-5
WavePort/PE16 ……4-5
WavePort/PE8 …… 4-6
WavePort/V Devices …… 4-7
Overview……4-7
Basic Operation ……4-8
Signal Aspects ……4-9
Ground Connections ……4-10
DB25F “Digital I/O, External Clock, TTL Trigger” Connection ……4-11
Programmable Features ……4-12
Triggers ……4-13
Pulse Trigger ……4-13
Digital-Pattern Trigger ……4-14
Multi-channel Triggering ……4-14
External Clock and Counter-Timer ……4-15
Power Aspects ……4-16
Power Module Operation ……4-18
Charging ……4-19
Fuse Replacement …… 4-19
Factory-Installed Option Cards (for WaveBook and WBK10A-based modules) …… 4-20
WBK11A – Simultaneous Sample and Hold Card……4-20
WBK12A and WBK13A Programmable Low-Pass Filter Cards ……4-21
WavePort’s Fan ……4-22
WavePort User’s Manual
09-29-00
Hardware and Operation Reference 4-1
Page 30
WavePort/PE Devices
Overview
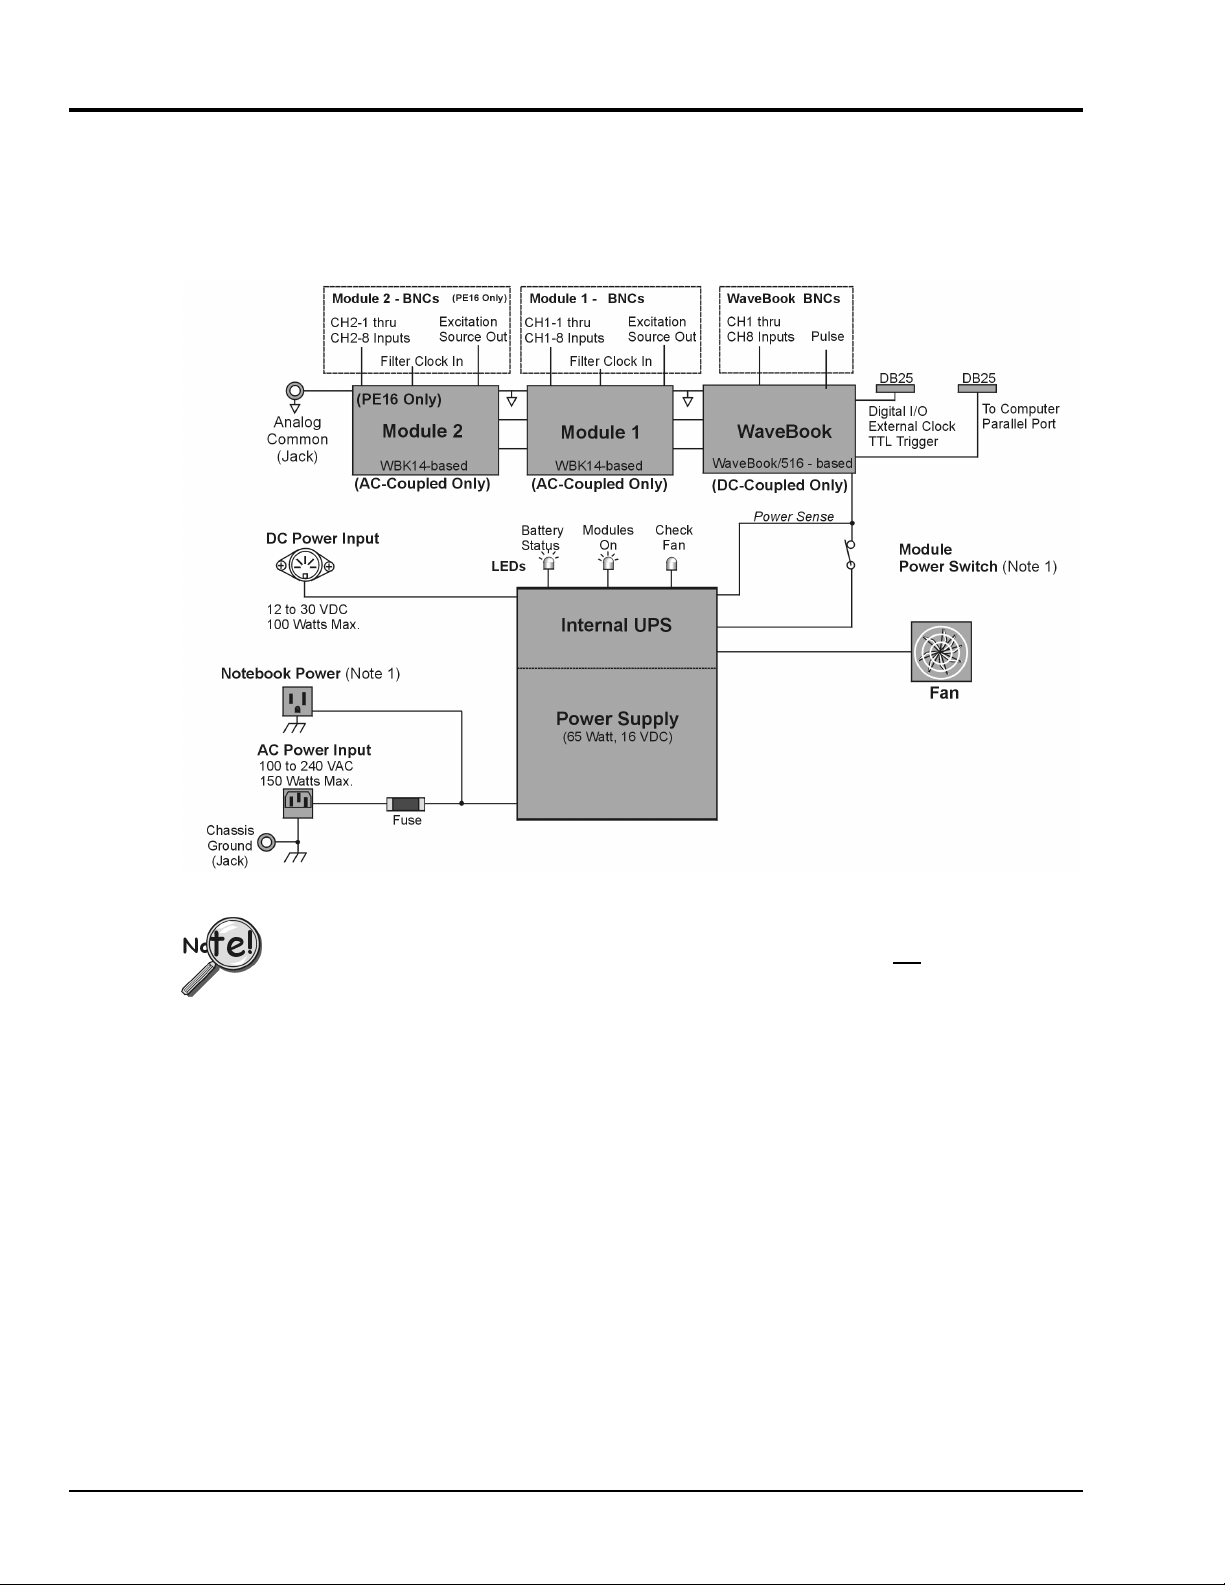
The following block diagram serves to provide a general understanding of WavePort/PE devices. Detailed
information regarding such items as the signal and power modules, indicator lights, and the unit fan are
included later in this chapter.
WavePort/PE, Simple Block Diagram
The Notebook Power receptacle on WavePort’s cover plate is “LIVE” whenever WavePort is
connected to a “live” AC power source. The Module Power Switch can not be used to turn
off the Notebook Power Receptacle.
From the diagram we can see that WavePort/PE16* consists of:
•
Two Dynamic Signal Input Modules (Module 2 and Module 1).* Both modules provide for 8 input
channels (through BNC connectors), an Excitation Source Out BNC, and a Filter Clock In BNC. The
dynamic signal input modules are based on WBK14 architecture.
•
One WaveBook Module. This module provides for 8 analog channel inputs through BNC connectors
and a Pulse input.
•
A 65 watt, 16 VDC Power Supply and Internal UPS (Uninterruptible Power Supply) System
• Two 25-pin connectors (DB25). One for connecting to the Notebook’s parallel port and another for
connecting to Digital I/O, External Clock, and TTL Trigger signals
• Three electrical connectors: DC Power Input, AC Power Input, and AC Auxiliary Output
•
Three Indicator Lights: for “Battery” Status, indication of “Modules On,” and “Fan” On
• Fan, variable speed to provide system cooling
*WavePort/PE 8 has one Dynamic Signal Input Module (Module 1).
4-2 Hardware and Operation Reference
09-29-00
WavePort User’s Manual
Page 31

Basic Operation
WavePort/PE units integrate WaveBook/516 architecture with that of one or two Dynamic Signal Modules.
The PE8 version has one dynamic module, and the PE16 has two. The architecture includes buffered input
for all channels, individual instrumentation amp/channel, per-channel programmable gain, and an
anti-aliasing filter. The operational description is presented separately for both the WAVEBOOK Module
and the Dynamic Signal Module(s).
WAVEBOOK Module Operation
WavePort’s WAVEBOOK Module includes 8 signal-input channel BNCs (CH1 through CH8). Each of
these BNCs allows for two differential signals.
• Both signals are buffered and applied to a differential amplifier.
• The output of each differential amplifier is applied to a low pass filter.
•
• The amplified signals are level-shifted to the specified range. Note that unipolar offset (for sampling
•
• The digitized value is conditioned to compensate for gain and offset errors.
• The conditioned signal is held in a FIFO data buffer until the PC reads the data. An internal processor
The signals are switched (via multiplexer) to a programmable gain amplifier.
signals that are always positive) and bipolar offset (for signals that may be positive or negative) are
available.
The signal is switched over to the A/D converter. The converter digitizes the signal to16 bits in 1 µs.
checks WAVEBOOK channel 1 to determine if a valid trigger event has occurred.
• The low-latency trigger is presented to a control and timing circuit for to start the acquisition after the
trigger. The TTL trigger is taken directly from the digital I/O port.
• At every sample time, WavePort’s Digital Signal Processor reads from the scan sequence table and
accordingly programs the Control and Timing Circuit for the next sample. In regard to the next sample,
the Control and Timing Circuit selects the input channel, PGA gain, level-shifter offset, and the A/D
input source. It also conveys this information to dynamic signal modules (MODULE 1 and
MODULE 2) and precisely controls the A/D conversion timing.
• The Digital Signal Processor makes real-time sample corrections using calibration information that is
stored in an EEPROM.
• The digital I/O port is read and written by the processor to transfer bytes of digital data. The I/O port
may be used as a simple 8-bit input port or as a 32-address byte-wide I/O port.
•
Acquisition data is sent from WAVEBOOK to the Notebook PC through a high-speed EPP
(Enhanced Parallel Port). The port makes use of a DB25 connector labeled “TO COMPUTER
PARALLEL PORT.”
MODULE 1 and MODULE 2, Dynamic Signal Module Operation
WavePort’s WAVEBOOK module is connected to two dynamic analog signal input modules, for PE16; and
one such module for PE8. The dynamic modules are referred to, simply, as MODULE 1 and MODULE 2.
Each module provides a means of interfacing with piezoelectric transducers. These transducers include, but
are not limited to, accelerometers, microphones, and force/pressure transducers.
Reference Note:
Appendix A contains information regarding the use of accelerometers.
MODULE 1 and MODULE 2 each include:
The gain, filter cut-off frequencies and current biasing levels are software programmable.
WavePort User’s Manual
• excitation source for transducer biasing
•
high-pass filter
• programmable gain amplifier (PGA)
•
anti-aliasing low-pass filter
• simultaneous sample-and-hold (SSH) amplifiers
09-29-00
Hardware and Operation Reference 4-3
Page 32

Excitation Source
A built-in, programmable excitation source stimulates dynamic systems for transfer function measurements,
and serves as a reference signal for calibration. The excitation source includes a sine/random waveform
generator, a programmable gain amplifier (PGA), a DC-level DAC, and a phase-lock loop. The phase-lock
loop synthesizes the frequency of a fixed-amplitude sine wave and controls the bandwidth of the random
signals. The PGA conditions the signal amplitude to a value between 0 V to 5 V peak. The DC level of the
signal is varied independently of signal amplitude by a software-controlled DAC from -5 V to +5 V. The
DC level of the excitation signal can be used to balance static loads, while the AC signal provides the
dynamic excitation.
MODULE 1 and MODULE 2 provide constant current to bias ICP® transducers. Two current levels
(2 mA or 4 mA) with voltage compliance of 27 V can be selected via software. The bias current is sourced
through the center conductor of a coaxial lead and returns to the dynamic signal MODULE by way of the
outer conductor. The output impedance is larger than 1 MΩ and presents virtually no loading effect on the
transducer’s output. For applications that do not require bias, the current source can be removed from the
BNC input by opening a relay contact.
The Dynamic Signal MODULE’s current sources are applied to (or removed from) the input in
channel-groups of two.
For MODULE 1 these are: [CH1-1 / CH1-2], [CH1-3 / CH1-4], [CH1-5 / CH1-6] and [CH1-7 / CH1-8].
For MODULE 2 these are: [CH2-1 / CH2-2], [CH2-3 / CH2-4], [CH2-5 / CH2-6] and [CH2-7 / CH2-8].
High-Pass Filter
– for MODULES 1 & 2
Every Dynamic Signal MODULE’s signal input channel has two independent High-Pass Filters (HPFs) with
a 3-dB cut-off frequency (Fc) at 0.1 Hz and 10 Hz. The 0.1-Hz HPF is a single-pole RC filter, and is
primarily used to couple vibration signals. The 10-Hz HPF is a 2-pole Butterworth type and can be used to
couple acoustic signals or attenuate setup-induced low-frequency signals that can reduce the dynamic range
of the measurement (for example when using tape recorders as signal sources).
Programmable Gain Amplifier (PGA)
– for MODULES 1 & 2
The High-Pass Filter removes the DC voltage from the input signal. A PGA amplifies the AC voltage with
flat response up to 500 kHz. Each channel has a PGA with 8 programmable gains (1, 2, 5, 10, 20, 50, 100,
and 200) and a software-controlled DAC for offset nulling. The Dynamic Signal MODULES measure only
bipolar signals up to 5 V peak.
Programmable Low-Pass Filter Phase Equalizer
– for MODULES 1 & 2
The first filter stage is a programmable 2-pole continuous-time low-pass filter. The phase equalizer provides
more than 65 dB alias protection to the next filter stage. In addition, it fine-tunes the phase shift of the
channel to optimize the phase-matching between channels. At calibration, the phase shift of each channel is
measured and stored in an EEPROM that is read at configuration.
Programmable Low-Pass Anti-Aliasing Filter [
and
FILTER CLK. IN]
for MODULES 1 & 2
Most signal alias rejection is performed by an 8-pole Butterworth filter. This filter is implemented with a
switch-capacitor network driven by a programmable clock. Each channel has an independent clock that
determines the filter’s 3dB cut-off frequency. The switch-capacitor filter provides no attenuation at the
clock frequency—hence, the need for the continuous-time low-pass filter.
Note: The Low-Pass Anti-Aliasing Filter can be bypassed to process signals with a bandwidth higher
than 100 kHz.
FILTER CLK. IN - MODULE 1 and MODULE 2 each have a BNC labeled FILTER CLK. IN (Filter
Clock In). These BNC connectors provide a path to externally control the cut-off frequency of the LowPass Anti-Aliasing Filter. The input waveform can be TTL or sinusoidal, with an amplitude peak of at least
500 mV. In this “External Clock” mode, cut-off frequency is set to the input frequency divided by 50.
Simultaneous Sample and Hold
– for MODULES 1 & 2
All MODULE 1 and MODULE 2 channels are sampled simultaneously, after which the WAVEBOOK
Module measures each output at 1 µs/channel until all channels are digitized. The time-skew between
sampling on all channels is 150 ns.
When a Dynamic Signal MODULE’s SSH channel is enabled, the per-channel sample rates are reduced.
The rate reduction is the same as that which would occur if another channel were added.
The per-channel rate (with SSH enabled) is:
1 MHz / (n+1), where n is the number of active channels.
4-4 Hardware and Operation Reference
09-29-00
WavePort User’s Manual
Page 33

Signal Aspects, WavePort/PE16
WavePort/PE16 can measure up to eight channels of voltages within ±10V and up to 16 channels of ICP® transducer
excitation. WavePort/PE16 receives its channel-input signals through three columns of eight BNC connectors (24 channel
inputs total). The columns are labeled MODULE 2, MODULE 1, and WAVEBOOK. In addition to the channel-input BNCs,
WAVEBOOK contains a BNC for PULSE Trigger Input, and the two MODULEs include BNCs for filter clock input
(FILTER CLK. IN), and EXCITATION SOURCE OUT (see following figure).
The signal panel includes a DB25 connector for DIGITAL I/O, EXT CLOCK (external clock), and TTL TRIGGER.
Connection nodes for CHASSIS (ground) and ANALOG COMMON are also provided.
Module 1 and Module 2
Dynamic Signal Conditioning
CH1-1 through CH1-8 and
CH2-1 through CH2-8, respectively
• Gain Ranges:
x1, 2, 5, 10, 20, 50, 100, and 200
• Input Ranges:
5V, 2.5V, 1V,
500 mV, 250 mV,
100 mV, 50 mV,
and 25 mV peak
AC-Coupled Only,
BNC shells are analog common.
See Chapter 6, WaveView and
Chapter 10, Specifications for
additional information.
Filter Clock In
(See page 4-4)
WaveBook
Analog Inputs
CH1 through CH8, Analog Inputs via
BNC Connectors.
•
16 bit resolution
• Software selectable for unipolar or
bipolar operation
• Unipolar Ranges
0 to +10V
0 to + 4V
0 to +2V
• Bipolar Ranges
±10V, ±5V, ±2V, ±1V
•
Maximum Overvoltage: ±30 VDC
DC-Coupled Only,
Fully Differential
See Chapter 6, WaveView and
Chapter 10, Specifications for
additional information.
Pulse Trigger Input (see page 4-13)
• Input Signal Range: ±5V
•
Input Characteristics: 75 Ω
•
Input Protection: ±10V max.
• Minimum Pulse Width: 100 ns
• Maximum Pulse Width: 0.8 sec
• Latency: 300 ns
Excitation Source Out
Reference Notes:
Additional information regarding WavePort/PE signal connections appears elsewhere in this manual.
WavePort/PE8 information appears on the following page. Chapter 6, WaveView, includes information
regarding channel configuration. Maintenance, intended environment, and transportation issues are discussed
in chapter 9. Specifications are provided in chapter 10.
WavePort User’s Manual
(See page 4-4)
Chassis Ground
(See page 4-10)
WavePort/PE16 Signal Panel
09-29-00
Digital I/O (see page 4-11)
External Clock (see page 4-11, 15)
TTL Trigger (see page 4-11)
Analog Common (see page 4-10)
Hardware and Operation Reference 4-5
Page 34

WavePort/PE8
WavePort/PE8 can measure up to eight channels of voltages within ±10V; and up to 8 channels of ICP® transducer excitation.
The unit receives its channel-input signals through two columns of eight BNC connectors (16 channel inputs total). The
columns are labeled MODULE 1 and WAVEBOOK. In addition to the channel-input BNCs, WAVEBOOK contains a BNC
for PULSE Trigger Input, and MODULE 1 include one BNCs for filter clock input (FILTER CLK. IN), and another BNC for
EXCITATION SOURCE OUT (see following figure).
The signal panel includes a DB25 connector for DIGITAL I/O, EXT CLOCK (external clock), and TTL TRIGGER.
Connection nodes for CHASSIS (ground) and ANALOG COMMON are also provided.
Module 1
Dynamic Signal Conditioning
CH1-1 through CH1-8
• Gain Ranges:
x1, 2, 5, 10, 20, 50, 100, and 200
• Input Ranges:
5V, 2.5V, 1V,
500 mV, 250 mV,
100 mV, 50 mV,
and 25 mV peak
AC-Coupled Only,
BNC shells are analog common.
See Chapter 6, WaveView and
Chapter 10, Specifications for
additional information.
Filter Clock In
(See page 4-4)
WaveBook
Analog Inputs
CH1 through CH8, Analog Inputs via
BNC Connectors.
•
16 bit resolution
• Software selectable for unipolar or
bipolar operation
• Unipolar Ranges
0 to +10V
0 to + 4V
0 to +2V
• Bipolar Ranges
±10V, ±5V, ±2V, ±1V
• Maximum Overvoltage: ±30 VDC
DC-Coupled Only,
Fully Differential
See Chapter 6, WaveView and
Chapter 10, Specifications for
additional information.
Pulse Trigger Input (see page 4-13)
• Input Signal Range: ±5V
•
Input Characteristics: 75 Ω
•
Input Protection: ±10V max.
• Minimum Pulse Width: 100 ns
• Maximum Pulse Width: 0.8 sec
• Latency: 300 ns
Excitation Source Out
(See page 4-4)
Chassis Ground
(See page 4-10)
WavePort/PE8 Signal Panel
Reference Notes:
Additional information regarding WavePort/PE signal connections appears elsewhere in this manual.
WavePort/PE16 information appears on the previous page. Chapter 6, WaveView, includes information
regarding channel configuration. Maintenance, intended environment, and transportation issues are discussed
in chapter 9. Specifications are provided in chapter 10.
4-6 Hardware and Operation Reference
09-29-00
Digital I/O (see page 4-11)
External Clock (see page 4-11, 15)
TTL Trigger (see page 4-11)
Analog Common (see page 4-10)
WavePort User’s Manual
Page 35

WavePort/V Devices
Overview
The following block diagram serves to provide a general understanding of WavePort/V devices. Detailed
information regarding such items as the signal and power modules, indicator lights, and the unit fan are
included later in this chapter.
From the diagram we can see that WavePort/V24 consists of:
• Two Analog Input Modules (Module 2 and Module 1).* Both modules provide for 8 input channels
•
•
• Two 25-pin connectors (DB25). One for connecting to the Notebook’s parallel port and another for
•
• Three Indicator Lights: for “Battery” Status, indication of “Modules On,” and “Fan” On
• Fan, variable speed to provide system cooling
*In the WavePort/V product line, only WavePort/V24 includes a WaveBook module plus two additional
analog input modules (Module 1 and Module 2). WavePort/V8 includes the WaveBook module, but has
no WBK10-based modules. WavePort/V16 includes the WavePort module and the WBK10A-based
Module 1.
WavePort User’s Manual
WavePort/V, Simple Block Diagram
The Notebook Power receptacle on WavePort’s cover plate is “LIVE” whenever WavePort is
connected to a “live” AC power source. The Module Power Switch can not be used to turn
off the Notebook Power Receptacle.
(through BNC connectors). These modules are based on WBK10A architecture.
One WaveBook Module. This module provides for 8 analog channel inputs through BNC connectors
and a Pulse input.
A 65 watt, 16 VDC Power Supply and Internal UPS (Uninterruptible Power Supply) System
connecting to Digital I/O, External Clock, and TTL Trigger signals
Three electrical connectors: DC Power Input, AC Power Input, and AC Auxiliary Output
09-29-00
Hardware and Operation Reference 4-7
Page 36

Basic Operation
WavePort/V units integrate WaveBook/516 architecture. In addition, the V16 unit includes a WBK10Abased analog input module; and V24 units include two WBK10A-based analog input modules. The
architecture includes buffered input for all channels, individual instrumentation amp/channel, per-channel
programmable gain, and an anti-aliasing filter. The operational description is presented separately for both
the WAVEBOOK Module and the WBK10A-based module(s).
WAVEBOOK Module Operation
WavePort/V WAVEBOOK Modules include 8 signal-input channel BNCs (CH1 through CH8). Each of
these BNCs allows for two differential signals.
•
•
•
•
•
•
•
•
•
•
•
•
Both
signals are buffered and applied to a differential amplifier.
The output of each differential amplifier is applied to a low pass filter.
The signals are switched (via multiplexer) to a programmable gain amplifier.
The amplified signals are level-shifted to the specified range. Note that unipolar offset (for sampling signals that
are always positive) and bipolar offset (for signals that may be positive or negative) are available.
The signal is switched over to the A/D converter. The converter digitizes the signal to16 bits in 1 µs.
The digitized value is conditioned to compensate for gain and offset errors.
The conditioned signal is held in a FIFO data buffer until the PC reads the data. An internal processor checks
WAVEBOOK channel 1 to determine if a valid trigger event has occurred.
The low-latency trigger is presented to a control and timing circuit for to start the acquisition after the trigger. The
TTL trigger is taken directly from the digital I/O port.
At every sample time, WavePort’s Digital Signal Processor reads from the scan sequence table and accordingly
programs the Control and Timing Circuit for the next sample. In regard to the next sample, the Control and Timing
Circuit selects the input channel, PGA gain, level-shifter offset, and the A/D input source. It also conveys this
information to WBK10A-based modules (MODULE 1 and
MODULE 2) and precisely controls the A/D conversion timing.
The Digital Signal Processor makes real-time sample corrections using calibration information that is stored in an
EEPROM.
The digital I/O port is read and written by the processor to transfer bytes of digital data. The I/O port may be used
as a simple 8-bit input port or as a 32-address byte-wide I/O port.
Acquisition data is sent from WAVEBOOK to the Notebook PC through a high-speed EPP
(Enhanced Parallel Port). The port makes use of a DB25 connector labeled “TO COMPUTER PARALLEL
PORT.”
MODULE 1 and MODULE 2, Analog Expansion Modules
Each WBK10A-based expansion module provides 8 differential analog inputs. The modules are typically
equipped with a factory-installed programmable gain instrumentation amplifier (PGA). When WavePort/Vs
are ordered, the customer can specify that one of the following option cards be installed in place of the
standard PGA card: WBK11A, WBK12A, or WBK13A. Each of these options is discussed shortly.
Note 1: The standard WBK10A-based module comes with a pre-installed PGA card; however, WavePort
orders can specify that the module is to have a WBK11A, WBK12A, or WBK13A option card in
place of the PGA card.
Note 2: Refer to chapter 10 for specifications.
Hardware Setup Configuration
The analog input channel numbers are determined by the order
of connection among the WaveBook module and the
WBK10A-based modules (Module 1 and Module 2, as
applicable.)
• Channel 0 is the WaveBook module’s 8-bit digital I/O port.
• Channels 1 through 8 are the WaveBook’s main channels.
• Channels 9 through 16 (CH1-1 through CH1-8) are located on
the WBK10A-based Module 1 (not applicable to V8 units).
• Channels 17-24 (CH2-1 through CH2-8) are located on the
WBK10A-based Module 2 (not applicable to V8 or V16 units).
WavePort Module Channel #
/V8, /V16, /V24 WaveBook 0 (dig I/O)
/V8, /V16, /V24 WaveBook CH1-8
/V16 and /V24 Module 1 CH1-1 to
CH1-8
/V24 only Module 2 CH2-1 to
CH2-8
4-8 Hardware and Operation Reference
09-29-00
WavePort User’s Manual
Page 37

Signal Aspects, WavePort/V
WavePort/V24 can measure up to 24 channels of voltages within ±10V. The V8 and V16 version WavePorts measure up to 8
and 16 channels, respectively. WavePort/V24 receives its channel-input signals through three columns of eight BNC
connectors (24 channel inputs total). The columns are labeled [from left to right] MODULE 2, MODULE 1, and
WAVEBOOK. In addition to the channel-input BNCs, WAVEBOOK contains a BNC for PULSE Trigger Input (see
following figure). Note that WavePortV8 and V16 BNC panels are illustrated in chapter 2.
The signal panel includes a DB25 connector for DIGITAL I/O, EXT CLOCK (external clock), and TTL TRIGGER.
Connection nodes for CHASSIS (ground) and ANALOG COMMON are also provided.
Module 1 and Module 2*
Analog Inputs
CH1-1 through CH1-8, and
CH2-1 through CH2-8, respectively.
•
16 bit resolution
• Software selectable for unipolar or
bipolar operation
• Unipolar Ranges
0 to +10V
0 to + 5V
0 t0 + 2V
0 to +1V
• Bipolar Ranges
±10V, ±5V, ±2V, ±1V, ±0.5V
• Maximum Overvoltage: ±30 VDC
DC-Coupled Only,
Fully Differential
See Chapter 6, WaveView and
Chapter 10, Specifications for
additional information that includes
ranges available with WBK11A,
WBK12A, and WBK13A factoryinstalled options.
* WavePort/V16 does not include
Module 2. WavePort/V8 includes the
WaveBook and Pulse Trigger BNCs
(but no Module BNCs.
Chassis Ground
(See page 4-10)
WaveBook
Analog Inputs
CH1 through CH8, Analog Inputs via
BNC Connectors.
•
16 bit resolution
• Software selectable for unipolar or
bipolar operation
• Unipolar Ranges
0 to +10V
0 to + 4V
0 to +2V
• Bipolar Ranges
±10V, ±5V, ±2V, ±1V
• Maximum Overvoltage: ±30 VDC
DC-Coupled Only,
Fully Differential
Pulse Trigger Input (see page 4-13)
• Input Signal Range: ±5V
• Input Characteristics: 75 Ω
•
Input Protection: ±10V max.
• Minimum Pulse Width: 100 ns
• Maximum Pulse Width: 0.8 sec
• Latency: 300 ns
Digital I/O (see page 4-11)
External Clock (see page 4-11, 15)
TTL Trigger (see page 4-11)
Analog Common (see page 4-10)
WavePort/V24 Signal Panel
Reference Notes: Additional information regarding WavePort signal connections appears elsewhere in this
manual. Chapter 6, WaveView, includes information regarding channel configuration.
Information regarding maintenance, intended environment, and transportation is included in chapter 9.
Specifications are provided in chapter 10.
Software Setup
You will need to set several parameters so WaveView can best meet your application requirements. For
software setup information, refer to the "Software Setup" section in Chapter 2, WaveBook Setup. For
detailed WaveView information, refer to Chapter 5, WaveView.
WBK10A-Based Module Specifications
Specifications are provided in chapter 10.
WavePort User’s Manual
09-29-00
Hardware and Operation Reference 4-9
Page 38

Ground Connections
The center (+) and shield (-) each connect to ANALOG COMMON through a 5 MΩ resistor, resulting in a
Ω
10 M
differential input resistance (see above figure). WavePort’s ANALOG COMMON connects to the
computer power supply ground through the TO COMPUTER DB25 connector and cable.
When using a Notebook PC the computer ground could be:
(a) floating, for example, when the Notebook is operating on batteries, or
(b) connected to vehicle ground, for example, when using an automotive cigarette-lighter adapter in conjunction with
the vehicle’s battery.
Note that a pair of Schottky diodes is used in the WBK14 to clamp the ANALOG COMMON to within
0.3V of computer ground (see figure).
Channel Analog Input, WavePort/PE BNC Signal Connections
WavePort has an isolated power supply. Power input common is isolated from ANALOG COMMON by
9
>10
Ω in parallel with 0.1µF.
For the “WaveBook” module to correctly measure analog signals, each signal must be within
±11 volts of ANALOG COMMON. The following notes provide guidelines on how to achieve this.
Like WavePort, Notebook computers are rarely connected to AC power line ground.
This is true even when these devices are plugged into AC adapters.
Connecting to ANALOG COMMON
If the computer is battery operated and the signal source is floating (such as an ungrounded sensor), then the
internal 5 M
computer or the analog signal source is committed to AC power line ground, then you will require a
direct connection between the signal source and ANALOG COMMON.
When in doubt, connect the signal source common to ANALOG COMMON.
A single-ended signal source needs to have its common connected to ANALOG COMMON.
When connecting several signal source commons to ANALOG COMMON, it is important that there is
no voltage potential [between these signal source commons]. Otherwise, ground currents will circulate,
leading to measurement errors.
If there is a fixed voltage potential between multiple signal source commons, then only one of these signal
source commons needs connected to ANALOG COMMON. This is true as long as the common mode
voltage of any input does not exceed ±11 volts.
Ω
resistors may provide enough of a return path to ANALOG COMMON. If either the
4-10 Hardware and Operation Reference
09-29-00
WavePort User’s Manual
Page 39

Connecting to CHASSIS (Ground)
WavePort includes a CHASSIS ground node. Though it never hurts to connect the WavePort CHASSIS to
a reliable ground, it is recommended that you do make this connection to ground when WavePort is …
•
… being used in a vehicle.
• … being used in a static-prone environment.
• … experiencing Radio Frequency Interference (RFI) (see following note).
If WavePort experiences Radio Frequency Interference (RFI) you should:
(a) connect the WavePort CHASSIS to ground, and
(b) connect the cable-shields (of the channel inputs) to CHASSIS ground.
DB25F “Digital I/O, External Clock, TTL Trigger” Connection
The following signals are present on WavePort’s DB25F
(25-pin, female connector) labeled “Digital I/O, External Clock, and
TTL Trigger.”
•
16 High-Speed Digital I/O Lines (D0 through D15)
•
TTL Trigger Input (TTLTRG)
•
+15 V (pin 23), -15 V (pin 22), 50 mA max. (each)
• two +5 V (pin 19 and pin 21), 250 mA max. (total)
• External Clock (pin 20)
•
two Digital Grounds (pins 24 and 25)
To sample just 16 digital input signals, connect them directly to
the digital I/O data lines. D15 is the most significant bit, and D0
is the least.
The following figure depicts the DB25F connector (located on
WavePort’s cover plate) and the optional CA-178 cable. The
cable option is intended for External Clock and TTL External
Trigger applications. Both are discussed shortly.
Digital I/O Connections, WaveBook/516
D0 – D15 High Speed Digital I/O data lines
TTLTRG TTL trigger input
External Clock 16 bit mode, read/write strobe
+5 VDC 250 mA maximum
+15,-15 VDC 50 mA maximum (each)
Digital Grounds Pins 24 and25
WavePort User’s Manual
Optional Clock and External Trigger Cable (CA-178)
09-29-00
Hardware and Operation Reference 4-11
Page 40

Programmable Features
Channels can be configured through your own custom programs or through the included out-of-the-box
WaveView software. WaveView includes a Channel Configuration screen (following figure) that allows
you to turn channels ON or OFF, select channel ranges, change channel labels, and select engineering units.
Reference Note:
Chapter 6, WaveView contains more detailed information. Individuals who write their own
programs should refer to the readme.txt file on the install CD-ROM regarding the location of
API reference material, including program examples.
Selecting a Channel’s Range
You can use WaveView to select a channel’s range in one of two ways.
(1) Click in a channel’s Range cell, then select the desired range from the “Select Range” pull-down list.
(2) Continue to double-click in the applicable channel’s Range cell to cycle through the available ranges.
Stop double-clicking when the desired range is indicated.
Configuring Channels from WaveView’s Main Window
Selecting a Channel’s Units
You can use WaveView to select a channel’s units in one of two ways.
(1) Click in a channel’s Units cell, then select the desired units from the “Select Units” pull-down list.
(2) Double-click in a channel’s Units cell to cycle through the units. Note that after the mX+b dialog box
appears you must click “OK” to continue cycling.
Note: You can use the mX+b equation to adjust a channel’s scale and offset. You can enter
user-defined units from the mX+b dialog box.
After completing channel
configuration, you can select the
Acquisition Configuration option from
WaveView’s View menu or tool bar.
The figure to the right represents the
Acquisition Configuration dialog box.
The parameters shown are a result of
the values entered below the figure.
Clicking the Close button sets the
acquisition parameters as the active
parameters.
Acquisition Configuration Dialog Box
Triggering
Type: Manual
Scanning Duration
Convention: Scans
Pre-Trigger: 1000 scans
Post-Trigger: 5000 scans
Scanning Rate
Clock: Internal
Convention: Frequency
Pre-Trigger: 50 kHz
Post-Trigger: 50 kHz
4-12 Hardware and Operation Reference
09-29-00
WavePort User’s Manual
Page 41

Triggers
Pulse Trigger
This section discusses the following topics:
Pulse Trigger
•
• Digital-Pattern Trigger
• Multi-Channel Triggering
• External Clock and Timer
In addition to the standard “single-channel” trigger-on-level functions, the WavePort system supports
pulse trigger. With pulse trigger, you can define both the amplitude and the duration of the pulse that will
be used to trigger the acquisition. Pulse trigger can be used to detect spurious transients that can be missed
by simple level triggers.
WavePort includes a BNC connector labeled “PULSE.” This connector located on the cover plate (just
below the WaveBook Channel 8 BNC).
Pulse Trigger allows the use of a highbandwidth input for triggering, and the
correlation of lower-speed waveforms with
the occurrence of a high-speed pulse. You
can set a pulse amplitude between ±5 V and
a pulse width in the range of
100 ns and 800 ms.
This option allows you to trigger on analog level “pulses” on either the Channel 1 input or the Pulse Trigger
input. This trigger type is similar to the Channel 1 Analog trigger but places an additional time-based
condition on the signal. Depending on whether the pulse width is set as a minimum or a maximum, the
signal either must or must not cross the threshold again within the given amount of time.
The red horizontal line (Threshold) and blue vertical lines (defining maximum width) will vary according to
the parameter settings. You can specify either one or two thresholds for the level and width settings. The
number of labels matches the number of thresholds and the placement follows the polarity.
•
•
Note: When used as a maximum, the pulse width setting can capture signal pulses.
WavePort User’s Manual
Pulse Trigger Selected
For positive polarity, the text is “Rise Above... Stay Below.”
For negative polarity, the text is “Fall Below and Stay Above.”
As a minimum, it is useful for ignoring pulses.
09-29-00
Hardware and Operation Reference 4-13
Page 42

Digital-Pattern Trigger
This type of trigger is useful when trying to capture noise, vibrations or some other physical disturbance
that occurs at a particular point in a digitally-sequenced process, such as a relay-logic-control system.
When “Digital Pattern” is selected as the Triggering Type, the 16-bit pattern extension appears (as indicated
in the following figure). The Condition box allows the following choices:
Equal To (=) / Not Equal To (< >) – These options treat each digital line as a separate input to be
compared to logical 1 or 0. Selecting “Equal To” triggers only on the exact pattern of 1’s and 0’s selected.,
while “Not Equal” triggers on all others. You can also set any of the inputs to “don’t care” (X), which
excludes it from the comparison.
Greater Than (>) / Less Than (<) – These options interpret the digital inputs as a single 16-bit value and
allow a threshold trigger.
Acquisition Configuration Dialog Box, with Digital Pattern Extensions
The top row contains a button labeled “External” for enabling the External Clock.
Note:
Multi-channel Triggering
Multi-channel triggering allows you to select a combination of analog input channels as the analog
trigger, including any of its 64 optional expression channels. You can set trigger-level slope, polarity, and
hysteresis for each trigger channel, then combine the trigger channels in a logical “and/or” function to
define the desired trigger condition. This is made possible by Signal Digital Processing (DSP). DSP
initiates sampling of the trigger channels, calibrates the incoming data, compares readings to
pre-programmed trigger states, and then determines whether or not trigger conditions are satisfied.
4-14 Hardware and Operation Reference
09-29-00
WavePort User’s Manual
Page 43

External Clock and Counter-Timer
WavePort is capable of receiving external clock input. The external clock is useful when data collection
depends on rotational speed or axial position. By synchronizing the system with an external event for
correlation of data, you can collect event-dependent data instead of time-dependent data.
WaveBook/516 can receive an external clock input through pin 20 of the DB25 connector labeled
DIGITAL I/O, EXTERNAL CLOCK, TTL TRIGGER. This enables data scanning to be correlated with an
external pulse train. To enable the external clock, select “External” for the Scanning Rate in the
Acquisition Configuration Dialog Box (see following screen shot). When the external clock is enabled,
WaveBook/516 begins a scan only after a rising edge on the TTL level occurs. Optionally, the external
clock may be divided [by a factor of 1 to 255]. This “pre-scaling” allows the user to select a reduced scan
rate.
Acquisition Configuration Dialog Box with External Clock Enabled
Note: The Clock Divider can be set from 1 to 255
The WAVEBOOK module has a 32-bit internal counter that calculates and reports the external clock’s
period. The counter can be read with each scan of the analog data. This is often beneficial in later analysis,
when there is a need to correlate physical phenomena with speed.
The counter channel actually consists of two independent channels (CtrLo and CtrHi). These can be turned
“On” in the Channel Configuration Spreadsheet. When enabled, the low (CtrLo), then high (CtrHi) words
of the counter will be configured in each scan. Note that the spreadsheet’s Units column can be used to
view a predefined period in units of seconds, ms, or µsec.
WaveView can be configured to read only the low word of the counter data (CtrLo:“On,” CtrHi: “Off”).
This decreases the minimum scan period by 1 usec. This LoCtr only option can be used only when the
external clock frequency is greater than 305 Hz (20,000,000 MHz / 65536]. Note that WaveView does not
enforce this.
WavePort User’s Manual
09-29-00
Hardware and Operation Reference 4-15
Page 44

Power Aspects
WavePort’s Power-Related Aspects
WARNING
WARNING
WARNINGWARNING
The Notebook Power receptacle is “LIVE” whenever WavePort is plugged into a live AC power source.
The Module Power Switch can not
WavePort contains no user serviceable components. Do not remove WavePort’s cover plate.
Lethal voltages are present which could cause serious injury or death.
be used to turn this receptacle “Off.”
WavePort can receive power from one of three sources:
From External AC
: Connect the AC power cord to the LINE INPUT (100 to 240 VAC) receptacle on
WavePort’s cover plate; then plug the cord into a standard AC outlet. After the power cord is properly
connected, turn WavePort’s Module Power Switch “On.”
Note that the external AC power is also used to supply the Notebook power receptacle. As long as AC power is
supplied to WavePort, the Notebook receptacle will have power. The Module Power Switch is not in line with
the receptacle and cannot be used to turn it off.
From External DC
: Connect the DC power cord to the DC Power Input DIN5 connector on WavePort’s
cover plate. Connect the other end of the cable to a 12 to 30 VDC source, such as an automotive electrical
system. After the power cord is properly connected, turn WavePort’s Module Power Switch “On.” Note that a
CA-198 cable can be used to link a WavePort to a vehicle battery via a connection from WavePort’s DIN5
connector to the vehicle’s cigarette lighter.
From Internal Sealed Gel-Pack Batteries
batteries will supply power to modules if insufficient power is available from an AC or other another DC source.
Fully charged batteries will provide approximately 30 minutes of operation.
4-16 Hardware and Operation Reference
. When the Module Power Switch is “On,” internal gel-pack
09-29-00
WavePort User’s Manual
Page 45

WavePort’s self-contained power module can power the unit in portable, or “in-vehicle” UPS applications
[both 12 and 24 Volt DC systems]. The power module provides clean and uninterrupted operating power
for reliable data acquisition in a vehicle. This can be:
•
Before (and during) connection to the vehicle
• Prior to engine/generator start
• During engine start-up (battery sag due to the high-current demand of starter motor and solenoid)
• After engine turn off
• When (and after) disconnecting from the vehicle
The power module contains two rechargeable gel-pack batteries, associated charging circuits, and current
indicators. The charging process is relatively fast, and extreme temperature performance is good.
Main and auxiliary power input comes from 12 to 30 VDC via WavePort’s DIN5 connector, labeled:
DC POWER INPUT, and located on WavePort’s cover plate. Lines from the DIN5 pins connect to
WavePort’s internal power module.
DC Power Input
DIN5 Connector on WavePort’s Cover Plate
A CA-198 (10 foot-long power-adapter cable) can be used to power WavePort from a vehicle.
The CA-198 can link WavePort’s DIN5 connector to a vehicle’s cigarette lighter.
The 5-pin DIN connector is rated at a maximum load of 5 Amps.
CA-198 Power-Adapter Cable
For trouble-free operation, you must fully charge the batteries before use.
Charged battery runtime depends on the load and on the mode of operation.
When useful battery power is nearly depleted, a Beeper sounds to provide warning. A few minutes after
the beeper begins sounding, an internal cutoff circuit disconnects the load from the battery. This feature
protects the batteries from “deep-cycle” damage.
WavePort User’s Manual
09-29-00
Hardware and Operation Reference 4-17
Page 46

As indicated by the following block diagram, automatic temperature compensated charging circuits
recharge the internal batteries. The charging process is safe and relatively quick. The battery status LED
lights solid to indicate a charge is in progress. If this LED is blinking, the batteries are at a low energy
level, but are not yet being charged.
WavePort Power Distribution, Simplified Block Diagram
Power Module Operation
LED Indicators: WavePort’s power module interacts with three LEDs located on WavePort’s cover plate.
Indicator LEDs (Located on WavePort’s Cover Plate)*
BATTERY
MODULES ON Lights when power is being supplied to the WavePort modules.
CHECK FAN Verify the fan is operating properly and that the vents are not obstructed.
* Located on WavePort’s Cover Plate. Visible only when WavePort’s lid is open.
4-18 Hardware and Operation Reference
Lights solid when the internal batteries are being fast-charged at a rate of 0.2 amp/cell or
greater.
Off when no charge is in progress.
Blinking indicates low battery level. Note that the beeper sounds at low battery level.
The CHECK FAN LED lights when activated by the internal temperature sensor.
When this LED is lit, a possible overheating condition exists.
09-29-00
WavePort User’s Manual
Page 47

Charging
In general, lead-acid batteries [and comparable gel-pack batteries] require charging at 120% of drain energy
(e.g., the 4 A-hr power module requires a charge equal to, or greater than 5 A-hr). Charging times vary; but
times of 4 to 5 hours are typical for a battery that is fully discharged at the time a charge commences.
If WavePort’s modules are powered-on, then the charge rate is reduce and a charge time of approximately
15 hours will be required to return the power module’s batteries to a full-charge state.
Follows these simple steps to ensure the best charge possible.
1. Turn the WavePort’s Module Power Switch to OFF.
2. Ensure WavePort is connected to a suitable AC-line power source. Note that the unit will accept AC
power in the voltage range of 90 to 260 VAC, and within the frequency range of 50-400 Hz.
3. Allow the charge to run until the BATTERY indicator LED goes out. The BATTERY indicator
will be lit solid while the batteries are being fast-charged at the 0.2 amp/cell rate.
To ensure the best charge possible:
always use the AC line power to charge WavePort’s batteries.
Fuse Replacement
If there is no power available at WavePort’s Notebook Power receptacle, and WavePort is plugged in to a
“live” 100 to 240 VAC Power Source, it is likely that the AC in-line fuse has blown. You can replace the
fuse as follows:
Note: If you do not need WavePort’s modules powered, position the Module Power Switch to “Off” to
CAUTION
CAUTION
CAUTIONCAUTION
DC Voltage applied to WavePort must not exceed 30 VDC.
Two Views of WavePort’s AC Line Power Receptacle
conserve battery power while the unit is disconnected from the AC power supply.
1. Remove WavePort’s power cord from the AC Power Supply and from the AC Line Receptacle on
2. Open the Fuse Access on the AC Line Receptacle (see figure).
3. Remove the lower “In-Line” Fuse.
4. Verify that the fuse is blown.
WavePort User’s Manual
WavePort’s cover plate.
If the fuse is not blown, and your AC Power Supply is known to be reliable,
promptly notify your service representative.
09-29-00
Hardware and Operation Reference 4-19
Page 48

5. Position a new 2 Amp, Type T, 250V fuse (or the Spare fuse) in the In-Line position (see figure).
Note: It is recommended that you keep a Spare fuse in the holder.
6. Push the Fuse Access down such that the new fuse is place in-line.
You can now return the WavePort to normal operation.
Factory-Installed Option Cards
(for WaveBook and WBK10A-based modules)
WBK11A - Simultaneous Sample & Hold Card
WBK11A is a simultaneous sample-and-hold card (SSH) that can be factory-installed in WavePort, in place
of the standard PGA card. The WBK11A option can simultaneously sample 8 channels. It can be installed
in WavePort’s WaveBook, as well as in the WBK10A-based modules. The WaveBook portion of
WavePort controls the WBK11A.
Note that the WBK11 allows concurrent (<150 ns) capture of multiple input channels and virtually
eliminates channel-to-channel time skewing.
When using WavePort with an SSH channel enabled, the per-channel sample rates are
reduced. The rate reduction is the same as that which would occur if another channel
were added. The per-channel rate (with SSH enabled) is:
1 MHz / (n+1), where n is the number of active channels.
The WBK11A SSH card can accommodate higher gains than the main unit because its gains are fixed for
each channel prior to the acquisition. Each channel may be set, in software for ranges shown in the table.
All channels equipped with SSH circuitry are sampled simultaneously as a system.
Hardware Setup
Configuration
All WBK11A configurations are controlled by software. There are no hardware settings.
Installation
For the WavePort product lines, WBK11A cards are only to be installed at the factory. Customer
installation or removal of internal WavePort components will result void of your product’s warranty.
Software Setup
Reference Note:
For software setup information, refer to the "Software Setup" section in chapter 2.
For detailed WaveView information, refer to chapter 5.
WBK11A - Specifications
Specifications are provided in Chapter 10.
4-20 Hardware and Operation Reference
09-29-00
WavePort User’s Manual
Page 49

WBK12A and WBK13A - Programmable Low-Pass Filter Cards
The WBK12A and WBK13A are 8-channel programmable low-pass filter cards for use with 1-MHz
WaveBook data acquisition systems, including WavePort. These cards, when ordered as an option, are
factory-installed into WavePort’s WaveBook module, the WBK10A-based Module 1, and/or the WBK10Abased Module 2, as applicable.
Note that the Module 1 and Module 2 expansions provide programmable low-pass filtering over all
channels. All WBK12A and WBK13A low-pass filters and cutoff frequencies are configured via software.
Note: WBK13A is like the WBK12A, except in that the WBK13A has the additional capability of
simultaneous sampling all of the module’s channels. If multiple WBK13A cards are installed within
one system, all channels will be sampled within 100 ns of each other.
Features of the WBK12A and WBK13A include:
• Low-Pass Filters. Each card provides 8 input channels, arranged in two 4-channel banks; the filter and
cutoff frequency configurations are applied per bank. The cards’ filters can be configured as either an
8-pole elliptic filter with cutoff frequencies of 400 Hz to 100 kHz, or an 8-pole linear-phase filter with
400 Hz to 50 kHz cutoff frequencies.
• Cutoff Frequencies. The WBK12 and WBK13 provide 747 discrete cutoff frequencies that can be
determined exactly by the formula Fc = 300 kHz/N; where the integer N = 3 to 750. Alternatively, you
can configure any channel to bypass the programmable filter entirely, resulting in a 1-pole low-pass
filter at about 500 kHz.
• Programmable-Gain Amplifiers. The cards’ programmable-gain instrumentation amplifiers can be
software selected to various gains on a per channel basis. The gains are set prior to the beginning of an
acquisition sequence and cannot be changed during an acquisition.
Note: WBK12A and WBK13A gain specifications are provided in Chapter 10.
• Simultaneous Sample-and-Hold (SSH) (WBK13A only). In addition to the filtering capability of the
WBK12A, the WBK13A provides per channel SSH. Simultaneous sampling of all channels occurs at
the start of a scan sequence.
When using WaveBook with an SSH channel enabled, the per-channel sample rates are
reduced. The rate reduction is the same as that which would occur if another channel
were added. The per-channel rate (with SSH enabled) is:
1 MHz / (n+1), where n is the number of active channels.
Hardware Setup
Configuration
The WBK12A and WBK13A configurations are controlled by software. No hardware settings are required.
Installation
For the WavePort product lines, WBK12A and WBK13A cards are only to be installed at the factory.
Customer installation or removal of internal WavePort components will void of your product’s warranty.
Software Setup
Reference Note:
For software setup information, refer to the "Software Setup" section in Chapter 2.
For detailed WaveView information, refer to chapter 5.
WBK12A and WBK13A - Specifications
Specifications are provided in Chapter 10.
WavePort User’s Manual
09-29-00
Hardware and Operation Reference 4-21
Page 50

WavePort’s Fan
WavePort components are air-cooled and cooling to ambient occurs as long as the
surrounding environment is cooler than the unit. When the unit becomes too warm
for ambient cooling, a temperature sensor signals the fan to run.
The fan’s speed varies, depending on WavePort’s internal temperature. In cooler
environments the fan operates at lower speeds, thus reducing audible noise.
Typically, if the modules are powered on, or if the batteries are charging, the fan
will run.
Note that long term trickle charging is accomplished without the use of the fan.
To maintain sufficient cooling, it is important to keep the fan and vents free of
obstruction.
If the CHECK FAN indicator LED comes on you should:
1) Check WavePort’s cover plate. If the plate feels hot, turn the Module Power
Switch to OFF.
2) Verify that the fan is running. If not, proceed to step 6.
3) Verify that the fan and the casing vents are not obstructed.
4) Remove obstructions to the fan and vent, if applicable.
5) If the fan’s filter appears dirty or clogged, replace it as described in Chapter 9.
6) If there appears to be a problem with overheating or with the fan, contact your
service representative.
4-22 Hardware and Operation Reference
09-29-00
WavePort User’s Manual
Page 51

Software, An Introduction 5
This section provides a brief summary of software that can be used with WavePort. References to relevant
documentation are included. Software discussed in this chapter includes:
• WaveView™
• DIAdem
• DASYLab
• DaqX
®
Out-of-the-Box
®
Language Drivers for Programmers
Out-of-the-Box
Icon-Based Software
TM
TM
Software
Software
WaveView™
Out-of-the-Box
WaveView is a graphical Windows-based program for use in WaveBook applications. This program allows
users to acquire data for immediate viewing or for storage to the PC's hard disk. WaveView’s
“spread-sheet” style interface makes it easy to set up your application quickly and begin acquiring data
within minutes of completing hardware connections. No programming knowledge is required.
WaveView
From
•
Set up all analog or digital input parameters.
• Acquire and save data to disk.
• View the acquisition in real-time.
• Send data to other Windows applications, such as spreadsheets and databases.
• Launch DIAdem, an independent application, to view file data that was recorded by WaveView.
WaveView is detailed in Chapter 6.
DIAdem® Out-of-the-Box
The basic DIAdem-View application is included as part of the Out-of-the-Box application software. The
program’s interactive graphics makes it possible to examine large data files at high speeds. Zoom and
cursor features permit the viewing of small details in the collected data.
Add-on software modules can be used to enhance the basic DIAdem-View. The add-on options provide
additional data-viewing and data-management tools, along with data analysis and report generation
functions.
TM
you can:
TM
Software
Software
DIA
DASYLab®
, Icon-Based
Most WavePort users do not need to go beyond WaveView and DIAdem to satisfy their application needs.
However, for individuals who want to customize their application the “Icon-Based” DASY
offers a great degree of flexibility. DASYLab configurations make use of icons and spreadsheets, but
unlike many other graphic program environments, DASY
of a few hours or days, without the use of expensive training courses.
DASYLab’s display formats include: Chart Recorders, Analog and Digital Meters, Bar Graphs,
Y/t and X/Y charts, and status lamps. Other features include limit markers, trend indicators, zooming, 3-D
waterfall displays, and the ability to display multiple waveforms in one chart.
DASY
additional information from your sales representative or from the world wide web at:
http://www.iotech.com
WavePort User’s Manual
dem
is detailed in Chapter 7.
Lab
is detailed in a separate document, DASY
04-19-00
Lab
Lab
applications can be up and running in a matter
Lab
User’s Manual, p/n 472-0901. You can obtain
Software, An Introduction 5-1
program
Page 52

DaqX
,
Language Drivers for Programmers
No programming knowledge is required for using WavePort in conjunction with the included
Out-of-the-Box software package; However, a set of language drivers is included on the install CD-ROM
for individuals who want to develop their own custom applications using:
• C/C++
• Visual Basic
• Delphi
The CD includes program examples and a Programmer’s Manual (p/n 1008-0901) in PDF format.
The Programmer’s Manual automatically installs during software installation for WaveBook Support, and
will be located in the directory you chose to install the WaveBook Support programs.
Note that you will need to use Adobe® Acrobat Reader, version 3.0 or later, to view or print the manual.
We have included a copy of the reader on the CD.
5-2 Software, An Introduction
04-19-00
WavePort User’s Manual
Page 53

WaveView 6
Software Setup Notice for WavePort… 6-1
Introduction…… 6-2
Software Startup & Sample Acquisition…… 6-2
Startup WaveView…… 6-2
Configure Channels…… 6-4
Configure Acquisition…… 6-5
Collect Data…… 6-6
Store Data [and View File Data], Option…… 6-7
WaveView Configuration Main Window…… 6-7
Menu Items & Buttons…… 6-7
File…… 6-8
Edit…… 6-8
View…… 6-8
System…… 6-9
Input Channel Configuration…… 6-10
Software Setup Notice for WavePort
WavePort/PE16 makes use of two Dynamic Signal MODULES (WBK14); WavePort/PE8 makes use of
one such module. You must set pertinent software parameters from the WaveView Configuration main
window. Related Input Channel Configuration information begins on page 6-10.
In WaveView, WavePort/V8 appears as a WaveBook. The other two WavePort/V versions (V16 and
V24) appear as a WaveBook and one (or two) WBK10A modules. WavePort/V24 makes use of two
Analog Expansion MODULES (WBK10A); WavePort/V16 makes use of one such module. You must set
pertinent software parameters from the WaveView Configuration main window. Related Input Channel
Configuration information begins on page 6-10.
Data Conversion…… 6-12
Acquisition Configuration…… 6-13
General Information ….. 6-13
Trigger Types ….. 6-14
External Clock and Counter-Timer …… 6-15
Digital Pattern Trigger…… 6-16
Pulse Trigger …… 6-17
WaveView Scope Window…… 6-18
Menu Items & Buttons…… 6-19
File…… 6-19
Acquire…… 6-19
Charts…… 6-19
Scope Display…… 6-20
WaveView Direct-To-Disk Window… 6-21
The Module Configuration window allows you to set the following Excitation Source parameters:
amplitude, offset, waveform, and frequency.
WavePort/PE units appear as a WaveBook with one WBK14 (PE8), or two WBK14s (PE16).
WavePort/V units will appear as a WaveBook with one WBK10A (V16), two WBK10As (V24), or none (V8).
Note
WavePort User’s Manual
WaveView and Module Configuration Windows
: WBK14-related information does not apply to WavePort/V units.
09-29-00
WaveView 6-1
Page 54

Introduction
WaveView is a graphical Windows-based program for use in WaveBook applications. The program allows
users to acquire data for immediate viewing or for storage to the PC's hard disk. No programming
knowledge is required by the user.
From WaveView you can:
•
Set up all analog or digital input parameters.
•
Acquire and save data to disk.
•
View the acquisition in real-time.
•
Send data to other Windows applications, such as spreadsheets and databases.
•
Launch an independent application (DIAdem) to view file data recorded by WaveView.
Refer to Chapter 7, DIAdem, for detailed information.
6 7 8 9 10 11 1254321
WaveView Configuration Main Window
Item Description Item Description
1 Open Module Configuration Window 7 Open Acquisition Configuration Window
2 Make All Channels Active 8 Open WaveView Scope Window
3 Make All Channels Inactive 9 Open WaveView Direct to Disk Window
4 Fill Down (copy selected cell to lower ones) 10
5 Enable Spreadsheet Reading Column 11 Auto Zero Enabled Channels
6 Disable Spreadsheet Reading Column 12 Open WBK16 Sensor Calibration Window
Software Startup & Sample Acquisition
The program installation CD-ROM contains both a 16-bit and a 32-bit version of WaveView. The figures in
this chapter reflect the 32-bit version, only. Note that the16-bit version has fewer toolbar buttons and
exhibits minor screen differences.
Startup WaveView
Start WaveView by double-clicking on its icon. WaveView holds user-configured parameters that can be
saved to disk. The default configuration filename is
the working directory for this configuration file. One of the following 5 situations will occur:
• If the default configuration file is found, all the required setup information is extracted from it, and
the application’s main window opens.
• If the default configuration file is not found, WaveView attempts to connect with WaveBook using
the following default parameters: Printer Port LPT1, Interrupt Level 7, and 4-bit Standard Protocol. If
this fails, the program tries LPT2 and Interrupt Level 5.
View File Data (launches DIAdem)
WAVEVIEW.CFG. When WaveView starts up, it searches
6-2 WaveView
• If connection is established, WaveView’s main window opens.
09-29-00
WavePort User’s Manual
Page 55

• If the above fail, a dialog box appears, providing you with certain options. These are:
Retry, Select Device, Load File, and Exit. (See following figure).
WaveView StartUp Box
Reference Note:
Refer to page 8-2 of the Troubleshooting Chapter for advice regarding connection problems.
• If no user-configuration file is found, or if no communication established, a dialog box prompts you
to choose an actual WaveBook from the device inventory, or to select a simulated device.
Select Device Box
Simulated WaveBook. If the hardware is not available, or if you just want to practice using the software,
select Simulated Device. The Simulated Device allows you to run various software functions with no
hardware concerns.
The Simulated mode is also available from WaveView’s pull-down menu. To select the simulated mode:
1. Choose Select Device from the System pull-down menu.
2. Select Simulated Device from the Available Devices list.
WaveBook Attached. If the WaveBook hardware is connected and switched on, select the applicable
WaveBook device. Then click on the Properties button to view the Device Properties screen (see following
figure).
WavePort User’s Manual
09-29-00
WaveView 6-3
Page 56

After you have selected the device parameters, click Close.
WaveView attempts to find the WaveBook at the specified port. One of the following situations will occur:
• The hardware is found, the WaveView main window opens.
• The hardware is not found, a dialog box informs you and provides another chance to select
parameters.
WaveView interrogates the hardware after it starts up to see what options and expansion modules are
actually connected to the WaveBook. The number of channels (shown on the configuration menu)
represents the number of channels actually connected to WaveBook.
Configure Channels
Once WaveView determines the options and expansion modules, the individual channels can be configured,
as described in the text that follows.
Devices Properties
If WaveView cannot identify the hardware, and you have verified that the selected hardware
parameters are correct, exit WaveView and then use the “Test Hardware” feature of the
Daq* Configuration control panel. A discussion of this feature begins on page 2-6.
6-4 WaveView
Configuring Channels from WaveView’s Main Window
• On/Off Column. To acquire data with WaveView, channels must be properly connected to signal
sources, and must be enabled (On). Channels can be enabled as follows:
(1) Click in a channel’s On/Off cell, then select "On" from the drop-down menu (that appears above
the range column), or
09-29-00
WavePort User’s Manual
Page 57

(2) Double-click in a channel’s On/Off cell to toggle to “On.” Note that the on/off status will change
with each double-click, or
(3) Click on the toolbar’s “On” button (Make All Channels Active) to turn all channels on. Note that
the “Off” button (Make All Channels Inactive) turns all channels off.
• Reading Column. Not user configurable. This column displays values of enabled channels.
• Range Column. Select a channel’s range in one of two ways.
(1) Click in a channel’s Range cell, then select the desired range from the drop-down menu.
(2) Continue to double-click in the applicable channel’s Range cell to cycle through the available
ranges. Stop double-clicking when the desired range is indicated.
• Label Column. Channels have default labels, such as CH05. You can change the label by clicking on
the cell, then typing in the new label. Labels must be unique, i.e., each channel must have its own
label. Attempts to use duplicate labels, or use no label will result in a warning message.
• Units Column. Select a channel’s units in one of two ways.
(1) Click in a channel’s Units cell, then select the desired units from the pull-down menu.
(2) Double-click in a channel’s Units cell to cycle through the units. Note that when the mX+b dialog
box appears you need to click “OK” to continue cycling.
Note: You can use the mX+b equation to adjust a channel’s scale and offset. You can enter
user-defined units from the mX+b dialog box.
Configure Acquisition
The following text describes how to configure an acquisition.
After completing channel configuration, select the Acquisition Configuration option from the View menu or
the tool bar. The following figure represents the Acquisition Configuration dialog box. The parameters
shown are a result of the values entered below.
Acquisition Configuration Dialog Box
Triggering
Type: Manual
Scanning Duration
Convention: Scans
Pre-Trigger: 1000 scans
Post-Trigger: 5000 scans
Scanning Rate
Clock: Internal
Convention: Frequency
Pre-Trigger: 50 kHz
Post-Trigger: 50 kHz
After entering the values, click the Close button to set the acquisition parameters.
WavePort User’s Manual
09-29-00
WaveView 6-5
Page 58

Collect Data
The following text describes how to collect data for a sample acquisition.
To read data from the WaveBook (or Simulated Device), select the Scope option from the View menu or the
tool bar. The WaveView Scope window will display. Complete the acquisition setup as follows:
• Number of Charts. First, the Scope window should be configured to display 4 charts since 4 channels
were previously selected for the acquisition. Select the Number of Charts option from the Charts menu
item. When the flyout appears showing a selection of up to 8 channels for display, click on 4.
• Arm and Trigger. The system is now set to start collecting data. At this point, you may acquire one
acquisition or continuous acquisitions. For this sample acquisition, click the Arm button, then click the
Trigger button.
• Data Acquisition. The system has now collected 1000 pre-trigger scans and 5000 post-trigger scans.
If desired, you may modify the current Scope window display as follows:
• View additional channels (up to 8) simultaneously by changing the entry in the Number of Charts
menu.
• Change the channels viewed. Use the channel select list box at the right of the waveforms to display
waveforms of other active channels.
• To scale the waveforms, click on the Scale All Charts button. All 4 waveforms should then be visible.
•
Examine the waveforms at any point along the timeline by using the horizontal scroll-bar.
• Vary the number of scans displayed by using the Zoom In or Zoom Out buttons.
..
6 7 8 9 10 11 1254321
WaveView Scope Window
Item Description Item Description
1 Save 7 Stop Rearming
2 Print Window 8 Zoom In
3 Arm 9 Zoom Out
4 Trigger 10 Scale All Charts
5 Stop Acquiring 11 Toggle Cross Hairs
6 Auto-Rearm 12 Toggle Grids
6-6 WaveView
09-29-00
WavePort User’s Manual
Page 59

Store Data
[and View File Data],
Option
Data to be viewed with the post acquisition data viewer must be in the appropriate
binary format. From WaveView, you can select the format by navigating as follows:
File
WaveView Main Window
⇒⇒⇒⇒
appropriate box.
Save collected data to disk by clicking on the Save button ("floppy disk" or left-most button) of the
WaveView Scope window, and then giving the file a name. Note that you can analyze the saved data with
DIAdem, a post-acquisition data-viewer program.
To open DIAdem, return to the WaveView Configuration main window then click on the View File Data
toolbar button (button 10 in the following figure).
Reference Note:
For detailed information regarding DIAdem, refer to Chapter 7.
WaveView Configuration Main Window
The following figure shows a sample of the WaveView Configuration main window.
Data Conversion Preferences and check the
⇒⇒⇒⇒
6 7 8 9 10 11 1254321
WaveView Configuration Main Window
Item Description Item Description
1 Open Module Configuration Window 7 Open Acquisition Configuration Window
2 Make All Channels Active 8 Open WaveView Scope Window
3 Make All Channels Inactive 9 Open WaveView Direct to Disk Window
4 Fill Down (copy selected cell to lower ones) 10 View File Data by launching separate program
5 Enable Spreadsheet Reading Column 11 Auto Zero Enabled Channels
6 Disable Spreadsheet Reading Column 12 Open WBK16 Sensor Calibration Window
WaveView interrogates the hardware after it starts up to see what options and expansion modules are
actually connected to the WaveBook. The number of channels displayed on the configuration menu
corresponds to all the channels connected.
Menu Items & Buttons
WaveView functions are initiated through toolbar buttons and pull-down menu selections. The toolbar
buttons are identified in the above figure. In the following sections, menu functions are explained in order
of the menu structure.
Note: The following menu descriptions also apply to corresponding toolbar buttons, when applicable. Not
all menu items have a corresponding tool button.
WavePort User’s Manual
09-29-00
WaveView 6-7
Page 60

File
Edit
New
Open
Save
Save As
Convert Data Files
Data Conversion
Preferences
Open a WBK16
Calibration File
(WBK16 Only)
Exit
Make All Channels
Active
Make All Channels
Inactive
Go To Row
Fill Down
Hide Inactive
Channels
Show All Channels
Auto Zero Enabled
Channels
Enable Spreadsheet
Reading Column
Disable Spreadsheet
Reading Column
Sets all parameters to their default startup settings.
Loads a saved configuration.
Saves the existing configuration for later recall.
Prompts for a file name and saves the current configuration to that file name.
Runs the File Converter, which converts any acquired data file to any of the supported data
types.
Opens a dialog box, which lets you set the data file conversion options that WaveView will
apply automatically whenever you acquire data.
Loads a WBK16 sensor calibration table. This command loads saved WBK16 calibration
data.
Note: This selection is not available unless WaveView detects the presence of a WBK16.
Closes WaveView.
Note: Before WaveView exits, it saves the current configuration in a file named
WAVEVIEW.CFG. The next time you run WaveView, this file is loaded automatically.
This command places an “On” in the “On/Off” field of all channels.
This command places an “Off” in the “On/Off” field of all channels. If your channel scan
includes only a few channels, it may be easier to make all of the channels inactive, then
turn on only those few channels that you want.
Opens a dialog box that lets you enter a channel number to be modified. For hardware
configurations that contain a large number of channels, this is a faster method of moving
around than using the scroll bars.
When multiple cells within a column are selected, this command takes the top-most
selected cell and copies its contents to the selected cells below.
Temporarily removes all inactive channels from the channel configuration worksheet. If
there are inactive (“Off”) channels, this results in a smaller spreadsheet showing just the
currently active channels. A status indicator “HIDDEN ROWS” appears above the
spreadsheet when one or more channels are hidden.
Note: When a channel is hidden, its configuration settings cannot be changed. Block
operations and other “All” actions, like the Make All Channels Active menu item, have no
effect on hidden channels.
Makes all channel rows visible. Can be used to restore the full spreadsheet after a Hide
Inactive Channels action.
This zeros out a DC offset signal on all channels that are “On” and have Auto Zero set to
“Yes.”
This causes all channels that are “On” to display an actual reading of the input signal in the
channel reading column. This column is updated with new readings about twice per
second. A status indicator “READINGS” appears above the spreadsheet when the
reading column is enabled.
This stops the reading column from being updated.
View
6-8 WaveView
Acquisition
Configuration
Module Configuration
Scope
Direct to Disk
View File Data
Opens the display window to allow selection of the number/speed of the scan and the
triggering method to start the scan.
Opens the display window that shows the current inventory of expansion modules in the
system and allows the configuration of some expansion module parameters.
Opens the display window to allow real-time viewing of the acquired data.
Opens the display window to allow the writing of acquisition data to disk files.
Starts the independent application to view file data.
09-29-00
WavePort User’s Manual
Page 61

System
Select Device
Options
WBK16 Sensor
Calibration
(WBK16 Only)
WBK16 Advanced
Features
(WBK16 Only)
Brings up a dialog box that lets you select a WaveBook device. It also provides access to
the Simulated Device, which is listed as an option.
Brings up the WaveView System Options dialog box. From there, you can enable or disable
WaveView options. The Performance and Memory Module options are described below.
This command runs the sensor calibration program. Selecting this option will temporarily
disable WaveView and open a sensor calibration spreadsheet so that each channel on a
WBK16 can be calibrated to the specifications of the sensor in use.
Note: This selection is available if WaveView detects a WBK16 module.
This command brings up a dialog box to select new cutoff frequencies for the LPF on a
WBK16. The WBK16 has a Low Pass Filter with two selectable cutoff frequencies.
Although the frequencies are factory configured at 10 Hz and 1 kHz, changing the resistor
packs inside the WBK16 can modify them. After the cutoff frequencies are altered, the
values that WaveView displays can then be modified to match the LPF frequencies using
this command.
Note: This selection is available if WaveView detects a WBK16 module.
Performance
•
Acquisition Data Packing:
The Data Packing option does not apply to
WavePort and is disabled.
•
Calibration:
WavePort should only be calibrated at
the factory, or by a factory-authorized
service representative.
Leave the Calibration Radio Button
selected to Factory Calibration Table
(see figure at right). The Calibration section
of Chapter 9, Maintenance, Service, and
Part Replacement, contains additional
information.
•
Acquisition Buffer Size:
Allows you to set a new buffer size for data
acquisition. The dialog displays the maximum size
of the acquisition buffer. The buffer is never sized
larger than needed by the acquisition. For a onechannel, 1000 scan acquisition the buffer will be
2000 bytes, not the size shown in the dialog.
Memory Module
Note: The WaveView System Memory Module
Option settings are only pertinent if a WBK30
Memory module option card is installed in your
WavePort or WaveBook.
• Pre-Trigger Mode: This allows you to use the full
bandwidth of your instrument regardless of the
computer's data transfer speed. Note that when
Pre-Trigger is in effect, certain conditions apply: (1)
The entire acquisition must fit in the WBK30's
internal memory, (2) The scan count will not update
during acquisition, and (3) The Pre-Trigger Mode
selection only applies if pre-trigger is used.
• Overflow Protection: This preserves and transfers
all data in the instrument when an acquisition ends
early due to an error or manual disarm. This option
should not be used if you: (1) Never want to save
data from an incomplete acquisition, or (2) You want
the option to work like it does without a WBK30
installed.
WavePort User’s Manual
09-29-00
WaveView 6-9
Page 62

Input Channel Configuration
The spreadsheet allows the analog input channels and/or digital channel to be configured and displayed.
The spreadsheet consists of rows and columns much like an accounting spreadsheet. The top few rows are
used for the high-speed digital input and other non-analog channels. The following rows (up to 72)
configure the analog input channels. The number of rows varies depending on system configuration.
The various columns contain the configuration information for each channel. Some columns allow blocks of
cells to be altered simultaneously, while others allow one cell to be changed at a time. Some columns may
be static and cannot be altered. Clicking a column header will select the entire column if applicable.
Channel Configuration Spreadsheet
• CH. The channel number column labeled CH is static and cannot be altered. This column identifies the
analog (or digital) input channel to be configured in that row. This number includes all channel
numbers from the WaveBook and any attached expansion chassis (WBK10/10H/10A, WBK14,
WBK15, and WBK16). The channels are numbered as follows:
CH Description Default Label
CtrLo WavePort External Clock Period (Lo) CtrLo
CtrHi WavePort External Clock Period (Hi) CtrHi
Dig WaveBook Digital Channel Dig
0-1 to 0-8 W aveBook Analog Channels CH01 to CH08
1-1 to 1-8 First set of Expansion Channels* CH09 to CH16
2-1 to 2-8 Second set of Expansion Channels* CH17 to CH24
WavePort/PE
*
(PE16).
*WavePort/V
WBK10As (V24), or none (V8).
units appear as a WaveBook with one WBK14 (PE8), or two WBK14s
units will appear as a WaveBook with one WBK10A (V16), two
• On/Off. This column allows you to include or exclude a channel from the scan list. When a cell is
selected, the selection box above the spreadsheet allows “On” or “Off” to enable or disable the channel.
Double-clicking a cell in this column will toggle the channel status. The Make All Channels Active and
Make All Channels Inactive menu items under the Edit menu can be used to globally change all
channels to either “On” or “Off.”
• Reading. Not user configurable. This column displays values of enabled channels.
• Range. This column allows you to set the gain and polarity for the selected channel(s). Clicking the
mouse in any of the analog channel Range boxes brings up the "Select Range" selection box. The
range of gains available in the selection box depends on the hardware installed in the system. Doubleclicking on a channel’s Range box will cycle through the available ranges. The Range selections have
no effect on the Digital Input channel.
6-10 WaveView
Reference Note:
Ranges are presented in Chapter 10, Specifications.
09-29-00
WavePort User’s Manual
Page 63

• Label. This column contains a descriptive name for the input channel. By default, it contains a label
that is similar to its channel number, but this can be changed to any combination of 8 characters. Click
on the desired cell, and type in the desired label name. This column does not have a selection list
above the spreadsheet and does not allow selecting multiple blocks of cells.
• Units. This column allows you to change the voltage scale setting of each analog channel displayed
when the Scope option is selected. When a cell is selected, a selection box gives you a choice between
volts (V) or millivolts (mV). You can also enter user units and mX+b scales from this point. Making a
selection sets the choice into the individual cell or block of cells. This option has no effect on the
Digital Input channel.
From the mX+b dialog box, you can
enter values for m and b components
of the equation that will be applied to
the data. There is also an entry field
that allows you to enter a label for the
new units that may result from the
mX+b calculation.
• Auto Zero (32-Bit WaveView Only). Auto-zero is used to null out any DC offset that might be present
in a channel. WaveView nulls out the offsets of all channels set to “Yes” in the Auto Zero column,
providing the channels are enabled (“On”).
The following options depend on your actual WaveBook configuration.
• LPF On (WBK12/13, WBK14, WBK16). This column allows you to include or exclude the low-pass
filter from a channel. When selecting a cell, the selection box above the spreadsheet allows “On” or
“Bypass” to enable or disable the filter or block of filters. In WBK14 applications, LPF On allows you
to select an external filter. Double-clicking a cell in the LPF On column will cycle through the available
options.
• LPF Cutoff (WBK12/13, WBK14, WBK16). This column allows you to set the low-pass filter cut-off
frequency for the selected channel(s). If you enter an inappropriate cut-off frequency, the software will
round up or down to the next appropriate frequency for your particular hardware. Since the WBK12/13
filters are assigned to banks, setting one channel of a bank will also update the others.
• LPF Type (WBK12/13, WBK14, WBK16). This column allows you to configure the low-pass filter for
the selected channel(s). When selecting a cell or block of cells in this column, a selection box above the
spreadsheet may or may not appear, depending upon your particular hardware. If the selection box
appears, it will display the appropriate low-pass filter selections (such as “Elliptic” or “Linear” for the
WBK12/13) allowed by your hardware. Double-clicking a cell in this column will toggle the filter-type
status. A change in the low-pass filter type for one channel will appropriately update any other affected
channels.
• HPF Cutoff (WBK14, WBK16). This column allows you to set the high-pass filter cut-off frequency
for the selected channel(s). When a cell is selected, a selection box above the spreadsheet will display
the appropriate cut-off frequency selections (such as “0.1 Hz” or “10 Hz” for a WBK14 or “DC” and
“10 Hz” for a WBK16) to configure the filter(s). Double-clicking a cell in this column will toggle the
cut-off frequency status. A change in the high-pass filter cut-off frequency for one channel will
appropriately update any other affected channels.
WavePort User’s Manual
09-29-00
WaveView 6-11
Page 64

• Source Level (WBK14, WBK16). This column allows you to apply or remove the source level for the
selected channel(s). When selecting a cell or block of cells in this column, a selection box above the
spreadsheet may or may not appear, depending upon your particular hardware. If the selection box
appears, it will display the appropriate source level selections (such as “Off”, “2 mA”, or “4 mA” for a
WBK14 or an excitation voltage level for a WBK16) allowed by your hardware to configure a source
or block of sources. Double-clicking a cell in this column will toggle the source level status. A change
in the source level for one channel will appropriately update any other affected channels.
Note: For WBK14 Only, when using an ICP transducer, either 2 mA or 4 mA must be selected.
Set the current-source level to “Off” before measuring voltage.
• Bridge Type (WBK16 Only). This column allows you to select the specific bridge configuration for a
strain gage or load cell sensor. When a cell is selected, a selection box above the spreadsheet will
display the appropriate bridge configuration selections (such as Full Bridge, Half-Bridge and
Quarter-Bridge). Double-clicking a cell in this column toggles the Bridge Type.
• Invert (WBK16 Only). This column allows you to invert the signal level of a channel. When a cell is
selected, the selection box above the spreadsheet allows “Yes” or “No” options to determine whether
the channel is inverted. Double-clicking a cell in this column will toggle the invert status.
Data Conversion
WaveView contains a file converter capable of converting raw binary data to other file formats. From the
File pull-down menu, select Data Conversion Preferences to choose the desired file formats. Note that the
application for viewing file data is selected by default. The following window is displayed:
6-12 WaveView
Check any box to set the file conversion options that WaveView will apply automatically to acquired data.
WaveView’s Convert Data Files option of the File menu allows you to run the File Converter on previously
acquired data. A dialog box is displayed for you to select files from:
During the conversion, a “Converting File” box shows an animated completion bar, the format of the source
and target files, and the file paths of the source and target.
09-29-00
WavePort User’s Manual
Page 65

Acquisition Configuration
General Information
You can access the Acquisition Configuration dialog box from
the main window’s View pull-down menu or toolbar.
The Duration column has text-boxes for pre-trigger scans,
post-trigger scans, and convention (number of scans or time
period).
The following formula determines the maximum number of
scans that can be stored for use in the Scope mode.
This does not apply to storage to disk.
(Scan duration) * (# of Channels) * 4 < Available PC Memory
A scan includes all channels that are set to “On” in the analog
input configuration spreadsheet.
The Rate column allows you to set pre-trigger and post-trigger
scan rates. Timebase settings can be for Frequency or Period.
Timebase units are as follows:
Acquisition Configuration (Internal Clock)
Frequency - Hz, kHz, or MHz.
Period - seconds, milliseconds, or microseconds.
The scan rate can also be driven by the External clock of the
digital input port. With this option, enabled scans occur as
pulses are input on the external clock pin. The scan rate is set as
a fraction of the external clock rate by the Clock Divider
setting. The fastest scan rate is obtained from a clock divider
setting of 1. A setting of 10 would take one scan every tenth
pulse.
Acquisition Configuration (External Clock)
WavePort User’s Manual
09-29-00
WaveView 6-13
Page 66

Trigger Types
The Trigger selection pull-down list allows you to select
the triggering method to start the scan. The figure shows
the various triggering options available.
Immediate
Manual
Digital
Channel 1 Analog
Triggering starts immediately when the Arm toolbar
button of WaveView Scope is clicked.
Prior to acquiring data, the system must first be
armed by clicking on the Arm toolbar button of
WaveView Scope. Triggering starts when the
Trigger button is clicked.
Selecting Digital brings 2 triggering options to the
Trigger selection box, allowing you to select either a
"Rising" or "Falling" edge trigger. The TTL trigger
signal connects to pin (TTLTRG) of the Digital I/O
& Trigger port on the WaveBook front panel.
This option allows you to set up additional
parameters for the acquisition of analog data.
Several new items are added to the Trigger selection
box, including options for the Trigger Condition
and Trigger Threshold.
The selections for trigger correspond to the
following trigger conditions:(1) "Rising Edge",
where the signal level must have a positive slope as
it crosses the trigger threshold, or
(2) "Falling Edge", where the signal level must have
a negative slope as it crosses the trigger threshold.
Trigger Source Pull-Down List
(On Acquisition Configuration Dialog Box)
Provides the means of selecting the desired Trigger Type.
Digital Trigger
With Digital Trigger, the user must indicate Rising or
Falling Edge.
Channel 1 Analog Trigger
Allows you to set a Trigger Threshold Value and indicate
whether the signal is to be Rising or Falling in relation to
the trigger line.
Note: Channel 1 Analog triggering is only valid for
channel 1.
Multiple Ch Analog
6-14 WaveView
This Trigger Source provides a scroll list of Trigger
Conditions for use with AND, or OR Logical
Operators, as follows:
(1) Selecting "OR channels" causes the acquisition
to trigger when any of the selected channel
conditions become true
(2) Selecting "AND channels" issues a trigger when
all the selected channel conditions become true.
If Multiple Ch Analog is selected, the Trigger
Condition option has the following choices:
◊ No Trigger. The channel will not be included in
the list of channels to examine for trigger
conditions
.
Provides a variety of Trigger Conditions and the use of
And or Or Logic Operators.
Multiple Ch Analog
◊ Rising Edge. The signal level must first go below the trigger level by the user-set hysteresis amount.
Then, the trigger channel is valid whenever the signal level is above the trigger level and stays valid
until the signal level goes below the trigger level by at least the hysteresis amount.
◊ Falling Edge. The signal level must first go below the trigger level by the user-set hysteresis amount.
Then, the trigger channel is valid whenever the signal level is below the trigger level and stays valid
until the signal level goes above the trigger level by at least the hysteresis amount.
09-29-00
WavePort User’s Manual
Page 67

◊ Above Thresh. A trigger channel is valid whenever the signal level is above the trigger level and stays
valid until the signal level goes below the trigger level by at least the user-set hysteresis amount.
◊ Below Thresh. A trigger channel is valid whenever the signal level is below the trigger level and stays
valid until the signal level goes above the trigger level by at least the user-set hysteresis amount.
◊ Latch Rising Edge. The signal level must first go below the trigger level by the user-set hysteresis
amount. Then, the trigger channel is valid whenever the signal level is above the trigger level and stays
valid until the acquisition is complete.
◊ Latch Falling Edge. The signal level must first go below the trigger level by the user-set hysteresis
amount. Then, the trigger channel is valid whenever the signal level is below the trigger level and stays
valid until the acquisition is complete.
◊ Latch Above Thresh. A trigger channel is valid whenever the signal level is above the trigger level and
stays valid until the acquisition is complete.
◊ Latch Below Thresh. A trigger channel is valid whenever the signal level is below the trigger level and
stays valid until the acquisition is complete.
Note: The threshold voltage and hysteresis level may be set for each channel as required. Position the
cursor per channel and enter the desired value(s).
External Clock and Counter-Timer
WavePorts can receive an external clock input through pin 20 of the DB25 connector labeled DIGITAL
I/O, EXTERNAL CLOCK, TTL TRIGGER. This enables data scanning to be correlated with an external
pulse train. To enable the external clock, select “External” for the Scanning Rate in the Acquisition
Configuration Dialog Box (see following screen shot). When the external clock is enabled, WavePort
begins a scan only after a rising edge on the TTL level occurs. Optionally, the external clock may be
divided [by a factor of 1 to 255]. This “pre-scaling” allows the user to select a reduced scan rate.
Acquisition Configuration Dialog Box with External Clock Enabled
Note: Clock Divider can be set from 1 to 255
WavePort has a 32-bit internal counter that calculates and reports the external clock’s period. The counter
can be read with each scan of the analog data. This is often beneficial in later analysis, when there is a need
to correlate physical phenomena with speed.
The counter channel actually consists of two independent channels (CtrLo and CtrHi). These can be turned
“On” in the Channel Configuration Spreadsheet. When enabled, the low (CtrLo), then high (CtrHi) words
of the counter will be configured in each scan. Note that the spreadsheet’s Units column can be used to
view a predefined period in units of seconds, ms, or µsec.
WaveView can be configured to read only the low word of the counter data (CtrLo:“On,” CtrHi: “Off”).
This decreases the minimum scan period by 1 usec. This LoCtr only option can be used only when the
external clock frequency is greater than 305 Hz (20,000,000 MHz / 65536]. Note that WaveView does not
enforce this.
WavePort User’s Manual
09-29-00
WaveView 6-15
Page 68

Digital-Pattern Trigger
In addition to digital trigger, the WavePort series supports a digital-pattern trigger (not available in the
WaveBook/512). This expanded capability allows data collection to start when a user-defined 16-bit digital
pattern is matched on the digital I/O connector. This feature is useful when trying to capture noise,
vibrations or some other physical disturbance that occurs at a particular point in a digitally-sequenced
process (from a PLC or relay-logic-control system).
When “Digital Pattern” is selected as the Triggering Type, the 16-bit pattern extension appears (as indicated
in the following figure). The Condition box allows the following choices:
Equal To (=) / Not Equal To (< >) – These options treat each digital line as a separate input to be
compared to logical 1 or 0. Selecting “Equal To” triggers only on the exact pattern of 1’s and 0’s selected.,
while “Not Equal” triggers on all others. You can also set any of the inputs to “don’t care” (X), which
excludes it from the comparison.
Greater Than (>) / Less Than (<) – These options interpret the digital inputs as a single 16-bit value and
allow a threshold trigger.
Acquisition Configuration Dialog Box, with Digital Pattern Extensions
The top row contains a button labeled “External” for enabling the External Clock.
Note:
6-16 WaveView
09-29-00
WavePort User’s Manual
Page 69

Pulse Trigger
Pulse Trigger allows the use of a high-bandwidth input for triggering, and the correlation of lower-speed
waveforms with the occurrence of a high-speed pulse. You can set a pulse amplitude between ±5 V and a
µ
pulse width in the range of 10 ns to10
s.
Pulse Trigger Selected
This option allows you to trigger on analog level “pulses” on either the Channel 1 input or the Pulse Trigger
input. This trigger type is similar to the Channel 1 Analog trigger but places an additional time-based
condition on the signal. Depending on whether the pulse width is set as a minimum or a maximum, the
signal either must or must not cross the threshold again within the given amount of time.
The red horizontal line (Threshold) and blue vertical lines (defining maximum width) will vary according to
the parameter settings. You can specify either one or two thresholds for the level and width settings. The
number of labels matches the number of thresholds and the placement follows the polarity.
• For positive polarity, the text is “Rise Above... Stay Below.”
• For negative polarity, the text is “Fall Below and Stay Above.”
Note: When used as a maximum, the pulse width setting can capture signal pulses. As a minimum, it is
useful for ignoring pulses.
WavePort User’s Manual
09-29-00
WaveView 6-17
Page 70

WaveView Scope Window
Scope mode is a WaveView utility that can display data acquisition waveforms in real-time. Before this
mode can be enabled, at least one channel must be "ON." Up to eight channels can be displayed at a time.
Note: The following formula determines the maximum number of scans that can be stored for use in the
Scope mode. The formula does not apply to disk storage.
( Total Scans ) * ( # of Channels ) * 4 < Acquisition Buffer Size
..
6 7 8 9 10 11 1254321
WaveView Scope Window
Item Description Item Description
1 Save 7 Stop Rearming
2 Print Window 8 Zoom In
3 Arm 9 Zoom Out
4 Trigger 10 Scale All Charts
5 Stop Acquiring 11 Toggle Cross Hairs
6 Auto-Rearm 12 Toggle Grids
To view additional channels in Scope Display, simply change the entry in the Number of
Charts selection of the Charts pull-down menu. You can simultaneously view up to eight
channels in Scope Display.
A Channel pull-down menu box is located at the right end of each chart and is used to select the desired
channel. Click on the box to display the channel list; then click on the desired channel.
The waveform display is actually a window looking at a section of the acquisition. The window size may be
increased or decreased and moved to any location on the time-line. The waveforms may be examined during
or after the acquisition.
6-18 WaveView
09-29-00
WavePort User’s Manual
Page 71

Menu Items & Toolbar Buttons
You can control the acquisition process and the Scope display from the menu selections and toolbar
buttons. There are more pull-down menu selections available than there are buttons; however, each button
does have a corresponding menu item.
File
Save Data Files
Save Data File As
Print Window
Close Scope
Acquire
Arm
Saves data in the file name and data formats that have been previously assigned.
Prompts you for a name for the data file before saving the data.
Prints the contents of the display screen.
Closes the Scope display and returns to the configuration menu.
Arms the WaveBook to acquire data. Data acquisition will commence as soon as the
triggering conditions are satisfied.
Charts
Trigger
Stop Acquiring
Auto-Rearm
Stop Rearming
Number of Charts
Zoom In
Zoom Out
Enable AutoScaling
Scale All Charts
Display Cross Hairs
Display Grids
Issues a Software Trigger to the W aveBook. Whenever the WaveBook is armed and
waiting for a trigger, you can take this action to force data acquisition to start.
Ends the current acquisition immediately. All data collected prior to this action will be
retained in memory and displayed in the chart control. If auto-rearm is enabled, this
action stops the rearming as well.
When enabled, the WaveBook is automatically re-armed whenever an acquisition ends.
With this feature, you can use WaveView like an oscilloscope to display a rapid series of
your channel inputs.
With auto-rearm enabled, this action stops auto-rearming but allows the current
acquisition to complete. (Pressing “Stop Acquiring” ends the current acquisition
immediately.)
Sets the number of charts (maximum of 8) to be displayed simultaneously.
Halves the visible timebase. Example: if 10 ms of information is visible, clicking Zoom In
will show 5 ms. Maximum Zoom In is 2 samples.
Doubles the visible timebase. Example: if 10 seconds of information is visible, clicking
Zoom Out will show 20 seconds. Maximum Zoom Out is 2000 samples.
Continuously adjusts the Y-axis for all channels so that the visible waveform fills 90% of
the graph’s range.
Adjusts the Y axis for all channels so that the visible waveform fills 90% of the graph’s
range.
A cross hair is a marker that shows the numerical values of time and amplitude at its
present location in the waveform. Toggle button to turn cross hairs on or off.
Displays a grid for each chart. Toggle button to turn grids on or off.
Individual cross-hairs can be moved by holding down the left mouse button and dragging the selected crosshair to the new location on the chart. Holding the right mouse button and dragging, moves all the cross-hairs
simultaneously to a new location. The voltage and time display at the side changes as you do this.
Cross-hairs are disabled during an acquisition.
WavePort User’s Manual
09-29-00
WaveView 6-19
Page 72

Scope Display
The following figure identifies features of the WaveView Scope display.
Y-axis Adjust,
Y-axis Adjust,
Time of
First Scan
in View
Upper Limit
Individual
Channel
Scaling
Lower Limit
Y-axis Adjust
Individual Channel
Scaling
Time of First Scan in
View
Trigger Point
Time of Last Scan in
View
Channel Select
Magnitude
Time
Channel
Select
Magnitude
Time
Time of
Last Scan
in View
Trigger Point
Scope Mode Indicators & Descriptions
Allows adjustment of the displayed range. Clicking on the value highlights the number.
Enter desired new value and press Enter.
Adjusts the scaling of the individual channels so that the visible waveform fills 90% of the
graphs range.
Displays the acquisition time of the first scan currently displayed on the chart.
Displays the trigger event.
Note: Depending on the current acquisition parameters and chart display configuration,
the trigger point may or may not appear on the chart.
Displays the acquisition time of the last scan currently displayed on the chart.
Clicking on this control displays the list of all channels selected in the WaveView
configuration menu. A maximum of 8 channels may be displayed at one time with the
remaining channels available through the scroll bar.
Displays the magnitude of the signal at the point where the marker cross-hair intersects
the waveform. Moving the marker to different locations on the waveform changes the
value of the displayed voltage.
Displays the point on the acquisition time-line where the marker cross-hair intersects the
waveform. This value changes as the marker is moved along the X-axis (time scale).
6-20 WaveView
In addition to the above features of the Scope window, there are status bars above and below the charts that
display information about the timebase of the current display and the status of the current acquisition:
Status – Indicates the current acquisition state of the WaveBook. If there is no acquisition in progress, the
status is Idle. During an acquisition, the status steps through all or part of the following sequence:
Configuring, Waiting For Trigger, Triggered, Transferring, Graphing, and then back to Idle.
Scans – During an acquisition, this field displays the current transfer count. Afterwards, it is the total scans
in the previous acquisition. A percent complete value is shown to the right of the scan count. After an
acquisition, this normally reads 100%.
Activity Indicator – During an acquisition, a small window appears next to the status field that shows an
animated sine wave. This indicator is active whenever the acquisition status is not “Idle.”
Scans in View – The number of scans displayed across the X-axis.
Pre-trigger Timebase – The pre-trigger timebase in time units per division. This field is blank when no
pre-trigger data is currently on the chart.
Post-trigger Timebase – The post-trigger timebase in time units per division. This field is blank when no
post-trigger data is currently on the chart.
09-29-00
WavePort User’s Manual
Page 73

WaveView Direct-To-Disk Window
54321
WaveView Direct-to-Disk Window
Item Description
1Arm
2 Trigger
3 Stop Acquiring
4 Auto-Rearm
5 Stop Rearming
Control functions in the WaveView Direct-To-Disk window are available through the pull-down menu or the
toolbar. The figure shows the menu, the toolbar, and each tool button. In addition to the tool buttons, there
are status bars that display information about the data file and data conversion:
Status – Indicates the current acquisition state of the WaveBook. If there is no acquisition in progress, the
status is Idle. During an acquisition, the status steps through all or part of the following sequence:
Configuring, Waiting For Trigger, Triggered, Transferring, Graphing, and then back to Idle.
Scans – During an acquisition, this field displays the current transfer count. Afterwards, it is the total scans
in the previous acquisition. A percent complete value is shown to the right of the scan count. After an
acquisition, this normally reads 100%.
Activity Indicator – During an acquisition, a small window appears next to the status field that shows an
animated sine wave. This indicator is active whenever the acquisition status is not “Idle.”
Data File Name – Displays base filename; allows user to input filename using keyboard or Browse button.
Data File Path – Displays the path of the root data directory. All acquired and converted data is placed in
subdirectories of this location. You can press the Browse button to display a tree of all directories available
to your computer.
Subdirectory Tree Display – Shows the directory structure of the location where the data files are stored.
The presence of data subdirectories in the tree indicates the current data conversion setting. For example, if
you see a “DIAdem” subdirectory, you know that your data is automatically converted to the DIAdem
format at the end of every acquisition.
Note: If you double-click on a branch of the tree, Windows Explorer opens a folder view of that
WavePort User’s Manual
subdirectory.
09-29-00
WaveView 6-21
Page 74

Data Conversion Options – Opens a dialog that allows you to set the data file conversion options that
WaveView will apply automatically whenever you acquire data.
Auto Increment Filename checkbox – If checked, allows automatic change to the suffix of the Current
Filename using the base Filename and the numbers in the “Start – End” range. If not checked, Current
Filename will be equal to base Filename. The current Filename is shown at the bottom of the dialog box.
Reset Current Index button – Resets current index and Current Filename to the “Start Index.”
Next Data File - Displays the full path and file name of the next acquisition data file that will be created.
This field is most useful when the Auto-Increment feature is enabled since WaveView constructs the
filenames by combining the User File Name with the current file increment.
Note: During an acquisition this field displays the path of the file that will be created at the end of the
acquisition. With auto-increment enabled, as soon as the acquisition has ended the field is updated to
display the name of the next data file that will be created, not the name of the file just created.
In the following sections, menu functions are explained in order of the menu structure. Note that not all
menu items have a corresponding toolbar button.
Acquire (Direct to Disk Pull-down Menu)
Arm
Trigger
Stop Acquiring
Auto-Rearm
Stop Rearming
Close Direct to Disk
Arms the WaveBook to acquire data. Data acquisition will commence as soon as the
triggering conditions are satisfied.
Issues a Software Trigger to the W aveBook. Whenever the WaveBook is armed and
waiting for a trigger, you can take this action to force data acquisition to start.
Ends the current acquisition immediately. All data collected prior to this action will be
retained in memory and displayed in the chart control. If auto-rearm is enabled, this
action stops the rearming as well.
When enabled, the WaveBook is automatically re-armed whenever an acquisition ends.
When this feature is used in conjunction with the Auto-Increment feature, you can create
a series of acquisition files with no user intervention. Once armed, the WaveBook will
continue to wait for triggers and acquire data unattended until the desired number of
acquisitions has been done.
With auto-rearm enabled, this action stops auto-rearming but allows the current
acquisition to complete. (Pressing “Stop Acquiring” ends the current acquisition
immediately.)
Closes the Direct-To-Disk display and returns to the Configuration menu.
6-22 WaveView
09-29-00
WavePort User’s Manual
Page 75

®
DIAdem
DIAdem® is owned and registered by GfS Systemtechnik GmbH & Co.KG.
Preface …… 7-2
DIAdem Quick Start …… 7-3
Installing DIAdem …… 7-3
Launching DIAdem from an Acquisition Program …… 7-3
Using DIAdem with ChartView …… 7-5
Where to go from here …… 7-9
DIAdem-VIEW Help Files ……7-9
“Examples” Help Files …… 7-10
DIAdem - the PC Workshop …… 7-13
The Overall Design …… 7-13
Context Menus and Tool Tips …… 7-15
The DIAdem Devices …… 7-15
The Module Bar …… 7-15
Functions …… 7-16
The Working Area …… 7-16
Dialog Boxes …… 7-16
Default Settings for Functions …… 7-17
Commands …… 7-17
Menus …… 7-18
DIAdem Help …… 7-18
Tool tips …… 7-18
Dialog Box Help …… 7-18
Help Menu …… 7-18
Active Help: Demos and Examples …… 7-19
Options …… 7-19
Desktop Settings …… 7-19
The Device-Specific Settings …… 7-20
Directory Structure …… 7-20
Saving and Loading Settings …… 7-21
DIAdem DATA: Loading and Saving Data …… 7-23
The Data Area …… 7-23
Copying, Pasting, and Deleting Data Channels …… 7-25
Saving and Opening Data Sets …… 7-26
DIAdem VIEW: Viewing, Measuring & Editing Data …… 7-27
Viewing Data as Graphs …… 7-28
Graph Definitions: Entering & Deleting Graphs in an Axis System …… 7-28
Using the Graphics Cursor in DIAdem View …… 7-29
Using the Cursor Position to Measure a Graph …… 7-29
Graph Legend: Displaying the Axis-Oriented Display …… 7-30
Global Coordinate Display: Displaying Cursor Coordinates in Overview Format …… 7-31
Axis-local Scaling: Various Graphs in one Axis System for Clarity …… 7-31
How to Copy or Delete a Graph …… 7-32
Using Zoom, Scrolling, & Screen Partition …… 7-33
Zoom: Enlarging Graph Segments ……7-33
Scrolling Through Graph Segments…… 7-34
Screen Partition: Re-arranging Axis Systems…… 7-35
7
DIAdem®
DIAdem® is owned and registered by GfS Systemtechnik GmbH & Co.KG.
GfS Systemtechnik GmbH & Co.KG maintains the copyright to the material
presented in this chapter unless otherwise noted or implied.
09-00
DIAdem Quick Start Guide 7-1
Page 76

Preface
Devices and Interfaces of DIAdem - the PC Workshop
DIAdem - the PC workshop, provides solutions for your technical tasks. It is made up of seven components called
devices.
DIAdem -DATA
DIAdem®-VIEW
DIAdem®-CALC
DIAdem® DATA manages data sets. Data can be processed individually, in blocks or in channels.
Data is displayed for overview in data channels; the corresponding data properties are displayed in
sorted table format.
With DIAdem® VIEW you can view data or “look at it under the magnifying glass.” The Working
area is divided into several axis systems to facilitate viewing. Curve sections can be deleted and
recalculated.
DIAdem® CALC lets you evaluate data mathematically. Each mathematical operation can be
performed with custom parameters or configured with permanent default settings. Individual
calculations are documented in the background in the form of a script.
With DIAdem® GRAPH you can document data in presentation format. Represent your
information using graphs, bars, or tables. You can also embed in background graphics.
DIAdem®-GRAPH
DIAdem®-DAC
DIAdem®-VISUAL
DIAdem-AUTO
DIAdem® Interfaces
With DIAdem® DAC (Data Acquisition and Control) you can process data online. Measurement
and control tasks are described graphically and are divided into four separate layers: the data
layer, the Packet Processing layer, the control layer and the system layer.
With DIAdem® VISUAL your terminal becomes a real-time display instrument. The wide range of
indicator and input instruments and the capability of linking in images and image sequences allow
you to simulate any number of measurement instruments and situations (real world
instrumentation).
DIAdem® AUTO allows you to automate procedures as Autosequences. Procedures can be
recorded interactively and then run off any number of times, with results that can be accessed by
all the DIAdem
®
devices. DIAdem® user dialogs enable you to intervene interactively while the
Autosequence is running.
DIAdem® has various interfaces for linking external applications: data is exchanged with other
Windows applications via DDE and OLE and with databases via ODBC/SQL. External hardware
drivers (OPC server) can be accessed via OPC. Via the TCP/IP interface, (measured) data can be
exchanged online between DIAdem
®
-PCs within a network. The DLL interface GPI in DIAdem
®
can be used to integrate measurement hardware, data file drivers, commands and variables.
7-
2 DIAdem Quick Start Guide
09-00
DIAdem®
Page 77

DIAdem Quick Start
Reference Note:
DIAdem’s Help Menu, represented by a question mark (?) in the tool bar contains a great deal of helpful information,
including examples and user tips pertaining to all of the DIAdem software features and options.
Installing DIAdem
Minimum System Requirements
IBM compatible computer 80386, with coprocessor
•
Minimum 66 MHz
•
At least 8 MB RAM (16 MB RAM or more recommended)
•
At least 20 MB of available disk space
•
Microsoft Windows (version 3.1, Windows95/98, or WindowsNT)
•
Minimum monitor resolution: 800 x 600 pixels
•
Installation Steps
Note:
More than likely you installed DIAdem during the installation of the primary Data Acquisition Software for
your device. If you already installed DIAdem, please ignore the following steps.
1. Install Software.
(a) Insert the install CD-ROM and wait for
your PC to auto-access the CD.
(b) When the Data Acquisition Software – Master Setup
screen appears, check:
“DIAdem Post Acquisition Data Analysis Program.”
(c) Click Start Install.
2. Choose a DIAdem Installation Type.
You will be prompted to choose a DIAdem installation
type.
: Select one of these two options unless you purchased a licensed version of DIAdem
Note
DIAdem Shell + View for IOtech Customers
This version is provided free to users of IOtech hardware.
DIAdem 30 Day Trial – Select this installation type if you did not purchase a licensed version of DIAdem,
– Installs a free version with DIAdem Shell and DIAdem View.
.
but would like to try out DIAdem’s expanded features.
Select one of the above options unless you purchased a DIAdem licensed version. Do not confuse the
“Standard” Licensed version (below) with the DIAdem Shell + View for IOtech Customers version, as
these are completely different installs. To install any of the following three “Licensed” versions you must
have a license disk and password. The DIAdem program will inform you when to insert a License Disk,
password, and user name.
DIAdem Licensed Version
DIAdem.
DIA
DIA
Licensed Version
dem
view” or “help files” installed.
Licensed Version
dem
licensed version.
(Customized) – Allows you to specify the installed software components for licensed
(Minimized) – Installs only the program files for Licensed DIAdem. There are no “quick
(Standard) – Installs program, “quick view,” and documentation files for a DIAdem
If you purchased a licensed version of DIAdem, a license disk and password were included in your
order. The DIAdem install program will inform you when to insert the License Disk and when to
enter your license password and user name.
DIAdem®
3. Click <Next> (after making your selection from step 2).
09-00
DIAdem Quick Start Guide 7-3
Page 78

4. Select Options and Click <Finish>.
Just before the setup is complete, you will see the following two option check boxes.
• Display the latest information now
This box is checked by default. Leaving the boxed checked brings up the readme file
contents listed below. We recommend that you leave this box checked.
Start the program now
•
Launches the DIAdem program for immediate use.
–
–
After selecting one, both, or neither option, click <Finish> to complete the setup.
Readme File Contents
Readme file contents are subject to change. File categories are typically as follows:
Getting Started
Updates to the Current Version
Additional Information
Conditions for Use
Launching DIAdem from an Acquisition Program
The steps in this section do not apply to ChartView.
The following steps can be used with data acquisition programs that contain a file converter capable
of converting raw binary data to the DIAdem data format. ChartView User’s should skip to the
following section,
Using
DIA
dem with ChartView
.
Reference Note:
The following steps apply to DaqView, Personal DaqView, LogView, and WaveView. The steps
are discussed in general terms since the data acquisition programs differ in regard to toolbars, pulldown menus, and other aspects of GUI layout. Refer to your specific application’s documentation
as needed.
1. Include the DIAdem File Format as a Data Conversion Preference
Verify DIAdem is selected as a file format. This is
accomplished through your application’s
“Conversion Preferences.”
Refer to your application’s user documentation as
needed.
Selecting DIAdem as a File Format
Note: DIAdem is initially selected by default.
2. Acquire Data to Disk and Convert File
When acquiring data to disk, your application’s file
converter automatically converts the Raw Binary data
to the DIAdem Target Format (verified in the
previous step).
During the conversion, a “Converting File” box
shows: an animated completion bar, format of the
source and target files, and file paths of the source
and target. The box is usually on screen for only a
moment; however, we can obtain the information
from your application’s Data Destination region,
as mentioned in the following tip.
File Conversion in Progress
7-
4 DIAdem Quick Start Guide
09-00
DIAdem®
Page 79

After the data conversion completes, check the Data Destination area of your application. Certain applications,
such as DaqView, make use of a Data Destination tab. Other applications (such as WaveView), show data
destination after a “Direct to Disk” [or equivalent] button is pressed. Consult your application’s user
documentation as needed.
It is a good idea to write down the complete file path for the newly created DIAdem data. This allows you to access
the file later from DIAdem’s Load Data box, as discussed on page QS-8.
Checking Data Destination
In this example, the DIAdem target file is located at
3. View Data
From your data acquisition program’s main window, click the View Data button. This launches the DIAdem
program. DIAdem’s main window will appear with waveforms from the most recently acquired file.
c:\program files\daqx\applications\diadem\daqv.r32
DIAdem®
DIAdem’s Main Window, Showing Graphs for Three Channels
We recommend that you review sections 1, 2, and 3 of this document, as well as DIAdem’s help files. The section
entitled, “
Where to go from here….
” on page QS-10 includes instruction on accessing the help files and identifies
the various help topics.
09-00
DIAdem Quick Start Guide 7-5
Page 80

Using DIAdem with ChartView
This method must be used for data acquisition
programs that have no integrated converter capable
of converting raw binary data to the DIAdem data
format.
ChartView has no direct support for DIAdem. In this
case a stand-alone file converter is used to convert
binary data to the DIAdem format.
Note: The Data Conversion Utility (file converter)
is installed automatically when you install
ChartView from CD-ROM release version 1.9
or greater.
The following steps show how to convert a binary
file from a data acquisition program to DIAdem
format, then load the converted file into DIAdem.
A simplified view of the procedure is at right.
(A) Use ChartView to acquire and save data in
binary [raw binary] format.
(B) Use the Data Conversion Utility to convert the
raw binary format into the DIAdem format.
(C) Load the converted file into DIAdem.
ChartView, Data Conversion Utility, and DIAdem
on a Desktop Concurrently
During a session in which several acquisitions are to be followed by viewing each file in DIAdem, it is recommended
that: the data acquisition application, the file converter, and DIAdem remain on the desktop concurrently.
(A) Acquire and Save Data in Binary Format
1.
Open ChartView.
Consult the ChartScan Users Manual as needed.
2.
Select Binary Data Format.
This is done in ChartView’s Data Destination section (see figure).
3.
Acquire and Save Data.
In the example at the right we are saving a binary data file named
DATA_GG.IOT
to folder
E:XFER\BIN\
(B) Convert Binary Data to DIAdem Format
1.
Open the Data Conversion Utility.
Use a shortcut icon, or navigate from your desktop’s Start Menu as follows and
double-click on the Data Conversion Utility item:
Start ⇒⇒⇒⇒ Programs ⇒⇒⇒⇒ ChartView ⇒⇒⇒⇒Applications ⇒⇒⇒⇒ Data Conversion Utility
Select Binary Format
Shortcut to the Data
Conversion Utility
The conversion utility appears similar to that shown in the following figure.
7-
6 DIAdem Quick Start Guide
09-00
DIAdem®
Page 81

Data Conversion Utility (appearance shown is for ChartView)
2.
Select "ChartView Binary" as the Data Type.
The first time you run the data converter, a dialog box prompts you to select a data
type. The data type designation is based on the program that was used to collect the
data, e.g., ChartView.
If the prompting dialog box does not appear, use the Select Source Data Type Tool
to select ChartView Binary (as shown in the figure at the right).
If this is the first time you are using the data converter you can skip
to step 4 since the DIAdem format is initially selected by default.
3.
Select the DIA
File Format.
dem
This can be done as follows by dropping down the
data converter's File menu and clicking
"Preferences." This opens a dialog box displaying
a list of formats into which your data can be
converted.
If there is not a check mark next to the DIAdem
item, click on it once to check it.
Note: You can select additional file formats for
other application uses; but for our Quick Start
Selecting the DIAdem File Format
purposes we only need to select the DIAdem
format.
Selecting a Data Type
4.
Click the Convert Button [on the data converter's tool bar].
A dialog box will appear that is similar to the Open File dialog used by many programs (see following figure).
Note that this directory differs for each of the View programs.
If this is the first time
your data. For example, to get to
E:\XFER\BIN\DATA_GG.IOT Note that this is the path that was identified earlier in our example application’s Data
that you are converting files of this type, you will have to navigate to the directory containing
data_gg.iot (as shown if the following figure), we navigated as follows:
Destination for the binary file (on page QS-4).
Converting a ChartView Binary File to a DIAdem Format File
DIAdem®
09-00
DIAdem Quick Start Guide 7-7
Page 82

5.
Select the Files as you want to Convert.
In the example we only have one file available (
6.
Enter the Target Directory Path.
data_gg.iot
).
In the Target Directory textbox, type the path of the directory that you want to use as the parent directory of the
converted data. Note that you can press the Browse button to navigate to the target directory instead of typing it.
In the example above we used:
C:\WINDOWS\TEST_Save\
The converted data files will be placed in a sub-directory named "DIAdem". Thus the complete path for our saved
data is:
7.
Press the Convert Button (in the Select Files to Convert box).
C:\WINDOWS\TEST_Save\DIAdem\data_gg.DAT
This action starts the file conversion and displays a progress meter.
After the DIAdem format file has been created, we can load our acquired data into DIAdem as discussed in the
following section.
(C) Load the Converted File into DIAdem
(these steps are not exclusive to ChartView and can be applied to other acquisition programs)
If you do not already have DIAdem open, launch the program from a desktop shortcut (if applicable), or by
navigating from the PC desktop as follows:
Start ⇒⇒⇒⇒ Programs ⇒⇒⇒⇒ DIAdem ⇒⇒⇒⇒ DIAdem
1. Click the DIA
-DATA: Data Management button.
dem
2. Click Load Data. A Load Data box appears.
3. Using the Load Data window, locate your DIAdem
target file and highlight its name.
In the example we have highlighted daqv.DAT.
Note: We reached this target file by navigating as shown in
steps A through E (below).
We used the Target Directory path we created earlier
C:\WINDOWS\TEST_Save\
The complete path for our saved data was
C:\WINDOWS\TEST_Save\DIAdem\data_gg.DAT
Note: DIAdem data files always have a "DAT" file
extension. The file name itself will match the name of
the raw binary file you converted.
If you need help finding a target directory path, see the
related tip on page QS-3; or consult your application’s
users manual, if needed.
Loading Converted ChartView Data into DIAdem
Navigating via DIAdem’s Load Data Box to Locate the Target File
7-
8 DIAdem Quick Start Guide
09-00
DIAdem®
Page 83

4. Click Open.
5. Click the DIAdem-VIEW: Data Viewing button.
6. Right-click in the empty graph region of a chart. A specific location
is not required.
7. Click on the Graph Definition item listed at top of the pop-up box.
A Graph Definition box appears, as shown in the following figure.
8. Click New Entry. A New Graph Definition box appears.
Selecting “New Entry”
Selecting Three Channels for Viewing
9. Select three channels. Do this by holding down your keyboard’s CTRL key, then selecting three channels with the
mouse. In our example we have selected Channels 0, 1, and 2 (CH00, CH01, CH02).
10. Click OK. A Graph Definition box appears with information regarding the three graphs. For each graph (1, 2, and 3)
the X-axis and Y-axis are identified and a graph color is indicated as shown in the following figure.
In the Graph Definitions example to the right, we see
that the X-axis represents time and the Y-axis
represents channel values.
11. Click OK.
The three graphs can now be viewed as indicated in
the following two figures.
Graph Definition for 3 Channels
DIAdem®
Viewing Three Graphs of Channel Values over Time
09-00
DIAdem Quick Start Guide 7-9
Page 84

Viewing Three Graphs and Basic Graph Information
Where to go from here …
At this point you should have just completed viewing data in DIAdem. What’s next?
We recommend that you experiment with the program to get a better feel for its many features and capabilities. You
should review the available documentation, including the DIAdem Help files. Several help topics are identified in the
remaining figures.
Reference Notes:
(1) Refer to the sections 1, 2, and 3 of this document for more
detailed information regarding DIAdem.
(2) DIAdem’s Help Menu, represented by a question mark (?)
in the tool bar contains a great deal of helpful information,
including examples and user tips.
DIAdem-VIEW Help Files
Selecting DIAdem-VIEW from the Help pull-down menu provides quick access to the following help topics. You can
also use your keyboard’s F1 key for immediate access to the topics identified below.
Accessing
DIA
dem’s Help Files
7-
10 DIAdem Quick Start Guide
09-00
DIAdem®
Page 85

“Examples” Help Files
Selecting Examples from the Help pull-down menu provides quick access to the following help topics.
DIAdem®
09-00
DIAdem Quick Start Guide 7-11
Page 86

7-
12 DIAdem Quick Start Guide
09-00
DIAdem®
Page 87

DIAdem - the PC Workshop
DIAdem® has been designed as a PC workshop for solving technical tasks. The underlying
principle is a logical arrangement which gives you an overview of all program elements.
Individually encapsulated devices ensure an orderly division of tasks. Similar functions are
grouped together and parameters in dialog boxes are hierarchically ordered according to their
importance.
Symbolic interface
Three guidelines determine the nature of DIAdem
®
from the most basic layer up: functionality,
clear layout and an intuitive interface.
Functionality means that DIAdem
with consistent operating logic. All similar functions have been grouped together into complete
units, the DIAdem
DIAdem
®
CALC device, all functions for creating graphic documents in the optional DIAdem
®
devices. All mathematical analysis functions are found in the optional
®
allows you to manage, analyze and document your data
GRAPH device, etc.
®
This brings us to the second concept, DIAdem
’s clear layout. As a rule, only the device
which is currently being used is visible. The others remain in the background. The surface layer
of a device is designed so that only the functions required for the task at hand are visible.
The third concept, intuitive interface, makes it easy for you to use DIAdem®’s full range of
features. All features can be activated by graphic symbols (icons). You can also make changes
to an axis system directly on-screen with the mouse. And context menus accessed by clicking
the right mouse button bring up context-specific menus, making it easy to set parameters for an
object.
This document is an abbreviated manual designed for rapid familiarization with the free
DIAdem-VIEW device. More detailed information is available in the DIAdem User’s Manual
that is distributed with Licensed-Versions of DIAdem.
Note that all available DIAdem
®
functions are explained in the program’s online help.
®
The Overall Design
Throughout the manual, you will see sample tasks you can execute with DIAdem
®
. The steps
demonstrate typical examples of the kind of work you can perform with each device.
Sections you can perform on your own computer are printed in italics.
The structure of the screen is based on a consistent operating logic. In the following figure you
will notice that the Device and Module Bars (used to access functions) are arranged vertically,
whereas the operating elements of the Function Bar are arranged horizontally. Common
operating elements are always visible.
The following screen view and detailed description [of the individual structural and interface
elements] illustrate the design of a DIAdem
®
PC workshop. The description begins at the left
edge of the screen with the Device bar, moves right to the Module bar, then to the Function bar
and up to the Tool bar and Menu bar.
DIAdem®
04-22-00
DIAdem – The PC Workshop 7-13
Page 88

DIAdem® screen layout
Note:
The DIAdem® devices are lined up one under the other on the left side of the screen, where
they are always accessible. Each of the individual DIAdem
®
application windows is known as a
device. They represent the topmost layer in the arrangement of PC workshop. The Device bar
is always visible, making it easy to move from one device to another.
When you choose a device by clicking on it with the mouse, the corresponding Module bar
appears for most devices. On this second layer, functions and actions are grouped thematically.
After you click on a button on the Module bar, the corresponding Function bar opens up
horizontally. You can perform functions such as choosing an axis system and tables in the
optional DIAdem
DIAdem
®
CALC device. Functions are processed in the Working area of each device.
®
GRAPH device or choosing mathematical functions in the optional
When symbols appear grayed-out in the Function bar, Module bar, or Device bar, the
corresponding function, option or device is not part of the current installation.
Devices and options can be included at any time.
The horizontal Tool bar is located above the Working area. It contains all the features and
commands you will need to use DIAdem
®
in the Working area.
You can also access all the features, functions and commands of the currently active device in
the corresponding menus through the Menu bar with the keyboard.
You should also be familiar with the Status line. In addition to general messages, brief help
messages appear here describing each symbol or function. For example if you are working with
an axis system in the optional DIAdem
®
GRAPH device, you can tell [from the Status line]
which item is used to move an object.
7-14 DIAdem – The PC Workshop
04-22-00
DIAdem®
Page 89

Context Menus and Tool Tips
Two important elements do not appear in the screen above, since they are not normally visible:
context menus (sometimes called shortcut menus) and tool tips.
Context menus provide rapid access to the most important features. You can access them by
clicking on the right mouse button from many places in the program. For example one context
menu offers features used in working with the active axis system in the optional DIAdem
GRAPH device.
Tool tips are text fields used to identify symbols. A tool tip appears whenever the mouse
pointer momentarily rests on the corresponding symbol.
You can use Tool tips to familiarize yourself with the individual devices. To activate a tool tip,
Tool tips
slowly move the mouse pointer over the Device bar without pressing a mouse key.
The DIAdem Devices
The DIAdem® devices could be thought of as a set of work tools. Each tool is intended for a
specific purpose. Note that devices can be easily distinguished by their graphic images (icons).
The element common to each of these devices is the data, which is processed in different
manners by different devices. In our analogy, the data is then the work object on which the
tools are used. Data must first be available to be processed by the devices.
®
Part of the DIAdem® Device Bar
Mouse pointer
Note:
The Module Bar
There are two types of devices:
•
devices that can create data, for example, the optional DATA and optional CALC devices
• devices that merely display data, such as the VIEW device and the optional GRAPH
device.
The optional Autosequences represent a special case, as they can use features from all the
devices, in order to automate work sequences.
To select a device, simply click on the corresponding symbol in the Device bar with the left
mouse button. For example to choose the optional DIAdem
®
GRAPH device, if applicable.
Whenever you are told in this manual to activate, click on or execute a feature, device or
object, it means you should click on the appropriate symbol or object with the left mouse
button. Similarly, “double-clicking” and “pressing a button” refer to the left mouse button.
When you select a device, the Module bar, another vertical bar, appears to the right of the
DIAdem
®
Device bar. Similar features and functions are arranged together in groups on this
bar.
For the optional DIAdem
®
GRAPH device, this means that the symbols for individual graphic
modules are found here: axis system, tables, and background images to name a few.
For the optional DIAdem
®
CALC device, the mathematical formulas are grouped together on
the module bar: basic math functions and features for signal analysis and statistics.
DIAdem® GRAPH
Module Bar
DIAdem®
04-22-00
DIAdem – The PC Workshop 7-15
Page 90

Functions
Part of Function bar for 2D axis
systems in DIAdem
®
GRAPH
When a group symbol is activated, the corresponding Function bar opens up horizontally.
Executable functions are for example choosing an axis system and tables in the optional
DIAdem
®
GRAPH device, or choosing mathematical functions in the optional DIAdem
®
CALC device.
The Working Area
Mouse pointer
Marking a frame around an object
If you have the optional DIAdem
®
GRAPH device, choose one of the various 2D axis systems
in by clicking on the corresponding symbol in the Function bar.
The selected axis system is indicated in the upper left-hand corner of the Working area.
The function bar is the same in all the DIAdem
®
devices. Autosequences that are used
frequently can be assigned to these symbols and are thus available in all the devices.
When you select a device the Working area is automatically filled with a pattern. The same
procedure is always used for working with objects: a left-button mouse click is used to
activate, left double-click to set parameters and right mouse click to open context menus.
If you have the optional DIAdem® GRAPH device, click on one of the 2D axis systems.
You will notice light gray marking at the corners and at the middle of each side of the active
axis system. If you click inside the markings again and hold the left mouse button down, you
can move the axis system.
When you “pull” on one of the marks, the axis system increase in size correspondingly. You
can pull by clicking with the mouse and holding the left button down while you move the
mouse. If you pull the marks on the sides, the axis system will increase in size horizontally or
vertically. If you pull on a corner mark, you will zoom the entire axis system.
Dialog Boxes
All settings for objects are
handled in dialog boxes.
Generally dialog boxes are used to associate data with objects such as axis systems or tables,
or to set properties such as line style and color.
To access graph and axis definitions in DIAdem®-GRAPH, double-click on the axis system
in which you wish to represent the data.
7-16 DIAdem – The PC Workshop
04-22-00
DIAdem®
Page 91

ntering a new graph
E
To enter a graph, use the New entry button. At this point it will be sufficient to specify from the list of
available data channels an X channel to represent data values on the X axis and a Y channel to represent
corresponding values on the Y axis. Exit the sub-dialog box and the main dialog box with the OK button.
Note:
In the “graph entries heading” of above mentioned dialog box , the word “Color” is not complete [it appears
as “Co…”]. As soon as the mouse cursor crosses the vertical line separating the columns "F..." and "Data,"
the cursor appears as parallel lines with arrows to the left and the right. You can use this cursor to expand
the column, allowing you to read "Color" [instead of “Co…”].
Graph and axis definition is a rather complicated example of a dialog box, but it illustrates well the concept
of hierarchy in dialog boxes.
Basic options that are often changed are at the top of the dialog box hierarchy. In the graph and axis
definition, for example, a quick glance reveals which data channels are represented and how. These can be
changed directly on the top layer.
Less common options are located one layer “deeper“ to allow room for the essential ones. They can be
reached by a button. Standard features such as OK, Cancel, Delete, Change, and Close are also accessed by
buttons. The Help button is always in the bottom right-hand corner. It provides explanations of the
individual dialog parameters.
Default Settings for Functions
The properties of any object can be changed at any time and maintained in a diagram or block diagram (see
the explanation of dialog boxes above). These settings, however, apply only to the object at hand or the
mathematical function which has just been called. The next time the mathematical function is called, the
default setting will appear again. To change settings permanently, use Default setting.
To reach the default settings for a function, click on the Function bar with the right mouse button
(for example on an analysis symbol in the optional DIAdem
which includes the Default setting. Activate this menu item with the left mouse key, and the
appropriate configuration dialog box will appear.
®
CALC device). A context menu appears
Default setting on the function
bar (use right-mouse button)
Note:
Part of the DIAdem
GRAPH Tool bar
Sketch Mode in
DIAdem
®
GRAPH
After you exit with Save changes, the changes you have made to the settings will become permanent.
In the optional DIAdem
background graphics; in the optional DIAdem
In optional DIAdem
®
GRAPH device you can change default settings for axis systems, tables, and
®
-CALC, the standard settings of the functions can be reproduced with “Reset.”
®
CALC device all mathematical functions are affected.
The related action can be executed with “Activate.” The function bar for the Autosequences can be
assigned an Autosequence using “Default” and it can be removed with “Delete default.” The
Autosequence currently assigned to the icon can be edited by clicking “Edit.”
The altered default settings are automatically written into the Desktop file in DIAdem
®
and thus saved.
When the default settings of an action have been altered, they no longer affect objects that have already
been used in a diagram or block diagram!
Commands
The Tool bar which extends horizontally above the DIAdem® Working area contains the commands you
will need most commonly for working with any of the DIAdem
®
commands such as Delete, Open and Save as; others are device-specific commands. The most important
commands in the optional DIAdem
®
GRAPH device are: Print, Output to clipboard, various commands for
®
devices. Some of these are basic
aligning objects to each other, the magnifying glass and Sketch presentation. Most important in DIAdem
VIEW are graph definitions and various types of cursors.
Activate an object in DIAdem® GRAPH. As soon as you press the Sketch mode button, the object is faded
out and is represented only by a place holder.
Symbolically representing objects as rectangles makes it possible for you to work with them quickly and
easily even in diagrams containing numerous objects.
®
DIAdem®
04-22-00
DIAdem – The PC Workshop 7-17
Page 92

Menus
Part of the Menu bar in
DIAdem
DIAdem Help
All of the functions and commands needed for any device in which you are working are found in
text format in the Menu bar located above the Tool bar. In these menus any feature can be
®
GRAPH
accessed and executed via the keyboard instead of the mouse.
Use the<Alt > key to access the Menu bar. Then type the underlined letters for individual menu
items on you keyboard. When a second menu opens up, choose a feature from it and execute it
directly by again typing the underlined letter for the desired menu item.
Note: You can also use arrow keys to select a menu item and execute it with the <Enter> key.
Tool tips
Tool tips
Dialog Box Help
Dialog Box Help
Help Menu
Use DIAdem® Help to explain, describe and clarify the program. There are three separate types
of help in DIAdem
®
: Tool tips for the user interface, context-sensitive help in dialog boxes,
with explanations of all parameters, and the Help menu with explanations grouped by subject
matter.
You have already used Tool tips several times during the description of the DIAdem® interface
to learn the meaning and function of a symbol. Bring up Tool tips by letting the mouse pointer
rest for a moment on the unknown symbol. A yellow “banner” soon appears with a brief
explanation of the symbol.
You can choose long Tool tips in the Options menu (under General). Then the function of a
symbol will be described with more than just one word.
Dialog boxes are used whenever the settings for an object need to be precisely adjusted. You
can get context-sensitive help for dialog boxes and parameters in them by pressing the Help
button found in any dialog box. Dialog box Help explains each of the parameters in the open
dialog box, and what parameters lead to what results. More complete explanations and related
topics are available through references.
To reach the Help menu, use the question mark in the Menu bar. In the Help menu you will find
a description of the active DIAdem
®
device, the contents of the main Help subjects, Search for
Help on... and View report.
The first line of the Help menu is reserved for a description of the Device currently running. In
the Help menu to the left, this is DIAdem
The DIA
®
DATA Help menu
dem
the design and functionality and characteristics of each DIAdem
you learn how to work with the device.
You can access the main Help file in DIAdem
with DIAdem
®
explanations are intended for the user who wants to learn the basics about the design of the
program and how to use it.
On the other hand, if you need to learn something about a specific concept or a special topic, use
the menu item Search for Help on.... Enter a search concept. Then choose from the list of
subjects the one which best answers your question. The Glossary is especially useful as a source
of DIAdem
7-18 DIAdem – The PC Workshop
®
definitions.
®
DATA. Descriptions of devices are arranged so that
®
through Contents in the Help menu. Working
®
device are discussed first; then
in general and the DIAdem® devices in particular are described here. These
04-22-00
DIAdem®
Page 93

Sample demos in Help
Start Example
The Report is a DIAdem® record of the previous DIAdem® sessions with the start and finish of
each work session, along with error messages and warnings and the corresponding dates and
times. You can find out more about the nature and meaning of these messages from Report in the
Options menu. You can also delete the report there.
Active Help: Demos and Examples
The examples and demos are in general intended as solutions to specific tasks in a DIAdem
can start these examples directly from DIAdem
®
Help.
®
device. You
Click on the question mark in the Menu bar, then choose Examples. Click on a device symbol to go directly
to the list of corresponding examples.
With the examples, there are differences in the level of complexity between the demo sequences,
applications and templates. The demo sequences are short film sequences, which present the creation of a
graphic DIAdem
®
-GRAPH ,for example. The applications and templates demonstrate not only the spectrum
of application for the program, they can also be used as the basis for your own (partial) solutions. For this
purpose, press the info button
before the particular example, for a display of a task description and the
files used.
The Start button is used to start the example; and <ESC> cancels the display, measurement, or
Autosequence.
To use a demo you have opened as a pattern, save it under a new name in the user directory
(..\diadem\user\dac). Since these solutions are not directed towards specific tasks, you can use them as
building blocks in material you are working on by transferring them with the clipboard.
Copy and Insert You can mark the entire display or block diagram with <CTRL + A>. To select a portion of either, expand
the blue frame to the desired dimension while holding down the left mouse button. Then you can copy the
selected portion to the clipboard with <CTRL + C> and insert it back into another block diagram in the
Working area at the position of the mouse cursor with <CTRL + V>.
Options
The various program settings in DIAdem® can be accessed via the “Settings” menu. The “Desktop
Parameters” include all the workshop-related settings such as the menu points General, Parameter file,
Device-specific, Memory organization, GPI-DLL Registration and Report. In the single devices, you will
Desktop Settings
Desktop Settings
General Settings
Device-specific
also find device-specific settings such as the hardware assignment and packet processing, or the page
layout (in the optional DIAdem
The Desktop settings include the General Settings, such as those for program behavior (warnings, warning
tone for errors, long Quickinfo), for the data format and channel characteristics as well as the selection of
other ASCII editors, in particular for the Autosequences.
The path selection (see Directory structure) and the specification of the standard files to be loaded for all
the DIAdem
®
devices are made in the sub-menu with the same name. Although the library paths can only be
altered using the settings, DIAdem
device.
Device-specific settings include, for example, specifying the memory form in DIAdem
ASCII data and the data checks.
Note: Another start file can be entered here. By the way, if no file name is entered here, no template will
be loaded in the appropriate device!
®
-GRAPH device) to name a few.
®
retains the path the last file was loaded from as the user path, for each
®
-DATA, the
DIAdem®
04-22-00
DIAdem – The PC Workshop 7-19
Page 94

Memory organization
Define Report
The Device-Specific Settings
Directory Structure
Standard directory structure
The organization of the memory area or data area can only be altered when no DIAdem
®
device is active. This means that all the DIAdem® devices can be closed with the window menu
with "Close all". As soon as only the SHELL is displayed, the size of the data area can be
increased or decreased. For these settings to become effective, DIAdem
®
has to be restarted. This
is performed automatically if you affirm the appropriate request.
The Report contains a record of the DIAdem® program start and finish, error messages and
confirmation messages. The extent of the Report, as well as the associated Editor, with which the
memory format is selected, can be defined.
Depending on which DIAdem
with the Desktop settings, such as, for example, the page layout and the color palette in the
DIAdem
®
-GRAPH device. They are explained briefly in the following.
When you install DIAdem
®
device is open, other settings specific to this device also appear
®
, the setup program creates the directory structure shown below on the
path you enter. This structure consists of three directory layers.
I. In the Program directory (e.g., c:\diadem) you will find the program files (*.exe, *.dll),
control files and others such as the Readme file.
II. The first sub-directory layer serves to organize the remaining files (ADDINFO, DEMO, LIBR,
SYMBOLS and USER).
You will find all the practice examples from the manual and the patterns (example.*) in the
DEMO directory. These can be used whenever you start the program. The library directory
LIBR contains all the examples and demos which can be started from Help (you choose during
installation whether to install these). Neither the demo files nor the Libr files should be changed
by individual users. Instead personal copies (which can be changed) should be stored in a
personal directory, for example USER1, etc. This is especially important when you run
DIAdem
®
on a network. The LIBR, SYMBOLS and ADDINFO sub-directories contain
systems files necessary for DIAdem
The user path can be changed using the Autosequence "ChDir", which is connected to the
twelfth function symbol. This applies globally, i.e. the same for all the DIAdem® devices.
7-20 DIAdem – The PC Workshop
04-22-00
®
. They should never be changed.
DIAdem®
Page 95

Save Desktop under
New Name
III. The individual files are located on the second sub-directory layer, each in the appropriate directory:
AUT Autosequences (*.aut), compiled Autosequences (*.auc), list files (*.lst), variable definitions
(*.vas), user dialogs (*.cod),
DAC Block diagrams (*.dac), sub-block diagrams (*.sub), control file (*.atr), message file (*.asc)
DAT Data header file (*.dat), data file (*.r48, u.a.)
GRA Picture definition (*.lpd), meta files (*.wmf)
Saving and Loading Settings
While you are working with DIAdem
requirements. The program settings are stored in the Desktop file (desktop.ddd). When you leave
DIAdem
®
, modifications are registered and you are asked if you want to save them. You should save your
®
, you will have to modify the standard settings according to your
personal settings in your own Desktop file , so you don’t lose them.
First close all the DIAdem® devices with "Close all " in the "Window" menu. Don’t worry: the contents of
the window are retained, even if they have not yet been saved. Then click to the diskette symbol in the
command line. Now you can save your settings in a new Desktop file.
In order for them to take effect, DIAdem
the files are to be saved and DIAdem
®
is now automatically shut down. You will now be asked whether
®
will start again with your settings.
Load Desktop file
DIAdem® starts with the Desktop file desktop.ddd. If you are working on various projects, which require
varying settings in DIAdem
then to be loaded with each project. Don’t be startled when DIAdem
®
, they can be saved in various Desktop files. The associated Desktop file is
®
is restarted. This is necessary in order
for the settings in the newly-loaded Desktop file to take effect.
DIAdem®
04-22-00
DIAdem – The PC Workshop 7-21
Page 96

7-22 DIAdem – The PC Workshop
04-22-00
DIAdem®
Page 97

DIAdem Data: Loading and Saving Data
The functions of DIAdem® DATA available with the DIAdem®-SHELL allow you to manage
data: you can open and save data, and import external data. Data is organized in channels, with
each channel representing an independent series of data. The data may originate directly from
DIAdem® DATA
The DIAdem® DATA Tool bar
Access context menus with
the right mouse button
measurement by an external device connected to your PC or may be in file format. All the
DIAdem
The DIAdem®-DATA Tool bar allows you to open and save data files and delete all files in the
Data area.
The DIAdem®-DATA Working area gives you an overview of open data channels. From the
Working area you can cut, copy, paste or delete data channels.
Context menus play an important role in DIAdem
menu depending on whether you click the right mouse button in the data overview or in the
Channel contents.
®
devices use the data in the Data area.
®
-DATA. Different functions appear in a
The Data Area
dem
-DATA
DIA
You can see key information
on your stored data at a glance
in the Channel overview
Select DIAdem® DATA by clicking on the corresponding button on the Device bar.
An overview in table format appears in the Working area, representing the data channels
currently open in the Data area. This overview includes the name, index number, and other
information such as the length and type (origin) of each data channel. You can make the
columns larger or smaller as you wish to enhance readability. Simply move the column dividers
in the Title bar by holding down the left mouse button.
You can alter the appearance of the data overview by changing the order of the columns.
Select Data overview in the Options menu. The clicked line can be moved with the Up and
Down buttons. Confirm with “OK” and the column order will be altered accordingly.
DIAdem®
04-19-00
DIAdem – The PC Workshop 7-23
Page 98

Using Options
to move lines
Data Resources
Channel lengths and
number of channels
Sample Data Set
Data may originate from various sources. In the illustration above, various symbols and
descriptions represent the origin (type) of data in the column under T... (Type): Data which has
been input, read in, calculated and measured, or is “free.” Free channels do not yet contain any
data.
Data in DIAdem® is organized into channels. A data set may contain several data channels,
which may be of unequal length. Each individual channel represents a series of logically
connected independent numbers. The maximum channel length and the maximum number of
channels are practically unlimited, since up to 2 billion values are possible. The resulting data
matrix is dynamically adjusted to the current data stock. If more channels arise than were
preset, DIAdem
extended to the actual number of values. The channel length and the number with which
DIAdem
none of the DIAdem
®
extends the data matrix accordingly. The channel length is also dynamically
®
is to be started is specified in the “Options” menu at the DIAdem® main level (i.e. if
®
devices are open) in the menu point “Memory organization - Data area.”
As this involves a complete reorganization of memory, these alterations do not become
effective until the program is automatically restarted.
The Data area exists only at program runtime! Manual changes to the Data area are
temporarily registered, but are not permanently stored until the data set is stored on
your hard drive. Data sets to which changes have been made should be saved under a
new name so that the original data is still accessible.
The data opened by default was acquired during an automobile test drive. Included are the
driving time, speed and the motor rpm and torque.
If you have already made changes in the Data area after starting DIAdem
®
, open the sample
data set ‘data.dat’ from Open in the File menu. For more information on opening files, see the
end of this chapter.
7-24 DIAdem – The PC Workshop
04-19-00
DIAdem®
Page 99

Copying, Pasting, and Deleting Data Channels
Not only does the Working area in DIAdem® DATA offer you a data overview; you can also
copy, paste and delete data channels in the Working area. You can perform these operations on
individual channels or on groups of channels.
Marking multiple channels
Cutting and pasting channels
Cut channels are pasted in
from the Windows clipboard
at the marked location.
In this case that leaves
a free channel in the first
line of the Working area.
Mark all four channels by holding down the left mouse button and dragging the mouse over the
desired channels.
You may also mark the first data channel by clicking with the mouse and then clicking on the
last channel while the Shift Key is held down. You can mark separate, non-contiguous data
channels in the same manner: click on the channels with the left mouse button while the
Control Key
is held down.
Click on the right mouse button. Choose the option “Cut” from the Context menu. After
confirmation the marked channels will be deleted from the Data area and copied into the
Windows clipboard. Click with the mouse on the second line of the channel overview. Paste in
the contents of the clipboard with <CTRL + V>.
DIAdem®
04-19-00
DIAdem – The PC Workshop 7-25
Page 100

Saving and Opening Data Sets
Save Data as…
Delete all data
Open new data file
Data in the Data area is only present during program runtime. It is deleted as soon as a new data
set is opened in DIAdem
®
DATA or when the program is terminated. To use this data in the
future you must save it to the hard drive.
To save the data set, click on the corresponding symbol in the Tool bar. Save the edited data set
to the demo path (...\diadem\demo\dat) under the name example1.dat. The data set can also be
saved directly with its name, using the file menu.
A bit of theory: as soon as you have saved data, DIAdem
®
stores two files with the same names
on the data path: the actual data file, usually with the extension *.R32, and the associated header
file with the extension *.DAT.
The header file contains all the information required to open the (numeric) data files. The header
file contains not only the general data set description, but also all the information required to read
in the single channels of the data file(s). The data file contains the numeric data, saved in one or
more channels.
The whole data area is emptied with the “empty page” symbol in the tool bar.
In the following, the example file “Data.dat” should be loaded from the hard disk, because this
data is used in the following chapters of the manual.
Click on the Open symbol in the Tool bar. Choose the file data.dat, which has the demo path
(..\diadem\demo\dat). Confirm your selection with “OK”.
The newly opened DIAdem
in the Data area to be used by other DIAdem
®
data channels now appear in the overview. They are thus available
®
devices.
Note: The last path [from which a data file was loaded]is used as a new user path in
DIAdem
®
-DATA for the current session.
Apart from DIAdem® data files, other external data can be imported using the File menu. The
user can extend the list of available file formats by including appropriate GPI file import/export
filters. Information about these filters can be requested in the “Options – External file type info”
menu. You will find more details about the GfS Programming Interface GPI in the program help.
7-26 DIAdem – The PC Workshop
04-19-00
DIAdem®
 Loading...