

Page 1

the smart approach to instrumentation
TM
IOtech, Inc.
25971 Cannon Road
Cleveland, OH 44146-1833
Phone: (440) 439-4091
Fax: (440) 439-4093
E-mail (sales): sales@iotech.com
E-mail (post-sales): productsupport@iotech.com
Internet: http://www.iotech.com/
ScanServer
User's Guide
p/n
1027-0901
©1998, 1999 by IOtech October 2000 Released per EO# 2115R4
Rev
2.0
Page 2

Warranty Information
Your IOtech warranty is as stated on the product warranty card. You may
contact IOtech by phone, fax machine, or e-mail in regard to warranty-related
issues.
Phone: (440) 439-4091, fax: (440) 439-4093, e-mail: sales@iotech.com
Limitation of Liability
IOtech, Inc. cannot be held liable for any damages resulting from the use or
misuse of this product.
Copyright, Trademark, and Licensing Notice
ScanServerTM is a registered trademark of IOtech, Inc.
ScanServer software copyright is maintained by
Harmon Research and Development Corporation. © 1998, 1999
All IOtech documentation, software, and hardware are copyright with all rights
reserved. No part of this product may be copied, reproduced or transmitted by
any mechanical, photographic, electronic, or other method without IOtech’s
prior written consent. IOtech product names are trademarked; other product
names, as applicable, are trademarks of their respective holders. (Microsoft,
Windows, and Visual Basic are registered trademarks of Microsoft Corporation.
NT and Excel are trademarks of Microsoft Corporation. RSView is a trademark
of Rockwell Software. WonderWare is a registered trademark of WonderWare
Corporation. InTouch is a trademark of WonderWare Corporation.
All supplied IOtech software (including miscellaneous support files, drivers, and
sample programs) may only be used on one installation. You may make archival
backup copies.
Quality Notice
IOtech has maintained ISO 9001 certification since 1996. Prior to shipment, we
thoroughly test our products and r eview our documentation to assure the highest
quality in all aspects. In a spirit of continuous improvement, IOtech welcomes
your suggestions.
Page 3

Introduction
Contents
Introduction... 1
Contents... 1
About ScanServer... 2
Features... 2
System Requirements... 2
Specifications... 2
Getting Started... 3
Installing ScanServer... 3
Quick Start... 3
Starting ScanServer... 4
Creating a Node... 5
Configuring Channels... 8
Set the Node Online... 8
Saving the Project... 9
Testing the Node... 9
Projects... 13
Overview... 13
File Menu... 13
Starting a New Project... 14
Saving a Project... 14
Nodes... 15
Overview... 15
Node Menu... 15
Creating a Node... 16
Editing a Node... 18
Deleting a Node... 18
Items... 19
Item Types... 19
Item Names... 20
Copy DDE Link... 21
Overview... 21
Copying a DDE Link... 21
Options... 23
View Menu... 23
Using Microsoft Excel with
ScanServer... 25
Procedures... 25
Tips... 26
Using RSView32 6.0 with
ScanServer and OPC... 27
Procedures... 27
Tips... 31
Using DDE Client w i th
ScanServer... 33
Introduction... 33
Procedures... 33
Start DDE Client... 33
Connect to ScanServer and a
Topic... 33
Start a Transaction... 34
Poke a Value... 34
Abandon a Transaction... 35
Glossary... 37
Index... 39
ScanServer User's Guide,
3-26-99
Introduction 1
Page 4

About ScanServer
ScanServer is a Microsoft Windows (95/98 & NT) application that acts as a DDE Server
and/or OPC (OLE for Process Control) to allow other Windows applications to access
measurement data from TempScan, MultiScan, NetScan and ChartScan instruments.
ScanServer supports all Windows DDE and OPC Client applications, including
Wonderware’s InTouch, Rockwell Software’s RSView, Microsoft’s Excel, and
Visual Basic.
Features
•
Supports RS-232/422, IEEE 488, and Ethernet 10BASE-T (TCP/IP)
•
Supports "Advanced DDE" and "Fast DDE" formats, standard XL Table, and
CF_TEXT.
•
Supports OPC Data Access Standard Release 1.0A.
•
Supports strings and numerics in single channel and multichannel arrays.
•
Provides DDE monitoring and diagnostic services.
•
Supports measurement rates up to ten times a second.
•
Supports unlimited modules over any number of communication ports.
System Requirements
•
IBM®-compatible 486.
•
Windows 95/98,or Windows NT 4.0.
•
8 MB (megabytes) of RAM (12 MB is recommended).
•
2 MB of hard disk space.
•
RS232/RS422, IEEE 488, or Ethernet 10BASE-T (TCP/IP)
Specifications
Maximum Nodes
Communication
Interface
Poll Rates Foreground Polls: User-set from 0.1 to 100 s; default: 1 s.
2 Introduction
Unlimited.
RS232/RS422, IEEE 488, and Ethernet 10BASE-T (TCP/IP)
Background Polls: User-set from 1 s to 1000 s; default: 10 s.
Time-outs: User-set from 2 sec to 10 s; default: 2 s.
Automatic Retries: User-set from 1 to 10; default:2.
(Minimum)
10-11-00
ScanServer User's Guide
Page 5
Getting Started
Reference Note: To set up NetScan, TempScan, MultiScan or ChartScan
hardware, refer to the setup and installation sections of the corresponding user's
manual.
Reference Note: A Net232 Ethernet/RS-232 Converter is required for TempScan,
MultiScan and ChartScan Ethernet Applications. The Net232 User’s Guide
(p/n 1037-0901) contains Ethernet-related information pertaining to these data
acquisition systems.
Installing ScanServer
The ScanServer disks include the ScanServer program files and a simple DDE Client
application useful in testing and troubleshooting DDE communications. Complete the
following steps to install ScanServer on the computer hard drive:
Note: The following steps are for installing from disks. If your ScanSever program is on
a CD-ROM, simply install the CD-ROM and follow the installation screen
prompts.
1. Close all currently running Windows applications.
2. Insert ScanServer disk 1 in your floppy drive.
3. Choose Start/Run (or File/Run from Program Manager).
4. In the dialog box, type a:setup.exe (b:setup.exe if installing from the b drive).
5. Choose OK and follow the on-screen instructions.
6. ScanServer will install to the directory you specify during installation. The
default directory is:
c:\Program Files\ScanServer
Quick Start
After you have installed ScanServer on your system, you must set up communication with
the TempScan, MultiScan, NetScan, or ChartScan instrument(s) attached to your system.
To do this, follow the procedures for:
1. Starting ScanServer.
2. Creating a node.
3. Configuring channels.
4. Saving the project.
5. Testing a nod e using the provided DDE Client.
ScanServer User's Guide Getting Started 3
Page 6

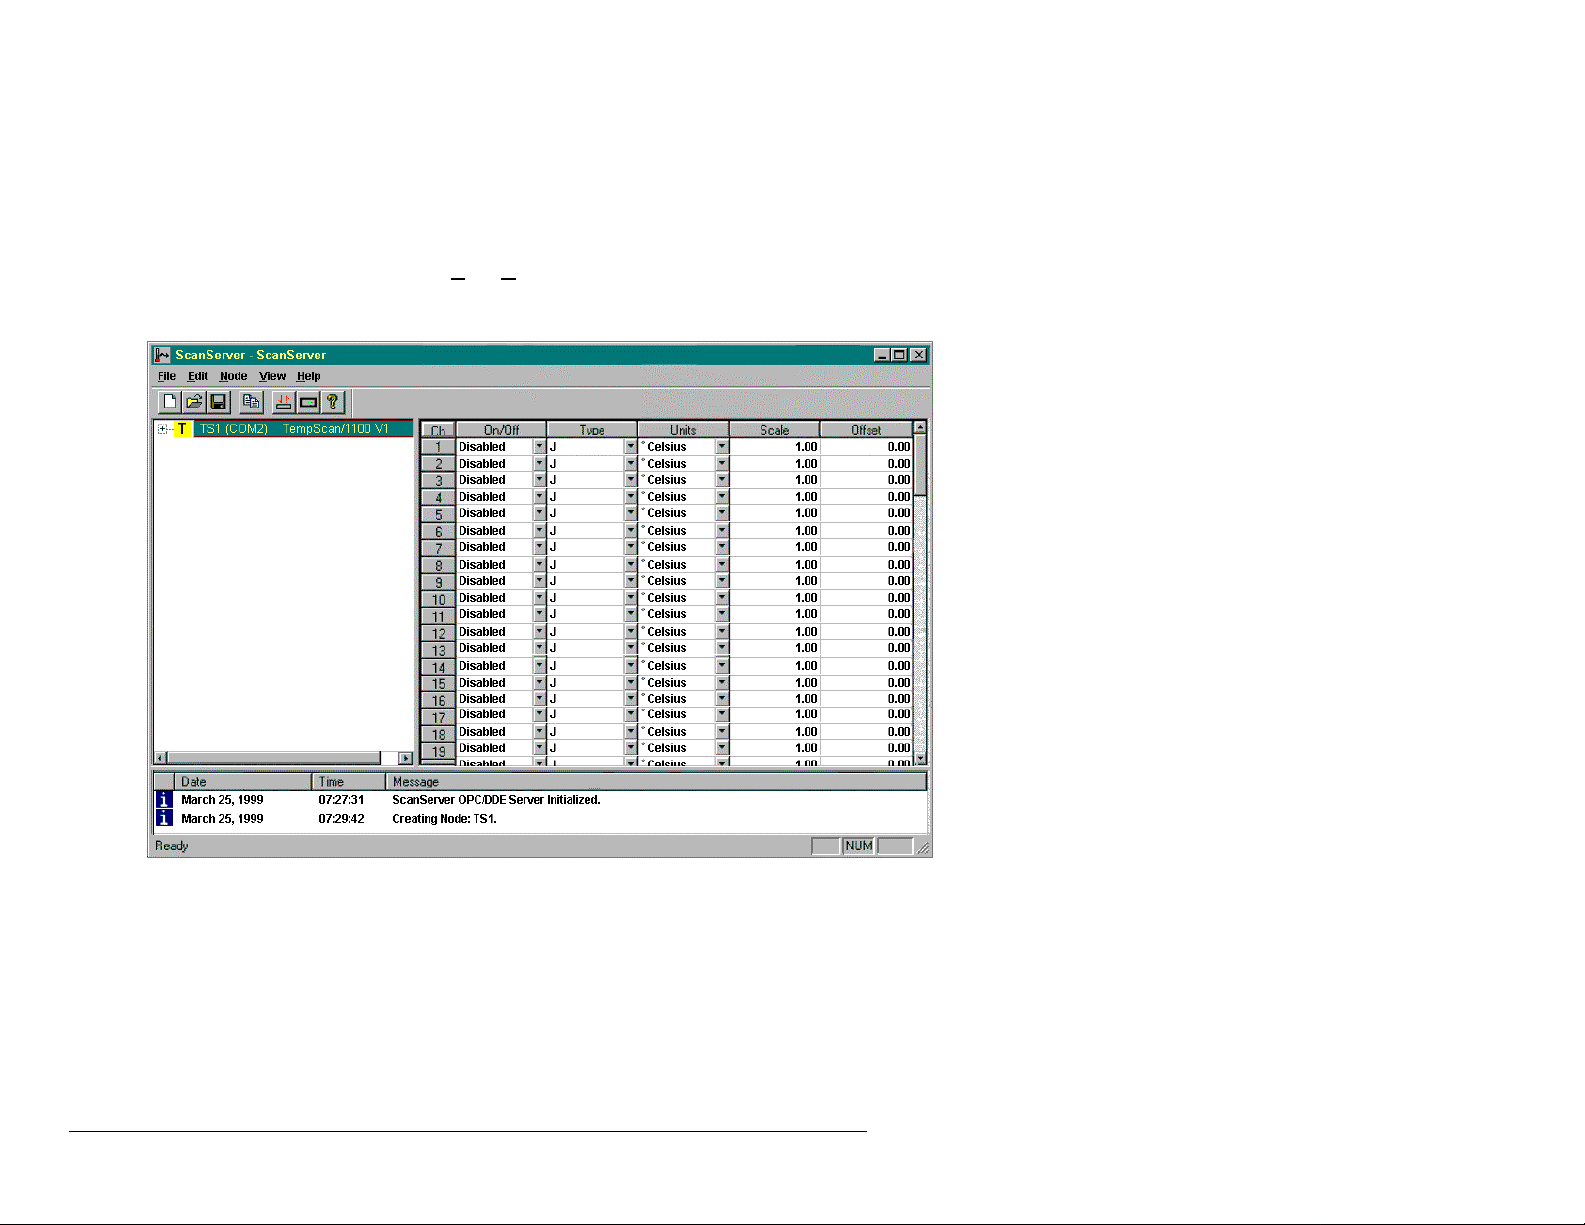
Starting ScanServer
From Windows 95/98 and Windows NT4.0, choose
Start/Programs/ScanServer/ScanServer. The ScanServer Window will open.
ScanServer Window
4 Getting Started ScanServer User's Guide
Page 7
Creating a Node
1. From the ScanServer window, choose Node/N
opens.
2. In the Node Name box, enter an alphanumeric string (e.g., TS1, a TempScan).
This string will be used for referencing the instrument in the DDE Connect
Topic box (discussed on page 10).
ew Node. The New Node dialog
3. Set the Foreground (Sec) and Background (Sec) poll rates in the Poll Rate
box:
−
Enter a value in the Foreground (Sec) box. Valid Foreground Poll Rates
are 0.10 second through 10,000 seconds (in 0.10 second increments). The
default Foreground Poll Rate is 1 second.
−
Enter a value in the Background (Sec) box. Valid Background Poll Rates
are 1 second through 10,000 seconds (in 1 second increments). The default
Background Poll Rate is 10 seconds).
4. From the Interface box; select the appropriate radio button (Serial Port,
IEEE 488, or Ethernet).
5. Select the appropriate communications parameters in the Serial Port, IEEE 488,
or Ethernet box.
−
For Serial Port (RS232/RS422) select the communication port where
ScanServer is connected (e.g., COM1). Set the Baud Rate, Parity and
Handshaking configuration of the device. Refer to your device user’s
manual as needed.
ScanServer User's Guide Getting Started 5
Page 8
−
For IEEE 488, enter the bus address or IEEE 488 device name assigned to
the instrument.
−
For Ethernet, enter the IP address or name.
Reference Note: The communications settings must correspond to the instrument's
interface configuration. Refer to the appropriate user’s manual(s), as needed.
Reference Note: A Net232 Ethernet/RS-232 Converter is required for TempScan,
MultiScan and ChartScan Ethernet Applications. The Net232 User’s Guide
(p/n 1037-0901) contains Ethernet-related information pertaining to these data
acquisition systems.
6. Ensure the instrument is connected to the selected communications port and is
turned on.
7. Choose OK.
ScanServer now attempts to communicate with and identify an instrument using
the configuration settings for the New Node.
If communications and identification are successful, a “T” icon and text
(indicating the type of instrument found) are displayed in the project window.
In this screen shot, the created node (TS1) is displayed. ScanServer has detected a
device at COM2 and identified the device as a TempScan/1100.
6 Getting Started ScanServer User's Guide
Page 9
If communications or identification is not successful, a question mark (?) icon is
displayed; and an error is reported in the event window. If this occurs, check that the
instrument is powered on and connected to the appropriate communications port.
In this screen shot, a new node could not be created.
ScanServer User's Guide Getting Started 7
Page 10
Configuring Channels
Using the configuration grid on the right side of the ScanServer window, select the
appropriate type channel type and enable the channels using the drop-down controls.
Configure only a few channels now. More channe l s may be configured later.
Set the Node Online
From the ScanServer window, choose Node/O
The Online menu selection will be checked and the Online/Offline icon in the iconbar will
be displayed as depressed.
nline to set the node in the online state.
8 Getting Started ScanServer User's Guide
Page 11
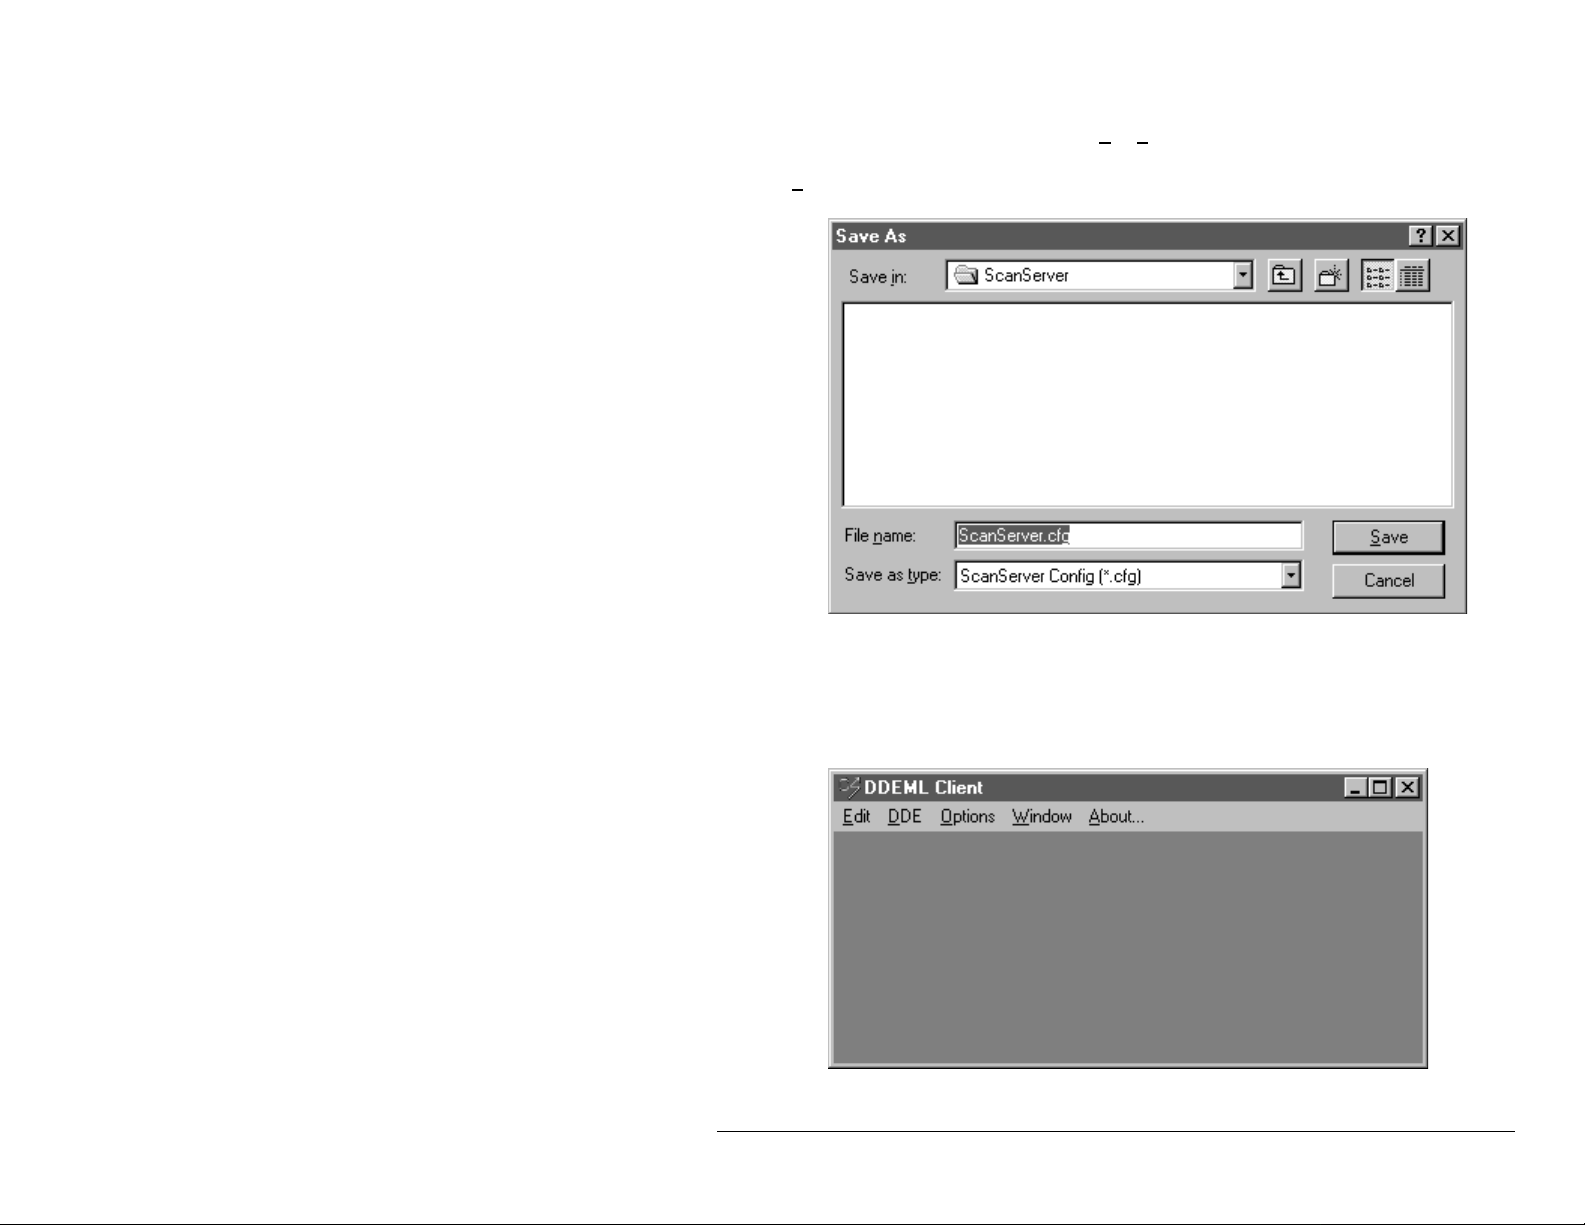
Saving the Project
From the ScanServer window, choose File/S
for a filename to be entered. The default name is ScanServer. Enter a name and click the
Save button.
ave Project. A dialog box will open, waiting
Testing the Node
We will use the DDE client supplied with ScanServer to test the node we have created.
1. From Windows 95, and with ScanServer running, choose
Start/Programs/ScanServer/DDE Client. The DDE Client Window will open.
ScanServer User's Guide Getting Started 9
Page 12
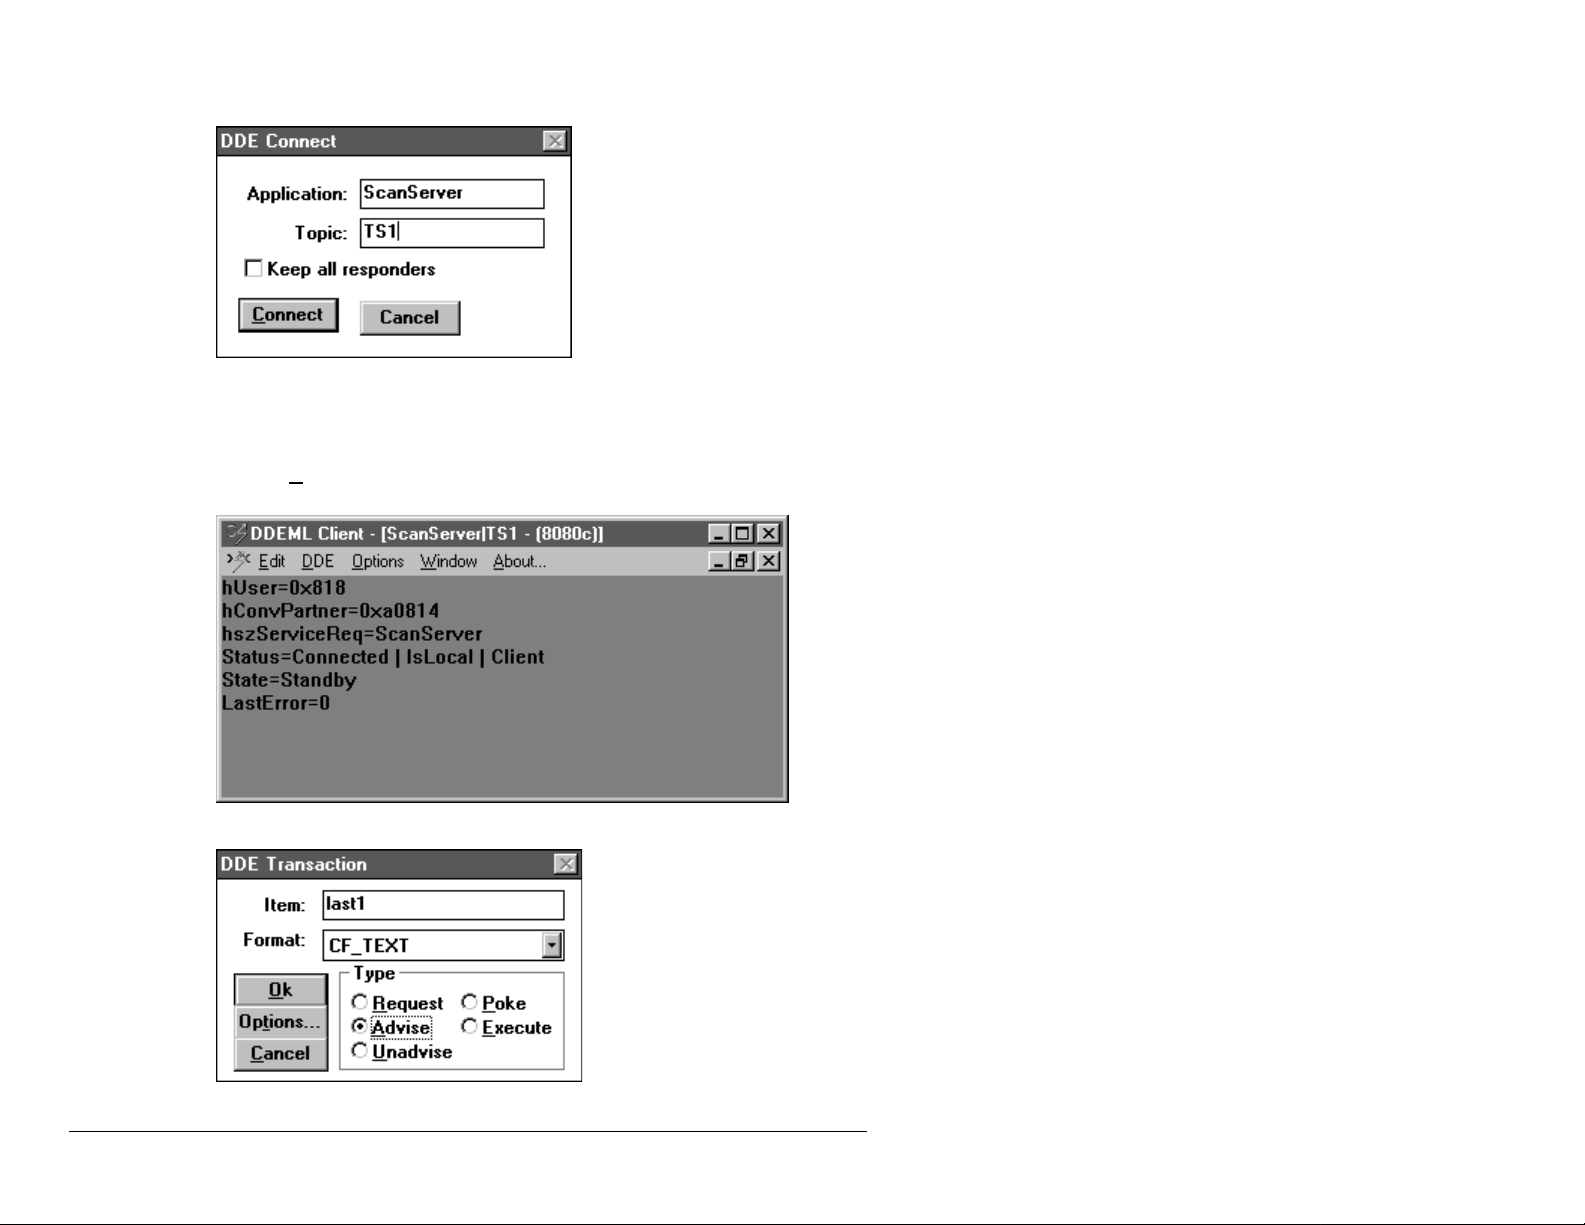
2. Choose DDE/Connect. The DDE Connect dialog will open.
3. Type ScanServer in the Application box.
4. In the Top ic box, type the name of the node (that you currently have configured
in ScanServer).
5. Click on Connect. Information about the node will be displayed in the DDE
Client Window.
6. Choose DDE/Start Transaction. The DDE Transaction dialog will open.
7. Enter last1 in the item box to select data from channel 1.
10 Getting Started ScanServer User's Guide
Page 13
8. Be sure CF_Text is displayed in the Format box.
9. Be sure Advise is selected in the Type box.
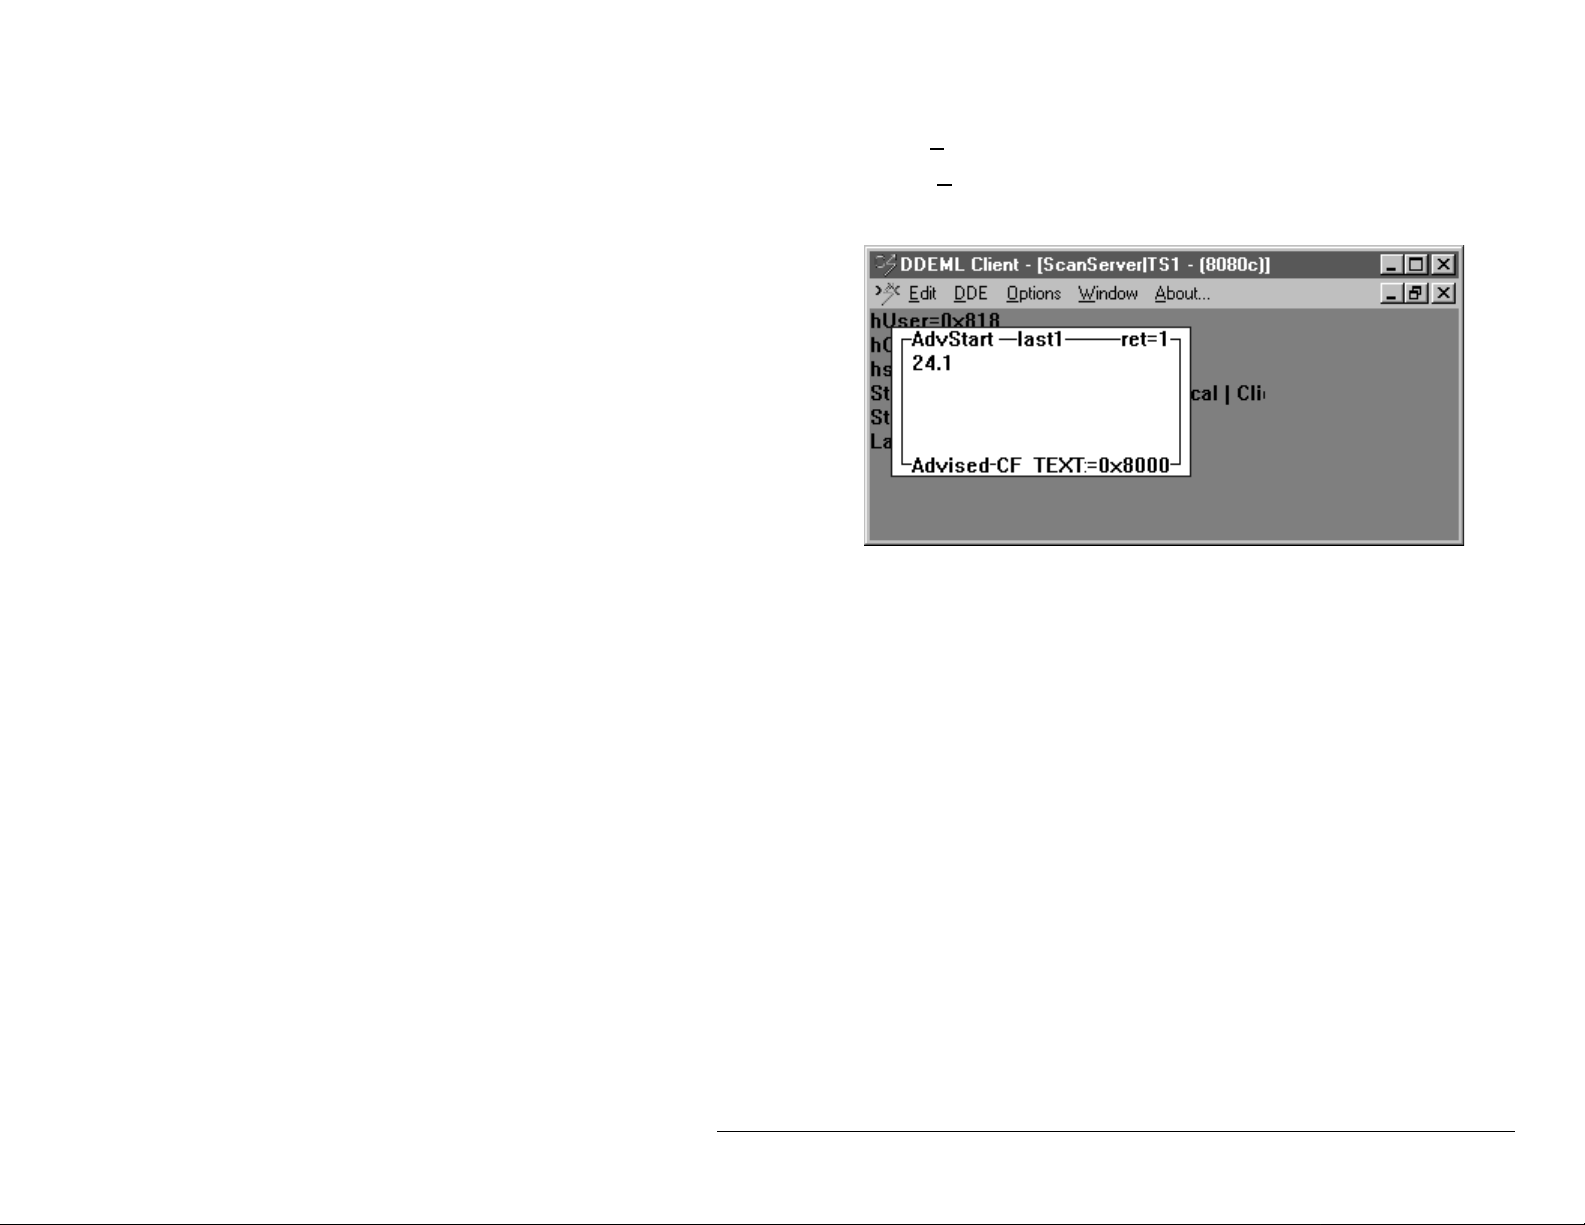
10. Click on Ok. A transaction box will appear in the DDE Client window. Data
from channel 1 of the attached ScanServer module should be displayed in the
box.
ScanServer User's Guide Getting Started 11
Page 14

✍
Notes
12 Getting Started ScanServer User's Guide
Page 15

Projects
Overview
Projects are mechanisms for saving and recalling a group of configured nodes; projects
are stored as .cfg files. Nodes may be added to, deleted from, or modified within a
project.
Note: Only one project may be opened at a given time.
File Menu
Project options are available from the File menu.
ScanServer User's Guide Projects 13
Page 16

From the File menu,
•
Choose New Project… to open a new project window.
•
Choose Open Project… to open a previously saved project.
•
Choose Save Project to save changes to the open project since the last save.
•
Choose Save Project As… to save the open project with a new name.
•
Choose a project name from the list of recently open projects to open that
project.
•
Choose Exit to close the ScanServer application.
Starting a New Project
From the ScanServer window, choose File/N
without any nodes.
Saving a Project
You may save an open project by choosing File/S
menu. Saving a project makes the current project the default project when ScanServer is
next started.
ew Project. A fresh window is displayed
ave Project from the ScanServer file
You can save an open project with a different name by choosing File/Save Project A
from the ScanServer window. The Save As dialog opens and allows you to name the
project and save it in a folder of your choice.
Saving a project with a different name allows you to create a new project with similar
node configurations. After rena ming a project, nodes and channel configurations within it
can be modified and saved as needed.
14 Projects ScanServer User's Guide
s…
Page 17

Nodes
Overview
A ScanServer Node defines a NetScan, TempScan, MultiScan, or ChartScan instrument—
including its name, communication protocol, and foreground/background poll rates.
Node Menu
Node options are available from the Node menu.
ScanServer User's Guide Nodes 15
Page 18

From the Node menu:
•
Choose Online to toggle all configured nodes between the online and offline
states.
Note: ScanServer requires the nodes to be offline before allowing configuration of
nodes or channels.
•
Choose New Node… to open the New Node dialog from which you can enter
information for a new node.
•
Choose Edit Node… to open the Edit Node dialog from which you can change
information for the selected node.
•
Choose Delete Node… to delete the selected node from the open project.
Creating a Node
1. From the ScanServer window, choose Node/N
opens.
ew Node. The New Node dialog
2. In the Node Name box, enter an alphanumeric string (e.g., TS1, a TempScan).
This string will be used for referencing the instrument in the DDE Connect
Topic box (discussed on page 33).
16 Nodes ScanServer User's Guide
Page 19

3. Set the Foreground (Sec) and Background (Sec) poll rates in the Poll Rate
box:
−
Enter a value in the Foreground (Sec) box. Valid foreground poll rates are
0.10 seco nd through 10,000 seconds (in 0.10 second increments). The
default Foreground Poll Rate is 1 second.
−
Enter a value in the Background (Sec) box. Valid Background Poll Rates
are 1 second through 10,000 seconds (in 1 second increments). The default
Background Poll Rate is 10 seconds).
4. From the Interface box; select the appropriate radio button (Serial Port,
IEEE 488, or Ethernet).
5. Select the appropriate communications parameters in the Serial Port, IEEE 488,
or Ethernet box.
−
For Serial Port (RS232/RS422) select the communication port where
ScanServer is connected (e.g., COM1). Set the Baud Rate, Parity and
Handshaking configuration of the device. Refer to your device user’s
manual as needed.
−
For IEEE 488, enter the bus address or IEEE 488 device name assigned to
the instrument.
−
For Ethernet, enter the IP address or name.
Reference Note: The communications settings must correspond to the instrument's
interface configuration. Refer to the appropriate user’s manual(s), as needed.
Reference Note: A Net232 Ethernet/RS-232 Converter is required for TempScan,
MultiScan and ChartScan Ethernet Applications. The Net232 User’s Guide
(p/n 1037-0901) contains Ethernet-related information pertaining to these data
acquisition systems.
6. Ensure the instrument is connected to the selected communications port and is
turned on.
7. Choose OK.
ScanServer now attempts to communicate with and identify an instrument using
the configuration settings for the New Node.
If communications and identification are successful, a “T” icon and text
(indicating the type of instrument found) are displayed in the project window.
This is indicated in the figure on page 6.
If communications or identification is no t successful, a question mark icon (?) is
displayed and an error is reported in the event window. This is indicated in the
figure on page 7.
ScanServer User's Guide Nodes 17
Page 20

Editing a Node
To modify an existing node, first select it with a mouse click then choose the
Node/E
be made.
dit Node menu selection. The Edit Node dialog opens and allows changes to
Deleting a Node
Note: The following method deletes the mode immediately. There is no warning.
To delete a node:
1. Select the node to be deleted.
2. Choose the Node/D
(from the ScanServer window).
The selected node is deleted.
18 Nodes ScanServer User's Guide
elete Node menu selection
Page 21

Items
Item Types
ScanServer supports both strings and numeric data types for returning data.
Numeric items, indicated by a # preceding the item name, return a float or integer value
for the data item retrieved. For example,
String items, indicated by a $ preceding the item name, return data in formated ASCII
strings. For example,
Note: Items not preceded with a # or $, default to numeric items.
Array data items return 2 or more String or Numeric data items. Channels may be
indicated with commas separating them, with an inclusive dash between them, or with
both. For example:
Another example:
#last1 returns: 23.752 to the client in a 4-byte floating-point variable,
if 23.752 degrees is read on channel 1.
$last1 returns: 23.752 to the client as above but now in a 7-byte ASCII
string.
last1,3 returns two numeric data items, 23.752 and 24.567, assuming 23.752
degrees is read on channel 1 and 24.567 is read on
channel 3.
$last1-3 returns three string data items, 23.752, 24.111 and 24.567.
In addition,
#last1-3,5 returns four numeric data items: 23.752, 24.111, 24.567and 25.333
ScanServer User's Guide Items 19
Page 22

Item Names
Item Valid Formats Poll Rate Description
Numeric/String/Array Foreground Returns last stored data from channel(s) x.
x
Last
Numeric/String Foreground As a request: Returns the bit value the specified
x
Output
Input
Inputx
Time
Date
Status
Version
Numeric/String Foreground Returns the value of the 8 bit input port.
Numeric/String Foreground Returns the bit value of the specified digital input
Numeric/String Foreground As a request: Returns the current time from the
Numeric/String Background As a request: Returns the current date from the
String Background Returns the device’s error status. This string is
String Background Returns the device Firmware version string
x = 1 - 992
digital output bit, x, is currently set to.
As a poke: Sets the bit value of digital output bit x.
x = 1 - 32
bit x.
x = 1 - 8
device.
As a poke: Sets the device’s time; poke value
syntax:
hh:mm:ss
device.
As a poke: Sets the device’s date; poke value
syntax:
mm/dd/yyyy
empty if no error exists.
.
.
Output, Input, Time, Date, and Version commands are not channel-dependent.
Note:
20 Items ScanServer User's Guide
Page 23

Copy DDE Link
Overview
The DDE link copy feature allows you to copy information needed to create a DDE Link
to the Windows clipboard. A DDE client that supports paste link can then use this
information to start a DDE conversation. This feature simplifies many of the syntax
problems encountered in DDE Client applications.
Copying a DDE Link
The Copy DDE Link dialog is accessed from the Edit Menu.
1. From the ScanServer window, choose Edit/Copy D
The Copy DDE Link to Clipboard dialog box opens.
DE Link….
ScanServer User's Guide Copy DDE Link 21
Page 24

2. Enter a DDE command in the DDE Link String box, either by typing it in
manually or by selecting appropriate options from the other boxes in the dialog:
The Server name is ScanServer and cannot be modified.
•
Choose a node from the pull-down list of available nodes in the Node Name
•
box.
Choose an item from the pull-down list of available items in the Item Name
•
box.
For channel specific commands, select the channel(s) for the command.
•
Channels are selected/deselected by clicking on them.
◊
Consecutive channels are selected by selecting one channel, then
◊
pressing SHIFT and the first or last channel in the sequence.
An unordered sequence of channels is selected by pressing CTRL and
◊
clicking on each channel in the sequence.
If applicable, select either Text or Numeric as the Data Format for the
•
command.
3. Choose OK to copy the displayed DDE Link String to the clipboard.
22 Copy DDE Link ScanServer User's Guide
Page 25

Options
View Menu
From the View menu, you can select whether to display the Toolbar and the Status Bar.
From the View menu,
Select/deselect Toolbar.
•
When checked, the Toolbar is displayed under the Menu bar in the
◊
ScanServer window.
When not checked, the Toolbar is not displayed.
◊
Select/deselect Status Bar.
•
When checked, the Status Bar is displayed at the bottom of the ScanServer
◊
window.
When not checked, the Status Bar is not displayed.
◊
ScanServer User's Guide Options 23
Page 26

✍
Notes
24 Options ScanServer User's Guide
Page 27

Using Microsoft Excel with ScanServer
Procedures
1. Start Microsoft Excel.
Note: In Excel, DDE information must be entered in the following format:
=application|topicname!item
2. Enter the following in any empty cell:
=ScanServer|ts1!last1
where ts1 is the node name you entered when you created the node.
3. Press ENTER. Data from channel 1 should be displayed as an alphanumeric
string in the cell.
4. Now create an array by selecting six adjacent cells in any column.
Note: In Excel, arrays of DDE information must be entered by selecting the same
number of cells as channels to be read, entering =application|topicname!’item’,
and then pressing CTRL-SHIFT_ENTER to execute the command.
5. Type the following :
=ScanServer|ts1!’last1-4’
ScanServer User's Guide Using RSView32 6.0 with ScanServer and OPC 25
Page 28

6. Press CTRL-SHIFT-ENTER. Numeric data fr om channels one thro ugh si x
should be displayed in the selected cells.
Tips
In Excel, DDE information must be entered in the following format:
=application|topicname!’item’
Press CTRL-SHIFT-ENTER to execute an array command.
The ScanServer Copy DDE Link command simplifies formatting DDE commands in
Excel. We strongly recommend that you use this feature when working with Excel.
26 Using RSView32 6.0 with ScanServer and OPC ScanServer User's Guide
Page 29

Using RSView32 6.0 with ScanServer and OPC
Procedures
1. Start RSView32 Works.
2. From an open project, create a Node using the System Node editor, to access the
ScanServer device.
ScanServer User's Guide Using RSView32 6.0 with ScanServer and OPC 27
Page 30

The OPC browser may be used from within the RSView32 Node Editor to easily
select ScanServer from a list of the installed OPC servers.
28 Using RSView32 6.0 with ScanServer and OPC ScanServer User's Guide
Page 31

3. Create tags to access ScanServer data via the RSView32 System Tag Database
Editor. The tag address uses the ScanServer node name enclosed in square
brackets followed by the item name.
ScanServer User's Guide Using RSView32 6.0 with ScanServer and OPC 29
Page 32

4. Test the tags using the RSVi ew32 System Tag Monitor.
30 Using RSView32 6.0 with ScanServer and OPC ScanServer User's Guide
Page 33

5. Create a graphic that uses the tags.
Tips
RSView32 can uses both the DDE and OPC services of ScanServer, however the OPC
services are preferred because of better performance and future compatibility.
To allow RSView32 to automatically start ScanServer, its location must be added to the
“Path” environment variable.
ScanServer User's Guide Using RSView32 6.0 with ScanServer and OPC 31
Page 34

✍
Notes
32 Using RSView32 6.0 with ScanServer and OPC ScanServer User's Guide
Page 35

Using DDE Client with ScanServer
Introduction
The DDE Client application is provided as a quick and convenient way of verifying that
ScanServer software is configured properly; and that the data acquisition devices are
connected correctly to your system.
Note: DDE Client is for configuration verification only. It is not a data collection or data
analysis application.
Procedures
Start DDE Client
Start the DDE client application from the “Start” menu.
Connect to ScanServer and a Topic
Connect the DDE client to the ScanServer via the Connect item in the DDE menu.
Note: The ScanServer “Node” name is used for the DDE “Topic” name.
ScanServer User's Guide Using DDE Client with ScanServer 33
Page 36

Start a Transaction
DDE transactions are started via the Start Transaction item in the DDE menu.
Several types of transactions are supported. The “Advise” type is commonly used to
establish a “Hot Link” with the ScanServer. Alternately the “Request” type may be
used to establish a “Warn Link” with the server.
Note: ScanServer does not support Execute type transactions.
Poke a Value
The DDE client supports sending data to the ScanServer via the Poke type
transaction. Using this type of transaction, a user may set an output bit on an
instrument.
34 Using DDE Client with ScanServer ScanServer User's Guide
Page 37

When a Poke transaction is selected, the DDE client then asks for the data to be sent
to the selected item, in this case a “1” is sent to output bit 1.
Abandon a transaction
Abandon transaction is used to terminate a previously established “Advise” or
“Hot Link” transaction.
ScanServer User's Guide Using DDE Client with ScanServer 35
Page 38

✍
Notes
36 Using DDE Client with ScanServer ScanServer User's Guide
Page 39

Glossary
AdvanceDDE
Advise
Background Poll
Rate
CF_Text
Communication
Protocol
DDE Client
DDE Server
DDE
FastDDE
Foreground Poll
Rate
Item
Rockwell Software’s highly optimized DDE format; capable of
transferring multiple data items efficiently in a single DDE message.
A DDE service that receives the specified data item from the module
continually as it changes.
The rate at which ScanServer queries the module for static data (e.g., unit
ID).
A standard DDE format for transferring data between a DDE Server and a
DDE Client; designed to transfer a single ASCII text string in a DDE
message.
Mechanism or network that ScanServer uses to communicate with the
ScanServer instruments (RS232/RS422 or RS485).
A Windows application that requests services from a DDE Server.
A Windows application that provides data services to a DDE Client.
Dynamic Data Exchange; Microsoft’s standard inter-process
communication protocol; a mechanism for transferring data between
applications.
WonderWare’s highly optimized DDE format; capable of transferring
multiple data items efficiently in a single DDE message.
The rate at which ScanServer queries the module for constantly changing
data (e.g., meas1).
Defines the specific data sent to or received from a DDE topic through the
DDE Server (e.g., time or meas1)
Poke
Project
Request
Node
XL_Table
ScanServer User's Guide Glossary 37
A DDE service that send s data to the module through the DDE Server.
A mechanism for saving and recalling a group of configured nodes; stored
as a .cfg file.
A DDE service that receives the specified data item from the module
through the DDE Serve r.
Defines a ScanServe r instrument, including its name, communication
protocol, and foreground and background poll rates.
An optimized DDE format for transferring multiple cells of data between a
DDE Server and Microsoft’s Excel in a single DDE message.
Page 40

✍
Notes
38 Glossary ScanServer User's Guide
Page 41

Index
A
AdvanceDDE 37
advise 37
B
Background Poll 2, 5, 15
Background Poll Rate 37
C
CF_Text 37
communication port 2, 5, 17
Communication Protocol 37
configuration 2, 5, 14, 20
D
DDE 37
DDE Client 2, 3, 5, 20, 37
DDE menu 15
DDE Server 2, 5, 20, 37
F
File menu 13
Foreground Poll 2, 5, 16
Foreground Poll Rate 37
G
Getting Started 3
S
Specifications 2
string 2, 5, 16, 19, 25
X
XL_Table 37
I
item 2, 5, 20, 37
item name 19
P
poke 20, 37
poll rate 2, 5, 20
Poll Rate 2
project 3, 8, 9, 13, 37
R
request 20, 37
ScanServer User's Guide Index 39
Page 42

40 Index ScanServer User's Guide
 Loading...