

Page 1
Installing and Operating Protective Ears
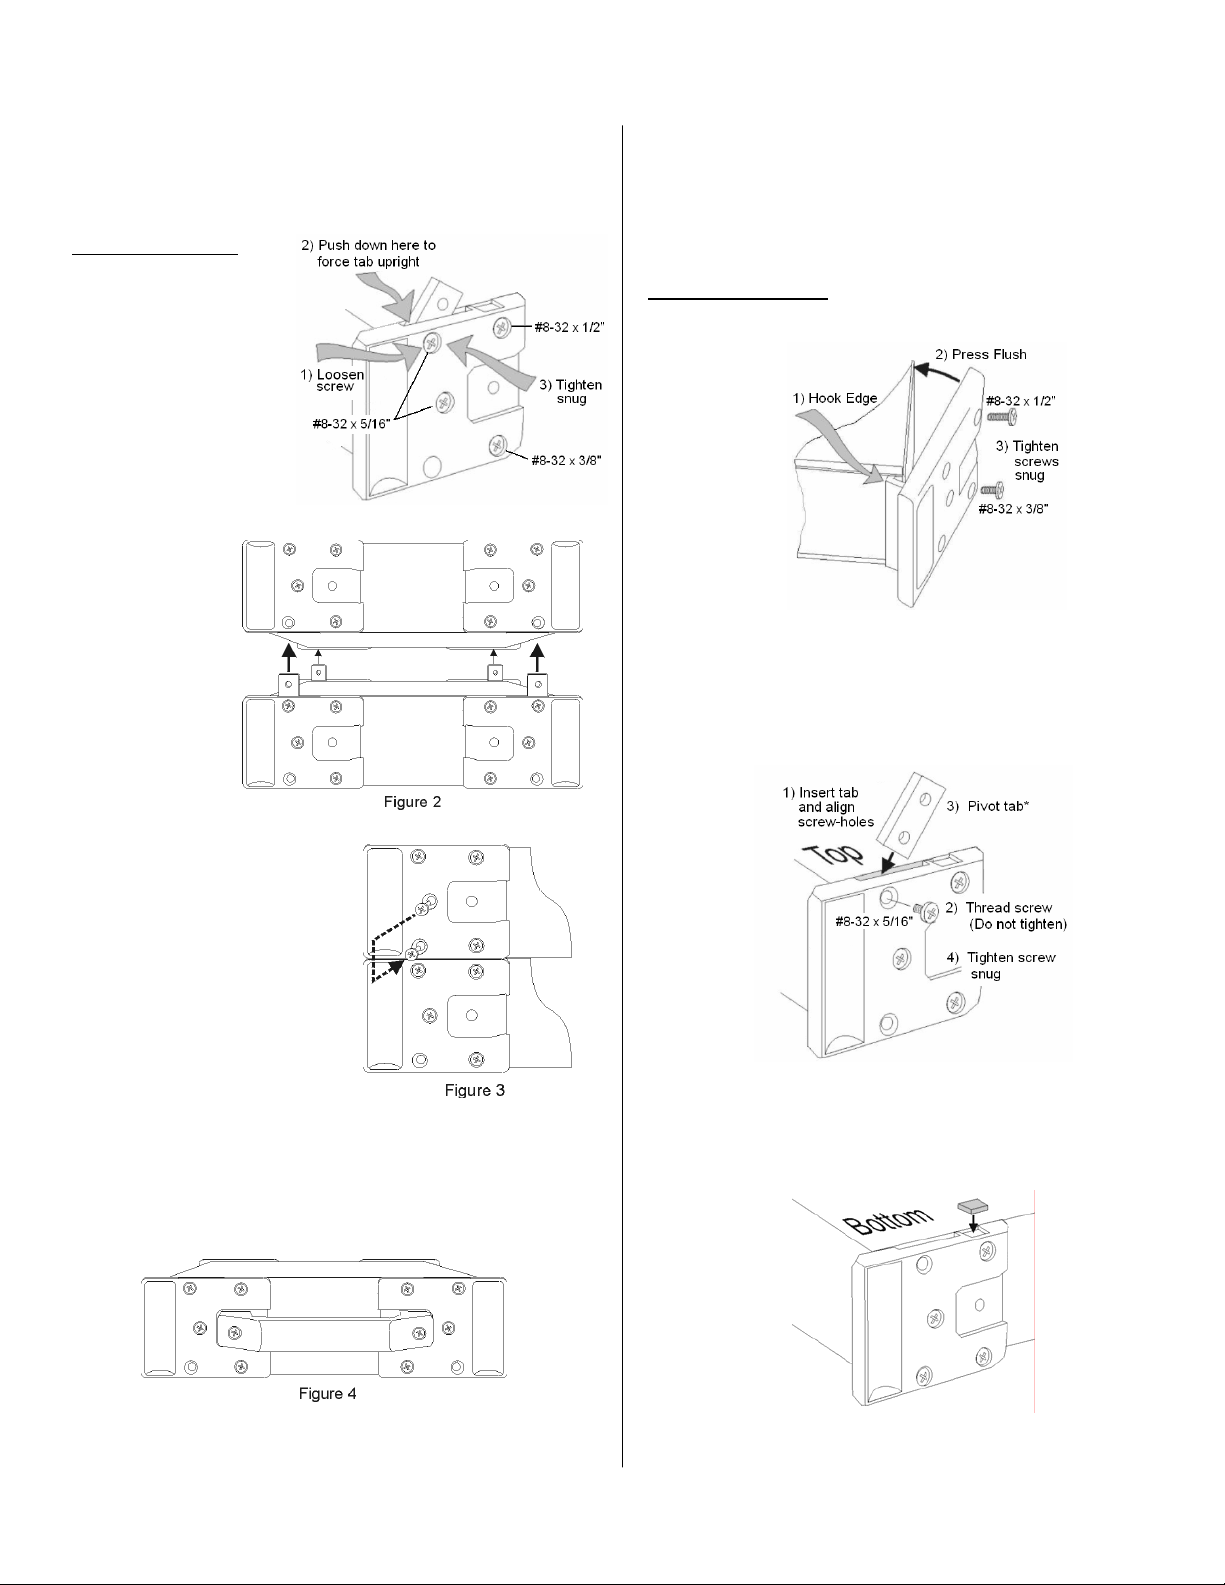
Unit-to-Unit Attachment
For applications that are generally undisturbed, simply stacking the
product enclosures causes a modest engagement where the
bottom rubber feet of the top unit fit into the recesses of the lower
unit. No additional assembly is required.
Unit-to-Unit Attachment
Temporarily stack the
units to develop a
configuration that best
suits your application.
For all but the top-most
unit, deploy the 4 Splice
Tabs on each ear,
following steps 1-4, in
sequence, as shown in
Figure 1.
Restack the units
as shown in
Figure 2.
For each ear: remove the spare
#8-32 x 5/16 “screw from its
screw-hold and relocate it as
shown in Figure 3. Tighten the
screw snug.
Figure 1
Attaching a Handle
One or more handles can be applied to a single unit or to a stack of
units. The handle is affixed with two # ¼-20 x 7/8” screws (included
with the handle). For stacked systems, the handle should be
attached near the center of the stack to achieve reasonable
balance.
Attaching Ears to an Enclosure
Should you need to add or replace a protective ear, use the chart
on page 2 to identify the kit associated with your device; then follow
the steps for type “A” or type “B” as applicable. Note that all newer
data acquisition devices are shipped with protective ears already
attached.
Attaching Protective Ears
Type A Ears (see chart on back)
Type B Ears (see chart on back)
Since Type B ears have no hook to grasp the front and back
panel edge, simply place each ear on the side panel, line up
the screw holes and apply two #8-32 x 3/8” machine screws.
For each of the 4 ears follow steps 1-4 in Figure 6.
* Pivot the tab upright if you will be attaching a unit, otherwise you
can pivot the tab to be flush with the protective ear.
Turn the unit upside down. For each ear, apply a rubber foot
(included) into the recess, as shown in Figure 7.
Figure 5
Figure 6
Figure 7
pg. 1 of 2 909094 p/n 1102-0940 rev 3.0
Page 2

Usage Exceptions
DaqBook/260, LogBook/360, and DBK60
Protective ears can be used on shallow or deep enclosures. To
stack shallow with deep enclosures, an additional ear needs to be
installed on each side panel of the deeper unit (see Figure 8). Use
2 of the 4 ears in an ear kit for this purpose. The shaded ear in
Figure 8 is used to splice to a shallower enclosure.
DBK41
To attach a DBK41 to an 8½” deep enclosure, install a bracket
(p/n 296-2016) as shown in Figure 9 and Figure 10.
DBK90
Protective ears are not needed for the DBK90. To attach DBK90(s)
to the top of an enclosure, remove all 4 Splice Tabs from the topmost unit, then install a bracket (part number 1109-0804 contains 2
brackets) on each side panel as shown in Figure 11.
Note that the shaded ear
is also used if an optional
handle is being attached to
the assembly. See page 1
for handle attachment
instructions.
Ear Kit Lookup Table
Ear Type >>
DaqBook/1xx
DaqBook/200 & /216
DaqBook/260 1
DaqBook/2000A
DaqBook/2000E & /2000X
DaqBook/2001 & /2005
DaqBook/2020
DaqLab/2001 & /2005
DBK1
DBK10
DBK23
DBK24
DBK30
DBK34
DBK41 2
DBK42
DBK43
DBK50
DBK51
DBK52
DBK53
DBK55
DBK60 1
DBK65
DBK70
DBK84
DBK85
DBK90 3
DBK101
DBK203
LogBook/300
LogBook/360 1
StrainBook/616
WaveBook/512
WaveBook/512A & /516A
WaveBook/516E
WBK10
WBK10A
WBK14
WBK15
WBK16
WBK17
WBK18
WBK40
WBK41
WBK25
ZonicBook-Medallion/4 & /8
ZonicBook-Medallion/16
ZonicBook/618
Notes:
1. To stack units, a second ear kit is required.
2. To stack units, bracket (p/n 296-2016) is also required.
3 . Does not require ears. See part number 1109-0804 for
attaching DBK90 to ears.
A B
EAR-KIT/0/BK
EAR-KIT/1/BK
EAR-KIT/1.5/BK
EAR-KIT/2/BK
EAR-KIT/0/BK/M
√
√
√
√
√
√
√
√
√
√
√
√
√
√
√
√
√
√
√
√
√
√
√
√
√
√
√
√
√
√
√
√
√
√
√
√
√
√
√
√
√
√
√
√
√
√
√
√
EAR-KIT/2/BK/M
p/n 1102-0940 rev 3.0 909094 pg. 2 of 2
 Loading...