

Page 1
Micro488/p
the smart approach to instrumentation ™
IOtech, Inc.
25971 Cannon Road
Cleveland, OH 44146-1833
Phone: (440) 439-4091
Fax: (440) 439-4093
E-mail (Product Information): sales@iotech.com
E-mail (Technical Support): productsupport@iotech.com
Internet: www.iotech.com
User’s Manual
Micro488/p
User’s Manual
223-0901
p/n
© 1992 by IOtech, Inc. October 2002 Printing Revised per EO # 1634R1
Rev.
2.0
Page 2

ii
Page 3
Warranty Information
Your IOtech warranty is as stated on the product warranty card. You may contact IOtech by
phone, fax machine, or e-mail in regard to warranty-related issues.
Phone: (440) 439-4091, fax: (440) 439-4093, e-mail: sales@iotech.com
Limitation of Liability
IOtech, Inc. cannot be held liable for any damages resulting from the use or misuse of this product.
Copyright, Trademark, and Licensing Notice
All IOtech documentation, software, and hardware are copyright with all rights reserved. No part of
this product may be copied, reproduced or transmitted by any mechanical, photographic, electronic, or
other method without IOtech’s prior written consent. IOtech product names are trademarked; other
product names, as applicable, are trademarks of their respective holders. All supplied IOtech software
(including miscellaneous support files, drivers, and sample programs) may only be used on one
installation. You may make archival backup copies.
FCC Statement
IOtech devices emit radio frequency energy in levels compliant with Federal Communications
Commission rules (Part 15) for Class A devices. If necessary, refer to the FCC booklet How To
Identify and Resolve Radio-TV Interference Problems (stock # 004-000-00345-4) which is
available from the U.S. Government Printing Office, Washington, D.C. 20402.
CE Notice
Many IOtech products carry the CE marker indicating they comply with the safety and emissions
standards of the European Community. As applicable, we ship these products with a Declaration
of Conformity stating which specifications and operating conditions apply.
Warnings, Cautions, Notes, and Tips
Refer all service to qualified personnel. This caution symbol warns of possible personal injury or
equipment damage under noted conditions. Follow all safety standards of professional practice and
the recommendations in this manual. Using this equipment in ways other than described in this
manual can present serious safety hazards or cause equipment damage.
This ESD caution symbol urges proper handling of equipment or components sensitive to damage
from electrostatic discharge. Proper handling guidelines include the use of grounded anti-static
mats and wrist straps, ESD-protective bags and cartons, and related procedures.
Specifications and Calibration
Specifications are subject to change without notice. Significant changes will be addressed in an
addendum or revision to the manual. As applicable, IOtech calibrates its hardware to published
specifications. Periodic hardware calibration is not covered under the warranty and must be
performed by qualified personnel as specified in this manual. Improper calibration procedures may
void the warranty.
Quality Notice
IOtech has maintained ISO 9001 certification since 1996. Prior to shipment, we thoroughly test
our products and review our documentation to assure the highest quality in all aspects. In a spirit
of continuous improvement, IOtech welcomes your suggestions.
iii
Page 4

iv
Page 5

Contents
1 Introduction
1.1 Description …… 1-1
1.2 Available Accessories …… 1-1
1.3 Specifications …… 1-2
1.4 Abbreviations …… 1-3
2 Getting Started
2.1 Inspection …… 2-1
2.2 Serial Coonfiguration …… 2-1
2.3 Serial Signal Descriptions …… 2-2
2.4 Serial Cable Wiring …… 2-4
2.5 Hardware Installation …… 2-4
2.6 Is Anyone Out There? …… 2-5
2.7 Programming the Micro488/p …… 2-5
3 Command Descriptions
3.1 Introduction…… 3-1
3.2 Command Description Format …… 3-2
3.3 The Commands …… 3-5
Appendices
A – Micro488/p Command Summary
B – Character Codes and IEEE Multiline Messages
C – Sample Initialiazation Program
Micro488/p, Contents
09-26-02
v
Page 6

vi
09-26-02
Micro488/p
Page 7

Introduction
1.1 Description
The Micro488/p Bus Controller converts a host RS-232 computer into an IEEE 488
bus talker, listener, and controller. It provides the basic IEEE 488-1978 bus
implementation required for a system controller. The Micro488/p may be located up
to fifty feet from the host and may control as many as eight IEEE 488 bus
instruments.
The Micro488/p interprets simple high level commands sent from the computer's
serial port and performs the necessary, and usually complex, bus control and
handshaking. The commands and protocol are similar to those used by the Hewlett
Packard HP-85 computer.
1.2 Available Accessories
Available accessories for the Micro488/p include:
CA-7-1 1.5 foot IEEE 488 Cable.
CA-7-2 6 foot IEEE 488 Cable.
CA-7-3 6 foot shielded IEEE 488 Cable.
CA-7-4 6 foot reverse entry IEEE 488 Cable.
CA-35 Cable Set; includes one IBM PC/XT/PS2 to Micro488/p RS-232
Cable and one IBM AT to Micro488/p RS-232 Cable.
CN-20 Right Angle IEEE 488 adapter, male and female.
CN-22 IEEE 488 Multi-tap bus strip, four female connectors in parallel.
CN-23 IEEE 488 panel mount feed-through connector, male and female.
ABC488 IEEE 488 ABC switch.
Micro488/p, Introduction
09-26-02
1-1
Page 8

1.3 Specifications
IEEE 488-1978
Implementation: C1, C2, C3, C4 and C28 controller subsets.
Terminators: Selectable CR, LF, LF-CR and CR-LF with EOI.
Connector: Standard IEEE 488 connector with metric studs.
Serial Interface
EIA RS-232C: AB, BA, BB, CA, CB.
Character Set: Asynchronous bit serial.
Output Voltage: 5 volts min. (RS-232C).
Input Voltage: 3 volts min.; 15v max.
Baud Rate: Selectable 300, 1200, 2400, 4800, 9600, and 19200.
Data Format: 8 data bits; 1 or 2 stop bits, no parity.
Duplex: Full with Echo/No Echo.
Serial Control: Selectable CTS/RTS or XON/XOFF.
Terminators: Selectable CR, LF, LF-CR and CR-LF.
Connector: 25-pin Sub-D male. RS-232C DCE Configured.
General
Data Buffer: 120 character input buffer.
Power: Draws less than 5mA from the DTR or DSR serial lines on the
host computer.
Max. Dimensions: 50mm x 60mm x 25mm (2" x 2.3" x 0.9").
Weight: 51.2 grams (1.8 oz).
Environment: 0° to 50°C; 0 to 90% R.H. non-condensing.
Controls: All settings auto or software configurable.
Note: Specifications subject to change without notice.
1-2
09-26-02
Micro488/p, Introduction
Page 9

1.4 Abbreviations
The following IEEE 488 abbreviations are used throughout this
manual:
addr n IEEE bus address "n"
ATN Attention line
CR Carriage Return
data Data String
DCL Device Clear
GET Group Execute Trigger
GTL Go To Local
LAG Listen Address Group
LF Line Feed
LLO Local Lock Out
MLA My Listen Address
MTA My Talk Address
REN Remote Enable
SDC Selected Device Clear
SPD Serial Poll Disable
SPE Serial Poll Enable
SRQ Service Request
TA Talker Active
TAD Talker Address
term Terminator
UNL Unlisten
UNT Untalk
* Unasserted
Micro488/p, Introduction
09-26-02
1-3
Page 10

Notes:
1-4
09-26-02
Micro488/p, Introduction
Page 11
Getting Started
2.1 Inspection
The Micro488/p was carefully inspected, both mechanically and electrically, prior to
shipment. When you receive the interface, carefully unpack all items from the
shipping carton and check for any obvious signs of physical damage which may
have occurred during shipment. Immediately report any such damage found to the
shipping agent. Remember to retain all shipping materials in the event that shipment
back to the factory becomes necessary.
Every Micro488/p is shipped with the following....
• Micro488/p IEEE488 Bus Controller
• Micro488/p User’s Manual, p/n 232-0901
2.2 Serial Configuration
Some of the Micro488/p serial communication parameters are pre-configured, and
can not be changed. The following list describes the parameters which are fixed
and, therefore, can not be changed:
Parameter Setting
Data Bits 8 Bit ASCII
Stop Bits 1 or 2
Parity None
Receive Terminator CR
The rest of the parameters are configured through software, after power on.
The following is a list of the software-configurable parameters:
Parameter Setting
Baud Rate 300, 1200, 2400, 4800, 9600, 19200
Duplex Full with echo/no-echo
Transmit Terminator LF, CR, LF-CR, CR-LF
Handshaking XON/XOFF or CTS/RTS
Getting Started
09-26-02
2-1
Page 12
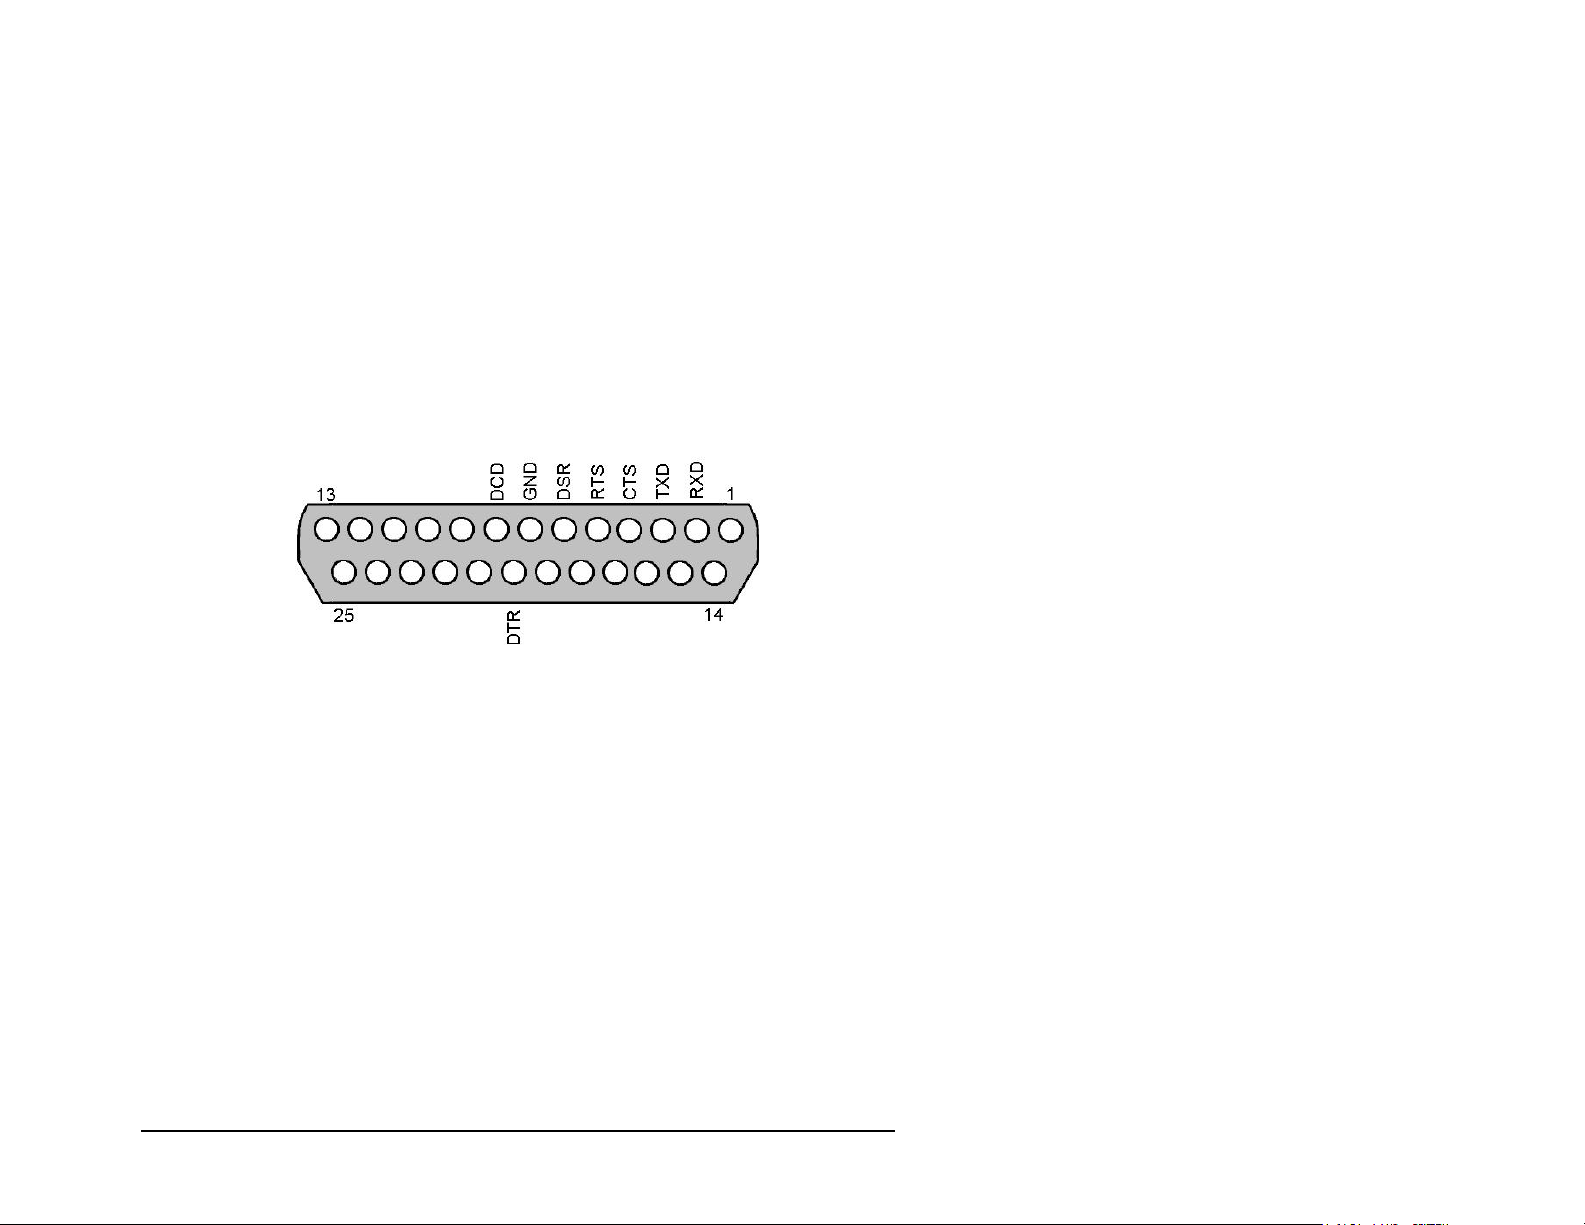
2.3 Serial Signal Descriptions
The Micro488/p serial connector is configured as DCE type equipment for
RS-232 communications. This means the Micro488/p always transmits data on
Pin 3 and always receives data on Pin 2.
Note that the Micro488/p is equipped with a standard DB-25S connector and
requires a standard DB-25P mating connector.
Refer to the following figure and table to understand the relationship of the
Micro488/p connector’s pins and the associated RS-232 signals. Section 2.4 of
this document includes wiring information for making your own cables.
Micro488p Serial Connector Pinout
The following table idetifies the above connector pins in regard to
signal name and I/O type.
2-2
09-26-02
Getting Started
Page 13

Micro/488p Serial Connection
Pin Signal Name I/O Function
2RxD
Receive Data
Input
Accepts serial data sent by the RS-232 host.
The signal level is low true.
3TxD
Transmit Data
4CTS
Clear To Send
5RTS
Request To Send
6DSR
Data Set Ready
7Gnd
Ground
8DCD
Data Carrier Detect
Output
Input
Output
Input
N/A
Output
Transmits serial data to the RS-232 host.
The signal level is low true.
The CTS input is used as a hardware handshake
line to prevent the Micro488/p from transmitting
serial data when the RS-232 host is not ready to
accept it.
When RTS/CTS handshake is selected, the
Micro488/p will not transmit data out TxD while
this line is un-asserted (low).
If XON/XOFF handshake is selected, the CTS
line is not tested to determine if it can transmit
data.
The RTS output is used as a hardware
handshake line to prevent the RS-232 host from
transmitting serial data if the Micro488/p is not
ready to accept it.
This pin is used to provide power for the
Micro488/p if the DTR pin is in its false (LOW)
state, this pin must be in its true (HIGH) state in
order for the Micro488/p to operate properly.
This pin sets the ground reference point for
the other RS-232 inputs and outputs.
The function of this pin is similar to the CTS pin.
This pin is tied internally to its true (HIGH) state.
20 DTR
DataTerminal Ready
Getting Started
Input
Used to provide power for the Micro488/p when
the DSR pin (pin 6) is in its false (LOW) state.
Note that the DTR pin (pin 20) must be in its
true (HIGH) state in order for the Micro488/p to
operate properly.
09-26-02
2-3
Page 14
2.4 Serial Cable Wiring
If a cable was not purchased with the interface, the following diagrams will be helpful
in making your own cable. Simple soldering skills and attention to detail will ensure
successful construction.
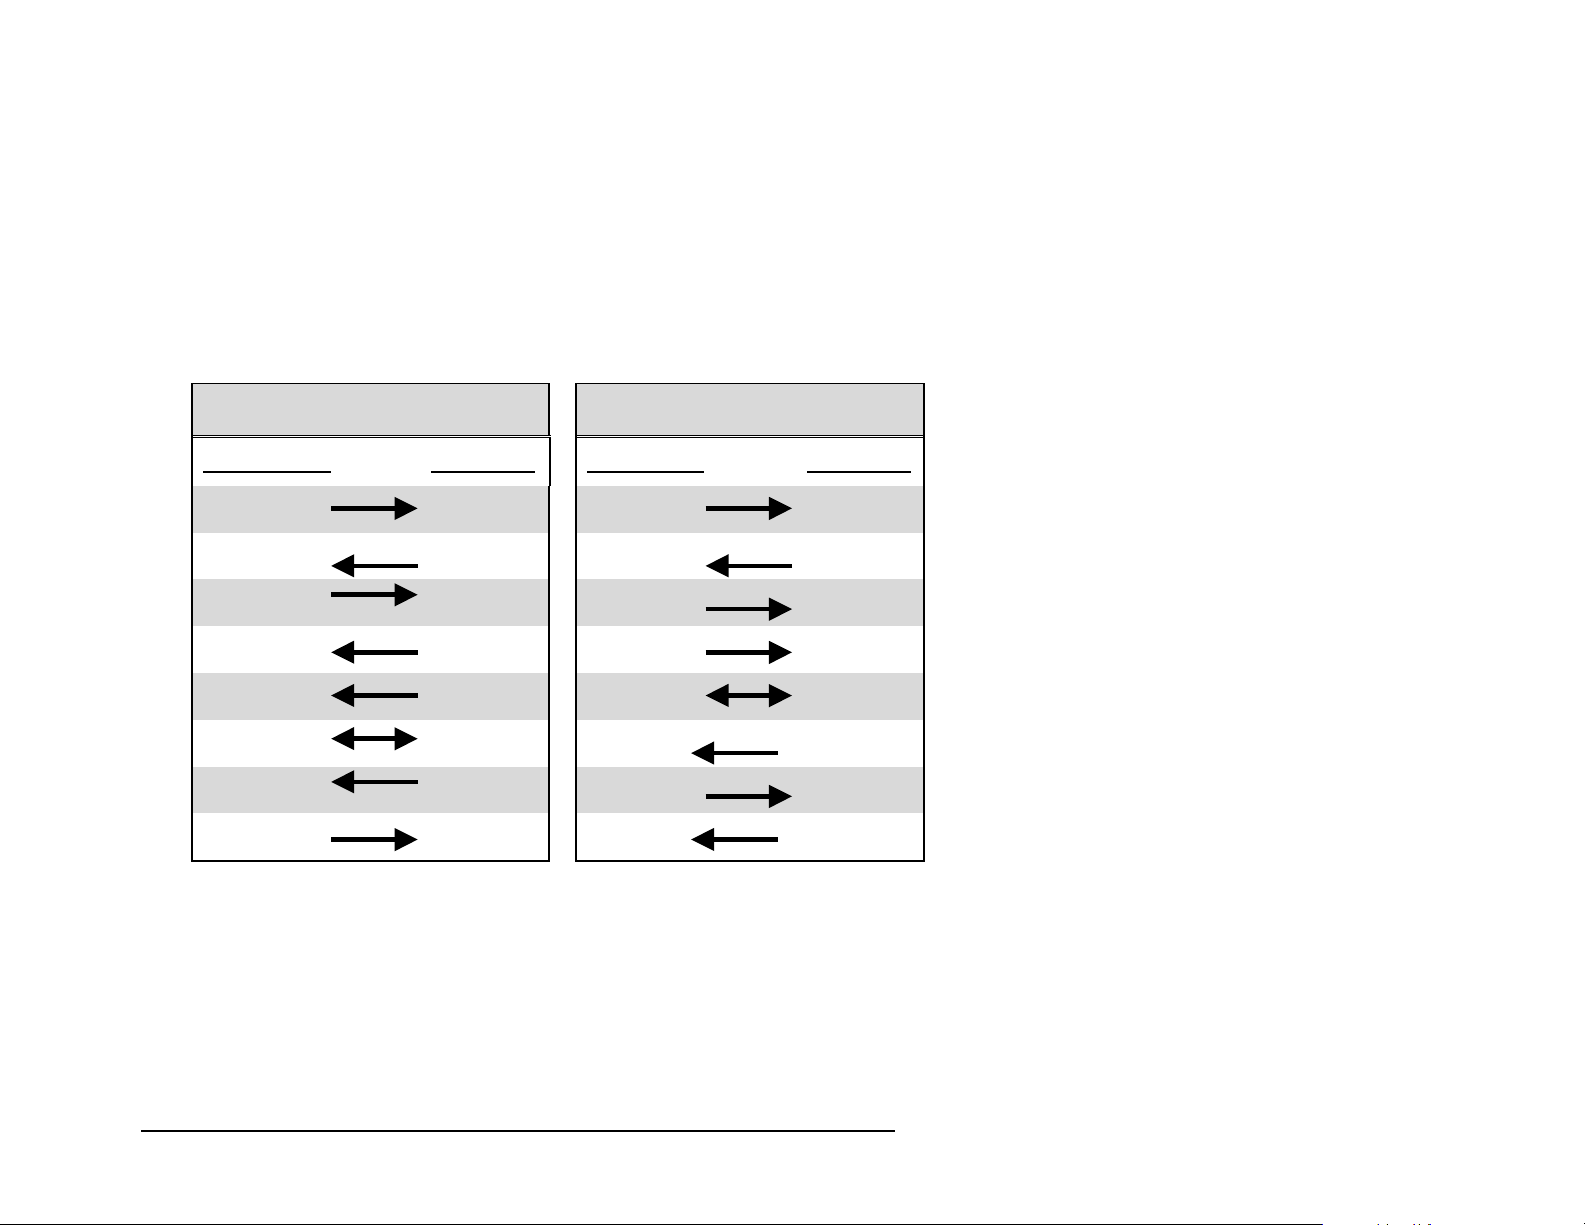
IBM PC/XT/PS2 to Micro488/p IBM AT to Micro488/p
DB25,
Female
TXD 2 2 TXD DCD 1 8 DCD
RXD 3 3 RXD RXD 2 3 RXD
RTS 4 4 RTS TXD 3 2 TXD
CTS 5 5 CTS DTR 4 20 DTR
DSR 6 6 DSR GND 5 7 GND
GND 7 7 GND DSR 6 6 DSR
DCD 8 8 DCD RTS 7 4 RTS
DTR 20 20 DTR CTS 8 5 CTS
Two Scenarios for Making an Interface Cable (RS-232)
2.5 Hardware Installation
Installation of the Micro488/p consists of plugging the device into an available serial
port on the host computer.
DB25,
Male
DB9,
Female
DB25,
Male
2-4
09-26-02
Getting Started
Page 15

2.6 Is Anyone Out There?
In order to properly operate the Micro488/p, the DTR and DSR lines on the COM port
must be initialized first. Usually this can be accomplished by closing and then opening
the serial port. Appendix C includes a Sample Initialization Program.
Once the DTR and DSR ines have been initialized, the next step is to initialize the baud
rate to be used with the Micro488/p. This is done by sending the Micro488/p five
carriage returns, separated by a 0.1 second delay. Now send the Micro488/p the
following command:
"I" <CR>.
The Micro488/p should respond with the prompt ">" character. Now the IEEE488 bus
is initialized, and the Micro488/p ready for operation.
2.7 Programming the Micro488/p
The next step involves writing a simple dumb terminal program to communicate with
the Micro488/p. The dumb terminal program is written in QuickBASIC for any IBM
PC compatable computer, and allows simple communication with IEEE 488 devices
connected to the Micro488/p.
The first task is to open the serial port to which the Micro488/p is connected. If the
Micro488/p is connected to serial port 1, then the following line will open that serial
port with the following parameters:
Baud Rate - 19200
Parity - NONE
Data Bits - 8
Stop Bits - 2
OPEN "COM1:19200,N,8,2,cs,ds" FOR RANDOM AS #1
Next, wait a moment for the Micro488/p's power supply to stabilize.
t = TIMER
DO WHILE t + .1 > TIMER
LOOP
Getting Started
09-26-02
2-5
Page 16

Now that the Micro488/p is powered on, send it five carriage returns for the buad rate
detection circuitry to set the internal baud rate. Place a short time delay between the
characters to ensure that the proper baud rate will be detected.
FOR i = 1 TO 5
PRINT #1, CHR$(13);
t = TIMER
DO WHILE t + .2 > TIMER
LOOP
NEXT i
Next, initialize the Micro488/p with the following command:
PRINT #1, "I"
Now, set up the Micro488/p with the following parameters:
Serial echo - OFF
Hardware Handshake - ON
XON/XOFF handshaking - OFF
Serial terminator - CARRIAGE RETURN
IEEE bus terminator - CARRIAGE RETURN, LINE FEED
PRINT #1, "EC;0"
PRINT #1, "H;1"
PRINT #1, "X;0"
PRINT #1, "TC;2"
PRINT #1, "TB;4"
After a short delay for command processing, input any garbage
characters that may be in the PC's serial input buffer.
t = TIMER
DO WHILE t + .5 > TIMER
LOOP
a$ = INPUT$(LOC(1), #1)
2-6
09-26-02
Getting Started
Page 17

Now the Micro488/p is ready for operation. Simply set up an infinite loop to check
for user keypresses and to look for serial data in the PC's serial input buffer.
PRINT "Ready!"
DO
IF LOC(1) THEN PRINT INPUT$(LOC(1), 1); 'If anything is in the
'PC's serial input
'buffer
'print it to the screen.
k$ = INKEY$ 'Get key press
PRINT #1, k$; 'Send it to the
'Micro488/p
PRINT k$; 'Echo keypress to screen
LOOP
The following is a complete listing of 'DUMBTERM.BAS"
'Micro488/p Dumb Terminal Program
'Copyright 1992 IOtech Inc.
CLS
PRINT "Initializing..."
OPEN "COM1:19200,N,8,2,cs,ds" FOR RANDOM AS #1
t = TIMER
DO WHILE t + .1 > TIMER
LOOP
FOR i = 1 TO 5
PRINT #1, CHR$(13);
t = TIMER
DO WHILE t + .2 > TIMER
LOOP
NEXT i
PRINT #1, "I"
PRINT #1, "EC;0"
PRINT #1, "H;1"
PRINT #1, "X;0"
PRINT #1, "TC;2"
PRINT #1, "TB;4"
t = TIMER
Getting Started
09-26-02
2-7
Page 18

DO WHILE t + .5 > TIMER
LOOP
a$ = INPUT$(LOC(1), #1)
PRINT "Ready!"
DO
IF LOC(1) THEN PRINT INPUT$(LOC(1), 1);
k$ = INKEY$
PRINT #1, k$;
PRINT k$;
LOOP
Section 3 contains detailed command descriptions which are applicable Micro488/p.
2-8
09-26-02
Getting Started
Page 19

Command Descriptions
3.1 Introduction
This section contains detailed descriptions of each of the low and high-level
commands available for the Micro488/p. There are two types of commands: bus
commands and system commands. Bus commands communicate with the IEEE 488
bus. System commands configure or request information from the Micro488/p.
Bus Commands:
A (ABORT I/O)
C (DEVICE CLEAR)
C;<addr> (DEVICE CLEAR w/device specified)
EO;n (EOI ENABLE/DISABLE)
EN (ENTER)
EN;<addr> (ENTER w/device specified)
L (LOCAL)
L;<addr> (LOCAL w/device specified)
LL (LOCAL LOCKOUT)
O;cmd$ (OUTPUT)
OA;<addr>;cmd$ (OUTPUT w/device specified )
RE (REMOTE)
RE;<addr> (REMOTE w/device specified)
RS (RESUME)
SP;<addr>; (SERIAL POLL)
SQ (SRQ CHECK)
TR (TRIGGER)
TR;<addr> (TRIGGER w/device specified)
/A (LOW-LEVEL COMMAND)
/L;<addr> (SEND LISTEN ADDRESS w/device specified)
/ML (LOW-LEVEL COMMAND)
/MT (LOW-LEVEL COMMAND)
/T;<addr> (SEND TALK ADDRESS w/device specified)
/UL (LOW-LEVEL COMMAND)
/UT (LOW-LEVEL COMMAND)
Command Descriptions
3-1
09-27-02
Page 20

System Commands:
<CTRL> A (ESCAPE)
<CTRL> Q (XON)
<CTRL> S (XOFF)
EC;n (ECHO)
H;n (HARDWARE HANDSHAKE)
I (INIT)
TB;n (IEEE BUS TERMINATOR)
TC;n (SERIAL TERMINATOR)
X;n (XOFF/XON)
3.2 Command Description Format
Each command description includes syntax, response, bus states,
and examples.
3.2.1 Syntax
The syntax portion of the command description describes the proper command
syntax which must be sent to the Micro488/p using the IBM BASIC PRINT#
command, or its equivalent in other languages, to the COM port. The following
conventions apply throughout the syntax descriptions:
• The Micro488/p is case insensitive; i.e., system commands may be in upper
or lower case.
•
Commands to an individual IEEE device must conform to the device's
particular syntax.
• Items in lower case, such as addr or n, represent parameters which must be
substituted with an appropriate value.
• Numeric parameters (those that are given as numbers) are decimal unless
preceded by &H, in which case they considered to be hexadecimal. For
example, 100 is decimal 100, &H64 is hexadecimal 64 which equals decimal
100, &HFF is decimal 255, and 0FF is invalid because F is not a valid
decimal digit.
Note: Bus addresses are the only exception to the numeric parameters rule.
•
Bus addresses, both primary and secondary, must be specified as two-digit
decimal numbers. Hexadecimal bus addresses are not allowed.
3-2
09-27-02
Command Descriptions
Page 21

3.2.1.1 Bus Addressing
The following conventions apply to bus addressing:
addr
cmd$
CR
LF
3.2.1.2 Terminators
The following conventions apply to terminators:
term
EOI
An IEEE bus address in the range from 00 through 30.
An arbitrary command string which is sent to the
particular IEEE device being addressed.
The carriage return character ($13, $&H0D).
The line feed character ($10, $&H0A).
Any single character, specified as CR, LF, 'X', as described
previously; part of terminator sequence used to mark the
end of lines of data and commands.
The IEEE bus End-Or-Identify signal; when asserted during
the transfer of a character, EOI signals that character as the
last in the transfer. On input, EOI, if specified, causes the
input to stop. On output, EOI causes the bus EOI signal to
be asserted during transmission of the last character
transferred.
Command Descriptions
3-3
09-27-02
Page 22

3.2.2 Response
This portion of the command description describes the response that the user's
program should read from the serial host's COM port after sending the command. If
a response is provided, it must be read to maintain proper program seqence.
3.2.3 Bus States
This portion of the command description describes the bus command and data
transfers using IEEE bus mnemonics as listed in the following table.
Bus States DIO lines
ATN Attention
data Data String
DCL Device Clear
GET Group Execute Trigger
GTL Go To Local
IFC Interface Clear
LAG Listen Address Group
LLO Local Lock Out
MLA My Listen Address
MTA My Talk Address
REN Remote Enable
SDC Selected Device Clear
SPD Serial Poll Disable
SPE Serial Poll Enable
SRQ Service Request
TAG Talker Address Group
UNL Unlisten
UNT Untalk
87654321
x 0 0 1 0 1 0 0
x0001000
x 0 0 0 0 0 0 1
x 0 1 a d d r n
x0010001
x 0 1 a d d r n
x10addr n
x0000100
x 0 0 1 1 0 0 1
x 0 0 1 1 0 0 0
x10addr n
x 0 1 1 1 1 1 1
x1011111
x = "don't care"
addrn = IEEE bus address “n”
3-4
09-27-02
Command Descriptions
Page 23

If a command is preceded by an asterisk, it is unasserted. For example, *REN
states that the remote enable line is unasserted; REN without the asterisk states
that the line is asserted.
3.2.4 Examples
This portion of the command description includes programming
examples written in BASIC.
3.3 The Commands
Command descriptions, relevant to Micro488/p, now follow.
Command Descriptions
3-5
09-27-02
Page 24

/A
The /A command is a low level IEEE command which asserts the attention line. After
completion of this command, the Micro488/p is left in the controller active state.
SYNTAX /A
RESPONSE None
BUS STATES ATN
EXAMPLE PRINT#1,"/A"
/L
The /L command is a low level IEEE command which sends the LAG command to the
specified device. After completion of this command, the Micro488/p is left in the controller
active state.
SYNTAX /L
RESPONSE None
BUS STATES ATN,LAG
EXAMPLE PRINT#1,"/L;10" Send LAG10 on the IEEE bus.
3-6
09-27-02
Command Descriptions
Page 25

/ML
The /ML command is a low level IEEE command which places the Micro488/p in the listen
state. After completion of this command, the Micro488/p is ready to listen as soon as the
RESUME (RS) command is issued.
SYNTAX /ML
RESPONSE None
BUS STATES ATN
EXAMPLE PRINT#1,"/ML"
/MT
The /MT command is a low level IEEE command which places the Micro488/p in the talk
state. After completion of this command, the Micro488/p is ready to talk as soon as the
RESUME (RS) command is issued.
SYNTAX /MT
RESPONSE None
BUS STATES ATN,UNT
EXAMPLE PRINT#1,"/MT"
Command Descriptions
09-27-02
3-7
Page 26

/T
The /T command is a low level IEEE command which issues the talk command to the
specified IEEE device.
SYNTAX /T;addr
RESPONSE None
BUS STATES ATN,TAG
EXAMPLE PRINT#1,"/T;10" Issue TAG to device 10.
/UL
The /UL command is a low level IEEE command which sends the UNL command to the
IEEE bus. This command instructs all devices on the IEEE bus to get off the IEEE bus.
SYNTAX /UL
RESPONSE None
BUS STATES ATN,UNL
EXAMPLE PRINT#1,"/UL"
3-8
09-27-02
Command Descriptions
Page 27

/UT
The /UT command is a low level IEEE command which sends the UNT command to the
IEEE bus. This command instructs all devices on the IEEE bus to get off the IEEE bus.
SYNTAX /UT
RESPONSE None
BUS STATES ATN,UNT
EXAMPLE PRINT#1,"/UT"
AABORT I/O
The ABORT I/O command causes the Interface Clear (IFC) bus management line to be
pulsed. By asserting IFC, the Micro488/p regains control of the bus even if one of the
devices has locked it up during a data transfer. ABORT I/O forces all IEEE bus device
interfaces into a quiescent idle state.
SYNTAX A
RESPONSE None
BUS STATES *REN, IFC, *IFC, ATN, REN
EXAMPLE PRINT#1,"A"
Command Descriptions
3-9
09-27-02
Page 28

C DEVICE CLEAR
The DEVICE CLEAR command causes the Device Clear (DCL) bus command to be issued
by the Micro488/p. If the optional addresses are included, the Selected Device Clear (SDC)
command is issued to the specified devices. IEEE 488 bus devices which receive a Device
Clear or Selected Device Clear command normally reset to their power-on state.
SYNTAX C[;addr]
RESPONSE None
BUS STATES ATN, DCL (all devices)
ATN, UNL,UNT,LAG,SDC (selected devices)
EXAMPLES PRINT #1,"C" Issue a Device Clear to all devices.
PRINT #1,"C;10" Issue a Selected Device Clear to
device 10.
EC ECHO
The system command ECHO instructs the Micro488/p to either enable, or disable serial
echo.
SYNTAX EC;n
n = 1, enable serial echo.
n = 0, disable serial echo.
RESPONSE None
BUS STATES None
EXAMPLE PRINT#1,"EC;1" Enable serial echo.
3-10
09-27-02
Command Descriptions
Page 29

EN ENTER
The ENTER command reads data from the IEEE bus. If a device address is specified, that
device is addressed to talk. If no address is specified, the Micro488/p must already be
configured to receive data as a result of an immediately preceding ENTER command. The
Micro488/p hangs the bus if no device is present to provide the data. From either mode
(addressed or unaddressed), the Micro488/p inputs data from the IEEE bus and sends it to
serial port until one of the following conditions is met:
1. A terminator character is received from the IEEE device that is talking.
2. An EOI is received with the data from the IEEE device that is talking.
3. An Escape command is received from the host computer via the serial port.
SYNTAX EN[;addr]
addr is the IEEE bus device address.
RESPONSE Device-dependent data. The response ends when the IEEE bus
input terminator is detected and the serial output terminators are
appended to the returned data.
BUS STATES ATN,UNL,TAG,*ATN
Micro488/p is in the listener active state, and IEEE device is in
the talker active state.
EXAMPLES PRINT#1,"EN;16" Read data from device 16.
INPUT#1,A$
PRINT#1,"EN;16"
LINE INPUT#1,A$ Read an entire line of data
from device 16 even if it
contains commas or other
punctuation.
Command Descriptions
3-11
09-27-02
Page 30

<CTRL>A ESCAPE
The system command ESCAPE unlocks the Micro488/p from an inappropriate command,
such as a command requesting data from a nonexistent device.
When the ESCAPE command is received, the serial handshake line (RTS) is un-asserted. It
is asserted when the Micro488/p is capable of buffering commands. If XON/XOFF
handshake is selected, the software handshake state is not modified.
Issuing the ESCAPE command clears the serial input (pending commands) and causes the
Micro488/p to wait for new commands.
SYNTAX <CTRL> A or CHR$(1)
RESPONSE None
BUS STATES None
EXAMPLE PRINT #1, CHR$(1)
H HARDWARE HANDSHAKE
The system command HARDWARE HANDSHAKE enables or disables hardware
(CTS/RTS) handshake.
SYNTAX H;n
n = 0, disable hardware handshake.
n = 1, enable hardware handshake.
RESPONSE None
BUS STATES None
EXAMPLE PRINT#1,"H;1" Enable hardware handshake.
3-12
09-27-02
Command Descriptions
Page 31

TB IEEE BUS TERMINATOR
The IEEE BUS TERMINATOR command is used to select the IEEE bus terminator for
reads from the IEEE bus. The selected terminator signifies the end of an ENTER sequence.
The available terminators are:
1 - LF
2 - CR
3 - LF-CR
4 - CR-LF
SYNTAX TB;n
n is one of the available terminator types.
RESPONSE None
BUS STATES None
EXAMPLE PRINT #1, "TB;1" Select LF as an IEEE bus
terminator.
Command Descriptions
3-13
09-27-02
Page 32

IINIT
The system command INIT provides a warm start of the interface. Issuing the INIT
command clears the serial input (pending commands) and output (pending data) buffers and
re-initializes the internal IEEE controller hardware.
SYNTAX I
RESPONSE None
BUS STATES IFC, REN, *IFC, ATN, *REN, REN
EXAMPLE PRINT#1,"I"
L LOCAL
The LOCAL command, without optional address, causes the Micro488/p to un-assert the
Remote Enable line causing devices on the bus to return to manual operation. With the
address specified, the bus device is placed in the local mode by the Go To Local (GTL) bus
command.
SYNTAX L [;addr]
RESPONSE None
BUS STATES *REM
unaddressed.
ATN, UNL, UNT, LAG, GTL
addressed.
EXAMPLES PRINT#1,"L" Un-assert the REN Line.
PRINT #1,"L;16" Cause device 16 to go to
local.
3-14
09-27-02
Command Descriptions
Page 33

LL LOCAL LOCKOUT
The LOCAL LOCKOUT command causes the Micro488/p to issue a Local Lockout IEEE
bus command which inhibits bus devices that support this command from being controlled
manually from their front panels.
SYNTAX LL
RESPONSE None
BUS STATES ATN, LLO
EXAMPLES PRINT#1,"LL" Send Local Lockout command.
OOUTPUT
The OUTPUT command sends data to the IEEE bus. The Remote Enable line is first
asserted, then, if a device address is specified, that device is addressed to listen. If an
address is not specified, the Micro488/p must already be configured to send data as a result
of an immediately preceding OUTPUT command.
SYNTAX O;cmd$
unaddressed.
OA;addr;cmd$
addressed.
addr is a bus device address.
cmd$ is a string of characters to OUTPUT terminated by the
serial terminator(s).
RESPONSE None
BUS STATES REN , *ATN, cmd$
unaddressed.
ATN, UNL, UNT, LAG, GTL, data
addressed.
EXAMPLES PRINT#1,"OA;22;R0C0T1X"
Send "R0C0T1X" to device 22.
PRINT#1,"O;XYZ" Send device 22 "XYZ".
Command Descriptions
3-15
09-27-02
Page 34

RE REMOTE
The REMOTE command asserts the Remote Enable (REN) bus management line. If the
optional bus address is specified, then REMOTE also addresses the device to listen, placing
it in the Remote addressed state.
SYNTAX RE [;addr]
RESPONSE None
BUS STATES REN
unaddressed.
REN, ATN, UNL. UNT. LAG
addressed.
EXAMPLE PRINT #1,"RE" Assert Remote Enable.
RS RESUME
The RESUME command un-asserts the Attention (ATN) bus signal removing the
Micro488/p from the active controller state and allowing transfers to take place between two
peripheral devices.
SYNTAX RS
RESPONSE None
BUS STATES *ATN
EXAMPLE PRINT#1,"RS" Un-assert ATTENTION line.
3-16
09-27-02
Command Descriptions
Page 35

SP SERIAL POLL
The SERIAL POLL command performs a Serial Poll of the bus device specified and
responds with a number from 0 to 255 representing the decimal equivalent of the eight-bit
device response. If rsv (DIO7, decimal value 64) is set, then that device is signaling that it
requires service. Serial Polls are normally performed in response to assertion of the Service
Request (SRQ) bus signal by some bus device.
SYNTAX SP; addr
RESPONSE 0 to 255
BUS STATES ATN, UNL, TAG, SPE, *ATN, data, ATN, SPD, UNT
EXAMPLES PRINT#1,"SP 16" Serial Poll device 16.
INPUT#1,SPSTAT Receive the Spoll status.
TC SERIAL TERMINATOR
The SERIAL TERMINATOR command sets the end-of-line terminators for input from the
serial host. All input from the serial host must be terminated by the selected terminator.
During INPUT, the Micro488/p takes the data it receives from the bus device until it detects
the LF of other optionally specified input terminating condition. It strips all CR and LF from
the input data and appends the serial output terminator CR before sending it to the serial
host. The available terminators are:
1 - LF
2 - CR
3 - LF-CR
4 - CR-LF
SYNTAX TC;n
n is one of the available terminator types.
RESPONSE None
BUS STATES None
EXAMPLES PRINT#1,"TC;2" Select CR as the serial output
terminator.
Command Descriptions
3-17
09-27-02
Page 36

SQ SRQ CHECK
The system command SRQ CHECK inquires whether or not the SRQ line on the IEEE bus
is currently being asserted.
SYNTAX SQ
RESPONSE Y
SRQ is being asserted.
N
SRQ is not being asserted.
BUS STATES None
EXAMPLES PRINT #1, "SQ" Issue SRQ CHECK
command.
INPUT#1,SRQSTAT Receive SRQ status.
TR TRIGGER
The TRIGGER command issues a Group Execute Trigger (GET) bus command to the
specified device. If no address is specified, then GET only affects those devices that are
already in the listen state as a result of a previous OUTPUT command.
SYNTAX TR[;addr]
RESPONSE None
BUS STATES ATN, GET
unaddressed.
ATN, UNL,UNT, LAG, GET
addressed.
EXAMPLES PRINT#1,"TR;16" Issue Group Execute Trigger
to device 16.
3-18
09-27-02
Command Descriptions
Page 37

X XOFF/XON
The system command XOFF/XON enables or disables XON/XOFF handshaking.
SYNTAX X;n
n = 0, disable XON/XOFF handshaking.
n = 1, enable XON/XOFF handshaking.
RESPONSE None
BUS STATES None
EXAMPLE PRINT #1, "X;1" Enable XON/XOFF
handshaking.
<CTRL>S XOFF
The system command XOFF temporarily inhibits serial transmission from the Micro488/p.
SYNTAX <CTRL> S or CHR$(19)
RESPONSE None
BUS STATES None
EXAMPLE PRINT #1, CHR$(19)
Command Descriptions
3-19
09-27-02
Page 38

<CTRL>Q XON
The system command XON restarts serial transmission from the Micro488/p following
reception of the XOFF command.
SYNTAX <CTRL> Q
CHR$(17)
RESPONSE None
BUS STATES None
EXAMPLE PRINT #1, CHR$(17)
3-20
09-27-02
Command Descriptions
Page 39

Appendix A Micro488/p Command Summary
Command Code Description Page
/A /A Asserts the attention line; leaves Micro488/p in the controller active
state.
/L /L Sends the LAG command to the specified device; leaves Micro488/p in
the controller active state.
/ML /ML Places the Micro488/p in the listen state on RESUME (RS). 3-7
/MT /MT Places the Micro488/p in the talk state on RESUME (RS). 3-7
/T /T;addr Issues the talk command to the specified IEEE device. 3-8
/UL /UL Sends the UNL command to the IEEE bus; instructs all devices on the
IEEE bus to get off the IEEE bus.
/UT /UT Sends the UNT command to the IEEE bus; instructs all devices on the
IEEE bus to get off the IEEE bus.
ABORT I/O A Pulses Interface Clear (IFC) bus management line to be pulsed; forces all
IEEE bus device interfaces into a quiescent idle state.
DEVICE CLEAR C[;addr] Instructs Micro488/p to issue Device Clear (DCL) bus command; if
optional addresses are included, issues the Selected Device Clear (SDC)
command to the specified devices.
ECHO EC;n Instructs the Micro488/p to enable or disable serial echo. 3-10
ENTER ENTER[;addr] Reads data from the IEEE bus and sends it to serial port; a terminator
character, an EOI, or an ESCAPE command terminates data
input/output.
3-6
3-6
3-8
3-9
3-9
3-10
3-11
ESCAPE <CTRL> A
HARDWARE
HANDSHAKE
IEEE BUS
TERMINATOR
INIT I Provides a warm start of the interface; clears the serial input (pending
Appendix A, Micro488/p Command Summary
CHR$(1)
H;n Enables or disables hardware (CTS/RTS) handshake. 3-12
TB;n Selects the IEEE bus terminator for reads from the IEEE bus; selected
Unlocks the Micro488/p from an inappropriate command; clears the
serial input (pending commands) and instructs Micro488/p to wait for
new commands.
terminator signifies the end of an ENTER sequence.
commands) and output (pending data) buffers and re-initializes the
internal IEEE controller hardware.
09-26-02
3-12
3-13
3-14
A-1
Page 40

Command Code Description Page
LOCAL L[;addr] Without optional address, instructs the Micro488/p to un-assert the
LOCAL LOCKOUT LL Instructs the Micro488/p to issue a Local Lockout IEEE bus command. 3-15
OUTPUT O;cmd$
REMOTE RE[;addr] Asserts the Remote Enable (REN) bus management line. 3-16
RESUME RS Un-asserts the Attention (ATN) bus signal; removes the Micro488/p
SERIAL POLL SP;addr Performs a serial poll of the bus device specified; responds with a
SERIAL
TERMINATOR
SRQ CHECK SQ Inquires whether or not the SRQ line on the IEEE bus is currently being
TRIGGER TR[;addr] Issues a Group Execute Trigger (GET) bus command to the specified
XOFF/XON X;n Enables or disables XON/XOFF handshaking. 3-19
O;addr;cmd$
TC;n Sets the end-of-line terminators for input from the serial host. 3-17
Remote Enable line causing devices on the bus to return to manual
operation; with optional address, places bus device in the local mode by
the Go To Local (GTL) bus command.
Sends data to the IEEE bus. 3-15
from the active controller state and allows transfers between two
peripheral devices.
number from 0 to 255 representing the decimal equivalent of the eightbit device response.
asserted.
device; if no address is specified, then GET affects those devices already
in the listen state.
3-14
3-16
3-17
3-18
3-18
XOFF <CTRL>S
XON <CTRL>Q
A-2
CHR$1(9)
CHR$1(17)
Temporarily inhibits serial transmission from the Micro488/p. 3-19
Restarts serial transmission from the Micro488/p. 3-20
09-26-02
Appendix A, Micro488/p Command Summary
Page 41

Appendix B Character Codes and IEEE Multiline Messages
$00 0
NUL
$01 1
SOH
GTL
$02 2
STX
$03 3
ETX
$04 4
EOT
SDC
$05 5
ENQ
PPC
$06 6
ACK
$07 7
BEL
$08 8
BS
GET
$09 9
HT
TCT
$0A 10LF$1A 26
$0B 11VT$1B 27
$0C 12FF$1C 28FS$2C 44
$10 16
DLE
$11 17
DCI
LLO
$12 18
DC2
$13 19
DC3
$14 20
DC4
DCL
$15 21
NAK
PPU
$16 22
SYN
GTL
$17 23
ETB
$18 24
CAN
SPE
$19 25
EM
SPD
SUB
ESC
$20 32
SP
00
$21 33
!
01
$22 34
"
02
$23 35
#
03
$24 36
$
04
$25 37
%
05
$26 38
&
06
$27 39
'
07
$28 40
(
08
$29 41
)
09
$2A 42
*
10
$2B 43
+
11
,
12
$0D 13CR$1D 29GS$2D 45
-
13
$0E 14SO$1E 30RS$2E 46
.
14
$0F 15SI$1F 31US$2F 47
/
15
$30 48
0
16
$31 49
1
17
$32 50
2
18
$33 51
3
19
$34 52
4
20
$35 53
5
21
$36 54
6
22
$37 55
7
23
$38 56
8
24
$39 57
9
25
$3A 58
:
26
$3B 59
;
27
$3C 60
<
28
$3D 61
=
29
$3E 62
>
30
$3F 63
?
31
$40 64
@
00
$41 65
A
01
$42 66
B
02
$43 67
C
03
$44 68
D
04
$45 69
E
05
$46 70
F
06
$47 71
G
07
$48 72
H
08
$49 73
I
09
$4A 74
J
10
$4B 75
K
11
$4C 76
L
12
$4D 77
M
13
$4E 78
N
14
$4F 79
O
15
$50 80
P
16
$51 81
Q
17
$52 82
R
18
$53 83
S
19
$54 84
T
20
$55 85
U
21
$56 86
V
22
$57 87
W
23
$58 88
X
24
$59 89
Y
25
$5A 90
Z
26
$5B 91
[
27
$5C 92
\
28
$5D 93
]
29
$5E 94
^
30
$5F 95
_
31
$60 96
`
SCG
$61 97
a
SCG
$62 98
b
SCG
$63 99
c
SCG
$64 100
d
SCG
$65 101
e
SCG
$66 102
f
SCG
$67 103
g
SCG
$68 104
h
SCG
$69 105
i
SCG
$6A 106
j
SCG
$6B 107
k
SCG
$6C 108
l
SCG
$6D 109
m
SCG
$6E 110
N
SCG
$6F 111
o
SCG
$70 112
p
SCG
$71 113
q
SCG
$72 114
r
SCG
$73 115
s
SCG
$74 116
t
SCG
$75 117
u
SCG
$76 118
v
SCG
$77 119
w
SCG
$78 120
x
SCG
$79 121
y
SCG
$7A 122
z
SCG
$7B 123
{
SCG
$7C 124
|
SCG
$7D 125
}
SCG
$7E 126
~
SCG
$7F 127
DEL
SCG
ACG UCG LAG TAG SCG
ACG = Addressed Command Group TAG = Talk Address Group
UCG = Universal Command Group SCG = Secondary Command Group
LAG = Listen Address Group
Appendix B, Character Codes and IEEE Multiline Messages
09-27-02
B-1
Page 42

Notes:
B-2
Page 43

Appendix C Sample Initialization Program
'Sample Micro488/p initialization program
'Copyright 1992, IOtech Inc.
'
'This program demonstrates how to initialize the Micro488/p IEEE
'controller using Quick Basic. This program will initialize the
'Micro488/P, and establish IEEE communications.
CLS
CLOSE 'Close all files, this turns off DTR and DSR.
com$ = "COM1:19200,N,8,1,BIN"
IeeeOut = FREEFILE
IeeeIn = FREEFILE
OPEN com$ FOR RANDOM AS #IeeeOut 'Open the serial port on COM 1
t = TIMER
DO WHILE t + .1 > TIMER 'Wait for .1 Seconds
LOOP
FOR i = 1 TO 5 'Send 5 carriage returns, with a .1
'second delay seperation.
PRINT #IeeeOut, CHR$(13);
t = TIMER
DO WHILE t + .1 > TIMER
LOOP
NEXT i
PRINT #IeeeOut, "I" 'Send Init command
PRINT #IeeeOut, "EC;0" 'Turn off serial echo
PRINT #IeeeOut, "H;1" 'Turn on hardware handshake
PRINT #IeeeOut, "X;0" 'Turn off XON/XOFF handshake
PRINT #IeeeOut, "TC;2" 'Set serial terminator to CR
PRINT #IeeeOut, "TB;4" 'Set IEEE bus terminator to CR
LF
t = TIMER
DO WHILE t + .5 > TIMER 'Wait .5 seconds
LOOP
a$ = INPUT$(LOC(1), #IeeeIn) 'Clear the serial input buffer.
Appendix C, Sample Initialization Program
09-27-02
C-1
Page 44

Notes:
C-2
 Loading...