

Page 1
IOtech® LabVIEWTM Substitution VIs
A Guide to using Virtual Instruments in LabVIEWTM for DaqBoard/2000 Series Boards
the smart approach to instrumentation ™
IOtech, Inc.
25971 Cannon Road
Cleveland, OH 44146-1833
Phone: (440) 439-4091
Fax: (440) 439-4093
E-mail (Product Information): sales@iotech.com
E-mail (Technical Support): productsupport@iotech.com
Internet: www.iotech.com
471-0902,
rev
3.0
Revised per EO # 2045R3
10-03-02
Page 2

Copyright, Trademark, and Licensing Notice
All IOtech documentation, software, and hardware are copyright with all rights reserved. No part of this product may be copied,
reproduced or transmitted by any mechanical, photographic, electronic, or other method without IOtech’s prior written consent. IOtech
product names are trademarked; other product names, as applicable, are trademarks of their respective holders. All supplied IOtech
software (including miscellaneous support files, drivers, and sample programs) may only be used on one installation. You may make
archival backup copies.
LabVIEW
TM
and NI-DAQTM are trademarks of National Instruments
TM
Corporation.
ii
10-02-02
IOtech LabVIEW Substitution VIs
Page 3

Foreword
IOtech LabVIEW Substitution VIs can be used to replace NI-DAQTM VIs. The Substitution VIs provide a
means of using IOtech DaqBoard/2000 Series boards with LabVIEW programs, while maintaining the
NI-DAQ look and feel.
Note that this document serves as a supplement to both DaqBoard/2000 Series and LabVIEW
documentation.
This document is intended for use by individuals who:
• Want to convert LabVIEW VIs so they may be used with IOtech Daqboard/2000 Series
boards.
• Are familiar with LabVIEW VIs and would like to create new VIs for use with IOtech
Daqboard/2000 Series boards.
IOtech LabVIEW Substitution VIs do not support DBK signal conditioning options.
IOtech LabVIEW Substitution VIs are compatible with LabVIEW versions 5.1 and higher. There are no
special system requirements for using the substitution VIs, other than those specified for the version of
LabVIEW used.
LabVIEW support is provided for basic Analog Input, Analog Output, Digital IO, and Counter Functions.
Each includes program examples that can be modified, or used as is.
Contents
1 – Installation …… 1-1
2 – Adding the IOtech Menu to a Palette Set in LabView 6i …… 2-1
3 – Using IOtech LabVIEW Substitution VIs …… 3-1
4 – Issues and Caveats …… 4-1
IOtech LabVIEW Substitution VIs
10-02-02
iii
Page 4

iv
10-02-02
IOtech LabVIEW Substitution VIs
Page 5
Installation 1
IOtech LabVIEW Substitution VIs are included on the IOtech Data Acquisition CD, versions 2.4 and
higher. The following steps take into account that you have previously installed a DaqBoard/2000 Series
board and 32-bit DaqBook/DaqBoard Support. If this is not the case, install your DaqBoard support
software and your DaqBoard/2000 Series board according to one of the following documents. The first two
documents are available on our website, www.iotech.com.
•
DaqBoard/2000 Series Installation Guide (1033-0940, rev 3.0 or higher)
• DaqBoard/2000 Series Users Manual (1033-0901, rev. 2.0 or higher)
•
DaqBoard/2000 Compact PCI Documentation
Complete the following steps to successfully launch and run the installation program.
1. Start Windows.
2. Close all running applications.
3. Insert the Data Acquisition CD into your CD-ROM drive and wait for the CD to auto-run.
If the CD does not start on its own:
(a) click the descktop’s <Start> button
(b) choose the Run command
(c) select the CD-ROM drive, then select the setup.exe file
(d) click <OK>
An Opening Screen will appear.
4. Click the <ENTER SETUP> button.
5. From the hardware selection screen [which follows a licensing agreement], select
DaqBoard2000 Boards from the drop-down list.
6. On the resulting software options screen, select LabVIEW. You can select, or de-select other software
options as applicable to your system.
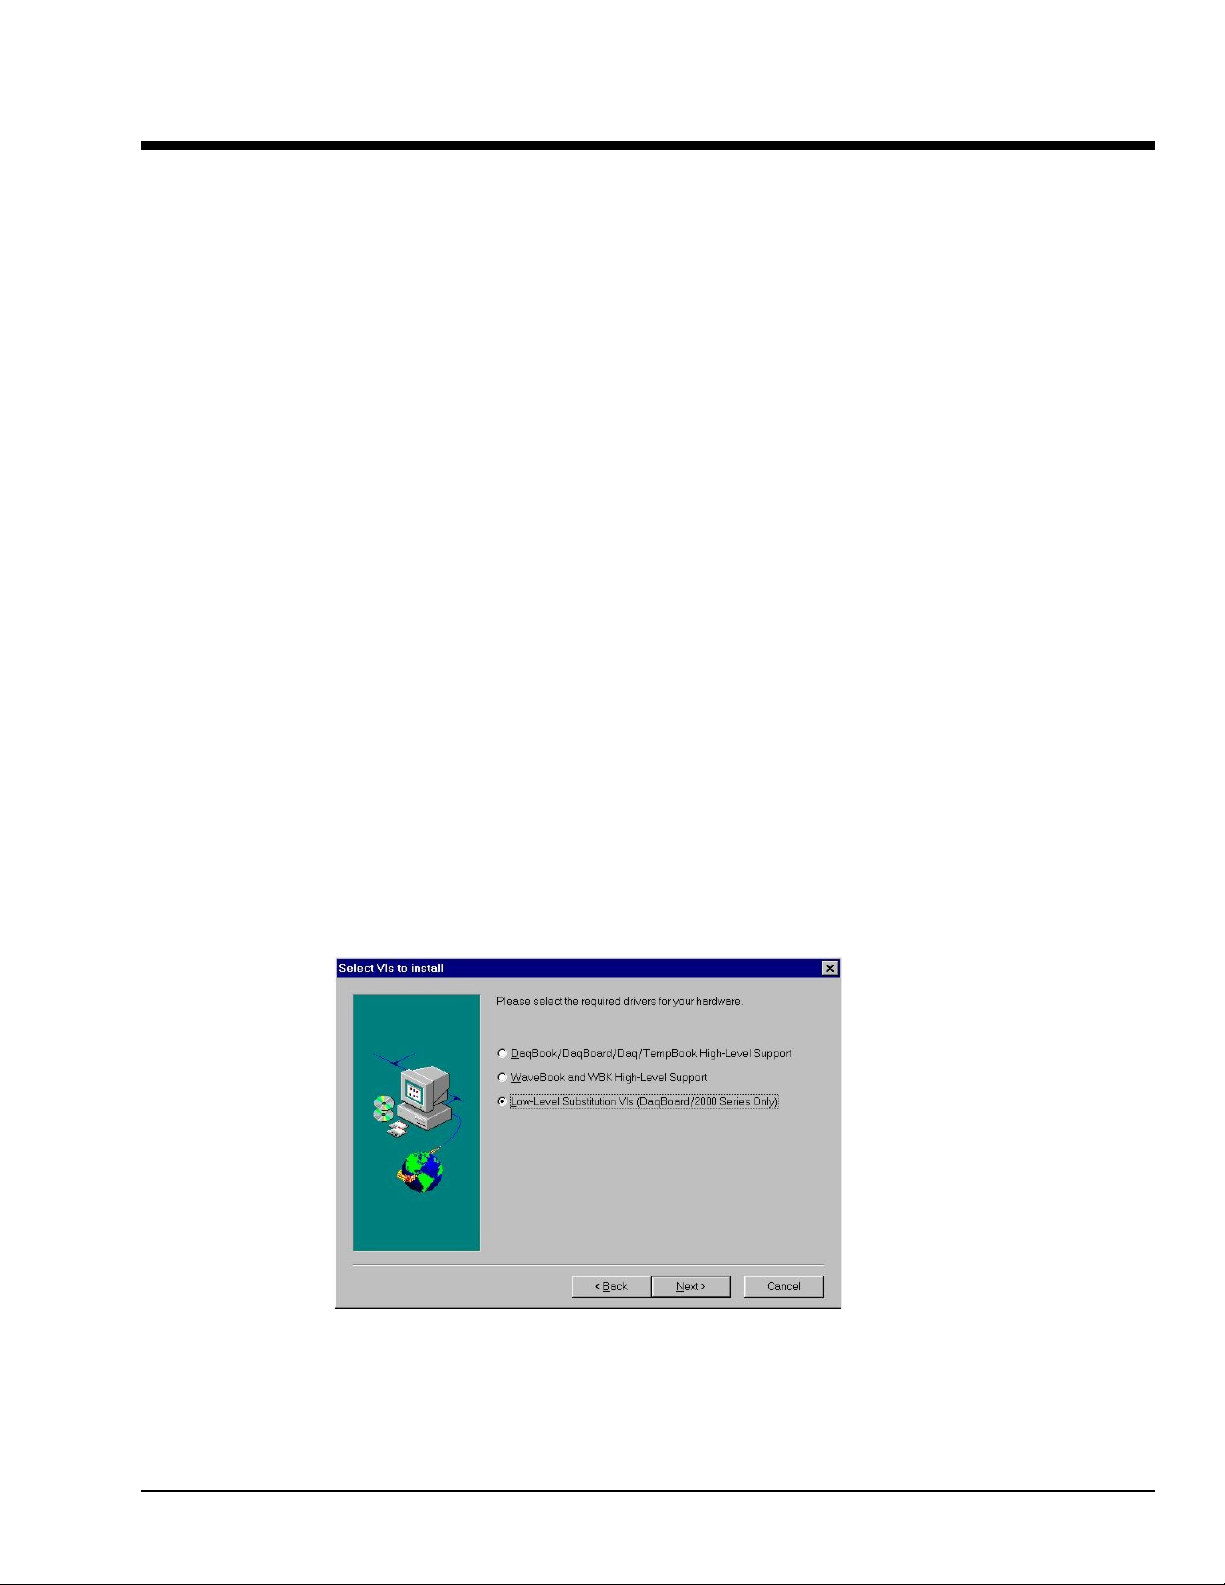
7. Follow the screen prompts until the “Select VIs to Install Screen Appears.” (Following figure).
“Select VIs to Install” Screen
8. Select Low-Level Substitution VIs (DaqBoard/2000 Only), as indicated in the preceding figure.
9. Click Next.
IOtech LabVIEW Substitution Vis
10-02-02
1-1
Page 6

The software will now be installed in a sub-directory named IOtech Data Acquisition. This subdirectory is located within the LabVIEW directory. A shortcut, located under DaqXSoftware, can be
reached via the Windows Start Menu.
1-2
10-02-02
IOtech LabVIEW Substitution VIs
Page 7

Adding the IOtech Menu to a Palette Set in LabVIEW 6i 2
This chapter applies to LabVIEW 6i only. In LabVIEW 5 menu addition is automatic.
1. Start LabVIEW and select New VI.
2. From the “Window” pull down menu select Show Diagram.
3. From the “Window” pull down menu select Show Functions Palette.
Function Palette and Diagram layer
4. Click on the Options button within the functions palette.
Option Button
Option Button in the Function Palette
5. In the Function Browser Options click Edit Palettes …
IOtech LabVIEW Substitution VIs
Function Browser Options
10-03-02
2-1
Page 8

6. You will get a menu box titled “Edit Controls and Function Palettes.”
Edit Controls and Function Palettes
7. Select new setup from the Palette Set menu and enter a new name such as “Mymenu.” in the text
box.
Palette Set Menu
8. Click Save Changes.
9. Return to the diagram layer of your new VI.
10. Click on the Option button and make sure the newly created menu item is the one selected.
If not, select it at this time In the Function Browser Options and click OK.
11. Right click on a blank area within the function palette.
This will allow insertion of a sub menu.
Function Palette Resulting From Right Click on a Blank Area
2-2
10-03-02
IOtech LabVIEW Substitution VIs
Page 9

12. Choose “Link to an existing menu file (.mnu).”
Insert Submenu
13. Click <OK>
14. Use the directory search window to find the dir.mnu menu within the Iotech Data Acquisition folder
under LabVIEW.
If you have installed both version 5 and version 6i on the same computer, it is possible
that this folder would be under LabVIEW 5 rather than LabVIEW 6i.
15. Highlight the directory menu.
16. Click <Open>.
The IOtech menu now appears in the function palette, as can be
seen in the lower-center of the right-hand figure.
The IOtech functions are now available for use.
IOtech LabVIEW Substitution VIs
Directory Search Window
10-03-02
Modified Function Palette
2-3
Page 10

2-4
10-03-02
IOtech LabVIEW Substitution VIs
Page 11

Using IOtech LabVIEW Substitution VIs 3
Overview
The IOtech Data Acquisition sub-directory contains folders for the various types of Virtual Instruments.
Each folder contains pertinent sample programs. The folders are designated:
• Analog Input
• Analog Output
• Counter
• Digital IO
In addition to these four VI folders, the sub-directory also contains a Documentation folder. The folders
can be accessed from the Windows Start Menu, under the LabVIEW directory (located under
DaqXSoftware).
IOtech LabVIEW Substitution VIs were designed to emulate National Instruments VIs. The substitutions
can be made in applications where an IOtech DaqBoard/2000 Series board is being used to replace a
NI-DAQ “E” Series device, a PC-LPM-16, or an AT-MIO-16 “H” or “L” Series board; however, for the
AT-MIO-16 L, the x500 gain-setting will not be supported. NI devices can typically be replaced with little
effort. An example follows shortly.
Supported VIs
Easy VIs Intermediate VIs Advanced VIs
AI Sample Channel
AI Sample Channels
AI Acquire Waveform
AI Acquire Waveforms
AO Update Channel
AO Update Channels
AO Generate Waveform
AO Generate Waveforms
Read from Digital Line
Read from Digital Port
Write to Digital Line
Write to Digital Port
Count Events or Time
Measure Pulse Width or
Period
AI Clear
AI Config
AI Continuous Scan
AI Read One Scan
AI Read
AI Single Scan
AI Start
AI Waveform Scan
AO Clear
AO Config
AO Continuous Gen
AO Start
AO Wait
AO Waveform Gen
AO Write One Update
AO Write
DIO Clear
DIO Config
DIO Read
DIO Single Read_Write
DIO Start
DIO Wait
DIO Write
Adjacent Counters
Counter Read
Counter Start
Counter Stop
Event or Time Counter Config
Pulse Width or Period Meas
Config
Wait+ (ms)
AI Buffer Config
AI Buffer Read
AI Clock Config
AI Control
AI Group Config
AI Hardware Config
AI Parameter
AI SingleScan
AI Trigger Config
AO Buffer Config
AO Buffer Write
AO Clock Config
AO Control
AO Group Config
AO Hardware Config
AO Parameter
AO Single Update
AO Trigger and Gate Config
Digital Buffer Config
Digital Buffer Control
Digital Buffer Read
Digital Clock Config
Digital Group Config
Digital Single Read
Digital Single Write
Digital Trigger Config
DIO Port Config
DIO Port Read
DIO Port Write
CTR Control
CTR Group Config
CTR Hardware Config
CTR Mode Config
Channel To Index
IOtech LabVIEW Substitution VIs
3-1
10-03-02
Page 12
An “IOtech LabVIEW Substitution VIs” Walk-Through
In this walk-through we will use IOtech LabVIEW Substitution VIs to modify the National Instruments
Cont Acq&Chart (buffered).vi. The Cont Acq&Chart (buffered).vi example can be accessed via the
LabVIEW Help menu under the “Search Examples-Data Acquisition(Daq) Analog Input” sub-heading.
If you intend to use both National InstrumentsTM Hardware and IOtech DaqBoards, we
recommend that you create a new folder in which to keep your converted VIs.
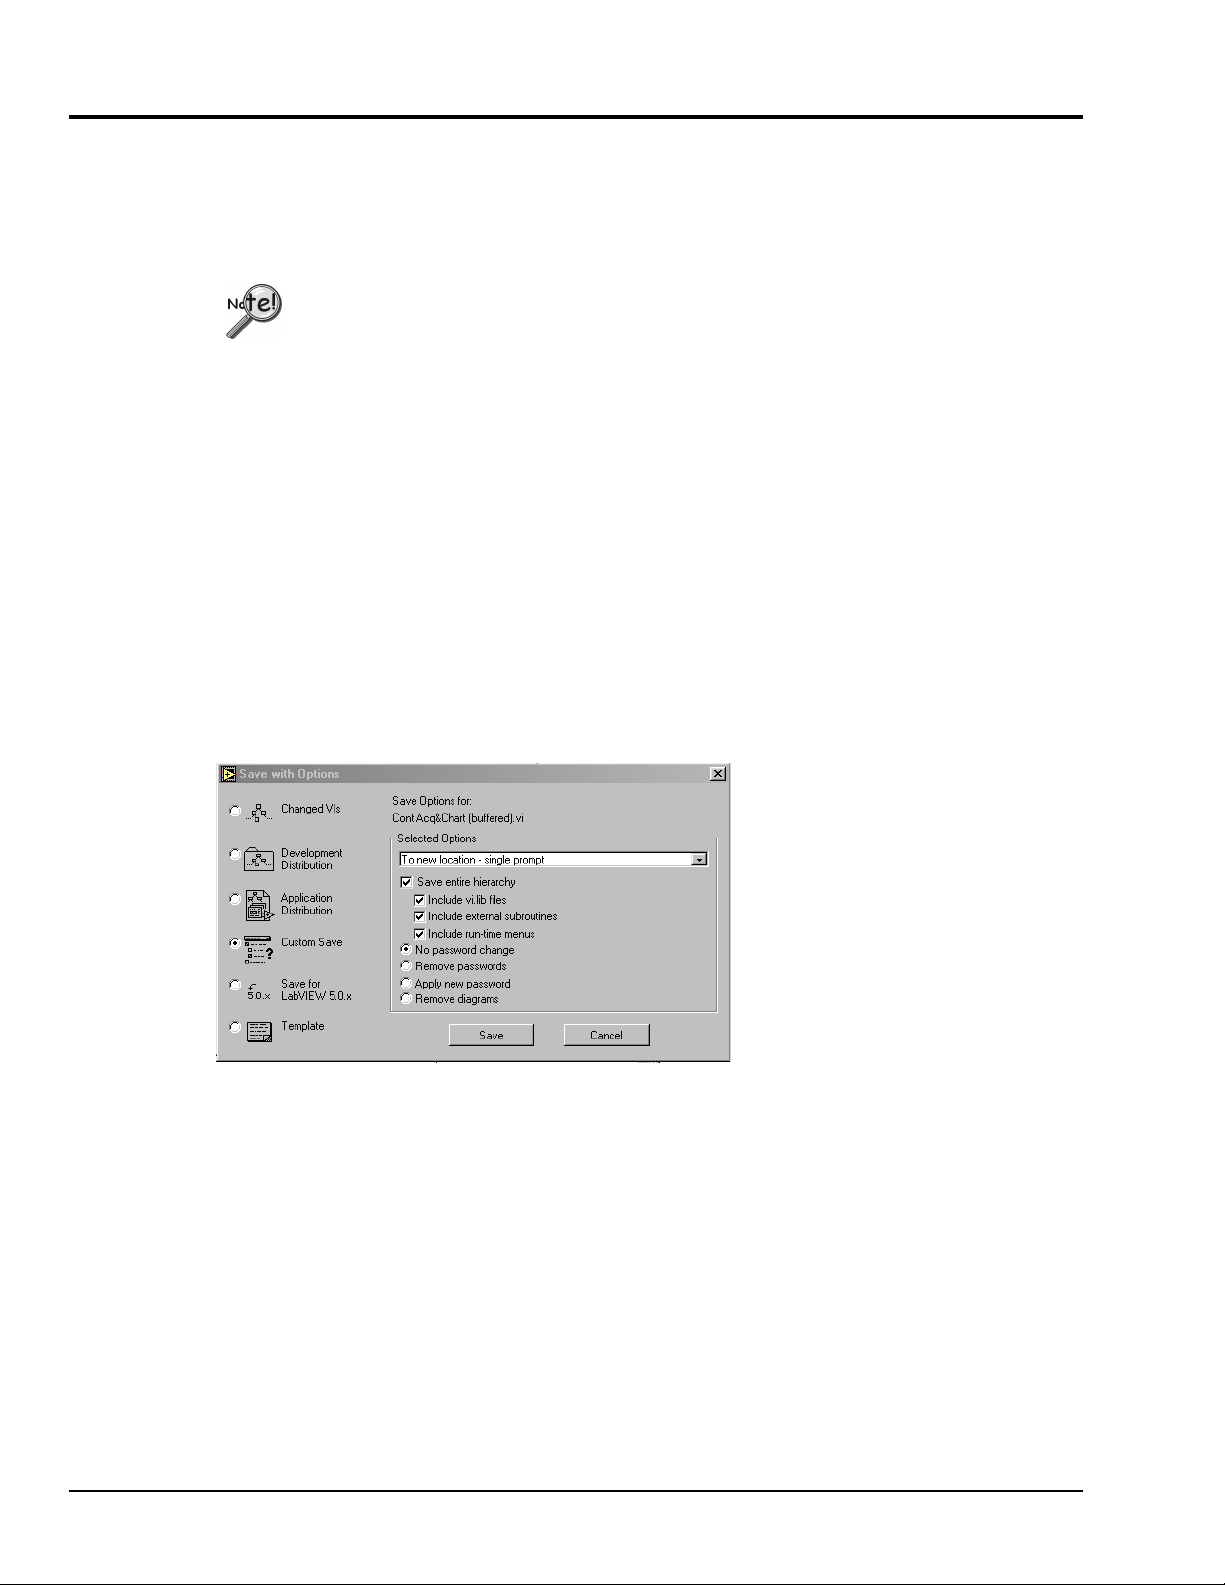
1. Pull-down the File menu.
2. Select “Save With Options.”
3. Refer to the following figure. Select “Custom Save.” This will allow you to make the IOtech
LabVIEW Substitution VIs while keeping the National Instrument VIs.
4. In the “Selected Options” section of screen, choose the options as indicated in the following figure.
These are:
To new location – single prompt
•
Save entire hierarchy
•
Include vi.lib files
•
Include external subroutines
•
Include run-time menus
•
No password change
•
3-2
Performing a Custom Save of Cont Acq&Chart (buffered).vi
5. Click “Save” and create a new folder in which to keep your IOtech LabVIEW Substitution VIs.
6. Close the National Instruments example.
7. Open the Cont Acq&Chart (buffered).vi version you just saved from the location chosen in step 5.
8. Look at the Virtual Instruments Diagram for Cont Acq&Chart (buffered). See following figure.
10-03-02
IOtech LabVIEW Substitution VIs
Page 13
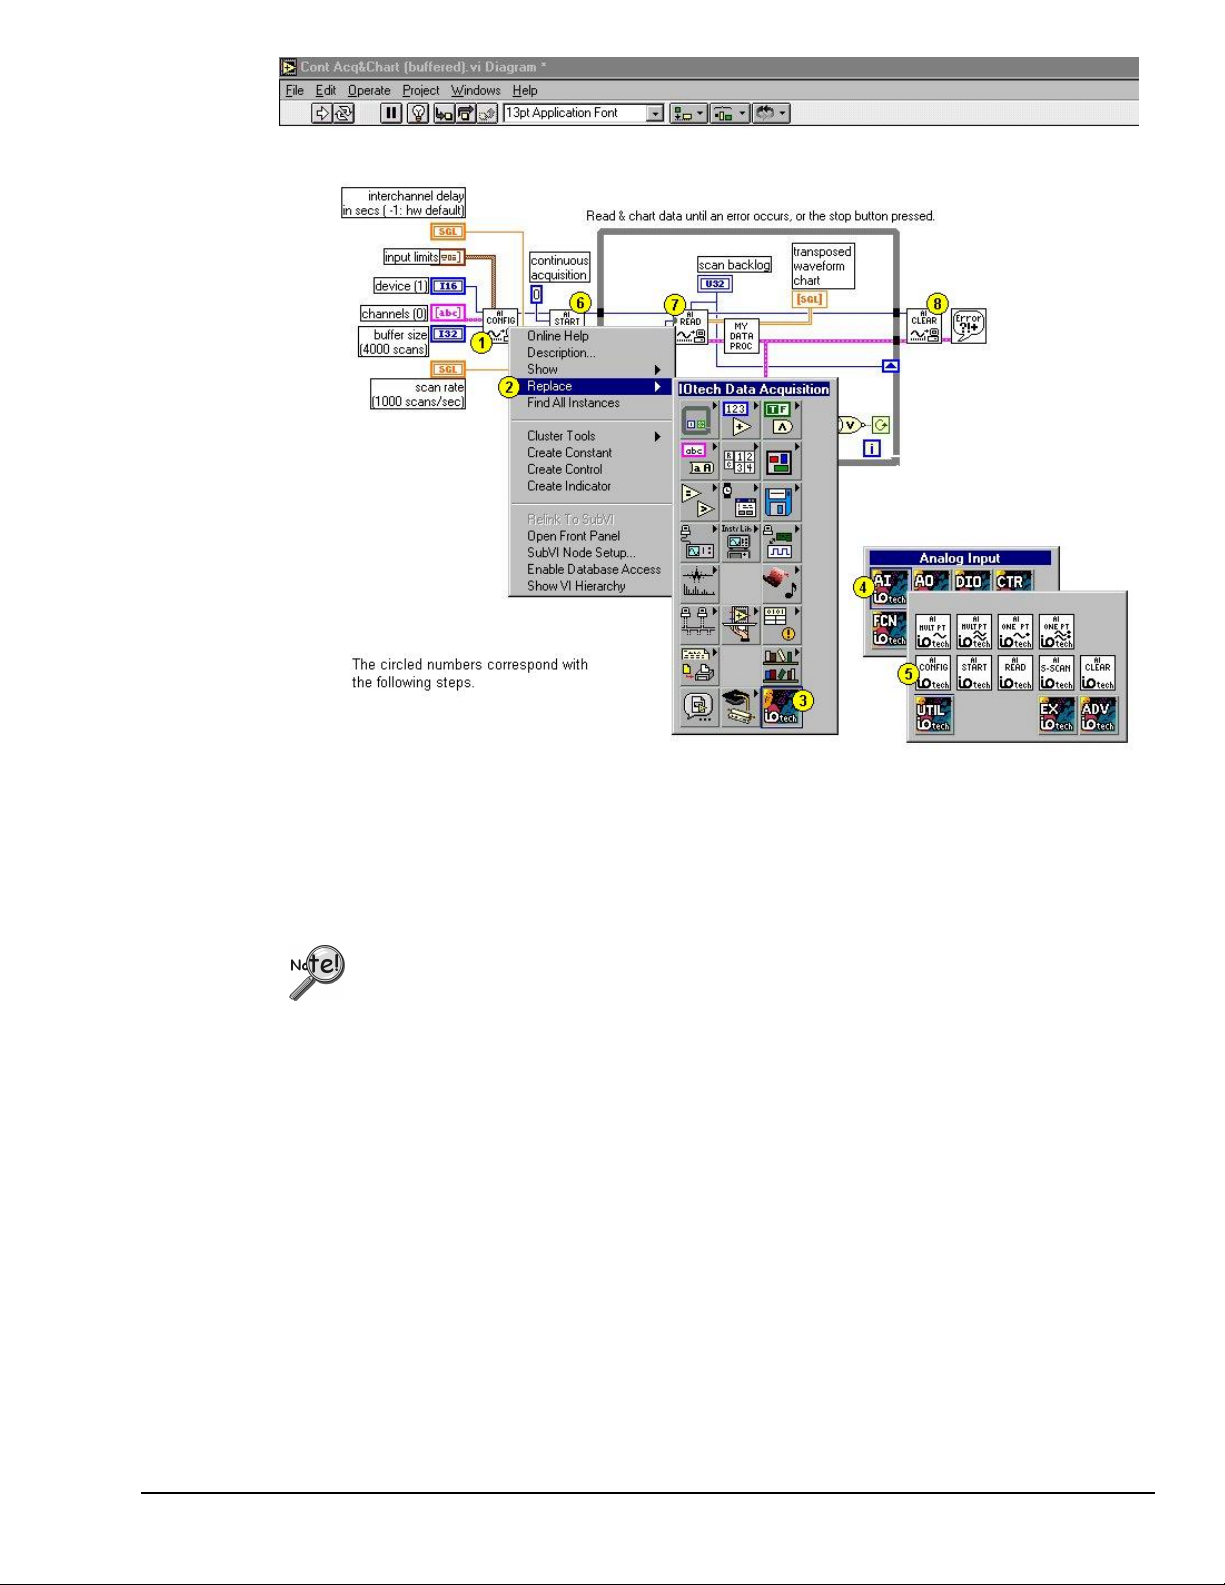
Replacing the VIs within the Cont Acq&Chart (buffered).vi Diagram
In this example there are four hardware-related items that need replaced,
• AI Config
• AI Start
• AI Read
• AI Clear
Two other Virtual Instruments, My Data Proc and the Error handler have no
associated IOtech LabVIEW Substitution VI, as they do not directly pertain to
hardware. My Data Proc and the Error handler, should not be altered.
For the following steps, refer to the above figure as needed.
1. Right-click on AI Config. A list of options appears.
2. Move the mouse-pointer over the Replace option. The Functions Palette will appear.
3. Move the mouse-pointer over the IOtech Data Acquisition Button --
The IOtech Data Acquisition Palette will appear.
4. Move the mouse-pointer over IOtech’s “AI” button -- The Analog Input function palette will appear.
5. Click the IOtech AI Config.vi.
IOtech LabVIEW Substitution VI now replaces the original AI Config.vi.
Note: When the mouse-pointer moves over the IOtech AI Config VI, the Analog Input function pallet’s title
bar will show IO_AI Config.vi. The names of some high-level and low-level VIs look very similar.
When replacing VIs, the proper IOtech LabVIEW Substitution VI can be recognized by the
following naming convention:
“IO_” will be appended to the beginning of the original LabVIEW VI name. In this example
AI Config.vi is replaced with IO_AI Config.vi.
IOtech LabVIEW Substitution VIs
10-03-02
3-3
Page 14

6. Right-click on AI Start; then repeat steps 2 through 4. At what would be step 5, select AI Start.
7. Right-click on AI Read; then repeat steps 2 through 4. At what would be step 5, select AI Read.
8. Right-click on AI Clear; then repeat steps 2 through 4. At what would be step 5, select AI Clear.
Testing, Debugging, and Saving the New Application
Testing
You should always verify that your Virtual Instruments function as you expect them to. For example, if you
modified an Analog Input VI, you should connect a known signal to the inputs and verify functionality. If
you modified an Analog Output VI you should use an oscilloscope, or meter, to verify the actual output.
Debugging your Application
If testing your application shows that it does not function properly, debug the application as follows:
1. Using the IOtech Control Panel Applet, verify that the DaqBoard/2000 Series board has been properly
installed and configured. Correct installation and configuration issues as applicable.
2. Physically check all hardware connections. Correct improper connections.
3. Determine if LabVIEW is communicating with the DaqBoard/2000 device.
(a) Go to the LabVIEW Directory.
(b) Go to the IOtech Data Acquisitions Functions Palette.
(c) Open and Run the IOtech LabVIEW Substitution VI named “Install Test.”
(d) Open and Run the “Install Test” VI.
Running Install Test generates a list of every DaqBoard/2000 Series board that is located in your PC.
You can run a communications test on a specific board. If the test does not pass, contact product
support. Chapter 4 includes contact information. If the test does pass, proceed to step 4.
4. Run one of the example programs to ensure that LabVIEW and the DaqBoard/2000 Series Board are
communicating properly.
If you cannot resolve the problem, review Chapter 4, Issues and Caveats. If the problem still can’t be
resolved, seek customer assistance. Note that Chapter 4 includes contact information for product support.
Saving your Application
Save your application using LabVIEW’s standard save procedure. If you are using both IOtech and
National Instrument devices it is a good idea to save your VIs in separate folders.
3-4
10-03-02
IOtech LabVIEW Substitution VIs
Page 15

Issues and Caveats 4
Intended Use
No Signal Conditioning DBK Support –
DSP
– Some of the Low Level NI-DAQ VIs reference DSP handles to buffers. The DSP handle functionality is
Trigger Types
Analog Input Range Settings
– IOtech LabVIEW Substitution VIs are intended for LabVIEW users who are replacing one of the
following devices with an IOtech DaqBoard/2000 Series board.
• National Instruments “E” series board
• PC-LPM-16
• AT-MIO-16 “H” or “L” series board, with this exception, IOtech LabVIEW Substitution VIs
do not support the x500 gain-setting on the AT-MIO-16 L board.
If you need to access the full functionality of DaqBoard/2000 Series boards,
the IOtech LabVIEW API VIs must be used.
Architectural differences exist between IOtech and National
Instruments boards. For this reason, certain features that are available in DaqBoard/2000 Series boards
[and in National Instruments boards] are not supported by the Substitution VIs. For example, the
Substitution VIs do not support DBK signal conditioning options.
automatic in the DaqBoard/2000 Series and the VI DSP handles are simply ignored.
Any VIs that are dependant on reading from or writing to a buffer [using either a DSP handle or a buffer
offset] will not function properly when replaced.
– Attempting to use a trigger type that is not supported will result in error 10083. Refer to
DaqBoard/2000 Series documentation for a list of valid trigger types.
– It is often the case that IOtech and National Instruments devices have different
range and gain settings. Gain selection for DaqBoard/2000 Series boards is automatic and is based on the
user-selected voltage limits.
Analog Output
the output must be stopped, changed, and restarted.
Counters and Timers
examples located under the IOtech CTR VI Palette. The support of this section is restricted to event
counting in 16-bit and 32-bit counter lengths. Frequency measurements can be made using event counting
within a known time frame. See the “Measure Frequency.vi” within the IOtech CTR Palette under
examples.
– Live update of an output buffer is not supported. If an output buffer needs to be changed, then
– Low-speed frequency measurement and signal timing can be accomplished with the
The CTR example VIs are NOT exact replacements for NI-DAQ VIs and will require program
modification if they are to be used. You can run the examples to determine application suitability.
Pulse and Square Wave Generation
DaqBoard/2000 Series boards. Square wave generation can be accomplished with the example square wave
generation VI located under Digital IO.
The square wave generation VI example is NOT an exact replacement for NI-DAQ VIs and will
require program modification if it is to be used. You can run the example to determine suitability for
your application.
Analog Output VIs can provide functionality for applications that make use of one-shot pulse or square
waves with asymmetrical duty cycles.
– Pulse and square wave generation are limited with the IOtech
IOtech LabVIEW Substitution VIs
4-1
10-03-02
Page 16

Questions and Answers
Q: Who should I contact if I have questions that are not answered by my documentation?
A: If you believe you are having a problem with IOtech LabVIEW Substitution VIs or IOtech Hardware,
contact IOtech. Contact information is provided at the end of this chapter.
Q: What is meant by “IOtech LabVIEW Substitution VI”?
A: IOtech has developed a series of the VIs that emulate the NI-DAQ VIs. These IOtech VIs are referred
to as IOtech LabVIEW Substitution VIs.
Q: How do I install VIs?
A: Refer to chapter 1 of this document for installation instructions.
Q: How are Substitution VIs accessed and where are they physically located?
A: Substitution VIs can be accessed from within LabVIEW through the Function Palette.
The VIs are physically located under
...\Program Files\National Instuments\Labview(X)\IOtech Data Acquisition\
Q: What version(s) of LabVIEW do I need to have?
A: IOtech LabVIEW Substitution VIs are supported by LabVIEW versions 5.1 and higher.
Q: What operating systems are supported?
A: IOtech LabVIEW Substitution VIs are supported by Windows 9x, Me, NT, 2000, and XP.
Q: Are there any examples on how to use IOtech LabVIEW Substitution VIs? If so, where are they?
A: Program examples exist for each function. They are located in the sub-palette, or sub-directory, below
the major function. For example: IOtech Data Acquisition\Analog Input\Examples)
Q: Can I use both IOtech and NI devices?
A: You may use IOtech and National Instruments boards in the same machine and even within the same
program as long as (1) the IOtech LabVIEW Substitution VIs are used to control IOtech boards, and (2)
the NI-DAQ VIs are used to control the National Instruments boards. You cannot mix VIs.
Q: Can I use boards other than those manufactured by IOtech and National Instruments, providing these
devices have LabVIEW support?
A: Yes, but you will need to use NI compatible virtual instruments that were developed for those specific
devices, providing those VIs exist.
Q: What do I have to do to my existing LabVIEW application to make it work?
A: If you have an existing National Instruments board-based test system, and you want to convert it for use
with An IOtech DaqBoard/2000 Series board, you must replace all the NI-DAQ Device Specific VIs
with the corresponding IOtech LabVIEW Substitution VIs.
Q: Can I use the IOtech LabVIEW Substitution VIs with National Instruments examples, or with higher
level VIs?
A: Yes, refer to the examples.
Q: How do I determine that a VI substitution operation was successful?
A: Test the modified application using known input and output values.
Q: Will using IOtech LabVIEW Substitution VIs change the performance of my LabVIEW application?
A: Under most circumstances, no. The IOtech LabVIEW Substitution VIs do not introduce any additional
processor overhead. If you must have absolute peak performance consider using the IOtech API
LabVIEW VIs. Note that these are stand-alone VIs that cannot be used with the Substitution VIs.
4-2
10-03-02
IOtech LabVIEW Substitution VIs
Page 17

Customer Assistance
To report problems and receive support, call or e-mail our Applications department, or visit our web site.
When you contact us, please provide the following information so support personnel can help you most
efficiently:
• Hardware model numbers and software version numbers.
•
Operating system, type of computer, and device information in the Windows control panel
• Results of tests, such as the Daq* Configuration control panel.
• Hardware setup and software configuration.
•
Information on input and/or output signals, as applicable.
• The replacement steps you performed, e.g., what VIs did you replace and what were the
before and after results.
All equipment returned to the manufacturer must have an RMA (Return Material Authorization) number.
You can obtain an RMA number by calling the Customer Service or Applications departments. When
returning the equipment, use the original shipping container (or equivalent) to prevent damage. Put the
RMA number on your shipping label to ensure that your shipment will be handled properly. After receiving
your equipment, we will fax a confirmation form that summarizes the charges (if applicable) and expected
return date.
IOtech can be reached by one of the following means:
Phone: (440) 439-4091
Fax: (440) 439-4093
E-mail (Product Information/Sales): sales@iotech.com
E-mail (Technical Support): productsupport@iotech.com
Internet: http//:www.iotech.com
Mail: IOtech, Inc.
25971 Cannon Road z Cleveland, Ohio 44146-1833
z
IOtech LabVIEW Substitution VIs
10-03-02
4-3
Page 18

4-4
10-03-02
IOtech LabVIEW Substitution VIs
 Loading...