

Page 1

CIO-EXP-RTD16
RTD EXPANSION BOARD
User’s Manual
Revision 2
© Copyright, November, 2000
Page 2

LIFETIME WARRANTY
Every hardware product manufactured by Measurement Computing Corp. is warranted against defects in materials or
workmanship for the life of the product, to the original purchaser. Any products found to be defective will be repaired or
replaced promptly
LIFETIME HARSH ENVIRONMENT WARRANTY
Any Measurement Computing Corp. product which is damaged due to misuse may be replaced for only 50% of the current pr ice.
I/O boards face some harsh environments, some harsher than the boards are designed to withstand. When that happ ens, just
return the board with an o rder for its replacement at o nly 50% of the list p rice. Measurement Comput ing Corp. does not n eed to
profit from your misfortune. By the way, we will honor this warranty for any other manufacture’s board that we have a
replacement for!
.
TM
30 DAY MONEY-BACK GUARANTEE
Any Measurement Computing Corp. product may be returned within 30 days of purchase for a full refund of the price paid for
the product being returned. If you are not satisfied, or chose the wrong product by mistake, you do not have to keep it. Please call
for a RMA number first. No credits or returns accepted without a copy of the original invoice. Some software products are
subject to a repackaging fee.
These warranties are in lieu of all other warranties, expressed or implied, including any implied warranty of merchantability or fitness for a
particular application. The remedies provided herein are the buyer’s sole and exclusive remedies. Neither Measurement Computing Corp., nor
its employees shall be liable for any direct or indirect, special, incidental or consequential damage arising from the use of its products, even if
Measurerment Computing Corp. has been notified in advance of the possibility of such damages.
MEGA-FIFO, the CIO prefix to data acquisition board model numbers, the PCM prefix to data acquisition board model numbers,
PCM-DAS08, PCM-D24C3, PCM-DAC02, PCM-COM422, PCM-COM485, PCM-DMM, PCM-DAS16D/12,
PCM-DAS16S/12, PCM-DAS16D/16, PCM-DAS16S/16, PCI-DAS6402/16, Universal Library,
Warranty
and Measurement Computing are registered trademarks of Measurement Computing Corp.
Insta
Cal,
Harsh Environment
IBM, PC, and PC/AT are trademarks of International Business Machines Corp. Windows is a trademark of Microsoft Corp. All
other trademarks are the property of their respective owners.
Information furnished by Measurement Computing Corp. is believed to be accurate and reliable. However, no responsibility is
assumed by Measurement Computing Corp. neither for its use; nor for any infringements of patents or other rights of third
parties, which may result from its use. No license is granted by implication or otherwise under any patent or copyrights of
Measurement Computing Corp.
All rights reserved. No part of this publication may be reproduced, stored in a retrieval system, or transmitted, in any form by any
means, electronic, mechanical, by photocopying, recording or otherwise without the prior written permission of Measurement
Computing Corp.
Notice
Measurement Computing Corp. does not authorize any Measurement Computing Corp. product for
use in life support systems and/or devices without the written approval of the President of
Measurement Computing Corp. Life support devices/systems are devices or systems which, a) are
intended for surgical implantation into the body, or b) support or sustain life and whose failure to
perform can be reasonably expected to result in injury. Measurement Computing Corp. products
are not designed with the components required, and are not subject to the testing required to
ensure a level of reliability suitable for the treatment and diagnosis of people.
HM CIO-EXP-RTD16.lwp
Page 3

Table of Contents
1 INTRODUCTION
2 SOFTWARE INSTALLATION
3 GENERAL CONFIGURATION
3.1 A/D BOARD-TYPE SELECT JUMPER
3.2 SETTING THE OUTPUT CHANNEL
3.3 CONFIGURING THE A/D BOARD
3.3.1 DAS08 Family Setup
3.3.2 DAS16 Family Setup
3.3.3 All A/D Boards
..............................................................
..................................................
..................................................
.........................................
...........................................
............................................
.....................................................
.....................................................
..........................................................
3.4 CONNECTING THE CIO-EXP-RTD16 TO THE A/D BOARD
3.4.1 Connecting to a DAS08 Series A/D Board
3.4.2 Connecting to a DAS16 Series A/D Board
3.4.3 Other A/D Boards
3.5 POWERING THE CIO-EXP-RTD16
3.5.1 Power Source Switch
........................................................
............................................
.....................................................
3.5.2 Powering with the 37 pin connector:
3.5.3 Powering with the C-PCPOWER-10 cable:
3.6 DAISY-CHAINING CIO-EXP-RTD16 BOARDS
3.7 CONNECTING A VOLTAGE SIGNAL
3.8 VERIFYING THE INSTALLATION
.........................................
............................................
4 VOLTAGE MEASUREMENT CONFIGURATION
4.1 CHANNEL SELECTION
4.2 POWER SOURCE SWITCH
......................................................
...................................................
4.3 DETERMINING THE APPROPRIATE GAIN
4.4 SETTING THE GAIN
4.4.1 First Stage Gain Switch
4.4.2 Second Stage Gain Switch
4.5 ATTENUATION
.........................................................
...................................................
................................................
.............................................................
4.6 CHANNEL CONFIGURATION SWITCH
4.7 CONNECTING VOLTAGE SIGNALS
4.7.1 Single Ended
4.7.2 Floating Differential
4.7.3 Fully Differential
............................................................
.....................................................
.......................................................
..........................................
5 RTD MEASUREMENT CONFIGURATION
5.1 CHANNEL SELECTION
5.2 POWER SOURCE SWITCH
.....................................................
..................................................
5.3 DETERMINING THE APPROPRIATE GAIN
5.4 SETTING THE GAIN
5.4.1 First Stage Gain
5.4.2 Second Stage Gain
........................................................
........................................................
......................................................
5.5 CHANNEL CONFIGURATION SWITCH
...................................
...................................
........................................
..................................
.................................
................................
....................................
.......................................
.....................................
...................................
......................................
5.6 CONNECTING THE RTD TO THE SCREW TERMINALS
.....................
......................
1
1
2
2
2
3
3
3
3
4
4
4
4
5
5
5
5
6
6
6
7
7
7
7
8
8
8
9
9
9
9
10
11
12
12
12
12
13
14
14
15
15
iii
Page 4

5.6.1 Two-wire RTD Hookup
5.6.2 Three-Wire RTD Hookup
5.6.3 Four-Wire RTD Hookup
5.7 CALIBRATION AND TEST
..................................................
................................................
.................................................
..................................................
6 CUSTOM GAIN AND EXCITATION CALCULATIONS
6.1 CUSTOM EXCITATION CURRENT - R89
.....................................
6.2 CUSTOM SECOND STAGE GAIN RESISTOR - RX100
7 SPECIFICATIONS
............................................................
.........................
.........................
16
16
17
17
17
17
18
19
iv
Page 5

1 INTRODUCTION
The CIO-EXP-RTD16 is a signal conditioning accessory designed for use with the DAS08 and DAS16
family of data acquisition boards. Circuitry to excite selected RTDs on a per channel basis converts the
RTD's output current to a voltage suitable for conversion by a DAS08 or other analog to digital
conversion board.
This manual is loosely organized into sections that explain the CIO-EXP-RTD16:
Installation: Installation and initial setup.
Voltage Reading: Explains how to set up for and make voltage only readings.
RTD: Describes how two, three, and four-wire type RTDs are connected.
Please carefully read the Installation section and follow the initial installation and test steps. Verify the
installation with a voltage measurement prior to connecting RTDs and attempting to measure
temperature.
2 SOFTWARE INSTALLATION
There is no software shipped with the CIO-EXP-RTD16. The CIO-EXP-RTD16 is an accessory board
intended to be used with an A/D board such as a CIO-DAS08 or -DAS16. A program called InstaCal is
shipped with every DAS board. InstaCal has installation information in it about the CIO-EXP-RTD16.
Refer to the Software Installation Manual for complete information.
To update the InstaCal configuration file to include CIO-EXP-RTD16 information, start InstaCal, select
the board number of the DAS board that has the CIO-EXP-RTD16 connected to it, and select the channel
number the CIO-EXP-RTD16 is connected to. The options for the CIO-EXP-RTD16 will be available to
set and change. After this is done, you can use the InstaCal calibrate and test options.
You must use InstaCal to update and configure the configuration file CB.CFG to include the
CIO-EXP-RTD16 settings before you can use the CIO-EXP-RTD16 with InstaCal, Universal Library and
some applications packages. Initially, accept the default settings so that you can verify the installation.
You may have to go back and make changes with InstaCal once you have selected a sensor and read the
section on installing that sensor.
1
Page 6
3 GENERAL CONFIGURATION
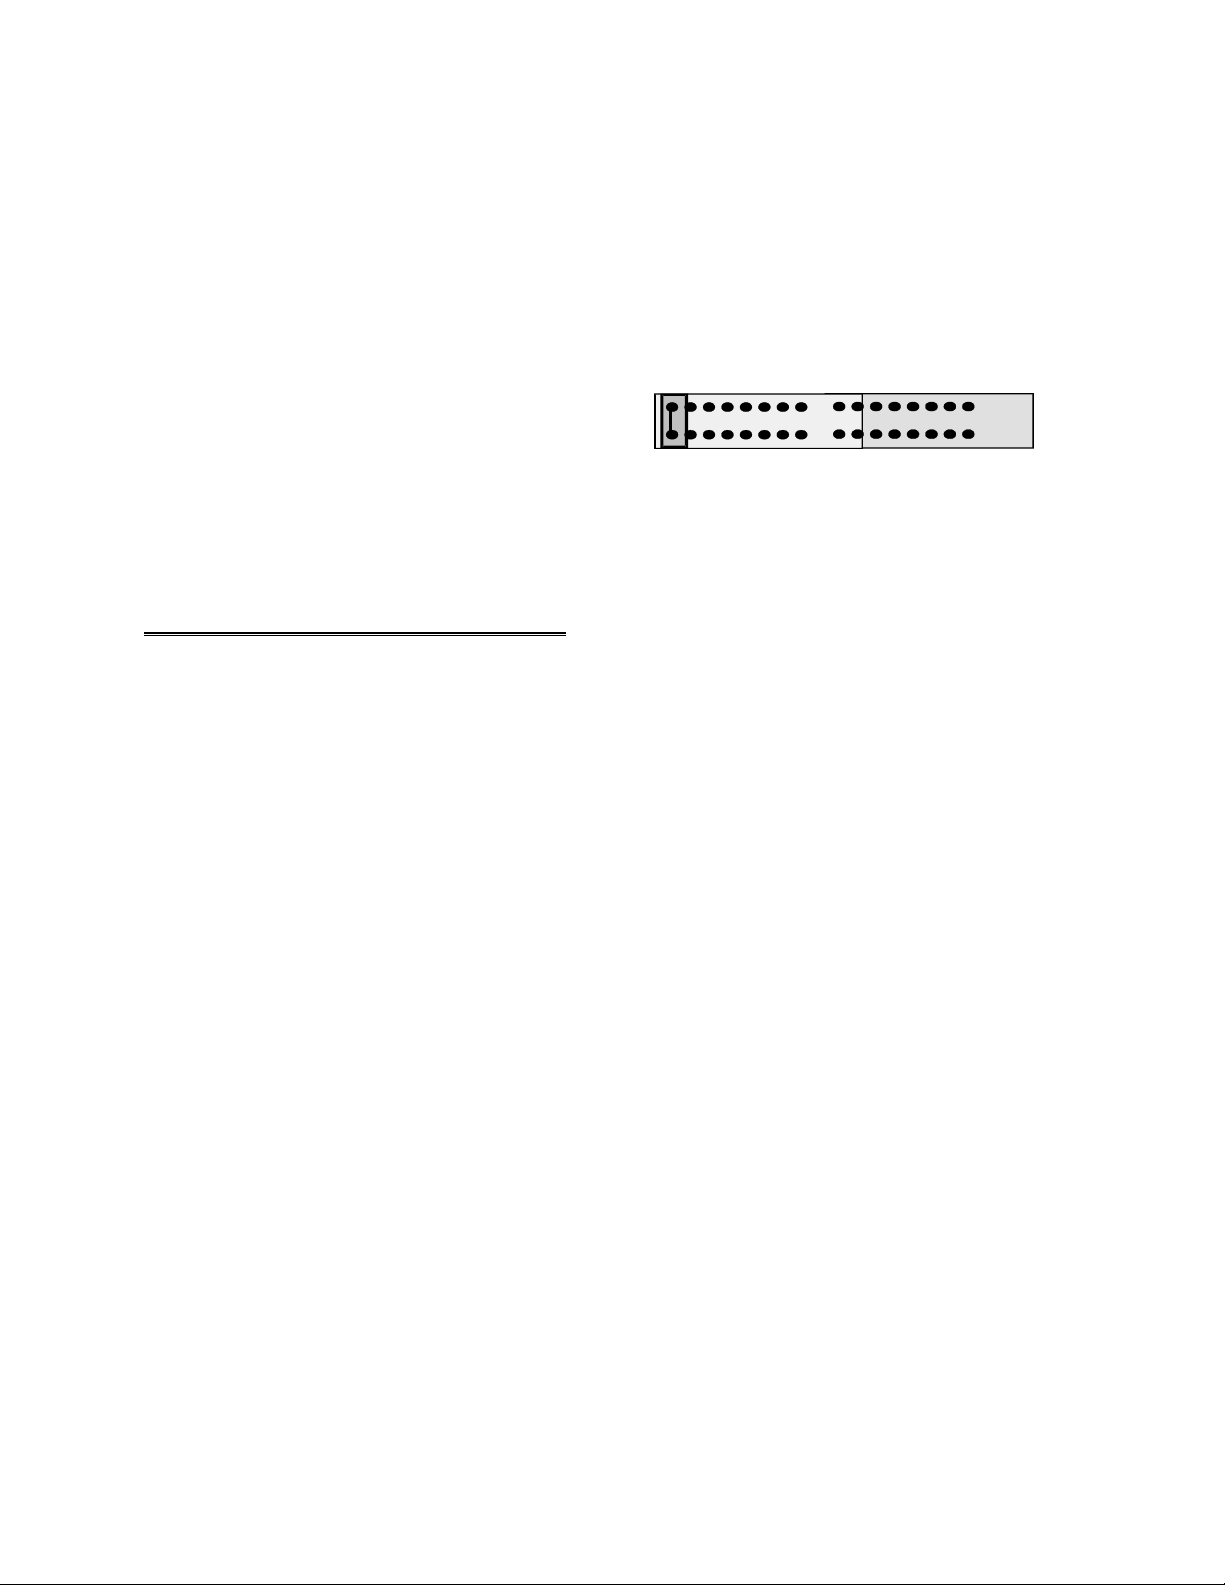
3.1 A/D BOARD-TYPE SELECT JUMPER
The CIO-EXP-RTD16 may be used with either DAS08 or DAS16 family boards because the signal
assignments of the 37 pin connector match those of the DAS08, and may be adapted to those of the
DAS16 with a C-EXP2DAS16-10 cable. Jumper JB10 on the CIO-EXP-RTD16 board located near the
37-pin connectors is used to select the either the DAS08 or DAS16 A/D board family.
Select the A/D board type (DAS08 or DAS16) using the JB 10 jumper
(Figure 3-1).
The jumper is shown here with the CIO-EXP-RTD16 configured for
DAS08
DAS16
use with a CIO-DAS08 family board.
Figure 3-1. DAS08/16 Select Jumper
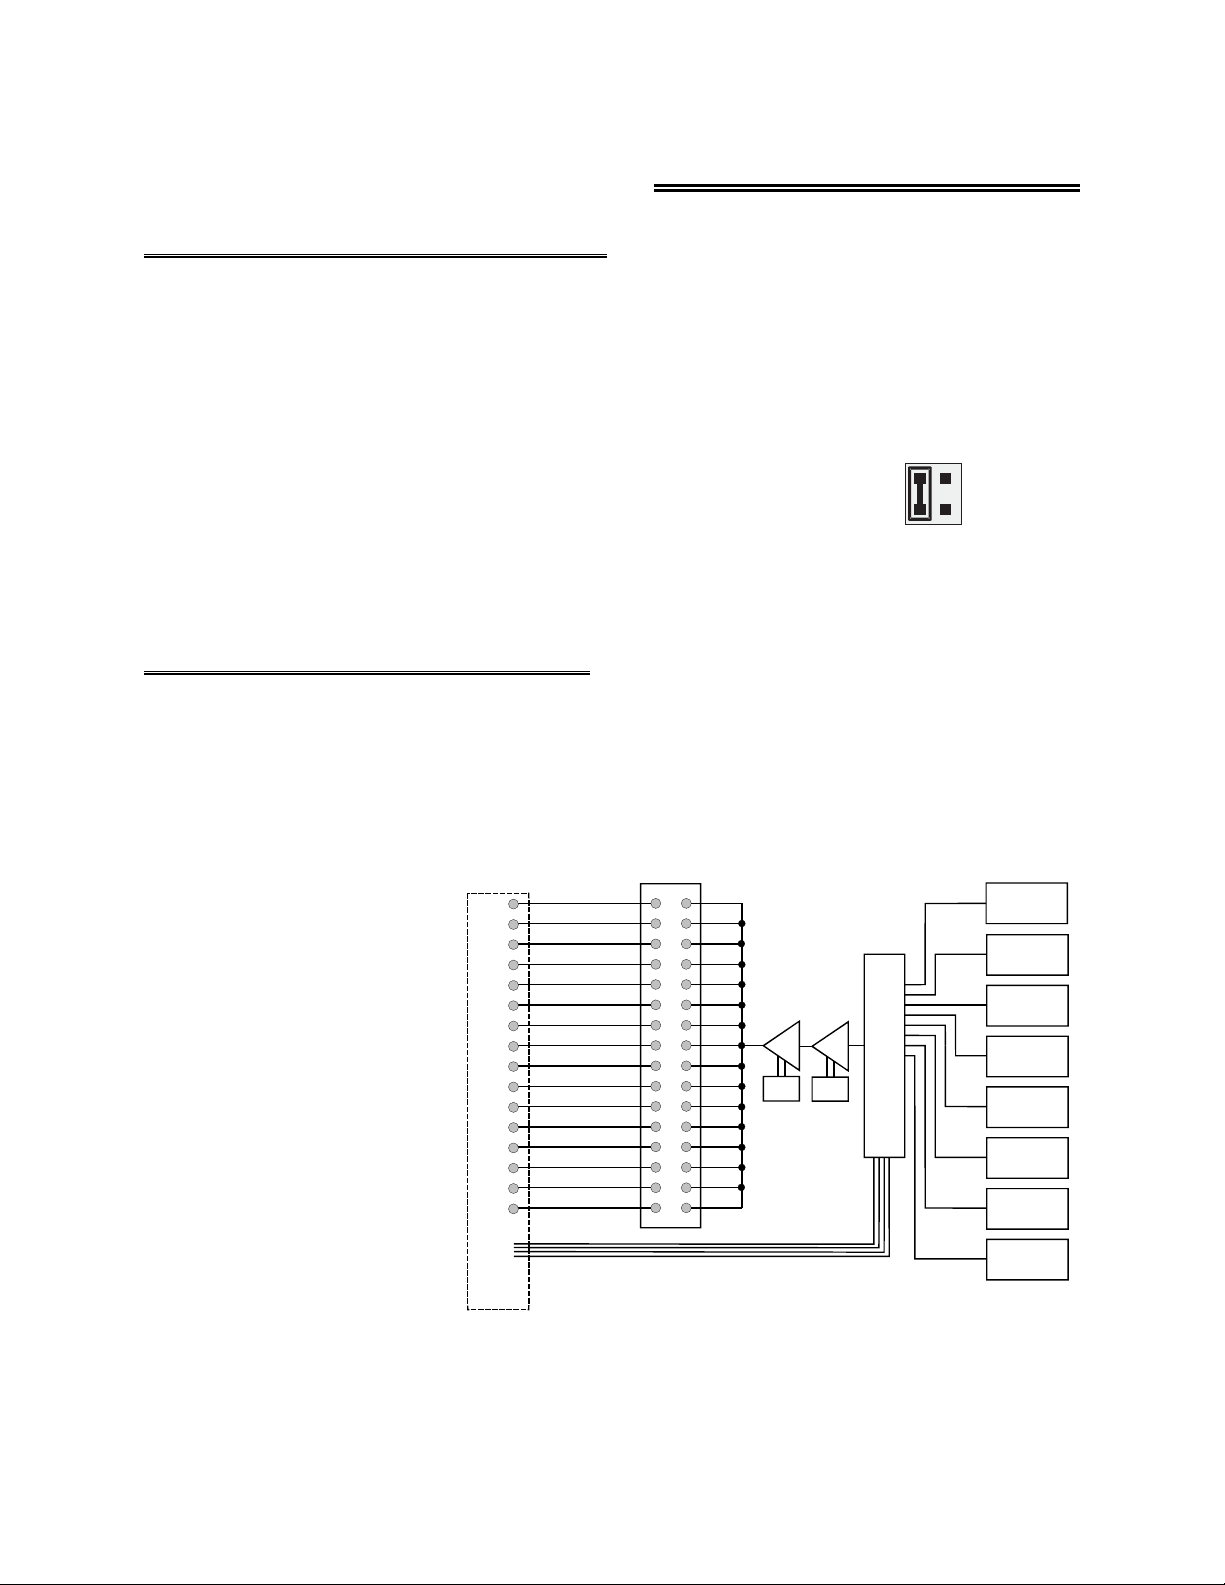
3.2 SETTING THE OUTPUT CHANNEL
Jumper positions labeled “CH SEL” located near the 37-pin connectors are used to select one
CIO-EXP-RTD16 output channel to which the output from the addressed RTD will be connected. This
setting determines which A/D channel is used to acquire data from the CIO-EXP-RTD16 when it is
connected to an A/D board.
There are 16 jumpers for the
output. Each jumper corresponds
to one of the 16 output pins on
the 37-pin connector.
When the CIO-EXP-RTD16 is
connected to a DAS08 series
board, any one of the first 8
channels (labeled 0-7) may be
used.
When the CIO-EXP-RTD16 is
connected to a DAS16 series
board, any one of 16 jumper
positions may be used.
In each case, the jumper
corresponds to an input channel
number on the A/D board. See
Figure 3-2 and 3-3.
37 D
CONNECTOR
37
36
35
34
33
32
31
30
18
17
16
15
14
13
12
11
7-10
OUTPUT CHANNEL SELECT
0
1
2
3
4
5
6
7
8
9
10
11
12
13
14
15
AMP
AMP
GAIN
GAIN
1 OR 7
1,2, 4, 8
MUX CONTROL
INPUT 0
INPUT 1
INPUT 2
INPUT N
INPUT N + 1
8 CHANNEL MULTIPLEXOR
16-CHANNEL MULTIPLEXER
INPUT 13
INPUT 14
INPUT 15
Figure 3-2. Channel-Selection Block Diagram
2
Page 7
NOTE: If the jumper setting does not agree with the selection made in InstaCal setup, InstaCal and the
Universal Library will not be able to make readings from the CIO-EXP-RTD16.
One individual channel must be selected for each bank of 16 EXP channels. For example, if you are
using several CIO-EXP-RTD16 boards, the jumper setting for each board must be unique. If you select
channel 0 for the first board, do not use this channel for any of the other boards.
Figure 3-3 is a diagram of the jumper
positions.
1234567
0
8 9 10 11 12 1415
13
Place the jumper on the pin which
corresponds to the A/D board's input
channel.
CH SEL
CHANNEL 0 SELECTED
FOR BOARD OUTPUT
Figure 3-3. Channel Selection Jumper Locations
3.3 CONFIGURING THE A/D BOARD
3.3.1 DAS08 Family Setup
The input mode of the A/D board must be single-ended to be compatible with the CIO-EXP outputs.
Some of the boards in the DAS08 series have differential inputs that can be converted to single-ended
inputs. See the information shipped with your A/D board for conversion to single-ended inputs.
3.3.2 DAS16 Family Setup
The input mode of the A/D board must be single-ended to be compatible with the CIO-EXP outputs.
Most of the DAS16 series is switch selectable for either 8 differential or 16 single ended inputs. When
used with the CIO-EXP, set the switch to 16 channel, single-ended mode.
3.3.3 All A/D Boards
If the range of your A/D board is switch selectable and you are using RTDs, set the range of the A/D
board to 5V Unipolar, if available, or 10V Unipolar if not. Some software packages base the calculation
of temperature on these ranges only. (The optional Universal Library does allow other ranges, but 5V
Unipolar is preferred.)
If your A/D board has a UNI / BIP switch (for setting the range to either unipolar or bipolar), the
preferred setting is UNI (unipolar).
If the range on your A/D board is fully programmable, the software you use for temperature measurement
will determine the correct range to use
If you are not using RTDs, set the range of the A/D board to accommodate the maximum output expected
from the CIO-EXP-RTD16 board.
3
Page 8

3.4 CONNECTING THE CIO-EXP-RTD16 TO THE A/D BOARD
L
3.4.1 Connecting to a DAS08 Series A/D Board
A CIO-DAS08 series board may be connected directly through a C37FF series cable from the P1
connector on the CIO-EXP-RTD16 to the A/D analog connector. The JB10 jumper should be left in the
DAS08 position as set at the factory.
3.4.2 Connecting to a DAS16 Series A/D Board
The CIO-EXP can be used with DAS16 series boards, expanding the DAS16's 16 inputs to 256 inputs.
The connection requires a special 37-conductor cable (CEXP2DAS16-10) since pin relationship of
CIO-EXP and DAS16 signals is not 1:1.
Install the CEXP2DAS16-10 cable connector labeled “MUX” into the P1 connector of the
CIO-EXP-RTD16 board and the other end into the DAS16 series board’s analog connector.
3.4.3 Other A/D Boards
If you need to connect to a board other than
those described above, call technical support.
We may have the cable you need.
Alternatively, you could use this connector
diagram to construct a cable.
The signal from the CIO-EXP-RTD16 is a
multiplexed voltage from each RTD input to a
single jumper-selected channel and an analog
ground (LLGND). There should be no voltage
between analog ground and power ground.
The MUX address lines control the setting of
the channel multiplexer. When all are low, the
mux is set to channel 0. The lines are binary
coded with MUXADDR1 being the LSB and
MUXADDR4 being the MSB.
The output digital address lines from an A/D
card are typically named Dig. Out 0 to Dig.
Out 3 respectively.
NC / LLGND
LGND / OUTPUT 8
OUTPUT 9
OUTPUT 10
OUTPUT 11
OUTPUT 12
OUTPUT 13
OUTPUT 14
OUTPUT 15
MUX ADDR 4
MUX ADDR 3
MUX ADDR 2
MUX ADDR 1
NC
NC
NC
NC
NC
NC
19
18
17
16
15
14
13
12
11
10
9
8
7
6
5
4
3
2
1
37
36
35
34
33
32
31
30
29
28
27
26
25
24
23
22
21
20
OUTPUT 0
OUTPUT 1
OUTPUT 2
OUTPUT 3
OUTPUT 4
OUTPUT 5
OUTPUT 6
OUTPUT 7
+5 VOLTS FROM PC
POWER GROUND
NC
NC
NC
NC
NC
NC
NC
NC
Figure 3-4. 37-Pin Connector Pin-out
4
Page 9

3.5 POWERING THE CIO-EXP-RTD16
The CIO-EXP-RTD16 can be powered through the 37-pin cable or the Molex connector. The power that
can be carried through the 37-pin connector is limited so we recommend this only when a single
CIO-EXP-RTD16 is used.
The power required to run a CIO-EXP-RTD16 channel is dependent on the sensor connected to it.
Voltage measurements do not draw additional power from the CIO-EXP-RTD16, but RTDs do for the
excitation current.
3.5.1 Power Source Switch
One of the switches on the four-position DIP
switch labeled “2” controls the source of the +5V
power to the CIO-EXP-RTD16.
When positioned down, (+5 COMP), the +5V
power is drawn from the personal computer
through the signal cable. In the +5REM position
(up) power is drawn through the MOLEX
connector.
The right-hand switch selects the source of the
excitation current. The choices are 1 mA source
or a custom current selected by installing a
resistor at R89.
X1
4 3 2 1
GND
X7
CUSTOM IEXC
+5 REM
N
O
+5 COMP
IEXC=1MA
Figure 3-5. Power Source Switch
3.5.2 Powering with the 37 pin connector:
You may power the CIO-EXP-RTD16 via the 37-pin cable. Only one CIO-EXP-RTD16 can be powered
via the 37-pin cable. If you are powering multiple boards, use the C-PCPOWER-10 cable.
3.5.3 Powering with the C-PCPOWER-10 cable:
The CIO-EXP-RTD16 may be powered from the PC's power supply by connecting it to that power supply
through a C-PCPOWER-10 cable. This cable has the same Molex connector that is used inside the PC
and so may be connected directly to the PC's power supply through one of the spare connectors. The
cable is keyed, so it should not be forced. When inserted properly it will slide easily and snap in place.
5
Page 10

3.6 DAISY-CHAINING CIO-EXP-RTD16 BOARDS
Connect one CIO-EXP-RTD16 to another using a C37FF-# ribbon cable. Connect from P2 on the
‘upstream’ board to P1 on the ‘downstream’ board. Make sure each of the boards in the chain have a
unique channel selected (CH SEL jumper is set to a different number on each board).
3.7 CONNECTING A VOLTAGE SIGNAL
Make your initial test of the CIO-EXP-RTD16 with a simple voltage signal of between 0 and 5V. If you
have a variable signal source, all the better.
Each input circuit has four screw terminals
associated with it. These terminals are shown in
Add Jumper
CH0
Figure 3-6 to the right.
To connect a voltage signal to the input circuit you
need only use three screw terminals, these are:
−
−
SENSE
IEXC
+IEXC
+SENSE
+SENSE Connect the + voltage to this
-SENSE Place a wire between this and -IEXC
-IEXC Connect the Ground to this
Signal-Low
(Gnd.)
Single-Ended Voltage Input
Voltage
Source
Signal-High
Figure 3-6. Connection Terminal Block for
Voltage Test (Channel 0 Shown)
There is not room on the board for the full name next to each terminal so the eight screw terminals
associated with each input circuit are labeled on the CIO-EXP-RTD16 as follows:
+IEXC High side of RTD excitation current
+SENSE High side of input signal from voltage or RTD current
-IEXC Low side of excitation current or chassis ground for volts
-SENSE Low side of input signal from voltage or RTD
The use of the terminals is dependent on the type of sensor you have connected to the input circuit, and
the nomenclature on the terminals has been chosen to make the most sense for RTD sensors.
3.8 VERIFYING THE INSTALLATION
To verify the installation, test or calibrate the CIO-EXP-RTD16, use the InstaCal program installed on
your computer. This software came with your A/D board if you bought the board from the same
manufacturer as the CIO-EXP-RTD16. If your A/D board is not from the same manufacturer but is
compatible, please call technical support and request a copy of InstaCal.
Use InstaCal's TEST option to verify that a signal present at one of the CIO-EXP-RTD's inputs can be
read. You will not need to set any jumpers other than those previously mentioned, and should not set any
switches or install any passive components until you have verified the installation.
6
Page 11

4 VOLTAGE MEASUREMENT CONFIGURATION
The CIO-EXP-RTD16 is an amplification, signal conditioning and multiplexing accessory for DAS
boards. The inputs are suitable for connecting a voltage to the DAS board so it may be measured. The
CIO-EXP-RTD16 is a “one of sixteen” multiplexer which means that for every channel in your DAS
board, you can multiplex sixteen different signals into it. You can expand the number of inputs of your
DAS board by sixteen for every CIO-EXP-RTD16 board, up to the number of inputs on the DAS board.
For example, a DAS08 has eight inputs. Eight times sixteen is one hundred and twenty eight. Using
CIO-EXP-RTD16 boards you can bring 128 inputs into the PC with one DAS08 in one slot.
It is unlikely that you purchased a CIO-EXP-RTD16 to measure voltages. The CIO-EXP-RTD16 has
quite a bit of special circuitry designed for RTD sensors. For only voltage measurements, a CIO-EXP16
or CIO-EXP32 would be less expensive and do the same job.
However, you may have one or two voltages to measure in addition to RTD sensors and would like to
connect those signals to the CIO-EXP-RTD16. This chapter explains how to make those connections.
4.1 CHANNEL SELECTION
The General Configuration section describes the channel selection, setting the jumper and verifying the
installation and operation of the CIO-EXP-RTD16 with your data acquisition board. Configure your
boards as described in that section before continuing with this section.
4.2 POWER SOURCE SWITCH
The General Configuration section describes the power selection options, setting the power select switch
and verifying the installation and operation of the CIO-EXP-RTD16 with your data acquisition board.
Configure your boards as described in that section before continuing with this section.
4.3 DETERMINING THE APPROPRIATE GAIN
To accurately measure a voltage, the full scale of the signal should be matched to the full range of the
input circuit. Most DAS boards have an input range of ±5V, which is the native range of the analog to
digital converter at the heart of the board. Some DAS boards include amplification on the input circuit to
allow the signal to be amplified to make better use of the resolution of the A/D.
For example, a sine wave which varies between 0 and 1 volt would only be using 1/10th of the ±5V A/D
converter's resolution. By switching the input signal of the DAS board to unipolar (no negative voltage)
and amplifying the sign wave signal by 5, the entire range of the A/D converter is used and a higher
resolution measurement may be made.
In order to match your signals with the input range of the A/D board, you should do a similar calculation
and set switches on the CIO-EXP-RTD16 for the correct gain.
Gain, or amplification, allows you to boost your signal to take full advantage of the resolution of the A/D
converter. While amplifying the signal, any noise is amplified as well. If your signal ranges greater than
±5V, please go to section on attenuation.
The first stage has gain options of 1, 2, 4 or 8 and the second stage gain options are 1, 7 or CUSTOM.
7
Page 12

To choose a switch-selectable amplification, calculate as follows:
If your signal is bipolar, divide 10 by the full range of the signal. For example, if your signal ranges
between ±1/2 volt, the full range is 1 volt. Divide 10 by 1 for a result of 10. That is the maximum gain
you can use.
If your signal is unipolar and ranges less than 0 to 5V, divide 5 by the full range of the signal. For
example, if the signal ranges from 0 to 1/2 volt, the full range is 1/2 volt. Divide 5 by 0.5 for a result of
10. That is the maximum gain you can use.
4.4 SETTING THE GAIN
4.4.1 First Stage Gain Switch
A set of three Gain Select switches on the
S1 switch block selects the first stage gain
(Figure 4-1). The fourth switch on this
block (marked CUSTOM) is used to select
a custom second stage gain.
When all three switches are up, the first
stage gain is 1. Moving a switch down
selects that gain. The other two switches
should be up. (Gains choices for the first
stage are NOT additive.)
Thus, gains of 1, 2, 4 or 8 can be selected
by these switches. A gain of X2 is shown in
Figure 4-1.
4.4.2 Second Stage Gain Switch
Switch #3 on the S2 DIP switch block (Figure
4-2) is labeled X1 and X7. Setting this switch
down (ON) will amplify the output of the first
stage amplifier by 7. The factory default position
(up) has a gain of 1 (unity).
GAIN
SELECT
O
N
CUSTOM
X2
X4
X8
Figure 4-1. First Stage Gain Select Switches (S1)
CUSTOM IEXC
+5 REM
X1
When set to X7, the first stage gain is multiplied
by 7 yielding overall gains of 7, 14, 28 or 56.
A custom second stage gain of greater than 7 and
less than 64 may be added by installing a
precision resistor at RX100 and setting the switch
marked CUSTOM on.
Figure 4-2. Second Stage Gain Switch (#3 of S2)
N
O
4 3 2 1
GND
+5 COMP
X7
IEXC=1MA
8
Page 13

When using the custom second stage gain, set the switch marked CUSTOM on the S1 bank to the ON
position (down) and set the X7 switch on the S2 bank to the ON position (X7). Install a precision
resistor of the appropriate value in the RX100 location. Calculate the value using the formula found in
the Custom Gain and Excitation Calculations chapter.
4.5 ATTENUATION
If your signal range is greater than ±5V, you
will have to divide it until the result is less than
or equal to ±5V for bipolar, or 0-5V for
unipolar signals.
A voltage divider is constructed from a pair of
precision resistors selected according to the
equation:
Attenuation = (R1 + R2) / R2
PC GROUND
You will need to construct the voltage divider
remote from the CIO-EXP-RTD16.
4.6 CHANNEL CONFIGURATION SWITCH
A channel configuration switch is associated with
each channel. The switch is used to configure the
input circuit for 2, 3 or 4-wire hookup to RTDs.
NOTE: When doing voltage measurements, set
the switches to the 4-wire position (switches
labeled “4” in white on the board in the ON
position - switches labeled “3” OFF).
RES IN
INPUT
Ra
Volts In
Rb
RES OUT
RES
IN
RES
OUT
OUT
Volts Divided
PC GROUND
Figure 4-3. Voltage Divider Schematic
3
3
4
1
Set for 2 or 4-Wire Connection
3
4
INPUT CONFIG
O
N
4
Set for 3-Wire Connection
3
4
O
0
N
Figure 4-4. Channel Configuration Switches
4.7 CONNECTING VOLTAGE SIGNALS
Voltage signals may be single ended or differential, and the full scale may have to be matched to the
range of the CIO-EXP-RTD16 and DAS board combination via amplification or division. To connect a
voltage and make an accurate measurement, each of these factors must be considered.
4.7.1 Single Ended
A single-ended input has two wires; a signal high and a Ground (−IEXC). The Low Level Ground signal
must be the same ground the PC is on. Single-ended mode is selected by installing a jumper between the
signal input low and ground (−SENSE to −IEXC) (Figure 4-5).
9
Page 14

Each input circuit has four screw terminals associated with it.
These terminals are shown in Figure 4-5 to the right.
Add Jumper
CH0
To connect a voltage signal to the input circuit you only use
three screw terminals; these are:
+SENSE Signal high, or CH HI on a DAS board
-SENSE Signal low, or CH LO on a DAS board
-IEXC Low Level Ground (LLGND)
Figure 4-5. Single-Ended Voltage Input
4.7.2 Floating Differential
A floating differential input has two wires from the
signal source and a 10K ground reference resistor
installed at the CIO-EXP-RTD16 input. The two
signals from the signal source are Signal High and
Signal Low. The reference resistor is connected
between the CIO-EXP-RTD16 -SENSE and -IEXC
pins (Figure 4-6).
A floating differential hookup is handy when the signal
source is floating with respect to ground, such as a
battery-powered device. The floating differential input
will reject up to 10V of EMI energy on the signal
wires.
−
−
SENSE
IEXC
+IEXC
+SENSE
−
SENSE
Voltage
Source
−
IEXC
Voltage
Source
+SENSE
Signal-High
+IEXC
Add 10K
Resistor
Signal-Low
(Gnd.)
Single-Ended Voltage Input
Signal-Low
Floating-Differential Voltage Input
Signal-High
Figure 4-6. Floating-Differential Voltage Input
CAUTION
:
Verify that the signal source is really floating. Check it with a voltmeter before risking the
CIO-EXP-RTD16 and PC!
10
Page 15

4.7.3 Fully Differential
X
A differential signal has three wires from
the signal source. The signals are Signal
High, Signal Low and Signal Ground
(-IEXC) (which is LLGND).
A differential connection allows you to
connect the CIO-EXP-RTD16 to a signal
source with a ground that is different from
the PC ground, but less than 10V
difference, and still make a true
measurement of the signal.
−
SENSE
−
IEXC
+SENSE
+IEXC
Ground cable s hield at –IE
terminal o nly.
EXAMPLE: A laboratory instrument with
its own wall plug.
NOTE: There are sometimes voltage
differences in wall GND between outlets.
Measure it to verify that it doesn’t exceed
10V.
Signal-Low
Voltage
Source
Signal-High
Differential Volta ge I nput
Figure 4-7. Differential Voltage Input
11
Page 16

5 RTD MEASUREMENT CONFIGURATION
An RTD is a temperature sensor that consist of a resistive element, usually a length of wire encased in a
sheath. Various wire materials are used with platinum being the most common. There are three types of
hookups: two-wire, three-wire, and four-wire. An excellent source of information on RTDs and how to
select one for your application may be found in the OMEGA Engineering catalog.
5.1 CHANNEL SELECTION
The General Configuration section describes the channel selection, setting the jumper and verifying the
installation and operation of the CIO-EXP-RTD16 with your data acquisition board. Configure your
boards as described in that section before continuing with this section.
5.2 POWER SOURCE SWITCH
The General Configuration section describes the power selection options, setting the power select switch
and verifying the installation and operation of the CIO-EXP-RTD16 with your data acquisition board.
Configure your boards as described in that section before continuing with this section.
5.3 DETERMINING THE APPROPRIATE GAIN
To select the best gain for RTD type, base resistance and temperature range, consider that RTD
resistance changes with temperature, but the magnitude of the change also changes with temperature.
RTD type determines the ‘slope’ of the ohms vs. temperature curve. The most popular type has an
‘alpha’ of .00385, known as the European standard. Its value is .00385 ohms per ohm per °C.
The Universal Library and InstaCal support six different RTD types. Please call if you do not see the
RTD you are interested in listed here.
Material
Platinum 0.00392 American standard
Platinum 0.00391
Platinum 0.00385 European standard (Most popular, OMEGA’s standard also)
Copper 0.00427
Nickel/Iron 0.00581
Nickel/Iron 0.00527
To determine which gain to use, you must know the maximum temperature the RTD will be used to
measure, and thus the maximum change in resistance that the RTD will undergo. Here is a table for
platinum:
‘alpha’
12
Page 17

For 100 ohm RTD, alpha = .00385:
Temp (°C
) Resistance (ohms)
-200 18.49
-100 60.25
0 100.00
100 138.50
200 175.84
300 212.02
400 247.04
At a temperature of 400°C, the maximum resistance is 247.04 ohms
The equation for the voltage out of the CIO-EXP-RTD16 (the voltage your DAS board will convert into a
number) is:
= I
V
OUT
EXC
* R
* GAIN
RTD
Normally, the CIO-EXP-RTD16 supplies 1 mA of excitation current. The choices for standard gains are
1, 2, 4, 7, 8, 14, 28, or 56.
Thus, if you want to measure temperature in the range of -200 to 400°C with the RTD listed above, the
maximum voltage output would be:
V = 0.001 * 247.04 = 0.24704
With a gain of 14, the DAS board will read 3.459 volts. If the gain is 28, the output is 6.917 volts. The
DAS board would have to be set to the 0 to 10 volt range.
If you are limiting your range of interest to -200 to 100°C, a common range, the calculations are:
V = 0.001 * 138.50 = 0.1385. Gain of 28 = 3.878V. Gain of 56 = 7.756V. In this case, a gain of 28 and
a range of 0 to 5 volts would be best (0.517 to 3.878 volts would be the temperature range − 200 to 100).
A 12-bit A/D converter would be using 67% of its range of 4096 counts, or a total of 2752 counts, or
divisions of 300°C. The converter would be able to resolve to 0.109°C. That is more than enough
converter resolution even though you are not using the full range of the DAS board in this example.
If your DAS board has 16 bits of resolution, the DAS board would resolve to 0.006°C. This is far in
excess of the accuracy of the RTD.
The stages of gain you choose are not only dependent on the RTD you choose, but on the range of
temperature you are measuring. Use the equation above to fine tune the CIO-EXP-RTD16 circuit to your
advantage, then be sure to update the InstaCal program so the Universal Library linearization routines
will operate properly.
5.4 SETTING THE GAIN
Set the first and second stage gains according to the base resistance of the RTD, the RTD type and the
temperature range you intend to measure. The base resistance is the resistance of the RTD at zero
degrees Centigrade. The following table is a “quick reference” guide of recommended gains.
13
Page 18

Base Resistance Stage 1 Gain Stage 2 Gain Total Gain
100 Ohms 8 7 56
1000 Ohms 4 7 28
5.4.1 First Stage Gain
A set of three Gain Select switches on the S1
switch block selects the first stage gain (Figure
4-4). The fourth switch on this block (marked
CUSTOM) is used to select a custom second
stage gain.
When all three switches are up, the first stage
gain is 1. Moving a switch down (ON) selects
that gain. The other two switches should be up.
(Gains choices for the first stage are NOT
additive.)
Thus, gains of 1, 2, 4 or 8 can be selected by
these switches. A gain of X2 is shown in Figure
5-1.
5.4.2 Second Stage Gain
Switch #3 on the S2 DIP switch block (Figure
5-2) is labeled X1 and X7. Setting this switch
down (ON) will amplify the output of the first
stage amplifier by 7. The factory default
position (up) has a gain of 1 (unity).
GAIN
SELECT
O
N
CUSTOM
X2
X4
X8
Figure 5-1. First Stage Gain Select Switches
CUSTOM IEXC
+5 REM
X1
When set to X7, the first stage gain is
multiplied by 7 yielding overall gains of 7, 14,
28 or 56.
4 3 2 1
GND
X7
N
O
+5 COMP
IEXC=1MA
A second stage gain of 7 is recommended for
RTD applications.
Figure 5-2. Second Stage Gain Switch Location
A custom second stage gain of greater than 7 and less than 64 may be added by installing a precision
resistor at RX100 and setting the switch marked CUSTOM on.
When using the custom second stage gain, set the switch marked CUSTOM on the S1 bank to the ON
position (down) and set the X7 switch on the S2 bank to X1. Install a precision resistor of the
appropriate value in the RX100 location. Calculate the value using the formula found in the Custom
Gain and Excitation Calculations chapter.
14
Page 19

5.5 CHANNEL CONFIGURATION SWITCH
RTD connections may use 2, 3, or 4 wires coming from the probe. The three-wire connection is the
most common. The purpose of the three-wire connection is that the circuit will null-out resistance
variations in the connecting wires. A four-switch DIP switch block labeled INPUT CONFIG must be set
to match the number of wires connecting to each RTD. There is one switch block per RTD.
Type INPUT CONFIG Switch Settings
RTD
2 Wire 4 & 4 ON; 3 & 3 OFF
3 Wire 3 & 3 ON; 4 & 4 OFF
4 Wire 4 & 4 ON; 3 & 3 OFF
Channel Configuration Switch
Associated with each RTD is an
INPUT CONFIGuration switch. The
switch is used to configure the input
circuit for 2, 3, or 4 wire connections
(Figure 5-3).
Two and four-wire connections share
the same switch position. Set both
‘4’ switches ON and set both ‘3’
switches OFF.
3
4
1
INPUT CONFIG
O
N
3
4
3
4
3
4
O
N
0
For three-wire connection, set both
‘3’ switches ON and set both ‘4’
Set for 2 or 4-Wire Connection
Set for 3-Wire Connection
switches OFF.
Figure 5-3. Input Configuration Switches
5.6 CONNECTING THE RTD TO THE SCREW TERMINALS
The connections made to the screw terminal depend on the type of RTD you are using. The inputs of the
CIO-EXP-RTD16 are designed to provide the excitation and signal conditioning required to use RTDs.
An RTD may have 2, 3, or 4 wires that connect to the CIO-EXP-RTD16. Figures 5-4, 5-5, and 5-6 show
the three types of RTD connections and how to connect them to the input channels.
15
Page 20

5.6.1 Two-wire RTD Hookup
gaug
A two wire RTD has two leads, one to each side
of the temperature sensitive resistor. The
excitation current is connected directly to the
leads at the CIO-EXP-RTD16 screw terminals. A
two wire connection is less accurate than the 4
wire type, and so is not the first choice for the
best measurements. The reason for the inaccuracy
is that there is a varying resistance associated with
the excitation current flowing in the sense leads
and this resistance is added to the measurement.
The amount of inaccuracy is determined by the
wire
e and length.
5.6.2 Three-Wire RTD Hookup
A three-wire RTD connection allows the use of
special circuit to compensate for resistance
variations in the lead wires with temperature
changes (Figure 5-5 at right).
NOTE: The +Sense terminal is not used in this
non-standard hookup.
CIO-EXP-RTD BOARD
2-WIRE
RTD
Add Jumper Wires
Between Terminals
+IEXC (EXCITATION CURRENT (+))
+ SENSE
- SENSE
-IEXC (EXCITATION CURRENT
-
(−))
Figure 5-4. Two-Wire RTD Connections
3-WIRE
RTD
CIO-EXP-RTD BOARD
+IEXC (EXCITATION CURRENT (+))
+ SENSE
- SENSE
-IEXC (EXCITATION CURRENT
-
(−))
NOTE: The CIO-EXP-RTD uses a non-stan dard 3-wire hook-up.
Figure 5-5. Three-Wire RTD Connections
16
Page 21

5.6.3 Four-Wire RTD Hookup
W
A four wire RTD has four leads. One to each side
of the temperature sensitive resistor and an
excitation current source and return. This
connection eliminates the inaccuracy associated
with the two-wire RTD hookup. Because no
current flows on the sense lines there is no voltage
drop in the sense lines, thus the error associated
with two-wire RTDs is eliminated. .
IRE
RTD
EXCITATION CURRENT (+)
SENSE HIGH (+)
SENSE LOW (-)
EXCITATION CURRENT (-)
Figure 5-6. Four-Wire RTD Hookup
5.7 CALIBRATION AND TEST
After your CIO-EXP-RTD16 is configured and your RTDs are connected, return to InstaCal and
complete the setup information. Then, use calibration to verify the calibration of your RTDs, and finally,
use TEST to make several temperature measurements.
6 CUSTOM GAIN AND EXCITATION CALCULATIONS
There are resistor positions on the CIO-EXP-RTD16 which are unpopulated. These two resistors are
labeled R89 and RX100. R89 is the custom excitation current resistor and RX100 is the custom second
stage gain resistor. The formulas and constraints to needed to calculate a resistor value are given below.
The value of the resistor must be exact to yield the result you desire. There are two ways to insure the
value is exact. The first is to measure the resistor with an Ohmmeter to check its value, rejecting
resistors that do not meet the desired value. The second way is to purchase precision resistors with a 1%
tolerance. Even then, it’s advisable to check the value with an Ohmmeter before soldering the resistor
into the board.
Please solder carefully!
Remember, you are making a modification to the CIO-EXP-RTD16 and if it is not made well the quality
of the signal may be affected. Use only solder with a water soluble flux and be sure to remove all the
flux after you have finished soldering. Flux residue can add capacitance to a circuit which will affect the
signal.
6.1 CUSTOM EXCITATION CURRENT - R89
The formula for IEXC on the CIO-EXP-RTD16 is:
IEXC = (10V − Vref) / 5K Where Iexc is Minimum = 0.1 mA and Maximum = 1 mA
Vref is nominally 5V, so Iexc is nominally 1 mA
The procedure for selecting a value for R89 to get a custom excitation current is:
17
Page 22

Calculate a new Vref using the desired Iexc:
Vref = 10V - 5K * Iexc
Then calculate R89 value:
R89 = 10K [ ( 2 − 10V / Vref ) / ( 10V / Vref − 1 ) ]
Install the custom excitation current resistor in R89.
Set switch S2 position 1 to OFF
6.2 CUSTOM SECOND STAGE GAIN RESISTOR - RX100
The formula for calculating the value of RX100 is:
RX100 = 149K / ( Gain - 6.96 ) Where Gain cannot be less than 7 nor greater than 64.
Install the custom gain resistor at position RX100 (next to S1 on board).
Set S1, switch 4 to ON. That is the switch labeled CUSTOM.
Set the S2, second stage gain to X7, ON.
Because this is a second stage gain, you can still use the first stage gains of 2, 4, and 8 or turn them all off
for a first stage gain of 1. That will make the second stage gain the only gain more than one.
18
Page 23

7 SPECIFICATIONS
Power consumption
+5V 380mA typical, 533mA max
Analog input section
Multiplexer type HI507
Number of channels 16 differential
Input ranges ±10V
Gain options
First stage X1, X2, X4 or X8
Second stage X1, X7 or User defined between X7 and X64
Multiplexor switching time 5 µS typical to 0.01% of 5V step
Channel to channel settling time 50 µS max to 0.01% of 5V step
Gain Error ±0.02% of full scale typical, 0.25% of full scale max
Gain Non-Linearity
Gain = X1, X2 or X4 ±0.002% of full scale typical, 0.015% of full scale max
Gain = X8 ±0.002% of full scale typical, 0.025% of full scale max
Offset Error Each channel adjustable to zero
Gain drift ±10 ppm/°C typical
Offset drift
Gain = X1 ±60µV/°C typical
Gain = X2 ±40µV/°C typical
Gain = X4 ±25µV/°C typical
Gain = X8 ±20µV/°C typical
Common Mode Range ±10V
CMRR @ 60Hz
Gain = X1 94 dB
Gain = X2, X4 or X8 100 dB
Absolute maximum input voltage ±50V
Miscellaneous 79 Hz low pass filter each channel
Analog Output
Amplifier type OP07
Number of channels 1
Output Range ±10V
19
Page 24

Current Excitation
Excitation Switch selectable for 1 mA on board or custom value
determined by resistor selection
Voltage compliance 2V
Accuracy Trimmable
Digital Section
Digital Type
Din 0 - 2 HI508 multiplexor
Din 3 1 CMOS load
Number of channels 4 inputs
Input High 2.0 volts min, +5.5 volts absolute max
Din 0 - 2 2.4V min
Din 3 1.7V min
Input Low 2.0 volts min, +5.5 volts absolute max
Din 0 - 2 0.8V max
Din 3 1.0V max
Environmental
Operating temperature range 0 to 60°C
Storage temperature range −40 to 100°C
Humidity 0 to 90% non-condensing
20
Page 25

EC Declaration of Conformity
We, Measurement Computing Corp.., declare under sole responsibility that the product:
CIO-EXP-RTD16 RTD Expansion Board
Part Number Description
to which this declaration relates, meets the essential requirements, is in conformity with, and CE marking
has been applied according to the relevant EC Directives listed below using the relevant section of the
following EC standards and other informative documents:
EU EMC Directive 89/336/EEC: Essential requirements relating to electromagnetic compatibility.
EU 55022 Class B: Limits and methods of measurements of radio interference characteristics of
information technology equipment.
EN 50082-1: EC generic immunity requirements.
IEC 801-2: Electrostatic discharge requirements for industrial process measurement and control
equipment.
IEC 801-3: Radiated electromagnetic field requirements for industrial process measurements and control
equipment.
IEC 801-4: Electrically fast transients for industrial process measurement and control equipment.
Carl Haapaoja, Director of Quality Assurance
Page 26

Measurement Computing Corporation,
16 Commerce Blvd.,
Middleboro, MA 02346
Tel: (508) 946-5100
Fax: (508) 946-9500
E-mail: info@MeasurementComputing.com
www.MeasurementComputing.com
 Loading...