

Page 1
29/07/2014
DC
(+) (-)
LED
(+) (-)
Wireless DC multi-channel PWM dimmer
A
WPD-06KIT
Operating Guide
CN1
E
English
Please take the time to carefully read and follow the operating guide.
What’s in the Box
1) WPD-06 X 1
2) EnOcean Wireless batteryless 2 Key (4 switches) X 1
3) WAGO - 2092-1102/002-000 plug x 8
Connector Description
CN4
CN3
CN2
CN1
CN7 CN8
Pin1
CN9
+-+-
+-+-+-+-
WPD-06
Vin+Vin-Vin+Vin-
CN0
CN5
CN6
CN0
CN1
CN2
CN3
CN4
CN5
CN6
CN7
CN8
CN9
Function
Vin
Vout_channel1
Vout_channel2
Vout_channel3
Vout_channel4
Vout_channel5
Vout_channel6
N.C.
N.C.
Push dimming
and other control
Mating connector
WAGO - 2092-1104/002-000
or 2092-1102/002-000 x 2
WAGO - 2092-1102/002-000
WAGO - 2092-1102/002-000
WAGO - 2092-1102/002-000
WAGO - 2092-1102/002-000
WAGO - 2092-1102/002-000
WAGO - 2092-1102/002-000
WAGO - 2091-1106/002-000
Wire thickness
0.2-2.5mm
0.2-2.5mm
0.2-2.5mm
0.2-2.5mm
0.2-2.5mm
0.2-2.5mm
0.2-2.5mm
0.2-1.5mm
2
2
2
2
2
2
2
2
Getting Started
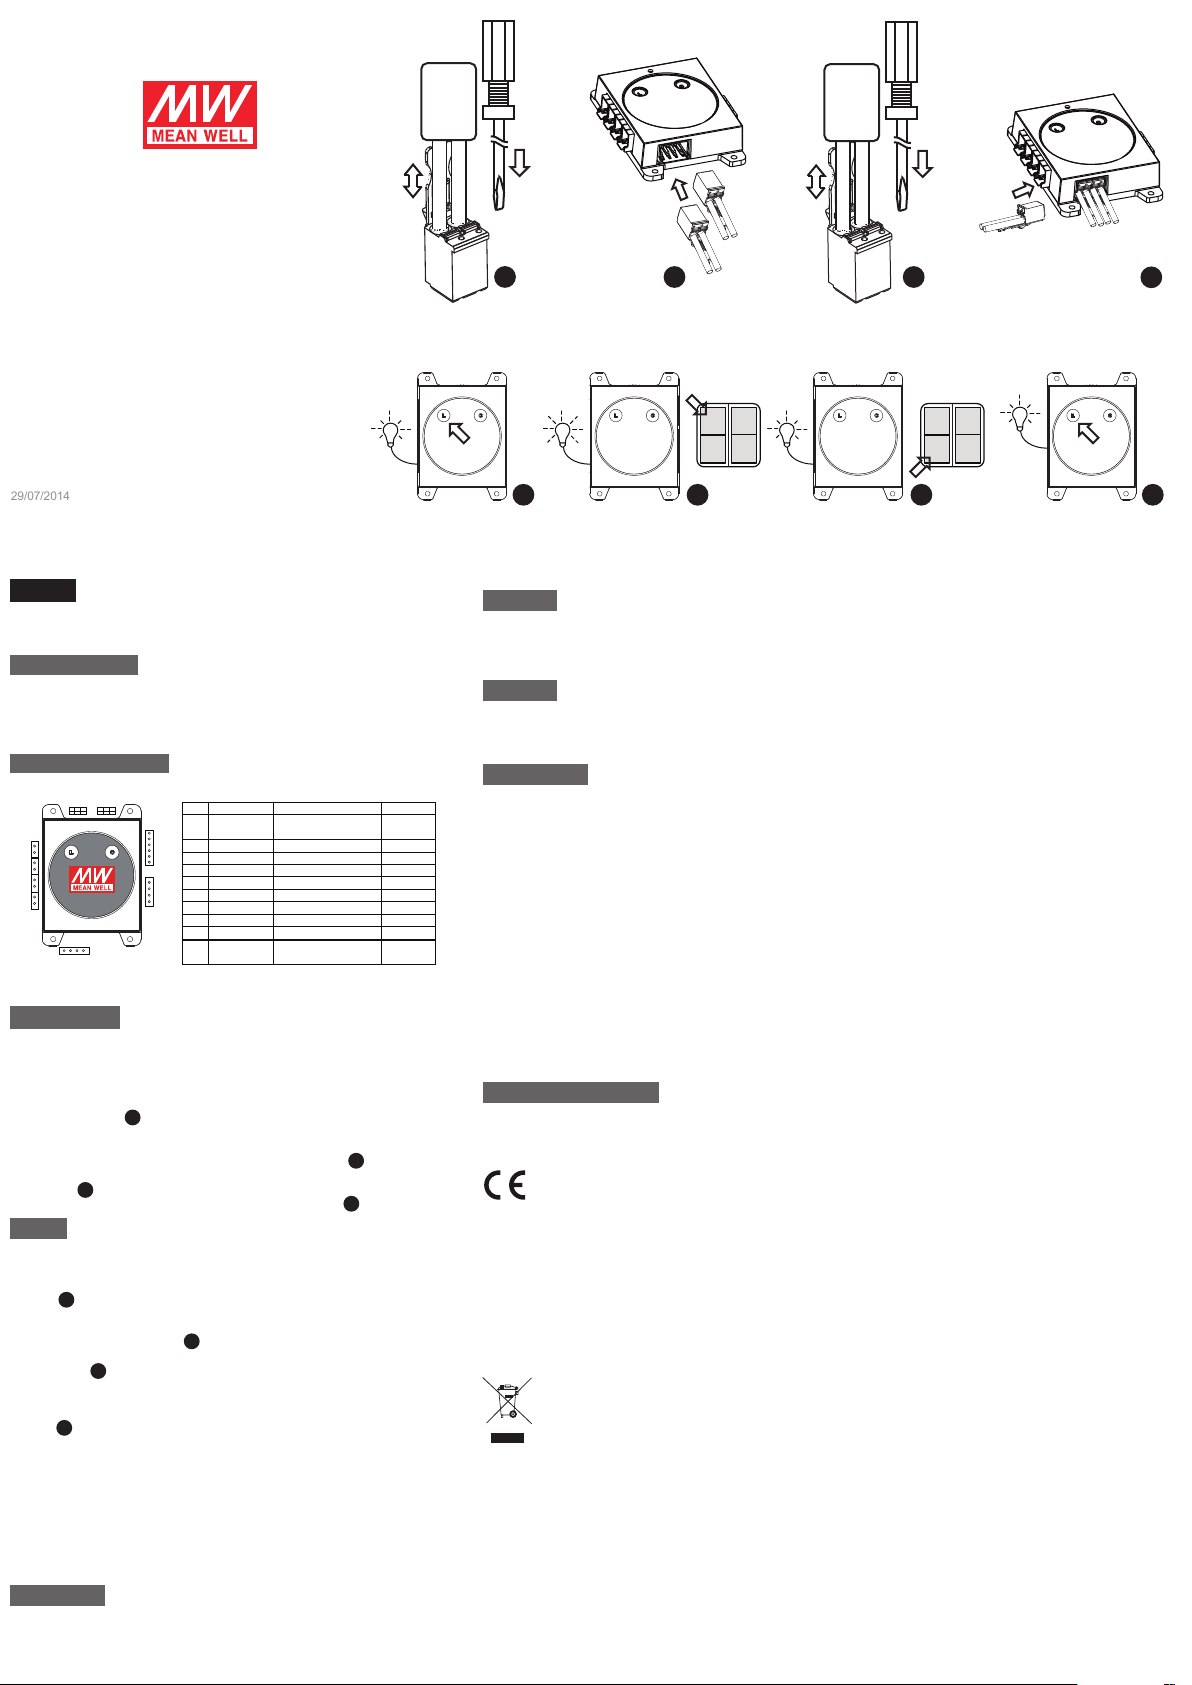
1) Select a proper DC power source (LED driver or adaptor or power supply)
based on the load (LED lamps).
For example, Mean well LED driver LPF-90-24 can be used for 90 Watt 24V
LED strip.
2) Check the polarity before insert the output cable of DC power source into the
plug via push-button.
3) In case total output current is higher than 16 A, take second plug and re-do 2)
otherwise go to 4).
4) Push plug(s) of DC power source into connector CN0 of unit.
5) Check the polarity before insert the cable of LED strip into the plug via
push-button.
6) Push plug(s) of LED strip into connector of specific channel.
A
B
C
D
Setting
The following step is assuming that one LED strip connected to Channel 1 (CN1)
and make sure DC source is turn ON:
1) Long press L button on dimmer and LED connected to Channel 1 is now
E
blinking.
It means now Channel 1 is at pairing mode.
2) Press on wireless batteryless switch to pair it. First press on switch 1 to pair
turn on and dim up to Channel1.
Press on switch 2 to pair turn off and dim down to Channel1. The LED is
blinking again.
Now this wireless batteryless switch is paired with Channel 1.
In case there is another switch needs to be paired, re-do the step 2).
3) Press L button on dimmer. The pairing is now moving to Channel 2 with
blinking.
4) Press L button on dimmer. The pairing is now moving to Channel 3 with
blinking.
5) Press L button on dimmer. The pairing is now moving to Channel 4 with
blinking.
6) Press L button on dimmer. The pairing is now moving to Channel 5 with
blinking.
7) Press L button on dimmer. The pairing is now moving to Channel 6 with
blinking.
8) Press L button on dimmer to finish the pairing.
9) Now the system is set and ready to control the LED lamp on channel 1.
G
H
F
Clear Setting
C (Clear) Button: In pairing mode, a long press (1.5sec) on the C button erases the pairing of the blinking output. In normal
mode, a long press (1.5sec) on the C button erases the 6 outputs of the dimmer and it will automatically enter the pairing mode
on Channel 1. Press L button 6 times to exit the pairing mode. Remark: It is also possible to erase one switch from one channel
(without erasing the other wireless batteryless switches paired on this output)
Warnings
To reduce the risk of fire or electric shock, do not expose the unit to rain or moisture.
Do not expose this unit to dripping or splashing and do not place objects filled with liquids, such as vases, on the unit.
Liquids can cause a failure and/or a fire hazard.
Cautions
This unit must be installed by a qualified electrician.
This unit is not suitable for constant current LED lamps applications.
Specifications
Output channel: Six(6) independent dimmable channels
Output voltage: depending on input
Output current: 4.5 A per channel; 27 A in total
Power requirements: DC 10-32 V SELV, Maximum 27.5 A
Mating Plug: WAGO 16 A 0.2 -2.5 mm2 female types with gripping plate and sliding connector release
Wireless dimming control
For more specifications, refer to http://www.meanwell.eu/search/WPD-06/default.htm
Design and specifications are subject to change without notice.
On trademarks
EnOcean are trademarks of EnOcean GmbH
WAGO are trademarks of WAGO Kontakttechnik GmbH
In addition, system and product names used in this manual are, in general, trademarks or registered trademarks of their
respective developers or manufacturers. However, the ™ or ® marks are not used in all cases in this manual.
For Customers in Europe
Notice for the customers in the countries applying EU Directives
Manufacturer: Mean Well Europe B.V. Langs de Werf 8, 1185XT Amstelveen, The Netherlands
For EU product compliance: Mean Well Europe B.V. Langs de Werf 8, 1185XT Amstelveen, The Netherlands
Hereby, Mean Well Europe B.V., declares that this WPD-06 Wireless DC multi-channel PWM dimmer is in compliance with the
essential requirements and other relevant provisions of Directive 1999/5/EC. For details, please access the following
URL:
http://www.meanwell.eu/search/WPD-06/default.htm
This product has been tested and found compliant with the limits set out in the EMC regulation for using connection cables
shorter than x meter.
Disposal of Old Electrical & Electronic Equipment (Applicable in the European Union and
other European countries with separate collection systems)
This symbol on the product or on its packaging indicates that this product shall not be treated as household waste. Instead it shall
be handed over to the applicable collection point for the recycling of electrical and electronic equipment. By ensuring this product
is disposed of correctly, you will help prevent potential negative consequences for the environment and human health, which
could otherwise be caused by inappropriate waste handling of this product. The recycling of materials will help to conserve
natural resources. For more detailed information about recycling of this product, please contact your local Civic Office, your
household waste disposal service or the shop where you purchased the product.
DC
(+)
(-)
(+)
B
(-)
C
123
4
F
G
123
LED
D
4
CN2
H
 Loading...