


Operating Instructions
Meade Zero Image-Shift Microfocuser
For use with LS, LX85, LX200, LX600 and LX850 Telescopes
Introduction
The Meade Zero Image-Shift Microfocuser allows precise, vibration-free image focus during visual,
CCD, and astrophotograhic applications. It also allows you to achieve focus without causing a viewed
object to move out of position in the field of view.
The microfocuser maintains precise image centering on even the smallest CCD chips. The microfocuser
operates at four speeds: Fine to fast.
To Attach the Microfocuser to the Telescope
1. Remove the dust cap from the rear cell port of your telescope. Thread the microfocuser adapter
(B, Fig. 1) onto the rear cell port thread (A, Fig. 1). Slide the microfocuser (C, Fig. 1) over the
microfocuser adapter and tighten the three set screws (K, Fig. 1) using the provided hex key.
2a. 1.25" Diagonal Prism Users: Slide the 1.25" adapter (D, Fig. 1) into the microfocuser. Line up the
thumbscrew (H, Fig. 1) into the groove in the microfocuser (Fig. 2a and 2b). Tighten the
microfocuser thumbscrews (I, Fig. 1) to a firm feel only. Slide the 1.25" diagonal prism into the
adapter (D, Fig. 1). Tighten the accessory adapter thumbscrew to a firm feel only.
2b. SC Optional Accessory Users: If using any of the Meade Schmidt-Cassegrain optional accessories,
slide the supplied SC accessory adapter (L, Fig. 1) into the microfocuser. Line up the groove on the
side of the adapter with either of the microfocuser thumbscrews (Fig. 3a and 3b) and tighten the
thumbscrew to a firm feel only. Attach the optional accessory into the accessory adapter.
2c. 2.0" Diagonal Mirror Users: Slide the 2.0" diagonal mirror directly into the microfocuser. The
adapters are not required. Tighten the thumbscrews (I, Fig. 1) to a firm feel only.
3. Plug in the Microfocuser: Plug the coiled cord attached to the microfocuser into the Focus port
located on the Computer Control Panel.

Groove
Line up
Fig. 3a: SC adapter groove. Fig. 3b: Line up SC adapter groove
with microfocuser thumbscrew.
Fig. 2a: Microfocuser groove. Fig. 2b: Microfocuser 1.25” adapter
grove thumbscrew in grove.
OR
Fig. 1: Microfocuser and eyepiece assembly. (A) Rear cell of telescope
(shown separate from the telescope assembly for the sake of clarity); (B)
Microfocuser adapter; (C) Microfocuser; (D) 1.25" accessory adapter. SC
accessory adapter (L) may be used in this position instead if Schmidt-
Cassegrain accessories are being used. Do not use either adapter if using
a 2" diagonal mirror; (E) Diagonal Prism holder thumbscrew; (F) Eyepiece;
(G) 1.25" Diagonal Prism. 2" diagonal mirror may also be used in this
position (12" models); (H) Adapter thumbscrew; (I) Microfocuser
thumbscrews; (J) Microfocuser bearings; (K) Set screws.

Maintenance
The microfocuser is carefully adjusted at the factory. If it becomes necessary to adjust the
microfocuser ball bearings (see Fig. 5), it must be performed by factory trained technicians. If the
microfocuser is improperly adjusted, performance will degrade and damage will result. Damage due
to improper adjustments not authorized by the factory will not be covered under warranty.
Note: If you wish to mount a camera directly to the microfocuser, you need to
attach an optional T-Adapter to the microfocuser. For more information about
Meade optional accessories, see the Meade Product Catalogue or contact your
local Meade dealer.
To Focus Using the Microfocuser
1. Perform this part of the procedure during the daytime, without the eyepiece assembly
(eyepiece, diagonal, etc.) attached to the microfocuser. On the AutoStar II press the Focus
button and then the Up and Down Arrow keys. Observe the microfocuser drawtube as it
travels in and out. When the drawtube reaches the furthest extension of its travel, listen for
a change in the pitch of the motor. Notice that the drawtube's maximum extension is about a
half-inch out from the microfocuser. Set the drawtube so that it extends about a quarter-inch
(about halfway).
2. When you begin your viewing session, attach the eyepiece assembly.
3. Make sure that the microfocuser is plugged into the computer control panel focus port.
4. Point the telescope at a bright star.
5. Rotate the mirror lock knob towards the “unlock” position until it feels loose. Use the coarse
focus control to achieve a rough focus of the star (see Fig. 4).
6. Rotate the mirror lock knob towards the “lock” position and adjust the tension to a firm feel;
this action serves to lock in the coarse focus.
Important Note: Do not use or bump the coarse focus knob once you have set the
coarse focus. If you do so, repeat steps 5 and 6 above to reset the coarse focus.
7. Press the Focus key (Number key “4”). “Focus Control: Speed: Fast” displays. Press the Up or
Down Scroll keys to cycle through the four speed options. Press ENTER to select the desired
speed. Or press one of the following Number keys after pressing the Focus key to change the
speed:
Key # Speed Key # Speed
1 or 2 Fine 6 or 7 Medium
3, 4 or 5 Slow 8 or 9 Fastest
8. Use the Arrow keys to bring the star into fine focus.
9. You may need to repeat this procedure when you change eyepieces.

Use with Meade De-Rotater
When using a Meade de-rotater, it is important to attach the microfocuser so that it is backed off
slightly from the de-rotater. If the microfocuser is flush against the de-rotater, the assembly will not
work properly. This is true also with other accessories that may attach flush against the de-rotater
housing.
To Attach the Microfocuser to the De-rotater
Refer to Fig. 1. Perform this assembly on a flat surface (such as a desk or a table) before you attach
the de-rotater and microfocuser to the telescope.
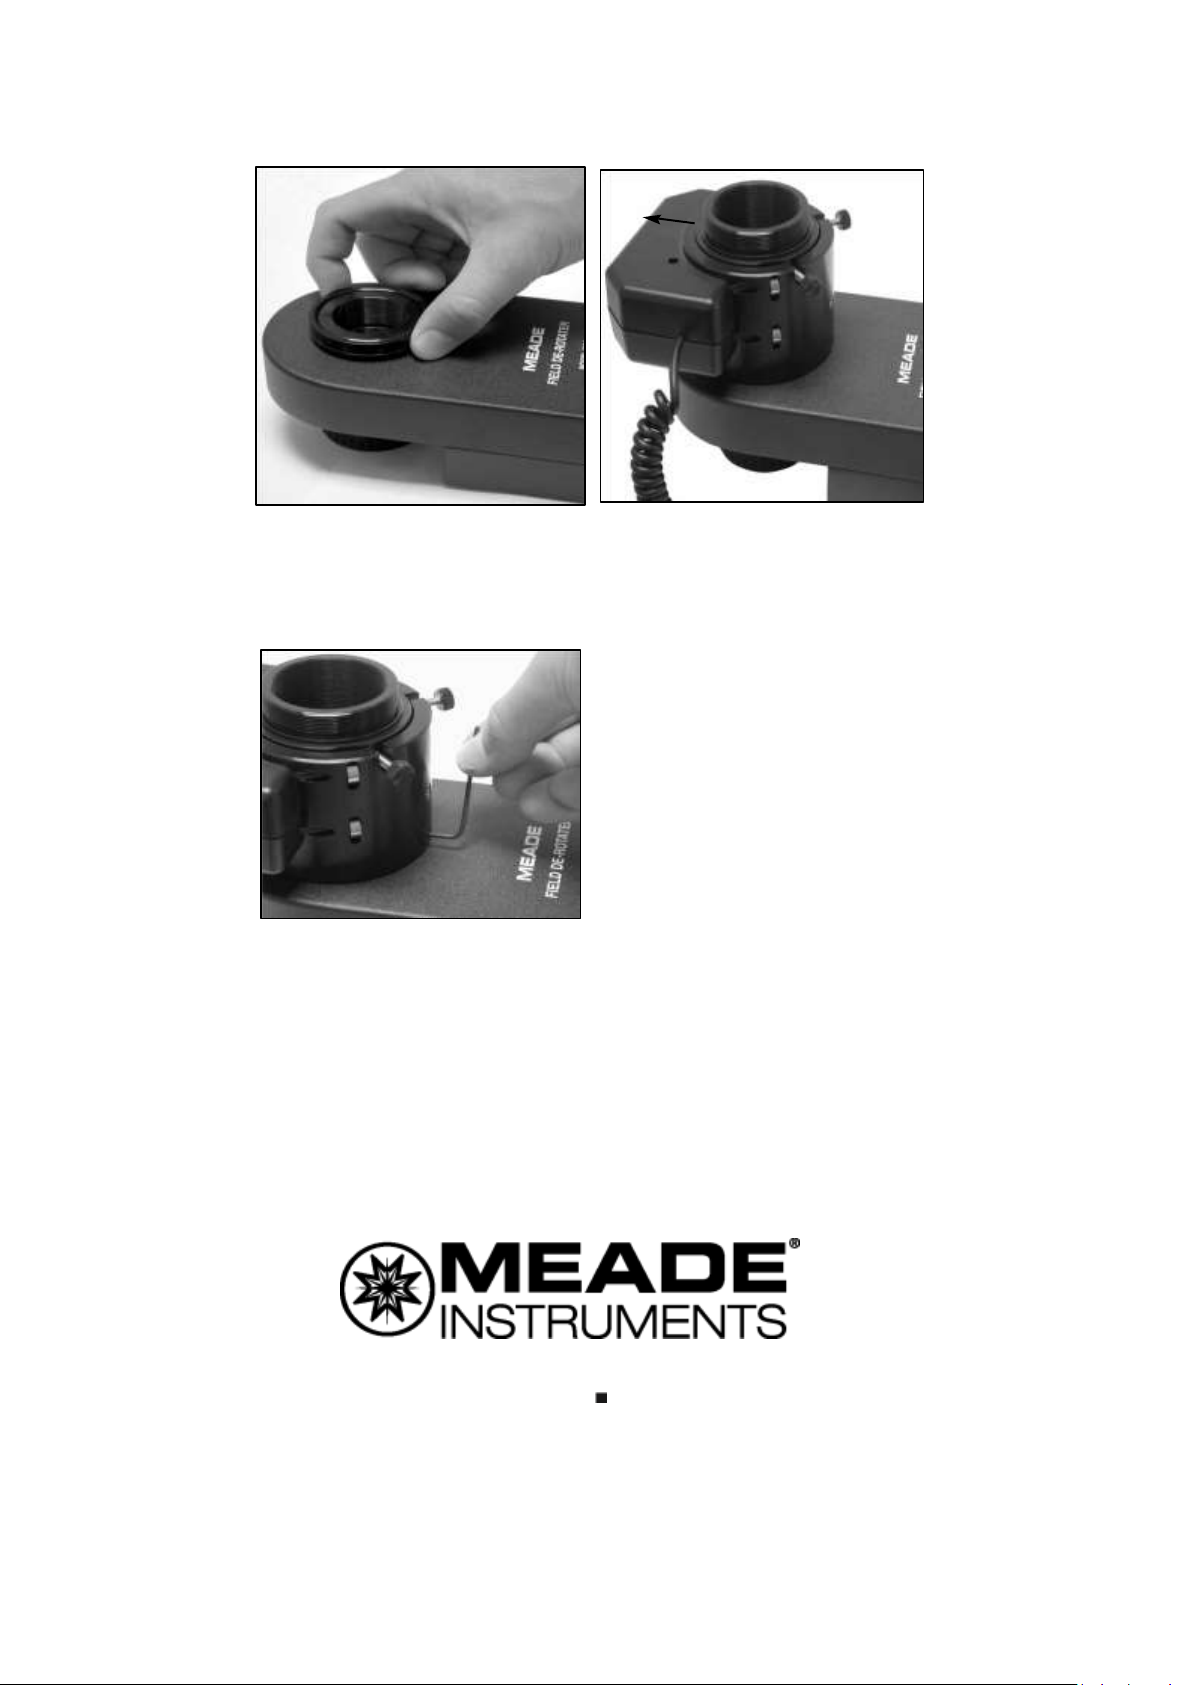
1. With the de-rotater on a flat surface, thread on the adapter ring until it just touches
the housing; then back off the adapter ring (i.e., turn it counter-clockwise) one full
revolution as shown in Fig. 6.
2. Place the microfocuser over the ring with the "hump" of the microfocuser in the 12:00
position as shown in Fig. 7.
3. Using the provided hex key, tighten to a firm feel one of the three microfocuser set
screws against the adapter ring as shown in Fig. 8. Take care not to tighten or loosen
the adapter ring as you position and tighten the microfocuser in place.
4. Tighten to a firm feel the other two microfocuser set screws.
5. Attach the de-rotater to the rear cell of the telescope.
Fig. 4: Microfocuser and 1.25"
diagonal prism with eyepiece
completely assembled. Microfocuser
shown attached to a Meade LX200
telescope.
Fig. 5: Microfocuser ball bearings.
If you have a question concerning use of the Meade Zero Image-Shift Microfocuser, call the Meade
Instruments Customer Service Department at (800) 626-3233. Customer Service hours are 7:00 AM to
6:00 PM, Pacific Time, Monday through Friday.
Part no. 14-0204-10 Ver. 3-09
12:00
position
Fig. 6: Back off the adapter ring one
full revolution.
Fig. 7: Place the microfocuser over
the adapter ring. Notice the
orientation of the microfocuser.
Fig. 8: Tighten the three microfocuser
set screws to a firm feel.
27 Hubble, Irvine, California, 92618
(949) 451-1450 www
.meade.com
 Loading...