

Page 1
Meade Instruments
Stella Wi-Fi Adapter
Users Guide
INTRO TO STELLA
Stella is a Wi-Fi adapter that allows wireless connection to your telescope
mount. It is used in combination with Meade’s StellaAccess application
which is available for purchase on the iOS and Android platform through
the iTunes and Google Play store. To fully utilize Stella, download
StellaAccess and become familiar with the app before you connect Stella
to the telescope.
• AutoStar III telescopes, such as the Lightswitch (LS) telescope,
will require a USB A/B cable to connect to the telescope mount.
Connect the USB-B side to the LS control panel, and USB-A side
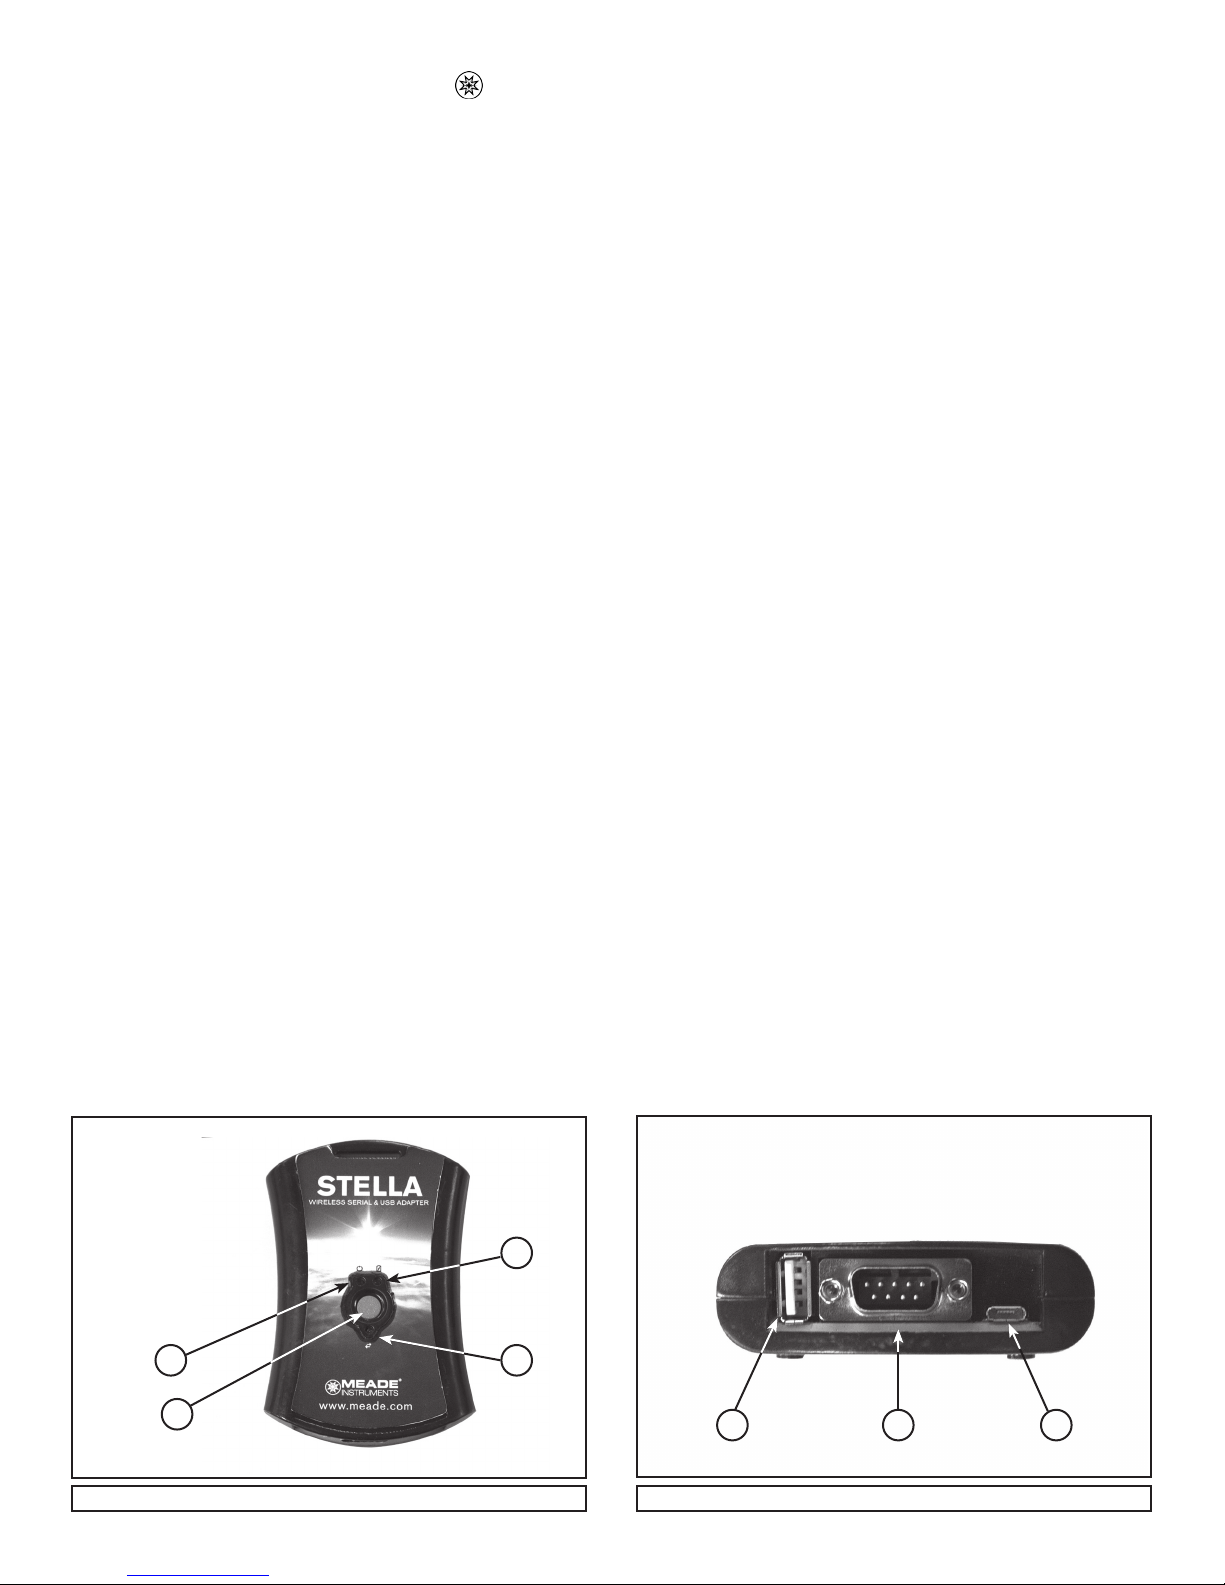
to Stella (1, Fig. 2).
For non-Meade telescopes, consult with the manufacturer for selecting
the proper cabling.
BEFORE USING STELLA
Charge Stella before use! Plug in the included AC adapter into Stella’s
micro-USB port (3, Fig. 2) to charge. Stella will be fully charged once its
charging indicator LED (3, Fig. 1) turns off. Charging time will depend
on initial battery level. When fully charged, Stella’s internal rechargeable
lithium ion battery should last 4-8 hours depending on usage.
POWERING STELLA ON & OFF
To turn Stella on and off, press and release the center on/off button (2,
Fig. 1). The power LED (1, Fig. 1) will illuminate when on.
CONFIGURING STELLA
Stella’s default settings allow quick connection to the telescope without
worrying about security passwords. Just power on Stella and connect to
the “Stella” network using a phone or tablet. Stella connection will occur
without passwords using the default settings.
To enable password protection or security features, power Stella on,
connect to the “Stella” Wi-Fi network, open your web browser and go to
the following address http:// 10.0.0.1. The Stella webpage will load and
various security and rmware settings can be congured. Or from within
the StellaAccess app, go to Settings -> Setup -> Stella Wi- settings to
congure Stella.
CONNECTING STELLA TO YOUR TELESCOPE
Connect Stella to your telescope using the required cables.
• For Meade AutoStar and AudioStar equipped telescopes, use the
Meade #505 Cable set. Connect the 4-pin cable side to the bottom
of the hand box and 9-pin serial side (2, Fig. 2) to Stella.
• For AutoStar II equipped telescopes, use the Meade #507 cable
set. Connect the 6-pin cable side to the RS232 port on the
telescope control panel, and 9-pin serial side (2, Fig. 2) to Stella.
USING STELLA
1. Once Stella is connected to the telescope, perform a telescope
alignment on the night sky as normal. When aligned, power the
Stella Wi-Fi adapter on and open the StellaAccess app. If your
telescope hand controller reads “Press 0 to Align or Mode for
Menu”, press “Mode” to go to the default menu.
2. In the app settings tab, navigate to the Setup page under
Telescope. Select the correct telescope model, mount type, and
Stella communications settings. Next select the Auto-detect Stella
feature to use the default connection settings.
NOTE: If you wish to use a static IP address and port number to
congure Stella, the default IP Address is 10.0.0.1, and the default
Port Number is 4030. Or, you may select a unique IP address and port
number that matches with Stella.
3. When you have entered the correct information, connect to the
telescope by going to the Scope tab and pressing Connect. The
sky view in the app will point to where the telescope is pointing.
4. You can now use StellaAccess to point your telescope to any
object shown above the horizon.
5. When nished using Stella, disconnect from the telescope and
press the center button on Stella to power off.
RESETTING STELLA TO THE FACTORY DEFAULTS
1. Power on Stella.
2. Press and hold the center button for 5 seconds, then release. The
data LED (4, Fig. 1) will begin to ash slowly. When Stella has
completed the reset it will ash quickly.
3. Release the center button and Stella will power down.
4. Stella has now been congured to its factory settings.
(1) Power LED
(2) On/O Button
(3) Charging LED
(4) Data LED
1
2
Fig. 1: Stella Wi-Fi Adapter (Top View) Fig. 2: Stella Wi-Fi Ports (Side View)
(1) USB-A Port
(2) DB9 Serial Port
(3) Micro-USB Port
3
4
1 2 3
Page 2

TROUBLESHOOTING STELLA
Can’t connect to Stella:
• Verify Stella is charged, powered on, and within range of the
connecting device.
• Verify your Stella app settings match Stella’s Wi-Fi settings.
• Verify you Stella app settings for telescope type and mount type
are correct.
• Verify the Stella name, IP Address, and port number are correct
in the StellaAccess app Settings page.
• Change the SSID and/or transmitting channel to one with less
trafc to prevent interference issues. See Stella’s settings
webpage at http://10.0.0.1 for more information.
• If your telescope has GPS, try turning off “Set Time & Location”
in the StellaAccess app. Go to Settings ->Setup and turn off Set
Time & Location.
• Contact Meade Instruments Corp. for further troubleshooting.
• StellarCAT ServoCAT
• Starmaster Sky Tracker
• SiTech Controller
• Takahashi Temma 2
• Bisque Paramount + TheSkyX
• Celestron AstroMaster
• JMI NGC Max
• Lumicon Sky Vector
• Orion Sky Wizard / IntelliScope
• Takahashi Super Navigator
• Tangent Instruments BBox Encoder System (and compatible)
Telescope behaves erratically or has motor run-away:
• Verify Stella and the telescope do not have low battery. Low
battery often causes erratic behavior to occur. Plug-in or charge
Stella, the telescope, and phone or tablet as needed.
• Make sure to perform a telescope alignment on the night sky
before connecting to Stella.
• Verify the telescope hand box does not read “Press 0 to Align
or MODE for Menu”
• Move to a location with less Wi-Fi interference.
• Change Stella’s SSID, Channel, or other settings to prevent
unwanted individuals from connecting to your telescope.
• In StellaAccess’s Settings->Setup change the Readout Rate
setting to a lower value.
UPDATING STELLA FIRMWARE
1. Connect to Stella and navigate to the “Firmware” tab.
2. Browse and select rmware le.
3. Click the “Update Firmware” button ONCE.
4. Wait for a notication of rmware application.
5. If no notication is seen within 10 seconds, refresh the page
6. and try again (most likely a faulty le).
SOFTWARE COMPATIBILITY
• Compatible with Meade’s StellaAccess application on phone
or tablet. Available for purchase on iOS & Android platforms.
Download from iTunes or Google Play store.
MEADE TELESCOPE COMPATIBILITY
• Meade LX200 Classic / GPS / ACF
• Meade LX400
• Meade LX600/850
• Meade LS / LT
• Meade ETX (when equipped with #497 or AudioStar Controller)
• Meade LXD 55 / 75 / 650 / 750
• Meade LX 80 / 90
• Meade Magellan I
• Meade Magellan II
OTHER TELESCOPE COMPATIBILITY
• Celestron NexStar 5i / 8i / GPS / SLT / SE / Advanced GT
• Celestron AVX / CGE / CGEM / CPC series
• SkyWatcher SynScan
• Orion Sirius / Atlas / SkyView Pro / SkyQuest XTg / StarSeeker
/ HDX
• iOptron SmartStar / MiniTower
• iOptron iEQ45 with 8406 controller
• iOptron 8407 / 8408 contollers
• Astro-Physics GTO
• Losmandy Gemini
• Vixen SkySensor 2000
• Vixen StarBook / Sphinx
• Sky Commander
• Losmandy DSC
MEADE CUSTOMER SERVICE
If you have a question concerning your Meade Stella Wi-Fi Adapter, contact
the Meade Instruments Customer Service Department at: Telephone: (800)
626-3233 or E-mail: [email protected]
Customer Service hours are 7:00 AM to 4:00 PM, Pacic Time, Monday
through Friday. In the unlikely event that your Meade Stella Wi-Fi Adapter
requires factory servicing or repairs, write or call the Meade Customer Service
Department rst, before returning the telescope to the factory, giving full
particulars as to the nature of the problem, as well as your name, address,
and daytime telephone number. The great majority of servicing issues can be
resolved by telephone, avoiding return of the telescope to the factory. If factory
service is required, you will be assigned a Return Goods Authorization (RGA)
number prior to return.
MEADE LIMITED WARRANTY
Every Meade telescope and telescope accessory is warranted by Meade
Instruments Corporation (“Meade”) to be free of defects in materials and
workmanship for a period of ONE YEAR from the date of original purchase in
the U.S.A. and Canada. Meade will repair or replace a product, or part thereof,
found by Meade to be defective, provided the defective part is returned to
Meade, freight-prepaid, with proof of purchase. This warranty applies to the
original purchaser only and is non-transferable. Meade products purchased
outside North America are not included in this warranty, but are covered under
separate warranties issued by Meade international distributors.
RGA Number Required: Prior to the return of any product or part, a Return
Goods Authorization (RGA) number must be obtained from Meade by writing,
or calling (800) 626-3233. Each returned part or product must include a written
statement detailing the nature of the claimed defect, as well as the owner’s
name, address, and phone number.
This warranty is not valid in cases where the product has been abused or
mishandled, where unauthorized repairs have been attempted or performed,
or where depreciation of the product is due to normal wear-and-tear. Meade
specically disclaims special, indirect, or consequential damages or lost prot
which may result from a breach of this warranty. Any implied warranties which
cannot be disclaimed are hereby limited to a term of one year from the date of
original retail purchase. This warranty gives you specic rights. You may have
other rights which vary from state to state. Meade reserves the right to change
product specications or to discontinue products without notice.
For 608003
Rev 2
2/2016
 Loading...