

Page 1

Page1
Meade LS6 & LS8 LightSwitch Primer
last updated: 21st, June 2019
can be freely distributed while this document remains unaltered. © Opticstar Ltd 2019
Introduction
For setting up and using your telescope please refer to the comprehensive manual that came with your LS
telescope. This document is targeted to new owners and covers a number of topics as follows:
Traversing the handset menus p1
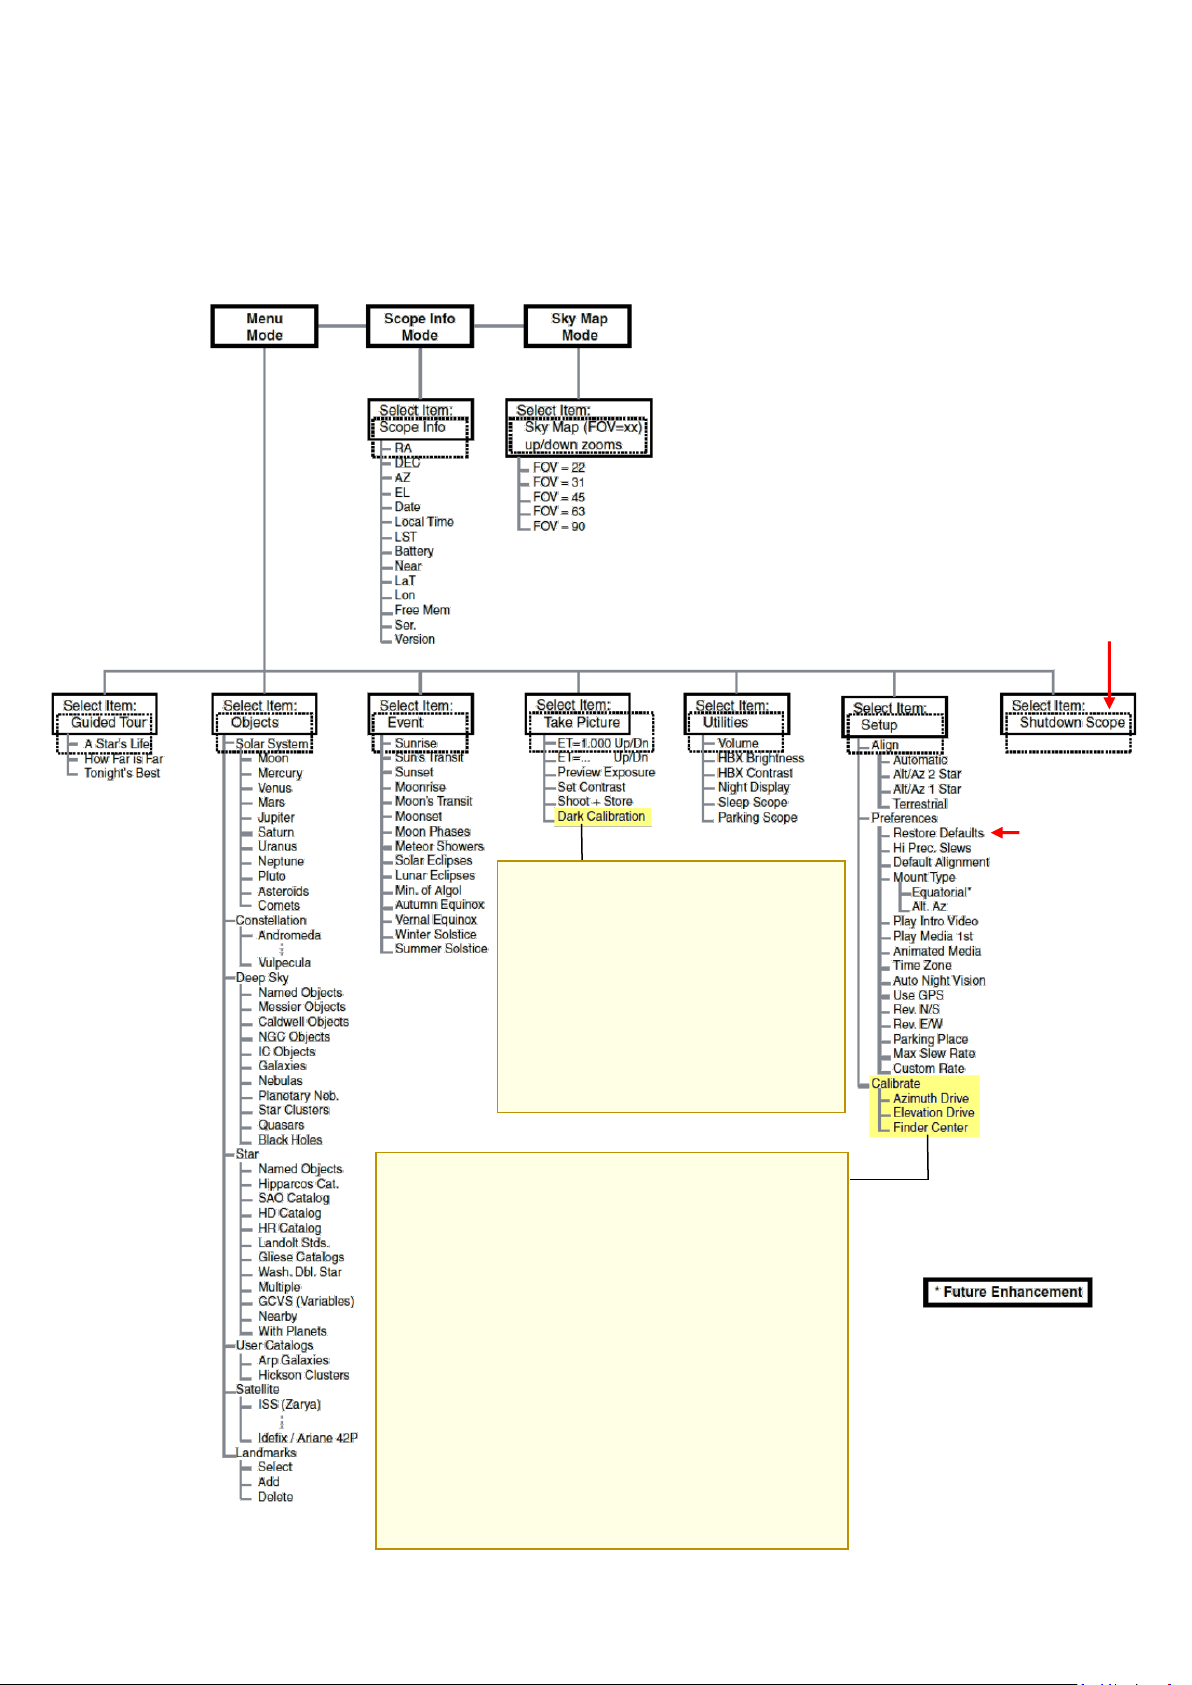
Restoring the telescope to factory settings p1
Properly shutting down the telescope p1
Telescope alignment primer p2
Calibrating the Eclips camera p4
Training the Azimuth and Elevation Drives p4 – p5
General Information
Traversing the Handset Menus
The MODE Key on the Autostar III handset cycles the telescope through its three different modes; Menu
Mode, Info Mode and Skymap Mode.
During most telescope operations, pressing the MODE key will stop the current operation.
Restore to Factory Settings
If you are having difficulties with the telescope, the first step to getting back on track is to reset the
telescope to factory settings. This will enable you to follow the telescope instruction manual as if you used
the telescope for the very first time.
To reset the telescope to factory settings, the option is under:
Menu Mode →
Preferences →
Restore Factory Defaults
Please refer to page 4 of this document for the location of this option in the Menu tree.
Telescope Shutdown
Select “Shutdown” from the main top level menu. After the telescope has moved to its storage position and
the AutoStar displays “Turn Off Telescope”, flip the LightSwitch to the OFF (0) position.
Menu Mode →
Shutdown Scope
Please refer to page 10 of this document for the location of this option in the handset’s menu tree.
Page 2

Page2
Telescope Alignment
Please follow the instructions in the LS LightSwitch manual to align your telescope. If the telescope cannot
find the stars during auto-alignment and assuming a clear sky, please refer to the possible causes and
remedies as outlined below. These are listed in a recommended order but feel free to choose the order if
you are experienced.
Tripod Platform
Ensure that the telescope is level prior to alignment and the tripod leg knobs tight. Also, ensure that the
tripod does sink into the ground, this can happen when the telescope is on grass or on a soft surface.
Power
Powering your LightSwitch telescope from batteries will prove expensive in the medium to long term. We
recommend a 17Ah 12VDC (pin positive) Power Tank or a good quality, regulated/switch-mode 12VDC 5A
mains Power Supply (pin positive).
Please note that low power levels including weak batteries or inadequate power supply will cause your
telescope to automatically reset.
Firmware
You may have an older version of the firmware or the firmware has been corrupted. You would need to
update your telescope’s firmware. The latest version of the firmware at the time of writing is V1.6D.
Stretched Cables
Stretched cables can cause various issues including poor communication connections and power loss.
Both, will affect alignment and operation.
ECLIPS Camera Field of View
If you have alignment issues, ascertain that you are able to see the alignment star through a wide angle
40mm eyepiece and once the telescope has slued to the target star. That you can see the star through your
eyes is no guarantee that the ECLIPS camera can also see it. The ECLIPS camera is at a lower position
when compared to your eyes and has a comparatively much smaller field of view.
Please keep in mind that an obstructed horizon and passing clouds can also cause star alignment to fail.
ECLIPS Camera Cap
Please make certain that you have removed the Eclips camera cap.
ECLIPS Camera Condensation
Ensure that there is no condensation on the camera lens. You could consider making a small dew shield to
protect the camera lens from condensation.
ECLIPS Camera Dark Calibration
Dark Calibration should help with the “not finding stars” issue during auto-alignment. It’s something that can
be done indoors. The handset will lead you through this procedure once Dark Calibration has been
selected. The Dark Calibration procedure is under the Utilities Menu on your handset.
Telescope Calibration
You could improve telescope accuracy in general by performing the Azimuth Drive, Elevation Drive and
Finder Center procedures under the Setup Menu on your handset. It’s something that can be done during
the day. Take care not to point your telescope to or close to the Sun during this procedure.
Magnetic Interference
Large metal objects close to telescope like a car, motors, magnets and atmospheric magnetic fields in
general could affect the alignment and operation of any telescope that relies on its on-board electronic
compass to find North.
Page 3
Page3
Firmware Update Using a Pre-programed mini SD Card
Firmware Update Basics
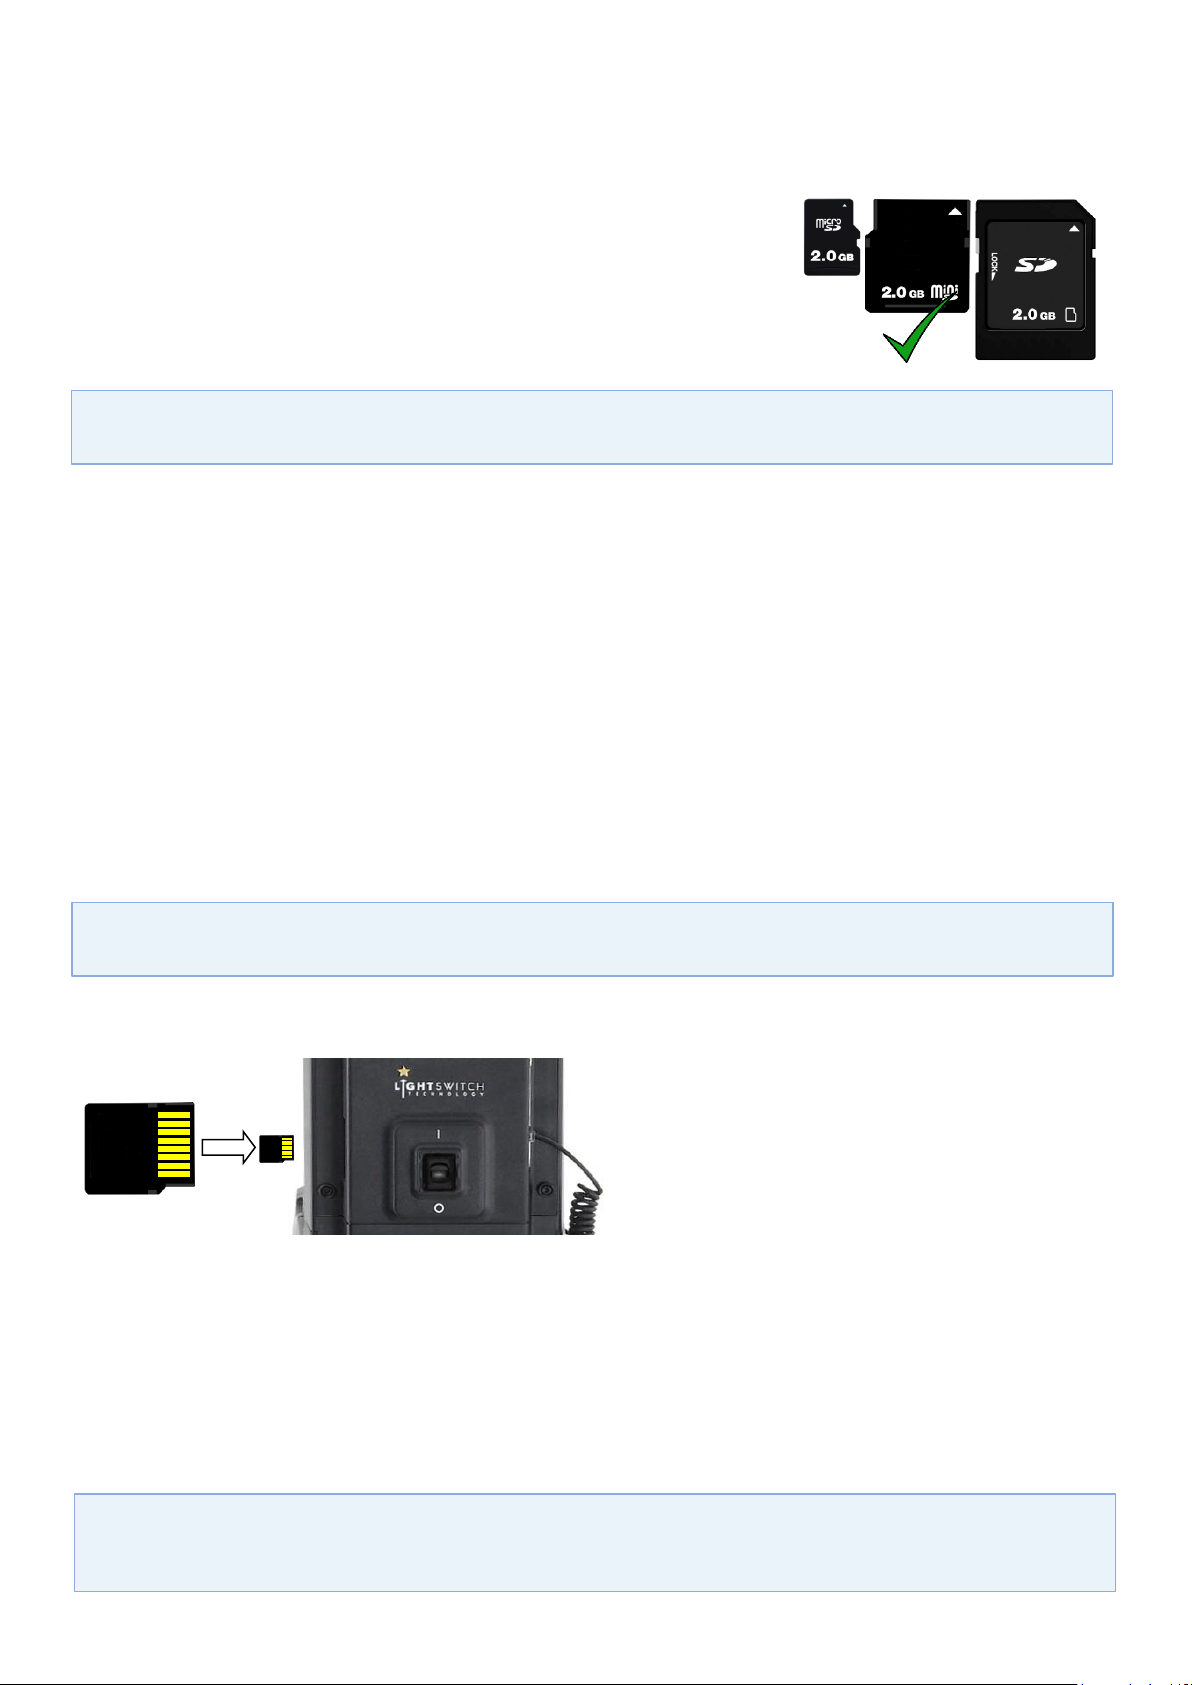
You will need a pre-programmed 500MB-2GB mini SD card to update
your telescope’s firmware. Alternatively, a 500MB-2GB micro SD can be
used in conjunction with a mini SD adapter card.
NOTE: You can also program your own mini SD card using the Meade
Autotostar Updater (ASU) software that can be downloaded
from the Meade Instruments website.
Instructions
1. Use a reliable power supply.
2. Ensure that your Meade LS telescope is switched off.
3. Insert the pre-programmed Mini SD card supplied into the telescope’s mini SD slot as described
under the Inserting the mini SD Card heading in this document.
4. Switch ON the telescope and wait for around 10 seconds for the hand box to respond. Then follow
the instructions on the hand box display.
5. Wait for approximately 30 minutes for the firmware to be updated.
6. Do not remove the mini SD card or switch off the telescope while updating the firmware or the
telescope may need to be returned back to Meade Instruments Inc. for re-flashing.
7. The AutoStar III handset will confirm that the software has been updated.
8. Switch OFF the telescope.
9. Remove the Mini SD card from the telescope.
10. The firmware update is now complete.
Inserting the mini SD card
Please observe the correct orientation of the mini
SD card when inserting it into the mini SD slot on
the telescope.
It is important that you do not force the mini SD card
into the slot.
Slowly press the mini SD card into position making certain that the mini SD card is not at an angle when
inserted. If the mini SD card is at an angle or facing the wrong way it will stop half way and you will be unable
to push it into position. Finally, push the mini SD card in all the way so that it ‘clicks’ in place.
Note that once you switch ON the telescope with the mini SD card inserted, the red power LED should remain
switched on. If the telescope is unable to read the mini SD card for any reason, the red power LED will flash
intermittently for a short period of time and/or the handset display will remain blank. If the update starts but
takes too long to complete (typically over 30 minutes) the files on the mini SD card may have been corrupted.
Note that in some cases, leaving the telescope switched on overnight may still complete the update.
We strongly recommend that you always update the LightSwitch telescope’s firmware via a 500MB-2GB
mini SD card as outlined in this document and not via a PC. Other capacity SD cards will not work.
CAUTION: Do not plug or unplug the power supply or handset to/from your telescope while the
telescope’s ON/OFF switch is at the ON position.
micro SD mini SD SD
CAUTION: Please make certain that when you insert a micro SD card into a mini SD adapter this is
done with care. In rare cases, it is possible that the contacts in the mini SD adapter end
up over the top of the micro SD card rather than below.
Page 4
Page4
LightSwitch LS6 & LS8 Calibration
Calibrating your Lightswitch telescope will enable you to tune several aspects of the telescope for peak
performance including pointing accuracy and camera image quality which helps with auto-alignment.
Calibration can be done during daytime but you must take care not to point your telescope to or close to the
Sun since this cause to both your telescope and eyes.
Dark Calibration: Allows you to
take a dark frame of the same
exposure as your image but with
the camera lens covered to
combine and subtract out noise
from your image. You must
cover the camera lens with the
lens cap before you take the
dark calibration frame.
HANDSET
MENU
STRUCTURE
CALIBRATE
Azimuth Drive
allows you train your azimuth
drive for peak pointing accuracy.
Elevation Drive allows you train your
elevation drive for peak pointing accuracy.
Finder Center recomputes the center of the
ECLIPS camera. When you change
diagonals or other equipment the alignment
of the equipment with the ECLIPS camera
can change. If you are getting good
alignments, but objects are consistently off
center by the same amount, you should use
the option to improve centering.
© Meade Instruments
Reset
telescope
to factory
settings
Shutdown
telescope
Page 5
Page5
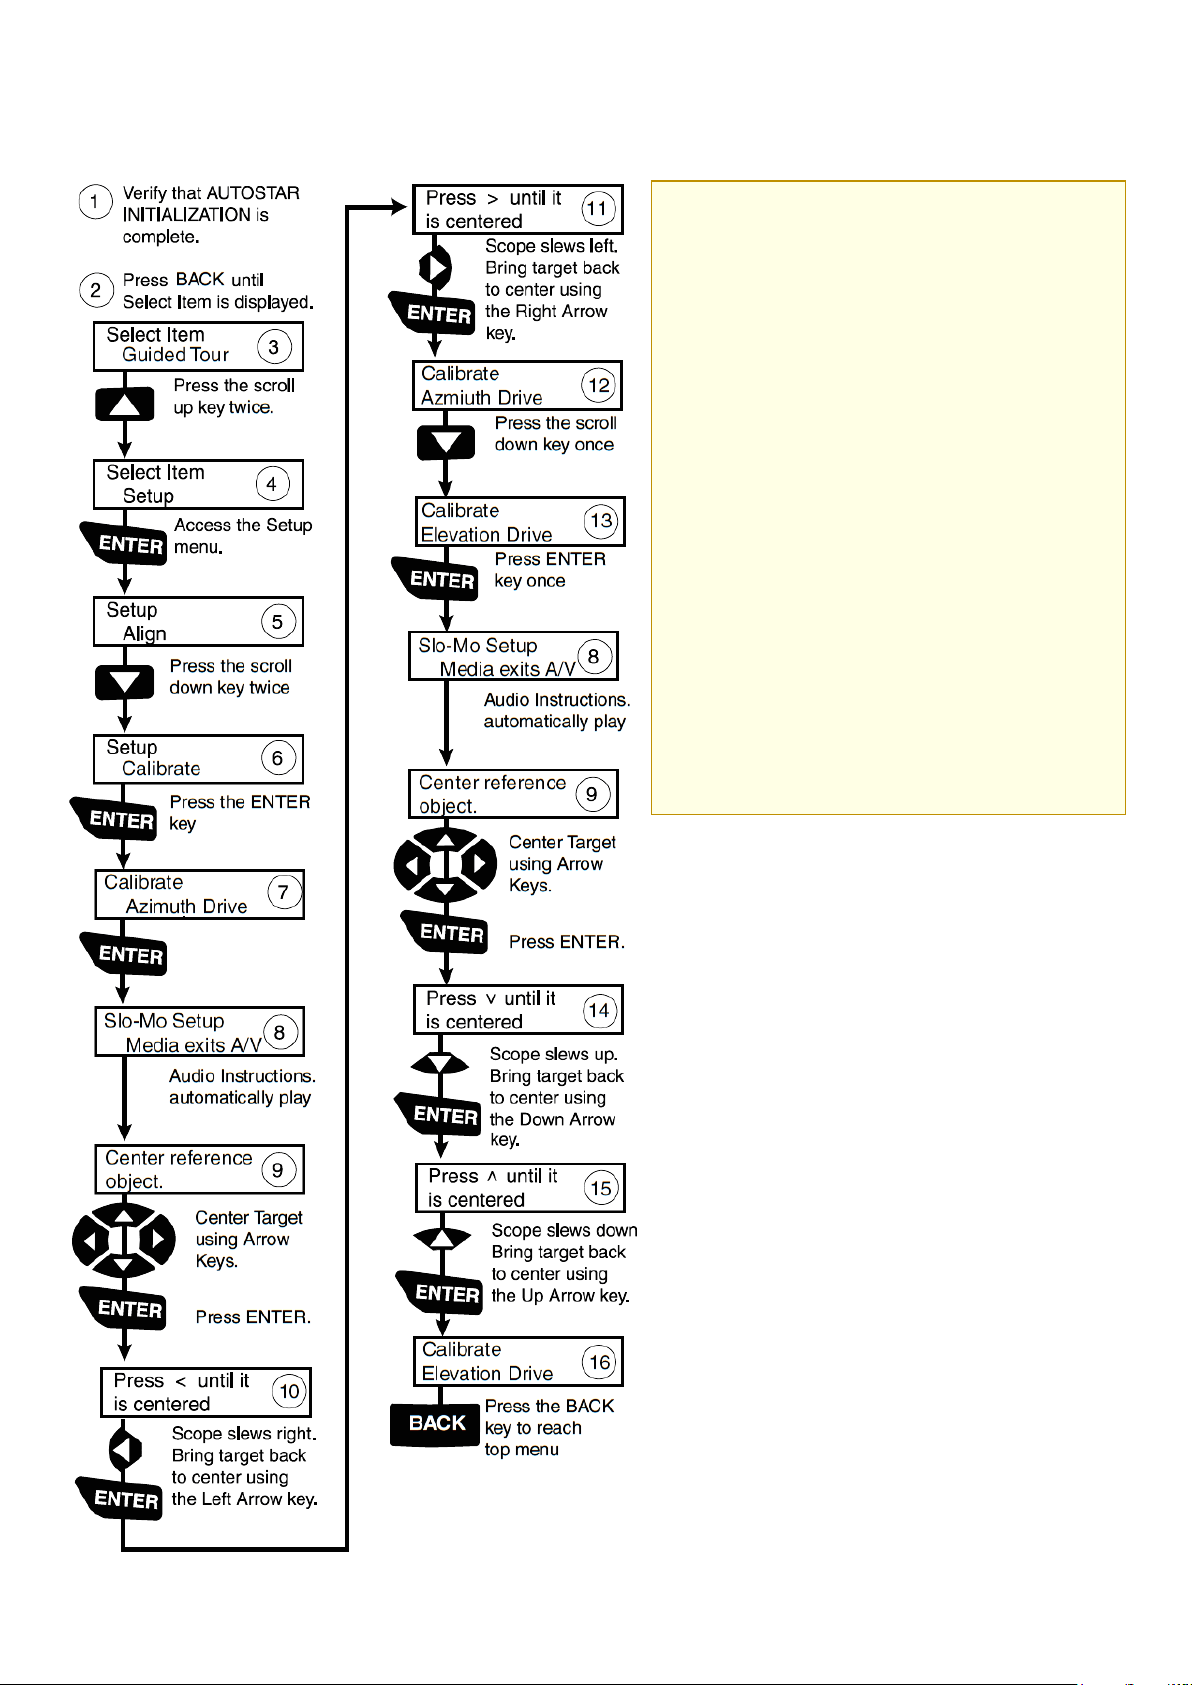
Training the Azimuth and Elevation Drives
CALIBRATE: Training the Drive
Perform this procedure if you are
experiencing any pointing accuracy
problems.
NOTE: Use a terrestrial object, such as a
telephone pole or lamp post, to train the
drive. Complete this exercise once every 3 to
6 months. Take care not to point the
telescope to or close to the Sun.
Calibrate allows you to precisely tune
several aspects of your telescope for peak
performance. Calibration options include:
• Azimuth Drive allows you train your
azimuth drive for peak pointing accuracy.
• Elevation Drive allows you train your
elevation drive for peak pointing accuracy.
• Finder Centre
recomputes the centre of the
ECLIPS camera.
© Meade Instruments 2019
 Loading...