

Page 1
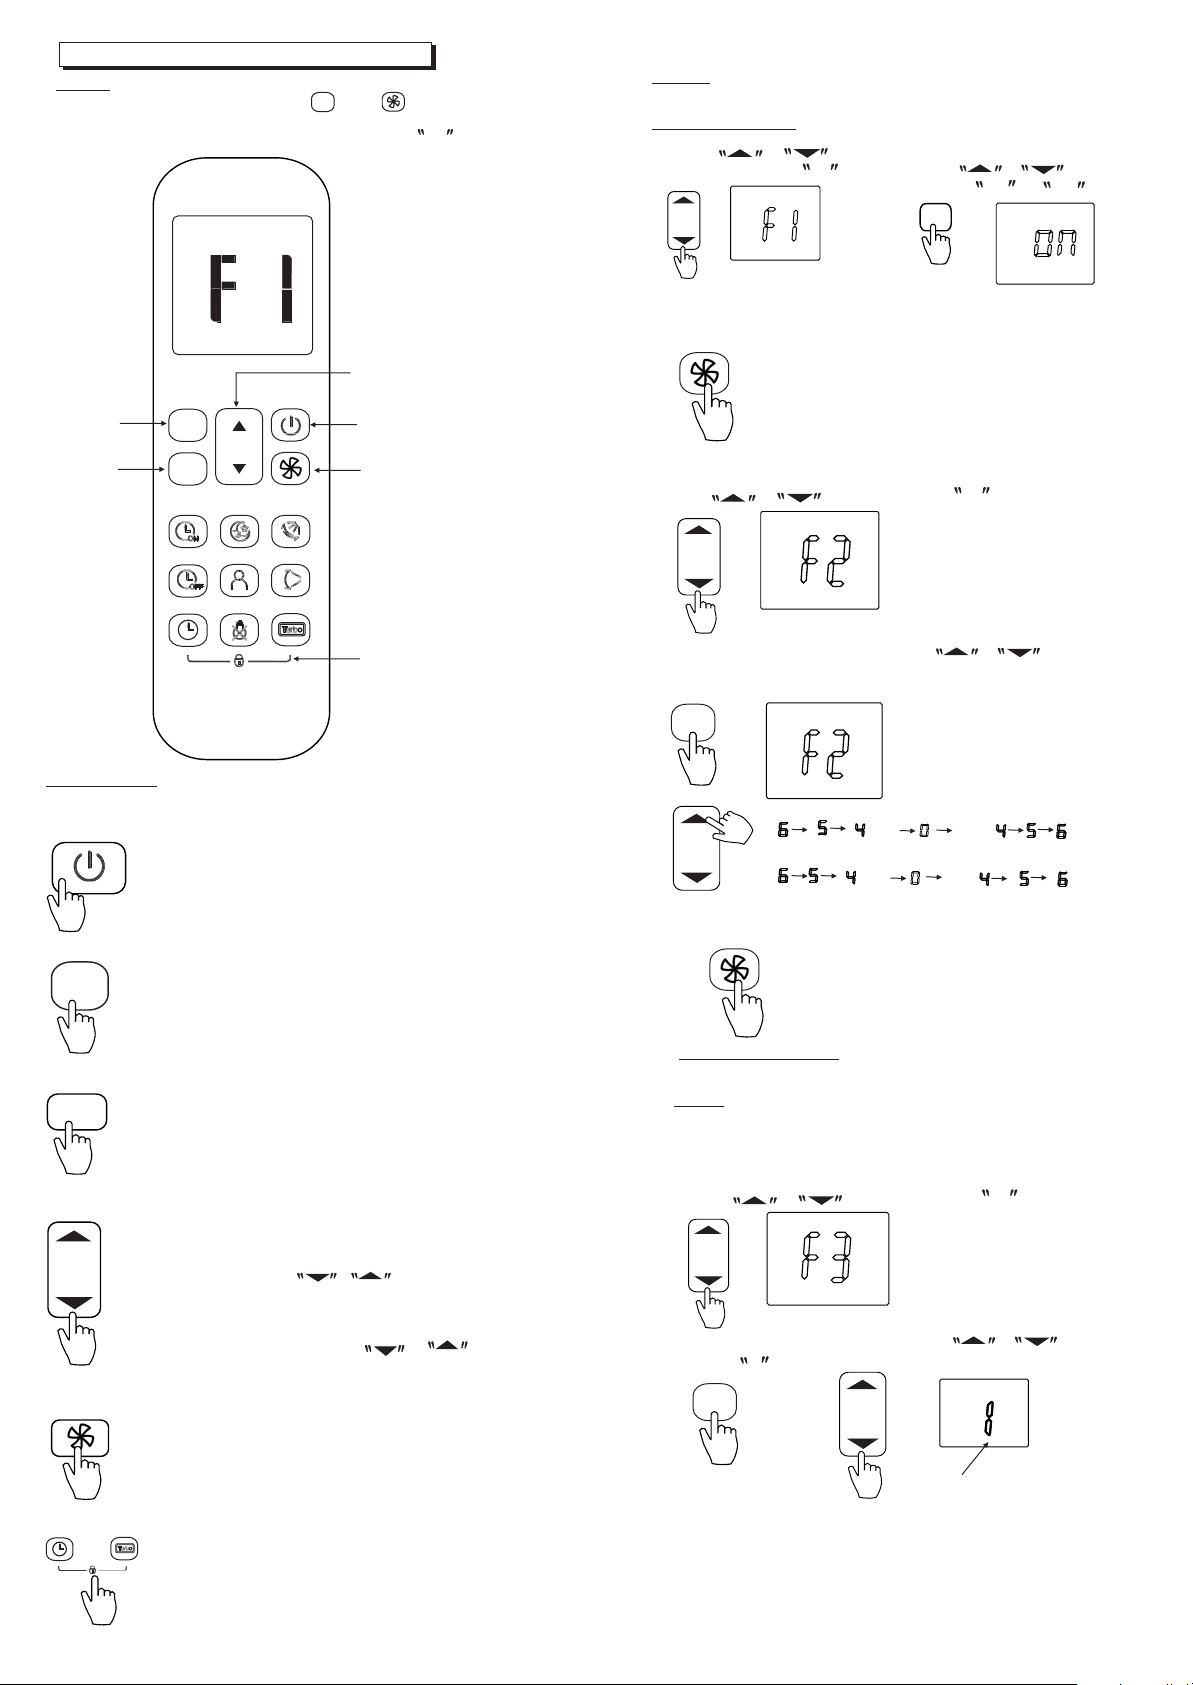
Features of Remote Controller buttons
NOTE: After installing the batteries,
period, please holding down the and buttons
together for 5 seconds, the remote controller will enter
function reset state, and LCD window displays F1 .
QUERY
button
MODIFY
button
24 c
M
o
during the first 30 seconds
M
ADJUST
button
POWER
button
CONFIRM
button
How to set up the functions
NOTE: The indoor unit will beep for 2 seconds indicating the
function being set up successfully.
Auto-start function
1. Press &
button to choose F1.
2. Press MODIFY button. Then
press & button to
choose On or Off .
M
3. Press CONFIRM button, and the Auto-start function on/off
setting has finished.
Heating temperature compensation
1. Press & button to choose F2.
LOCK
button
IMPORTANT: The remote controller is only enabled within10
minutes after the indoor unit is powered on, and the indoor unit
must be switched off.
POWER button: Press this button to turn off
the unit
QUERY button: Press this button to check the
o
24 c
M
current special function parameters of the indoor
unit.
MODIFY button: Used to modify the selected
function or adjust the parameter. Press this button
to enter the parameter setting interface, and the
parameter to be modified will be kept flashing.
ADJ US T bu tt on : Us ed t o ch oo se f un ct io ns o r
adjust parameters. On parameter unadjustable
interface, press the & button to select
the specified function in a range of F1 ~ F9 and
E1~E9. Then pressing the MODIFY button to enter
the parameter modifying interface, the relevant
parameter flashes, pressing & button
to adjust the paramter.
2. Press MODIFY button. Then press & button to
choose the parameter. The parameters can be adjusted
within a range of -6 C~6 C.
M
3. Press button.CONFIRM
Anti-cold air function
Intelligent anti-cold air function setting:
NOTE: T he p ar amete r of i ntellig en t anti- co ld air is cha ng ed with t he
room te mp er ature . Aft er the room t em perat ur e raised, t he t emper at ure
of anti -c ol d air wou ld r aise too, w hi ch can ma ke y ou feel mor e co mfort ab le.
After t he r oo m tempe ra ture decr ea sed, th e an ti-cold a ir t emper at ure
would dec re ase too , wh ich can imp ro ve the fa n sp eed and bri ng f ast
heating o pe ratio n.
1. Press & button to choose F3.
2. Press button. Then press & button to
select 1 .
MODIFY
M
O O
.... ....
-
-
-
....
....
-
-
-
CONFIRM button:Press this button to confirm the
setting parameter and transmit the singal to the
machine.
LOCK button: Hold and press these two buttons for
2 seconds, all current settings of indoor unit are locked
in and the remote controller does not accept any
operation except that of the LOCK.
Flashing
Page 2
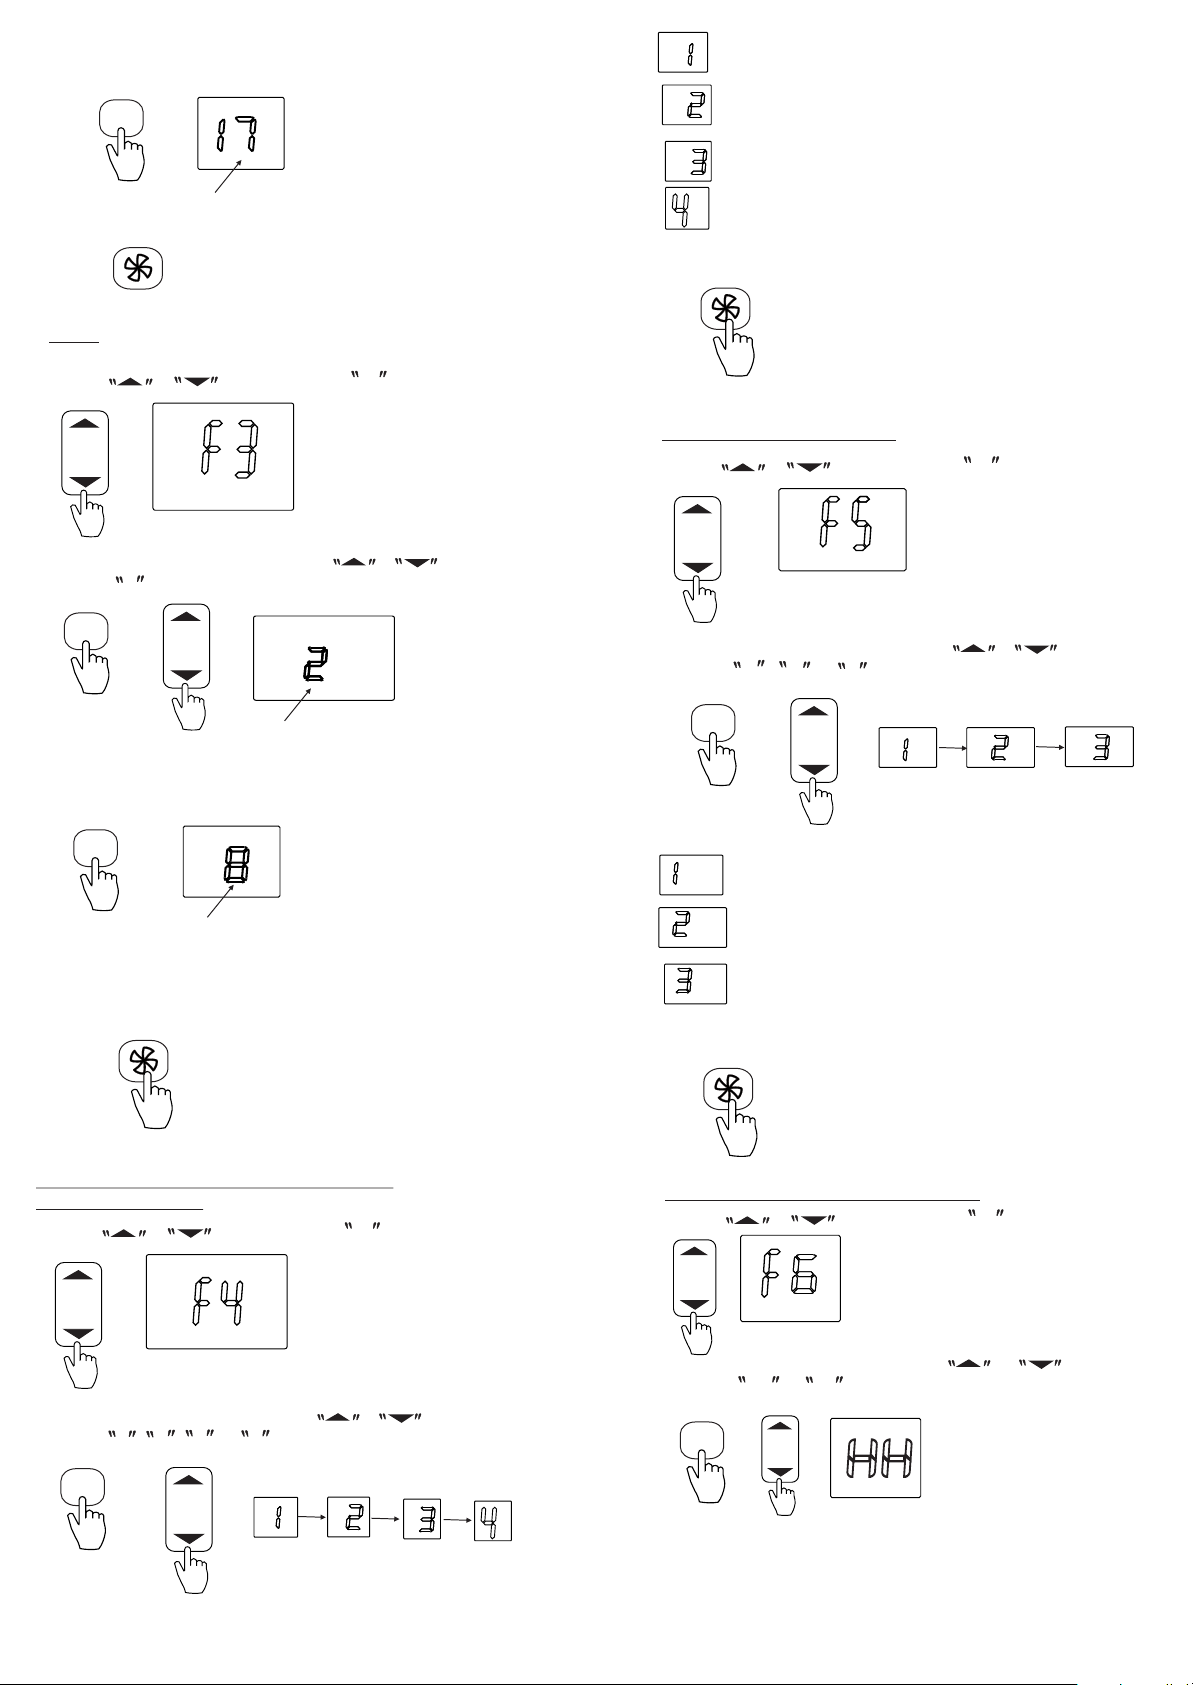
3.Press button to adjust the parameter. The parameter
keeps flashing. The parameter can be adjusted in the range
of 17 C~21 C.
MODIFY
O O
M
Indicates stopping fan motor
Indicates operating at lowest fan speed
Indicates operating at setting fan speed
Flashing
4. Press button to confirm. CONFIRM
General Ant i- co ld a ir f un ct io n se tt in g:
NOTE: T he p ar amete r of g eneral an ti -cold a ir i s fixed reg ar dless
of room t em pe ratur e.
1. Press & button to choose F3.
2. Press button. Then press & button to
select 2 .
MODIFY
M
Flashing
3.Press button to adjust the parameter in the range of
8 C~28 C.
O O
MODIFY
Indicates Termal function
3. Press button.CONFIRM
Louver angle memory function
1. Press & button to choose F5.
2. Press button. Then press & button to
select 1 , 2 or 3 .
MODIFY
M
M
Flashing
4. Press button to confirm. CONFIRM
Speed control of indoor fan motor after the set
temperature reached
1. Press & button to choose F4.
2. Press button. Then press & button to
select 1 , 2 , 3 or 4 .
MODIFY
M
Indicates cancelling memory function.
Indicates the louver angle memory function is enabled
under switching off or power failure.
Indicates the louver angle memory function is enabled
under switching off, disabled under power failure.
3. Press button to confirm.CONFIRM
Heating only or Cooling & heating setting
1. Press & button to choose F6.
2. Press button. Then press & button to
select HH or CH. (HH: Heating only, CH: Cooling
& Heating)
MODIFY
M
3. Press button to confirm.CONFIRM
Page 3
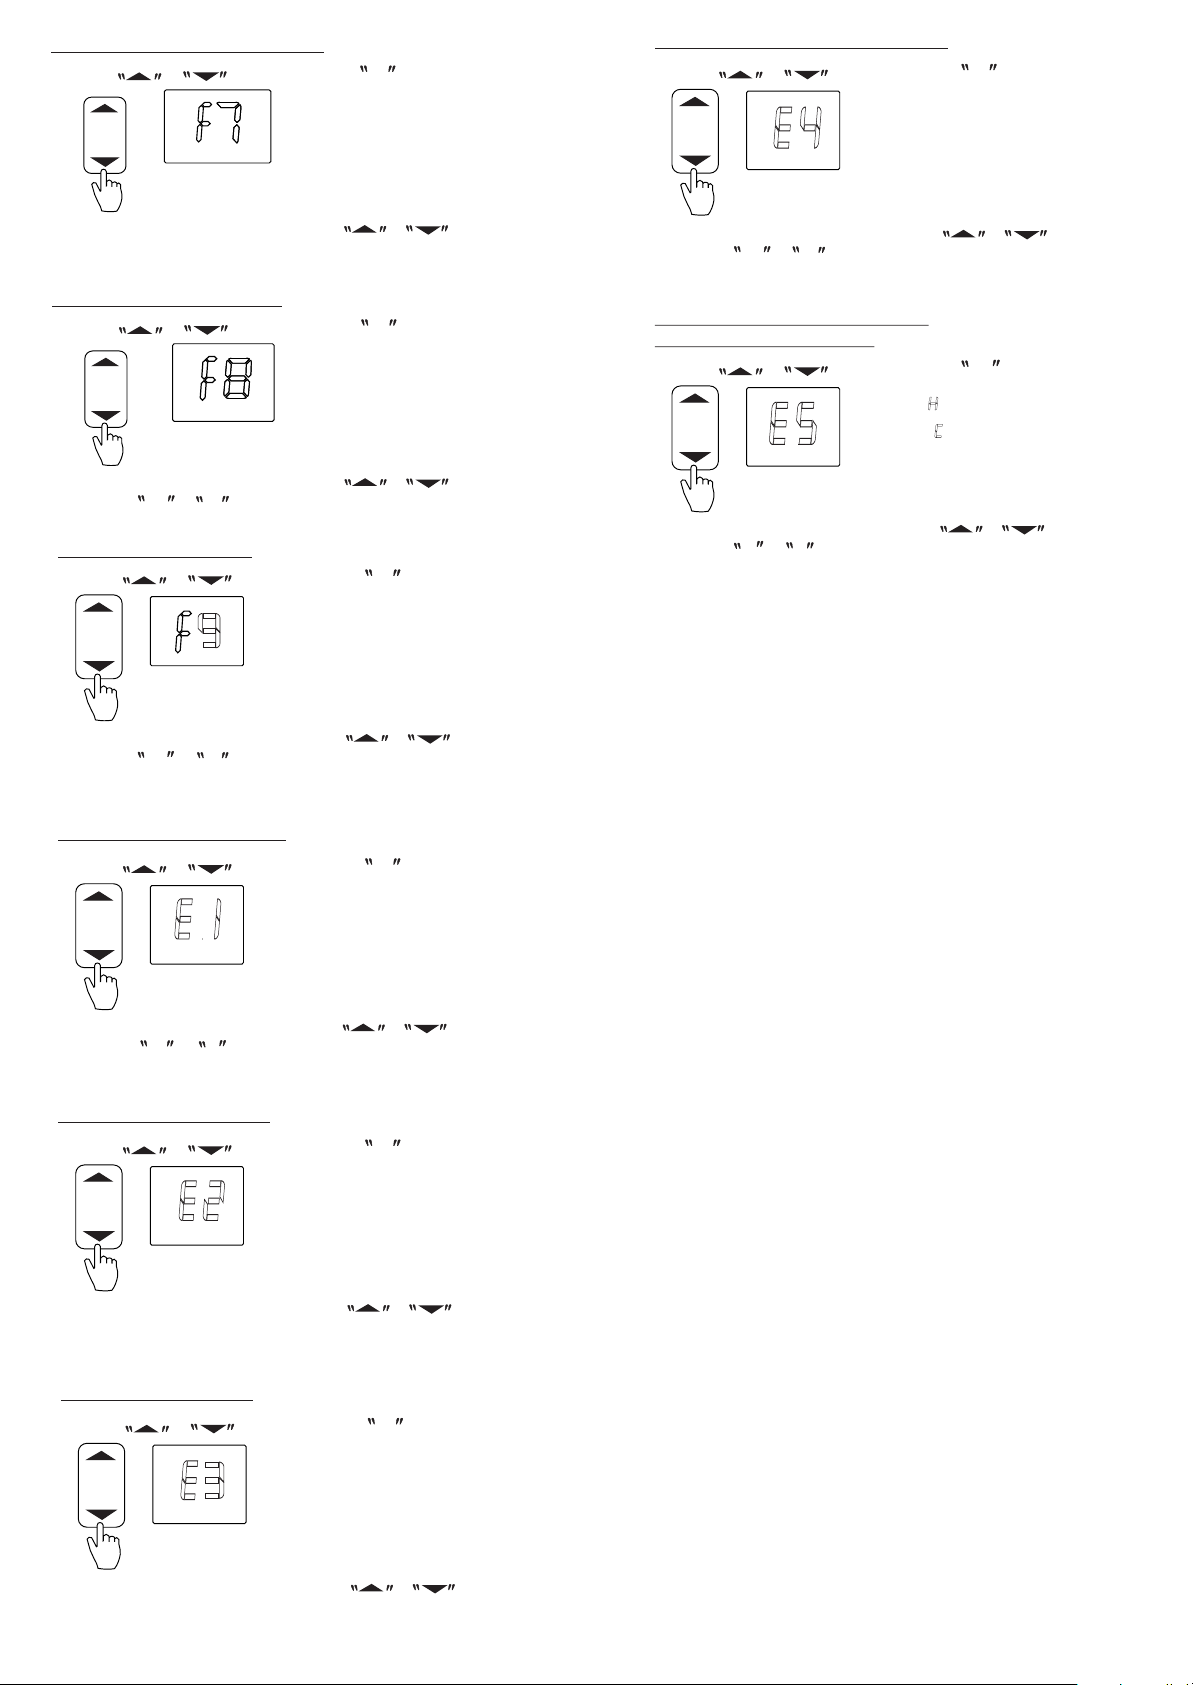
Cooling temperature compensation
1. Press & button to choose F7.
Special Anti-cold air function setting:
1. Press & button to choose E4.
2. Press button. Then press & button to
choose the parameter in a range of -2 C~2 C.
MODIFY
O O
3. Press CONFIRM button to confirm.
Refrigerant leakage detection
1. Press & button to choose F8.
2. Press button. Then press & button to
MODIFY
choose on or of .
3. Press button to confirm.CONFIRM
Cleaning Filter Reminder
1. Press & button to choose F9.
2. Press button. Then press & button to
MODIFY
choose on or of .
3. Press button to confirm.CONFIRM
2. Press MODIFY button. Then press & button to
choose on or of .
3. Press CONFIRM button to confirm.
Priority setting of heating or cooling
(applicable for multi models)
1. Press & button to choose E5.
: Heating mode first
: cooling mode first
2. Press MODIFY button. Then press & button to
choose H or C.
3. Press CONFIRM button to confirm.
Filter Replacement Reminder
1. Press & button to choose E1.
2. Press button. Then press & button to
MODIFY
choose on or of .
3. Press button to confirm.CONFIRM
Lowest temperature setting
1. Press & button to choose E2.
2. Press MODIFY button. Then press & button to
set the temperature in a range of 17 C to 24 C.
O O
3. Press CONFIRM button to confirm.
High temperature setting
1. Press & button to choose E3.
2. Press MODIFY button. Then press & button to
set the temperature in a range of 25 C to 30 C.
O O
3. Press CONFIRM button to confirm.
 Loading...