

Page 1

MDG User Guide 1.0
MDG Computer – Windows XP User Manual
Copyright 2005 – MDG Computers Canada Inc.
Page 2

MDG Computers Canada Inc. User Guide Version1.1
Copyright 2005 by MDG Computers Canada Inc.
First Edition
No part of this document may be copied reproduced, transmitted, translated,
stored in a retrieval system or altered by any means, except documentation kept
by the MDG Customer for backup purposes, without the explicit, written
permission of MDG Computers Canada Inc.
This document is presented ‘as is’ and is for informational purposes only.
Although every precaution has been taken in the preparation of this document
MDG Computers Canada Inc, the publisher and author assume no responsibility
for error or omissions contained in this document. MDG Computers Canada Inc,
the publisher and author assume no responsibility for any damages or loss which
may result from the use of the information contained within this document. The
information in this document including information regarding third party products
and services is subject to change at any time without prior notification.
Products and corporate names contained within this document may or may not
be registered trademarks or copyrights of their respective owners. Any such
names are capitalized and are only used for identification or explanation and to
the owners’ benefit. MDG Computers Canada Inc. does not intend to infringe
and fully recognizes the proper ownership on any such trademarks or copyrights.
4238A288-1BE1-20EB53 Page 2 of 78
Page 3

MDG Computers Canada Inc. User Guide Version1.1
TABLE OF CONTENTS
TABLE OF CONTENTS .....................................................................................3
1 INTRODUCTION.......................................................................................5
1.1 Activating Windows XP.......................................................................6
1.1.1 Activate Windows XP Over the Internet
1.1.2 Activating Windows by Telephone
2 BASIC COMPUTER OPERATION USING WINDOWS XP ..............................10
2.1 The Windows XP Desktop................................................................. 10
2.1.1 The Start Menu, Task Bar and System Tray
2.1.2 Application Windows
2.1.3 Window Menus and Toolbars
2.2 The Control Panel ............................................................................ 15
2.3 User Accounts .................................................................................16
2.4 Files................................................................................................17
2.5 Folders and File Paths ......................................................................18
2.6 Hard Drives and Partitions................................................................20
2.7 Saving Your Documents ...................................................................21
2.8 Basic Mouse Operation.....................................................................22
.................................................................13
.....................................................14
2.8.1 Using Your Mouse to Select Icons
2.8.2 Moving and Copying Files With Your Mouse
2.9 Using the Cut, Copy and Paste Commands ........................................27
2.10 Microsoft Works Suite ......................................................................29
2.10.1 Microsoft Task Launcher
2.10.2 Microsoft Word
2.10.3 Microsoft Money
.........................................................................30
.......................................................................32
2.10.4 Microsoft Streets and Trips
2.10.5 Microsoft Encarta
......................................................................34
2.10.6 Microsoft PictureIt!
3 INTERNET CONNECTION ........................................................................ 36
3.1 Spyware, Viruses and Firewalls .........................................................36
3.2 Setting Up Your Internet Connection.................................................38
3.2.1 Dial-Up Connection
3.2.2 DSL Connection
3.2.3 Cable Connection
3.3 Outlook Express ..............................................................................47
........................................................................42
......................................................................45
3.3.1 Configuring Outlook Express
3.3.2 Using Outlook Express
3.4 Internet Explorer .............................................................................54
3.4.1 Using Internet Explorer
4 CD READERS AND WRITERS................................................................... 56
A Simple Explanation of Optical Drive (CD & DVD) Technology .....................56
4.1 Nero CD Writing Software ................................................................57
............................................................29
........................................................33
....................................................................35
...................................................................40
......................................................47
...............................................................51
.............................................................54
........................................6
................................................8
................................11
..............................................22
................................26
4238A288-1BE1-20EB53 Page 3 of 78
Page 4

MDG Computers Canada Inc. User Guide Version1.1
4.1.1 Creating Data CDs
4.1.2 Copying a CD
5 TROUBLESHOOTING AND MAINTENANCE................................................63
5.1 Maintaining and Cleaning Your Physical Components ........................ 63
5.1.1 Selecting the Proper Location for Your Computer
5.1.2 Cleaning Your PC
5.2 Windows XP System Restore ............................................................64
5.2.1 Overview
..................................................................................64
5.2.2 Manually Creating a Restore Point
5.2.3 Restoring Your Computer From a Restore Point
5.2.4 Undoing a System Restore
5.3 Identifying Your Motherboard...........................................................68
5.4 Downloading Drivers........................................................................ 69
5.5 Installing Drivers .............................................................................69
5.5.1 Locating the drivers on your System Recovery Tools CD
5.5.2 Uncompressing a WinZip Self-Extractor file
5.5.3 Running Driver Installation Routines
5.6 Reinstalling Windows XP ..................................................................74
5.6.1 Configuring Your Computer to Start From a CD
5.6.2 Using the MDG System Recovery Tools CD
5.6.3 Installing Windows XP From the Windows XP CD
5.7 Frequently Asked Questions (FAQ).................................................... 77
5.8 Returning Your PC for Repair............................................................77
5.8.1 MDG Computers RMA Form
.....................................................................57
............................................................................60
........................63
......................................................................63
..............................................65
..........................66
.........................................................67
..............70
.................................71
..........................................73
...........................74
.................................76
........................76
.......................................................77
4238A288-1BE1-20EB53 Page 4 of 78
Page 5

MDG Computers Canada Inc. User Guide Version1.1
1 INTRODUCTION
Thank you for purchasing a computer from MDG Computers Canada. Now that
you’ve connected all your basic devices and have turned on your computer it’s
time to become familiar with Microsoft Windows XP .
This User Manual should assist you in becoming more familiar with some of the
basic functions of your computer. For more detailed instructions there is a vast
array of information about using and maintaining your computer both in hard
copy format (Book, Cassette, Video, DVD etc) and on the Internet. Please be
sure to visit the Help and Support section of Windows XP under Start. Help and
Support is a trove of specific information for most XP tasks. Save links to your
favourite topics there and print out sections that you wish to refer to later.
Read or review this manual through to the end to get an appreciation of what is
covered. Tech Support may refer you to this manual for subjects already
covered herein. You may also wish to have the manual printed at a copy shop
for reference.
This manual is a work in progress. If there are areas that are not covered, not
specific enough or too complex, please let us know so that we can improve it for
the next edition. Email us at support@mdg.ca with your comments.
After you have reviewed this guide you may want to check the computer section
of your local library or bookstore or log on to the Internet and read the support
sections of such pages as Microsoft (http://www.microsoft.com), Nero
(http://www.nero.com), Intel (http://www.intel.com) and Lexmark
(http://www.lexmark.com) for more detailed information about the hardware
and software you have purchased.
Common Terms used throughout this text.
! Where possible new words or concepts will be explained in further detail
within the document where the new word or concept appears, through the
use of footnotes or via the appendix at the end of this document.
! When introducing a technical concept that you should pay
attention to, you will see the following image displayed to the left
of the comment.
! When you see instructions in this
document which are formatted like
4238A288-1BE1-20EB53 Page 5 of 78
‘Start’ # ‘All Programs’ # ‘Internet
Explorer’
Page 6

MDG Computers Canada Inc. User Guide Version1.1
the example on the right it means
that you must click on the first item
(which should be present on your
screen) and a window or menu will
open, inside the new menu is the
second item you click on.
1.1 Activating Windows XP
Microsoft has implemented an Activation policy to stem software piracy.
Windows XP must be activated, either by Telephone (Semi-Automatic
or Voice) or automatically over the Internet within 30 days of
installation or you will no longer be able to log in to Windows. After 30
days you must activate XP first before you can continue to use the
computer.
The Activate Windows section appears automatically when you turn on your
computer for the first time or when you reinstall Windows XP. If you wish to
activate windows over the phone follow the instructions on activating Windows
XP by Telephone. If you wish to activate windows over the Internet Choose ‘No,
remind me to activate Windows every few days.’ And click ‘Next’. Follow the
steps in this manual to set up your computer for Internet Access and then when
the notification which states ‘You have X days to activate Windows’ appears click
on it to start the Windows Activation process.
You can also start the Windows Activation process by clicking ‘Start’ # ‘All
Programs’ # ‘Accessories’ # ‘System Tools’ # ‘Activate Windows’
If ‘Activate Windows’ does not appear in your start menu you can start the
activation by clicking ‘Start’ # ‘Run’. In the ‘Run’ box type in (without the
quotes) ‘c:\windows\system32\oobe\msoobe /a’ and click ‘OK’.
1.1.1 Activate Windows XP Over the Internet
Check your Internet Connection to make sure you are connected. If you are not
connected do so now.
4238A288-1BE1-20EB53 Page 6 of 78
Page 7

MDG Computers Canada Inc. User Guide Version1.1
The first page of the
Windows Activation process
will ask you if you want to
activate Windows over the
Internet, By Telephone or to
stop the activation process
and be reminded to activate
it later.
Select ‘Yes, lets activate
windows over the Internet
now’
Click ‘Next’.
You will then be asked to
register Windows.
Registration provides
personal information to
Microsoft and is optional.
Click ‘read the Windows
Registration Privacy
Statement’ to review the
benefits of registering. If
you choose to Register
Windows Select ‘Yes, I want
to register and activate
Windows at the same time’
and click Next.
If you do not want to
Register select ‘No I don’t
want to register now, let’s
just activate Windows’
Click ‘Next’.
If you choose not to register
disregard the next step in
the activation process.
4238A288-1BE1-20EB53 Page 7 of 78
Page 8

MDG Computers Canada Inc. User Guide Version1.1
If you have chosen to
register Windows as well as
activating it fill out the form
with your personal
information.
Click ‘Next’
If you wish to skip this step
at this time click ‘Skip’.
Windows is now activated. Click ‘OK’.
1.1.2 Activating Windows by Telephone
Activating windows by Telephone is necessary if you do not have an Internet
connection or if you receive an error while trying to activate Windows over the
Internet.
The first page of the
Windows Activation process
will ask you if you want to
activate Windows over the
Internet, By Telephone or to
stop the activation process
and be reminded to activate
it later.
Select ‘Yes, I want to
telephone a customer service
representative to activate
Windows’.
Click ‘Next’.
4238A288-1BE1-20EB53 Page 8 of 78
Page 9

MDG Computers Canada Inc. User Guide Version1.1
Select your Country.
Telephone the number on
the page.
Provide Microsoft with your
Installation ID.
Type in the confirmation
code Microsoft Provides.
Click ‘Next’.
If you receive a message
stating that the Installation
ID is invalid click ‘Change
Product Key’ at the bottom
of the screen.
Type in your product key.
The product key can be
located on a sticker which is
attached to the top or the
side of your PC.
Click ‘Update’. Do not omit
this important step as this
will “lock down” your product
key into your computer.
Repeat the steps in the
previous step.
You will receive a message stating that Windows has been activated successfully.
Click ‘OK’.
4238A288-1BE1-20EB53 Page 9 of 78
Page 10

MDG Computers Canada Inc. User Guide Version1.1
2 BASIC COMPUTER OPERATION USING WINDOWS XP
2.1 The Windows XP Desktop
1
2
i
This is an example of a standard Windows XP desktop. The desktop consists of
two major areas.
1) The desktop area
2) The Taskbar
The Taskbar itself contains three major sections.
i) The Start menu
ii) The Taskbar buttons and Taskbar Toolbars
iii) The System Tray
The desktop is the working area of your computer. Many computer programs
ii
iii
4238A288-1BE1-20EB53 Page 10 of 78
Page 11

MDG Computers Canada Inc. User Guide Version1.1
place Icons1 on the desktop which you can double click on to activate the
program. Running programs will normally appear in windows which either take
up all or part of your desktop space. You can have multiple windows open on
the desktop sitting on top of each other. To switch back and forth between
these windows you use the Taskbar which is explained further on this page.
Some programs such as games or video programs may take up the entire
screen, covering the desktop space as well as the taskbar.
The Taskbar and its components give you easy access to your Start button
menu, running programs and background processes.
2.1.1 The Start Menu, Task Bar and System Tray
The Start Button menu allows you to
access the programs installed on your
computer. You are also able to access
the Control Panel as well as many
other functions of your computer.
The Start Menu normally has two
columns. The left column has three
sections; the top section is generated
automatically as Windows XP learns
what programs you use most
frequently. The second section
contains shortcuts to programs which
are placed during installation. The
third section is the All Programs button,
which when clicked will display a list of
all the programs installed on your
computer.
The second column contains links to frequently accessed sections of your
computer such as the My Documents folder and the Control Panel as well as
links to the Windows XP Help and Support Center, Search and Run functions.
Additionally, the bottom of the Start Menu contains buttons you can click on to
‘Log Off’ or ‘Turn Off Computer’. Logging off a computer means you unload all
of your running programs and personal settings without shutting down the
system components of windows.
1
An icon is an image that represents an application.
4238A288-1BE1-20EB53 Page 11 of 78
Page 12

MDG Computers Canada Inc. User Guide Version1.1
prog
Basic mouse operation involves moving the mouse so the arrow
(mouse pointer) on the screen is over the desired item and either
clicking, double clicking or right clicking. When asked to ‘click’ on
something simply tap the left mouse button once. When asked to
double click then quickly tap the left mouse button twice. When asked
to right click on something simply tap the right mouse button once.
Most menus and buttons are activated by a single click and most Icons
are activated by double clicking an item. Right clicking usually brings
up a small menu of options specific to the item you right clicked on.
These items are activated by left clicking once.
The Taskbar is used to easily switch
back and forth between open programs
or windows. When you open a program it is displayed in the Taskbar. To switch
to a particular program locate the item in the Taskbar and single click on it with
your mouse. You can click on it again to minimize it. Minimizing a window
removes the window from your desktop without closing it. This lets you have
many things open on your desktop without being overwhelmed by having too
many windows sitting on top of each other.
The Taskbar can also be used to display additional toolbars. Note the example
above. Between the Start Button and the first item labeled MDG Computers,
which represents an open, but minimized Internet Explorer window, is a toolbar
called the Quick Launch. This toolbar displays Icons in your taskbar which you
can easily click on to open programs. You can access this and other toolbars by
right clicking on a blank part of your Taskbar and left clicking Toolbars.
The System Tray contains icons which
represent programs which normally run
in the background automatically, easily
accessed system settings and your system clock. Programs normally found in
the system tray include but are not limited to virus scan and Internet Security
rams, Internet programs such as MSN Messenger, video and sound settings.
Double left clicking on a system tray icon usually brings up the settings
associated with that program and right clicking usually brings up a list of options
associated with that program.
The more programs you have listed in your system tray, the more
programs you have running in the background. If your computer is
running slowly you may want to adjust the settings of some of
these programs so that they only load when you need them to free
up some additional system resources.
4238A288-1BE1-20EB53 Page 12 of 78
Page 13

MDG Computers Canada Inc. User Guide Version1.1
2.1.2 Application Windows
Information such as programs and folders are displayed either by taking up the
whole screen or appearing on the desktop in windows. Above is an example of a
computer with three open windows on the desktop. The first window, an
Internet Explorer window displaying the MDG Computers Canada page is on top
and active. The second window, My Computer, is behind it and inactive. The
third window, My Documents, is not currently on the desktop because it is
minimized so it does not take up any more desktop space but it can be made
active and appear on the screen by clicking on the ‘My Documents’ button on the
Taskbar.
On the top right hand corner of most windows you will see one, two
or all three of these buttons. The left button will Minimize the
window so that it does not appear on the desktop but is still active
in the Taskbar. The middle button will toggle the window between
full screen mode and window mode. The third button is used to
close the window completely and terminate the program.
4238A288-1BE1-20EB53 Page 13 of 78
Page 14

MDG Computers Canada Inc. User Guide Version1.1
2.1.3 Window Menus and Toolbars
Most programs are operated by using menus and toolbars. On most programs
both the Menus and Toolbars will be located at the top of the window, above the
actual document you have opened.
The Menus at the top of the screen usually start with the ‘File’ menu on the left
and end with ‘Help’ on the right. These menus are accessed by single clicking on
the desired option.
The toolbars contain buttons which are activated by holding your mouse over the
button and clicking. On most programs the toolbars can be can be configured to
be displayed on the top or bottom of the window, or they can float above your
document for easy access. You can view which toolbars you have available by
clicking ‘View’ # ‘Toolbars’. The toolbars which are currently displayed on the
screen will have a checkmark icon next to them. Click on a toolbar to toggle
between displaying and not displaying the toolbar.
To see what the buttons on the toolbars do move your mouse pointer over the
toolbar and the title of the function will be displayed.
Menus
Toolbars
4238A288-1BE1-20EB53 Page 14 of 78
Page 15

MDG Computers Canada Inc. User Guide Version1.1
p
2.2 The Control Panel
The control panel is the central location for system wide configuration settings
and settings which are specific only to the current user. To access the Control
Panel click ‘Start’ # ‘Control Panel’.
The Control Panel in Windows XP can be listed in two ways. The first way,
Category View, groups functions and settings into similar categories. The
second way, Classic View, displays the control panel the same way it was
displayed in previous versions of Windows. To switch back and forth between
these two different methods of viewing the Control Panel click ‘Switch to Classic
View’ on the left hand side when the Control Panel is currently displaying the
Category View and ‘Switch to Category View’ when the Control Panel is currently
displaying the Classic View.
Category View
The control panel when in Category View works
much the same as a webpage viewed in Internet
Explorer. To operate the Control Panel in Category
View single click a category to view the settings
associated with it. To exit a category and return to
the previous screen click the ‘Back’ button.
Classic View
The control panel when in Classic View contains
Icons which are accessed the same way as Icons
on your desktop. Double click on an Icon to open
the settings associated with the
articular Icon.
Depending on the Icon either the whole Control
Panel will change, displaying the settings
associated with the Icon or a window will open on
top of the Control Panel. If the whole control panel
changes click the Back button to go back to the
Control Panel. If a window opens you can close it
either by clicking OK which saves your changes and
Exits, Cancel which exits the window without saving
your changes or the X in the top right hand corner
which does the same thing as the Cancel button.
4238A288-1BE1-20EB53 Page 15 of 78
Page 16
MDG Computers Canada Inc. User Guide Version1.1
2.3 User Accounts
Windows XP uses User accounts and System accounts in order to operate. User
accounts can have varying levels of restriction on the computer, depending on
how you configure the system.
Windows XP uses two default user account settings: ‘Normal User’ and
‘Administrator’. Normal Users have limited access to system settings, cannot
normally add new programs to the computer and cannot delete, create or
change user account settings. Administrator accounts have the ability to access
all system settings, add and delete programs and change user account settings.
Even if you do not actively choose an account when you start your computer you
still have a user account, it is simply configured to log in automatically.
User accounts in windows serve two purposes. The first is security: Every file
and folder in Windows XP has security built in to it to ensure that only the
allowed accounts can access, modify and delete these files. This adds protection
and privacy on your computer.
The second is customizability. By operating with the use of user accounts
multiple people can use the computer without having to worry about having their
personal settings and files altered. Each users files and settings are stored in
their profile folder. These folders, which always have the same name as the
user account they belong to, can be located in the ‘Documents and Settings’
folder inside the Local Disk (C:) drive by default.
In the example to the right the location
of the user profiles.
Expanded is the ‘All Users’ Profile. This
profile contains files which are
available to everyone who logs in. If
you wish to create a file which will be
available for everyone to work with
copy it to the appropriate user in the
‘All Users’ profile.
The user account settings, including options to create, modify and delete user
accounts can be found in the ‘User Accounts’ category in the Control Panel.
4238A288-1BE1-20EB53 Page 16 of 78
Page 17

MDG Computers Canada Inc. User Guide Version1.1
2.4 Files
Although the concepts of files and folders, as well as displaying these files and
folders as icons as been around for decades, for a beginner it’s still a concept
which requires explanation.
A file is a collection of information. This information can either be a program
itself or a collection of information that is accessed by another program. A file in
Windows XP is represented by using an Icon, which is a small picture, with the
file name underneath the icon or beside the icon depending on how Windows XP
is configured to display files.
All files are saved on the computer the same way, regardless of what kind of file
it is. To determine what program is supposed to access the file, these files use
File Extensions. A file extension is simply the last period in the file name and the
characters after the last period. For example, if you had a file called work.txt the
extension would be .txt. The computer contains settings which tell it to open .txt
files with notepad so whenever you double clicked on it Notepad would open and
display the information contained in the work.txt file.
Windows is configured to not display these file extensions by default unless there
is no program designated to interact with files which have that extension. This is
done because changing a file’s extension would confuse the computer in to
thinking that the file was to be opened with a different program. With the file
extension hidden you can rename a file and not have to worry about changing
the extension by accident.
For example, if you set Windows to display file extensions and then renamed
work.txt, which is supposed to be opened in notepad, to work.wav, which is the
extension for a type of sound file, the program designated to open sound files
with a .wav extension would try to open it and when it did the program would
either say that the file was unreadable. In some cases the program might crash
(quit unexpectedly due to an error) or freeze completely.
Regardless of the type of file, the size is always measured the same, in bytes. A
Byte of information is the amount of information needed to store a single typed
character. A kilobyte is 1024 bytes, a megabyte is 1024 kilobytes, a gigabyte is
1024 megabytes. Generally, a single page document with no pictures is usually
about 2 to 4 kilobytes.
4238A288-1BE1-20EB53 Page 17 of 78
Page 18

MDG Computers Canada Inc. User Guide Version1.1
You may run in to a situation where
you will want to view file extensions,
such as while doing system
maintenance or troubleshooting. To do
so open a folder and click ‘Tools’ #
‘Folder Options’.
In the ‘Folder Options’ window click on
the ‘View’ tab and uncheck ‘Hide
extensions for known file types’.
If you do this make sure that when you
rename a file you always
leave the file
extension intact. If you make a
mistake you can click ‘Edit’ # ‘Undo
Rename’ and try again.
2.5 Folders and File Paths
A folder is an organizational tool. A folder can contain files or other folders. By
putting folders inside other folders you can further organize your files. For
example, if you were storing recipes on your computer you could make a folder
called ‘Recipes’ and inside that folder you could create separate folders for
‘Poultry’, ‘Beef’, ‘Soups’ and ‘Deserts’ and store your individual recipes in their
respective folders, keeping your files organized and easy to find.
The layout of the files and folders is called a tree. The base of this tree, called
the Root, is marked with a drive letter, such as C:\. In Windows the root of a
drive is displayed as ‘Local Disk (C:\)’ when viewed as an icon or in a list of files.
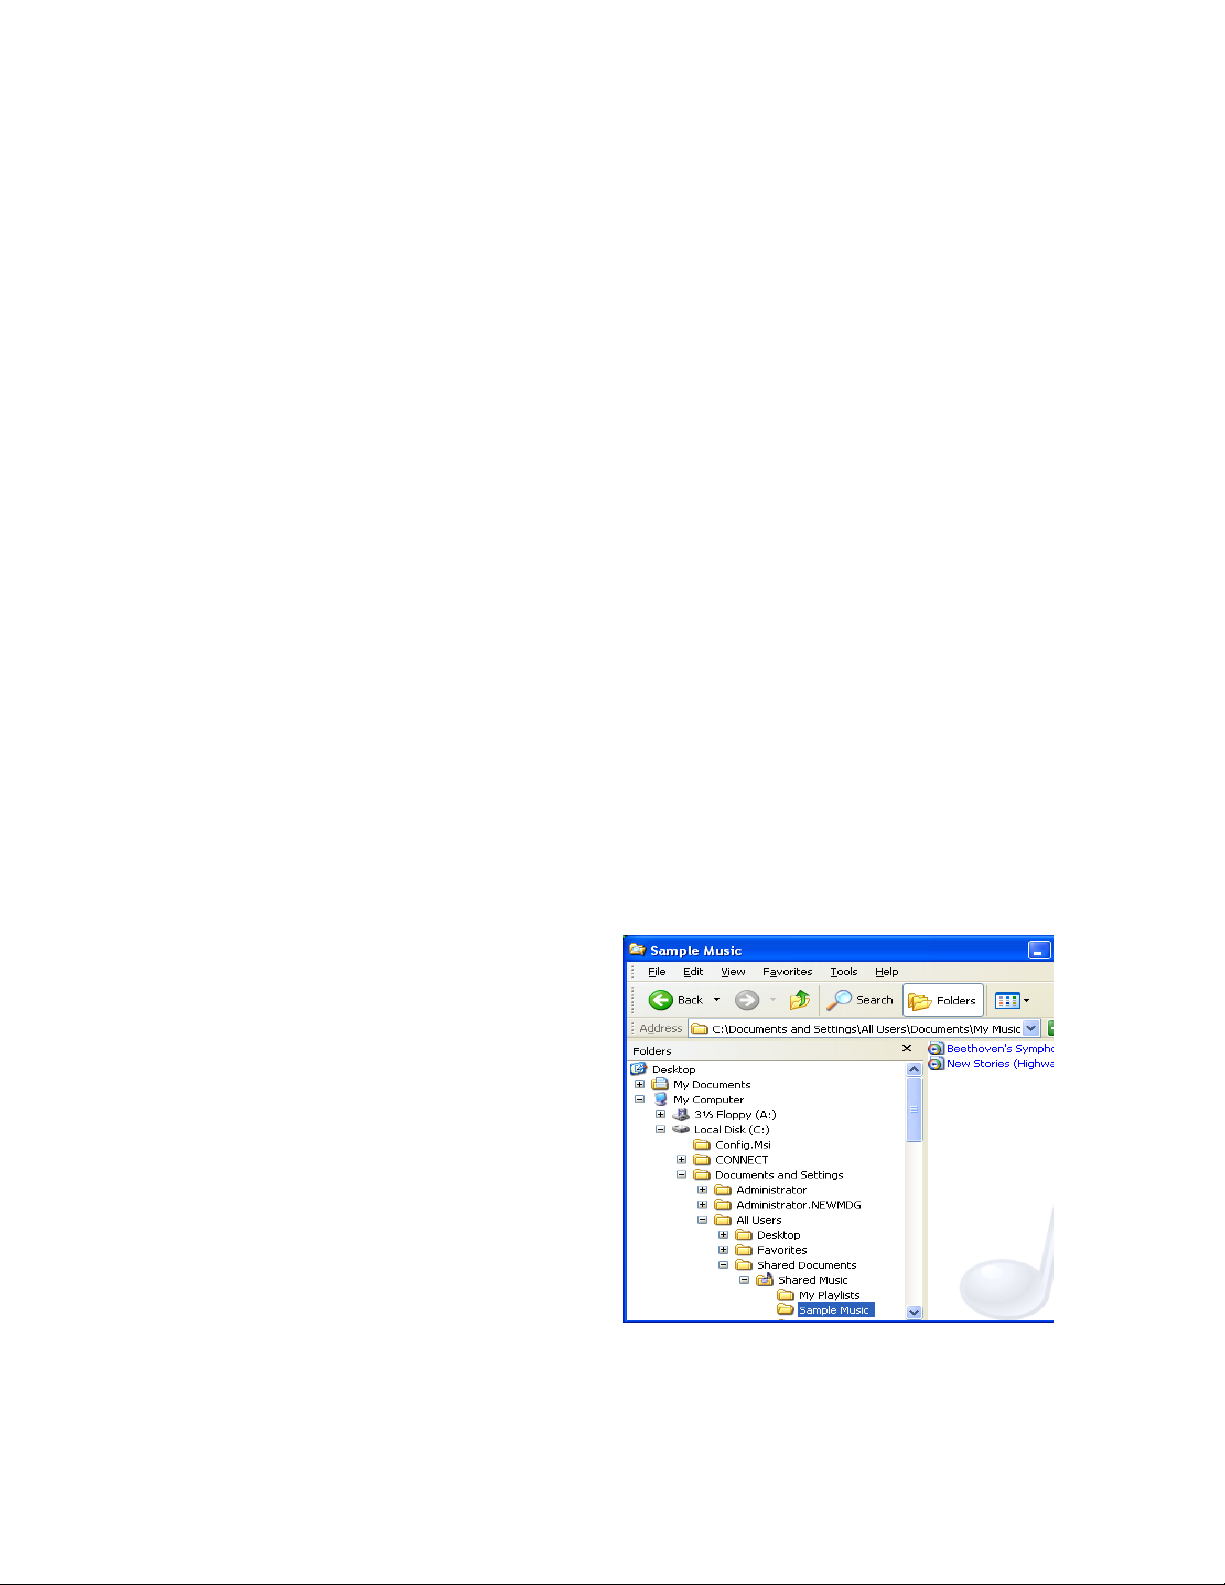
The example below should help to clarify. This window shows both the Folders
list and the files inside the folder. To view the folders list click open up a folder
and click ‘View’ # ‘Explorer Bar’ # ‘Folders’.
4238A288-1BE1-20EB53 Page 18 of 78
Page 19

MDG Computers Canada Inc. User Guide Version1.1
This example shows
both the tree which is
the left hand window
and the address at
the top.
If you were to
interpret this window
literally you would
probably assume that
the Root was the
Desktop. This is
incorrect.
The ‘Desktop’ and
‘My Documents’ icons
in this view are links
to the actual folders
which are inside your
user profile folder on
‘Local Disk (C:)’
The reason why these locations are displayed at the top of the list are for
convenience. Most users store the majority of their files in their ‘My Documents’
folder or on their desktop so Windows added this feature when Windows 95 was
introduced. The actual location of the files on a users desktop are folders named
‘Desktop’ and ‘My Documents’ which are located in the ‘Documents and Settings’
folder which is stored on the root of ‘Local Disk (C:\) by default.
The written address or ‘Path’ to a folder is displayed in the following format:
[Drive letter]:\[Folder]\[SubFolder]\Filename
The path is not case sensitive. For example, if you made a folder called STUFF
right in the root of the ‘Local Disk C:\’ and put a file called work.txt inside the
STUFF folder the path of that file would be c:\stuff\work.txt
If the file was saved in the Root of the C: drive the path would be c:\work.txt
4238A288-1BE1-20EB53 Page 19 of 78
Page 20

MDG Computers Canada Inc. User Guide Version1.1
2.6 Hard Drives and Partitions
A hard drive is a device for storing electronic data. An easy way to deal with
hard drives is to think of the hard drive as an electronic filing cabinet. The only
difference between how a person uses a filing cabinet and how a computer uses
a hard drive is that when a computer uses information on a hard drive it is
copied in to memory and is read and manipulated there, the information on the
hard drive remains unchanged until these changes are saved to the file.
A real filing cabinet could have one large drawer or several drawers. A hard drive
is laid out the same way. Inside a hard drive is a partition, which is much like an
electronic drawer. Each readable partition is displayed as a Local Disk with a
drive letter (C:, D:, E: etc).
Computers use file systems in order to keep track of all of the data
in the partition. There are many different types of file systems.
Windows XP uses the NTFS file system to store files as it has
enhanced security. If this File System becomes damaged you may
lose some or all the information in the partition. By partitioning your
hard drive you can reduce the risk of loosing all your information as
each partitions file system is independent.
A hard drive can contain one partition or many partitions of varying sizes which
would add up to the total size of the drive. For example, if you had a 160
gigabyte hard drive with one 160 gigabyte partition you could delete it and
recreate a new 160 gigabyte partition or create two 80 gigabyte partitions in its
place. If you had two 80 gigabyte partitions you could delete one of the 80
gigabyte partitions, leaving the other partition intact and then you would have 80
gigabytes of free space in which you could make several partitions.
When it comes to storing files Windows only cares about the partitions, not the
drives themselves. If you had two hard drives total, one with two partitions in it
and one with a single partition in it, your computer would display three local
disks. To continue with the filing cabinet analogy, that would be like putting a
two-drawer cabinet on top of a one drawer cabinet. When you looked at the
stacked cabinets you would see three drawers.
Each partition has a root, which like an empty drawer. You could put all of your
files right in the root but that would be hard to organize and every time you
wanted to find something you’d have to go sifting through all your files, this is
why you use folders. This would be the same as opening up a filing cabinet and
putting a piece of paper in it without using a folder, after a while it would
become very cluttered.
4238A288-1BE1-20EB53 Page 20 of 78
Page 21

MDG Computers Canada Inc. User Guide Version1.1
2.7 Saving Your Documents
The most important part of working with any program is saving
your work. Although many programs, including Microsoft Word,
have built in features to periodically save changes to your work
you should still save your work manually.
When working with most programs there are two ways to save your work, the
first is called ‘Save’, the second is called ‘Save As’. Both of these options are
normally located in the ‘File’ menu at the top of the window.
The ‘Save’ option will save your document in the folder the document was
opened from, keeping the current file name. If the document is a new document
which has not been previously saved, your computer will automatically switch to
the ‘Save As’ option.
The ‘Save As’ option
will open a new
Window. In this
dialogue box choose
the folder you wish to
save to either with the
quick buttons on the
left of the screen or
with the pull-down
menu on the top of
the window.
In the middle box is
the list of files and
folders currently in the
folder you have
selected.
The bottom two boxes are where you type in the file name you wish to use (top)
and the file format you wish to save the document in (bottom). It is
recommended that you use the format which is automatically selected unless you
know exactly which format you wish to use.
Once you have made your selections click ‘Save’.
Although many programs also have features to track changes made to your
document it is recommended that you periodically save an important piece of
4238A288-1BE1-20EB53 Page 21 of 78
Page 22

MDG Computers Canada Inc. User Guide Version1.1
work as a new document with a slightly different name manually in order to
review the progress of your document or recover information you removed and
later wish to retrieve.
When saving documents you have downloaded or created yourself it is important
to make sure you know where all your files are being saved. The ‘My
Documents’ folder is created at the same time as a user account to facilitate the
proper organization of files. It is recommended that you save all your files in the
‘My Documents’ folder or a folder you have created inside the ‘My Documents’
folder so that you can easily locate your files.
2.8 Basic Mouse Operation
2.8.1 Using Your Mouse to Select Icons
Your mouse is a powerful tool and along with the keyboard is the primary
method of adding and manipulating information on your computer. By learning
how to properly use your mouse you can increase the speed at which you
operate your computer.
By learning how to move files and folders around effectively you will have an
easer time keeping track of your data and reduce your chance of losing a file.
Selecting files using the methods below
becomes much easier when you
change the way you view the files in a
folder to match the method you’re
using to select files.
To check this click ‘View’.
The ‘Thumbnails’, ‘Tiles’ and ‘Icons’
views are very similar, all three show a
fairly large Icon with the file name
underneath or on the side. There are
subtle differences between these three
different views, open a folder and
check out all three of these views to
observe the subtle differences.
Both ‘List’ and ‘Details’ provide a list of files. The difference is ‘List’ will show you
a small icon followed by the file name and the list is broken up in to multiple
4238A288-1BE1-20EB53 Page 22 of 78
Page 23

MDG Computers Canada Inc. User Guide Version1.1
columns based on the folder windows width.
‘Details’ always shows a single column and will provide you with a small icon
followed by the file name and then the size, type and other information based on
the type of file.
For this section we will be switching back between the two most common view
methods, ‘Icons’ and ‘List’. Every one of these methods below can be used in
any view mode, however, some methods are better suited for different view
modes.
You can switch between the view types by single clicking on the desired method
of viewing.
Select a Single File
If you want to move or copy a single
file single click on it (1).
Any view type is suitable for this
method.
4238A288-1BE1-20EB53 Page 23 of 78
Page 24

MDG Computers Canada Inc. User Guide Version1.1
Select Multiple Files By Dragging
Your Mouse
To select multiple files by dragging
your mouse hold the mouse at the
corner of the icon you wish to select
(1).
Hold down the mouse button and drag
your mouse diagonally, refer to the
diagram to the right. A box will appear
(2).
When you let go of your mouse button
the files inside the box will be selected
(3).
This method is best when used with
‘Thumbnails’, ‘Tiles’ and ‘Icons’ views.
Selecting a list of files using the
Shift key in Icon View
In Icon view the files are seen as Icons
yet are controlled much like a list. The
list starts at the top left corner and
moves to the right, ending at the
bottom right file. A dotted line has
been drawn in this example to
demonstrate.
Left click on the first file in the list
which you wish to select(1).
Hold down the shift key on your
keyboard and left click on the last file
in the list(2).
This method applies to ‘‘Thumbnails’,
‘Tiles’ and ‘Icons’ views.
4238A288-1BE1-20EB53 Page 24 of 78
Page 25

MDG Computers Canada Inc. User Guide Version1.1
Selecting a list of files using the
shift key in List View
List view will show the files in a list. If
there are multiple columns then the list
starts at the top of column 1, goes to
the bottom of column 1 and then
moves to the top of column 2 and so
on. A dotted line has been drawn in
this example to demonstrate. To select
a list of files single click on the first file
(1).
Hold down the Shift key and single
click the last file in the list (2).
The files are now selected. Let go of
the Shift key.
Select Files At Random
If you want to select files at random
click the fist file(1)
Hold down Control while clicking the
other files in the list (2, 3, and 4).
If you select a file you don’t want by
accident while holding down Control
(Ctrl) single click the file again to
unselect it.
4238A288-1BE1-20EB53 Page 25 of 78
Page 26

MDG Computers Canada Inc. User Guide Version1.1
Selecting all the files in a folder
To select ALL the files and folders in
the folder click ‘Edit’ # ‘Select All’
You can unselect files after using
‘Select All’ by holding down Control
(Ctrl) and clicking on the files you don’t
want.
2.8.2 Moving and Copying Files With Your Mouse
Although the Cut, Copy and Paste commands are very handy, sometimes it’s
easier to simply use your mouse to drag and drop the file where you want it to
go.
The term ‘Drag and Drop’ is an accurate description for the procedure.
Below is an example of the drag and drop function. There are two folders, ‘My
Documents’ and ‘New Folder’, open. To move the folder ‘Work Files’ from ‘My
Documents’ to ‘New Folder’ you place your mouse pointer over the folder (1).
While holding down the mouse button drag it until it is on top of the ‘New Folder’
window (2) and once the file is where you want it to go, let go of the mouse
button (3).
1
2 3
4238A288-1BE1-20EB53 Page 26 of 78
Page 27

MDG Computers Canada Inc. User Guide Version1.1
You can also move a file in to another folder if only the folder icon is visible. The
procedure is the same as above, the only difference is you hold the mouse
pointer over the folder icon and then let go. The file will be moved into the new
folder.
You can also copy files this way. While holding down the mouse button press
the Shift key, you will see a little plus (+) sign appear next to your mouse
pointer. This means that when you let go of the mouse button the file will be
copied instead of moved.
You can drag and drop multiple files at the same time. To do so select the files
using the method described in the ‘Using Your Mouse to Select Icons’ section
above. Once they are selected hold your mouse over one of the selected files
and hold down the mouse button. You will be able to drag all of the files
selected.
2.9 Using the Cut, Copy and Paste Commands
The functions ‘Cut’, ‘Copy’ and ‘Paste’ are very simplistic, yet very powerful. Cut,
Copy and paste can also be used on images, files, folders and text. Here is a
description on how you can use Cut, Copy and Paste to move files.
First you must select the files you want to Cut or Copy, refer to the section
‘Selecting Files With Your Mouse’ for instructions.
Next choose to Cut or Copy the selected files.
If you choose the Cut command the file it’s icon will turn grey to indicate that
the file has been cut. Once you Cut or Copy a file it is placed on the clipboard.
The clipboard is an imaginary place where information (files,
pictures, text) is stored until it is pasted. Most programs only allow
for one set of information to be kept in the clipboard, so if you Cut
or Copy something to the clipboard (a set of files for example) and
then Cut or Copy something else, that information is written over by
the second set of information.
This DOES NOT apply to files. If you Cut a file it is ONLY deleted
from the original location AFTER you paste it. If you do not paste
the file stored in the clipboard or use the Cut or Copy command
again without pasting the file stored in the clipboard the file remains
in the original location.
4238A288-1BE1-20EB53 Page 27 of 78
Page 28

MDG Computers Canada Inc. User Guide Version1.1
‘Cut’ means that when you paste the files they
are removed from the original location and
placed on the new location.
To Cut click ‘Edit’ # ‘Cut’
You can also right click on a selected file, the
menu that appears will contain a ‘Cut’ option.
‘Copy’ means that when you paste the files they
are left in the original location and placed on the
new location.
To Copy click ‘Edit’ # ‘Copy’
You can also right click on a selected file, the
menu that appears will contain a ‘Copy’ option.
Once you select the destination click ‘Edit’ #
‘Paste’.
The file or files in the clipboard will now transfer
over. You can also right click inside the
destination folder or on top of the destination
folders icon. The Paste option will appear in the
popup menu.
‘Paste Shortcut’ will place a small file in the new
location which when accessed will open the file
in the old location. ‘Paste Shortcut’ only works
when you Copy a file.
If the file was Cut it is deleted from the old location and placed in the new
location. If the file was Copied the file is left in the old location and placed in the
new location. Even after you paste information it will remain in the clipboard,
this way you can paste information to multiple locations while only having to
Cut/Copy it once.
4238A288-1BE1-20EB53 Page 28 of 78
Page 29

MDG Computers Canada Inc. User Guide Version1.1
2.10 Microsoft Works Suite
Your MDG Computer comes bundled with the Microsoft Works Suite which
includes Microsoft Word, Microsoft Money, Microsoft Streets & Trips, Microsoft
Encarta and Microsoft Picture It!
This section of the user guide contains a brief overview of each of these
applications. The applications in the Microsoft Works Suite are loaded with a
multitude of features. The built in and online help section of these applications
can all be accessed by clicking the ‘Help’ menu at the top of the programs
window. Additionally, you may want to review the Microsoft Works Getting
Started guide by clicking ‘Start’ # ‘All Programs’ # ‘Microsoft Works’ # ‘Getting
Started’.
2.10.1 Microsoft Task Launcher
Although not a program
in itself, the Microsoft
Task Launcher, which
comes bundled with the
Microsoft Works Suite
package, can be used to
easily use all of the
features of your Microsoft
Works Suite software
with a few easy clicks.
To access the Microsoft
Task Launcher click ‘Start’
# ‘All Programs’ #
‘Microsoft Task Launcher.’
The Microsoft Task Launcher is operated with easily identifiable buttons on the
top of the screen. This program will allow you to do many things such as access
all of the programs in the Microsoft Works Suite software bundle, Internet
Explorer, MSN, and Outlook Express.
The Microsoft Task Launcher contains a multimedia Quick Tour of the Microsoft
Works software bundle. To access this tour open the Microsoft Task Launcher.
Inside the Microsoft Task Launcher click ‘Home’ and then click ‘Quick Tour’.
4238A288-1BE1-20EB53 Page 29 of 78
Page 30

MDG Computers Canada Inc. User Guide Version1.1
Activating Microsoft Word
The first time you try to use
Microsoft Word you will have
to activate it.
Click ‘Start’ # ‘All Programs’
# ‘Microsoft Word.’ To open
Microsoft Word and begin
the activation process.
Fill in the User Name, Initials
and Organization boxes any
way you wish.
Type in the activation key
listed on the back of the
Microsoft Works Suite CD
package that you received
from MDG Computers.
Click ‘OK’.
The next step is to activate
the product either over the
Internet or by telephone.
Make your selection and
follow the on screen
instructions to activate your
product with Microsoft.
This procedure is similar to
the one you completed to
activate your copy of
Microsoft Windows XP
when you first set up your
home computer.
2.10.2 Microsoft Word
4238A288-1BE1-20EB53 Page 30 of 78
Page 31
MDG Computers Canada Inc. User Guide Version1.1
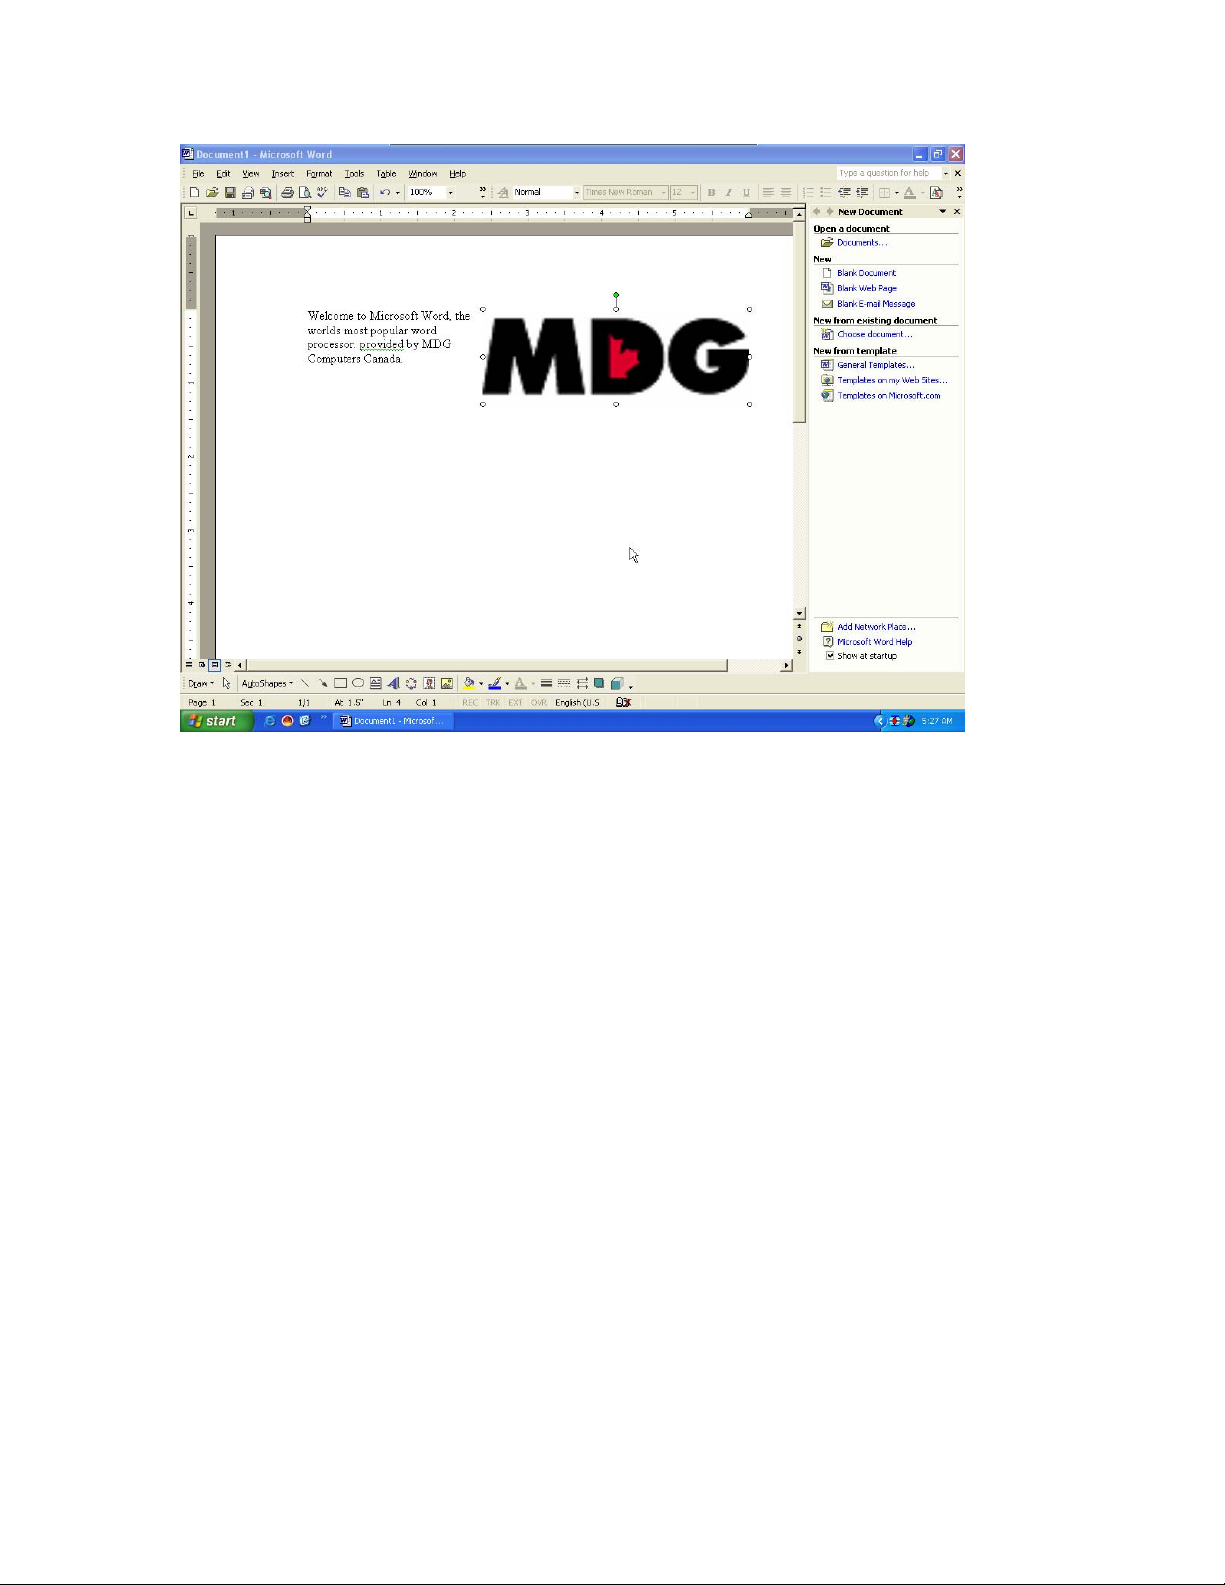
Microsoft Word is a powerful computer program allows you to open existing
documents or create brand new documents. Microsoft Word will even let you
insert pictures and other objects in to your document so you for professional
looking results.
Microsoft Word comes with many useful features such as spelling and grammar
checking. The spell checker will automatically notify you of misspelled words by
underlining them in red, sometimes correcting common mistakes without any
user interaction. The grammar checking feature of Microsoft word will notify you
of grammar and sentence structure problems such as missing capital letters at
the beginning of sentences. Simply hold your mouse button over the
problematic word or sentence and right click on it to bring up a list of suggested
corrections.
Microsoft Word can be accessed by clicking ‘Start’ # ‘All Programs’ # ‘Microsoft
Word’
4238A288-1BE1-20EB53 Page 31 of 78
Page 32

MDG Computers Canada Inc. User Guide Version1.1
2.10.3 Microsoft Money
Microsoft Money is used to assist you in keeping track of your bank and credit
card accounts online. Microsoft Money requires you to have an Internet
connection and a Microsoft Passport account to use this program.
For assistance with this program please consult the Microsoft Money Help menu
by clicking on the Question Mark icon at the top right corner of the program.
For assistance with the Microsoft Passport service please contact Microsoft at
www.passport.net
Microsoft Money Can be accessed by clicking ‘Start’ # ‘All Programs’ # ‘Microsoft
Money’
4238A288-1BE1-20EB53 Page 32 of 78
Page 33

MDG Computers Canada Inc. User Guide Version1.1
2.10.4 Microsoft Streets and Trips
Microsoft Streets and Trips can be used to plan the route of your next vacation.
Use the toolbars at the top and left of the screen to quickly select your
destination, mapping features, and information about the locations you have
selected. You can even search the Internet about a location you have clicked by
right clicking on the location you wish to search for and clicking ‘Search the
Web’.
Microsoft Streets and Trips can be accessed by clicking ‘Start’ # ‘All Programs’ #
‘Microsoft Streets and Trips’.
4238A288-1BE1-20EB53 Page 33 of 78
Page 34

MDG Computers Canada Inc. User Guide Version1.1
2.10.5 Microsoft Encarta
Microsoft Encarta is an Encyclopedia program which you can use as a reference
for school, work or to satisfy your curiosity.
Microsoft Encarta is easily operated. Simply type in what you want to look for
and click the ‘Go’ button. A list of results will appear on the left. Click the result
you wish to view and the information will be displayed on the page. The right
column contains additional information, options and resources which relate to
what you are currently viewing.
Microsoft Encarta can be accessed by clicking ‘Start’ # ‘All Programs’ #
‘Microsoft Encarta’.
4238A288-1BE1-20EB53 Page 34 of 78
Page 35

MDG Computers Canada Inc. User Guide Version1.1
2.10.6 Microsoft PictureIt!
Microsoft Picture It! Is used to edit image files. Open an image by clicking ‘File’
‘Open’ and selecting an image file you wish to edit. Picture It can add text to
an image, adjust it’s size and make color adjustments to the image.
Microsoft Picture It is perfect for adjusting digital photos you’ve downloaded that
are just a ‘little bit off’.
Microsoft Picture It can be accessed by clicking ‘Start’ # ‘All Programs’ #
‘Microsoft Picture It! 10’ # ‘Microsoft Picture it Premium 10’
4238A288-1BE1-20EB53 Page 35 of 78
Page 36

MDG Computers Canada Inc. User Guide Version1.1
3 INTERNET CONNECTION
3.1 Spyware, Viruses and Firewalls
Before you attempt to connect your computer to the Internet it is important that
you understand some of the major threats to personal computers on the
Internet. These threats can be broken down into three basic categories: ‘hacks
and exploits’, viruses and spyware.
Hacks and exploits are security vulnerabilities which are discovered and exploited
by individuals on the Internet for various reasons. These individuals can use
these security vulnerabilities to cause your computer to stop functioning correctly
or possibly access your computer using these vulnerabilities. Some viruses are
also written to spread from computer to computer automatically using these
same vulnerabilities. Although software developers, including Microsoft, strive to
release security updates to repair these vulnerabilities when they are detected it
is important that
yourself from these threats.
Viruses are self contained computer programs. Viruses can spread through
intentionally downloaded and copied files as well as spreading themselves
automatically through hacks and exploits. To protect yourself from these viruses
it is important that you install an anti-virus program such as McAfee Anti-Virus or
Norton Anti-Virus. These programs will scan any file or e-mail which is
downloaded from the Internet and/or run on your computer. If an infected file
or e-mail is found the program can either clean, quarantine or delete the infected
file. It is important to keep these programs up to date to protect your computer
from new viruses as they are discovered.
Spyware has also become a serious issue on the Internet. Once installed on
your computer spyware can, among other things, track your surfing habits to sell
to companies for marketing purposes, use your computer to send junk e-mail,
reset internet settings to use their websites. Spyware often slows down
computers or causes programs to malfunction.
Spyware is not considered a virus because it is installed on your computer with
your consent, however, this consent is sometimes received through deceptive
means. For example, some spyware distributors may try to trick you in to
consenting to install them by displaying false error messages in popup windows.
you
, the home computer user, take an active part in protecting
4238A288-1BE1-20EB53 Page 36 of 78
Page 37

MDG Computers Canada Inc. User Guide Version1.1
Here is an example of a deceptive popup web advertisement. Notice how it
looks almost identical to an error message you’d expect to see when your
computer has a problem. The only thing which identifies this as a popup
advertisement is the fact that the title of the window contains a webpage
address at the beginning of the title (which has been blacked out for legal
reasons) and ‘Microsoft Internet Explorer’ at the end of the title, indicating that
this message is not an error message produced by your computer but a
webpage. A website address (blacked out again for legal reasons) was also
displayed at the bottom of the window, however, this status line at the bottom of
an Internet Explorer window is often hidden by popup ads, especially ones
designed specifically to deceive. Clicking anything inside this message including
the ‘Cancel’ button will bring you to this popup ad’s host page and quite possibly
install spyware on your PC. The safe way to close such a popup advertisement is
to click the red ‘X’ at the top right corner of the window or right click on the
corresponding option in the Taskbar and clicking close.
Microsoft recently released Windows XP Service Pack 2 which addresses many of
the issues surrounding popup advertisements.
Some spyware programs also come bundled with various programs offered free
for download on the Internet. Read the license agreement of any program you
download off the Internet very carefully before installing it or you may
inadvertently be consenting to installing spyware on your computer along with
the program.
If you do end up with spyware on your computer there are many programs you
can purchase from companies like McAfee or Symantec and there are several
free spyware scanning programs on the Internet. Do some research before
installing any of these free spyware scanning programs as, with many other free
4238A288-1BE1-20EB53 Page 37 of 78
Page 38

MDG Computers Canada Inc. User Guide Version1.1
programs on the Internet, some free anti-spyware programs do come bundled
with spyware. Two free options which at this time do not come with spyware
are Ad-Aware which can be downloaded from http://ad-aware.com and SpyBot
Search and Destroy which can be downloaded from http://www.safer-
networking.org/en/index.html. It is recommended that you use more than one
spyware removal program to scan your computer for spyware as each program
has a different method of scanning your computer so one may detect something
that the other may not. Please be advised that these programs may contain
features which can automatically detect and remove spyware and although these
features, on their own, prove to be very useful they may conflict with each other
or with other programs you’ve installed in your computer so it may be best if you
install these programs with these automatic features disabled and activate the
scans yourself roughly once a week or so or whenever you notice your computer
running slowly or operating in a strange manner.
To protect your self from hacks and viruses which spread directly from computer
to computer such as infections of the Blaster worm virus, set up a firewall.2
Windows XP has a built in firewall which can be activated quite easily. Click
‘Start’ # ‘Control Panel’ # ‘Network and Internet Connections’ # ‘Windows
Firewall’ to access the Windows Firewall settings. Click on ‘On’ and click ‘Ok’ to
activate the Windows Firewall.
Once you have turned on your firewall it should be safe enough to connect to
the Internet. Once on the internet you should check with your various software
manufacturers to see if they have released any security updates which could be
used to gain access to your computer. Microsoft has automated this process
with Windows Automatic Updates. This feature can be turned on by accessing
the Windows Security Center in your Control Panel. Please note that Windows
Automatic Updates
only
updates Microsoft software.
3.2 Setting Up Your Internet Connection
The three most common methods of connecting to the Internet are using an
always on connection such as those offered by your cable television provider, a
Digital Subscriber Line (DSL) connection commonly provided by telephone
companies or a standard Dial-Up connection. If your Internet Service Provider
(ISP) provides you with specific instructions to set up your Internet connection
please disregard this section of the manual and refer to your ISPs instructions.
2
A firewall is a piece of hardware or software which monitors Internet traffic and blocks unwanted
requests.
4238A288-1BE1-20EB53 Page 38 of 78
Page 39

MDG Computers Canada Inc. User Guide Version1.1
To configure your computer to access the Internet click ‘Start’ # ‘Control Panel’.
Once inside the Control Panel click on the ‘Network and Internet Connections’
category.
The Network and Internet Connections window will allow you to add, view,
change and delete the various settings needed to set up and maintain your
Internet connection.
To set up your
Internet Connection
click ‘Set up or
change your Internet
connection’.
The following window will appear. To
begin the configuration of your Internet
connection click ‘Setup’.
This window can also be used to change
the many of the settings associated with
the operation of Internet Explorer, a
powerful Web browser bundled with
Microsoft Windows XP . Internet Explorer
is explained later in this chapter.
4238A288-1BE1-20EB53 Page 39 of 78
Page 40

MDG Computers Canada Inc. User Guide Version1.1
3.2.1 Dial-Up Connection
When the Welcome to the New
Connection Wizard window appears
click ‘Next’.
Select ‘Connect to the Internet’.
Click ‘Next’.
Select ‘Set up my connection
manually’.
Click ‘Next’.
4238A288-1BE1-20EB53 Page 40 of 78
Page 41

MDG Computers Canada Inc. User Guide Version1.1
Select ‘Connect using a dial-up
modem’.
Click ‘Next’.
Type in the Name of your connection
Click ‘Next’.
Type in the phone number your ISP
provided to you.
Click ‘Next’.
4238A288-1BE1-20EB53 Page 41 of 78
Page 42

MDG Computers Canada Inc. User Guide Version1.1
Type in your user name and password,
these should have been provided to
you by your ISP.
Select the choices from the check
boxes you wish to use. If you enable
the first option box your computer will
automatically attempt to connect to the
Internet whenever a program requests
a connection to the Internet.
It is strongly recommended that you
enable the Internet Connection Firewall
at this time.
Click ‘Next’.
On the last page is an option to add a
shortcut to this connection to your
desktop. You may want to do this to
allow you to easily connect to the
internet Manually.
Once you have made your selection
click ‘Finish’.
Your dial-up Internet connection is now
properly configured.
3.2.2 DSL Connection
When the Welcome to the New
Connection Wizard window appears
click ‘Next’.
4238A288-1BE1-20EB53 Page 42 of 78
Page 43

MDG Computers Canada Inc. User Guide Version1.1
Select ‘Connect to the Internet’.
Click ‘Next’.
Select ‘Set up my connection
manually’.
Click ‘Next’.
Select ‘Connect using a broadband
connection that requires a user name
and password’.
Click ‘Next’.
4238A288-1BE1-20EB53 Page 43 of 78
Page 44

MDG Computers Canada Inc. User Guide Version1.1
Type in the Name of your connection.
Click ‘Next’.
your user name and password, these
should have been provided to you by
your ISP.
Select the choices from the check
boxes you wish to use. If you enable
the first option box your computer will
automatically attempt to connect to the
Internet whenever a program requests
a connection to the Internet.
It is strongly
recommended that you
enable the Internet Connection Firewall
at this time.
Click ‘Next’.
On the last page is an option to add a
shortcut to this connection to your
desktop. You may want to do this to
allow you to easily connect to the
internet Manually.
Once you have made your selection
click ‘Finish’.
Your DSL Internet connection is now
properly configured.
4238A288-1BE1-20EB53 Page 44 of 78
Page 45

MDG Computers Canada Inc. User Guide Version1.1
3.2.3 Cable Connection
High speed through cable usually does not need to be configured if you are
connecting the cable modem to your network adapter using an Ethernet cable,
however, you should turn on the Windows Firewall before
computer in to the cable modem.
If your cable modem is connected to your computer using a USB cable you will
have to install the cable modem software and configure your cable modem
according to your ISPs specifications. Once you have completed those steps
then proceed with these instructions.
Click ‘Start’ # ‘Control
Panel’ # ‘Network And
Internet Connections’
The Network And
Internet Connections
window should appear.
Click ‘Windows Firewall’.
you plug your
4238A288-1BE1-20EB53 Page 45 of 78
Page 46

MDG Computers Canada Inc. User Guide Version1.1
The following window should appear.
Select ‘On’.
Click ‘OK’.
The Windows Firewall is now turned
on.
It is now safe to connect your cable modem to your computer with the Ethernet
cable. Connect the cable and check to see if you have an Internet connection.
If you do not, restart your computer.
4238A288-1BE1-20EB53 Page 46 of 78
Page 47

MDG Computers Canada Inc. User Guide Version1.1
3.3 Outlook Express
3.3.1 Configuring Outlook Express
Outlook Express comes bundled with Windows XP and is usually a home users
first choice for sending and receiving e-mail. Either as a continuation of your
Internet connection setup or during the first time you run Outlook Express you
will be asked to configure your account. The following steps below should
suffice in configuring Outlook Express properly to receive e-mail from your ISP,
however, if these instructions do not work you will have to contact your ISPs
help-desk to be instructed on how to enter the correct settings.
Outlook Express can be accessed by clicking ‘Start’ # ‘All Programs’ # ‘Outlook
Express’.
If the Internet Connection Wizard does
not appear when you run Outlook
Express you can access the new
account creation by opening Outlook
Express and then clicking on ‘Tools’ #
‘Accounts’. The following window
should appear.
Click ‘Add’ # ‘Mail’.
Type in your name as you want it to
appear to people you’re sending mail
to.
Click ‘Next’.
4238A288-1BE1-20EB53 Page 47 of 78
Page 48
MDG Computers Canada Inc. User Guide Version1.1
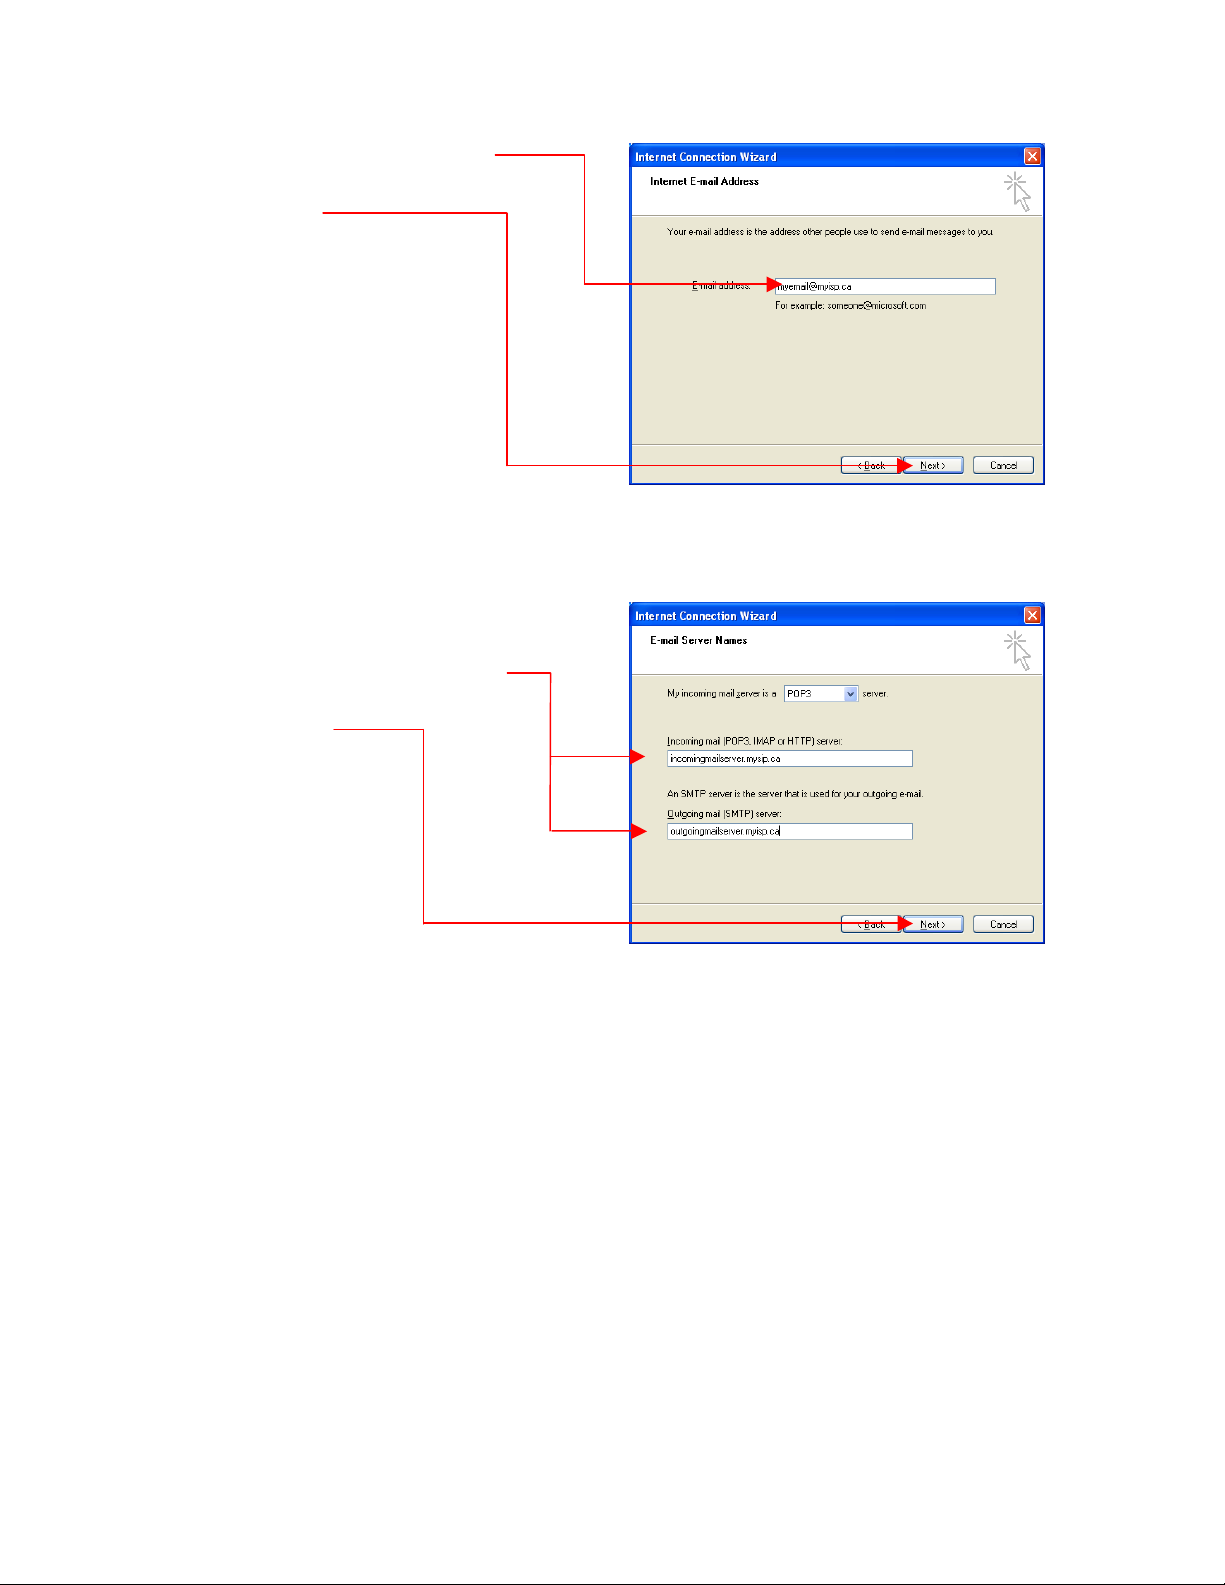
Type in your e-mail address.
Click ‘Next’.
Type in the names of the Incoming and
Outgoing mail servers (these names
will be provided by your ISP).
Click ‘Next’
4238A288-1BE1-20EB53 Page 48 of 78
Page 49

MDG Computers Canada Inc. User Guide Version1.1
Type in your username (usually either
the portion of your e-mail address in
front of the ‘@’ symbol or the entire email address) and password.
Click ‘Next’.
On the last page click ‘Finish’.
You should now be able to send and
receive e-mail. If you receive error
messages you may need to change
certain settings to coincide with those
required by your ISP. To change the
settings of your account click ‘Tools’
‘Accounts’. The following window,
Internet Accounts, will appear.
Click the ‘Mail’ tab.
Double click on the account you wish
to change.
An account properties window should
appear on top of the Internet Accounts
window.
4238A288-1BE1-20EB53 Page 49 of 78
Page 50

MDG Computers Canada Inc. User Guide Version1.1
In the account properties window you
may adjust the settings to match those
required by your ISP.
Click ‘OK’ to save the changes.
Click ‘Close’ to close the Internet
Accounts window.
4238A288-1BE1-20EB53 Page 50 of 78
Page 51

MDG Computers Canada Inc. User Guide Version1.1
3.3.2 Using Outlook Express
Once your e-mail account is configured
you may use Outlook Express to send
and receive e-mail. Here is an example
of the Outlook Express window.
If your Outlook Express window does
not appear as it is displayed in the
above example you must adjust the
Layout Properties.
Click on ‘View’ # ‘Layout’
Ensure that all of the options which are
circled in the example to the right are
selected.
Click ‘OK’.
Outlook Express is broken down in to
four main sections. The top of the
window contains all the toolbars and
buttons used to operate Outlook
Express. These toolbars are activated
by single clicking on them.
4238A288-1BE1-20EB53 Page 51 of 78
Page 52

MDG Computers Canada Inc. User Guide Version1.1
Below the toolbars and buttons are
three windows. The window on the
left is the Folders window. The Inbox
displays messages you’ve received.
The Outbox displays messages which
are waiting to be sent. The Sent Items
folder contains messages which have
already been sent to their recipients.
The Deleted Items box contains
messages which have been deleted
from any of the other folders. The
Drafts folder contains messages which
have been saved as drafts.
The two windows on the right side of
Outlook Express are the Message List
and Preview Pane. The Message List
at the top displays a list of messages in
the folder currently selected in the
Folder List.
The Preview Pane at the bottom allows
you to quickly view the contents of the
message selected in the Message List.
4238A288-1BE1-20EB53 Page 52 of 78
Page 53

MDG Computers Canada Inc. User Guide Version1.1
g
To create an e-mail to send to someone click the
Create Mail button located at the top right corner
of Outlook Express. The following window will
appear.
In the To line type in the recipient’s e-mail
address. You may enter more than one e-mail
address.
In the CC line you may carbon copy recipients, to
do so type in their e-mail address. They will also
receive this message when it is sent.
In the Subject line type in the subject of this
message.
Type the message you wish to send in the bottom
box.
When you have finished composing the message
click ‘Send’.
Your message will be saved in the Outbox.
Outlook Express should, by default, send any messages waiting in the
Outbox and check for new messages waiting to be downloaded to
your Inbox every few minutes. You can perform this operation
manually if you wish by clicking the ‘Send and Receive’ button at the
top of the Outlook Express Window.
Be wary of junk e-mail, commonly known as ‘Spam’. Just like
normal junk mail many of the offers you’ll get in junk mail are ‘too
ood to be true’. Read the fine print before agreeing to anything.
You may want to subscribe to a service or download a program
that will automatically block junk e-mail.
4238A288-1BE1-20EB53 Page 53 of 78
Page 54

MDG Computers Canada Inc. User Guide Version1.1
3.4 Internet Explorer
3.4.1 Using Internet Explorer
Internet Explorer is bundled with Windows XP and is used to view and search
for web pages online. To run Internet Explorer double click on the icon on your
Desktop or access it from the Start Menu by clicking ‘Start’ # ‘All Programs’ #
‘Internet Explorer’.
Internet Explorer, by default, has toolbars
and buttons on the top for easy navigation
followed by an Address bar which is used to
display the address of the webpage you are
currently viewing.
If you know the exact address of the page you wish to view (i.e. www.mdg.ca
for MDG Computers Canada or www.msnbc.msn.com for MS NBC News) type it
in the Address bar and press the Enter key on your keyboard or click the ‘Go’
button. The ‘Go’ button is not shown in the example above but it should appear
at the far right end of the Address bar.
Here is an example of an Internet Explorer window displaying the MSN webpage.
If you do not know the exact address of the page you are looking for you will
have to use a search page to do so. MSN has a search function, type in the term
4238A288-1BE1-20EB53 Page 54 of 78
Page 55

MDG Computers Canada Inc. User Guide Version1.1
or terms you are looking for and click ‘Search’. There are many different search
pages with various features. Some of the more popular ones are Google
(www.google.ca), Yahoo (www.yahoo.ca) and Alta Vista (www.altavista.com).
Searching the Internet successfully using these search engines is a bit of an art
form, consult the help sections of these web pages if you are having problems
getting the desired results from your web searches. Internet Explorer can also
be configured to do searches from the address bar, to find out how to configure
and use this and other features of Internet Explorer consult the Help section of
Internet Explorer by clicking on the ‘Help’ menu.
4238A288-1BE1-20EB53 Page 55 of 78
Page 56

MDG Computers Canada Inc. User Guide Version1.1
4 CD READERS AND WRITERS
A Simple Explanation of Optical Drive (CD & DVD) Technology
Every MDG computer comes with at least one Optical drive. Optical drives use
lasers to read information from CDs and DVDs. There are many different kinds
of optical drives, and depending on the type of drive you have you may be able
to perform many different tasks with your drive.
CD-ROM drive: CD-ROM drives can be used to read computer files stored on a
CD or play standard audio CDs.
CD-R drive: A CD-R drive can do all the things a CD-ROM drive can do. In
addition, a CD-R drive can write information to blank CDs. Many CD-R drives
support multiple sessions which means you can partially fill a CD and later add
additional files to a CD.
CD-RW drive: A CD-RW drive can do all the things a CD-R drive can do and can
also delete files from special rewritable CDs called CD-RW discs.
DVD-ROM drive: A DVD-ROM drive can read standard computer files and play
DVD movies (if a hardware or software DVD decoder is installed in the computer)
as well as perform all of the tasks that a CD-ROM drive can.
DVD-R/DVD+R drive: A DVD-R/DVD+R drive can perform all of the tasks of a
DVD-ROM and can also write files and DVD movies to DVD. DVD-R drives can
also write to CDs the same way a DVD-RW drive can. Please note that there are
two common standards for DVD writing, DVD+R and DVD-R. A DVD+R drive
cannot read discs written in a DVD-R drive and vice versa. There are drives
known as DVD +/- R drives which can read and write both formats.
DVD-RW/DVD+RW drive: These drives work the same as DVD-R and DVD+R
drives but they can also delete and overwrite information on DVD+RW/DVD-RW
discs. As with DVD-R/DVD+R drives, there are DVD +/- RW drives available
which can read, write and rewrite in both DVD+R and DVD-R formats.
Please note that in addition to the physical drive, you also need the proper
software to fully utilize all the abilities of your optical drive.
4238A288-1BE1-20EB53 Page 56 of 78
Page 57

MDG Computers Canada Inc. User Guide Version1.1
4.1 Nero CD Writing Software
If your MDG computer came with an optical drive which can write information to
a disc the Nero CD Burning software suite can be used to copy files to CD/DVD,
make complete backups of your hard drive, duplicate CDs you already own and
create audio CDs for playback in an audio CD player.
This section of the user manual will show you the step by step process for
copying standard computer files and folders to a CD and how to duplicate a CD.
4.1.1 Creating Data CDs
Creating a data CD is commonly done to back up important personal files to CD
in case of a system failure, to duplicate documents such as pictures to give to
other people or in order to be able to delete infrequently used files from your
hard drive to free up hard drive space while having a copy of the file readily
available.
The first step is to open the Nero
StartSmart Launcher by clicking ‘Start
# ‘All Programs’ # ‘Nero’ # ‘Nero
StartSmart’. The following window will
appear.
This application will allow you to easily
access all of the features of Nero.
Please note that some of these
features may be disabled, to enable all
of the features of Nero you must
purchase the complete version of Nero.
To copy files to a CD click ‘Make Data
Disc’.
The Nero Express window will appear.
4238A288-1BE1-20EB53 Page 57 of 78
Page 58

MDG Computers Canada Inc. User Guide Version1.1
y
In the Nero Express window you will
see a list of files and folders which
have been selected to be written to the
blank CD.
To select a file or folder to burn to the
CD click ‘Add’.
A Select Files and Folders window will
appear.
In this window you can select which
files or folders you wish to burn to the
CD. Use this window to browse to the
file or folder
ou wish to burn to CD.
Click it to select it and click ‘Add.’ You
may repeat this process as many times
as you like.
Once you have selected all the files you
wish to copy to CD click ‘Finished’.
Once you have finished the Select Files
and Folders process you will be able to
review which files you’ve selected and
remove any if you choose to do so.
At the bottom of this window is a blue
bar which indicates how much space
the selected files will take on the CD.
Make sure you do not go beyond the
capacity of the CD you plan to write to.
If you are ready to write the files to CD
click ‘Next’.
4238A288-1BE1-20EB53 Page 58 of 78
Page 59

MDG Computers Canada Inc. User Guide Version1.1
The Final Burn Properties window will
appear.
The two options on this page which
may cause problems are the burn
speed and the multi session option. A
slower burn speed takes longer to read
and the files are read slower. A low
burn speed is usually not needed
unless you plan on accessing the CD in
an older computer with a slower drive.
The multisession option means that
you can add files to the CD later if
there is space left on the CD, however,
a few older computer CD-ROM drives
and most older standard audio CD
players cannot read multi session CDs.
Once you have selected the desired
options and wish to start the file
writing process click ‘Burn’.
When the file writing process is
completed a message stating so will
pop up on your screen. Your files are
now on the CD.
Click ‘OK’
The CD has now been burned
successfully, you may review any
information regarding what happened
during the CD writing process in this
window.
Click ‘Next’.
4238A288-1BE1-20EB53 Page 59 of 78
Page 60

MDG Computers Canada Inc. User Guide Version1.1
You will now be asked what you want
to do next. Make your selection or if
you do not want to choose any
additional tasks click ‘Exit’.
You will be asked if you want to save
the project, saving the project means
that you can open the project file later
and Nero will pre-select the files you
have already burned. You can safely
click ‘No’ and not lose the data you
have written to CD if you do not want
to save the project.
4.1.2 Copying a CD
It is important to understand that copying a CD with copyrighted
material and then giving that CD to someone may be illegal or
restricted in some countries, however, making a copy of a
copyrighted CD for the purpose of having a backup in case the
original CD becomes damaged is generally considered a legal
practice. To find out more do a search on the Internet for
copyright law in your country. Please note that some CDs have
built in copy protection and cannot be copied.
Another commonly used feature of Nero is the Copy Disc feature. You can use
this to make backup copies of your application and audio CDs.
4238A288-1BE1-20EB53 Page 60 of 78
Page 61

MDG Computers Canada Inc. User Guide Version1.1
To copy a CD open the Nero
StartSmart by clicking ‘Start’ # ‘All
Programs’ # ‘Nero’ # ‘Nero
StartSmart’.
Click ‘Copy Disc’.
In the Nero Express window that
appears select your source and
destination drives.
It is possible to copy a CD if all you
have in your computer is a single
optical drive. In that situation your PC
will first copy all of the information
from the original (source) CD to
computer. It will then write the
information to the blank (destination)
disc.
Make your selections and click ‘Burn’.
The progress of the CD copy will be
displayed. If you are using a single
drive to copy the CD your computer
will ask for the blank (destination) CD
half way through the burn process.
Insert the blank CD, the CD copy
process will continue automatically.
When the file writing process is
completed a message stating so will
pop up on your screen. Click OK. Your
files are now on the CD.
Click ‘OK’
4238A288-1BE1-20EB53 Page 61 of 78
Page 62

MDG Computers Canada Inc. User Guide Version1.1
The CD has now been burned
successfully, you may review any
information regarding what happened
during the CD writing process in this
window.
When you wish to continue click ‘Next’.
You will now be asked what you want
to do next. Make your selection or if
you do not want to choose any
additional tasks click ‘Exit’.
For more detailed instructions about these or the other features of the Nero
software or to download updates for your Nero CD burning software suite please
consult the help section of the program or go to http://www.nero.com.
4238A288-1BE1-20EB53 Page 62 of 78
Page 63

MDG Computers Canada Inc. User Guide Version1.1
5 TROUBLESHOOTING AND MAINTENANCE
5.1 Maintaining and Cleaning Your Physical Components
In addition to taking care of the software installed on your computer you must
also take care of the physical components of your computer. Many of the
electronic components are sensitive to certain environmental conditions and
special steps may need to be taken to clean your physical components.
This section will outline some of the basic things you must take in to
consideration when setting up and maintaining your computer.
5.1.1 Selecting the Proper Location for Your Computer
When setting up your computer you must take the environment in to
consideration. Computer electronics are best kept in a relatively cool, dry place
which is dust free. Generally, an operating environment of 15-30 degrees
Celsius with less than 80% relative humidity.
In addition to these environmental variables, ensure that your computer is not
located near strong electric or magnetic interference. Things like large electric
motors, transmitters for high powered radio devices and microwaves may disrupt
the operation of your computer. If your computer exhibits abnormal operation
these may be some things to check for.
5.1.2 Cleaning Your PC
Along with maintaining the software environment of your PC you must also take
care of the physical components of your computer. Doing so properly will keep
your PC clean, cool and will prolong the lifespan of your components.
Dust is a major issue with computers, not only do computers attract dust like a
magnet which can trigger allergic reactions, dust will impede your computers
ability to dissipate heat which in turn will reduce the lifespan of your computer
and possibly lead to a catastrophic component failure.
Keep the surfaces of your PC free of dust by periodically wiping down all the
exposed surfaces with a damp cloth. Ensure that the cloth is not dripping wet,
you do not want to drip water on to any of the electrical components.
4238A288-1BE1-20EB53 Page 63 of 78
Page 64

MDG Computers Canada Inc. User Guide Version1.1
Do not use anything other than water or a cleaning solution which is specifically
designed to clean computers. Other household chemicals may corrode the case
or cause damage to the computer components.
To keep the inside of your computer free of dust you should vacuum it gently.
You should also periodically vacuum the dust from your monitor and from your
keyboard.
If you must use a cleaning agent other than water or a specific computer
cleaning solution please note that it may prematurely wear out your keyboard.
However, as the price of the average keyboard and mouse is less than twenty
dollars you may wish to put cleanliness before component life span.
Do not spray water or your cleaning solution directly on the keyboard as it may
damage the electrical components inside. Instead, spray the solution on a damp
cloth or paper towel and use that to clean off the keyboard and mouse. You
may want to use cotton swab sticks to get in to some of the hard to reach places
on your keyboard and mouse. Disconnect the keyboard and mouse first before
cleaning. Remove the mouse ball and carefully clean the rollers inside.
5.2 Windows XP System Restore
5.2.1 Overview
Windows XP comes packaged with a built-in system restore feature. This feature
can be used to create a ‘restore point’ which is essentially a file containing all of
your system settings. This restore point can be used to restore your computer
to this configuration.
The Windows XP System Restore feature regularly creates ‘checkpoints’ which
are restore points that are created automatically. Some applications also create
system restore points during the installation of the application or driver. You can
also manually create a restore point manually and it is recommended that you do
so before making any significant change to your system such as installing a
large, complex application, installing a major application update or driver, or
running a spyware removal tool.
Unlike the MDG System Recovery Tools, the built in Windows XP System Restore
should not erase any of your files, e-mails or Internet favorites during the
restoration process. If you use System Restore to restore your computer to a
previous date and do not like the results you can undo the system restore.
Please note that the Windows XP system restore feature cannot undo all changes
4238A288-1BE1-20EB53 Page 64 of 78
Page 65

MDG Computers Canada Inc. User Guide Version1.1
to your system. Some spyware, viruses and extensive system file damage may
require a complete hard drive erasure and reinstallation of Window XP.
To access the Windows XP System Restore program click ‘Start’ # ‘All Programs’
# ‘Accessories’ # ‘System Tools’ # ‘System Restore’
5.2.2 Manually Creating a Restore Point
Open the Windows XP System Restore
application. The following window will
appear.
Select ‘Create a restore point’
Click ‘Next’
Type in a description of your restore
point. This description is useful as it
will remind you of why you created this
restore point, for instance, if you
decided to create a restore point
before installing a particular application
update you may want to type that in.
Click ‘Create’
The system restore point has now been
created. You may either click ‘Home’
to return to the main system restore
screen or click ‘Close’ to exit System
Restore.
4238A288-1BE1-20EB53 Page 65 of 78
Page 66

MDG Computers Canada Inc. User Guide Version1.1
p
5.2.3 Restoring Your Computer From a Restore Point
Open the Windows XP System Restore
application. The following window will
appear.
Select ‘Restore my computer to an
earlier time’
Click ‘Next’
This screen will allow you to select a
articular system restore point to use.
The left window displays a calendar, if
a system restore point was created on
a particular day that day will be
displayed with a bold number.
The right window displays all of the
system restore points created on the
selected day.
Choose the restore point you wish to
use.
Click ‘Next’
This window will display warnings and
information about the system restore
process.
Close down any open programs
besides System Restore
Click ‘Next’
Your system settings will now be
restored to the way they were when
the restore point was created. During
4238A288-1BE1-20EB53 Page 66 of 78
Page 67

MDG Computers Canada Inc. User Guide Version1.1
this process your computer will restart.
After the restoration is completed and
your computer restarts a window will
open confirming that the restoration is
complete.
Click ‘OK’
The System Restore is now complete.
5.2.4 Undoing a System Restore
If you have restored your computer
and it did not resolve the problem you
may undo the restoration.
Select ‘Undo my last restoration’
Click ‘Next’
Close any open applications besides
System Restore.
Click ‘Next’
System Restore will now reset your
system configuration to the state it was
in before you restored your computer.
During this process the computer will
restart.
4238A288-1BE1-20EB53 Page 67 of 78
Page 68

MDG Computers Canada Inc. User Guide Version1.1
After the restoration is completed and
your computer restarts a window will
open confirming that the restoration is
complete.
Click ‘OK’
The Undo System Restore is now
complete.
5.3 Identifying Your Motherboard
Click ‘Start’ # ‘Run’
In the ‘Run’ window
type in “msinfo32”
Click ‘OK’
In the System
Information window
locate the System Model
on the right hand side.
The System Model is the
model of motherboard
your computer contains.
In this example the
model number is GVSR.
Once you have identified
your motherboard click
the ‘X’ to close the
window.
MDG Computers currently uses three different types of motherboards in our
desktop systems; the Intel D845GVSR, Intel D865GBF and the Intel D915GAV. If
the system model is off by one or two characters (for example, D845GVS1) do
not worry, your motherboard just has a slight revision, use the closest match.
4238A288-1BE1-20EB53 Page 68 of 78
Page 69

MDG Computers Canada Inc. User Guide Version1.1
The System Information window can be used to provide you with a wealth of
information about the hardware and software environment of your computer.
There are many other applications available which can be used to provide similar
information such as Belarc Advisor which can be downloaded from
http://www.belarc.com
5.4 Downloading Drivers
Once you have identified what motherboard you have you will need to download
the appropriate drivers for your computer. If you have not done so refer to the
‘Identifying Your Motherboard’ section.
The drivers for your motherboard can be downloaded from the Intel webpage.
The front page of the Intel website can be accessed by logging on to the
Internet and typing the following address in to the address bar: www.intel.com
Below are direct links to the appropriate sections of the Intel website for the
three main motherboards MDG computers contain.
If you have a D845GVSR motherboard go to this address:
http://www.intel.com/design/motherbd/sr/sr_drive.htm#XP
If you have a D865GBF motherboard go to this address:
http://www.intel.com/design/motherbd/bf/bf_drive.htm#XP
If you have a D915GAV motherboard go to this address:
http://www.intel.com/design/motherbd/av/av_drive.htm#XP
Click on the floppy disk picture next to the items in the list and save them to a
folder in your computer. Make a note of the file name for each of these files as
the file names do not always match the category you are downloading. You may
want to change the filename during the file download process.
5.5 Installing Drivers
Windows XP may not have all the drivers necessary to operate your computer. A
driver is a piece of software which is required for a hardware component to work
properly.
Occasionally driver files may become corrupt and the device will stop working
properly. When this happens you must reinstall the driver(s) to restore your
computer hardware functionality.
4238A288-1BE1-20EB53 Page 69 of 78
Page 70

MDG Computers Canada Inc. User Guide Version1.1
Drivers are also frequently updated by the manufacturer. If a specific
component of your computer starts behaving strangely you should attempt to
reinstall the driver you have and if that does not resolve the problem contact the
hardware manufacturer or look on their webpage to see if there is an updated
driver which you should install.
5.5.1 Locating the drivers on your System Recovery Tools CD
If you received an MDG System Recovery Tools CD with your computer the
driver files will be found on the CD.
Insert the CD and click the red X to close any windows that pop up.
Click ‘Start’ # ‘My Computer’. In the
My Computer window right-click on the
‘MDG Computers Ca’ logo and left click
‘Explore’. The following window will
appear.
Double click on the ‘Win XP – Data’
folder and then double click on the
folder for your motherboard; ‘GBF’ for
D856GBF motherboards, ‘GVSR’ for
D845GVSR motherboards.
Inside this folder is a group of folders, one for each device. Locate the setup file
inside each folder and double click it.
If you are unsure of which file is the setup program single click on the setup icon
you think is the setup program and then hold your mouse over it, a dialogue box
4238A288-1BE1-20EB53 Page 70 of 78
Page 71

MDG Computers Canada Inc. User Guide Version1.1
will pop up, if the dialogue mentions ‘InstallShield’ then it is most likely the
proper file. Double click on the file.
If a window comes up with the title ‘WinZip Self-Extractor’ follow the steps in the
‘Uncompressing a WinZip Self Extractor file’ section, otherwise skip to the ‘Driver
Installation Routines’ section.
Here is an example of what the setup icons should normally
look like.
5.5.2 Uncompressing a WinZip Self-Extractor file
A WinZip file is one of many different kinds of compressed archives.
A compressed archive is a single file which contains multiple files in
a compressed format. This compressed archive is easier and faster
to download and store as you only have to download a single file
and the compression reduces the size of the file, allowing it to be
downloaded faster and take up less space on your hard drive.
Intel, our primary hardware vendor,
uses WinZip Self-Extracting archives to
distribute some of their drivers. If you
double click on a driver file and you
see this window then the file you
clicked on is a WinZip Self-Extracting
file which must be unzipped.
Follow the steps below to unzip
(uncompress) the archive.
4238A288-1BE1-20EB53 Page 71 of 78
Page 72

MDG Computers Canada Inc. User Guide Version1.1
Click ‘Browse’ in the WinZip SelfExtractor window to select where you
want the files to be extracted to. The
following window will appear. Select
the location where you want the files
to be extracted to.
In this example, I have selected ‘Local
disk (C:)’.
Click ‘OK’
This next step is very important. Some
archives are created so that it creates
a folder with all the files inside it but
some archives just put all the files
directly in the folder you’ve selected.
To ensure that this does not happen
type in the name of a folder you would
like these files to appear in, in this
example, I added ‘video’ so that I
could easily identify the folder.
Whenever you add to this text to
create a separate folder ensure that
there is a single slash ( \ ) between the
end of the text that is there and the
text you add.
Click ‘Unzip’.
You will receive a message stating that
the files have been unzipped
successfully.
Click ‘OK’.
4238A288-1BE1-20EB53 Page 72 of 78
Page 73

MDG Computers Canada Inc. User Guide Version1.1
You will then be returned to the WinZip
Self-Extractor window.
Click ‘Close’
Once this process is complete you may
install the driver you have extracted by
locating the Setup file which was
extracted from the archive and double
clicking on it.
If you are unsure of which file is the
setup file check the Details pane.
Underneath the file name will be the
type of file. The setup file is almost
always an Application.
5.5.3 Running Driver Installation Routines
Installing a driver is usually extremely
simple once you find the proper file to
click on.
Double click on the file and a setup
screen will appear. Generally all you
have to do is keep on clicking ‘Next’
‘Yes’ ‘OK’ etc. until the installation
routine is completed.
If there are options during any of the
installation routines one is usually preselected and/or is recommended. If
you are unsure of an option always
choose the recommended or preselected one.
4238A288-1BE1-20EB53 Page 73 of 78
Page 74

MDG Computers Canada Inc. User Guide Version1.1
5.6 Reinstalling Windows XP
When your computer starts malfunctioning, running slowly or displaying other
undesired symptoms, troubleshooting the specific problem can sometimes
become so time consuming and difficult that it is more time and cost effective to
simply remove Windows from your computer and reinstall it from scratch.
These next three sections will outline what must be done to properly erase the
partition Windows is on and then reinstall Windows XP from scratch.
5.6.1 Configuring Your Computer to Start From a CD
You cannot erase Windows XP while it is running. In order to access your
computer without running windows you must first start it off of a CD drive. This
section will detail the steps required to perform this task on a computer built
with one of our three primary Intel motherboards.
Turn off your computer.
Locate the Delete key on your keyboard. It is usually above the arrow keys,
labeled Delete or DEL. Turn on your computer and immediately start tapping
this key.
The BIOS Setup Utility screen should appear.
Stop Tapping the Delete Key.
Press the Right arrow key until the ‘BOOT’ menu at the top of the screen
becomes highlighted.
Press the down arrow key to highlight ‘Boot Device Priority’
Press the Enter key.
Highlight the First Boot Device and press the Enter key.
A box should appear with three or more options. Highlight the device which
starts with SM and press Enter.
If you wish to immediately start your computer from your System Recovery Tools
CD or your Windows XP CD ensure that the CD is in the drive.
4238A288-1BE1-20EB53 Page 74 of 78
Page 75

MDG Computers Canada Inc. User Guide Version1.1
Press the F10 key on your keyboard. If your F10 key has ‘Spell’ written on it
then you will need to press the F-Lock key located to the right of your F keys and
then press F10.
Press the Enter key to save your changes and Exit.
Watch the screen carefully for any messages that may appear on boot up. If the
words “Press any key to boot from CD appear” then very quickly press the
spacebar to cause the CD drive to boot the inserted CD. If you miss this prompt
then just restart the computer and watch again for the prompt.
4238A288-1BE1-20EB53 Page 75 of 78
Page 76

MDG Computers Canada Inc. User Guide Version1.1
5.6.2 Using the MDG System Recovery Tools CD
Once you have completed the steps in the ‘Configure Your Computer to Start
From CD’ section, using the MDG System Recovery Tools CD is very easy. This
CD will erase the C: partition where Windows XP is installed and completely
reinstall all the software, including Windows XP, which was installed on your PC
when you first received it.
Insert the CD and restart the computer. The computer will now start off the
MDG System Recovery Tools CD.
There are three confirmation messages, press any key to continue past these
three screens.
The Messages state that continuing with this procedure will erase all
data on the C: partition including any user data stored on the same
partition.
When the Norton Ghost (Recovery Procedure) window appears, your computer
may appear to freeze as the progress indicator bar may not move. This is
normal. After approximately 10 minutes the Norton Ghost screen will disappear
and you should get a message announcing the end of the recovery procedure
and instructions on restarting the computer.
Remove the MDG System Recovery Tools CD and turn your computer off and on.
The recovery is now complete, follow the on screen instructions to recreate your
user account and activate Windows XP.
5.6.3 Installing Windows XP From the Windows XP CD
These instructions will completely erase everything off of your hard drive and
reinstall Windows XP without any additional drivers or software. You may need
to do this if the information stored on the D: partition of your hard drive
becomes damaged or if you wish to set up your computer with multiple
partitions.
These instructions will completely erase everything off of your hard drive and
reinstall Windows XP without any additional drivers or software.
Please consult the sections on the manual regarding Identifying your
4238A288-1BE1-20EB53 Page 76 of 78
Page 77

MDG Computers Canada Inc. User Guide Version1.1
Motherboard and Downloading your Drivers before performing this procedure to
ensure that you have your drivers downloaded on to a location you can access
once you erase your hard drive. Ideally you should download your drivers and
burn them to a CD.
Also, ensure that any personal files you have on the computer are backed up,
either to a CD, floppy disk or uploaded to another computer on a network/on the
Internet before you continue with this procedure.
Insert your Windows XP CD in to the computer and press the reset button on the
front of your computer. When you receive the message ‘Press any key to boot
from CD’ press a key. If you do not receive this message follow the steps in
‘Configuring Your Computer to Start From a CD’ in this manual.
Windows XP will need to initialize, during this sequence you will be asked to
press F6 to install third party drive controller components. If you have installed
any such components yourself and need them installed press F6, otherwise
ignore this message.
You will now be given three options: ‘Enter’ to start a new installation, ‘R’ to
enter the Recovery Console or ‘F3’ to quit setup. Do NOT press “R”, press ‘Enter’
to begin a new installation of Windows XP. Note that you would also press
“Enter” to perform a Repair Installation of Windows XP. The “R” Recovery
Console is only to be used if you know what you are doing or have been
instructed to do so by MDG Tech Support.
Press ‘F8’ to accept the license agreement.
You will now be asked to set up partitions on your hard drive and select the
partition in which you would like to install windows. A partition is a way to
logically split your drive in to separate volumes. You may have a single partition
taking up all your space or multiple partitions, one of which you will install
Windows on. Having multiple partitions is beneficial as you can format and
otherwise manipulate one partition without having to alter the data on another.
These instructions detail how to create a single partition. For more information
on setting up partitions consult the Microsoft knowledgebase at
www.microsoft.com
If there is already a C: partition on your hard drive highlight it and press D to
delete it. After you have deleted the C partition if you wish to create multiple
partitions press C to create a partition. If you only want to use one partition
highlight the unpartitioned space and press Enter to install.
Highlight ‘Format the partition using the NTFS file system’ but do not select the
4238A288-1BE1-20EB53 Page 77 of 78
Page 78

MDG Computers Canada Inc. User Guide Version1.1
option that ends in (Quick). Press the Enter key to begin the installation.
Your computer will then begin copying files to the hard drive. After the PC has
finished copying files it will reboot. Allow the computer to reboot, ignore the
message stating ‘Press any key to boot from CD’ as we have just reinstalled
Windows and need the computer to boot off the hard disk drive now.
Windows will load and continue installing. After approximately 20 minutes or so
you will be asked to select your Region and Language settings. Click ‘Customize’
to change your regional settings. Click ‘Details…’ to change your keyboard input
language. Usually the keyboard input language should be left as ‘US keyboard
layout’ as MDG ships computers with standard US keyboard layouts.
Once you have changed these settings to your liking click ‘Next’.
Enter your name and organization. You may enter anything you like. Click
‘Next’.
Enter your Product Key. Your product key can be located on a sticker
on the top or side of your MDG computer. Do not try to use the sticker
that comes with Microsoft Works CD Pak – this will not work. Click
‘Next’.
Enter your computer name. The computer will generate a computer name
automatically, change it if you wish. You may want to keep your computer name
vague as this information may be visible on the Internet. Click ‘Next’.
Change your date, time and time zone settings so they are correct. Click ‘Next’.
Windows will now attempt to configure your network settings. It is
recommended that you choose ‘Typical’ and configure your Internet connection
after Windows XP has completed installing.
Enter a workgroup name. Unless you have a specific workgroup you wish to
connect to leave the default setting in place. Click ‘Next’.
The computer will now restart. Again, ignore the message stating ‘Press any key
to boot from CD’
Windows XP will now attempt to set up your Internet connection. I recommend
you either skip this process completely or follow your ISPs directions. You
should finish installing Windows without an Internet connection to keep your
computer safe from viruses. Consult the Internet Connection section of this
manual to set up your Internet connection properly to keep yourself safe from
4238A288-1BE1-20EB53 Page 78 of 78
Page 79

MDG Computers Canada Inc. User Guide Version1.1
viruses after the Windows XP installation is complete.
You will now be asked to Register and Activate Windows. Consult the section of
this manual on Activating Windows by Telephone to activate windows now by
telephone or choose to skip the Windows activation, you may do it later, either
by Telephone or by Internet after you have set up your Internet connection.
Windows XP must be activated within 30 days or Windows will stop working until
you complete the Windows activation.
Set up your user accounts. One user account is mandatory but you may wish to
create more than one so that each person in your household may have their own
separate account. Separate user accounts allow people to keep their personal
files and settings separate from each other.
Windows XP is now completely installed. You should now install your Drivers
and then configure your Internet connection. Consult the appropriate sections in
this manual to do so.
5.7 Frequently Asked Questions (FAQ)
Q: I cannot find the information I need in this manual – What should I do.
A: Call MDG Tech Support at 1-877-466-3634. Remember Tech Support is a
complimentary service for one year from date of purchase – two years in the
case of Platinum Warranty. Out of warranty service is available for a modest fee
– call our support line for details. Please note that unauthorized work on MDG
system during the warranty period invalidates the warranty.
Q: I have some questions on creating files and working with some supplied
programs – can you help me.
A: Yes and No – MDG cannot train new users through getting basic computing
tasks done through the support line. MDG Tech Support receives hundreds of
calls per day and we try to average 5 minutes per call to handle all callers with
minimum wait times. However MDG does offer introductory Online Training in
partnership with a recognized third party provider. Call our Help Desk for details.
Q: Why is my screen suddenly upside down?
A: Your Intel integrated graphics adapter can be configured to rotate the image
on the screen by holding down the Control (CTRL) and Alt keys and then
pressing one of the arrow keys on your keyboard. Odds are you did this by
accident as it is often too easy to do. Many of our customers never have this
happen to them until their children use the computer to play a video game; this
is because many games commonly require players to use the Control, Alt and
arrow keys simultaneously to control the game.
4238A288-1BE1-20EB53 Page 79 of 79
Page 80

MDG Computers Canada Inc. User Guide Version1.1
To reset the display so it is right side up hold down the Control and Alt keys on
your keyboard and then press the up key. When your screen flashes let go of all
the keys. Your screen should now be normal.
To permanently disable this feature click Start and then Control Panel. In the
Control Panel click Appearance and Themes then click the Display icon. In the
Display properties click the tab labeled ‘Settings’ at the top of the screen then
click the ‘Advanced’ button. In the new window click ‘Intel® Extreme Graphics’
then click ‘Graphics Properties’. In the Intel® Graphics Properties window click
the ‘Rotation’ tab at the top and remove the checkmark next to ‘Enable Rotation’.
Click OK to close all of the windows that you have opened during this process.
Q: What is the difference between logging off of windows and switching users?
A: When you log off your settings are unloaded, freeing up system resources for
other programs to use. Switching users leaves your settings loaded. This means
that you can switch back to your user account and all of the things that were
opened when you switched away from that user account will be back on the
screen.
Q: What is the difference between Shutting Down, Hibernate and Standby?
Which one should I use?
A: Shut Down unloads all of your information and completely turns off the
computer. It is recommended that you Shut Down the computer if you are not
going to use it for an extended period of time like when you go to bed or you
leave the house.
Hibernate is like Shut Down but with a twist. If you click Hibernate then your
computer will save the current state of your computer including what programs
you have open to the disk drive before your computer turns off. When you hit
the power button on your computer the computer starts back up and then
restores itself to the exact state it was when you clicked on Hibernate by loading
the information saved in that file. Hibernate is very useful as a time saving
measure, however, many users experience problems with hibernate as some
software and hardware combinations either simply do not allow hibernate to
appear as an option or will cause the computer to crash or freeze when entering
or resuming from Hibernate mode. MDG Computers does not recommend using
the Hibernate feature of Windows XP.
Standby only shuts your computer down half way. It leaves all of your programs
open but in a dormant state. It suspends all active processes in your computer,
slows down or stops your cooling fans, disables any displays and ‘parks’ the hard
4238A288-1BE1-20EB53 Page 80 of 80
Page 81

MDG Computers Canada Inc. User Guide Version1.1
drive. Standby is useful for computer users who are concerned about power
consumption, especially laptop users who want to conserve battery power. If
the power source for your computer is disrupted when your computer is in
Standby mode you may experience data loss or corruption, therefore it is not
recommended to use Standby for extended periods of time.
Q: What is a Driver?
A: Every piece of hardware (device) in your computer including sound devices,
Network (Ethernet/LAN) devices and display adapters require software to
operate properly. This software is known as a device driver. In most cases if a
device is physically present in your computer but no device driver is present the
hardware will not work at all. In limited cases such as with Video display
adapters the device is standardized enough that a Default driver can be loaded
which will allow the device to work in a limited basis. Many device drivers come
standard on the Windows XP CD and are installed automatically, however, if a
device driver is not found on the Windows CD it must be installed separately.
Device drivers are constantly revised by hardware manufacturers, if you are
having a problem with a device that is not behaving properly check with your
hardware manufacturer to see if there is an updated version of the driver.
Q: I need to reinstall a driver and I don’t have it, where can I get it?
A: Most of the drivers you need for your computer can be located on one of two
pages hosted on the Intel website. If your MDG computer contains a D845GVSR
motherboard open up Internet Explorer and type in the following address: page:
http://www.intel.com/design/motherbd/sr/sr_drive.htm. If your MDG computer
contains D865GBF motherboard open Internet Explorer and type in the following
address: http://www.intel.com/design/motherbd/bf/bf_drive.htm
If these two pages do not have the driver you are looking for do a search on the
Internet for the manufacturer of your component to access their webpage.
If you do not have access to the Internet contact the nearest MDG Store at 1
(877) 466-3634 (1-87-PHONE-MDG) for assistance.
Q: Where is my Windows XP Home/Pro edition product key?
A: Your product key should be on a sticker on the top or side of your computer.
This sticker is for Windows XP only, it cannot be used to activate any other
program.
Q: Where is my Microsoft Works product key?
4238A288-1BE1-20EB53 Page 81 of 81
Page 82

MDG Computers Canada Inc. User Guide Version1.1
A: The Microsoft Works product key is printed on the back of the Microsoft
Works software suite box. This key can only be used to activate the programs
listed on the front of the box.
Q: I need to activate Windows XP and I get a message from Microsoft that states
that my installation ID is invalid, what do I do?
A: When you receive this message click Change Product Key. Type in the
Windows XP Home/Pro Edition product key in to the boxes and click Update Key.
A new installation ID should be created. Complete the on screen instructions.
Q: I have a computer with a D865GBF motherboard and I have two places to
plug my monitor in to, one is above the sound and USB plugs, the other is
below, can I connect two monitors to my computer using these two plugs?
A: Unfortunately no. The plug above the USB ports and Sound ports are for an
on board video display adapter. This display adapter is automatically deactivated when a separate AGP Video Adapter Card (the plug below the sound
plugs) is installed in the computer.
Q: I have an optical drive which can play DVDs yet my computer won’t play DVD
movies, what is wrong?
A: In order to play DVD movies you must have a drive which can read DVDs and
a piece of hardware or software known as a DVD Decoder. If your computer
came with a DVD player program install it, if it did not you can purchase a
software package that includes a DVD decoder or download a DVD decoder
online.
One free DVD decoder you may wish to try is the VLC Media Player. This
program can be downloaded from the VideoLAN webpage at www.videolan.org.
5.8 Returning Your PC for Repair
In the event that your system stops functioning properly and using the MDG
System Recovery Tools CD and/or performing a full reinstallation of Windows XP
does not correct the problem you may need to have your computer serviced by
MDG.
Please note that this only applies to systems that are still covered by the
warranty. All devices external to the computer case including monitors, printers,
scanners and networking devices are covered by their respective manufacturers
warranty and are only serviced by the manufacturer.
4238A288-1BE1-20EB53 Page 82 of 82
Page 83

MDG Computers Canada Inc. User Guide Version1.1
If you purchased your system from an MDG store please bring it back to the
store you purchased it from. If you purchased your system from the MDG web
sales division or the MDG telephone sales division you may either bring it to an
MDG store for repairs or ship the computer back to the MDG head office for
repair. Please call ahead and remember to bring evidence of warranty
entitlement to avoid delays. All shipping charges are paid for by MDG
Computers for in-warranty systems.
If you do choose to ship the system to MDG for repair please contact the MDG
Helpdesk at 1-877-466-3634. A helpdesk technician will create a work order for
the repair and an RMA (Return Manufacturers Authorization) number. The MDG
helpdesk technician will also arrange the date that the courier will come to the
specified pick-up location.
Please write down the pick up date, RMA number and the name of the technician
you spoke to. Put the computer back in the box it came in, or another box if
that box is not available and be sure it is securely protected from damage as
neither MDG nor our carrier can be responsible for damage in this instance. Print
the form on the next page. Fill out the required information and attach the form
to the box. If you cannot print the form please write the information directly on
the box.
4238A288-1BE1-20EB53 Page 83 of 83
Page 84

MDG Computers Canada Inc. User Guide Version1.1
5.8.1 MDG Computers RMA Form
SHIP FROM:
NAME:
STREET ADDRESS:
CITY, PROVINCE/STATE:
POSTAL/ZIP CODE:
SHIP TO:
MDG Computers Canada
2940 Bristol Circle
Oakville, ON
L6H 6G4
RMA NUMBER:
PROBLEM DESCRIPTION:
4238A288-1BE1-20EB53 Page 84 of 84
 Loading...