

Page 1
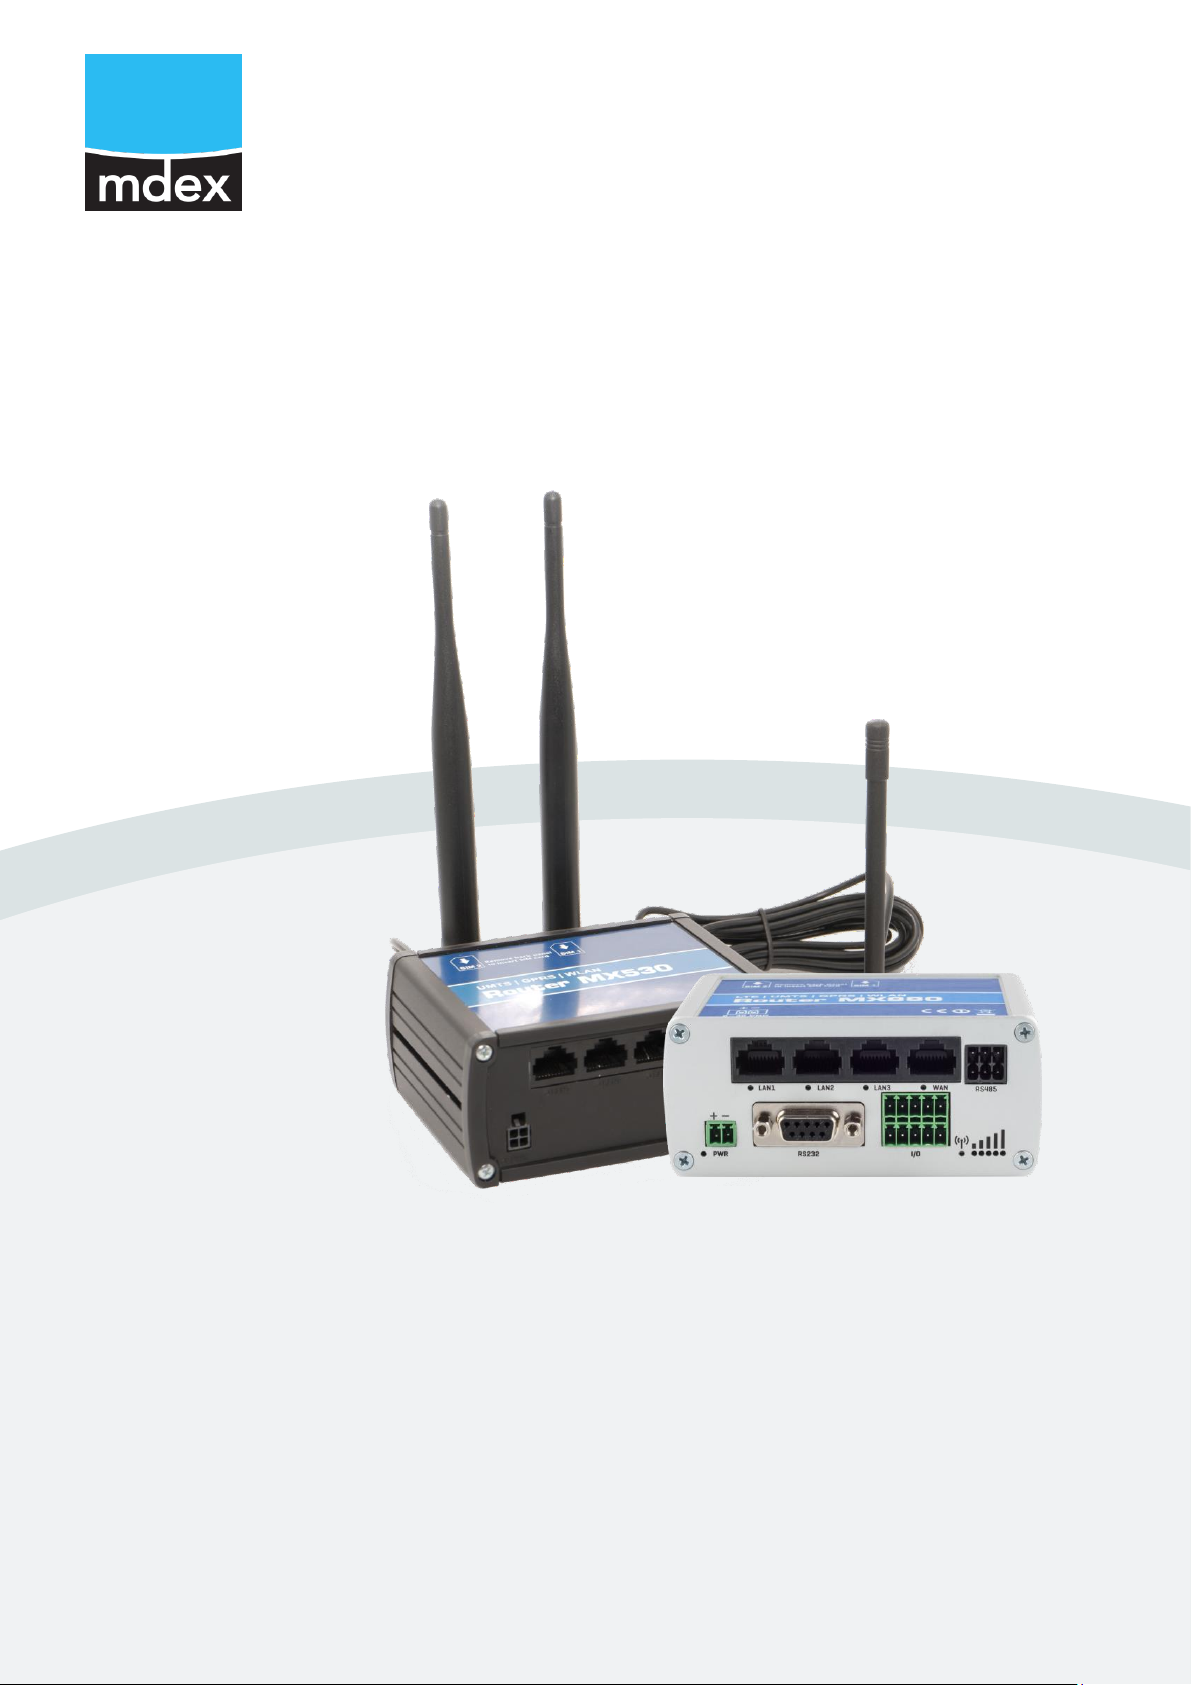
Setup Guide
mdex Router
MX530|MX880
Release: January 22, 2019 (v.1.4)
This Setup Guide describes the commissioning of the mdex Router MX530
and mdex Router MX880 with the commonly used functions.
Page 2

Setup Guide - mdex Router MX530|MX880
Page 2
This Setup Guide may be different when the MX530/MX880 is shipped with individual configuration,
project business, or other mdex product (for example as ,mdex mobile.LAN’ or ‘mdex LTE package’).
In this case please follow the instructions in the enclosed Supplementary Instructions Manual.
All functions and settings described are only available when using the software valid at the time of drafting of this
document. All information is provided without any guarantee.
The information and data contained in this document are subject to change without notice.
Copyright notice:
This document is copyrighted by mdex GmbH and may only be reproduced for internal use. All other reproductions, in
whole or in part, are not permitted without the prior written consent of mdex GmbH.
© 2019 mdex GmbH. All rights reserved
This Setup Guide and further information and descriptions of the mdex router
MX530/MX880 can be found in the mdex Support Wiki at https://wiki.mdex.de.
Page 3

Setup Guide - mdex Router MX530|MX880
Page 3
Table of contents
1 Introduction .......................................................................................................................... 4
1.1 Scope of Delivery ........................................................................................................ 4
1.2 Technical specifications .............................................................................................. 5
1.3 Preconfiguration (factory default) ................................................................................ 6
1.4 Connections and interfaces ......................................................................................... 7
1.5 Preinstalled mdexSIM ................................................................................................. 8
2 Installation ........................................................................................................................... 11
2.1 Quick Start ................................................................................................................ 11
2.2 Replace SIM card ...................................................................................................... 13
2.3 Connect antennas ..................................................................................................... 14
2.4 Power supply ............................................................................................................. 15
2.5 Din rail bracket .......................................................................................................... 16
2.6 Connecting terminal devices ..................................................................................... 17
3 Setup configuration ............................................................................................................ 19
3.1 Connect a PC ............................................................................................................ 19
3.2 Login into the web interface ...................................................................................... 20
3.3 Setup Wizard ............................................................................................................. 21
3.4 Login Password ......................................................................................................... 22
3.5 SIM mobile settings ................................................................................................... 22
3.6 OpenVPN-Client ........................................................................................................ 27
3.7 Router LAN IP Address ............................................................................................. 29
3.8 DHCP Server............................................................................................................. 30
3.9 Forwarding ................................................................................................................ 32
3.10 Configuration Access / Remote Access .................................................................... 34
3.11 Ping Reboot............................................................................................................... 36
3.12 Periodic Reboot ......................................................................................................... 37
4 Additional functions ........................................................................................................... 38
4.1 WLAN (Wireless Access Point) ................................................................................. 38
4.2 Connection status and signal strength ...................................................................... 39
4.3 NTP time server (automatic time synchronization) .................................................... 41
4.4 Save configuration & import ...................................................................................... 41
4.5 Reboot ....................................................................................................................... 42
4.6 Reset to factory defaults ............................................................................................ 42
4.7 Firmware Update ....................................................................................................... 43
4.8 Expert Mode ................................................................ ................................ .............. 44
4.9 IPsec connection ....................................................................................................... 44
5 Important informations ....................................................................................................... 45
Page 4
Setup Guide - mdex Router MX530|MX880
Page 4
1 Introduction
The MX530 is a Dual-SIM UMTS mobile router for the 2G and 3G mobile networks.
The MX880 is a Dual-SIM LTE mobile router and intended for the 2G, 3G and 4G mobile networks.
The MX880 has additional interfaces (RS232, RS485, USB) for optional special functions and offers
the possibility to connect an optional GPS antenna.
For further details see Section 1.2 Technical specifications (Page 5).
1.1 Scope of Delivery
Accessories:
MX530
MX880
230V plug-in power supply with router connector
Quantity: 1
Quantity: 1
Additional power cable with router connector
(Only required with MX530 to connect an external power supply.)
Quantity: 1
-
Mobile antenna – with screw thread and articulated joint
-
Quantity: 2
Mobile antenna – with connection cable and magnetic base
Quantity: 1
Quantity: 2
WiFi antenna – with screw thread and articulated joint (WLAN)
Quantity: 2
Quantity: 2
Network cable (Ethernet)
Quantity: 1
Quantity: 1
DIN rail bracket (including 2 fixing screws)
Quantity: 1
Quantity: 1
Blind plug for WAN socket
Quantity: 1
Quantity: 1
mdexSIM Vodafone (already preinstalled in ‘SIM1’ Slot) (1
Quantity: 1
Quantity: 1
mdexSIM Telekom (already preinstalled in ‘SIM2’ Slot) (1
Quantity: 1
Quantity: 1
MX530/MX880 Setup Guide
Quantity: 1
Quantity: 1
I/O connector strip (10-pin)
-
Quantity: 1
RS485 connector strip (6-pin)
-
Quantity: 1
(1
For the use of the respective mdexSIM see Section 1.5 Preinstalled mdexSIM (Page 8).
Page 5
Setup Guide - mdex Router MX530|MX880
Page 5
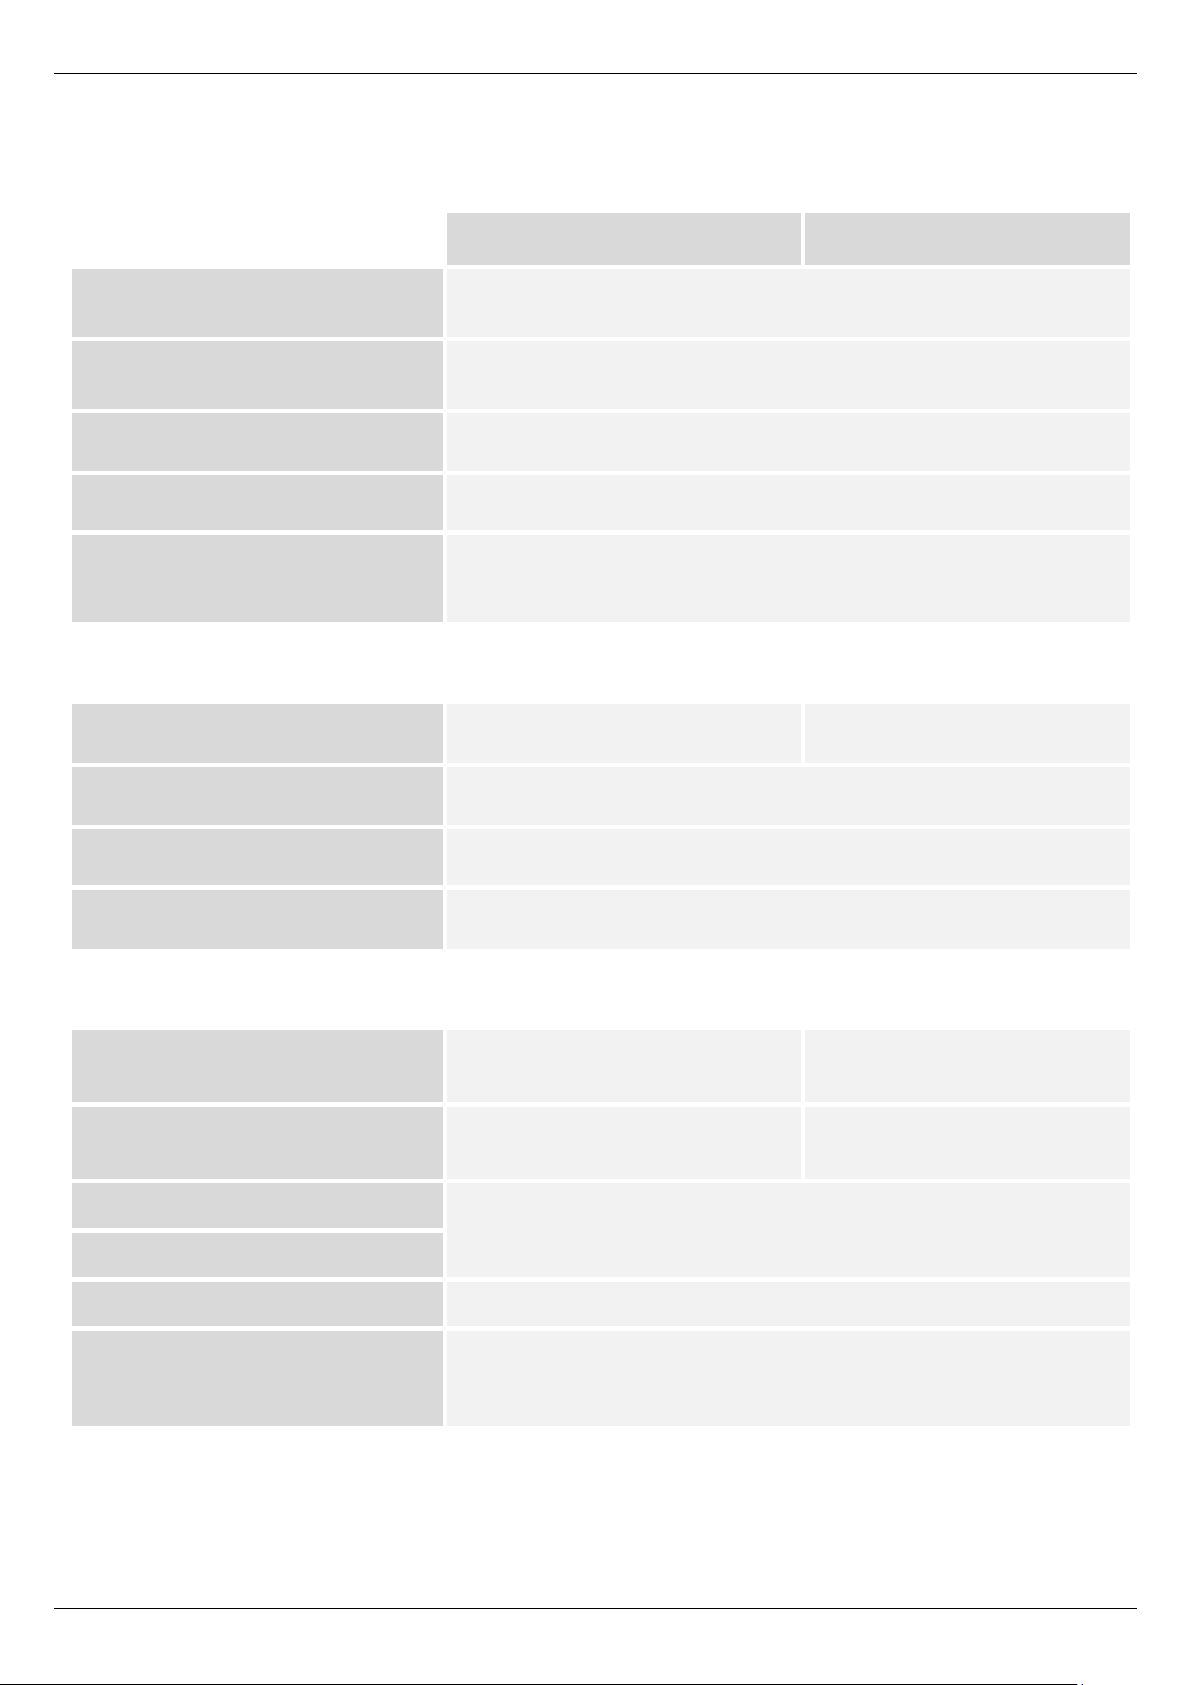
1.2 Technical specifications
Hardware:
MX530
MX880
Dimensions L x W x H:
80 mm x 106 mm x 46 mm
(without DIN rail bracket)
Weight:
about 280g
(without DIN rail bracket)
CPU / RAM:
560 MHz MIPS CPU, 128MB RAM
Input voltage:
9 - 30VDC, max. 7W
4-port switch:
(3 x LAN, 1 x WAN/configurable)
10/100 Mbps BASE-T, Auto MDI/MDIX
Environmental conditions:
Temperature range (operation):
-40° to +70° C
-30° to +60° C
Humidity (operation):
10% to 90%, non-condensing
Temperature range (storage):
-45° to +80° C
Humidity (storage):
5% to 95%, non-condensing
Mobile & WLAN:
4G LTE:
-
max. 100 Mbit/s Download /
50 Mbit/s Upload
3G HSPA+:
-
max. 42.2 Mbit/s Download /
5.76 Mbit/s Upload
3G HSPA:
max. 14.4 Mbit/s Download / 5.76 Mbit/s Upload
3G UMTS:
2G GPRS/EDGE:
max. 236.8 Mbit/s Download / 236.8 Mbit/s Upload
WLAN:
IEEE 802.11 b/g/n (2.4 GHz), WEP/WPA/WPA2 encryption,
2T2R (up to 300 Mbit/s)
Page 6
Setup Guide - mdex Router MX530|MX880
Page 6
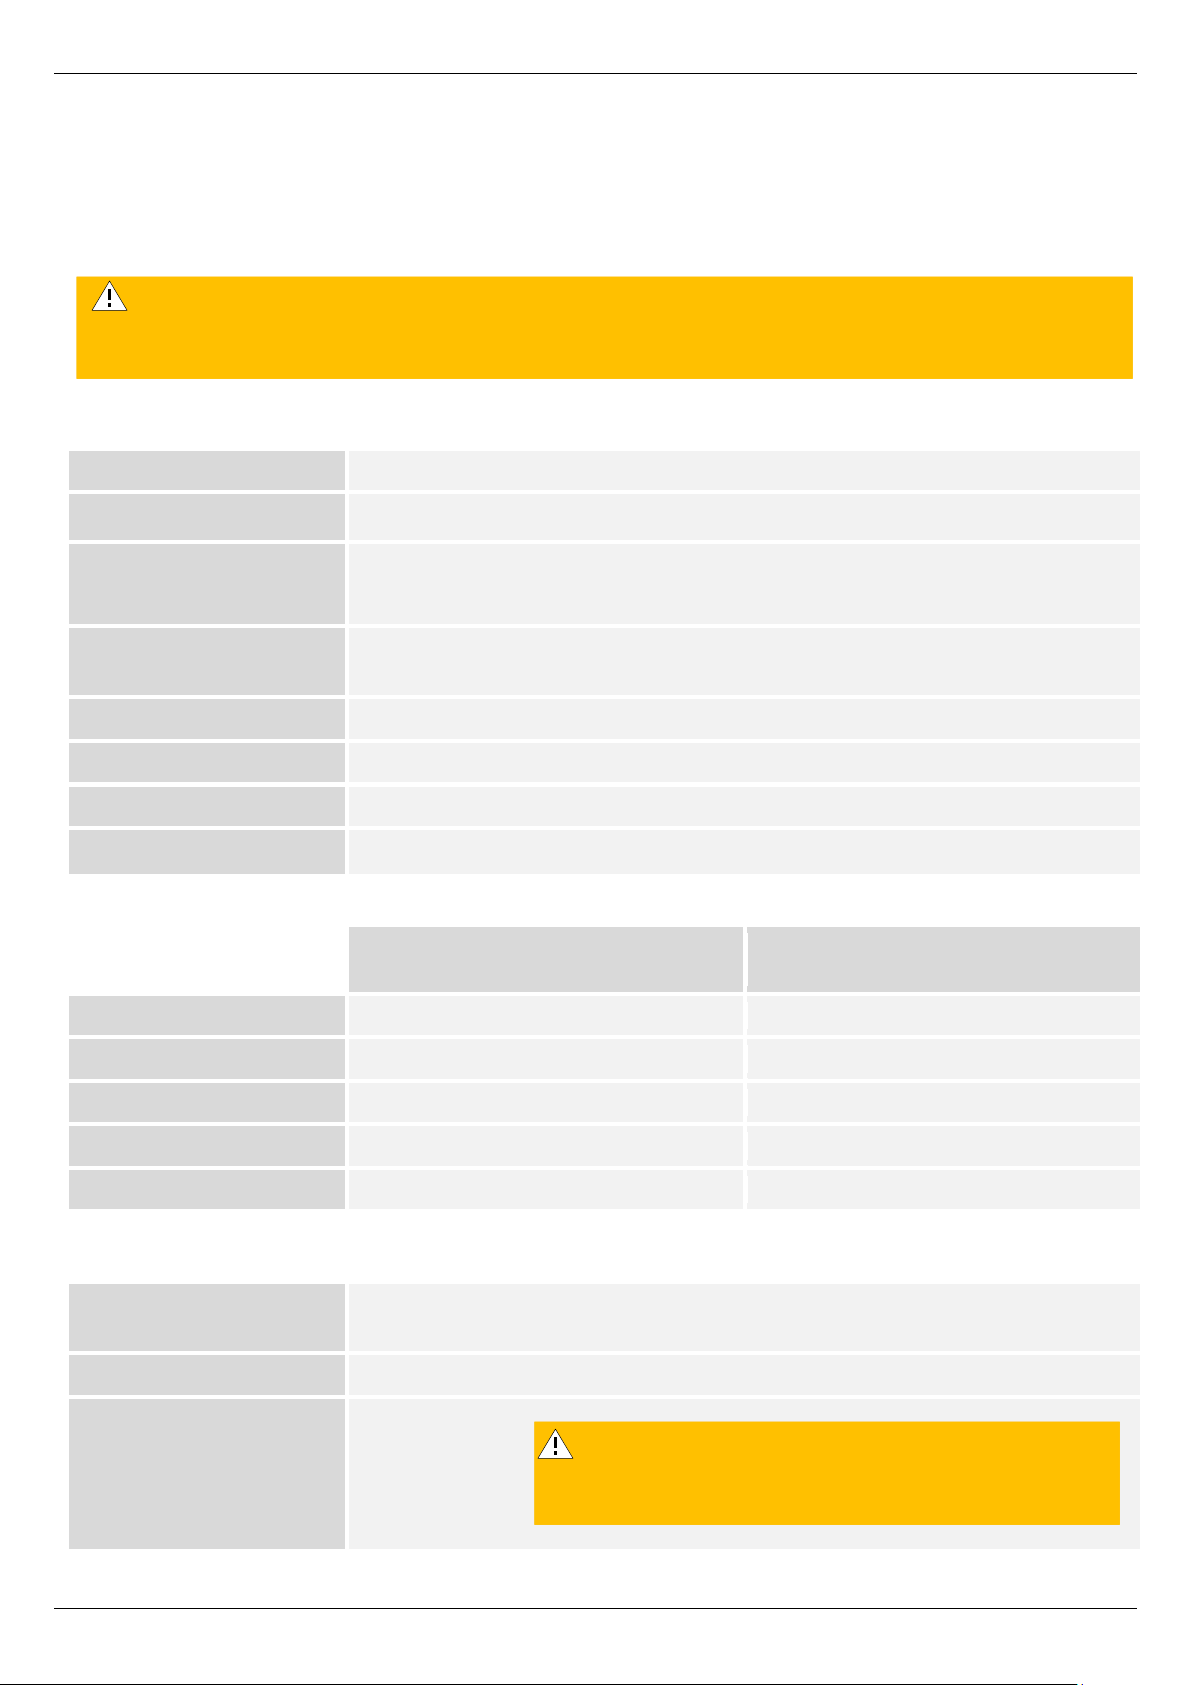
1.3 Preconfiguration (factory default)
The MX530/MX880 is preconfigured for the operation of the mdexSIM Vodafone (SIM1) and for the
accessibility of a connected terminal device. Here you will find the factory defaults in detail.
Network settings
LAN IP address:
192.168.0.1
LAN access:
HTTP Port: 8080 | HTTPS Port: 443 | SSH Port: 22
Remote access:
HTTP Port 8080: enabled (via WAN IP of the SIM card)
HTTPS Port 443: locked | SSH port 22: locked
Login Username /
Password:
admin / admin01
DHCP Server:
enabled (IP address 192.168.0.100 is assigned)
Port forwarding:
Host forwarding to 192.168.0.100
Wireless LAN (WLAN):
disabled
NTP (Time Server):
Time synchronization enabled (Time Server: time.mdex.de)
Mobile settings
SIM 1 (primary SIM)
SIM 2
SIM card (preinstalled):
mdexSIM Vodafone
mdexSIM Telekom
APN:
m2m.cda.vodafone.de
mdex.ic.m2mportal.de
User name:
Password:
mdex
mdex
PIN:
without
without
Settings for stable connection
Daily restart
(Daily reboot):
enabled (daily at 23:00 pm)
Ping reboot:
enabled (every 5 minutes)
Ping Server:
ping.mdex.de
Please note that the preconfiguration of the MX530/MX880 may differ for orders with
individual configuration, in the project business or as another mdex product (for example,
'mdex mobile.LAN packet' or 'mdex LTE per packet').
The server ping.mdex.de is only accessible from
the mdex network! See Section 3.2.1 Important
notes about the Ping Reboot (Page20).
Page 7
Setup Guide - mdex Router MX530|MX880
Page 7
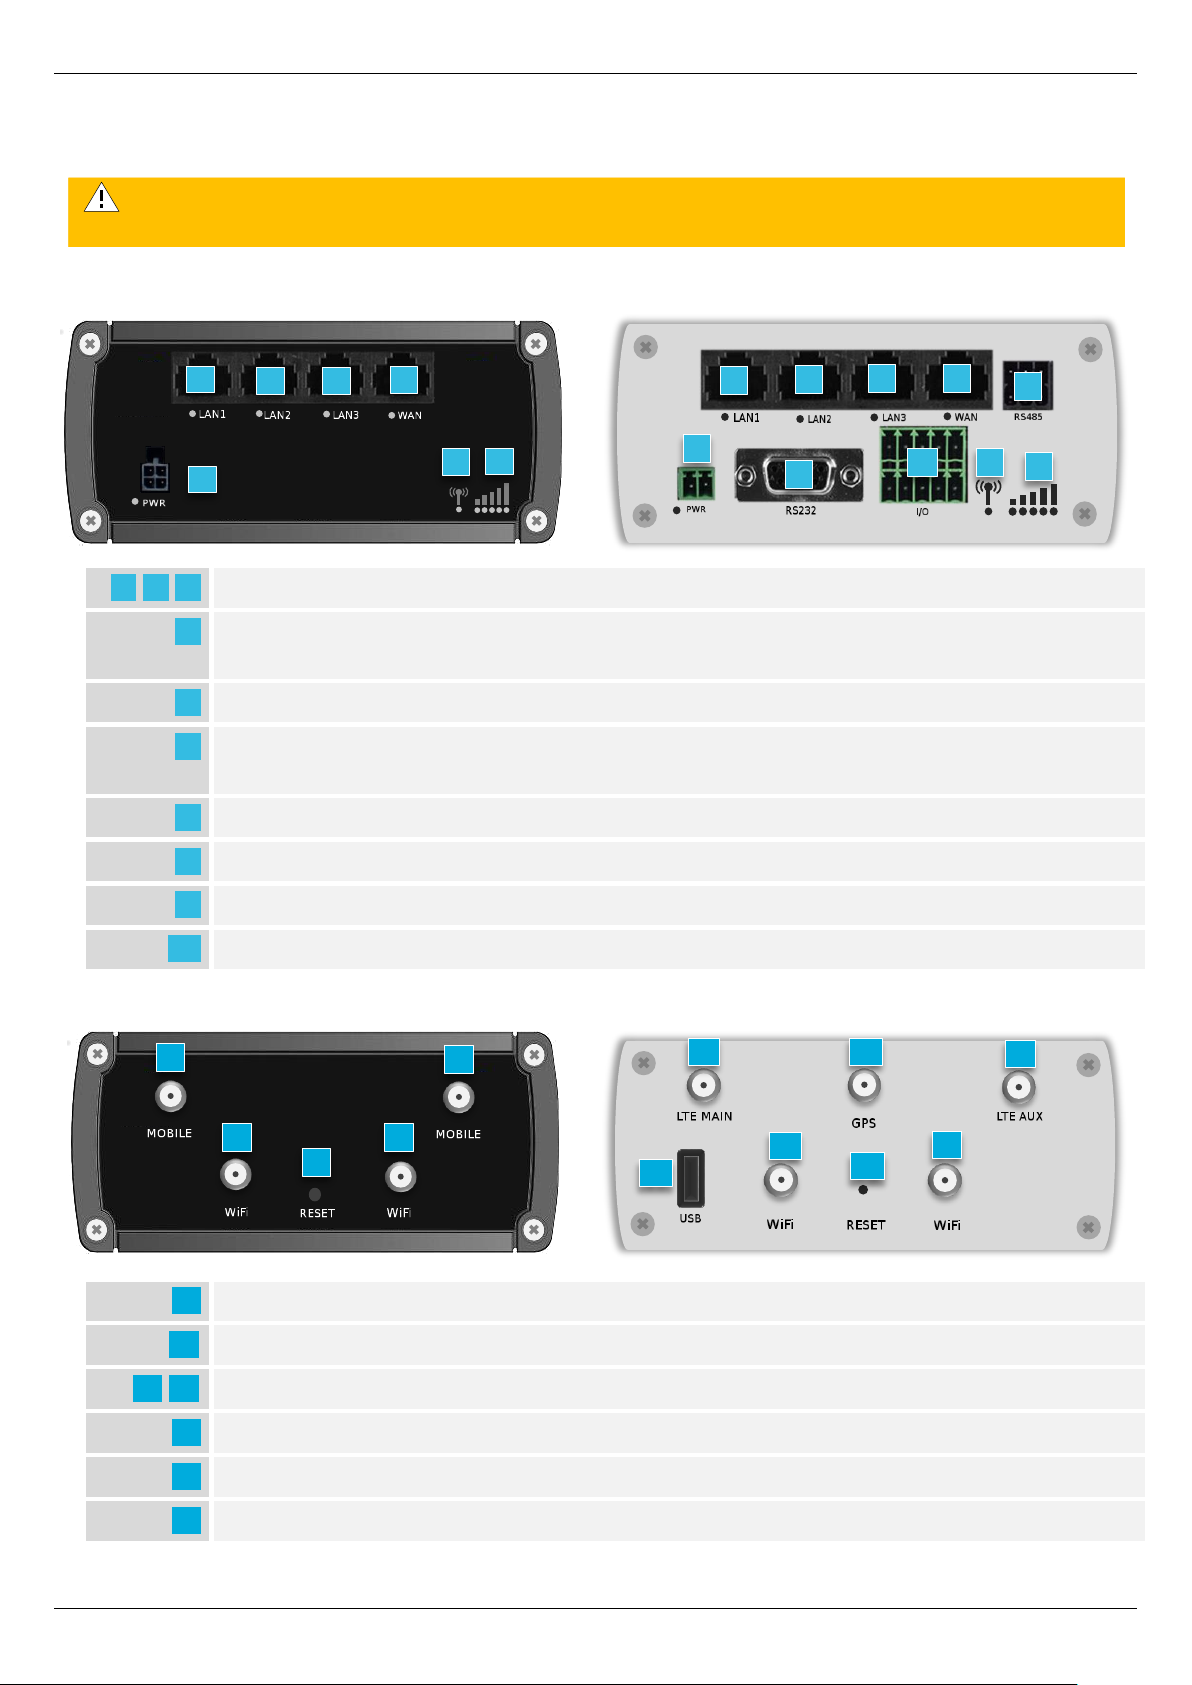
1.4 Connections and interfaces
MX530 front side MX880 front side
LAN Ethernet ports with status LED for connecting a PC or terminal devices
WAN Ethernet port with status LED for special function to connect the MX530/MX880
to external networks or routers
Connection for power supply (9-30V DC, 7W) with power LED
Mobile connection Status Display ‘Led Status Display’ → 4.2.1 LED status
indicators (Page 39)
Mobile strength display ‘Led Status Display’→ 4.2.1 LED status indicators (Page 39)
RS485 contacts for special functions (MX880 only)
RS232 socket for special functions for connecting serial devices (only MX880)
I/O contacts for input and output for special functions (MX880 only)
MX530 backside MX880 backside
SMA connector for main mobile antenna (MAIN)
SMA connector for additional mobile antenna (AUX)
RP-SMA connectors for WLAN (WiFi) antenna
RESET button for restart and resetting to factory defaults
SMA connector for optional GPS antenna (MX880 only)
USB connector for special functions (MX880 only)
3 2 1 4 5
6 7 8 9 10 1112
14 1315
16
17
3 2 1 4 8
5
10 6 7
9
11
12
13
14
15
16
17
3 2 1
4
5 6 7
13
14
15
11
12
No PoE (Power over Ethernet) powered network cable may be connected to the LAN/WAN
sockets! The PoE voltage would destroy the MX530/MX880!
Page 8
Setup Guide - mdex Router MX530|MX880
Page 8
1.5 Preinstalled mdexSIM
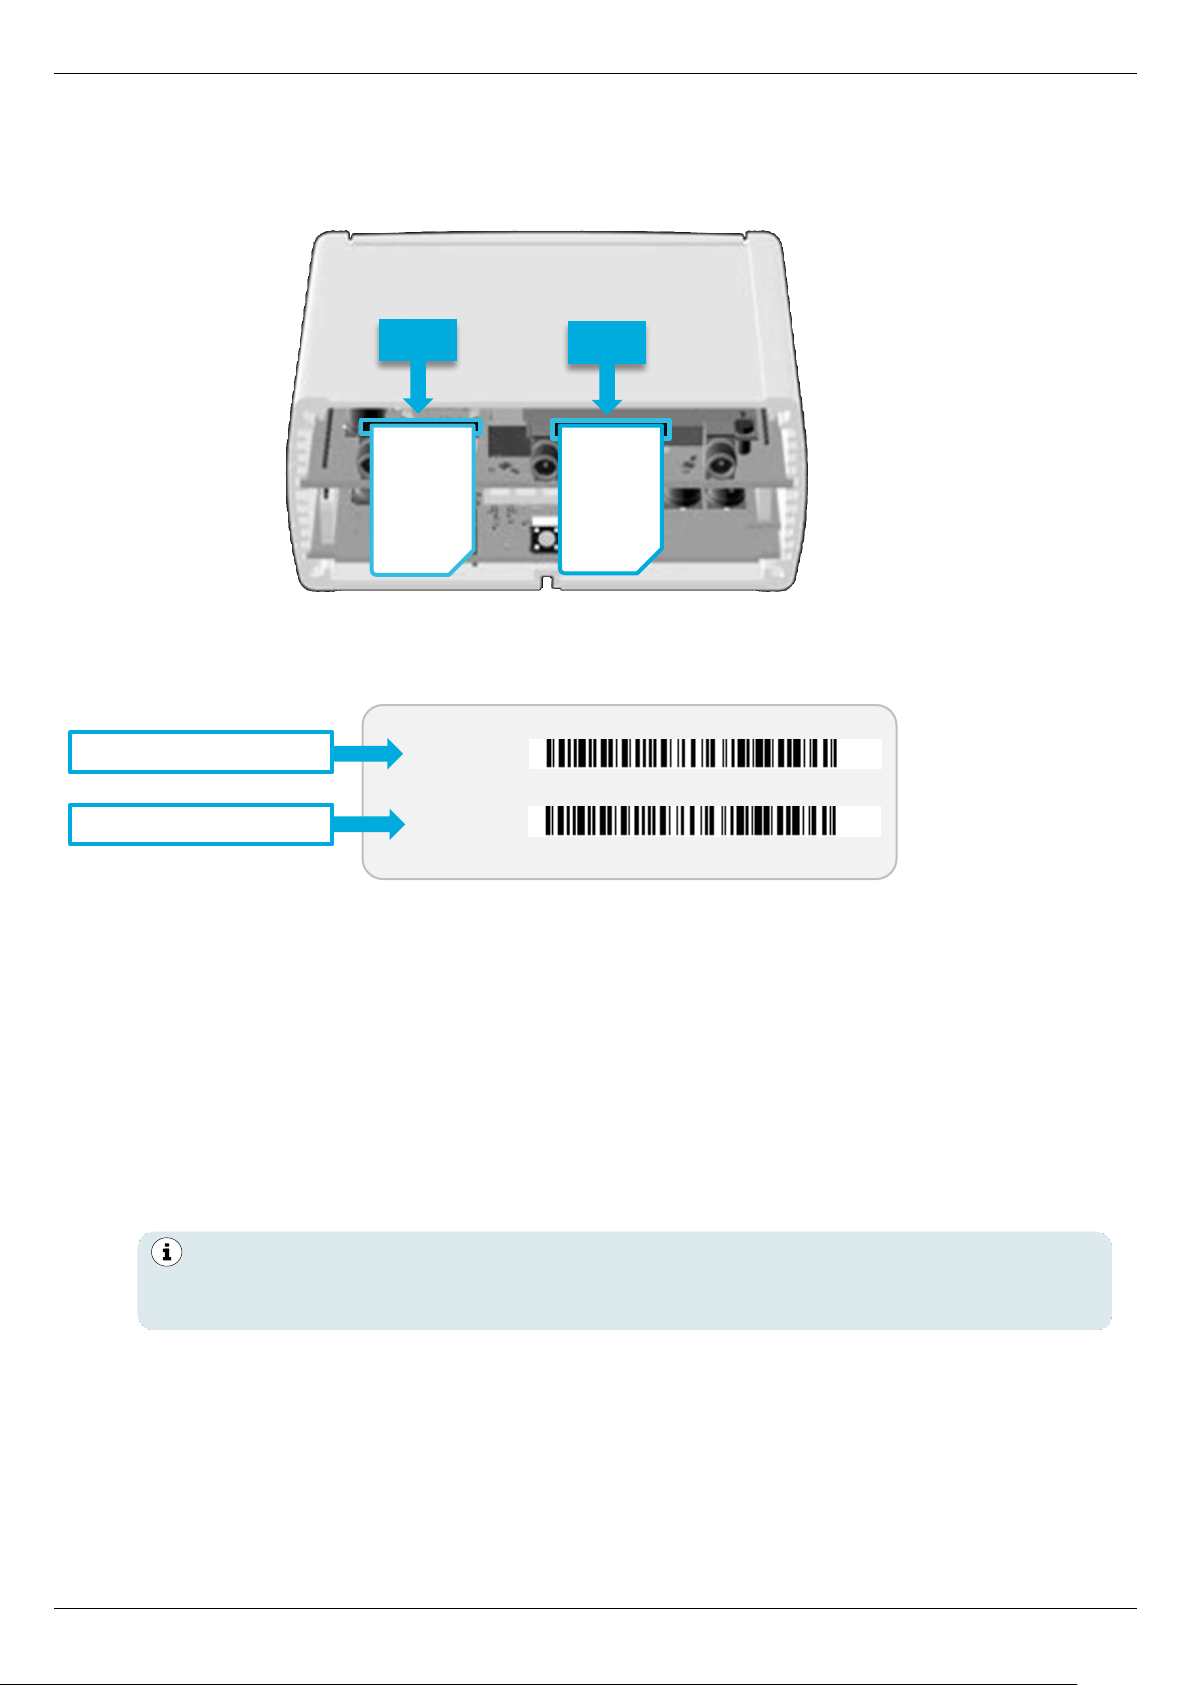
The MX530/MX880 comes with two preinstalled mdex SIM cards.
The ICCIDs of the preinstalled mdex SIM cards can be found on the label of the box or the bottom of
the MX530/MX880:
1.5.1 mdex SIM Vodafone (SIM1)
For the use of the preinstalled mdexSIM Vodafone , please note the following:
▪ The mdex SIM Vodafone is preinstalled in SIM1 Slot of the MX530/MX880.
▪ The desired tariff of this mdex SIM Vodafone must be ordered from mdex.
▪ The mobile settings are already preconfigured to operate the mdex SIM Vodafone.
When using the mdexSIM Vodafone incl. mdex public.IP, a different SIM card user name
may be required according to the Section 3.5 SIM mobile settings (Page22).
▪ The mdex SIM must be unlocked according to Section 1.5.3 Unlock mdexSIM (Page10).
▪ To avoid unnecessary costs, the mdex SIM is monitored by an alarm profile.
See https://wiki.mdex.de/Support/DOCKostenfallenVerhindern
▪ Further information on using a mdex SIM can be found in the mdex Support Wiki at
https://wiki.mdex.de → mdex SIM
XXXXXXXXXXXXXXXX
XXXXXXXXXXXXXXXX
SIM1 ICCID:
SIM2 ICCID:
mdexSIM Vodafone
mdexSIM Telekom
The required username of the mdex SIM can be found in the order confirmation which
was sent to you by e-mail. Alternatively, you can also read the username in the mdex
Management Portal as described on the following page.
SIM 1
SIM 2
mdexSIM
Telekom
mdexSIM
Vodafone
Page 9
Setup Guide - mdex Router MX530|MX880
Page 9
1.5.2 mdex SIM Telekom (SIM2)
To use the preinstalled mdexSIM Telekom please note the following:
▪ The mdex SIM Telekom is preinstalled in SIM2 Slot of the MX530/MX880.
▪ The desired tariff of this mdex SIM Telekom must be ordered from mdex.
▪ The mdex SIM must be unlocked according to Section 1.5.3 Unlock mdexSIM (Page 10).
▪ To avoid unnecessary costs, the mdex SIM is monitored by an alarm profile.
See https://wiki.mdex.de/Support/DOCKostenfallenVerhindern
▪ Further information on using a mdex SIM can be found in the mdex Support Wiki at
https://wiki.mdex.de → mdex SIM
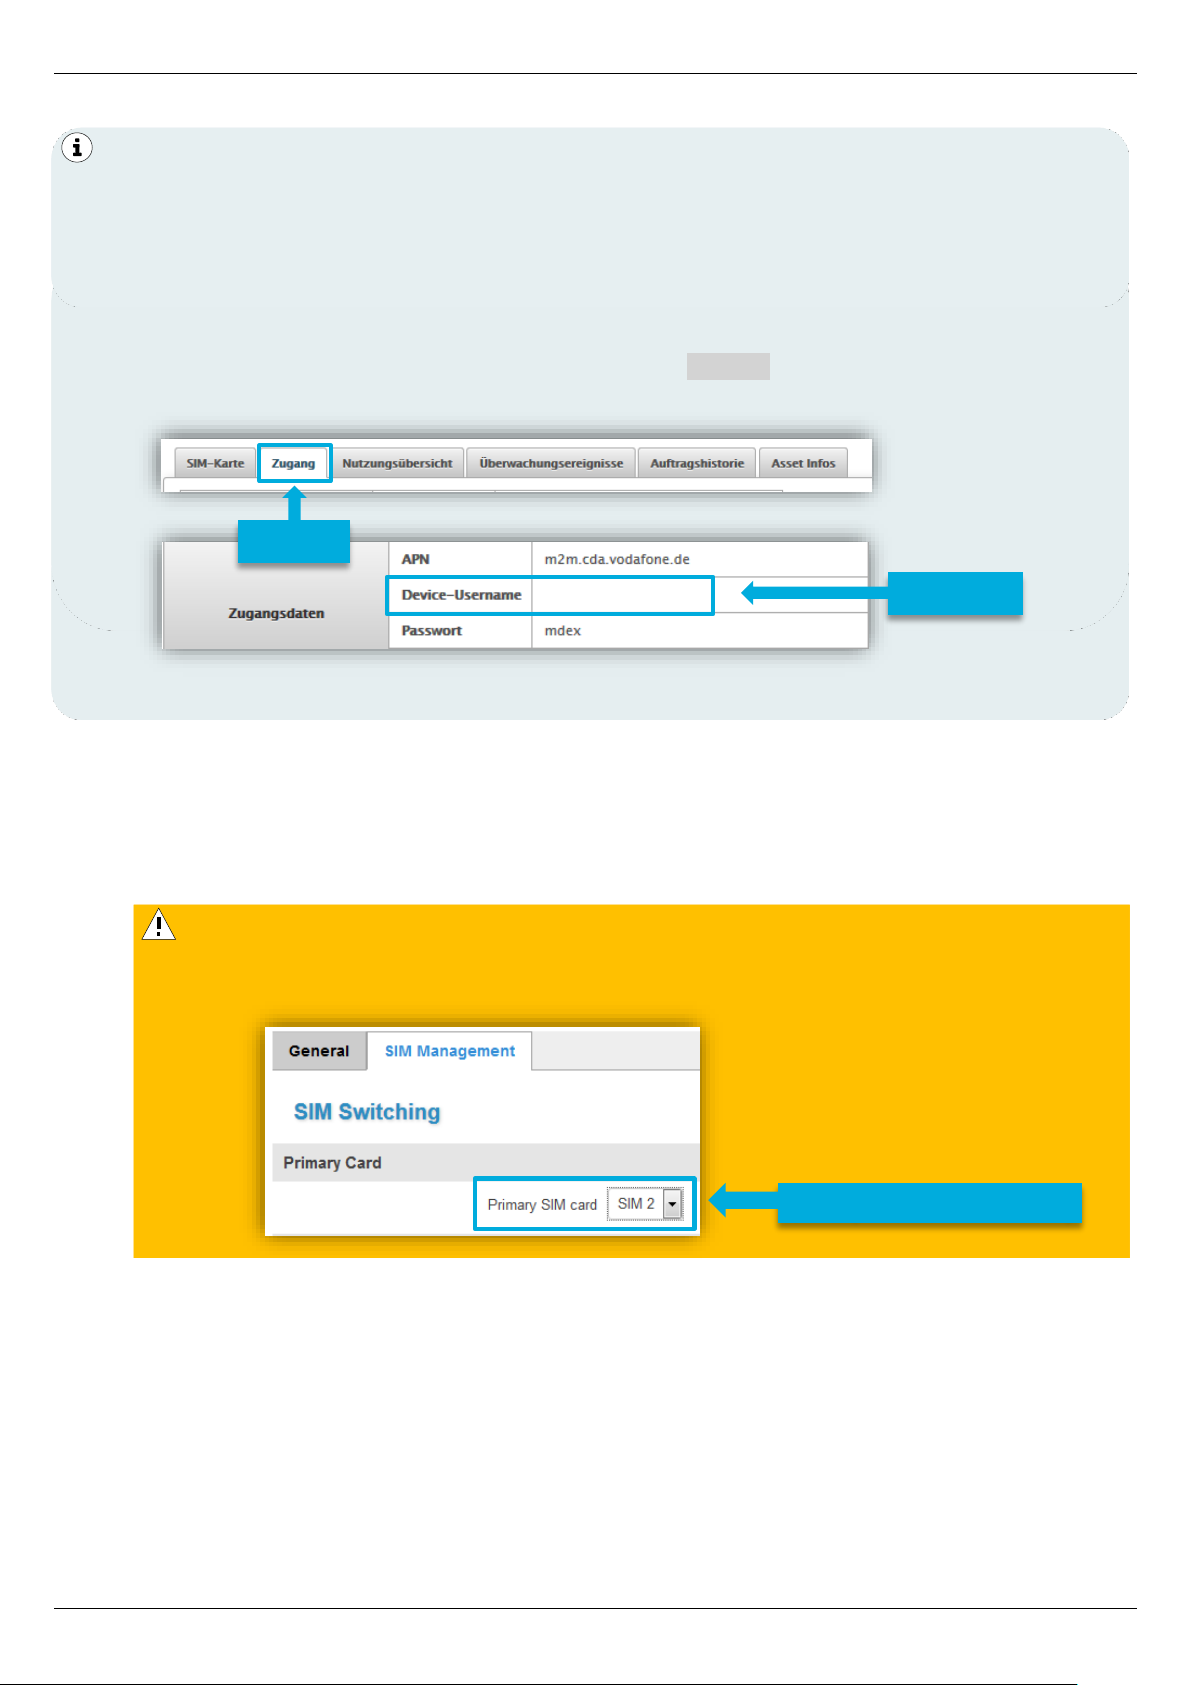
Read out the SIM card username in the mdex Management Portal
1. Log into themdex Management Portal: https://manager.mdex.de.
(Your access data have been sent to you via email.)
2. Click on SIM Cards → brows SIM cards.
3. Clicking on Start Search displays all mdex SIM cards.
(You can limit the search by, for example, entering the ICCID of the mdex SIM.)
4. Click on the respective SIM card and switch to the Access tab.
Under Access data you will find APN, username and password of your mdex SIM.
xxxxxxxxxxxxxxxxxxxx
User name
Access
To use the mdexSIM Telekom (SIM2) the following settings are required:
1. Click on the Network → Mobile (SIM), then at the top click on SIM Management.
2. Set the Primary SIM card to SIM 2 and click on Save.
SIM2 (mdex SIM Telekom)
Page 10
Setup Guide - mdex Router MX530|MX880
Page 10
1.5.3 Unlock mdexSIM
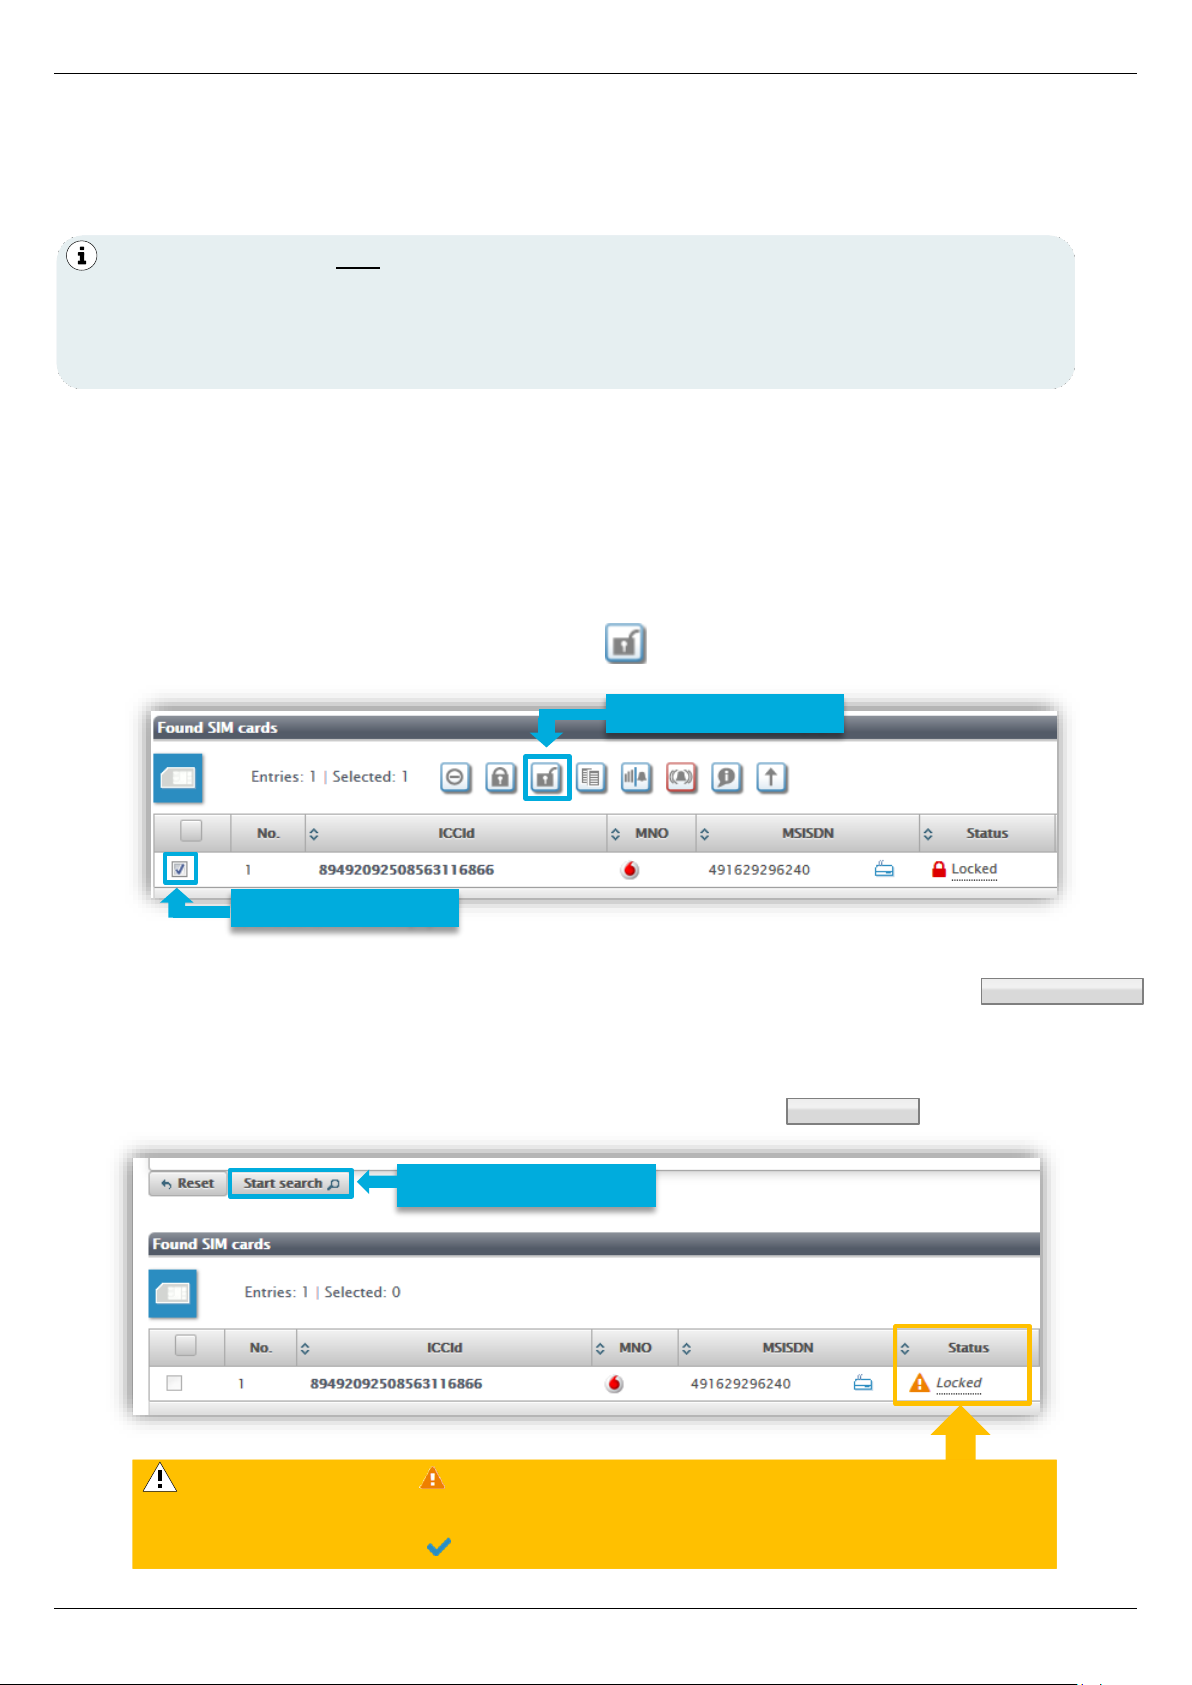
For safety reasons, the mdex SIM cards are locked on delivery and must first be unlocked before
being used for the first time.
Unlock SIM card:
1. Log into mdex Management Portal at https://manager.mdex.de.
(Your login access data have been sent to you via email.)
2. Click on SIM Cards → Locked SIM Cards.
Check the SIM card(s) and click on the icon (Unlock SIM cards).
3. Follow the instructions on the portal to unlock the SIM card(s) and then click on
button.
4. Full unlocking of the SIM card can take up to 20 minutes.
After a few minutes, check the SIM card status by clicking on . button.
This step is required only when using a preinstalled mdexSIM !
▪ The tariff for the desired SIM card must have been ordered from mdex.
▪ The ICCIDs of the preinstalled SIM cards are located on the router label.
SIM1: mdexSIM Vodafone SIM2: mdexSIM Telekom
Start Search
Back to the Search
Unlock SIM card(s)
Select SIM card(s)
As long as the status Locked is displayed, the process is still in progress.
To update the status display, click on Start Search button again.
As soon as the status Enabled is displayed, the SIM card is ready for use.
Update Status Display
Page 11

Setup Guide - mdex Router MX530|MX880
Page 11
2 Installation
Please pay attention to the notes in the Section 5 Important information (Page 45).
2.1 Quick Start
Depending on the intended use of the MX530/MX880, here you will find the necessary setup steps
for quick commissioning.
For more individual settings, see the Sections 3 Setup configuration and 4 Additional functions
relevant descriptions.
2.1.1 Own SIM card without mdex IP service
Using the MX530/MX880 as an Internet router with your own SIM card, without mdex IP service
(fixed.IP+ / public.IP) for remote access to a connected terminal device.
1. Install your SIM card according to Section 2.2 Replace SIM card (Page 13).
2. Connect LTE mobile antennas according to Section 2.3 Connect antennas (Page 14).
3. Connect power supply according to Section 2.4 Power supply (Page 15).
4. Change the login password according to Section 3.4 Login Password (Page 22).
5. Set the mobile settings in MX530/MX880 (APN, user name, password, PIN) for your SIM card
according to the Section 3.5 SIM mobile settings (Page 22).
6. Expand the DHCP IP address range according to Section 3.8 DHCP Server (Page 30) for the
number of connected network devices.
7. Disable the ‘DMZ configuration’ according to Section 3.9 Forwarding (Page 32).
8. As per Section 3.11 Ping Reboot (Page 36) a publicly accessible server must be set as Ping
Server e.g. ‚public-ping.mdex.de‘ (185.39.176.22).
9. If remote access is not required, it should be disabled for security reasons according to
Section 3.10 Configuration Access / Remote Access (Page 34).
10. Connect terminal devices according to Section 2.6 Connecting terminal devices (Page 17).
2.1.2 With mdexSIM & mdex IP service
Using the MX530/MX880 with the preinstalled mdexSIM Vodafone or mdexSIM Telekom, optionally
with a mdex IP service (fixed.IP+ / public.IP).
1. Carry out the measures as per Section 1.5 Preinstalled mdexSIM (Page 8)
2. Connect LTE mobile antennas according to Section 2.3 Connect antennas (Page 14).
3. Connect power supply according to Section 2.4 Power supply (Page 15).
4. Change the login password according to Section 3.4 Login Password (Page 22).
5. If remote access is not required, it should be disabled for security reasons according to
Section 3.10 Configuration Access / Remote Access (Page 34).
6. Connect terminal device(s) according to Section 2.6 Connecting terminal devices (Page 17).
Page 12

Setup Guide - mdex Router MX530|MX880
Page 12
2.1.3 Own Vodafone/Telekom SIM card & mdex IP service
Using the MX530/MX880 with your own Vodafone/Telekom SIM card with mdex IP service fixed.IP+ /
public.IP as network type ‘Vodafone’ or ‘Telekom’.
1. Install your SIM card according to Section 2.2 Replace SIM card (Page 13).
2. Connect LTE mobile antennas according to Section 2.3 Connect antennas (Page 14).
3. Connect power supply according to Section 2.4 Power supply (Page 15).
4. Change the login password according to Section 3.4 Login Password (Page 22).
5. If remote access is not required, it should be disabled for security reasons according to
Section 3.10 Configuration Access / Remote Access (Page 34).
6. Set the mobile settings in MX530/MX880 (APN, user name, password, PIN) for your SIM card
according to the Section 3.5 SIM mobile settings (Page 22).
7. Connect terminal device(s) according to Section 2.6 Connecting terminal devices (Page 17).
2.1.4 Own SIM card & mdex IP service, fixed.IP+ via OpenVPN'
Using the MX530/MX880 with your own (any) SIM card and the mdex IP service ‘public.IP’ as
network type ‚OpenVPN‘.
1. Install your SIM card according to Section 2.2 Replace SIM card (Page 13).
2. Connect LTE mobile antennas according to Section 2.3 Connect antennas (Page 14).
3. Connect power supply according to Section 2.4 Power supply (Page 15).
4. Change the login password according to Section 3.4 Login Password (Page 22).
5. Set the mobile settings in MX530/MX880 (APN, user name, password, PIN) for your SIM card
according to the Section 3.5 SIM mobile settings (Page 22).
6. Setup the integrated OpenVPN Client according to Section 3.6 OpenVPN-Client (Page 27)
with the Role ‚mdex fixed.IP+‘.
7. Set the Source zone to VPN for forwarding according to Section 3.9 Forwarding (Page 32).
8. Set the Source zone to VPN for remote access according to Section 3.10 Configuration
Access / Remote Access (Page 34) or disable it for security reasons if no remote access is
required.
9. Connect terminal device(s) according to Section 2.6 Connecting terminal devices (Page 17).
2.1.5 Own SIM card & mdex IP servic, public.IP via OpenVPN‘
Using the MX530/MX880 with your own (any) SIM card and the mdex IP service ‘public.IP’ as
network type ‚OpenVPN‘.
1. Install your SIM card according to Section 2.2 Replace SIM card (Page 13).
2. Connect LTE mobile antennas according to Section 2.3 Connect antennas (Page 14).
3. Connect power supply according to Section 2.4 Power supply (Page 15).
4. Change the login password according to Section 3.4 Login Password (Page 22).
5. Set the mobile settings in MX880 (APN, user name, password, PIN) for your SIM card
according to the Section 3.5 SIM mobile settings (Page 22).
6. Setup the integrated OpenVPN Client according to Section 3.6 OpenVPN-Client (Page 27)
with the Role ‚mdex fixed.IP+‘.
7. Set the Source zone to VPN for forwarding according to Section 3.9 Forwarding (Page 32).
8. Set the Source zone to VPN for remote access according to Section 3.10 Configuration
Access / Remote Access (Page 34) or disable it for security reasons if no remote access is
required.
9. Connect terminal device(s) according to Section 2.6 Connecting terminal devices (P. 17).
Page 13
Setup Guide - mdex Router MX530|MX880
Page 13
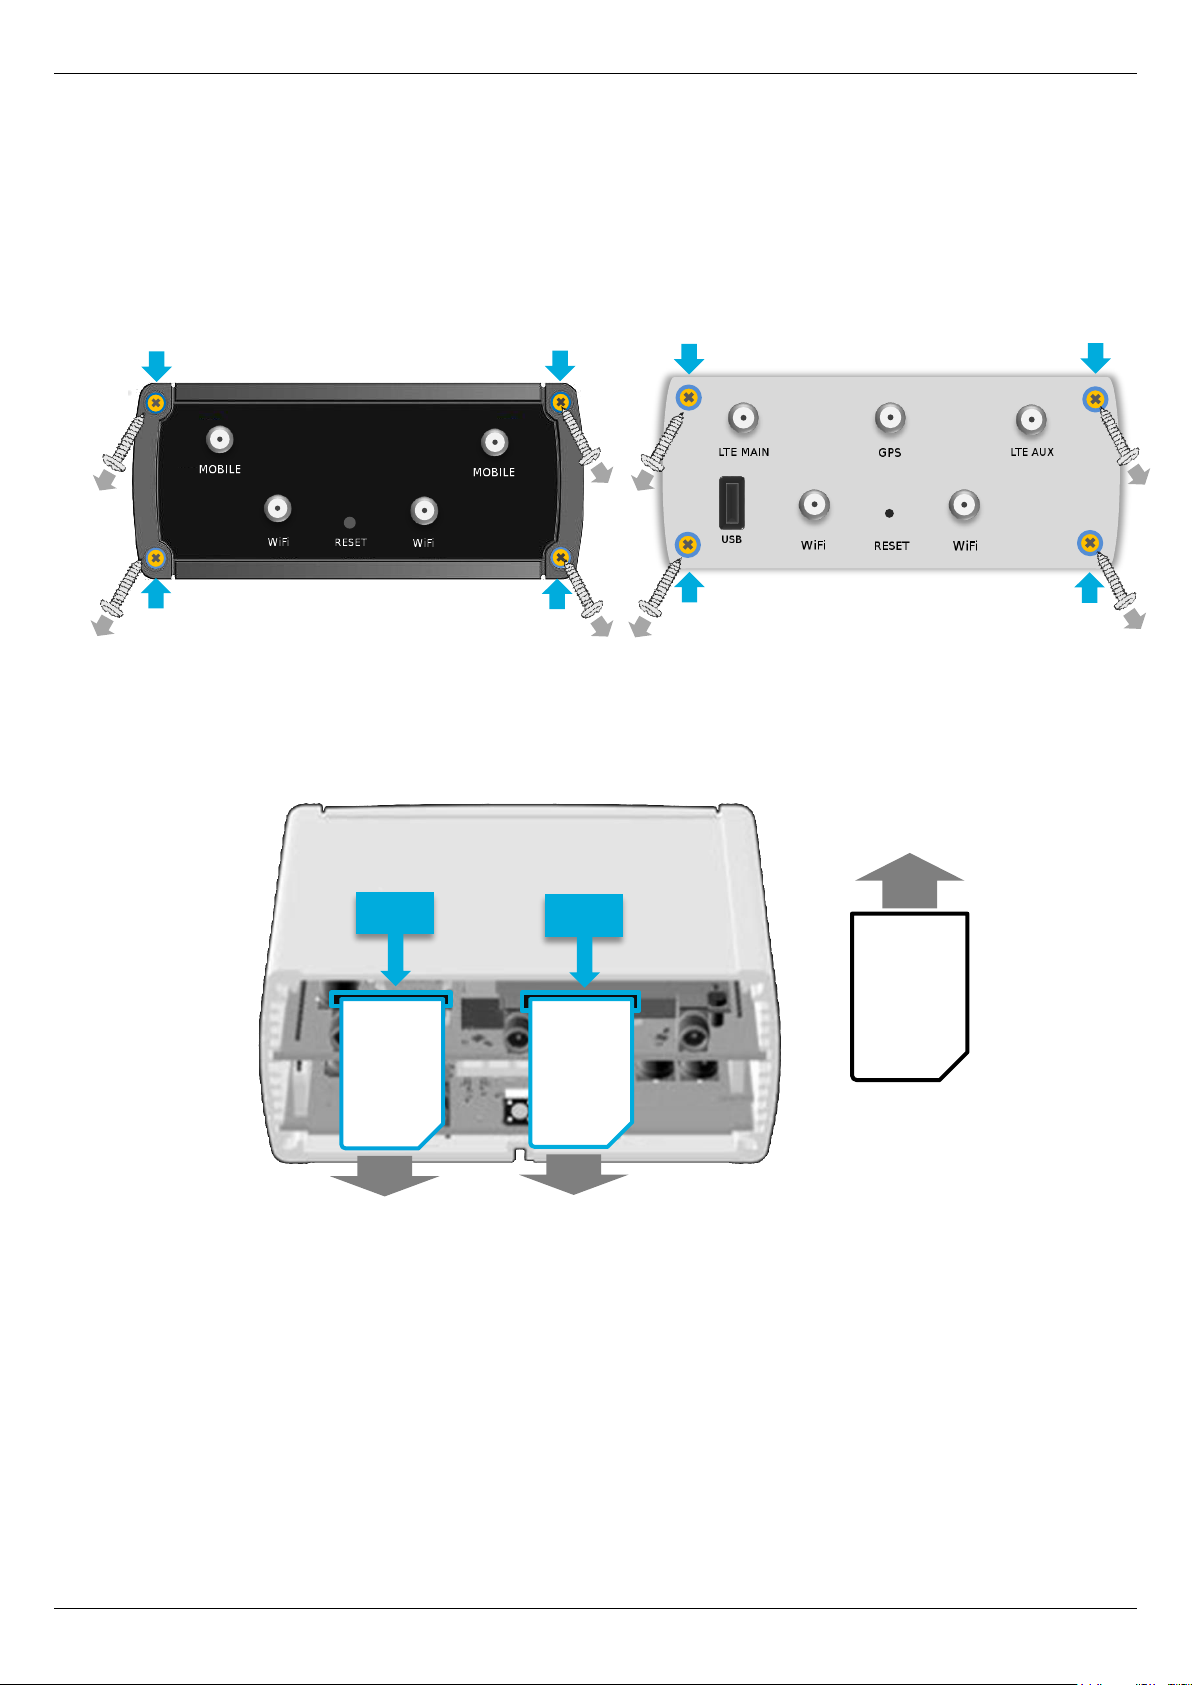
2.2 Replace SIM card
This step can be skipped when using the preinstalled mdex SIM card(s).
To insert another (own) SIM card, follow the steps below.
1. Unscrew the 4 screws on the back of the router (antenna side) and remove the back cover.
MX530 MX880
2. Pull out the preinstalled SIM card(s) and insert the new SIM card(s) into the desired SIM card
slot (preferably SIM 1).
3. Secure the back cover with the four screws.
4. The MX530/MX880's mobile settings must be adjusted to use the new SIM card(s) as per
Section 3.5 SIM mobile settings (Page 22).
new
SIM
SIM 1
SIM 2
mdexSIM
Telekom
mdexSIM
Vodafone
Page 14
Setup Guide - mdex Router MX530|MX880
Page 14
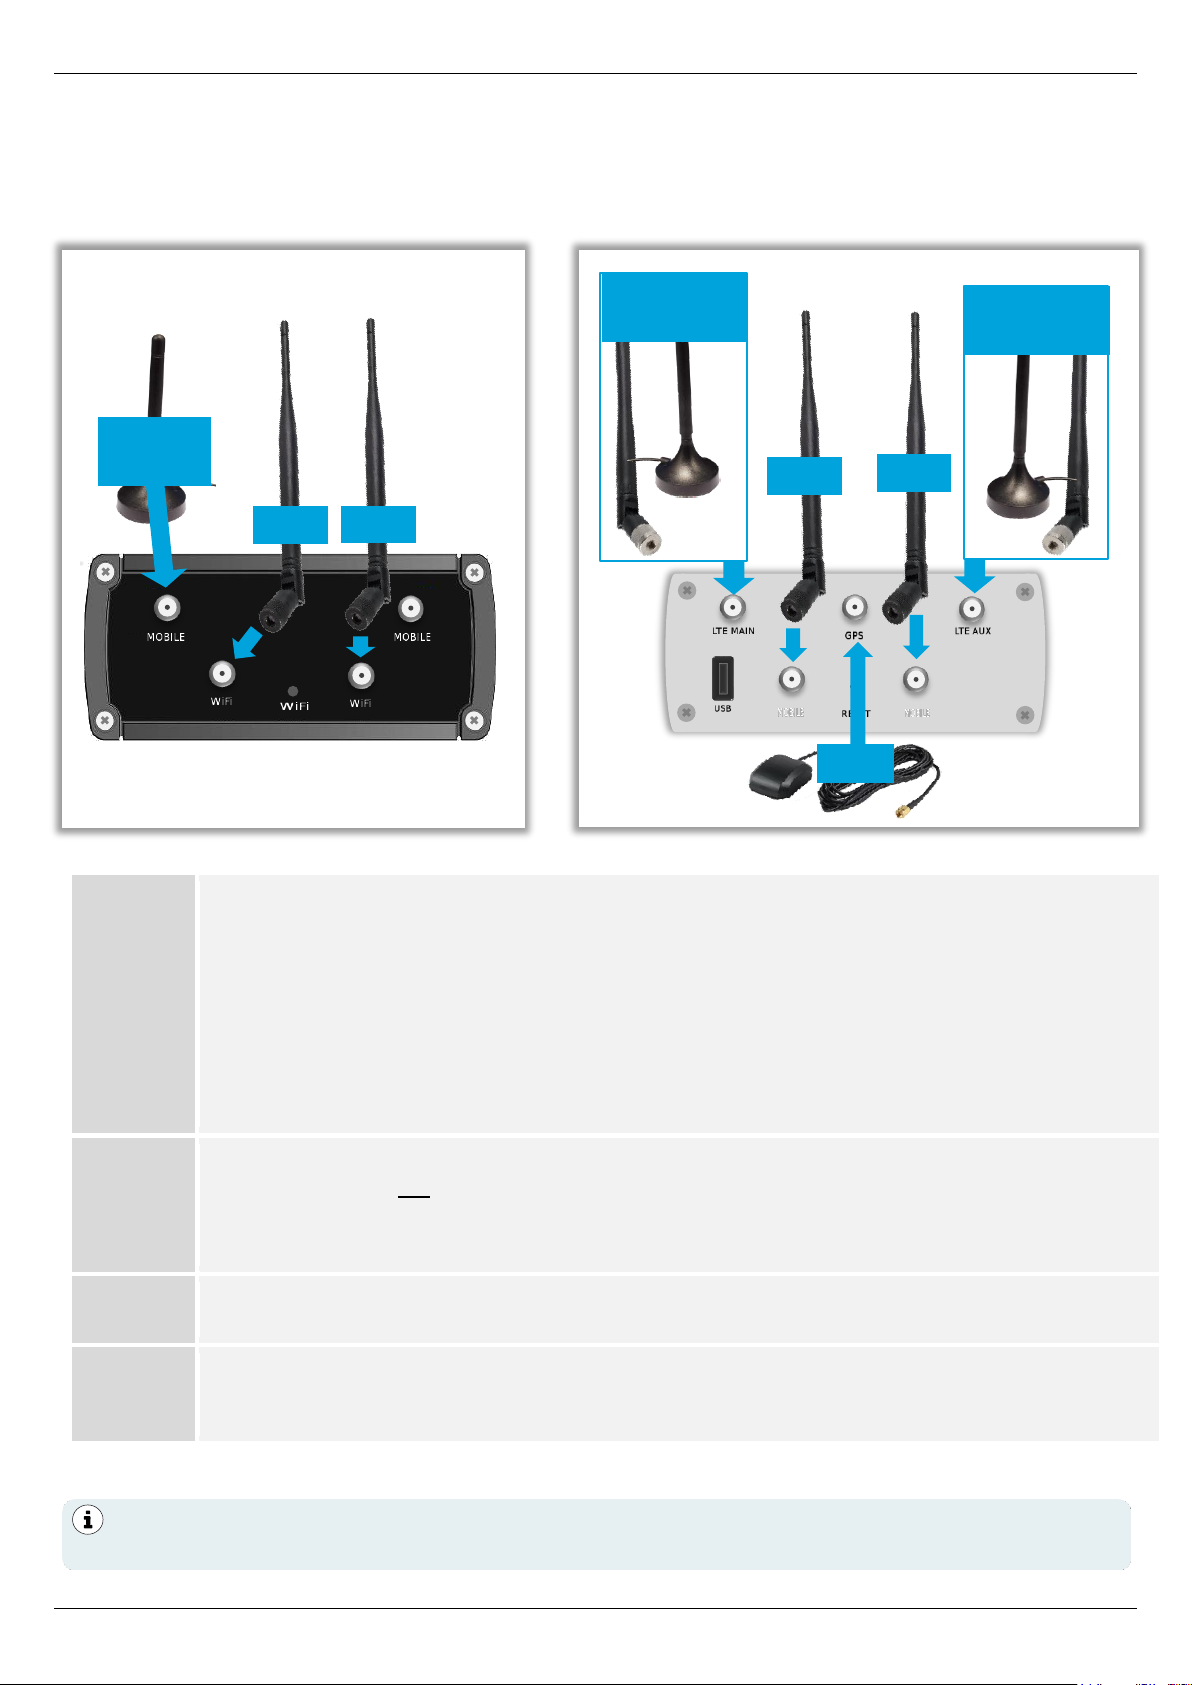
2.3 Connect antennas
There are labels on the antennas with the name of the associated antenna connection.
LTE
(MX880)
The MX880 comes with 4 mobile antennas (MOBILE/LTE). Depending on the installation
site, you can either attach the mobile antennas directly on the router using the
articulated joint or set the two magnetic base antennas with the connection cable and
magnetic base slightly away from the router, e.g. when the MX880 is mounted in an IT
cabinet.
To establish a mobile connection, mobile antenna must be connected to the LTE MAIN
socket. By using the second LTE antenna to LTE AUX the LTE download rate can be
increased.
MOBILE
(MX530)
The MX530 comes with a mobile antenna (with connection cable and magnetic base) for
connecting to the left MOBILE (MAIN) socket. (see Figure)
(The other socket, MOBILE '(AUX) serves to connect another (optional) mobile antenna,
for example to increase the download rate in mobile use.)
WiFi
Only when using the WLAN according to Section 4.1 WLAN (Wireless Access Point)
(Page 38) the two WiFi antennas must be connected to the WiFi sockets.
GPS
(MX880)
The MX880 has a GPS receiver to determine the current position. The optional GPS
antenna needs to be connected only when using the GPS function and is located in a
GPS reception area.
MX530
WiFi
WiFi
MOBILE
(MAIN)
The magnetic base antennas have the best reception strength when mounted on a metal
surface. You can also use outdoor antennas in order to further enhance mobile reception.
GPS
WiFi
WiFi
LTE MAIN
(MOBILE)
MX880
LTE AUX
(MOBILE)
Page 15
Setup Guide - mdex Router MX530|MX880
Page 15
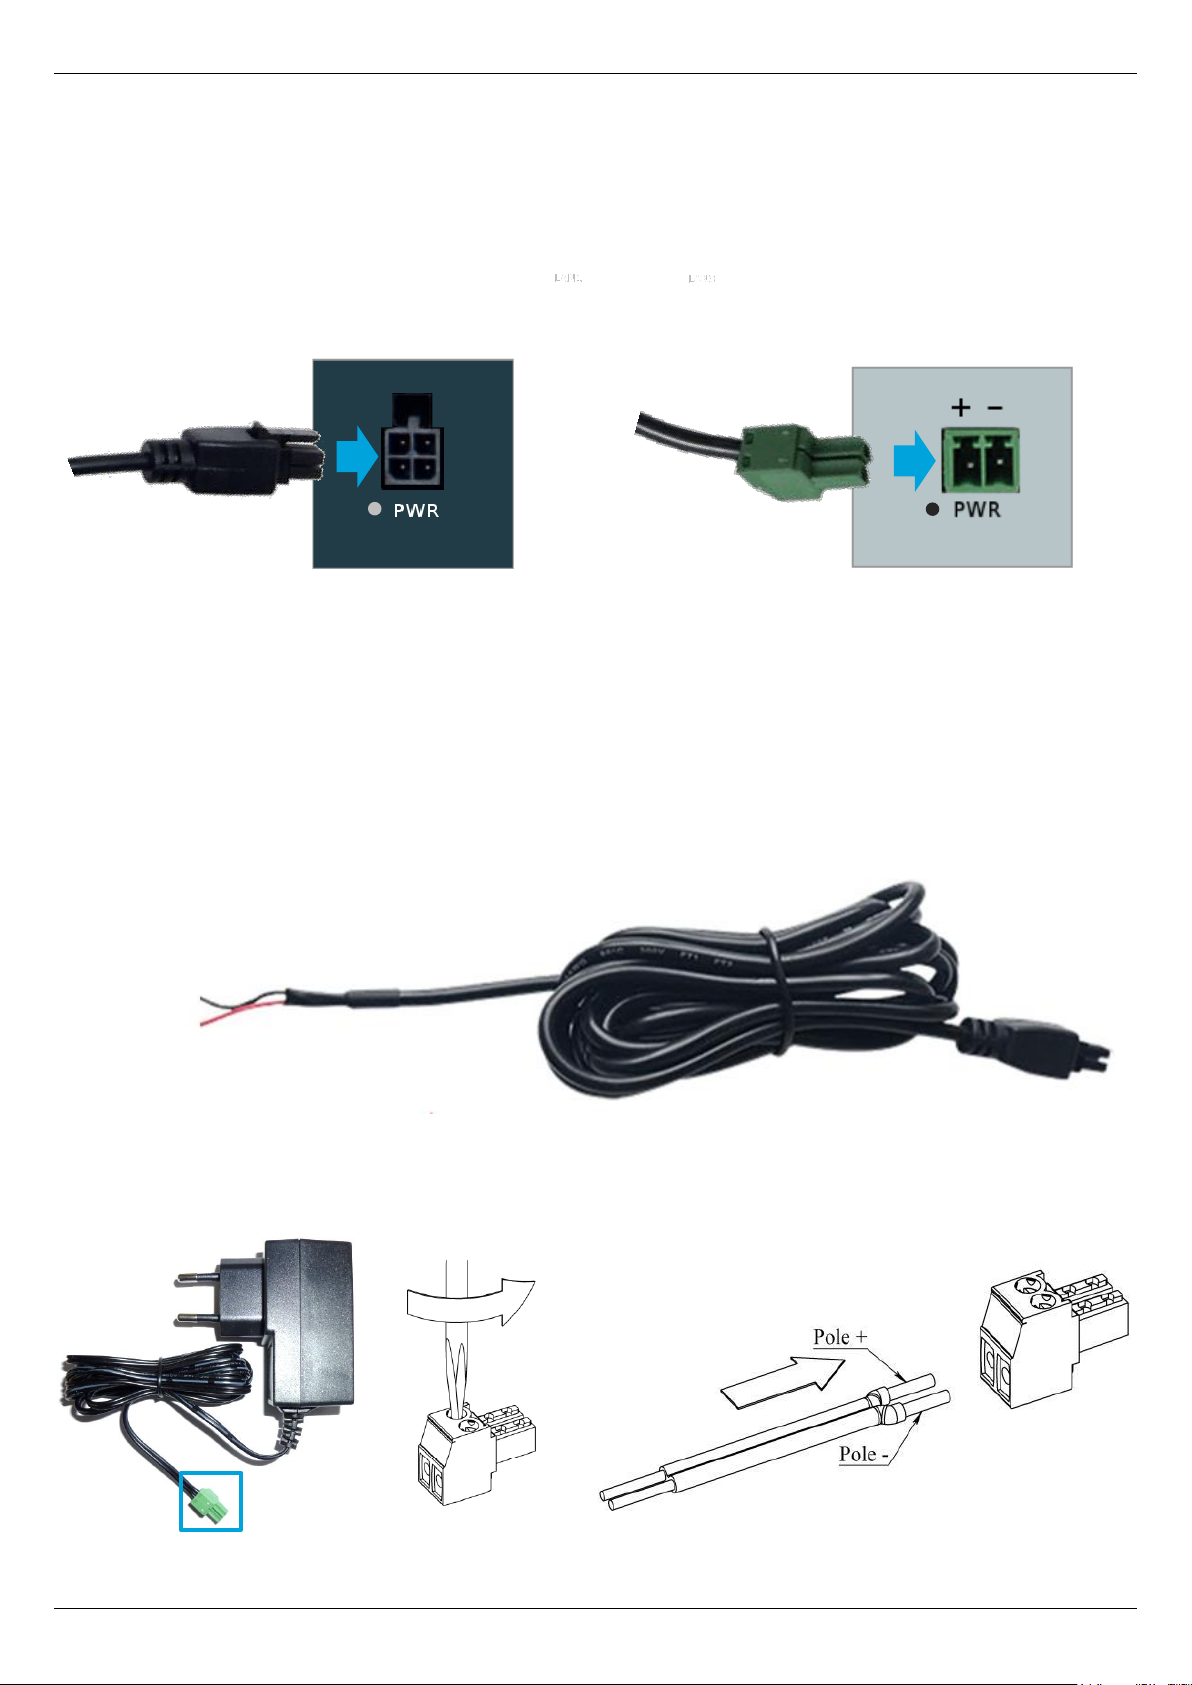
2.4 Power supply
Power is supplied to the MX530/MX880 using the supplied plug-in power supply.
(Temperature range of the plug-in power supply: 0° to + 40° Celsius)
The router connector of the plug-in power supply is plugged into the PWR socket.
2.4.1 Using another power supply
As an alternative to the enclosed plug-in power supply, the MX530/MX880 can also be supplied with
a DIN rail power supply or own power supply (9V to 30V DC, 7W).
MX530
Use the supplied power cable and attach the red wire (+) and black wire (-) to the external power
supply. Pay attention to the correct polarity!
MX880
Unscrew the screws of the green router connector plug attached to the power supply and attach the
wires to the external power supply.
Pay attention to the correct polarity!
MX530
-
+
9V to 30V DC (7W)
9V to 30V DC (7W)
black
-
red +
MX880
Page 16
Setup Guide - mdex Router MX530|MX880
Page 16
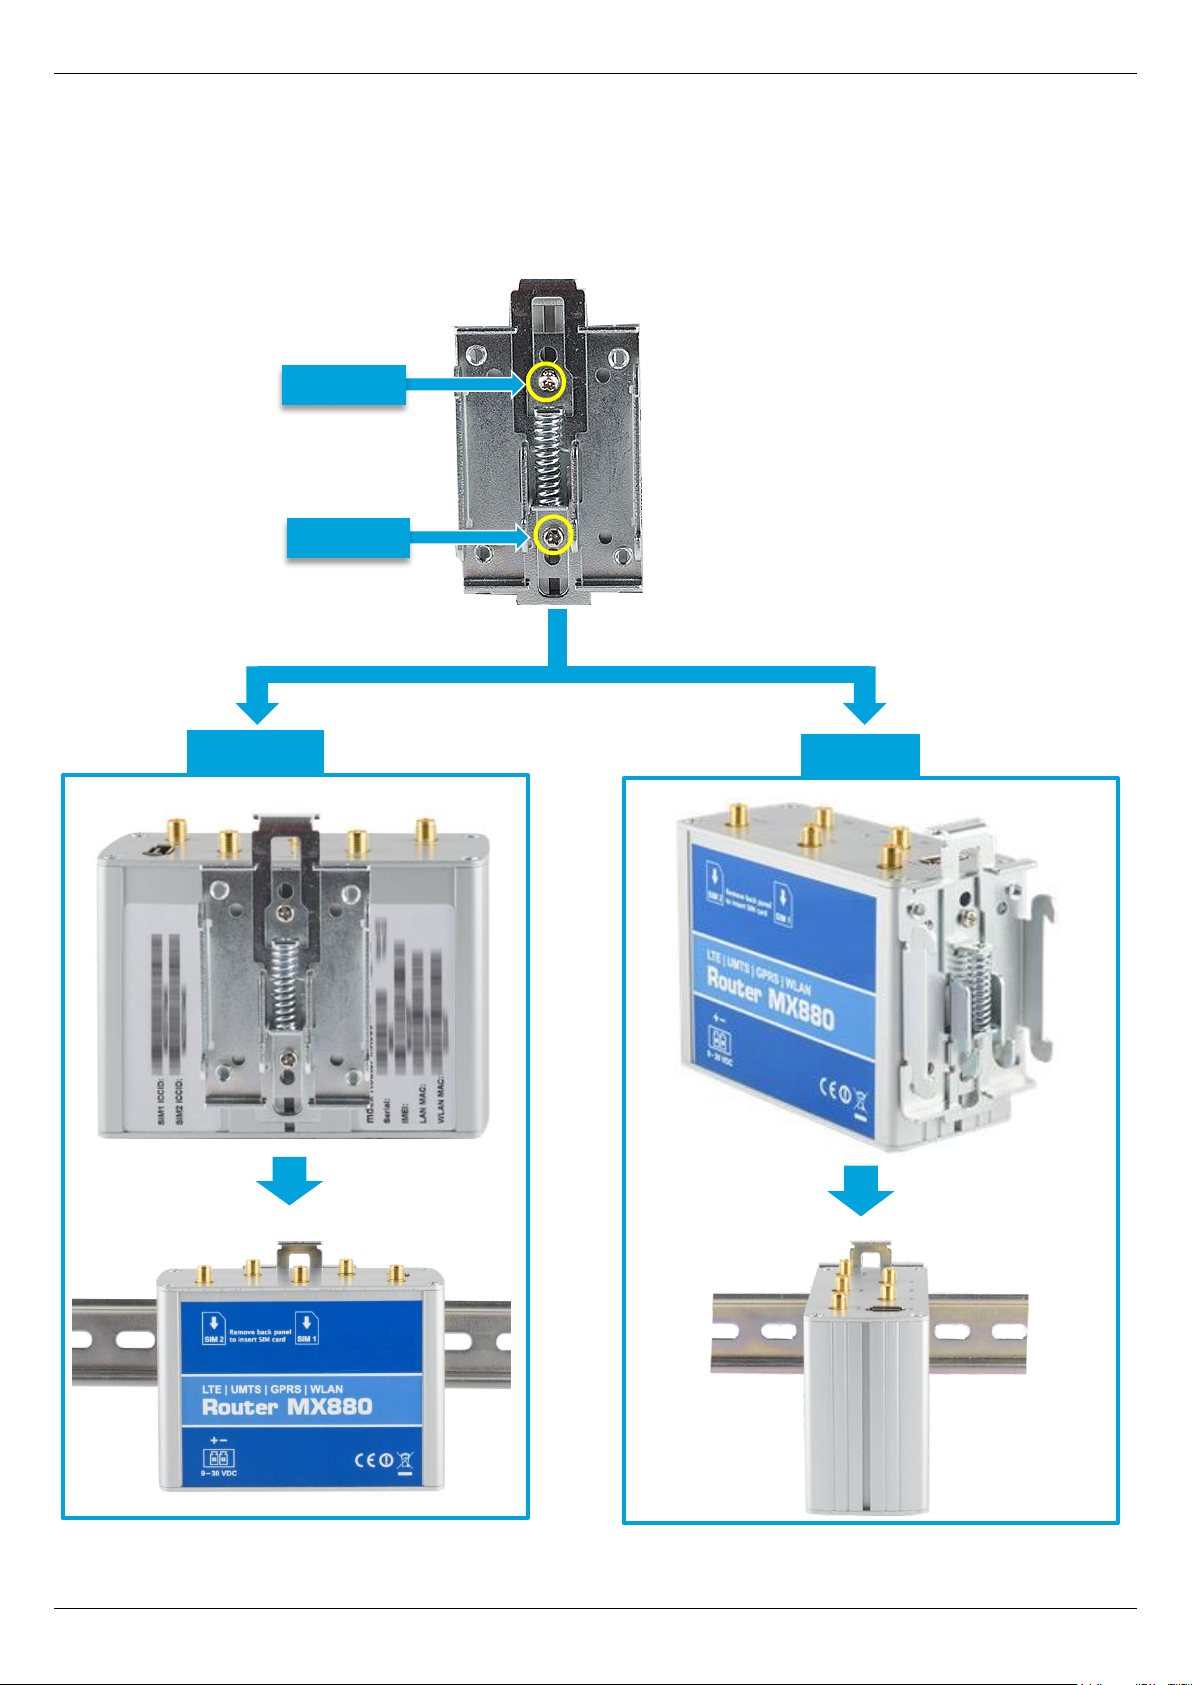
2.5 Din rail bracket
The MX530/MX880 can be mounted on a Din rail using the supplied DIN rail bracket. The Din rail
bracket is fastened to the bottom or side of the router with the two supplied screws.
(Mounting the Din rail bracket on the MX530 is the same as mounting on the MX880.)
Screw
Screw
laterally
Bottom
Page 17
Setup Guide - mdex Router MX530|MX880
Page 17
2.6 Connecting terminal devices
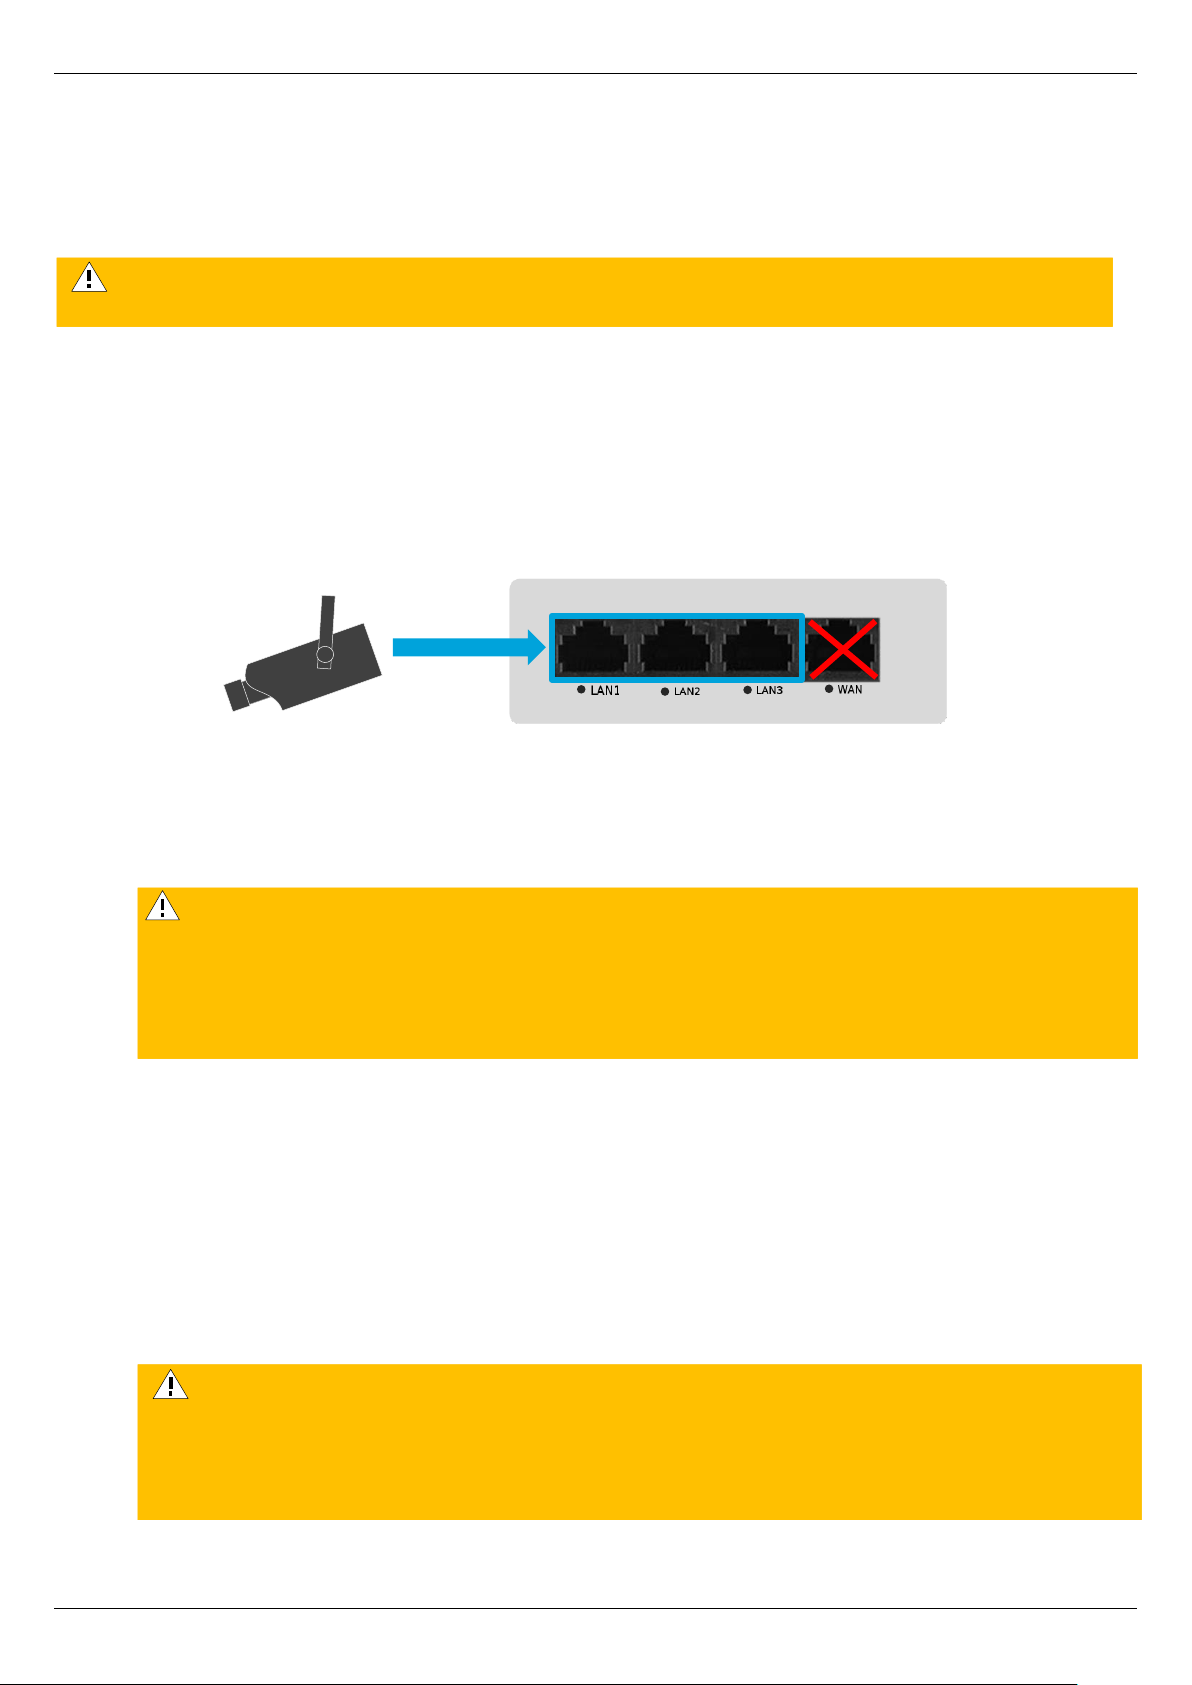
There are 3 LAN sockets available for connecting the terminal devices. The WAN socket is reserved
for special functions and is not intended for the connecting terminal devices.
2.6.1 Connecting of only one terminal device
The MX530/MX880 is already preconfigured for connecting a terminal device.
Please note the following information.
1. Connect the terminal device to a free LAN socket (LAN1, LAN2 or LAN3) with a network
cable. The WAN socket is not intended for connecting terminal devices!
2. Network setting of the connected terminal device:
The terminal device can be set to ‘Obtain an IP address automatically’. The MX530/MX880
is preconfigured for dynamic assignment of IP addresses (DHCP) and then assigns the IP
address 192.168.0.100.
Alternatively, the network settings can also be set permanently in the terminal device:
• IP address: 192.168.0.100
• Default Gateway: 192.168.0.1 (LAN IP address of the MX530/MX880)
• DNS Server: 192.168.0.1 (LAN IP address of the MX530/MX880)
The IP address range of the DHCP server should then be changed according to Section 3.8
DHCP Server (Page 30) as 192.168.0.100 is no longer assigned automatically.
3. All incoming data packets to the WAN IP address of the MX530/MX880 will be forwarded to
the IP address 192.168.0.100. This terminal device is thus accessible via remote access.
No PoE (Power over Ethernet) powered network cable may be connected to the LAN/WAN
sockets! The PoE voltage would destroy the MX530/MX880!
By default, the MX530/MX880 assigns only one IP address!
If you have connected a PC to the router for configuration, the IP address
192.168.0.100 assigned to the PC will be assigned to another connected terminal
device after 5 minutes (timer preset Lease time) once the PC has been removed.
Restarting the router releases the IP address immediately.
When using a public.IP, access is possible without restrictions via the Internet. For
security reasons, the terminal device should therefore be secured with a firewall
against unauthorised access. Additional protection is required if port forwarding is set
up only for the required ports according to the Section 3.9.2 Port forwarding (of
individual ports) (Page 33).
Page 18
Setup Guide - mdex Router MX530|MX880
Page 18
2.6.2 Connecting several terminal devices
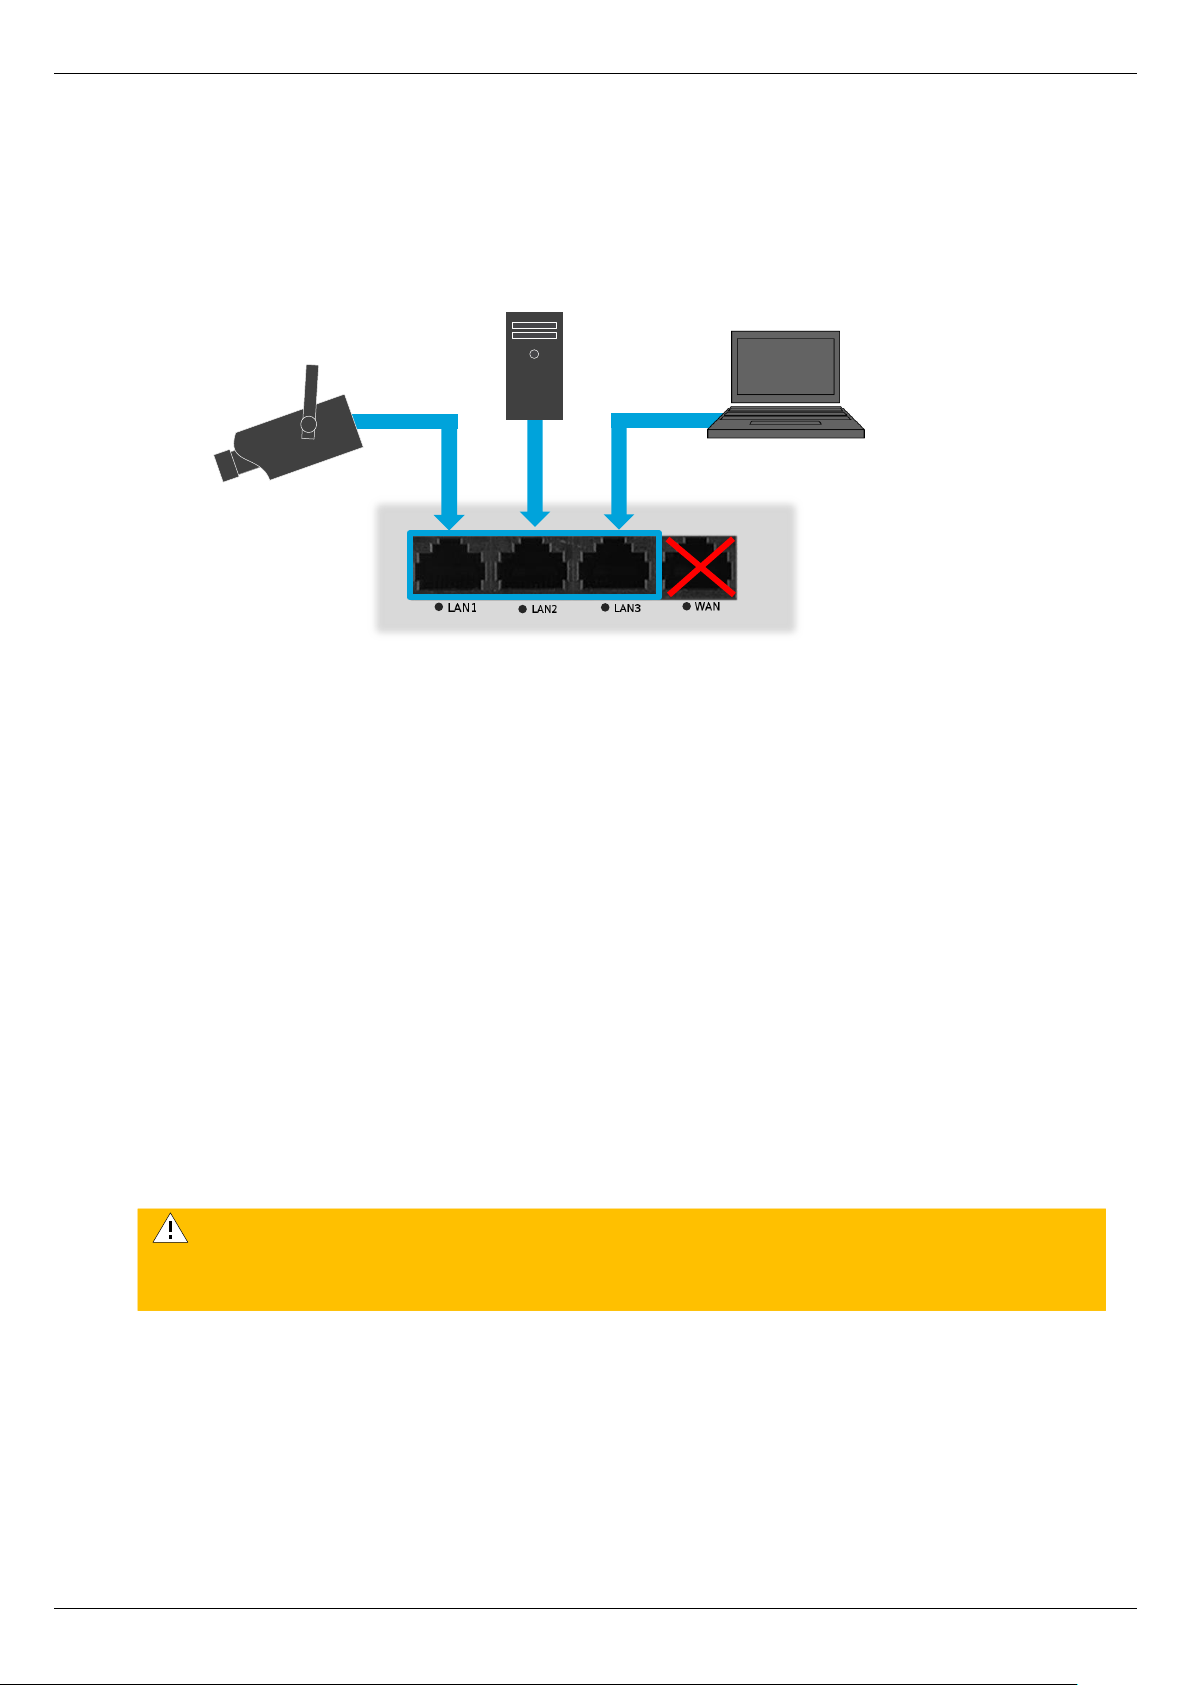
To connect multiple terminal devices to the MX530/MX880, note the following:
1. Connect the terminal devices to a free LAN socket (LAN1, LAN2 or LAN3) with a network
cable. The WAN socket is not intended for connecting terminal devices!
If more than 3 terminal devices are to be connected, an additional (commercially available)
Ethernet switch must be used which is connected to a free LAN port (LAN1, LAN2 or LAN3)
of the MX530/MX880.
2. Set the network settings of the connected terminal devices:
If the terminal devices are to obtain their IP addresses automatically from the MX530/MX880,
you must expand the DHCP server to assign additional IP addresses according to Section 3.8
DHCP Server (Page 30) and, if necessary, set up a fixed assignment according to the
Section 3.8.1 Fixed assignment of IP addresses (Page 31).
Alternatively, you can also set the IP addresses in the terminal devices permanently.
IP address: 192.168.0.2 to 192.168.0.255
Default Gateway: 192.168.0.1 (LAN IP address of the MX530/MX880)
DNS Server: 192.168.0.1 (LAN IP address of the MX530/MX880)
3. If several connected terminal devices are to be remotely available, a forwarding must be
configured in the MX530/MX880 according to Section 3.9.2 Port forwarding (of individual
ports) (Page 33).
If remote access is not desired for any connected terminal device, the default 'DMZ
Configuration' should be disabled for security reasons according to Section 3.9.1
Host Forwarding (DMZ Configuration) (Page 32).
Page 19
Setup Guide - mdex Router MX530|MX880
Page 19
3 Setup configuration
3.1 Connect a PC
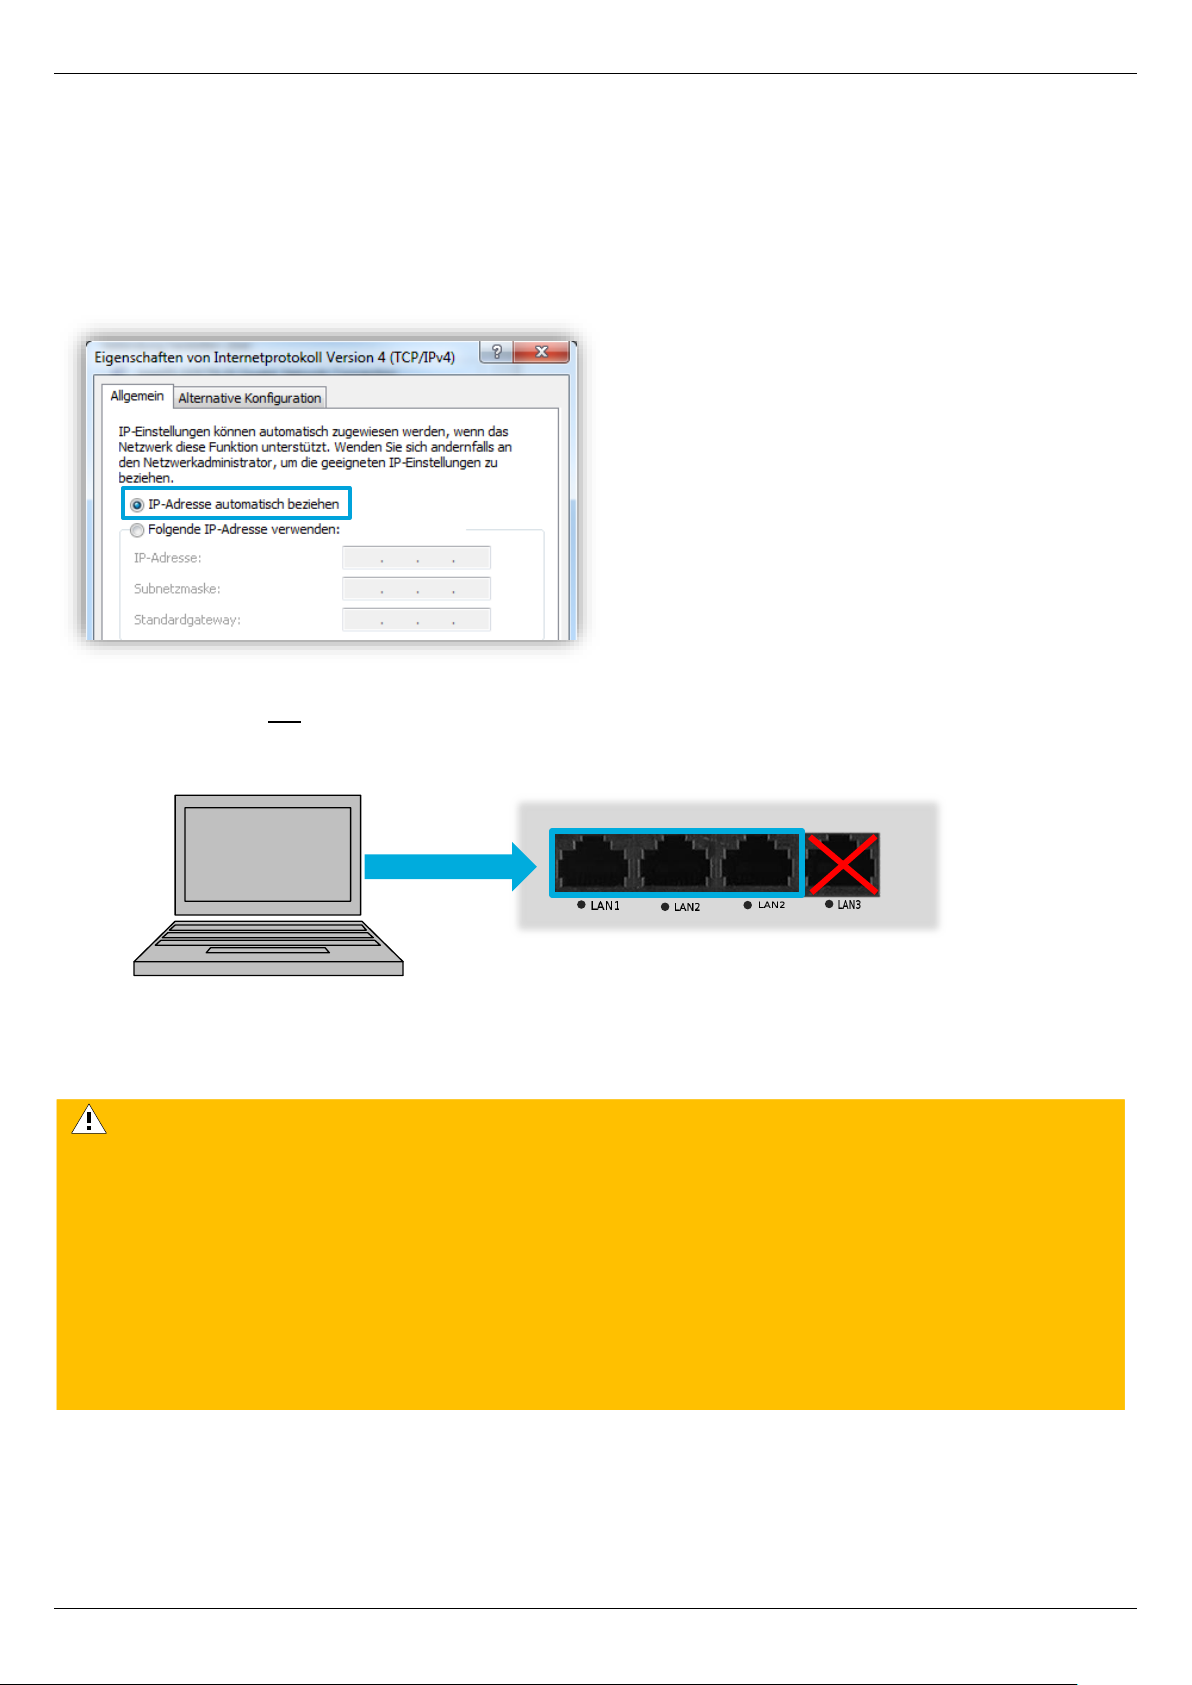
The network card of the PC can be set to Obtain an IP address automatically.
Plug the network cable of the PC into a LAN socket (LAN1, LAN2 or LAN3) of the MX530/MX880.
The WAN socket is not intended for connecting terminal devices!
MX530/MX880
The MX530/MX880 is preconfigured for the dynamic assignment of IP addresses (DHCP) and
automatically assigns the IP address 192.168.0.100 to the connected PC.
The PC and MX530/MX880 are now in the same IP address range, allowing the PC to access the
MX530/MX880 web interface using a web browser.
By default, the MX530/MX880 assigns only one IP address (192.168.0.100) to a connected
network device!
• If another network device is connected that already has the IP address 192.168.0.100,
remove this device again.
• The IP address 192.168.0.100 will be released after 5 minutes and then assigned to
your connected PC. Restarting the MX530/MX880 immediately releases the IP address
and then assigns it to your connected PC.
• Alternatively, you can also set the PC NIC to a fixed IP address from the IP address
range 192.168.0.2 to 192.168.0.255 (for example, 192.168.0.20).
Page 20
Setup Guide - mdex Router MX530|MX880
Page 20
3.2 Login into the web interface
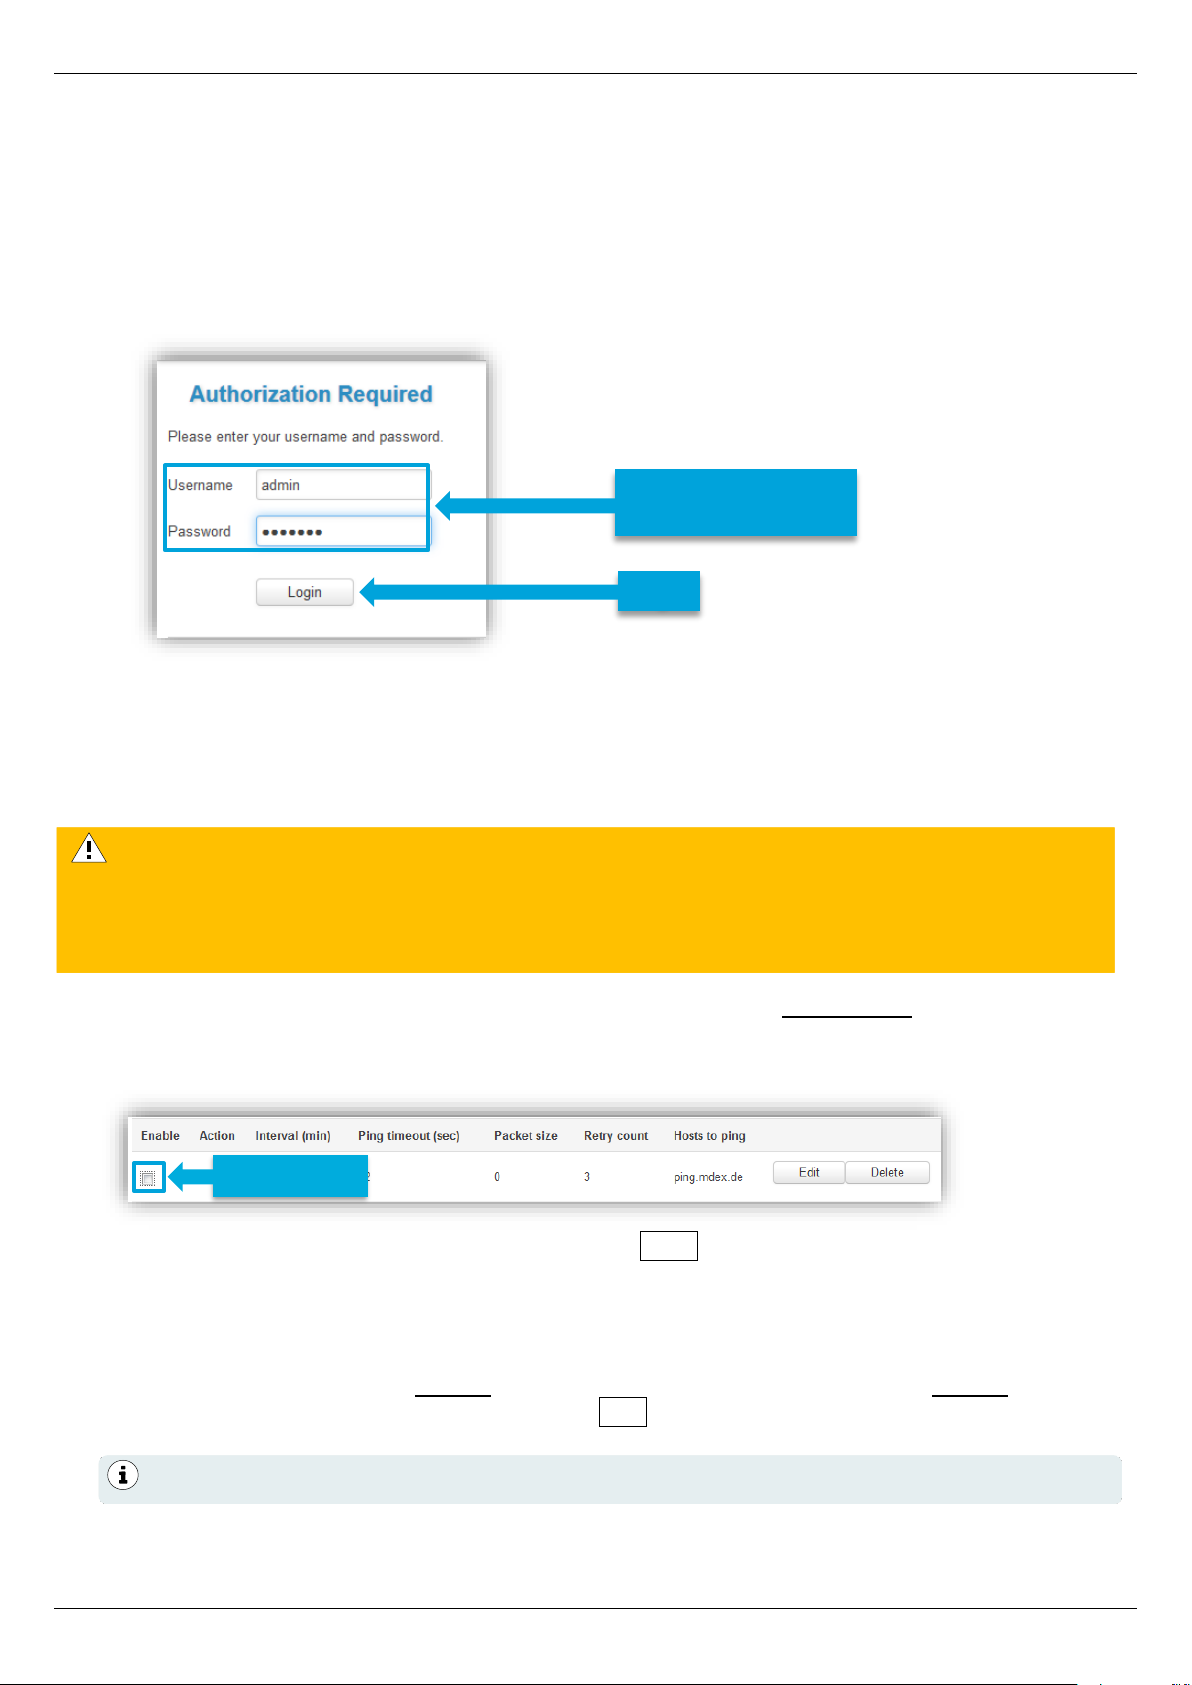
Enter this URL in your web browser: http://192.168.0.1:8080
(Or the current IP address of the MX530/MX880, if it has been changed.)
User name: admin
Password: admin01
(Or the current password, if already changed)
3.2.1 Important notes about the Ping Reboot
Please note the following about the default Ping Reboot.
▪ During the MX530/MX880 configuration, Ping Reboot should be temporarily disabled to prevent
the router from rebooting.
Services → Ping/Periodic Reboot: Ping Reboot
The changed setting must be saved by clicking on Save.
▪ The "Ping Reboot" should then be enabled again for normal operation.
▪ The default server ’ping.mdex.de‘’ is only accessible from the mdex network!
If you use the MX530/MX880 without mdex IP service (fixed.IP+ / public.IP) or without mdex SIM,
be sure to set a publicly accessible server with Edit, e.g. public-ping.mdex.de (185.39.176.22).
In the MX530/MX880, the automatic ping connection check for the Ping Server
ping.mdex.de is enabled by default.
Without mobile reception or without connection to mdex, an automatic reboot of the
MX530/MX880 is performed every 15 minutes.
Detailed instructions can be found in the Section 3.11 Ping Reboot (Page 36).
User name: admin
Password: admin01
Login
Disable
Page 21

Setup Guide - mdex Router MX530|MX880
Page 21
3.3 Setup Wizard
The Setup Wizard starts when you log in for the first time, allowing you to make the following settings.
The Setup Wizard can also be called-up again at a later time under System → Setup Wizard
Step 1 - General
It is imperative that you change the login password of the MX530/MX880 to a secure password.
Further details can be found in the Section 3.4 Login Password (Page 22).
You can set the Time Zone under 'Time Zone Settings'. (For Germany: Europe/Berlin)
More details can be found in the Section 4.3 NTP time server (automatic time synchronization)
(Page 41).
Step 2 - Mobile
Here you can set the mobile settings for the operation of the 'SIM card 1'.
▪ APN
▪ PIN number
▪ Authentication method: None, PAP, CHAP
('PAP' must be set for a mobile connection to mdex.)
▪ User name
▪ Password
▪ Service mode: Setting the desired mobile network
More details can be found in the Section 3.5 SIM mobile settings (Page 22).
Step 3 - LAN
The network settings of the MX530/MX880 can be customised.
More details can be found in the Section 3.7 Router LAN IP Address (Page 29).
Step 4 - WiFi
The WLAN network is disabled by default. You can enable and set the WLAN of the MX530/MX880.
More details can be found in the Section 4.1 WLAN (Wireless Access Point) (Page 38).
Page 22
Setup Guide - mdex Router MX530|MX880
Page 22
3.4 Login Password
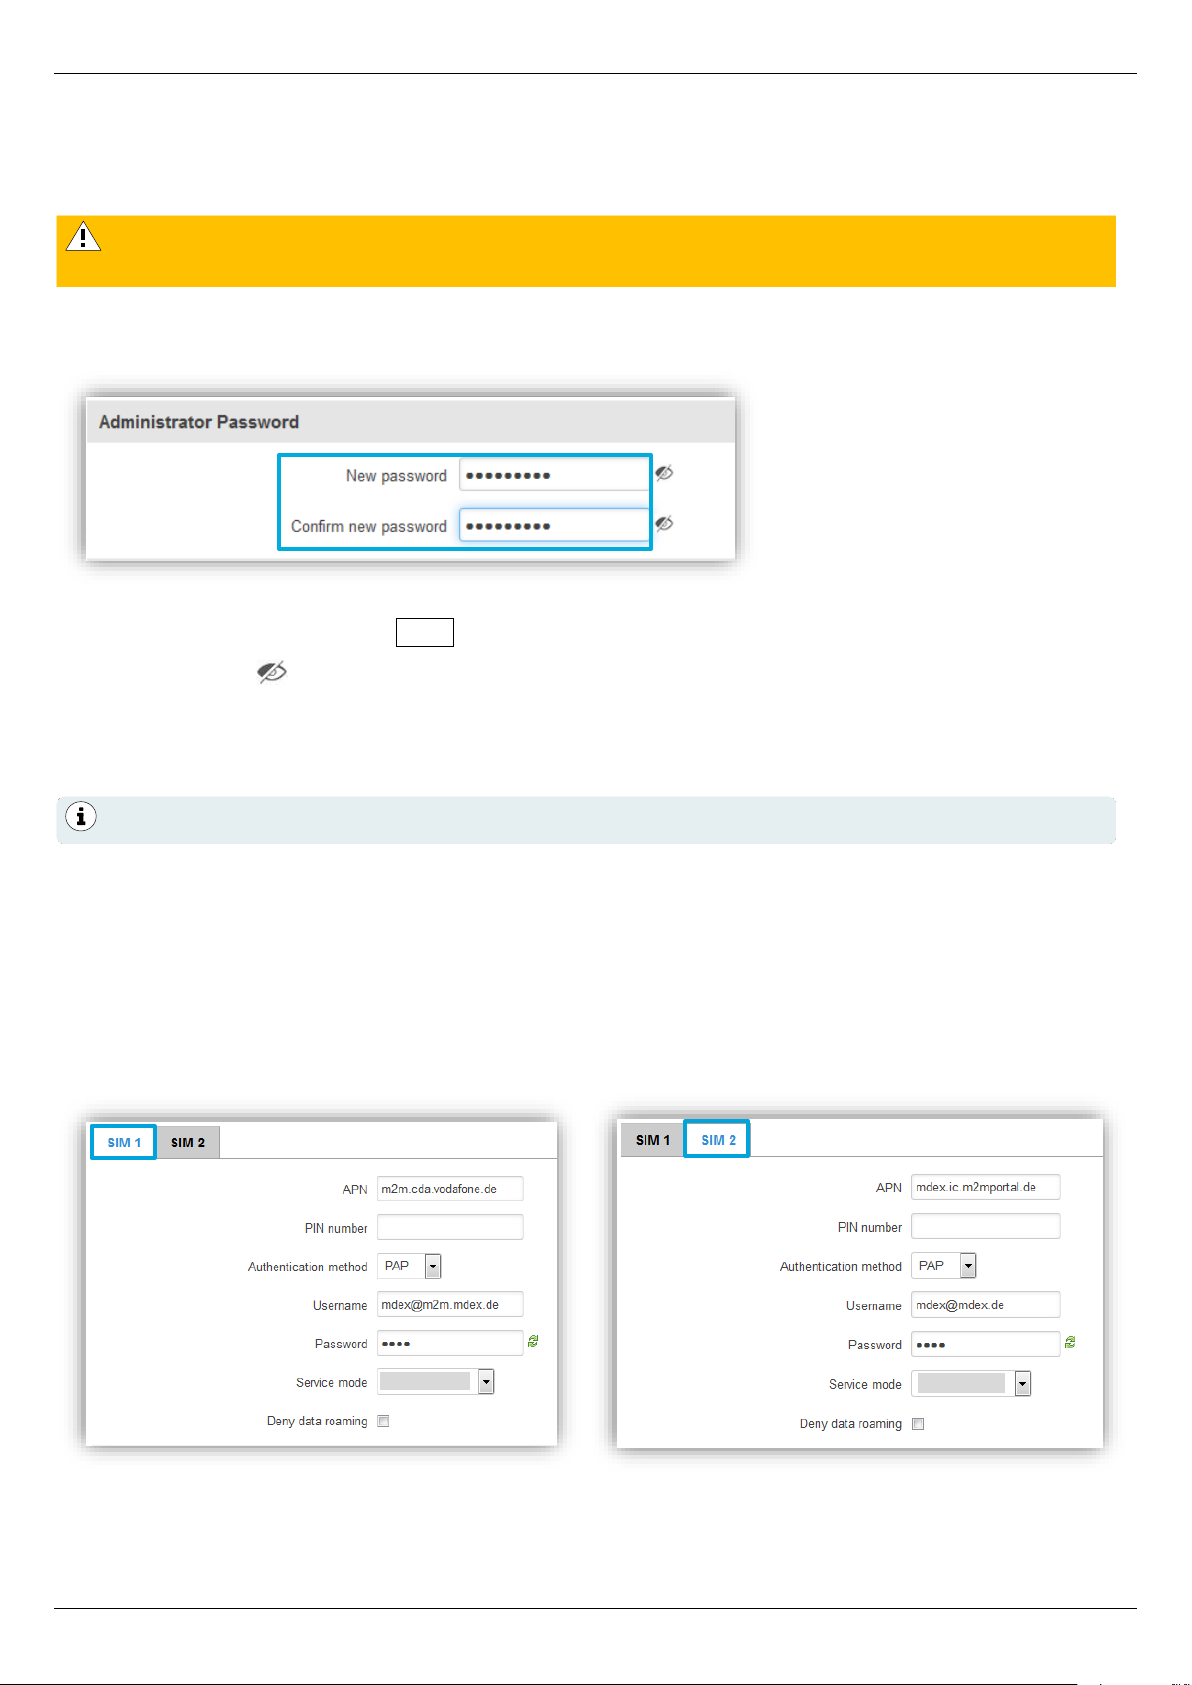
The login password is used to access the web interface and SSH interface of the MX530/MX880.
System → Admin Settings
With New Password and Confirm new password enter the new MX530/MX880 login password
and accept it by clicking on Save.
By clicking on you can display the set password in plain text.
3.5 SIM mobile settings
3.5.1 SIM Basic Settings (General)
The mobile settings are preconfigured for mdexSIM Vodafone (SIM1) and mdexSIM Telekom
(SIM2).
When using a different SIM card, the mobile settings must be adjusted accordingly.
Network → Mobile (SIM): General
In particular, if the MX530/MX880 is accessible via a public IP address over the Internet, a
secure login password must be set for security reasons!
The router is preset to operate the preinstalled mdexSIM Vodafone (SIM1).
Page 23
Setup Guide - mdex Router MX530|MX880
Page 23
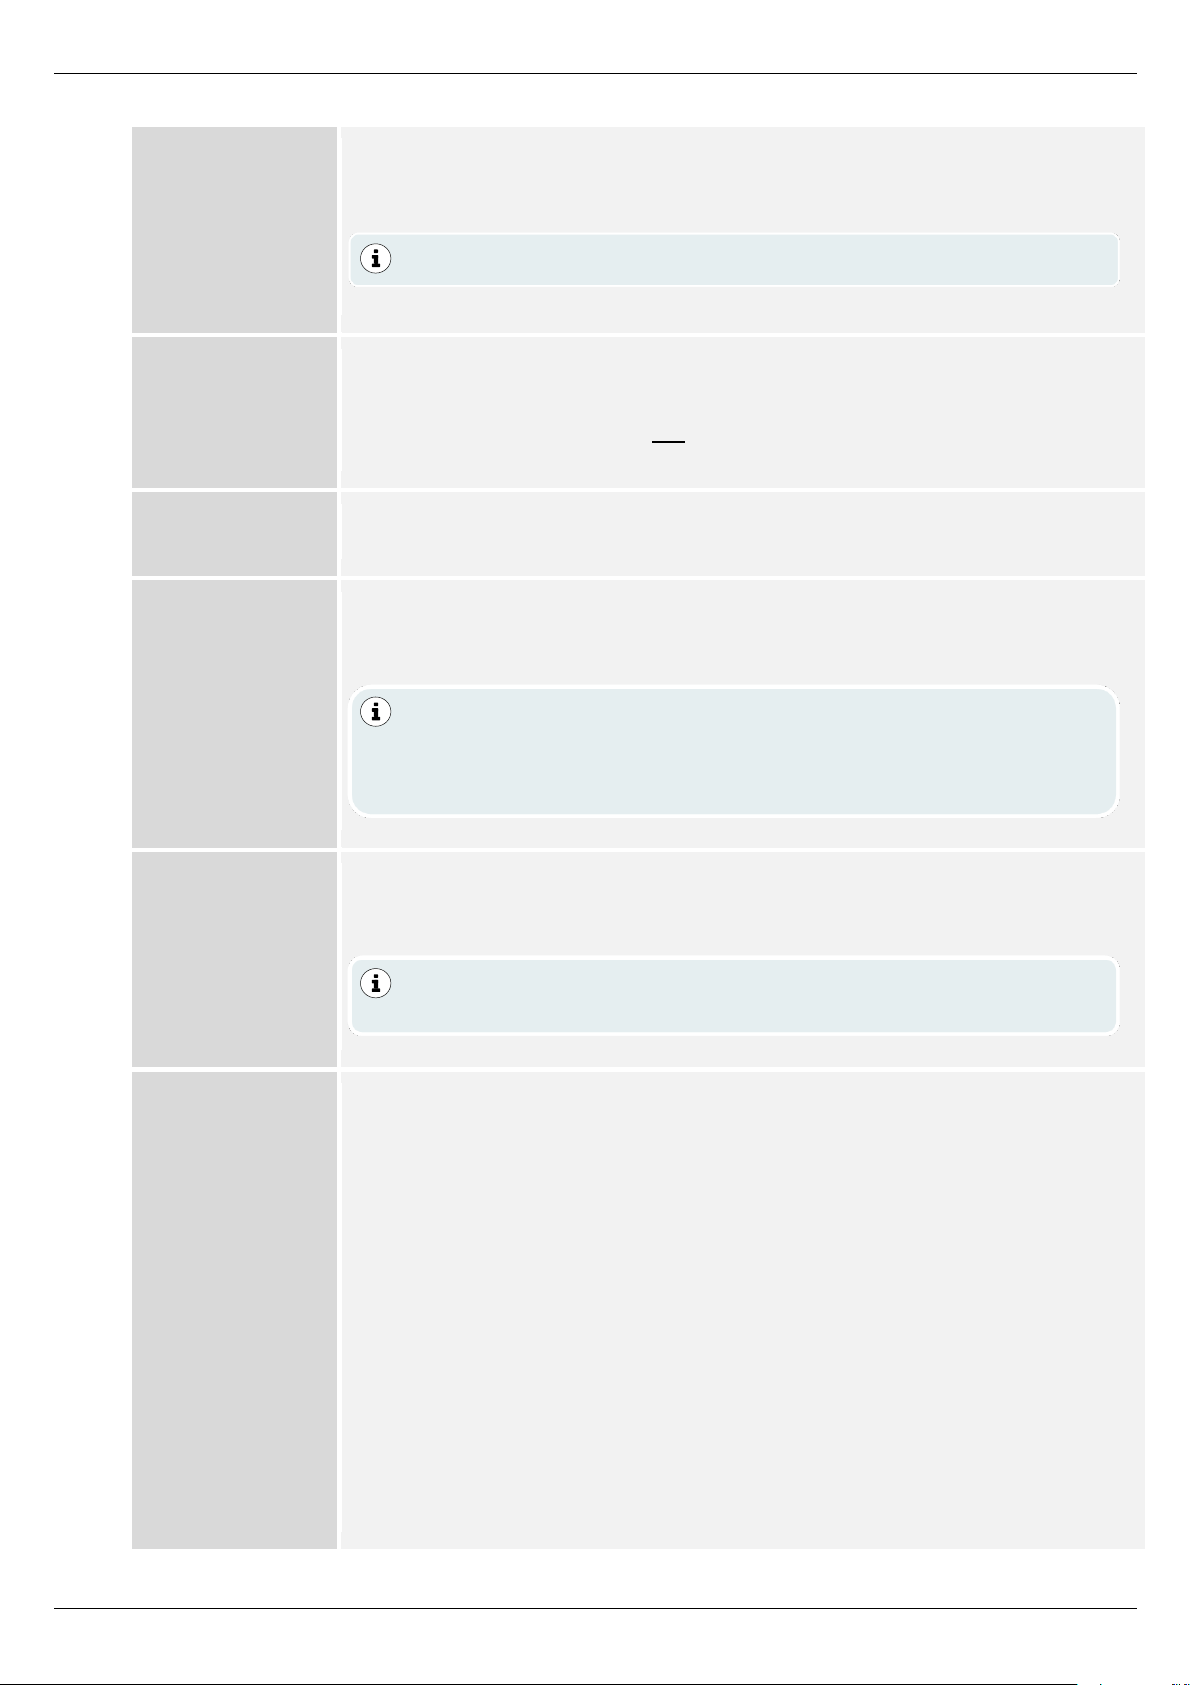
APN:
Access point of your mobile provider for the mobile connection.
For use with mdex, please refer to your mdex order confirmation e-mail or
the mdex Management Portal.
PIN number:
PIN of the SIM card. As a mdex SIM usually has no active PIN, please
leave this field blank when using a mdex SIM.
We recommend that you do not provide your SIM card with a PIN.
Otherwise, if the PIN is wrong, the SIM card will be locked immediately.
Authentication
method:
Authentication method (PAP, CHAP or None).
To log into mdex, PAP must be set.
Username:
Username (Username/Device-Username) of the mobile operator.
For use with mdex, please refer to your mdex order confirmation e-mail or
the mdex Management Portal.
Password:
Enter the APN password of your mobile network operator here. For the
use of a mdex service, please refer to your mdex order confirmation email or the mdex Management Portal.
Service mode:
Here you can set the priority for the desired mobile network to establish
mobile connection.
4G + 3G + 2G:
MX880 only: The mobile connection is established
with the following priority depending on network
availability: 4G (LTE) → 3G Network (UMTS/HSPA)
→ 2G Network (GPRS/EDGE).
4G + 3G:
MX880 only: The mobile connection is established
with the following priority depending on network
availability: 4G network (LTE) → 3G network
(UMTS/HSPA). (1
The APN is already set for the preinstalled mdexSIM.
For the preinstalled mdexSIM the username is already preset.
When using the, mdexSIM Vodafone’ incl. mdex public.IP a
different username may be required as per Section 1.5.1 mdex
SIM Vodafone (SIM1) (Page 8).
For the preinstalled mdexSIM the password mdex is already
preset.
Page 24

Setup Guide - mdex Router MX530|MX880
Page 24
4G + 2G:
MX880 only: The mobile connection is established
with the following priority depending on network
availability: 4G (LTE) → 2G network (GPRS/EDGE).
(1
3G + 2G:
The mobile connection is established with the
following priority depending on network availability:
3G network (UMTS/HSPA) → 2G network
(GPRS/EDGE). (1
4G only:
MX880 only: The connection is made only to the 4G
mobile network (LTE). (1
3G (UMTS) only:
The connection is made only to the 3G mobile
network (HSPA/UMTS). (1
2G (GPRS) only:
The connection is made only to the 2G mobile
network (GPRS/EDGE). (1
Automatic:
The best possible mobile connection is established.
(recommended)
Deny data
roaming:
Roaming block to prevent a mobile connection to third party mobile
networks. (For example, to prevent neighbouring third party mobile
networks from being used in bordering areas and causing unwanted
roaming costs).
Roaming is generally not possible.
The SIM card may only use its own mobile network.
Roaming is possible with appropriate authorisation of the SIM card.
Roaming can also be used by third party mobile networks (for
example, abroad), which can lead to high mobile costs!
The preinstalled mdex SIM cards have no roaming authorisation!
1)
These settings only make sense if specific mobile networks are to be used
selectively (for example, with incompatible SIM cards, reception problems or
interference in certain mobile networks).
Page 25
Setup Guide - mdex Router MX530|MX880
Page 25
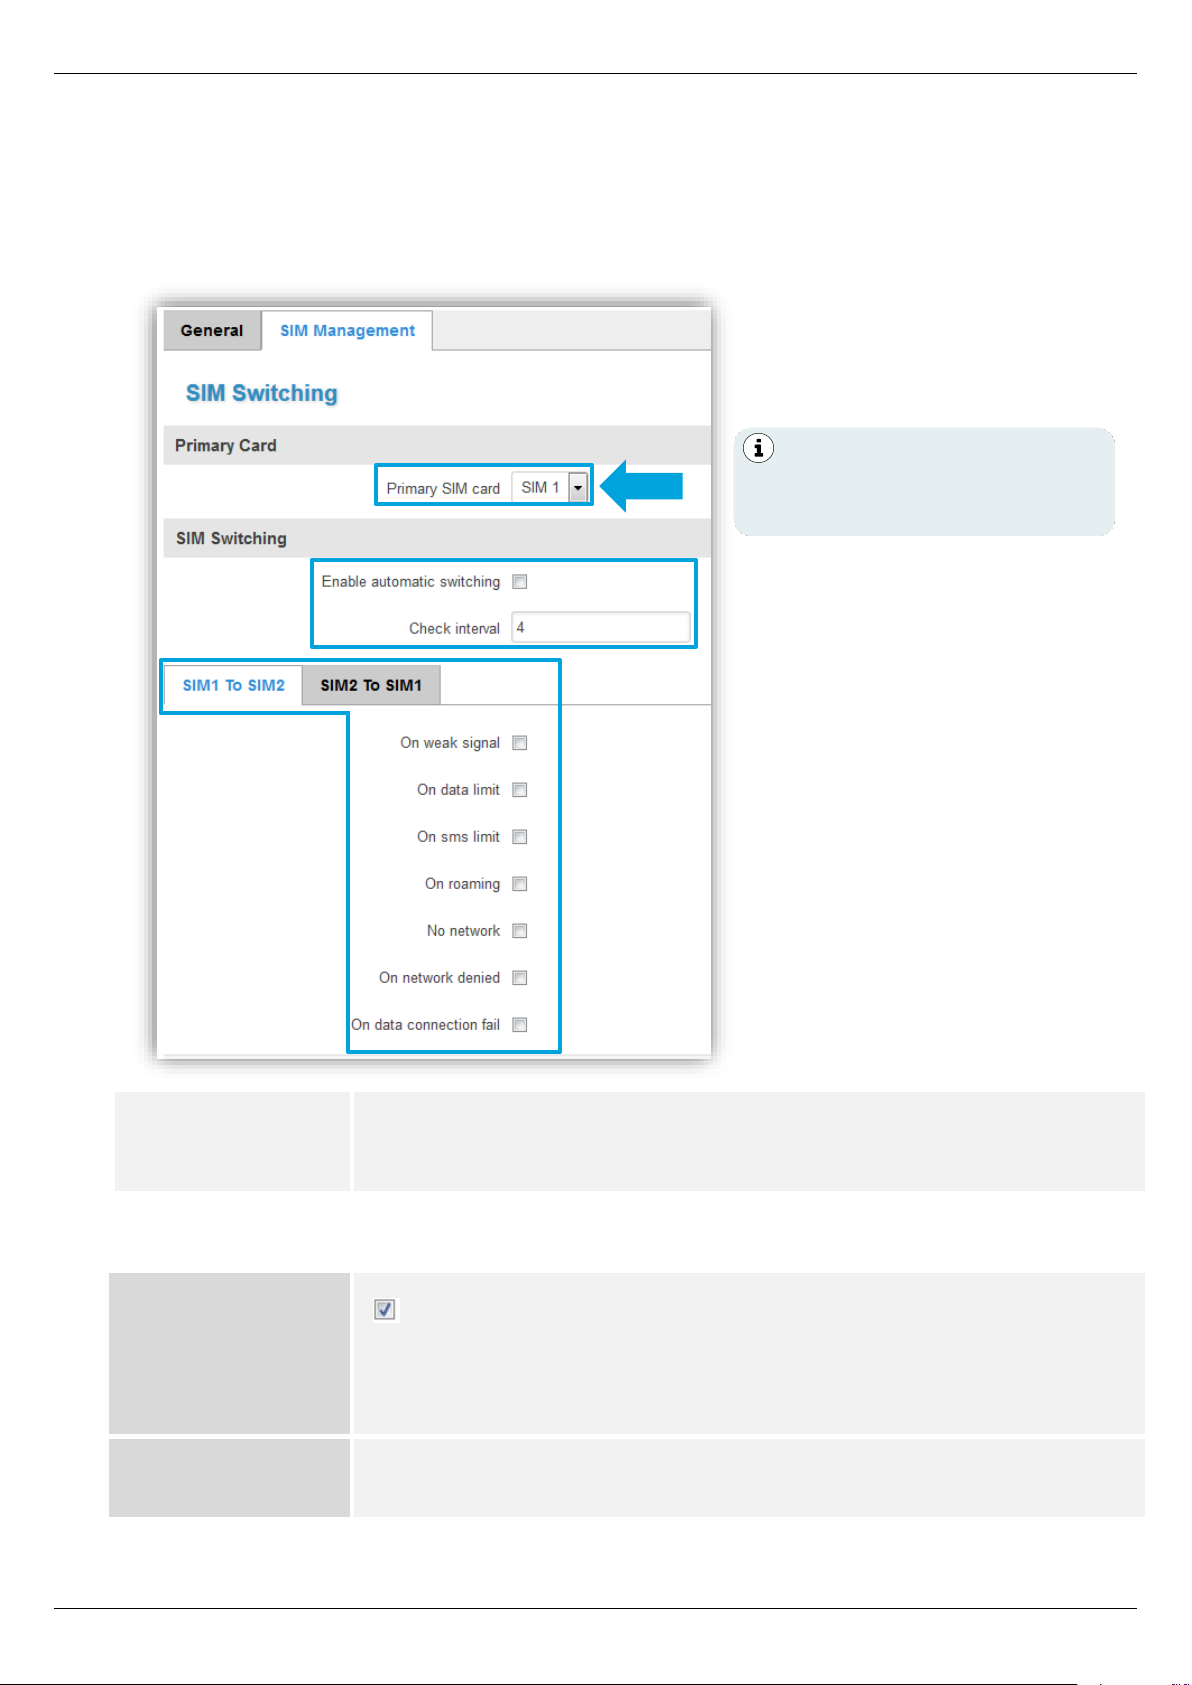
3.5.2 SIM Management
In the menu 'SIM Management' settings can be made for the use and switching of the installed SIM
cards.
Network → Mobile: SIM Management
Primary SIM card:
Defining the SIM card for the primary establishment of the mobile
connection (SIM 1 or SIM 2).
SIM Switching:
Enable automatic
switching:
Automatic switching of SIM cards enabled.
With a defined event, the mobile connection of the primary SIM
card is terminated and automatically established with the
secondary SIM card.
Check interval:
Time interval (in seconds) for checking if a defined SIM card switching
event has occurred.
Preconfiguration:
SIM 1: mdexSIM Vodafone
SIM 2: mdexSIM Telekom
Page 26
Setup Guide - mdex Router MX530|MX880
Page 26
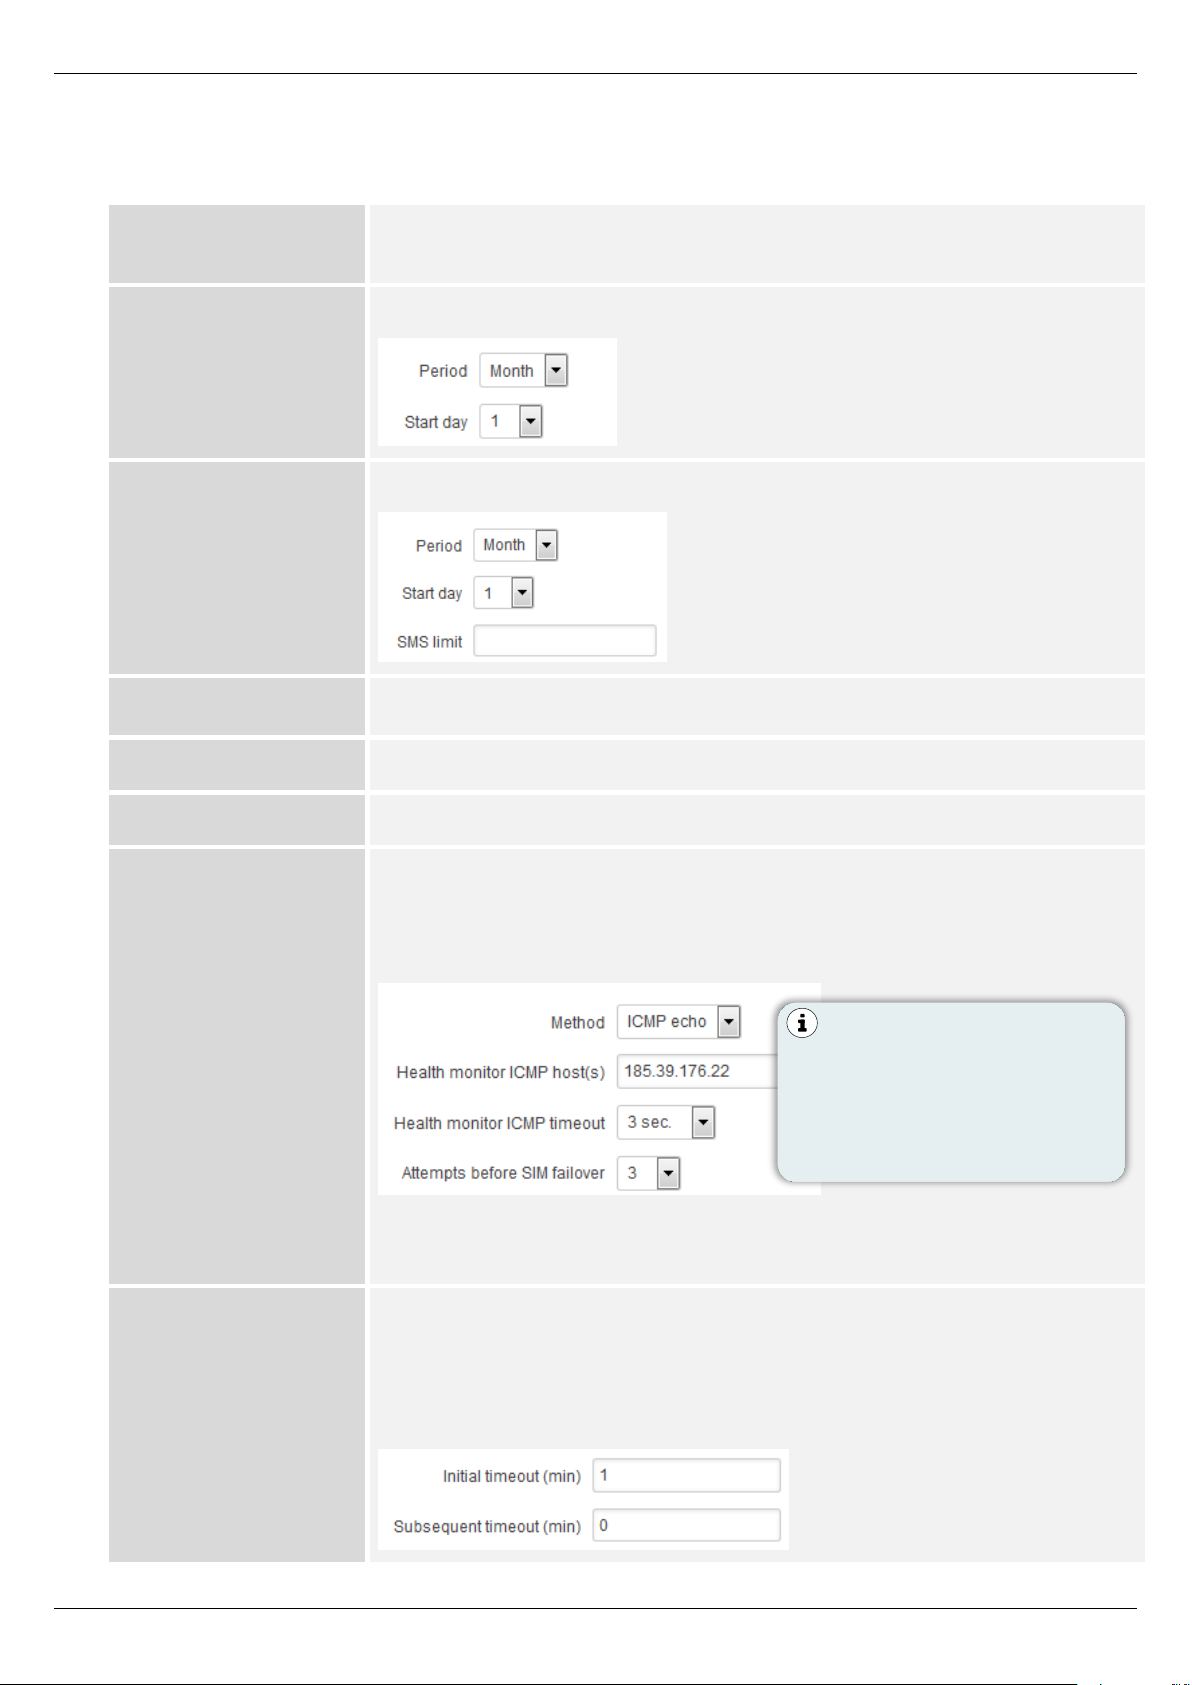
SIM1 To SIM2 → Adjustable events for switching from SIM1 to SIM2.
SIM2 To SIM1 → Adjustable events for switching from SIM2 to SIM1.
On weak signal:
If the signal strength is worse than in the field, the ‘signal strength
(dBm)’ is adjusted. (Input of signal strength in dBm, e.g. -100)
On data limit:
If the data volume is reached in the set period.
On sms limit:
If the number of SMS has been reached in the set period.
On roaming:
If roaming has been detected.
No network:
If no mobile network has been found for this SIM card.
On network denied:
If the mobile connection was rejected.
On data connection
fail:
ICMP Echo Method (recommended): If the set target device at Health
Monitor ICMP host(s) has not responded to ping within the ‘Health
Monitor ICMP timeout period’ and the number of failed attempts has
been reached:
LCP Echo Method: Monitoring the internal modem connection. (Data
connection is not recommended for monitoring the SIM card.)
Switch back to
primary SIM card
after timeout
After expiry of the timer ‘Initial timeout (min)’, the mobile connection is
established again with the ‘Primary SIM’'. If this connection fails with
the 'Primary SIM', the next connection attempt will not be made until
the timer ‘Initial timeout (min)‘ + the timer ‚Subsequent timeout
(min)’ expires.
As target device the mdex
ping server offers
185.39.176.22, since this
is usually accessible from
the Internet and mobile
network.
Page 27
Setup Guide - mdex Router MX530|MX880
Page 27
3.6 OpenVPN-Client
The MX530/MX880's built-in OpenVPN Client is designed to use an IP-service via OpenVPN, e.g.:
▪ mdex fixed.IP+ via OpenVPN
▪ mdex public.IP via OpenVPN
▪ mdex mobile.LAN
When using a mdexSIM or a mdex mobile access, where connecting to mdex is done directly with
the SIM card, the use of the OpenVPN Client in the MX530/MX880 is not required!
Configure OpenVPN-Client:
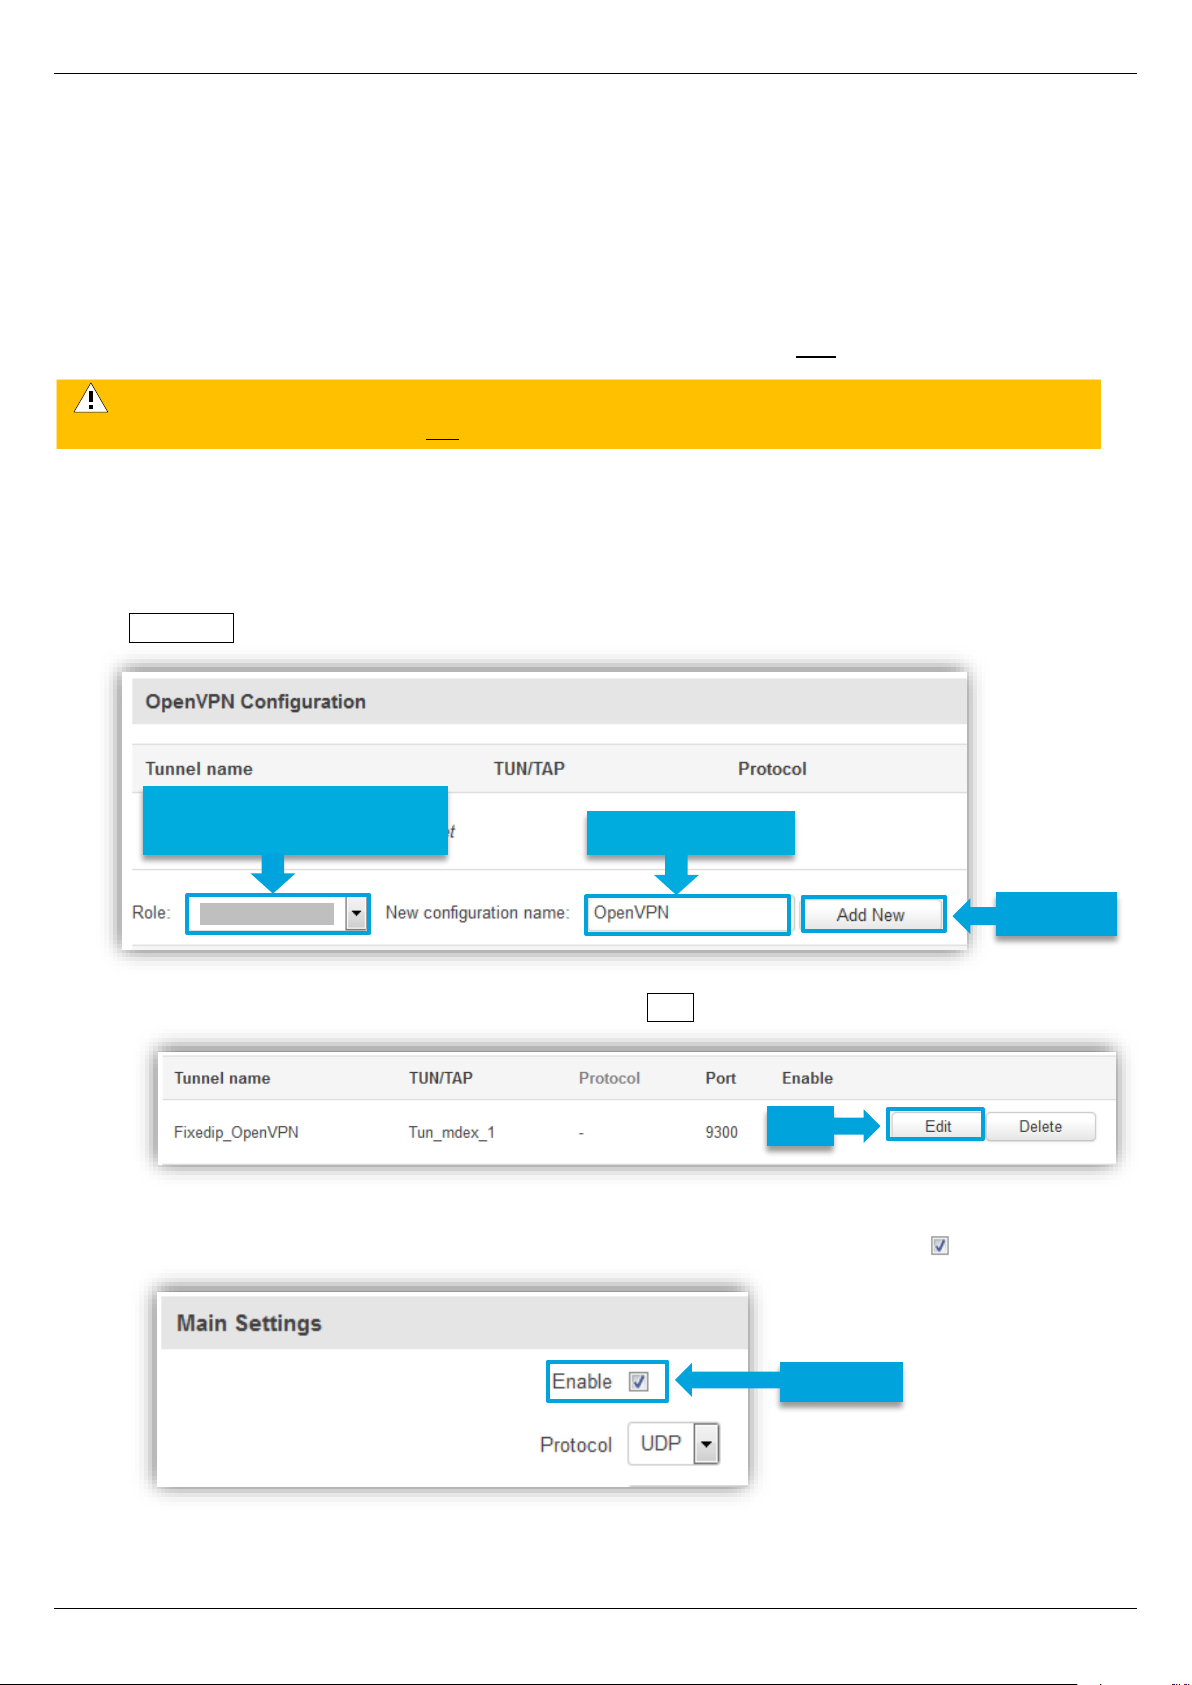
1. Under VPN → OpenVPN at 'Role’ select the mdex OpenVPN Access for the ordered mdex
service (mdex fixed.IP+ or mdex public.IP), enter a name (e.g. OpenVPN) and click on button
Add New .
2. Once the OpenVPN Client is added, click on the Edit button.
3. The OpenVPN Client must be enabled by activating the check box: Enable .
The access data of the mdex control centre tunnel are intended only for
PCs/smartphones and must not be used in the OpenVPN Client of the MX530/MX880!
Enable
Edit
Add New
‘mdex fixed.IP+’ or
Select ‘mdex public.IP’
Enter name
Page 28
Setup Guide - mdex Router MX530|MX880
Page 28
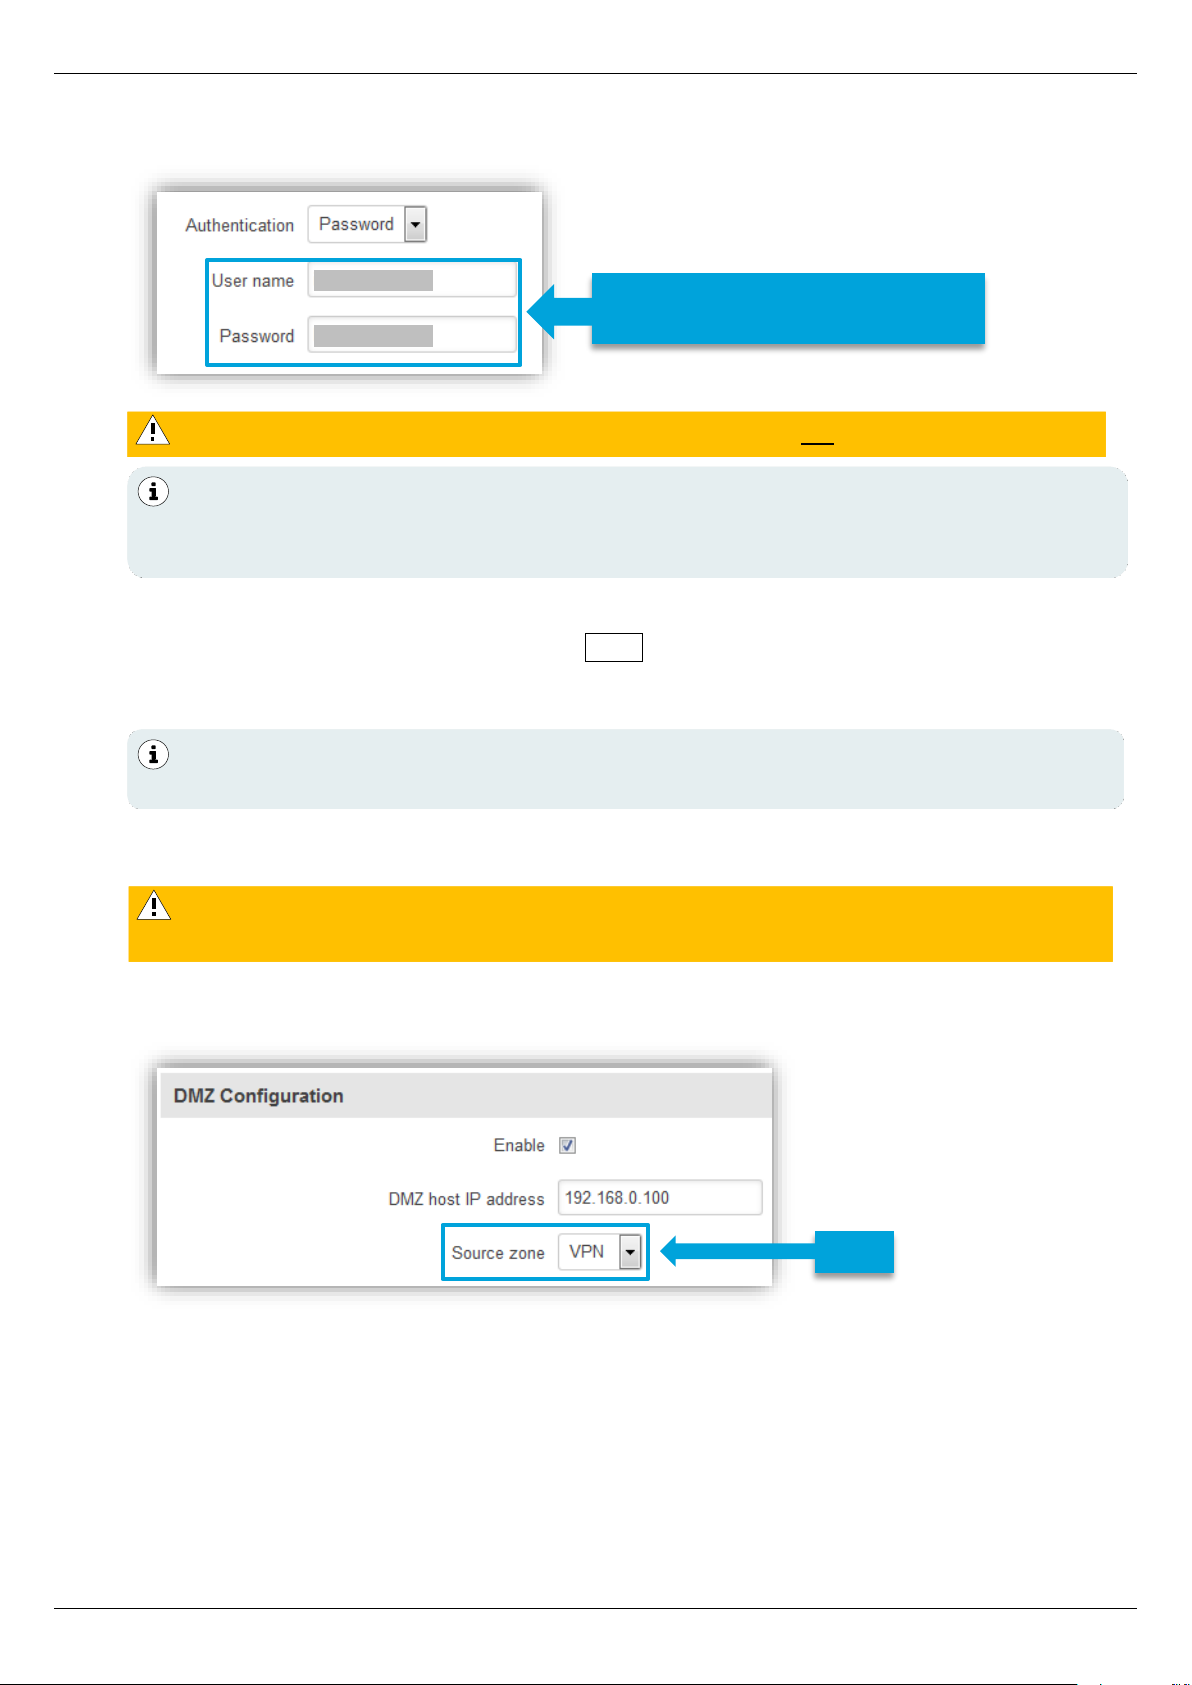
4. Enter the Username and Password of the desired mdex OpenVPN access.
5. Save the OpenVPN settings by clicking on Save.
The MX530/MX880's OpenVPN Client now establishes an OpenVPN connection to mdex via
the MX530/MX880's Internet connection (e.g. SIM card).
6. For forwarding, the Source zone must be switched to VPN.
Network → Port Forwarding: DMZ Configuration
Even when using individual port forwarding according to the Section 3.9 Forwarding (Page
32) basically the ‘VPN’ must now be used as the 'source zone'.
The access data of the mdex control centre tunnel may not be used here!
The OpenVPN access data (Username & Password) of the mdex OpenVPN access
can be found in the mdex order confirmation e-mail or in the mdex Management Portal
at https://manager.mdex.de.
The OpenVPN status can be queried under Status → Network → OpenVPN .
More details can be found in the Section 4.2.3 OpenVPN connection status (P. 41).
With the source zone setting ‘WAN’ no forwarding is performed when using the
‘mdex fixed.IP+ / public.IP’ via OpenVPN.
VPN
Enter username and password of
the mdex OpenVPN device
Page 29
Setup Guide - mdex Router MX530|MX880
Page 29
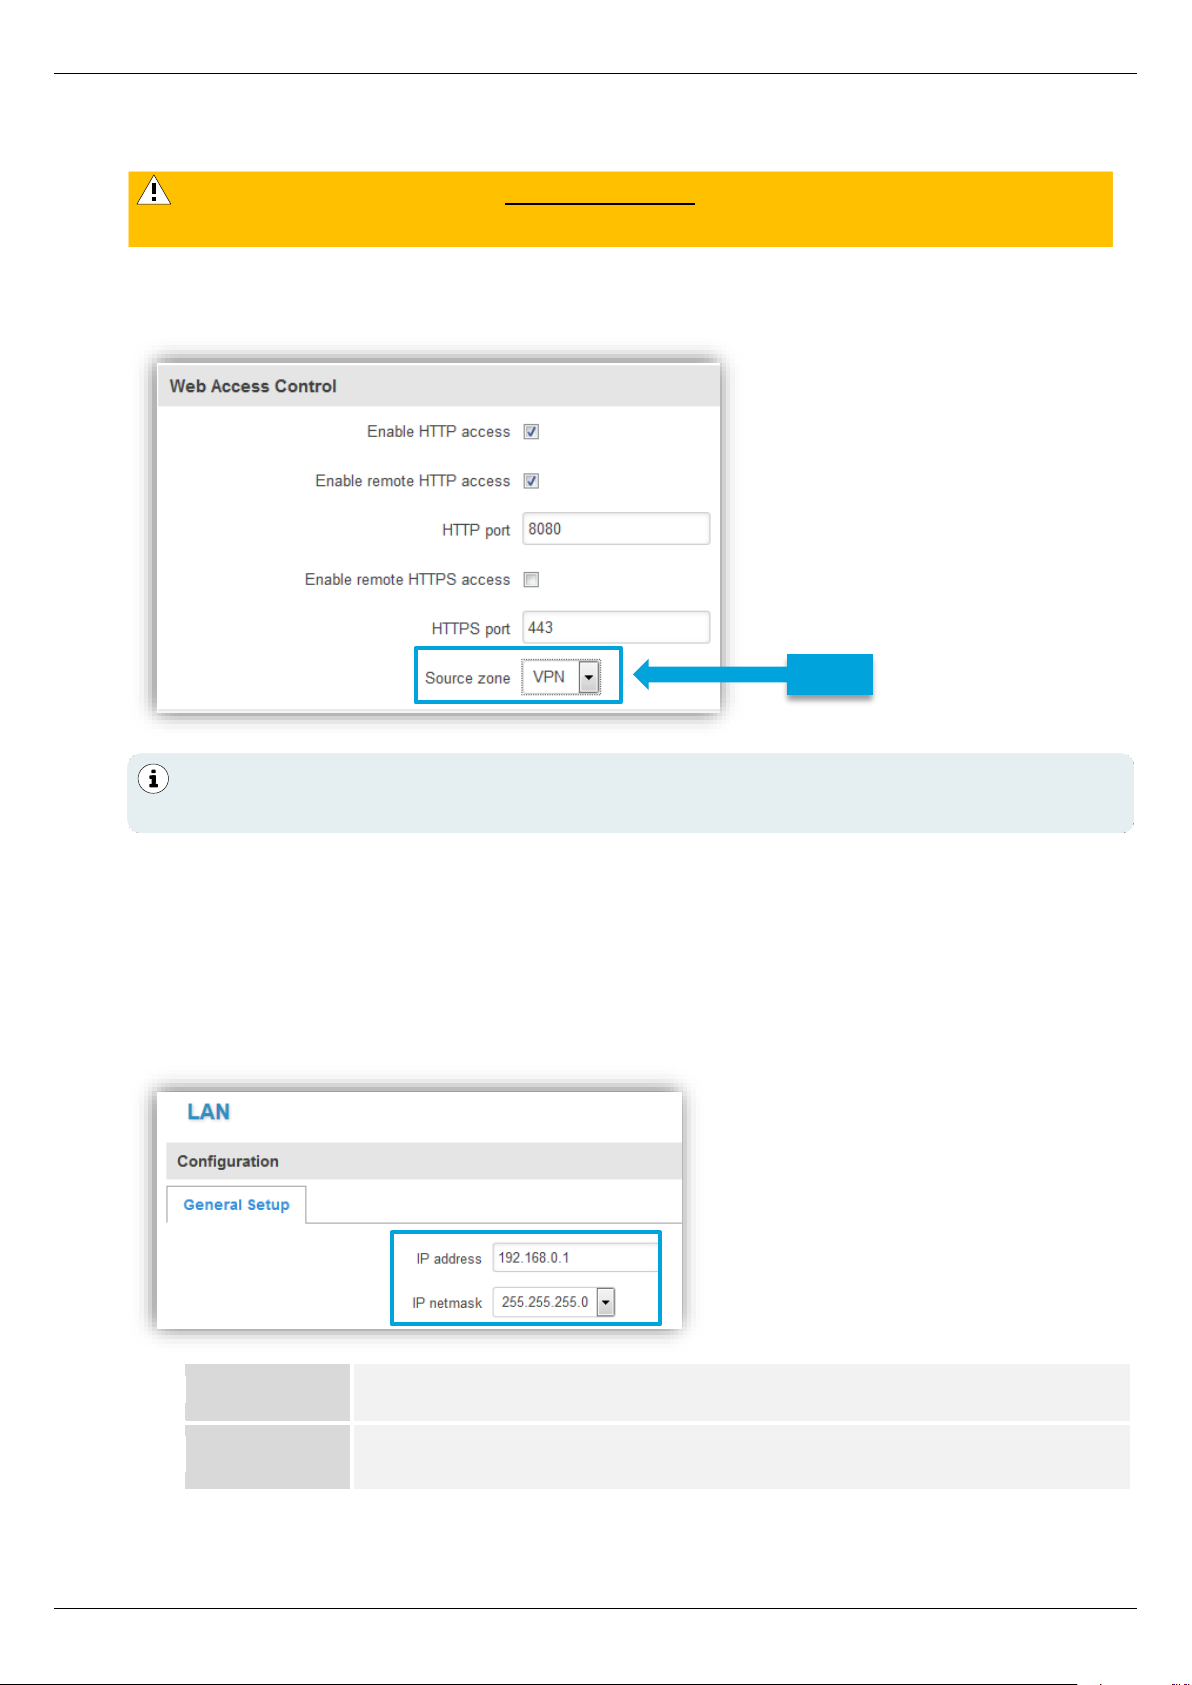
7. For the MX530/MX880 remote access, the Source zone must be switched to VPN.
Services → HTTP / SSH: SSH Access Control
3.7 Router LAN IP Address
The default LAN network address of the MX530/MX880 (192.168.0.1) can be changed under
Network → LAN.
Network → LAN
IP address:
Current LAN IP address of the MX530/MX880
IP netmask:
Netmask of the MX530/MX880
With the source zone WAN is no remote access to the MX530/MX880 is possible
when using the ‘mdex fixed.IP+ / public.IP’ via OpenVPN.
More information on configuring the MX530/MX880 remote access can be found in the
Section 3.10 Configuration Access / Remote Access (Page 34).
VPN
Page 30
Setup Guide - mdex Router MX530|MX880
Page 30
3.8 DHCP Server
The integrated DHCP server automatically assigns an IP address to the connected network device.
The network device must be set to 'Obtain an IP address automatically‘ (DHCP).
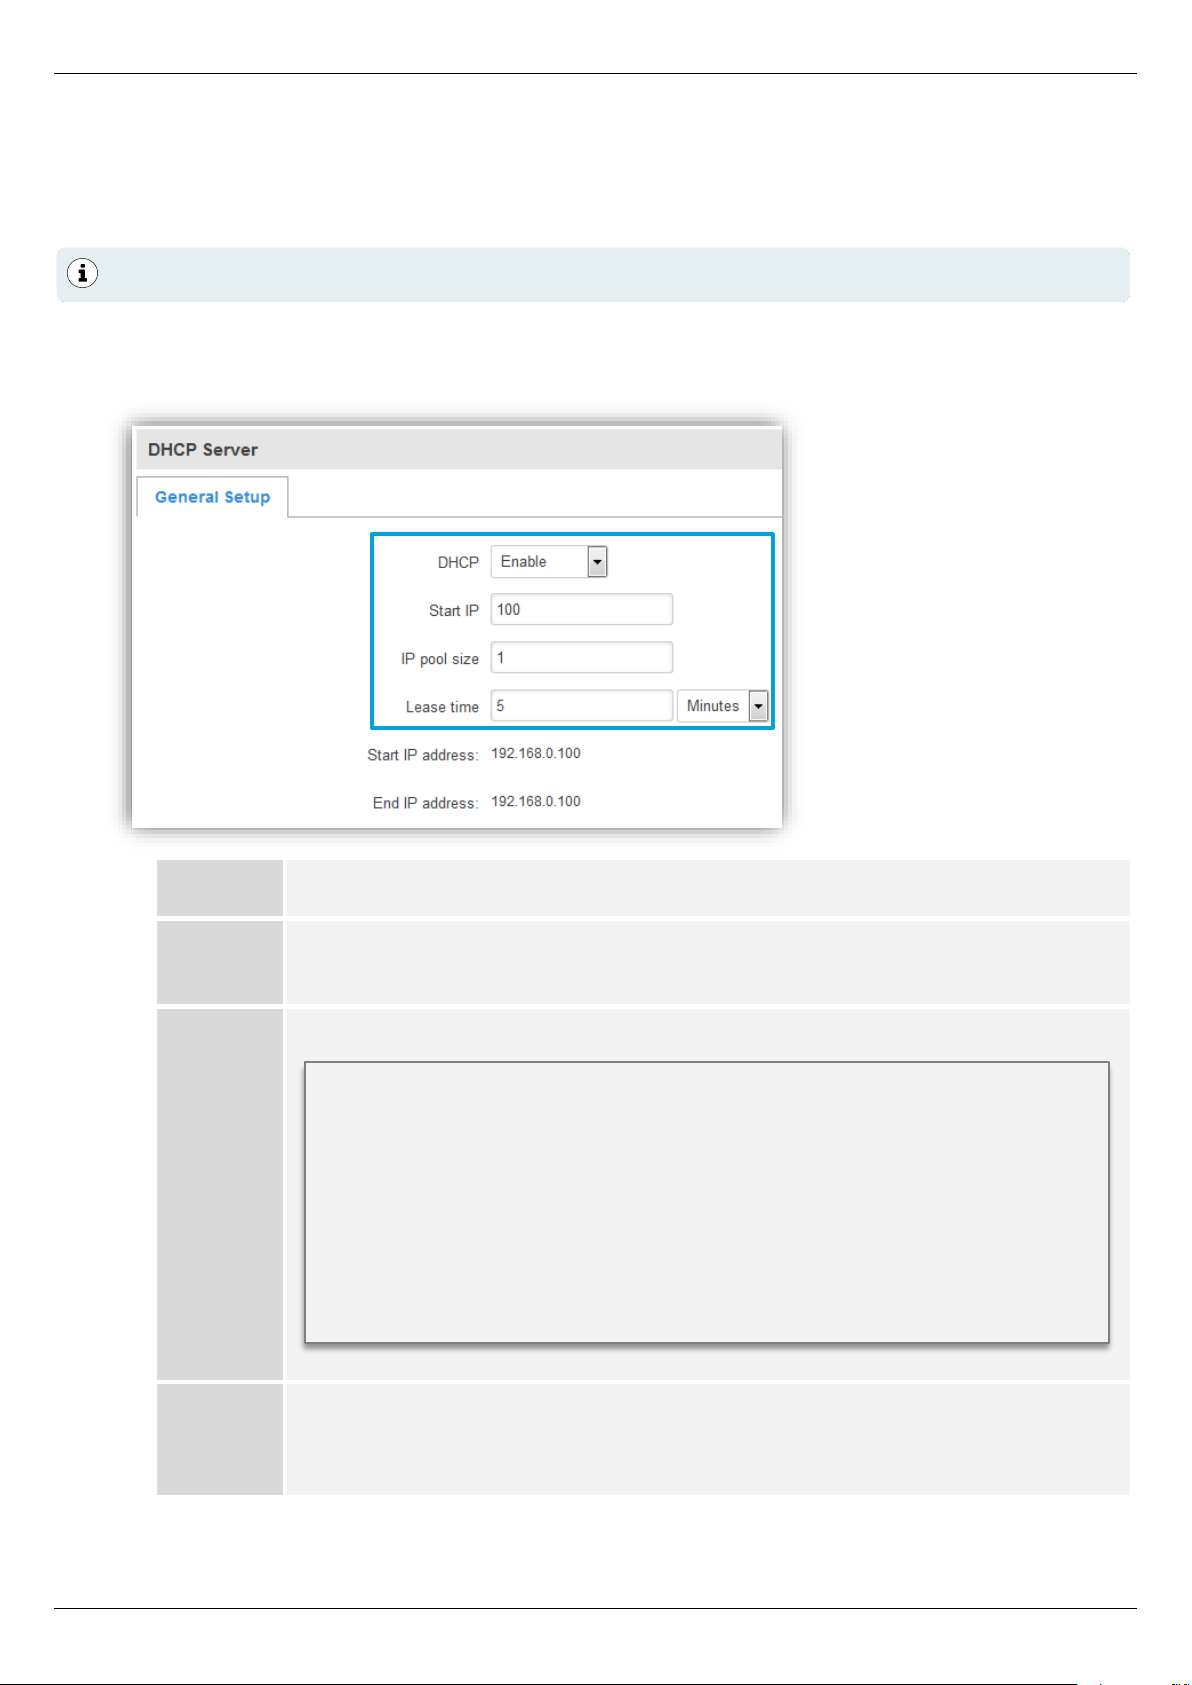
The default settings of the DHCP server can be changed under Network → LAN .
Network → LAN
DHCP:
Enables or Disables the DHCP server.
Start IP:
First IP address of the configured MX530/MX880 netmask, which the DHCP
server should assign to a connected network device.
IP pool
size
Number of IP addresses to be assigned by the DHCP server.
Lease
time:
For this period of time in minutes or hours, an assigned IP address remains
reserved for a terminal device. Only after this timer has elapsed can another
terminal device automatically obtain this IP address.
Example
LAN ‘IP address’: 192.168.1.250
LAN ‘IP netmask’: 255.255.255.0
DHCP ‘Start IP’: 51
DHCP ‘IP pool size’: 10
The DHCP server assigns 10 IP addresses, starting with 51. IP address
of the set netmask:
192.168.1.51 to 192.168.1.60
The DHCP server is preset to assign the IP address 192.168.0.100.
Page 31
Setup Guide - mdex Router MX530|MX880
Page 31
3.8.1 Fixed assignment of IP addresses
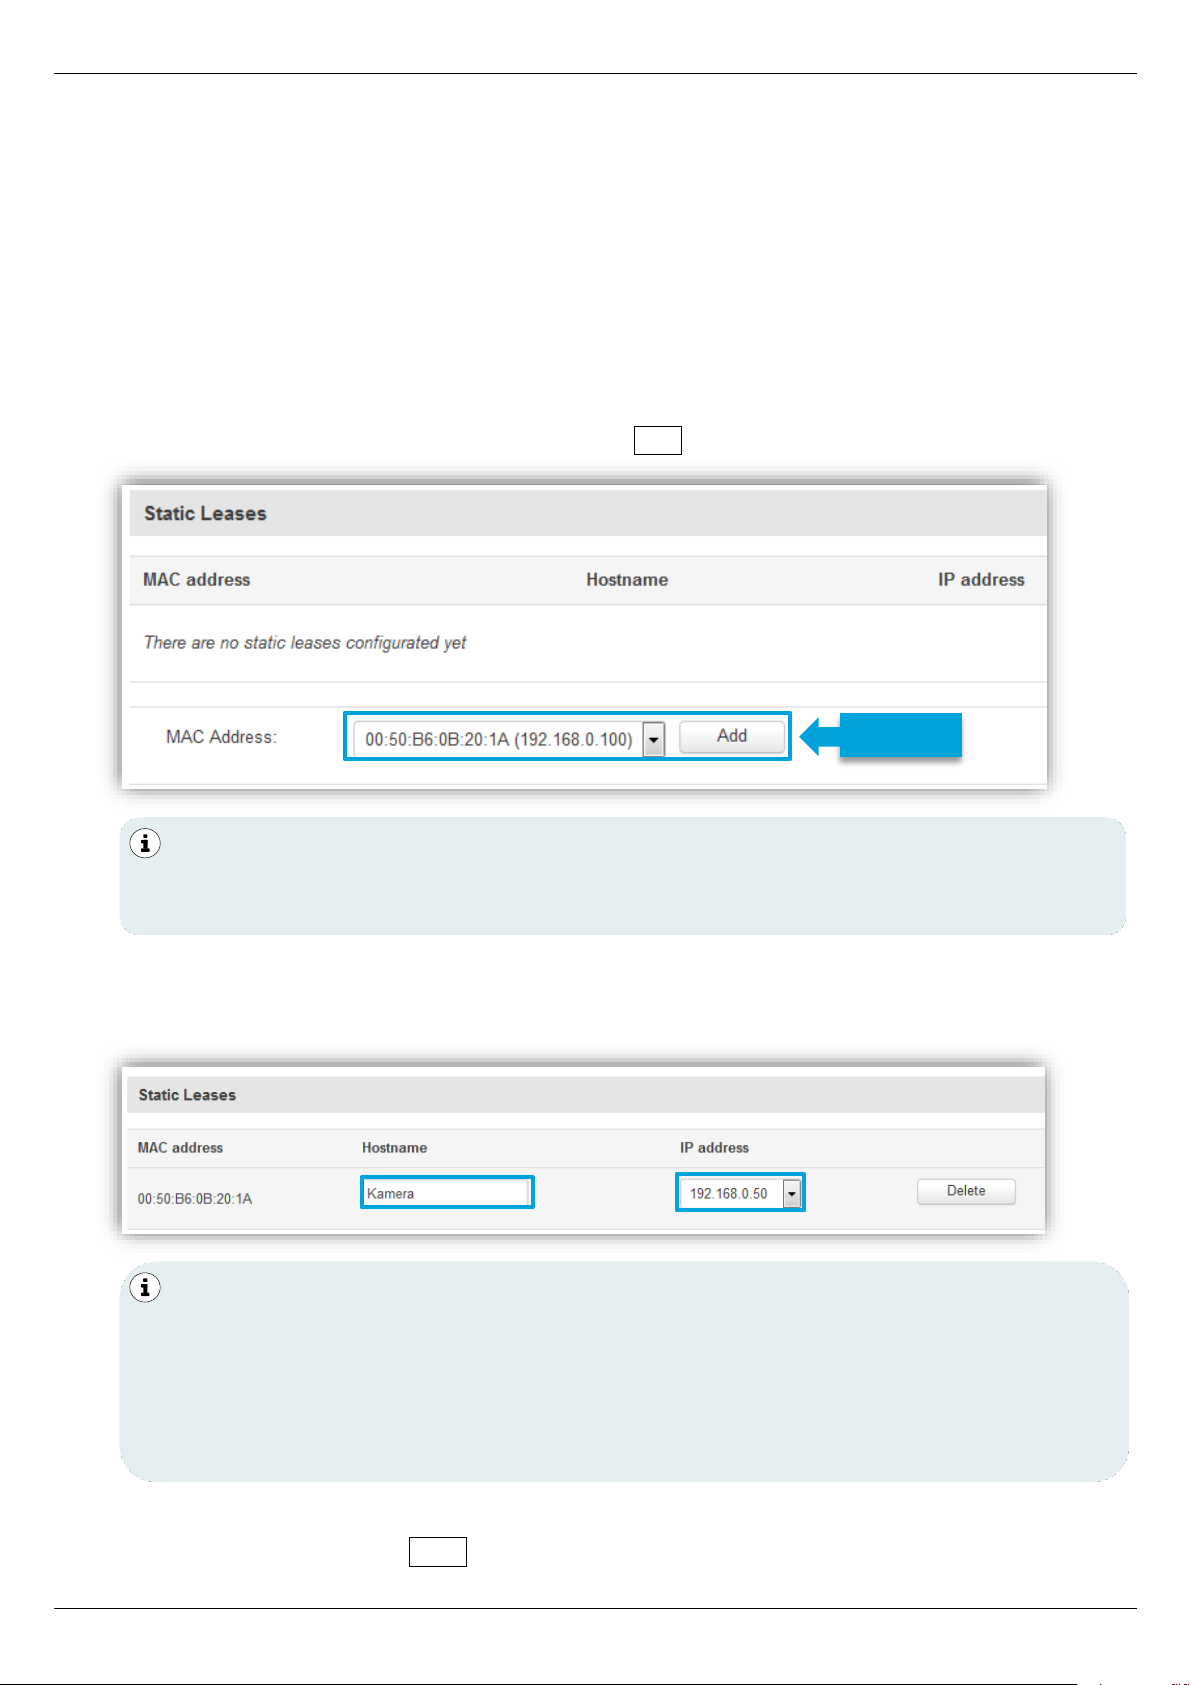
If certain terminal devices are always to receive the same IP address from the MX530/MX880's
DHCP server, they can be assigned permanently using the MAC address.
This fixed assignment is e.g. required if port forwarding for certain terminal devices has been set for
remote access and the respective terminal device is to obtain its IP address automatically.
1. The terminal device must have communicated with the MX530/MX880 router, e.g. to have
already obtained an IP address automatically from the MX530/MX880.
2. Select at Network → LAN → Static Leases in the dropdown box MAC Address the desired
terminal device and add it by clicking on button Add.
3. At Host name enter a name for the link and under IP address select the desired IP address
which should be assigned to this terminal device.
4. If necessary, repeat this process until all desired links are set in the router.
To save the links, click on Save.
With Status → Network in the LAN tab, all connected terminal devices (including MAC
address, IP address and lease time) that have currently obtained an IP address from
the MX530/MX880 DHCP server are displayed for DHCP Leases.
With 'IP address' you can also enter another IP address outside the defined IP address
range of the MX530/MX880 DHCP server, e.g. 192.168.0.50. The terminal device with
this MAC address will henceforth be assigned this set IP address.
• All IP addresses must be in the LAN IP address range of the router.
• If necessary, adjust the port forwarding according to Section 3.9 Forwarding
(Page 32) so that this terminal device can be reached remotely.
Add link
Page 32
Setup Guide - mdex Router MX530|MX880
Page 32
3.9 Forwarding
For remote access to the connected terminal devices, the incoming data packets must be forwarded
to the local IP address of the terminal device.
The MX530/MX880 considers incoming ports in the following priority:
1. Remote access ports according to Section 3.10 Configuration Access / Remote Access
2. Defined ports according to Section 3.9.2 Port forwarding (of individual ports)
3. All other ports to the forwarding target as per 3.9.1 Host Forwarding (DMZ Configuration)
3.9.1 Host Forwarding (DMZ Configuration)
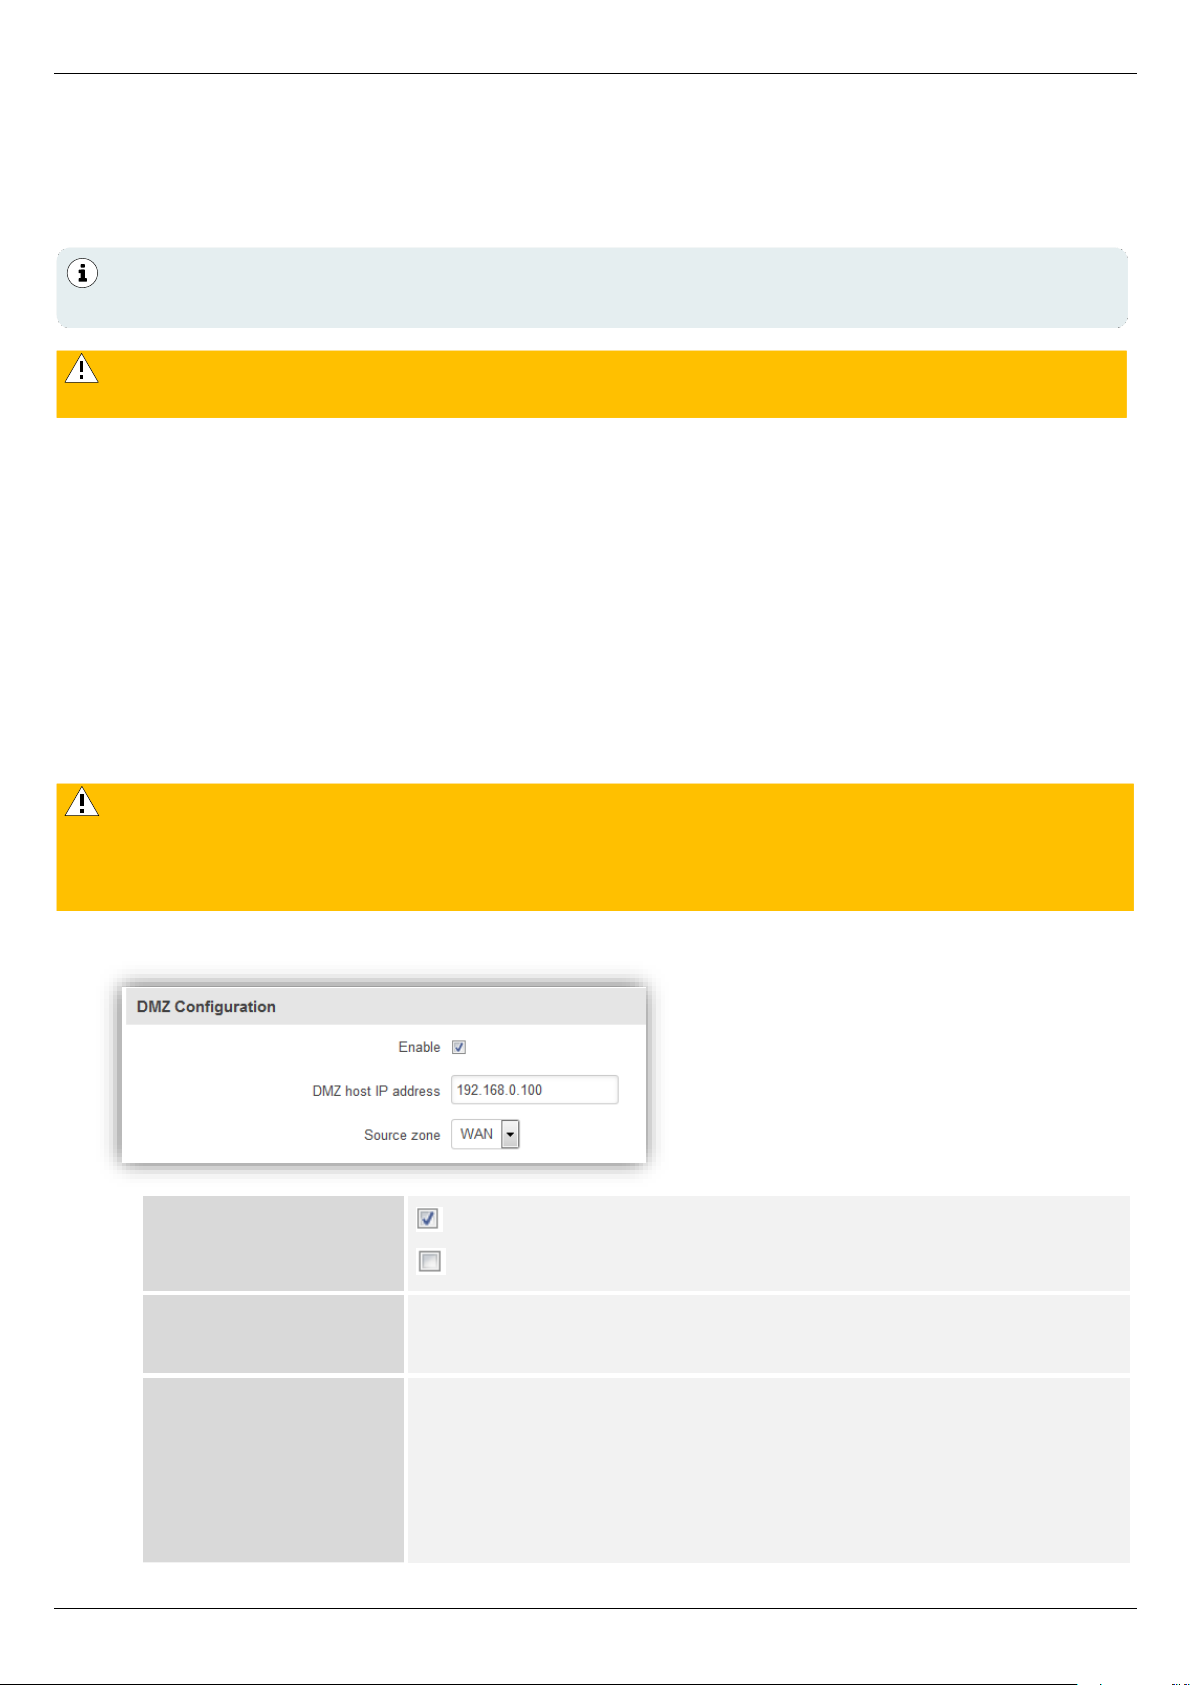
All ports and protocols are forwarded to the selected target device.
Only the enabled ports for MX530/MX880 remote access (according to 3.10, Page 34) and
configured port forwarding (according to Section 3.9.2 Port forwarding (of individual ports) (Page
33) are not forwarded to the 'DMZ host IP address'.
Network → Port Forwarding: DMZ Configuration
Enable:
Forwarding of all ports and protocols enabled
Forwarding of all ports and protocols disabled
DMZ host IP
address:
All data packets are forwarded to this IP address.
Source zone:
Interface of incoming data packets for remote access:
WAN: Remote access is possible via the IP address of the
installed SIM card (or WAN IP address of the MX530/MX880).
VPN: Remote access is possible via the IP address of the
OpenVPN-Client (Section 3.6, Page 27) in MX530/MX880.
By default, all incoming ports and protocols to the IP address of the SIM card (WAN) are
forwarded to the local IP address 192.168.0.100.
When using the integrated OpenVPN-Client (Section 3.6, Page 27) the Source zone must
be switched to VPN!
When using a public.IP, access is possible without restrictions via the Internet.
The terminal device should therefore be secured against unauthorised access via the Internet
with a firewall. More protection is available, if instead only the required ports are forwarded
according to Section 3.9.2 Port forwarding (of individual ports) (Page 33).
Page 33
Setup Guide - mdex Router MX530|MX880
Page 33
3.9.2 Port forwarding (of individual ports)
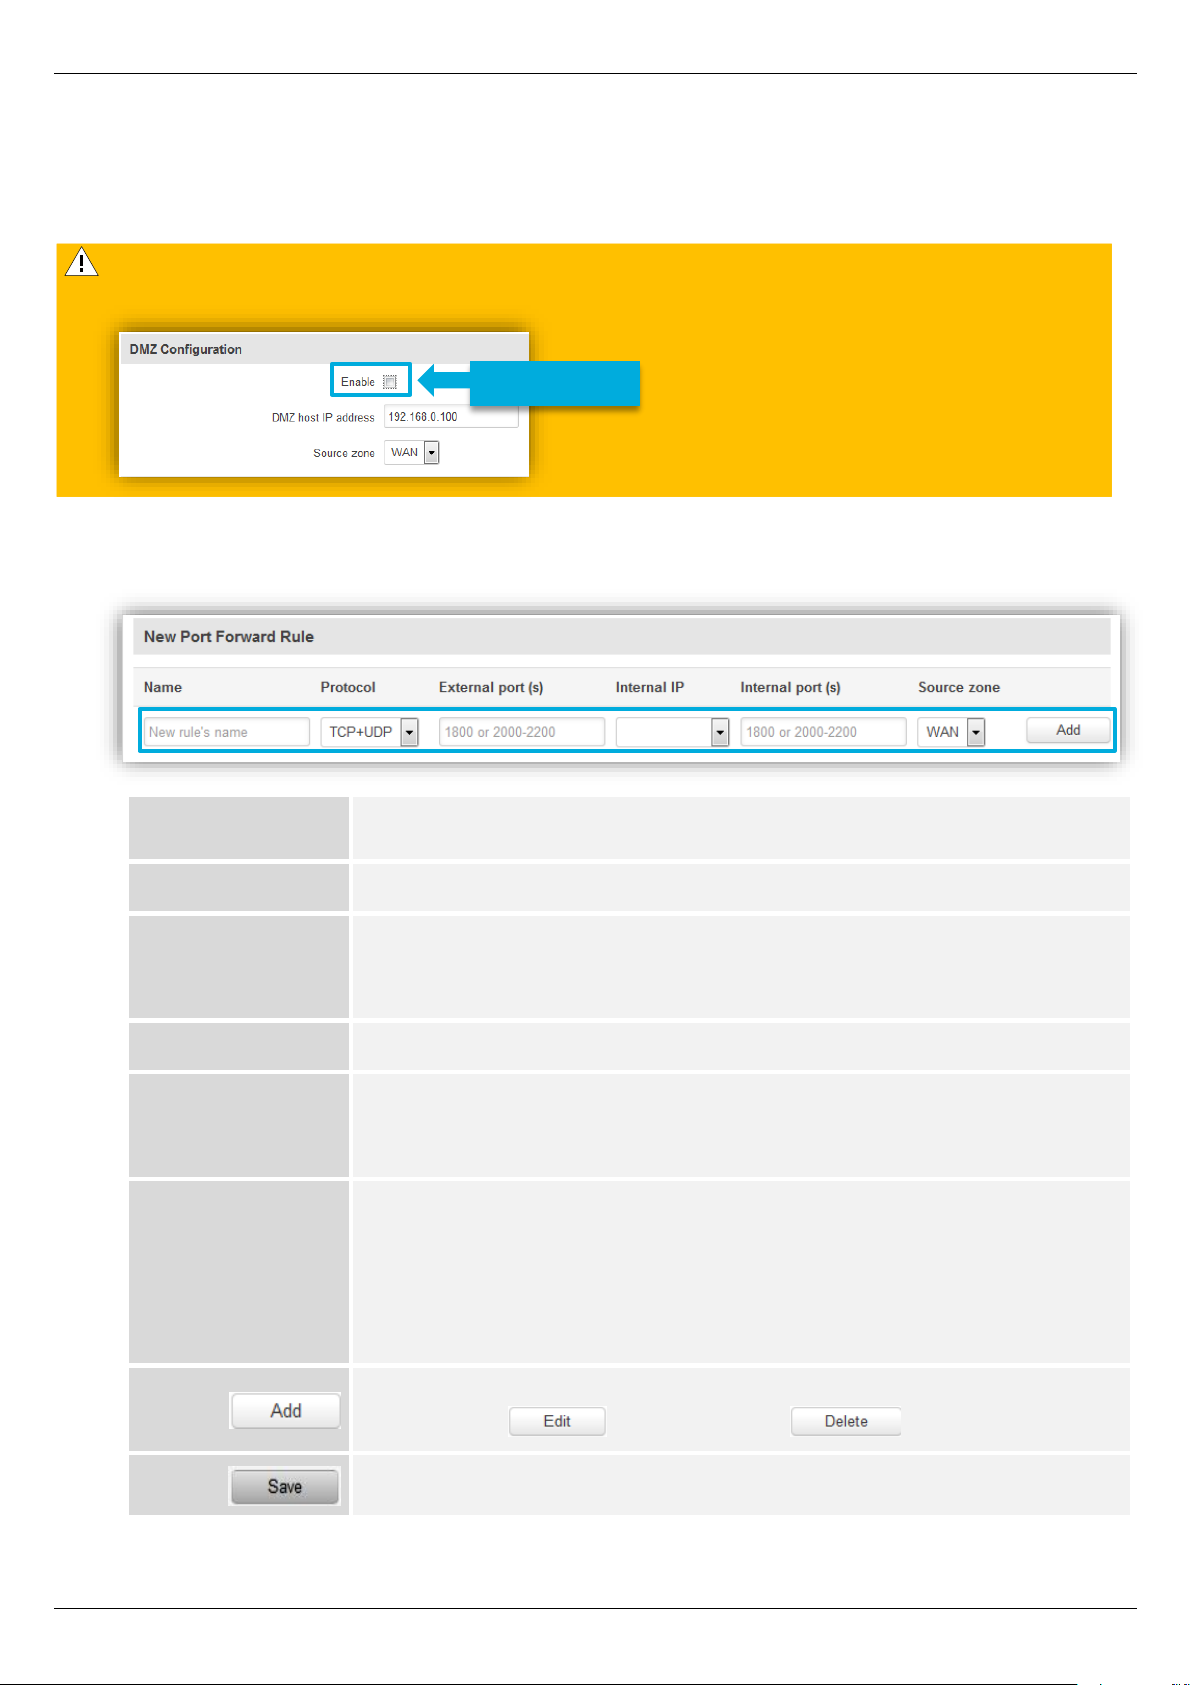
With port forwarding, you can connect multiple devices to the MX530/MX880 and remotely reach
them via the external IP address using the respective port.
Network → Port Forwarding: New Port Forwarding Rule
Name:
Desired name of this forwarding.
Protocol:
Set the desired protocol (TCP/UDP).
External port(s):
Incoming port for forwarding.
Port ranges can also be set.
Example: 2000-2200 = For ports 2000, 2001,2002, ... to 2200
Internal IP:
Target IP address of the terminal device.
Internal port(s):
Target port of the terminal devices.
Port ranges can also be defined.
Example: 2000-2200 = For ports 2000, 2001,2002, ... to 2200
Source zone:
Interface of incoming data packets for remote access:
WAN: Remote access is possible via the IP address of the installed
SIM card (or WAN IP address of the MX530/MX880).
VPN: Remote access is possible via the IP address of the OpenVPN-
Client (Section 3.6, Page 27) in MX530/MX880.
The forwarding is added to Port Forwarding Rules and can later be
adjusted with or removed with .
All changed settings are accepted and saved.
Undefined ports are forwarded to the target device ‘DMZ host IP address’.
If this is not desired DMZ Configuration must be disabled.
Disable
Page 34
Setup Guide - mdex Router MX530|MX880
Page 34
3.10 Configuration Access / Remote Access
Local configuration access and remote access to the MX530/MX880 can be customised.
3.10.1 SSH access
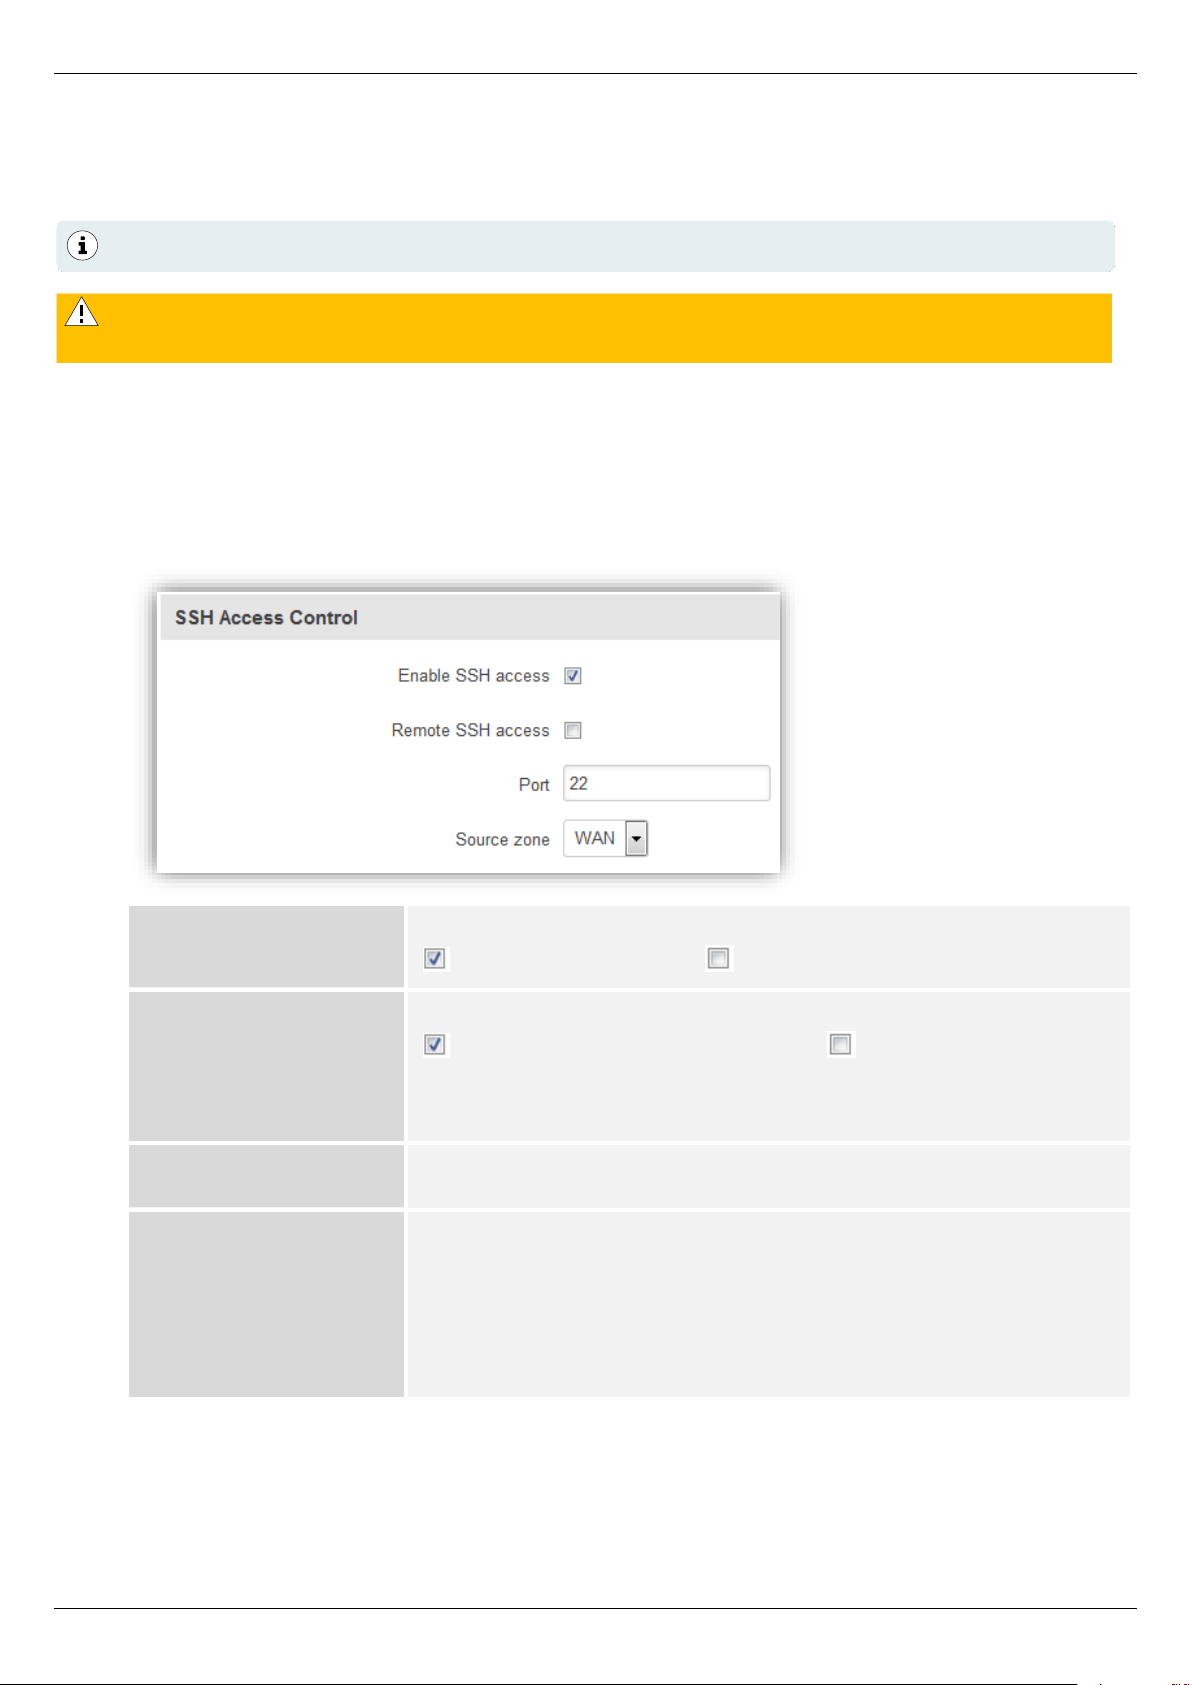
Local and remote access to the SSH interface of the MX530/MX880 can be customised.
SSH access is required only in special cases.
Services → HTTP / SSH: SSH Access Control
Enable SSH access:
Enables local SSH access to the MX530/MX880.
SSH access enabled SSH access disabled
Remote SSH Access:
Enables SSH remote access to the MX530/MX880.
SSH remote access enabled(1 SSH remote access
disabled
For security reasons, SSH remote access should be disabled.
Port:
Port for SSH access (port 22 is the default port)
Source zone:
Interface of incoming data packets for remote access:
WAN: Remote access is possible via the IP address of the
installed SIM card (or WAN IP address of the MX530/MX880).
VPN: Remote access is possible via the IP address of the
OpenVPN-Client (Section 3.6, Page 27) in MX530/MX880.
1)
Remote access to the set port will be answered by the MX530/MX880, even if a
forwarding to another device has been set up for this port.
The web interface is already accessible locally and remotely via port 8080.
When using the integrated OpenVPN-Client (Section 3.6, Page 27) the Source zone must
be switched to VPN!
Page 35
Setup Guide - mdex Router MX530|MX880
Page 35
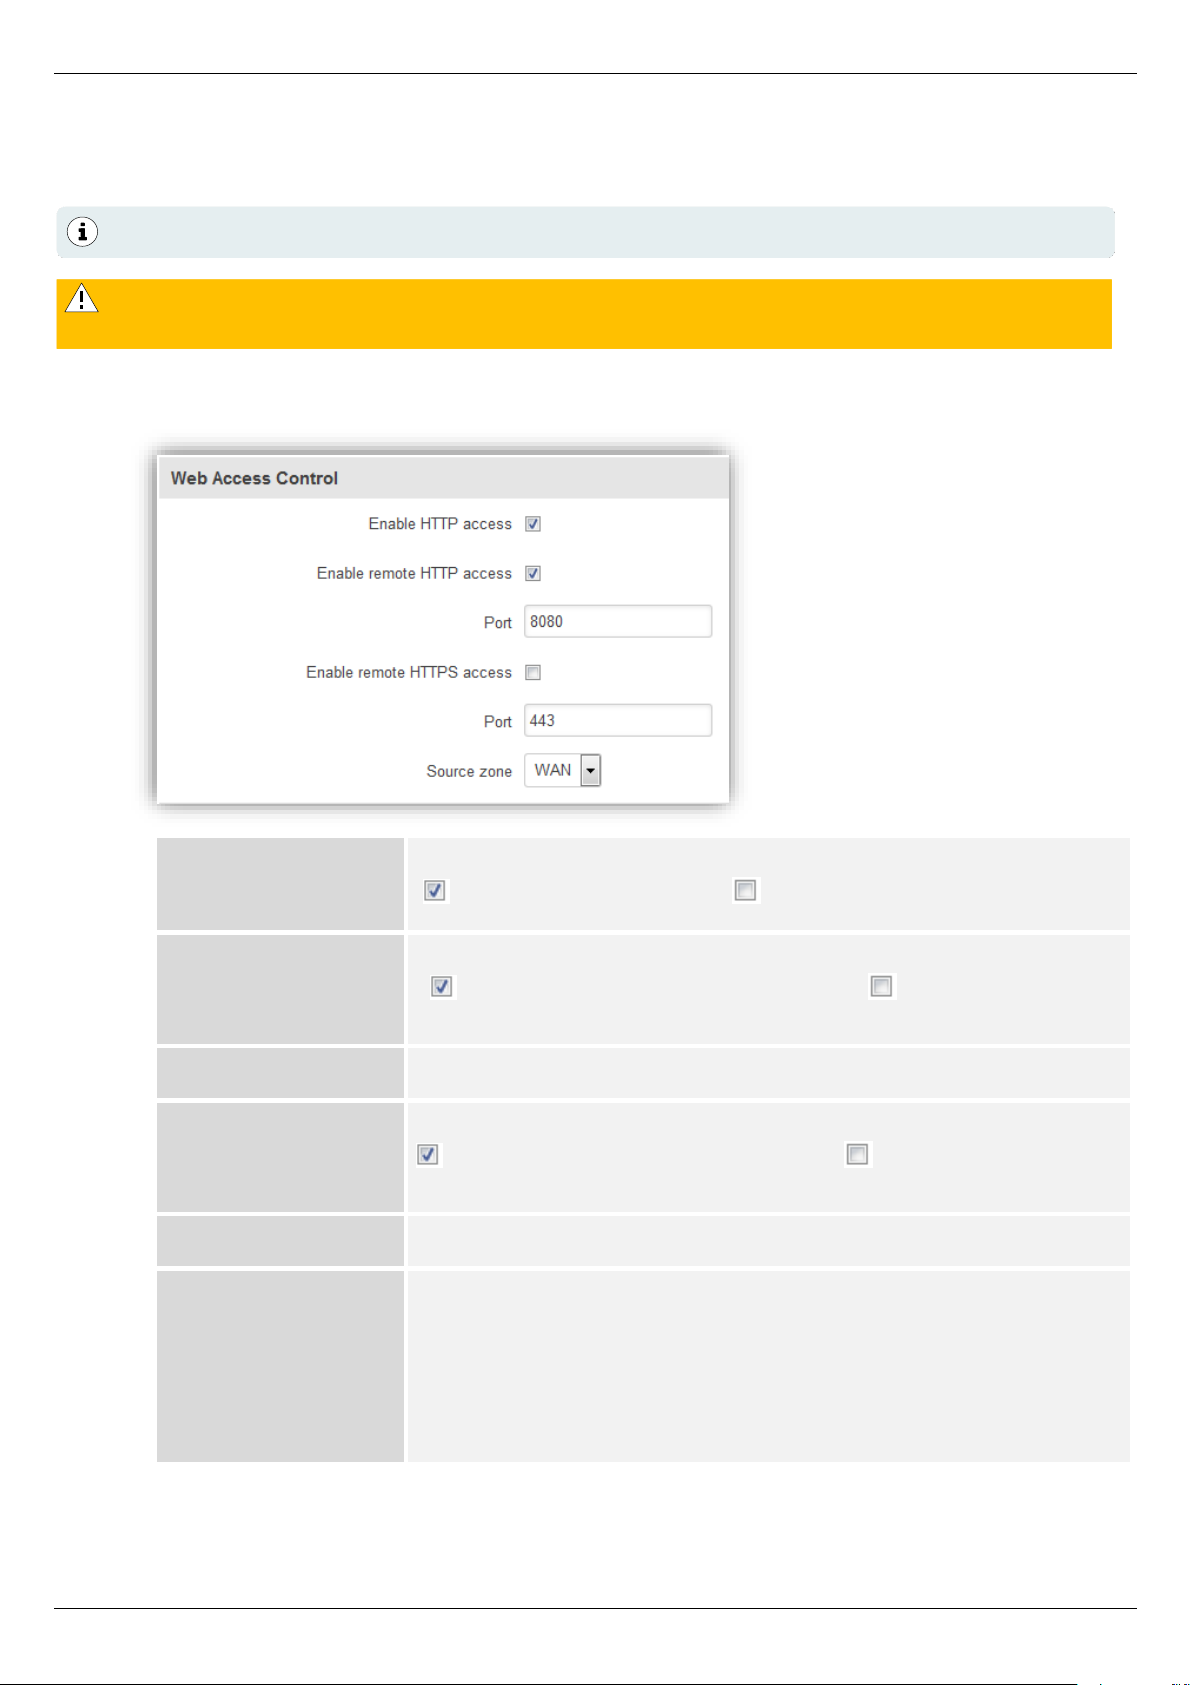
3.10.2 Access to the web interface
Local access and remote access to the web interface of the MX530/MX880 can be customised.
Services → HTTP / SSH: Web Access Control
Enable HTTP
access:
Enables local HTTP access to the web interface
HTTP access enabled HTTP access disabled
Enable remote
HTTP access:
Enables HTTP remote access to the web interface
HTTP remote access enabled (1 HTTP remote
access disabled
HTTP Port:
HTTP port for access to the web interface.
Enable remote
HTTPS access:
Enables HTTPS remote access to the web interface
HTTPS remote access enabled (1 HTTPS remote access
disabled
HTTPS Port:
HTTPS port for accessing the web interface
Source zone:
Interface of incoming data packets for remote access:
WAN: Remote access is via the IP address of the installed SIM
card (or WAN IP address of the MX530/MX880).
VPN: Remote access is via the IP address of the OpenVPN-
Client (Section 3.6, Page 27) in MX530/MX880.
1)
Remote access to the set port will be answered by the MX530/MX880, even if a
forwarding to another device has been set up for this port.
The web interface is already accessible locally and remotely via port 8080.
When using the integrated OpenVPN-Client (Section 3.6, Page 27) the Source zone must
be switched to VPN!
Page 36
Setup Guide - mdex Router MX530|MX880
Page 36
3.11 Ping Reboot
In order for the MX530/MX880 and the terminal devices to always be reliably accessible,
even after maintenance work or malfunctions in the mobile network, the ping reboot should be
enabled.
The MX530/MX880 will periodically ping the target server. If there is no response from the target
server within the defined time period, the router will assume a connection error and initiate a desired
reconnect action.
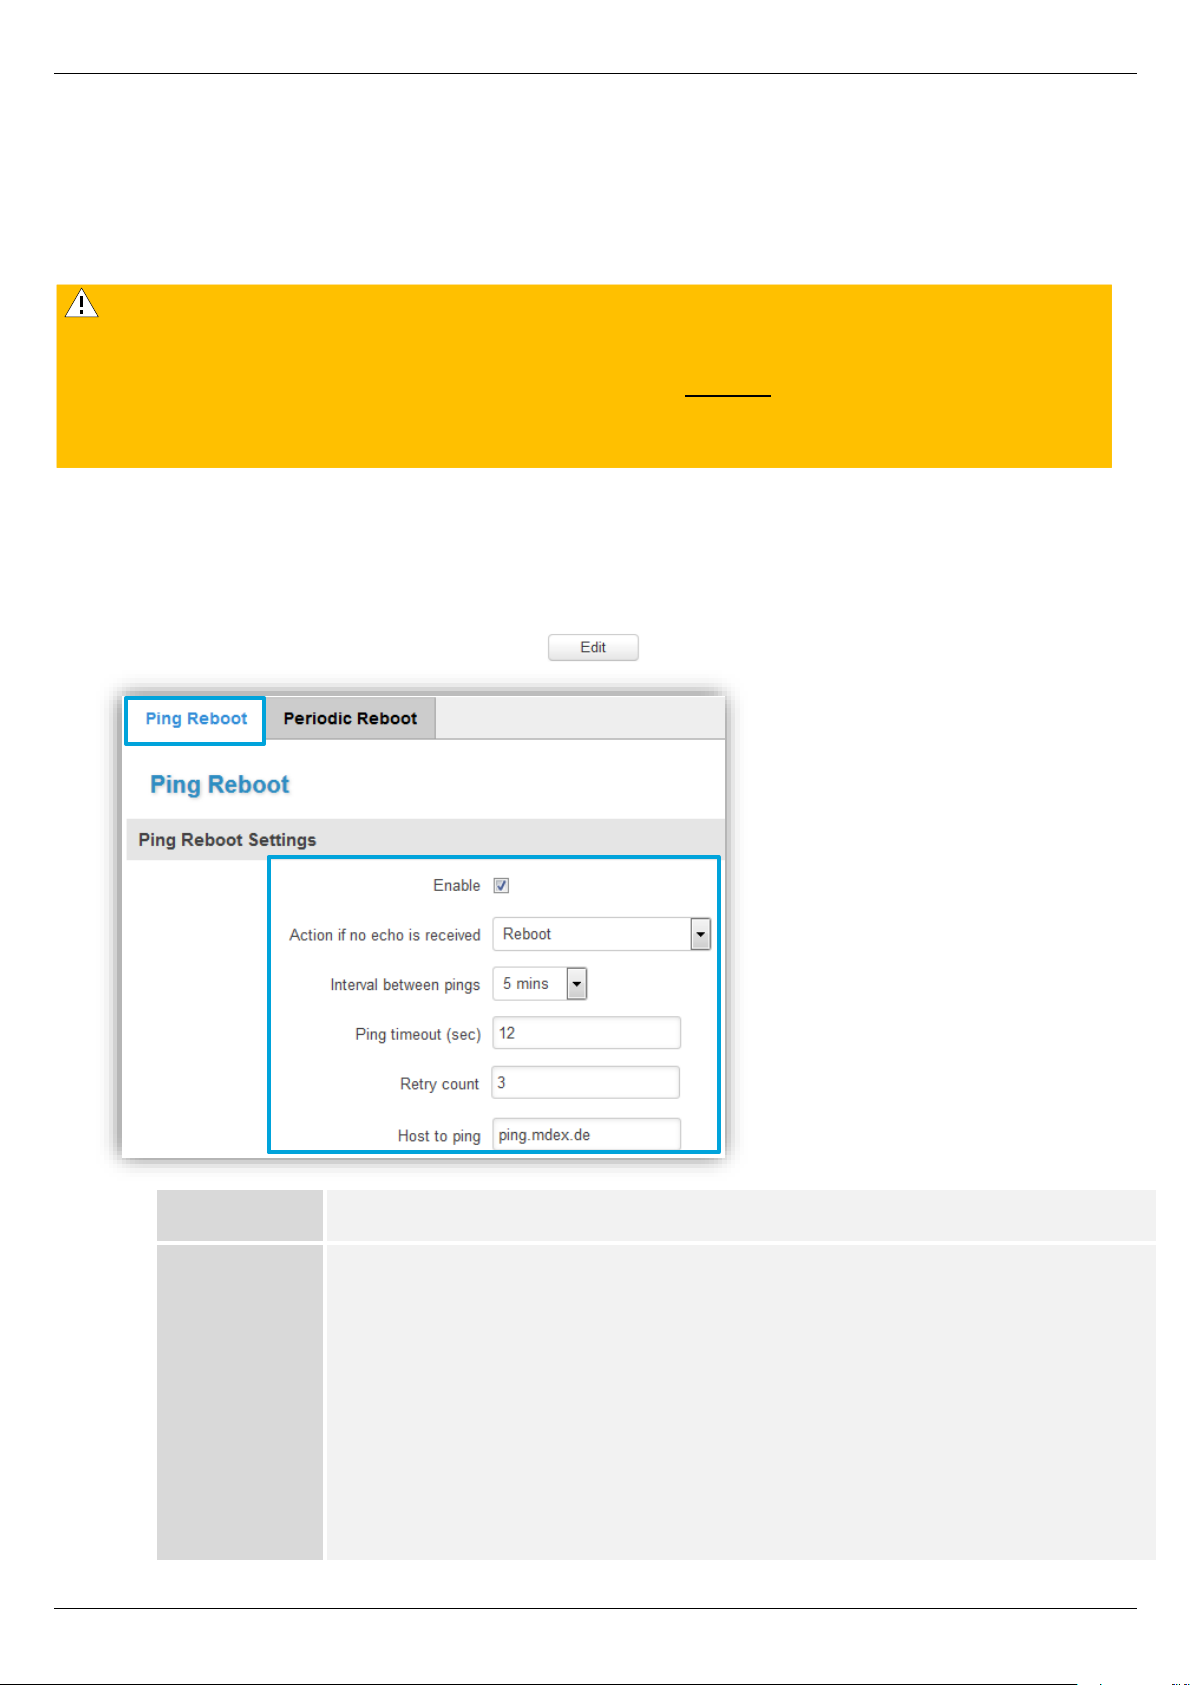
Services → Ping Periodic/Reboot: Ping Reboot
The ping reboot function can be adjusted with .
Enable:
Enables or disables the ping reboot feature
Action:
This action is performed with a detected connection error:
Reboot:
A restart of the MX530/MX880 is triggered.
Modem restart:
The mobile modem will be restarted.
Restart mobile
connection:
The mobile connection is terminated and restored.
(Re-)Register:
Renewed registration in the mobile network.
None:
No action is triggered.
The Ping Reboot function is enabled for the ping server ping.mdex.de.
However, the server ping.mdex.de is only accessible from the mdex network!
If you use the MX530/MX880 with your own SIM card without mdex IP service (fixed.IP+ /
public.IP), be sure to set up a publicly accessible server, e.g. public-ping.mdex.de
(185.39.176.22).
Page 37
Setup Guide - mdex Router MX530|MX880
Page 37
Interval
between
pings:
Interval in minutes at which the MX530/MX880 sends a ping to the selected
target server. (Minimum setting is 5 minutes).
Please note that each ping generates additional data. The smaller the
interval is set, i.e. the more often a ping is sent, the more data is generated
in the mobile network.
Ping timeout
(sec):
If the target server does not respond within this time period (in seconds), it
will be considered an unsuccessful ping attempt.
Retry count:
If after the set attempts no response has been received from the target
server, the MX530/MX880 will trigger the set action.
Host to ping:
Target server for connection verification
3.12 Periodic Reboot
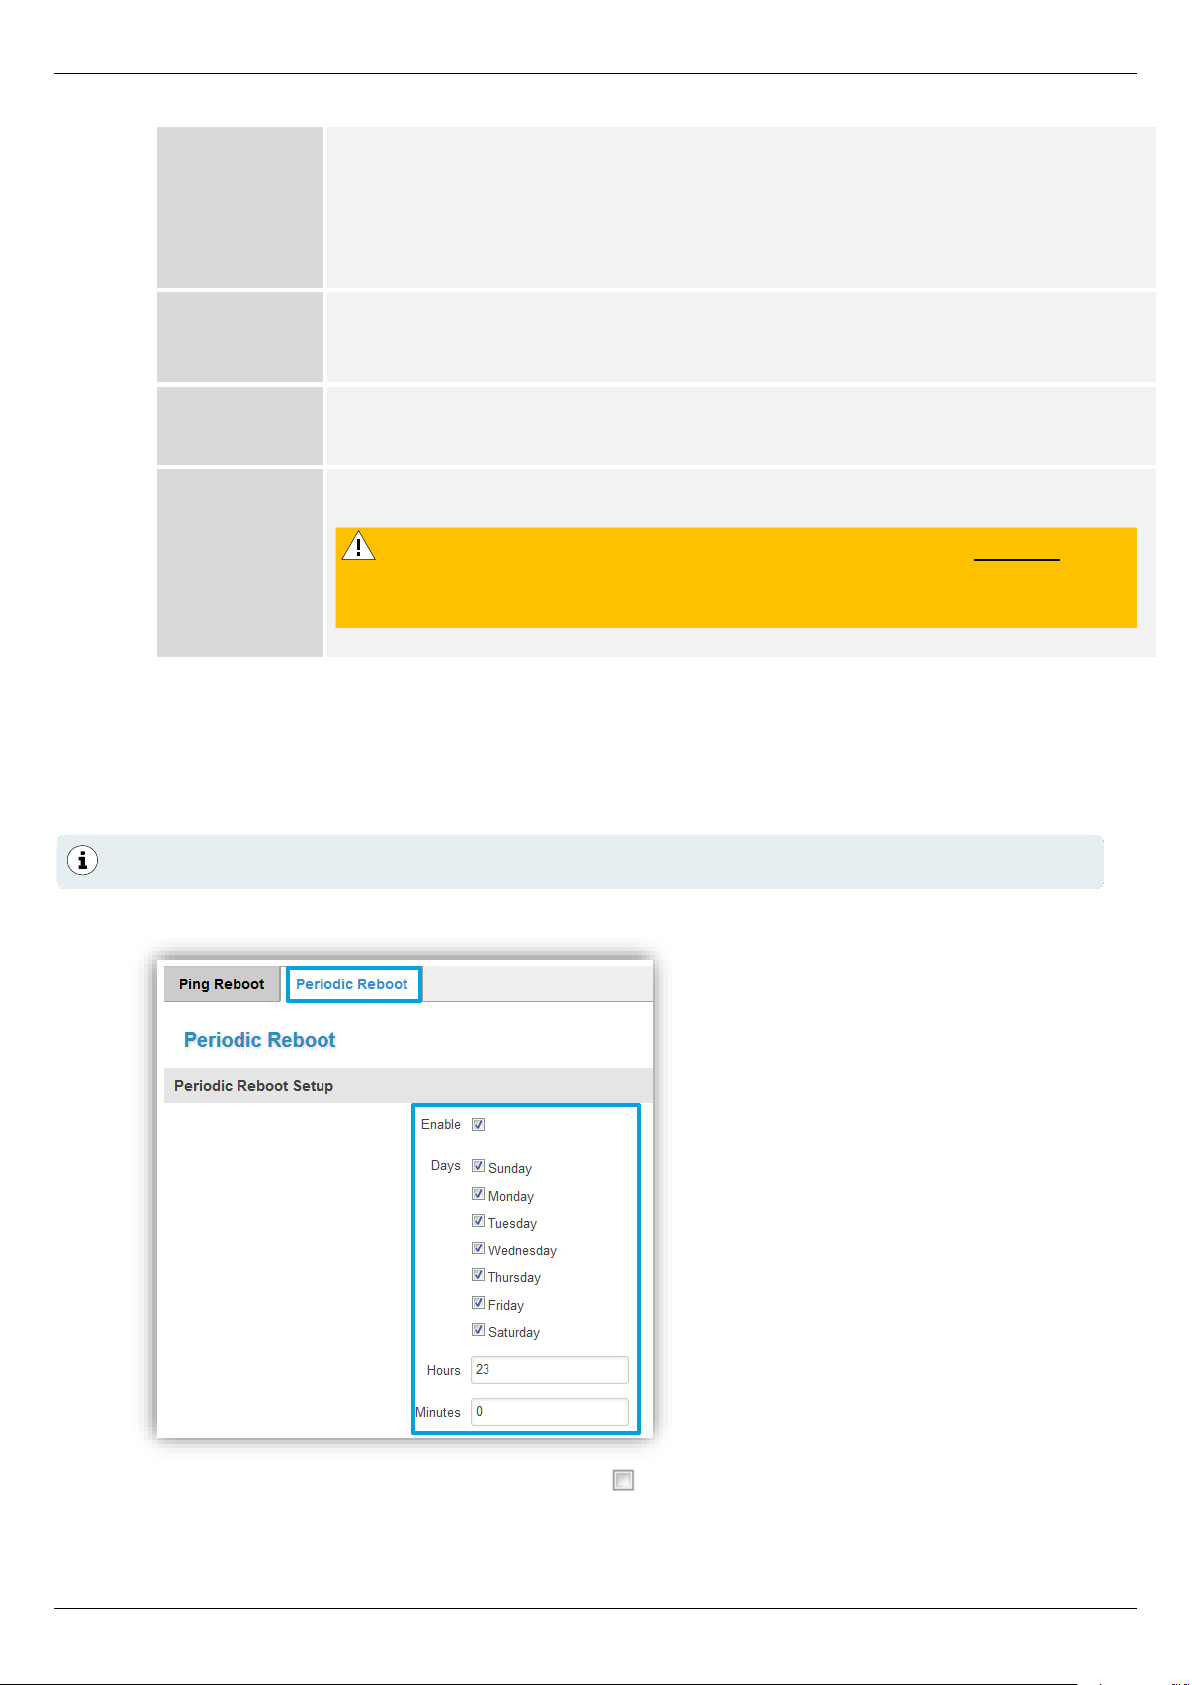
At the set time (Hours, Minutes), the MX530/MX880 automatically reboots on the desired days of the
week.
Services → Ping Periodic/Reboot
This feature can be disabled with the Enable setting.
If you use the MX530/MX880 with your own SIM card without
mdex IP service (fixed.IP+ / public.IP), be sure to set up a publicly
accessible server, e.g. public-ping.mdex.de (185.39.176.22).
According to pre-configuration, an automatic restart is triggered daily at 23:00 pm.
Page 38
Setup Guide - mdex Router MX530|MX880
Page 38
4 Additional functions
4.1 WLAN (Wireless Access Point)
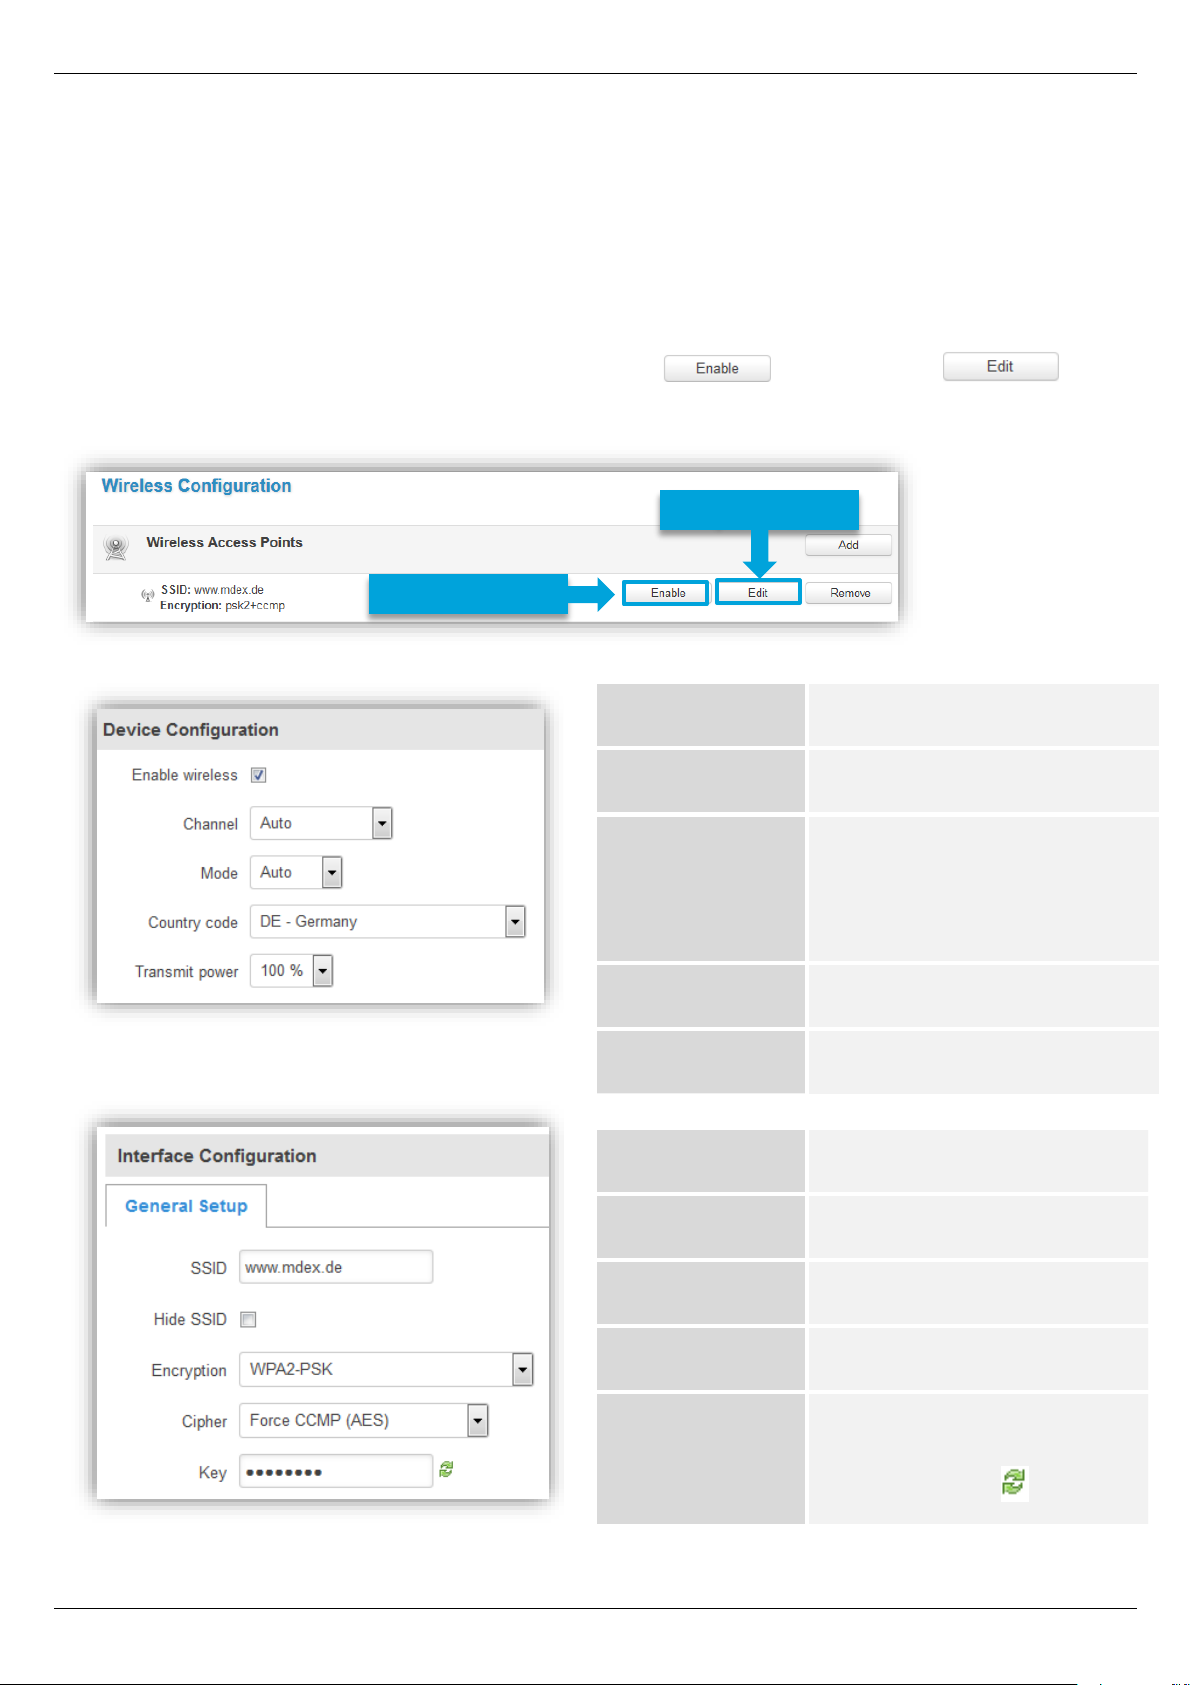
A Wireless Access Point can be enabled in the MX530/MX880 to connect network devices via
WLAN. The WLAN is already preconfigured, but still disabled at delivery.
If necessary, you can switch on the WLAN by clicking on and adjust with .
Network → WLAN
Enable wireless:
Enables/disables WLAN
Channel:
WLAN channel
Mode:
WLAN mode
Auto,
802.11b, 802.11g ,
802.11 g+n
Country code:
MX530/MX880 location
Transmit power:
Desired transmission power
SSID:
WLAN Name
Hide SSID:
Hide WLAN name
Encryption:
Encryption protocol
Cipher:
Encryption algorithm
Key:
WLAN network key
Display in plain text:
Adjust WLAN
Enable WLAN
Page 39
Setup Guide - mdex Router MX530|MX880
Page 39
4.2 Connection status and signal strength
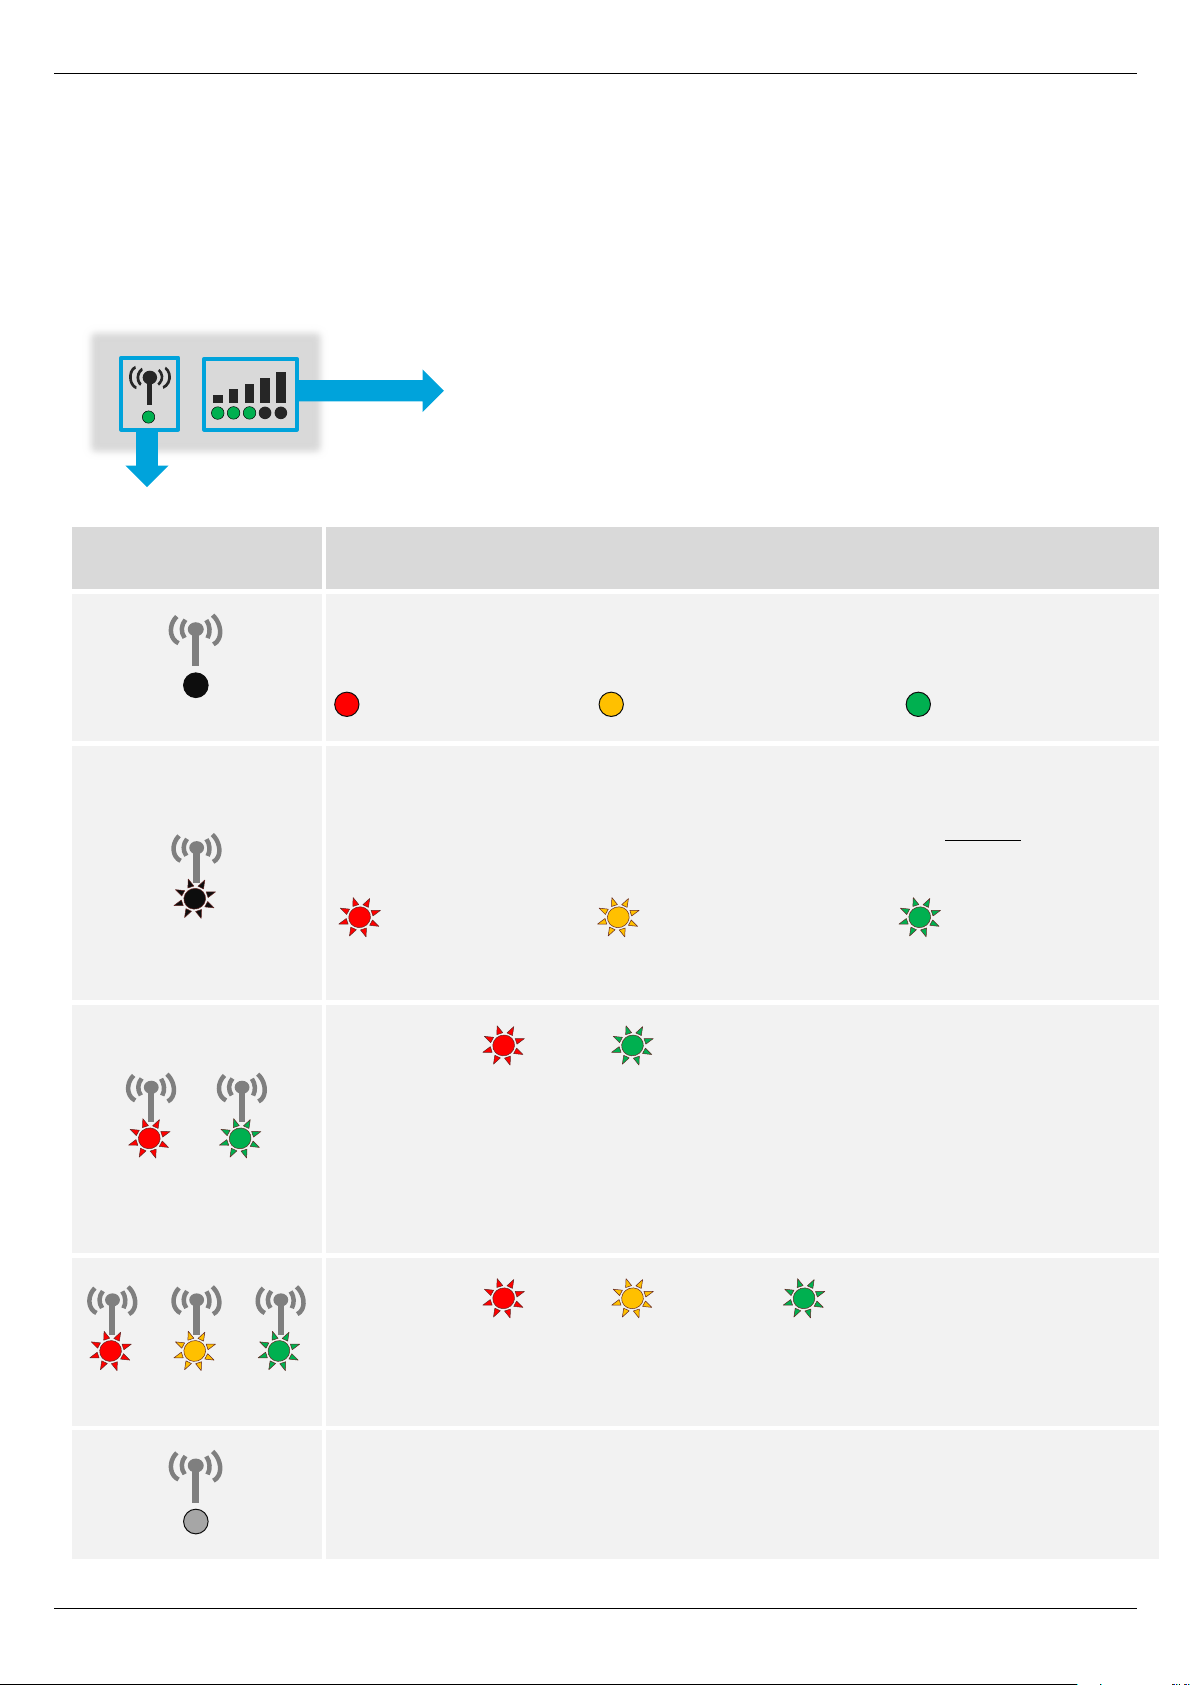
Mobile connection status and available signal strength can be read from different locations on the
MX530/MX880.
4.2.1 LED status indicators
Mobile connection status
LED display
Status
lights up/flickers
LED lights up continuously (& flickers during data transmission)
Mobile & data connection successfully established in the following network:
red: 2G Network orange: 3G Network green: 4G Network
1 S
LED flashes in monochrome at one-second intervals
No data transmission possible! Only a mobile connection without data
connection was established in the following network:
red: 2G Network orange: 3G Network green: 4G Network
Possible causes: Incorrect APN access data, SIM without data tariff
→
0.5 S 0.5 S
LED flashes red → green every 0.5 seconds
No data transmission possible! Mobile reception has been detected, but the
mobile connection could not be established.
Possible causes:
▪ SIM card inactive, locked, missing or wrong ‘primary SIM’ set.
▪ SIM PIN missing / wrong (only for SIMs with active SIM PIN protection)
→ →
0.5 S 0.5 S 0.5 S
LED flashes red → orange → green every 0.5 seconds
No data transmission possible! Router is in mobile setup, but the connection
has not yet been established.
LED does not light up
No data transmission possible! No mobile network found.
Possible causes: Antenna connected incorrectly, no reception
Mobile signal strength
The current mobile signal strength is indicated by the green
LEDs. If no LED lights up, there is currently no mobile
reception.
Page 40
Setup Guide - mdex Router MX530|MX880
Page 40
4.2.2 Mobile connection status
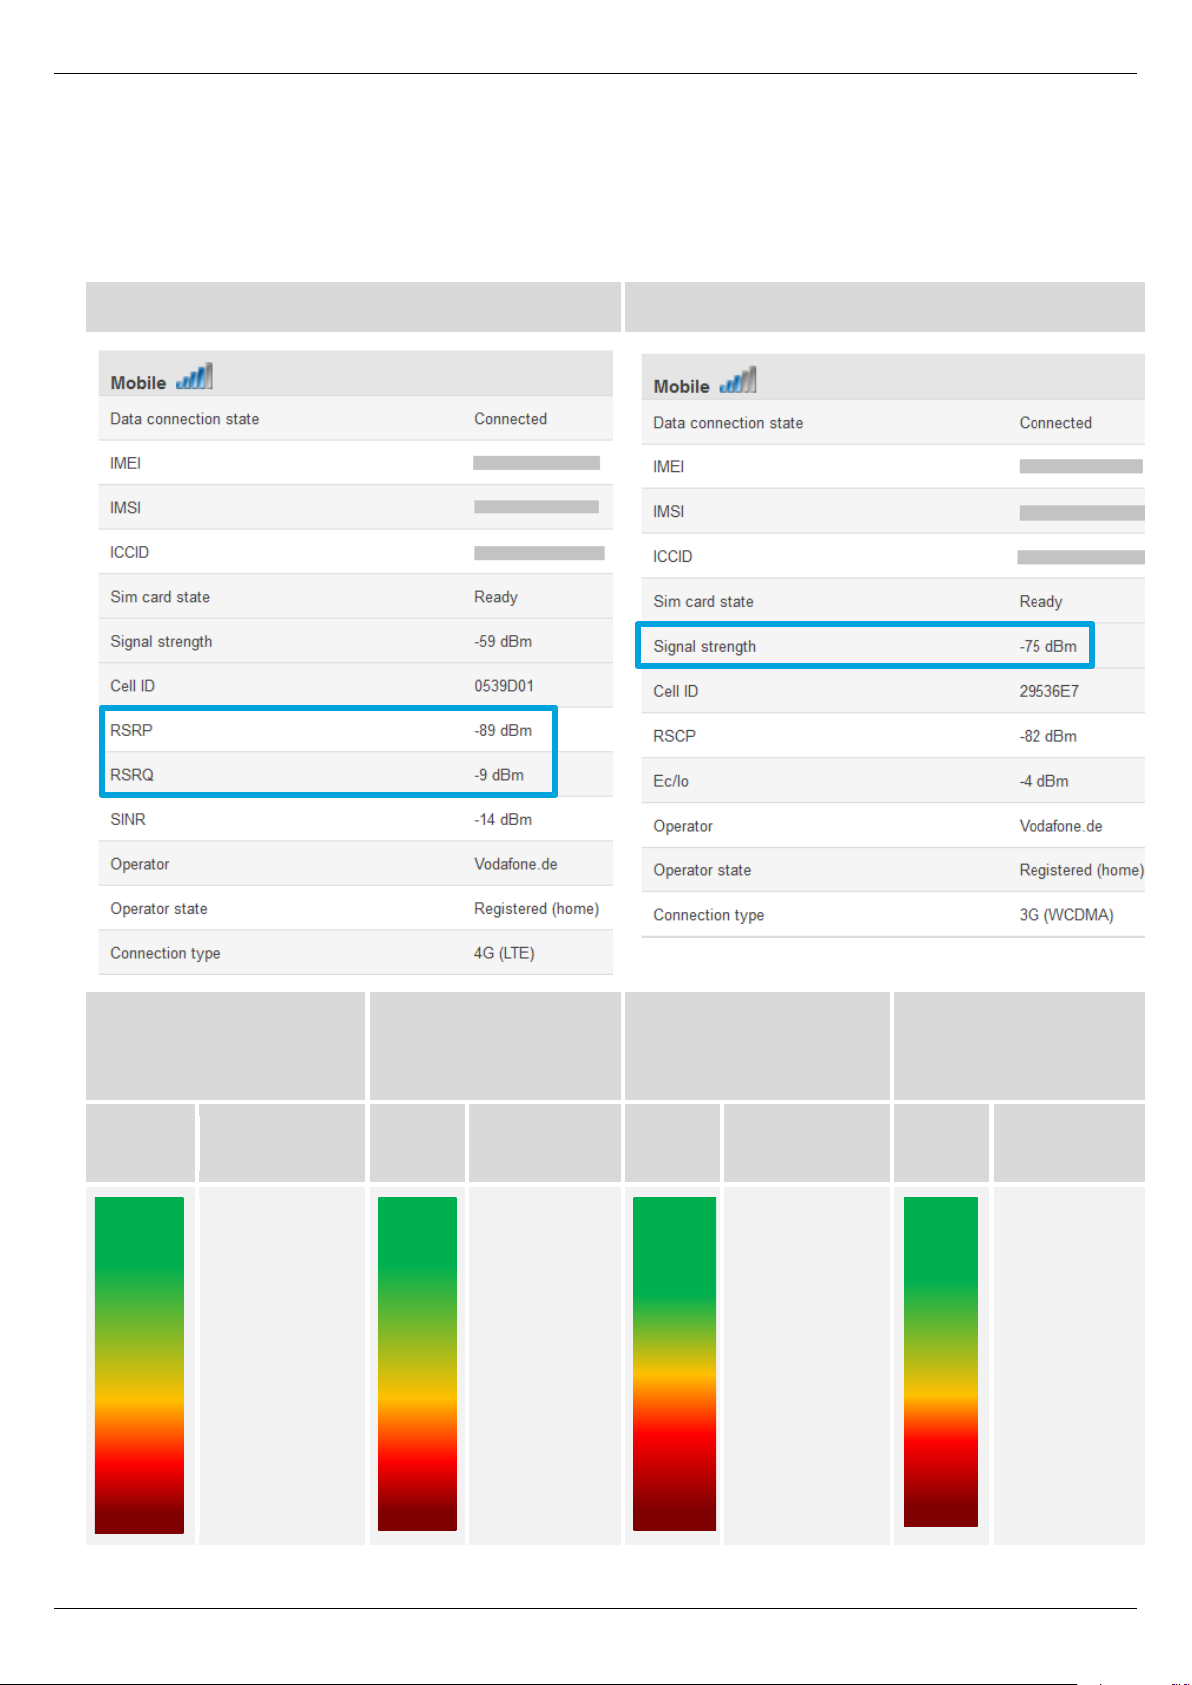
To determine the current mobile reception power for a good data transmission, different reception
values are relevant depending on the mobile network. For a detailed display of the relevant values,
see Status → Network: Mobile
4G connection (only MX880)
3G / 2G connection
RSRP
(Referece Signal
Received Power)
RSRQ
(Reference Signal
Received Quality)
RSSI (3G)
(Received Signal
Strength Indicator)
RSSI (2G)
(Received Signal
Strength Indicator)
dBm
Data
transfer
dBm
Data
transfer
dBm
Data
transfer
dBm
Data
transfer
optimal
good
possibly
interrupted
not possible
optimal
good
possibly
interrupted
not possible
optimal
good
possibly
interrupted
not possible
optimal
good
possibly
interrupted
not possible
-75
-80
-85
-90
-95
-100
-105
- 110
-3
-6
-9
-12
-15
-18
-70
-75
-80
-85
-90
-95
-100
-105
-60
-65
-70
-75
-80
-85
-90
-95
Page 41
Setup Guide - mdex Router MX530|MX880
Page 41
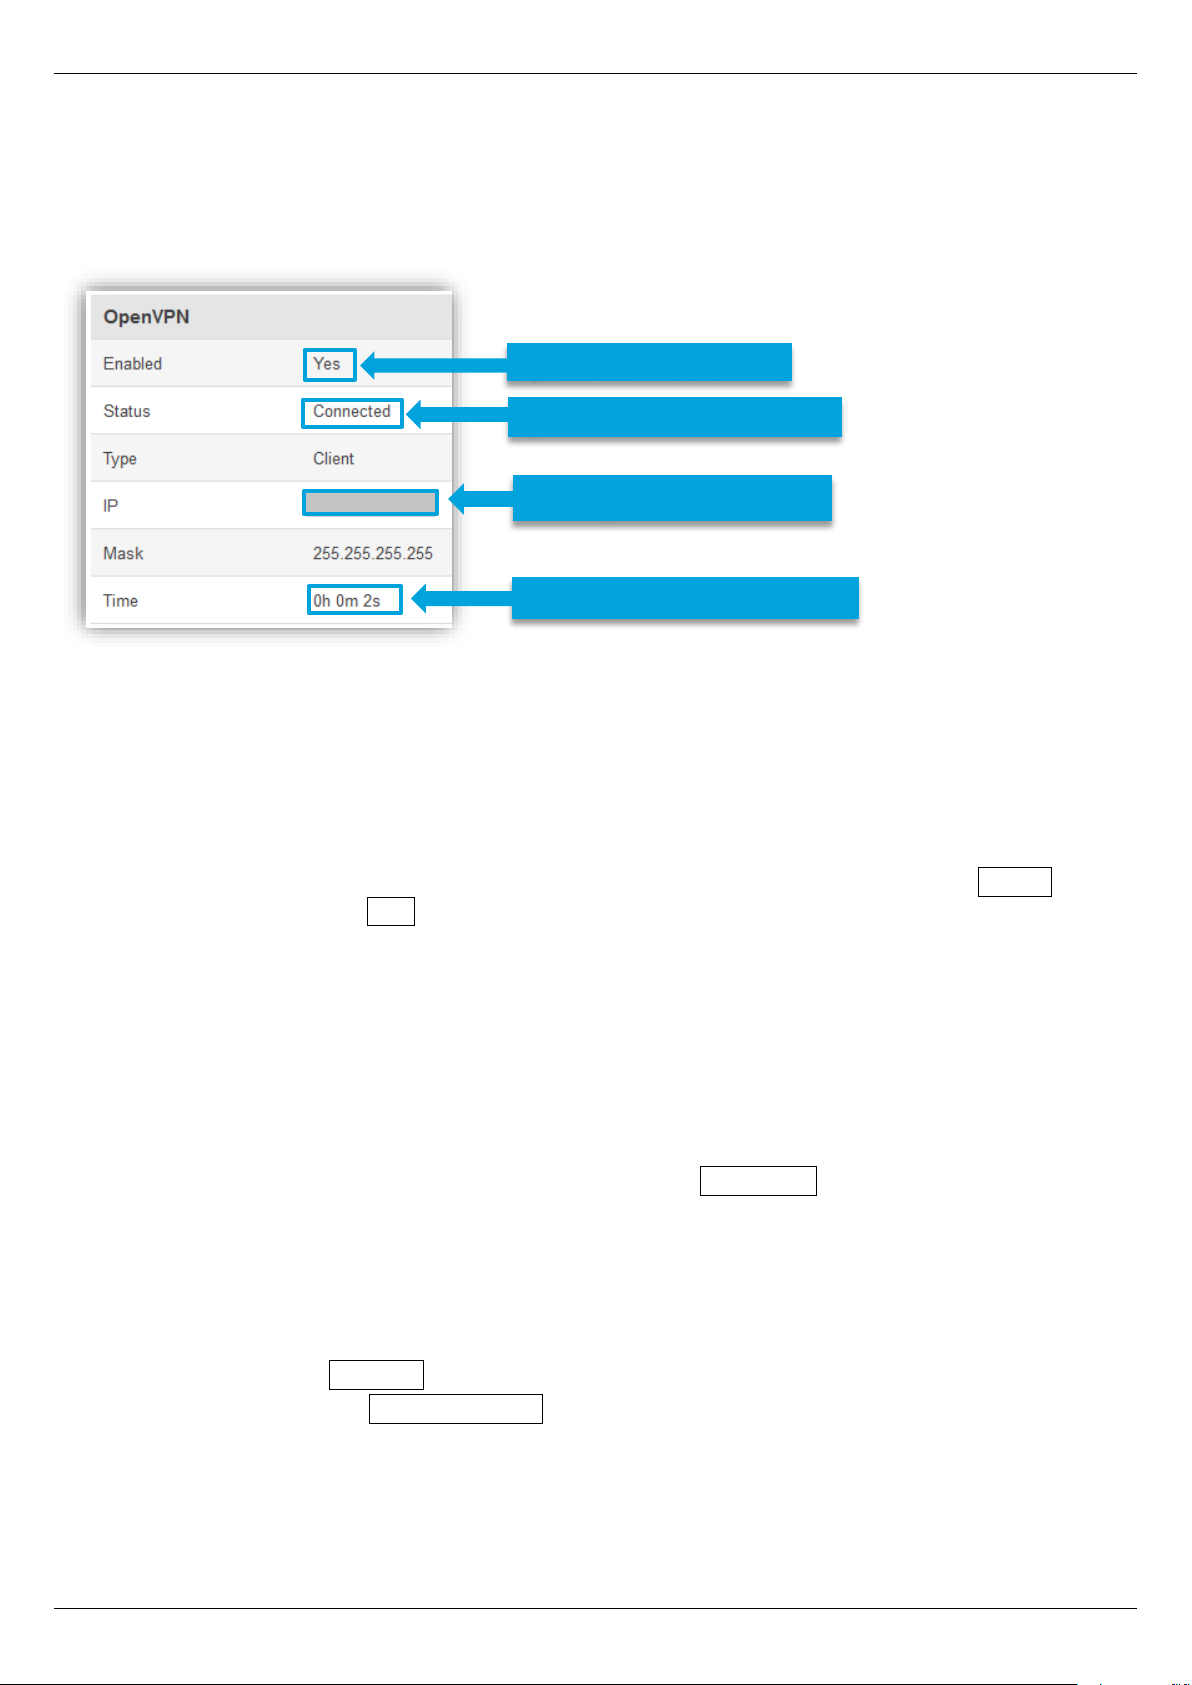
4.2.3 OpenVPN connection status
Display the OpenVPN connection status of the MX530/MX880.
Status → Network: OpenVPN
4.3 NTP time server (automatic time synchronization)
The automatic time synchronization is already preset for the NTP Server time.mdex.de .
You can adjust or disable the settings under Services → NTP → General .
Under Services → NTP → Time Servers you can remove the default time server with Delete and
add another time server with Add.
4.4 Save configuration & import
The configuration of the MX530/MX880 can be saved and restored.
System → Config Profiles → Backup
Save configuration:
1. Under Backup Configuration, click on the button Download.
2. Select a location for the MX530/MX880 configuration file.
3. The MX530/MX880 configuration is saved as ‘backup…..tar.gz‘ file.
Import configuration:
1. Under Restore Configuration, select Upgrade from file.
2. Click on button Browse and select the desired configuration file.
3. Click on the button Upload archive.
4. The configuration file will now be loaded and the router will be restarted.
All current configuration settings will be overwritten!
5. After the restart, the loaded router configuration is enabled.
(The router is now reachable with the IP address and port of the new configuration.)
OpenVPN Client enabled
OpenVPN connection status
mdex OpenVPN IP address
OpenVPN connection duration
Page 42
Setup Guide - mdex Router MX530|MX880
Page 42
4.5 Reboot
With rebooting of the MX530/MX880 the configuration settings are retained. Only the mobile
connection (and possibly OpenVPN connection) is re-established.
The restart can be done with the following methods.
Restart via software setting:
Under System → Reboot you can reboot the MX530/MX880 by clicking on the button Reboot. The
settings stored in the MX530/MX880 are retained.
Restart via the RESET button:
Press the RESET button briefly (1-3 seconds) with a pointed object, then restart the MX530/MX880.
The saved settings are retained.
4.6 Reset to factory defaults
The MX530/MX880 can be reset to factory defaults using one of the following methods.
Reset by RESET button
The MX530/MX880 must be started. Once the boot process is complete, press the RESET button
with a pointed object for more than 5 seconds until all 5 LEDs of ‘Mobile signal strength’ light up,
then release.
The MX530/MX880 router is now reset to factory defaults.
The reset is complete as soon as you can reconnect to the URL http://192.168.0.1:8080.
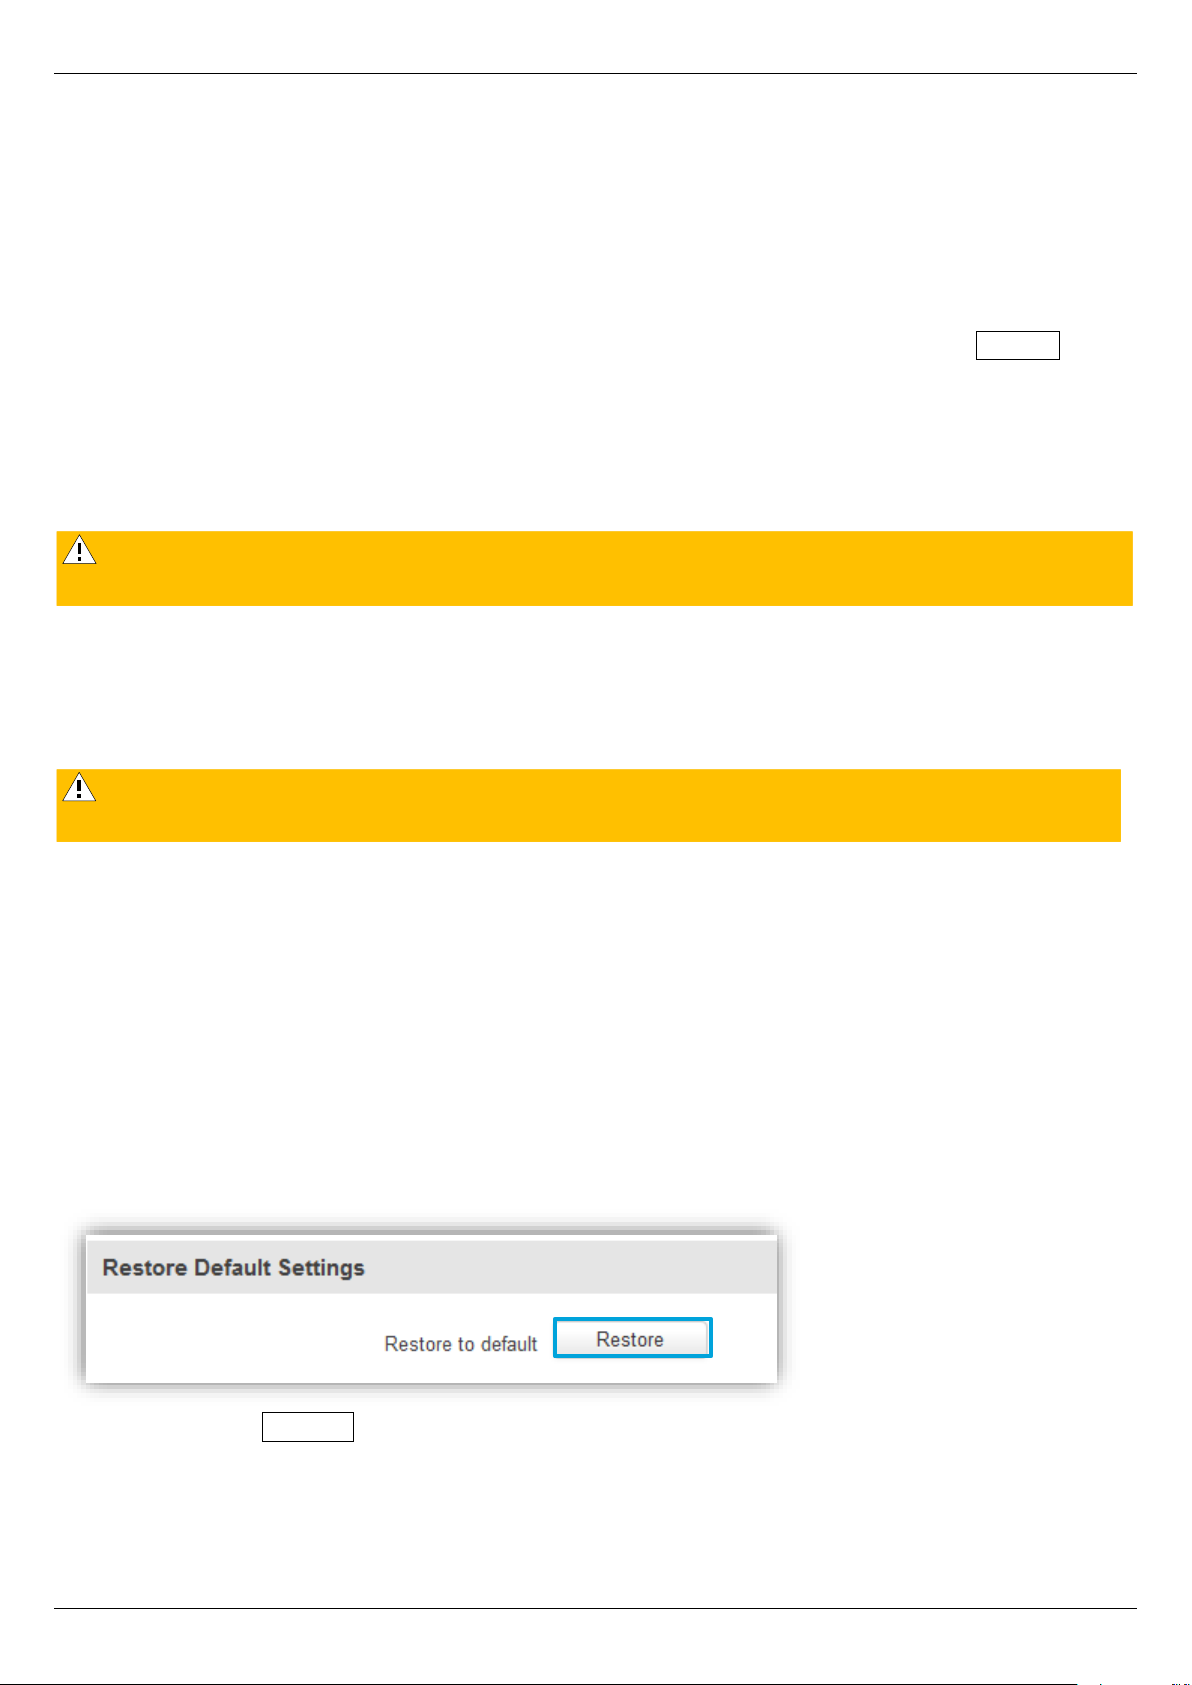
Reset by software setting
System → Admin Settings
Click on the button Restore and confirm the message ‘Really Restore all changes?‘.
The MX530/MX880 router is now reset to factory defaults.
If you press and hold the reset button for more than 5 seconds, all settings that have already
been made will be deleted and the MX530/MX880 will be reset to factory defaults.
All settings already made will be deleted. The MX530/MX880 is reset to the default setting as
per Section 1.3 Preconfiguration (factory default) (Page 6).
Page 43
Setup Guide - mdex Router MX530|MX880
Page 43
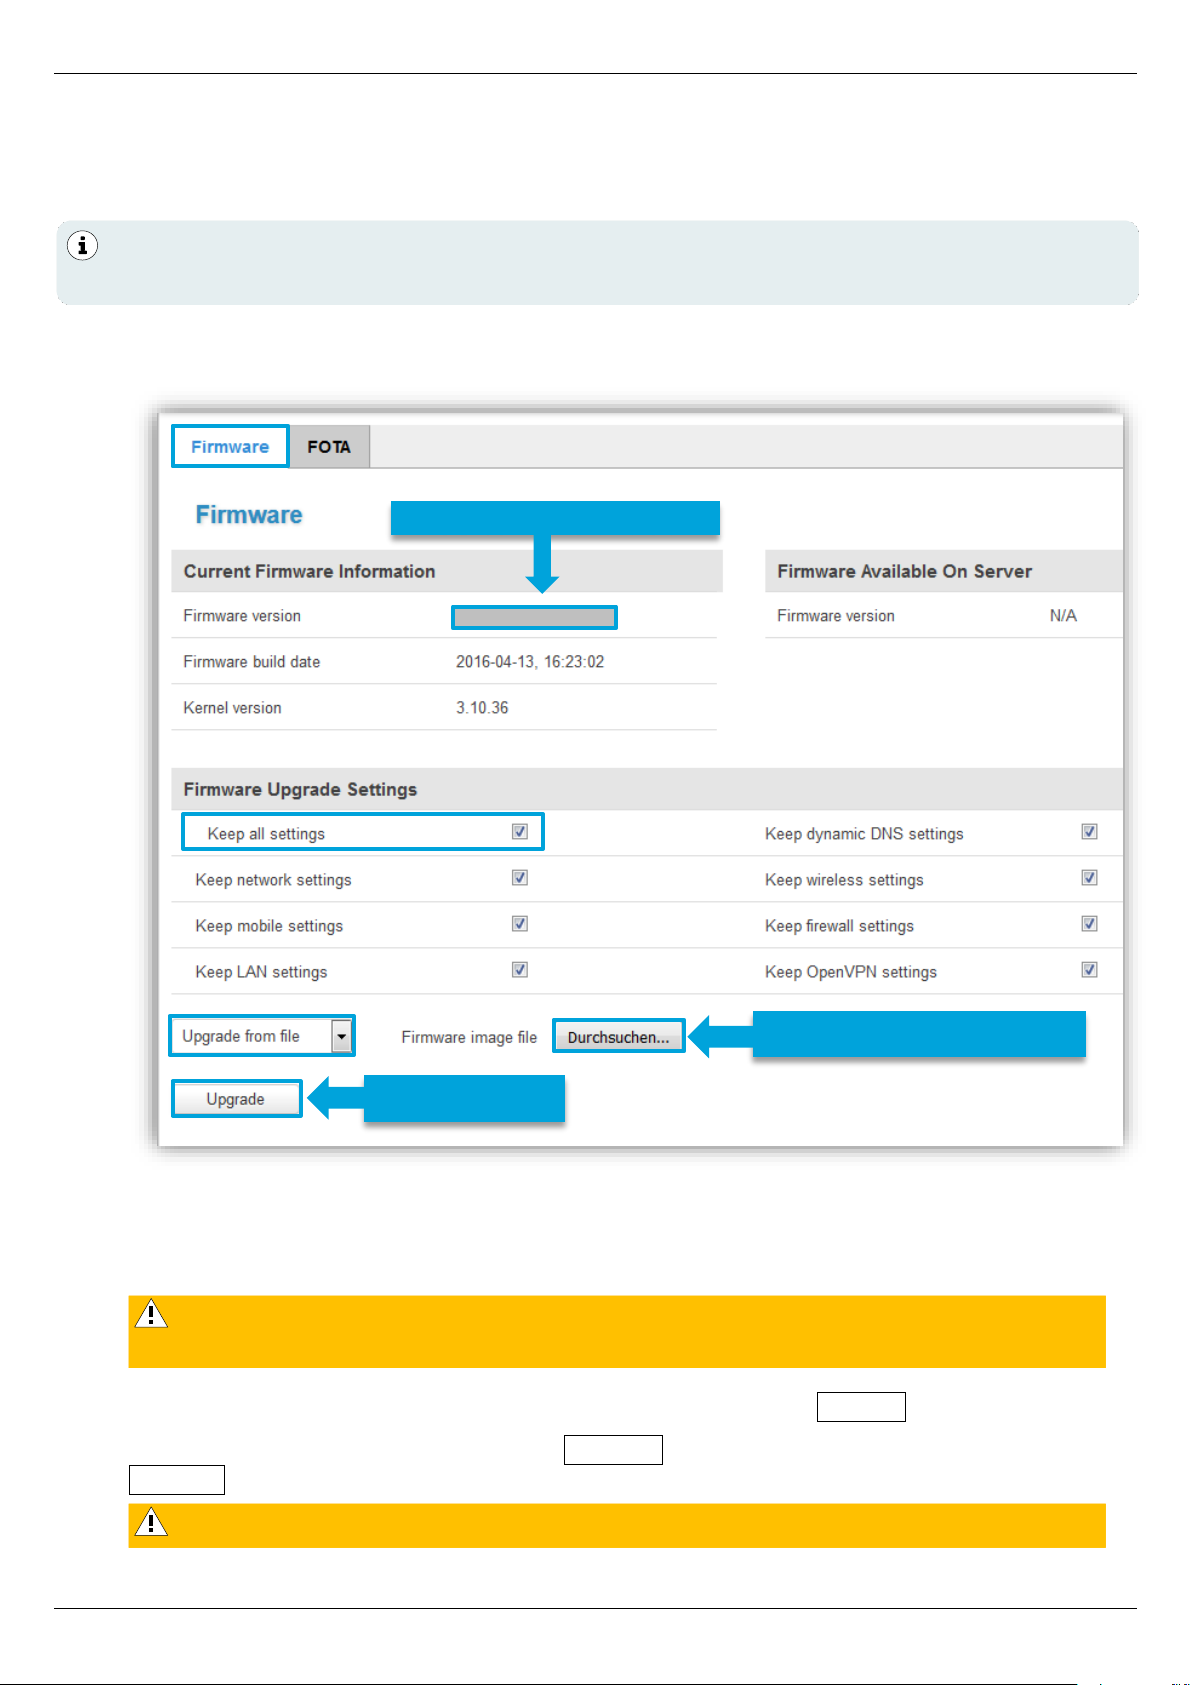
4.7 Firmware Update
If a new firmware of the MX530/MX880 is available, it can be updated.
System →Firmware
Perform firmware update:
1. The setting ‘Keep all settings’ should be enabled.
2. Set Upgrade from file and select the new firmware file (*.bin) at Browse.
3. To upgrade the firmware, click on button Upgrade and confirm the following message with
Proceed. The update will be executed.
Current router firmware can be downloaded from the mdex Support page at
https://wiki.mdex.de → Downloads
If the options available under Firmware Upgrade Settings are disabled, the current
configuration settings are reset during the update!
The power supply must not be interrupted during the update!
1. Select new firmware
2. Start update
Installed firmware version
Page 44
Setup Guide - mdex Router MX530|MX880
Page 44
4.8 Expert Mode
Experienced users will find additional setting options in Expert Mode for using additional functions of
the MX530/MX880.
To enable Expert Mode you must click on Expert Mode: off at top right.
The status then changes to Expert Mode: on.
4.9 IPsec connection
To establish an IPsec connection to your own IPsec VPN router connected to the MX530/MX880,
please note the following setup steps:
1. Connect the IPsec VPN router to a LAN port and assign it an IP address. See also Section
2.6.1 Connecting of only one terminal device (Page 17).
Please note that the MX530/MX880 LAN IP must be used as default gateway and DNS server.
2. Set up a forwarding to the connected VPN router according to Section 3.9.1 Host Forwarding
(DMZ Configuration) (Page 32).
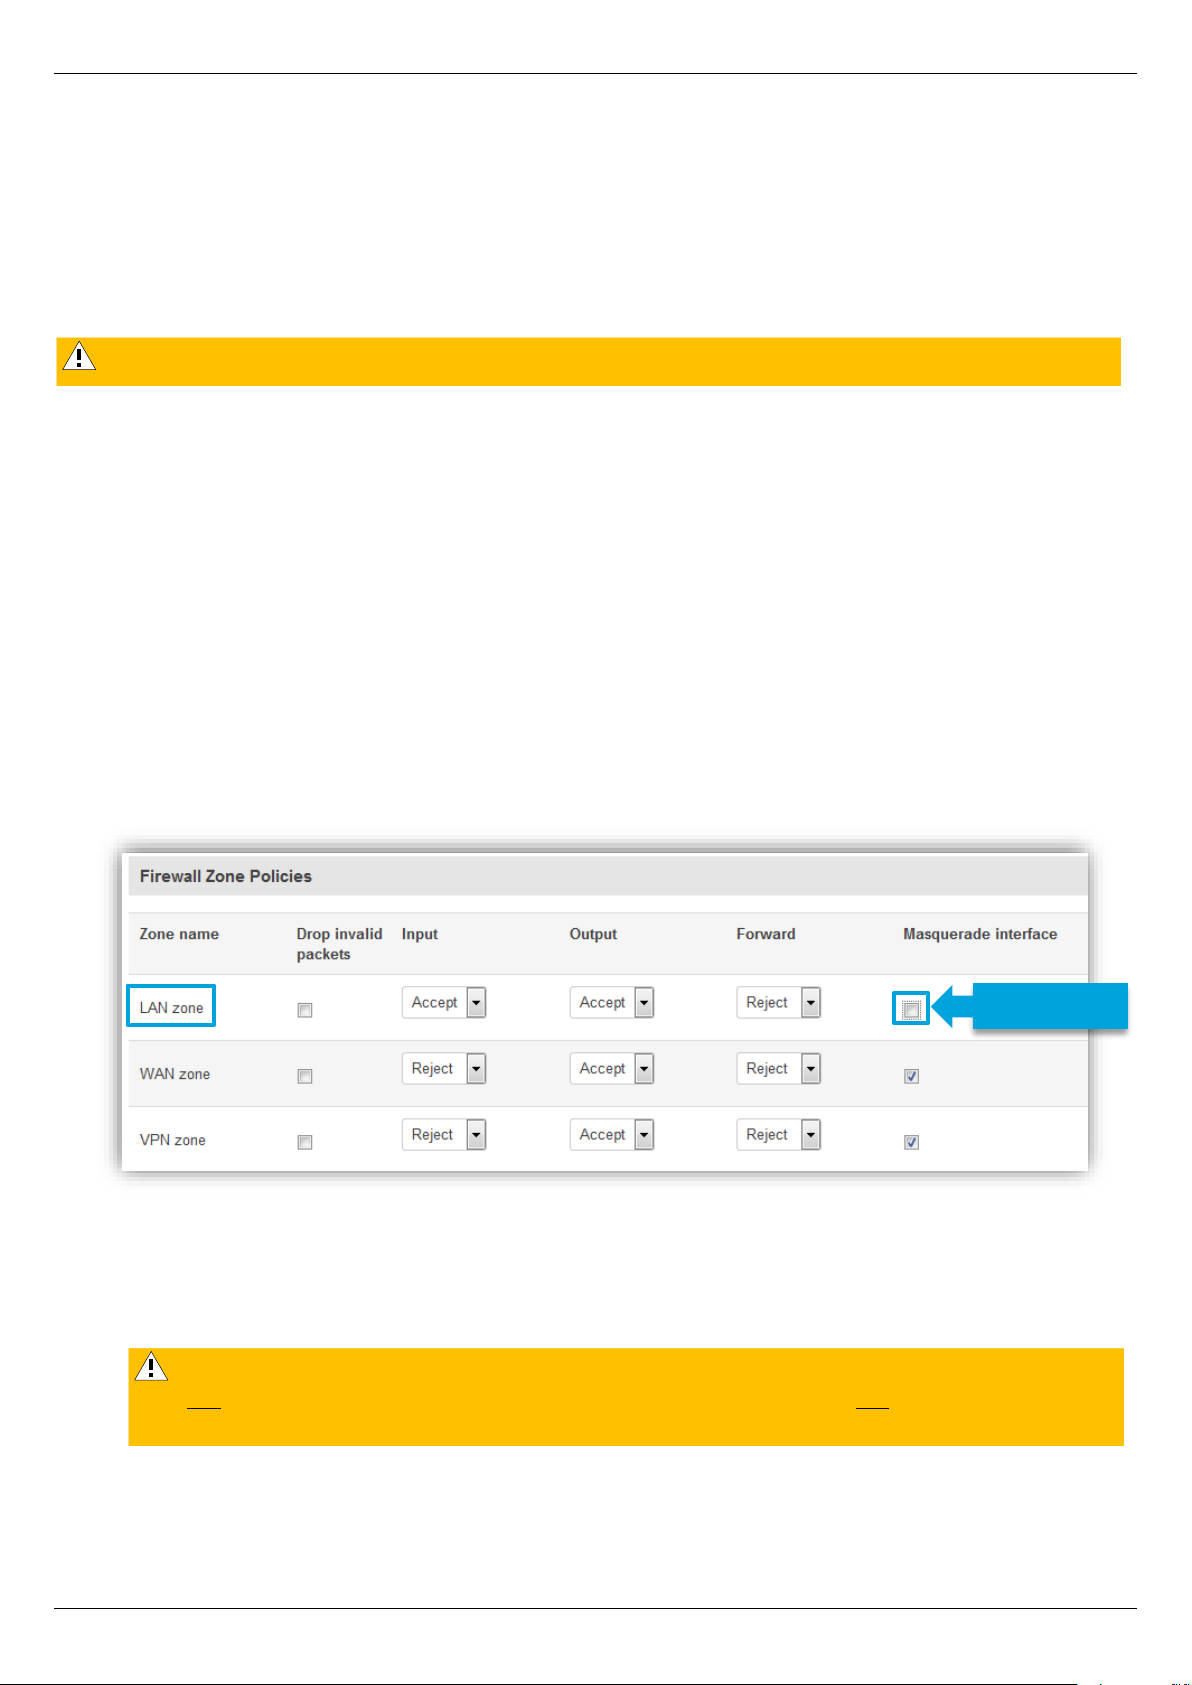
3. In the MX530/MX880 under Network → Firewall, the “Masquerade Interface” for the LAN
zone must be disabled.
4. In the IPsec VPN settings of your VPN routers/clients, enable the option NAT Traversal (NATT). Otherwise, it is usually not possible to establish an IPsec connection.
5. All further required settings for an IPsec VPN connection can be found in the instructions of
your used IPsec VPN router.
The mdex Support can not support the additional functions and settings of the Expert Mode.
The integrated IPsec client of MX530/MX880 is only available in Expert Mode and is
not part of the mdex scope of services. The mdex Support can not support you in
configuring the integrated IPsec client.
Disable
Page 45

Setup Guide - mdex Router MX530|MX880
Page 45
5 Important informations
Safety Instructions
This Section describes the safety instructions to be followed. These apply in the Federal Republic of
Germany. When used in other countries, the relevant national regulations must be observed.
Disruptions of other devices
Using the router may interfere with other devices. The use of the router should be avoided in the
following areas:
• Where there is a risk of disrupting the function of other electronic devices, such as in hospitals,
airports, airplanes, etc.
• Where there is a risk of explosion, such as gas stations, oil refineries, etc.
It is your responsibility to comply with an applicable statutory regulations and environmental laws. Do
not disassemble the router. Any indication of tampering will void the warranty. Follow the instructions
for the correct wiring of the router. All devices should be connected to a stable power supply. The
wiring should comply with safety and fire protection requirements.
Use and operation
Always handle the router with care. Avoid direct contact with connections and pins as electrostatic
discharge can damage the router.
The system integrator is responsible for the functioning of the final product; therefore, please pay
attention to the external components of the router and, if necessary, to installation problems as there
is a risk of disruption of external devices or system security.
• Do not disassemble the router and do not open it while in use.
• Do not drop the router and prevent shocks to avoid damages to the internal electronics. The
router must not be installed in areas where it is subject to strong impacts and shocks.
• Do not use harsh chemicals, solvents or cleaning agents to clean the router.
• Do not expose the router to liquids (rain, drinks, etc.). It is not waterproof.
• Make sure the router is operated under the specified temperature and humidity conditions.
• Do not store or operate the router in dusty, dirty places. Connections, plugs and other
mechanical parts could be damaged.
• Do not install the router in the area with disruptive electrical fields such as those produced by
fluorescent lamps, machines and televisions. Such sources of interference may affect the
operation of the router.
• The router's power cable also serves as the main shutdown device.
• For safety reasons, when using plug-in power supply, the power outlet must be in the
immediate vicinity of the router and easily accessible at all times during operation.
• If there is smoke, unusual odours or noticeable noises, unplug the power plug from the main
socket.
• Do not touch the router or plug-in power supply with wet hands. Otherwise, interference, short
circuits or electric shocks may occur.
• The router includes removable hardware that may pose a risk of suffocation. Always keep the
router and its accessories away from children!
Page 46
Setup Guide - mdex Router MX530|MX880
Page 46
• No LAN/WAN (Power over Ethernet) powered network cable may be connected to the
LAN/WAN sockets! The PoE voltage would destroy the MX530/MX880!
Environmental conditions
Operation of the router is permitted in the following areas:
• Temperature range of the router: MX530: -40° to +70° Celsius | MX880: -30° to +60° Celsius)
• Temperature range of the plug-in power supply: 0° to +40° Celsius)
• The humidity should be in the range of 10% to 90% (non-condensing).
Use the devices only in dry environments.
Attention: Operating outside the permissible range can significantly shorten the service life of the
router.
EU Declaration of Conformity
The mdex MX530/MX880 router complies with the basic requirements of Directive 2014/53/EU. The
complete EU Declaration of Conformity can be downloaded from wiki.mdex.de/Support/DoC .
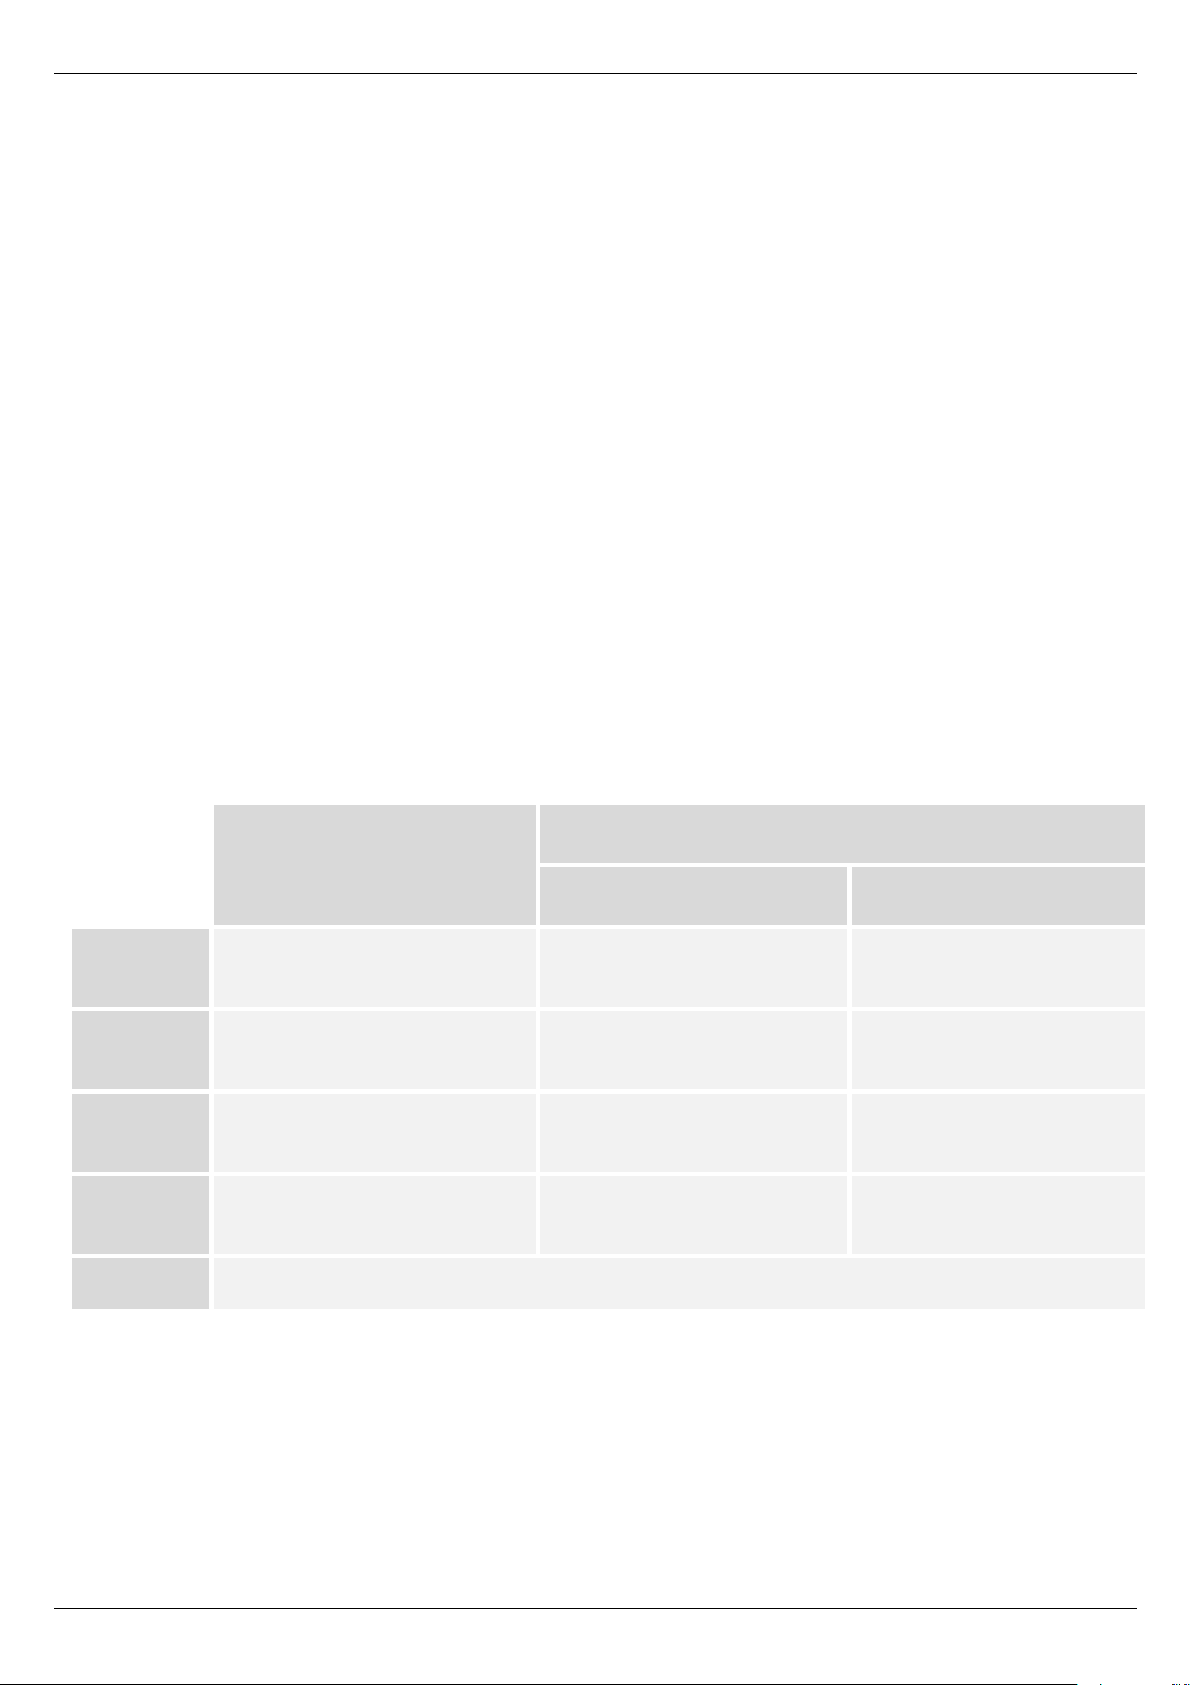
Frequency bands and max. transmission powers
MX530
MX880
Up to Serial 08xxxxx
From Serial 10xxxxxxxx
LTE-FDD:
-
B1/B2/B3/B5/B7/B8/B20,
23 dBm
B1/B3/B5/B7/B8/B20,
23 dBm
LTE-TDD - -
B38/B40/B41,
23 dBm
UMTS:
900/2100 MHz,
24 dBm
850/900/1900/2100 MHz,
24 dBm
850/900/2100 MHz,
24 dBm
GSM:
850/900/1800/1900 MHz,
33/33/30/30 dBm
850/900/1800/1900 MHz,
33/33/30/30 dBm
900/1800 MHz,
33/30 dBm
WLAN:
2400 MHz to 2483.5 MHz, 20 dBm
Page 47

Setup Guide - mdex Router MX530|MX880
Page 47
Manufacturer's specifications.
The mdex MX530/MX880 router has been produced by Teltonika:
Teltonika UAB, Saltoniskiu st. 10c, LT-08105, Vilnius, Lithuania
Export Notes
This product is subject to European/German and/or US export regulations. Any export or re-export
subject to approval requires the approval of the competent authorities. According to the current
regulations, the following export classifications must be observed for this product: ECCN/AL:
5A002.a.1, TSU as per EAR 740.13(e). The current version of the export list can be found on the
website of the Federal Office of Economics and Export Control (BAFA).
Note: The above export list item has been compiled for informational purposes to the best of our knowledge
and belief and should be used to classify the export together with the export provisions. The exporters are
responsible for complying with all trade regulations, including export regulations, and rely on this information at
their own risk and responsibility.
Customer service
Please contact mdex Support if the information in these safety instructions proves to be insufficient or
the router does not work properly:
Address: mdex GmbH, Bäckerbarg 6, 22889 Tangstedt, Germany
Internet: www.mdex.de
e-mail: [email protected]
Tel.: +49 (0)4109-555 444
Disposal
The router as well as all electronic parts included in the scope of delivery must not
be disposed of in the household waste. This can be recognised by the marking with
the crossed-out wheelie bin symbol . Please dispose of the router and the electronic
parts supplied with it after expiry of their service life for reuse or recycling in
accordance with the disposal regulations applicable at the installation site at the
time. This will avoid harmful effects on the environment and human health.
You can also return the router and the electronic parts included in the scope of
delivery to mdex at your expense for proper disposal:
mdex GmbH, Bäckerbarg 6, D-22889 Tangstedt, Deutschland
mdex GmbH
Bäckerbarg 6
22889 Tangstedt
Germany
Internet: http://www.mdex.de
e-mail: [email protected]
Tel.: +49 (0)4109-555 444
Page 48

Setup Guide - mdex Router MX530|MX880
Page 48
Open Source license notes
The MX Router product line also includes so-called Open Source Software, manufactured by third parties and
released for free use by all. The Open Source Software is under special Open Source Software licenses and the
copyright of third parties. The rights of the customer to use the Open Source Software are governed in detail by the
respective open Source Software licenses.
The Open Source Software under GNU General Public License (GPL) or GNU Lesser General Public License (LGPL)
is made available and used without any warranty or liability of the programmers who created the software. For
details, please refer to the respective license terms.
You can find the Open Source Software when downloading the software in the Zip archive and when purchasing the
product on the supplied data medium (USB stick or CD/DVD). The licenses mentioned above are directly available to
you in the directory "Licenses". In the "Source code" directory, you will find the corresponding source code for the
Open Source Software, with the licenses applicable to the various software components.
You may edit and reverse engineer any part of the Software for your own use, provided that such software
components are linked to program libraries under the LGPL. Disclosure of the information obtained from the
reengineering and the processed software, however, is not permitted.
If the software is subject to the GPL, LGPL or the Clarified Artistic License or if the license provisions otherwise
stipulate that the source code must be made available, we will send it to you at any time upon request and make a
binding offer to that extent. If in this case the delivery is required on a data medium, then the shipment takes place
against payment of a flat rate amount of EUR 10.00. If our costs for the production and the dispatch of the data
medium should be lower, we calculate only this smaller amount.
Our offer to ship the source code upon request is valid for a period of three years after the product has been
distributed by us, or at least as long as we provide support and replacement parts for the product. In this respect,
inquiries should be sent (if possible stating the serial number of the purchased product) to the following address:
mdex GmbH
Bäckerbarg 6
22889 Tangstedt
Germany
Fax: +49 4109 555 55
e-mail: [email protected]
 Loading...