

MCZ KLIN COMFORT AIR 8 M1, TILDA COMFORT AIR 10 M1 Installation Manual
INSTALLATION GUIDE GB
SEALED PELLET STOVE
KLIN COMFORT AIR 8 M1
TILDA COMFORT AIR 10 M1
PART 2 - OPERATION AND CLEANING
Instructions in English

TABLE OF CONTENTS
TABLE OF CONTENTS .................................................................................................. II
13FIRST STARTUP .....................................................................................................3
14SYSTEM REQUIREMENTS .........................................................................................4
15FIRST APP STARTUP AND ASSOCIATION WITH MCZ STOVES ......................................5
16STOVE ACCESSORY CONFIGURATION ........................................................................8
17EMERGENCY PANEL ..............................................................................................10
18EMERGENCY PANEL FUNCTIONS ............................................................................11
19MANUAL CONFIGURATION ....................................................................................12
20APP FUNCTIONS...................................................................................................13
21BASIC SET SCREEN ................................................................................................17
22OPERATION SCREEN .............................................................................................26
23ECO STOP .............................................................................................................27
24SLEEP ..................................................................................................................28
25TIMER .................................................................................................................29
26SETTINGS MENU ..................................................................................................33
27ACTIVATE FEED SCREW .........................................................................................34
28RECIPES ..............................................................................................................35
29SUMMER/WINTER ................................................................................................ 36
30TECHNICAL MENU ................................................................................................37
31SOFTWARE VERSION ............................................................................................39
32INFO MENU..........................................................................................................41
33SAFETY DEVICES ..................................................................................................42
34ALARMS ..............................................................................................................43
35RECOMMENDATIONS FOR SAFE USE ....................................................................... 49
36CLEANING ...........................................................................................................50
37TROUBLESHOOTING .............................................................................................58
38CIRCUIT BOARD ...................................................................................................61
II
13-FIRST START-UP
WARNINGS BEFORE IGNITION
GENERAL PRECAUTIONS
Remove all parts that may burn from the brazier and the glass (manual, various adhesive labels or any polystyrene).
Check that the brazier is positioned correctly and rests properly on the base.
The rst ignition may not be successful as the feed screw is empty and does not always manage to load the brazier
with the required amount of pellets in time to light the ame.
CLEAR THE FAILED IGNITION ALARM FROM THE STOVE PANEL OR APP.
REMOVE THE PELLETS LEFT IN THE BRAZIER AND REPEAT THE IGNITION. (SEE “SAFETY DEVICES/ALARMS” PARAGRAPH)
If after repeated attempts, the ame fails to ignite, despite a regular ow of pellets, check the correct positioning of the brazier, which
must rest snugly against the slots. If no anomaly is found during this inspection, there may be a problem with the product components
or installation may not be correct.
REMOVE THE PELLETS FROM THE BRAZIER AND CONTACT AN AUTHORISED TECHNICIAN.
Do not touch the stove during the rst lighting, as it is during this phase that the paint sets. If you touch the paint,
you may expose the steel surface.
It is good practice to ensure eective ventilation in the room during the initial start-up, as the stove will emit some
smoke and smell of paint.
If necessary, touch up the paint with the spray can of the specic colour.
Do not stand close to the stove and, as mentioned, air the room. The smoke and smell of paint will disappear after about an hour of
operation, however, they are not harmful in any case.
The product will be subject to expansion and contraction during the start-up and cooling stages, therefore slight
creaking noises may be heard. This is absolutely normal as the structure is made of laminated steel and must not
be considered a defect.
Upon rst ignition, for the rst pellet tank, it is recommended to start the stove at maximum power so that the structure and the smell
of the paint settle more quickly.
It is recommended to install the ceramic or Serpentine stone cladding after the rst successful ignition.
DO NOT EXPECT HEATING EFFICIENCY IMMEDIATELY!!!
Technical Dept. - All rights reserved - Reproduction prohibited
3

14-SYSTEM REQUIREMENTS
APP
The MCZ -MAESTRO App is already available on the “Handheld remote control” accessory or will be available in various playstores.
STOVE
Equipped with MAESTRO system
OPERATION
For the utmost versatility of use, two Wi-Fi modules have been designed, supporting priority connection with your smartphone and/or
handheld remote control (optional).
The stove’s operation status, room temperature, operating parameters (such as ventilation, power, etc.) and any alarms may be checked
remotely.
Attention!
The App is already available in English on the “Handheld remote control” accessory as the language used on the
telephone is set by default. If the App is downloaded onto a personal smartphone, it similarly adopts the language
already in use on the phone. In either case, it is possible to open the “LANGUAGE” screen in the app and select the
desired language.
4
15-FIRST APP START-UP AND ASSOCIATION WITH MCZ STOVES
The app lets you communicate with MCZ stoves using two technologies:
• home Wi-Fi
• remote Wi-Fi
HOME WI-FI
Point-to-point connection between the telephone and the stove, to communicate with the stove without relying on routers or internet
connections. This is possible when the telephone and stove are located nearby (we recommend max 5 metres). The range of action
depends on the characteristics of the walls and the conformation of the home.
REMOTE WI-FI
Connection between the app and stove using an internet connection. With this technology you can communicate with the stove from
anywhere. Near the stove there must be a Wi-Fi router providing an internet connection and the mobile phone in turn must have a data
connection.
The rst time you start the app without having congured any devices, the app opens displaying the “device list” screen.
There are two ways to associate MCZ devices:
• automatically
• manually
Technical Dept. - All rights reserved - Reproduction prohibited
5
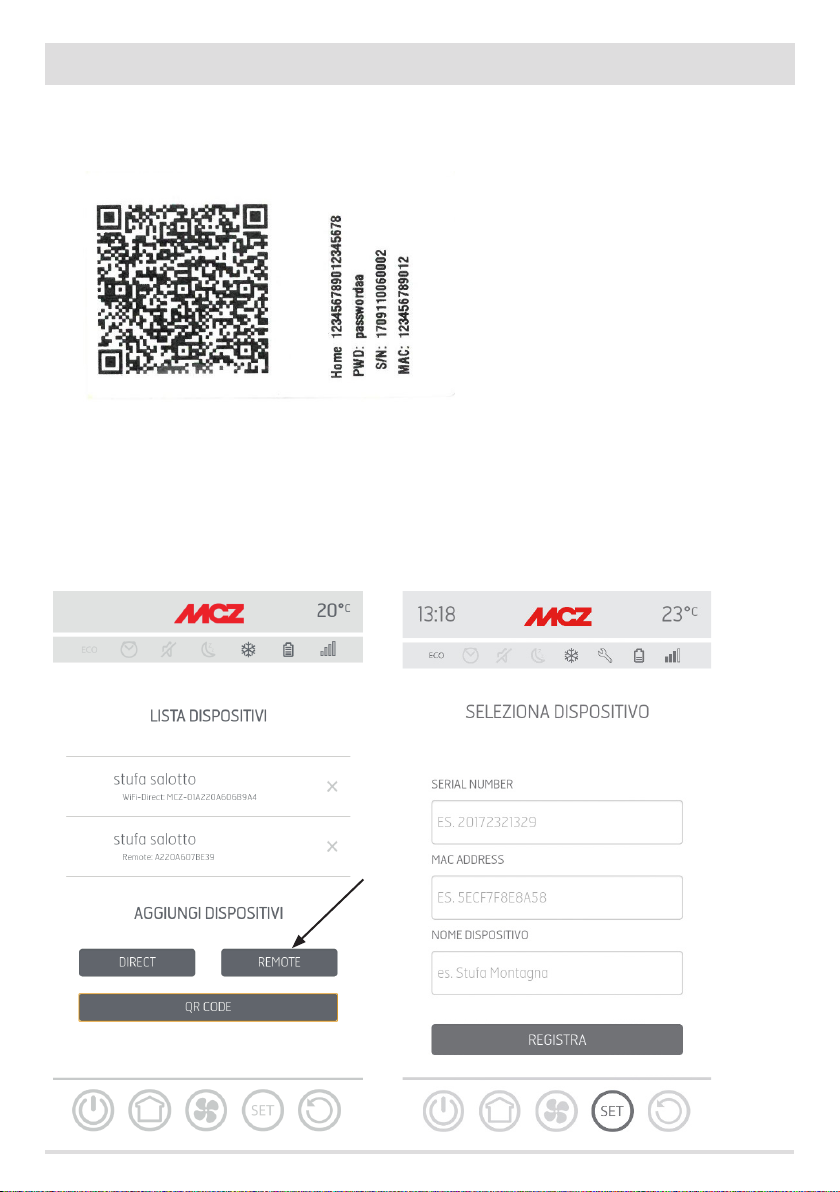
15-FIRST APP START-UP AND ASSOCIATION WITH MCZ STOVES
IMPORTANT!! Do not lose or remove the QR code from the stove. If the stove is reset and/or the smartphone and/or
handheld remote control are changed, you must have the QR code and passwords available to congure the system.
AUTOMATIC MODE
The QR code and the passwords are located at the back of the stove and in the warranty.
EXAMPLE OF QR AND PASSWORD LABEL
Scan the QR code using the camera of the device (accessory or smartphone) and acquire it.
When the code is acknowledged, the app will ask you to enter an identication number for the stove (for example “living room stove”) to
easily identify the stove/s in the list of congured devices.
This will automatically congure the app to work with both home WI-FI and remote WI-FI technology.
6
15-FIRST APP START-UP AND ASSOCIATION WITH MCZ STOVES
MANUAL MODE
The QR code and the passwords are located at the back of the stove and in the warranty. In this case, the codes must be used.
If the stove cannot be congured using the QR code, it can be done using the DIRECT or REMOTE key.
To congure operation in HOME WI-FI mode, click on the “DIRECT” key and the “select device” screen opens. The stoves nearby are scanned;
select your stove and enter the password (located near the QR code at the top) and a stove identication name (for example “living room
stove”) to easily identify the stove/s in the list of congured devices.
To congure operation in REMOTE WI-FI mode, click on the “REMOTE” key and the “SELECT DEVICE” screen opens. Fill in all the elds with
the codes on the label (near the QR code at the bottom) and a stove identication name (for example “living room stove”) to easily identify
the stove/s in the list of congured devices.
Technical Dept. - All rights reserved - Reproduction prohibited
7
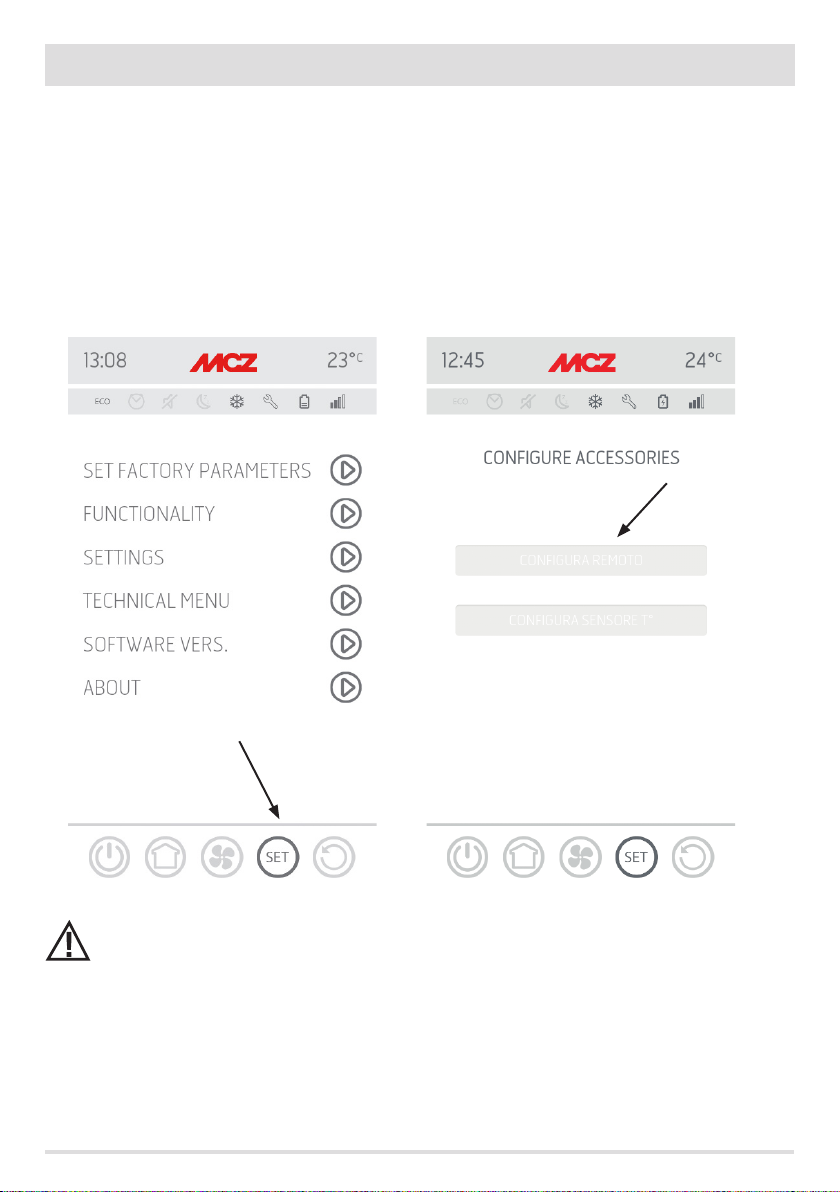
16-STOVE ACCESSORY CONFIGURATION
Once the app has been congured, you can communicate with the stove in Home mode and also congure stove accessories from the app:
• REMOTE WI-FI module (if any)
• WI-FI temperature probe (not supplied)
In order to congure the accessories, the mobile phone must be near the accessories.
CONFIGURATION OF REMOTE WI-FI MODULE FROM MCZ MAESTRO APP
To do this connect to the stove in home mode through the app. From the “settings” / “basic settings” menu, select the congure accessories
item: if there are still accessories to be congured, the two keys can be selected.
click on congure remote ------ a screen opens, displaying nearby Wi-Fi routers. Select the router providing internet connection and enter
the respective password. From now on, if the router provides a stable internet connection, it is possible to command the stove remotely.
REMOTE CONFIGURATION
T PROBE CONFIGURATION
The access password to the network by the Maestro App must have a maximum of 32 characters. For longer
passwords, for example generated automatically by the router upon initial installation, the length must be modied
according to the procedures for your router.
Additional functions
Once the remote stove Wi-Fi module has been connected to the home router, every time the router is available, the remote stove Wi-Fi
module will reconnect automatically.
If the router is replaced or the password is changed, the remote stove Wi-Fi module will revert to conguration mode as it can no longer
connect.
The WI-FI modules have an auto-reset mechanism.
8
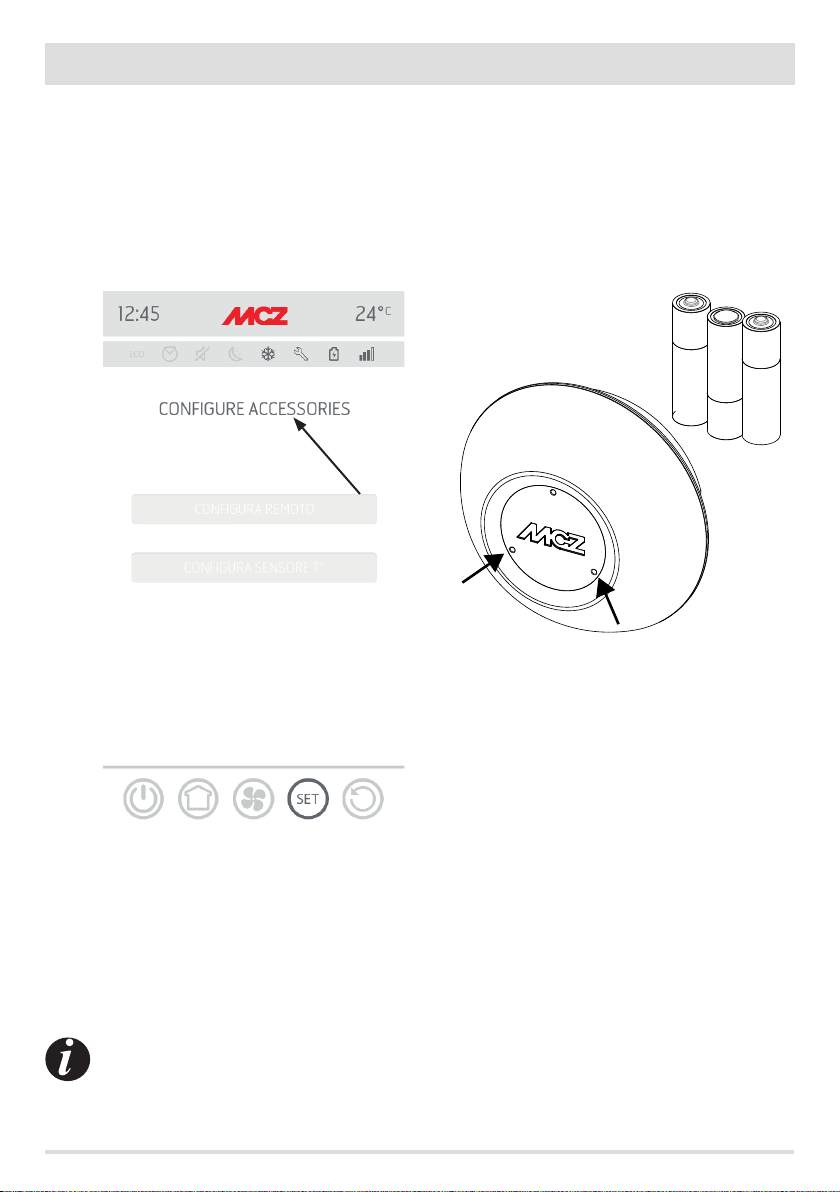
16-STOVE ACCESSORY CONFIGURATION
CONFIGURATION OF WI-FI TEMPERATURE PROBE FROM MCZ MAESTRO APP
The Wi-Fi temperature probe (ACCESSORY) is supplied without batteries. From when the batteries are inserted, the probe can be congured
within the next 8 minutes. Therefore insert the three AA batteries shortly before you are ready to proceed with the conguration.
So:
• insert two batteries immediately, then insert the third after placing the sensor next to the WiFi emergency panel (approximately 2
cm)
• wait for the beep-beep indicating that pairing has successfully occurred (it must occur within 10”)
• connect to the stove through the app in home mode
• access the settings - basic settings - accessories menu selecting the congure accessories item
REMOTE CONFIGURATION
T PROBE CONFIGURATION
TEMPERATURE SENSOR
If the Wi-Fi temperature probe is available for conguration, the key can be selected, while if the key stays disabled check that the probe
batteries are charged, or check that the maximum available time has not elapsed.
In this case, remove the batteries and put them back in, or press the reset button by inserting a paper clip in the hole to the right of the
sensor dome. From this time on, the 8 minutes for conguration restart.
If the probe is ready for conguration click the key in the app screen, click T° probe conguration ------ the screen will show the stoves
with which the Wi-Fi probe can be associated; select your stove and enter the home Wi-Fi password (see QR code label).
Once the Wi-Fi probe is connected, you can congure the stove to use the remote sensor; to do this use the shortcut by clicking on the
temperature indicator at the top right of the app screen and select the “Wi-Fi probe” as the temperature input. Or from the setup menu
choose congure ambient input and select the “Wi-Fi probe” temperature input.
Should it be necessary to reset the WiFi probe, because already coupled to another device or congured incorrectly,
use two paper clips. With the rst one, press and hold the key below the bottom left hole and with the other one,
press the key below the right hole once.
Repeat the conguration procedure indicated at the start of the page.
Technical Dept. - All rights reserved - Reproduction prohibited
9
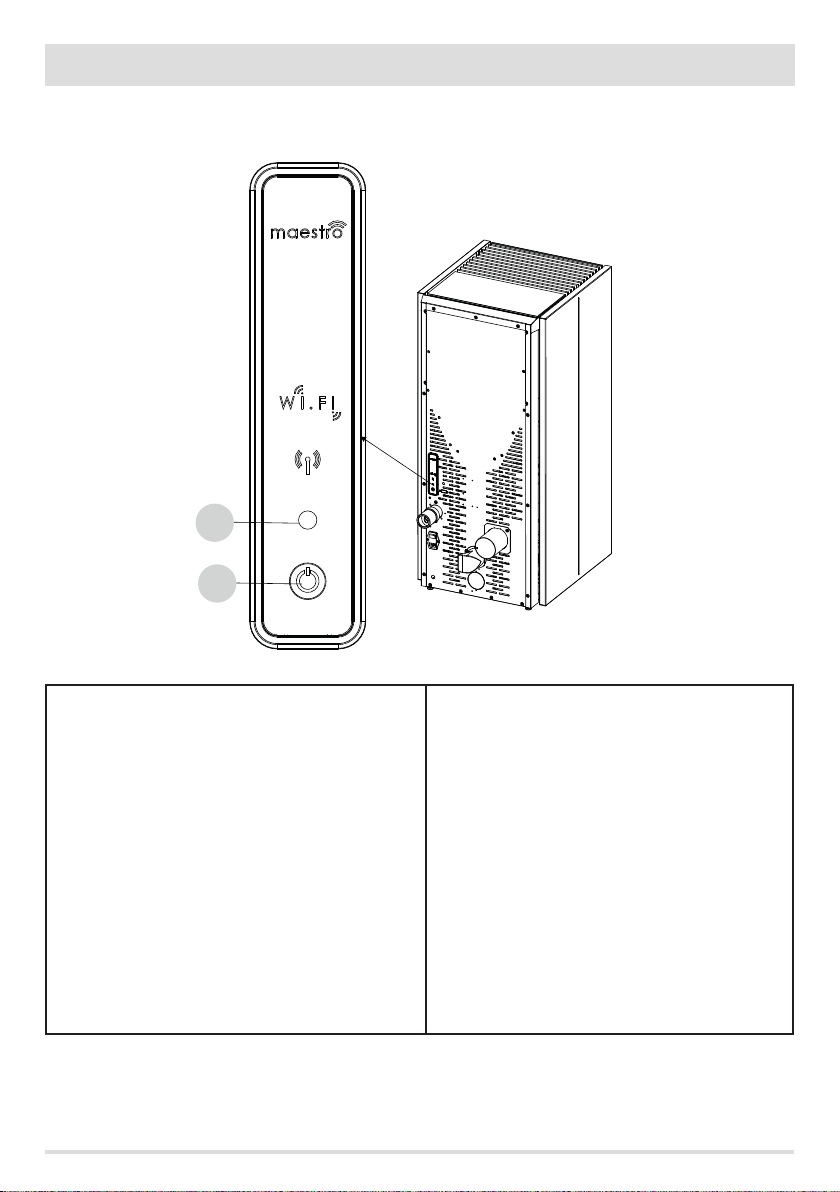
17-EMERGENCY PANEL
At the back of the stove, there is the emergency panel that provides some information about the stove status.
A
B
KEY
A - MULTICOLOUR LED
Green LED that indicates:
• Stove in OPERATION
Red LED that indicates:
• Stove OFF
Blue LED that indicates:
• Stove START-UP
Yellow LED that indicates:
• Stove cooling for SHUTDOWN
Flashing red LED that indicates:
• Stove in ALARM conditions
10
B - BUTTON - functions
Turns the product ON
Turns the product OFF
Changes the operating POWER:
• 1 beep = LOW
• 3 beeps = MEDIUM
• 5 beeps = HIGH
ALARM RESET

18-EMERGENCY PANEL FUNCTIONS
The emergency panel provides the following information:
• through a multicolour LED (A) it provides information about the stove status (o-starting-up-in operation-cooling for shutdown-in
error conditions)
• using the button (B) the following functions can be activated:
• if the product triggered an error ----- reset the error by pressing the key for more than 3 seconds
Attention! Alarms A01, A02, A03, A05 and A21 can only be reset from the panel and not from the app.
• if the product is o ------- switch it on (press the key for more than 3 seconds)
• if the product has completed the ignition procedure (green LED on), press the key (briey for 0.5 seconds) to change the power
according to this diagram:
• LOW ame power 1 and ventilation level 1
• MEDIUM ame power 3 and ventilation level 3
• HIGH ame power 5 and ventilation level 5
Every time the power is changed, a buzzer will indicate the selected power on the stove:
• 1 beep = LOW
• 3 beeps = MEDIUM
• 5 beeps = HIGH
If the product is running, switch it o by pressing the key for 3 seconds.
Attention! If the user erroneously presses the button for more than 10 seconds with the stove o, it will automatically
place the stove in download mode to update the rmware (operation restricted to an authorised technician). This
way, the stove remains on standby, with an intermittent buzzer, for a USB key containing the rmware update. If a
USB key is not inserted, the stove exits this mode after 10 seconds.
Technical Dept. - All rights reserved - Reproduction prohibited
11

19-MANUAL CONFIGURATION
If the remote Wi-Fi and temperature probe congurations do not work automatically, you must proceed with manual conguration.
MANUAL REMOTE WI-FI MODULE CONFIGURATION
From a mobile phone -> Wi-Fi settings menu, enable cellular Wi-Fi.
Search for “MCZ-RemoteService” from among the Wi-Fi networks available and connect to it (no password is required since it is an open
network).
Once connected to the following network, open the phone’s browser and enter the following address: 192.168.1.1.
A screen opens, displaying nearby Wi-Fi routers. Select the router providing internet connection and enter the respective password. From
now on, if the router provides a stable internet connection, it is possible to control the stove remotely.
Note: when the remote Wi-Fi module is congured correctly and connected to a router, the “MCZRemote Service” network disappears from
the list of available Wi-Fi networks.
MANUAL WI-FI TEMPERATURE PROBE CONFIGURATION
Once the 3 AA batteries are installed, the Wi-Fi temperature probe remains congurable for 8 minutes (ATTENTION! Only insert the
batteries just before proceeding with conguration).
Insert the batteries and start the procedure.
From a mobile phone -> Wi-Fi settings menu, enable cellular Wi-Fi.
Search for “MCZ-Sensor” from among the Wi-Fi networks available and connect to it (no password is required since it is an open network).
Once connected to the following network, open the phone’s browser and enter the following address: 192.168.1.1.
A window opens that displays the stoves that can be associated with the Wi-Fi probe. Select your stove and enter the Wi-Fi Home password
(on the QR code label)
Once the Wi-Fi probe is connected, you can congure the stove to use the remote sensor; to do so, open the MCZ MAESTRO APP, connect
to your previously congured stove, use the shortcut by clicking on the temperature indicator at the top right of the app screen and select
the “Wi-Fi probe” as the temperature input.
Or from the setup menu -> congure ambient input and select the “Wi-Fi probe” temperature input.
Notes: when the Wi-Fi temperature sensor has been congured correctly and connected to your MCZ stove, the “MCZ-Sensor” network
disappears from the list of Wi-Fi networks available.
12
20-APP FUNCTIONS
Once the devices are congured, the App will automatically try to connect to the last device used. If connection is successful, the App will
display the “I/O” screen. It is possible to switch on and use all stove functions from here.
If it tries to connect to the last device connected and something goes wrong, the App will display the list of congured devices.
Click the device you want to connect to for connection.
When connected, the icon of a stove together with the name of the selected stove will be displayed.
It is now possible to access all stove functions.
I/O SCREEN
SWITCHING THE EQUIPMENT OFF
To switch the equipment o, press and hold the ON-OFF button on the
remote control or on the APP. The acoustic beep conrms this phase has
started.
Alternatively, switch it o from the emergency panel by following the
instructions provided in the dedicated chapter
The equipment will start the shutdown process which involves
consuming the residual pellets in the brazier, the latter being cleaned
and the residual heat in the structure being disposed of.
During the disposal phase of the residual heat, the fans operate at about
80% of their output and the speed cannot be varied. This is determined
by the need for all the accumulated heat to be evacuated safely and
quickly. The switch-o phase can last 15 - 30 minutes depending on
the heat stored in the structure, determined by the duration and the
operating regime of the product throughout the day.
When the internal temperature drops below the set thresholds, the fans
for hot air and exhaust fume extraction will automatically switch o.
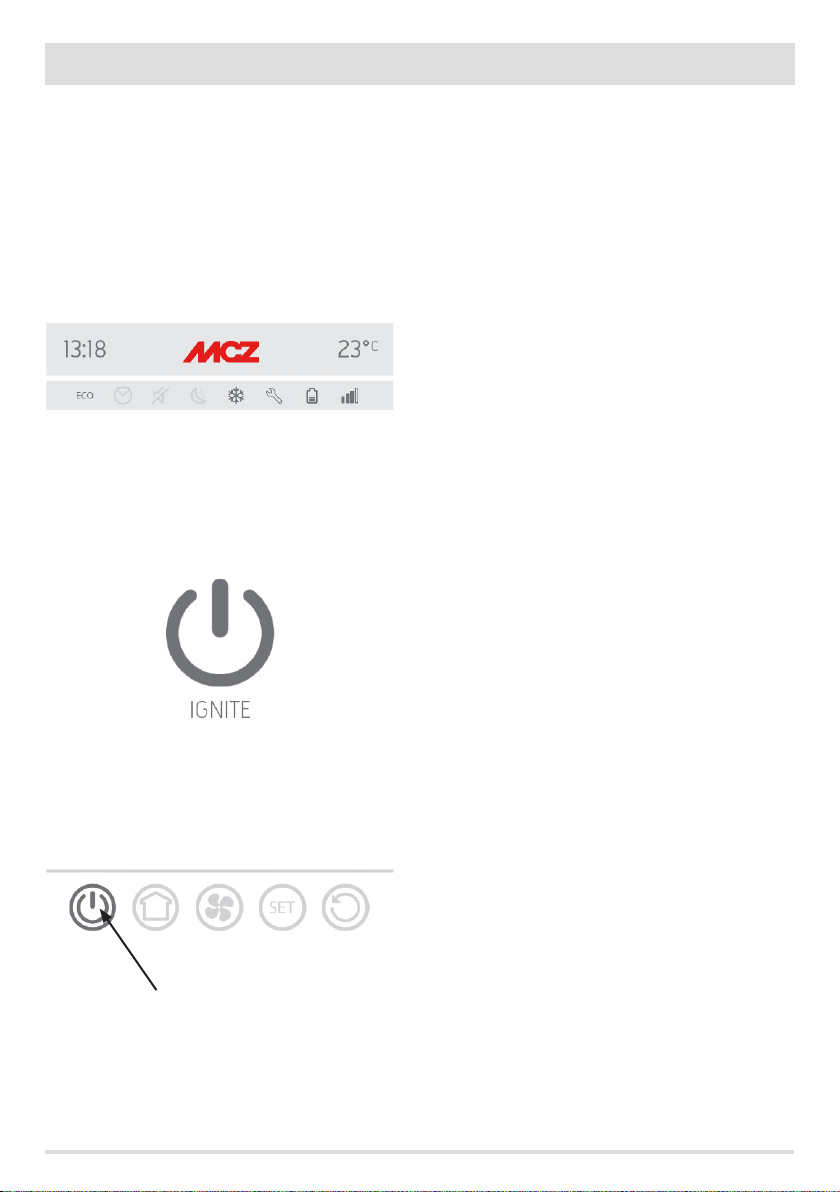
ON/OFF KEY
• START-UP
• SHUTDOWN
Technical Dept. - All rights reserved - Reproduction prohibited
13
20-APP FUNCTIONS
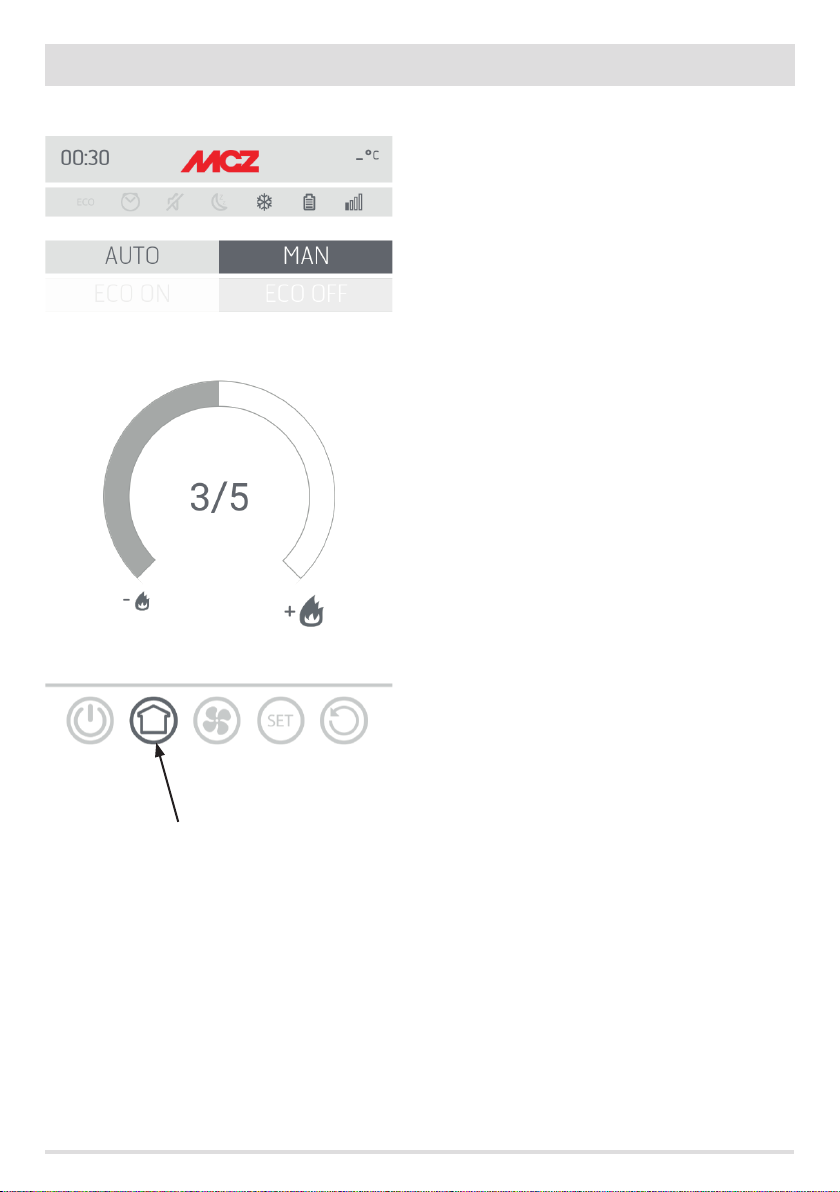
HOME SCREEN
To access the AUTO and MAN functions screen, press the key shown in the image.
From this screen, it is possible to manage the operating mode:
• manual operation
• automatic operation
AUTOMATIC OPERATION
In automatic mode, it is possible to set the desired room temperature and ecostop function
MANUAL OPERATION
In manual mode, it is possible to set the ame power. The ecostop function is not available during manual operation.
14

20-APP FUNCTIONS
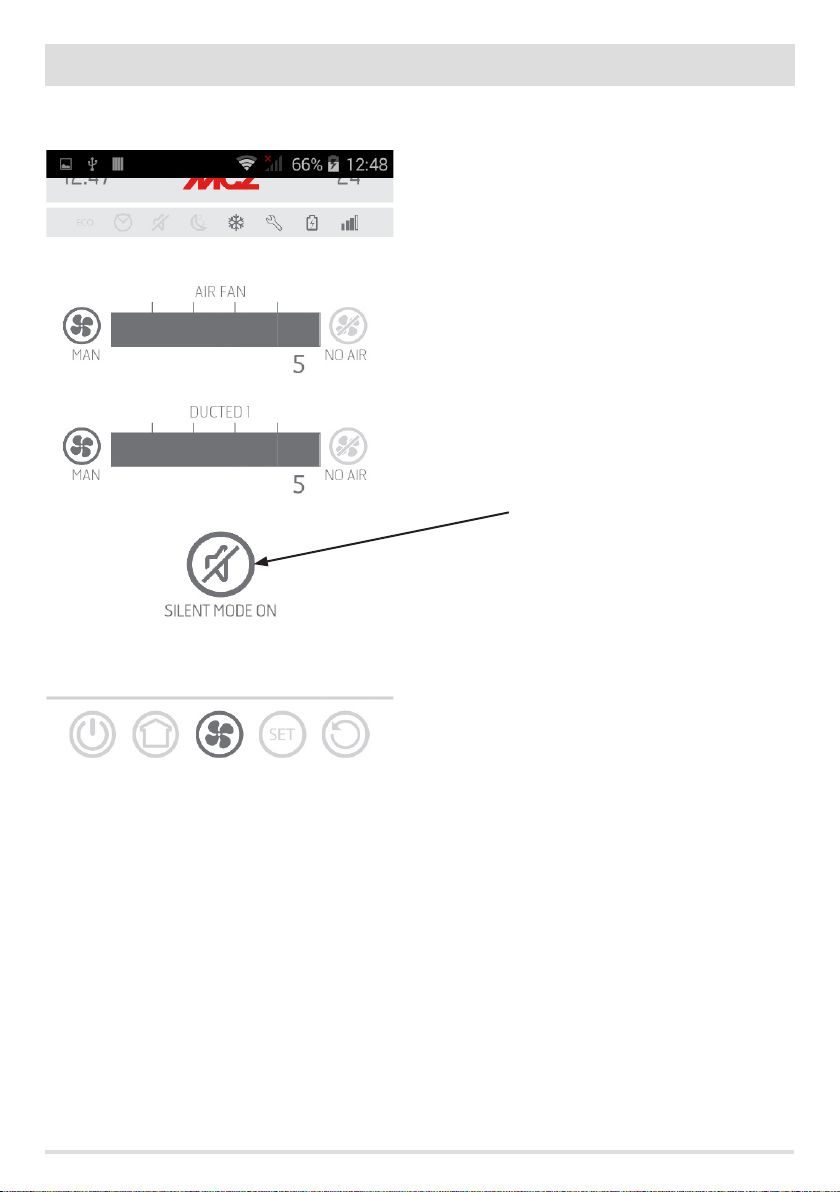
FAN SCREEN
This screen manages the fan power of each single fan.
There are 5 power levels that can be set.
Each fan has the option of automatic operation and the option to switch o the fan
If ventilation is MANUALLY set, the function which limits the maximum power of the stove according to the ventilation is enabled.
COMFORT AIR (3 FANS): maximum power level = total of the levels of ventilation/2.
AIR: maximum power level = twice the total of the levels of ventilation
Technical Dept. - All rights reserved - Reproduction prohibited
15
20-APP FUNCTIONS
VENTILATION - SILENT FUNCTION SCREEN
The SILENT function allows the stove to operate at the minimum power throughout the night, with no room ventilation. This function is
only available in AUTO and MAN mode(not in TIMER mode). The function is enabled by pressing the silent mode key.
Once the function is activated, the ame power goes to 1 and the ventilation switches o within about 10 minutes.
16

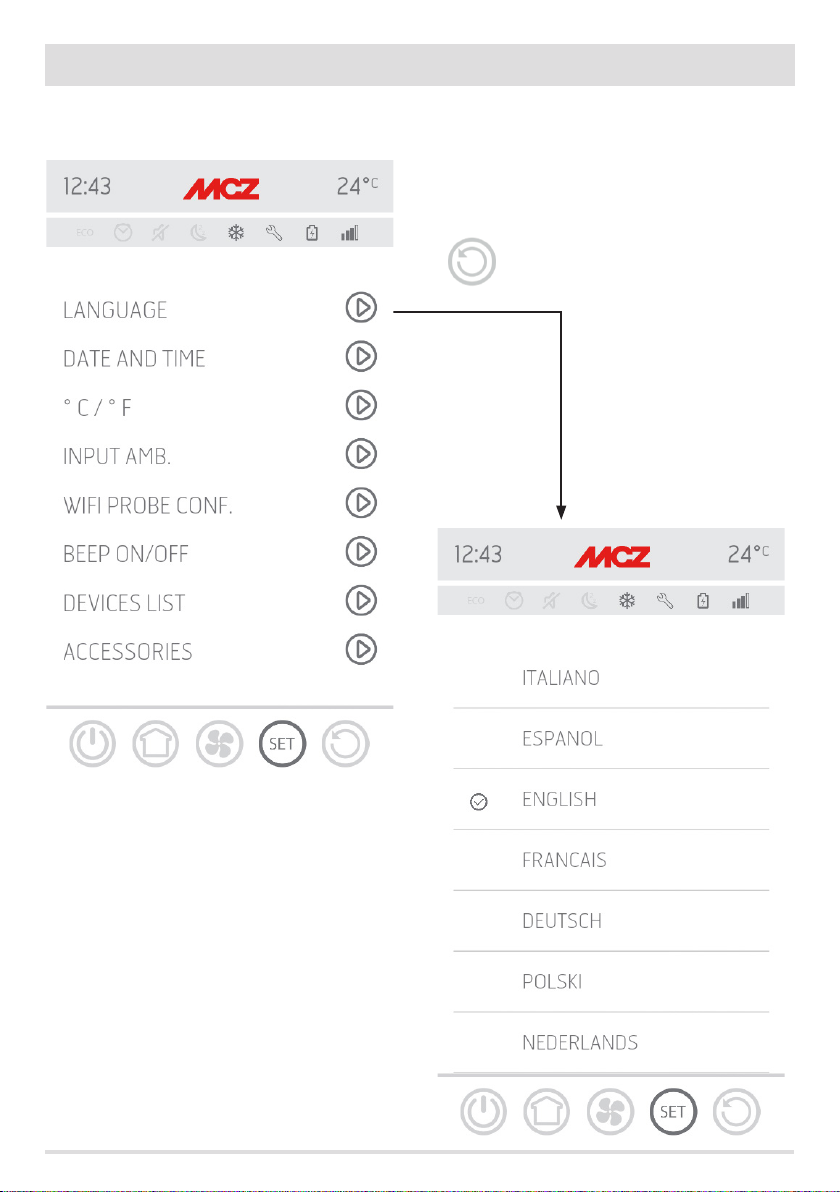
21-BASIC SET SCREEN
SET SCREEN
The SET menu includes:
• BASIC SETTINGS
• OPERATION
• SETTINGS
• TECHNICAL MENU
• SOFTWARE VERSION
• INFO
The following functions are available in the BASIC SETTINGS menu:
• LANGUAGE
• DATE AND TIME
• C°/F°
• ROOM INPUT
• WI-FI PROBE CONFIGURATION
• TONES ON-OFF
• LIST OF DEVICES
• ACCESSORIES
Technical Dept. - All rights reserved - Reproduction prohibited
17
21-BASIC SET SCREEN
LANGUAGE SCREEN
The system displays the languages available when accessing the
LANGUAGE menu.
Select the desired language.
The key takes you back to the previous page.
18
21-BASIC SET SCREEN
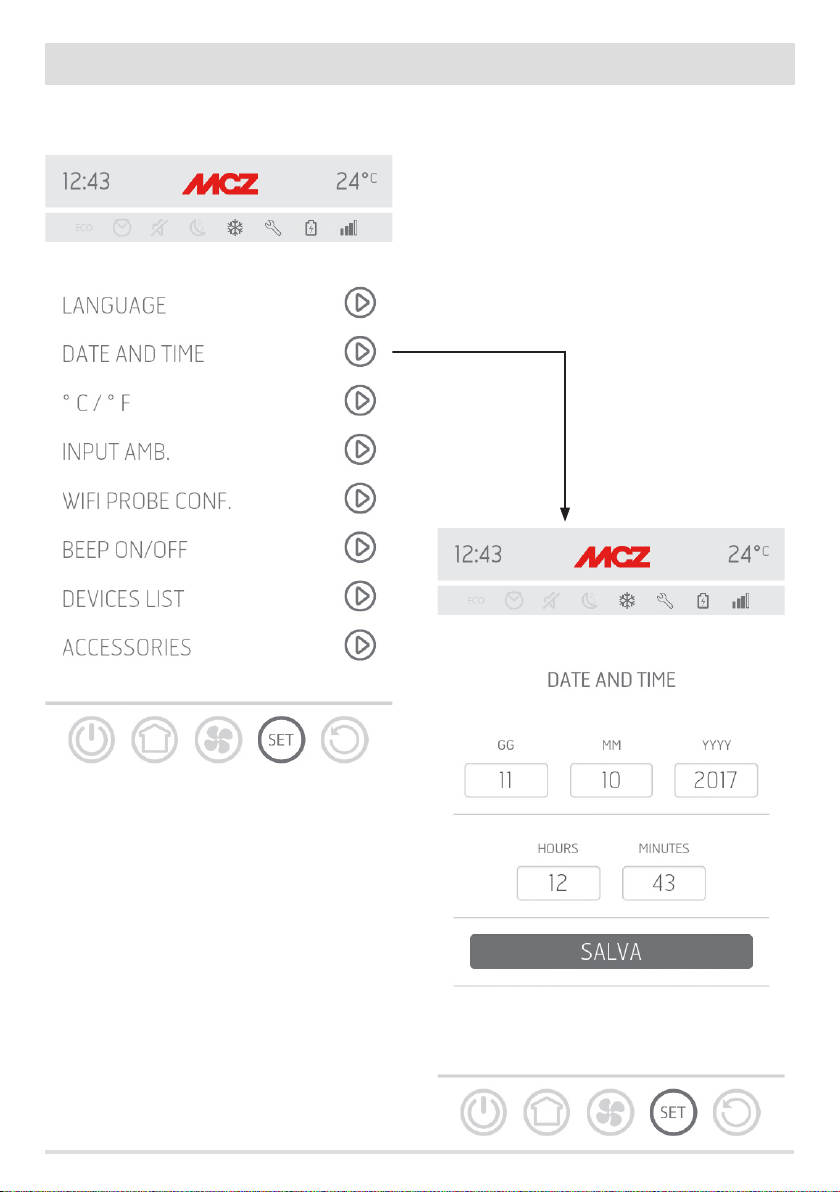
DATE AND TIME SCREEN
Press the DATE AND TIME key to access the screen to edit data. After
setting the data, press SAVE and exit the screen.
Technical Dept. - All rights reserved - Reproduction prohibited
19
21-BASIC SET SCREEN
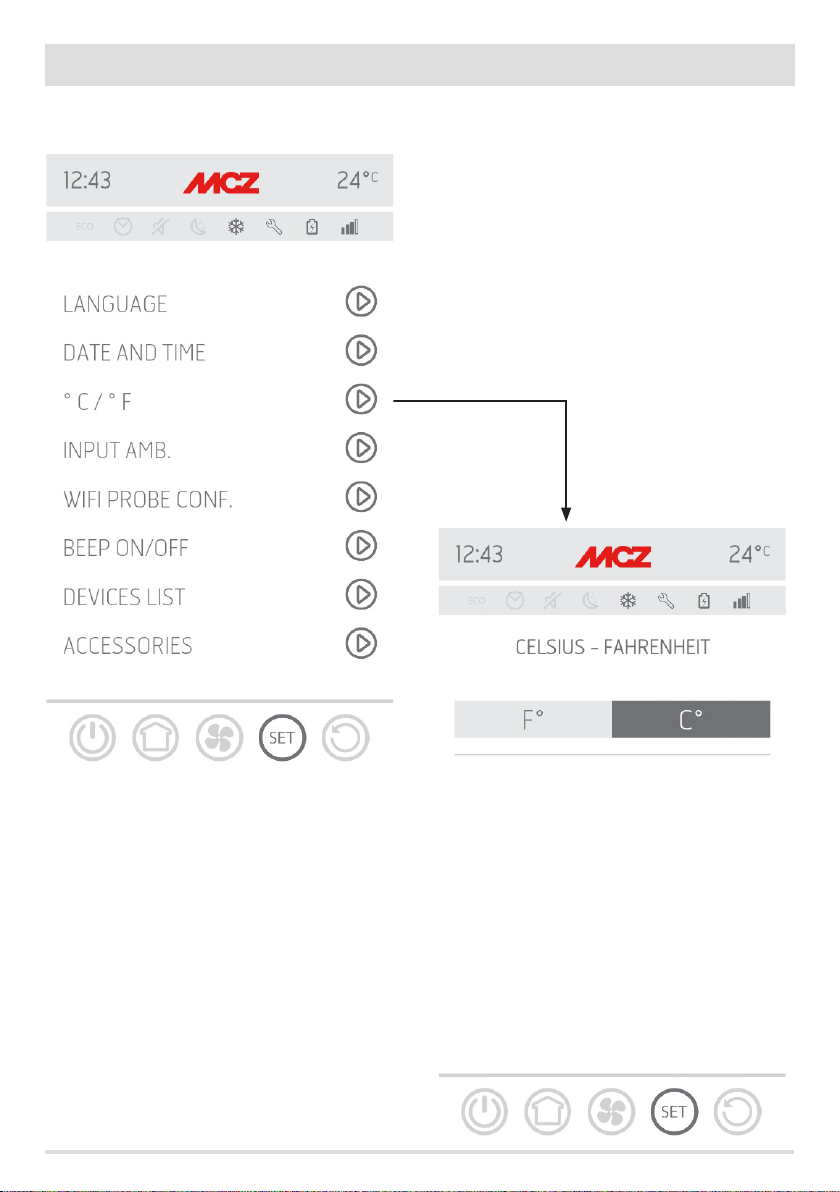
C°/F* SCREEN
It is possible to set the Centigrade or Fahrenheit temperature from this
screen.
20
 Loading...