

Page 1
USER’S MANUAL
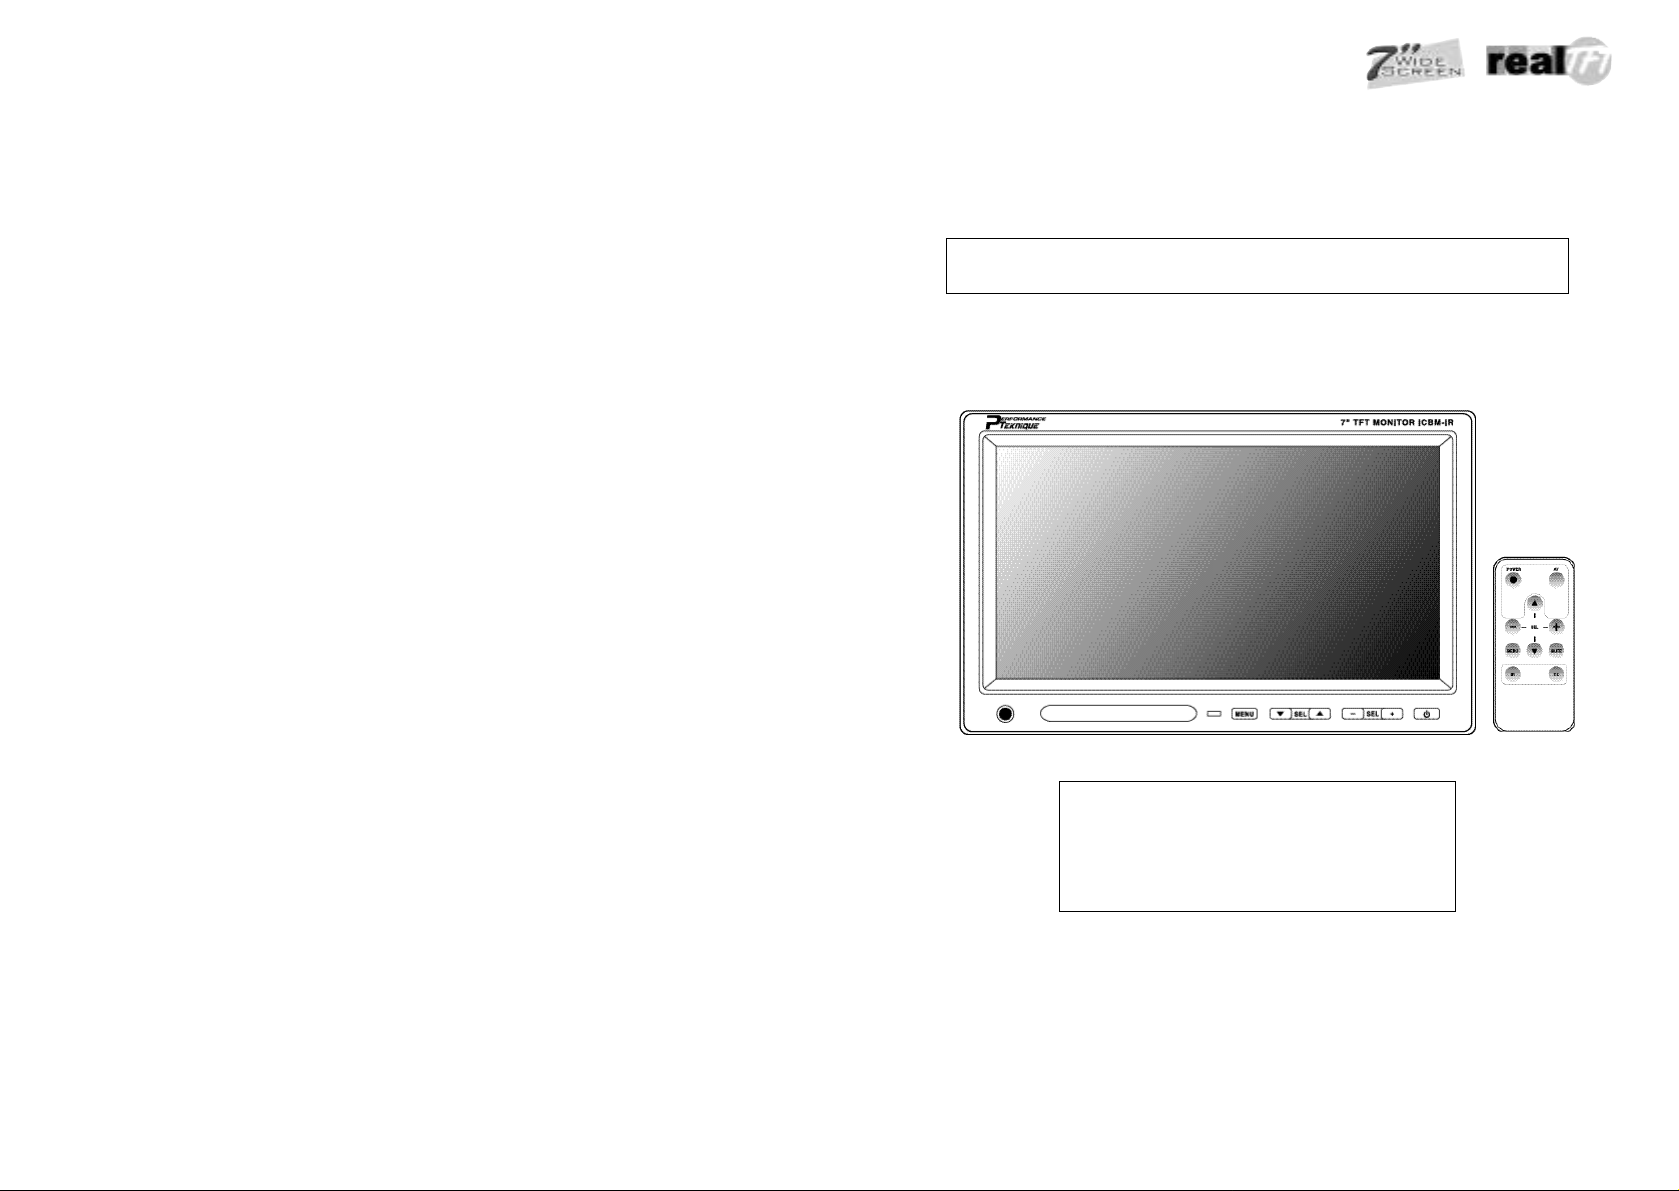
7” TFT LCD HEADREST MONIT O R
WA R N I N G
Do not watch T.V. while vehicle is
in motion, it can be hazardous.
OWNER’S RECORD
The model and serial numbers are located on the back.
Record the serial numbers in the space provided below.
Model No. : ICBM-IR Serial No. :
ICBM-HD REST
Page 2
FCC NOTICE
THIS DEVICE COMPLIES WITH PART 15 OF THE FCC RULES.
OPERATION IS SUBJECT TO THE FOLLOWING TWO CONDITION:
(1) THIS DEVICE MAY NOT CAUSE HARMFUL INTERFERENCE, AND
(2) THIS DEVICE MUST ACCEPT ANY INTERFERENCE RECEIVED,
INCLUDING INTERFERENCE THAT MAY CAUSE UNDERSIRED
OPERATION.
This equipment has been tested and found to comply with the limits for a Class B digital device, pursuant to part 15 of the FCC Rules.
These limits are designed to provide reasonable protection against harmful interferen ce in a residential installation.
This equipment generates, uses and can radiate radio frequency energy and, if not
installed and used in accordance with the instructions, may cause harmful interference to radio communication.
However, there is no g uarantee that interference will not occur in a particular installation. If this equipment does cause harmful interference to
radio or television reception, which can be determined by turning the equipment off and on, the user is encouraged to try to
correct the interference by one or more of the following measures :
- Reorient or relocate the receiving antenna.
- Increase the separation between the equipment and receiver.
- Connect the equipment into an outlet on a circuit difference from that to which
the receiver is connected.
- Consult the dealer of an experienced radio/TV technician for help.
NOTE : The manufacturer is not responsible for any radio or TV interference caused by
unauthorized modifications to this equipment. Such modifications could void the user’s
authority to operate the equipment.
CAUTION : Changes or modifications not expressly approved by the party responsible
for compliance could void the user’s authority to operate the equipment.
Page 3
/ /
TABLE OF C O N T E N T S
1. TABLE OF CONTENTS 1
2. PRODUCT COMPOSITION 2
3. FEATURES 2
4. PRECAUTIONS FOR SAFETY 3
5. SYSTEM FUNCTIONS
DISPLAY UNIT 4
REMOTE CONTROL 4
6. BASIC OPERATION
INPUT MODE CHOICE - 1 5
INPUT MODE CHOICE - 2 5
SCREEN ADJUSTMENTS 6
7. APPLICATION BEHAVIOUR
TX : BUTTON TO SELECT FM FREQUENCY
FOR USAGE OF BUILT-IN CAR AUDIO SYSTEM 7
MUTE FUNCTION 7
MENU BEHAVIOUR METHOD 8
TO REPLACE THE BATTERY 8
8. SPECIFICATION 9
9. TROUBLE-SHOOTING GUIDE 10
P RODUCT COMPOSITION
The components of this device are as follows.
• 7 inch 16:9 wide monitor 1ea
• HeadRest shroud 1ea
• Stand for Monitor 1ea
• Screw 6ea
• Remote Control(included battery) 1ea
• AV cable 1ea
F E AT U R E S
• 7 INCH 16:9 WIDE SCREEN HEADREST MONITOR.
• MULTI-MODE AUDIO/VIDEO INPUT FACILITY(AV1/AV2).
• NTSC/PAL SWITCHABLE(AUTO SELECTION).
• BUILT-IN IR-TRANSMITTER FOR IR-WIRELESS HEADPHONE SYSTEM.
• FULL FUNCTION ON-SCREEN DISPLAY(O.S.D).
• BUILT-IN FM MODULATOR(FM-TX FOR AUDIO SIGNAL 88.1 ~ 89.6 MHz).
• INSTALLATION HEADREST, STAND & SCREWS SUPPLIED.
• POWER-IN & AV INPUT CONNECTOR SUPPLIED.
• MULTI FUNCTION REMOTE CONTROL.
1 2
Page 4
/ /
P R E C AUTIONS FOR SAFETY S YSTEM FUNCTIONS
•Make sure to read the “manual” for safety precautions before installing unit or
accessories.
•Do not install unit in location where it may obstruct or cause injury to driver or
passengers while driving under normal driving conditions.
•Do not install unit where it may be exposed to high temperatures, moisture,
dust or any foreign matter which will damage unit and cause it to malfunction.
•Avoid direct sunray and keep away from heating apparatus. Packing outdoor
for a longtime with exposure to the direct sunray during summertime, the
temperature inside the car can rise over 50~60°C (114~140°F). Also when
use indoor, please keep away from any heating apparatus such as electric
heater or stove.
•Do not watch TV/Monitor while driving.
•Do not open the monitor. Opening or removing covers may expose you to
dangerous shock hazards or the risks.
•Avoid dropping and hard impact.
•Do not spill any liquid into the cabinet or use your monitor near water.
•Do not Scratch or Press the surface of the LCD panel, it will cause a
permanent damage. Use only soft cloth with non-ammonia glass cleaner to
clean the panel.
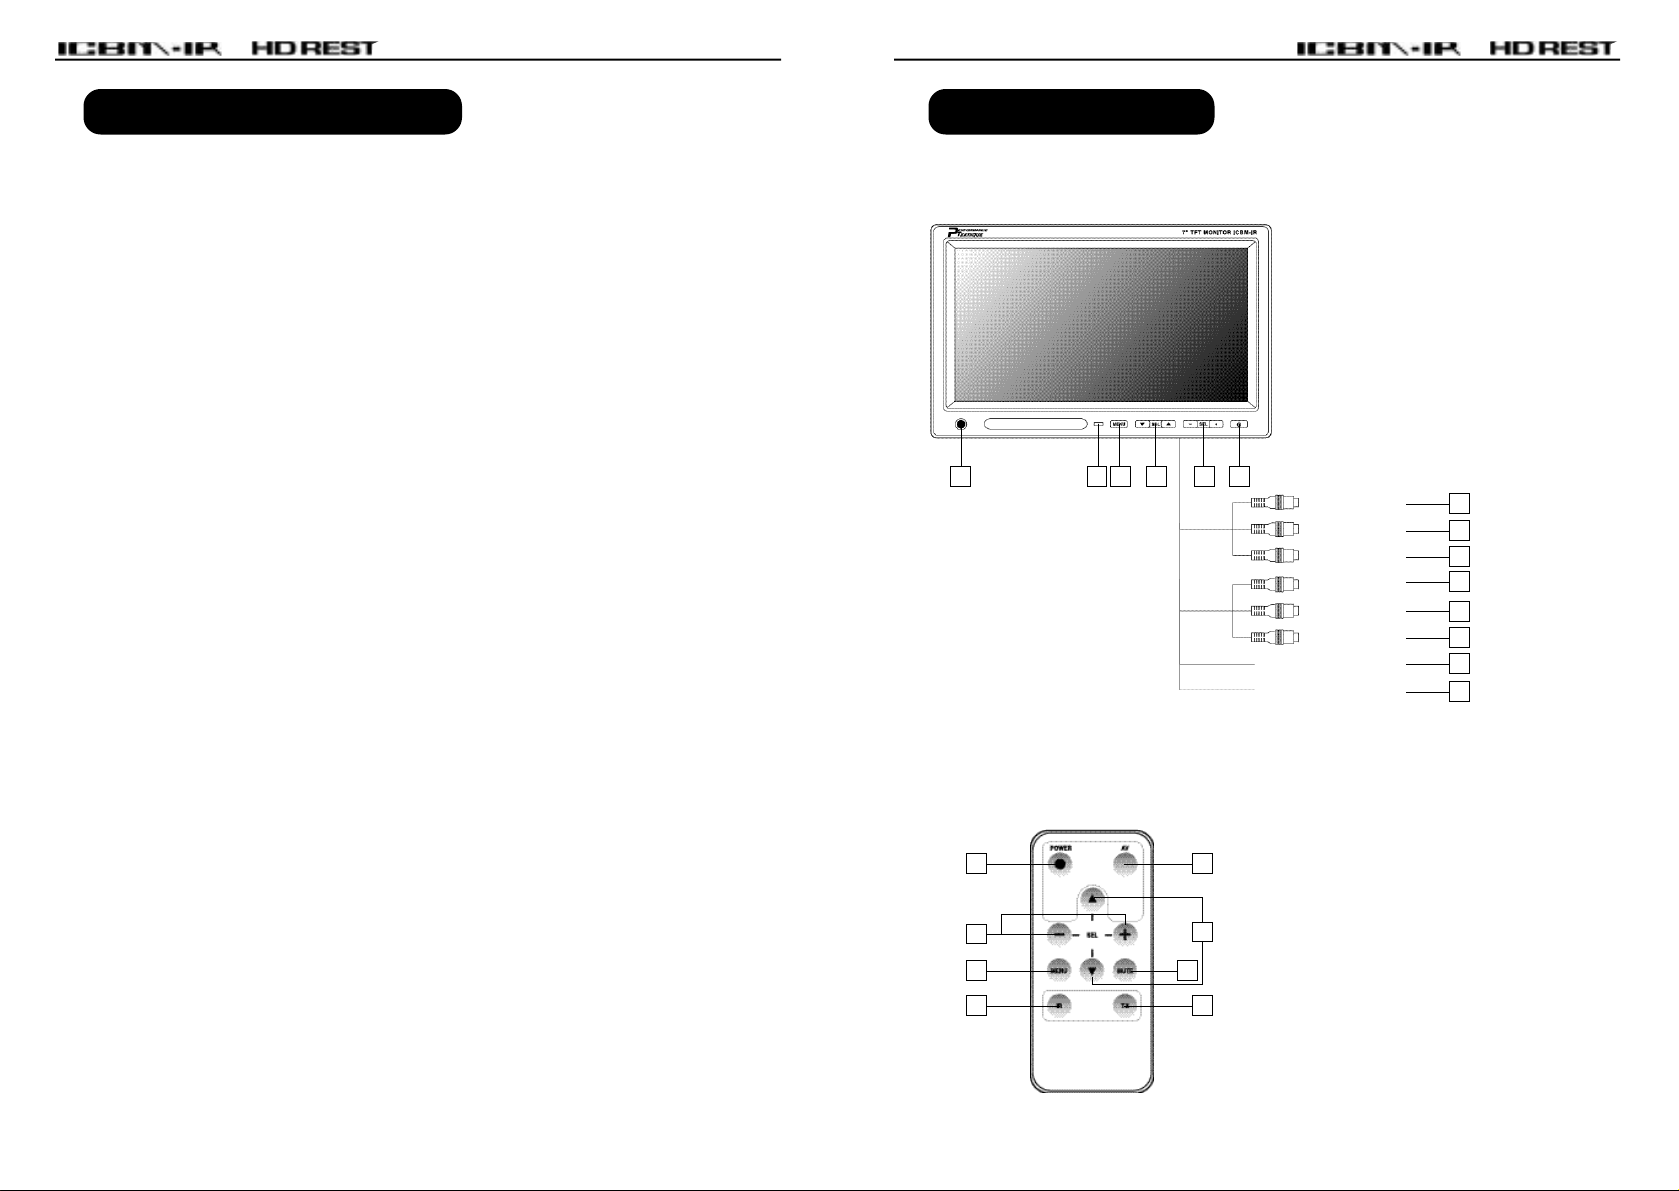
1. DISPLAY UNIT
6 5
4 3 2 1
1. POWER ON/OFF
2. SELECTION MENU UP/DOWN
3. SELECTION UP/DOWN
4. MENU, MODE SELECTION
5. IR/REMOTE SENSOR
6. HEADPHONE JACK
7. VIDEO 1/2 INPUT
8. AUDIO (L) 1/2 INPUT
9. AUDIO (R) 1/2 INPUT
10. DC + 12V(RED) FUSE : 2A
11. GND (BLACK)
Video 1
Audio 1(L)
Audio 1(R)
Video 2
Audio 2(L)
Audio 2(R)
B+ (+)
Ground (-)
7
8
9
7
8
9
10
11
2. REMOTE CONTROL
1. POWER ON/OFF
1
5
2. SELECTION MENU UP/DOWN
3. MENU, MODE SELECTION
2
3
4
6
7
8
4. IR ON/OFF
5. AV INPUT SELECTION
6. SELECTION UP/DOWN
7. MUTE
8. FM TX ON/OFF
3 4
Page 5
/ /
BASIC OPERAT I O N
1. INPUT MODE CHOICE - 1
2. INPUT MODE CHOICE - 2
1 2
INPUT MODE
AUX 1
AUX 2
or
INPUT MODE
AUX 1
AUX 2
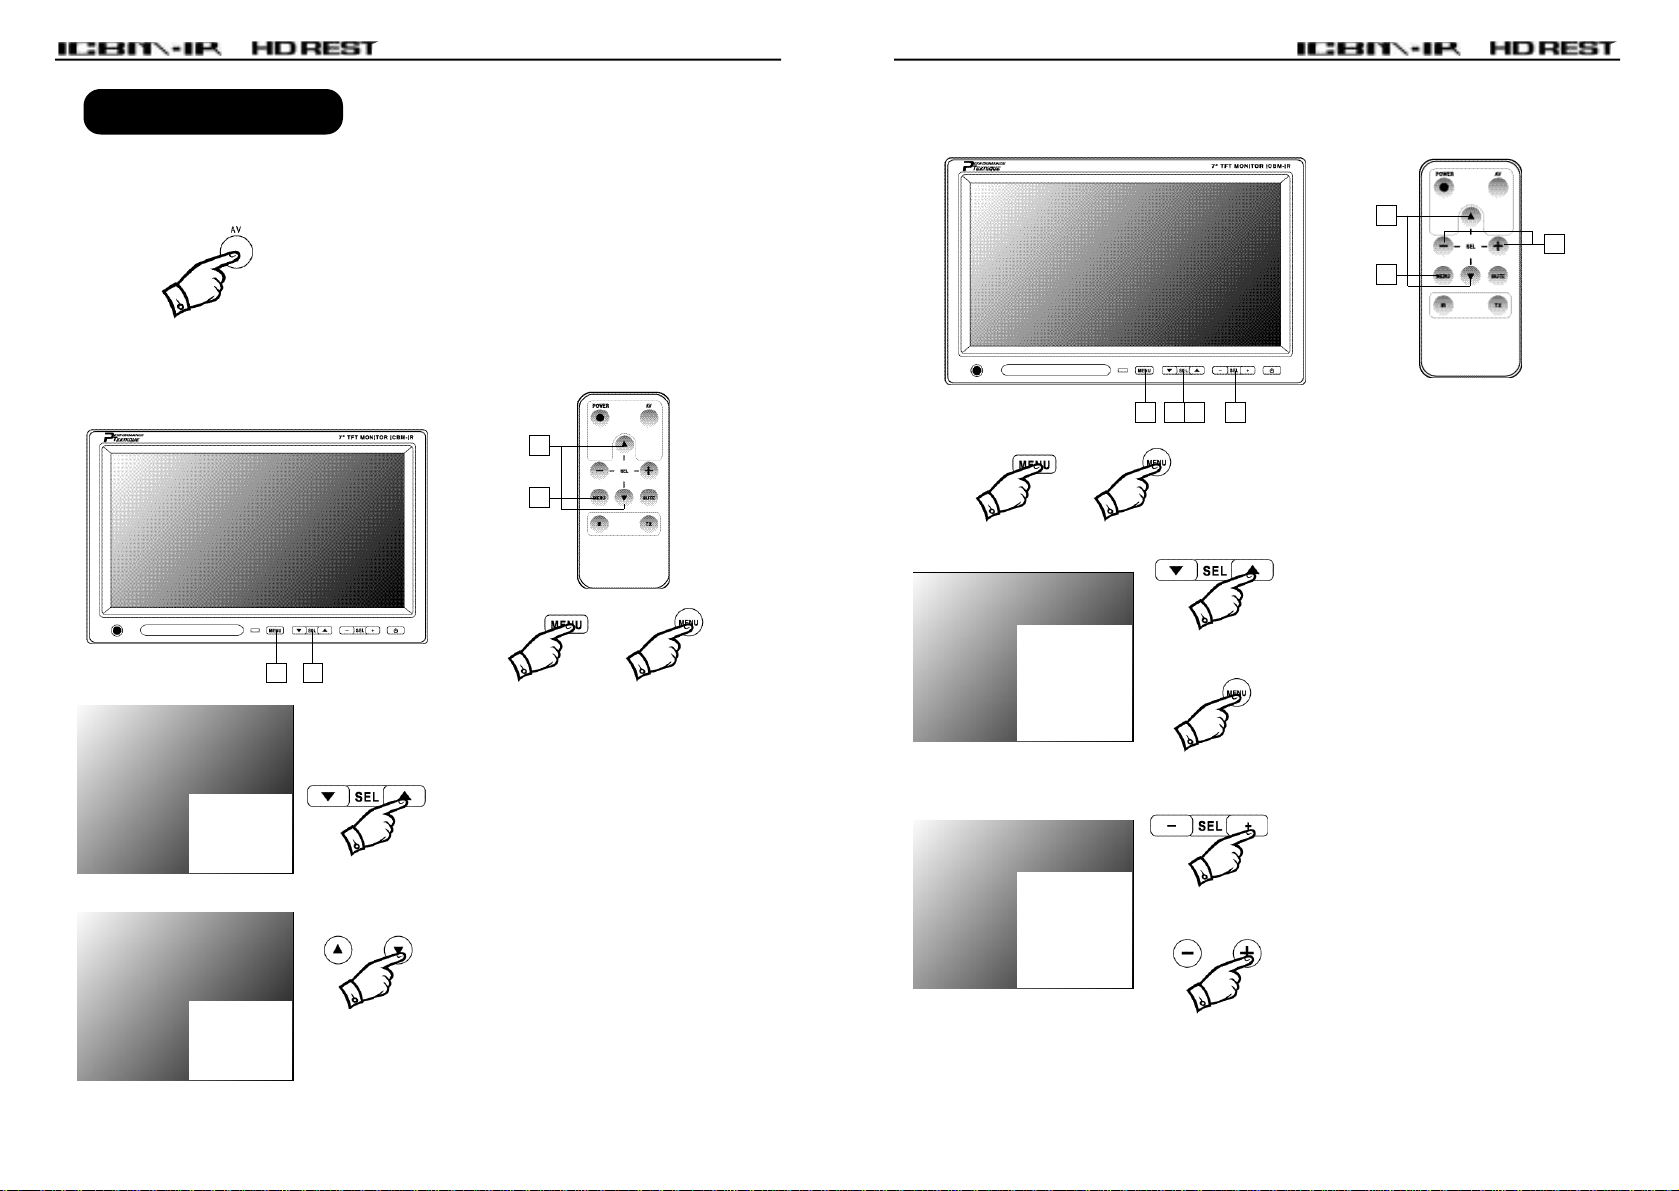
1. Press AV button on the remote control.
On the upper left of the screen,
following order will be displayed and
received in sequence. Select the
INPUT MODE of your choice.
AUX 1 AUX 2
2
1
or
1. Press the “MENU” button or the
“MENU” button of the remote
control once. INPUT MODE will
be displayed when you press ▼ of
SEL button or ▼ button of the
remote control twice.
2. Press ▲ of SEL button or + button
of the remote control and choose
the mode of your choice by
pressing ▲, ▼ of the SEL button
or ▲, ▼ button of the remote
control. Then, press ▲, ▼ of the
SEL button or +, - button of the
remote control to set the mode.
3. SCREEN ADJUSTMENTS
2
3
1
1 2 4 3
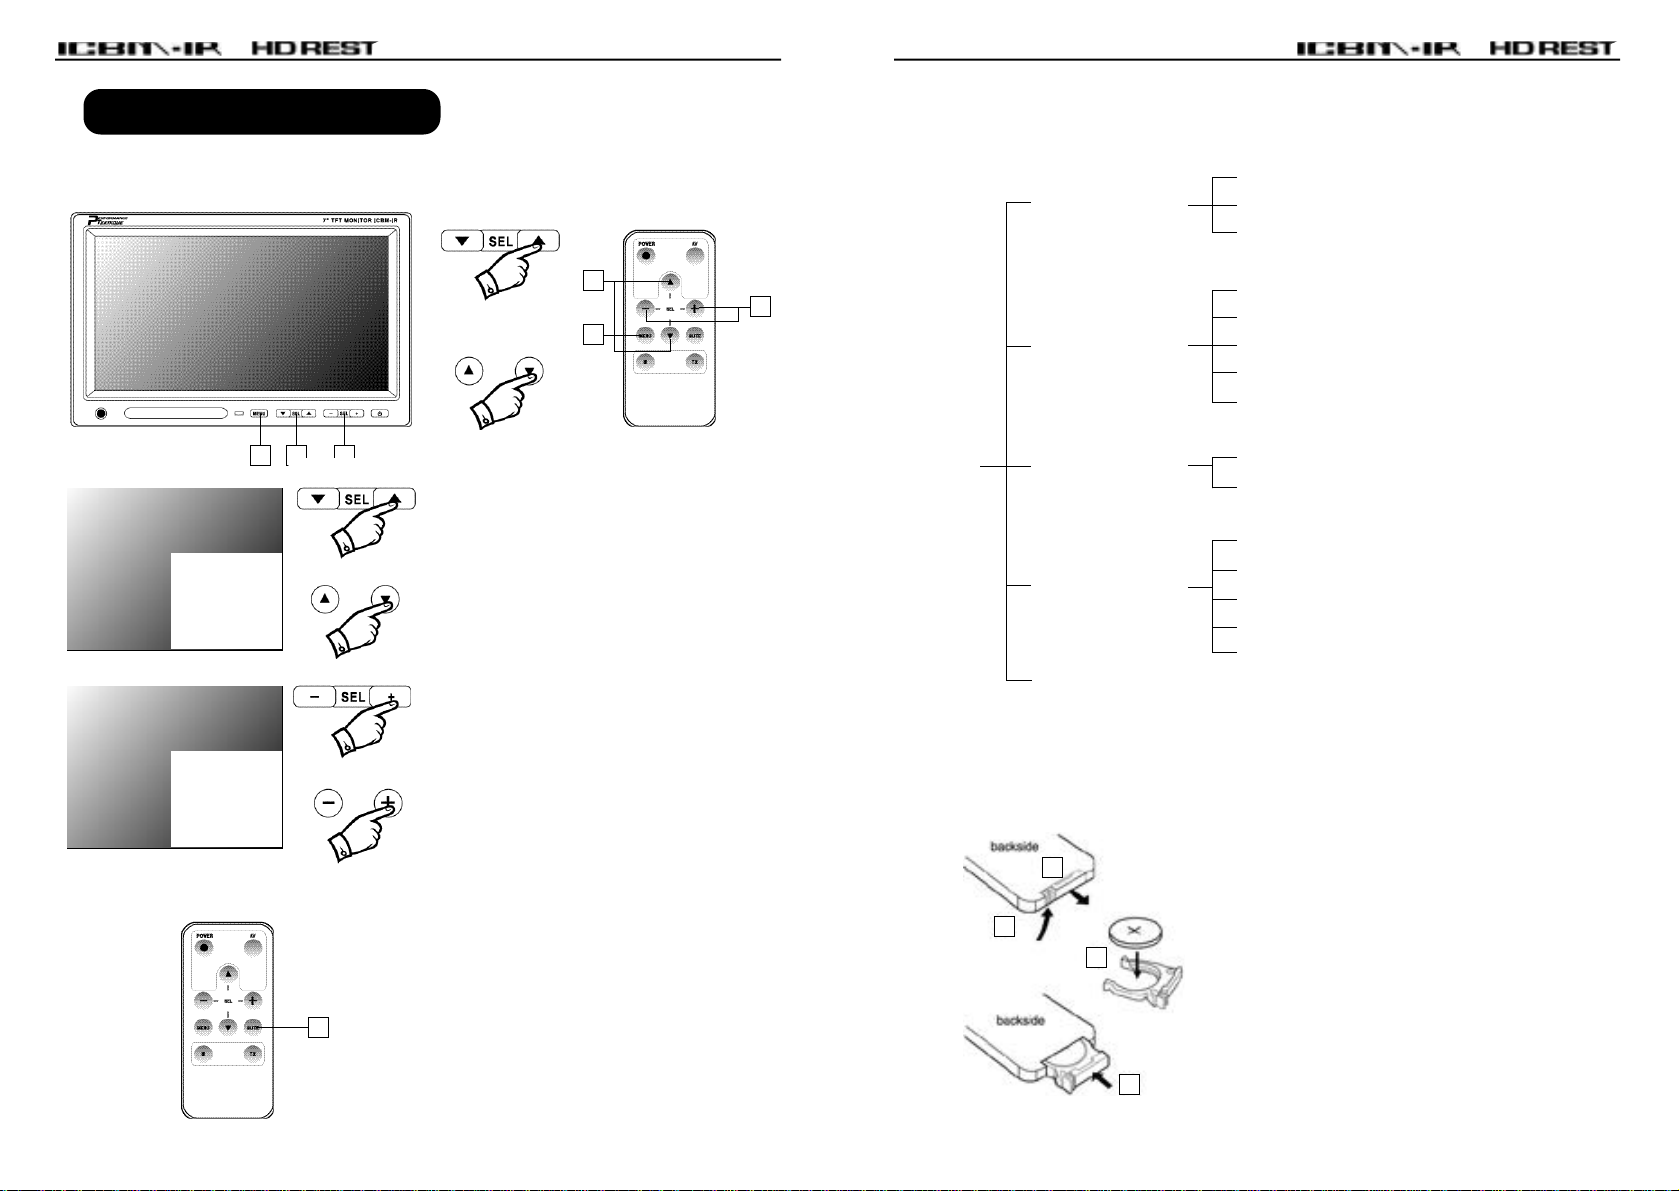
1. Press the “MENU” button once or
or
press the “MENU” button of the
remote control. PICTURE MODE
will be displayed on the lower right
side of the screen.
2. Press ▲, ▼ of the SEL button or ▲,
▼ button of the remote control to
PICTURE MODE
Bright 32
Contrast 32
Sharpness 32
Tint 32
Color 32
or
select the mode of your need.
3. Press of the SEL button or + button
of the remote control to make
adjustments of that mode and press
of the SEL button or +, - button of
the remote control to increase or
decrease the value. To move to the
next stage, press ▲, ▼ of the SEL
button or ▲, ▼ button of the remote
PICTURE MODE
Bright 45
Contrast 32
Sharpness 32
Tint 32
Color 32
or
control and the location will be
shifted.
4. If you press ▲, ▼ of the SEL button
or +, - button of the remote control
in the PICTURE MODE, it will move
in the sequence as shown below.
Bright Contrast Sharpness Tint C o l o r
5 6
Page 6
/ /
A P P L I C ATION BEHAV I O U R
1. TX : BUTTON TO SELECT FM FREQUENCY FOR USAGE OF
BUILT- IN CAR AUDIO SYSTEM
3
2 3 4
SYSTEM MODE
FM TX OFF
DIMMER OFF
AGC ON
RESET
SYSTEM MODE
FM TX OFF
DIMMER OFF
AGC ON
RESET
2. MUTE FUNCTION
or
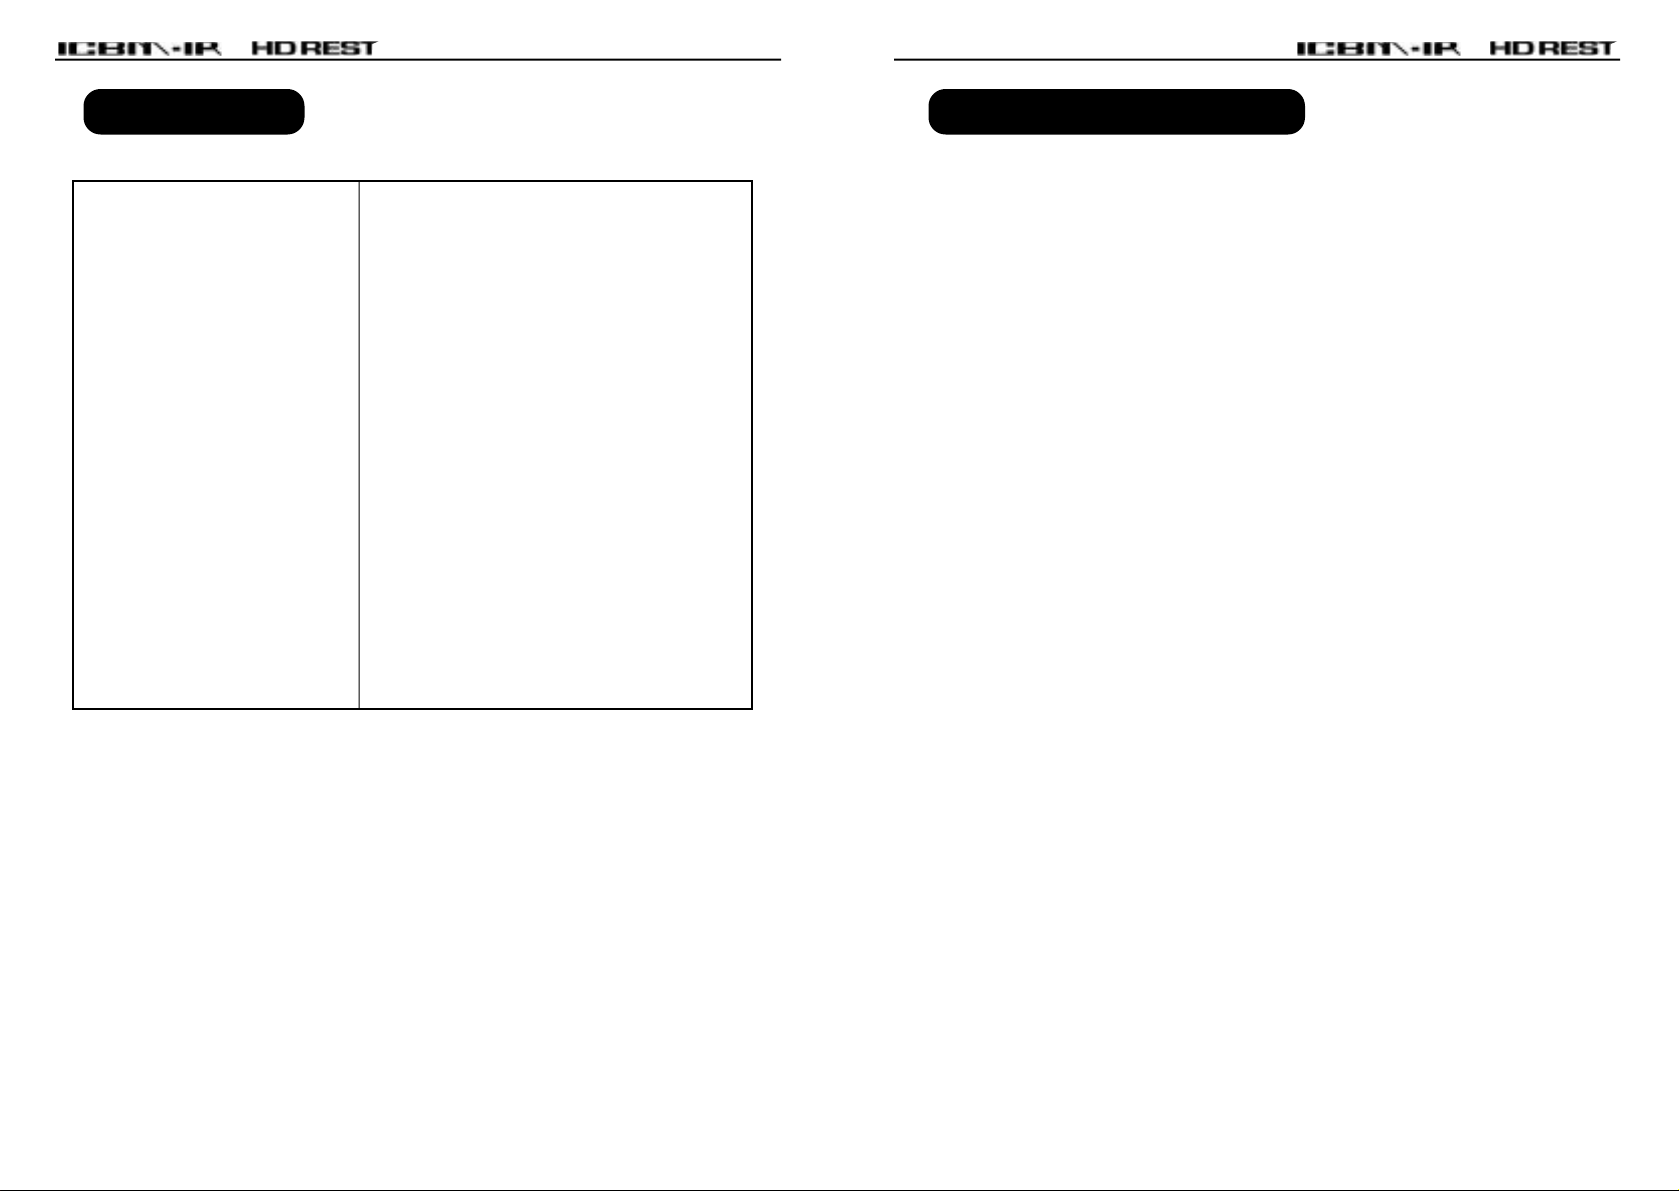
1. Put the Radio frequency to 88.1 MHz
~ 89.6 MHz where there is no signal.
2. Press the MENU button or the MENU
or
button of the remote control once.
SYSTEM MODE will be displayed on
the lower right of the serene.
3. Press + of SEL button + button of the
remote control to move to FM TX.
4. Press +, - of the SEL button or +, button of the remote control to select
or
the frequency equal to that of a F
radio.
5. You can receive the sound of the TV
through the radio.
1. Press the MUTE button of the remote
control. All sounds will be intercepted.
2. Press the MUTE button again. The
1
sounds will be recovered.
2
3. MENU BEHAVIOUR METHOD
WIDE
SCREEN MODE
NORMAL
ZOOM
4
VIDEO MODE
Bright 0 ~ 63 Level
Contrast 0 ~ 63 Level
Sharpness 0 ~ 63 Level
Tint 0 ~ 63 Level
Color 0 ~ 63 Level
MENU
SOURCE MODE
AUX1
AUX2
FM TX OFF/ON 88.1 ~ 89.6 MHz
DIMMER OFF/ON
SYSTEM MODE
AGC OFF/ON
IR TX OFF/ON
RESET
EXIT
4. TO REPLACE THE BATTERY
2
1. Please push the part marked in arrow
to the right.
1
3
2. Push the battery case forward to
open.
3. Put the battery in the case with
positive pole facing the top as shown
in the picture.
4. Push the battery case in the direction
4
of the arrow.
7 8
Page 7
/ /
S P E C I F I C AT I O N
Power Source
Display Size
Active Area
Display Pixels
Number of Colors
Contrast (CR)
Brightness
Viewing Angle
Power Consumption
IR-TX Frequency
IR Range
FM-TX Frequency
Features
Dimension (Main unit)
Net Weight
Standard Accessories
DC 12V Fuse : 2A
7 inch (18cm)
152.4(H) X 91.44(V)mm
800(H) X 480(V) Pixels
262,144 colors
200:1
400 cd/m2
65/65(R/L), 45/60(U/D) Degrees
8.0W
L : 2.3MHz, R : 2.8MHz
1m ± 30°, 3m ± 15°
88.1 ~ 89.6MHz
Video/Audio 2 input
DC 12V input
174(W) X 126(H) X 27(L)mm
470g
User’s Manual, A/V cable, Screw
Remote Control, Stand
T RO U B L E - S H O OTING GUIDE
• No power
▷ POSSIBLE CAUSES
- Power connection is not properly connected ⇒ Connect correctly
- Fuse on power cable burn out ⇒ Replace fuse
• Remote control unit doesn’t work
▷ POSSIBLE CAUSES
- Batteries are missing, dead or incorrect polarity ⇒ Replace batteries.
- Remote control distance is too far ⇒ The distance must be less than 5m.
- Improper direction of remote control ⇒ Point the remote control unit to the
sensor directly.
• No picture and sound
▷ POSSIBLE CAUSES
- A/V source connection is wrong ⇒ Check the A/V source power.
• Blurry picture and noise
▷ POSSIBLE CAUSES
- Interference from automobiles, electric appliances, ⇒ Move further away
from appliances causing interference.
• Sound heard but picture all white or dark
▷ POSSIBLE CAUSES
- Brightness control is not set correctly ⇒ Adjust brightness.
• Sound heard but color light
▷ POSSIBLE CAUSES
- Color control is not set correctly ⇒ Adjust color.
• Picture visible but no sound
▷ POSSIBLE CAUSES
- Earphone inserted ⇒ Disconnect earphone.
• No color
▷ POSSIBLE CAUSES
- Incorrect setting of playback system ⇒ Switch NTSC/PAL Switch to correct
position of A/V sources.
9 10
 Loading...