

MCS Master B 35CEL, B 65CEL, B 35CED, B 70CED, B 100CED Maintenance Manual [en, de, it, fr]
...Page 1

USER AND MAINTENANCE BOOK
en
LIBRETTO USO E MANUTENZIONE
BEDIENUNGS- UND WARTUNGSANLEITUNG
MANUAL DE INSTRUCCIONES PARA EL USO Y MANTENIMIENTO
MANUEL D’UTILISATION ET DE MAINTENANCE
HANDLEIDING VOOR GEBRUIK EN ONDERHOUD
MANUAL DE USO E MANUTENÇÃO
VEJLEDNING OM BRUG OG VEDLIGEHOLDELSE
KÄYTTÖ- JA HUOLTO-OHJE
HEFTE FOR BRUK OG VEDLIKEHOLD
ANVÄNDAR- OCH UNDERHÅLLSHANDBOK
INSTRUKCJA OBSŁUGI I KONSERWACJI
РУКОВОДСТВО ПО ЭКСПЛУАТАЦИИ И ТЕХНИЧЕСКОМУ ОБСЛУЖИВАНИЮ
PŘÍRUČKA PRO POUŽITÍ A ÚDRŽBU
it
de
es
fr
nl
pt
da
no
sv
pl
ru
cs
HASZNÁLATI ÉS KARBANTARTÁSI KÉZIKÖNYV
PRIROČNIK Z NAVODILI ZA UPORABO IN VZDRŽEVANJE
KULLANIM VE BAKIM K
KNJIŽICA O UPORABI I ODRŽAVANJU
NAUDOJIMO IR PRIEŽIŪROS KNYGELĖ
LIETOŠANAS UN TEHNISKĀS APKOPES GRĀMATIŅA
KASUTUS- JA HOOLDUSJUHEND
MANUAL DE UTILIZARE ŞI ÎNTREŢINERE
PRÍRUČKA PRE POUŽITIE A ÚDRŽBU
НАРЪЧНИК ЗА ИЗПОЛЗВАНЕ И ПОДДРЪЖКА
КЕРІВНИЦТВО З ЕКСПЛУАТАЦІЇ Й ТЕХНІЧНОГО ОБСЛУГОВУВАННЯ
KNJIŽICOM O UPOTREBI I ODRŽAVANJU
ΕΓΧΕΙΡΙΔΙΟ ΧΡΗΣΗΣ ΚΑΙ ΣΥΝΤΗΡΗΣΗΣ
i
TAPÇIĞI
hu
sl
tr
hr
lt
lv
et
ro
sk
bg
uk
bs
el
使用和维护手册
ПАЙДАЛАНУ МЕН ТЕХНИКАЛЫҚ ҚЫЗМЕТ КӨРСТЕУ БОЙЫНША ЖЕТЕКШІЛІК
zh
kk
B 35CEL - B 65CEL - B 95CEL - B 145CEL
B 35CED - B 70CED - B 100CED - B 150CED - B 300CED
B 35CEG - B 70CEG - B 100CEG - B 150CEG
Page 2
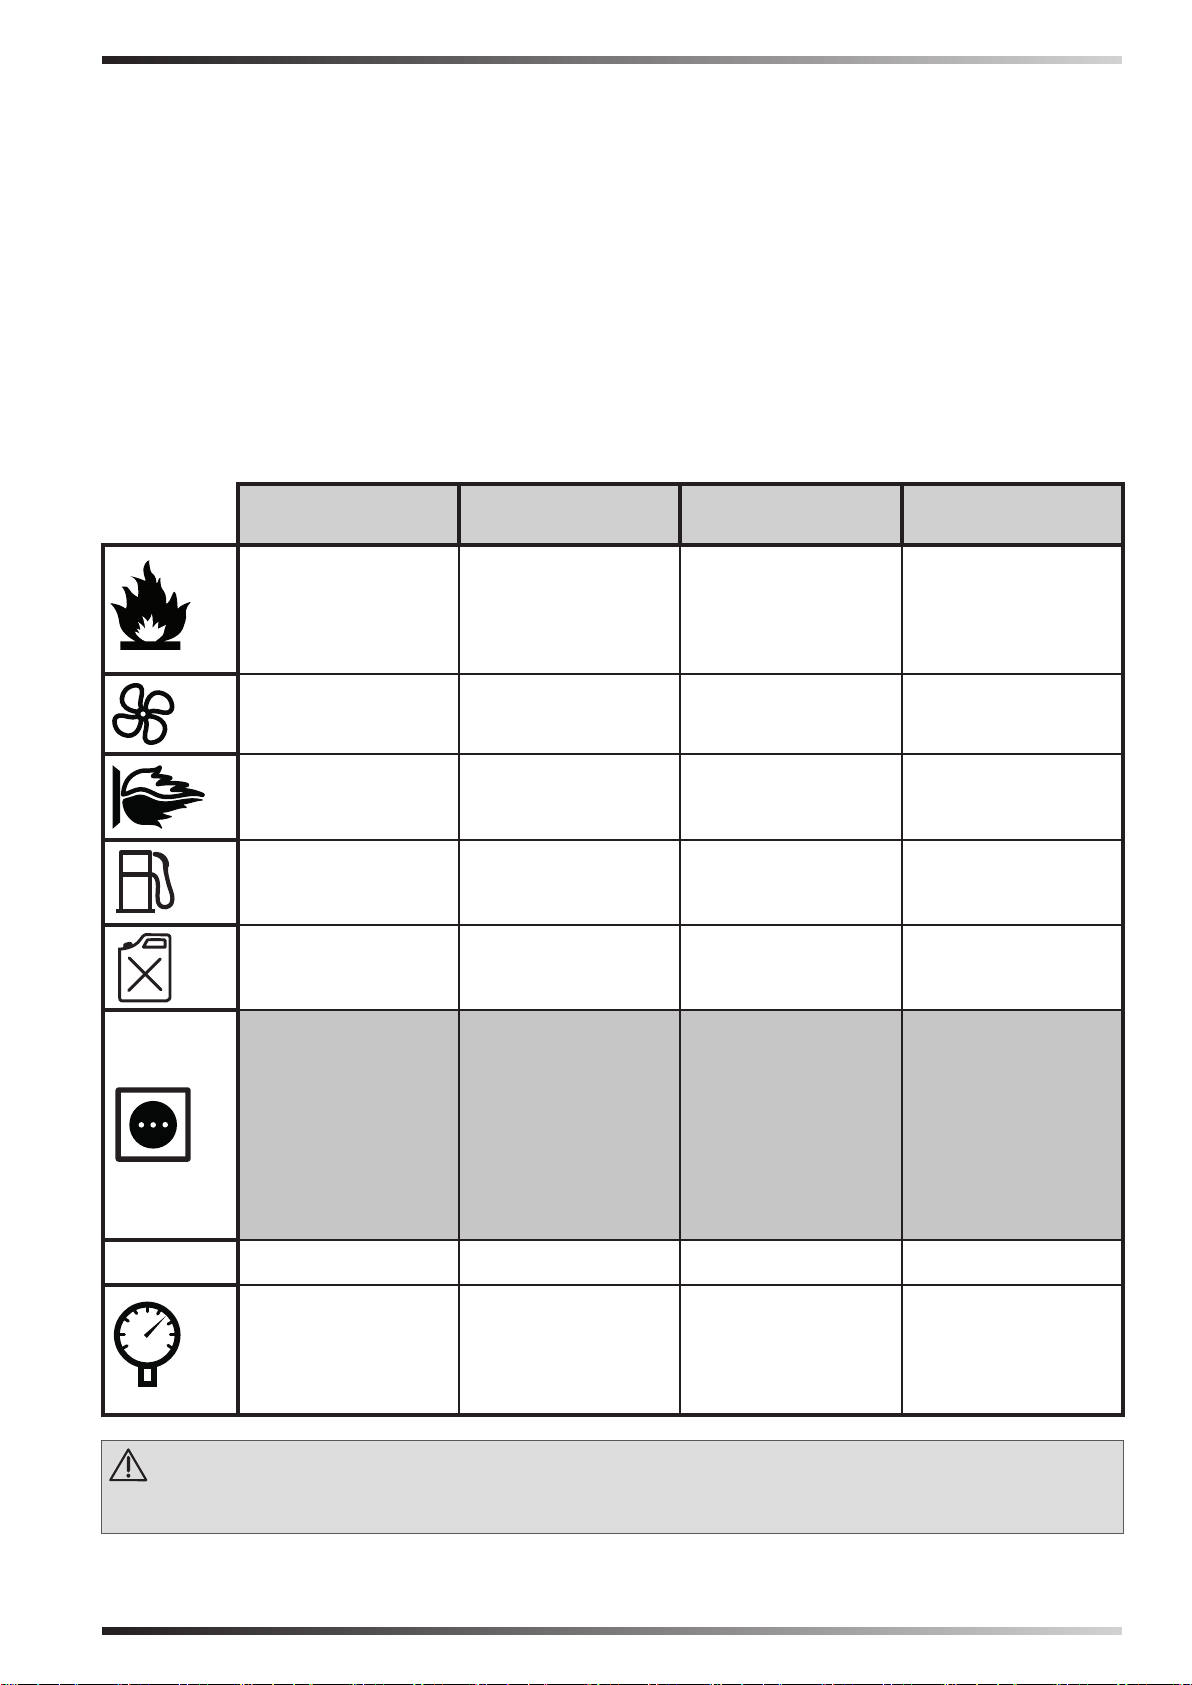
TECHNICAL DATA TABLE - TABELLA DATI TECNICI - TECHNISCHE DATEN
- TABLA DE DATOS TÉCNICOS - TABLEAU DES DONNEES TECHNIQUES -
TABEL TECHNISCHE GEGEVENS - TABELA DE DADOS TÉCNICOS - TABEL
OVER TEKNISKE DATA - TEKNISET TIEDOT SISÄLTÄVÄ TAULUKKO -
TABELL MED TEKNISKE DATA - TABELL ÖVER TEKNISKA DATA - TABELA
DANYCH TECHNICZNYCH - ТАБЛИЦА ТЕХНИЧЕСКИХ ДАННЫХ - TABULKA
TECHNICKÝCH ÚDAJŮ - MŰSZAKI ADATTÁBLÁZAT - PREGLEDNICA
TEHNIČNIH PODATKOV - TEKNÝK VERÝLER TABLOSU - TABLICA SA
TEHNIČKIM PODACIMA - TECHNINIŘ DUOMENŘ LENTELË - TEHNISKO DATU
TABULA - TEHNILISTE ANDMETE TABEL - TABEL DATE TEHNICE - TABUĽKA
TECHNICKÝCH ÚDAJOV - ТАБЛИЦА ТЕХНИЧЕСКИ ДАННИ - ТАБЛИЦЯ
ТЕХНІЧНИХ ДАНИХ - TABELA S TEHNIČKIM PODACIMA - ΠΙΝΑΚΑΣ
ΤΕΧΝΙΚΩΝ ΣΤΟΙΧΕΙΩΝ - 技术参数 - TЕХНИКАЛЫҚ КӨРСЕТКІШТЕР КЕСТЕСІ
B 35CEL B 65CEL B 95CEL B 145CEL
MAX
10 kW-кВт
8.600 kcal/h-ккал/ч
34.200 Btu/h-БТЕ/ч
280 m³/h-м³/ч 400 m³/h-м³/ч 800 m³/h-м³/ч 900 m³/h-м³/ч
0,8 kg/h-кг/ч 1,5 kg/h-кг/ч 2,3 kg/h-кг/ч 3,5 kg/h-кг/ч
DIESEL-KEROSENE
дизель-керосин
15 l-л 19 l-л 44 l-л 44 l-л
~220-240 V-В
(-15%÷10%)
50 Hz-Гц
0,35 A
0,08 kW-кВт
18,5 kW-кВт
15.900 kcal/h-ккал/ч
63.100 Btu/h-БТЕ/ч
DIESEL-KEROSENE
дизель-керосин
~220-240 V-В
(-15%÷10%)
50 Hz-Гц
0,8 A
0,18 kW-кВт
29 kW-кВт
25.000 kcal/h-ккал/ч
99.300 Btu/h-БТЕ/ч
DIESEL-KEROSENE
дизель-керосин
~220-240 V-В
(-15%÷10%)
50 Hz-Гц
1 A
0,23 kW-кВт
44 kW-кВт
37.900 kcal/h-ккал/ч
150.500 Btu/h-БТЕ/ч
DIESEL-KEROSENE
дизель-керосин
~220-240 V-В
(-15%÷10%)
50 Hz-Гц
1,2 A
0,28 kW-кВт
RPM
IMPORTANT: In order to have a correct function you must use an electrical generator in class G3 or more (frequency variation ±1%, tension variation ±2%). The maximum power of electrical generator must be three time the nominal power of device
that you must connected.
1425 2850 2850 2850
0,20 bar-бар 0,36 bar-бар 0,27 bar-бар 0,34 bar-бар
Page 3
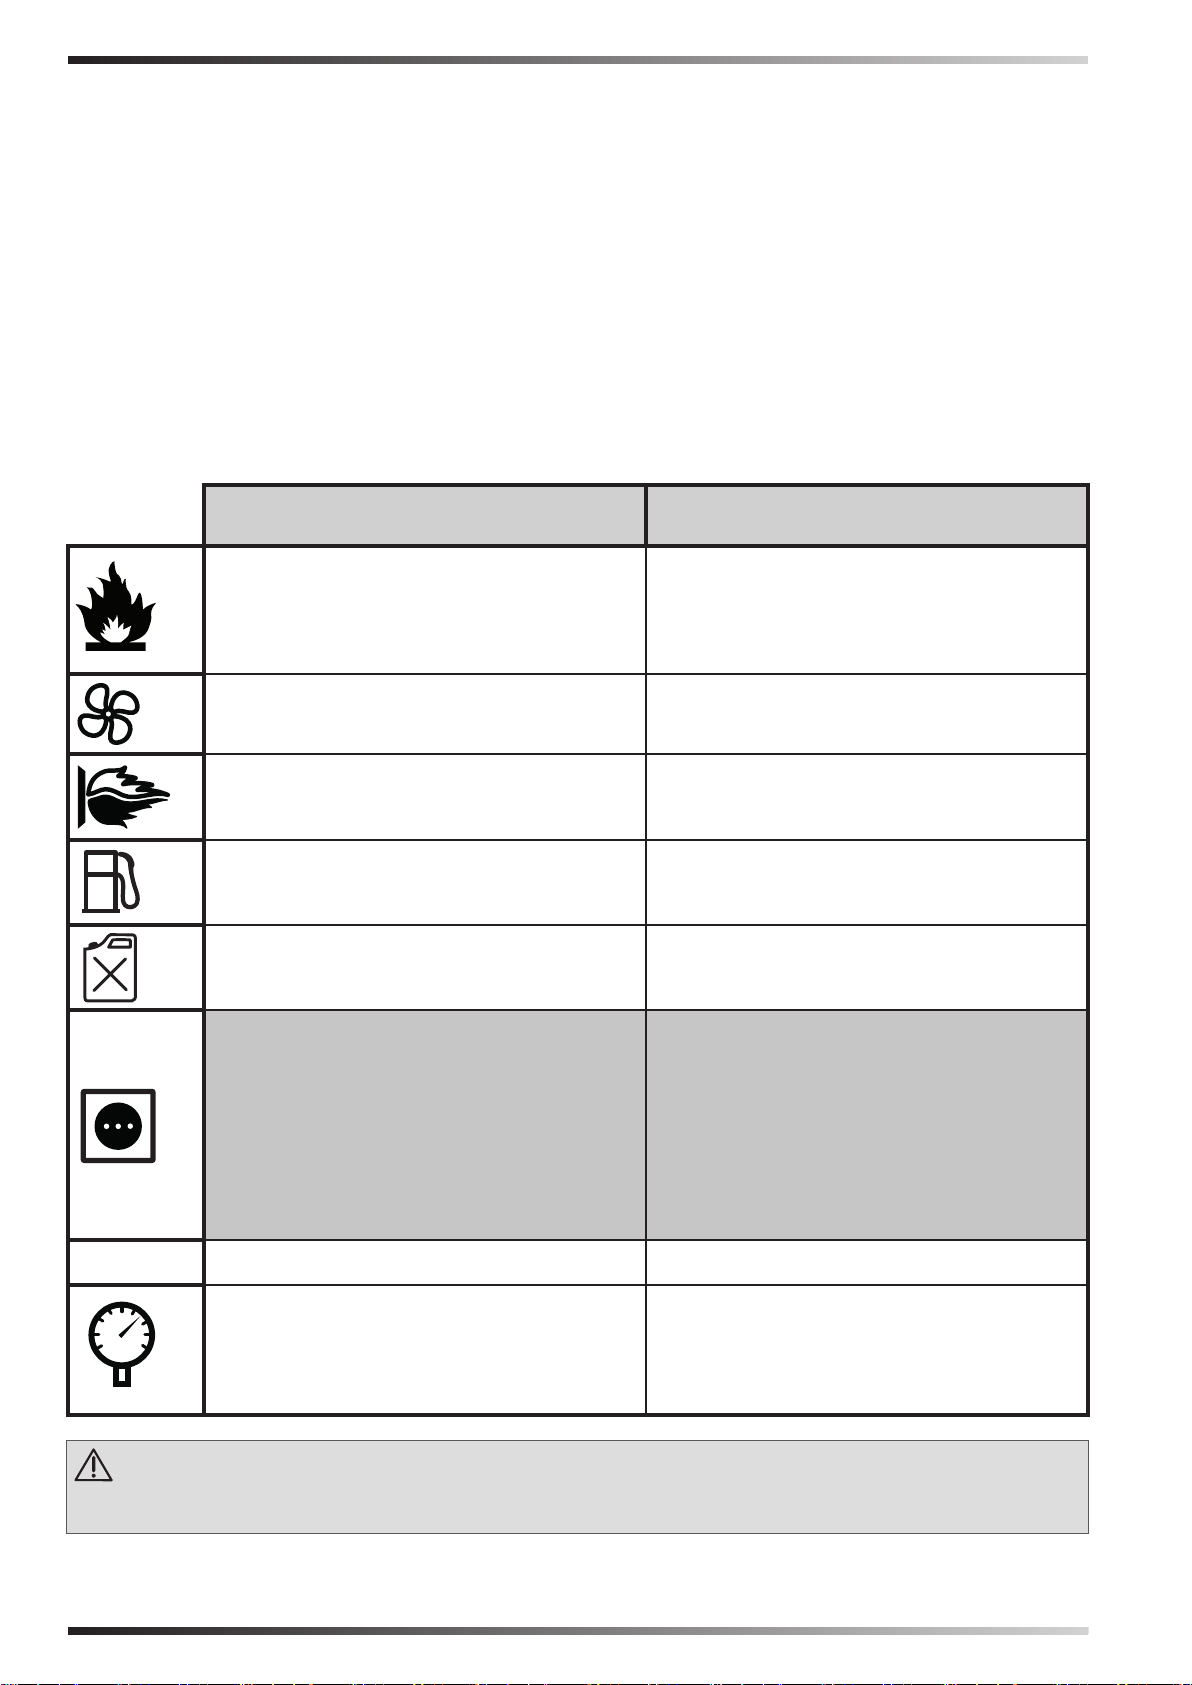
TECHNICAL DATA TABLE - TABELLA DATI TECNICI - TECHNISCHE DATEN
- TABLA DE DATOS TÉCNICOS - TABLEAU DES DONNEES TECHNIQUES -
TABEL TECHNISCHE GEGEVENS - TABELA DE DADOS TÉCNICOS - TABEL
OVER TEKNISKE DATA - TEKNISET TIEDOT SISÄLTÄVÄ TAULUKKO -
TABELL MED TEKNISKE DATA - TABELL ÖVER TEKNISKA DATA - TABELA
DANYCH TECHNICZNYCH - ТАБЛИЦА ТЕХНИЧЕСКИХ ДАННЫХ - TABULKA
TECHNICKÝCH ÚDAJŮ - MŰSZAKI ADATTÁBLÁZAT - PREGLEDNICA
TEHNIČNIH PODATKOV - TEKNÝK VERÝLER TABLOSU - TABLICA SA
TEHNIČKIM PODACIMA - TECHNINIŘ DUOMENŘ LENTELË - TEHNISKO DATU
TABULA - TEHNILISTE ANDMETE TABEL - TABEL DATE TEHNICE - TABUĽKA
TECHNICKÝCH ÚDAJOV - ТАБЛИЦА ТЕХНИЧЕСКИ ДАННИ - ТАБЛИЦЯ
ТЕХНІЧНИХ ДАНИХ - TABELA S TEHNIČKIM PODACIMA - ΠΙΝΑΚΑΣ
ΤΕΧΝΙΚΩΝ ΣΤΟΙΧΕΙΩΝ - 技术参数 - TЕХНИКАЛЫҚ КӨРСЕТКІШТЕР КЕСТЕСІ
B 35CED B 70CED
MAX
10 kW-кВт
8.600 kcal/h-ккал/ч
34.200 Btu/h-БТЕ/ч
280 m³/h-м³/ч 400 m³/h-м³/ч
0,8 kg/h-кг/ч 1,6 kg/h-кг/ч
DIESEL-KEROSENE
дизель-керосин
15 l-л 19 l-л
~220-240 V-В
(-15%÷10%)
50/60 Hz-Гц
0,35 A
0,08 kW-кВт
20 kW-кВт
17.200 kcal/h-ккал/ч
68.300 Btu/h-БТЕ/ч
DIESEL-KEROSENE
дизель-керосин
~220-240 V-В
(-15%÷10%)
50/60 Hz-Гц
0,8 A
0,18 kW-кВт
RPM
IMPORTANT: In order to have a correct function you must use an electrical generator in class G3 or more (frequency variation ±1%, tension variation ±2%). The maximum power of electrical generator must be three time the nominal power of device
that you must connected.
1425 2850
0,20 bar-бар 0,36 bar-бар
Page 4
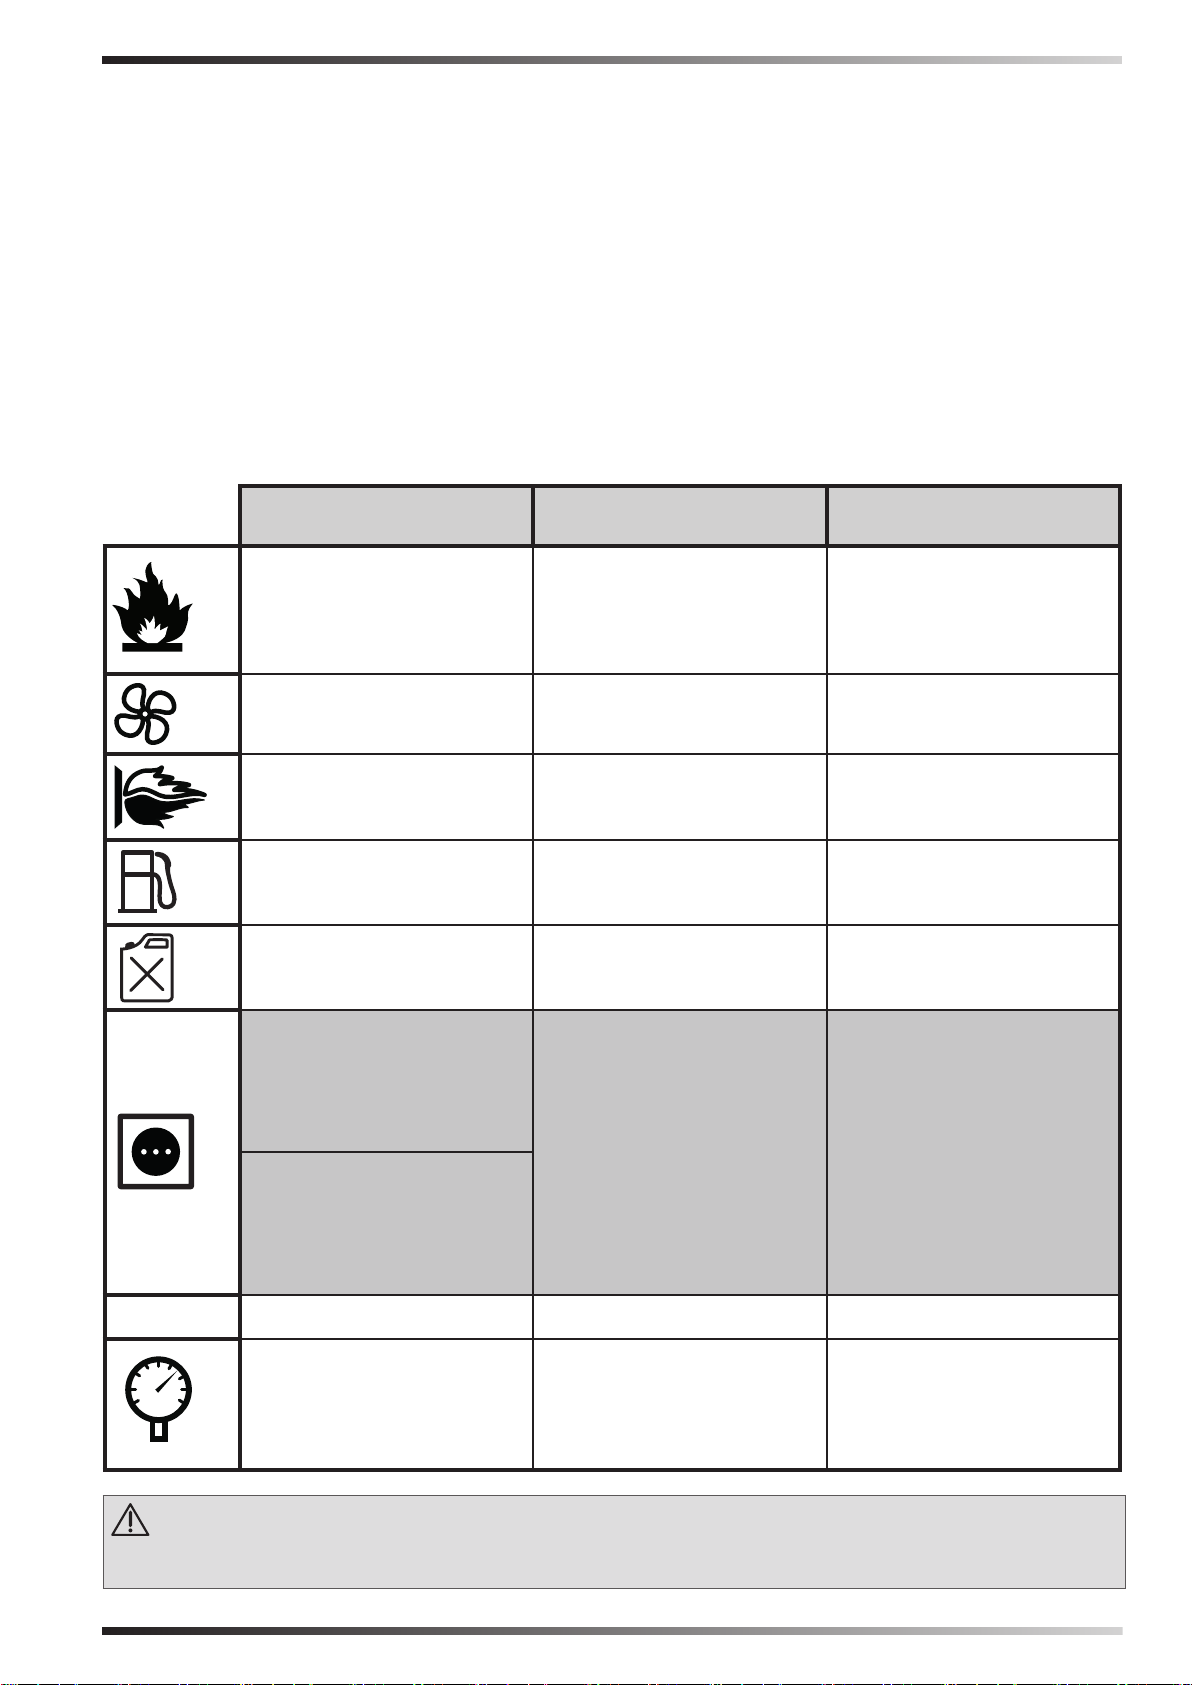
TECHNICAL DATA TABLE - TABELLA DATI TECNICI - TECHNISCHE DATEN
- TABLA DE DATOS TÉCNICOS - TABLEAU DES DONNEES TECHNIQUES -
TABEL TECHNISCHE GEGEVENS - TABELA DE DADOS TÉCNICOS - TABEL
OVER TEKNISKE DATA - TEKNISET TIEDOT SISÄLTÄVÄ TAULUKKO -
TABELL MED TEKNISKE DATA - TABELL ÖVER TEKNISKA DATA - TABELA
DANYCH TECHNICZNYCH - ТАБЛИЦА ТЕХНИЧЕСКИХ ДАННЫХ - TABULKA
TECHNICKÝCH ÚDAJŮ - MŰSZAKI ADATTÁBLÁZAT - PREGLEDNICA
TEHNIČNIH PODATKOV - TEKNÝK VERÝLER TABLOSU - TABLICA SA
TEHNIČKIM PODACIMA - TECHNINIŘ DUOMENŘ LENTELË - TEHNISKO DATU
TABULA - TEHNILISTE ANDMETE TABEL - TABEL DATE TEHNICE - TABUĽKA
TECHNICKÝCH ÚDAJOV - ТАБЛИЦА ТЕХНИЧЕСКИ ДАННИ - ТАБЛИЦЯ
ТЕХНІЧНИХ ДАНИХ - TABELA S TEHNIČKIM PODACIMA - ΠΙΝΑΚΑΣ
ΤΕΧΝΙΚΩΝ ΣΤΟΙΧΕΙΩΝ - 技术参数 - TЕХНИКАЛЫҚ КӨРСЕТКІШТЕР КЕСТЕСІ
B 100CED B 150CED B 300CED
MAX
29 kW-кВт
25.000 kcal/h-ккал/ч
99.300 Btu/h-БТЕ/ч
800 m³/h-м³/ч 900 m³/h-м³/ч 1.800 m³/h-м³/ч
2,3 kg/h-кг/ч 3,5 kg/h-кг/ч 7 kg/h-кг/ч
DIESEL-KEROSENE
дизель-керосин
44 l-л 44 l-л 105 l-л
~220-240 V-В
(-15%÷10%)
50 Hz-Гц
1 A
0,23 kW-кВт
~220-240 V-В
(-15%÷10%)
60 Hz-Гц
1 A
0,23 kW-кВт
44 kW-кВт
37.900 kcal/h-ккал/ч
150.500 Btu/h-БТЕ/ч
DIESEL-KEROSENE
дизель-керосин
~220-240 V-В
(-15%÷10%)
50/60 Hz-Гц
1,2 A
0,28 kW-кВт
88 kW-кВт
75.800 kcal/h-ккал/ч
301.000 Btu/h-БТЕ/ч
DIESEL-KEROSENE
дизель-керосин
~220-240 V-В
(-15%÷10%)
50/60 Hz-Гц
2,4 A
0,56 kW-кВт
RPM
IMPORTANT: In order to have a correct function you must use an electrical generator in class G3 or more (frequency variation ±1%, tension variation ±2%). The maximum power of electrical generator must be three time the nominal power of device
that you must connected.
2850 2850 2850
0,27 bar-бар 0,34 bar-бар 0,40 bar-бар
Page 5
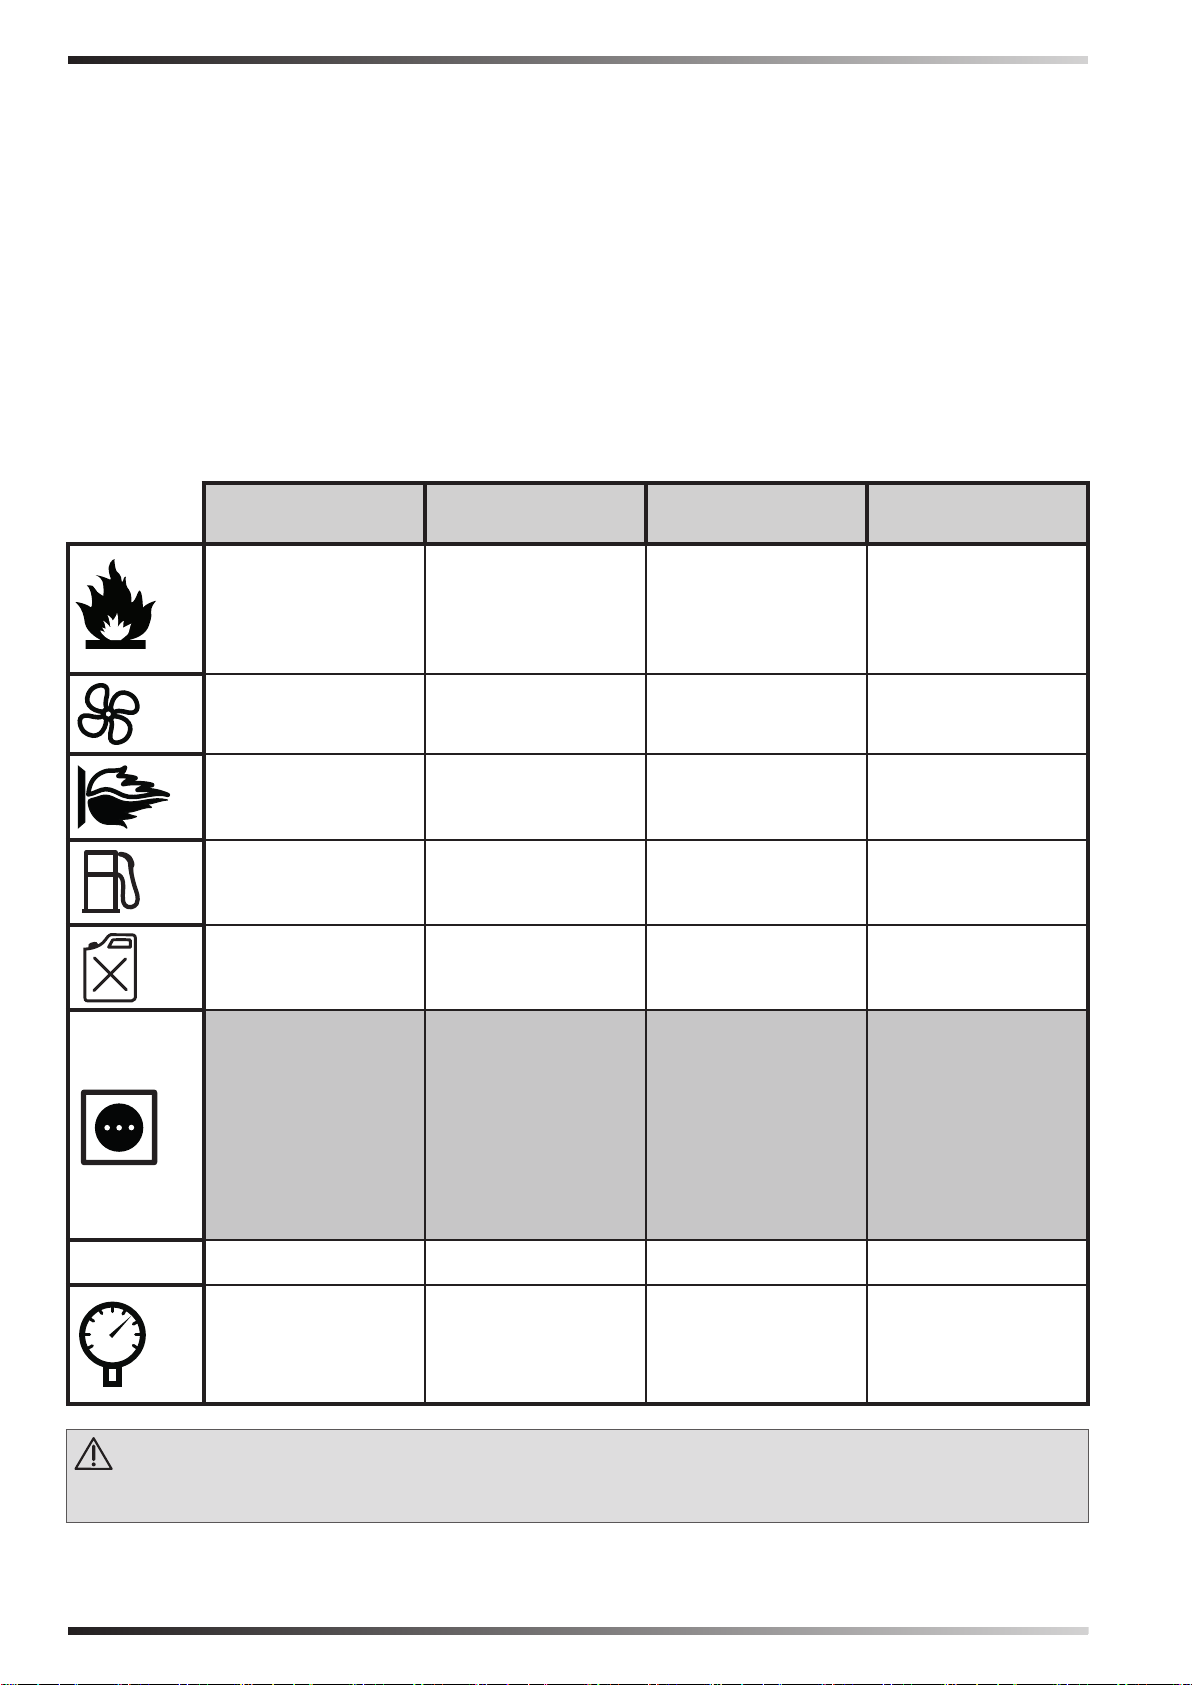
TECHNICAL DATA TABLE - TABELLA DATI TECNICI - TECHNISCHE DATEN
- TABLA DE DATOS TÉCNICOS - TABLEAU DES DONNEES TECHNIQUES -
TABEL TECHNISCHE GEGEVENS - TABELA DE DADOS TÉCNICOS - TABEL
OVER TEKNISKE DATA - TEKNISET TIEDOT SISÄLTÄVÄ TAULUKKO -
TABELL MED TEKNISKE DATA - TABELL ÖVER TEKNISKA DATA - TABELA
DANYCH TECHNICZNYCH - ТАБЛИЦА ТЕХНИЧЕСКИХ ДАННЫХ - TABULKA
TECHNICKÝCH ÚDAJŮ - MŰSZAKI ADATTÁBLÁZAT - PREGLEDNICA
TEHNIČNIH PODATKOV - TEKNÝK VERÝLER TABLOSU - TABLICA SA
TEHNIČKIM PODACIMA - TECHNINIŘ DUOMENŘ LENTELË - TEHNISKO DATU
TABULA - TEHNILISTE ANDMETE TABEL - TABEL DATE TEHNICE - TABUĽKA
TECHNICKÝCH ÚDAJOV - ТАБЛИЦА ТЕХНИЧЕСКИ ДАННИ - ТАБЛИЦЯ
ТЕХНІЧНИХ ДАНИХ - TABELA S TEHNIČKIM PODACIMA - ΠΙΝΑΚΑΣ
ΤΕΧΝΙΚΩΝ ΣΤΟΙΧΕΙΩΝ - 技术参数 - TЕХНИКАЛЫҚ КӨРСЕТКІШТЕР КЕСТЕСІ
B 35CEG B 70CEG B 100CEG B 150CEG
MAX
10 kW-кВт
8.600 kcal/h-ккал/ч
34.200 Btu/h-БТЕ/ч
280 m³/h-м³/ч 400 m³/h-м³/ч 800 m³/h-м³/ч 900 m³/h-м³/ч
0,8 kg/h-кг/ч 1,6 kg/h-кг/ч 2,3 kg/h-кг/ч 3,5 kg/h-кг/ч
DIESEL-KEROSENE
дизель-керосин
15 l-л 19 l-л 44 l-л 44 l-л
~220-240 V-В
(-15%÷10%)
50 Hz-Гц
0,35 A
0,08 kW-кВт
20 kW-кВт
17.200 kcal/h-ккал/ч
68.300 Btu/h-БТЕ/ч
DIESEL-KEROSENE
дизель-керосин
~220-240 V-В
(-15%÷10%)
50 Hz-Гц
0,8 A
0,18 kW-кВт
29 kW-кВт
25.000 kcal/h-ккал/ч
99.300 Btu/h-БТЕ/ч
DIESEL-KEROSENE
дизель-керосин
~220-240 V-В
(-15%÷10%)
50 Hz-Гц
1 A
0,23 kW-кВт
44 kW-кВт
37.900 kcal/h-ккал/ч
150.500 Btu/h-БТЕ/ч
DIESEL-KEROSENE
дизель-керосин
~220-240 V-В
(-15%÷10%)
50 Hz-Гц
1,2 A
0,28 kW-кВт
RPM
IMPORTANT: In order to have a correct function you must use an electrical generator in class G3 or more (frequency variation ±1%, tension variation ±2%). The maximum power of electrical generator must be three time the nominal power of device
that you must connect.
1425 2850 2850 2850
0,20 bar-бар 0,36 bar-бар 0,27 bar-бар 0,34 bar-бар
Page 6

NOTE:_____________________________________________________________
____________________________________________________________________
____________________________________________________________________
____________________________________________________________________
____________________________________________________________________
____________________________________________________________________
____________________________________________________________________
____________________________________________________________________
____________________________________________________________________
____________________________________________________________________
____________________________________________________________________
____________________________________________________________________
____________________________________________________________________
____________________________________________________________________
____________________________________________________________________
____________________________________________________________________
____________________________________________________________________
____________________________________________________________________
____________________________________________________________________
____________________________________________________________________
____________________________________________________________________
____________________________________________________________________
____________________________________________________________________
____________________________________________________________________
____________________________________________________________________
____________________________________________________________________
____________________________________________________________________
____________________________________________________________________
____________________________________________________________________
____________________________________________________________________
____________________________________________________________________
____________________________________________________________________
____________________________________________________________________
____________________________________________________________________
____________________________________________________________________
____________________________________________________________________
____________________________________________________________________
____________________________________________________________________
____________________________________________________________________
____________________________________________________________________
____________________________________________________________________
____________________________________________________________________
____________________________________________________________________
Page 7
FIGURES - FIGURE - ABBILDUNGEN - FIGURAS - FIGURES - FIGUREN - FI-
7
2
3
5
9 10
GURAS - FIGURER - KUVAT - FIGURER - BILDER - RYSUNKI - РИСУНКИ - OB-
RÁZKY - ÁBRÁK - SLIKE - ŞEKİLLER - SLIKE - PAVEIKSLĖLIAI - ATTĒLI - JO-
ONISED - FIGURI - OBRÁZKY - СХЕМИ - МАЛЮНКИ - SLIKE - ΕΙΚΟΝΕΣ - 图
- СУРЕТТЕР
1
1
Page 8
FIGURES - FIGURE - ABBILDUNGEN - FIGURAS - FIGURES - FIGUREN - FI-
9 10
GURAS - FIGURER - KUVAT - FIGURER - BILDER - RYSUNKI - РИСУНКИ - OB-
RÁZKY - ÁBRÁK - SLIKE - ŞEKİLLER - SLIKE - PAVEIKSLĖLIAI - ATTĒLI - JO-
ONISED - FIGURI - OBRÁZKY - СХЕМИ - МАЛЮНКИ - SLIKE - ΕΙΚΟΝΕΣ - 图
- СУРЕТТЕР
3
5
4
6
7
8
Page 9
en
it
IMPORTANT: READ AND UNDERSTAND THIS OPERATIONAL MANUAL
BEFORE PERFORMING ASSEMBLY, COMMISSIONING OR MAINTENANCE
ON THIS HEATER. INCORRECT USE OF THE HEATER CAN CAUSES
de
es
fr
1. INFORMATION REGARDING
SAFETY
nl
WARNINGS
pt
KEEP THIS MANUAL FOR FURTHER REFERENCE.
IMPORTANT: This air heater has
da
been designed for mobile and temporary
professional applications. It has not been
designed for domestic use nor for thermal
comfort of human.
no
sv
pl
ru
IMPORTANT: This appliance is not
intended for use by persons (including
children) with reduced physical, sensory and mental capacities or with lack of
experience or knowledge unless super-
cs
vised by a person responsible for their
safety. Children must be supervised to
hu
make sure they neither do nor play with
the appliance.
sl
tr
hr
DANGER: Suocation by carbon
monoxide can be fatal.
The rst symptoms of suocation by
lt
carbon monoxide are similar to those of
u with headache, light-headedness and/or
lv
nausea. These symptoms could be caused
et
by the faulty functioning of the heater. IF
THESE SYMPTOMS SHOULD OCCUR, DO
ro
OUTDOORS IMMEDIATELY and have the
generator repaired by a technical after-
sk
sales centre.
bg
►►1.1. TOPPING-UP:
►1.1.1. Sta in charge of top-up must be
uk
bs
qualied and understand the manufacturer’s instructions and the Standards in
force regarding safe top-up of the heaters.
el
►1.1.2. Only use the type of fuel express-
zh
ly specied on the heater identication
plate.
►1.1.3. Before topping-up, switch the heat-
er o and wait for it to cool down.
►1.1.4. The fuel storage tanks must be in a
separate structure.
►1.1.5. All fuel tanks must be at a minimum
safety distance from the heater, accord
ing to the Standards in force.
SERIOUS INJURY.
►1.1.6. The fuel must be kept in rooms
where the oor does not allow penetration and dripping of the same onto ames
below, which can cause ignition.
►1.1.7. The fuel must be stored in compli-
ance with the Standard in force.
►►1.2. SAFETY:
►1.2.1. Never use the heater in rooms
where petrol, solvents for paints or other
highly inammable vapours are present.
►1.2.2. During use of the heater, follow
all local regulations and the Standard in
force.
►1.2.3. The heaters in proximity of tarpau
lin, curtains or other similar covering
materials, must be situated at a safe dis
tance from the same. It is advised to use
re-proof covering material.
►1.2.4. Only use in well-ventilated areas.
Set-up a suitable opening according to
the Laws in force, with the purpose of introducing fresh air from outdoors.
►1.2.5. Power the heater only with current
that has voltage and frequency specied
on the heater identication plate.
►1.2.6. Only use extensions with three
wires, appropriately connected to earth.
►1.2.7. Minimum safety distances recom-
mended, running between the heater and
the inammable substances are: front
output = 2,5 m; side, at top and on rear =
1,5 m.
►1.2.8. Put the heater in hot mode or run-
ning, on a stable level surface, in a way to
prevent the risk of re.
►1.2.9. Keep animals at a safe distance
from the heater.
►1.2.10. Disconnect the heater from the
mains socket when not in use.
►1.2.11. When it is controlled by a
thermostat, the heater can switch on at
any time.
►1.2.12. Never use the heater in frequently
inhabited rooms, or in the bedroom.
►1.2.13. Never block the air vent (rear side)
-
or the air outlet (front side) of the heater.
-
-
Page 10

►1.2.14. When the heater is hot or connected
to the mains electricity or functioning, it
must never be moved, handled, toppedup or subject to any maintenance
interventions.
►1.2.15. Do not duct the air entering or
exiting the heater.
►1.2.16. Keep the hot parts of the heater at
an adequate distance from inammable
or termolabile materials (including the
power supply cable).
►1.2.17. If the power supply cable is
damaged, it must be replaced by the
technical after-sales centre, in order to
prevent all risks.
2. UNPACKING
►2.1. Remove all packaging materials used
to wrap and deliver the heater and dispose
of them in compliance with the Standards in
force.
►2.2. Extract all articles from the packaging.
►2.3. Control for any damage undergone
during transport. If the heater appears
damaged, inform the dealer, where the
purchase was made, immediately.
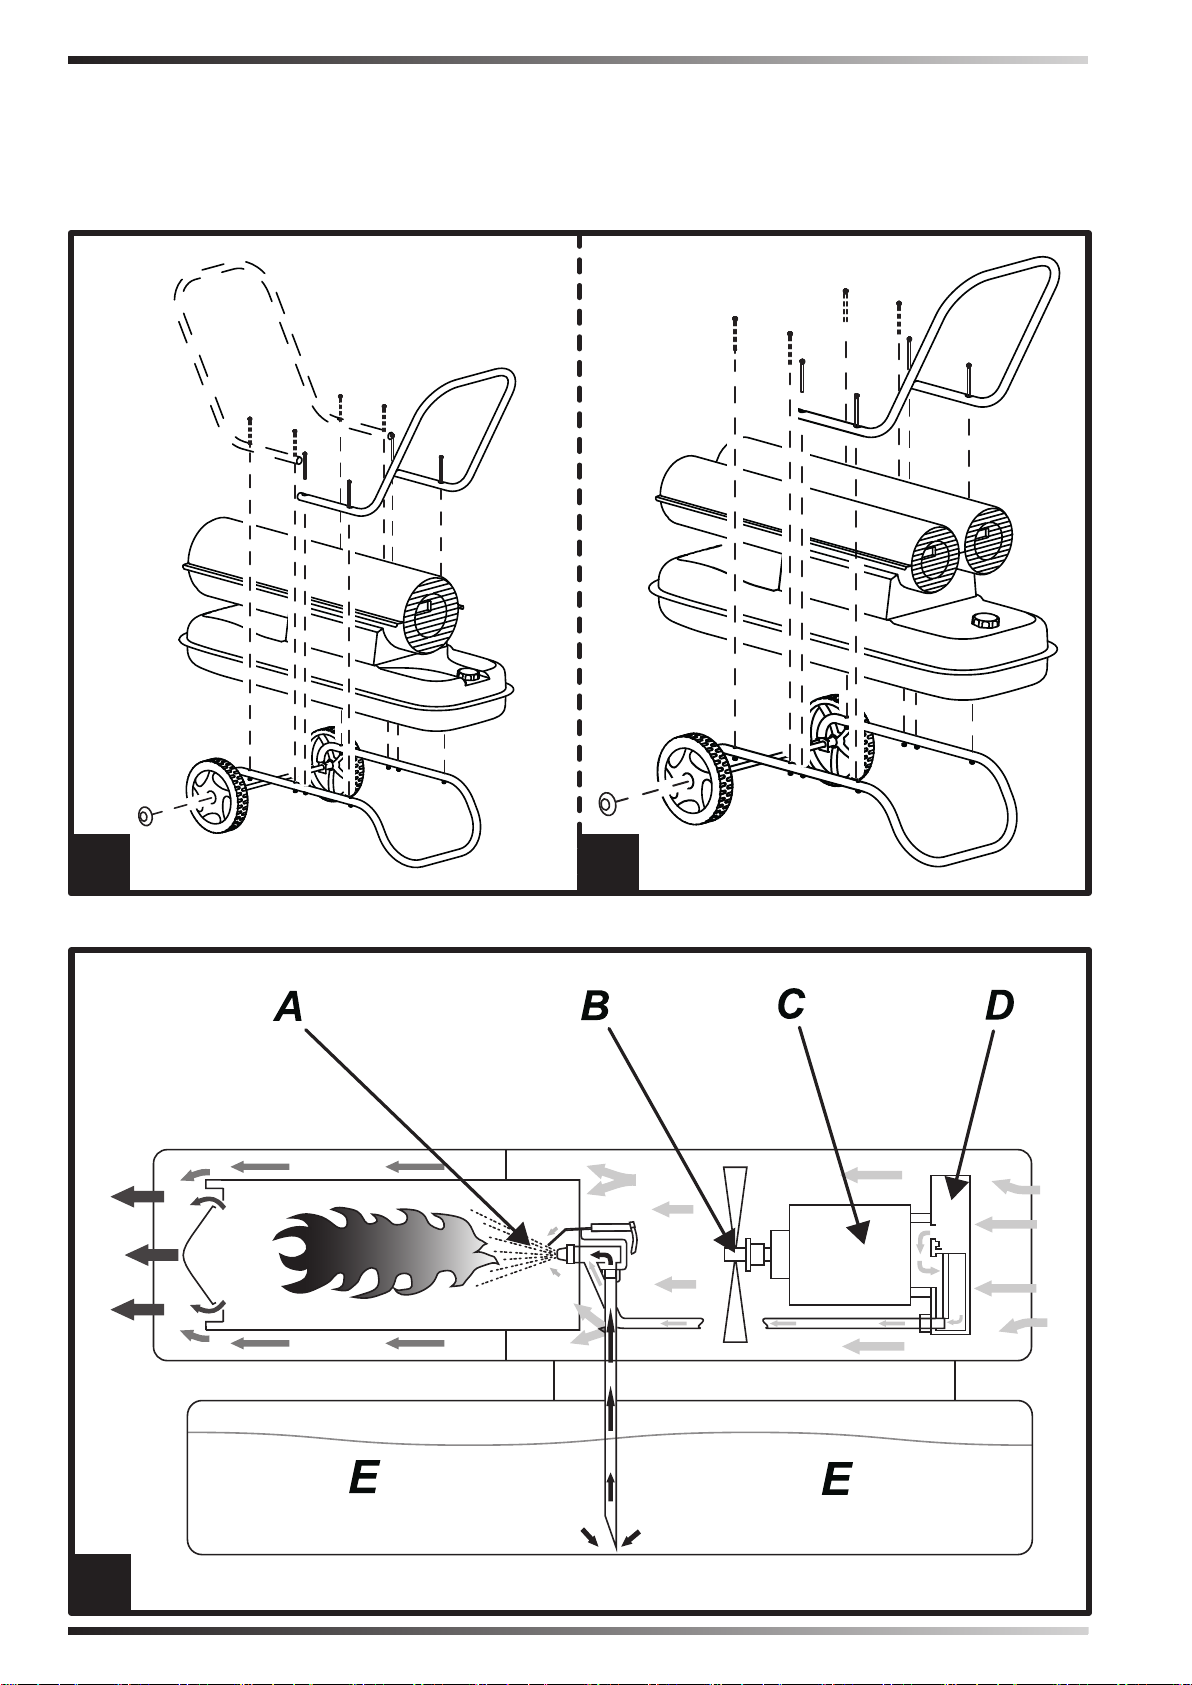
3. ASSEMBLY (29-44 kW)
(SEE FIG. 1)
These models have wheels and handle/s depending on the model. These components,
complete with relative nuts and bolts, are situated in the heater box.
4. FUEL
WARNING: The heater only functions
with DIESEL or KEROSENE.
Only use diesel or kerosene, to prevent the risk
of re or explosion. Never use petrol, naphtha,
solvents for paints, alcohol or other highly
inammable fuels.
Use non-toxic anti-freeze additives in the case
of very low temperatures.
5. FUNCTIONING PRINCIPLES
The series of compressor products has a wide
range of power. Models are available with
both single and double combustion anked
chambers. For heaters with a double combustion
chamber, the two combustion chambers can
be used simultaneously for maximum power,
or a single combustion chamber can be used
for intermediate power.
(SEE FIG. 2)
A. Combustion chamber and heads,
B. Fan,
C. Motor,
D. Compressor,
E. Tank.
The compressor (D) started by the motor
(C) compresses the air, which through the
atomising nozzle, sucks up the fuel from the
tank (E) due to the “VENTURI EFFECT”. On
contact with the igniter, the atomised fuel
ignites inside the combustion chamber (A).
The combustion products are mixed with the
ow of room air generated by the rotation of
the fan (B) and pushed towards the outside of
the heater. A photoresistance, connected to
a circuit board, constantly checks the correct
functioning of the heater, stopping the cycle in
the event of anomalies.
6. FUNCTIONING
WARNING: Thoroughly read the
”INFORMATION REGADRING SAFETY”,
before switching the heater on.
►►6.1. SWITCHING THE HEATER ON:
►6.1.1. Follow all instructions relative to safety.
►6.1.2. Check the presence of fuel in the tank.
►6.1.3. Close the tank cap.
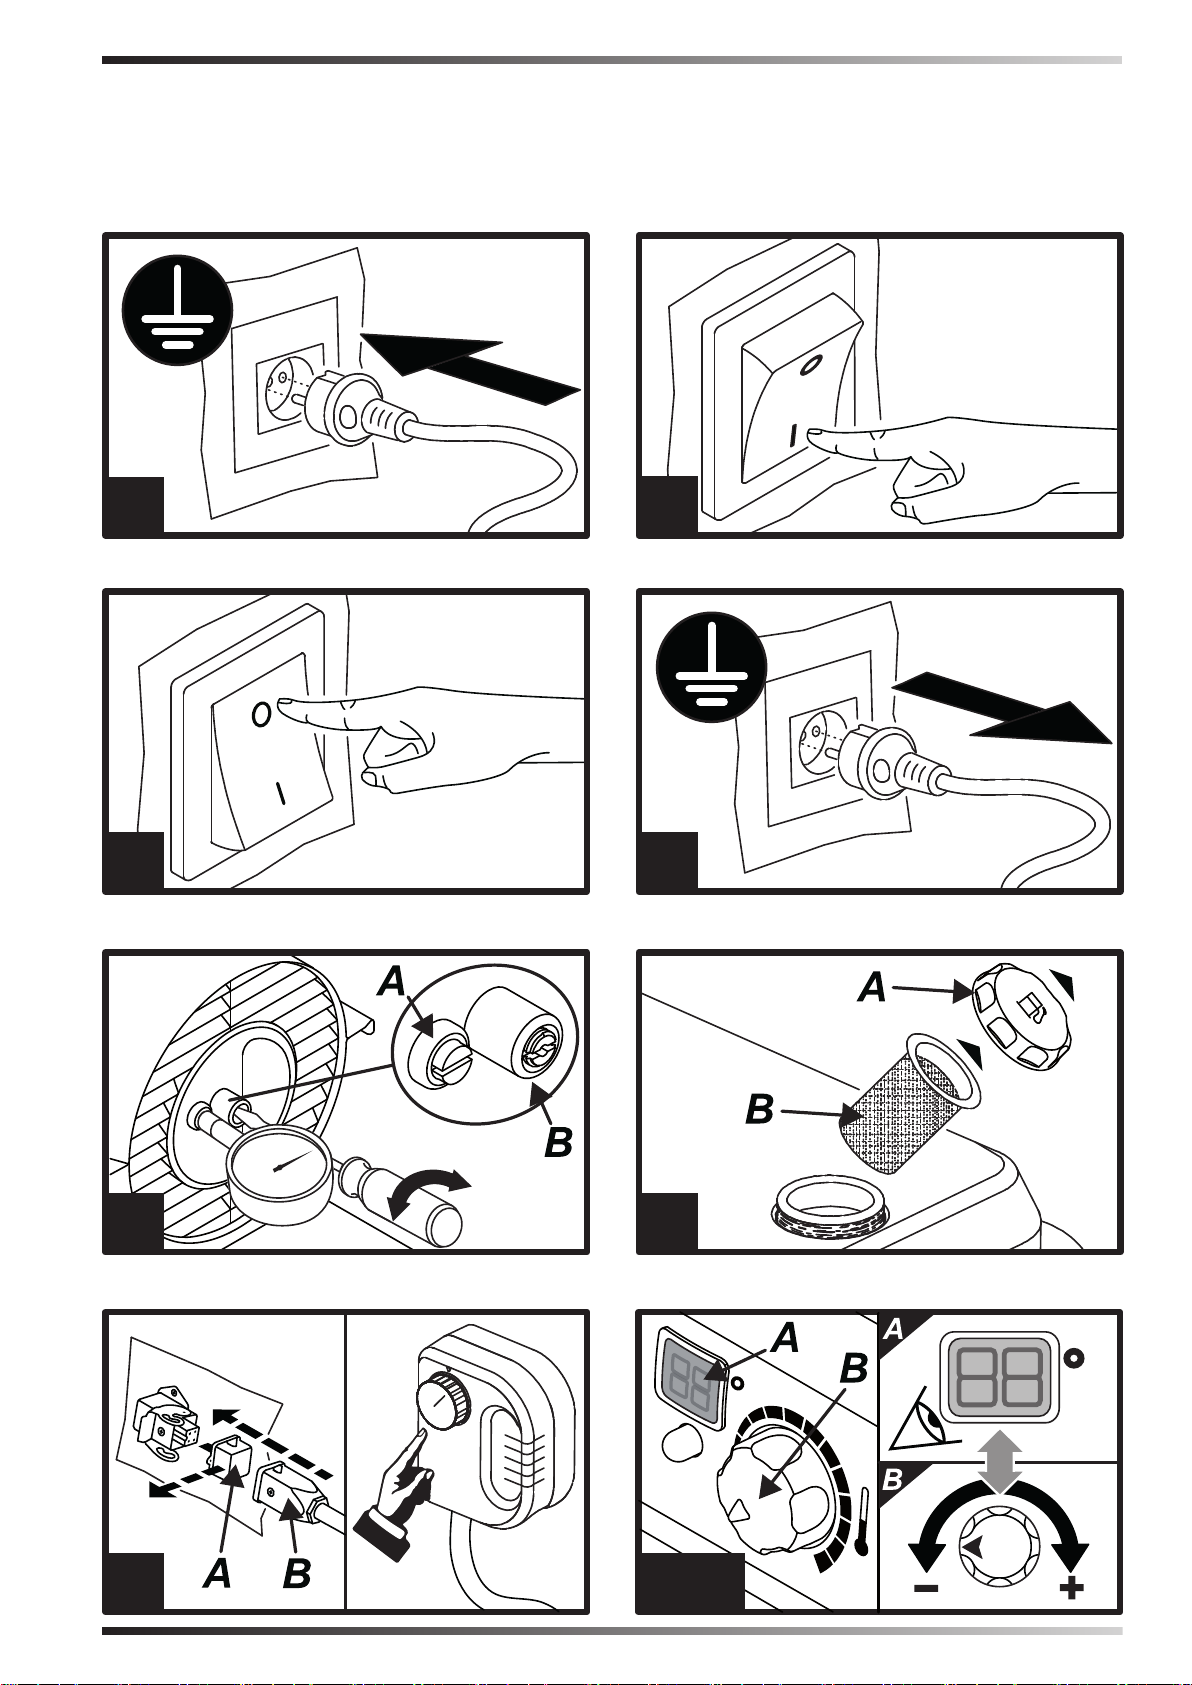
►6.1.4. Connect the power supply plug to
the mains electricity (SEE VOLTAGE IN
“TECHNICAL DATA TABLE”) (SEE FIG. 3).
►6.1.5. Take the “ON/OFF” switch to the
“ON” (|) position (SEE FIG. 4). The heater
should switch-on within a few seconds. If
the heater does not start, consult the “13.
TROUBLESHOOTING” paragraph.
MODELS WITH A DOUBLE COMBUSTION
CHAMBER: To use the heater at maximum
power turn both “ON/OFF” switches to “ON”
(I). To use the heater at intermediate power
turn only one of the “ON/OFF” switches
to “ON” (I). Indications for managing and
selecting ignition of the single chamber are
on the control panel and on the combustion
chamber.
►6.1.6. For the models with room thermostat,
check the position of the knob (SEE FIG.
9-10).
N.B.: IF THE HEATER SHOULD SWITCHOFF DUE TO THE LACK OF FUEL, TOP-UP
THE TANK AND RESET THE HEATER (SEE
PAR. 6.2).
en
it
de
es
fr
nl
pt
da
no
sv
pl
ru
cs
hu
sl
tr
hr
lt
lv
et
ro
sk
bg
uk
bs
el
zh
Page 11

►►6.2. RESETTING THE HEATER:
en
In the models with automatic “RESET”, switch
the heater o and back on again (SEE FIG.
it
5-4).
de
►►6.3. SWITCHING THE HEATER OFF:
es
DO NOT PULL THE PLUG OUT UNTIL THE
COOLING CYCLE HAS TOTALLY ENDED.
fr
►6.3.1. Take the “ON/OFF” switch to the “OFF”
nl
(O) position (SEE FIG. 5).
►6.3.2. Disconnect the heater from the mains
pt
electricity (SEE FIG. 6).
da
7. REGULATING THE PRESSURE
OF THE COMPRESSOR (Contact the
technical service center)
no
(SEE FIG. 7)
THE COMPRESSOR PRESSURE MAY HAVE
sv
TO BE RESTORED WITH WEAR OF THE
pl
HEATER.
►7.1. Use the “TECHNICAL DATA TABLE” to
ru
identify the correct pressure (Bar - PSI - kPa)
cs
of your heater.
►7.2. Remove the screw/cap of the manometer
hu
connection (A).
►7.3. Assemble the manometer (not supplied,
sl
see “ACCESSORIES”).
►7.4. Switch the heater on.
tr
►7.5. Act on the regulation screw by turning it
hr
clockwise to increase the pressure and anticlockwise to decrease it (B).
lt
►7.6. Remove the manometer and restore the
screw/cap (A).
lv
et
8. CLEANING THE TANK FILTER
(SEE FIG. 8)
ro
DEPENDING ON THE QUALITY OF THE
FUEL THAT IS USED, THE TANK FILTER
sk
MAY HAVE TO BE CLEANED.
bg
►8.1. Remove the cap (A) from the tank.
►8.2. Extract the lter (B) from the tank.
uk
►8.3. Clean the lter (B) with clean fuel, paying
bs
attention not to damage it.
►8.4. Re-mount the lter (B) in the tank.
el
►8.5. Close the cap (A).
zh
9. PRESERVATION AND
TRANSPORT
I ORDER TO KEEP AND/OR TRANSPORTAR
THE HEATER IN THE BEST WAY, STHE
FOLLOWING PROCEDURE MUST BE
FOLLOWED.
►9.1. Empty the fuel tank (some models have
a draining cap on the bottom of the tank. In
this case, remove the drain cap and empty
the fuel).
►9.2. If the presence of residues is noted, pour
clean fuel into the tank and drain o again.
►9.3. Close the tank cap and/or the draining
cap and dispose of the fuel appropriately
according to the Standards in force.
►9.4. In order to keep the heater in the best
way possible, it must be kept on a level
surface to prevent the escape of fuel and in
a dry place away from any possible external
threats.
10. ROOM THERMOSTAT
►►10.1. MODELS PRE-SET FOR REMOTE
ROOM THERMOSTAT:
(SEE FIG. 9)
For models preset for remote room thermostat,
remove the cover connected to the heater
(A), connect the thermostat (B) (optional) and
set the desired room temperature. The room
thermostat completely turns o the heater once
the set temperature has been reached. If the
temperature drops below the set temperature,
the heater will automatically turn itself on again.
►►10.2. MODELS WITH ROOM
THERMOSTAT INSTALLED ON THE
CONTROL PANEL:
(SEE FIG. 10)
For models with room thermostat installed on
the control panel, when the knob (B) is turned
the desired temperature starts ashing on the
display (A) for a few seconds, after which the
display shows the room temperature. When the
knob (B) is turned completely to the right, the
display (A) shows “CH”, after which the heater
works continuously.
►►10.3. MODELS PRE-SET FOR REMOTE
ROOM THERMOSTAT AND ROOM
THERMOSTAT INSTALLED ON THE
CONTROL PANEL:
(SEE FIG. 9-10)
For models preset for remote room thermostat
and room thermostat installed on the control
panel, remove the cover connected to the
heater (SEE A FIG. 9) and connect the
thermostat (SEE B FIG. 9) (optional). For
correct heater operation, completely turn the
knob to the right (SEE B FIG. 10), the display
(SEE A FIG. 10) shows “CH”, after which set
the desired temperature on the remote room
thermostat.
Page 12
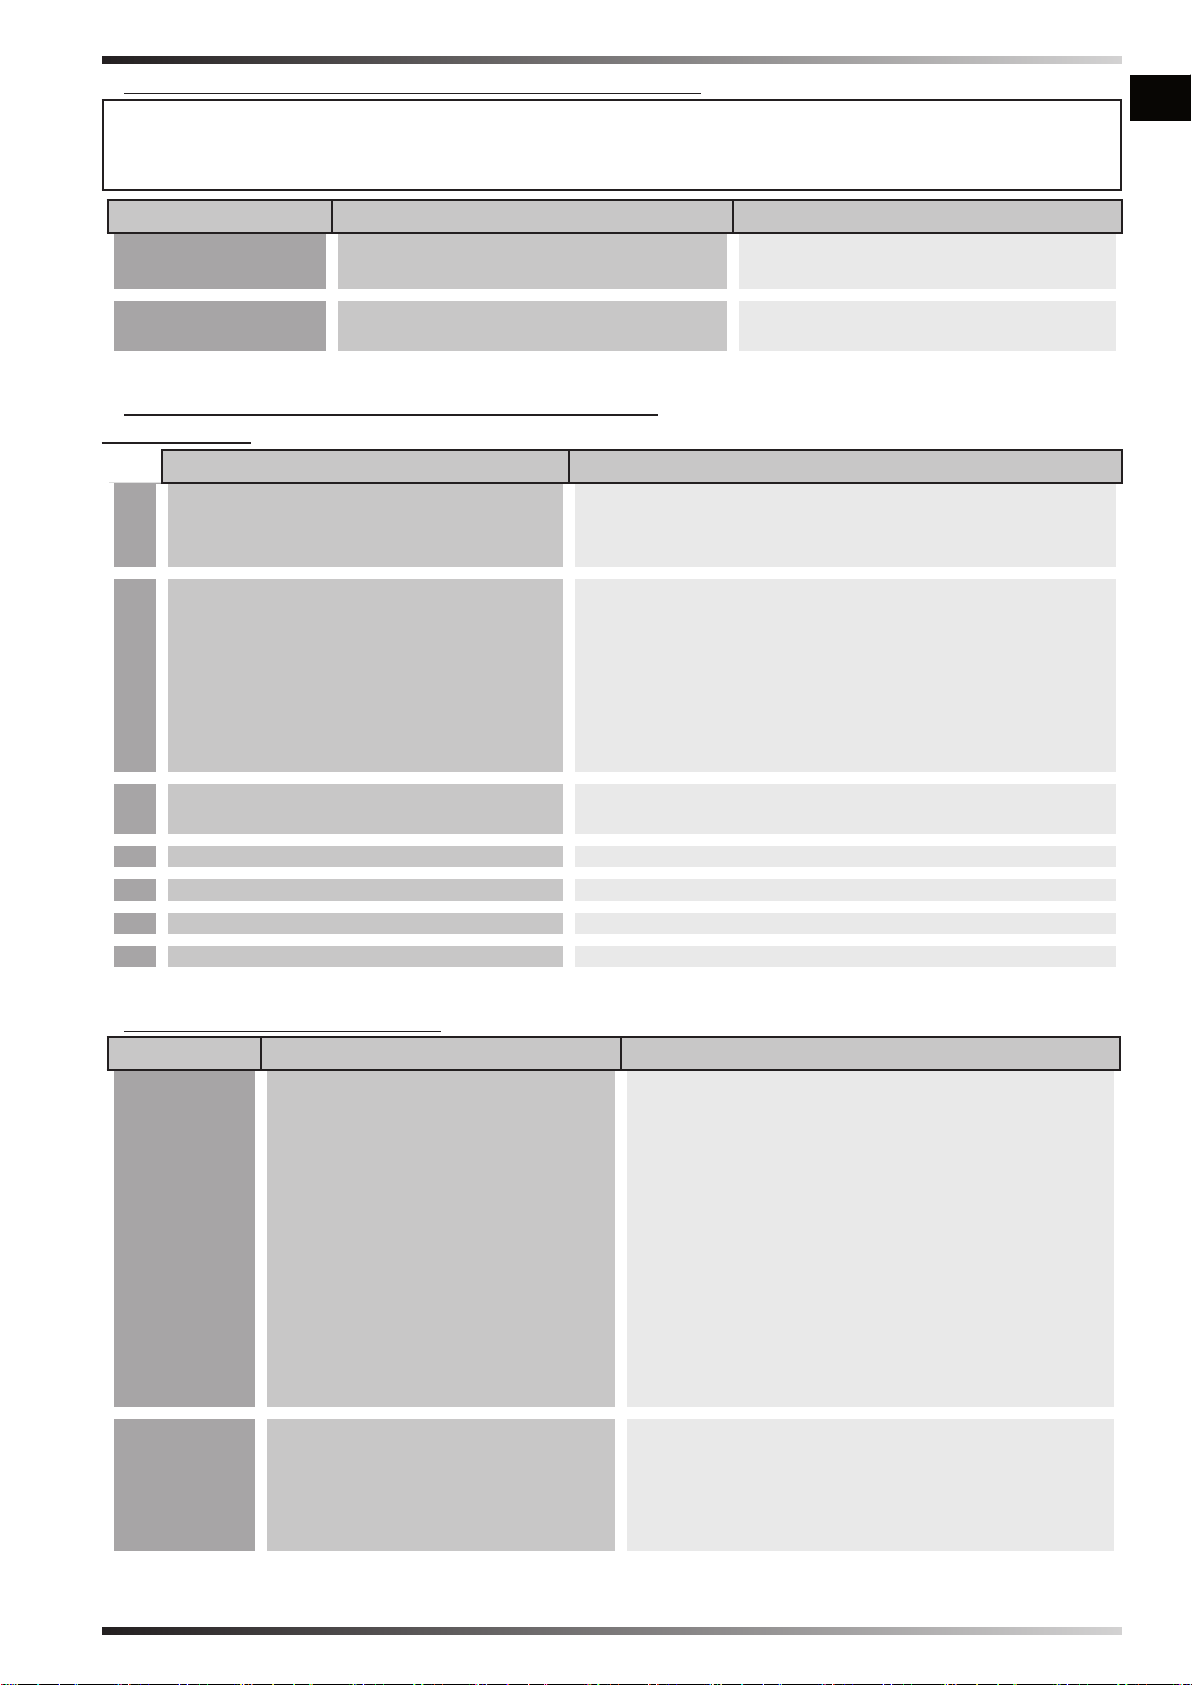
11. PREVENTIVE MAINTENANCE SCHEDULE
WARNING: BEFORE PERFORMING ANY MAINTENANCE OR REPAIRS, DISCONNECT
THE POWER SUPPLY CABL FROM THE MAINS AND MAKE SURE THAT THE HEATER IS
COLD.
COMPONENT MAINTENANCE FREQUENCY MAINTENANCE PROCEDURE
Fuel tank Empty and rinse the tank with clean
fuel every 150-200 working hours
Filters Clean or replace every 500 working
hours or when necessary
Empty and rinse the tank with
clean fuel (SEE PAR. 9)
Contact the technical service
center
12. DISPLAY ERRORS (WHERE PRESENT)
(SEE FIG. 10)
en
it
de
es
fr
nl
pt
da
CAUSE SOLUTION
F0
1. The “ON/OFF” switch is turned
“ON” (|) when the heater is
plugged in
F1
1. No fuel
2. Fuel is contaminated
1. After disconnecting the heater, see that the
switch is in the “OFF” (0) position, plug the
heater in and turn the switch “ON” (|)
1. Turn the switch “OFF” (0), rell the fuel tank
2. Turn the switch “OFF” (0) empty and rell the
fuel tank. Clean the lter using clean fuel, do not
damage the lter (SEE PAR. 8)
3. Photocell is dirty or damaged
4. Fuel lter is dirty
5. Ignition error
F2
1. Interrupted cable
2. Sensor is damaged
F3
1. Internal heater overheating 1. Turn the heater o, wait until it is cooled down
F4
1. Incorrect voltage 1. Check voltage of your electric supply system
LO
1. External temperature below -5°C 1. Normal condition
CH
1. Continuous operation 1. Normal condition
3. Contact the technical service center
4. SEE PAR. 8
5. Contact the technical service center
1. Contact the technical service center
2. Contact the technical service center
13. TROUBLESHOOTING
PROBLEM POSSIBLE CAUSE POSSIBLE SOLUTION
The heater
does not
start
1. Generator blocked
2. Starter switch in “OFF”
position (0)
3. No power supply
1. Reset the heater (SEE PAR. 6.2)
2. Take the “ON/OFF” switch to the “ON” (|)
position
3. Insert the power supply cable into the
mains socket correctly
4. Temperature sensor override
4. Wait at least ten minutes then try to run
ignition again
5. Control card blocked
5a. Reset the heater (SEE PAR. 6.2)
5b. Identify the display error (where present)
6. Incorrect setting of the room
thermostat (where present)
6. Act on the room thermostat, taking it to a
higher temperature than that of the work
environment (SEE FIG. 9-10)
The motor
starts but
the ame is
not triggered
1. No fuel
2. Incorrect pump pressure
3. Presence of foreign
substances in the tank
1. Top-up fuel and reset the heater
2. Regulate the pressure of the compressor
(SEE PAR. 7)
3. Empty and ll the tank with clean fuel (SEE
PAR. 9)
no
sv
pl
ru
cs
hu
sl
tr
hr
lt
lv
et
ro
sk
bg
uk
bs
el
zh
Page 13
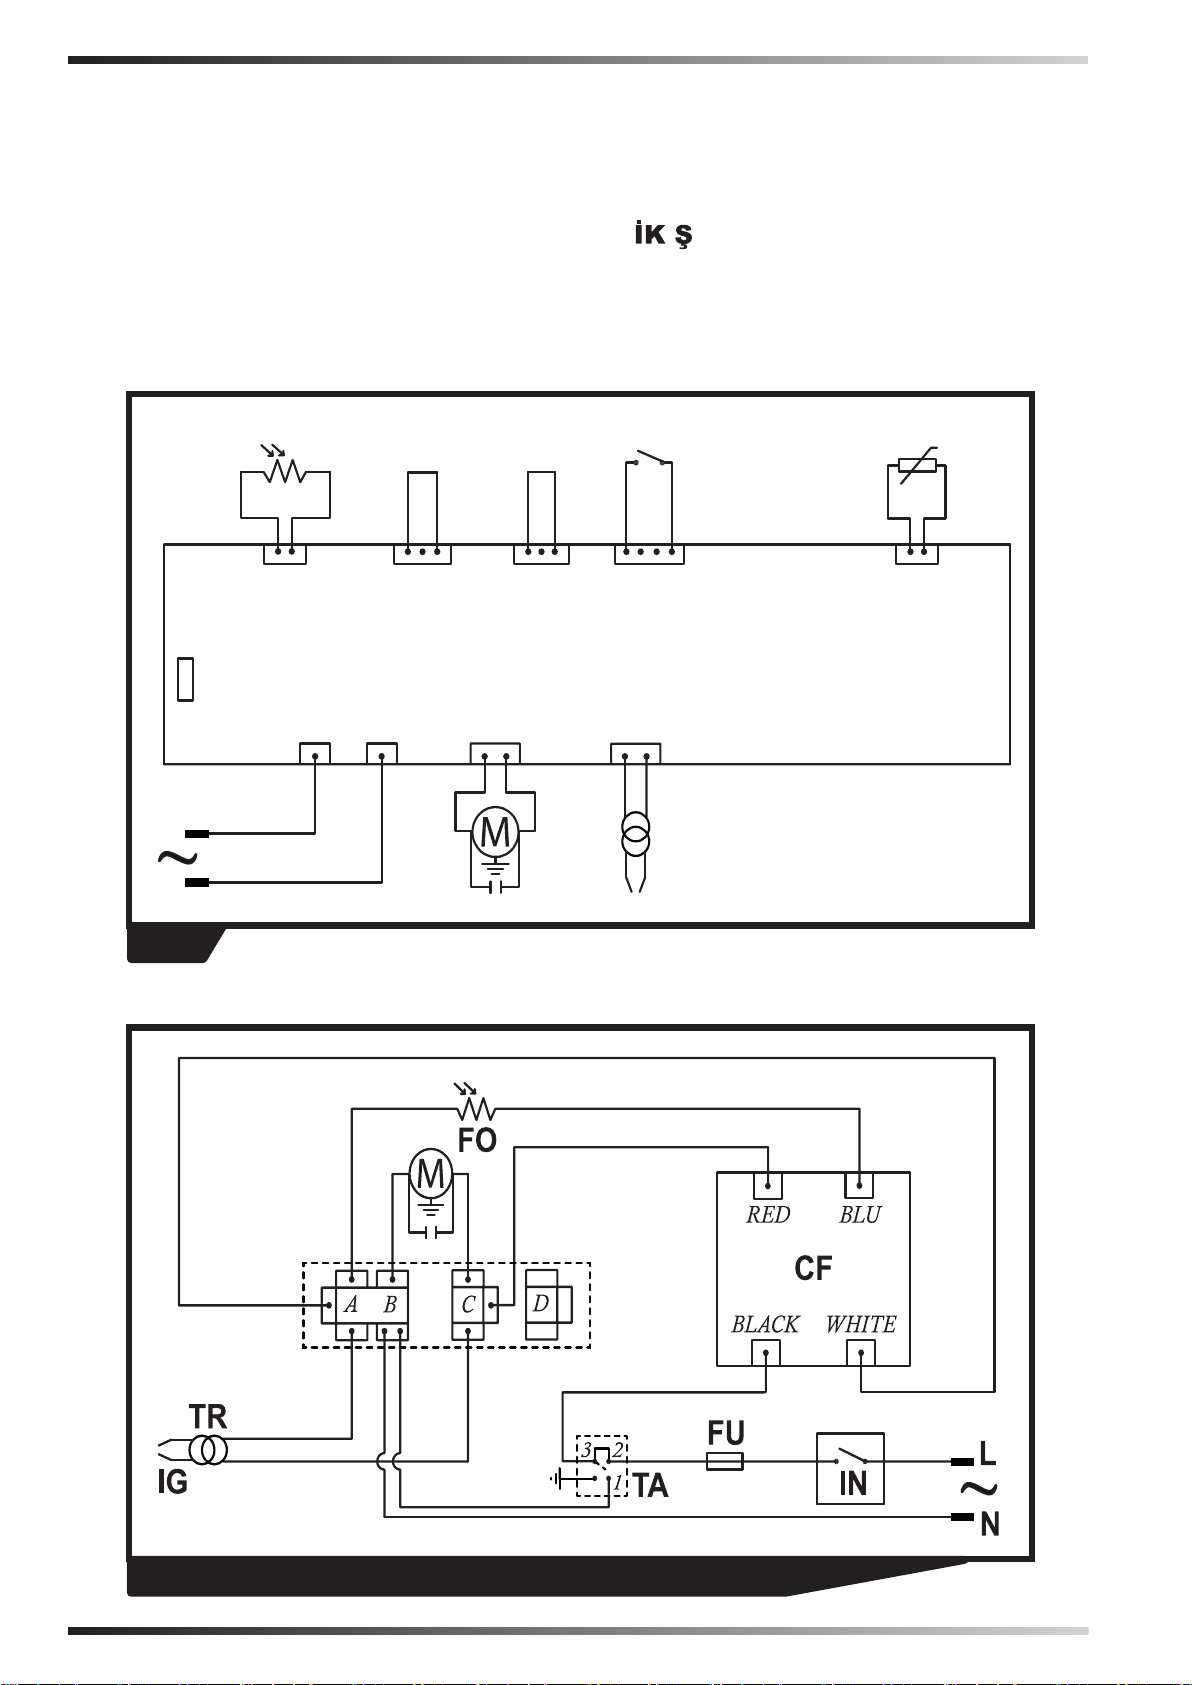
WIRING DIAGRAMS - SCHEMI ELETTRICI - SCHALTPLÄNE - ESQUEMAS
IGNITIONFANACN ACL
LIGHT
DEPENDENT
RESISTOR
TEMP1 ROCKER
TEMP
DUMP
FO
IN
FU
IG
TR
L
N
SC
IGNITIONFANACN ACL
LIGHT
DEPENDENT
RESISTOR
TEMP1 ROCKER
TEMP
DUMP
FO
IN
FU
IG
TR
L
N
SC
ELÉCTRICOS - SCHEMAS ELECTRIQUES - ELEKTRISCHE SCHEMA’S - ESQUE-
MAS ELÉCTRICOS - ELEKTRISKE SKEMAER - SÄHKÖKAAVIOT - KOPLINGS-
SKJEMA - ELEKTRISKA KOPPLINGSSCHEMAN - SCHEMATY ELEKTRYCZNE
- ЭЛЕКТРИЧЕСКИЕ СХЕМЫ - ELEKTRICKÁ SCHÉMATA - VILLANYBEKÖTÉSI
RAJZOK - ELEKTRIČNE SHEME - ELEKTR EMALARI - ELEKTRIČNE SH-
EME - ELEKTROS SCHEMOS - ELEKTRISKĀS SHĒMAS - ELEKTRISKEEMID
- SCHEME ELECTRICE - ELEKTRICKÉ SCHÉMY - ЕЛЕКТРИЧЕСКИ СХЕМИ
- ЕЛЕКТРИЧНІ СХЕМИ - ELEKTRIČNE ŠEME - ΗΛΕΚΤΡΙΚΑ ΣΧΕΔΙΑ - 线路图 -
ЭЛЕКТРЛІ СҮЛБЕЛЕР
CEL
B 35CED - B 70CED - B 100CED - B 150CED
Page 14

WIRING DIAGRAMS - SCHEMI ELETTRICI - SCHALTPLÄNE - ESQUEMAS
ELÉCTRICOS - SCHEMAS ELECTRIQUES - ELEKTRISCHE SCHEMA’S - ESQUE-
MAS ELÉCTRICOS - ELEKTRISKE SKEMAER - SÄHKÖKAAVIOT - KOPLINGSSKJEMA - ELEKTRISKA KOPPLINGSSCHEMAN - SCHEMATY ELEKTRYCZNE
- ЭЛЕКТРИЧЕСКИЕ СХЕМЫ - ELEKTRICKÁ SCHÉMATA - VILLANYBEKÖTÉSI
RAJZOK - ELEKTRIČNE SHEME - ELEKTR EMALARI - ELEKTRIČNE SH-
EME - ELEKTROS SCHEMOS - ELEKTRISKĀS SHĒMAS - ELEKTRISKEEMID
- SCHEME ELECTRICE - ELEKTRICKÉ SCHÉMY - ЕЛЕКТРИЧЕСКИ СХЕМИ
- ЕЛЕКТРИЧНІ СХЕМИ - ELEKTRIČNE ŠEME - ΗΛΕΚΤΡΙΚΑ ΣΧΕΔΙΑ - 线路图 -
ЭЛЕКТРЛІ СҮЛБЕЛЕР
Switch - Interruttore - Schalter - Interruptor - Interrupteur - Schakelaar - Interruptor - Afbryder - Katkaisin - Bryter - Brytare
IN
- Włącznik - Включатель - Vypínač - Kapcsoló - Stikalo - Açma kapama düğmesi - Prekidač - Jungiklis - Slēdzis - Lüliti Întrerupător - Vypínač - Прекъсвач - Вимикач - Prekidač - Διακόπτης - 开关 - Қосқыш.
Motor - Motore - Motor - Motor - Moteur - Motor - Motor - Motor - Moottori - Motor - Motor - Silnik - Двигатель - Motor - Motor
M
- Motor - Motor - Motor - Variklis - Dzinējs - Mootor - Motor - Motor - Двигател - Двигун - Motor - Κινητήρας - 电机 - Тежегіш.
Transformer - Trasformatore - Transformator - Transformador - Transformateur - Transformator - Transformador - Transformator
TR
- Muunnin - Transformator - Transformator - Transformator - Трансформатор - Transformátor - Transzformátor - Transformator
- Trasformatör - Transformator - Transformatorius - Transformators - Transformaator - Transformator - Transformátor - Трансформатор - Трансформатор - Transformator - Μετασχηματιστής - 点火变压器 - Трансформатор.
Flame Control - Controllo Fiamma - Flammkontrolle - Control de la llama - Contrôle de la Flamme - Controle Vlam - Controlo
CF
Chama - Kontrol Flamme - Liekin tarkkailu - Flammekontroll - Flamvakt - Sterowanie Płomieniem - Контроллер пламени - Kontrola plamene - Lángőr - Nadzor plamena - Alev Kontrolü - Kontrola Plamena - Liepsnos valdymas - Liesmas Kontrole - Leegikontrolli seade - Control Flacără - Kontrola plameňa - Проверк на искрата - Контроль полум’я - Kontrola Plamena - Έλεγχος
Φλόγας - 火焰控制 - Flame бақылау.
Igniter - Accenditore - Anzünder - Encendedor - Allumeur - Ontsteker - Acendedor - Tænder - Sytytin -Tenner - Tändare -
IG
Zapalnik - Зажигатель - Zapalovač - Begyújtó kacsoló - Vžigalo - Ateşleyici - Upaljač - Uždegiklis - Uguns slēdzis - Süütur Aprinzător - Zapaľovač - Запалване - П’єзоелектричний - Upaljač - Έναυσμα - 点火器 - Воспламенитель.
Photoresistance - Fotoresisteza - Fotowiderstand - Fotorresistencia - Photorésistance - Fotoweerstand - Foto-resistência - Fo-
FO
tomodstand - Valovastus - Fotomotstand - Fotomotstånd - Fotorezystor - Фоторезистор - Fotoelektrický odpor - Fotócella ellenállás - Fotoupor - Fotorezistans - Fotootpornost - Fotorezistorius - Fotorezistors - Fototakisti - Fotorezistenţă - Fotoelektrický
odpor - Фоторезистор - Розпалювач - Fotootpornik - Φωτοαντίσταση - 光电感应器 - Фоторезистор.
Fuse - Fusibile - Schmelzsicherung - Fusibile - Fusée - Veiligheid - Fusível - Sikring - Sulake - Fuse - Säkring - Bezpiecznik
FU
- Предохранитель - Pojistka - Biztosíték - Fuse - Sigorta - Osigurač - Saugiklių - Drošinātājs - Kaitse - Siguranţă - Poistka Предпазител - Запобіжник - Fuse - Ασφάλεια - 保险丝 - Сақтандырғыш.
Room thermostat - Termostato ambiente - Raumthermostat - Termostato ambiente - Thermostat d’ambiance -
TA
Omgevingsthermostaat - Termóstato ambiente - Rumtermostat - Huonetermostaatti -Romtermostat - Rumstermostat Termostat pokojowy - Комнатный термостат - Termostat prostředí - Szobatermosztát - Sobni termostat - Oda termostatı
- Ambijentalni termostat - Aplinkos termostatas - Vides termostats - Ümbritseva keskkonna termostaat - Termostat ambiental
- Termostat prostredia - Ресет - Термостат температури зовнішнього середовища - Ambijentalni termostat - Θερμοστάτης
περιβάλλοντος - 温控器 - Бөлме термостаты.
Control sensor - Sensore di controllo - Kontrollsensor - Sensor de control - Senseur de contrôle - Controlesensor - Sensor de
SC
controlo - Kontrolsensor - Ohjausanturi - Kontrollsensor - Kontrollsensor - Czuinik kontrolny - Контрольный датчик - Kontrolní
senzor - Vezérlő érzékelő - Kontrolni senzor - Kontrol sensörü - Senzor za kontrolu - Valdymo jutiklis - Kontroles sensors Kontrollandur - Senzor de control - Kontrolný senzor - Контролен сензор - Світлодіодний - Senzor kontrole - Αισθητήρας
ελέγχου - 控制感应器 - бақылау датчик.
Solenoid valve - Elettrovalvola - Elektroventil - Electroválvula - Électrovalve - Elektroklep - Eletroválvula - Magnetventil -
EV
Solenoidiventtiili - Magnetventil - Magnetventil - Zawór elektromagnetyczny - Соленоид - Elektrický ventil - Mágnesszelep
- Elektromagnetni ventil - Elektrovalf - Električni ventil - Elektrinis vožtuvas - Elektrovārsts - Solenoidventiil - Electrovalvă Elektrický ventil - Електроклапан - Електроклапан - Električni ventil - Ηλεκτροβαλβίδα - 电磁阀 - Соленоид.
Safety thermostat - Termostato sicurezza - Sicherheitsthermostat - Termostato de seguridad - Thermostat de sécurité
TS
- Veiligheidsthermostaat - Termóstato de segurança - Sikkerhedstermostat - Turvatermostaatti - Sikkerhetstermostat Säkerhetstermostat - Termostat bezpieczeństwa - Термостат безопасности - Bezpečnostní termostat - Biztonsági termosztát Varnostni termostat -
- Termostat de siguranţă - Bezpečnostný termostat - Предпазен термостат - Запобіжний термостат - Sigurnosni termostat
- Θερμοστάτης ασφαλείας - 过热保护 - Қауіпсіздік термостаты.
Line - Linea - Leitung - Línea - Ligne - Lijn - Linha - Linje - Linja - Linje - Linje - Linia - Линия - Linka - Sor - Linija - Hat - Linija
L
- Linija - Līnija - Liin - Linie - Linka - Линия - Фаза - Linija - Γραμμή - 线 - Сызық.
Neutral - Neutro - Nullleiter - Neutro - Neutre - Neutraal - Neutro - Neutral - Neutraali - Nøytral - Noll - Neutralny - Нейтраль -
N
Neutrální - Semleges - Nevtralni vod - Nötr - Neutralna - Neutralus - Neitrāls - Neutraal - Nul - Neutrál - Неутрално - Нейтраль
- Neutralna - Ουδέτερο - 零线 - Нейтраль.
Emniyet termostatı - Sigurnosni termostat - Apsaugos termostatas - Drošības termostats - Ohutustermostaat
Page 15
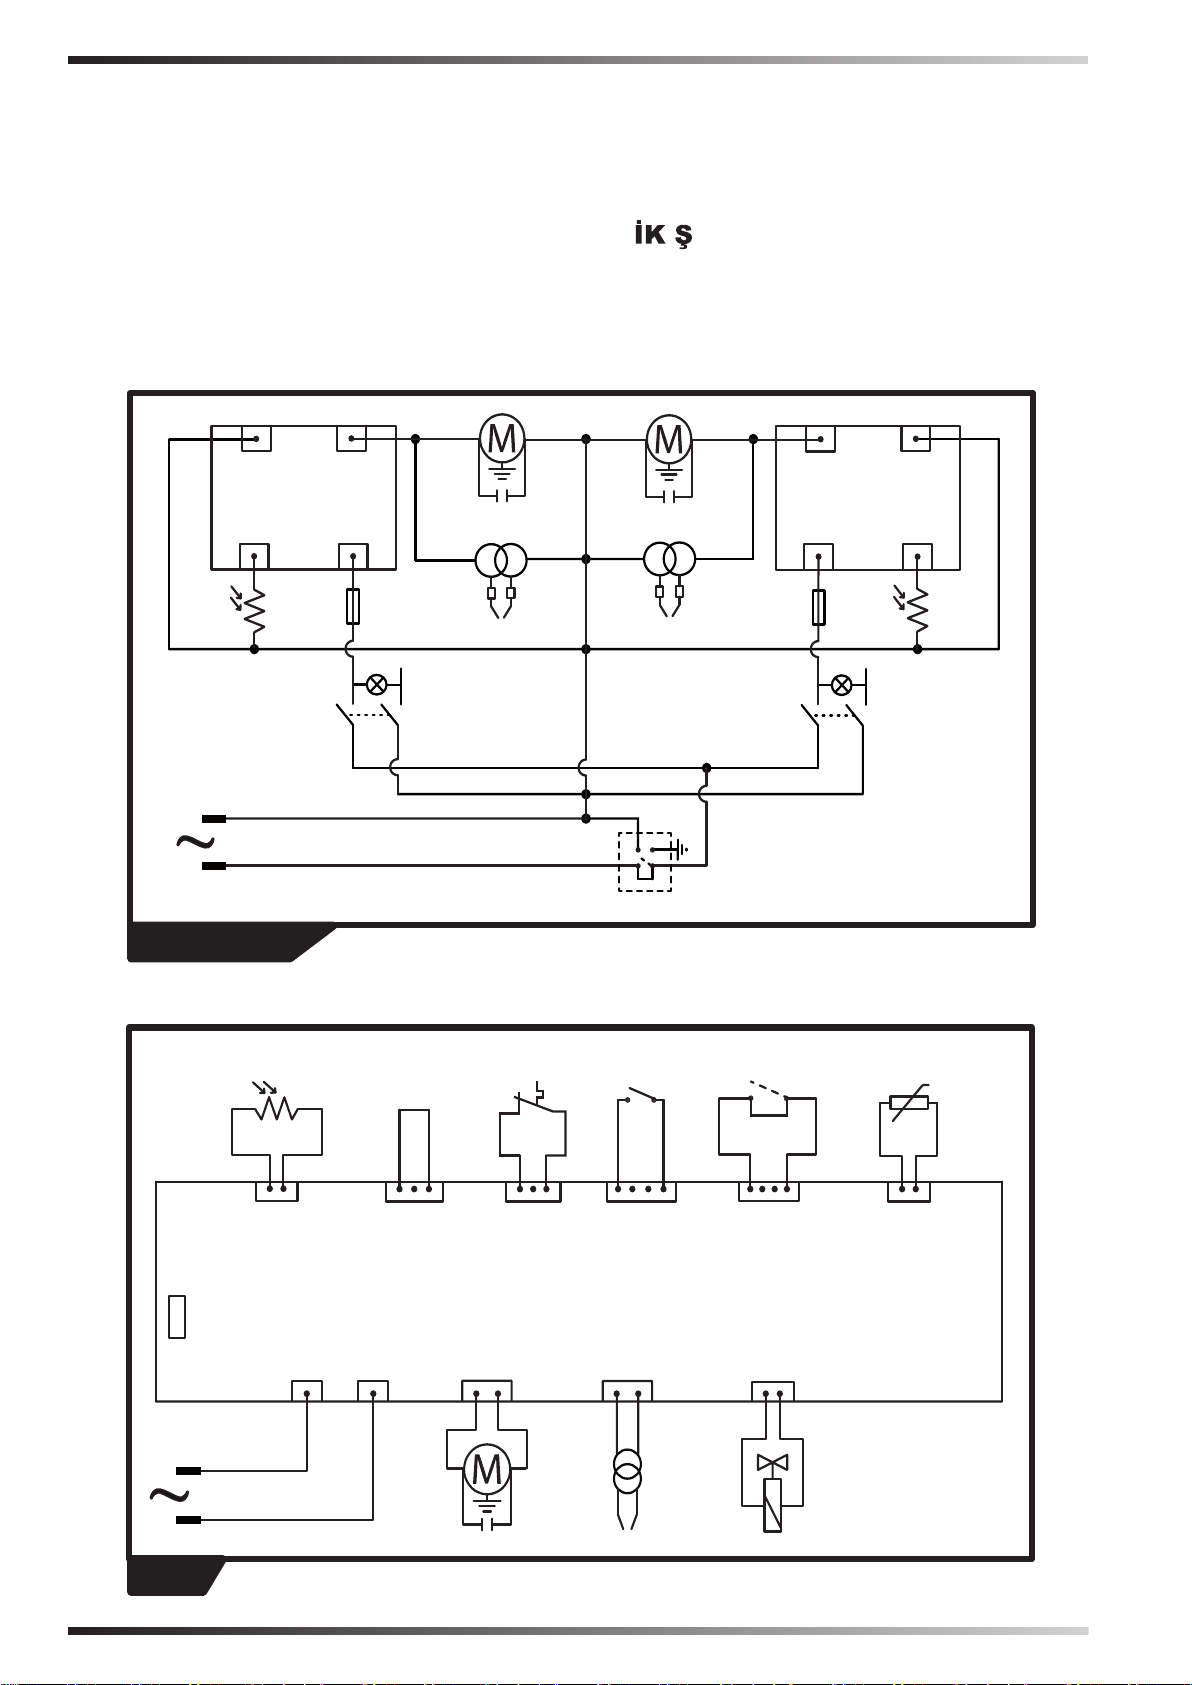
2
3
SOLENOID
VALVES
IGNITIONFANACN ACL
LIGHT
DEPENDENT
RESISTOR
TEMP1 ROCKER
TEMP2
TEMP
DUMP
FO
TS
IN
TA
FU
EV
IG
TR
L
N
SC
IGNITIONFANACN ACL
LIGHT
DEPENDENT
RESISTOR
TEMP1 ROCKER
TEMP
DUMP
FO
IN
FU
IG
TR
L
N
SC
2
3
SOLENOID
VALVES
IGNITIONFANACN ACL
LIGHT
DEPENDENT
RESISTOR
TEMP1 ROCKER
TEMP2
TEMP
DUMP
FO
TS
IN
TA
FU
EV
IG
TR
L
N
SC
TR
IG
IN
FU
FO
CF
BLACK
WHITE
BLU
RED
CF
BLACK
WHITE
BLU
RED
L
N
IN
TR
IG
FU
FO
2 5
1
4
2 5
1
4
TA
2 3
1
WIRING DIAGRAMS - SCHEMI ELETTRICI - SCHALTPLÄNE - ESQUEMAS
ELÉCTRICOS - SCHEMAS ELECTRIQUES - ELEKTRISCHE SCHEMA’S - ESQUE-
MAS ELÉCTRICOS - ELEKTRISKE SKEMAER - SÄHKÖKAAVIOT - KOPLINGS-
SKJEMA - ELEKTRISKA KOPPLINGSSCHEMAN - SCHEMATY ELEKTRYCZNE
- ЭЛЕКТРИЧЕСКИЕ СХЕМЫ - ELEKTRICKÁ SCHÉMATA - VILLANYBEKÖTÉSI
RAJZOK - ELEKTRIČNE SHEME - ELEKTR EMALARI - ELEKTRIČNE SH-
EME - ELEKTROS SCHEMOS - ELEKTRISKĀS SHĒMAS - ELEKTRISKEEMID
- SCHEME ELECTRICE - ELEKTRICKÉ SCHÉMY - ЕЛЕКТРИЧЕСКИ СХЕМИ
- ЕЛЕКТРИЧНІ СХЕМИ - ELEKTRIČNE ŠEME - ΗΛΕΚΤΡΙΚΑ ΣΧΕΔΙΑ - 线路图 -
ЭЛЕКТРЛІ СҮЛБЕЛЕР
B 300CED
CEG
Page 16

WIRING DIAGRAMS - SCHEMI ELETTRICI - SCHALTPLÄNE - ESQUEMAS
ELÉCTRICOS - SCHEMAS ELECTRIQUES - ELEKTRISCHE SCHEMA’S - ESQUE-
MAS ELÉCTRICOS - ELEKTRISKE SKEMAER - SÄHKÖKAAVIOT - KOPLINGSSKJEMA - ELEKTRISKA KOPPLINGSSCHEMAN - SCHEMATY ELEKTRYCZNE
- ЭЛЕКТРИЧЕСКИЕ СХЕМЫ - ELEKTRICKÁ SCHÉMATA - VILLANYBEKÖTÉSI
RAJZOK - ELEKTRIČNE SHEME - ELEKTR EMALARI - ELEKTRIČNE SH-
EME - ELEKTROS SCHEMOS - ELEKTRISKĀS SHĒMAS - ELEKTRISKEEMID
- SCHEME ELECTRICE - ELEKTRICKÉ SCHÉMY - ЕЛЕКТРИЧЕСКИ СХЕМИ
- ЕЛЕКТРИЧНІ СХЕМИ - ELEKTRIČNE ŠEME - ΗΛΕΚΤΡΙΚΑ ΣΧΕΔΙΑ - 线路图 -
ЭЛЕКТРЛІ СҮЛБЕЛЕР
Switch - Interruttore - Schalter - Interruptor - Interrupteur - Schakelaar - Interruptor - Afbryder - Katkaisin - Bryter - Brytare
IN
- Włącznik - Включатель - Vypínač - Kapcsoló - Stikalo - Açma kapama düğmesi - Prekidač - Jungiklis - Slēdzis - Lüliti Întrerupător - Vypínač - Прекъсвач - Вимикач - Prekidač - Διακόπτης - 开关 - Қосқыш.
Motor - Motore - Motor - Motor - Moteur - Motor - Motor - Motor - Moottori - Motor - Motor - Silnik - Двигатель - Motor - Motor
M
- Motor - Motor - Motor - Variklis - Dzinējs - Mootor - Motor - Motor - Двигател - Двигун - Motor - Κινητήρας - 电机 - Тежегіш.
Transformer - Trasformatore - Transformator - Transformador - Transformateur - Transformator - Transformador - Transformator
TR
- Muunnin - Transformator - Transformator - Transformator - Трансформатор - Transformátor - Transzformátor - Transformator
- Trasformatör - Transformator - Transformatorius - Transformators - Transformaator - Transformator - Transformátor - Трансформатор - Трансформатор - Transformator - Μετασχηματιστής - 点火变压器 - Трансформатор.
Flame Control - Controllo Fiamma - Flammkontrolle - Control de la llama - Contrôle de la Flamme - Controle Vlam - Controlo
CF
Chama - Kontrol Flamme - Liekin tarkkailu - Flammekontroll - Flamvakt - Sterowanie Płomieniem - Контроллер пламени - Kontrola plamene - Lángőr - Nadzor plamena - Alev Kontrolü - Kontrola Plamena - Liepsnos valdymas - Liesmas Kontrole - Leegikontrolli seade - Control Flacără - Kontrola plameňa - Проверк на искрата - Контроль полум’я - Kontrola Plamena - Έλεγχος
Φλόγας - 火焰控制 - Flame бақылау.
Igniter - Accenditore - Anzünder - Encendedor - Allumeur - Ontsteker - Acendedor - Tænder - Sytytin -Tenner - Tändare -
IG
Zapalnik - Зажигатель - Zapalovač - Begyújtó kacsoló - Vžigalo - Ateşleyici - Upaljač - Uždegiklis - Uguns slēdzis - Süütur Aprinzător - Zapaľovač - Запалване - П’єзоелектричний - Upaljač - Έναυσμα - 点火器 - Воспламенитель.
Photoresistance - Fotoresisteza - Fotowiderstand - Fotorresistencia - Photorésistance - Fotoweerstand - Foto-resistência - Fo-
FO
tomodstand - Valovastus - Fotomotstand - Fotomotstånd - Fotorezystor - Фоторезистор - Fotoelektrický odpor - Fotócella ellenállás - Fotoupor - Fotorezistans - Fotootpornost - Fotorezistorius - Fotorezistors - Fototakisti - Fotorezistenţă - Fotoelektrický
odpor - Фоторезистор - Розпалювач - Fotootpornik - Φωτοαντίσταση - 光电感应器 - Фоторезистор.
Fuse - Fusibile - Schmelzsicherung - Fusibile - Fusée - Veiligheid - Fusível - Sikring - Sulake - Fuse - Säkring - Bezpiecznik
FU
- Предохранитель - Pojistka - Biztosíték - Fuse - Sigorta - Osigurač - Saugiklių - Drošinātājs - Kaitse - Siguranţă - Poistka Предпазител - Запобіжник - Fuse - Ασφάλεια - 保险丝 - Сақтандырғыш.
Room thermostat - Termostato ambiente - Raumthermostat - Termostato ambiente - Thermostat d’ambiance -
TA
Omgevingsthermostaat - Termóstato ambiente - Rumtermostat - Huonetermostaatti -Romtermostat - Rumstermostat Termostat pokojowy - Комнатный термостат - Termostat prostředí - Szobatermosztát - Sobni termostat - Oda termostatı
- Ambijentalni termostat - Aplinkos termostatas - Vides termostats - Ümbritseva keskkonna termostaat - Termostat ambiental
- Termostat prostredia - Ресет - Термостат температури зовнішнього середовища - Ambijentalni termostat - Θερμοστάτης
περιβάλλοντος - 温控器 - Бөлме термостаты.
Control sensor - Sensore di controllo - Kontrollsensor - Sensor de control - Senseur de contrôle - Controlesensor - Sensor de
SC
controlo - Kontrolsensor - Ohjausanturi - Kontrollsensor - Kontrollsensor - Czuinik kontrolny - Контрольный датчик - Kontrolní
senzor - Vezérlő érzékelő - Kontrolni senzor - Kontrol sensörü - Senzor za kontrolu - Valdymo jutiklis - Kontroles sensors Kontrollandur - Senzor de control - Kontrolný senzor - Контролен сензор - Світлодіодний - Senzor kontrole - Αισθητήρας
ελέγχου - 控制感应器 - бақылау датчик.
Solenoid valve - Elettrovalvola - Elektroventil - Electroválvula - Électrovalve - Elektroklep - Eletroválvula - Magnetventil -
EV
Solenoidiventtiili - Magnetventil - Magnetventil - Zawór elektromagnetyczny - Соленоид - Elektrický ventil - Mágnesszelep
- Elektromagnetni ventil - Elektrovalf - Električni ventil - Elektrinis vožtuvas - Elektrovārsts - Solenoidventiil - Electrovalvă Elektrický ventil - Електроклапан - Електроклапан - Električni ventil - Ηλεκτροβαλβίδα - 电磁阀 - Соленоид.
Safety thermostat - Termostato sicurezza - Sicherheitsthermostat - Termostato de seguridad - Thermostat de sécurité
TS
- Veiligheidsthermostaat - Termóstato de segurança - Sikkerhedstermostat - Turvatermostaatti - Sikkerhetstermostat Säkerhetstermostat - Termostat bezpieczeństwa - Термостат безопасности - Bezpečnostní termostat - Biztonsági termosztát Varnostni termostat -
- Termostat de siguranţă - Bezpečnostný termostat - Предпазен термостат - Запобіжний термостат - Sigurnosni termostat
- Θερμοστάτης ασφαλείας - 过热保护 - Қауіпсіздік термостаты.
Line - Linea - Leitung - Línea - Ligne - Lijn - Linha - Linje - Linja - Linje - Linje - Linia - Линия - Linka - Sor - Linija - Hat - Linija
L
- Linija - Līnija - Liin - Linie - Linka - Линия - Фаза - Linija - Γραμμή - 线 - Сызық.
Neutral - Neutro - Nullleiter - Neutro - Neutre - Neutraal - Neutro - Neutral - Neutraali - Nøytral - Noll - Neutralny - Нейтраль -
N
Neutrální - Semleges - Nevtralni vod - Nötr - Neutralna - Neutralus - Neitrāls - Neutraal - Nul - Neutrál - Неутрално - Нейтраль
- Neutralna - Ουδέτερο - 零线 - Нейтраль.
Emniyet termostatı - Sigurnosni termostat - Apsaugos termostatas - Drošības termostats - Ohutustermostaat
Page 17
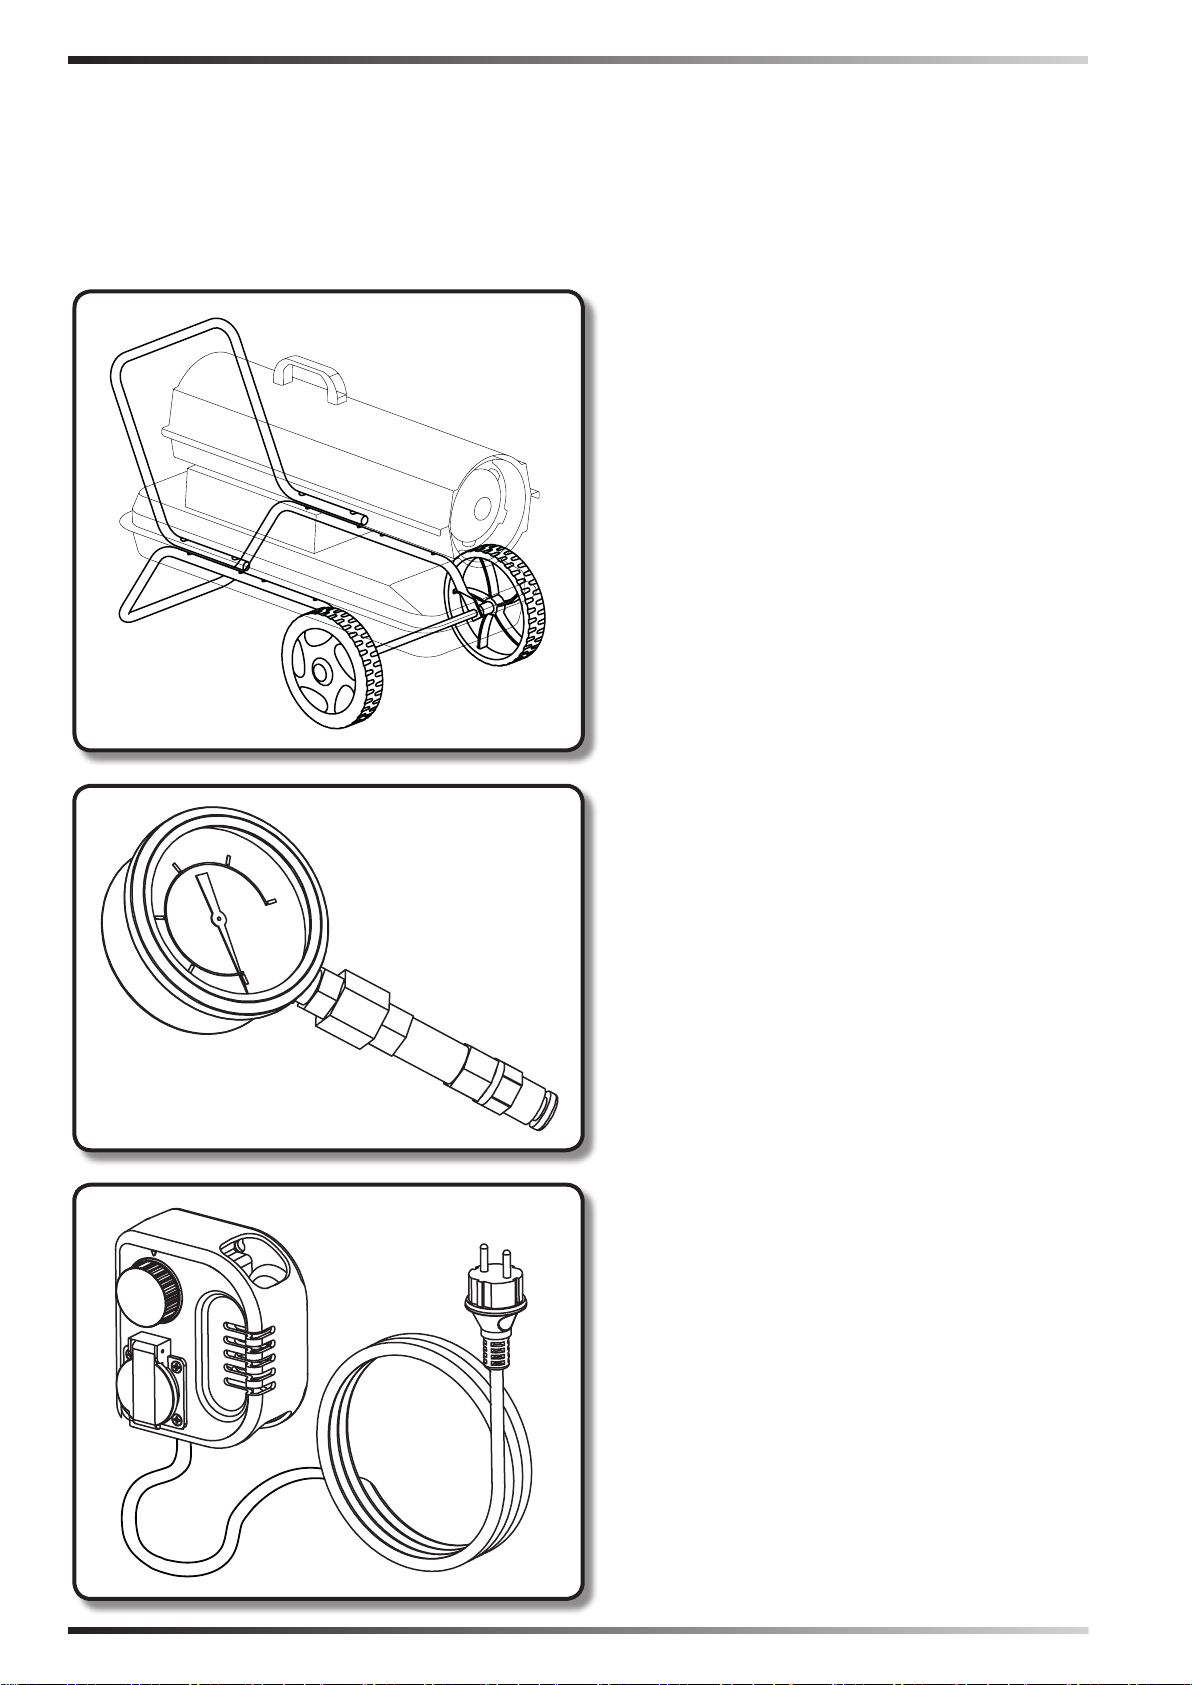
ACCESSORIES - ACCESSORI - ZUBEHÖR - ACCESORIOS - ACCESSOIRES - AC-
CESSOIRES - ACESSÓRIOS - TILBEHØR - LISÄVARUSTEET - TILLEGGSUT-
STYR - TILLBEHÖR - AKCESORIA - ФАКУЛЬТАТИВНЫЕ ПРИНАДЛЕЖНОСТИ
- PŘÍSLUŠENSTVÍ - TARTOZÉKOK - DODATNA OPREMA - AKSESUARLAR - OP-
REMA - PRIEDAI - PIEDERUMI - LISASEADMED - ACCESORII - PRÍSLUŠENSTVO
- АКСЕСОАРИ - АКСЕСУАРИ - DODATNA OPREMA - ΑΞΕΣΟΥΑΡ - 选配件 -
ҚОСЫМША ЖАБДЫҚТАР
WHEELS AND HANDLE KIT - KIT RUOTE E
MANIGLIA - SATZ RÄDER UND TRAGEGRIFF - KIT
DE RUEDAS Y MANIJA - KIT ROUES ET POIGNEE
- KIT WIELEN EN HANDVAT - KIT RODAS E ALÇA
- KIT MED HJUL OG HÅNDTAG - PYÖRÄ- JA
KAHVASARJA - SETT MED HJUL OG HÅNDTAK
- SATS MED HJUL OCH HANDTAG - ZESTAW
KÓŁEK I UCHWYT - НАБОР КОЛЕС И РУЧЕК SOUPRAVA KOLEČEK A RUKOJETÍ - KERÉK ÉS
FOGÓKÉSZLET - KOMPLET KOLES IN ROČAJA
- TEKERLEKLER VE KULP KİTİ - GARNITURA
KOTAČA I RUČICE - RATUKŲ IR RANKENŲ
RINKINYS - RITEŅU UN ROKSTURA KOMPLEKTS
- RATASTE JA KÄEPIDEMETE KOMPLEKT - KIT
ROŢI ŞI MÂNER - SADA KOLIESOK A RUKOVÄTÍ
- КОМПЛЕКТ КОЛЕЛА И РЪКАХВАТКА КОМПЛЕКТ КОЛІС І РУЧКИ - KOMPLET TOČKOVA
I RUČKA - KIT ΤΡΟΧΩΝ ΚΑΙ ΧΕΙΡΟΛΑΒΗΣ - 轮子和
把手包 - ДӨҢГЕЛЕКТЕРІ ЖӘНЕ HANDLE KIT
MANOMETER - MANOMETRO - MANOMETER
- MANÓMETRO - MANOMETRE - MANOMETER
- MANÓMETRO - MANOMETER - PAINEMITTARI
- MANOMETER - MANOMETER - MANOMETR
- МАНОМЕТР - MANOMETR - MANOMÉTER -
MANOMETER - MANOMETRE - MANOMETAR MANOMETRAS - MANOMETRS - MANOMEETER
- MANOMETRU - MANOMETER - МАНОМЕТЪР
- МАНОМЕТР - MANOMETAR - ΜΑΝΟΜΕΤΡΟ - 气
压表 - МАНБМЕТР
ROOM THERMOSTAT - TERMOSTATO
AMBIENTE - RAUMTHERMOSTAT TERMOSTATO AMBIENTE - THERMOSTAT
D’AMBIANCE - OMGEVINGSTHERMOSTAAT TERMÓSTATO AMBIENTE - MILJØTERMOSTAT
- HUONETERMOSTAATTI - ROMTERMOSTAT
- RUMSTERMOSTAT - STEROWNIK POKOJOWY
- КОМНАТНЫЙ ТЕРМОСТАТ - TERMOSTAT
PROSTŘEDÍ - SZOBATERMOSZTÁT - SOBNI
TERMOSTAT - ODA TERMOSTATI - AMBIJENTALNI
TERMOSTAT - APLINKOS TERMOSTATAS - VIDES
TERMOSTATS - RUUMITERMOSTAAT - TERMOSTAT
DE MEDIU ÎNCONJURĂTOR - TERMOSTAT
PROSTREDIA - СТАЕН ТЕРМОСТАТ - ТЕРМОСТАТ
ТЕМПЕРАТУРИ ЗОВНІШНЬОГО СЕРЕДОВИЩА
- AMBIJENTALNI TERMOSTAT - ΘΕΡΜΟΣΤΑΤΗΣ
ΧΩΡΟΥ - 温控器
- БӨЛМЕ ТЕРМОСТАТЫ
Page 18
CE CONFORMITY CERTIFICATE
CE CONFORMITY CERTIFICATE - DICHIARAZIONE DI CONFORMITÀ CE - EG-KON-
FORMITÄTSERKLÄRUNG - DECLARACIÓN DE CONFORMIDAD CE - DECLARATION DE
CONFORMITE CE - EG-CONFORMITEITVERKLARING - DECLARAÇÃO DE CONFORMIDA-
DE CE - EU-OVERENSSTEMMELSESERKLÆRING - EY-VAATIMUSTENMUKAISUUSVA-
KUUTUS - CE-SAMSVARSERKLÆRING - EG-FÖRSÄKRAN OM ÖVERENSSTÄMMELSE
- DEKLARACJA ZGODNOŚCI WE - ДЕКЛАРАЦИЯ О СООТВЕТСТВИИ СЕ - PROHLÁŠENÍ
O SHODĚ CE - EK MEGFELELŐSÉGI NYILATKOZAT - IZJAVA O SKLADNOSTI IN
OZNAKA CE - CE UYGUNLUK BEYANI - IZJAVA CE O SUKLADNOSTI - ES ATITIKTIES
DEKLARACIJA - EK ATBILSTĪBAS - DEKLARĀCIJA - EÜ VASTAVUSDEKLARATSIOON -
DECLARAŢIE DE CONFORMITATE CE - PREHLÁSENIE O ZHODE CE - ДЕКЛАРАЦИЯ ЗА
СЪВМЕСТИМОСТ СЕ - ДЕКЛАРАЦІЯ ВІДПОВІДНОСТІ CE - IZJAVA CE O PRIKLADNOSTI
ΔΗΛΩΣΗ ΣΥΜΜΟΡΦΩΣΗΣ CE - CE 符合性声明
DANTHERM S.p.A. Via Gardesana 11, -37010- Pastrengo (VR), ITALY
Product: - Prodotto: - Produkt: - Producto: - Produit: - Product: - Produto: - Produkt: - Tuote: - Produkt: - Produkt:
- Produkt: - Изделие: - Výrobek: - Termék: - Izdelek: - Ürün: - Proizvod: - Gaminys: - Ierīce: - Toode: - Produsul:
- Výrobok: - Продукт: - Виріб: - Proizvod: - Προϊόν: - 产品:
B 35CEL - B 65CEL - B 95CEL - B 145CEL
B 35CED - B 70CED - B 100CED - B 150CED - B 300CED
B 35CEG - B 70CEG - B 100CEG - B 150CEG
We declare that it is compliant with: - Si dichiara che è conforme a: - Es wird als konform mit den folgenden
Normen erklärt: - Se declara que está en conformidad con: - Nous déclarons sa conformité à: - Hierbij wordt
verklaard dat het product conform is met: - Declara-se que está em conformidade com: - Vi erklærer at produktet
er i overensstemmelse med: - Vakuutetaan olevan yhdenmukainen: - Man erklærer at apparatet er i overens-
stemmelse med: - Härmed intygas det att produkten är förenlig med följande: - Oświadcza się, że jest zgodny z: -
Заявляем о соответствии требованиям: - Prohlašuje se, že je v souladu s: - Kijelentjük, hogy a termék megfe-
lel az alábbiaknak: - Izpolnjuje zahteve: - Aşağıdaki standartlara uygun olduğunu beyan ederiz: - Izjavljuje se
da je u skladu s: - Pareiškiame, kad atitinka: - Tiek deklarēts, ka atbilst: - Käesolevaga deklareeritakse, et toode
vastab: - Declarăm că este conform următoarelor: - Prehlasuje sa, že je v súlade s: - Декларира се че отговаря
на: - Відповідає вимогам: - Izjavljuje se da je u skladu s: - Δηλώνουμε ότι είναι σύμφωνο με: - 兹证明符合:
2014/30/EU, 2014/35/EU
EN 62233:2008, EN 61000-3-2:2014, EN 61000-3-3:2013, EN 55014-1:2006/
A2:2011, EN 55014-2:2015, EN 60335-1:2012/A11:2014, EN 60335-2-
102:2016
Pastrengo, 2019
Stefano Verani (Member of the Board)
Page 19

►en - DISPOSAL OF THE PRODUCT
-This product has been designed and manufactured with top-quality materials and components, which can be re-cycled and re-used.
-When a crossed-wheely bin symbol is attached to the product, it means that the product is protected by the, 2012/19/UE European
Directive.
-Please obtain information regarding the local dierentiated collection system for electrical and electronic products.
-Respect local Standards in force and do not dispose of old products as normal domestic waste. Correct disposal of the product helps
to prevent possible negative consequences for health, the environment and mankind.
►it - SMALTIMENTO DEL PRODOTTO
-Questo prodotto è stato progettato e fabbricato con materiali e componenti di alta qualità, che possono essere riciclati e riutilizzati.
-Quando ad un prodotto è attaccato il simbolo del bidone con le ruote segnato da una croce, signica che il prodotto è tutelato dalla
Direttiva Europea 2012/19/UE.
-Si prega di informarsi in merito al sistema locale di raccolta dierenziata per i prodotti elettrici ed elettronici.
-Rispettare le norme locali in vigore e non smaltire i prodotti vecchi nei normali riuti domestici. Il corretto smaltimento del prodotto
aiuta ad evitare possibili conseguenze negative per la salute dell’ambiente e dell’uomo.
►de - ENTSORGUNG DES PRODUKTS
-Dieses Produkt wurde unter Verwendung von Qualitätsmaterialien und -bauteilen entwickelt und hergestellt, die recycelt und wieder
verwendet werden können.
-Ist ein Produkt gekennzeichnet durch die Mülltonne mit Rädern und einem Kreuz, wird hier angezeigt, dass dieses Produkt durch die
europäische Direktive 2012/19/UE überwacht ist.
-Es wird gebeten, sich über die vor Ort bestehende Mülltrennung bezüglich elektrischer und elektronischer Produkte zu informieren.
-Die vor Ort geltenden Vorschriften zur Müllentsorgung müssen eingehalten werden und alte Produkte dürfen nicht zusammen mit
dem Hausmüll entsorgt werden. Die ordnungsgemäße Entsorgung des Produkts hilft mögliche negative Folgen für Gesundheit und
Umwelt zu vermeiden.
►es - ELIMINACIÓN DEL PRODUCTO
-Este producto ha sido diseñado y fabricado con materiales y componentes de alta calidad que se pueden reciclar y reutilizar.
-Cuando en el producto se encuentra el símbolo del contenedor con las ruedas tachado con una cruz, signica que el producto está
tutelado por la Directiva europea 2012/19/UE.
-Se ruega informarse acerca del sistema local de recogida selectiva para los productos eléctricos y electrónicos.
-Respete las normas locales vigentes y no elimine los productos viejos junto con los residuos domésticos normales. La eliminación
correcta del producto ayuda a evitar posibles consecuencias negativas para la salud del ambiente y del hombre.
►fr - SE DÉBARRASSER DE VOTRE PRODUIT USAGÉ
-Ce produit a été conçu et fabriqué avec des matériaux et des composants de haute qualité, qui peuvent être recyclés et utilisés de
nouveau.
-Lorsque le symbole d’une poubelle à roue barrée est appliqué à un produit, cela signie que le produit est couvert par la Directive
Européenne 2012/19/UE.
-Veuillez vous informer du système local de séparation des déchets électriques et électroniques.
-Veuillez agir selon les règles locale set ne pas jeter vos produits usagés avec les déchets domestiques usuels. Jeter correctement
votre produit usagé aidera à prévenir les conséquences négatives potentielles contre l’environnement et la santé humaine.
►nl - VERWIJDERING VAN HET PRODUCT
-Dit product werd ontworpen en gemaakt met hoogwaardige materialen en componenten, die gerecycleerd en herbruikt kunnen
worden.
-Wanneer op een product het symbool van de afvalbak op wielen met een kruis erdoor is aangebracht, betekent dit dat het product
valt onder de Europese Richtlijn 2012/19/UE.
-Gelieve inlichtingen in te winnen betreende het plaatselijke systeem voor gedierentieerde inzameling van elektrische en
elektronische toestellen.
-Respecteer de plaatselijke normen die van kracht zijn, en verwijder de oude toestellen niet als gewoon huishoudelijk afval. Een
correcte verwijdering van het product helpt om mogelijke negatieve gevolgen voor de gezondheid van mens en milieu te voorkomen.
►pt - ELIMINAÇÃO DO PRODUTO
-Este produto foi projetado e fabricado com materiais e componentes de alta qualidade que podem ser reciclados e reutilizados.
-Quando for axado em um produto o símbolo do bidão com rodas marcado com uma cruz, signica que o produto é protegido pela
Diretiva Europeia 2012/19/UE.
-Solicitamos informar-se sobre o sistema local de recolha diferenciada para os produtos elétricos e eletrónicos.
-Respeitar as normas locais em vigor e não eliminar os produtos antigos como normais detritos domésticos. A correta eliminação do
produto ajuda a evitar possíveis consequências negativas para a saúde do ambiente e do homem.
Page 20

NOTE:_____________________________________________________________
____________________________________________________________________
____________________________________________________________________
____________________________________________________________________
____________________________________________________________________
____________________________________________________________________
____________________________________________________________________
____________________________________________________________________
____________________________________________________________________
____________________________________________________________________
____________________________________________________________________
____________________________________________________________________
____________________________________________________________________
____________________________________________________________________
____________________________________________________________________
____________________________________________________________________
____________________________________________________________________
____________________________________________________________________
____________________________________________________________________
____________________________________________________________________
____________________________________________________________________
____________________________________________________________________
____________________________________________________________________
____________________________________________________________________
____________________________________________________________________
____________________________________________________________________
____________________________________________________________________
____________________________________________________________________
____________________________________________________________________
____________________________________________________________________
____________________________________________________________________
____________________________________________________________________
____________________________________________________________________
____________________________________________________________________
____________________________________________________________________
____________________________________________________________________
____________________________________________________________________
____________________________________________________________________
____________________________________________________________________
____________________________________________________________________
____________________________________________________________________
____________________________________________________________________
____________________________________________________________________
 Loading...