

Page 1

M5RT-B-2011
R410A Rooftop Packaged
B Series
Catalog
Models:
M5RT 90 BR
M5RT 120 BR
M5RT 150 BR
M5RT 180 BR
M5RT 210 BR
M5RT 250 BR
EC 90 B
EC 120 B
EC 150 B
EC 180 B
EC 210 B
EC 250 B
Economizer Kit (Option)
Page 2

Nomenclature .......................................................................................................................1
- Indoor
- Outdoor
- Product Line-Up
Features ...............................................................................................................................3
Application Information.........................................................................................................6
- Operating Range
- Refrigerant Circuit Diagrams
- Installation Guideline
Sound data .........................................................................................................................16
- Sound Pressure/Power Level
- NC Curve
Selection Process ..............................................................................................................20
- Variable Pitch Pulley (VPP)
- Blower Curve
Engineering and Physical Data ..........................................................................................30
Performance Data ..............................................................................................................35
- Calculation Steps
- Performance tables
Outlines & Dimensions .......................................................................................................48
Wiring Diagrams .................................................................................................................60
Service and Maintainance ..................................................................................................68
Troubleshooting .................................................................................................................70
Part list ............................................................................................................................... 72
Table of Contents
Note : Installation and maintenance are to be performed only by qualied personnel who are
familiar with local codes and regulations, and experienced with this type of equipment.
Caution : Sharp edges and coil surfaces are a potential injury hazard. Avoid contact with them.
Warning : Moving machinery and electrical power hazard. May cause severe personnel
injury or death. Disconnect and lock off power before servicing equipment.
“McQuay” is a registered trademark of McQuay International. All rights reserved.
© 2011 McQuay International. All rights reserved throughout the world.
Bulletin illustrations cover the general appearance of McQuay International products at the time of publication.
We reserve the right to change design and construction specications at any time without notice.
Supersedes: M5RT-B-2010
Page 3

1
Nomenclature
M RT 90 B R – F E AA
Brand
M : McQuay
Product Specification
Variation
A : First Issue
Optional Specification
E : Economizer
Model
“ ” : Cooling Only
R : Heat Pump
Electrical Characteristics
F : 50Hz / 3Ph / 380-415V
Refrigerant
“ ” : R22
4 : R407C
5 : R410A
Product Type
RT : Rooftop
Size
90 : 90,000 Btu/h
Product series
B : B Series
Page 4

2
Product Line-up
M5RT-BR Series
Heat pump
Rooftop panel
PCB
EXV
Gold Fin (NA549)
Scroll compressor
Saranet Air Filter
Side flow
Convertible
Filter Drier
High pressure switch
Low pressure switch
90BR FEAA X X X XX X X X X X X
120BR FEAA X X X X X X X X X
150BR FEAA X X X X X X X X X
180BR FEAA X X
X
X
X
X
X
X X X X X X X X
Economizer Kit *
X
X
X
X
210BR FEAA X XXX X X X X X X X X
250BR FEAA X XXX X X X X X X X X
Heating
Nomenclature
Classification
Model
M5RT
Heat pump
Variable Pitch Pulley (VPP)
X
X
X
X
X
X
* Optional accessories (field install)
Page 5

3
• PackageUnit:
McQuay’s new range of rooftop packaged units has been developed specically to suit commercial applications
and are designed to be easy to install, requiring only ducting (and associated ttings), power/ control wiring
and drain piping. Along with the light grey colour, the at top and compact design gives an aesthetic and neat
appearance when installed in line of sight. The unit cabinet is made of powder coated sheet metal especially
suitable for outdoor use. All parts of the structure are fastened with corrosion resistant screws and bolts.
• BaseBeam:
The base beams are xed and provide a rigid foundation for the entire unit. The beam has the forklift slots and
rigging holes for better handling purpose. It is also designed to allow mounting on a roof curb, the dimension
of the roof curb should be followed strictly in accordance with the installation manual.
• FlexibleAirSupply:
Since all the units utilize a belt/ pulley driven supply air fan, the units are able to meet a wide range of supply
air volumes and external static pressures. Furthermore, the supply air fan motors, pulleys and belts (eld
supplied) can be easily changed on site to meet exact air ow and ESP requirement if required.
• ConvertibleReturnandSupplyAir:
Unit can be easily converted from horizontal to vertical (downward) supply and return air duct conguration
by relocating the panels and supply air fan mounting.
• ScrollCompressor:
Units are equipped with high efciency and reliable scroll compressors. Each compressor is mounted on
rubber vibration isolators in order to reduce the noise level and vibration transmissions.
• PowderCoatedCondensateDrainPan:
The sheet metal condensate drain pan is powder coated to resist corrosion.
• Slotsfor2inchesReturnAirFilters:
A 2 inches rail is provided as standard in instances where a eld supplied lter casement need to be
installed.
• HigherEnergyEfciencyRating:
The M5RT-BR series is designed in line with market requirement for better energy saving.
TechnicalSpecication
• Compressor
Compressor used in M5RT-BR series Packaged Units are hermetically sealed scroll type. All the compressors
are provided with an internal overload protection.
• Condenser
Condenser coils are manufactured from seamless inner grooved copper tubes mechanically bonded to
aluminium ns to ensure optimum heat transfer. All coils are tested against by Nitrogen holding at 609psig
and highly precise Helium leak test at 235psig.
ALL standard coils are up to 3 rows / 14-16 FPI, 3/8” (9.52mm) O.D. tubes.
Hydrophilic Gold Fin coating (NA549) is offered as standard, which has longer life span under corrosive
environment.
Features
GeneralSpecication
Page 6

4
• Evaporator
Evaporator coils are manufactured from seamless inner grooved copper tubes mechanically bonded to
aluminium ns to ensure optimum heat transfer. All coils are tested against by Nitrogen holding at 609psig
and highly precise Helium leak test at 235psig.
ALL standard coils are 3-4 rows / 14-16 FPI, 3/8” (9.52mm) O.D. tubes.
Hydrophilic Gold Fin coating (NA549) is offered as standard, which has longer life span under corrosive environment.
• CondenserFanandMotor
Fans are of propeller type, direct driven by weatherproof electrical induction motors. Condenser fan motor
has class F insulation and splash-proof enclosure, IP44.
• EvaporatorFanandDrive
Blower is DWDI centrifugal, forward curved type. It is mechanically and dynamically balanced and being
mounted on a rigid shaft in a self aligned bearing block. The motor is tted with an adjustable variable pitch
pulley (VPP) drive as standard. It has class B insulation and dripping water proof, IP22.
• RefrigerantCircuit
Each refrigerant circuit shall have independent electronic expansion devices, HP/LP switch and refrigerant
line service pressure ports as standard factory installed.
• ExpansionDevice
Electronic Expansion Valve is being used to ensure accurate control of refrigerant ow.
• Casing/Structure
The unit casing used in M5RT-BR series is made of zinc coated galvanized steel sheets. It is further coated
with an electrostatic powder coat and then oven-baked for a tough and lasting weather resistant nish. Zinc
plated screws are used throughout to further reduce possibility of unit rusting.
• Insulation
ALL possible areas of condensation to happen are insulated by PE, Polyethelene. Panel insulation is 10mm
thickness while drain pan insulation is 5mm thickness.
• Control
Units shall be completely factory supplied with an integrated controlled Module, with built in resident control
algorithms to make decide heating, cooling, or ventilating operations in response to electronic signals from
indoor & outdoor temperature sensors.
• RooftopPanel-handset
Rooftop Panel comprises all starting, operating and safety controls setting. It is connected to the IC module
PCB and supplied as standard. Standard wire length is 15 meter and it can be extended up to 100 meter.
OptionalFeatures
• 3rdPartyThermostat
For application that requires uniform thermostat outlook with other electrical appliances. 3rd Party thermostat
can be connected to the factory supplied module via the contact point available on PCB board.
• BasicBMSConnection
Unit’s standard PCB board provides dry contact for basic BMS connection. Input signal will go to dry contact
ON/OFF, COOL/HEAT, and 4 to 20 mA temperature adjuster while output signal will come from ON/OFF,
COOL/HEAT, ALARM and DEFROST dry contact.
• Economizer
The economizer kit allows outside air to be mixed with return air for ‘free’ cooling if the outdoor air temperature
is suitable. Economizer cooling can be used alone or in conjunction with mechanical cooling. Beside that,
the economizer kit can be used as well to provide ventilation air thus can improve indoor air quality. Please
refer to the economizer kit features for more details.
• CO2Sensor
Field specied CO2 sensor can be easily plug on the control board’s dry contact, which is available on the
economizer extension board.
• AuxiliaryHeater
Auxiliary heater connection point is available on the standard PCB for eld supplied heater connection.
Page 7

5
EconomizerKitFeatures
Introduction
Economizer kit is an accessory provided by the factory, but requires eld installation. It is also designed to cater
for horizontal or vertical down throw air discharge orientation. Economizer kit is compatible for R410A rooftop
models. If you are unsure whether this kit can be used with your particular unit, please contact authorized service
division. It is vital to do a correct selection on economizer kit, refer the table below for kit selection guideline:
1.Easyinstallation
- The economizer kit can be installed on all new M5RTBR-FEAA Rooftop series.
- No additional wiring is needed as the unit comes from factory is ready for this.
- No additional cost for standard unit, when the users do not require economizer features since
the kit is elded installed.
2.Control
- Economizer is controlled by differential temperature.
- By using certain temperature inputs, the economizer will be activated once a certain set point is
achieved
3.FreeCooling
- Economizer kit is able to provide ‘free cooling’.
- Depending on outdoor air conditions, the opening of the damper will be changed.
- The better the outdoor air conditions, the higher efciency of the unit due to lesser mechanical
cooling.
4.IndoorAirQuality
- Economizer kit is able to provide fresh air; it helps to maintain indoor air quality.
- The build-in controller is ready to be used with eld installed CO2 sensor.
- Thus, it further improves the indoor air quality.
5.Damper
- Dampers modulation are controlled by reliable spring-return motor.
- Designed with extruded aluminium blades and frame, it is always light and it has low air
leakage.
6.Filter
- Pre-ltration is used to prevent foreign objects, such as birds, stones, leaves from going into the unit.
- An additional slot is ready for secondary lter for better ltering (to be eld installed)
No.
NOTE:
1 M5RT90BR
2
M5RT120BR
3 M5RT150BR
4 M5RT180BR
5 M5RT210BR
6 M5RT250BR
Wrong selection may cause the kit is unable to be assembled with the rooftop unit.
Economizer kit which is compatible with
rooftop unit
Rooftop Unit
EC90B
EC120B
EC150B
EC180B
EC210B
EC250B
Page 8

6
Application Information
Operating Range
The applicable operating range for unit with economizer feature same like normal unit.
However, the restriction of fresh air opening will occur in high ambient or low ambient in order to ensure the
reliability of the unit.
For high ambient in cooling operation, fresh air opening will be restricted at not more than 15%. When the
outdoor DB temperature is more than 50°C, the fresh air opening will be closed to 0%.
For low ambient in heating operation, fresh air opening will be restricted at not more than 10% to avoid cold
draft issue.
It is recommended to select an appropriate fresh air opening by considering the whole operating range of the
air-conditioner unit in both cooling and heating operation.
10 30
15
-15
-10
20
20
18
10
0
-20
27
52
50
43
40
20
10
30
0
-10
14
10 20
19
23 30
Cooling
Heating
Indoor WB temperature (°C) Indoor DB temperature (°C)
Outdoor DB temperature (°C)
Outdoor WB temperature (°C)
CAUTION
The use of the air conditioner outside the
range of working temperature and humidity
can result in serious failure.
Ensure the operating temperature is within the allowable range, as stated in diagram below:
Page 9

7
RefrigerantCircuitDiagrams
Model: M5RT90/120/150/180/210/250BR
Cooling Operation
Heating Operation
13
12
10 11 14
15
16
17
4
3
3
2
9
8
1
5
7
6
7
Note: (a) M5RT 120,150,180,210 & 250 consists of 2 circuits in the system.
(b) Item no. 15 & 16 are applicable for M5RT 120 only.
(c) Item no. 17 are applicable for M5RT 250 only.
Item Part’s Model/Part No/Size
1 Compressor
2 High Pressure Switch
3 Access Valve
4 4 - Ways Valve
5 Filter Drier
6 Electronic Expansion Valve
7 Strainer
8 Accumulator
9 Low Pressure Switch
10 Solenoid Valve
11 Bypass Capillary Tube
12 Indoor Heat Exchanger
13 Outdoor Heat Exchanger
14 Check Valve 1
15 Check Valve 2
16 Compensator
17 Capillary Tube
4100581, 4106124, 4100582, 4107111
Page 10
8
Condenser
air outlet
3000
Condenser
air inlet
1200
1200
Blower & motor
service
Evaporator coil
& economizer
kit service
1000
Electrical control
circuit service
Compressor service
lter for economizer
kit service
lter
service
Fresh air
inlet
X
1200
X : No obstacles and no accumulation of
snow or water shall be allowed in this area.
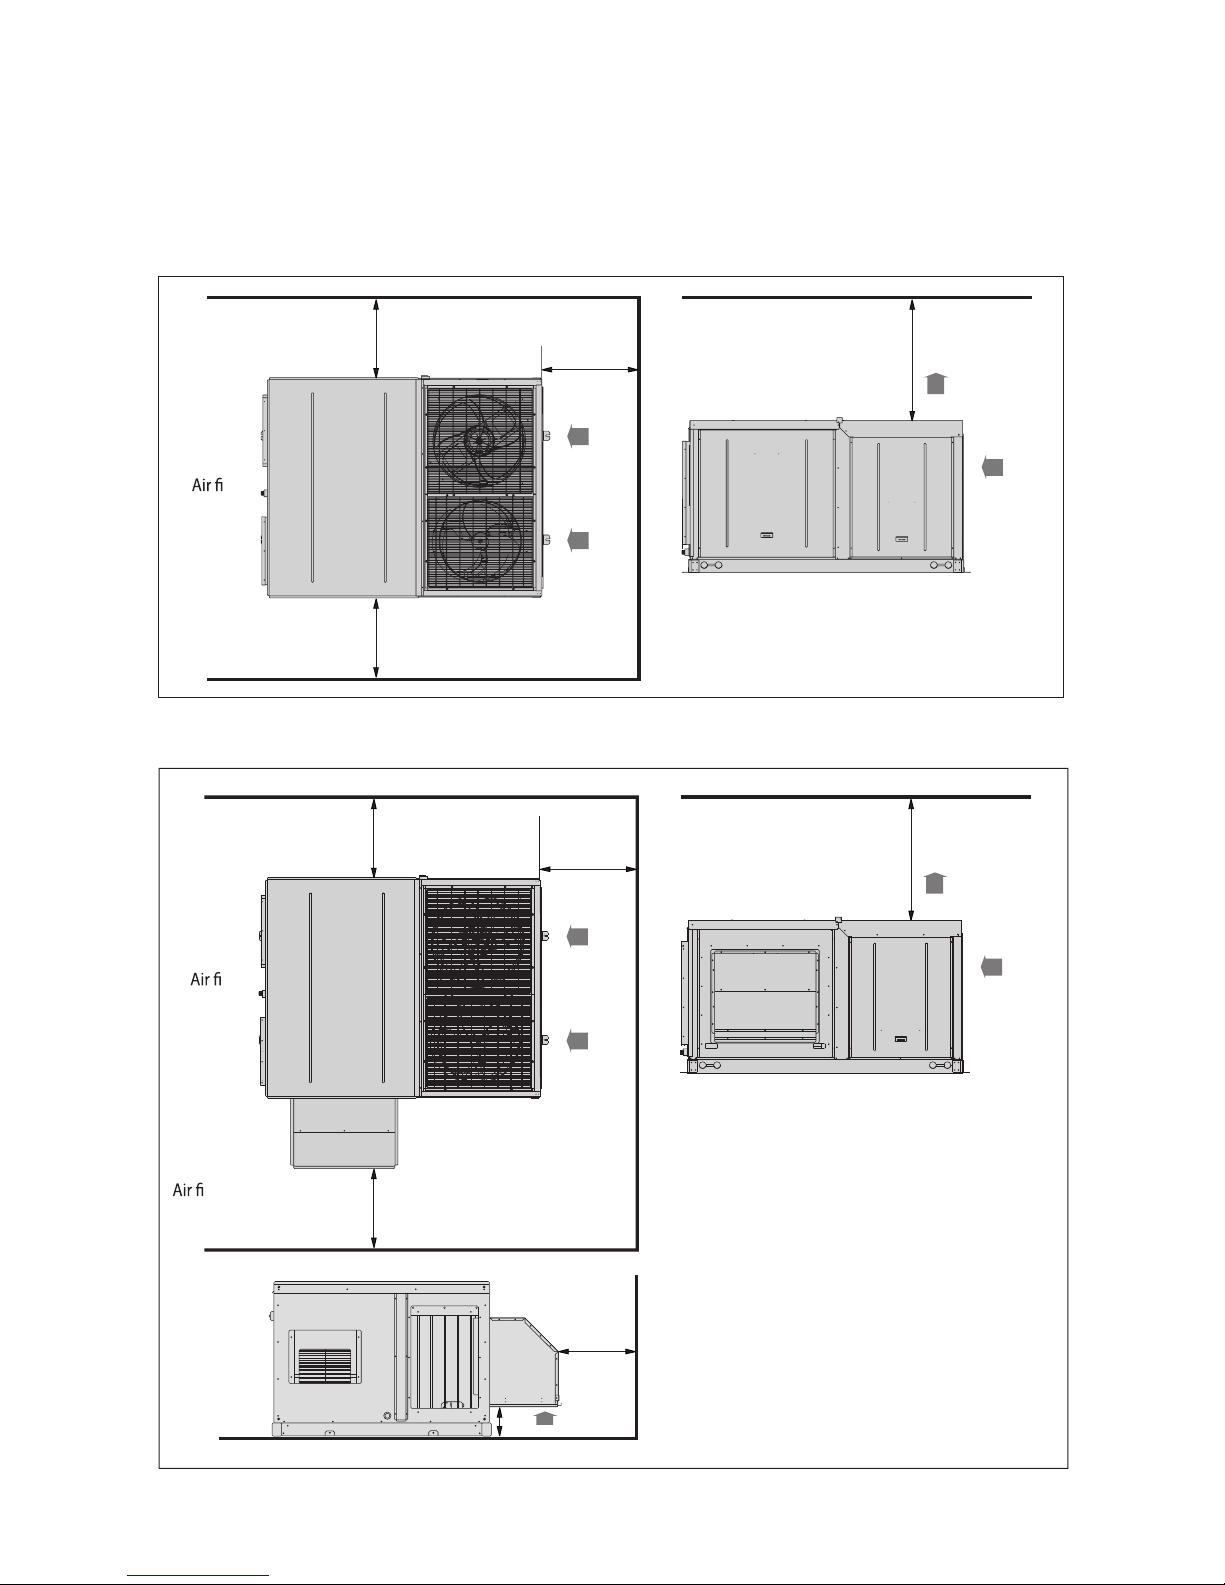
Note 1:
Additional space or clearance is required when economizer kit is installed. Whenever the unit is equipped with
economizer kit, the space required around the unit with economizer kit shall follow the diagram below:-
Installation Clearance
Installation
Refer diagram below for the space required around the unit. Note that:-
All dimensions shown are in mm.
All space value shown are minimum clearance required for the unit.
Unit shown in the diagram is M5RT90BR. Other models shall follow the same clearance.
●
●
●
Condenser
air outlet
3000
Condenser
air inlet
1200
1200
Blower & motor
service
lter
service
Evaporator coil
service
1200
Electrical control
circuit service
Compressor service
Page 11
9
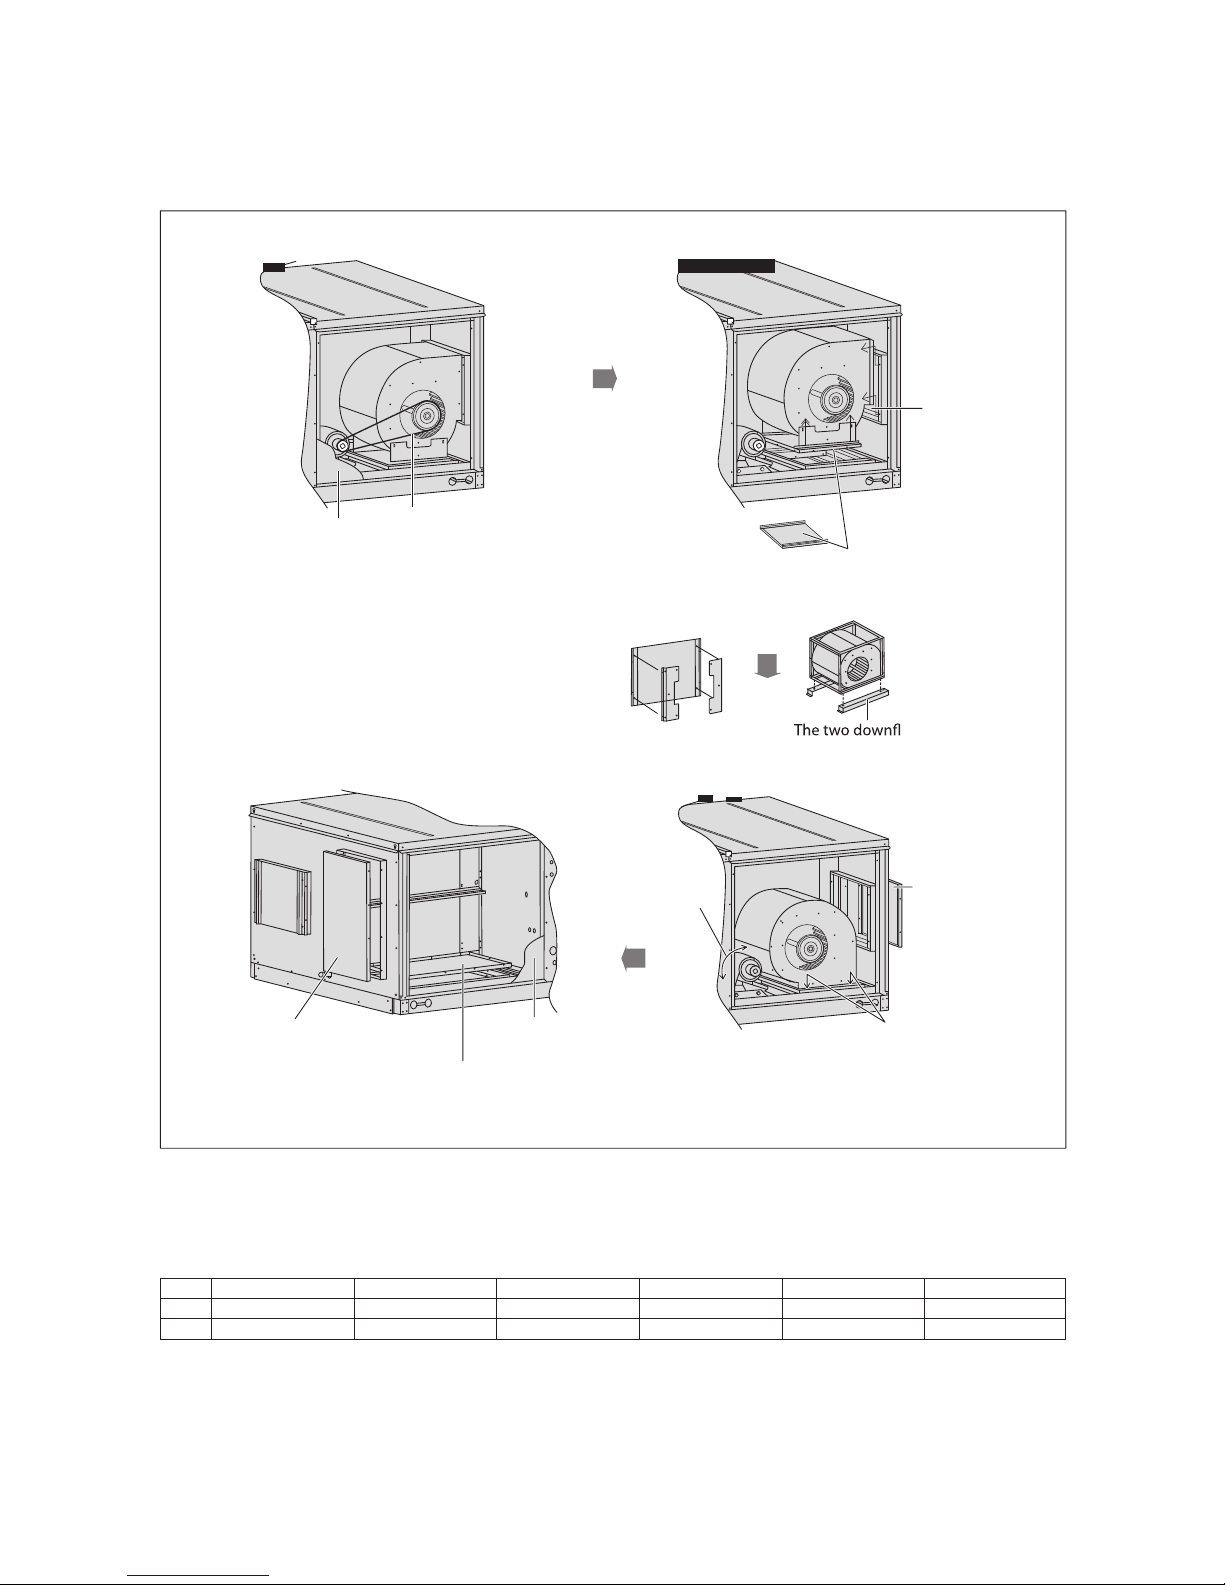
M5RT 90,120, 150, 180, 210 & 250 BR
Unit Conversion
In the case of converting standard unit to downthrow unit, follow the steps as stated below:
Remove the
side panel
Remove the
Pulley Belt
Detached the
blower support
Detached
blower
Remove screws
at both sides
For M5RT 90BR
The two side plates are screwed
on the blower support as shown
For M5RT 120, 150, 180, 210 & 250BR
ow structure
are screwed to blower
Cover the
horiz
ontal supply
opening with the
blower support
that detached
from the blower
and screw tightly.
Refer Note 2.
Turn the blower to face bottom.
Screw at both sides.
Install back the pulley
belt. Adjust the belt
tension by moving the
motor base.
Cover the horizontal
return opening with the
cover and screw tightly.
Refer Note 2.
Unscrew the vertical return
cover from the base panel
Remove the side
panel at return side
Lastly, install back the side panel.
Install back the pulley belt. Adjust the belt tension. Lastly, install back the side panel. Refer Note 1.
Note 1
Note 2
For downthrow conversion, belt length need to be changed.
For unit with standard pulley, belt length = a mm
Shaft to shaft distance for downthrow, C-C = b mm
M5RT90BR M5RT120BR M5RT150BR M5RT180BR M5RT210BR M5RT250BR
a 1382
1357 1250 1382 1382 1382
b 375 388 375 445 445 435
1
►►►
4
2
▼▼▼
3
◄◄◄
Sealant such like gasket (field supply) shall be placed in between the metal cover and flange. Besides that,
weather-proof silicone shall be applied on all the joints, screw holes and gaps to ensure water-tight condition.
Page 12

10
Wire Connection
• All electrical work must be carried out by qualified electrician and accordance with local supply requirement
and associate regulation.
Method for connecting electric wire
Before connecting the wire, consult the electric power company of jurisdiction.
(1) The entire wiring diagram of unit
PE
a
b
c
d
g
e
f
(2) Wiring connection to unit
Route the power supply wires and control wire through the knockout holes in the unit.
Remove the service panels and connect the units power supply wires to terminal block inside the control
box, as shown.
Power supply
Main switch/fuse
(field supply)
Power supply
wiring for unit
Unit
Remote control
Connection wiring for
unit & remote controller
Earth
a.
b.
c.
d.
e.
f.
g.
Note:
While installing the circuit breaker onto the unit, make sure that the screws do not damage the components
(e.g. coil) inside the unit.
The switch box also can be installed without attaching to the unit.
The knockout holes are only in M5RT90BR; M5RT120BR; M5RT150BR; M5RT180BR; M5RT210BR;
M5RT250BR comes with a power cable hole.
M5RT90BR
Recommended
switch box position
Terminal block
Terminal block
(seal off the knockout holes after installation)
Power cable
Control wire
Power cable
Control wire
M5RT120/150/180/210/250BR
CONTROL
BOX
CONTROL
BOX
Model
Power cable
(mm2)
M5RT90BR
M5RT120BR
4 32 32 4
6 40 40 6
10 40 40 10
10 50 50 10
16 63 63 16
25 80 80 25
M5RT150BR
M5RT180BR
M5RT210BR
M5RT250BR
Wiring Example And Selection Of Circuit Breaker
Earth cable
(mm
2
)protection switch (A)
Over current
capacity(A)
Breaker
Page 13

11
Note:
A main switch or other means for disconnection, having a contact separation in all poles, must be incorporated
in fixed wiring in accordance with local and national legislation.
• The unit is to be wired directly from an electrical distribution board either by a circuit breaker (preferred) or HRC fuse.
• Fix the power supply wiring to control module. Connect control wiring to control terminal block through the
control box’s hole.
• Earth wiring must be connected.
• The power supply cord must be equivalent to H05VV-F (60227 IEC 52 or 60227 IEC 53) which is the minimum
requirement, and to be used in protective tube.
! WARNING
• Before working in this unit, isolate it from the power supply.
• Electrical wiring to this unit and the remote controller shall be installed in accordance with the appropriate
requirement of the local wiring code.
Observe the notes mentioned below when wiring to the terminal
block. Precautions to be taken for power supply wiring.
(Use a round crimp-style terminal for connection to the terminal
block. In case it cannot be used due to unavoidable reasons, be
sure to observe the following instruction.)
When connecting the connection wires to the terminal block using a single core wire, be sure to perform curling.
Problems with the work may cause heat and fires.
CAUTION
• Pull the wire and make sure that it does not disconnect. Then fix the wire in place with a wire stop.
Stripping wire at terminal block
Good
Wrong
Strip wire end
to this point.
Excessive strip length
may cause electrical
shock or leakage.
Round crimp-style
terminal
Stranded wire
!
Control Operation Guide
The unit is equipped with a controller main board, and a wired remote controller is connected to the controller
main board.
All the setting in the unit is preset by the manufacturer. It is not recommended to change the setting unless
necessary or mentioned below.
a) Remote Controller Location
The remote controller is located on a metal bracket behind the service panel. It is packed together with
installation manual.
RB052 & 012,081,051,021TRM5
Remove
panel
CONTROL
BOX
CONTROL
BOX
M5RT90BR
Page 14

12
G Y1 Y2 W1 W2 Mode Operation
0 0 0 0 0 - Unit off
1 0 0 0 0 Cool Indoor fan on
X 1 0 X X Cool 1 stage compressor
X 1 1 X X Cool 2 stage compressor
X 0 X 1 0 Heatpump/Heater 1 stage compressor
X 0 X 1 1 Heatpump/Heater 2 stage compressor
Remark: X = Don’t care.
ON
OFF
b) LED Display (Controller Main Board)
The LED will blink when power up the unit.
c) LCD Display (Remote Controller)
During normal operations, the LCD displays compressor on/off status, mode, set temperature and so on.
Refer to Operating Manual for the details of operation guide. The LCD will display the main screen upon
power-up. When malfunctioning occur, a pop-up message will appear on the LCD with backlight blinking
and ‘beep’ sound.
d) Optional Confi gurations
The controller main board can be used as the interface for thermostat control and BMS system.
(i) Thermostat control (TB_THM-I)
• To use this control, set Dip Switch Setting: SW1-ON (default is OFF).
• Follow the method below for thermostat control inputs:
• Refer table below for installation recommendations:
Input Rated voltage Rated current Wire size
G
24V AC 5mA AWG18~22
Y1
Y2
W1
W2
Input TB_BMS-I Rated voltage Rated current Wire size
24V AC 5mA
AWG18~22Operating mode 24V AC 5mA
Cool/Heat set point - 4~20mA
1 2 3 4 5 6 7 8
ON
OFF
Note:
•
When the controller main board is confi gured as thermostat control, the remote controller is used for
monitoring purpose only.
• Unit needs to be restarted (power off and on) whenever dip switch setting is changed.
Note:
•
When the controller main board is confi gured as BMS control, the remote controller is used for
monitoring purpose only.
• Unit needs to be restarted (power off and on) whenever dip switch setting is changed.
Note:
•
G8 = Control Type
0 = Panel
1 = BMS
(ii) BMS control (TB_BMS-I)
• To use this control, set Dip Switch Setting: SW3 - ON (default is OFF) and panel parameter G8 to ‘1’
(default is ‘0’).
(iii) Dry contact output (TB_BMS-O)
• For TB_BMS-O, there are 4 monitoring outputs: error alarm; output1; output2; and defrost signal.
• Refer table below for installation recommendations:
• For TB_BMS-I, there are 3 control inputs:
unit on/off ; operating mode (cool-0/heat-1); and set point (4~20mA).
• Refer below table for installation recommendations:
ezis eriW)A( tnerruc detaRegatlov detaRO-SMB_BT tupnI
Alarm output (AL) 230V AC/125V AC/30V DC 1/3/3
AWG18~22
3/3/2)1O( 1tuptuO
3/3/3)2O( 2tuptuO
Defrost signal (DFRT) 230V AC/125V AC/30V DC 4/3/3
230V AC/125V AC/30V DC
230V AC/125V AC/30V DC
• The output signals will vary depending on the confi guration of controller main board, whether it is
thermostat control or BMS control.
Page 15

13
(1) For thermostat control, the outputs are summarized as below:
(2) For BMS control, the outputs are summarized as below:
Output 1*
OFF OFF OFF mode
FAN mode
COOL mode
HEAT mode
OFF
ON
ON
OFF
ON
ON
Output Status
Output 2* Description of operation
Output statusOutput
Output
Output 1
ON
ON mode
OFF mode
HEAT mode
COOL mode
System defrosting
Normal
Alarm occurred
No alarm occurred
OFF
ON
OFF
ON
OFF
ON
OFF
Output 2
Defrost
Alarm
Output status
System defrosting
Normal
Alarm occurred
No alarm occurred
OFF
OFF
ON
ON
Defrost
Alarm
* Output 1 = ON/OFF
* Output 2 = COOL/HEAT
Description of operation
Description of operation
The diagram below shows the position for terminal blocks in the controller main board which are used for
thermostat control and BMS system. Beside that, the output pins for auxilliary electrical heater are shown
as well.
Thermostat Control (TB_THM-l)
Connect to
third party
controller
BMS System (TB_BMS-l)
Connect to
BMS
System
Dry Contact Outputs (TB_BMS-O)
Controller Main Board
Alarm
output
(AL)
Output
1 (O1)
Output
2 (O2)
Defrost
signal
(DFRT)
Heater Output (HTR1 and HTR2)
Connect to
heater
contactor
Connect to
heater
contactor
Unit
on/
Cool/
Heat
mode
select
Cool/
Heat
set
point
Supply
Voltage
24V AC
Thermostat control
inputs
(G, Y1, Y2, W1, W2)
Page 16

14
(iv) Auxilliary Electrical Heater Output (HTR1 and HTR2)
• There are two output pins (HTR1 and HTR2) on controller main board, which are used to energize
the heater contactor. The contactor must be selected accordingly to avoid any safety issue(s).
• The heater shall be installed in accordance with local and national legislation. It must comply with
EN60335-2-40.
• Thermal fuse(s) shall be installed on the heater to eliminate any danger or damage on the
heater/unit. This is especially critical when there is any malfunction happen to controller main board
or blower.
• The heater shall be in a safe location, whereby no risk of damage could be happen on the unit.
• Use non-flammable duct for the unit that is installed with heater
• Use diff erent power supply for electrical heater and install a circuit breaker for each of the heater.
• Maximum temperature in the unit must not exceed 60°C. Temperature measurement shall be taken
during the installation or commisioning in order to ensure the temperature not exceed this value.
• Select the proper safety device or thermal protector accordingly.
• The heater shall never be installed inside the unit. The recommended location for the heater is inside
the supply duct, whereby the distance of the heater is suffi cient to ensure the temperature inside the
unit does not exceed 60°C.
(v) Economizer control
• Ensure the economizer kit has been incorporated with rooftop unit before activate the economizer
function in the controller main board. Else, error will occur.
•
To activate economizer function, set Dip Switch Setting: SW4 - ON (default is OFF) in the controller main
board and panel parameter G6 to ‘1’ (default is ‘0’).
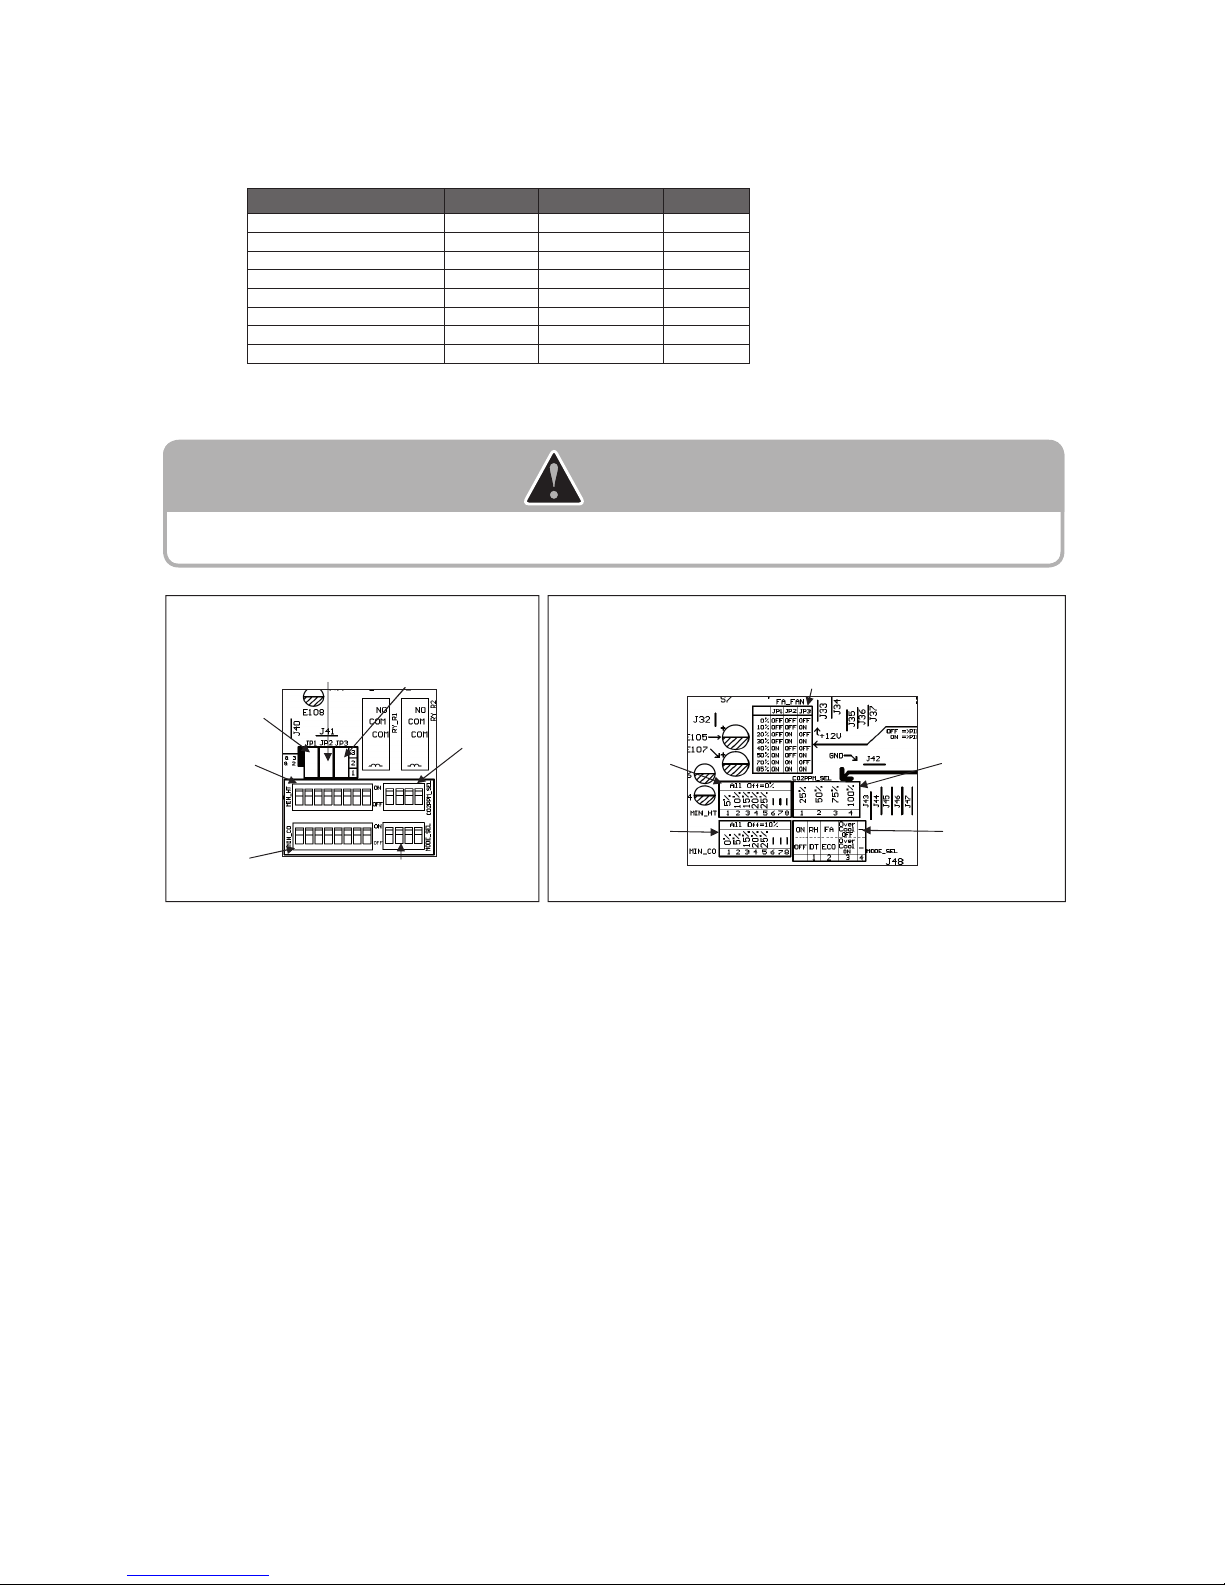
• In economizer controller board, there are 4 dip switches and 3 shunt jumpers which provide flexible
selection based on different requirements:
– Dip Switch 1: Minimum fresh air opening setting in heating mode, where by the selection of
different pins will give different opening setting. SW1: 5%, SW2: 10%, SW3: 15%,
SW4: 20%, SW5: 25%, SW6/7/8:
no function, Default: 0% (no selection, all OFF).
– Dip Switch 2: Minimum fresh air opening setting in cooling mode, where by the selection of
different pins will give different opening setting. SW1: 0%, SW2: 5%, SW3: 15%,
SW4: 20%, SW5: 25%, SW6/7/8:
no function, Default: 10% (no selection, all OFF).
– Dip Switch 3: CO2 PPM level threshold value selection, where by the selection of different pins
will give different value setting. SW1: 25%, SW2: 50%, SW3: 75%, SW4: 100%,
Default: 0% (no selection, all OFF).
– Dip Switch 4: Type of operation, which include the following selection: SW1: OFF = Differential temperature operation (default), ON = No function at this
moment.
SW2: OFF = Economizer mode (default), ON = Fresh air mode.
SW3: OFF = Overcooled protection is not activated (default), ON = Overcooled
protection is activated.
1 2 3 4 5 86 7
ON
OFF
Note:
G6 = Economizer control
0 = disable
1 = enable.
Page 17
15
Shunt jumper 1, 2 and 3: Minimum fresh air opening setting in fan mode, where by the selection of
different pins will give different opening setting. Let name the shunt jumper 1 = JP1, shunt jumper 2
= JP2 and shunt jumper 3 = JP3; refer the table below for different fresh air opening selection:-
Fresh air opening (%) JP1 JP2 JP3
0 (default) OFF OFF OFF
10 OFF OFF ON
20 OFF ON OFF
30 OFF ON ON
40 ON OFF OFF
50 ON OFF ON
70 ON ON OFF
85 ON ON ON
Legend: OFF = Short pin 2 and pin 3
ON = Short pin 1 and pin 2
CAUTION
Dip Switch 1, 2 and 3 allow only 1 pin selection. Multiple pins selection will cause error and the operation will go
back to default setting. While Dip Switch 4 allow multiple pins selection.
Location of dip switches and shunt jumpers
in the economizer controller board:
Indication on the economizer controller board:
Shunt jumper 1
Shunt jumper 2
Shunt jumper 3
Dip Switch 3
Indication for the
means of selection
for Dip Switch 1.
Indication for the
means of selection
for Dip Switch 3.
Indication for the
means of selection
for Dip Switch 2.
Indication for the
means of selection
for Dip Switch 4.
Dip Switch 4
Dip Switch 2
Dip Switch 1
Indication for the means of selection for shunt
jumper 1, 2 and 3.
Page 18

16
Sound Data
Outdoor Noise Level
Coil
Mic. position 1
Mic. position 2
Mic. position 3
Discharge air flow
Note:- Microphone position: 1m away from every side of the unit and 1m above floor level
63Hz 125Hz 250Hz 500Hz 1kHz 2kHz 4kHz 8kHz
M5RT90BR
77 76 64 65 63 60 55 48
78 75 62 60 59 54 50 44 64 65
77 74 61 60 61 54 52 45 65 63
78 82 66 63 63 56 51 45 68 73
85 76 69 66 65 61 53 46 70 66
83 74 70 66 65 62 56 47 70 68
68
66
M5RT120BR
M5RT150BR
M5RT180BR
M5RT210BR
M5RT250BR
M5RT90BR
M5RT120BR
M5RT150BR
M5RT180BR
M5RT210BR
M5RT250BR
63Hz 125Hz 250Hz 500Hz 1kHz 2kHz 4kHz 8kHz
91 91 79 78 78 72 68 61 82
96 91 79 78 80 72 70 64 83
93 90 79 78 80 73 71 64 83
95 96 83 82 84 78 73 66 87
101 94 87 85 87 81 76 69 90
99 91 88 85 86 83 77 69 90
Model
1/1 Octave Sound Power Level (dB, ref 1pW)
Overall
(dBA)
Noise Criteria
(NC)
1/1 Octave Sound Pressure Level (dB, ref 20µPa)
Model
Overall
(dBA)
0152213B
0252213B
Page 19
17
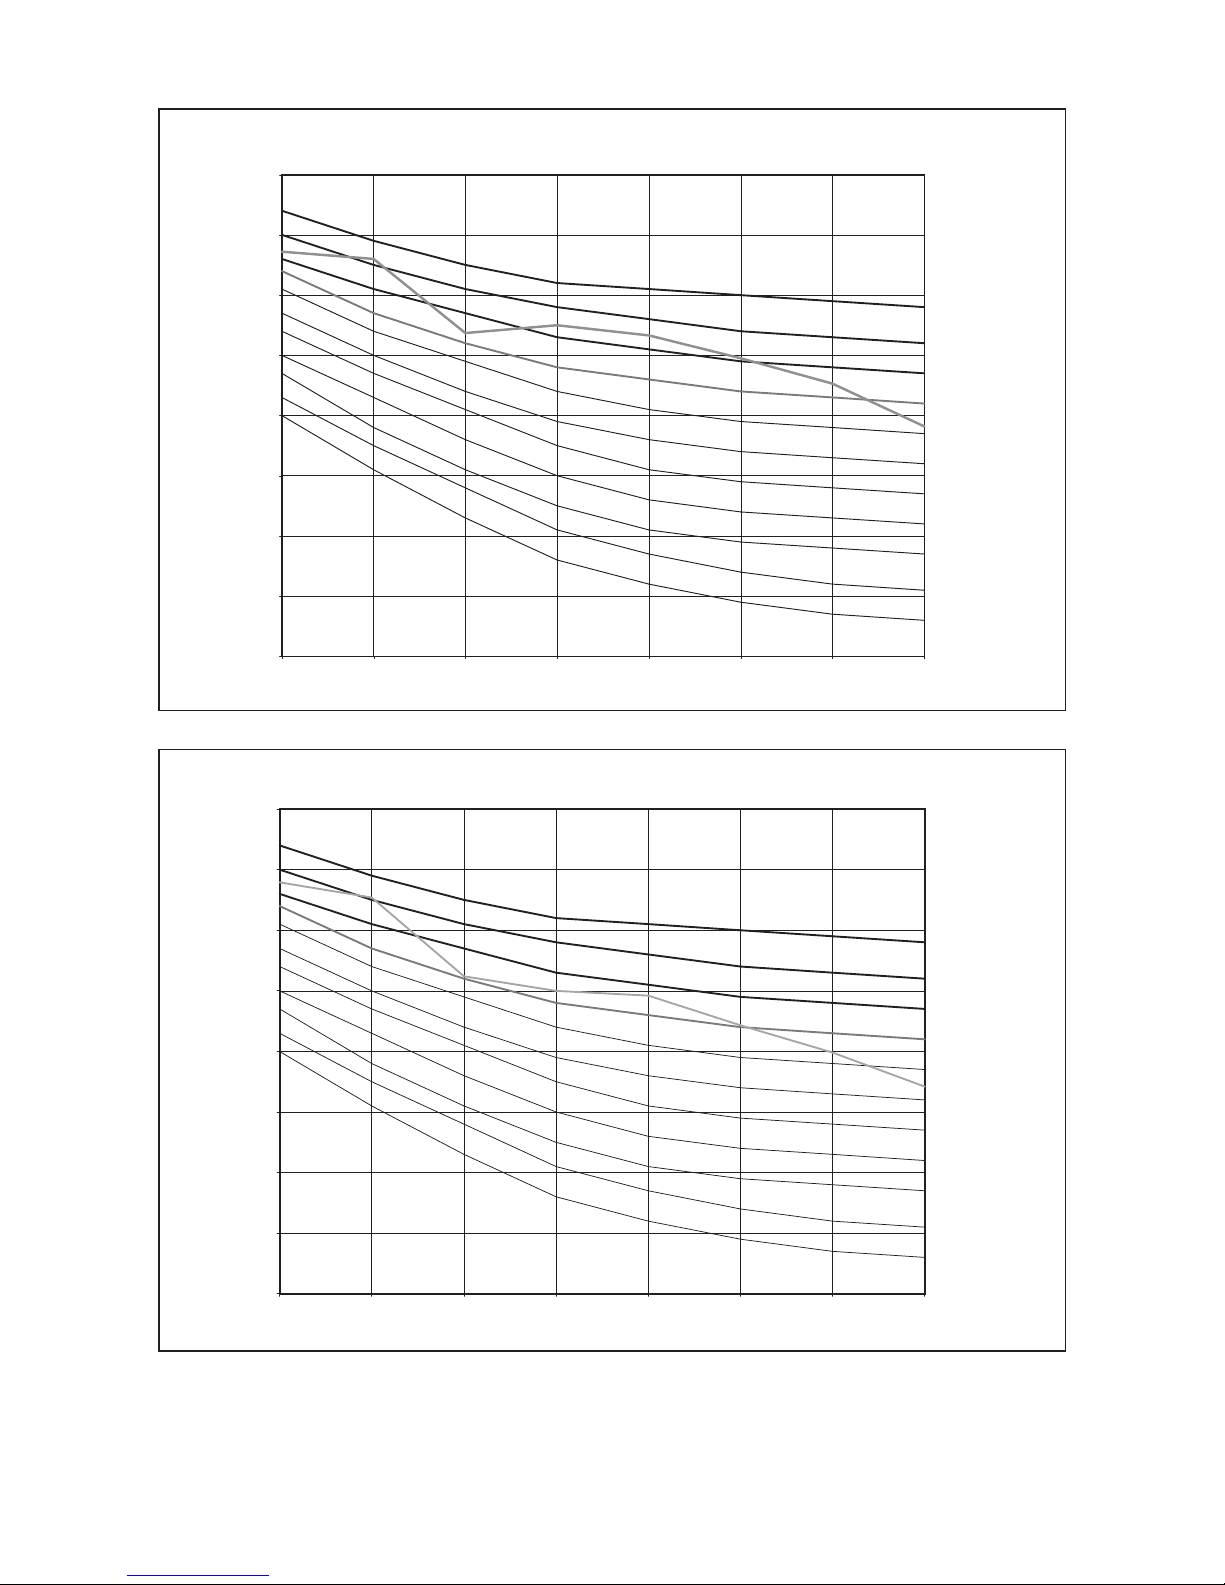
M5RT90BR NC CURVES
M5RT120BR NC CURVES
10
20
30
40
50
60
70
80
90
63 125 250 500 1000 2000 4000 8000
Octave-band frequency (Hz)
Sound pressure level (dB, ref 20μPa)
NC70
NC45
NC50
NC55
NC60
NC65
NC20
NC25
NC30
NC35
NC40
10
20
30
40
50
60
70
80
90
63 125 250 500 1000 2000 4000 8000
Octave-band frequency (Hz)
Sound pressure level (dB, ref 20μPa)
NC70
NC45
NC50
NC55
NC60
NC65
NC20
NC25
NC30
NC35
NC40
0352213B90
0352213B120
Page 20
18
M5RT150BR NC CURVES
10
20
30
40
50
60
70
80
90
63 125 250 500 1000 2000 4000 8000
Octave-band frequency (Hz)
Sound pressure level (dB, ref 20μPa)
NC70
NC45
NC50
NC55
NC60
NC65
NC20
NC25
NC30
NC35
NC40
0352213B150
M5RT180BR NC CURVES
10
20
30
40
50
60
70
80
90
63 125 250 500 1000 2000
4000
8000
Octave-band frequency (Hz)
Sound pressure level (dB, ref 20μPa)
NC70
NC45
NC50
NC55
NC60
NC65
NC20
NC25
NC30
NC35
NC40
0352213B180
Page 21

19
M5RT210BR NC CURVES
10
12563 250 500 1000 2000 4000 8000
20
30
40
50
60
70
80
Octave-band frequency (Hz)
Sound pressure level (dB, ref 20μPa)
0352213B210
M5RT250BR NC CURVES
10
20
30
40
50
60
70
80
63 125 250 500 1000 2000
4000
8000
Octave-band frequency (Hz)
Sound pressure level (dB, ref 20μPa)
0352213B250
Page 22
20
M5RT90BR
Selection Process
Page 23

21
Exampleforselectionprocess:
The following data are the rated design points for model R410A rooftop M5RT90BR:
Airow Rate = 3300 cfm
External Static Pressure (ESP) = 150Pa
Blower RPM = 657
To increase the ESP to 200Pa, but maintain the airow rate at 3300cfm, please follow the steps below:
Step1:Selectionofnewdesiredpoint.
From the blower curve, select the point that can meet both of the requirements
(ESP = 200Pa and airow rate = 3300cfm).
Step2:ReadRPMvaluefromtheblowercurve.
Next, refer to the RPM value in the blower curve which is corresponding to this point.
For instance, from the blower curve on the right, RPM which is corresponding to this point = 727.
Step3:Readpowerconsumptionvalueforindoorfanmotor.
Then, use this RPM value to estimate the power consumption of indoor fan motor by referring to the table
of ‘Motor Variable Pitch Pulley Data’. For instance, from the table, indoor fan motor with 727RPM consumes
1000W.
Step4:Readnumberofturnsforvariablepitchpulley.
Similarly, use this RPM value to read the no. of turns (N) by referring to the table of ‘Motor Variable Pitch Pulley
Data’. The variable pitch pulley for motor shall be adjusted to this ‘N’ in order to achieve the desired point
(ESP = 200Pa and airow rate = 3300cfm). For instance, from the table, no. of turns (N) = 1.5 in order to get
727RPM. First, adjust the motor pulley to 0 turns. Then, makes 1 and half turns on the pulley. Cross check the
dimension ‘X’, which stands for regulation space of motor pulley. In this case, X = 3.5mm.
Page 24

22
MotorVariablePitchPulleyData:
Date is provided according to factory tted standard motor and blower. The range of airow & ESP must be
worked within blower curve boundary.
N 0 0.25 0.5 0.75 1 1.25 1.5 1.75 2 2.25 2.5 2.75 3 3.25 3.5 3.75 4
X 0.5 1 1.5 2 2.5 3 3.5 4 4.5 5 5.5 6 6.5 7 7.5 8 8.5
Fan Speed (RPM) 738 733 727 722 716 711 704 698 691 683 676 670 663 656 650 643 638
Power Input (W) 2005 1950 1890 1830 1770 1715 1660 1605 1550 1490 1420 1350 1275 1205 1130 1060 990
Fan Speed (RPM) 760 754 748 741 735 728 721 713 706 699 691 684 676 668 660 652 645
Power Input (W)
2690 2590 2495 2390 2295 2190 2095 2005 1905 1815 1725 1650 1575 1515 1455 1390 1350
Fan Speed (RPM)
820 815 810 805 800 793 787 780 773 765 758 750 742 734 726 718 710
Power Input (W)
3775 3660 3545 3450 3350 3250 3140 3030 2920 2810 2700 2590 2480 2370 2275 2185 2100
Fan Speed (RPM)
890 882 873 864 855 846 837 828 820 811 802 793 784 775 766 757 748
Power Input (W)
5450 5300 5150 5010 4870 4720 4580 4440 4300 4160 4010 3870 3720 3570 3410 3240 3070
Fan Speed (RPM)
889 880 871 862 853 844 835 826 818 810 802 794 786 778 770 762 754
Power Input (W)
5570 5460 5320 5180 5040 4900 4760 4620 4500 4380 4260 4140 4020 3900 3780 3660 3540
Fan Speed (RPM)
1004 994 984 974 964 954 944 933.8 924 914 904 894 884 874 864 854 844
Power Input (W)
9430 9155 8880 8605 8330 8055 7780 7505 7230 6955 6680 6405 6130 5855 5580 5305 5030
N 0 0.25 0.5 0.75 1 1.25 1.5 1.75 2 2.25 2.5 2.75 3 3.25 3.5 3.75 4
X 0.5 1 1.5 2 2.5 3 3.5 4 4.5 5 5.5 6 6.5 7 7.5 8 8.5
Fan Speed (RPM) 750 744 738 733 727 721 714 708 701 693 686 678 671 664 657 650 643
Power Input (W) 1790 1720 1645 1580 1510 1445 1375 1325 1270 1205 1130 1045 955 870 800 755 715
Fan Speed (RPM) 769 762 755 748 741 734 727 720 713 706 698 690 682 673 665 657 650
Power Input (W) 2300 2205 2105 2000 1900 1800 1700 1610 1530 1460 1380 1300 1230 1160 1110 1060 1000
Fan Speed (RPM) 833 827 821 814 807 801 795 788 780 771 765 759 752 745 737 727 717
Power Input (W) 3440 3330 3220 3110 3000 2890 2780 2670 2560 2450 2340
2230 2120 2020 1910 1830 1740
Fan Speed (RPM) 882 875 868 861 853 846 838 830 821 812 804 796 788 779 770 761 752
Power Input (W) 5210 5050 4890 4720 4550 4400 4260 4100 3930 3770 3620 3480 3340 3190 3030 2890 2750
Fan Speed (RPM) 892 883 874 865 856 847 838 829 821 813 805 797 789 781 773 765 757
Power Input (W) 5270 5160 5020 4880 4740 4600 4460 4320 4200 4080 3960 3840 3720 3600 3480 3360 3240
Fan Speed (RPM) 1008 998 988 978 968 958 948 938 928 918 908 898 888 878 868 858 848
Power Input (W) 8910 8645 8380 8115 7850 7585 7320 7055 6790 6525 6260 5995 5730 5465 5200 4935 4670
N 0 0.25 0.5 0.75 1 1.25 1.5 1.75 2 2.25 2.5 2.75 3 3.25 3.5 3.75 4
X 0.5 1 1.5 2 2.5 3 3.5 4 4.5 5 5.5 6 6.5 7 7.5 8 8.5
Fan Speed (RPM)
763 757 751 744 738 733 727 721 715 708 700 693 685 677 669 661 653
Power Input (W)
1370 1320 1265 1195 1130 1065 1000 950 905 850 790 725 650 605 555 510 460
Fan Speed (RPM)
776 769 762 755 748 741 733 726 718 711 703 695 687 679 671 663 655
Power Input (W)
1910 1830 1740 1650 1560 1470 1390 1300 1210 1140 1055 985 920 850 790 740 690
Fan Speed (RPM)
842 836 830 823 817 811 805 796 788 781 773 764 755 746 738 731 723
Power Input (W)
3080 2980 2890 2780 2670 2560 2450 2340 2230 2120 2020 1910 1820 1730 1620 1520 1420
Fan Speed (RPM)
889 882 875 868 861 853 845 837 828 819 810 801 792 783 774 765 757
Power Input (W)
4670 4520 4370 4210 4060 3900 3750 3600 3430 3260 3090 2920 2750 2580 2470 2330 2230
Fan Speed (RPM)
896 887 880 873 864 855 846 837 828 819 811 802 793 784 778 768 759
Power Input (W)
4950 4710 4570 4430 4290 4150 4010 3870 3870 3730 3590 3450 3310 3170 3030 2890 2750
Fan Speed (RPM)
1010 1000 990 980 970 960 950 940 930 920 910 900 890 880 870 860 850
Power Input (W)
8180 7925 7670 7415 7160 6905 6650 6395 6140 5885 5630 5375 5120 4865 4610 4355 4100
N 0 0.25 0.5 0.75 1 1.25 1.5 1.75 2 2.25 2.5 2.75 3 3.25 3.5 3.75 4
X 0.5 1 1.5 2
2.5 3 3.5 4 4.5 5 5.5 6 6.5 7 7.5 8 8.5
Fan Speed (RPM) 894 887 880 871 866 857 850 841 832 826 817 808 798 790 778 773 761
Power Input (W) 4310 4120 4050 3890 3630 3560 3370 3220 3020 2930 2780 2730 2570 2370 2210 2030 1960
Fan Speed (RPM) 898 893 886 877 868 859 850 841 832 823 814 805 796 787 778 769 761
Power Input (W) 4690 4550 4410 4270 4130 3990 3850 3690 3530 3370 3210 3050 2890 2730 2570 2410 2250
Fan Speed (RPM) 1013 1003 993 983 973 963 953 943 933 923 913 903 893 883 873 863 853
Power Input (W) 7560 7315 7070 6825 6580 6335 6090 5845 5600 5355 5110 4865 4620 4375 4130 3885 3640
Legend: X: Regulation Space of Motor Pulley (mm)
N: Number of Turns
ESP: External Static Pressure (mmAq)
: Data is out of blower curve (for reference only)
210
250
250Pa
: Factory Set Point
External Static Pressure (ESP)
External Static Pressure (ESP)
External Static Pressure (ESP)
Models
R410A
Rooftop
250
120
150
180
90
210
250
External Static Pressure (ESP)
Model 90/120/150/180/210/250 = 150Pa
Model 90/120/150 = 200Pa, Model 180/210/250 = 210Pa
210
150
210
150
180
Model 90/120/150/180/210/250 = 100Pa
180
90
250
90
120
120
180
Models
R410A
Rooftop
Models
R410A
Rooftop
Models
R410A
Rooftop
0952213B
Page 25

23
Motor Pulley Dimensions
(Note: All dimensions are in mm)
(Note: All dimensions are in mm)
Medium Min - Max
VPT139A1 121 109 - 133 35 1
VPT139A1 121 109 - 133 35 1
VPT139A2 121 109 - 133 70 2
VPT139A2 121 109 - 133 70 2
VPT139A2 121 109 - 133 70 2
VPT139A2 121 109 - 133 70 2
Legend: PD: Pitch Diameter of Motor Pulley (mm)
V-Belt Dimensions
A 12.7 10 40 1657 1382 1
A 12.7 10 40 1782 1357 1
A 12.7 10 40 1657 1250 2
A 12.7 10 40 1932 1382 2
A 12.7 10 40 1957 1382 2
A 12.7 10 40 1907 1382 2
210
445
510
590
375
388
515
PD
Pulley Type
Quantity
(pcs)
Pulley center
distance (mm)
Models R410A Rooftop
(M5RT-BR)
250
V-belt
length
Down flow
Pulley center
distance(mm)
Section
Nominal
Angle (º)
V-belt
length
Nominal
Side flow
90
120
150
180
Quantity (pcs)Total Length
250 690 435
210 710
180
Models R410A
Rooftop
(M5RT-BR)
Top Width
90
120
445
150
Thickness
710
375
X
Y
PD
140
104
0952213B
0952213B
Page 26

24
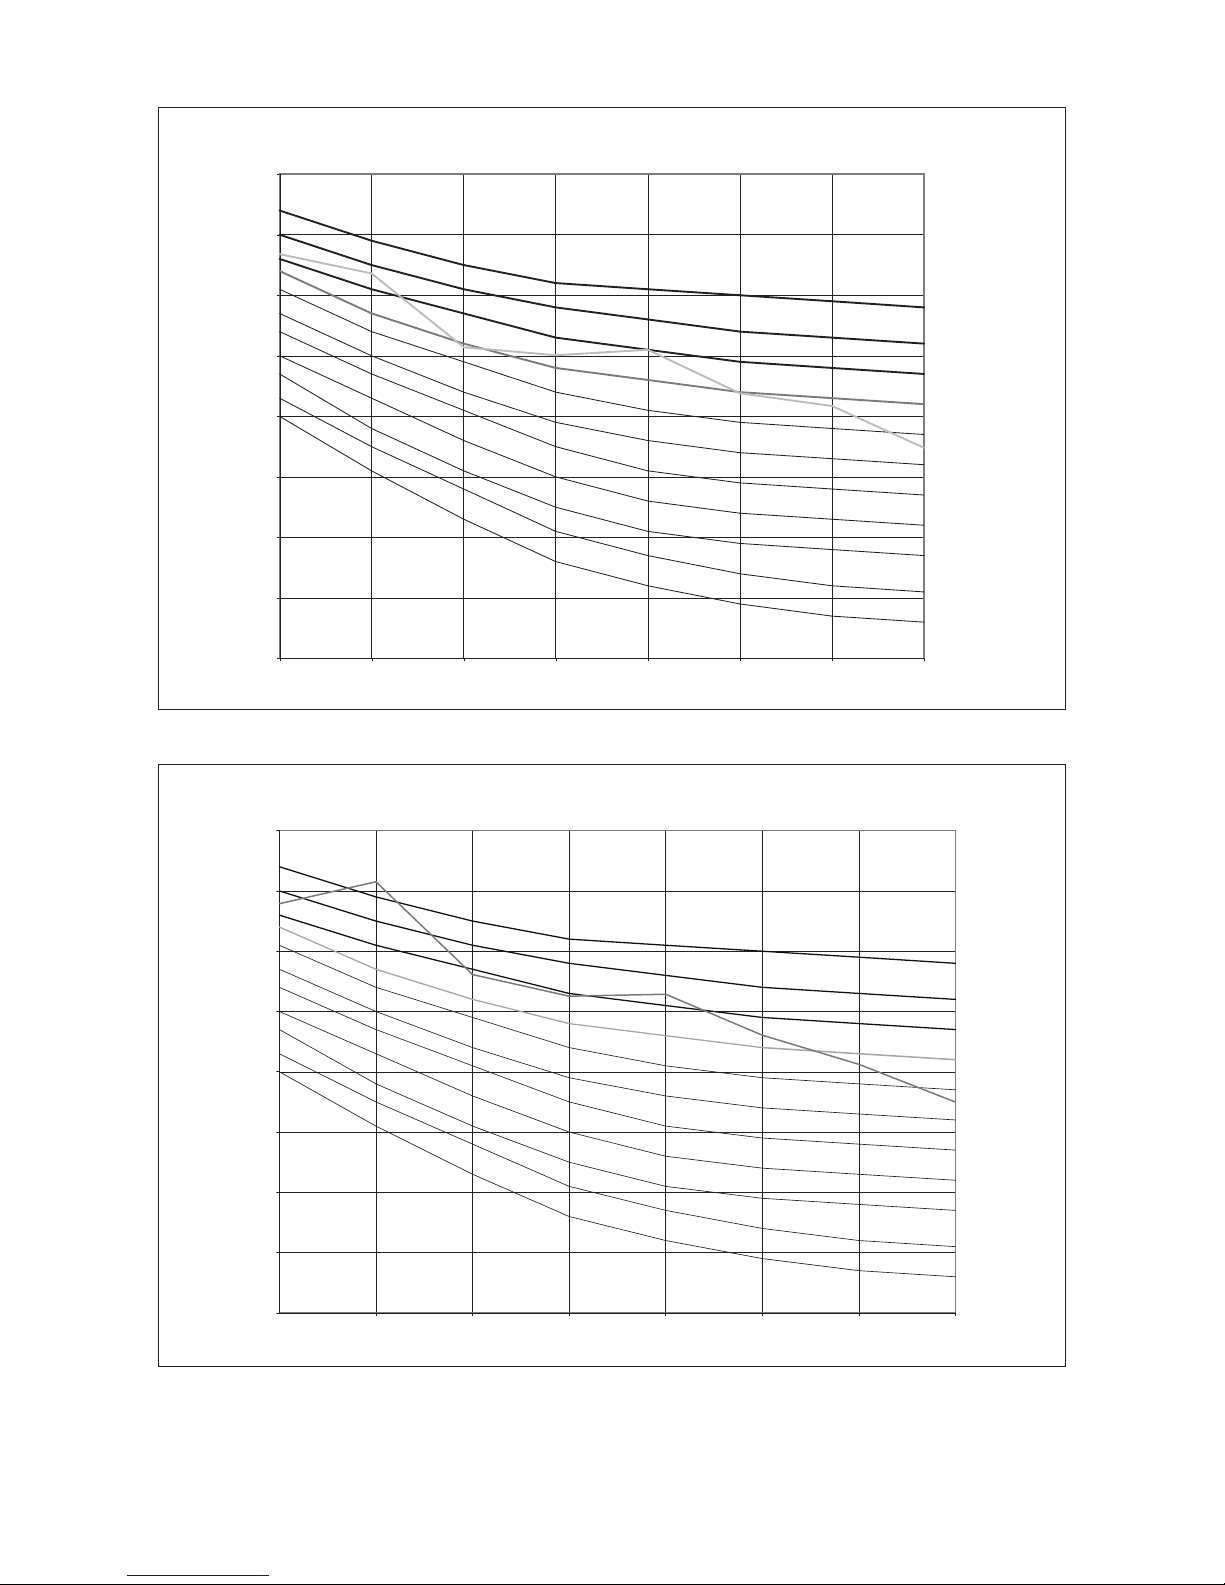
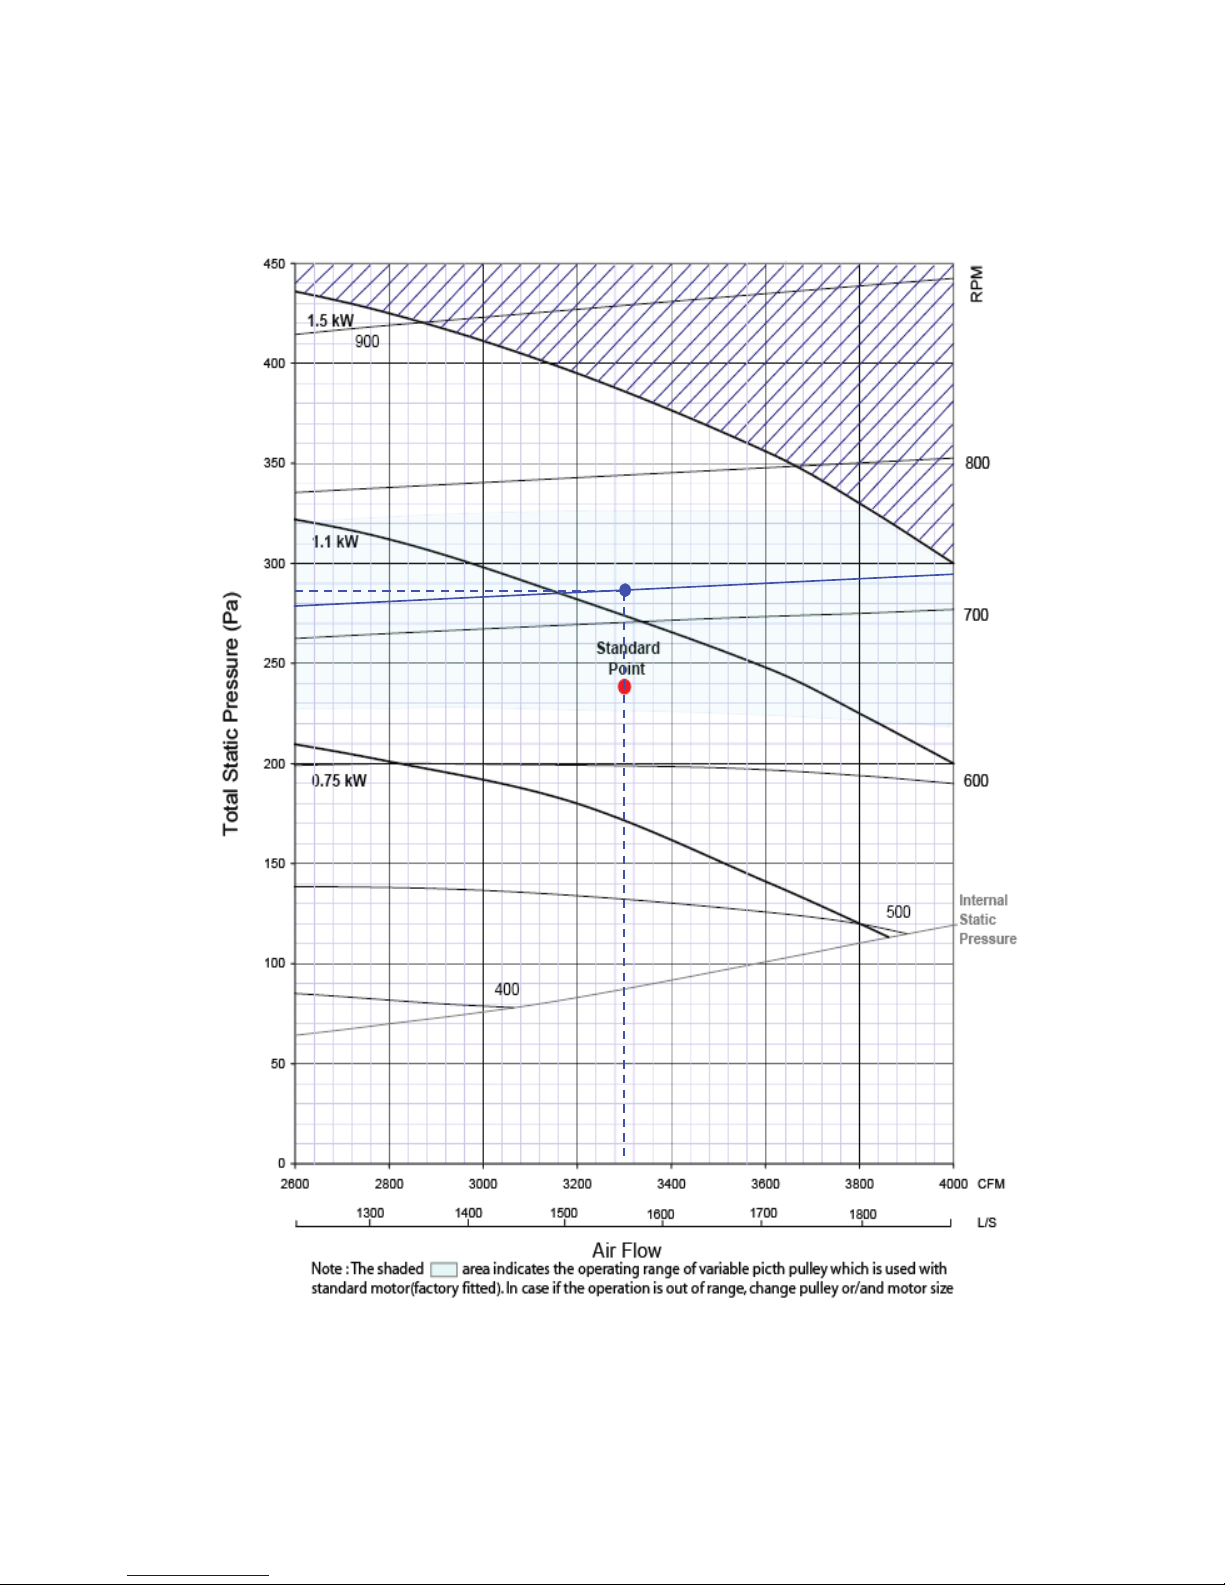
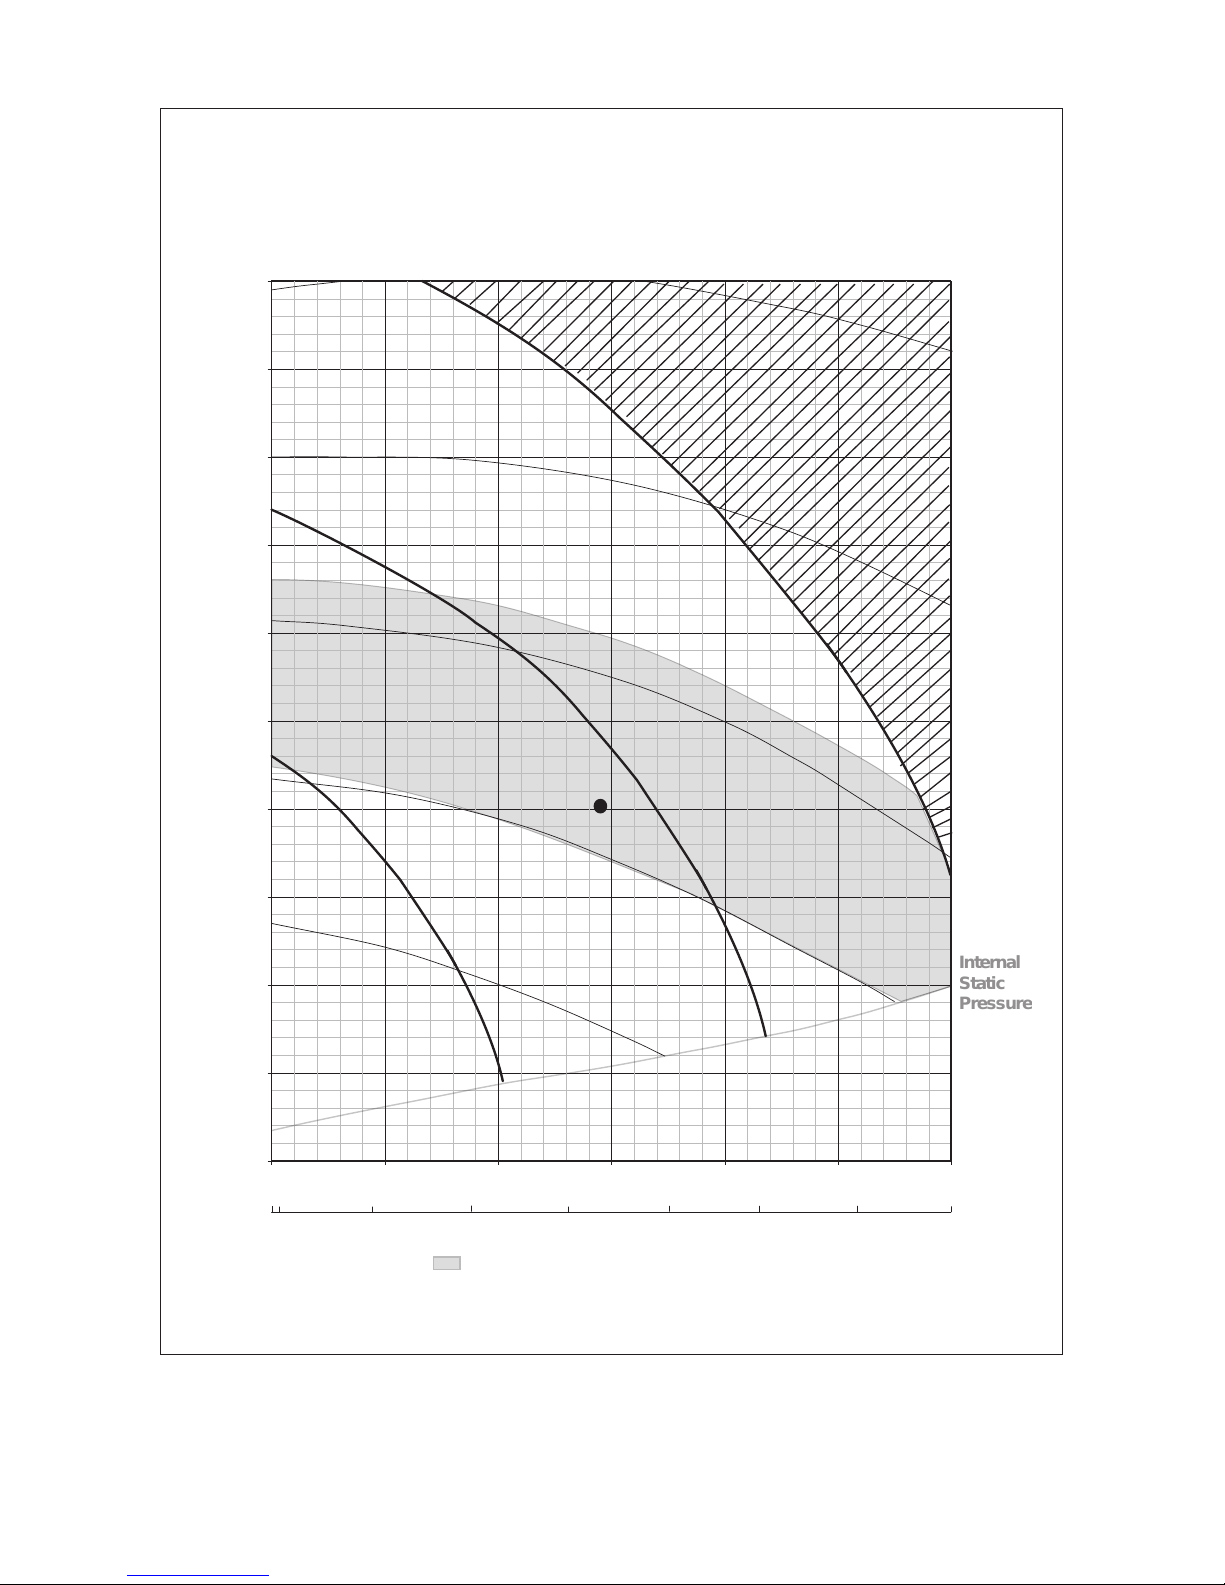
BlowerCurves
M5RT90BR
0
50
100
150
200
250
300
350
400
450
2600 2800 3000 3200 3400 3600 3800 4000
Air Flow
)aP(erusserPcitatSlatoT
800
700
600
500
Internal
Static
Pressure
Standard
Point
400
CFM
900
1.5 kW
1.1 kW
0.75 kW
MPR
L/S
1800
1500
14001300
1600
1700
Note : The shaded area indicates the operating range of variable picth pulley which is used with
standard motor(factory fitted). In case if the operation is out of range, change pulley or/and motor size
0752213B90
Page 27

25
M5RT120BR
50
100
150
200
250
300
350
400
450
500
550
600
3200 3500 3800 4100 4400 4700 5000 5300
Air Flow
T o t a l S t a t i c P r e s s u r e ( P a )
900
800
700
600
Internal
Static
Pressure
Standard
Point
CFM
2.2 kW
1.5 kW
1.1 kW
R P M
L/S
2300
1700
1600
500
1000
1800
1900
2000
2100
2200
2400 2500
Note : The shaded area indicates the operating range of variable picth pulley which is used with standard
motor ( factory fitted ) . In case if the operation is out of range, change pulley or / and motor size.
0752213B120
Page 28
26
M5RT150BR
700
600
Standard
Point
CFM
3.0 kW
2
.
2kW
1.5
k
W
RPM
800
900
1000
50
100
150
200
300
350
400
450
500
4200 4700 5200 5700 6200 6700 7200
250
L/S
3000
2400
2200
2600
2000
2800
3200
3400
Total Static Pressure (Pa)
Air Flow
Internal
Static
Pressure
Note : The shaded area indicates the operating range of variable picth pulley which is used with standard
motor ( factory fitted ) . In case if the operation is out of range, change pulley or / and motor size.
0752213B150
Page 29

27
M5RT180BR
50
150
250
350
450
550
650
5300 5800 6300 6800 7300 7800 8300
700
600
Standard
Point
CFM
3.0 kW
2.2 kW
3.7 kW
2500 2700 2900 3100 3300 3500 3700 3900 L/S
800
900
1000
Air Flow
RPM
Internal
Static
Pressure
Total Static Pressure (Pa)
Note : The shaded area indicates the operating range of variable picth pulley which is used with standard
motor ( factory fitted ) . In case if the operation is out of range, change pulley or / and motor size.
0752213B180
Page 30

28
M5RT210BR
100
200
300
400
500
600
700
5500 6000 6500 7000 7500 8000 8500 9000 9500 CFM
AIR FLOW
3.7 kW
3.0 kW
5.5 kW
900
800
700
600
Standard
Point
2600 2800 3000 3200 3400 3600 3800 4000 4200 4400 L/S
RPM
Total Static Pressure (Pa)
Note : The shaded area indicates the operating range of variable picth pulley which is used with standard
motor ( factory fitted ) . In case if the operation is out of range, change pulley or / and motor size.
Internal
Static
Pressure
0752213B210
Page 31

29
M5RT250BR
150
250
350
450
550
650
750
6500 7000 7500 8000 8500 9000 9500 10000 10500 CFM
AIR FLOW
Internal
Static
Pressure
800
900
700
7.5 kW
5.5 kW
3100 3300 3500 3700 3900 4100 4300 4500 4700 4900 L/S
RPM
1000
Standard
Point
3.7 kW
Total Static Pressure (Pa)
Note : The shaded area indicates the operating range of variable picth pulley which is used with standard
motor ( factory fitted ) . In case if the operation is out of range, change pulley or / and motor size.
0752213B250
Page 32

30
Engineering & Physical Data
Btu/h
93300
121400
152600
190000
W
27340
35580
44720
55690
Btu/h
85000
118700
142600
184000
W
24910
34790
41790
53930
W
8140
10780
13040
16740
W
7330
10840
12860
15540
A
16.6
21.2
28.3
30.2
A
14.8
20.8
26.9
28.8
W/W
3.36
3.30
3.43
3.33
W/W
3.40
3.21
3.25
3.47
kg
6.1 / 13.4
(5.8 X 2) / (12.8 X 2)
(7.2 X 2) / (15.9 X 2)
(8.7 X 2) / (19.2 X 2)
V/Ph/Hz
AIR FLOW
l/s / CFM
1560 / 3300
2030/ 4300
2670 / 5650
3160/ 6700
EXTERNAL STATIC PRESSURE
Pa (in.wg.)
147 (0.6)
147 (0.6)
147 (0.6)
206 (0.8)
SOUND POWER LEVEL @ 100 ESP
dBA
68
72
75
82
dBA
73
76
80
84
mm
25.4
25.4
25.4
25.4
W
800
1,160
1910
2,580
A
1.7
3.10
3.7
4.70
W
1100
1,500
2200
3,000
mm
m
2
0.07 / 0.80
0.04 / 0.46
0.51 / 5.49
0.61 / 6.55
3
3
4
4
pc
2
2
2
2
COLOUR
l/s / CFM
3884 / 8230
5664 / 12000
5710 / 12100
6090 / 12900
dBA
82
83
83
87
mm
1150 x 1638 x 2063
1028 x 2209 x 2113
1130 x 2209 x 2113
1048 x 2209 x 2670
mm
1345 x 1758 x 2321
1223 x 2372 x 2304
1325 x 2304 x 2372
1252 x 2304 x 2929
kg
445
580
610
780
W
560
870
790
780
A
2.5
3.8
3.6
3.4
W
360
550
510
590
cm
3
3253
1656
1774
3253
W
7140
4,460
5950
7,530
W
5640
4,350
5500
6,740
A
13.1
7.9
11.0
13.8
A
11.3
7.7
15.0
12.8
A
111
74
101.0
111
mm
m
2
0.12 / 1.28
0.10 / 1.10
1.24 / 13.35
1.33 / 14.34
2
3
3
3
COLOUR
0452213B90
0452213B120
0452213B150
0452213B180
FAN MOTOR
POLES
UNIT DIMENSION
HEIGHT X WIDTH X DEPTH
QUANTITY
CONDENSATE DRAIN SIZE
MATERIAL
TUBE
F
HIGH
HEIGHT X WIDTH X DEPTH
RATED RUNNING CURRENT
SOUND PRESSURE LEVEL
AIR QUALITY
INDEX OF PROTECTION (IP)
INDEX OF PROTECTION (IP)
RATED INPUT POWER
TYPE
FAN
COIL
MATERIAL
DIAMETER
DRIVE
FILTER
TYPE
PACKING DIMENSION
INSULATION GRADE
TYPE
UNIT WEIGHT
CASING
ROW
AIR FLOW
FACE AREA
NOMINAL COOLING CAPACITY
NOMINAL HEATING CAPACITY
FAN
TYPE
DRIVE
CONTROL
REFRIGERANT TYPE
TYPE
FIN
NOMINAL TOTAL INPUT POWER (COOLING)
NOMINAL TOTAL INPUT POWER (HEATING)
NOMINAL RUNNING CURRENT (COOLING)
NOMINAL RUNNING CURRENT (HEATING)
POWER SOURCE
EER
OPERATION
TYPE
OIL TYPE
MOTOR OUTPUT
COP
EVAPORATORCONDENSER
FAN MOTOR
INSULATION GRADE
SOUND POWER LEVEL @ Std ESP
OIL AMOUNT
COIL
TUBE
MATERIAL
DIAMETER
FIN
COMPRESSOR
RATED RUNNING CURRENT (HEATING)
MATERIAL
FACE AREA
REFRIGERANT CONTROL (EXPANSION DEVICE)
EXV
REFRIGERANT CHARGE
IP44
6
380 ~ 415 / 3 / 50
R410A
WIRED ROOFTOP PANEL
DUCTED
AIR DISCHARGE
RATED INPUT POWER
9.53 / 3/8
INDUCTION
S.I.G.C.
LIGHT GREY
RATED INPUT POWER (HEATING)
RATED RUNNING CURRENT (COOLING)
RATED INPUT POWER (COOLING)
RATED RUNNING CURRENT
MOTOR OUTPUT
POLES
9.53 / 3/8
CASING
DRAWING NUMBER
ALUMINIUM
LIGHT GREY
ROW
MODEL
M5RT90BR
M5RT120BR
M5RT150BR
M5RT180BR
LOCKED ROTOR AMP.
POE
4
PROPELLER
ALUMINIUM
CENTRIFUGAL FORWARD CURVE
IP 22
B
S.I.G.C.
WASHABLE SARANET
SCROLL
DRIVE
INDUCTION
BELT DRIVE
Engineering Data - Heat Pump (R410A)
ALL UNITS ARE BEING TESTED AND COMPLY TO ISO 5151 (NON-DUCTED UNIT) OR ISO 13253 (DUCTED UNIT).
HEATING
INDOOR: 20°C DB
OUTDOOR: 8°C DB / 6°C WB
COOLING
OUTDOOR: 35°C DB / 24°C WB
INDOOR: 27°C DB / 19°C WB
Page 33

31
Engineering Data - Heat Pump (R410A)
ALL UNITS ARE BEING TESTED AND COMPLY TO ISO 5151 (NON-DUCTED UNIT) OR ISO 13253 (DUCTED UNIT).
HEATING
INDOOR: 20°C DB
OUTDOOR: 8°C DB / 6°C WB
COOLING
OUTDOOR: 35°C DB / 24°C WB
INDOOR: 27°C DB / 19°C WB
Btu/h
228000
247700
W
66820
72600
Btu/h
210500
237500
W
61690
69610
W
19650
21610
W
18580
21420
A
33.8
39.0
A
32.3
40.2
W/W
3.40
3.36
W/W
3.32
3.25
kg
(10.4 x 2) / (22.9 x 2)
11.6 x 2 / 25.6 x 2
V/Ph/Hz
AIR FLOW l/s / CFM
3445 / 7300
3917 / 8300
EXTERNAL STATIC PRESSURE Pa (in.wg.)
196 (0.8)
206 (0.8)
SOUND POWER LEVEL @ 100 ESP dBA
84
87
dBA
84
90
mm
25.4
25.4
W
3130
4220
A
5.8
7.8
W
3700
5500
mm
m
2
0.76 / 8.19
0.91 / 9.82
4
4
pc
2
2
COLOUR
l/s / CFM
9534 / 20200
10006 / 21200
dBA
90
90
mm
1302 x 2209 x 2670
1454 x 2209 x 2670
mm
1506 x 2304 x 2929
1674 x 2304 x 2929
kg
830
970
W
1700
1540
A
2.9
2.8
W
1200
1200
cm
3
3253
3253
W
8130
9180
W
7150
8300
A
15
16.4
A
14.1
15.6
A
118
118
mm
m
2
1.75 / 18.82
2.00 / 21.51
3
3
COLOUR
0452213B210
0452213B250
SCROLL
POE
AIR QUALITY
TYPE
COMPRESSOR
TYPE
OIL TYPE
RATED RUNNING CURRENT
MOTOR OUTPUT
FAN MOTOR
INDUCTION
DIAMETER
FIN
MATERIAL
IP 22
INSULATION GRADE B
NOMINAL RUNNING CURRENT (COOLING)
NOMINAL RUNNING CURRENT (HEATING)
EER
COP
REFRIGERANT CONTROL (EXPANSION DEVICE)
EVAPORATOR
CONTROL
TYPE
INDEX OF PROTECTION (IP)
RATED INPUT POWER
M5RT210BR
M5RT250BR
NOMINAL HEATING CAPACITY
NOMINAL TOTAL INPUT POWER (HEATING)
NOMINAL COOLING CAPACITY
MODEL
NOMINAL TOTAL INPUT POWER (COOLING)
EXV
REFRIGERANT CHARGE
POWER SOURCE 380 ~ 415 / 3 / 50
REFRIGERANT TYPE R410A
AIR DISCHARGE DUCTED
OPERATION WIRED ROOFTOP PANEL
HIGH
SOUND POWER LEVEL @ Std ESP
CONDENSATE DRAIN SIZE
FAN
TYPE CENTRIFUGAL FORWARD CURVE
DRIVE BELT DRIVE
POLES 4
COIL
TUBE
MATERIAL S.I.G.C.
9.53 / 3/8
ALUMINIUM
FACE AREA
ROW
FILTER
TYPE WASHABLE SARANET
QUANTITY
CASING LIGHT GREY
CONDENSER
AIR FLOW
SOUND PRESSURE LEVEL
UNIT DIMENSION HEIGHT X WIDTH X DEPTH
PACKING DIMENSION HEIGHT X WIDTH X DEPTH
UNIT WEIGHT
FAN
RATED INPUT POWER
PROPELLER
DRIVE DRIVE
FAN MOTOR
TYPE INDUCTION
INDEX OF PROTECTION (IP) IP44
INSULATION GRADE F
RATED RUNNING CURRENT
MOTOR OUTPUT
POLES 6
FIN
MATERIAL ALUMINIUM
FACE AREA
OIL AMOUNT
RATED INPUT POWER (COOLING)
RATED INPUT POWER (HEATING)
RATED RUNNING CURRENT (COOLING)
RATED RUNNING CURRENT (HEATING)
LOCKED ROTOR AMP.
CASING
DRAWING NUMBER
ROW
LIGHT GREY
COIL
TUBE
MATERIAL S.I.G.C.
DIAMETER 9.53 / 3/8
Page 34

32
Safety Devices- Heatpump (R410a)
OPEN kPa/psi
CLOSE kPa/psi
OPEN kPa/psi
CLOSE kPa/psi
DISCHARGE THERMOSTAT SETTING °C / °F
M5RT90BR M5RT120BR
YES
MODEL
SAFETY
DEVICE
PHASE SEQUENCER
HIGH PRESSURE SWITCH
LOW PRESSURE SWITCH
TYPE
TYPE
120 / 248
NC, Auto Reset
NC, Auto Reset
124 / 18
193 / 28
4137 / 600
3309 / 480
OPEN kPa/psi
CLOSE kPa/psi
OPEN kPa/psi
CLOSE kPa/psi
DISCHARGE THERMOSTAT SETTING
°C / °F
TYPE
TYPE
120 / 248
NC, Auto Reset
NC, Auto Reset
124 / 18
193 / 28
4137 / 600
3309 / 480
M5RT150BR M5RT180BR
YES
MODEL
SAFETY
DEVICE
PHASE SEQUENCER
HIGH PRESSURE SWITCH
LOW PRESSURE SWITCH
OPEN kPa/psi
CLOSE kPa/psi
OPEN kPa/psi
CLOSE kPa/psi
DISCHARGE THERMOSTAT SETTING
°C / °F
TYPE
TYPE
120 / 248
NC, Auto Reset
NC, Auto Reset
124 / 18
193 / 28
4137 / 600
3309 / 480
M5RT210BR M5RT250BR
YES
MODEL
SAFETY
DEVICE
PHASE SEQUENCER
HIGH PRESSURE SWITCH
LOW PRESSURE SWITCH
0552213B
Page 35

33
ENGINEERING DATA - ECONOMIZER
POWER SOURCE
VDC
NOMINAL AIR FLOW
L/S / CFM
1560 3300 2030 4300 2670 5650 3160 6700
HEIGHT MM
WIDTH MM
DEPTH MM
NET MASS KG
GROSS MASS KG
BRAND
MODEL
V/PH/HZ
VDC
CONTROL SIGNAL INPUT VDC
DEGREE OF PROTECTION (IP)
BRAND
MODEL
V/PH/HZ
VDC
CONTROL SIGNAL INPUT VDC
DEGREE OF PROTECTION (IP)
SHAPE
MATERIAL
NO. OF BLADES
BLADE ARRANGEMENT
CONTINUOUS OPERATING TEMPERATURE
C
OPENING DIMENSION ( H X W )
MM
SHAPE
MATERIAL
NO. OF BLADES
BLADE ARRANGEMENT
CONTINUOUS OPERATING TEMPERATURE
C
OPENING DIMENSION ( H X W )
MM
TYPE
QUANTITY
DIMENSION ( H X W )
MM
24
FILTRATION
DRAWING NUMBER
BELIMO
24
2 -10
1440
1144
LF24-SR
DAMPER OA
ACTUATOR RA
LF24-SR
5
OPPOSED
RECTANGULAR
534
54
BELIMO
24
SARANET
1
60
712.2 X 510.0
ACTUATOR OA
2 -10
54
DAMPER RA
ALUMINIUM
M5RT120BR-FEAA
515.0 X 750.0
ALUMINIUM
7
OPPOSED
60
RECTANGULAR
511.6 X 710.0
24
534
1430
1124
BELIMO
MODEL
CORRESPONDING ROOF TOP UNIT
EC90B-AA
M5RT90BR-FEAA
EC120B-AA
LF24-SR
24
2 -10
54
RECTANGULAR
LF24-SR
24
2 -10
54
BELIMO
ALUMINIUM
6
OPPOSED
60
562.2 X 610.0
RECTANGULAR
ALUMINIUM
6
OPPOSED
60
562.2 X 610.0
SARANET
1
560.0 X 658.0
53
165
EC150B-AA
M5RT150BR-FEAA
24
534
1430
1124
EC180B-AA
M5RT180BR-FEAA
BELIMO
LF24-SR
24
2 -10
54
BELIMO
LF24-SR
24
2 -10
54
RECTANGULAR
ALUMINIUM
6
OPPOSED
60
60
562.2 X 610.0
RECTANGULAR
ALUMINIUM
OPPOSED
24
534
1458
1564
24
2 -10
BELIMO
LF24-SR
141
54
BELIMO
LF24-SR
560.0 X 658.0
562.2 X 610.0
SARANET
1
6
24
2 -10
54
RECTANGULAR
ALUMINIUM
6
ALUMINIUM
7
OPPOSED
60
OPPOSED
60
706.2 X 610.0
RECTANGULAR
PACKAGING DIMENSION
51
152
42
140
43
POWER SOURCE
POWER SOURCE
606.8 X 710.0
SARANET
1
604.0 X 750.0
ALL UNITS ARE BEING TESTED AND COMPLY TO ISO 5151 (NON-DUCTED UNIT) OR ISO 13253 (DUCTED UNIT).
HEATING
INDOOR: 20°C DB
OUTDOOR: 8°C DB / 6°C WB
COOLING
OUTDOOR: 35°C DB / 24°C WB
INDOOR: 27°C DB / 19°C WB
0452212CP90
045221CP120
045221CP150 045221CP180
Page 36

34
ENGINEERING DATA - ECONOMIZER
045221CP250
24 / 1 / 50/60
24 / 1 / 50/60
ALL UNITS ARE BEING TESTED AND COMPLY TO ISO 5151 (NON-DUCTED UNIT) OR ISO 13253 (DUCTED UNIT).
HEATING
INDOOR: 20°C DB
OUTDOOR: 8°C DB / 6°C WB
COOLING
OUTDOOR: 35°C DB / 24°C WB
INDOOR: 27°C DB / 19°C WB
POWER SOURCE
VDC
NOMINAL AIR FLOW
L/S / CFM
3445 7300 3917 8300
HEIGHT MM
WIDTH MM
DEPTH MM
NET MASS
KG/LB
GROSS MASS
KG/LB
BRAND
MODEL
V/PH/HZ
VDC
CONTROL SIGNAL INPUT VDC
DEGREE OF PROTECTION (IP)
BRAND
MODEL
V/PH/HZ
VDC
CONTROL SIGNAL INPUT VDC
DEGREE OF PROTECTION (IP)
SHAPE
MATERIAL
NO. OF BLADES
BLADE ARRANGEMENT
CONTINUOUS OPERATING TEMPERATURE
C
OPENING DIMENSION ( H X W )
MM
SHAPE
MATERIAL
NO. OF BLADES
BLADE ARRANGEMENT
CONTINUOUS OPERATING TEMPERATURE
C
OPENING DIMENSION ( H X W )
MM
TYPE
QUANTITY
DIMENSION ( H X W )
MM
MODEL EC210B-AA EC250B-AA
CORRESPONDING ROOF TOP UNIT M5RT210BR-FEAA M5RT250BR-FEAA
POWER SOURCE
1458
1564 1564
24 24
PACKAGING DIMENSION
534 534
1458
24 24
2 -10 2 -10
ACTUATOR RA
BELIMO BELIMO
LF24-SR LF24-SR
54 4
ACTUATOR OA
BELIMO BELIMO
LF24-SR
2 -10 2 -10
LF24-SR
POWER SOURCE
24 24
ALUMINIUM
6 6
54 54
DAMPER RA
RECTANGULAR RECTANGULAR
ALUMINIUM
60 60
OPPOSED OPPOSED
706.2 X 610.0 1012.4 X 610.0
DAMPER OA
RECTANGULAR RECTANGULAR
ALUMINIUM
OPPOSED OPPOSED
10
604.0 X 750.0 690.0 X 1088.0
606.8 X 710.0 683.8 X 1010.0
54
166
69
181
1
ALUMINIUM
7
60 60
FILTRATION
DRAWING NUMBER
SARANET SARANET
1
045221CP210
Page 37

35
Performance Data
1st Step
Interpolation of Indoor DB
Find TC, SC, PI for
(a) Indoor: 25°C DB, 16°C WB
Outdoor: 35°C DB
(b) Indoor: 25°C DB, 19°C WB
Outdoor: 35°C DB
(c) Indoor: 25°C DB, 16°C WB
Outdoor: 40°C DB
(d) Indoor: 25°C DB, 19°C WB
Outdoor: 40°C DB
2nd Step
Interpolation of Indoor WB
Find TC, SC, PI for
(a) Indoor: 25°C DB, 17°C WB
Outdoor: 35°C DB
(b) Indoor: 25°C DB, 17°C WB
Outdoor: 40°C DB
3rd Step
Interpolation of Outdoor DB
Find TC, SC, PI for
(a) Indoor: 25°C DB, 17°C WB
Outdoor: 37°C DB
Interpolation method can be used to get the total capacity, TC and sensible capacity, SC and power input,
PI at those temperatures which are not stated out in the table. Extrapolation method are not allowed to be
used to get the TC, SC and PI.
Example:
Model: M5RT150BR
Indoor Condition: 25°C DB, 17°C WB
Outdoor Condition: 37°C DB
Fan Speed: High (5650CFM)
Solution:
Overall
Based on the Performance Table
1. Refer to the Indoor DB column,
- 25°C is located between 24°C and 27°C for 16˚CWB (Thus, Interpolation need to be applied)
- 25°C is located between 24°C and 27°C for 19˚CWB (Thus, Interpolation need to be applied)
2. Refer to the Indoor WB column,
- 17°C is located between 16°CWB and 19°CWB for 25°CDB
(Thus, Interpolation need to be applied)
3. Refer to the Outdoor DB column,
- 37°C is located between 35°C and 40°C. (Thus, Interpolation need to be applied)
Please follow the steps below in order to get the required capacity.
Calculation Steps
Page 38

36
Details:
1
st
Step:
Indoor WB
˚C
Indoor DB
˚C
Outdoor DB, ˚C
35
TC (kW)
16
25
.......................
x
1
y
1
24 41.41
43.48
35.59
41.63
12.81
12.94
27
Total capacity, TC
⇒
⇒
Interpolation Method:
27º C – 24º C
=
43.48kW – 41.41kW
27º C – 25º C
x1 = 42.10kW
Sensible capacity, SHC
Interpolation Method:
⇒
27º C – 24º C
27º C – 25º C
=
41.63kW – 35.59kW
⇒ y
1
= 37.60kW
To obtain the Total capacity and Sensible capacity and Power input for
(a) Indoor Condition: 25˚C DB, 16˚C WB
Outdoor Condition: 35°C DB
43.48kW – x
1
kW
41.63kW – y
1
kW
Power Input, PI
Interpolation Method:
⇒
27º C – 24º C
27º C – 25º C
=
12.94kW – 12.81kW
⇒ z
1
= 12.85kW
12.94kW – z
1
kW
SHC (kW)
z
1
PI (kW)
Page 39

37
Indoor WB
˚C
Indoor DB
˚C
Outdoor DB, ˚C
40
TC (kW)
16
25
.......................
2
x
2
y
2
24 38.59
40.74
33.52
39.20
13.91
14.06
27
Total capacity, TC
⇒
⇒
Interpolation Method:
27º C – 24º C
=
40.74kW – 38.59kW
27º C – 25º C
x2 = 39.31kW
Sensible capacity, SHC
Interpolation Method:
⇒
27º C – 24º C
27º C – 25º C
=
39.20kW – 33.52kW
⇒ y
2
= 35.41kW
(b) Indoor Condition: 25˚C DB, 16˚C WB
Outdoor Condition: 40°C DB
(c) Indoor Condition: 25˚C DB, 19˚C WB
Outdoor Condition: 35°C DB
40.74kW – x
2
kW
39.20kW – y
2
kW
Power Input, PI
Interpolation Method:
⇒
27º C – 24º C
27º C – 25º C
=
14.06kW – 13.91kW
⇒ z
2
= 13.96kW
⇒ x
3
= 44.55kW
⇒ y3 = 31.63kW
⇒ z3 = 13.03kW
(d) Indoor Condition: 25˚C DB, 19˚C WB
Outdoor Condition: 40°C DB
⇒ x4 = 41.46kW
⇒ y4 = 29.99kW
⇒ z4 = 14.13kW
14.06kW – z
2
kW
SHC (kW)
z
2
PI (kW)
* Repeat process (a) and (b) in 1st step for the condition below:
Page 40

38
2nd Step:
Indoor WB
˚C
Indoor DB
˚C
Outdoor DB,˚C
35
TC (kW)
....
....
........................
42.10
17 25
x
5
y
5
19
16
44.55
37.60
31.63
z
5
12.85
13.03
Total capacity, TC
Sensible capacity, SHC
Interpolation Method:
⇒
19ºC – 16ºC
=
44.55kW – 42.10kW
44.55kW – x
5
kW
19ºC – 17ºC
⇒ x
5
= 42.92kW
To obtain the Total capacity, Sensible capacity and Power Input for
(a) Indoor Condition: 25°C DB, 17°C WB
Outdoor Condition: 35°C DB
SHC (kW) PI (kW)
Interpolation Method:
⇒
19ºC – 16ºC
=
31.63kW – 37.60kW
31.63kW – y
5
kW
19ºC – 17ºC
⇒ y
5
= 35.61kW
Power Input, PI
Interpolation Method:
⇒
19ºC – 16ºC
=
13.03kW – 12.85kW
13.03kW – z
5
kW
19ºC – 17ºC
⇒ z
5
= 12.91kW
Page 41

39
Indoor WB
˚C
Indoor DB
˚C
Outdoor DB,˚C
40
TC (kW)
....
....
........................
39.31
17 25
x
6
y
6
19
16
41.46
35.41
29.99
z
6
13.96
14.13
Total capacity, TC
Sensible capacity, SHC
Interpolation Method:
⇒
19ºC – 16ºC
=
41.46kW – 39.31kW
41.46kW – x
6
kW
19ºC – 17ºC
⇒ x
6
= 40.03kW
(b) Indoor Condition: 25°C DB, 17°C WB
Outdoor Condition: 40°C DB
SHC (kW) PI (kW)
Interpolation Method:
⇒
19ºC – 16ºC
=
29.99kW – 35.41kW
29.99kW – y
6
kW
19ºC – 17ºC
⇒ y
6
= 33.60kW
Power Input, PI
Interpolation Method:
⇒
19ºC – 16ºC
=
14.13kW – 13.96kW
14.13kW – z
6
kW
19ºC – 17ºC
⇒ z
6
= 14.02kW
Page 42

40
3rd Step:
To obtain the Total capacity and Sensible capacity for
(a) Indoor Condition: 25°C DB, 17°C WB
Outdoor Condition: 37°C DB
Indoor WB˚CIndoor DB
˚C
Outdoor DB, ˚C
35
TC
(kW)
SHC
(kW)
25
......
42.92 35.61
PI
(kW)
37 40
TC
(kW)
SHC
(kW)PI(kW)
12.91 40.03 33.60 14.02x y z
Total capacity, TC
Interpolation Method:
⇒
40º C – 35º C
=
40.03kW – 42.92kW
40.03kW – xkW
40º C – 37ºC
⇒ x = 41.76kW
Sensible capacity, SHC
Interpolation Method:
⇒
40º C – 35º C
=
33.60kW – 35.61kW
40º C – 37º C
⇒ y
= 34.81kW
33.60kW – ykW
Power Input, PI
Interpolation Method:
⇒
40º C – 35º C
=
14.02kW – 12.91kW
40º C – 37º C
⇒ z = 13.35kW
14.02kW – zkW
17
TC
(kW)
SHC
(kW)PI(kW)
Page 43

41
0 5 10 15 20 25
Cooling
1.00 0.97 0.93 0.90 0.86 0.80
Heating
1.00 0.97 0.93 0.90 0.87 0.83
cfm m
3
/s
0%
Outdoor
Air
Damper
Opening
(Pa)
Outdoor
Air
Damper
Opening
(Pa)
Outdoor
Air
Damper
Opening
(Pa)
Outdoor
Air
Damper
Opening
(Pa)
Outdoor
Air
Damper
Opening
(Pa)
Outdoor
Air
Damper
Opening
(Pa)
5%
10%
15%
20%
25%
Maximum
Pressure
Drop
(Pa)
Pressure Drop
(Pa)
EC90B-AA
3300 1.56 0 3 5 10 15 20 0
EC120B-AA
4300 2.03 0 5 10
10
13
13
13
30 40 0
EC150B-AA
5650 2.67 0 7 21 38 68 0
EC180B-AA
6700 3.16 0 15 30 50 70 0
EC210B-AA
7300 3.45 0 20 37 52 65 0
EC250B-AA
8300
3.92 0 5 20 42 15
Rooftop
Model
Economizer
Kit Model
Operation
Mode
Fresh Air Opening (%)
5RT-BR
Series
EC Series
Rooftop
Model
Economizer
Kit
Model
Fresh Air Mode
Standard Airflow Rate
Table 1: Correction factor for unit's performance.
Performance Adjustment
Performance of the unit will derate when it operates with fresh air mode and this condition depends on user’s selection.
Before installation, it is recommended to check the correction factor table (table 1) below in order to do a correct design
selection.
Noted that it has different factor used for different selection of fresh air opening, in both cool mode and heat mode.
Performance of the unit will derate when it operates with fresh air mode and this conditiondepends on user’s selection.
Pressure Drop Table
Airflow resistance refers to pressure drop caused by the economizer kit. Before installation, it is recommended
to check the pressure drop in table 2 below in order to do a correct design selection.
Table 2: Pressure drop in economizer kit.
M5RT90BR
M5RT120BR
M5RT150BR
M5RT180BR
M5RT210BR
M5RT250BR
Economizer Mode
Fresh Air Mode or Economizer Mode
Down Return (Vertical) Application
Side Return (Horizontal) Application
Maximum Pressure Drop in Economizer Kit
20
53 58
60 65
58 61
32
01052213CP
01052213CP
cfm m
3
/s
0%
Outdoor
Air
Damper
Opening
(Pa)
Outdoor
Air
Damper
Opening
(Pa)
Outdoor
Air
Damper
Opening
(Pa)
Outdoor
Air
Damper
Opening
(Pa)
Outdoor
Air
Damper
Opening
(Pa)
Outdoor
Air
Damper
Opening
(Pa)
5%
10%
15%
20%
25%
Maximum
Pressure
Drop
(Pa)
Pressure Drop
(Pa)
ECONO250
3300 1.56 0 3 5 10 15 20 0
ECONO350
4300 2.03 0 5 10
10
13
13
13
30 40 0
ECONO450
5650 2.67 0 7 21 38 68 0
ECONO550
6700 3.16 0 15 30 50 70 0
ECONO6000
7300 3.45 0 20 37 52 65 0
ECONO700
8300
3.92 0 5 20 42 15
Rooftop
Model
Economizer
Kit
Model
Fresh Air Mode
Standard Airflow Rate
M5RT90BR
M5RT120BR
M5RT150BR
M5RT180BR
M5RT210BR
M5RT250BR
Economizer Mode
Fresh Air Mode or Economizer Mode
Down Return (Vertical) Application
Side Return (Horizontal) Application
Maximum Pressure Drop in Economizer Kit
20
53 58
60 65
58 61
32
For example:
Indoor Condition: 27°C DB 19°C WB
Outdoor Ambient: 35°C DB
Model: M5RT90BR
Airflow: 3300 CFM
Total Cooling Capacity: 27.34 KW
Sensible Cooling Capacity: 21.87 KW
For fresh air opening of 25%, the correction factor is 0.80.
Thus, the adjusted capacity will be:
Total Cooling Capacity = 0.80 X 27.34 = 21.87 KW
Sensible Cooling Capacity = 0.8 X 21.87 = 17.50 KW
For example:
Model: M5RT90BR (Horizontal Throw)
Economizer kit operating mode: fresh air mode at 25%, the corresponding pressure drop is 15 Pa.
As a result, the External Static Pressure (ESP) will be reduced by 15 Pa.
Page 44

42
Table 3: Technical specifications for air filter in economizer rain hood.
Pressure drop in economizer kit from table 2 refers to initial resistance. An air filter that is installed in the rain
hood of economizer will expose to outdoor environment and easily becomes dirty. Regular service is required
for this filter (recommended at least once every two weeks). The final resistance shall not exceed the
recommended value in table 3 below.
The resistance values mentioned in table 3 have been incorporated into pressure drop values in table 2.
Table 3 provides guidelines only on the service of filter. Thus, system sizing does not require to include these
values into consideration.
EC
90B-AA
1
1
1
1
1
1
80
EC120B-AA
658 x 560 x 4
658 x 560 x 4
13 70
EC150B-AA 27 70
EC180B-AA
Saranet Filter
34 110
EC210B-AA 30 105
EC250B-AA
Washable
Saranet Filter
Washable
Saranet Filter
Washable
Saranet Filter
Washable
Saranet Filter
Washable
Saranet Filter
Washable
16 110
* Initial
Resistance (Pa)
Recommended
Final Resistance
Economizer Kit
Model
Recommended
Type
Quantity (L x W x t)
Note: * Initial resistance is rated based on 85% of outdoor air opening.
Dimension
750 x 515 x 4
750 x 604 x 4
750 x 604 x 4
1088 x 690 x 4
15
01052213CP
Page 45

43
Model: M5RT90BR
TC SHC PI TC SHC PI TC SHC PI TC SHC PI TC SHC PI TC SHC PI
21°C 26.92 17.79 6.55 25.90 17.33 6.93 25.31 17.19 7.46 24.12 16.64 7.91 22.42 15.75 8.60 20.86 15.04 9.52
24°C 27.02 20.73 6.56 26.00 20.27 6.94 25.41 20.17 7.47 24.23 19.64 7.92 22.60 18.55 8.61 21.16 17.59 9.54
27°C 27.60 25.41 6.58 26.65 24.72 6.97 26.15 24.48 7.51 25.07 23.64 7.97 23.52 22.40 8.67 22.18 21.23 9.62
30°C 28.31 28.31 6.65 27.43 27.43 7.05 26.49 26.49 7.60 25.49 25.49 8.08 23.92 23.92 8.78 22.61 22.61 9.72
24°C 29.44 16.79 6.69 28.30 16.35 7.08 27.67 16.22 7.61 26.39 15.74 8.07 24.56 14.94 8.76 22.90 14.29 9.68
27°C 29.52 20.66 6.70 28.39 20.20 7.09 27.75 20.12 7.62 26.48 19.60 8.08 24.65 18.68 8.76 23.00 18.02 9.69
30°C 29.67 24.23 6.71 28.66 23.57 7.10 28.13 23.34 7.64 26.94 22.58 8.11 25.20 21.36 8.80 23.69 20.39 9.74
33°C 30.23 30.23 6.75 28.93 28.93 7.15 29.12 29.12 7.71 28.05 28.05 8.18 25.58 25.58 8.89 24.48 24.48 9.84
27°C 31.94 16.47 6.85 30.87 16.13 7.25 30.19 16.01 7.79 28.81 15.54 8.25 26.84 14.76 8.93 25.10 14.19 9.86
30°C 32.17 20.48 6.86 30.94 20.03 7.25 30.25 19.95 7.79 28.89 19.46 8.25 26.91 18.57 8.94 25.16 17.95 9.86
33°C 32.25 24.1
9 6.86 31.02 23.73 7.26 30.32 23.72 7.80 28.97 23.22 8.26 27.10 21.99 8.96 25.53 21.02 9.89
36°C 32.40 26.87 6.89 31.28 26.17 7.29 30.91 26.12 7.84 29.66 25.35 8.31 27.94 24.19 9.02 26.43 23.19 9.96
21°C 27.89 18.62 6.60 26.78 18.12 6.98 26.14 17.97 7.51 24.90 17.42 7.97 23.11 16.51 8.65 21.47 15.80 9.57
24°C 28.06 22.96 6.62 27.05 22.29 7.00 26.49 22.00 7.54 25.32 21.22 7.99 23.59 19.99 8.68 22.07 18.98 9.61
27°C 29.12 26.80 6.67 28.17 26.05 7.07 27.69 25.74 7.61 26.58 24.83 8.08 24.90 23.38 8.78 23.45 22.13 9.72
30°C 30.19 30.19 6.77 29.19 29.19 7.17 28.15 28.15 7.72 27.06 27.06 8.20 25.10 25.10 8.90 23.69 23.69 9.84
24°C 30.42 18.53 6.75 29.22 18.04 7.14 28.53 17.90 7.67 27.19 17.36 8.13 25.27 16.47 8.81 23.53 15.79 9.73
27°C 30.57 22.98 6.76 29.37 22.49 7.15 28.69 22.42 7.68 27.34 21.87 8.14 25.50 20.72 8.83 23.88 19.68 9.76
30°C 31.20 26.32 6.79 30.07 25.60 7.19 29.48 25.35 7.74 28.23 24.56 8.20 26.44 23.20 8.90 24.97 22.02 9.84
33°C 31.86 31.86 6.87 30.85 30.85 7.28 29.77 29.77 7.84 28.63 28.63 8.32 26.87 26.87 9.03 25.43 25.43 9.97
27°C 33.11 18.28 6.91 31.80 17.84 7.31 31.07 17.74 7.85 29.63 17.22 8.31 27.56 16.35 9.00 25.73 15.70 9.91
30°C 33.22 22.84 6.92 31.9
2 22.36 7.32 31.19 22.30 7.86 29.75 21.77 8.32 27.69 20.80 9.01 25.88 20.15 9.92
33°C 33.46 27.07 6.94 32.26 26.33 7.34 31.64 26.07 7.89 30.30 25.24 8.36 28.32 23.90 9.06 26.66 22.87 9.99
36°C 34.08 29.22 6.99 32.88 28.63 7.39 32.05 28.12 7.96 30.87 27.22 8.44 28.71 25.44 9.16 26.93 23.98 10.11
21°C 28.55 20.03 6.64 27.41 19.53 7.02 26.74 19.37 7.55 25.45 18.80 8.01 23.61 17.83 8.69 21.92 17.08 9.60
24°C 29.05 24.35 6.67 27.95 23.62 7.06 27.35 23.32 7.59 26.12 22.50 8.05 24.34 21.22 8.74 22.83 20.03 9.67
27°C 30.46 28.03 6.75 29.39 27.18 7.14 28.90 26.86 7.69 27.71 25.88 8.16 25.94 24.35 8.86 24.39 23.02 9.80
30°C 31.28 31.28 6.85 30.22 30.22 7.26 29.11 29.11 7.82 27.95 27.95 8.29 26.31 26.31 8.99 24.55 24.55 9.93
24°C 31.12 19.98 6.79 29.87 19.47 7.18 29.13 19.32 7.72 27.73 18.76 8.17 25.77 17.83 8.85 24.00 17.13 9.77
27°C 31.33 25.03 6.81 30.11 24.43 7.20 29.49 24.14 7.74 28.17 23.28 8.20 26.26 21.96 8.89 24.60 20.89 9.81
30°C 32.28 27.64 6.86 31.18 26.95 7.26 30.65 26.63 7.82 29.43 25.69 8.29 27.58 24.20 8.99 26.01 22.94 9.93
33°C 33.03 33.03 6.97 31.95 31.95 7.38 31.12 31.12 7.94 29.92 29.92 8.42 28.06 28.06 9.13 26.23 26.23 10.07
27°C 33.81 19.81 6.96 32.47 19.31 7.3
5 31.68 19.18 7.90 30.17 18.63 8.35 28.08 17.73 9.04 26.22 17.07 9.95
30°C 34.00 24.92 6.97 32.65 24.41 7.37 31.86 24.37 7.91 30.36 23.82 8.37 28.30 22.72 9.05 26.55 21.64 9.98
33°C 34.64 28.87 7.01 33.36 28.08 7.41 32.68 27.82 7.96 31.30 26.96 8.43 29.24 25.53 9.13 27.65 24.26 10.07
36°C 35.21 30.28 7.08 33.71 29.13 7.50 33.22 28.86 8.08 31.96 27.90 8.56 29.70 26.06 9.27 28.12 24.80 10.22
Model: M5RT120BR
TC SHC PI TC SHC PI TC SHC PI TC SHC PI TC SHC PI TC SHC PI
21°C 35.03 23.44 8.48 33.71 22.84 8.97 32.94 22.65 9.66 31.40 21.92 10.25 29.18 20.75 11.13 27.15 19.82 12.33
24°C 35.17 27.32 8.49 33.84 26.70 8.98 33.07 26.58 9.67 31.54 25.88 10.26 29.41 24.44 11.15 27.53 23.17 12.35
27°C 35.91 33.48 8.52 34.68 32.58 9.03 34.04 32.25 9.72 32.62 31.14 10.33 30.61 29.52 11.23 28.86 27.97 12.45
30°C 36.85 36.85 8.62 35.70 35.70 9.13 34.47 34.47 9.84 33.17 33.17 10.46 31.13 31.13 11.37 29.42 29.42 12.59
24°C 38.31 22.12 8.67 36.83 21.54 9.17 36.02 21.38 9.86 34.34 20.74 10.45 31.97 19.68 11.34 29.80 18.83 12.53
27°C 38.41 27.23 8.67 36.95 26.62 9.17 36.12 26.51 9.87 34.46 25.83 10.46 32.08 24.62 11.35 29.93 23.75 12.54
30°C 38.61 31.92 8.68 37.30 31.06 9.19 36.60 30.7
5 9.90 35.06 29.75 10.50 32.80 28.14 11.40 30.84 26.87 12.61
33°C 39.34 39.34 8.74 37.65 37.65 9.26 37.89 37.89 9.98 36.50 36.50 10.60 33.28 33.28 11.51 31.86 31.86 12.74
27°C 41.56 21.70 8.87 40.17 21.25 9.38 39.29 21.10 10.08 37.49 20.48 10.68 34.93 19.45 11.57 32.66 18.70 12.76
30°C 41.87 26.99 8.88 40.27 26.39 9.39 39.36 26.29 10.09 37.59 25.64 10.69 35.02 24.47 11.58 32.75 23.65 12.77
33°C 41.97 31.88 8.88 40.37 31.27 9.39 39.46 31.25 10.10 37.71 30.59 10.69 35.27 28.97 11.60 33.22 27.70 12.81
36°C 42.16 35.40 8.92 40.71 34.49 9.44 40.22 34.41 10.16 38.60 33.40 10.77 36.36 31.87 11.68 34.39 30.55 12.90
21°C 36.29 24.53 8.55 34.85 23.88 9.04 34.02 23.68 9.73 32.40 22.96 10.32 30.07 21.76 11.20 27.95 20.82 12.39
24°C 36.52 30.25 8.57 35.20 29.37 9.06 34.48 28.99 9.76 32.95 27.97 10.35 30.70 26.34 11.24 28.72 25.01 12.44
27°C 37.90 35.31 8.63 36.66 34.33 9.15 36.04 33.91 9.85 34.59 32.72 10.46 32.41 30.81 11.37 30.52 29.16 12.58
30°C 39.29 39.29 8.76 37.99 37.99 9.28 36.64 36.64 10.00 35.22 35.22 10.61 32.66 32.66 11.52 30.84 30.84 12.74
24°C 39.59 24.42 8.74 38.02 23.77 9.24 37.13 23.58 9.94 35.38 22.87 10.53 32.88 21.70 11.41 30.63 20.80 12.60
27°C 39.78 30.28 8.75 38.22 29.63 9.26 37.33 29.54 9.95 35.5
8 28.82 10.54 33.19 27.31 11.43 31.08 25.94 12.63
30°C 40.60 34.68 8.80 39.13 33.73 9.31 38.36 33.40 10.02 36.74 32.36 10.62 34.41 30.57 11.52 32.50 29.01 12.74
33°C 41.47 41.47 8.89 40.14 40.14 9.42 38.74 38.74 10.15 37.25 37.25 10.77 34.97 34.97 11.69 33.09 33.09 12.91
27°C 43.08 24.09 8.95 41.39 23.51 9.46 40.44 23.37 10.17 38.56 22.69 10.76 35.87 21.54 11.65 33.48 20.68 12.84
30°C 43.24 30.09 8.96 41.54 29.46 9.47 40.59 29.39 10.18 38.72 28.69 10.77 36.04 27.41 11.66 33.68 26.54 12.85
33°C 43.54 35.67 8.98 41.98 34.70 9.50 41.17 34.36 10.22 39.43 33.26 10.82 36.85 31.49 11.73 34.69 30.14 12.93
36°C 44.35 38.50 9.05 42.79 37.73 9.57 41.71 37.05 10.30 40.17 35.87 10.93 37.36 33.52 11.86 35.05 31.60 13.09
21°C 37.15 26.40 8.60 35.67 25.73 9.10 34.80 25.53 9.78 33.12 24.77 10.37 30.72 23.49 11.25 28.53 22.51 12.44
24°C 37.81 32.08 8.64 36.37 31.12 9.14 35.60 30.73 9.83 33.99 29.65 10.42 31.67 27.96 11.31 29.72 26.40 12.52
27°C 39.64 36.93 8.74 38.25 35.82 9.25 37.61 35.39 9.96 36.06 34.11 10.57 33.75 32.08 11.47 31.75 30.33 12.69
30°C 40.70 40.70 8.88 39.33 39.33 9.40 37.89 37.89 10.12 36.38 36.38 10.73 34.24 34.24 11.64 31.95 31.95 12.86
24°C 40.50 26.32 8.80 38.87 25.65 9.30 37.91 25.46 9.99 36.08 24.72 10.5
8 33.54 23.49 11.46 31.23 22.57 12.65
27°C 40.77 32.98 8.81 39.19 32.20 9.32 38.38 31.80 10.02 36.66 30.68 10.62 34.18 28.93 11.51 32.02 27.53 12.71
30°C 42.01 36.43 8.88 40.57 35.51 9.40 39.89 35.08 10.12 38.30 33.85 10.73 35.89 31.89 11.64 33.85 30.22 12.86
33°C 42.99 42.99 9.02 41.59 41.59 9.55 40.50 40.50 10.28 38.94 38.94 10.90 36.52 36.52 11.82 34.14 34.14 13.04
27°C 44.00 26.10 9.01 42.25 25.45 9.52 41.23 25.28 10.23 39.27 24.55 10.82 36.55 23.36 11.70 34.12 22.49 12.89
30°C 44.25 32.84 9.03 42.49 32.17 9.54 41.47 32.11 10.24 39.52 31.38 10.84 36.83 29.94 11.72 34.56 28.51 12.92
33°C 45.08 38.04 9.07 43.41 37.00 9.60 42.53 36.65 10.31 40.73 35.53 10.92 38.05 33.64 11.82 35.98 31.96 13.04
36°C 45.82 39.90 9.17 43.87 38.39 9.72 43.23 38.03 10.46 41.59 36.77 11.08 38.65 34.34 12.00 36.60 32.68 13.24
5160
16°C
19°C
22°C
Outdoor temperature
46°CC°04C°53C°03C°52
EDB
19°C
3440
16°C
19°C
22°C
4300
16°C
19°C
22°C
AFR (CFM) EWB
40°C
2640
16°C
19°C
22°C
AFR (CFM) EWB EDB
C°03C°52C°91
Outdoor temperature
46°C
3960
16°C
19°C
22°C
3300
16°C
19°C
22°C
35°C
Remark:
AFR: Air flow rate (CFM)
EWB: Entering Wet Bulb Temp. (˚C)
EDB: Entering Dry Bulb Temp. (˚C)
Notes:
1. Ratings shown are gross capacities which do not include a deduction for indoor fan motor heat.
2. shows nominal capacities.
3. Direct interpolation is permissible. Do not extrapolate.
4. Unit is able to operate at ambient from 0˚C to 52˚C without pressure trip.
TC: Total Cooling Capacity (kW)
SHC: Sensible Heat Capacity (kW)
PI: Power Input
0652211B90
0652211B120
PerformanceTable
R410AModel
CoolingMode
Page 46

44
Model: M5RT150BR
Model: M5RT180BR
TC SHC PI TC SHC PI TC SHC PI TC SHC PI TC SHC PI TC SHC PI
21°C 44.03 29.82 10.49 42.37 29.06 11.10 41.41 28.82 11.95 39.46 27.89 12.68 36.67 26.40 13.77 34.12 25.22 15.25
24°C 44.20 34.76 10.50 42.53 33.98 11.11 41.57 33.82 11.96 39.64 32.93 12.69 36.97 31.10 13.79 34.60 29.48 15.28
27°C 45.14 42.60 10.55 43.59 41.45 11.17 42.78 41.04 12.03 41.00 39.63 12.77 38.48 37.56 13.89 36.28 35.59 15.40
30°C 46.31 46.31 10.66 44.87 44.87 11.30 43.33 43.33 12.18 41.69 41.69 12.94 39.13 39.13 14.06 36.98 36.98 15.58
24°C 48.15 28.14 10.72 46.29 27.41 11.34 45.27 27.20 12.20 43.16 26.39 12.93 40.18 25.04 14.03 37.46 23.96 15.50
27°C 48.28 34.64 10.73 46.44 33.87 11.35 45.40 33.74 12.21 43.31 32.87 12.94 40.32 31.33 14.04 37.62 30.22 15.52
30°C 48.53 40.62 10.74 46.88 39.53 11.37 46.01 39.13 12.24 44.06 37.85 12.99 41.23 35.81 14.10 38.76 34.19 15.60
33°C 49.45 49.45 10.81 47.32 47.32 11.45 47.63 47.63 12.35 45.88 45.88 13.11 41.83 41.83 14.24 40.04 40.04 15.76
27°C 52.24 27.61 10.98 50.49 27.04 11.61 49.38 26.84 12.48 47.12 26.05 13.21 43.90 24.75 14.31 41.05 23.79 15.79
30°C 52.63 34.34 10.98 50.61 33.58 11.61 49.48 33.46 12.49 47.25 32.63 13.22 44.01 31.13 14.32 41.16 30.10 15.80
33°C 52.76
40.56 10.99 50.74 39.79 11.62 49.60 39.76 12.49 47.39 38.93 13.23 44.33 36.87 14.35 41.76 35.24 15.84
36°C 52.99 45.05 11.03 51.17 43.88 11.68 50.55 43.79 12.57 48.52 42.50 13.32 45.70 40.55 14.44 43.22 38.87 15.96
21°C 45.61 31.21 10.58 43.80 30.39 11.19 42.77 30.13 12.04 40.72 29.21 12.76 37.80 27.69 13.86 35.12 26.50 15.33
24°C 45.90 38.49 10.60 44.24 37.37 11.21 43.33 36.89 12.07 41.41 35.59 12.81 38.59 33.52 13.91 36.09 31.82 15.39
27°C 47.64 44.93 10.68 46.08 43.68 11.32 45.29 43.15 12.19 43.48 41.63 12.94 40.74 39.20 14.06 38.36 37.10 15.57
30°C 49.38 49.38 10.84 47.75 47.75 11.48 46.05 46.05 12.37 44.27 44.27 13.13 41.05 41.05 14.26 38.76 38.76 15.76
24°C 49.76 31.07 10.82 47.79 30.25 11.44 46.67 30.00 12.29 44.47 29.11 13.02 41.33 27.61 14.12 38.49 26.47 15.59
27°C 50.00 38.53 10.83 48.04 37.70 11.45 46.92 37.59 12.31 44.72 36.67 13.04 41.71 34.75 14.14 39.07 33.00 15.63
30°C 51.03 44.13 10.88 49.19 42.92 11.52 48.22 42.50 12.39 46.18 41.17 13.13 43.26 38.90 14.26 40.85 36.92 15.76
33°C 52.12 52.12 11.00 50.46 50.46 11.66 48.70 48.70 12.56 46.82 46.82 13.32 43.95 43.95 14.46 41.59 41.59 15.97
27°C 54.15 30.65 11.08 52.02 29.91 11.71 50.82 29.74 12.58 48.46 28.87 13.31 45.08 27.41 14.41 42.08 26.32 15.88
30°C 54.34 38.29 11.09
52.22 37.49 11.72 51.02 37.40 12.59 48.67 36.51 13.33 45.29 34.88 14.43 42.33 33.78 15.90
33°C 54.72 45.39 11.11 52.77 44.15 11.75 51.75 43.71 12.64 49.56 42.32 13.39 46.32 40.07 14.51 43.60 38.35 16.00
36°C 55.74 48.99 11.19 53.78 48.01 11.84 52.42 47.14 12.75 50.49 45.64 13.52 46.96 42.65 14.67 44.05 40.21 16.20
21°C 46.70 33.59 10.64 44.83 32.74 11.25 43.73 32.48 12.10 41.63 31.51 12.82 38.61 29.89 13.91 35.86 28.64 15.39
24°C 47.52 40.82 10.69 45.72 39.59 11.30 44.74 39.10 12.16 42.73 37.73 12.90 39.81 35.57 13.99 37.35 33.59 15.49
27°C 49.82 46.99 10.81 48.08 45.57 11.44 47.27 45.04 12.33 45.32 43.40 13.07 42.42 40.82 14.19 39.90 38.59 15.70
30°C 51.16 51.16 10.98 49.43 49.43 11.63 47.62 47.62 12.52 45.72 45.72 13.28 43.03 43.03 14.40 40.15 40.15 15.91
24°C 50.91 33.49 10.88 48.86 32.64 11.50 47.65 32.40 12.36 45.35 31.45 13.09 42.15 29.89 14.18 39.25 28.72 15.65
27°C 51.25 41.96 10.90 49.26 40.97 11.53 48.24 40.47 12.40 46.07 39.04 13.14 42.96 36.82 14.24 40.24 35.02 15.72
30°C 52.80 46.35 10.99 51.00 45.18 11.63 50.14 44.64 12.52 48.13 43.07 13.28 45.11 40.57 14.40 42.55 38.45 15.91
33°C 54.03 54.03 11.16 52.27 52.27 11.82 50.90 50.90 12.72 48.94 48.94 13.49 45.90 45.90 14.62 42.91 42.91 16.14
27°C 55.30 33.21 11.15 53.11 32.38
11.78 51.83 32.16 12.65 49.35 31.24 13.38 45.93 29.72 14.48 42.88 28.61 15.95
30°C 55.62 41.78 11.17 53.40 40.93 11.80 52.12 40.86 12.67 49.67 39.93 13.41 46.29 38.09 14.51 43.44 36.28 15.99
33°C 56.66 48.41 11.22 54.57 47.07 11.87 53.46 46.64 12.76 51.20 45.21 13.51 47.83 42.80 14.63 45.22 40.67 16.14
36°C 57.59 50.76 11.35 55.14 48.85 12.02 54.34 48.38 12.94 52.28 46.78 13.71 48.58 43.69 14.85 46.00 41.58 16.38
6780
16°C
19°C
22°C
5650
16°C
19°C
22°C
40°C
EDB
C°03C°52C°91
Outdoor temperature
46°C35°C
4520
16°C
19°C
22°C
AFR
(CFM)
EWB
TC SHC PI TC SHC PI TC SHC PI TC SHC PI TC SHC PI TC SHC PI
21°C 54.83 38.04 13.47 52.77 37.07 14.25 51.56 36.77 15.34 49.14 35.58 16.28 45.67 33.68 17.68 42.49 32.17 19.58
24°C 55.05 44.34 13.48 52.96 43.34 14.26 51.76 43.15 15.35 49.36 42.01 16.29 46.04 39.67 17.71 43.09 37.61 19.62
27°C 56.21 54.34 13.54 54.29 52.88 14.34 53.27 52.35 15.44 51.06 50.55 16.40 47.92 47.91 17.83 45.18 45.18 19.78
30°C 57.67 57.67 13.68 55.88 55.88 14.50 53.95 53.95 15.63 51.92 51.92 16.61 48.73 48.73 18.05 46.05 46.05 20.00
24°C 59.96 35.90 13.76 57.64 34.96 14.56 56.37 34.70 15.66 53.75 33.66 16.60 50.04 31.95 18.01 46.65 30.56 19.90
27°C 60.12 44.19 13.77 57.83 43.21 14.57 56.53 43.04 15.67 53.94 41.93 16.61 50.21 39.96 18.02 46.85 38.55 19.92
30°C 60.43 51.81 13.79 58.38 50.42 14.60 57.29 49.91 15.72 54.87 48.29 16.68 51.34 45.68 18.10 48.26 43.62 20.02
33°C 61.57 61.57 13.88 58.92 58.92 14.70 59.31 59.31 15.85 57.14 57.14 16.83 52.10 52.10 18.29 49.86 49.86 20.24
27°C 65.06 35.23 14.09 62.88 34.50 14.90 61.49 34.24 16.02 58.67 33.24 16.96 54.67 31.57 18.37 51.12 30.35 20.27
30°C 65.54 43.81 14.10 63.03 42.84 14.91 61.61 42.68 16.03 58.84 41.62 16.97 54.81 39.72 18.39 51.25 38.39 20.28
33°C 65.70 51.74
14.11 63.19 50.75 14.92 61.77 50.72 16.04 59.02 49.66 16.98 55.21 47.03 18.42 52.00 44.95 20.34
36°C 65.99 57.46 14.16 63.72 55.98 14.99 62.96 55.86 16.13 60.42 54.22 17.10 56.91 51.73 18.54 53.83 49.59 20.49
21°C 56.80 39.81 13.58 54.55 38.76 14.36 53.26 38.44 15.45 50.71 37.27 16.38 47.07 35.32 17.79 43.74 33.80 19.67
24°C 57.15 49.10 13.60 55.10 47.67 14.40 53.96 47.06 15.50 51.57 45.40 16.44 48.05 42.76 17.85 44.95 40.60 19.76
27°C 59.32 57.31 13.71 57.38 55.72 14.53 56.40 55.05 15.65 54.14 53.11 16.62 50.73 50.01 18.05 47.78 47.33 19.98
30°C 61.50 61.50 13.92 59.47 59.47 14.74 57.35 57.35 15.88 55.13 55.13 16.85 51.13 51.13 18.30 48.26 48.26 20.23
24°C 61.97 39.63 13.88 59.52 38.59 14.68 58.12 38.28 15.78 55.38 37.13 16.72 51.47 35.22 18.12 47.93 33.77 20.01
27°C 62.27 49.15 13.90 59.82 48.09 14.70 58.43 47.95 15.80 55.69 46.78 16.74 51.95 44.33 18.15 48.65 42.10 20.06
30°C 63.54 56.30 13.97 61.25 54.75 14.78 60.05 54.22 15.91 57.51 52.52 16.86 53.87 49.63 18.30 50.87 47.10 20.24
33°C 64.91 64.91 14.13 62.83 62.83 14.97 60.64 60.64 16.12 58.31 58.31 17.10 54.73 54.73 18.56 51.79 51.79 20.51
27°C 67.44 39.11 14.22 64.78 38.16 15.03 63.29 37.94 16.15 60.35 36.82 17.09 56.14 34.96 18.50 52.40 33.57 20.39
30°C 67.67 48.84 14.24 65.03
47.82 15.05 63.54 47.70 16.17 60.61 46.57 17.11 56.41 44.49 18.52 52.71 43.09 20.41
33°C 68.15 57.90 14.26 65.71 56.32 15.09 64.44 55.77 16.23 61.72 53.99 17.19 57.68 51.11 18.63 54.30 48.92 20.54
36°C 69.42 62.50 14.37 66.98 61.24 15.21 65.28 60.14 16.37 62.88 58.22 17.36 58.48 54.41 18.83 54.86 51.30 20.79
21°C 58.15 42.85 13.66 55.83 41.76 14.45 54.46 41.43 15.53 51.84 40.20 16.46 48.09 38.13 17.86 44.66 36.54 19.75
24°C 59.18 52.07 13.72 56.93 50.51 14.51 55.71 49.88 15.61 53.21 48.13 16.56 49.58 45.38 17.96 46.51 42.85 19.89
27°C 62.04 59.94 13.88 59.87 58.14 14.69 58.87 57.45 15.82 56.44 55.36 16.78 52.83 52.08 18.22 49.69 49.23 20.15
30°C 63.71 63.71 14.10 61.56 61.56 14.93 59.30 59.30 16.07 56.94 56.94 17.04 53.59 53.59 18.49 50.00 50.00 20.42
24°C 63.40 42.73 13.97 60.84 41.64 14.77 59.34 41.33 15.87 56.48 40.13 16.80 52.49 38.13 18.20 48.88 36.63 20.09
27°C 63.82 53.53 14.00 61.34 52.26 14.80 60.07 51.62 15.91 57.37 49.80 16.86 53.49 46.97 18.28 50.11 44.68 20.18
30°C 65.76 59.13 14.11 63.51 57.63 14.93 62.43 56.95 16.07 59.94 54.95 17.05 56.18 51.76 18.49 52.98 49.05 20.42
33°C 67.29 67.29 14.33 65.09 65.09 15.17 63.39 63.39 16.33 60.95 60.95 17.31 57.16 57.16 18.77 53.44 53.44 20.72
27°C 68.87 42.37 14.31 66.13 41.31 15.13
64.54 41.03 16.24 61.46 39.85 17.18 57.20 37.92 18.59 53.40 36.50 20.47
30°C 69.26 53.30 14.34 66.50 52.21 15.15 64.91 52.13 16.27 61.85 50.94 17.21 57.65 48.59 18.62 54.09 46.28 20.53
33°C 70.56 61.75 14.41 67.95 60.05 15.24 66.57 59.49 16.38 63.75 57.67 17.34 59.56 54.60 18.78 56.32 51.88 20.72
36°C 71.72 64.76 14.57 68.66 62.31 15.43 67.67 61.72 16.61 65.10 59.68 17.59 60.50 55.73 19.07 57.28 53.04 21.03
C°03C°52
EDB
19°C
8040
16°C
19°C
22°C
19°C
22°C
AFR
(CFM)
EWB
Outdoor temperature
46°C
6700
16°C
19°C
22°C
C°04C°53
5360
16°C
Remark:
AFR: Air flow rate (CFM)
EWB: Entering Wet Bulb Temp. (˚C)
EDB: Entering Dry Bulb Temp. (˚C)
Notes:
1. Ratings shown are gross capacities which do not include a deduction for indoor fan motor heat.
2. shows nominal capacities.
3. Direct interpolation is permissible. Do not extrapolate.
4. Unit is able to operate at ambient from 0˚C to 52˚C without pressure trip.
TC: Total Cooling Capacity (kW)
SHC: Sensible Heat Capacity (kW)
PI: Power Input
0652211B150
0652211B180
Page 47

45
Model: M5RT210BR
Model: M5RT250BR
Remark:
AFR: Air flow rate (CFM)
EWB: Entering Wet Bulb Temp. (˚C)
EDB: Entering Dry Bulb Temp. (˚C)
Notes:
1. Ratings shown are gross capacities which do not include a deduction for indoor fan motor heat.
2. shows nominal capacities.
3. Direct interpolation is permissible. Do not extrapolate.
4. Unit is able to operate at ambient from 0˚C to 52˚C without pressure trip.
TC: Total Cooling Capacity (kW)
SHC: Sensible Heat Capacity (kW)
PI: Power Input
TC SHC PI TC SHC PI TC SHC PI TC SHC PI TC SHC PI TC SHC PI
AFR
(CFM)
EWB EDB
19°C
Outdoor temperature
46°CC°04C°53C°03C°52
21°C 65.79 42.92 15.81 63.31 41.83 16.73 61.87 41.49 18.01 58.96 40.15 19.11 54.79 38.00 20.75 50.98 36.30 22.98
24°C 66.05 50.03 15.82 63.54 48.91 16.74 62.11 48.69 18.02 59.22 47.41 19.12 55.24 44.77 20.78 51.70 42.44 23.03
27°C 67.45 61.32 15.89 65.13 59.67 16.83 63.92 59.08 18.13 61.26 57.04 19.25 57.49 54.07 20.93 54.21 51.23 23.21
30°C 69.20 69.20 16.06 67.05 67.05 17.03 64.74 64.74 18.35 62.29 62.29 19.50 58.46 58.46 21.19 55.26 55.26 23.48
24°C 71.95 40.51 16.16 69.16 39.46 17.09 67.64 39.16 18.38 64.49 37.98 19.48 60.04 36.05 21.14 55.97 34.48 23.36
27°C 72.14 49.87 16.17 69.39 48.76 17.10 67.83 48.57 18.39 64.72 47.31 19.50 60.24 45.09 21.15 56.21 43.50 23.38
30°C 72.51 58.47 16.19 70.04 56.90 17.14 68.74 56.32 18.45 65.84 54.49 19.57 61.60 51.55 21.25 57.91 49.22 23.50
33°C 73.88 73.88 16.29 70.70 70.70 17.26 71.16 71.16 18.60 68.56 68.56 19.75 62.51 62.51 21.46 59.83 59.83 23.75
27°C 78.06 39.75 16.54 75.45 38.93 17.49 73.78 38.64 18.80 70.40 37.51 19.91 65.59 35.63 21.57 61.34 34.25 23.80
30°C 78.64 49.44 16.55 75.63 48.34 17.50 73.93 48.16 18.81 70.60 46.97 19.92 65.77 44.82 21.58 61.50 43.32 23.81
33°C 78.83 58.39 16.56 75.82 57.27 17.51 74.12 57.24 18.83 70.81 56.04 19.94 66.24 53.07 21.62 62.40 50.73 23.88
36°C 79.18 64.8
4 16.62 76.46 63.17 17.60 75.54 63.04 18.94 72.49 61.18 20.07 68.28 58.37 21.77 64.58 55.96 24.05
21°C 68.15 44.93 15.94 65.45 43.74 16.86 63.90 43.37 18.14 60.85 42.05 19.23 56.48 39.86 20.88 52.48 38.14 23.09
24°C 68.58 55.41 15.97 66.11 53.79 16.90 64.75 53.10 18.19 61.88 51.23 19.30 57.66 48.25 20.96 53.93 45.81 23.20
°
5840
16°C
19°C
22°C
27°C 71.18 64.67 16.10 68.85 62.88 17.06 67.68 62.12 18.37 64.97 59.93 19.51 60.87 56.43 21.19 57.32 53.41 23.46
30°C 73.79 73.79 16.34 71.35 71.35 17.30 68.81 68.81 18.64 66.14 66.14 19.78 61.34 61.34 21.48 57.91 57.91 23.75
24°C 74.36 44.73 16.30 71.41 43.55 17.23 69.74 43.19 18.52 66.45 41.90 19.62 61.76 39.75 21.27 57.52 38.11 23.49
27°C 74.72 55.47 16.32 71.78 54.27 17.25 70.11 54.11 18.55 66.82 52.79 19.65 62.33 50.02 21.31 58.37 47.51 23.55
30°C 76.24 63.53 16.40 73.49 61.78 17.35 72.05 61.18 18.67 69.00 59.26 19.79 64.63 56.00 21.48 61.03 53.14 23.75
33°C 77.88 77.88 16.58 75.39 75.39 17.57 72.76 72.76 18.92 69.96 69.96 20.08 65.67 65.67 21.79 62.14 62.14 24.07
27°C 80.91 44.13 16.69 77.73 43.06 17.64 75.94 42.81 18.96 72.41 41.55 20.06 67.36 39.45 21.71 62.88 37.88 23.93
30°C 81.20 55.11 16.71 78.02 53.96 17.66 76.24 53.83 18.98 72.72 52.55 20.08 67.68 50.21 21.74 63.24 48.62 23.96
33°C 81.77 65.34 16.74 78.85 63.55 17.71 77.32 62.93 19.05 74.05 60.93 20.17 69.21 57.68 21.86 65.15 55.20 24.11
36°C 83.29 70.53 16.87 80.36 69.10 17.85 78.33 67.86 19.21 75.44 65.69 20.38 70.16 61.40 22.10 65.82 57.89 24.41
21°C 69.77 48.35 16.04 66.98 47.13 16.96 65.35 46.76 18.23 62.20 45.37 19.32 57.70 43.03 20.97 53.58 41.23 23.18
24°C 71.01 58.7
6 16.10 68.31 57.00 17.03 66.85 56.28 18.33 63.84 54.31 19.43 59.48 51.21 21.09 55.81 48.35 23.34
27°C 74.44 67.64 16.29 71.84 65.61 17.25 70.63 64.83 18.58 67.72 62.47 19.70 63.39 58.77 21.39 59.62 55.55 23.65
30°C 76.44 76.44 16.55 73.86 73.86 17.53 71.16 71.16 18.87 68.32 68.32 20.01 64.30 64.30 21.70 59.99 59.99 23.97
16°C
7300
16 C
19°C
22°C
24°C
76.0748.
22
16.4073.00
46.99
17.3471.20
46.64
18.63
6
7.7745.
28
19.72
62.99
43.03
21.3
7 58.6541.
34
23.58
27°C 76.57 60.41 16.43 73.60 58.97 17.37 72.07 58.25 18.68 68.84 56.20 19.79 64.19 53.00 21.46 60.13 50.42 23.69
30°C 78.90 66.72 16.56 76.20 65.04 17.53 74.91 64.26 18.87 71.92 62.01 20.01 67.41 58.40 21.70 63.57 55.36 23.97
33°C 80.73 80.73 16.82 78.10 78.10 17.81 76.06 76.06 19.17 73.13 73.13 20.32 68.58 68.58 22.04 64.12 64.12 24.32
27°C 82.63 47.81 16.80 79.35 46.62 17.75 77.44 46.30 19.07 73.74 44.97 20.17 68.63 42.79 21.82 64.07 41.19 24.03
30°C 83.11 60.14 16.83 79.79 58.92 17.78 77.88 58.82 19.10 74.21 57.49 20.20 69.17 54.83 21.86 64.90 52.22 24.10
33°C 84.67 69.68 16.91 81.53 67.76 17.89 79.87 67.13 19.23 76.50 65.07 20.35 71.47 61.61 22.04 67.57 58.55 24.32
36°C 86.05 73.08 17.10 82.38 70.32 18.11 81.19 69.65 19.49 78.11 67.34 20.65 72.59 62.89 22.38 68.73 59.85 24.68
TC SHC PI TC SHC PI TC SHC PI TC SHC PI TC SHC PI TC SHC PI
°
EDB
19°C
Outdoor temperature
46°CC°04C°53C°03C°52
AFR
(CFM)
EWB
8760
19°C
22°C
21°C
71.48
48.41
17.39
68.79
47.18
18.40
67.22
46.80
19.80
64.06
45.28
21.01
59.53
42.86
22.82
55.39
40.94
25.27
24°C 71.76 56.43 17.40 69.04 55.16 18.41 67.48 54.91 19.82 64.35 53.47 21.03 60.02 50.49 22.86 56.18 47.87 25.33
27°C 73.28 69.15 17.48 70.77 67.29 18.51 69.45 66.63 19.93 66.56 64.33 21.17 62.47 60.98 23.02 58.90 57.78 25.53
30°C 75.19 75.19 17.67 72.85 72.85 18.72 70.34 70.34 20.18 67.68 67.68 21.44 63.52 63.52 23.31 60.04 60.04 25.82
24°C 78.17 45.69 17.77 75.14 44.50 18.80 73.49 44.16 20.22 70.07 42.84 21.43 65.23 40.66 23.25 60.81 38.89 25.69
27°C 78.38 56.24 17.78 75.39 54.99 18.81 73.70 54.77 20.23 70.32 53.36 21.44 65.45 50.85 23.26 61.07 49.06 25.71
30°C 78.78 65.94 17.80 76.10 64.17 18.85 74.69 63.52 20.29 71.53 61.45 21.53 66.93 58.13 23.37 62.92 55.51 25.85
33°C 80.27 80.27 17.92 76.81 76.81 18.98 77.32 77.32 20.46 74.49 74.49 21.72 67.92 67.92 23.61 65.00 65.00 26.12
27°C 84.81 44.83 18.19 81.97 43.90 19.24 80.16 43.58 20.68 76.49 42.30 21.89 71.27 40.18 23.72 66.65 38.63 26.17
30°C 85.44 55.76 18.20 82.17 54.52 19.25 80.32 54.31 20.69 76.71 52.97 21.91 71.46 50.54 23.74 66.82 48.86 26.18
33°C 85.64 65.85 18.21 82.38 64.59 19.26 80.53 64.55 20.71 76.94 63.20 21.93 71.97 59.85 23.78 67.79 57.21 26.26
36°C 86.03 73.13 18.28 83.07 71.24 19.35 82.07 71.09 20.82 78.76 69.00 22.07 74.19 65.83 23.94 70.17 63.11 26.45
21°C 74.05 50.6
7 17.53 71.11 49.33 18.54 69.43 48.92 19.95 66.11 47.43 21.15 61.36 44.95 22.96 57.02 43.01 25.40
24°C 74.51 62.49 17.56 71.83 60.66 18.58 70.35 59.89 20.01 67.23 57.77 21.22 62.64 54.42 23.05 58.60 51.66 25.51
27°C 77.33 72.94 17.70 74.81 70.91 18.76 73.53 70.06 20.21 70.59 67.59 21.45 66.13 63.64 23.30 62.28 60.23 25.80
16°C
5840
16°C
19°C
22°C
27 C
77.33
72.94
17.70
74.81
70.91
18.76
73.53
70.06
20.21
70.59
67.59
21.45
66.13
63.64
23.30
62.28
60.23
25.80
30°C 80.17 80.17 17.96 77.52 77.52 19.03 74.76 74.76 20.50 71.87 71.87 21.76 66.65 66.65 23.62 62.92 62.92 26.12
24°C 80.79 50.44 17.92 77.59 49.11 18.95 75.77 48.71 20.37 72.20 47.25 21.58 67.10 44.83 23.39 62.49 42.97 25.84
27°C 81.18 62.55 17.95 77.98 61.20 18.98 76.17 61.02 20.40 72.60 59.53 21.61 67.72 56.41 23.43 63.42 53.58 25.90
30°C 82.84 71.64 18.03 79.85 69.68 19.08 78.28 69.00 20.54 74.97 66.84 21.77 70.22 63.15 23.63 66.31 59.93 26.12
33°C 84.61 84.61 18.24 81.91 81.91 19.32 79.05 79.05 20.81 76.02 76.02 22.08 71.35 71.35 23.96 67.52 67.52 26.47
27°C 87.91 49.77 18.36 84.45 48.56 19.40 82.51 48.28 20.85 78.67 46.86 22.06 73.18 44.49 23.88 68.31 42.73 26.32
30°C 88.22 62.16 18.38 84.77 60.86 19.42 82.83 60.71 20.87 79.01 59.27 22.09 73.53 56.62 23.91 68.72 54.83 26.35
33°C 88.84 73.68 18.41 85.67 71.67 19.48 84.01 70.97 20.95 80.45 68.71 22.19 75.20 65.04 24.05 70.78 62.26 26.51
36°C 90.50 79.54 18.55 87.31 77.93 19.63 85.10 76.53 21.13 81.97 74.09 22.41 76.23 69.25 24.31 71.51 65.28 26.84
21°C 75.81 54.53 17.64 72.78 53.15 18.65 71.00 52.73 20.05 67.58 51.16 21.25 62.69 48.53 23.06 58.21 46.50 25.50
24°C 77.15 66.27 17.71 74.22 64.28 18.73 72.63 63.48 20.16 69.37 61.25 21.37 64.63 57.75 23.19 60.63 54.53 25.67
27°C 80.88 76.2
8 17.91 78.05 73.99 18.97 76.74 73.11 20.43 73.58 70.45 21.67 68.87 66.27 23.52 64.78 62.64 26.01
30°C 83.05 83.05 18.20 80.25 80.25 19.27 77.31 77.31 20.75 74.23 74.23 22.00 69.86 69.86 23.87 65.18 65.18 26.36
24°C 82.65 54.38 18.04 79.31 52.99 19.07 77.36 52.60 20.49 73.63 51.06 21.69 68.43 48.53 23.50 63.73 46.62 25.93
16°C
7300
19°C
22°C
27°C 83.20 68.12 18.07 79.96 66.50 19.10 78.31 65.70 20.54 74.79 63.38 21.77 69.74 59.77 23.60 65.33 56.86 26.05
30°C 85.72 75.24 18.21 82.79 73.35 19.27 81.39 72.47 20.75 78.14 69.93 22.00 73.24 65.87 23.87 69.07 62.43 26.36
33°C 87.72 87.72 18.50 84.85 84.85 19.59 82.64 82.64 21.08 79.46 79.46 22.35 74.51 74.51 24.23 69.66 69.66 26.74
27°C 89.78 53.91 18.48 86.22 52.57 19.53 84.13 52.21 20.97 80.12 50.72 22.18 74.57 48.25 23.99 69.62 46.45 26.43
30°C 90.30 67.83 18.51 86.69 66.45 19.56 84.62 66.34 21.00 80.63 64.83 22.22 75.15 61.84 24.04 70.51 58.90 26.50
33°C 91.99 78.59 18.60 88.59 76.42 19.67 86.78 75.71 21.14 83.11 73.39 22.38 77.65 69.49 24.24 73.42 66.03 26.74
36°C 93.50 82.41 18.81 89.51 79.30 19.92 88.22 78.55 21.44 84.87 75.95 22.71 78.86 70.93 24.61 74.68 67.50 27.15
8760
19°C
22°C
0652211B210
0652211B250
Page 48

46
HeatingMode
Model: M5RT90BR
TC (kW) PI (kW) TC (kW) PI (kW) TC (kW) PI (kW) TC (kW) PI (kW) TC (kW) PI (kW)
15 17.71 5.41 24.99 6.49 28.96 7.08 30.95 7.38 32.93 7.67
17 17.23 5.64 24.96 6.77 28.12 7.39 30.04 7.70 31.96 8.01
19 16.75 5.87 24.93 7.05 27.27 7.70 29.12 8.02 30.98 8.34
21 16.27 6.09 24.31 7.33 26.42 8.00 28.21 8.34 30.00 8.68
23 15.79 6.32 23.10 7.61 25.57 8.31 27.30 8.66 29.03 9.01
25 15.31 6.55 21.89 7.89 24.73 8.62 26.39 8.98 28.05 9.35
27 14.83 6.78 20.69 8.17 23.88 8.92 25.48 9.30 27.08 9.68
Model: M5RT120BR
TC (kW) PI (kW) TC (kW) PI (kW) TC (kW) PI (kW) TC (kW) PI (kW) TC (kW) PI (kW)
15 24.73 7.83 34.90 9.40 40.44 10.25 43.21 10.68 45.99 11.11
17 24.23 8.18 34.86 9.88 40.18 10.80 42.99 11.27 45.80 11.73
19 23.74 8.53 34.81 10.36 39.91 11.36 42.76 11.86 45.61 12.35
21 23.24 8.88 34.51 10.84 39.64 11.91 42.53 12.44 45.43 12.98
23 22.74 9.23 33.94 11.32 39.37 12.46 42.31 13.03 45.24 13.60
25 22.25 9.58 33.37 11.80 39.11 13.01 42.08 13.62 45.06 14.22
27 21.75 9.93 32.81 12.28 38.84 13.57 41.85 14.21 44.87 14.85
Model: M5RT150BR
TC (kW) PI (kW) TC (kW) PI (kW) TC (kW) PI (kW) TC (kW) PI (kW) TC (kW) PI (kW)
15 29.71 9.55 41.92 11.46 48.58 12.50 51.92 13.02 55.25 13.54
17 29.15 9.94 41.87 11.92 48.43 13.00 51.83 13.55 55.24 14.09
19 28.58 10.34 41.82 12.39 48.28 13.51 51.75 14.07 55.23 14.63
21 28.01 10.73 41.56 12.86 48.12 14.02 51.67 14.60 55.22 15.18
23 27.45 11.13 41.08 13.33 47.97 14.53 51.59 15.13 55.21 15.73
25 26.88 11.52 40.61 13.80 47.82 15.04 51.51 15.66 55.21 16.28
27 26.32 11.92 40.13 14.26 47.67 15.54 51.43 16.18 55.20 16.82
Model: M5RT180BR
TC (kW) PI (kW) TC (kW) PI (kW) TC (kW) PI (kW) TC (kW) PI (kW) TC (kW) PI (kW)
15 38.34 11.76 54.09 14.11 62.69 15.39 66.99 16.03 71.28 16.67
17 37.53 12.22 54.03 14.58 62.09 15.88 66.42 16.52 70.76 17.17
19 36.72 12.68 53.96 15.06 61.49 16.36 65.86 17.01 70.23 17.66
21 35.92 13.14 53.38 15.54 60.89 16.85 65.29 17.51 69.70 18.16
23 35.11 13.60 52.27 16.02 60.29 17.34 64.73 18.00 69.17 18.66
25 34.30 14.06 51.16 16.49 59.69 17.82 64.17 18.49 68.64 19.15
27 33.50 14.52 50.05 16.97 59.09 18.31 63.60 18.98 68.12 19.65
Indoor DB,
°C
Indoor DB,
°C
Indoor DB,
°C
Indoor DB,
°C
Outdoor WB, ° C
-5 6 12 15 18
Outdoor WB, ° C
-5 6 12 15 18
Outdoor WB, ° C
-5 6 12 15 18
Outdoor WB, ° C
-5 6 12 15 18
Remarks:
TC = Total Cooling Capacity (kW)
PI = Power Input (kW)
0652212B90
0652212B120
0652212B150
0652212B180
Page 49

47
Model: M5RT210BR
TC (kW) PI (kW) TC (kW) PI (kW) TC (kW) PI (kW) TC (kW) PI (kW) TC (kW) PI (kW)
15
17
19
21
23
25
27
Model: M5RT250BR
TC (kW) PI (kW) TC (kW) PI (kW) TC (kW) PI (kW) TC (kW) PI (kW) TC (kW) PI (kW)
15
17
19
21
23
25
27
Indoor DB,
°C
Indoor DB,
°C
Outdoor WB, ° C
-5 6 12 15 18
Outdoor WB, ° C
-5 6 12 15 18
Remarks:
TC = Total Cooling Capacity (kW)
PI = Power Input (kW)
43.85 14.19 61.88 17.03 71.71 18.58 76.63 19.36 81.55 20.13
42.61 14.83 61.81 17.91 69.37 19.58 74.10 20.42 78.82 21.26
41.38 15.47 61.73 18.78 67.04 20.59 71.56 21.49 76.09 22.39
40.14 16.10 60.05 19.65 64.70 21.59 69.03 22.55 73.36 23.52
38.90 16.73 56.76 20.52 62.36 22.59 66.50 23.62 70.64 24.65
37.67 17.37 53.47 21.39 60.02 23.59 63.96 24.69 67.91 25.79
36.43 18.00 50.18 22.27 57.68 24.59 61.43 25.75 65.18 26.92
49.48 13.42 69.82 16.11 80.91 17.57 86.46 18.30 92.00 19.03
48.43 14.02 69.73 16.93 80.08 18.52 85.67 19.31 91.26 20.10
47.38 14.63 69.65 17.76 79.26 19.46 84.88 20.32 90.51 21.17
46.32 15.22 68.86 18.58 78.43 20.41 84.09 21.33 89.76 22.24
45.27 15.82 67.37 19.40 77.60 21.36 83.31 22.33 89.01 23.31
44.22 16.42 65.87 20.23 76.77 22.31 82.52 23.34 88.26 24.38
43.17 17.02 64.38 21.05 75.95 23.25 81.73 24.35 87.52 25.45
0652212B210
0652212B250
Page 50

48
Outline And Dimension
All dimensions are in mm
CENTER OF GRAVITY
FOR HORIZONTAL DISCHARGE
FOR VERTICAL DISCHARGE
22
98 1052
1660
2063
2181
45
51
154
171 779
VERTICAL
RETURN
AIR
VERTICAL
SUPPLY
AIR
97
513384537133
408
2131
171
1150
1638
779
117
544
RETURN
AIR
SUPPLY AIR
369
405
398
872
788
DRAIN PIPE Ø 1"
379
513
85
180
214
437
437
786
1275
850
Back view of the unit:
70014106717
Model:M5RT90BR
Page 51

49
Model:M5RT90BR(WithEconomizerOption)
All dimensions are in mm
DRAIN PIPE
ø 1"
SUPPLY AIR
RETURN AIR
OUTDOOR AIR
OUTDOOR AIR
437786437
808191
2063
22
98
2181
51
154
97
180779
788872
117
544
379
513 85
214
398 405 369
171
522
1638
1150
223 672 277
513384537
133
171
408
2131
1660
779
VERTICAL
RETURN AIR
VERTICAL
SUPPLY
AIR
FOR VERTICAL DISCHARGE
1052
Back view of the unit:
FOR HORIZONTAL DISCHARGE
70014112026
Page 52

50
Model:M5RT120BR
All dimensions are in mm
CENTER OF GRAVITY
DRAIN PIPE ø 1"
RETURN
AIR
VERTICAL
RETURN
AIR
342
342
1546
22
99
2113
2230
58
207
213
630
265
544
651
614
136
250
395
405
1161
1070
164
630
187
614613082 835
407164
VERTICAL
SUPPLY
AIR
2180
168
1000
1410
SUPPLY AIR
Back view of the unit:
2209
1028
CONTROL
BOX
FOR HORIZONTAL DISCHARGE
FOR VERTICAL DISCHARGE
70014107020
Page 53

51
Model:M5RT120BR(WithEconomizerOption)
DRAIN PIPE ø 1"
SUPPLY AIR
All dimensions are in mm
FOR HORIZONTAL DISCHARGE
FOR VERTICAL DISCHARGE
2180
342
1546
342
709
223
2113
2230
22
99
58
168
207
136614
651
1161 1069
2209
1028
562
166
710
175
544
265
250
593 504
630
213
RETURN AIR
OUTDOOR AIR
OUTDOOR AIR
630
164
187
614
VERTICAL
RETURN AIR
VERTICAL
SUPPLY AIR
613
538
280
164
407
CONTROL
BOX
Back view of the unit:
70014112027
Page 54

52
Model:M5RT150BR
342
2180
1546342
22
2113
99
58
168
2230
630
164
VERTICAL
RETURN
AIR
VERTICAL
SUPPLY
AIR
407164
187614613082 835
2209
1130
265 544 651 614 136
DRAIN PIPE
ø 1"
235630
264
1161 1069
504 823395
CONTROL
BOX
SUPPLY AIR
RETURN
AIR
Back view of the unit:
1385
1000
All dimensions are in mm
CENTER OF GRAVITY
FOR HORIZONTAL DISCHARGE
FOR VERTICAL DISCHARGE
70014107156
Page 55

53
Model:M5RT150BR(WithEconomizerOption)
All dimensions are in mm
DRAIN PIPE ø 1"
SUPPLY AIR
FOR HORIZONTAL DISCHARGE
FOR VERTICAL DISCHARGE
2180
342
1546
342
709
223
2113
2230
22
99
58
168
235
136
614651
1161 1069
2209
1130
562
207
710237
562 445
504 823
395
630
264
RETURN AIR
OUTDOOR AIR
OUTDOOR AIR
630164
187
614
VERTICAL
RETURN AIR
VERTICAL
SUPPLY
AIR
613
538
280
164
407
CONTROL
BOX
Back view of the unit:
70014112028
Page 56

54
Model:M5RT180/210/250BR
All dimensions are in mm
CENTER OF GRAVITY
Model (M5RT)
A 1048 1302 1454
B 770 770 1176
C 182 322 182
FOR HORIZONTAL DISCHARGE
FOR VERTICAL DISCHARGE
342
2739
1547342
23
2670
99
48
168
2789
770
172
VERTICAL
RETURN
AIR
VERTICAL
SUPPLY AIR
509 179
201610560182 185
2209
A
268 586 558 610 187
BC
1162 1069
509405
CONTROL
BOX
SUPPLY AIR
RETURN
AIR
Back view of the unit:
1735
1000
DRAIN PIPE ø 1"
180 210 250
70014107006, 70014107007, 70014107008
Page 57

55
Model:M5RT180BR(WithEconomizerOption)
DRAIN PIPE
ø 1"
SUPPLY AIR
All dimensions are in mm
FOR HORIZONTAL DISCHARGE
FOR VERTICAL DISCHARGE
2739
342
1547
342
806
269
2670
2789
23
99
48
168
96
187
610
558
1161
1069
2209
1048
607
128
771
149
586
268
134509
405
770
182
RETURN AIR
OUTDOOR AIR
OUTDOOR AIR
770
172
201
610560
581
281
179
509
CONTROL
BOX
Back view of the unit:
VERTICAL
RETURN AIR
VERTICAL
SUPPLY
AIR
70014112418
Page 58

56
Model:M5RT210BR(WithEconomizerOption)
All dimensions are in mm
DRAIN PIPE
ø 1"
SUPPLY AIR
FOR HORIZONTAL DISCHARGE
FOR VERTICAL DISCHARGE
2739
342
1547
342
806
269
2670
2789
23
99
48
168
210
187
610558
1161
1069
2209
1302
607
187
771
344
586
268
387
509
405
770
322
RETURN AIR
OUTDOOR AIR
OUTDOOR AIR
770172
201
610560
581
281
179
509
CONTROL
BOX
Back view of the unit:
VERTICAL
RETURN AIR
VERTICAL
SUPPLY
AIR
70014112419
Page 59

57
Model:M5RT250BR(WithEconomizerOption)
DRAIN PIPE ø 1"
SUPPLY AIR
All dimensions are in mm
FOR HORIZONTAL DISCHARGE
FOR VERTICAL DISCHARGE
2739
342
1547
342
1140
102
2670
2789
23
99
48
168
96
187
610558
1161
1069
2209
1454
693
216923
315
586268
539
509405
1176
182
RETURN AIR
OUTDOOR AIR
OUTDOOR AIR
770172
201
610
560
581281
179
509
CONTROL
BOX
Back view of the unit:
VERTICAL
RETURN AIR
VERTICAL
SUPPLY
AIR
70014112420
Page 60

58
ControlModuleOfUnitM5RT90BR
ControlModuleOfUnitM5RT120/150/180BR
11
10
2
1
9
5
6
8
7
7
4
3
No. Item Description
1
Controller Main Board
2
EXV Controller Board
3
Capacitor
4
Contactor
5
Phase Protector
6
Relay
7
Terminal Block
8
Fuse
9
Transformer
10
Terminal Block Cover
11
Economizer Controller Board
11
10
2
1
9
5
6
8
7
7
4
4
3
(Bottom Layer)
(Top Layer)
No. Item Description
1
Controller Main Board
2
EXV Controller Board
3
Capacitor
4
Contactor
5
Phase Protector
6
Relay
7
Terminal Block
8
Fuse
9
Transformer
10
Terminal Block Cover
11
Economizer Controller Board
Page 61

59
ControlModuleOfUnitM5RT210/250BR
11
1
9
5
6
8
7
7
4
4
2
10
No. Item Description
1
Controller Main Board
2
EXV Controller Board
3
Capacitor
4
Contactor
5
Phase Protector
6
Relay
7
Terminal Block
8
Fuse
9
Transformer
10
Terminal Block Cover
11
Economizer Controller Board
Page 62

60
Wiring Diagrams
Model:M5RT90BR
08024106498E
Page 63

61
Model:M5RT90BR(WithEconomizerOption)
08024110270B
Page 64

62
Model:M5RT120BR
08024106505F
Page 65

63
Model:M5RT150BR
08024106505F
Page 66

64
Model:M5RT180BR
08024106505F
Page 67

65
Model:M5RT120/150/180BR(WithEconomizerOption)
08024110274B
Page 68

66
Model:M5RT210/250BR
08024107686C
Page 69

67
Model:M5RT210/250BR(WithEconomizerOption)
08024110292B
Page 70

68
Servicing & Maintenance
Service Of The Filter
Filter Position
The filters are mounted in front of the indoor heat exchanger.
Unit shown in the diagram is M5RT90BR. Other models shall follow the same method.
• Remove any dust adhering to the filter by using a vaccum cleaner or wash in lukewarm water (below 40°C)
with neutral cleaning detergent.
• Rinse the filter well and dry before placing it back onto the unit.
• Do not use gasoline, volatite substances or chemicals to clean the filter.
• Clean the filter at least once every 2 weeks. Or more frequently if necessary.
CAUTION
Remove filter cover for filter service.
Rain hood (field installed)
Remove filter cover on the rain hood for filter service.
Alternatively, remove side panel for fi lter service.
For unit which is installed together with economizer kit, there is one additional fi lter which is mounted at the
bottom side of rain hood. Unit shown in the diagram is M5RT90BR + economizer kit (field installed). Other
models shall follow the same method.
Ensure the filter is placed properly and the filter cover is
fastened with screws tightly after the service to avoid
water leaking. If necessary, weather-proof sealant shall
be applied in order to ensure water-proof finishing on the
fi lter cover and rain hood.
Page 71

69
Vacuuming And Charging
Invert cylinder
without dip-pipe
Liquid
withdrawal
Dip-pipe
The rooftop package units are factory pre-charged with sufficient refrigerant. However, there may be a need
for charge recovery during service and maintenance works. Therefore, some precautions must be taken to
ensure optimum and trouble-free system operation:
(i) The system should be throughly vacuumed to ensure no incompressible gas and moisture in the system.
(ii) Use a vacuum pump for R410A exclusively. Using the same vacuum pump for different refrigerants may
damage the vacuum pump or the unit.
(iii) The refrigerant should never be released directly into the environment.
(iv) When charging R410A, ensure that only liquid is being withdrawn from the cylinder or can.
CAUTION
R410A must be charged as liquid. Usually R410A cylinder is equipped with a dip-pipe for liquid withdrawal. If there is no dip-pipe,
the cylinder should be inverted so as to withdraw liquid R410A from the valve.
Do not top-up when servicing leak, as this will reduce the unit performance. Vacuum the unit thoroughly and then charge the
unit with fresh R410A according to the amount recommended in the specification.
n
n
Normally, the R410A cylinder or can is equipped with a dip-pipe for liquid withdrawal. However, if the dip-pipe
is not a vailable, invert the cylinder or can so as to withdraw liquid from the valve at the bottom.
Page 72

70
Troubleshooting
Causes
Power failure.
Fuse blown or circuit breaker tripped.
Power supply wiring phase incorrect.
Protection against frequent starting.
Filter is filled with dust and dirt.
There are some obstacles at the air inlet
or outlet of the units.
Dirty air filter.
Temperature setting is too low (for cooling).
Temperature setting is too high (for heating).
Temperature setting is too high (for cooling).
Temperature setting is too low (for heating).
Unit is in defrosting cycle.
Problem
Unit does not run.
Compressor does not operate in
3 min after unit has started.
Air flow is low.
Compressor operate
continuously.
No cool air delivered during
cooling cycle, or no hot air
delivered during heating cycle.
On heating cycle, no air
delivered (M5RT90BR).
Or, the delivered air is not warm
enough (M5RT120BR).
Action
Press the [ON/OFF] after power restore.
Replace fuse or reset circuit breaker.
Modify the wiring phase.
Wait for 3 min for the compressor
to start.
Clean the filter.
Remove obstacles.
Clean the air filter.
Reset the temperature.
Set the temperature lower.
Set the temperature higher.
Wait for a while.
(It will be resumed after defrosting.)
If the fault persists, please call your authorized local dealer/serviceman.
For any enquiries on spare part please contact your authorized dealer. If any malfunction of the
air conditioner unit is noted, check the following fault conditions and causes for some simple
troubleshooting tips.
AlarmShownOnTheRooftopPanel
• Whenever panel received a new alarm, an alarm message will pop up on the LCD. It shows type of alarm,
alarm occurred time and date. Backlight blinking (if backlight is not OFF) and alarms buzzer produces
beeping sound (if it’s set ON).
The buzzer will beep for 10 minutes after that stop for 5 minutes (with the backlight still blinking), this
process keep looping until the alarm is dissolved or a key press is detected.
• Backlight will stop blinking via key press. Press UP or DOWN key to scroll the alarms display if more than
one alarms occurred. Press ESC to exit to the summary pages.
• If one of the alarms has been dissolved, pop up message will update its display (would not show the dissolved
alarm anymore). If all the alarms have been dissolved, it will exit to the summary pages automatically.
• If the existing alarm has not been dissolved and another new alarm is occurred, the pop up message will
update to the latest alarm.
• A sign [A] will be shown and blink in Summary Pages as long as the alarm has not been dissolved. If user
needs to view current existing alarms, press “ALARM” key in the summary pages or go to ALARM MENU
in MAIN MENU.
• The panel can display up to 20 new alarms at once (which are not dissolve yet).
• All the incoming new alarms record will be store in ALARM MENU – Show Alarms.
• The alarm histories are viewable ONLY when all the new alarm already dissolved.
• If the contact type alarm is set to manual reset, the alarm can only be dissolved by off and on back
rooftop unit.
Page 73

71
Error Message Possible causes Action
Communication wires not connected Connect correctly and operate again.
External noise / interference
Avoid from noise source /
add ferrite core.
Main PCB / Economizer PCB faulty
Replace main PCB / economizer PCB.
2. Memory Error EEPROM data corrupted
Replace main PCB and operate again.
3. Economizer Error
Refer to the economizer board error
code table.
Refer to the economizer board
error code table.
4. ESD contact open
Normally close ESD contact become open
ESD contact shorted with wired. If fail,
replace main board and operate again.
Insufficient airflow / Air short circuit /
Ensure no obstacle around the unit.
Heat exchanger dirty
Ensure no dirt or dust on filter and coil.
Refrigerant overcharge / undercharge
Recharging with correct amount of
refrigerant.
Condenser fan motor faulty Replace fan motor.
EXV or EXV PCB defective Replace EXV or EXV PCB.
Compressor malfunction Replace compressor.
Main PCB faulty Replace main PCB.
Refrigerant undercharge
Top up with correct amount of refrigerant.
Pressure switch faulty Replace pressure switch.
Main PCB faulty Replace main PCB.
Insufficient airflow / Air short circuit Ensure no obstacle around the unit
Heat exchanger dirty Ensure no dirt or dust on filter and coil.
Condenser fan motor faulty Replace fan motor.
Refrigerant overcharge
Recharging with correct amount
of refrigerant.
EXV or EXV PCB faulty Replace EXV or EXV PCB.
High Pressure switch faulty Replace pressure switch.
Main PCB faulty
Replace main PCB.
Discharge sensor malfunction Replace new discharge sensor.
Insufficient airflow / Air short circuit Ensure no obstacle around the unit.
Heat exchanger dirty Ensure no dirt or dust on filter and coil.
Condenser fan motor faulty Replace new motor.
Main PCB faulty Replace main PCB.
9. Disconnection of discharge
thermistor 1 / 2
Poor sensor connection Connect correctly and operate again.
Discharge sensor malfunction /
poor sensor connection
Connect sensor correctly /
replace sensor.
Insufficient Air Flow / Air Short Circuit Ensure no obstacle around the unit.
Heat Exchanger Dirty Ensure no dirt or dust on filter and coil.
Condenser fan motor faulty Replace new motor.
Compressor malfunction Replace new compressor.
EXV or EXV PCB faulty Replace new EXV.
Main PCB faulty Replace main PCB.
Poor coil sensor connection
Connect sensor correctly /
replace new sensor.
Compressor malfunction Replace new compressor.
Leaking in piping joint Fix the leak point / Change coil.
EXV or EXV PCB faulty Replace new EXV.
Main PCB faulty Replace main PCB.
1. MB & economizer
communication fail
5. Compressor 1 / 2 overload
6. Compressor 1 / 2 low
pressure trip
7. Compressor 1 / 2
high pressure trip
8. Compressor 1 / 2
discharge overheat
10. Heat Exchanger
1 / 2 high temperature
11. Indoor HEX 1 / 2 abnormal
temperature
Page 74

72
Seven segment display
Error
Code
Fault
F0 Fresh air actuator faulty/ malfunction
F1 Return air actuator faulty/ malfunction
F2 Communication error
F3 CO2 sensor short
F4 CO2 sensor open
F5 Fresh air RH sensor short
F6 Fresh air RH sensor open
F7 Return air RH sensor short
F8 Return air RH sensor open
F9 Activation of actuator protection
FA Multiple pins selection in Dip Switch 1, 2 or 3
The error codes will be shown on the seven segment
display on the economizer controller board.
There are two LEDs in economizer controller board, which are green LED and red LED. Green LED will blink
when economizer controller board is powered-up. Red LED will blink when error(s) occur. Refer the table
below for error codes and their meaning:-
Note:
Note:
When error(s) occur and the faults persist, please call your authorized local dealer/ serviceman for troubleshooting.
However, all the errors occur in economizer controller board will not affect the normal operation of rooftop unit.
Error Message Possible causes Action
Motor internal over current protection faulty
Winding resistance out of spec
Fan motor short body
Main PCB faulty
Replace main PCB
13. Return air sensor short / open
Faulty Sensor / Poor sensor connection
Connect sensor correctly / replace sensor.
14. Outdoor air sensor short / open
Faulty Sensor / Poor sensor connection
Connect sensor correctly / replace sensor.
15. Comp discharge sensor 1 / 2 short
Faulty Sensor / Poor sensor connection
Connect sensor correctly / replace sensor.
16. Comp discharge sensor 1 / 2 open
Faulty Sensor / Poor sensor connection
Connect sensor correctly / replace sensor.
17. Outdoor HEX sensor 1 / 2 short
Faulty Sensor / Poor sensor connection
Connect sensor correctly / replace sensor.
18. Outdoor HEX sensor 1 / 2 open
Faulty Sensor / Poor sensor connection
Connect sensor correctly / replace sensor.
19. Indoor HEX sensor 1 / 2 short
Faulty Sensor / Poor sensor connection
Connect sensor correctly / replace sensor.
20. Indoor HEX sensor 1 / 2 open
Faulty Sensor / Poor sensor connection
Connect sensor correctly / replace sensor.
Replace indoor fan motor.
12. Indoor fan overload
Page 75

73
Exploded View And Parts List
1 Structure, Base Right
Support, Structure, Base
Assy, Structure Base Back
Assy, Structure Base Front
Structure, Base Left
Structure, Center
2 Assy Tubing
3 Assy, Outdoor Base Panel
4 Comp, Assy. ZP103KCE-TFD-522 Copeland
5 Assy, Separator 5RT90BR
Ins., Separator 1 (T10.0x986.0x700.0)
Ins, Separator 2 (T10.0x986.0x894.5)
Ins, Separator 3 (T10.0x878.6x157.0)
6 Assy, Pillar Left Back
7 Assy, Pillar Right Back
8 Assy, Outdoor Coil
9 Assy, Indoor Coil
10 Support, Pipe
11 Cover, Separator
12 Assy, Indoor Base Panel
Ins, Base Panel ID 1 (T10x1065.4x345.1)
Ins, Base Panel ID 2 (T10.0x530.4x136.0)
Ins, Base Panel ID 3 (T10.0x530.4x142.8)
Ins, Base Panel ID 4 (T10.0x1056.4x51.0)
Ins, Panel, Base ID 5 T10x505x375 (87523)
Ins, Panel, Base ID 6 (T10x538x147.3)
Ins, Panel, Base ID 7 (T10x1065.4x66)
Ins, Panel, Base ID 8 T10x505x155 (87523)
Insulation, Base/top (T3x20x990)
13 Assy, Drain Pan
Ins, Drain Pan 1 (T10x1091x45)
MODEL: M5RT90BR
No Description
Ins, Drain Pan 2 T10x1091x52 (87577)
Ins, Drain Pan 3 T10x1091x155 (87577)
Ins, Drain Pan 4 T3x175x40 (87577)
Ins. Drain Pan 5 (T3.0x243.5x65.0)
14 Assy, Left Front Pillar
Ins, Pillar Front 1 L/R (T10x1030x57)
Ins, Pillar Front 2 Left (T10x1004x42)
Ins., Centre Pillar L/R (T3.0x946x20)
15 Assy, Right Front Pillar
Ins, Pillar Front 1 L/R (T10x1030x57)
Ins, Pillar Front 2 Right (T10x1004x42)
Ins., Centre Pillar L/r (T3.0x946x20)
16 Drain Pan, Secondary
17 Assy, Pillar Right Center
Ins., Centre Pillar L/R (T3.0x946x20)
18 Assy, Pillar Left Center
Ins., Centre Pillar L/R (T3.0x946x20)
19 Assy, Front Panel
Ins., Front Panel 1 (T10.0x1000.0x255.0)
Ins., Front Panel 2 (T10.0x545.0x342.0)
Ins., Front Panel 3 (T10.0x545.0x251.0)
Ins., Front Panel 4 (T10.0x1000.0x25.0)
Ins., Front Panel 5 (T10.0x1000.0x45.0)
Ins., Front Panel 6 (T10.0x510.0x148.0)
Ins., Front Panel 7 (T10.0x510.0x70.0)
Ins., Front Panel 8 (T10.0x937.0x42.0)
Ins., Front Panel 9 (T10.0x887.0x54.0)
Ins., Front Panel 10 (T10.0x548.0x55.0)
Ins., Front Panel 11 (T10.0x426.0x55.0)
Ins., Front Panel 12 (T10.0x127.0x62.5)
No Description
70024107445
Page 76

74
No Description
47 Pulley, 1 SPZ 160/1610
48 Pulley, Bush 1610/25
49 Belt, V SPZ 1450
50 Cover Top Panel
Ins, Cover Top Panel (T3x1636x40)
51 Panel, Service L/R
Ins., Side Panel (T10.0x1000.0x959.0)
52 Assy, Panel Service Comp.
53 Panel Service Control Box
54 Handling Handle SL/MSS
55 Panel Return Cover
Ins., Side Panel (T10.0x1000.0x959.0)
56 Panel Return Cover 2
Ins., Side Panel (T10.0x1000.0x959.0)
57 Fixture
58 Support, ACC
59 Fan, Guard Right
60 Fan, Guard Left
61 Assy, Main Isolator
62 Plate, Cover Isolator
63 Coil Guard Back, 5RT90B(R)
64 Plate, Cover
65 Air Filter,saranet 880x467 5RT90BR
66 CAP S655002H03
67 Refrigerant
68 Assy, Control Box UY09 (5RT90BR)
Assy Control Module UQ250 (5RT90BR)
Cont, PAK-26JT-FC,2N0,2NC,AC240V,31A TOGA
Cont,PAK-6JT-S628,1NO,AC240V,2.8A,TOGAMI
Ter. Block, T3011-5P-P1.4 60A W865569G05
Ter. Block, T3011-4P-C1.1 60A
Terminal Block, T3020A-1-7P-C1.0 20A
Phase Protector, PP1.03 No Sensor Export
Capacitor, CMPSR 15UF/450VAC Shizuki
Relay, LY2F AC220/240V Omron P421132x01
69 Accumulator,4.5l R410A AC-PA153025
70 Fan Propeller,681mm P68l11S Kohbunshi
Part Not In Diagram
Handset, Wired Rooftop Panel Daikin
Press Switch, 18psi N/C Export Nantong
Press Switch,600psi N/C Exp ACB4UB70W SG
Filter Drier, Bfk 305S Alco
No Description
20 Cover, Filter
Ins., Cover Filter (T10.0x958.0x72.0)
21 Assy, Filter Rail Center
22 Assy, Return Supply Separator
Ins,s'rator,rtn Sply1 T10.0x1095x49
Ins,s'rator,rtn Sply2 T10x900x20 (87535)
Ins,s'rator,rtn Sply3 T10x1035x15(87535)
Ins,s'rator,rtn Sply4 T3x1095x12
Ins,s'rator,rtn Sply4 T3x1095x12
23 Channel, Indoor Top Left (P087554)
Ins, Channel, ID Top 1 (T10x1040.5x62)
Ins, ID Top Channel2 T10x59x62mm (92635)
24 Channel, Indoor Top Right (P087559)
Ins, Channel, ID Top 1 (T10x1040.5x62)
Ins, ID Top Channel2 T10x59x62mm (92635)
25 Assy, Support Blower B
26 Assy, Support, Blower A (P087561)
Ins, Blower Support T10.0x468.0x400.0mm
27 Support, Blower Plate
28 Blower, AT15/15 Nicotra NA-DX1501.02
29 Assy, Fan Frame
30 Motor,M5RR90BR-501
31 Panel, Top Indoor (P087568)
Ins., ID Top Panel 1 (T10x1085x850)
Ins., ID Top Panel2 T10x1085x685 (87575)
32 Assy, OD Top Panel
Ins., OD Top Panel 1 (T10.0x1395.0x20.0)
Ins., OD Top Panel 2 (T3.0x1625.5x27.0)
33 Orifice, Right
34 Orifice, Left (681mm Fan)
35 Assy, Motor Bracket OD Right
36 Motor,M5RT90BR-502
37 Assy, Motor Bracket OD (681mm Fan)
38 Fan Propeller, 24" Oyl SL35/40/50C
39 Base, Motor Lower
40 Base, Motor Upper
41 Screw
42 Washer
43 Sheet, Rubber 38x165mm
44 Motor, 11KTML 1.1kW P714958x01
45 Pulley, 1 SPZ 71/1108 Reptech
46 Pulley, Bush 1108/24
* ALL SPECIFICATION ARE SUBJECTED TO CHANGE BY THE MANUFACTURER WITHOUT PRIOR NOTICE.
Page 77

75
1 Unit M5RT90BR
2 Flange Back Support
3 Support, Damper Down Throw Top
4 AL Associate, Damper OA 710x511.6
5 Al Associate, Damper RA 510x712.2
6 Assy, Belimo Actuator OA Wire (ECO)
7 Assy, Belimo Actuator RA Wire (ECO)
8 Air Filter, Saranet 515x750
9 Assy, Ins. Rain Hood L
10 Assy, Ins. Rain Hood R
11 Assy, Ins. Rain Hood Top
12 Air Hood, Top 2
13 Assy, Ins. Rain Hood Back
14 Assy, Ins. Cover Rain Hood Filter
15 Assy, Ins. Side Panel
16 Handling Handle
MODEL: M5RT90BR (With Economizer Kit)
No Description
No Description
* ALL SPECIFICATION ARE SUBJECTED TO CHANGE BY THE MANUFACTURER WITHOUT PRIOR NOTICE.
70024112023
Page 78

76
1 Assy Tubing
2 Assy, Base Pan Main
3 Assy, Separator
Ins, Separator 3
Ins, Separator 3b
Ins, Separator 3c
Ins, Separator 3d
Ins, Separator 3e
Ins, Separator 3f
4 Separator 1
Ins, Separator 1
Ins, Separator 4
5 Assy, Separator 2
Ins, Separator 2
Ins, Separator 4
6 Cover, Separator Big
Ins, Cover Separator
7 Assy, Drain Pan
Ins, Drain Pan 1a T3.0x1233.0x45.0mm
Ins, Drain Pan 1b
Ins, Drain Pan 2 T3.0x1308.0x71.0mm
Ins, Drain Pan 3 T3.0x1308.0x220.0mm
Ins, Drain Pan 4 T3.0x271.0x40.0mm
Ins, Drain Pan 5 T3.0x275.0x45.0mm
8 Compressor, Assy ZP67KCE-TFD-522 Copeland
9 Assy, Outdoor Coil L (5RT120BR)
10 Assy, Outdoor Coil R (5RT120BR)
11 Assy, Indoor Coil (5RT120BR)
12 Attachment 1, Separator
13 Assy, Pillar Centre Left
Ins, Center Pillar L/R
14 Assy, Pillar Centre Right
Ins, Center Pillar L/R
MODEL: M5RT120BR
No Description
15 Assy, Pillar Rear Centre Right
Ins, Rear Center Right
16 Assy, Pillar Rear Centre Left
Ins, Pillar Rear Center L
17 Assy, Separator OD
18 Assy, Separator OD. Small
19 Assy., Left Front Pillar
Ins., Front Pillar 1
Ins., Front Pillar 2
Ins, Center Pillar L/R
20 Assy., Right Front Pillar
Ins., Front Pillar 1
Ins., Front Pillar Right
Ins, Center Pillar L/R
21 Pillar, Back L/R
22 Panel, Service Compressor
23 Assy, Front Panel
Ins, Front Panel 1
Ins, Front Panel 2
Ins, Front Panel 3
Ins, Front Panel 4
Ins, Front Panel 5
Ins, Front Panel 6
Ins, Front Panel 7
Ins, Front Panel 8
Ins, Front Panel 9
24 Assy, Partition Top
Ins, Partition Cover Top
25 ID Channel, Top Left
Ins, ID Top Channel 1
Ins, ID Top Channel 2
Ins, ID Top Channel 3
Ins, ID Top Channel 4
No Description
70024107446
Page 79

77
No Description
48 Assy, Main Isolator
49 Plate, Cover Isolator
50 Coil Guard, Side
51 Coil Guard, Back (Right)
52 Coil Guard, Back (Left)
53 Air Filter,saranet 1126x385 5RT120BR
54 Fixture
55 Pulley, Bush 1108/24
56 Pulley, Bush 1610/25
57 Pulley, 1 Spz 160/1610
58 Belt, V SPZ 1600
59 Motor, 15ktml 1.5kw P714959x01
60 Assy, Blower Suport Bottom (U092563)
Ins, Blower Support T10.0x468.0x400.0mm
61 Cap S655002h03
62 Assy, Support Down Flow L
63 Assy, Support Down Flow R
64 Assy, Support Accumulator
65 Sheet, Rubber 38x165mm
66 Refrigerant
67 Panel, Return Cover
Ins, Panel Cover 1
68 Support, Pipe
69 Pulley, 1 SPZ 71/1108 Reptech
70 Cover, Filter
Ins, Cover Filter
Part Not In Diagram
Accumulator,4.5l R410a Ac-pa153025
Filter Drier, Dmb 084s Biflow Danfoss
Handset, Wired Rooftop Panel Daikin
Press Switch, 18psi N/c Export Nantong
Press Switch,600psi N/c Exp Acb4ub70w Sg
No Description
26 ID Channel, Top Right
Ins, ID Top Channel 1
Ins, ID Top Channel 2
Ins, ID Top Channel 3
Ins, ID Top Channel 4
27 Panel, Side Front L/R
Ins, Side Panel L/R
28 Assy, Control Box UY12 (5RT120BR)
29 Assy, Filter Rail Top
30 Assy, Filter Rail Center
31 Blower, Sirocco At 15-15SC Nicotra
32 Base, Motor Lower
33 Base, Motor Upper
34 Assy, Fan Frame Attachment L (97563)
35 Assy, Fan Frame Attachment R
36 Assy, Rear Top Panel
Ins, OD Top Panel 2
Ins, OD Top Panel 5 T10.0x610x20.0mm
37 Top Panel, Indoor
Ins, ID Top Panel 1
Ins, ID Top Panel 2
38 Orifice, Left
39 Orifice Right
40 Assy, Motor Bracket OD (681mm Fan)
41 Motor,M5RT120BR-501
42 Fan Propeller,681mm P68l11S Kohbunshi
43 Fan Guard Left
44 Fan Guard Right
45 Cover, Top Panel
Ins, Cover Top Panel
46 Handling Handle Sl/mss
47 Panel, Return Cover 2
Ins, Panel Cover 2
* ALL SPECIFICATION ARE SUBJECTED TO CHANGE BY THE MANUFACTURER WITHOUT PRIOR NOTICE.
Page 80

78
1 Unit M5RT120BR
2 Assy, Ins. Rain Hood Top
3 Air Hood, Top 2
4 Assy, Ins. Rain Hood R
5 Assy, Ins. Rain Hood Back
6 Assy, Ins. Cover Rain Hood Filter
7 Air Filter, Saranet 560x658
8 Assy, Ins. Rain Hood L
9 Handling Handle
10 Assy, Ins. Side Panel
11 Support, Damper Down Throw Top
12 AL Associate, Damper RA/OA 610x562.2
13 Flange, Back Support
14 Assy, Belimo Actuator RA Wire (ECO)
15 Assy, Belimo Actuator OA Wire (ECO)
MODEL: M5RT120BR (With Economizer Kit)
No Description
No Description
* ALL SPECIFICATION ARE SUBJECTED TO CHANGE BY THE MANUFACTURER WITHOUT PRIOR NOTICE.
70024112024
Page 81

79
MODEL: M5RT150BR
No Description
15 Assy, Pillar Rear Centre Right
Ins,pillar Rear CTR R (T3.0x916.2x168.8)
16 Assy, Pillar Rear Centre Left
Ins., Pillar Rear CTR L T3.0x916.2x118.8
17 Assy, Od Separator
18 Assy, Separator Outdoor Small
19 Assy, Left Front Pillar
Ins,front Pillar 1 T10.0 X 1010.2 X 57.0
Ins, Front Pillar L T10.0 X 984.2 X 42.0
Ins, Centre Pillar L/R T3.0x926.2x20.0
20 Assy, Right Front Pillar
Ins,front Pillar 1 T10.0 X 1010.2 X 57.0
Ins, Front Pillar R T10.0 X 984.2 X 42.0
Ins, Centre Pillar L/R T3.0x926.2x20.0
21 Pillar, Back L/R
22 Panel, Service Compressor
23 Assy, Front Panel
Ins, Front Panel 1 T10x980.1x446.4
Ins, Front Panel 2 T10.0x548.0x328.2
Ins, Front Panel 3 T10.0x548x239.8
Ins, Front Panel 4 T10.0x980.1x92.0
Ins, Front Panel 5 T10.0x980.1x196.0
Ins, Front Panel 6 T10.0 X 609.1 X 233.3
Ins, Front Panel 7 T10x609.1x120.8
Ins, Front Panel 8 T10.0 X 980.1 X 205.7
Ins, Front Panel 9 T10.0 X 865.3 X 61.0
24 Assy, Partition Top
Ins, Partition Cover Top
25 ID Channel, Top Right
Ins, ID Top Channel 1
Ins, ID Top Channel 2
Ins, ID Top Channel 3
Ins, ID Top Channel 4
No Description
1 Assy Tubing
2 Assy, Base Pan Main
3 Assy, Separator
Ins, Separator 3 T10.0 X 924.2 X 299.0
Ins, Separator 3b T10.0x 924.2 X 34.0
Ins, Separator 3c T10.0 X 924.2 X 111.0
Ins, Separator 3d T10.0 X 924.2 X 146.0
Ins, Separator 3e T3.0 X 961.2 X 23.0
Ins, Separator 3f T3.0 X 961.2 X 23.0
4 Separator 1
Ins, Separator 1 T10.0x949.2x689.0
Ins, Separator 4 T10.0x919.2x188.4
5 Separator 1
Ins, Separator 2 T10.0x949.2x692.0
Ins, Separator 4 T10.0x919.2x188.4
6 Cover, Separator Big
Ins,cover Separator T10.0x739.2x 271.2
7 Assy, Drain Pan
Ins, Drain Pan 1a T3.0x1233.0x45.0mm
Ins, Drain Pan 1b T3.0x1188x54.2
Ins, Drain Pan 2 T3.0x1308.0x71.0mm
Ins, Drain Pan 3 T3.0x1308.0x220.0mm
Ins, Drain Pan 4 T3.0x271.0x40.0mm
Ins, Drain Pan 5 T3.0x275.0x45.0mm
8 Compressor,assy,zp83kce-tfd,copeland
9 Assy, Outdoor Coil L (5RT150BR)
10 Assy, Outdoor Coil R (5RT150BR)
11 Assy, Indoor Coil 5RT150BR
12 Attachment 1, Separator
13 Assy., Pillar Center Left
Ins, Centre Pillar L/R T3.0x926.2x20.0
14 Assy., Pillar Centre Right
Ins, Centre Pillar L/R T3.0x926.2x20.0
70024108697
Page 82

80
No Description
43 Fan Guard Left
44 Fan Guard Right
45 Cover, Top Panel
Ins, Cover Top Panel
46 Handling Handle Sl/MSS
47 Panel, Return Cover 2
Ins, Panel Cover 2
48 Assy, Main Isolator
49 Plate, Cover Isolator
50 Coil Guard, Side
51 Coil Guard, Back Right
52 Coil Guard, Back Left
53 Air Filter,saranet 1126x435 5RT150BR
54 Fixture
55 Pulley Bush
56 Pulley Bush
57 Pulley, 2 Spz 160/2012
58 Belt, V Spz 1500
59 Motor, 2.2kw 50hz L P714607x01
60 Handset, Wired Rooftop Panel Daikin
61 Filter Drier, Bfk 165s Alco
62 Assy, Support Down Flow L
63 Assy, Support Down Flow R
64 Assy, Blower Suport Bottom (U092563)
Ins, Blower Support T10.0x468.0x400.0mm
65
Sheet, Rubber MTGT5x38x180mm R331F133H02
66 Cover, Filter
Ins, Cover Filter T10.0 X 66.6 X 784.0
67 Panel, Return Cover
Ins, Panel Cover 1
68 Support, Pipe
69 Assy, Support Accumulator
70 Pulley, 2 Spz 80/1210
Part Not In Diagram
Accumulator,4.5l R410a Ac-pa153025
Press Switch, 18psi N/C Export Nantong
Press Switch,600psi N/C
No Description
26 ID Channel, Top Left
Ins, ID Top Channel 1
Ins, ID Top Channel 2
Ins, ID Top Channel 3
Ins, ID Top Channel 4
27 Panel, Side Front L/R
Ins, Side Panel L/R T10.0 X 954.2 X 988
28 Assy, Control Box UQ450 (5RT150BR)
Assy Control Module UQ400 (5RT150BR)
Contactor,PAK-21JT-FC 1no 1nc 18a Togami
Cont,PAK6JTH-S628,1no,240v,4.0~.6.0a
Ter Block, T3011-5p-c1.4 60a W865569g05
Ter Block, T3011-4p-c1.1 60a
Terminal Block, T3020a-1-4p-c1.0 20a
Phase Protector, Pp1.03 No Sensor Export
Capacitor, Cmpsr 15uf/450vac Shizuki
Relay, G7l-1a-tub 200-240v Omron
Relay, LY2F AC220/240v Omron P421132x01
29 Assy, Filter Rail Top
30 Assy, Filter Rail Center
31 Blower, Sirocco At 15-15sc Nicotra
32 Base, Motor Lower
33 Base, Motor Upper
34 Assy, Fan Frame Attachment L (97563)
35 Assy, Fan Frame Attachment R
36 Assy, Rear Top Panel
Ins, OD Top Panel 2 T10.0x810.0x20.0
Ins, OD Top Panel 3
Ins, OD Top Panel 5
37 Top Panel, Indoor
Ins, OD Top Panel 2 T10.0x810.0x20.0
Ins, OD Top Panel 3
Ins, OD Top Panel 5
38 Orifice, Left
39 Orifice Right
40 Assy, Motor Bracket Od (681mm Fan)
41 Motor,M5RT150BR-501 510w
42 Fan Propeller,681mm P68l11s Kohbunshi
* ALL SPECIFICATION ARE SUBJECTED TO CHANGE BY THE MANUFACTURER WITHOUT PRIOR NOTICE.
Page 83

81
1 Unit M5RT150BR
2 Assy, Ins. Rain Hood Top
3 Air Hood, Top 2
4 Assy, Ins. Rain Hood R
5 Assy, Ins. Rain Hood Back
6 Assy, Ins. Cover Rain Hood Filter
7 Air Filter, Saranet 560x658
8 Assy, Ins. Rain Hood L
9 Handling Handle
10 Assy, Ins. Side Panel
11 Support, Damper Down Throw Top
12 AL Associate, Damper RA/OA 610x562.2
13 Flange, Back Support
14 Assy, Belimo Actuator RA Wire (ECO)
15 Assy, Belimo Actuator OA Wire (ECO)
MODEL: M5RT150BR (With Economizer Kit)
No Description
No Description
* ALL SPECIFICATION ARE SUBJECTED TO CHANGE BY THE MANUFACTURER WITHOUT PRIOR NOTICE.
70024112025
Page 84

82
1 Assy Tubing
2 Assy Base Pan Main
3 Plate, Support Solenoid Valve
4 Panel Return Cover
Ins, Panel Cover
Ins, Panel Cover
5 Assy, Blower Support Bottom
Ins, Blower Support
6 Separator Cover Bottom
Ins, Separator Cover 1
Ins, Separator Cover 2
7 Assy, Drain Pan
Ins, Drain Pan 1a
Ins, Drain Pan 1b
Ins, Drain Pan 2
Ins, Drain Pan 3
Ins, Drain Pan 4
Ins, Drain Pan 5
8 Assy., Separator 5RT180B(R)
Ins., Separator 3a
Ins., Separator 3b
Ins., Separator 3c
Ins., Separator 3d
Ins., Separator 3e
Ins., Separator 3f
9 Separator 1
Ins., Separator 1a
Ins., Separator 1&2
10 Separator 1
11 Cover, Separator Big
Ins, Cover Separator Big
12 Attachment Separator
13 Assy, Pillar Rear L
Ins, Pillar Rear Left
MODEL: M5RT180BR
No Description
No Description
14 Assy, Pillar Rear R
Ins Pillar Rear Right
15 Assy, Pillar Center L
Ins, Pillar Center
16 Assy, Pillar Center R
Ins, Pillar Center
17 Assy, Indoor Coil (5RT180BR)
18 Assy, Outdoor Coil Left (5RT180BR)
19 Assy, Outdoor Coil Right (5RT180BR)
20 Comp, Assy. ZP103KCE-TFD-522 Copeland
21 Assy., Partition
22 Assy, Partition OD Small
23 Support, Pipe
24 Pipe, Support Solenoid Valve
25 Assy., Pillar Front Left
Ins., Pillar Front 1
Ins., Pillar Front 2
Ins, Pillar Center
26 Assy., Pillar Front Right
Ins., Pillar Front 1
Ins, Pillar Front 3
Ins, Pillar Center
27 Pillar, Back L/R
28 Panel, Indoor Top Channel Right
Ins, ID Top Channel 1
Ins, ID Top Channel2 T10x59x62mm (92635)
Ins, ID Top Channel 3
Ins, ID Top Channel 4 T3.0x48.0x20.0mm
29 Panel, Indoor Top Channel Left
Ins, ID Top Channel 1
Ins, ID Top Channel2 T10x59x62mm (92635)
Ins, ID Top Channel 3
Ins, ID Top Channel 4 T3.0x48.0x20.0mm
70024108871
Page 85

83
No Description
No Description
30 Assy., Panel Front
Ins., Panel Front 1
Ins., Panel Front 2
Ins, Front Panel 3
Ins., Panel Front 4
Ins, Front Panel 5
Ins., Panel Front 6
Ins, Front Panel 7
Ins., Panel Front 8
Ins., Panel Front 9
31 Panel, Side Front L/R (P096571)
Ins., Panel Side
32 Panel, Service Comp.
33 PVC Lining (138.0mm)
34 Cover Filter
Ins, Cover Filter
35 Assy, Filter Rail Centre
36 Assy, Filter Rail Top
Ins. Filter Rail Top 3
Ins. Filter Rail Top 2
Ins, Filter Rail Top
37 Assy, Separator Cover Top
Ins, Separator Cover Top
38 Assy, Panel OD Top
Ins, OD Top Panel 1
Ins, OD Top Panel 2
Ins, OD Top Panel 3
39 Panel, Indoor Top
Ins, Indoor Top Panel 1
Ins, Indoor Top Panel 2
Ins, OD Top Panel 3
40 Orifice Left
41 Orifice Right
42 Fan Guard Left 5RT180B(R)
43 Fan Guard Right 5RT180B(R)
44 Cover, Top Panel
Ins, Cover Top Panel
45 Handling Handle Sl/MSS
46 Panel, Return Cover 2
Ins, Panel Return Cover 2
47 Fixture
48 Assy, Main Isolator
* ALL SPECIFICATION ARE SUBJECTED TO CHANGE BY THE MANUFACTURER WITHOUT PRIOR NOTICE.
49 Plate, Cover Isolator
50 Switch,Isolator 63a 3ID2504-1TL53 Siemen
51 Base, Motor Lower
52 Base, Motor Upper
53 Motor,3.0kw 50Hz L 4HTD00885
54 Assy, Fan Frame Attachment
55 Blower,sirocco SYD 400 Yilida
56 Assy, Support Down Flow L
57 Assy, Support Down Flow R
58 Assy, Motor Bracket OD (681mm Fan)
59 Motor,M5RT180BR-501 585W
60 Fan Propeller,681mm P68l11s Kohbunshi
61 Coil Guard, Side (R) 5RT180B(R)
62 Coil Guard, Back (L) 5RT180B(R)
63 Coil Guard, Back (R) 5RT180B(R)
64 Assy, Control Box UQ550 (5RT180BR)
Assy Control Module UQ500 (5RT180BR)
Cont,Pak26JT-FC,2no,2nc,AC240V,27.5a TOG
Cont,Pak-11JT-3c 1no AC230V 50/60 7.5a
Terminal, Block 100amp T3015-5P W65569G12
Terminal Block, HP-T3015-4P-100a
Terminal Block, T3020a-1-4P-C1.0 20a
Phase Protector, PP1.03 No Sensor Export
Capacitor, Cmpsr 15UF/450VAC Shizuki
Relay, G7l-1a-TUB 200-240V Omron
Relay, LY2F AC220/240V Omron P421132x01
65 Air Filter,Saranet 1497x392 5RT180BR
66 Bush Pulley,2012,30,8/3.3
67 Pulley, Bush 1610/28
68 Pulley, 2 SPZ 95/1610
69 Pulley, 2 SPZ 180/2012
70 Belt,v SPZ 1862
71
Sheet, Rubber MTGT5x38x180mm R331F133H02
72 Drain Pan 2nd
73 Cover, Separator Small B
74 Accumulator,4.5l R410a AC-PA153025
75 Support, Pipe And Access Valve
76 Handset, Wired Rooftop Panel Daikin
77 Filter Drier, BFK 305S AlCO
Part Not In Diagram
Press Switch, 18psi N/C Export Nantong
Press Switch,600psi N/C
Page 86

84
1 Unit M5RT180BR
2 Assy, Ins. Rain Hood Top
3 Air Hood, Top 2
4 Assy, Ins. Rain Hood R
5 Assy, Ins. Rain Hood Back
6 Assy, Ins. Cover Rain Hood Filter
7 Air Filter, Saranet 604x750
8 Assy, Ins. Rain Hood L
9 Handling Handle
10 Assy, Ins. Side Panel
11 Support, Damper Down Throw Top
12 AL Associate, Damper RA 610x706.2MM
13 AL Associate, Damper OA 610x706.2MM
14 Flange, Back Support
15 Assy, Belimo Actuator RA Wire (ECO)
16 Assy, Belimo Actuator OA Wire (ECO)
MODEL: M5RT180BR (With Economizer Kit)
No Description
No Description
* ALL SPECIFICATION ARE SUBJECTED TO CHANGE BY THE MANUFACTURER WITHOUT PRIOR NOTICE.
70024112421
Page 87

85
1 Assy. Tubing
2 Assy Base Pan Main
3 Plate, Support Solenoid Valve
4 Panel Return Cover
Ins, Panel Cover
5 Assy, Blower Support Bottom
Ins, Blower Support
6 Separator Cover Bottom
Ins, Separator Cover 1
Ins, Separator Cover 2
7 Assy, Drain Pan
Ins, Drain Pan 1a
Ins, Drain Pan 1b
Ins, Drain Pan 2
Ins, Drain Pan 3
Ins, Drain Pan 4
Ins, Drain Pan 5
8 Assy, Separator 3
Ins Separator 3a
Ins Separator 3b
Ins Separator 3c
Ins Separator 3d
Ins Separator 3e
9 Separator 1
Ins Separator 1a
Ins Separator 1&2
10 Assy, Separator 2
Ins Separator 2a
Ins Separator 1&2
11 Cover, Separator
Ins Cover Separator Big
Ins, Cover Separator Big 2
Ins, Cover Separator Big 3
Ins, Cover Separator Big 4
Ins, Cover Separator Big 5
12 Attachment, Separator
13 Assy, Pillar Rear Left
Ins Pillar Rear Left
14 Assy, Pillar Rear Right
Ins Pillar Rear Right
15 Assy, Pillar Centre Right
Ins Pillar
16 Assy, Pillar Centre Left
Ins Pillar
17 Assy, Indoor Coil Top/bottom M5RT210BR
18 Assy, OD Coil Main Left
19 Assy, OD Coil Main Right
20 Compressor,Assy,ZP120KCE-TFD,Copeland
21 Assy, Partition OD Big
22 Assy, Partition OD Small
23 Support, Pipe
24 Support, Pipe Solenoid Valve
25 Assy, Front Pillar Left
Ins Left Front 1
Ins Left Front 2
Ins Pillar
26 Assy, Pillar Front Right
Ins Left Front 1
Ins Pillar Front 2
Ins Pillar
27 Pillar, Back L/R
28 Panel, Indoor Top Channel Right
Ins, ID Top Channel 1
Ins, ID Top Channel 2 T10x59x62mm (92635)
Ins, ID Top Channel 3
Ins, ID Top Channel 4 T3.0x48.0x20.0mm
MODEL: M5RT210BR
No Description
No Description
70024110249
Page 88

86
46 Panel, Return Cover 2
Ins, Panel Return Cover 2
47 Fixture
48 Assy, Main Isolator (M5RT210/250BR)
49 Plate, Cover Isolator
50 Switch,Isolator100a 3lD2704-0TK53 Siemen
51 Base, Motor Lower
52 Base, Motor Upper
53 Motor, 3.7Kw 50Hz L P714608x02
54 Assy, Fan Frame Attachment
55 Blower,Sirocco SYD 400 Yilida
56 Assy, Support Down Flow L
57 Assy, Support Down Flow R
58 Bracket, Motor
59 Motor,M5RT210/250BR-501 6P 1200W 3PH400V
60 Fan Propeller,800mm P80G11S Kohbunshi
61 Coil Guard, Side (L/R)
62 Coil Guard, Back (L)
63 Coil Guard, Back (R)
64 Assy, Control Box UQ600 (M5RT210BR)
Assy Control Module UQ600 (M5RT210BR)
Cont,Pak26JT-FC,2NO,2NC,AC240V,27.5A TOG
Cont,Pak-12JT31-3C 1NO AC230V 50/60 11A
Cont,Pak-6JT31-3S628 1NC AC230V 5.4-8A
Terminal,Block 100AMP T3015-5P W65569G12
Terminal Block, HP-T3015-4P-100A
Terminal Block, T3020A-1-4P-C1.0 20A
Phase Protector, PP1.03 No Sensor Export
Relay, LY2F AC220/240V Omron P421132x01
65 Air Filter,Saranet 495x1530 M5RT210BR
66 Bush Pulley,2012,30,8/3.3
67 Pulley, Bush 1610/28
68 Pulley, 2 SPZ 95/1610
69 Pulley, 2 SPZ 180/2012
70 Belt,V SPZ 1887
71 Sheet, Rubber MTGT5x38x180mm R331F133H02
72 Switch,Neutral 100A 3LD9 280-0B Siemens
73 Drain Pan 2nd
74 Cover, Separator Small B
75 Accumulator,AC-PA153013
76 Support, Pipe and Access Valve
77 Handset, Wired Rooftop Panel Mcquay
78 Filter Drier, BFK 305S ALCO
29 Panel, Indoor Top Channel Left
Ins, ID Top Channel 1
Ins, ID Top Channel 2 T10x59x62mm (92635)
Ins, ID Top Channel 3
Ins, ID Top Channel 4 T3.0x48.0x20.0mm
30 Assy, Front Panel
Ins Front Panel 1
Ins Front Panel 2
Ins Front Panel 3
Ins Front Panel 4
Ins Front Panel 5
Ins Front Panel 6
Ins Front Panel 7
Ins Front Panel 8
Ins Front Panel 9
Ins, Front Panel 10
31 Panel, Side
Ins Panel Side
32 Panel, Service Comp
33 PVC Liming
34 Cover, Filter
Ins Filter Cover
35 Assy, Filter Rail Centre
36 Assy, Filter Rail Top
Ins. Filter Rail Top 3
37 Assy, Separator Cover Top
Ins, Separator Cover Top
38 Assy, Panel Od Top
Ins, OD Top Panel 1
Ins, OD Top Panel 2
Ins, OD Top Panel 3
39 Panel, Indoor Top
Ins, Indoor Top Panel 1
Ins, Indoor Top Panel 2
Ins, OD Top Panel 3
40 Orifice Left 800mm
41 Orifice Right 800mm
42 Fan Guard Left M5RT180/210/250B(R)
43 Fan Guard Right M5RT180/210/250B(R)
44 Cover, Top Panel
Ins, Cover Top Panel
45 Handling Handle SL/MSS
No Description
No Description
* ALL SPECIFICATION ARE SUBJECTED TO CHANGE BY THE MANUFACTURER WITHOUT PRIOR NOTICE.
Page 89

87
1 Unit M5RT210BR
2 Flange Back Support
3 Support, Damper Down Throw Top
4 AL Associate, Damper OA 710x606.8MM
5 AL Associate, Damper RA 610x705.2MM
6 Assy, Belimo Actuator OA Wire (ECO)
7 Assy, Belimo Actuator RA Wire (ECO)
8 Air Filter, Saranet 604x750
9 Assy, Ins. Rain Hood L
10 Assy, Rain Hood R
11 Assy, Ins. Rain Hood Top
12 Air Hood, Top 2
13 Assy, Ins. Rain Hood Back
14 Assy, Ins. Cover Rain Hood Filter
15 Assy, Ins. Side Panel
16 Handling Handle
MODEL: M5RT210BR (With Economizer Kit)
No Description
No Description
* ALL SPECIFICATION ARE SUBJECTED TO CHANGE BY THE MANUFACTURER WITHOUT PRIOR NOTICE.
70024112423
Page 90

88
1 Assy. Tubing
2 Assy Base Pan Main
3 Plate, Support Solenoid Valve
4 Panel Return Cover
Ins, Panel Cover
5 Assy, Blower Support Bottom
Ins, Blower Support
6 Separator Cover Bottom
Ins, Separator Cover 1
Ins, Separator Cover 2
7 Assy, Drain Pan
Ins, Drain Pan 1a
Ins, Drain Pan 1b
Ins, Drain Pan 2
Ins, Drain Pan 3
Ins, Drain Pan 4
Ins, Drain Pan 5
8 Separator 3
Ins, Separator 3 (1)
Ins, Separator 3 (2)
Ins, Separator 3 (3)
Ins, Separator 3 (4)
Ins, Separator 3 (E)
9 Separator 1
Ins Separator 1
Ins Separator 3
10 Assy, Separator 2
Ins, Separator 2
Ins Separator 3
11 Separator Cover
Ins., Separator Cover
Ins, Cover Separator Big 2
Ins, Cover Separator Big 3
Ins, Cover Separator Big 4
Ins, Cover Separator Big 5
12 Attachment, Separator 2
13 Assy, Pillar Rear CTR L
Ins, Pillar Rear CTR L
14 Assy, Pillar Rear CTR R
Ins, Rear Center R
15 Assy, Pillar CTR Left
Ins Pillar 3
16 Assy, Pillar Center R
Ins Pillar 3
17 Assy, Indoor Coil Top/Bottom M5RT250BR
18 Assy, OD Coil Main Left
19 Assy, OD Coil Main Right
20 Compressor, Assy ZP137KCE-TFD Copeland
21 Assy, Partition OD
22 Assy, Partition OD 2
23 Support, Pipe
24 Support, Pipe Solenoid Valve
25 Assy, Pillar Fnt Left
Ins, Pillar Front 1
Ins, Pillar Front 2
Ins Pillar 3
26 Assy, Pillar FNT Right
Ins, Pillar Front 1
Ins, Pillar Front 4
Ins Pillar 3
28 Panel, Indoor Top Channel Right
Ins, ID Top Channel 1
Ins, ID Top Channel 2 T10x59x62mm (92635)
Ins, ID Top Channel 3
Ins, ID Top Channel 4 T3.0x48.0x20.0mm
MODEL: M5RT250BR
No Description
No Description
Page 91

89
29 Panel, Indoor Top Channel Left
Ins, ID Top Channel 1
Ins, ID Top Channel 2 T10x59x62mm (92635)
Ins, ID Top Channel 3
Ins, ID Top Channel 4 T3.0x48.0x20.0mm
30 Front Panel
Ins, Front Panel 1
Ins, Front Panel 2
Ins, Front Panel 3
Ins, Front Panel 4
Ins, Front Panel 5
Ins, Front Panel 6
Ins, Front Panel 7
Ins, Front Panel 8
Ins, Front Panel 9
Ins, Front Panel 10
31 Panel Side Front L/R
Ins, Side Panel Left
32 Panel, Service Comp.
33 PVN Lining
34 Cover Filter
Ins, Filter Cover
35 Assy, Filter Rail Centre
36 Assy, Filter Rail Top
Ins. Filter Rail Top 3
Ins. Filter Rail Top 2
Ins, Filter Rail Top
37 Assy, Separator Cover Top
Ins, Separator Cover Top
38 Assy, Panel Od Top
Ins, OD Top Panel 1
Ins, OD Top Panel 2
Ins, OD Top Panel 3
39 Panel, Indoor Top
Ins, Indoor Top Panel 1
Ins, Indoor Top Panel 2
Ins, OD Top Panel 3
40 Orifice Left 800mm
41 Orifice Right 800mm
42 Fan Guard Left M5RT180/210/250B(R)
43 Fan Guard Right M5RT180/210/250B(R)
44 Cover, Top Panel
Ins, Cover Top Panel
No Description
No Description
* ALL SPECIFICATION ARE SUBJECTED TO CHANGE BY THE MANUFACTURER WITHOUT PRIOR NOTICE.
45 Handling Handle SL/MSS
46 Panel Return Cover 2
Ins, Panel Cover 2
47 Fixture
48 Assy, Main Isolator (M5RT210/250BR)
49 Plate, Cover Isolator
50 Switch
51 Base, Motor Lower
52 Base, Motor Upper
53 Motor, 5.5kw 50HZ L P714609X02
54 Assy, Fan Frame Attachment
55 Blower,sirocco SYD 400 Yilida
56 Assy, Support Down Flow L
57 Assy, Support Down Flow R
58 Bracket, Motor
59 Motor,M5RT210/250BR-501 6P 1200W 3PH400V
60 Fan Propeller,800mm P80G11S Kohbunshi
61 Coil Guard, Side (L/R) M5RT250B(R)
62 Coil Guard, Back (L) M5RT250B(R)
63 Coil Guard, Back (R) M5RT250B(R)
64 Assy, Control Box UQ700 (M5RT250BR)
Assy Control Module UQ700 (M5RT250BR)
Cont,Pak-26JT-FC,2N0,2NC,AC240V,31A TOGA
Cont,Pak-20JT31-3C 1NC AC230V 12-18A
Cont,Pak-6JT31-3S628 1NC AC230V 5.4-8A
Terminal, Block 100AMP T3015-5P W65569G12
Terminal Block, HP-T3015-4P-100A
Terminal Block, T3020A-1-4P-C1.0 20A
Phase Protector, PP1.03 No Sensor Export
Relay, LY2F AC220/240V Omron P421132x01
65 Air Filter,saranet 595x1530 M5RT250BR
66 Bush Pulley,2012,30,8/3.3
67 Pulley, Bush 1610/38
68 Pulley, 2 SPZ 85/1610
69 Pulley,2 SPZ 150/2012 Reptech
70 Belt, V SPZ 1737
71 Sheet, Rubber MTGT5X38x180mm R331f133h02
72 Drain Pan 2nd
73 Cover, Separator Small B
74 Accumulator, AC-PA153015
75 Support, Pipe and Access Valve
76 Handset, Wired Rooftop Panel Mcquay
77 Filter Drier, BFK 305S ALCO
Page 92

90
1 Unit M5RT250BR
2 Flange Back Support
3 AL Associate, Damper OA 1010x683.8MM
4 AL Associate, Damper RA 610x1012.4MM
5 Assy, Belimo Actuator OA Wire (ECO)
6 Assy, Belimo Actuator RA Wire (ECO)
7 Air Filter, Saranet 690x1088
8 Assy, Ins. Rain Hood L
9 Assy, Ins. Rain Hood R
10 Assy, Ins. Rain Hood Top
11 Air Hood, Top 2
12 Assy, Ins. Rain Hood Back
13 Assy, Ins. Rain Hood Back
14 Assy, Ins. Side Panel
15 Handling Handle
MODEL: M5RT250BR (With Economizer Kit)
No Description
No Description
* ALL SPECIFICATION ARE SUBJECTED TO CHANGE BY THE MANUFACTURER WITHOUT PRIOR NOTICE.
Page 93

91
©
2011 McQuay International
www .mcquayup. com
Products manufactured in an ISO certified facility.
This document contains the most current product information as of this printing.
 Loading...