

Page 1
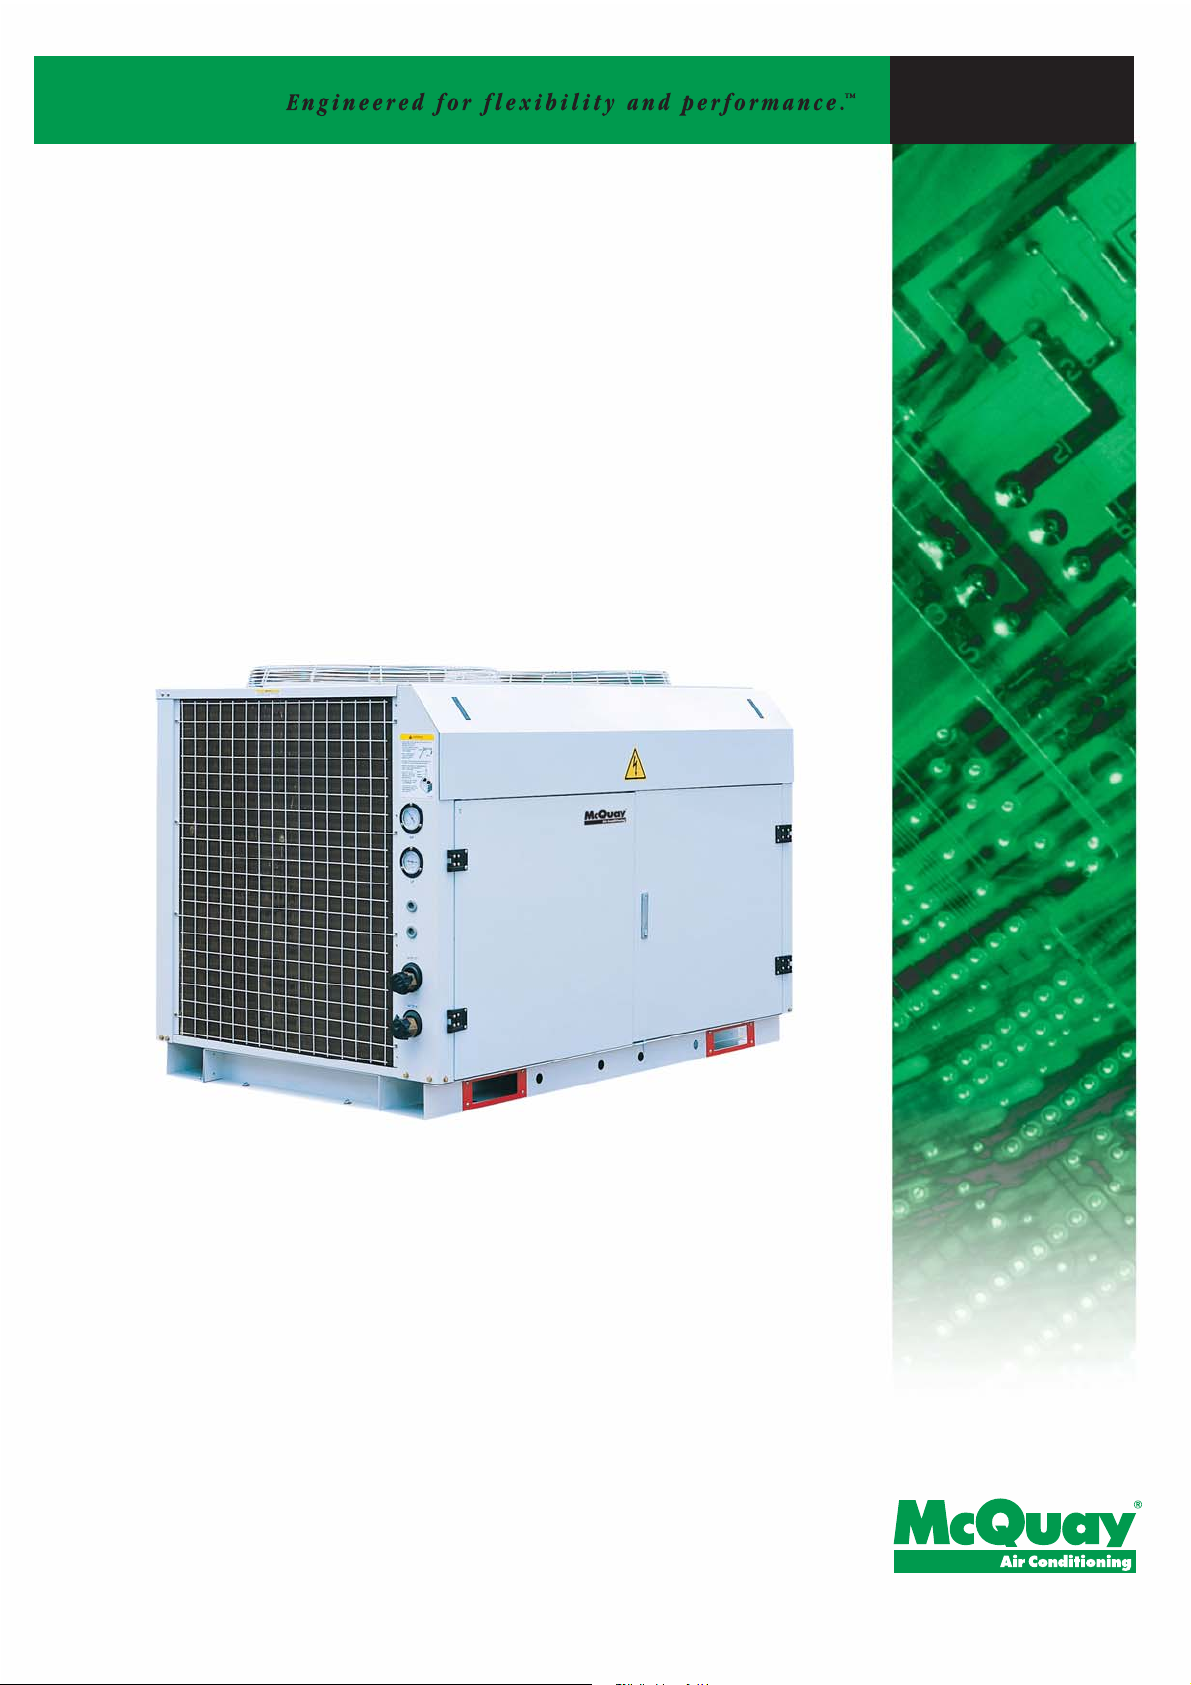
Air-Cooled Mini Chiller
MAC-C-2004
Models: MAC 080 C/CR
MAC 100 C/CR
MAC 120 C/CR
MAC 150 C/CR
M4AC 080 C/CR
M4AC 100 C/CR
M4AC 120 C/CR
M4AC 150 C/CR
Page 2

Contents
Nomenclature.................................................................................................................. 2
General Features and Specifications...................................................................... 2 - 3
Chiller Panel Controller .......................................................................................... 4 - 35
Specifications ........................................................................................................ 36 - 39
Performance Table ................................................................................................ 40 - 45
Technical Data ....................................................................................................... 46 - 47
Outlines and Dimensions...................................................................................... 48 - 50
Wiring Diagrams .................................................................................................... 51 - 54
Special Precautions for R407C............................................................................. 55 - 56
Installation ............................................................................................................. 57 - 61
Servicing and Maintenance ......................................................................................... 62
Troubleshooting ........................................................................................................... 63
Schematic Diagram ...................................................................................................... 64
Parts List and Exploded View............................................................................... 65 - 66
Note: Installation and maintenance are to be performed only by qualified personnel who are
familiar with local codes and regulations, and experienced with this type of equipment,
Caution: Sharp edges and coil surfaces are a potential injury hazard. Avoid contact with them.
Warning: Moving machinery and electrical power hazards. May cause severe personal injury or death.
Disconnect and lock off power before servicing equipment.
"McQuay" is a registered trademark of McQuay International. All rights reserved throughout the world.
2003 McQuay International
"Bulletin illustrations cover the general appearance of McQuay International products at the time of publication
and we reserve the right to make changes in design and construction at any time without notice."
1
Page 3

Nomenclature
M 4AC080 C R
Brand Name _ R22 Equipment Air Cooled Norminal Generation
(McQuay) 4 R407C Equipment Chiller Cooling _ Cooling
Capacity R Heating
General Features and Specifications
Refrigerant circuit
The unit has been designed with two separate refrigerant circuits, i.e. it has two compressors. By doing so,
the unit has part loading capabilities, i.e. 0-50-100% of rated capacity. This will improve the reliability and
energy efficiency of the unit, especially during low loading operations. Each circuit is factory brazed and
evacuated before accurately charged with refrigerant to ensure optimum performance. Because each circuit
is separated, there is no danger of crosscontamination should either one of the compressors experiences a
burnt-up. Each circuit is also equipped with a carefully sized thermostatic expansion valve (for cooling only
units) to give optimum performance characteristics. For the heat pump versions, the expansion process is
done with capillary tubes.
Scroll compressors are used in the unit to give quiet and reliable performance over a wide operating
temperature range. However, in order to protect the compressors from damage, a phase protector is
provided to prevent the compressors from rotating in the wrong direction.
Condenser Fan Motor
The unit is equipped with two high air flow propeller fan blades which are made of metal. The fans are
directly driven by weather proof motors, the motors are of single phase type.
Evaporator
The heat exchanger is made of stainless steel plates closely arranged and brazed together (BPHE) to
ensure high heat exchange efficiency. The water flows through the BPHE in a channel on its own, while
because of the two compressors, the refrigerant flows through another two separate channels. The
refrigerant will either be in a counter-flow or parallel-flow with respect to the water, depending on the mode
of operation (cooling or heating).
Safety Protection
The safety protections provided for in the chiller unit are:
a) High and low pressure switches
b) Differential water flow switch
c) Compressor, water pump and fan motor overload protectors
d) Anti-freeze protection sensor
During abnormal condition, the electronic controller will turn off the unit and then display the fault of
operation.
Other than that, the unit also has pressure gauges (analog) for each compressor suction and discharge
pipes. These are useful for detecting abnormal operating conditions, especially during maintenance
services.
2
Page 4

Water buffer tank & pipe connection
The unit does not come with a water buffer tank. However, the unit does come with an 8 liters expansion
tank.
(A 135L water tank is available as optional item)
The external water piping connection can be made either from the left or right side of the unit. Connection is
done with I1-1/4” female thread couplings for both supply and return pipes.
Anti-freeze protection
The chiller unit has several anti-freeze protection features:
1. Brazed plate heat exchanger anti-freeze
The BPHE has a strip heater around it to prevent water freezing inside.
2. Auto mode
The chiller controller will force-on the unit to the heat mode if the outdoor ambient air temperature
becomes too cold.
Maintenance
In order to facilitate maintenance of the controller, a rocker switch is provided to power-off the supply to the
PCB. However, switching off this switch will not disconnect the main incoming power supply to the chiller
unit.
Coil Guard
The unit also comes with two sets of coil guards (i.e. on the left and right side coils). Each guard is basically
a metal mesh which protects the coil from damage due to a side impact on the coil surface itself.
Fin Coating
The finned tube heat exchanger coil used on the chiller unit is made of staggered rows of 3/8” seamless
copper tubes, mechanically expanded into die-formed louvered fins. The slit openings on the fins enhance
the heat transfer coefficient between the fin surfaces and air.
In order to protect these fins from corrosion, a special fin coating (gold fin) is applied on the surface. This
coating is standard on the heat pump version, whereas it is an option on the cooling only model.
3
Page 5

Chiller Panel Controller
1. SAFETY CONSIDERATION
Only specially trained and qualified technicians and installers are authorized to install and service this equipment.
1.1 General Installation Recommendations
x Only supply DC voltage (9-17V, typically 12V, maximum current 200mA) as a power source to the device.
x Input contact voltage supply should limit to 12VDC or 24VAC.
x Isolated all the low voltage wiring (communication bus, etc.) from high voltage power supply wiring.
2. GENERAL DESCRIPTION
2.1 General
The Chiller Panel Controller is designed to control the Chiller operation. This device allows the user to have
customized control for each connected unit.
2.2 Features
The requirements of user friendly and easy to use have been taken into account in designing this Chiller
Panel Controller. It can do the task as follow:
x Whole system configuration
x Unique parameter settings
x Operation status display
x Tracing fault record (easy in hardware troubleshooting)
The display is shown in an 8-line graphical LCD display. There are 8 dedicated keys available in the panel,
which allow user to do the following task:
x Menu selection
x Navigation on the screen
x Modification of the selected value
During first start-up, the panel will have a default configuration (timer schedule, set point, miscellaneous
settings, etc). User can do the changes on that particular configuration later.
2.3 Panel Position
The Chiller Panel Controller can be installed anywhere, as long as it is easy to accessed by authorized
personnel.
The requirements of installation are:
x Avoid exposure to shocks
x Avoid any source of electromagnetic pollution
x Avoid installation on uneven vertical surface
2.4 Operation Environmental Condition
x Temperature:
-10ºC to 65ºC Operating Temperature
-20ºC to 85ºC Storage Temperature
x Relative Humidity:
0 to 95% Non - Condensing
4
Page 6
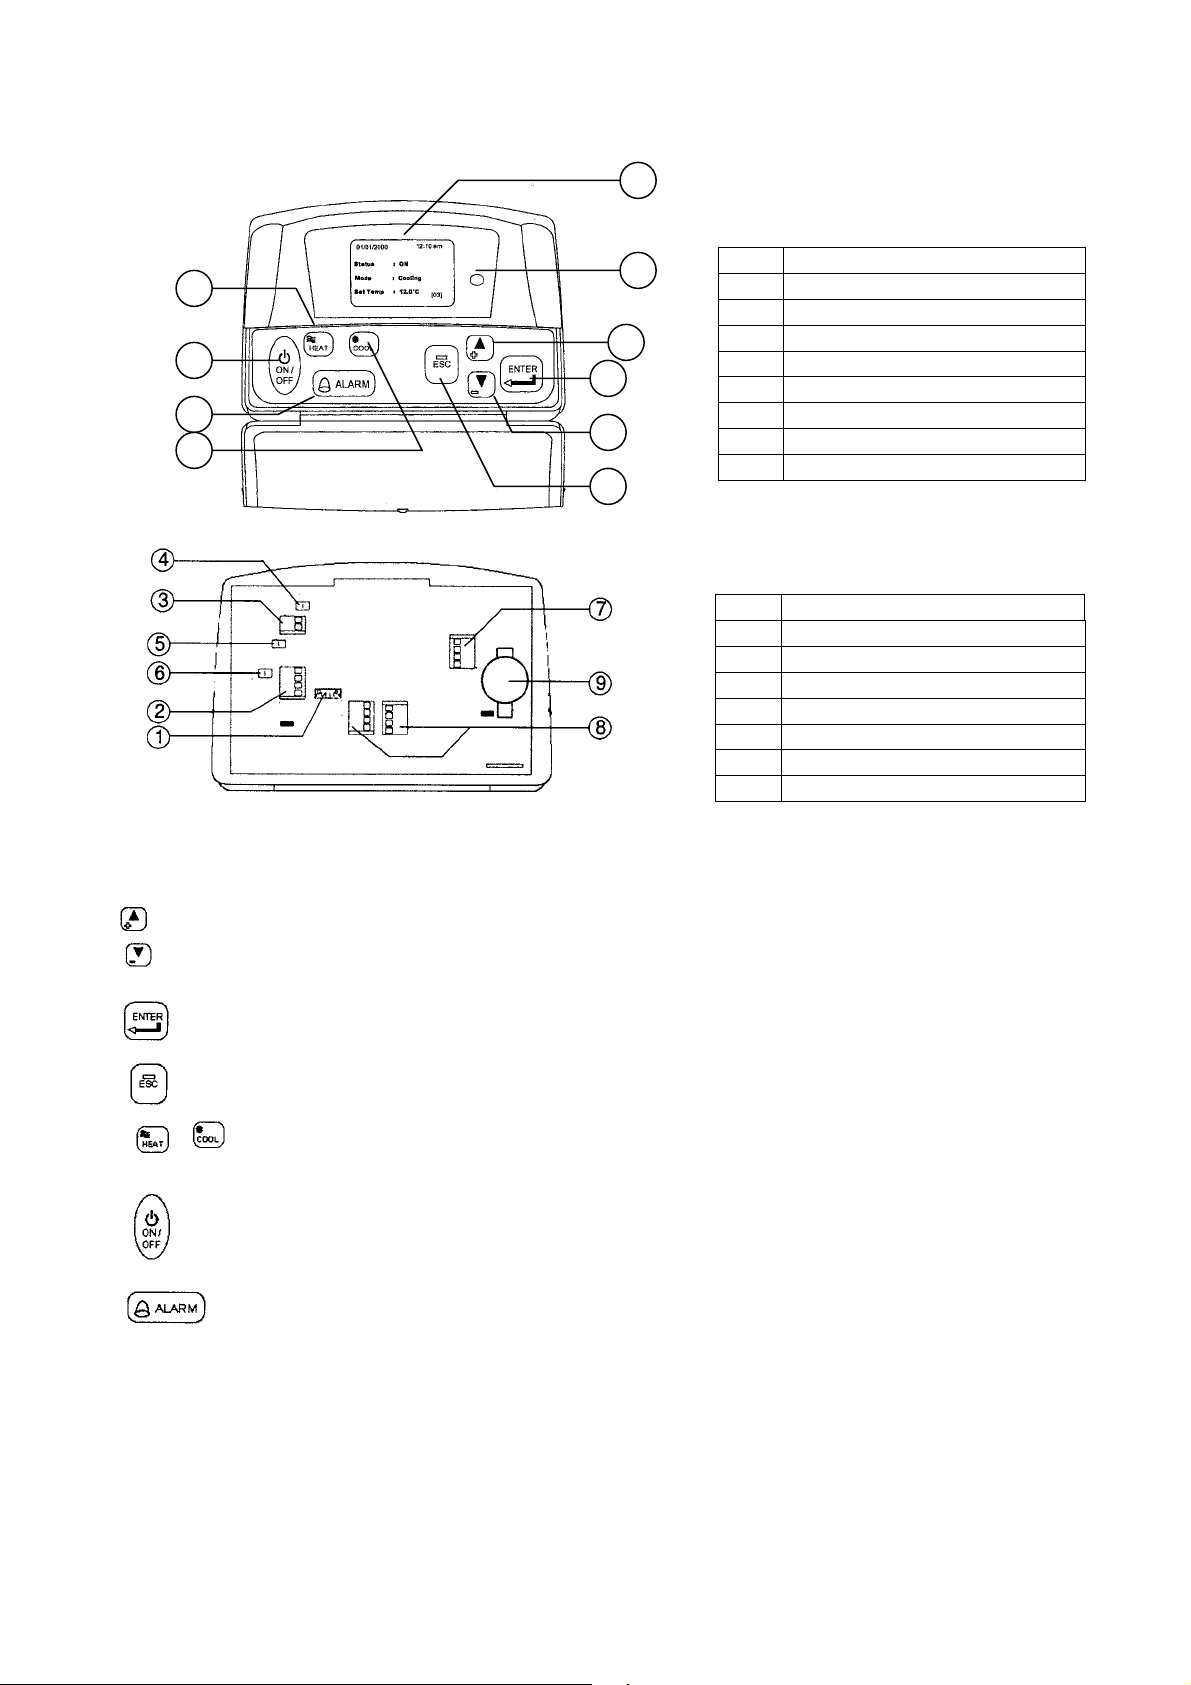
3. HARDWARE DESCRIPTION
9
Legend
5
7
8
6
Front View
Back View
3
2
4
1
10
1 & 2 Navigation key
3 Execute instruction key
4 Cancel instruction key
5 Switching to Heat mode shortcut key
6 Switching to Cool mode shortcut key
7 Toggle ON/OFF shortcut key
8 Show alarm key
9 Graphical LCD display
10 ON/OFF indicator
Legend
Chiller terminal unit connection
1 & 2
3
Not available
CMOS reset jumper (JH2)
4
5
Chiller bus resistor configuration (JH3)
Not available
6
Not available
7
Not available
8
Backup battery
9
3.1 Key Explanation
The 2 navigation keys permit item selection and modifying the selected value.
ENTER key is used to execute the navigation instruction
ESC key is used to cancel the navigation instruction
Shortcut key to switch the operation mode in the Summary Pages
Shortcut key to trigger ON/OFF in the Summary Pages
Shortcut key to show fault / alarm in the Summary Pages
5
Page 7

4. INSTALLATION
pp
r
r
r
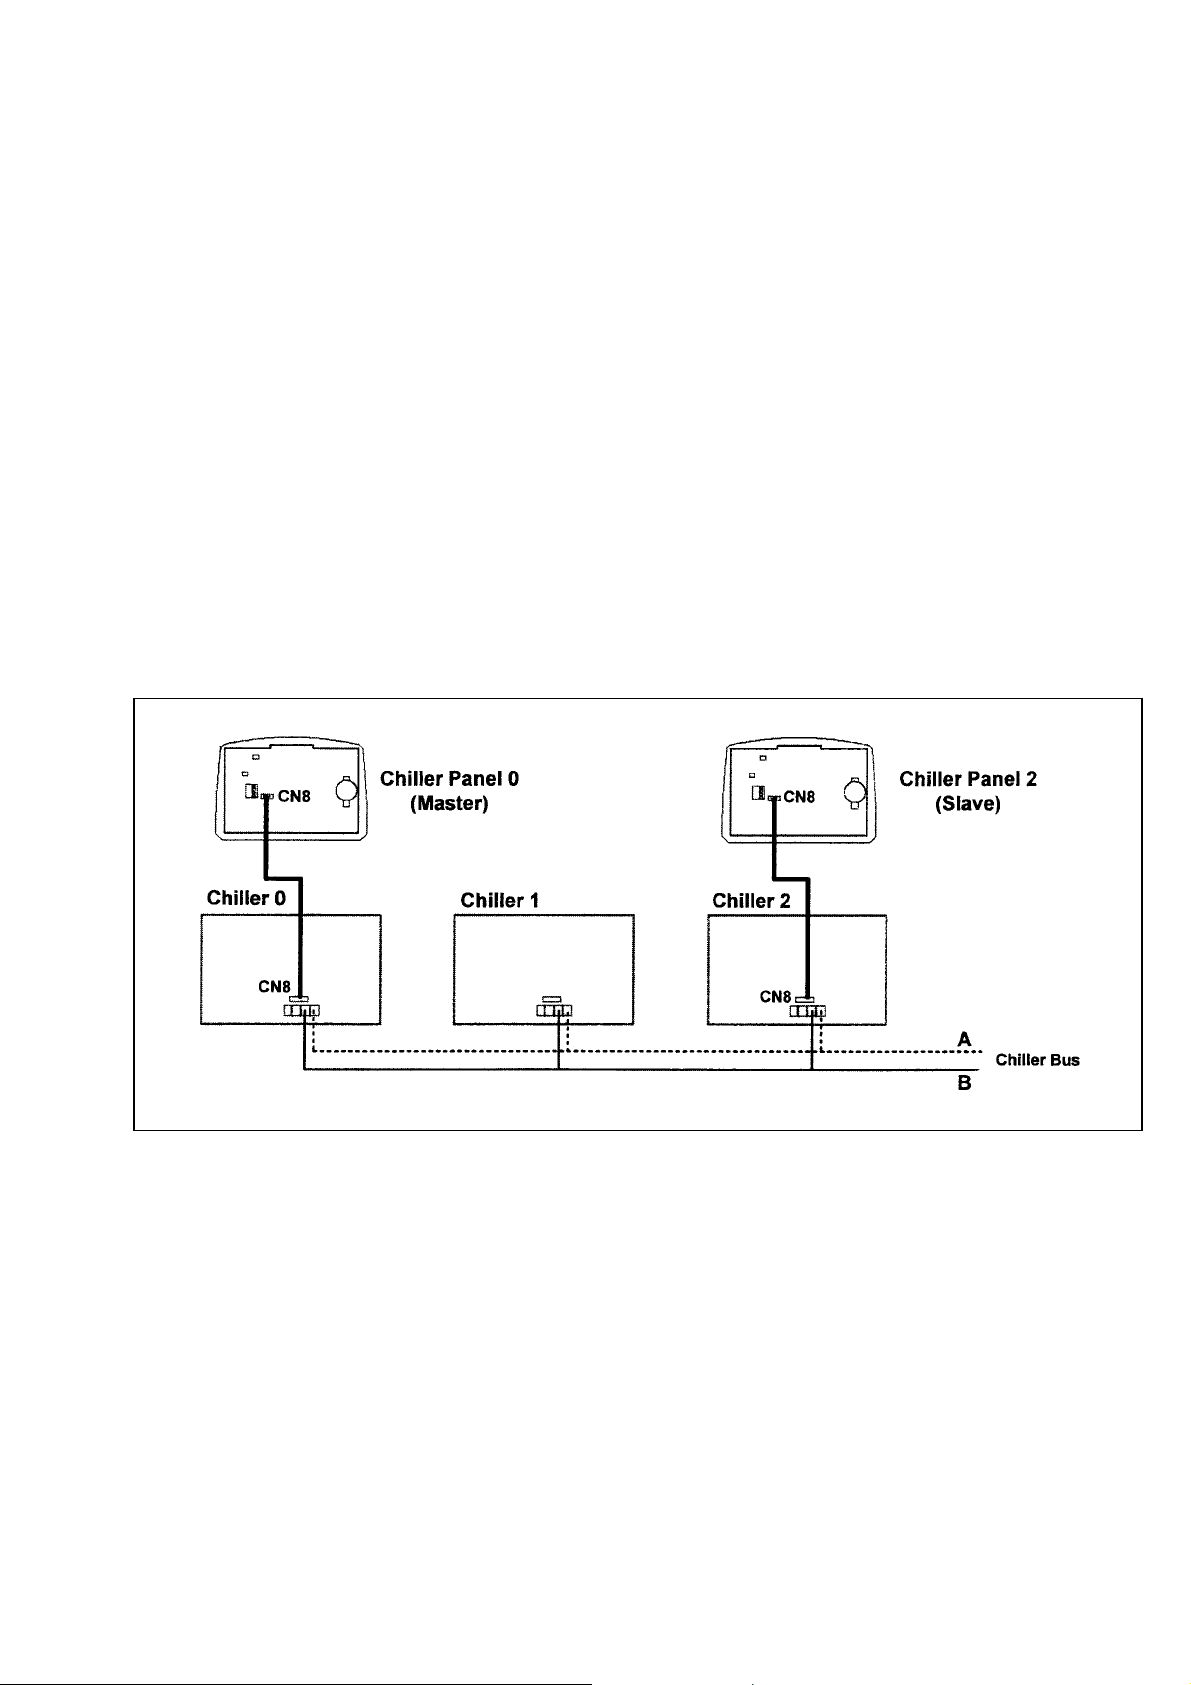
4.1 Chiller Bus
Su
orted up to 50 units of Chille
Chiller 0 Chiller 1 Chiller 2
Chiller Panel 0
(Master)
Chille
(Slave)
Panel 1
5 way wire (CN8)
Chille
Communication bus
CHILLER NETWORK
Chiller panel needs to be energized with +12Vdc. The 5 way wires that provided is once on the easiest solution to
establish a communication between the panel and chiller main board (CN8-CN8). If the 5-way wires socket has been
occupied in main board, just using 2 insulation wires connected to the +12Vdc and GND terminal block from main
board to panel can still energize a panel. Beside that, another 2 insulation wired are needed to establish a
communication between panel and chiller main board.
Chiller panel can support maximum up to 50 units of chiller. In the chiller network, duplication of main board unit
address is not allowed. Each chiller main board should have their unique unit address (0 – 50).
For first time running, user need to assign a unique unit address to each main board in the chiller network. User
should follow the procedure below:
x Only power ON one main board at once time. Make sure not others main boards are energized.
x By using the panel connected to the main board.
<ENTER> <ENTER>
Summary Pages Main Menu Settings Menu
<ENTER>
1. General Set ParameterG7 Unit No
<ENTER>
Key in a unique unit address and press ENTER to execute.
x
x De-energized the main board and repeat the procedures again until all the main boards have been assigned a unique unit
<ENTER>
Key in “0001” as
password
address
IMP ORT A NT : Do not assign a same unit address to more than one chiller main board.
RECOMMENDATION: Please select a coherent model (G1 Model) to all the chiller main boards in the same
network
6
Page 8
4.2 Others Configuration
x JH2 in Chiller panel should let it open (put the jumper header on one pin only) all the time unless user need to
do CMOS reset to that particular panel.
x JH3 should let it open (put the jumper header on one pin only) all the time as well.
x Remember to put in the coin cell battery on the panel. Without the backup battery, the panel will always reset
the time to 12:00am, 1st Jan 2000.
4.3 Installation of the Chiller Panel Controller
x Disconnect the unit and ensure no others unit energy source that supplies the panel.
x Open the rear panel of the Chiller Panel (insert a ‘flat-head’ screwdriver in the top joint of main casing with
rear panel to open the rear panel)
x Pass the necessary wires of the panel across the large opening in the rear panel. Place the rear panel flat
support against the wall and make marks on the wall through the four installation holes (inner or outer).
x Drill four appropriate holes in the marked places.
x Attach the rear panel to the wall and put on the screws on it. Ensure that all cables are passed through the
hole of the rear panel.
x Connect the wires to the corresponding terminal according to the wiring bus network. The power supply and
communication wires must be correctly connected to ensure that the panel works.
x Close the Chiller panel (ensure the bottom joint is aligned for the casing, then complete others joint part.
Ensure that the contacts at the back of the panel are aligned with each others)
BUS WIRING NETWORK
7
Page 9

5. SOFTWARE DESCRIPTION
5.1 Introduction
The Chiller Panel Controller can be used to control/display the status of Chiller.
Status viewing:
x ON/OFF status
x Mode (Cooling/Heating/Boiling)
x Mode set temperature
x Compressor status (ON/OFF/DEFROST)
x Water in, Water out, Outdoor air and Panel temperature
x Chiller Model (Chiller, Heat Pump, Chiller/Boiler, Chiller+Boiler, Heat Pump/Boiler, Heat Pump+Boiler)
x Advance Parameter settings
x Defrost sensor temperatures
x Compressor Discharge sensor temperatures
x Compressor run times
x Incoming alarm/fault/error
Status settings:
x ON/OFF switching
x Mode setting (Cooling/Heating/Boiling)
x Mode set temperature
x Manual entering defrost
x Advance Parameter settings
x Password changing
x Panel Option setting (Backlight, Alarm Buzzer, Screen saver, Contrast, Brightness, temperature unit)
x Time and Date settings
x 7 day programmable settings
x Clearing compressor run time
8
Page 10

5.2 Menu Structure
Menu Structure Diagram for Chiller
9
Page 11

5.3 Chiller Menu Structures
[00]
[00]
[00]
[00]
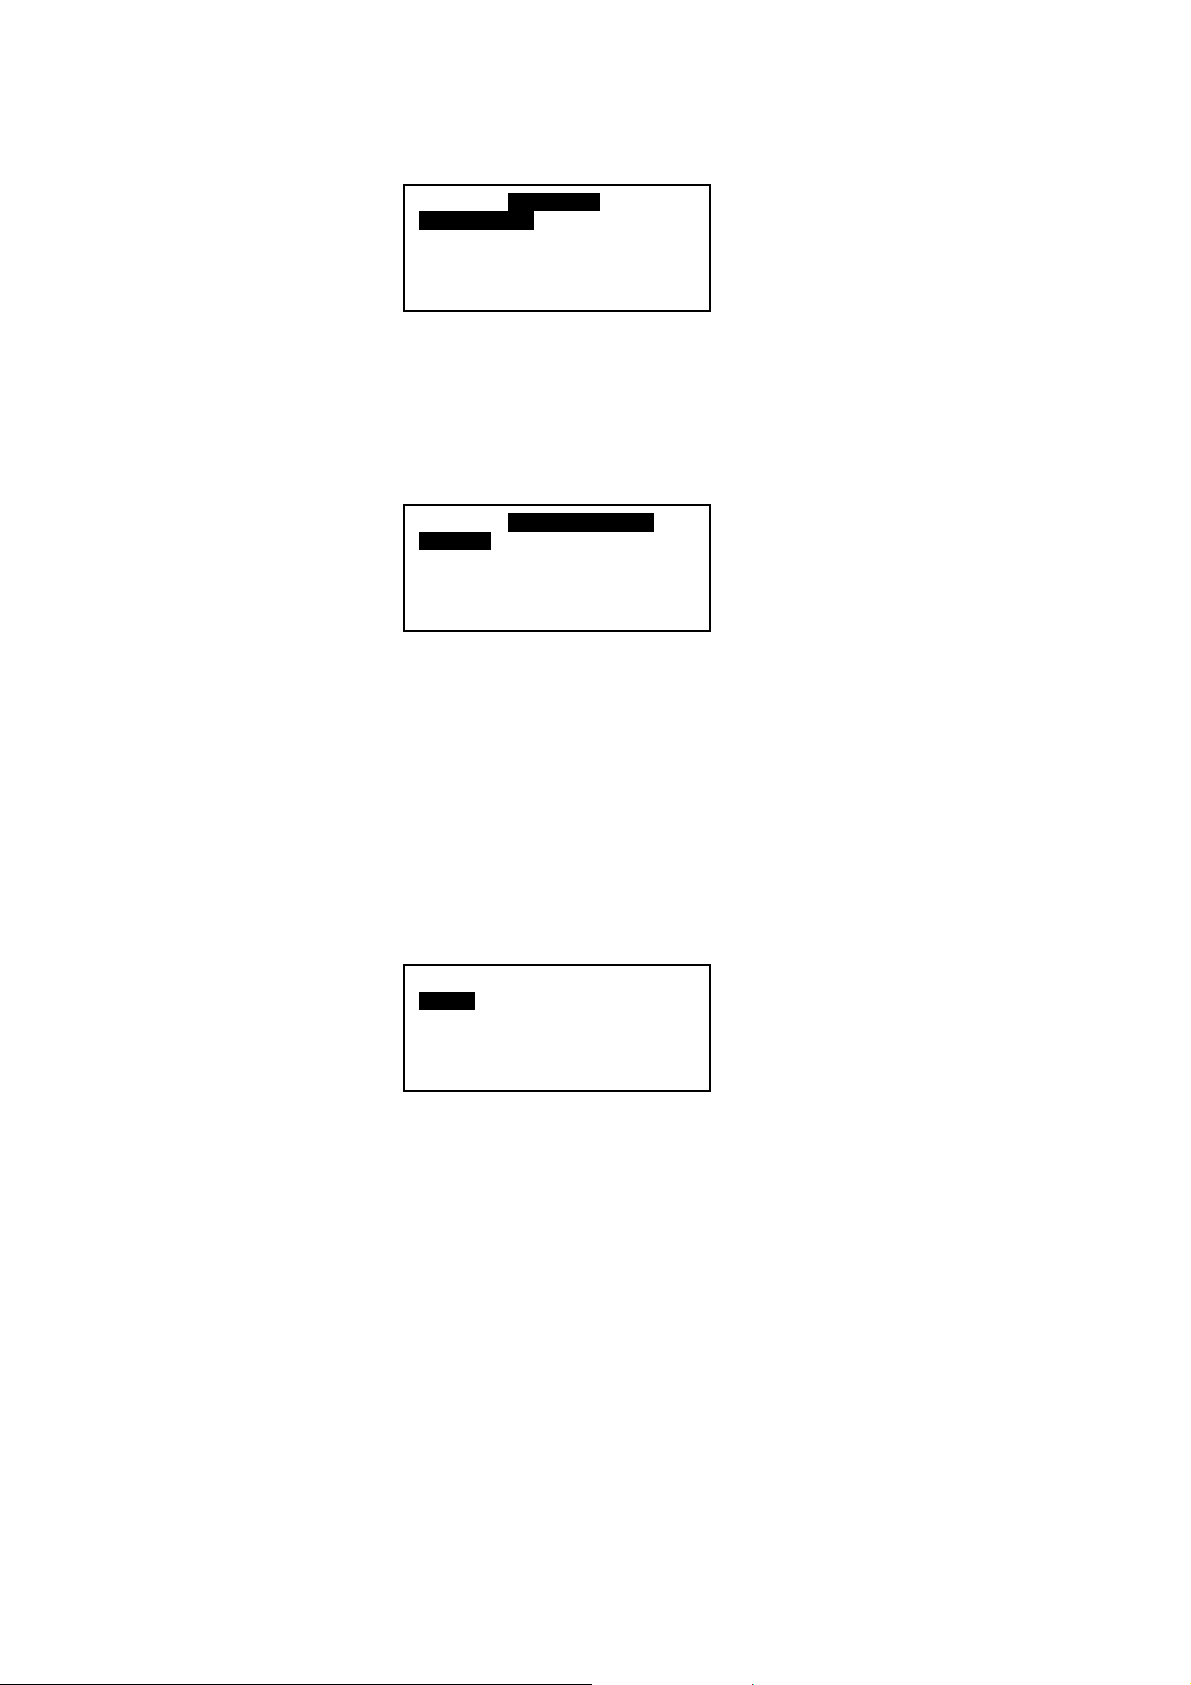
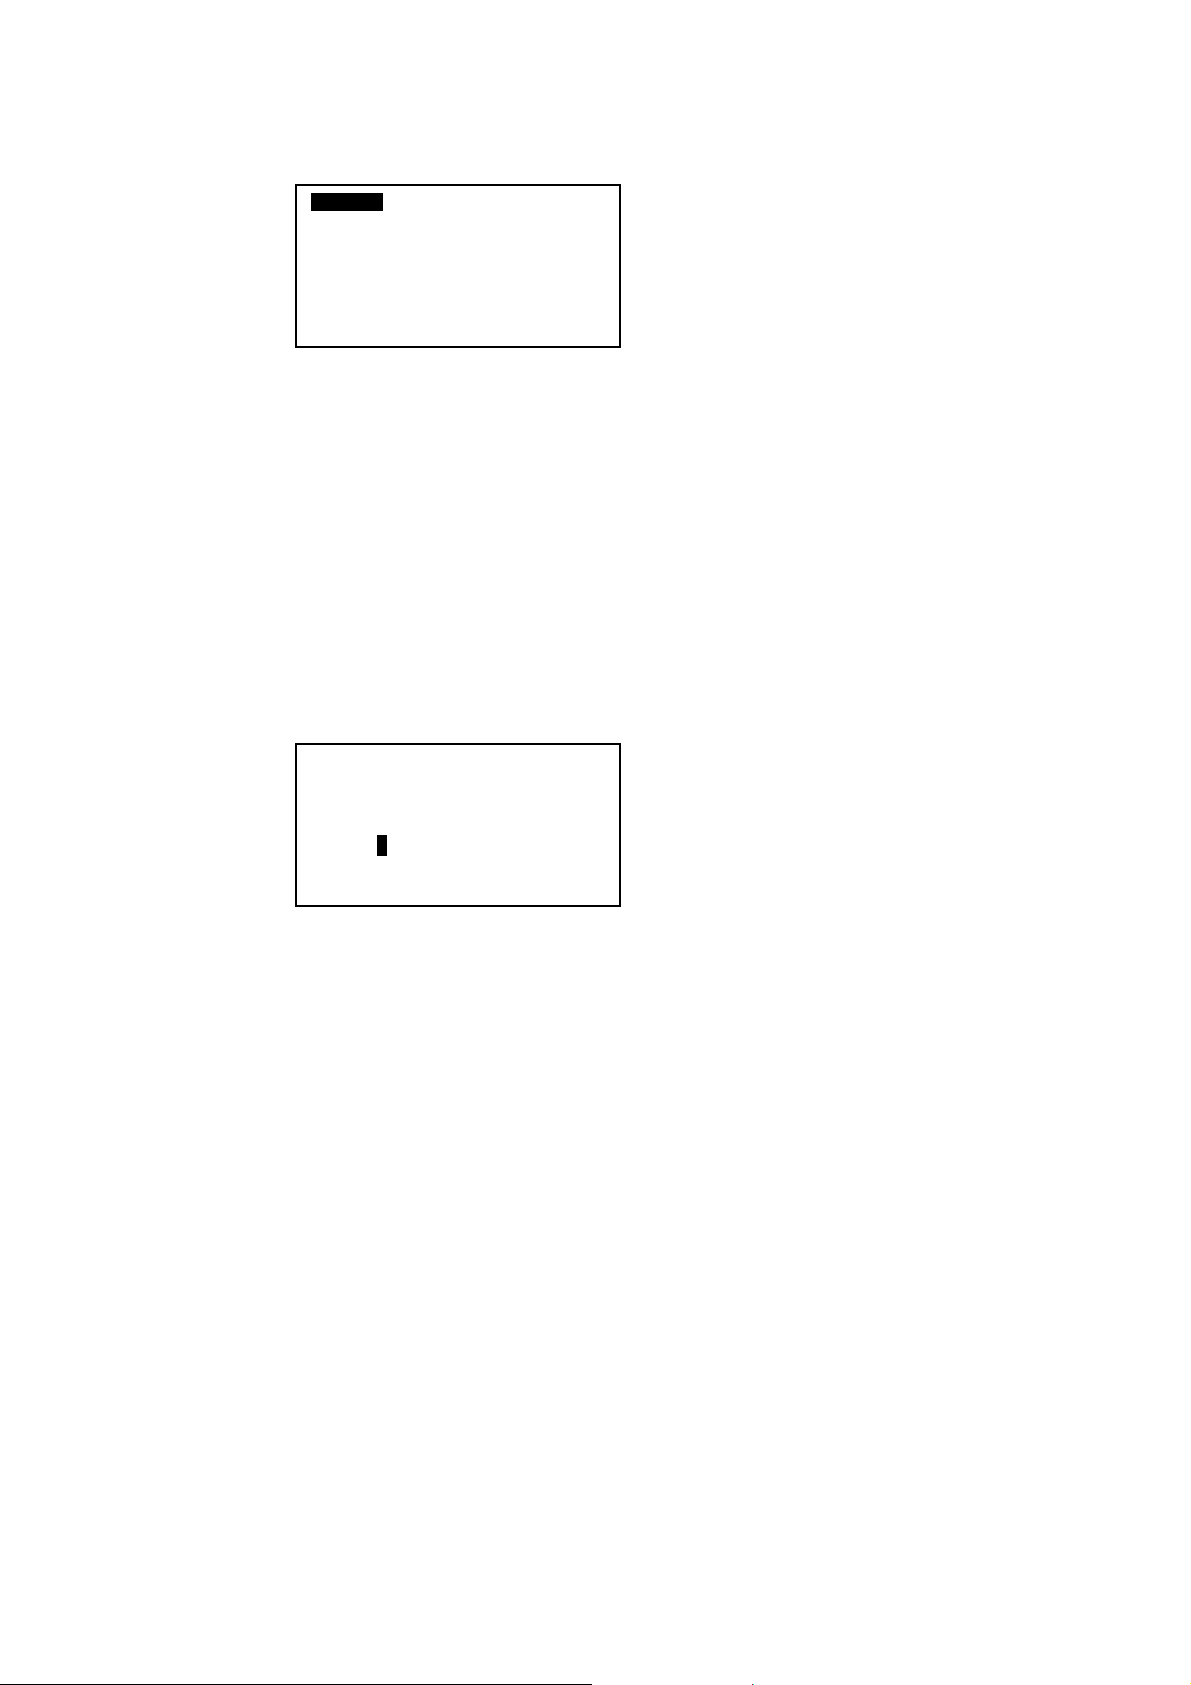
5.3.1 Summary Pages
There are 4 pages in [Summary Pages]. Press UP or DOWN for page scrolling. Press ENTER to go into [Main
Menu].
Time and date are shown on top of each page. Beside that, the bottom of each page shows current control unit of the
Chiller.
For example: [00] – Chiller Panel controls Chiller ID 0 currently
[03] – Chiller Panel controls Chiller ID 3 currently
[All] – Chiller Panel controls all Chiller currently
1st page: Display ON/OFF status, Mode Settings and Temperature settings.
01/01/2000 12:00am
Status : ON
Mode : Cooling
Cool Temp : 12.0ºC
2nd page: Display Compressor status.
01/01/2000 12:00am
Compressor 1 : ON
3rd page : Display Water In, Water Out, Outdoor Air and Panel temperatures.
01/01/2000 12:00am
Water In : 19.8ºC
Water Out : 25.6ºC
Outdoor Air : 32.2ºC
Panel : 20.5ºC
4th page : Display Chiller model, Compressor No. and Chiller ID.
01/01/2000 12:00am
Model : Chiller
No. Comp : 1 Comp
Unit No. : 0
10
Page 12
5.3.2 Main Menu
y
Press ENTER in [Summary Pages] to go into this menu.
Operating Menu
Setting Menu
Timer Menu
Alarm Menu
Displa
MAIN MENU
Menu
Operation Menu
MAIN MENU
There are 5 sub menus in [Main Menu]. Press UP or DOWN to select sub menus, ENTER to enter into the sub menu
or press ESC to exit to [Summary Pages].
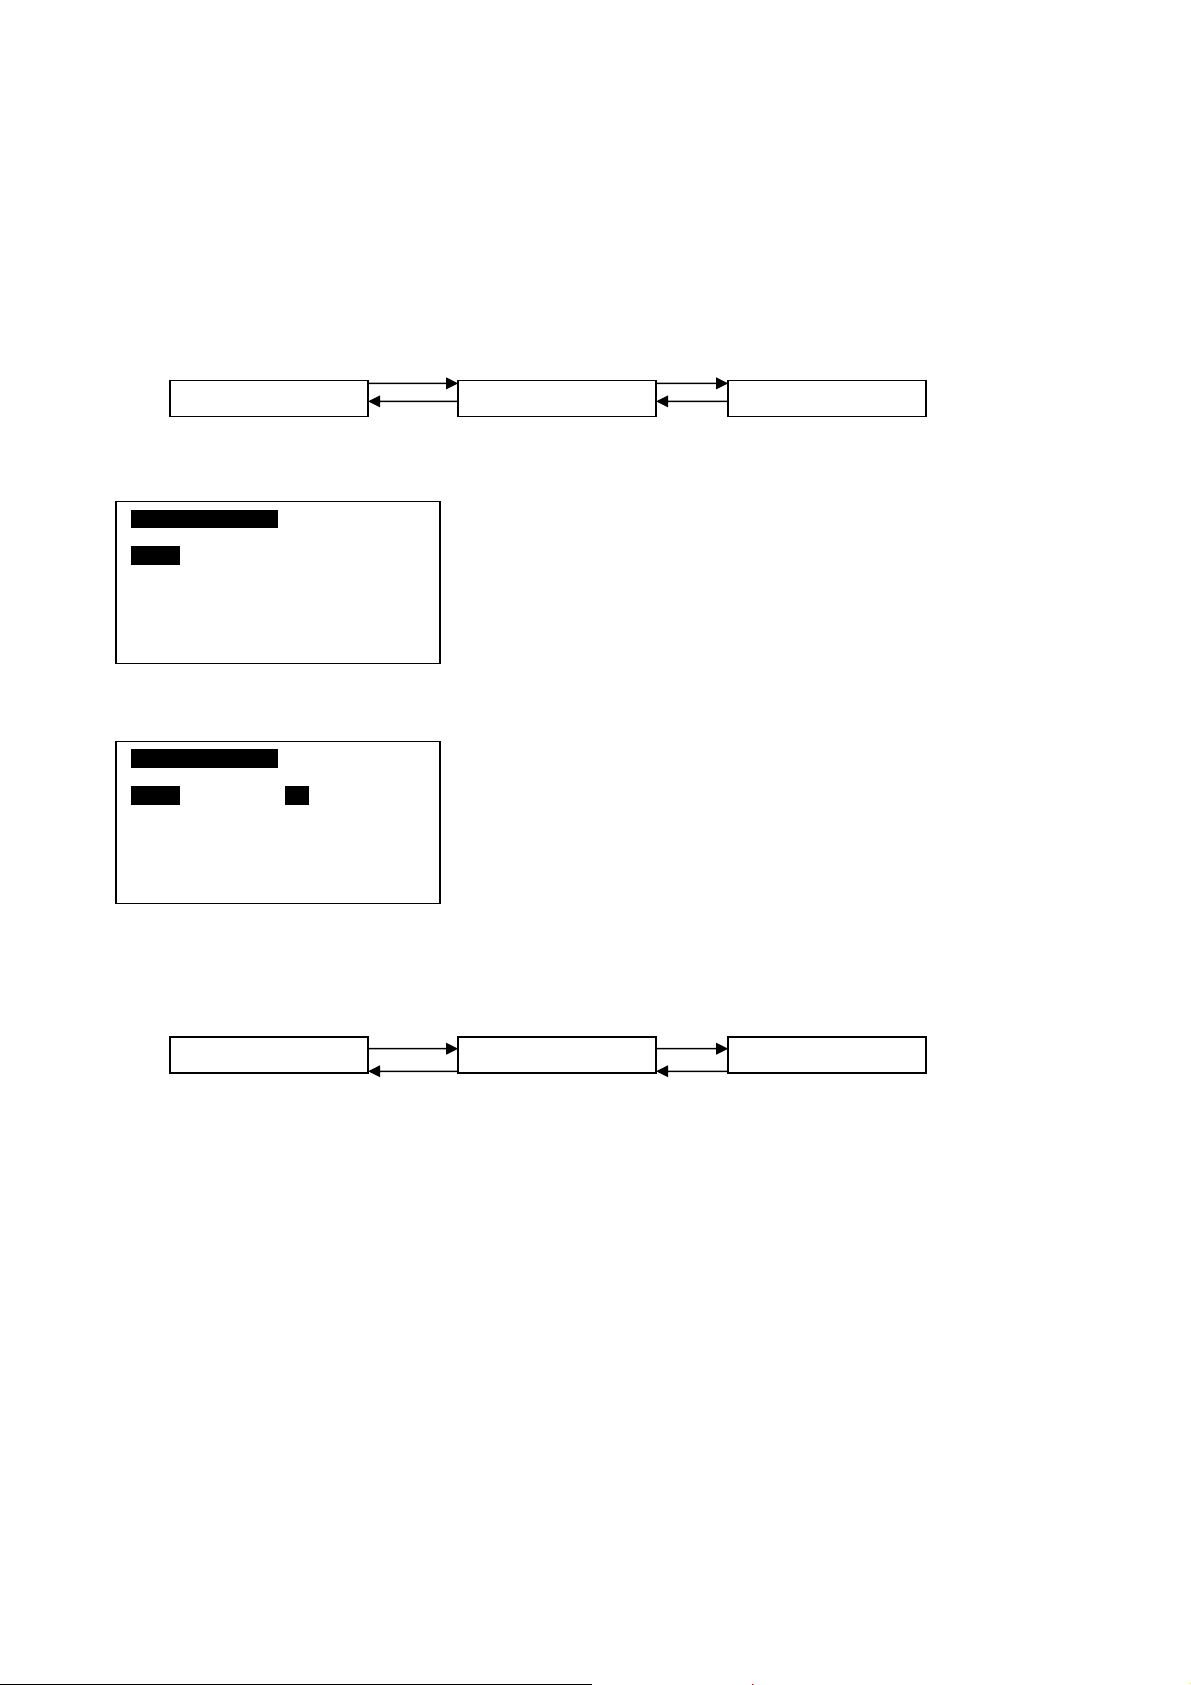
5.3.2.1 Operation Menu
Select [Operation Menu] in [Main Menu] and press ENTER to go into this menu.
OPERATION MENU
Status :ON
Mode : Cooling
Cool Temp : 12.0ºC
Heat Temp : 40.0ºC
OPERATION MENU
Some normal settings can be found here. Press UP or DOWN to select each settings, ENTER to start the setting or
press ESC here to exit to [Main Menu].
Settings: - ON/OFF unit
- Mode changing (Cooling/Heating/Boiling)
- Cooling temperature setting
- Heating temperature setting
- Manual Defrost Selection
Comp 1
5.3.2.1.1 Manual Defrost
Select [Manual Defrost] in [Operation Menu] and press ENTER to go into this menu.
Defrost Compressor
Comp 1
This menu lets user select one compressor to enter into defrost cycle manually, as long as the environment
fulfill the defrost requirement.
11
Page 13

5.3.2.2 Settings Menu
Select [Settings Menu] in [Main Menu] and press ENTER to go into this menu.
SETTINGS MENU
Set Parameter
Change Password
Panel Option
Set Panel ID
Operation Menu
MAIN MENU
Some advance settings can be found here. Press UP or DOWN to select each settings, ENTER to start the setting or
press ESC here to exit to [Main Menu].
Settings: - Set Parameter
- Password Changing
- Panel Option
- Set Panel ID
5.3.2.2.1 Set Parameter
Select [Set Parameter] in [Settings Menu] and press ENTER to go into this menu.
1.General
2. Sensor
3. Regulator
4. Compressor
5. Defrost
6. Antifreeze
7. Alarm and Contact
Comp 1
There are 7 groups of advance parameters for user to set in this menu. Press UP or DOWN to select the
group, ENTER to go into the group or ESC to exit to [Setting Menu].
Settings: - General
- Sensor
- Regulator
- Compressor
- Defrost
- Antifreeze
- Alarm and Contact
5.3.2.2.2 Password Changing
Select [Password Changing] in [Settings Menu] and press ENTER to go into this menu.
Please enter the
old password………
0
- - - -
User can change the old password in this menu.
Press ESC to exit to [Settings Menu].
12
Page 14
5.3.2.2.3 Panel Option
Select [Panel Option] in [Settings Menu] and press ENTER to go into this menu.
Operation Menu
MAIN MENU
User can do some miscellaneous settings for the panel. These settings would not affect whole system
performance.
Settings - toggle Backlight
Press ESC to exit to [Settings Menu].
5.3.2.2.4 Set Panel ID
Select [Set Panel ID] in [Settings Menu] and press ENTER to go into this menu.
Backlight : Normal
Buzzer : On
Screen Saver : Disable
Timeout : 5m
Contrast : 50%
Brightness : Medium
Temp Unit : ºC
- Alarm Buzzer
- Enable/Disable Screen Saver
- Screen Saver timeout
- Contrast display
- Backlight brightness
- Temperature unit
Please enter the0
Panel ID...
=> Unit 0
User can assign the ID no. to the panel.
Example: If ID no. 0 has been assigned, the panel acts like Master Panel Unit. It can choose to control each
Chiller in the network.
If other ID no. (1-50) has been assigned, the panel acts like Slave Panel Unit. It is dedicated to one
particular Chiller. It can only control the Chiller with same ID in the network.
Press [ESC] to exit to [Settings Menu].
13
Page 15

5.3.2.3 Timer Menu
Select [Timer Menu] in [Main Menu] and press ENTER to go into this menu.
TIMER MENU
Clock Setting
Date Setting
Timer Schedule
Timer : Disable
Operation Menu
MAIN MENU
All the timer/schedule settings are included in this menu. Press UP or DOWN to select each settings, ENTER to start
the setting or press ESC here to exit to [Main Menu].
Settings: - Set Clock
- Set Date
- Set Schedule (7 days Programmable Timer)
- Enable/Disable Timer Schedule
5.3.2.3.1 Set Clock
Select [Clock Setting] in [Timer Menu] and press ENTER to go into this menu.
Set Time :
hh mm
00 : 00
User can set the time in this menu. The time setting is in 24-hour format.
Press [ESC] to exit to [Timer Menu].
14
Page 16

5.3.2.3.2 Set Date
Select [Date Setting] in [Timer Menu] and press ENTER to go into this menu.
Operation Menu
MAIN MENU
User can set the date in this menu. The date is set according to sequence below:
Press [ESC] to exit to [Timer Menu].
5.3.2.3.3 Set Schedule
Select [Schedule Timer] in [Timer Menu] and press ENTER to go into this menu.
Set Date :
yyyy mm dd
2000 / 01 / 01
(year) / (month) / (day)
Timer 1 Timer 2
ON OFF ON OFF
Sun 0800 1600 - - - - - - - - -
Mon 0800 1600 - - - - - - - - Tue 0800 1600 - - - - - - - - Wed 0800 1600 - - - - - - - - -
This is the 7 days programmable timer schedule menu. There are 2 ON/OFF events in one day. User can
choose to set each day of week (Sunday – Saturday) ON/OFF timer. Before this schedule carry their effect to
the Chiller, user need to set the [Timer] in [Timer Menu] to enable.
Press [ESC] to exit to [Timer Menu].
5.3.2.4 Alarm Menu
Select [Alarm Menu] in [Main Menu] and press ENTER to go into this menu.
ALARM MENU
Show Alarms
Erase All Alarms
This place keeps records for all previous occurred fault/alarms. User can view the alarm history and clear that
record (alarm history) as well. The panel can keep up to 20 fault/alarm records.
Press ESC to exit to [Main Menu].
15
Page 17

5.3.2.4.1 Show Alarms
Select [Show Alarms] in [Alarm Menu] and press ENTER to go into this menu.
Operation Menu
MAIN MENU
Alarm 1
[Ch 0]
Comp 1 overload
01/ 01 / 00 12:00am
User can view all the fault/alarm records in this menu.
The record shows - Alarm type
- Alarm occurred date
- Alarm occurred time
- Alarm occurred unit (Chiller ID)
Beside that, user can erase the alarm record in this menu.
Press [ESC] to exit to [Alarm Menu].
5.3.2.4.2 Erase All Alarms
Select [Erase All Alarms] in [Alarm Menu] and press ENTER to go into this menu.
Are you sure ?
Press Enter to erase,
or ESC to exit
User can erase all the alarm/fault records at once in this menu.
Press [ESC] to exit to [Alarm Menu].
5.3.2.5 Display Menu
Select [Display Menu] in [Main Menu] and press ENTER to go into this menu.
DISPLAY MENU
Detrost Sensor
Discharge Sensor
Comp Run Time
This menu displays Defrost Sensor temperature, Compressor Discharge sensor temperature and Compressor Run
Time. Beside that, user can clear each Compressor Run Time for Chiller.
Press ESC to exit to [Main Menu].
16
Page 18

Operation Menu
MAIN MENU
5.3.2.5.1 Defrost Sensor
Select [Defrost Sensor] in [Display Menu] and press ENTER to go into this menu.
Defrost Sensor
Cimo 1 : 12.8ºC
User can view the defrost sensor temperature for each compressor in the Chiller.
Press [ESC] to exit to [Display Menu].
5.3.2.5.2 Discharge Sensor
Select [Discharge Sensor] in [Display Menu] and press ENTER to go into this menu.
Discharges Sensor
Comp 1 : 36.5ºC
User can view the discharge sensor temperature for each compressor in the Chiller.
Press [ESC] to exit to [Display Menu].
5.3.2.5.3 Comp Run Time
Select [Comp Run Time] in [Display Menu] and press ENTER to go into this menu.
.
Comp Run Time
Comp 1 : 13579h
User can view the compressor run time for each compressor in the Chiller. Beside that, user can
clear each compressor run time in this menu. User needs to key in the correct password before
clearing the compressor run time.
Press [ESC] to exit to [Display Menu].
17
Page 19

6. OPERATION USER MANUAL
6.1 Starting
Chiller panel can be set as Master or Slave panel unit. When the Panel ID is set to ‘0’, it acts like a Master panel,
whereas it is Slave panel if Panel ID is set to others number (1-50).
Chiller panel can control the Chiller if both ID no. (Panel ID and Chiller ID) are same.
For example: Panel ID 1 can only control Chiller ID 1
Master Panel can choose to control each Chiller or control all Chiller at once in the network.
For example: Panel ID 0 (master) can control Chiller ID 0 / ID 1 / ID 32…. or all Chillers at once.
Panel ID can be set in Set Panel ID in Settings Menu:
Please enter the
Panel ID….
=> Unit 0
18
Page 20

6.2 Chiller Operation Control
[00]
[00]
[00]
6.2.1 Starting
During power on for the Chiller Panel, it needs to take several times to collect information from the Chiller. At this time,
all the status will show ‘--’. Please ensure the particular Chiller exists in the network. When the process is completed,
user can start to control the Chiller using the panel.
01 / 01 /2000 12:00am
Status : --
Mode : --
Cool Temp : --
01 / 01 /2000 12:00am
Status : ON
Mode : Cooling
Cool Temp : 12.0ºC
In gathering information process Gathering information completed
6.2.2 Changing Display Unit
Chiller Panel (Master) can choose to control/display each Chiller status. This can be done in [Summary Pages] only.
01 / 01 /2000 12:00am
Status : ON
Mode : Cooling
Cool Temp : 12.0ºC
In [Summary Pages], press and hold ENTER button (1
second) to go into [Unit Selection] menu.
Unit Selection :
Select All
Select One : 0
Unit Selection :
Select All
Select One : 0
Select “Select All” and press ENTER if user want
to control all Chiller in the network, or select
“Select One” to control a particular Chiller. Press
ESC to exit to [Summary Pages].
Select a Chiller ID via UP or DOWN and press
ENTER to confirm or ESC to cancel.
19
Page 21
6.2.3 Switching ON/OFF
There are several ways to switch ON/OFF for the Chiller.
i) [Summary Pages]
Press and hold ON/OFF button (hold 1 second). Please note that the ON/OFF button will only function in
[Summary Pages].
ii) [Operation Menu]
<ENTER> <ENTER>
Summary Pages Main Menu Operation Menu
<ESC> <ESC>
OPERATION MENU
Status :ON
Mode : Cooling
Cool Temp : 12.0ºC
Heat Temp : 40.0ºC
OPERATION MENU
Status : ON
Mode : Cooling
Cool Temp : 12.0ºC
Heat Temp : 40.0ºC
iii) [Timer Menu]
In [Operation Menu], select “Status” and press
ENTER.
Toggle ON/OFF via UP or DOWN button, and then
press ENTER to confirm the change or ESC to
cancel.
<ENTER> <ENTER>
Main Menu Timer MenuSummary Pages
<ESC> <ESC>
7 days programmable timer can turn chiller ON/OFF. User can set the schedule in this [Timer Menu].
Please refer 6.2.11 (page 27) for schedule settings.
20
Page 22

6.2.4 Switching Mode
There are several ways to switch the mode for the Chiller. Please take note that some mode cannot be set due to
current Chiller model settings.
Chiller Model
Chiller ¥ xx
Heat Pump
Chiller / Boiler
Heat Pump / Boiler
Chiller + Boiler
Heat Pump+ Boiler
Cooling Heating Boiling
¥
¥
¥
¥
¥
Mode
¥ x
X ¥
¥¥
x Auto
¥ Auto
¥ - Allow to set
x - Not allow to set
Auto - Turn ON automatically
i) [Summary Pages]
Cooling - Press and hold COOL button.
Heating - Press and hold HEAT button (if it allows to set).
Boiling - Press and hold HEAT button again (if it allows to set).
ii) [Operation Menu]
<ENTER> <ENTER>
<ESC> <ESC>
OPERATION MENU
Main Menu Summary Pages
Operation Menu
Status : ON
Mode : Cooling
Cool Temp : 12.0ºC
Heat Temp : 40.0ºC
OPERATION MENU
Status : ON
Mode : Cooling
Cool Temp : 12.0ºC
Heat Temp : 40.0ºC
In [Operation Menu], select “Mode” and press
ENTER to start setting or ESC to exit to [Main Menu].
Toggle ON/OFF via UP or DOWN button, and then
press ENTER to confirm the change or ESC to
cancel.
21
Page 23

6.2.5 Changing Mode Set Temperature
There are 2 ways to change the mode set temperature for the Chiller.
i) [Operation Menu]
OPERATION MENU
Status : ON
Mode : Cooling
Cool Temp : 12.0ºC
Heat Temp : 40.0ºC
OPERATION MENU
Status : ON
Mode : Cooling
Cool Temp : 12.0ºC
Heat Temp : 40.0ºC
ii) [Set Parameter]
<ENTER> <ENTER>
Main Menu Summary Pages
<ESC> <ESC>
In [Operation Menu], select “Cool Temp” / “Heat
Temp” and press ENTER to start setting or ESC to exit
to [Main Menu].
Change value via UP or DOWN button, and then
press ENTER to confirm the change or ESC to
cancel.
Operation Menu
Summary Pages Main Menu
<ENTER> <ENTER>
Settings Menu
<ESC> <ESC>
<ENTER> <ESC>
KeyinPassword
Set Parameter
1. General
2. Sensor
3. Regulator
4. Compressor
5. Defrost
6. Antifreeze
7. Alarm and Contact
R1 Cool SP : 12.0ºC
R2 Cool Diff : 3.0ºC
R3 Heat SP : 40.0ºC
R4 Heat Diff : 3.0ºC
R5 Min Cool SP : -20ºC
R6 Max Cool SP : 40ºC
R7 Min Heat SP : -20ºC
R1 Cool SP : 12.0ºC
R2 Cool Diff : 3.0ºC
R3 Heat SP : 40.0ºC
R4 Heat Diff : 3.0ºC
R5 Min Cool SP : -20ºC
R6 Max Cool SP : 40ºC
R7 Min Heat SP : -20ºC
3. Regulator
In [Set Parameter], select “Regulator” and press
ENTER. Press ESC to exit to [Main Menu].
3. Regulator
Select “R3” / “R5” and press ENTER to start
setting or ESC to exit to [Set Parameter] menu.
Change value via UP or DOWN button. The
borderlines limited by R5&R6 (cool), R7&R8 (heat).
Press ENTER to confirm or ESC to cancel.
22
Page 24

6.2.6 Manual Defrost
User can choose which compressor will go into manual defrost cycle by using the Chiller Panel, as long as the
condition is fulfilled with defrost condition. This can be done in [Operation Menu].
<ENTER> <ENTER>
<ESC> <ESC>
Main Menu Summary Pages
Operation Menu
Please take note that “Manual Defrost” option will only available in HEATING mode. It will disappear in
COOLING/BOILING mode.
OPERATION MENU
Status : ON
Mode : Cooling
Cool Temp : 12.0ºC
Heat Temp : 40.0ºC
OPERATION MENU
Status : ON
Mode : Heating
Cool Temp : 12.0ºC
Heat Temp : 40.0ºC
Manual Defrost
“Manual Defrost” disappear when Chiller not in HEATING mode
OPERATION MENU
Status : ON
Mode : Cooling
Cool Temp : 12.0ºC
Heat Temp : 40.0ºC
Manual Defrost
In [Operation Menu], select [Manual Defrost],
press ENTER to go into it, or ESC to exit to [Main
Menu].
Defrost Compressor
Comp 1
Comp 1
Select which compressor to go into defrost cycle
via UP or DOWN button. Press ENTER to confirm
or ESC to exit to [Operation Menu].
23
Page 25

6.2.7 Advance Parameter Settings
The Chiller Panel provide user a lot of advance parameter settings for the Chiller. The parameters are divided into 7
groups. There all are stored in [Set Parameter] menu and it is password-protected layer in the panel.
*CAUTION: INPROPER SETTINGS WILL CAUSE PERMANENT DAMAGE TO THE CHILLER!!!
Summary Pages Main Menu
7 groups of Advance Parameter:
1) General
G1 Model : Chiller
G2 No.Comp : 1 Comp
G3 On/Off In : Disabale
G4 Co/ Heat In : Disable
G5 Ext Alarm in : Disable
G6 Water Sys : Isolated
G7 Unit No : 0
2) Sensor
S1 Water Enter : 0.0ºC
S2 Water Leave : 0.0ºC
S3 Air Sensor : 0.0ºC
S4 Defrost 1 : 0.0ºC
S5 Defrost 2 : 0.0ºC
S6 Defrost 3 : 0.0ºC
S7 Defrost 4 : 0.0ºC
<ENTER> <ENTER>
Settings Menu
<ESC> <ESC>
<ENTER> <ESC>
Key in password
Set Parameter
S8 Cp Dish 1 : 0.0ºC
S9 Cp Dish 2 : 0.0ºC
S10 Cp Dish 3 : 0.0ºC
S11 Cp Dish 4 : 0.0ºC
3) Regulator
R1 Cool SP : 12.0ºC
R2 Cool Diff : 3.0ºC
R3 Heat SP : 40.0ºC
R4 Heat Diff : 3.0ºC
R5 Mix Cool SP : -20ºC
R6 Max Cool SP : 40ºC
R7 Min Heat SP : -20ºC
R8 Max Heat SP : 90ºC
R9 Ax Heat SP : 5.0ºC
R10 Ax Heat Diff : 2.0ºC
R11 Au Bo SP : 5.0ºC
R12 Au Bo Diff : 2.0ºC
R13 Au Bo Start : 30m
24
Page 26

4) Compressor
p
C1 Min Run : 120s
C2 Min Stop : 240s
C3 2On Interval : 360s
C4 2Cp ON Dly : 15s
C5 P-Cp ON Dly : 60s
C6 Cp-P OFF Dly : 60s
Cut Off : 120ºC
C7 C
5) Condenser Defrost
D1 Start Temp : -3ºC
D2 End Temp : 14ºC
D3 Max Dura : 10m
D4 Interval : 45m
D5 Dly Bfr Def : 0s
D6 Dly Aft Def : 0s
6) Cool Mode Antifreeze
A1 Heater SP :5ºC
A2 Heater Diff : 2.0ºC
A3 Sensor : Leave
A4 Alarm SP : 3ºC
A5 Alarm Diff : 2.0ºC
7) Alarm and Contact
P1 FS Confirm :5s
P2 FS Delay : 180s
P3 LP Delay : 30s
P4 CO Reset : Manual
P5 HP Rest : Auto
P6 LP Reset : Auto
P7 FO Reset : Manual :
P8 RO Reset : Manual
P9 FS Reset : Manual
P10 Aux Reset : Manual
P11 A/F Reset : Manual
P12 CO Contact : Normal
P13 HP Contact : Normal
P14 LP Contact : Normal
Please refer to 8. APPENDIX for detail description.
P15 FO Contact : Normal
P16 PO Contact : Normal
P17 FS Contact : Normal
P18 EA Contact : Normal
P19 DE Contact : Normal
25
Page 27

6.2.8 Changing Password
For security purpose, some places in the panel are password-protected. User can change the password at anytime.
Summary Pages
<ENTER> <ENTER>
<ESC> <ESC>
<ENTER> <ESC>
Please enter the
Old password…….
Main Menu
Settings Menu
Change Password
User needs to enter the old password in order to
change the password.
0
- - - -
Change the 1st digit value via UP or DOWN. Press
ENTER to start enter 2nd digit and the rest, or ESC to
exit at anytime.
Password accepted ….
Access granted !
Password error ….
Access denied !
If password correct, this message will be If password not correct, this message will be
shown and proceed to new password shown and exit to [Settings Menu]
settings.
Please enter the
New password…….
0
- - - -
New password
has been set……
Same as previous, UP DOWN to change value, ENTER
to go to next digit, ESC to exit.
User is not allowed to set the password to 0000.
New password
‘0 0 0 0’
Is not accepted ……
If new password is accepted, this message If new password is ‘0000’, this message will be
will be shown and then exit to [Settings shown and then exit to [Settings Menu]. The
Menu]. password remains as previous.
26
Page 28

6.2.9 Clock Setting
User can set the clock for the panel.
Summary Pages Main Menu
<ENTER> <ESC>
Set Time :
hh mm
00 : 00
<ENTER> <ENTER>
Timer Menu
<ESC> <ESC>
Set Time
UP or DOWN to change ‘hour’. ENTER to set ‘minute’
or ESC to exit to [Timer Menu].
UP or DOWN to change ‘minute’. ENTER to confirm or
ESC to set ‘hour’ again.
6.4.10 Date Setting
User can set the date for the panel.
Summary Pages Main Menu
<ENTER> <ENTER>
Timer Menu
<ESC> <ESC>
<ENTER> <ESC>
Set Date
Set Date :
yyyy mm dd
2000 / 01 / 01
000
UP or DOWN to change ‘year’. ENTER to set ‘month’ or
ESC to exit to [Timer Menu].
UP or DOWN to change ‘month’. ENTER to set ‘day’ or
ESC to set ‘year’ again.
UP or DOWN to change ‘day’. ENTER to confirm or
ESC to set ‘month’ again.
27
Page 29

6.2.11 7 Days Programmable Setting
There are 2 ON/OFF events in one day for the schedule. This schedule is applicable to all the chillers in the network.
Summary Pages
<ENTER> <ESC>
Timer 1 Timer 2
ON OFF ON OFF
Sun 0800 1800 - - - - - - - -
Mon 0800 1800 - - - - - - - Tue 0800 1800 - - - - - - - Wed 0800 1800 - - - - - - - -
Timer 1 Timer 2
ON OFF ON OFF
<ENTER> <ENTER>
Main Menu
<ESC> <ESC>
Sun
UP or DOWN select day of week. ENTER to select
event or ESC to exit to [Timer Menu].
OFF ON OFF
UP or DOWN select event. ENTER to start setting or
Timer Menu
Set Schedule
ESC to back to select day of week.
Sun 0800 1800 - - - - - - - Mon 0800 1800 - - - - - - - Tue 0800 1800 - - - - - - - Wed 0800 1800 - - - - - - - -
Event setting is same like time setting. User can disable
the event by set it to‘- - - -’
Before the schedule will carry the effect, user need to set ENABLE for “TIMER” in [Timer Menu].
OFF ON OFF
TIMER MENU
Set Time
Set Date
Set Schedule
Timer : Disable
Select “Timer” and press ENTER to start the settings.
UP or DOWN to toggle Enable/Disable, ENTER to
confirm or ESC to cancel.
28
Page 30

6.2.12 Viewing Alarm / Erase Alarm Record
Whenever a new fault/alarm is occurred, there will be a message pop up to show the fault/alarm. Backlight
will blinking with beeping sound (if “Alarm Buzzer” is set ON). If the fault/alarm has not been dissolved
from the Chiller, a sign [A] will be shown in the [Summary Pages]. Whereas, it will return to [Summary
Pages] (from pop up menu) automatically if the fault/alarms have been dissolved.
While the fault/alarms have not been dissolved (sign [A]), user can check that fault/alarm by go into [Alarm
Menu]. If all the fault/alarm have been dissolved, user can view the fault/alarm history records in [Alarm
Menu] as well. Screen saver will be deactivated while all the alarms have not been dissolved.
If panel ID is set 0 (Master panel), it can receive and view all the fault/alarms from all chillers in the network.
New Alarm 1
Comp 1 overload
12:00am 01/01/2000
<ENTER> <ESC>
Alarm 1
Comp 1 overload
01/01/00 12:00am
[Ch 0]
[Ch 0] show alarm occurred unit.
Press any button to stop backlight blinking and beeping.
Press ESC again to exit to normal page.
<ENTER> <ENTER>
Summary Pages Main Menu
<ESC> <ESC>
[Ch 0]
Press UP or DOWN to scroll the record.
Press ENTER if user want to erase the record, or ESC
to exit to [Alarm Menu].
Alarm Menu
Show Alarms
Erase Alarn ?
Press Enter to erase,
Or ESC to exit
000
Press ENTER to erase the alarm, or ESC to cancel.
User can erase all the fault / alarm record at once time through [Erase All Alarms] in [Alarm Menu].
29
Page 31

6.2.13 Viewing Defrost Sensor Temperature
The Chiller Panel displays defrost sensor temperature for each compressor in [Defrost Sensor] in [Display Menu].
Summary Pages Main Menu
<ENTER> <ESC>
Defrost Sensor
<ENTER> <ENTER>
Display Menu
<ESC> <ESC>
Defrost Sensor
Press ESC to exit to [Display Menu]
Comp 1 : 12.8ºC
6.2.14 Viewing Compressor Discharge Temperature
The Chiller Panel displays compressor discharge temperature for each compressor in [Discharge Sensor] in
[Display Menu].
<ENTER> <ENTER>
Main Menu Summary Pages
<ESC> <ESC>
<ENTER> <ESC>
Display Menu
Discharge Sensor
Comp1 36.5ºC
Discharge Sensor
000
Press ESC to exit to [Display Menu]
30
Page 32

6.2.15 Viewing/Clear Compressor Run Time
f
l
User can view / clear the compressor run time for the Chiller in [Comp Run Time] in [Display Menu].
Summary Pages Main Menu
<ENTER> <ENTER>
<ESC> <ESC>
Comp Run Time
Comp 1 : 13579h
Clear Run Time ?
Press Enter to clear,
Or ESC to exit
Display Menu
<ENTER> <ESC>
Comp Run Time
Press UP or DOWN to select the compressor. ENTER
to start clear the run time, or ESC to exit to [Display
Menu].
Press ENTER and key in the password to confirm or
ESC to cancel.
6.2.16 Miscellaneous Settings
User can do some miscellaneous settings to the panel.
<ENTER> <ENTER>
Summary Pages Main Menu
<ESC> <ESC>
Backlight : Normal
Buzzer : ON
Screen Saver : Disable
Timeout : 5m
Contrast : 50%
Brightness : Medium
Temp Unit : ºC
000
Press UP or DOWN to select the item. ENTER to set,
or ESC to exit to [Settings Menu].
Press UP or DOWN to toggle the value. ENTER to
irm, or ESC to cance
con
Settings Menu
<ENTER> <ESC>
Panel Option
31
Page 33

Parameter Value Description
Backlight
Buzzer
* Screen Saver
* Timeout 1 – 30m Timeout for showing screen saver
Contract 0 – 100% Adjust the contrast setting for the LCD panel
Brightness
Temp Unit
Normal Turn ON backlight for 30s via key press
Always Always ON backlight
ON Enable beeping sound when fault/ alarm occurred
OFF Disable beeping sound when fault / alarm occurred
Enable Show screen saver when timeout
Disable No screen save
OFF No backlight
Low, Medium, High Adjust the backlight intensity
ºC Display temperature in degree Celsius
ºF Display temperature in Fahrenheit
* This product must be branded. Screen saver will be deactivated for brand less panel
6.3 CMOS Reset
x CMOS reset allows user to reset some settings to default value such as:
Password -> 0001
Backlight -> Normal
Buzzer -> ON
Screen Saver -> Disable
Timeout -> 5m
Contrast -> 50%
Brightness -> Medium
Temp Unit -> ºC
x Procedures
1. Power OFF the panel
2. Close the jumper JH2 with the provided jumper header
3. Power ON the panel and the LCD panel should display as follow:
CMOS is resetting ……….
CMOS reset completed!
Please remove JUMPER
and restart the panel
4. Remove the jumper header (put the jumper header on 1 pin only), power OFF and then power ON the panel.
32
Page 34

7. PROBLEMS AND TROUBLESHOOTING
Symptoms Possible Cause Troubleshooting
Panel gets hot
1
abnormally
The LCD no display
2
(blank screen)
'- -' for all status (quite
3
a long time)
• Wiring fault in 12VDC supply
• Wiring fault in the 12VDC
supply
• No power supply • Check the wiring and supply 12VDC to panel
• Voltage supply too low • Check the power source
• Module defective • Change a new panel module
• Panel cannot/not yet
received the information
from Chiller or FCU
completely
• That particular unit address
is not recognized by the
panel
• Module defective • Change a new module
• Change a new panel module and turn ON the unit again
after the verification
• Correct the wiring problem
• Ensure the selected unit exists in the network.
• Ensure the wiring is correct.
• Ensure the wiring is not defective.
• Ensure the wiring has been isolated from high power cable
• Select a coherent unit address on the panel (refer to
6.2.2)
ON/OFF, COOL or
4
HEAT button not
function
Cannot switch to
5
HEATING mode
Cannot switch to
6
BOILING mode
No "Manual Defrost"
7
item
Cannot step inside [Set
8
Parameter]
7 Days Programmable
9
Timer not function
No beeping sound
10
when new alarm
occurred
No screen saver after
11
timeout
• Software limitation
• Module defective • Change a new module
• Software limitation
• Software limitation
• Software limitation • Ensure current running mode is HEATING
• Software limitation. Panel
has not received all the
information from Chiller
completely
• Software limitation. User
did not activate the
schedule
• Software limitation. User
did not set ON to the alarm
buzzer
• Software limitation. User
did not set ENABLE to the
screen saver
• Ensure it is pressed (hold 1s) in [Summary Pages],
not in others menu.
• Ensure this mode is available in current "Model" of
Chiller. Please refer to 6.2.4
• Ensure this mode is available in current "Model" of
Chiller. Please refer to 6.2.4
• Refer to symptoms 3
Control of Chiller:
• Ensure the "Timer" in [Timer Menu] is set ENABLE
Control of Chiller:
• Ensure the "Timer" in [Operation Menu] is set
ENABLE
• Ensure "Buzzer" in [Panel Option] is set ON
• Ensure "Screen Saver" in [Panel Option] is set
ENABLE
12
Time always reset to
12:00am,1
Panel stop operation.
13
Whole operation
freezing (hang)
St
Jan 2000
• No backup battery
• Energy of the backup
battery is low
• Unstable power supply
• Energy of the backup
battery is low
• Replace a coin cell battery
• Power off the panel. Take out the backup battery as
well. Replace with a new 3V coil cell battery if
necessary. Put back the backup battery into the
panel and power on again.
33
Page 35

8. APPENDIX
)0(0)
)0(0)
)0(0)
)0(0)
)0(0)
)0(0)
)0(0)
)0(0)
)0(0)
)
g
)
)
)10(18)
p
)
)
)10(18)
y
y
GENERAL Type Unit Default
G1 Model
O=Chiller,
1=Heat Pump,
2=Chiller/ Boiler,
3=Heat pump/Boiler, 4=Chiller+Boiler,
5=Heat pump+Boiler
Number of compressor
G2
1=1 compressor,
2=2 compressor
3=3 compressor,
4=4 compressor
On/off input
G3
0=disable, 1=enable
Cool/Heat input
G4
0=disable, 1=enable
External alarm input
G5
0=disable, 1=enable
Water system for chiller network
G6
0=independent, 1=modular
G7 Unit number F Flag 0 0 50 1
Min Max Resolution
FFlag4
(Chiller+Boiler)
FFlag1 14 1
FFlag0(disable)01 1
F Flag 0 (disable) 0 1 1
FFlag0(disable)01 1
FFlag0(disable)01 1
0 2 1
SENSOR
S1 Entering water sensor calibration
S2 Leavingwater sensor calibration U °C(°F
S3 Air sensor calibration U °C(°F
S4 Defrost(condenser) sensor 1 calibration U °C(°F
S5 Defrost(condenser) sensor 2 calibration U °C(°F
S6 Defrost(condenser) sensor 3 calibration U °C(°F
S7 Defrost(condenser) sensor 4 calibration U °C(°F
S8 Compressor discharge sensor 1 calibration U °C(°F
S9 Compressor discharge sensor 2 calibration U °C(°F
S 10 Compressor discharge sensor 3 calibration U °C(°F
S11 Compressor discharge sensor 4 calibration U °C (°F) 0 (0) -12 (-21.6) 12 (21.6) 0. 1
REGULATOR Type Unit Default Min Max Resolution
R1 Cooling set-point D °C (°F) 12 (53.6) R5 R6 0.1
R2 Cooling differential U °C (°F) 1.5* (2.7) 0.4 (0.7) 10(1 8 ) 0.1
R3 Heating set-point D °C (°F) 40 (104) R7 R8 0.1
R4 Heating differential U °C (°F) 1.5* (2.7) 0.4 (0.7) 10 (18) 0.1
R5 Minimum Cooling set-point U °C (°F) 7 (44.6) -20 (-4) R6 1
R6 Maximum Cooling set-point U °C(°F)20(68
R7 Minimum Heating set-point U °C (°F) 3 0 (8 6 ) -20 (-4) R8 1
R8 Maximum Heating set-point U °C (°F) 50 (122) R7 90 (194) 1
Auxiliary heater set-point (threshold below
R9
R10 Auxiliary heater differential U °C(°F)2(3.6
R11
R12 Auto boiler differential U °C(°F)2(3.6
R13 Auto boiler start time threshold U min 30 0 199 1
set-point
heatin
Auto boiler set-point (threshold below heating
oint
set-
Type Unit Default Min Max Resolution
U
U °C (°F) 5 (9) 0 (0) 40 (72) 0.1
U °C (°F) 5 (9) 0 (0) 40 (72) 0.1
ºC( F) 0 (0) -12 ( 216) 12 (21.6) 0.1
-12(-21.6)12(21.6)0.1
-12(-21.6)12(21.6)0.1
-12(-21.6)12(21.6)0.1
-12(-21.6)12(21.6)0.1
-12(-21.6)12(21.6)0.1
-12(-21.6)12(21.6)0.1
-12(-21.6)12(21.6)0.1
-12(-21.6)12(21.6)0.1
-12(-21.6)12(21.6)0.1
R5 40(104)1
0.4(0.7
0.4(0.7
0.1
0.1
COMPRESSOR Type Unit Default Max Min Resolution
C1 Compressor minimum run time
C2 Compressor minimum stop time U sec 180 0 1990 10
C3 Time interval between two starts U sec 450 0 1990 10
C4 Start delay between two compressors U sec 15 0 199 1
C5 Pump on ĺ compressor on dela
C6 Comp off ĺ pump off dela
C7 Discharge cut-off set-point U °C 120 (248) 0 (32) 150 (302) 1
CO ND EN SE R DE FR OST Typ e Unit Default Max Min Resolution
D1 S ta rt d ef rost t em pera tu re U °C (ºF ) 0 (32) -20 (-4) D2 1
D2 End defrost temperature U °C (ºF) 14 (57) D1 40 (104) 1
Usec120
U sec 180 0 1990 10
U sec 60 0 199 10
0
1990 10
34
Page 36

D3 Maximum duration of defrost cycle U min 10 1 40 1
g
r
(
g)
(
)
5
(
)
g
(
)
g
(
)
8
g
(
)
g
(
)
g
(
)
g
(
)
y open(NO)
g
y open(NO)
g
y open(NO)
g
y op
)
g
y open(NO)
g
y open(NO)
g
y open(NO)
g
D4 Defrost interval time U min 4 5 0 199 1
D5 Delay before defrosting U sec 0 0 1990 10
D6 Delay after defrosting U sec 120 0 1990 10
COOL MODE ANTIFREEZE Type Unit Default Min Max Resolution
A1 Antifreeze heater set-point U °C ( F) 5 (41) -40 (-40) 40 (104) 1
A2 Antifreeze heater differential U °C (°F) 2 (3.6) 0.4 (0.7) 10 (18) 0.1
Antifreeze sensor select
A3
0=Leavin
A4 Antifreeze alarm set-point U °C (°F) 3 (37) -40 (-40) 40 (104) 1
A5 Antifreeze alarm differential U °C (°F) 2 (3.6) 0.4 (0.7) 10 (18) 0 .1
water, 1=Entering wate
U Flag
0
leavin
01
1
ALARM AND CONTACT
P1 Flow switch confirmation time U sec 5 0
P2 Flow switch alarm delay at pump start U sec 120 0 199 1
P3 Low pressure alarm delay at compressor start-up U sec 30 0 199 1
P4 Comp overload alarm reset type U Flag 0 0 1 1
0=Manual reset, 1=Auto reset
P
High pressure alarm reset type U Flag 1 0 1 1
0=Manual reset, 1=Auto reset
P6 Low pressure alarm reset type U Fla
0=Manual reset, 1=Auto reset
P7 Fan overload alarm reset typeUFla
0=Manual reset, 1=Auto reset
P
Pump overload alarm reset typeUFla
0=Manual reset, 1=Auto reset
P9 Flow switch alarm reset type U Fla
0=Manual reset, 1=Auto reset
P10 Auxiliary alarm reset type U Fla
0=Manual reset, 1=Auto reset
P11 Antifreeze alarm reset type U Fla
0=Manual reset, 1=Auto reset
P12 Comp overload contact type U Flag 0 0 1 1
0=Normally close (NC)
1=Normall
P13 High pressure contact type U Fla
0=Normally close (NC)
1=Normall
P14 Lowpressure contact typeUFla
0=Normally close (NC)
1=Normall
P15 Fan overload contact typeUFla
0=Normally close (NC)
1=Normall
P16 Pump overload contact typeUFla
0=Normally close (NC)
1=Normall
P17 Flow switch contact type U Fla
0=Normally close (NC)
1=Normall
P18 External alarm contact typeUFla
0=Normally close (NC)
1=Normall
P19 Defrost end contact typeUFla
0=Normally close (NC)
1=Normally open (NO)
en(NO
Type Unit Default Min Max Resolution
199 1
manual
auto
10 11
auto
10 11
auto
00 11
manual
00 11
manual
10 11
auto
10 11
auto
(NC)
00 11
(NC)
00 11
(NC)
00 11
(NC)
00 11
(NC)
00 11
(NC)
00 11
(NC)
00 11
(NC)
35
Page 37

Specifications
Air Cooled Chiller – R22 Cooling Only
MODEL MAC080C MAC100C MAC120C MAC150C
NOMINAL CAPACITY kcal/hr 19657 23437 29233 34777
MATERIAL
CASING FINISH
THICKNESS mm
HEIGHT (H) mm
DIMENSION W IDTH (W) mm
DEPTH (D) mm
WEIGHT kg 340 350 460 540
NOISE LEVEL dBA 65 66 67 69
PACKING HEIGHT (H) mm
DIMENSION W IDTH (W) mm
DEPTH (D) mm
CONDENSER COIL
TYPE
MATERIAL
TUBE W ALL THICKNESS mm
OUTER DIAMETER mm
MATERIAL
FIN THICKNESS mm
ROWS 2222
FIN PER INCH 14 14 14 14
TOTAL FACE AREA
EVAPORATOR
TYPE
PLATE MATERIAL
NOMINAL WATER FLOW L/s 1.08 1.31 1.67 2.00
CONDENSER FAN
TYPE/DRIVE
QUANTITY
BLADE MATERIAL
BLADE DIAMETER INCH
POWER SUPPLY V/Ph/Hz
RATED RUNNING CURRENT Amp 1.2 x 2 1.2 x 2 1.8 x 2 3.4 x 2
RATED INPUT Watt 386 x 2 766 x 2
RATED OUTPUT Watt 200 x 2 450 x 2
MOTOR POLES 8886
WATER LINE (HYDRAULIC KIT)
TYPE
PUMP MAX. WATER OPER. PRESSURE kPa
RUNNING CURRENT Amp 1.5 1.5 2.0 2.0
WATER FLOW RATE GPM 17.2 20.7 26.4 31.7
PIPING INSTALLATION PIPE CONNECTION
HEAD m 26 23.5 25 23
COMPRESSOR
TYPE
POWER SUPPLY V/Ph/Hz
RATED CURRENT Amp x 2 7.0 7.4 9.9 11.2
RATED INPUT Watt x 2 3526 4280 4717 5724
MAXIMUM STARTING CURRENT Amp 65 x 2 74 x 2 76 x 2 95 x 2
PROTECTION DEVICES
STAGE OF CAPACITY CONTROL
REFRIGERANT
TYPE
CONTROL
CHARGING MASS kg 4.5 x 2 3.9 x 2 6.0 x 2 7.1 x 2
Btu/hr 78000 93000 116000 138000
Watt 22860 27257 33998 40445
1245
1500
900
1452 1452
1732 2032
1032 1282
2
m
mm(in)
1.37 1.37 1.79 1.79
283 x 2
120 x 2
Overload Protection, Differential and H/L Pressure Switch
Electro-galvanized Mild Steel
Polyester Powder
1.5
Cross Finned Tubes
Seamless Copper
0.35
Aluminium (Hydrophilic)
Brazed Plate Heat Exchanger
24 26
Horizontal Multistage End-Suction
9.52
0.11
Stainless Steel
Propeller/Direct
Aluminium
220-240/1/50
1000
42mmBSP(1
SCROLL
380-415/3/50
0~50~100
R22
TXV
1
/4")
1245
1800
1150
22
Note : Nominal values are based on 12°C / 7°C entering / leaving evaporator water temperature , 35°C air ambient temperature.
36
Page 38

Air Cooled Chiller – R22 Heat Pump
MODEL MAC080CR MAC100CR MAC120CR MAC150CR
NOMINAL CAPACITY (COOLING / HEATING) k cal/ hr 19405 / 22680 23689 / 27721 28477 / 30241 34778 / 33266
MATERIAL
CASING FINISH
THICK NE SS mm
HEIGHT (H) m m
DIMENSION WIDTH (W) mm
DEPTH (D) mm
WEIGHT kg 350 360 480 560
NOISE LEVEL dBA 61 62 63 64
PACKING HEIGHT (H) mm
DIMENSION WIDTH (W) mm
DEPTH (D) mm
CONDENSER COIL
TYPE
MATERIAL
TUBE WALL THICKNESS mm
OUTER DIAM ETER m m
MATERIAL
FIN THICKNES S mm
ROWS 2222
FIN PERINCH 14141414
TOTAL FACE AREA m
EVAPORATOR
TYPE
PLATE MATERIAL
NOMINAL W ATER FLOW L/s 1.08 / 1.14 1.31 / 1. 37 1.67 / 1.79 2. 00 / 2. 10
CONDENSER FAN
TYPE/DRIVE
QU ANTITY
BLADE MATERIAL
BLADE DIAMETER INCH
POWER SUPPLY V/Ph/Hz
RATED RUNNING CURRE NT Amp 1.2 x 2 1. 2 x 2 1.8 x 2 3.4 x 2
RATED INPUT(COOLIING / HEATING) W att 386 x 2 766 x 2
RATED OUTPUT(COOLING / HEATING) W att 200 x 2 450 x 2
MOTOR POLES 8 8 8 6
WAT ER LINE (HYDRAULIC KI T)
TYPE
PUMP MAX. WATER OPER. PRESSURE kPa
RUNNING CURRENT Amp 1.5 1.5 2.0 2.0
WATER FLOW RATE GPM 17.2 / 18.1 20.7 / 21.7 26.4 / 28.4 31.7 / 33.3
PIPING INSTALLATION PIPE CONNECTION
HEAD m 26 / 25 23.5 / 22.5 25 / 24.5 23 / 22.5
COMPRESSOR
TYPE
POWER SUPPLY V/Ph/Hz
RATED CURRE NT (COOLING / HEA TING) A mp x 2 7.0 / 6.7 8.0 / 7. 6 10.2 / 10. 3 11.0 / 11.5
RATED INPUT (COOLING / HEATING) Watt x 2 3981 / 3857 4595 / 4347 5071 / 5188 5775 / 6120
MAXIMUM S TARTING CURRENT A mp 65 x 2 74 x 2 76 x 2 95 x 2
PROTECTION DEVICES
STAGE OF CAPACITY CONTROL
REFRIGERANT
TYPE
CONTROL
CHARGING MASS kg 4.3 x 2 4.5 x 2 7.6 x 2 6.5 x 2
Note : Nominal values are based on 12°C / 7°C entering / leaving evaporator water temperature , 35°C air ambient temperature.
Note : Nominal values are based on 40°C / 45°C entering / leaving evaporator water temperature , 7°C air ambient temperature.
Note : Unit dimension withouit hydraulic kit.
Btu/ hr 77000 / 90000 94000 / 110000 113000 / 120000 138000 / 132000
Wat t 22567 / 26376 27549 / 32239 33118 / 35169 40445 / 38686
1245
1500
1452 1452
1732 2032
1032 1282
2
mm(in)
1.37 1. 37 1.79 1. 79
283 x 2
120 x 2
Oveload Protection, Differential and H/L Pressure Switch
Elec tro-galvanized Mild S teel
Polyester Powder
1.5
900
Cross Finned Tubes
Seaml ess Copper
0.35
Aluminium (Hydrophilic)
Brazed Plate Heat Ex changer
24 26
Horizontal Multist age End-Suc tion
9.52
0.11
Stainless Steel
Propell er/Direct
Aluminium
220-240/1/ 50
1000
42mmBSP(1
SCROLL
380-415/3/ 50
ON/OFF
R22
Capillary Tube
1
/4")
1245
1800
1150
22
37
Page 39

Air Cooled Chiller – R407 Cooling Only
MODEL M4AC080C M4AC100C M4AC120C M4AC150C
NOMINAL CAPACITY kcal/hr 18649 22177 28982 34525
MATERIAL
CASING FINISH
THICKNESS mm
HEIGHT (H) mm
DIMENSION WIDTH (W) mm
DEPTH (D) mm
WEIGHT kg 340 350 460 540
NOISE LEVEL dBA 65 66 67 69
PACKING HEIGHT (H) mm
DIMENSION WIDTH (W) mm
DEPTH (D) mm
CONDENSER COIL
TYPE
MATERIAL
TUBE WALL THICKNESS m m
OUTER DIAMETER mm
MATERIAL
FIN THICKNESS mm
ROWS 2222
FIN PER INCH 14 14 14 14
TOTAL FACE AREA
EVAPORATOR
TYPE
PLATE MATERIAL
NOMINAL WATER FLOW L/s 1.08 1.31 1.67 2.00
CONDENSER FAN
TYPE/DRIVE
QUANTITY
BLADE MATERIAL
BLADE DIAMETER INCH
POWER SUPPLY V/Ph/Hz
RATED RUNNING CURRENT Amp 1.2 x 2 1.2 x 2 1.8 x 2 3.4 x 2
RATED INPUT Watt 386 x 2 766 x 2
RATED OUTPUT Watt 200 x 2 450 x 2
MOTOR POLES 8886
WATER LINE (HYDRAULIC KIT)
TYPE
PUMP MAX. WATER OPER. PRESSURE kPa
RUNNING CURRENT Amp 1.5 1.5 2.0 2.0
WATER FLOW RATE GPM 17.2 20.7 26.4 31.7
PIPING INSTALLATION PIPE CONNECTION
HEAD m 26 23.5 25 23
COMPRESSOR
TYPE
POWER SUPPLY V/Ph/Hz
RATED CURRENT Amp x 2 7.5 7.9 10.2 11.8
RATED INPUT Watt x 2 3924 4578 5117 6100
MAXIMUM STARTING CURRENT Amp 65 x 2 74 x 2 76 x 2 95 x 2
PROTECTION DEVICES
STAGE OF CAPACITY CONTROL
REFRIGERANT
TYPE
CONTROL
CHARGING MASS kg 4.0 x 2 3.9 x 2 5.6 x 2 6.0 x 2
Btu/hr 74000 88000 115000 137000
Watt 21688 25791 33705 40152
Electro-galvanized Mild Steel
Polyester Powder
1.5
1245
1500
900
1245
1800
1150
1452 1452
1732 2032
1032 1282
Cross Finned Tubes
Seamless Copper
0.35
9.52
Aluminium (Hydrophilic)
0.11
2
m
1.37 1.37 1.79 1.79
Brazed Plate Heat Exchanger
Stainless Steel
Propeller/Direct
22
Aluminium
24 26
220-240/1/50
283 x 2
120 x 2
Horizontal Multistage End-Suction
1000
mm(in)
42mmBSP(1
1
/4")
SCROLL
380-415/3/50
Overload Protection, Differential and H/L Pressure Switch
0~50~100
R407C
TXV
Note : Nominal values are based on 12°C / 7°C entering / leaving evaporator water temperature , 35°C air ambient temperature.
38
Page 40

Air Cooled Chiller – R407 Heat Pump
MODEL M4AC080CR M4AC100CR M4AC120CR M4AC150CR
NOMINAL CAPACITY (COOLING / HEATING) kcal/hr 18649 / 22681 22177 / 24697 27721 / 29737 33266 / 30997
MATERIAL
CASING FINISH
THICKNESS mm
HEIGHT (H) mm
DIMENSION WIDTH (W) mm
DEPTH (D) mm
WEIGHT kg 350 360 480 560
NOISE LEVEL dBA 61 62 63 64
PACKING HEIGHT (H) mm
DIMENSION WIDTH (W) mm
DEPTH (D) mm
CONDENSER COIL
TYPE
MATERIAL
TUBE WALL THICKNESS m m
OUTER DIAMETER mm
MATERIAL
FIN THICKNESS mm
ROWS 2222
FIN PER INCH 14 14 14 14
TOTAL FACE AREA
EVAPORATOR
TYPE
PLATE MATERIAL
NOMINAL WATER FLOW L/s 1.08 / 1.14 1.31 / 1.37 1.67 / 1.79 2.00 / 2.10
CONDENSER FAN
TYPE/DRIVE
QUANTITY
BLADE MATERIAL
BLADE DIAMETER INCH
POWER SUPPLY V/Ph/Hz
RATED RUNNING CURRENT Amp 1.2 x 2 1.2 x 2 1.8 x 2 3.4 x 2
RATED INPUT(COOLIING / HEATING) Watt 386 x 2 766 x 2
RATED OUTPUT(COOLING / HEATING) Watt 200 x 2 450 x 2
MOTOR POLES 8886
WATER LINE (HYDRAULIC KIT)
TYPE
PUMP MAX. WATER OPER. PRESSURE kPa
RUNNING CURRENT Amp 1.5 1.5 2.0 2.0
WATER FLOW RATE GPM 17.2 / 18.1 20.7 / 21.7 26.4 / 28.4 31.7 / 33.3
PIPING INSTALLATION PIPE CONNECTION
HEAD m 26/25 23.5/22.5 25/24.5 23/22.5
COMPRESSOR
TYPE
POWER SUPPLY V/Ph/Hz
RATED CURRENT (COOLING / HEATING) Amp x 2 7.1 / 7.3 8.1 / 8.1 10.5 / 10.3 11.7 / 12.4
RATED INPUT (COOLING / HEATING) W att x 2 4166 / 4180 4707 / 4760 5351 / 5407 6410 / 6746
MAXIMUM STARTING CURRENT Amp 65 x 2 74 x 2 76 x 2 95 x 2
PROTECTION DEVICES
STAGE OF CAPACITY CONTROL
REFRIGERANT
TYPE
CONTROL
CHARGING MASS kg 4.0 x 2 3.3 x 2 5.8 x 2 6.1 x 2
Btu/hr 74000 / 90000 88000 / 98000 110000 / 118000 132000 / 123000
Watt 21688 / 26377 25791 / 28722 32239 / 34583 38686 / 36049
Electro-galvanized Mild Steel
Polyester Powder
1.5
1245
1500
900
1245
1800
1150
1452 1452
1732 2032
1032 1282
Cross Finned Tubes
Seamless Copper
0.35
9.52
Aluminium (Hydrophilic)
0.11
2
m
1.37 1.37 1.79 1.79
Brazed Plate Heat Exchanger
Stainless Steel
Propeller/Direct
22
Aluminium
24 26
220-240/1/50
283 x 2
120 x 2
Horizontal Multistage End-Suction
1000
mm(in)
42mmBSP(1
1
/4")
SCROLL
380-415/3/50
Oveload Protection, Differential and H/L Pressure Switch
ON/OFF
R407C
Capillary Tube
Note : Nominal values are based on 12°C / 7°C entering / leaving evaporator water temperature , 35°C air ambient temperature.
Note : Nominal values are based on 40°C / 45°C entering / leaving evaporator water temperature , 7°C air ambient temperature.
Note : Unit dimension withouit hydraulic kit.
39
Page 41

4219 4640
AMBIENT TEMPERATURE (°C)
28 32 35
kW kW kW kW kW kW kW kW kW kW kW kW kW kW
CAP. INPUT CAP. INPUT CAP. INPUT CAP. INPUT CAP. INPUT CAP. INPUT CAP. INPUT
COOL C OMP. COOL COMP. COOL COMP. COOL COMP. COOL COMP. COOL COMP. COOL COMP.
LEAVING WATER TEMP (°C)
5 25.4 4.2 23.3 5.3 22.4 5 .8 21.7 6.2 19.7 6.9 18.8 7.2 17.2 7.8
6 26.2 4.5 24.0 5.7 23.1 6 .2 22.4 6.6 20.3 7.4 19.4 7.7 17.8 8.3
7 26.4 4.7 24.4 6.0 23.5 6 .6 22.9 7.0 20.9 7.8 20.1 8.1 18.5 8.7
8 26.7 5.0 24.7 6.3 23.9 6 .9 23.2 7.3 21.1 8.1 20.2 8.4 18.6 9.1
9 27.5 5.4 25.5 6.8 24.5 7 .4 23.8 7.9 21.6 8.7 20.7 9.0 18.9 9.6
5 28.9 5.0 27.2 6.5 26.5 7 .1 25.9 7.6 23.4 8.5 22.4 8.9 20.3 9.6
6 29.8 5.4 28.1 6.9 27.3 7 .6 26.7 8.1 24.1 9.1 23.1 9.4 21.0 10.2
7 30.5 5.5 28.7 7.2 27.9 8 .0 27.3 8.6 24.8 9.5 23.8 9.9 21.8 10.7
8 30.7 6.0 29.0 7.7 28.2 8 .4 27.7 9.0 25.1 10.0 24.0 10.4 22.0 11.2
9 31.2 6.5 29.7 8.3 29.0 9 .0 28.4 9.6 25.7 10.7 24.7 11.1 22.5 11.9
5 35.9 6.2 33.9 7.4 33.0 8 .0 32.3 8.4 30.1 9.4 29.2 9.8 27.3 10.6
6 37.1 6.5 35.0 7.9 34.0 8 .5 33.3 9.0 31.1 10.0 30.1 10.4 28.3 11.2
7 37.3 7.0 35.5 8.3 34.6 9 .0 34.0 9.4 31.8 10.6 30.9 11.0 29.1 11.9
8 38.1 7.4 36.1 8.8 35.2 9 .4 34.5 9.9 32.2 11.0 31.3 11.4 29.5 12.3
9 38.7 7.8 36.9 9.4 36.1 10.1 35.5 10.6 33.0 11.7 32.0 12.2 30.1 13.1
5 43.2 7.0 40.5 8.8 39.3 9 .6 38.4 10.2 35.7 11.3 34.6 11.8 32.4 12.7
6 44.5 7.6 41.6 9.4 40.3 10.3 39.4 10.9 36.7 12.0 35.7 12.5 33.6 13.4
7 45.4 8.0 42.6 9.9 41.4 10.8 40.4 11.4 37.8 12.7 36.8 13.2 34.7 14.2
8 45.8 8.4 43.1 10.5 41.9 11.4 41.0 12.0 38.2 13.2 37.1 13.7 34.9 14.7
10 28.2 5.8 26.0 7.5 25.0 8.2 24.2 8.7 22.2 9.4 21.4 9.7 19.7 10.2
MODEL
Performance Table
Cooling Only
Refrigerant: R22
MAC080C
MAC100C
10 32.1 7.0 30.3 9.1 29.5 10.0 28.9 10.7 26.3 11.6 25.2 11.9 23.1 12.6
MAC120C
10 39.8 8.5 37.7 10.3 36.7 11.2 36.0 11.8 33.3 13.2 32.1 13.8 29.9 15.0
9 46.7 9.1 44.1 11.2 43.0 12.2 42.2 12.9 39.4 14.2 38.3 14.7 36.0 15.8
10 47.9 9.8 44.9 12.4 43.6 13.5 42.6 14.3 40.0 15.3 39.0 15.7 36.9 16.5
MAC150C
CH4-40 PUMP (080 & 100)
CH8-30 PUMP (120 & 150)
40
Page 42

AMBIENT TEMPERATURE (°C)
4219 4640
28 32 35
kW kW kW kW kW kW kW kW kW kW kW kW kW kW
CAP. INPUT CAP. INPUT CAP. INPUT CAP. INPUT CAP. INPUT CAP. INPUT CAP. INPUT
COOL COMP. COOL COMP. COOL COMP. COOL COMP. COOL COMP. COOL COMP. COOL COMP.
LEAVING WATER TEMP (°C)
5 22.1 4.5 21.6 6.0 21.5 6.6 21.3 7.1 19.7 7.7 19.1 7.9 17.8 8.4
6 22.8 4.9 22.4 6.4 22.2 7.1 22.1 7.6 20.4 8.1 19.7 8.4 18.4 8.8
MODEL
Heat Pump – Cooling Mode
Refrigerant: R22
7 23.2 5.1 22.8 6.7 22.7 7.4 22.6 8.0 21.0 8.6 20.3 8.9 19.0 9.4
MAC080CR
8 23.6 5.4 23.3 7.1 23.1 7.8 23.0 8.4 21.3 9.0 20.7 9.2 19.4 9.7
9 24.2 5.9 23.8 7.6 23.6 8.4 23.5 9.0 21.7 9.6 21.0 9.9 19.6 10.4
5 27.5 5.3 26.7 6.9 26.3 7.7 26.0 8.2 23.8 9.1 22.9 9.4 21.1 10.1
6 27.7 5.7 27.3 7.4 27.1 8.2 26.9 8.8 24.7 9.7 23.8 10.0 22.0 10.7
7 29.0 5.9 28.2 7.8 27.8 8.6 27.5 9.2 25.2 10.2 24.2 10.5 22.4 11.3
8 29.6 6.3 28.7 8.2 28.3 9.1 28.1 9.7 25.6 10.6 24.7 11.0 22.7 11.7
9 30.2 6.8 29.3 8.8 29.0 9.7 28.7 10.4 26.3 11.3 25.3 11.7 23.4 12.5
5 33.7 6.2 32.4 7.8 31.8 8.5 31.3 9.1 28.6 9.8 27.5 10.1 25.4 10.7
6 34.4 6.6 33.3 8.3 32.8 9.1 32.4 9.7 29.7 10.4 28.6 10.7 26.4 11.3
7 35.2 7.0 34.0 8.8 33.5 9.6 33.2 10.2 30.3 11.0 29.1 11.3 26.8 11.9
8 35.6 7.4 34.6 9.3 34.1 10.1 33.8 10.7 30.7 11.4 29.5 11.7 27.0 12.3
9 36.4 8.0 35.4 9.9 34.9 10.8 34.5 11.5 31.5 12.2 30.3 12.5 27.9 13.2
5 39.6 6.9 38.8 8.8 38.5 9.6 38.2 10.3 35.5 11.1 34.4 11.5 32.2 12.1
6 41.0 7.4 40.2 9.4 39.8 10.3 39.5 11.0 36.7 11.8 35.5 12.2 33.3 12.9
7 41.6 7.9 40.9 9.9 40.7 10.8 40.4 11.5 37.6 12.5 36.5 12.9 34.3 13.6
8 42.7 8.3 41.9 10.4 41.5 11.4 41.2 12.1 38.1 13.0 36.9 13.4 34.4 14.1
10 24.8 6.3 24.5 8.4 24.4 9.3 24.3 10.0 22.4 10.4 21.7 10.6 20.2 11.0
MAC100CR
10 31.0 7.4 30.3 9.7 29.9 10.8 29.7 11.5 27.2 12.3 26.2 12.6 24.2 13.3
MAC120CR
10 37.7 8.6 36.6 10.9 36.1 12.0 35.7 12.7 32.6 13.3 31.3 13.5 28.8 14.0
9 43.6 9.0 42.8 11.2 42.4 12.2 42.1 13.0 39.1 13.9 37.9 14.2 35.5 15.0
10 45.2 9.7 44.3 12.3 43.9 13.5 43.6 14.4 40.5 15.1 39.2 15.4 36.7 15.9
MAC150CR
CH8-30 PUMP (120 & 150)
CH4-40 PUMP (080 & 100)
41
Page 43

AMBIENT TEMPERATURE (°C)
-5 0 4 21-7 15710
kW kW kW kW kW kW kW kW kW kW kW kW kW kW kW kW
CAP. INPUT CAP. INPUT CAP. INPUT CAP. INPUT CAP. INPUT CAP. INPUT CAP. INPUT CAP. INPUT
HEATING COMP. HEATING COMP. HEATING COMP. HEATING COMP. HEATING COMP. HEATING COMP. HEATING COMP. HEATING COMP.
LEAVING WATER TEMP (°C)
35 16.5 4.2 18.1 4.6 22.2 5.4 25.4 6.1 27.8 6.6 33.7 8.2 43.6 10.7 55.5 13.8
40 16.1 4.8 17.7 5.1 21.6 6.0 24.7 6.7 27.0 7.3 32.8 8.8 42.6 11.2 54.2 14.2
45 15.8 5.1 17.3 5.5 21.1 6.4 24.1 7.1 26.4 7.7 32.3 9.3 42.1 11.9 53.8 15.0
50 15.2 5.1 16.7 5.5 20.5 6.5 23.5 7.4 25.8 8.0 31.6 9.7 41.2 12.4 52.7 15.7
55 14.5 5.2 16.0 5.6 19.7 6.7 22.7 7.7 24.9 8.4 30.5 10.0 39.9 12.8 51.2 16.2
35 20.7 6.5 22.6 6.6 27.3 7.0 31.0 7.2 33.8 7.5 35.7 7.9 38.7 8.6 42.3 9.4
40 20.3 7.3 22.1 7.4 26.6 7.7 30.2 8.0 32.9 8.2 34.8 8.5 37.9 9.1 41.7 9.7
45 19.5 8.1 21.4 8.2 25.9 8.4 29.5 8.6 32.2 8.7 34.1 8.9 37.2 9.3 41.0 9.8
50 19.0 8.2 20.8 8.3 25.3 8.6 28.9 8.8 31.6 9.0 33.4 9.4 36.4 9.9 40.0 10.6
55 18.1 8.3 19.9 8.5 24.3 8.9 27.8 9.2 30.4 9.4 32.2 9.8 35.3 10.3 39.0 11.0
35 21.1 7.3 23.0 7.5 28.8 8.1 33.5 8.6 36.9 8.9 39.1 9.1 42.6 9.5 46.9 9.9
40 19.9 8.2 22.2 8.5 27.9 9.0 32.4 9.4 35.9 9.8 38.0 9.9 41.6 10.0 45.9 10.2
45 19.7 8.8 22.0 9.1 27.5 9.6 31.9 10.0 35.2 10.4 37.3 10.4 40.8 10.4 45.1 10.5
50 19.3 9.1 21.2 9.3 26.7 9.9 31.1 10.4 34.5 10.8 36.6 10.9 40.2 11.1 44.4 11.3
55 18.2 9.3 20.2 9.6 25.6 10.3 30.0 10.8 33.2 11.3 35.3 11.3 38.9 11.5 43.2 11.6
35 21.5 8.8 23.8 9.0 30.8 9.7 36.4 10.2 40.6 10.6 42.1 10.7 44.7 11.1 47.8 11.4
40 20.5 9.9 23.2 10.2 30.0 10.8 35.4 11.2 39.5 11.6 41.1 11.6 43.8 11.7 47.0 11.8
45 20.1 10.4 22.8 10.7 29.4 11.4 34.7 11.9 38.7 12.3 40.3 12.2 43.0 12.2 46.2 12.1
50 19.6 10.6 22.2 10.9 28.7 11.7 34.0 12.3 37.9 12.8 39.4 12.8 41.9 12.9 44.9 13.0
55 18.5 10.7 20.9 11.1 27.4 12.0 32.6 12.8 36.5 13.3 38.0 13.4 40.6 13.4 43.6 13.4
MODEL
Heat Pump – Heating Mode
Refrigerant: R22
MAC080CR
MAC100CR
MAC120CR
MAC150CR
CH8-30 PUMP ( 120 & 150 )
CH4-40 PUMP ( 080 & 100 )
42
Page 44

AMBIENT TEMPERATURE (°C)
4219 4640
28 32 35
MODEL
Cooling Only
Refrigerant: R 407C
COOL COMP. COOL COMP. COOL COMP. COOL COMP. COOL COMP. COOL COMP. COOL COMP.
kW kW kW kW kW kW kW kW kW kW kW kW kW kW
CAP. INPUT CAP. INPUT CAP. INPUT CAP. INPUT CAP. INPUT CAP. INPUT CAP. INPUT
LEAVING WATER TEMP (°C)
5 24.0 4.6 21.9 6.1 21.1 6.6 20.6 6.9 19.3 7.3 17.4 7.8 15.0 8.5
6 24.7 4.9 22.6 6.6 22.2 7.1 21.3 7.4 20.0 7.8 18.0 8.3 15.5 9.1
7 24.9 5.1 23.0 6.9 22.3 7.5 21.7 7.8 20.4 8.2 18.6 8.7 16.1 9.5
8 25.2 5.5 23.2 7.3 22.6 7.9 22.0 8.2 20.8 8.6 18.7 9.1 16.2 9.9
9 26.0 5.9 23.6 7.9 23.1 8.5 22.6 8.8 21.4 9.2 19.1 9.7 16.5 10.5
5 26.5 5.2 25.5 7.2 24.9 7.8 24.5 8.2 23.2 8.7 21.6 9.2 18.9 10.0
6 27.3 5.6 26.3 7.7 26.1 8.4 25.3 8.7 24.0 9.2 22.3 9.8 19.5 10.6
7 27.9 5.7 26.7 8.1 26.2 8.8 25.8 9.2 24.5 9.7 23.0 10.3 20.3 11.1
8 28.1 6.2 27.1 8.6 26.6 9.3 26.2 9.7 25.0 10.1 23.2 10.7 20.4 11.6
9 28.6 6.7 27.5 9.3 27.2 10.0 26.9 10.4 25.7 10.8 23.7 11.4 20.9 12.3
5 34.1 6.3 33.4 8.0 32.6 8.7 32.0 9.1 30.4 9.6 28.2 10.2 26.3 11.5
6 35.2 6.7 34.5 8.6 34.2 9.3 33.0 9.7 31.4 10.2 29.3 10.9 27.2 12.2
7 35.5 7.1 35.0 9.0 34.3 9.8 33.7 10.2 32.0 10.7 30.2 11.4 28.0 12.9
8 36.2 7.5 35.5 9.5 34.8 10.3 34.2 10.7 32.7 11.2 30.4 11.9 28.3 13.3
9 36.8 8.0 36.1 10.3 35.6 11.1 35.2 11.5 33.7 12.0 31.1 12.7 28.9 14.2
5 42.5 7.6 41.3 9.5 39.6 10.4 38.2 10.9 37.0 11.5 34.9 12.3 31.8 14.0
6 43.8 8.2 42.6 10.3 41.5 11.1 39.4 11.6 38.2 12.2 36.1 13.0 32.9 14.8
7 44.7 8.6 43.3 10.8 42.0 11.7 40.2 12.2 39.0 12.8 37.3 13.7 34.0 15.6
8 45.1 9.1 43.8 11.4 42.4 12.3 40.8 12.8 39.8 13.4 37.6 14.2 34.2 16.2
M4AC080C
10 26.6 6.4 24.3 8.5 23.4 9.1 23.0 9.8 22.1 9.8 19.8 10.3 17.2 11.2
M4AC100C
10 29.4 7.2 28.3 10.0 27.6 10.8 27.3 11.5 26.5 11.6 24.6 12.2 21.5 13.1
M4AC120C
10 37.8 8.7 37.1 11.1 36.1 11.9 35.7 12.8 34.7 12.8 32.2 13.5 29.9 15.0
M4AC150C
9 45.9 9.9 44.6 12.3 43.1 13.3 41.9 13.7 41.0 14.3 38.4 15.2 35.3 17.4
10 47.2 10.6 45.8 13.3 44.0 14.3 42.6 15.3 42.2 15.3 39.8 16.1 36.2 18.2
CH8-30 PUMP (120 & 150)
CH4-40 PUMP (080 & 100)
43
Page 45

4219 4640
AMBIENT TEMPERATURE (°C)
28 32 35
COOL COMP. COOL COMP. COOL COMP. COOL COMP. COOL COMP. COOL COMP. COOL COMP.
MODEL
Heat Pump - Cooling Only
Refrigerant: R 407C
kW kW kW kW kW kW kW kW kW kW kW kW kW kW
CAP. INPUT CAP. INPUT CAP. INPUT CAP. INPUT CAP. INPUT CAP. INPUT CAP. INPUT
LEAVING WATER TEMP (°C)
5 21.2 4.7 20.8 6.5 20.6 7.1 20.5 7.4 19.4 7.8 18.1 8.3 16.8 8.9
6 21.9 5.1 21.5 7.0 21.3 7.6 21.2 7.9 20.1 8.3 18.9 8.8 17.4 9.4
7 22.3 5.3 22.0 7.4 21.8 8.0 21.7 8.3 20.6 8.7 19.2 9.3 18.0 10.0
8 22.7 5.7 22.4 7.8 22.2 8.4 22.1 8.7 20.9 9.1 19.5 9.7 18.3 10.3
9 23.2 6.2 22.9 8.4 22.7 9.1 22.6 9.3 21.5 9.8 20.1 10.3 18.5 11.0
5 25.9 5.4 25.0 7.7 24.7 8.4 24.4 8.8 23.1 9.3 21.5 9.9 20.0 10.5
6 26.1 5.8 25.6 8.3 25.4 9.0 25.2 9.4 23.9 9.8 22.4 10.5 20.9 11.1
7 27.3 6.0 26.5 8.7 26.1 9.5 25.8 9.8 24.5 10.3 22.8 11.0 21.3 11.7
8 27.8 6.4 26.9 9.2 26.6 9.9 26.3 10.3 24.9 10.8 23.2 11.5 21.6 12.1
9 28.4 7.0 27.5 9.9 27.2 10.7 26.9 11.1 25.5 11.6 23.9 12.2 22.3 13.0
5 33.2 6.3 31.7 8.6 31.0 9.4 30.5 9.8 28.9 10.4 26.9 11.1 24.5 12.0
6 33.9 6.8 32.6 9.3 32.0 10.1 31.5 10.5 29.9 11.0 28.1 11.8 25.5 12.7
7 34.7 7.2 33.3 9.8 32.7 10.6 32.2 11.0 30.6 11.6 28.5 12.4 25.9 13.4
8 35.1 7.6 33.8 10.3 33.3 11.2 32.9 11.6 31.1 12.1 29.0 12.9 26.1 13.8
9 35.9 8.1 34.6 11.2 34.0 12.0 33.6 12.4 31.9 13.0 29.9 13.7 26.9 14.8
5 39.0 7.6 37.6 9.7 37.0 10.6 36.6 11.1 34.6 11.7 32.3 12.5 31.3 13.7
6 40.4 8.2 39.0 10.5 38.3 11.4 37.8 11.9 35.9 12.5 33.7 13.3 32.3 14.5
7 41.0 8.6 39.7 11.0 39.1 12.0 38.7 12.5 36.7 13.1 34.2 14.0 33.3 15.3
8 42.1 9.1 40.6 11.7 39.9 12.6 39.4 13.1 37.3 13.7 34.8 14.5 33.4 15.9
10 23.8 6.6 23.6 9.1 23.5 9.7 23.4 10.4 22.1 10.4 20.8 11.0 19.1 11.6
M4AC080CR
M4AC100CR
10 29.2 7.5 28.4 10.7 28.1 11.5 27.8 12.3 26.3 12.4 24.8 13.0 23.0 13.8
M4AC120CR
10 37.2 8.8 35.8 12.0 35.2 12.9 34.8 13.8 32.9 13.9 31.0 14.6 27.9 15.7
9 43.0 9.8 41.5 12.6 40.8 13.6 40.3 14.0 38.3 14.7 35.9 15.5 34.5 16.8
10 44.5 10.6 42.9 13.6 42.2 14.6 41.7 15.6 39.5 15.7 37.1 16.5 35.7 17.9
M4AC150CR
CH8-30 PUMP (120 & 150)
CH4-40 PUMP (080 & 100)
44
Page 46

AMBIENT TEMPERATURE (°C)
-5 0 4 21-7 15710
kW kW kW kW kW kW kW kW kW kW kW kW kW kW kW kW
CAP. INPUT CAP. INPUT CAP. INPUT CAP. INPUT CAP. INPUT CAP. INPUT CAP. INPUT CAP. INPUT
HEATING COMP. HEATING COMP. HEATING COMP. HEATING COMP. HEATING COMP. HEATING COMP. HEATING COMP. HEATING COMP.
LEAVING WATER TEMP (°C)
35 16.0 6.4 18.6 6.5 25.1 6.7 26.9 6.9 27.7 7.2 28.3 7.7 29.5 8.2 33.6 8.5
40 15.6 7.2 18.2 7.3 24.5 7.5 26.1 7.8 26.9 7.9 27.9 8.1 29.1 8.4 32.9 8.7
45 15.2 7.7 17.7 7.8 24.0 7.9 25.6 8.2 26.4 8.4 27.4 8.5 28.5 8.9 32.6 9.2
50 14.6 7.8 17.2 7.9 23.5 8.0 25.1 8.5 25.9 8.7 26.9 9.0 28.0 9.3 31.9 9.6
55 14.0 7.9 16.4 8.0 22.4 8.2 24.4 8.8 24.9 9.1 26.1 9.2 27.2 9.6 31.0 9.9
35 16.9 7.3 19.2 7.4 27.3 7.6 29.3 7.8 30.2 8.2 30.8 8.7 32.2 9.3 36.4 9.5
40 16.5 8.1 18.7 8.3 26.7 8.6 28.4 8.8 29.3 9.0 30.4 9.2 31.7 9.6 35.8 9.8
45 15.9 9.0 18.1 9.1 26.1 9.2 27.8 9.3 28.7 9.5 29.8 9.7 31.1 9.8 35.2 9.9
50 15.5 9.1 17.7 9.2 25.6 9.5 27.3 9.7 28.2 9.9 29.2 10.3 30.5 10.6 34.3 10.7
55 14.8 9.3 16.8 9.4 24.4 9.7 26.6 10.0 27.1 10.3 28.4 10.5 29.6 10.9 33.5 11.1
35 18.6 8.3 22.7 8.4 32.9 8.6 35.3 8.9 36.3 9.3 37.1 9.9 38.7 10.6 42.6 10.9
40 17.9 9.3 21.9 9.4 32.2 9.7 34.2 10.0 35.3 10.2 36.6 10.5 38.1 10.9 41.8 11.2
45 17.6 10.0 21.7 10.1 31.5 10.4 33.5 10.5 34.6 10.8 35.9 11.0 37.4 11.2 41.0 11.6
50 16.9 10.3 20.9 10.4 30.8 10.7 32.9 11.0 33.9 11.2 35.2 11.7 36.7 12.0 40.4 12.4
55 16.2 10.5 20.0 10.7 29.4 11.0 32.0 11.3 32.7 11.7 34.2 11.9 35.7 12.4 39.3 12.8
35 19.4 10.0 23.7 10.3 34.3 10.8 36.8 11.1 37.9 11.6 38.6 12.4 40.4 13.2 44.4 13.6
40 18.9 11.3 23.1 11.6 33.5 12.2 35.7 12.6 36.8 12.7 38.2 13.1 39.7 13.6 43.7 14.0
45 18.6 11.9 22.7 12.2 32.8 12.8 34.9 13.2 36.1 13.5 37.4 13.8 39.0 14.0 42.9 14.4
50 18.1 12.1 22.1 12.4 32.1 13.0 34.3 13.8 35.3 14.0 36.7 14.6 38.3 15.0 41.7 15.5
55 16.9 12.3 20.8 12.6 30.6 13.3 33.4 14.2 34.0 14.7 35.7 14.9 37.2 15.5 40.5 16.0
MODEL
Heat Pump - Heating Mode
Refrigerant: R 407C
M4AC080CR
M4AC100CR
M4AC120CR
M4AC150CR
CH8-30 PUMP (120 & 150)
CH4-40 PUMP (080 & 100)
45
Page 47

Technical Data
Water Pressure Drop
MAC/M4AC080C/CR
Flowrate
(m3/hr)
2.4 2.0 14 300 2,81 0.7 2.7 18.7
3.2 3.6 25 270 237 1.1 4.7 32.6
4.8 7.8 54 230 160 2.3 10.1 69.6
5.6 10.6 73 200 106 3.0 13.6 93.5
6.4 13.8 95 175 54 3.8 17.6 121.0
MAC/M4AC100C/CR
Flowrate
(m3/hr)
Pressure drop
(psig)
4 5.5 38 260 211 1.7 7.2 49.3
Pressure drop
(psig)
3 2.3 16 280 257 1.0 3.3 22.9
4 4.1 28 260 221 1.7 5.7 39.3
56.243220160 2.4 8.7 59.8
6 8.8 61 180 96 3.4 12.2 84.2
7 11.9 82 150 37 4.5 16.3 112.6
BPHE
(kPa)
BPHE
(kPa)
Pump head
(kPa)
Pump head
(kPa)
Hydraulic life
(kPa)
Hydraulic lift
(kPa)
Unit Water
Piping (psig)
Unit Water
Piping (psig)
Unit Pressure
Drop (psig)
Unit Pressure
Drop (psig)
Total Pressure
Drop (kPa)
TotaL Pressure
Drop (kPa)
MAC/M4AC120C/CR
Flowrate
(m3/hr)
3 1.4 9.7 280 263 1.0 2.4 16.6
4 2.5 17 270 241 1.7 4.1 28.6
5 3.8 26.4 260 216 2.5 6.3 43.6
6 5.5 37.7 250 188 3.5 8.9 61.5
7 7.4 51 230 148 4.6 12.0 82.4
Pressure drop
(psig)
BPHE
(kPa)
Pump head
(kPa)
Hydraulic lift
(kPa)
Unit Water
Piping (psig)
Unit Pressure
Drop (psig)
MAC/ M4AC150C/CR
Flowrate
(m3/hr)
Pressure drop
(psig)
3 1.0 6.9 280 266 1.0 2.0 13.8
4 1.8 12.1 270 246 1.7 3.4 23.7
5 2.7 18.8 260 224 2.5 5.2 36.0
6 3.9 26.9 250 199 3.5 7.4 50.7
7 5.3 36.4 230 162 4.6 9.8 67.8
8 6.9 47.3 210 123 5.8 12.6 87.1
BPHE
(kPa)
Pump head
(kPa)
Hydraulic lift
(kPa)
Unit Water
Piping (psig)
Unit Pressure
Drop (psig)
Total Pressure
Drop (kPa)
Total Pressure
Drop (kPa)
46
Page 48

Correction Factors with GLYCOL use
CAPACITY FACTOR
GLYCOL
LWT/ deg C
-12.2
-9.4
-6.7
-3.9
-1.1
1.7
4.4
7.2
10.0
10
0.925 0.925 0.892 0.796
0.945 0.938 0.906 0.809
0.956 0.949 0.918 0.82
0.965 0.959 0.927 0.829
0.962 0957 0.926
20 30 40
0.8 0.7
0.827 0.735
0.88 0.85 0.756
0.9 0.876 0.781
0.828
GLYCOL%WATER
FLOW
10 1.015 1.06
20 1.04 1.12
30 1.08 1.18
40 1.135 1.24
PRESSURE
DROP
47
Page 49

Outlines and Dimensions
Model : M4AC/ MAC080/ 100 C/CR
48
Page 50

Model : M4AC/ MAC120/150 C/CR
49
Page 51

Accessory Hydraulic Kit (Optional)
Hydraulic kit consists of 135L capacity water storage buffer tank, over pressure release value and drainage point.
50
Page 52

Wiring Diagrams
Model : M4AC / MAC080 / 100 / 120 /150C (Isolator Switch)
51
Page 53

Model : M4AC / MAC080 / 100 / 120 / 150C (Terminal Block)
52
Page 54

Model : M4AC / MAC080 / 100 / 120 / 150CR (Isolator Switch)
53
Page 55

Model : M4AC / MAC080 / 100 / 120 / 150CR (Terminal Block)
54
Page 56

Special Precautions for R407C
1) What is new refrigerant R407C?
R407C is a zeotropic refrigerant mixture which has zero ozone depletion potential and thus conformed
to the Montreal Protocol regulation. It requires Polyol ester oil (POE) oil for its compressor's lubricant.
Its refrigerant capacity and performance are about the same as the refrigerant R22.
2) Components
Mixture weight composition R32(23%), R125(25%), R134a(52%)
3) Characteristic
x R407C liquid and vapor components have different compositions when the fluid evaporates or
condenses. Hence, when leak occurs and only vapor leaks out, the composition of the refrigerant
mixture left in the system will change and subsequently affect the system performance. If just additional
refrigerant is added to leaked system, system performance will drop. It is recommended that the system
should be evacuated thoroughly before recharging with R407C.
x When refrigerant R407C is used, the composition will differ depending on whether it is in gaseous or
liquid phase. Hence when charging R407C, ensure that only liquid is being withdrawn from the cylinder
or can. This is to make certain that only original composition of R407C is being charged into the
system.
x POE oil is used as lubricant for R407C compressor, which is different from the mineral oil used for R22
compressor. Extra precaution must be taken not to expose the R407C system too long to moist air.
4) Check list before installation/servicing
x Tubing
Refrigerant R407C is more easily affected by dust of moisture compared with R22, make sure to
temporarily cover the ends of the tubing prior to installation
x Compressor oil
No additional charge of compressor oil is permitted.
x Refrigerant
No other refrigerant other that R407C
x Tools
Tools specifically for R407C only (must not be used for R22 or other refrigerant)
i) Manifold gauge and charging hose
ii) Gas leak detector
iii) Refrigerant cylinder/charging cylinder
iv) Vacuum pump c/w adapter
v) Flare tools
vi) Refrigerant recovery machine
5) Handling and installation guidelines
Like R22 system, the handling and installation of R407C system are closely similar. All precautionary
measures; such as ensuring no moisture, no dirt or chips in the system, clean brazing using nitrogen, and
thorough leak check and vacuuming are equally important requirements. However, due to zeotropic nature
of R407C and its hydroscopic POE oil, additional precautions must be taken to ensure optimum and
trouble-free system operation.
a) Filter-dryer must be installed along the liquid line for all R407C air conditioners. This is to minimise the
contamination of moisture and dirt in the refrigerant system. Filter-dryer must be of molecular sieve
type. For a heat-pump system, install a two-way flow filter dryer along the liquid line.
b) During installation or servicing, avoid prolong exposure of the internal part of the refrigerant system to
moist air. Residual POE oil in the piping and components can absorb moisture from the air.
55
Page 57

c) Ensure that the compressor is not expose to open air for more than the recommended time specified
by its manufacturer (typically less than 10 minutes). Removed the seal-plugs only when the
compressor is about to be brazed.
d) The system should be thoroughly vacuumed to 1.0 Pa (-700mmHg) or lower. This vacuuming level is
more stringent than R22 system so as to ensure no incompressible gas and moisture in the system.
e) When charging R407C, ensure that only liquid is being withdrawn from the cylinder or can. This is to
ensure that only the original composition of R407C is being delivered into the system. The liquid
composition can be different from the vapor composition.
R32/R125/R134
33% / 33% / 34%
23% / 25% / 52%
Composition of R407C in vapor
phase is different from liquid phase.
f) Normally, the R407C cylinder or can is being equipped with a dip-pipe for liquid withdrawal. However, if
the dip-pipe is not available, invert the cylinder or can so as to withdraw liquid from the valve at the
bottom.
Dip-pipe
Invert cylinder
without dip-pipe
Liquid
withdrawal
g) When servicing leak, the top-up method, commonly practiced for R22 system, is not recommended for
R407C system. Unlike R22 where the refrigerant is of a single component, the composition of R407C,
which made-up of three different components, may have changed during the leak. Consequently, a
top-up may not ensure that the R407C in the system is of original composition. This composition shift
may adversely affect the system performance. It is recommended that the system should be evacuated
thoroughly before recharging with R407C.
56
Page 58

Installation
!
M4AC / MAC080 / 100 / 120 / 150 C/CR
700mm
500mm 500mm
1100mm
Safety Precautions
Before installing the air conditioner unit, please read the following safety precautions carefully
Warning
x Installation and maintenance should be performed by qualified persons who are familiar with
local code and regulation, and experienced with this type of appliance.
x All field wiring must be installed in accordance with the national wiring regulation.
x Ensure that the rated voltage of the unit corresponds to that of the name plate before
commencing wiring work according to the wiring diagram.
x The unit must be GROUNDED to prevent possible hazards due to insulation failure.
x All electrical wiring must not touch the refrigerant piping, compressor or any moving parts of the fan
motors.
x Confirm that the unit has been switched OFF before installing or servicing the unit.
x Do not touch the compressor or refrigerant piping without wearing gloves.
IMPORTANT
DO NOT INSTALL OR USE THE AIR CONDITIONER UNIT IN A LAUNDRY ROOM.
57
Page 59

Caution
!
Please take note of the following important points when installing.
• Do not install the unit where leakage of flammable gas may occur.
If gas leaks and accumulates around the unit, it may cause fire ignition.
x Ensure that the drainage piping is connected properly.
If the drainage piping is not connected properly, it may cause water leakage which will dampen
the furniture.
x Do not overcharge the unit.
This unit is factory pre-charged. Overcharge will cause over-current or damage to the
compressor.
x Ensure that the units panel is closed after service or installation.
Unsecured panels will cause unit to operate noisily.
Installation Location
x Installation work should be done by the authorized dealer or qualified contractor. Never install the unit
yourself.
x Make sure there is sufficient airflow around the unit. The discharged air should be directed outside
using a duct should the unit be installed in a plant room.
x Vibration isolator should be provided to reduce the vibration and noise of the unit.
x There should be sufficient space allocated for servicing and maintenance when installing the unit.
Transportation
x The unit should be lifted using a crane. Ensure that the hanger belts are
not touching the coil, top panel and front panel (use protective panel) as
shown in Figure 1.
x The bolt of the base and channel support can be removed after putting
the unit on the fixed location.
Figure 1
Water Piping ad Fitting
x All water pipe must be insulated to prevent capacity losses and condensation.
x Install a 40-60 mesh strainer to ensure water quality is good.
x Water pipe recommended are GI pipe, black steel pipe, steel pipe and copper pipe.
x During installation, the piping of the unit should be clamp before rotating the installation pipe to reduce the
moment induce on the unit piping.
x Users are recommended to install the pipe and accessories as shown in Figure 2.
x An air vent must be installed at the highest position, while a drainage plug at the lowest position of the
water circuit. After the leak test (0.6MPa), open the air vent to release any air trap in the water circuit.
x Run the clean water through the water inlet and operate the pump to drain out the dirty water. Clean
the strainer after running the pump for 30 minutes.
58
Page 60

Electrical and Wiring
x Refer to the wiring diagram provided on the unit when making electrical wiring.
x Install an isolator (if it is not provided) to prevent electrical shock.
x Do not ground any electrical equipment to the water piping.
x Operation of the mini chiller without any fan speed controller (Field supply) is limited to an ambient
temperature of 20ºC. With the fan speed controller (Field supply), the unit is able to operate down to 5ºC.
Cooling Only Unit
Model
Voltage Range **
Recommended Fuse * A 35 40 50 60
Power Supply Cable Size * mm
Number of Conductor
Interconnection Cable Size * mm
M4AC080C
MAC080C
2
2
M4AC100C
MAC100C
-
10
5
1.5 1.5
M4AC120C
MAC120C
+
+
10
5
M4AC150C
MAC150C
Heat Pump Unit
Model
Voltage Range **
Recommended Fuse * A 35 40 50 60
Power Supply Cable Size * mm
Number of Conductor
Interconnection Cable Size * mm
M4AC080CR
MAC080CR
2
2
M4AC100CR
MAC100CR
-
10
5
1.5 1.5
M4AC120CR
MAC120CR
+
+
10
5
M4AC150CR
MAC150CR
IMPORTANT : * The figures shown in the table are for information purpose only. They should be checked
and selected to comply with the local/national codes of regulations. This is also subject
to the type of installation and conductors used.
** The appropriate voltage range should be checked with label data on the unit.
59
Page 61

!
WARNING
!
x All terminals and connection must be tightened.
x Avoid any wires from touching the refrigerant pipe. Apply insulation if necessary.
x Avoid any wires from touching the moving components such as, fan motor, pump & compressor.
Water Piping System Setup
x Fill up the water circuit after connecing all the pipes and equipment. Perform leak checks for all
connections and joints. Do not start the unit when the system is leaking.
x To optimize the capacity of the system, ensure that the system is free of air bubbles.
The air trapped in the system would make the system unbalanced.
x Ensure that the water tank (optional) is not full. This is to ensure optimal performance of the mini chiller.
If the pressure is too high, release the air trapped from the auto air vent (on the tank) and manual air
vent (installed on the water system).
Refrigerant Circuit
x All mini chillers units are pre-charged with R22 or R407C refrigerant. The only piping that needs to be
done is the water piping from mini chiller (outdoor) to the fan coil unit (indoor).
Safety and Caution
It is advisable to read through all the safety precautions before installing and commissioning of the unit.
x Contact your dealer for installation, reinstallation or dismantling of unit. Improper handling of unit could
result in leaks, electrical shock or unit malfunction.
x Use the controller handset to switch on/off the unit. Do not plug off the main power supply directly, it
would cause the unit to breakdown.
x Improper connections and fastening could cause electric shock, short circuit and fire.
x Do not introduce foreign objects such as fingers, sticks etc. into the air inlet and outlet.
x Do not spray any chemical agents or flammable agents to the unit. It would cause fire or explosion.
x Do not climb or place objects on top of the mini chiller.
x Do not operate the chiller with wet hands. It would result in electric shock.
x Do not use fuse of different amperage than stated. Using wire, etc. to replace a fuse could cause
equipment damage or fire.
x Provide proper grounding for the mini chiller. Do not connect the ground wire to gas piping, water piping,
lighting rods or telephone ground wire. Improper grounding could cause electrical shock.
x Do not attempt to do any service or maintenance when unit is operating.
x Do not change the settings of the safety devices.
x Do not consume the chilled water in the unit.
x Do not allow water to remain in the water pipes if the unit is not operating for a long period. Water
must be drained out if the unit is not running during winter. Failing to do so would cause the pipe to
crack.
x Do not touch the aluminum fin coil. It would damage the coil or cause injury.
Caution
x R407C must be charged as liquid. Usually R407C cylinder is equipped with a dip-pipe for liquid withdrawal.
If there is no dip-pipe, the cylinder should be inverted so as to withdraw liquid R407C from the valve.
x Do not top-up when servicing leak, as this will reduce the unit performance. Vacuum the unit thoroughly and
then charge the unit with fresh R407C according to the amount recommended in the specification.
60
Page 62

Control Operation Guide
The unit is equipped with a microprocessor controller board. The microprocessor controller is provided to give
temperature control for the system by accurately measuring the ambient temperature, and controlling the water
entering and water leaving temperature. The temperature setting in the unit is preset in the factory. It is
not recommended to change the setting unless necessary. A wired controller handset is connected to the
microprocessor board. Every parameter setting and reading can be observed from the LCD of the handset.
1. Handset location
The handset is located on a metal bracket behind the right door panel.
2. LED Display (microprocessor board)
The keypad LED will light up when the unit is powered up.
The LCD will light up when the unit is turned on.
3. LCD display (controller handset)
During normal operations, the LCD can display the entering water temperature, the leaving water
temperature, the entering water setpoint temperature, compressor on or off status and outdoor air
temperature. When malfunctioning occurred, the LCD would blink. The display would show the faulty
parameter and the date and time of the occurrence.
4. Controller functioning specification
There is a 3 minute delay for the compressor and fan motor to restart (default setting). During
defrosting, fan motor is not running.
61
Page 63

Servicing and Maintenance
Servicing
Servicing or maintenance of these unit must be carried out by experienced personnel with specific
training in refrigeration. Repeated check the safety devices and continuous cycling of control
components must be analyzed and corrected before being reset.
The simple design of the refrigeration circuit totally eliminates potential problems during normal unit
operation. No maintenance work is needed on the refrigeration circuit as long as the unit is operating
normally.
Ease of maintenance has been taken into consideration during the design stage such that the unit is
easily accessible for servicing and maintenance. By accessing from the front panel of the unit,
servicing and maintenance operation can be done easily. The electrical components are especially easy
to access since it is located in the terminal box on top of the front panel.
Under normal circumstances, these chiller require only a check and cleaning of air intake through the coil
surface only. These can be done monthly or quarterly depending on the surrounding where the units are
installed.
When the surrounding is very oily or dusty, then the coils must be regularly cleaned by a qualified air
conditioner service technician to ensure sufficient cooling capacity and efficient unit operation. The
normal life span might be shortened if no proper service is provided.
Maintenance
For consistent performance and durability, always conduct proper and regular maintenance to the unit.
For prolong period of operation time, the heat exchanger will become dirty impairing its effectiveness and
reducing the performance of the units. Consult your local dealer about the cleaning of the heat
exchanger.
No major maintenance or servicing needed for the internal water circuit in the unit except the water pump
failure. It is advised that regular check on the filter to be conducted and change the water filter if the filter
is dirty or choked.
Always check the water level in the system, in order to protect the moving components in the hydraulic kit
from over heating and excessive wear.
62
Page 64

Troubleshooting
When any malfunction is occurred, immediately switch off the power supply to the unit, and contact the
local dealer, if necessary. Some simple troubleshooting tips are given below:
SYMPTOMS POSSIBLE CAUSES REMEDIAL ACTION
1. Compressor
does not start.
2. Fan does not
work
3. Unit does work,
but insufficient
cooling.
x No power supply.
x Fuses blown or automatic circuit break-
down open.
x Defective contactor or coil.
x Unit is stopped because safety device
has tripped.
x Loose wires.
x Compressor faulty
x No power supply.
x Fan motor faulty.
x Thermostat setting too high.
x Condenser coil dirty.
x Obstacle blocking air inlet or outlet of
the unit.
x Insufficient refrigerant in the system.
x Improper water flow rate.
x Water in the system is contaminated.
x Check power supply.
x Look for short circuit or grounded wires
In motor windings. Replace fuses
and reset circuit breakers when the
fault has been corrected. Check
tightness and soundness of all electrical
connections.
x Repair or replace.
x Determine the type of safety shutdown
and correct the default before the unit is
restarted.
x Check wire connections and tighten
terminal screws.
x Contact local dealer.
x Check power supply.
x Contact local dealer.
x Reset thermostat.
x Contact local dealer.
x Remove the obstacle.
x Contact local dealer.
x Contact local dealer.
x Contact local dealer.
Phase Protector (Optional)
The unit with Scroll Compressor can only rotate in one direction. For this reason, a protective device
(phase protector) is fitted to prevent incorrect wiring of the electrical phases. When the three phases
are not connected correctly, the phase protector operates, and the unit will not start. This devise is
located in the control box of the outdoor unit.
The following table shows the LED indicator liuht for phase protector under normal operation and fault conditions.
Description
Normal operation
Reverse phase
T phase missing
S phase missing
R phase missing
S &T phase missing
Overload
Sensor missing
On Off Fast Blink
Notes: 1. “+” indicates additional functions for PP01 phase protector.
2. When R phase missing, no LED or buzzer will indicate the error, but relay 71 and 81 will out off.
+
LED
+
PW
(Red)
+
P_R
(Yellow)
P_S
(Yellow)
P_T
(Yellow)
Actions
-
Switch off the unit. Check the 3 phase wiring.
Switch off the unit. Check the 3 phase wiring.
Switch off the unit. Check the 3 phase wiring.
Switch off the unit. Check the 3 phase wiring.
Switch off the unit. Check the 3 phase wiring.
High discharge temperature. Check the refrigerant system.
Switch off the unit. Plug in sensor.
63
Page 65

Schematic Diagram
M4AC/ MAC080C, 100C, 120C, 150C
Refrigerant Circuit Diagram
M4AC/ MAC080CR, 100CR, 120CR, 150CR
Refrigerant Circuit Diagram
64
Page 66

Part Lists and Exploded View
M4AC / MAC080 / 100C/CR
I ASSY, PANEL BASE MAIN 19 BRACKET, BPHE 37 FAN BLADE 24"
2 ASSY, INS. PARTITION PANEL 20 SUPPORT, TUBE 38 FAN, GUARD 24"
3 SUPPORT, FLUTTED WIRE 21 CLIP, FILTER 39 COIL GUARD, LEFT/RIGHT
4 ASSY, RIGHT PANEL 22 ASSY, COMPRESSOR 40 COIL GUARD, BACK
5 ASSY, LEFT PANEL 23 ASSY, BPHE PVC, TRUNKING (33.0x45.Ox710.0)
6 PANEL, SUPPORT FRONT 24 PANEL, BPHE CLAMP PVC, TRUNKING (33.Ox45.OxII54.0)
7 STRUCTURE, BACK L/R 25 INS, ACCUMULATOR BODY PANEL, PARTITION COVER
8 PANEL, COIL SUPPORT 26 INS, LIQUID RECEIVER 41 SCREW, TRUSS PHILIP HEAD
9 PANEL, ORIFICE RIGHT 27
10 PANEL, ORIFICE LEFT 28 ASSY., TER. BOX MAIN 43 WASHER, SPRING
II SUPPORT, EXPANSION TANK 2 9 ASSY, FRONT PANEL 44 NUT, HEXAGON
12 HINGE, DOOR 30 ASSY, PANEL HOOK 45 WASHER, FLAT
13 ASSY, DOOR PANEL RIGHT MAIN 31 PUMP, WATER 46 SPACER
14 ASSY, DOOR PANEL LEFT MAIN 32 EXPANSION TANK 47 RUBBER, GROMMET
15 ASSY, COIL RIGHT 33 CLAMP, EXPANSION TANK 48 HEX, BOLT
16 ASSY, COIL LEFT 34 PLATE, PARTITION
17 ACCUMULATOR 35 BRACKET, MOTOR
18 LIQUID RECEIVER 36 MOTOR
PANEL, TERMINAL BOX
SUPPORT
42 SCREW, TRUSS PHILIP HEAD
65
Page 67

M4AC/ MAC120/ 150C/CR
I ASSY. PANEL BASE MAIN 17 ASSY, DOOR PANEL RIGHT MAIN 33 CLAMP, EXPANSION TANK
2 ASSY, INS. PARTITION PANEL 18 ASSY, DOOR PANEL LEFT MAIN 34 PUMP, WATER
3 ASSY, RIGHT PANEL 19
4 AS SY, LEFT PANEL 20 ACCUMULATOR 36 BRACKET, MOTOR
5 PANEL, COIL SUPPORT 21 LIQUID RECEIVER 37 MOTOR
6 STRUCTURE, BACK L/R 22 BRACKET, BPHE 38 FAN BLADE 24"
PANEL, TERMINAL BOX
7
SUPPORT
8 ASSY., TER, BOX MAIN 24 PANEL, BPHE CLAMP 40 ASSY, PANEL HOOK
9 PANEL, SUPPORT FRONT 25 SUPPORT, TUBE
10 SUPPORT, WIRE BOARD 26 CLIP, FILTER
II PANEL, RIGHT ORIFICE 27 COIL GUARD, BACK 41 SCREW, TRUSS PHILIP HEAD
12 PANEL, LEFT ORIFICE 28 COIL GUARD, LEFT/RIGHT 42 SCREW, TRUSS PHILIP HEAD
13 ASSY, INS. FRONT PANEL 29 FAN, GUARD 26" 43 WASHER, SPRING
14 ASSY, COIL LEFT 3 0 INS, ACCUMULATOR BODY 44 NUT, HEXAGON
15 ASSY, COIL RIGHT 31 INS, LIQUID RECEIVER BODY 45 WASHER, FLAT
16 HINGE, DOOR 32 SUPPORT. EXPANSION TANK 46 SPACER
ASSY, COMPRESSOR
(ZR94KC-TFD)
23 ASSY, BPHE 39 PLATE, PARTITION
35 EXPANSION TANK
PVC, TRUNKING
(3'3.0x45.OM710.0)
PVC, TRUNKING
(33.0x45.OM1481.0)
66
Page 68

©2004 McQuay International +1 (800) 432-1342 www.mcquay.com
REGISTERED
ISO 9002
 Loading...