

Page 1
Installation and Maintenance Manual IM 782-7
Destiny™ Indoor Air Handler
Sizes 002 through 030
Group: Applied Air
Part Number: IM 782
Date: March 2012
© 2012 McQuay International
Page 2

Contents
Introduction . . . . . . . . . . . . . . . . . . . . . . . . . . . . . . . 3
General Information . . . . . . . . . . . . . . . . . . . . . . . 3
Smoke Control and Management Systems. . . 3
Receiving and Handling . . . . . . . . . . . . . . . . . 4
Storing the Unit . . . . . . . . . . . . . . . . . . . . . . . . 4
Installation Guidelines . . . . . . . . . . . . . . . . . . . . . . 5
Attaching the Mixing Box . . . . . . . . . . . . . . . . . . . 5
Service Clearances . . . . . . . . . . . . . . . . . . . . . . . 6
Rigging. . . . . . . . . . . . . . . . . . . . . . . . . . . . . . . . . 7
Unit Leveling . . . . . . . . . . . . . . . . . . . . . . . . . . . . 7
Panels and Doors. . . . . . . . . . . . . . . . . . . . . . . . . 8
Panel Removal . . . . . . . . . . . . . . . . . . . . . . . . 8
Actuators . . . . . . . . . . . . . . . . . . . . . . . . . . . . . . . 8
Installing Damper Actuator . . . . . . . . . . . . . . . 9
Reversing the Coil Handing . . . . . . . . . . . . . . . . 10
Reversing the Belt Drive Package . . . . . . . . . . . 12
Hanging the Unit from a Ceiling . . . . . . . . . . . . . 12
Piping and Coils . . . . . . . . . . . . . . . . . . . . . . . . . 13
Water Cooling Coils . . . . . . . . . . . . . . . . . . . 13
Direct Expansion Coils . . . . . . . . . . . . . . . . . 13
Steam Coils (provided as Specials only). . . . 13
Water Heating Coils . . . . . . . . . . . . . . . . . . . 14
Drain Pan Traps. . . . . . . . . . . . . . . . . . . . . . . . . 15
Internal Isolation Assembly Adjustment . . . . . . . 15
Before Operating the Unit . . . . . . . . . . . . . . . 15
Spring Mount Adjustments—Twin Fan Units 15
Electric Heat Section (Optional). . . . . . . . . . . . . 16
Open Coil Duct Heater . . . . . . . . . . . . . . . . . 16
Single Point Power . . . . . . . . . . . . . . . . . . . . 16
Quality Control . . . . . . . . . . . . . . . . . . . . . . . 16
Electric Heat kW Options . . . . . . . . . . . . . . . 17
Heater Amps. . . . . . . . . . . . . . . . . . . . . . . . . 17
Electric Heat Safety. . . . . . . . . . . . . . . . . . . . 18
Minimum Air Velocity. . . . . . . . . . . . . . . . . . . 19
Electric Heat Operation. . . . . . . . . . . . . . . . . 20
Field Power Wiring . . . . . . . . . . . . . . . . . . . . 20
Supply Power Wiring. . . . . . . . . . . . . . . . . . . 20
Electrical Installation . . . . . . . . . . . . . . . . . . . 20
Variable Frequency Drive (VFD) - Optional . 21
Starters and Disconnect - Optional. . . . . . . . 21
Wiring Diagrams . . . . . . . . . . . . . . . . . . . . . . . . . . 22
Electric Heat Diagrams . . . . . . . . . . . . . . . . . . . 22
Disconnect-Only Diagrams . . . . . . . . . . . . . . . . 24
VFD Diagrams. . . . . . . . . . . . . . . . . . . . . . . . . . 25
Physical Data. . . . . . . . . . . . . . . . . . . . . . . . . . . . . 29
Component and Section Weights . . . . . . . . . . . 29
Fan Data . . . . . . . . . . . . . . . . . . . . . . . . . . . . . . 32
Filter Data . . . . . . . . . . . . . . . . . . . . . . . . . . . . . 32
Coil Data . . . . . . . . . . . . . . . . . . . . . . . . . . . . . . 33
Drain Pan Data . . . . . . . . . . . . . . . . . . . . . . . . . 34
Electric Heat Data . . . . . . . . . . . . . . . . . . . . . . . 34
Fan Curves . . . . . . . . . . . . . . . . . . . . . . . . . . . . . . 35
Dimensional Data . . . . . . . . . . . . . . . . . . . . . . . . . 40
Cabinet Dimensions—Horizontal. . . . . . . . . . . . 40
Cabinet Dimensions—Vertical. . . . . . . . . . . . . . 42
Mixing Box Dimensions . . . . . . . . . . . . . . . . . . . 43
Electric Heat Dimensions—Left/Right Oriented. 44
Control Box Dimensions . . . . . . . . . . . . . . . . . . 45
Operation Guidelines . . . . . . . . . . . . . . . . . . . . . . 46
Startup Checks . . . . . . . . . . . . . . . . . . . . . . . . . 46
Before Starting the Unit . . . . . . . . . . . . . . . . 46
Operating Limits . . . . . . . . . . . . . . . . . . . . . . 47
Fan Vibration Levels. . . . . . . . . . . . . . . . . . . 47
Service and Maintenance. . . . . . . . . . . . . . . . . . . 48
Periodic Service and Maintenance . . . . . . . . . . 48
Ball Bearing Lubrication . . . . . . . . . . . . . . . . 48
Fan Drive Adjustments. . . . . . . . . . . . . . . . . 48
Fan Drive Belt Adjustment . . . . . . . . . . . . . . 52
Coil Maintenance . . . . . . . . . . . . . . . . . . . . . 53
Component Removal and Replacement. . . . 53
Warranty . . . . . . . . . . . . . . . . . . . . . . . . . . . . . . . . 54
Warranty Details . . . . . . . . . . . . . . . . . . . . . . . . 54
Warranty Return Material Procedure . . . . . . 54
Replacement Parts. . . . . . . . . . . . . . . . . . . . 54
Destiny Equipment Warranty Registration Form 55
Quality Assurance Survey Report . . . . . . . . . . . 57
Page 3

Introduction
General Information
WARNING
Improper installation or maintenance can cause equipment
damage or personal injury.
Installation and maintenance must be performed by qualified
personnel familiar with applicable codes and regulations, and
experienced with this type of equipment.
AVERTISSEMENT
Une installation ou un entretien inadéquats peut
endommager l’équipement ou entraîner des blessures
personnelles. L’installation et l’entretien doivent être
exécutés par un personnel qualifié, familier avec les codes et
règlements applicables et possédant de l’expérience avec ce
type d’équipement.
Introduction
WARNING
Fan motor requires overload protection.
Failure to provide motor overload protection can result in fire,
property damage, electric shock, personal injury or death.
Connect motor to an overload protective device rated in
compliance with local electric codes.
AVERTISSEMENT
Risques d’incendie. À défaut d’installer un sectionneur à
fusible à action rapide de type J, cela peut entraîner des
dommages à la propriété, des blessures ou la mort.
Un sectionneur à fusible à action rapide de type J doit être
installé avant le variateur de fréquence
Smoke Control and Management Systems
CAUTION
Sharp edges and coil surfaces can cause personal injury.
Avoid contact with them.
ATTENTION
Les bords tranchants et les surfaces des bobines sont un
risque de blessure. Ne les touchez pas.
CAUTION
Destiny units are not designed to be weather resistant; DO
NOT install outdoors.
ATTENTION
Les Unités Destiny ne sont pas à l’épreuve des intempéries;
NE PAS les installer à l’extérieur.
WARNING
Improper grounding may result in severe injury or death.
Check grounding nut tightness before connecting power to the
external junction box.
AVERTISSEMENT
Une mise à la terre défaillante peut causer des blessures
graves ou la mort. Vérifiez l’étanchéité des vis de mise à terre
avant d’alimenter la boite de jonction externe.
The system design and installation must follow accepted
industry practice, such as described in the ASHRAE
Handbook, the National Electric Code, and other applicable
standards. The installation of this equipment must be in
accordance with regulations of authorities having jurisdiction
and all applicable codes. It is the responsibility of the installer
to determine and follow the applicable codes
.
WARNING
Improper smoke or fume air handling can result in severe
personal injury or death.
A registered professional engineer must design and approve
the air conditioner and air handler application to make sure
smoke and fume control meet local fire codes and NFPA
requirements for the specific building application.
Due to the wide variation in building design and ambient
operating conditions into which our products can be applied,
we do not represent or warrant that our products will be fit and
sufficient for smoke and fume control and management
purposes. The owner and building designer must consult a
registered professional engineer to satisfy themselves in this
regard.
AVERTISSEMENT
Un traitement inadéquat de l’air contenant de la fumée peut
entraîner des blessures personnelles ou même la mort.
Un ingénieur professionnel doit faire la conception et
approuver l’unité de traitement d’air et son application pour
s’assurer que le contrôle de la fumée rencontre les codes
d’incendies locaux et les normes NFPA pour l’application
spécifique du bâtiment.
Dû à la grande diversité de conceptions des édifices ainsi que
des conditions d’opération ambiantes dans lesquelles nos
produits peuvent être appliqués, nous n’avançons ni ne garantissons que nos produits seront adéquats et efficaces quant au
contrôle de la fumée. Le propriétaire et le concepteur du
bâtiment doivent consulter un ingénieur professionnel à cet
égard
McQuay IM 782-7 3
Page 4

Introduction
Receiving and Handling
1 Carefully check items against the bills of lading to verify
all crates and cartons were received. Carefully inspect all
units for damage when received. Report visible and
concealed damage immediately to the carrier and a file a
claim for damage.
2 Destiny air handler units are thoroughly inspected before
leaving the factory. Install units carefully to prevent
damage.
3 Leave enough space around the unit for proper
maintenance, filter removal, lubricat ion, belt adjust ment,
and removal of coils, if necessary (refer to Figure 2 for
service clearances).
4 Use flexible connections on the inlet and outlet duct
connections of the unit.
5 For 002 - 010 sized ceiling hung units, spring isolation of
the cabinet is recommended.
6 All fans are dynamically balanced before leaving the
factory. Carefully inspect fans for rough handling that
can cause misalignment or a damaged shaft.
7 Adequately pitch and trap drain line from drain pan
connection.
Storing the Unit
Store unit on a level surface. If air handling units are to be
stored for any period of time, it is important to rotate the fan
wheel (quarterly, as a minimum) to prevent permanent
distortion of drive components. Keep the fan bearings
lubricated. Grease may settle in the lower part of the bearing,
which may lead to oxidation on the upper portion of the
bearing surface.
Store units indoors in a clean, dry environment on a level
surface. Moisture, debris, and minerals can cause permanent
damage to the cabinet and components. Do not allow
coverings to trap moisture on the galvanized surface.
4 McQuay IM 782-7
Page 5
Installation Guidelines
Cleat locations
Cleat
installation
Cleat locations
(sizes 015 and above)
Attaching the Mixing Box
Mixing boxes ship with Destiny units as a field-installed
option. Attach the mixing box to the intake end of the air
handler using cleats included with the mixing box section.
Install the cleats into the interior mounting frames, with the
hardware included as shown in Figure 1.
Figure 1: Mixing Box Installation
Installation Guidelines
McQuay IM 782-7 5
Page 6
Installation Guidelines
Width
To p v i e w
Width of
fan section
Width of
C
oil section
30.00”
Width
Height
Vertical uni t
Electric power clearance
54"
12"
Height
Horizontal unit
For Bottom Filter Access Only
Provide 30 Clearance for
Filter Removal
" Vertical
Width
(maximum)
Service Clearances
Leave adequate space around the unit for piping, coils, and
drains. Always have access to at least one side of the unit for
regular service and maintenance. See Figure 2 for servicing
space requirements. Routine maintenance examples include
filter replacement, drain pan inspection and cleaning, fan
bearing lubrication, and belt adjustment. Provide sufficient
space on the drive side of the fan and the connection side of
the coil for shaft and coil removal, if necessary (refer to the
“Coil Data” section in Catalog 580 for information about coil
sizes). Both the fan drive and coil can be field modified to
right or left hand to accommodate clearance restrictions. See
Reversing the Coil Handing‚ page 10 and Reversing the Belt
Drive Package‚ page 12.
Figure 2: Servicing Space Requirements
For routine maintenance, remove panels on either side of the
unit. See Panel Removal‚ page 8. Optional service doors are
available for the fan and filter sections. Allow sufficient space
for service door(s) to swing completely open, or to meet the
clearance requirement of the section it accesses, whichever is
greater. Service doors are not interchangeable with access
panels on the opposite side of the unit. Determine clearances
before specifying doors.
Have at least 54" of clearance in front of electrical power
devices (starters, VFDs, disconnect switches, and combination
devices). Electrical power devices that are mounted on the side
of the unit typically are 6" deep (12" maximum (see Figure 2,
page 6).
6 McQuay IM 782-7
Page 7

Installation Guidelines
Vertical unit
Horizontal unit
Rigging
Rig units using straps or a sling. Fasten strapping under the
skid that ships with the section. If a field-installed mixing box
is attached, adjust to balance the unit properly.
To avoid damage to the unit cabinetry, use spreader bars.
Position spreader bars to keep cables from rubbing the frame,
connections, or panels. Before hoisting into position, test lift
for stability and balance. Avoid twisting or uneven lifting of
the unit.
Figure 3: Rigged Unit on Skids
Horizontal unit
Unit Leveling
Place the equipment on a flat and level surface (or verify that
unit is level when hanging from the ceiling). Where the surface
irregularities allow the equipment to distort, shim the base of
the unit to a straight line. Distorted units can cause misfit or
binding of the doors and panels and improper draining of drain
pans.
Figure 4: Leveling the Unit
Vertical unit
McQuay IM 782-7 7
Page 8
Installation Guidelines
Panels and Doors
DANGER
Hazardous moving parts, high static pressure, and/or high
voltage. Can cause severe injury or death.
Disconnect and lock ALL electric power off before entering or
servicing unit. Unit may employ multiple power supplies and/or
remote disconnects.
Secure drive sheaves to prevent motors and fan from free
wheeling.
When leaving the unit, use screw or door handle locking
mechanism provided to secure access panel closed and
prevent unintentional entry.
DANGER
Pieces mobiles dangereuses, haute pression statique et/ou
de hautes tensions. Risques de blessures graves, voire
mortelles.
Débranchez et verrouillez toutes les alimentation électriques
avant de pénétrer ou d’intervenir sur cet appareil. Cet appareil
peut étre alimenté par plusieurs sources etlou par
l’intermédiaire de plusieurs disjoncteurs éloignés.
Attachez les disques d’entrainement afin d’éviter que les
moteurs et le ventilateur ne tournent librement.
A Ia sortie de l’appareil, fermer le panneau d’accès avec Ia vis
ou avec le mécanisme de verrouillage de Ia poignée de porte
qui sont founis pour éviter toute entrée inopinée.
Panel Removal
Destiny air handlers have pocket pull handles in alternate
sections that allow side panels to be easily removed and
handled. To gain access through a side panel, remove the
fasteners along the sides of the panel and lift the panel off
using the pocket pull handle. If the panel you are accessing
does not have a pocket pull handle, remove an adjoining panel
with a pocket pull handle and push the panel out from inside
the unit.
Figure 5: Panel Removal
Figure 6: Fan Section Doors
Actuators
The factory-mounted actuator has been initially adjusted in the
factory. Power and control wiring, as well as fine-tuning
adjustment, is to be performed in the field.
The installing contractor is responsible for the mounting of all
field-installed actuators. An actuator mounting plate is
provided on the shaft side of the damper frame to
accommodate many actuators. However, due to the number of
options, size variations, and arrangements available, some
actuators may require alternate field provided mounting
hardware. Provide proper support for the actuator to avoid
excessive stress in the cabinet, linkage, or damper shafts.
Fresh air and return air dampers can be linked together and
driven from the same actuator if the dampers are the same size.
If the dampers are different sizes, they must be driven by
separate actuators and controlled appropriately.
A typical rotary electric actuator can handle up to 40 square
feet of damper. For pneumatic actuators, allow 5 in.-lb. per
square foot of damper area.
CAUTION
Maximum damper rotation is 70°. Maximum shaft torque is 205
in.-lb. Greater rotation or torque can cause equipment damage.
ATTENTION
La rotation maimale des volets est de 70°. Le couple (torque)
maximum de l’arbre est de 205 in./lb. Une plus grande rotation
Fan Section Doors
1 Use a flat head screwdriver and rotate the screw 1/4 turn
(ou torque) peut endommager l’équipement.
as shown in Figure 6.
2 Rotate door handle 1/4 turn and open the door.
8 McQuay IM 782-7
Page 9

Installation Guidelines
Figure 7: Factory Mounted Actuator
For good air flow control, adjust the linkage so that the damper
blades do not open beyond 70°. Opening a damper blade
beyond 70° will have little effect on unit performance.
Do not “over-close” the low-leak damper blades as the blades
may lock up if the accompanying seal goes over the center of
the adjoining blade. Instead, close the damper blades until the
edge seal just lightly contacts the adjoining blade.
Installing Damper Actuator
1 Turn the damper shaft until the blades are fully closed.
2 Place the actuator’s universal clamp over the damper
shaft (Figure 8). Make sure that the controls on the
actuator cover are accessible. Place the actuator in the
desired mounting position.
Figure 9: Actuator Manual Override Button and Strap
4 Slide the anti-rotation strap (Figure 9) under the actuator
so it engages the actuator at the center of the actuator cut
out (located on the back side). Bend the bracket as
needed to support the back side of the actuator. Secure
the strap/actuator to ductwork with self-tapping screws
(#8 recommended).
5 Loosen the nuts on the universal clamp. Press the manual
override button and rotate the clamp to about 5°
(Figure 10) from the closed position (1/16" to 1/8"
between stop and clamp).
Figure 10: Actuator Universal Clamp Rotation
Figure 8: Actuator on Damper Shaft
Disengage the actuator gear train by pressing the manual
3
override button (Figure 9) and ro tate the clamp until
centered.
Tighten the two nuts on the universal clamp with a
6
wrench.
McQuay IM 782-7 9
Page 10
Installation Guidelines
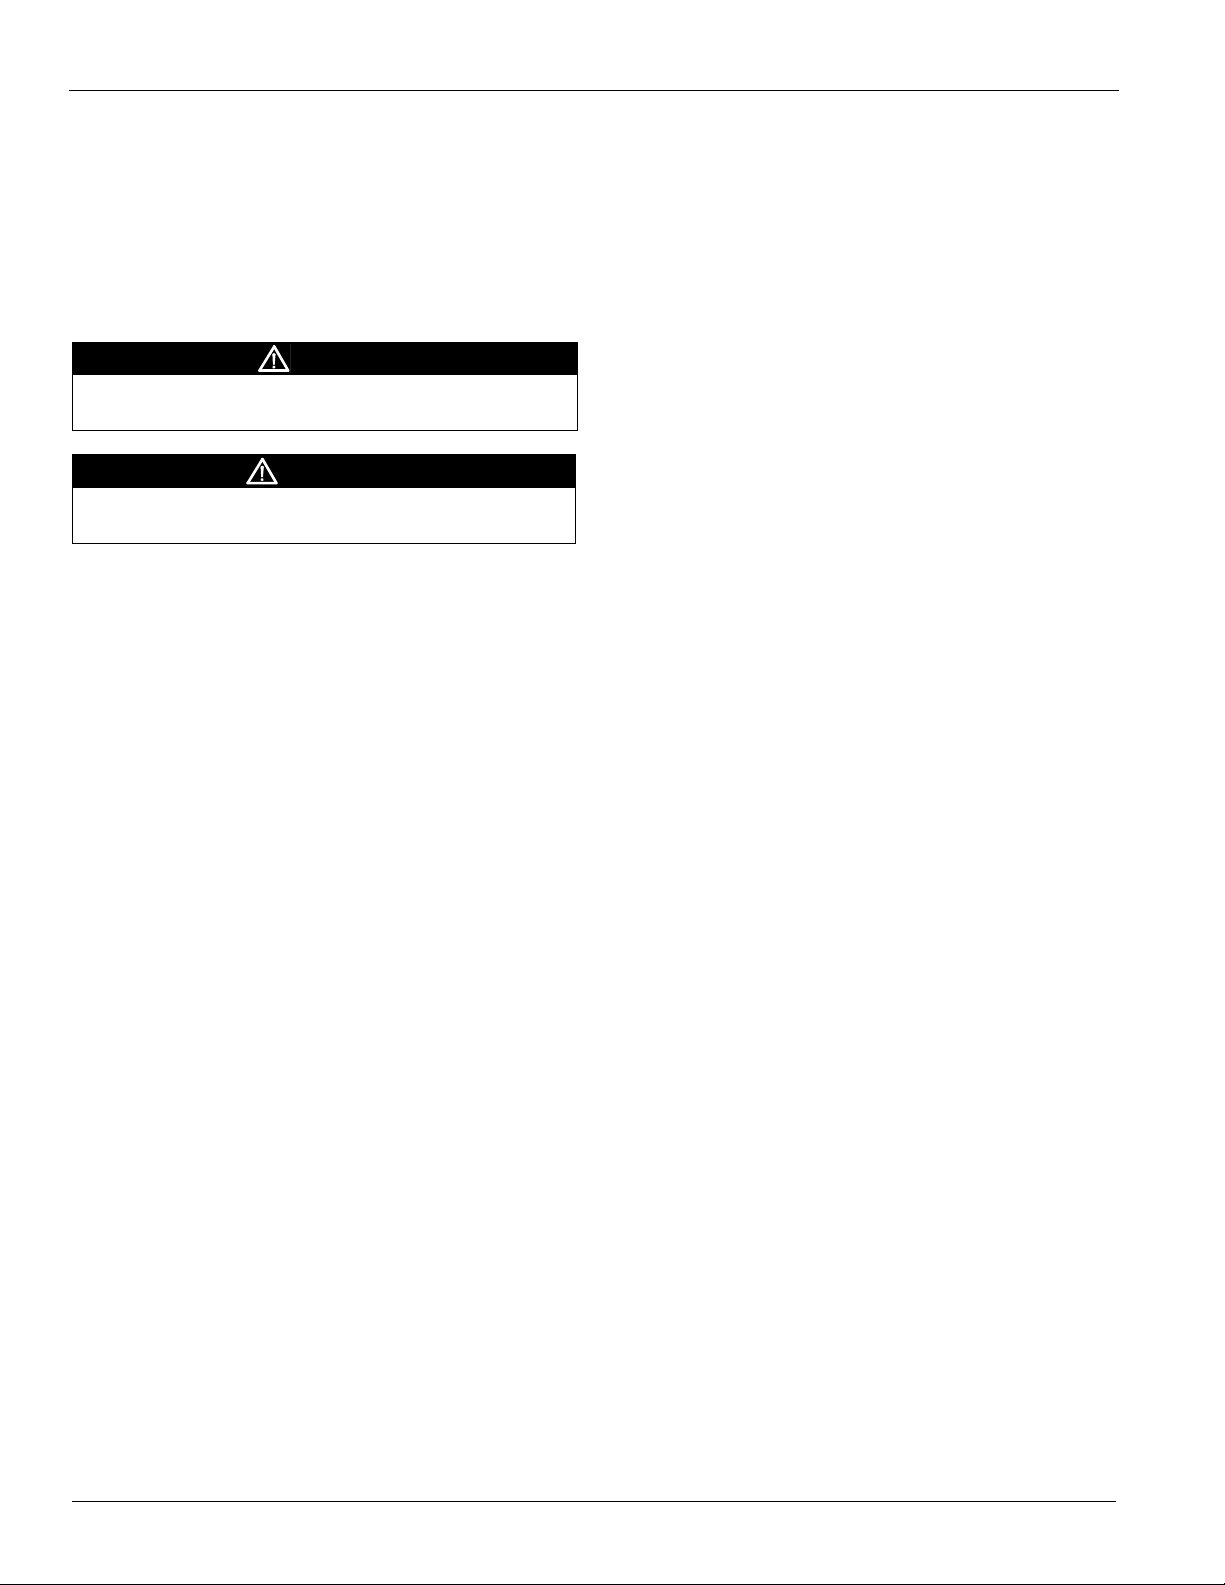
Reversing the Coil Handing
Destiny coils universal-hand and coil connections can be
switched to the opposite side of the unit by rotating the coil(s)
180 degrees side to side and reworking the coil section panel
on the opposite side of the air handler.
Note: Direct expansion (DX) coils require 180 degree rotation
on the top to bottom to locate distributor tubes at the
leaving face of the coil.
CAUTION
Sharp edges and coil surfaces can cause personal injury.
Avoid contact with them.
ATTENTION
Les bords tranchants et les surfaces des bobines sont un
risque de blessure. Ne les touchez pas.
To reverse the coil connections, follow the steps below, (also
refer to Figure 11, page 11).
1 Remove exterior panels from both sides of the coil
section. Remove screws that secure the top of the leaving
coil face to the upper track on the inside top of the unit.
2 Lift drain pan condensate connection above the unit
frame flange and slide drain pan, coil(s) and baffles out
of unit.
3 Remove screws and remove coil blockoffs.
4 Remove screws holding coil to drain pan and remove
coil.
5 Rotate the coil 180° and reposition coil blockoffs to the
entering air side of the coil.
6 Drill holes if required and fasten the blockoffs to the
entering side of the coil.
7 If unit has both heating and cooling coils, position and
bolt heating coil and cooling coil casings together in
same arrangement in the direction of airflow as unit was
shipped from factory. Reheat coils must remain in reheat
position; do not place in preheat position. Fasten the first
coil in the air stream to the entering side of the drain pan
using the same holes provided for the coil before it was
rotated.
8 Mark locations and drill holes to align with holes in
upper track.
9 Slide the coil, blockoffs and drain pan assembly back
into unit the same way it was removed. Check the
installation for an airtight fit. Re-install screws that
secure the top of the leaving coil face to the upper track
on the inside top of the unit.
Depending on whether the air handler was purchased from
stock or if it was manufactured for the specific job, the panel
on the opposite side may or may not have predrilled
connection holes.
1 If connection holes need to be drilled, determine the
proper diameter in order to use the existing grommets.
2 Mark connection locations on panel and drill new holes
to accommodate connections and grommets.
3 Plug and seal unused connection holes on opposite side
panel with new solid grommet or other suitable material.
10 McQuay IM 782-7
Page 11
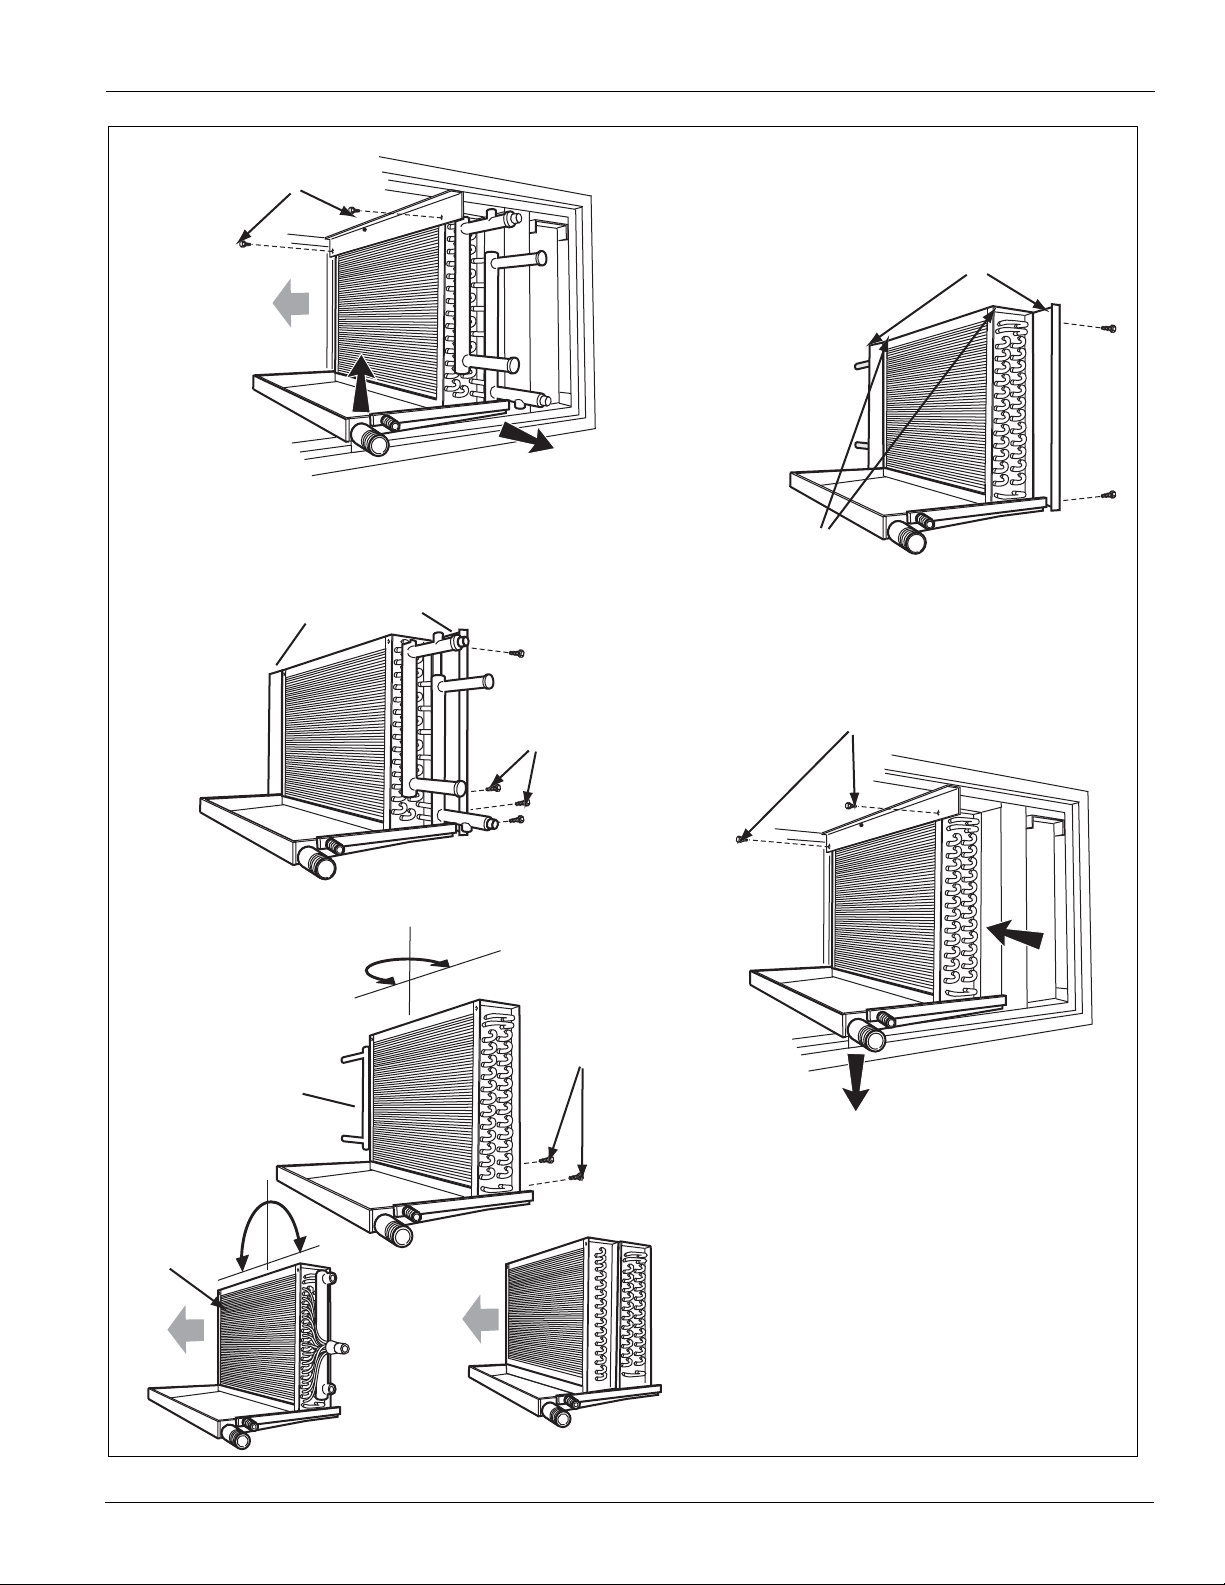
Figure 11: Reversing the Coil Handing
Remove screws
from the upper track
that hold coil/drain pan
in place
Position coil/drain pan
assembly in unit and install
screws in upper track.
Lift drain pan connection
up and slide coil/drain pan
assembly out.
Remove screws and
remove coil blockoffs.
Drill holes in coil header plate
flanges, position block offs
and install screws to secure to coil.
Drill holes in coil
bottom flange
and install screws
to secure to
drain pan.
Remove screws
holding coil to
drain pan and
remove coil.
Rotate coil 180°
and reposition in
drain pan.
Mark locations
and drill holes
to align with holes
in upper track.
4
5
6
7
8
3
2
1
9
NOTE:
Rotate a DX
(evaporator)
coil 180° TOP
to BOTTOM.
Distributors
must be on the
leaving air side
of the coil.
NOTE:
If a heating coil
is used, position
heating coil in
the same location
as unit was shipped
from factory. Reheat
coils must remain in
reheat positon; do not
place in preheat postiion.
Airflow
Airflow
Airflow
All coils
except DX
Installation Guidelines
McQuay IM 782-7 11
Page 12
Installation Guidelines
Belt
adjustment
bolts (2)
Upper motor
mounting
plate bolts (2)
Lower motor
mounting
plate bolts (2)
C-channels are required on all units.
On unit sizes 007 and above, L-channels
on both ends are also required.
Spring Isolators
Reversing the Belt Drive Package
A motor side or “hand” is determined by looking in the
direction of air flow with the air contacting the back of the
head. The drive package on the air handler can be changed to
the other side of the blower. The motor base and motor are
attached to back of the fan housing. They can be removed,
rotated 180 degrees, and reattached. The fan sheave can be
removed and reinstalled on the opposite end of the shaft
(Figure 12). Review Fan Drive Adjustments‚ page 48 when
reinstalling the belts.
To reverse the drive package:
1 Loosen the belt adjustment screws to relieve the drive
belt tension.
2 Remove the drive belt and the blower pulley.
3 Loosen the two upper bolts on the motor mounting plate
and slide the motor out from the blower housing mount.
4 Move the top motor mounting bolts to the bottom motor
mounting plate location and vice versa. Fasten securely.
5 Turn the motor 180° and slide it back into the blower
housing mount and tighten bolts.
Note: Change the motor wiring so the motor rotates in the
opposite direction.
1 Install the blower pulley and the belt to the other side of
the blower housing.
2 Adjust belt tension.
Hanging the Unit from a Ceiling
Before hanging, rig and completely assemble the unit.
WARNING
Do not suspend the unit from the top. The unit top will not
support the weight of the unit. Equipment damage and severe
personal injury can result.
AVERTISSEMENT
Ne pas suspendre l’unité par le toit. Le dessus de l’unité ne
supportera pas le poids de l’unité. Ceci pourrait entraîner des
dommages à l’unité ou des blessures personnelles graves.
The Destiny air handler has circular knockouts on the corner
connections. Remove the knockouts and suspend the unit using
threaded rods and hardware with required C-channels on both
sides as shown in Figure 13. On unit sizes 007 and larger,
L-channels are required on both ends in addition to
C-channels. For 002 - 010 sized ceiling hung units, spring
isolation of the cabinet is recommended. See Figure 13.
Figure 13: Ceiling Hung Installation, Horizontal Units Only
Figure 12: Reversing the Drive Package
12 McQuay IM 782-7
Page 13
Installation Guidelines
LH
AIR
FLOW
AIR
FLOW
RH
SUPPLY
RETURN
Left Hand AIr Flow Coil
Right Hand AIr Flow Coil
LH
AIR
FLOW
AIR
FLOW
RH
SUCTION
CONNECTION
SUCTION
CONNECTION
SUCTION
CONNECTION
LIQUID
CONNECTION
Left Hand
Air Flow Coil
Left Hand
Air Flow Coil
Right Hand
Air Flow Coil
Right Hand
Air Flow Coil
LH
AIR
FLOW
AIR
FLOW
RH
LIQUID
CONNECTION
LIQUID
CONNECTION
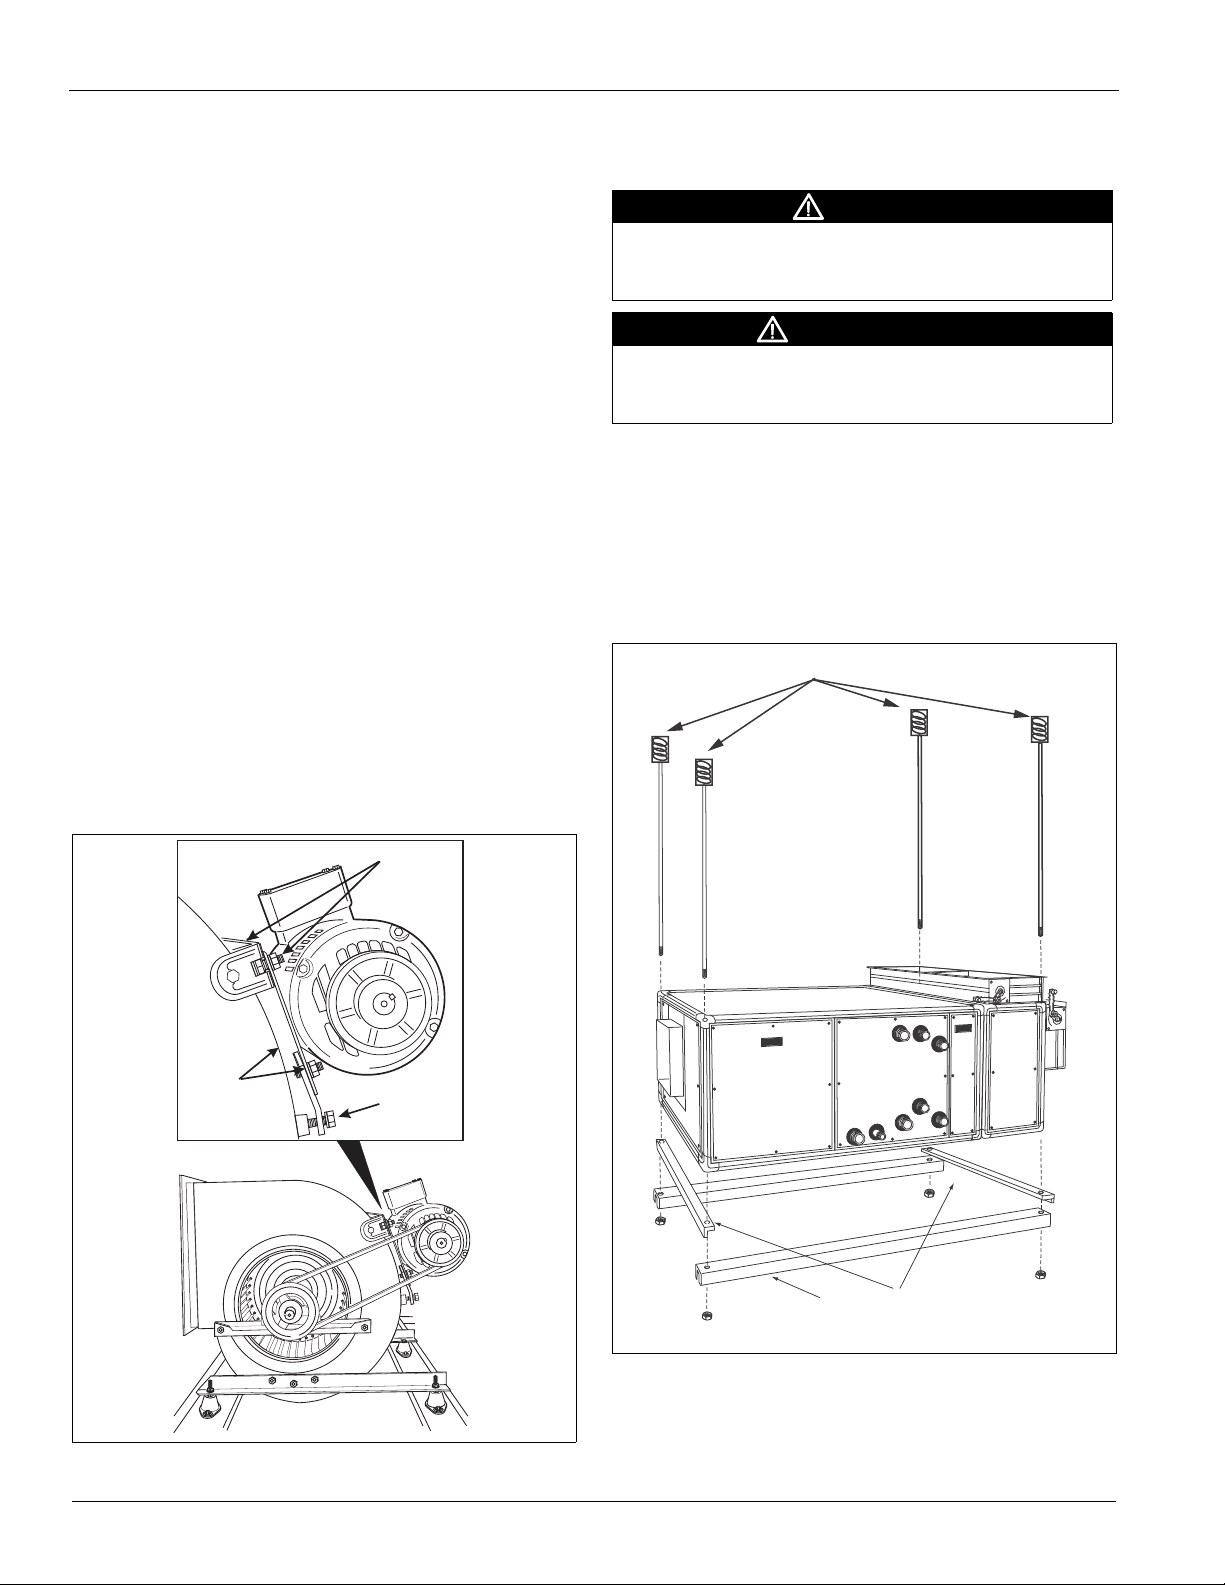
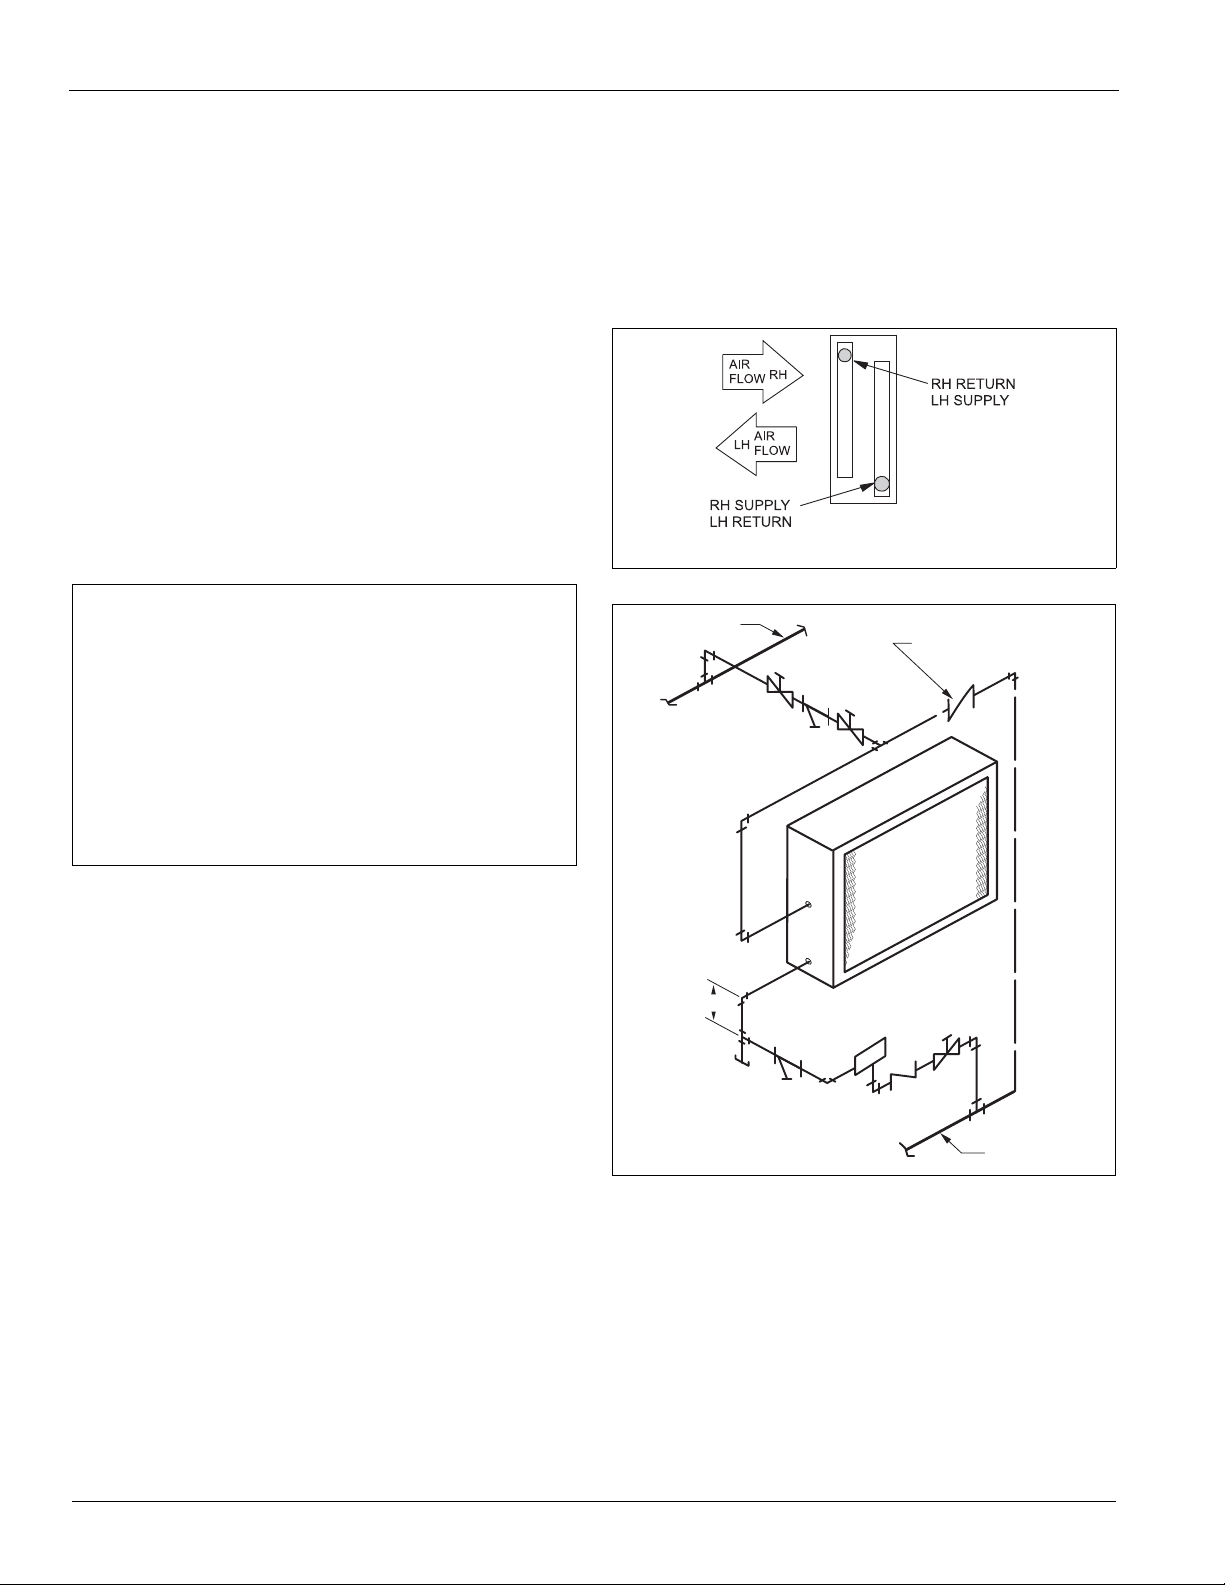
Piping and Coils
Follow applicable piping design, sizing, and installation
information presented in ASHRAE Handbooks in the design
and installation of piping. Observe all local codes and industry
standards. Do not apply undue stress at the connection to the
coil headers. Support pipe work independently of the coils.
Note: Destiny cooling coils are supplied as universal-hand
coils. The coils feature four water piping connection
stubs for hydronic coils and two suction line connections
for DX coils. The connections to be used are clearly
marked with labels. Keep other (unmarked) connections
capped. Refer to Figure 14 and Figure 15, detailing the
correct stubs that are to be connected to the system
piping.
Water Cooling Coils
Water cooling coil guidelines are listed below. Also, refer to
Figure 14.
1 Water supply, water return, drain, and vent connections
extend through the end panel of the coil section. All
connections are labeled on the end panel.
2 Water supply and water return connections are copper
sweat on units 002 through 010 and male NPT iron pipe
on units 015 through 030.
3 When installing couplings, do not apply undue stress to
the connection extending through unit panel. Use a
backup pipe wrench to avoid breaking the weld
between coil connection and header.
4 Follow recommendations of the control manufacturer
regarding types, sizing, and installation of controls.
Figure 14: Water Cooling Coil Connections
Direct Expansion Coils
Direct expansion coil connection guidelines are listed below.
Also, refer to Figure 15.
1 The coil distributor and suction connection extend
2 Check nozzle in distributor for proper tonnage.
3 The thermostat expansion valve must be an external
through the end panel of the coil section.
equalizer tube type. Connect the equalizer tube provided
on the coil (3/16" for units 002 to 010, and 1/4" for units
015 to 030) to the connection on the expansion valve.
4 Use care when piping up the system, making sure all
joints are tight and all lines are dry and free of foreign
material. For typical refrigerant piping, see the
condensing unit product manual.
Figure 15: DX Coil Connections
Steam Coils (provided as Specials only)
Steam coil connection guidelines are listed below. Also, refer
to Figure 16, page 14.
1 All steam coils are non-distributing (freeae) type. They
are not designed to be used in 100% OA applications.
2 Steam supply and steam return connections are typically
male NPT iron pipe and are labeled on the end panel of
coil section. Connections extend through coil section end
panel.
3 When installing couplings, do not apply undue stress to
the connection extending through unit panel. Use a
backup pipe wrench to avoid breaking the weld between
coil connection and header.
4 Support piping independently of coils and provide
adequate piping flexibility. Stresses resulting from
expansion of closely coupled piping can cause serious
damage.
5 Do not reduce pipe size at the coil return connection.
Carry return connection size through the dirt pocket,
making the reduction at the branch leading to the trap.
6 Install vacuum breakers on all applications to prevent
retaining condensate in the coil. Connect the vacuum
breaker between the coil inlet and the return main.
7 Do not drip supply mains through the coil.
McQuay IM 782-7 13
Page 14
Installation Guidelines
One and Two Row Coil
with Spayed Headers
8 Do not attempt to lift condensate when using modulating
or on/off control.
9 Size traps in accordance with manufacturers’
recommendations. Be certain the required pressure
differential will always be available. Do not undersize.
10 Use float and thermostatic or bucket traps with low
pressure steam. On high pressure steam, use bucket
traps. Use thermostatic traps only for air venting.
11 Use bucket traps only with on/off control.
12 Locate traps at least 12 inches below the coil return
connection.
13 Do not use modulating steam valves on high pressure
systems.
14 Size modulating valves properly. Do not undersize.
15 Destiny steam coils are not recommended for freezing
conditions or entering temperatures below 35°F (1.6°C).
Figure 16: Steam Coil Connections (Type SS)
4 Follow recommendations of the control manufacturer
regarding types, sizes, and installation of controls.
5 Hot water coils are not recommended for use with
entering air below 40°F.
6 If fresh air and return air are to be heated by a hot water
coil, take care in the design of the system to provide
thorough mixing before air enters the coil.
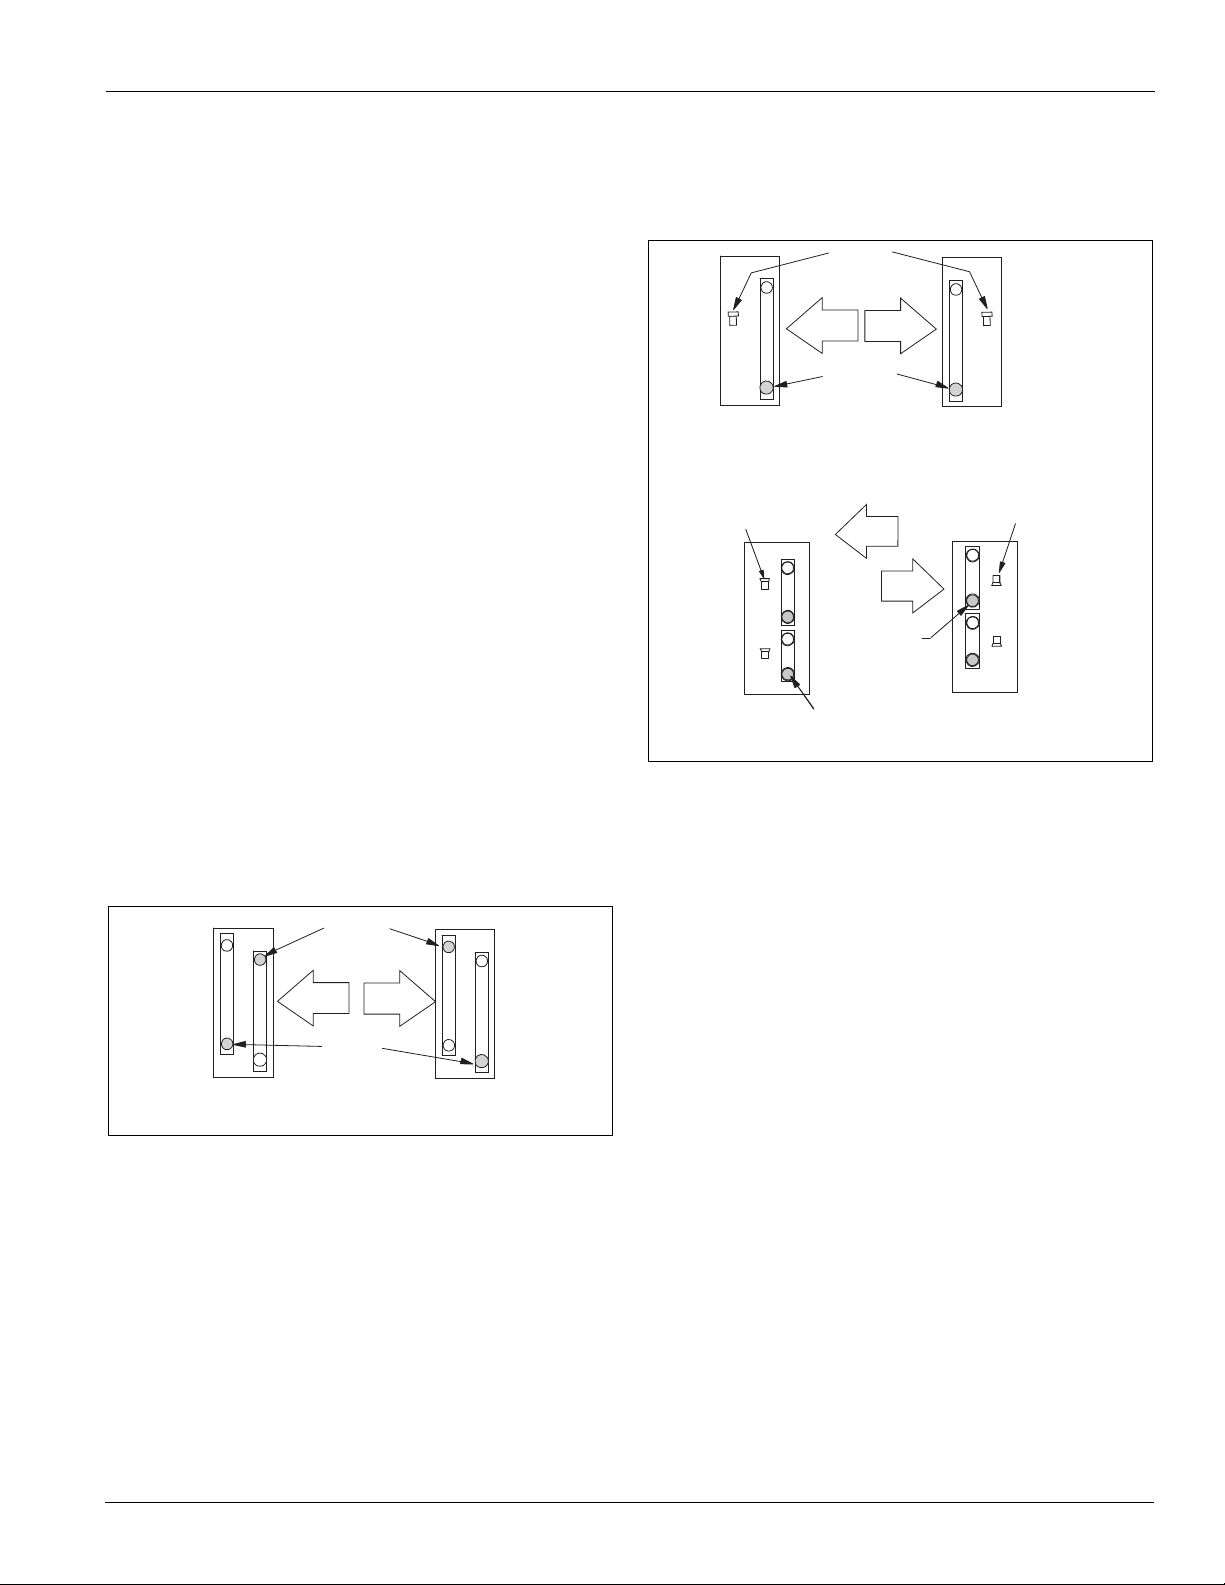
Figure 17: Water Heating Coil Connections
Figure 18: Piping Arrangements
Steam main
Vacuum breaker
1/2" check valve
Water Heating Coils
Heating coil connection guidelines are listed below. Also, refer
to Figure 17 and Figure 18.
1 Water supply and water return connections extend
through the end panel of the coil section. All connections
are labeled on the end panel.
2 Water supply and water return connections are copper
sweat on units 002 through 010 and male NPT iron pipe
on units 015 through 030.
3 When installing couplings, do not apply undue stress to
the connection extending through unit panel. Use a
backup pipe wrench to avoid breaking the weld between
coil connection and header.
12" min.
Return main
14 McQuay IM 782-7
Page 15
Installation Guidelines
Pressure (P)
at the drain pan
2P
2P
Motor
Fan
POS 1
POS 2
POS 3
POS 4
Airflow
Fan isolator position numbers
Dim "H"
Spring height
adjustment screw
Drain Pan Traps
Destiny air handlers have a drain pan connection on both sides
of the unit. Drain connections can be made on either side or
both sides. Drain lines and traps should run full size from the
drain pan connection. Drain pans should have traps to allow
condensate from coils to drain freely. The trap depth and
distance between the trap outlet and the drain pan outlet should
be twice the static pressure in the drain pan section under
normal operation for the trap to remain sealed. Refer to
Figure 19.
A secondary drain connection on the drain pan is standard on
all Destiny units. Secondary drain connections are required in
some applications as a visual means of identifying clogged
primary drain lines.
Figure 19: Allow Adequate Distance Between Trap Outlet
and Drain Outlet
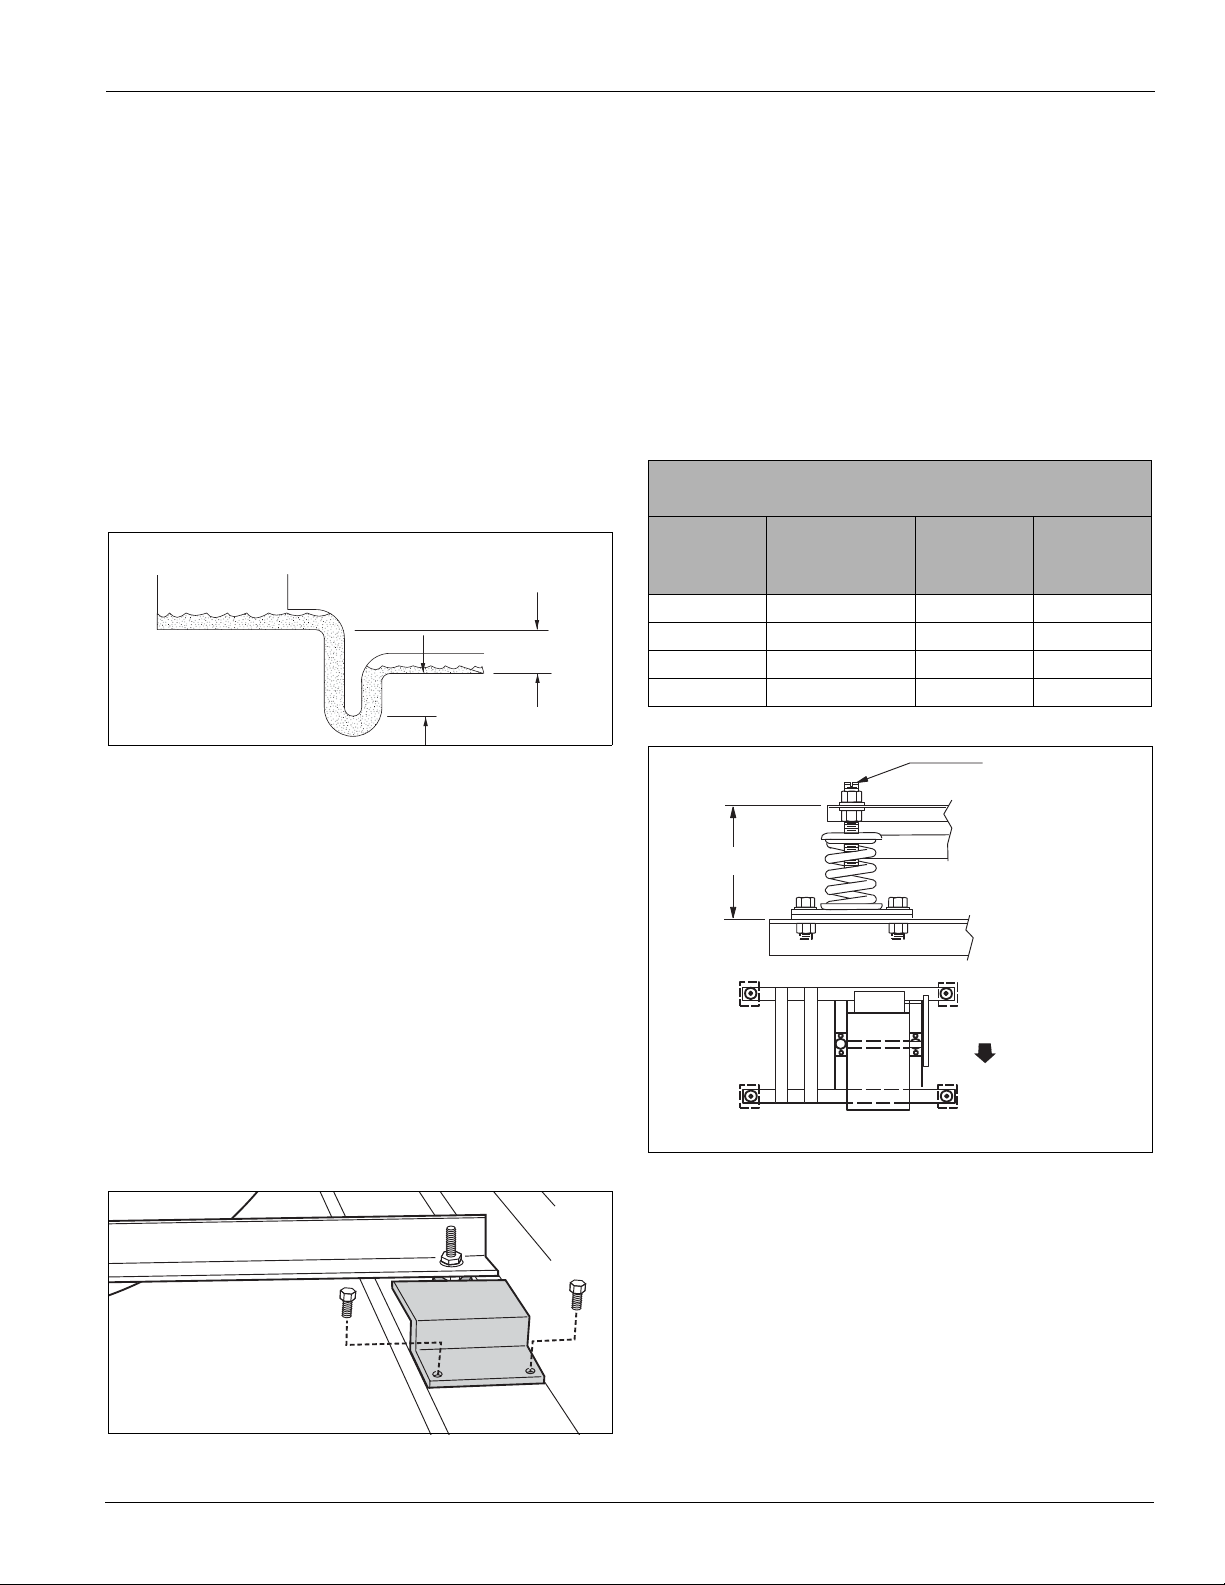
Spring Mount Adjustments—Twin Fan Units
The spring isolators under the four corners of the fan and
motor assembly have been factory adjusted while the fan was
not running. Refer to Table 1. With the unit operating at
normal cfm and static pressure, the isolators should all be at
the same height opening. If adjustments are required, loosen
the 5/16" capscrew on top of the isolator and turn the adjusting
bolt to lower or raise the fan and motor base. Retighten the
capscrew when adjustments are completed. See Figure 21
below.
When seismic snubbers and/or thrust restraints are provided,
no additional adjustments are required.
Table 1: Spring Mount Adjustment—Twin Fan Units
Spring mount adjustment at rest, unit sizes 015 to 030
ONLY
Fan
discharge
position
1 3.75 3.75 4.25
2 4.25 3.75 4.25
3 4.25 3.75 4.25
4 3.75 3.75 4.25
Top or bottom
horizontal H
DownblastHUpblast
H
Figure 21: Spring Mount Adjustments—Twin Fan Units
Note: The door panels on some applications have a close
clearance over the drain pipes. Extend the drain fitting
with a coupling if necessary for door clearance.
Internal Isolation Assembly Adjustment
Units have internally isolated fan and motor assemblies that
are secured with brackets for shipment.
Before Operating the Unit
Remove the shipping bracket and bolts and discard. The
shipping brackets located on the opposite drive side of the unit
(Figure 20) are difficult to access from the drive side of the
unit. Either remove them before the unit is assemb led , or
remove the panel on the opposite drive side to gain access.
Figure 20: Removing the Shipping Bracket, Sizes 002–010
McQuay IM 782-7 15
Page 16
Installation Guidelines
C M XX - XX - XX
Heater
Phases
Wattage
Voltage
Modular
Steps
Airflow
Removable Panel
for Full Access
9.50
2.25
3.00
Knockouts: Four Diameters
2.38, 1.62, 1.88, 1.00
Front
Electric Heat Matches
Destiny Fan Discharge
and Attaches Directly
to Destiny Unit
3.00
Left Hand Electric
Heat Shown
(Right Hand Optional)
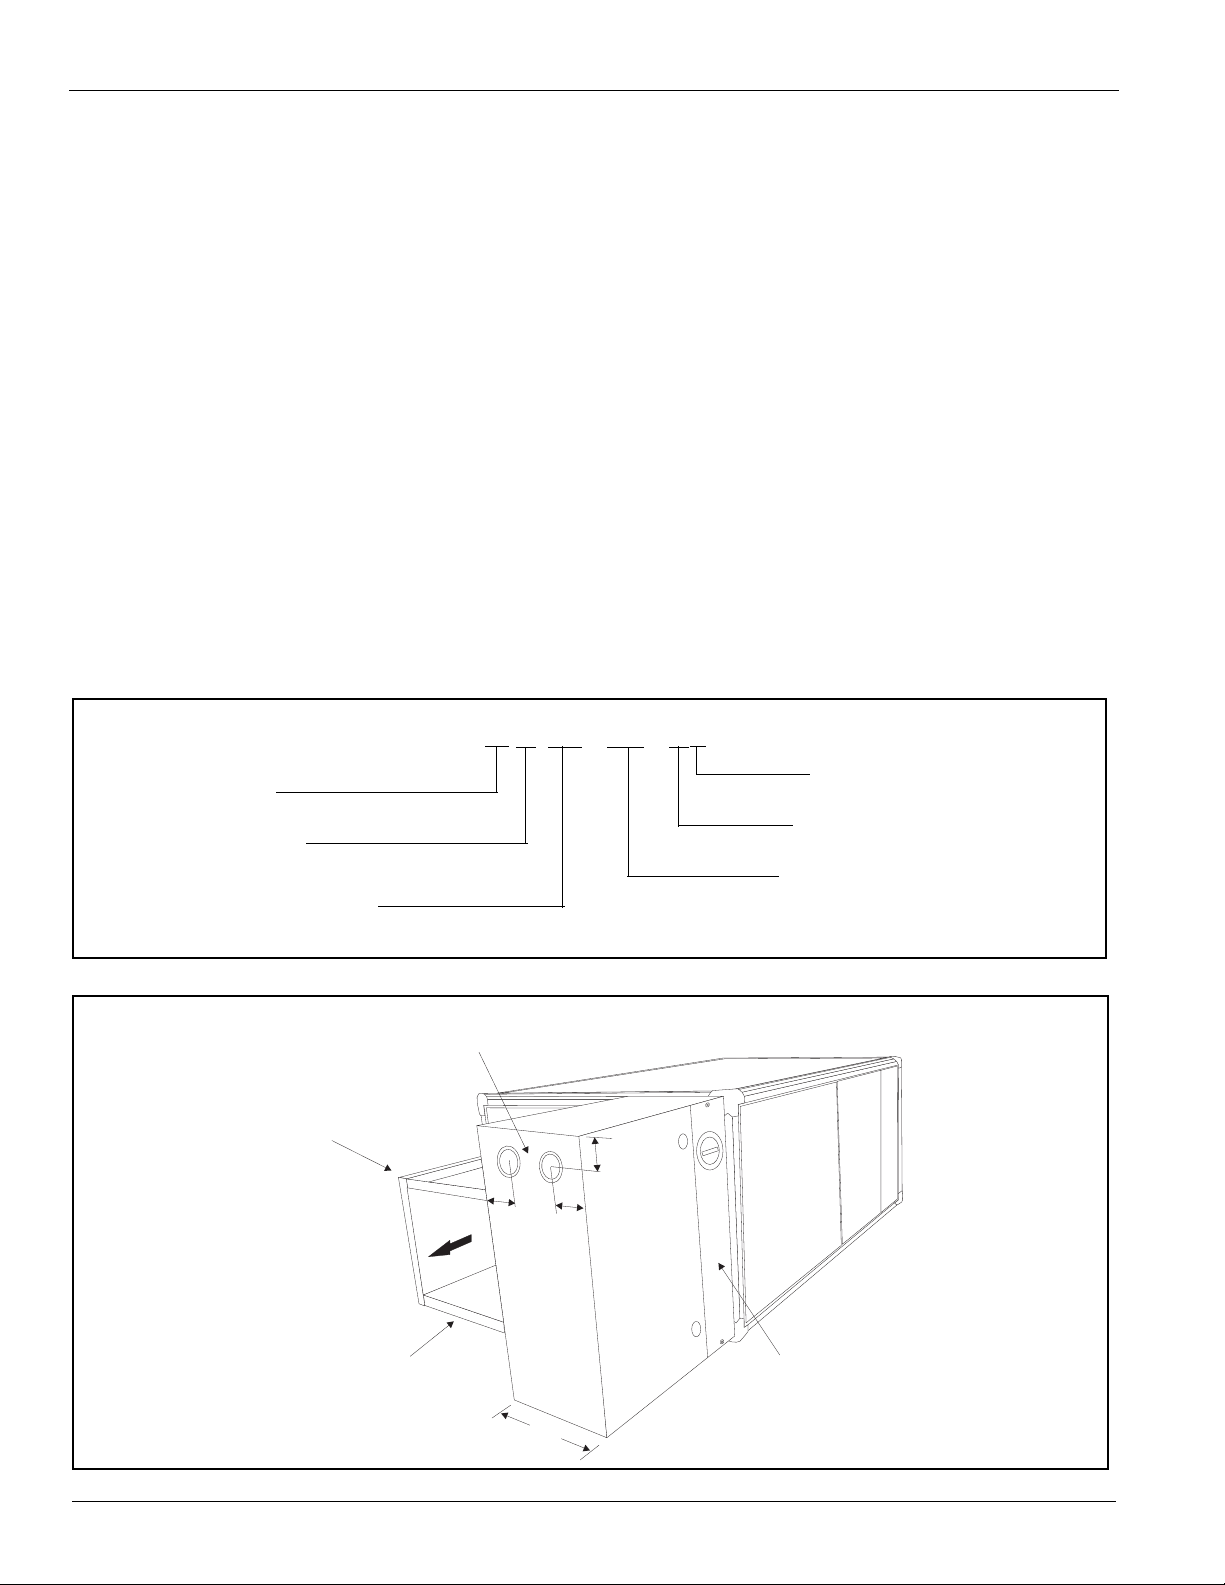
Electric Heat Section (Optional)
Optional factory installed electric heat section consists of open
coil duct heater mounted to the unit at the supply fan
discharge. Heat section includes heating coils and an electrical
control box with single point field power connection for heater
and supply air fan.
Factory provided field knockouts are located on the side of the
electric heat control panel for field power and control wiring to
pass through. A factory installed non-fused disconnect is
located in the electric heat control panel to disconnect power to
the supply air fan and heater components. All wiring must be
in conformance with the national electric code and local
restrictions.
Open Coil Duct Heater
• Complete with overload and thermal protection
• Includes fan interlock and air flow switch safety protection
• High quality, alloy nichrome wire [80%Ni / 20%Cr]
• High di-electric level ceramic insulators
• Screw terminals
Figure 22: Heater Nomenclature
Single Point Power
• Non-fused disconnect
• Electric heat is factory wired including contactors and fu ses
per step and as required by UL. Refer to Electric Heat
Diagrams‚ page 22 for typical electric heat wiring diagrams
• Fan motor is factory wired including contactor or starter and
fuses as applicable
• Fused control transformer allows the heater and fan to be
sequenced by standard 24 volt thermostat
• Indoor control panel with tool access hinged door houses all
components
Quality Control
• Heaters are di-electrically tested for 1000V plus twice the
rated volts, or 2000V whichever is greater. The resistance of
each heater is measured and recorded and must be within 5%
of the rated value
• Every heater is checked during the production process and
as a final assembly
Figure 23: Destiny Unit with Left Hand Electric Heat
16 McQuay IM 782-7
Page 17

Electric Heat kW Options
Table 2: KW Options by Unit Size
Unit Size
002 003 004 005 007 010
KW Range
1.5 - 102.5 - 202.5 20
Heater Amps
Table 3: Heater Amps
Installation Guidelines
4 - 26 6 - 38 6 - 55
KW
1 8.33 4.17 2.41 1.20 0.96
1.5 12.50 6.25 3.61 1.81 1.45
2 16.67 8.33 4.82 2.41 1.93
2.5 20.83 10.42 6.02 3.01 2.41
3 25.00 12.50 7.23 3.61 2.89
3.5 29.17 14.58 8.43 4.21 3.37
4 33.33 16.67 9.63 4.82 3.85
4.5 37.50 18.75 10.84 5.42 4.34
5 41.67 20.83 12.04 6.02 4.82
5.5 45.83 22.92 13.25 6.62 5.30
6 50.00 25.00 14.45 7.23 5.78
6.5 54.17 27.08 15.66 7.83 6.26
7 58.33 29.17 16.86 8.43 6.74
7.5 62.50 31.25 18.06 9.03 7.23
8 66.67 33.33 19.27 9.63 7.71
8.5 70.83 35.42 20.47 10.24 8.19
9 75.00 37.50 21.68 10.84 8.67
10 83.33 41.67 24 .08 12.04 9.63
11 91.67 45.83 26.49 13.25 10.60
12 100.00 50.00 28.90 14.45 11.56
13 108.33 54.17 31.31 15.66 12.52
14 116.67 58.33 33.72 16.86 13.49
15 125.00 62.50 36.13 18.06 14.45
16 133.33 66.67 38.54 19.27 15.41
17 141.67 70.83 40.94 20.47 16.38
18 150.00 75.00 43.35 21.68 17.34
19 158.33 79.17 45.76 22.88 18.30
20 N/A 83.33 48.17 24.08 19.27
22 N/A 91.67 52.99 26.49 21.19
24 N/A 100.00 57.80 28.90 23.12
26 N/A 108.33 62.62 31.31 25.05
28 N/A 116.67 67.44 33.72 26.97
30 N/A 125.00 72.25 36.13 28.90
32 N/A 133.33 77.07 38.54 30.83
34 N/A 141.67 81.89 40.94 32.76
36 N/A 150.00 86.71 43.35 34.68
38 N/A 158.33 91.52 45.76 36.61
40 N/A N/A 96.34 48.17 38.54
45 N/A N/A 108.38 54.19 43.35
50 N/A N/A 120.42 60.21 48.17
55 N/A N/A 132.47 66.23 52.99
120 V / 1Ø 240 V / 1Ø 240 V / 3Ø 480 V / 3Ø 600 V / 3Ø
Heater Amps
McQuay IM 782-7 17
Page 18

Installation Guidelines
Electric Heat Safety
Overcurrent Protection
Overcurrent fuse protection is provided for each stage of
electric heat (in lieu of one per 48 amperes).
Thermal (Over Te mperature) Pro tectio n
Primary - Automatic limit switches, one per step (120°F or
150°F as appropriate).
Backup - Manual reset thermal cutout (180°F).
Fan Interlock Method:
To prevent the heater from being energized unless the fan is
on, the heater includes two interlock methods: an airflow
switch, and the use of an auxiliary contact in the motor starter
contactor (3ph) or a fan relay (1ph).
Airflow Switch:
The airflow switch provides the best means of protection
against air failure caused by fan belt or other malfunction.
Switches are of the differential pressure, diaphragm-operated
type and require a minimum total pressure differential of .05"
WC. The switch is factory wired in series with the manual
reset cutout.
18 McQuay IM 782-7
Page 19

Installation Guidelines
Minimum Air Velocity
Recommended minimum air flow through a specific heater is
shown in the following tables.
Table 4: LAH002 Minimum Air Flow
Heater Capacity, kW 1.5 2 2.5 3 3.5 4 4.5 5 5.5 6 6.5 7 7.5 8 8.5
Minimum air flow, CFM 184 218 249 274 292 310 328 344 359 371 382 387 398 396 400
Heater Capacity, kW 9 10
Minimum air flow, CFM 404 409
Table 5: LAH003 Minimum Air Flow
Heater Capacity, kW 2.5 3 3.5 4 4.5 5 5.5 6 6.5 7 7.5 8 8.5 9 10
Minimum air flow, CFM 298 339 368 400 426 446 466 484 501 519 536 550 565 579 605
Heater Capacity, kW 11 12 13 14 15 16 17 18 19 20
Minimum air flow, CFM 620 629 637 646 652 658 660 660 663 663
Table 6: LAH004 Minimum Air Flow
Heater Capacity, kW 2.5 3 3.5 4 4.5 5 5.5 6 6.5 7 7.5 8 8.5 9 10
Minimum air flow, CFM 298 339 368 400 426 446 466 484 501 519 536 550 565 579 605
11 12 13 14 15 16 17 18 19 20
Minimum air flow, CFM 620 629 637 646 652 658 660 660 663 663
Table 7: LAH005 Minimum Air Flow
Heater Capacity, kW 4 4.5 5 5.5 6 6.5 7 7.5 8 8.5 9 10 11 12 13
Minimum air flow, CFM 447 477 511 538 561 584 603 622 641 656 672 706 740 771 794
Heater Capacity, kW 14 15 16 17 18 19 20 22 24 26
Minimum air flow, CFM 809 824 832 840 847 855 859 866 870 874
Table 8: LAH005 Minimum Air Flow
Heater Capacity, kW 4 4.5 5 5.5 6 6.5 7 7.5 8 8.5 9 10 11 12 13
Minimum air flow, CFM 447 477 511 538 561 584 603 622 641 656 672 706 740 771 794
Heater Capacity, kW 14 15 16 17 18 19 20 22 24 26
Minimum air flow, CFM 809 824 832 840 847 855 859 866 870 874
Table 9: LAH007 Minimum Air Flow
Heater Capacity, kW 6 6.5 7 7.5 8 8.5 9 10 11 12 13 14 15 16 17
Minimum air flow, CFM 637 673 704 729 750 765 790 831 867 903 938 969 1000 1030 1056
Heater Capacity, kW 18 19 20 22 24 26 28 30 32 34 36 38
Minimum air flow, CFM 1076 1096 1102 1117 1132 1142 1153 1163 1168 1168 1173 1173
Table 10: LAH010 Minimum Air Flow
Heater Capacity, kW 6 6.5 7 7.5 8 8.5 9 10 11 12 13 14 15 16 17
Minimum air flow, CFM 637 673 704 729 750 765 790 831 867 903 938 969 1000 1030 1056
Heater Capacity, kW 18 19 20 22 24 26 28 30 32 34 36 38 40 45
Minimum air flow, CFM 1076 1096 1102 1117 1132 1142 1153 1163 1168 1168 1173 1173 1173 1178
McQuay IM 782-7 19
Page 20

Installation Guidelines
Electric Heat Operation
The sampling probe is suitable for left-hand or right-hand
airflow and in positive pressure applications may require field
adjustment so the probe faces upstream. This is normally done
during installation by removing two screws, rotating the probe
180° and replacing the screws. Removing the heater from the
duct is not necessary.
The electric heater is designed to operate while installed and
connected to the unit at the supply air fan discharge, to heat air
passing through the heating elements.
Temperature rise is very important and can be obtained using
the following calculation:
Temperature Rise = (KW) × (3159) /
CFM
Note: Maximum leaving air temperature = 120°F
NOTICE
Heaters are furnished for zero clearance between the duct and
combustible surfaces. However, it is not recommended that
any combustible material be allowed to touch any electric duct
heater or immediate surrounding areas.
NOTICE
Heaters are not intended to be installed with less than 20” of
straight duct at the outlet of the heater.
NOTICE
Field wiring necessary temperatures are:
1) 194°F for dry weather.
2) 167°F for humid weather.
Field Power Wiring
WARNING
Improper grounding may result in severe injury or death.
Check grounding nut tightness before connecting power to the
external junction box.
AVERTISSEMENT
Une mise à la terre défaillante peut causer des blessures
graves ou la mort. Vérifiez l’étanchéité des vis de mise à terre
avant d’alimenter la boite de jonction externe.
Wiring must comply with all applicable codes and ordinances.
The warranty is voided if wiring is not in accordance with
these specifications. An open fuse or starter indicates a short,
ground, or overload. Before replacing a fuse or resetting a
starter, identify the trouble and correct.
According to the National Electrical Code, a disconnecting
means shall be located within sight of and readily accessible
from the air conditioning equipment. Power leads must be
over-current protected at the point of distribution. The
maximum allowable overcurrent protection (MROPD) appears
on the unit nameplate.
WARNING
Hazardous voltage. Can cause severe injury or death.
Disconnect electric power before servicing equipment. More
than one disconnect may be required to de-energize the unit.
AVERTISSEMENT
Haut voltage. Peut causer des blessures sévères ou la mort.
Déconnectez la puissance électrique avant tous travaux de
maintenance. Plus d’une déconnection peut être requis pour
éteindre complètement l’unité.
Supply Power Wiring
1 Allowable voltage tolerances:
a 60 Hertz
– Nameplat e 208V: Min. 187V, Max. 229V
– Nameplat e 230V: Min. 207V, Max. 253V
– Nameplat e 460V: Min. 414V, Max. 506V
– Nameplat e 575V: Min. 518V, Max. 633V
b 50 Hertz
– Nameplat e 380V: Min. 360V, Max. 418V
2 Minimum Circuit Ampacity (MCA) Calculation is based
on the following formulas:
– Electric heat less than or equal to 50 kW
MCA = 1.25 (heater FLA + largest motor loads) +
(the rest of the loads)
– Electric heat greater than or equal to 50 kW
MCA = 1.25 (largest motor load) + (the rest of the
loads) + heater FLA
3 Size wires in accordance with Table 310-16 or 310-19 of
the National Electrical Code.
4 Wires should be sized for a maximum of 3% voltage
drop.
Electrical Installation
1 Electrical service to the fan must correspond to the rated
voltage on the motor nameplate and be in conformance
with the National Electric Code and local restrictions.
2 The fan section metal frame must be connected to the
building electrical ground.
3 A door electrical interlock is not provided as standard.
4 Thermal motor protection is external to the unit. Unless
the unit is provided with a unit mounted starter, thermal
protection and a disconnect switch provision per electric
codes are provided by others.
5 When the unit is factory provided with a junction box,
disconnect switch, starter, or a variable frequency drive
(VFD), the components are mounted on the outside of
the unit cabinet. Factory wiring is provided from the
device to the unit internal motor.
20 McQuay IM 782-7
Page 21

Variable Frequency Drive (VFD) - Optional
1 When the unit is provided with a VFD only, refer to the
VFD manual for wire size and torque requirements. A fastblow fused disconnect is recommended for VFD
applications. Motor operation below 20 Hz or over 90 Hz is
not recommended. For typical wiring diagrams, see
Figure 28 and Figure 29.
2 Refer to OM 844-1 (MD2 drives) or OM 895 (MD3 drives)
for VFD set-up details. The drives are installed with only
default programming and are to be field configured to meet
application requirements. Information on ATV11 drives
may be found in VFD manufacturer’s manuals.
WARNING
Fire hazard. Failure to use fast-blow J-type fuses could
result in property damage, injury, or death. Fast-blow fuses
must be installed upstream of a VFD.
AVERTISSEMENT
Risques d’incendie. À défaut d’installer un sectionneur à
fusible à action rapide de type J, cela peut entraîner des
dommages à la propriété, des blessures ou la mort.
Un sectionneur à fusible à action rapide de type J doit être
installé avant le variateur de fréquence
3 Units with Direct-Drive Plenum fans need to be
reprogrammed in the field according to design point
parameters. Refer to project documentation and/or fan
curves (Figure 32 through Figure 40) for appropriate fan
speeds associated with the job. Use the formula below to
calculate the maximum frequency associated with the
maximum allowable fan speed.
F
= 60 Hz * (W
max
max
/ W
motor
)
Installation Guidelines
CAUTION
Never operate a fan over the maximum speed indicated on
the fan curve, as this may cause fan damage and severe
unit vibration.
ATTENTION
Ne jamais faire tourner le ventilateur plus rapidement que la
vitesse maximum indiquée sur la courbe de performances.
Cela pourrait causer des dommages au ventilateur et
provoquer de sévères vibrations de l’unité.
Starters and Disconnect - Optional
1 The fan motor is factory wired to an externally mounted
control box. Control box options include: disconnectonly (fused and non-fused) and starter-fused disconnect
transformer.
2 A fast-blow fused disconnect (J-type fuses) is used in
VFD applications.
3 A fused control transformer allows the fan to be
sequenced by standard 24-volt thermostat or controller.
4 An indoor panel with tool access hinged door houses all
the components and is generally mounted on the unit’s
bulkhead panel. The panel enclosure has several
knockouts located on the side, top, and bottom.
5 All field wiring must be in conformance with the
National Electric Code and local restrictions.
6 Refer to Figure 26 and Figure 27 for typical disconnect-
only wiring diagrams. Refer to Figure 41 and Figure 43
for typical full control box diagrams.
- maximum frequency allowable for particular
F
max
application (Hz)
- maximum fan speed (rpm); refer to fan curves
W
max
W
- nominal motor speed (1800/3600 rpm); refer to
motor
motor nameplate
Refer to Table 34 for operating li mit information for
Backward-Inclined Direct-Drive Plenum fans.
McQuay IM 782-7 21
Page 22

Wiring Diagrams
Wiring Diagrams
Electric Heat Diagrams
Figure 24: Typical 1-Phase, 240 Volt Electric Heat Wiring Diagram
1 step, 1 phase, 240 VAC, 60 Hz
22 McQuay IM 782-7
Page 23

Figure 25: Typical 3-Phase, 575 Volt Electric Heat Wiring Diagram
Wiring Diagrams
4 steps, 3 phase, 575 VAC, 60 Hz
McQuay IM 782-7 23
Page 24

Wiring Diagrams
Disconnect-Only Diagrams
Figure 26: Typical Single-Phase, Disconnect-Only Wiring Diagram
Figure 27: Typical 3-Phase, Disconnect-Only Wiring Diagram
24 McQuay IM 782-7
Page 25

VFD Diagrams
Figure 28: Typical MD2 VFD Wiring Diagram
Wiring Diagrams
McQuay IM 782-7 25
Page 26

Wiring Diagrams
Figure 29: Typical MD3 VFD Wiring Diagram
26 McQuay IM 782-7
Page 27

Figure 30: Typical Single-Phase Starter/Disconnect Wiring Diagram
Wiring Diagrams
McQuay IM 782-7 27
Page 28

Wiring Diagrams
Figure 31: Typical 3-Phase Starter/Disconnect Wiring Diagram
28 McQuay IM 782-7
Page 29

Physical Data
Component and Section Weights
Table 11: Unit Coil Weights
Coil type
4-row chilled water
6-row chilled water
1-row hot water
2-row hot water
4-row DX
6-row DX
002 003 004 005 007 010 015 020 025 030
31.64
(14.35)
39.94
(18.12)
16.11
(7.31)
24.36
(11.05)
32.73
(14.85)
43.37
(19.67)
40.56
(18.40)
54.81
(24.86)
19.95
(9.05)
29.96
(13.59)
42.91
(19.46)
57.01
(25.86)
54.30
(24.64)
69.01
(31.30)
28.36
(12.86)
38.07
(17.27)
50.11
(22.73)
71.53
(32.45)
59.19
(26.85)
86.91
(39.42)
33.60
(15.24)
46.13
(20.92)
64.80
(29.39)
91.69
(41.59)
Table 12: Base Unit Cabinet Weights—Horizontal Unit with Forward Curved Fan
Weight—lbs (kg)
Configuration Configuration Configuration Configuration Configuration
Unit
size
No heat
Flat
filters
Cooling
coil
Reheat
coil
Flat
filters
Cooling
coil
No heat
Angular
filters
Cooling
coil
Reheat
coil
Angular
filters
Cooling
coil
No heat*
filters
Fan Fan Fan Fan Fan Fan Fan Fan Fan Fan
002 142.34 (64.56) 187.56 (85.08) 122.36 (55.50) 149.39 (67.76)
003 170.89 (77.51) 213.02 (96.62) 148.04 (67.150 169.18 (76.74)
004 207.68 (94.20) 257.99 (117.02) 182.04 (82.47) 205.76 (93.33)
005 245.41 (111.32) 317.41 (143.98) 213.25 (96.73) 253.09 (114.80)
007 262.71 (119.16) 340.86 (154.61) 224.74 (101.94) 271.81 (123.29)
010 302.58 (137.25) 392.63 (178.09) 260.15 (118.00) 312.73 (141.85)
015 359.18 (162.92) 463.09 (210.05) 352.58 (159.93) 411.89 (186.83)
020 445.55 (202.10) 596.73 (270.67) 440.70 (199.90) 533.01 (241.77)
025 559.02 (253.57) 736.09 (333.89) 554.95 (251.72) 658.10 (298.51)
030 603.25 (273.63) 817.52 (370.82) 599.00 (271.70) 730.10 (331.17)
Note: *Ventilation only
Weight—lbs (kg)
84.80
(38.46)
112.30
(50.94)
45.86
(20.80)
64.28
(29.16)
88.18
(40.00)
105.18
(47.71)
Reheat
Flat
coil
Flat
filters
111.99
(50.80)
154.05
(69.88)
66.07
(29.97)
83.91
(38.06)
115.42
(52.35)
158.52
(71.90)
No heat*
Angular
185.93
(84.34)
261.55
(118.64)
91.35
(41.44)
121.10
(54.93)
195.54
(88.70)
268.37
(121.73)
filters
N/A N/A N/A N/A
255.08
(115.70)
353.14
(160.18)
116.29
(52.75)
171.48
(77.78)
248.63
(112.78)
365.31
(165.71)
Reheat
coil
Angular
filters
Physical Data
298.34
(135.32)
416.35
(188.85)
132.03
(59.89)
197.12
(89.41)
300.8
136.44)
(
429.85
(194.98)
Preheat coil
Flat
filters
Cooling
coil
157.12
(71.27)
186.67
(84.67)
233.73
(106.02)
267.13
(121.17)
298.53
(135.41)
341.67
(154.98)
419.72
(190.38)
511.86
(232.18)
616.52
(279.65)
633.19
(287.21)
341.54
(154.92)
477.93
(216.79)
168.86
(76.59)
223.03
(101.16)
344.86
(156.43)
493.24
(223.73)
Angular
filters
Cooling
coil
184.19
(83.55)
208.34
(94.50)
257.55
(116.82)
307.89
(139.66)
346.93
(157.36)
395.58
(179.43)
480.74
(218.06)
606.56
(275.13)
773.96
(351.06)
830.10
(376.53)
McQuay IM 782-7 29
Page 30

Physical Data
Table 13: Base Unit Cabinet Weights—Horizontal Unit with Plenum Fan
Weight—lbs (kg)
Configuration Configuration Configuration Configuration Configuration
Reheat
coil
Flat
filters
Cooling
coil
No heat
Angular
filters
Cooling
coil
Unit
size
No heat
Flat
filters
Cooling
coil
Fan Fan Fan Fan Fan Fan Fan Fan Fan Fan
002 126 (57) 125 (57) 102 (46) 105 (47) 129 (59) 128 (58)
003 140 (63) 161 (73) 131 (59) 151 (69) 168 (76) 173 (78)
004 220 (100) 214 (97) 193 (88) 193 (88) 225 (102) 252 (114)
005 186 (84) 231 (105) 175 (79) 202 (92) 216 (98) 237 (107)
007 285 (129) 315 (143) 224 (102) 267 (121) 304 (138) 349 (158)
010 309 (140) 395 (179) 270 (122) 316 (143) 392 (178) 454 (206)
015 561 (254) 600 (272) 545 (247) 583 (264) 626 (284) 674 (306)
020 663 (301) 708 (321) 679 (308) 692 (314) 729 (331) 774 (351)
025 743 (337) 740 (335) 698 (317) 845 (383) 767 (348) 788 (357)
030 770 (349) 947 (430) 749 (340) 894 (406) 929 (421) 941 (427)
Note: *Ventilation only
Table 14: Base Unit Cabinet Weights—Vertical Unit
Configuration Configuration
Unit size
No heat Reheat coil No heat* Reheat coil
Flat filters Flat filters Flat filters Flat filters
Cooling coil Cooling coil N/A N/A
Fan Fan Fan Fan
002 134.70 (61.10) 134.70 (61.10)
003 183.20 (83.10) 183.20 (83.10)
004 209.79 (95.16) 209.79 (95.16)
005 239.00 (108.40) 239.00 (108.40)
007 349.08 (158.30) 349.08 (158.30)
010 399.23 (181.09) 399.23 (181.09)
015 484.20 (219.63) 484.20 (219.63)
020 566.96 (257.17) 566.96 (257.17)
025 725.28 (328.98) 725.28 (328.98)
030 750.14 (340.26) 750.14 (340.26)
Note: *Ventilation only
Reheat
coil
No heat*
Angular
filters
Cooling
coil
Weight—lbs (kg)
Flat
filters
Reheat
coil
Flat
filters
No heat*
Angular
filters
Reheat
Angular
filters
N/A N/A N/A N/A
coil
Preheat coil
Flat
filters
Cooling
coil
Angular
filters
Cooling
coil
Table 15: Electric Heat Weights
Unit size
002 31 (14.00) 35 (16.00) - 003 32 (14.50) 36 (16.50) 41 (18.50) 45 (20.50)
004 32 (14.50) 36 (16.50) 41 (18.50) 45 (20.50)
005 34 (15.50) 39 (17.50) 43 (19.50) 47 (21.50)
007 36 (16.50) 41 (18.50) 45 (20.50) 50 (22.50)
010 36 (16.50) 41 (18.50) 45 (20.50) 50 (22.50)
1 Step 2 Steps 3 Steps 4 Steps
Weight—lbs (kg)
30 McQuay IM 782-7
Page 31

Table 16: Motor Weights***
Unit
size
002
003
004
005
007
010
015
020
025
030
Note: * 56/ 56H fr ame an d 5/8" shaft dia meter for 1 -ph mo tors
Motor
Max. weight, lb
(kg)
Frame size 56 56 56 * ** 145T ------
Shaft dia. in5/85/85/8***7/8------
Max. weight, lb
(kg)
Frame size 56 56 56 * ** 145T 182T 184T - - - -
Shaft dia. in 5/8 5/8 5/8 * ** 7/8 1-1/8 1-1/8 - - - -
Max. weight, lb
(kg)
Frame size 56 56 56 * ** 145T 182T 184T - - - -
Shaft dia. in 5/8 5/8 5/8 * ** 7/8 1-1/8 1-1/8 - - - -
Max. weight, lb
(kg)
Frame size - - 56 * ** 145T 182T 184T - - - -
Shaft dia. in - - 5/8 * ** 7/8 1-1/8 1-1/8 - - - -
Max. weight, lb
(kg)
Frame size - - - * ** 145T 182T 184T 213T - - -
Shaft dia. in - - - * ** 7/8 1-1/8 1-1/8 1-3/8 - - -
Max. weight, lb
g)
(k
Frame size - - - * ** 145T 182T 184T 213T - - -
Shaft dia. in - - - * ** 7/8 1-1/8 1-1/8 1-3/8 - - -
Max. weight, lb
(kg)
Frame size----143T 145T 182T 184T 213T 215T 254T -
Shaft dia. in----7/87/81-1/81-1/81-3/81-3/81-5/8-
Max. weight, lb
(kg)
Frame size---- 145T 182T 184T 213T 215T 254T -
Shaft dia. in---- 7/81-1/81-1/81-3/81-3/81-5/8-
Max. weight, lb
(kg)
Frame size-------184T 213T 215T 254T 256T
Shaft dia. in-------1-1/81-3/81-3/81-5/81-5/8
Max. weight, lb
(kg)
Frame size-------184T 213T 215T 254T 256T
Shaft dia. in-------1-1/81-3/81-3/81-5/81-5/8
143T frame and 7/8" shaft diameter for 3-ph motors
** 56/56H frame and 5/8" shaft diameter for 1-ph motors
143T frame and 7/ 8" sh aft diamet er for 3-ph m otor s
*** Refer to “HP range” in Table 18, page 32 for applicable motors per unit size
0.33 0.5 0.75 1 1.5 2 3 5 7.5 10 15 20
25
(11.33)
25
(11.33)
25
(11.33)
--
---
---
----
----
-------
-------
27
(12.25)
27
(12.25)
27
(12.25)
27
(12.25)
27
(12.25)
27
(12.25)
27
(12.25)
40
(18.41)
40
(18.41)
40
(18.41)
40
(18.41)
40
(18.41)
40
(18.41)
Fan motor size – horsepower (hp)
44
(19.96)
44
(19.96)
44
(19.96)
44
(19.96)
44
(19.96)
44
(19.96)
44
(19.96)
46
(20.87)
46
(20.87)
46
(20.87)
46
(20.87)
46
(20.87)
46
(20.87)
46
(20.87)
46
(20.87)
------
69
(31.30)
69
(31.30)
69
(31.30)
69
(31.30)
69
(31.30)
69
(31.30)
69
(31.30)
85
(38.55)
85
(38.55)
85
(38.55)
85
(38.55)
85
(38.55)
85
(38.55)
85
(38.55)
85
(38.55)
85
(38.55)
Physical Data
----
----
----
129
(58.51)
129
(58.51)
129
(58.51)
129
(58.51)
129
(58.51)
129
(58.51)
---
---
129
(58.51)
129
(58.51)
129
(58.51)
129
(58.51)
217
(98.43)
217
(98.43)
217
(98.43)
217
(98.43)
-
-
259
(117.48)
259
(117.48)
McQuay IM 782-7 31
Page 32

Physical Data
Fan Data
Table 17: Forward Curved Fan Data
Fan data
Fan type
Diameter 7/7 9/9 9/9 10/10 12/12 12/12 10/10 12/12 15/15 15/15
HP range .50–2 .50–3 .5–5 .75–5 1–5 1–7.5 2–15 3–15 5–20 5–20
cfm minimum—fan
limit
cfm maximum—fan
limit
Maximum rpm 2,680 2,650 2,650 2,100 1,700 1,700 2,100 1,700 1,500 1,500
Class 1111111111
Motor sheave
Fan sheave AK, BK AK, BK AK, BK AK, BK AK, BK AK, BK AK, BK AK, BK AK, BK AK, BK
Belt
Fan shaft diameter 3/4" 3/4" 3/4" 3/4" 1.0" 1 .0" 3/4" 1.0" 1.0" 1.0"
Weight—lbs (kg)
002 003 004 005 007 010 015 020 025 030
DWDI
FC
206 206 529 529 765 765 1059 1529 2118 2118
2,088 2,088 5,765 6,176 8,529 8,529 12,353 17,059 26,706 26,706
VP, VL, VMVP, VL, VMVP, VL, VMVP, VL, VMVP, VL, VMVP, VL, VMVP, VL, VMVP, VL, VMVP, VL, VMVP, VL,
A, AX, B, BXA, AX, B, BXA, AX, B, BXA, AX, B, BXA, AX, B, BXA, AX, B, BXA, AX, B, BXA, AX, B, BXA, AX, B, BXA, AX, B,
19.03
(8.63)
DWDI FCDWDI FCDWDI FCDWDI
33.95
(15.40)
33.95
(15.40)
41.45
(18.80)
Table 18: Plenum Fan Data
Fan data
Fan type
Diameter (in) 9 10 11 12.5 14 16 20 22 25 25
HP range 1.5–2 1.5–5 1–5 1–5 1–7.5 1–7.5 1.5–15 2–15 5–20 5–20
cfm minimum—fan
limit
cfm maximum—fan
limit
Maximum rpm 5175 5175 4245 4245 3600 2625 2265 2310 2060 2060
Weight with smallest
motor—lbs (kg)
Weight with largest
motor—lbs (kg)
002 003 004 005 007 010 015 020 025 030
SWSI DD
Plenum
100 150 200 200 250 325 525 650 800 800
1800 2650 4100 4100 5000 5200 9200 12,900 16,150 16,150
50 (22.7) 57 (25.9) 59 (26.8) 62 (28.1) 71 (32.2) 86 (39)
56 (25.4) 84 (38.1) 86 (39) 89 (40.4)
SWSI DD
Plenum
SWSI DD
Plenum
SWSI DD
Plenum
Unit size
FC
60.85
(27.60)
Unit size
SWSI DD
Plenum
114
(51.7)
DWDI
FC
60.85
(27.60)
SWSI DD
Plenum
154
(69.9)
Twin
DWDI FC
79.37
(36.00)
SWSI DD
Plenum
147
(66.7)
281
(127.4)
Twin
DWDI FC
126.77
(57.50)
SWSI DD
Plenum
176
(79.8)
312
(141.5)
Twin
DWDI FC
154.87
(70.25)
SWSI DD
Plenum
263
(119.3)
363
(164.7)
Twin
DWDI FC
VM
BX
154.87
(70.25)
SWSI DD
Plenum
263
(119.3)
363
(164.7)
Filter Data
Table 19: Filter Data
Filter data
Flat filter bank
number
Flat filter (qty)
size
Flat filter
depth options
002 003 004 005 007 010 015 020 025 030
1111112222
(1) 16 × 25 (1) 18 × 24 (2) 16 × 20 (2) 20 × 24 (2) 24 × 24 (3) 20 × 25
2", 4" 2", 4" 2", 4" 2", 4" 2", 4" 2", 4" 2", 4" 2", 4" 2", 4" 2", 4"
Angular filters
Angular filter
bank number
Angular filter
(qty) size
Angular filter
depth options
1112222333
(1) 20 × 24 (2) 16 × 20 (2) 20 × 20 (4) 16 × 20 (4) 16 × 25 (6) 16 × 20 (6) 20 × 24 (9) 20 × 24
2" 2" 2" 2" 2" 2" 2" 2" 2" 2"
32 McQuay IM 782-7
Unit size
Flat filters
(3) 12 × 24
(3) 24 × 24
(6) 24 × 24
(4) 20 × 24
(4) 24 × 24
(6) 20 × 24
(6) 24 × 24
(6) 16 × 25
(4) 20 × 25
(6) 20 × 24
(6) 24 × 24
Page 33

Physical Data
Coil Data
Table 20: Coil Data—Chilled Water
Chilled
water coil
data
Fin height 14 16 16 22 22 26 32.5 45 45 52.5
Fin length 21 27 34 34 48 54 65 65 80 80
Rows 4, 6 4, 6 4, 6 4, 6 4, 6 4, 6 4, 6 4, 6 4, 6 4, 6
FPI12121212121212121212
Connection
material
Connection
size 4-row
Connection
size 6-row
Casing Galv./SS Galv./SS Galv./SS Galv./SS Galv./SS Galv./SS Galv./SS Galv./SS Galv./SS Galv./SS
002 003 004 005 007 010 015 020 025 030
Copper
sweat
0.875 OD 1.125 OD 1.625 OD 1.625 OD 1.625 OD 1.625 OD 1.5 NPT 2.5 NPT 2.5 NPT 2.5 NPT
0.875 OD 1.125 OD 1.625 OD 1.625 OD 1.625 OD 2.125 OD 2.0 NPT 2.5 NPT 2.5 NPT 2.5 NPT
Copper
sweat
Copper
sweat
Copper
sweat
Table 21: Coil Data—DX Coils
DX coils
data
Fin height 14 16 16 22 22 26 32.5 45 45 52.5
Fin length21273434485465658080
Rows 4, 6 4, 6 4, 6 4, 6 4, 6 4, 6 4, 6 4, 6 4, 6 4, 6
FPI12121212121212121212
Connection
material
Suction
Connection
size
4-row
Liquid
Connection
size 4-row
Suction
Connection
size
6-row
Liquid
Connection
size 6-row
Casing Galv./SS. Galv./SS Galv./SS Galv./SS Galv./SS Galv./SS Galv./SS Galv./SS Galv./SS Galv./SS
Number of
circuits
Circuit type Normal Normal Normal Normal Normal Normal Face split Face split Face split Face split
002 003 004 005 007 010 015 020 025 030
Copper
sweat
0.875 OD 1.125 OD 1.125 OD 1.125 OD 1.625 OD 1.625 OD 1.625 OD 1.625 OD 1.625 OD 1.625 OD
0.625 OD 0.625 OD 0.625 OD 0.875 OD 0.875 OD 1.125 OD 0.625 OD 0.875 OD 1.125 OD 1.125 OD
0.875 OD 1.125 OD 1.625 OD 1.625 OD 1.625 OD 2.125 OD 1.625 OD 1.625 OD 2.125 OD 2.625 OD
0.625 OD 0.625 OD 0.625 OD 1.125 OD 1.125 OD 1.125 OD 0.875 OD 0.875 OD 1.125 OD 1.375 OD
1111112222
Copper
sweat
Copper
sweat
Copper
sweat
Copper
sweat
Unit size
Copper
sweat
Unit size
Copper
Copper
sweat
sweat
Steel
NPT
Copper
sweat
Steel
NPT
Copper
sweat
Steel
NPT
Copper
sweat
Steel
NPT
Copper
sweat
Table 22: Coil Data—Hot Water Coils
Hot water
coil data
Fin height 14 16 16 22 22 26 32.5 45 45 52.5
Fin length 21 27 34 34 48 54 65 65 80 80
Rows 1, 2 1, 2 1, 2 1, 2 1, 2 1, 2 1, 2 1, 2 1, 2 1, 2
FPI12121212121212121212
Connection
material
Connection
size 1-row
Connection
size 2-row
Casing Galv./SS Galv./SS Galv./SS Galv./SS Galv./SS Galv./SS Galv./SS Galv./SS Galv./SS Galv./SS
002 003 004 005 007 010 015 020 025 030
Copper
sweat
.625 OD .625 OD .875 OD .875 OD 1.125 OD 1.375 OD 1.0 NPT 1.5 NPT 1.5 NPT 2.0 NPT
.875 OD .875 OD 1.125 OD 1.125 OD 1.625 OD 1.625 OD 1.5 NPT 2.0 NPT 2.0 NPT 2.0 NPT
Copper
sweat
Copper
sweat
Copper
sweat
Unit size
Copper
sweat
Copper
sweat
Steel
NPT
Steel
NPT
Steel
NPT
Steel
NPT
McQuay IM 782-7 33
Page 34

Physical Data
Drain Pan Data
Table 23: Drain Pan Connections
Standard
and optional
stainless
002 003 004 005 007 010 015 020 025 030
steel
Arrangement Sloped Sloped Sloped Sloped Sloped Sloped Sloped Sloped Sloped Sloped
Connection size
- Main
Connection size
- Secondary
1" ID MPT 1" ID MPT 1" ID MPT 1" ID MPT 1" ID MPT 1" ID MPT
1/2" ID
MPT
1/2" ID
MPT
1/2" ID
MPT
1/2" ID
MPT
Electric Heat Data
Table 24: Electric Heat Data for Unit Sizes
Unit size # Stages
002
003
004
005
007
010
1 1.5 - 4.5 1.5 - 8 1.5 - 9 1.5 - 10 1.5 - 10 1.5 - 10 1.5 - 10
2 4 - 9 4 - 9 4 - 10 4 - 10 4 - 10 4 - 10 4 - 10
1 2.5 - 4.5 2.5 - 8 2.5 - 9 2.5 - 13 2.5 - 15 2.5 - 20 2.5 - 20
2 4 - 9 4 - 16 4 - 20 4 - 20 4 - 20 4 - 20 4 - 20
3 10 - 13 15 - 20 15 - 20 15 - 20 15 - 20 15 - 20 15 - 20
4 14 - 18 20 20 20 20 20 20
1 2.5 - 4.5 2.5 - 8 2.6 - 9 2.5 - 13 2.5 - 15 2.5 - 20 2.5 - 20
2 4 - 9 4 - 16 4 - 18 4 - 20 4 - 20 4 - 20 4 - 20
3 9.5 - 13 15 - 20 15 - 20 15 - 20 15 - 20 15 - 20 15 - 20
4 14 - 18 20 20 20 20 20 20
1 4 - 4.5 4 - 8 4 - 9 4 - 13 4 - 15 4 - 24 4 - 26
2 4 - 9 4 - 16 4 - 18 4 - 26 4 - 26 4 - 26 4 - 26
3 10 - 13 15 - 24 15 - 26 15 - 26 15 - 26 15 - 26 15 - 26
4 14 - 18 20 - 26 20 - 26 20 - 26 20 - 26 20 - 26 20 - 26
1 NA 6 - 8 6 - 9 6 - 13 6 - 15 6 - 20 6 - 20
2 6 - 9 6 - 16 6 - 18 6 - 26 6 - 30 6 - 36 6 - 36
3 10 - 13 15 - 24 15 - 26 15 - 38 15 - 38 15 - 38 15 - 38
4 14 - 18 20 - 32 20 - 36 20 - 38 20 - 38 20 - 38 20 - 38
1 NA 6 - 8 6 - 9 6 - 13 6 - 13 6 - 19 6 - 19
2 6 - 9 6 - 16 6 - 18 6 - 26 6 - 30 6 - 36 6 - 36
3 10 - 13 15 - 24 15 - 26 15 - 40 15 - 45 15 - 55 15 - 55
4 14 - 18 20 - 32 20 - 36 20 - 55 20 - 55 20 - 55 20 - 55
120/1/60 208/1/60 240/1/60 208/3/60 240/3/60 480/3/60 600/3/60
Voltage/kW Range
Unit size
1/2" ID
MPT
1/2" ID
MPT
1-1/4" ID
MPT
1/2" ID
MPT
1-1/4" ID
MPT
1/2" ID
MPT
1-1/4" ID
MPT
1/2" ID
MPT
1-1/4" ID
MPT
1/2" ID
MPT
34 McQuay IM 782-7
Page 35

Fan Curves
Figure 32: 9.0" SWSI - Backward Inclined Pl enum Supply Fan at Standard Conditions
Fan Curves
Figure 33: 10.0" SWSI - Backward Inclined Plenum Supply Fan at Standard Conditions
McQuay IM 782-7 35
Page 36

Fan Curves
Figure 34: 11.0" SWSI - Backward Inclined Plenum Supply Fan at Standard Conditions
Figure 35: 12.0" SWSI - Backward Inclined Plenum Supply Fan at Standard Conditions
36 McQuay IM 782-7
Page 37

Figure 36: 14.0" SWSI - Backward Inclined Plenum Supply Fan at Standard Conditions
Fan Curves
Figure 37: 16.0" SWSI - Backward Inclined Plenum Supply Fan at Standard Conditions
McQuay IM 782-7 37
Page 38

Fan Curves
Figure 38: 20.0" SWSI - Backward Inclined Plenum Supply Fan at Standard Conditions
Figure 39: 22.0" SWSI - Backward Inclined Plenum Supply Fan at Standard Conditions
38 McQuay IM 782-7
Page 39

Figure 40: 25.0" SWSI - Backward Inclined Plenum Supply Fan at Standard Conditions
Fan Curves
McQuay IM 782-7 39
Page 40

Dimensional Data
Length
Height
Width
Width
Front View
Side View
Top View
Dimensional Data
Cabinet Dimensions—Horizontal
Table 25: Cabinet Dimensions—Horizo nt al Unit
28.35
(720)
56.50
(1435)
58.86
(1495)
70.08
(1780)
65.55
(1665)
76.77
(1950)
49.80
(1265)
61.02
(1550)
49.80
(1265)
61.02
(1550)
15.51
(394)
13.46
(342)
Unit size
32.48
(825)
63.00
(1600)
58.86
(1495)
70.08
(1780)
65.55
(1665)
76.77
(1950)
49.80
(1265)
61.02
(1550)
49.80
(1265)
61.02
(1550)
15.51
(394)
13.46
(342)
39.37
(1000)
74.41
(1890)
53.74
(1365)
64.37
(1635)
62.80
(15.95)
73.42
(18.65)
52.56
(1335)
63.19
(1605)
52.56
(1335)
63.19
(1605)
2 x 13.07*
(332)
2 x 11.34*
(288)
Dimension/
Configuration
002 003 004 005 007 010 015 020 025 030
Cabinet Dimension Unit height and width dimensions in. (mm)
Height
Width
20.47
(520)
28.54
(725)
22.44
(570)
34.84
(885)
22.44
(570)
42.52
(1080)
28.35
(720)
42.52
(1080)
Configuration Unit length dimensions in. (mm)
Cooling only or
cooling with
reheat coils
Cooling with
preheat coils
Heating only
Ventilation only
Discharge Opening
Dimension
Height
Width
Note: * Twin openings
Flat
filter
Angular
filter
Flat
filter
Angular
filter
Flat
filter
Angular
filter
Flat
filter
Angular
filter
47.84
(1215)
58.27
(1480)
51.97
(1320)
62.40
(15.85)
39.96
(1015)
50.39
(1280)
39.96
(1015)
50.39
(1280)
9.17
(233)
8.74
(222)
47.84
(1215)
55.12
(1400)
51.97
(1320)
59.25
(1505)
39.96
(1015)
47.24
(1200)
39.96
(1015)
47.24
(1200)
11.77
(299)
10.20
(259)
53.35
(1355)
60.63
(1540)
59.25
(15.05)
66.53
(1690)
45.47
(1155)
52.76
(1340)
45.47
(1155)
52.76
(1340)
11.77
(299)
10.20
(259)
54.72
(1390)
65.95
(1675)
59.45
(15.10)
70.67
(17.95)
45.67
(1160)
56.89
(1445)
45.67
(1160)
56.89
(1445)
Unit height and width dimensions in. (mm)
13.07
(332)
11.34
(288)
Figure 41: Horizontal Unit Dimensions
51.57
(1310)
75.00
(1905)
56.30
(1430)
71.26
(1810)
65.35
(1660)
80.32
(2040)
55.51
(1410)
70.47
(1790)
55.51
(1410)
70.47
(1790)
2 x 15.51*
(394)
2 x 13.46*
(342)
51.57
(1310)
89.96
(2285)
62.00
(1575)
76.97
(1955)
69.09
(17.55)
84.06
(2135)
61.42
(1560)
76.38
(1940)
61.42
(1560)
76.38
(1940)
2 x 18.54*
(471)
2 x 15.83*
(402)
59.06
(1500)
89.96
(2285)
62.00
(1575)
80.12
(2035)
69.09
(17.55)
87.20
(2215)
61.42
(1560)
79.53
(2020)
61.42
(1560)
79.53
(2020)
2 x 18.54*
(471)
2 x 15.83*
(402)
40 McQuay IM 782-7
Page 41

Table 26: Cabinet Dimensions—Horizontal Unit with Plenum Fan
Dimension/
Configuration
002 003 004 005 007 010 015 020 025 030
Unit size
Cabinet Dimension Unit height and width dimensions in. (mm)
Height
Width
20.47
(520)
28.54
(725)
22.44
(570)
34.84
(885)
22.44
(570)
42.52
(1080)
28.35
(720)
42.52
(1080)
28.35
(720)
56.50
(1435)
32.48
(825)
63.00
(1600)
39.37
(1000)
74.41
(1890)
Configuration Unit length dimensions in. (mm)
Cooling only or
cooling with
reheat coils
Cooling with
preheat coils
Heating only
Ventilation only
Angular
Angular
Angular
Angular
Discharge Opening
Dimension
Height
Width
Flat
filter
filter
Flat
filter
filter
Flat
filter
filter
Flat
filter
filter
47.83
(1215)
58.27
(1480)
51.97
(1320)
62.40
(15.85)
39.96
(1015)
50.79
(1290)
39.96
(1015)
50.79
(1290)
18.11
(460)
26.18
(665)
53.94
(1370)
61.42
(1560)
58.27
(1480)
65.55
(1665)
46.06
(1170)
53.54
(1360)
46.06
(1170)
53.54
(1360)
20.08
(510)
32.48
(825)
59.45
(1510)
66.54
(1690)
62.99
(1600)
70.08
(1780)
51.57
(1310)
58.66
(1490)
51.57
(1310)
58.66
(1490)
62.01
(1575)
73.03
(1855)
66.73
(1695)
77.76
(1975)
52.95
(1345
63.98
(1625)
52.95
(1345)
63.98
(1625)
70.08
(1780)
81.50
(2070)
76.77
(1950)
88.19
(2240)
61.02
)
(1550)
72.44
(1840)
61.02
(1550)
72.44
(1840)
70.08
(1780)
81.50
(2070)
76.77
(1950)
88.19
(2240)
61.02
(1550)
72.44
(1840)
61.02
(1550)
72.44
(1840)
Unit height and width dimensions in. (mm)
20.08
(510)
40.16
(1020)
25.98
(660)
40.16
(1020)
25.98
(660)
54.13
(1375)
30.11
(765)
60.63
(1540)
70.87
(1800)
81.50
(2070)
79.92
(2030)
90.55
(2300)
69.69
(1770)
80.31
(2040)
69.69
(1770)
80.31
(2040)
37.00
(940)
72.05
(1830)
Dimensional Data
51.57
(1310)
75.00
(1905)
78.35
(1990)
93.31
(2370)
87.40
(2220)
102.36
(2600)
77.56
(1970)
92.52
(2320)
77.56
(1970)
92.52
(2320)
49.21
(1250)
72.64
(1845)
51.57
(1310)
89.96
(2285)
88.54
(2250)
103.54
(2630)
95.67
(2430)
110.63
(2810)
88.19
(2240)
103.15
(2620)
88.19
(2240)
103.15
(2620)
49.21
(1250)
87.60
(2225)
59.06
(1500)
89.96
(2285)
88.54
(2250)
106.69
(2710)
95.67
(2430)
95.67
(2430)
88.19
(2240)
105.91
(2690)
88.19
(2240)
105.91
(2690)
56.69
(2225)
87.60
(2225)
Figure 42: Horizontal Unit Dimensions
McQuay IM 782-7 41
Page 42

Dimensional Data
Front View Side View
Top View
Width
Length
Height
Height
Height
Width
Cabinet Dimensions—Vertical
Table 27: Cabinet Dimensions —Vertical Unit
Dimensions
Cabinet
Dimension
Width—in (mm)
Length—in (mm)
Upper section
height—in (mm)
Lower section
height—in (mm)
Discharge
Opening
Dimensions
Height—in (mm)
Width—in (mm)
Note: * Twin openings
Figure 43: Vertical Unit Dimensions
002 003 004 005 007 010 015 020 025 030
Unit height, length, and width dimensions in. (mm)
28.54
(725)
29.92
(760)
17.13
(435)
20.47
(520)
9.17
(233)
8.74
(222)
34.84
(885)
33.07
(840)
19.88
(505)
22.44
(570)
11.77
(299)
10.20
(259)
42.52
(1080)
33.07
(840)
19.88
(505)
22.44
(570)
11.77
(299)
10.20
(259)
Unit size
42.52
(1080)
36.42
(925)
22.05
(560)
28.35
(720)
56.50
(1435)
39.96
(1015)
24.61
(625)
28.35
(720)
62.99
(1600)
39.96
(1015)
24.61
(625)
32.48
(825)
74.41
(1890)
42.72
(1085)
23.82
(605)
39.37
(1000)
Unit height and width dimensions in. (mm)
13.07
(332)
11.34
(288)
15.51
(394)
13.46
(342)
15.51
(394)
13.46
(342)
13.07*
(332)
11.34
(288)
75.00
(1905)
47.83
(1215)
26.97
(685)
51.57
(1310)
15.51*
(394)
13.46
(342)
89.96
(2285)
51.18
(1300)
31.30
(795)
51.57
(1310)
18.54*
(471)
15.83
(402)
89.96
(2285)
51.18
(1300)
31.30
(795)
59.06
(1500)
18.54*
(471)
15.83
(402)
42 McQuay IM 782-7
Page 43

Mixing Box Dimensions
Table 28: Mixing Box Dimensions—Horizontal and Vertical Units
Unit size
002
003
004
005
007
010
015
020
025
030
W H L W1 L1 Area (ft2)
28.54
(725)
34.84
(885)
42.52
(1080)
42.52
(1080)
56.50
(1435)
62.99
(1600)
74.41
(1890)
75.00
(1905)
89.96
(2285)
89.96
(2285)
Cabinet in. (mm) Damper in. (mm)
20.47
(520)
22.44
(570)
22.44
(570)
28.35
(720)
28.35
(720)
32.48
(825)
39.37
(1000)
51.57
(1310)
51.57
(1310)
59.06
(1500)
10.24
(260)
10.24
(260)
10.24
(260)
14.17
(360)
14.17
(360)
14.17
(360)
18.11
(460)
25.98
(660)
25.98
660)
(
29.92
(760)
26.18
(665)
32.48
(825)
40.16
(1020)
40.16
(1020)
54.13
(1375)
60.63
(1540)
72.05
(1830)
72.64
(1845)
87.60
(2225)
87.60
(2225)
Dimensional Data
7.87
(200)
7.87
(200)
7.87
(200)
11.81
(300)
11.81
(300)
11.81
(300)
15.75
(400)
23.62
(600)
23.62
(600)
27.56
(700)
1.43
1.78
2.20
3.29
4.44
4.97
7.88
11.92
14.37
16.76
Figure 44: Mixing Box DImensions
McQuay IM 782-7 43
Page 44

Dimensional Data
H
Left Hand
Right Hand
NOTE: Heaters are not intended to be installed with less than 20" of straight duct at the outlet of the heater.
Electric Heat Dimensions—Left/Right Oriented
Table 29: Electric Heat Dimensions - in. (mm), Sizes 002 through 004
Dimension
-in. (mm)
002 003 004
1 Step 2 Steps 1Step 2 Steps 3 Steps 4 Steps 1Step 2 Steps 3 Steps 4 Steps
A 9-1/2 (241) 9-1/2 (241) 9-1/2 (241) 9-1/2 (241) 9-1/2 (241) 9-1/2 (241) 9-1/2 (241) 9-1/2 (241)
B 20 (508) 20 (508)
C
D 8-3/4 (222) 8-3/4 (222)
E 3/4 (19) 3/4 (19) 3/4 (19) 3/4 (19) 3/4 (19) 3/4 (19) 3/4 (19) 3/4 (19) 3/4 (19) 3/4 (19)
F 10 (254) 10 (254)
G 3/4 (19) 3/4 (19) 3/4 (19) 3/4 (19) 3/4 (19) 3/4 (19) 3/4 (19) 3/4 (19) 3/4 (19) 3/4 (19)
H 9-1/4 (235) 9-1/4 (235) 12 (305) 12 (305) 12 (305) 12 (305) 12 (305) 12 (305) 12 (305) 12 (305)
11-1/2
(292)
16 (406)
22-1/4
(565)
11-1/2
(292)
10-3/8
(264)
12-3/4
(324)
22-1/4
(565)
16 (406) 20 (508) 24 (610)
10-3/8
(264)
12-3/4
(324)
Table 30: Electric Heat Dimensions - in. (mm), Sizes 005 through 010
Dimension
- in. (mm)
1Step
A
B
C
D
E 3/4 (19) 3/4 (19) 3/4 (19) 3/4 (19) 3/4 (19) 3/4 (19) 3/4 (19) 3/4 (19) 3/4 (19) 3/4 (19) 3/4 (19) 3/4 (19)
F
G 3/4 (19) 3/4 (19) 3/4 (19) 3/4 (19) 3/4 (19) 3/4 (19) 3/4 (19) 3/4 (19) 3/4 (19) 3/4 (19) 3/4 (19) 3/4 (19)
H
9-1/2
(241)
23-1/2
(597)
11-1/2
(292)
11-3/8
(289)
14
56)14(356)
(3
13-1/4
(337)
005 007 010
2
Steps3 Steps4 Steps
9-1/2
(241)
23-1/2
(597)
16
(406)
11-3/8
(289)
13-1/4
(337)
9-1/2
(241)
23-1/2
(597)
20
(508)
11-3/8
(289)
14
(356)
13-1/4
(337)
9-1/2
(241)
23-1/2
(597)
24
(610)
11-3/8
(289)
14
(356)
13-1/4
(337)
1Step
9-1/2
(241)
25
(635)
11-1/2
(292)
13-1/2
(343)
16-1/2
(419)
15-3/4
(400)
Unit Size
22-1/4
(565)
10-3/8
(264)
12-3/4
(324)
22-1/4
(565)
10-3/8
(264)
12-3/4
(324)
Unit Size
2
Steps3 Steps4 Steps
9-1/2
(241)
25
(635)
16
(406)
13-1/2
(343)
16-1/2
(419)
15-3/4
(400)
9-1/2
(241)
25
(635)
20
(508)
13-1/2
(343)
16-1/2
(419)
15-3/4
(400)
9-1/2
(241)
25
(635)
24
(610)
13-1/2
(343)
16-1/2
(419)
15-3/4
(400)
22-1/4
(565)
11-1/2
(292)
10-3/8
(264)
12-3/4
(324)
9-1/2
(241)
22-1/4
(565)
16 (406) 20 (508) 24 (610)
10-3/8
(264)
12-3/4
(324)
1Step
9-1/2
(241)
25
(635)
11-1/2
(292)
13-1/2
(343)
16-1/2
(419)
15-3/4
(400)
22-1/4
(565)
10-3/8
(264)
12-3/4
(324)
2
Steps3 Steps4 Steps
9-1/2
(241)
25
(635)
16
(406)
13-1/2
(343)
16-1/2
(419)
15-3/4
(400)
9-1/2
(241)
(635)
(508)
13-1/2
(343)
16-1/2
(419)
15-3/4
(400)
25
20
9-1/2
(241)
22-1/4
(565)
10-3/8
(264)
12-3/4
(324)
9-1/2
(241)
25
(635)
24
(610)
13-1/2
(343)
16-1/2
(419)
15-3/4
(400)
Figure 45: Electric Heat Dimensions
44 McQuay IM 782-7
Page 45

Control Box Dimensions
Table 31: Control Box Dimensions – Left and Right Hand Access
Dimension/
Configuration
Disconnect/Starter/
Transformer
Width
Depth
Height
Disconnect Only/
Left Hand Access Only
Width
Depth
Height
Figure 46: Control Box Dimensions
002 003 004 005 007 010 015 020 025 030
8
(203)
6
(152)
18
(407)
7
(178)
5
(125)
15
(378)
8
(203)
6
(152)
18
(407)
7
(178)
5
(125)
15
(378)
8
(203)
6
(152)
18
(407)
7
(178)
5
(125)
15
(378)
8
(203)
6
(152)
18
(407)
7
(178)
5
(125)
15
(378)
Unit size
Dimensions in. (mm)
8
(203)
6
(152)
18
(407)
8
(203)
6
(152)
18
(407)
Dimensions in. (mm)
7
(178)
5
(125)
15
(378)
9
(223)
6.5
(162)
17.5
(444)
Dimensional Data
12
(305)
6
(152)
16
(415)
9
(223)
6.5
(162)
17.5
(444)
12
(305)
6
(152)
16
(415)
9
(223)
6.5
(162)
17.5
(444)
12
(305)
6
(152)
16
(415)
9
(223)
6.5
(162)
21.3
(540)
12
(305)
6
(152)
16
(415)
9
(223)
6.5
(162)
21.3
(540)
McQuay IM 782-7 45
Page 46

Operation Guidelines
Operation Guidelines
St artup Checks
When performing startup and service, always take thorough
safety precautions. Start-up functions must be performed by
trained, experienced personnel.
WARNING
ROTATING FAN.
Can cause severe injury or death. Before servicing fans, lockout
and tag out power.
AVERTISSEMENT
PIÈCES MOBILES DANGEREUSES.
Avant de réparer ou entretenir les ventilateurs, coupez
l’alimentation èlectrique de cet appareil et bloquez le
commutateur à OFF.
WARNING
FIRE/ELECTRIC SHOCK HAZARD.
Can cause property damage, personal injury or death. Wire fan
power supply and ground motor frame in accordance with local
electric codes.
AVERTISSEMENT
Risques d’incendie et d’électrocution pouvant causer des
dommages matériels, des blessures et même la mort.
L’alimentation électrique du moteur du ventilateur de même
que la mise à la terre du chàssis du moteur doivent être faits
conformément aux codes d’installations électriques en vigueur.
WARNING
FAN MOTOR REQUIRES OVERLOAD PROTECTION.
Failure to provide motor overload protection can result in fire,
property damage, electric shock, personal injury or death.
Connect motor to an overload protective device rated in
compliance with local electric codes.
AVERTISSEMENT
Risques d’incendie et d’électrocution pouvant causer des
dommages matériels, des blessures et même la mort.
Connecter au moteur du ventilateur électrique un dispositif de
protection contre les surcharges conforme aux codes
d'installations électriques en vigueur.
CAUTION
DO NOT OVERHEAT FAN MOTOR.
High air temperatures in the fan section can cause the fan
motor to burnout. On draw-through air handlers or air handlers
with the fan section down the air stream from the heating
section, the discharge air temperature of the heating section
must not exceed 104°F (40°C).
ATTENTION
Risques de dommages dans le moteur du ventilateur
électrique. Si Ia température de l’air a proximité du
ventilateurest élevée, le moteurdu ventilateur électrique peut
chauffer et brûler. Sur les transmetteurs d’air à circulation
transversale ou les transmetteurs dont le ventilateur est en aval
de l’unité de chauffage, régler la température de l’air sortant de
l’unité de chauffage à 40°C (104°F).
Before Starting the Unit
Make sure that fan electrical power source is disconnected and
locked in the OFF position before entering fan section.
1 With ductwork connected, check the unit for complete
and proper installation.
2 Check that all construction debris is removed and filters
are clean.
3 Check that all electrical work is complete and properly
terminated. Check that all electrical connections are tight
and that the proper voltage is connected. Phase
imbalance must not exceed 2%.
4 Ball bearings on fan shaft and motor are prelubricated
and do not need grease before startup.
5 Check tightness of setscrews in bearings and fan
wheel(s). If retightening is needed, make certain the fan
wheel(s) are aligned properly or setscrews are torqued
per Table 37, page 51.
CAUTION
Equipment damage due to loose fasteners represents
improper start-up and equipment abuse. It is not covered by
the warranty.
ATTENTION
Des dommages causés à l’unité dû à des attaches mal
serrées signifie que le démarrage a été inadéquat et
constitue un usage abusif de l’équipement. Ceci n’est pas
couvert par la garantie.
6 Check alignment of fan and motor sheaves and belt
tension. Adjust if necessary. Check tightness of sheave
setscrews and/or capscrews. See Figure 48, page 49 and
Figure 49, page 50 and Figure 50, page 50.
7 Leak test the thermal system to verify that connections
are tight.
46 McQuay IM 782-7
Page 47

Operation Guidelines
8 Check that condensate drain is trapped.
9 Rotate shaft by hand to be sure it is free.
10 Fan startup: Fan should start and run. Observe the
rotation. If the fan is operating backward, reverse two
legs of the three-phase supply power.
Note: Variable pitch fan drives are usually provided for
operation in the mid-speed adjustment range. However,
the drives usually ship with the adjustment opened for
minimum fan speed. Adjust the drives for the proper
airflow. Refer to Fan Drive Adjustments‚ page 48.
After first 48 hours of operation:
1 Disconnect and lockout electrical power source.
2 Check tightness of all bearing, wheel, and sheave
setscrews (or capscrews). See Table 32.
3 Recheck belt tension and adjust if necessary. Belts
tensioned sufficiently to slip one to two seconds at
startup will perform satisfactorily, extending life and
reducing vibration. If retensioning is necessary, be
certain to retain sheave alignment.
Table 32: Bearing Collar and Wheel Hub Setscrew Torque
Setscrew Minimum torque
Diameter (inches) ft / lbs kg / M
1/4 5.5 .76
1/16 10.5 1.45
3/8 19.0 2.63
7/16 29.0 4.01
Operating Limits
Do not exceed the operating limits in Table 33 and Table 34. A
fan wheel that is operated beyond the rpm and temperature
limits shown may suffer permanent distortion or fracture. The
resulting unbalance may cause severe unit vibration.
Table 33: Forward Curved Fan Operating Limits
Forward curved—housed
Dia.
(in)
Max. rpm 2680 2650 2100 1700 2100 1700 1500
Table 34: Backward Inclined Plenum Fan Operating Limits
Dia.
(in)
Max.
rpm
7- 7 9 - 9 10 - 10 12 - 12
Backward inclined —plenum
9 101112.514161820222528
5940 5350 4775 4245 3765 3340 2970 2675 2310 2060 1840
Twin
10"
Twin
12"
Twin
15"
For units with direct drive plenum fans employing variable
frequency drives, use the formula below to calculate the
maximum allowable frequency associated with the maximum
allowable fan speed.
F
= 60 Hz * (W
max
- maximum frequency allowable for particular
F
max
max
/ W
motor
)
application (Hz)
- maximum fan speed (rpm); refer to fan curves
W
max
(Figure 32 through Figure 40)
W
- nominal motor speed (1800/3600 rpm); refer to
motor
motor nameplate
Fan Vibration Levels
Each unit as shipped is trim balanced to operate smoothly. To
provide satisfactory operation after shipping and installation,
use the accepted industry guidelines for field balancing fans.
Vibration 0.20 in/sec.
Note: Excessive vibration from any cause contributes to
premature fan and motor bearing failure. Monitor overall
vibration levels every six months of operation. An
increase in levels is an indication of potential trouble.
Vibration Causes
1 Wheel imbalance
a Dirt or debris on wheel blades
b Loose setscrews in wheel hub or bearing-to-shaft
c Wheel distorted from overspeed
2 Bent shaft
3 Drive faulty
a Variable pitch sheaves—Axial and radi al runout of
flanges, uneven groove spacing, out of balance. Also
similar faults in driven sheave.
b Bad V-belts, lumpy or mismatched, belt tension too
tight or too loose
4 Bad bearings, loose bearing hold-down bo lt s
5 Motor imbalance
6 Fan section not supported evenly on foundation
McQuay IM 782-7 47
Page 48

Service and Maintenance
Grease
(one each side
of fan shaft)
fitting
Service and Maintenance
Periodic Service and Maintenance
1 Check all moving parts for wear every six months.
2 Check bearing collar, sheave, and wheel hub setscrews,
sheave capscrews, and bearing hold-down bolts for
tightness every six months.
Ball Bearing Lubrication
1 Motor bearings—All ball bearings are prelubricated and
do not require additional grease during installation.
However, periodic cleaning out and renewal of grease is
necessary. Exercise extreme care when cleaning to
prevent foreign matter from entering the bearing. It is
also important to avoid over greasing. Only use a high
grade, clean mineral grease with the following
characteristics.
a Melting point preferably over 302°F (150°C).
b Does not separate by oil and soap under operating and
storage conditions.
c Free of abrasive matter, acid, alkali, and moisture.
d Specific greasing instructions are located on a label
attached to the fan section door.
2 Fan shaft bearings—All ball bearings are prelubricated
and do not require additional grease during installation.
Periodic greasing is necessary. Bearings are accessible in
the fan section. A grease fitting is located on each side of
the fan shaft. Do not over lubricate. Wipe off any
excess grease to prevent overheating. The lubrication
interval varies with the period of operation and
temperature of the ambient air. Use the guidelines in the
table below:
Table 35: Bearing Operating Temperature Range
Bearing operating temperature range
Operation
Continuous operation 6 months 4 months 2 months
12-hr/day operation 12 months 12 months 6 months
Figure 47: Fan Shaft Bearing Grease Fitting
To 130°F
(54°C)
To 150°F
(66°C)
Over 150°F
(66°C)
Table 36: Lubricants Recommended for Fan Shaft Ball
Bearings
Manufacturer
Texaco Lubricants
Company
Keystone Ind. Lubricants 81EP-2 0 to 250 –18 to 121
Mobil Oil Corporation
Exxon Company, U.S.A. Ronex MP –40 to 300 –40 to 149
Shell Oil Company Alvania No. 2 –20 to 240 –29 to 116
Note: Note:Temperature ranges over 225°F are shown for lubricants only.
High temperature applications are not suitable for standard air
handler components.
Product
name
Premium RB –30 to 300 –34 to 149
Mobilith
SCH100
Temperature range
°F °C
–40 to 350 –40 to 177
Fan Drive Adjustments
WARNING
ROTATING FAN can cause severe injury or death. Before
servicing fans, lockout and tag out power.
Do not open the hinged access door and access panels while
the unit is operating. Moving parts and strong suction forces can
cause severe personal injury or death.
Before entering any fan section, make sure the electrical power
source to the fan motor is disconnected, locked out and tagged
out.
AVERTISSEMENT
PIÈCES MOBILES DANGEREUSES.
Avant de réparer ou entretenir les ventilateurs, coupez
l’alimentation èlectrique de cet appareil et bloquez le
commutateur à OFF.
Upon completion of the air balance, replace the variable
pitched motor sheave with a properly sized, fixed sheave. A
matching fixed sheave provides longer belt and bearing life
and vibration-free operation. Initially, it is best to have a
variable pitched motor sheave for the purpose of air balancing.
Once the balance is achieved, fixed sheaves maintain
balancing and alignment more effectively. Replace the
adjustable sheaves with fixed sheaves.
With the electrical power disconnected, locked and tagged out,
measure the diameter of the V-belt outer surface where it
passes around the sheave (pitch diameter). Calculate fan speed
from the motor nameplate rpm.
Fan rpm = Motor rpm ×
Measured diameter at motor sheave
Measured diameter at fan sheave
VM and VP Variable Pitch Key Type Sheaves
Mounting:
Mount all sheaves on the motor or driving shaft with the
1
setscrews
2 Verify that both driving and driven sheaves are in
A toward the motor.
alignment and that shafts are parallel.
48 McQuay IM 782-7
Page 49

Service and Maintenance
Two groove
C
A
B
B
D
E
C
A
B
E
D
C
Single groove
Key E projects
to provide a grip
for removal.
3 Fit internal key D between sheave and shaft and lock
setscrew
Adjusting:
1 Loosen setscrews B and C in moving parts of sheave and
pull out external key
A securely in place.
E. (This key projects a small
amount to provide a grip for removing.)
2 Adjust sheave pitch diameter for desired speed by
opening moving parts by half or full turns from closed
position.
Do not open more than five full turns for
six full turns for
3 Replace external key E and securely tighten setscrews B
over key and setscrews
B belts.
C into keyway in fixed half of the
A belts or
sheave.
4 Put on belts and adjust belt tension.
Do not force belts over grooves. See “Fan Drive Belt
Adjustment” on page 28.
5 Make future adjustments by loosening the belt tension
and increasing or decreasing the pitch diameter of the
sheave by half or full turns as required. Readjust belt
tension before starting drive.
6 Adjust both halves of two-groove sheaves the same
number of turns from closed position to provide the same
pitch diameter.
7 Verify that all keys are in place and that all setscrews are
tight before starting drive. Check setscrews and belt
tension after 24 hours service.
Figure 48: VP Type Sheave Adjustment
LVP Variable Speed Sheaves
Mounting:
1 Slide sheave on motor shaft so that the side of the sheave
with setscrew
A is next to the motor, when setscrew A is
in the hub or barrel of the sheave.
2 When setscrew A is at an angle in the center flange B,
mount it away from the motor so the outer locking ring
and flange can be removed to get to the setscrew.
3 To remove the flange and locking ring:
a Loosen setscrews D.
b Loosen but do not remove capscrews E.
c Remove key F. (This key projects a small amount to
provide a grip for removing.)
d Rotate the flange counterclockwise until it disengages
the threads on the sheave barrel.
4 Verify that the driving and driven sheaves are in
alignment and the shafts are parallel. When aligning two-
groove sheaves, allow room between the sheave and
motor to get to capscrews
5 Insert key C between the sheave and the shaft and tighten
setscrew
6 If flange and locking ring have been removed, when
A securely.
E.
replacing them make sure that the inner and outer flanges
are open from the closed position by the same amount as
the other flange. Determine this by accurately measuring
the top width of the grooves.
7 Insert key F.
8 Tighten setscrews D and capscrews E.
9 Put on belts and adjust belt tension. Do not force belts
over grooves. See “Fan Drive Belt Adjustment” on page
28.
10 Be sure that all keys are in place and all setscrews and all
capscrews are tight before starting the drive. Check and
retighten all screws and retension belts after
approximately 24 hours of service.
Adjusting:
Slack off belt tension if belts have been installed.
1
2 Loosen setscrews D.
3 Loosen but do not remove capscrews E.
4 Remove key F. (This key projects out a small amount to
provide a grip for removing.)
5 Adjust pitch diameter by opening or closing the movable
flanges by half or full turns. (Two-groove sheaves are
supplied with both grooves set at the same pitch
diameter.) Move both movable flanges the same
number of turns to provide the same pitch diameter
for satisfactory operation. Do not open sheaves more
than five turns for
6 Replace key F.
A belts or six turns for B belts.
McQuay IM 782-7 49
Page 50

Service and Maintenance
e
7 Tighten setscrews D and capscrews E.
8 If belts have been installed, readjust belt tension. If belts
have not been installed, install them and adjust belt
tension. Do not force belts over grooves. See Fan Drive
Belt Adjustment‚ page 52.
Figure 49: LVP Type Sheave Adjustment
A
E
C
F
D
E
D
Section A-A Section A-A
MVP Variable Speed Sheaves
Mounting:
1 Verify that both driving and driven sheaves are in
alignment and the shafts are parallel. The centerline of
the driving sheave must be in line with the centerline of
the driven sheave. See Sheave Adjustment.
2 Before starting drive, verify that all setscrews are
torqued to the values shown in Table 37, page 51. Check
setscrew torque and belt tension after 24 hours of
service.
9 Verify that all keys are in place and all setscrews and all
capscrews are tight before starting the drive. Check and
retighten all screws and retension belts after
approximately 24 hours of operation.
A
E
C
A
F
D
B
• Do not open
8V sheaves more than 8 turns.
6 Before operating the drive, tighten BOTH locking
A in the outer locking ring. Use a torque wrench
screws
A
and tighten to the value shown in Table 37, page 51.
7 Replace belts and adjust the motor base to tension the
belts properly . See Fan Drive Belt Adjustment‚ page 52.
8 Do not loosen any screws other than the two locking
A in the outer locking ring when adjusting the
screws
sheave pitch. Do not operate the drive until the locking
screws are set to the torque specifications.
Adjusting:
1 Adjust motor base forward to release belt tension. For
easier adjustment, remove the belts.
2 Loosen, but do not remove both of the locking setscrews
A in the outer locking ring by using a hex key or torque
wrench with a hex bit.
3 Adjust sheave to desired pitch diameter by turning the
outer locking ring. Use a spanner wrench or drift inserted
into the three holes that are located 120° apart on the
ring.
4 Any pitch diameter can be obtained within the sheave
range. One complete turn of the outer locking ring
changes the pitch diameter 0.233".
5 Do not open sheaves more than the following amounts:
• Do not open
belts or 6 turns for the
• Do not open
• Do not open
B sheaves more than 4 3/4 turns for the A
B belts.
C sheaves more than 9 1/2 turns.
5V sheaves more than 6 turns.
Figure 50: Sheave Adjustment
Must be
parallel
Bearing
Motor
Must be
parallel
Center lines
must coincid
Adjustable
sheave
50 McQuay IM 782-7
Page 51

Service and Maintenance
Table 37: Screw Torque Values
Hollow head setscrews only
diameter
(2) Locking
setscrews A
For lengths (L) less than
diameter
Flathead socket screws
(Do not remove.)
Nominal screw
Socket head
cap screws
Flat head
socket screws
Lengths equal or greater than
size
(dia-thds/in)
Seating torque Seating torque Seating torque Seating torque Length (L) Seating torque
(in-lbs) (ft-lbs) (in-lbs) (in-lbs) (ft-lbs) (in) (in-lbs)
1/4-20NC 150 12.5 100 87 7.3 3/16 50
5/16-11NC 305 25.4 200 165 13.8 1/4 90
3/8-16NC 545 45.4 350 290 24.2 1/4, 5/16 150, 250
1/2-13NC 1300 108.3 N/A 620 51.7 N/A N/A
5/8-11NC N/A N/A N/A 1225 102.1 N/A N/A
Figure 51: Sheave Adjustment
Adjustable
center-flange
Split taper
bushing
Fixed
center-flange
Capscrews
(Do not remove.)
Stationary
end-flange
Outer
locking-ring
Inner locking-ring
(3) Holes for
spanner wrench
or drift
McQuay IM 782-7 51
Page 52

Service and Maintenance
Fan Drive Belt Adjustment
General Rules of Te nsioning
1 The ideal tension is the lowest tension at which the belt
does not slip under peak load conditions.
2 Check tension frequently during the first 24 to 48 hours
of operation.
3 Over tensioning shortens belt and bearing life.
4 Keep belts free from foreign material, which may cause
slippage.
5 Make V-drive inspection on a periodic basis. Adjust
tension if the belt is slipping. Do not apply belt dressing.
This may damage the belt and cause early failure.
Tension Measurement Procedure
1 Measure the belt span. See Figure 52.
2 Place belt tension checker squarely on one belt at the
center of the belt span. Apply force to the checker,
perpendicular to the belt span, until the belt deflection
equals belt span distance divided by 64. Determine force
applied while in this position.
3 Compare this force to the values in Table 38.
4 Adjust to the minimum value. If the belts slip, add
tension.
Table 38: Belt Deflection Force
Sheave diameter (inches) Deflection force (lbs)/belt deflection force
Cross section
A, AX
B, BX
5V, 5VX
Smallest sheave
diameter range
3.0 to 3.6
3.8 to 4.8
5.0 to 7.0
3.4 to 4.2
4.4 to 5.6
5.8 to 8.6
4.4 to 6.7
7.1 to 10.9
11.8 to 16.0
rpm range
1000 to 2500 2.8 5.5 3.0 6.1
2501 to 4000 2.1 4.2 2.5 5.0
1000 to 2500 3.4 6.8 3.7 7.4
2501 to 4000 2.4 5.7 3.2 6.4
1000 to 2500 4.0 8.0 4.7 9.4
2501 to 4000 3.5 7.0 3.8 7.6
850 to 2500 — — 3.6 7.2
2501 to 4000 — — 3.1 6.2
860 to 2500 4.0 7.9 5.2 10.5
2501 to 4000 3.3 6.7 4.5 9.1
860 to 2500 4.7 9.4 6.3 12.6
2501 to 4000 4.5 8.9 5.4 10.9
500 to 1749 — — 7.6 15.2
1750 to 3000 — — 6.6 13.2
3001 to 4000 — — 4.2 8.5
500 to 1740 9.5 18.9 11.0 22.1
1741 to 3000 8.3 16.7 10.0 20.1
500 to 1740 11.7 23.4 12.7 25.5
1741 to 3000 10.5 21.8 12.5 25.0
Figure 52: Drive Belt Adjustment
Deflection =
B
el
Belt span
64
t
p
s
an
WARNING
Moving belt and fan can cause severe personal injury or death.
During installation and filter maintenance:
• Lock and tag out fans to prevent accidental start up.
• Do not enter the filter compartment until the fan is
completely stopped.
• Use approved equipment for reaching filters located above
normal reach. Do not step on filter frames or unit
components.
• Floor surfaces must be dry and free of oil or grease.
Cross section A, B, 5V Cross section AX, BX, 5VX
Min Max Min Max
52 McQuay IM 782-7
Page 53

Service and Maintenance
Remove screws
from the upper track
that hold coil/drain pan
in place.
Lift drain pan connection
up and slide coil/drain pan
assembly out.
2
1
Airflow
Coil Maintenance
CAUTION
SHARP EDGES AND COIL SURFACES are a potential injury
hazard. Avoid contact with them.
ATTENTION
Les bords tranchants et les surfaces des bobines sont un
risque de blessure. Ne les touchez pas.
1 For maximum performance, the coil must be clean.
Check once a year under normal operating conditions
and brush or vacuum clean if necessary. Use a chemical
coil cleaner on multiple row coils. Read and follow the
chemical cleaner’s instructions since some cleaners may
contain harsh chemicals. Take care not to damage fins
while cleaning.
2 Drain pans in any air conditioning unit may have some
moisture. Algae and other organisms can grow due to
airborne spores and bacteria. Clean periodically to
prevent build-up from plugging the drain and causing the
drain pan to overflow. Keep drain pans clean to prevent
the spread of disease. Cleaning should be performed by
qualified personnel.
3 Dirt and lint can clog the condensate drain, especially
with dirty filters. Inspect twice a year to help avoid
overflow.
WARNING
Clean drain pan regularly so mold does not develop.
AVERTISSEMENT
Pour eviter la moisissure Nettoyer regulierement le bassin de
recuperage.
If fan replacement is required, the entire fan assembly can be
pulled out the side of the cabinet. The fan assembly includes
the fan housing, the bearing support, and the fan base.
1 To remove the fan assembly, remove the side panels
(follow instructions for side panel removal).
2 Disconnect the neoprene bulkhead seal that is attached to
the fan discharge. Then disconnect the fan sled from
each of the corner mounts and pull the entire assembly
out the side of the unit.
3 Loosen the fan bearings and pull out the shaft.
Disconnect the fan housing from the fan sled and bearing
support by removing the attaching bolts.
4 Replace the new fan, reconnect the shaft and bearings
and put the fan assembly in the cabinet. Replace panels
and fasteners.
Coil Removal and Replacement
Before removing the coil, disconnect all piping.
1 Remove exterior panels from both sides of the coil
section. Remove screws that secure the top of the leaving
coil face to the upper track on the inside top of the unit.
2 Lift drain pan condensate connection above the unit
frame flange and slide drain pan, coil(s), and baffles out
of unit.
3 Slide the coil, blockoffs, and drain pan assembly back
into unit the same way it was removed. Check the
installation for an airtight fit.
4 Reinstall screws that secure the top of the leaving coil
face to the upper track on the inside top of the unit.
Figure 53: Coil Removal
Component Removal and Replacement
Panel Removal
Remove the screws located along the sides of the panel. Pull
the panel out using the pocket pull handles. If the panel does
not have a pull handle, remove the adjacent panel with a
pocket pull or door and pop out the panel from the inside.
Fan Section Removal
The fan shaft, motor, and any drive components are removable
through the access door or panel opening.
McQuay IM 782-7 53
Page 54

Warranty
Warranty
Warranty Details
Consult your local Daikin McQuay Representative for
warranty details. Refer to Form 933- 430285Y. To find your
local Daikin McQuay Representative, go to
www.daikinmcquay.com.
Warranty Return Material Procedure
Defective material may not be returned without permission of
authorized factory service personnel of McQuay International
in Minneapolis, Minnesota, (763) 553-5330. A “Return
Goods” tag must be included with the returned material. Enter
the required information to expedite handling and prompt
issuance of credits. All parts must be returned to the
appropriate Daikin McQuay facility, designated on the “Return
Goods” tag. Transportation charges must be prepaid.
The return of the part does not constitute an order for
replacement. Therefore, a purchase order must be entered
through the nearest Daikin McQuay representative. The order
should include part number, model number, and serial number
of the unit involved.
Credit will be issued on customer’s purchase order following
an inspection of the return part and upon determination that the
failure is due to faulty material or workmanship during the
warranty period.
Replacement Parts
When writing to Daikin McQuay for service or replacement
parts, refer to the model number and serial number of the unit
stamped on the serial plate attached to the unit. If replacement
parts are required, mention the date of installation of the unit
and date of failure, along with an explanation of the
malfunctions and a description of the replacement parts
required.
54 McQuay IM 782-7
Page 55

Warranty
Destiny Equipment Warranty Registration Form
T o comply with the terms of Daikin McQuay W arranty, complete and return this form within
10 days to Daikin McQuay Warranty Department.
Check, test, and start procedure for Daikin McQuay Air Handling Units.
Job Name:________________________________________
Installation address: __________________________________________________________________________________________________
City: ______________________________________________________________________________ State: __________________________
Purchasing contractor:________________________________________________________________________________________________
City: ______________________________________________________________________________ State: __________________________
Name of Person doing start-up (print) ___________________________________________________________________________________
Company name_____________________________________________________________________________________
Address ___________________________________________________________________________________________
City/State/Zip_______________________________________________________________________________________
Unit model number: ________________________________________________ Unit serial number: _______________________________
SF VFD model number:_____________________________ Serial number: ___________________________________
RF VFD model number:_____________________________ N/A
Circle Yes or No. If not applicable to the type of unit, circle N/A.
I. INITIAL CHECK
A. Is any shipping damage visible? . . . . . . . . . . . . . . . . . . . . . . . . . . . . . . . . . . . . . . . . . . . . . . . . . . . . . . . . . . . . . . . . . . Yes No N/A
B. Are fan drives properly aligned and belts properly adjusted? . . . . . . . . . . . . . . . . . . . . . . . . . . . . . . . . . . . . . . . . . . . . Yes No N/A
C. Tightened all setscrews on pulleys, bearings and fans? . . . . . . . . . . . . . . . . . . . . . . . . . . . . . . . . . . . . . . . . . . . . . . . . Yes No N/A
D. Have the hold-down bolts been backed off on spring mounted fan isolators?. . . . . . . . . . . . . . . . . . . . . . . . . . . . . . . . Yes No N/A
E. With power off, do fans turn freely by hand? . . . . . . . . . . . . . . . . . . . . . . . . . . . . . . . . . . . . . . . . . . . . . . . . . . . . . . . . . Yes No N/A
F. Electrical service corresponds to unit nameplate?. . . . . . . . . . . . . . . . . . . . . . . . . . . . . . . . . . . . . . . . . . . . . . . . . . . . . Yes No N/A
Volts __________ Hertz __________ Phase __________
G. Is the main disconnect adequately fused and are fuses installed? . . . . . . . . . . . . . . . . . . . . . . . . . . . . . . . . . . . . . . . . Yes No N/A
H. Are all electrical power connections tight?. . . . . . . . . . . . . . . . . . . . . . . . . . . . . . . . . . . . . . . . . . . . . . . . . . . . . . . . . . . Yes No N/A
I. Is the condensate drain trapped?. . . . . . . . . . . . . . . . . . . . . . . . . . . . . . . . . . . . . . . . . . . . . . . . . . . . . . . . . . . . . . . . . . Yes No N/A
J. Fill drain pan. Does water drain freely? . . . . . . . . . . . . . . . . . . . . . . . . . . . . . . . . . . . . . . . . . . . . . . . . . . . . . . . . . . . . . Yes No N/A
K. Is the unit mounted level? . . . . . . . . . . . . . . . . . . . . . . . . . . . . . . . . . . . . . . . . . . . . . . . . . . . . . . . . . . . . . . . . . . . . . . . Yes No N/A
II. FAN DATA
A. Check rotation of supply fan. . . . . . . . . . . . . . . . . . . . . . . . . . . . . . . . . . . . . . . . . . . . . . . . . . . . . . . . . . . . . . . . . . . . . . Yes No N/A
B. Voltage at supply fan motor: 1–2 _________V 2–3__________V 1–3_________ V
C. Supply fan motor amp draw per phase: L1____________ L2___________ L3 ___________
D. Overload amp setting: ______________
E. What is the supply fan rpm? ______________
F. Record supply static pressure at unit discharge: _______ inches of H20
G. Record return static pressure at unit (with outside air dampers closed) _____________ inches of H20
III. DAMPERS
A. Are blades and seals present?. . . . . . . . . . . . . . . . . . . . . . . . . . . . . . . . . . . . . . . . . . . . . . . . . . . . . . . . . . . . . . . . . . . . Yes No N/A
B. Do dampers open smoothly and shut tight?. . . . . . . . . . . . . . . . . . . . . . . . . . . . . . . . . . . . . . . . . . . . . . . . . . . . . . . . . . Yes No N/A
IV. ELECTRIC HEAT
A. Electrical heat service corresponds to unit nameplate?. . . . . . . . . . . . . . . . . . . . . . . . . . . . . . . . . . . . . . . . . . . . . . . . . Yes No N/A
_________ Volts _________Hertz _________Phase
B. Are there any signs of physical damage to the electric heat coils? . . . . . . . . . . . . . . . . . . . . . . . . . . . . . . . . . . . . . . . . Yes No N/A
C. Have all electrical terminals been tightened?. . . . . . . . . . . . . . . . . . . . . . . . . . . . . . . . . . . . . . . . . . . . . . . . . . . . . . . . . Yes No N/A
D. Does sequence controller stage contactors properly? . . . . . . . . . . . . . . . . . . . . . . . . . . . . . . . . . . . . . . . . . . . . . . . . . . Yes No N/A
E. Electric heater voltage across each phase: L1–2_________V L2–3________ V L1–3 _______ V
F. Amp draw across each phase at each heating stage:
Stage 1 Stage 2 Stage 3 Stage 4 Stage 5 Stage 6
Phase L1: ___________ ___________ ____________ ____________ ___________ ___________
Phase L2: ___________ ___________ ____________ ____________ ____________ ___________
Phase L3 ___________ ___________ ____________ ____________ ___________ ___________
G. FLA: L1 ___________ L2 ___________ L3____________
McQuay S.O. No.: _________________ McQuay G.O. No.: _________________
N/A
Serial number: ___________________________________
McQuay IM 782-7 55
Page 56

Warranty
H. Operate electric heat with fans off. Electric heat must cycle OFF on high limit control.. . . . . . . . . . . . . . . . . . . . . . . . . Yes No N/A
V. CHILLED WATER COIL
A. Pressure test okay? . . . . . . . . . . . . . . . . . . . . . . . . . . . . . . . . . . . . . . . . . . . . . . . . . . . . . . . . . . . . . . . . . . . . . . . . . . . . Yes No N/A
B. Drain pan draining okay? . . . . . . . . . . . . . . . . . . . . . . . . . . . . . . . . . . . . . . . . . . . . . . . . . . . . . . . . . . . . . . . . . . . . . . . . Yes No N/A
VI. HOT WATER COIL
A. Pressure test okay? . . . . . . . . . . . . . . . . . . . . . . . . . . . . . . . . . . . . . . . . . . . . . . . . . . . . . . . . . . . . . . . . . . . . . . . . . . . . Yes No N/A
VII. Variable Frequency Drive (VFD)
A. VFD control in manual . . . . . . . . . . . . . . . . . . . . . . . . . . . . . . . . . . . . . . . . . . . . . . . . . . . . . . . . . . . . . . . . . . . . . . . . . . Yes No N/A
1. Minimum speed not less than 20 Hz . . . . . . . . . . . . . . . . . . . . . . . . . . . . . . . . . . . . . . . . . . . . . . . . . . . . . . . . . . . Yes No N/A
2. Amps at minimum speed____________
3. Amps at 60 Hz____________
B. Automatic control functioning . . . . . . . . . . . . . . . . . . . . . . . . . . . . . . . . . . . . . . . . . . . . . . . . . . . . . . . . . . . . . . . . . . . . . Yes No N/A
C. Type of auto control (circle one) 0 -10 VDC 4 - 20 mA Other
Signature:______________________________________________________ Startup date:____________________________________
RETURN COMPLETED FORM WITHIN 10 DAYS OF START-UP TO:
McQuay International Warranty Department, 13600 Industrial Park Boulevard, Minneapolis, MN 55441
Please list any additional comments that could affect the operation of this unit; e.g., shipping damage, failed components, adverse installation
applications, etc., on a separate sheet and attach to this form.
56 McQuay IM 782-7
Page 57

Warranty
Quality Assurance Survey Report
Quality Assurance Survey Report
To whom it may concern:
Please review the items below upon receiving and installing our product. Mark N/A on any item that does not apply to the
product.
Job Name: _____________________________________________________ McQuay G.O. no. __________________
Installation Address: _____________________________________________________
City: __________________________________________________________ State: __________________
Purchasing Contractor: __________________________________________________
City:__________________________________________________________
Name of person doing start-up (print): _____________________________________________________
1. Is there any shipping damage visible? . . . . . . . . . . . . . . . . . . . . . . . . . . . . . . . . . . . . . . . . . . . . . . . . . . . . . . . . . . .
__Location on unit _____________________________________________________
2. How would you rate the overall appearance of the product; i.e., paint, fin damage, etc.?
Excellent Good Fair Poor
3. Did all sections of the unit fit together properly? . . . . . . . . . . . . . . . . . . . . . . . . . . . . . . . . . . . . . . . . . . . . . . . . . . .
4. Did the cabinet have any air leakage?. . . . . . . . . . . . . . . . . . . . . . . . . . . . . . . . . . . . . . . . . . . . . . . . . . . . . . . . . . .
Location on unit ___________________________________________________________________________
5. Were there any refrigerant leaks? . . . . . . . . . . . . . . . . . . . . . . . . . . . . . . . . . . . . . . . . . . . . . . . . . . . . . . . . . . . . . . Yes No N/A
Shipping Workmanship Design
6. Does the refrigerant piping have excessive vibration?. . . . . . . . . . . . . . . . . . . . . . . . . . . . . . . . . . . . . . . . . . . . . . .
Location on unit ___________________________________________________________________________
7. Did all of the electrical controls function at start-up? . . . . . . . . . . . . . . . . . . . . . . . . . . . . . . . . . . . . . . . . . . . . . . . .
Comments _______________________________________________________________________________
8. Did the labeling and schematics provide adequate information?. . . . . . . . . . . . . . . . . . . . . . . . . . . . . . . . . . . . . . . Yes No N/A
9. How would you rate the serviceability of the product?
Excellent Good Fair Poor
10. How would you rate the overall quality of the product?
Excellent Good Fair Poor
11. How does the quality of Daikin McQuay products rank in relation to competitive products?
Excellent Good Fair Poor
Comments:
Please list any additional comments which could affect the operation of this unit; i.e., shipping damage, failed
components, adverse installation applications, etc. If additional comment space is needed, write the comment(s) on a
separate sheet, attach the sheet to this completed Quality Assurance Survey Report, and return it to the Warranty
Department with the completed preceding “Equipment Warranty Registration Form”.
State: __________________
Yes No N/A
Yes No N/A
Yes No N/A
Yes No N/A
Yes No N/A
McQuay IM 782-7 57
Page 58

Page 59

Daikin McQuay Training and Development
Now that you have made an investment in modern, efficien t Daikin McQuay equipment, its care should be a high
priority. For training information on all Daikin McQuay HVAC products, please visit us at www.DaikinMcQuay.com
and click on training, or call 540-248-9646 and ask for the Training Department.
Warranty
All Daikin McQuay equipment is sold pursuant to its standard terms and conditions of sale, including Limited Product
Warranty. Consult your local Daikin McQuay Representative for warranty details. Refer to Form 933-430285Y. T o find
your local Daikin McQuay Representative, go to www.DaikinMcQuay.com.
Aftermarket Services
To find your local parts office, visit www.DaikinMcQuay.com or call 800-37PARTS (800-377-2787). To find your
local service office, visit www. DaikinMcQuay.com or call 800-432-1342.
This document contains the most current product info rm a tio n as of this pr int ing . Fo r th e mo st up - to- d ate pro d uc t
information, please go to www.DaikinMcQuay.com.
Products Manufactured in an ISO Certified Facility.
© 2012 McQuay International • www.DaikinMcQuay.com • 800-432-1342 03/12
 Loading...