

Page 1

ICM 450
Programmable Three Phase Voltage
Monitor with 25-Fault Memory
Protects motors from premature failure
and burnouts
Installation, Operation & Application Guide
For more information on our complete range of American-made
products – plus wiring diagrams, troubleshooting tips and more,
visit us at www.icmcontrols.com
Page 2

Specication
Input
• Line Voltage: Universal, 190-630 VAC
• Frequency: 50-60 Hz
• Load Side Monitoring: Optional
• Control Voltage: 18-240 VAC
• Frequency: 50-60 Hz
Output
• Type: Relay, SPDT
• Voltage Range: 240VAC @ 10A maximum
• Frequency: 50-60 Hz
Control Operating Temperature
• Operating Temperature: -40ºF to +167ºF (-40ºC to +75ºC)
• Storage Temperature: -40ºF to +185ºF (-40ºC to +80ºC)
LCD Operating Temperature
• Operating Temperature: -4ºF to +167ºF (-20ºC to +75ºC)
Mechanical
• Mounting: Surface mount using (2) #8 screws
• Terminations: Screw terminals
• Weight: 12 ounces (341 grams)
Dimensions
• 6 1/2” L, 4 1/4” W, 1 3/8” H (16.5 cm. L, 10.8 cm. W, 3.5 cm. H)
Parameters
Phase Unbalance Protection
• Voltage Unbalance: 2-20% adjustable
Over/Under Voltage Protection
• Under Voltage: 2-25% adjustable
• Over Voltage: 2-25% adjustable
Phase Loss Protection
• Phase Loss Condition: Equals 25% of nominal for any given phase; system
will shut down and a fault will be recorded should this occur
Delay on Break Timer
• Control Voltage: 18-240 VAC
• Time Delay: 0 to 10 minutes adjustable
Fault Interrogation Delay
• Time Delay: 0 to 15 seconds adjustable
• Provides a delay between fault detection and system shutdown - helps to
eliminate nuisance trips or unnecessary shutdowns
Caution
Installation of the ICM450 shall be performed by trained technicians only.
Adhere to all local and national electric codes.
Disconnect all power to the system before making any connections.
Page 3
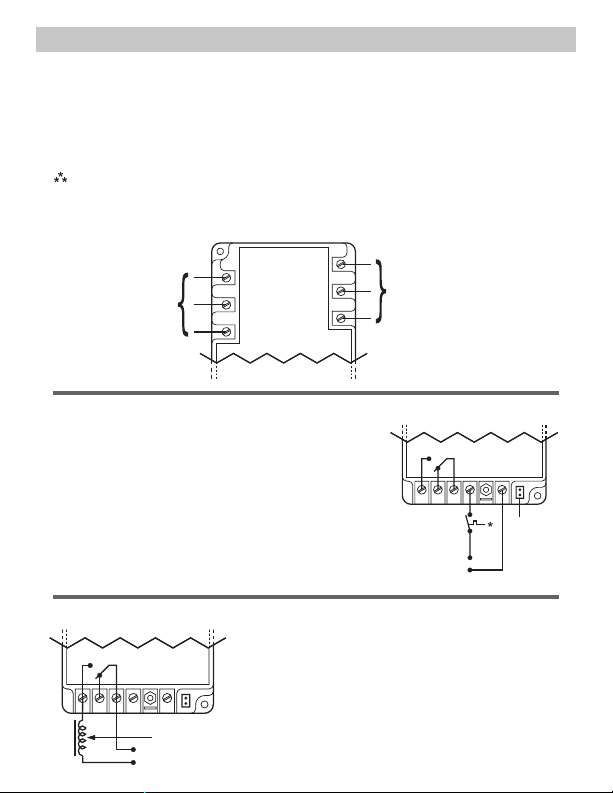
Installation
1. Using (2) #8 screws, mount the ICM450 in a cool, dry, easily accessible
location in the control panel.
2. Connect voltage as shown in Figure 1 (below). Leave existing line and load
side connections intact on the contactor.
3. Load side monitoring is optional (unit may be used to monitor line side
only). Wire the contactor and optional control voltage monitoring as in
Figures 2 and 3 (below).
Note: Load/line wire must be rated for 3-phase voltage rating, 20ga
4. Upon application of power, the ICM450 will be on line and will begin to
monitor the system.
“back” side of contactor
minimum.
Figure 1
Incoming 3-phase
voltage from load or
(optional)
LOAD
3
LOAD
2
LOAD
1
LINE
3
LINE
2
LINE
1
Incoming 3-phase voltage from
line or “front” side of contactor
The incoming 3-phase voltage is
used to power up the ICM450 as
well (190-600)
• Terminals 1 and 3 are the control signal input terminals
• “Control Mode” is turned ON or OFF in setup
• With “Control Mode” set to “ON,” there must be a
voltage present on terminals 1 and 3 for the relay
output terminals 4 and 6 to close; this voltage can be
supplied from a thermostat, pressure switch, etc.
• When the voltage on these terminals is re-applied,
the unit will not re-energize until the delay on break
(0-10 minutes) time has elapsed
• Use of terminals 1 and 3 is optional; they will be
ignored if the “Control Mode” is set to “OFF”
Figure 3
• Terminals 4 and 6 are “dry,” normally open
6 5 4
13
Contactor Coil
Contactor Voltage (18-240 VAC)
contacts
• Terminals 4 and 6 are closed when power is
within specifications
• Terminals 4 and 6 open when there is a fault
condition or loss of control signal
Figure 2
6 5 4
* Switch can be
a thermostat,
pressure
switch, etc.
Control Voltage
(18-240 VAC)
13
Short pins
when using
24 VAC
control
voltage
1
Page 4

ICM450 Wiring Diagrams
2-Pole Contactor 3-Pole Contactor
3
2
1
LOAD
LOAD
LOAD
L03
LINE
3
LINE
2
LINE
1
LI3
LI2
LI1
3
2
1
LOAD
LOAD
LOAD
LINE
3
LINE
2
LINE
1
LI3
LI2
LI1
Control
Voltage
L01
L02
* Thermostat, pressure switch, etc. * Thermostat, pressure switch, etc.
L0AD
Control
Voltage
L01
L02
L03
L0AD
Setting the Parameters
1. Press the green SETUP button to enter Setup mode. Setup LED will light.
2. Use the and arrows to change user parameters.
3. Scroll through setup by pressing and releasing the SETUP button.
4. When the last parameter has been set, the phase average will be
displayed and the Setup LED will automatically turn OFF.
Button Functions
Press arrows to scroll through
and select user parameter
settings in Setup mode.
HOLD down for fast edit.
Press to enter
Setup mode
and select user
parameters.
Hold for
voltage display
a b, b c, a c
(simultaneously).
Press to read faults.
Hold for 5 seconds
to clear faults and
reset memory.
2
Page 5

Parameters
Parameter Description Range Default Recommended
Line
Voltage
Delay On
Break
Fault Inter-
rogation
Over/Under
Voltage
% Phase
Unbalance
Reset
Mode
Control
Mode
Average phase to phase
line voltage
Amount of time between
the load de-energizing and
re-energizing
Amount of time before
the load de-energizes due
to a non-critical fault*
%
Maximum/minimum phase
to phase average voltage,
respectively
Amount of allowable
voltage unbalance
AUTO or number of
times the load can be
re-energized after a load
side fault before a manual
reset is necessary
Note: When monitoring
With control mode set
to OFF, the load will
energize if no 3- phase
fault conditions exist;
with control mode ON,
the load will energize if no
fault conditions exist and
control voltage is present
at terminals 1 and 3 of
the ICM450
line side only, the
reset mode will
always be AUTO
190-600 208 Nameplate
0-10
minutes
0-15
seconds
2-25% 20% 12-15%**
2-20% 20% 4-5%**
AUTO,
0-10
ON
or
OFF
.1
minute
15
seconds
AUTO
ON Based on wiring
Voltage
4 minutes**
7-8 seconds**
AUTO
* Non-critical faults are faults such as High/Low Voltage and Phase Unbalance.
Critical faults, such as Phase Loss and Phase Reversal, have a fault
interrogation of under 2 seconds and it is not user adjustable.
** For best recommendations, consult manufacturer of equipment.
3
Page 6

Fault Conditions
Press and release fault button to scroll through all saved faults.
Note: For initial setup, press and hold FAULT for 5 seconds to
remove any previously stored faults.
Fault Problem Corrective Action
Back
Not all three of the
Phase
phases on the load side
Loss
are present
Back
Loads 1, 2, or 3 are not
Phase
in sequence (not 120º
Rev
phase shifted)
Back
A voltage unbalance
Phase
between the three load
Unbal
phases exceeds the
unbalance setpoint
Front
Average phase-phase
Over
voltage exceeds the
Volt
maximum percentage
Front
Not all three of the
Phase
phases on the line side
Loss
are present
Front
Lines 1, 2, or 3 are not
Phase
in sequence (not 120º
Rev
phase shifted)
Front
A voltage unbalance
Phase
between the three line
Unbal
phases exceeds the
unbalance setpoint
Front
Average phase-phase
Under
voltage is below the
Volt
minimum percentage
* Only swap phases during initial setup, not after the ICM450 has been in operation without
errors.
1. Re-energize the contactor.
2. If the fault reappears after the load energizes:
a. Turn all power OFF
b. Check all load side connections
c. Check the contacts of the contactor for debris
or excess carbon.
1. Turn OFF all power.
2. Swap any 2 phases on the load side of the
ICM450 only (example: swap load 1 and load 2) *
3. Re-apply power.
1. Press the READ button to observe the present
load voltages. Check system for unbalance cause.
2. Increase the fault interrogation time if necessary.
3. Increase the percent unbalance setting if
necessary.
1. Check system for over-voltage cause.
2. Increase the percent over-voltage setting if
necessary.
3. Increase the fault interrogation time if necessary.
1. Press and hold the READ button on the phase
monitor or use an AC voltmeter to carefully
measure all three phase-phase line voltages
(example: Line 1 Line 2, Line 2 Line 3, Line
3 Line 1).
2. Repair the missing phase.
1. Turn OFF all power.
2. Swap any 2 phases on the line side of the ICM450
(example: swap load 1 and load 2)*
3. Re-apply power.
1. Press the READ button to observe the present
load voltages. Check system for unbalance cause.
2. Increase the fault interrogation time if necessary.
3. Increase the percent unbalance setting if
necessary.
1. Check system for under-voltage cause.
2. Increase the percent under-voltage setting if
necessary.
3. Increase the fault interrogation time if necessary.
4
Page 7

Problem
Load will not
energize
Load will not
energize
Fault LED
blinks
repeatedly
while load is
energized
Load will not
de-energize
when control
voltage is OFF
Setup LED
is on while
load is being
energized
Load will not
energize
Load turns ON
and OFF
repeatedly
Troubleshooting
LCD
Readout
Phase
Avg.
Phase
Avg.
Phase
Avg.
Phase
Avg.
Anything
Other Than
Phase Avg.
Reset Fault LED
Readout is
Irrelevant
LED Status Corrective Action
All LEDs Off Confir m that the control input
Load LED Off,
Fault LED
blinking
Fault LED
Blinking,
Load LED On
Load LED On,
Control LED Off
Setup LED On,
Load LED On
Blinking
Fault LED
Blinking
(terminals 1 & 3) is properly
connected and configured (see
Pages 1 and 3)
Press FAULT to observe the
current fault; correct the
condition of the first fault that
appears (see Fault Conditions,
Page 4 for a list of corrective
actions)
Indicates there are faults
saved in the memory, press
FAULT rapidly to scroll through
saved faults; to clear the
faults, press and hold FAULT
for more than 5 seconds
The control mode setting is
OFF; press SETUP to get to
the control mode. Press to
set the control mode ON
To exit the setup mode, press
either READ or FAULT
Unit in lockout; maximum
number of retries in manual
reset mode has been reached;
to reset unit, press FAULT and
hold for more than 5 seconds
Fix load side fault; press FAULT
to observe condition; the delay
on break period may be too
short; press SETUP to enter
the delay on break mode;
press to lengthen the delay
5
Page 8

ONE-YEAR LIMITED WARRANTY
The Seller warrants its products against defects in material or
workmanship for a period of one (1) year from the date of manufacture.
The liability of the Seller is limited, at its option, to repair, replace or
issue a non-case credit for the purchase prices of the goods which are
provided to be defective. The warranty and remedies set forth herein
do not apply to any goods or parts thereof which have been subjected
to misuse including any use or application in violation of the Seller’s
instructions, neglect, tampering, improper storage, incorrect installation
or servicing not performed by the Seller. In order to permit the Seller
to properly administer the warranty, the Buyer shall: 1) Notify the
Seller promptly of any claim, submitting date code information or any
other pertinent data as requested by the Seller. 2) Permit the Seller to
inspect and test the product claimed to be defective. Items claimed
to be defective and are determined by Seller to be non-defective are
subject to a $30.00 per hour inspection fee. This warranty constitutes
the Seller’s sole liability hereunder and is in lieu of any other warranty
expressed, implied or statutory. Unless otherwise stated in writing,
Seller makes no warranty that the goods depicted or described herein
are fit for any particular purpose.
7313 William Barry Blvd., North Syracuse, NY 13212
(Toll Free) 800-365-5525 (Phone) 315-233-5266 (Fax) 315-233-5276
www.icmcontrols.com
LIA164-4
 Loading...