

Page 1

Installation and Maintenance Manual
IM 918-2
Group: Controls
Part Number: IM 918
Date: April 2012
Supercedes: IM 918-1
NOTICE
Use this manual to physically connect the LonWorks Communication Module to the unit controller and
connect the air handler unit controller to your network. Connections and service to the MicroTech III
Air Handling Unit Controller must be performed only by personnel knowledgeable in the operation of
the equipment being controlled. Use the appropriate Engineering Data (ED), known as the Protocol
Information document, to integrate the unit into your network. The Protocol Information document
contains addressing details, LONWORKS® protocol information, and a list of the data points available to
the network. See the Reference Documents section of this manual for Protocol Information document
numbers. MicroTech III control integration literature is available from your local Daikin McQuay sales
representative and www.daikinmcquay.com.
MicroTech® III
Rooftop and Self Contained Unit Controller
LONWORKS® Communication Module
RoofPak™ Applied Rooftop Models: RPE, RDE, RCE, RPS, RDT, RFS, RCS, RDS and RAH
Self-Contained Models: SWP and SWT
Maverick™ II Model MPS
Rebel™ Model DPS
© 2012 McQuay International
Page 2

Table of Contents
Figures ................................................................................................................................................... 2
Revision History .................................................................................................................................... 3
Reference Documents ........................................................................................................................... 3
Limited Warranty .................................................................................................................................. 3
Trademark Notices ................................................................................................................................ 3
General Information .............................................................................................................. 4
Hazard Identification Messages ............................................................................................................ 4
Description ............................................................................................................................................ 5
Application ............................................................................................................................................ 5
Component Data.................................................................................................................................... 5
Service Pin ........................................................................................................................................ 6
Light Emitting Diodes (LEDs) ................................ ................................................................ .......... 7
LonWorks Network Connector ......................................................................................................... 7
Board-To-Board Connector .............................................................................................................. 7
LonMark Profile Software................................................................................................................. 7
Neuron ............................................................................................................................................... 7
Transceiver ........................................................................................................................................ 8
Specifications ........................................................................................................................................ 8
Installation ............................................................................................................................. 9
Contents of the LONWORKS Communication Module Kit................................................................. 9
Installing a LONWORKS Communication Module ............................................................................. 9
Replacing an Existing LONWORKS Communication Module .......................................................... 11
Integration ............................................................................................................................ 13
Connecting to the Network .................................................................................................................. 13
Addressing and Establishing Communications ................................................................................... 13
LONWORKS Network Addressing .................................................................................................... 13
Commissioning the Network ........................................................................................................... 13
External Interface File (XIF) and NXE Files .................................................................................. 13
Resource Files ................................................................................................................................. 14
Configuring the Unit Controller .......................................................................................................... 14
Service Information ............................................................................................................. 15
Test Procedures ................................................................................................................................... 15
Parts List ............................................................................................................................................. 15
Kit ................................................................................................................................................... 15
Figures
Figure 1. LONWORKS Communication Module Attached to the Unit Controller .................................. 5
Figure 2. LONWORKS Communication Module Major Components ..................................................... 6
Figure 3. Service Pin: Before and After ................................................................................................ 6
Figure 4. LONWORKS Communication Module Knockout .................................................................. 10
Figure 5. Diagram of Board-to-Board Connector ............................................................................... 11
IM 918-2
2 2
Page 3

Revision History
IM 918
October 2008
Preliminary release.
IM 918-1
January 2009
Updated figure 3 & text for setting service pin with hex key.
IM 918-2
October 2009
March 2012
Added Maverick II (MPS) model
Updated to Daikin McQuay logo and references. Added
Rebel to cover
Number
Company
Title
Source
078-0014-01E
LONMARK Interoperability
Association
LONMARK Layers 1-6 Interoperability Guidelines,
Version 3.4
www.lonmark.org
078-0120-01E
LONMARK Interoperability
Association
LONMARK Application Layer Interoperability
Guidelines, Version 3.4
www.lonmark.org
078-0156-01G
Echelon® Corporation
LONWORKS® FTT-10A Free Topology
Transceiver Users Guide
www.echelon.com
8500_20
LONMARK Interoperability
Association
Space Comfort Controller Functional Profile
www.lonmark.org
8610_10
LONMARK Interoperability
Association
Discharge Air Controller Functional Profile
www.lonmark.org
OM 920
McQuay International
MicroTech III Unit Controller Operation Manual
for Applied Rooftop and Self-Contained Systems
www.daikinmcquay.com
ED 15112
McQuay International
Protocol Information, BACnet and LonWorks
www.daikinmcquay.com
Reference Documents
Limited Warranty
Consult your local Daikin McQuay Representative for warranty details. Refer to Form 933-43285Y.
To find your local Daikin McQuay Representative, go to www.daikinmcquay.com.
Trademark Notices
Copyright © 2012 McQuay International, Minneapolis MN. All rights reserved throughout the world.
McQuay International reserves the right to change any information contained herein without prior
notice. The user is responsible for determining whether this software is appropriate for his or her
application.
®™ The following are trademarks or registered trademarks of their respective companies.
LONWORKS, LONMARK, LonTalk, and Neuron from Echelon Corporation; Windows from Microsoft
Corporation; Daikin McQuay, Maverick II, Rebel, and MicroTech III from McQuay International.
LONMARK and the LONMARK logo are managed, granted, and used by LONMARK International under
a license granted by Echelon Corporation.
IM 918-2
3 3
Page 4
General Information
!
DANGER
Dangers indicate a hazardous situation which will result in death or serious injury if not
avoided.
!
WARNING
Warnings indicate potentially hazardous situations, which can result in property damage,
severe personal injury, or death if not avoided.
!
CAUTION
Cautions indicate potentially hazardous situations, which can result in personal injury or
equipment damage if not avoided.
!
WARNING
Electric shock hazard. Can cause personal injury or equipment damage.
This equipment must be properly grounded. Connections and service to the Unit
Controller must be performed only by personnel knowledgeable in the operation of the
equipment being controlled.
!
CAUTION
Static sensitive components. Can cause equipment damage.
Discharge any static electrical charge by touching the bare metal inside the control panel
before performing any service work. Never unplug cables, circuit board terminal blocks, or
power plugs while power is applied to the panel.
NOTICE
This equipment generates, uses and can radiate radio frequency energy and, if not
installed and used in accordance with this instruction manual, may cause interference to
radio communications. It has been tested and found to comply with the limits for a Class
A digital device, pursuant to part 15 of the FCC rules. These limits are designed to
provide reasonable protection against harmful interference when the equipment is
operated in a commercial environment. Operation of this equipment in a residential area
is likely to cause harmful interference in which case the user will be required to correct the
interference at his or her own expense. Daikin McQuay disclaims any liability
resulting from any interference or for the correction thereof.
This manual contains the information you need to install a MicroTech III LONWORKS Communication
Module and integrate it into the network.
Hazard Identification Messages
IM 918-2
4 4
Page 5
Description
A MicroTech III LONWORKS Communication Module provides the interface between a MicroTech
III Rooftop or Self-Contained Unit Controller (i.e. Applied Rooftop, Self-Contained, Maverick II™ or
Rebel™ Unit) and a LONWORKS Local Operating Network (LON). It translates the LonTalk®
variables used on the network to the variables used in the unit controller and vice versa. It translates
in accordance with the LONMARK Functional Profile. Profiles are interpreted in loaded programs
(firmware).
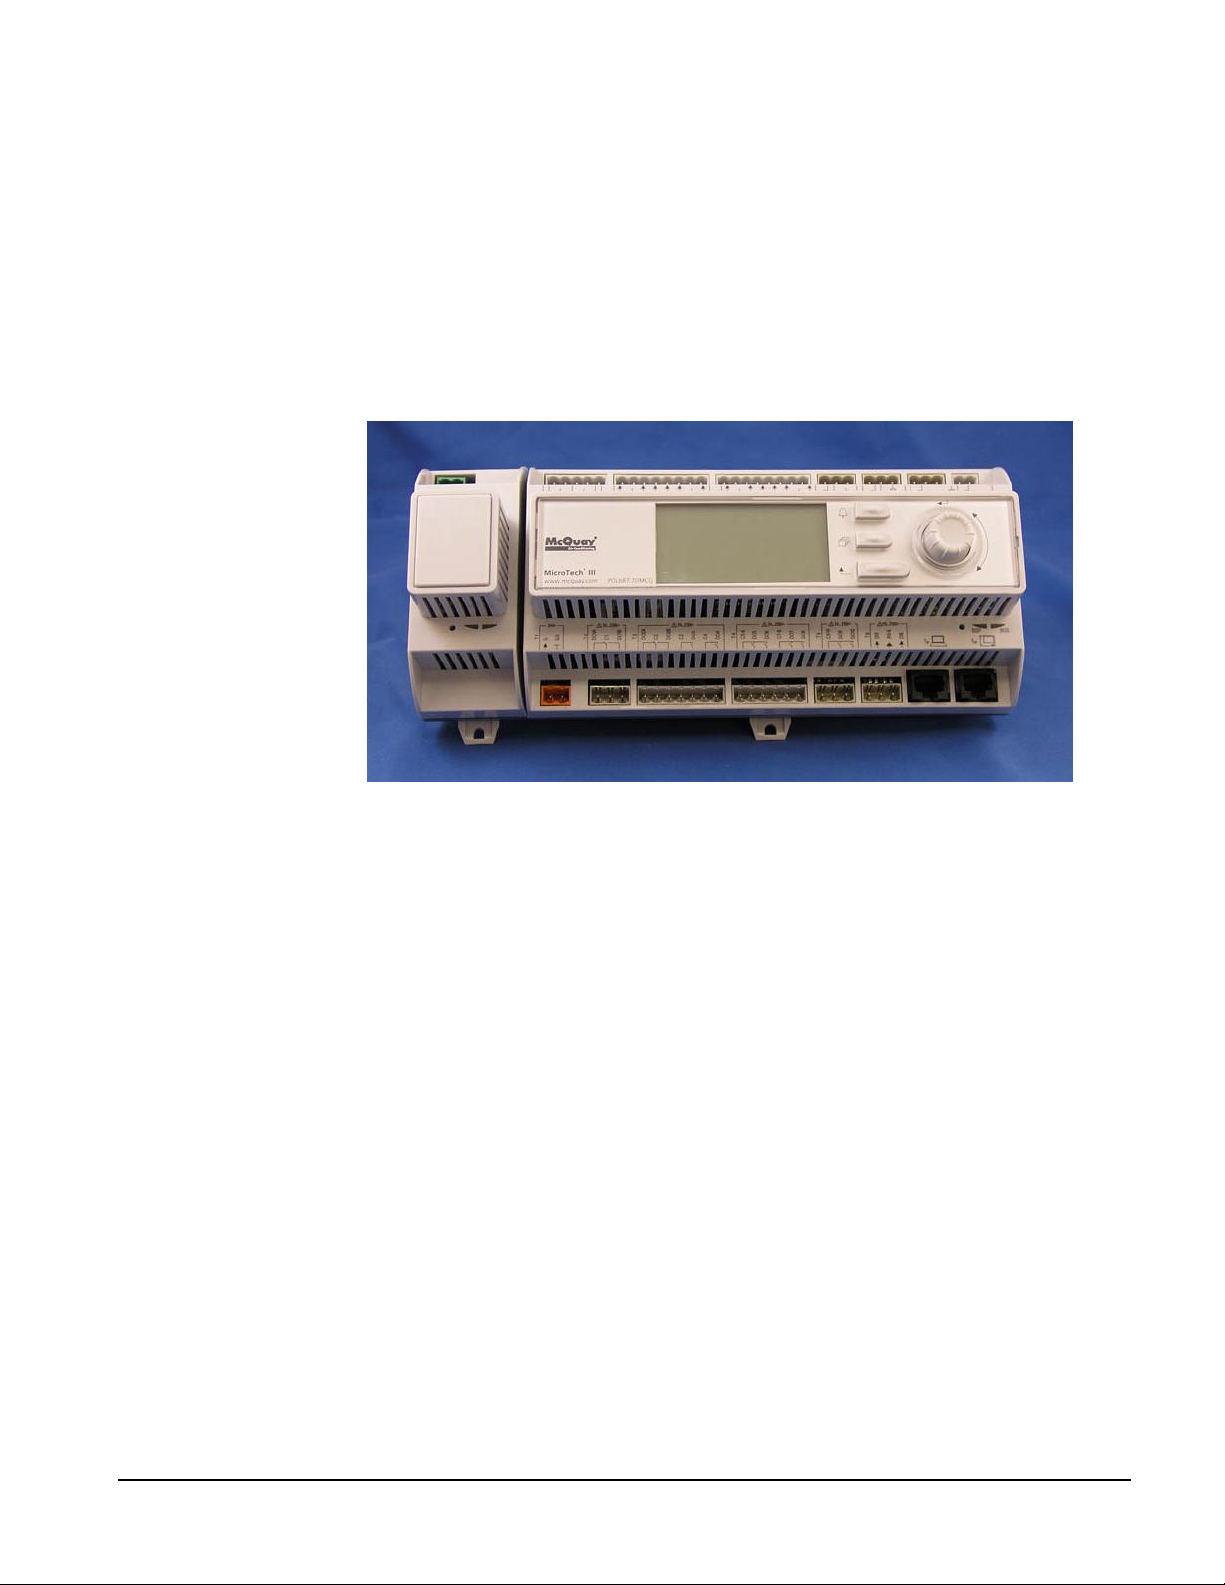
The LONWORKS Communication Module is a printed circuit board with a plastic enclosure that
connects onto the left side of the Unit Controller (see Figure 1).
Figure 1. LONWORKS Communication Module Attached to the Unit Controller
Application
A LONWORKS Communication Module connects the Unit Controller to the building automation
system (BAS) on a LONWORKS network. It is the interface adapter for the exchange of LonTalk
variables between the network and the unit controller. The LONWORKS Communication Module
translates the LonTalk variables of the profile into the native information of the unit controller. Refer
to the MicroTech III Air Handling Unit Controller Operation Manual, OM 920 for keypad details.
Component Data
Figure 2 shows the location of the major components of the LONWORKS Communication Module.
IM 918-2
5 5
Page 6

Figure 2. LONWORKS Communication Module Major Components
Pin CLB
Pin CLA
Network Connector
Service Pin
BUS LED
BSP LED
Service Pin
The service pin generates a service-pin message that contains the Neuron® ID and the program code
identification of the node. A service-pin message is a network message that is generated by a node
and broadcast on the network. It can be used to commission the LONWORKS network.
The service pin button is located below the enclosure just left of the LEDs. To activate the service
pin, insert the end of a 5/64 “ (1.985 mm) Hex Key (Allen wrench), or other similar tool with a
narrow end, approximately 1.5 inches (3.8 cm) into the small hole to the left of the LEDs (see Figure
3).
Figure 3. Service Pin: Before and After
IM 918-2
6 6
Page 7

Light Emitting Diodes (LEDs)
BSP LED Color
Meaning
Flashing between Red & Green
Board Support Package (BSP) upgrade in progress
Green
Communication is established between the communication
module and the unit controller.
Yellow
The communication module is capable of communicating to
the unit controller. However, communication is not
established.
Red flashing with 2Hz
Red flashing with 2Hz = Software error.1
Red
Hardware error. 1
BUS LED Color
Meaning
Green
The unit controller is capable of communicating to the network.
Red
The unit controller is not capable of communicating to the network.
Orange / Yellow
Communication module is initializing.
Orange / Yellow Flashing
Unit has not yet communicated with a LON network
Pin
Function
CLA
FTT-10A
CLB
FTT-10B
Two LEDs indicate communication activity and status of the LONWORKS Communication Module.
These indicators can be seen when the LONWORKS Communication Module is connected to the
MicroTech III Air Handling Unit Controller.
BSP LED
The BSP LED indicates the communication status between the LONWORKS Communication Module
and the Unit Controller. The table below describes the status of the BSP LED.
1
In the event that this should occur, cycle power to the unit controller to attempt to clear the problem. Contact the Controls
Customer Support Group at 866-4MCQUAY (866-462-7829) for additional assistance if necessary.
BUS LEDs
The BUS LED indicates the communication status between the LONWORKS Communication Module
and the network. The table below describes the status of the BUS LED.
LonWorks Network Connector
The network connector connects the LONWORKS Communication Module to the LONWORKS FTT10A bus.
Board-To-Board Connector
The board-to-board connector connects the unit controller to the LONWORKS Communication Module
(see Figures 3 and 4).
LonMark Profile Software
The LONWORKS Communication Module software translates the Standard Network Variable Types
(SNVTs) and Standard Network Configuration Parameter Types (SCPTs) in accordance with the
LONMARK profiles used on the LONWORKS network into the variables and parameters used in the
Unit Controller.
Neuron
The basis of the LONWORKS Communication Module is an Echelon Neuron integrated circuit. Each
Neuron chip contains a globally (i.e., worldwide) unique, 48-bit serial number called the Neuron ID.
The Neuron ID can be used to address the device on the LONWORKS network.
IM 918-2
7 7
Page 8

Transceiver
Characteristic
Description
Network Topology
Flexible Free Topology
Neuron Chip Processor
3150
Free Topology Transceiver (FTT-10A)
50051
Cable Types
TIA Category 5 (recommended)
Maximum Bus Length
1476 ft (450) meters per segment
Maximum Node Separation
820 ft (250 meters)
Data Transmission
Two-wire, half duplex
Data Transmission Rate
78 kbps (baud)
The Echelon Corporation Free Topology Transceiver (FTT-10A) is used to communicate on the
LONWORKS network. The network topology may consist of a star, daisy-chain, or other topology.
Data transmission rate on the network is 78 kbps (baud).
Specifications
IM 918-2
8 8
Page 9

Installation
!
CAUTION
Electrostatic discharge hazard.
Can cause equipment damage.
This equipment contains sensitive electronic components that may be damaged by
electrostatic discharge from your hands. Before you handle a communications module, you
need to touch a grounded object, such as the metal enclosure, in order to discharge the
electrostatic potential in your body.
!
WARNING
Electric shock hazard. Can cause personal injury or equipment damage.
This equipment must be properly grounded. Connections and service to the Unit Controller
must be performed only by personnel knowledgeable in the operation of the equipment
being controlled.
Contents of the LONWORKS Communication Module Kit
The following section describes how to field install a new LONWORKS Communication Module or
replace an existing LONWORKS Communication Module on the MicroTech III Applied Air Unit
Controller so that it can be incorporated into the LONWORKS network. The Communication Module
can be factory or field installed. See Parts List for details.
The following is the list of items included in the field-installed kit:
The LONWORKS Communication Module
Board-to-board connector
Network connector Installing a LONWORKS Communication Module
Installing a LONWORKS Communication Module
Follow these steps to install a LONWORKS Communication Module on the Unit Controller to
incorporate it into an existing LONWORKS network.
1. Set the “Control Mode = Off” from the main menu on the unit controller keypad display (refer to
OM 920, available on www.daikinmcquay.com, for details). This must be done prior to installing
a new communication module.
2. Remove power from the Unit Controller.
3. Remove the knockout on the far right side of the LONWORKS Communication Module (see Figure
4).
Note: To prevent damage to the LONWORKS Communication Module, insert a small screwdriver
or other tool to the tab on the bottom of the controller and pull the screwdriver or tool in the
direction away from the unit controller.
4. Insert the board-to-board connector into the LONWORKS Communication Module. It will only fit
one way. Note that baffles must line up with corresponding slots in LONWORKS Communication
Module and the unit controller (see Figures 4 and 5).
5. Connect the other end of the board-to-board connector to the far left of the unit controller.
IM 918-2
9 9
Page 10

Note: If the knockout on the unit controller is still in place, remove it using the same procedure as
with the LONWORKS Communication Module (see Figure 4).
6. Connect the LONWORKS Communication Module to the network (see Figure 2 for locations of
network connections).
a. Connect one wire of the network cable to Pin CLA of the connector plug.
b. Connect the other wire to Pin CLB of the connector plug.
6. Apply power to the Unit Controller.
7. The unit controller automatically resets approximately 20 seconds after it is powered up. This
reset is necessary so that the LONWORKS Communication Module is synchronized with the unit
controller.
Figure 4. LONWORKS Communication Module Knockout
IM 918-2
10 10
Page 11

!
WARNING
Electric shock hazard. Can cause personal injury or equipment damage.
This equipment must be properly grounded. Connections and service to the MicroTech III Air
Handling Unit Controller must be performed only by personnel knowledgeable in the operation of
the equipment being controlled.
Figure 5. Diagram of Board-to-Board Connector
Replacing an Existing LONWORKS Communication Module
Follow these steps to remove an existing LONWORKS Communication Module from the unit
controller and replace it with a new LONWORKS Communication Module.
1. Set the “Control Mode = Off” from the main menu on the unit controller keypad display (refer to
OM 920, available on www.daikinmcquay.com, for details). This must be done prior to replacing
a communication module.
2. Remove power from the Unit Controller.
3. Locate the LONWORKS Communication Module. It is situated to the left of the Unit Controller
(see Figure 1).
4. Pull the network cable connector from the LONWORKS Communication Module.
5. Grasp the LONWORKS Communication Module and carefully pull it from the Unit Controller.
6. Install the new LONWORKS Communication Module.
7. Insert the network cable connector into the LONWORKS Communication Module.
8. Apply power to the Unit Controller.
IM 918-2
11 11
Page 12

9. The unit controller automatically resets approximately 20 seconds after it is powered up. This
reset is necessary so that the LONWORKS Communication Module is synchronized with the unit
controller.
IM 918-2
12 12
Page 13

Integration
Integrating the LONWORKS Communication Module into a BAS involves three steps:
• Connecting the unit (node) to the network
• Addressing and establishing communications with the unit
• Configuring the unit to the building
Connecting to the Network
After you have connected the LONWORKS Communication Module to the Maverick I Rooftop Unit
Controller, you must connect it into the LONWORKS network. Each LONWORKS Communication
Module is equipped with an FTT-10A transceiver for network communications. This transceiver
allows for (1) free topology network wiring schemes using twisted pair (unshielded) cable and (2)
polarity insensitive connections at each node. Free topology segments require termination for proper
transmission performance.
Refer to Echelon LONWORKS FTT-10A Transceiver User’s Guide for details regarding acceptable
configurations, cabling requirements, terminations, and other requirements for proper connection of
the unit to the LONWORKS network.
Addressing and Establishing Communications
LONWORKS Network Addressing
Every Neuron Chip has a unique 48-bit Neuron ID or physical address. This address is generally used
only at initial installation or for diagnostic purposes. For normal network operation, a device address
is used.
Device addresses are defined at the time of network configuration. All device addresses have three
parts. The first part is the Domain ID, designating the domain. Devices must be in the same domain in
order to communicate with each other. The second part is the Subnet ID that specifies a collection of
up to 127 devices that are on a single channel or a set of channels connected by repeaters. There may
be up to 255 subnets in a domain. The third part is the Node ID that identifies an individual device
within the subnet.
A group is a logical collection of devices within a domain. Groups are assembled with regard for their
physical location in the domain. There may be up to 256 groups in a domain. A group address is the
address that identifies all devices of the group. There may be any number of devices in a group when
unacknowledged messaging is used. Groups are limited to 64 devices if acknowledged messaging is
used.
A broadcast address identifies all devices within a subnet or domain.
Commissioning the Network
To commission the device (i.e. LONWORKS Communication Module), press the service pin (see
Figure 3). Doing so generates a service-pin message, which is broadcast on the network and
contains the Neuron ID and the program code identification of the node.
Next, use a LONWORKS network configuration tool, such as LonMaker®, to map the device
Neuron ID to the domain/subnet/node logical addressing scheme when it creates the network
image, the logical network addresses and connection information.
External Interface File (XIF) and NXE Files
LONMARK guidelines specify exact documentation rules so that proprietary configuration tools are
not required to commission and configure LONWORKS devices. The LONWORKS Communication
Module is self-documenting so that any LONWORKS network management tool can obtain all the
information needed over the network to connect it into the system and to configure and manage it.
IM 918-2
13 13
Page 14

An external interface file (a specially formatted PC text file with the extension .XIF) is required,
along with LONWORKS network management tool, so that you can design and configure the device
prior to installation.
The NXE file contains the application image that is downloaded into the LONWORKS Communication
Module. The LONWORKS Communication Module uses a separate NXE file, depending on the
whether the unit is configured for the DAC or SCC functional profile.
The XIF and NXE files are available at www.daikinmcquay.com or www.lonmark.org. Refer to
MicroTech III Applied Air Unit Controller Protocol Information, ED 15112 for additional details.
Resource Files
Resource files contain definitions of functional profiles, network variables types, configuration
property types, and enumerations. Resource files are required for 1) displaying McQuay-specific
variables that are not included in the standard device profile or 2) switching from one device
functional profile to another (SCC to DAC or vice versa). The LONWORKS Communication Module
uses a separate set of resource files, depending on the whether the unit is configured for the DAC or
SCC functional profile. These files are available at www.daikinmcquay.com or www.lonmark.org.
Refer to ED 15112 for additional details.
Configuring the Unit Controller
The LONWORKS Communication Module typically does not require configuration. Refer to the
MicroTech III Applied Air Controller Operation Manual for additional information about using the
unit controller keypad display to set unit parameters and modify unit setpoints. Refer to ED 15112
for descriptions of the available LONWORKS variables.
IM 918-2
14 14
Page 15

Service Information
Description
Part Number
MicroTech III LONWORKS Communication Module Kit, Space
Comfort Controller (SCC). Kit includes communication
module, board-to-board connector, and Installation Manual.
090016711
MicroTech III LONWORKS Communication Module Kit,
Discharge Air Controller (DAC). Kit includes communication
module, board-to-board connector, and Installation Manual.
090016712
Test Procedures
If you can control the MicroTech III Air Handling Unit from the keypad, but you are unable to
communicate with it via the network:
• Check the network wiring.
• Check addressing.
- Activate the Service Pin on the LONWORKS Communication Module to send the service
message to the network.
- The service-pin message contains the Neuron ID and the program code identification of the
node.
Contact the Controls Customer Support group at 866-4MCQUAY (866-462-7829) for additional
assistance if necessary.
Parts List
Kit
IM 918-2
15 15
Page 16

This document contains the most current product information as of this printing. For the most current product
information, please go to www.daikinmcquay.com. All equipment is sold pursuant to Daikin McQuay Standard
Terms and Conditions of Sales and Limited Warranty
IM 918-2
16 16
 Loading...