

MNC-H200 USER'S MANUAL
Full HD Wi-Fi Network Camera

Before using this product...
www.mcnmate.com
Thank you for purchasing this product.
■ is the trademark of MCNEX Co. Ltd.
■ The model and services of this product are the trademarks of the owner.
■ MCNEX Co. Ltd. owns the copyright of this document.
■ Copying, distributing, reproducing or modifying any part of this document is prohibited without an official approval
of MCNEX Co. Ltd.
■ Before using this product, please register the product number attached on the back of the product warranty of this
manual as well as on the product for the best customer support and after services. On the website.
(If not registered, it requires the purchase receipt for seamless A/S.)
Important Notes
■ This manual has been produced as of today/the present (by current standards). Best efforts were put for
completeness and accuracy. However, there may be editorial errors or omissions, and there is no guarantee for this.
The responsibility for using this document entirely depends on the user.
■ Any change(s) in the product specifications or manual for improvement in the product performance may take place
without notice.
■ The images in this manual may look a little differently depending on the printer or a change in specifications.
■ We do not take any responsibility for loss or radio/TV interference caused by the user’s misusage or remodeling
of the camera out of its original purpose. Please be aware that you may be legally punished by‘the Private Act
and related statutes’if you intentionally record others.
■ This device as a home appliance (B grade), Electromagnetic compatibility device is mainly suitable for use in the
home and can be used in all areas. The radio/wireless equipment may cause a mixed radio signal so cannot
provide services related with life-saving.
Date of Publication: November 2014 Publisher: MCNEX Co. Led.
02

Table of Contents
01 Warnings and Cautions
02 Product Features
03 Parts of Product
04 Installation
05 Viewer Monitoring
06 Mobile Monitoring
06 Others
1. Safety Warnings
2. Safety Cautions
1. Product Features
1. Components
2. Names and Functions
1. Product Installation
2. Network Connection
1. Camera Registration
2. Live Video
3. Playback
4. Settings
1. Camera Registration
2. Live Video
3. SD Card Playing
4. Settings
1. Product Specification
2. Troubleshooting
3. A/S Guidelines
4. Warranty
03

01
Warnings and Cautions
1. Safety Warnings
The following precautions are to prevent unexpected risks or damage by using the product safe and correct /
correct use / the product.
The precautions are divided into two types,“Warning”and“Caution”, meaning as follows:
This graphic symbol is a symbol for attention on the operations and items that might cause a hazard. So, please
read and follow the instructions carefully to prevent any risk. If you do not follow the instructions, the user takes
!
all the responsibility.
!
!
Warning
Caution
If this sign is violated, it may cause a serious injury or death.
If this sign is violated, it may cause a minor injury or damage to the product.
05

1. Warnings for Safety
WARNING
!
■ Before using the product, please read the instructions thoroughly, and follow the operating guidelines and warnings
enclosed and indicated with this manual.
■ Do not touch the power cable with wet hands when plugging or unplugging. It can cause an electric shock.
■ Plug the power cable all the way in so that it’s not wobble, and do not use a damaged cable which can cause a
fire/electric shock.
■ Use the supplied power adapter only. Use of a unauthorized adapter may cause a damage to the product.
The power adapter must be used for home-rated power.
■ Install the product and power cable out of reach of children, and Place them away from infant beds or any other
children’s furniture. Install the power cable especially out of children’s reach.
■ This product has been designed for indoor use, not for medical purposes, and requires supervision of an adult.
■ Install the product in a well-ventilated place.
■ Do not touch any uninsulated, exposed part of the power adapter when plugging or unplugging.
■ Do not place the product or power cable near any hear sources.
■ Do not leave any sharp objects near the adapter cable to prevent cable damage.
■ This product is not intended to replace human supervisory ability of children.
■ This product does not have a function of immediately notifying adults of any unexpected and sudden movements of
children, so it requires a regular inspection and supervision management by staff.
■ Because this product as a Wi-Fi and Network product is used with transceivers of the antenna, keep the distance of
longer than 20 cm between the antenna of the product and the user to satisfy the RF exposure specifications.
■ Do not operate the product with wet hands. This may cause an electric shock or product malfunction.
06

2. Safety Cautions
CAUTION
!
■ Use genuine McnMate products and parts only. Using a non-genuine product or part can cause a product damage.
■ Make sure the Micro SD card turned off before inserting or taking it out.
■ If the storage space in the Micro SD card is full, the oldest video is automatically deleted. Therefore, keep important
recording files on a separate storage device.
■ When changing the mounting position of the product, the camera angle can be changed, so check the images after
mounting the camera and adjusting its angle. If it is attached to the wrong location, normal recording may not be done.
■ Keep the front of the lens clean.
■ The best temperature for its functioning is between -20 ~ +55℃. Keep this temperature to prevent any problem
especially in hot summer or cold winder.
■ Do not use the product in a place with high temperature or humidity.
■ Please contact the customer service immediately if you suspect a problem with the product or its function. Otherwise,
the symptoms may get worse, and you may not be able to get normal customer support.
■ This product record images using a camera, so the quality may depredate depending on the conditions.
The degradation of image quality may be caused by a large difference in the shades of the object, severe backlight
during daytime and in the middle of the night.
■ Do not clean the product with chemicals or detergents. Please wipe it gently with a soft cloth to prevent any color
change of the product case.
■ Keep the product and cables from dust. Dusk can cause the product malfunction or error.
07

02
Features

Features
■ Clear Video Recording
Sony Exmor sensor provides clear images.
■ High Definition Video Recording
FHD (1920x1080) provides high-quality images of 30 fps.
■ Remote Monitoring
Wherever the Internet connection is available, remote monitoring is available on any smart phone device (Android, iOS) or PC.
■ Real-time Alarm
As motions and sounds are detected, real-time alarming is sent to your smartphone.
■ Two-way Audio
A built-in microphones and speaker enable communication in both directions.
■ SD Card Storage
When an event occurs, the real-time images can be stored on the SD card inserted in the product.
■ IR LED
IR LED can be used to enable monitoring objects in low light.
■ Easy Installation
The product can be installed without any additional setup program at the website www.smartiview.com, and the images
can be monitored through the Web viewer.
09

03
Parts of Product
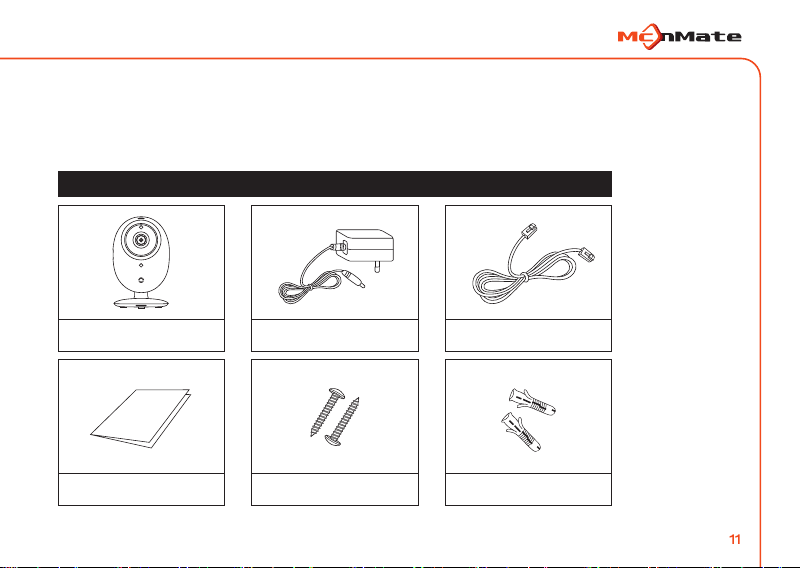
1. Components
■ Make sure the components as shown in the pictures below are all included.
(Contact your dealer if something is missing.)
■ The components of this product are subject to change without notice for improvement of product
performance or quality.
■ Please download the manual and VMS program from www.mcnmate.com.
Components
Main body
Quick Guide
Adapter
Tapping screws
Network cables
Plastic anchors
11
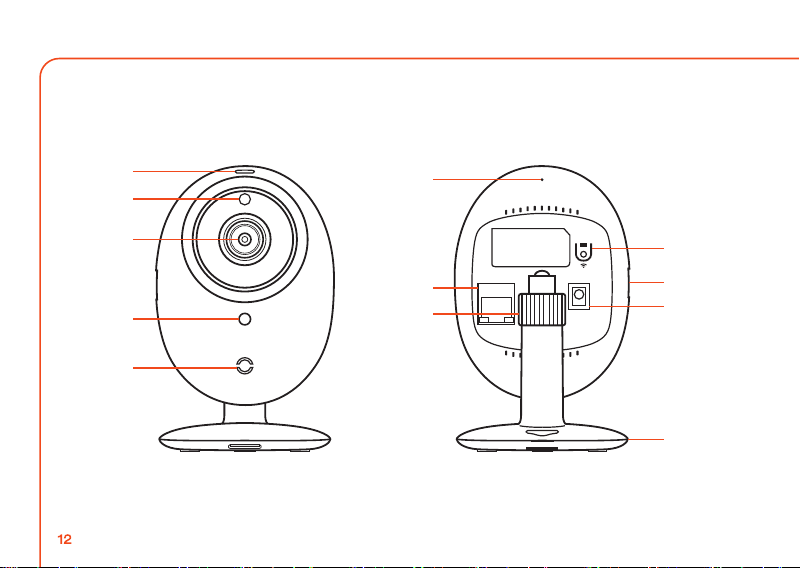
2. Names and Functions
■ Main body
①
⑥
MIC
②
③
④
⑦
⑫
NETWORK
RESET
DC IN 5V
⑧
⑨
⑩
⑤
⑪
12

2. Names and Functions
■ Main body
① Power / Network status LED
② Ambient light sensor
③ Camera lens
④ High-intensive IR LED
⑤ Speaker
⑥ Microphone
⑦ Network connection port
⑧ WPS / Reset button
⑨ Micro SD card slot
⑩ Power connection port
⑪ Mounting bracket
⑫ Angle-adjustment nut
Indicates the operating (power / network) status of the product.
Switches to night-vision mode depending on the brightness detected around the camera.
Record the front
Built-in IR LED for night time
Outputs the audio transmitted from outside using the built-in speaker.
Inputs audio using the built-in microphone.
Used for wired network connection (PoE power available)
1 second: pairing the camera with a wireless router
10 seconds: reset to the factory condition of the camera settings
Insert / take out the Micro SD card (note the insertion direction)
Power cable port
Used for desk, wall or ceiling installation
Fix the recording position after loosening the screws and securing / tightening direction.
13

04
Installation
1. Product Installation
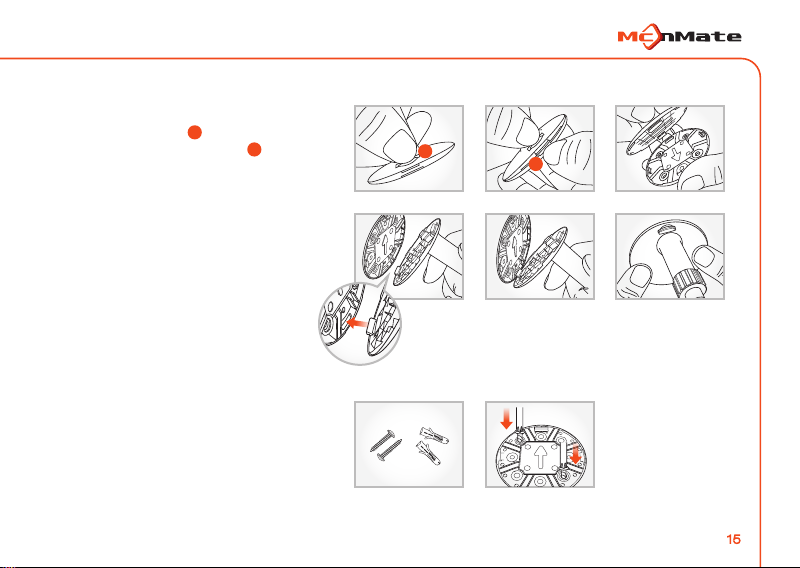
1. Wall-mounting with screws
■ Remove
Holding the hook on the back of the
bracket body, open the gap below it
to separate the bracket body and mount.
■ Assembly
After aligning it to the right direction, first
set the hole on the opposite of the arrow
on the bracket mount with the hook on
the bracket body, and then push to
complete the assembly.
■ Installation
Get the screw (M3 x 20) and
1)
the anchor (Ø 5 x 25) ready.
If the wall is wooden, place the arrow
2)
toward 12 o’clock of the bracket mount
on the wall, chose one of the four holes
and fix the screws into the two holes
(in diagonal direction) with a screwdriver.
A
B
A
B
15

1. Product Installation
If the wall is concrete, first place the bracket
3)
mount with the arrow pointing at 12 o’clock
and mark two (in diagonal) of the four holes
as shown in the illustration.
4)
Drill with a 6 mm concrete bit into the depth
of about 3 cm. Remove the scrapings in the
holes.
DRILL
Be careful of an injury when drilling.
5)
Insert the anchors in the two holes and hit
them lightly with a rubber hammer to insert
them to the wall.
6)
Fix the screws into two holes with a
screwdriver.
16
When the installation is complete,
remove the protective plastic on the lens.
1. Product Installation
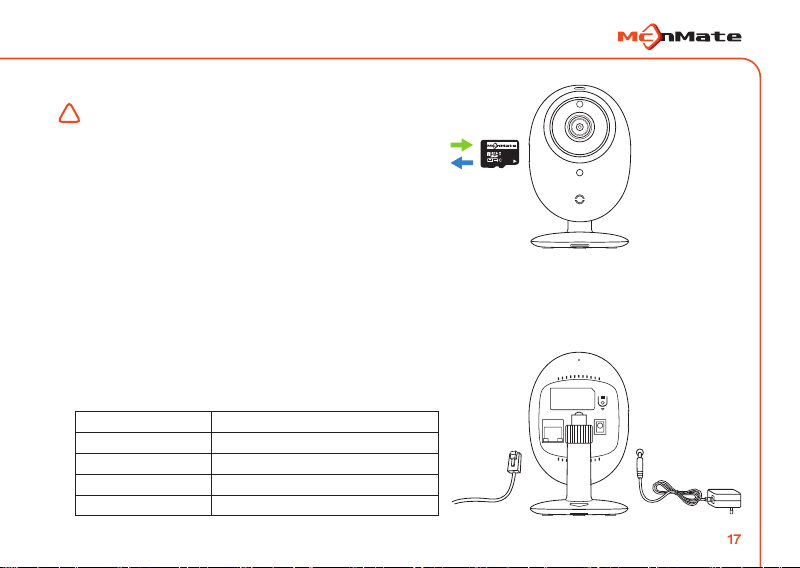
2. How to insert / remove Micro SD card
Cautions in the use of the Micro SD card
!
- It is recommended to regularly inspect or replace the
Micro SD card (formatting it every fortnightly recommended).
- When removing the card from the product, make sure the
power is turned off. If you remove the card with the power on,
it may cause an error or failure.
- Inserting the card too hard or in the other direction may cause
a damage to the card.
- The capacity of the Micro SD card is up to 32G.
3. Power connection
■ Plug the power adapter into a wall outlet and connect the camera with the power and network cables
as shown in the picture.
- Use the supplied power adapter only. Using an adapter other than specified may result in the malfunction of the product.
- It takes about 1 minute for the camera to completely turned on.
- Once the camera is completely on, the red light flashes and then stays on.
4. Network connection
■ Connect the network cable with the network connector
on the camera as shown.
Red
Flashing red(500ms)
Green
Flashing green(200ms)
Purple(red+green)
Loading complete/Network not connected
Network connected/Normal operation
Loading
WPS on
Upgrading firmware
Insert
Remove
l0
MIC
RESET
DC IN 5V
NETWORK
17
2. Network Connection
5. Network connection and settings
Cautions
!
- The wireless network connection may fail depending on the communication conditions, and network delay or interruption may occur
depending on the network conditions.
- The father it is from the wireless router, the longer the connection takes.
- Do not access to unauthorized network. Services may not be provided for certain Internet services that require user authentication.
In this case, contact your service provider.
- Contact your network administrator or service provider for network settings and password in more detail.
- Refer to the router manual or contact the router manufacturer for router or wireless connection in more detail.
- Some routers may have a compatibility problem.
- If the camera is installed on a network environment with multiple wireless connections, some image packets may be lost according
to the network traffic load.
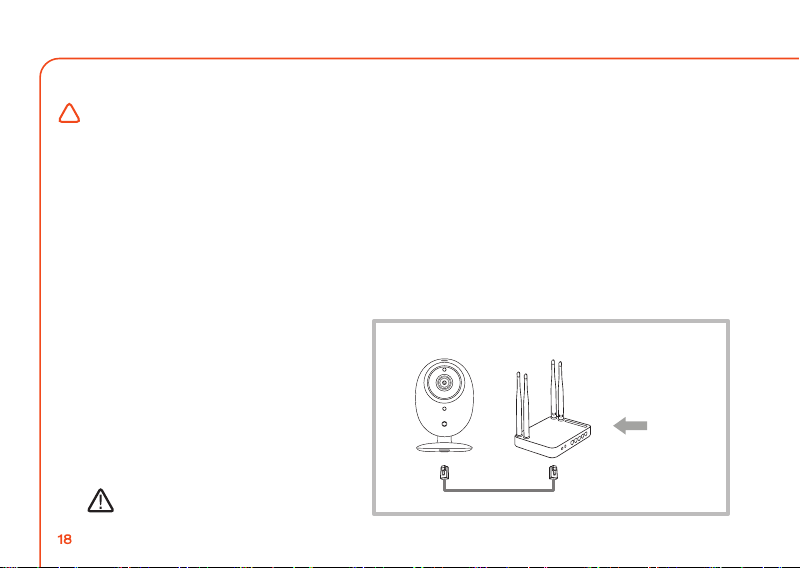
1) Network Cable Connection
If you do not have a wireless router, the camera
can be connected directly to the router using a
network cable.
① When the power is connected,
the red light comes on; when it’s complete,
the green light flashes.
② Connect the camera and the router with a
network cable.
③ When the network is properly connected,
the green on the LED status indicator stops
flashing. If not, repeat from step ②.
Using the router set to DHCP (Dynamic Host
Configuration Protocol) server recommended.
18
Wireless router
Internet
services
2. Network Connection
RESET
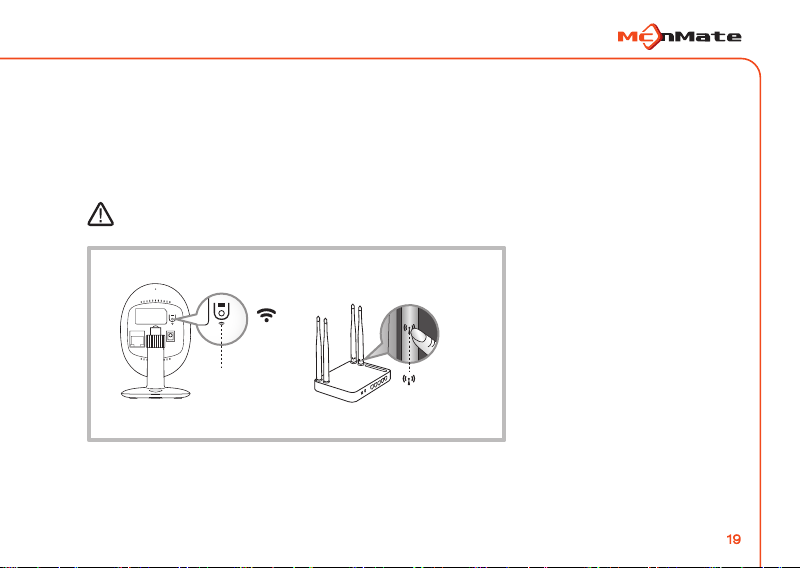
2) WPS Connection
Using the WPS function with a single push of a button, you can connect the camera to your wireless router.
① When the power is connected, the red light comes on; when it’s complete, the green light flashes.
② Press the WPS button on back of the camera and hold it for one second. Then, press the WPS button
on the wireless router within two minutes.
③ When the network is properly connected, the green on the LED status indicator stops flashing. If not,
repeat from step ②.
Available only with a wireless router that supports WPS.
MIC
RESET
DC IN 5V
NETWORK
WPS button
Wireless router
WPS button
19

2. Network Connection
3) Wi-Fi Connection without WPS
To connect to a wireless router without WPS, change the network settings to‘wired’and try wireless network.
① When the power is connected, the red light comes on; when it’s complete, the red light flashes.
② Connect the camera and the router with a network cable.
③ Register and select the camera as described in the Web Monitoring Site on page 21.
④ Set up the wireless network as described in the Wireless Network Settings on page 29. When the network is
properly connected, the green on the LED status indicator turns on.
⑤ When the wireless network setting is completed, remove the network cable.
Wireless router
Internet
services
20

05
Viewer Monitoring

1. Camera Registration
If you register the product on the website, you can monitor the video on your PC.
1. Web Browser Requirements
■ Supports Windows 7 and 8
- Internet Explorer 9 or later
2. Starting
1) Launch a web browser on your PC.
2) Access to www.smartiview.com.
3) Select your language.
4) Only for the first time, click on“Start Smartiview”to sign up and register your camera.
And then, log in with your ID and password and enter the Web Viewer.
Customer serviceProduct Info KoreanLog in
Go to Smartiview
ID
PASSWORD
Remember ID
Forgot ID / PASSWORD
Start Smartiview
You can sign up and register
your camera at once.
22
iOS / Android / Real-time Web Monitoring
Tow-way talk with family
Clear images even at night time!!
Download Viewer
Android
iOS
Hanshin IT Tower 2 (5F–8F, 10F–12F), 47, Digital-ro 9-gil, Geumcheon-gu, Seoul, Korea
TEL : 02-2025-3600 I FAX : 02-2025-3610
LOG IN
Start

1. Camera Registration
■ Install ActiveX
You have to install this program to search for your network-connected camera and view its images.
■ If you log in on a PC without this program installed or click on“Start Smartview,”
an installation window pops up.
The additional function of‘CameraServer’distributed by HS Networks Co,Ltd. is being installed on this website. Risk(W)
① Click Install. ② Click Install.
Do you want to install the software?
Name:
Posted by:
Other options(O)
This file format can damage a user’s computer. Please install the software
posted by a reliable source ONLY. Risk
Install(I)
Security Warning
Install(I) Do Not Install(D)
23

1. Camera Registration
5) Enter the required information and click on“Sign up.”
Customer serviceProduct Info KoreanLog in
Start Smartiview
You have to sign up and register your camera to use Web Viewer.
Sign up Register your camera Complete
These are all required fields.
ID
ㆍ
Password
ㆍ
Confirm Password
ㆍ
Name
ㆍ
Email Address
ㆍ
I agree to the Terms of Service.
I agree to use of personal information.
Sign up Cancel
■ Use letters, numbers and special characters in your ID and password for security.
■ Restricted passwords - same as ID, three or more consecutive characters or numbers (e.g. 123 and abc)
and three or more same characters, numbers or special characters (e.g. 111, aaa and $$$)
■ Enter your password exactly since your email address will be used when you forget your ID or password.
24
6 - 12 digits and alphanumeric
6 - 12 combination of alphanumeric and digits

1. Camera Registration
6) Connect the camera to the power and the network cable. If the status indicator turns green, click“Next.”
Customer serviceProduct Info KoreanLog in
Start Smartiview
You have to sign up and register your camera to use Web Viewer.
Sign up Register your camera Complete
Check the camera power adapter and network cable and then connect them as shown below.
Connect the power adapter to
the camera power socket.
Flashing Red → Red
(takes about 40 seconds)
Connect the network cable
to the camera and router.
Next
The LED indicator lamp turns green
(takes about 10 seconds)
25

1. Camera Registration
7) Select the product serial number (S/N) from the search list of cameras.
If the camera is not detected, enter its S/N in the field.
8) Click on“Next.”
Start Smartiview
You have to sign up and register your camera to use Web Viewer.
Sign up Register your camera Complete
Check the serial number in the list of cameras and select the camera to be registered.
The camera is automatically searched if the camera and PC are connected on the same network.
A list of cameras found
S21AA00001T
Customer serviceProduct Info KoreanLog in
26
Serial Number
Enter the product S/N here if the camera is not detected.
The S/N is on the back of the product.
NextPrevious

1. Camera Registration
9) Create a name and password for your camera.
10) Click on“Next.”
Start Smartiview
You have to sign up and register your camera to use Web Viewer.
Sign up Register your camera Complete
Enter the camera name and password for camera security.
Customer serviceProduct Info KoreanLog in
Camera Name
ㆍ
Camera Password
ㆍ
Confirm Password
ㆍ
E.g. Lounge
A combination of 3-8 alphabetic,
alphanumeric and digits.
NextPrevious
27

1. Camera Registration
11) When the registration is complete, and a wireless network pop-up window appears, click“Yes.”
If you click“No,”wired network monitoring is possible. Go to step“14).”
Wireless network setting can be done in the Web Viewer setting.
Customer serviceProduct Info KoreanLog in
Start Smartiview
You have to sign up and register your camera to use Web Viewer.
Sign up Register your camera Complete
Enter the camera name and password for camera security.
28
Camera Name
ㆍ
Camera Password
ㆍ
Confirm Password
ㆍ
Camera registration is now complete.
Would you like to set the
camera’s wireless network?
Yes No
NextPrevious
E.g. Lounge
A combination of 3-8 alphabetic,
alphanumeric and digits.

1. Camera Registration
12) When the registration is complete, and a wireless network pop-up window appears, click“Yes.”
If you click“No,”wired network monitoring is possible.
Customer serviceProduct Info KoreanLog in
Start Smartiview
You have to sign up and register your camera to use Web Viewer.
Sign up Register your camera Complete
Select your wireless network and enter the password of the router.
AP Connected
ㆍ
Password
ㆍ
Other Wi-Fi Network (Set a wireless network not in the list).
Security Type
ㆍ
Network SSID
ㆍ
Password
ㆍ
iptime12
○ Open ◎ WEP ○ VGA ○ WPA/WPA2 PSK
Next
■ If you do not see the wireless network to set up, select“Other Wi-Fi Network (Set a wireless network
not in the list)”and enter the required fields.
29

1. Camera Registration
13) Remove the network cable from the router and camera.
14) When the“Complete”button is on, click it.
Start Smartiview
You have to sign up and register your camera to use Web Viewer.
Sign up Register your camera Complete
When the network cable between the router and camera is removed and complete button activated, click“complete.”
Removing the network cable
from the camera.
30
Customer serviceProduct Info KoreanLog in
NextPrevious

1. Camera Registration
15) Upon successful registration, you see a screen that looks like this below, and you can check the cameral in the list.
Log out ㅣ Personal Information
Camera List
Lounge
Main Bedroom
Add a Camera
31

2. Live Video
1) Select the camera from the camera list on top-left.
Log out ㅣ Personal Information
Camera List
Lounge
Main Bedroom
Add a Camera
■ Since any Inactivated camera in the list are not functioning, it can not be monitored.
2) Live video screen appears.
32

2. Live Video
Camera List
1
2
3
5
7
Lounge
Main Bedroom
Add a Camera
Log out ㅣ Personal Information
6
4 6 7 8 9 10 11 12
13
14
33

2. Live Video
Title Description
① List of Cameras
② Add a Camera
③ Adjust Speaker
④ Adjust Microphone
⑤ Speaker
⑥ Microphone
⑦ Stream
⑧ Navigation Key
⑨ Zoom In
⑩ Zoom Out
⑪ Mirror
⑫ Flip
⑬ Save Image
⑭ Save Video
⑮ Night Vision
16
WDR
34
You can see the live images, if you select a camera.
You can add a camera.
You can adjust the volume of the built-in speaker of the camera.
You can adjust the volume of the built-in microphone of the camera.
You can turn on or off the audio of the viewer.
You can turn on or off the microphone. Microphone is used for two-way voice communication.
You can select FHD / HD / VGA MJPEG stream.
The screen moves to the arrow direction if you click it. (This functions in Zoom In,)
You can go back to the original screen by clicking“Back”in Zoom In / Zoom Out. Same
when you place the cursor on the screen and move by holding the left button of the mouse.
You can zoom in by clicking this, up to 10 times.
You can zoom out by clicking this.
You can change the image orientation from left to right or vice versa.
You can change the image orientation from up to down or vice versa.
You can save the live images in a single image file. The saved location is My PC / My photos.
You can save the live images in a video file. The saved location is My PC / My Videos.
If set to Auto, when it’s dark, the images are automatically converted to black and write,
and the IR lighting functions. If set to Off, it is not converted to Auto vision, so the images
are still in colors.
This is a function that makes a dark place brighter and a bright place dark.
You can use this function when installed toward a gate or window.

3. Playback
Sun Mon Tu e We d Thu Fri Sat
Log out ㅣ Personal Information
1
5
2
3 7
4
6
Continuous Recording Event Recording
8
9
35

3. Playback
Title Description
① Date
② Timeline
③ Play / Pause
④ Stop
⑤ Skip File
⑥ Skip Frame
⑦ Audio
⑧ Type
⑨ Type Bar
36
Searches the data on the SD card by date.
Dates with data are activated only.
Shows the playback progress.
Plays or pauses the video.
Stops the playback of the video.
Moves to the previous or next file.
Moves to the previous or next frame.
Adjusts the audio volume of the current video.
Sets the event type to search in a specified period.
Shows status by type of a specified search period.
Blue: Continuous recording, Green: Event recording

4. Configuration
If the SD card is full, the oldest video is automatically deleted.
Serviceable/All 3GB/16GB
Change
Change
Apply
Format
Serial Number
Camera Password
Camera Name
Firmware
Version
Current Version
Latest Version
xxxxxxxxxx
xxxxxxxxxx
Lounge
S21AA00001T
FHD HD VGA
Setting the Recording Schedule
Time Settings
Network
Motion Zone/Alarm Settings
Privacy Zone Settings
Basic Configuration
Continuous recording first
1. Basic Information
Basic Configuration
Installation environment
Scene
Log out ㅣ Personal Information
1
2
3
4
5
SD card Management
SD Card Status
Partition Settings
Recording Quality Settings
6
7
8
37

4. Configuration
1. Basic Information
Title Description
① Serial Number
② Camera Password
③ Camera Name
④ Firmware Version
⑤ SD Card Status
⑥ Partition Settings
⑦ Recording Quality Settings
⑧ Type
■ The camera reboots after the firmware update.
■ Do not turn on the power while updating. Otherwise, it may not function properly.
■ Wired network connection is recommended for the firmware update.
■ The time of the firmware update depends on the file size and network connection.
38
Check the product serial number.
You can change the camera password by clicking“Change.”
Change the password by entering the existing password and a new combination of
3~8 alphanumeric and clicking“Apply.”
You can change the camera name by clicking“Change.”
Enter a new name and click“Apply.”
You can check the current and recent version of the camera software.
If the software needs a new version, the download icon is activated,
and you can start updating by clicking this icon.
You can format the SD card.
You can set the capacity of the SD card by recording type.
Priority of continuous recording: Continuous 70% and Event 30%.
Priority of event recording: Continuous 50% and Event 50%.
Set the quality of the images to be saved on the SD card.
Set the type of the event to be searched in the search period.

Delete All
Apply
○ Continuous Recording
◎ Event Recording
4. Configuration
Setting the Recording Schedule
Time Settings
Network
Motion Zone/Alarm Settings
Privacy Zone Settings
Basic Configuration
Mon
Tue
Wed
Thu
Fri
Sat
2. Setting the Recording Schedule
■ Select the continuous recording or event recording and then select a time to record the time and
set the alarm.
① Continuous Recording
② Camera Password
③ Delete All
Log out ㅣ Personal Information
Setting the Schedule
Sun
Item Description
Records the images during the set time on the SD card.
Records the images of before and after 10 seconds before and after the accident.
Delete all of the selected.
1
2
3
39

4. Configuration
Save
Time Zone
● Automatic
● Computer time
Date :
Time :
● Assign value
Date :
Time :
NTP server
Update interval
Display the time
Setting the Recording Schedule
Time Settings
Network
Motion Zone/Alarm Settings
Privacy Zone Settings
Basic Configuration
Osaka, Sapporo, Tokyo, Seoul, Yakutsk
3. Time Settings
① Time Settings
② Time Zone
③ Auto
④ Computer Time
⑤ User Settings
⑥ Display the time
40
Log out ㅣ Personal Information
Setting time
Title Description
Shows the set time of the camera.
Select a region.
The server time is applied to you PC.
The time of the PC using the monitoring is applied.
You can directly input the time.
Overlaid on the camera images.
1
2
3
4
5
6

4. Configuration
◎ Wired network
IP Address
Subnet Mask
Default Router
● Fixed IP Address
○ Wired network
● Auto IP Address
Setting the Recording Schedule
Time Settings
Network
Motion Zone/Alarm Settings
Privacy Zone Settings
Basic Configuration
4. Network (Wired)
Log out ㅣ Personal Information
Advanced Settings
Save
Title Description
① Auto IP Address
② Manual IP Address
③ Advanced Settings
When selected, the IP address is assigned automatically.
You have to enter the IP address, subnet mask and gateway.
Manual settings enables ideas on the manual IP address.
■ When the camera is connected to both the wired and wireless network, the wired network is priotized.
■ Connecting from wireless to the wired can convert it into the wired.
■ If the manual settings are incorrect, the network settings are not applied.
1
2
3
41

4. Configuration
◎ Wired network
IP Address
Subnet Mask
Default Router
Primary DNS
Secondary DNS
HTTP Port
RTSP Port
○ Wireless network
Setting the Recording Schedule
Time Settings
Network
Motion Zone/Alarm Settings
Privacy Zone Settings
Basic Configuration
4. Network (Wired, Advanced Settings)
42
Log out ㅣ Personal Information
HTTP
RTSP Streaming
Save

◎ Wired network
○ Wireless network
AP Connected :
4. Configuration
Setting the Recording Schedule
Time Settings
Network
Motion Zone/Alarm Settings
Privacy Zone Settings
Basic Configuration
Wireless network Names(SSID)
Security
Sign
4. Network (Wireless)
Log out ㅣ Personal Information
1
2
Other WiFi Network(Set the wireless network not in the list.)
Security Type
Network SSID
Password
Item Description
① AP Connected
② AP List
③ Hidden SSID
Shows wireless network already set.
Displays a list of available Aps (Access Point). When you select an AP you want,
enter the password in the pop-up field.
In this case, enter SSID name and password.
■ For open Aps, no password is required. If you fail to enter the password to a secured AP,
you can access to network.
3
43

4. Configuration
You can drag the mouse to create up to three zones.
Detect Motion
Sensitivity
Detect Audio
Push Alarm
Google Drive
E-mail Alarm
Setting the Recording Schedule
Time Settings
Network
Motion Zone/Alarm Settings
Privacy Zone Settings
Basic Configuration
5. Motion Zone / Alarm Settings
Motion Zone Settings
Log out ㅣ Personal Information
Delete All
1
Title Description
① Delete All
② Detect Motion
③ Detect Audio
④ Push Alarm
⑤ Google Drive
⑥ Email Alarm
44
Set the alarm sensitivity.
4
5
6
Alarm Settings
Setting
Setting
Save
2
3
Deletes all the set motion jones.
Activates and sets the motion detector. Higher motion sensitivity makes more motions detected.
Activates and sets the audio detector. Higher the motion sensitivity makes more audio detected.
Provides a push alarm service on the Web Viewer or mobile app with the camera registered.
When an event occurs, an alarm is saved on Google Drive.
Sends an alarm event to the set email address.

4. Configuration
5. Motion Zone / Alarm Settings
1) Configure Google Drive
2) Set the Email Alarm
45

4. Configuration
Privacy Zone On
Setting the Recording Schedule
Time Settings
Network
Motion Zone/Alarm Settings
Privacy Zone Settings
Basic Configuration
6. Privacy Zone Settings
Title
① Privacy Zone On
② Delete All
46
Log out ㅣ Personal Information
Privacy Zone Settings
You can drag the mouse to create up to four zones.
Save
Delete All
Description
Activates the privacy zone settings
Delete everything related with the privacy zone.
1
2

06
Mobile Monitoring

1. Camera Registration
Remember ID
Auto log in
Forgot ID / PASSWORD
Start Smartiview
Sign up
ID
6 -12 combination of alphanumeric and digits
6 -12 combination of alphanumeric and digits
PASSWORD
Name
E-mail
Sign up
Next
Next
Serial Number
Connect wireless network
Select the wanted wireless network
and enter the router’s password.
If no camera is found, enter the model No.(S/N) in person.
- It can be directly monitored through a mobile app, using a mobile device.
- Download an app (keyword:“MCNEX,”Smartiview) from the Play store and install it on your mobile device.
1. Device specification
■ Android 4.0/4.1/4.2/4.3/4.4
2. Start
1) Install and start the downloaded app.
2) Click“Start Smartiview”. Then, join the membership and upload the camera.
After signing in on a web viewer or mobile, log in and enter the mobile viewer with your ID and password.
Camera Registration
48
ID
PASSWORD
■ The camera registration is handled after connecting the power with the network (state LED: Green).
LOG IN
① Click“Smartiview”.
② Enter your ID, password,
name and email and click
[JOIN THE MEMBERSHIP].
③ Select the WiFi to be
connected with a camera
and make a connection.
④ Enter the serial No. on the
back of the camera and
click NEXT.

1. Camera Registration
Camera Registration
Camera Name
Camera Password
6 -12 combination of alphanumeric and digits
Complete
Live Viewer
Camera Registration
Camera List
Live Viewer
Camera Registration
Camera List
2.Camera Name
3.Camera Name
4.Camera Name
E.g. Lounge
E.g. Lounge
⑤ Enter the camera’s model number
and password and click NEXT.
⑥ Select one on the list of cameras
and put it into the page below.
Then, a video appears.
⑦ If a wanted image is double-touched,
a single image appears.
49

2. Live Video
1 2
3
4
5 6 7 8 9 10
① Camera model No.
Title Description
② Conversion into Split Images
③ Regeneration of SD card
④ Live video
⑤ Speaker
⑥ Microphone
⑦ HD
⑧ Capture
⑨ Photography
⑩ Environment setting
⑪ Viewer page
50
The camera’s model No. appears.
The page is divided into four sections.
The images saved in the SD card are seen.
The camera’s live video is played.
Turn on/off the viewer audio.
It turns on/off the viewer’s microphone.
Select the quality of the image.
During monitoring, still image videos are stored.
During monitoring, images are stored (10 seconds).
The camera’s environmental setting is determined.
A user can expand the images and move them to the up and down and left to the right.

3. SD Card Playing
Delete All
Delete All
Event
Continuous
- If PLAY SD CARD is pressed on the live page, a list of the recorded images in the card appears.
- If an item is double-clicked, it is played.
- To delete the recorded image(s), click DELETE ALL or select the image to delete and hold for few seconds.
[List of continuously recorded images] [List of the recorded images by event]
Title Description
① Skip Frame
② Play / Pause
③ Skip Frame
④ Capture
Move to the previous frame from the current file.
Play / pause the image.
Move to the next frame from the current file.
Save the still image.
1 2 43
51

4. Settings
4.Camera Name
Cancel
Application
Settings
Camera Model No.
Speaker
Microphone
Record Quality
Night Vision
WDR
Motion Detection
Audio Detection
Time Display
Time Setting
Network Setting
System Setting
- If SETTINGS is click on the live page, the camera functions can be set.
52
Setting
Setting
Setting
1
2
3
4
5
6
7
8
9
10
11
12
Display Description
① Camera Model No.
② Speaker
③ Microphone
④ Record Quality
⑤ Night Vision
⑥ WDR
⑦ Motion Detection
⑧ Audio Detection
⑨ Time Display
⑩ Time Setting
⑪ Network Setting
⑫ System Setting
Camera Model No. appears.
The speaker volume is adjusted.
The microphone volume is adjusted.
The quality of the images recorded
in the SD card is set.
Select either AUTO or OFF (click).
Select either ON (click) or OFF.
Select either ON (click) or OFF.
Select either ON (click) or OFF.
Time is displayed with overlapped
on the image.
Time is set.
Select the WiFi to be connected with
the camera and connect.
Set firmware update and SD card.

07
Others

1. Product Specifications
1. Product Specifications
Item Specification
Resolution
Max Frame
Video Compression
Simultaneous
Transmission
Low Light
WDR
DNR
Day & Night
Night Vision
Angle of View
Digital Zoom
Flip / Mirror
Motion Detection
Audio Detection
Audio Compression
54
1920x1080, 1280x720, 640x360
1080p@30fps
H.264, MJPEG
Multi-Streaming(Up to 5Profiles)
0.1Lux(Color), 0lux(B/W)
Support
3D DNR
True D/N Filter
IR-LED, 5m
128°/ 106°/ 58°
Mobile: 4x, Web Viewer: 10x
Support
Support
Support
G.711, G.726
Item Specification
Audio Communication
Memory Slot
Save & Playback
(Built-in Microphones & Speaker)
Micro SD(FAT32) Up to 32GB
Event Recording/Manual Recording
Ethernet
Wireless
Maximum Users
Temperature for Use
Power Supply
Power Consumption
Status Indicator
Dimensions(WxHxL)
Weight
Color
2-Way Audio
Continuous Recording/
Remote Playback
RJ-45(10/100BASE-T)
Wi-Fi 802.11 b/g/n(2.4G)
5 Users
-20℃ ~ +55℃ / 90% RH
DC 5V / 1.5A
Max 4.5W
1LED(Power / Link)
73 x 98 x 44mm
123g
White / Black

1. Product Specifications
■ Dimensions
71.0mm[2.8”]
73.0mm[2.9”]44.3mm[1.7”]
98.0mm[3.9”]
117.0mm[4.6”]
72.0mm[2.8”]77.0mm[3.0”]
55

2. Troubleshooting
Problem Action
I’ve forgotten my ID and password.
I’ve forgotten my camera password.
I can’t connect the camera to the
wireless connection.
I can’t register my camera.
I don’t hear anything from the video.
The camera images temporarily lose vision.
56
Click“Forgot ID/PASSWORD”on the log in page.
Press the RESET button in the back of the camera and hold it for
about ten (10) seconds for initiation. Then, reset the system.
Check if the wireless router and the camera are located too far away.
Install them close to each other and try connecting them again.
Press the reset button on the back of the product and regenerate
the password.
Check the audio icon and volume on the viewer page and turn
them on.
Check if the camera is installed where the wireless communication
is normally working.

3. A/S Guidlines
Location Address and Contact Number
Headquarter Level 11, Hanshin Tower 2, 60-18 Gasan-dong, Geumcheon-gu, Seoul, Korea / TEL: 1688-8811
Free Services
Type of Consumer Damage
A major problem taken place within
10 days after purchase
Performance or functional problem
taken place on a normal operation
within 1 month after purchase
Up to 3 times with the same problem
More than 4 times with the
same problem
Different problem for the 5th time
If the manufacturer loses the product
requested for repair
Repair parts available but not
possible to repair (within the part
ownership period).
Repair parts not available so not
possible to repair (within the part
ownership period).
※ Failure within 1 year (the warranty period) after purchase can get free
services only. When the product is used for a commercial purpose,
the warranty period is reduced by half.
Compensation
Within the Warranty
Period
Product Replacement
or Refund
Free Repair
Free Repair
Product Replacement
or Refund
Product Replacement
or Refund
Product Replacement
or Refund
Product Replacement
or Refund
Product Replacement
or Refund
After the warranty
period
NA
NA
Paid Repair
Paid Repair
Paid Repair
Return of 10% added
to the original price
of the product
Return of 10% added
to the original price
of the product
Return of 10% added
to the original price
of the product
Paid Services
A service requested,
but not a failure
Product failure
due to the
consumer’s
negligence
Others
※ You have to pay if the service requested is not a break-down.
So, please read the manual.
When a simple adjustment is made without the
manual or disassembly
When removing dust off the inside of the product
When the failure occurs due to inappropriate handling
or wrong repair
When the failure occurs by a person other than the
authorized service man from the company
When the failure occurs by an item or option,
not provided by the company
When broken down or damaged by it being
dropped to the ground
When the product is disassemble intentionally
In the event of failure due to natural disasters
(e.g. lightning, fire, salt and water).
When used in a shock voltage which can not be protected.
When the life of consumable parts is due
57

4. Product Warranty
Product Warranty
1. This product has been subjected to strict quality management and inspection.
2. Warranty Period: 1 Year from the date of purchase. (If the purchase date cannot be confirmed, the warranty period is counted from 3
months after the date of manufacture.)
3. When requesting a major repair within 10 days after purchase: Exchange or free services.
4. Within the Warranty Period: Free repairs
5. After the Warranty Period: Paid repairs
●
Free services are only offered for errors that occur on a normal operation.
●
Unspecified issues follow the ‘consumer dispute resolution criteria of the Fair Trade Commission.”
●
For the following cases, paid repairs are provided even within the warranty period.
- Natural disasters (fire, lightning, wind and water damage, etc.)
- When the breakdown has occurred by careless use (fall, immersion, shock, damage or unreasonable behavior).
- When the broken power and connection devices are repaired at a center other than the authorized service center.
- When the warranty has been lost, there’s no seal by the sales person or some notes have been changed.
Product DIR Model MNC-H220
Manufacture Number
Customer
Sales Shop
※ If a problem occurs on this product, please check the user’s guide and then contact our A center.
Level 11, Hanshin IT Tower 2, 60-18 Gasan-dong, Guemcheon-gu, Seoul, Korea
TEL : 1688-5889 / www.mcnmaet.com / www.mcnex.com
58
Name
Address
Branch
Address
Date of Purchase Year Month Day
Contact Number
Contact Number
Sales Person (Sign)

FCC Information to User
This equipment has been tested and found to comply with the limits for a Class B digital device,
pursuant to part 15 of the FCC Rules. These limits are designed to provide reasonable protection
against h armful inter ference in a residential installation. This equipment generates, uses and can
radiate radio frequency energy and, if not installed and used in accordance with the instructions,
may cause harmful interference to radio communications. However, there is no guarantee that
interference will not occur in a particular installation. If this equipment does cause harmful
interference to radio or television reception, which can be determined by turning the equipment
off and on, the user is encouraged to tr y to correct the interference by one or more of the
following measures:
—Reorient or relocate the receiving antenna.
—Increase the separation between the equipment and receiver.
—Connect the equipment into an outlet on a circuit different from that to which the receiver is
connected.
—Consult the dealer or an experienced radio/TV technician for help.
This device complies with Part 15 of the FCC Rules. Operation is subject to the following two
conditions: (1) this device may not cause harmful interference, and (2) this device must accept any
interference received, including interference that may cause undesired operation.
Any changes or modifications not expressly approved by the party responsible for compliance
could void the user's authority to operate this equipment.

IMPORTANT NOTE:
FCC RF Radiation Exposure Statement:
This equipment complies with FCC radiation exposure limits set for th for an uncontrolled
environment. This equipment should be installed and operated with minimum distance 20cm
between the radiator & your body.
This transmitter must not be co-located or operating in conjunction with any other antenna or
transmitter.

MNC-H200 USER'S MANUAL
Full HD Wi-Fi Network Camera
 Loading...