

Page 1

HR085 Learning Guide
McIntosh Laboratory, Inc. 2 Chambers Street Binghamton, New York 13903-2699 Phone: 607-723-3512 www.mcintoshlabs.com
Page 2
Introduction
The HR085 Remote Control is supplied with McIntosh
Preamplifiers, Integrated Amplifiers and Tuners.
The HR085 Remote Control has the ability to learn
and store Remote Control (RC) Commands from
three non-McIntosh Components. The RC Commands
stored in the HR085 can be accessed by using the
“DEVICE” Push-button together with the LED Indicators to select one of the three (TV, CABLE or AUX).
Refer to figure 1 and the instructions starting on page
3 on “How to Learn and Store Commands”.
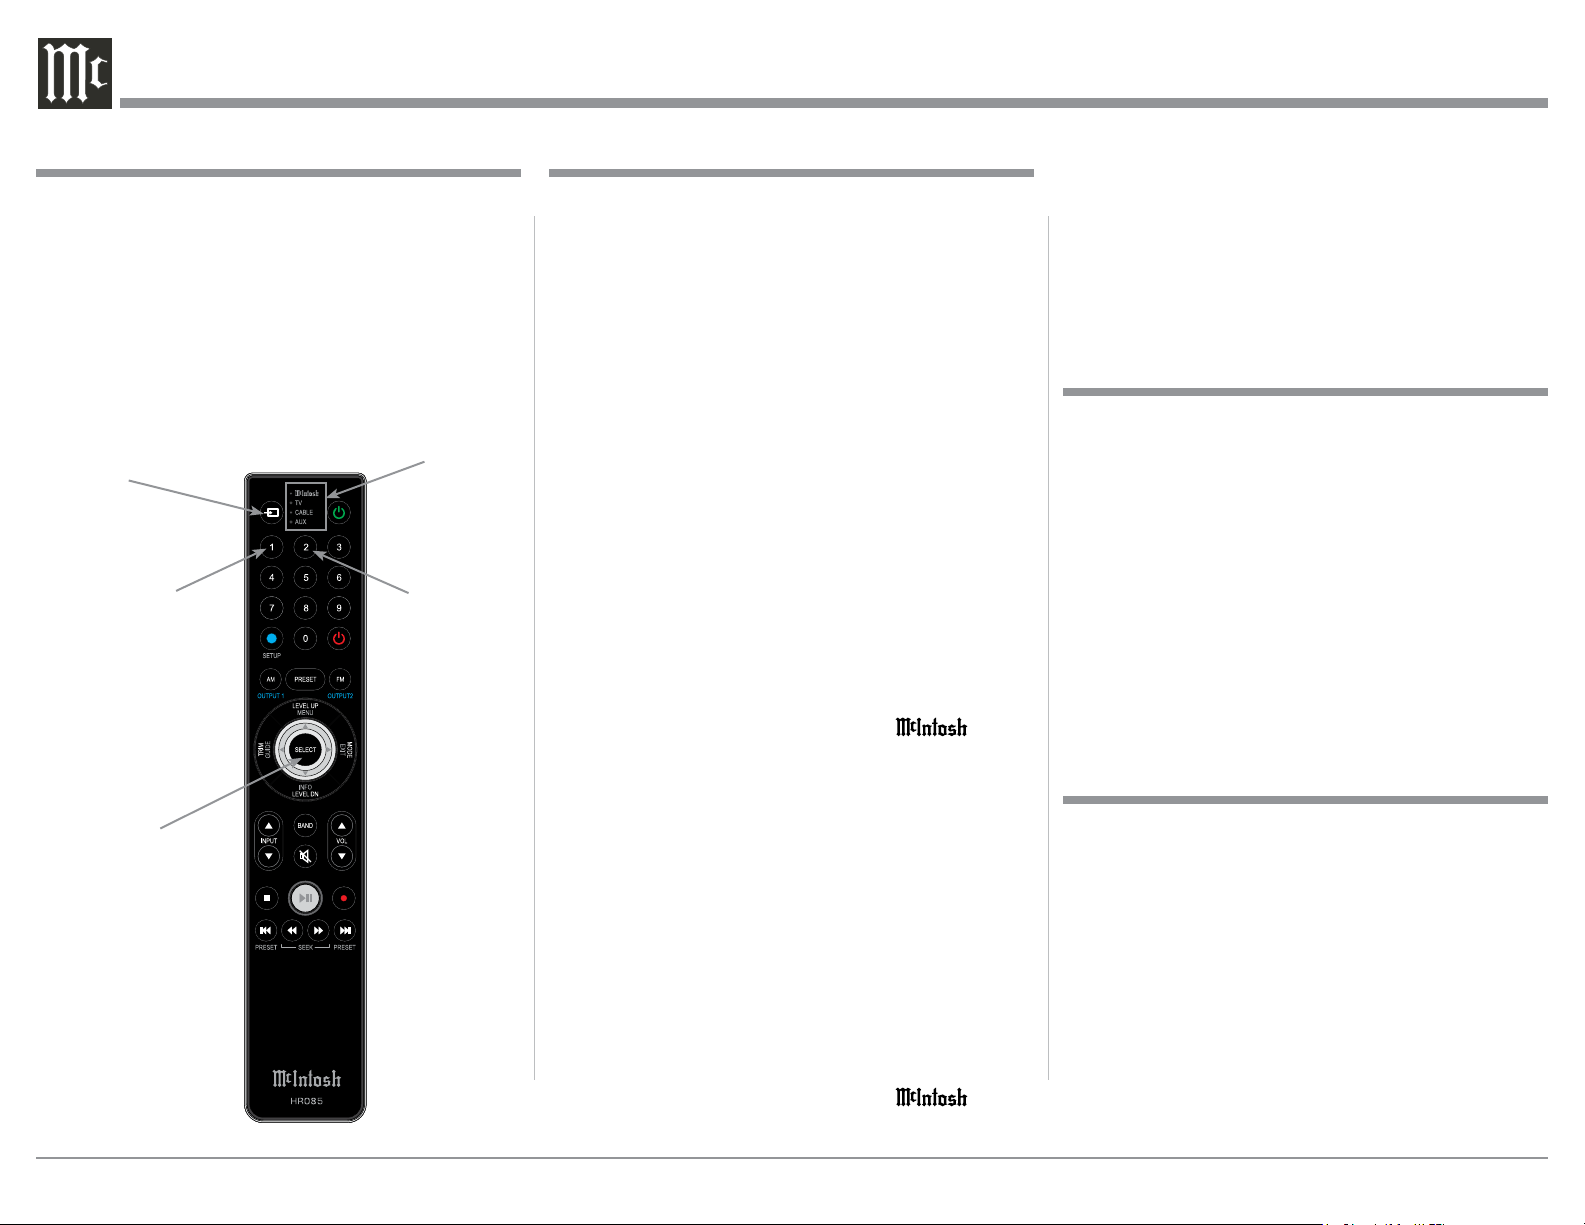
LED
DEVICE
Push-button
Number 1
Push-button
SELECT
Push-button
Figu re 1
indicators
Number 2
Push-button
Remote Control Codes
The HR085 Remote Control has been factory configured for the “Normal” McIntosh Control Codes
used with most models. There is a set of “Alternate”
McIntosh Control Codes for the HR085 Remote Control. “This Alternate Control Code” is to be used when
there are two McIntosh Models (A/V Control Center,
Integrated Amplifier or Preamplifier) in the same
location at the same time. This will prevent the HR085
Remote Control from adversely affecting the operation of the units. Refer to figure 1 when performing
the steps below.
Note: Refer to the “Setup” Section of the Owner’s
Manual supplied with the A/V Control Center,
Integrated Amplifier and/or Preamplifier for additional information about using the “Alternate
Control Codes”.
To change the HR085 from “Normal” to “Alternate”
Control Codes perform the following steps:
1. To change from the “Normal” to “Alternate”
Control Codes, press and hold the SELECT and
number 2 Push-buttons simultaneously (for about
8 seconds) until the Device Select LED
flashes twice.
2. Referring to the SETUP Steps outlined in the
McIntosh Model Owner’s Manual, change one of
the two Models over to the “Alternate” Codes.
3. Press the VOLume ▲Up/ ▼Down Push-button
on the Remote Control to verify proper operation
using the Alternate Codes.
To change the HR085 from “Alternate” to “Normal”
Control Codes perform the following steps:
1. To change from the “Alternate” to “Normal”
Control Codes, press hold the SELECT and
number 1 Push-buttons simultaneously (for about
8 seconds) until the Device Select LED
flashes once.
2. Refering to the SETUP Steps outlined in the McIntosh Model Owner’s Manual change one of the
two Model over to the “Normal” Codes.
3. Press the VOLume ▲Up/ ▼Down Push-button
on the Remote Control to verify proper operation
using the Normal Codes.
Technical Assistance
If at any time you have questions about your McIntosh
product, contact your McIntosh Dealer who is familiar
with your McIntosh equipment and any other brands
that may be part of your system. If you or your Dealer
wish additional help concerning a suspected problem,
you can receive technical assistance for all McIntosh
products at:
McIntosh Laboratory, Inc.
2 Chambers Street
Binghamton, New York 13903
Phone: 607-723-3512
Fax: 607-724-0549
Table of Contents
Introduction ................................................................ 2
Remote Control Codes .............................................. 2
Technical Assistance .................................................. 2
Table of Contents ....................................................... 2
Preliminary Step ........................................................ 3
Signal Strength Test .................................................. 3
Learning Commands .................................................. 3
Delete Learned Commands ........................................ 4
Reset the HR085 to Default Settings .......................... 4
HR085 HEX Code Table ..........................................4-5
Copyright 2015 © by McIntosh Laboratory, Inc.
2
Page 3
Preliminary Step
A successful learning process requires adequate IR
Signal Strength, both sending and receiving, from the
McIntosh HR085 and the other Brand Remote Control. Please make sure the Remote Controls have fresh
batteries installed and functioning correctly with their
respective component(s) before proceeding.
Signal Strength Test
First perform the following test with the HR085 Remote Control and other Brand Remote Control before
attempting to have the HR085 learn commands from
them.
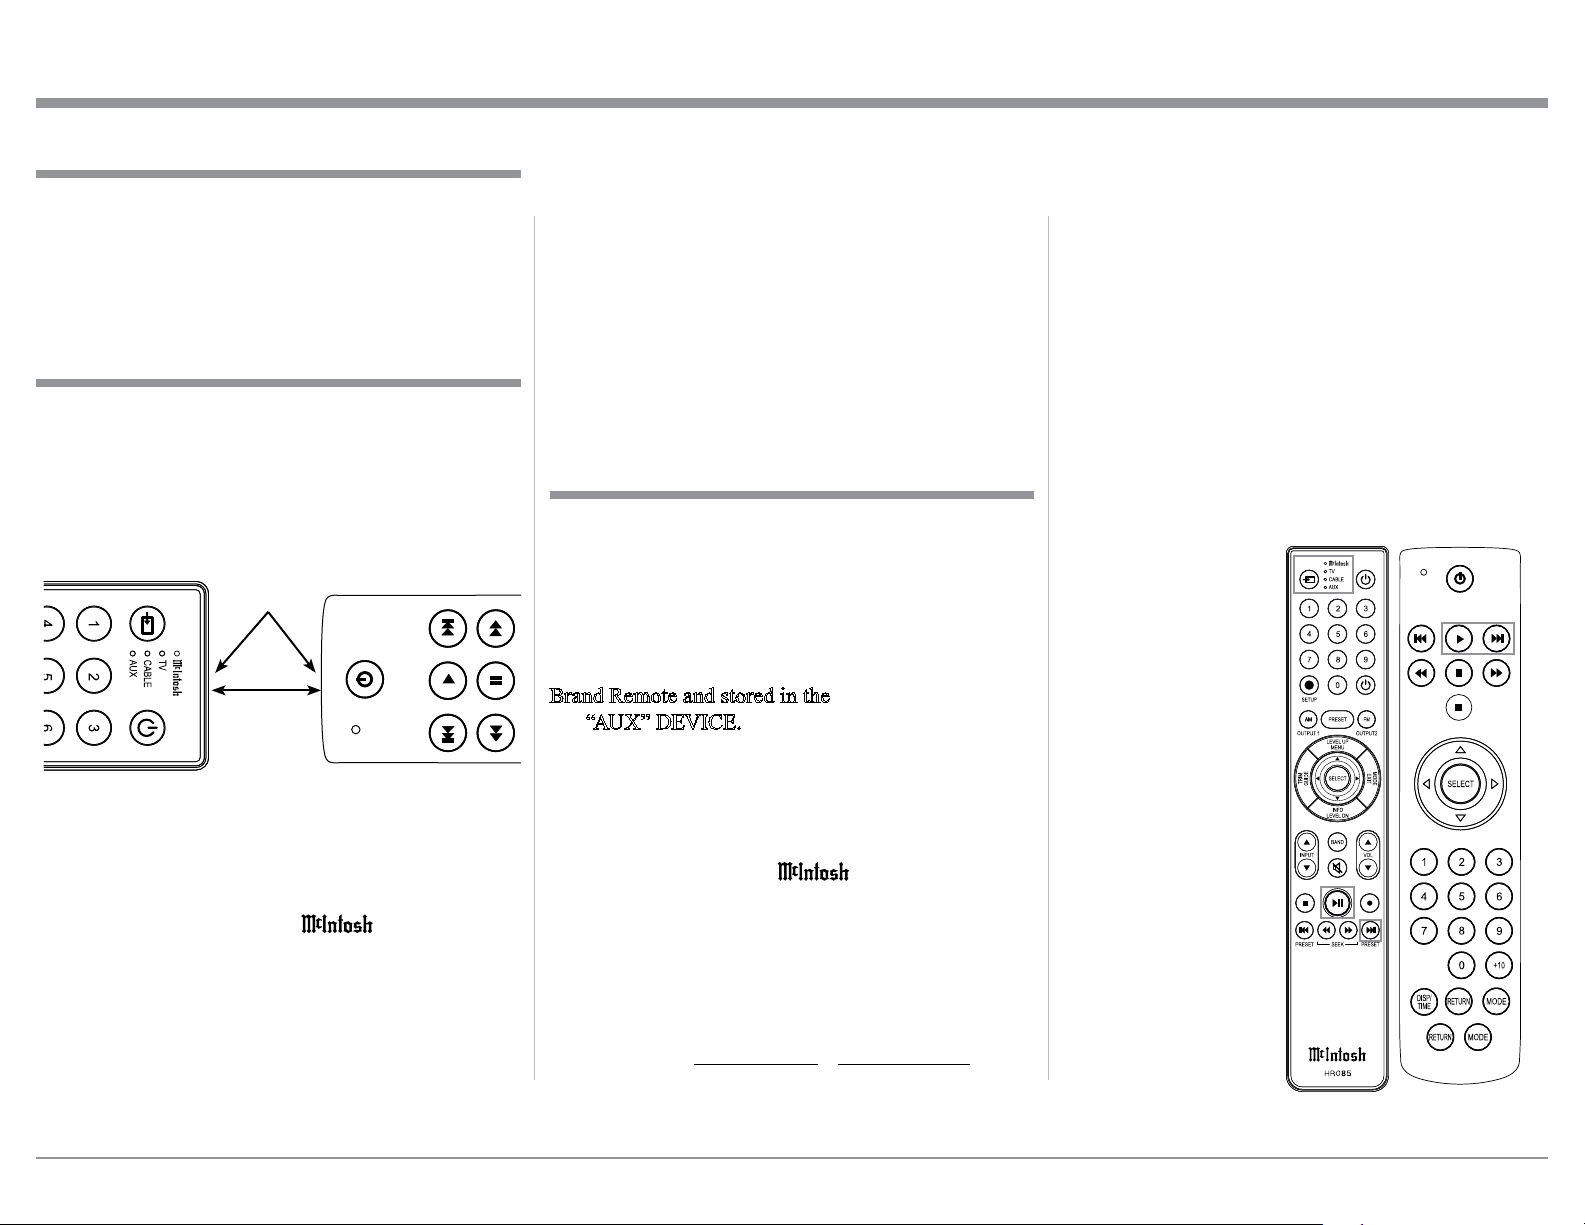
1. Referring to figure 2, position the remote controls
as illustrated.
HR085
2. The HR085 IR sensor must be receiving an
adequate IR signal for the learning process to be
successful.
3. Press and hold in the DEVICE Push-button for
about 4 seconds, and the LED will f lash
twice. This indicates the HR085 Remote Control
is in the Programming Mode. Immediately press
the following number Push-buttons:
9, 1, 0, 0
4. Press and hold in one of the Push-buttons on the
“Other Brand Remote”.
5. One or more of the DEVICE LEDs on the HR085
IR Signal
Send/Receive
Locations
2-5cm
Figu re 2
Other Brand Remote
will illuminate (the four LEDs function like a
signal strength meter). Change the position of
the HR085 or the other brand remote control, to
illuminate as many of the four LEDs as possible.
After the optimum position has been determined,
do not move either remote control until learning
process has been completed.
6. Press the DEVICE Push-button to exit the
Programming Mode and proceed to “Learning
Comm a nds”.
Learning Commands
All of the Push-buttons on the HR085 Remote Control
except for the DEVICE Push-button, may be used to
store RC Commands. Before proceeding make sure
the Remote Controls have fresh batteries installed
and the optimum position has been determined. In
the following example, the (Play) and the : ( Next)
transport commands will be learned from the Other
Brand Remote and stored in the HR085 Remote Control “AUX” DEVICE. Refer to figure 3 and perform
the following steps:
Note: It is important to perform the learning/storing
steps at a moderate pace, thus preventing dropping out of the Programming Mode.
1. Press and hold in the DEVICE Push-button for
about 4 seconds, the LED will flash
twice.
2. Using the Numeric Push-buttons on the HR085,
enter in the Programming Code for the selecting
the device (TV, CABLE or AUX) in which the
learned commands will be stored, enter 3004:
Note: The AUX Device will be using in this example.
DEVICE NAME CODE NUMBER
TV 1004
CABLE 2004
AUX 3004
How to use the HR085 Learning Capabilities
3. The AUX LED will flash twice, followed by
all four LEDS illuminating.
4. On the HR085, press and release the (Play)
Push-button and three LEDs (TV, CABLE or
AUX) will be illuminated.
5. Then press and hold in the (Play) P ushbutton on the Other Brand Remote until the
TV and CABLE LEDs extinguish and just the
AUX LED will be illuminated momentarily.
6. All four LEDs will illuminate on the HR085
Remote Control indicating it is now ready to
learn an additional command(s).
7. Repeat steps four and five, except this time
press the : (Next) Push-button in place of the
(Play) P u shbutton.
8. When the AUX
LED illuminates,
quickly press the
DEVICE Pushbutton until the
AUX LED flashes
twice. This will
store the two
learned commands
(Play) and the
: (Next).
9. The HR085
Remote Control
returns to normal operation.
By pressing the
DEVICE twice
(AUX LED will
illuminated) and
the newly learned
transport commands can sent.
Other Brand
Figu re 3
3
Page 4
Delete Learned Commands
If at any time it becomes desirable to remove previously learned commands for a given Device (TV, CABLE
or AUX) perform the following the steps below:
1. Press and hold in the DEVICE Push-button for
about 4 seconds, the LED will flash
twice.
2. Using the Numeric Push-buttons on the HR085,
enter in the Code Number for the selected device
(TV, CABLE or AUX). This will remove the
stored commands for the device. In this example,
the commands previously store for the AUX
Device will be deleted by entering code number
3009:
DEVICE NAME CODE NUMBER
TV 1009
CABLE 2009
AUX 3009
The DEVICE AUX LED will flash twice indicating
the stored commands have been deleted.
Reset the HR085 to default Settings
To remove all previously made changes to the DEVICE settings ,TV, CABLE and AUX perform
the following the steps below:
1. Press and hold in the DEVICE Push-button for
about 4 seconds, the LED will flash
twice.
2. Using the Numeric Push-buttons on the HR085,
enter in the Code Number 9999.
The LED will flash twice.
4
HR085 Hex Code Table
Before implementing the procedures below, it is
important to make sure the HR085 in the McIntosh
Mode:
1. Press and hold in the DEVICE Push-button for
about 4 seconds, the LED will flash
twice.
The following HR085 information (and the table on
the next page) is intended to be used by McIntosh
Dealers and Professional A/V Custom Installers.
While most McIntosh models utilize the “Normal”
Remote Control Codes, a few models utilize the “Alternate” Remote Control Codes. To change the HR085
from “Normal (page 1)” to “Alternate (page 2)”
Control Codes perform the following step:
1. Press and hold the SELECT and number 2 Pushbuttons simultaneously (for about 8 seconds) until
the Device Select LED flashes twice.
To change the HR085 back to the Normal Control
Codes perform the following step:
2. Press and hold the SELECT and number 1 Pushbuttons simultaneously (for about 8 seconds) until
the Device Select LED flashes twice.
The HR085 Remote Control has stored into its memory additional special Control Codes used in previous McIntosh Remote Controls. These stored Control
Codes can be used for the purpose of learning the
commands for programming other Remote Control(s)
and/or Remote Control Systems. For example, to learn
the Control Code for selection of the “DVD” Input on
the HR070/071 Remote Controls using the “Normal
Control Codes” perform the following steps:
Note: Refer to the top row of information on the
chart on the next page to select “Remote
Control Model” and “Normal” or “Alternate”
Code by entering the “Page _ number” in the
steps.
1. Press and hold the SELECT and number 3 Pushbuttons simultaneously (for about 8 seconds) until
the Device Select LED flashes twice.
2. To learn the “DVD” Input Command press the
numeric keypad “8” to send out the IR Command
to select the DVD Input.
To change the HR085 back to the Normal Control
Codes perform the following step:
2. Press and hold the SELECT and number 1 Pushbuttons simultaneously (for about 8 seconds) until
the Device Select LED flashes twice.
Page 5
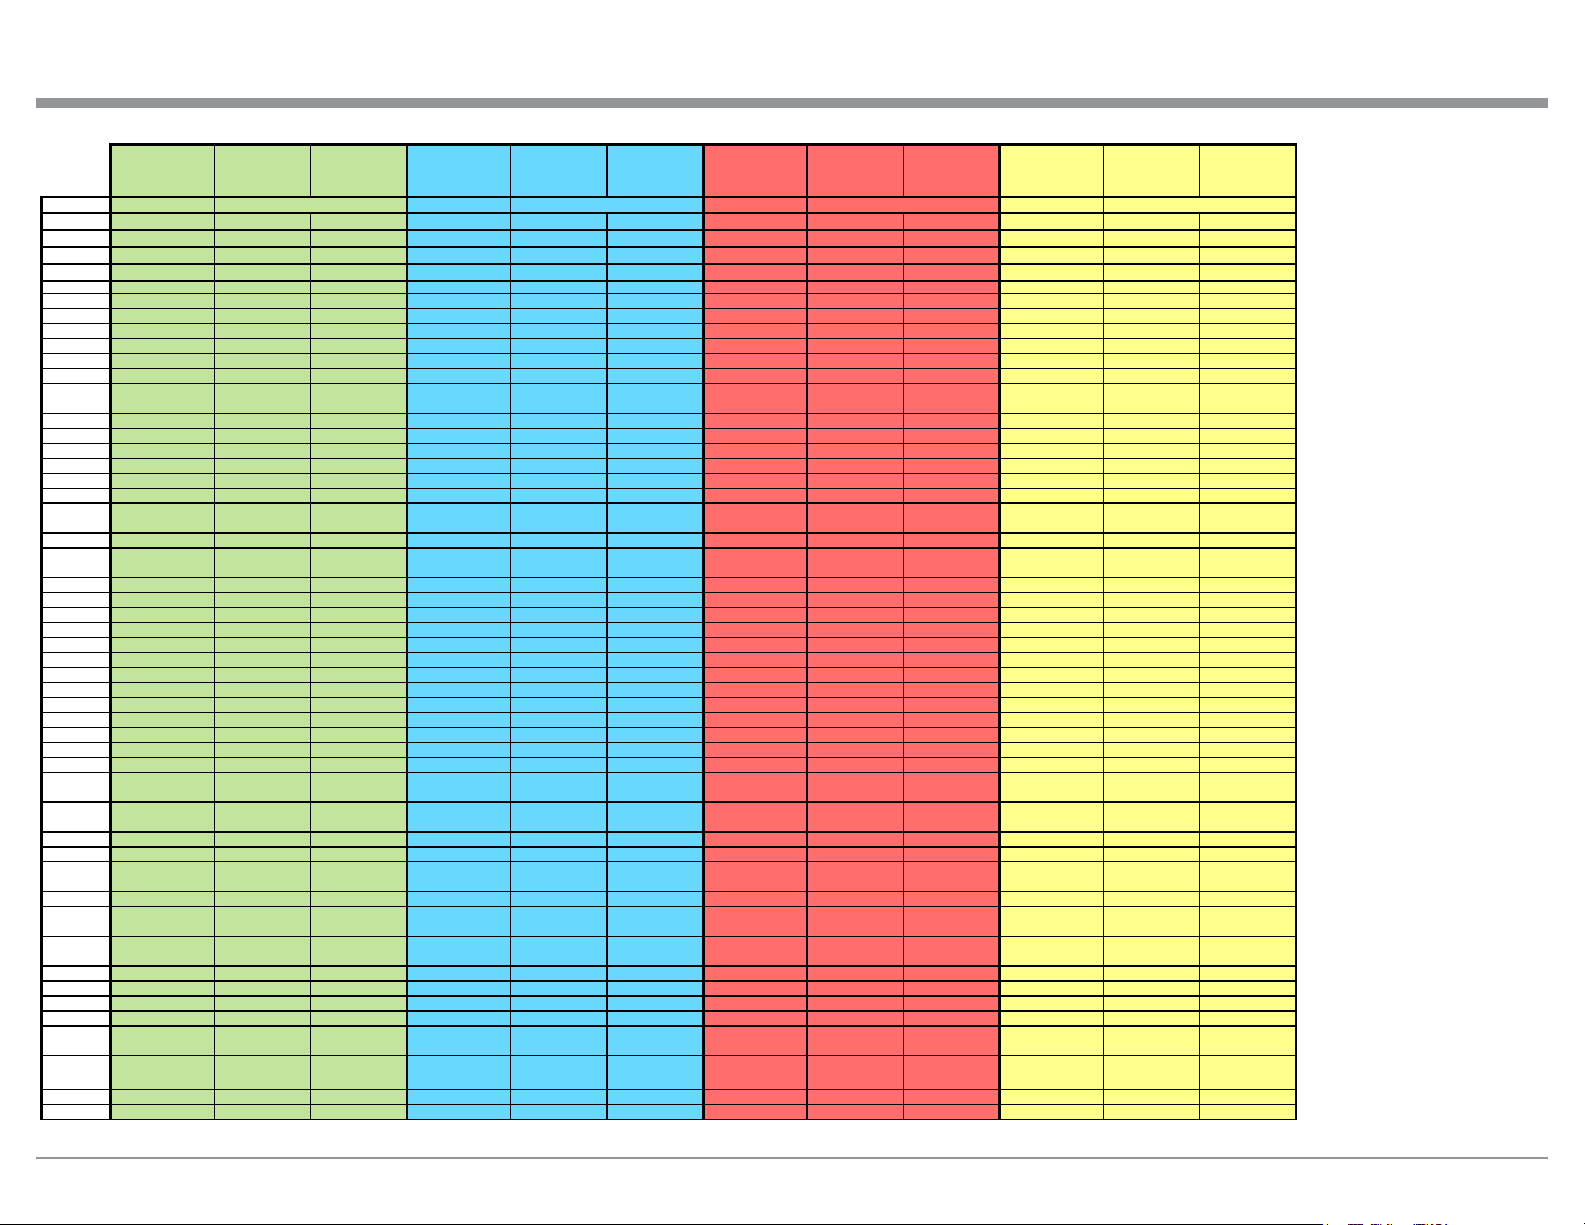
How to use the HR085 Remote Control
5 STOP
1 -(ACC "ON") 05H 85H 1 -(ACC "ON") 05H 85H 1 -(ACC "ON") 05H 85H
3-(PAUSE) 07H 87H 3-(PAUSE) 07H 87H 3-(PAUSE) 07H 87H
5-(TV) 09H 89H 5-(SERVER) 09H 89H
8-(INPUT UP) 0CH 8CH
SETUP-(MM) 15H 95H
AM-(AUX) 17H 97H PWROFF-(AUX) 17H 97H FM-(AUX Note 1) 17H 97H
UP
DOWN
INFO-(INFO) 1DH 9 DH INFO-(INFO) 1DH 9DH INFO-(INFO) 1DH 9DH
MENU-(MENU) 1FH 9FH MENU-(MENU) 1FH 9FH MENU-(MENU) 1FH 9 FH
MUTE (Note
MODE
INPUT UP (Note
INPUT DOWN (Note
1
Additional Codes
HR085
Remote Control
Additional Codes
Additional Codes
Normal Codes
(Page 1)
Code # PUSH-BUTTON PUSH-BUTTON PUSH-BUTTON PUSH-BUTTON
1
2 PLAY
3 NEXT
4 BACK
6
7
8
9
10
11
12
13
14
15 TRIM
16 PRESET
17
18
19
20
21
22
23
24
25 LEFT
26
27 RIGHT
28
29 SELECT
30
31
32
33
34
35
36
37 LEVEL UP
38 LEVEL DOWN
39
40
VOLUME UP
(Note 1)
VOLUME DOWN
(Note 1)
1)
41 BLUE BTN (SETUP)
42
43 RECORD
44 POWER ON
45 46 -
47
48
49
50 2
1)
1)
00H 80H
01H 81H
02H 82H
03H 83H
04H 84H
05H 85H
06H 86H
07H 87H
08H 88H
09H 89H
0AH 8AH
0BH 8BH
0CH 8CH
0DH 8DH
0EH 8EH
0FH 8FH
10H 90H
11H 91H
12H 92H
13H 93H
14H 94H
15H 95H
16H 96H
17H 97H
18H 98H
19H 99H
1AH 9AH
1BH 9BH
1CH 9CH
1DH 9DH
1EH 9EH
1FH 9FH
40H C0H
41H C1H
42H C2H
43H C3H
44H C4H
45H C5H
46H C6H
47H C7H
48H C8H
49H C9H
4AH CAH
4BH CBH
4CH CCH
4DH CDH
4EH CEH
4FH CFH
50H D0H
51H D1H
Alternate Codes
HEX CODES
(Page 2)
HR070/71
2-(ACC "OFF") 06H 86H 2-(ACC "OFF") 06H 86H 2-(ACC "OFF") 06H 86H
4-(SAT) 08H 88H 4-(CDR) 08H 88H
6-(SERVER) 0AH 8AH 4-(SERVER) 0AH 8AH 6-(MM) 0AH 8 AH
7-(DVR) 0BH 8BH 7-(INPUT DOWN) 0BH 8BH
8-(DVD) 0DH 8DH 5-(DVD) 0DH 8DH 9-(MC) 0DH 8DH
9-(CD) 10H 90H 6-(CD) 10H 90H SETUP-(CD) 10H 90H
SETUP-(CD2) 11H 91H 7 -(CD2) 11H 91H 0-(DVD) 11H 91H
0-(TUNER) 12H 92H 8-(TUNER) 12H 92H PWROFF-(TUNER) 12H 92H
PWROFF-(RE C) 13H 93H AM-(D/A) 13H 93H
GUIDE-(DISP) 1EH 9EH GUIDE-(DISP) 1EH 9EH GUIDE-(DISP) 1EH 9EH
Normal Codes
(Page 3)
Alternate Codes
HEX CODES
(Page 4)
HR072
Normal Codes
(Page 5)
Alternate Codes
HEX CODES HEX CODES
9-(D/A) 14H 94H
0-(MC) 16H 96H
AM-(REC
MONITOR)
49H C9H
(Page 6)
Note 1: Punch through to Mcintosh key definition and function
HR073
PRESET-(REC
MONITOR)
Normal Codes
(Page 7)
14H 94H
Alternate Codes
(Page 8)
5
Page 6

McIntosh Laboratory, Inc.
2 Chambers Street
Binghamton, NY 13903
www.mcintoshlabs.com
The continuous improvement of its products is the
policy of McIntosh Laboratory Incorporated who
reserve the right to improve design without notice.
Printed in the U.S.A.
McIntosh Part No. 04161301
 Loading...