

Page 1

McIntosh Laboratory, Inc. 2 Chambers Street Binghamton, New York 13903-2699 Phone: 607-723-3512 www.mcintoshlabs.com
HR070 Series
Remote Control
Programming Guide
Page 2
Introduction
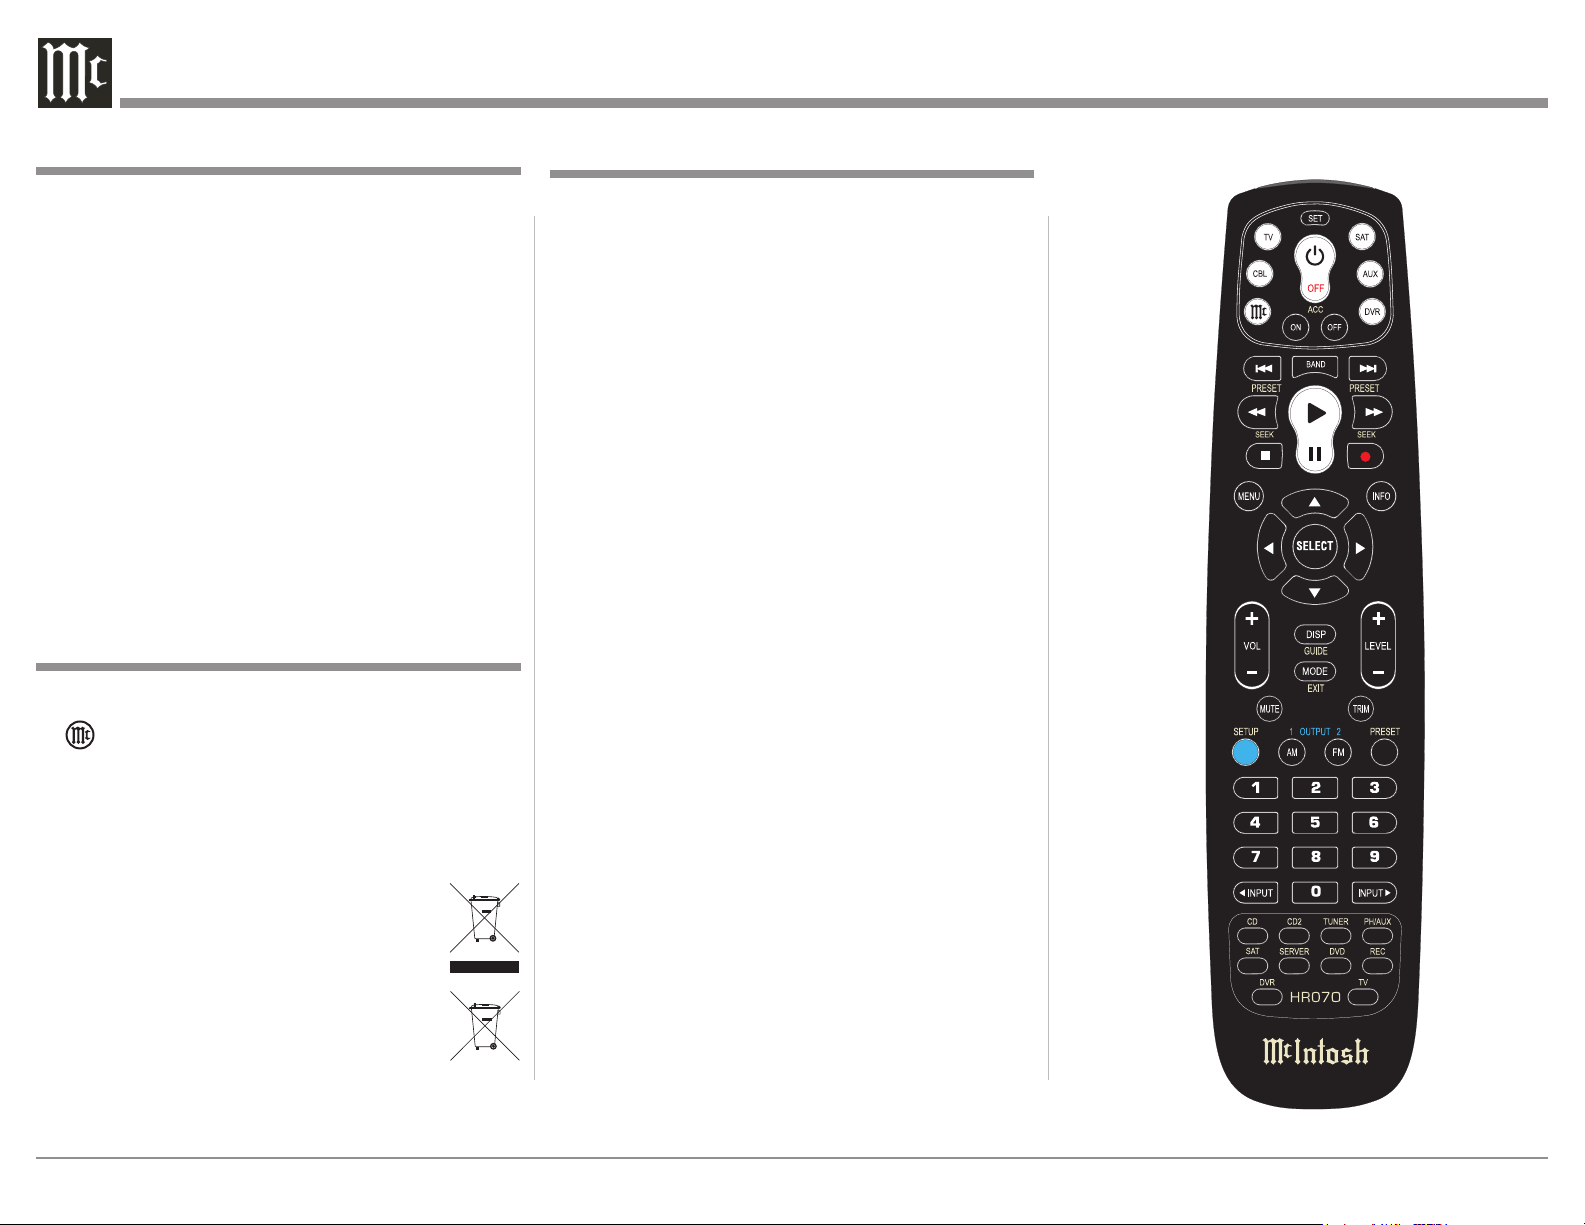
The McIntosh HR070 Series Remote Controls
(HR070, HR071, HR072 and HR073) supplied with
McIntosh Preamplifiers, Integrated Amplifiers, A/V
Control Centers, and Source Components not only
control a McIntosh Component System, but also have
the ability of controlling non McIntosh Components in
your system. Refer to figures 1 through 4
The HR70 Series Remote Controls have stored
in permanent memory the necessary information to
send the correct commands to the component to be
controlled. By entering a five digit numeric code the
commands for controlling the component is activated.
In the event the Remote Control doesn’ t have the
code to control a particular component, the Remote
Control has the ability to learn and store the IR Signals sent out by the Remote Control originally supplied with the component.
Battery Information
Use only fresh batteries of the required size and
recommended type. When the battery voltage is low,
the Push-button will blink 5 times after another
Push-button on the Remote Control is pressed. Do not
mix old and new batteries, different types of batteries
(standard, alkaline, or rechargeable), or rechargeable
batteries of different capacities.
If the Remote Control will not be used for an
extended period, remove the batteries. They
can leak chemicals and destroy the Remote
Control.
When discarding the Remote Control,
comply with local rules or regulations. Batteries should never be thrown away or incinerated but disposed of in accordance with the
local regulations concerning battery disposal.
For additional information please visit the McIntosh Web Site at www.mcintoshlabs.com.
Installing Batteries
1. Open the battery compartment cover (located on
the back of the remote).
2. Place the AA batteries in the compartment and
match the + and - polarity symbols inside.
3. Replace the cover.
Figure 1
2
Page 3

Table of Contents
Introduction ................................................................ 2
Battery Information ...................................................5
Installing Batteries ..................................................... 6
Installation .................................................................7
Figure 2 Figure 3 Figure 4
Copyright 2009 © by McIntosh Laboratory, Inc.
3
Page 4

Programming a Component
Program this Remote Control by first find the codes
for the components you want to program (starting on
page XX) and then follow the steps below:
1. Turn on the component (in this example, the TV).
2. Press TV Push-button on the Remote Control to be
programmed. Refer to figure 5.
3. Press and hold SET Push-button until the Pushbutton illuminaton blinks twice, then release.
4. Enter the first five-digit code for the component
(TV) and brand that you wish to program. The
Push-button blinks once as each digit is entered. If
the code is valid, the Push-button blinks twice.
Note: If the Push-button does not blink twice, repeat
steps 2 to 4 and try entering the code again.
5. Aim the McIntosh Remote Control at the component and press Power Off. The TV should turn
Off. If it does not, repeat steps 3–5, trying each
code for your brand until you find one that works.
If you cannot find a working TV codes refer to
“Searching Codes” on this page.
Note: There might be more than one Program Code
Number capable of switching power Off to the
TV. Choose the Code Number with the greatest number of desired active commands for the
TV to be controlled.
6. Repeat steps 1 to 5 for the other components you
want to control. For future reference, write down
each working component code below:
HR Series Remote Control Programming
Assigned Push-button Component Program Code
TV
CBL
SAT
AUX
DVR
Push-buttons
available for
Programming
Flashes during
Programming
Used to activate
Programming Mode
Figure 5
Push-buttons
available for
Programming
Push-buttons
used to enter
Program Code
Searching for Code
If your component (TV in the Programming a Component example) does not respond to the Remote Control
Control after trying all codes listed for your (TV)
brand, or if your TV brand is not listed, try searching
for your code:
1. Switch On the TV you wish to control.
2. Press the TV Push-button on the Remote Control
Control once.
3. Press and hold SET Push-button until the Pushbutton illuminaton blinks twice, then release.
4. Enter 9 9 1, then the component group number (see
below). The Push-button blinks twice.
Code Number Component Group
0 Cable (Cable Converter, Video Accessories,
Satellite Receivers)
1 TV
2 VCR (VCRs, DVD Players)
3 Audio (Audio Ampliers, Audio Amp
/Tuners, CD Players)
5. Aim the Remote Control Control at the TV and
press Power Off. The Remote Control sends IR
Codes from its library to the selected TV, starting
with the most popular code first. If the component
responds, go to step 7.
6. If the component does not respond, press LEVEL+
Push-button and the Remote Control will test
the next code for that TV type. Continue to press
LEVEL+ Push-button until the TV switches Off.
Note: Press LEVEL- Push Button to try the previous code.
7. Now that you have found the correct code, press
SET to save the code that worked for the TV. The
Push-button will blink twice to indicate the
code has been saved. To search for other component codes, repeat steps 1 to 5.
4
Page 5

Checking the Codes
CHECKING THE CODES
If you have set up the remote using the procedure in
“Searching for Your Code”, you may need to find out
which five-digit code is operating your quipment.
For example, to find out which code is assigned to
your TV:
1. Press TV once.
2. Press and hold SETUP until the red LED blinks
twice, then release.
3. Enter 9 9 0. The LED blinks twice.
4. To view the code for the first digit, press 1. Count
the LED blinks (for example, three blinks = 3), and
write down the number in the appropriate code listing
at the top of this column.
NOTE: If a code digit is 0, the LED does not blink.
5. Repeat step 4 for the four remaining digits, using
2 for the second digit, 3 for the third digit, 4 for the
fourth digit, and 5 for the fifth digit.
6. To check for other device codes, repeat steps 1—5,
substituting the device key the desired mode you
would like to check.
USING LEARNING
This universal remote control includes a Learning
feature (some models may not include Learning) so
you can add functions that are unique to your home
entertainment components (e.g.,VCR Tracking Up or
Down). However, there are some
considerations.
Learning Precautions
• Your original remote controls must be in working
order for learning to work properly.
• Learned keys are mode-specific, so each one can
store a unique function for each mode.
• Do not use the following keys for learning: Device
Keys, SETUP, or Record (•).
• Learning capacity is approximately 42 to 75 keys,
depending on the code being learned.
• Certain device functions are not learnable including
multi-frequency types, some
high frequency ones, and other unusual formats.
• For optimum learning, avoid high levels of ambient light such as natural sunlight or energy-efficient
fluorescent lights.
NOTE: Please have your original remote controls
handy before programming learning.
Programming a Learned Push-button
Programming a Learned Key
NOTE: If more than 10 seconds pass between key
presses, the remote exits programming.
1. Place the Potenza head-to-head (about 2” apart)
from your original remote control. Also locate the key
(on your original remote control) that you want the
Potenza to learn. Press the mode key you wish to learn
keys on.
2. Press and hold SETUP until the LED blinks twice,
then release.
3. Enter 9 7 5. The LED blinks twice.
NOTE: If the LED displays one long flash instead,
either your batteries are low,
or the Potenza has a memory fault. In either case, the
remote cannot learn a new key.
4. Press the key on the remote you wish to learn onto.
The feedback LED
will blink rapidly for three seconds, suggesting the
remote is ready to learn.
5. On the original remote, press and hold the key to be
learned. Continue
holding the key on the original remote until the Potenza’s LED blinks
twice.
NOTE: If the LED displays one long blink, a learning
error has occurred. Try
repeating this step again until a successful capture occurs. If the function
is still not captured, press and hold SETUP to exit
programming and
review the “Learning Precautions” above. If needed,
also see “Troubleshooting”
below. After review, start programming again at step
1.
6. Repeat steps 4 through 5 for another key you would
like to learn onto.
5
Page 6

Once you have completed learning all keys, press and
hold SETUP until
the LED blinks twice to save all data learned.
Deleting a Single Learning Key
This process returns the key to its original programming for the mode you
select. You can also delete learned programming by
teaching a different
function to the key (see “Programming a Learned
Key”).
NOTE: If more than 10 seconds pass between key
presses, the remote exits programming.
1. Press the mode key that you wish to remove the
learned key from.
2. Press and hold SETUP until the LED blinks twice,
then release.
3. Enter 9 7 6. The LED blinks twice.
4. Press the key containing the learned function to be
deleted twice. The
LED blinks twice and exits from programming.
Deleting All Learned Keys in a Specific Mode
NOTE: If more than 10 seconds pass between key
presses, the remote exits
programming.
1. Press and hold SETUP until the LED blinks twice,
then release.
2. Press 9 7 6. The LED blinks twice.
3. Press a mode key twice (i.e., TV. VCR/DVD, CBL/
SAT, etc.) to clear all the
learned keys for that mode. The LED blinks twice and
exits from programming.
Volume Lock
CHANGING VOLUME LOCK
The Potenza universal remote control comes preset to
allow independent
volume control of each selected device (Global Volume Unlock). However, you
may change the Volume Lock setting to Global Volume Lock so that one
device’s volume will control volume in all other
modes. After that, you can
perform Individual Volume Unlock on a selected device to set its volume
control for independent operation or Global Volume
Unlock to remove all
volume locking.
Locking Volume Control to One Mode (Global Volume Lock)
1. Press and hold SETUP until the red LED blinks
twice, then release.
2. Enter 9 9 3, the LED blinks twice.
3. Press the mode key for the device you want to control (for example, TV).
4. The LED blinks twice. Now when you press VOL+,
VOL-, or Mute, the
selected device (for example, TV) controls the volume
regardless of the
current mode.
Unlocking All Volume Control (Restoring Global
Unlock)
1. Press and hold SETUP until the red LED blinks
twice, then release.
2. Enter 9 9 3, the LED blinks twice.
3. Press VOL+. The LED blinks four times. Volume is
independently
controlled for all programmed components.
Unlocking a Single Device’s Volume Control
1. Press a device key (TV. VCR/DVD, CBL/ SAT,
etc.).
2. Press and hold SETUP until the red LED blinks
twice, then release.
3. Enter 9 9 3. The LED blinks twice.
4. and then press VOL-. The LED blinks four times.
Volume is independently controlled for the selected
components.
6
Page 7

Amplifier
Adcom ......................................................30577, 31100
Bose .................................................................... 30674
Car ver ................................................................ 30892
Curtis Mathes ..................................................... 30300
Durabrand ...........................................................31561
Elan .................................................................... 30647
GE ......................................................................30078
Harman/Kardon ................................................. 30892
JVC......................................................................30331
Left Coast ........................................................... 30892
Lenoxx ................................................................31561
Marantz .............................................................. 30892
McIntosh ............................................................ 30251
Modulaire ........................................................... 30395
NEC ................................................................... 30264
Optimus ........................... 30395, 30013, 30300, 30823
Parasound ........................................................... 30246
Philips ................................................................ 30892
Pioneer ........................................30013, 30300, 30823
Polk Audio ......................................................... 30892
RadioShack ........................................................ 30395
RCA ............................................. 30013, 30300, 30823
Realistic................................................... 30395, 30013
Shure .................................................................. 30264
Sony ........................................................30689, 30815
Soundesign ......................................................... 30078
Victor ..................................................................30331
Wards ......................................................30078, 30013
Ya ma ha ................................................... 30354, 30133
Cable Set Top Box
A-Mark ................................................... 00008, 00144
ABC ....................00237, 00003, 00008, 00014, 00017
Accuphase ...................................00003, 00014, 00017
Acorn ................................................................. 00237
Action ................................................................. 00237
Active ................................................................. 00237
Americast ........................................................... 00899
Amino .................................................................01822
Archer ................................................................ 00237
BCC .................................................................... 00276
Bell & Howell .................................................... 00014
Bell South ........................................................... 00899
British Telecom .................................................. 00003
Century ..............................................................00008
Citation ............................................................... 00017
Clearmaster ........................................................ 00883
ClearMax............................................................ 00883
Cool Box ............................................................ 00883
Coolmax ............................................................. 00883
Digeo ................................................................... 01187
Digi .................................................................... 00637
Director .............................................................. 00476
Dumont .............................................................. 00637
DX Antenna ....................................................... 0150 0
Emerson ............................................................. 00014
Fosgate ............................................................... 0 0276
Fujitsu ..................................................................01497
GE ...................................................................... 0 014 4
General Instrument ..................... 00476, 00810, 00276
.....................................................00003, 00012, 00014
Gibralter ............................................................. 00003
GMI .................................................................... 00883
GoldStar ............................................................. 00144
Hamlin ................................................... 00009, 00273
Hitachi ..........................................0003, 00008, 00009
Insight .....................................................00476, 00810
Jebsee ................................................................. 00014
Jerrold ..... 00476, 00810, 00276, 00003, 00012, 00014
Maspro ................................................................01510
Memorex ............................................................ 00000
Mitsubishi ..........................................................00003
Motorola ...........................01376, 00476, 00810, 00276
...........................................01187, 01254, 00014, 01106
Multitech ............................................................ 00883
Myrio ..................................................................01822
NEC ....................................................................01496
Nova Vision ........................................................00008
Novaplex ................................................ 00008, 00017
NSC ........................................................ 00012, 00637
Oak ..................................................................... 00017
Pace ..................................01877, 00877, 00237, 00008
Panasonic ............ 00000, 00008, 00144, 00107, 01488
Panther ............................................................... 00637
Paragon ......................................00000, 00008, 00525
Penney ...................................................... 0000, 00637
Philips ..................................................... 01305, 00317
Pioneer ..................01877, 00877, 00144, 00533, 01500
Prism .................................................................. 00012
Pulsar .................................................................00000
Quasar ................................................................ 00000
RadioShack ........................................................ 00883
RCA .....................................................................01256
Regal ...........................................00276, 00279, 00273
Runco .................................................................00000
Samsung ................................................. 00003, 00144
Scientific Atlanta .............01877, 00877, 00477, 00237
........................................00003, 00000, 00008, 00012
..................................................................00017, 01510
Sony ........................................................01006, 01460
Sprucer ............................................................... 0 0144
Starcom .................................................. 00003, 00014
Stargate .............................................................. 00014
Storm .................................................................. 00637
Sumitomo ........................................................... 01500
Supercable .......................................................... 00276
Supermax ........................................................... 00883
Thomson .............................................................01256
Toc om ................................................................. 00012
Tor x .................................................................... 00003
11
Page 8

Cable Set Top Box, con’t
Tosh ib a ................................................... 00000, 01509
Tristar ................................................................. 00883
United Cable ...............................00276, 00003, 00014
US Electronics ............... 00276, 00003, 00008, 00017
V2 ....................................................................... 00883
Videoway ...........................................................00000
Viewmaster ........................................................ 00883
Vision ................................................................. 00883
Vortex View ....................................................... 00883
Zenith ..............................00000, 00525, 00899, 00017
Cable/PVR Combination
Americast ........................................................... 00899
Amino .................................................................01822
Digeo ................................................................... 01187
General Instrument ............................................ 00810
Jerrold ................................................................ 00810
Motorola ............................ 01376, 00810, 01187, 01106
Myrio ..................................................................01822
Pace ......................................................... 01877, 00237
Pioneer ....................................................01877, 00877
RCA .....................................................................01256
Scientific Atlanta ....................................01877, 00877
Sony ................................................................... 01006
Supercable .......................................................... 00276
Thomson .............................................................01256
Zenith ................................................................. 00899
CD Player
Acoustic Research .............................................. 30420
Admiral .............................................................. 30305
Aiwa ....................................................................30157
Arcam .................................................................30157
Audio Research ...................................................30157
Burmester ........................................................... 30420
Cairn ...................................................................30157
California Audio Labs ............................30029, 30303
Cambridge Soundworks ......................................30157
Car ver ......................................................30157, 30179
Curtis Mathes ..................................................... 30032
Denon ......................................... 30626, 30003, 30034
DKK ................................................................... 30000
DMX Electronics ................................................30157
Emerson ............................................................. 30305
Fisher .......................................................30000, 30179
Funai .................................................................. 30305
Garrard ....................................................30393, 30420
Genexxa ................................................. 30032, 30305
Grundig ...............................................................30157
Hafler ..................................................................30173
Harman/Kardon ........................... 30100, 30157, 30173
Hitachi ................................................................ 30032
Inkel .........................................................30157, 30180
Integra .................................................................30101
Jerrold ................................................................30003
JVC......................................................... 30032, 30072
Kenwood . 30626, 30000, 30029, 30028, 30037, 30190
KLH ...................................31318, 31372, 31373, 31711
Krell ....................................................................30157
Linn .....................................................................30157
LXI .......................................................... 30179, 30305
Magnavox .........................30157, 30038, 30274, 30305
Marantz .....30626, 30029, 30157, 30038, 30180, 30435
Matsui .................................................................30157
McIntosh .....................................30256, 30290, 30660
MCS ................................................................... 30029
Memorex ............. 30000, 30032, 30179, 30420, 30468
Micromega ..........................................................30157
Miro ...................................................................30000
Mission ................................................................30157
Modulaire ........................ 30000, 30032, 30087, 30179
.....................................................30180, 30420, 30468
MTC ................................................................... 30420
NSM ....................................................................30157
Onkyo ......................................................31327, 30101
Optimus ...........................30000, 30032, 30037, 30087
..............................30179, 30305, 30393, 30420, 30468
Panasonic ........................ 30029, 30303, 30388, 30752
Parasound ........................................................... 30420
Penney ................................................................ 30029
Philips ..........................................30626, 30157, 30274
Pioneer ................. 31062, 30032, 31087, 30305, 30468
Polk Audio ..........................................................30157
Proceed............................................................... 30420
Proton ..................................................................30157
QED ....................................................................30157
Quad ....................................................................30157
Quasar ................................................................ 30029
RadioShack 30000, 30032, 30179, 30180, 30420, 30468
RCA 31062, 30032, 30053, 30179, 30305, 30420, 30468
Realistic........................... 30000, 30032, 30087, 30179
.......................................... 30180,30305, 30420, 30468
Revox ..................................................................30157
Roksan ............................................................... 30435
Rotel ........................................................ 30157, 30420
SAE .....................................................................30157
Sansui .......................................... 30000, 30157, 30305
Sanyo ........................................... 30000, 30087, 30179
Scott ................................................................... 30305
Sears ........................................................ 30179, 30305
Sharp ........................................... 30037, 30034, 30180
Sherwood ............................................................30180
Sonic Frontiers ....................................................30157
Sony .....................30490, 30000, 30100, 31364, 30185
Sugden .................................................................30157
Sylvania ...............................................................30157
Symphonic ..............................................30180, 30305
TAG McLaren .....................................................30157
Tandy .................................................................. 30032
Tascam ....................................................30393, 30420
12
Page 9

Tea c ......................30490, 30180, 30378, 30393, 30420
Tec hnic s ..................................................30029, 30303
Techwood ........................................................... 30303
Thule Audio ........................................................30157
Victor ................................................................. 30072
Wards ................... 30032, 30157, 30053, 30087, 30179
Ya ma ha ....................................... 30490, 30036, 31292
Yo r x .................................................................... 30000
Home Automation
Accutek ...............................................................31215
Amana ................................................................. 31716
Bionaire ................................................... 30846, 31215
Frigidaire .............................................................31333
GE ......................................................................30240
GoldStar ..............................................................31537
Holmes ................................................................31215
Kenmore ..............................................................31537
Lasko .................................................................. 30846
LG .......................................................................31537
Lightolier .............................................................30184
Lutron ................................30597, 30318, 31239, 31597
Marmitek.............................................................30167
One For All .........................................................30167
PCS .....................................................................30184
RadioShack ........................................................ 30240
Royal Sovereign .................................................. 31651
Security System ..................................................30167
Sharper Image .................................................... 30846
SmartLinc ...........................................................30184
Universal .............................................................3 0167
Universal X10 .....................................................30167
Whirlpool ............................................................31332
Windmere............................................................ 31215
X10 ......................................................................30167
Audio - Accessory
Accurian .............................................................. 31106
Altec Lansing .......................................... 31056, 31485
Apple ........................................................ 31115, 31644
Cambridge Soundworks ......................................31530
Creative .............................................................. 30872
D-Link .................................................................31522
Imerge ................................................................. 31491
Integra .................................................................31789
iPort ..................................................................... 31917
Marantz ............................................................... 31491
Motorola ..............................................................31464
NaviPod ...............................................................316 44
Netgear ................................................................ 3178 5
Omnifi .................................................................316 05
Onkyo .................................................................3178 9
Roku ....................................................................31828
Russound .............................................................32019
Slim Devices .......................................................31844
Sonance ............................................................... 31917
SSI .......................................................................31522
Ya ma ha .................................................... 31809, 31810
Video - Accessory
ABS .....................................................................01272
Accurian ..............................................................01653
Alienware ............................................................01272
Allegro ................................................................0016 0
Archer .................................................................0016 0
Bantor ..................................................................00160
Centronic .............................................................00160
CyberPower .........................................................01272
D-Link ......................................................01554, 01731
Epson ...................................................................01563
Gateway ..............................................................01272
GC Electronics ....................................................0016 0
Hauppauge ..........................................................01757
Hewlett Packard ...................................... 01272, 01267
Howard Computers .............................................01272
HP ........................................................... 01272, 01267
Hush ....................................................................01272
iBUY POWER .....................................................01272
Jebsee ..................................................................00160
JVC......................................................................01384
Keyspan.............................................................. 0134 4
Leadtek................................................................ 01614
LG ....................................................................... 01415
Linksys .................................................... 01272, 01365
Macro Image Technology ...................................01383
Media Center PC .................................................01272
Microsoft .............................................................01272
Mind ....................................................................01272
Motorola ..............................................................01363
MyHD .................................................................01383
Niveus Media ......................................................01272
Northgate ............................................................01272
Panasonic ............................................................01120
Pinnacle Systems ................................................01268
Pioneer ................................................................01010
Princeton ................................................. 00113, 00295
RadioShack .........................................................0 0160
Ricavision ...........................................................01272
Roku ....................................................................01486
Samsung .................................................. 01190, 01490
Sensory Science ..................................................01126
Sharp ...................................................................01010
Sony .............................................01272, 01324, 01364
Stack 9 .................................................................01272
Sylvania ...............................................................01563
Systemax .............................................................01272
Tagar Systems .....................................................01272
Tosh ib a ................................................................01272
Touch ...................................................................01272
Verator .................................................................0 0113
Viewsonic ................................................ 01272, 01329
Vizio ....................................................................01126
Voodoo ................................................................01272
ZT Group ............................................................01272
13
Page 10

Audio Receiver
ADC ....................................................................30531
Adcom ................................................................ 30616
Aiwa ....................... 31405, 30189, 30121, 31388, 31641
Akai ......................................................... 30244, 31512
Alco .....................................................................31390
AMC ...................................................................31077
Amphion Media Works ............................31563, 31615
AMW ....................................................... 31563, 31615
Anam ........................................................31609, 31074
Apex Digital ..................................31257, 31430, 31774
Arcam ................................................................. 31189
Audiotronic ......................................................... 31189
Audiovox ..................................................31390, 31627
B & K .............................. 30701, 30702, 30820, 30840
BK ...................................................................... 30702
Bose ........................31229, 30639, 31253, 31841, 31933
Brix .....................................................................31602
Cairn .................................................................. 30189
Cambridge Soundworks ......................................31370
Capetronic ...........................................................30 531
Car ver ............................... 31189, 30189, 30121, 31289
Classic ................................................................. 31352
Coby ....................................................................31389
Criterion ..............................................................31420
Curtis Mathes ......................................................30014
Daewoo ...............................................................312 50
Delphi .................................................................. 31414
Denon .................... 31360, 30121, 30771, 31142, 31306
Emerson ..............................................................30531
Fisher ................................................................... 318 01
Garrard ............................................................... 30463
Gateway .............................................................. 31517
Go Video ............................................................ 31532
Grundig ...............................................................30189
Harman/Kardon ........................... 30110, 30189, 30891
......................................................31289, 31304, 31306
Hitachi ......................................................31273, 31801
Initial ...................................................................31426
Inkel .................................................................. 30491
Insignia .............................................................. 31030
Integra .............................. 30135, 30842, 31298, 31320
JBL .......................................................... 30110, 31306
JVC.........................31058, 30074, 31374, 31495, 31811
Kawasaki ............................................................ 31390
Kenwood ........................... 31313, 31570, 31569, 30186
KLH ............................................. 31390, 31412, 31428
Koss ......................................................... 31366, 31497
Lasonic ................................................................31798
Lenoxx ................................................................31437
Lexicon ...............................................................31076
LG ...................................................................... 31293
Linn .....................................................................30189
Liquid Video31497
Magnavox ......................... 31189, 31269, 30189, 30391
...................................................... 30531, 31266, 31514
Marantz .................. 31189, 31269, 30189, 30891, 31289
McIntosh ............................................................ 31289
Micromega ............................................... 31189, 30189
Mitsubishi ...........................................................31393
Myryad ................................................................ 3118 9
Nakamichi ............................................... 31313, 30097
New Castle ......................................................... 30502
Norcent ................................................................31389
Nova ....................................................................31389
Onkyo ...... 30135, 30380, 30842, 31298, 31320, 31531
Optimus ............................ 31023, 30074, 30014, 30121
...............................30186, 30502, 30531, 30670, 31074
Oritron ..................................................... 31366, 31497
Outlaw .................................................................30391
Panasonic ..............31308, 31518, 30309, 30367, 31288
................................ 31316, 31548, 31633, 31763, 31764
Philips .........31189, 31269, 30189, 30391, 30891, 31266
Pioneer .....31023, 30014, 30150, 30244, 30531, 30630,
31384
Polaroid .............................................................. 31508
Polk Audio ....................................30189, 31289, 31414
Proscan ................................................................312 54
RadioShack .........................................................31609
RCA . 31023, 31609, 31254, 30531, 31074, 31390, 31511
Realistic........................................ 31609, 30121, 30186
Regent .................................................................31437
Revox ................................................................. 30189
Rio .......................................................................31869
Saba ..................................................................... 31519
Samsung .......................................31295, 31304, 31500
Sansui ............................................31189, 30189, 31764
Sanyo ............................................ 31251, 31469, 31801
Sharp ........................................... 30186, 30771, 31286
Sharper Image ..................................................... 31556
Sherwood ... 30491, 30502, 31077, 31423, 31517, 31653
Shinsonic .............................................................31426
Sirius ..................................31602, 31627, 31811, 31987
Sonic Blue ................................................31532, 31869
Sony 31058, 31441, 31258, 31759, 31622, 30168, 30474,
31406,
........................................... 31558, 31658, 31758, 31858
Soundesign ......................................................... 30670
Stereophonics ......................................................31023
Sunfire ................................................................31313
Tea c .................................. 30463, 31074, 31390, 31528
Tec hnic s ............... 31308, 31518, 30309, 31384, 31633
Thorens ...............................................................31189
Tosh ib a .........................................30135, 30842, 31788
Vent ur er ............................................................. 31390
Victor ................................................................. 30 074
Waitec .................................................................31352
Wards ..................................................... 30189, 30014
XM .......................................................... 31406, 31414
Ya ma ha ............................. 31023, 30176, 30186, 31176
............................................31276, 31331, 31375, 31476
Zenith ...................................................... 30857, 31293
14
Page 11

Satellite Set Top Box
Aiwa .................................................................... 01514
AlphaStar ........................................................... 00772
Bell ExpressVu ................................................... 00775
Chaparral ............................................................00216
Coolsat ................................................................01806
Crossdigital .........................................................01109
Di recT V ............... 01377, 00392, 00566, 00639, 01639
............................... 01142, 00247, 00749, 01749, 00724
...............................00819, 01856, 01076, 01108, 00099
................................01109, 01392, 01414, 01442, 01443
......................................................01444, 01609, 01640
Dish Network System ..................01505, 01005, 00775
..................................................................01170, 01775
Dishpro ............................. 01505, 01005, 00775, 01775
DX Antenna ........................................................01530
Echostar .................01505, 01005, 00775, 01170, 01775
Expressvu ................................................ 00775, 01775
Fortec Star ...........................................................01821
Funai ...................................................................01377
GE .......................................................... 00392, 00566
General Instrument ............................................ 00869
GOI ......................................................... 00775, 01775
Hisense ................................................................01535
Hitachi .......................................... 00749, 00819, 01518
Houston .............................................................. 0 0775
HTS ......................................................... 00775, 01775
Hughes Network Systems ............ 01142, 00749, 01749
......................................................01442, 01443, 01444
Humax .................................................................0179 0
iLo .......................................................................01535
Innova ................................................................00099
Jerrold ................................................................ 00869
JVC.................................... 00775, 01170, 01507, 01775
LG ............................................................01226, 01414
Magnavox ............................................... 00724, 00722
Maspro ................................................................01530
McIntosh ............................................................ 00869
Memorex ............................................................ 00724
Mitsubishi .......................................................... 00749
Motorola ............................................................. 00869
NEC ....................................................................01519
Netsat .................................................................00099
Next Level .......................................................... 00869
Optimus .............................................................. 00724
Panasonic .................................... 00247, 00701, 01508
Pansat ..................................................................01807
Paysat ................................................................. 00724
Philips ...................01142, 00749, 01749, 00775, 00724
..............................00819, 01076, 00722, 00099, 01442
Pioneer .....................................................01142, 01442
Primestar ............................................................ 00869
Proscan ................................................... 00392, 00566
Proton .................................................................. 01535
RadioShack .................................00566, 00775, 00869
RCA ................................. 00392, 00566, 01142, 00775
.......................................... 00855, 00143, 01392, 01442
Samsung .....01377, 01142, 01276, 01108, 01109, 01442,
01609
Sharp .................................................................. 01489
SKY .................................................................... 00099
Sony ................................. 00639, 01639, 01524, 01640
Star Choice ......................................................... 00869
Star Trak................................................. 00772, 00869
Thomson ................................................ 00392, 00566
Tivo ...................................01142, 01442, 01443, 01444
Tosh ib a ............................. 00749, 01749, 00790, 00819
...................................................... 01285, 01501, 01530
Ult im at eTV .............................................01392, 01640
Ultrasat ................................................................01806
Uniden .................................................... 00724, 00722
US Digital ...........................................................01535
USDTV ...............................................................01535
Voom .................................................................. 00869
Zenith ..................................................................01856
DBS/PVR Combination
Di recT V ........................... 01377, 00392, 00639, 01142
..........................................01076, 00099, 01392, 01442
......................................................01443, 01444, 01640
Dish Network System ............................. 01505, 00775
Dishpro .................................................... 01505, 00775
Echostar ....................................... 01505, 00775, 01170
Expressvu ........................................................... 00775
Hughes Network Systems . 01142, 01442, 01443, 01444
JVC...................................................................... 01170
Motorola ............................................................. 00869
Philips ......................................................01142, 01442
Proscan ............................................................... 00392
RCA .....................................................................01392
Samsung ..............................................................01442
Sharp ...................................................................014 89
Sony ........................................................00639, 01640
Star Choice ......................................................... 00869
Television
A-Mark .........................................10047, 10054, 10165
Accuscan ...................................... 10047, 10018, 10135
Action ...................................................... 10030, 10185
Admiral .................10047, 10054, 10017, 10051, 10093
...........................................10463, 10180, 10018, 10165
Advantz .............................................................. 10282
Advent ........ 10761, 10783, 10815, 10817, 10842, 11933
Adventuri ........................................................... 10000
Agna ....................................................................10150
Aiko ................................................................... 10092
Akai ...................... 10060, 10812, 10702, 10030, 10145
...........................................10151, 10672, 11903, 11935
Albatron ..................................................10700, 10843
Alfide ................................................................. 10672
Alleron ............................................................... 10030
Ambassador .............................................10150, 10177
America Action ...................................................10180
American High ...................................... 10000, 10060
15
Page 12

Television, con’t
Ampro .................................................................10751
Amstrad ...................................................10171, 10177
Amtron .................................................... 10000, 10180
Anam ...................................................................10180
Anam National ................................................... 10055
AOC .............................................10180, 10030, 10185
Apex Digital1 .................... 0156, 10748, 10879, 10765,
.......................................................10185, 10767, 11943
Audinac ...............................................................10180
Audiovox ......................... 10451, 10180, 10092, 10623,
................................10802, 10875, 11937, 11951, 11952
Ave nt ur a .............................................................. 10171
Axion ..................................................................11937
Baysonic ..............................................................10180
Beaumark ..................................... 10017, 10178, 10030
Belcor ................................................................. 10030
Bell & Howell ............................. 10054, 10154, 10093
BenQ ...................................................................110 32
Boxlight .............................................................. 10893
Bradford .............................................................. 10180
Brockwood .............................................. 10178, 10030
Broksonic .........................10236, 10463, 10180, 10177,
...................................................... 11929, 11935, 11938
Candle ................................................................ 10030
Capehart ........................... 10017, 10178, 10030, 10092
Carnivale ............................................................ 10030
Car ver ................................................................ 10054
Celebrity ............................................................. 10000
Celera ..................................................................10765
Changhong ........................10156, 10765, 10767, 10783
Cineral ..................................................... 10451, 10092
Citek ................................................................... 10047
Citizen .............................10054, 10000, 10451, 10463,
......................................... 10180, 10060, 10030, 10171,
..................................................... 10092, 10282, 11928
Civet .................................................................... 10185
Clairtone .............................................................10185
Clarion ................................................................10180
Classic .....................................................10030, 10092
Colortyme ....................... 10047, 10054, 10017, 10060,
......................................................10178, 10030, 10018
Commercial Solutions ............................. 11447, 10047
Conic ................................................................... 10178
Contec ......................................................10180, 10185
Craig ............................................. 10180, 10171, 10282
Crosley ...... 10054, 10000, 10180, 10030, 10171, 10187
Crown ...........................................10093, 10180, 10672
Crown Mustang .................................................. 10672
Curtis Mathes ..................10047, 10054, 10154, 10000,
................................10051, 10451, 10093, 10180, 0060,
.............................. 10702, 10178, 10030, 10145, 10166,
................................. 10018, 10466,11147, 11347, 11919
CXC.....................................................................10180
Cytron .................................................................11326
Daewoo ..................10451, 10178, 10092, 11661,10623,
.................................10661, 10672, 11755,11756, 11928
Dayton ................................................................ 10092
Daytron ....................................... 10178, 10030, 10092
Dell ...........................................................11080, 11178
Denon .......................................... 10145, 10055, 10511
Denstar ............................................................... 10628
Digital Life10872
Dumont .........................................10017, 10180, 10178
Durabrand .............. 10463, 10180, 10178, 10171, 11034
Dwin ........................................... 10093, 10720, 10774
Eaton ................................................................. 10060
Electroband ............................................. 10000, 10185
Electrograph ........................................................ 11755
Electrohome ...................... 0154, 10000, 10150, 10178,
...................................................... 10030, 10151, 10185
Emerald .................................................... 10178, 10177
Emerson ................10047, 10154, 10451, 10236,10463,
............................... 10180, 10150, 10178, 10171, 11944,
............................... 11929, 11928,10623, 10282, 10185,
.................................................................. 10177, 10135
Envision .................................................. 10030, 10813
Epson .......................................................10833, 10840
ESA .............................................. 10812, 10171, 11944
Fisher ................................10054, 10154, 10000, 10159
Fortress............................................................... 10093
Fujitsu .......................................... 10683, 10809, 10853
Funai .................................10000, 10180, 10171, 11904
Futuretech ...........................................................10180
Gateway ................................................... 11755, 11756
GE ........................11447, 10047, 10000, 10051, 10451,
............................... 10060, 10178, 10030,10135, 10055,
................................10282, 11147, 11347, 10018, 11917,
..................................................................11919, 11922
Gemini ............................................................... 10047
Gibralter ...................................... 10017, 10000, 10030
Go Video ............................................................ 10886
Go Vision ............................................................11937
GoldStar .......................... 10047, 10054, 10178, 10030,
...................................................... 10018, 11154, 11926
Gradiente ............................................................ 10053
Grundig ....................................... 10706, 10672, 10683
Grundy ................................................................10180
Grunpy ................................................................10180
Haier ........................................................ 11034, 10768
Hallmark ................10236, 10180, 10178, 10135, 10187
Harley Davidson ........................10000, 10180, 10060,
......................................................10178, 10030, 11904
Harman/Kardon ................................................. 10054
Harvard ...............................................................10180
Havermy ............................................................. 10093
Heathkit ...............................................................10017
Helios ................................................................. 10865
Hello Kitty ........................................................... 0451
Hewlett Packard ........................... 11089, 11494, 11502
Hisense ................................................................10748
Hitachi ..................10047, 10054, 10017, 10000, 10051,
.................................10178, 11145, 10145,10018, 10055,
........................................... 10151, 10185, 11904, 11960
16
Page 13

HP ................................................ 11089, 11494, 11502
Hyundai ................................................... 10849, 10865
Ima ............................................... 10236, 10180, 10178
Infinity ............................................................... 10054
Insignia ......................................... 10171, 11326, 11517
Inteq ......................................................... 10017, 10145
JBL ..................................................................... 10054
JCB ..................................................................... 10000
Jensen .................................10761, 10815, 10817, 11933
JIL ...................................................................... 10030
Jutan ................................................................... 10030
JVC............ 10054, 10053, 10030, 10055, 10731, 11253
Kamp .............................................10017, 10180, 10185
Kawasho .................................................. 10030, 10185
KEC ........................................................ 10180, 10060
Kenwood ................................................. 10180, 10030
KLH ..................................10156, 10180, 10765, 10767
Kloss .................................................................. 10030
Konka ..............................10180, 10080, 10628, 10632,
.......................................... 10638, 10703, 10707, 10720
Kost .....................................................................11262
KTV ................................. 10463, 10180, 10030, 10185
Lark .....................................................................10154
LG ................................... 10054, 11265, 10060, 10178,
.......................................... 10030,10700, 10856, 11154,
.................................................................. 11178, 11758
Lloyd’s .............................. 10236, 10180, 10030, 11904
Logik ....................................................... 10236, 10180
LXI ...................................10047, 10054, 10017, 10154,
.........................................10000, 10156, 10051, 10093,
.........................................10060, 10053, 10178, 10030,
.......................................... 10171, 10166, 10055, 10135,
.......................................................10018, 10159, 10165
Magnasonic .................... 10054, 10000, 10156, 10093,
..................................................... 10030, 10092, 11928
Magnavox ..............10047, 11454, 10054, 10154,10000,
...............................10250, 10051, 10180,10060, 10030,
....................10171, 10092,10706, 10187, 10282, 10386,
.................... 10802, 11254, 11755, 11904, 11931, 11944
Majestic ...............................................................10017
Marantz ........................... 11454, 10054, 10030, 10704,
......................................................10854, 10855, 11154
Matsui .................................................................10177
Matsushita ................................... 10250, 10051, 10650
Maxent ..................................................... 11755, 11756
Megapower ......................................................... 10700
Megatron ........................... 10047, 10178, 10145, 10151
MEI ..................................................................... 10185
Memorex ..........................10154, 10463, 10180, 10150,
...........................................10178, 10030, 10165, 11926
MGA ............................................10150, 10178, 10030
MGN Technology ................................................10178
Micro Genius ......................................................10150
Midland ..................10047, 10017, 10051, 10018, 10135
Mitsubishi .............10154, 10250, 10093, 11250,10150,
................................ 10178, 10030, 10836,10868, 11917
Monivision ..............................................10700, 10843
Motorola ............... 10054, 10051, 10093, 10150, 10055
MTC ..........10180, 10060, 10030, 10092, 10185, 10282
Multitech .............................................................10180
NAD ..................................10156, 10178, 10166, 10866
NEC ..................... 10047, 10156, 10178, 10030, 10497,
..................................................... 10704, 10882, 11704
NetTV ................................................................. 11755
Nikko .......................................... 10178, 10030, 10092
Nikkodo ...................................... 10178, 10030, 10092
Nishi ........................................................ 10030, 10018
Norcent .........................................10748, 10824, 11089
Noshi ...................................................................10018
NTC.................................................................... 10092
Nyon ................................................................... 10000
Olevia ........................................... 11144, 11240, 11331
Onwa ...................................................................10180
Optimus ................ 10154, 10250, 10093, 10180, 10150,
............................... 10178, 10030, 10166, 10165, 10650
Optoma ............................................................... 10887
Optonica .................................................. 10093, 10165
Orion ................................10017, 10236, 10463, 10180,
........................................... 10178, 11463, 10177, 11929
Pace .................................................................... 10092
Panasonic ........................10054, 10000, 10156, 10250,
................... 10051, 10236, 10030, 10018,10055, 10650,
......................11291, 11410, 11919, 11941, 11946, 11947
Panda .................................................................. 10706
Paxonic ....................................................10060, 10030
PCE ......................................................... 10156, 10060
Penney ...................10047, 10000, 10156, 10250,10051,
............................... 10060, 10178, 10030,10018, 10135,
............................................10159, 11347, 11919, 11926
Philco ....................10054, 10463, 10030, 10145, 10187
Philips ..............................11454, 10054, 10030, 10171,
...........................................10187, 10690, 11154, 11254
Pilot ................................. 10051, 10060, 10178, 10030
Pioneer ..................10166, 10055, 10679, 10866, 11260
Polaroid ................. 10765, 10865, 11262, 11276,11314,
................................ 11316, 11326, 11327, 11328, 11341
Portland .................................................. 10451, 10092
Precision .................10236, 10180, 10177, 10185, 10282
Prima ..................... 10761, 10783, 10815, 10817, 11933
Princeton ................................................. 10700, 10717
Prism ........................................... 10250, 10051, 10055
Proscan ............................. 11447, 10047, 10018, 10135,
......................................................10466, 11347, 11922
Proton ...................................................... 10178, 10466
Pulsar ...................................................... 10017, 10092
Pulser ...................................................... 10178, 10092
Quartz ......................................................10150, 10178
Quasar ........ 10250, 10051, 10055, 10165, 10650, 11919
Rabbit ................................................................. 10047
Radio Shack ..........10047, 10154, 10180, 10150, 10178,
......................................................10030, 10165, 11904
17
Page 14

Television, con’t
RCA ......................11447, 10047, 10054, 10000, 10051,
................................10093, 10178, 11958,11953, 11948,
................................ 11922, 11919, 11917, 11547, 11347,
.................................11247,11147, 11047, 10774, 10679,
...........................................10165, 10135, 10090, 10018
Realistic............................10047, 10154, 10180, 10150,
...................................................... 10178, 10030, 10165
Rhapsody ............................................................10185
Road Authority .................................................. 10282
Runco ................... 10017, 10060, 10030, 10497, 10603
Sampo ............................... 10047, 10030, 11755, 11756
Samsung ...............10047, 10054, 10017, 10154, 10060,
......................10812, 10702, 10178,0030, 11959, 11903,
....................11312, 11060, 10814, 10766, 10587, 10055
Sanky ......................................................10060, 10030
Sansui .............................. 10463, 10060, 10030, 10165,
...................................................... 11904, 11929, 11935
Sanyo ................... 10047, 10054, 10154, 10000, 10463,
................................ 10171, 10159, 10799, 10893, 11755
Saville ................................................................ 10060
Sceptre ............................................................... 10878
Scotch ..................................................................10178
Scott ...................... 10236, 10180, 10178, 10030, 10177
Sears .....................10047, 10054, 10017, 10154, 10000,
............................... 10156, 10051, 10093, 0060, 10053,
...............................10178, 10030, 10171, 10166, 10055,
.....................10135, 10018, 10159, 10165, 11904, 11926
Sharp .........10054, 10093, 10180, 10165, 10386, 10491,
.................... 10688, 10689, 10818, 10851, 11393, 11917
Sheng Chia ......................................................... 10093
Shivaki ................................................................10178
Siemens ............................................................... 10145
Signature ............... 10047, 10093, 10030, 10165, 10187
Signet ..................................................................11262
Simpson ........................................10178, 10030, 10187
Singer ..................................................... 10060, 10092
Solar Drape ........................................................10000
Sole ......................................................................10813
Sony ........... 10017, 10154, 11100, 10000, 10150,10053,
.............................. 10080, 10632, 10834, 11904, 11925
Soundesign ...............................................10180, 10178
Sova .....................................................................11952
Spectravision ................................ 10156, 10178, 10159
Squareview ..........................................................10171
SR2000 ....................................................10154, 10171
SSS ......................................................................10180
Starlite ..................................................... 10236, 10180
Studio Experience .............................................. 10843
Superscan .................................... 10093, 10864, 11944
Supreme .............................................................10000
SV2000 .............................................................. 10054
S VA ................................. 10748, 10587, 10768, 10865,
......................................................10870, 10871, 10872
Sylvania ............... 10047, 10054, 10154, 10000, 10051,
...............................10178, 10030, 10171, 10092, 10159,
................................10187, 11904, 11926, 11931, 11944
Symphonic . 10000, 10180, 10178, 10171, 11904, 11944
Syntax .......................................... 11144, 11240, 11331
Tandy ....................................................... 10093, 10165
Tatu ng .............................. 10000, 10051, 10055, 11756
Tea c .......................10154, 10706, 10159, 10282, 10689
Tec hnic s ...........................10054, 10250, 10051, 10055
Tec hnovo x .......................................................... 10030
Tec hv ie w ............................................................ 10847
Techwood .........................10250, 10051, 10060, 10055
Tek ni ka ........................... 10054, 10463, 10180, 10150,
..................................................... 10060, 10178, 10092
Tele co lo r ..............................................................10017
Telefunken.......................................................... 10702
Thomas .........................................10047, 10178, 11904
Thomson ................................................. 11447, 10047
TMK .................................10236, 10180, 10178, 10177
TNCi ...................................................................10017
Toc om ..................................................................10156
Tom as hi .............................................................. 10282
Tosh ib a ..................10154, 11256, 10156, 10150, 11265,
....................10060, 11145, 10145, 10166, 11945, 11936,
.................... 11935, 11918, 11704, 11656, 11356, 11156,
..................................................... 10845, 10832, 10650
Toso ni c ................................................................10185
Tote vi si on ............................................................10 051
Toyo men ka .......................................................... 10178
Truetone .......................................10250, 10051, 10055
TVS .................................................................... 10463
Ultra ................................................................... 10092
Universal ................................................. 10047, 10135
Universum ...........................................................10177
V ........................................10864, 10885, 11755, 11756
Vector Research ................................................. 10030
Victor ................................................................. 10053
Vidikron ............................................................. 10054
Vidtech ................................................................ 10178
Viewsonic .............. 10857, 10864, 10885, 11578, 11755
Viking ................................................................ 10060
Vizio .......................10864, 10885, 11499, 11756, 11758
Wards ........ 10047, 10054, 10017, 10154, 10000,10051,
....................10093, 10236,10178, 10030, 10166, 11156,
.......................................... 10866, 10187, 10165, 10151,
.................................................................10080, 10018
Waycon ................................................................10156
Welton .................................................................10178
Westinghouse ........10000, 10451, 10885, 10889, 11282
White Westinghouse ...................10451, 10236, 10463,
.................................................................10623, 10889
World ................................ 10451, 10236, 10463, 10180
XR-1000 ....................................... 10154, 10180, 10171
Ya ma ha ............................ 10030, 10769, 10833, 10839
Yo r x .................................................................... 10030
Zenith .................. 10047, 10017, 10000, 10093, 10463,
...............................11265, 10812, 10178, 10030, 11145,
............................... 10145, 10171, 10092, 11904, 11929
18
Page 15

TV/DVD Combination
Advent .................................................................119 33
Akai .....................................................................11935
Apex Digital ........................................................11943
Audiovox .......................................11937, 11951, 11952
Axion ..................................................................11937
Broksonic ............................................................11935
Hitachi .................................................................119 60
Jensen ..................................................................119 33
Panasonic ............................................................11941
Prima ...................................................................11933
RCA ......................................................... 11948, 11958
Samsung ..............................................................119 03
Sansui ..................................................................11935
Sova .....................................................................11952
Tosh ib a ................................................................11935
TV/VCR Combination
America Action ...................................................10180
Audiovox .............................................................10180
Broksonic ............................................................11929
Citizen .................................................................11928
Curtis Mathes ...................................................... 11919
Daewoo ...............................................................119 28
Emerson .......................................10236, 11928, 11929
Funai ...................................................................1190 4
GE .................................................11917, 11919, 11922
GoldStar ..............................................................11926
Harley Davidson .................................................11904
Hitachi .................................................................119 04
Lloyd’s .................................................................119 04
Magnasonic .........................................................11928
Magnavox ................................................ 11904, 11931
Memorex .............................................................119 26
Mitsubishi ........................................................... 11917
Orion ...................................................................11929
Panasonic ............................................................11919
Penney ...................................................... 11919, 11926
Quasar ................................................................. 11919
RadioShack .........................................................1190 4
RCA ............................................... 11917, 11919, 11922
Samsung ..............................................................11959
Sansui ...................................................... 11904, 11929
Sears ........................................................ 11904, 11926
Sharp ................................................................... 11917
Sony ........................................................ 11904, 11925
Sylvania ............................................................... 119 31
Symphonic ..........................................................1190 4
Thomas ................................................................1190 4
Tosh ib a .....................................................11918, 11936
Zenith ...................................................... 11904, 11929
TV/VCR/DVD Combination
Akai .....................................................................11903
Broksonic ............................................................119 38
Emerson ..............................................................1194 4
ESA .....................................................................11944
Magnavox ............................................................119 44
Panasonic ................................................ 11946, 11947
RCA ..................................................................... 11953
Sharp ................................................................... 11917
Sylvania ...............................................................1194 4
Symphonic ..........................................................1194 4
Tosh ib a ................................................................119 45
VCR
A-Mark ................20037, 20240, 20000, 20278, 20046
ABS .....................................................................21972
Admiral ..........................20060, 20048, 20039, 20047,
............................. 20104, 20209, 20020, 20062, 20479
Adventura ................................... 20037, 20240, 20000
Adyson ............................................................... 20072
Aiko ................................................................... 20278
Aiwa .....................20037, 20000, 20124, 20307, 20479
Akai .................................. 20041, 20061, 20106, 20175
Alba .............................................20209, 20072, 20278
Alienware ............................................................21972
Allegro ............................................................... 20039
America Action .................................................. 20278
American High .......................................20035, 20081
Amstrad .............................................................20000
Asha ................................................................... 20240
Astra ....................................................... 20035, 20240
Audiovox ..................................... 20037, 20278, 20038
Avis ........................................................ 20000, 20072
Beaumark ........................................................... 20240
Bell & Howell ................20035, 20048, 20039, 20000,
.....................................................20104, 20046, 20479
Broksonic ........................20184, 20121, 20209, 20002,
..................................................... 20208, 20479, 21479
Calix ................................................................... 20037
Candle .....................................................20037, 20038
Canon ................................................................. 20035
Capehart ..................................... 20002, 20020, 20062
Carrera ............................................................... 20240
Car ver .....................................................20035, 20081
CCE ........................................................ 20072, 20278
Cineral ................................................................ 20278
Citizen ............................20035, 20037, 20240, 20000,
..........................................20209, 20278, 20479, 21278
Classic ................................................................ 20037
Colortyme .......................20060, 20035, 20045, 20278
Colt ......................................................... 20000, 20072
Craig .................... 20037, 20047, 20240, 20072, 20271
Criterion ................................................. 20000, 20072
Crosley ............................ 20035, 20081, 20000, 20149
Crown ..................................................... 20072, 20278
Curtis Mathes ..... 20060, 20035, 20162, 20240, 20000,
..............................20041, 20278, 20432, 20760, 21035
Cybernex ............................................................ 20240
CyberPower .........................................................21972
Daewoo ..........................20037, 20045, 20278, 20020,
..................................................... 20046, 20561, 21278
Daytron .......................................20037, 20278, 20020
19
Page 16

VCR, con’t
Dell ......................................................................21972
Denon ..................................................... 20081, 20042
Derwent .............................................................. 20 041
Di recT V ............................................................. 20739
Dual .................................................................... 20000
Durabrand ...............................................20039, 20038
Dynatech ................................................ 20240, 20000
Electrohome .................. 20060, 20037, 20240, 20000,
.....................................................20043, 20209, 20061
Electrophonic ..................................................... 20037
Emerald ................................................... 20184, 20121
Emerex ............................................................... 20032
Emerson .........................20037, 20184, 20240, 20000,
............................ 20121, 20043, 20209, 20002, 20278,
.............................20202, 20208, 20061, 20479, 20561,
...........................................20593, 21278, 21479, 21593
Fisher ................... 20039, 20047, 20000, 20104, 20046
Fuji ..........................................................20035, 20033
Fujitsu ..................................................... 20045, 20000
Funai ........20037, 20000, 20072, 20278, 20593, 21593
Garrard ...............................................................20000
Gateway ..............................................................21972
GE ..........20060, 20035, 20048, 20240, 20000, 20149,
.............................. 20202, 20760, 20807, 21035, 21060
Gemini ...............................................................20060
General ............................................................... 20045
Genexxa ......................................20037, 20000, 20278
Go Video ......................... 20240, 20432, 20526, 20614
GoldStar ......................... 20035, 20037, 20039, 20000,
..................................................... 20278, 20038, 21237
Goodmans ...................... 20037, 20081, 20000, 20072,
.................................................... 20278, 20020, 20062
Gradiente ................................................20000, 20008
Granada .................................................. 20081, 20042
Grundig .............................................................. 20081
Harley Davidson ................................................20000
Harman/Kardon ......................................20081, 20038
Harvard .............................................................. 20072
Harwood............................................................. 20072
Headquarter .......................................................20046
Hewlett Packard ..................................................21972
HI-Q ............................................20035, 20047, 20000
Hitachi ................ 20035, 20037, 20045, 20000, 20042,
.......................................... 20041, 20089, 20105, 21037
Howard Computers .............................................21972
HP .......................................................................21972
Hughes Network Systems ...................... 20042, 20739
Humax ................................................................ 20739
Hush ....................................................................21972
Hytek .......................................... 20047, 20000, 20072
iBUY POWER .....................................................21972
ITT Nokia .............................................. 20240, 20041
Janeil ..................................................................20240
Jensen ......................................................20067, 20041
JVC....................... 20067, 20041, 20008, 20061, 21162
KEC ........................................................20037, 20278
Kenwood .........................20067, 20041, 20038, 20046
KLH ...................................................................20072
Kodak ......................................................20035, 20037
KTV ...................................................................20000
LG ................................... 20037, 20240, 20038, 21037
Linksys ................................................................21972
Lloyd’s ................ 20240, 20000, 20072, 20038, 20208
Loewe ................................................................. 20081
Logik .......................................... 20240, 20000, 20072
Lumatron ............................................................ 20278
Luxor ...................................................... 20046, 20106
LXI ................................. 20037, 20000, 20042, 20067
M Electronic ...................................................... 20240
Magnasonic ........20037, 20240, 20000, 20072, 20278,
..................................................... 20020, 20593, 21278
Magnavox ............20035, 20037, 20048, 20039, 20081,
.............................20240, 20000, 20149, 20563, 20593,
...................................................... 20618, 21593, 21781
Magnin ............................................................... 20240
Marantz ........................... 20035, 20081, 20038, 20062
Marta .................................................................. 20037
Matsui .....................................................20037, 20209
Matsushita ........................ 20035, 20162, 20081, 21162
Media Center PC .................................................21972
MEI .................................................................... 20035
Memorex ............. 20035, 20162, 20037, 20048, 20039,
............................ 20047, 20240, 20000, 20104, 20209,
............................20072, 20278, 20062, 20046, 20307,
................................20479, 21037, 21162, 21237, 21262
Metz ................................................................... 20037
MGA ...............................20060, 20240, 20043, 20061
MGN Technology ............................................... 20240
Microsoft .............................................................21972
Midland .............................................................. 20240
Mind ....................................................................21972
Minolta ....................................................20042, 20105
Mitsubishi ......... 20060, 20048, 20047, 20000, 20042,
............................. 20067, 20043, 20041, 20061, 20807
Motorola ................................................. 20035, 20048
Movie Walker ..................................................... 20072
MTC ........................................... 20240, 20000, 20072
MTX ...................................................................20000
Multitech .................................... 20039, 20000, 20072
NAD ........................................................20240, 20104
NEC ................................ 20104, 20067, 20041, 20038
New Tech ...........................................................20072
Nikko ......................................................20037, 20278
Nikkodo ..................................................20037, 20278
Nishi ................................................................... 20240
Niveus Media ......................................................21972
Noblex ................................................................ 20240
Northgate ............................................................21972
Olympus ...................................... 20035, 20162, 20104
Onkyo ................................................................ 20222
Optimus ............... 21062, 20035, 20162, 20037, 20048,
............................20047, 20240, 20000, 20104, 20062,
20
Page 17

...............................20432, 20593, 21048, 21162, 21262
Optonica ............................................................. 20062
Orion ...................20184, 20240, 20000, 20104, 20121,
..................20209, 20002, 20278, 20208, 20479, 21479
Panama ............................................................... 20035
Panasonic ....................... 21062, 20035, 20162, 20000,
........................................ 20020, 20225, 20614, 20616,
...................................................... 21035, 21162, 21262
Penney ................. 20035, 20162, 20037, 20047, 20081,
....................................... 20240, 20000, 20042, 20067,
......................................................20038, 21035, 21237
Pentax ......................................................20042, 20105
Philco ..................20035, 20081, 20000, 20209, 20479
Philips .................20035, 20162, 20048, 20081, 20045,
............................ 20000, 20209, 20062, 20616, 20618,
.......................................................20739, 21081, 21181
Pilot .................................................................... 20037
Pioneer ............................ 20162, 20081, 20042, 20067
Polk Audio ......................................................... 20081
Portland .................................................. 20278, 20020
Presidian ..............................................................21593
Profitronic .......................................................... 20240
Proscan ............................20060, 20202, 20760, 21060
Protec ..................................................... 20000, 20072
Protech ............................................................... 20072
Pulsar ..........................................20039, 20240, 20278
Pulser ................................................................. 20240
Quarter ............................................................... 20046
Quartz .........................................20035, 20047, 20046
Quasar ...................20035, 20162, 20002, 21035, 21162
RadioShack .................... 20035, 20162, 20037, 20048,
........................................20047, 20240, 20000, 20104,
..........................................20046, 20062, 21037, 21162
Radix .................................................................. 20037
Randex ............................................................... 20037
RCA ....................20060, 20035, 20048, 20240, 20045,
.................20000, 20042, 20149, 20105, 20106, 20202,
.............................. 20760, 20807, 20880, 21035, 21060
Realistic...............20035, 20162, 20037, 20048, 20047,
.............................20240, 20000, 20104, 20121, 20278,
.....................................................20046, 20062, 21162
Re pl ayT V ................................................20614, 20616
Ricavision ...........................................................21972
Runco ................................................................. 20039
Samsung ........................ 20060, 20240, 20045, 20000,
..........................................20038, 20432, 20739, 21014
Samtron .............................................................. 20240
Sanky ..................................................... 20048, 20039
Sansui ................. 20240, 20000, 20067, 20209, 20041,
..............................20072, 20002, 20271, 20479, 21479
Sanyo ..............................20047, 20240, 20000, 20104,
..................................................... 20046, 20159, 20479
Scientific Atlanta ...............................................20008
Scott .....................20184, 20045, 20121, 20043, 20208
Sears ........20060, 20035, 20162, 20037, 20048, 20039,
................. 20047, 20033,20045, 20000, 20042, 20104,
................. 20067, 20043, 20209, 20041,20072, 20046,
................................................................. 20105, 21237
Sharp ............................. 20048, 20047, 20032, 20000,
.................................................... 20062, 20807, 20848
Shintom ...............20039, 20240, 20000, 20072, 20208
Shogun ...............................................................20240
Siemens ................................................... 20037, 20104
Signature ........................20060, 20035, 20037, 20048,
.........................................20000, 20149, 20046, 20479
Singer ..........................................20037, 20240, 20072
Sonic Blue ............................................... 20614, 20616
Sonographe ........................................................ 20046
Sony ................... 20035, 20047, 20032, 20033, 20000,
................... 20067, 20046, 20636,21032, 21232, 21972
Soundmaster ......................................................20000
Stack ..................................................................921972
STS ..........................................................20042, 20105
SV2000 ..................................................20000, 20072
S VA .................................................................... 20000
Sylvania .......................... 20035, 20081, 20000, 20043,
...................................................... 20593, 21593, 21781
Symphonic ..........20240, 20000, 20002, 20593, 21593
Systemax .............................................................21972
Tagar Systems .....................................................219 72
Tandy ...................................................... 20000, 20104
Tatu ng .....20048, 20081, 20000, 20067, 20041, 20008
Tea c ............................................ 20000, 20067, 20041
Tec hnic s .......................... 20035, 20162, 20037, 20000
Tek ni ka .......................................20035, 20037, 20000
Telecorder ........................................................... 20240
Telefunken...............................................20041, 20208
Tev io n ................................................................. 20479
Thomas ...................................................20000, 20002
Thomson .....................................20060, 20041, 20202
Tisonic ................................................................ 20278
Tivo ..................................20618, 20636, 20739, 21996
TMK .......................................... 20240, 20000, 20208
TNIX .................................................................. 20037
Toc om .................................................................20240
Tosh ib a .............. 20240, 20045, 20000, 20042, 20043,
............................ 20209, 20041, 20062, 20845, 21008,
...................................................... 21145, 21972, 21996
Toso ni c ............................................................... 20278
Tote vi si on ................................................20037, 20240
Touch ...................................................................21972
Trix ..................................................................... 20037
Ultra ............................................20045, 20278, 20020
Unitech ............................................................... 20240
Vector ................................................................. 20045
Vector Research ......................................20184, 20038
Vext ra ................................................................. 20072
Victor ..........................................20067, 20041, 20008
Video Concepts ...................................... 20045, 20061
Videomagic ........................................................ 20037
Videosonic ................................. 20240, 20000, 20072
Viewsonic ............................................................21972
Villain ................................................................20000
Voodoo ................................................................21972
21
Page 18

VCR, con’t
Wards ................. 20060, 20035, 20037, 20048, 20047,
............................20081, 20033, 20240, 20045, 20000,
............................20042, 20043, 20041, 20072, 20038,
............................. 20149, 20046, 20062, 20479, 20760
Wharfedale ......................................................... 20593
White Westinghouse ..... 20000, 20209, 20072, 20278,
20479
World .......................................... 20209, 20002, 20479
XR-1000 ............. 20035, 20240, 20000, 20072, 20208
Ya ma ha ...................................................20041, 20038
Zenith ................. 20037, 20039, 20033, 20000, 20209,
............................... 20041, 20278, 20479, 21139, 21479
ZT Group ............................................................21972
DBS/PVR Combination
Hughes Network Systems .................................. 20739
Philips ................................................................ 20739
Samsung ............................................................. 20739
DVD/PVR Combination
Emerson .............................................................20000
RCA .................................................................... 20880
Sylvania .............................................................. 20000
Tosh ib a .................................................... 21008, 21996
PVR
ABS .....................................................................21972
Alienware ............................................................21972
CyberPower .........................................................21972
Dell ......................................................................21972
Di recT V ............................................................. 20739
Gateway ..............................................................21972
Hewlett Packard ..................................................21972
Howard Computers .............................................21972
HP .......................................................................21972
Hughes Network Systems .................................. 20739
Humax ................................................................ 20739
Hush ....................................................................21972
iBUY POWER .....................................................21972
Linksys ................................................................21972
Media Center PC .................................................21972
Microsoft .............................................................21972
Mind ....................................................................21972
Niveus Media ......................................................21972
Northgate ............................................................21972
Panasonic ............................................................20616
Philips .....................................................20618, 20739
RCA .................................................................... 20880
Re pl ayT V ................................................20614, 20616
Samsung ............................................................. 20739
Sonic Blue ............................................... 20614, 20616
Sony ........................................................20636, 21972
Stack 9 .................................................................21972
Systemax .............................................................21972
Tagar Systems .....................................................219 72
Tivo .............................................20618, 20636, 20739
Tosh ib a ........................................ 21008, 21972, 21996
Touch ...................................................................21972
Viewsonic ............................................................21972
Voodoo ................................................................21972
ZT Group ............................................................21972
TV/VCR Combination
Aiwa ................................................................... 20479
America Action .................................................. 20278
Audiovox ............................................................ 20278
Broksonic .................................... 20002, 20479, 21479
Citizen .................................................................21278
Colt ..................................................................... 20072
Curtis Mathes ......................................................21035
Daewoo ...............................................................21278
Emerson ...............20002, 20479, 20593, 21278, 21479
Funai ..................................................................20000
GE ....................................20240, 20807, 21035, 21060
GoldStar ..............................................................21237
Harley Davidson ................................................20000
Hitachi ................................................................ 20000
LG .......................................................................21037
Lloyd’s ................................................................20000
Magnasonic ............................................. 20593, 21278
Magnavox .................................... 20000, 20593, 21781
Magnin ............................................................... 20240
Memorex ................ 20162, 21037, 21162, 21237, 21262
MGA .................................................................. 20240
Mitsubishi .............................................. 20043, 20807
Optimus ............................ 20162, 20593, 21162, 21262
Orion ........................................... 20002, 20479, 21479
Panasonic ..........................20162, 21035, 21162, 21262
Penney ..........................................20240, 21035, 21237
Quasar .......................................... 20162, 21035, 21162
RadioShack .............................................20000, 21037
RCA .................................. 20240, 20807, 21035, 21060
Samsung .............................................................. 21014
Sansui .......................................... 20000, 20479, 21479
Sanyo .................................................................. 20240
Sears ........................................................20000, 21237
Sharp .................................................................. 20807
Sony ........................................................20000, 21232
Sylvania ............................................................... 21781
Symphonic ............................................. 20000, 20593
Thomas ...............................................................20000
Tosh ib a .................................................... 20845, 21145
Zenith .......................................... 20000, 20479, 21479
TV/VCR/DVD Combination
Sharp .................................................................. 20807
DVD Blue Ray Disk Players
Integra .................................................................22147
LG .......................................................................20741
Marantz ...............................................................22414
Onkyo .................................................................22147
Panasonic ............................................................21641
22
Page 19

Sony .................................................................... 21516
Samsung ..............................................................20199
DVD Players
3D LAB ...................................................20503, 20539
Accurian ...................................................21072, 21416
Acoustic Solutions ............................................. 20730
Advent ................................................................. 21016
Afreey ................................................................ 20698
Aiwa ................................................................... 20 641
Akai ......................20695, 20705, 20770, 20899, 21089
Alba .........................................................20672, 20717
Alco .................................................................... 20790
Allegro ............................................................... 20869
Amphion Media Works ...................................... 20872
AMW ................................................................. 20872
Apex Digital ........ 20533, 20672, 20717, 20755, 20794,
.............................20796, 20797, 20830, 21004, 21020,
...................................................... 21056, 21061, 21100
Arrgo ...................................................................21023
Aspire Digital .......................................... 21168, 21407
Audiovox ..........................20717, 20790, 21041, 21071,
...................................................... 21072, 21121, 21122
Awa .................................................................... 20730
Axion .......................................................21071, 21072
Blaupunkt ............................................................20717
Blue Parade ........................................................ 20571
Blue Sky ............................................................. 20695
Bose .....................................................................21895
Brandt ................................................................. 20651
Broksonic ............................................... 20695, 20868
Byd:sign ............................................................. 20872
California Audio Labs ....................................... 20490
Celestial ...............................................................21020
Centrex ....................................................20672, 21004
Cinea ...................................................................20831
CineVision ...................................20876, 20833, 20869
Citizen ..................................................... 21003, 21277
Clairtone ............................................................ 20571
Coby .................................. 20778, 21086, 21107, 21177
Craig ....................................................................20831
Creative ...................................................20503, 20539
Curtis Mathes ......................................................21087
CyberHome ..................... 20816, 20874, 21023, 21024,
....................................................... 21117, 21129, 21502
Cytron ................................................................ 20705
Daewoo ...............20784, 20705, 20770, 20833, 20869,
........................................... 21169, 21172, 21234, 21242
Dansai ................................................................ 20770
Daytek ................................................................ 20872
Decca ................................................................. 20770
Denon ..................................................... 20490, 20634
Denver ................................................................ 20778
Desay ...................................................................21407
Digitrex .............................................................. 20672
Disney .....................................................20675, 21270
DiViDo ............................................................... 20705
Dual ..............................................20675, 21068, 21085
Durabrand ........................................................... 21127
DVD2000 ............................................................20521
Electrohome ........................................................21003
Emerson ........................... 20591, 20675, 20821, 21268
Enterprise ............................................................20591
Entivo ......................................................20503, 20539
Enzer .................................................................. 20770
ESA ......................................................... 20821, 21268
Firstline .............................................................. 20651
Fisher .................................................................. 20670
Funai ............................................20675, 21268, 21334
Gateway ...................................................21073, 21158
GE ............................................... 20522, 20815, 20717
Go Video ......................... 20573, 20744, 20717, 20715,
.............................. 20741, 20783, 20833, 20869,21044,
................................21075, 21099, 21158, 21304, 21730
Go Vision .................................................21071, 21072
GoldStar ...................................... 20741, 20801, 20869
Goodmans .......................................................... 20790
Gradiente .................................................20490, 20651
Greenhill .............................................................20717
Grundig ................................................... 20539, 20705
Harman/Kardon ..................................... 20582, 20702
Hitachi .............................. 20573, 20664, 21247, 21764
Hiteker ................................................................ 20672
Humax .................................................................21588
iLo .......................................................................21348
Initial ...................................................................20717
Insignia ...............................................................21268
Integra .....................................................20571, 20627
IRT ..................................................................... 20783
JBL ..................................................................... 20702
Jensen .................................................................. 21016
JMB .................................................................... 20695
JVC...................................20558, 20623, 20867, 21164
Kawasaki ............................................................ 20790
Kenwood ................................................ 20490, 20534
KLH ..................................20717, 20790, 21020, 21149
Kloss .................................................................. 20533
Koss ......................................................... 20651, 21061
Lasonic ....................................................20627, 20798
Lecson ................................................................. 21533
Lenoxx ................................................................21127
LG .................................... 20591, 20741, 20801, 20869
LiteOn ............................... 21058, 21158, 21416, 21440
Loewe ...................................................... 20511, 20741
Logix .................................................................. 20783
Magnasonic ............................................. 20651, 20675
Magnavox ...................................20503, 20539, 20646,
......................................................20675, 20821, 21268
Malata ..................................................... 20782, 21159
Marantz ....................................... 20503, 20539, 20675
McIntosh .............................................................21533
Medion ............................................................... 20651
Memorex ......................................20695, 20831, 21270
Microsoft ................................................. 20522, 21708
23
Page 20

DVD Players, con’t
Minato .................................................................20752
Mintek ..................................................... 20839, 20717
Mitsubishi .................................... 21521, 20521, 21403
Momitsu ..............................................................21082
Mustek ................................................................ 20730
NAD ........................................................ 20591, 20741
Naiko .................................................................. 20770
NEC ........................................................20785, 20869
Nesa .....................................................................20717
Nex xTec h ............................................................21402
Norcent ............................. 21003, 20872, 21107, 21265
Onkyo .........................................20503, 20627, 20792
Optimus .............................................................. 20571
Oritron ................................................................ 20651
Palsonic .............................................................. 20672
Panasonic ....................... 20503, 20490, 20571, 20703,
............................... 21362, 21462, 21490, 21632, 21762
Philips .................20503, 20539, 20646, 20675, 20854,
......................................................21260, 21267, 21354
PianoDisc ............................................................21024
Pioneer ........................................ 20525, 20571, 20631
Polaroid ........................................ 21020, 21061, 21086
Polk Audio ......................................................... 20539
Portland .............................................................. 20770
Presidian .................................................. 20675, 21072
Prima ................................................................... 21016
Proceed............................................................... 20672
Proscan ............................................................... 20522
ProVision ............................................................ 20778
Qwestar .............................................................. 20651
Radionette ...........................................................20 741
RadioShack ........................................................ 20571
RCA ................................. 20522, 20571, 20717, 20790,
......................................................20822, 21022, 21132
Realistic.............................................................. 20571
Reoc ....................................................................20752
Rio ...................................................................... 20869
Rotel ................................................................... 20623
Rowa .......................................................20823, 21004
Saba .................................................................... 20651
Sampo .....................................................20698, 20752
Samsung ......................... 20490, 20573, 20744, 20820,
..................................................... 20899, 21044, 21075
Sansui ................................................................. 20695
Sanyo .................... 20670, 20675, 20695, 20873, 21334
Schneider............................................................ 20783
Schwaiger ............................................................20752
Sensory Science .................................................. 21158
Sharp .................... 20630, 20675, 20752, 21256, 21642
Sharper Image ..................................................... 21117
Sherwood ................................................20770, 21043
Shinsonic .................................................20533, 20839
Slim Art ............................................................. 20784
SM Electronic .................................................... 20730
Sonic Blue ............ 20573, 20715, 20783, 20869, 21099
Sony ...........20533, 21533, 20864, 21033, 21070, 21431
Sova .....................................................................21122
Superscan ........................................................... 20821
S VA ......................................................... 20717, 20860
Sylvania ........................................20675, 20821, 21268
Symphonic ....................... 20675, 20821, 21268, 21334
Tatu ng ................................................................ 20770
Tea c ..............................................20571, 20717, 20790
Tec hnic s ................................................. 20490, 20703
Tec hni ka ............................................................. 20770
Tec hnos on ic ....................................................... 20730
Tev io n ................................................................. 20651
Theta Digital ...................................................... 20571
Thomson ................................................. 20522, 20511
Tivo ......................................................... 21503, 21588
Tosh ib a ............................20503, 20573, 20539, 20695,
..........................................21045, 21154, 21503, 21588,
.............................................................................21639
Tredex ................................................................ 20800
Unimax .............................................................. 20770
United ................................................................. 20730
Universum ...........................................................20591
Urban Concepts .......................................20503, 20539
US Logic ............................................................ 20839
V .............................................................. 21064, 21226
Vent ur er ............................................................. 20790
Victor ..................................................................21597
Vizio ........................................................ 21064, 21226
Xbox ........................................................ 20522, 21708
Ya ma ha ....................................... 20490, 20539, 20545
Ya ma ka wa .......................................................... 20872
Zenith ...............................20503, 20591, 20741, 20869
Zeus .................................................................... 20784
Zoece ...................................................................21265
DVD/PVR Combination
Emerson ............................................................. 20675
Go Video .............................................................21730
Hitachi .................................................................2176 4
Mitsubishi ...........................................................21403
Panasonic ................................................20490, 21632
Pioneer ............................................................... 20 631
RCA .................................................................... 20522
Sharp ........................................... 20630, 21256, 21642
Sony ....................................................................21033
Sylvania .............................................................. 20675
Tosh ib a .................................................... 21503, 21639
Victor ..................................................................21597
TV/DVD Combination
Advent ................................................................. 21016
Akai .................................................................... 20695
Apex Digital ....................................................... 20830
Audiovox .......................................21071, 21121, 21122
Axion ..................................................................210 71
Broksonic ........................................................... 20695
Emerson ..................................................20675, 21268
ESA .....................................................................21268
24
Page 21

Funai ...................................................................21268
Go Vision ............................................................21071
Hitachi .................................................................21247
Insignia ...............................................................21268
Jensen .................................................................. 21016
Magnavox ............................................................21268
Panasonic ............................................................21490
Philips .....................................................20854, 21260
Prima ................................................................... 21016
RCA .....................................................................21022
Samsung ............................................................. 20899
Sansui ................................................................. 20695
Sova .....................................................................21122
Sylvania ................................................... 20675, 21268
Tosh ib a ............................................................... 20695
TV/VCR/DVD Combination
Akai .................................................................... 20899
Broksonic ........................................................... 20868
Emerson ............................................................. 20821
ESA .................................................................... 20821
Funai ...................................................................21334
Magnavox ........................................................... 20821
Panasonic ................................................ 21362, 21462
RCA ..................................................................... 21132
Sharp .................................................................. 20630
Superscan ........................................................... 20821
Sylvania .............................................................. 20821
Symphonic ......................................................... 20821
Tosh ib a ................................................................210 45
25
 Loading...