

Page 1

Team LiBTeam LiB
Brought to You by
Like the book? Buy it!
Page 2
Page 3
Tablet PC
Bill Mann
McGraw-Hill/Osborne
New York Chicago San Francisco
Lisbon London Madrid Mexico City
Milan New Delhi San Juan
Seoul Singapore Sydney Toronto
HowTo8 (8) / How to Do Everything with Your Tablet PC / Mann / 222771-0 / Front Matter
blind folio 1
Color profile: Generic CMYK printer profile
Composite Default screen
Page 4

Copyright © 2003 by The McGraw-Hill Companies, Inc.]. All rights reserved. Manufactured in the United States of America. Except
as permitted under the United States Copyright Act of 1976, no part of this publication may be reproduced or distributed in any form or
by any means, or stored in a database or retrieval system, without the prior written permission of the publisher.
0-07-223047-8
The material in this eBook also appears in the print version of this title: 0-07-222771-0.
All trademarks are trademarks of their respective owners. Rather than put a trademark symbol after every occurrence of a trademarked name, we use names in an editorial fashion only, and to the benefit of the trademark owner, with no intention of infringement of the trademark. Where such designations appear in this book, they have been printed with initial caps.
McGraw-Hill eBooks are available at special quantity discounts to use as premiums and sales promotions, or for use in corporate
training programs. For more information, please contact George Hoare, Special Sales, at [email protected] or (212)
904-4069.
TERMS OF USE
This is a copyrighted work and The McGraw-Hill Companies, Inc. (“McGraw-Hill”) and its licensors reserve all rights in and to the
work. Use of this work is subject to these terms. Except as permitted under the Copyright Act of 1976 and the right to store and
retrieve one copy of the work, you may not decompile, disassemble, reverse engineer, reproduce, modify, create derivative works
based upon, transmit, distribute, disseminate, sell, publish or sublicense the work or any part of it without McGraw-Hill’s prior consent. You may use the work for your own noncommercial and personal use; any other use of the work is strictly prohibited. Your
right to use the work may be terminated if you fail to comply with these terms.
THE WORK IS PROVIDED “AS IS”. McGRAW-HILL AND ITS LICENSORS MAKE NO GUARANTEES OR WARRANTIES
AS TO THE ACCURACY, ADEQUACY OR COMPLETENESS OF OR RESULTS TO BE OBTAINED FROM USING THE
WORK, INCLUDING ANY INFORMATION THAT CAN BE ACCESSED THROUGH THE WORK VIA HYPERLINK OR
OTHERWISE, AND EXPRESSLY DISCLAIM ANY WARRANTY, EXPRESS OR IMPLIED, INCLUDING BUT NOT LIMITED
TO IMPLIED WARRANTIES OF MERCHANTABILITY OR FITNESS FOR A PARTICULAR PURPOSE. McGraw-Hill and its
licensors do not warrant or guarantee that the functions contained in the work will meet your requirements or that its operation will
be uninterrupted or error free. Neither McGraw-Hill nor its licensors shall be liable to you or anyone else for any inaccuracy, error
or omission, regardless of cause, in the work or for any damages resulting therefrom. McGraw-Hill has no responsibility for the content of any information accessed through the work. Under no circumstances shall McGraw-Hill and/or its licensors be liable for any
indirect, incidental, special, punitive, consequential or similar damages that result from the use of or inability to use the work, even
if any of them has been advised of the possibility of such damages. This limitation of liability shall apply to any claim or cause whatsoever whether such claim or cause arises in contract, tort or otherwise.
DOI: 10.1036/0072230478
ebook_copyright 7.5x9.qxd 7/8/03 8:44 AM Page 1
Page 5

This book is for Patti and Jenn, who once again put up
with the crazy hours and endless evenings at the keyboard I
put in to get this project done. You two are great. In addition,
this book is dedicated to the newest member of our household,
Lightning the kitten, for her clear love for my Tablet PC and
the many “paragraphs” she typed into the manuscript when
I wasn’t looking.
HowTo8 (8) / How to Do Everything with Your Tablet PC / Mann / 222771-0 / Front Matter
Blind Folio FM:3
Color profile: Generic CMYK printer profile
Composite Default screen
Page 6

About the Author
Bill Mann (Bedford, NH) is the author of more than a dozen books, plus numerous
technology articles for publications including Internet World, TECH Edge, Palm
Power, and Computer Bits. Bill’s past projects for McGraw-Hill/Osborne include I
Want My MP3! How to Download, Rip, & Play Digital Music and Genealogy Online
Special America Online Edition. He specializes in mobile and wireless gadgets, and
has written about most of the major handheld and wireless devices available in the
U.S. When not writing, Bill spends his time with his family and plays far too many
computer games.
About the Technical Editor
Chris De Herrera is webmaster of Tablet PC Talk (http://www.tabletpctalk.com),
a leading resource on Tablet PC news. His website, CEWindows.NET
(http://www.cewindows.net), assists users of Pocket PCs and Windows CE
devices. He has been recognized for the past five years as a Microsoft Most
Valuable Professional for Mobile Devices, which include the Pocket PC and
SmartPhone. You can contact Chris at [email protected].
HowTo8 (8) / How to Do Everything with Your Tablet PC / Mann / 222771-0 / Front Matter
Blind Folio FM:4
Color profile: Generic CMYK printer profile
Composite Default screen
Page 7

Contents
Acknowledgments . . . . . . . . . . . . . . . . . . . . . . . . . . . . . . . . . . . . . . . . . . xi
Introduction . . . . . . . . . . . . . . . . . . . . . . . . . . . . . . . . . . . . . . . . . . . . . . . xiii
PART I
Get Acquainted with Your Tablet PC
CHAPTER 1 Meet Your Tablet PC . . . . . . . . . . . . . . . . . . . . . . . . . . . . . . . . . . . . 3
Examine Your Tablet PC Hardware . . . . . . . . . . . . . . . . . . . . . . . . . . . . . . 4
Turn Your Tablet PC On and Off . . . . . . . . . . . . . . . . . . . . . . . . . . . . . . . . 6
Use the Pen to Control Your Tablet PC . . . . . . . . . . . . . . . . . . . . . . . . . . . 7
Work with the Windows Desktop . . . . . . . . . . . . . . . . . . . . . . . . . . . . . . . 9
Examine the Items on the Desktop . . . . . . . . . . . . . . . . . . . . . . . . 10
Find Your Way Around Windows . . . . . . . . . . . . . . . . . . . . . . . . . . . . . . . 11
Learn About the Taskbar . . . . . . . . . . . . . . . . . . . . . . . . . . . . . . . . 11
Learn About the Start Menu . . . . . . . . . . . . . . . . . . . . . . . . . . . . . 12
CHAPTER 2
Explore Your Tablet PC . . . . . . . . . . . . . . . . . . . . . . . . . . . . . . . . . . 15
Take Notes with Your Tablet PC . . . . . . . . . . . . . . . . . . . . . . . . . . . . . . . . 16
Enter Text with the Pen . . . . . . . . . . . . . . . . . . . . . . . . . . . . . . . . . . . . . . . 18
Change the Screen Orientation for Comfort and Usability . . . . . . . . . . . . 20
Post a Handwritten Reminder on the Screen . . . . . . . . . . . . . . . . . . . . . . . 20
Draw Pictures on the Screen . . . . . . . . . . . . . . . . . . . . . . . . . . . . . . . . . . . 22
Try Out the Enhanced Microsoft Reader . . . . . . . . . . . . . . . . . . . . . . . . . . 24
Play a Game on Your Tablet PC Using the Pen . . . . . . . . . . . . . . . . . . . . . 26
PART II
Set Up Your Tablet PC
CHAPTER 3 Configure the Tablet PC for Your Needs . . . . . . . . . . . . . . . . . . . . . 31
Import Your Old Files and Settings . . . . . . . . . . . . . . . . . . . . . . . . . . . . . . 32
Decide How You Will Transfer Your Files and Settings . . . . . . . . 32
Put the Files and Settings Transfer Wizard to Work . . . . . . . . . . . 33
Configure the Windows Interface . . . . . . . . . . . . . . . . . . . . . . . . . . . . . . . 34
Configure Accessibility Options . . . . . . . . . . . . . . . . . . . . . . . . . . 35
Configure Language and Regional Options . . . . . . . . . . . . . . . . . 36
Configure the Windows Desktop . . . . . . . . . . . . . . . . . . . . . . . . . . 37
Customize the Taskbar . . . . . . . . . . . . . . . . . . . . . . . . . . . . . . . . . . 44
Configure the Start Menu . . . . . . . . . . . . . . . . . . . . . . . . . . . . . . . 47
Change Folder Views . . . . . . . . . . . . . . . . . . . . . . . . . . . . . . . . . . . 48
Configure the Explorer Bar . . . . . . . . . . . . . . . . . . . . . . . . . . . . . . 50
Configure Your Tablet PC Hardware . . . . . . . . . . . . . . . . . . . . . . . . . . . . . 52
Configure the Tablet and Pen . . . . . . . . . . . . . . . . . . . . . . . . . . . . 52
Configure the Keyboard . . . . . . . . . . . . . . . . . . . . . . . . . . . . . . . . . 56
Configure the Mouse . . . . . . . . . . . . . . . . . . . . . . . . . . . . . . . . . . . 58
Configure Your Display . . . . . . . . . . . . . . . . . . . . . . . . . . . . . . . . . 58
v
HowTo8 (8) / How to Do Everything with Your Tablet PC / Mann / 222771-0 /Front Matter
Color profile: Generic CMYK printer profile
Composite Default screen
For more information about this title, click here.
Copyright 2003 by The McGraw-Hill Companies, Inc. Click Here for Terms of Use.
Page 8

CHAPTER 4 Use Windows XP Tablet PC Edition . . . . . . . . . . . . . . . . . . . . . . . . . 63
Create and Manage User Accounts . . . . . . . . . . . . . . . . . . . . . . . . . . . . . . 64
Modify Existing Accounts and Create New Ones . . . . . . . . . . . . . 65
Add Password Protection for User Accounts . . . . . . . . . . . . . . . . 68
Easily Share Your Tablet PC with Fast User Switching . . . . . . . . 70
Manage Files and Folders . . . . . . . . . . . . . . . . . . . . . . . . . . . . . . . . . . . . . 72
Understand File and Folder Properties . . . . . . . . . . . . . . . . . . . . . 72
Manage Your Folders . . . . . . . . . . . . . . . . . . . . . . . . . . . . . . . . . . . 73
Manage Your Files . . . . . . . . . . . . . . . . . . . . . . . . . . . . . . . . . . . . . 76
Manage Programs and Components . . . . . . . . . . . . . . . . . . . . . . . . . . . . . 77
Get Your CD-ROM Drive Connected . . . . . . . . . . . . . . . . . . . . . . 78
Install Programs . . . . . . . . . . . . . . . . . . . . . . . . . . . . . . . . . . . . . . . 78
Install Components . . . . . . . . . . . . . . . . . . . . . . . . . . . . . . . . . . . . 78
Remove Programs . . . . . . . . . . . . . . . . . . . . . . . . . . . . . . . . . . . . . 80
Remove Components . . . . . . . . . . . . . . . . . . . . . . . . . . . . . . . . . . . 82
Find Stuff with the Search Companion . . . . . . . . . . . . . . . . . . . . . . . . . . . 82
Search for Files and Folders . . . . . . . . . . . . . . . . . . . . . . . . . . . . . 83
Use More Advanced Search Techniques . . . . . . . . . . . . . . . . . . . . 84
Work with the Recycle Bin . . . . . . . . . . . . . . . . . . . . . . . . . . . . . . . . . . . . 87
CHAPTER 5
Manage Your Tablet PC Hardware . . . . . . . . . . . . . . . . . . . . . . . . . . 91
Install and Remove Hardware . . . . . . . . . . . . . . . . . . . . . . . . . . . . . . . . . . 93
Install Plug-and-Play Hardware . . . . . . . . . . . . . . . . . . . . . . . . . . . 93
Install Non-Plug-and-Play Hardware . . . . . . . . . . . . . . . . . . . . . . 94
Remove Plug-and-Play Hardware . . . . . . . . . . . . . . . . . . . . . . . . . 95
Remove Non-Plug-and-Play Hardware . . . . . . . . . . . . . . . . . . . . . 96
Manage Hardware . . . . . . . . . . . . . . . . . . . . . . . . . . . . . . . . . . . . . . . . . . . 96
Manage Sound, Speech, and Audio Devices . . . . . . . . . . . . . . . . . 96
Manage Printers and Other Hardware . . . . . . . . . . . . . . . . . . . . . . 99
Use Device Manager . . . . . . . . . . . . . . . . . . . . . . . . . . . . . . . . . . . 100
Check the Status of Your Hardware . . . . . . . . . . . . . . . . . . . . . . . 102
Update Hardware Device Drivers . . . . . . . . . . . . . . . . . . . . . . . . . 102
Set Up Hardware Profiles . . . . . . . . . . . . . . . . . . . . . . . . . . . . . . . . . . . . . 104
CHAPTER 6
Connect to Peripheral Devices . . . . . . . . . . . . . . . . . . . . . . . . . . . . 107
Choose Between Peripheral Formats and Connectors . . . . . . . . . . . . . . . . 108
Choose Between Firewire and USB . . . . . . . . . . . . . . . . . . . . . . . 109
Choose Among External, PC Card, or CompactFlash Peripherals . . 109
Connect to Printers and Faxes . . . . . . . . . . . . . . . . . . . . . . . . . . . . . . . . . . 110
Work with Printers . . . . . . . . . . . . . . . . . . . . . . . . . . . . . . . . . . . . . 110
Work with Faxes . . . . . . . . . . . . . . . . . . . . . . . . . . . . . . . . . . . . . . 116
Connect to Scanners and Digital Cameras . . . . . . . . . . . . . . . . . . . . . . . . 119
Work with Scanners . . . . . . . . . . . . . . . . . . . . . . . . . . . . . . . . . . . . 120
Work with Digital Cameras . . . . . . . . . . . . . . . . . . . . . . . . . . . . . . 121
Connect to Other Peripherals . . . . . . . . . . . . . . . . . . . . . . . . . . . . . . . . . . . 124
CHAPTER 7
Set Up an Internet Connection for Your Tablet PC . . . . . . . . . . . . . . 125
Install and Configure Dial-Up Connections . . . . . . . . . . . . . . . . . . . . . . . 127
Configure Your Dial-Up Connection . . . . . . . . . . . . . . . . . . . . . . . 127
Create and Use Dialing Rules . . . . . . . . . . . . . . . . . . . . . . . . . . . . 127
vi How to Do Everything with Your Tablet PC
HowTo8 (8) / How to Do Everything with Your Tablet PC / Mann / 222771-0 / Front Matter
Color profile: Generic CMYK printer profile
Composite Default screen
Page 9

Install and Configure Broadband Connections . . . . . . . . . . . . . . . . . . . . . 133
Understand the Types of Broadband Connections . . . . . . . . . . . . 133
Install Your Broadband Connection . . . . . . . . . . . . . . . . . . . . . . . 135
Configure Your Broadband Connection . . . . . . . . . . . . . . . . . . . . 135
Connect to the Internet . . . . . . . . . . . . . . . . . . . . . . . . . . . . . . . . . . . . . . . 136
Use the Internet Applications Installed on Your Tablet PC . . . . . . . . . . . . 137
Explore Internet Explorer . . . . . . . . . . . . . . . . . . . . . . . . . . . . . . . 137
Explore Outlook Express . . . . . . . . . . . . . . . . . . . . . . . . . . . . . . . . 144
Work with Windows Messenger . . . . . . . . . . . . . . . . . . . . . . . . . . 150
Use Remote Desktop to Control Another Computer . . . . . . . . . . . 156
CHAPTER 8
Use Your Tablet PC on a Network . . . . . . . . . . . . . . . . . . . . . . . . . . 159
Use Your Tablet PC on a Corporate Network . . . . . . . . . . . . . . . . . . . . . . 161
Make the Physical Connection . . . . . . . . . . . . . . . . . . . . . . . . . . . 161
Make the Logical Connection . . . . . . . . . . . . . . . . . . . . . . . . . . . . 161
Check the Status of a Connection . . . . . . . . . . . . . . . . . . . . . . . . . 164
Connect to the Internet Across the Network . . . . . . . . . . . . . . . . . 165
Use Your Tablet PC on a Home Network . . . . . . . . . . . . . . . . . . . . . . . . . 165
Make Network Connections . . . . . . . . . . . . . . . . . . . . . . . . . . . . . 166
Build a Simple Home Network . . . . . . . . . . . . . . . . . . . . . . . . . . . . . . . . . 170
Figure Out What Hardware You Need . . . . . . . . . . . . . . . . . . . . . 172
Buy and Install the Hardware . . . . . . . . . . . . . . . . . . . . . . . . . . . . 173
Connect the Computers . . . . . . . . . . . . . . . . . . . . . . . . . . . . . . . . . 173
Run the Network Setup Wizard on Each Computer . . . . . . . . . . . 174
Troubleshoot Network Adapter Problems . . . . . . . . . . . . . . . . . . . 177
CHAPTER 9
Go Wireless . . . . . . . . . . . . . . . . . . . . . . . . . . . . . . . . . . . . . . . . . . . 181
Understand Wireless Networking Basics . . . . . . . . . . . . . . . . . . . . . . . . . 182
What’s the Big Deal about Wireless? . . . . . . . . . . . . . . . . . . . . . . 183
Get the Terminology Straight . . . . . . . . . . . . . . . . . . . . . . . . . . . . 184
What about Security? . . . . . . . . . . . . . . . . . . . . . . . . . . . . . . . . . . . 186
Other Things to Know about Wireless Networking . . . . . . . . . . . 186
Connect Your Tablet PC to an Existing Wireless Network . . . . . . . . . . . . 190
Build a Simple Wireless Network . . . . . . . . . . . . . . . . . . . . . . . . . . . . . . . 193
Decide How You Will Handle Security . . . . . . . . . . . . . . . . . . . . . 194
Figure Out What Hardware You Need . . . . . . . . . . . . . . . . . . . . . 194
Buy and Install the Hardware . . . . . . . . . . . . . . . . . . . . . . . . . . . . 195
PART III
Put Your Tablet PC to Work
CHAPTER 10 Understand Handwritten Input on the Tablet PC . . . . . . . . . . . . . . . 199
Understand Handwritten Input Basics . . . . . . . . . . . . . . . . . . . . . . . . . . . . 200
Understand Tablet PC Digital Ink . . . . . . . . . . . . . . . . . . . . . . . . . . . . . . . 204
Learn Why Digital Ink Looks So Good . . . . . . . . . . . . . . . . . . . . . 204
Understand Characteristics of Digital Ink . . . . . . . . . . . . . . . . . . . 206
Understand Tablet PC Handwriting Recognition . . . . . . . . . . . . . . . . . . . 209
Understand Gestures . . . . . . . . . . . . . . . . . . . . . . . . . . . . . . . . . . . 211
Learn How to Get Better Handwriting Recognition . . . . . . . . . . . 215
Contents vii
HowTo8 (8) / How to Do Everything with Your Tablet PC / Mann / 222771-0 / Front Matter
Color profile: Generic CMYK printer profile
Composite Default screen
Page 10

CHAPTER 11 Take Advantage of Accessories . . . . . . . . . . . . . . . . . . . . . . . . . . . . 219
Explore the Accessories Folder . . . . . . . . . . . . . . . . . . . . . . . . . . . . . . . . . 220
The Accessibility Folder . . . . . . . . . . . . . . . . . . . . . . . . . . . . . . . . 220
The Communications Folder . . . . . . . . . . . . . . . . . . . . . . . . . . . . . 224
The Entertainment Folder . . . . . . . . . . . . . . . . . . . . . . . . . . . . . . . 224
The System Tools Folder . . . . . . . . . . . . . . . . . . . . . . . . . . . . . . . . 226
Other Common Accessories . . . . . . . . . . . . . . . . . . . . . . . . . . . . . 228
Try the Snipping Tool . . . . . . . . . . . . . . . . . . . . . . . . . . . . . . . . . . 234
CHAPTER 12
Get the Most from Those Multimedia Applications . . . . . . . . . . . . . 241
Use Windows Media Player . . . . . . . . . . . . . . . . . . . . . . . . . . . . . . . . . . . 242
Upgrade to Media Player 9 . . . . . . . . . . . . . . . . . . . . . . . . . . . . . . 242
Start Using the Media Player . . . . . . . . . . . . . . . . . . . . . . . . . . . . . 244
Play Audio CDs . . . . . . . . . . . . . . . . . . . . . . . . . . . . . . . . . . . . . . . 246
View a Video Clip . . . . . . . . . . . . . . . . . . . . . . . . . . . . . . . . . . . . . 248
Listen to an Internet Radio Station . . . . . . . . . . . . . . . . . . . . . . . . 248
Stock Your Media Library . . . . . . . . . . . . . . . . . . . . . . . . . . . . . . . 250
Play Content from Your Media Library . . . . . . . . . . . . . . . . . . . . . 252
Learn to Skin Your Media Player . . . . . . . . . . . . . . . . . . . . . . . . . 253
Try These Media Player 9 Tips and Tricks . . . . . . . . . . . . . . . . . . 255
Take a Quick Look at Windows Movie Maker . . . . . . . . . . . . . . . . . . . . . 257
An Introduction to Windows Movie Maker . . . . . . . . . . . . . . . . . . 257
Should You Upgrade to Movie Maker 2? . . . . . . . . . . . . . . . . . . . 259
Sketch, Annotate, Draw, and Collaborate with Corel Grafigo . . . . . . . . . 263
Make Your Tablet PC a Digital Sketchbook with Alias SketchBook . . . . 264
CHAPTER 13
Use Journal and Other Cool Tablet PC Programs . . . . . . . . . . . . . . . 267
Take Advantage of Windows Journal . . . . . . . . . . . . . . . . . . . . . . . . . . . . 268
Learn All the Journal Fundamentals with the Journal Tutorial . . . 268
Explore Some Advanced Journal Topics . . . . . . . . . . . . . . . . . . . . 270
Apply These Tips to Work More Efficiently . . . . . . . . . . . . . . . . . 273
Use the Tablet PC Input Panel for Pen Input . . . . . . . . . . . . . . . . . . . . . . . 273
Explore the Different Pen Input Modes . . . . . . . . . . . . . . . . . . . . . 274
Experiment with Write Anywhere . . . . . . . . . . . . . . . . . . . . . . . . . 276
Customize the Input Panel . . . . . . . . . . . . . . . . . . . . . . . . . . . . . . . 276
Make Corrections to Your Entries . . . . . . . . . . . . . . . . . . . . . . . . . 277
Try These Input Panel Tips . . . . . . . . . . . . . . . . . . . . . . . . . . . . . . 279
Read Your Favorite Magazines on Your Tablet PC with Zinio Reader . . . 280
Explore the World of eBooks with the Enhanced Microsoft Reader . . . . . 281
Configure the Tablet PC Buttons to Work with
Microsoft Reader . . . . . . . . . . . . . . . . . . . . . . . . . . . . . . . . . . . . 283
Download Free eBooks . . . . . . . . . . . . . . . . . . . . . . . . . . . . . . . . . 285
Activate Microsoft Reader and Shop for eBooks . . . . . . . . . . . . . 287
Experience Mobile Collaboration with Groove . . . . . . . . . . . . . . . . . . . . . 288
Enhance Your Productivity with FranklinCovey TabletPlanner . . . . . . . . 291
Stay in Sync with Corporate Data . . . . . . . . . . . . . . . . . . . . . . . . . 293
Tie All Your Information Together with eBinder . . . . . . . . . . . . . 294
View a Demo and Download a Trial Version . . . . . . . . . . . . . . . . 294
Try Your Hand at These Tablet PC Power Toys . . . . . . . . . . . . . . . . . . . . 295
Thumbnail View . . . . . . . . . . . . . . . . . . . . . . . . . . . . . . . . . . . . . . 296
Tablet Pool . . . . . . . . . . . . . . . . . . . . . . . . . . . . . . . . . . . . . . . . . . . 297
viii How to Do Everything with Your Tablet PC
HowTo8 (8) / How to Do Everything with Your Tablet PC / Mann / 222771-0 / Front Matter
Color profile: Generic CMYK printer profile
Composite Default screen
Page 11

Puzzle Game . . . . . . . . . . . . . . . . . . . . . . . . . . . . . . . . . . . . . . . . . 298
Tic Tac Toe . . . . . . . . . . . . . . . . . . . . . . . . . . . . . . . . . . . . . . . . . . 300
CHAPTER 14
Extend Office XP with the Tablet Pack . . . . . . . . . . . . . . . . . . . . . . . 303
Download and Install the Office XP Pack for Tablet PC . . . . . . . . . . . . . . 305
Uninstall the Tablet Pack . . . . . . . . . . . . . . . . . . . . . . . . . . . . . . . . 309
Repair Your Tablet Pack Installation . . . . . . . . . . . . . . . . . . . . . . . 309
Use Handwriting in Word Documents . . . . . . . . . . . . . . . . . . . . . . . . . . . . 309
Add Handwritten Content in an Ink Drawing and
Writing Area . . . . . . . . . . . . . . . . . . . . . . . . . . . . . . . . . . . . . . . 310
Add Handwritten Comments with the Ink
Comment Command . . . . . . . . . . . . . . . . . . . . . . . . . . . . . . . . . 311
Use Handwriting in E-mail . . . . . . . . . . . . . . . . . . . . . . . . . . . . . . 312
Use Handwriting in Excel Spreadsheets . . . . . . . . . . . . . . . . . . . . . . . . . . 316
Use Handwriting in PowerPoint . . . . . . . . . . . . . . . . . . . . . . . . . . . . . . . . 317
Add Ink While Editing . . . . . . . . . . . . . . . . . . . . . . . . . . . . . . . . . 317
Add Ink While Presenting . . . . . . . . . . . . . . . . . . . . . . . . . . . . . . . 317
Take Advantage of the Tablet Pack Extension for Windows Journal . . . . 320
Use Journal Information in Outlook XP . . . . . . . . . . . . . . . . . . . . 320
Insert Outlook Meeting Information into a Journal Note . . . . . . . 321
CHAPTER 15
Talk to Your Tablet PC . . . . . . . . . . . . . . . . . . . . . . . . . . . . . . . . . . . 325
Understand Speech Recognition Basics . . . . . . . . . . . . . . . . . . . . . . . . . . 326
Check Out This Speech Recognition Timeline . . . . . . . . . . . . . . . 326
Learn a Little about How Speech Recognition Works . . . . . . . . . 329
Discover the Types of Speech Recognition Systems . . . . . . . . . . . 329
Use Tablet PC Speech Recognition . . . . . . . . . . . . . . . . . . . . . . . . . . . . . . 330
Train the Speech Recognizer . . . . . . . . . . . . . . . . . . . . . . . . . . . . . 330
Run the Speech Tutorial . . . . . . . . . . . . . . . . . . . . . . . . . . . . . . . . 333
Start Using Speech Recognition in Your Daily Work . . . . . . . . . . 334
Use These Tips for Speech Recognition in Specific Applications . . . . . . 337
Speak to Microsoft Office Applications . . . . . . . . . . . . . . . . . . . . 337
Speak to Internet Explorer . . . . . . . . . . . . . . . . . . . . . . . . . . . . . . . 338
Speak to Windows Journal . . . . . . . . . . . . . . . . . . . . . . . . . . . . . . 338
Try These General Speech Recognition Tips . . . . . . . . . . . . . . . . 339
Try These Advanced Speech Recognition Options . . . . . . . . . . . . 340
PART IV
Fix What Ails Your Tablet PC
CHAPTER 16 Prevent Problems with Regular Maintenance . . . . . . . . . . . . . . . . . 349
Maintain Your Tablet PC Hardware . . . . . . . . . . . . . . . . . . . . . . . . . . . . . 351
Maintain Your Disk Drive . . . . . . . . . . . . . . . . . . . . . . . . . . . . . . . . . . . . . 354
Detect and Deal with Disk Errors . . . . . . . . . . . . . . . . . . . . . . . . . 354
Defragment Your Hard Disk . . . . . . . . . . . . . . . . . . . . . . . . . . . . . 355
Free Disk Space with Disk Cleanup . . . . . . . . . . . . . . . . . . . . . . . 358
Schedule Maintenance Tasks . . . . . . . . . . . . . . . . . . . . . . . . . . . . . . . . . . . 364
Maintain Optimum Performance . . . . . . . . . . . . . . . . . . . . . . . . . . . . . . . . 367
Add Memory . . . . . . . . . . . . . . . . . . . . . . . . . . . . . . . . . . . . . . . . . 367
Tune Display Settings . . . . . . . . . . . . . . . . . . . . . . . . . . . . . . . . . . 367
Adjust Processor and Memory Settings . . . . . . . . . . . . . . . . . . . . 369
Resize the Paging File . . . . . . . . . . . . . . . . . . . . . . . . . . . . . . . . . . 370
Contents ix
HowTo8 (8) / How to Do Everything with Your Tablet PC / Mann / 222771-0 / Front Matter
Color profile: Generic CMYK printer profile
Composite Default screen
Page 12

CHAPTER 17 Back Up Your Tablet PC . . . . . . . . . . . . . . . . . . . . . . . . . . . . . . . . . . 373
Understand Your Tablet PC Backup Options . . . . . . . . . . . . . . . . . . . . . . 375
Use Backup to Protect Your System and Personal Data . . . . . . . . . . . . . . 375
Let the Backup or Restore Wizard Do the Work . . . . . . . . . . . . . . 376
Use Automated System Recovery . . . . . . . . . . . . . . . . . . . . . . . . . 378
Use the Advanced Backup Mode . . . . . . . . . . . . . . . . . . . . . . . . . 379
Use System Restore to Quickly Recover from Problems . . . . . . . . . . . . . 380
Configure System Restore . . . . . . . . . . . . . . . . . . . . . . . . . . . . . . . 380
Create a Restore Point . . . . . . . . . . . . . . . . . . . . . . . . . . . . . . . . . . 382
Return the System to a Previous Restore Point . . . . . . . . . . . . . . . 383
Undo the Return to a Previous Restore Point . . . . . . . . . . . . . . . . 384
Prepare Your Tablet PC for Possible Problems . . . . . . . . . . . . . . . . . . . . . 384
Prepare a System Recovery Disk . . . . . . . . . . . . . . . . . . . . . . . . . . 384
Configure Startup and Recovery Settings . . . . . . . . . . . . . . . . . . . 385
Consider Using a Portable Automatic Backup System . . . . . . . . . 386
CHAPTER 18
Use the Tablet PC’s Tools to Solve Problems . . . . . . . . . . . . . . . . . . 389
Get Familiar with the Help and Support Center . . . . . . . . . . . . . . . . . . . . 390
Get Right to It with the Fixing a Problem Link . . . . . . . . . . . . . . . 390
Run Dr. Watson When Required . . . . . . . . . . . . . . . . . . . . . . . . . . 392
Use Windows Update to Fix Problems . . . . . . . . . . . . . . . . . . . . . 393
Solve Problems with the Troubleshooters . . . . . . . . . . . . . . . . . . . 398
Get Your Old Programs to Run on Your Tablet PC . . . . . . . . . . . . 398
Use Other Tools for Diagnosing Problems . . . . . . . . . . . . . . . . . . . . . . . . 400
Investigate Problems with System Information . . . . . . . . . . . . . . . 400
Solve Specific Problems . . . . . . . . . . . . . . . . . . . . . . . . . . . . . . . . . . . . . . 401
Office XP Pack for Tablet PC Security Warning Appears
in Journal . . . . . . . . . . . . . . . . . . . . . . . . . . . . . . . . . . . . . . . . . . 402
Terminate Hung Programs with Windows Task Manager . . . . . . . . 403
Do a Reset to Recover from a Hung Tablet PC . . . . . . . . . . . . . . . 405
Make the Tablet Buttons Work . . . . . . . . . . . . . . . . . . . . . . . . . . . 406
Identify and Deal with Resource Problems . . . . . . . . . . . . . . . . . . 406
Repair Windows Problems with the Windows XP Setup Wizard . 409
Get Help with Remote Assistance . . . . . . . . . . . . . . . . . . . . . . . . . . . . . . . 410
Prepare Your Computer to Receive Remote Assistance . . . . . . . . 412
Request Remote Assistance . . . . . . . . . . . . . . . . . . . . . . . . . . . . . . 414
Participate in the Remote Assistance Session . . . . . . . . . . . . . . . . 416
Index . . . . . . . . . . . . . . . . . . . . . . . . . . . . . . . . . . . . . . . . . . . . . . . . . . . . 419
x How to Do Everything with Your Tablet PC
HowTo8 (8) / How to Do Everything with Your Tablet PC / Mann / 222771-0 / Front Matter
Color profile: Generic CMYK printer profile
Composite Default screen
Page 13

Acknowledgments
I want to thank everyone at McGraw-Hill/Osborne who was involved in this
project, in particular Megg, Jenn, Carolyn, and Tana. It was a pleasure to work
with you, and I hope to do so again. In owe Tina a big thank you for getting me
the hardware I needed to do the project, and Chris the same for this tech editing.
Margot, thanks for handling this and all my other book projects. Last, but certainly
not least, my sincere thanks to all the folks who provided me with the information
(and the cool toys!) I needed to do the job.
xi
HowTo8 (8) / How to Do Everything with Your Tablet PC / Mann / 222771-0 /Front Matter
Color profile: Generic CMYK printer profile
Composite Default screen
Copyright 2003 by The McGraw-Hill Companies, Inc. Click Here for Terms of Use.
Page 14

This page intentionally left blank.
Page 15

Introduction
The Tablet PCs are finally here. We’ve been hearing about them for years—small,
light, capable machines that you can write on as if they were a pad of paper or
a personal digital assistant. These three-pound powerhouses run a version of
Windows XP, so you can use them like high-end notebook computers and run all
your favorite applications. But you can also use them like virtually endless digital
notebooks or sketchbooks, entering information with a digital pen in environments
where a desktop or notebook computer just won’t cut it. You can even talk to them.
People have built tablet computers before. Some were ill-conceived, some
were underpowered, most were just ahead of their time. Even so, tablet computers
have found some niches where their unique characteristics have made them the
computer of choice. Now Microsoft and its partners have built the first Tablet PCs
that provide real benefits for general users like you and me.
Tablet PCs stake out a unique place in the market. They give you much of the
convenience of a personal digital assistant (PDA) like the Palm or Pocket PC
devices, but have the power to do real work. And with pen and voice for input,
you don’t have to do that work by sitting down and typing somewhere. If you need
to be able to take serious processing power with you wherever you go, or if you
spend a lot of time taking notes in meetings (where regular notebook computers
and the tappety-tap of their keyboards have become unwelcome), the Tablet PC
may be exactly what you need.
This book is meant to be your guide to the new breed of Tablet PC. This isn’t
some encyclopedic reference guide that covers every possible aspect of using a
Tablet PC. Instead, it is designed to be your guide to the things that you’ll need
to know to set up, use, and maintain your new machine. Beyond that, this book
introduces many of the new applications designed to take advantage of the
capabilities of the Tablet PC. I think you’ll find that this book tells you how to
do everything you’re likely to do with your machine.
I’ve divided the book into four parts. In Part I, “Get Acquainted with Your
Tablet PC,” you’ll do exactly that. We start at the very beginning, by examining
your Tablet PC and figuring out how to start it up, using the pen in lieu of a mouse,
and navigating around the user interface. Once you have the bare basics down, we
get down to work with a whirlwind tour of some of the unique benefits of the
Tablet PC. But this is no lecture—we fire up applications like Windows Journal,
the Tablet PC Input Panel, even a game. You get to experience for yourself some
of what makes the Tablet PC special.
xiii
HowTo8 (8) / How to Do Everything with Your Tablet PC / Mann / 222771-0 /Front Matter
Color profile: Generic CMYK printer profile
Composite Default screen
Copyright 2003 by The McGraw-Hill Companies, Inc. Click Here for Terms of Use.
Page 16

xiv How to Do Everything with Your Tablet PC
HowTo8 (8) / How to Do Everything with Your Tablet PC / Mann / 222771-0 / Front Matter
In Part II, “Set Up Your Tablet PC,” we’ll get into the nitty-gritty aspects of
owning and using a Tablet PC. By the end of this section, you’ll be able to
configure your software and manage your hardware, and generally set up your
shiny new Tablet PC to work the way you want it to. You’ll also be able to get
your Tablet PC connected to wired and wireless networks, as well as the Internet.
Imagine yourself sitting in a meeting with wireless access to the company
network, all on a machine scarcely much bigger or heavier than this book. Even
better, imagine yourself surfing the Web on your Tablet PC while sipping a glass
of wine in front of the fireplace.
In Part III, “Put Your Tablet PC to Work,” you’ll get to roll up your sleeves
and put your machine to work with the utilities and applications that come on your
Tablet PC. You’ll revisit the applications you played with in Chapter 2, but this
time you’ll learn how to use them in your day-to-day work. You’ll also get a tour
of some great applications that were either modified to work better on the Tablet
PC or written specifically for this new class of machine. Handwritten input and
spoken input are the two aspects of the Tablet PC designed to make using the
machine a more natural experience for us human beings. This is the part of the
book where you really learn about handwriting and speech recognition, including
lots of tips for getting the most from them in your work.
In Part IV, “Fix What Ails Your Tablet PC,” we look at preventive maintenance
on your new toy, as well as the all-important task of backing up your system.
Think about it: A Tablet PC is meant to be used more often, in more places, and
under more circumstances than any personal computer that came before it.
Knowing how to back up, maintain, and fix your Tablet PC could come in very
handy.
As I hope you can tell from this introduction, I’ve written this book in a casual,
easy-to-read style. It’s designed so that, to the extent possible, each chapter stands
alone. You can certainly read the book cover to cover, and I encourage you to at
least read the introduction to each chapter. But if you’re looking for specific
information, you can skip around without worry. To make the book more useful
to you, I’ve included certain helpful design elements. They are:
■
How to sidebars How to sidebars provide step-by-step instructions on
completing a particular task. They can be particularly important tasks, or
just tasks that are related to a subject we’re discussing in the chapter.
■
Did You Know sidebars Did You Know sidebars contain extra
information. They’re usually background info like historical notes or other
interesting tidbits.
Color profile: Generic CMYK printer profile
Composite Default screen
Page 17

■
Note icons Note icons provide helpful information related to the topic at
hand. Be sure to read any Note you come across.
■
Tip icons Tip icons describe ways to make better use of an application or
feature, as well as anything else that might make things easier.
■
Shortcut icons Shortcut icons provide quicker/easier ways to do things.
They’re good to read if you want to make the best use of your Tablet PC.
■
Caution icons Caution icons flag things you need to be aware of. Always
read these to avoid potential problems.
And with that, you’re ready to learn how to do everything with your Tablet PC.
If you have any thoughts on the book, or the Tablet PC in general, I would love to
hear them. You can reach me by e-mail at: [email protected]. Or you can
visit my web site at: http://www.techforyou.com.
Introduction xv
HowTo8 (8) / How to Do Everything with Your Tablet PC / Mann / 222771-0 / Front Matter
Color profile: Generic CMYK printer profile
Composite Default screen
Page 18

This page intentionally left blank.
Page 19
HowTo8 (8) / How to Do Everything with Your Tablet PC / Mann / 222771-0 / Chapter 1
blind folio 1
Par t I
Get Acquainted
with Your
Tablet PC
Color profile: Generic CMYK printer profile
Composite Default screen
Copyright 2003 by The McGraw-Hill Companies, Inc. Click Here for Terms of Use.
Page 20

This page intentionally left blank.
Page 21
HowTo8 (8) / How to Do Everything with Your Tablet PC / Mann / 222771-0 / Chapter 1
blind folio 3
Chapter 1
Meet Your
Tablet PC
Color profile: Generic CMYK printer profile
Composite Default screen
Copyright 2003 by The McGraw-Hill Companies, Inc. Click Here for Terms of Use.
Page 22

How to…
■
Examine Your Tablet PC Hardware
■
Turn Your Tablet PC On and Off
■
Understand Docking, Undocking, and Converting Your Tablet PC
■
Use the Pen to Control Your Tablet PC
■
Work with the Windows Desktop
■
Find Your Way Around Windows
The Tablet PC is a bid by Microsoft and its partners to evolve the notebook
computer into something more usable, more practical, more natural than the
machines most people use today. Since you’re reading this book, you’ve probably
bought yourself a Tablet PC, or had one provided to you by the IT department of
your company. Whichever the case may be, I’m going to assume that you want to
get the most out of your new toy (or burden, or tool) that you can.
Throughout the book, we’ll explore the capabilities and benefits of the Tablet
PC hardware and software. To do that, you’ll need a basic understanding of your
Tablet PC and the Windows XP Tablet PC Edition operating system that runs on
it. So let’s start at the beginning, by investigating that shiny new machine.
Examine Your Tablet PC Hardware
When you take your Tablet PC out of the box, spend a few minutes looking it over.
Depending on the style of machine you have, your new Tablet PC may look like
an ultralight notebook computer. Or it may look like nothing so much as a small
flat-panel display that came off its stand. But whatever your new machine looks
like, somewhere among all the accoutrements of a modern notebook computer—
a spare battery, charger, cables, and whatnot—is a digital pen. This pen, and the
digital ink that “flows” from it, are what make Tablet PCs unique. You’ll learn the
basics of how to use this pen later in this chapter, in the section, “Use the Pen to
Control Your Tablet PC.”
4 How to Do Everything with Your Tablet PC
HowTo8 (8) / How to Do Everything with Your Tablet PC / Mann / 222771-0 / Chapter 1
Color profile: Generic CMYK printer profile
Composite Default screen
Page 23
CHAPTER 1: Meet Your Tablet PC 5
HowTo8 (8) / How to Do Everything with Your Tablet PC / Mann / 222771-0 / Chapter 1
1
Throughout this book, when I refer to digital pen (or just pen), I always
mean the digital pen that came with your Tablet PC or any other digital
pen designed specifically to work with your Tablet PC. There are two types
of Tablet PC pens, so the pen from someone else’s machine might not work
for yours. A regular ballpoint pen or even a stylus from your Pocket PC
device definitely won’t work with your Tablet PC. They can, however, make
a mess of your machine’s screen, so make sure you use the correct pen.
Digital ink and using the pen to write with it are covered in Chapter 10.
Tablet PCs Come in
Many Shapes and Sizes?
While the kinds of Tablet PCs we’re talking about in this book all have to
conform to certain requirements defined by Microsoft, those requirements
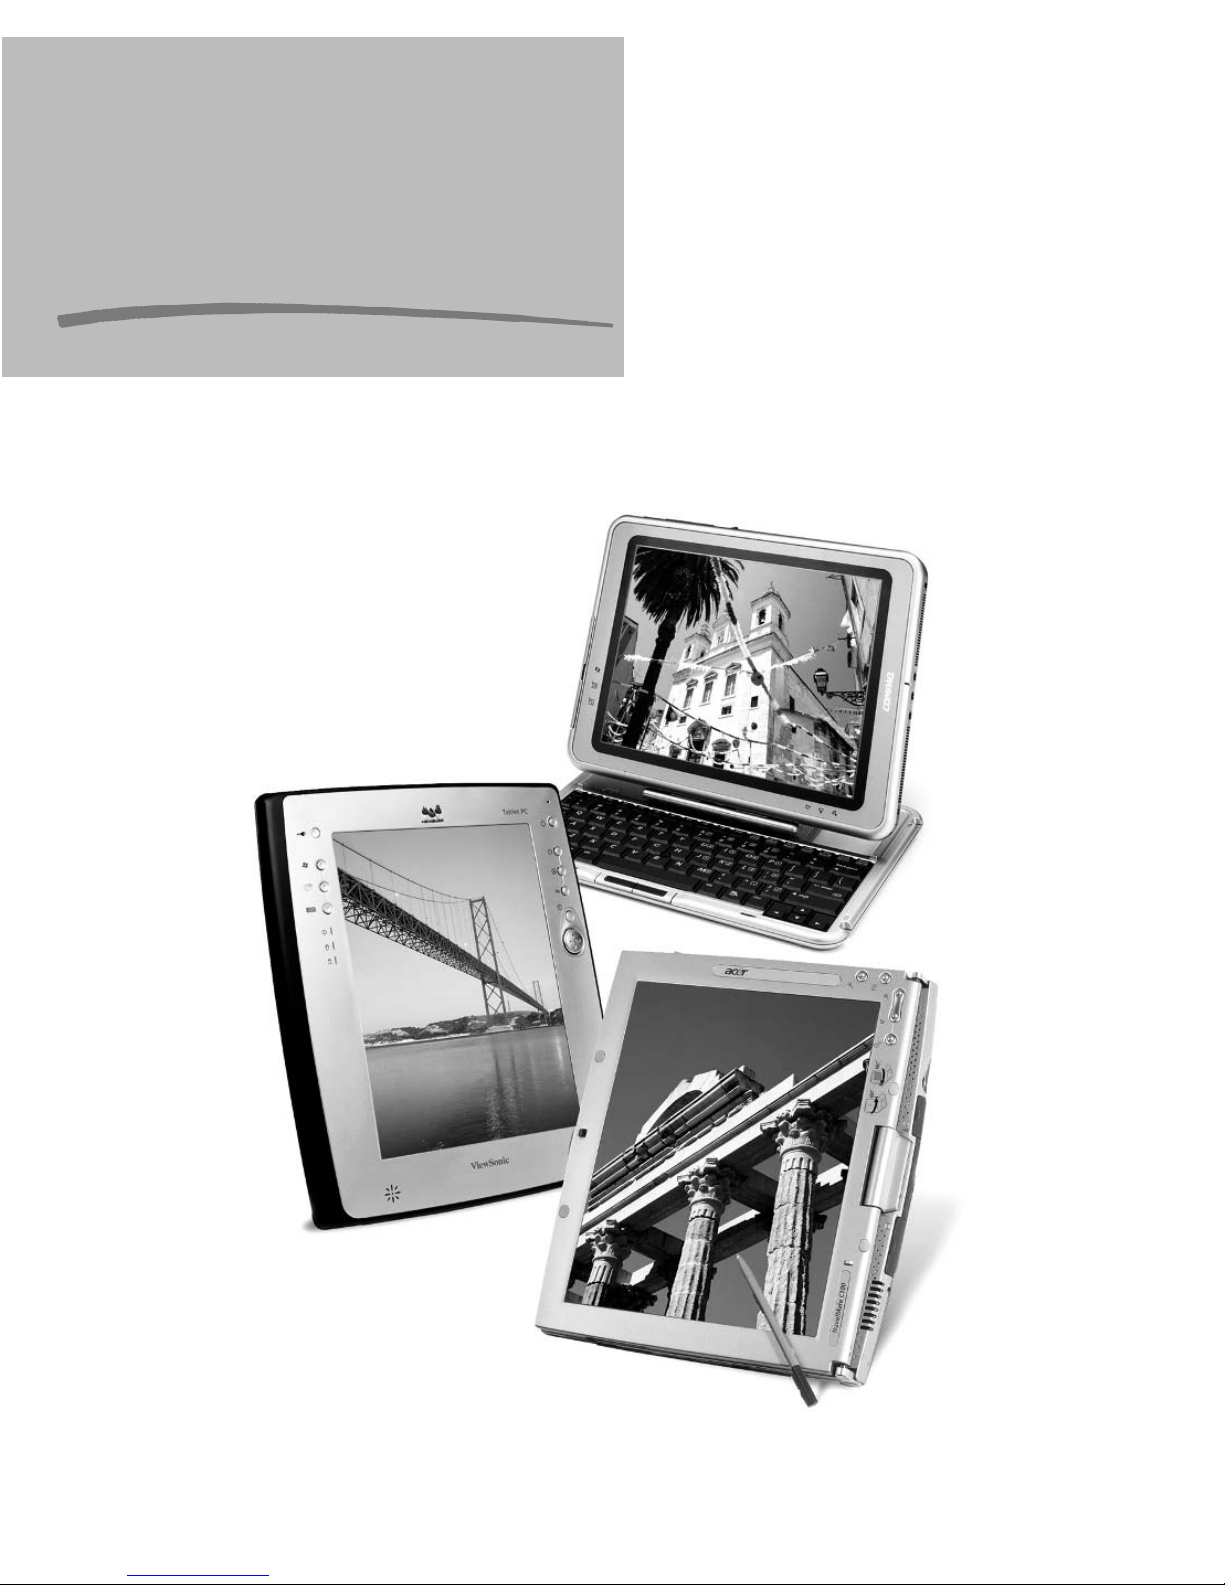
leave room for a lot of variety. Tablet PCs come in two basic forms:
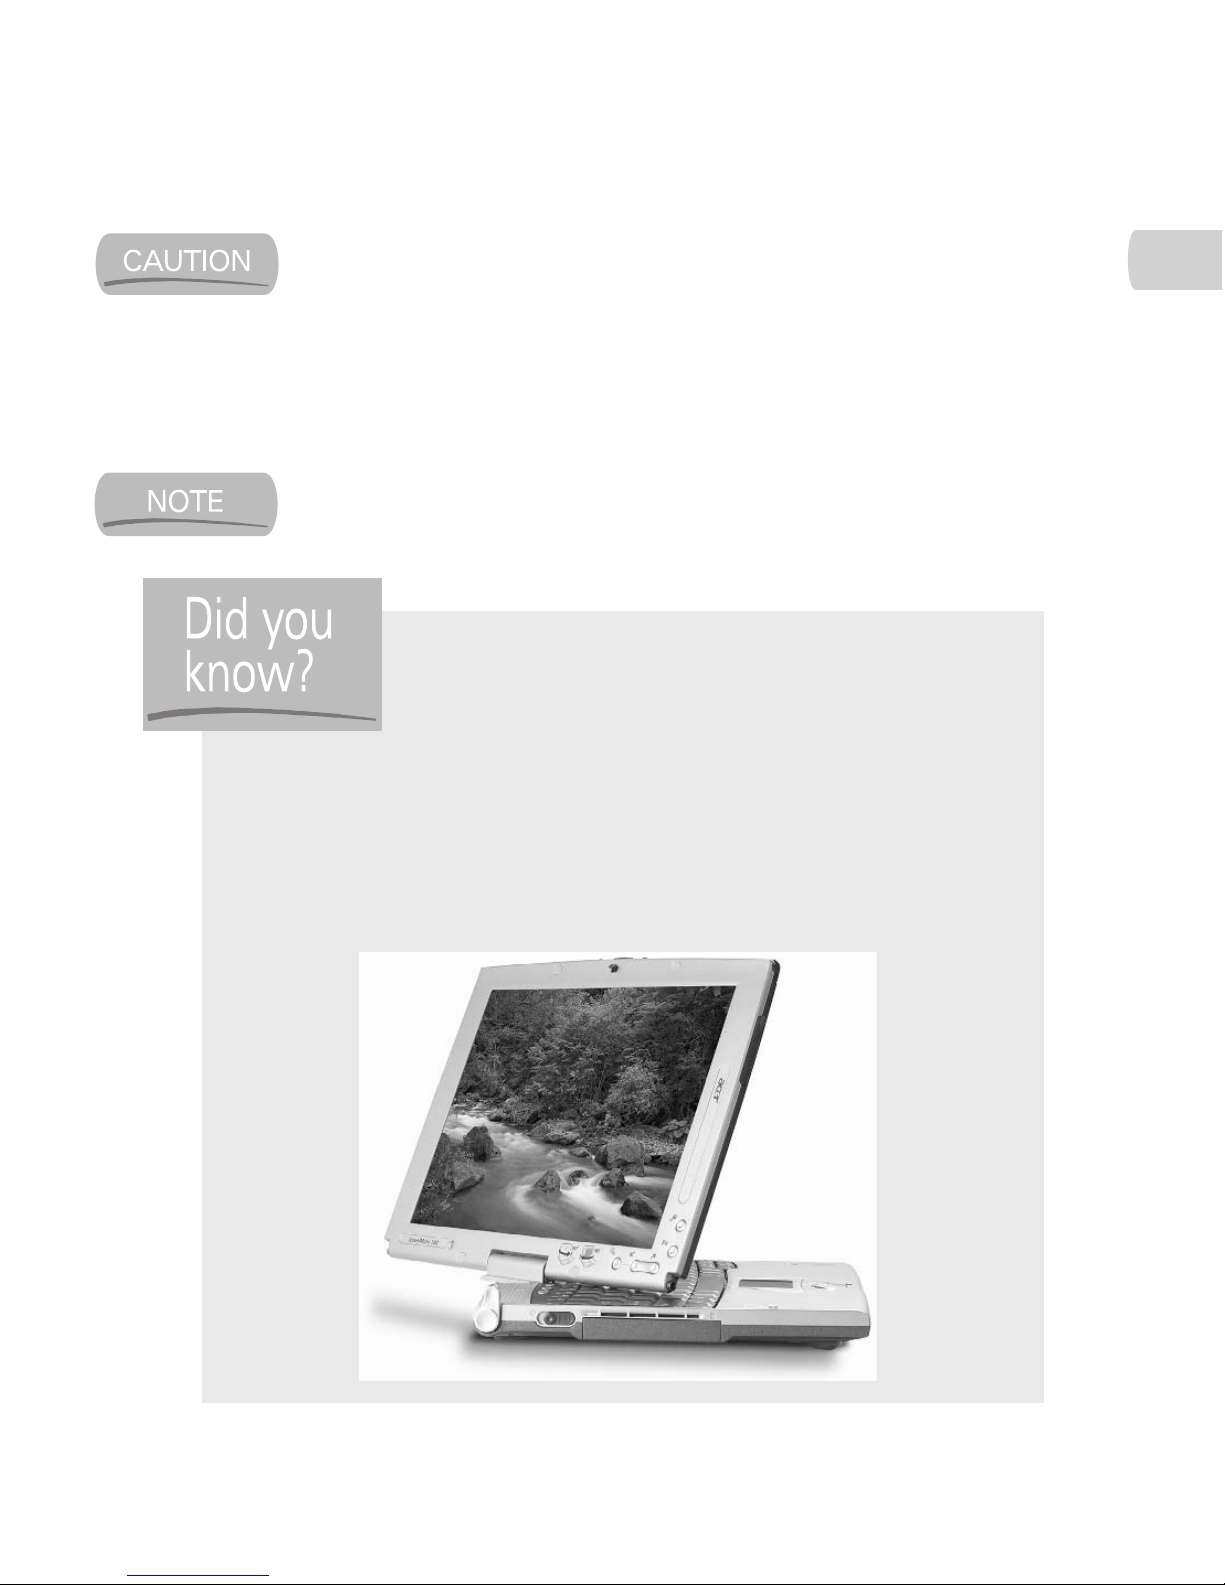
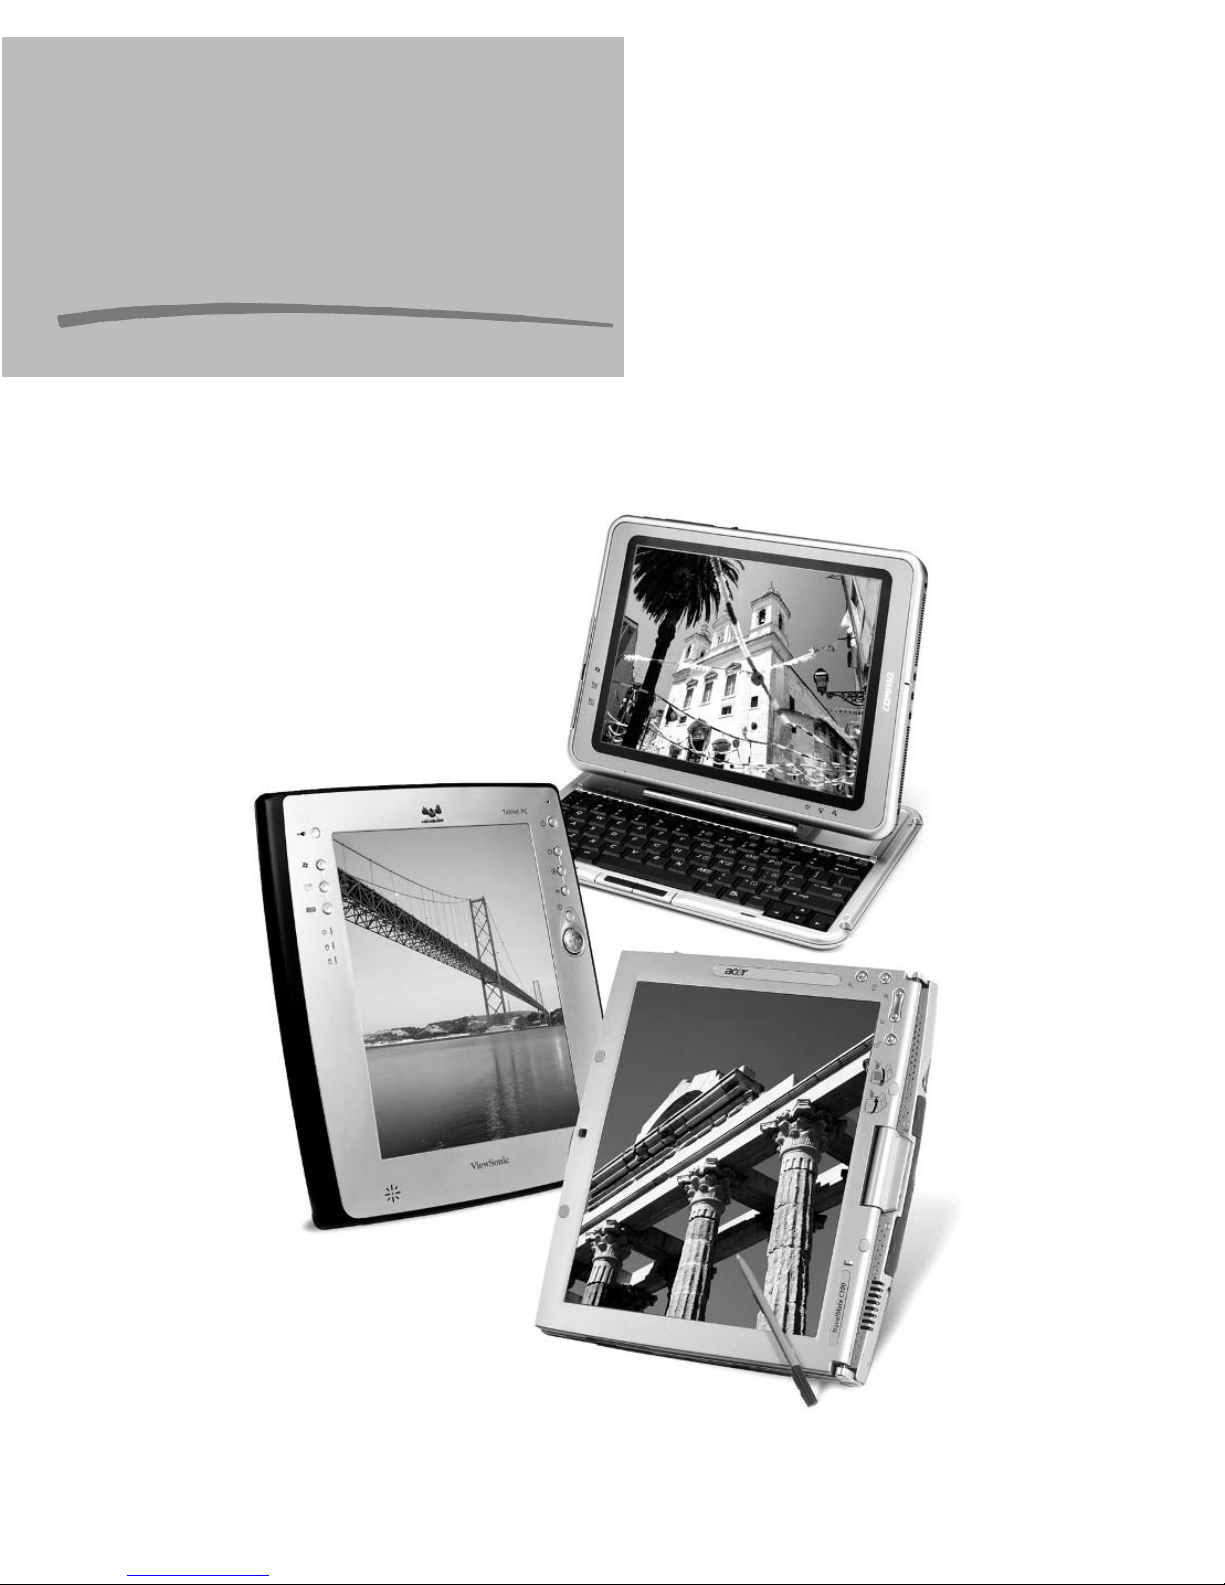
convertibles and slates. A convertible Tablet PC, like the Acer TravelMate
C100 shown next, has a built-in keyboard and can function like a regular
notebook, as well as a tablet.
Color profile: Generic CMYK printer profile
Composite Default screen
Page 24
6 How to Do Everything with Your Tablet PC
HowTo8 (8) / How to Do Everything with Your Tablet PC / Mann / 222771-0 / Chapter 1
Turn Your Tablet PC On and Off
It’s time to turn on your Tablet PC. To do so, you must first provide power to the
machine. If you bought the machine yourself, the package it came in should have
instructions for providing power. If you are using a Tablet PC provided by the
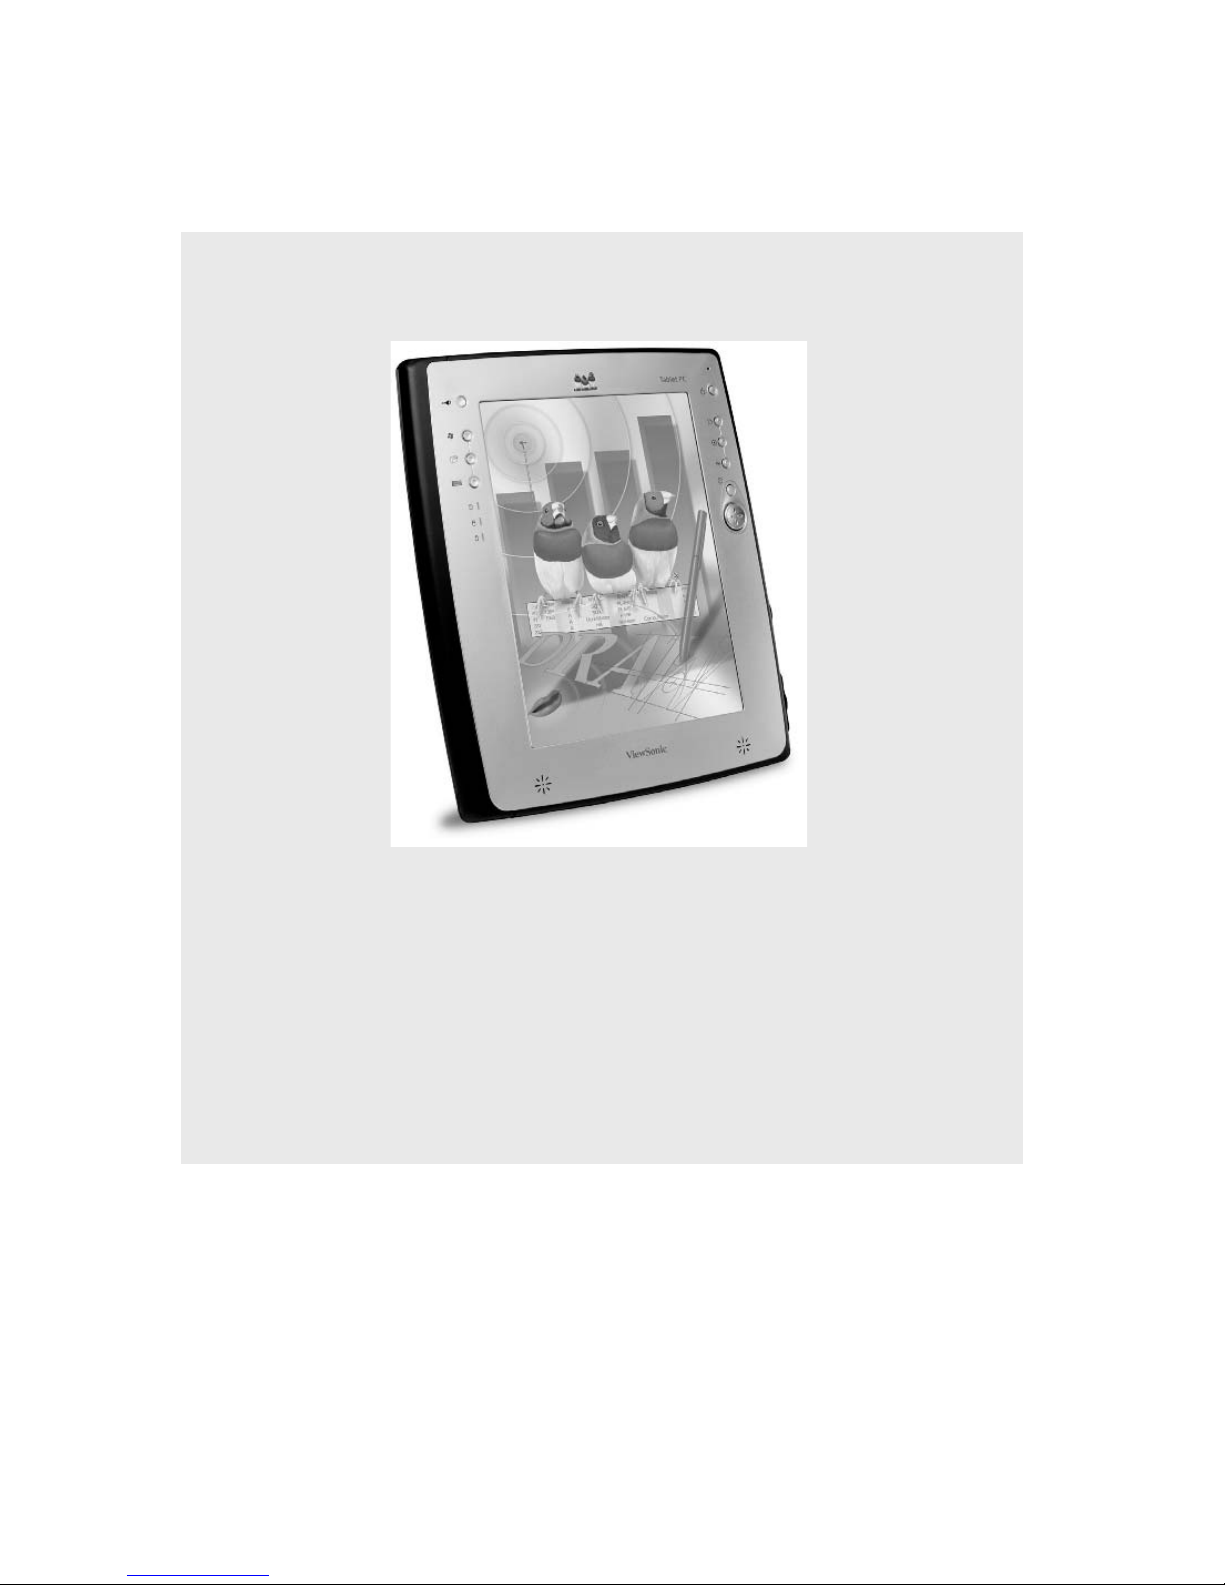
The slate machines, such as the ViewSonic V1100 shown next, which are
sometimes also called pure tablets, don’t have built-in keyboards.
Some machines, like the Compaq Tablet PC TC1000 from Hewlett-Packard,
are even more chameleon-like and can be used as both a slate and a convertible.
Scattered throughout this book you’ll find descriptions of still other styles of
Tablet PCs, including machines designed for specialized uses or with other
unique features.
A docking station is an add-on for many Tablet PCs. These docks support
the Tablet PC when you are using it at your desk, usually providing additional
disk drives and ports for connecting to a wired network or other peripherals.
For slates, the dock can also provide connections to a keyboard and mouse.
Color profile: Generic CMYK printer profile
Composite Default screen
Page 25
corporate IT department, the system should already be connected to power (and
the battery likely already charged).
Your Tablet PC should also have instructions for turning it on. The location of
a Tablet PC power switch isn’t something that’s specified by Microsoft, so you’ll
have to consult the documentation that came with your particular computer. Once
you flip the switch, your Tablet PC will go through its startup procedure. While
Tablet PCs are designed to resume from Standby mode in just a few seconds,
starting from scratch usually takes a minute or two.
If this is the first time anyone has turned on your Tablet PC, Windows
will walk you through some setup procedures. Just follow the onscreen
instructions and answer the questions and you should be done with that
process in a short while. If you are required to enter a username and
password, make sure you record this information so you can actually log
onto your computer when the time comes.
Once you get past any initial setup steps, you’re ready to log on to your
computer. If Windows asks for it, enter your username and password. If the
Windows Welcome Screen appears, use the pen that came with your Tablet PC
to tap the icon that has your username. After a minute or two, you will see the
Windows desktop.
If your Tablet PC is connected to a corporate network, it may be set up
to use a smart card for security. Your network administrators will need
to provide you with information on how to use the smart card.
You should not try to turn off your Tablet PC by flipping the power switch,
unplugging the machine from the wall, or anything like that. If you don’t
want to risk losing data and generally playing havoc with your system,
you need to follow the proper procedure when you want to turn off your
Tablet PC. This procedure is covered later in the chapter, in the section,
“Turn Off Your Tablet PC.”
Use the Pen to Control Your Tablet PC
In the previous section, I asked you to use the pen to tap an icon. That’s the most
basic way to use the Tablet PC pen. But you can use the pen to do more than just
tap—it can completely replace the mouse.
CHAPTER 1: Meet Your Tablet PC 7
HowTo8 (8) / How to Do Everything with Your Tablet PC / Mann / 222771-0 / Chapter 1
1
Color profile: Generic CMYK printer profile
Composite Default screen
Page 26
I usually recommend that people play with new hardware or software to
get a feel for it, but not when it comes to using the Tablet PC pen. While
it isn’t hard to do, and the different actions soon seem perfectly natural,
if you don’t learn to use the pen the right way, right away, you’ll have
trouble using your Tablet PC.
The best way to learn to use the pen as a mouse replacement is to work through
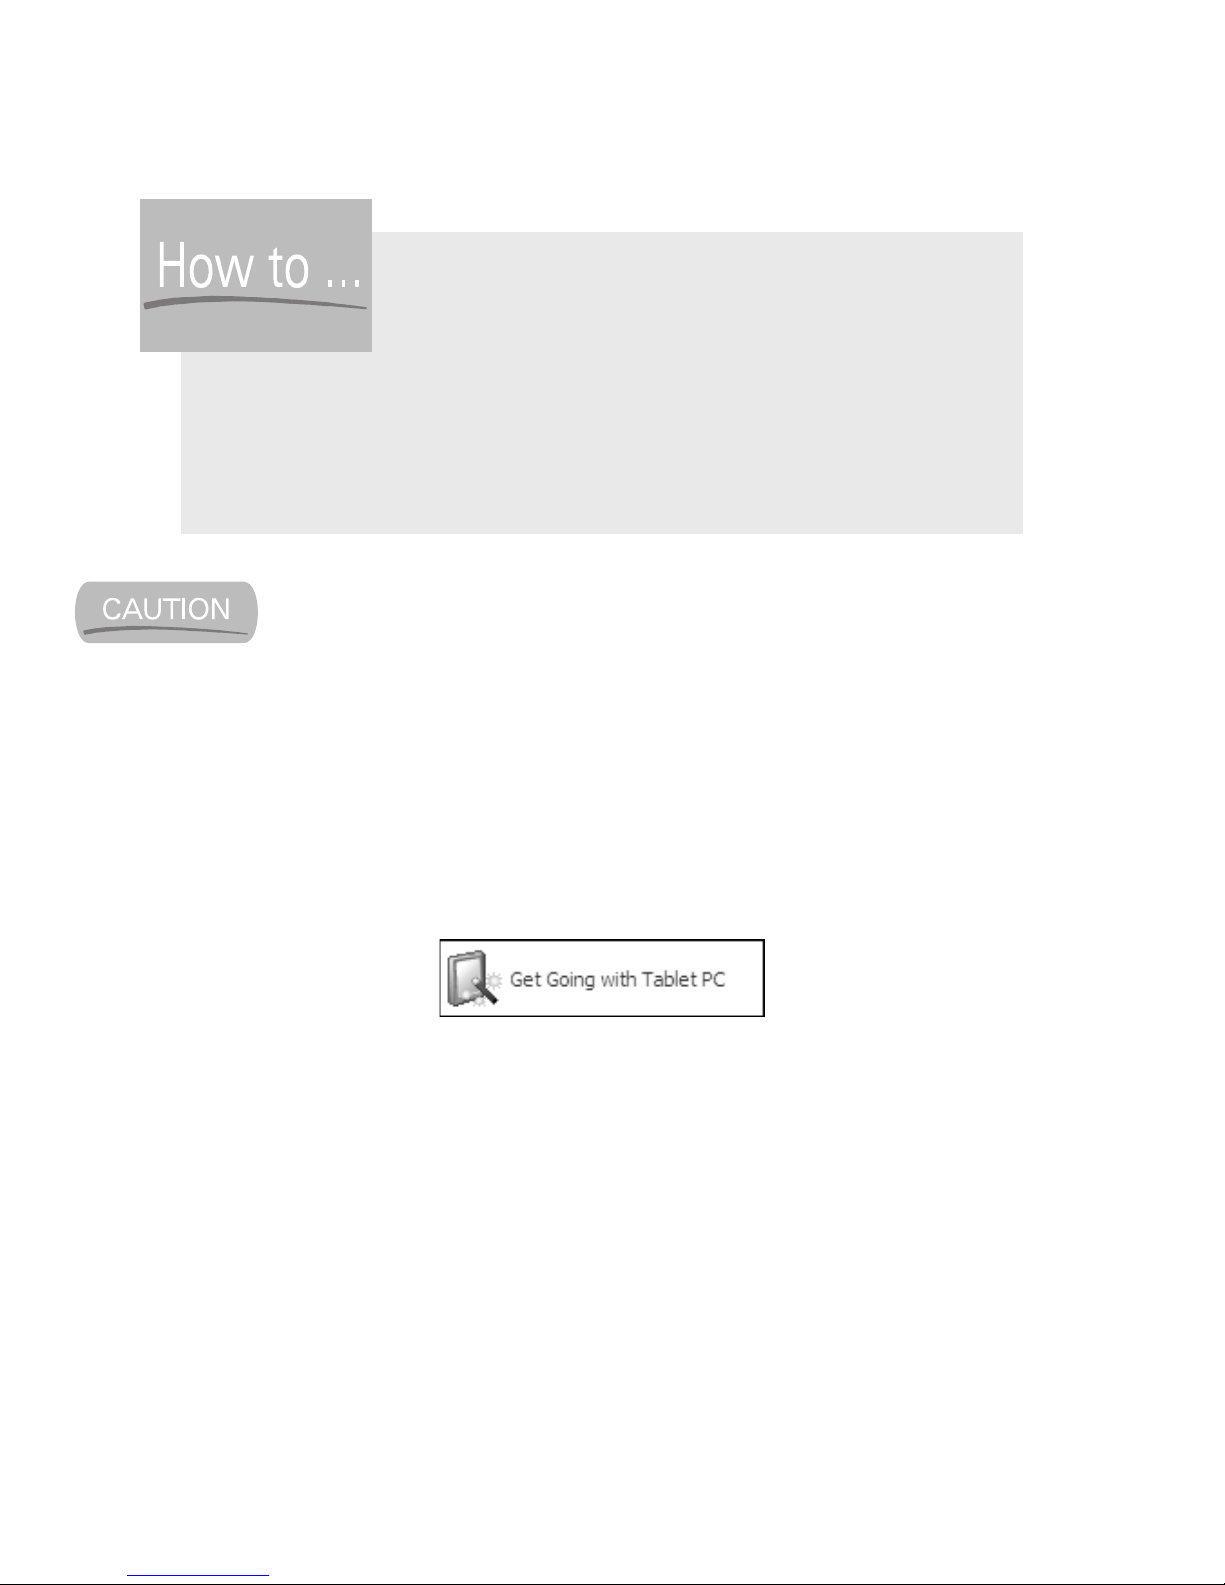
one of the tutorials that come installed on Tablet PCs. The tutorial you’ll use is
named Get Going With Tablet PC, and you can run it by tapping Start | Get Going
With Tablet PC. The icon for this tutorial is on the left side of the menu that appears
when you tap Start, as shown next.
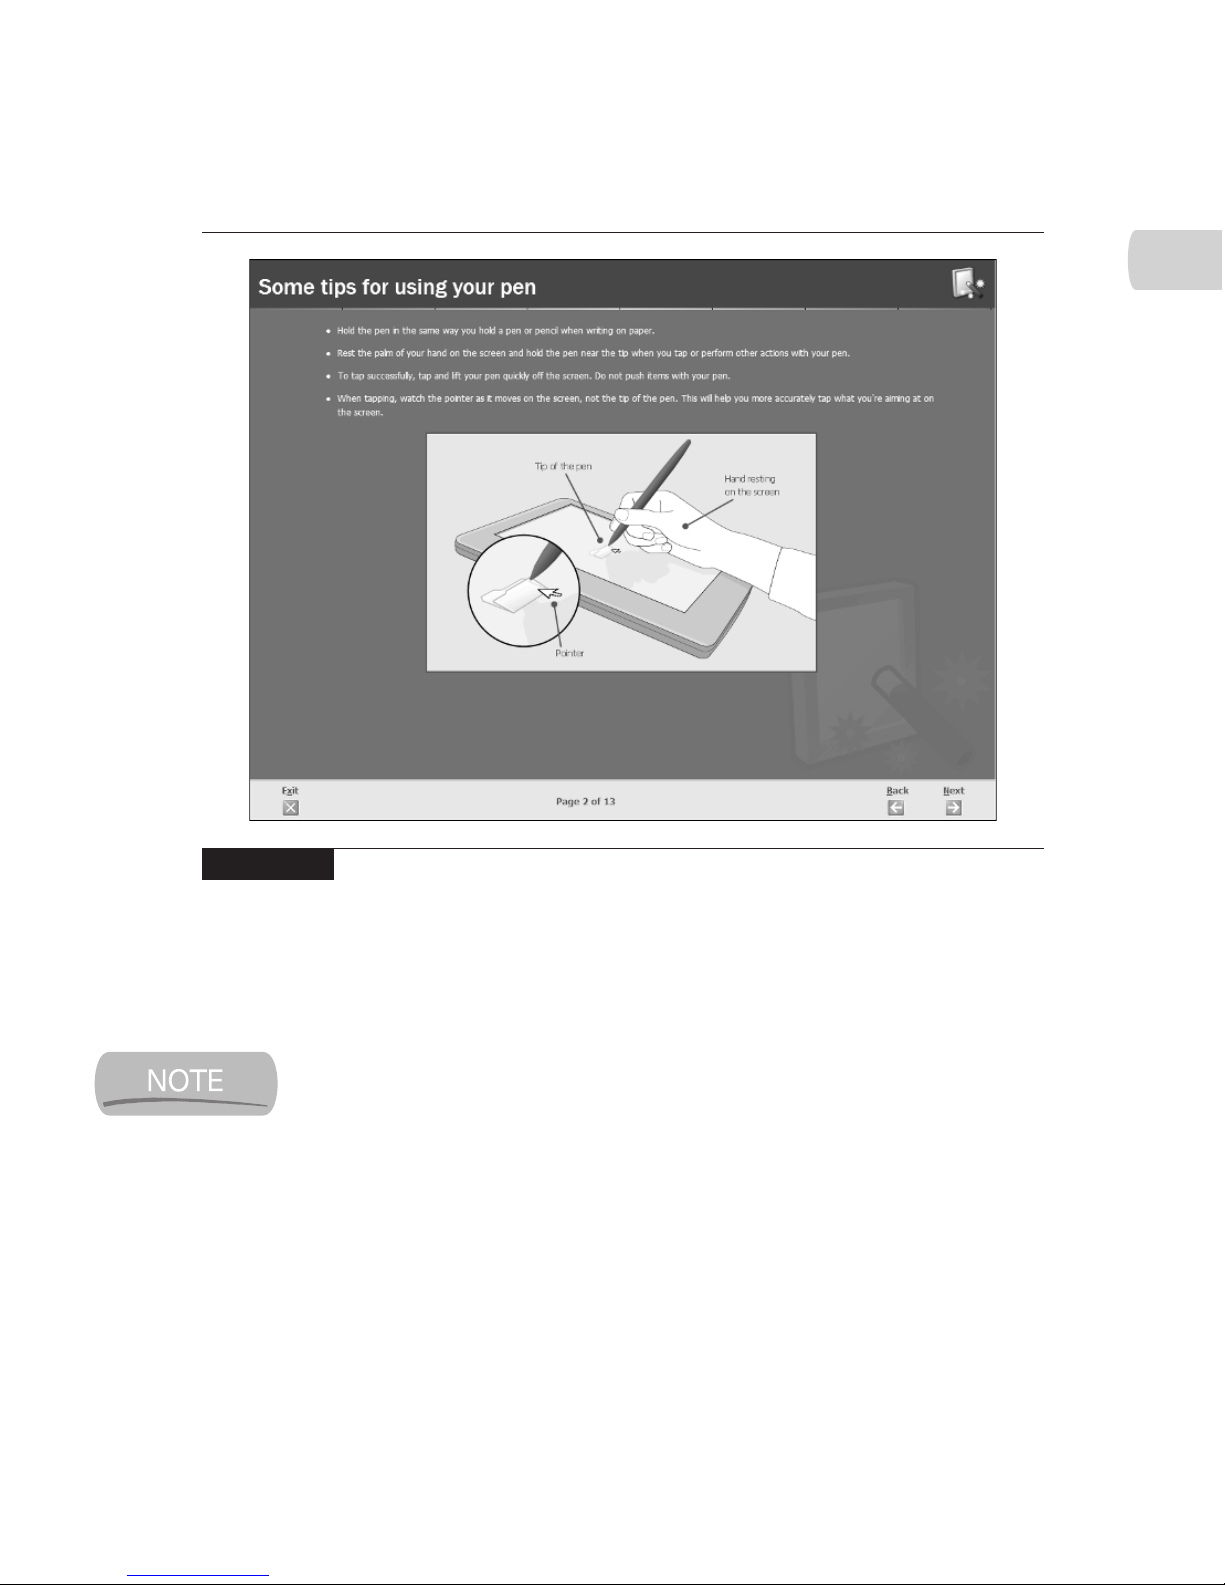
The first six screens of this tutorial are all you really need to go through to
learn to use the pen instead of a mouse. Starting with tips for holding the pen
(see Figure 1-1), the tutorial shows you how to single-tap (I’ll call this tapping in
this book), double-tap, and right-tap (also called press and hold). These actions
correspond to left-clicking, double-clicking, and right-clicking with a mouse.
One additional mouse-like capability of the Tablet PC pen is the ability to
hover. In Microsoft Windows XP, if you point the mouse at an icon on a toolbar
without clicking or moving it, the mouse is said to be hovering over the icon.
When the mouse pointer hovers over an icon, Windows can display a tooltip, or
other descriptive information related to that icon.
For the Tablet PC pen, the equivalent of hovering the mouse pointer over an
icon is hovering the pen tip over that icon. Because of the way they’re designed,
8 How to Do Everything with Your Tablet PC
HowTo8 (8) / How to Do Everything with Your Tablet PC / Mann / 222771-0 / Chapter 1
Find Out What Kind
of Pen You Have
Now that you know there are two types of pens, you’re probably wondering
which kind your favorite Tablet PC has. If you’re still shopping for a Tablet PC,
your best bet is to ask. If you already have the Tablet PC, there are a few things
you can do. The easiest is to see if your pen contains a battery. If it does, your
pen (and the digitizer in the Tablet PC itself) is from FinePoint.
Color profile: Generic CMYK printer profile
Composite Default screen
Page 27
Tablet PCs can detect their pens without the pen tip touching the screen. To make
this happen, you just need to place the tip of the pen close to the screen without
touching it.
Since the Tablet PC is sensitive to the pen and not to you, you can rest
your hand on the screen while using the pen, making it much easier
to hover.
Now that you’re trained in using the pen instead of a mouse, you’re ready to
start exploring Windows XP Tablet PC edition.
Work with the Windows Desktop
The Windows desktop occupies the majority of the screen and is designed to look
a lot like a real-world desktop. It’s a work space where you can open files, run
CHAPTER 1: Meet Your Tablet PC 9
HowTo8 (8) / How to Do Everything with Your Tablet PC / Mann / 222771-0 / Chapter 1
1
FIGURE 1-1 The Get Going with Tablet PC tutorial teaches you how to use the pen in
place of a mouse.
Color profile: Generic CMYK printer profile
Composite Default screen
Page 28
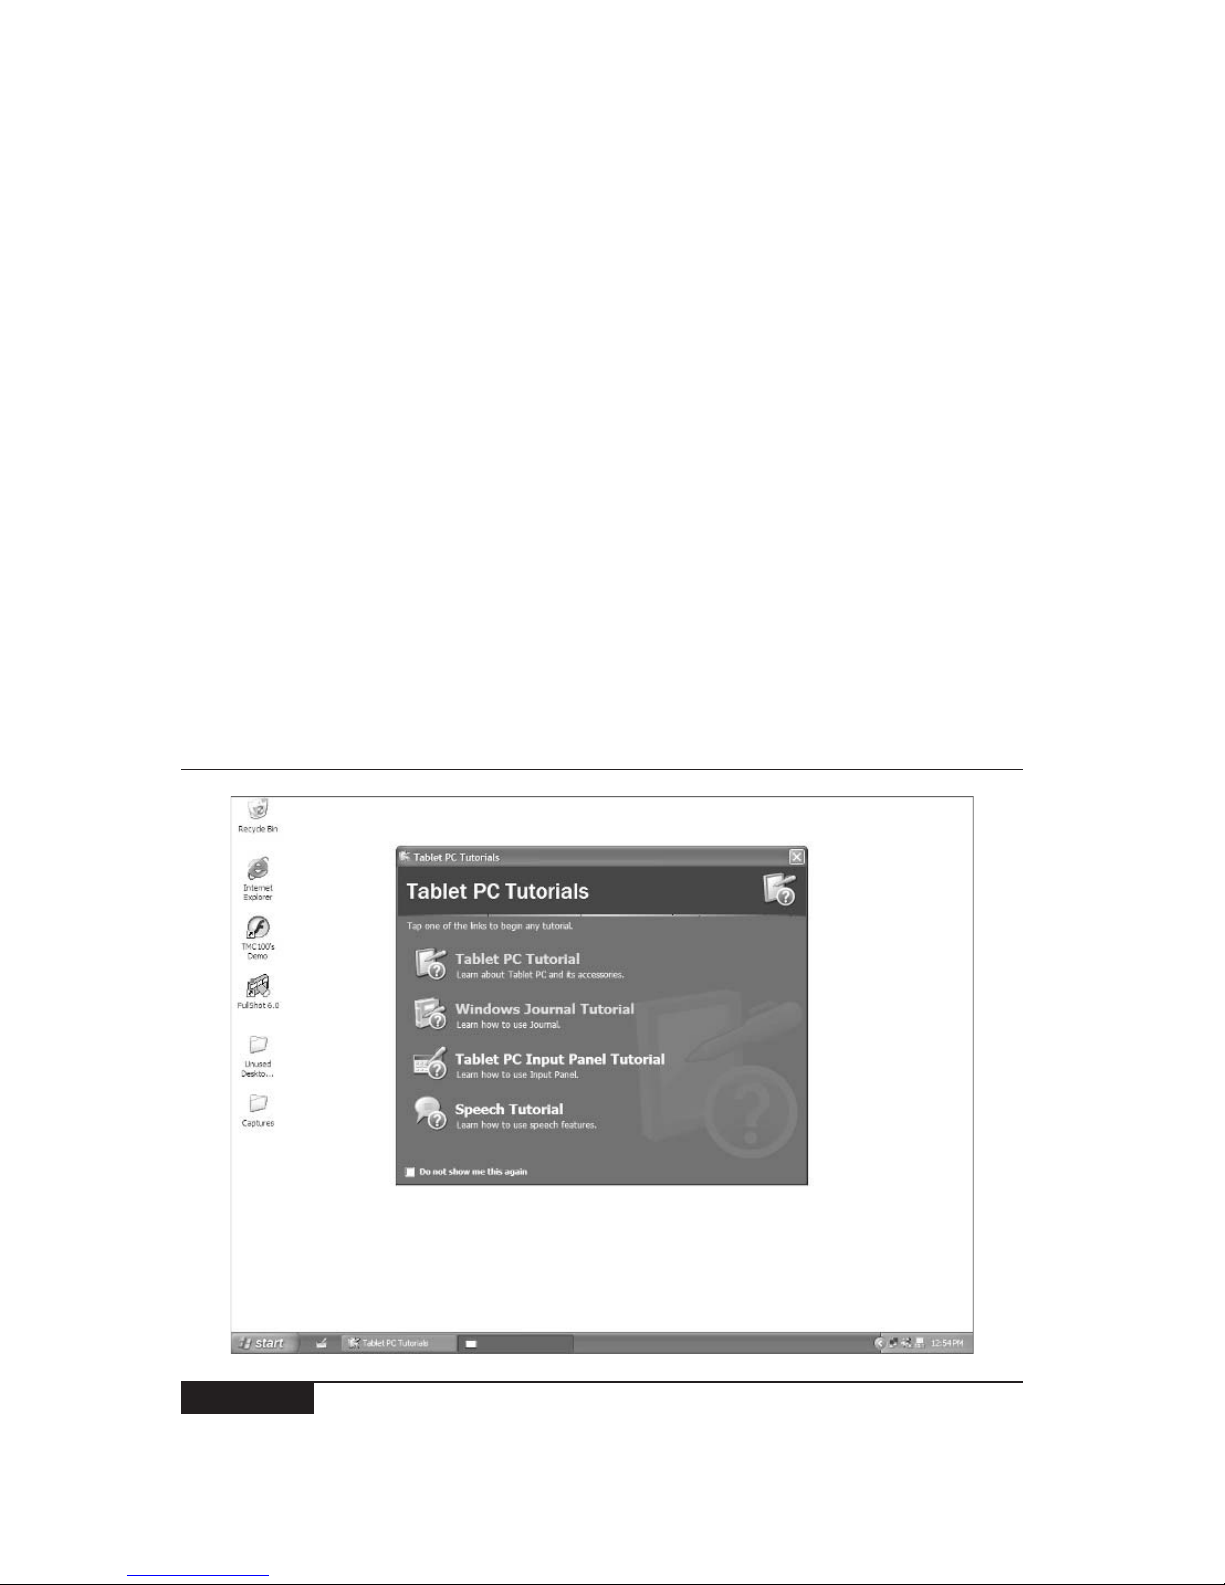
applications, and generally do your work. When you’re working with Windows,
you can imagine that whatever you are working on is lying on top of the desk
where you can get at it. Figure 1-2 shows what my Tablet PC screen looks like
when I start my system. What you see will vary—each manufacturer sets things up
a little differently. Also, I’ve been using my computer for some time, so I’ve made
changes to the default layout and installed additional programs to suit my needs.
Examine the Items on the Desktop
On your Tablet PC desktop, you’ll likely see a window (a rectangular area of the
screen surrounded by a frame and containing information related to a specific
activity) containing one or more Tablet PC tutorials. The window is in the center
of Figure 1-2. You’ll certainly see some icons, small pictures representing programs,
files, or commands, that you can activate. The pictures often serve as a visual
shorthand to give you an idea of what they represent.
For example, one icon you’ll see on the desktop is the Recycle Bin. This icon
looks like a little office trash can with a recycling symbol on its side. You can tell
10 How to Do Everything with Your Tablet PC
HowTo8 (8) / How to Do Everything with Your Tablet PC / Mann / 222771-0 / Chapter 1
FIGURE 1-2 This Windows XP Tablet PC edition desktop shows some icons, the
taskbar, and an open window.
Color profile: Generic CMYK printer profile
Composite Default screen
Page 29

CHAPTER 1: Meet Your Tablet PC 11
HowTo8 (8) / How to Do Everything with Your Tablet PC / Mann / 222771-0 / Chapter 1
1
at a glance, without reading the icon’s title, that the Recycle Bin is a place to discard
things. In Figure 1-2, all the icons are lined up along the left edge of the desktop,
but they could be placed anywhere, as shown next.
The other thing you can see on the desktop in Figure 1-2 is the taskbar, which
is covered in more detail later in the chapter, in the section, “Learn About the
Taskbar.”
Find Your Way Around Windows
Navigation around the Windows XP Tablet PC edition is virtually the same as
with previous versions of Windows. The only difference is that you can navigate
with the pen in addition to, or in place of, the mouse. With Windows XP Tablet PC
edition, you can use the mouse and the pen interchangeably without any restrictions.
Having said all that, two aspects of Windows XP that you may not be familiar
with are the taskbar and the Start menu.
Learn About the Taskbar
The Windows taskbar is one of the key components of the Windows XP user
interface. The taskbar is a row of buttons and icons that appears in a bar along one
side of the screen, usually the bottom. By default, your Tablet PC should start out
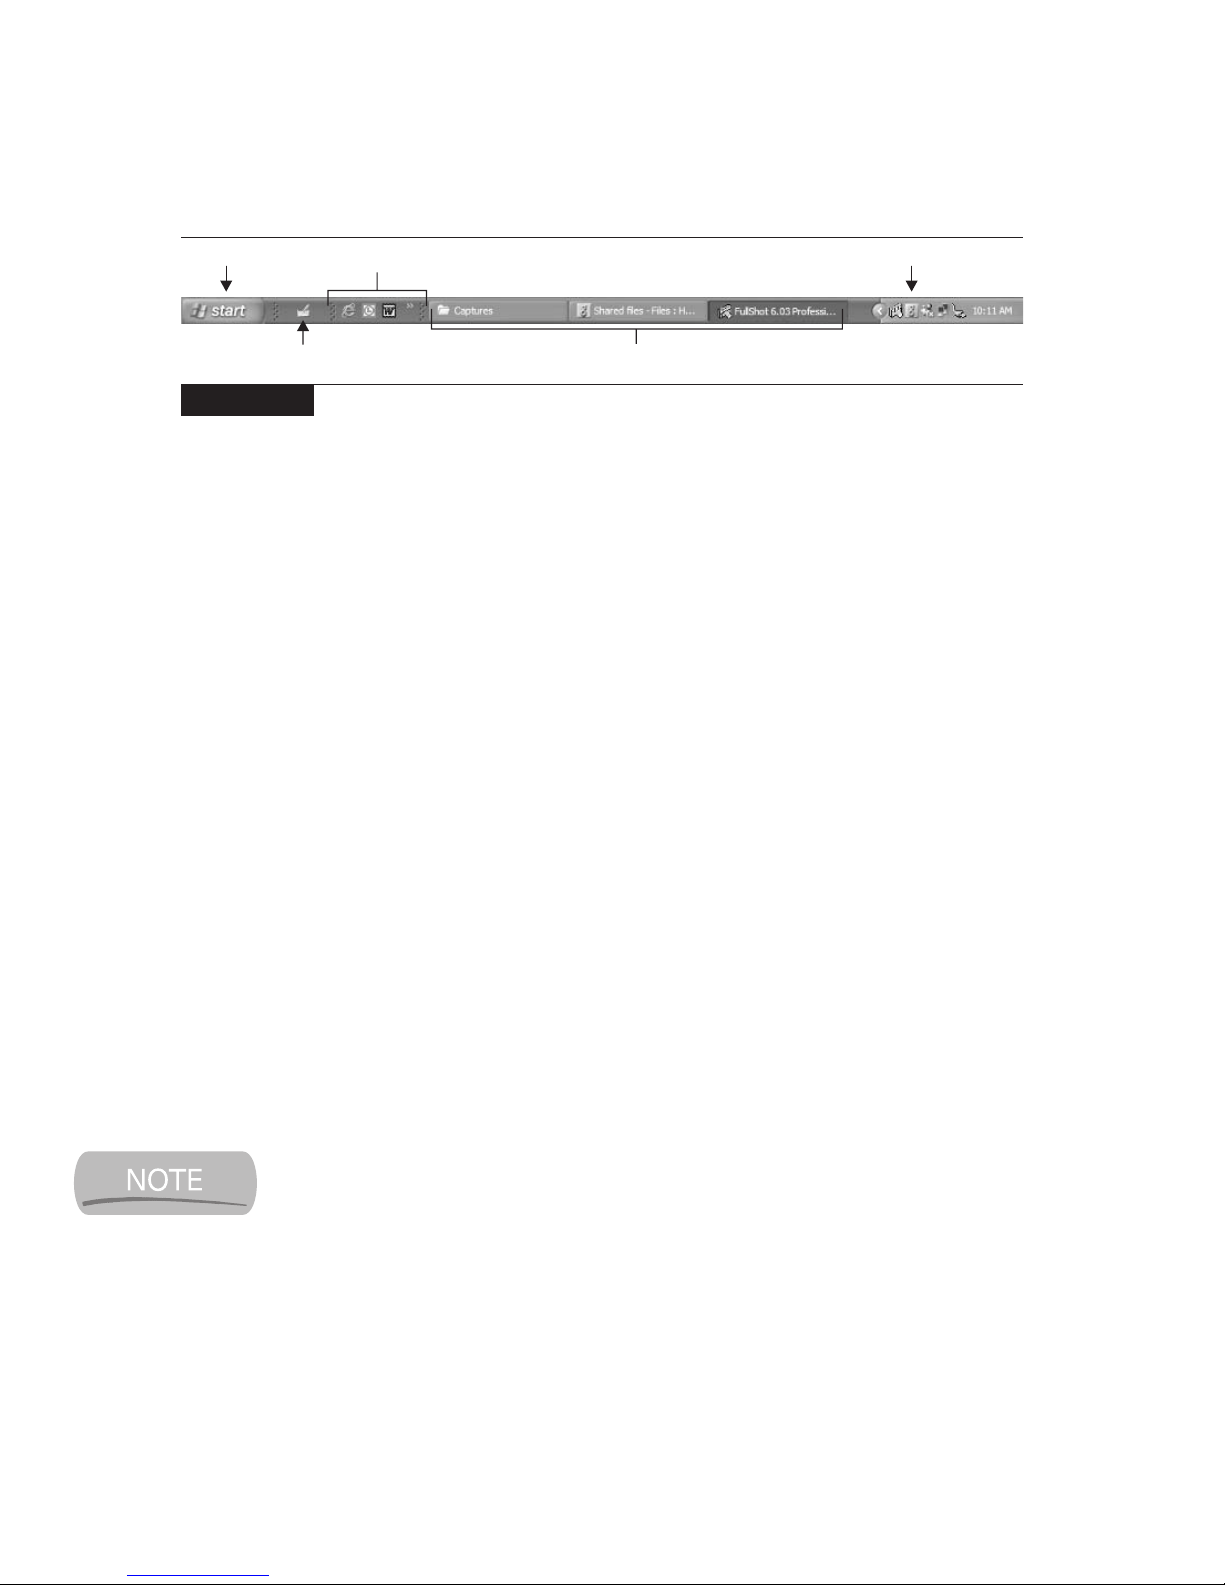
with the taskbar visible at the bottom of the screen. Figure 1-3 shows the taskbar.
Proceeding from left to right, the taskbar is divided into five sections: the Start
button, the Tablet PC Input Panel icon, the Quick Launch toolbar, an area holding
buttons for each running application, and the notification area.
■
Start button The Start button opens the Start menu and is covered in
detail in the “Learn About the Start Menu” section later in this chapter.
■
Tablet PC Input Panel icon This icon activates the Tablet PC Input
Panel (a tool that allows you to enter text into Windows applications
by writing or speaking it instead of typing it), which is covered in more
detail in Chapters 2, 10, and 15.
■
Quick Launch toolbar The Quick Launch toolbar is an area containing
icons for applications that you can start with a single tap of the pen. This
Color profile: Generic CMYK printer profile
Composite Default screen
Page 30
12 How to Do Everything with Your Tablet PC
HowTo8 (8) / How to Do Everything with Your Tablet PC / Mann / 222771-0 / Chapter 1
area is not normally visible on the taskbar, but I recommend you activate it.
It’s a quick way to start the programs you use frequently.
■
Application buttons The area to the right of the Quick Launch toolbar
contains buttons representing each program that’s running. Tap a button to
bring the corresponding program into view. If you have several instances
of a particular program running simultaneously, Windows will group
them under a single button for easier handling. When you tap this button,
Windows displays a small menu you can use to choose which of the
grouped instances of the program you want to see.
■ Notification area At the end of the taskbar is the Notification area, a
place where Windows can provide information on the status of your computer.
Learn About the Start Menu
The Start menu is the launching point for most programs on any PC running
Windows XP. The Start menu is the menu that appears when you tap the Start button
on the Windows taskbar. This menu, which looks something like Figure 1-4, is
divided into two columns. The left column contains icons that start specific programs
and the All Programs menu (the Program menu), while the right column contains
icons that open specific folders, as well as special tools like the Control Panel, Help
and Support (online help), Search, and the DOS Command Line.
If you’ve customized your Start menu, it may look significantly different
than the one shown in Figure 1-4, and therefore, it may function somewhat
differently.
The eight Start menu sections shown in Figure 1-4 are listed here:
■
Pinned item list The pinned item list appears at the top of the left column.
It contains program icons ( pinned items) that remain in place unless you
explicitly move them.
FIGURE 1-3 Although relatively few people do so, you can customize the taskbar in
several ways.
Tablet PC Input Panel icon Running applications
Start button
Quick Launch toolbar
Notification area
Color profile: Generic CMYK printer profile
Composite Default screen
Page 31
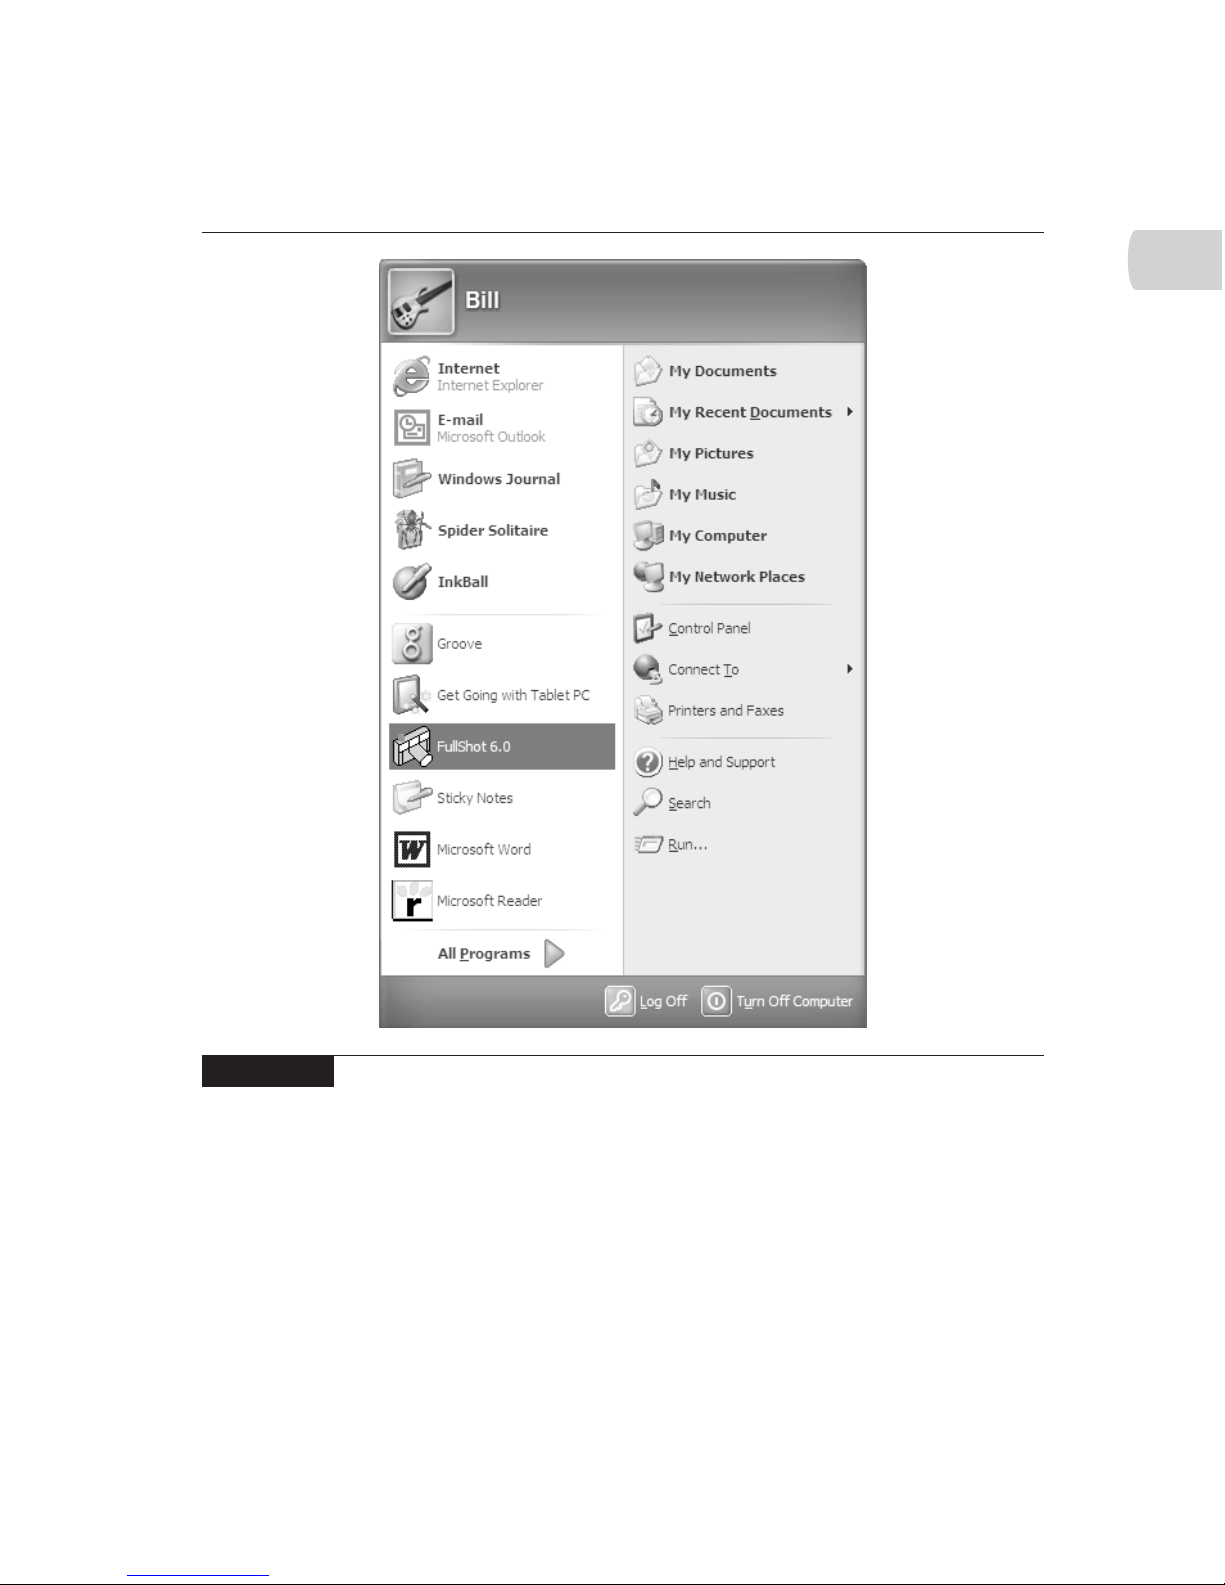
■
Most frequently used programs list The most frequently used programs
list appears beneath the pinned item list. Windows automatically adds
programs to this list, based on how often you use them. That means this
list changes as the way you work with your Tablet PC changes.
■
All Programs All Programs appears beneath the most frequently used
programs list and displays a menu of the programs you can run.
■
Special folders At the top of the right column is a list of special folders.
Tap one of these to quickly open that folder.
CHAPTER 1: Meet Your Tablet PC 13
HowTo8 (8) / How to Do Everything with Your Tablet PC / Mann / 222771-0 / Chapter 1
1
FIGURE 1-4 The Start menu gives you access to your applications and folders.
Color profile: Generic CMYK printer profile
Composite Default screen
Page 32
14 How to Do Everything with Your Tablet PC
HowTo8 (8) / How to Do Everything with Your Tablet PC / Mann / 222771-0 / Chapter 1
■
Control Panel The Control Panel appears below the special folders. As
you’ve seen earlier in this chapter, the Control Panel is one of the primary
locations for configuring your Tablet PC.
■
Help and Support Help and Support displays the online help system,
which is covered in Chapter 4.
■
Search Search lets you search your Tablet PC for files and other
information. Its use is also covered in Chapter 4.
■
Run Run opens the Run dialog box, where you can execute programs
by typing their name and location.
You can open the Start menu by tapping the Start button. You can also
open the menu by pressing the
WINDOWS key or CTRL-ESC (assuming,
of course, that you have access to a keyboard). The Input Panel, a new
feature of Windows XP Tablet PC edition, includes a virtual keyboard
complete with a
WINDOWS key.
Turn Off Your Tablet PC
As I mentioned earlier in the chapter, there’s a correct process for turning off
your Tablet PC. Although I’ve probably made it sound complex to you, it isn’t
really. Here’s how you do it:
1. Tap St ar t.
2. Tap the Turn Off Computer icon (it’s in the lower-right corner of the
Start menu).
3. In the Turn Off Computer window that appears, tap Turn Off to shut
down your computer completely.
After a moment or two of whirring and chugging, your Tablet PC turns itself
off. That’s all there is to it.
Color profile: Generic CMYK printer profile
Composite Default screen
Page 33
HowTo8 (8) / How to Do Everything with Your Tablet PC / Mann / 222771-0 / Chapter 2
blind folio 15
Chapter 2
Explore Your
Tablet PC
Color profile: Generic CMYK printer profile
Composite Default screen
Copyright 2003 by The McGraw-Hill Companies, Inc. Click Here for Terms of Use.
Page 34

16 How to Do Everything with Your Tablet PC
HowTo8 (8) / How to Do Everything with Your Tablet PC / Mann / 222771-0 / Chapter 2
How to…
■
Take Notes with Your Tablet PC
■
Enter Text with the Pen
■
Change the Screen Orientation for Comfort and Usability
■
Post a Handwritten Reminder on the Screen
■
Draw Pictures on the Screen
■
Try Out the Enhanced Microsoft Reader
■
Play a Game on Your Tablet PC Using the Pen
In Chapter 1, you accomplished the work needed to get your new Tablet PC up
and running. Although there’s still plenty you can do to configure, customize, and
optimize your new machine, you’re probably itching to explore some of the unique
capabilities of your Tablet PC. If so, you’re reading the right chapter.
This chapter takes you on a whirlwind tour of some of the unique benefits of
a Tablet PC. For now, you’ll stick with pen input only. Voice takes more effort to
set up, and is covered in detail starting in Chapter 15. Grab your pen, and let’s give
this thing a workout.
If you have a convertible Tablet PC, like the Acer TravelMate, you’ll find it
easier to follow along if you convert to tablet mode before going any further.
Take Notes with Your Tablet PC
One of the most commonly cited benefits of the Tablet PC is that it can replace
a pad and paper for taking notes in meetings. Windows Journal is the application
that comes with every Tablet PC that is specifically designed for note taking.
When you’re working with Windows Journal, it’s almost as if you were writing
on an endless pad of paper. But it is an endless pad of paper that can do all sorts
of things no real pad of paper can do. Let’s give this a try right now.
To start Windows Journal, tap Start | All Programs | Windows Journal.
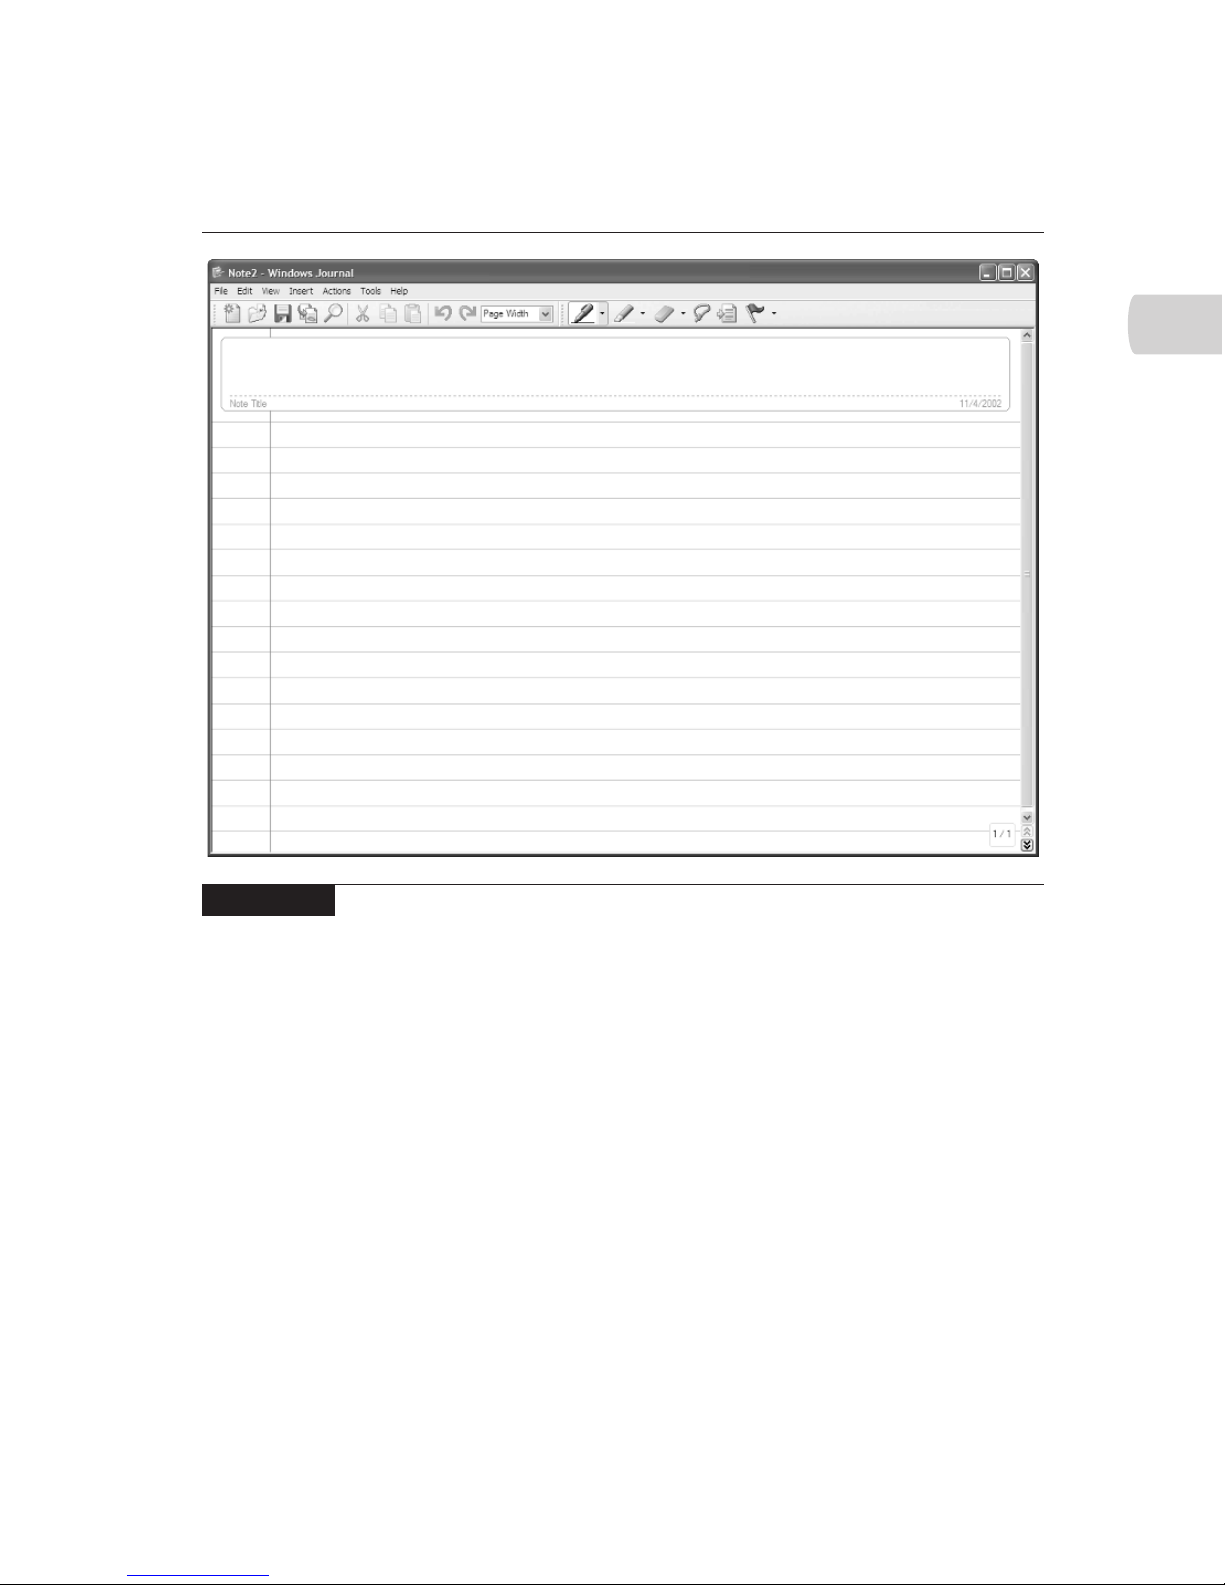
Windows Journal opens with a new blank page ready for writing, as shown
in Figure 2-1.
With Windows Journal open, take your digital pen and start writing on the
Tablet PC screen. Or start drawing. Or graphing. Or just plain old doodling. Anything
you can write on a piece of paper, you can write in the Windows Journal.
Color profile: Generic CMYK printer profile
Composite Default screen
Page 35
CHAPTER 2: Explore Your Tablet PC 17
HowTo8 (8) / How to Do Everything with Your Tablet PC / Mann / 222771-0 / Chapter 2
2
If you wanted to save your note, you could write a title in the box at the top of
the page and tap the Save icon on the Windows Journal toolbar. Although you can
do that now, you’ll get the chance to work with Windows Journal in much more detail
in Chapter 13. There, you’ll get to experience the full power of Windows Journal,
including its ability to handle these tasks:
■
Organize and search notes
■
Modify notes by adding space, even dragging text around the page
■
Convert notes to text you can use in other applications
■
Mark up images of documents as if they were hard copies
■
Share notes with others, even if they don’t use Windows Journal
For now, just get the feeling of taking notes.
FIGURE 2-1 Windows Journal acts like an almost inexhaustible notebook filled with
searchable, modifiable paper.
Color profile: Generic CMYK printer profile
Composite Default screen
Page 36
18 How to Do Everything with Your Tablet PC
HowTo8 (8) / How to Do Everything with Your Tablet PC / Mann / 222771-0 / Chapter 2
Enter Text with the Pen
Being able to take handwritten notes on your Tablet PC is undoubtedly useful,
but what if you want to write instead of typing when you’re working with regular
applications like word processors and spreadsheets? That’s a particularly crucial
question if you have a true tablet-style Tablet PC. When you’re working away
from your Tablet PC’s docking station, you won’t have access to a real keyboard.
Although an onscreen keyboard works fine for short bits of text, tapping in
characters with the pen isn’t very productive for writing something substantial.
Well, your Tablet PC has this contingency covered too, thanks to a nifty little
tool called Tablet PC Input Panel.
Using the Tablet PC Input Panel is the way you get handwritten text into
applications that don’t work directly with handwriting. Input Panel is so important
that it has a permanent icon on the Windows Taskbar. To open Input Panel, tap its
icon, which is right next to the Start button on the Windows Taskbar.
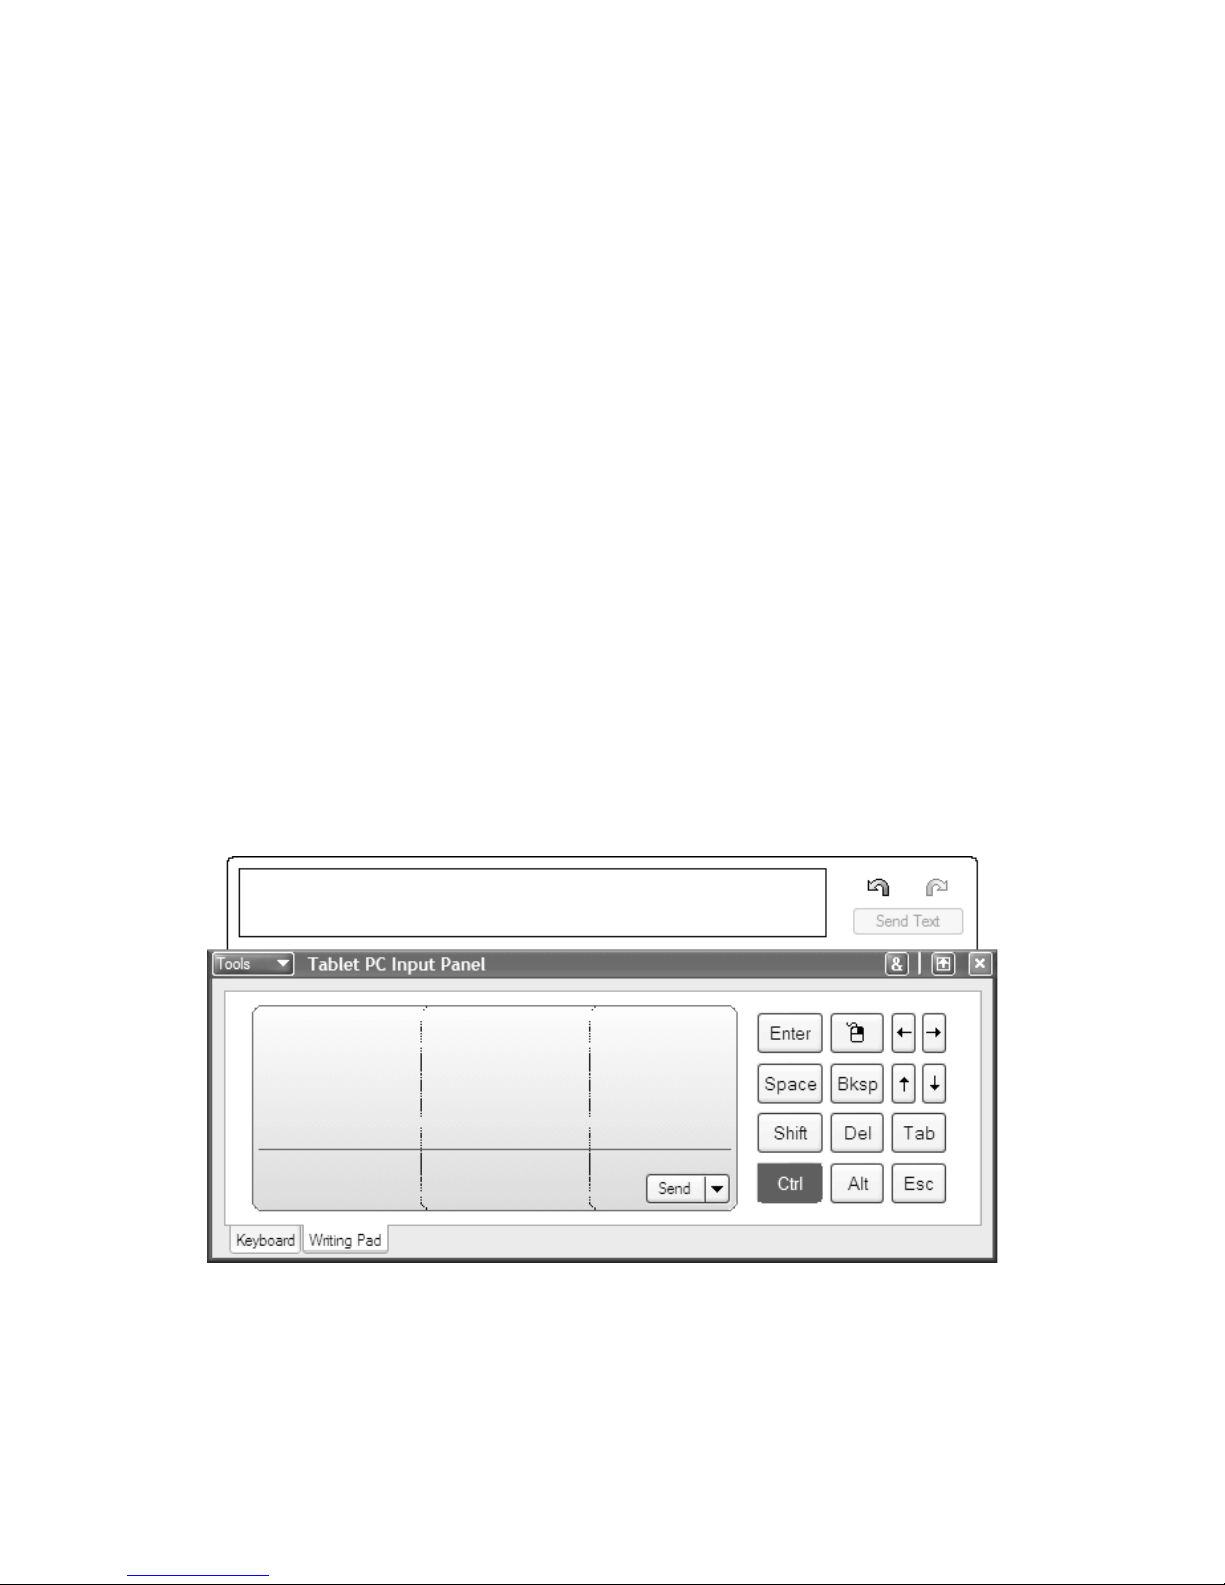
The Tablet PC Input Panel includes the onscreen keyboard, as well as a
writing pad. Tablet PC Input Panel also handles speech recognition (covered
later in Chapter 15) and the very helpful Text Preview tool shown next. Tap the
Writing Pad tab, and then tap the Tools button and select Text Preview to see
the Tablet PC Input Panel’s handwriting recognition abilities for yourself.
Write something on the Input Panel Writing Pad. You can print, write in
cursive, or both. Then wait a few seconds while your Tablet PC tries to recognize
Color profile: Generic CMYK printer profile
Composite Default screen
Page 37
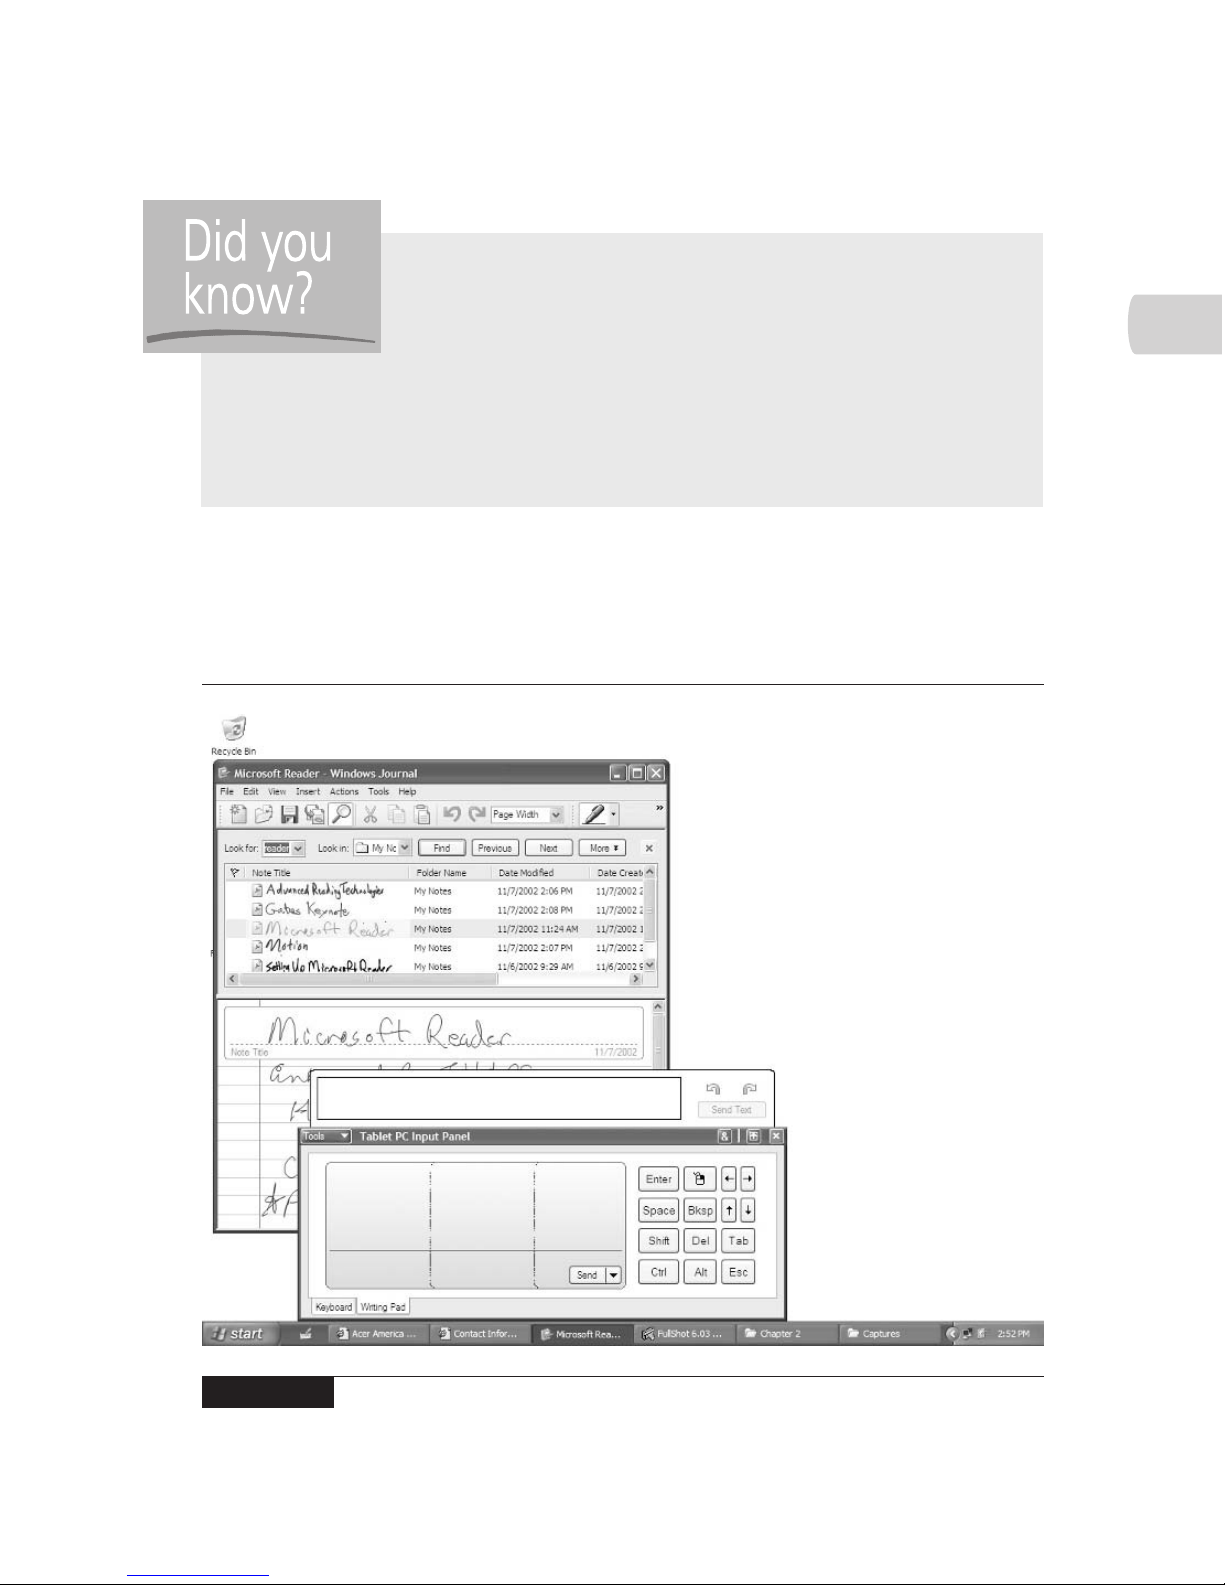
what you wrote. Don’t worry if Input Panel has trouble with your handwriting.
Chapter 10 will help you understand the issues involved in handwriting recognition,
and will give you tips to increase the recognition accuracy.
CHAPTER 2: Explore Your Tablet PC 19
HowTo8 (8) / How to Do Everything with Your Tablet PC / Mann / 222771-0 / Chapter 2
2
You Can Talk to Input Panel?
Input Panel not only handles handwriting recognition for the Tablet PC, but it
handles speech recognition too. This tool is clearly a key to working with your
Tablet PC, and clearly merits its special spot on the Windows Taskbar. You’ll
learn how to talk to Input Panel in Chapter 15.
FIGURE 2-2 The Tablet PC screen is wider than it is tall in landscape mode.
Color profile: Generic CMYK printer profile
Composite Default screen
Page 38

20 How to Do Everything with Your Tablet PC
HowTo8 (8) / How to Do Everything with Your Tablet PC / Mann / 222771-0 / Chapter 2
Change the Screen Orientation
for Comfort and Usability
One of the design requirements for Tablet PCs is that you be able to change the
screen orientation to match the way you are working with the device. In other
words, you can change the display on your Tablet PC so it is readable no matter
how you’re holding the device. The easiest way to understand this is to try it out
for yourself.
To change the screen orientation, tap the Tablet And Pen Settings icon in the
notification area. The icon looks like a Tablet PC with a stylus. In the menu that
appears, tap Change Screen Orientation. The screen orientation changes to the next
of four possible orientations, two each of landscape mode (Figure 2-2) and portrait
mode (Figure 2-3).
In Chapter 3, you’ll learn how to control which orientations your Tablet PC will
switch through and the order in which it will do so, as well as some other ways to
trigger the change. But for now, just continue through the default orientation order
until you get to the one you’re most comfortable with.
Post a Handwritten Reminder on the Screen
Chances are good that you’ve got little notes stuck to your desk, wall, even your
monitor. I certainly do. But your notes won’t do you much good if they’re in your
office and you’re somewhere else. That’s where the new Microsoft Sticky Notes
come in. Now when you need to write yourself a note, just open Sticky Notes and
write it. Windows will keep track of your notes for you. Even better, since this is
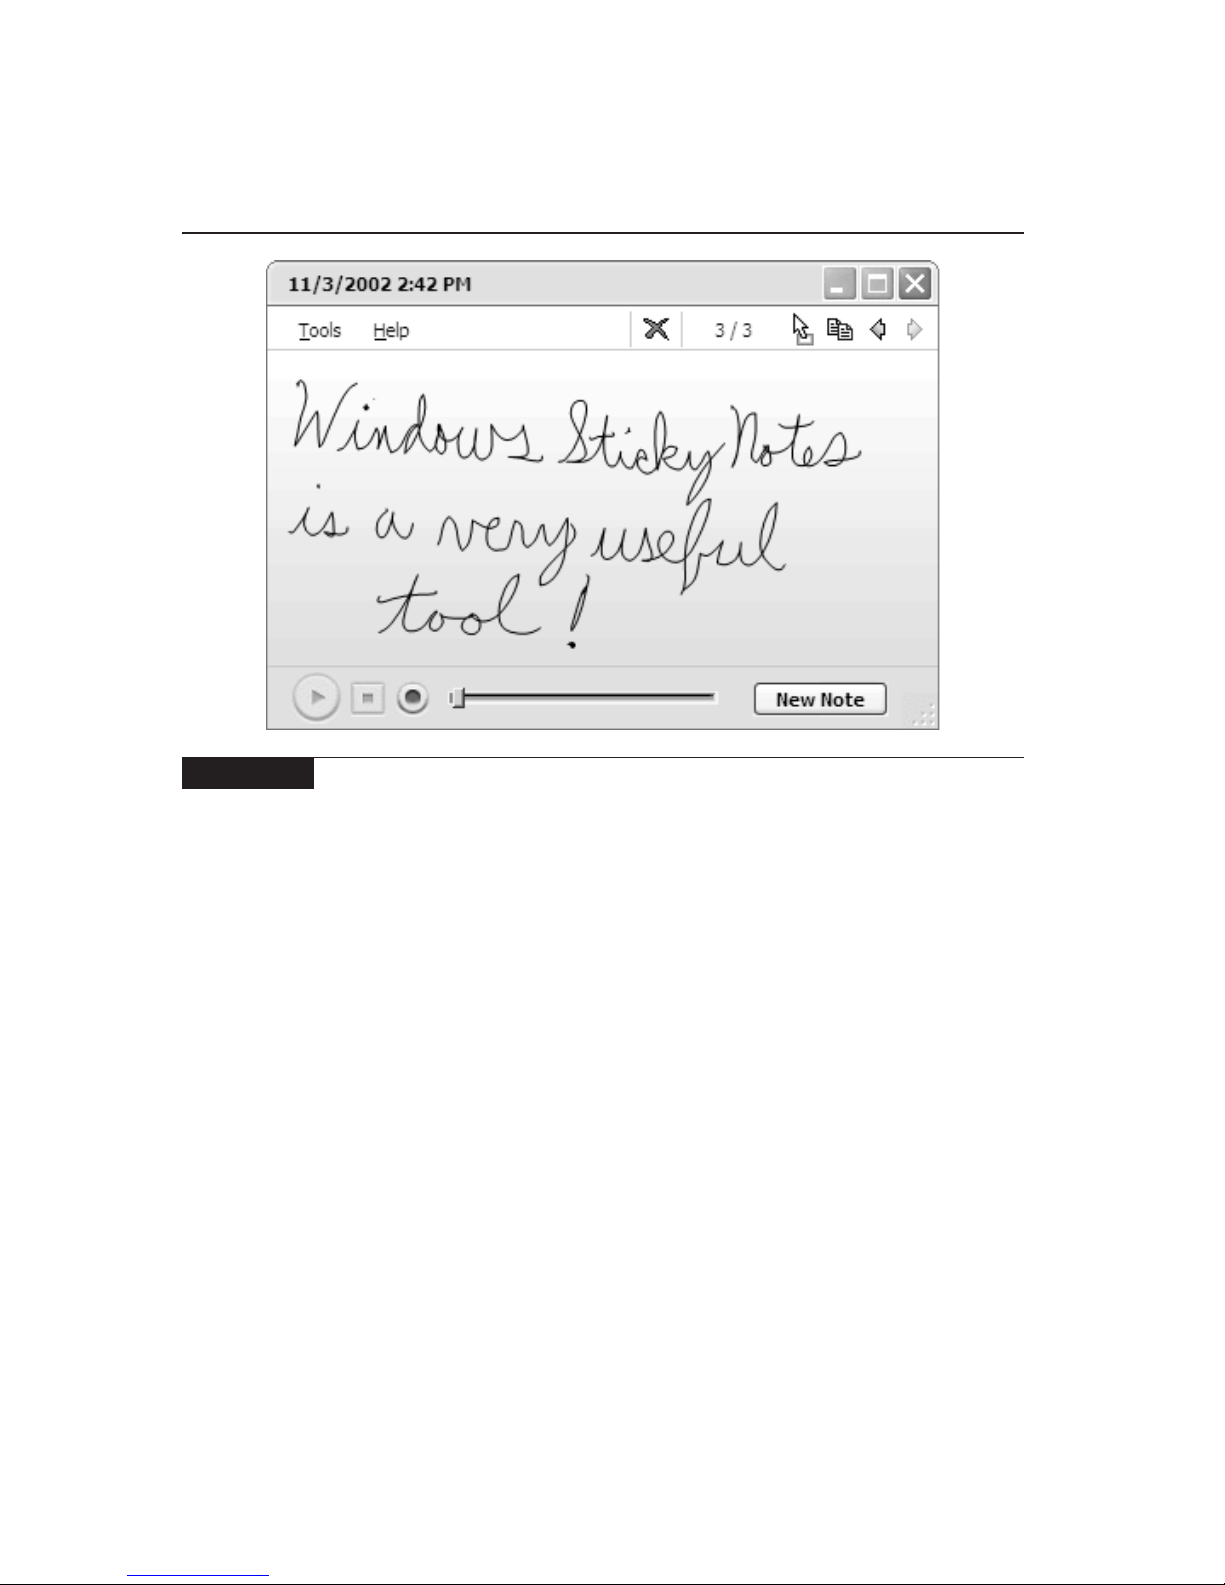
the Tablet PC, you get to handwrite your sticky notes instead of typing them. (See
Figure 2-4.)
Try creating a sticky note. Tap Start | All Programs | Sticky Notes. Assuming
you haven’t tried Sticky Notes yet, a blank note appears. (If you had used Sticky
Notes before, your last note would appear instead.) Write something in the note,
and then close it. Open Sticky Notes again, and your note reappears. Now tap New
Note. A new blank note appears directly on top of the previous one. Windows keeps
all your sticky notes in a stack so you can easily browse through them. The left and
right arrows on the Sticky Notes toolbar let you scroll through the stack easily.
Color profile: Generic CMYK printer profile
Composite Default screen
Page 39
CHAPTER 2: Explore Your Tablet PC 21
HowTo8 (8) / How to Do Everything with Your Tablet PC / Mann / 222771-0 / Chapter 2
2
FIGURE 2-3 The Tablet PC screen is taller than it is wide in portrait mode.
Color profile: Generic CMYK printer profile
Composite Default screen
Page 40
22 How to Do Everything with Your Tablet PC
HowTo8 (8) / How to Do Everything with Your Tablet PC / Mann / 222771-0 / Chapter 2
Sticky Notes is not only convenient, but it’s much more flexible than a stack of
paper notes. Because the notes are digital, you can perform tasks like the following:
■
Scratch out material you don’t want
■
Resize notes
■
Import and export sticky notes
■
Record voice notes
Draw Pictures on the Screen
One of the great advantages about using the pen on a Tablet PC is that it works with
existing, familiar applications, not just new ones like Windows Journal. In some
cases, writing (or drawing) with the pen is a much more natural way to use an
application than the keyboard or mouse. One such application is Windows Paint
(shown in Figure 2-5), the paint program that has come with every version of
Windows since the dawn of time.
FIGURE 2-4 Windows Sticky Notes lets you replace your paper sticky notes with the
digital equivalent.
Color profile: Generic CMYK printer profile
Composite Default screen
Page 41
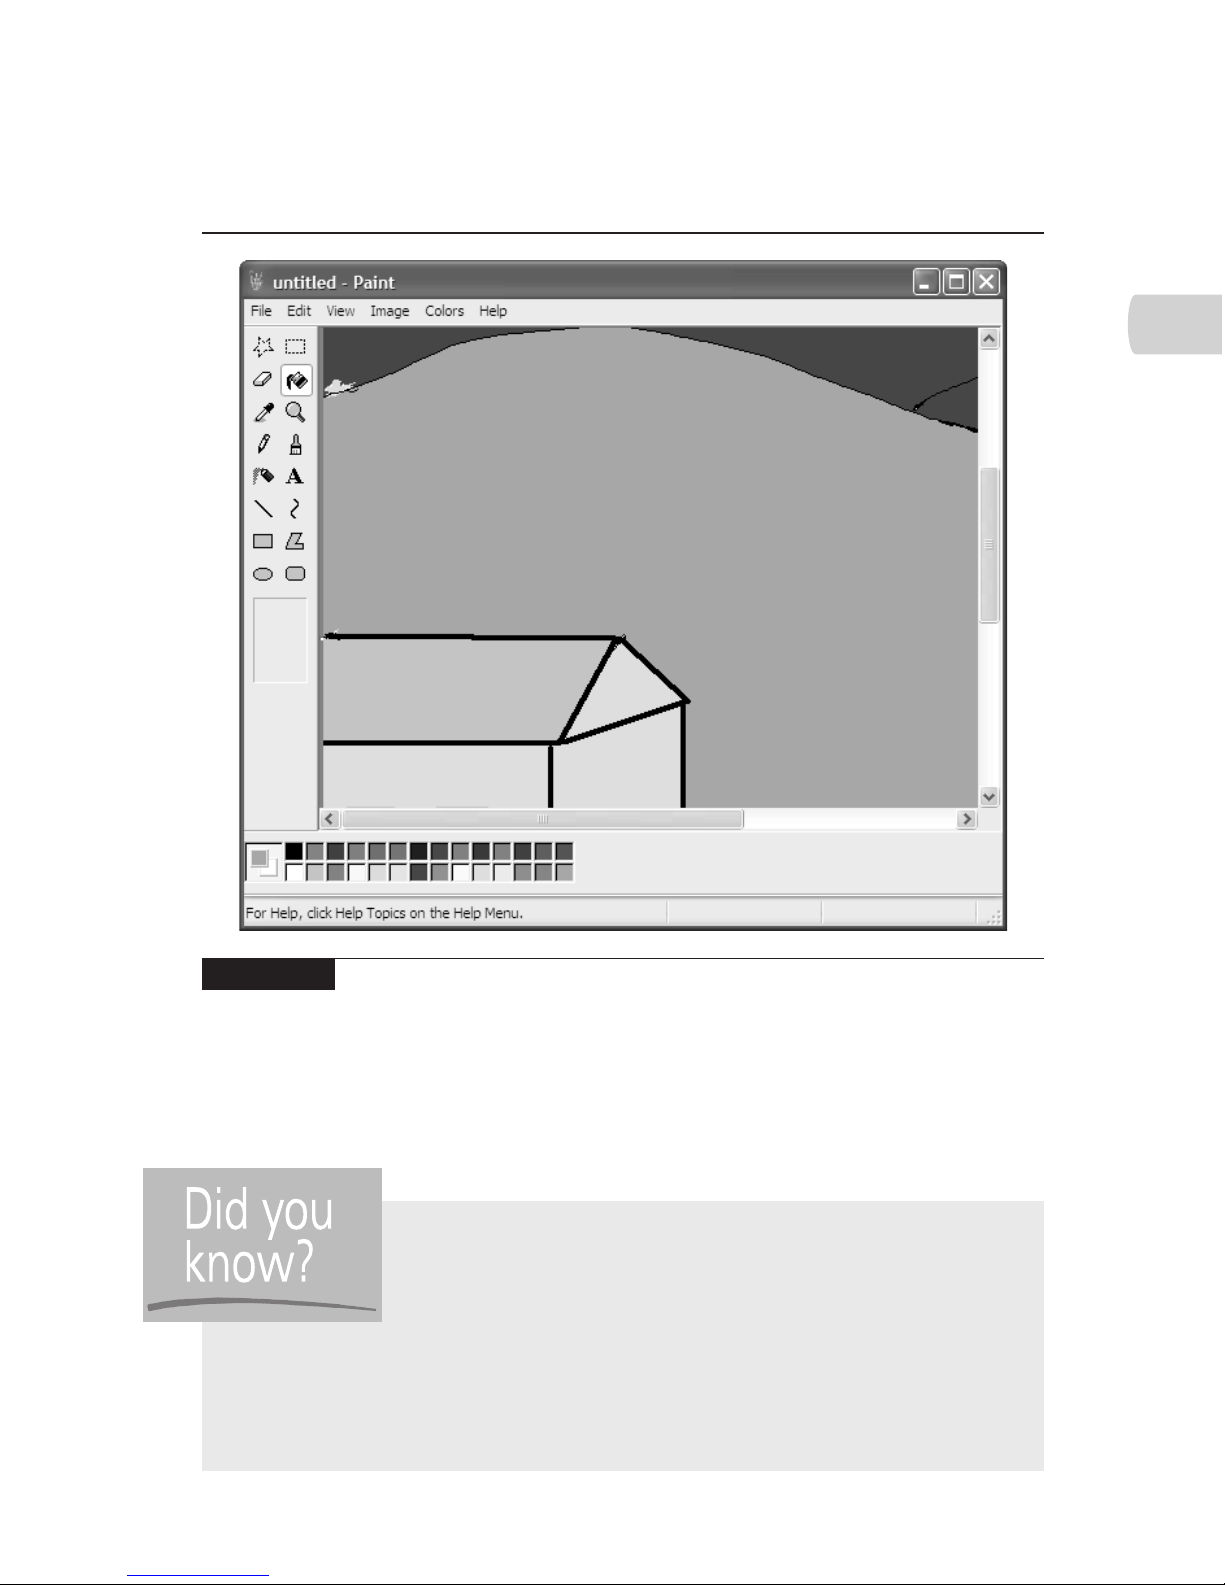
If you’ve ever used Windows Paint on a conventional PC, you know that a mouse
is a clumsy tool for drawing. On a Tablet PC, Windows Paint is a much better tool
because you can now use the pen on the screen to draw instead of the mouse on
CHAPTER 2: Explore Your Tablet PC 23
HowTo8 (8) / How to Do Everything with Your Tablet PC / Mann / 222771-0 / Chapter 2
2
FIGURE 2-5 When you can draw with a digital pen instead of a mouse, Windows Paint
becomes a much more capable application.
Corel Grafigo Brings Collaborative
Drawing to Tablet PC?
Corel’s Grafigo application is a new sketching and drawing tool for the
Tablet PC. It offers features like handwritten input, shape recognition, and
group collaboration on designs. See Chapter 12 for more information on
this and other applications specifically designed for your Tablet PC.
Color profile: Generic CMYK printer profile
Composite Default screen
Page 42
24 How to Do Everything with Your Tablet PC
HowTo8 (8) / How to Do Everything with Your Tablet PC / Mann / 222771-0 / Chapter 2
a mouse pad. With your computer in tablet mode, working with Windows Paint is
much like using a sketchbook.
To see what I mean, take a minute and play with Windows Paint yourself. Tap
Start | All Programs | Accessories | Paint to start Windows Paint. You can use your
pen to draw anywhere on the white background that Paint opens for you. It’s much
more natural than trying to draw with a mouse.
Try Out the Enhanced Microsoft Reader
Microsoft Reader is an application that lets you read eBooks (electronic books
formatted for viewing with Microsoft Reader) on your PC. Reader has been around
for a while now and can be used on traditional PCs and laptops. The version of
Reader that comes on your Tablet PC has been enhanced with the ability to display
eBooks in portrait mode, add handwritten notes to eBooks, and more. With
Microsoft Reader, a Tablet PC is a great way to read eBooks.
If you would like to give Microsoft Reader a try, I suggest you start with your
screen oriented in portrait mode. Then tap Start | All Programs | Microsoft Reader
to launch Microsoft Reader. When the License Agreement window pops up, read
the agreement, and then signal your acceptance of it by tapping I Accept The Terms
In The License Agreement. Tap OK to start Microsoft Reader.
Microsoft Reader opens to the Library, which contains all your eBooks. Tap
Microsoft Reader Help to open the help system. This brings you to the cover page
of the Microsoft Reader Help eBook. Tap Microsoft Reader Help again to open the
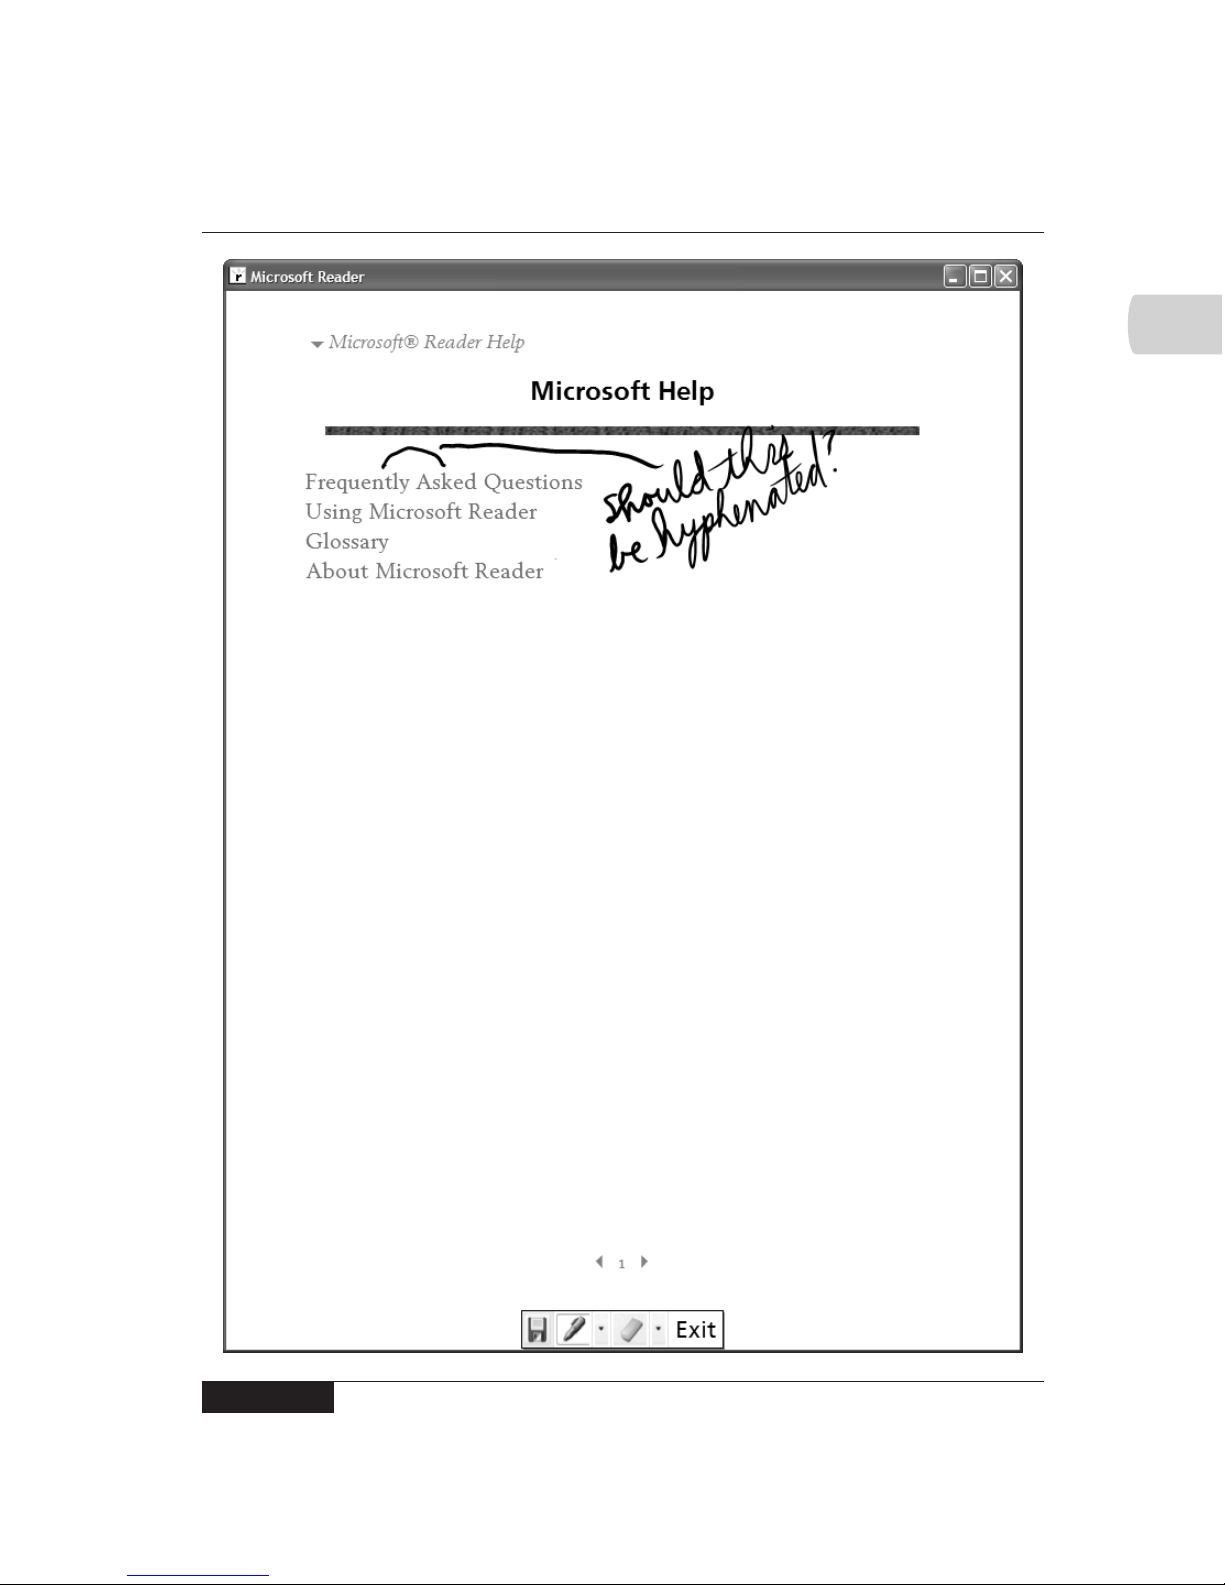
table of contents of this eBook. Now right-tap the word Asked in the first line of
the table of contents. In the shortcut menu that appears, tap Add Ink Comment.
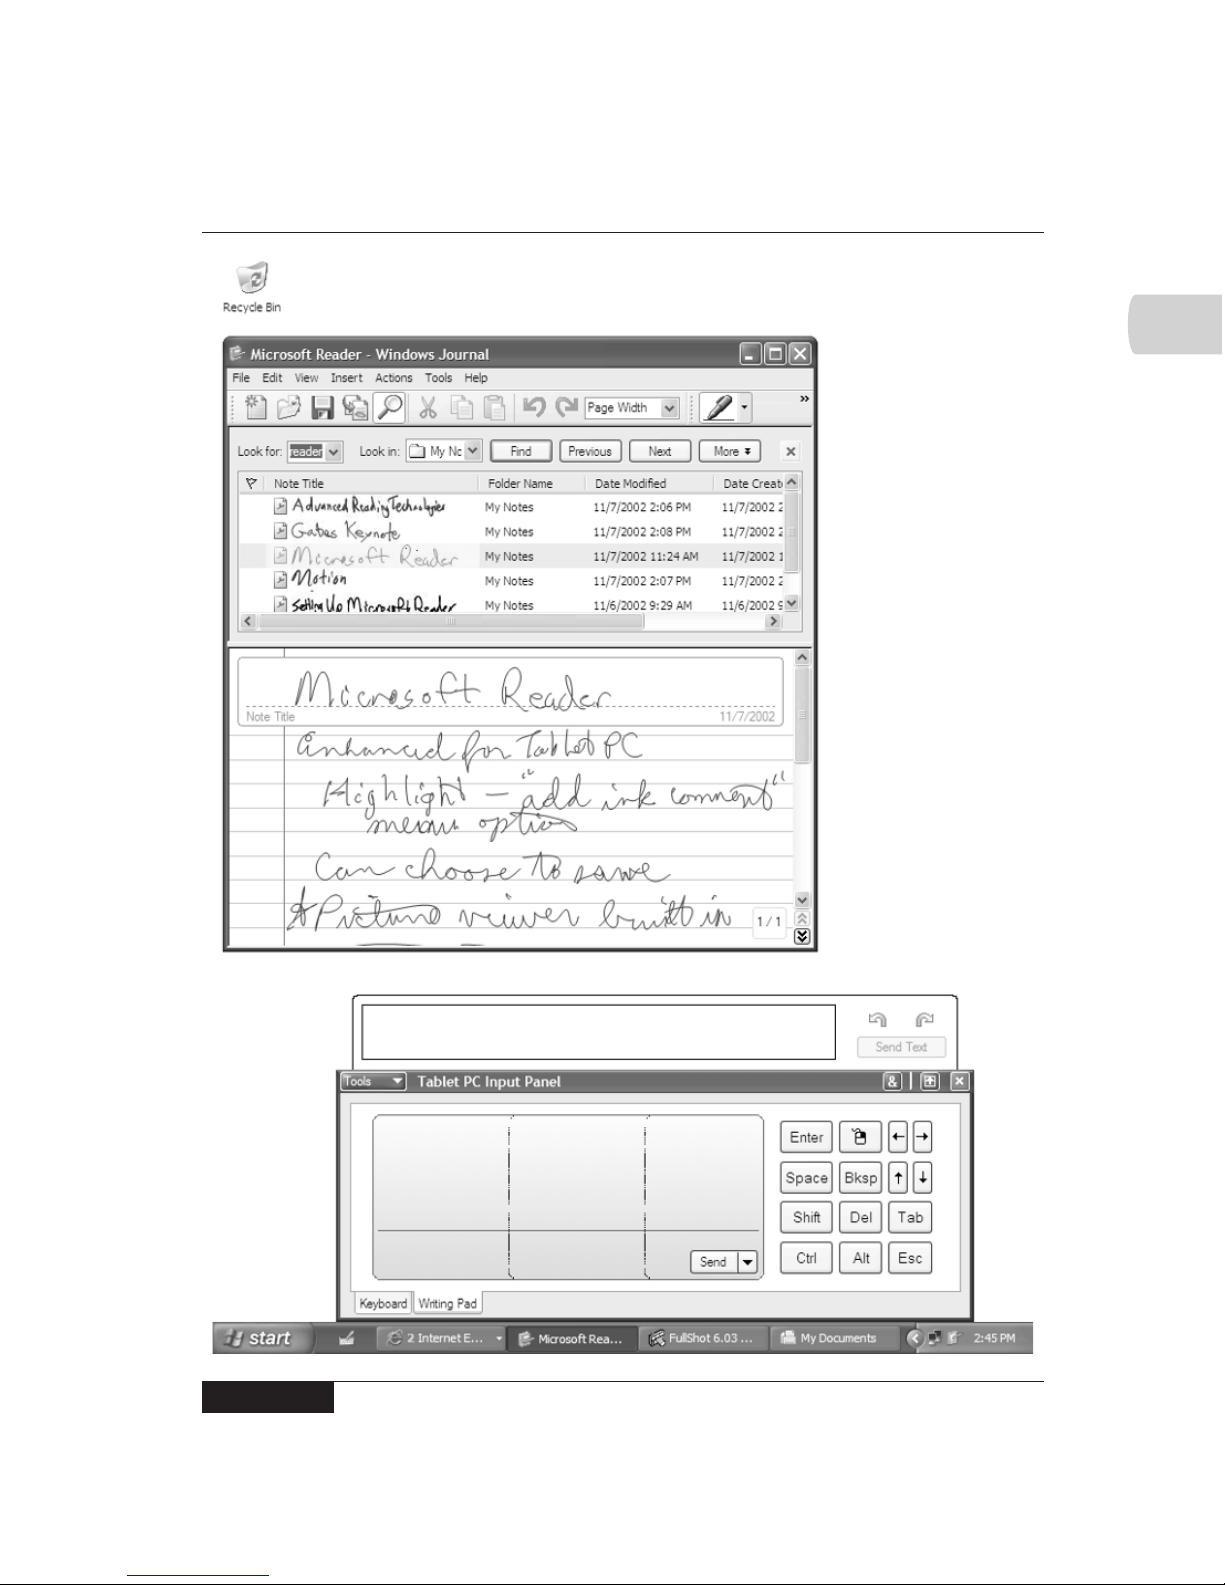
You can now make handwritten comments like the one in Figure 2-6. Tap Exit on
Resize the Windows Paint
Background
You can easily resize the Windows Paint background to give yourself plenty of
room to draw. Here’s how:
1. On the Windows Paint toolbar, tap Image | Attributes.
2. In the Attributes dialog box, set the width and height you want to use.
3. Tap OK.
Color profile: Generic CMYK printer profile
Composite Default screen
Page 43
CHAPTER 2: Explore Your Tablet PC 25
HowTo8 (8) / How to Do Everything with Your Tablet PC / Mann / 222771-0 / Chapter 2
2
FIGURE 2-6 With the Tablet PC version of Microsoft Reader, you can write in your
eBooks like you might do in a printed book.
Color profile: Generic CMYK printer profile
Composite Default screen
Page 44

26 How to Do Everything with Your Tablet PC
HowTo8 (8) / How to Do Everything with Your Tablet PC / Mann / 222771-0 / Chapter 2
the toolbar at the bottom of the page when you’re done. You’ll have the option to
save your comments or discard them. If you do save your comments, they stay with
your copy of the eBook and will reappear the next time you open to that page.
To go much further with Microsoft Reader, you’ll need to configure some of
the Tablet PC buttons and download some new eBooks. For now, just note how
nicely the Microsoft Reader eBook pages match up to the display in portrait mode
and how nice the text looks, thanks to the Clear Type font technology used by the
Tablet PC and Microsoft Reader.
Play a Game on Your Tablet PC Using the Pen
Games have always been a part of Windows. They’re a fun, nonthreatening way
for beginners to get comfortable with their computer and show off new capabilities.
Windows XP for Tablet PC comes with a few new games, including InkBall. Despite
its name, InkBall isn’t a digital simulation of Paint Ball (a game where people go
out in the woods and shoot each other with paint pellets). In InkBall, you use your
pen to draw ink strokes on the playing surface and direct bouncing balls into the
appropriate holes. It’s surprisingly fun and a good way to get comfortable with
the pen (at least that’s what I tell my wife).
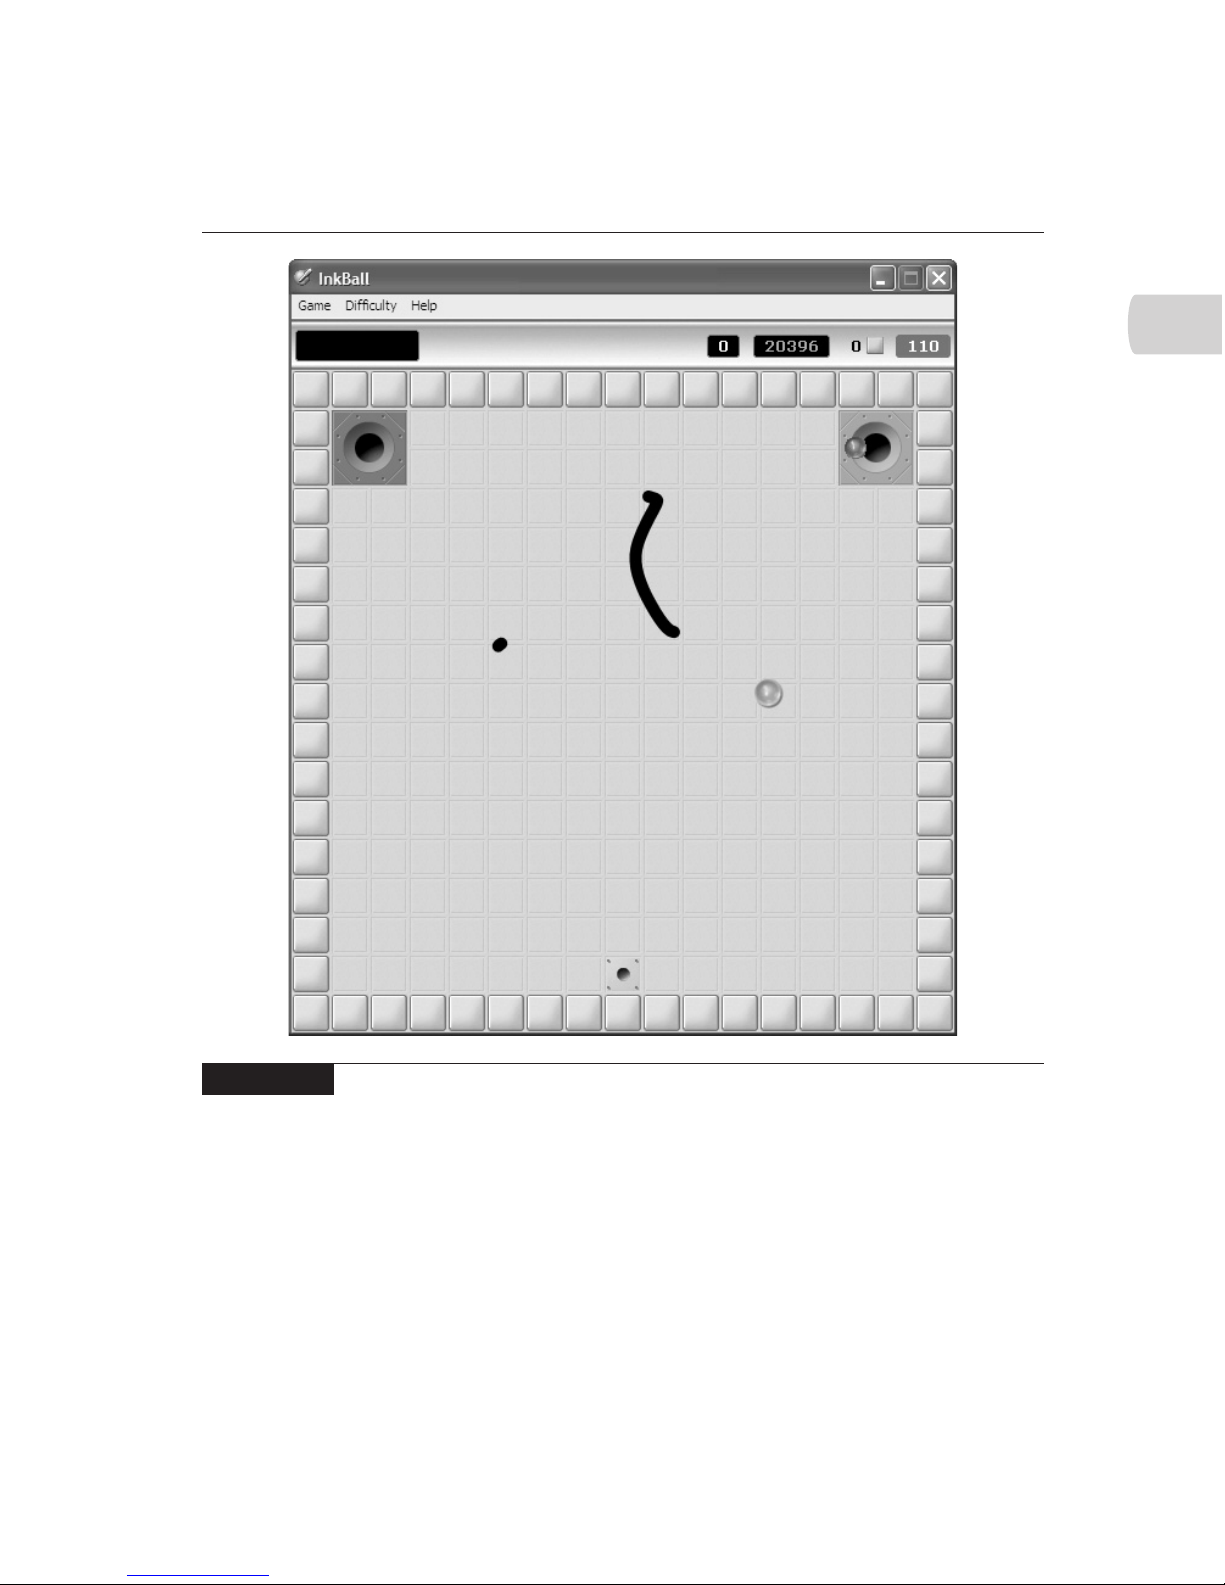
To start InkBall, tap Start | All Programs | Games | InkBall. A playing area
similar to the one shown in Figure 2-7 will appear. The exact appearance of the
screen varies from round to round, getting more complicated as you go. The
figure also shows two balls in play.
The balls bounce around the playing area according to the laws of physics.
If that’s all that happened, InkBall might make a nice screen saver but wouldn’t
be much of a game. You play by making marks on the screen with the pen. When
a ball hits one of your marks, it bounces off the mark at an angle and velocity
determined by the angle of impact. The objective is to get all the balls to go into
the holes of the same color. If a ball goes into a hole of a different color, you lose.
At first, the game seems pretty trivial. You could continue to draw lines around
a particular area to corral the balls into the right holes. However, when a ball strikes
one of your marks, the mark disappears, making that strategy much harder to execute.
The arc near the center of the figure and the small dot to the lower left of the
arc are the only marks remaining of the ten or so I had already made to help direct
the balls.
Color profile: Generic CMYK printer profile
Composite Default screen
Page 45
That’s basic InkBall. But things quickly get more complicated, with disappearing
walls, walls that change the color of the ball, one-way color-filter walls, ramps,
and assorted other twists on the basic pattern. Have fun.
CHAPTER 2: Explore Your Tablet PC 27
HowTo8 (8) / How to Do Everything with Your Tablet PC / Mann / 222771-0 / Chapter 2
2
FIGURE 2-7 Sharpen your digital pen skills and take a break at the same time
with InkBall.
Color profile: Generic CMYK printer profile
Composite Default screen
Page 46

This page intentionally left blank.
Page 47
HowTo8 (8) / How to Do Everything with Your Tablet PC / Mann / 222771-0 / Chapter 3
blind folio 29
Par t II
Set Up Your
Tablet PC
Color profile: Generic CMYK printer profile
Composite Default screen
Copyright 2003 by The McGraw-Hill Companies, Inc. Click Here for Terms of Use.
Page 48

This page intentionally left blank.
Page 49
HowTo8 (8) / How to Do Everything with Your Tablet PC / Mann / 222771-0 / Chapter 3
blind folio 31
Chapter 3
Configure the
Tablet PC for
Your Needs
Color profile: Generic CMYK printer profile
Composite Default screen
Copyright 2003 by The McGraw-Hill Companies, Inc. Click Here for Terms of Use.
Page 50

How to…
■
Import Your Old Files and Settings
■
Configure the Windows Interface
■
Configure Your Tablet PC Hardware
Now that you’ve had a chance to explore your Tablet PC a bit, it’s time to get down
to serious business. In this chapter, you’ll learn how to configure your Tablet PC to
suit your needs. Windows XP Tablet PC edition has new controls and settings to go
with its new features and the new capabilities of the Tablet PC hardware. So even
if you have lots of experience setting up PCs and laptops, you’ll find some
interesting new settings to play with.
Import Your Old Files and Settings
The most important step in configuring your Tablet PC is to get your old files and
settings onto the device. You spent a lot of time working on your old machine and
getting it configured to meet your needs, so why not take advantage of all that
work? Microsoft has made this usually painful task a lot easier for people who use
Windows XP, a group that includes Tablet PC owners. The new Files And Settings
Transfer Wizard (see Figure 3-1) can do most of the work for you. But first, you
need to come up with a file transfer strategy.
If you plan to use your Tablet PC as a second computer, and you will
continue to use your old PC as your main computer, you don’t need to
import your old files and settings. All you need to do is install the right
applications on your Tablet PC.
Decide How You Will Transfer Your Files and Settings
Because your old files and settings could amount to hundreds of megabytes, even
gigabytes of information, you need to have a plan for transferring them from your
old PC to your Tablet PC. Moving the information by floppy disk isn’t a viable option,
considering that it would likely take hundreds of floppy disks to hold everything,
and I can’t think of a brand of Tablet PC that comes with a floppy drive.
If you have a Zip drive or a similar high-density removable storage device, you
can use that to transfer the information. However, using the Files And Settings
Transfer Wizard makes the most sense when you can connect the old PC to the
32 How to Do Everything with Your Tablet PC
HowTo8 (8) / How to Do Everything with Your Tablet PC / Mann / 222771-0 / Chapter 3
Color profile: Generic CMYK printer profile
Composite Default screen
Page 51
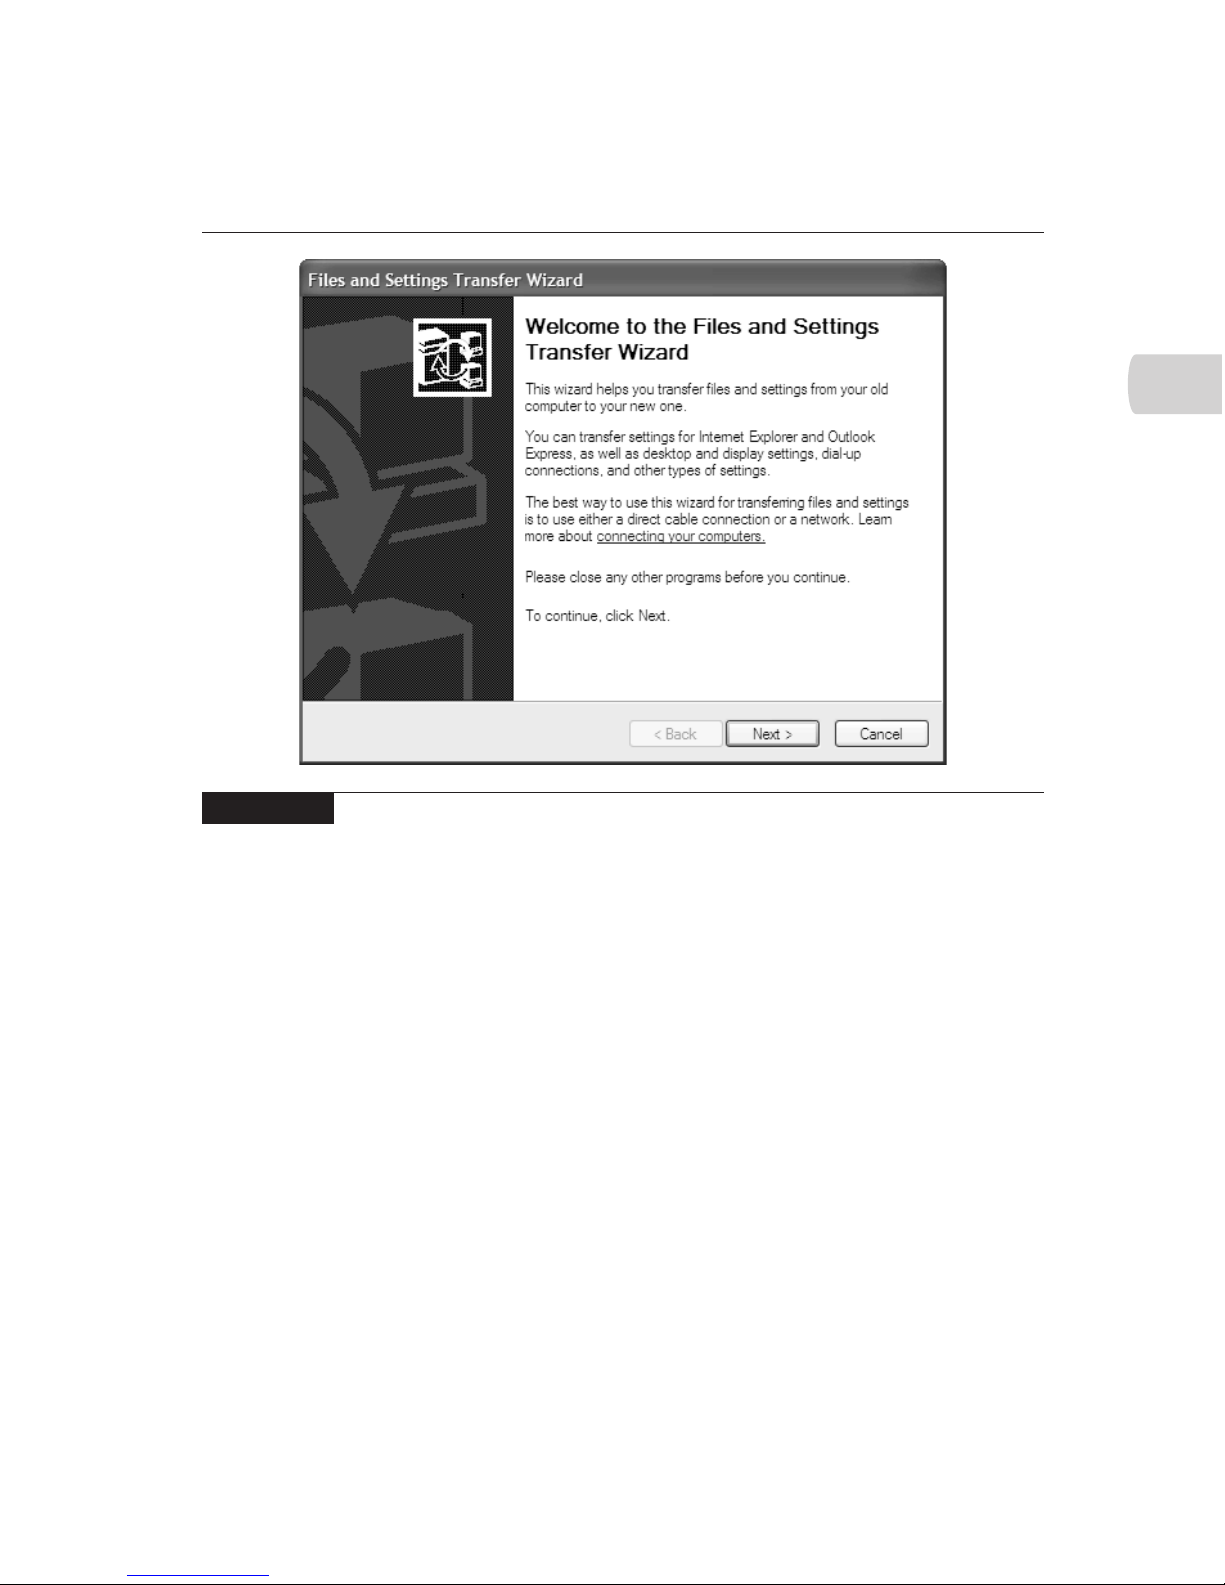
3
Tablet PC through a network. If you can have both machines on the network
simultaneously, the wizard will make short work of the transfer. A direct
connection between the two machines will also work, but using an existing
network is much easier.
Other factors to consider include the following:
■
The Files And Settings Transfer Wizard primarily transfers settings
from Microsoft applications like Outlook Express and Internet Explorer, as
well as a few third-party applications. That means you’ll still need to
change some settings manually on your Tablet PC.
■
The wizard can transfer settings only for applications that are already
installed on the new machine. That means you’ll need to install the
applications you want to use before you run the wizard.
Put the Files and Settings Transfer Wizard to Work
Assuming that you have already installed your applications on the Tablet PC,
putting the Files And Settings Transfer Wizard to work is pretty easy. You start by
running the wizard on your new computer.
CHAPTER 3: Configure the Tablet PC for Your Needs 33
HowTo8 (8) / How to Do Everything with Your Tablet PC / Mann / 222771-0 / Chapter 3
FIGURE 3-1 Follow the Files and Settings Transfer Wizard onscreen instructions to
transfer much of your personal information from your old computer
to your Tablet PC.
Color profile: Generic CMYK printer profile
Composite Default screen
Page 52
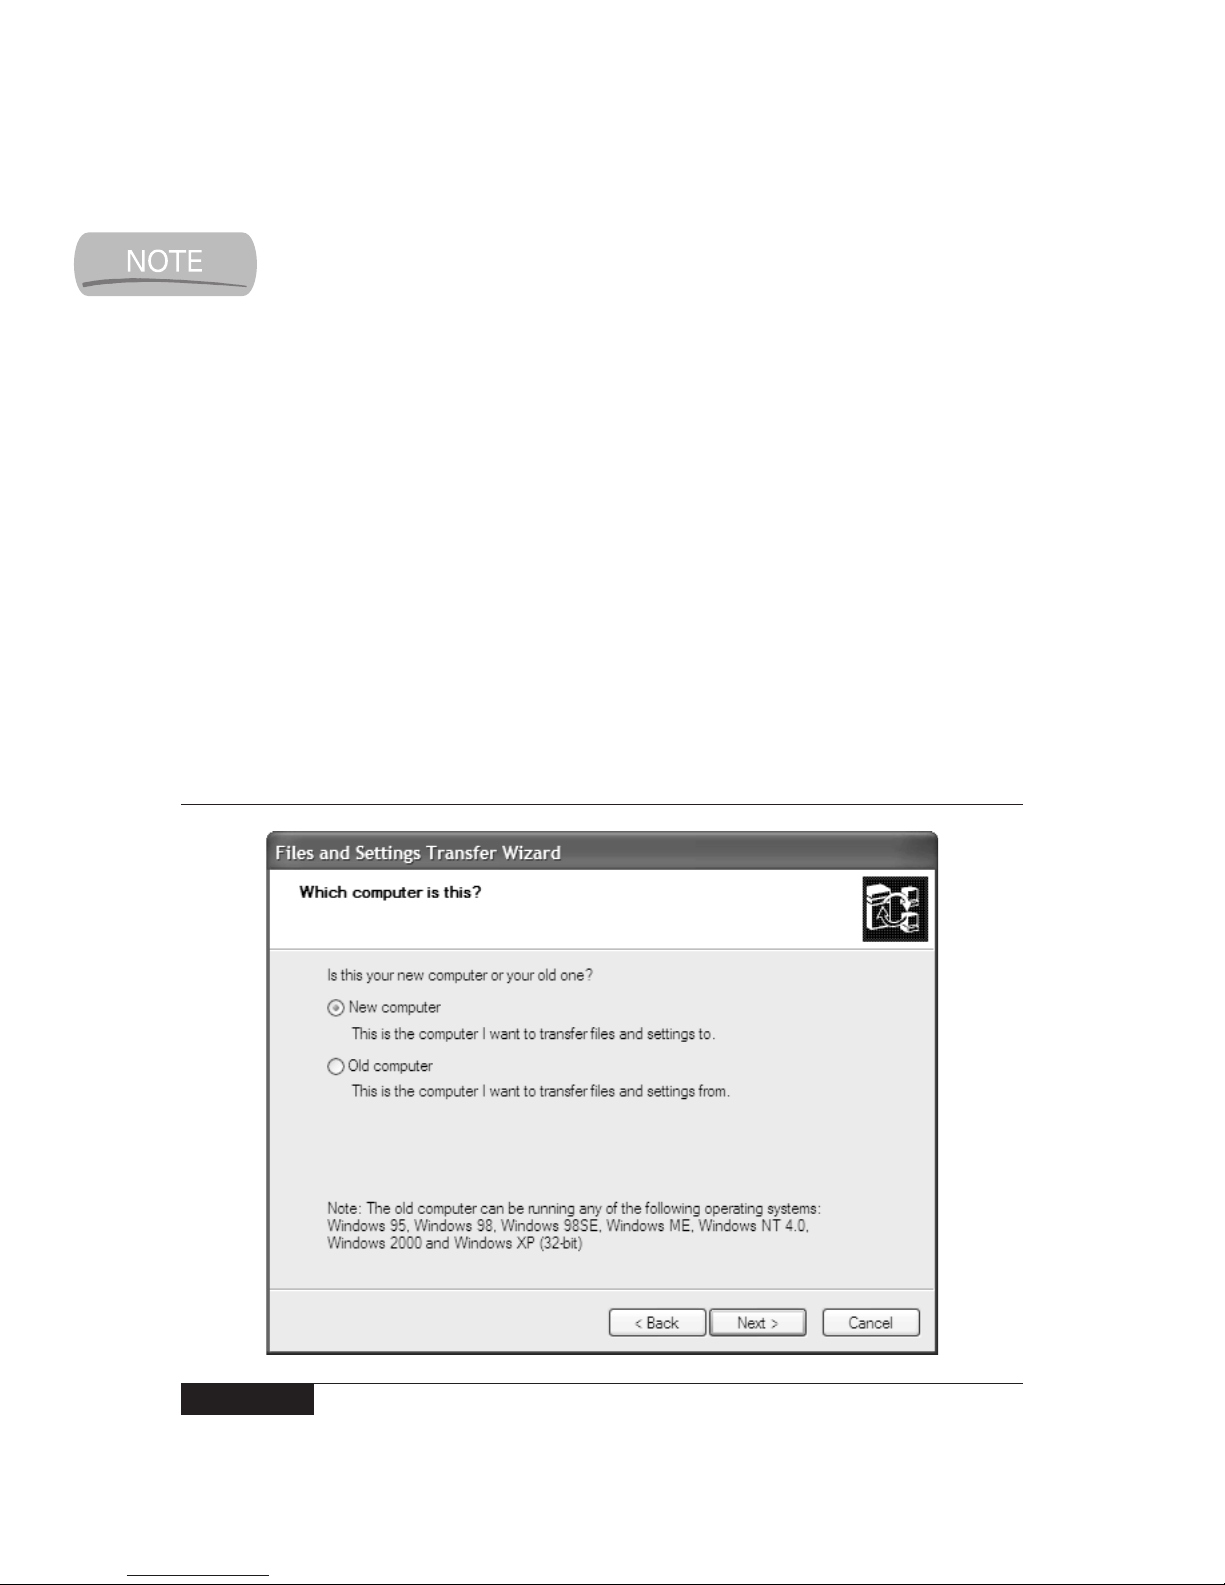
34 How to Do Everything with Your Tablet PC
HowTo8 (8) / How to Do Everything with Your Tablet PC / Mann / 222771-0 / Chapter 3
You must make sure the hard disk of the old computer is shared with your
Tablet PC if you’re transferring the files and settings across the network.
To start the wizard on the Tablet PC, tap Start | All Programs | Accessories |
System Tools | Files And Settings Transfer Wizard. Follow the step-by-step
instructions and answer the questions that appear (see Figure 3-2) to complete the
transfer. If you’re using Zip disks or other removable storage to transfer the files,
the wizard will calculate how much information it needs to transfer and will prompt
you to provide fresh disks as necessary.
Once you finish transferring the files and settings to your Tablet PC, you are
ready to configure the Windows interface on your Tablet PC.
Configure the Windows Interface
Once you have your important files and settings transferred to the Tablet PC, it’s
time to start configuring your new machine. Windows XP Tablet PC edition and
the Tablet PC hardware are both highly configurable. This makes sense because
the Tablet PC is probably the most personal personal computer you’ve ever used.
FIGURE 3-2 Its clear onscreen instructions make using the Files And Settings Transfer
Wizard a straightforward, if possibly time-consuming, task.
Color profile: Generic CMYK printer profile
Composite Default screen
Page 53
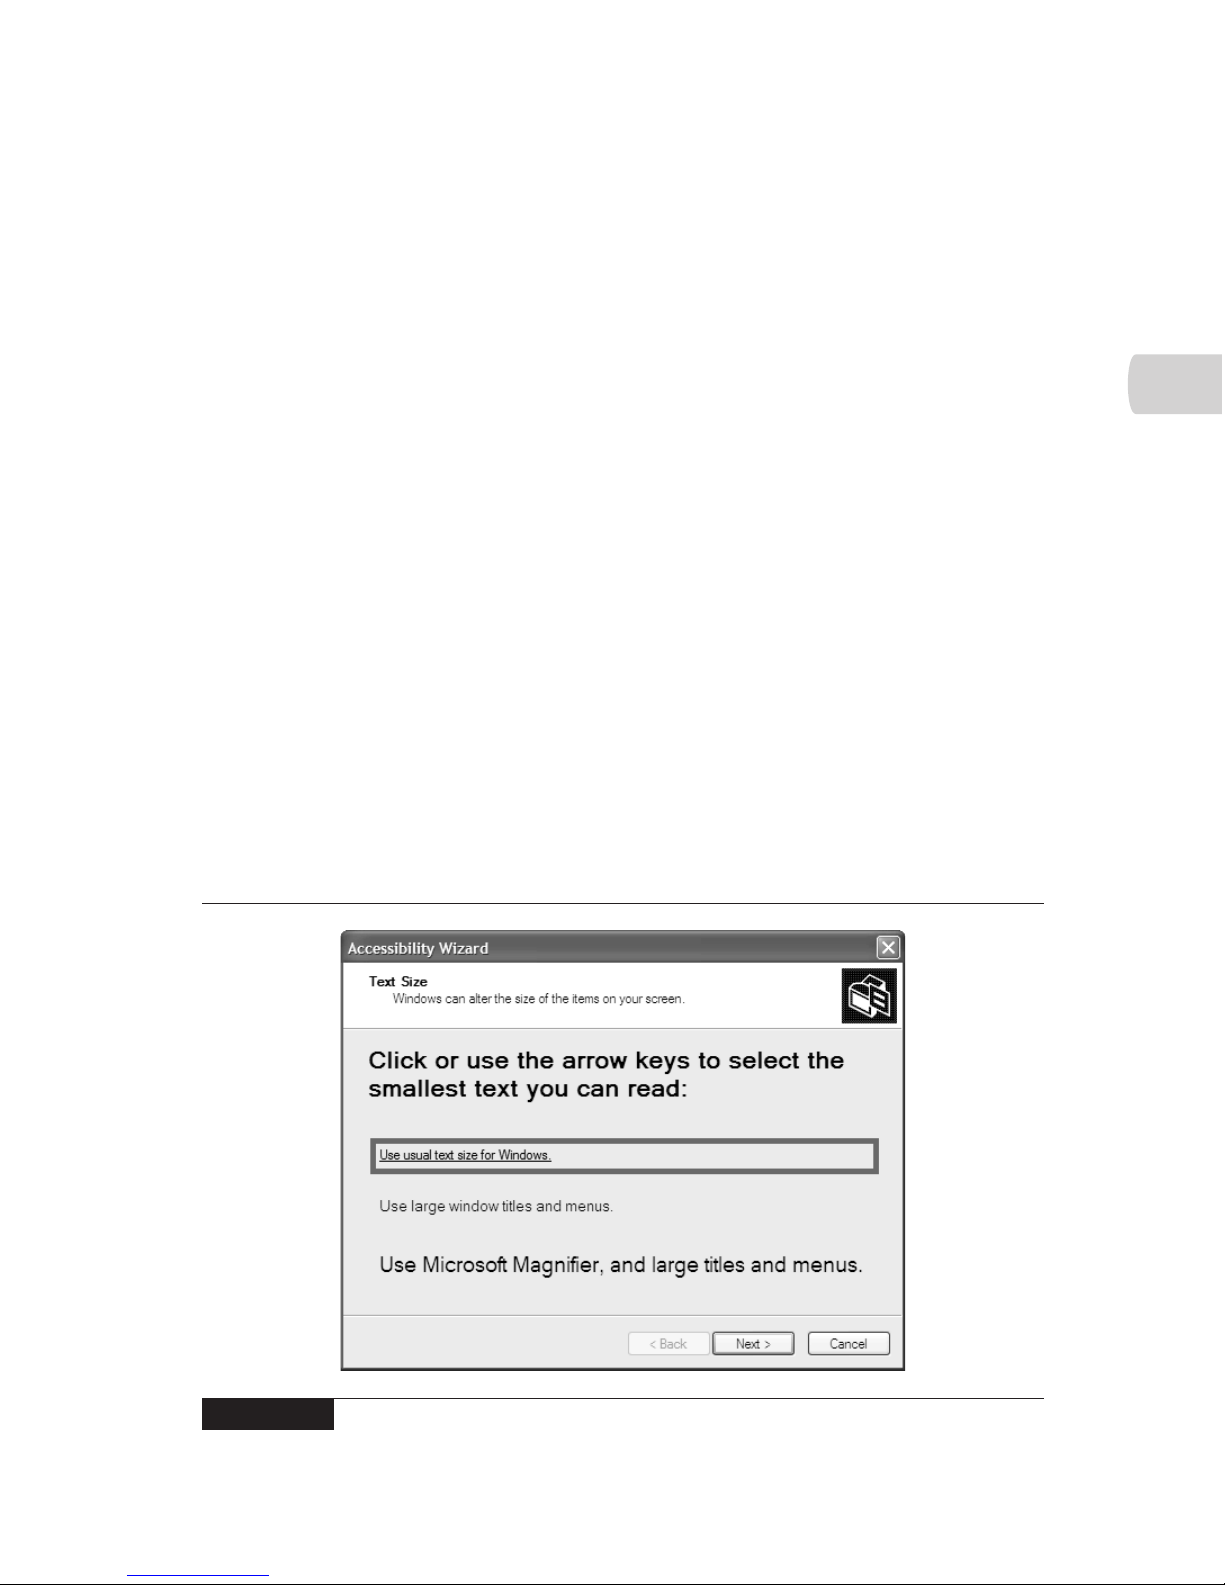
CHAPTER 3: Configure the Tablet PC for Your Needs 35
HowTo8 (8) / How to Do Everything with Your Tablet PC / Mann / 222771-0 / Chapter 3
3
One of the main goals Microsoft had in developing the Tablet PC was to create
a personal computer that you would use more of the time, in more ways, and in
more places than ever before. The more you use something, the more you want to
make it work exactly the way you want it to.
The following sections address the major areas where you can configure the
Windows interface on your Tablet PC. You can also configure various elements of
the Tablet PC hardware. These elements are covered later in this chapter, in the
section “Configure Your Tablet PC Hardware.”
Configure Accessibility Options
Recent versions of Microsoft Windows have included tools to make PCs easier to
use for people with disabilities. Windows XP is no exception. The tools included
with Windows XP Tablet PC edition are the same as those included in Windows XP
Home and Professional.
Tap Start | All Programs | Accessories | Accessibility to see the five accessibility
tools included with Windows XP Tablet PC edition. Unless you know exactly which
accessibility settings you would like to use, I suggest you open the Accessibility
Wizard and let it guide you in adjusting the Windows interface to meet your needs.
Work your way through the wizard by reading the onscreen instructions and
selecting the vision options (shown in Figure 3-3), as well as hearing and mobility
options that work for you.
FIGURE 3-3 The Accessibility Wizard can help you adjust the Windows interface
to meet your unique needs.
Color profile: Generic CMYK printer profile
Composite Default screen
Page 54
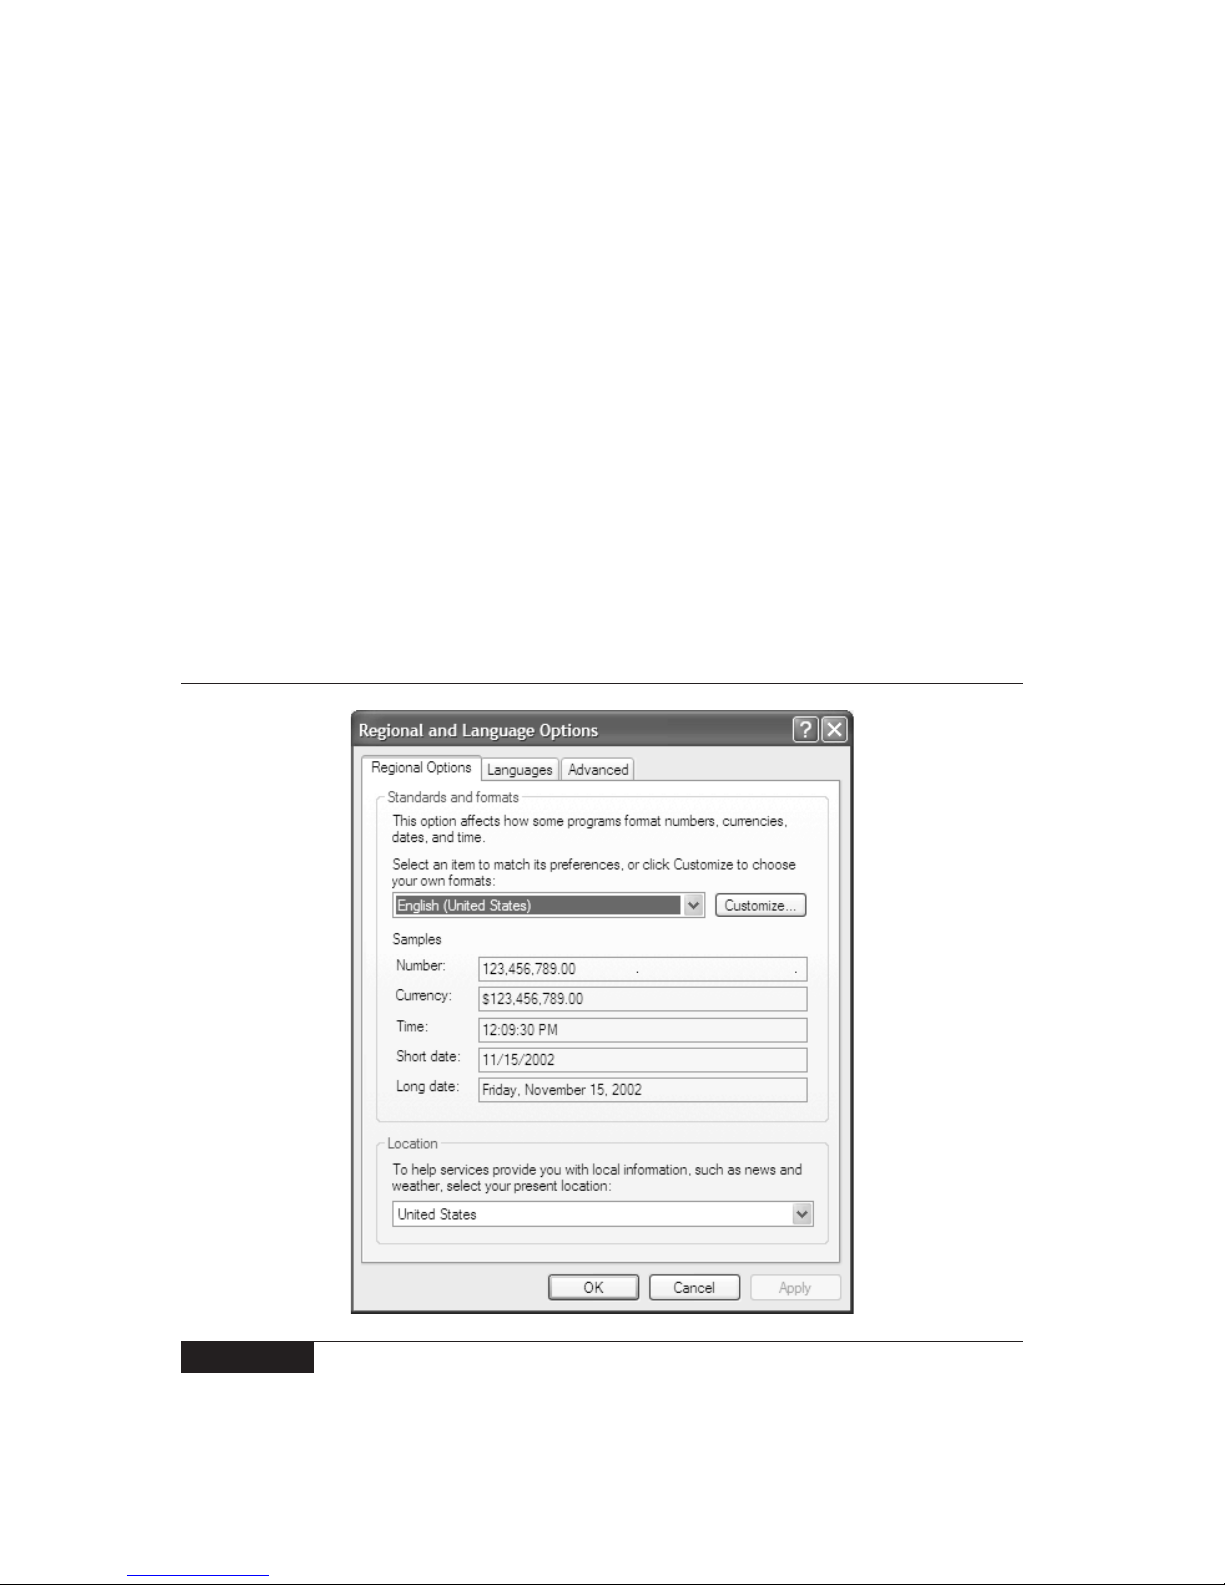
36 How to Do Everything with Your Tablet PC
HowTo8 (8) / How to Do Everything with Your Tablet PC / Mann / 222771-0 / Chapter 3
Configure Language and Regional Options
Windows XP supports multiple languages. It can also customize the display of certain
types of information to correspond to the standards of particular regions of the world.
To configure these options, tap Start | Control Panel | Date, Time, Language, And
Regional Options. When the Pick A Task screen appears, tap Regional And Language
Options to open the Regional And Language Options dialog box shown in Figure 3-4.
This dialog box provides options on three tabs.
■
Regional The Regional tab keeps the current language, but allows you to
adjust the way numbers, currencies, dates, and times appear on the screen.
Some services provide localized news and information based on the location
listed here. Set the region to your current location if you want services that
use this information to know where you are in the world.
FIGURE 3-4 Configure your Tablet PC for your region and language to make yourself
more productive.
Color profile: Generic CMYK printer profile
Composite Default screen
Page 55
HowTo8 (8) / How to Do Everything with Your Tablet PC / Mann / 222771-0 / Chapter 3
3
■
Languages The Languages tab lets you configure Windows to display
information in the language you select. Most of the programs you use will
automatically adapt to match the language you select, although a few thirdparty applications might not work in anything but the default language
installed on the Tablet PC.
■
Advanced The Advanced tab allows you to adjust the behavior of nonUnicode applications. (These are applications that won’t automatically
switch to a new language when Windows does.) By selecting the correct
code tab conversion tables, you can get some non-Unicode programs to
display their menus and dialog boxes in the correct language.
If you need to choose code tabs to make a non-Unicode application
work the way you want it to, I suggest you contact the manufacturer of the
application causing the problem. They may be able to give you useful
advice or information on how to address the problem. They may even have
a new version that works properly with Windows XP Tablet PC edition.
Configure the Windows Desktop
The Windows desktop is the workspace on your Tablet PC screen. Applications like
Windows Journal, your word processor, and similar programs appear on the Windows
desktop. You can adjust many of the characteristics of the Windows desktop to suit
your own needs and tastes, using the Display Properties dialog box, which appears
in Figure 3-5.
Like the Display Properties dialog box, the Accessibility Wizard (covered in
the “Configure Accessibility Options” section) can change some Windows
desktop characteristics.
In this section, you’ll learn to configure the options on four of the five tabs of the
Display Properties dialog box. The fifth tab, Settings, deals with hardware display
options like the screen resolution, and is covered in the “Configure Your Tablet PC
Hardware” section of this chapter.
The four tabs you will work with now are called Themes, Desktop, Screen Saver,
and Appearance.
Choose Windows Themes
A theme is a group of visual elements that you can select with a single click. A
theme specifies the Windows background, icons, sounds, and other elements of the
CHAPTER 3: Configure the Tablet PC for Your Needs 37
Color profile: Generic CMYK printer profile
Composite Default screen
Page 56
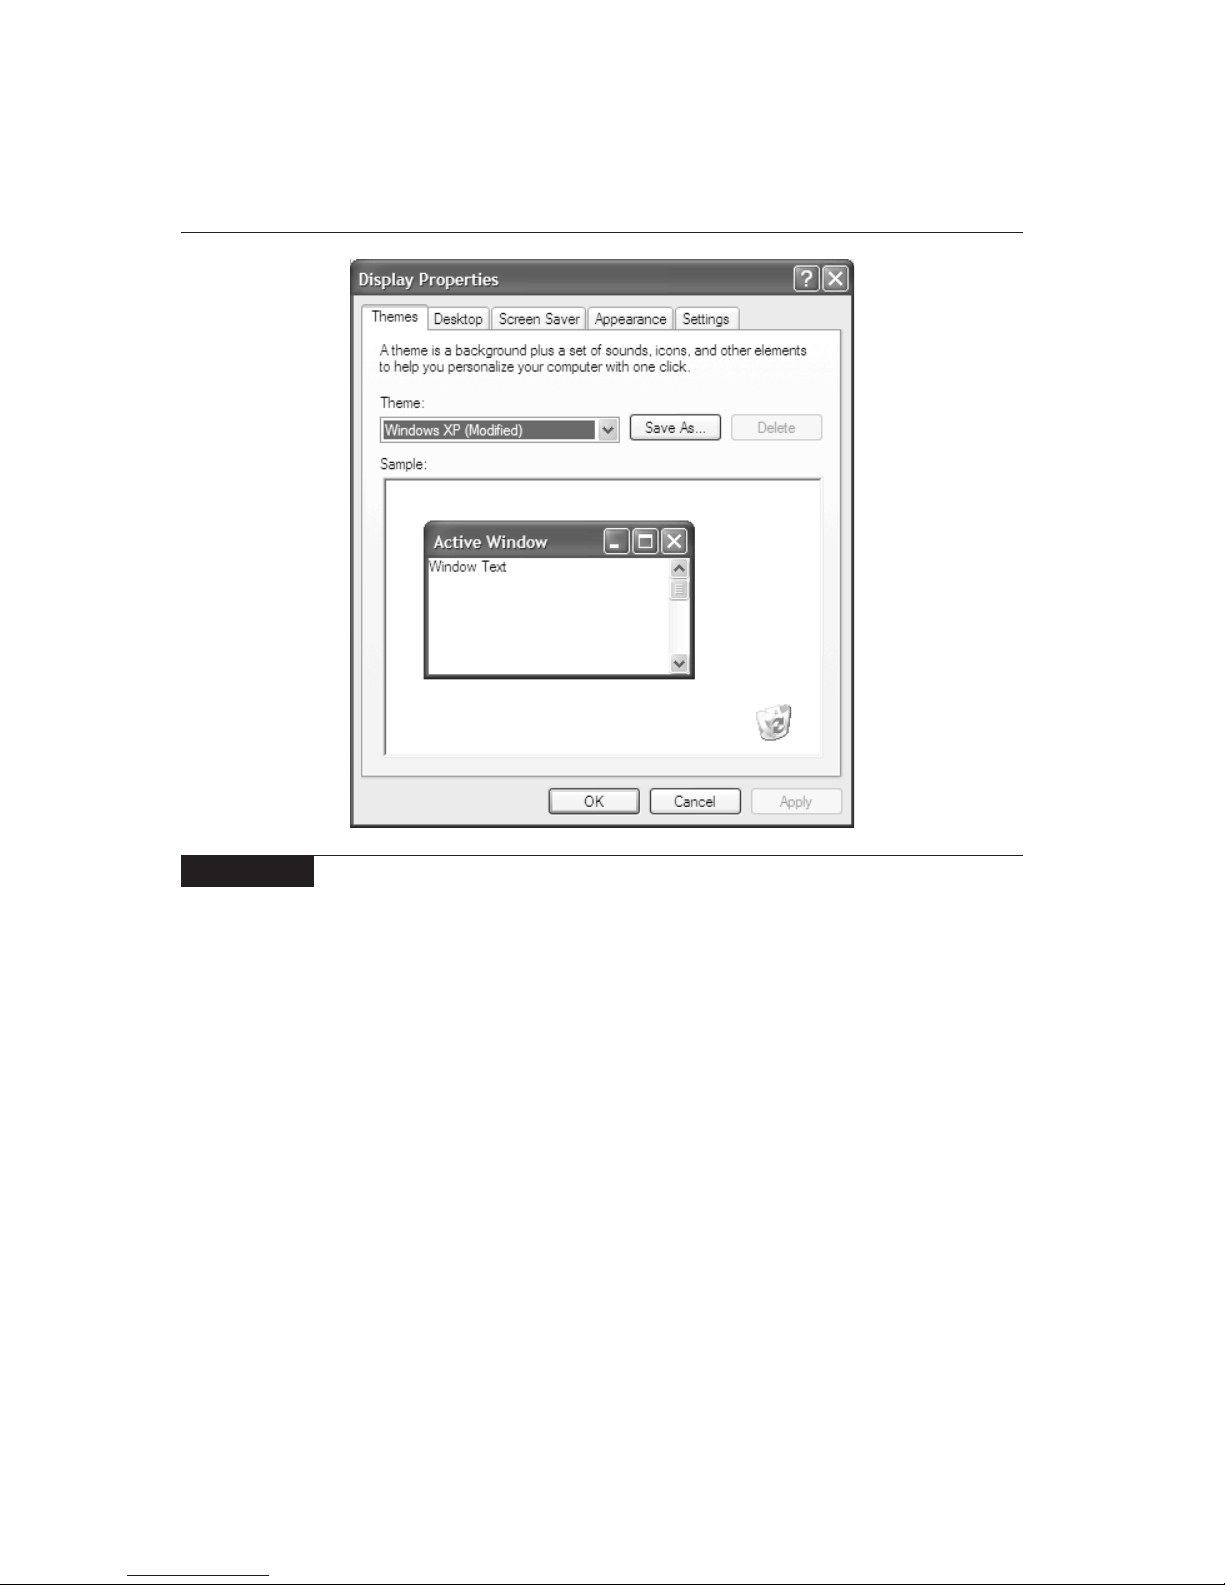
38 How to Do Everything with Your Tablet PC
HowTo8 (8) / How to Do Everything with Your Tablet PC / Mann / 222771-0 / Chapter 3
Windows desktop and interface. You can use the Themes tab to change your theme.
You can use the themes that came with your Tablet PC, save your current Windows
desktop settings as a theme, or buy additional themes as part of Plus! for Windows
XP—a set of graphics, games, and multimedia tools published by Microsoft.
Customize the Desktop
Use the Desktop tab to change the Windows background. You can choose from
dozens of included backgrounds, or tap Browse to find images on your hard disk
that you can use as backgrounds. The Position button lets you control how Windows
displays background images that are smaller than the background, while the Color
list lets you select the color of the portions of the background that aren’t covered
by background images.
Tap Customize Desktop to customize the desktop even further. On the General
tab, you can control which icons appear on the desktop, change their appearance,
and control the Desktop Cleanup Wizard. This wizard can automatically gather
desktop icons that you haven’t used recently and put them in a folder so they’re
not cluttering your system.
FIGURE 3-5 You can significantly change the look of the Windows desktop with the
options in the Display Properties dialog box.
Color profile: Generic CMYK printer profile
Composite Default screen
Page 57
3
The Web tab of the Customize Desktop dialog box lets you display web pages
on your Windows desktop. Select your current home page by tapping the check
box next to it in the Web Tabs list, or choose one or more additional pages by
tapping New and entering the appropriate URL.
To control how often the information on your desktop web pages gets updated,
select a page in the Web Pages list, and then tap Properties | Schedule and create
a synchronization schedule. To control which content gets synchronized, tap the
Download tab and set the options you want to use in the Content To Download
section of the tab.
CHAPTER 3: Configure the Tablet PC for Your Needs 39
HowTo8 (8) / How to Do Everything with Your Tablet PC / Mann / 222771-0 / Chapter 3
That Choosing the Right Link
Depth Is Important?
One of the options on the Download page has the somewhat confusing title,
“Download Pages X Links Deep From This Page,” where X is a number from
zero to three. This option has a direct but nonobvious effect on how much work
your Tablet PC must do when it synchronizes the web content. By default, X is
0, which means Windows downloads only the page you specified. If you set X
to 1, Windows downloads the page you specified, as well as every other page
on the same site the original page links to. So if the original page linked to five
additional pages at the same site, Windows would download the original page
and the five pages to which it links.
If you set X to 2, Windows downloads the original page, all the pages at that
site to which the original page links, and all the pages at the original site to
which those pages link. If your original page and every page at the original
page’s web site link to five other pages on the site, you get a situation like this:
■
With X set to 0, Windows downloads the original page.
■
With X set to 1, Windows downloads the original page, plus the five
pages it links to, for a total of six.
■
With X set to 2, Windows downloads the original page, plus the five pages
it links to, plus the 25 pages to which those five link, for a total of 31.
Color profile: Generic CMYK printer profile
Composite Default screen
Page 58

In addition to controlling which content gets downloaded and when, you can
use the Web tab to have Windows send e-mail whenever it detects that the selected
web content has changed. This feature is useful because it saves you from having
to constantly scan the sites for changes yourself. Finally, if the web content to be
displayed on your Windows desktop requires a user name and password, tap Login
to provide Windows with that information.
Choose and Customize Screen Savers
The Screen Saver tab allows you to control what happens on your Tablet PC display
when you’re not actively using it. This tab also gives you access to the full range
of Tablet PC power schemes—which, among other things, determine when to turn
off the display to save power.
I cover Tablet PC power settings in the “Configure Your Tablet PC
Hardware” section of this chapter, so we’ll concentrate on screen
savers here.
Screen savers are usually some sort of animation that appears on the screen when
you haven’t used the computer for a certain amount of time. Windows XP comes
with a collection of screen savers, ranging from a simple blank screen to elaborate,
ever-changing 3-D images, to text or images that you create. The manufacturer of
your Tablet PC also likely included their own screen saver.
40 How to Do Everything with Your Tablet PC
HowTo8 (8) / How to Do Everything with Your Tablet PC / Mann / 222771-0 / Chapter 3
■
With X set to 3, Windows downloads the original page, plus the five
pages it links to, plus the 25 pages those five link to, plus the 125 pages
the previous 25 link to, for a total of 156.
The situation gets even worse if you set the option Follow Links Outside Of
This Page’s Web Site. That allows Windows to download pages that aren’t on
the site of the original page, as well as those that are on the site. Imagine if one
of those offsite links leads to an index site like Yahoo! There could be dozens,
even hundreds of links to follow on such an index page.
As I’ve shown, the situation can quickly get out of hand if you set a link depth
greater than absolutely necessary. That’s why another option here is to set a limit
on how much hard disk space Windows will allow a single page (and the pages to
which it is linked) to consume. The best approach is to limit the number of web
pages you display on your desktop, and limit the link depth as much as you can.
Color profile: Generic CMYK printer profile
Composite Default screen
Page 59

To choose a screen saver, select the name of one from the Screen Saver list on
this tab. To see what that screen saver does, tap Preview. This activates the screen
saver immediately so you can see how it looks. To end the preview, as well as to
stop a running screen saver, you need only move the cursor or type a keystroke.
Make sure you remove the pen tip from the screen once you tap Preview, or you’ll
likely twitch your hand enough to end the preview almost instantly.
Many screen savers have options you can adjust. With the screen saver you’re
interested in selected, tap Settings to see the options for that specific screen saver.
Make your changes, and then use Preview to see what effect they have. To control
how long it takes the screen saver to pop up when there is no activity on the Tablet
PC, set the number of minutes in the Wait list.
You can use screen savers as a basic form of security on your computer by
selecting the On Resume, Password Protect check box. If you do this, you’ll need
to enter your normal login password to end the screen saver.
An important point to remember about screen savers is that any kind of action
on the display consumes more power than simply turning the display off when
you’re not using it. You’ll learn how to do this when we reach the Power Options
Properties dialog box in the “Configure Your Tablet PC Hardware” section of this
chapter.
Change the Appearance of the Desktop
If you’re interested in customizing the look of your Windows desktop, you’ll really
love the Appearance tab shown in Figure 3-6. Using this tab, you can change the
style of your desktop, select a default color scheme, and even change the size of the
fonts Windows uses for things like dialog box and button titles. The related Effects
and Advanced Appearance dialog boxes give you even more precise control.
Visual elements of Windows XP (buttons and windows) normally have rounded
corners, and an overall look that is distinct from earlier versions of Windows. Using
the Appearance tab, you can switch between the Windows XP style and the Classic
(old) style. Just choose the style you want in the Windows And Buttons list. Tap
Apply to make the change go into effect. This will take a short while, and your
computer will be unresponsive while Windows reworks everything.
Windows XP comes with three predefined color schemes: Default (a blue scheme),
Olive Green, and Silver. Choose a scheme from the Color Scheme list and tap Apply
to switch. As with choosing a style, Windows will be unavailable for a moment as it
reworks everything to match the new color scheme.
Changing the font size works the same way as changing the styles and schemes.
Choose a size from the Font Size list and click Apply. Then wait while Windows
reworks everything.
CHAPTER 3: Configure the Tablet PC for Your Needs 41
HowTo8 (8) / How to Do Everything with Your Tablet PC / Mann / 222771-0 / Chapter 3
3
Color profile: Generic CMYK printer profile
Composite Default screen
Page 60
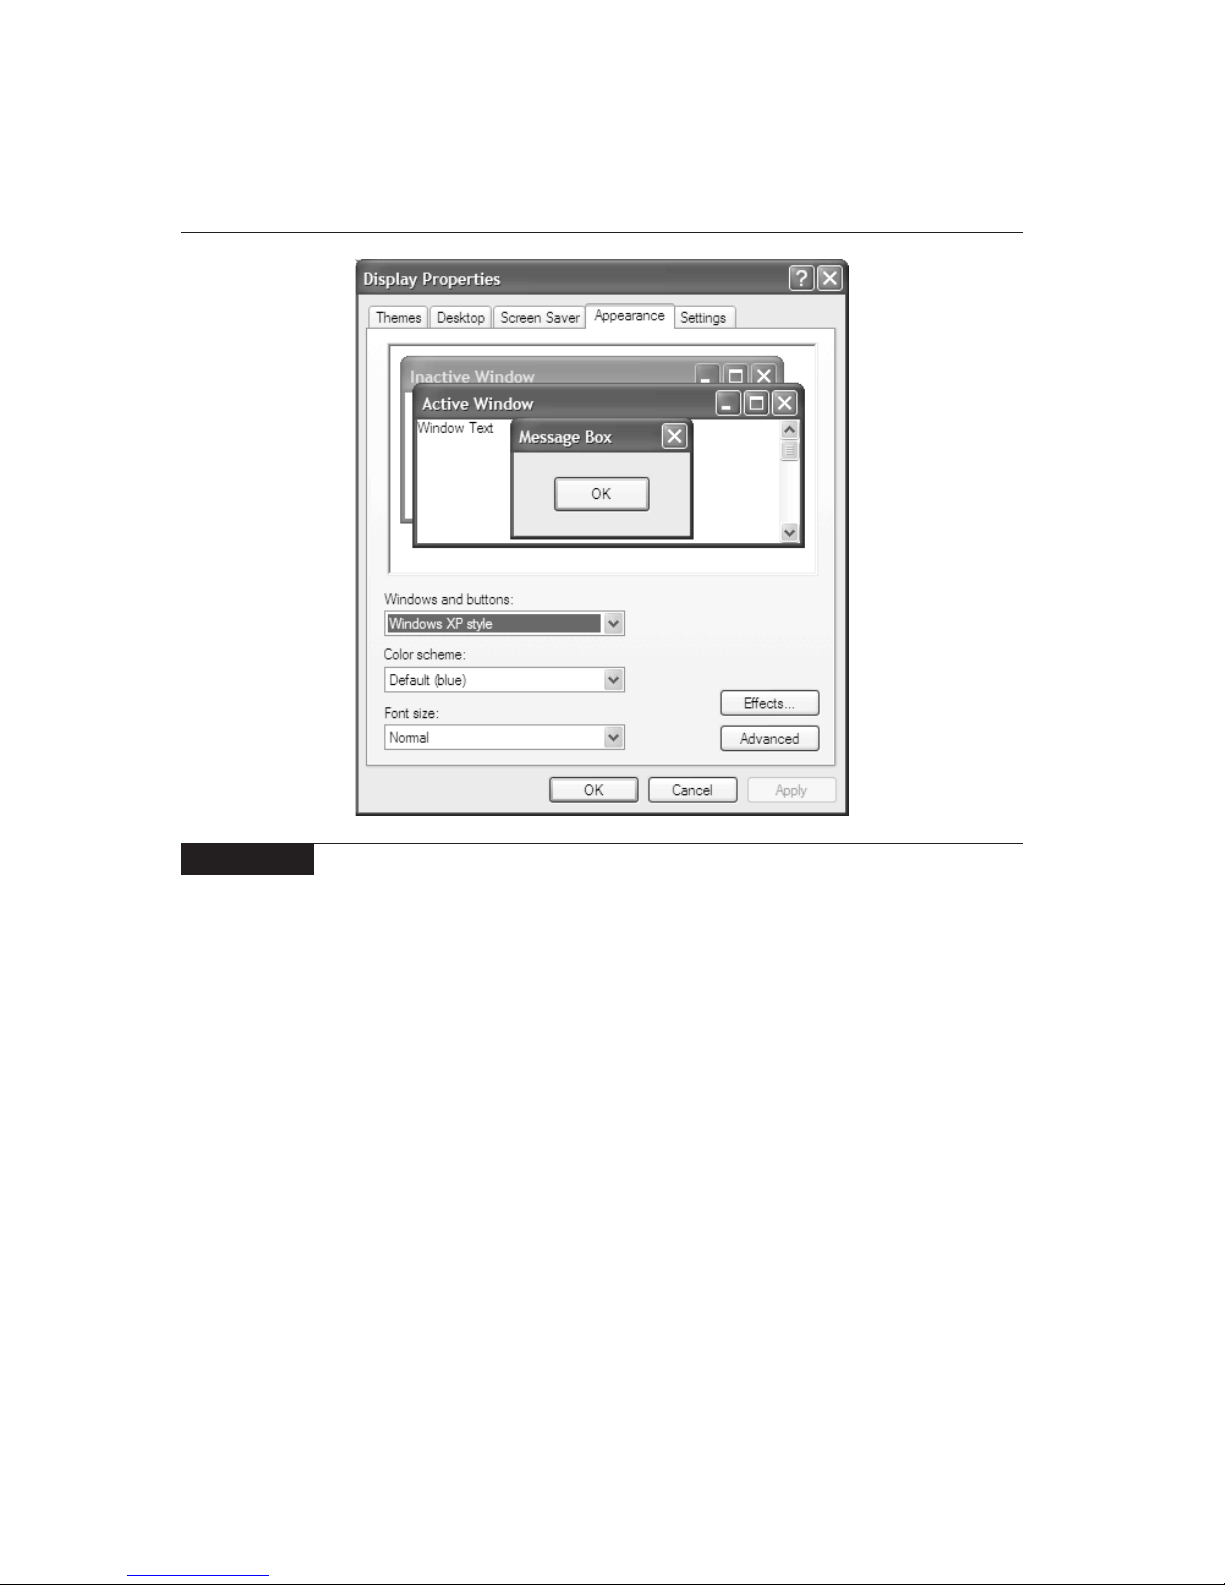
Tapping the Effects button opens the Effects dialog box, where you can
configure several of the special effects that Windows uses. To change the way
menus and tooltips appear, you can select the Fade effect or the Scroll effect. To
eliminate these transitional special effects altogether, clear the Transition Effect
check box.
The next option controls how Windows smoothes the edges of screen fonts.
By default, your Tablet PC should be set to use ClearType, a technology that takes
advantage of the physical design of your Tablet PC liquid crystal display (LCD)
screen. Choose one of the two methods in the list, or turn off font smoothing altogether
by clearing the Smooth Edges check box. You have to trade off between processing
power expended on font smoothing and an easier-to-read display. ClearType gives
the best visual results, but it uses the most processing power. Clearing the check
box means no processing power is expended on font smoothing, but the display is
less pleasant to look at and slightly harder to read than with either of the smoothing
methods.
42 How to Do Everything with Your Tablet PC
HowTo8 (8) / How to Do Everything with Your Tablet PC / Mann / 222771-0 / Chapter 3
FIGURE 3-6 Use the Appearance tab and its associated dialog boxes to customize the
look of Windows XP on your Tablet PC.
Color profile: Generic CMYK printer profile
Composite Default screen
Page 61

The other four options in the Effects dialog box are aesthetic choices that you
can use or not, remembering always that every effect you select consumes a tiny
bit of processing power and adds a bit to the drain on your battery.
The final dialog box associated with the Appearance tab is Advanced Appearance.
Tap the Advanced button on the Appearance tab to open the Advanced Appearance
dialog box. Here, you can adjust 18 different items on the Windows desktop,
everything from the color of the active title bar, to the size of message box text, to
the distance between icons. To do this, select an item from the Item list, and then
adjust its settings using the controls to the right of the list. Many of the changes you
make will be immediately visible in the example window at the top of this dialog
box, but for the rest, you’ll need to tap OK | Apply and actually make the changes
to see their effects. If you change the Windows And Buttons style to anything other
than Windows Classic, that change will override the changes you make here.
3
CHAPTER 3: Configure the Tablet PC for Your Needs 43
HowTo8 (8) / How to Do Everything with Your Tablet PC / Mann / 222771-0 / Chapter 3
Did You Know How Screen
Font Smoothing Works?
Windows XP has two different methods for smoothing the fonts you see on the
screen. Without going too far into the technical details, the standard method
smooths fonts by adjusting the colors of pixels adjacent to the pixels that
make up the font. By setting the color of the adjacent pixels to intermediate
values, Windows makes the fonts look smoother, at the expense of making
them slightly fuzzier.
The ClearType method takes advantage of the fact that physically, each of the
pixels on the Tablet PC LCD screen is made up of red, green, and blue elements
side by side. ClearType manipulates the brightness of each of these elements to
smooth the fonts. Because ClearType can control each of the three elements of
each pixel individually, it can, in effect, use as little as a third of a pixel for
smoothing. This results in much smoother fonts on LCD displays like the one
on your Tablet PC. Unfortunately, ClearType can do its magic only for one set
of screen orientations. Because it relies on the horizontal layout of the elements
of pixels, ClearType can’t work when the orientation of the screen is rotated 90
degrees, because this in effect makes the layout of the elements vertical. You’ll
need to experiment with these settings and choose the one that works best
for you.
Color profile: Generic CMYK printer profile
Composite Default screen
Page 62
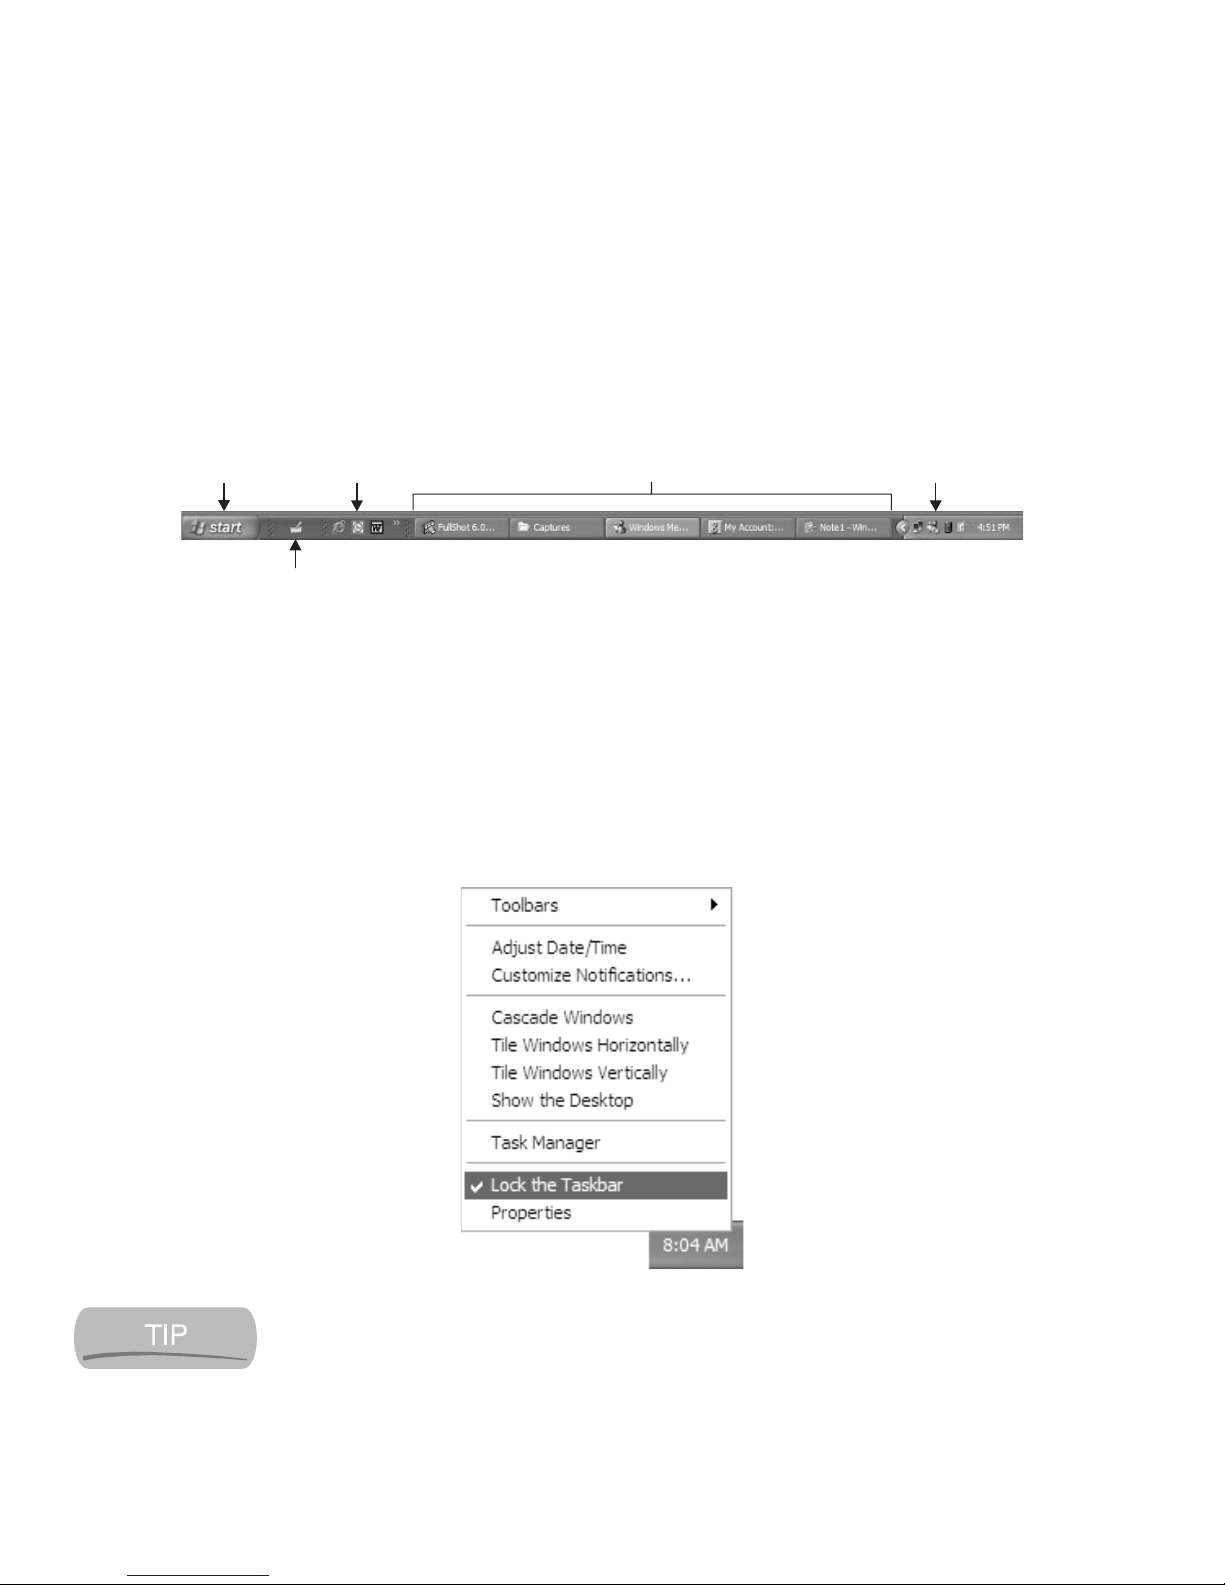
Customize the Taskbar
By default, your Tablet PC should start out with the taskbar visible at the bottom
of the screen. The taskbar is shown next. Proceeding from left to right, the taskbar
is divided into several sections: the Start button, the Tablet PC Input Panel icon, the
Quick Launch toolbar, an area holding buttons for each running application, and
the notification area.
Although relatively few people do so, you can customize the taskbar in several
ways. You can move it, resize it, add toolbars and shortcuts to it, and change its
properties. Before you can perform most of those tasks, however, you need to enable
taskbar changes.
The taskbar is normally locked to prevent any changes other than which toolbars
the taskbar shows. You unlock the taskbar by right-tapping an empty area of the
taskbar to open the taskbar shortcut menu. Once the menu appears, shown next,
clear the Lock The Taskbar option by tapping it.
You can always find some unused space next to the time display in the
notification area.
44 How to Do Everything with Your Tablet PC
HowTo8 (8) / How to Do Everything with Your Tablet PC / Mann / 222771-0 / Chapter 3
Quick Launch toolbar
Notification AreaStart button
Tablet PC Input Panel icon
Running applications
Color profile: Generic CMYK printer profile
Composite Default screen
Page 63
With the taskbar unlocked, you can start customizing it. You can move the
taskbar to another edge of the screen by simply dragging it there and dropping it.
Placing the taskbar along one of the sides of the screen allows it to show many
more application buttons than it would normally (and looks pretty cool), but it
occupies a lot more of the screen.
You can change the size of the taskbar by dragging the edge of the taskbar
closest to the Windows desktop. A larger taskbar allows for more information on
each application button but occupies more of the screen.
CHAPTER 3: Configure the Tablet PC for Your Needs 45
HowTo8 (8) / How to Do Everything with Your Tablet PC / Mann / 222771-0 / Chapter 3
3
Find the Taskbar When It
Isn’t Visible
Although Tablet PCs normally come configured so that the taskbar is always
visible, two settings can cause the taskbar to be hidden. One setting allows
windows on the desktop to cover the taskbar, and the other hides the taskbar when
it isn’t needed. Follow these steps to find the taskbar when it is missing in action:
1. Minimize any open windows in case they are covering the taskbar.
2. Drag the cursor to the bottom of the screen. If the taskbar is set to hide
itself, this can cause it to appear.
3. If the taskbar still isn’t visible, use your Tablet PC mouse, touch pad,
or other nonpen pointing device to drag the cursor to the bottom of the
screen. Using the pen, it can be difficult to bring the cursor close enough
to the bottom of the screen to cause the taskbar to appear.
4. Adjust the taskbar settings to force it to stay visible. Tap Start | Control
Panel | Appearance And Themes | Taskbar And Start Menu. On the
Taskbar tab, make sure that Auto-Hide The Taskbar is cleared and that
Keep The Taskbar On Top Of Other Windows is selected. Then tap OK.
This should bring the taskbar into view.
Color profile: Generic CMYK printer profile
Composite Default screen
Page 64
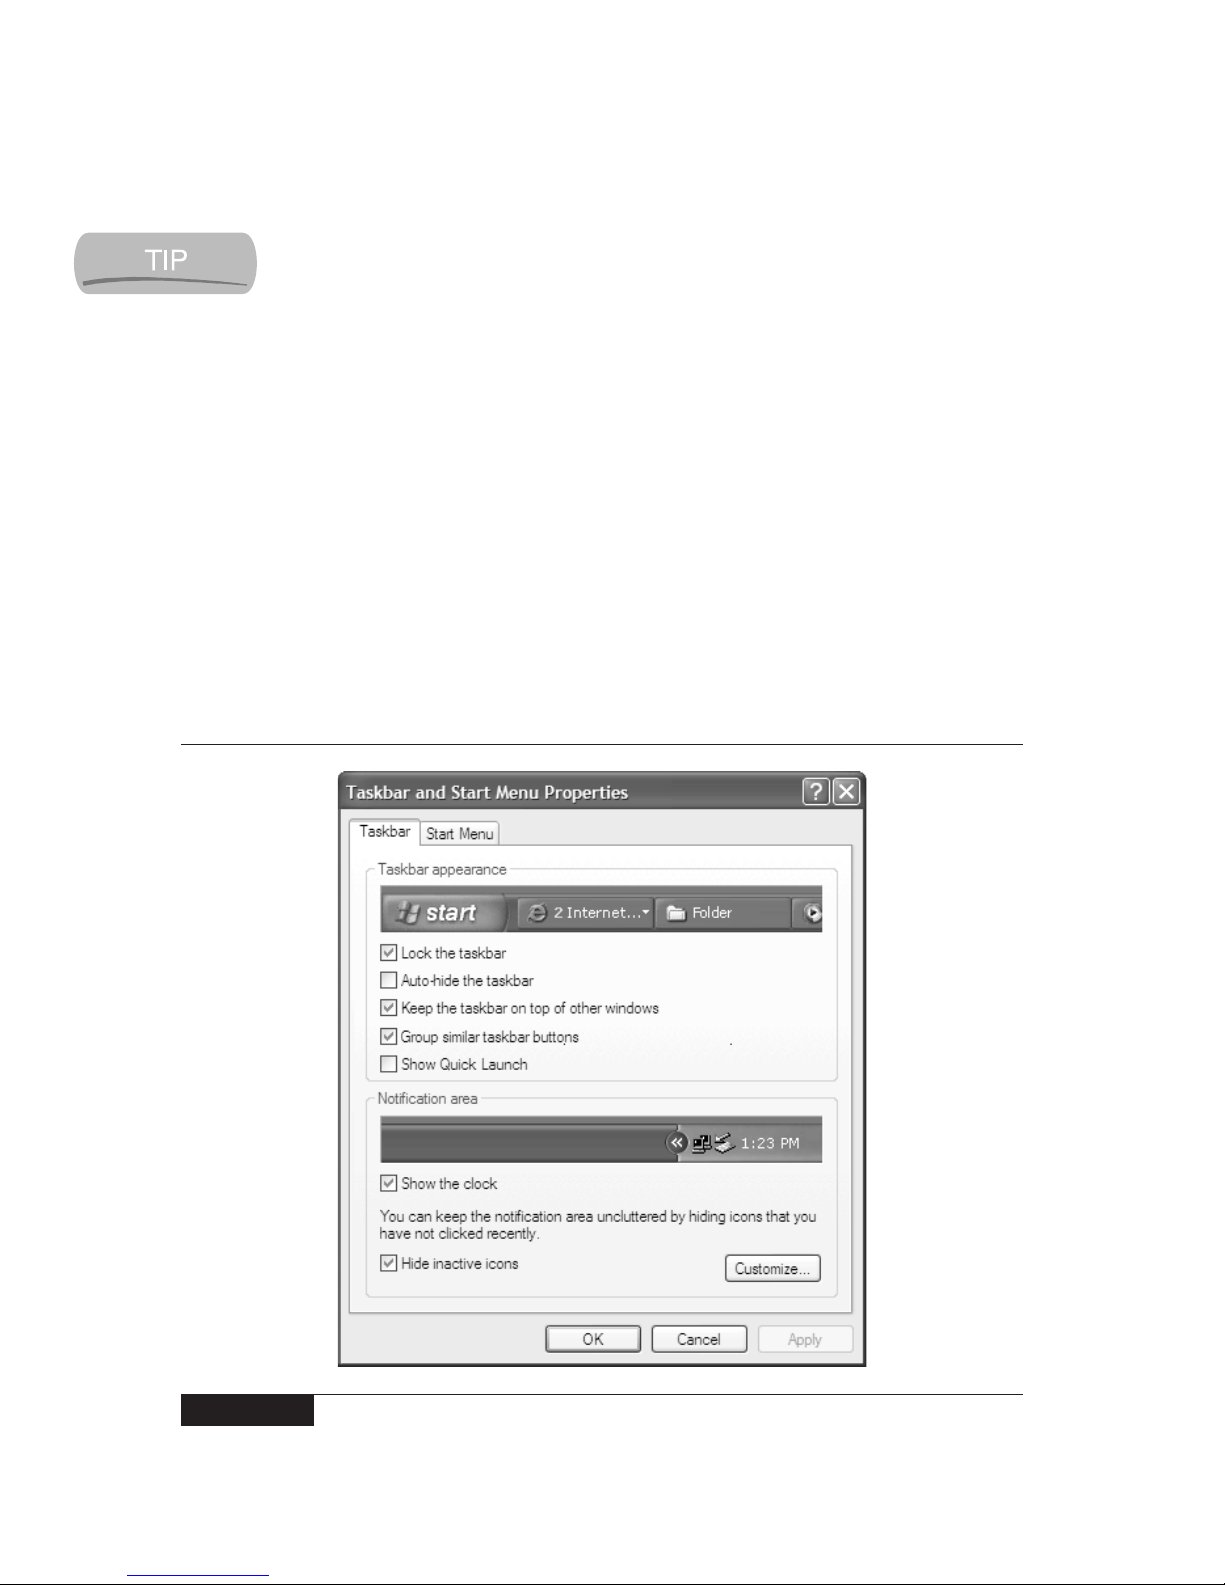
46 How to Do Everything with Your Tablet PC
HowTo8 (8) / How to Do Everything with Your Tablet PC / Mann / 222771-0 / Chapter 3
Using this technique, you can reduce your taskbar to a thin strip along the
edge of the screen, which can be very hard to work with, particularly using
the pen. If this happens, you may need to use your mouse to drag the
taskbar back to a usable size, or press the Windows key on the keyboard.
Other changes you may wish to make to the taskbar require you to use the
Taskbar And Start Menu dialog box. Tap Start | Control Panel | Appearance And
Themes | Taskbar And Start Menu to open this dialog box. On the Taskbar tab,
shown in Figure 3-7, you can change the appearance of both the main taskbar and
the notification area. Select the options you want to use and tap OK to put them
into effect.
■
Auto-Hide The Taskbar This option makes the taskbar disappear when it
isn’t needed, freeing the area of the screen that would otherwise be occupied
by the taskbar. When the taskbar is hidden, you can make it reappear by
dragging the cursor to the screen edge on which the taskbar is located.
FIGURE 3-7 Use the Taskbar tab of the Taskbar And Start Menu dialog box if you want
to change key aspects of the taskbar.
Color profile: Generic CMYK printer profile
Composite Default screen
Page 65

CHAPTER 3: Configure the Tablet PC for Your Needs 47
HowTo8 (8) / How to Do Everything with Your Tablet PC / Mann / 222771-0 / Chapter 3
3
If you select Auto-Hide The Taskbar and are using the pen, you may find it
very hard to drag the cursor close enough to the edge to make the taskbar
reappear. I strongly recommend that you do not auto-hide the taskbar on
your Tablet PC.
■
Group Similar Taskbar Buttons This option, which is set by default,
allows Windows to combine all your active instances of say, Microsoft
Word, into a single application button. This reduces the number of application
buttons on the taskbar and makes it easier to read the titles of each.
■
Show Quick Launch This option adds an area to the taskbar where you
can place shortcuts to the applications you want to be able to launch quickly.
When this option is selected, you can place the icons of your favorite
applications on the taskbar just to the right of the icon that starts the Tablet
PC Input Panel. This is the one change I make to the standard taskbar
setup. I add applications that I frequently use to the Quick Launch toolbar
so I can start them with a single click.
■ Hide Inactive Icons This option conserves space on the taskbar by hiding
notification icons when they’re not active. This leaves more space on the
taskbar for other information. You can control which notification icons are
hidden by tapping Customize and following the directions in the Customize
Notifications dialog box.
The final configuration option for the taskbar is to add additional toolbars to it.
The Quick Launch area is actually a predefined toolbar. You can add a toolbar that
represents a folder, a drive, or even an Internet address. To add a toolbar to the
taskbar, right-tap an open area on the taskbar, and in the shortcut menu, tap Toolbars |
New Toolbar. Browse to the folder, drive, or Internet address you want to include,
and tap OK to add it to the taskbar. Adding toolbars to the taskbar can be a good
idea when you need quick access to the information stored on that toolbar.
Configure the Start Menu
You can customize the Start menu by right-tapping the Start button to open the
shortcut menu, and then tapping Properties | Start Menu | Customize. The General
tab of the Customize Start Menu dialog box (Figure 3-8) lets you control which
application shortcuts appear in the menu and how large they are. It also allows you
to specify a web browser and e-mail program that will appear in the Pinned Item
list, as well as the number of programs that will appear in the Most Frequently Used
Programs list.
Color profile: Generic CMYK printer profile
Composite Default screen
Page 66
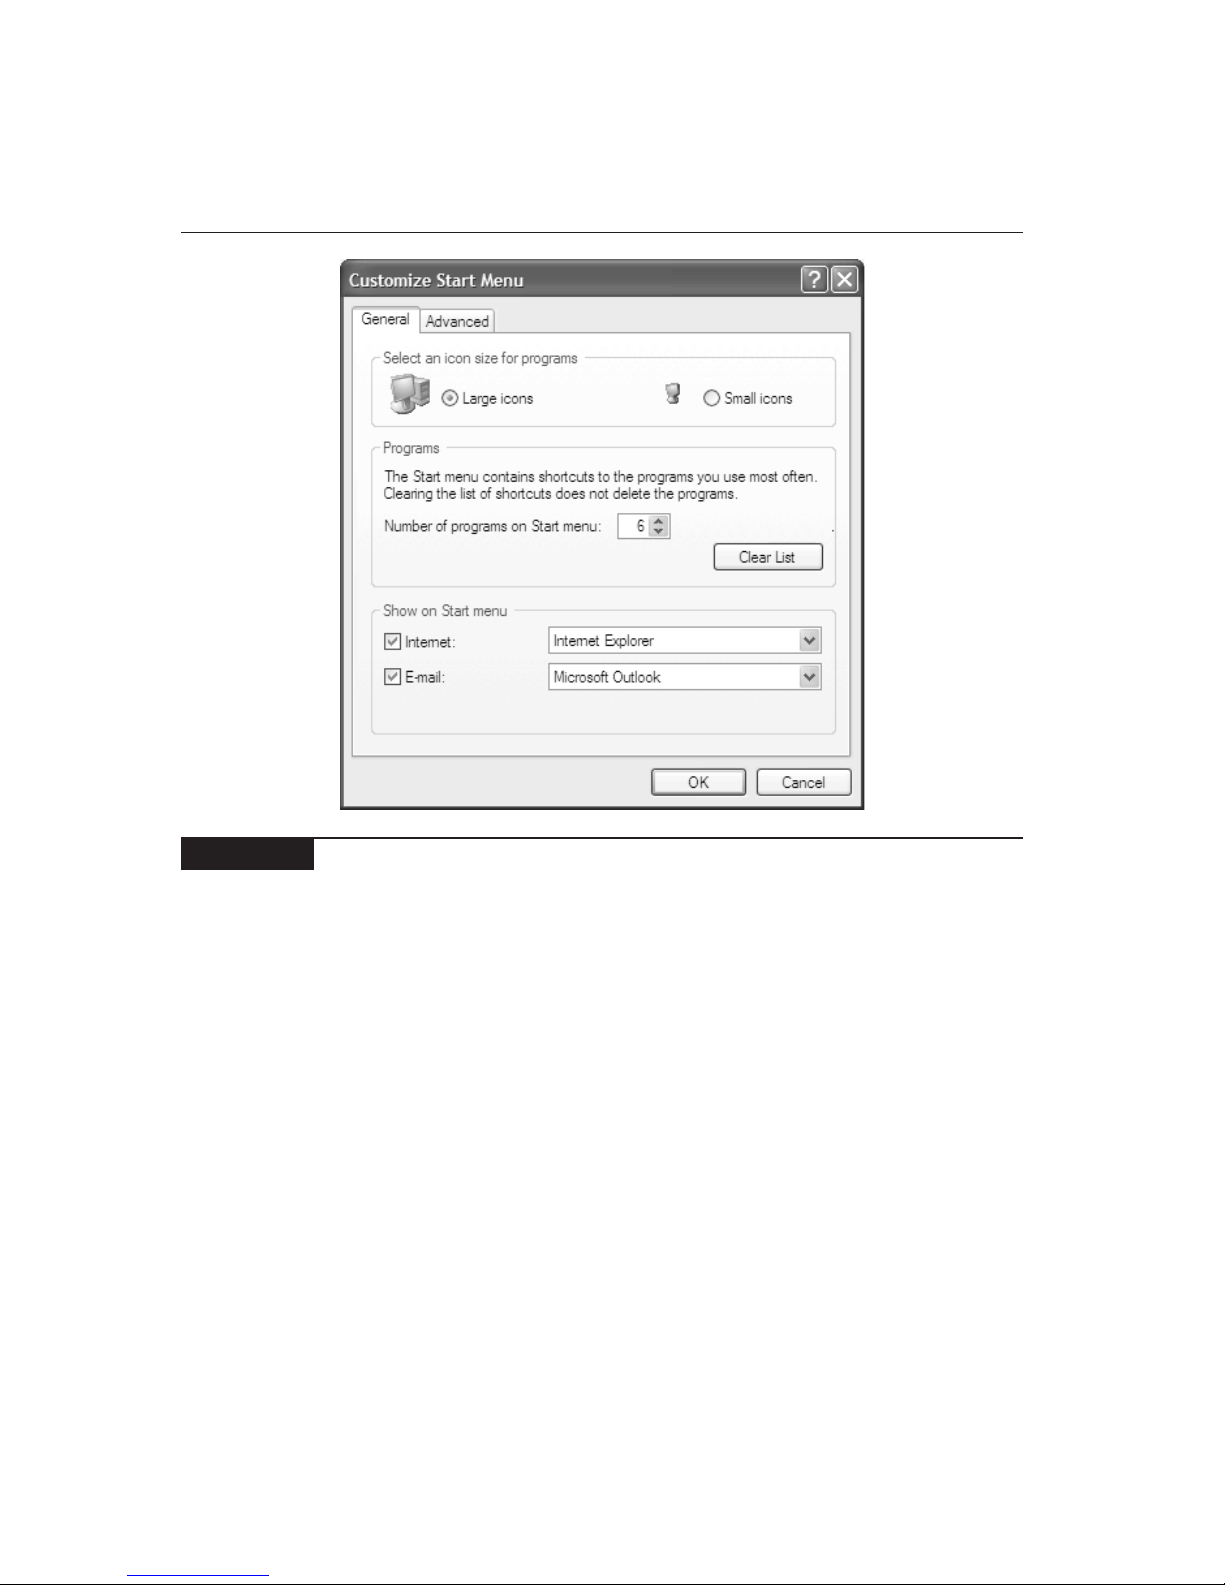
48 How to Do Everything with Your Tablet PC
HowTo8 (8) / How to Do Everything with Your Tablet PC / Mann / 222771-0 / Chapter 3
On the Advanced tab, you can go further in controlling which applications
appear in the menu. This is also the place to activate the Most Recently Used
Documents list, as well as set submenus to appear automatically when you hover
the pen over the main menu. Both of these options are useful in making you more
productive.
Change Folder Views
You can change the way Windows displays the contents of folders to accommodate
the way you use the contents of those folders. As you learned in Chapter 1, most
folders are document folders. Windows comes with a total of seven folder templates:
Documents, Pictures, Photo Albums, Music, Music Artist, Music Album, and Videos.
FIGURE 3-8 Use the Customize Start Menu dialog box to control what appears on the
Start Menu.
Color profile: Generic CMYK printer profile
Composite Default screen
Page 67
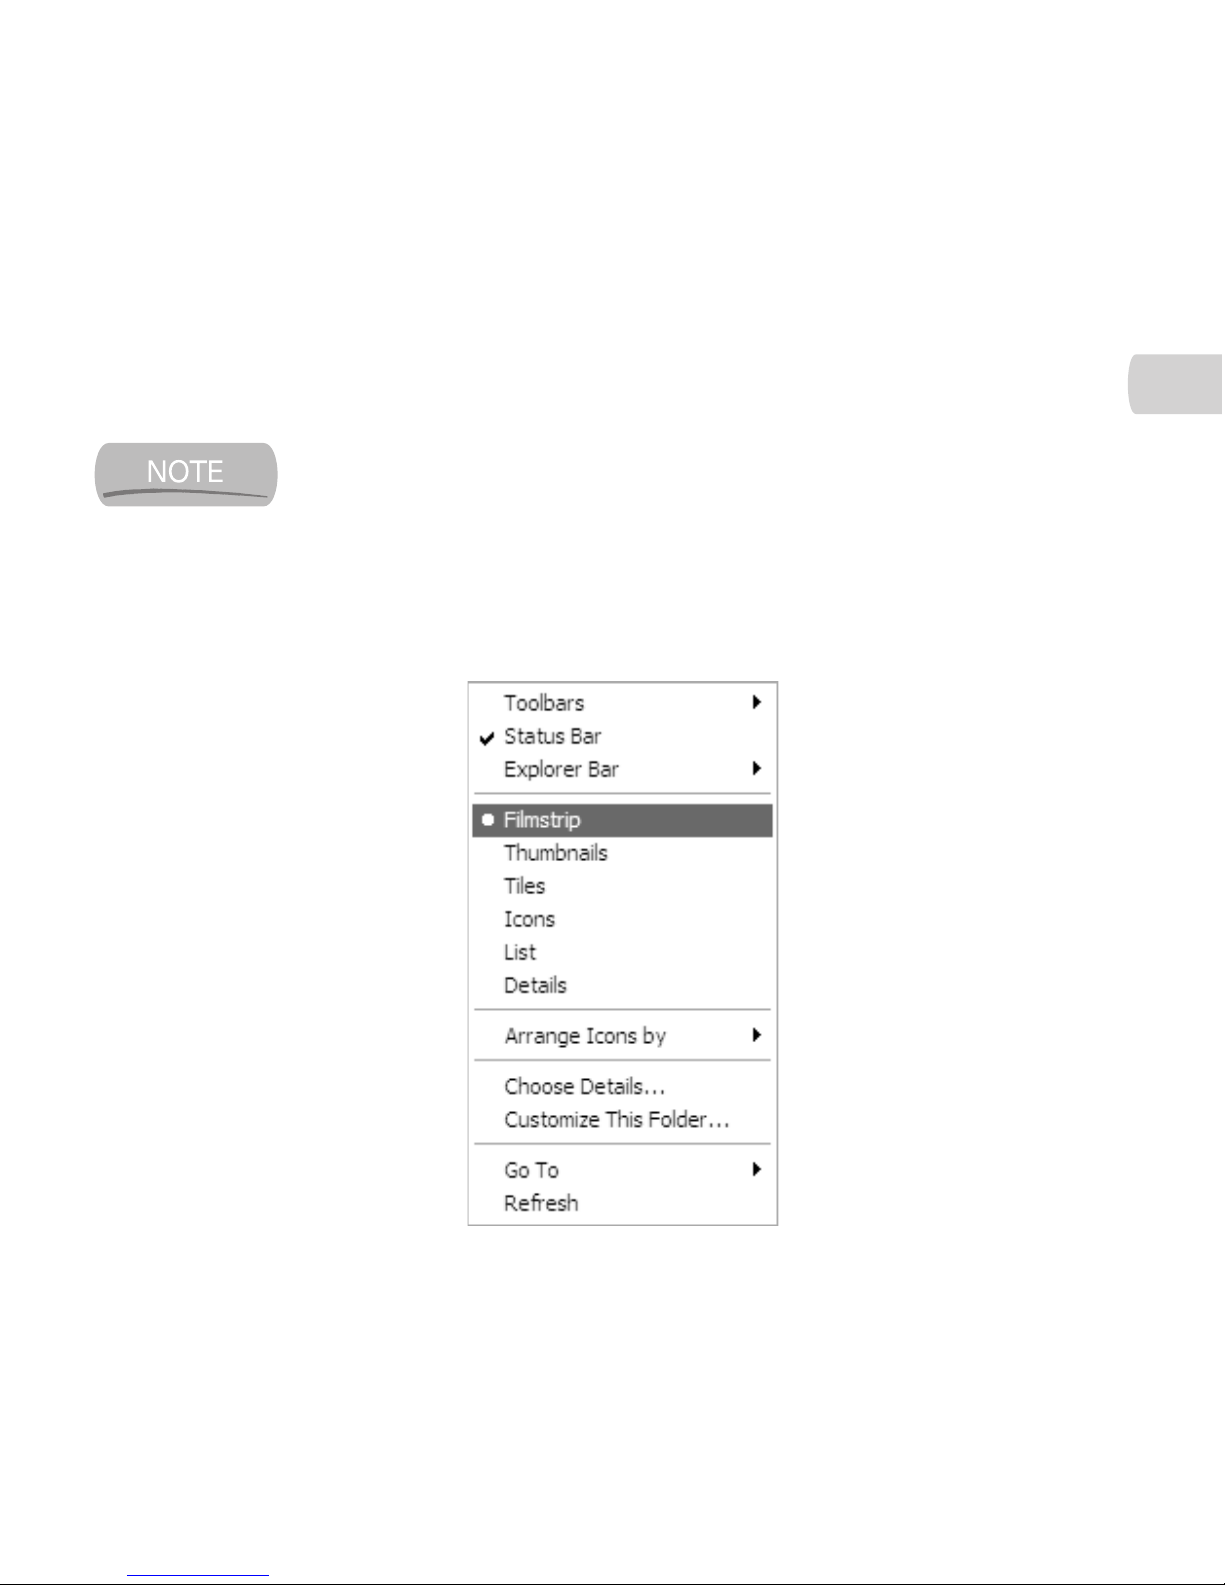
CHAPTER 3: Configure the Tablet PC for Your Needs 49
HowTo8 (8) / How to Do Everything with Your Tablet PC / Mann / 222771-0 / Chapter 3
3
Each template has specialized properties that are appropriate for the kind of content
Windows expects you to store in them. To change the template used with a particular
folder, you need to right-tap the folder’s icon; then in the shortcut menu that appears,
tap Properties | Customize. Select the template you want to use in the Use This
Folder Type As A Template list. If all the subfolders of this folder are the same
type as this folder, set the Also Apply This Template To All Subfolders option.
If the Properties dialog box for a folder doesn’t have a Customize tab, you
cannot change the template it uses.
You can also customize a folder without changing its template. To do so, open
the folder you want to customize. Tap View, and then select your options from the
View menu that appears. The first section of this menu allows you to adjust the
toolbars and other bars that appear at the top of the folder.
Color profile: Generic CMYK printer profile
Composite Default screen
Page 68

50 How to Do Everything with Your Tablet PC
HowTo8 (8) / How to Do Everything with Your Tablet PC / Mann / 222771-0 / Chapter 3
The second section of the View menu lists basic styles that the folder can use
when displaying its contents. I suggest you try the styles yourself to get an idea of
what works best for you. Folders that use the Pictures template have an additional
style, Filmstrip, which arranges the pictures in a strip along the bottom of the window
and displays the selected picture in the upper part of the folder.
The third section allows you to change the order of the contents. You can choose
to arrange them by size, date, or other characteristics. Although the menu option
says Arrange Icons By, it really applies to whichever form the folder content is
displayed in.
In the fourth section, the Choose Details option controls which properties are
displayed for each item in the folder, when you view the folder in the Detail style.
As I said before, your best bet here is to try different options for your folders over
time. You’ll likely evolve your own preferences for the folders you use frequently,
just as I have.
Another way you can customize folders is by changing around the menu bars
and toolbars that appear in each folder. You can not only control the positions in
which they appear, but you can also decide which ones will appear.
To change the positions of the bars, you must first unlock them. Tap View |
Toolbars, and make sure the Lock The Toolbars option is cleared. If the bars are
unlocked, they’ll have a column of dots near the left end. To actually move the
bars, point to that column of dots, and use it to drag the column to a new location.
You may have to fool around with the bars for a bit to get them where you want
them, so just keep at it.
To change which bars appear in the folder, tap View | Toolbars; then select the
ones you want from the menu that appears. The exact contents of this menu vary
depending on the applications installed on your Tablet PC. For example, I have
Norton AntiVirus installed on my Tablet PC, and my Toolbars menus include the
option to display a Norton AntiVirus toolbar.
Configure the Explorer Bar
You can make the Explorer bar appear in place of the Task pane. The Explorer bar
can contain various types of information and tools, including the following:
■
Search Provides the Windows XP search tool.
■
Favorites Provides a collection of shortcuts to your favorite folders, web
sites, and other items. Favorites are covered in Chapter 7.
■
Media Gives you direct access to the Windows Media Player. Windows
Media Player is covered in Chapter 12.
Color profile: Generic CMYK printer profile
Composite Default screen
Page 69
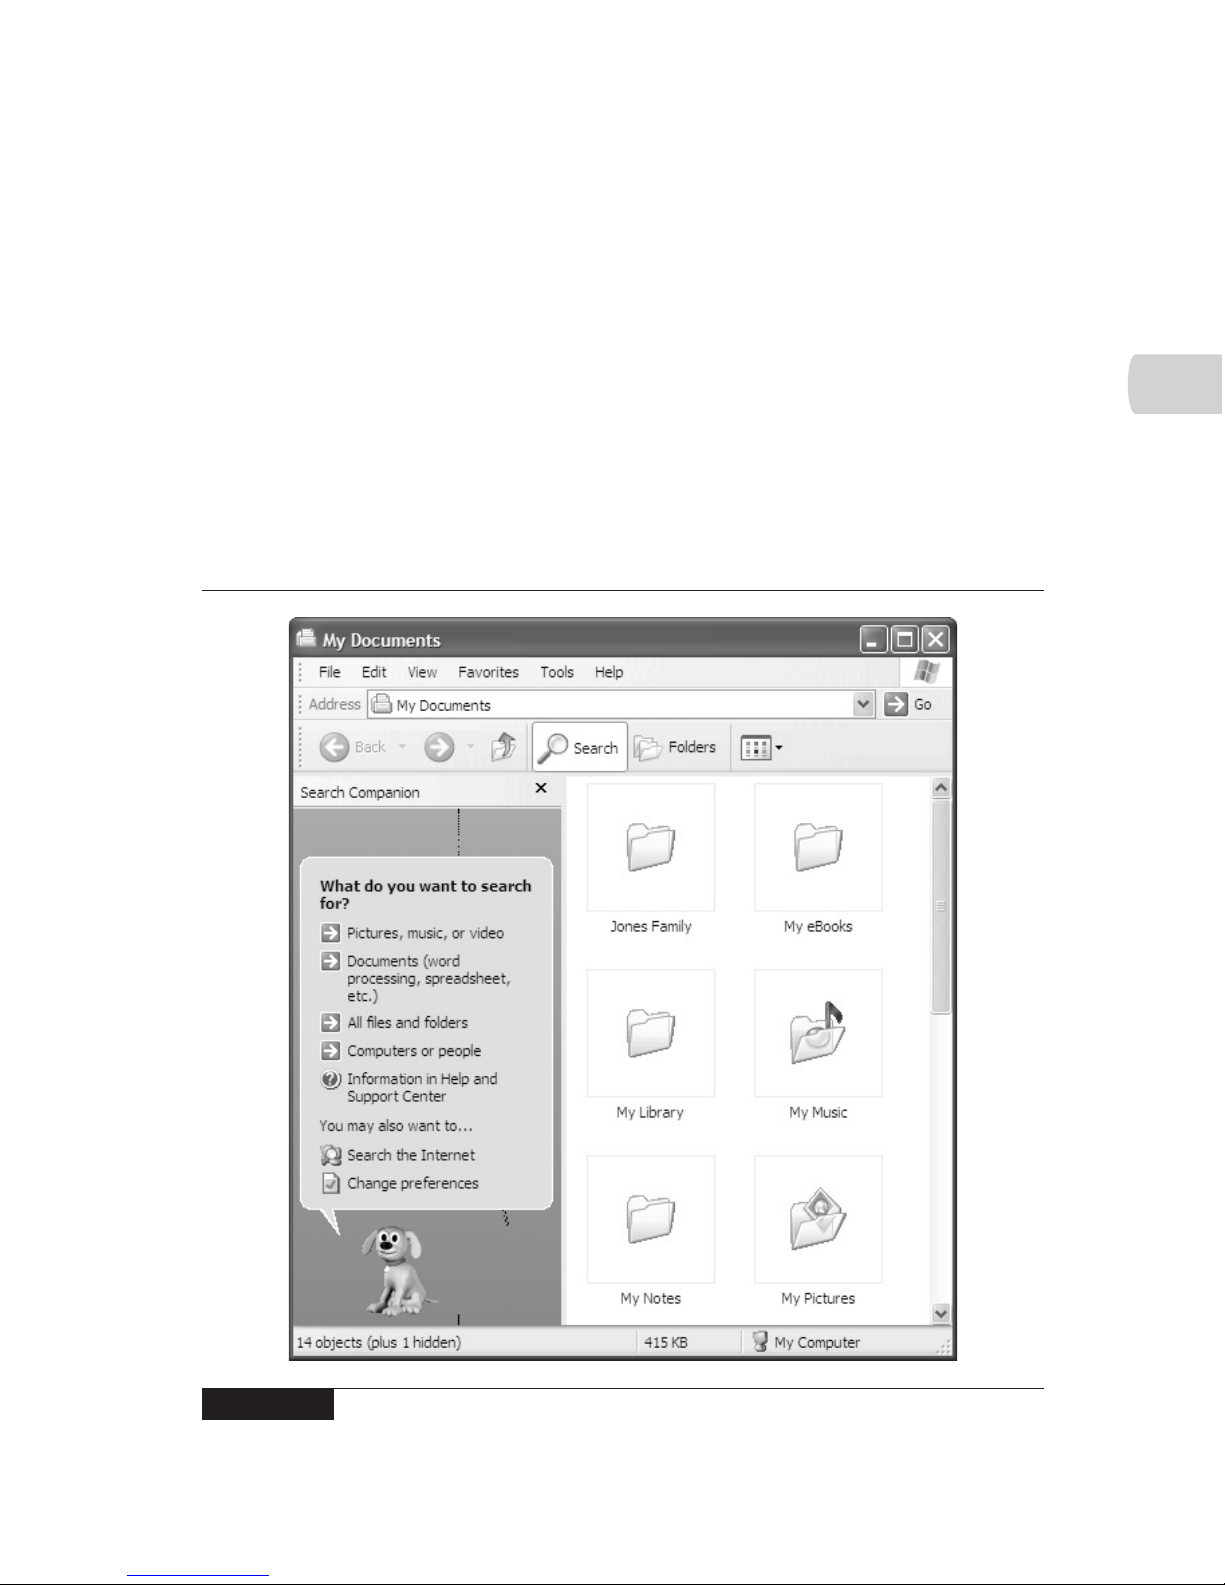
HowTo8 (8) / How to Do Everything with Your Tablet PC / Mann / 222771-0 / Chapter 3
3
■
History Shows a day-by-day list of the files you’ve opened recently in
Windows Explorer or Internet Explorer. Internet Explorer is covered
in Chapter 7.
■
Folders Displays the folder tree.
To display the Explorer bar in a folder, tap View | Explorer Bar, and then select
the type of Explorer bar you want to use. Figure 3-9 shows the Search Explorer bar
in the My Documents folder. To close the Explorer bar once it is visible, you must
tap the Close button in the upper right-hand corner of the Explorer bar. You cannot
close the bar from the Explorer Bar menu.
CHAPTER 3: Configure the Tablet PC for Your Needs 51
FIGURE 3-9 Search is one of the Explorer bar options you can choose for a
particular folder.
Color profile: Generic CMYK printer profile
Composite Default screen
Page 70
Tip Of The Day and Discuss are not Explorer bar options, even though they
appear on this menu. Tip Of The Day displays a daily tip at the bottom of the
folder window, whereas Discuss attempts to activate a discussion of the
selected item. This is not a topic we will cover in this book.
Configure Your Tablet PC Hardware
In keeping with the more personal nature of a Tablet PC, its hardware is configurable.
The rest of this chapter addresses the main hardware areas you can configure: the
pen and tablet, the keyboard, the mouse, and the display.
Configure the Tablet and Pen
Because the tablet and pen are a new way to interact with your Tablet PC, it’s no
surprise that Windows XP Tablet PC edition includes a new Control Panel applet
you can use to configure them. This dialog box is called Tablet And Pen Settings.
To open it, tap Start | Control Panel | Printers And Other Hardware | Tablet And
Pen Settings. This dialog box, shown in Figure 3-10, uses four tabs (Settings,
Display, Tablet Buttons, and Pen Options) to give you extensive control over the
behavior of the pen and tablet.
Aside from the options on the Settings tab, I recommend you use your
Tablet PC for at least a few days before changing anything in the Tablet
And Pen Settings dialog box. Give yourself a chance to get used to the
different feel of a Tablet PC before making other pen and tablet changes.
Adjust Settings
When you are typing on a keyboard, the operating system of your computer doesn’t
need to know whether you are left- or right-handed. But for devices like the Tablet
PC—which use pen input instead of, or in addition to, keyboard input—which hand
you use to control the pen makes a big difference. Left-handed and right-handed
people form characters differently, affecting the way the handwriting recognition
software should function. Also, the area of the screen that’s covered by your hand
when you use the pen is different if you are left-handed than it is if you are
right-handed.
Handedness and Menu Location aren’t really hardware options, but I’ve
covered them here with the rest of Tablet And Pen Settings options.
52 How to Do Everything with Your Tablet PC
HowTo8 (8) / How to Do Everything with Your Tablet PC / Mann / 222771-0 / Chapter 3
Color profile: Generic CMYK printer profile
Composite Default screen
Page 71
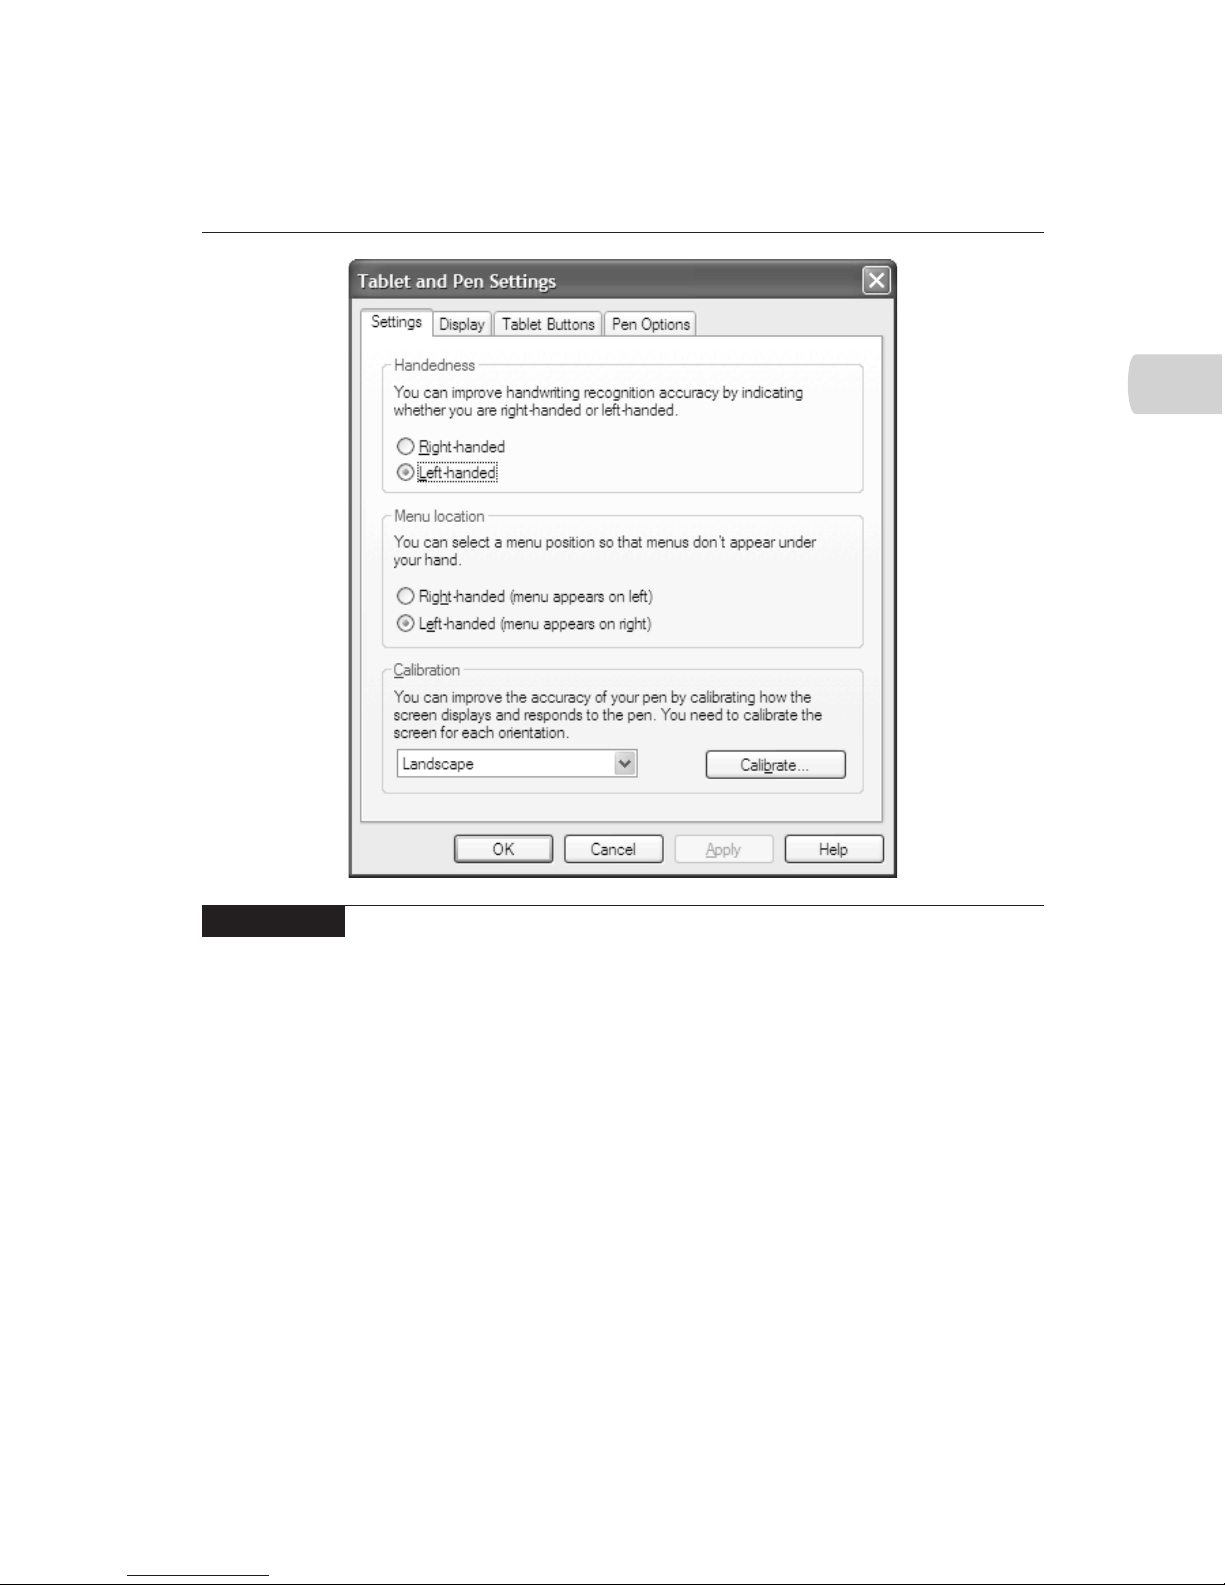
In the Handedness section of the Settings tab, select the hand you use to hold
the pen. You won’t detect any visible changes, but the Tablet PC handwriting
recognition should work somewhat better than it would otherwise.
In the Menu Location section of the tab, you should also select the option that
corresponds to the hand you use. If you select for right-handedness, it does produce a
visible difference, but only when Windows is showing a submenu. In this situation,
if there is enough room to the left of the main menu, the submenu will appear on
the left instead of the right, where it would normally be. Putting the menu on the
left keeps it from being hidden beneath your hand if you are right-handed.
Pen-sensitive displays like those found on Tablet PCs and personal digital
assistants (PDAs) sometimes require calibration to ensure that the computer is
accurately interpreting the position of the pen. The Calibration section of the
Settings tab lets you calibrate the accuracy of pen positioning for each of the
screen orientations you use.
3
CHAPTER 3: Configure the Tablet PC for Your Needs 53
HowTo8 (8) / How to Do Everything with Your Tablet PC / Mann / 222771-0 / Chapter 3
FIGURE 3-10 Use the Tablet And Pen Settings dialog box to configure these new
Tablet PC components.
Color profile: Generic CMYK printer profile
Composite Default screen
Page 72
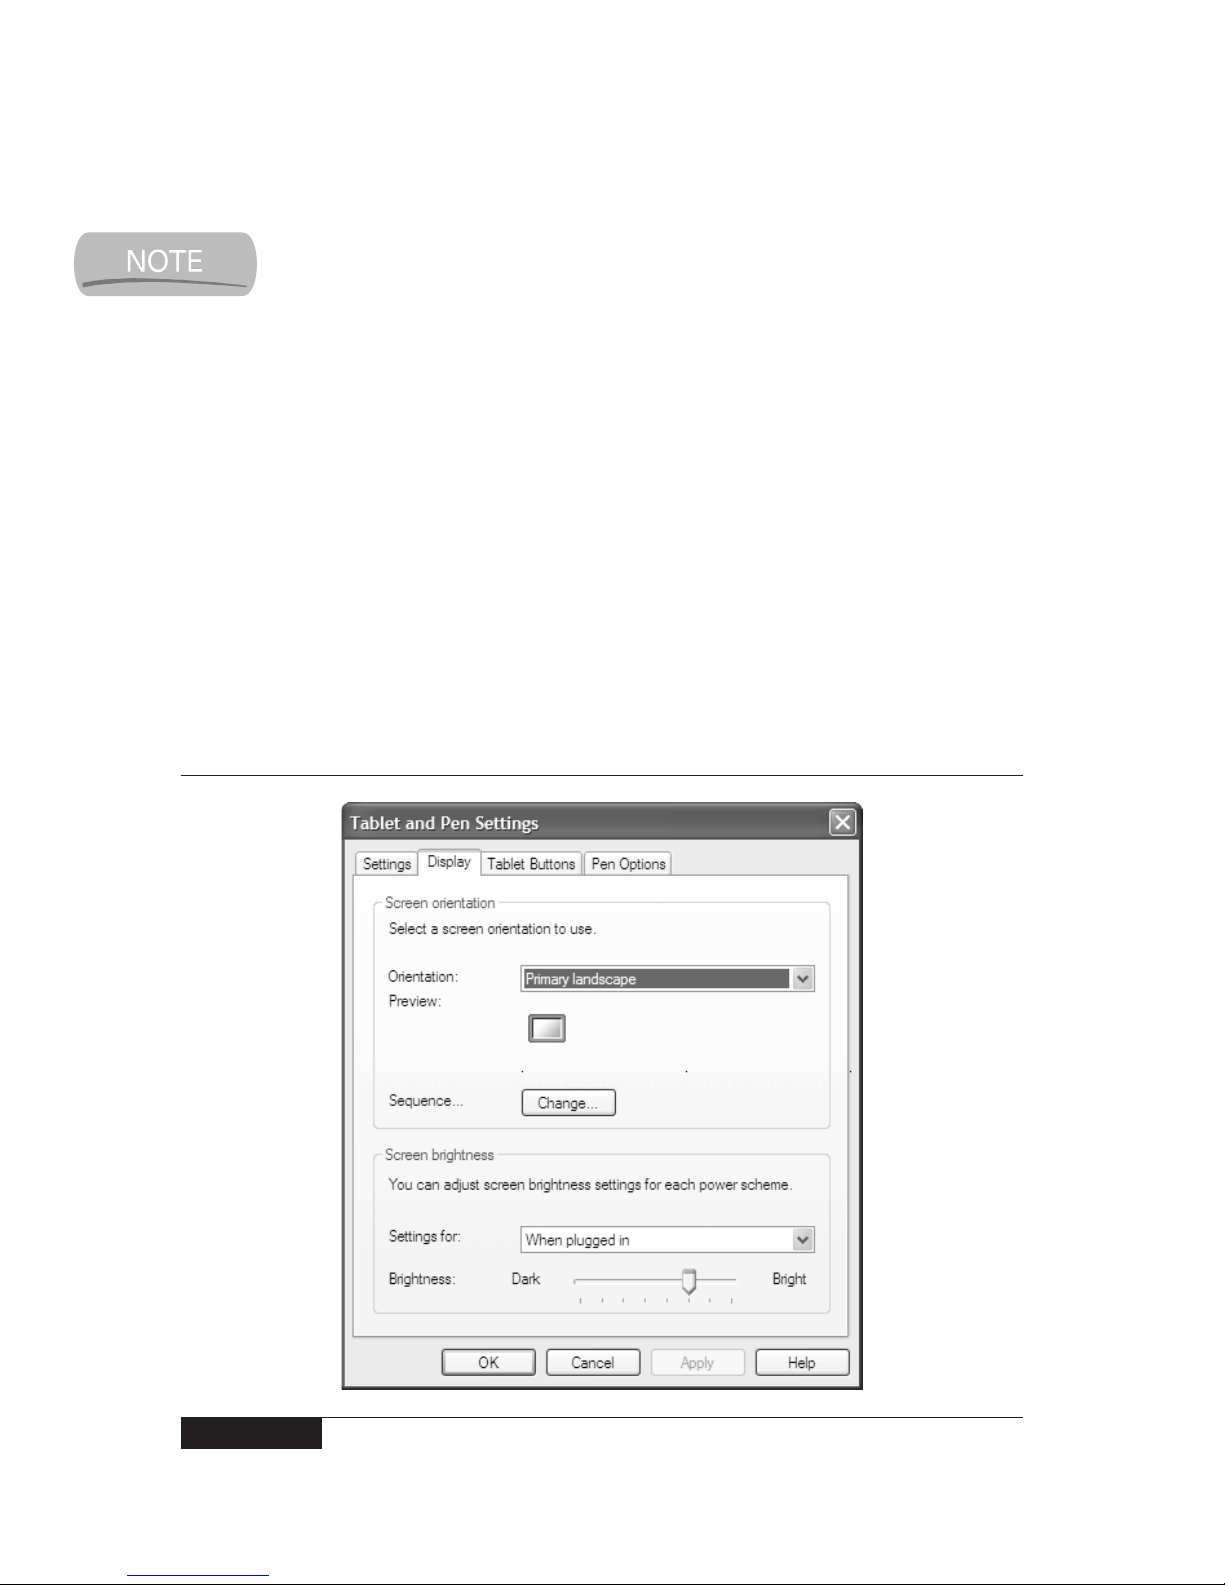
54 How to Do Everything with Your Tablet PC
HowTo8 (8) / How to Do Everything with Your Tablet PC / Mann / 222771-0 / Chapter 3
Screen orientations are covered in detail in the next section.
Adjust the Display
On the Display tab (Figure 3-11) of the Tablet And Pen Settings dialog box, you can
change the screen orientation, control the sequence of screen orientation changes,
and adjust the screen brightness. Screen orientation refers to how Windows displays
information on the screen. Most PC and laptop screens have a landscape orientation,
where the screen is wider than it is high. Tablet PC screens can work in landscape
orientation, but they can also work in portrait orientation. In a portrait orientation, the
screen is taller than it is wide. Paper and books usually have a portrait orientation.
Tablet PCs also use the concept of primary and secondary orientations. To a
certain extent, this distinction is nothing more than a naming convenience. If you
use a convertible Tablet PC, like the Acer or the Toshiba, the primary landscape
orientation is the orientation that would work if you were using the Tablet PC
keyboard. The secondary orientation is the primary orientation rotated 180 degrees.
The primary and secondary portrait orientations work similarly.
FIGURE 3-11 Use the Display tab to adjust screen orientation and brightness.
Color profile: Generic CMYK printer profile
Composite Default screen
Page 73
3
In the Screen Orientation section of the Display tab, you can change the screen
orientation by selecting an orientation from the Orientation list and tapping OK
or Apply.
You can also change the screen orientation by using the Change Tablet
And Pen Settings icon in the Notification Area, as well as using the Tablet
buttons.
Your Tablet PC allows you to select each of the four possible screen orientations
one after the other. You can change the screen orientation with the Hardware button
assigned to screen orientation on your Tablet PC. This gives you a quick way to adjust
the orientation to match the way you’re using the computer at the moment. However,
most people find that they use only one or two orientations. By tapping Change, you
CHAPTER 3: Configure the Tablet PC for Your Needs 55
HowTo8 (8) / How to Do Everything with Your Tablet PC / Mann / 222771-0 / Chapter 3
Calibrate the Screen
To calibrate the screen, you need to start with the Settings tab of the Tablet And
Pen Settings dialog box.
1. In the Calibration section of the tab, select a screen orientation.
2. Tap Calibrate. The display changes to a blank background with some
instructions in the center and a cross hair (a cross with a small empty
space in the center) in the upper-left corner of the display.
3. Hold the pen as you normally would for writing on the screen in this
orientation, and tap the center of the cross hair.
4. The cross hair appears in another corner of the screen. While holding
the pen naturally, keep tapping the center of the cross hair until it has
appeared in all four corners of the display.
5. When the OK button appears near the center of the screen, the calibration
is complete. Tap OK to return to the normal display.
6. Repeat steps 1 through 5 for each screen orientation you want to calibrate.
The Tablet PC automatically adjusts the screen orientation to match the one
you selected, then restores the original orientation once you are done
calibrating.
Color profile: Generic CMYK printer profile
Composite Default screen
Page 74

56 How to Do Everything with Your Tablet PC
HowTo8 (8) / How to Do Everything with Your Tablet PC / Mann / 222771-0 / Chapter 3
can use the Orientation Sequence Settings dialog box to modify the screen orientation
sequence, including removing those orientations you don’t use.
In the Screen Brightness section of the Display tab, you can tell the Tablet PC
which screen brightness to use when the system is running on batteries and when it
is plugged in. Select the situation you want to work on and adjust the Brightness
slider. If you’re interested in extending your battery life, choose the lowest brightness
you can comfortably use.
Configure Tablet Buttons
Use the Tablet Buttons tab to configure the Tablet buttons. Tablet buttons are
physical buttons (often called Hardware buttons) on the face of your Tablet PC.
You can configure these buttons for performing common tasks like changing the
screen orientation, starting an application, or activating the Input Panel.
Consult the documentation that came with your Tablet PC to find the
names and locations of the Tablet buttons on your particular system.
The Tablet buttons on your Tablet PC were set to certain functions when you
received it. You can find out what those settings are by looking at the list of Tablet
buttons and actions on the Tablet Buttons tab. This list contains the names of all
the Tablet buttons you can customize. Other buttons, like the Security button, have
fixed functions that you cannot change.
To customize a Tablet button, select it in the list, tap Change, and select a function
from the dialog box that appears. If you are unhappy with the changes you’ve made,
tap Reset to return to the defaults.
Set Pen Options
You use the Pen Options tab to control how the pen and the screen interact. The
Pen Actions section of the tab seems like it should be similar to configuring Tablet
buttons, but it’s not. Here, the relationship between pen and mouse actions is fixed.
What you can do is modify how each action works a bit. For example, if you select
Press And Hold in the list, and then tap Settings, you can change the length of time
you need to press and hold before the Tablet PC recognizes a right-click, as well as
how long you have to actually complete the action. I haven’t found it necessary to
change any of these options, but you may find doing so to be helpful.
Configure the Keyboard
You may not have even realized that there was anything to configure on your
keyboard, but there is. Specifically, you can use the Speed tab in the Keyboard
Color profile: Generic CMYK printer profile
Composite Default screen
Page 75
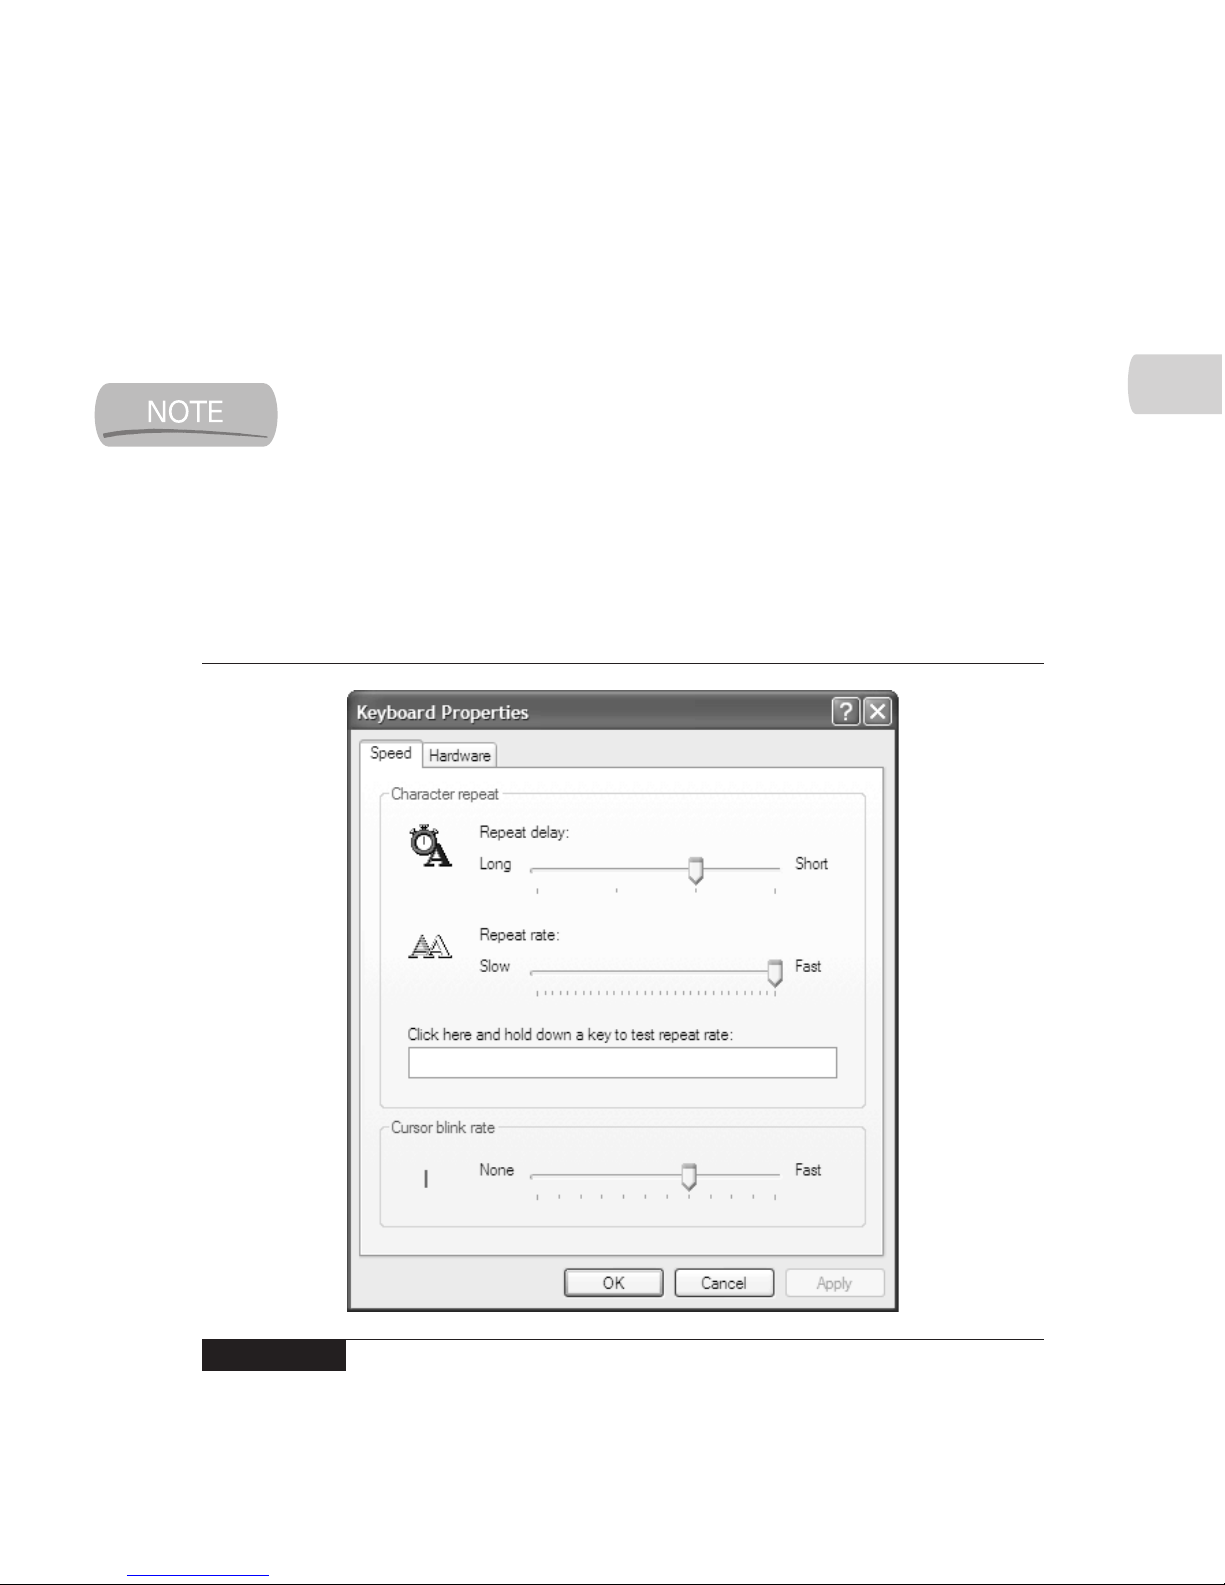
CHAPTER 3: Configure the Tablet PC for Your Needs 57
HowTo8 (8) / How to Do Everything with Your Tablet PC / Mann / 222771-0 / Chapter 3
3
Properties dialog box (see Figure 3-12) to adjust the amount of time that you can
hold down a key before the Tablet PC starts repeating the character. To open the
Keyboard Properties dialog box, tap Start | Control Panel | Printers And Other
Hardware | Keyboard.
Details of the Keyboard Properties dialog box may vary from one model of
Tablet PC to the next.
From the Speed tab, you can control how fast the tablet PC repeats the character
once it has started doing so. You can also adjust how fast the cursor blinks when you
are entering text into a word processor or other program that isn’t using ink.
The Hardware tab is primarily useful for fixing keyboard problems, and is covered
in Chapter 18.
FIGURE 3-12 Use the Keyboard Properties dialog box to adjust some basic keyboard
characteristics.
Color profile: Generic CMYK printer profile
Composite Default screen
Page 76

58 How to Do Everything with Your Tablet PC
HowTo8 (8) / How to Do Everything with Your Tablet PC / Mann / 222771-0 / Chapter 3
Configure the Mouse
Configuring the mouse may seem like an odd activity to undertake on a Tablet PC,
but every Tablet PC can be connected to a keyboard and a mouse. Plus, convertible
machines like the Acer and Toshiba include a touch pad that can take the place of
a mouse. I’ve even seen a few Tablet PCs with hardware that emulates a mouse
attached to the tablet instead of the keyboard, so it can be used independently of
the keyboard.
The basic components you can adjust for any mouse or mouse work-alike are
the buttons and the pointers used to indicate where the mouse is pointing on the
screen. You’ll also find a Hardware tab similar to the one for keyboards. And like
that tab, the mouse Hardware tab is covered in Chapter 19.
To open the Mouse Properties dialog box, tap Start | Control Panel | Printers And
Other Hardware | Mouse. You will likely see quite a number of tabs related to the
mouse and mouse-like gizmos that come with your model of Tablet PC. Figure 3-13
shows the crowd of tabs in my Mouse Properties dialog box. Most of these should be
self-explanatory, but for those that are not, you’ll need to consult the documentation
that came with your Tablet PC.
Configure Your Display
Because your Tablet PC probably runs on batteries much of the time, managing
its power use is very important. One of the best ways to do that is to turn off
components of the machine when you’re not using them. You can set up power
schemes on your Tablet PC that determine when (if ever) to turn off the display and
the hard disk, as well as when the Tablet PC should go into standby or hibernate.
When in standby, the Tablet PC is just idling along, running in a minimal
power use state that can significantly prolong the battery life. According to the
specifications from Microsoft, a Tablet PC must return to full functionality from
standby in around 5 seconds.
When in hibernation, the Tablet PC is fully shut down. Before it hibernates, your
machine copies the contents of its memory to the hard disk, allowing it to restore
Windows and all your applications to the state they were in before the hibernation.
If you have three applications open when the Tablet PC hibernates, you’ll have
those three applications open when the computer returns from hibernation. When
hibernating, the Tablet PC consumes no power. Unfortunately, it can take 30 seconds
or more for the machine to wake up from hibernation, so this isn’t something you
want to have happen while you’re in the middle of working on something.
Color profile: Generic CMYK printer profile
Composite Default screen
Page 77
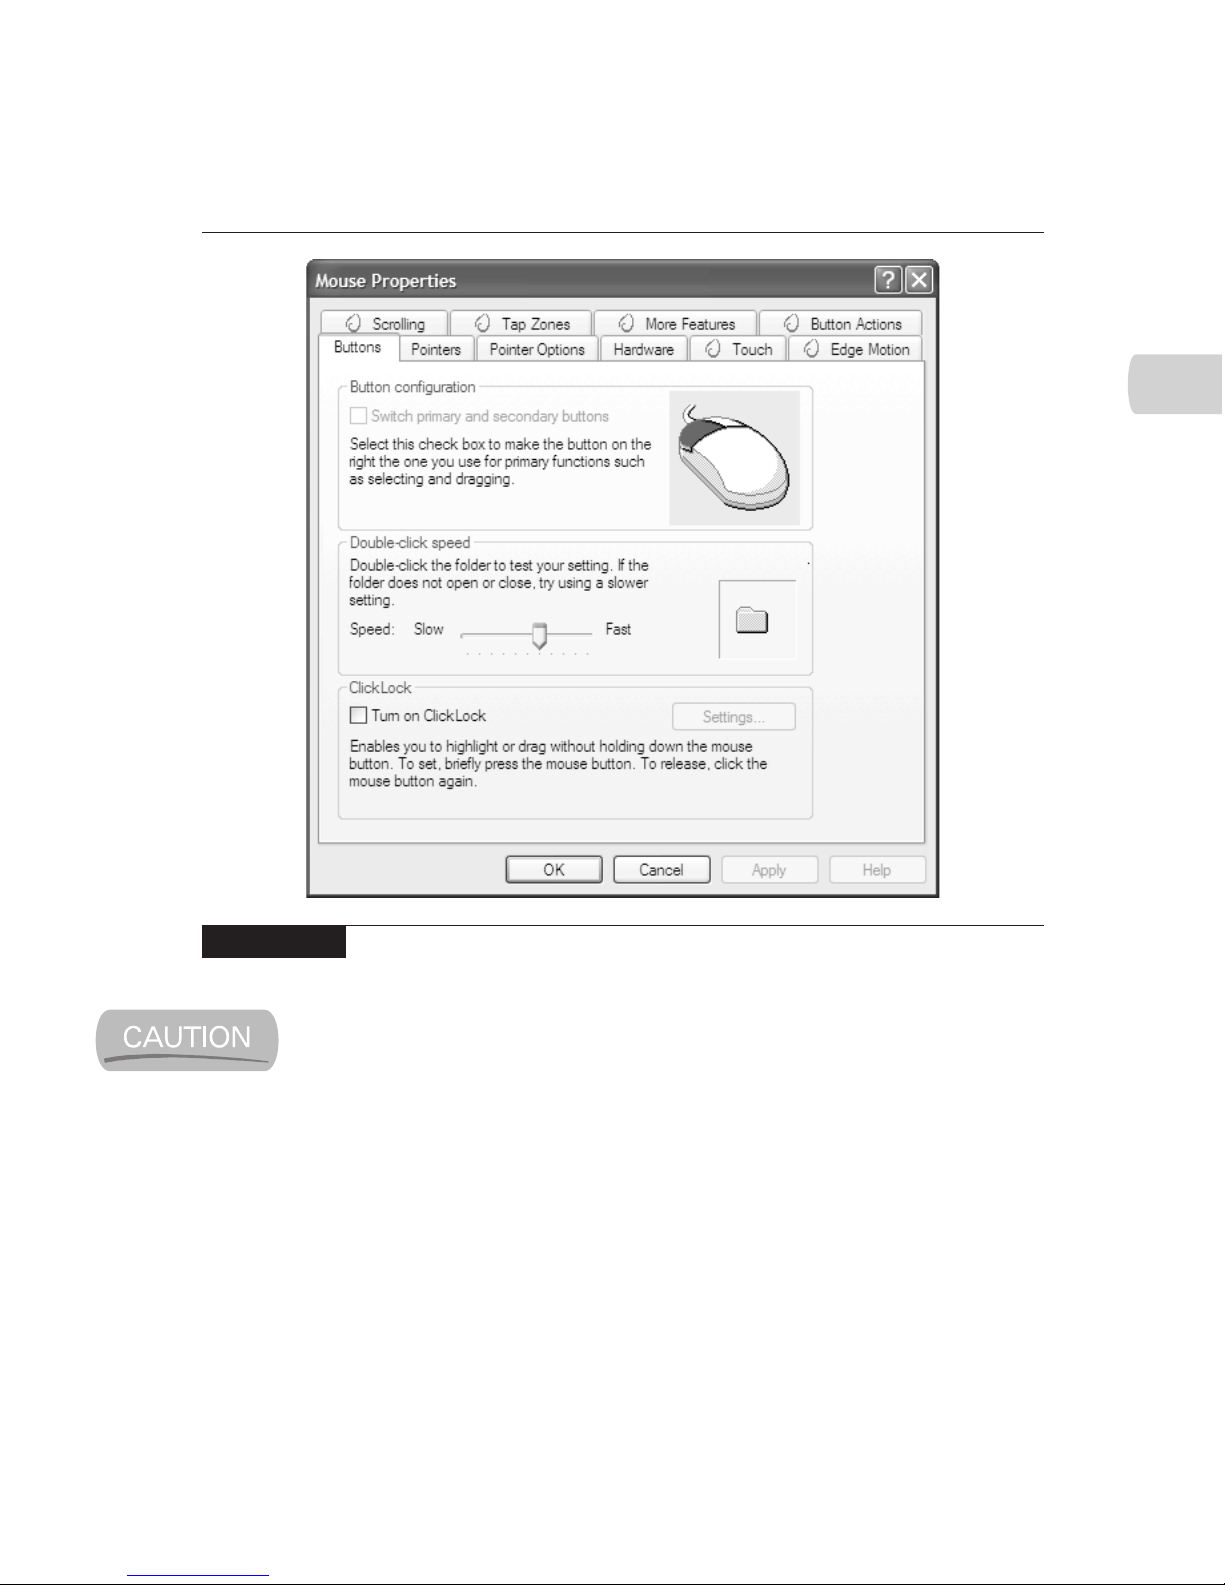
CHAPTER 3: Configure the Tablet PC for Your Needs 59
HowTo8 (8) / How to Do Everything with Your Tablet PC / Mann / 222771-0 / Chapter 3
3
Some hardware may not work properly after hibernation, and it may need
to be disconnected and reconnected before it functions properly again. In
some cases, you may have to reboot the Tablet PC to clear up the problem.
You control the power schemes with the Power Options Properties dialog box. To
open this dialog box, right-tap an empty spot on the desktop. When the shortcut menu
appears, tap Properties | Screen Saver | Power | Power Schemes. (See Figure 3-14.)
As Figure 3-14 shows, there’s a menu of power schemes in the dialog box. When
you select a scheme, the settings it includes appear at the bottom of the dialog box.
Notice that there are settings for both when the Tablet PC is plugged in and when it
is running on batteries.
Windows comes with a large set of predefined schemes, but you may want to
do as I did and define your own by putting your own values into the settings fields
and then saving those settings as a new power scheme.
FIGURE 3-13 The Mouse Properties dialog box can get quite busy with mouse and
mouse-like hardware options.
Color profile: Generic CMYK printer profile
Composite Default screen
Page 78
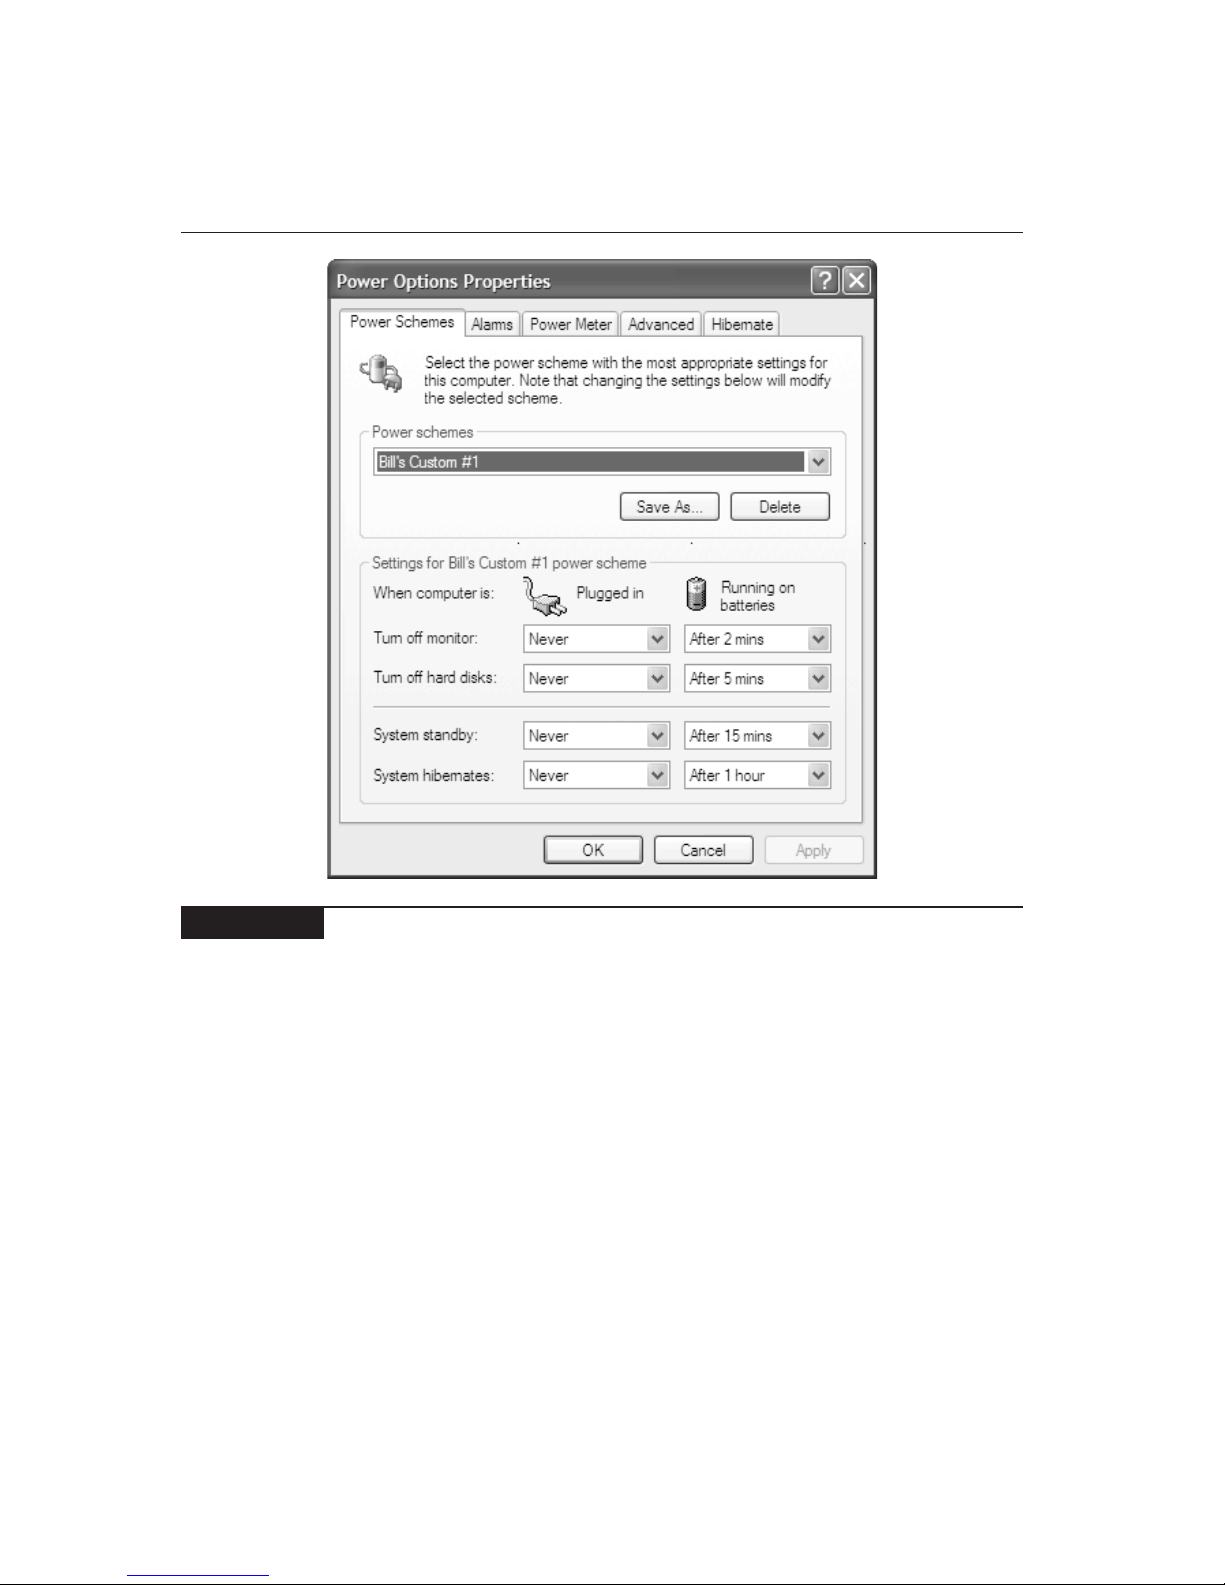
60 How to Do Everything with Your Tablet PC
HowTo8 (8) / How to Do Everything with Your Tablet PC / Mann / 222771-0 / Chapter 3
The exact values you should choose for the settings depend on the way you work.
If you seldom spend long periods using your Tablet PC away from your desk,
you’ll probably want to keep everything running as much as possible. On the other
hand, if you spend a lot of time running on batteries, you’ll want to consider turning
off the screen after just a minute or two and the hard disk shortly after that. The
screen takes almost no time to come back on, so turning it off as much as possible
will save you power without affecting your work.
If your work involves significant periods of thought interspersed with short bursts
of computer use, you’ll want to delay hibernation and perhaps standby enough to
avoid having the machine go to sleep just when you need it.
In addition to the power options you just learned about, we’ve already looked at
some settings you can change for the display (see the “Adjust the Display” section
FIGURE 3-14 Use the Power Options Properties dialog box to manage power use on
your Tablet PC.
Color profile: Generic CMYK printer profile
Composite Default screen
Page 79
CHAPTER 3: Configure the Tablet PC for Your Needs 61
HowTo8 (8) / How to Do Everything with Your Tablet PC / Mann / 222771-0 / Chapter 3
3
earlier in this chapter), but you can adjust another whole set of options. These have
to do with the display resolution, the screen refresh rate, and similar settings.
However, you don’t really want to do anything with these settings. Remember,
your Tablet PC comes with a built-in display. You can be sure that the manufacturer
adjusted the display settings to work properly with the installed display. My best
advice for you is to leave these settings as they are.
Take Advantage of Other Power Options
The Power Options Properties dialog box has a few other tabs you might want
to configure.
■
Alarms Lets you set the battery power levels that will cause Windows to
set off alarms, and decide what form those alarms will take.
Enable Hibernation
Your Tablet PC may not have come with hibernation enabled. Here’s how you
can enable (or disable) hibernation. First, you need to figure out if hibernation is
enabled already, which is easy. Just look at the Power Schemes tab in the Power
Options Properties dialog box. If the tab doesn’t include any boxes called System
Hibernates, hibernation is turned off.
To enable hibernation, follow these steps:
1. Tap the Hibernate tab while you’re in the Power Options Properties
dialog box.
2. Look at the amount of disk space you have available and the amount of
disk space required to hibernate in the Disk Space For Hibernation area
of the dialog box.
3. Assuming you have significantly more disk space available than is
needed to hibernate, tap Enable Hibernation, and then Apply.
4. Go back to the Power Schemes tab. If you see the System Hibernates
boxes, you’ve successfully enabled hibernation on your Tablet PC.
Color profile: Generic CMYK printer profile
Composite Default screen
Page 80

■
Power Meter Shows how much power is left in the Tablet PC battery
or batteries.
■
Advanced Among other things, lets you set a Power Meter icon to appear
in the notification area so you can easily check power levels. There’s an
option to require a password when resuming from standby, but this doesn’t
make much sense for a Tablet PC. They’re designed to resume from standby
within seconds, and requiring a password each time runs counter to that fast
recovery requirement.
62 How to Do Everything with Your Tablet PC
HowTo8 (8) / How to Do Everything with Your Tablet PC / Mann / 222771-0 / Chapter 3
Color profile: Generic CMYK printer profile
Composite Default screen
Page 81
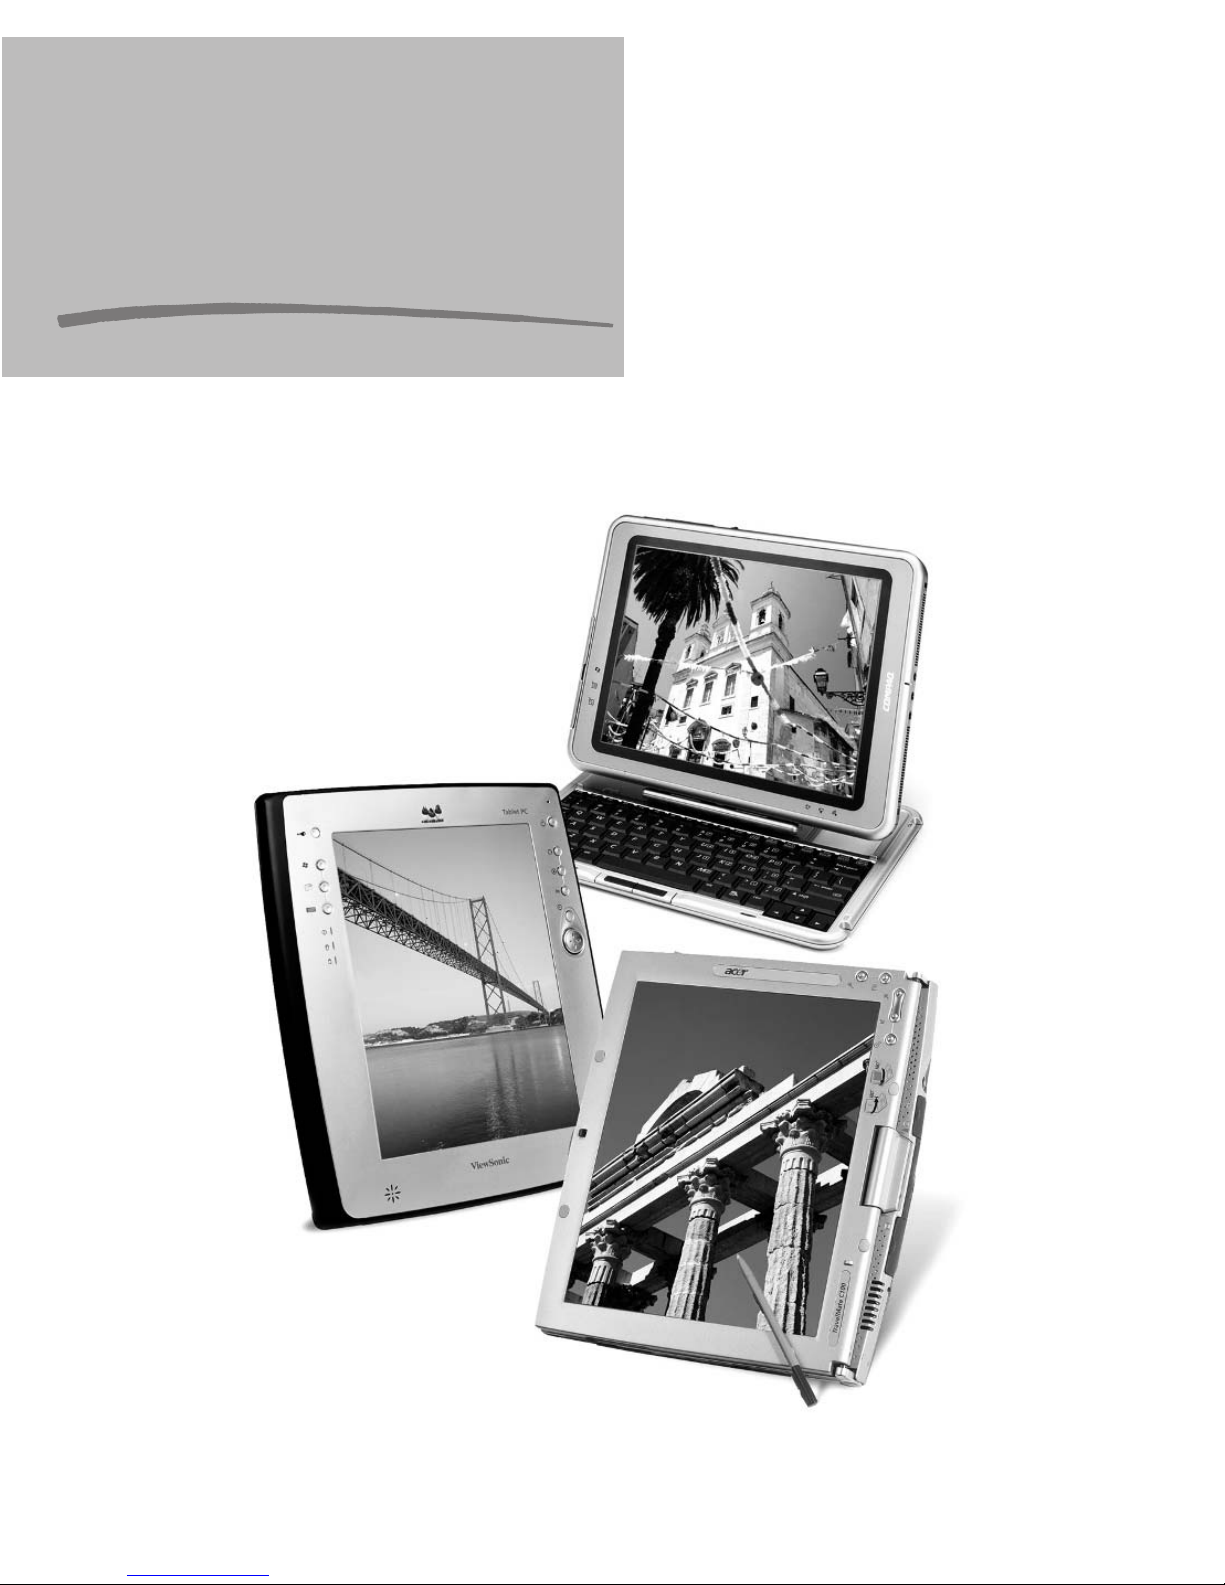
HowTo8 (8) / How to Do Everything with Your Tablet PC / Mann / 222771-0 / Chapter 4
blind folio 63
Chapter 4
Use Windows XP
Tablet PC Edition
Color profile: Generic CMYK printer profile
Composite Default screen
Copyright 2003 by The McGraw-Hill Companies, Inc. Click Here for Terms of Use.
Page 82

How to…
■
Create and Manage User Accounts
■
Manage Files and Folders
■
Manage Programs and Components
■
Find Stuff with the Search Companion
■
Work with the Recycle Bin
Although you can accomplish all sorts of tasks on your Tablet PC with just the
skills you’ve learned so far in the book, to make full use of your machine, you
need to learn about a few more topics. You can share your Tablet PC with others,
and Windows XP Tablet PC edition lets you do so safely by managing user accounts.
Just as you can add and manage user accounts, Windows XP allows you to add and
manage files, folders, entire programs, and even individual Windows components. This
chapter walks you through all those topics, as well as the use of the Recycle Bin.
Create and Manage User Accounts
A user account contains Windows settings and other information relevant to a
particular user. If everybody who uses your Tablet PC has their own user account,
then they can configure the computer to work the way they want when they are
using it. Each user account can have the following individual settings:
■
Screen settings
■
Web favorites and recently visited sites list
■
Password protection of important or personal information
Windows XP Tablet PC edition supports four types of user accounts. Each has
different capabilities and is suitable for different kinds of users. The following list
describes the four types of user accounts:
■
Computer Administrator account A Computer Administrator account
allows users to make any modifications to the computer they want, including
viewing and modifying the files and information in other accounts. There
64 How to Do Everything with Your Tablet PC
HowTo8 (8) / How to Do Everything with Your Tablet PC / Mann / 222771-0 / Chapter 4
Color profile: Generic CMYK printer profile
Composite Default screen
Page 83
CHAPTER 4: Use Windows XP Tablet PC Edition 65
HowTo8 (8) / How to Do Everything with Your Tablet PC / Mann / 222771-0 / Chapter 4
4
must always be at least one Computer Administrator account. Windows
will not let you remove the last such account, or change the last such account
into another type of account. If you have set up your Tablet PC yourself, your
personal account should be a Computer Administrator account.
■
Standard account A Standard account is available only if the user is a
member of a domain on a network.
■
Limited account A Limited account is exactly that: a user with a limited
account has only a limited ability to make changes to the computer. Holders
of limited accounts can change only their password and change the picture
associated with their account.
■
Guest account You can enable a single Guest account if you want to
allow people who don’t have their own account to use your computer. A
Guest account is even more limited than a Limited account. The only task
the user can perform is run programs that are installed on the Tablet PC.
Enabling a Guest account can compromise the security of your Tablet PC
because it does give anyone who picks up your computer some access to
its resources.
Modify Existing Accounts and Create New Ones
The User Accounts window is the place to start when you want to modify existing
user accounts or create new ones. To open the User Accounts window, tap Start |
Control Panel | User Accounts.
The Computer Management console is another place where you can make
changes to user accounts. The changes you make there are primarily related
to using the Tablet PC on a network, so the Computer Management console
is covered in Chapter 8.
If you are using a Computer Administrator account, you should see something
like Figure 4-1. In this case, the window contains shortcuts to common tasks you
can perform on user accounts, a list of accounts you can change, and links to
information about various user account topics.
If you are using a Standard or Limited account, you should see something like
Figure 4-2. Note that the window doesn’t show any other accounts, because only
Computer Administrator accounts have the right to modify other accounts.
Color profile: Generic CMYK printer profile
Composite Default screen
Page 84
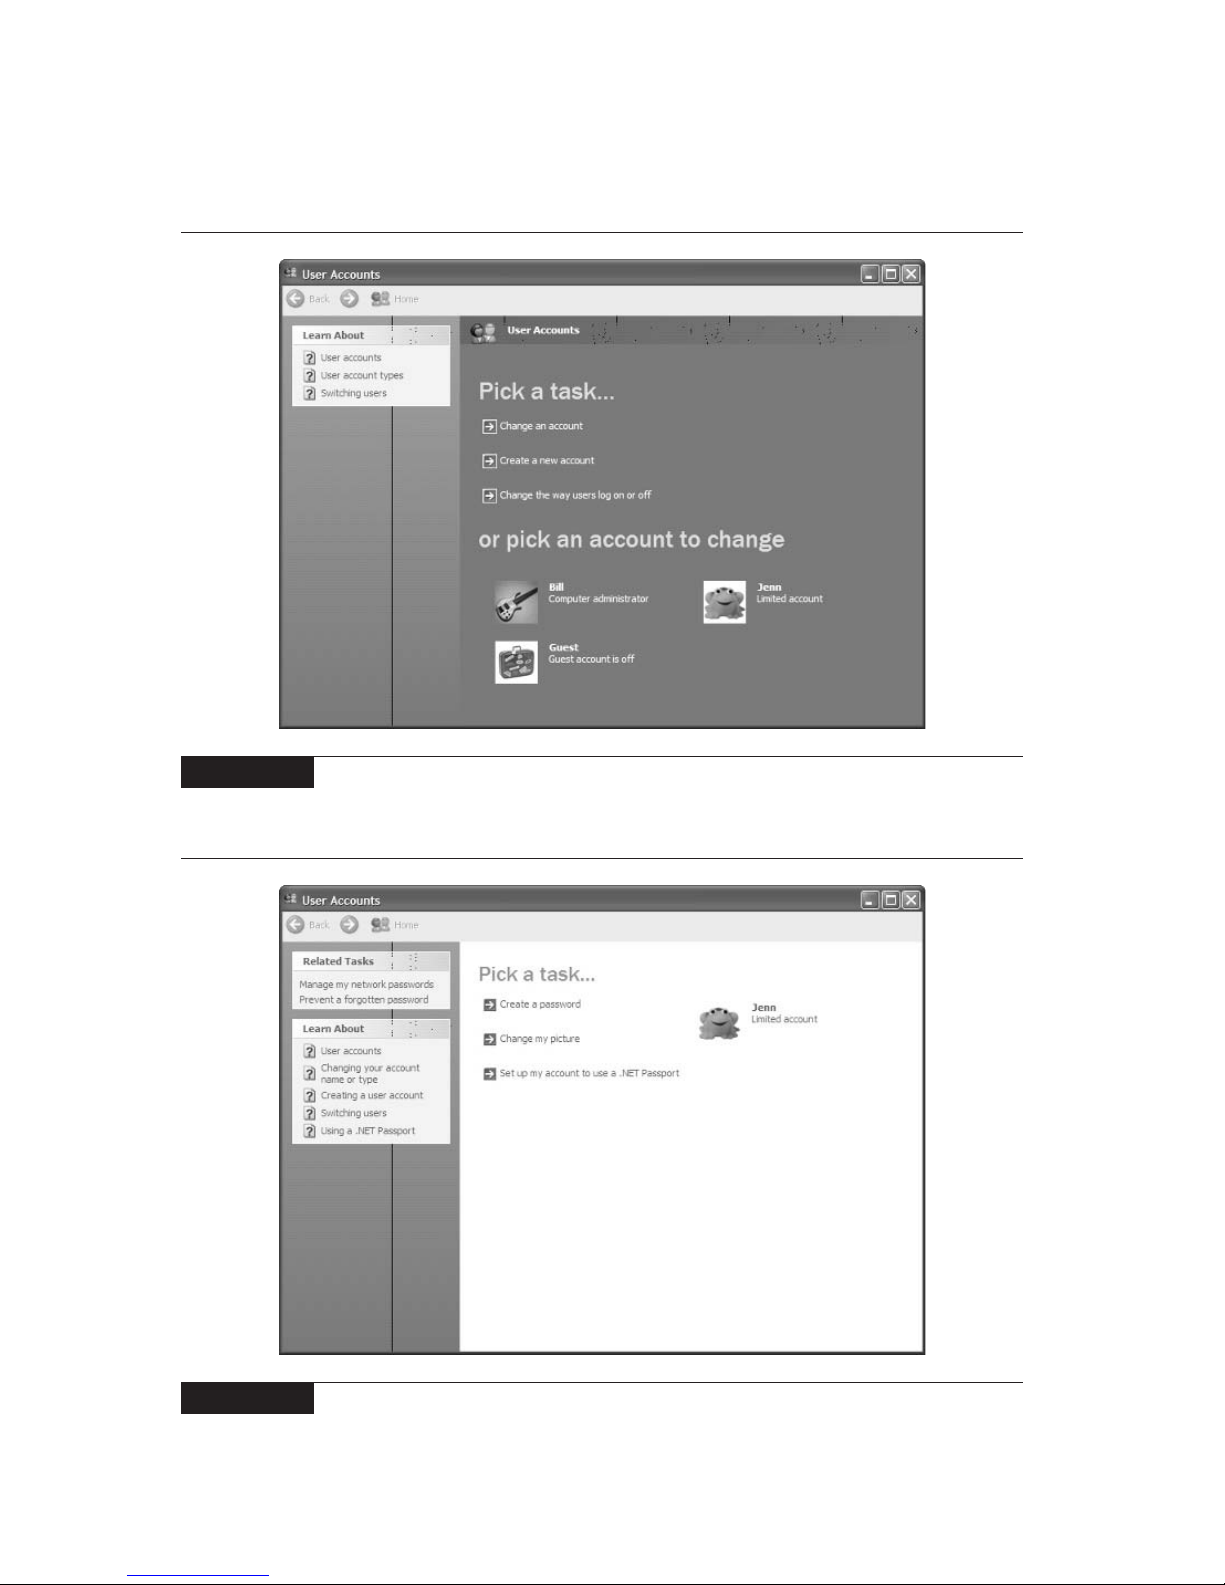
66 How to Do Everything with Your Tablet PC
HowTo8 (8) / How to Do Everything with Your Tablet PC / Mann / 222771-0 / Chapter 4
FIGURE 4-1 The User Accounts window for Computer Administrators is where you
create new accounts and modify existing ones.
FIGURE 4-2 The User Accounts window for Standard or Limited accounts has fewer
capabilities than the one for Computer Administrators.
Color profile: Generic CMYK printer profile
Composite Default screen
Page 85
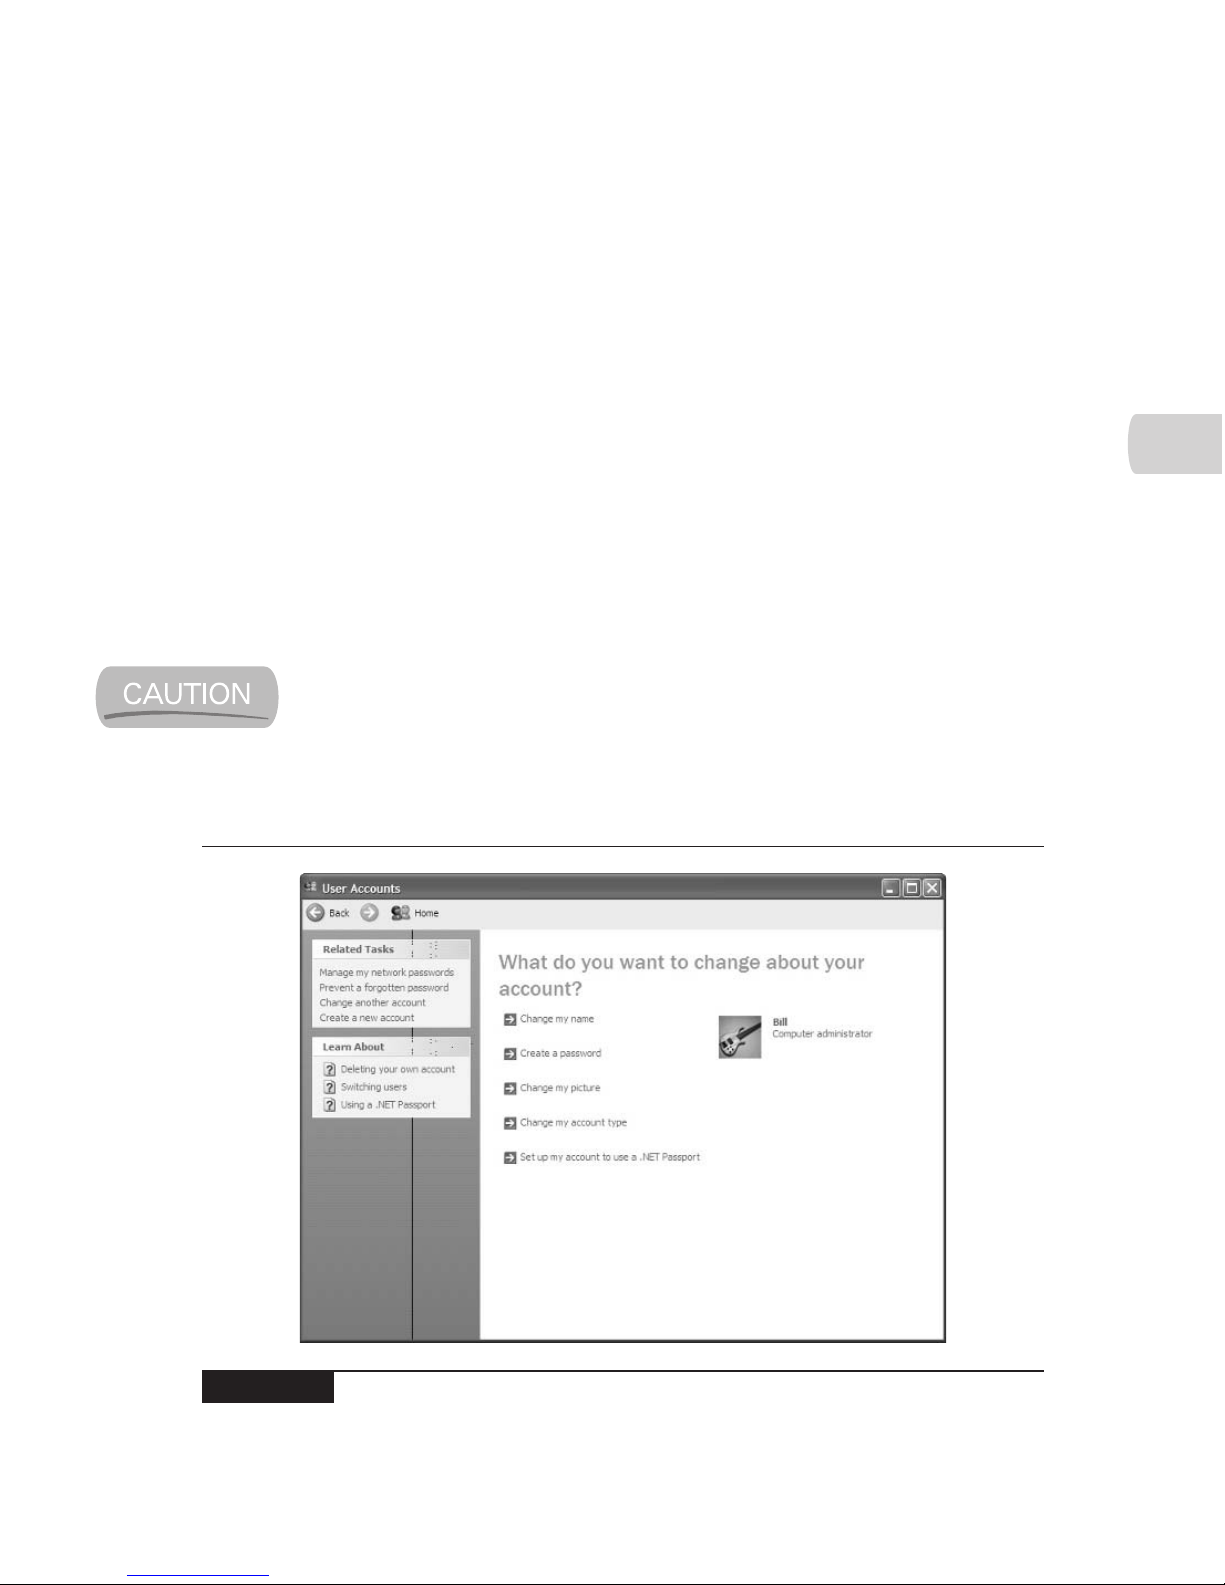
CHAPTER 4: Use Windows XP Tablet PC Edition 67
HowTo8 (8) / How to Do Everything with Your Tablet PC / Mann / 222771-0 / Chapter 4
4
Change a User Account
You can always make changes to your own account (unless you’re using a Guest
account). For the rest of this section, I’ll assume you are using a Computer
Administrator account. If you’re not, your options are pretty limited and clearly
visible from the User Accounts window.
To modify an account, tap the Change An Account link. Windows displays a
new window showing all the accounts you can change. Tap the icon for the account
you want to change. The window that appears next lists all the changes you can
make to the account, as well as a collection of shortcuts to related tasks and more
information in case you’re unsure what to do next. The contents of this window
will be similar to the one shown in Figure 4-3.
Tap the link for the change you would like to make, and then follow the
onscreen instructions to make the change.
If you want to add a password to your account for protection, please read
the section “Add Password Protection for User Accounts” later in this
chapter before doing so. This section provides additional information,
including instructions on how to recover if you forget your password.
FIGURE 4-3 Use this window to change characteristics of a user account.
Color profile: Generic CMYK printer profile
Composite Default screen
Page 86

Create a New User Account (Computer Administrators Only)
To create a new account, you begin at the main User Accounts window. (Tap Start |
Control Panel | User Accounts to get there.) Under Pick A task, tap Create A New
Account, and then follow the instructions and fill in the fields to create the account.
If you’re unsure what to do at any point in the process, consult the information
listed in the Learn About box on the left side of the window.
Remember that Computer Administrator accounts provide full control over your
computer. If you give someone a Computer Administrator account, that person can
even delete all other administrator accounts on your computer and lock you out
of your own Tablet PC. Unless someone specifically needs to install hardware and
software on your computer, or needs one of the other rights reserved for Computer
Administrator accounts, you should create only Limited or Standard accounts for
other people on your Tablet PC.
Add Password Protection for User Accounts
Adding a password to a user account is easy to do, but there are ramifications to
doing so, particularly on a Tablet PC. This section covers the issues you should
understand before you add password protection to a user account.
In general, adding password protection to a user account is a good idea. Doing
so prevents unauthorized persons from logging in as you and making changes to
your account. You can also apply your password to all your files, using the Encrypting
File System (EFS). When files are encrypted with EFS, even people with valid
accounts on your computer cannot look at your files.
There are two drawbacks to adding a password to your user account. The first
is that you must remember that password. If you don’t remember the password,
you can’t log in to your account. Forgetting a password is such a common cause of
problems for computer users that Microsoft has included some ways to address the
problem in Windows XP.
If you can log in to the computer using a Computer Administrator account for
which you do know the password, you can reset the forgotten password. However,
there is a potential disaster here. If the user account with the forgotten password
has files protected with EFS, resetting the password could result in the permanent
loss of all the encrypted files. As Figure 4-4 shows, the range of files that could be
lost is quite extensive.
Do not reset a password unless you have no other choice. Permanent loss
of data may result.
68 How to Do Everything with Your Tablet PC
HowTo8 (8) / How to Do Everything with Your Tablet PC / Mann / 222771-0 / Chapter 4
Color profile: Generic CMYK printer profile
Composite Default screen
Page 87
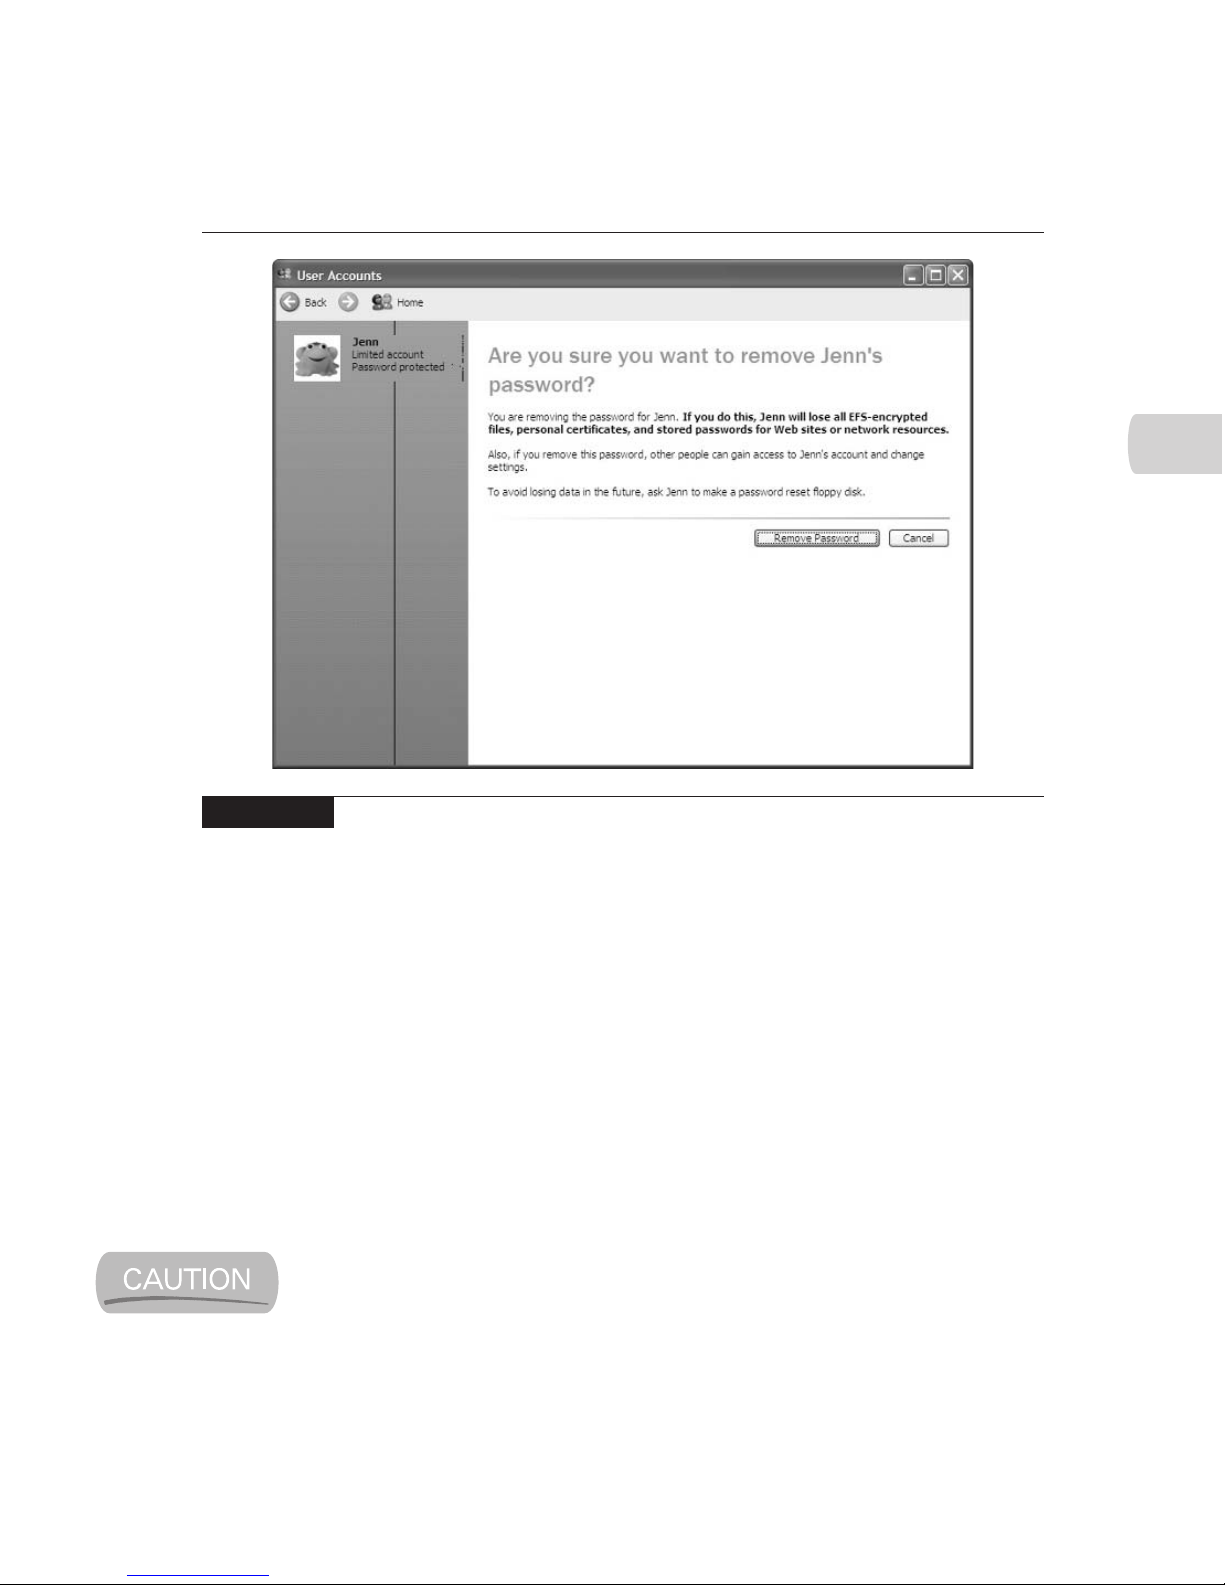
CHAPTER 4: Use Windows XP Tablet PC Edition 69
HowTo8 (8) / How to Do Everything with Your Tablet PC / Mann / 222771-0 / Chapter 4
4
The second problem with adding a password to a user account isn’t potential
data loss. It is a usability problem. One of the key design goals for Tablet PCs is
the ability to resume working quickly when the computer has been in standby
mode. Because Tablet PCs are expected to be in use throughout the day, they may
well go into and out of standby mode several times a day. Adding a password to
your account makes resuming from standby a much slower and clumsier affair.
You’ll have to balance the need for security with the need for usability.
Another approach to this problem is to create a password reset disk. Then you
can store it in a secure location and use it to log in to your computer if you’ve
forgotten the password.
If your Tablet PC doesn’t have a removable disk drive (in the computer
itself or in the dock), you cannot create a password reset disk. If a password
reset disk is important to you, you may wish to invest in a USB floppy
disk drive.
FIGURE 4-4 Resetting passwords should be a last resort because doing so can result in
significant data loss.
Color profile: Generic CMYK printer profile
Composite Default screen
Page 88
70 How to Do Everything with Your Tablet PC
HowTo8 (8) / How to Do Everything with Your Tablet PC / Mann / 222771-0 / Chapter 4
If you still want to add a password to a user account, tap Start | Control Panel |
User Accounts, and then tap the icon representing the account to which you want
to add a password. Then fill in the fields and follow the directions to complete the
task and add the password.
The process for removing a password from a user account is also simple (but
remember the possibility of losing encrypted data). Tap Start | Control Panel | User
Accounts, and then tap the icon representing the account you want to reset. Tap
Remove The Password | Remove Password, and you’re done.
Easily Share Your Tablet PC with Fast User Switching
Fast User Switching is a feature of Windows XP that allows you to switch from one
user account to another without closing your applications or logging off the computer.
With earlier versions of Windows, if you were working on something, say a
book, and your daughter wanted to use the computer for a few minutes to play
Spider Solitaire, you would have two choices. One, you could let your daughter
play the game and hope she doesn’t do anything to mess up your work while she’s
at it. Two, you could close everything you were working on, log off the computer,
and let your daughter log on using her own account. That would protect your work,
but at the cost of several minutes at each end of the session to switch accounts and
get the right applications running. If Fast User Switching is enabled on your
Create a Password Reset Disk
The steps needed to create a Password Reset Disk are different if your Tablet
PC is part of a network domain than if it is not. If your computer is part of a
network domain, consult with your IT department for instructions on creating
a Password Reset Disk. Otherwise, follow these instructions:
1. Tap Start | Control Panel | User Accounts to open the User Accounts window.
2. If you are logged on as a Computer Administrator, tap the icon of the
account for which you want to create the Password Reset Disk.
3. In the Related Tasks box, tap Prevent A Forgotten Password.
4. Follow the instructions that appear on the screen to create the disk.
Color profile: Generic CMYK printer profile
Composite Default screen
Page 89
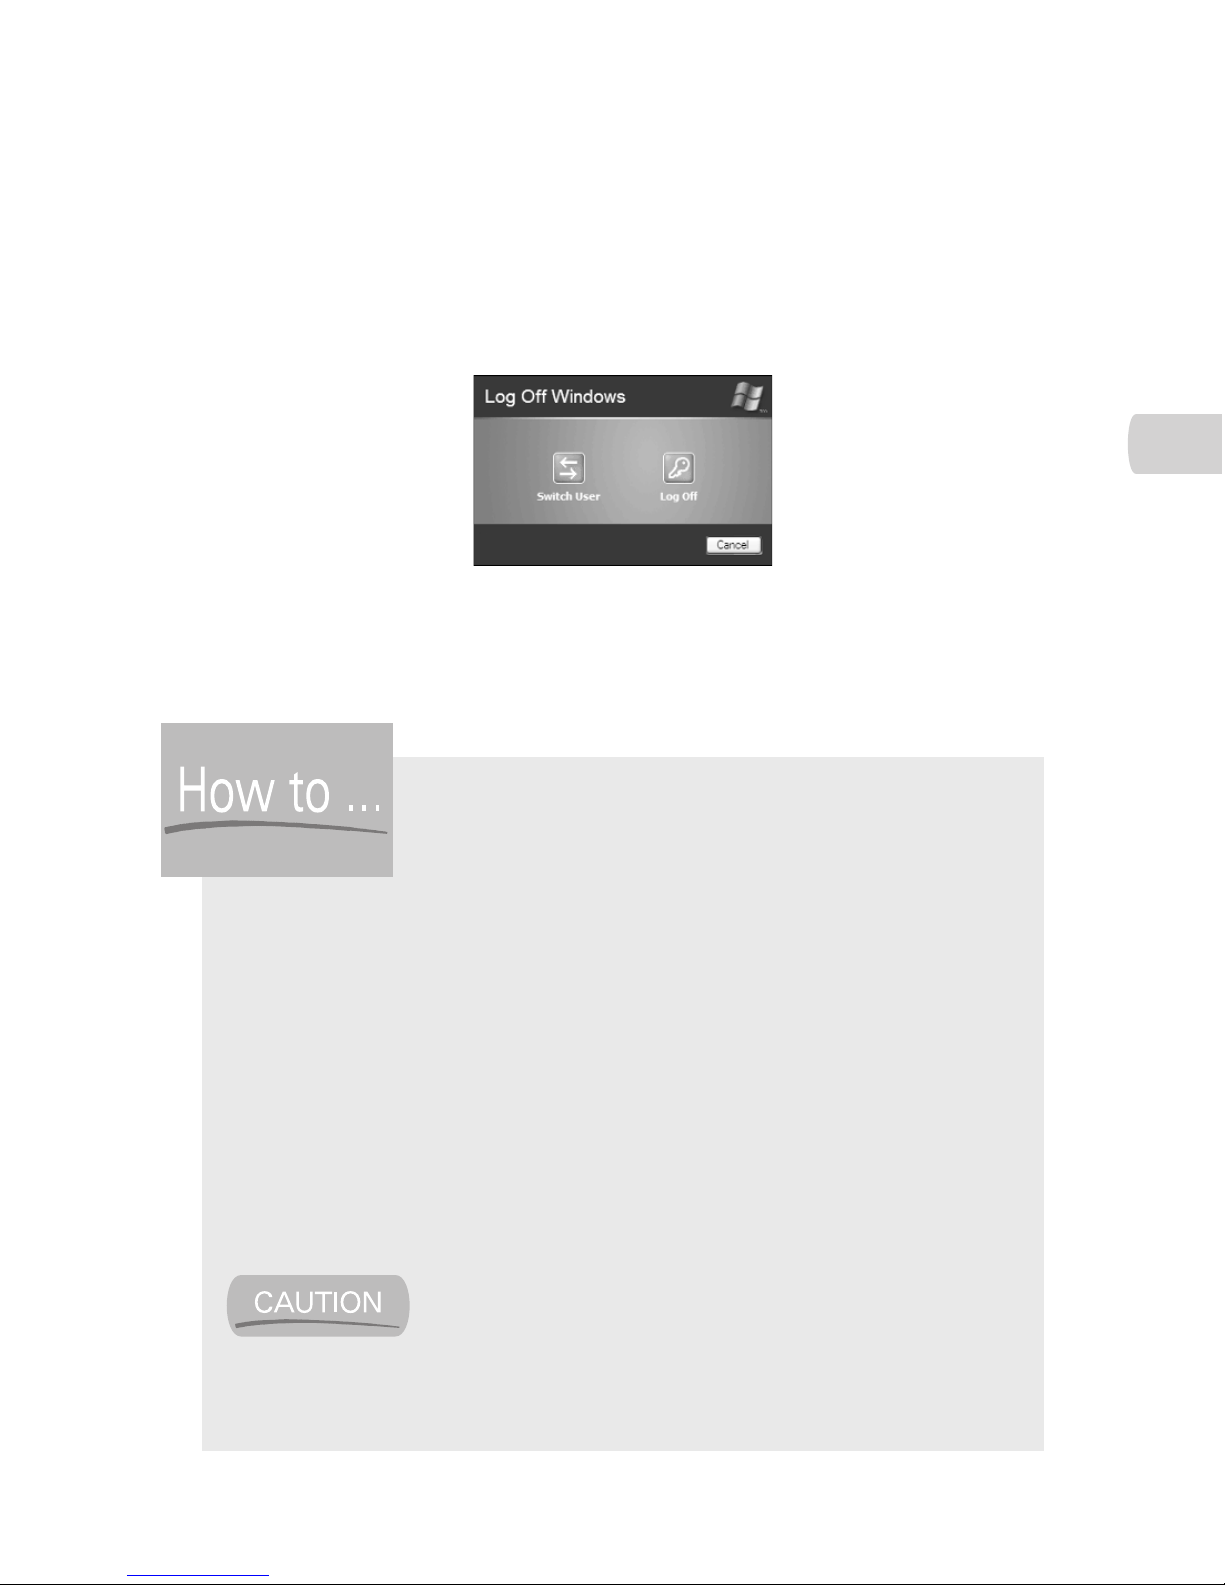
4
Tablet PC, this process becomes much easier. Your daughter can just switch to her
account without you having to close anything or turn off your computer.
To switch user accounts, tap Start | Log Off | Switch User. When the Welcome
screen appears, tap the icon belonging to the next person who will use the computer.
When you switch back to the first user account, you will find that everything
is the way you left it. However, there are two drawbacks to activating Fast User
Switching. The first is that turning off the computer while another user is logged
CHAPTER 4: Use Windows XP Tablet PC Edition 71
HowTo8 (8) / How to Do Everything with Your Tablet PC / Mann / 222771-0 / Chapter 4
Turn On Fast User Switching
Before you can use Fast User Switching, it must be turned on. You need to be
using an account with administrator privileges to turn Fast User Switching on
or off, and your computer cannot be part of a network domain. If you meet
these criteria, here’s how you can turn Fast User Switching on or off.
1. Tap Start | Control Panel, and double-tap User Accounts.
2. In the User Accounts window, tap Change The Way Users Log On Or Off.
3. In the Select Logon And Logoff Options window, set or clear the Use
Fast User Switching option.
4. Tap Apply Options to put the new settings into effect.
If you turn on Fast User Switching, the Serial Keys
accessibility option will not work. If you control your
computer with puff and sip or other alternative input devices, you shouldn’t
turn on Fast User Switching. Other features and devices, including ActiveSync
and offline files, will also be affected by Fast User Switching.
Color profile: Generic CMYK printer profile
Composite Default screen
Page 90

on could cause that user to lose data. The second is that each user session uses
some computer processing power, slowing down other activities on the Tablet PC.
So if several other users are logged on to your machine, you may find your
work slowed to a crawl and your computer’s ability to recognize handwriting
compromised.
Manage Files and Folders
Although I’ve used the term “file” numerous times in this book, I’ve never defined
it. A file is a collection of information grouped together with a single name and
stored on a disk. Programs are stored as files. So are music and video clips,
spreadsheets, word processor documents, saved searches, Windows settings, and
so on. A folder is a container for files and other folders. They’re useful for organizing
your files. Once a computer has been in use for a while, you’re likely to find that
its hard disk contains dozens of folders and thousands or tens of thousands of files.
Your Tablet PC hard disk contains many files and folders created for use by
Windows and by the various programs installed on the machine. You can also
create new folders, as well as rename, copy, move, delete, and compress them. If
your Tablet PC connects to a network, you can share your folders, making them
accessible to other computers on the network.
Understand File and Folder Properties
Like most things in Windows XP, files and folders have properties. Although files
and folders can have a wide range of properties, they do have certain properties in
common. These include the following:
■
A name
■
A location
■
The date and time they were created, modified, and last accessed
■
The size of the file or folder and the amount of space it takes up on the disk
You can view properties without opening the folder or file to which they belong.
Figure 4-5 shows the General tab for the My Documents folder on my Acer, along
with the General tab for one of the files stored in the My Documents folder.
72 How to Do Everything with Your Tablet PC
HowTo8 (8) / How to Do Everything with Your Tablet PC / Mann / 222771-0 / Chapter 4
Color profile: Generic CMYK printer profile
Composite Default screen
Page 91
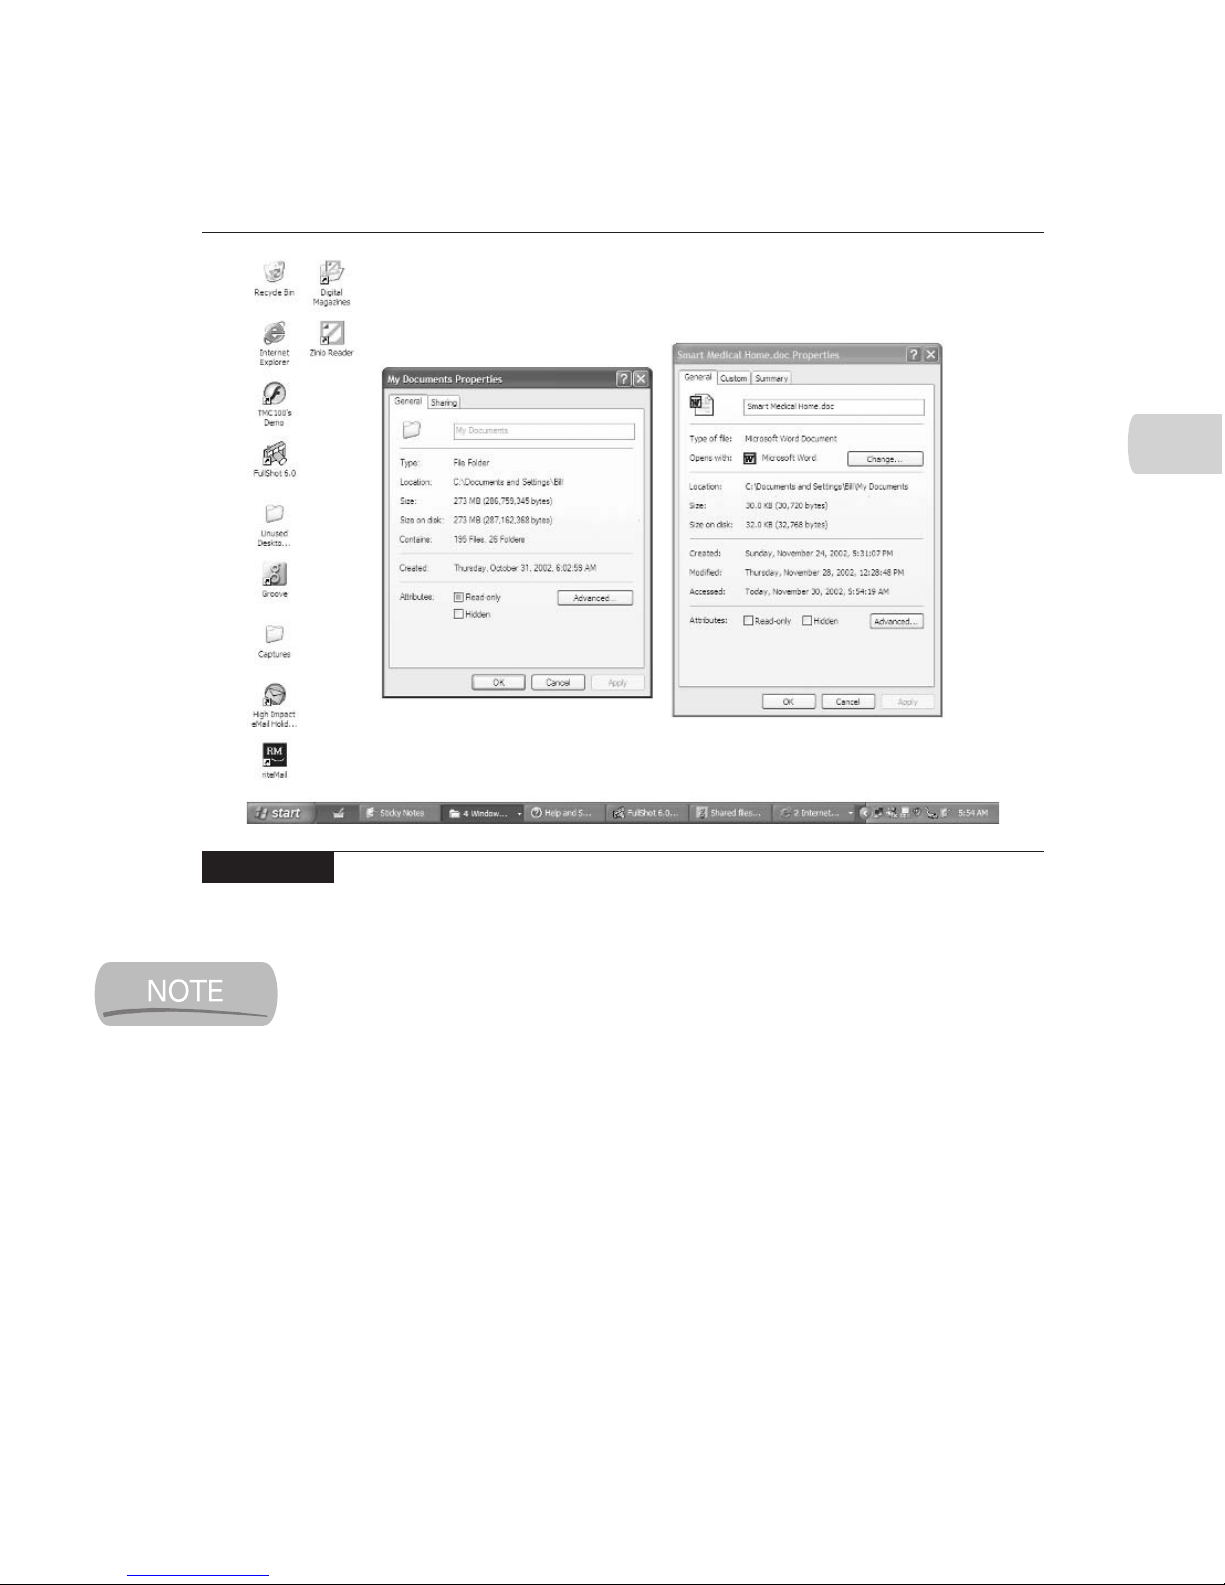
4
As you’ll see in the section titled “Find Stuff with the Search Companion,”
you can search for files or folders using these properties as search criteria,
which makes for fast and efficient searching.
Under most circumstances, you won’t have to worry about file and folder
properties because Windows XP will handle them for you, so we won’t go into more
depth on them. Instead, let’s look at how you can manage your files and folders.
Manage Your Folders
When Windows XP Tablet PC edition was installed on your computer, part of the
process involved creating a number of folders on your hard disk. These include a
CHAPTER 4: Use Windows XP Tablet PC Edition 73
HowTo8 (8) / How to Do Everything with Your Tablet PC / Mann / 222771-0 / Chapter 4
FIGURE 4-5 Files and folders can have many different properties, but they also have
several basic properties in common.
Color profile: Generic CMYK printer profile
Composite Default screen
Page 92
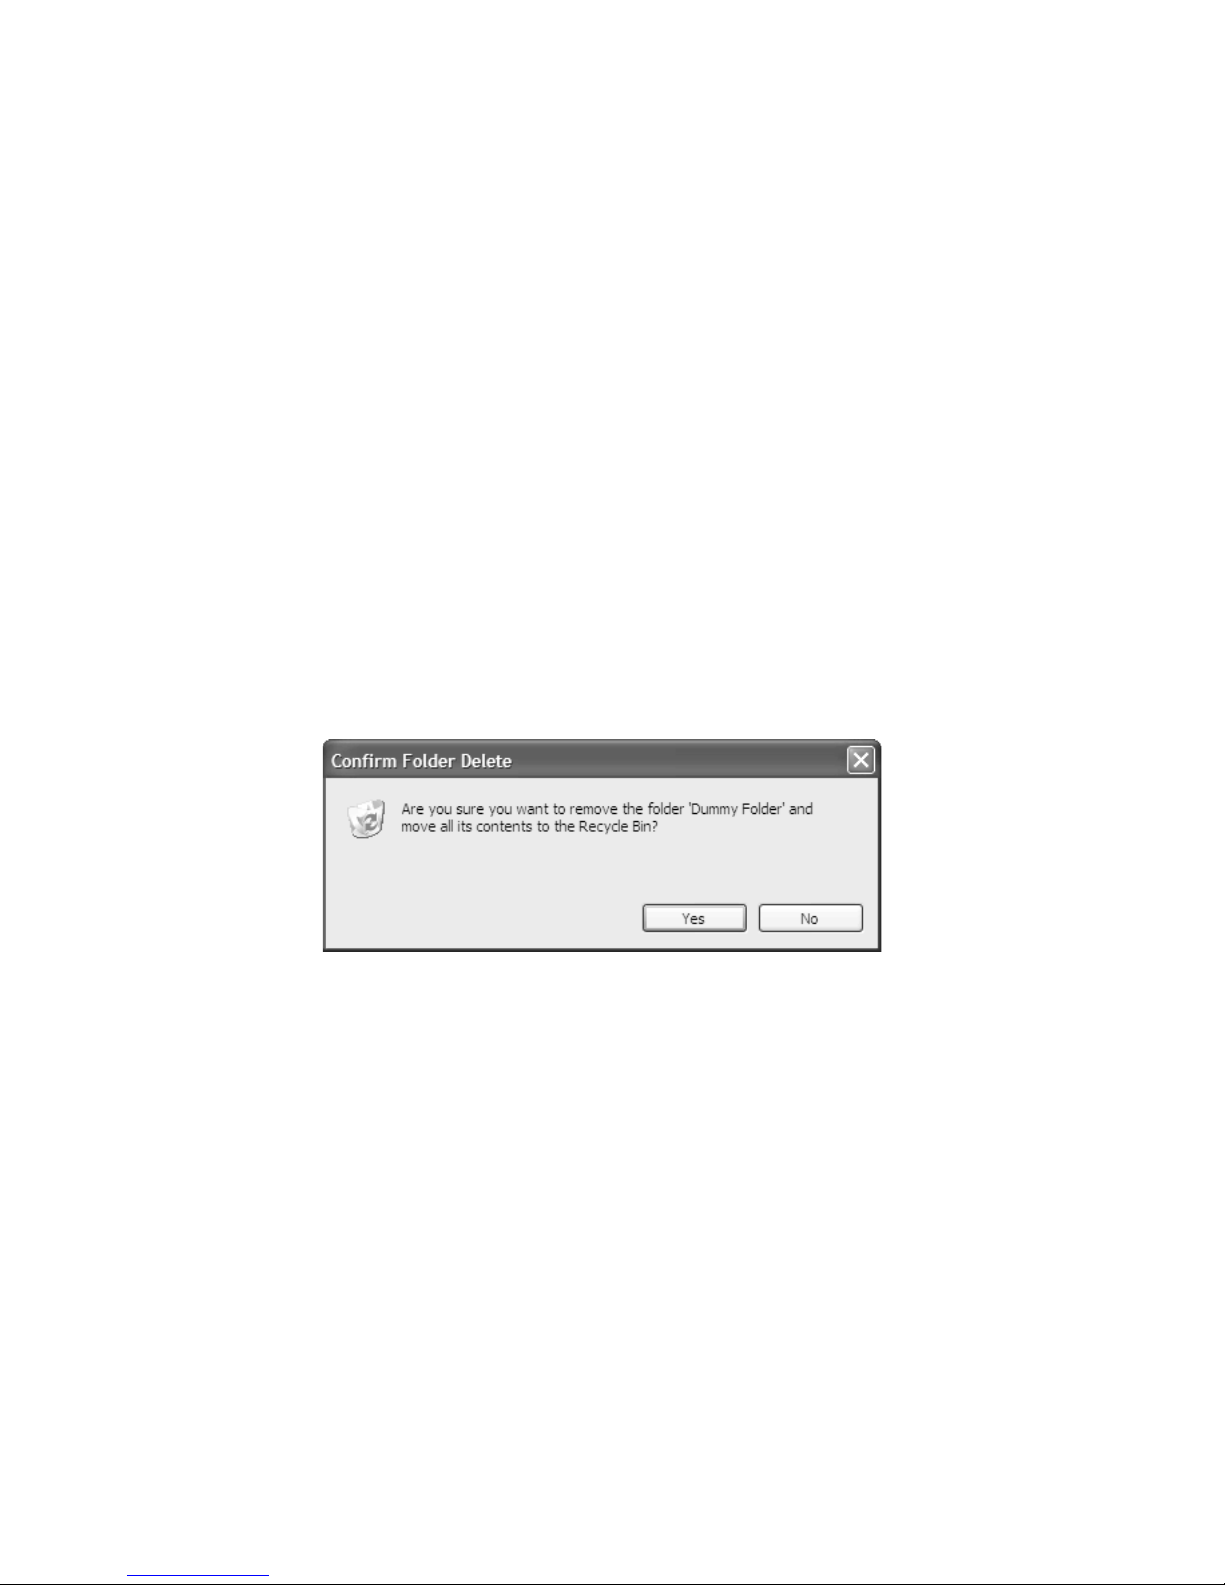
74 How to Do Everything with Your Tablet PC
HowTo8 (8) / How to Do Everything with Your Tablet PC / Mann / 222771-0 / Chapter 4
bunch of folders that Windows uses, as well as a set of folders for the kinds of files
with which you’re likely to work. My Documents, My Pictures, and similar folders
make great places to store the relevant types of files.
Even though Windows provides useful folders for you, you are likely to need to
create your own folders sooner or later. For example, every book or magazine article
I write has its own folder in the My Documents folder. Within each of those folders
are subfolders for pictures, chapters, and other types of files related to the project.
To create a new folder, simply open the folder that will contain the new folder,
and then tap File | New | Folder. Windows creates a new folder for you with the
name New Folder. This name is highlighted, so just enter the name you want for
the folder and you’re done.
If you want to rename a folder, right-tap that folder, and in the shortcut menu
that appears, tap Rename. Then enter the new name.
To delete a folder, right-tap it, and then tap Delete in the shortcut menu. Windows
asks you to confirm that this is what you want to do and warns you that the contents
of the folder (including any subfolders) will all be moved to the Recycle Bin.
Most of the menu options for folders are self-explanatory.
We should, however, spend a few minutes on the View menu. It lets you change
the way Windows displays the contents of folders to accommodate the way you
use the contents of those folders. Windows XP provides six folder templates,
which provide specific views of the contents of a folder. Most folders are document
folders, which are folders designed to hold any kind of content. Figure 4-6 is a
typical document folder.
Windows has five other folder templates, each of which is designed to hold a
certain type of content and display it in a particular way. The My Pictures folder
(see Figure 4-7) uses the Pictures template to display its contents in a particular
way, with specific Picture Tasks options like Order Prints Online, available right
in the folder.
Color profile: Generic CMYK printer profile
Composite Default screen
Page 93
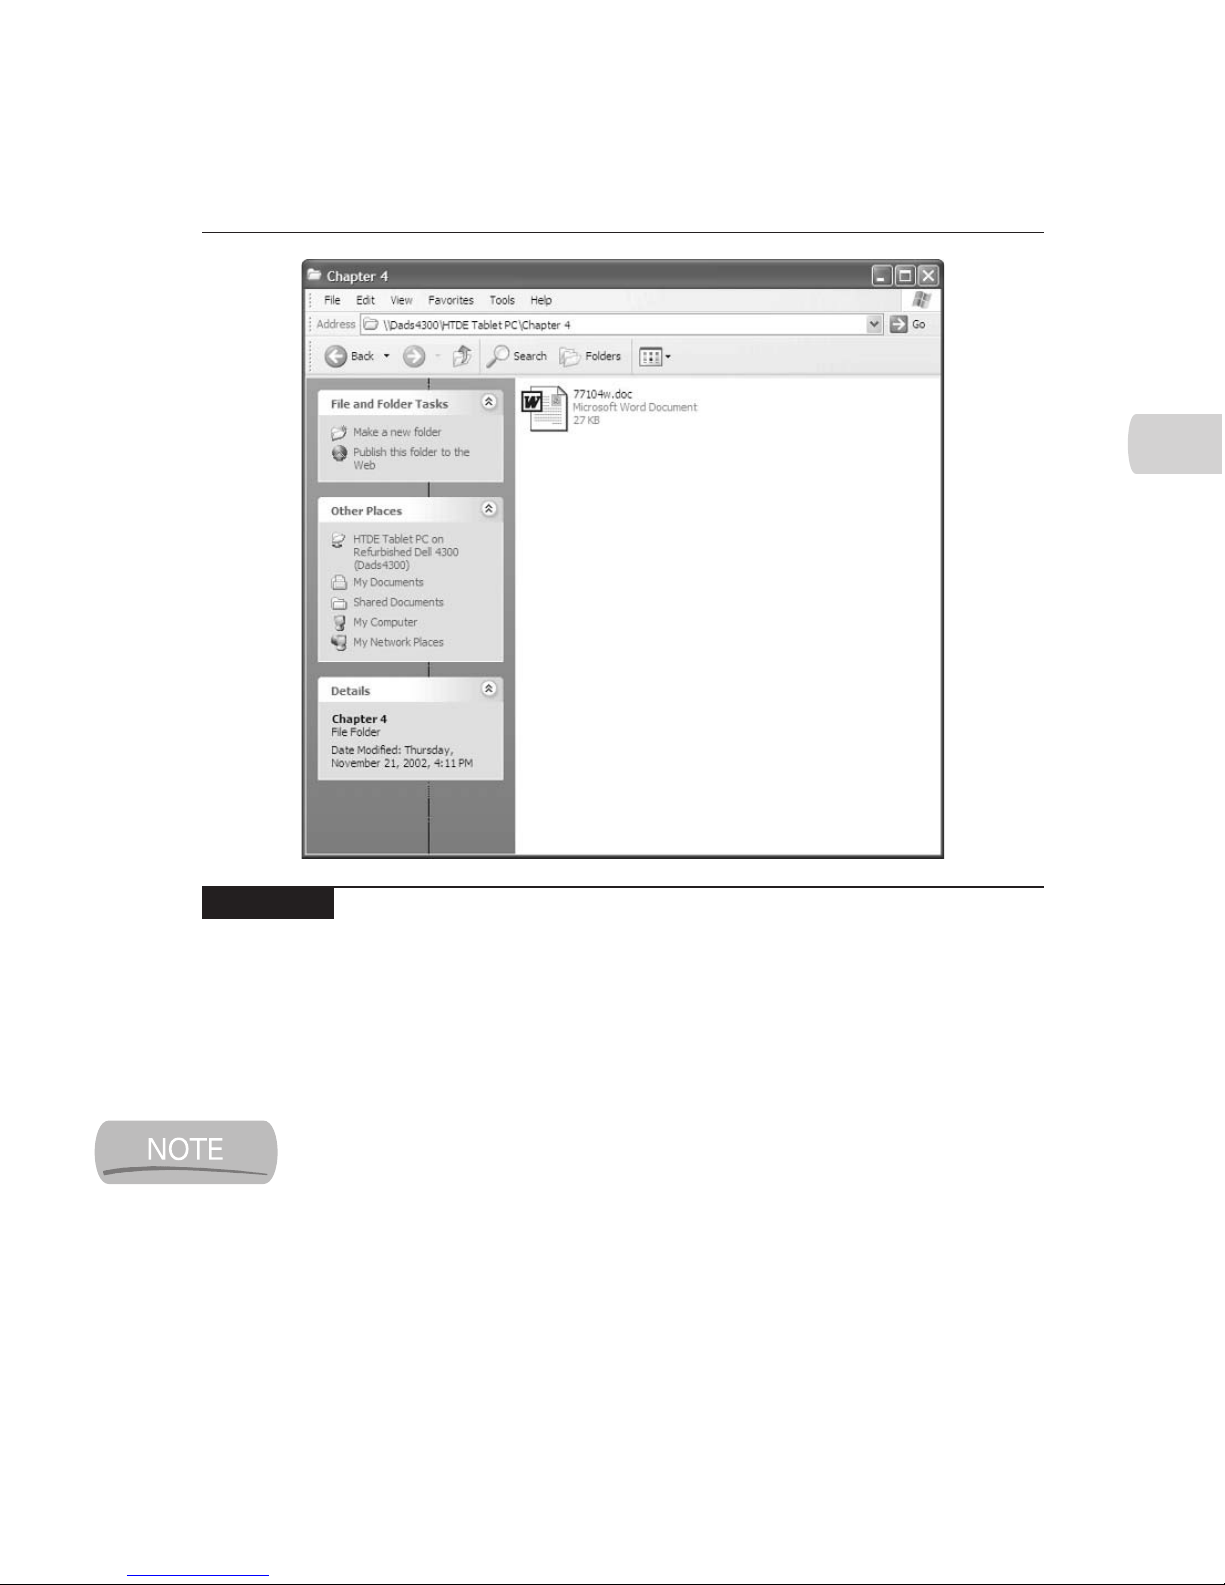
To change the folder template, tap View | Customize This Folder, and then
select the template you want to use from the list provided. Within the bounds of
the selected folder template, you can change how the folder’s contents appear in
the right-hand pane. Tap View, and then select among the options available.
You cannot change the template for special folders like My Documents and
My Pictures.
For folders that you expect to use frequently, you may want to experiment with
different View menu options to decide which ones work best for that folder. I find
myself frequently adjusting the view of folders like My Documents to meet the
needs of the moment. So don’t be afraid to experiment. Remember that when you
use the View menu, you’re just changing the way the folder displays its contents.
You’re not changing the properties of those contents, so you can’t hurt anything.
CHAPTER 4: Use Windows XP Tablet PC Edition 75
HowTo8 (8) / How to Do Everything with Your Tablet PC / Mann / 222771-0 / Chapter 4
4
FIGURE 4-6 Document folders like this one are the most versatile type of folder for
most uses.
Color profile: Generic CMYK printer profile
Composite Default screen
Page 94
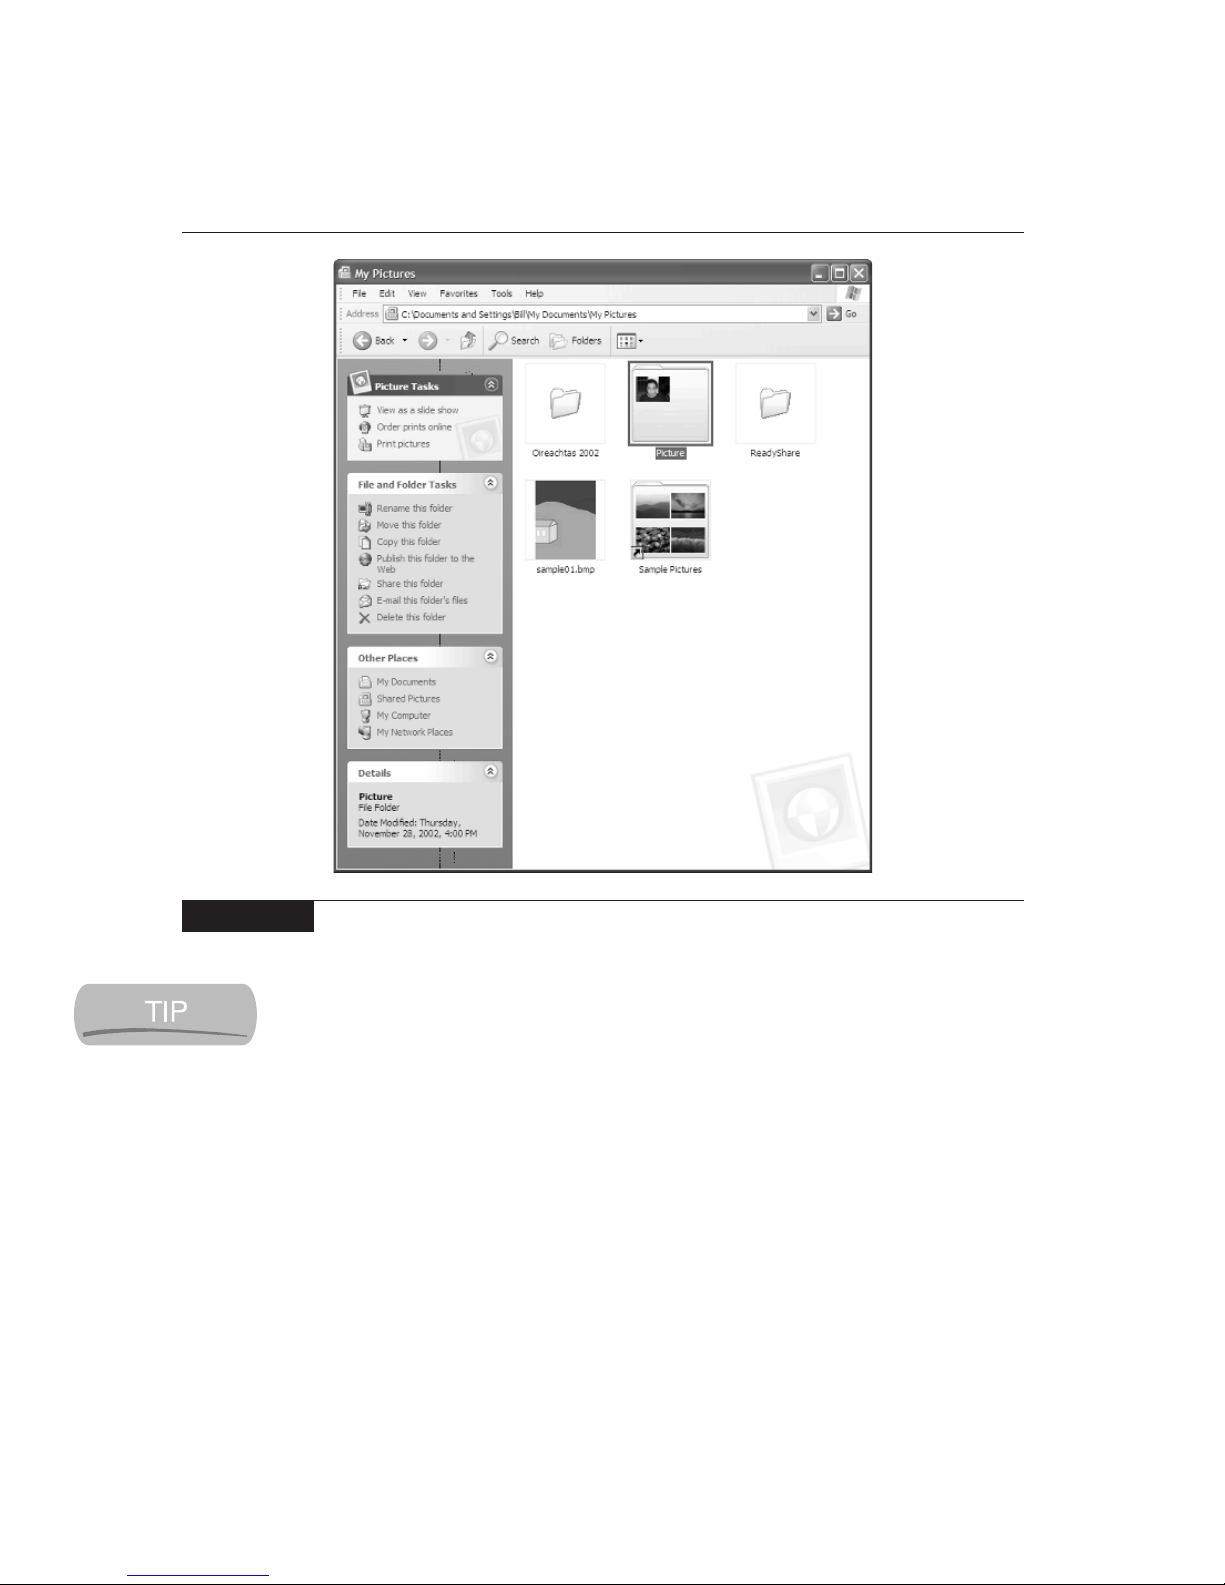
Before you start creating lots of folders, think about a strategy for storing
information on your computer. One approach is to put all your picture
folders in My Pictures, music folders in My Music, and so on. But if you do
lots of projects that involve different types of files, consider creating project
folders in My Documents, and putting all the files and folders for a project
in that project folder. This approach lets you easily find everything related
to a particular project.
Manage Your Files
Although your Tablet PC may have tens of thousands of files on its hard disk,
managing those files is relatively simple. You don’t create files like you create
folders. Programs create files in the course of their operation. When you’re using
an application like Microsoft Word, the program creates files for you and saves
76 How to Do Everything with Your Tablet PC
HowTo8 (8) / How to Do Everything with Your Tablet PC / Mann / 222771-0 / Chapter 4
FIGURE 4-7 Windows can also present specialized folders designed for specific types
of content.
Color profile: Generic CMYK printer profile
Composite Default screen
Page 95

them where you tell it to, so you don’t really have to worry too much about that
aspect of managing files. You can usually use an application to delete and rename
the files it works with, so that’s easy too.
You can delete, rename, and move files without the help of the program with
which they’re associated. You delete or rename them by right-tapping their icons
and selecting the appropriate option in the shortcut menu. You move them by
dragging them from their old location to the new one.
Manage Programs and Components
Programs are sets of software instructions that tell your computer what to do.
Certain types of programs go by different names: a utility is generally a small
program that performs specific functions like defragmenting the hard disk or
scanning for viruses. An application is a program you use for getting your work
done, such as a word processor or spreadsheet. And games, well, they’re games
you play on your computer. But whatever the name for the particular category,
they’re all still programs.
Windows components are also programs. But these programs are optional parts
of the Windows XP Tablet PC edition operating system. Windows XP is itself a
very large and complex program.
You install programs on your Tablet PC to allow it to perform tasks it couldn’t
do before, or so it can perform those tasks better than it did before. For example,
Windows XP doesn’t include its own antivirus program. By adding one, you give
your Tablet PC the ability to do something it couldn’t do before.
To reduce the amount of memory, disk space, and processor time Windows uses,
some less-frequently used components of Windows are not installed automatically
when Windows is installed on a computer. You treat Windows components very
similarly to other programs when it comes to installing them on your computer
and removing them.
Just as you can install programs or components when you need them, you can
uninstall (remove) them when you no longer need them. The next two sections
show you how to install and remove programs and components when your Tablet
PC has either a built-in CD-ROM drive or one that connects directly to it through
a dock or a cable.
You can also install programs by downloading them from the Internet or
installing them from another computer on a network. Downloading from the
Internet is covered in Chapter 7, where we connect your Tablet PC to the Internet.
CHAPTER 4: Use Windows XP Tablet PC Edition 77
HowTo8 (8) / How to Do Everything with Your Tablet PC / Mann / 222771-0 / Chapter 4
4
Color profile: Generic CMYK printer profile
Composite Default screen
Page 96

Get Your CD-ROM Drive Connected
Most programs that you will want to install on your Tablet PC come on a CD-ROM.
Similarly, you’ll install Windows components from the Windows CD-ROM that
came with your Tablet PC. Your computer may have a built-in CD-ROM drive, it
may have a drive in the docking station, or it may have an external drive that
connects to the Tablet PC through a cable. In all cases, the documentation that
came with your computer tells you what, if anything, you need to do to connect
your CD-ROM drive to your Tablet PC. Once they’re connected, the way they’re
connected is irrelevant when it comes to installing and removing programs.
Install Programs
Make sure your CD-ROM drive is turned on, and then insert the CD-ROM containing
the program into the drive. Normally the CD-ROM will start spinning, and Windows
will display a dialog box asking if you want to install the program. If that happens,
all you need to do is follow the onscreen instructions and Windows will install the
program.
If you put the CD-ROM in the drive and nothing happens, first make sure the
CD-ROM drive has power and is connected to the Tablet PC properly. Consult the
documentation that came with your system if necessary to ensure that the CD-ROM
drive is on and connected to the computer. If everything seems to be connected and
powered properly, tap Start | My Computer, and look for an icon that represents
the CD-ROM drive. Figure 4-8 shows that icon under the heading Devices With
Removable Storage. If you don’t see the icon, the CD-ROM drive still isn’t
connected properly, or isn’t turned on. (Or the drive is in the dock, and the Tablet
PC is in your hands. Although your Tablet PC has wireless capabilities, it needs
to be physically connected to the CD-ROM drive for this procedure to work.)
If you do see the icon, right-tap it. In the shortcut menu that appears, tap either
Install or AutoPlay to start installing the program. Follow the installation instructions
that appear.
Install Components
You install Windows components with the Add Or Remove Programs window.
To open the window, tap Start | Control Panel | Add Or Remove Programs. The
window opens with a list of all the programs currently installed on your Tablet PC.
On the left side of the window, tap Add/Remove Windows Components to open
the Windows Components Wizard shown in Figure 4-9.
78 How to Do Everything with Your Tablet PC
HowTo8 (8) / How to Do Everything with Your Tablet PC / Mann / 222771-0 / Chapter 4
Color profile: Generic CMYK printer profile
Composite Default screen
Page 97
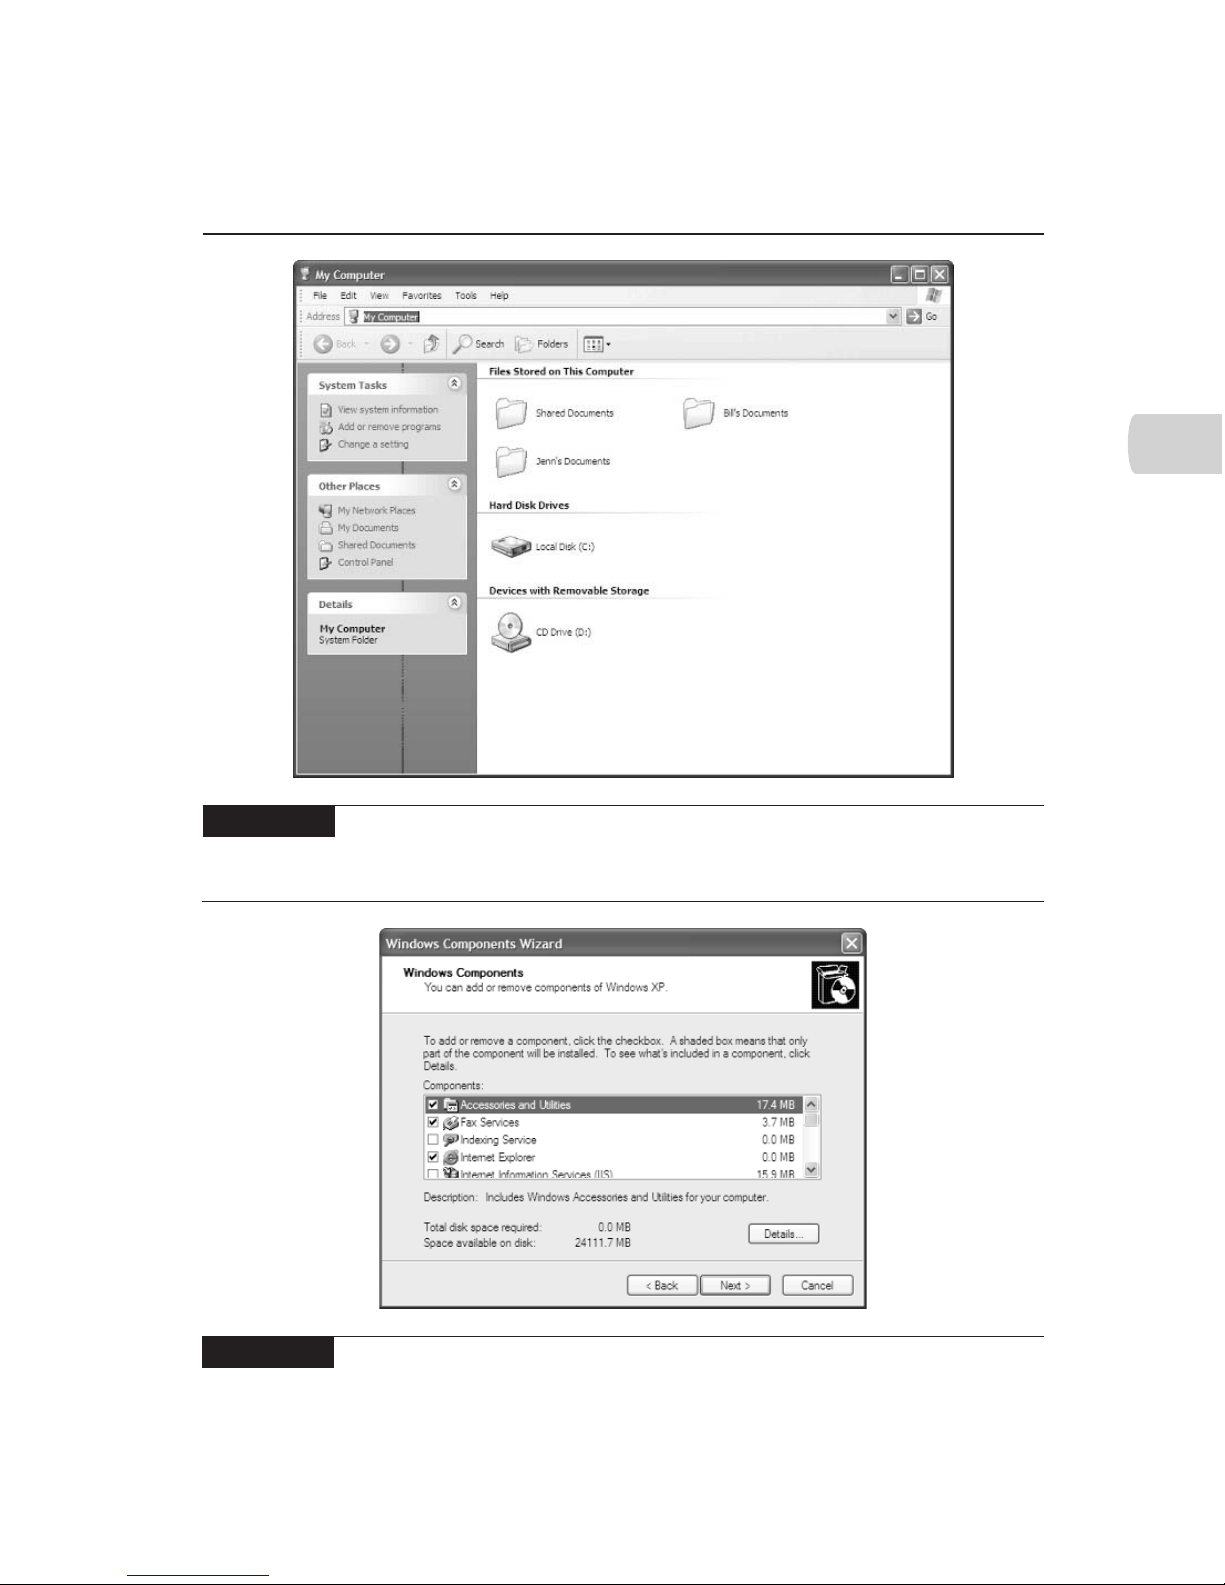
CHAPTER 4: Use Windows XP Tablet PC Edition 79
HowTo8 (8) / How to Do Everything with Your Tablet PC / Mann / 222771-0 / Chapter 4
4
FIGURE 4-8 If you don’t see an icon for the CD-ROM drive in the My Computers
window, the drive isn’t connected properly or isn’t turned on.
FIGURE 4-9 The Windows Components Wizard makes it easy to install or remove
optional components.
Color profile: Generic CMYK printer profile
Composite Default screen
Page 98

80 How to Do Everything with Your Tablet PC
HowTo8 (8) / How to Do Everything with Your Tablet PC / Mann / 222771-0 / Chapter 4
You can use the Add Or Remove Programs window to install new
programs if you wish. Tap Add New Programs and then follow the
directions on the screen.
To use the wizard, you need only follow the instructions that appear on the
screen. Some components will contain subcomponents, which you can learn more
about by tapping Details. Every time you tap Details, you get another window,
which looks very similar to the main Windows Components Wizard window.
Once you select the components you wish to install, Windows XP figures out
what it needs to do next. This typically involves getting files and programs from
the Windows CD that came with your Tablet PC, so you should have that CD-ROM
in the drive or have it handy. The wizard guides you through the rest of the process.
Remove Programs
When you no longer need a program, you can remove or uninstall it from your
Tablet PC. The preferred approach is to use the Add Or Remove Programs window.
To do this, open the window (tap Start | Control Panel | Add Or Remove Programs),
and then find the name of the program in the Currently Installed Programs list.
If the Currently Installed Programs list isn’t visible in the window, tap
Change Or Remove Programs. That should bring the list into view.
Tap the program’s icon to select it. One or more buttons should appear to the
right of the icon. If there’s a Remove button, tap that to remove the program. If
there’s a Change/Remove button, that will also work; you’ll just need to select the
Remove option when it is presented by the program. Figure 4-10 shows the Add
Or Remove Programs window with a program that has a Change/Remove button.
If the program you want to uninstall doesn’t appear in Add Or Remove Programs,
or Add Or Remove Programs cannot remove the program for some reason, you
can use the program’s own uninstaller. Look for the program’s folder in the Start
menu. (Tap Start | All Programs, and then look for the name of the program or the
name of the publisher of the program.) Look in the folder for a shortcut named
Uninstall, or Remove, or something similar. Double-tap that program and follow
the onscreen directions to uninstall the program.
There is one other way to remove a program from your Tablet PC, but don’t
use it if you don’t have to. If you can’t find any other way to delete a program, you
can search your hard disk to find the program’s folder (learn how to search your
hard disk in the “Find Stuff with the Search Companion” section later in this chapter),
and then delete that folder.
Color profile: Generic CMYK printer profile
Composite Default screen
Page 99
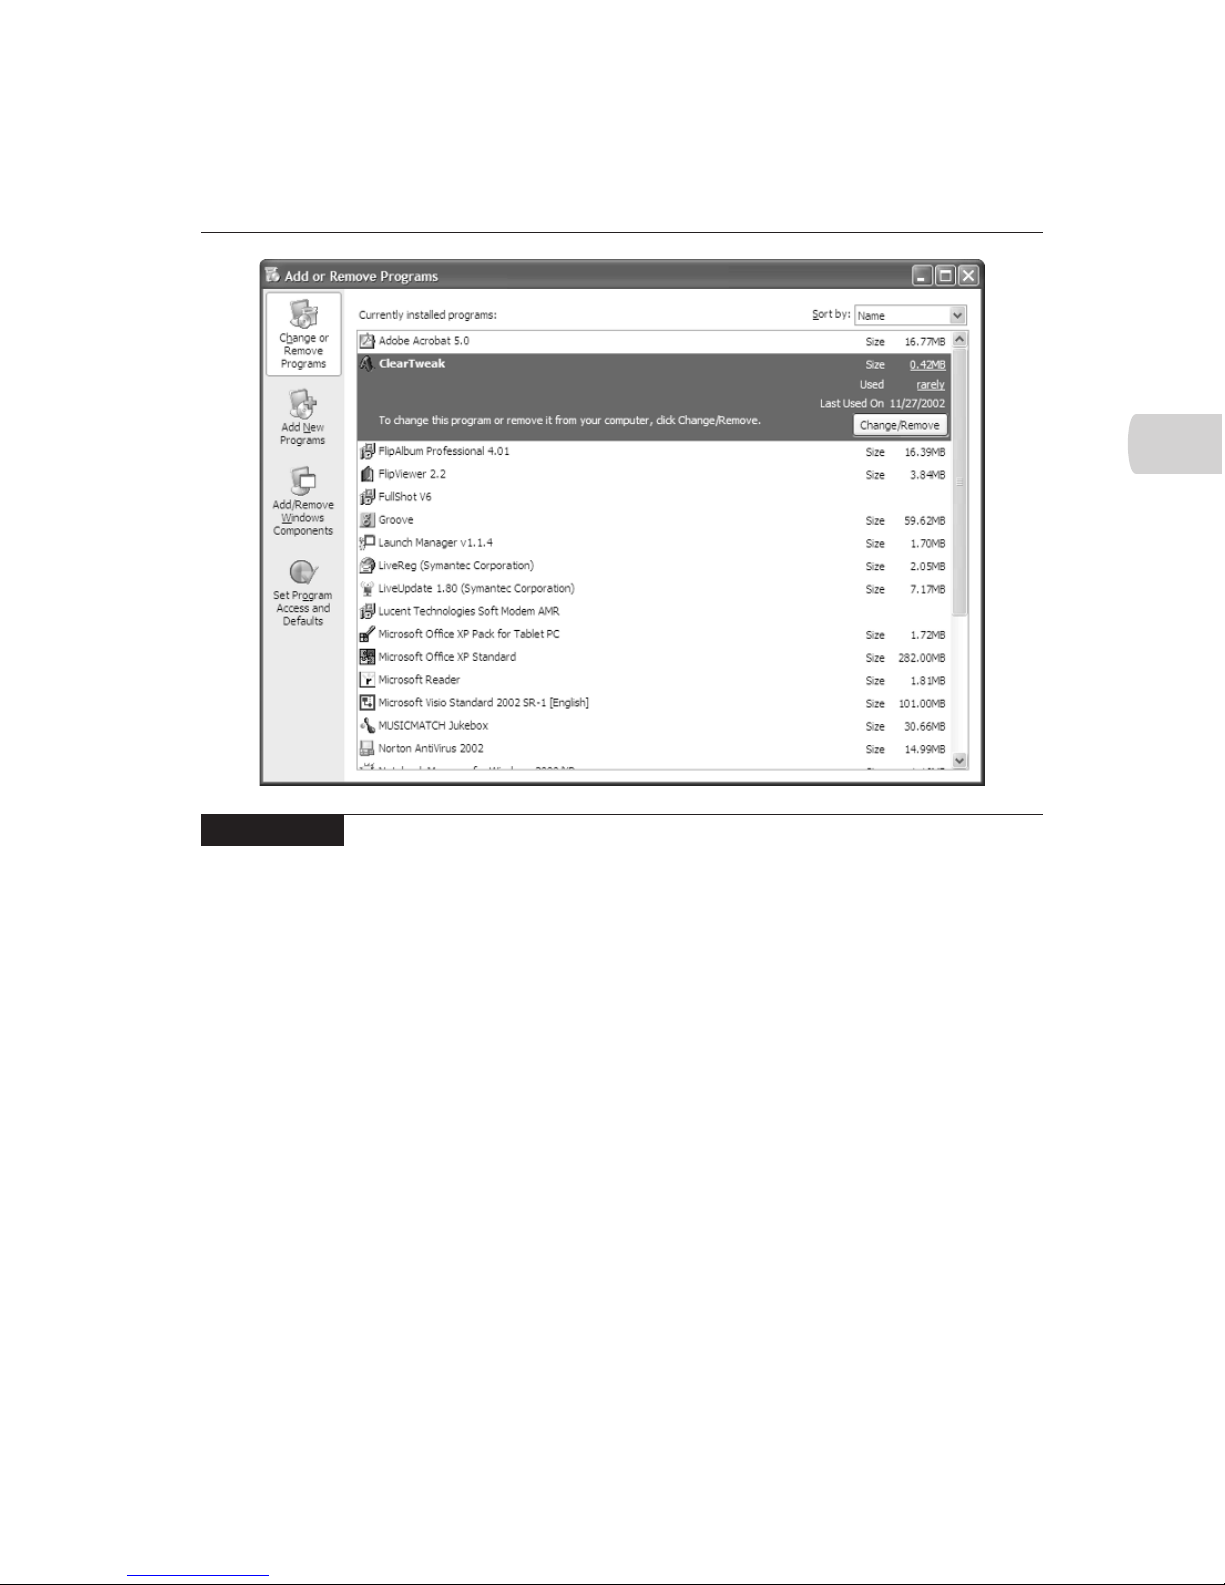
CHAPTER 4: Use Windows XP Tablet PC Edition 81
HowTo8 (8) / How to Do Everything with Your Tablet PC / Mann / 222771-0 / Chapter 4
4
Although this method will get rid of the program, it isn’t a very neat solution.
Many programs have pieces of themselves scattered in various locations on your
hard disk. Deleting the main folder for a program will get rid of the majority of
the files, but probably not all of them. Worse, many programs make changes deep
inside Windows. Removing a program in one of the other ways will usually undo
those changes. Deleting the folder will not. So save this as a last resort.
When removing programs, be aware that even when you use their own uninstallers,
programs sometimes leave bits of themselves behind on your hard disk. This is
particularly true with pieces of programs called DLLs. What they are or why they’re
there isn’t relevant. What’s important is that while you are removing a program from
your computer, Windows may ask you whether it should delete certain files. Unless
you are absolutely certain that deleting the files will not cause any problems, I
recommend telling Windows not to delete the files.
Files that are left behind but not used waste a tiny bit of disk space. Files that
are deleted when they shouldn’t be can cause major problems for you. So play it
safe and tell Windows to leave them alone.
FIGURE 4-10 When it is time to remove a program from your Tablet PC, the Add Or
Remove Programs window gets the job done efficiently and cleanly.
Color profile: Generic CMYK printer profile
Composite Default screen
Page 100
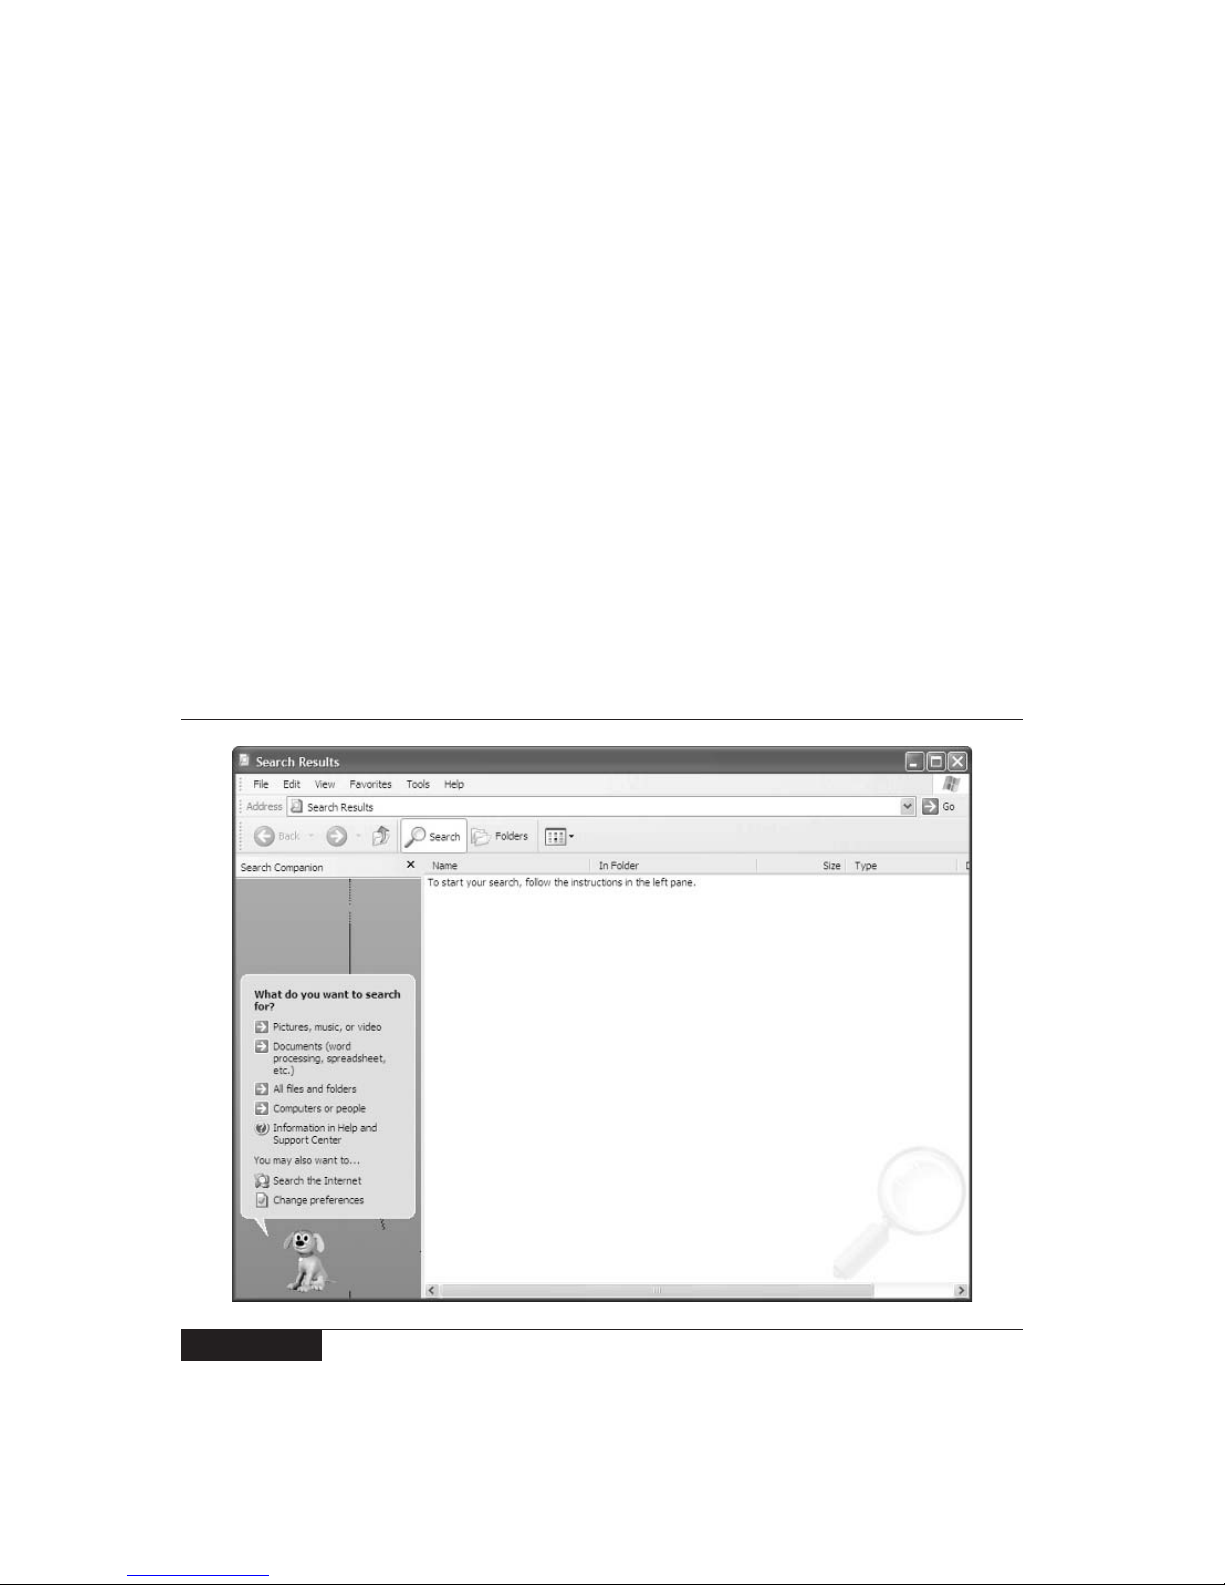
82 How to Do Everything with Your Tablet PC
HowTo8 (8) / How to Do Everything with Your Tablet PC / Mann / 222771-0 / Chapter 4
Remove Components
You remove Windows components in much the same way you add them, using
the Add Or Remove Programs window. To start the Windows Components Wizard,
tap Start | Control Panel | Add Or Remove Programs | Add/Remove Windows
Components. Clear the check boxes of the components you want to remove, tap
Next, and follow the instructions that appear.
Find Stuff with the Search Companion
For me, one of the keys to managing anything on your computer (or anywhere else
in your life, for that matter) is being able to find it. That’s why I love the Search
Companion. The Search Companion panel (see Figure 4-11) is a general-purpose
tool for searching out darn near anything on your computer. And I do mean darn
near anything.
FIGURE 4-11 The Search Companion is a user-friendly way to find virtually anything
stored on or connected to your Tablet PC.
Color profile: Generic CMYK printer profile
Composite Default screen
 Loading...