

Page 1
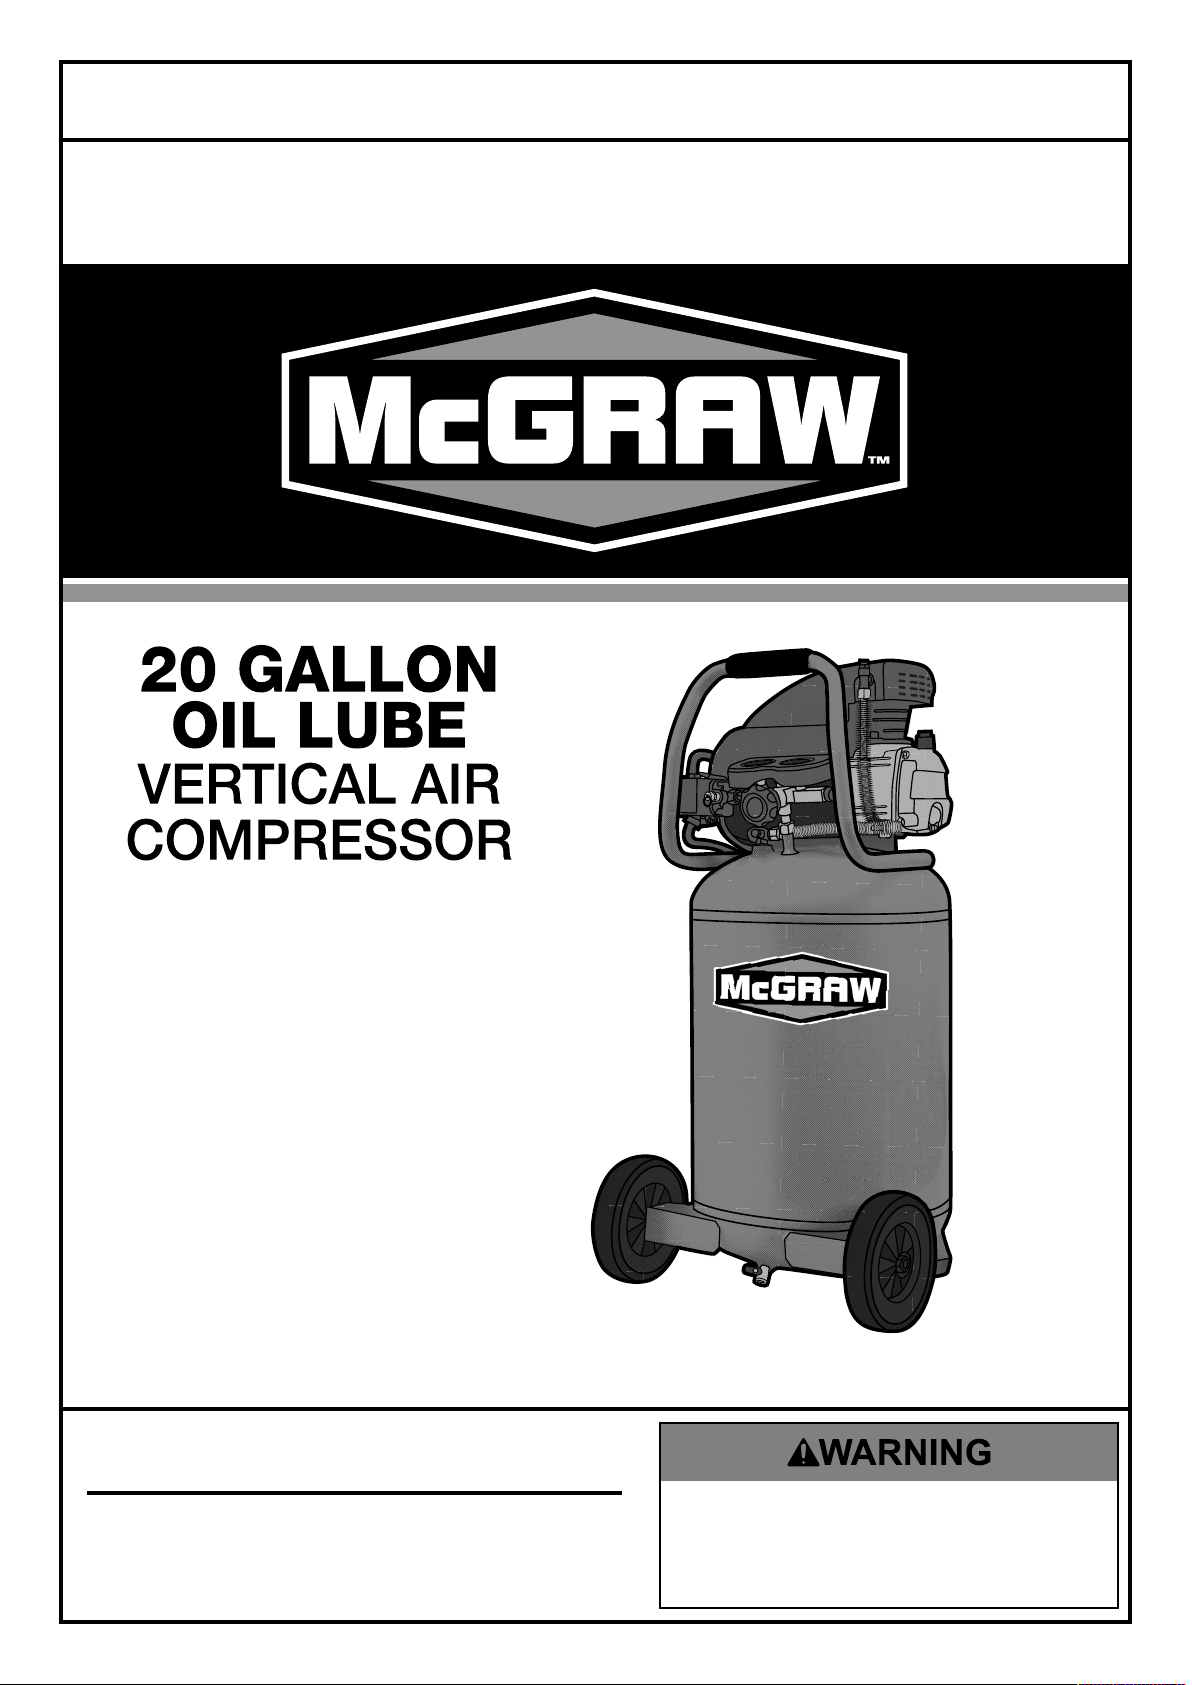
Owner’s Manual & Safety Instructions
Save This Manual Keep this manual for the safety warnings and precautions, assembly,
operating, inspection, maintenance and cleaning procedures� Write the product’s serial number in the
back of the manual near the assembly diagram (or month and year of purchase if product has no number)�
Keep this manual and the receipt in a safe and dry place for future reference� 18j
When unpacking, make sure that the product is intact
and undamaged� If any parts are missing or broken,
please call 1-888-866-5797 as soon as possible�
Copyright© 2018 by Harbor Freight Tools®� All rights reserved�
No portion of this manual or any artwork contained herein may be reproduced in
any shape or form without the express written consent of Harbor Freight Tools�
Diagrams within this manual may not be drawn proportionally� Due to continuing
improvements, actual product may differ slightly from the product described herein�
To ol s re q u ir e d fo r as s e mb l y a n d s e r vi c e m a y n o t b e in c l ud e d �
;:1'<*+,-*)/93='91<*(,44+-)*1)2*4-+>,9)(,44+-)?31-0+-7-/'83)69+:
&'(')*+,-*./0(')/*1)2*3))4255...631-0+-7-/'83)69+:
!"#$%
Read this material before using this product�
Failure to do so can result in serious injury�
SAVE THIS MANUAL�
Page 2
H10</*+7*P+=)/=)(
Safety ��������������������������������������������������������� 2
Installation �������������������������������������������������� 6
Specifications ��������������������������������������������� 6
FG@;HI JK;LGHMJN OGMNH;NGNP;MNFHGQQGHMJN
Operation ��������������������������������������������������� 12
Maintenance ���������������������������������������������� 14
Parts List and Diagram ������������������������������ 18
Warranty ���������������������������������������������������� 20
RGLNMNS*FIOTJQF*GNU*U;@MNMHMJNF
This is the safety alert symbol� It is used to alert you to potential
personal injury hazards� Obey all safety messages that
follow this symbol to avoid possible injury or death�
Indicates a hazardous situation which, if not avoided,
will result in death or serious injury�
Indicates a hazardous situation which, if not avoided,
could result in death or serious injury�
Indicates a hazardous situation which, if not avoided,
could result in minor or moderate injury�
Addresses practices not related to personal injury�
MOKJLHGNH*FG@;HI*MN@JLOGHMJN
S/=/-1<*F17/)V*R1-='=8(
* RGLNMNS*L/1>*1<<*(17/)V*.1-='=8(*1=>*'=()-,9)'+=(6***
Failure to follow the warnings and instructions may result in electric shock, fire and/or serious injury.
F1W/*1<<*.1-='=8(*1=>*'=()-,9)'+=(*7+-*7,),-/*-/7/-/=9/6
The warnings, precautions, and instructions discussed in this instruction manual cannot cover all possible
conditions and situations that may occur� It must be understood by the operator that common sense
and caution are factors which cannot be built into this product, but must be supplied by the operator�
1� R+-X*1-/1*(17/)V
a� Y//4*.+-X*1-/1*9</1=*1=>*./<<*<')6
Cluttered or dark areas invite accidents�
b� U+*=+)*+4/-1)/*)3/*P+:4-/((+-*'=*/Z4<+('W/*
1):+(43/-/(B*(,93*1(*'=*)3/*4-/(/=9/*
+7*7<1::10</*<'A,'>(B*81(/(*+-*>,()6
Compressor motors produce sparks
which may ignite the dust or fumes�
c� Y//4*93'<>-/=*1=>*0V()1=>/-(*1.1V*
7-+:*1=*+4/-1)'=8*9+:4-/((+-6
2� ;</9)-'91<*(17/)V
a� P+:4-/((+-*4<,8(*:,()*:1)93*)3/*+,)</)6**
N/W/-*:+>'7V*)3/*4<,8*'=*1=V*.1V6**
U+*=+)*,(/*1=V*1>14)/-*4<,8(*.')3*8-+,=>/>*
9+:4-/((+-(6 Standard plugs and matching
outlets will reduce risk of electric shock�
b� U+*=+)*/Z4+(/*9+:4-/((+-*)+*-1'=*+-*./)*
9+=>')'+=(6 Water entering a compressor
will increase the risk of electric shock�
Page 2 @+-*)/93='91<*A,/()'+=(B*4</1(/*91<<*CD###D#!!D$%E%6 Item 64857
Page 3

c� U+*=+)*10,(/*)3/*9+->6**N/W/-*,(/*)3/*
9+->*7+-*,=4<,88'=8*)3/*9+:4-/((+-6**
Y//4*9+->*1.1V*7-+:*3/1)B*+'<B*(31-4*/>8/(*
+-*:+W'=8*41-)(6**Damaged or entangled
cords increase the risk of electric shock�
3� K/-(+=1<*(17/)V
a� F)1V*1</-)B*.1)93*.31)*V+,*1-/*>+'=8*1=>*
,(/*9+::+=*(/=(/*.3/=*+4/-1)'=8*)3'(*
9+:4-/((+-6**U+*=+)*,(/*)3'(*9+:4-/((+-*
.3'</*V+,*1-/*)'-/>*+-*,=>/-*)3/*'=7<,/=9/*
+7*>-,8(B*1<9+3+<*+-*:/>'91)'+=6 A moment
of inattention while operating a compressor
may result in serious personal injury�
b� [(/*4/-(+=1<*4-+)/9)'W/*/A,'4:/=)6**
G<.1V(*./1-*GNFMD144-+W/>*/V/*
4-+)/9)'+=*>,-'=8*(/),4*1=>*,(/6
c� K-/W/=)*,='=)/=)'+=1<*()1-)'=86**;=(,-/*)3/*
(.')93*'(*'=*)3/*+77D4+(')'+=*0/7+-/*9+==/9)'=8*
)+*4+./-*(+,-9/*+-*:+W'=8*)3/*9+:4-/((+-6
4� P+:4-/((+-*,(/*1=>*91-/
a� U+*=+)*,(/*)3/*9+:4-/((+-*'7*)3/*(.')93*
>+/(*=+)*),-=*')*+=*1=>*+776 Any compressor
that cannot be controlled with the switch
is dangerous and must be repaired�
b� U'(9+==/9)*)3/*4<,8*7-+:*)3/*4+./-*(+,-9/*
0/7+-/*:1X'=8*1=V*1>\,():/=)(B*931=8'=8*
199/((+-'/(B*+-*()+-'=8*)3/*9+:4-/((+-6
Such preventive safety measures reduce the
risk of starting the compressor accidentally�
c� F)+-/*1=*'></*9+:4-/((+-*+,)*+7*)3/*-/193*
+7*93'<>-/=*1=>*>+*=+)*1<<+.*4/-(+=(*
,=71:'<'1-*.')3*)3/*9+:4-/((+-*+-*)3/(/*
'=()-,9)'+=(*)+*+4/-1)/*')6 A compressor is
dangerous in the hands of untrained users�
d� O1'=)1'=*)3/*9+:4-/((+-6**Y//4*)3/*
9+:4-/((+-*9</1=*7+-*0/))/-*1=>*(17/-*
4/-7+-:1=9/6**@+<<+.*'=()-,9)'+=(*7+-*
<,0-'91)'=8*1=>*931=8'=8*199/((+-'/(6**
Y//4*>-VB*9</1=*1=>*7-//*7-+:*+'<*1=>*8-/1(/6**
P3/9X*7+-*:'(1<'8=:/=)*+-*0'=>'=8*+7*:+W'=8*
41-)(B*0-/1X18/*+7*41-)(*1=>*1=V*+)3/-*
9+=>')'+=*)31)*:1V*177/9)*)3/*9+:4-/((+-](*
+4/-1)'+=6**M7*>1:18/>B*31W/*)3/*9+:4-/((+-*
-/41'-/>*0/7+-/*,(/6 Many accidents are
caused by a poorly maintained compressor�
e� [(/*)3/*9+:4-/((+-*'=*199+->1=9/*.')3*
)3/(/*'=()-,9)'+=(B*)1X'=8*'=)+*199+,=)*
)3/*.+-X'=8*9+=>')'+=(*1=>*)3/*.+-X*)+*
0/*4/-7+-:/>6 Use of the compressor for
operations different from those intended
could result in a hazardous situation�
5� F/-W'9/
a� ^1W/*V+,-*9+:4-/((+-*(/-W'9/>*0V*1*
A,1<'7'/>*-/41'-*4/-(+=*,('=8*+=<V*'>/=)'91<*
-/4<19/:/=)*41-)(6 This will ensure that the
safety of the compressor is maintained�
FG@;HIJK;LGHMJNOGMNH;NGNP; MNFHGQQGHMJN
G'-*P+:4-/((+-*F17/)V*R1-='=8(
1� L'(X*+7*7'-/*+-*/Z4<+('+=*D*>+*=+)*(4-1V*
7<1::10</*<'A,'>*'=*1*9+=7'=/>*1-/1*+-*)+.1->(*1*
3+)*(,-719/6**F4-1V*1-/1*:,()*0/*./<<DW/=)'<1)/>6**
U+*=+)*(:+X/*.3'</*(4-1V'=8*+-*(4-1V*.3/-/*
(41-X*+-*7<1:/*'(*4-/(/=)6**G-9'=8*41-)(*D*X//4*
9+:4-/((+-*1)*</1()*_`*7//)*1.1V*7-+:*/Z4<+('W/*
W14+-(B*(,93*1(*.3/=*(4-1V'=8*.')3*1*(4-1V*8,=6
2� L'(X*+7*0,-()'=8*D*>+*=+)*1>\,()*-/8,<1)+-*3'83/-*
)31=*:1-X/>*:1Z':,:*4-/((,-/*+7*1))193:/=)6
3� L'(X*+7*'=\,-V*D*>+*=+)*>'-/9)*1'-*
()-/1:*1)*4/+4</*+-*1=':1<(6
4� U+*=+)*,(/*)+*(,44<V*0-/1)3'=8*1'-6
5� U+*=+)*</1W/*9+:4-/((+-*,=1))/=>/>*
7+-*1=*/Z)/=>/>*4/-'+>*.3'</*4<,88/>*'=6**
[=4<,8*9+:4-/((+-*17)/-*.+-X'=86
6� Y//4*9+:4-/((+-*./<<DW/=)'<1)/>6**
U+*=+)*9+W/-*9+:4-/((+-*>,-'=8*,(/6
7� Drain Tank daily and after use� Internal rust causes
tank failure and explosion�
8� Add correct amount of compressor oil before first
use and every use� Operating with low or no oil
causes permanent damage and voids warranty�
9� Do not remove the valve cover or
adjust internal components�
10� Compressor head gets hot during operation�
Do not touch it or allow children nearby
during or immediately following operation�
11� Do not use the air hose to move the compressor�
12� Release the pressure in the
storage tank before moving�
13� The use of accessories or attachments not
recommended by the manufacturer may
result in a risk of injury to persons�
14� All air line components, including hoses, pipe,
connectors, filters, etc�, must be rated for a minimum
working pressure of 150 PSI, or 150% of the
maximum system pressure, whichever is greater�
Page 3@+-*)/93='91<*A,/()'+=(B*4</1(/*91<<*CD###D#!!D$%E%6Item 64857
Page 4
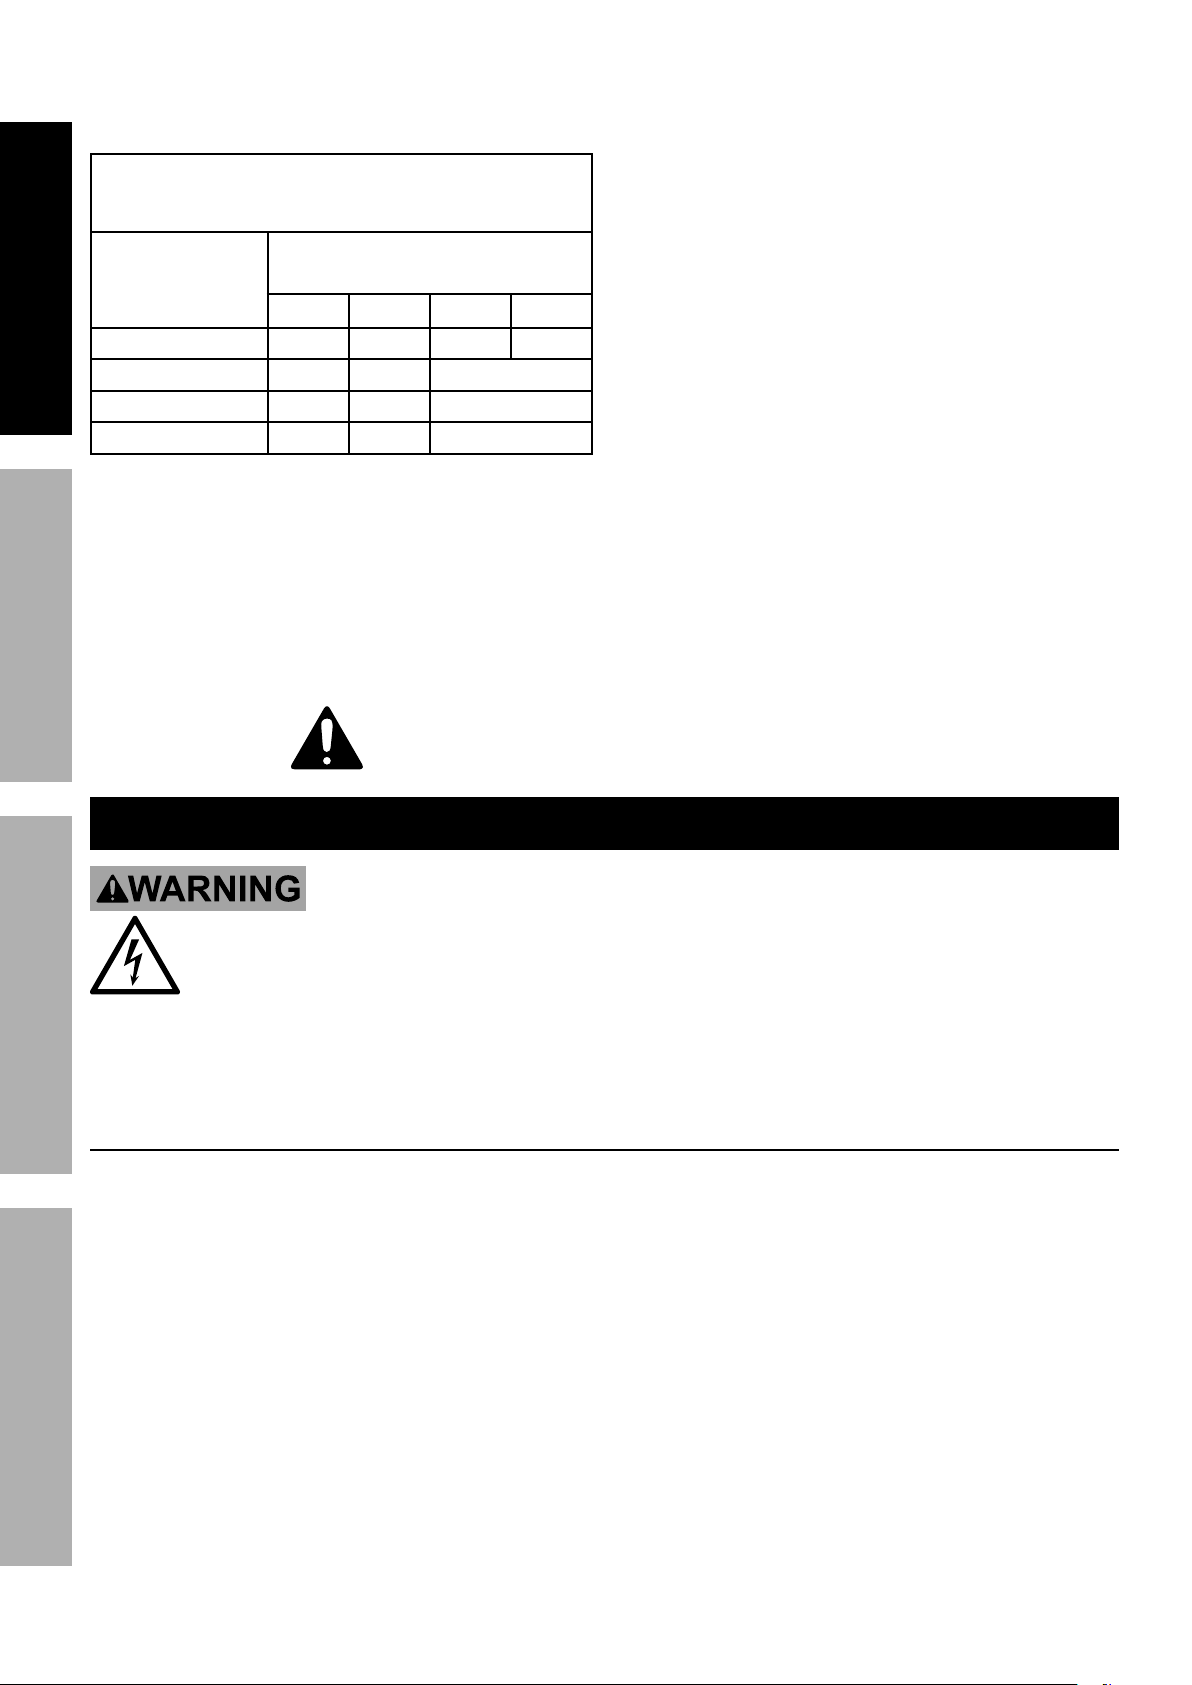
15� USE OF AN EXTENSION CORD IS NOT
RECOMMENDED� If you choose to use an
extension cord, use the following guidelines:
HGTQ;*G2**L;PJOO;NU;U*OMNMO[O*RML;*
SG[S;*@JL*;aH;NFMJN*PJLUF*
FG@;HI JK;LGHMJN OGMNH;NGNP;MNFHGQQGHMJN
NGO;KQGH;*
bC_`*&JQHc
;aH;NFMJN*PJLU*
GOK;L;F
b1)*7,<<*<+1>c
0 – 6 18 16 16 14
6�1 – 10 18 16 U+*=+)*,(/6
10�1 – 12 16 16 U+*=+)*,(/6
12�1 – 16 14 12 U+*=+)*,(/6
a� Make sure your extension cord
is in good condition�
25′ 50′ 100′ 150′
Q;NSH^
b� Be sure to use an extension cord which
is heavy enough to carry the current your
product will draw� An undersized cord will
cause a drop in line voltage resulting in loss
of power and overheating� Table A shows the
correct size to use depending on cord length
and nameplate ampere rating� If in doubt,
use the next heavier gauge� The smaller
the gauge number, the heavier the cord�
16� Industrial applications must follow OSHA guidelines�
17� Maintain labels and nameplates on the
compressor� These carry important safety
information� If unreadable or missing, contact
Harbor Freight Tools for a replacement�
18� This product is not a toy�
Keep it out of reach of children�
19� Operate unit on level surface� Check oil level
daily and fill to marked level if needed�
20� People with pacemakers should consult their
physician(s) before use� Electromagnetic fields in
close proximity to heart pacemaker could cause
pacemaker interference or pacemaker failure�
*FG&;*H^;F;*MNFHL[PHMJNF6
S-+,=>'=8
HJ*KL;&;NH*;Q;PHLMP*F^JPY*GNU*U;GH^**
@LJO*MNPJLL;PH*SLJ[NUMNS*RML;*PJNN;PHMJN2*
P3/9X*.')3*1*A,1<'7'/>*/</9)-'9'1=*'7*V+,*1-/*'=*>+,0)*1(*)+*.3/)3/-*)3/*+,)</)*'(*
4-+4/-<V*8-+,=>/>6**U+*=+)*:+>'7V*)3/*4+./-*9+->*4<,8*4-+W'>/>*.')3*)3/*9+:4-/((+-6**
N/W/-*-/:+W/*)3/*8-+,=>'=8*4-+=8*7-+:*)3/*4<,86**U+*=+)*,(/*)3/*9+:4-/((+-*'7*)3/*4+./-*9+->*+-*4<,8*
'(*>1:18/>6**M7*>1:18/>B*31W/*')*-/41'-/>*0V*1*(/-W'9/*719'<')V*0/7+-/*,(/6**M7*)3/*4<,8*.'<<*=+)*7')*)3/*+,)</)B*
31W/*1*4-+4/-*+,)</)*'=()1<</>*0V*1*A,1<'7'/>*/</9)-'9'1=6
CC`DC_`*&GP*S-+,=>/>*P+:4-/((+-(2*P+:4-/((+-(*.')3*H3-//*K-+=8*K<,8(
1� In the event of a malfunction or breakdown,
grounding provides a path of least resistance for
electric current to reduce the risk of electric shock�
This compressor is equipped with an electric
cord having an equipment-grounding conductor
and a grounding plug� The plug must be
plugged into a matching outlet that is properly
installed and grounded in accordance
with all local codes and ordinances�
2� Do not modify the plug provided –
if it will not fit the outlet, have the proper
outlet installed by a qualified electrician�
3� Improper connection of the equipment-grounding
conductor can result in a risk of electric shock�
The conductor with insulation having an outer
surface that is green with or without yellow
stripes is the equipment-grounding conductor�
If repair or replacement of the electric cord or
plug is necessary, do not connect the equipmentgrounding conductor to a live terminal�
4� Check with a qualified electrician or service
personnel if the grounding instructions are
not completely understood, or if in doubt as to
whether the compressor is properly grounded�
5� Use only 3-wire extension cords that have
3-prong grounding plugs and 3-pole receptacles
that accept the compressor’s plug�
Page 4 @+-*)/93='91<*A,/()'+=(B*4</1(/*91<<*CD###D#!!D$%E%6 Item 64857
Page 5
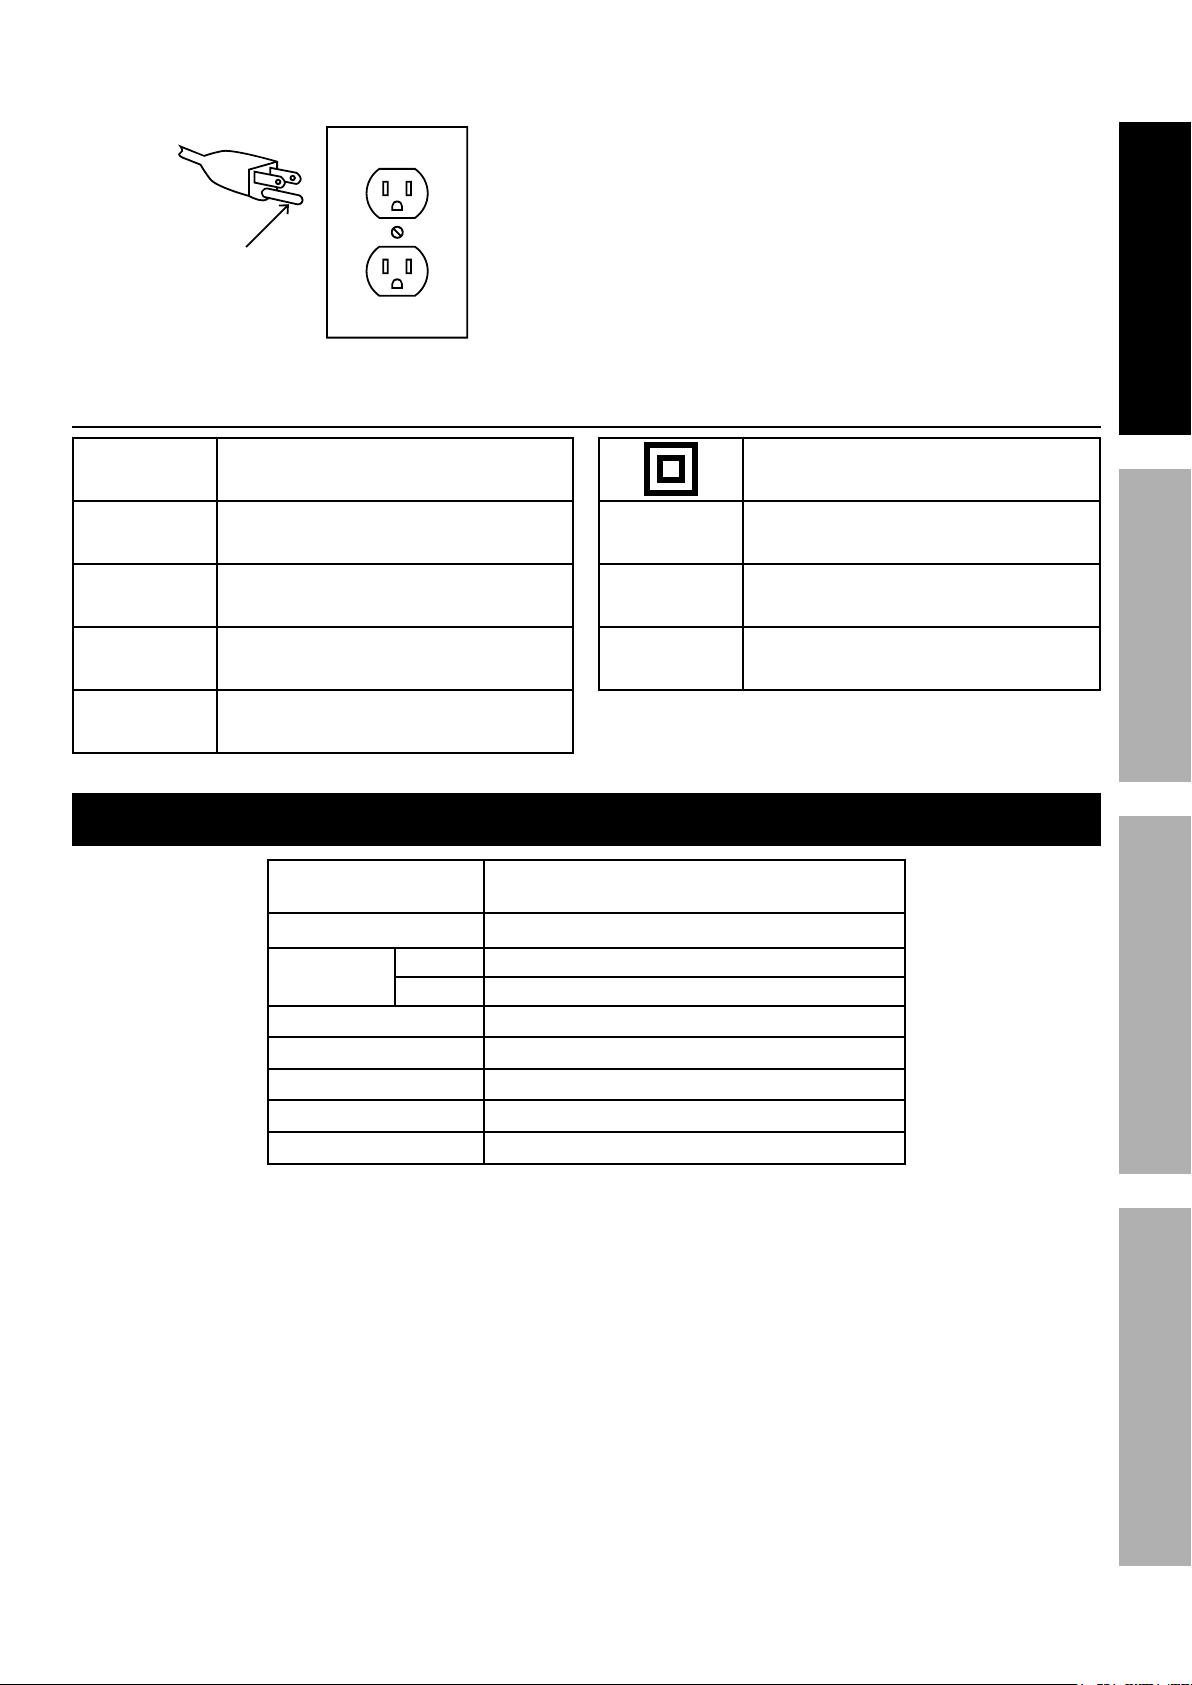
6� Repair or replace damaged or
worn cord immediately�
S-+,=>'=8*
K'=
C_$*&GP*dDK-+=8*K<,8*1=>*J,)</)
FV:0+<+8V
b7+-*,4*)+*C_$*&GP*1=>*,4*)+*C$*Gc
7� This compressor is intended for use on a
circuit that has an outlet that looks like the one
illustrated above in C_$*&GP*dDK-+=8*K<,8*
1=>*J,)</)� The compressor has a grounding
plug that looks like the plug illustrated above
in C_$*&GP*dDK-+=8*K<,8*1=>*J,)</)�
8� The outlet must be properly installed and grounded
in accordance with all codes and ordinances�
9� Do not use an adapter to connect this
compressor to a different outlet�
FG@;HIJK;LGHMJNOGMNH;NGNP; MNFHGQQGHMJN
KFM
P@O
FP@O
NKH
NKF
Pounds per square inch of pressure
Cubic Feet per Minute flow
Cubic Feet per Minute flow
at standard conditions
National pipe thread, tapered
National pipe thread, straight
F4/9'7'91)'+=(
Double Insulated
&
e
G
Electrical Rating
Air Outlet Size 1/4″ -18 NPT
Air Pressure
Air Tank Capacity 20 Gallons
Air Flow Capacity 4�0 SCFM @ 90 PSI
Sound Level 85 dBA
Oil Capacity 5�6 oz�
Oil Type SAE 30W, non-detergent, Air Compressor Oil
Shut-off 135 PSI
Restart 105 PSI
120VAC / 60Hz / 14A
(Dedicated circuit recommended)
Volts
Alternating Current
Amperes
Page 5@+-*)/93='91<*A,/()'+=(B*4</1(/*91<<*CD###D#!!D$%E%6Item 64857
Page 6
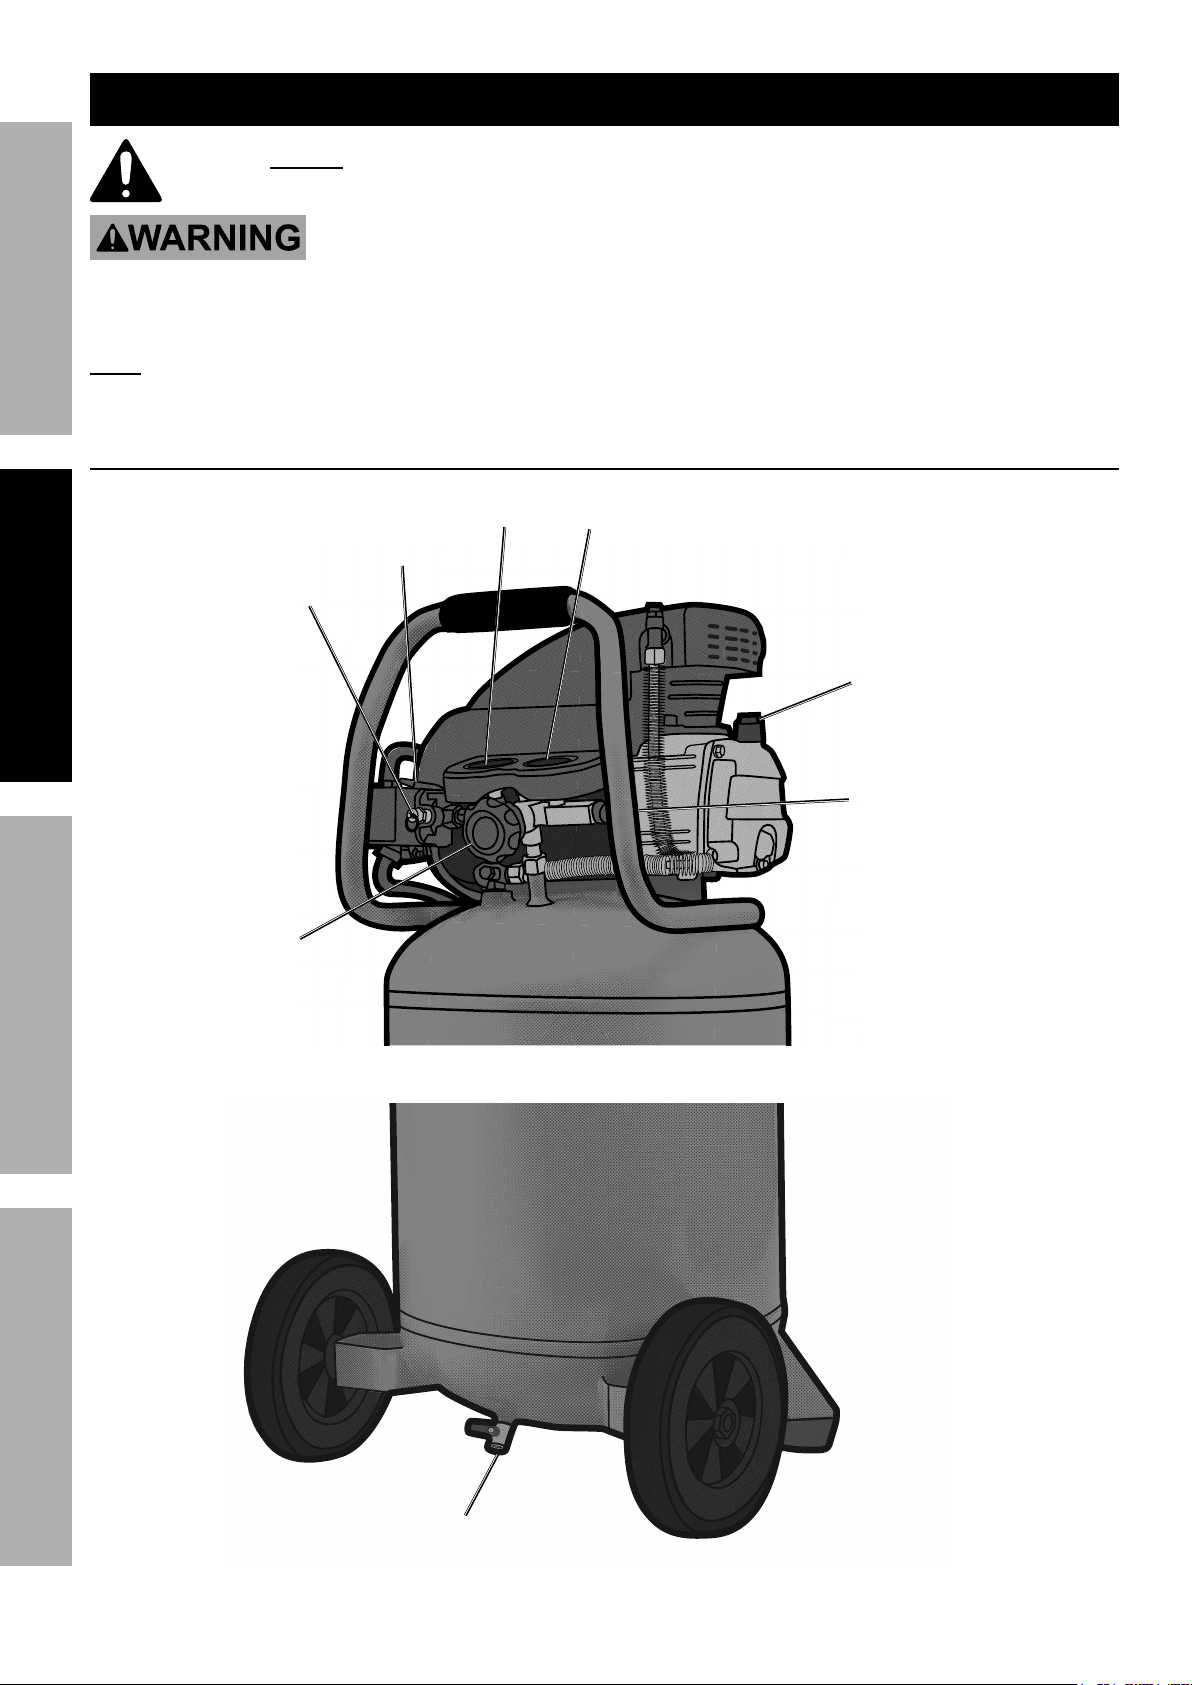
*M=()1<<1)'+=
* L/1>*)3/*;NHML;*MOKJLHGNH*FG@;HI*MN@JLOGHMJN*(/9)'+=*1)*)3/*0/8'=='=8*+7*)3'(*
:1=,1<*'=9<,>'=8*1<<*)/Z)*,=>/-*(,03/1>'=8(*)3/-/'=*0/7+-/*(/)*,4*+-*,(/*+7*)3'(*4-+>,9)6
FG@;HI JK;LGHMJN OGMNH;NGNP;MNFHGQQGHMJN
HJ*KL;&;NH*F;LMJ[F*MNf[LI*@LJO*GPPMU;NHGQ*JK;LGHMJN2
H,-=*)3/*K+./-*F.')93*gJ@@h*1=>*,=4<,8*)3/*G'-*P+:4-/((+-*7-+:*')(*/</9)-'91<*
+,)</)*0/7+-/*1((/:0<'=8*+-*:1X'=8*1=V*1>\,():/=)(*)+*)3/*9+:4-/((+-6
N+)/2 For additional information regarding the parts listed in the following pages,
refer to the Assembly Diagram near the end of this manual�
@,=9)'+=(
F17/)V*
&1<W/
L/8,<1)+-
K+./-*
F.')93
H1=X*
S1,8/
J,)</)*
S1,8/
J'<*
T-/1)3/-
G'-*J,)</)*
b0/3'=>*
^1=></c
U-1'=*
&1<W/
Page 6 @+-*)/93='91<*A,/()'+=(B*4</1(/*91<<*CD###D#!!D$%E%6 Item 64857
Page 7
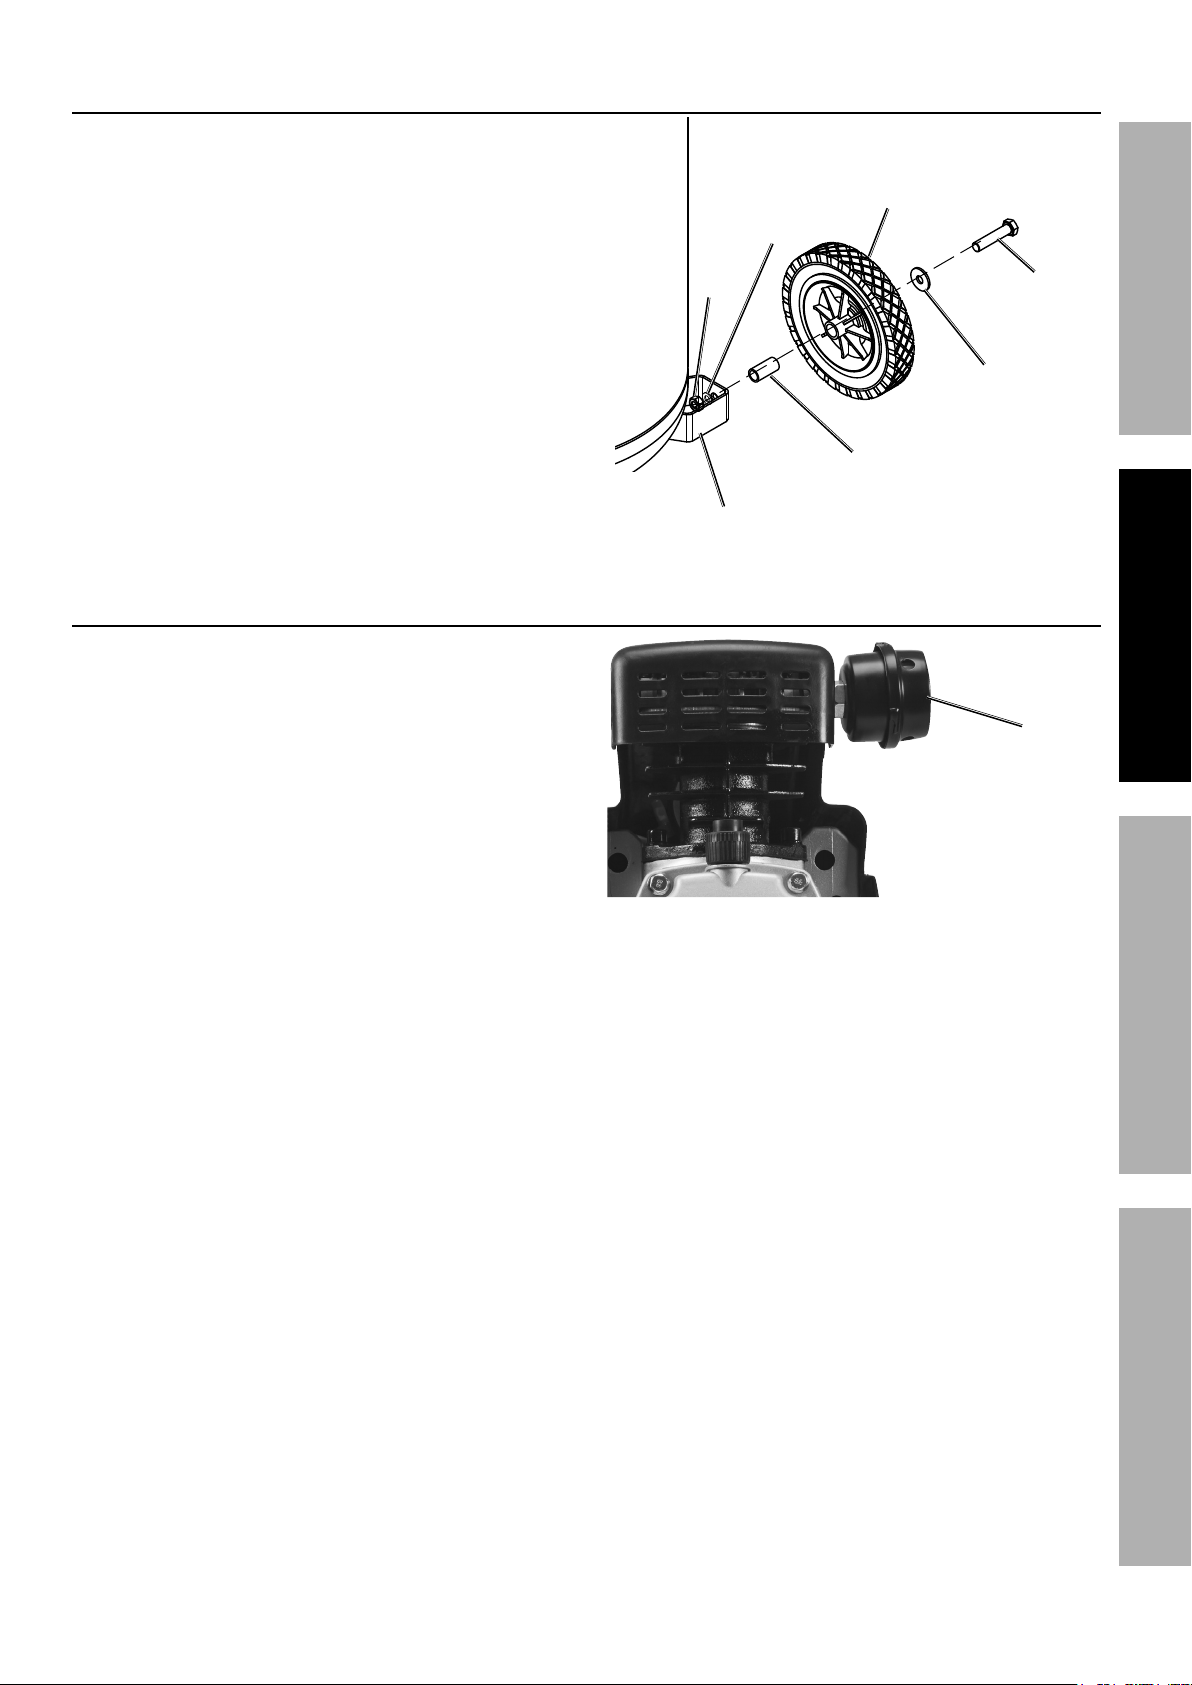
G))193*R3//<(
Attach the Wheels to the brackets on the Tank,
using Bolts (96), Washers (95), Sleeves (97),
Spring Washers (98) and Nuts (99)�
M=()1<<*G'-*@'<)/-
Thread the Air Filter onto the side of
the Pump/Motor Assembly�
F4-'=8*
R1(3/-
N,)*
bEEc
0-19X/)
+=*H1=X
R3//<
bE#*c
T+<)*
bE!c
FG@;HIJK;LGHMJNOGMNH;NGNP; MNFHGQQGHMJN
R1(3/-*
bE$c
F<//W/
bE%c
G'-*
@'<)/-
Page 7@+-*)/93='91<*A,/()'+=(B*4</1(/*91<<*CD###D#!!D$%E%6Item 64857
Page 8
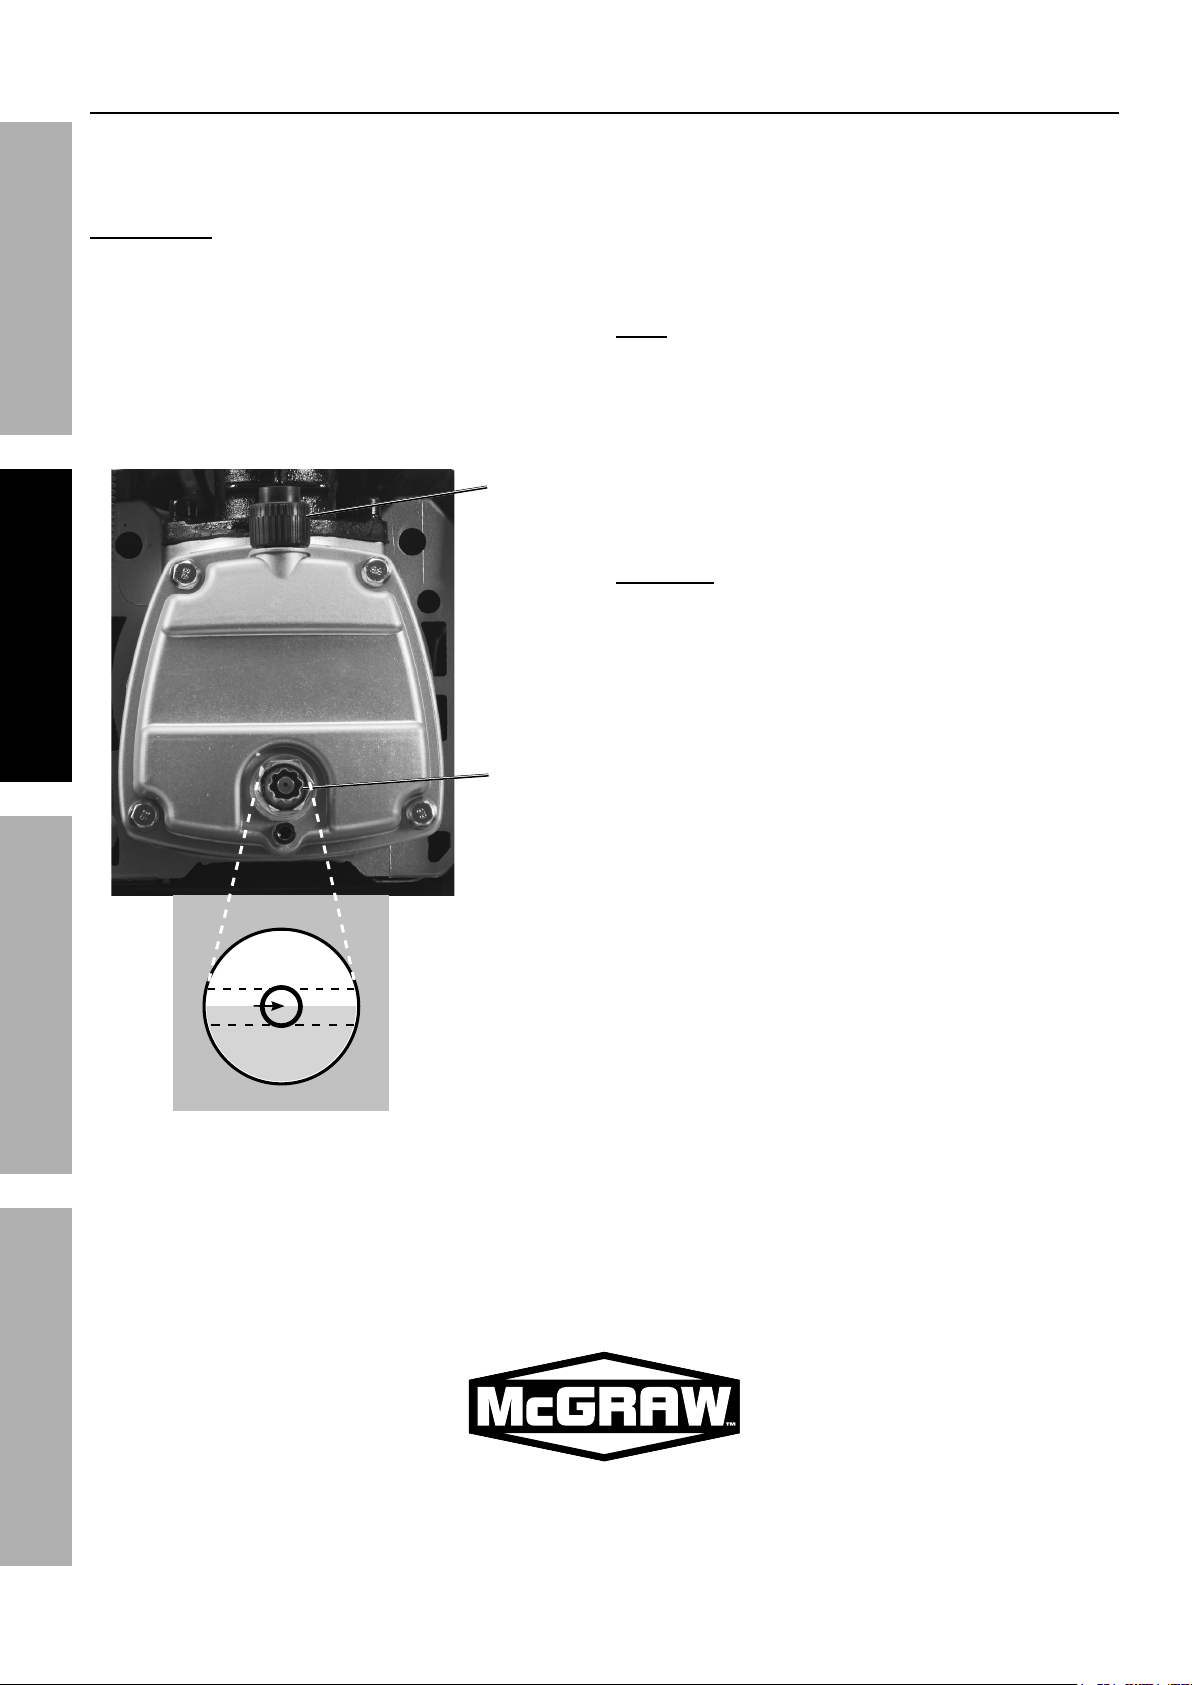
P3/9X'=8*)3/*J'<
1� Check the oil level before operation�
Fill the Pump Crankcase with included
SAE 30W, non-detergent, Air Compressor Oil�
FG@;HI JK;LGHMJN OGMNH;NGNP;MNFHGQQGHMJN
MOKJLHGNH2 L,=='=8*)3/*G'-*P+:4-/((+-*
.')3*=+*+'<*+-*<+.*+'<*.'<<*91,(/*>1:18/*)+*
)3/*/A,'4:/=)*1=>*W+'>*)3/*.1--1=)V6
2� The oil level should be at the center of the “full” level
on the Oil Sight Glass�
Add oil as needed to maintain this level�
Do not let the oil level go below
the center dot and do not overfill the oil
so that it is above the center dot�
J'<*
T-/1)3/-
3� To add oil:
a� Remove the Oil Breather�
b� Using a funnel to avoid spills, pour enough
oil into the Pump Crankcase to reach
the “full” level in the Oil Sight Glass�
c� Replace the Oil Breather�
N+)/2 SAE 30W, non-detergent,
Air Compressor Oil (sold separately) is
recommended for use with this compressor�
4� If uncertain which oil to use for this compressor,
call Harbor Freight Tools customer service
at 1-888-866-5797 for assistance�
5� P31=8/*)3/*9+:4-/((+-*+'<*17)/-*)3/*7'-()*
3+,-*+7*,(/*)+*-/:+W/*1=V*>/0-'(6
PG[HMJNi*HJ*KL;&;NH*MNf[LI*@LJO*T[LNF2**
U+*=+)*1>>*+-*931=8/*)3/*+'<*.3'</*
)3/*9+:4-/((+-*'(*'=*+4/-1)'+=6**
G<<+.*)3/*9+:4-/((+-*)+*9++<*0/7+-/*-/4<19'=8*+'<6
J&;L@MQQ
@[QQ
J'<*
F'83)*
S<1((
QJR
Page 8 @+-*)/93='91<*A,/()'+=(B*4</1(/*91<<*CD###D#!!D$%E%6 Item 64857
Page 9

T-/1X'=8*'=*)3/*P+:4-/((+-
1� Turn the Power Switch OFF and unplug Power Cord�
2� Fully open Drain Valve�
3� Plug in the Power Cord�
4� Turn the Power Switch ON�
G'-*P+==/9)'+=*F/),4
1� Connect a regulator valve, an inline shut off valve
and a 1/4″ NPT air hose to the Quick Coupler
(all sold separately)� The air hose must be long
enough to reach the work area with enough extra
length to allow free movement while working�
N+)/2 G=*'=D<'=/*(3,)+77*01<<*W1<W/*'(*1=*':4+-)1=)*
(17/)V*>/W'9/*0/91,(/*')*9+=)-+<(*)3/*1'-*(,44<V*/W/=*
'7*)3/*1'-*3+(/*'(*-,4),-/>6**H3/*(3,)+77*W1<W/*(3+,<>*
0/*1*01<<*W1<W/*0/91,(/*')*91=*0/*9<+(/>*A,'9X<V6
5� Let the unit run for 30 minutes�
Air will expel freely through the Drain Valve�
6� Turn the Power Switch OFF�
7� Unplug the Power Cord and close Drain Valve�
FG@;HIJK;LGHMJNOGMNH;NGNP; MNFHGQQGHMJN
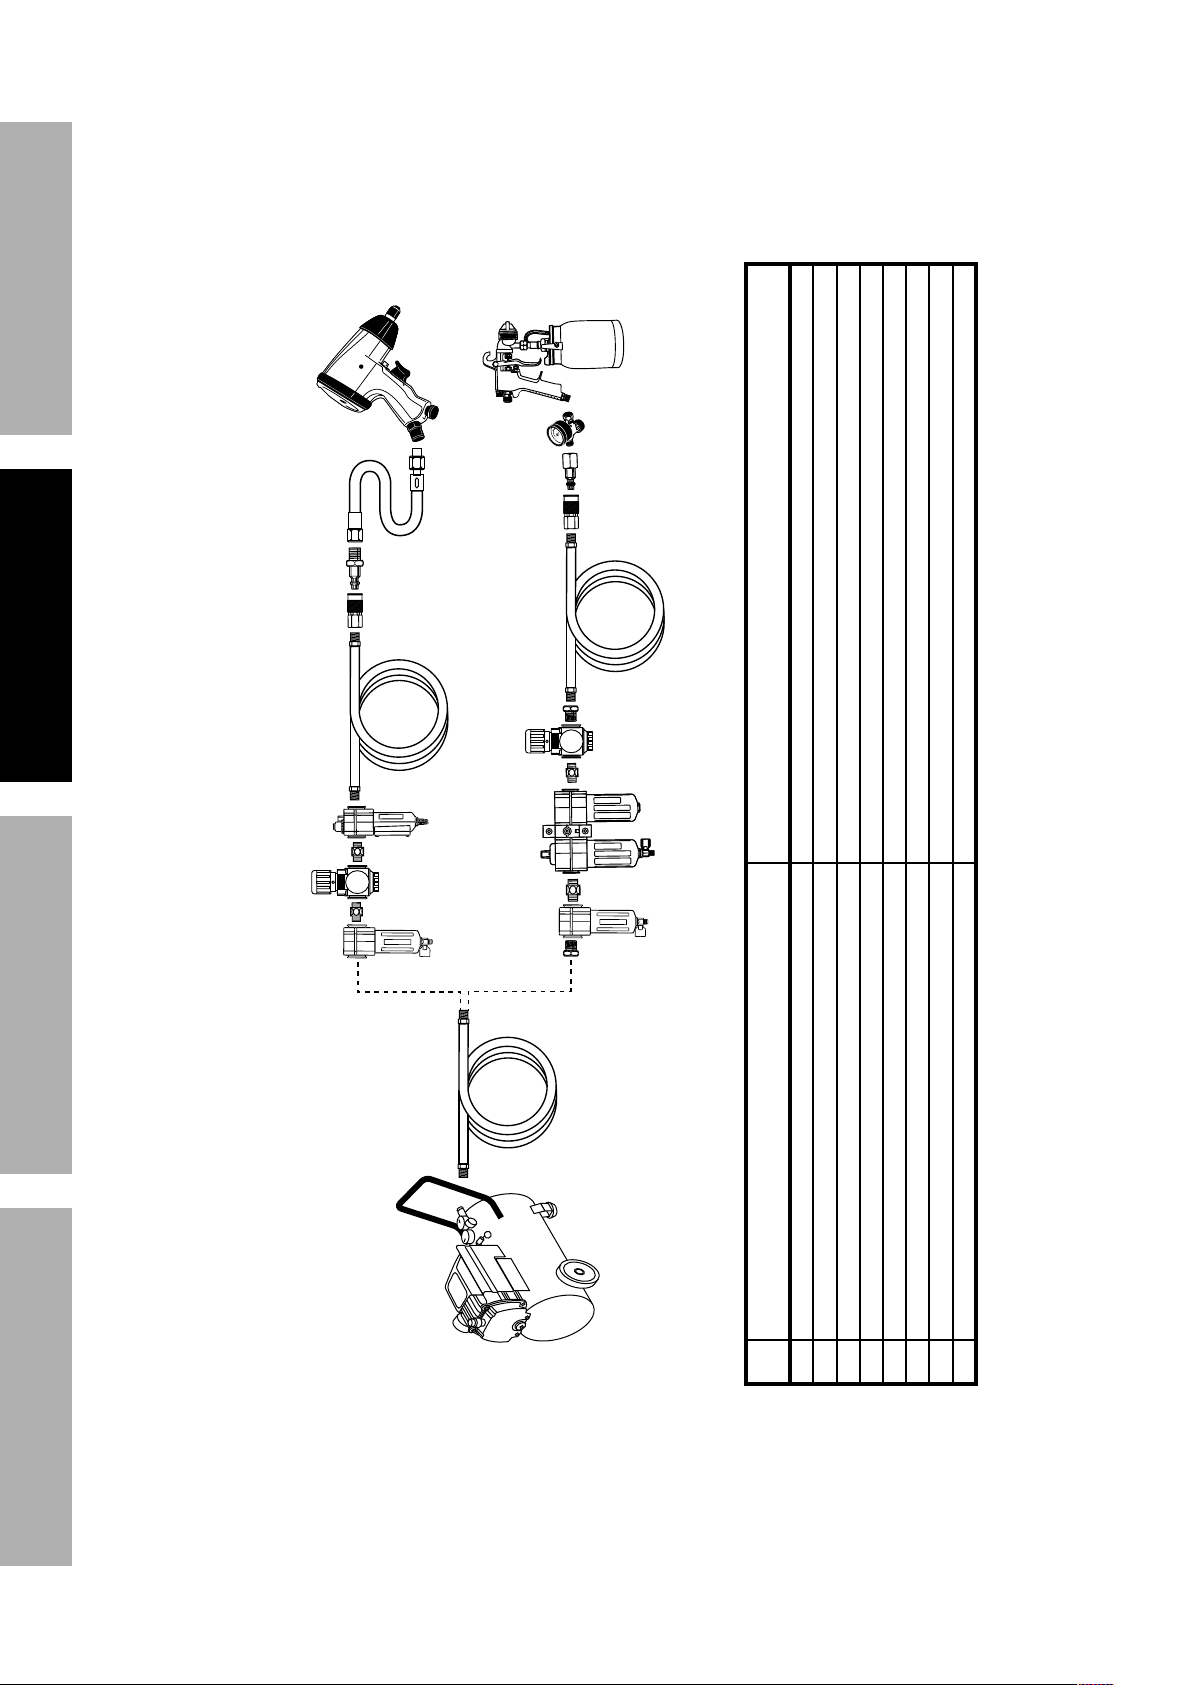
2� Depending on the tool that will be used
with this compressor, incorporate additional
components, such as an in-line oiler, a filter,
or a dryer (all sold separately), as shown on
Figure A on page 10 and Figure B on page 11�
Consult air tool’s manual for needed accessories�
Page 9@+-*)/93='91<*A,/()'+=(B*4</1(/*91<<*CD###D#!!D$%E%6Item 64857
Page 10
FG@;HI JK;LGHMJN OGMNH;NGNP;MNFHGQQGHMJN
$
"
9
%
#
#
"
9
:
&
@'8,-/*G2**K+-)10</*G'-*F,44<V*F/),4
8,-./012345
6((+7
"
!
&
'()*+,-./0123455
6((+7
U/(9-'4)'+= @,=9)'+=
A Air Hose Connects air to tool
B Filter Prevents dirt and condensation from damaging tool or workpiece
C Regulator Adjusts air pressure to tool
F Leader Hose (optional) Increases coupler life
E Coupler and Plug Provides quick connection and release
D Lubricator (optional) For air tool lubrication
H Air Adjusting Valve (optional) For fine tuning airflow at tool
G Air Cleaner / Dryer (optional) Prevents water vapor from damaging workpiece
Page 10 @+-*)/93='91<*A,/()'+=(B*4</1(/*91<<*CD###D#!!D$%E%6 Item 64857
Page 11
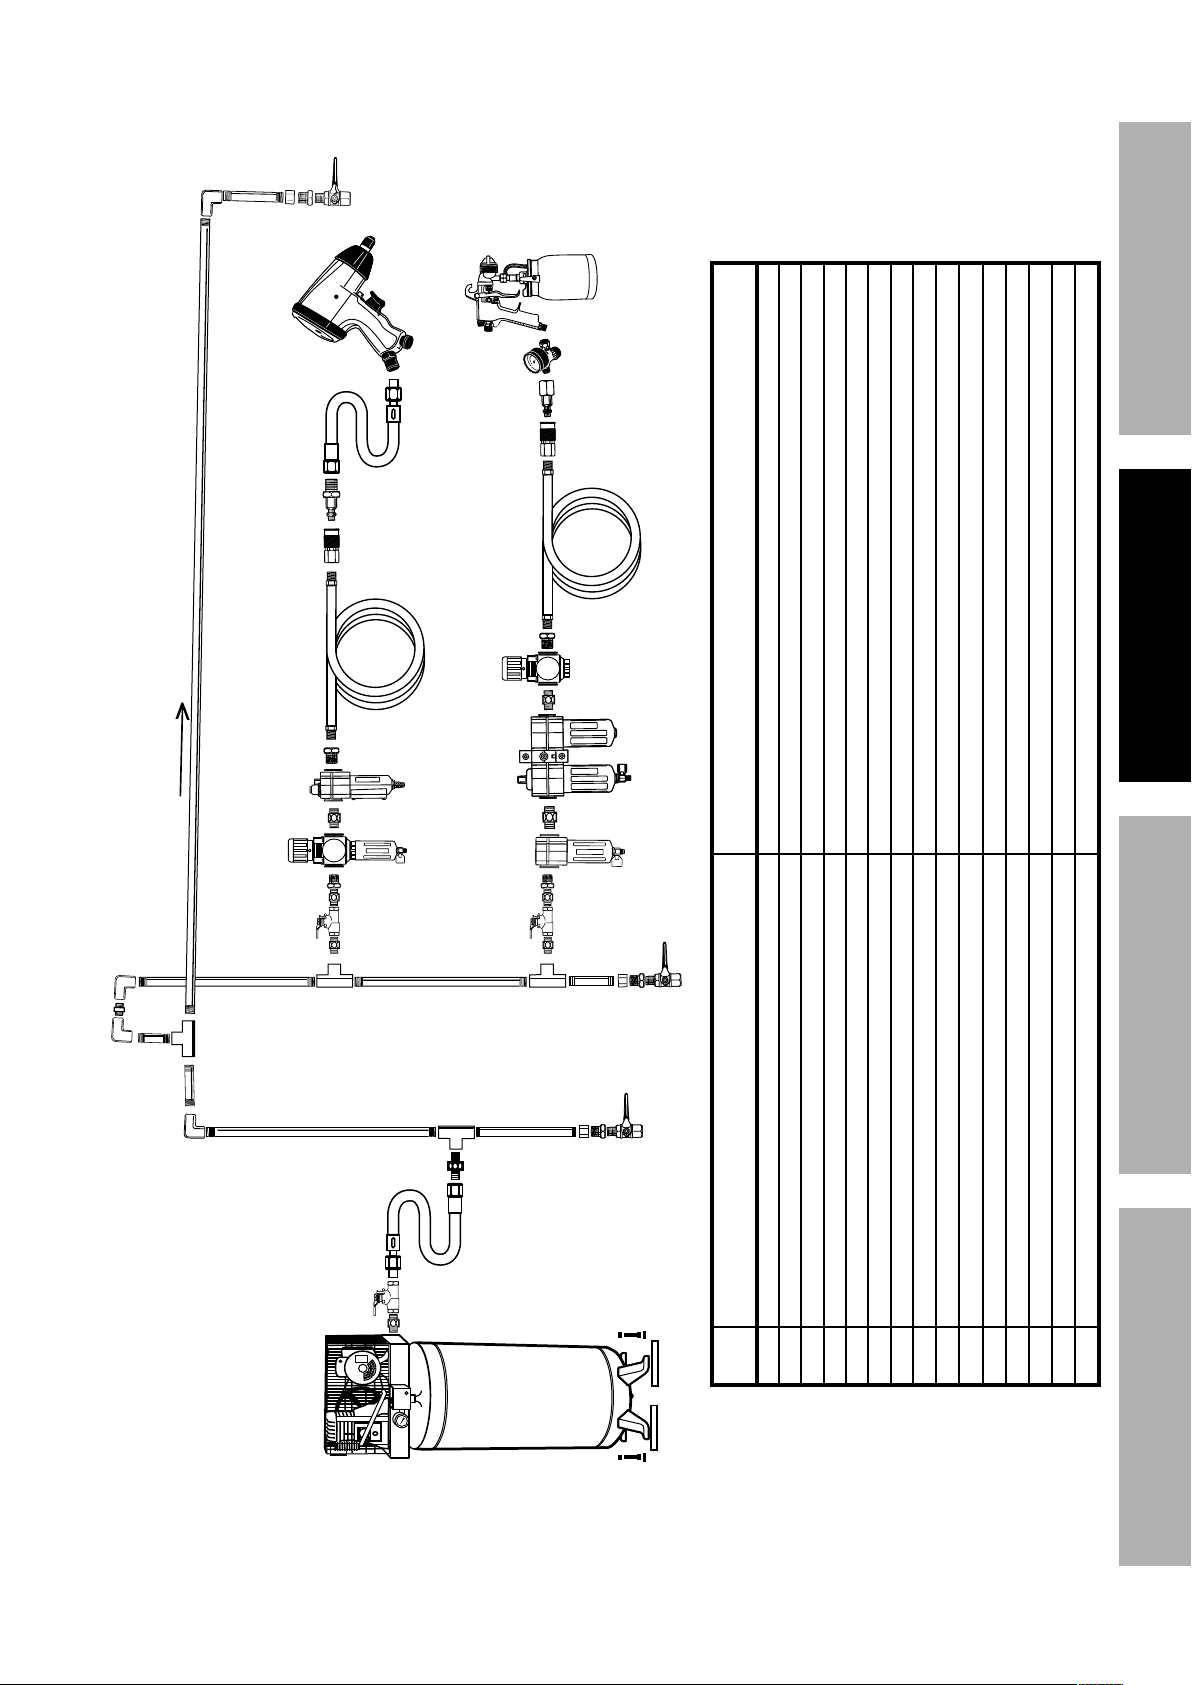
!'()*+,-./0123%4''*5
6
:
:
?
$%%%
"
FG@;HIJK;LGHMJNOGMNH;NGNP; MNFHGQQGHMJN
" #
=*'>2
@'8,-/*T2**F)1)'+=1-V*G'-*F,44<V*F/),4
6
9
8
&
"+,-./0123%
4''*5
;
<
A%
8
!
7
7
&
:
U/(9-'4)'+= @,=9)'+=
&
?
@
I Filter Prevents dirt and condensation from damaging tool or workpiece
J Regulator Adjusts air pressure to tool
A Vibration Pads For noise and vibration reduction
B Anchor Bolts Secures air compressor in place
C Ball Valve Isolates sections of system for maintenance
F Ball Valve To drain moisture from system
E Main Air Line - 3/4″ minimum recommended Distributes air to branch lines
D Isolation Hose For vibration reduction
H Air Hose Connects air to tool
G Branch Air Line -1/2″ minimum recommended Brings air to point of use
L Coupler and Plug Provides quick connection and release
K Lubricator (optional) For air tool lubrication
N Air Cleaner / Dryer (optional) Prevents water vapor from damaging workpiece
O Air Adjusting Valve (optional) For fine tuning airflow at tool
M Leader Hose (optional) Increases coupler life
Page 11@+-*)/93='91<*A,/()'+=(B*4</1(/*91<<*CD###D#!!D$%E%6Item 64857
Page 12
J4/-1)'=8*M=()-,9)'+=(
*L/1>*)3/*;NHML;*MOKJLHGNH*FG@;HI*MN@JLOGHMJN*(/9)'+=*1)*)3/*0/8'=='=8*+7*)3'(*
:1=,1<*'=9<,>'=8*1<<*)/Z)*,=>/-*(,03/1>'=8(*)3/-/'=*0/7+-/*(/)*,4*+-*,(/*+7*)3'(*4-+>,9)6
FG@;HI JK;LGHMJN OGMNH;NGNP;MNFHGQQGHMJN
P+:4-/((+-*G-/1*F/)*[4
1� Designate a work area that is clean and well-lit�
The work area must not allow access by
children or pets to prevent injury�
2� Locate the Compressor on a flat level surface to
ensure proper pump lubrication and to prevent
damage to the unit. Keep at least 12″ of space
around the unit to allow air circulation�
S/=/-1<*J4/-1)'+=
1� Close the Drain Valve�
2� Check for oil leaks and check the oil level
(See Checking the Oil on page 8)�
3� Close the in-line Shutoff Valve between
the compressor and the air hose�
4� Plug the Power Cord into a grounded
120 VAC electrical outlet�
5� Pull the ring on Safety Valve to release pressure�
6� Turn the Power Switch to AUTO�
7� Allow the Air Compressor to build
up pressure until it cycles off�
N+)/2 At the beginning of the day’s first use
of the Air Compressor, check for air leaks by
applying soapy water to connections while the
Air Compressor is pumping and after pressure cutout� Look for air bubbles� If air bubbles are present
at connections, tighten connections� Do not use the
Air Compressor unless all connections are air tight,
the extra air leaking out will cause the compressor to
operate too often, increasing wear on the compressor�
N+)/2 As long as the Power Switch is ON, the operation
of the Air Compressor is automatic, controlled by an
internal pressure switch� The Compressor will turn on
automatically when the air pressure drops to 105 PSI,
and will turn off automatically when the
air pressure reaches 135 PSI�
3� Route the power cord from the compressor
to the grounded wall outlet, along a safe path
without creating a tripping hazard or exposing
the power cord to possible damage�
RGLNMNSi*HJ*KL;&;NH*F;LMJ[F*
MNf[LI*GNU*U;GH^*@LJO*
;aKQJFMJN2
U+*=+)*1>\,()*)3/*'=)/-=1<*
4-/((,-/*(.')936**Any change to the
automatic pressure levels may cause excess pressure to
accumulate, causing a hazardous situation�
8� Adjust the Regulator so that the air output is
enough to properly power the tool, but the output
will not exceed the tool’s maximum air pressure
at any time� Turn the knob clockwise to increase
the pressure and counter-clockwise to decrease
pressure� Adjust the pressure gradually, while
checking the air output gauge to set the pressure�
9� Make sure the air tool’s throttle or switch is in the
off position� Connect the air tool to the air hose�
10� Open the in-line Shutoff Valve�
11� Use the air tool as needed�
12� After the job is complete, turn the Power Switch OFF�
13� Unplug the Air Compressor�
14� Close the in-line Shutoff Valve�
15� Bleed air from the tool then disconnect the tool�
16� Drain Tank according to ;W/-V*!*:+=)3(*+-*
C``*J4/-1)'+=*^+,-(2*+=*418/*C"6
17� Clean, then store the Air Compressor indoors�
Page 12 @+-*)/93='91<*A,/()'+=(B*4</1(/*91<<*CD###D#!!D$%E%6 Item 64857
Page 13

;:/-8/=9V*U/4-/((,-'j1)'+=
If it is necessary to quickly depressurize the Compressor, turn the Power Switch OFF�
Then, pull on the ring on the Safety Valve to quickly release stored air pressure�
G,)+:1)'9*F3,)*+77*FV()/:
1� If the Compressor automatically shuts off
before reaching its normal cutoff pressure:
a� Shut off all tools�
b� Turn Power Switch OFF
c� Unplug Compressor�
d� Wait until the Compressor cools down
(about 10 minutes);
e� Plug in Compressor�
f� Turn Power Switch ON�
g� Resume operation�
2� Possible causes of repeated automatic
shut off of the compressor are:
a� Using an extension cord that
is too long or narrow;
b� An air leak or open hose causing the compressor
to cycle too often and build up heat�
c� Turning Air Compressor off and
on again too quickly�
3� Correct any issues before further use to
avoid damage to the compressor�
FG@;HIJK;LGHMJNOGMNH;NGNP; MNFHGQQGHMJN
Page 13@+-*)/93='91<*A,/()'+=(B*4</1(/*91<<*CD###D#!!D$%E%6Item 64857
Page 14
O1'=)/=1=9/*1=>*F/-W'9'=8
*K-+9/>,-/(*=+)*(4/9'7'91<<V*/Z4<1'=/>*'=*)3'(*:1=,1<*:,()*
0/*4/-7+-:/>*+=<V*0V*1*A,1<'7'/>*)/93='9'1=6
FG@;HI JK;LGHMJN OGMNH;NGNP;MNFHGQQGHMJN
HJ*KL;&;NH*F;LMJ[F*MNf[LI*@LJO*GPPMU;NHGQ*JK;LGHMJN2*
H,-=*)3/*K+./-*F.')93*gJ@@h*1=>*,=4<,8*)3/*P+:4-/((+-*7-+:*')(*/</9)-'91<*+,)</)*
0/7+-/*4/-7+-:'=8*1=V*'=(4/9)'+=B*:1'=)/=1=9/B*+-*9</1='=8*4-+9/>,-/(6
HJ*KL;&;NH*F;LMJ[F*MNf[LI*@LJO*PJOKL;FFJL*@GMQ[L;2*
U+*=+)*,(/*>1:18/>*/A,'4:/=)6**M7*10=+-:1<*=+'(/*+-*W'0-1)'+=*+99,-(B*
31W/*)3/*4-+0</:*9+--/9)/>*0/7+-/*7,-)3/-*,(/6
P</1='=8B*O1'=)/=1=9/B*1=>*Q,0-'91)'+=
1� T;@JL;*;GP^*[F;B inspect the general
condition of the air compressor� Check for:
• loose hardware,
• misalignment or binding of moving parts,
• cracked or broken parts,
• damaged electrical wiring, and
• any other condition that may
affect its safe operation�
2� G@H;L*[F;B wipe external surfaces of
the compressor with a clean cloth�
3� RGLNMNSi**M7*)3/*(,44<V*9+->*+7*)3'(*
9+:4-/((+-*'(*>1:18/>B*')*:,()*0/*-/4<19/>*
+=<V*0V*1*A,1<'7'/>*(/-W'9/*)/93='9'1=6
O1'=)/=1=9/*F93/>,</
Following are general guidelines for maintenance checks of the Air Compressor�
N+)/2 The environment in which the compressor is used, and the frequency of use will affect how often
you will need to check the Air Compressor components and perform maintenance procedures�
U1'<V2
a� Check oil level�
b� Check for oil leaks�
c� Make sure all nuts and bolts are tight�
d� Drain moisture from air tank�
e� Check for abnormal noise or vibration�
f� Check for air leaks�
g� Wipe off any oil or dirt from the compressor�
*
**
R//X<V2
a� Inspect Air Filter�
b� Inspect Oil Breather�
O+=)3<V2
Inspect Safety Valve�
;W/-V*!*:+=)3(*+-*C``*J4/-1)'+=*^+,-(2
Replace Pump oil�***
* To check for air leaks, apply soapy water to joints while
the Air Compressor is pressurized� Look for air bubbles�
** To clean the compressor surface, wipe with
a damp cloth, using a mild detergent or mild solvent�
Page 14 @+-*)/93='91<*A,/()'+=(B*4</1(/*91<<*CD###D#!!D$%E%6 Item 64857
*** Use SAE 30W, non-detergent,
Air Compressor Oil only (sold separately)�
Page 15

J'<*O1'=)/=1=9/
Check the oil periodically for clarity� Replace oil if it appears milky or if debris is present,
or every 6 months, or 100 operation hours, whichever comes first�
Replace the oil more frequently if compressor is used in harsh environments such as high heat or high humidity�
PG[HMJNi**HJ*KL;&;NH*MNf[LI*@LJO*T[LNF2*
G<<+.*G'-*P+:4-/((+-*)+*9++<*0/7+-/*931=8'=8*)3/*+'<6
1� Place a container under the Oil Drain Bolt�
2� Remove the Oil Breather to allow
air flow into the Pump�
3� Remove the Oil Drain Bolt, allowing
the oil to drain into the container�
4� When the oil is completely drained from the Pump,
replace the Oil Drain Bolt�
5� Fill the Pump with new SAE 30W, non-detergent,
Air Compressor Oil to the FULL level
on the Oil Sight Glass (5�6 oz�)�
6� Replace and tighten the Oil Breather�
7� Discard the old oil according to local,
state and federal regulations�
U-1'='=8*O+'(),-/*7-+:*)3/*H1=X
The Moisture Drain is located under the Tank� It must be used daily to release all trapped air and
moisture from the Tank� Doing this will eliminate condensation and prevent tank corrosion�
1� Turn the Power Switch off�
2� Place a collection pan under the Drain Valve�
3� Turn the Drain Valve to open it� Tilt
Compressor forward to drain�
4� When all the pressure and moisture are released,
close the Drain Valve�
G'-*@'<)/-*O1'=)/=1=9/
Check the Air Filter weekly to see if it needs replacement�
Replace the filter more often if compressor is used in dirty environments�
FG@;HIJK;LGHMJNOGMNH;NGNP; MNFHGQQGHMJN
1� Remove the Cover�
2� Remove the Air Filter�
3� Replace with a new Air Filter�
4� Replace the Cover�
Page 15@+-*)/93='91<*A,/()'+=(B*4</1(/*91<<*CD###D#!!D$%E%6Item 64857
Page 16
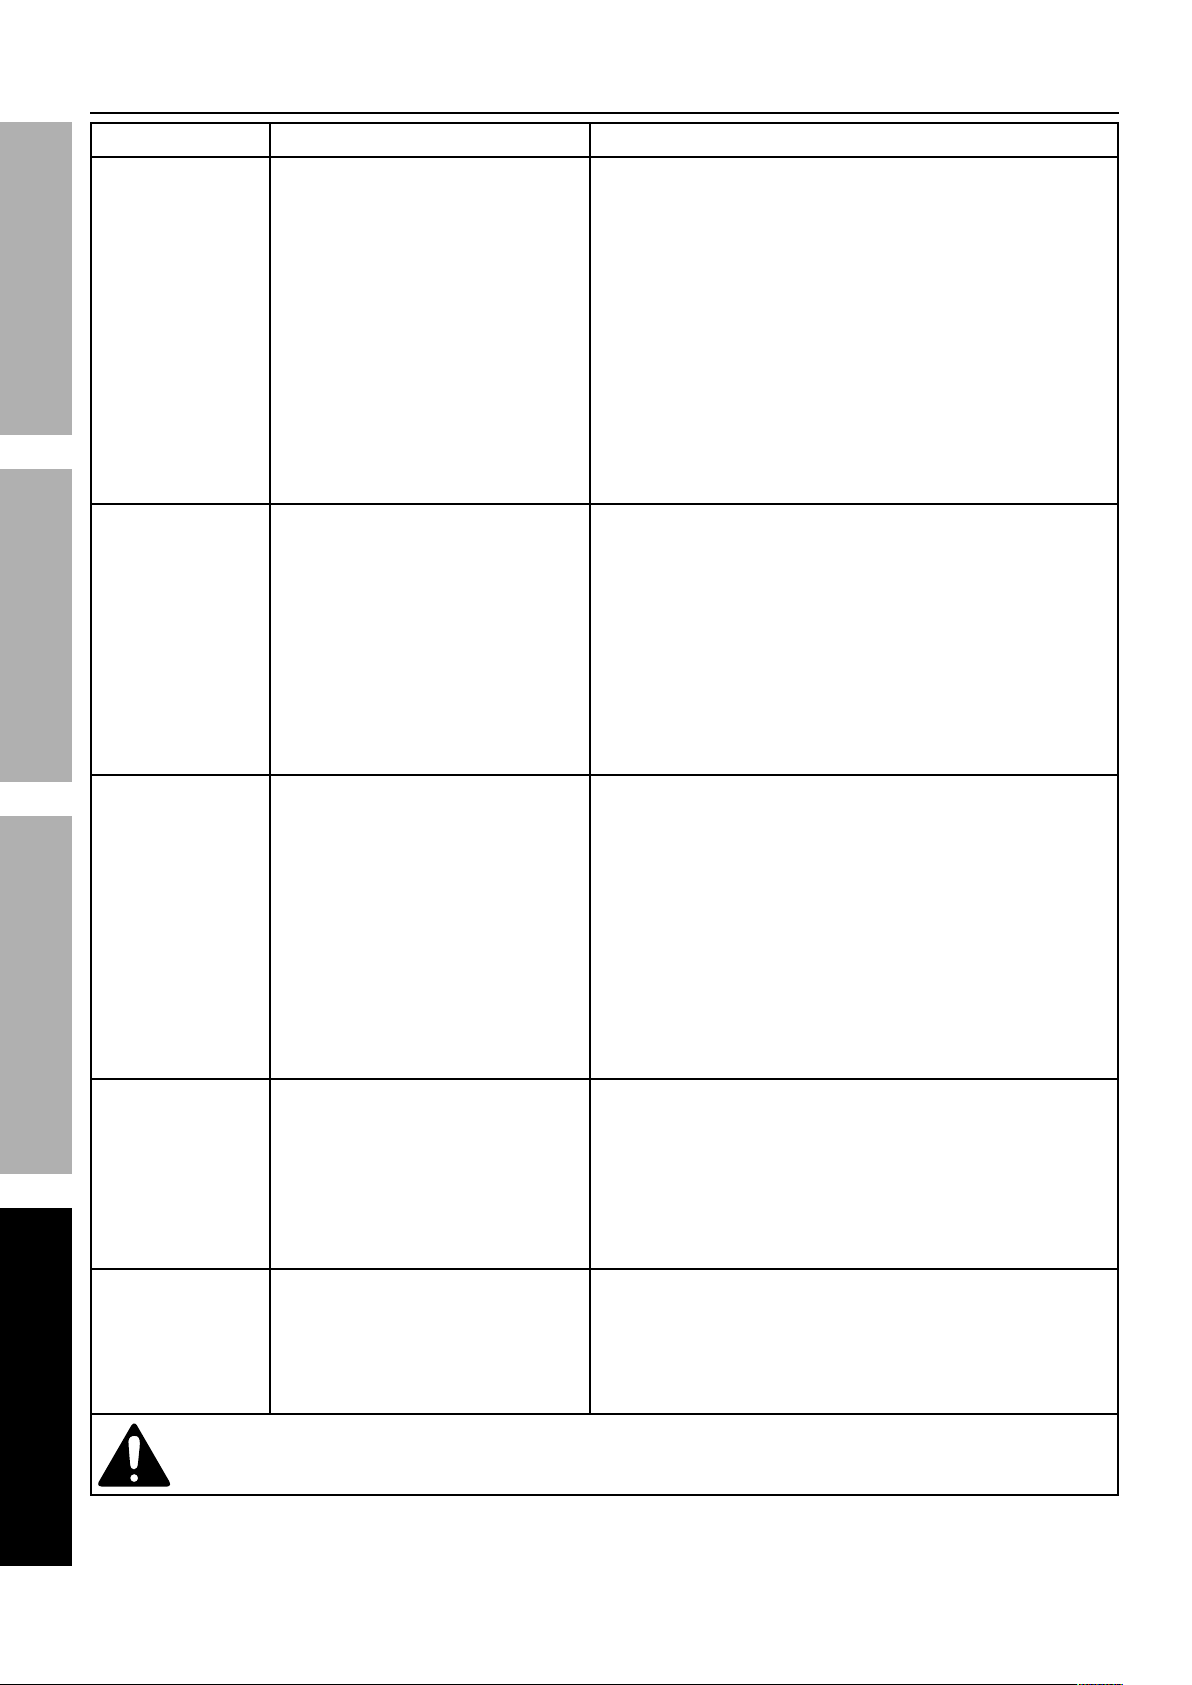
H-+,0</(3++)'=8
K-+0</: K+(('0</*P1,(/( Q'X/<V*F+<,)'+=(
Compressor does
not start or restart
FG@;HI JK;LGHMJN OGMNH;NGNP;MNFHGQQGHMJN
Compressor builds
pressure too slowly
Compressor not
building enough
air pressure
Overheating 1� Air filter needs cleaning�
Compressor
starts and stops
excessively
1� Tank(s) already pressurized�
2� Power cord not plugged
in properly�
3� Incorrect power supply�
4� No power at outlet�
5� Building power supply circuit
tripped or blown fuse�
6� Cord wire size is too small or
cord is too long to properly
power compressor�
7� Compressor needs service�
1� Incorrect power supply�
2� Crankcase oil overfilled
or oil too thick�
3� Working environment too cold�
4� Safety valve leaking�
5� Loose fittings�
1� Air filter needs cleaning�
2� Check Valve needs service�
3� Compressor not large enough for
job�
4� Loose fittings�
5� Hose or hose connections
too narrow�
6� Crankcase oil too thick�
7� High altitude reducing air output�
2� Crankcase oil too thin
or incorrect type�
3� Crankcase oil level too low�
4� Unusually dusty environment�
5� Extension cord used�
6� Unit not on level surface�
1� Loose fittings�
2� Compressor not large
enough for job�
1� No problem� Compressor will start when needed�
2� Check that cord is plugged in securely�
3� Check that circuit matches compressor requirements�
4� Reset circuit breaker, or have outlet
serviced by a qualified technician�
5� Reset circuit or replace fuse� Check for low voltage
conditions� It may be necessary to disconnect
other electrical appliances from the circuit or
move the compressor to its own circuit�
6� Use larger diameter or shorter extension cord or
eliminate extension cord� See Recommended Wire
Gauge for Extension Cords in Safety section�
7� Have unit inspected by a qualified technician�
1� Check that circuit matches compressor requirements�
2� Drain oil and refill to proper level with recommended oil�
3� Move compressor to a warmer location�
Check that recommended oil is in crankcase�
4� Listen for air leaking from valve�
If leaking, replace with identical valve with same rating�
UJ*NJH*F;GQ*JL*HGOK;L*RMH^*FG@;HI*&GQ&;6
5� Reduce air pressure, then check all fittings
with a soap solution for air leaks and tighten
as needed� Do not overtighten�
1� Check air filter and clean as needed�
2� Have technician clean or replace, as needed�
3� Check if accessory CFM is met by Compressor�
If Compressor cannot supply enough
air flow (CFM), use a larger Compressor�
4� Reduce air pressure, then check all fittings
with a soap solution for air leaks and tighten
as needed� Do not overtighten�
5� Replace with wider hose and/or hose connections�
6� Drain oil and refill to proper level with recommended oil�
7� Higher altitudes require compressors with greater output�
1� Check air filter and clean as needed�
2� Drain oil and refill to proper level with recommended oil�
3� Add oil to proper level, check for leaks�
4� Clean filter more often or move unit to cleaner environment�
5� Eliminate extension cord�
6� Reposition unit on a level surface�
1� Reduce air pressure, then check all fittings
with a soap solution for air leaks and tighten
as needed� Do not overtighten�
2� Check if accessory CFM is met by Compressor�
If Compressor cannot supply enough
air flow (CFM), use a larger Compressor�
* @+<<+.*1<<*(17/)V*4-/91,)'+=(*.3/=/W/-*>'18=+('=8*+-*(/-W'9'=8*)3/*9+:4-/((+-6***
U'(9+==/9)*4+./-*(,44<V*0/7+-/*(/-W'9/6
Page 16 @+-*)/93='91<*A,/()'+=(B*4</1(/*91<<*CD###D#!!D$%E%6 Item 64857
Page 17
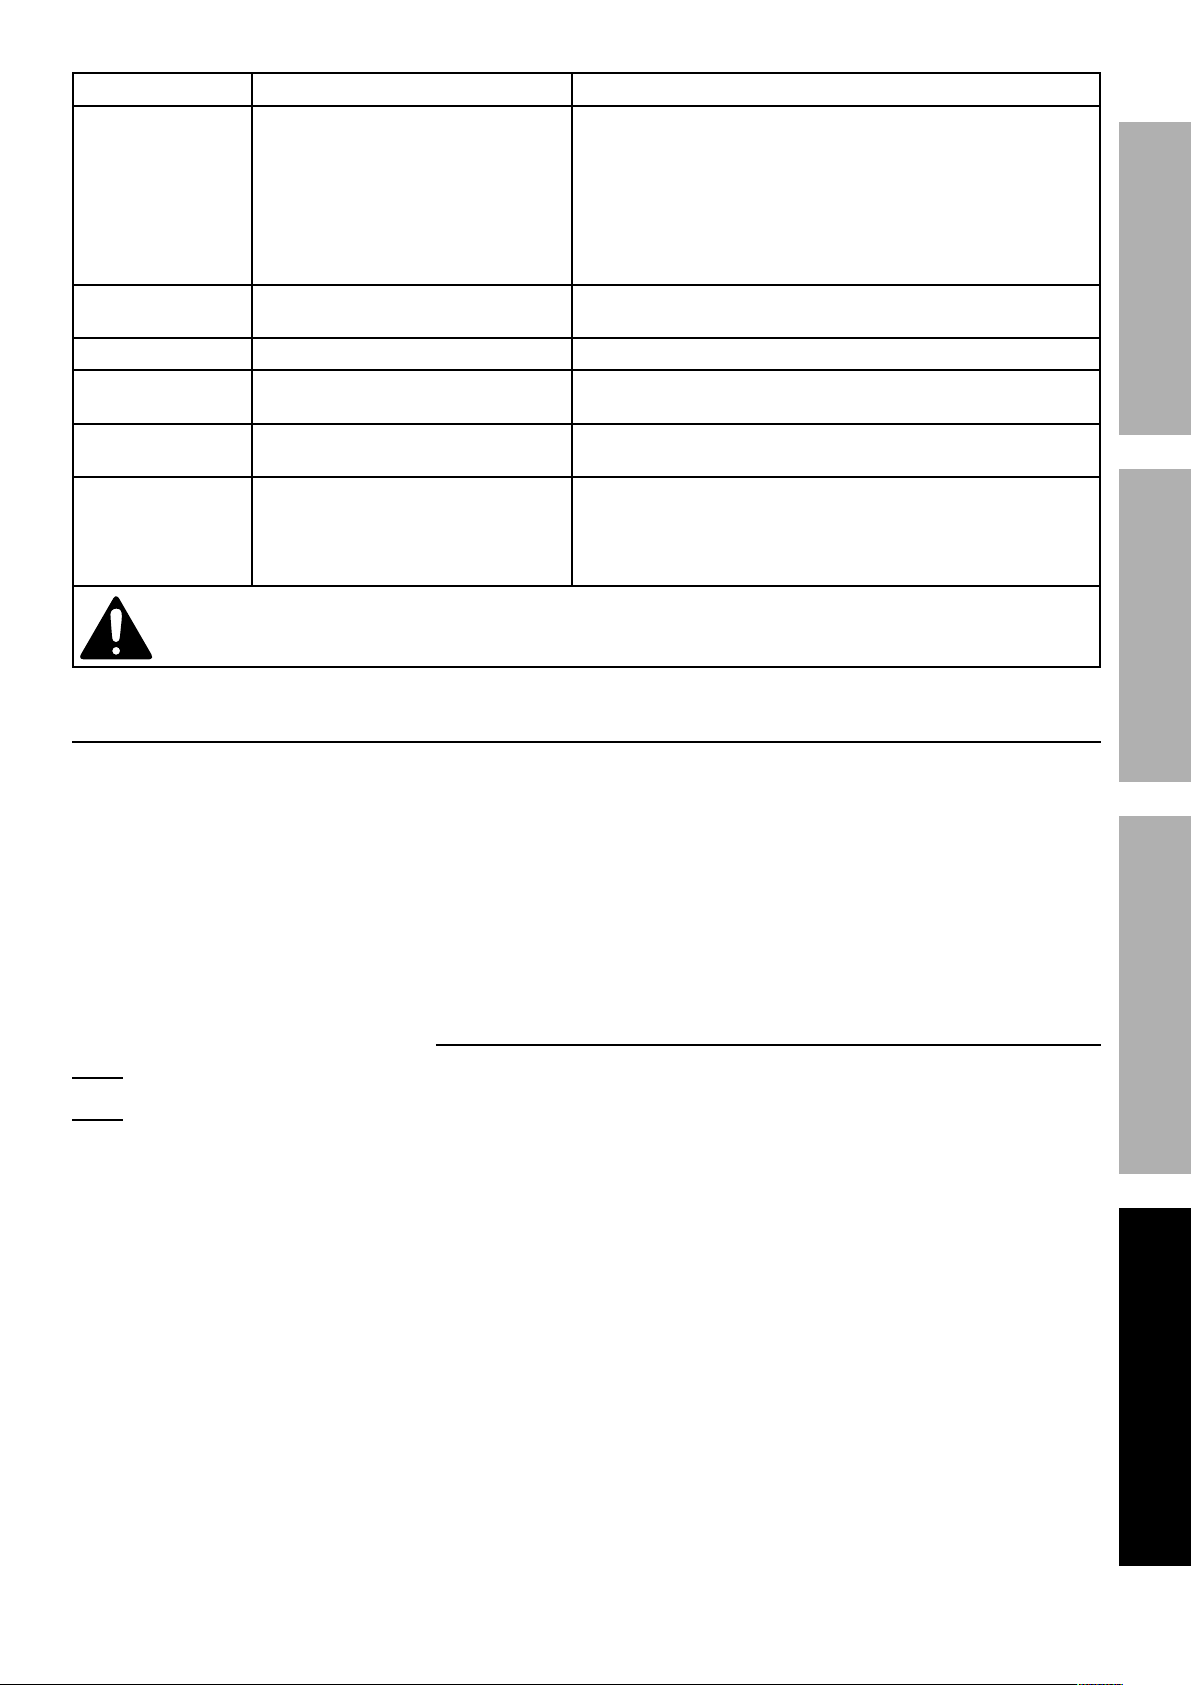
K-+0</: K+(('0</*P1,(/( Q'X/<V*F+<,)'+=(
Excessive noise 1� Loose fittings�
2� Crankcase overfilled with oil or
oil is incorrect thickness or type�
3� Crankcase oil level too low�
4� Unit not on level surface�
Moisture in
discharge air
Safety Valve “pops” Safety valve needs service� Pull on test ring of safety valve� If it still pops, replace�
Air leaks from
pump or fittings
Air leaks from tank Defective or rusted tank� Have tank replaced by a qualified technician�
Oil in discharge
air or high oil
consumption
Too much moisture in air� Install inline air filter/dryer, and/or relocate
Loose fittings� Reduce air pressure, then check all fittings with a soap solution
1� Crankcase oil too thin or
crankcase overfilled with oil�
2� Unit not on level surface�
3� Crankcase vent clogged�
1� Reduce air pressure, then check all
fittings with a soap solution for air
leaks and tighten as needed� Do not overtighten�
2� Drain oil and refill to proper level with recommended oil�
3� Add oil to proper level, check for leaks�
4� Reposition unit on a level surface�
to less humid environment�
for air leaks and tighten as needed� Do not overtighten�
Drain moisture from tank daily to prevent future corrosion�
1� Drain oil and refill to proper level with recommended oil�
2� Reposition unit on a level surface�
3� Clean Crankcase vent�
* @+<<+.*1<<*(17/)V*4-/91,)'+=(*.3/=/W/-*>'18=+('=8*+-*(/-W'9'=8*)3/*9+:4-/((+-6***
U'(9+==/9)*4+./-*(,44<V*0/7+-/*(/-W'9/6
FG@;HIJK;LGHMJNOGMNH;NGNP; MNFHGQQGHMJN
KQ;GF;*L;GU*H^;*@JQQJRMNS*PGL;@[QQI
THE MANUFACTURER AND/OR DISTRIBUTOR HAS PROVIDED THE PARTS LIST AND ASSEMBLY DIAGRAM
IN THIS MANUAL AS A REFERENCE TOOL ONLY� NEITHER THE MANUFACTURER OR DISTRIBUTOR
MAKES ANY REPRESENTATION OR WARRANTY OF ANY KIND TO THE BUYER THAT HE OR SHE IS
QUALIFIED TO MAKE ANY REPAIRS TO THE PRODUCT, OR THAT HE OR SHE IS QUALIFIED TO REPLACE
ANY PARTS OF THE PRODUCT� IN FACT, THE MANUFACTURER AND/OR DISTRIBUTOR EXPRESSLY
STATES THAT ALL REPAIRS AND PARTS REPLACEMENTS SHOULD BE UNDERTAKEN BY CERTIFIED AND
LICENSED TECHNICIANS, AND NOT BY THE BUYE R� THE BUYER ASSUMES ALL RISK AND LIABILITY
ARISING OUT OF HIS OR HER REPAIRS TO THE ORIGINAL PRODUCT OR REPLACEMENT PARTS
THERETO, OR ARISING OUT OF HIS OR HER INSTALLATION OF REPLACEMENT PARTS THERETO�
L/9+->*K-+>,9)](*F/-'1<*N,:0/-*^/-/2*
N+)/2 If product has no serial number, record month and year of purchase instead�
N+)/2 Some parts are listed and shown for illustration purposes only,
and are not available individually as replacement parts�
Page 17@+-*)/93='91<*A,/()'+=(B*4</1(/*91<<*CD###D#!!D$%E%6Item 64857
Page 18
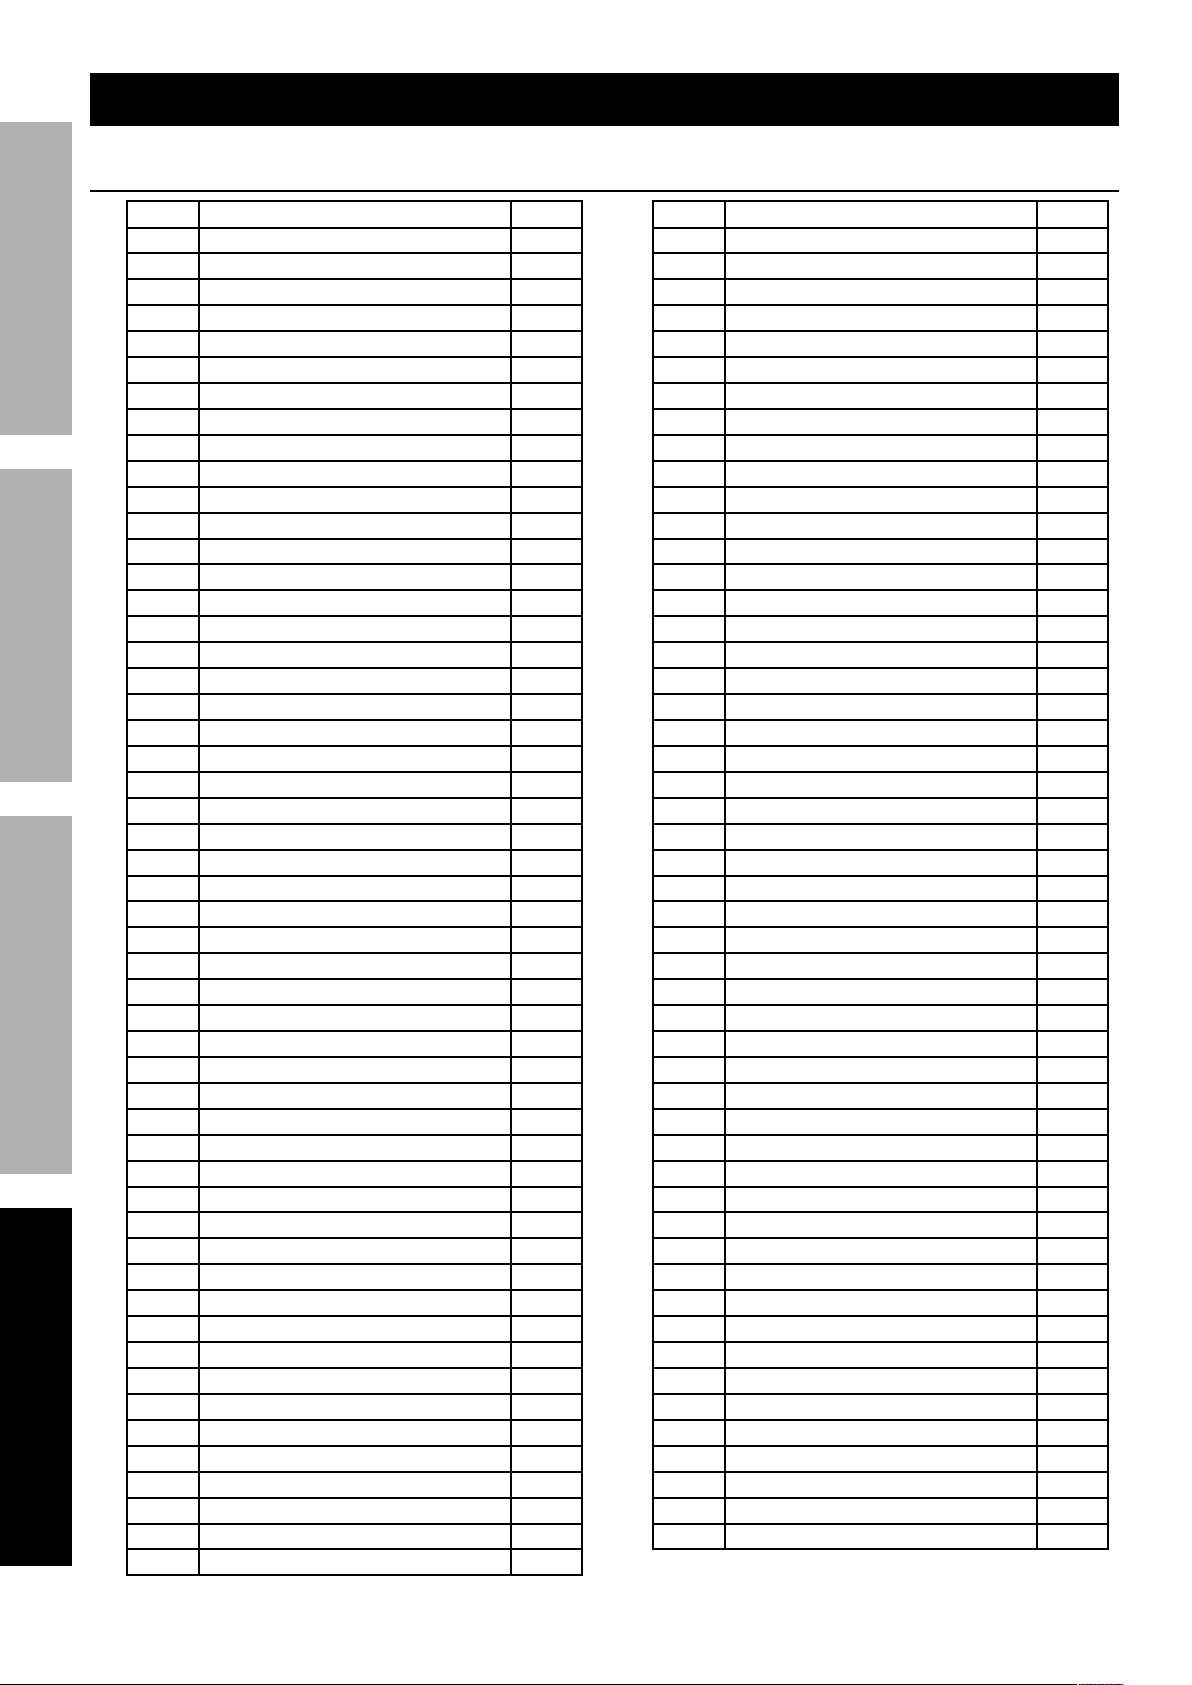
K1-)(*Q'()*1=>*U'18-1:
K1-)(*Q'()
FG@;HI JK;LGHMJN OGMNH;NGNP;MNFHGQQGHMJN
K1-) U/(9-'4)'+= k)V
1 Plug 1
2 Shroud 1
3 Snap Ring 1
4 Fan 1
5 Bolt M5x117 4
6 Spring Washer 4
7 Washer 4
8 Bolt M5x16 16
9 Washer 10
10 Coupling Assembly 1
11 Front Cover 1
12 Coupling Assembly 1
13 Bearing 1
14 Rotor Assembly 1
15 Thermal Protector 1
16 Bearing 1
17 Stator 1
18 Oil Seal 1
19 Nut M8 3
20 Spring Washer 3
21 Block 2
22 Bolt M8x20 2
23 Crank Case 1
24 Bolt M3x6 2
25 Locking Washer 2
26 Nut M3 2
27 Capacitor 1
28 O-Ring 2
29 Bolt M8x16 1
30 Capacitor Bracket 1
31 Coupling Assembly 1
32 Bolt M6x25 3
33 Nut M6 3
34 Crank Shaft 1
35 Connecting Rod 1
36 Piston 1
37 Oil Ring 1
38 Piston Ring 2
39 Gasket 1
40 Cylinder 1
41 Spring Washer 2
42 Bolt M8x30 2
43 Seal 1
44 Valve Plate 2
45 Reed Valve 1
46 Reed Valve 1
47 Seal 1
48 Air Filter 1
49 Bolt M6x50 4
50 Spring Washer 8
51 Washer 4
52 Start Valve 1
K1-) U/(9-'4)'+= k)V
53 Cylinder Cap 1
54 Elbow 1
55 Snap Ring 2
56 Piston Pin 1
57 Rubber Seal 1
58 End Cover 1
59 Oil Breather 1
60 O-Ring 1
61 Bolt M6x20 4
62 Oil Glass 1
63 Bolt M5x10 1
64 O-Ring 1
65 Coupling Assembly 1
66 Nut 2
67 Funnel 2
68 Nut 1
69 Check Valve 1
70 Funnel 2
71 Nut 1
72 End Cap 5
73 Tube 1
74 Power Switch 1
75 Safety Valve 1
76 Nut 2
77 Connecting Joint 2
78 O-Ring 2
79 Handle Plug 2
80 Wire 1
81 Power Cord 1
82 Cooling Fins 1
83 Air Tube 1
84 Bolt M5x12 1
85 Washer 1
86 Gauge Cover 1
87 Pressure Gauges 1
88 Coupler 1
89 Pressure Regulator 1
90 Regulator Knob 1
91 Screw 1
92 Rubber Grip 1
93 Tank Assembly 1
94 Wheel 2
95 Washer 2
96 Bolt M12x60 2
97 Sleeve 2
98 Spring Washer 2
99 Nut 2
100 Drain Valve 1
101 Foot 2
102 Washer 2
103 Bolt M8x25 2
Page 18 @+-*)/93='91<*A,/()'+=(B*4</1(/*91<<*CD###D#!!D$%E%6 Item 64857
Page 19
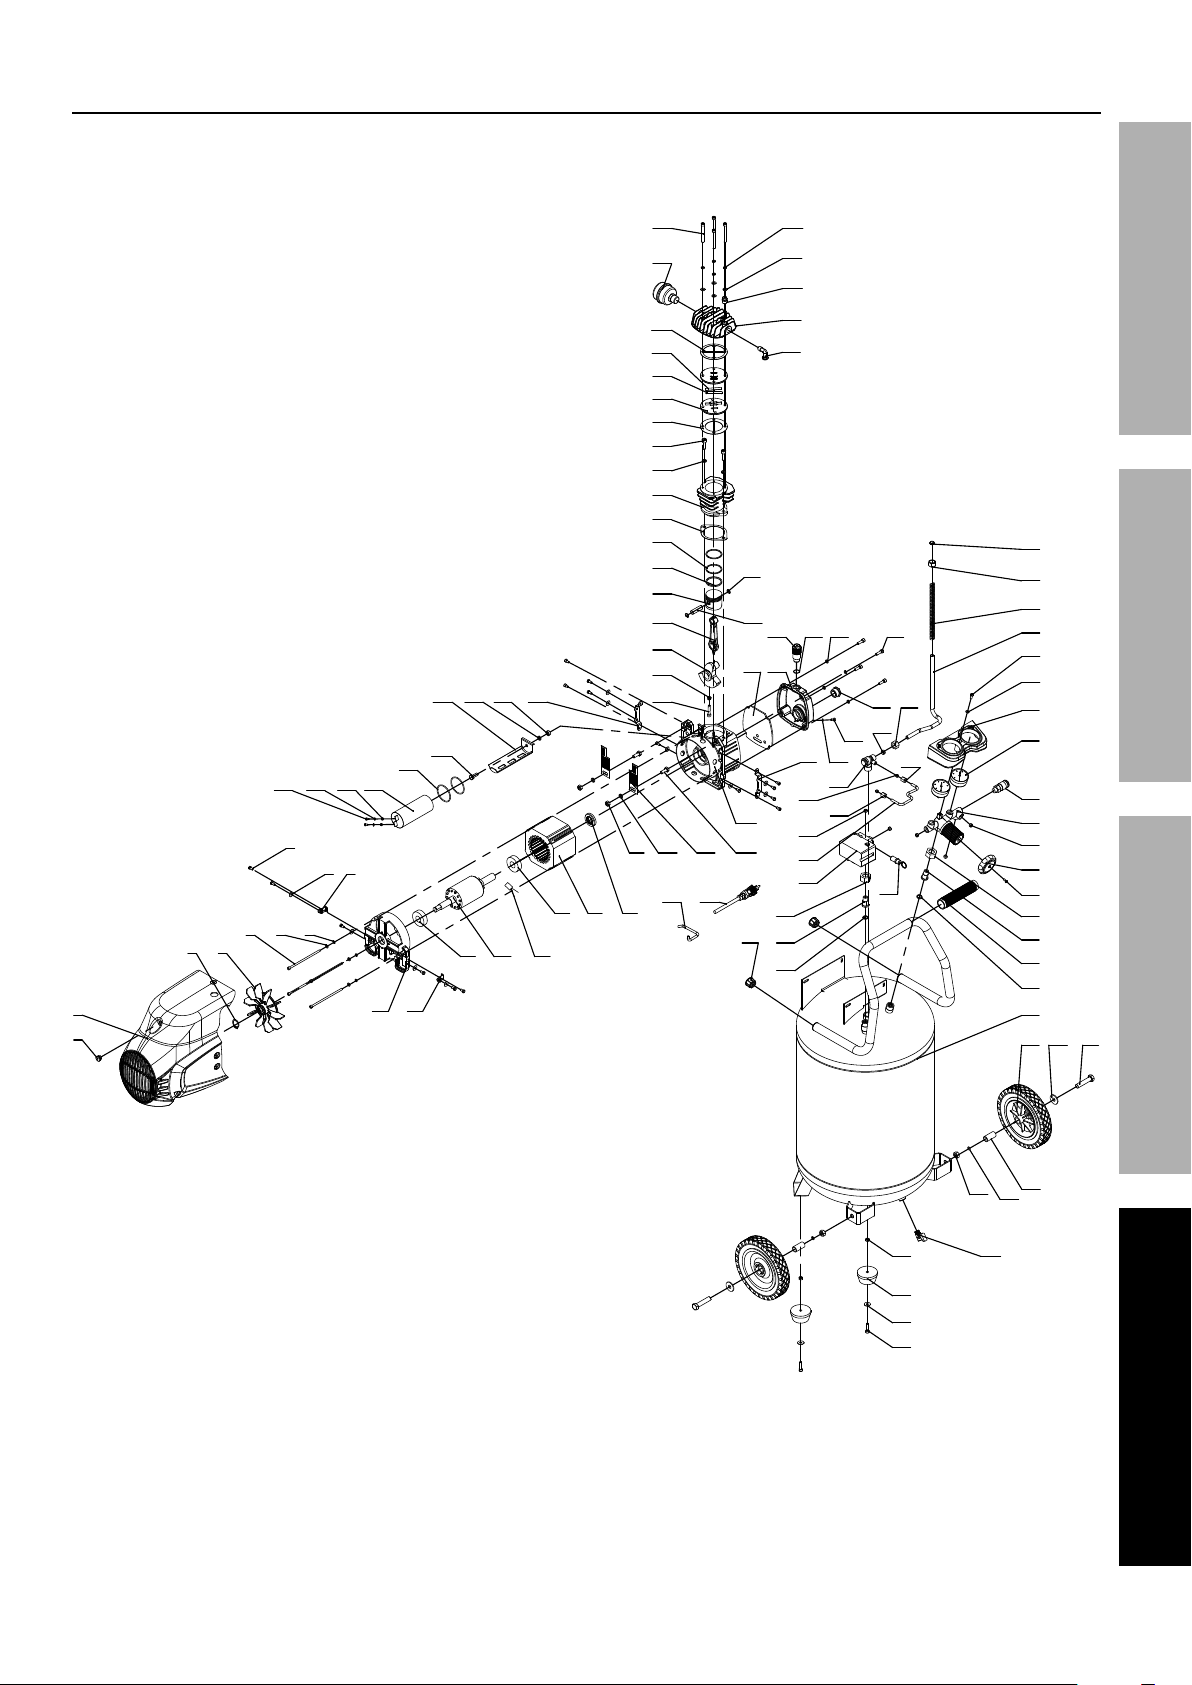
G((/:0<V*U'18-1:
2
1
49 50
3 4
24 25 26
8
5 6 7
9 10
28
27
11 12
48
47
46
45
44
43
42
41
40
39
30 19 31 32
20
29
16 17
13 14 15
38
37
36
35 56
34
33
2019 21 22
18
51
52
53
54
67
55
59 60 50
57 58
65 64
70
23
8180
79
72
73
74
76
77
78
69
71
63
61
62 66
67
68
75
66
82
83
84
85
86
87
88
89
72
90
91
76
77
92
78
93
94
95
96
FG@;HIJK;LGHMJNOGMNH;NGNP; MNFHGQQGHMJN
97
99
98
10033
101
102
103
Page 19@+-*)/93='91<*A,/()'+=(B*4</1(/*91<<*CD###D#!!D$%E%6Item 64857
Page 20

Q':')/>*E`*U1V*R1--1=)V
Harbor Freight Tools Co� makes every effort to assure that its products meet high quality and durability standards,
and warrants to the original purchaser that this product is free from defects in materials and workmanship for the
period of 90 days from the date of purchase� This warranty does not apply to damage due directly or indirectly,
to misuse, abuse, negligence or accidents, repairs or alterations outside our facilities, criminal activity, improper
installation, normal wear and tear, or to lack of maintenance� We shall in no event be liable for death, injuries
to persons or property, or for incidental, contingent, special or consequential damages arising from the use of
our product� Some states do not allow the exclusion or limitation of incidental or consequential damages, so the
above limitation of exclusion may not apply to you� THIS WARRANTY IS EXPRESSLY IN LIEU OF ALL OTHER
WARRANTIES, EXPRESS OR IMPLIED, INCLUDING THE WARRANTIES OF MERCHANTABILITY AND FITNESS�
To take advantage of this warranty, the product or part must be returned to us with transportation charges
prepaid� Proof of purchase date and an explanation of the complaint must accompany the merchandise�
If our inspection verifies the defect, we will either repair or replace the product at our election or we may
elect to refund the purchase price if we cannot readily and quickly provide you with a replacement� We will
return repaired products at our expense, but if we determine there is no defect, or that the defect resulted
from causes not within the scope of our warranty, then you must bear the cost of returning the product�
This warranty gives you specific legal rights and you may also have other rights which vary from state to state�
d"EC*O'(('+=*J1X(*T<W>6**l**KJ*T+Z*!``E**l**P1:1-'<<+B*PG*Ed`CC**l**CD###D#!!D$%E%
 Loading...