

Page 1

www.mcetech.com
OptiBay Hard Drive
Installation Guide
for MacBook &
MacBook Pro 15-inch
Page 2
MCE OptiBay Hard Drive for MacBook and MacBook Pro
2
Before You Begin
1. Ground yourself when working on the computer.
2. To avoid generating static electricity, do not walk around the
room until you have nished working and closed the computer.
3. The internal components of your MacBook Pro can be warm.
If you have been using your MacBook Pro, wait 10 minutes
after shutting down to let the internal components cool before
continuing.
4. Keep drinks and other liquids away from the area where you
are working on the system.
Opening the Computer
Step 1. Shut down the system. Disconnect the power adapter,
Ethernet cable, USB cables, security lock, and any other cables
connected to the system to prevent damaging the computer.
Step 2. Turn over your system and locate the latch. Push down to
release the latch and remove the access door that covers the battery and hard drive.
Note: The latch must be in its released, open position to
remove and replace the battery and access door.
Step 3. With the latch still in its open position, gently pull up on the
see-thru tab attached to the battery to lift it out of its bay.
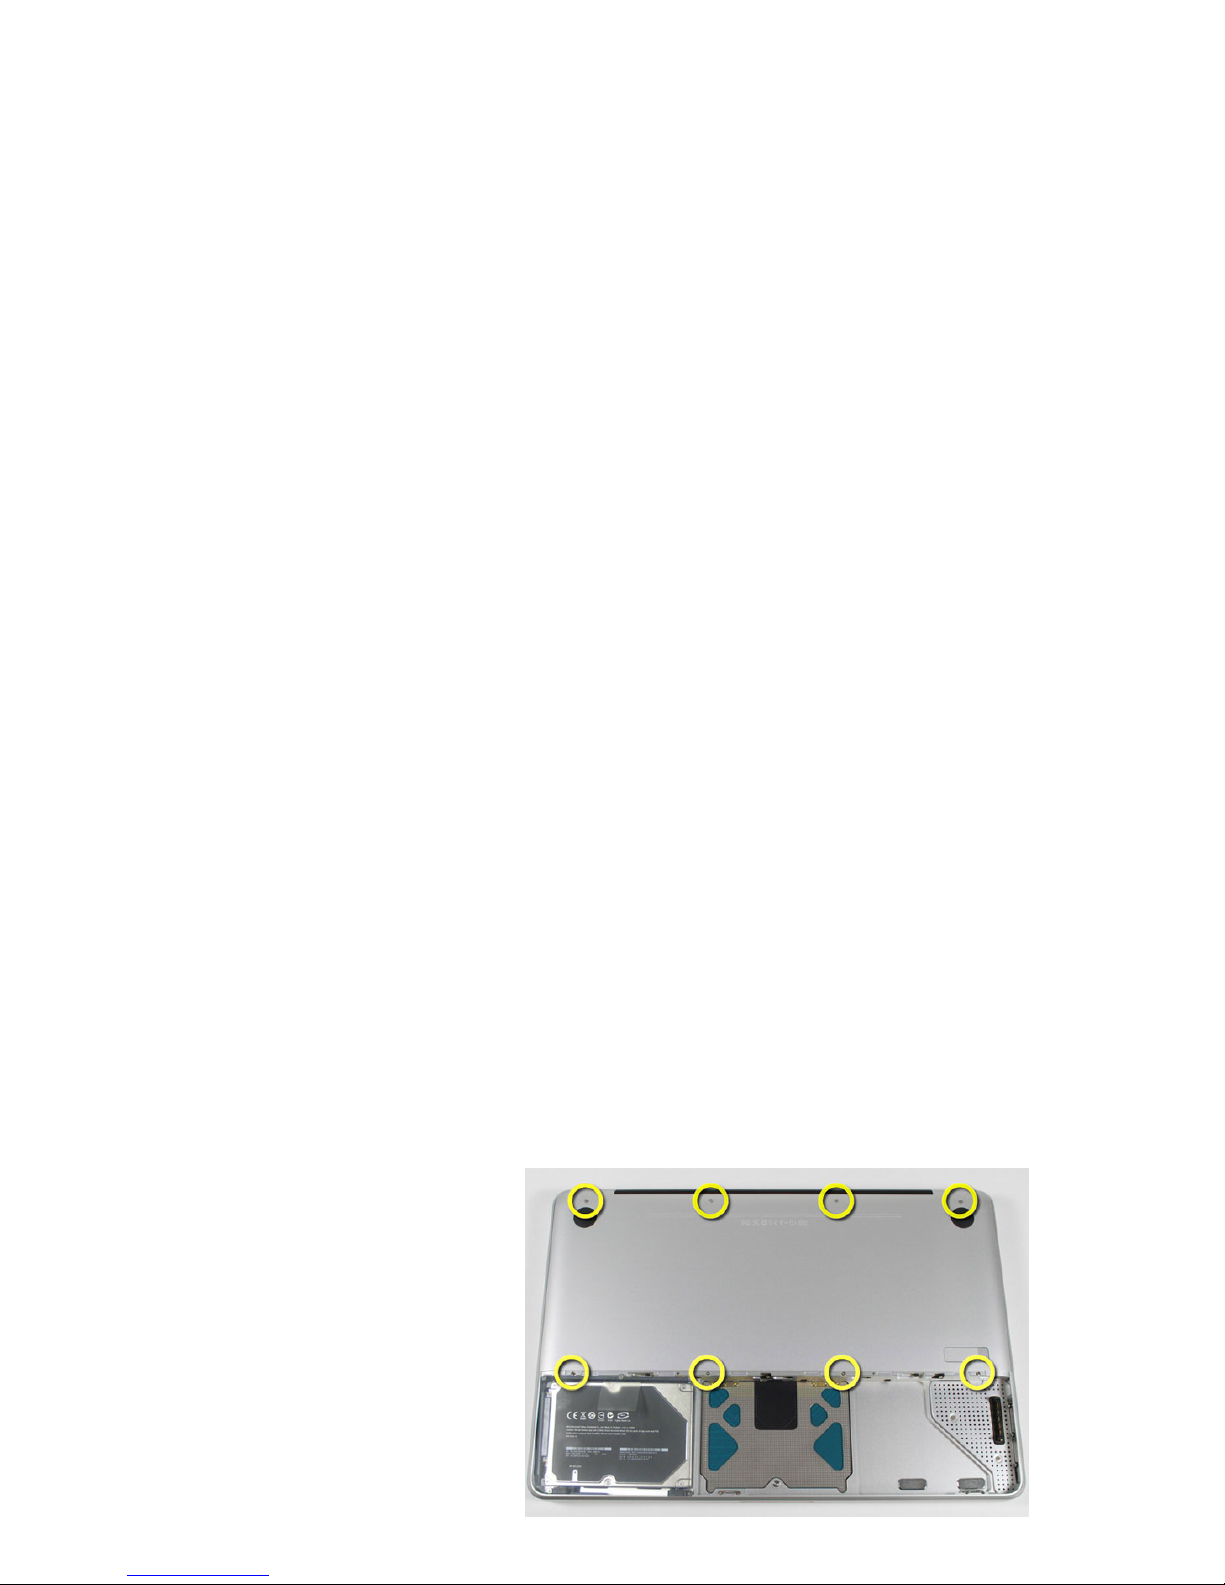
Step 4. Using the supplied screwdriver, remove
the eight screws that secure the bottom case, and
then remove the bottom
case.
Page 3

MCE OptiBay Hard Drive for MacBook and MacBook Pro
3
Important: Because the screws are different lengths, note
the screw lengths and locations so you can replace the
screws correctly. Put them aside in a safe place.
Important: When you remove the bottom case, you ex-
pose sensitive internal components. Avoid touching anything other than the items directly involved with the insallation of the OptiBay hard drive.
Step 5. Touch a metal surface inside the computer to discharge
any static electricity from your body.
Step 6. Disconnect the connectors shown here (only
the left two for the MacBook
Pro).
Step 7. Remove the screws
shown here (MacBook Pro
does not have the speaker
strip or screw towards the top
of the image here).
Page 4

MCE OptiBay Hard Drive for MacBook and MacBook Pro
4
Step 8. Carefully move the cables situated on top of the optical
drive out of the way.
Step 9. Carefuly remove the black speaker assembly from the
optical drive (it may be adhered to the drive, so be careful not to
damage it).
Step 10. Remove the optical drive from its bay.
Note: If you have the OptiBay enclosure without a hard
drive installed, now you should install your 2.5-inch SATA
hard drive into the enclosure and attach it using the four
screws included with the enclosure.
Step 11. Remove the optical drive cable/connector from the optical drive and attach it to the OptiBay hard drive.
Step 12. Insert the OptiBay
case into position inside the
system.
Step 13. Replace the speaker strip on top of the OptiBay
hard drive and re-attach the
connectors onto the logic
board.
Step 14. Replace the bottom case. Replace and tighten the eight
screws.
Step 15. Replace the battery and the access door that covers the
battery and hard drive.
Page 5

MCE OptiBay Hard Drive for MacBook and MacBook Pro
5
Congratulations! You have completed the installation of the
OptiBay hard drive.
Once you restart your system, the OptiBay hard drive should
mount onto the system’s desktop along with the standard internal
hard drive. You can now use the OptiBay hard drive just as you
use the system’s standard internal hard drive. Now you’ll have
room for all the les you need to have with you while you’re on the
go... disk intensive digital video, that seemingly endless library of
music les and as many hi-res photos as you can shoot!
Two bootable hard drives inside your system provide a freedom
and exibility never before experienced in a MacBook or MacBook
Pro. You can use one drive as a scratch disk and the other as
your system/applications disk, set up RAID congurations, organize one as a Mac volume and the other as a PC volume, and
more.
If the OptiBay drive does not mount on the system’s desktop, you
may use the Apple Disk Utility (Applications > Utilities > Disk Utility) to format (erase) the drive. The drive will automatically mount
onto the desktop when Disk Utility has nished reformatting the
drive and you may use it just as you use the system’s standard
internal hard drive.
Note: If you will be conguring the drive as a software
RAID using Disk Utility, you must boot the system from a
drive that will not be included as part of the RAID, such as
a Mac OS installation disc or an external hard drive, and
run Disk Utility from the boot volume. Please refer to Disk
Utility help for further instructions on RAID setup.
Note: In order to view DVD video using an OptiBay-con-
gured system and an external DVD drive, one must use a
third-party media player (for example, VLC media player)
since Apple disables their DVD Player utility when an internal optical drive is not recognized by the system.
Page 6

Limited Warranty
This is your MCE Technologies, LLC (MCE) one year limited warranty. The original purchaser
(Purchaser) must present a dated proof of purchase (Bill of Sale) to obtain warranty service.
This product is warranted by MCE to be free from defects in material and workmanship for one (1)
year from the date of purchase by the Purchaser.
Purchaser’s sole remedy under an MCE warranty shall be, at MCE’s sole election, refund, repair or
replacement as provided in this warranty. An MCE warranty shall not apply to any failure or defect
caused by misuse, abnormal use, neglect, abuse, alteration, improper installation, unauthorized repair
or modication, improper testing, accident or causes external to the product such as but not limited
to excessive heat or humidity, power failure, or surges, or improper installation, or damage arising
from improper packaging during transport; and damage resulting from causes, including without
limitation, lack of technical skill, competence, or experience of the user. This warranty shall not be
enlarged, diminished or affected by, and no liability shall arise out of, MCE’s rendering of technical advice or providing information to Purchaser. Service by anyone other than MCE authorized
service personnel voids any MCE warranty. MCE makes no representations or warranties, express or
implied, regarding the tness of a product for any particular purpose, or that a product is compatible
with any particular hardware or software.
MCE’s sole and exclusive maximum liability for any claim by Purchaser arising out of Purchaser’s
purchase of a product and/or the above warranty shall not in any event exceed the actual amount
paid by Purchaser for the product. In no event shall MCE be liable for any direct, indirect, incidental,
collateral, exemplary, consequential or special damages or losses arising out of Purchaser’s purchase
and/or use of products, including, without limitation, loss of use, prots, goodwill or savings, or loss
of data, data les, or programs that may have been stored by a user of the product.
Continued use or possession of a product after expiration of its warranty period shall be conclusive
evidence that the warranty is fullled to the full satisfaction of Purchaser.
MCE shall honor the terms of an MCE warranty as described herein, provided that the defective
product is sent in its original packaging to MCE, together with a copy of the dated proof of purchase
on which the product appears, transportation and insurance prepaid, within the warranty period, and
if the product is found by MCE to be defective within the terms of the warranty. Prior to returning
any product to MCE, Purchaser must obtain a Return Merchandise Authorization (RMA) number
from MCE. No product shall be accepted for return, repair or replacement without an RMA number
visibly written on the outside of its original packaging or comparable packaging affording an equal
degree of protection. MCE shall not be responsible for merchandise sent to MCE improperly packaged. Purchaser must prepay shipping charges for merchandise shipped back to MCE for warranty
service. Prior to returning the product, Purchaser must, if possible, remove any and all programs and
data from any storage media. Replacement products and parts used to repair products may be similar
new or other than new items. Replaced products and parts shall become the property of MCE. If any
product returned by Purchaser to MCE for repair or replacement is not defective within this warranty, MCE shall so advise Purchaser and thereafter MCE shall handle such products in accordance
with Purchaser’s instructions and at Purchaser’s cost, after reimbursement to MCE by Purchaser
of freight charges at then current rates, and examination and testing expenses at then current rates
($80.00 per hour as of January 2008). Prices, terms and conditions are subject to change without
notice.
MCE Technologies, LLC
Irvine, California, USA
Technical Support
(949)458-0800
support@mcetech.com
http://www.mcetech.com
 Loading...