

Hornet™ XL
Fusion Machine
Models: ASW31401, ASW31402
Foreword
Manual: SW31301
Revision A 09/19
Original Language: English
Operator’s
Manual
1 Hornet™ XL

Copyright 2019 McElroy Manufacturing, Inc.
All rights reserved.
P.O. Box 580550
Tulsa, Oklahoma 74158-0550, USA
Important Safety Information
8163361
Most accidents that involve product operation, maintenance and repair are caused by failure to observe basic safety rules or
precautions. An accident can often be avoided by recognizing potentially hazardous situations before an accident occurs. A person
must be alert to potential hazards. This person should also have necessary training, skills and tools to perform these functions properly.
Advanced training is offered through McElroy University. Course offerings are meant to enhance your efficiency, productivity and safety
in the proper use of McElroy equipment.
Improper operation, maintenance or repair of this product can be dangerous and could result in injury or death.
Do not operate this product until you have carefully read, and understand all the sections of this manual, and all
other equipment manuals that will be used with it.
Follow all applicable federal, state, local, and industry specific regulations.
The hazards are identified by the “Safety Alert Symbol” and followed by a “Signal Word” such as “DANGER”, “WARNING” or
“CAUTION”. The Safety Alerts are shown below.
The meaning of these safety alert symbols are as follows:
- Indicates an imminently hazardous situation which, if not avoided, will result in death or serious injury.
- Indicates a potentially hazardous situation which, if not avoided, could result in death or serious injury.
- Indicates a hazardous situation which, if not avoided, may result in minor or moderate injury.
Signal words “NOTICE” and “IMPORTANT” are used to bring attention to important information.
The meaning of these signal words are as follows:
“NOTICE” - Can keep you from doing something that might damage the machine or someone’s property. It may also be used to
alert against unsafe practices.
“IMPORTANT” - Can help you do a better job or make your job easier in some way.
McElroy cannot anticipate every possible circumstance that might involve a potential hazard. The warnings in this
publication and on the product are, therefore, not all inclusive. If a tool, procedure, work method or operating
technique that is not specifically recommended by McElroy is used, you must satisfy yourself that it is safe for you
and for others. You should also ensure that the product will not be damaged or be made unsafe by the operation,
maintenance or repair procedures that you choose.
The information, specifications, and illustrations in the publication are on the basis of information that was available at the time that the
publication was written. The specifications, pressures, measurements, adjustments, illustrations, and other items can change at any time.
These changes can affect the service that is given to the product. Obtain the complete and most current information before you start any
job. The most current information is available at our website
www.mcelroy.com.
TX05337-04-18
Cancer and Reproductive Harm www.P65warnings.ca.gov
When replacement parts are required for this
product McElroy recommends using McElroy
replacement parts or parts with equivalent
specifications including, but not limited to,
physical dimensions, type, strength and material.
Failure to heed this warning can lead to premature
failures, product damage, personal injury or death.

TABLE OF CONTENTS
FOREWORD
Literature Information ......................................................................................1-1
Safety ..................................................................................................1-1
Operation ...............................................................................................1-1
Maintenance ............................................................................................1-1
McElroy University ........................................................................................1-1
Patent Information ........................................................................................1-2
Replacement Literature .....................................................................................1-2
Nameplate Location ......................................................................................1-2
Replacement Parts ........................................................................................1-2
Limited Warranty .........................................................................................1-3
SAFETY
General Safety ...........................................................................................2-1
Safety Equipment .........................................................................................2-1
Heater Is Not Explosion Proof ...............................................................................2-2
Electric Motors are Not Explosion Proof ......................................................................2-2
Electrical Safety ..........................................................................................2-2
Power Tool Safety ........................................................................................2-2
Heater is Hot ............................................................................................2-2
Fusion Procedures ........................................................................................2-3
Do Not Modify Machine ...................................................................................2-3
GENERAL INFORMATION
Theory of Heat Fusion .....................................................................................3-1
Nomenclature ............................................................................................3-1
Attach Drill to Drill Adapter ................................................................................. 3-4
Attach Extension Chains ...................................................................................3-5
Install Heater Adapters ....................................................................................3-6
Detachable Handle .......................................................................................3-6
OPERATION - FUSION OUTLET
Attach Hornet™ XL to Pipe .................................................................................. 4-1
Prepare Heater ...........................................................................................4-2
Drill Main Pipe ...........................................................................................4-3
Insert Fitting ..............................................................................................4-4
Insert Heater ............................................................................................. 4-5
Heat Fitting and Pipe ......................................................................................4-5
Fuse Fitting and Pipe ......................................................................................4-6
Remove Hornet™ XL .......................................................................................4-6
OPERATION - SOCKET FUSE TO OUTLET
Prepare Pipe End .........................................................................................5-1
Prepare Heater ...........................................................................................5-1

Mark Insertion Depth ...................................................................................... 5-2
Clean Fitting and Pipe .....................................................................................5-2
Load Pipe ...............................................................................................5-2
Heat Fitting and Pipe ......................................................................................5-3
Fusion and Cooling .......................................................................................5-3
Remove Hornet™ XL .......................................................................................5-4
STORAGE/TRANSPORT
Storage/Transport ........................................................................................6-1
MAINTENANCE
Preventative Maintenance ..................................................................................7-1
Clean Machine ..........................................................................................7-1
Check Machine Operation .................................................................................7-1
Fasteners Are Tight ........................................................................................7-1
Changing Heater Plates/Adapters ...........................................................................7-1
Clean Chains ............................................................................................7-2
Clean Fitting Adapter ...................................................................................... 7-2
Clean Drill Adapter .......................................................................................7-2
Adjust Gearbox Chain Tension ..............................................................................7-2
SPECIFICATIONS
Specifications ............................................................................................8-1
NOTES
Notes ..................................................................................................9-1
For Digital Copy:
Press Alt + Left Arrow
to return to the link that was clicked.

FOREWORD
Literature Information
This manual should be stored in a protected location for
Foreword
future reference. Use the literature holder if provided with the
product. Digital copy will contain hyperlinks. Press Alt + Left
Arrow to return to the selected hyperlink.
This manual contains safety information, operation instructions,
transportation information, lubrication information and
maintenance information.
Some photographs or illustrations in this publication show
details or equipment that can be different from your machine.
Guards and covers might have been removed for illustrative
purposes.
Continuing improvement and advancement of product design
might have caused changes to your machine which are not
included in this publication. Read, study and keep this manual
with the machine.
Whenever a question arises regarding your machine, or this
publication, please contact McElroy Technical Services at 918831-9224 or techsupport@mcelroy.com
Safety
Some maintenance procedures may be referenced in a
manual pertaining to that component of the machine. For
example, maintenance for an engine component would have
its intervals and procedures in the engine operator’s manual.
Use the hour meter (if equipped) to determine servicing
intervals. Calendar intervals will be used instead of hour
meter intervals if no hour meter is equipped on a machine.
Recommended service should always be performed at the
interval that occurs first.
Under extremely severe, dusty or wet operating conditions,
more frequent lubrication than is specified in the maintenance
schedule might be necessary.
McElroy University
The safety section lists basic safety precautions. In addition,
this section identifies the text and locations of warning signs
and labels used on the machine.
Read and understand the basic precautions listed in the safety
section before operating or performing maintenance and
repair on this machine.
Operation
The operation section is a reference for the new operator
and a refresher for the experienced operator. This section
includes a discussion of gauges, switches, machine controls,
accessories and transportation.
Photographs and illustrations guide the operator through
correct procedures of setting up, checking and operating the
machine.
Operating techniques outlined in this publication are basic.
Proficiency develops as the operator gains knowledge and
experience with the machine and its capabilities.
Maintenance
The maintenance section is a guide to equipment care. The
maintenance schedule lists the items to be maintained at a
specific service interval. Items without specific intervals are
listed under the “As Needed” service interval. The schedule
lists the page for the step-by-step instructions required to
accomplish the scheduled maintenance. Use the schedule as
an index for all maintenance procedures.
For more than 30 years, McElroy has been the only pipe
fusion machine manufacturer to continuously offer advanced
training. Course offerings are meant to enhance your
efficiency, productivity and safety in the proper use of
McElroy machines. McElroy University classes are structured
so that the skills learned and the machines used in each class
closely match the machines found on pipelining jobsites. We
offer training at our facility or yours. Our uniquely qualified
McElroy University course instructors offer years of industry
experience.
Tuition for each course includes lunches, course materials and
a certificate of completion. Online registration, as well as
up-to-date course offerings and dates, is available at www.
mcelroy.com/university
This manual is intended as a guide only and does not take
the place of proper training by qualified instructors. The
information in this manual is not all inclusive and can not
encompass all possible situations that can be encountered
during various operations.
1-1Foreword Hornet™ XL

Patent Information
This product and other products could be protected by patents
or have patents pending. All the latest patent information is
available at patent.mcelroy.com
Replacement Literature
This product is shipped with a printed operator’s manual. If
the manual becomes lost or damaged, order a replacement
manual or download and print a copy of the manual at www.
mcelroy.com.
Nameplate Location
Every machine has a name plate that includes the machine’s
model number, serial number, and power requirements. The
model and serial numbers can be used to register the machine
online and activate the warranty. Reference warranty card for
information on registering your product.
Foreword
Machine Nameplate
CD02423-02-12-19
Replacement Parts
Refer to the McElroy parts finder at
www.mcelroy.com to locate parts for purchase. Reference the
model number on the nameplate of the machine when using
the parts finder.
Contact your McElroy distributor to order replacement parts.
Find your closest distributor on our website at www.mcelroy.
com.
TX05397-03-15-19
1-2 ForewordHornet™ XL

Limited Warranty
McElroy Manufacturing, Inc. (McElroy) warrants all products
Foreword
manufactured, sold and repaired by it to be free from defects
in materials and workmanship, its obligation under this
warranty being limited to repairing or replacing at its factory
and new products, within 5 years after shipment, with the
exception of purchased items (such as electronic devices,
pumps, switches, etc.), in which case that manufacturer’s
warranty applies. Warranty applies when returned freight
is prepaid and which, upon examination, shall disclose to
have been defective. This warranty does not apply to any
product or component which has been repaired or altered
by anyone other than McElroy or has become damaged due
to misuse, negligence or casualty, or has not been operated
or maintained according to McElroy’s printed instructions
and warnings. This warranty is expressly in lieu of all other
warranties expressed or implied. The remedies of the Buyer
are the exclusive and sole remedies available and Buyer shall
not be entitled to receive any incidental or consequential
damages. Buyer waives the benefit of any rule that disclaimer
of warranty shall be construed against McElroy and agrees
that such disclaimers herein shall be construed liberally in
favor of McElroy.
Return of Goods
Buyer agrees not to return goods for any reason except upon
the written consent of McElroy obtained in advance of such
return, which consent, if given, shall specify the terms and
conditions and charges upon which any such return may be
made. Materials returned to McElroy, for warranty work,
repair, etc., must have a Return Material Authorization
(RMA) number, and be so noted on the package at time of
shipment. For assistance, inquiry shall be directed to:
McElroy Manufacturing, Inc.
P.O. Box 580550
833 North Fulton Street Tulsa, Oklahoma 74158-0550
PHONE: (918) 836–8611, FAX: (918) 831–9285.
EMAIL: fusion@McElroy.com
Note: Certain repairs, warranty work, and inquiries may
be directed, at McElroy’s discretion, to an authorized service
center or distributor.
Disclaimer of Liability
McElroy accepts no responsibility of liability for fusion joints.
Operation and maintenance of the product is the responsibility
of others. We recommend qualified joining procedures be
followed when using McElroy fusion equipment.
McElroy makes no other warranty of any kind whatever,
express or implied; and all implied warranties of
merchantability and fitness for a particular purpose which
exceed the aforestated obligation are hereby disclaimed by
McElroy.
Product Improvement
McElroy reserves the right to make any changes in or
improvements on its products without incurring any liability
or obligation to update or change previously sold machines
and/or the accessories thereto.
Information Disclosed
No information of knowledge heretofore or hereafter
disclosed to McElroy in the performance of or in connection
with the terms hereof, shall be deemed to be confidential or
proprietary, unless otherwise expressly agreed to in writing by
McElroy and any such information or knowledge shall be free
from restrictions, other than a claim for patent infringement, is
part of the consideration hereof.
Proprietary Rights
All proprietary rights pertaining to the equipment or the
components of the equipment to be delivered by McElroy
hereunder, and all patent rights therein, arising prior to, or in
the course of, or as a result of the design or fabrication of the
said product, are exclusively the property of McElroy.
Law Applicable
All sales shall be governed by the Uniform Commercial Code
of Oklahoma, U.S.A.
Register your product online to activate your
warranty: www.McElroy.com/fusion
(Copy information listed on the machine nameplate here for
your records).
Model No.
Serial No.
Date Received
Distributor
TX05339-04-18
1-3Foreword Hornet™ XL
SAFETY
CD02424-02-12-19
Safety
410906
8163210
There can be several specific safety messages on this machine.
The exact location of the hazards and the description of
the hazards are reviewed in this section. Please become
familiarized with all safety messages.
Make sure that all of the safety messages on the machine
are legible. Clean the safety messages or replace the
safety messages if you cannot read the words. Replace if
the illustrations are not legible. When you clean the safety
messages, use a cloth, water and soap. Do not use solvent,
gasoline, or other harsh chemicals to clean the safety
messages. Solvents, gasoline, or harsh chemicals could loosen
the adhesive that secures the safety message or damage the
print of the safety message.
Replace any safety message that are damaged, or missing.
If a safety message is attached to a part that is replaced,
install a safety message on the replacement part. New safety
messages can be ordered from McElroy using the part number
listed.
General Safety
Safety is important. Report anything unusual that you notice
during set up or operation.
LISTEN for thumps, bumps, rattles, squeals, air leaks, or
unusual sounds.
SMELL odors like burning insulation, hot metal, burning
rubber, hot oil, or natural gas.
FEEL any changes in the way the equipment operates.
SEE problems with wiring and cables, hydraulic connections,
or other equipment.
REPORT anything you see, feel, smell, or hear that is different
from what you expect, or that you think may be unsafe.
SAFE1ST-2-21-18
Safety Equipment
Wear a hard hat, safety shoes, safety glasses, and other
applicable personal protective equipment.
Remove jewelry and rings, and do not wear loose fitting
clothing or long hair that could catch on controls or moving
machinery. Remove any loose safety equipment during an
operation that could be drawn into or caught in the machine.
Ensure proper fire prevention or other fire-fighting equipment
is available and all personnel know how and when to use it.
2-1 SafetyHornet™ XL

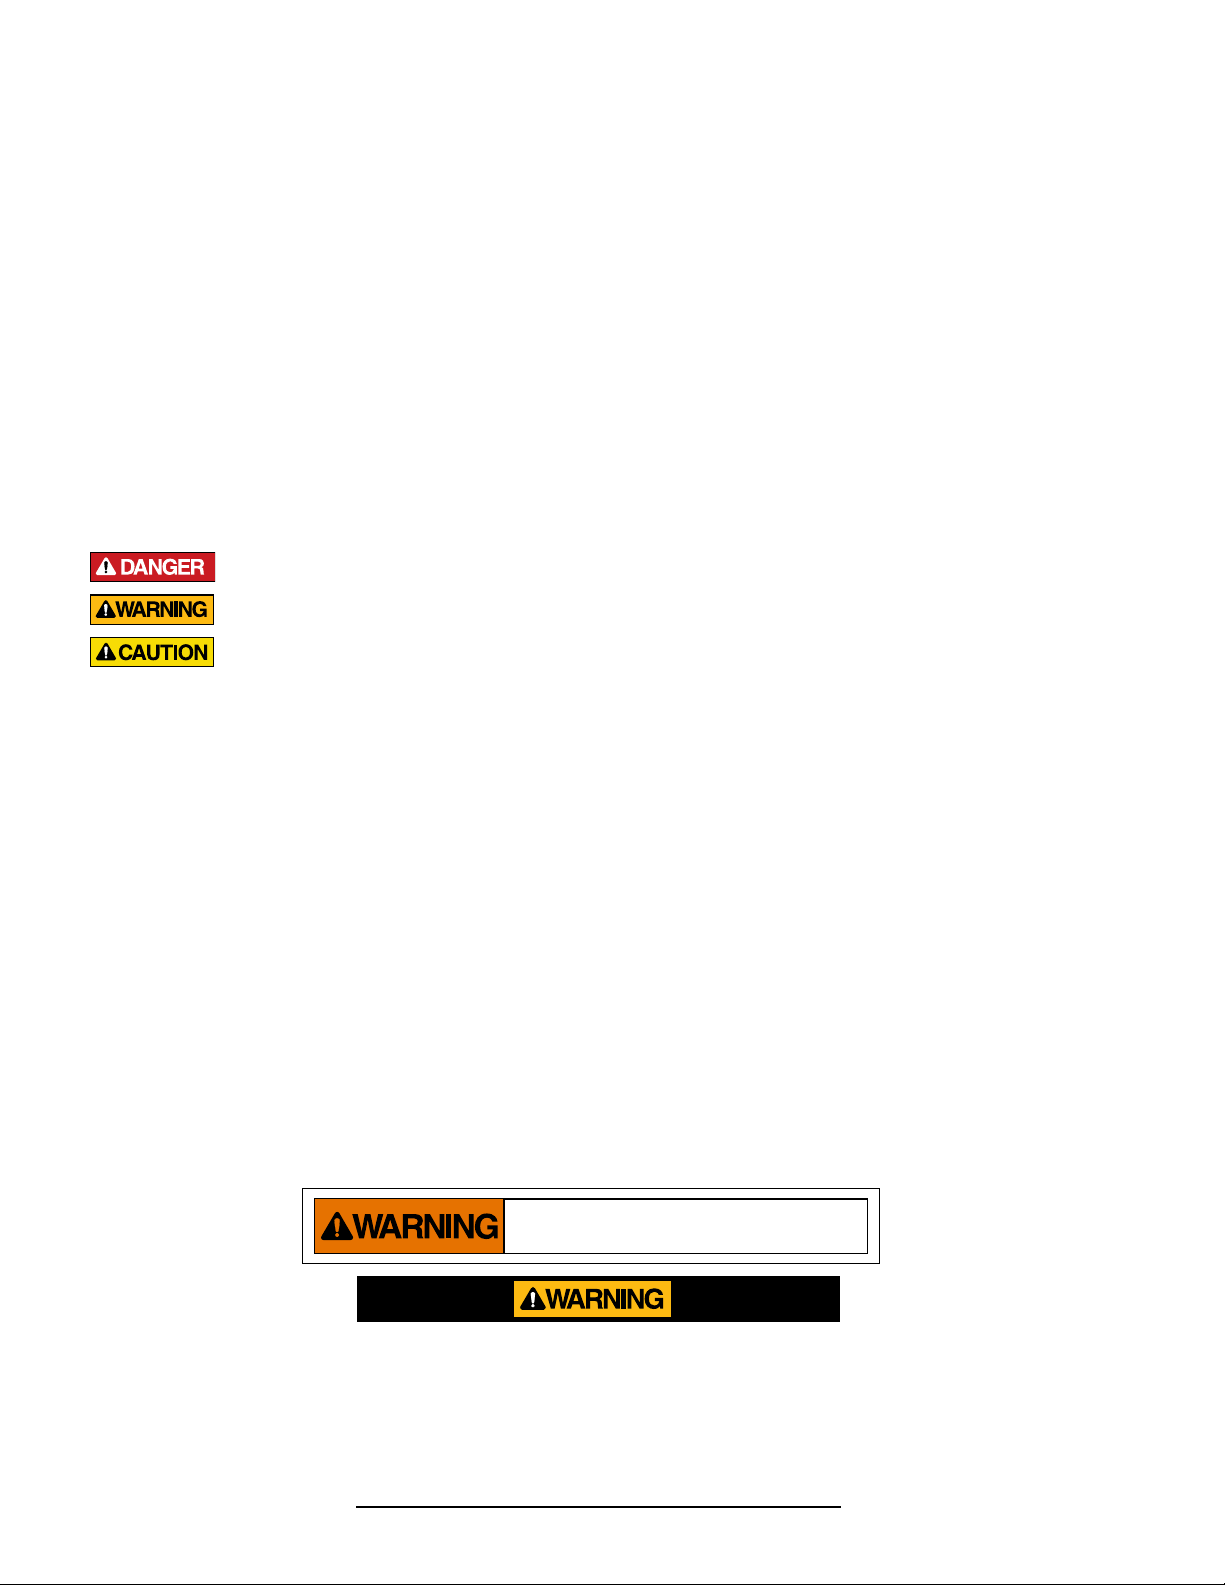
Heater Is Not Explosion Proof
This safety message is located on the cord of the heater.
This heater is not explosion proof. Operation of
heater in an explosive atmosphere without necessary
safety precautions will result in serious injury or
death.
Safety
When operating in an explosive atmosphere, the heater
should be brought up to temperature in a safe environment,
then unplugged before entering the explosive atmosphere for
fusion.
Electrical Safety
Always ensure equipment is properly grounded. It
is important to remember that if you are working in
a wet environment with electrical devices. Proper
ground connections help to minimize the chances of
an electric shock.
Frequently inspect electrical cords and unit for damage. Have
damaged components replaced and service performed by a
qualified electrician.
Do not carry electrical devices by the cord
NOTICE: Always connect units to the proper power source
as listed on the unit, or in the owner’s manual. Use GFCI
electrical connections when available.
WR00065-2-21-18
WR00080-2-21-18
Electric Motors are Not Explosion Proof
Electric motors are not explosion proof. Operation
of these components in an explosive atmosphere
without necessary safety precautions will result in
serious injury or death.
The drill motor cannot be used manually and must not be used
in an explosive atmosphere.
Power Tool Safety
Read and understand the all instructions provided
with your power tool. Failure to follow all the power
tool instructions, may result in electric shock, fire
and/or serious personal injury.
Heater is Hot
The heater is hot and will burn clothing and skin.
Keep the heater in its insulated heater stand or
blanket when not in use, and use care when heating
the pipe.
NOTICE: Use only a clean dry lint free non-synthetic cloth to
clean the heater plates.
WR00080-4-12-93
WR00080-2-21-18
WR00030-2-21-18
2-2Safety Hornet™ XL

Fusion Procedures
Obtain a copy of the pipe manufacturer’s fusion procedures
or appropriate joining standard for the pipe being fused.
Follow the procedure carefully, and adhere to all specified
parameters.
NOTICE: Failure to follow the pipe manufacturer’s fusion
procedures or appropriate joining standard could result in a
bad fusion joint.
Do Not Modify Machine
Make no modifications to your equipment unless specifically
recommended or requested by McElroy.
Safety
TX05398-03-15-19
2-3 SafetyHornet™ XL
GENERAL INFORMATION
General
Information
Theory of Heat Fusion
The principle of heat fusion is to heat two pipe surfaces to
a designated temperature, and then fuse them together by
application of force. This develops pressure which causes flow
of the melted materials, which causes mixing and thus fusion.
When the thermoplastic material is heated, the molecular
structure is transformed into an amorphous condition.
When fusion pressure is applied, the molecules from each
thermoplastic part mix. As the joint cools, the molecules return
to their form, the original interfaces are gone, and the fitting
and pipe have become one monolithic unit. A strong, fully
leak tight connection is the result.
The principle operations include:
Clamping The pipe and fitting must be held firmly to allow
all subsequent operations to take place.
Cleaning The area of pipe that the fitting will come in
contact with must be cleaned and roughed up,
as well as the base of the fitting.
Aligning The fitting must be properly seated on the pipe
and then clamped in the machine for proper
alignment.
Heating A melt pattern must be formed that penetrates
into the pipe and into the fitting.
Joining The melt patterns must be joined with a specified
force. The force must be constant around the
interface area.
Holding The molten joint must be held immobile with a
specified force until adequately cooled.
Inspecting Visually examine the entire circumference of the
joint for compliance with standards established
by your company, customer, industry, federal,
state, or local regulations.
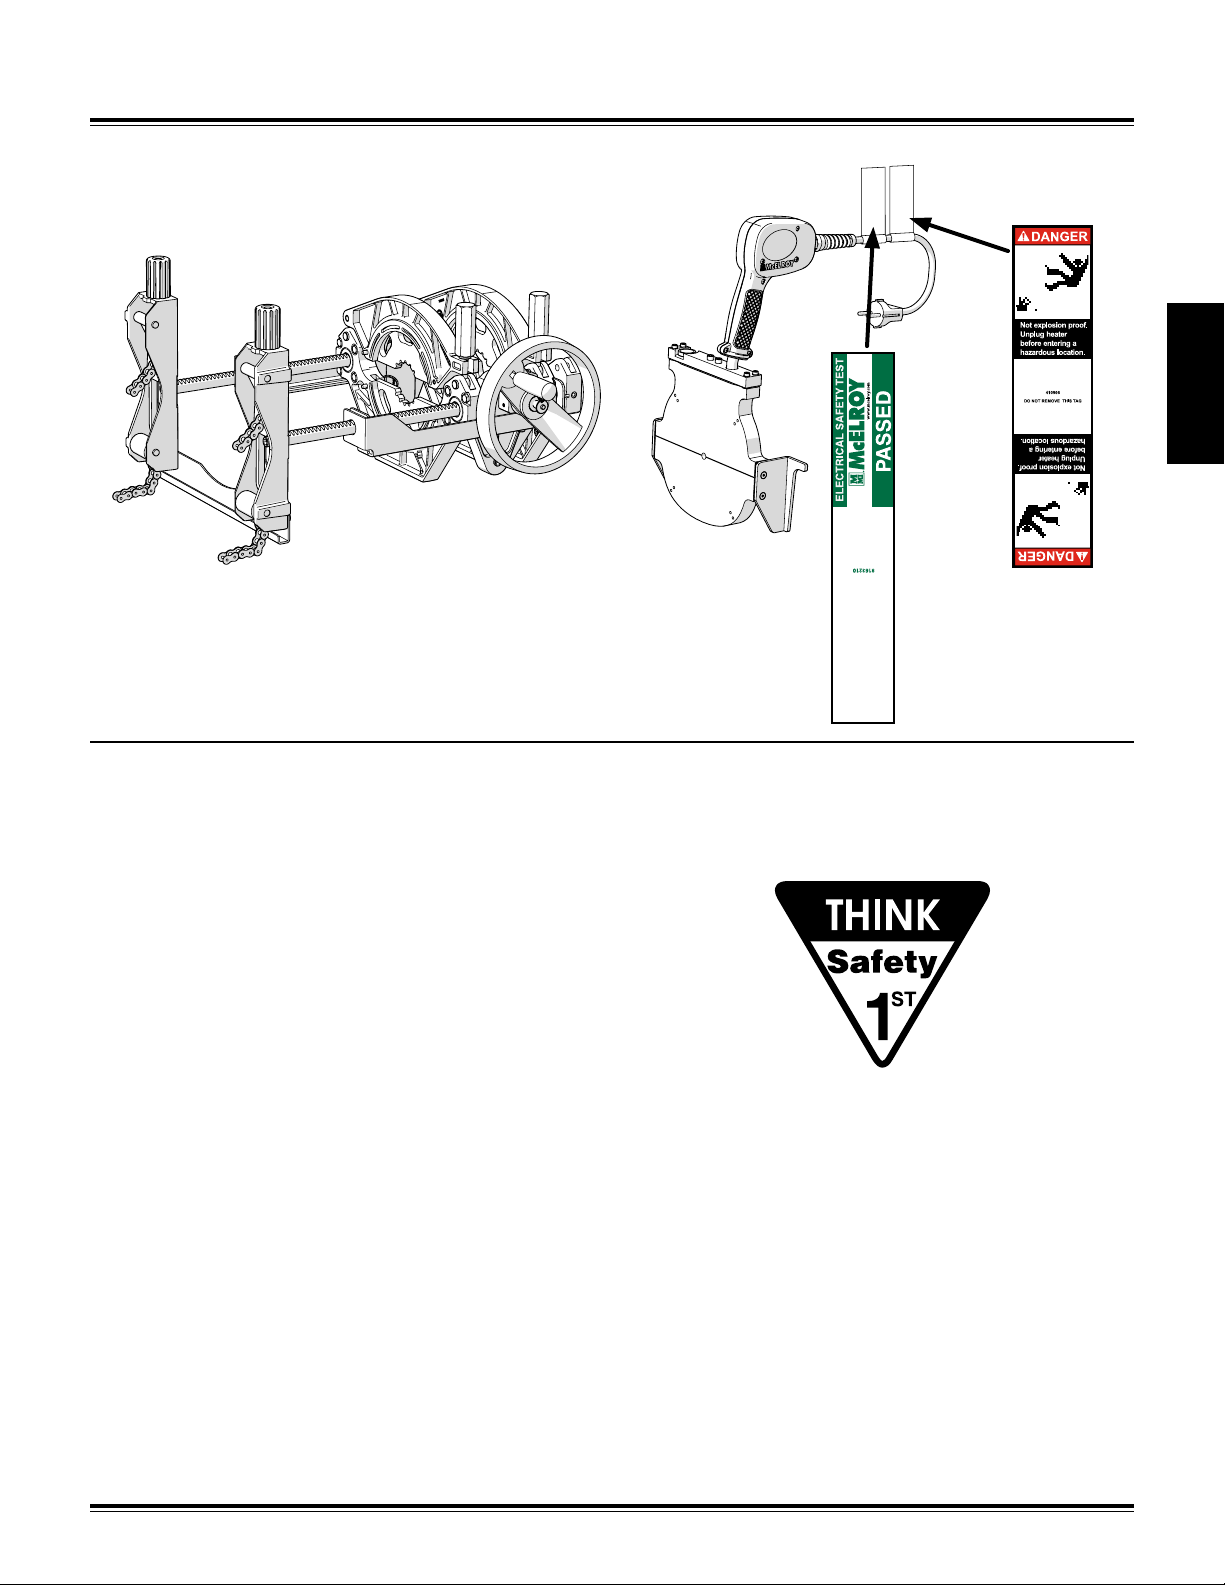
Nomenclature
Hornet™ XL Carriage
B
C
A
I
A - Main Pipe Chains
Chain used to secure the Hornet XL to the main pipe.
B - Main Pipe Clamp Knobs
Used to tighten the main pipe chain on the pipe.
C - Heater Stripper Bars
Strips the heater from the main pipe and the fitting.
D - 160mm Pipe Jaws
Jaws used to clamp onto pipe, fitting adapter or drill adapter.
E - 63mm Pipe Inserts
Size of inserts used to clamp the fitting adapter and drill
adapter.
F - Pipe Jaws Clamp Knobs
Used to tighten the pipe jaws to pipe, fitting adapter or drill
adapter.
G - Brake
Holds the position of the carriage when applied.
H - Detachable Handwheel
Rotates to open and close the carriage. The handle can be
folded in for storage. The handwheel is also detachable and
can be attached to the other side of the carriage.
I - Tailstock
The tailstock allows the Hornet XL to attach to any size main.
With the extension chains from the accessory kit, the Hornet XL
can attach to a 125mm to 630mm main pipe.
H
D
E
F
G
CD02425-02-11-19
CD05428-3-15-19
3-1General Information Hornet™ XL
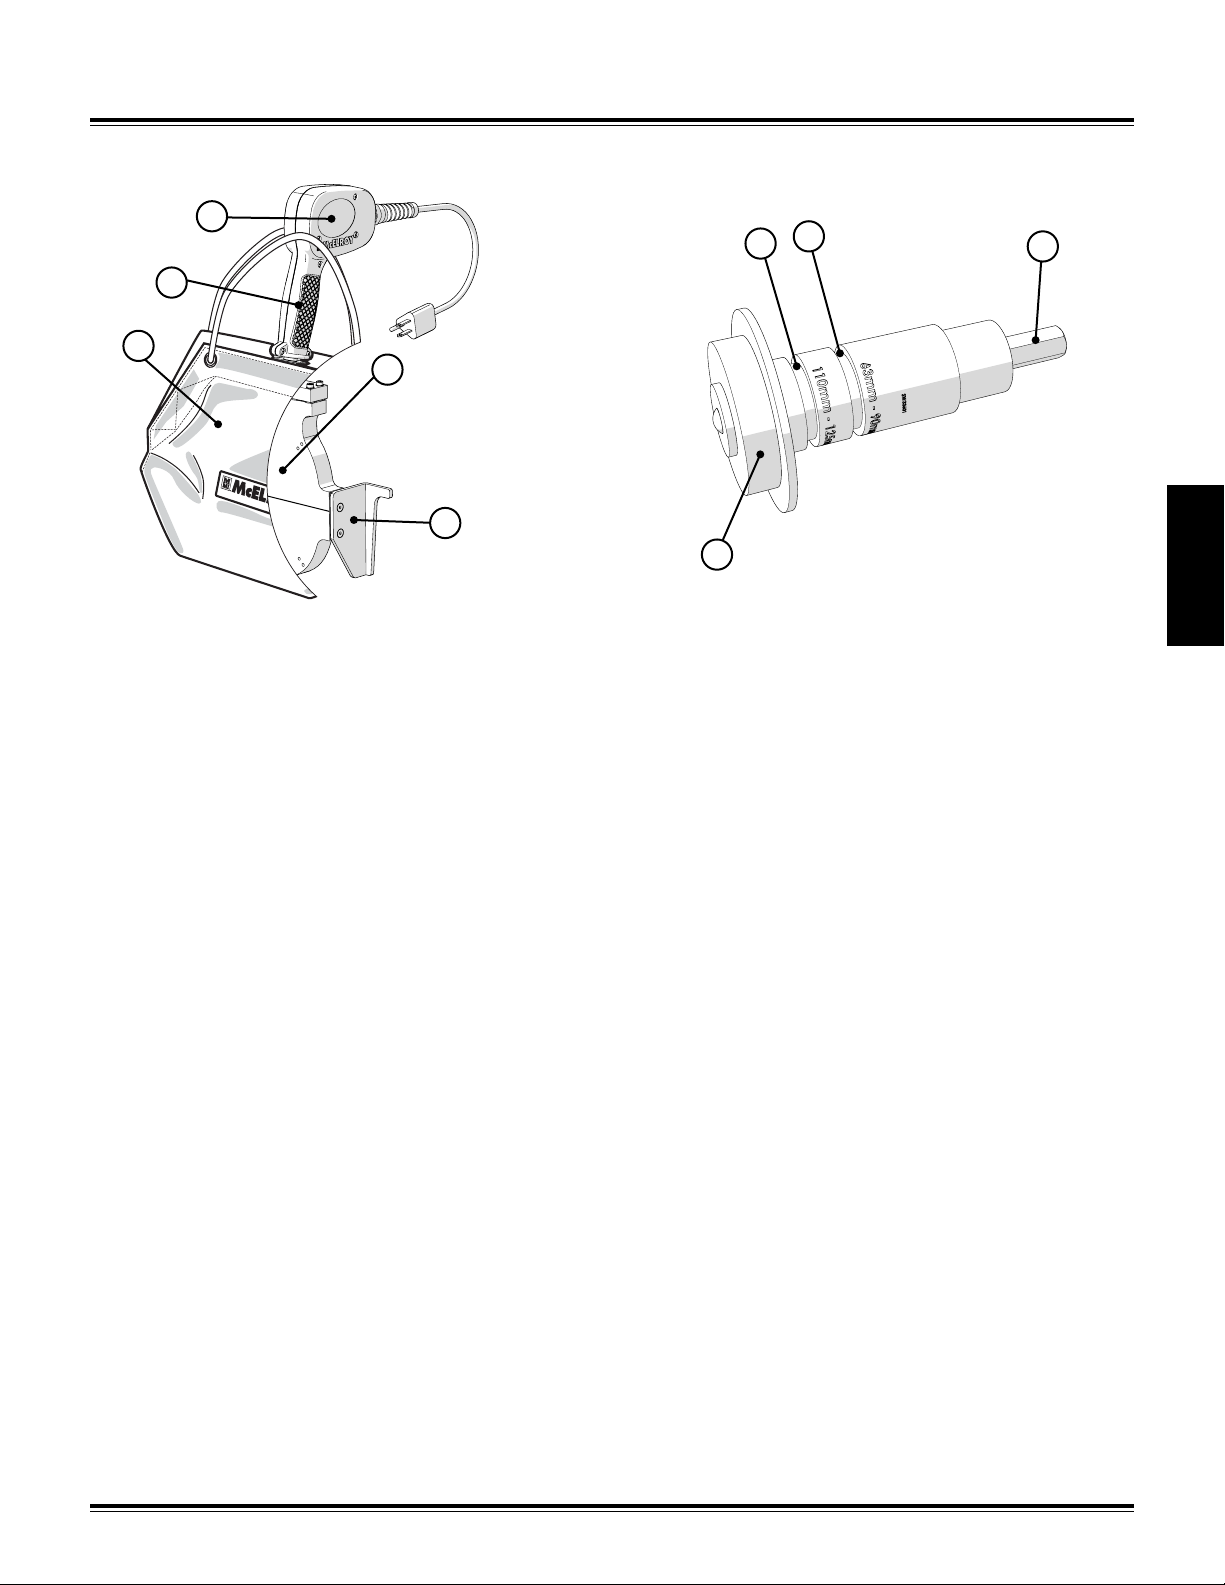
Heater
J
K
M
L
N
CD02482-02-13-19
J - Heater Information Label
Provides model number, power and indicator light information.
K - Heater Handle
Location to hold the heater and has a potentiometer to adjust
the heater temperature.
L - Heater Body
Non-stick coated heater adapters attach to the heater body.
M - Insulated Heater Bag
This bag insulates the heater while stored. Helps maintain the
set heater temperature.
N - Heater Support Bracket
Inserts into the stripper bars to allow the heater to be stripped
from the main pipe and fitting.
Fitting Adapter
Q
P
O
CD02427-02-13-19
O - Fitting Puck
Rubber puck that fits inside the inner diameter of the fitting. The
pucks are sized to fit a specific size fitting.
P - 110mm to 125mm Clamp Channel
Used with the 63mm pipe inserts to clamp the fitting adapter
in the carriage for 110mm to 125mm fittings.
Q - 63mm to 90mm Clamp Channel
Used with the 63mm pipe inserts to clamp the fitting adapter
in the carriage for 63mm to 90mm fittings.
R - Fitting Adapter Clamp Knob
Tighten knob to secure the fitting to the fitting adapter.
R
General
Information
3-2 General InformationHornet™ XL

Drill Adapter
S
U
T
V
General
Information
W
CD02428-03-15-19
X
S - Drill Adapter Chuck
Holds the hole saw (not included) used to drill the main pipe.
T - Drill Adapter
Attached to a drill (not included) so it can be clamped into
the jaws of the Hornet XL. The adapter fits drills with a circular
pilot size of 1-29/32" (48.5mm).
U - Drill Adapter Sleeve
Used inside the drill adapter for drills with a circular pilot size
of 1-13/16" (46mm).
V - 3/8" Square to 5/16" Hex Adapter
Attaches to one of the sockets to connect the drill to the hex of
drill adapter.
W - 7/16" Deep Socket, 3/8" Drive
Socket used to connect a standard drill with the drill adapter.
X - 7/16" Socket, 3/8" Drive
Socket used to connect a 90° drill with a long drill chuck with
the drill adapter.
3-3General Information Hornet™ XL

Attach Drill to Drill Adapter
Drill Pilot
Drill Sleeve
Drill Chuck
3) Insert the drill into the drill adapter. If the drill pilot
is 1-13/16" (46mm), then the drill sleeve must be
inserted into the drill adapter so that the drill adapter
can be tightened to the drill pilot. Align the slot on the
drill sleeve with the slot of the drill adapter.
Drill Adapter
Socket
Socket Adapter
CD02431-02-18-19
1) Attach the required socket to the socket adapter to
make up the length 4-7/8" between the end of the drill
pilot and the end of the socket.
The socket adapter with deep socket length is
3-13/16" (97mm).
The socket adapter with short socket length is 2-5/8"
(67mm).
4-7/8"
End of Socket
CD02433-02-18-19
End of Drill Pilot
Drill Sleeve - Only used
for a drill pilot size of
1-13/16" (46mm)
CD02434-02-18-19
4) Ensure the drill is fully inserted over the drill pilot of the
drill. If the drill will not insert completely, you may need
to adjust the socket adapter. Tighten the drill adapter
clamp.
General
Information
2) Insert the adapter and socket into the drill chuck. The
amount of adapter inserted into the chuck will need to
make the total measurement from the end of the drill
pilot to the end of the socket to equal 4-7/8". Tighten
the drill chuck.
4-7/8"
CD02430-02-18-19
Tighten Clamp
CD02435-02-18-19
5) Check the function of drill by pressing the trigger. The
chuck of the drill adapter should turn when operated.
If the drill adapter does not turn, remove the drill and
extend more of the socket adapter.
IMPORTANT: Dedicating a drill to the drill adapter will
defeat the need to remove and reattach the drill adapter to the
drill. Leave the drill attached and store it in the Hornet XL case.
3-4 General InformationHornet™ XL
General
Information
Attach Extension Chains
The Hornet™ XL comes equipped with base chains that will
attach the Hornet™ XL to a main pipe size up to 315mm (12"
OD). The accessory kit has extension chains that will allow the
Hornet™ XL to attach to a main pipe size up to 630mm (24"
OD).
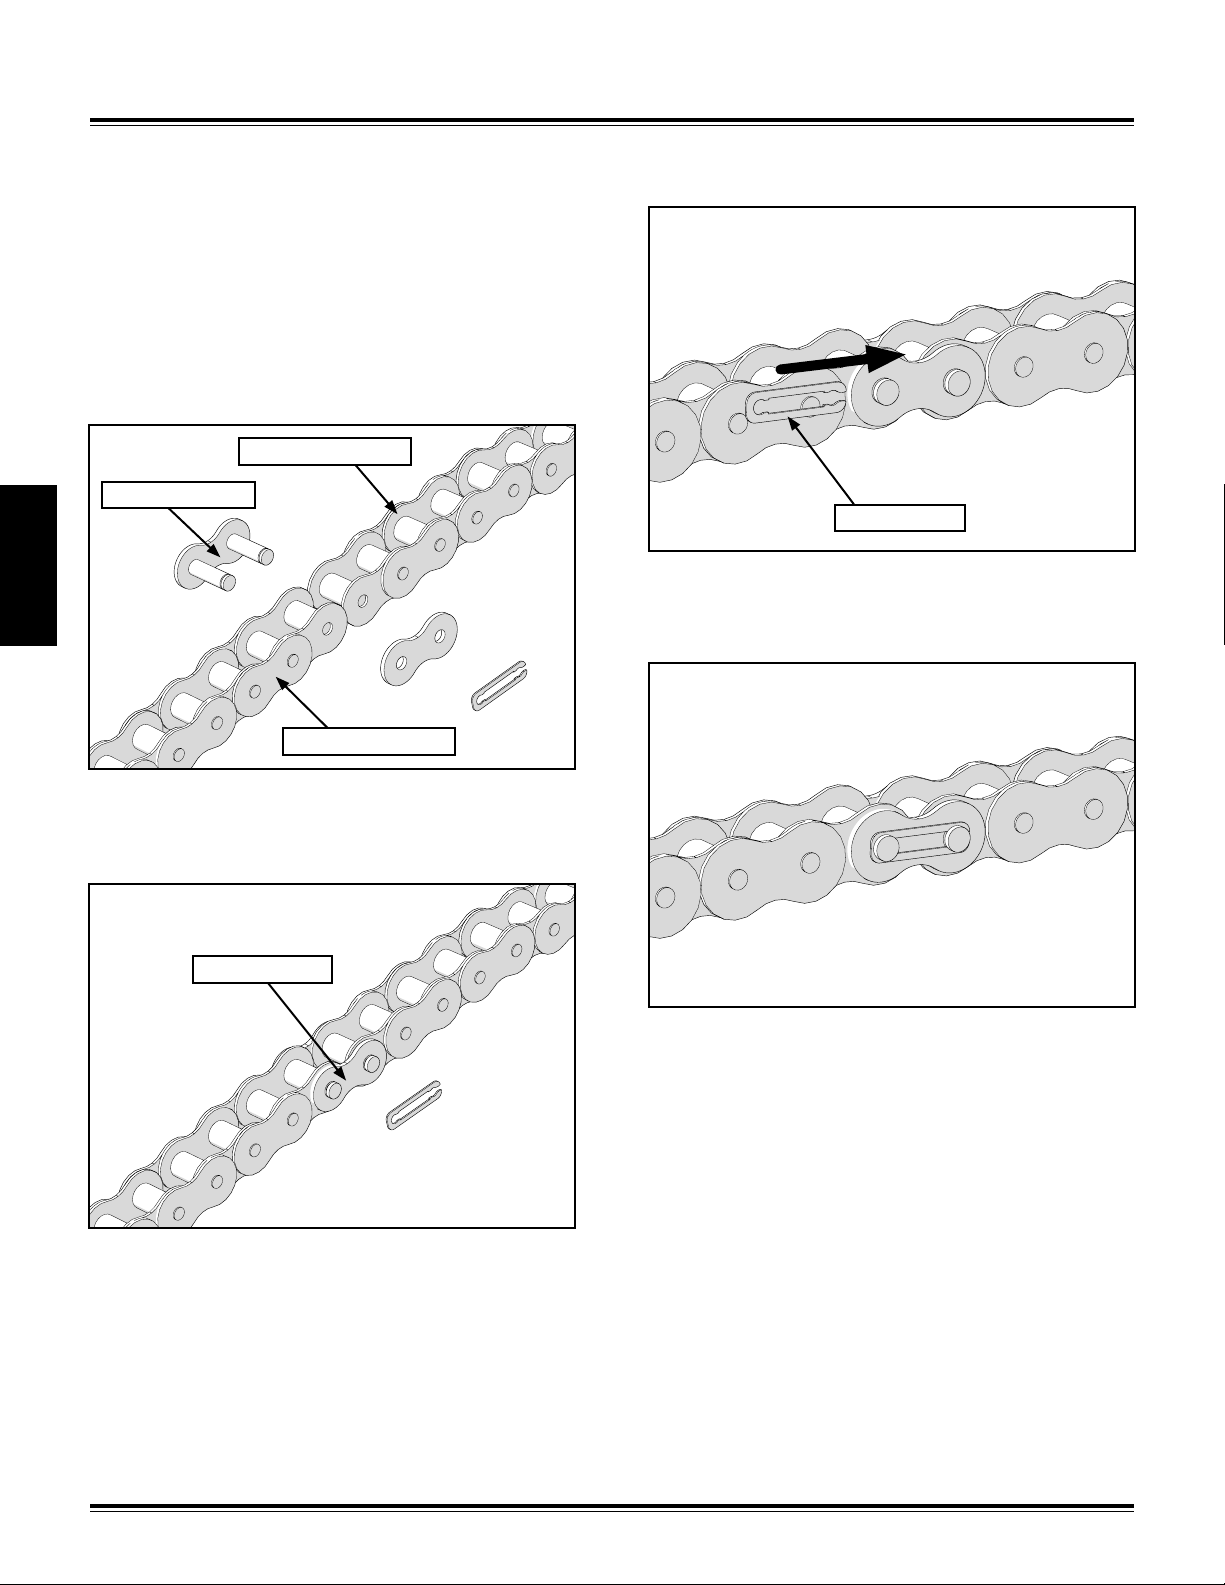
Attach Extension Chains:
1) Position the extension chain next to the end of the base
chain.
Base Chain
Master Link
3) Insert the link clip between the grooves of the master
link to secure the link cover.
Link Clip
CD02437-02-21-19
4) Ensure the clip is seated completely on the pins of the
master link. Repeat these instructions for the other chain.
Extension Chain
CD02439-02-21-19
2) Insert the pins of the master link into the base chain and
the extension chain. Place the link cover over the pins
of the master link.
Link Cover
CD02436-02-21-19
CD02438-02-21-19
3-5General Information Hornet™ XL

Install Heater Adapters
Correctly sized heater adapters must be installed before
performing a fusion with the Hornet™ XL. The adapters are
sized by the main pipe size and the fitting size.
Fitting Size
3) Rotate the adapters and align the marks on the
adapters with the mark on the heater body.
Heater Alignment
Mark
Adapter Alignment
Mark
CD02443-03-15-19
Main Pipe Size Alignment Mark
CD02441-03-15-19
Install Heater Adapters:
1) Position the fitting adapter between the bends of the
heater support bracket. Position the pipe adapter
opposite of the fitting adapter.
Pipe Adapter
Heater Support Bracket
CD02440-03-15-19
2) Insert the screw into the pipe adapter and tighten the
screw enough to hold the adapters to the heater body.
Fitting Adapter
Heater Alignment
Mark
CD02444-03-15-19
Adapter Alignment
Mark
4) After both adapter are aligned, tighten the screw to
secure the position of the adapters.
Detachable Handle
The handwheel can be removed and positioned on either side
of the carriage.
1) Push the button of the detent pin, grasp the handwheel
and pull away from the carriage.
2) Align the tab on the back of the handwheel with the slot
on the carriage to attach the handwheel.
General
Information
CD02442-02-21-19
3-6 General InformationHornet™ XL
Carriage Slot
Handwheel Tab
CD02493-03-15-19
Detent Pin Button
TX05399-03-15-19

OPERATION - FUSION OUTLET
Attach Hornet™ XL to Pipe
1) Determine the size of the main pipe and the size of
outlet that will be fused. If the main pipe size is greater
than 315mm (12" OD), the extension chains need to
installed. Refer to “Attach Extension Chains” section of
this manual for installation procedure.
2) Apply the carriage brake so the carriage will not move
while attaching the Hornet™ XL. The handwheel can
be removed and positioned on the other side of the
carriage if needed.
Carriage Brake
5) Pull the chain tight and insert the closest link of the
chain into the slot of the clamp bracket.
Clamp Bracket
CD02448-03-15-19
6) Tighten the clamp knob until the tailstock is firmly
secured to the main pipe. Repeat these steps for the
other chain.
Operation
Fusion Outlet
CD02446-02-25-19
3) Position the tailstock against the main pipe.
CD02445-02-25-19
4) Wrap the chains around the pipe and up to the clamp
knobs of the tailstock.
CD02448-02-25-19
The clamp knobs are equipped with a ball thrust bearing,
which permit the operator to develop high clamp forces with
minimal effort.
7) Clean the main pipe in the area where the fitting will be
fused.
CD02447-02-25-19
4-1Operation - Fusion Outlet Hornet™ XL

Prepare Heater
This heater is not explosion proof. Operation of
heater in an explosive atmosphere without necessary
safety precautions will result in serious injury or
death.
When operating in an explosive atmosphere, the heater
should be brought up to temperature in a safe environment,
then unplugged before entering the explosive atmosphere for
fusion.
1) Ensure the heater is cool. Install fusion outlet heater
adapters.
NOTICE: The heater should never be used without fusion
heater adapters installed. Refer to the “Install
Heater Adapters” section of this manual for
installation procedure.
CD02152-2-21-18
The heater has a green indicator light which will flash on and
off. This indicates that the controller is operating normally. If
the green indicator is not flashing then the controller may not
be operating properly. If this occurs, disconnect power and
have the heater repaired by an McElroy Authorized Service
Center.
The heater has a red indicator light on the handle at the
bottom of the temperature scale. When the heater is plugged
in and preheating the red light glows steadily until the set
temperature is reached. The red light then goes off and on as
the heater maintains temperature.
If the heater is not operating properly, the control will attempt
to turn the heater off and the red indicator light will flash
rapidly. If this occurs, disconnect the power and take it to a
McElroy Authorized Service Center for repair.
Operation
Fusion Outlet
CD02449-03-15-19
2) Place heater in insulated heater bag.
3) Plug heater into a proper power source. Refer to
Heater Information Label for power information.
Adjusting Heater Temperature:
4) Turn knob to desired temperature. Allow heater to reach
temperature. Measure the heater surface temperature
with a pyrometer. Any variance must be corrected to
the pyrometer reading.
Loosen set screw in the knob. Turn knob to point to the
temperature of the pyrometer reading. Tighten set screw
in the knob.
Turn knob to desired temperature. Allow heater to
stabilize at the new temperature (5 to 10 minutes) after
adjusting.
The thermometer on the heater body indicates internal
temperature and should be used as a reference only.
PH02571-2-21-18
5) Allow heater to warm-up to operating temperature.
4-2 Operation - Fusion OutletHornet™ XL

Drill Main Pipe
The drill adapter is used with a hole saw to drill a hole in the
main pipe.
Insert Drill Adapter in Carriage:
1) Attach drill (not included) to the drill adapter. Refer to
the “Attach Drill to Drill Adapter” section of this manual
for installation procedure.
2) Install a hole saw (not included) that matches the fitting
size to be fused. Contact fitting manufacturer for hole
saw recommendations.
Hole Saw
4) Unlock the brake on the carriage. Pull the trigger on
the drill and close the carriage toward the main pipe.
Apply extra pressure as needed to advance the hole
saw into the main pipe. Drill until the hole saw cuts
through the pipe wall completely.
CD02455-02-27-19
5) Release the drill trigger and open the carriage
completely and apply the brake.
Operation
Fusion Outlet
CD02454-02-27-19
3) Ensure the 63mm pipe inserts are installed in the jaws
of the carriage. Unlock the brake on the carriage and
open the carriage completely then lock the brake.
Insert the drill and drill adapter in the lower jaws of the
carriage. There are two steps in the drill adapter and
each one will rest in the pipe inserts. Close the jaws
and tighten the clamps to secure the adapter in the
carriage.
CD02456-02-27-19
6) Open the jaws of the carriage and remove the drill and
drill adapter.
Steps on Adapter
CD02453-02-26-19
CD02458-02-27-19
4-3Operation - Fusion Outlet Hornet™ XL
Insert Fitting
The fitting adapter secures the position and orientation of the
fitting in the carriage for 63mm - 125mm fittings.
If pipe is pupped to the fitting, the fitting can be clamped using
Acrobat™ pipe inserts instead of the fitting adapter.
For 160mm fittings the adapter is not required and the fitting
can be clamped directly in the machine.
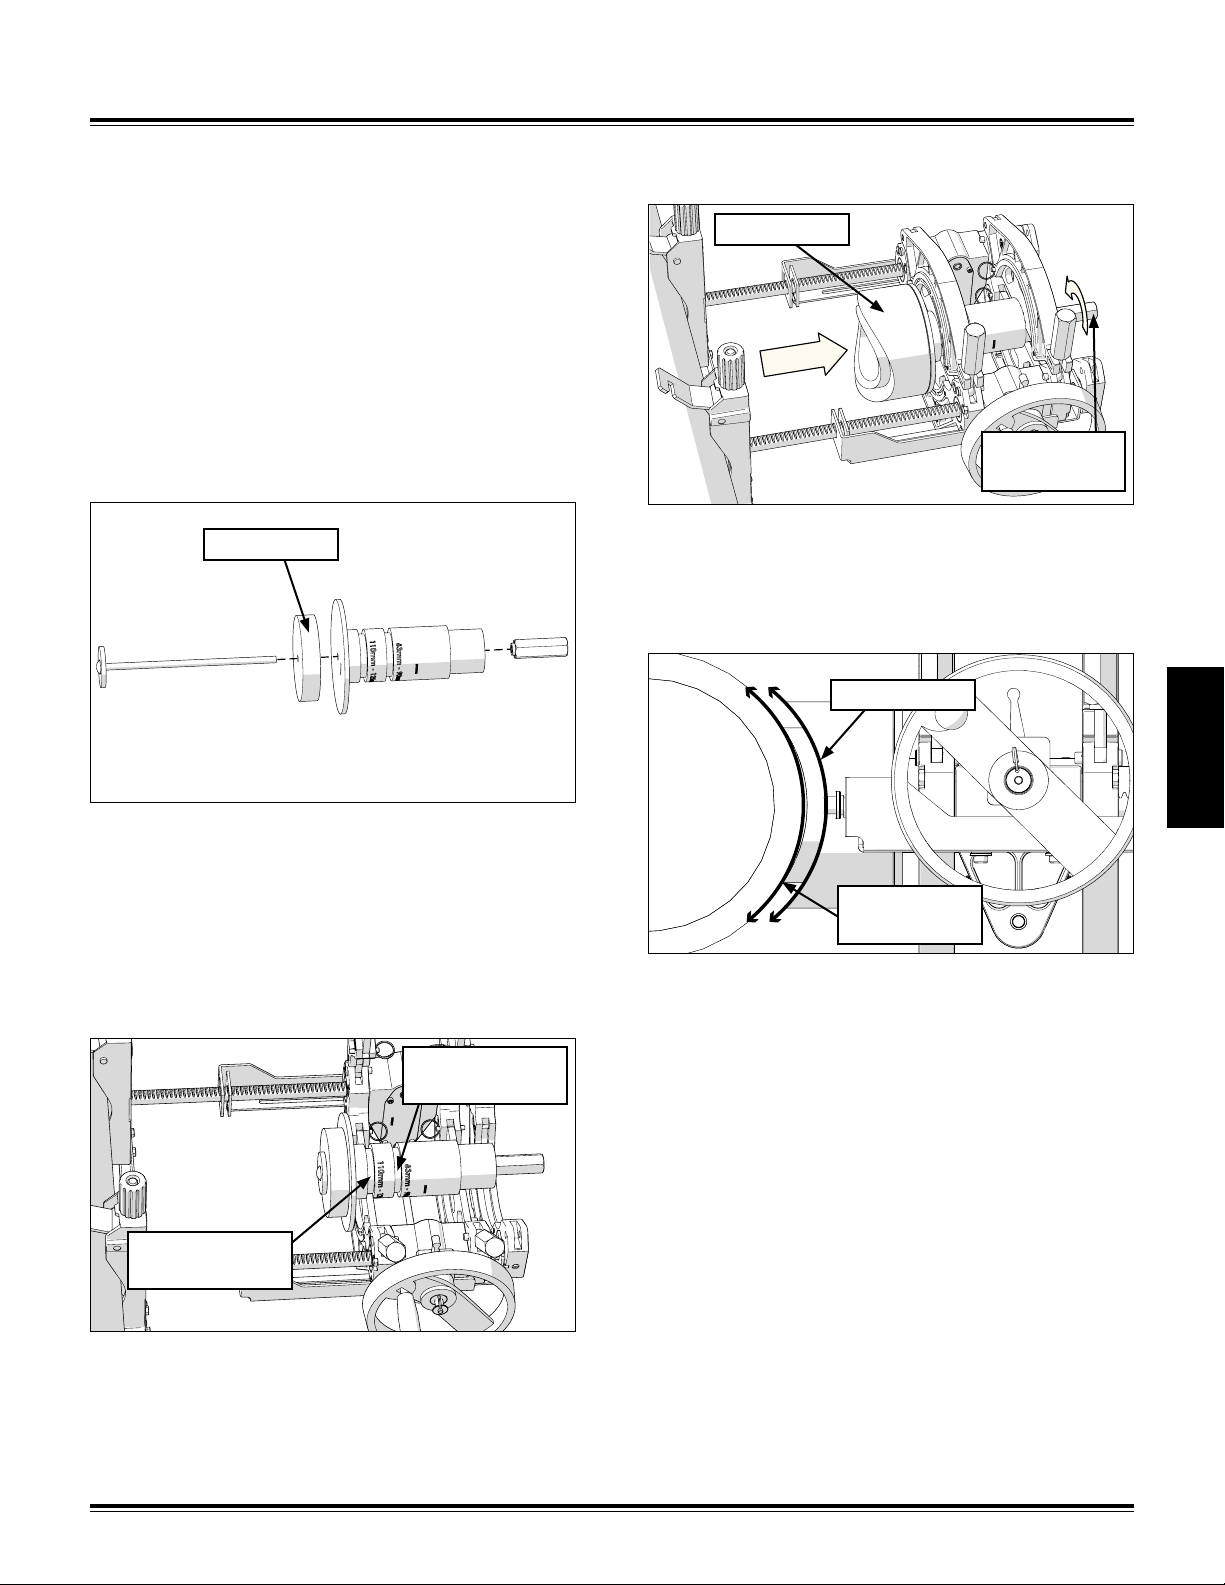
Insert Fitting Adapter in Carriage (63mm to
125mm Fittings):
1) Open the jaws of the carriage.
2) Install a fitting puck for the size fitting to be fused.
4) Insert the fitting over the fitting puck and against the
backing plate of the adapter.
Fitting
Fitting Adapter
Clamp Knob
CD02452-03-15-19
Fitting Puck
CD02450-03-15-19
3) Ensure the 63mm pipe inserts are installed in the jaws
of the carriage. Insert the fitting adapter in the lower
jaws of the carriage. There are two grooves on the
adapter one for 110mm - 125mm fittings and the
other for 63mm - 90mm fittings. Ensure the adapter is
inserted with the appropriate groove in the lower jaw
closest to the main pipe. Close the jaws and tighten the
clamps to secure the adapter in the carriage
63mm - 90mm
Fitting Groove
5) Close the carriage and bring the fitting next to the main
pipe.
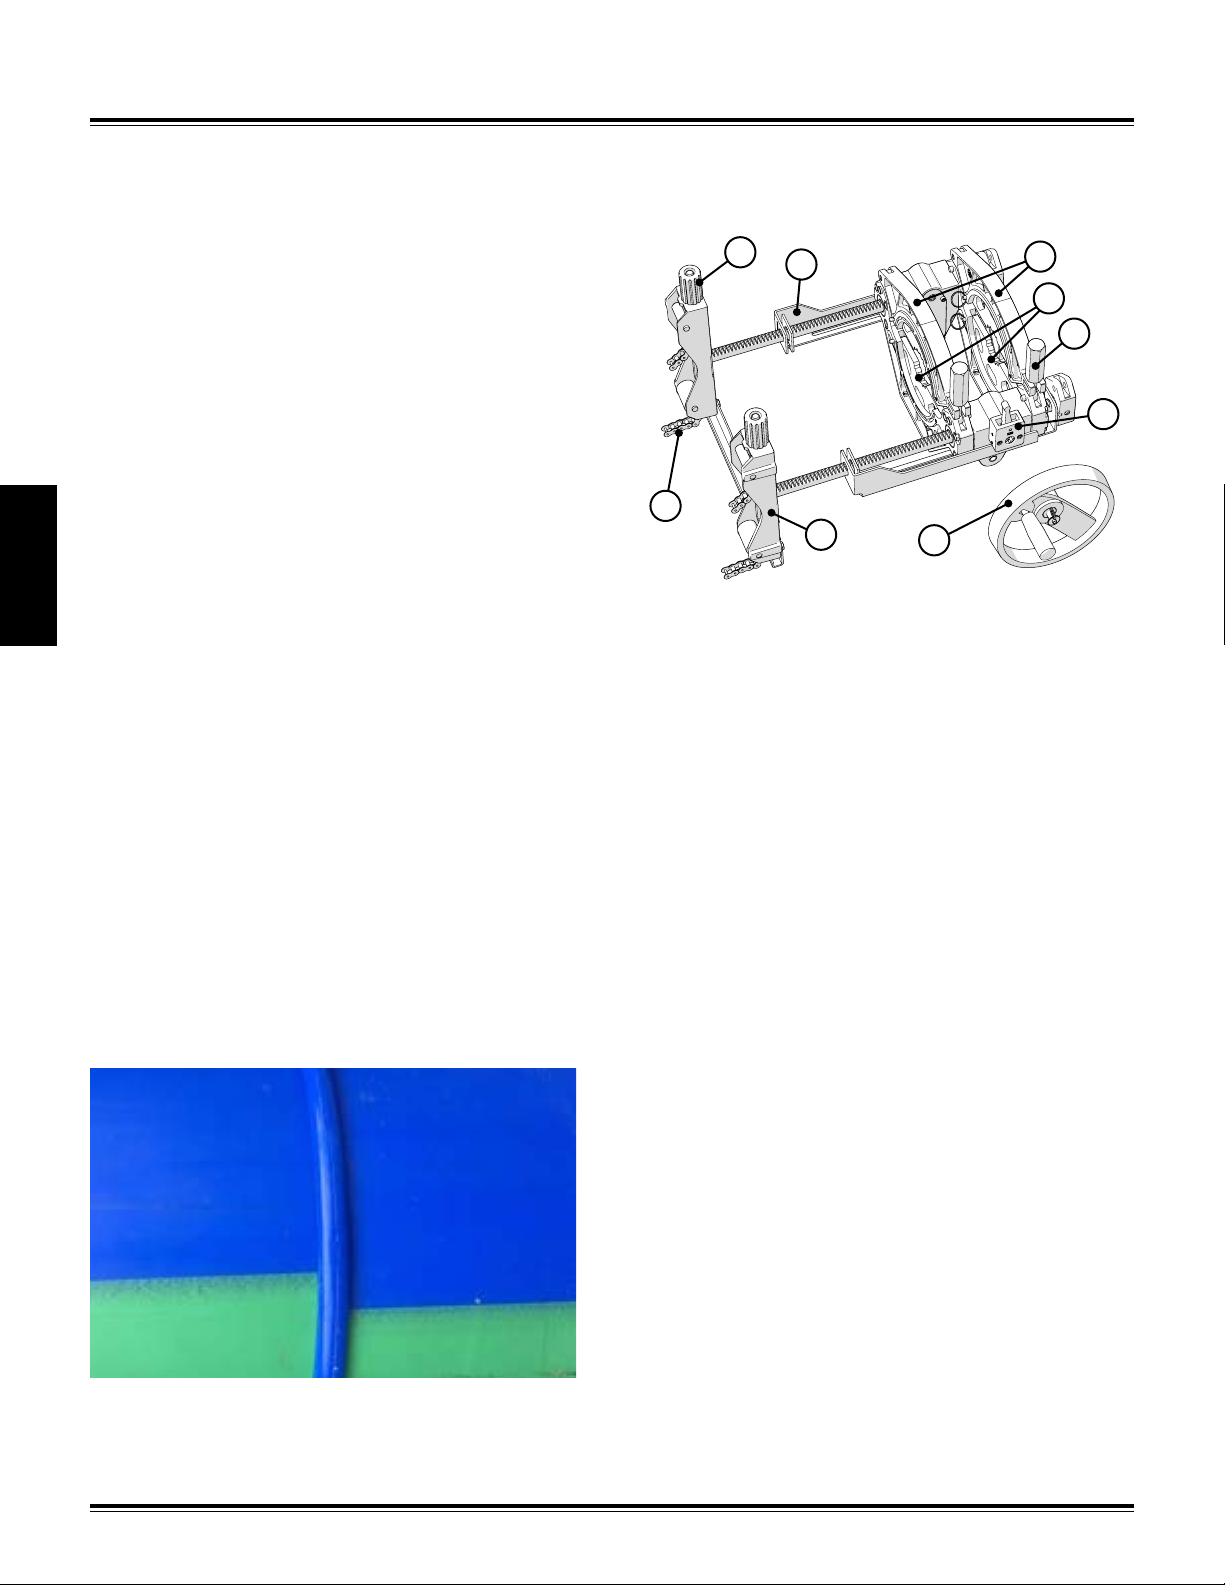
6) Adjust the fitting by rotating it to align the curve of the
fitting to the curve of the main pipe.
Curve of Fitting
Curve of Main
Pipe
CD02459-03-15-19
7) After alignment, tighten the fitting adapter clamp knob
to secure the fitting.
8) Clean the fitting where the fitting will make contact with
the main pipe.
Operation
Fusion Outlet
110mm - 125mm
Fitting Groove
CD02451-02-26-19
4-4 Operation - Fusion OutletHornet™ XL

Insert Heater
NOTICE: Incorrect heating temperature can result in
questionable fusion joints. Check heater adapters periodically
with a pyrometer and make necessary adjustments.
Refer to “Prepare Heater” section for how to adjust heater
temperature.
1) Check heater surface temperature with a pyrometer.
Refer to the pipe manufacturer’s recommendations or
appropriate joining standard for proper heater temperature.
IMPORTANT: The dial thermometer on the heater indicates
internal temperature which varies from the actual surface
temperature.
The dial thermometer can be used as reference once the
surface temperature has been verified and is never a substitute
for actual surface temperature.
4) Open carriage completely. Insert heater in the heater
strippers between the main pipe and fitting. Ensure the
tabs of the heater insert between the tabs of the heater
stripper.
CD02460-03-15-19
Operation
Fusion Outlet
This heater is not explosion proof. Operation of
heater in an explosive atmosphere without necessary
safety precautions will result in serious injury or
death.
2) Use a clean dry lint free non-synthetic cloth to clean the
fusion heater adapters.
CD02461-03-15-19
The heater is hot and will burn clothing and skin.
Keep the heater in its insulated heater stand or
blanket when not in use, and use care when heating
the pipe.
Heat Fitting and Pipe
1) Rotate the handwheel to close the carriage bringing the
heater into the pipe and the fitting into the heater.
IMPORTANT: Do not force the heater onto the pipe
and fitting. Allow the pipe and fitting to
melt onto the heater. Forcing the heater
onto the fitting and pipe will damage
the Hornet XL or create a questionable
melt pattern.
CD02462-03-15-19
Heating time starts when the heater adapters are fully
inserted into the pipe and fitting.
Heat fitting and pipe for the pipe manufacturer’s
specified period of time or appropriate joining
standard.
4-5Operation - Fusion Outlet Hornet™ XL

2) Engage the carriage brake to hold the position of the
carriage during heating time.
3) When the heating time is complete, release the
carriage brake. Open the carriage until there is enough
room to remove the heater. Quickly remove the heater
from heater strippers.
4) Quickly inspect the heated parts to make sure all
surfaces have been melted properly.
Fuse Fitting and Pipe
1) Close the carriage bringing the fitting and pipe
together. Continue to close the carriage until the fitting
is inserted completely into the pipe.
NOTICE: Be sure to complete the joint in the time
allowed by the pipe manufacturer or
appropriate joining standard.
2) Engage the carriage brake to hold the carriage
position after the fitting is completely inserted.
Allow the carriage to stay in place for the total cooling
time specified by the pipe manufacturer or appropriate
joining standard.
CD02463-03-15-19
2) Release the carriage brake. Open the carriage
completely and reapply the carriage brake.
CD02463-03-15-19
Remove Hornet™ XL
After completing the specified cooling time, inspect the joint
for compliance with the appropriate joining standard.
There should be no gaps or voids between the fitting and the
pipe.
If the joint is not acceptable, cut out the pipe section and fuse
a new pipe in the removed section.
1) Unclamp the fitting from the fitting adapter.
CD02468-03-15-19
3) If a pipe needs to be fused to the fitting, refer to
“Operation - Socket Fuse to Outlet” for a socket fusion.
4) Remove the carriage from the main pipe by loosening
the clamp knobs on the tailstock. Slide the chains from
the clamp brackets and lift machine from the main pipe.
IMPORTANT: Support the machine while unclamping to
avoid the machine falling or swinging around the main pipe.
5) Refer to “Attach Hornet™ XL to Pipe” section and start a
new fusion outlet.
Operation
Fusion Outlet
TX05400-03-15-19
4-6 Operation - Fusion OutletHornet™ XL

OPERATION - SOCKET FUSE TO OUTLET
After creating a fusion outlet on a main pipe, you can use
the Hornet™ XL to fuse a pipe to the fusion outlet. A 63mm to
125mm outlet requires a socket fusion to be performed. Leave
the machine attached in the same position after making the
fusion outlet. The jaw inserts and socket fusion heater adapters
are not included and will need to be obtained separately.
Prepare Pipe End
1) Cut off damaged or oval ends of pipe squarely with a
pipe cutter.
2) Remove shavings and burrs inside pipe end.
CD02479-03-15-19
3) Plug heater into a proper power source. Refer to
Heater Information Label for power information.
Adjusting Heater Temperature:
Fuse to Outlet
Operation - Socket
CD00999-2-21-18
Prepare Heater
This heater is not explosion proof. Operation of
heater in an explosive atmosphere without necessary
safety precautions will result in serious injury or
death.
When operating in an explosive atmosphere, the heater
should be brought up to temperature in a safe environment,
then unplugged before entering the explosive atmosphere for
fusion.
1) Ensure the heater is cool. Install socket fusion heater
adapters (not included) for 63mm to 125mm outlets.
Refer to “Changing Heater Plates/Adapters” in the
Maintenance section for information about heater
plates and adapters.
NOTICE: The heater should never be used without fusion
heater adapters installed.
2) Place heater in insulated heater bag.
CD02152-2-21-18
4) Turn knob to desired temperature. Allow heater to reach
temperature. Measure the heater surface temperature
with a pyrometer. Any variance must be corrected to
the pyrometer reading.
Loosen set screw in the knob. Turn knob to point to the
temperature of the pyrometer reading. Tighten set screw
in the knob.
Turn knob to desired temperature. Allow heater to
stabilize at the new temperature (5 to 10 minutes) after
adjusting.
The thermometer on the heater body indicates internal
temperature and should be used as a reference only.
The heater has a green indicator light which will flash on and
off. This indicates that the controller is operating normally. If
the green indicator is not flashing then the controller may not
be operating properly. If this occurs, disconnect power and
have the heater repaired by an McElroy Authorized Service
Center.
The heater has a red indicator light on the handle at the
bottom of the temperature scale. When the heater is plugged
in and preheating the red light glows steadily until the set
temperature is reached. The red light then goes off and on as
the heater maintains temperature.
5-1Operation - Socket Fuse to Outlet Hornet™ XL

If the heater is not operating properly, the control will attempt
to turn the heater off and the red indicator light will flash
rapidly. If this occurs, disconnect the power and take it to a
McElroy Authorized Service Center for repair.
PH02571-2-21-18
5) Allow heater to warm-up to operating temperature.
Clean Fitting and Pipe
1) Fitting and pipe must be clean and dry. Use a clean lint
free cloth to wipe the mating surfaces.
NOTICE: Do not touch fusion area with hands.
Mark Insertion Depth
1) Use a marking instrument and mark the insertion depth
according to the appropriate joining standard. The
mark can be made using the insertion depth gauge.
This mark is the insertion depth used when fusing the
pipe and fitting.
The chamfer/depth gauge tool may be used to
chamfer the end of the pipe as well as determine the
insertion depth. Mark the insertion depth along the
edge of the chamfer/depth gauge. The chamfer/depth
gauge is pipe size specific.
CD0120 9-2-21-18
CD02464-03-15-19
CD00999-2-21-18
Load Pipe
1) Ensure the Acrobat™ pipe inserts are installed for the
size of pipe to be fused.
2) Load the pipe into the jaws of the carriage. Allow
enough pipe to protrude so that the pipe can be
inserted to the insertion depth. Tighten the clamp knobs
on the carriage.
NOTICE: Overtightening the jaws could distort the pipe or
fitting resulting in a questionable fusion joint.
5) Open the carriage completely to allow the heater to be
inserted.
Fuse to Outlet
Operation - Socket
CD01238-2-21-18
Insertion Depth
Mark
CD02465-03-15-19
5-2 Operation - Socket Fuse to OutletHornet™ XL

Heat Fitting and Pipe
1) Use a pyrometer to check the temperature on the socket
faces.
2) Use a clean non-synthetic lint free cloth to clean the
heater socket adapter surfaces.
3) Insert the heater into the heater strippers in between
the pipe end and fitting. Rotate the handwheel moving
the pipe onto the heater and the heater onto the fitting.
Close the jaws until the heater is inserted completely
into the fitting and the pipe is inserted to the insertion
depth mark.
IMPORTANT: Do not force the heater onto the pipe
and fitting. Allow the pipe and fitting to
melt onto the heater. Forcing the heater
onto the fitting and pipe will damage
the Hornet XL or create a questionable
melt pattern.
2) Engage the carriage brake to hold the position of the
carriage during heating time.
3) When the heating time is complete, release the
carriage brake. Open the carriage completely. Quickly
remove the heater from heater strippers.
4) Quickly inspect the heated parts to make sure all
surfaces have been melted properly.
Fusion and Cooling
1) Close the carriage bringing the fitting and pipe
together. Close the carriage to the insertion depth mark
on the pipe. Engage the carriage brake to hold the
position of the carriage.
Fuse to Outlet
Operation - Socket
CD02466-03-15-19
Heating time starts when the pipe and fitting are fully
inserted onto the heater adapters.
Heat fitting and pipe for the pipe manufacturer’s
specified period of time or appropriate joining
standard.
CD02469-03-15-19
NOTICE: Be sure to complete the joint in the time
allowed by the pipe manufacturer or
appropriate joining standard.
Allow the jaws to stay in place for the total cooling
time specified by the pipe manufacturer or appropriate
joining standard.
CD02467-03-15-19
5-3Operation - Socket Fuse to Outlet Hornet™ XL

Remove Hornet™ XL
After completing the specified cooling time, inspect the joint
for compliance with the appropriate joining standard.
There should be no gaps or voids between the fitting and the
pipe.
If the joint is not acceptable, cut out the pipe section and fuse
a new pipe in the removed section.
1) Open the jaws of the carriage.
2) Remove the machine from the main pipe by loosening
the chains on the tailstock and removing the chains
from the chain brackets. Lift the machine away from the
pipe.
IMPORTANT: Support the machine while unclamping to
avoid the machine falling or swinging around the main pipe.
CD02470-03-15-19
Fuse to Outlet
Operation - Socket
TX05401-03-15-19
5-4 Operation - Socket Fuse to OutletHornet™ XL
STORAGE/TRANSPORT
Storage/Transport
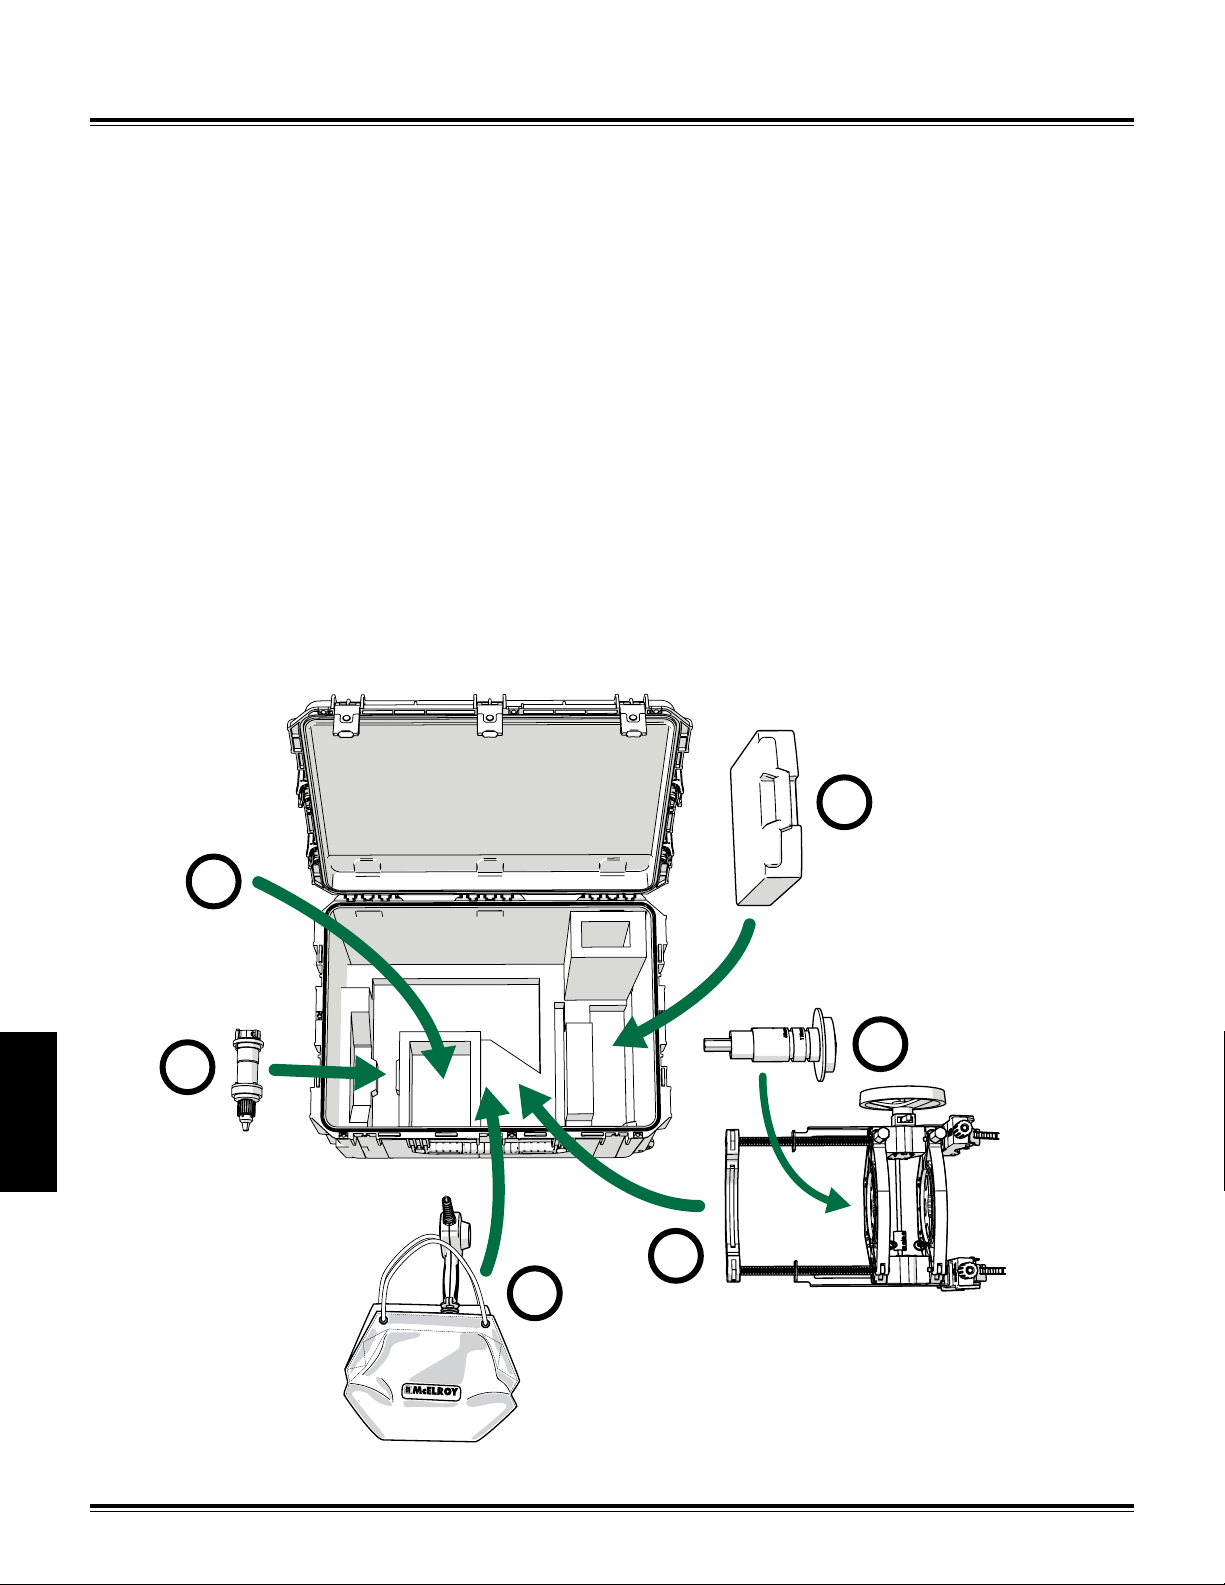
A storage/transport case is available to store the Hornet™ XL
fusion machine package. The case has wheels for mobility and
carrying handle options that aid in loading and unloading.
Foam inserts inside the case provide storage locations for each
component of the package.
Refer to the illustrations for component locations.
1) Drill Adapter - The drill adapter can be stored with the
drill attached. The drill is not included.
A) Additional Storage Area - Can be used to store drill
battery and charger (not included).
2) Hornet™ XL Fusion Machine - Clamp the fitting adapter
(B) in the fusion machine. Close the carriage against
tailstock and apply the carriage brake. Attach the
handwheel to the brake side of the carriage. Insert the
fusion machine into the case.
3) Hornet™ XL Accessory Case - Insert the accessory case
in front of the tailstock of the fusion machine.
4) Heater - Insert the heater into the insulated heater bag.
Position the heater with bag on top of fusion machine
with the heater cord pointing upward.
NOTICE: Ensure the heater is cool before inserting the
heater bag into the case. Damage to the foam
inserts could occur.
TX05402-03-15-19
3
A
B
1
Storage/Transport
2
4
Hornet™ XL Storage Case Storage Locations
6-1Storage/Transport Hornet™ XL

Hornet™ XL Storage Case with All Items Stored
6-2 Storage/TransportHornet™ XL
Storage/Transport

MAINTENANCE
Task As Needed Daily Monthly Yearly
Clean Machine
Check Machine Operation
Fasteners Are Tight
Changing Heater Plates/Adapters
Clean Chains
Clean Fitting and Drill Adapter
Adjust Gearbox Chain Tension
Preventative Maintenance
To insure optimum performance, the machine must be kept
clean and well maintained.
With reasonable care, this machine will give years of service.
Therefore, it is important that a regular schedule of preventive
maintenance be kept.
Store machine inside, out of the weather, whenever possible.
Clean Machine
1) Clean the machine with soap and water as needed.
Do not pressure wash.
Check Machine Operation
1) Open and close the carriage of the machine. If the
machine has resistance opening or closing, inspect the
carriage guide rods for debris in the rack and brush
any debris out of the rack.
2) Inspect the gearboxes and cross shaft for damage.
Ensure power is being transmitted from gearbox to
gearbox with a minimal amount of free play in the
handle.
3) Engage the carriage brake and orient the machine
vertically. Apply pressure on the carriage with hands. If
the brake slips and doesn't hold the carriage position,
replace the brake.
4) Inspect the jaw clamps for proper operation. Replace
Maintenance
any damaged jaw clamps.
5) Inspect chain clamps for proper operation. Replace
any damaged chain clamps.
l
l
l
l
l
l
l
Fasteners Are Tight
1) Inspect all machine fasteners for tightness. Tighten any
loose fasteners.
Changing Heater Plates/
Adapters
The heater body of this assembly is not coated. Coated heater
plates/adapters are available for all fusion applications.
Heater plates/adapters are installed with stainless steel cap
screws.
Care should be taken to assure that the heater adapters are
seated on the heater body, and that there is no foreign matter
trapped between these surfaces.
IMPORTANT: Do not over-tighten the bolts.
The surface of the heater adapters are coated with an antistick coating.
NOTICE: Only install heater adapters when the heater is
cool.
CD02479-03-15-19
7-1Maintenance Hornet™ XL

Clean Chains
Chains and extension chains can become dirty causing the
chains to slip on the pipe.
1) Clean any debris from the chains using a stiff bristled
brush.
Clean Fitting Adapter
1) Clean any debris from the adapter using a clean cloth.
Clean Drill Adapter
1) Clean any debris from the adapter using a clean cloth.
Adjust Gearbox Chain Tension
1) Tighten the set screw to adjust the chain tension.
NOTICE: Over-tightening the screw will apply too much chain
tension and will cause the carriage to not move easily and
damage the chain and gears of the gearbox.
2) Move the handwheel to the other gearbox and adjust
the chain tension on the second gearbox.
CD02478-03-15-19
Chain Tension
Foot
Chain Tension
Adjustment Screw
Maintenance
TX05403-03-15-19
7-2 MaintenanceHornet™ XL
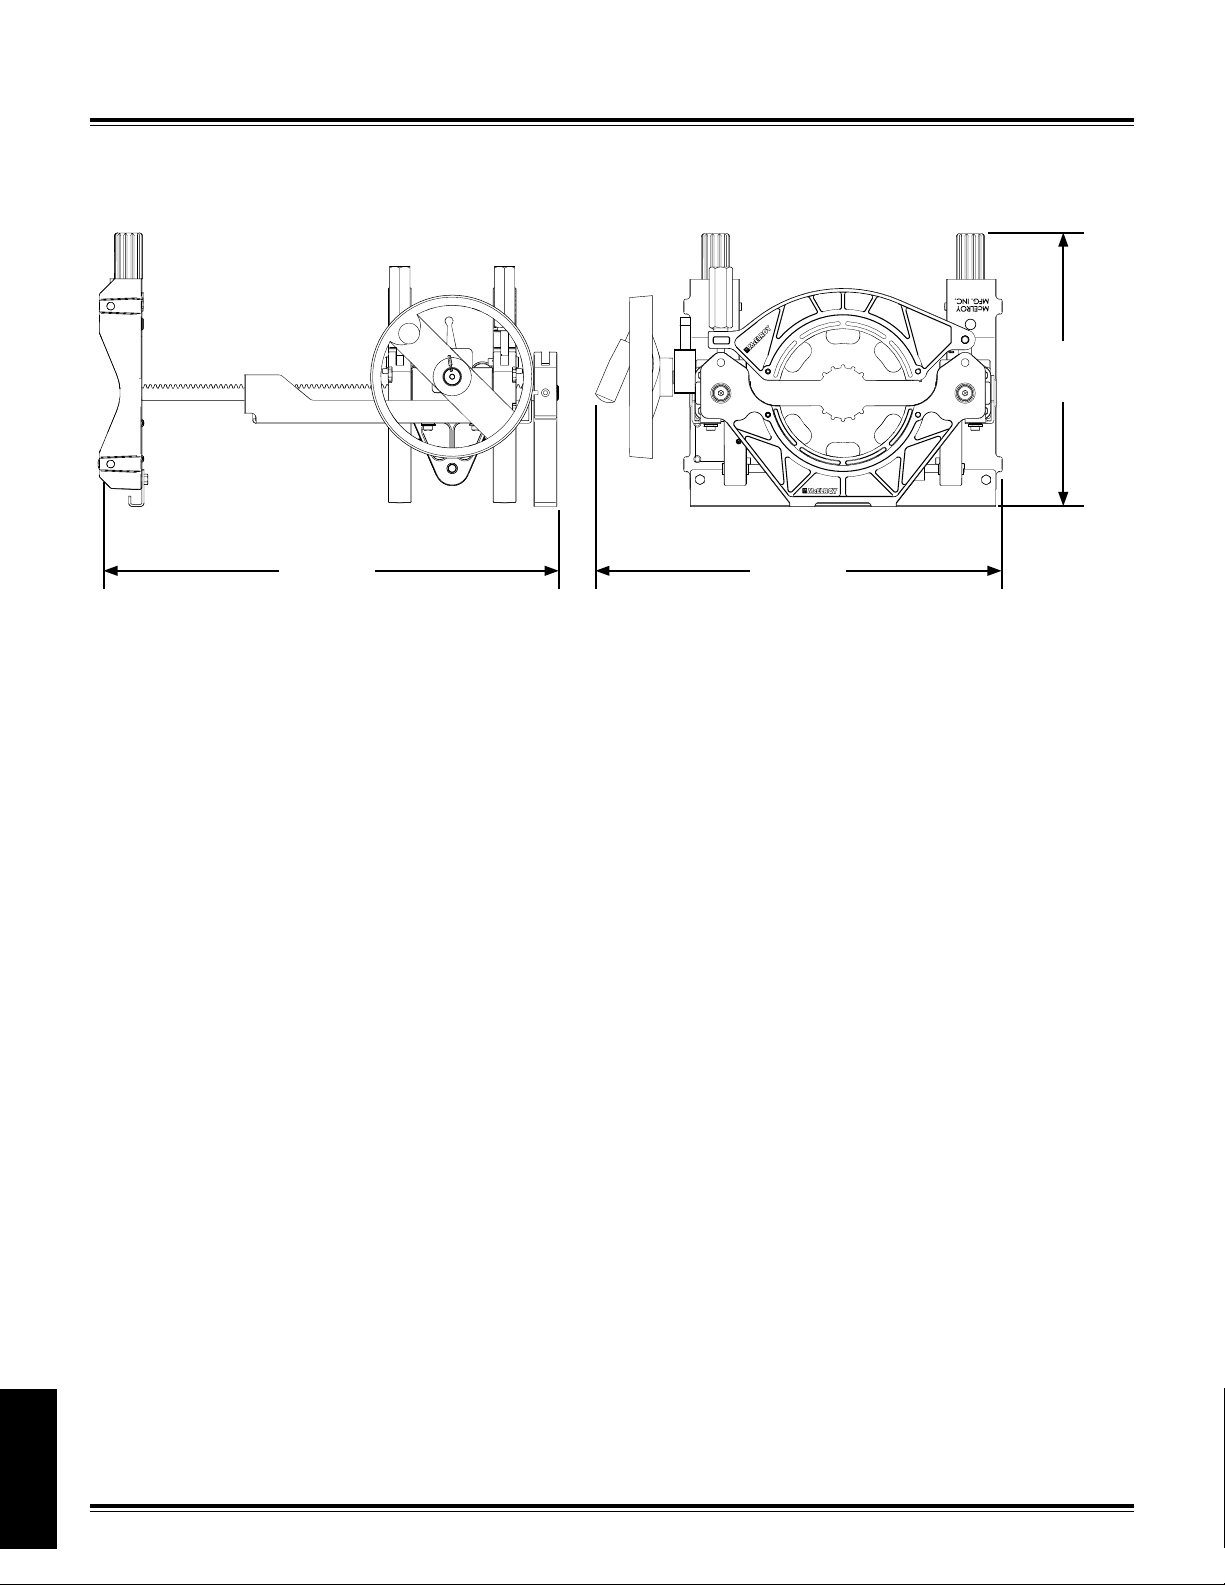
SPECIFICATIONS
13.5"
(343mm)
22.5"
(546mm)
19.5"
(495mm)
Specifications
Hornet™ XL Specifications
Models: ASW31401 - 120V Machine Package
ASW31402 - 240V Machine Package
Capacity: Fuses Outlet Sizes 63mm - 160mm (2" - 6")
Fuses to Main Sizes 125mm - 630mm (4" - 24")
Weight: Machine: 42 lbs. (19.0 kg)*
Dimensions: Length: 22.5" (546mm)
Width: 19.5" (495mm)
Height: 13.5" (343mm)
Power: Heater Power: 1,600 Watt
Package Inclusions:
Package includes Hornet™ XL carriage, heater, 63mm jaw inserts, drill adapter, drill adapter sleeve, 7/16" deep socket, 7/16"
socket, 3/8" square drive, fitting adapter, fitting clamp puck kit, chain extensions, accessory case and storage case. Drill and hole
saws are not included. Heater adapters/plates, other jaw inserts sold separately.
* Carriage weight can be reduced by removing upper jaws, lower jaw inserts, clamp handles and handwheel (all done without use of
tools) to 34 lbs. (15.5 kg).
TX05404-03-15-19
Specifications
8-1Specifications Hornet™ XL

NOTES
Notes
Notes
9-1 NotesHornet™ XL

 Loading...