

Page 1

MCDI SECURITY PRODUCTS INC.
7055 JEAN-BOURDON MONTREAL QC H4K 1G7 Canada
PH: +514-481-1067 FAX: +514-481-1487 support@mcdi.com
Page 2

TABLE OF CONTENT Page 1 | 41
Operating guide for Alarm Receiver D E C R Y P T A
3
MCDI Security Products Inc.. Internet: mcdi.com
7055 Jean-Bourdon Avenue, Montreal, QC, Canada H4K 1G7 Telephone: +514-481-1067 Fax: +514-481-1487
CONTENTS
Description................................................................................................................................................................................................2
What’s in the box ..................................................................................................................................................................................2
Physical description of DECRYPTA3........................................................................................................................................2
Size ....................................................................................................................................................................................................2
Buffer memory ................................................................................................................................................................................... 2
Buzzer Alert/Warning.........................................................................................................................................................................2
Powering DECRYPTA3 receiver ...................................................................................................................................................4
Configuring DECRYPT A3 receiver ...............................................................................................................................................7
MCDI winExprecium2.exe ....................................................................................................................................................................7
MCDI Axe configurator 0.1.0 ................................................................................................................................................................7
Installation ..........................................................................................................................................................................................8
Un-Installation ....................................................................................................................................................................................8
Usage.................................................................................................................................................................................................8
Starting other MCDI software from Axe ..........................................................................................................................................10
Logger tool .........................................................................................................................................................................................10
Parameter definitions ..........................................................................................................................................................................11
Transmission rate ...................................................................................................................................................................................13
Transmission rate Serial port..............................................................................................................................................................13
Transmission rate USB port ............................................................................................................................................................... 13
Connecting DECRYPTA3 to PCs................................................................................................................................................13
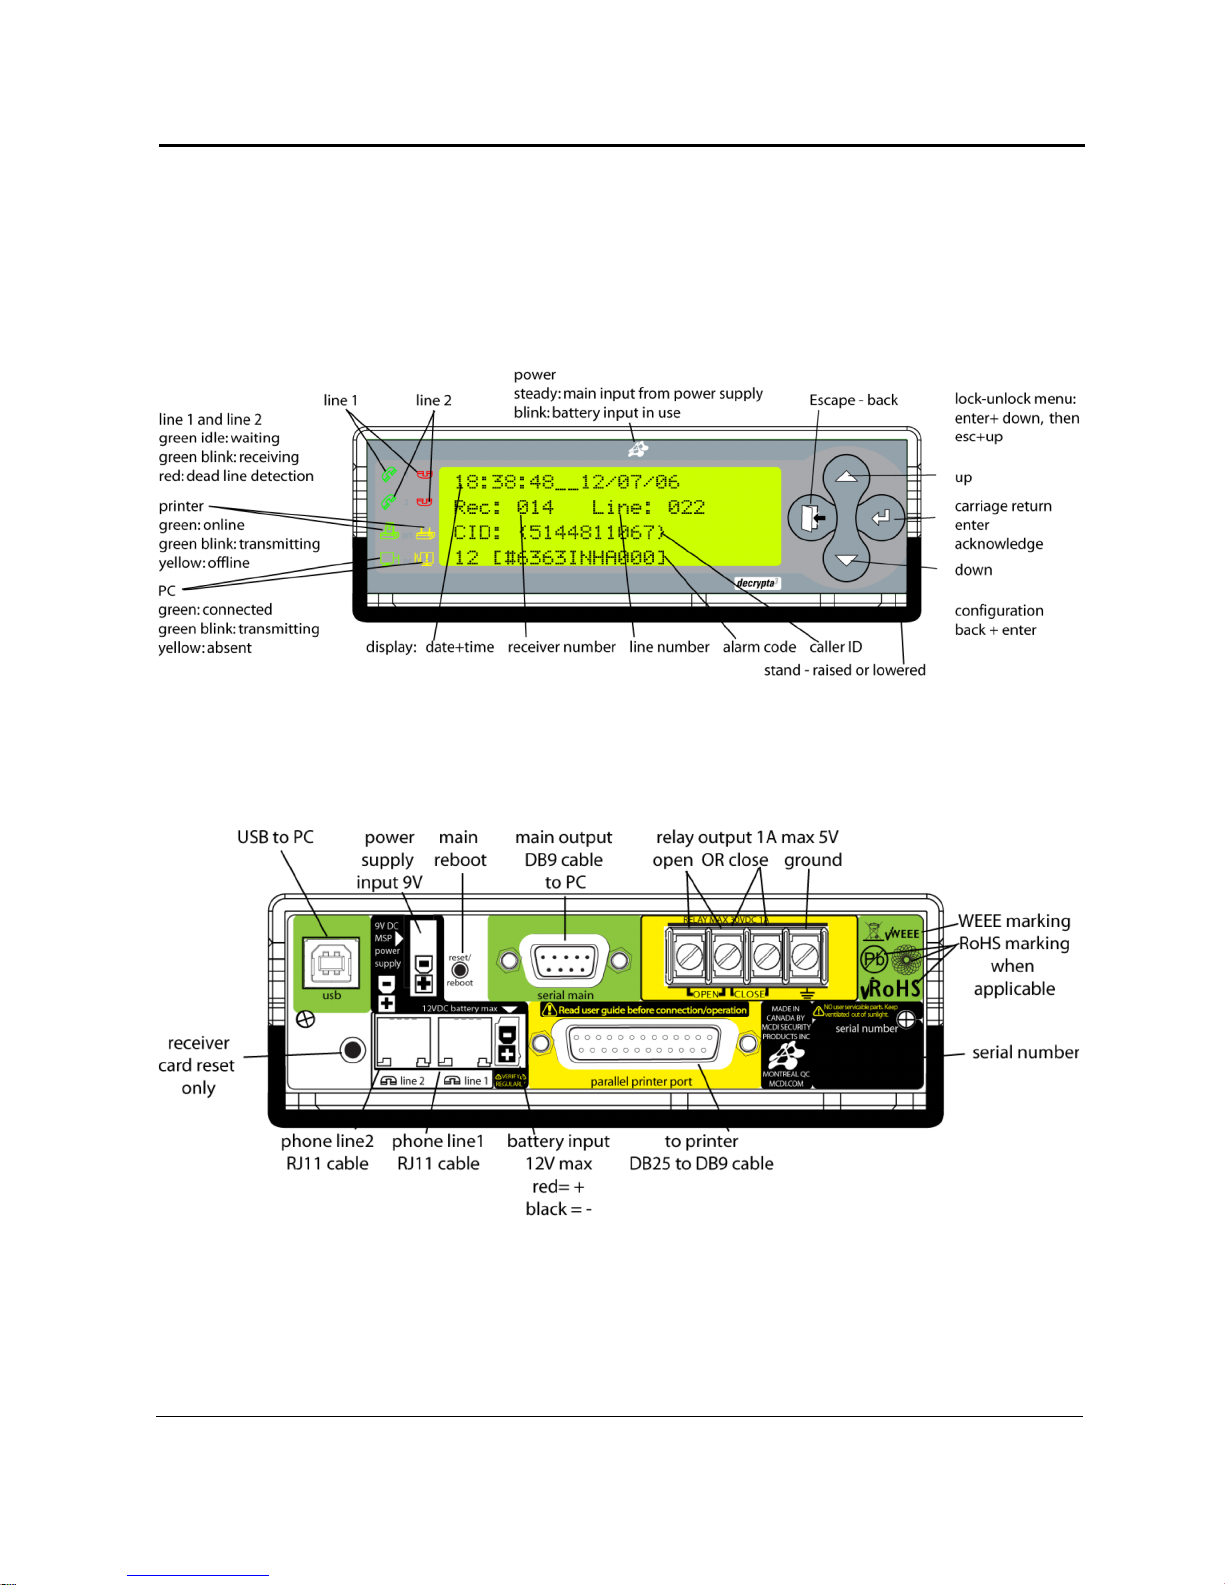
Front panel commands and displays.....................................................................................................................................................16
Toolbox ...................................................................................................................................................................................................21
Configuration tools ..............................................................................................................................................................................21
Communication tools ..........................................................................................................................................................................21
Software tool COMIRQ ....................................................................................................................................................................21
Software tool WINCOMM ................................................................................................................................................................22
DOS Not available...............................................................................................................................................................................22
LINUX ..................................................................................................................................................................................................22
MACINTOSH....................................................................................................................................................................................... 23
WINDOWS ..........................................................................................................................................................................................23
Receiving ................................................................................................................................................................................................27
Listen-in, Two way voice..................................................................................................................................................................... 27
Transmission to computer and printer in MCDI mode .......................................................................................................................28
Transmission to computer and printer in ADEMCO 685 / Surgard emulation mode........................................................................30
Messages from DECR YPTA3 to DECRYPTA3 printer port: .......................................................................................31
Warranty .................................................................................................................................................................................................31
Legal compliance and Warning .............................................................................................................................................................32
United States Regulation FCC Warning.........................................................................................................................................32
EC Declaration of Conformity .............................................................................................................................................................33
EN41003 Warning Application Note 48, Issue 5................................................................................................................................34
Glossary..................................................................................................................................................................................................35
Version 070710
Page 3

DESCRIPTION Page 2 | 41
Operating guide for Alarm Receiver DE CRYPTA
3
MCDI Security Products Inc.. Internet: mcdi.com
7055 Jean-Bourdon Avenue, Montreal, QC, Canada H4K 1G7 Telephone: +514-481-1067 Fax: +514-481-1487
DESCRIPTION
Alarm Receiver DECRYPTA3
The twin line alarm receiver DECRYPTA3 for PC compatible computers is a MCDI product. This new breed of alarm
receivers is equiped with advanced features such as USB port and dual output to PC.
DECRYPTA3 is available in RoHS and non RoHS version. Must be specified at the time of the order. Pricing differs
between the two versions.
What’s in the box
DECRYPTA
3
Alarm Receiver
Cables:
2 RJ11 Phone cables
1 USB Type A to Type B cable 6 feet (1.8M)
1 Serial communication cable 6 feet DB9F to DB9F Null modem
1 Printer loopback plug
Power:
1 AC/DC power supply with localized IEC power cord.
1 Power cable for batteries (red and black)
Documentation/tools/drivers
1 Printed manual
1 CD with:
PDF documentation/tools/drivers/
Windows logger software
WinSAMM Central station trial version
Drivers and configuration tool WINEXPRECIUM2.EXE
Physical description of DE CR Y P T A3
Size Receiver has all out dimensions ( with Acrylic cover ) :
9” (L) x 6.3” (W) x 3.1”(H) Stand Raised
229 mm (L) x 161 mm (W) x 79 mm (H)
9” (L) x 6.3” (W) x 2.25”(H) Stand Lowered
229 mm (L) x 161 mm (W) x 58 mm (H)
Receiver has all out dimensions ( outer cover removed for insertion in PC/Server ) :
8.95” (L) x 5.75” (W) x 1.66”(H)
222 mm (L) x 146 mm (W) x 42.3 mm (H)
Measurements do not include connectors
Housing: Inner Box : Anodized aluminium, green.
Outer Cover : Clear and black acrylic.
Front : Mylar and Polyester tactile membrane.
Back : Polyester membrane and aluminium.
Buffer memory Buffer holds up to 1800 events in Native mode (4+2 signal). Buffer is used when computer
is absent. Unit keeps printing during fail time if power is connected and maintained. When
computer comes back on, buffer empties to the computer. If more than 1800 events (4+2
Native mode ) are received in the buffer during fail time, DECRYPTA3 writes over the
oldest event. Written records may be available on printer connected to parallel printer port.
Alert/WarningBuzzer On board buzzer is available for alert warning when the Computer is absent.
Is enabled if setup parameter “Check printer” is set to Yes.
Is activated (starts buzzing) by event to be printed on DECRYPTA3 printer port.
Page 4
DESCRIPTION Page 3 | 41
Operating guide for Alarm Receiver DE CRYPTA
3
MCDI Security Products Inc.. Internet: mcdi.com
7055 Jean-Bourdon Avenue, Montreal, QC, Canada H4K 1G7 Telephone: +514-481-1067 Fax: +514-481-1487
To stop buzzing press ON-LINE printer key twice (2). Refer to printer connected to DECRYPTA
3
parallel printer port. Will resume buzzing if printer is left off-line.
DE C R Y P T A
3
– FRONT VIEW
DE C R Y P T A
3
– REAR VIEW
Page 5

DESCRIPTION Page 4 | 41
Operating guide for Alarm Receiver DE CRYPTA
3
MCDI Security Products Inc.. Internet: mcdi.com
7055 Jean-Bourdon Avenue, Montreal, QC, Canada H4K 1G7 Telephone: +514-481-1067 Fax: +514-481-1487
REAR PANEL DESCRIPTION
USB PORT
Type B USB connector. USB client to host cable supplied
SERIAL NUMBER TAG
All DECRYPTA3 serial number contain 8 digits. Please
quote serial number in emails or when calling for support to
speed up identification process. Serial number appears in
configuration tool when using USB output.
SERIAL (DB9 male connector)
Data transfer to computer:,
Null modem cable supplied (DB9F to DB9F)
Serial port: 1200 Baud, 8 bit, 1 stop bit
Pin 2 = transmit
Pin 3= receive
Pin 7 = ground
RELAY TERMINAL 2 POSITIONS.
Terminal block used for trigger of external unit by inboard relay
( 30V DC 1A max). Supports normally open or normally closed.
GROUND POST
Used to mechanically ground the unit. Refer to Electrical feed
for more details.
POWER SUPPLY INPUT (SPU15A-104 )
100-240VAC to 9VDC 1.66A supplied with D
3
BATTERY INPUT
12 VDC
Supplied battery connector red = + black = -
Refer to section Electrical feed before using.
PRINTER (DB25 female connector)
Printer parallel port. Raw signals received by D
3
.
LINE 1, LINE 2
Incoming phone lines
Tip
Ring
Powering DECR YPTA3 receiver
In this section
Electrical inputs
Notes on electrical installation for DECRYPTA3
Alternative power source 9-12V DC
USB Hub
Ground post
Using a battery charger
Warnings
ELECTRICAL INPUTS
DECRYPTA3 can be powered from:
1.Power Supply Input ( 9 VDC adaptor supplied )
and / or
2.Battery Input ( 12VDC ) using supplied cable
1. DE C R Y P T A3 powered from the POWER SUPPLY INPUT
DECRYPTA
3
can powered from the 9-12VDC only. Minimum requirements 9VDC 500 Ma. Severe damages to the
unit may occur if power supply delivers more than 14VDC.
Power led of front display will be ON steady when the DECRY PTA3 gets the power from the Power Supply Input.
DECRYPTA3 is supplied with a 100-240V AC / 9 V DC power adapter. This power adapter is supplied with an IEC
power cord for localization.
Page 6

DESCRIPTION Page 5 | 41
Operating guide for Alarm Receiver DE CRYPTA
3
MCDI Security Products Inc.. Internet: mcdi.com
7055 Jean-Bourdon Avenue, Montreal, QC, Canada H4K 1G7 Telephone: +514-481-1067 Fax: +514-481-1487
WARNINGS
-Removal of the power source during reception of an alarm signal may result in losing said signal.
-If 9-12VDC input is used as DECRYPTA3 sole source of power, events in receiver buffer will be not be lost when
power is removed and will be transmitted to PC when power is restored.
2. DE C R Y P T A3 powered from the BATTERY INPUT
DECRYPTA
3
can powered from a 12VDC battery only. Minimum requirements 12VDC 500 Ma. Severe damages to
the unit may occur if the battery delivers more than 14VDC.
Power led of front display will be blinking when the DECRYPTA3 gets the power only from the Power Supply Input.
When both sources are used, the led will be ON steady.
WARNINGS:
-MCDI recommends choosing a high quality lead-acid battery or gel type. Most stores selling security equipment hold a variety of
power levels to choose from.
-If not charged, the battery will discharge. DECRYPTA3 does not provide battery supervision or charge to battery.
DECRYPTA
3
is supplied with a Molex lock type connector. This connector has a red and black wire for connection to
battery.
-Do not use a battery supplying more than 14V DC. Significant heat dissipation will result and may damage unit. Do not use a
battery showing signs of tear, leak or corrosion.
-Never connect a faulty or drained battery to the DECRYPTA3.
Battery time
To calculated battery time:
HOURS OF CONTINUOUS BATTERY OPERATION
= POWER IN A-H
Example with a fully charged new battery – 500mA drain from DECRYPTA3:
12V 600 mAh
1h12min
12V 700 mAh
1h25min
12V 70 Ah
140h
Always refer to battery manufacturer application notes on charging, using and discharging a battery.
Using 2 x 6Vbatteries (serial connection)
In using a serial connection, voltage of each power source will be added and delivered to DECRYPTA3.
Using 2 x 12V batteries (parallel connection)
Using a parallel connection of batteries, resulting current to DECRY PTA3 is the sum of current provided by each
source. Batteries should be matched to prevent heating among power components.
Battery charger
A battery along with a battery charger may be used . Using a supervision circuit is preferable. MCDI tested and recommends
Altronix PM212. and a 12V battery. A circuit like the Altronix PM212 will insure a constant tension (9-12V preferred), battery
charge and battery supervision
Page 7

DESCRIPTION Page 6 | 41
Operating guide for Alarm Receiver DE CRYPTA
3
MCDI Security Products Inc.. Internet: mcdi.com
7055 Jean-Bourdon Avenue, Montreal, QC, Canada H4K 1G7 Telephone: +514-481-1067 Fax: +514-481-1487
Insure that your circuit delivers less than 14V to DE CRYPTA3. Significant heat dissipation will result if using a power
source of more than 13.8V. This may damage the unit of reduce life expectancy of DECRYPTA3.
-Verify installation regularly.
-Consult a qualified Electrician prior to connecting DE CRYPTA3 If you are using a battery, a battery charger and/or
equipment
Alternative power source 9-12V DC
DECRYPTA
3
is shipped with a power adaptor. When another power supply is preferred for the 9-12V DC input, a
lower voltage should be preferred over a higher voltage to minimize heat dissipation in DECRYPTA3.
USB Hub
While testing several units, MCDI did not find a USB hub able to power TWO DECRYP TA3 units. You must power the
units by their 9-12V DC input if you plan to use a USB hub and use the USB hub only for the benefit of data concentration.
Ground post
As as safety for users and the DECRYPTA3 alarm receiver, DECRYPTA3 is provided with a ground post at
the back on the unit. A wire of AWG #14 should be used along with a lug connectors. Ground connection must be maintained
and verified regularly to insure ground to earth is always present.
Best practice in making a ground connection from DECRYP TA3 are to insure a non resistive connection to a known
and tested ground in a well built electrical installation or connect the ground lug of DECR YPTA3 to a metallic water
pipe going to earth or to a rod deeply planted to earth.
Should several DECR YPTA3 units be used it is preferable not to chain units by their ground lugs. A better practice is
to use a ground star technique according to Diagram.
Using a battery charger
MCDI tested and recommends a supervision circuit like Altronix PM212 (altronix.com). This circuit will take 16VAC wall
transformer (Alarm panel transformer) charge a 12V battery, insure supervision and will deliver power from battery when AC
feed is missing.
When using a battery charger, insure that the tension at DE CRYPTA3 electrical entry is less than 14VDC. Applying
voltage of more than 14V DC may cause significant heat dissipation within unit. Damages may result and this may reduce life
expectancy of DECR YPTA3
WARNINGS
- DECRYP TA3 does not supervise battery.
-Verify electrical set-up regularly.
-Always use properly mounted and approved cables to connect DECRYPTA3
-Do not use an over charger battery or a battery dispensing more than 14VDC.
-Consult a qualified Electrician prior to connecting DE CRYPTA3 If you are using a battery, a battery charger and/or
equipment not provided by MCDI Security Products Inc.
-Damages resulting from power surges of any kind of specifically excluded from DECRYPTA3 warranty.
USING ON-BOARD RELAY :
DECRYPTA
3
is equipped with a relay to trigger an external device such as strobe light, dialer, siren upon reception of
an alarm signal.
Terminal posts are located at the back of the unit. Posts: 1 and 2 are Normally Open. Posts 2 and 3 are Normally Closed. Post
2 is the Common. Maximum rating : 110V DC or 125 V AC / 1A UL/CSA rating : 30V DC / 1A 110V DC or 125V AC /
.3 A.
Page 8
DESCRIPTION Page 7 | 41
Operating guide for Alarm Receiver DE CRYPTA
3
MCDI Security Products Inc.. Internet: mcdi.com
7055 Jean-Bourdon Avenue, Montreal, QC, Canada H4K 1G7 Telephone: +514-481-1067 Fax: +514-481-1487
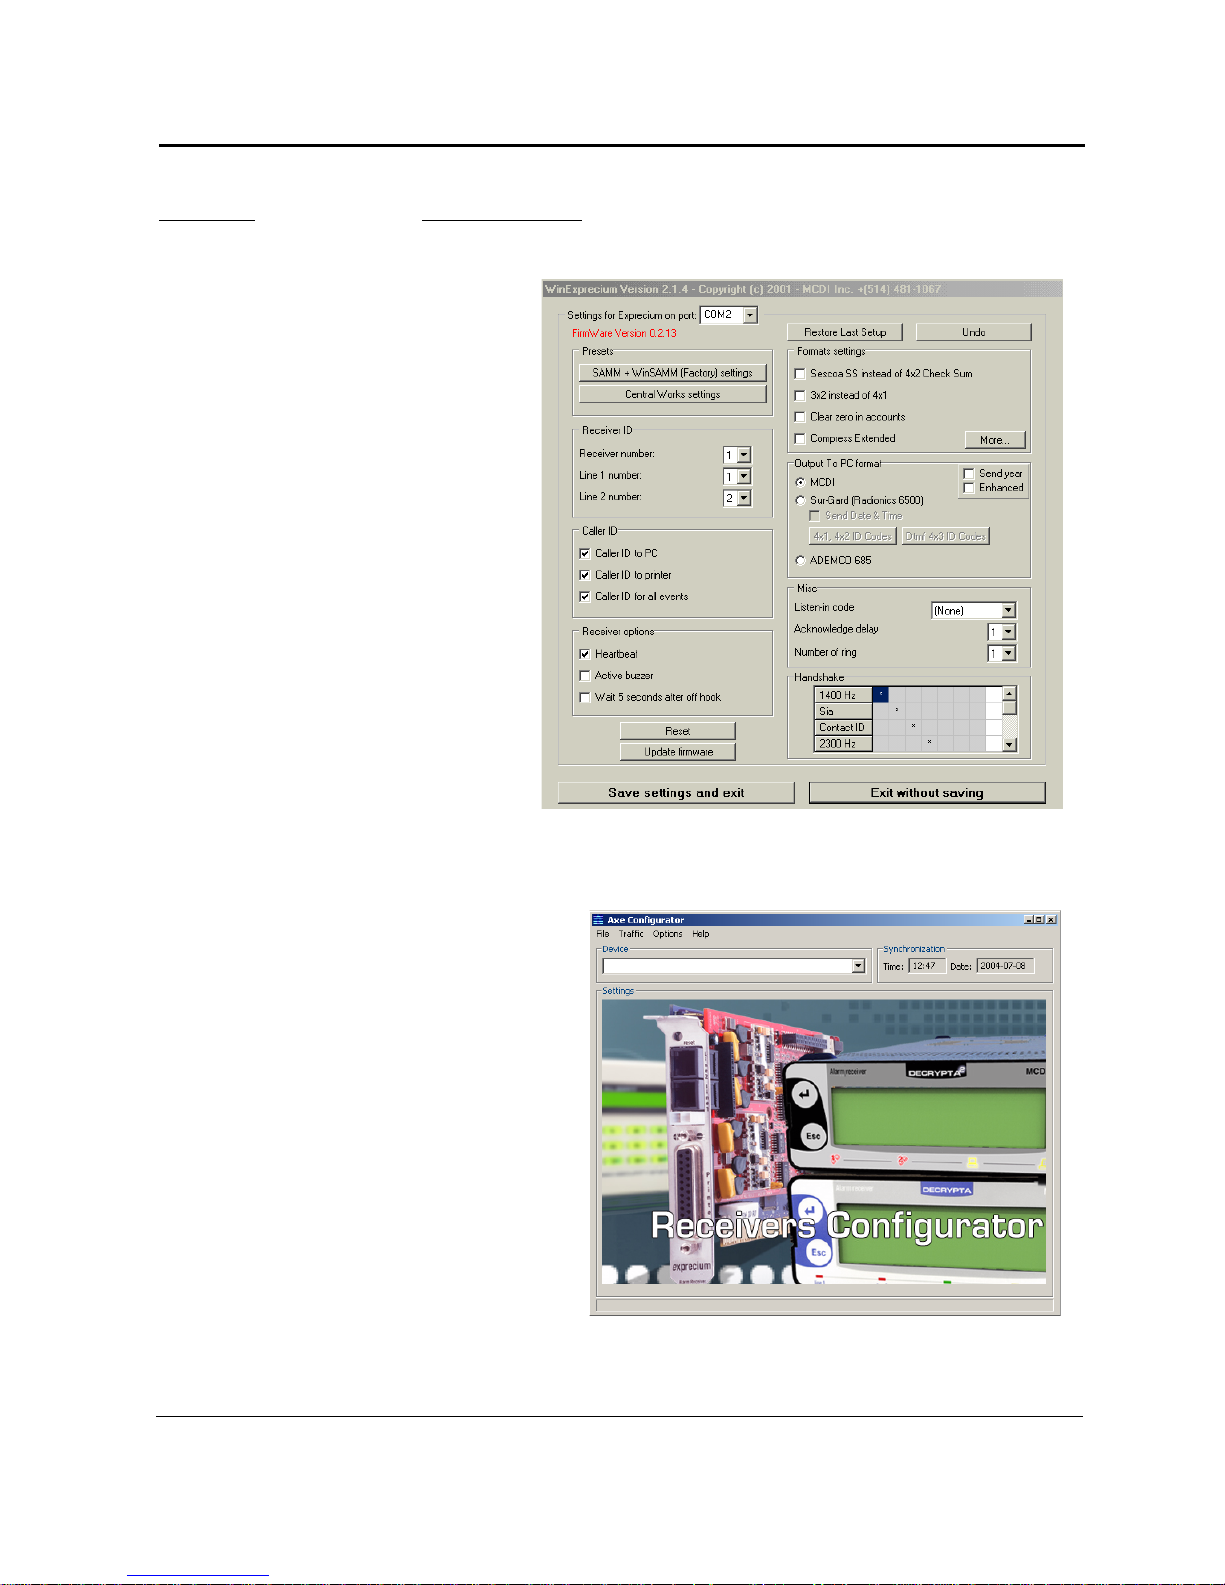
Configuring DECR YPTA3 receiver by software
MCDI winExprecium2.exe
There is no switches or jumpers to configure
your card. All settings are done using the setup
program called winExprecium2.exe ( provided
on the media coming with your card ). This
program works under Windows and can be
executed from any disk drive. To use it under
Windows, your Windows drivers must be
installed first and properly configured.
To enter the configuration menu double click
on the icon winExprecium2.exe
The following display will appear :
MCDI Axe and Logger tools
Axe configurator is a universal tool for configuring
MCDI receivers. Currently it supports the following
receivers:
Exprecium (I and II version)
USB DECRYPTA3
The support for other MCDI receivers will be done in a
near future.
Logger is a software tool to log to disk
DECRYPTA
3
raw output . Logged data may
be read by word processors and Excel for reporting or
/and analysis.
1. JAVA RUN TIME ENGINE Installation
If you don’t have Sun’s JRE installed you can install it
from the CD. It is located in \
Configurator_logger\Java_installer\ directory. To
install, run the installer program j2re-1_4_2_04-
windows-i586-p.exe. Under Windows XP you will
need administrative privileges in order to install JRE.
Page 9

DESCRIPTION Page 8 | 41
Operating guide for Alarm Receiver DE CRYPTA
3
MCDI Security Products Inc.. Internet: mcdi.com
7055 Jean-Bourdon Avenue, Montreal, QC, Canada H4K 1G7 Telephone: +514-481-1067 Fax: +514-481-1487
2. Installation of MCDI Axe configurator 0.1.0
Requirements:
MS Windows XP
Sun’s Java Runtime Environment (JRE) 2. Located on CD.
Axe Configurator Installation
The installation procedure is very simple. To start the installation, run the installer program, Axe_install_0.1.0.exe:
1. It will prompt you for the language you want the installer to run in.
2. The license is displayed. Read it carefully and then click on “I Agree” to agree with the licensing terms.
3. Select the directory in which the Axe Configurator will be installed or accept the default settings, then click on “Install”.
4. You will see the progress of the installation. If you want to see where and which files are being copied, click on “Show
Details”.
5. Press “Close” when finished
A few shortcuts are created for your convenience:
1. On your desktop
2. In the Start Menu, under Start Programs MCDI Axe Configurator
Un-installation
You can un-install Axe Configurator in two ways:
1.
From the Control Panel:
select Start Settings Control Panel. Then select “Add or remove programs”, choose “Axe
Configurator” from the list and follow the un-installation procedures.
OR
2.
Directly
: select Start Programs MCDI Axe Configurator Uninstall and follow the un-installation procedures.
Usage
At the startup, you will see the following welcome screen to
configure a device, select it from the device list:
NOTE: The configurator tries to detect what kind of receiver
is connected to the PC. Yet sometimes it’s necessary to
actually start the process of retrieving the configuration in
order to completely determine what kind of receiver it is.
Thus, in the device menu you may see:
“Exprecium” for Exprecium I and II cards
“Serial” for any device attached to physical COM port, for example, Decrypta or the serial port connection of DECRYPTA3.
“USB DECRYPTA3 for the USB connection of the DECRYPTA3.
When you select receiver, its configuration settings will be retrieved, and you will see different configuration screens according to
the type of the receiver (see section “Configuration screens”).
Setting language of the Axe Configurator
You can select English, French, Spanish, German, or Russian. To set the language, select it from the menu Options Language.
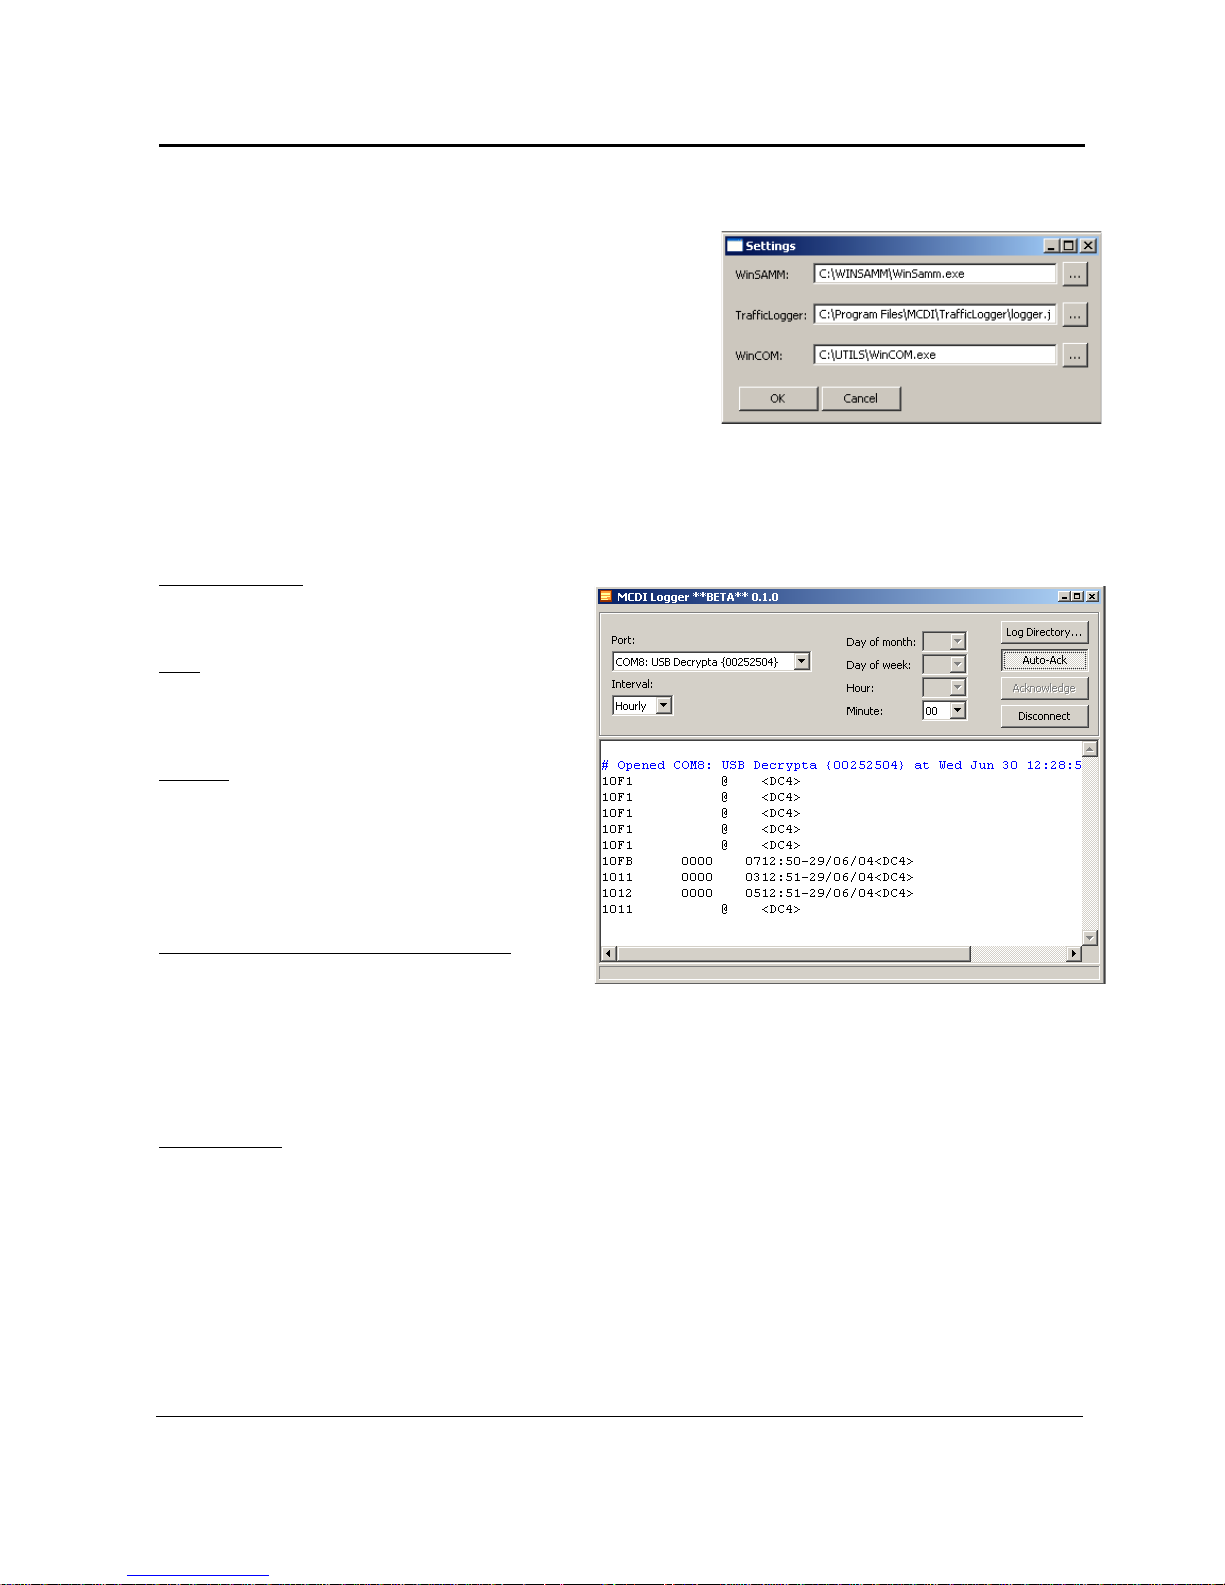
Starting other MCDI software from Axe Configurator
You can start WinSAMM, WS Receiver, Traffic Logger, or WinCOM from the Traffic Connect To menu. To set paths to those
programs, select Traffic Settings.
Page 10
DESCRIPTION Page 9 | 41
Operating guide for Alarm Receiver DE CRYPTA
3
MCDI Security Products Inc.. Internet: mcdi.com
7055 Jean-Bourdon Avenue, Montreal, QC, Canada H4K 1G7 Telephone: +514-481-1067 Fax: +514-481-1487
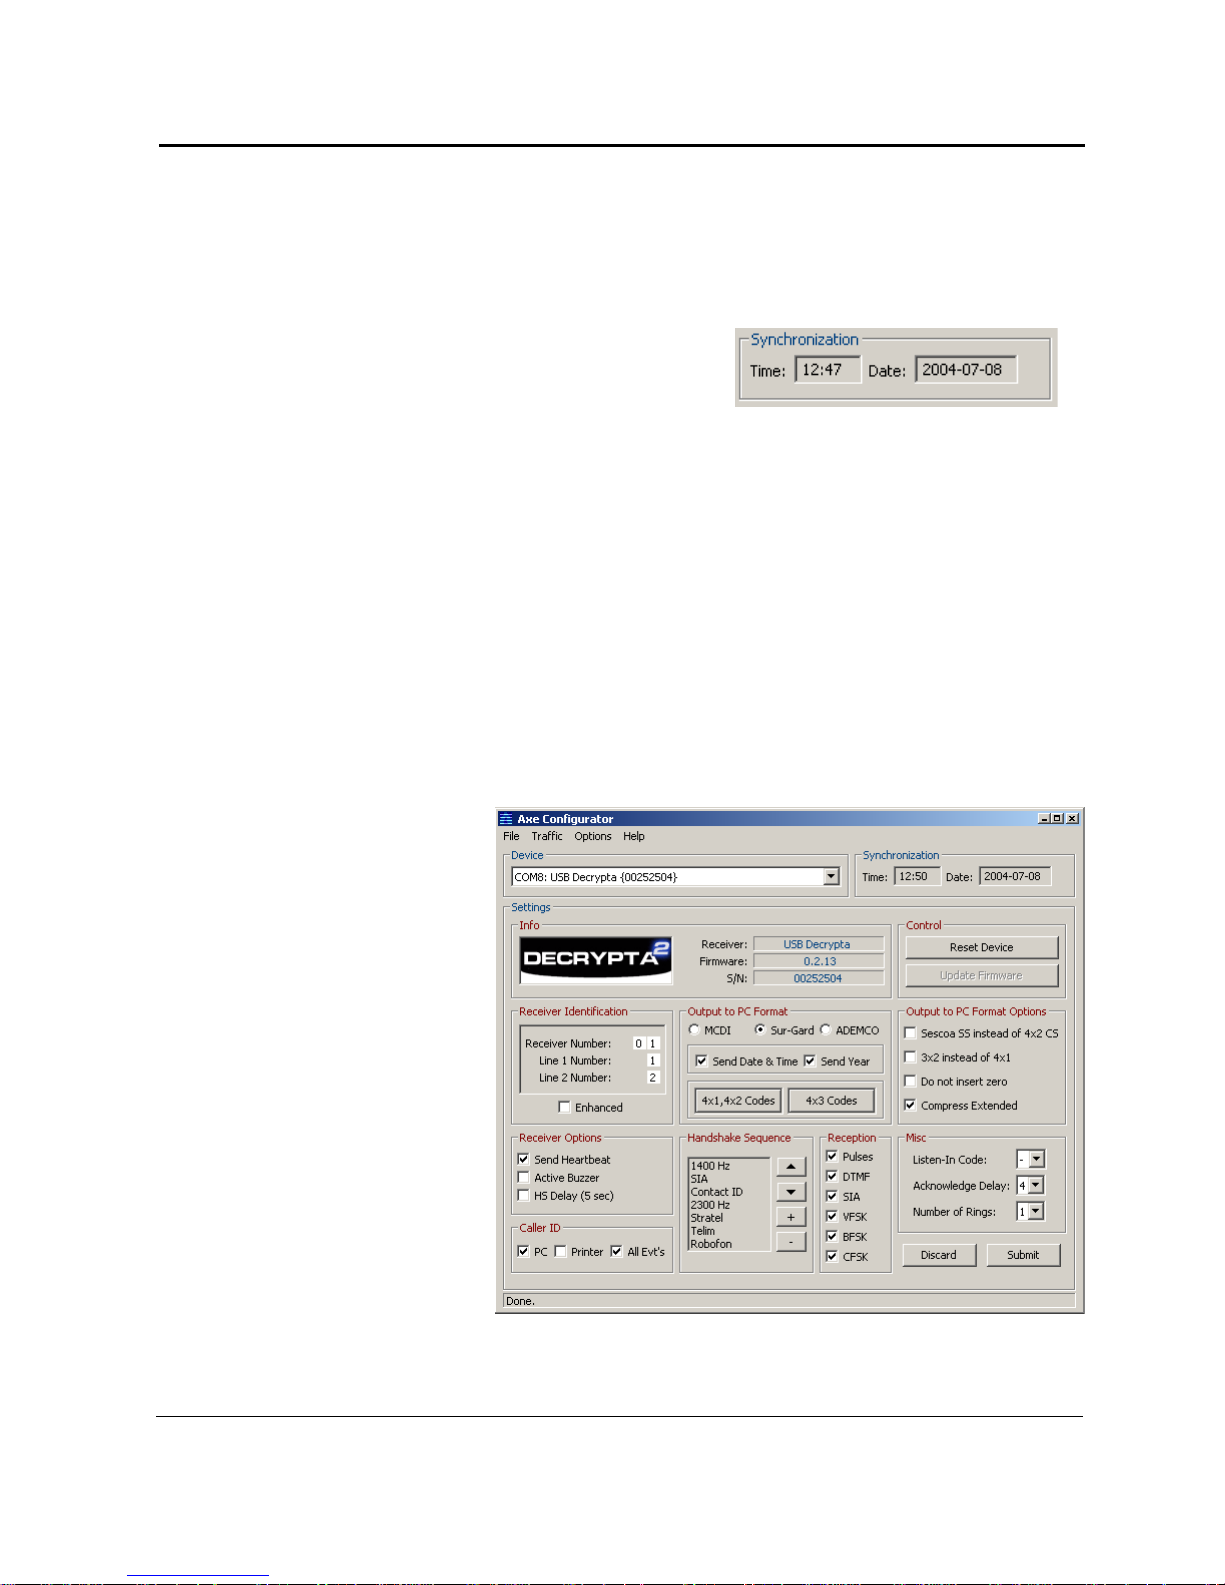
Receiver configuration
When a particular device is selected and its configuration screen is shown (see section “Configuration screens”), the following
actions are available:
Submit configuration
Press on the “Submit” button or, equivalently, select File Submit to send the configuration to the receiver, and close the
configuration screen.
NOTE: When the configuration is submitted the receiver is set to
the system time displayed in the “Synchronization” section:
Discard configuration
Press on the “Discard” button or, equivalently, select File Discard to discard any changes made and close the configuration
screen.
Save configuration
To save the current configuration to a file, select File Save.
Open a saved configuration
To load the configuration from a file, select File Open.
NOTE: File extensions are different for different receiver types. You will not be able, for example, to load an Exprecium I
configuration file (*.exp) while configuring an Exprecium II (*.expdec2).
Load Presets
For some receivers, there are preset configurations stored in the “presets” subdirectory of the Axe Configurator directory. You
will see the available presets under File Presets.
Configuration screens
Serial/USB DECRYPTA3
Axe configurator recognizes
Decrypta 3 connected on USB port
of PC. Some options specific to
Decrypta 2 will be showned in this
window when Axe recognizes a
Decrypta 2 unit. Axe will also render
more information from USB
connection, namely receiver name,
firmware version installed in receiver
and serial number of unit. USB port
and COM port redirection (virtual
serial port redirection) are indicated
in the Device drop down menu.
Page 11
DESCRIPTION Page 10 | 41
Operating guide for Alarm Receiver DE CRYPTA
3
MCDI Security Products Inc.. Internet: mcdi.com
7055 Jean-Bourdon Avenue, Montreal, QC, Canada H4K 1G7 Telephone: +514-481-1067 Fax: +514-481-1487
Starting other MCDI software from Axe Configurator
You can start WinSAMM, WS Receiver, Traffic Logger, or WinCOM from
the Traffic Connect To menu. To set paths to those programs, select
Traffic Settings. The following window will appear where you can
change your settings.
LOGGER TOOL
Logger is a software tool to log to disk DECRYPTA3 raw output . Logged data may be read by word processors and
Excel for reporting or /and analysis.
REQUIREMENTS
See Axe Configurator tool Java requirements
and installation procedure.
Port:
Choose and connect to the port your receiver
device is attached to.
Interval:
Set interval at which a new log file will be
created. Possible choices are “Hourly”, “Daily”,
“Weekly” and “Monthly”. Consequently, each log
file will contain signals came within an hour, a
day, a week, or a month, respectively.
Day of month, day of week, hour, minute:
Set the exact time when a new log will be
created. The choices available depend on the interval chosen above. For example, if “Hourly” interval is selected,
and the minute is set to “10”, then a new log will be created at 13:10, 14:10, 15:10, 16:10 etc.
NOTE:
Every time you change the interval type or its settings, you should reconnect in order for the changes to be
applied.
Log-Directory:
Select the location of the logged signals. The organization of this directory is as follows:
(log-dir) \ (com-port and device name) e.g. MyLogs\COM3__Exprecium\
Each log file is named as follows:
Year-Month-Day__Hour-Min.log e.g. 2004-06-12__13-00.log
Thus, it shows the date and time it was created.
Page 12

DESCRIPTION Page 11 | 41
Operating guide for Alarm Receiver DE CRYPTA
3
MCDI Security Products Inc.. Internet: mcdi.com
7055 Jean-Bourdon Avenue, Montreal, QC, Canada H4K 1G7 Telephone: +514-481-1067 Fax: +514-481-1487
NOTE:
Every time the logger starts, it attempts to open the previous log, based on the interval settings. For
example, if it was 14:25 currently, the interval was set to “Hourly”, and the Minute was set to “00”, the logger will try
to open the log created at 14:00. If, indeed, this file exists, the logger will use it to log incoming signals until 15:00,
as usual. If, on the other hand, the file does not exist, the logger will create a new log labeled with the current time
of 14:25 and use it to log incoming signals until 15:00.
Auto-Ack
Toggle automatic acknowledging of the incoming signals.
Acknowledge
Acknowledge the reception of the incoming signal.
Disconnect
Disconnect from the receiver device.
Change font size
To change font size of the signals, right-click on the signals window and select “Increase” or “Decrease Font Size”.
Parameter definitions
Emulation mode easy setting information: Select desired mode using a radio button.
MCDI Mode Standard or enhanced
Ademco Mode Ademco emulation
Surgard Mode MLR2 or MLR2000(enhanced) emulation
OPTIONS:
MCDI standard 1 digit for receiver# and 1 digit for line #
MCDI enhanced 3 digits for receiver# and 3 digits for line #.
Receiver Number sent to computer and printer 0 to F (default = 1)
Line 1 Number sent to computer and printer 0 to F (default = 1)
Line 2 Number sent to computer and printer 0 to F (default = 2)
Heartbeat Yes = enable No = disable (default)
DECRYPTA
3
sends Heartbeat signals to computer every 30 second only in Native mode
and Surgard mode.
Sescoa SS Yes = enable No = disable (default)
Conflict with Pulse 4X2 Checksum format
3x2 Instead 4x1 Yes = enable No = disable (default)
Conflict with 4X1 in Compressed Expanded
DO NOT select with Compressed Expanded = Yes
Clear Zero Yes = Zero removed in 3x1 and 4x1 No = zero present (default)
Page 13

DESCRIPTION Page 12 | 41
Operating guide for Alarm Receiver DE CRYPTA
3
MCDI Security Products Inc.. Internet: mcdi.com
7055 Jean-Bourdon Avenue, Montreal, QC, Canada H4K 1G7 Telephone: +514-481-1067 Fax: +514-481-1487
Tells DECRYPTA3 receiver not to insert a zero in front of the account number and in front
of the alarm code, for incoming 3 x 1 and 4 x 1.
Example: 3 x 1 Extended compressed in 3 x 2 standard
123 4
444 5 After compression: 123 45
Example: 3 x 1 Standard 3 x 1
123 1
Example: 4 x 1 Standard 4 x 1
1234 1
Example:3 x 1 and 4 x 1 without the CLEAR ZERO option:
0123 01 for 3 x 1
1234 01 for 4 x 1
Compressed/ Yes = Compressed extended 3x1 or 4x1 (No = default)
Extended
Example: 3 x 1 Extended compressed in 4 x 2 standard
123 4
444 5 After compression: 0123 45
Example: 4 x 1 Extended compressed in 4 x 2 standard
1234 5
5555 6 After compression: 1234 56
Listen-In Empty or 1 .. F
(3x1,4x2) Define code to trigger Listen-In mode in 3x1 or 4x2 formats
Printer/Buzzer Yes = Check printer on DECRYPTA3 port No= Do not check for printer (default)
By default DECRYPTA3 does not verify printer status on parallel port but sends data to be printed
as if a printer was connected to this port.
(Yes) option tells the DECRYPTA3receiver to verify and report on the status of the printer
connected to the DECRYPTA3 parallel port. The status verification applies to the
DECRYPTA
3
(lowest COM) in the computer if more than one MCDI receiver is installed. A
connector is needed to daisy chain multiple DECRYP TA3 receivers to send all output to one
printer only.
When Check printer option is enabled (Yes) and the computer is absent, each event being sent to printer
triggers a warning buzzer. This warning sound may be stopped by clicking twice the ON-LINE printer key.
Buzzing resumes if printer is left Off-line.
Do not set the "Yes" parameter if no printer is installed. Multiple error messages could be generated by
taking this action.
Handshake delay Delay to start Handshake after Off Hook. No = normal, Yes=5 seconds
Number of rings ( 1 to 5 ) Number of rings to answer Default = 1
Caller ID PC No = Do not send telephone ID data to PC
Yes = Send telephone ID data to PC
Caller ID Printer No = Do not send telephone ID data to DECRYPTA3 printer
Yes = Send telephone ID data to DECRYPTA3 printer
Caller ID ALL No = Do not send telephone ID data except when bad transmission occurs
Yes = Send telephone ID to PC and D3 printer unless PRN and PC select otherwise
Save Date / Time Yes = enable(Default) No = disable
Page 14

DESCRIPTION Page 13 | 41
Operating guide for Alarm Receiver DE CRYPTA
3
MCDI Security Products Inc.. Internet: mcdi.com
7055 Jean-Bourdon Avenue, Montreal, QC, Canada H4K 1G7 Telephone: +514-481-1067 Fax: +514-481-1487
Send year Yes = Date including the year No = Date with no year (default)
Yes, tells DECRYPTA3 to add the Year in date format: HH:mm _ _ MM/DD[/YY] ...
No, by default, tells DECRYPTA3 to use date and time format: MM/DD.
Display Last Event Display setting allowing to always display last Event received instead of default display Date and
Time
Yes = Enable keeping Last Event permanently displayed; No = Revert to Default display.
ACK delay Wait time in seconds for ACK reception before resend. (Surgard/Native mode only)
Handshake order selection
Options
1400hz / VFSK 2300hz ROBOFON
SIA / CFSK STRATEL
DUAL 1400hz / 2300hz TELIM Selection inserts
1]400Hz 5) On Hook
2)[ SIA ] 6) On Hook
3) Cont ID 7) On Hook
4) 2300Hz 8) On Hook
In each Selections field insert option needed.
Transmission rate serial communication
1200 bps, no parity, 8 bits, I stop bit
Transmission rate USB communication
1200 bps, no parity, 8 bits, I stop bit
Connecting DECRYP TA3 to PCs.
Typical scenarios are:
No connection to PC:
DECRYPTA3 can be used in a stand-alone way, without PC. All configuration parameters can be
accessed from the internal configuration menu.
Using one connection (USB or Serial)
- DECRYPTA3 connected by USB port only
USB
Decrypta3
USB
WSReceiver
application
COM7: Virtual COM
ACK
Page 15

DESCRIPTION Page 14 | 41
Operating guide for Alarm Receiver DE CRYPTA
3
MCDI Security Products Inc.. Internet: mcdi.com
7055 Jean-Bourdon Avenue, Montreal, QC, Canada H4K 1G7 Telephone: +514-481-1067 Fax: +514-481-1487
- Using only one connection: DECRYPTA3 connected by Serial port only
Using both connections (USB and Serial)
IMPORTANT: For flexibility of operations the signal received by the card can be acknowledged from either
USB or Serial connection. Therefore it is very important, when using both USB and serial connection, to
acknowledge signals ONLY from the main connection to the receiving software, and not from the
secondary one used for logging.
When connected in this fashion, Decrypta 3 will be seen by the PC as two COM ports. One, the serial
connection, is the physical COM port (ranged COM1 to COM4 usually depending on the number of
available serial ports). Another connection, through USB, is a ”virtual” COM port (can be in the range
COM5 to COM256). Both COM ports can be used to input signals to the PC, therefore one COM port can
be used to connect to PC receiver software, and the other port for logging or monitoring of signals.
DECRYPTA3 connected by USB and serial port on same PC
SERIAL
Decrypta3
COM PORT
COM1: Physical COM port
WSReceiver
application
ACK
SERIAL
USB
Decrypta3
COM
USB
WSReceiver
application
TrafficLogger
application
COM7: Virtual COM
COM1: Physical COM port
Main connection
Secondary logging connection:
signals NOT acknowledged
ACK
ACK
Page 16

DESCRIPTION Page 15 | 41
Operating guide for Alarm Receiver DE CRYPTA
3
MCDI Security Products Inc.. Internet: mcdi.com
7055 Jean-Bourdon Avenue, Montreal, QC, Canada H4K 1G7 Telephone: +514-481-1067 Fax: +514-481-1487
DECRYPTA3 connected by USB and serial port on different PC
Using USB Hub
- Several DECRYPTA3 connected to PC by USB hub.
-
- CAUTION. When using HUB always feed power to DECRYPTA3 by way of external power supply.
-
WSReceiver
application
COM7: Virtual COM port
COM8: Virtual COM port
COM9: Virtual COM port
USB
SERIA
Decrypta2
USB
SERIA
Decrypta2
USB
SERIA
Decrypta2
Available for
logging/monitoring
Signals NOT
acknowledged
Main connection: signals
acknowledged
ACK
ACK
SERIAL
USB
Decrypta2
COM
USB
COM7: Virtual COM
COM1:
Physical COM
WSReceiver
application
Main connection: signals
acknowledged
TrafficLogger
application
Secondary logging connection:
signals NOT acknowledged
ACK
ACK
Page 17

DESCRIPTION Page 16 | 41
Operating guide for Alarm Receiver DE CRYPTA
3
MCDI Security Products Inc.. Internet: mcdi.com
7055 Jean-Bourdon Avenue, Montreal, QC, Canada H4K 1G7 Telephone: +514-481-1067 Fax: +514-481-1487
Configuration by front panel commands and displays
General Configuration Procedure from the unit’s configuration menu
Start up display
Display on power-up. V.1.2.4 is the firmware version in this case
Configuration menu navigation. Modes
To enter configuration mode, press and simultaneously. In
the configuration mode there are two modes: viewing mode and
editing mode. In viewing mode parameters can only be viewed (not
modified) by navigating using and buttons, to go to the
previous/next parameter respectively.
Regular parameters
In order to change a regular parameter, enter the editing mode by
pressing . You will see a black triangle appear to the right of the
setting symbolizing the editing mode. Press and buttons to
change the current setting of the parameter. To go back to the view
mode, press or .
Parameters in a submenu
Some parameters are organized in a submenu. When “Edit>>” is
displayed, this means that there is a submenu. Press to enter the
submenu. Pressing simultaneously and or and in a
submenu allows to select a particular submenu element to be edited.
Press and to modify the current element’s setting. Press
to leave the submenu and go back.
Saving changes and exiting from configuration mode
Press to leave the configuration mode. (Note that you can do it
only in the viewing mode, NOT in the parameter editing mode.) Unless
locked (see Locking Settings below), you will be prompted if the new
configuration should be saved. Press for “Yes”, and for “No”.
If the new configuration is to be saved, “Saving configuration”
message will appear.
List of parameters
NOTE: Make sure you read the above section explaining how
to navigate around the configuration menu.
Choice of language
Select from English, Spanish (español), French (français) Portuguese
(português) or German (deutsch)
DECRYPTA
Alarm Receiver
Version 1.3.3.
MCDI SP Inc.
Configuration Mode
:::::::::::::::::::::::::::::
(SETTINGS)
Choice Option
……………………………………………………………………………………
Enhanced mode Yes
(SETTINGS)
Choice Option
……………………………………………………………………………………Rec
eiver ID Edit>>
Yes
Save configuration?
No
Saving Configuration
SETTINGS)
Choice Option
____________________________
Language English
Page 18

DESCRIPTION Page 17 | 41
Operating guide for Alarm Receiver DE CRYPTA
3
MCDI Security Products Inc.. Internet: mcdi.com
7055 Jean-Bourdon Avenue, Montreal, QC, Canada H4K 1G7 Telephone: +514-481-1067 Fax: +514-481-1487
Output Format to PC
Select between MCDI, ADEMCO, or SurGard Format
Enhanced mode
(MCDI format RRRLLL; SurGard 2000 format RRLLL)
Select either Yes or No
- Not available for ADEMCO format.
Assigning receiver and each Line a number
Enter sub-menu (See Parameters in a submenu above).
Select receiver and lines numbers. 0 to 9, and A - F
Enabling heartbeat
Enable/disable heartbeat signal
Enabling Sescoa SS format
Select Yes or No
Enabling 3x2 instead of 4x1
Select Yes or No
Enabling clear zero
Select Yes or No.
Enabling Extended/compressed
Select Yes or No
Choosing listen-in code
Select from “0” to “9”, “A” to “F”. {SPACE} = empty
Check printer/buzzer mode
Select Yes or No
(SETTINGS)
Choice Option
………………………………………………………………
Output Format MCDI
(SETTINGS)
Choice Option
………………………………………………………………
Enhanced mode Yes
(SETTINGS)
Choice Option
………………………………………………………………
Receiver ID Edit>>
Receiver #: 1
Line 1 #: 1
Line 2 #: 2
(SETTINGS)
Choice Option
____________________________
Heartbeat Yes
(SETTINGS)
Choice Option
_____________________________
Sescoa SS Yes
(SETTINGS)
Choice Option
_____________________________
3x2 inst’d 4x1 Yes
(SETTINGS)
Choice Option
_____________________________
Clear Zero Yes
(SETTINGS)
Choice Option
_____________________________
Extended Yes
(SETTINGS)
Choice Option
_____________________________
Listen-In code E
(SETTINGS)
Choice Option
_____________________________
Check printer Yes
Page 19

DESCRIPTION Page 18 | 41
Operating guide for Alarm Receiver DE CRYPTA
3
MCDI Security Products Inc.. Internet: mcdi.com
7055 Jean-Bourdon Avenue, Montreal, QC, Canada H4K 1G7 Telephone: +514-481-1067 Fax: +514-481-1487
Wait after off hook option
Select Yes (4.5 seconds delay) or No
Set the number of rings before answering
Select from 1 to 5 rings
Enabling CALLER ID to PC
Select Yes or No
Enabling CALLER ID to printer
Select Yes or No
Enabling CALLER ID to be sent with all events
Select Yes or No
Sending date and time option (Surgard mode option )
Select Yes or No
- Available only in SurGard mode
Sending year option (Surgard mode option )
Select from Yes or No (available only if “Set date and time” is YES)
Delay time for acknowledge to PC
Select delay in seconds from 1 to 5
Setting Time: hour
Select hour from 00 to 23
Setting Time: minutes
Select minutes from 00 to 59
Setting Date: day
Select date from 01 to 31
(SETTINGS)
Choice Option
_____________________________
Wait after O/H Yes
(SETTINGS)
Choice Option
………………………………………………………………
Number of Rings 1
(SETTINGS)
Choice Option
_____________________________
Caller ID to PC Yes
(SETTINGS)
Choice Option
_____________________________
Caller ID printer Yes
(SETTINGS)
Choice Option
_____________________________
Caller ID All Yes
(SETTINGS)
Choice Option
_____________________________
Date/time Yes
(SETTINGS)
Choice Option
_____________________________
Send year Yes
(SETTINGS)
Choice Option
_____________________________
ACK delay 2
(SETTINGS)
Choice Option
_____________________________
Time: hour 00
(SETTINGS)
Choice Option
_____________________________
Time: minutes 22
(SETTINGS)
Choice Option
_____________________________
Date: Day.. 02
Page 20

DESCRIPTION Page 19 | 41
Operating guide for Alarm Receiver DE CRYPTA
3
MCDI Security Products Inc.. Internet: mcdi.com
7055 Jean-Bourdon Avenue, Montreal, QC, Canada H4K 1G7 Telephone: +514-481-1067 Fax: +514-481-1487
Setting Date: year
Select year from 00 to 99
Setting the format for displaying the date in the IDLE MODE.
Select one of the three available formats.
Display Last Event option
Select either Yes or No.
Yes = Keeps last event received on display.
No = Reverts to IDLE MODE default setting.
Formats selection (Specific to Surgard format)
Enter the sub-menu. (See Parameters in a submenu above).
[ Formats selection sub-menu]
Select the formats you wish to receive.
Assigning 4x1 and 4x2 Codes
Enter the sub-menu. (See Parameters in a submenu above).
- Available only in SurGard format.
Assigning 4x3 Codes
Enter the sub-menu. (See Parameters in a submenu above).
- Available only in SurGard format.
[ 4x1, 4x2, 4x3 Codes sub-menus ] Selecting codes
Select codes from '0' to '9', and 'A' – 'F', or (none)
Assigning Handshake sequence
Enter the sub-menu. (See Parameters in a submenu above).
[ Handshake sequence sub-menu ] Specifying the order.
Specify the handshake order (1-first handshake tried, 8-last handshake
tried) by selecting from the list of available handshakes:
- 1400 Hz / VFSK - 2300hz
- Dual 1400Hz/2300Hz SIA / CFSK
(Contact ID) Telim(works on Telim models only)
- Stratel - Robofon(works on Robofon models only)
Resetting DE CRYPTA3
In the viewing mode only press and simultaneously to reset
DECRYPTA
3
to factory default, and clear buffer from all
events, unless locked (see Locking Settings below). Exit configuration
mode without saving changes to keep the factory settings.
(SETTINGS)
Choice Option
_____________________________
Date: Year 00
(SETTINGS)
Choice Option
______________________________
Date Format Y/M/D
(SETTINGS)
Choice Option
______________________________
Display Event No
(SETTINGS)
Choice Option
______________________________
Formats Edit>>
Pulses ► Yes VFSK No
DTMF Yes BFSK No
SIA Yes CFSK No
(SETTINGS)
Choice Option
______________________________
4x1,4x2 Codes Edit>>
(SETTINGS)
Choice Option
______________________________
4x3 DTMF Codes Edit>>
0>[0] 4> 0 8> A C> 0
1> 1 5> 0 9> B D>
2> 2 6> 0 A> C E> 0
3> 3 7> B> D F> 0
(SETTINGS)
Choice Option
______________________________
HS Sequence Edit>>
1) 1400Hz 5) Unused
2)[ SIA ] 6) Unused
3) Cont ID 7) Unused
4) 2300Hz 8) Unused
DECRYPTA II is reset
MCDI Inc.
Page 21

DESCRIPTION Page 20 | 41
Operating guide for Alarm Receiver DE CRYPTA
3
MCDI Security Products Inc.. Internet: mcdi.com
7055 Jean-Bourdon Avenue, Montreal, QC, Canada H4K 1G7 Telephone: +514-481-1067 Fax: +514-481-1487
IDLE MODE. BROWSING RECEIVED EVENTS
Idle Mode default display
When not in configuration nor receiving signals, DECRYPTA
3
displays date on first line and time on second line. Press or to
browse events in the buffer.
Idle Mode Display options
• To permanently display Last Event received, set “Display Event”
(see above) to Yes.
• To change the format in which the date is displayed, see the “Date
Format” setting above.
Locking / Unlocking Settings
To lock the settings, press simultaneously and , then and
. You will see a lock symbol in the upper left corner of the screen.
Repeat the same procedure to unlock the settings.
• Locking the settings makes them read-only to protect from
accidental changes. Settings can still be examined, but not
modified.
• Reset is unavailable in this mode.
• When leaving the configuration mode by pressing at any
time, no confirmation will be asked, and no changes saved.
TYPICAL DISPLAYS–INCOMING SIGNALS
4X2, CALLER ID NATIVE FORMAT
LINE 1: TIME AND DATE
LINE 2: RECEIVER AND LINE NUMBER;
SIGNAL FROM PANEL
LINE 3: CALLER ID INFORMATION
LINE 4 RAW DATA
CONTACT ID, CALLER ID, NATIVE FORMAT
LINE 1: TIME AND DATE
LINE 2: RECEIVER AND LINE NUMBER;
SIGNAL FROM PANEL
LINE 3: CALLER ID INFORMATION
LINE 4 RAW DATA
SIA, CALLER ID, NATIVE FORMAT
LINE 1: TIME AND DATE
LINE 2: RECEIVER AND LINE NUMBER;
SIGNAL FROM PANEL
LINE 3: CALLER ID INFORMATION
LINE 4 RAW DATA
...... 00/12/07 ......
...... 00:12:04 ......
15:30:27__12/07/00
Rec: 1 Line: 2
CID: {4811067}
12 6161 F6
15:30:38__12/07/00
Rec: 1 Line: 2
CID: {4811067}
12 6262 E121 01 000
15:30:47__12/07/00
Rec: 1 Line: 2
CID: {4811067}
12 [#6363INHA000]
Page 22

DESCRIPTION Page 21 | 41
Operating guide for Alarm Receiver DE CRYPTA
3
MCDI Security Products Inc.. Internet: mcdi.com
7055 Jean-Bourdon Avenue, Montreal, QC, Canada H4K 1G7 Telephone: +514-481-1067 Fax: +514-481-1487
TOOLBOX
CONFIGURATION TOOLS
DECRYPTA3 can be configured directly from its display and front panel commands. You may also enjoy
the same commands from a PC connected to DECRYPTA3. Configuration tools are provided on the CD
that came with DECRYP TA3 or by download from www.mcdi.com
DOS and Windows 95
No tools available under Dos up to Windows 98
USB port will not work under DOS and Windows 95 due to the nature of USB and OS limitations. Serial port must
be used.
Windows 98, ME, 2000, XP.
DECRYPTA3 may be configured by WINEXPRECIUM2.EXE or MCDI AXE configurator. Axe configurator
is a java class tools. Java engine must be present.
Linux
DECRYPTA3 may be configured with application located on CD or available by download from
www.mcdi.com. Traffic can be viewed with Lincomiq. Drivers are included on CD.
Macintosh
This OS is not supported although MCDI successfully tested one specially programmed DECRYPTA
3
with a G4 using a MacWIse under OS X (10.3.3). Adjustments to unit programming is needed in order to make it
work with Mac OS drivers. If you are planning to use DECRYPTA3 with Mac, please specify to sales when
ordering or contact MCDI support for reprogramming of unit.
Coding of commands
Line command from a terminal application may be used. Contact MCDI support for coding interface.
Developer's tools.
Coding interface of DECRYP TA3 commands is provided free of charge to developers who present projects
and credentials.
COMMUNICATION TOOLS
Software tool COMIRQ
COMIRQ is a DOS software program shipped with all MCDI receivers. It is used to check signals sent to PC by
DECRYPTA
3
. This tool will not work with USB port due to DOS restrictions.
To check installation and find free IRQ, run COMIRQ followed by COM,IRQ parameters.
Example: COMIRQ 2,3 (Checks if IRQ 3 is free for a DECRYPTA3 installed on COM2)
When COMIRQ is displayed, send a signal to DECRYPTA3 where same setup parameters have been given .
Press Space bar to display one signal at a time. Press A to empty receiver buffer and enable ACK.
Page 23

DESCRIPTION Page 22 | 41
Operating guide for Alarm Receiver DE CRYPTA
3
MCDI Security Products Inc.. Internet: mcdi.com
7055 Jean-Bourdon Avenue, Montreal, QC, Canada H4K 1G7 Telephone: +514-481-1067 Fax: +514-481-1487
Software tool WINCOM (Windows 95SE, 98, ME, 2000, XP)
Use WINCOM utility to test communication
between computer and DECRYPTA
3
.
- Double click on WINCOM icon to start
the application.
- Click on SETTINGS to choose COM
port ( do not change other parameters )
that your DECRYP TA3 is
connected to then click OK.
- Click on OPEN to start monitoring
selected port. If DECRYPTA
3
is properly installed and configured you
will see some signals.
- Click on ENABLE ACK to acknowledge
- all incoming signals.
DOS
Due to the nature of USB port, no drivers are provided for DOS
LINUX DRIVERS
USB drivers for supporting DECRYPTA3 are included in Linux mainstream kernel versions.
Creating nodes for DECRYPTA3:
If your Linux distribution is using devfs you can skip this step.
Create nodes by doing: mknode /dev/ttyUSB0 c 188 0
mknode /dev/ttyUSB1 c 188 1
mknode /dev/ttyUSB2 c 188 2
To check if you already have the driver enabled, plug the DECRYPTA3 into the USB port
and do the following: cat /dev/ttyUSB0
if the following appears: cat: /dev/ttyUSB0: No such file or directory
you DON'T have a loaded module.
Loading a module:
do the following: modprobe ftdi_sio
if no error messages were displayed, check if the driver was properly enabled as outlined before. If there was some errors, it
means that you will have to rebuild the drivers.
Rebuilding drivers:
cd /usr/src/linux if the directory does not exist, install kernel sources from your distribution CD. Contact your Linux vendor for
further support.
make menuconfig. If any error occurs try to reinstall the kernel sources.
Page 24

DESCRIPTION Page 23 | 41
Operating guide for Alarm Receiver DE CRYPTA
3
MCDI Security Products Inc.. Internet: mcdi.com
7055 Jean-Bourdon Avenue, Montreal, QC, Canada H4K 1G7 Telephone: +514-481-1067 Fax: +514-481-1487
Select "USB Support"
Select "Support for USB" <*>
Select "USB Serial Converter Support"
Select "USB Serial Converter Support" <M>
Select "USB FTDI Single Port Serial Driver" <M>
Select <Exit>
Select <Exit>
Select <Exit>
Save your configuration
regenerate dependencies:
make dep
build kernel modules:
make modules
install modules:
make modules_install
if no errors occurred, try to load the module as outlined before.
Displaying USB traffic using lincomirq. Lincomirq is a Linux software program shipped with E
2
and DECRYPTA3. It is
used to check signals sent to PC by DECRYPTA3.
Download lincomirq package from MCDI Inc. website or on included CD
DECRYPTA
3
>LINUX>Lincomirq
Unpack the file and recompile it (Refere to README file in lincomirq for further assistance). Run comirq -u 0 to display traffic
from the first USB DECRYPTA3. Running comirq -u 1 will display traffic from the 2nd DECRY PTA3 etc.
MACINTOSH DRIVERS
Located on CD DECRYPTA3>DRIVERS>MACINTOSH>
WINDOWS 95SE DRIVERS
Located on CD DECRY PTA3>DRIVERS>WIN95
WINDOWS 98, ME DRIVERS
Located on CD DECRY PTA3>DRIVERS>WIN98
WINDOWS ME DRIVERS
Located on CD DECRY PTA3>DRIVERS>WINME
WINDOWS 2000 DRIVERS
Located on CD DECRY PTA3>DRIVERS>WIN2000
WINDOWS XP DRIVERS
Located on CD DECRY PTA3>DRIVERS>WINXP
Page 25

DESCRIPTION Page 24 | 41
Operating guide for Alarm Receiver DE CRYPTA
3
MCDI Security Products Inc.. Internet: mcdi.com
7055 Jean-Bourdon Avenue, Montreal, QC, Canada H4K 1G7 Telephone: +514-481-1067 Fax: +514-481-1487
Connexion of DECRYPTA3 under Windows XP or Windows 2000. First time installation
USB port enables a rapid and easy deployment of peripherals such as DECRYPTA3. Follow the steps enumerated in
this section to enable USB communication between your PC and a DECRYPTA3Alarm Receiver. This procedure is
common to Windows XP and Windows 2000. The procedure demonstrates a first time installation.
1. Specify the location of the directory containing drivers.
Windows takes care of bringing on screen a new hardware dialog
box (fig. 1) upon first installation. At this point you should insert
the DECRYPTA3 CD supplied with your unit.
Select the Recommended option : ‘Install the software
automatically’ and click on Next
Windows will display a new window (fig.2) to locate the
direcrtory containing DE CRYPTA3 USB drivers. Make
sure the selection Search removable media if you are installing
drivers from the CD or write the direct path to a known location
for drivers using the ‘Browse’ window.
Click on Next.
Windows will then display a list of components useful to USB
installation of DECRYPTA3. Fig. 3 shows a warning
from Microsoft. You need to click on Continue Anyway to
finish installation of USB components of
DECRYPTA
3
.
Fig .4 will be displayed to confirm the correct installation of
USB components for DECRYPTA3. If an error
message is displayed contact MCDI support at
usb@mcdi.com or support@mcdi.com
Fig. 1
Fig. 2
Fig.3
Fig. 4
Page 26

DESCRIPTION Page 25 | 41
Operating guide for Alarm Receiver DE CRYPTA
3
MCDI Security Products Inc.. Internet: mcdi.com
7055 Jean-Bourdon Avenue, Montreal, QC, Canada H4K 1G7 Telephone: +514-481-1067 Fax: +514-481-1487
2. Installing the Virtual Serial Port.
A last component, a Virtual Serial Port, is needed to make
DECRYPTA3 talk to the PC. Fig. 5 shows a new
installation window that will pop on screen at this point
Once again, you will need to specify the location of the
component. We suggest you accept the Recommended
selection : ‘Install the software automatically’ and click on
Next.
A dialog box pops on screen to Select the location of the
Virtual Port component. Once again if working from the CD
select the Search removable media option and click on Next
or specify the exact location of component
Once again, a Microsoft warning (Fig. 6) will be displayed on
screen. You need to click on Continue Anyway in order to
finish installation of USB DECRY PTA
3
components.
Fig .7 will be displayed to confirm the correct installation of USB
Serial port component for DECRYPTA3. If an error
message is displayed contact MCDI support at usb@mcdi.com
or support@mcdi.com
Fig. 5
Fig.6
Fig. 7
Page 27

DESCRIPTION Page 26 | 41
Operating guide for Alarm Receiver DE CRYPTA
3
MCDI Security Products Inc.. Internet: mcdi.com
7055 Jean-Bourdon Avenue, Montreal, QC, Canada H4K 1G7 Telephone: +514-481-1067 Fax: +514-481-1487
3. Verification
You can verify the correct instalation of DECRYPTA3 by
looking at Windows Device Manager (Fig. 8) or you can directly go to
MCDI Configurator tool. Device Manager is located at Start>Control
Panel>System>>Hardware tab>>Device Manager
Click on tab Hardware and then select Device manager.
In Ports (COM &LPT), USB Decrypta 3 (COM N) will be
displayed for each DECRYPTA3 connected along
with the COM port in use for each DECRYPTA3 unit
connected via USB.
4. Changing COM Ports for USB DECRYPTA3
Assigning a new com port to a DECRYPTA3 is easily done.
COM port can be changed manually by double clicking in each
individual USB DECRYPTA3 in the Device manager. A new
Properties windows (Fig. 10) will be displayed. In Port Settings>>
Advanced a new window Ports will be displayed (fig.
11). Com port number can be changed to desired
port. It is not advisable to change other parameters.
To register changes click on OK in Port Settings
window and OK in the Properties window. Settings
will not be registered before this is done. In the Device Manager clicking on Refresh icon will bring a new enumeration
with changes.
You can now change internal settings of DECRYPTA3 using your PC and MCDI Configurator tool.
Fig. 8
Fig. 9
Fig. 10
Fig. 11
Page 28

DESCRIPTION Page 27 | 41
Operating guide for Alarm Receiver DE CRYPTA
3
MCDI Security Products Inc.. Internet: mcdi.com
7055 Jean-Bourdon Avenue, Montreal, QC, Canada H4K 1G7 Telephone: +514-481-1067 Fax: +514-481-1487
WORKING WITH OPERATING SYSTEM
DOS (Serial communication only- no config)
LINUX
Windows 95SE, 98, ME
Windows XP and 2000.
Macintosh: OS X
Receiving
Formats MCDI DTMF FSK
Acron Ademco Contact ID Ademco L/S Standard
Ademco L/S expanded Ademco Fast / High Speed Ademco Express
Ademco Old DCI FBI Super Fast
Franklin Fast Napco Radionics Standard
Radionics Expanded Scantronic Sescoa standard
Sescoa SS SIA I - II - ~III Silent Knight Slow/Fast
CFSK III Varitech VFSK Stratel
SurGard Robofon Telim
Pulse 10,20,40 pps 3x1 - 4x1 - 4x2 Dual Round
10,20,40 pps 4x2 Checksum
10,20,40 pps 3x1 - 4x1 Extended Dual Round
Frequencies 1800 Hz / 1900 Hz
Handshake and kissoff: 1400hz / 2300hz
DTMF 10 char/sec.
FSK 110 bauds or 300 bauds (SIA, CFSK, VFSK) Bell 103
Listen-in, Two way voice
Listen-in function
Some alarm panels offer the option for the Central station operator to listen for sound in the premises where the alarm signal
originates.
Alarm panels supporting “Listen-in” keep the telephone line open after having sent a signal, to allow sound monitoring. The
telephone line will be closed by the Central station subject to operator action or receiver setup.
Listen-in criteria
DECRYPTA
3
is triggered into “Listen-in” mode for incoming events according to panel setup for specific formats.
SIA and Contact ID formats have specific codes for Listen-in. See Panel setup.
DTMF formats use the AEx signal where x can be 0 to F at the Installer’s choice.
3x1 and 4x2 formats have no standard codes for Listen-in. DECRYPTA3 allows self selection of Listen-in codes at
Setup time.
Receiver action upon reception of “Listen-in” trigger
Upon reception of event in the Listen-in category, DECRYPTA3 receiver maintains the telephone line open for a
period of up to 180 seconds or less then 180 seconds upon reception of any telephone tone from the keypad.
Operator control for “Listen-in”
Page 29

DESCRIPTION Page 28 | 41
Operating guide for Alarm Receiver DE CRYPTA
3
MCDI Security Products Inc.. Internet: mcdi.com
7055 Jean-Bourdon Avenue, Montreal, QC, Canada H4K 1G7 Telephone: +514-481-1067 Fax: +514-481-1487
Operator must be warned by Monitoring software of account “listen-in” capability. Operator has a maximum of 180 seconds
from time of alarm reception to telephone pickup. Failure to pickup telephone in this delays will cause line hang-up by
DECRYPTA
3
receiver.
Once the line is seized by Central station local telephone, the hang-up action of DECRYPTA3 will have no effect.
To close communication with alarm signal site in the first 180 seconds when DECRYPTA3 is in action, operator
must press any key on the telephone keypad before hanging up. DECRYPTA3 will hang up telephone line before
180 seconds only upon reception of a tone from telephone keypad.
To close communication with alarm signal site after 180 seconds of event reception, simply hang-up the telephone. This is
because DECRYPTA3 is not in function anymore, its delay having expired.
Transmission to computer and printer in MCDI standard mode
Pulse, DTMF, FSK
FORMAT 3x1, 4x1
HH:mm_ _MM/DD[/YY] _ _ RL_CCCC_ØA<CR> Default
HH:mm_ _MM/DD[/YY] _ _ RL_CCCC_A<CR> Option 4x1 set by Setup tool
HH:mm_ _MM/DD[/YY] _ _ RL_CCC_A<CR> Option 3x1 set by Setup tool
HH:mm_ _MM/DD[/YY] _ _ RL_ØCCC_AZ<CR> Option 3x1 extended compressed 4x2
HH:mm_ _MM/DD[/YY] _ _ RL_CCCC_AZ<CR> Option 4x1 extended compressed 4x2
Option zero removed 3x1,4x1, extended
FORMAT 4x2
HH:mm_ _MM/DD[/YY] _ _RL_CCCC_AZ<CR>
FORMAT 4x3 (SESCOA SS)
HH:mm_ _MM/DD[/YY] _ _RL_CCCC_AZZ[Z]<CR>
FORMAT 4x3 (SUR GARD)
HH:mm_ _MM/DD[/YY] _ _RL_CCCC_AZZ<CR>
FORMAT ADEMCO HIGH SPEED
HH:mm_ _MM/DD[/YY] _ _RL_CCCC_AAAA_AAAA_A<CR>
FORMAT ACRON
HH:mm_ _MM/DD[/YY] _ _RL_CCCC_AAAAAAAA<CR>
HH:mm_ _MM/DD[/YY] _ _RL_ _CCC_AAAAAAAA<CR>
FORMAT FBI SUPER FAST
HH:mm_ _MM/DD[/YY] _ _RL_CCCC_EZZ<CR>
FORMAT CONTACT ID
HH:mm_ _MM/DD[/YY] _ _RL_CCCC_18_TAAA_GG_ZZZ<CR>
FORMAT MODEM SIA
HH:mm_ _MM/DD{YY}] _ _RL _ [#CCCCCC|EAAZZZ/AAZZZ/AAZZZ]<CR> Native mode
<LF>RL_ [#CCCCCC|EAAZZZ/AAZZZ/AAZZZ]<CR> Ademco685 Emulation
FORMAT MODEM CFSK / VFSK (same as 4x2)
Page 30

DESCRIPTION Page 29 | 41
Operating guide for Alarm Receiver DE CRYPTA
3
MCDI Security Products Inc.. Internet: mcdi.com
7055 Jean-Bourdon Avenue, Montreal, QC, Canada H4K 1G7 Telephone: +514-481-1067 Fax: +514-481-1487
HH:mm_ _MM/DD{/YY} _ _ RL_CCCC_AZ<CR>
CALLER ID
Phone signal added to event code. Examples
HH:mm_ _MM/DD[/YY] _ _RL_CCCC_AZ{t...t}<CR> Added to 4x2
HH:mm_ _MM/DD[/YY] _ _RL_CCCC_18_TAAA_GG_ZZZ {t...t}<CR> Added to Contact ID
HH:mm_ _MM/DD{YY}] _ _RL _ [#CCCCCC|EAAZZZ/AAZZZ/AAZZZ]{t...t}<CR> Added to SIA
Heartbeat
@<CR> Signal sent to the computer every 30 seconds if option is enabled
Page 31

DESCRIPTION Page 30 | 41
Operating guide for Alarm Receiver DE CRYPTA
3
MCDI Security Products Inc.. Internet: mcdi.com
7055 Jean-Bourdon Avenue, Montreal, QC, Canada H4K 1G7 Telephone: +514-481-1067 Fax: +514-481-1487
Code definitions
HH : Hour
: : Character ":"
mm : Minute
DD : Day
_ : 1 space
_ _ : 2 spaces
MM : Month
[YY] : Year [Present/Absent] Receiver Option)
/ : Character "/"
R : Receiver number (Receiver Option)
L : Line number (Receiver Option)
C : Account number
A : Event code or modifier
E : Zone type FBI super Fast
Z : Zone
G : Group (Partition)
T : Type(E or R) (Contact ID)
Ø : Zero
<CR> : EOS (Carriage Return)
<ACK> : Data retransmits to computer every 2 second until ACK is received by DECRYPTA II (ACK=06H or
$06).
@ : Heartbeat signal Receiver Option)
t...t : Telephone number from Caller ID
[ : Beginning data delimiter (SIA)
] : Ending data delimiter (SIA)
| : Field separator (SIA)
# : Account ID block code (SIA)
E : Function block code (SIA)
/ : Data code packet separator (SIA)
<LF> : Line Feed
DECRYPTA
3
Error and Warning messages sent to Printer port and PC:
HH:MM MM/DD[YY] RL Account XYY
Printer message Time Date Receiver 0000 01 Printer error
Time Date Receiver 0000 02 Printer reset
Telephone line monitoring Time Date Receiver 0000 03 Error Line 1
Time Date Receiver 0000 04 Reset Line 1
Telephone line monitoring Time Date Receiver 0000 05 Error Line2
Time Date Receiver 0000 06 Reset Line2
External battery backup Time Date Receiver 0000 07 Low external battery
Time Date Receiver 0000 08 Normal external battery
Transmission message Time Date Receiver 0000 00 Bad transmission
Time Date Receiver [#0000|A BAD TRANSMISSION] Format SIA
No Transmission Time Date Receiver 0000 F1 No signal received Line 1
Time Date Receiver 0000 F2 No signal received Line 2
Transmission to computer and printer in ADEMCO 685 / Surgard emulation mode
User Manual : for information on transmission See ADEMCO 685 standards
User Manual : for information on transmission See Surgard MRL2 documentation
Surgard emulation applies to Dial up Alarm signals and Telephone ID
Page 32

DESCRIPTION Page 31 | 41
Operating guide for Alarm Receiver DE CRYPTA
3
MCDI Security Products Inc.. Internet: mcdi.com
7055 Jean-Bourdon Avenue, Montreal, QC, Canada H4K 1G7 Telephone: +514-481-1067 Fax: +514-481-1487
Messages from DECRYPTA3 to DECRYP TA3 printer port
When computer ceases to answer "Computer absent" is sent to DECRYPTA3 parallel port
When computer answers "Computer restore" is sent to DECRYPTA3 parallel port
CARE OF DECRYPTA3 UNIT:
To clean, always use a slightly damp cloth; never use abrasives or solvents. Avoid pressure, shock, vibration, moisture and
excessive humidity: damage may result. Do not expose to direct sunlight.
Operating condition: 4°C to 40°C.
Storage condition: -15°c to 65°C
Always use with power source as indicated in powering the unit section. Consult a qualified Electrician before using power
sources other than supplied power adaptor.
FIELD REPLACEABLE PARTS (under MCDI SP Inc. direction)
NVRAM units (1).
Phone line interface (red PCB).
Selectable jumpers.
Cables.
FIELD UPGRADABLE (upon MCDI SP Inc. direction)
Firmware programming
Drivers
Communication tools
Enabling DECRY PTA3 in SAMM (DOS version 8.1.95 and lower)
Due to the nature of USB communication and the limitations of DOS, USB communication can not be established under dos
or with a strictly DOS based application. Serial communication from serial port may be established. Refer to SAMM
installation manual page 6 to establish a start up command string.
USB communication to the Signal logger (CD DECRYPTA3 >tools/communication/name of logger )can still be
achieved if PC is Windows 98 and up or by sending USB signal to another PC.
Enabling DECRY PTA3 in SAMM X (version 10.3 or up)
Using WSReceiver.
Enabling DECRY PTA3 in WinSAMM (version 1.2 or up)
Using WS Receiver
Enabling DECRY PTA3 in CentralWorks (DOS)
Due to the nature of USB communication and the limitations of DOS, USB communication can not be established under dos
or with a strictly DOS based application. Serial communication from serial port may be established. Refer to Alarmsoft/Jabco
www.alarmsoft.com 1-757-472-4687 for set-up of serial port communication.
USB communication to the Signal logger (CD DECRYPTA3 >tools/communication/name of logger )can still be
achieved if PC is Windows 98 and up or by sending USB signal to another PC.
Warranty
The Electronic products of MCDI SP Inc. are under a three year limited warranty. Material is repaired or exchanged, free of
charge, when returned to MCDI service points, post and duty paid. Abused or misused equipment is not covered by this
warranty. Damages or loss of business resulting from the use of MCDI products are not covered by this warranty.
Damages resulting from power surge damages are expressly excluded of warranty.
Loss of business, cost incurred during the the use ot MCDI equipment are expressely excluded of warranty.
Page 33

DESCRIPTION Page 32 | 41
Operating guide for Alarm Receiver DE CRYPTA
3
MCDI Security Products Inc.. Internet: mcdi.com
7055 Jean-Bourdon Avenue, Montreal, QC, Canada H4K 1G7 Telephone: +514-481-1067 Fax: +514-481-1487
During the period of warranty, advanced replacement service of DECRYPTA3 is available for during repairs and
upgrade. This service is available for a fee. Please contact our support department at support@mcdi.com to make
arrangements. This service maybe terminated without prior notice and his subject to warehouse stock.
Legal compliance and Warning
United States Regulation FCC Warning
Radio/TV interference
This device is not equipped with dialing equipment.
Telephones equipped with electronic dialing keys generate and use radio frequency energy, and if not installed and used
properly and in strict accordance with the manufacturer's instructions, may cause interference to radio and television reception.
NOTE: This device has been tested and found to comply with Part 15 if the FCC rules. Operation is subject to the following
two conditions:
1. This device may not cause harmful interference and
2. This device must accept any interference received, including interference that may cause undesirable operation.
If your device causes interference, one of the following measure may correct the problem:
. Reorient or relocate the receiving TV or radio antenna, when this may be done safely.
. To the extent possible, move the device and the radio or television farther away from each other, or connect the computer
with the device and the radio or television to outlets on separate circuits.
. Consult the dealer or an experienced radio/television technician for additional suggestions.
NOTE: FCC registration does not constitute an expressed or implied guarantee of performance.
Right of the Telephone Company
If this device causes harm to the telephone network, the telephone company may stop your service temporarily or ask you to
remove your equipment until the problem is resolved. If possible, they will notify you in advance. If advance notice is not
practical, you will be notified as soon as possible and be given the opportunity to correct the situation. You will also be informed
of your right to file a complaint with the FCC.
Your telephone company may make changes in its facilities, equipment, operations or procedures that could affect the proper
function of this device. If they do, you will be notified in advance to give you an opportunity to maintain uninterrupted telephone
service.
Federal communication commission (FCC) Notice
FCC Registration Number: This device complies with Part 68, Rules and Regulations, of the FCC for direct connection to the
Public Switched Telephone Network (the FCC registration number and REN number appear on a sticker). If requested, this
information must be provided to the telephone company.
Your connection to the telephone line must comply with these FCC rules:
. Use only an FCC standard RJ11W/RJ14W or RJ11C/RJ14C network interface jack and FCC compliant line cord and plug
to connect to the telephone line. (To connect the device press the s mall plastic tab on the plug at the end of the
telephone's line cord. Insert into a jack until it clicks. To disconnect, press the tab and pull out.)
. If a network interface jack is not already installed in your location, you can order one from your telephone company. Order
RJ11W/RJ14W for wall mounted telephones or RJ11C/RJ14C for desk/table use. In some states, customers are permitted
to install their own jacks.
Page 34

DESCRIPTION Page 33 | 41
Operating guide for Alarm Receiver DE CRYPTA
3
MCDI Security Products Inc.. Internet: mcdi.com
7055 Jean-Bourdon Avenue, Montreal, QC, Canada H4K 1G7 Telephone: +514-481-1067 Fax: +514-481-1487
. This device may not be connected to a party line or coin telephone line. Connection to Party Line Service is subject to
state tariffs (contact the state public utility commission, public service commission or corporation commission for
information).
. It is no longer necessary to notify the telephone company of your device's Registration and REN number however, you
must provide this information to the telephone company if they request it.
. If trouble is experienced with this equipment, for repair or warranty information please contact:
Local dealer or
MCDI Security Products Inc.
7055 Jean-Bourdon Avenue., Montreal, QC, Canada H4K 1G7
Telephone: +(514) 481-1067 Fax: +(514) 481-1487
. If the equipment is causing harm to the telephone network, the telephone company may request that you disconnect it
until the problem is resolved.
. This device does not have any serviceable parts. Repair or exchange must be made by the manufacturer or its
representatives.
Signaling method: This device does not dial out.
Ringer Equivalence Number: The FCC Registration label (on the device) includes a Ringer Equivalence Number (REN) which
is used to determine the number of devices you may connect to your telephone line. A high total REN may prevent telephones
from ringing in response to an incoming call and may make placing calls difficult. In most areas, a total REN of 5 should permit
normal telephone operation. To determine the total REN allowed on your telephone line, consult your local telephone company.
Hearing aids This device does not convert the signal for human hearing.
Programming Emergency numbers: This device does not dial out.
Important safety instructions
When using the device, basic safety precautions should always be followed to reduce risk of fire, electrical shock and injury to
persons including the following:
1. Read and understand all instructions.
2. Follow the warnings and instructions marked on the product.
3. This device is installed in a computer. This work should be done by a qualified computer technician.
4. Avoid using during electrical storm. There may be a remote risk of electrical shock from lightning.
5. CAUTION: Do no use sharp instruments during installation procedure to eliminate the possibility
of accidental damage to the device, the computer or the cord.
6. Save these instructions.
Europe EC Declaration of ConformityEC Declaration of ConformityEC Declaration of Conformity
We:
MCDI Security Products Inc.
7055 Jean-Bourdon Avec
Montreal, QC
Canada H4K 1G7
Declare under our sole legal responsibility that the following products conform to the protection requirements of council directive
89/336/EEC on the approximation of the laws of member states relating to electromagnetic compatibility, as amended by
directive 93/68/EEC:
MCDI - DECRYPTA3 alarm receiver
The products to which this declaration relates are in conformity with the following relevant harmonised standards, the reference
numbers of which have been published in the Official Journal of the European Communities:
Page 35

DESCRIPTION Page 34 | 41
Operating guide for Alarm Receiver DE CRYPTA
3
MCDI Security Products Inc.. Internet: mcdi.com
7055 Jean-Bourdon Avenue, Montreal, QC, Canada H4K 1G7 Telephone: +514-481-1067 Fax: +514-481-1487
EN50082-1:1992 --- EN55022 CLASS A --- EN 60555 PARTS 2 & 3 ---EN41003:1993 --- BAPT Note 48 revision 5
EN60950/IEC Ed 2 Amendment No1 1992, Amendment No2 1993, Amendment No3 1996
Signed this 7th day of January 1997
MCDI Security Products Inc.
Europe EN41003 Warning Application Note 48, Issue 5EN41003 Warning Application Note 48, Issue 5EN41003 Warning
Application Note 48, Issue 5
1) The power required by the host and the total of all adapter cards installed within the host environment, together with any
auxiliary apparatus, shall not exceed the power specification of the host apparatus.
The power requirements for the DECRYPTA3 receiver are:
From External Battery (standby) 12V 1A
2) It is essential that, when other option cards are introduced which use or generate a hazardous voltage, the minimum
creepages and clearances specified in the table below are maintained. A hazardous voltage is one which exceeds 42.4V peak
a.c. or 60V d.c. If you have any doubt, seek advice from a competent engineer before installing other adapters into the host
equipment.
3) The equipment must be installed such that with the exception of the connections to the host, clearance and creepage
distances shown in the table below are maintained between the card and any other assemblies which use or generate a voltage
shown in the table below. The larger distance shown in brackets applies where the local environment within the host is subject
to conductive pollution or dry non-conductive pollution which could become conductive due to condensation. Failure to maintain
these minimum distances would invalidate the approval.
4) The analogue telecommunications interface is intended to be connected to telecommunication network voltage (TNV)
circuits which may carry dangerous voltages. The telephone cord(s) must be disconnected from the telecommunications system
until the card has been installed within a host which provides the necessary protection of the operator. If it is subsequently
desired to open the host equipment for any reason, the telephone cord(s) must be disconnected prior to effecting access to any
internal parts which may carry telecommunication network voltages.
Page 36

DESCRIPTION Page 35 | 41
Operating guide for Alarm Receiver DE CRYPTA
3
MCDI Security Products Inc.. Internet: mcdi.com
7055 Jean-Bourdon Avenue, Montreal, QC, Canada H4K 1G7 Telephone: +514-481-1067 Fax: +514-481-1487
GLOSSARY
Account number Part of an alarm signal that designates the supervised location
Acknowledge Single or group of characters sent by a device or software to a device upstream. This distinctive
signal informs the device an alarm event/signal was received. Carriage return is mostly used.
ACRON Reporting format. Not widely used
Ademco 685 Reporting format of said Alarm receivers.
ANI Automatic number ID. A service feature in which the directory number or equipment number of a
calling station is automatically obtained
ASCII American Standard Code for Information Interchange. Pronounced "askee"; binary code of 128
characters represented by a string of seven binary numbers and a parity bit.
AWG Standardized system for sizing wires according to the wire's diameter. The smaller the AWG
number the larger the diameter of wire. When specified, it is essential to respect the gauge of the
wire to allow heat dissipation.
Automation software Central station Software
Baud rates A measure of speed. Alarm receivers mostly communicate with PCs at 1200 bits per second.
Bit Smallest element of computer information. Either 1 or 0 in binary system. 1 Kb is 1024 bits. A Mb
is 1048567bits. An Ethernet card usually transmits at 10Mb/100Mb
Bios Basic Input/Output System. Program residing in the ROM chip of a computer. Provides the basic
instructions for controlling computer hardware. Both the operating system and application
software use BIOS routines to ensure compatibility.
Buzzer Sound device located inside a DECRYPTA3 or on an Exprecium alarm receiver card.
Emits a sound when an alarm is received or when a reboot process is under way
Byte A group of 8 bits. A KB is 1024 bytes, A MB is 1048567 bytes
BFSK FSK type of communication
Catapult MCDI IP mode. Also designate a MCDI product Linux application which transforms a PC into an
alarm receiver/router with IP capabilities.
Page 37

DESCRIPTION Page 36 | 41
Operating guide for Alarm Receiver DE CRYPTA
3
MCDI Security Products Inc.. Internet: mcdi.com
7055 Jean-Bourdon Avenue, Montreal, QC, Canada H4K 1G7 Telephone: +514-481-1067 Fax: +514-481-1487
Caller ID Information sent by the Phone Company that reveals the phone number calling and sometimes
the name linked to this phone number.
CCITT European equivalent to Bell 103. Modem Format. MCDI can be fitted to accept CCITT.
CESA FSK format developed by Bosch. Used in Europe and mostly in France. Requires specific
programming of selected MCDI equipment
CFSK FSK format developed by the C & K Company.
Checksum Used to calculated integrity of an event. Calculating a value for each character of the event and
making a sum of values will generate a number, the checksum. The receiving device must match
this number in order to accept the event. This concept is also used by DECRYPTA3 when
in MCDI Catapult mode.
Close In alarm industry, the act of arming a system
CID Caller ID. This acronym is also used for Contact ID, an Ademco format. DECRYPTA
3
supports caller ID or type 1 originally developed by Bellcore. Other type of caller ID (DTMF type)
is used in few countries. Decrypta 2 is not compatible with this type.
Communicator Part of an alarm system. Dialer
COM port Other name for the serial port. It is Serial because it transmits the eight bits of a byte of data
along one wire, and receives data on a different wire.
Contact ID DTMF Alarm Format developed by Ademco. Wide ly used.
CR Carriage return
DECRYPTA3 DECRYPTA3 alarm receiver.
DB9 9 pins Connector used for serial communication. Located at the back of DECRYPTA3.
DB25 25 pins connector used for parallel communication to printer. Located at the back of
DECRYPTA3.
Dead line detection DECRYPTA3 probes phone lines at 4 seconds interval. If dial tone is not detected,
DECRYPTA3 reports a dead line.
DNIS Dialed number identification service. DTMF.
Dual round Some panels send alarm event twice. Receiver only if received twice sends kiss off. Pulse only.
Page 38

DESCRIPTION Page 37 | 41
Operating guide for Alarm Receiver DE CRYPTA
3
MCDI Security Products Inc.. Internet: mcdi.com
7055 Jean-Bourdon Avenue, Montreal, QC, Canada H4K 1G7 Telephone: +514-481-1067 Fax: +514-481-1487
Dot matrix Printer type. Mostly Parallel interface and impact printers. Commonly used to print directly from
DECRYPTA3. Support a line-by-line printing.
Drivers Software instructions used by kernel of operating software to direct or transform the signal of an
attached peripheral such as alarm receiver card Exprecium or DEC RYPTA3 USB port.
DTMF Dual tone multi frequency. Summation of the amplitudes of two sine (cosine) waves of different
frequencies. Example: Keying '1' will send a tone made by adding 1209 Hz and 697 Hz to the
other end of the line. Formats like Contact ID are of DTMF type.
Earth Ground Any device connection or a grounding rod used to connect devices such as DECRYPTA
3
to earth. Such a connection is used as a sink for electrical transients and possibly damaging
potentials, such as those produced by a nearby lightning strike.
E2 Exprecium2 mode. Advanced programming for Exprecium2 generation of receivers. Common to
MCDI Exprecium PCI cards and Decrypta 2. Suitable with MCDI Catapult and Extrium receivers.
Event MCDI uses this terminology to designate a string of characters or a packet that amounts to a
signal sent from an alarm panel.
Firmware Programs or instructions stored in a PROM. MCDI uses the term firmware to refer to the software
residing on a PROM or EPROM.
FSK Frequency shift keying. In digital communication, an audio frequency is used for 1 and a different
frequency is used to signal 0
FTC Fail to close. Event created when a system remains disarmed at preseted time.
FTO Fail to open. Event created when a system remains armed at preseted time.
GCI 1800/1900 GSM backup interface by MCDI. Iinterfaces GSM phone signal to PSTN (RJ11 plugs) and
transfers ring to let alarm receivers such as Decrypta and DEC RYPTA3 receive alarm
sent over a GSM network. 900/1800 are the frequencies used is most of the planet. 1900 is
mostly used in North America and parts of South America.
Ground Earth ground.
Ground Loop An alternative path in which current can travel. Ground loops can produce noise.
Ground Lug A lug used for connecting Decrypta alarm receivers to earth ground. Decrypta receivers should
be connected to earth ground to protect them from transient potentials such as nearby lightning
strikes.
GSM Global System for Mobile commincations.Wireless phone system used in most parts of the world.
Page 39

DESCRIPTION Page 38 | 41
Operating guide for Alarm Receiver DE CRYPTA
3
MCDI Security Products Inc.. Internet: mcdi.com
7055 Jean-Bourdon Avenue, Montreal, QC, Canada H4K 1G7 Telephone: +514-481-1067 Fax: +514-481-1487
GUI Graphical User Interface. Pronounced "gooey". Graphical rendering of the programming code
used by the PC.
Half Duplex Each end of a communication circuit can transmit and receive data, but not simultaneously. Most
alarm transmission are of this type.
Handshake Frequency emited by the alarm panel in order to match the format of the alarm panel.
DECRYPTA3 emits several handshake tones in order to mate with the panel.
Handshake sequence In DECRYPTA3, the hability to specify an order of appearance in order to speed the
matching process between the panel and the alarm receiver.
Hearbeat Single caracter or group of caracters sent from one device to the other at regular intervals.
HUB USB hub. Device used to link several USB client units to a USB port.
ISA Industry Standard Architecture. Slower 8 or 16-bit BUS (data pathway). TLR and TLR+ receiver
card are of this type. Fading out of the market.
Kiss off Tonality or signal sent by alarm panel or receiver to inform corresponding device of the end of
session. Some formats do not require handshake but most do.
LAN Local-Area Network. Connection of workstations, PCs or other LANs to enable data access and
device sharing.
Late to close LTC. Event created by arming a system after specified time.
Late to open LTO. Event created by disarming a system after specified time.
Listen-in Ability to hold the phone line and listen and sometimes talk on the phone line. This feature is
format related.
mA Milliampere Unit of current that is 1/1000 of an Ampere. Measure of current needed to power
DECRYPTA3
Modem The name combines "modulate" and "demodulate". Refers to its ability to transmit and receive
data superimposed on a carrier frequency. In alarm industry usage, a modem is a type of
communication. FSK formats are modem types.
Modem3a2 Alarm format owned by Radionics company. Built-in DECRYPTA3 and Exprecium2. An
agreement between the user and Radionics is required to activate.
mV Millivolt. Unit of electrical potential. 1/1000 of a volt.
Page 40

DESCRIPTION Page 39 | 41
Operating guide for Alarm Receiver DE CRYPTA
3
MCDI Security Products Inc.. Internet: mcdi.com
7055 Jean-Bourdon Avenue, Montreal, QC, Canada H4K 1G7 Telephone: +514-481-1067 Fax: +514-481-1487
NVRAM Non volatile memory. Holds memory without power. Memory with clock functions in use in
DECRYPTA3. Can be field reprogrammed.
Open In alarm industry, the act of disarming a system
Operator Alarm Central operator
OS Operating System such as Windows XP, Linux.
Output In context refered as 1) signal sent by alarm receiver to alarm panel over phone lines during a
communication 2) signal sent by alarm receiver to PC over USB port or Serial port.
Parity bit A redundant bit. Added to a record to allow alarm receiver to detect an odd number of bit errors
in said record.
Parallel port On DECRYPTA3, the printer port – DB25. Transmits the bits of a byte on eight different
wires at the same time (eight bits at the same time).
PCI Peripheral Component Interconnect. A 32-bit local bus which is faster than ISA bus. Exprecium
and Exprecium2 are of this type. Common in computer made since 2000.
Peripheral Auxiliary equipment such as DECRYPTA3 attached to a PC.
Pile Memory stack. Piling of events. Events are stacked in order memory. From the oldest to the
latest. Usually, latest erases the oldest when memory is full
Power Supplies Energy source for an electrical device. Can be AC powered through a standard wall s ocket, DC
powered through batteries or solar panel.
PPS Pulse per second. Signal sent by alarm panel. 10 pps, 20 pps, 40 pps indicates the frequency (or
number) of pulses per second.
PSTN Public system telephone network
Pulse Type of communication
Receiver Alarm receiver such a DECRYPTA3external receivers or Exprecium cards for PC
Relay A power switching device that completes or interrupts a circuit by physically moving electrical
contacts into contact with each other. Used in DECRYPTA3 to trigger an external device
such as strobe light, dialer, siren.
Page 41

DESCRIPTION Page 40 | 41
Operating guide for Alarm Receiver DE CRYPTA
3
MCDI Security Products Inc.. Internet: mcdi.com
7055 Jean-Bourdon Avenue, Montreal, QC, Canada H4K 1G7 Telephone: +514-481-1067 Fax: +514-481-1487
Relay normally close When relay closes the circuit, an electrical impulsion is sent. In DE CRYPTA3, will send an
impulsion to a device connected to trigger said device.
Relay normally open When relay opens the circuit, an electrical impulsion is sent. In DECRYPTA3, will send an
impulsion to a device connected to trigger said device.
RJ11 Type of connector. Terminology used to described phone line connectors.
Robofon FSK format used in Europe, mostly in Scandinavia. Reception of this format requires sprecific
frequeny tuning on MCDI equipment.
RS-232 DB9 connector. Interface between a computer input output port and a peripheral such as
DECRYPTA3.
SAMM Software developed by MCDI Security Products Inc. for alarm monitoring and Central station
management.
SERIEE French DTMF format developed by AEM. Requires specific programming of MCDI equipment
Sescoa SS Legacy alarm format. Rarely used
SIA Security Industry of America. Acronym is used to name a format designed under SIA guidance.
Several levels of SIA are used. MCDI supports level 1 and 2 and part of level 3.
S/N Serial number. Located at back of DECRYPTA
3
.
Starts by 60
SMS Short message service. Alpha numeric messages sent over GSM networks.
Surge Protector Device for protection of electronic equipment from damaging voltage levels sometimes occurring
in electrical transients.
STRING Sometimes referred as an event. A chain of characters that amounts to an alarm signal.
TCP/IP Transmission Control Protocol/Internet Protocol. Communications protocol commonly used over
Ethernet networks or the Internet.
Transmitter Digital communicator – alarm panel – located at supervised location
SIM Subscriber identity Module. SIM Card in a GSM phone. Contains phone identity, phone number
and sometimes address book
Start bit First bit in a byte
Page 42

DESCRIPTION Page 41 | 41
Operating guide for Alarm Receiver DE CRYPTA
3
MCDI Security Products Inc.. Internet: mcdi.com
7055 Jean-Bourdon Avenue, Montreal, QC, Canada H4K 1G7 Telephone: +514-481-1067 Fax: +514-481-1487
Stop bit First bit in a byte
SurGard formats Transmission formats from receiver to PC. Format designed by Surgard Company now a DSC
division. Close to Radionics 6500 format.
Telim FSK Format used in Europe, mostly in Germany. Reception of this format requires specific
frequency tuning on MCDI equipment.
USB Universal serial port
USB type A Type of connectors used in USB host devices
USB type B Type of connectors used in USB client devices. Connector used in DECRYPTA3
USB client Typically a peripheral device such as DECRYPTA3 who will send data to a USB host. Will
not accept signal from another USB client, Will transmit only to a USB host.
USB host Typically a PC with USB capabilities. The host receives the signal from the client.
USB hub Device used to connect several USB client devices to a USB host.
VCP Virtual com port.
VFSK FSK type of communication. Developped by Varitech (Optex)
VID Vendor ID. Number designating the vendor of the device.
Virtual com port Software tool used to emulate a com port and route data from USB to a memory address
equivalent to a serial port. Supplied with DECRYPTA3
Voltage Unit of measure for electrical potential Noted in volts. Energy potential of a source that can
produce a flow of electricity.
Wincom Software by MCDI. Communication tools for Windows compatible devices.
WinSAMM Central station software developed by MCDI SP Inc.
WSRECEIVER Software developed by MCDI SP Inc.. Key component of SAMM X (V 10.3) and WinSAMM.
Necessary to add inputs in both Central Station software.
 Loading...