

Page 1
Distributed Exclusively By
Harbor Freight Tools
3491 Mission Oaks Blvd.
Camarillo, CA 93011
Tel: (800) 444-3353
www.harborfreight.com
Printed in China
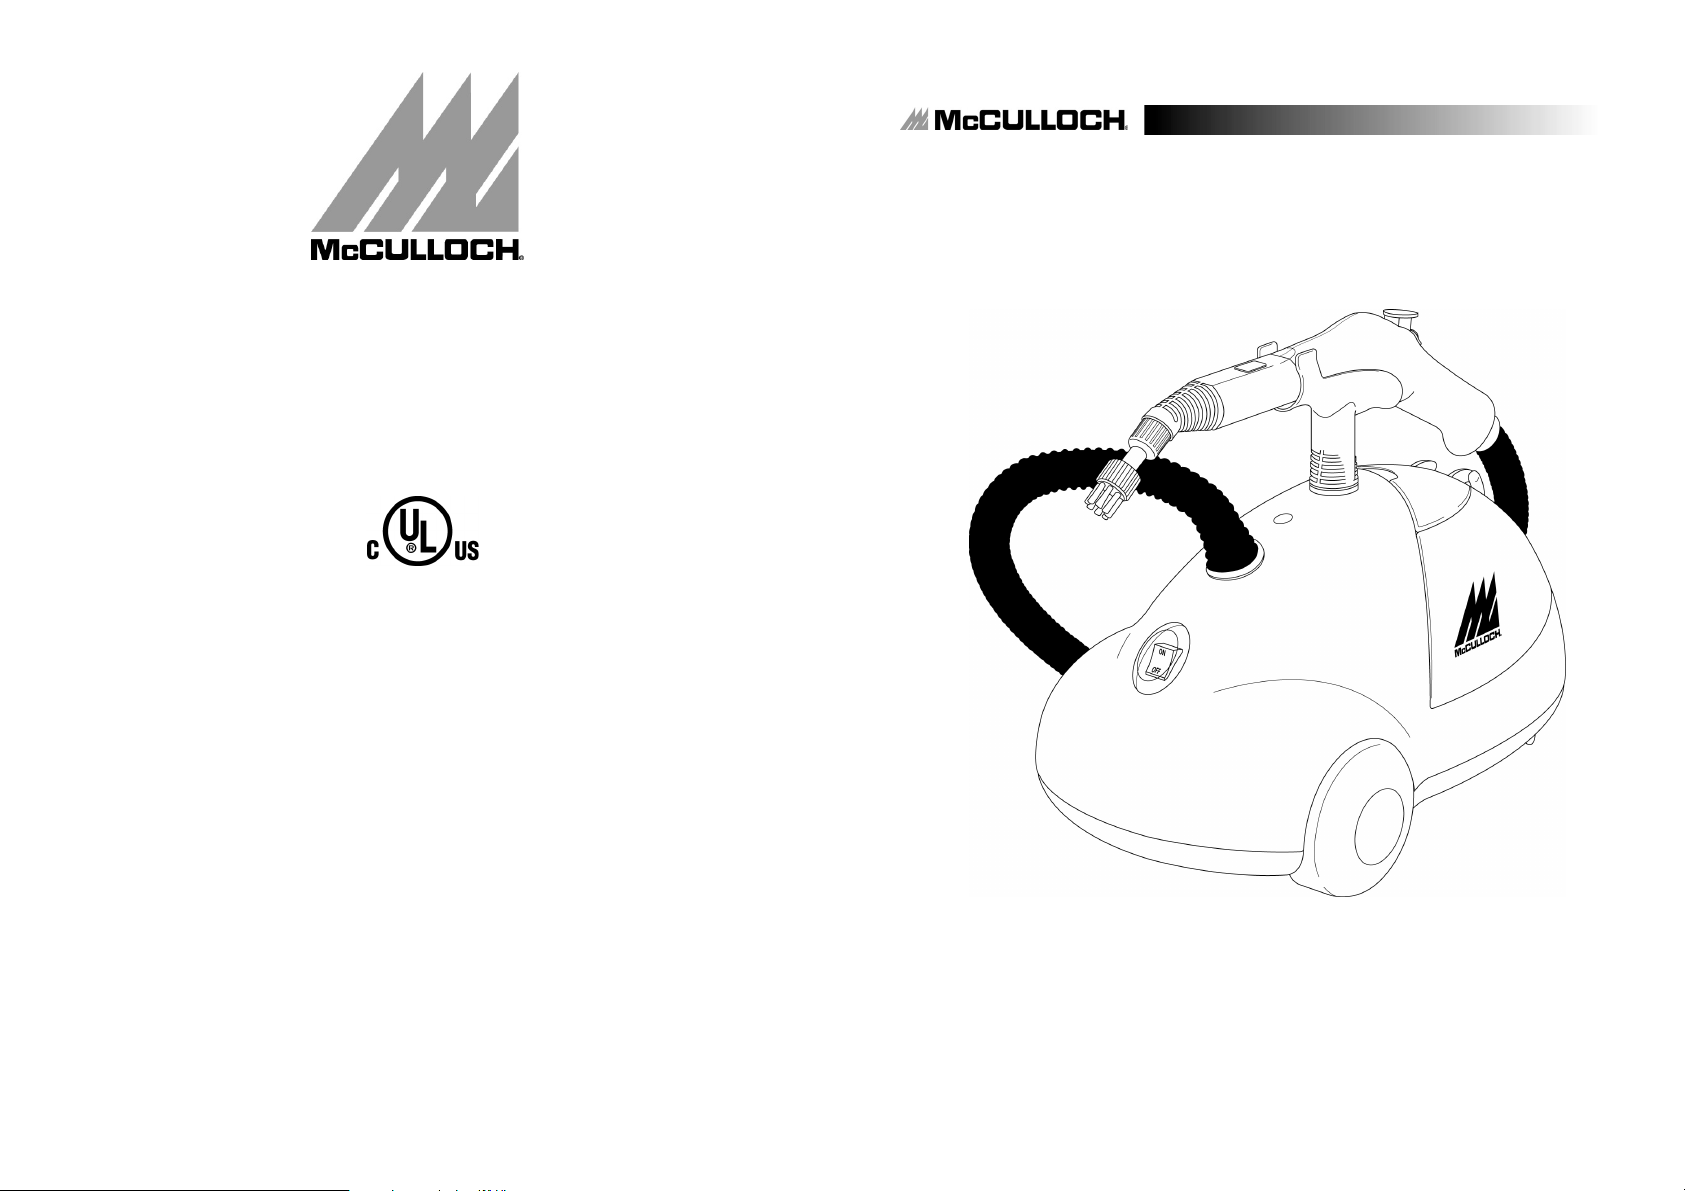
Heavy-Duty Steam Cleaner
V080716
Harbor Freight Tools
ITEM # 8823
Please read all instructions before use.
Page 2

Page 3
NOTES
IMPORTANT SAFEGUARDS
____________________________________________________
____________________________________________________
____________________________________________________
____________________________________________________
____________________________________________________
____________________________________________________
____________________________________________________
____________________________________________________
____________________________________________________
____________________________________________________
____________________________________________________
____________________________________________________
____________________________________________________
____________________________________________________
____________________________________________________
____________________________________________________
____________________________________________________
____________________________________________________
____________________________________________________
____________________________________________________
____________________________________________________
____________________________________________________
WARNING: To reduce the risk of fire, electrical shock, or injury, the
following basic safety precautions should always be followed when
using an electrical appliance.
READ ALL INSTRUCTIONS BEFORE USING YOUR
HEAVY-DUTY STEAM CLEANER
1. DO NOT overfill unit with water. DO NOT fill Water Reservoir with more than 48 oz.
(1,420 ml.) of water. Overfilling may result in burns from spilling water, or possible
electrical shock.
2. DO NOT leave your Heavy-Duty Steam Cleaner unattended when plugged in or not in
use. Use only for its intended purpose as indicated in this manual.
3. This unit is not a toy
children, pets, and plants. Steam produced by unit is hot and pressurized. Care
must be taken to avoid burns or other injuries. Never point nozzle at people or
pets.
4. To reduce the risk of contact with hot water emitting from steam vents, hold appliance
away from body and check for signs of condensation or leakage.
5. DO NOT use this unit if electrical cord or outlet is damaged. DO NOT use unit if it is
not working properly or has been dropped, damaged or left outdoors. If such damage
occurs, DO NOT disassemble or attempt repairs, take unit to a qualified service person
for examination and repair. Incorrect reassembly or repair could cause a risk of fire,
electrical shock, or injury to persons when steamer is used.
6. To reduce risk of electrical shock, DO NOT immerse in water or other liquids. DO
NOT use electrical cord as a handle. DO NOT allow cord to be crimped by closing it
in doors. DO NOT pull or stretch cord around sharp corners or edges.
7. Do not allow cord to touch hot surfaces. Let appliance cool completely before putting
away. Loop cord loosely around appliance when storing.
8. DO NOT use this unit with extension cords or electrical outlets that have inadequate
current capacity.
. Close supervision is required when using unit near
____________________________________________________
____________________________________________________
____________________________________________________
____________________________________________________
14
SAVE THESE INSTRUCTIONS!
FOR HOUSEHOLD USE ONLY
3
Page 4

IMPORTANT SAFEGUARDS
TROUBLESHOOTING &CUSTOMER SUPPORT
WARNING: To reduce the risk of electrical shock, this appliance has a
three-pronged plug. This plug will fit in a polarized wall outlet only one
way. If the plug does not fit fully in the outlet, contact a licensed
electrician to install a proper outlet. DO NOT attempt to modify the plug
or defeat this safety feature.
9. In order to unplug Heavy-Duty Steam Cleaner, grasp plug and pull smoothly and firmly
from outlet. DO NOT attempt to unplug unit by pulling or tugging on cord.
10. Burns could occur from touching hot metal parts, hot water or steam. Use care when
you turn a steam appliance upside down - there may be hot water in Water Reservoir.
11. Unit is only meant to be used with recommended accessories. Other types of
attachments are not to be used with Heavy-Duty Steam Cleaner. Doing so may result
in injuries or damage to unit.
12. Nozzle and attachments become hot during use. To avoid injuries, DO NOT touch
nozzle while using this appliance. DO NOT attempt to change attachments while unit
is emitting steam.
13. When filling your Heavy-Duty Steam Cleaner, only water should be used in unit.
Other cleaning agents will damage unit and can cause injuries.
14. Always disconnect appliance from electrical outlet when filling with water or
emptying, and when not in use.
15. DO NOT operate unit if steam opening is blocked. Should this occur, immediately
cease usage and unplug from electrical outlet.
PROBLEM
Water spills out from Water
Reservoir fill hole when adding
water.
Accessories do not stay firmly
attached to main steam nozzle.
POSSIBLE CAUSE SOLUTION
Water Reservoir is already full.
Water Reservoir is too hot to be
refilled.
Accessories are not being properly
installed.
Accessories or main steam nozzle
is damaged or otherwise incorrect.
Do not try to add any more water.
Allow more cooling time before
refilling.
Fill Water Reservoir more slowly.
Be sure to utilize the provided
Measuring Cup and Water Funnel
to refill the unit.
Review steps for proper
installation of accessories on
pages 7 & 8 of this manual.
Check to ensure that accessories
are installed correctly.
Contact 1-800-444-3353.
16. Store your Heavy-Duty Steam Cleaner in a cool, dry place.
SAVE THESE INSTRUCTIONS!
FOR HOUSEHOLD USE ONLY
4
13
Page 5

TROUBLESHOOTING
HEAVY-DUTY STEAM CLEANER
PRODUCT INFORMATION
PROBLEM
Unit fails to steam. Lighted
On/Off Switch does not
illuminate.
Unit fails to steam. Lighted
On/Off Switch does illuminate.
Steam output is intermittent.
Unit is emitting excess water. Water condensation in Steam
POSSIBLE CAUSE SOLUTION
Unit is not plugged in.
Household Circuit Breaker /
Ground Fault Interrupter has
tripped or blown a fuse.
Water Reservoir is empty. Refill Water Reservoir using
Mineral build-up in unit.
Mineral build-up in unit.
Hose.
Water Reservoir has been
over-filled.
Unit has not reached operating
temperature.
Plug into electrical outlet.
Reset Circuit Breaker / Ground
Fault Interrupter, or replace fuse.
If you need assistance, contact a
licensed electrician.
procedures on page 9 of this
manual.
Follow Removing Mineral
Build-Up procedure on page 11
of this manual.
It is normal for unit to
periodically stop steaming for a
few seconds. If steam stays off
for longer periods, follow
Removing Mineral Build-Up
procedure on page 11 of this
manual.
Point main steam nozzle towards
sink, tub or ground and shake
while depressing Steam Button.
Continue until excess water is
released.
Point main steam nozzle towards
sink, tub or ground and shake
while depressing Steam Button to
remove water that may have
condensed in Steam Hose.
Empty some water out of Water
Reservoir.
Wait until Steam Ready Light
deactivates to steam.
The following features and accessories are included with your Heavy-Duty Steam Cleaner.
Carefully inspect packaging material as some parts are shipped inside Styrofoam packaging.
UNIT FEATURES &ACCESSORIES
1. LIGHTED ON/OFF SWITCH
2. STEAM READY LIGHT
3. STORAGE COMPARTMENT
4. WATER RESERVOIR
5. HANDLE
6. STEAM LOCK SWITCH
7. STEAM BUTTON
8. CARRY HANDLE
9. STEAM JET NOZZLE
10. STEAM HOSE
11. FLOOR BRUSH
12. SQUEEGEE
13. EXTENSION WANDS
14. WATER FUNNEL
15. MEASURING CUP
16. CLOTH TOWEL
17. TRIANGLE BRUSH
18. ASSORTED UTILITY BRUSHES
19. BRASS UTILITY BRUSH
20. SCRUB PAD
12
5
Page 6

HEAVY-DUTY STEAM CLEANER
PRODUCT INFORMATION
CARE &STORAGE GUIDELINES
• The Lighted On/Off Switch (1) provides a clear visual indication of whether the unit is
powered on.
• The Steam Ready Light (2) indicates when the unit is ready to begin steaming.
• The Storage Compartment (3) is used for storing small accessories, and houses the Water
Reservoir cap.
• The Water Reservoir (4) is the tank in which water is stored for use by the unit. It is
accessed by removing the Water Reservoir cap found inside the Storage Compartment.
There must be a sufficient amount of water (16-48 oz. / 473-1,420 ml.) in the Water
Reservoir in order for the unit to properly function.
• The Handle (5) is designed to stay relatively cool while providing the optimum amount
of safety and user comfort.
• The Steam Lock Switch (6) is pushed forward to lock the Steam Button down and provide
continuous steam.
• The Steam Button (7) is depressed in order to release a spray of hot, penetrating steam
from the unit.
• The Carry Handle (8) provides a convenient place to set the main steam nozzle, and is
useful for carrying the unit up stairs and over obstacles.
• The Steam Jet Nozzle (9) focuses the spray of steam from the unit, and serves as the base
to which all other accessories connect.
• The Steam Hose (10) safely channels the flow of steam from the units boiler to the main
steam nozzle.
• The Floor Brush (11) is useful for cleaning floors and other large surfaces. The Cloth
To we l (16) attaches to the Floor Brush for cleaning tile and other hard surface floors.
• The Squeegee (12) can be used to clean mirrors, windows and other smooth glass
surfaces.
• The Extension Wands (13) connect to the main steam nozzle, allowing easy cleaning in
hard-to-reach places.
• The Water Funnel (14) and the Measuring Cup (15) are provided to assist you in
easily and consistently filling the Water Reservoir with the optimum amount of water
(16-48 oz. / 473-1,420 ml.).
• The Triangle Brush (17) is designed for cleaning corners and other difficult angles.
• The Assorted Utility Brushes (18) attach to the Steam Jet Nozzle, providing extra power
for removing exceptionally tough dirt and stains.
• The Brass Utility Brush (19) attaches to the Steam Jet Nozzle and is designed for
removing tough stuck-on grease and grime from ovens and grills.
• The Scrub Pad (20) attaches to the Steam Jet Nozzle and is used to clean porcelain and
countertops.
PROPER STORAGE
Preparing your Heavy-Duty Steam Cleaner for storage is quick and simple. When you
have finished your steaming tasks, follow the steps listed below.
1. Switch Lighted On/Off Switch to “Off” position and unplug grounded power cord from
electrical outlet.
2. Allow unit to cool completely (at least 30 minutes).
3. Remove all accessories from unit.
4. Drain any remaining water in Water Reservoir into a sink or tub to prevent over-filling
during your next use.
5. Store accessories safely away, near Heavy-Duty Steam Cleaner. Utility Brushes can be
conveniently stored in the Storage Compartment.
6. Store Heavy-Duty Steam Cleaner in a cool, dry location.
REMOVING MINERAL BUILD-UP
A common problem with steam appliances is mineral build-up caused by high mineral
content in many municipal water supplies. The best way to avoid this is to use de-
mineralized or distilled water in unit. If you are unable to use de-mineralized or
distilled water, we recommend you use this procedure monthly to help avoid mineral
build-up:
1. Switch Lighted On/Off Switch to “Off” position and unplug grounded power cord from
electrical outlet. Allow unit to completely cool.
2. Remove all accessories from unit.
3. Flip up Storage Compartment lid and remove Water Reservoir cap.
4. Drain water from Water Reservoir into sink or tub.
5. Using Measuring Cup, make a mixture of 8 oz. (237 ml.) vinegar and 8 oz. (237 ml.)
water.
6. Slowly pour water-vinegar solution into Water Reservoir.
7. Allow to stand for 40 minutes.
8. Drain water-vinegar solution from Water Reservoir.
9. Rinse Water Reservoir with fresh water, drain and repeat until vinegar odor dissipates.
10. Replace Water Reservoir cap and lower Storage Compartment lid back down.
6
11
Page 7

USING THE
HEAVY-DUTY STEAM CLEANER
ASSEMBLING THE
HEAVY-DUTY STEAM CLEANER
OPERATING HEAVY-DUTY STEAM CLEANER
NOTE: Be sure that Water Reservoir has already been filled and that all desired
accessories are connected before following these steps.
1. Plug grounded power cord into a convenient electrical outlet.
CAUTION: This unit uses a grounded (3-prong) electrical plug. Use only in
properly installed 3-prong electrical outlets. Do not attempt to alter plug or
circumvent this safety feature in any way.
2. Switch Lighted On/Off Switch to “On” position. Steam Ready Light will immediately
illuminate.
NOTE: Steam Ready Light is illuminated while boiler is heating.
3. Steam Ready Light will deactivate in 2-8 minutes (depending on how much water is in
Water Reservoir), indicating that boiler is heated and unit is ready to begin steaming.
4. Direct Steam Jet Nozzle (or other accessories) towards surface you desire to steam, and
press Steam Button. To sanitize surfaces, point Steam Jet Nozzle, press Steam Button
and hold approximately 1/2 inch from surface for at least 5 seconds. This will insure
that you have killed germs and bacteria.
CAUTION: Always be sure that Steam Jet Nozzle and other accessories are
pointed in a safe direction (away from yourself, other people, pets, and plants)
before pressing Steam Button.
5. Keep Steam Button depressed for a continuous flow of steam. You may also slide the
Steam Lock Switch forward while depressing the Steam Button to lock the Steam
Button down. This will let you have a continuous flow of steam without having to hold
down the Steam Button.
6. Using a slight back-and-forth motion over the area you are steaming will further
enhance the cleaning process. Wipe steamed areas with a clean cloth to remove
loosened dirt and grime. Wiping the area while it is still wet is recommended, but use
caution when wiping surfaces such as metal that may still be hot.
NOTE: During use, the Steam Ready Light may illuminate. This is normal. If you
notice a drop in steam pressure, release Steam Button until Steam Ready Light
deactivates once again.
ATTACHING CARRY HANDLE
1. Insert Carry Handle into Carry Handle hole
on top of unit. Please refer to illustration
for assistance with proper alignment
(FIGURE 1).
2. Use enclosed magnetic screw driver and
screw to securely fasten Carry Handle to
unit.
FIGURE 1
ATTACHING MAIN ACCESSORIES
WARNING: Do not try to connect accessories while unit is emitting steam.
This section applies to the Steam Jet Nozzle, Squeegee, Floor Brush, Extension
Wands and Triangle Brush.
1. Depress red lock/release button on main steam nozzle (FIGURE 2-A).
2. While still depressing lock/release button, slide Steam Jet Nozzle or other accessory
over this button, so that rectangular hole in attachment aligns with lock/release button
(FIGURE 2-B).
3. Once lock/release button and rectangular hole are properly aligned, button should click
through hole and into place.
4. To remove Steam Jet Nozzle or other accessory, press in red lock/release button and
pull attachment off of main steam nozzle.
7. Once steaming tasks are complete, immediately set Lighted On/Off Switch to “Off”
position and unplug grounded power cord from electrical outlet. Follow steps under
Proper Storage procedure on page 11 of this manual.
FIGURE 2
710
Page 8

ASSEMBLING THE
HEAVY-DUTY STEAM CLEANER
USING THE
HEAVY-DUTY STEAM CLEANER
ATTACHING UTILITY BRUSHES
WARNING: Do not try to connect accessories while unit is emitting steam.
This section applies to all Utility Brushes. Note that Utility Brushes attach to Steam
Jet Nozzle, not to main steam nozzle.
1. Align guide tab on inside of Utility Brush (FIGURE 3-A) with groove on bottom
of Steam Jet Nozzle tip (FIGURE 3-B), and firmly press Utility Brush onto
Steam Jet Nozzle.
2. Press Utility Brush as far on to Steam Jet Nozzle as possible to ensure that it is
properly sealed, to help prevent any steam leakage (FIGURE 4).
3. To remove Utility Brush, simply grip it firmly and pull it off of Steam Jet
Nozzle.
FIGURE 3
FIGURE 4
ATTACHING SCRUB PAD
This section applies to the Scrub Pad. Note that Scrub Pad
attaches to Steam Jet Nozzle, not to main steam nozzle.
FILLING WATER RESERVOIR WITH WATER
1. Place Steam Cleaner on a flat, level surface.
2. Make sure Lighted On/Off Switch is set to “Off” position and grounded power cord is
unplugged from electrical outlet.
3. Press and hold Steam Button to ensure that any remaining steam has been emitted from
unit.
4. Flip up Storage Compartment lid. Cautiously unscrew and remove Water Reservoir
cap.
5. Water Reservoir should always be emptied after each use. If it was not emptied after
the last use, empty it now. This will prevent over-filling.
6. Fill Measuring Cup to maximum fill line (16 oz. / 473 ml.) with water.
NOTE: To prolong the life of your Steam Cleaner, we recommend using distilled
or de-mineralized water.
7. Carefully pour water from Measuring Cup into Water Reservoir through fill hole.
WARNING: Extreme caution should be used when pouring water into the Water
Reservoir. Do not look directly down into fill hole when filling. Keep your free
hand and any children or pets at a safe distance.
8. Depending on how long you intend to steam, you may repeat steps 6 & 7 up to two
more times, to have up to a maximum of 48 oz. (1,420 ml.) of water. See chart for a
comparison of the amount of water vs. approximate steam time.
1. Place Scrub Pad over tip of Steam Jet Nozzle, and firmly
press it as far on to Steam Jet Nozzle as possible to ensure
that it is properly sealed (FIGURE 5). This will help
prevent any steam leakage.
2. To remove Scrub Pad, simply grip it firmly and pull it off of
Steam Jet Nozzle.
8
FIGURE 5
9. Replace Water Reservoir cap, ensuring that it is screwed on tightly to prevent hot steam
from escaping and causing injury.
10. Lower Storage Compartment lid back down.
9
 Loading...