

Page 1

INSTRUCTION MANUAL
IMPORTANT INFORMATION
GB
sure you understand them before using this unit. Retain these instructions for future
reference.
: Please read these instructions carefully and make
MANUEL D’INSTRUCTIONS
RENSEIGNEMENTS IMPORTANTS:
FR
atentivement les instructions et assurez- -vous de les avoir comprises. Conservez
les instructions pour référence ultérieure.
Avant d’utiliser cet appareil, veuillez lire
BETRIEBSANWEISUNG
WICHTIGE INFORMA TI ON:
DE
Geräts aufmerksam durch. Verwenden Sie es erst, wenn Sie sicher sind, daß Sie
alle Anweisungen verstanden haben und gut aufbewahren.
Lesen Sie diese Hinweise zur Handhabung des
MANUAL DE INST RU CCIONES
INFORMACIÓN IMPORTANTE:
ES
asegúrese de entenderlas antes de utilizar esta aparato. Conserve las instrucciones para la referencia en el futuro.
Lea atentamente las instrucciones y
545154243 Rev. 4 3/5/08 BRW
Page 2
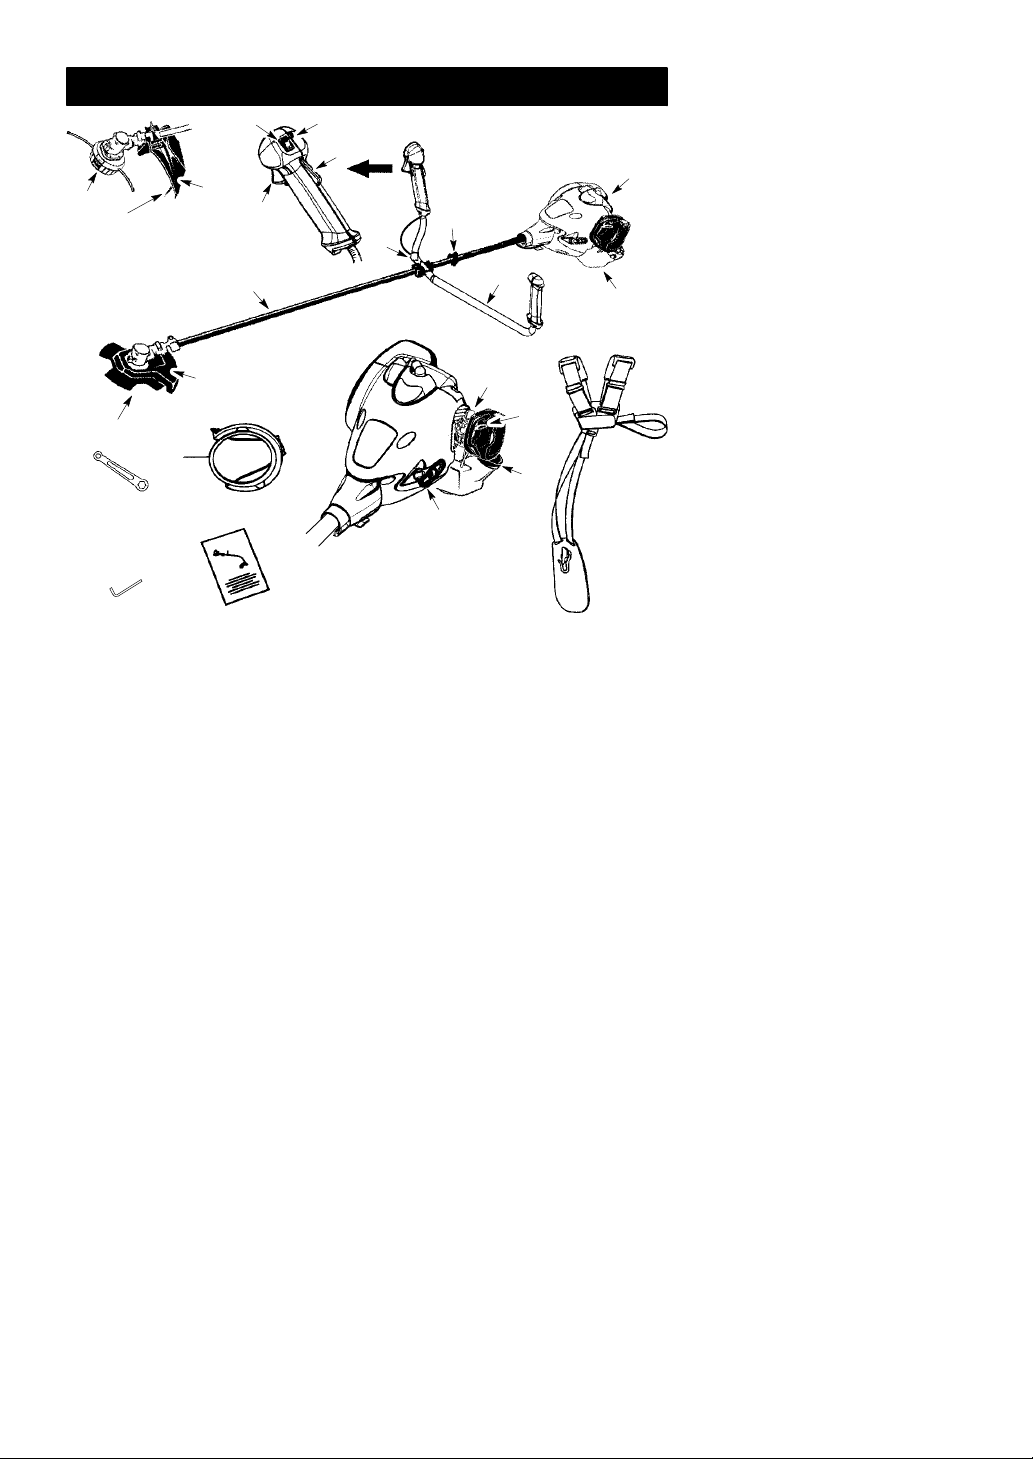
IDENTIFICATION (WHAT IS WHAT?)
3
7
8
9
12
10
14
13
19
5
4
2
1
9
11
22
20
21
1. Fuel tank
2. Handlebar
3. ON/STOP switch
4. Throttle cable clip
5. Shoulder harness clamp
6. Shoulder harness
7. Trimmer head
8. Line limiter blade
9. Shield
10. Shaft
11. Blade
12. Throttle trigger
17
18
6
16
15
23
13. Throttle lock--out
14. Start throttle button
15. Starter handle
16. Fuel cap
17. Primer bulb
18. Choke lever
19. Muffler
20. Wrench
21. Hex wrench
22. Transport guard
23. Instruction manual
2
Page 3
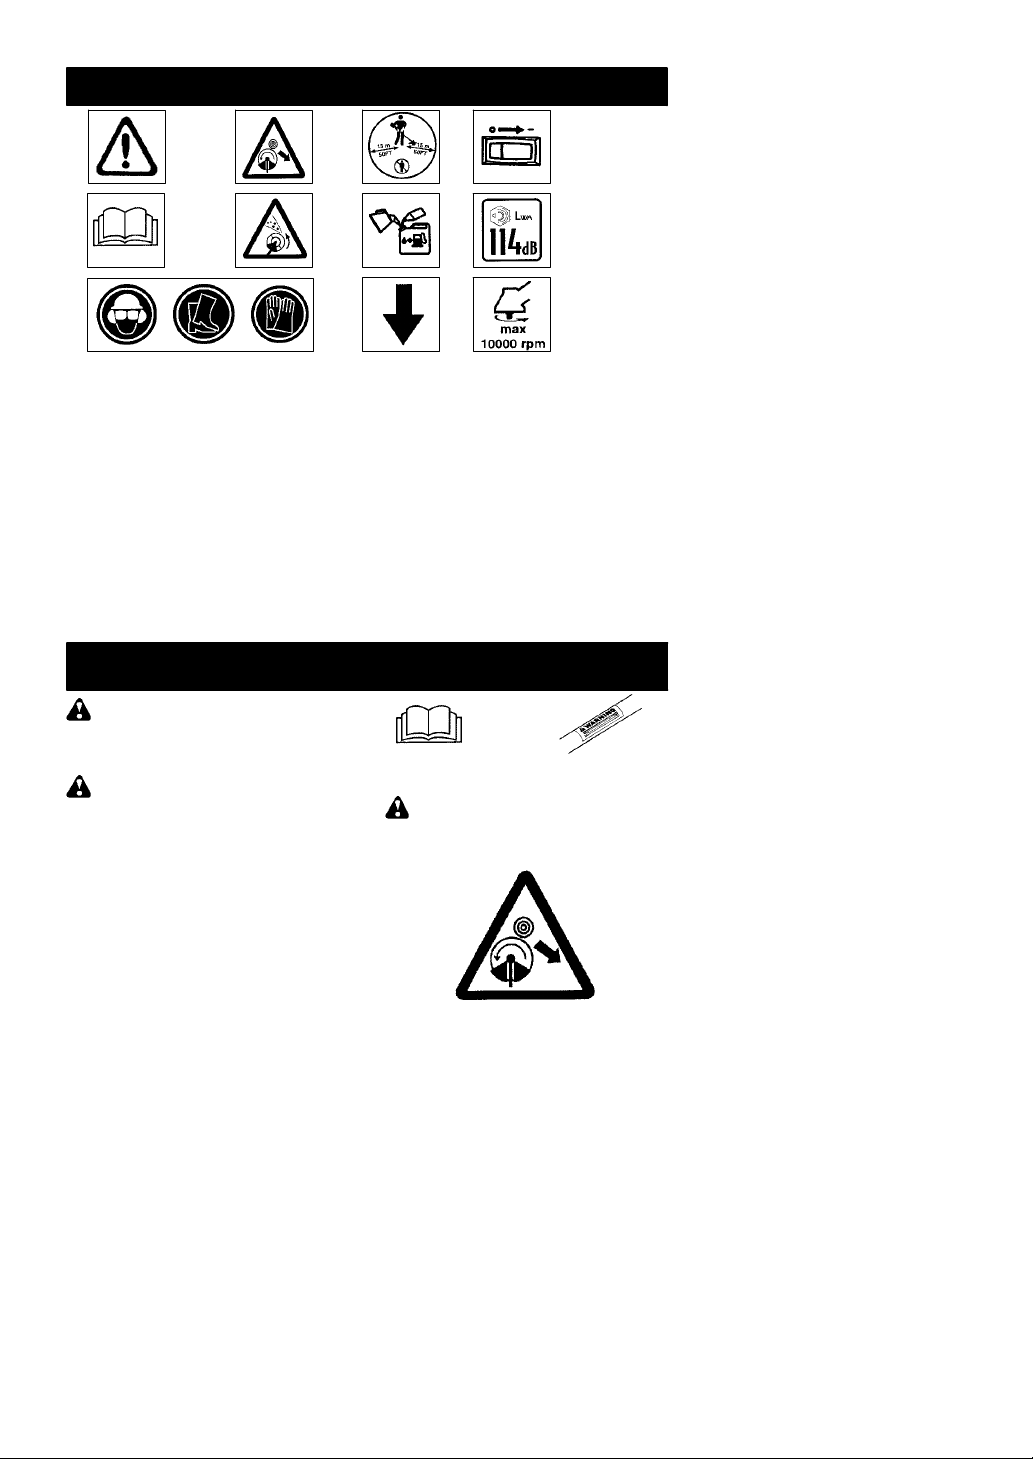
IDENTIFICATION OF SYMBOLS
A.
D.
F.
I.
B.
C.
A.
WARNING! This brushcutter can be dangerous! Careless or improper use can
cause serious or even fatal injury.
B. Read and understand the instruction manual before using the brushcutter.
C. Always use:
Ear protection, eye protection, head protection, boots, and gloves.
D. DANGER! Blade can thrust violently away from material it does not cut. Blade
thrust can cause amputation of arms or legs. Keep people and animals 15 meters
away.
E. WARNING! Blade/trimmer line can throw objects violently.You and others can be
blinded or injured. Always wear eye protection and leg protection.
F. The operator of the machine must insure that no one comes within a 15 meter radius
while working. When several operators are working within the same area a safety dis-
tance of at least 15 meters must be observed.
G. Use unleaded or quality leaded petrol and two--stroke oil mixed at a ratio of 2.5%.
H. Handlebar to be positioned only below the arrow.
I. Engine ON/STOP Switch.
J. Guaranteed sound power level according to Directive 2000/14/EC
K. Maximum rotational frequency of the spindle, rpm
E.
G.
H.
J.
K.
SAFETY RULES
WARNING: When using gardening
appliances, basic safety precautions should always be followed to reduce the risk of fire and
serious injury. Read and follow all instructions.
DANGER: This power tool can be
dangerous! This unit can cause serious injury
including amputation or blindness to the operator and others. The warnings and safety
instructions inthis manualmust befollowed to
provide reasonable safety and efficiency in
using the unit. The operator is responsible for
following the warnings and instructions in this
manual and on the unit. Read the entire instruction manual before assembling and using the unit! Restrict theuse of thisunit to persons who read, understand, and follow the
warnings and instructions in this manual and
on the unit. Never allow children to operate
this unit.
INSTRUCTION
MANUAL
DANGER: Blade can thrust violently
away from material it does not cut. Blade
thrust can cause amputation of arms or legs.
Keep people and animals 15 meters away.
SAFETY INFORMATION
ON THE UNIT
3
Page 4

WARNING: Blade/trimmer line can
throw objects violently. You and others can be
blinded or injured. Wear safety glasses and
leg protection.
WARNING: Hazard zone for thrown
objects. Blade/Trimmerline can throw objects
violently. Others can be blinded or injured.
Keep people and animals 15 meters away.
Hazard Zone
WARNING: Do not use trimmer head
as a fastening device for the blade.
WARNING: The blade continues to
spin after the throttle is released or, engine is
turned off. The coasting blade can throw objects
or seriously cut if accidentally touched. Stop the
blade by contacting the right hand side of the
coasting blade with material already cut.
Stop coasting
blade by contact
with cut material.
OPERATOR SAFETY
S Dress properly. Always wear safety
glasses or similar eye protection when operating, or performing maintenance, on
your unit (safety glasses are available).
Eye protection should be marked Z87.
S Always wear a helmet if the trees to be
cleared are taller than 2 meters.
S Always wear face or dust mask if operation
is dusty.
S Always wear heavy, long pants, long
sleeves, boots,and gloves. Wearing safety
leg guards is recommended.
S Always wear foot protection. Do not go
barefoot or wear sandals. Stay clear of
blade/spinning line.
S Secure hair above shoulder length. Secure
or remove loose clothing or clothing with
loosely hanging ties, straps, tassels, etc.
They can be caught in moving parts.
S Being fully covered also helps protect you
from debris and pieces of toxic plants
thrown by spinning line.
S Stay alert. Do not operate this unit when you
are tired, ill, upset or under the influence of alcohol, drugs, or medication. Watch what you
are doing; use common sense.
S Wear hearing protection. Long or continu-
ous exposure to high noise levels may
cause permanent hearing impairment.
S Mufflers fitted with catalytic converters get
very hot during use and remain so for some
time after stopping. This also applies at idle
speed. Contact can result in burns to theskin.
Remember the risk of fire!
S Never start or run inside a closed room or
building. Breathing exhaust fumes can kill.
S Keep handles free of oil and fuel.
S Always use the handlebar and a properly
adjusted shoulder harness with a blade
(see ASSEMBLY).
UNIT / MAINTENANCE SAFETY
WARNING: Stop unitand disconnect
the spark plug before performing maintenance (except carburetor adjustments).
S Throw away blades that are bent, warped,
cracked, broken, or damaged in any other
way. Replace trimmer head parts that are
cracked, chipped, broken, or damaged in
any other way before using the unit.
S Maintain unit according to recommended
procedures. Keep blade sharp. Keep cutting line at the proper length.
S Use only 2,4 mm diameter McCulloch
brand replacement line. Never use wire,
rope, string, etc.
S Install required shield properly before using
theunit.Usethemetalshieldforallmetal
blade use. Use the plastic shield for all line
trimmer use.
S Use only specified blade or trimmer head;
make sure it is properly installed and securely fastened.
S Never start engine with clutch shroud re-
moved. Theclutch can fly off and cause serious injury.
S Be sure blade ortrimmer headstops turning
when engine idles.
S Make carburetor adjustments with the low-
er end supported to prevent blade or trimmer line from contacting any object. Hold
4
Page 5

unit by hand; do not use the shoulder harness for support.
S Keep others awaywhen makingcarbure-
tor adjustments.
S Use only recommended McCulloch accesso-
ries and replacement parts.
S Have all maintenance and service not ex-
plained in this manual performed by your authorised service dealer.
FUEL SAFETY
S Mix and pour fuel outdoors.
S Keep away from sparks or flames.
S Use a container approved for fuel.
S Do not smoke or allow smoking near fuelor
the unit.
S Avoid spilling fuel or oil. Wipe up all fuel spills.
S Move at least 3 meters away from fueling
site before starting engine.
S Stop engine and allow to cool before re-
moving fuel cap.
S Always store petrolin acontainer approved
for flammable liquids.
CUTTING SAFETY
WARNING: Inspect thearea tobe cut
before each use. Remove objects (rocks,
broken glass, nails, wire, string, etc.) which
can be thrown or become entangled in the
blade or trimmer head.
S Keep others including children, animals,
bystanders, and helpers at least 50 feet(15
meters) away. Stop engine immediately if
you are approached.
S Always keep engine onthe right--hand side
of your body.
S Hold the unit firmly with both hands.
S Keep firm footing and balance. Do not
overreach.
S Keep blade or trimmer head below waist
level. Do not raise engine above your waist.
S Keep all parts of your body away from blade,
trimmer head, and muffler when engine is
running. A hot muffler can cause serious
burns.
S Cut from your left to your right. Cutting on
right side of the shield will throw debris
away from the operator.
S Use only in daylight or good artificial light.
S Use only for jobs explained in this manual.
TRANSPORTING AND STORAGE
S Allow the engineto cool; secure unit before
storing or transporting in vehicle.
S Empty fuel tank before storing or transporting
the unit. Use up fuel left in the carburetor by
starting engine and letting it run until it stops.
S Store unit andfuel inan area where fuelva-
pors cannot reach sparks or open flames
from water heaters, electric motors or
switches, furnaces, etc.
S Store unitso line limiter cannot accidentally
cause injury. Unit can behung by the shaft.
S Always install transport guard on blade be-
fore transporting or strorage.
S Store the unit out of the reach of children.
SPECIAL NOTICE: Exposure to vibrations
through prolonged use of petrol powered hand
tools could cause blood vessel or nerve damage in the fingers, hands, and joints of people
prone to circulation disorders or abnormal swellings. Prolonged use in cold weather has been
linked to blood vessel damage in otherwise
healthy people. If symptoms occur such as
numbness, pain, loss of strength, change inskin
color or texture, or loss of feeling in the fingers,
hands, or joints, discontinue the use of this tool
and seek medical attention. An anti-vibration
system does not guarantee the avoidance of
these problems. Users who operate power tools
on a continual and regular basis must monitor
closely their physical condition and the condition
of this tool.
ASSEMBLY
CARTON CONTENTS
Check carton contents against the following list:
S Brushcutter
S Blade shield
S Blade shield screws (4)
S Blade
S Cupped washer
S Large nut for installing blade
S Trimmer head
S Plastic shield
S Nut(screwedontoplasticshield)
S Handlebar
S Hand lebar brack et cover
S Hand lebar brack et cover scr ews (2)
S Upper shoulder harness clamp
S Lower shoulder harness clamp
S Shoulder harness clamp screws (2)
S Shoulder harness
S Hex wrench
S Wrench
S Transport guard
S Throttlecableclip
WARNING: Always stop unitand dis-
connect spark plugbefore performing any assembly procedures.
WARNING: If received assembled,
repeat allsteps to ensure your unit is properly
assembled and all fasteners are secure.
Examine parts for damage. Do not use damaged parts.
It is normal for the fuel filter to rattle in the
empty fuel tank.
Finding fuel or oil residue onmuffler is normal
due to carburetor adjustments and testing
done by the manufacturer.
TOOLS REQUIRED
S Hex wrench (provided)
S Adjustable wrench
S Phillips screwdriver
5
Page 6
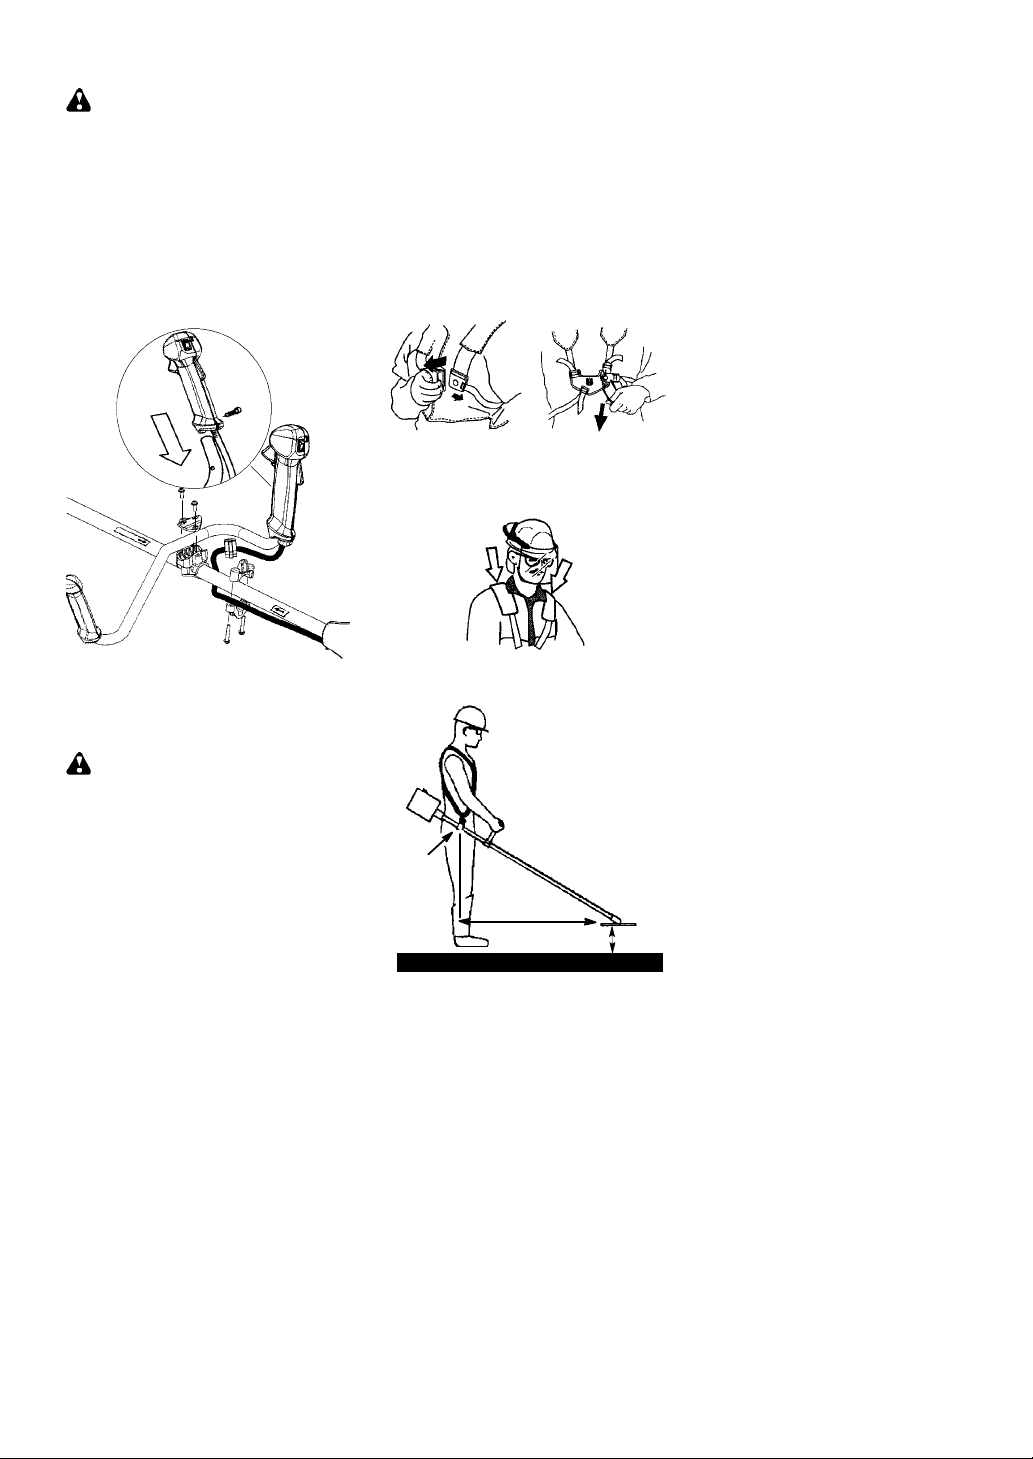
ATTACHING THE HANDLEBAR
DANGER: To avoid serious injury, the
barrier portion ofthe handlebar must beinstalled
as shown to provide a barrier between operator
and the spinning blade.
1. Remove the screw at the rear of the
throttle handle.
2. Slide the throttle handleonto the right side
of the handlebar (see illustration).
3. Align the screw hole inthe throttle handle
with the hole in the handlebar.
4. Refit the screw inthe hole inthe rearof the
throttle handle.
5. Screw the screw through the handle and
handlebar. Tighten the screw.
6. Fit the mounting components as shown.
2. Position the lower shoulder harness
clamp under theshaft and align the upper
and lower clamp screw holes. Clamp
must befittle above the arrow on the shaft
(see illustration above).
NOTE: Fit throttle wire in groove of lower
harness clamp before tightening screws.
3. Insert two screws into the screw holes.
4. Secure shoulder harness clamp by tightening screws with a hex wrench.
SHOULDER HARNESS
ADJUSTMENT
At the front of the shoulder harness is an easily
accessible quick release. Use the quick release
in any emergency situation that requires you to
free yourself from the machine and harness.
1. Put onthe harness. Adjust the harness for
the best working position.
2. Tension theside straps so that theweight
is evenly distributed across both shoulders.
7. The handlebar mounting must be fitted
between the arrows on the shaft.
8. Tighten the screws with a hex wrench.
ASSEMBLY OF SHOULDER
HARNESS
WARNING: When using a brushcut-
ter, it must always be hooked securely to the
shoulder harness. Otherwise, you will be unable to safely control the brushcutter. This
can result in injury to yourself or others.
Proper shoulder harness and handlebar adjustments must be made with the engine completely stopped before using unit. A well- -adjusted
shoulder harness and machine makes work
much easier.
ATTACHING SHOULDER HARNESS
CLAMP
1. Place the upper shoulder harness clamp
over the shaft.
NOTE: It may be necessary to relocate the
shoulder harness clampon theshaft for proper balancing of unit.
SHOULDER HARNESS
ADJUSTMENT
FOR BALANCE
15 cm
6
below
waist
76 cm
10 -- 30 cm
above
ground
Page 7

76 cm
3. Pivot shield until bolt passes through hole
in bracket.
4. Reinstall nut and tighten securely with
wrench (provided).
NOTE: If your unit has a plastic cover over
the threadson thethreaded shaft, remove the
covering to expose thethreads. Beforeinstalling thetrimmer head,make sure the dust cup
and retaining washer are positioned on the
gearbox as shown below.
Bracket
Slot
Nut
CONFIGURING YOUR UNIT
Youcan configure your unit using acutting head
for grass and light weeds, or a weed blade for
cutting grass, weeds, and brush up to 1 cm in
diameter. To assemble your unit, go to the section for the desired configuration and follow the
instructions.
ASSEMBLY INFORMATION -TRIMMER HEAD
TRIMMER
HEAD
NOTE: Remove the blade and metalshield be-
fore attaching the plastic shield and trimmer
head. To rem ove blade, align hole in the dust
cup with thehole in the side ofthe gearbox by
rotating the blade. Insert a small screwdriver
into alignedholes. Thiswillkeep the shaft from
turning while loosening the blade nut. Remove
blade nut by turning clockwise. Remove the
screwdriver. Remove both washers and blade.
T o remove metal shield, loosen and remove the
four mounting screws. See ATTACHING THE
METAL SHIELD and INSTALLATION OF THE
METAL BLADE forillustrations. Be sure to store
all parts and instructions for future use.
ATTACHING THE PLASTIC SHIELD
ANDTRIMMERHEAD
WARNING: The shield must be prop-
erly installed. The shield provides partial
protection to theoperator and others from the
risk of thrown objects, and is equipped with a
line limiterblade which cuts excess lineto the
proper length. The line limiter blade (on underside of shield) is sharp and can cut you.
1. Remove nut from shield.
2. Insert bracket into slot on shield.
Shield
NOTE: Make sure all parts are properly
installed as shown in the illustration before
installing the trimmer head.
5. Align hole in thedust cup with thehole in the
6. Insert a small screwdriver into aligned
Screwdriver
7. While holding the screwdriver in position,
NOTE: The retaining washer must be posi-
tioned with the raised section facing toward the
gearbox.
Gearbox
Dust Cup
Retaining Washer
side of thegearbox by rotating the dust cup.
holes. This will keep the shaft from turning
while tightening trimmer head.
thread trimmer head onto the shaft in the
direction shown on the decal (counterclockwise). Tighten until secure.
ASSEMBLY INFORMATION -- WEED
BLADE
WEED
BLADE
7
Page 8

NOTE: Remove the trimmer head and plastic
shield before attaching the metal shield and
installing the weed blade. To remove the trimmer
head, align hole in the dust cup with the hole in
the side of the gearbox by rotating the dust cup.
Insert a small screwdriver into aligned holes.
This will keep the shaft from turning while loosening the trimmer head. Remove the trimmer
head by turning clockwise. Remove the screwdriver. To remove the plastic shield, loosen and
remove nut. Pivot shield to release bracket from
slot. See INSTALLATION OF THE CUTTING
HEAD and ATT ACHING THE PLASTIC
SHIELD for illustrations. Be sure to store all
parts and instructions for future use. Never use
the trimmer head with the metal blade installed.
ATTACHING THE METAL SHIELD
WARNING: The metal shield must be
properly installed on the tool anytime the tool is
used with a blade. Failure to install the shield in
the position shown can result in serious injury to
the operator. The length of the shield must be
aligned with the length of the shaft.
1. Place the metal shield under the gearbox,
and align the screw holes.
1. Remove the retaining washer from the
threaded shaft of the gearbox. Leave the
dustcupontheshaft.
2. Install the blade and the retaining washer
over the threaded shaft.
3. Make sure the raised part of the retaining
washer is facing the gearbox and the raised
area fits into the hole in the center of the
blade.
4. Slide the blade and retaining washer onto
the shaft of the gearbox.
5. Place the cupped washer onto the shaft.
Make sure the cupped side of the washer
is toward the blade.
6. Install the blade nut by threading onto the
shaft counterclockwise.
Gearbox
Shield
Dust Cup
Threaded Shaft
Gearbox
Shield
2. Insert and thread the 4 mounting screws
through the holes of the gearbox and the
metal shield. Tightenevenly and securely
with the hex wrench provided.
INSTALLATION OF THE METAL
BLADE
WARNING: Wear protective gloves
when handling or performing maintenance on
the blade to avoid injury. The blade is sharp and
can cut you even when it is not moving.
WARNING: Do not use any blades, or
fastening hardware other than the washers and
nuts shown in the following illustrations. These
parts must be provided by McCulloch and
installed as shown below. Failure to use proper
parts can cause the blade to fly off andseriously
hurt you or others.
NOTE: The dust cup and retaining washer are
located on the gearbox shaft and notin the parts
bag. All other fasteners mentioned inthe following assembly steps are in the parts bag.
Retaining
Washer
Cupped
Washer
NOTE: Make sure all parts are in place as il-
lustrated, and the blade is sandwiched between
the dust cup and the retaining washer. There
should be no space between the blade and the
dust cup or the retaining washer.
7. Align hole in dust cup with hole in side of
gearbox by rotating the blade.
8. Insert a small screwdriver into aligned
holes. This will keep the shaft from turning
while tightening the blade nut.
Screwdriver
9. Tighten blade nut firmly with a wrench while
holding screwdriver in position.
10. Remove the screwdriver.
11. Turn blade by hand. If the blade binds
against the shield, or appears to be uneven,
the blade is not centered, and you must reinstall.
NOTE: T o remove blade, insert screwdriver
into aligned holes. Unthread the nut and remove
parts. Be sure to store parts andinstructions for
future use.
8
Blade
Nut
Page 9

OPERATION
WARNING: Be sure to read the fuel
information in the safety rules before you begin. If you do not understand the safety rules,
do not attemptto fuelyour unit.Contact anauthorised service dealer.
FUELING ENGINE
WARNING: Remove fuel cap slowly
when refueling.
This engine is certified to operate on unleaded
petrol. Before operation, petrol must be mixed
with a good quality 2-cycle air-cooled engine oil.
We recommend McCulloch brand oil mixed ata
ratio of 40:1 (2.5%). A 40:1 ratio is obtained by
mixing 5 liters of unleaded petrol with 0,125 liter
of oil. DO NOT USE automotive oil or boat oil.
These oils will cause engine damage. When
mixing fuel, follow instructions printed on oil container. Once oil is added to petrol, shake container momentarily to assure that the fuel is thoroughly mixed. Always read and follow the
safety rules relating to fuel before fueling your
unit.
IMPORTANT
Experience indicates that alcohol blended fuels
(called gasohol or using ethanol or methanol)
can attract moisture which leads to separation
and formation of acids during storage. Acidic
gas can damage the fuel system of an engine
while in storage. To avoid engine problems,
empty the fuel system before storage for 30
days or longer. Drain the gas tank, start the engine and let it run until the fuel lines andcarburetor are empty. Use fresh fuel next season. Never use engine or carburetor cleaner products in
the fuel tank or permanent damage may occur.
ST ARTI NG A COLD ENGINE (or a
warm engine after running out of fuel)
Starting position
NOTE: The throttle lock--out is designed to
prevent unintentional use of the throttle trigger. The lock--out must be pressed with the
palm of your handas you grip the throttle handle before the trigger can be used.
1. Set unit on a flat surface.
2. Move ON/STOP switch to the ON position.
3. Slowly press the primer bulb 6 times.
4. Move choke lever to FULL CHOKE position.
Primer Bulb
Choke
Lever
HOW TO STOP YOUR UNIT
S To stop the engine, move the ON/STOP
switch to the STOP position.
ON/STOP
Switch
HOW TO START YOUR UNIT
WARNING: Avoid any contact with the
muffler. A hot muffler can cause serious burns.
Starter
Handle
5. Set the throttle to the start position by first
pressing the throttle lock--out and the
throttle trigger, then pressing the start
throttle button. Then release the throttle
lock--out and the throttle trigger, followed
by the start throttle button. The throttle
function is now activated.
NOTE: The start throttle button should stay
depressed, holding the throttle open. If not, repeat step 5. To return the engine to idle, press
the throttle lock--out and throttle trigger again.
9
Page 10

Start throttle
button
Throttle
Throttle
trigger
6. Pull starter rope handle sharply until engine sounds as if it is trying to start, but do
not pull rope more than 6 times.
7. As soon as engine sounds as if it is trying to
start, move choke lever to HALF CHOKE.
8. Pull starter rope sharply until engine runs,
but no more than 6 pulls. If the engine
doesn’t start after 6 pulls (at the HALF
CHOKE position), move the choke lever to
the FULL CHOKE position and press the
primer bulb 6 times. Pull the starter rope 2
more times. Move the choke lever to the
HALF CHOKE position and pull the starter
rope until the engine runs, but no more than
NOTE: If engine still doesn’t start,
6 pulls.
it is probably flooded. Proceed to STARTING A FLOODED ENGINE.
9. Once the engine starts, allow it to run 10
seconds, then move the choke lever to
RUN. Allow the unit to run for 30 more
seconds at RUN before releasing the
throttle trigger.
the choke lever in theRUN position, move
the choke lever to the HALF CHOKE
position and pull the rope until engine
runs, but no more than 6 pulls.
STARTING A WARM ENGINE
1. Move ON/STOP switch to the ON position.
2. Move the choke lever to the HALF
CHOKE position.
3. Set the throttle tothe startposition by activating the start throttle button (see step 5
under STARTING A COLD ENGINE).
4. Pull starter rope sharply until engine runs,
but no more than 5 pulls.
5. Allow engine t o run 15 seconds, then move
the choke lever to the RUN position.
NOTE: If engine has not started, pull starter
rope 5more pulls. If enginestill does not run, it
is probably flooded.
STARTING A FLOODED ENGINE
Flooded engines can be started by placing
the choke lever in the RUN position. Fully
squeeze throttle trigger; then, pull the rope to
clear the engineof excess fuel. This could require pulling the starter handle many times
depending on how badly the unit is flooded.
If the unit still doesn’t start, refer to TROUBLESHOOTING TABLE.
NOTE: If enginedies with
lock--out
OPERATING POSITION
ALWAYS WEAR:
Hearing
Protection
Heavy,
Long Pants
Boots
Cut from your left to your right.
When operating unit, clip shoulder harness
onto clamp,stand asshown and check forthe
following:
S Wear eye protection and heavy clothing.
S Extend your left arm and hold handlebar
grip with your left hand.
S Hold throttle grip with your right hand with
finger on throttle trigger.
S Keep unit below waist level.
S Maintain full weight of tool on both shoulders.
S Without bending over, keep the blade or
trimmer head near and parallel to the ground
and not crowded into material being cut.
Safety Helmet
Eye Protection
OPERATING INSTRUCTIONS FOR
USE WITH TRIMMER HEAD
WARNING: Always wear eye protec-
tion. Never lean over the trimmer head. Rocks
or debris can ricochet or be thrown into eyes
and face and cause blindness or other serious
injury.
Before trimming, bring engineto a speed sufficient to cut material to be trimmed.
Do not run the engine at a higher speed than
necessary. The cutting line will cut efficiently
when the engine is run at less than full throttle.
At lower speeds, there is less engine noise and
vibration. The cutting line will last longer and will
be less likely to “weld” onto the spool.
Always release the throttle trigger and allow
the engine to return to idle speed when not
cutting.
To stop engine:
S Release the throttle trigger.
S Move the ON/ST O P switch to the STOP
position.
TRIMMER LINE ADVANCE
Advance line by tapping the bottom of the cutting head lightly on the groundwhile engineis
running at full speed. The metal line limiter
blade attached to the guard will cut the line to
the proper length.
WARNING: Use only 2,4 mm diameter
line. Other sizes of linewill not advance properly
and can cause serious injury. Do not use other
materials such as wire, string, rope, etc. Wire
can break off during cutting and become a dangerous missile that can cause serious injury.
10
Page 11

CUTTING METHODS
f
L
WARNING: Use minimumspeed and
do not crowd the line when cutting around
hard objects (rock, gravel, fence posts, etc.),
which candamage the trimmer head, become
entangled in the line, or be thrown causing a
serious hazard.
S The tip of the line does the cutting. You will
achieve the best performance and minimum
line wear by not crowding the line into the
cutting area. The right and wrong ways are
shown below.
line does
Tip o
the cutting.
ine crowded into
work area.
MOWING -- Your trimmer is ideal for mowing
in places conventional lawn mowers cannot
reach. In the mowing position, keep the line
parallel to the ground. Avoid pressing the
head into the ground as this can scalp the
ground and damage the tool.
Mowing
Right
S The line will easily remove grass and weeds
from around walls, fences, trees and flower
beds, but it also can cut the tender bark of
trees or shrubs and scar fences.
S For trimming or scalping, use less than full
throttle to increase linelife and decrease head
wear, especially:
S During light duty cutting.
S Near objects around which the line can
wrap such as small posts, trees or fence
wire.
S For mowing or sweeping, use full throttle for a
good clean job.
TRIMMING -- Hold the bottom of the trimmer
head about 8 cm above the ground and at an
angle. Allow only the tip of the line to make
contact. Do not force trimmer line into work
area.
Trimming
8 cm above
ground
SCALPING -- The scalping technique removes unwanted vegetation down to the
ground. Hold the bottom of the trimmer head
about 8cm abovethe groundand at an angle.
Allow the tip of the line to strike the ground
around trees, posts, monuments, etc. This
technique increases line wear.
Wrong
SWEEPING -- Thefanning action of the rotating line canbe used to blowaway loose debris
from an area. Keep the line parallel to and
above the area surface and swing the tool
from side to side.
Sweeping
OPERATING INSTRUCTIONS FOR
USE WITH WEED BLADE
S Blade Thrust is a reaction that only occurs
when using a bladed unit. This reaction can
cause serious injury such as amputation.
Carefully study this section. It is importantthat
you understand what causes blade thrust,
how you can reduce the chance of its
occurring, and how you can remain in control
of unit if blade thrust occurs.
S WHAT CAUSES BLADE THRUST -- Blade
Thrust can occur when the spinning blade
contacts an object that it does not cut. This
contact causes the blade to stop for aninstant
and then suddenly move or “thrust” away
from the object that was hit. The “thrusting”
reaction can be violent enough to cause the
operator to be propelled in any direction and
lose control of the unit. The uncontrolled unit
11
Page 12

can cause serious injury if the blade contacts
the operator or others.
S WHEN BLADE THRUST OCCURS --
Blade Thrust can occur without warning if
the blade snags, stalls, or binds. This is
more likely to occur in areas where it is
difficult to see the material being cut. By
using the unit properly, the occurrence of
blade thrust will be reduced and the
operator will be less likely to lose control.
S Cut only grass, weeds, and woody brush up
to 1 cm in diameter with the weed blade. Do
not let the blade contact material it cannot cut
such as stumps, rocks, fences, metal, etc., or
clusters of hard, woody brush having a
diameter greater than 1 cm.
S Keep the blade sharp. A dull blade is more
likely to snag and thrust.
S Cut only at full throttle. The blade will have
maximum cutting power and is less likely to
bind or stall.
S “Feed” the blade deliberately and not too
rapidly. The blade can thrust away if it is fed
too rapidly.
S Cut only from your leftto your right. Cutting on
right side of the shield will throw debris away
from the operator.
S Use the shoulder harness and keep a firm
grip on the unit with both hands. A properly
adjusted shoulder harness will support the
weight of the unit, freeing your arms and
hands to control and guidethe cutting motion.
S Keep feet comfortably spread apart and
braced for a possible sudden, rapid thrust of
unit. Do not overreach. Keep firm footing and
balance.
S Keep blade below waist level; it will be
easier to maintain control of unit.
S Do notraise theengine aboveyour waist as
the blade can come dangerously close to
your body.
S Do not swing unit with such force that you
are in danger of losing your balance.
Bring the engine to cutting speed before entering the material to be cut. If the blade does not
turn whenyou squeeze the throttle trigger,make
sure shaft is fully inserted into the engine.
Always release the throttle trigger and allow
engine to return to idle speed when not cutting. The blade should not turn while the engine isrunning atidle. Ifthe bladeturns atidle,
do not use your unit. Refer to the CARBURETOR ADJUSTMENT section or contact your
authorised service dealer.
S Maintain good firm footing while using the
unit. Do this by planting feet firmly in a
comfortable apart position.
S Cut while swinging the upper part of your
body from left to right.
S Asyoumoveforwardtothenextareatocut,
be sure to maintain your balance and footing.
RECOMMENDED CUTTING POSITION
Cut using the 2
o’clock to 4 o’clock
position of the
blade
2 o’clock
4 o’clock
WARNING: The operator or others
must not try to clear away cut materialwith the
engine running or the blade turning to avoid
serious injury. Stop engine and blade before
removing materials wrapped around blade or
shaft.
MAINTENANCE
The life span of the machine can be reduced
and the risk of accidents can increase if machine maintenanceis not carried outcorrectly
and if service and/or repairs are not carried
out professionally. If you need further information, please contact your nearest authorised service dealer.
WARNING: Disconnect the spark
plug before performing maintenance except
for carburetor adjustments.
CHECK FOR LOOSE
FASTENERS AND PARTS
S Spark Plug Boot
S Air Filter
S Housing Screws
S Handlebar Screws
S Debris Shield
CHECK FOR DAMAGED OR
WORN PARTS
Contact an authorised service dealer for replacement of damaged or worn parts.
S ON/STOP Switch - - Ensure ON/STOP switch
functions properly by moving the switch tothe
STOP position. Make sure engine stops; then
restart engine and continue.
S Fuel Tank -- Discontinue use of unit if fuel
tank shows signs of damage or leaks.
S Debris Shield -- Discontinue use of unit if
debris shield is damaged.
INSPECT AND CLEAN UNIT AND
LABELS
S After each use, inspect complete unit for
loose or damaged parts. Clean the unit and
labels using a damp cloth with a mild deter-
gent.
S Wipe off unit with a clean dry cloth.
12
Page 13

CLEAN AIR FILTER
A dirty air filter decreases engine performance and increases fuel consumption and
harmful emissions. Always clean after every
5 hours of operation.
1. Clean the cover and the area around it to
keep dirt from falling into the carburetor
chamber when the cover is removed.
2. Remove parts as illustrated.
NOTE: Do not clean filter in petrol or other
flammable solvent to avoid creating a firehazard or producing harmful evaporative emissions.
3. Wash the filter in soap and water.
4. Allow filter to dry.
5. Replace parts.
Button
Air Filter
Air Filter Cover
SERVICE AND ADJUSTMENTS
REPLACING THE LINE
1. Press the tabs on the side of the trimmer
head and remove cover and spool.
Cover
Tab
Tap Bu t to n
2. Remove any remaining line.
3. Clean dirt and debris from all parts. Replace spool if it is worn or damaged.
4. Replace with a pre-wound spool, or replace line using a 4,5 meters length of2,4
mm diameter McCulloch brand line.
5. When installing new line on an existing
spool, hold the spool as shown in the illustration below.
6. Bend the line at the midpoint and insert
the bend into the slot in the center rim of
the spool. Ensure line snaps into position
in the slot.
Slot
REPLACE SPARK PLUG
Replace the spark plug each year to ensure
the engine starts easier and runs better. Set
spark plug gap at 0,6 mm. Ignition timing is
fixed and nonadjustable.
1. Twist, then pull off spark plug boot.
2. Remove spark plug from cylinder anddiscard.
3. Replace with Champion RCJ-6Y spark
plug and tighten securely with a 19 mm
socket wrench.
4. Reinstall the spark plug boot.
7. With your finger between the lines, wrap
the lines evenly and firmly around the
spool in a clockwise direction.
8. Position the lines in the guide slots.
Guide Slot
Guide
Slot
9. Insert the ends of the lines through exit
holes in the sides of the cover.
10. Place the spool in the cover.
Spool
13
Page 14

Spool
Cover
11. Make sure the lines are not caught between the rim of the spool and the wall of
the cover.
12. Reinstall the spool and cover onto the
trimmer head.Push until cover snaps into
place.
BLADE REPLACEMENT
Refer to theASSEMBLYsection for bladereplacement instructions and illustrations.
CARBURETOR ADJUSTMENT
WARNING: Keep others away when
making idle speed adjustments. The trimmer
head will be spinning during most of this procedure. Wear your protective equipment and
observe all safety precautions. After making
adjustments, the trimmer head must not
move/spin at idle speed.
The carburetor has been carefully set at the
factory. Adjustments may be necessary ifyou
notice any of the following conditions:
S Engine will not idle when the throttle is re-
leased.
S The trimmer head moves/spins at idle speed.
Make adjustments with the unit supported so
the cutting attachment is off the ground and
will not make contact with anyobject. Holdthe
unit byhand whilerunning andmaking adjustments. Keep allparts ofyour body away from
the cutting attachment and muffler.
Idle Speed Adjustment
Allow engineto idle.Adjust speed until engine
runs without trimmer headmoving orspinning
(idle speed too fast) or engine stalling (idle
speed too slow).
S Turn idle speed screw clockwise to in-
crease enginespeed if enginestalls or dies.
S Turn idle speed screw counterclockwise to
decrease engine speed if trimmer head
moves or spins at idle speed.
WARNING: Recheck the idle speed
after each adjustment. The trimmer head
must not move or spin at idle speed to avoid
serious injury to the operator or others.
Idle Speed Screw
Air Filter Cover
If yourequire further assistance or areunsure
about performing this procedure, contact an
authorised service dealer.
STORAGE
WARNING: Perform the following
steps after each use:
S Allow engineto coolbefore storing ortrans-
porting.
S Store unit and fuel in a well ventilated area
where fuel vapors cannot reach sparks or
open flames from water heaters, electric
motors or switches, furnaces, etc.
S Empty fuel tank before storing or transport-
ing the unit.
S Store unit and fuel well out of the reach of
children.
S Store unit with all guards in place. Position
unit so that any sharp object cannot accidentally cause injury.
SEASONAL STORAGE
Prepare unit forstorage at end of season or if
it will not be used for 30 days or more.
If your unit is tobe stored for a period of time:
S Clean the entire unit before lengthy storage.
S Store in a clean dry area.
S Lightly oil external metal surfaces.
ENGINE
S Remove spark plug and pour 1teaspoon of
40:1, 2-cycle engine oil (air cooled) through
the spark plug opening. Slowly pull the
starter rope 8 to 10 times to distribute oil.
S Replace spark plugwith new oneof recom-
mended type and heat range.
S Clean air filter.
S Check entire unit for loose screws, nuts,
and bolts. Replace any damaged, broken,
or worn parts.
S At the beginning of the next season, use
only fresh fuel having the proper petrolto oil
ratio.
OTHER
S Do not store petrol from one season to
another.
S Replace your petrol can if it starts to rust.
14
Page 15

TROUBLESHOOTING TABLE
WARNING: Always stopunit anddisconnect spark plugbefore performingall of the
recommended remedies below except remedies that require operation of the unit.
TROUBLE CAUSE REMEDY
Engine will not
start.
Engine will
not idle
properly.
Engine will not
accelerate,
lacks power,
or dies under
a load.
Engine
smokes
excessively.
Engine runs
hot.
1. ON/STOP switch in STOP
position.
2. Engine flooded.
3. Fuel tank empty.
4. Spark plug not firing.
5. Fuel not reaching
carburetor.
6. Carburetor requires
adjustment.
1. Carburetor requires
adjustment.
2. Crankshaft seals worn.
3. Compression low.
1. Air filter dirty.
2. Spark plug fouled.
3. Carburetor requires
adjustment.
4. Carbon build-up on
muffler outlet screen.
5. Compression low.
1. Choke partially on.
2. Fuel mixture incorrect.
3. Air filter dirty.
4. Carburetor requires
adjustment.
1. Fuel mixture incorrect.
2. Spark plug incorrect.
3. Carburetor requires
adjustment.
4. Carbon build-up on
muffler outlet screen.
1.MoveON/STOPswitchtoON
position.
2. See “Starting a Flooded Engine” in
Operation Section.
3. Fill tank with correct fuel mixture.
4. Install new spark plug.
5. Check for dirty fuel filter; replace.
Check for kinked or split fuel line;
repair or replace.
6. Contact an authorised service dealer.
1. See “Carburetor Adjustment” in
Service and Adjustments Section.
2. Contact an authorised service dealer.
3. Contact an authorised service dealer.
1. Clean or replace air filter.
2. Clean or replace plug
and regap.
3. Contact an authorised service dealer.
4. Contact an authorised service dealer.
5. Contact an authorised service dealer.
1. Adjust choke.
2. Empty fuel tank and refill with
correct fuel mixture.
3. Clean or replace air filter.
4. Contact an authorised service dealer.
1. Empty fuel tank and refill with
correct fuel mixture.
2. Replace with correct spark plug.
3. Contact an authorised service dealer.
4. Contact an authorised service dealer.
15
Page 16

DECLARATION OF CONFORMITY
EC Declaration of Conformity (Only applies to Europe)
We, Husqvarna Outdoor Products Italia, S.p.A., Valmadrera, Italy. Tel: +39--0341--203211,
declare that the brushcutter model McCulloch Mac 250 B from serial numbers
2007--305N00001 and onwards (the year is clearly stated on the rating plate, followed by the
serial number), comply with the requirements of the COUNCIL’S DIRECTIVES:
of 22 June 1998 “relating to machinery” 98/37/EC, annex IIA;
of 15 December 2004 “relating to electromagnetic compatibility” 2004/108/EC, and applicable
supplements; and
of 8 May 2000 “relating to the noise emissions in the environment” in accordance with Annex
Vof2000/14/EC. The measured sound power is 110,3 dB(A), the guaranteed sound power is
114 dB(A). The cutting width is 431 mm.
The following standards have been applied: EN12100--1:2003, EN 12100 --2:2003, EN ISO
11806:1997 and CISPR 12:1997.
SMP, The Swedish Machinery Testing Institute, Fyrisborgsgatan 3 S--754 50 Uppsala,
Sweden, has carried out voluntary type approval. The certificate(s) are numbered:
SEC/07/1217.
0 1 -- 1 1 -- 0 7
Michael S. Bounds, Director
Product Safety and Standards
Handheld Consumer Products
16
Page 17

TECHNICAL DAT A SHEET
MODEL: Mac 250 B Blade Trimmer
ENGINE
Displacement, cm
Maximum engine power, measured in
accordance with ISO 8893, kW 0,7 0,7
Catalytic converter muffler Yes Yes
ENGINE ROTATIONAL SPEEDS
At maximum engine power, rpm 8000 8000
Maximum rotational frequency of the spindle 10000 10000
Engine speed at recommended maximum
spindle rotational frequency 7400 7400
Recommended speed idling, rpm 3000 3000
FUEL AND LUBRICATION SYSTEM
Fuel tank volume capacity, cm
Fuel consumption at maximum engine power,
measured in accordance with ISO 8893, g/h 407 407
Specified fuel consumption at max. engine power,
measured in accordance with ISO 8893, g/kWh 768 768
WEIGHT
Without cutting attachment or shield, empty tank, kg 3,7 3,7
CUTTING ATTACHMENT
Weed blade, part number #530055892 Opt.
Cutting head assembly, part number Opt. #537419202
NOISE LEVELS (Octave Band Analysis 100--10000hz 1/3 Octave)
SOUND PRESSURE LEVELS measured in accordance with ISO 22868
Idling, dB(A) 78,6 78,6
Racing, dB(A) 99,0 98,5
SOUND POWER LEVELS in accordance with ISO 22868
Sound power level, measured dB(A) 110,3 110,3
Sound power level, guaranteed L
VIBRATION LEVELS measured in accordance with ISO 22867
FRONT HANDLE
Idling, m/s
Racing, m/s
REAR HANDLE
Idling, m/s
Racing, m/s
3
3
dB(A) 114,0 114,0
WA
2
2
2
2
25 25
340 340
2,3 2,0
5,7 6,3
4,2 2,6
8,8 5,3
ADDRESS: Husqvarna Outdoor Products Italia S.p.A.
ViaComo72
Valmadrera, Lecco
ITAL Y I--23868
17
 Loading...