

Page 1

1
Active Monitor Box McCrypt S.T.E.V.E. 15”
Order No. 30 17 06
Page 2

2
McCrypt Active Monitor 15”
Introduction
Dear Customer,
Thank you for purchasing this McCrypt Active Monitor. You have chosen
a quality product with a state-of-the-art sound that will guarantee long and reliable use.
The McCrypt speaker enclosures have been developed as two-way systems for full range
operation in a variety of situations.
This product is built to conform with all European electronic, electrical and mechanical
standards, and therefore all operating instructions must be carefully observed to ensure
optimum results and maximum safety standards.
For technical advice about this product or its operation,
please contact our service department Tel. 0180 5312118
Mo. – Fr. 8.00 - 18.00
Description
The McCrypt Active Monitor amplifies an audio signal, then reproduces the sound using high
quality loudspeakers.
Only low voltage (line) audio signals should be fed to the inputs of the amplifier.
The McCrypt Active Monitor can be used as a monitor in studio, or live on stage. It can also
be used in pairs as a small PA System, or linked together to cover a large area.
It is recommended that these Monitors only be used in enclosed or sheltered spaces. Do not
expose to any form of dampness or water spray (rain-etc.).
Any other use of these Monitors apart from the above mentioned, could lead to damage
caused by short-circuiting or overheating.
Do not open or modify the casing in any way.
Use only 230V~/50Hz (10/16A) AC power supply.
To avoid mishaps or injury always follow the security precautions!
Index
Introduction
Description
Index
Basic Functions
Precautions
Operation
Placing
Connection & Set-up
Handling Tips
Maintenance
Troubleshooting
Specifications
Page 3
3
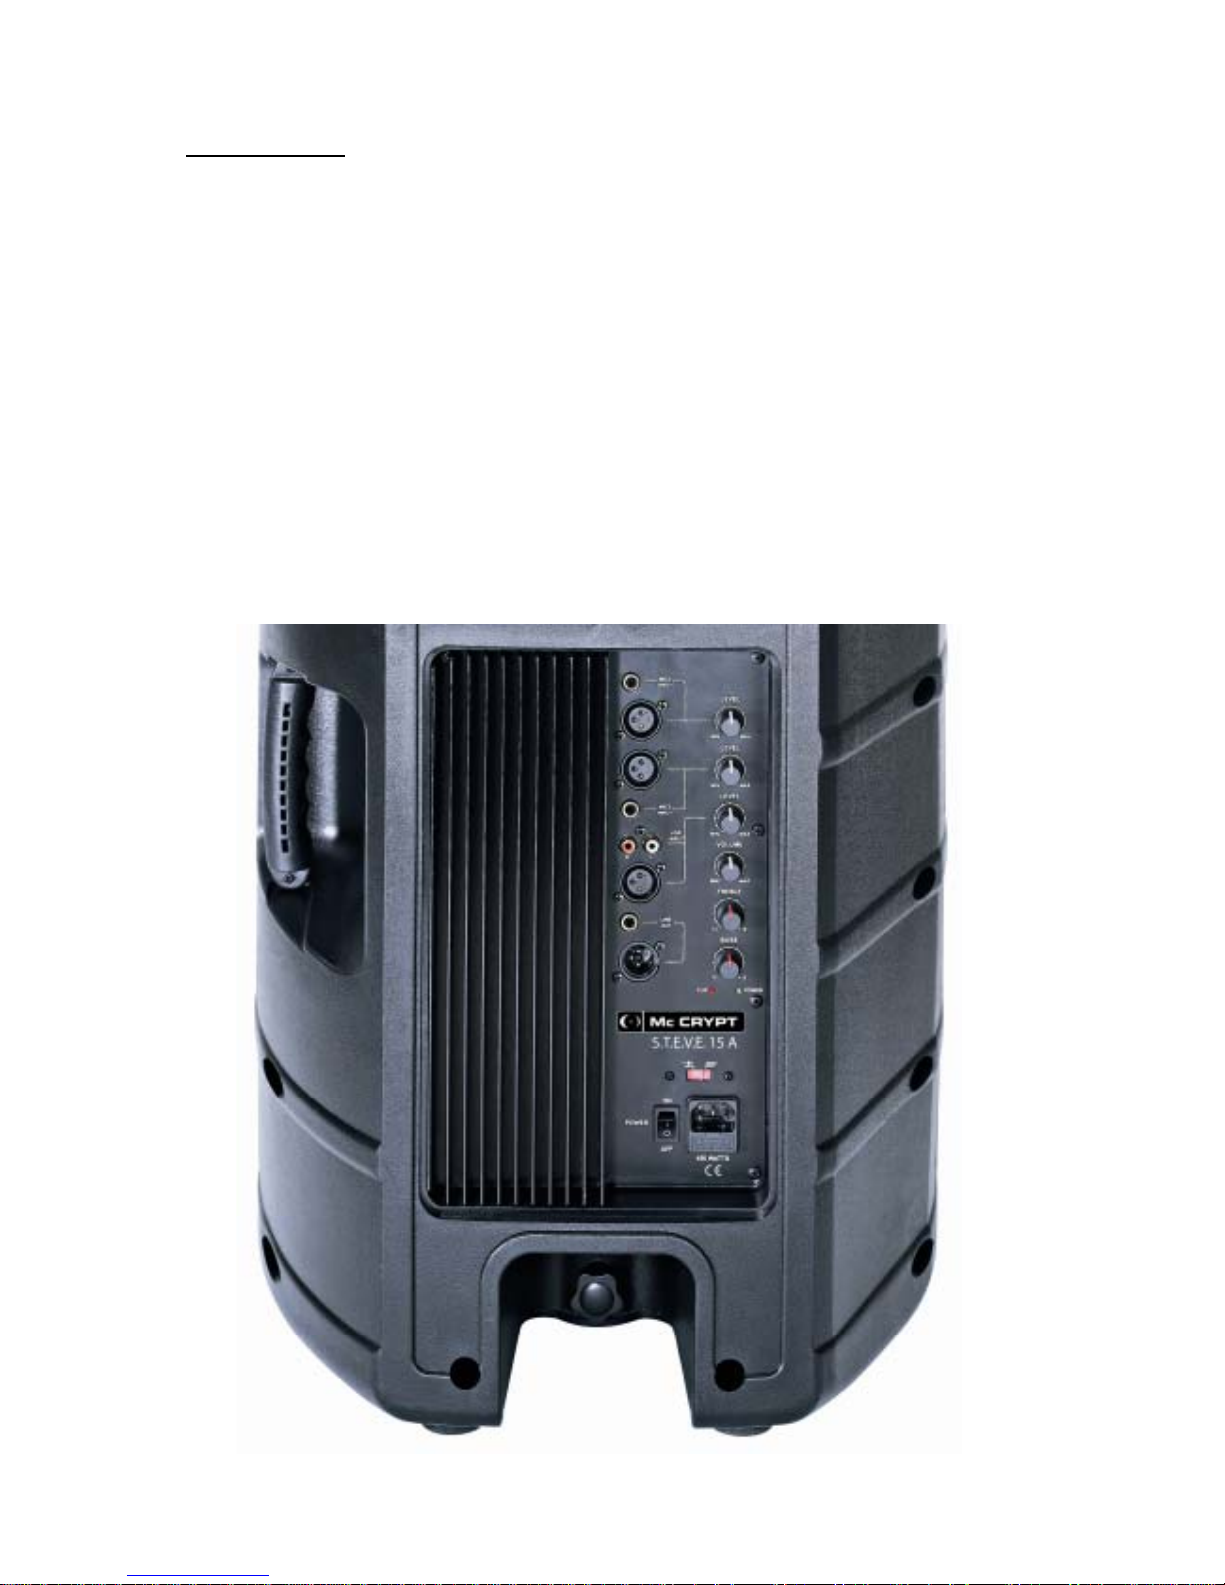
Basic Functions
Mic1 Input Microphone inputs 1
Mic1 Level Input gain control
Mic2 Input Microphone inputs 2
Mic2 Level Input gain control
Line Level Input gain control
Line Input Stereo (R & L internally mixed to mono)
Line Input XLR
Volume Master output control
Treble Master control
Bass Master control
Line Output
Clip LED indicator
Power LED indicator
Ground Lift
Power switch
AC power input & Fuse 3.15A
Page 4

4
Safety Warning
Damage caused by not following the manual instructions renders the
guarantee void.
We will not be responsible for any damage caused by neglecting these
operating procedures!
We cannot be held responsible for damage caused by neglecting these
safety instructions! The Guarantee, in this case, also becomes void!
Important instructions are marked by an exclamation mark in a triangle.
Please read the complete instruction book before you use the equipment,
it contains all the important instructions necessary for correct operation.
A warning triangle with a lightning symbol denotes danger from electric
shock due to open or unprotected cables or components. To avoid
electrical shock, do not touch any exposed cables, wires or electronic
parts!
Safety Precautions
• For maximum safety, do not alter this equipment in any way!
• Only use mains power supply
230V~/50Hz (10/16A).
• Ensure the proper use of the equipment. Pay attention to the manual instructions.
• Make sure that the power cable is not crushed or damaged by sharp edges when the
equipment is set up.
• Please exercise extreme caution in the presence of children! This equipment has
many possibilities for tiny hands to explore, or to place small objects in openings
which may come in contact with live components and cause an electrical shock!
• Keep electrical equipment dry at all times! Do not stand potentially dangerous objects
(water-filled vases etc.) on the top, or cover with a sheet or plastic cloth!
• Do not subject the equipment to high temperatures, water showers or spray, strong
vibration or physical stress.
• Audio and video tapes should not be stored beside the equipment as they can be
adversely affected by the magnetic field of the loudspeakers.
• Keep free of all heat sources – burning candles, radiators etc.
• Do not use in tropical climates.
• Do not leave the packing material lying around, as polystyrene, plastic bags and foil
can be dangerous for children to play with.
• Do no leave unattended when in use.
• Should an emergency occur, remove the power cable immediately
from the power
supply socket!
• Use caution when connecting with other equipment! When in doubt seek qualified
Advice!
If you are not sure about the proper way to connect the equipment , or you have
questions not clearly answered in these instructions, please call our service
department or contact a qualified technician.
Operation
Page 5

5
It is important to observe the instructions and safety precautions in this
manual to ensure a trouble-free operation of this equipment!
Placing
Always ensure that the Monitor is placed on a stable base, on the floor or
mounted on a loudspeaker stand.
Use the built-in flange to set on a tripod stand, the threaded socket (under
rubber cap) on top for flying flanges, or the supplied monitor stands.
Please ensure that the loudspeaker stand (tripod) is strong enough to support
the weight of the monitor.
Do not place the equipment close to television or computer screens, as they
can be adversely affected if too close to the magnetic field of the loudspeakers.
Serious damage can be caused by a falling loudspeaker box.
Connections and Set-up
Caution!
Always turn all level controls to Min. before switching the amplifier on!
Set the tone controls –Treble & Bass – to the middle position.
Set the master Volume to approximately middle position.
Microphone
A lo-impedance microphone can be connected using a balanced (XLR) cable
A hi-impedance microphone with an unbalanced (jack) cable.
Plug the microphone into the appropriate socket and slowly
turn the Level control up while
speaking into the microphone until the volume is loud enough – too much Level can cause
the loudspeaker to feedback (a loud squealing!) and should be avoided, as this can cause
damage to the loudspeaker membrane (and your ears!).
Line In
Connect a sound source to the Line Input and slowly
turn the level control up until the
volume is loud enough.
Line Out
Connect, using a XLR or jack cable, to the Line Input of another McCrypt Active Monitor or
similar equipment.
Ground Lift
When the Active Monitor is used alone, the Ground Lift switch should always be Off.
However, should a low buzzing noise (ground loop) occur when connected to other
equipment, this can be eliminated by switching to On. If the problem persists, seek
professional advice.
Volume & Tone
Use these controls to create an optimum sound reproduction. Always turn the controls slowly
as extremes of sound can damage the loudspeaker membrane (and your ears!)
Handling Tips
If equipment is taken from a cold climate into a warm room, water can
Page 6

6
condense onto the cold metal and cause short circuiting and damage to the
components. Do not connect to the mains, or switch on the power until the
equipment has reached room temperature!
Do not handle the power cable with wet hands!
Never pull the plugs out of equipment by the cable. Always grip the moulded
casing.
Extended exposure to overly loud music can cause damage to your hearing.
Maintenance
Check regularly for any signs of wear or damage to the equipment and especially all cables.
Do not use the equipment if it is obviously defective and ensure that no-one else can
inadvertently operate it. Remove the power cable!
The equipment should not be used when:
• the equipment is obviously damaged.
• the equipment does not work anymore.
• the equipment has been stored under poor conditions.
Please observe the following safety precautions before maintenance or cleaning :
Opening up the equipment or removing parts can leave electrical components
exposed.
If the equipment is opened up, make sure the power switch is Off and the
power cable is completely unplugged.
Although there is no power connected to the equipment, there remains a
possibility of an electrical shock from condensers, which hold their charge
even after the power has been switched off.
Repairs should only be carried out by qualified personnel.
Cleaning
• Clean only with a dry cloth or brush.
• Do not use any harsh detergents or chemicals, as these can damage the surfaces.
Fuse
Use only the correct size of replacement fuse.(see Specifications).
Do not temporarily or permanently bridge the fuse with wire or silver foil!
Remove the power cable from the rear of the Active Monitor and pull the fuse
holder cap until the fuse is exposed. Replace only with the correct fuse (see
Specifications), then press the holder back in place.
Troubleshooting
You have chosen a quality product with a state-of-the-art sound that will guarantee long and
reliable use, However, should you experience problems here are some basic solutions.
Page 7

7
Always observe the safety precautions!
Problem
Monitor does not work, no power
indicator
Power indicator lights up but
there is no sound.
Is there a buzzing noise?
• Is it switched on? Is the power cable properly
connected? (at both ends)
• Is the fuse OK?
• Does the wall socket have power?
• Has the internal protection activated itself?
(overheating?) If so, switch the equipment off for a
few minutes then switch on again.
• Is the Volume on Min?
• Is the audio source correctly plugged in?
• Is the audio source switched on and the master
Volume on Min
• Is the audio source Mute switch activated?
• Has the internal protection activated itself?
(overheating?) If so, switch the equipment off for a
few minutes then switch on again.
• Are the signal cables damaged or frayed?
• Is the Ground Lift switch in the wrong position?
Specifications
Power supply 230V~/50Hz
Fuse protection T 3,15A/250V (5x20mm)
Output power max. 500W
Output power RMS 250W
Frequency range 45 – 17.000Hz
Sensitivity 100dB/m
Bass Loudspeaker 15”
Horn 1”
 Loading...