


Digital-Piano „DP-263“
Best.-Nr. / Item No. / N° de commande / Bestelnr. 30 43 03
Digital Piano „DP-263“
Piano numérique « DP-263 »
Digitale piano „DP-263“
Bedienungsanleitung Seite 2 - 35
Operating instructions Page 36 - 69
Mode d’emploi Page 70 - 103
Gebruiksaanwijzing Pagina 104 - 137
30 48 54
Version 07/13

Inhaltsverzeichnis
1. Einführung ................................................................................................................................................................................................4
2. Bestimmungsgemäße Verwendung ....................................................................................................................................................... 4
3. Lieferumfang ............................................................................................................................................................................................ 5
4. Symbol-Erklärung ....................................................................................................................................................................................5
5. Sicherheitshinweise ................................................................................................................................................................................5
6. Beschreibung der Einzelteile ..................................................................................................................................................................7
7. Zusammenbau.......................................................................................................................................................................................... 8
a) Seitenteile und Fußpdeal zusammensetzen .........................................................................................................................................8
b) Rückwand festschrauben ......................................................................................................................................................................8
c) Oberteil mit Tastatur montieren .............................................................................................................................................................9
d) Fußpedal am Oberteil anschließen, Kabel fixieren, Gerät aufstellen .................................................................................................... 9
8. Bedienelemente ..................................................................................................................................................................................... 10
a) Oberteil ...............................................................................................................................................................................................10
b) Rückseite ............................................................................................................................................................................................ 10
c) Fußpedale ........................................................................................................................................................................................... 10
d) Bedienfeld ........................................................................................................................................................................................... 11
e) LC-Display .......................................................................................................................................................................................... 12
Seite
9. Anschlüsse .............................................................................................................................................................................................13
a) Kopfhörerbuchsen ...............................................................................................................................................................................13
b) Audioausgang "AUX OUT" .................................................................................................................................................................. 13
c) USB .....................................................................................................................................................................................................13
d) Fußpedale ...........................................................................................................................................................................................13
10. Inbetriebnahme, Anschluss an die Netzspannung .............................................................................................................................14
11. Demos abspielen ...................................................................................................................................................................................15
12. Instrumente und Effekte ........................................................................................................................................................................16
a) Instrument auswählen ("VOICE") ........................................................................................................................................................16
b) Zweiklang-Effekt ("DUAL VOICE"), Taste "DUAL" .............................................................................................................................. 16
c) Split-Funktion, Taste "Split" .................................................................................................................................................................17
13. Begleitrhythmen ("STYLE") .................................................................................................................................................................. 18
a) Begleitrhythmus auswählen ................................................................................................................................................................18
b) Begleitrhythmus abspielen/anhalten, Taste "START/STOP" ............................................................................................................... 18
c) Automatische Begleitung, Auto-Bass-Chord, Taste „A.B.C./MELODY OFF“ ........................................................................................ 19
d) Sync-Start, Taste „SYNC“ ................................................................................................................................................................... 19
e) Intro-Start, Taste „INTRO/ENDING“ ....................................................................................................................................................19
f) Normal-/Variation-Modus, Tasten „FILL A“ und „FILL B“ ...................................................................................................................... 20
g) Begleitrhythmus beenden.................................................................................................................................................................... 20
h) Lautstärke für Begleitrhythmus einstellen, Tasten „ACC. VOL“ ........................................................................................................... 21
i) Geschwindigkeit für Begleitrhythmus einstellen, Tasten „TEMPO“...................................................................................................... 21
j) Auswahl eines Akkords ....................................................................................................................................................................... 22
k) Metronom, Taste „METRO“ .................................................................................................................................................................22
2

Seite
14. Funktionseinstellungen .........................................................................................................................................................................23
a) Funktion „Transpose“ .......................................................................................................................................................................... 23
b) Funktion „Tune“ ...................................................................................................................................................................................23
c) Funktion „Beat“ ....................................................................................................................................................................................23
d) Funktion „Touch“ ................................................................................................................................................................................. 23
e) Funktion „Split-Point“ ...........................................................................................................................................................................24
f) Funktion „DSP-Level“ ..........................................................................................................................................................................24
g) Funktion „MIDI-IN-Channel“ ................................................................................................................................................................ 24
h) Funktion „MIDI-OUT-Channel“ ............................................................................................................................................................ 24
i) Funktion „Power Off“ ........................................................................................................................................................................... 24
15. Mixer ........................................................................................................................................................................................................25
16. Speicher ..................................................................................................................................................................................................26
a) Speicherbank und Speicher auswählen, Einstellungen laden ............................................................................................................. 26
b) Einstellungen speichern ...................................................................................................................................................................... 26
c) Speicher löschen .................................................................................................................................................................................26
17. „O.T.S.“, „One-Touch-Setting“ ............................................................................................................................................................. 27
18. Aufnahme-Funktion ............................................................................................................................................................................... 28
a) Aufnahmemodus vorbereiten .............................................................................................................................................................. 28
b) Aufnahme starten ................................................................................................................................................................................28
c) Aufnahme beenden ............................................................................................................................................................................. 28
d) Aufnahme abspielen ........................................................................................................................................................................... 28
e) Speicher löschen................................................................................................................................................................................. 28
19. Songs ...................................................................................................................................................................................................... 29
20. Handhabung ........................................................................................................................................................................................... 30
21. Wartung und Reinigung ........................................................................................................................................................................ 31
22. Entsorgung .............................................................................................................................................................................................31
23. Technische Daten .................................................................................................................................................................................. 31
24. Anhang A: Instrumente ......................................................................................................................................................................... 32
25. Anhang B: Begleitrhythmen ................................................................................................................................................................. 34
26. Anhang C: Songs ...................................................................................................................................................................................35
3
1. Einführung
Sehr geehrte Kundin, sehr geehrter Kunde,
wir bedanken uns für den Kauf dieses Produkts.
Dieses Produkt entspricht den gesetzlichen, nationalen und europäischen Anforderungen.
Diese Bedienungsanleitung gehört zu diesem Produkt. Sie enthält wichtige Hinweise zur Inbetriebnahme und Handhabung. Achten Sie hierauf, auch wenn Sie dieses Produkt an Dritte weitergeben.
Heben Sie deshalb diese Bedienungsanleitung zum Nachlesen auf!
Alle enthaltenen Firmennamen und Produktbezeichnungen sind Warenzeichen der jeweiligen Inhaber. Alle Rechte vorbehalten.
Bei technischen Fragen wenden Sie sich bitte an:
Tel.-Nr.: 0 96 04 / 40 87 87
Fax-Nr.: 0180 5 / 31 21 10 (der Anruf kostet 14 ct/min inkl. MwSt. aus dem Festnetz. Mobilfunkhöchstpreis: 42 ct/min inkl. MwSt.)
E-Mail: Bitte verwenden Sie unser Formular im Internet www.conrad.de, unter der Rubrik “Kontakt”.
Mo. - Fr. 8.00 bis 18.00 Uhr
www.conrad.at
www.business.conrad.at
Tel.: 0848/80 12 88
Fax: 0848/80 12 89
E-Mail: support@conrad.ch
Mo. bis Fr. 8.00-12.00, 13.00-17.00 Uhr
2. Bestimmungsgemäße Verwendung
Das Produkt dient zur Erzeugung von Tönen, die Sie über die Tasten spielen können. Diese werden über die eingebauten Lautsprecher
wiedergegeben. Der Anschluss eines Kopfhörers oder eines externen Verstärkers ist möglich. Zum Anschluss an einen Computer steht ein
USB-Anschluss zur Verfügung.
Eine Verwendung des gesamten Produkts ist nur in geschlossenen, trockenen Innenräumen erlaubt. Das Produkt darf nicht feucht oder nass
werden.
Eine andere Verwendung als zuvor beschrieben führt zu Beschädigungen dieses Produkts, außerdem ist dies mit Gefahren wie z.B. Kurzschluss,
Brand, elektrischer Schlag etc. verbunden. Das gesamte Produkt darf nicht geändert bzw. umgebaut werden. Das Gehäuse darf nicht geöffnet
werden.
Das Produkt ist kein Spielzeug, es ist nicht für Kinder unter 14 Jahren geeignet.
Beachten Sie alle Sicherheitshinweise dieser Bedienungsanleitung. Diese enthalten wichtige Informationen zum Umgang mit dem
Produkt.
4
3. Lieferumfang
• Digital-Piano (Oberteil, linkes Seitenteil, rechtes Seitenteil, Rückwand, Fußpedal-Box, Montagematerial)
• Bedienungsanleitung
4. Symbol-Erklärung
Dieses Symbol wird verwendet, wenn Gefahr für Ihre Gesundheit besteht, z.B. durch elektrischen Schlag.
Das Symbol mit dem Ausrufezeichen weist Sie auf besondere Gefahren bei Handhabung, Betrieb oder Bedienung hin.
Das „Pfeil“-Symbol steht für spezielle Tipps und Bedienhinweise.
5. Sicherheitshinweise
Bei Schäden, die durch Nichtbeachtung dieser Bedienungsanleitung verursacht werden, erlischt die Gewährleistung/
Garantie. Für Folgeschäden übernehmen wir keine Haftung!
Bei Sach- oder Personenschäden, die durch unsachgemäße Handhabung oder Nichtbeachten der Sicherheitshinweise
verursacht werden, übernehmen wir keine Haftung! In solchen Fällen erlischt die Gewährleistung/Garantie.
• Aus Sicherheits- und Zulassungsgründen (CE) ist das eigenmächtige Umbauen und/oder Verändern des Produktes nicht gestattet.
• Als Spannungsquelle für das interne Netzteil darf nur eine ordnungsgemäße Netzsteckdose (230 V/AC, 50 Hz) des öffentlichen
Versorgungsnetzes verwendet werden.
• Das Produkt ist kein Spielzeug, es ist nicht für Kinder geeignet. Kinder können die Gefahren, die im Umgang mit elektrischen
Geräten bestehen, nicht einschätzen.
• Alle Personen, die dieses Produkt bedienen, installieren, aufstellen, in Betrieb nehmen oder warten, müssen entsprechend ausgebildet und qualifiziert sein und diese Bedienungsanleitung beachten.
• Fassen Sie das Netzkabel oder den Netzstecker niemals mit feuchten oder nassen Händen an. Es besteht die Gefahr eines
lebensgefährlichen elektrischen Schlages!
• Sollte das Netzkabel Beschädigungen aufweisen, so berühren Sie es nicht. Schalten Sie zuerst die zugehörige Netzsteckdose
stromlos (z.B. über den zugehörigen Sicherungsautomaten) und ziehen Sie dann den Netzstecker vorsichtig aus der Netzsteckdose.
Betreiben Sie das Produkt danach nicht mehr, sondern bringen Sie es in eine Fachwerkstatt. Ein beschädigtes Netzkabel darf nur
vom Fachmann ausgetauscht werden.
• Stellen Sie sicher, dass das Netzkabel beim Aufstellen bzw. der Montage des Produktes nicht gequetscht oder durch scharfe
Kanten beschädigt wird.
• Setzen Sie das Gerät keinen hohen Temperaturen, Tropf- oder Spritzwasser, starken Vibrationen, sowie hohen mechanischen
Beanspruchungen aus.
5

• Stellen Sie keine Gefäße mit Flüssigkeiten, z.B. Gläser, Eimer, Vasen oder Pflanzen, auf das Gerät oder in seine unmittelbare
Nähe. Flüssigkeiten könnten ins Gehäuseinnere gelangen und dabei die elektrische Sicherheit beeinträchtigen. Außerdem besteht höchste Gefahr eines Brandes oder eines lebensgefährlichen elektrischen Schlages!
Schalten Sie in einem solchen Fall die zugehörige Netzsteckdose stromlos (z.B. Sicherungsautomat abschalten) und ziehen Sie
danach den Netzstecker aus der Netzsteckdose. Stecken Sie alle Kabel vom Gerät ab. Das gesamte Produkt darf danach nicht
mehr betrieben werden, bringen Sie es in eine Fachwerkstatt.
• Stellen Sie keine offenen Brandquellen wie brennende Kerzen auf oder direkt neben dem Gerät ab.
• Betreiben Sie das Gerät nicht unbeaufsichtigt.
• Benutzen Sie das Gerät nur in gemäßigtem Klima, nicht in tropischem Klima.
• Lassen Sie Verpackungsmaterial nicht achtlos liegen. Es könnte für Kinder zu einem gefährlichen Spielzeug werden.
• In gewerblichen Einrichtungen sind die Unfallverhütungsvorschriften des Verbandes der gewerblichen Berufsgenossenschaften
für elektrische Anlagen und Betriebsmittel zu beachten.
• In Schulen, Ausbildungseinrichtungen, Hobby- und Selbsthilfewerkstätten ist das Betreiben des Produkts durch geschultes Personal verantwortlich zu überwachen.
• Sollten Sie sich über den korrekten Anschluss nicht im Klaren sein oder sollten sich Fragen ergeben, die nicht im Laufe der
Bedienungsanleitung abgeklärt werden, so setzen Sie sich bitte mit unserer technischen Auskunft oder einem anderen Fachmann
in Verbindung.
6

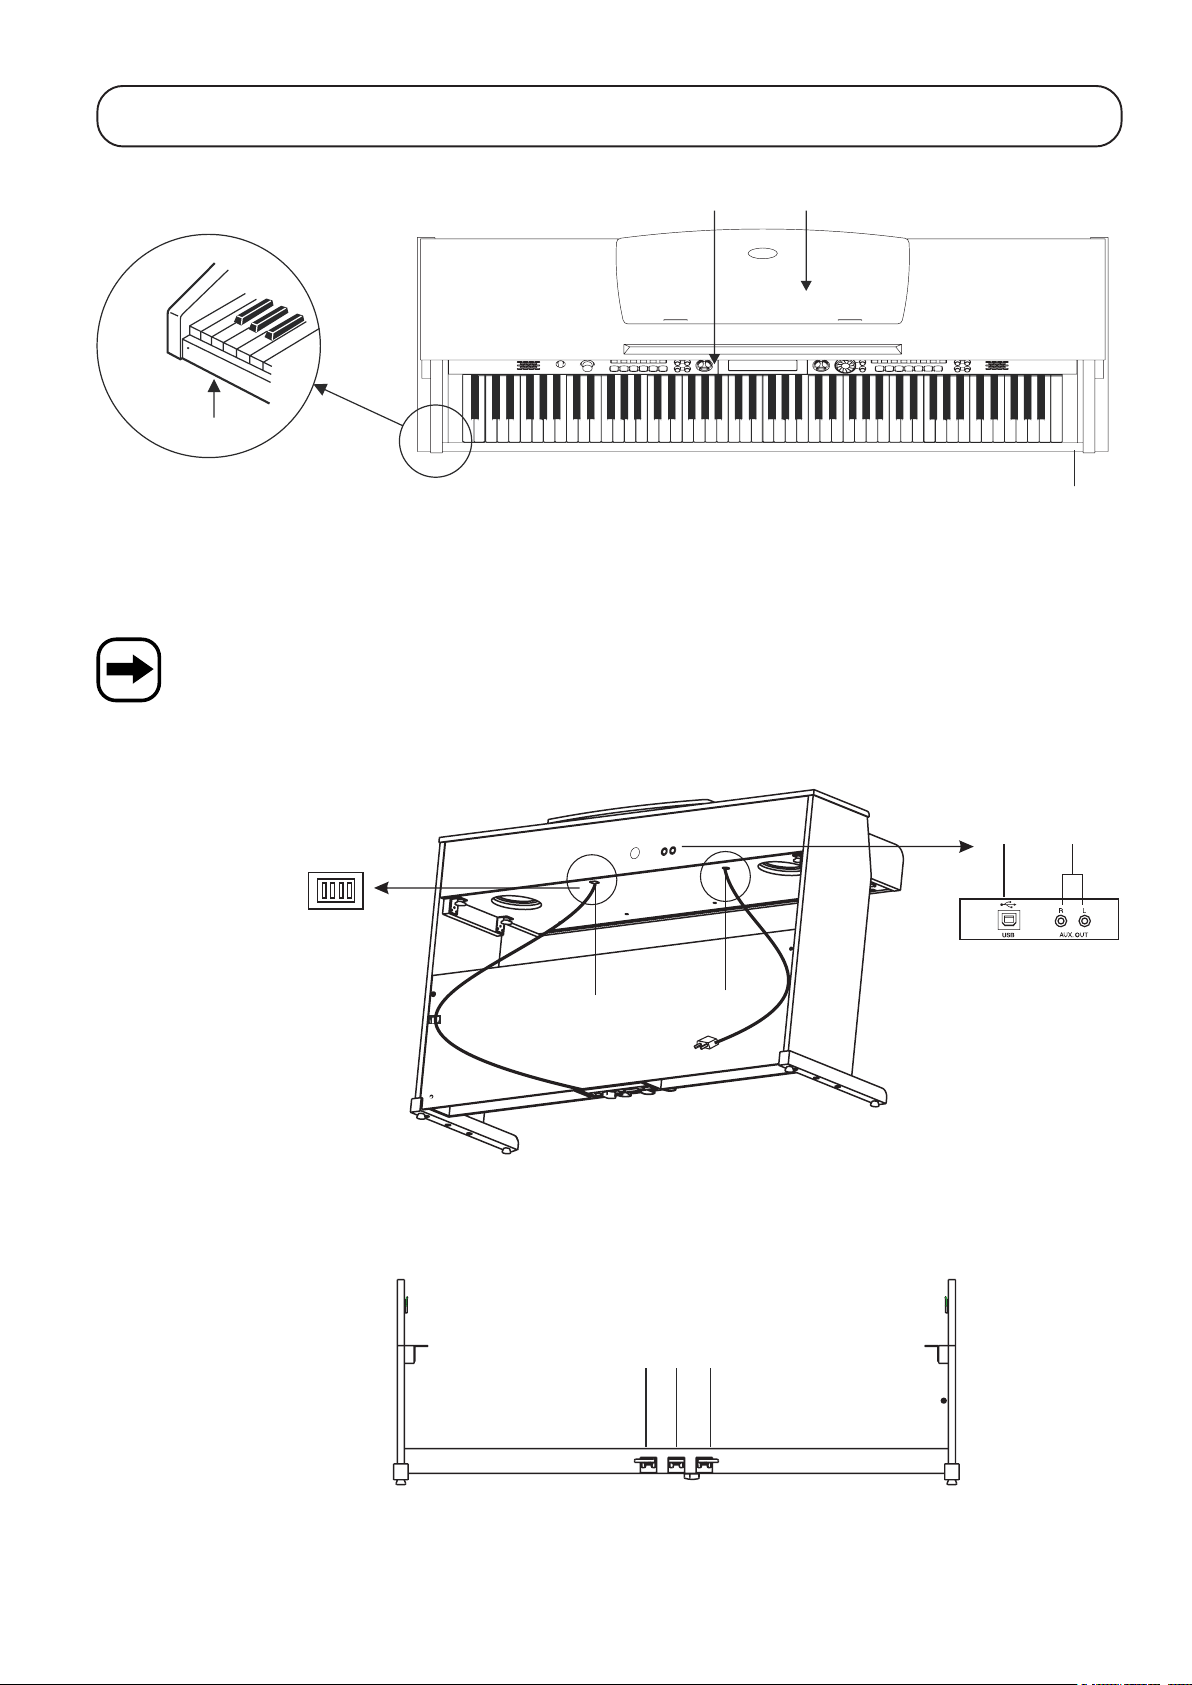
6. Beschreibung der Einzelteile
10
4
1
12
2
3
1 Oberteil mit Tastatur
2 Rechtes Seitenteil
3 Linkes Seitenteil
4 Rückwand
5 Fußpedale
6 Griff-Schraube (4 Stück)
5
6
7
8
9
11
7 Schraube Ø6mm x 30mm (4 Stück)
8 Schraube Ø4mm x 15mm (5 Stück)
9 Kabelhalterung mit Klebepad
10 Netzkabel
11 Schraube Ø6mm x 12mm (2 Stück)
12 Kabel des Fußpedals
7
7. Zusammenbau
Aufgrund der großen und schweren Einzelteile ist die Hilfe einer zweiten Person sehr empfehlenswert! Durch das Umfallen der
schweren Teile besteht nicht nur Verletzungsgefahr, sondern auch die Gefahr der Beschädigung des Produkts.
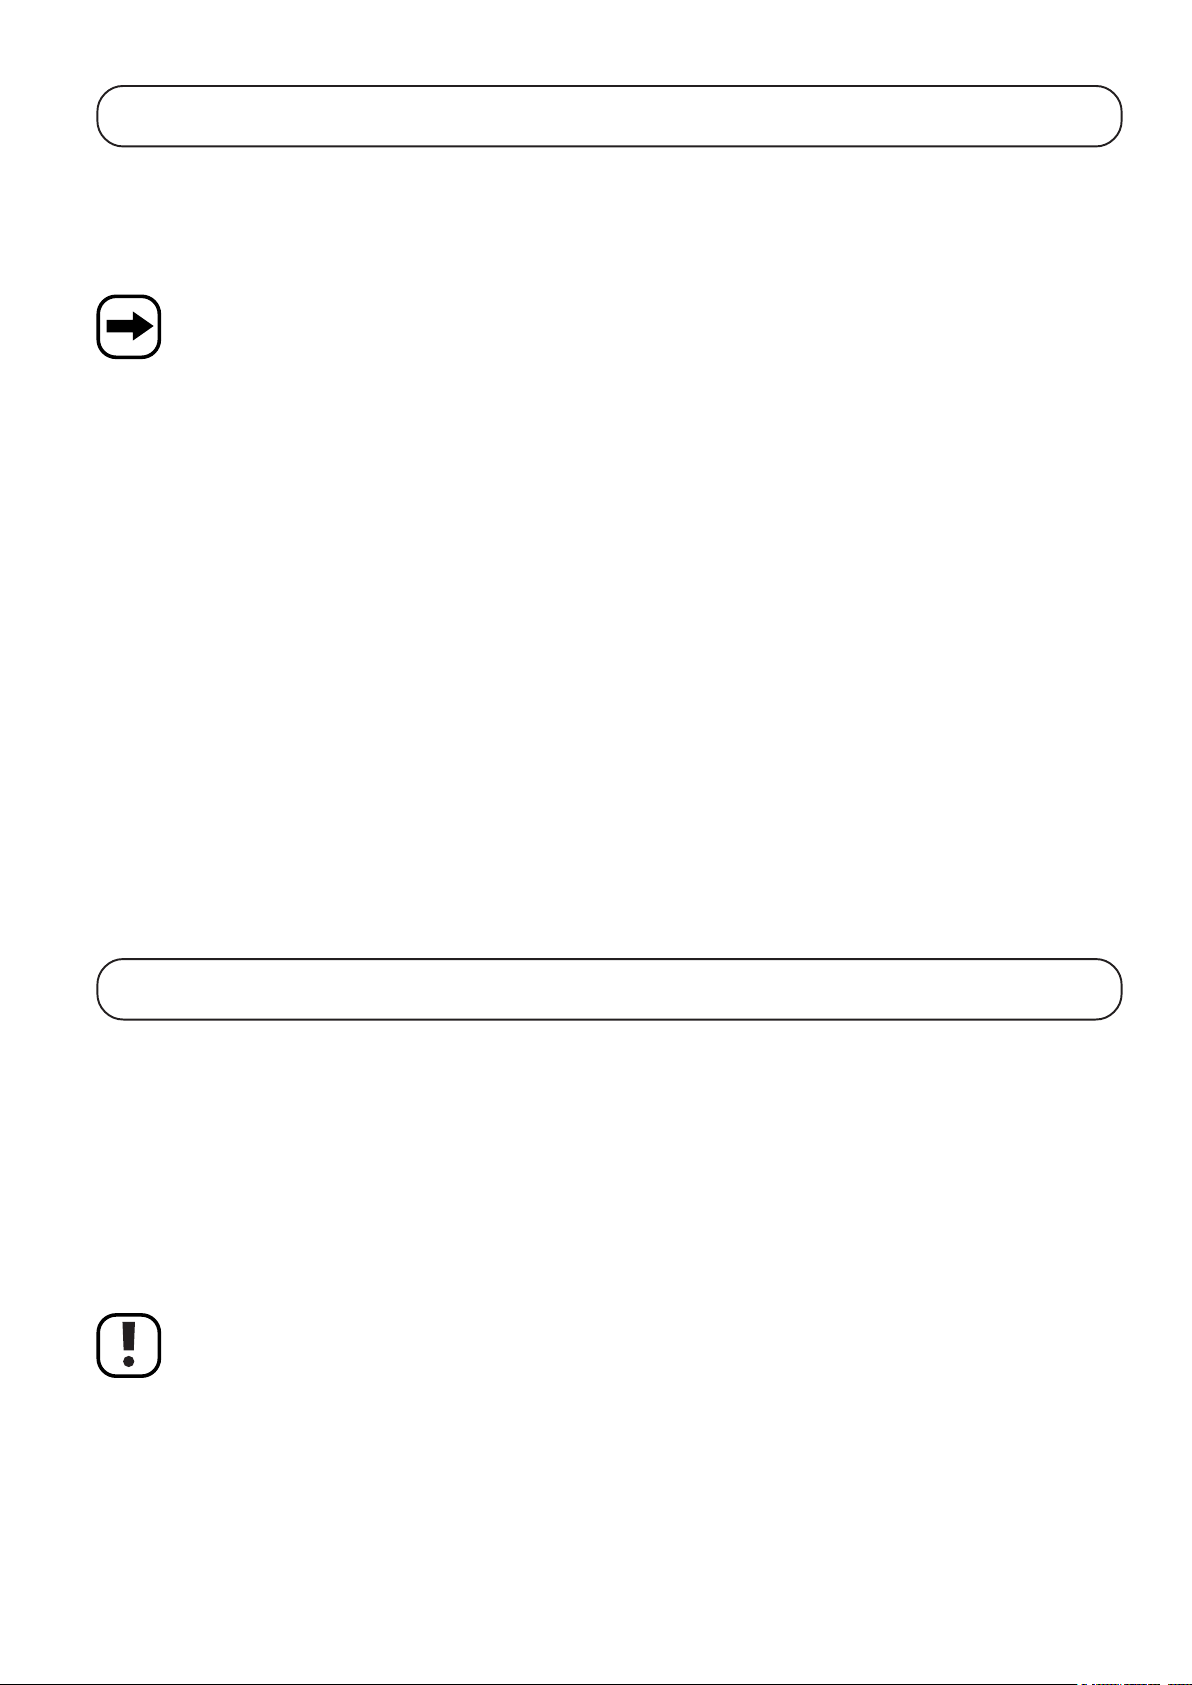
a) Seitenteile und Fußpedal zusammensetzen
Erforderliche Schrauben: Ø6mm x 30mm, 4 Stück
4 x
Setzen Sie wie im Bild gezeigt die beiden Seitenteile und das Fußpedal mit den 4 Schrauben (Ø6mm x 30mm) zusammen. Verkanten Sie die
Seitenteile nicht, wenden Sie beim Zusammenschrauben keine Gewalt an.
b) Rückwand festschrauben
Erforderliche Schrauben: Ø4mm x 15mm, 5 Stück
Ø6mm x 12mm, 2 Stück
2 x
5 x
Montieren Sie die Rückwand wie im Bild gezeigt mit 5 Schrauben (Ø4mm x 15mm) am Fußpedal und mit 2 Schrauben (Ø6mm x 12mm) an den
beiden Seitenteilen.
8
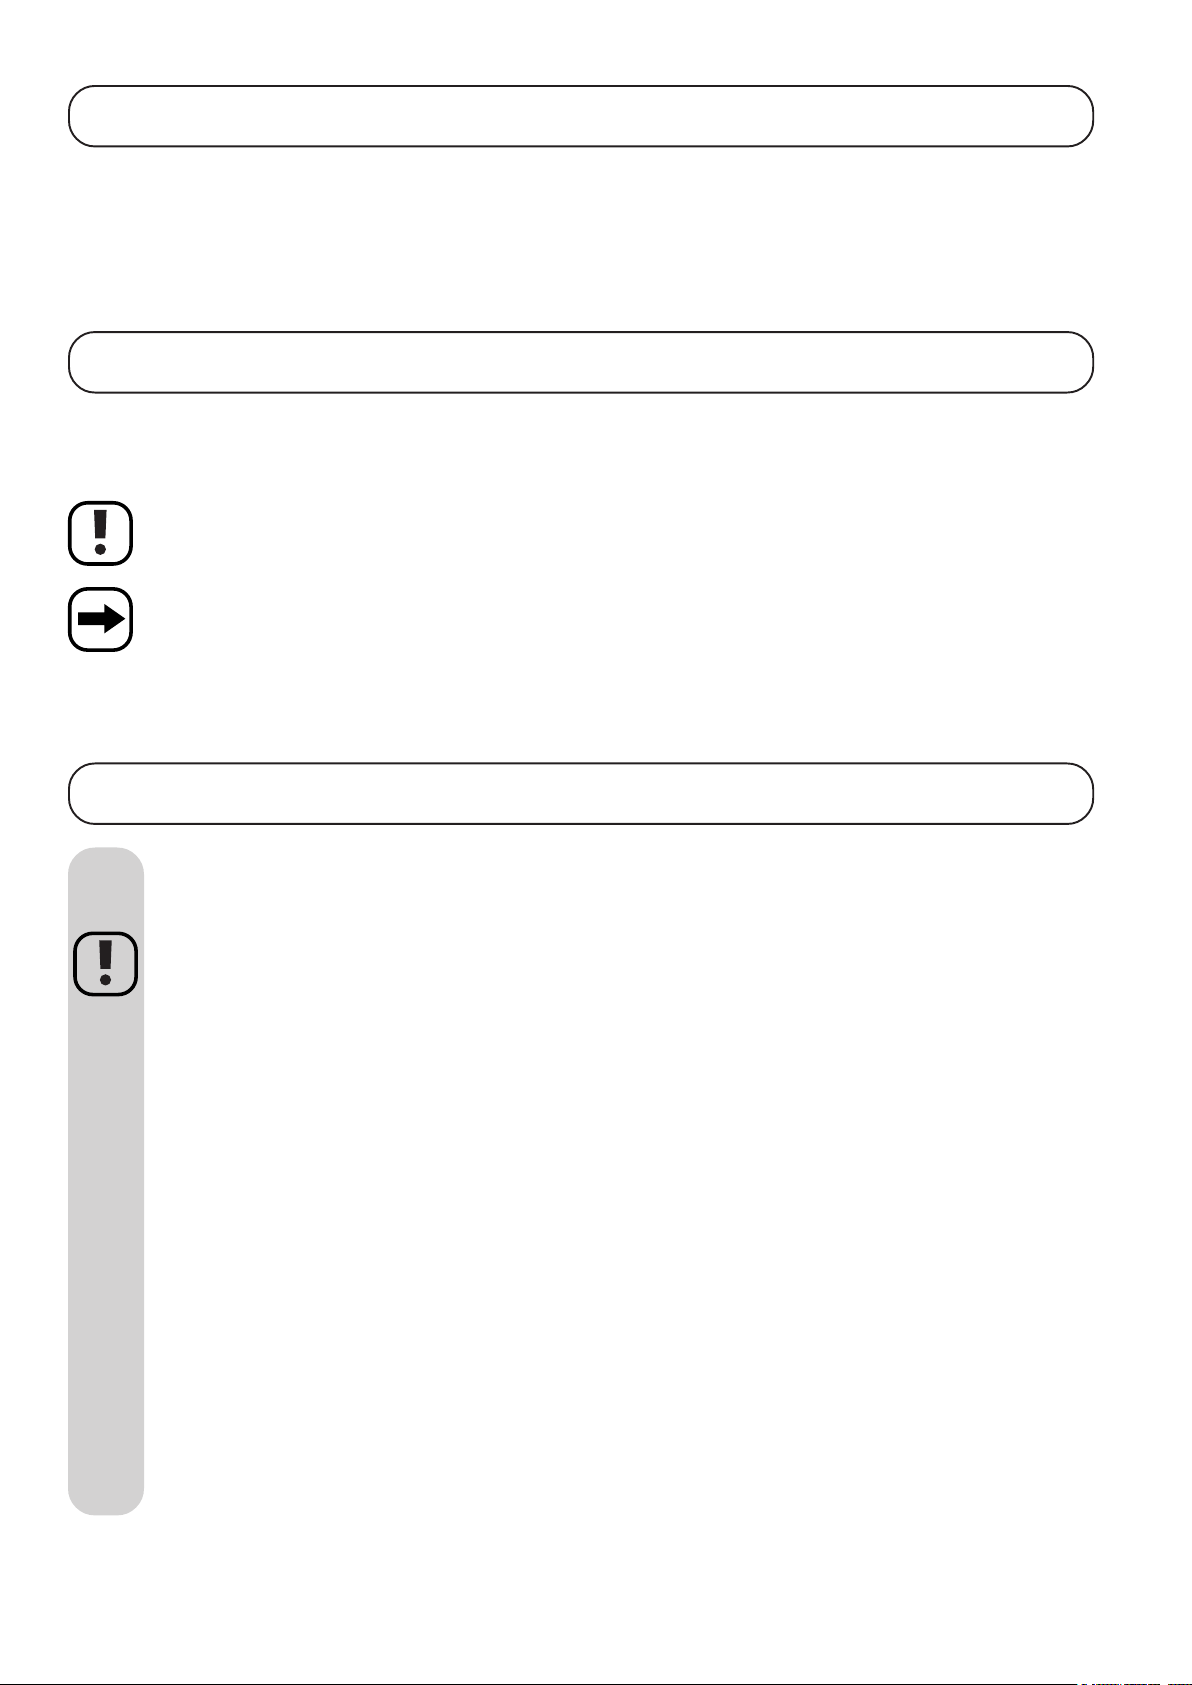
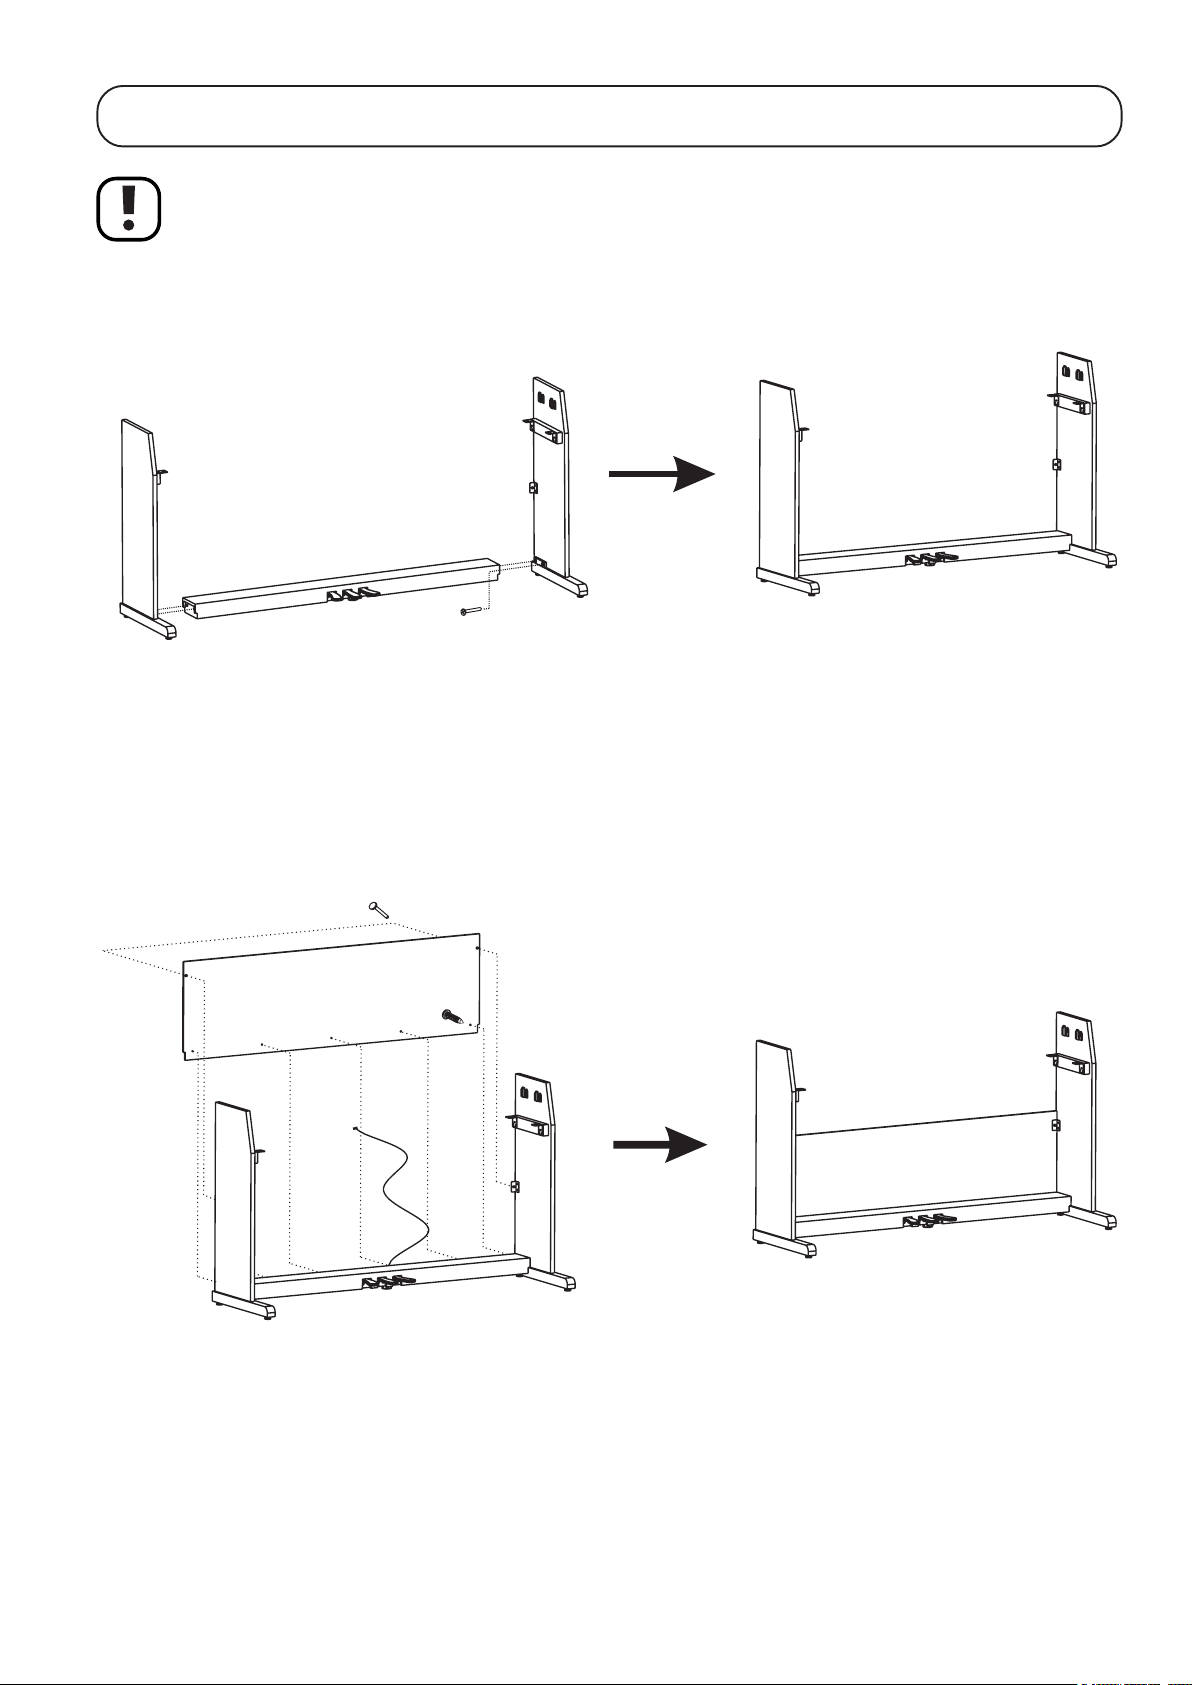
c) Oberteil mit Tastatur montieren
Setzen Sie das Oberteil auf die beiden Seitenteile auf. Mit den vier Griff-Schrauben kann das Oberteil dann fixiert werden.
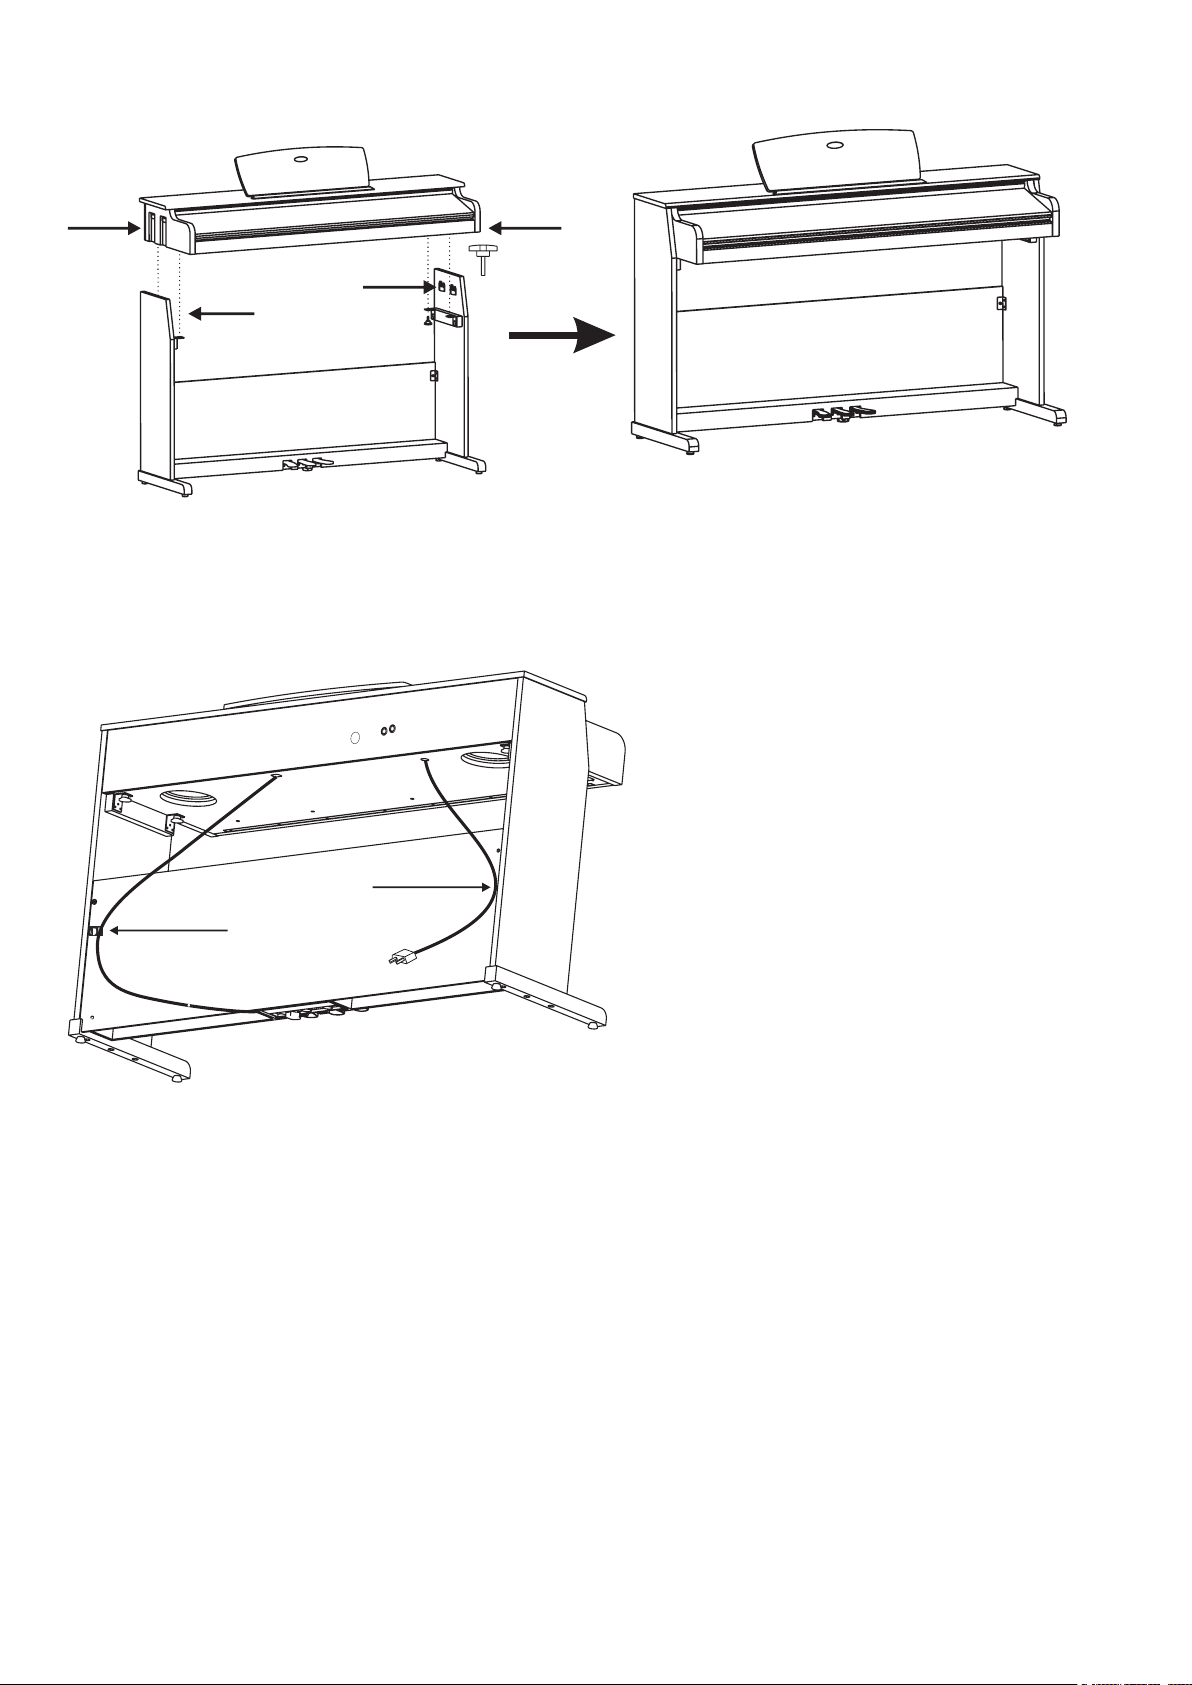
d) Fußpedal am Oberteil anschließen, Kabel fixieren, Gerät aufstellen
Verbinden Sie den Stecker des Fußpedals mit der entsprechenden Buchse am Oberteil.
Mit den zwei Kabelhalterungen kann sowohl das Netzkabel als auch das Kabel des Fußpedals an der Rückseite der Rückwand seitlich fixiert
werden.
Stellen Sie anschließend das Digital-Piano an der gewünschten Stelle auf. Wählen Sie eine ausreichend große, ebene, stabile Oberfläche. Mit
den verstellbaren Standfüßen können evtl. Unebenheiten des Bodens ausgeglichen werden, so dass das Digital-Piano stabil steht und nicht
wackelt.
9
8. Bedienelemente
a) Oberteil
2
1 Bedienfeld
2 Kopfhörer-Buchsen
3 Notenhalter
4 Klaviatur
Die Klaviatur ist mit einer Abdeckung versehen, die Sie leicht einschieben und auch wieder herausziehen können.
1 3
4
b) Rückseite
5 Fußpedale
6 Netzkabel
7 USB-Buchse
8 Ausgang „AUX OUT“
c) Fußpedale
9 Pedal „Soft“
10 Pedal „Sostenuto“
11 Pedal „Sustain“
7 8
5
9
6
10 11
10
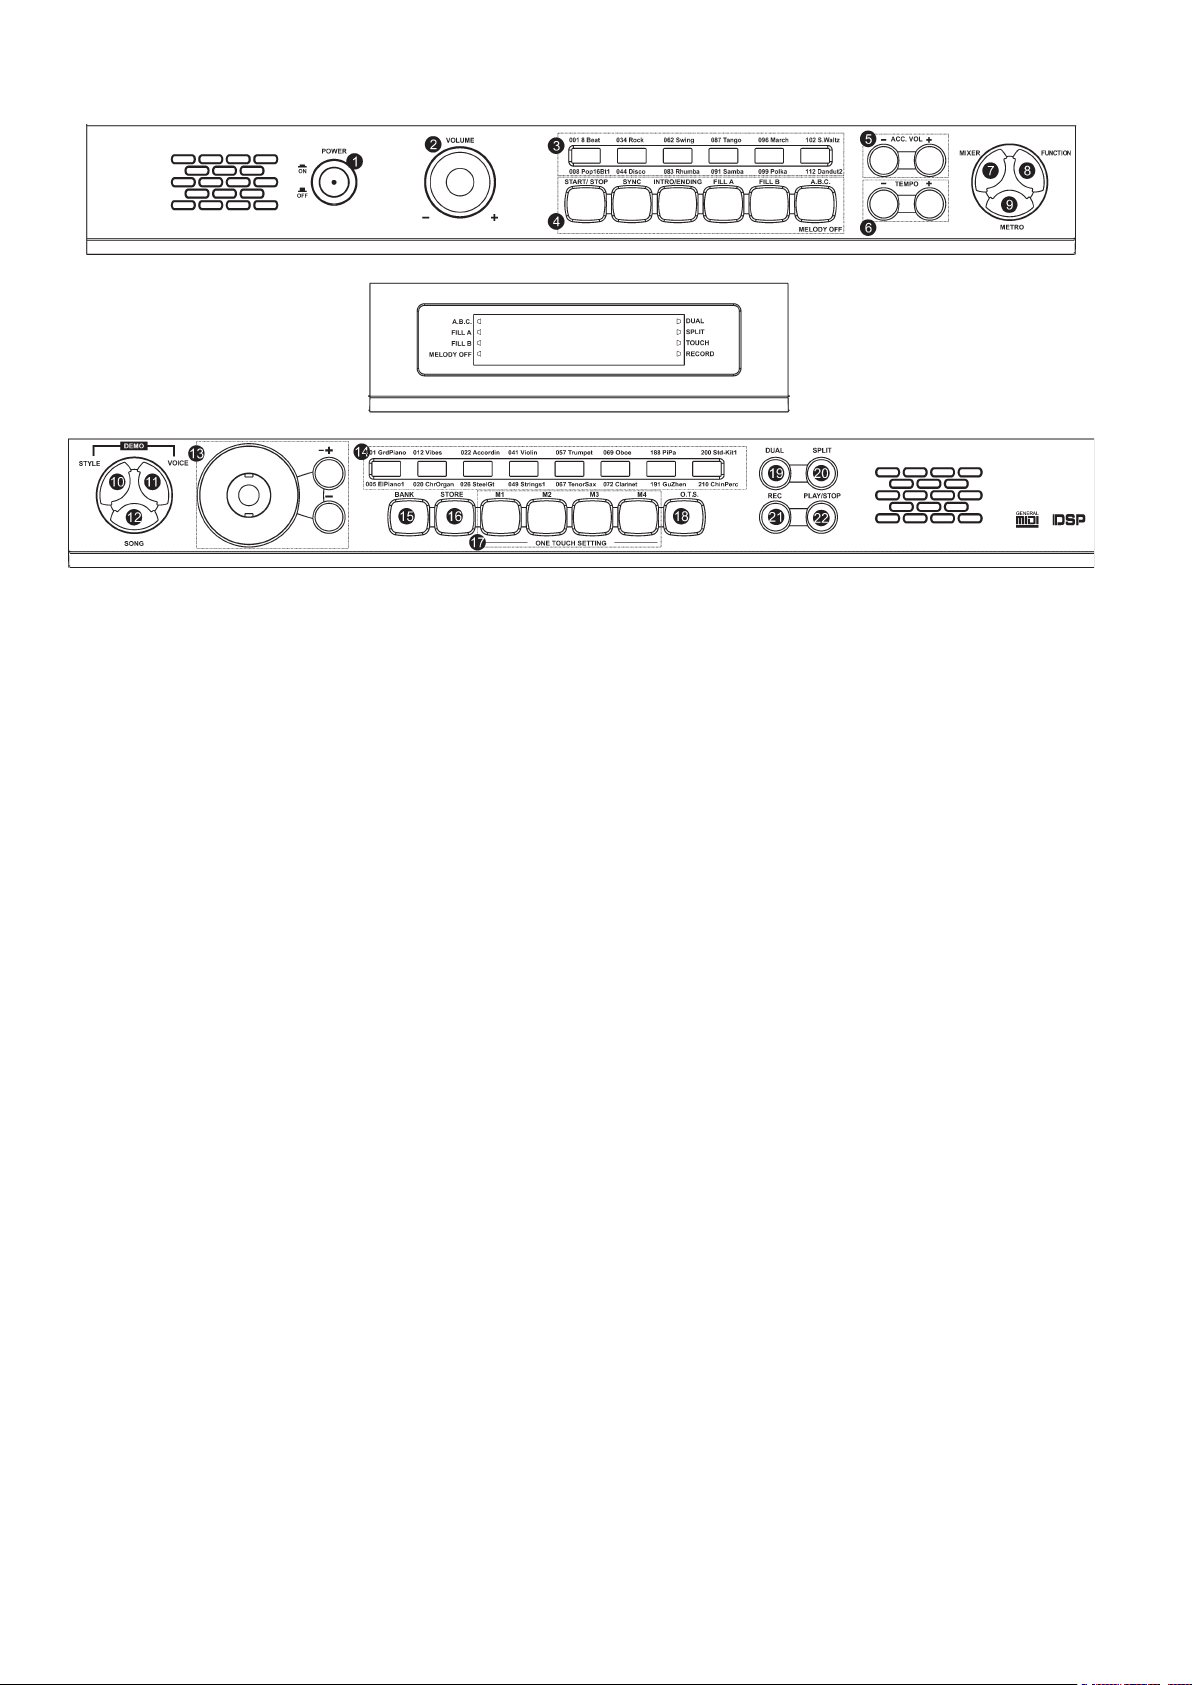
d) Bedienfeld
1 Ein-/Ausschalter („POWER“)
2 Haupt-Lautstärkeregler („VOLUME“)
3 Direktwahltasten für den Begleitrhythmus („STYLE“)
4 Funktionstasten für den Begleitrhythmus („START/STOP“, „SYNC“, „INTRO/ENDING“, „FILL A“, „FILL B“, „A.B.C./MELODY OFF“)
5 Lautstärke-Einstellung für die Begleitspuren („ACC VOL +/-“)
6 Tasten „TEMPO -“ und „TEMPO +“ für Geschwindigkeitseinstellung
7 Taste „MIXER“ für die Einstellung der Lautstärke der Audiospuren
8 Taste „FUNCTION“ für die Auswahl der Funktionseinstellungen
9 Taste „METRO“ für das Ein-/Ausschalten des Metronoms
10 Taste „STYLE“ für die Auswahl eines Begleitrhythmus
11 Taste „VOICE“ für die Auswahl eines Instruments
12 Taste „SONG“ für die Auswahl eines Songs
13 Einstellrad und Tasten für „+“ und „-“
14 Direktwahltasten für die Instrumente („VOICE“)
15 Taste „BANK“ für die Auswahl der Speicherbänke 1 bis 4
16 Taste „STORE“ für das Speichern von Einstellungen
17 Tasten „M1“, „M2“, „M3“ und „M4“ für das Speichern bzw. Abrufen von Einstellungen
18 Taste „O.T.S.“ (One-Touch-Setting)
19 Taste „DUAL“ für Zweiklang-Funktion
20 Taste „SPLIT“ für das Aufteilen der Klaviatur in zwei Teile (z.B. Schlagzeug links, Piano rechts)
21 Taste „REC“ für Aufnahme
22 Taste „PLAY/STOP“ für das Abspielen/Anhalten einer Aufnahme
11

e) LC-Display
1 Symbol für „A.B.C.“
2 Symbol für „FILL A“
3 Symbol für „FILL B“
4 Symbol für „MELODY OFF“
5 Symbol für „DUAL“
6 Symbol für „SPLIT“
7 Symbol für „TOUCH“
8 Symbol für „RECORD“
9 Symbole für die verschiedenen Einstellmodi (z.B. Begleitrhythmus „STYLE“ usw.)
10 Anzeigefeld „CHORD“ für die Akkorde
11 Anzeigefeld „TEMPO“ für die Geschwindigkeit
12 Anzeigefeld „MEASURE“
13 Anzeigefeld „BEAT“
14 Anzeigefeld „MEMORY/TICK/O.T.S.“
15 Anzeigefeld „DSP“
12
9. Anschlüsse
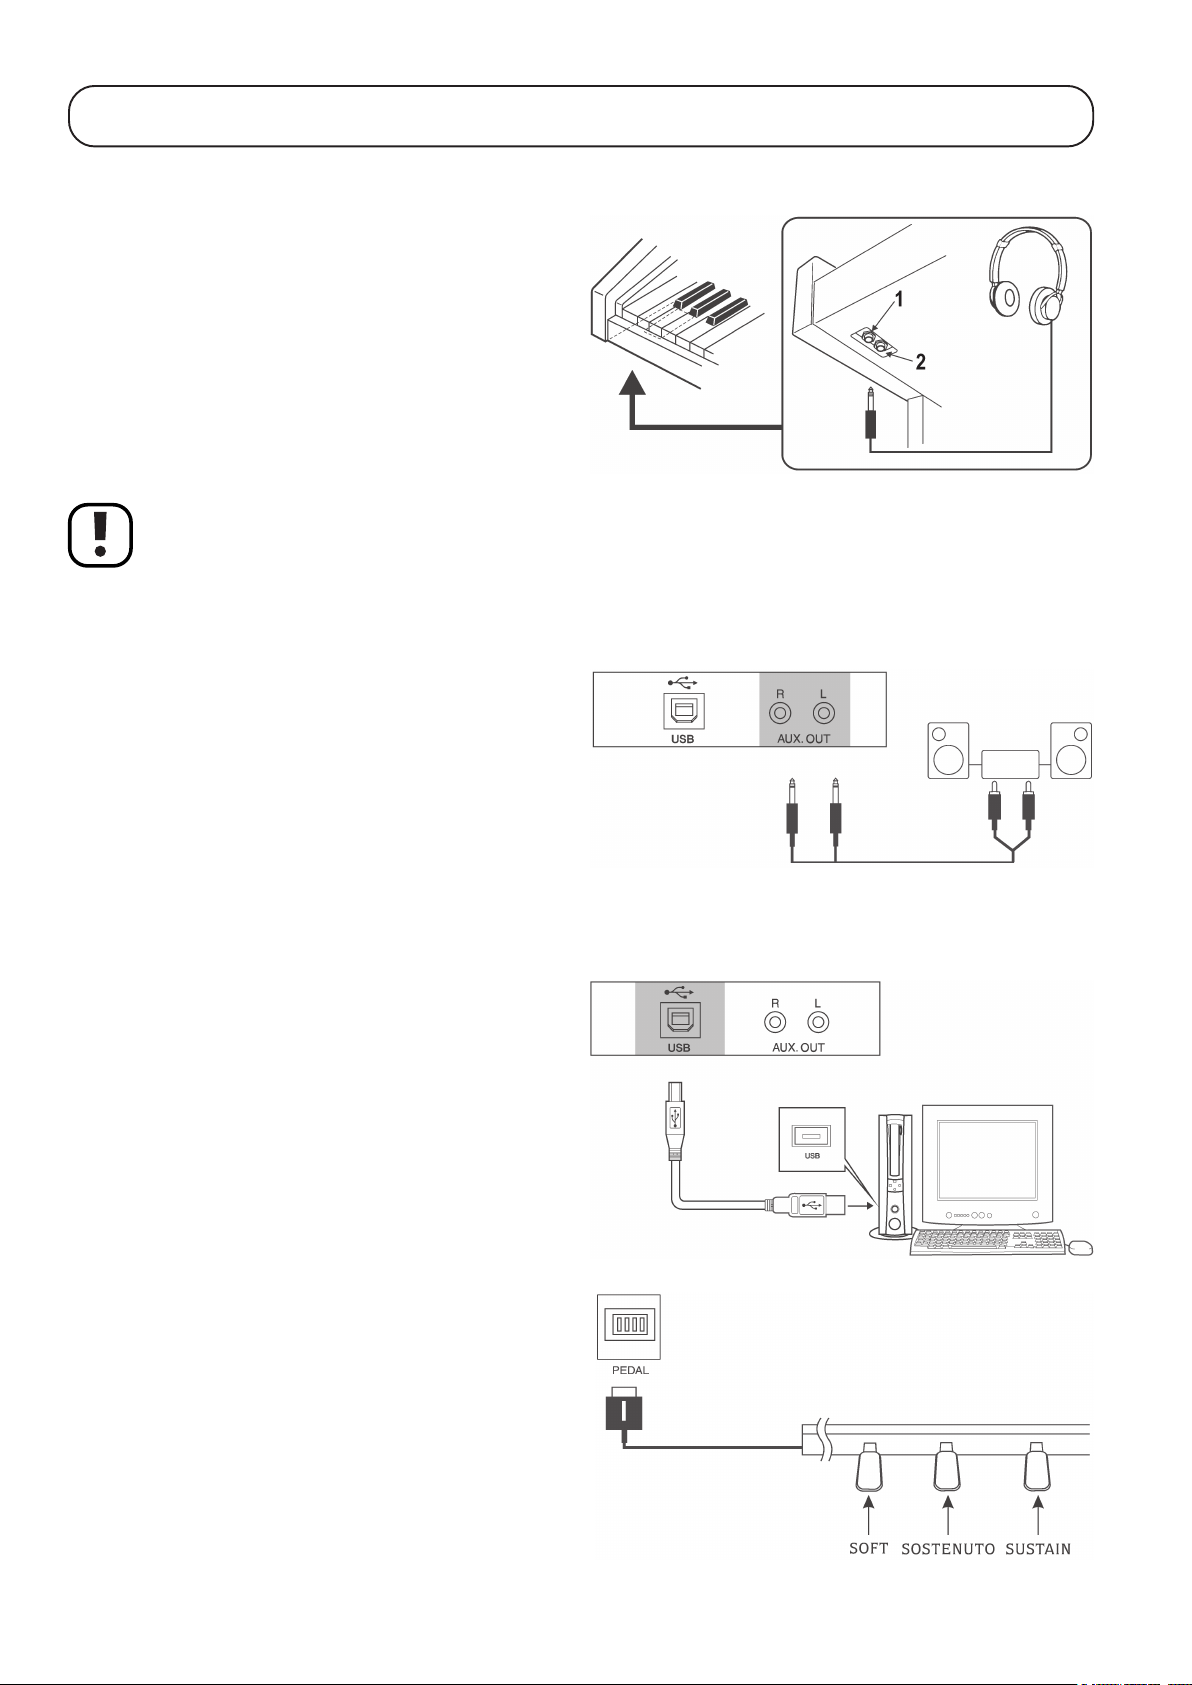
a) Kopfhörerbuchsen
Auf der Unterseite finden Sie zwei Kopfhörer-Buchsen (1) und (2).
Bei Anschluss eines Kopfhörers an Buchse (1) erfolgt die Wiedergabe
sowohl über den Kopfhörer als auch über die Lautsprecher im DigitalPiano.
Bei Anschluss eines Kopfhörers an Buchse (2) werden die Lautsprecher des Digital-Pianos abgeschaltet, die Wiedergabe erfolgt nur über
den Kopfhörer.
Schließen Sie nur dann einen Kopfhörer an, wenn die Lautstärke am Digital-Piano ganz heruntergeregelt ist (auf Minimum).
Wenn Sie einen Kopfhörer verwenden, so stellen Sie die Lautstärke nicht zu hoch ein, da andernfalls Gehörschäden möglich sind!
b) Audioausgang „AUX OUT“
Auf der Rückseite steht an den Anschlüssen „AUX OUT“ ein StereoLine-Signal für den Anschluss z.B. an eine Stereoanlage zur Verfügung.
Verbinden Sie diese Buchsen über ein geeignetes Kabel mit einem
Line-Eingang der Stereoanlage (keinen Phono-Anschluss verwenden!).
Regeln Sie sowohl die Lautstärke des Digital-Pianos als auch die der
Stereoanlage herunter (auf Minimum), bevor Sie die Geräte miteinander verbinden.
c) USB
Verbinden Sie die USB-Buchse des Digital-Pianos über ein geeignetes
USB-Kabel mit einem USB-Port Ihres Computers.
Die benötigten Treiber sind Bestandteil des Betriebssystems (mindestens Windows ME erforderlich, Windows XP/Vista empfohlen).
Folgen Sie bei Windows dessen Anweisungen zur Installation.
d) Fußpedale
Falls noch nicht bei der Montage geschehen, verbinden Sie den Stekker der Fußpedale mit der entsprechenden Buchse auf dem DigitalPiano.
13
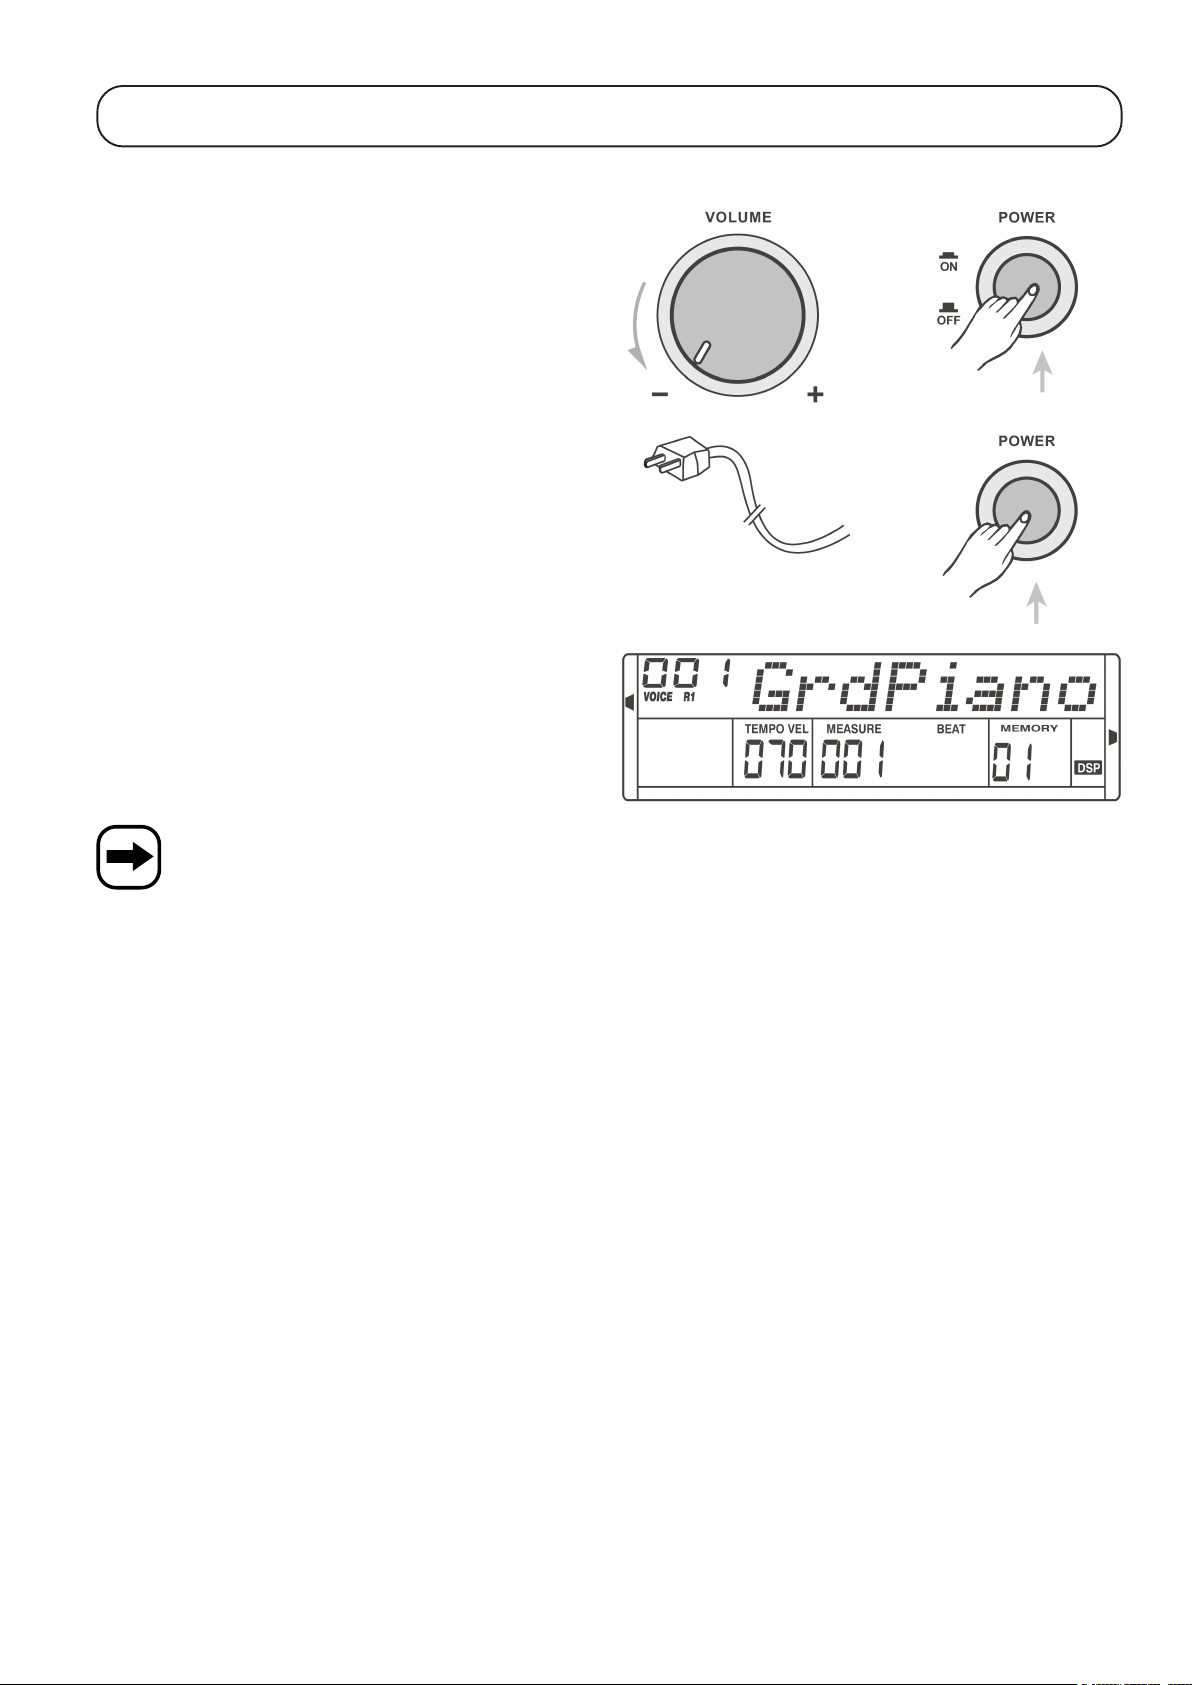
10. Inbetriebnahme, Anschluss an die Netzspannung
Gehen Sie in folgenden Schritten vor:
1. Drehen Sie die Lautstärke auf Minimum zurück („VOLUME“-Drehregler).
2. Schalten Sie das Digital-Piano aus.
3. Verbinden Sie den Netzstecker des Digital-Pianos mit einer Netzsteckdose (230 V/AC, 50 Hz).
4. Schalten Sie das Digital-Piano ein, die Anzeige leuchtet auf.
Drehen Sie den Lautstärkeregler („VOLUME“) ein kleines Stück nach
rechts.
12
34
Vor dem Ausschalten drehen Sie den Lautstärkeregler („VOLUME“) auf Minimum zurück, danach schalten Sie das Digital-Piano
aus.
Anschließend kann das Digital-Piano von der Netzspannung getrennt werden, ziehen Sie den Netzstecker aus der Netzsteckdose.
14
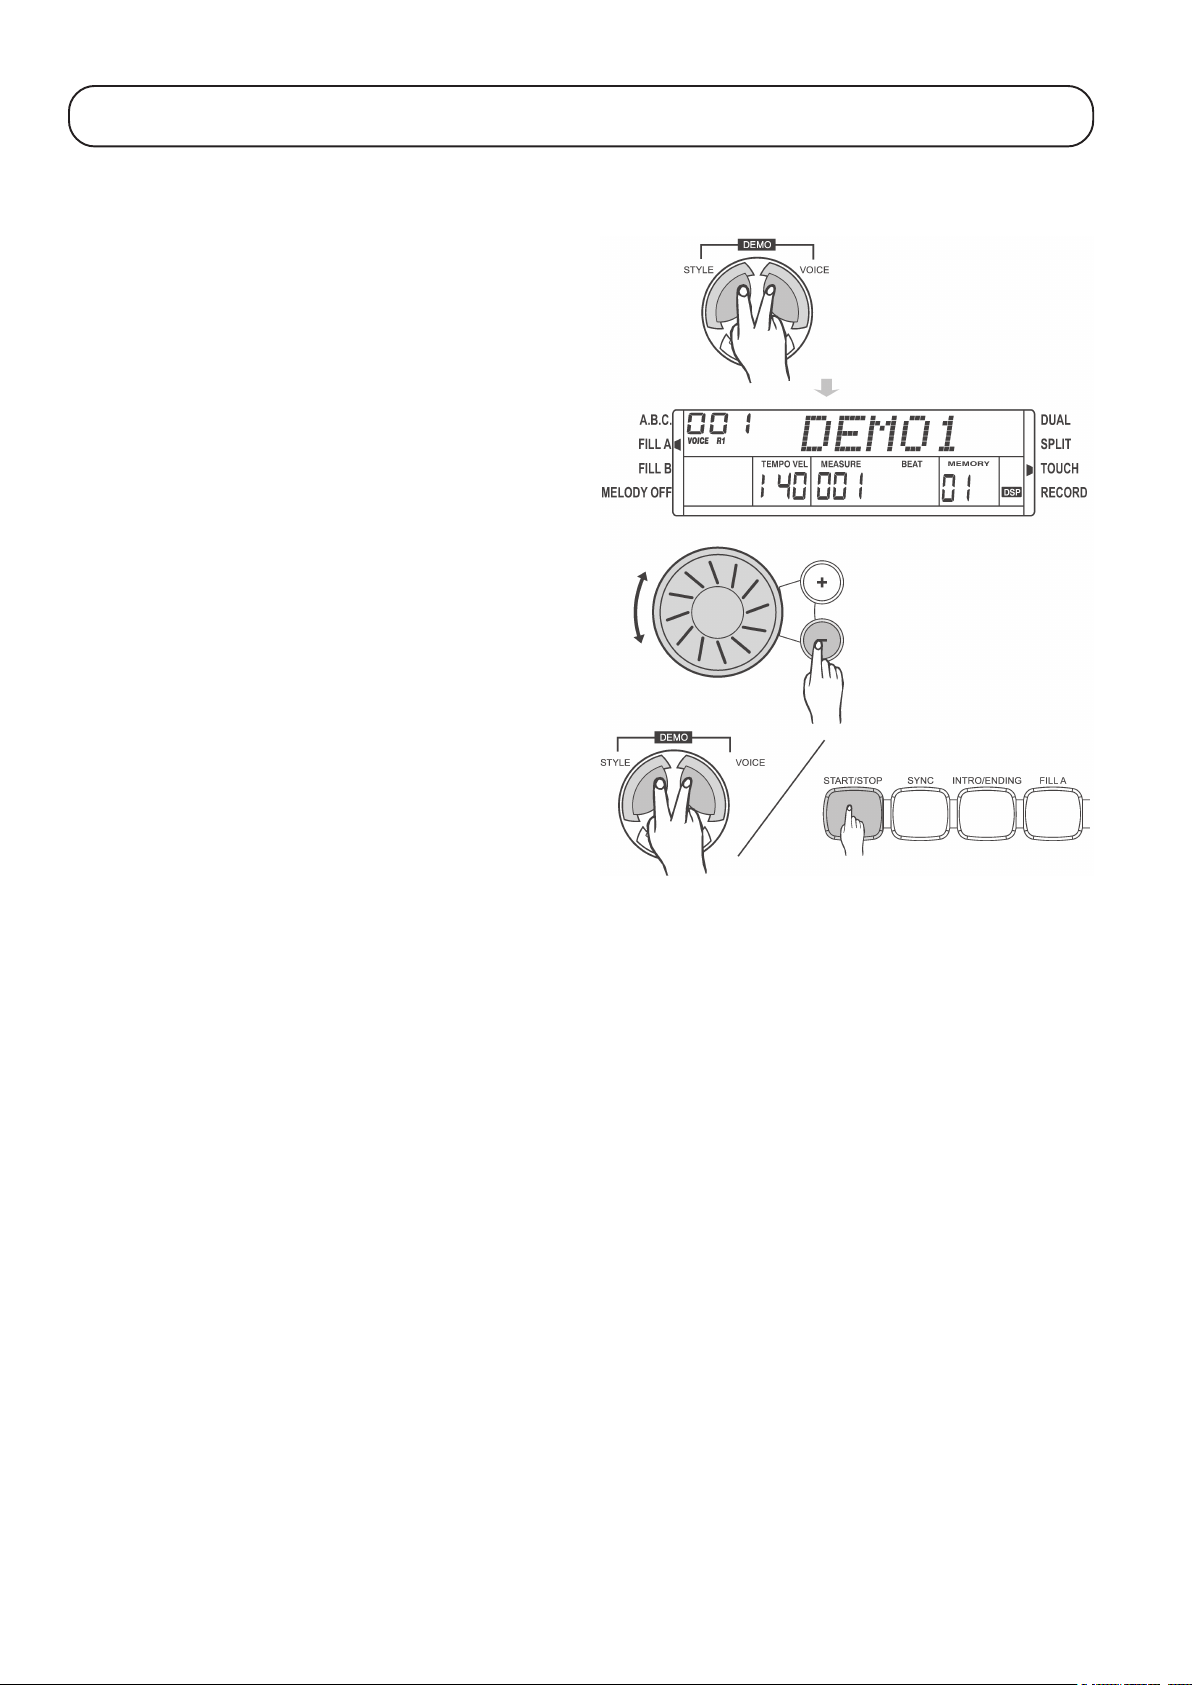
11. Demos abspielen
Um die Leistungsfähigkeit des Digital-Pianos zu demonstrieren, können insgesamt 3 verschiedene Demo-Songs ausgewählt und abgespielt
werden.
Drücken Sie gleichzeitig die beiden Tasten „VOICE“ und „STYLE“, um
die Wiedergabe des ersten Demo-Songs zu starten.
Stellen Sie mit dem Lautstärkeregler („VOLUME“) die gewünschte Lautstärke ein.
Mit dem Drehrad oder den daneben befindlichen Tasten „+“ und „-“
können Sie einen der 3 vorhandenen Demo-Songs auswählen.
Um die Wiedergabe des Demo-Songs zu beenden, drücken Sie erneut
die beiden Tasten „VOICE“ und „STYLE“.
Alternativ kann die Wiedergabe durch Drücken der Taste „START/STOP“
beendet werden.
15
12. Instrumente und Effekte
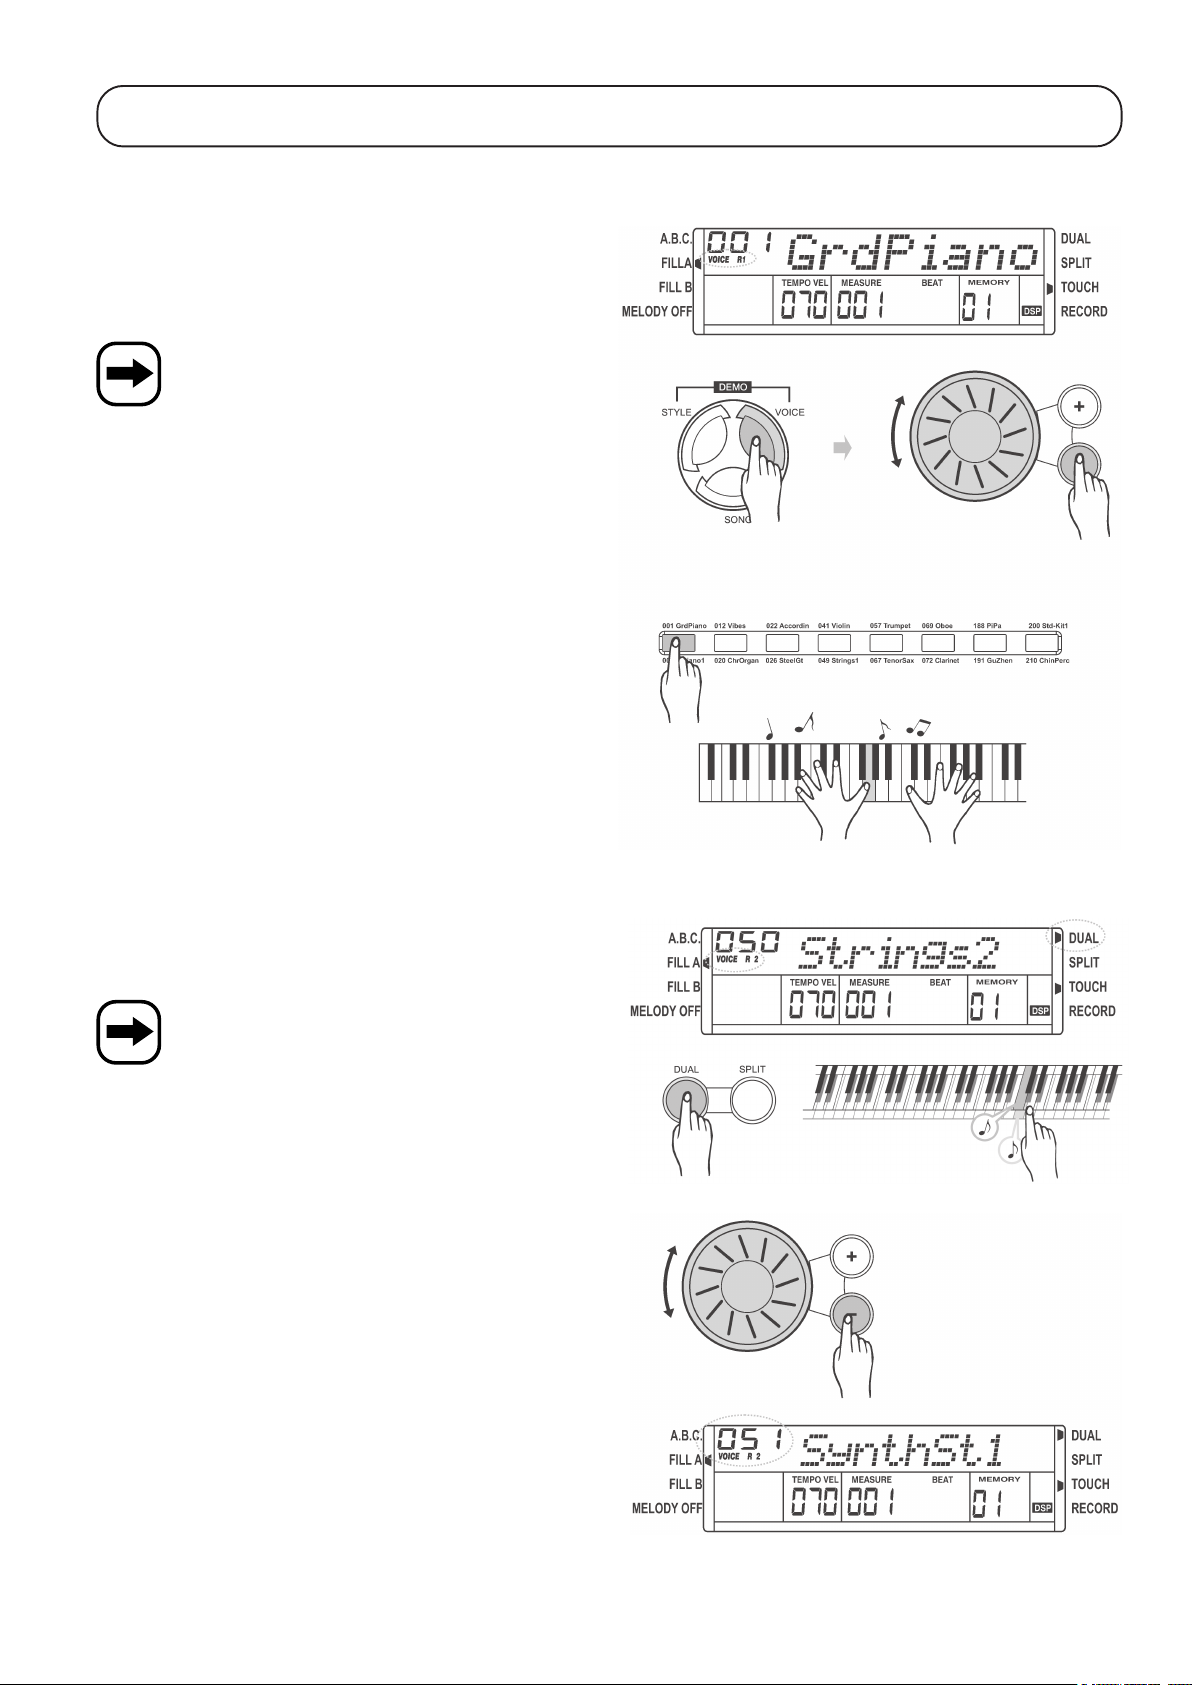
a) Instrument auswählen („VOICE“)
Das Digital-Piano verfügt über insgesamt 210 verschiedene Instrumente.
Nach dem Einschalten ist automatisch immer das Instrument „001“
(„GrdPiano“ = „Grand Piano“) voreingestellt. Im Display wird oben links
der Instrument-Modus „VOICE R1“ angezeigt
Im Anhang finden Sie eine Tabelle mit allen Instrumenten.
Gehen Sie zur Auswahl eines Instruments wie folgt vor:
• Drücken Sie die Taste „VOICE“.
• Danach ist das gewünschte Instrument auszuwählen, verwenden Sie
entweder das Drehrad oder die daneben liegenden beiden Tasten
„+“ und „-“.
• Auf den Direktwahltasten sind einige Standard-Instrumente abgelegt.
Drücken Sie ein- oder zweimal auf diese Taste, um das obere bzw.
untere Instrument (siehe Aufdruck bzw. unter der Taste) auszuwählen.
• Sie können jetzt mit dem ausgewählten Instrument auf der Klaviatur
des Digital-Pianos spielen.
b) Zweiklang-Effekt („DUAL VOICE“), Taste „DUAL“
Mit dieser Funktion spielt das Digital-Piano beim Drücken einer Taste
der Klaviatur zwei Instrumente gleichzeitig, z.B. ein Piano und ein
Schlagzeug.
Beachten Sie, dass dies nur für den rechten Bereich der
Klaviatur gilt, siehe Kapitel 12. c), Split-Funktion.
• Wählen Sie zuerst das erste Instrument, falls noch nicht geschehen
(siehe Kapitel 12. a), z.B. „001 GrdPiano“.
• Drücken Sie die Taste „DUAL“, oben rechts wird ein Symbol bei
„DUAL“ eingeblendet.
Oben links im Display erscheint „VOICE R2“ und das voreingestellte
Instrument „050 Strings 2“ wird angezeigt.
Das Digital-Piano spielt nun z.B. das Instrument „001“ und „050“ gleichzeitig.
• Falls gewünscht, kann mit dem Drehrad oder den daneben liegen-
den beiden Tasten „+“ und „-“ das zweite Instrument ausgewählt werden.
• Drücken Sie die Taste „DUAL“ erneut, um den Zweiklang-Effekt wie-
der auszuschalten.
16
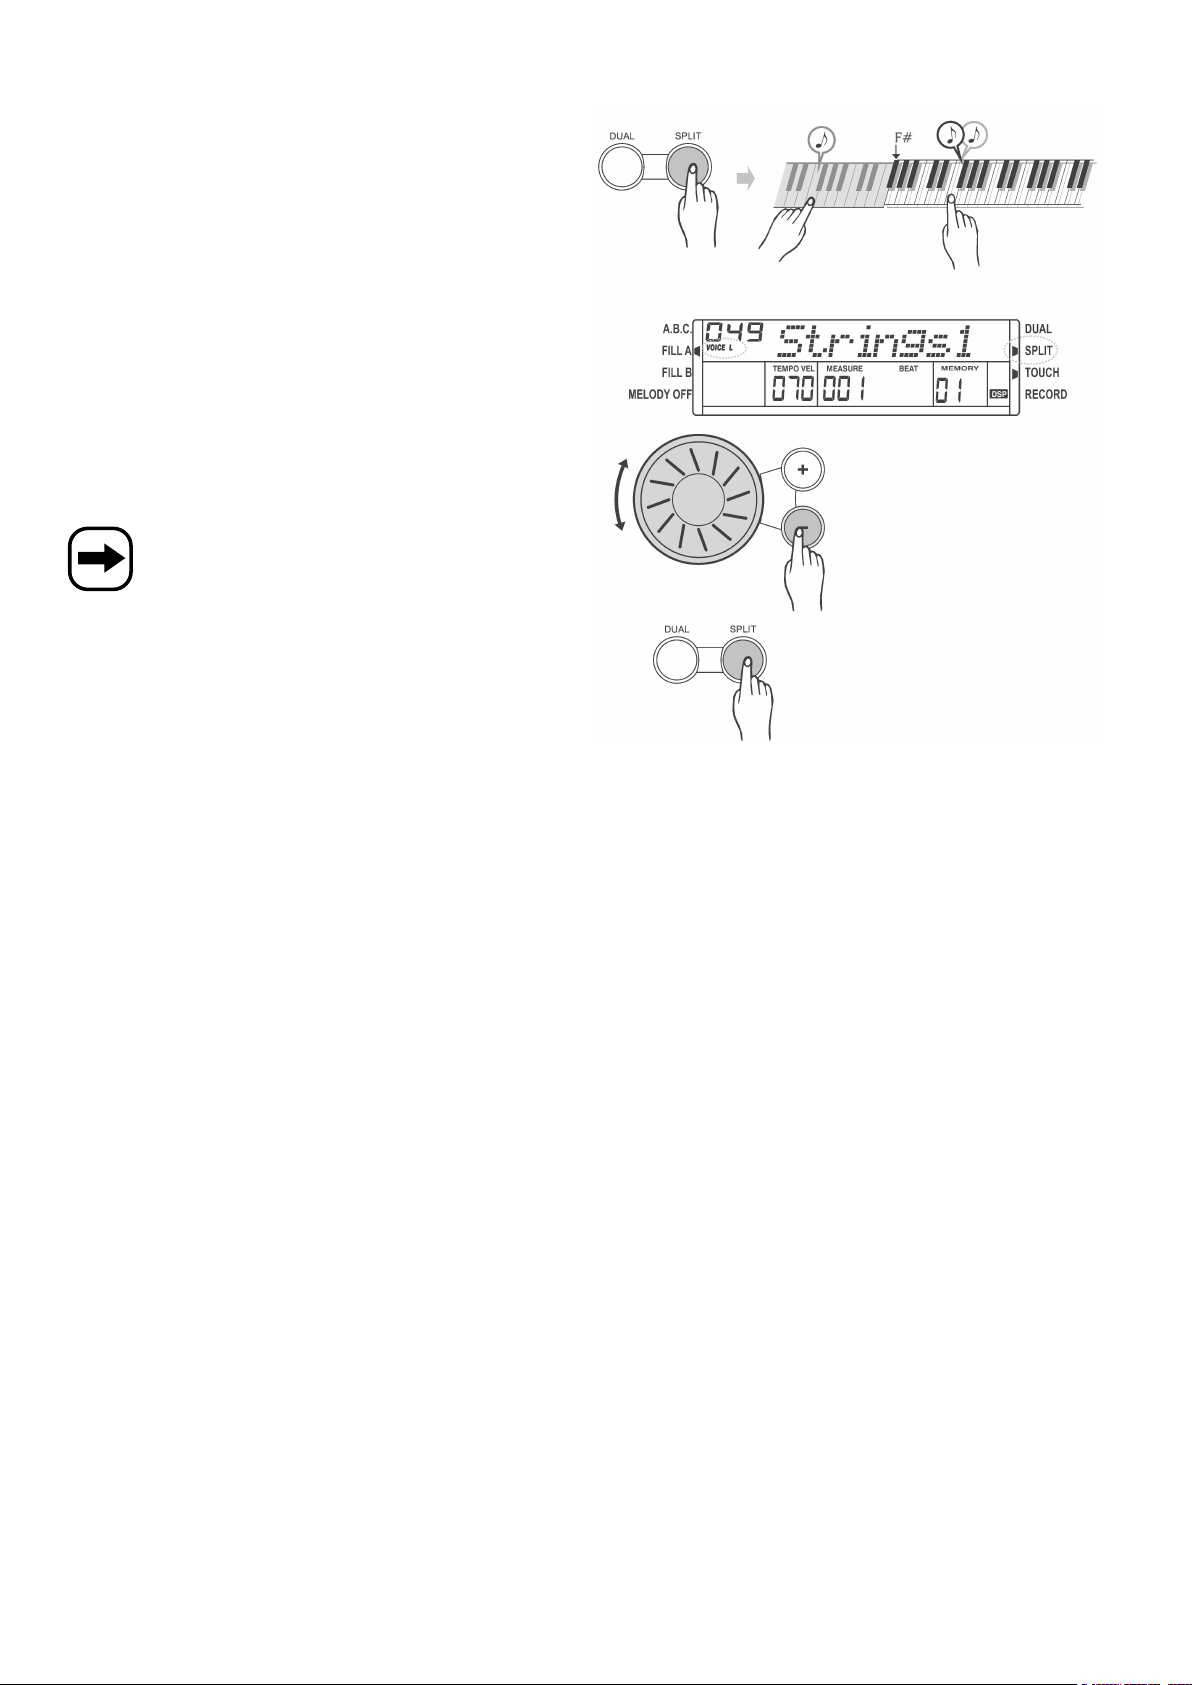
c) Split-Funktion, Taste „SPLIT“
Die Klaviatur lässt sich in zwei Bereiche aufteilen. Dabei kann z.B. der
linke Bereich mit einem Schlagzeug-Instrument belegt werden und der
rechte Bereich mit einem herkömmlichen Instrument.
Diese Einstellung gilt auch für den Zweiklang-Effekt, siehe dazu das
Kapitel 12. b).
• Wählen Sie zuerst das erste Instrument, falls noch nicht geschehen
(siehe Kapitel 12. a), z.B. „001“.
• Drücken Sie die Taste „SPLIT“ (Symbol bei „SPLIT“ oben rechts im
Display wird eingeblendet).
Oben links im Display erscheint „VOICE L“, es wird das voreingestellte Instrument „049 Strings1“ angezeigt.
Der linke Bereich der Klaviatur ist nun mit dem zweiten Instrument
belegt.
Die Klaviatur wird bei „F#“ geteilt, dies kann in den
Funktionseinstellungen verändert werden, siehe dazu Kapitel 14. e).
• Falls gewünscht, kann mit dem Drehrad oder den daneben liegenden beiden Tasten „+“ und „-“ das zweite Instrument für den linken
Bereich der Klaviatur ausgewählt werden, z.B. „050“.
• Zum Ausschalten der Funktion drücken Sie die Taste „SPLIT“ erneut,
das Symbol bei „SPLIT“ oben rechts im Display verschwindet.
.
17
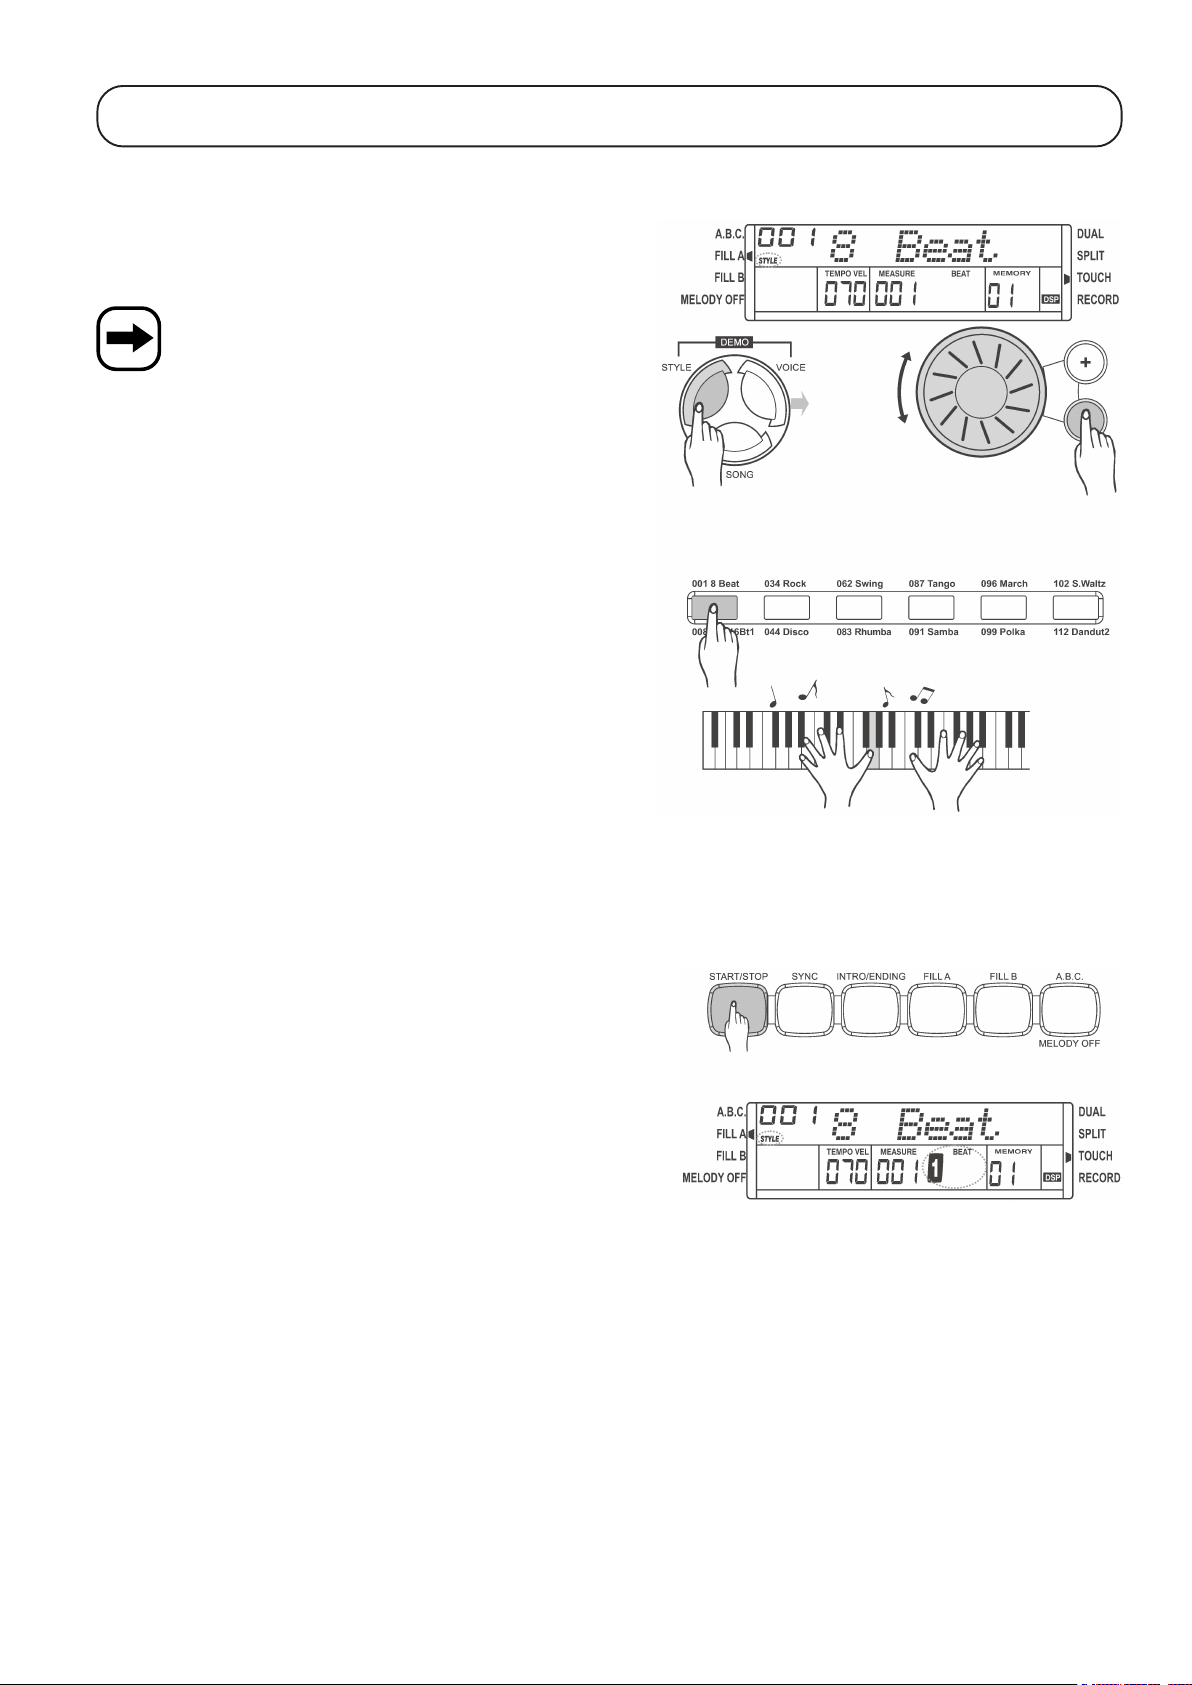
13. Begleitrhythmen („STYLE“)
a) Begleitrhythmus auswählen
Das Digital-Piano verfügt über insgesamt 120 verschiedene Begleitrhythmen. Der jeweils von Ihnen ausgewähltte Begleitrhythmus kann
im Hintergrund abgespielt werden.
Im Anhang finden Sie eine Tabelle mit allen Begleitrhythmen.
Gehen Sie zur Auswahl eines Begleitrhythmus („STYLE“) wie folgt vor:
• Drücken Sie die Taste „STYLE“. Dies aktiviert die Einstellung eines
Begleitrhythmus.
• Verwenden Sie zur Auswahl des Begleitrhythmus entweder das Drehrad oder die daneben liegenden beiden Tasten „+“ und „-“.
• Auf den Direktwahltasten für den Begleitrhythmus sind einige Standard-Begleitrhythmen abgelegt. Drücken Sie ein- oder zweimal auf
diese Taste, um den oberen bzw. unteren Begleitrhythmus (siehe Aufdruck bzw. unter der Taste) auszuwählen.
b) Begleitrhythmus abspielen/anhalten, Taste „START/STOP“
• Mit der Taste „START/STOP“ kann der unter Kapitel 13. a) ausgewählte Begleitrhythmus gestartet werden. Die Taktanzeige blinkt.
• Zum Beenden der Wiedergabe drücken Sie die Taste „START/STOP“
erneut.
18
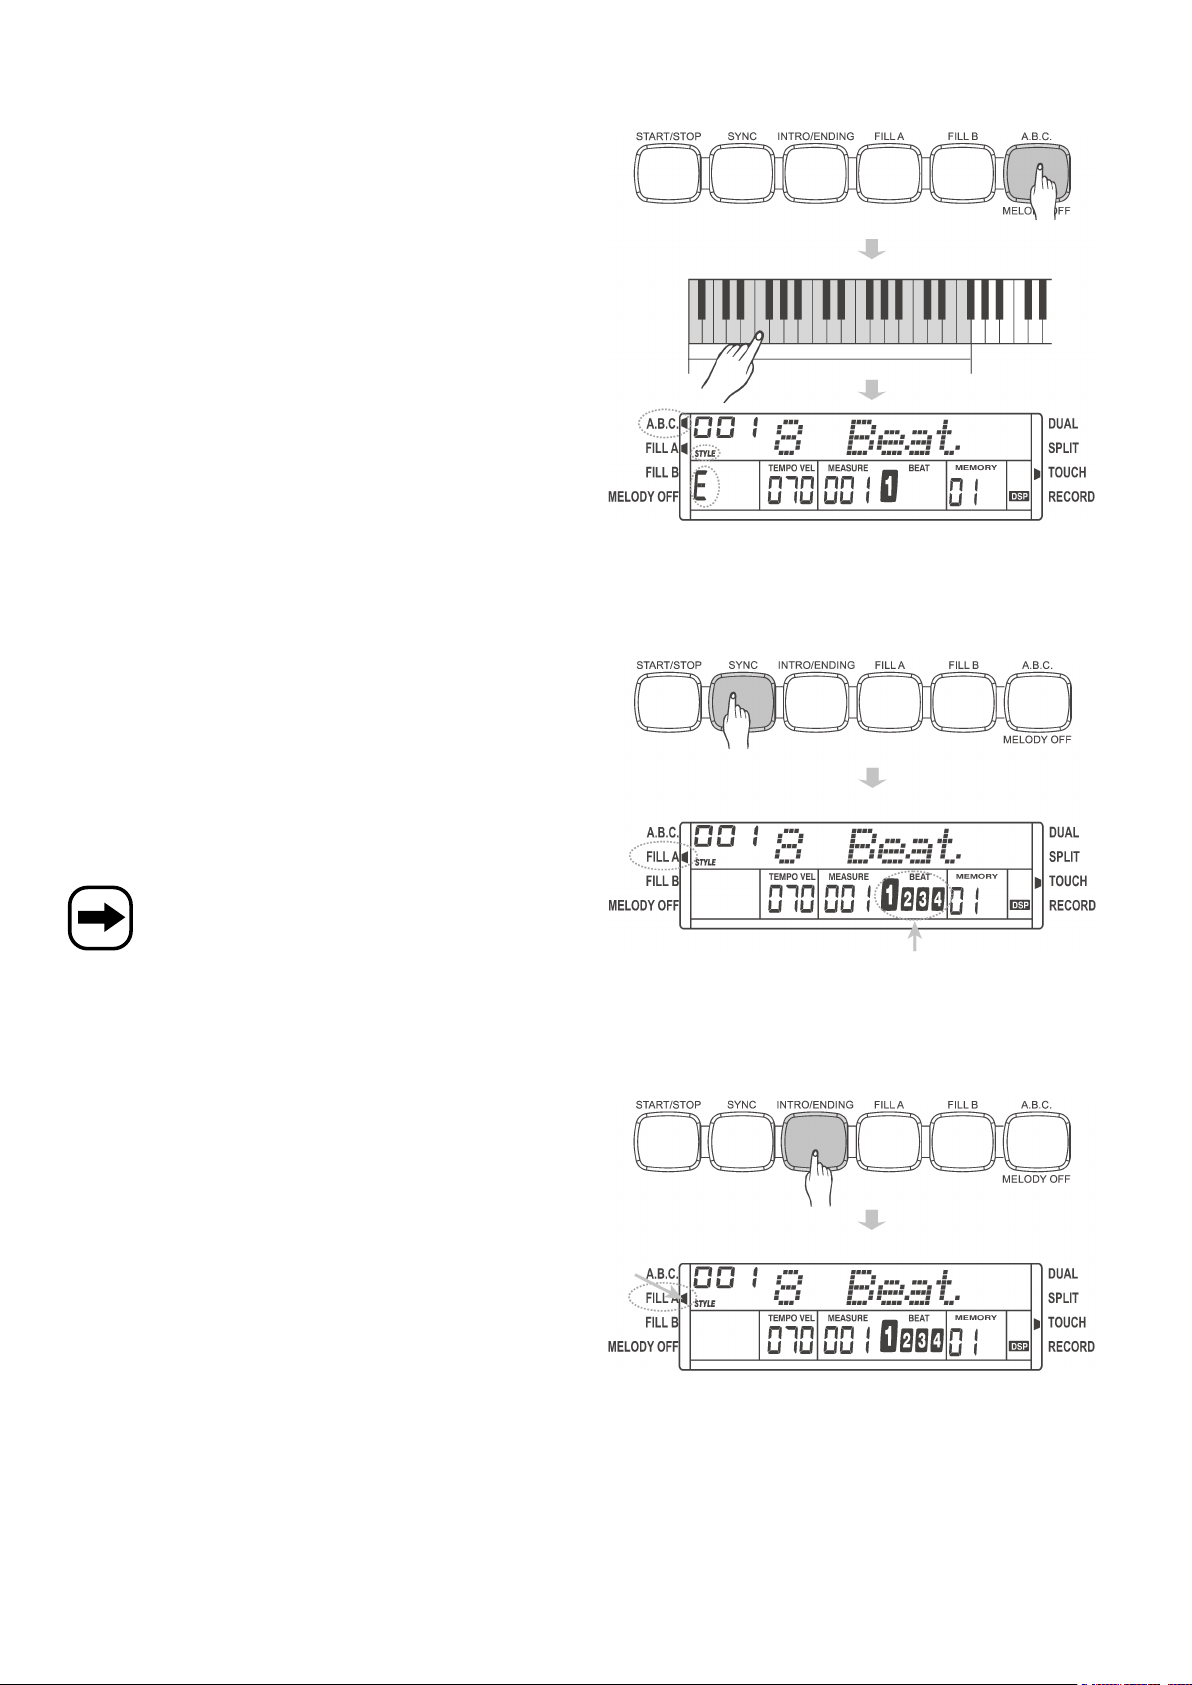
c) Automatische Begleitung, Auto-Bass-Chord, Taste „A.B.C./MELODY OFF“
• Drücken Sie die Taste „A.B.C./MELODY OFF“, um die sog. „AutoBass-Chord“-Funktion zu aktivieren (ein Symbol bei „A.B.C.“ erscheint
oben links im Display).
Drücken Sie je nach gewünschtem Akkord eine oder mehrere Tasten
im linken Bereich (siehe Kapitel 12. b) der Klaviatur.
• Um die Funktion auszuschalten, drücken Sie die Taste „A.B.C.“ erneut.
d) Sync-Start, Taste „SYNC“
Mit dieser Funktion startet die Wiedergabe des eingestellten
Begleitrhythmus erst dann, wenn Sie mit dem Spielen auf der Klaviatur
beginnen (Wiedergabe startet bei dem ersten Druck auf eine Taste der
Klaviatur).
• Drücken Sie die Taste „SYNC“. Im LC-Display beginnt die Taktanzeige zu blinken.
• Beim ersten Druck auf eine Taste der Klaviatur startet der
Begleitrhythmus.
Wenn die „A.B.C.“-Funktion (siehe Kapitel 13. c) aktiviert
ist, so startet die Wiedergabe nur dann, wenn ein Akkord
im linken Bereich der Klaviatur gewählt wird.
e) Intro-Start, Taste „INTRO/ENDING“
Die Wiedergabe des Begleitrhythmus kann mit einem speziellen Sound/
Rhythmus eingeleitet oder beendet werden (abhängig vom ausgewählten Begleitrhythmus).
• „Intro“, Einleitung
Drücken Sie die Taste „INTRO/ENDING“, bevor Sie die Wiedergabe
eines Begleitrhythmus starten.
Wenn Sie jetzt die Taste „START/STOP“ drücken, so wird nun zuerst
ein Intro-Sound abgespielt, bevor dieser in die Wiedergabe des normalen Begleitrhythmus übergeht.
• „Ending“, Ausleitung
Wenn bereits ein Begleitrhythmus abgespielt wird und Sie drücken
die Taste „INTRO/ENDING“, so wird die Wiedergabe nach dem Abspielen eines speziellen Schluss-Sounds automatisch beendet.
19
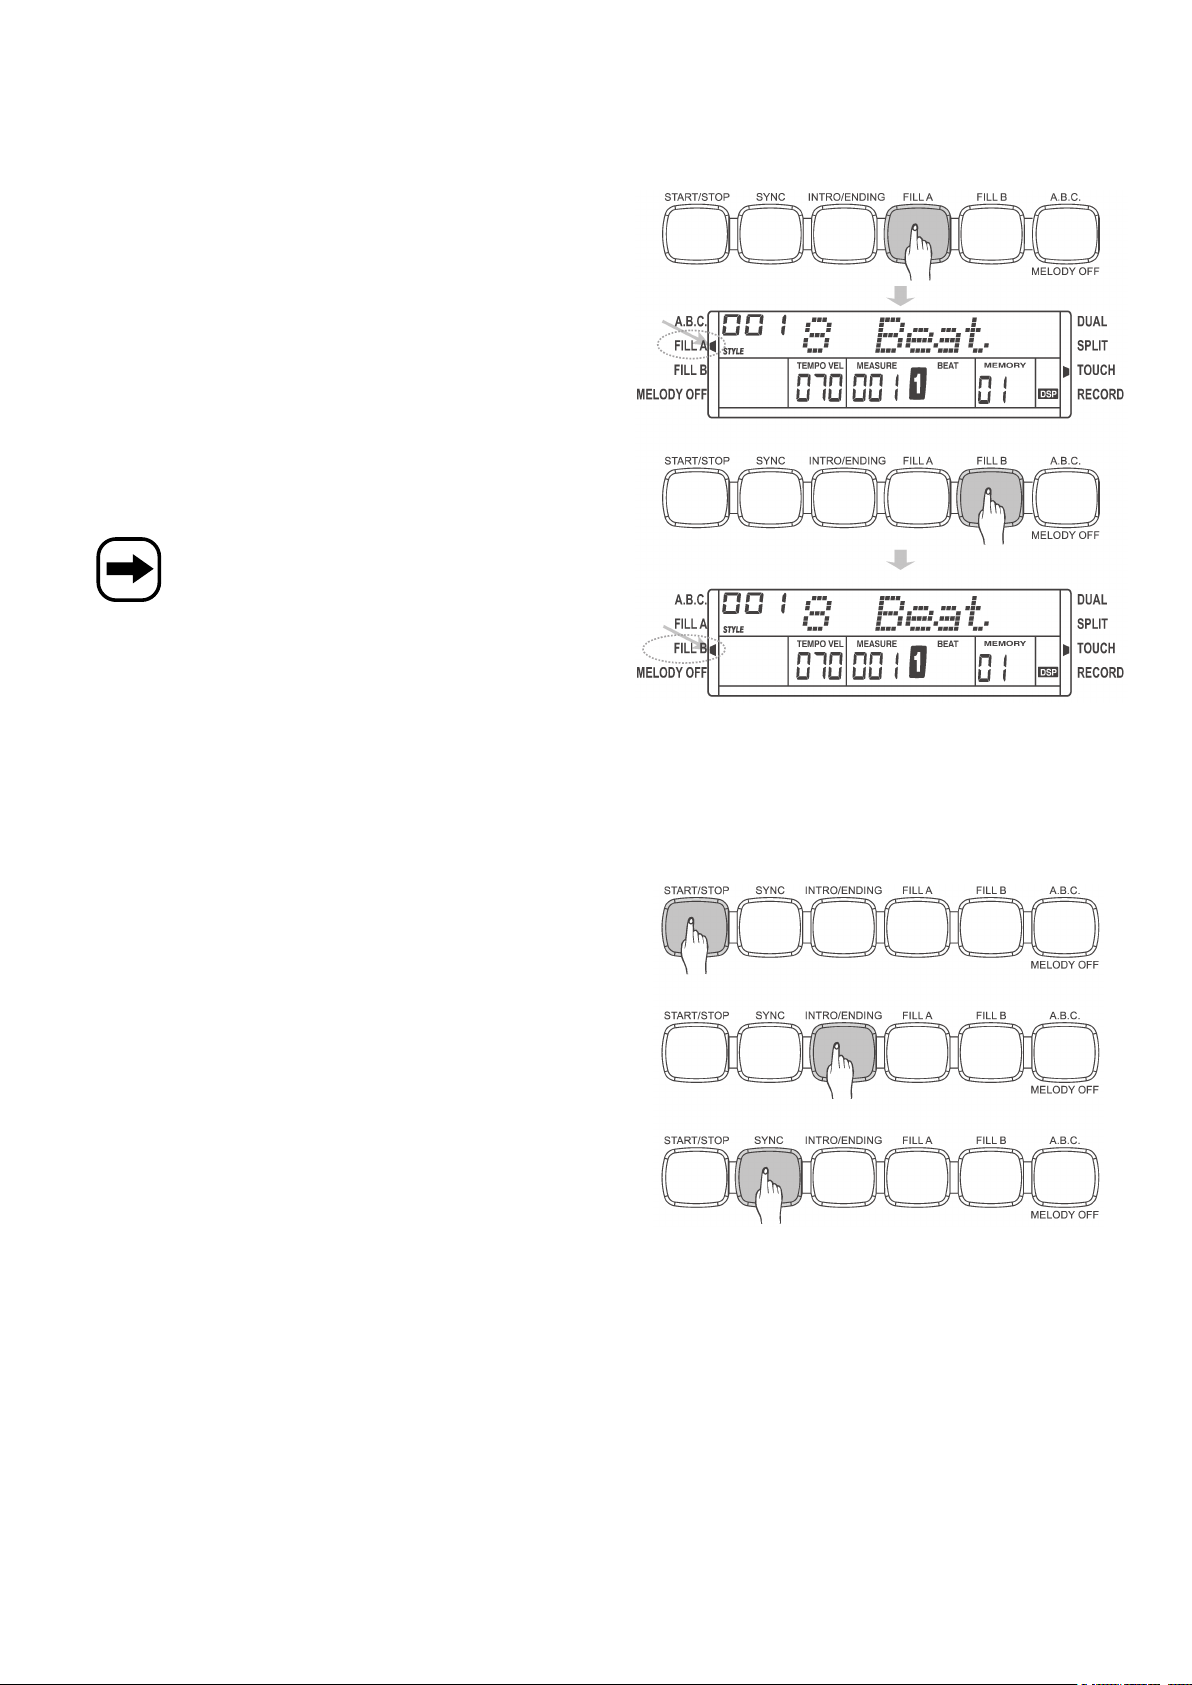
f) Normal-/Variation-Modus, Tasten „FILL A“ und „FILL B“
Jeder Begleitrhythmus hat zwei verschiedene Variationen („A“ und „B“). Normalerweise ist Version „A“ (Normal-Modus) einfacher ausgelegt
(z.B. wenig Schlagzeug-Einsatz) und Version „B“ (Variation-Modus) aufwändiger (z.B. mehr und unterschiedlicher Schlagzeug-Einsatz).
• Im Normal-Modus („A“) wird durch Drücken der Taste „FILL A“ ein
spezieller Einfüge-Rhythmus abgespielt, dann wird der normale Begleitrhythmus weiter abgespielt.
• Wird im Normal-Modus („A“) die Taste „FILL B“ gedrückt, so wird ein
Einfüge-Rhythmus abgespielt und dann zum Variation-Modus gewechselt.
• Im Variation-Modus („B“) wird durch Drücken der Taste „FILL B“ ein
spezieller Einfüge-Rhythmus abgespielt, dann wird der Variation-Begleitrhythmus weiter abgespielt.
• Wird im Variation-Modus („B“) die Taste „FILL A“ gedrückt, so wird ein
Einfüge-Rhythmus abgespielt und dann zum Normal-Modus gewechselt.
Beim Wechsel zwischen dem Normal- und Variation-Modus erfolgt durch den Einfüge-Rhythmus ein sauberer, sanfter Übergang. Es wird nicht direkt gewechselt, was sehr
störend wirken würde.
Wird die Taste „FILL A“ bzw. „FILL B“ länger gedrückt gehalten, so wird der Einfüge-Rhythmus entsprechend länger abgespielt.
Je nach Auswahl des Normal-/Variation-Modus erscheint
links im Display bei „FILL A“ bzw. „FILL B“ ein kleines Symbol.
g) Begleitrhythmus beenden
• Wie bereits in Kapitel 13. b) beschrieben, können Sie die Wiedergabe des Begleitrhythmus mit der Taste „START/STOP“ sofort beenden.
• Mit der Taste „INTRO/ENDING“ wird die Wiedergabe nach dem Abspielen eines speziellen Schluss-Sounds beendet (siehe Kapitel 13.
e).
• Mit der Taste „SYNC“ wird die Wiedergabe beendet und der SyncStart aktiviert, siehe Kapitel 13. d).
20
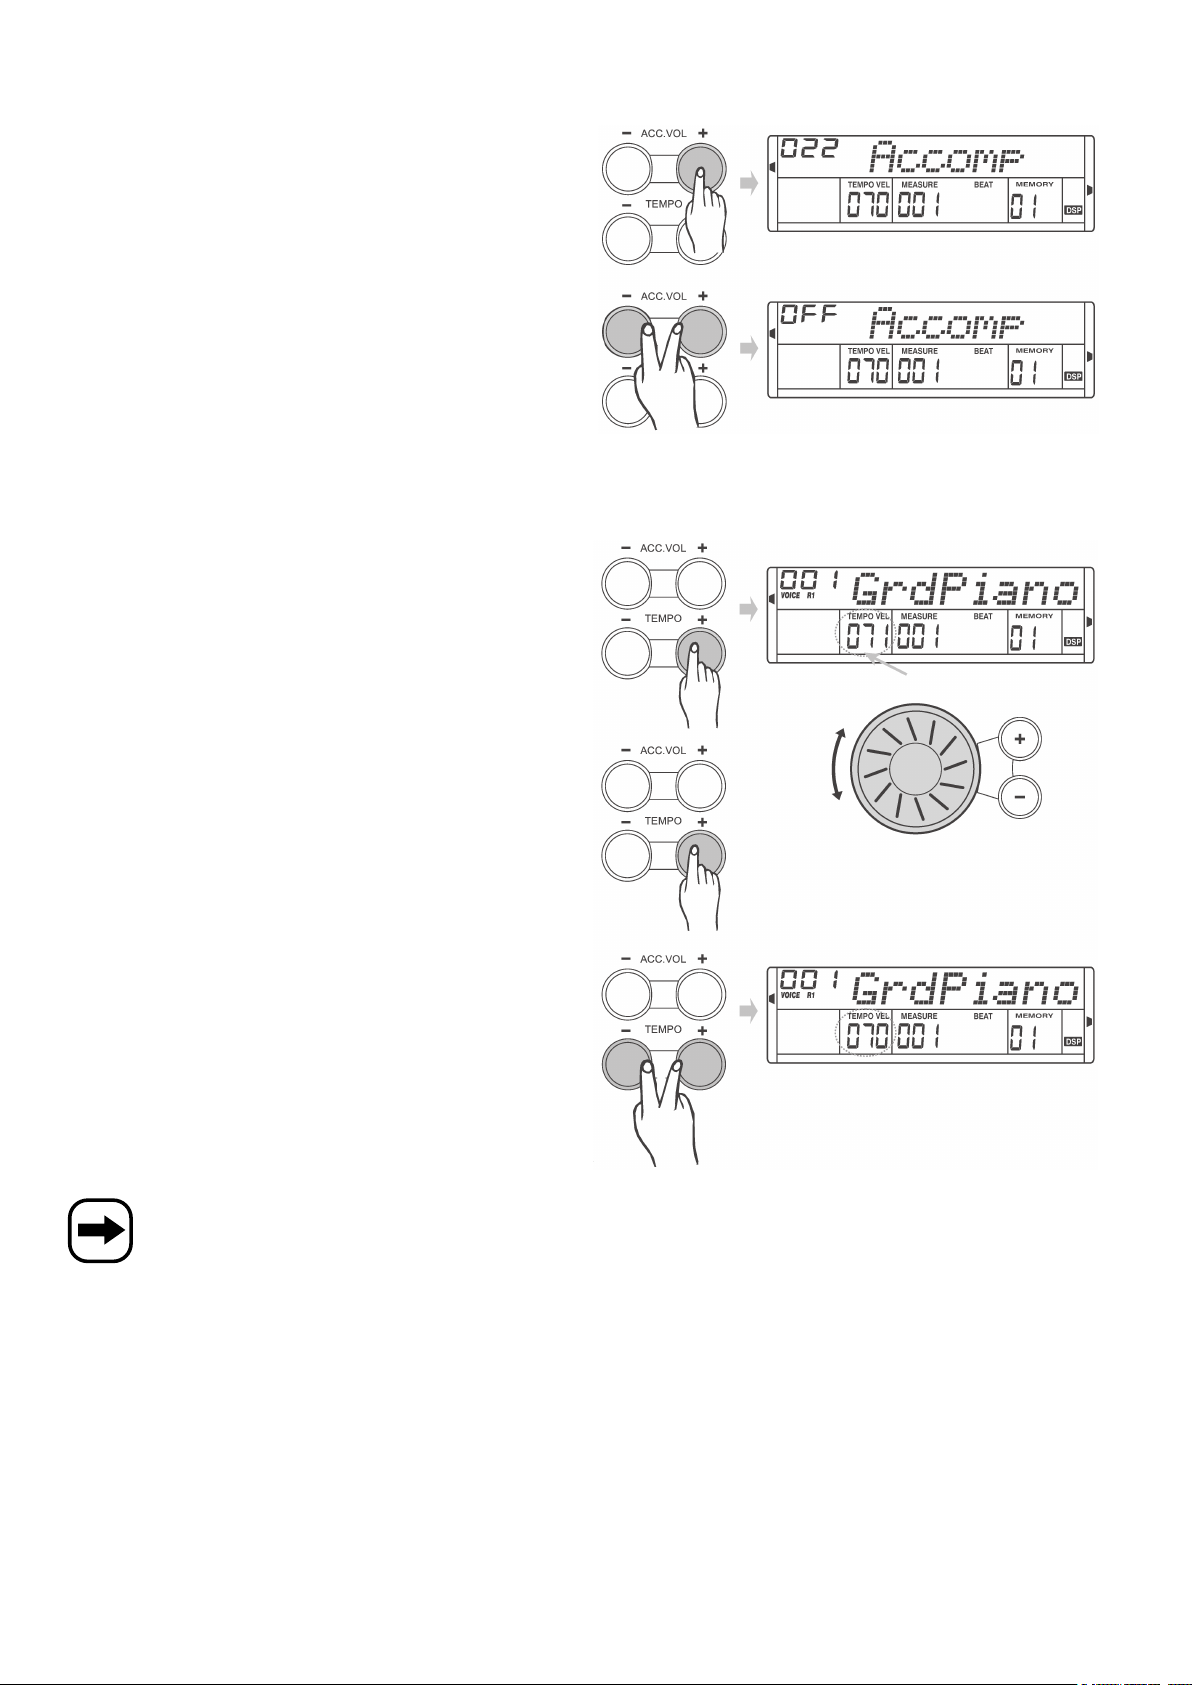
h) Lautstärke für Begleitrhythmus einstellen, Tasten „ACC. VOL“
• Mit den beiden Tasten „ACC. VOL +“ und „ACC. VOL -“ kann die
Lautstärke des Begleitrhythmus eingestellt werden.
• Durch gleichzeitiges Drücken der beiden Tasten wird die Lautstärke
auf „00“ gestellt (Stummschaltung), im Display wird oben links „OFF“
angezeigt.
i) Geschwindigkeit für Begleitrhythmus einstellen, Tasten „TEMPO“
• Drücken Sie kurz die Taste „TEMPO +“ oder „TEMPO -“, dann blinkt
der Wert für die Geschwindigkeit im Display für etwa 2 Sekunden.
Während die Anzeige blinkt, kann mit dem Drehrad die Geschwindigkeit für den Begleitrhythmus verändert werden (Einstellbereich 30-
280).
• Alternativ können Sie die Taste „TEMPO +“ bzw. „TEMPO -“ länger
gedrückt halten, um die Geschwindigkeit einzustellen.
• Halten Sie beide Tasten gleichzeitig gedrückt, um die Grundeinstellung für die Geschwindigkeit des momentanen Begleitrhythmus wieder herzustellen.
Wird während der Wiedergabe eines Begleitrhythmus ein anderer Begleitrhythmus ausgewählt, wird die momentane Geschwindigkeit beibehalten!
21
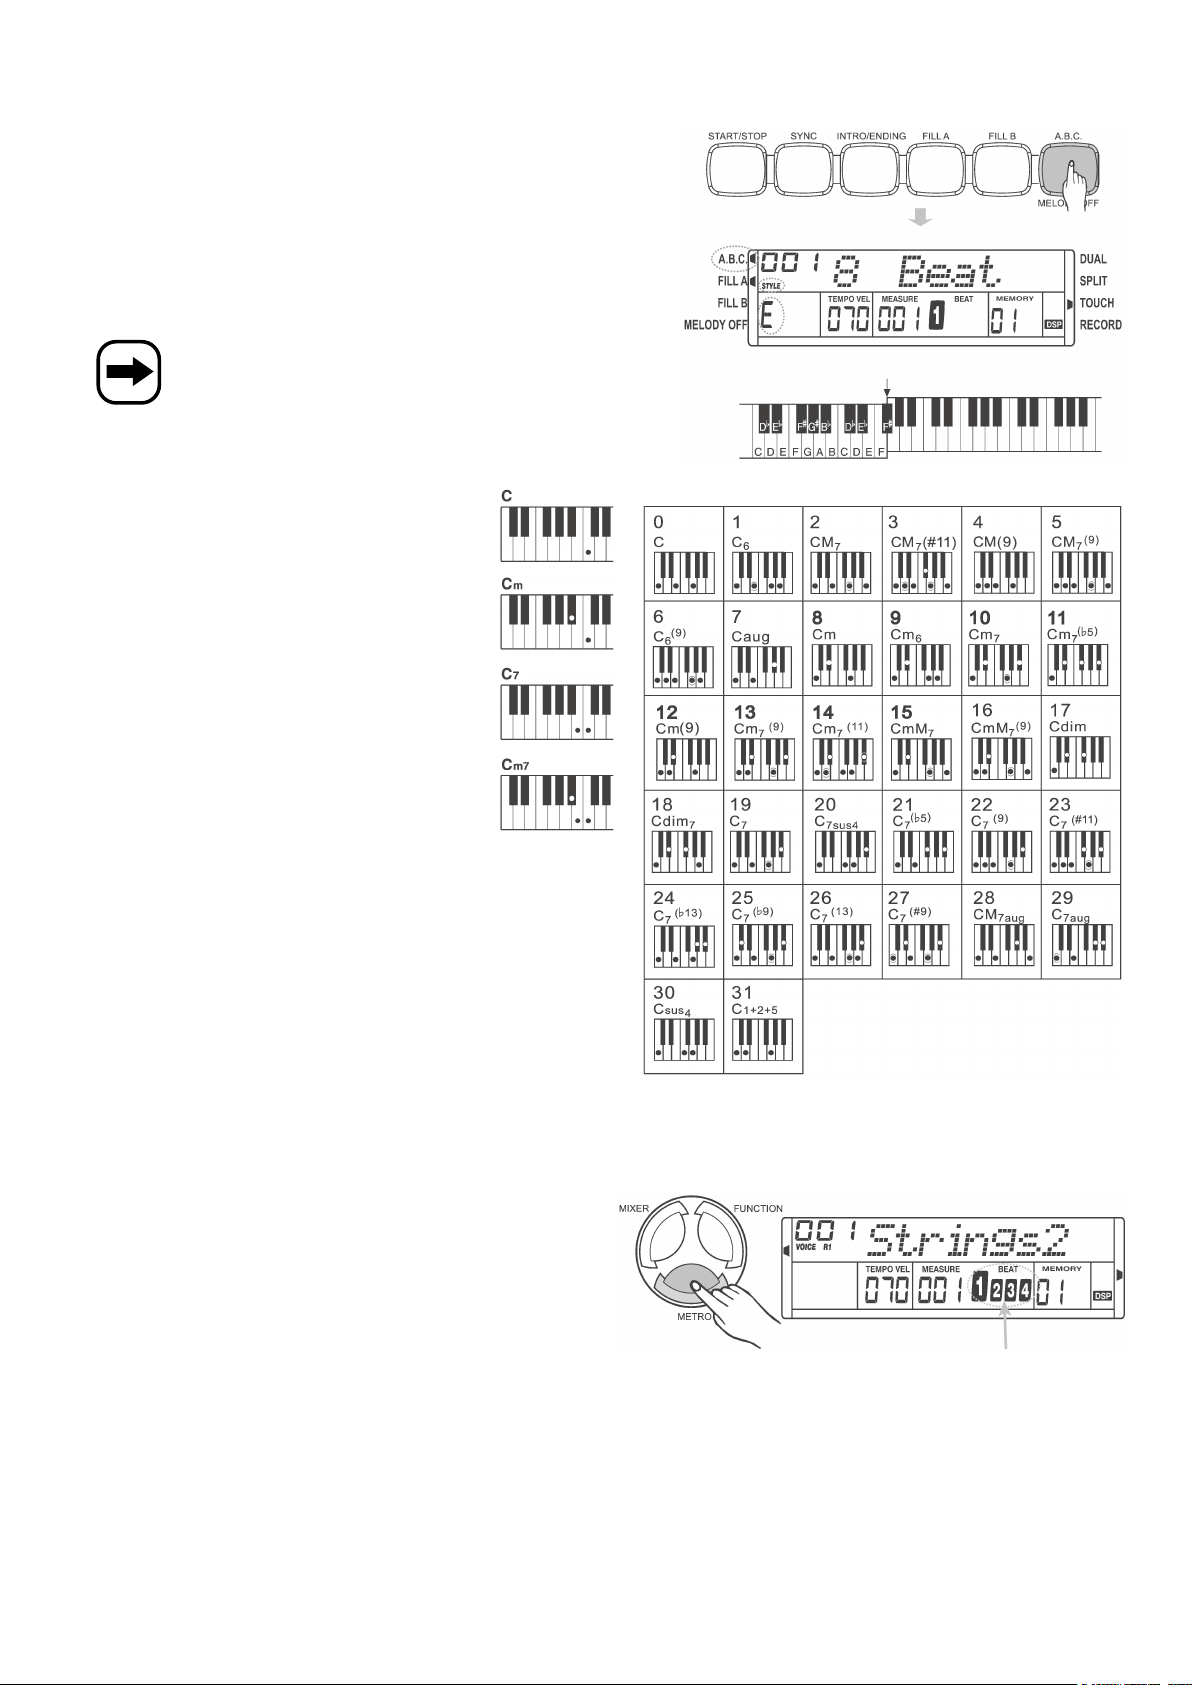
j) Auswahl eines Akkords
• Drücken Sie die Taste „A.B.C./MELODY OFF“, um die sog. „AutoBass-Chord“-Funktion zu aktivieren (ein Symbol bei „A.B.C.“ erscheint
oben links im Display), siehe Kapitel 13. c).
• Drücken Sie je nach gewünschtem Akkord eine oder mehrere Tasten
im linken Bereich (siehe Kapitel 12. b) der Klaviatur.
Beispiele für verschiedene Akkorde sehen Sie in den Abbildungen
unten.
Die Klaviatur wird in der Grundeinstellung bei „F#“ geteilt,
dies kann in den Funktionseinstellungen verändert werden,
siehe dazu Kapitel 14. e).
k) Metronom, Taste „METRO“
• Durch Drücken der Taste „METRO“ wird das Metronom eingeschaltet, ein entsprechender Metronom-Sound wird ausgegeben.
• In den Funktionseinstellungen (siehe Kapitel 14. c) kann die Lautstärke eingestellt werden.
• Ein erneuter Druck auf die Taste „METRO“ schaltet das Metronom
wieder ab.
22
14. Funktionseinstellungen
Durch mehrfaches Drücken der Taste „FUNCTION“ können verschiedene Funktionen aufgerufen werden, die in den nächsten Abschnitten
beschrieben werden. Drücken Sie einfach so oft die Taste „FUNCTION“, bis die gewünschte Funktion im Display angezeigt wird.
Wenn innerhalb von 5 Sekunden keine Taste gedrückt wird, so wird das Funktionsmenü automatisch verlassen.
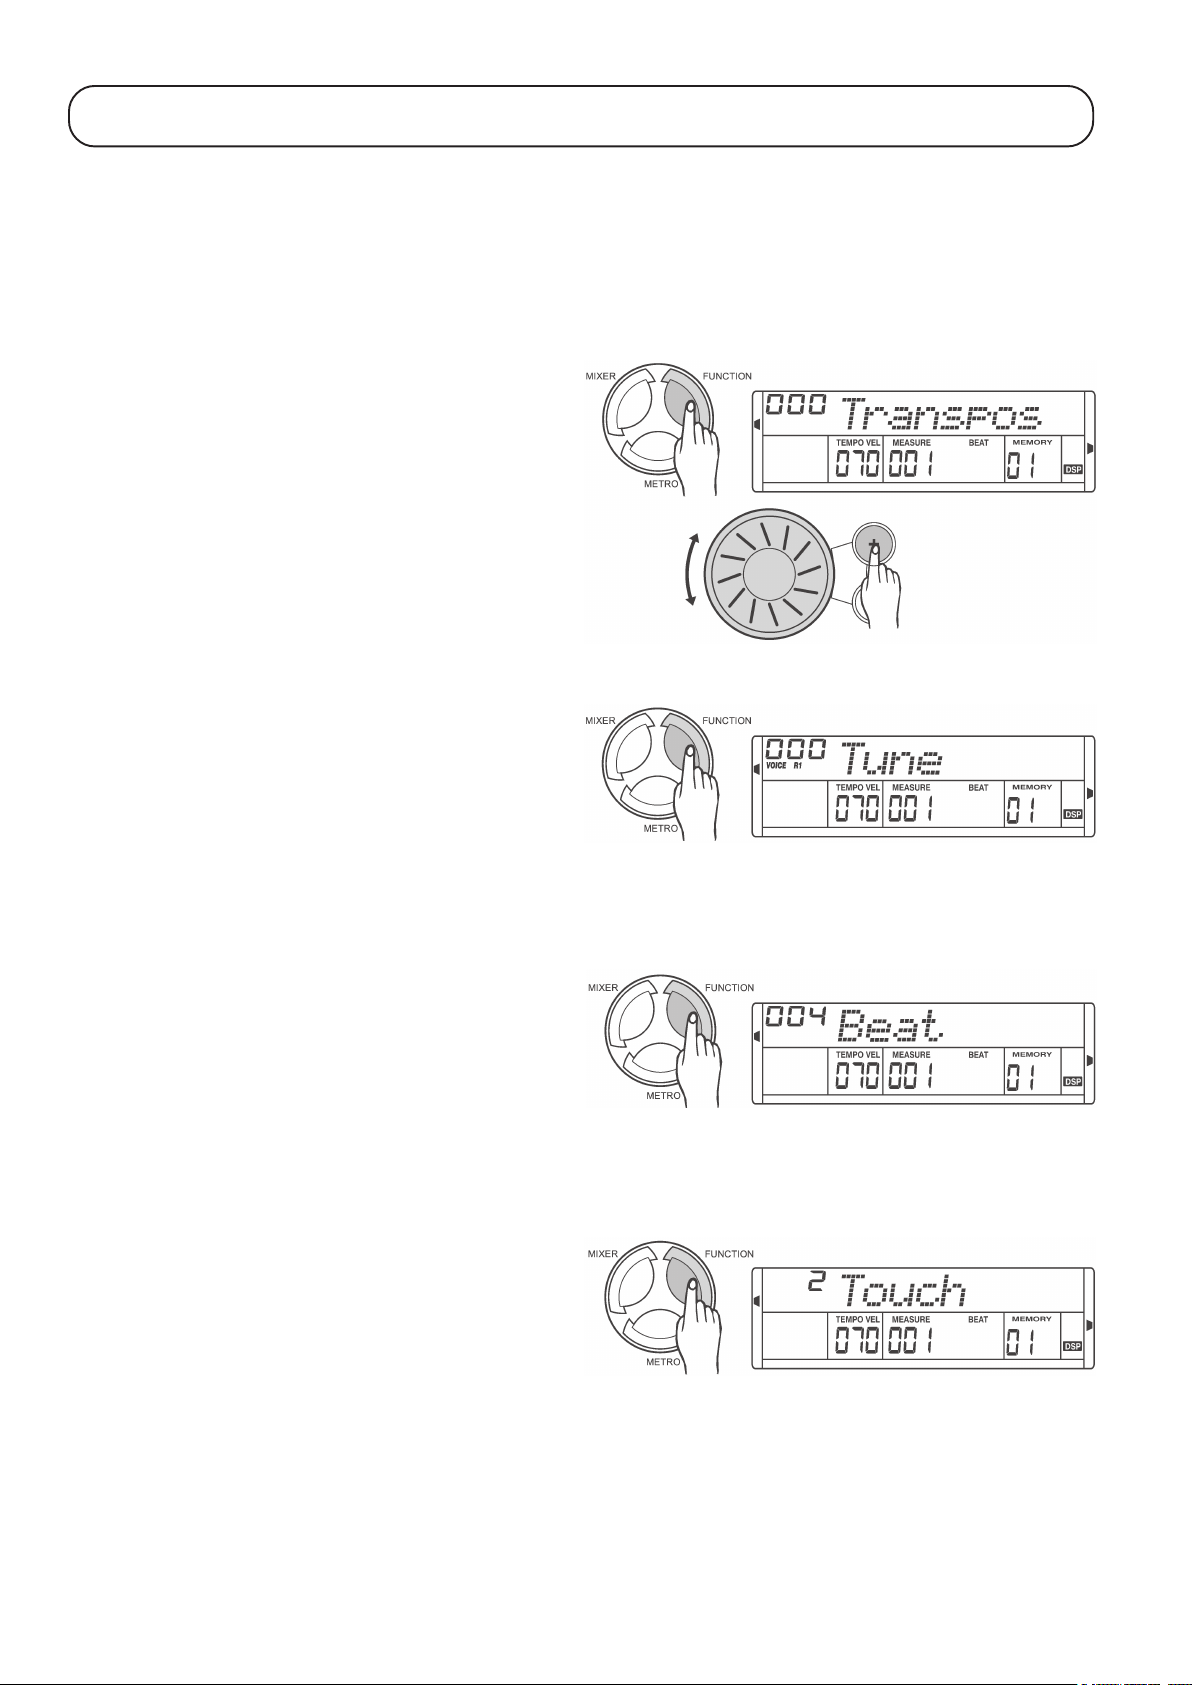
a) Funktion „Transpose“
Drücken Sie so oft die Taste „FUNCTION“, bis „Transpos“ im LC-Display erscheint.
Wählen Sie mit dem Drehrad oder den Tasten „+“ bzw. „-“ den gewünschten Wert aus (einstellbar ist „-12“ bis „12“ Halbtöne, Grundeinstellung
ist „0“).
b) Funktion „Tune“
Diese Funktion ist vergleichbar mit dem manuellen Stimmen eines Klaviers.
Drücken Sie so oft die Taste „FUNCTION“, bis „Tune“ im LC-Display
erscheint.
Wählen Sie mit dem Drehrad oder den Tasten „+“ bzw. „-“ den gewünschten Wert aus (einstellbar ist „-50“ bis „50“, Grundeinstellung ist „0“).
c) Funktion „Beat“
Mit dieser Funktion kann der Takt des Metronoms eingestellt werden,
wenn kein Begleitrhythmus verwendet/abgespielt wird.
Drücken Sie so oft die Taste „FUNCTION“, bis „Beat“ im LC-Display
erscheint.
Wählen Sie mit dem Drehrad oder den Tasten „+“ bzw. „-“ den gewünschten Wert aus (einstellbar ist „0“ und „2“ bis „9“, Grundeinstellung ist „4“).
d) Funktion „Touch“
Diese Funktion dient der Einstellung der Tasten-Empfindlichkeit der
Klaviatur.
Bei Auswahl von „OFF“ ist es belanglos, wie leicht oder fest eine Taste
der Klaviatur gedrückt wird.
Drücken Sie so oft die Taste „FUNCTION“, bis „Touch“ im LC-Display
erscheint.
Wählen Sie mit dem Drehrad oder den Tasten „+“ bzw. „-“ den gewünschten Wert aus (einstellbar ist „OFF“, „1“, „2“ und „3“, Grundeinstellung ist
„2“).
23
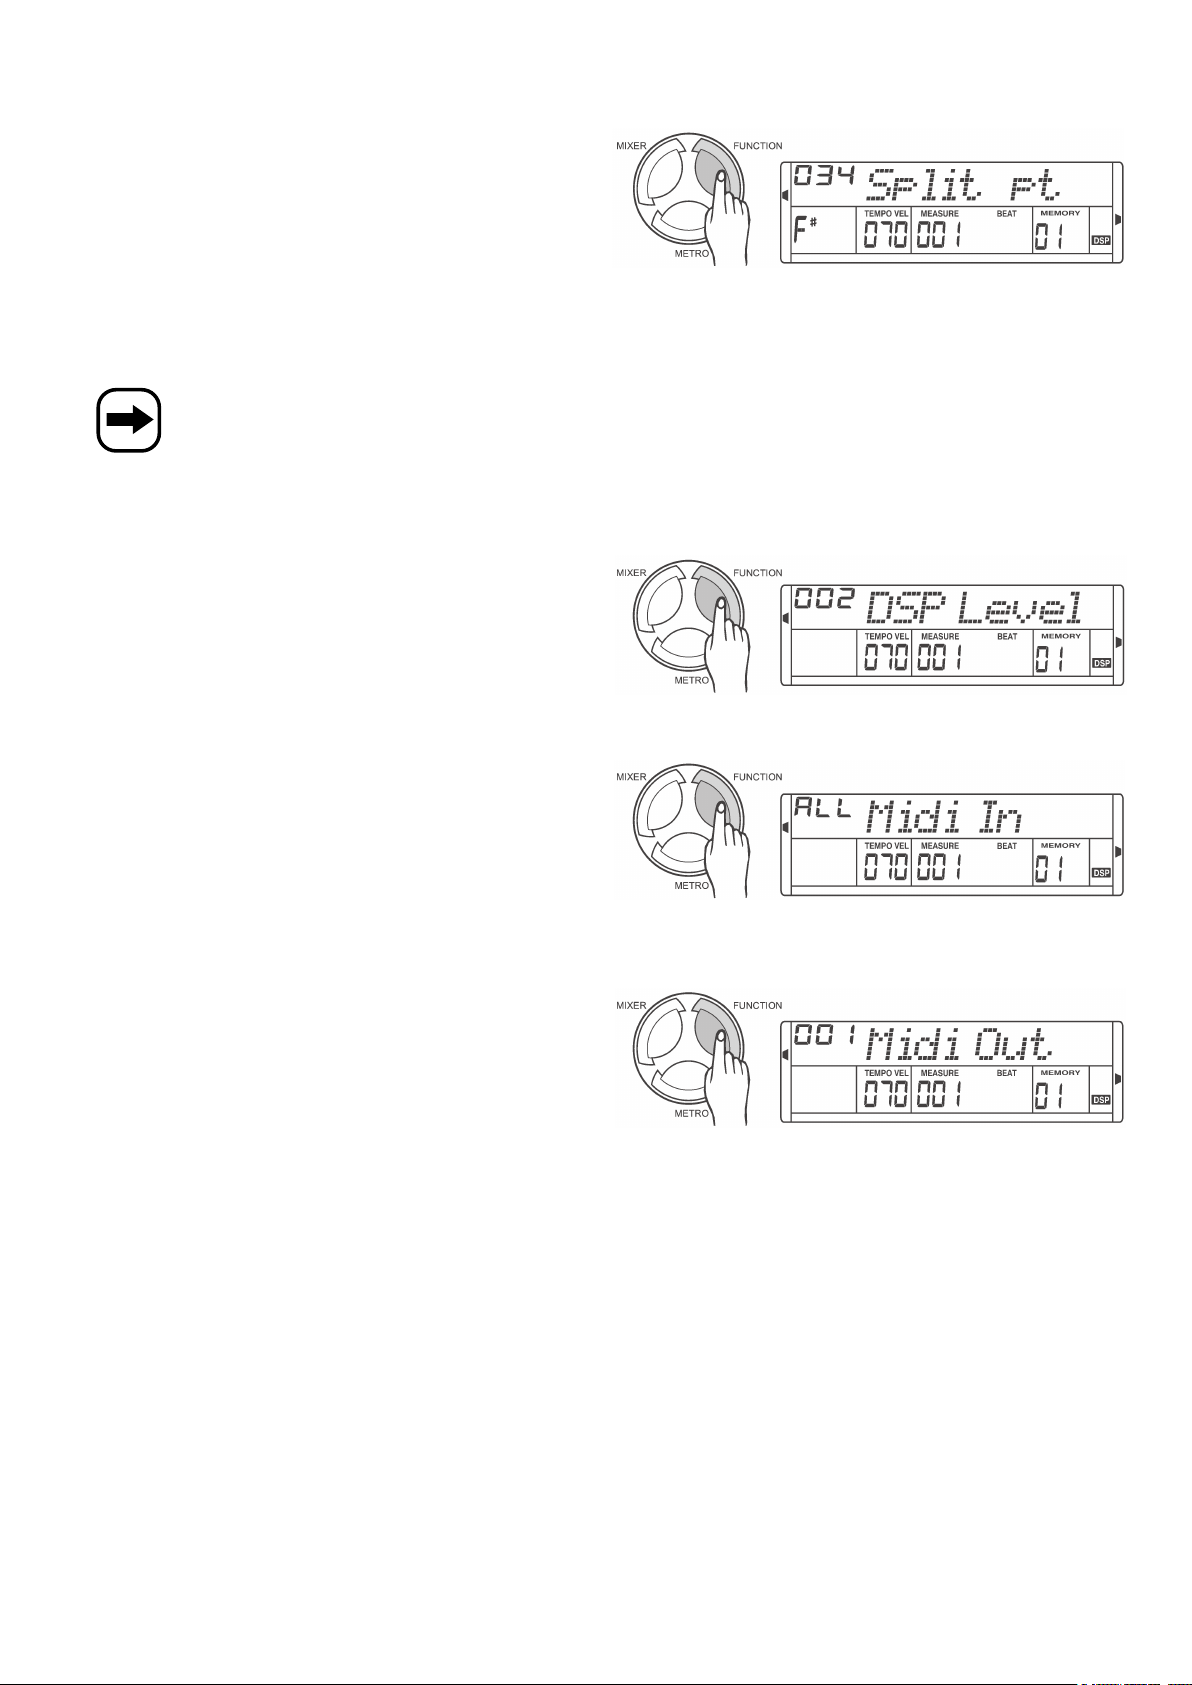
e) Funktion „Split-Point“
Beim Aufteilen der Klaviatur in zwei Bereiche (linker Teil der Klaviatur
z.B. Schlagzeug, rechter Teil Piano-Instrument) kann mit dieser Funktion festgelegt werden, an welcher Stelle die Klaviatur geteilt wird.
Drücken Sie so oft die Taste „FUNCTION“, bis „Split pt“ im LC-Display
erscheint.
Wählen Sie mit dem Drehrad oder den Tasten „+“ bzw. „-“ den gewünschten Bereich aus (einstellbar ist „1“ bis „88“, Grundeinstellung ist „34“).
Die Zahl steht dabei für die Anzahl der Tasten der Klaviatur für den
linken Teil.
Sie können die Trennstelle auch durch einen Druck auf eine
Taste der Klaviatur auswählen. Die gedrückte Taste ist dabei die letzte Taste des linken Teilbereichs.
f) Funktion „DSP-Level“
Drücken Sie so oft die Taste „FUNCTION“, bis „DSP Level“ im LCDisplay erscheint.
Wählen Sie mit dem Drehrad oder den Tasten „+“ bzw. „-“ den gewünschten Wert aus (einstellbar ist „OFF“ bis „7“, Grundeinstellung ist „2“).
g) Funktion „MIDI-IN-Channel“
Drücken Sie so oft die Taste „FUNCTION“, bis „Midi In“ im LC-Display
erscheint.
Wählen Sie mit dem Drehrad oder den Tasten „+“ bzw. „-“ den gewünschten Wert aus (einstellbar ist „1“ bis „16“, Grundeinstellung ist „ALL“ =
alle)
h) Funktion „MIDI-OUT-Channel“
Drücken Sie so oft die Taste „FUNCTION“, bis „Midi Out“ im LC-Display erscheint.
Wählen Sie mit dem Drehrad oder den Tasten „+“ bzw. „-“ den gewünschten Wert aus (einstellbar ist „1“ bis „16“, Grundeinstellung ist „1“)
i) Funktion „Power Off“
Um Energie zu sparen, schaltet sich das Digital-Piano nach 30 Minuten aus, wenn keine Taste betätigt wird. Um das Keyboard wieder zu
aktivieren, schalten Sie es aus und wieder ein.
Sie können auch eine Zeit von 60 Minuten einstellen oder die Funktion ausschalten, wenn Sie sie nicht benötigen.
Drücken Sie so oft die Taste „FUNCTION“, bis „Power Off“ im LC-Display erscheint.
Wählen Sie mit dem Drehrad oder den Tasten „+“ bzw. „-“ den gewünschten Wert aus (einstellbar ist „OFF“, „30“ und „60“).
24
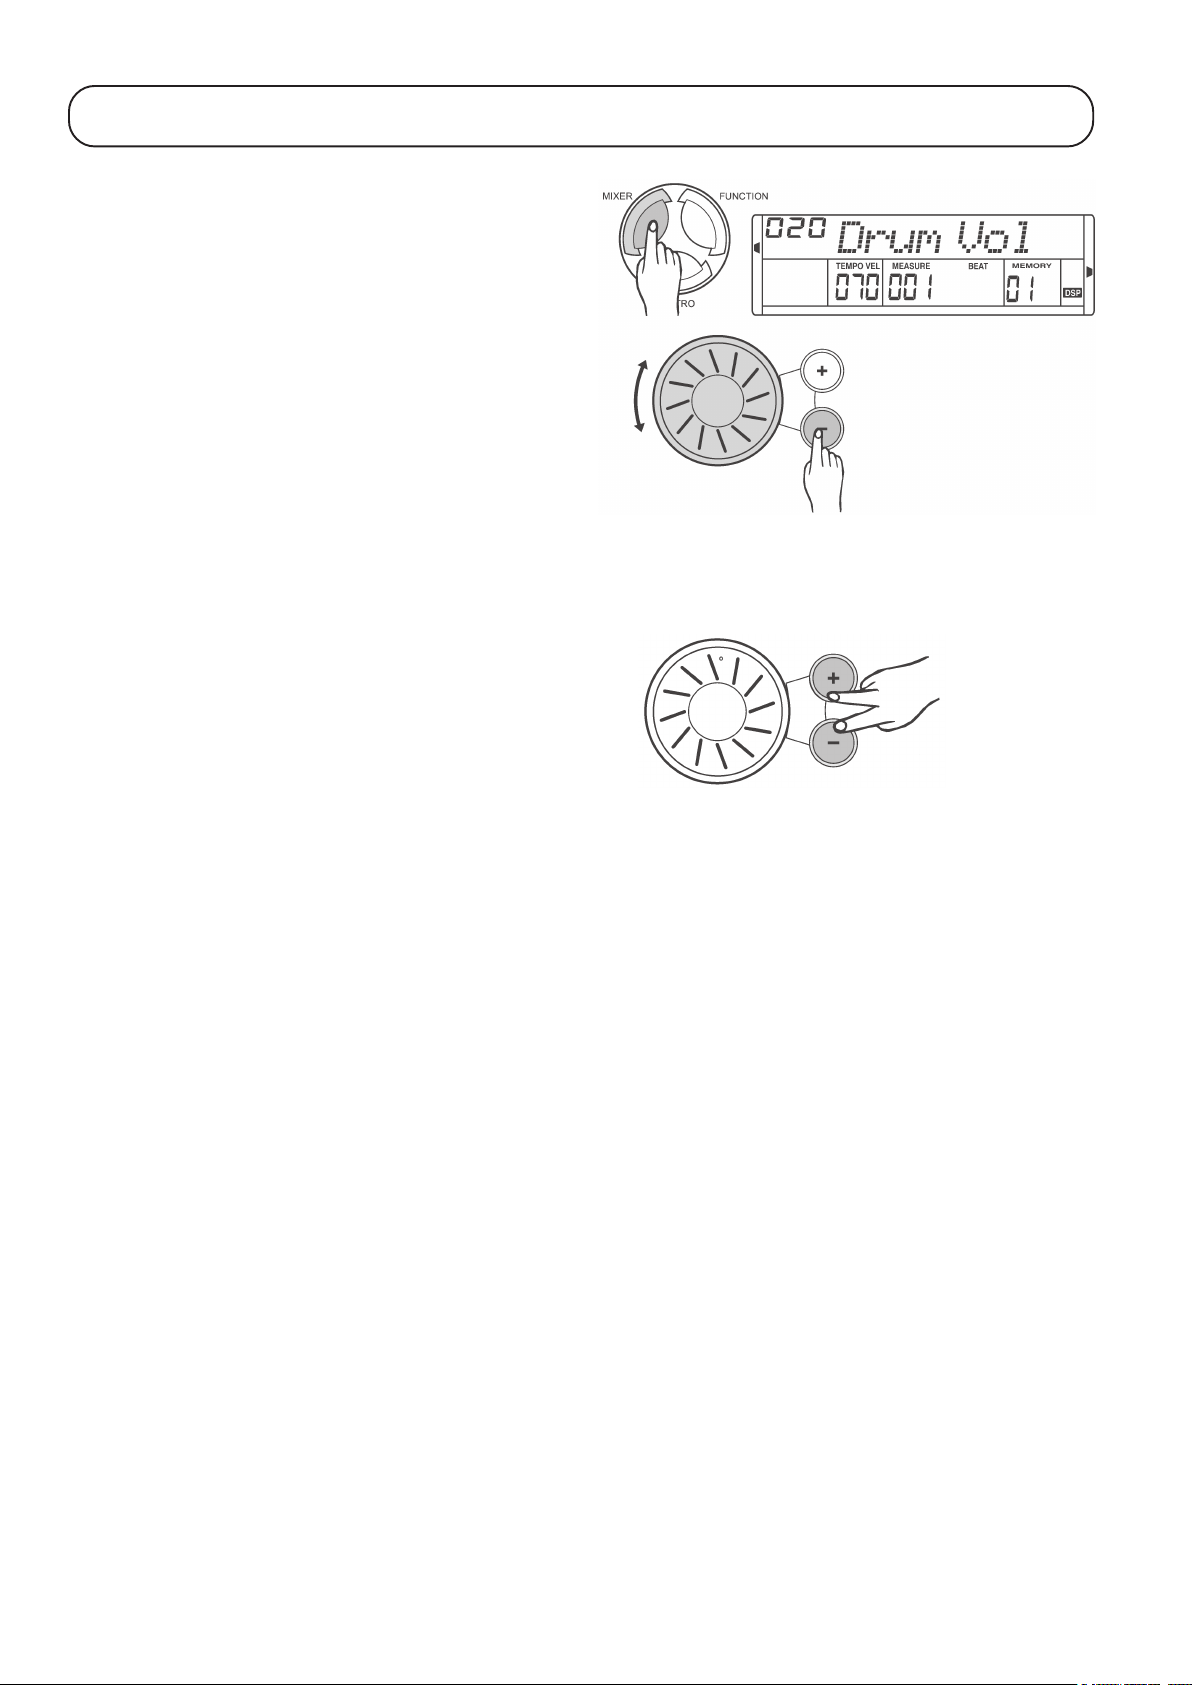
15. Mixer
Drücken Sie so oft die Taste „MIXER“, bis im LC-Display die gewünschte
Audiospur („Track“) erscheint. Wählen Sie mit dem Drehrad oder den
Tasten „+“ bzw. „-“ die Lautstärke für die jeweilige Audiospur aus.
Wird für einige Sekunden keine Taste betätigt, werden die Einstellungen übernommen und das Mixer-Menü automatisch verlassen.
Anzeige im Display Einstellbereich Grundeinstellung
„Drum Vol“ 000-031 020
„Bass Vol“ 000-031 018
„Oc Vol“ 000-031 021
„Voice R1“ 000-031 024
„Voice R2“ 000-031 012
„Voice L“ 000-031 012
Um die jeweilige Audiospur auszuschalten, wählen Sie zuerst die
Audiospur wie oben beschrieben mit der Taste „MIXER“ aus und drükken Sie anschließend gleichzeitig die beiden Tasten „+“ und „-“.
25
16. Speicher
Das Digital-Piano verfügt über 4 Speicherbänke mit je 4 Speichern. Damit stehen insgesamt 16 Speicher zur Verfügung, in denen Sie Voreinstellungen (z.B. eine Kombination aus Begleitrhytmus und Instrument) ablegen können. Diese lassen sich danach per Tastendruck schnell
wieder aufrufen.
Die Speicher sind ab Werk bereits mit diversen Kombinationen vorbelegt.
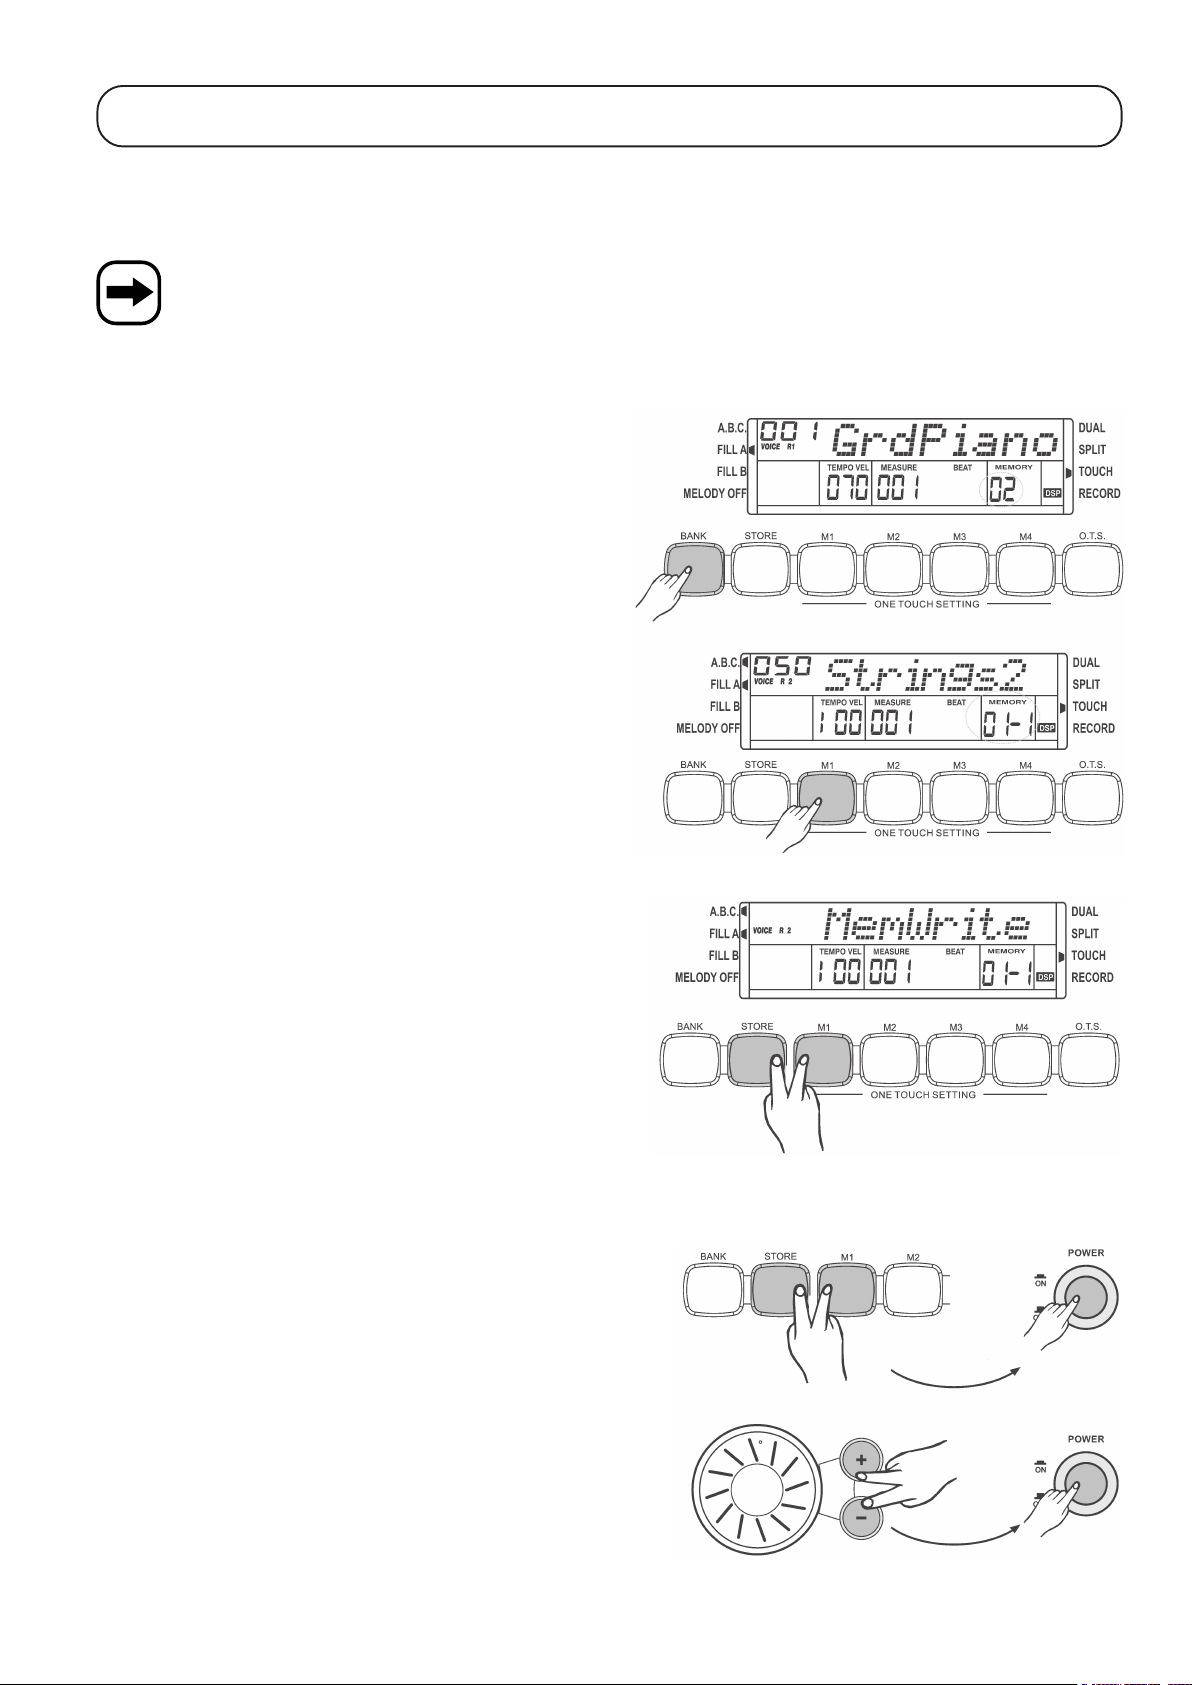
a) Speicherbank und Speicher auswählen, Einstellungen laden
Drücken Sie so oft die Taste „BANK“, bis die gewünschte Speicherbank im Display angezeigt wird (z.B. im Bild rechts Speicherbank 2,
Anzeige „MEMORY 02“).
Drücken Sie anschließend eine der vier Speichertasten „M1“, „M2“, „M3“
oder „M4“, um den jeweiligen Speicher auszuwählen und die dort abgelegten Einstellungen zu aktivieren.
b) Einstellungen speichern
Wählen Sie zuerst eine der vier Speicherbänke mit der Taste „BANK“
aus. Halten Sie dann die Taste „STORE“ gedrückt und betätigen Sie
zusätzlich eine der vier Speichertasten „M1“, „M2“, „M3“ oder „M4“. Die
aktuellen Einstellungen sind damit in dem Speicher der Speicherbank
abgelegt.
Gespeichert werden Daten für Instrumente, Zweiklang-Effekt, Begleitrhythmen, Geschwindigkeit, Funktionseinstellungen, Mixer, Lautstärke, Variation, A.B.C.-Werte usw.
Diese Daten gehen auch beim Ausschalten des Digital-Pianos nicht
verloren!
c) Speicher löschen
Halten Sie die beiden Tasten „STORE“ und „M1“ gleichzeitig gedrückt
und schalten Sie das Digital-Piano ein. Dadurch werden alle Speicher
gelöscht und die Einstellungen ab Werk wieder hergestellt.
Werden die beiden Tasten „+“ und „-“ gleichzeitig gedrückt und Sie schalten das Digital-Piano ein, so werden nicht nur die Speicher gelöscht,
sondern auch eine Aufnahme („RECORD“), siehe Kapitel 18.
26
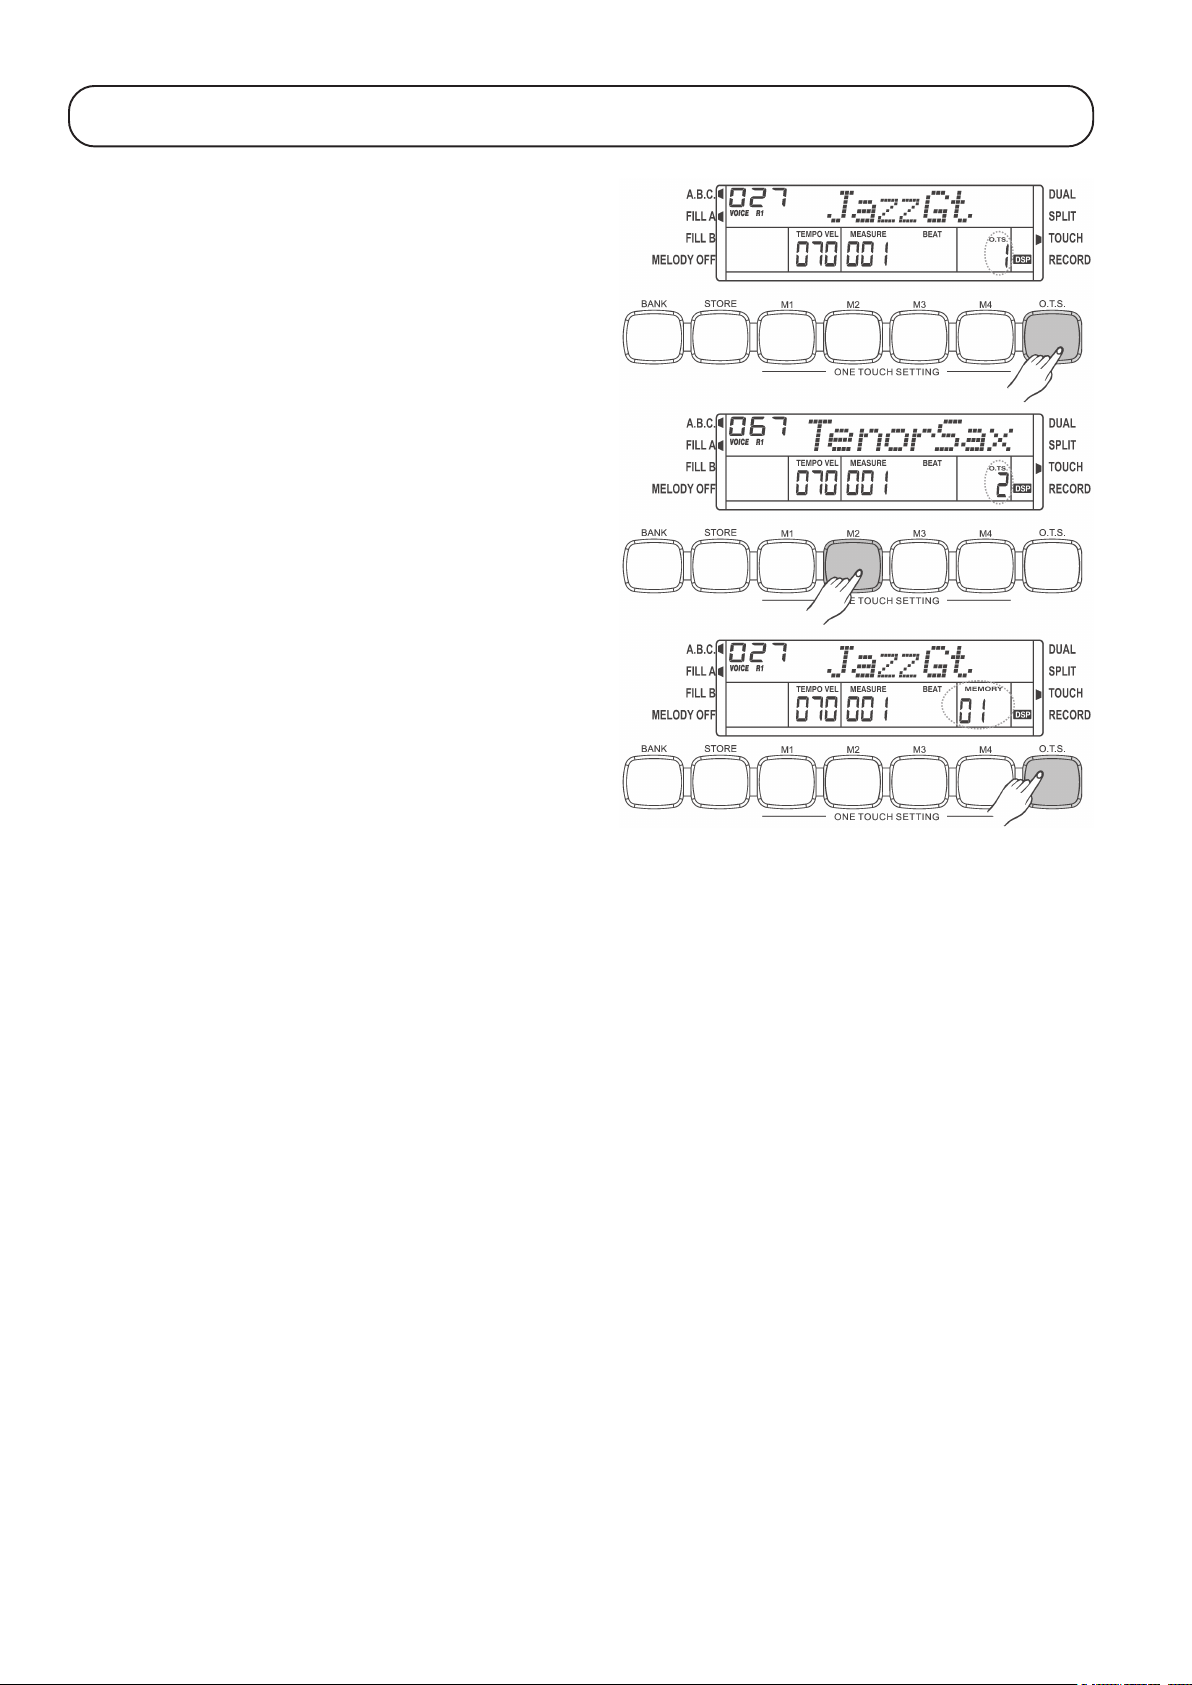
17. „O.T.S.“, „One-Touch-Setting“
Für jeden Begleitrhythmus gibt es je 4 unterschiedliche Voreinstellungen.
Beispielsweise hat der Hersteller ein zum Begleitrhythmus passendes
Instrument ausgesucht.
• Wählen Sie zuerst einen Begleitrhytmus aus.
• Drücken Sie die Taste „O.T.S.“. Im LC-Display erscheint rechts eine
kleine Einblendung „O.T.S.“.
• Mit den Tasten „M1“, „M2“, „M3“ oder „M4“ kann eine der vier Voreinstellungen abgerufen werden. Das Digital-Piano schaltet dabei den
„A.B.C.“-Modus (automatische Begleitung, „Auto-Bass-Chord“) ein.
• Um die „O.T.S.“-Funktion wieder abzuschalten, drücken Sie erneut
die Taste „O.T.S.“.
27
18. Aufnahme-Funktion
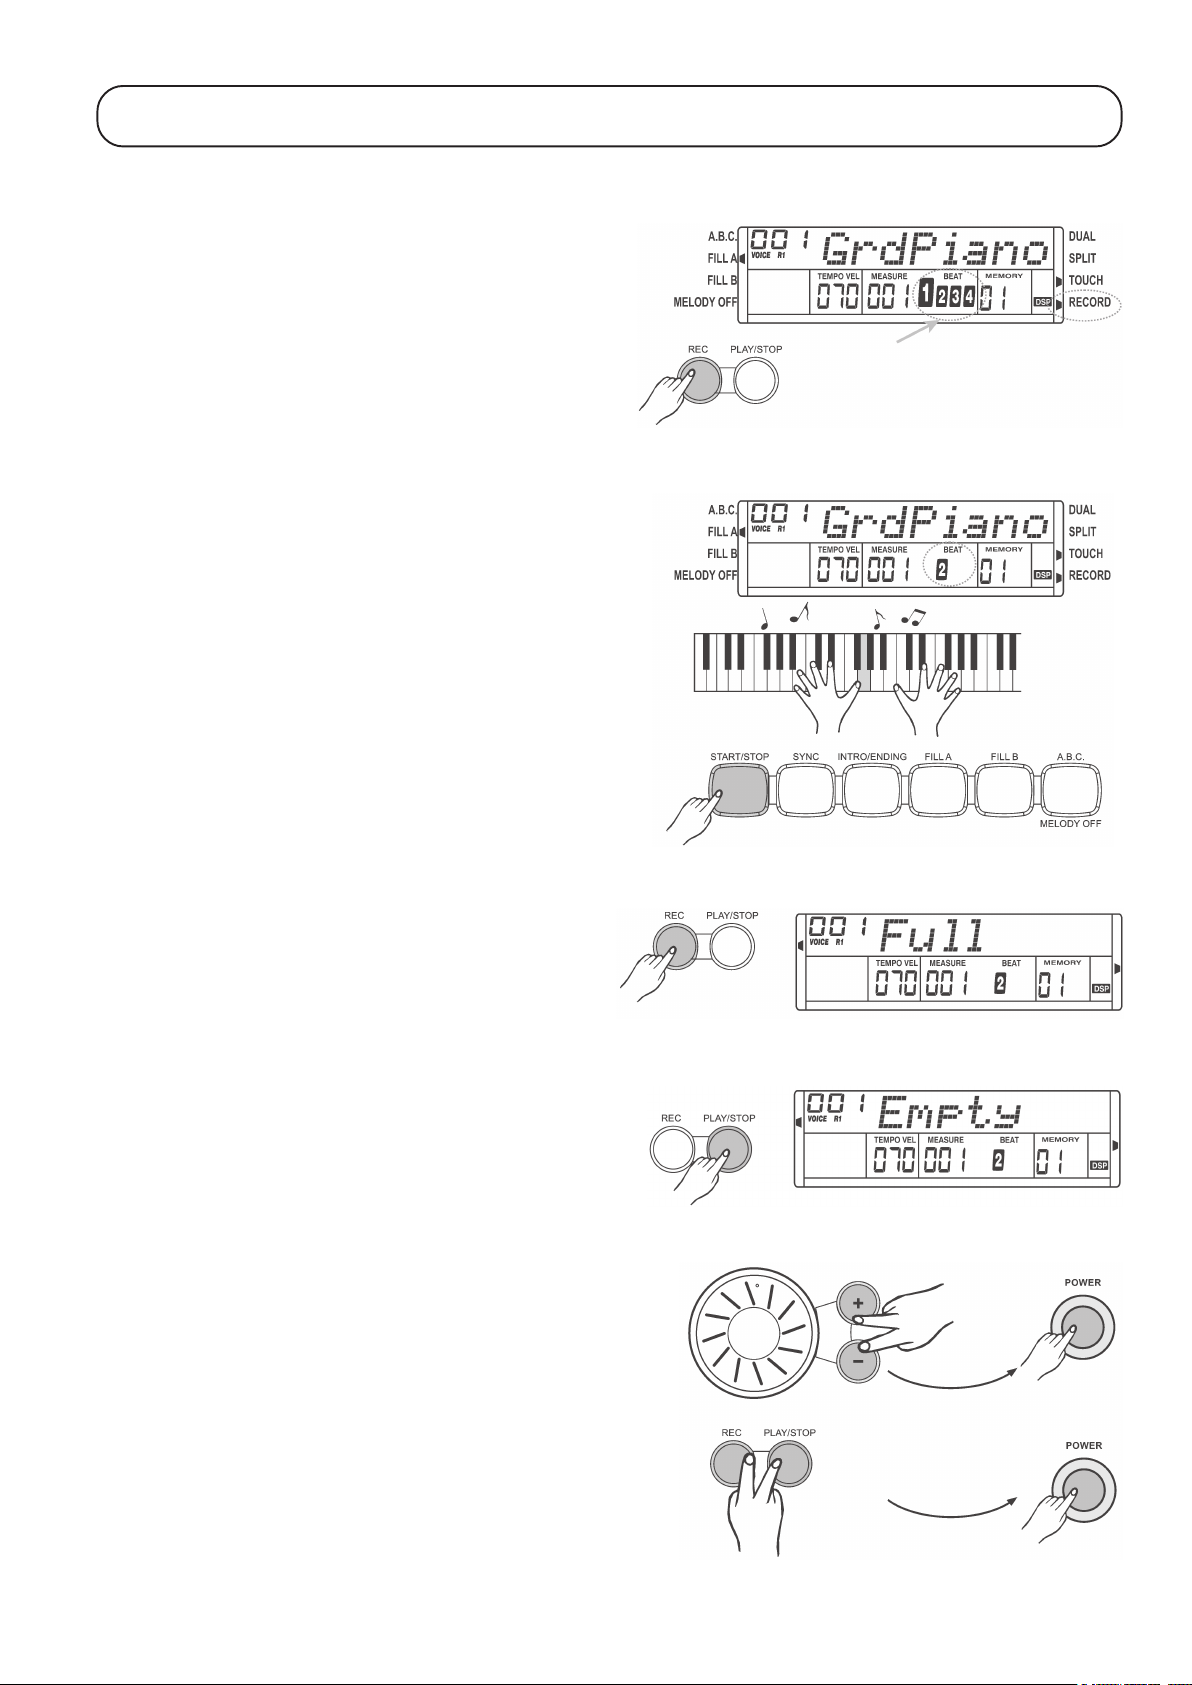
a) Aufnahmemodus vorbereiten
• Drücken Sie die Taste „REC“, rechts im LC-Display erscheint bei
„RECORD“ ein kleines Symbol, außerdem blinkt die Taktanzeige. Dies
zeigt Ihnen die Aufnahmebereitschaft an. Die Aufnahme startet jetzt
aber noch nicht!
• Sie können nun (falls gewünscht) noch ein anderes Instrument oder
einen anderen Begleitrhythmus auswählen, die Geschwindigkeit einstellen usw..
b) Aufnahme starten
Um die Aufnahme zu starten, drücken Sie entweder die Taste „START/
STOP“ oder beginnen Sie, auf der Klaviatur zu spielen.
c) Aufnahme beenden
Um die Aufnahme zu beenden, drücken Sie kurz die Taste „REC“.
Sollte der Speicher voll sein, wird die Aufnahme automatisch beendet
und im Display erscheint „Full“.
d) Aufnahme abspielen
Drücken Sie die Taste „PLAY/STOP“, um die Aufnahme abzuspielen
bzw. um den Abspielvorgang anzuhalten.
Ist keine Aufnahme vorhanden, wird im Display „Empty“ angezeigt.
e) Speicher löschen
Werden die beiden Tasten „+“ und „-“ gleichzeitig gedrückt und Sie schalten das Digital-Piano ein, so wird die Aufnahme gelöscht, außerdem
alle Daten in den Speichern „M1“ bis „M4“, siehe Kapitel 16.
Damit nur die Aufnahme gelöscht wird, halten Sie die beiden Tasten
„REC“ und „PLAY/STOP“ gedrückt und schalten Sie das Digital-Piano
ein.
28

19. Songs
Das Digital-Piano verfügt über 60 verschiedene Songs. Die Melodie ist dabei jeweils abschaltbar; damit Sie diese selbst spielen können.
Drücken Sie die Taste „SONG“, eine entsprechende Anzeige erscheint
im Display.
Mit der Taste „START/STOP“ kann die Wiedergabe gestartet bzw. beendet werden.
Wenn die Wiedergabe eines Songs angehalten wurde, wird der SongModus verlassen, indem Sie die Taste „STYLE“, „VOICE“, „DUAL“ oder
„LOWER“ drücken.
Wählen Sie einen der gewünschten Songs wie gewohnt mit dem Drehrad oder den Tasten „+“ und „-“ aus.
Der Song startet jeweils mit seinem eigenen Einleitungs-Rhythmus (negative Werte im rechts gekennzeichneten Feld).
Drücken Sie die Taste „O.T.S./ MELODY OFF“, um die Melodie des
gerade abgespielten Songs aus- oder wieder einzuschalten.
Bei ausgeschalteter Melodie erscheint links unten im Display ein Symbol bei „MELODY OFF“.
Wenn Sie die Wiedergabe durch Drücken der Taste „SONG“ starten, so werden alle Songs nacheinander abgespielt.
Wird ein Song jedoch mit der Taste „START/STOP“ gestartet, so wird der gerade ausgewählte Song immer wieder abgespielt.
29

20. Handhabung
Beachten Sie die Sicherheitshinweise und alle anderen Informationen in dieser Bedienungsanleitung
Stellen Sie das Gerät auf eine ebene, stabile, ausreichend große Fläche. Stellen Sie das Gerät nicht auf wertvolle Oberflächen, da
andernfalls Druckstellen oder Kratzer möglich sind. Verwenden Sie ggf. eine geeignete Unterlage. Durch das hohe Gewicht sind
außerdem Druckstellen in Teppichen, Linoleum- oder Korkböden möglich.
Vermeiden Sie folgende widrige Umgebungsbedingungen am Aufstellungsort oder beim Transport:
- Direkte Sonneneinstrahlung
- Nässe oder zu hohe Luftfeuchtigkeit
- Extreme Kälte oder Hitze
- Staub oder brennbare Gase, Dämpfe oder Lösungsmittel
- starke Vibrationen
- starke Magnetfelder, wie in der Nähe von Maschinen oder Lautsprechern
Schalten Sie das Gerät niemals gleich dann ein, wenn es von einem kalten in einen warmen Raum gebracht wird. Das dabei
entstehende Kondenswasser kann unter Umständen das Gerät zerstören. Außerdem besteht Lebensgefahr durch einen elektrischen Schlag!
Lassen Sie das Gerät zuerst uneingeschaltet auf Zimmertemperatur kommen. Dies kann u.U. mehrere Stunden dauern.
Achten Sie darauf, dass die Isolierung des gesamten Produkts weder beschädigt noch zerstört wird. Öffnen Sie das Gerät nicht.
Überprüfen Sie vor jedem Gebrauch das Produkt auf Beschädigungen!
Falls Sie Beschädigungen feststellen, so verbinden Sie das Produkt NICHT mit der Netzspannung. Bringen Sie das Produkt in eine
Fachwerkstatt oder entsorgen Sie es umweltgerecht.
Wenn das Gerät längere Zeit nicht in Betrieb genommen wird, so trennen Sie es von der Netzspannung.
Fassen Sie niemals mit spitzen Gegenständen (z.B. Kugelschreiber, Steck- und Stricknadeln, Büroklammern etc.) in die Lüftungsschlitze und Öffnungen des Geräts, das Gerät wird dadurch zerstört, außerdem besteht Lebensgefahr durch einen elektrischen
Schlag.
Achten Sie beim Aufstellen des Geräts darauf, dass keines der Verbindungskabel (z.B. das Netzkabel, das Kabel zum Fußpedal
oder zu Ihrem Kopfhörer) geknickt oder gequetscht wird.
Verlegen Sie alle Kabel so, dass niemand darüber stolpern kann.
Überprüfen Sie regelmäßig die technische Sicherheit des Produkts, z.B. Beschädigung des Gehäuses.
Wenn anzunehmen ist, dass ein gefahrloser Betrieb nicht mehr möglich ist, so ist das Produkt außer Betrieb zu setzen und gegen
unbeabsichtigten Betrieb zu sichern. Schalten Sie das Produkt aus, trennen Sie es von der Netzspannung.
Es ist anzunehmen, dass ein gefahrloser Betrieb nicht mehr möglich ist, wenn
- das Gerät sichtbare Beschädigungen aufweist,
- das Gerät nicht mehr funktioniert und
- nach längerer Lagerung unter ungünstigen Verhältnissen oder
- nach schweren Transportbeanspruchungen.
30

21. Wartung und Reinigung
Das Produkt ist für Sie wartungsfrei, öffnen oder zerlegen Sie es niemals. Eine Reparatur darf nur von einer Fachkraft oder Fachwerkstatt
vorgenommen werden.
Zur Reinigung des Produkts reicht ein trockenes, weiches Tuch.
Wir empfehlen Ihnen, das Produkt mit einer geeigneten Abdeckung gegen Staub zu schützen, wenn es längere Zeit nicht verwendet wird.
22. Entsorgung
Entsorgen Sie das Produkt am Ende seiner Lebensdauer gemäß den geltenden gesetzlichen Vorschriften.
23. Technische Daten
Betriebsspannung: ..................................... 230 V/AC, 50 Hz
Abmessungen: ........................................... Ca. 1419 x 460 x 832 mm (B x T x H)
Gewicht: ..................................................... Ca. 40 kg
Tasten:........................................................ 88
Instrumente: ............................................... 210
Begleitrhythmen: ........................................ 120
Songs: ........................................................ 60
Polyphonie: ................................................ 64 Noten (ohne DSP-Effekt), 38 Noten (mit DSP-Effekt)
Speicher für Einstellungen: ........................ 16 (4 Speicherbänke á 4 Speicher)
Aufnahmespeicher: .................................... 1
Interne Lautsprecher: ................................. Stereo, 8 Ohm, 2 x 25 W
Anschlüsse: ................................................ Aux Out (Line-Pegel), Kopfhörer, Fußpedale, USB
31

24. Anhang A: Instrumente
32

33

25. Anhang B: Begleitrhythmen
34

26. Anhang C: Songs
35

Table of contents
1. Introduction ............................................................................................................................................................................................38
2. Intended use ...........................................................................................................................................................................................38
3. Scope of delivery ................................................................................................................................................................................... 39
4. Explanation of symbols ......................................................................................................................................................................... 39
5. Safety instructions................................................................................................................................................................................. 39
6. Description of individual parts ............................................................................................................................................................. 41
7. Assembly ................................................................................................................................................................................................42
a) Assembly of side panels and pedal box .............................................................................................................................................. 42
b) Attaching the rear panel ...................................................................................................................................................................... 42
c) Attaching the top unit with keyboard ................................................................................................................................................... 43
d) Connecting the pedals, installing the cables, positioning the piano .....................................................................................................43
8. Controls .................................................................................................................................................................................................. 44
a) Top unit ............................................................................................................................................................................................... 44
b) Rear .................................................................................................................................................................................................... 44
c) Pedals ................................................................................................................................................................................................. 44
d) Operating panel................................................................................................................................................................................... 45
e) LC display ...........................................................................................................................................................................................46
Page
9. Connections ........................................................................................................................................................................................... 47
a) Headphones sockets ........................................................................................................................................................................... 47
b) Audio output „AUX OUT“..................................................................................................................................................................... 47
c) USB .....................................................................................................................................................................................................47
d) Pedals ................................................................................................................................................................................................. 47
10. Operation, mains connection................................................................................................................................................................ 48
11. Play demo tunes ....................................................................................................................................................................................49
12. Instruments and effects......................................................................................................................................................................... 50
a) Select instrument („VOICE“)................................................................................................................................................................ 50
b) Dual sound effect („DUAL VOICE“), „DUAL“ button ............................................................................................................................50
c) Split function, „SPLIT“ button .............................................................................................................................................................. 51
13. Accompaniment rhythms („STYLE“) ................................................................................................................................................... 52
a) Select accompaniment rhythm ............................................................................................................................................................52
b) Play/stop accompaniment rhythm, „START/STOP“ button ..................................................................................................................52
c) Automatic accompaniment, automatic bass chord, „A.B.C./MELODY OFF“ button ............................................................................53
d) Sync start, „SYNC“ button ...................................................................................................................................................................53
e) Intro start, „INTRO/ENDING“ button ...................................................................................................................................................53
f) Normal/variation mode, „FILL A“ and „FILL B“ buttons ........................................................................................................................54
g) Stop accompaniment rhythm............................................................................................................................................................... 54
h) Set volume of accompaniment rhythm, „ACC. VOL“ buttons ..............................................................................................................55
i) Set tempo of accompaniment rhythm, „TEMPO“ buttons .................................................................................................................... 55
j) Selecting a chord ................................................................................................................................................................................ 56
k) Metronome, „METRO“ button ..............................................................................................................................................................56
36

Page
14. Function settings ...................................................................................................................................................................................57
a) „Transpose“ function ...........................................................................................................................................................................57
b) „Tune“ function ....................................................................................................................................................................................57
c) „Beat“ function .....................................................................................................................................................................................57
d) „Touch“ function ................................................................................................................................................................................... 57
e) „Split Point“ function ............................................................................................................................................................................ 58
f) „DSP Level“ function ...........................................................................................................................................................................58
g) „MIDI IN Channel“ function .................................................................................................................................................................. 58
h) „MIDI OUT Channel“ function ..............................................................................................................................................................58
i) „Power off“ function ............................................................................................................................................................................. 58
15. Mixer .......................................................................................................................................................................................................59
16. Memory ................................................................................................................................................................................................... 60
a) Select memory bank and memory position, load settings ...................................................................................................................60
b) Save settings....................................................................................................................................................................................... 60
c) Delete memory ....................................................................................................................................................................................60
17. „O.T.S.“, „One Touch Setting“ ............................................................................................................................................................. 61
18 Recording function ................................................................................................................................................................................ 62
a) Prepare record mode .......................................................................................................................................................................... 62
b) Start recording..................................................................................................................................................................................... 62
c) Stop recording .....................................................................................................................................................................................62
d) Play back recording ............................................................................................................................................................................. 62
e) Delete memory ....................................................................................................................................................................................62
19. Songs ...................................................................................................................................................................................................... 63
20. Handling .................................................................................................................................................................................................. 64
21. Maintenance and cleaning..................................................................................................................................................................... 65
22. Disposal .................................................................................................................................................................................................. 65
23. Specifications .........................................................................................................................................................................................65
24. Appendix A: Instruments ......................................................................................................................................................................66
25. Appendix B: Accompaniment rhythms ................................................................................................................................................ 68
26. Appendix C: Songs ................................................................................................................................................................................69
37

1. Introduction
Dear Customer,
We thank you for purchasing this product.
This product meets the requirements of current statutory European and national guidelines.
These operating instructions are part of this product. They contain important information concerning operation and handling.
Bear this in mind when you pass on this product to others.
Therefore, keep these operating instructions for future reference!
Any company or product names are trademarks of their respective owners. All rights reserved.
For technical questions, please contact:
Tel. no.: +49 9604 / 40 88 80
Fax. no.: +49 9604 / 40 88 48
E-mail: tkb@conrad.de
Mon. to Thur. 8.00am to 4.30pm
Fri. 8.00am to 2.00pm
2. Intended use
The product is used for the generation of sounds which you can play through keys. The sounds are played by the built-in loudspeakers. It is
possible to connect headphones or an external amplifier. A USB socket allows the connection to a computer.
The product may only be used in closed, dry indoor rooms. The product must not get damp or wet.
Any use other than that described above will damage the product and may involve other risks such as short circuits, fire and electric shock etc.
Do not change or modify any part of the product. The housing must not be opened.
The product is not a toy. It is not suitable for children under 14 years of age.
Observe all safety instructions in these operating instructions. They contain important information regarding the handling of the
product.
38

3. Scope of delivery
• Digital piano (top unit, left side panel, right side panel, back panel, pedal box, installation material)
• Operating instructions
4. Explanation of symbols
This symbol is used when your health is at risk, e.g. through an electric shock.
The exclamation mark in a triangle indicates a particular risk in handling, operating or controlling the product.
The arrow symbol indicates special tips and operating information.
5. Safety instructions
The guarantee/warranty will be void if damage is incurred resulting from non-compliance with these operating instructions.
We assume no liability for any consequential damage!
We do not assume any liability for material and personal damage caused by improper use or non-compliance with the
safety instructions! In such cases the warranty/guarantee is voided.
• The unauthorized conversion and/or modification of the product is inadmissible because of safety and approval reasons (CE).
• Only connect the internal power supply to a standard mains socket (230 V/AC, 50 Hz) or the public mains supply system.
• This product is not a toy and should be kept out of reach of children! Children cannot judge the dangers involved when handling
electrical devices.
• Any person who operates this product, installs it, assembles it, puts it into operation or services it must be trained and qualified
correspondingly and must observe these operating instructions.
• Never touch the mains cable or the mains plug with damp or wet hands. There is a risk of a fatal electric shock!
• If the mains cable is damaged, do not touch it. First of all, cut off the power supply to the relevant mains socket (e.g. via the circuit
breaker) and then pull the mains plug carefully out of the mains socket. Do not use the product anymore and take it to a specialised
workshop. A defective mains cable may only be replaced by a specialist.
• When installing the device, make sure that the mains cable is not squeezed or damaged by sharp edges.
• Do not expose the device to high temperatures, dripping or splashing water, strong vibrations or high mechanical stress.
• Never place containers containing liquids, e.g. glasses, buckets, vases or plants on the device or in its vicinity. Liquids could enter
into the interior of the housing and impair the electrical safety of the device. There is also a great risk of fire or a fatal electric shock!
If this is the case, de-energize the respective socket (e.g. switch off circuit breaker) and only then pull the mains cable from the
socket. Disconnect all cables from the device. After that, the whole product must no longer be used; take it to a specialist workshop.
39

• Do not place open sources of fire, such as burning candles, on or directly next to the device.
• Do not operate the device when it is unattended.
• Only use the device in moderate climate and avoid tropical environments.
• Do not leave packing material lying around unattended. It may become a dangerous toy for children.
• The accident prevention regulations of the relevant trade associations for electrical systems and operating materials are to be
observed in commercial institutions.
• If the product is used at schools, training facilities, do-it-yourself or hobby workshops, it has to be supervised by trained personnel.
• If you are not sure about the correct connection or if questions arise which are not covered in these operating instructions, please
do not hesitate to contact our technical support or another specialist.
40

6. Description of individual parts
1
10
4
12
2
3
1 Top unit with keyboard
2 Right side panel
3 Left side panel
4 Rear panel
5 Pedals
6 4 knurled screws
5
6
7
8
9
11
7 4 screws Ø 6mm x 30mm
8 5 screws Ø 4mm x 15mm
9 Cable holder with stick pad
10 Mains cable
11 2 screws Ø 6mm x 12mm
12 Pedal cable
41

7. Assembly
Due to the weight of the heavy individual parts, the help of a second person is recommended! Not only can the heavy parts injure you
when tipping over, but the product itself might be damaged.
a) Assembling the side panels and the pedal box
Needed screws: 4 screws Ø 6mm x 30mm
4 x
Assemble the two side panels and the pedal box as illustrated using the 4 screws (Ø 6mm x 30mm). Do not tilt the side panels. Do not use force
when screwing together the parts.
b) Attaching the rear panel
Needed screws: 5 screws Ø 4mm x 15mm
2 screws Ø 6mm x 12mm
2 x
5 x
Attach the rear panel to the pedal box using five screws (Ø 4mm x 15mm) and to the two side panels using 2 screws (Ø 6 mm x 12 mm).
42

c) Attaching the top unit with keyboard
Put the top unit on the two side panels. Use the 4 knurled screws to fasten the top unit.
d) Connecting the pedal, installing the cables, positioning the piano
Connect the pedal cable with the respective socket at the top unit.
Use the two cable holders to secure the mains cable and the pedal cable on the sides at the back of the rear panel.
Position the digital piano at the desired location. Select a sufficiently large, even, and solid surface. Adjustable feet for levelling allow the digital
piano to stand firmly on uneven floors.
43

8. Controls
a) Top unit
2
1 Operating panel
2 Headphone sockets
3 Music rack
4 Keyboard
The keyboard has a lid which you can easily slide in and out again.
1 3
4
b) Back
5 Pedals
6 Mains cable
7 USB socket
8 „AUX OUT“ output
c) Pedals
9 „Soft“ pedal
10 „Sostenuto“ pedal
11 „Sustain“ pedal
7 8
5
9
6
10 11
44

d) Control panel
1 On/off switch („POWER“)
2 Main volume control („VOLUME“)
3 Direct selection buttons for accompaniment rhythm („STYLE“)
4 Function buttons for the accompaniment rhythm („START/STOP“, „SYNC“, „INTRO/ENDING“, „FILL A“, „FILL B“, „A.B.C./MELODY OFF“)
5 Volume control for accompaniment tracks („ACC VOL +/-“)
6 „TEMPO -“ and „TEMPO +“ buttons for speed control
7 „MIXER“ button for setting the volume of audio tracks
8 „FUNCTION“ button for the selection of function settings
9 „METRO“ button for turning the metronome on/off
10 „STYLE“ button for selecting an accompaniment rhythm
11 „VOICE“ button for selecting an instrument
12 „SONG“ button for selecting a song
13 control wheel and buttons „+“ and „-“
14 Direct selection buttons for instruments („VOICE“)
15 „BANK“ button for memory bank selection (1 to 4)
16 „STORE“ button for saving the settings
17 „M1“, „M2“, „M3“, „M4“ buttons for saving or loading settings
18 „O.T.S.“ button (One Touch Setting)
19 „DUAL“ button for dual sound function
20 „SPLIT“ button for splitting the keyboard into two parts (e.g. drums left, piano right)
21 „REC“ button for recording
22 „PLAY/STOP“ button for playing/pausing a recording
45

e) LC display
1 „A.B.C.“ symbol
2 „FILL A“ symbol
3 „FILL B“ symbol
4 „MELODY OFF“ symbol
5 „DUAL“ symbol
6 „SPLIT“ symbol
7 „TOUCH“ symbol
8 „RECORD“ symbol
9 Setting mode symbols (e.g. accompaniment rhythm „STYLE“ etc.)
10 „CHORD“ display
11 „TEMPO“ display
12 „MEASURE“ display
13 „BEAT“ display
14 „MEMORY/TICK/O.T.S.“ display
15 „DSP“ display
46

9. Connections
a) Headphone sockets
Two headphone sockets - (1) and (2) - are located on the underside.
When headphones are connected to socket (1), music is played through
the headphones as well as the loudspeakers in the digital piano.
When headphones are connected to socket (2), the loudspeakers in
the digital piano are switched off and music is only played through the
headphones.
Only connect headphones after turning down the volume of the digital piano completely (to the minimum).
When using headphones, do not turn up the volume too much to avoid hearing damage!
b) „AUX OUT“ output
The „AUX OUT“ sockets at the back provide a stereo line signal for
output e.g. on a hi-fi system.
Use a suitable cable to connect these sockets with the line input of your
hi-fi system (do not use the phono connection!).
Before connecting the two devices with each other, turn down the volume
of the digital piano as well as the hi-fi system completely.
c) USB
Connect the USB socket on the digital piano with the USB port of your
computer using a suitable USB cable.
The required drivers are part of the operating system (Windows ME or
higher, Windows XP/Vista recommended).
Follow the Windows instructions to install.
d) Pedals
If you have not already done so, connect the pedal cable to the respective
socket on the digital piano.
47

10. Operation, mains connection
Proceed as follows:
1. Turn down the volume completely („VOLUME“ control).
2. Turn off the digital piano.
3. Connect the mains plug of the digital piano to a 230 V/AC, 50 Hz
mains socket.
4. Turn on the digital piano. The display lights up.
Turn the volume control („VOLUME“) slightly to the right.
12
34
Before turning off the digital piano again, turn down the volume completely. Then turn off the digital piano.
Now the digital piano may be disconnected from the mains supply. Pull the mains plug from the mains socket.
48

11. Play demo tunes
To demonstrate the capabilities of the digital piano, you can choose between three different demo songs and play them.
Press the „VOICE“ and „STYLE“ buttons simultaneously to play the
first demo tune.
Set the desired volume using the volume control („VOLUME“).
Use the control wheel or the „+“ and „-“ buttons next to it to select one
of the three available demo tunes.
To stop playing a demo tune, press the „VOICE“ and „STYLE“ buttons
again.
You can also stop playback by pressing the „START/STOP“ button.
49

12. Instruments and effects
a) Select instrument („VOICE“)
The digital piano provides a total of 210 different instruments.
When the digital piano is switched on, instrument „001“ („GrdPiano“ =
„Grand Piano“) is selected. In the top left-hand corner of the display,
the instrument mode „VOICE R1“ is displayed.
See the appendix for a list of all instruments.
To select an instrument, proceed as follows:
• Press the „VOICE“ button.
• Use the control wheel or the „+“ and „-“ buttons next to it to select an
instrument.
• Some standard instruments are preset for the direct selection buttons.
Press this button once or twice to select the upper or the lower
instrument (see description above or below the button).
• Now you can play on the keyboard of the digital piano using the
selected instrument.
b) Dual sound effect („DUAL VOICE“), „DUAL“ button
This function allows you to play two instruments at the same time when
pressing a key, e.g. piano and drums.
Please note that this only applies to the right section of the
keyboard. See chapter 12. c), Split function.
• First select instrument 1, e.g. „001 GrdPiano“, if you have not already
done so. (See chapter 12. a)
• Press the „DUAL“ button. The „DUAL“ symbol is displayed in the top
right-hand corner.
„VOICE R2“ is displayed in the top left-hand corner. The preset
instrument „050 Strings 2“ is displayed.
The digital piano now plays instruments „001“ and „050“
simultaneously.
• If desired, you can use the control wheel or the „+“ and „-“ buttons
next to it to select the second instrument.
• Press the „DUAL“ button again to disable the dual sound effect.
50

c) Split function, „SPLIT“ button
The keyboard can be split into two sections. You can, for example,
assign a drum instrument to the left section and a common instrument
to the right section.
This also applies to the dual sound effect. See chapter 12. b).
• First select instrument 1, e.g. „001“, if you have not already done so.
(See chapter 12. a)
• Press the „SPLIT“ button („SPLIT“ symbol is displayed in the top righthand corner).
„VOICE L“ is displayed in the top left-hand corner. The preset
instrument „049 Strings1“ is displayed.
The left section of the keyboard has now been assigned the second
instrument.
The keyboard is split at „F#“ which can be changed in the
function settings. See chapter 14. e).
• If desired, you can use the control wheel or the „+“ and „-“ buttons
next to it to select the second instrument for the left section of the
keyboard, e.g. „050“.
• To deactivate the function, press the „SPLIT“ button again. The „SPLIT“
symbol in the top right-hand corner of the display disappears.
.
51

13. Accompaniment rhythms („STYLE“)
a) Select accompaniment rhythm
The digital piano provides a total of 120 different accompaniment
rhythms. The accompaniment rhythm selected can be played in the
background.
See the appendix for a list of all accompaniment rhythms.
To select an accompaniment rhythm („STYLE“), proceed as follows:
• Press the „STYLE“ button. This activates the accompaniment rhythm
settings.
• Use the control wheel or the „+“ and „-“ buttons next to it to select an
accompaniment rhythm.
• Some standard accompaniment rhythms are preset for the direct
selection buttons. Press this button once or twice to select the upper
or the lower accompaniment rhythm (see description above or below
the button).
b) Play/stop accompaniment rhythm, „START/STOP“ button
• Use the „START/STOP“ button to activate the accompaniment rhythm
selected as described in chapter 13. a). The beat display starts
flashing.
• Press the „START/STOP“ button again to stop playing the
accompaniment rhythm.
52

c) Automatic accompaniment, automatic bass chord, „A.B.C./MELODY OFF“ button
• Press the „A.B.C./MELODY OFF“ button to activate the „automatic
bass chord“ function (the „A.B.C.“ symbol is displayed in the top lefthand corner).
Depending on the desired chord, press one or more keys in the left
keyboard section (see chapter 12. b).
• Press the „A.B.C.“ button again to deactivate the function.
d) Sync start, „SYNC“ button
This function starts playing the accompaniment rhythm when you start
playing on the keyboard (the rhythm starts when the first key is
pressed).
• Press the „SYNC“ button. The beat display starts flashing.
• The accompaniment rhythm starts when the first key is pressed.
If the „A.B.C.“ function is active (see chapter 13. c), playback
only starts when a chord is played in the left keyboard
section.
e) Intro start, „INTRO/ENDING“ button
The accompaniment rhythm can be introduced or finished with a special
sound/rhythm (depending on the selected accompaniment rhythm).
• „Intro“
Press the „INTRO/ENDING“ button before starting the accompaniment
rhythm.
If you now press the „START/STOP“ button, an intro sound is played
before the regular accompaniment rhythm begins.
• „Ending“
If the accompaniment rhythm is already being played, pressing the
„INTRO/ENDING“ button will stop playback automatically after playing
a special ending sound.
53

f) Normal/variation mode, „FILL A“ and „FILL B“ buttons
Every accompaniment rhythm has two different variations („A“ and „B“). In general, „A“ (normal mode) is simpler (e.g. less drums) than „B“
(variation mode) (e.g. more drums are used in more variations).
• Press the „FILL A“ button in normal mode („A“) to play a special fill
followed by the normal accompaniment rhythm.
• Press the „FILL B“ button in normal mode („A“) to play a fill and then
switch to variation mode.
• Press the „FILL B“ button in variation mode („B“) to play a special fill
followed by the variation accompaniment rhythm.
• Press the „FILL A“ button in variation mode („B“) to play a fill and then
switch to normal mode.
Thanks to the fill, switching between normal and variation
mode is clean and smooth. The rhythm does not change
abruptly, which would have a disturbing effect.
Hold down the „FILL A“ or „FILL B“ button to extend the fill
accordingly.
Depending on your normal/variation mode selection the
„FILL A“ symbol or the „FILL B“ symbol is displayed on the
left-hand side.
g) Stop accompaniment rhythm
• As described is chapter 13. b), you can abruptly stop the
accompaniment rhythm by pressing the „START/STOP“ button.
• Press the „INTRO/ENDING“ button to stop playback after a special
ending sound (see chapter 13. e).
• Press the „SYNC“ button to stop playback or activate sync start. See
chapter 13. d).
54

h) Set volume of accompaniment rhythm, „ACC. VOL“ buttons
• Use the „ACC. VOL +“ and „ACC. VOL -“ buttons to set the volume of
the accompaniment rhythm.
• Press the two buttons simultaneously to set the volume to „00“
(muting). „OFF“ is displayed in the top left-hand corner.
i) Set tempo of accompaniment rhythm, „TEMPO“ buttons
• Press the „TEMPO +“ or „TEMPO -“ button shortly. The tempo value
flashes in the display for about 2 seconds.
While the display is flashing, use the control wheel to set the tempo
of the accompaniment rhythm (range from 30 to 280).
• You can also hold down the „TEMPO +“ and „TEMPO -“ buttons to
set the tempo.
• Hold down the two buttons simultaneously to restore the standard
tempo for the current accompaniment rhythm.
If you switch from one accompaniment rhythm to another during playback, the current tempo is maintained!
55

j) Selecting a chord
• Press the „A.B.C./MELODY OFF“ button to activate the „automatic
bass chord“ function (the „A.B.C.“ symbol is displayed in the top lefthand corner). See chapter 13. c).
• Depending on the desired chord, press one or more keys in the left
keyboard section (see chapter 12. b).
See the illustrations below for chord examples.
The keyboard is split at „F#“ by default which can be changed
in the function settings. See chapter 14. e).
k) Metronome, „METRO“ button
• Press the „METRO“ button to activate the metronome. A metronome
sound is played.
• You can set the volume in the function settings (see chapter 14. c).
• Press the „METRO“ button again to deactivate the metronome.
56

14. Function settings
Press the „FUNCTION“ button repeatedly to activate different functions that are described in the following sections. Press the „FUNCTION“
button repeatedly until the desired function type is displayed.
If no button is pressed for five seconds, the function menu is exited automatically.
a) „Transpose“ function
Press the „FUNCTION“ key repeatedly until „Transpos“ appears in the
display.
Use the control wheel or the „+“ and „-“ keys to select the desired value
(from „-12“ to „12“ halftones, default is „0“).
b) „Tune“ function
This function allows you to manually tune the piano.
Press the „FUNCTION“ key repeatedly until „Tune“ appears in the
display.
Use the control wheel or the „+“ and „-“ keys to select the desired value
(from „-50“ to „50“, default is „0“).
c) „Beat“ function
This function allows you to set the tempo of the metronome when no
accompaniment rhythm is activated.
Press the „FUNCTION“ key repeatedly until „Beat“ appears in the display.
Use the control wheel or the „+“ and „-“ keys to select the desired value
(„0“ or from „2“ to „9“, default is „4“).
d) „Touch“ function
This function allows you to set the sensitivity of the keys.
When „OFF“ is selected, touch sensitivity is inactive.
Press the „FUNCTION“ key repeatedly until „Touch“ appears in the
display.
Use the control wheel or the „+“ and „-“ keys to select the desired value
(select „OFF“, „1“, „2“, or „3“, default is „2“).
57

e) „Split Point“ function
This function allows you to determine at what position the keyboard is
split into two sections (e.g. left section for drums, right section for piano).
Press the „FUNCTION“ key repeatedly until „Split pt“ appears in the
display.
Use the control wheel or the „+“ and „-“ keys to select the desired value
(from „1“ to „88“, default is „34“). The value represents the number of
keys in the left section.
You can also set the split point by pressing a key. The
pressed key is the last key of the left section.
f) „DSP Level“ function
Press the „FUNCTION“ key repeatedly until „DSP Level“ appears in
the display.
Use the control wheel or the „+“ and „-“ keys to select the desired value
(from „OFF“ to „7“, default is „2“).
g) „MIDI IN Channel“ function
Press the „FUNCTION“ key repeatedly until „Midi In“ appears in the
display.
Use the control wheel or the „+“ and „-“ keys to select the desired value
(from „1“ to „16“, default is „ALL“).
h) „MIDI OUT Channel“ function
Press the „FUNCTION“ key repeatedly until „Midi Out“ appears in the
display.
Use the control wheel or the „+“ and „-“ keys to select the desired value
(from „1“ to „16“, default is „1“).
i) „Power Off“ function
In order to save energy, the Digital Piano turns itself off after 30 minutes if no key is touched. To re-activate the keyboard, turn it off and on again.
You can also set a time of 60 minutes or turn off the function, if you don’t need it.
Press the „FUNCTION“ key, until „Power Off“ appears in the LC display.
Select the desired value („OFF“, „30” and „60“ are adjustable) with the scroll or the „+“ or „-“ key.
58

15. Mixer
Press the „MIXER“ button repeatedly until the desired track („Track“)
appears in the display. Use the control wheel or the „+“ and „-“ buttons
to set the volume for the respective audio track.
If no button is pressed for some seconds, the settings are accepted
and the mixer menu is exited automatically.
Display Setting range Default setting
„Drum Vol“ 000-031 020
„Bass Vol“ 000-031 018
„Oc Vol“ 000-031 021
„VoiceR1“ 000-031 024
„Voice R2“ 000-031 012
„Voice L“ 000-031 012
To deactivate an audio track, first select the audio track as described
above using the „MIXER“ button. Then press the „+“ und „-“ buttons
simultaneously.
59

16. Memory
The digital piano has 4 memory banks with 4 memory positions each. This provides a total of 16 memory positions to save settings (e.g. a
combination of accompaniment rhythm and instrument). These settings can be loaded quickly by pressing a button.
The memory positions have already been preset with various combinations.
a) Select memory bank and memory position, load settings
Press the „BANK“ button repeatedly until the desired memory bank is
displayed (e.g. memory bank as illustrated to the right, „MEMORY 02“
is displayed).
Then press „M1“, „M2“, „M3“, or „M4“ to load the settings from the desired
memory position.
b) Save settings
First, use the „BANK“ button to select one of the four memory banks.
Hold down the „STORE“ button and press „M1“, „M2“, „M3“, or „M4“.
The current settings are now saved at the memory position of the
memory bank.
The saved settings include data of instruments, dual sound effect,
accompaniment rhythm, tempo, function settings, mixer, volume,
variation, A.B.C. values etc.
The data is stored even when the digital piano is switched off!
c) Delete memory
Hold down the „STORE“ and „M1“ buttons simultaneously and turn on
the digital piano. This deletes all memory positions any restores factory
settings.
Press the „+“ and „-“ buttons simultaneously and turn on the digital
piano to delete all memory positions and a recording „RECORD“. See
chapter 18.
60

17. „O.T.S.“, „One Touch Setting“
Every accompaniment rhythm has 4 different presettings. For instance,
the manufacturer has selected an instrument that suits the
accompaniment rhythm.
• First select the accompaniment rhythm.
• Press the „O.T.S.“ button. „O.T.S.“ is displayed on the right-hand side.
• Use „M1“, „M2“, „M3“, or „M4“ to load one of the four presettings. The
digital piano switches to „A.B.C.“ mode (automatic accompaniment,
„automatic bass chord“).
• To deactivate the „O.T.S.“ function, press the „O.T.S.“ button again.
61

18. Recording function
a) Prepare record mode
• Press the „REC“ button. The „RECORD“ symbol is displayed on the
right-hand side and the beat display starts flashing. The digital piano
is now ready for recording. However, the digital piano does not start
recording yet!
• If desired, you can now select another instrument or a different
accompaniment rhythm, set the tempo etc.
b) Start recording
To start recording, press the START/STOP button or start playing on
the keyboard.
c) Stop recording
Press the „REC“ button shortly to stop recording.
If memory is full, the recording stops automatically and „Full“ is displayed.
d) Play back recording
Press the „PLAY/STOP“ button shortly to play back the recording or
stop playback.
If no recording is available, „Empty“ is displayed.
e) Delete memory
Press the „+“ and „-“ buttons simultaneously and turn on the digital
piano to delete the recording and all memory positions from „M1“ to
„M4“. See chapter 16.
Hold down the „REC“ and „PLAY/STOP“ buttons simultaneously and
turn on the digital piano to delete the recording only.
62

19. Songs
The digital piano provides 60 different songs. For every song you can disable the melody and play it yourself.
Press the „SONG“ button. „SONG“ is displayed.
Press the „START/STOP“ button the start the song or stop it.
When a song has been stopped, you can exit song mode by pressing
one of these buttons: „STYLE“, „VOICE“, „DUAL“ or „LOWER“.
Select the desired song using the control wheel or the „+“ and „-“ buttons.
The song starts with its individual intro rhythm (negative values in the
field marked on the right).
Press the „O.T.S./MELODY OFF“ button to turn on/off the melody of
the currently played song.
When the melody is turned off, „MELODY OFF“ is displayed on the
bottom left-hand side.
If you press the „SONG“ button to start playback, all songs are played one after another.
If you press the „START/STOP“ button to start a song, the song is played repeatedly.
63

20. Handling
Observe the safety instructions and all other information in these instructions
Place the device on a flat, solid and sufficiently large surface. Do not place the device on valuable surfaces to avoid pressure marks
of scratches. Use a suitable mat, if needed. The weight of the digital piano might leave marks on carpets, linoleum or cork flooring.
Avoid the following adverse ambient conditions at the place of installation or during transport:
- direct sunlight
- moistness or high humidity
- extremely cold or hot temperatures
- dust or flammable gases, fumes or solvents
- strong vibrations
- strong magnetic fields such as near machines or loudspeakers
Never switch on the device immediately after taking it from a cold to a warm environment. The condensation water generated could
destroy the product. Moreover, there is the risk of a deadly electric shock!
Allow the device to reach room temperature before switching it on. This process may take several hours.
Make sure that the insulation of the entire product is not damaged or destroyed. Do not open the device.
Always check the product for damage before using it!
If the product is damaged, do NOT connect it to the mains supply. Take the product to a specialized workshop or dispose of it in an
environmentally friendly way.
If the product is not used for a longer period of time, disconnect it from the mains voltage.
Never insert pointed objects (e.g. ballpoint pens, pins or needles, paper clips etc.) into the air slits or openings of the device. This will
destroy the device and poses the danger of a deadly electric shock.
When installing the device, make sure none of the connection cables (e.g. mains cable, pedal cable or headphone cable) are bent or
squeezed.
Install the cables so that no-one can trip over them.
Regularly check the technical safety of the product, e.g. for damage of the housing.
If it can be assumed that safe operation is no longer possible, the device must be turned off and precautions must be to be taken to
ensure that it is not used unintentionally. Turn off the product and disconnect it from the mains supply.
It can be assumed that safe operation is no longer be possible if
- the device shows visible damage,
- the device does not operate any longer and
- after it has been stored under unfavourable conditions over a period of time or
- after it has been exposed to heavy stress during transport.
64

21. Maintenance and cleaning
The product does not require any maintenance. You should never open or disassemble it. Repairs may only be carried out by a specialist or
specialist workshop.
Use a dry, lint-free and soft cloth to clean the product.
We recommend using a suitable cover to protect the product against dust if it is not used over a period of time.
22. Disposal
At the end of its service life, dispose of the product according to the relevant statutory regulations.
23. Specifications
Operating voltage: ...................................... 230 V/AC, 50 Hz
Dimensions: ............................................... Approx. 1419 x 460 x 832 mm (W x D x H)
Weight: ....................................................... Approx. 40 kg
Keys: .......................................................... 88
Instruments: ............................................... 210
Accompaniment rhythms: ........................... 120
Songs: ........................................................ 60
Polyphony: ................................................. 64 notes (without DSP effect), 38 notes (with DSP effect)
Memory positions: ...................................... 16 (4 memory banks with 4 memory positions each)
Recording memory: .................................... 1
Internal loudspeakers: ................................ Stereo, 8 ohm, 2 x 25 W
Connections: .............................................. AUX OUT (line level), headphones, pedals, USB
65

24. Appendix A: Instruments
66

67

25. Appendix B: Accompaniment rhythms
68

26. Appendix C: Songs
69

Table des matières
1. Introduction ............................................................................................................................................................................................72
2. Utilisation conforme ..............................................................................................................................................................................72
3. Contenu de la livraison ......................................................................................................................................................................... 73
4. Explication des symboles ..................................................................................................................................................................... 73
5. Consignes de sécurité ........................................................................................................................................................................... 73
6. Description des pièces constitutives ................................................................................................................................................... 75
7. Assemblage ............................................................................................................................................................................................76
a) Assembler les pièces latérales et la pédale ........................................................................................................................................76
b) Visser la face arrière ........................................................................................................................................................................... 76
c) Monter la pièce supérieure avec le clavier .......................................................................................................................................... 77
d) Relier la pédale à la pièce supérieure, fixer le câble, installer l'appareil ..............................................................................................77
8. Eléments de commande ........................................................................................................................................................................78
a) Pièce supérieure ................................................................................................................................................................................. 78
b) Face arrière ......................................................................................................................................................................................... 78
c) Pédales ............................................................................................................................................................................................... 78
d) Tableau de commande ........................................................................................................................................................................ 79
e) Afficheur à cristaux liquides (LCD) ......................................................................................................................................................80
Page
9. Branchements ........................................................................................................................................................................................81
a) Prises pour casque d´écoute............................................................................................................................................................... 81
b) Sortie audio « AUX OUT » ..................................................................................................................................................................81
c) USB .....................................................................................................................................................................................................81
d) Pédales ............................................................................................................................................................................................... 81
10. Mise en serivce, branchement à la tension secteur ............................................................................................................................82
11. Lire des exemples musicaux ................................................................................................................................................................ 83
12. Instruments et effets ..............................................................................................................................................................................84
a) Choisir l'instrument (« VOICE ») ......................................................................................................................................................... 84
b) Effet double son (« DUAL VOICE »), touche « DUAL » ......................................................................................................................84
c) Fonction Split, touche « SPLIT » ......................................................................................................................................................... 85
13. Rythmes d'accompagnement (« STYLE ») .......................................................................................................................................... 86
a) Sélectionner le rythme d´accompagnement ........................................................................................................................................86
b) Lire/arrêter le rythme d'accompagnement, touche « START/STOP » ................................................................................................. 86
c) Accompagnement automatique, Auto-Bass-Chord, touche « A.B.C./MELODY OFF » ....................................................................... 87
d) Démarrage retardé, touche « SYNC » ................................................................................................................................................ 87
e) Démarrage par son d'introduction, touche « INTRO/ENDING » ......................................................................................................... 87
f) Mode normal/variation, touches « FILL A » et « FILL B » ...................................................................................................................88
g) Terminer le rythme d´accompagnement .............................................................................................................................................. 88
h) Régler le volume du rythme d'accompagnement, touches « ACC. VOL » ......................................................................................... 89
i) Régler la vitesse du rythme d'accompagnement, touches « TEMPO » ...............................................................................................89
j) Sélectionner un accord ........................................................................................................................................................................ 90
k) Métronome, touche « METRO » ......................................................................................................................................................... 90
70

Page
14. Réglages des fonctions ......................................................................................................................................................................... 91
a) Fonction « Transpose »....................................................................................................................................................................... 91
b) Fonction « Tune » ............................................................................................................................................................................... 91
c) Fonction « Beat » ................................................................................................................................................................................ 91
d) Fonction « Touch » ..............................................................................................................................................................................91
e) Fonction « Split-Point » ....................................................................................................................................................................... 92
f) Fonction « DSP-Level » ...................................................................................................................................................................... 92
g) Fonction « MIDI-IN-Channel » ............................................................................................................................................................ 92
h) Fonction « MIDI-OUT-Channel »......................................................................................................................................................... 92
i) Fonction « Power Off » ....................................................................................................................................................................... 92
15. Mixage .....................................................................................................................................................................................................93
16. Mémoire ..................................................................................................................................................................................................94
a) Sélectionner la base de mémoire et la mémoire, charger les réglages ...............................................................................................94
b) Enregistrer les réglages ...................................................................................................................................................................... 94
c) Effacer la mémoire .............................................................................................................................................................................. 94
17. « O.T.S. », « One-Touch-Setting » ........................................................................................................................................................95
18. Fonction d'enregistrement ....................................................................................................................................................................96
a) Préparer le mode d'enregistrement .....................................................................................................................................................96
b) Démarrer l'enregistrement ................................................................................................................................................................... 96
c) Terminer l'enregistrement .................................................................................................................................................................... 96
d) Reproduire l'enregistrement ................................................................................................................................................................ 96
e) Effacer la mémoire ..............................................................................................................................................................................96
19. Chansons ................................................................................................................................................................................................97
20. Manipulation ...........................................................................................................................................................................................98
21. Maintenance et nettoyage ..................................................................................................................................................................... 99
22. Elimination des éléments usés .............................................................................................................................................................99
23. Caractéristiques techniques .................................................................................................................................................................99
24. Annexe A : Instruments ....................................................................................................................................................................... 100
25. Annexe B : Rythmes d´accompagnement ......................................................................................................................................... 102
26. Annexe C : Chansons ..........................................................................................................................................................................103
71

1. Introduction
Chère cliente, cher client,
Nous vous remercions de l’achat du présent produit.
Le produit est conforme aux exigences des directives européennes et nationales en vigueur.
Le mode d'emploi suivant correspond au produit mentionné ci-dessus. Il contient des consignes importantes pour la mise
en service et la manipulation du produit. Il faut respecter ces instructions, même si ce produit est transmis à tierce personne.
Conservez le présent mode d'emploi afin de pouvoir le consulter à tout moment!
Tous les noms d’entreprises et appellations de produits contenus dans ce mode d’emploi sont des marques déposées des propriétaires
correspondants. Tous droits réservés.
Pour toutes vos questions techniques, veuillez vous adresser à :
Tél. : 0892 897 777
Fax : 0892 896 002
e-mail : support@conrad.fr
Du lundi au vendredi de 8h00 à 18h00, le samedi de 8h00 à 12h00
Tél. : 0848/80 12 88
Fax : 0848/80 12 89
e-mail : support@conrad.ch
Du lundi au vendredi de 8h00 à 12h00 et de 13h00 à 17h00
2. Utilisation conforme
Le produit sert à créer des sons que vous pouvez jouer par les touches. Ils sont reproduits via les haut-parleurs incorporés. Il est possible de
raccorder un écouteur ou un amplificateur externe. Le produit est équipé d'un port USB qui vous permet de le relier à un ordinateur.
L'intégralité du produit ne doit être utilisé que dans des locaux intérieurs secs. Il faut impérativement veiller à ce que l’appareil ne soit ni mouillé
ni humide.
Toute utilisation autre que celle décrite précédemment provoque l'endommagement de ce produit. De plus, elle peut occasionner des risques de
courts-circuits, d'incendie, d'électrocution, etc. Toute transformation ou modification de l'ensemble du produit est interdite. Il est interdit d'ouvrir
le boîtier.
Ce produit n’est pas un jouet et ne convient pas aux enfants de moins de 14 ans.
Tenir compte de toutes les consignes de sécurité du présent mode d’emploi! Celles-ci contiennent des informations importantes
relatives à l'utilisation du produit.
72

3. Contenu de la livraison
• Piano numérique (pièce supérieure, pièce latérale gauche, pièce latérale droite, face arrière, boîte des pédales, matériel de montage)
• Mode d'emploi
4. Explication des symboles
Ce symbole est utilisé pour signaler un danger pour votre santé, par ex. par une décharge électrique.
Un point d'exclamation placé dans un triangle attire l'attention sur des dangers particuliers lors du maniement, du fonctionnement et
de l'utilisation.
Le symbole de la « flèche » renvoie à des conseils et consignes d'utilisation particuliers.
5. Consignes de sécurité
Tout dommage résultant d'un non-respect du présent mode d'emploi a pour effet d'annuler la garantie. Nous déclinons
toute responsabilité pour les dommages consécutifs !
De même, nous n'assumons aucune responsabilité en cas de dommages matériels ou corporels résultant d'une utilisation
de l'appareil non conforme aux spécifications ou d'un non-respect des présentes consignes de sécurité ! De tels cas
entraînent l’annulation de la garantie.
• Pour des raisons de sécurité et d´homologation (CE), il est interdit de transformer et/ou de modifier le produit de son propre chef.
• Comme source de tension pour le bloc secteur interne, n'utilisez qu'une prise de courant en état de marche (230 V/CA, 50 Hz)
connectée au réseau d'alimentation public.
• Ce produit n'est pas un jouet, maintenez-le hors de la portée des enfants. Les enfants ne sont pas en mesure d'évaluer les risques
résultant de la manipulation des appareils électriques.
• Toute personne qui utilise, monte, installe, met la table de mixage en service ou effectue l´entretien doit être formée et qualifiée en
conséquence et respecter la notice d’utilisation.
• Ne touchez jamais le câble d'alimentation ni la fiche secteur avec les mains humides ou mouillées ! Risque d’électrocution
mortelle !
• Si le cordon de secteur est endommagé, ne le touchez pas. Mettez tout d'abord la prise de courant correspondante hors tension
(p. ex. par le biais du coupe-circuit automatique correspondant), puis retirez avec précaution la fiche secteur de la prise de
courant. N’utilisez plus le produit ensuite ; amenez-le dans un atelier spécialisé. Un câble secteur défectueux doit être remplacé
uniquement par un spécialiste.
• Lors de l'installation ou du montage du produit, veillez à ce que le cordon secteur ne soit pas écrasé ou endommagé par des
arêtes vives.
• N'exposez pas l'appareil ni à des températures extrêmes, des gouttes ou projections d'eau, de fortes vibrations ni à de fortes
contraintes mécaniques.
73

• Ne placez pas de récipients comportant des liquides, p. ex. verres, seaux, vases ou plantes, sur ou à proximité immédiate de
l'appareil. Les liquides pourraient pénétrer à l'intérieur du boîtier et compromettre sa sécurité électrique. Risque important d'incendie
ou d'électrocution mortelle !
Dans ce cas, mettez la prise de courant correspondante hors tension (déconnectez p. ex. le coupe-circuit automatique) et retirez
ensuite la fiche secteur de la prise de courant. Débranchez tous les câbles de l'appareil. L'intégralité du produit ne doit plus être
remis en service. Confiez-le à un atelier spécialisé.
• Ne placez jamais, par exemple, une bougie allumée sur l'appareil ou à sa proximité, car cela peut constituer une source d'incendie.
• Ne laissez pas l'appareil en marche sans surveillance.
• N'utilisez l'appareil que dans des régions d'un climat modéré et non pas dans des régions d'un climat tropical.
• Ne laissez pas traîner négligemment le matériel d’emballage. Il pourrait constituer un jouet dangereux pour les enfants.
• Dans les installations industrielles, il convient d'observer les prescriptions de prévention des accidents relatives aux installations
et aux matériels électriques des associations professionnelles.
• Dans les écoles, les centres de formation, les ateliers de loisirs et de réinsertion, la manipulation d'appareils alimentés par le
secteur doit être surveillée par un personnel responsable, spécialement formé à cet effet.
• En cas de doute quant au raccordement correct de l’appareil ou lorsque vous avez des questions pour lesquelles vous ne trouvez
aucune réponse dans le présent mode d’emploi, contactez notre service de renseignements techniques ou un autre spécialiste.
74

6. Description des pièces détachées
1
10
4
12
2
3
1 Pièce supérieure avec clavier
2 Pièce latérale droite
3 Pièce latérale gauche
4 Face arrière
5 Pédales
6 Vis à poignée (4 pièces)
5
6
7
8
9
11
7 Vis de Ø6mm x 30mm (4 pièces)
8 Vis de Ø4mm x 15mm (5 pièces)
9 Support de câble avec pad adhésif
10 Câble d'alimentation
11 Vis de Ø6mm x 12mm (2 pièces)
12 Câble de la pédale
75

7. Assemblage
En raison du poid et de la taille importants des pièces constitutives il est très recommandé de se faire aider par une seconde
personne ! Le renverserement des pièces lourdes ne risque pas seulement de blesser des personnes, mais aussi d'endommager le
produit.
a) Assembler les pièces latérales et la pédale
Vis requis : Ø6mm x 30mm, 4 pièces
4 x
Assemblez les deux pièces latérales et la pédale à l'aide des quatre vis (Ø6mm x 30mm) comme indiqué dans la figure. Ne pas coincer les
pièces latérales, ne pas forcer lors du vissage.
b) Visser la face arrière
Vis requis : Ø4mm x 15mm, 5 pièces
Ø6mm x 12mm, 2 pièces
2 x
5 x
Monter la face arrière à l'aide de cinq vis (Ø4mm x 15mm) sur la pédale et à l'aide de deux vis (Ø6mm x 12mm) sur les deux pièces latérales,
comme indiqué dans la figure.
76

c) Monter la pièce supérieure avec le clavier
Placez la partie supérieure sur les deux pièces latérales. Les quatre vis à poignée permettent de fixer la partie supérieure.
d) Relier la pédale à la partie supérieure, fixer le câble, installer l'appareil
Reliez le connecteur de la pédale à la douille correspondante sur la partie supérieure.
Les deux supports de câble permettent de fixer aussi bien le câble d'alimentation que le câble de la pédale sur le côté de la face arrière.
Ensuite, installez le piano numérique à l'emplacement souhaité. Choisissez une surface suffisamment grande, plane et stable. Les pieds
réglables permettent de compenser des inégalités du sol pour permettre que le piano numérique soit stable et ne vacille pas.
77

8. Éléments de commande
a) Partie supérieure
2
1 Tableau de commande
2 Prises pour casque d'écoute
3 Pupitre
4 Clavier
Le clavier est doté d'un revêtement qui se laisse facilement rentrer et ressortir.
1 3
4
b) Face arrière
5 Pédales
6 Câble d'alimentation
7 Port USB
8 Sortie « AUX OUT »
c) Pédales
9 Pédale « Soft »
10 Pédale « Sostenuto »
11 Pédale « Sustain »
7 8
5
9
6
10 11
78

d) Tableau de commande
1 Interrupteur marche/arrêt (« POWER »)
2 Régulateur principal du volume (« VOLUME »)
3 Touches de sélection directe du rythme d'accompagnement (« STYLE »)
4 Touches de fonction pour le rythme d'accompagnement (« START/STOP », « SYNC », « INTRO/ENDING », « FILL A », « FILL B »,
« A.B.C./MELODY OFF »)
5 Réglage du volume des pistes d'accompagnement (« ACC VOL +/- »)
6 Touches « TEMPO - » et « TEMPO + » pour le réglage de la vitesse
7 Touche « MIXER » pour le réglage du volume des pistes sonores
8 Touche « FUNCTION » pour la sélection des réglages des fonctions
9 Touche « METRO » pour la mise en marche/à l'arrêt du métronome
10 Touche « STYLE » pour la sélection d'un rythme d'accompagnement
11 Touche « STYLE » pour la sélection d'un rythme d'accompagnement
12 Touche « SONG » pour la sélection d'une chanson
13 Mollette de réglage et touches pour « + » et « - »
14 Touches de sélection directe des instruments (« VOICE »)
15 Touche « BANK » pour la sélection des bases de mémoire 1 à 4
16 Touche « STORE » pour enregistrer des réglages
17 Touches « M1 », « M2 », « M3 » et « M4 » pour l'enregistrement ou l'appel des réglages
18 Touche « O.T.S. » (One-Touch-Setting)
19 Touche « DUAL » pour la fonction de double son
20 Touche « SPLIT » pour diviser le clavier en deux parties (par ex. batterie à gauche, piano à droite)
21 Touche « REC » pour l'enregistrement
22 Touche « PLAY/STOP » pour lancer ou interrompre la reproduction d'un enregistrement
79

e) Afficheur à cristaux liquides (LCD)
1 Symbole pour « A.B.C. »
2 Symbole pour « FILL A »
3 Symbole pour « FILL B »
4 Symbole pour « MELODY OFF »
5 Symbole pour « DUAL »
6 Symbole pour « SPLIT »
7 Symbole pour « TOUCH »
8 Symbole pour « RECORD »
9 Symboles pour les différents modes de réglage (par ex. rythme d'accompagnement « STYLE » etc.)
10 Champ d'affichage « CHORD » pour les accords
11 Champ d'affichage « TEMPO » pour la vitesse
12 Champ d'affichage « MEASURE »
13 Champ d'affichage « BEAT »
14 Champ d'affichage « MEMORY/TICK/O.T.S. »
15 Champ d'affichage « DSP »
80

9. Branchements
a) Prises pour casque d'écoute
Deux prises pour casque d'écoute (1) et (2) se trouvent sur la face
inférieure.
Lors du branchement d'un casque d'écoute à la prise (1), la reproduction
se fait aussi bien par le casque d'écoute que par les haut-parleurs du
piano numérique.
Lors du branchement d'un casque d'écoute à la prise (2), les hautparleurs du piano numérique seront éteints, la reproduction ne se fait
que par le casque d'écoute.
Ne branchez un casque d'écoute que lorsque le volume du pano numérique est réduit sur le minimum.
Si vous utilisez un casque d'écoute, ne réglez qu'un volume faible pour ne pas risquer des dommages auditifs !
b) Sortie audio « AUX OUT »
Les branchements « AUX OUT » sur la face arrière mettent à disposition
un signal stéréo Line permettant ainsi par ex. le branchement à une
chaîne HiFi.
Reliez ces prises par un câble approprié à une entrée Line de la chaîne
HiFi (ne pas utiliser de prise Phono !).
Réglez aussi bien le volume du piano numérique que celui de la chaîne
HiFi sur le minimum avant de relier les deux appareils.
c) USB
Connectez la douille USB du piano numérique via un câble USB
approprié à un port USB de votre ordinateur.
Les pilotes requis sont déjà intégrés dans le système d'exploitation (au
moins Windows ME, Windows XP/Vista recommandés)
Sous Windows, suivez les instructions concernant l'installation.
d) Pédales
Si cela n'est pas encore fait lors du montage, reliez le connecteur des
pédales à la prise corresondante du piano numérique.
81

10. Mise en serivce, branchement à la tension secteur
Procédez de la manière suivant :
1. Réglez le volume sonore sur le minimum (bouton de réglage tournant
« VOLUME »).
2. Eteignez le piano numérique.
3. Branchez la fiche de secteur du piano numérique à une prise de
courant (230 V/CA, 50 Hz).
4. Allumez le piano numérique, l'afficheur s'allumera.
Tournez le bouton de réglage du volume (« VOLUME ») un petit peu
vers la droite.
12
34
Avant d'éteindre l'appareil, réduisez le volume sur le minium (bouton de réglage « VOLUME »), puis éteignez le piano numérique.
C'est seulement après que vous pouvez débrancher le piano numérique de la tension du secteur en retirant la fiche de secteur de la
prise de courant.
82

11. Lire des exemples musicaux
Afin de montrer la puissance du piano numérique, vous pouvez sélectionner et reproduire un total de 3 exemples musicaux.
Appuyez simultanément sur les touches « VOICE » et « STYLE », afin
de démarrer la reproduction de premier exemple musical.
Réglez le volume désiré avec le bouton de réglage du volume
(« VOLUME »).
Vous pouvez sélectionner l'un des 3 exemples musicaux à l'aide de la
molette de réglage ou les touches à côté « + » et « - ».
Pour terminer la lecture de l´exemple musical, appuyez de nouveau
simultanément sur les deux touches « VOICE » et « STYLE ».
Comme alternative, vous pouvez terminer la lecture en appuyant sur la
touche « START/STOP ».
83

12. Instruments et effets
a) Choisir l'instrument (« VOICE »)
Le piano numérique dispose au total de plus de 210 instruments
différents.
Après la mise en marche, l'instrument « 001 » (« GrdPiano » = « Grand
Piano ») s'active toujours par défaut. En haut à gauche de l'écran
apparaît le mode d'instruments « VOICE R1 ».
Dans l'annexe, vous trouverez un tableau qui liste tous les
instruments.
Pour choisir un instrument, procédez comme suit :
• Appuyez sur la touche « VOICE ».
• Choisissez ensuite l'instrument souhaité. Utilise à cet effet ou bien la
molette de réglage ou les deux touches à côté « + » et « - ».
• Quelques instruments standard sont mémorisés aux touches de
sélection directe. Appuyez une ou deux fois sur cette touche pour
choisir l'instrument supérieure ou inférieure (voir inscription sur ou en
dessous la touche).
• A présent, vous pouvez jouer de l'instrument choisi au moyen du
clavier du piano numérique.
b) Effet double son (« DUAL VOICE »), touche « DUAL »
Grâce à cette fonction, lorsque vous actionnez une touche du clavier
du piano numérique, vous pouvez jouer simultanément de deux
instruments, par ex. d'une piano et d'une batterie.
Veuillez tenir compte du fait que cela n'est valable que pour
la partie droite du clavier, voir chapitre 12. c), fonction Split.
• Choisissez d'abord le premier instrument, si cela n'est pas encore
fait (voir chapitre 12. a), par ex. « 001 GrdPiano ».
• Appuyez sur la touche « DUAL », un symbole est affiché en haut à
droit, dans le champt d'affichage « DUAL ».
En haut à gauche de l'écran apparaît « VOICE R2 » et l'instrumet
prédéfini « 050 Strings 2 » est affiché.
Le piano numérique joue maintenant simultanément des instruments
« 001 » et « 050 ».
• Si vous le souhaitez, vous pouvez choisir un autre second instrument
à l'aide de la molette de réglage ou des deux touches à côté « + » et
« - ».
• Appuyez de nouveau sur la touche « DUAL » pour désactiver l´effet
double son.
84

c) Fonction Split, touche « SPLIT »
Le clavier se divise en deux parties. La partie gauche peut par ex. être
utilisée pour un instrument de batterie et la partie drotie pour un
instrument classique.
Cette division est également valable lors de l'activation de l'effet double
son, voir à ce sujet chapitre 12. b.).
• Choisissez d'abord le premier instrument, si cela n'est pas encore
fait (voir chapitre 12. a), par ex. « 001 ».
• Appuyez sur la touche « SPLIT » (un symbole est affiché en haut à
droit, dans le champ d'affichage « SPLIT »).
En haut à gauche de l'écran apparaît « VOICE L » et l'instrumet
prédéfini « 049 Strings1 » est affiché.
La partie gauche du clavier est maintenant réservée par le second
instrument.
Le clavier se divise au point du « F# », cela peut pourtant
être modifié dans les réglages des fonctions, voir à ce sujet
chapitre 14. e).
• Si vous le souhaitez, vous pouvez choisir à l'aide de la molette de
réglage ou des deux touches à côté « + » et « - » le second instrument,
par ex. « 050 », pour la partie gauche du clavier.
• Appuyez de nouveau sur la touche « SPLIT » pour désactiver la
fonction, le symbole en haut à droit de l'écran, dans le champ
d'affichage « SPLIT », disparaîtra.
.
85

13. Rythmes d´accompagnement (« STYLE »)
a) Sélectionner un rythme d'accompagnement
Le piano numérique dispose au total de plus de 120 rythmes
d'accompagnements différents. Le rythme d'accompagnement choisi
peut être reproduit dans le fond.
Dans l'annexe, vous trouverez un tableau qui liste tous les
rythmes d'accompagnement.
Pour choisir un rythme d'accompagnement (« STYLE »), procédez
comme suit :
• Appuyez sur la touche « STYLE ». Cela active le réglage d'un rythme
d'accompagnement.
• Choisissez ensuite le rythme d'accompagnement souhaité en utilisant
la molette de réglage ou les deux touches à côté « + » et « - ».
• Quelques rythmes d'accompagnement standard sont mémorisés aux
touches de sélection directe. Appuyez une ou deux fois sur cette
touche pour choisir le rythme d'accompagnement supérieure ou
inférieure (voir inscription sur ou en dessous la touche).
b) Lire/arrêter le rythme d'accompagnement, touche « START/STOP »
• La touche « START/STOP » permet de lancer le rythme
d'accompagnement choisi dans chapitre 13. a). L'affichage de la
mesure clignote.
• Appuyez de nouveau sur la touche « START/STOP » pour achever
la lecture.
86

c) Accompagnement automatique, Auto-Bass-Chord, touche « A.B.C./MELODY OFF »
• Appuyez sur la touche « A.B.C./MELODY OFF », pour activer la
fonction dite « Auto-Bass-Chord » (en haut à gauche de l'écran, dans
le champ d'affichage « A.B.C. », apparaît un symbole).
Selon l'accord souhaité, appuyez sur l'une ou sur plusieurs touches
dans la partie gauche du clavier (voir chapitre 12. b).
• Réappuyez sur la touche « A.B.C. » pour désactiver cette fonction.
d) Démarrage retardé, touche « SYNC »
Cette fonction permet de ne faire démarrer le rythme d'accompagnement
choisi que lorsque vous commencez à jouer sur le clavier (rythme
démarre lors du premier actionnement d'une touche du clavier).
• Appuyez sur la touche « SYNC ». L'affichage de la mesure commence
à clignoter sur l'écran LC.
• Lors de la première pression sur une touche du clavier, le rythme
automatique démarre.
Lorsque la fonction « A.B.C. » (voir chapitre 13. c) est
activée, le rythme ne démarre que si un accord de la partie
gauche du clavier est choisi.
e) Démarrage par son d'introduction, touche « INTRO/ENDING »
La lecture du rythme d'accompagnement peut être introduite ou terminée
par un son/rythme spécial (en fonction du rythme d'accompagnement
choisi).
• « Intro », introduction
Appuyez sur la touche « INTRO/ENDING » avant de démarrer la
lecture du rythme d´accompagnement.
Si vous appuyez maintenant sur la touche « START/STOP », un son
d'introduction sera lu avant de passer à la lecture du rythme
d'accompagnement normal.
• « Ending », Terminaison
Si un rythme d'accompagnement est en train d'être lu et que vous
appuyez sur la touche « INTRO/ENDING », la lecture du rythme
d'accompagnement est automatiquement terminée par un son final
spécial.
87

f) Mode normal/variation, touches « FILL A » et « FILL B »
Chaque rythme d´accompagnement existe en deux variations (« A » et « B »). En règle général, la version « A » (mode normal) est la plus simple
(par ex. moins de sons de batterie) tandis que la version « B » (mode variation) est plus sophistiquée (par ex. plus de sons de batterie, différentes
batteries etc.).
• En mode normal (« A »), un rythme d'insertion spécial est reproduit
lorsque vous appuyez sur la touche « FILL A », ensuite le rythme
d'accompagnement normal continue.
• Si vous appuyez en mode normal (« A ») sur la touche « FILL B », un
rythme d'insertion spécial est reproduit et le rythme
d'accompagnement passe ensuite au mode variation.
• En mode variation (« B »), un rythme d'insertion spécial est reproduit
lorsque vous appuyez sur la touche « FILL B », ensuite le rythme
d'accompagnement du mode variation continue.
• Si vous appuyez en mode variation (« B ») sur la touche « FILL A »,
un rythme d'insertion spécial est reproduit et le rythme
d'accompagnement passe ensuite au mode normal.
Le rythme d'insertion permet une transition propre et douce lors du
changement entre les modes normal et variation. Cela évite un
brusque changement ce qui aurait un effet gênant.
Si vous maintenez enfoncé les touches « FILL A » ou « FILL B » de
façon prolongée, la durée de lecture du rythme d'insertion se prolonge
de manière correspondante.
En fonction du mode choisi (normal ou variation), l'écran affiche un
petit symbole sur le côté gauche dans le champ d'affichage « FILL A
» ou « FILL B ».
g) Terminer le rythme d'accompagnement
• Comme déja décrit au chapitre 13. b), vous pouvez arrêter
immédiatement la lecture du rythme d'accompagnement au moyen
de la touche « START/STOP »..
• La touche « INTRO/ENDING » permet de terminer le rythme après la
reproduction d'un son final spécial (voir chapitre 13. e).
• La touche « SYNC » permet de terminer la lecture et d'activer le
démarrage retardé, voir chapitre 13. d).
88

h) Régler le volume du rythme d'accompagnement, touches « ACC. VOL »
• Les deux touches « ACC. VOL + » et « ACC. VOL - » permettent de
régler le volume du rythme d'accompagnement.
• En appuyant simultanément sur les deux touches, le volume est réglé
sur « 00 » gestellt (son éteint), l'écran affiche en haut à gauche
« OFF ».
i) Régler la vitesse du rythme d'accompagnement, touches « TEMPO »
• Appuyez courtement sur la touche « TEMPO + » ou « TEMPO - », la
valeur de la vitesse clignotera alors pendant environ deux secondes
sur l'écran.
Pendant que l'affichage clignote, vous pouvez modifier la vitesse du
rythme d'accompagnement au moyen de la molette de réglage (plage de réglage de 30 à 280).
• Vous pouvez aussi appuyer plus longuement sur la touche
« TEMPO + » ou « TEMPO - » pour réglér la vitesse.
• Maintenez enfoncé les deux touches en même temps pour rétablir le
réglages défaut de la vitesse du rythme d'accompagnement actuel.
Si un autre rythme d'accompagnement est choisi pendant la lecfure d'un rythme d'accompagnement, la vitesse actuelle sera maintenue !
89

j) Sélectionner un accord
• Appuyez sur la touche « A.B.C./MELODY OFF », pour activer la
fonction dite « Auto-Bass-Chord » (en haut à gauche de l'écran, dans
le champ d'affichage « A.B.C. » apparaît un symbole), voir chapitre
13. c).
• Selon l'accord souhaité, appuyez sur l'une ou sur plusieurs touches
dans la partie gauche du clavier (voir chapitre 12. b).
Voici des exemples pour différents accords dans les figures en bas.
Dans le réglage de base, le clavier se divise au point du «
F# », cela peut pourtant être modifié dans les réglages des
fonctions, voir à ce sujet chapitre 14. e).
k) Métronome, touche « METRO »
• En appuyant sur la touche « METRO » le métronome est activé et un
son de métronome corespondant est reproduit.
• Dans les réglages des fonctions (voir chapitre 14. c) vous pouvez
régler le volume du métronome.
• Appuyez de nouveau sur la touche « METRO » pour éteindre le
métronome.
90

14. Réglages des fonctions
En appuyant à plusieurs reprises sur la touche « FUNCTION » vous pouvez appeler différentes fonctions, décrites dans les paragraphes
suivants. Appuyez simplement autant de fois que nécessaire sur la touche « FUNCTION » pour faire afficher la fonction souhaitée sur l'écran.
Si dans l'espace de 5 secondes aucune touche n'est actionnée, le menu des fonctions est automatiquement quitté.
a) Fonction « Transpose »
Appuyez autant de fois sur la touche « FUNCTION » que nécessaire
pour faire afficher « Transpos » sur l'écran LC.
Sélectionnez la valeur souhaité au moyen de la molette de réglage ou
des touches « + » ou « - » (plage réglable de « -12 » à « 12 » demi-tons,
le réglage de base étant « 0 »).
b) Fonction « Tune »
Cette fonction est comparable à l'accordement manuel d'un piano.
Appuyez autant de fois sur la touche « FUNCTION » que nécessaire
pour faire afficher « Tune » sur l'écran LC.
Sélectionnez la valeur souhaitée au moyen de la molette de réglage ou
des touches « + » ou « - » (plage réglable de « -50 » à « 50 », le réglage
de base étant « 0 »).
c) Fonction « Beat »
Cette fonction permet de régler la mesure du métronome au cas où
aucun rythme d'accompagnement ne serait utilisé/reproduit.
Appuyez autant de fois sur la touche « FUNCTION » que nécessaire
pour faire afficher « Beat » sur l'écran LC.
Sélectionnez la valeur souhaité au moyen de la molette de réglage ou
des touches « + » ou « - » (valeurs réglables sont « 0 » et « 2 » à « 9 »,
le réglage de base étant « 4 »).
d) Fonction « Touch »
Cette fonction sert au réglage de la sensibilité des touches du clavier.
En réglage « OFF » il n'a pas d'importance avec quelle force vous
appuyez sur une touche du clavier.
Appuyez autant de fois sur la touche « FUNCTION » que nécessaire
pour faire afficher « Touch » sur l'écran LC.
Sélectionnez la valeur souhaité au moyen de la molette de réglage ou
des touches « + » ou « - » (valeurs réglables sont « OFF », « 1 », « 2 »
et « 3 », le réglage de base étant « 2 »).
91

e) Fonction « Split-Point »
Lors de la division du clavier en deux parties (la partie gauche du clavier
par ex. pour la batterie, la partie droite pour un instrument de piano)
cette fonction permet de déterminer le point auquel le clavier sera divisé.
Appuyez autant de fois sur la touche « FUNCTION » que nécessaire
pour faire afficher « Split pt » sur l'écran LC.
Sélectionnez la valeur souhaitée au moyen de la molette de réglage ou
des touches « + » ou « - » (plage réglable de « 1 » à « 88 », le réglage
de base étant « 34 »). Les nombres représentent ici le nombre de
touches de la partie gauche du clavier.
Vous pouvez sélectionner le point de division également
en appuyant sur une touche du clavier. La touche enfoncée
est dans ce cas la dernière touche de la partie gauche.
f) Fonction « DSP-Level »
Appuyez autant de fois sur la touche « FUNCTION » que nécessaire
pour faire afficher « DSP Level » sur l'écran LC.
Sélectionnez la valeur souhaitée au moyen de la molette de réglage ou
des touches « + » ou « - » (plage réglable de « OFF » à « 7 », le réglage
de base étant « 2 »).
g) Fonction « MIDI-IN-Channel »
Appuyez autant de fois sur la touche « FUNCTION » que nécessaire
pour faire afficher « Midi In » sur l'écran LC.
Sélectionnez la valeur souhaitée au moyen de la molette de réglage ou
des touches « + » ou « - » (plage réglable de « 1 » à « 16 », le réglage
de base étant « ALL » = tous).
h) Fonction « MIDI-OUT-Channel »
Appuyez autant de fois sur la touche « FUNCTION » que nécessaire
pour faire afficher « Midi Out » sur l'écran LC.
Sélectionnez la valeur souhaitée au moyen de la molette de réglage ou
des touches « + » ou « - » (plage réglable de « 1 » à « 16 », le réglage
de base étant « 1 »).
i) Fonction « Power Off »
Afin d’économiser de l’énergie, le piano numérique s’éteint après 30 minutes, si aucune touche n’est actionnée. Afin de réactiver le clavier,
l’arrêter et le remettre en marche.
Vous pouvez également régler une durée de 60 minutes ou désactiver cette fonction, si vous n’en avez pas besoin.
Appuyer plusieurs fois sur la touche « FUNCTION » jusqu’à ce que « Power Off » s’affiche à l’écran LC.
Avec la roue tournante ou le touches « + » ou « - » sélectionner la valeur souhaitée (réglages possibles « OFF », « 30 » et « 60 »).
92

15. Mixage
Appuyez autant de fois sur la touche « MIXER » que nécessaire pour
faire afficher la piste sonore souhaitée (« Track ») sur l'écran LC.
Sélectionnez le volume de la piste sonores correspondante au moyen
de la molette de réglage ou des touches « + » ou « - ».
Si aucune touche n'est actionnée pendant quelques seonces, les
réglages sont repris et le menu de mixage est automatiquement quitté.
Affichage sur l'écran Plage de réglage Réglage de base
« Drum Vol » 000-031 020
« Bass Vol » 000-031 018
« Oc Vol » 000-031 021
« Voice R1 » 000-031 024
« Voice R2 » 000-031 012
« Voice L » 000-031 012
Afin d'éteindre une piste sonore correspondante, sélectionnez d'abord
la piste sonore au moyen de la touche « MIXER » comme décrit cidessus et appuyez ensuite simultanément sur les deux touches « + »
ou « - ».
93

16. Mémoire
Le piano numérique dispose de 4 bases de mémoire à 4 mémoires chacune. Ainsi, un total de 16 mémoires est à votre disposition pour
enregistrer des préréglages (tels qu'une combinaison de rythme d'accompagnement et d'instrument). Ces préréglages enregistrés peuvent être
appelés ensuite par une seule pression de touche.
Les mémoires contiennent par défaut des combinaisons diverses.
a) Sélectionner la base de mémoire et la mémoire, charger les réglages
Appuyez autant de fois que nécessaire sur la touche « BANK » pour
faire afficher la base de mémoire souhaitée sur l'écran (par ex. la base
de mémoire 2 dans la figure à droite, affichage « MEMORY 02 »)..
Appuyez ensuite sur l'une des quatre touches de mémoire « M1 », «
M2 », « M3 » ou « M4 » pour sélectionner la mémoire correspondante
et activer les réglages y déposés.
b) Enregistrer les réglages
Sélectionner d'abord l'une des quatres bases de mémoire à l'aide de la
touche « BANK ». Puis maintenez enfoncé la touche « STORE » et
actionnez en plus l'une des quatres touches de mémoire « M1 », « M2
», « M3 » ou « M4 ». Les réglages actuels sont ainsi déposés dans la
mémoire de la base de mémoire.
Les données enregistrées concernent les instruments, l'effet double
son, les rythmes d'accompagnements, la vitesse, les réglages des
fonctions, le mixage, le volume, la variation, les valeurs A.B.C. etc.
Même lorsque vous éteignez le piano numérique, ces données ne seront
pas perdues !
c) Effacer la mémoire
Maintenez enfoncé en même temps les deux touches « STORE » et «
M1 » et allumez le piano numérique. Ainsi, toutes les mémoires seront
effacées et les réglages seront remis au réglages de l'usine.
Si les touches « + » et « - » seront enfoncées simultanément et que
vous allumez le piano numérique, cela ne fera pas seulement effacer
les mémoires mais également un enregistrement (« RECORD »), voir
chapitre 18.
94

17. « O.T.S. », « One-Touch-Setting »
Pour chacun des rythmes d'accompagnement il y a 4 préréglages
différents. Par exemple, le constructeur a choisi un instrument allant
avec le rythme d'accompagnement.
• Sélectionnez en premier un rythme d'accompagnement.
• Appuyez sur la touche « O.T.S. ». « O.T.S. » apparaît à droit dans
l´afficheur LCD.
• Les touches « M1 », « M2 », « M3 » ou « M4 » permettent d'appeler
l'un des quatre préréglages. Le piano numérique active le mode
« A.B.C. » (accompagnement automatique, « Auto-Bass-Chord »).
• Appuyez de nouveau sur la touche« O.T.S. » pour désactiver la
fonction « O.T.S. »..
95

18. Fonction d'enregistrement
a) Préparer le mode d'enregistrement
• Appuyez sur la touche « REC » et à droite sur l'écran LC, dans le
champ d'affichage « RECORD », apparaîtra un petit symbole, de
plus, l'affichage de la mesure clignotera. Cela vous indique que
l'appareil est prêt à enregistrer. L'enregistrement ne démarre pas
immédiatement !
• Vous pouvez maintenant (si vous le souhaitez) sélectionner un
instrument supplémentaire ou un autre rythme d'accompagnement,
régler la vitesse etc.
b) Démarrer l'enregistrement
Pour démarrer l'enregistrement, appuyez courtement sur la touche
« START/STOP » ou commencer à jouer sur le clavier.
c) Arrêter l'enregistrement
Afin de terminer l'enregistrement, appuyez courtement sur la touche
« REC ».
Si la mémoire est plaine, l'enregistrement sera automatiquement terminé
et l'écran affiche « Full ».
d) Reproduire l'enregistrement
Appuyez sur la touche « PLAY/STOP » pour faire lire l'enregistrement
et aussi pour l'arrêter.
Si aucun enregistrement existe, l'écran affiche « Empty ».
e) Effacer la mémoire
Si les touches « + » et « - » seront enfoncées simultanément et que
vous allumez le piano numérique, cela fera effacer l'enregistrement et
en plus toutes les données contenues dans les mémoires effacer les
mémoires « M1 » bis « M4 », voir chapitre 16.
Pour effacer uniquement l'enregistrement, maintenez enfoncé les deux
touches « REC » et « PLAY/STOP » et allumez le piano numérique.
96

19. Chansons
Le piano numérique dispose au total de plus de 60 chansons différentes. La mélodie peut être éteinte pour que vous puissiez la jouer vousmême.
Appuyez sur la touche « SONG », un affichage correspondant apparaît
sur l'écran.
Vous pouvez lancer ou arrêter la lecture en appuyant sur la touche «
START/STOP ».
Lorsque la lecture d'une chanson a été arrêté, vous pouvez quitter le
mode chansons en appuyant sur les touches « STYLE », « VOICE », «
DUAL » ou « LOWER ».
Utilisez comme toujours la molette de réglage ou les touches « + » ou
« - » pour sélectionner l'une des chansons souhaitées.
Chacune des chanson commence par son propre rythme d'introduction
(valeurs négatives dans le champ marqué à droite).
Appuyez sur la touche « O.T.S./ MELODY OFF » pour éteindre et pour
rallumer la mélodie de la chanson actuelle.
Lorsque la mélodie est éteinte, l'écran affiche un symbole en bas à
gauche, dans l'affichage « MELODY OFF ».
Si vous lancer la lecture en appuyant sur la touche « SONG », toutes les chansons seront lues successivemet.
Si une chanson est lancée cependant par la pression de la touche « START/STOP », la chanson actuelle sera répétée en boucle.
97

20. Manipulation
Tenez compte des consignes de sécurité et de toutes les autres informations du présent mode d'emploi !
Placez l´appareil sur une surface plane, stable et suffisamment grande. Ne placez pas l'appareil sur des surfaces précieuses sous
risque de provoquer des marques ou des rayures. Utilisez si nécessaire un support approprié. Le poid important risque en plus de
laisser des traces dans les tapis ou les moquettes de linoleum ou de liège.
Evitez les conditions environnementales défavorables suivantes sur le lieu d'utilisation ou lors du transport :
- exposition directe aux rayons du soleil,
- une humidité ou un taux d'hygrométrie trop élevé
- froid ou chaleur extrême,
- la poussière ou des gaz, vapeurs ou solvants inflammables,
- de fortes vibrations,
- les champs magnétiques intenses à proximité de machines ou de haut-parleurs par ex.
Ne jamais allumer immédiatement l'appareil lorsqu'il vient d'être transporté d'un local froid à un local chaud. L'eau de condensation
qui se forme risquerait de détruire l'appareil. Danger de mort par choc électrique !
Attendez jusqu’à ce que l’appareil ait atteint la température ambiante pour le brancher. Selon le cas, cela peut prendre plusieurs
heures.
Veillez à ce que l'isolation de l'ensemble du produit ne soit ni endommagée ni détruite. N´ouvrez pas l´appareil.
Contrôlez l'appareil avant chaque mise en marche pour vérifier qu'il n'est pas endommagé!
Au cas où vous constateriez des endommagements, ne branchez PAS l'appareil à la tension du secteur ! Amenez le produit dans un
atelier spécialisé ou éliminez-le conformément aux lois pour la protection de l'environnement.
Lorsque l'appareil reste hors service pendant une période prolongée, débranchez-le de la tension secteur.
N´introduisez jamais d'objets pointus tels que stylos bille, épingles, aiguilles à tricoter, trombones etc. dans les ouïes d´aération ou
dans les ouvertures de l´appareil, ils entraînent la destruction de l´appareil. De plus, il y a danger de mor par électrocution.
Lors de l'installation de l´appareil, veillez à ce qu´aucun des câbles de connexion (par ex. le câble d'alimentation, le câble de la
pédale ou pour votre casque d´écoute) ne soit ni coudé ni écrasé.
Posez les câbles de façon à ce que personne ne trébuche dessus.
Contrôler régulièrement la sécurité technique du produit, p. ex. l'absence d'endommagements du boîtier.
S'il est probable qu'une utilisation sans danger n'est plus possible, l'appareil doit être mis hors service et protégé contre toute
utilisation involontaire. Arrêtez le produit et débranchez-le de l´alimentation électrique.
Un fonctionnement sans risque n'est plus assuré lorsque
- l'appareil présente des dommages visibles,
- l'appareil ne fonctionne plus,
- l'appareil a été stocké durant une période prolongée dans des conditions défavorables,
- l'appareil a subi de sévères contraintes liées au transport.
98

21. Maintenance et nettoyage
Le produit n'a pas besoin d'entretien, ne jamais l'ouvrir ou le démonter. Une reparation ne doit être effectuée que par une personne qualifiée ou
un atelier spécialisé.
Un chiffon sec, doux suffit pour le nettoyage du produit.
Nous vous recommandons de protéger le produit par un revêtement approprié contre la poussière lorsqu'il reste hors service pendant une
période prolongée.
22. Elimination
Jetez l’appareil devenu inutilisable suivant les lois en vigueur.
23. Caractéristiques techniques
Tension de service : .................................... 230 V/CA, 50 Hz
Dimensions : .............................................. Env. 1419 x 460 x 832 mm (l x p x h)
Poids : ........................................................ env. 40 kg
Touches : .................................................... 88
Instruments : .............................................. 210
Rythmes d´accompagnement : .................. 120
Chansons : ................................................. 60
Polyphonie : ............................................... 64 notes (sans effet DSP), 38 notes (avec effet DSP)
Mémoires pour réglages :........................... 16 (4 bases de mémoire à 4 mémoires chacune)
Mémoire d'enregistrement : ........................ 1
Haut-parleurs internes : .............................. stéréo, 8 ohms, 2 x 25 W
Connexions : .............................................. Aux Out (niveau Line), casque d'écoute, pédales, USB
99

24. Annexe A : Instruments
100
 Loading...