

Page 1
Digitales Drumkit
Digital Drum Kit
Diese Bedienungsanleitung gehört zu diesem Produkt. Sie enthält wichtige Hinweise zur Inbetriebnahme und Handha-
bung. Achten Sie hierauf, auch wenn Sie dieses Produkt an Dritte weitergeben.
Heben Sie deshalb diese Bedienungsanleitung zum Nachlesen auf! Eine Auflistung der Inhalte finden Sie in dem Inhaltsverzeichnis mit Angabe der entsprechenden Seitenzahlen auf Seite 4.
These Operating Instructions accompany this product. They contain important information on setting up and using the
device. You should refer to these instructions, even if you are buying this product for someone else.
Please retain these Operating Instructions for future use! A list of the contents can be found in the Table of contents, with
the corresponding page number, on page 25.
Le présent mode d’emploi fait partie intégrante du produit. Il comporte des directives importantes pour la mise en service
et la manipulation de l’appareil. Tenir compte de ces remarques, même en cas de transfert du produit à un tiers.
Conserver ce mode d’emploi afin de pouvoir le consulter à tout moment. La table des matières avec indication des pages
correspondantes se trouve à la page 46.
Deze gebruiksaanwijzing hoort bij dit product. Zij bevat belangrijke informatie over de inbedrijfstelling en het gebruik. Let
hierop, ook wanneer u dit product aan derden overhandigt.
Bewaar daarom deze gebruiksaanwijzing om in voorkomende gevallen te kunnen raadplegen. In de inhoudsopgave op
pagina 67 vindt u een lijst met inhoudspunten met vermelding van het bijbehorende.
Impressum
Diese Bedienungsanleitung ist eine Publikation der Conrad Electronic SE, Klaus-Conrad-Str. 1, D-92240 Hirschau (www.conrad.com).
Alle Rechte einschließlich Übersetzung vorbehalten. Reproduktionen jeder Art, z. B. Fotokopie, Mikroverfilmung, oder die Erfassung in elektronischen
Datenverarbeitungsanlagen, bedürfen der schriftlichen Genehmigung des Herausgebers. Nachdruck, auch auszugsweise, verboten.
Diese Bedienungsanleitung entspricht dem technischen Stand bei Drucklegung. Änderung in Technik und Ausstattung vorbehalten.
© Copyright 2013 by Conrad Electronic SE.
Legal Notice
These operating instructions are a publication by Conrad Electronic SE, Klaus-Conrad-Str. 1, D-92240 Hirschau (www.conrad.com).
All rights including translation reserved. Reproduction by any method, e.g. photocopy, microfilming, or the capture in electronic data processing systems
require the prior written approval by the editor. Reprinting, also in part, is prohibited.
These operating instructions represent the technical status at the time of printing. Changes in technology and equipment reserved.
© Copyright 2013 by Conrad Electronic SE.
Information légales
Ce mode d'emploi est une publication de la société Conrad Electronic SE, Klaus-Conrad-Str. 1, D-92240 Hirschau (www.conrad.com).
Tous droits réservés, y compris de traduction. Toute reproduction, quelle qu'elle soit (p. ex. photocopie, microfilm, saisie dans des installations de traitement
de données) nécessite une autorisation écrite de l'éditeur. Il est interdit de le réimprimer, même par extraits.
Ce mode d'emploi correspond au niveau technique du moment de la mise sous presse. Sous réserve de modifications techniques et de l'équipement.
© Copyright 2013 by Conrad Electronic SE.
Kit de batterie numérique
Digitale drumkit
Best.-Nr. / Item No. / N° de commande / Bestnr. 30 39 97
Bedienungsanleitung Seite 4 - 24
Colofon
Deze gebruiksaanwijzing is een publicatie van de firma Conrad Electronic SE, Klaus-Conrad-Str. 1, D-92240 Hirschau (www.conrad.com).
Alle rechten, vertaling inbegrepen, voorbehouden. Reproducties van welke aard dan ook, bijvoorbeeld fotokopie, microverfilming of de registratie in
elektronische gegevensverwerkingsapparatuur, vereisen de schriftelijke toestemming van de uitgever. Nadruk, ook van uittreksels, verboden.
Deze gebruiksaanwijzing voldoet aan de technische stand bij het in druk bezorgen. Wijziging van techniek en uitrusting voorbehouden.
© Copyright 2013 by Conrad Electronic SE. V2_0713_01
Operating instructions Page 25 - 45
Mode d’emploi Page 46 - 66
Gebruiksaanwijzing Pagina 67 - 87
Version 07/13
2
Page 2
59
6
7
8
Inhaltsverzeichnis
Seite
1
18
19
3
4
23
1. Einführung ................................................................................................................................................................................................5
2. Bestimmungsgemäße Verwendung ....................................................................................................................................................... 5
3. Lieferumfang ............................................................................................................................................................................................ 6
15
10 11 12
14
16
13
17
2
20
21 22
24
27
26
25
28
29
4. Symbol-Erklärung ....................................................................................................................................................................................6
5. Sicherheitshinweise ................................................................................................................................................................................7
6. Allgemeine Batterie- und Akku-Hinweise .............................................................................................................................................. 7
7. Bedienelemente ....................................................................................................................................................................................... 9
8. Batterie- oder Netzteilbetrieb ................................................................................................................................................................10
a) Einlegen von Batterien ........................................................................................................................................................................ 10
b) Anschluss eines externen Netzteils ..................................................................................................................................................... 10
9. Anschluss eines Kopfhörers ................................................................................................................................................................ 10
10. Fußpedale anschließen ......................................................................................................................................................................... 11
11. Grundfunktionen ....................................................................................................................................................................................11
a) Gerät ein-/ausschalten ........................................................................................................................................................................ 11
b) Drumkit auswählen .............................................................................................................................................................................. 11
c) Lautstärke einstellen („Master Volume“) .............................................................................................................................................. 11
12. Pads einstellen, Drumkit programmieren ............................................................................................................................................ 12
a) Schlagzeugsound eines Pads wählen .................................................................................................................................................12
b) Lautstärke eines Pads wählen ............................................................................................................................................................12
c) Stereo-Effekt einstellen ....................................................................................................................................................................... 13
d) Pad-Empfindlichkeit einstellen ............................................................................................................................................................ 13
e) Einstellungen speichern ...................................................................................................................................................................... 13
13. Begleitung .............................................................................................................................................................................................. 14
a) Song auswählen .................................................................................................................................................................................. 14
b) Wiedergabe eines Songs starten/beenden .........................................................................................................................................14
c) Geschwindigkeit des Songs verändern ............................................................................................................................................... 14
d) Song-Lautstärke verändern .................................................................................................................................................................14
e) Schlagzeugsounds eines Songs abschalten ....................................................................................................................................... 14
f) Metronom ............................................................................................................................................................................................15
14. Aufnahme/Wiedergabe .......................................................................................................................................................................... 16
a) Vorbereitungen.................................................................................................................................................................................... 16
b) Aufnahme starten ................................................................................................................................................................................16
c) Aufnahme beenden ............................................................................................................................................................................. 16
d) Wiedergabe .........................................................................................................................................................................................16
15. Sonstige Funktionen .............................................................................................................................................................................17
a) Demo-Modus....................................................................................................................................................................................... 17
b) Hall-Effekt............................................................................................................................................................................................ 17
c) Hand-Modus ........................................................................................................................................................................................ 17
d) USB-Anschluss ................................................................................................................................................................................... 17
16. Handhabung ........................................................................................................................................................................................... 18
17. Wartung und Reinigung ........................................................................................................................................................................ 19
18. Entsorgung .............................................................................................................................................................................................19
a) Allgemein ............................................................................................................................................................................................ 19
b) Batterien und Akkus ............................................................................................................................................................................ 19
19. Technische Daten .................................................................................................................................................................................. 20
20. Anhang A: Schlagzeug-Sounds ........................................................................................................................................................... 21
21. Anhang B: Drumkits .............................................................................................................................................................................. 23
22. Anhang C: Songs ...................................................................................................................................................................................23
PHONES KICK HI HAT USB 12V
3 4
89
Page 3
1. Einführung
Sehr geehrte Kundin, sehr geehrter Kunde,
wir bedanken uns für den Kauf dieses Produkts.
Dieses Produkt entspricht den gesetzlichen, nationalen und europäischen Anforderungen.
Diese Bedienungsanleitung gehört zu diesem Produkt. Sie enthält wichtige Hinweise zur Inbetriebnahme und Handhabung. Achten Sie hierauf, auch wenn Sie dieses Produkt an Dritte weitergeben.
Heben Sie deshalb diese Bedienungsanleitung zum Nachlesen auf!
Alle enthaltenen Firmennamen und Produktbezeichnungen sind Warenzeichen der jeweiligen Inhaber. Alle Rechte vorbehalten.
Bei technischen Fragen wenden Sie sich bitte an:
Tel.-Nr.: 0 96 04 / 40 87 87
Fax-Nr.: 0180 5 / 31 21 10 (der Anruf kostet 14 ct/min inkl. MwSt. aus dem Festnetz. Mobilfunkhöchstpreis: 42 ct/min inkl. MwSt.)
E-Mail: Bitte verwenden Sie unser Formular im Internet www.conrad.de, unter der Rubrik “Kontakt”.
Mo. - Fr. 8.00 bis 18.00 Uhr
www.conrad.at
www.business.conrad.at
Tel.: 0848/80 12 88
Fax: 0848/80 12 89
E-Mail: support@conrad.ch
Mo. bis Fr. 8.00-12.00, 13.00-17.00 Uhr
2. Bestimmungsgemäße Verwendung
Der Verwendungsbereich des digitalen Drumkits umfasst den Einsatz in Musikanlagen im Heim- und semiprofessionellen Bereich. Das Gerät
dient zur Erzeugung von Schlagzeug-Tönen/-Effekten, die über die eingebauten Lautsprecher wiedergegeben werden können.
Die Stromversorgung des digitalen Drumkits erfolgt über 6 Batterien vom Typ Baby/C. Alternativ kann ein externes Netzteil verwendet werden
(nicht im Lieferumfang, getrennt bestellbar).
Eine Verwendung des gesamten Produkts ist nur in geschlossenen, trockenen Innenräumen erlaubt. Das Produkt darf nicht feucht oder nass
werden.
Eine andere Verwendung als zuvor beschrieben führt zu Beschädigungen dieses Produkts, ausserdem ist dies mit Gefahren wie z.B. Kurzschluss,
Brand, elektrischer Schlag etc. verbunden. Das gesamte Produkt darf nicht geändert bzw. umgebaut werden. Das Gehäuse darf nicht geöffnet
werden.
Das Produkt ist kein Spielzeug, es ist nicht für Kinder unter 14 Jahren geeignet.
Beachten Sie alle Sicherheitshinweise dieser Bedienungsanleitung. Diese enthalten wichtige Informationen zum Umgang mit dem
Produkt.
5
Page 4
3. Lieferumfang
• Drumkit
• Zwei Drumsticks
• Zwei Fußpedale
• Bedienungsanleitung
4. Symbol-Erklärung
Dieses Symbol wird verwendet, wenn Gefahr für Ihre Gesundheit besteht, z.B. durch elektrischen Schlag.
Das Symbol mit dem Ausrufezeichen weist Sie auf besondere Gefahren bei Handhabung, Betrieb oder Bedienung hin.
Das „Pfeil“-Symbol steht für spezielle Tipps und Bedienhinweise.
6
Page 5

5. Sicherheitshinweise
Bei Schäden, die durch Nichtbeachtung dieser Bedienungsanleitung verursacht werden, erlischt die Gewährleistung/
Garantie. Für Folgeschäden übernehmen wir keine Haftung!
Bei Sach- oder Personenschäden, die durch unsachgemäße Handhabung oder Nichtbeachten der Sicherheitshinweise
verursacht werden, übernehmen wir keine Haftung! In solchen Fällen erlischt die Gewährleistung/Garantie.
• Aus Sicherheits- und Zulassungsgründen (CE) ist das eigenmächtige Umbauen und/oder Verändern des Produktes nicht gestattet.
• Alle Personen, die dieses Drumkit bedienen, installieren, aufstellen, in Betrieb nehmen oder warten, müssen entsprechend ausgebildet und qualifiziert sein und diese Bedienungsanleitung beachten.
• Das Produkt ist kein Spielzeug, es ist nicht für Kinder geeignet. Kinder können die Gefahren, die im Umgang mit elektrischen
Geräten bestehen, nicht einschätzen.
• Stellen Sie keine Gefäße mit Flüssigkeiten, z.B. Gläser, Eimer, Vasen oder Pflanzen, auf das Gerät oder in seine unmittelbare
Nähe. Flüssigkeiten könnten ins Gehäuseinnere gelangen und dabei die elektrische Sicherheit beeinträchtigen. Außerdem besteht höchste Gefahr eines Brandes oder eines lebensgefährlichen elektrischen Schlages!
Stecken Sie alle Kabel vom Gerät ab. Das gesamte Produkt darf danach nicht mehr betrieben werden, bringen Sie es in eine
Fachwerkstatt.
• Setzen Sie das Gerät keinen hohen Temperaturen, Tropf- oder Spritzwasser, starken Vibrationen, sowie hohen mechanischen
Beanspruchungen aus.
• Stellen Sie keine offenen Brandquellen wie brennende Kerzen auf oder direkt neben dem Gerät ab.
• Betreiben Sie das Gerät nicht unbeaufsichtigt.
• Benutzen Sie das Gerät nur in gemäßigtem Klima, nicht in tropischem Klima.
• Lassen Sie Verpackungsmaterial nicht achtlos liegen. Es könnte für Kinder zu einem gefährlichen Spielzeug werden.
• Wenden Sie sich an eine Fachkraft, wenn Sie Zweifel über die Arbeitsweise, die Sicherheit oder den Anschluss des Produktes
haben.
• In gewerblichen Einrichtungen sind die Unfallverhütungsvorschriften des Verbandes der gewerblichen Berufsgenossenschaften
für elektrische Anlagen und Betriebsmittel zu beachten.
• Sollten Sie sich über den korrekten Anschluss nicht im Klaren sein oder sollten sich Fragen ergeben, die nicht im Laufe der
Bedienungsanleitung abgeklärt werden, so setzen Sie sich bitte mit unserer technischen Auskunft oder einem anderen Fachmann
in Verbindung.
7
Page 6
6. Allgemeine Batterie- und Akkuhinweise
• Batterien/Akkus gehören nicht in Kinderhände.
• Lassen Sie Batterien/Akkus nicht offen herumliegen, es besteht die Gefahr, dass diese von Kindern oder Haustieren verschluckt
werden. Suchen Sie in einem solchen Fall sofort einen Arzt auf!
• Batterien/Akkus dürfen niemals kurzgeschlossen, zerlegt oder ins Feuer geworfen werden. Es besteht Explosionsgefahr!
• Ausgelaufene oder beschädigte Batterien/Akkus können bei Berührung mit der Haut Verätzungen verursachen, benutzen Sie
deshalb in diesem Fall geeignete Schutzhandschuhe.
• Herkömmliche Batterien dürfen nicht aufgeladen werden. Es besteht Brand- und Explosionsgefahr! Laden Sie ausschließlich
dafür vorgesehene Akkus; verwenden Sie dazu geeignete Akkuladegeräte.
• Achten Sie beim Einlegen von Batterien/Akkus auf die richtige Polung (Plus/+ und Minus/- beachten), es besteht Brand- und
Explosionsgefahr!
• Bei längerem Nichtgebrauch (z.B. bei Lagerung) entnehmen Sie die eingelegten Batterien (bzw. Akkus), um Schäden durch
auslaufende Batterien/Akkus zu vermeiden.
Laden Sie Akkus etwa alle 3 Monate nach, da es andernfalls durch die Selbstentladung zu einer sog. Tiefentladung kommen kann,
die die Akkus unbrauchbar macht.
• Wechseln Sie immer den ganzen Satz Batterien bzw. Akkus aus. Mischen Sie nicht volle mit halbvollen Batterien/Akkus. Verwenden Sie immer Batterien bzw. Akkus des gleichen Typs und Herstellers.
• Mischen Sie niemals Batterien mit Akkus! Verwenden Sie entweder 6 Batterien oder 6 Akkus.
Der Betrieb des Drumkits mit Akkus anstelle von Batterien ist möglich.
Die geringere Spannung (Batterien = 1,5 V, Akkus = 1,2 V) und die geringere Kapazität von Akkus führt jedoch zu einer Verringerung
der Betriebsdauer.
Wenn Sie Batterien im Drumkit einsetzen, so empfehlen wir Ihnen die Verwendung von hochwertigen Alkaline-Batterien.
8
Page 7

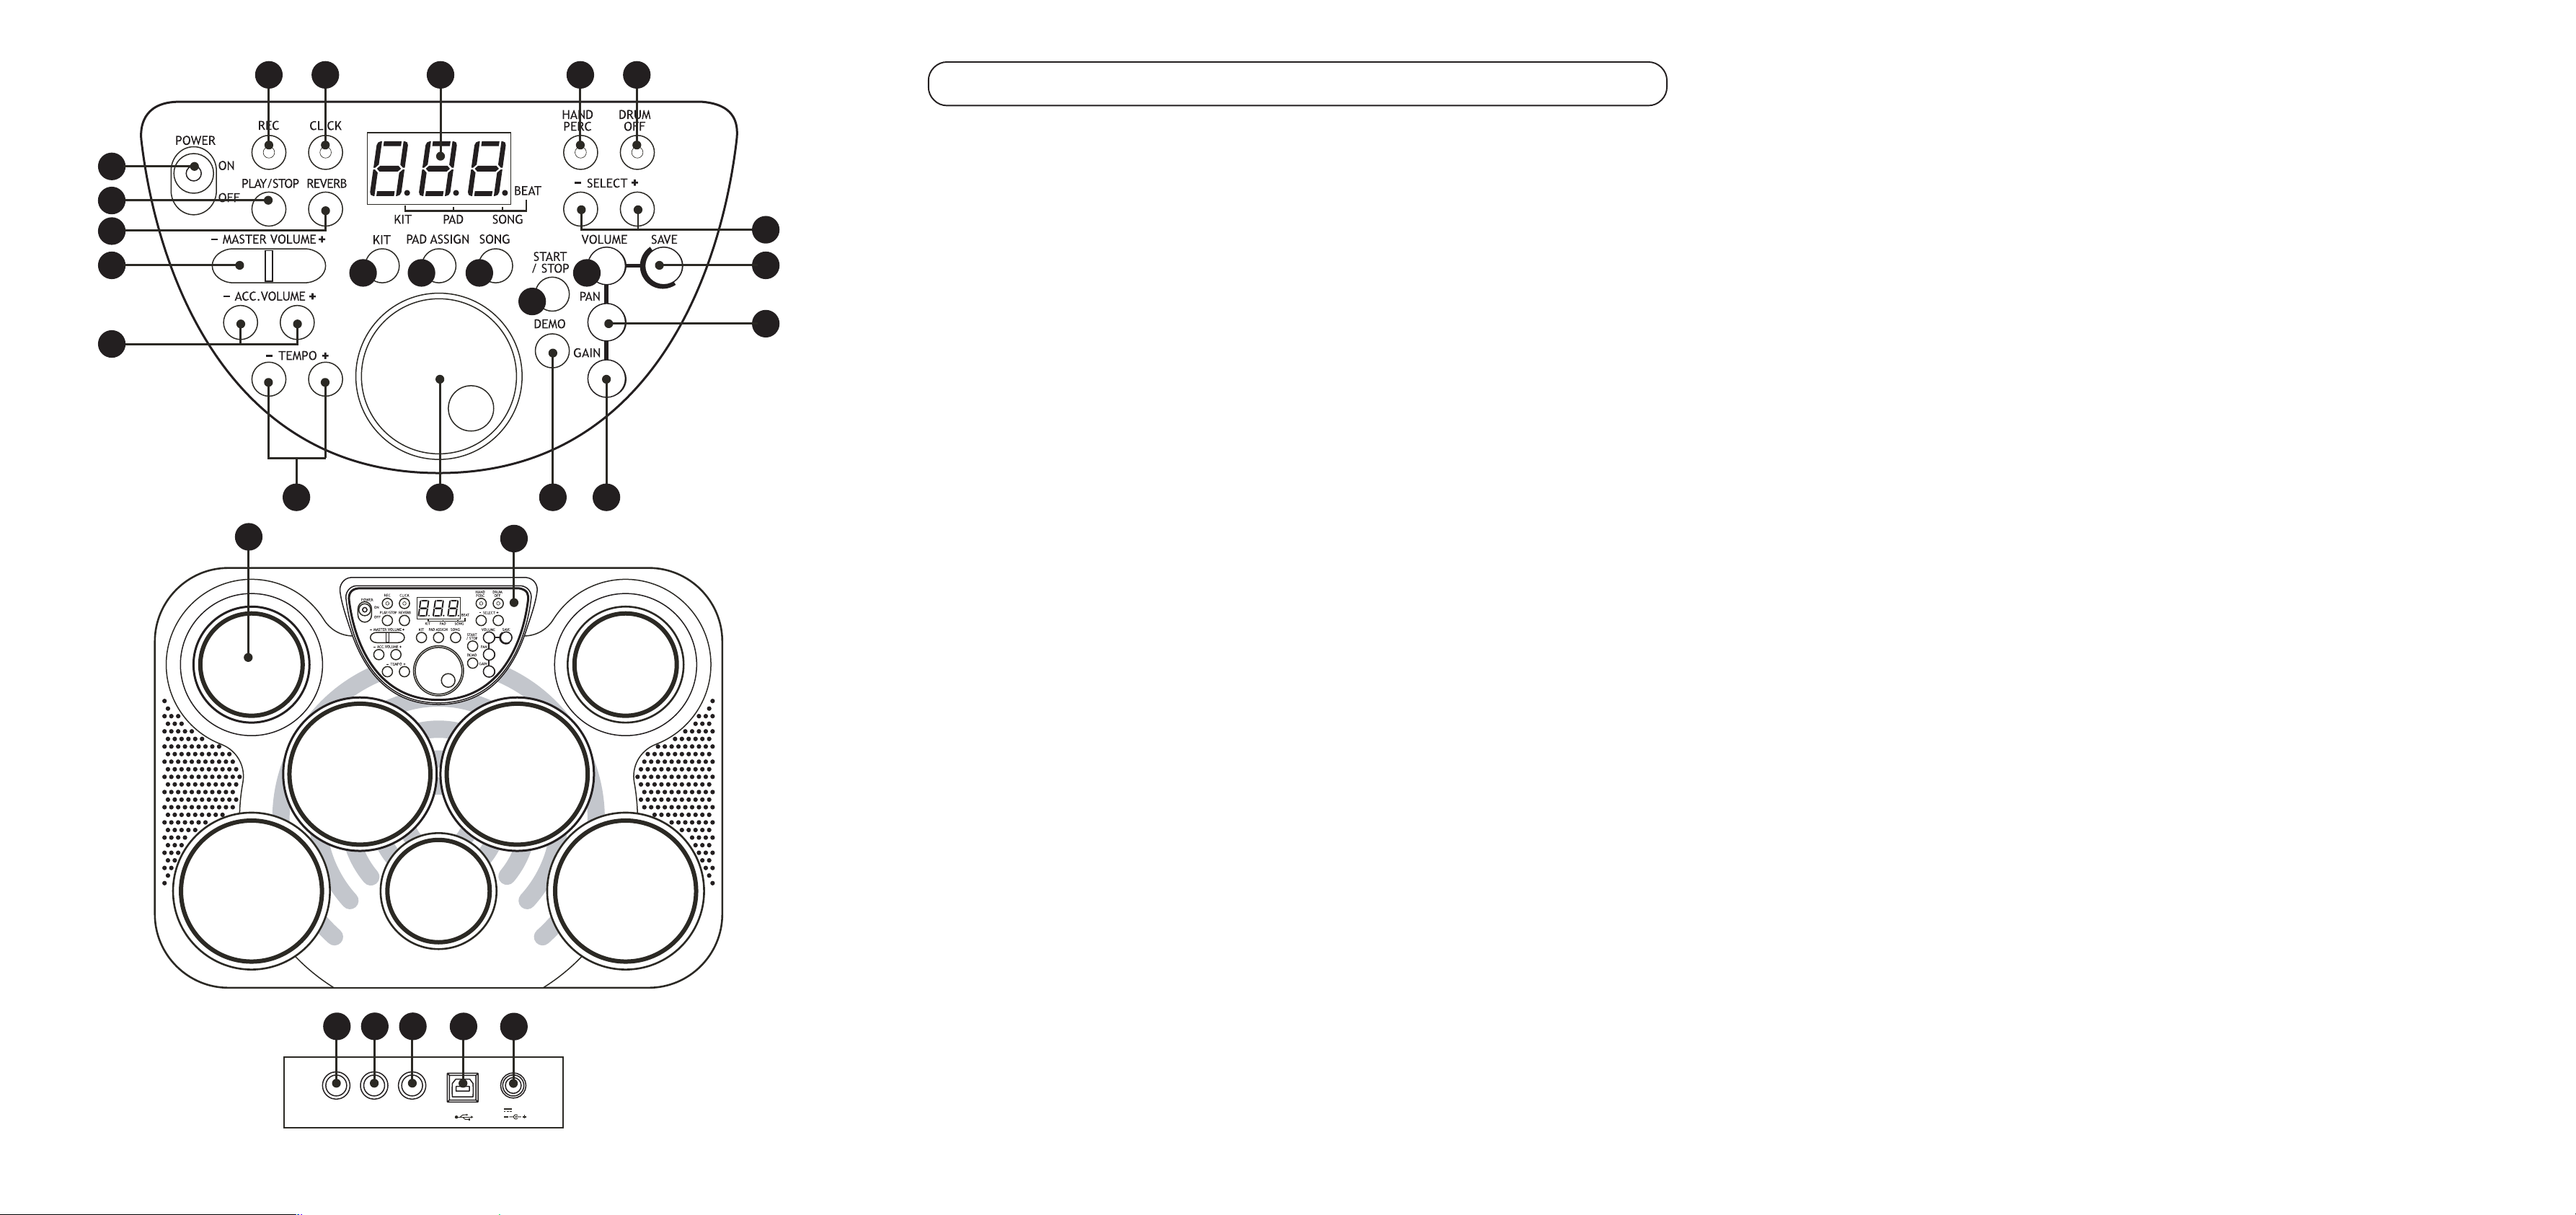
7. Bedienelemente
Die Abbildungen der Bedienelemente finden Sie auf der vorderen Ausklappseite.
1 Ein-/Ausschalter („ON“ = Ein, „OFF“ = Aus)
2 Tasten „TEMPO -“ und „TEMPO +“ für Geschwindigkeitseinstellung beim Abspielen eines Songs (Begleitmelodie)
3 Wipptaste „- MASTER VOLUME +“ für Lautstärke-Einstellung (Grundlautstärke)
4 Tasten „ACC. VOLUME -“ und „ACC. VOLUME +“ für Einstellung der Lautstärke beim Abspielen eines Songs (Begleitmelodie)
5 Taste „REC“ mit LED für Aufnahmemodus
6 Taste „CLICK“ für Ein-/Ausschalten des Metronoms, mit LED
7 3stellige Anzeige, z.B. für Sound-Nummer, Song-Nummer o.ä.
8 Taste „HAND PERC“ mit LED für Hand-Modus
9 Taste „DRUM OFF“ mit LED, zum Ein-/Ausschalten des Schlagzeugs beim Abspielen eines Songs
10 Taste „KIT“ zum Aktivieren der Auswahlfunktion eines Drumkits
11 Taste „PAD ASSIGN“ für die Zuweisung eines Schlagzeugeffekts zu einem Drumpad bzw. Fußpedal
12 Taste „SONG“ zur Auswahl eines der 100 Songs
13 Taste „START/STOP“ zum Abspielen bzw. Anhalten eines Songs
14 Taste „VOLUME“ für Einstellung der Lautstärke der einzelnen Pads bzw. Fußpedale
15 Tasten „SELECT +“ und „SELECT -“, z.B. für Auswahl eines Songs, eines Drumkits, o.ä.
16 Taste „SAVE“ zum Speichern eines Drumkits
17 Taste „PAN“ für Verstellung des Stereoeffekts (z.B. für Soundwiedergabe über die internen Lautsprecher) für jedes Pad
18 Taste „PLAY/STOP“ für das Starten/Anhalten der Wiedergabe einer von Ihnen erstellten Aufnahme
19 Taste „REVERB“ für Einstellung des Halleffekts
20 Drehrad für schnelle Auswahl z.B. eines Songs, eines Drumkits o.ä.
21 Taste „DEMO“ für Starten/Anhalten des Demo-Modus
22 Taste „GAIN“ für Einstellung der Pad-Empfindlichkeit
23 Drumpad (insgesamt 7 vorhanden)
24 Bedienfeld (siehe 1-22)
25 Buchse „PHONES“ für den Anschluss eines Kopfhörers
26 Buchse „KICK“ für Anschluss eines Fußpedals
27 Buchse „HI HAT“ für Anschluss eines Fußpedals
28 Buchse „USB“ für die Verbindung zu einem freien USB1.1/2.0-Ports eines Computers, für Midi-In/-Out
29 Niederspannungsbuchse für den Anschluss an ein externes Netzteil (nicht im Lieferumfang, getrennt bestellbar)
9
Page 8
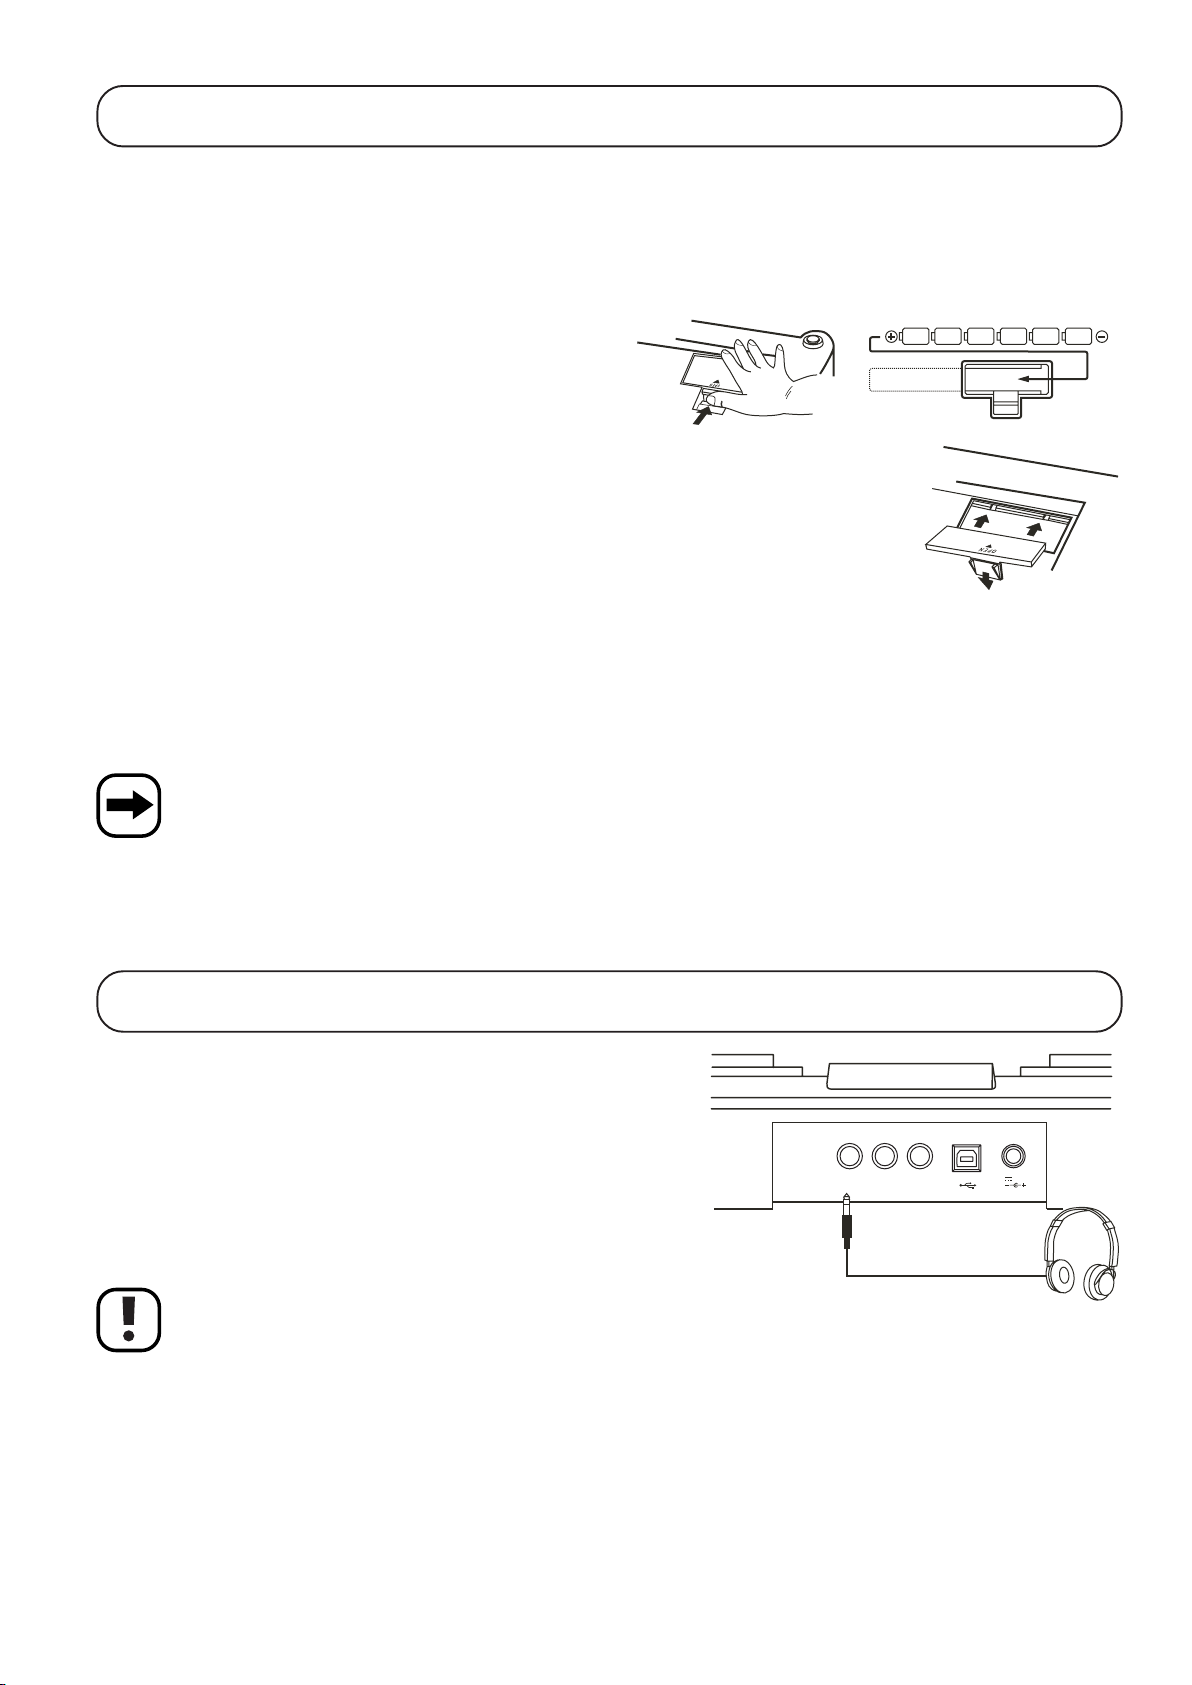
8. Batterie- oder Netzteilbetrieb
Zum Betrieb des Drumkits können entweder 6 Batterien vom Typ Baby/C oder ein externes Netzteil (nicht im Lieferumfang, getrennt bestellbar)
verwendet werden.
a) Einlegen von Batterien
Wenn Sie Batterien verwenden wollen, so öffnen Sie den Batteriefachdeckel auf der Unterseite des Drumkits und legen Sie 6 Batterien vom
Typ Baby/C polungsrichtig ein (Plus/+ und Minus/- beachten). Setzen
Sie dann den Batteriefachdeckel wieder ein und lassen Sie ihn einrasten.
Wenn Batterien verwendet werden, sollten Sie ausschließlich hochwertige Alkaline-Batterien einsetzen.
Ein Batteriewechsel ist erforderlich, wenn die Displayanzeige nur noch
sehr schwach ist oder die Soundwiedergabe verzerrt ist bzw. sich das
Drumkit beim Abspielen von Tönen selbst ausschaltet und das Display
erlischt.
b) Anschluss eines externen Netzteils
Verbinden Sie den runden Niederspannungsstecker des Netzteils (nicht im Lieferumfang, getrennt bestellbar) mit der entsprechenden Buchse
(29) auf der Rückseite des Drumkits. Verbinden Sie dann das Netzteil mit einer Netzsteckdose.
Wenn ein externes Netzteil verwendet wird, können die Batterien im Batteriefach eingesetzt bleiben, da die Stromversorgung automatisch vom externen Netzteil übernommen wird.
Vergessen Sie jedoch nicht, die Batterien zu entnehmen, wenn das Produkt längere Zeit nur mit einem Netzteil betrieben wird.
Überalterte Batterien können auslaufen und so das Batteriefach bzw. das Drumkit beschädigen!
9. Anschluss eines Kopfhörers
Nicht jeder empfindet die Geräusche bei den ersten Versuchen, Schlagzeug zu
spielen, als angenehm.
Um ungestört üben zu können, steht auf der Rückseite des Drumkits ein
Kopfhöreranschluss (6.35mm-Stereo-Klinkenbuchse) zur Verfügung (25).
Kopfhörer mit 3.5mm-Stereoklinkenstecker können auch verwendet werden, dazu
ist jedoch ein geeigneter Adapter erforderlich, den Sie im Zubehörhandel erhalten,
wenn er dem Kopfhörer nicht beiliegt.
PHONES KICK HI HAT USB 12V
10
Stellen Sie die Lautstärke nicht zu hoch ein, da es andernfalls zu Gehörschäden kommen kann!
Page 9
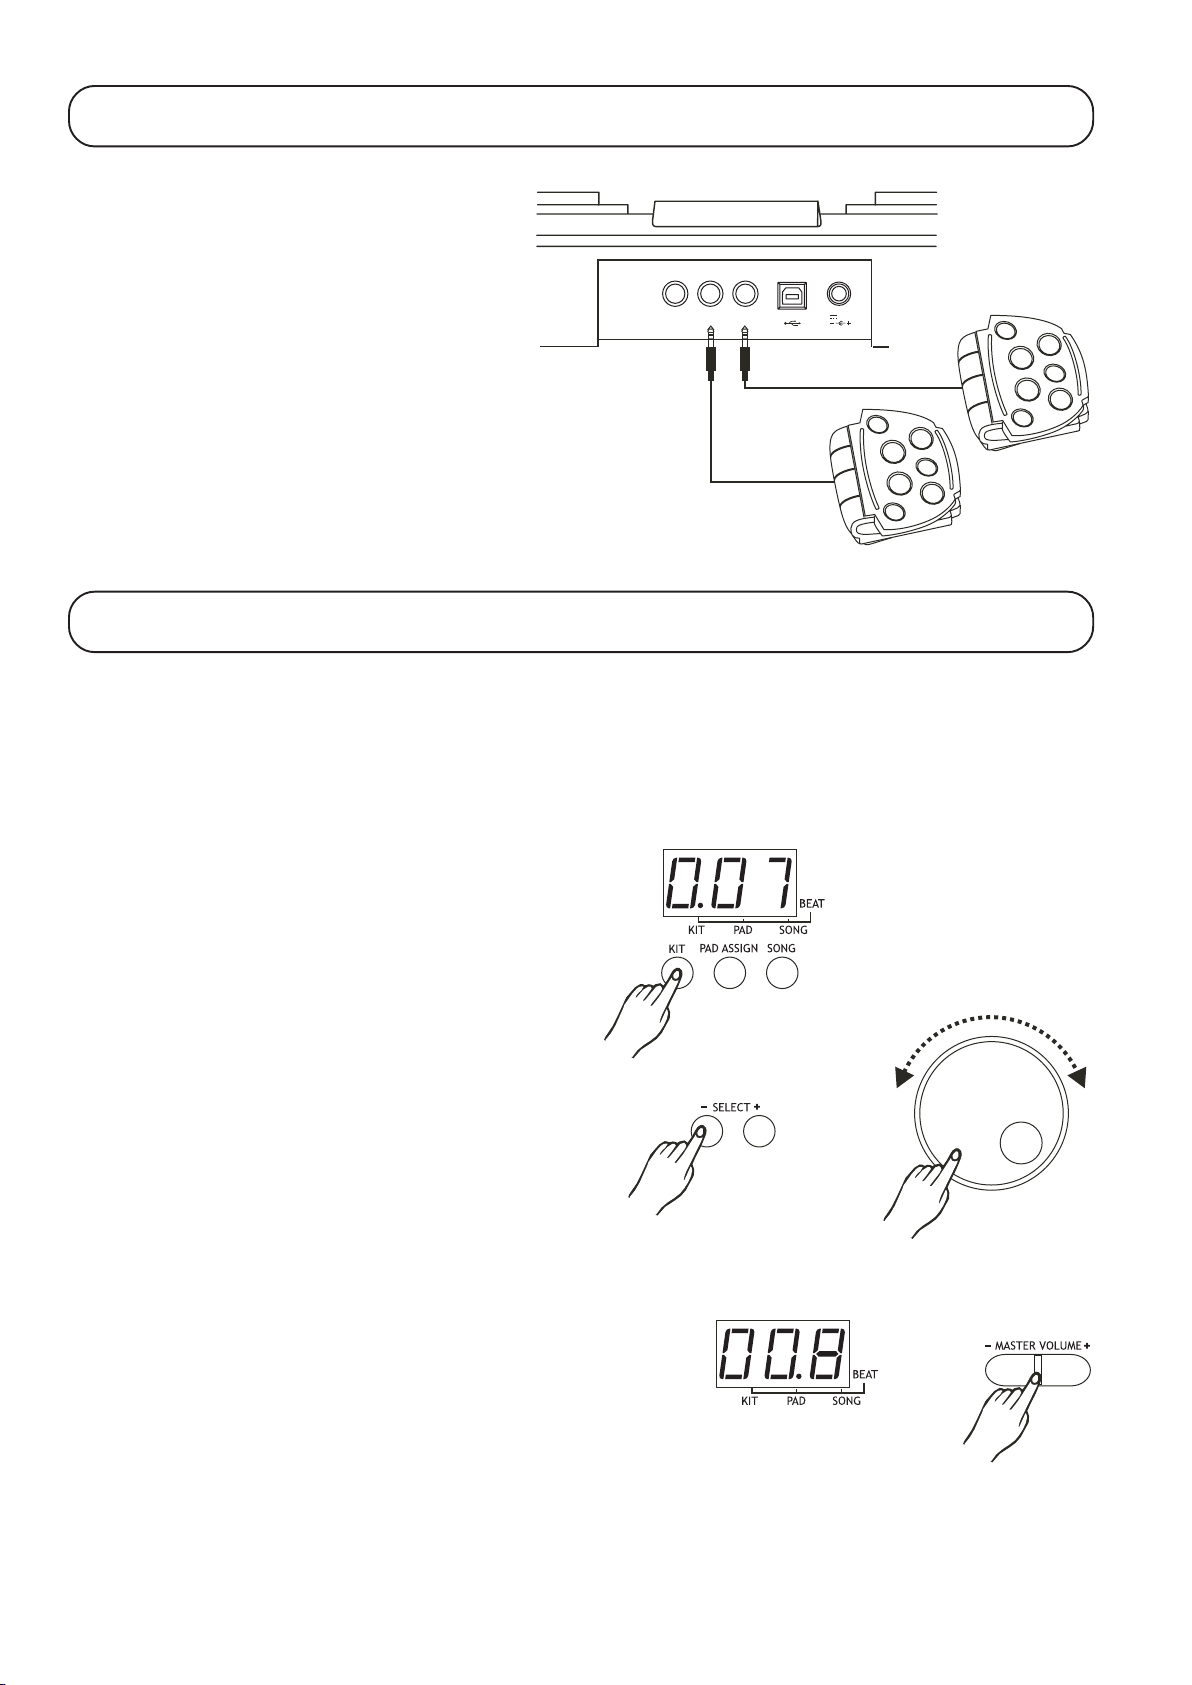
10. Fußpedale anschließen
Verbinden Sie die beiden mitgelieferten Fußpedale mit den
Anschlüssen „KICK“ und „HI HAT“.
11. Grundfunktionen
a) Gerät ein-/ausschalten
PHONES KICK HI HAT USB 12V
Mit dem Schalter „POWER ON/OFF“ (1) kann das Gerät eingeschaltet (Schalterstellung „ON“) bzw. ausgeschaltet („OFF“) werden.
b) Drumkit auswählen
Aktivieren Sie das Einstellmenü, indem Sie die Taste „KIT“ (10) kurz
drücken. Der Dezimalpunkt im Display leuchtet bei „KIT“ auf.
Anschließend kann mit den Tasten „SELECT +“ bzw. „SELECT -“ (15)
oder dem Einstellrad (20) das Drumkit ausgewählt werden (001-030).
c) Lautstärke einstellen („Master Volume“)
Mit der Wipptaste „- MASTER VOLUME +“ (3) kann die Lautstärke für
die Wiedergabe über die Lautsprecher bzw. den Kopfhörer eingestellt
werden.
Bitte beachten Sie, dass über die Wipptaste (3) die Grundlautstärke
des Geräts eingestellt wird.
Soll die Lautstärke eines einzelnen Pads verändert werden (z.B. wenn
ein Schlagzeugeffekt lauter oder leiser wiedergegeben werden soll),
so kann dies über die Taste „VOLUME“ (14) vorgenommen werden.
11
Page 10
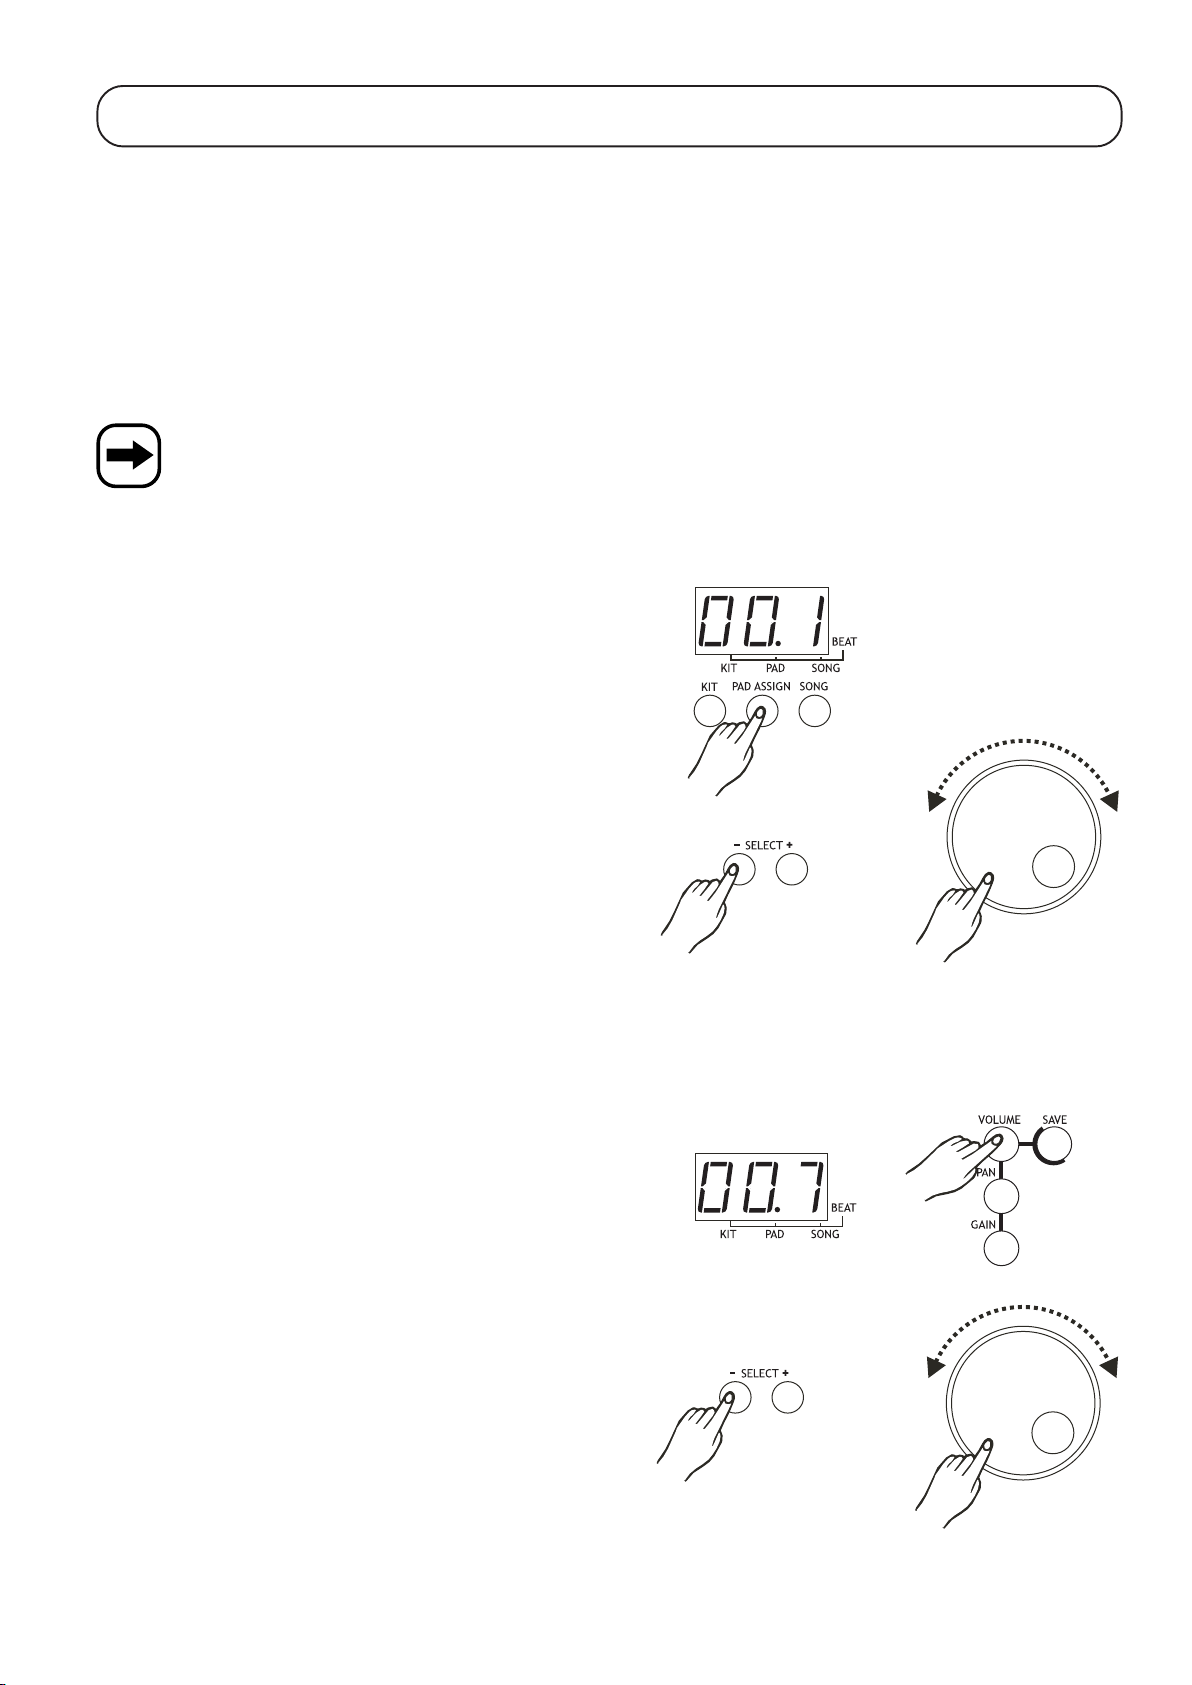
12. Pads einstellen, Drumkit programmieren
Nach dem Einschalten ist automatisch das Drumkit „001“ aktiviert. Die ersten 25 Drumkits „001“ bis „025“ beinhalten bestimmte Voreinstellungen
durch den Hersteller, siehe Anhang B (Kapitel 21).
In den Drumkits „026“ bis „030“ können Sie eigene Kombinationen der Belegung der 7 Pads und 2 Fußpedale speichern.
Folgende Einstellungen können vorgenommen werden:
• Schlagzeugsound
• Pad-Lautstärke
• Stereoeffekt
• Pad-Empfindlichkeit (nur für die 7 Pads, nicht für Fußpedale)
Wird ein anderes Drumkit ausgewählt (siehe Kapitel 11. b), so gehen alle bisher vorgenommenen Einstellungen verloren!
Soll eine bestimmte von Ihnen vorgenommene Einstellung gespeichert werden, so beachten Sie das Kapitel 12. e).
a) Schlagzeugsound eines Pads wählen
Wenn Sie mit den 30 voreingestellten Drumkits (siehe Kapitel 10. a)
nicht zufrieden sind, können Sie selbstverständlich die Pads
umkonfigurieren.
Die in den folgenden Abschnitten c) bis f) vorgenommenen Einstellungen können später in einem der Drumkits 026 bis 030 gespeichert werden.
Aktivieren Sie das Einstellmenü, indem Sie die Taste „PAD ASSIGN“
(11) kurz drücken. Der Dezimalpunkt im Display leuchtet bei „PAD“ auf.
Schlagen Sie kurz das Pad an, dessen Sound Sie ändern wollen. Der
aktuelle Sound wird über Lautsprecher oder Kopfhörer ausgegeben.
Wird das gleiche Pad nochmals betätigt, so wird der nächste Sound
ausgegeben.
Selbstverständlich können Sie zur Auswahl eines Sounds auch die Tasten „SELECT +“ bzw. „SELECT -“ (15) oder das Einstellrad (20) benutzen.
Im Anhang A (Kapitel 20) finden Sie eine Tabelle mit allen Sounds.
b) Lautstärke eines Pads einstellen
Die Lautstärke jedes Pads ist unabhängig von den anderen einstellbar.
Drücken Sie kurz die Taste „VOLUME“ (14).
Schlagen Sie kurz das Pad an, dessen Lautstärke Sie einstellen wollen.
Anschließend kann mit den Tasten „SELECT +“ bzw. „SELECT -“ (15)
oder dem Einstellrad (20) die Lautstärke verändert werden.
12
Page 11
c) Stereo-Effekt einstellen
Für jedes Pad können Sie die Balance einstellen, d.h. wie laut der jeweilige Soundeffekt eines Pads auf dem linken bzw. rechten Lautsprecher wiedergegeben wird (ähnlich der Balance-Einstellung bei einem
Radio).
Drücken Sie kurz die Taste „PAN“ (14).
Schlagen Sie kurz das Pad an, das Sie einstellen wollen.
Anschließend kann mit den Tasten „SELECT +“ bzw. „SELECT -“ (15)
oder dem Einstellrad (20) die Balance verstellt werden.
d) Pad-Empfindlichkeit einstellen
Jedes Pad kann in seiner Empfindlichkeit eingestellt werden, d.h. ab
welcher Schlagstärke der eingestellte Sound ausgegeben wird.
Drücken Sie kurz die Taste „GAIN“ (14).
Schlagen Sie kurz das Pad an, das Sie einstellen wollen.
Anschließend kann mit den Tasten „SELECT +“ bzw. „SELECT -“ (15)
oder dem Einstellrad (20) die Empfindlichkeit verstellt werden (E00E09, ein höherer Wert bedeutet, dass das Pad empfindlicher auf die
Berührungen reagiert).
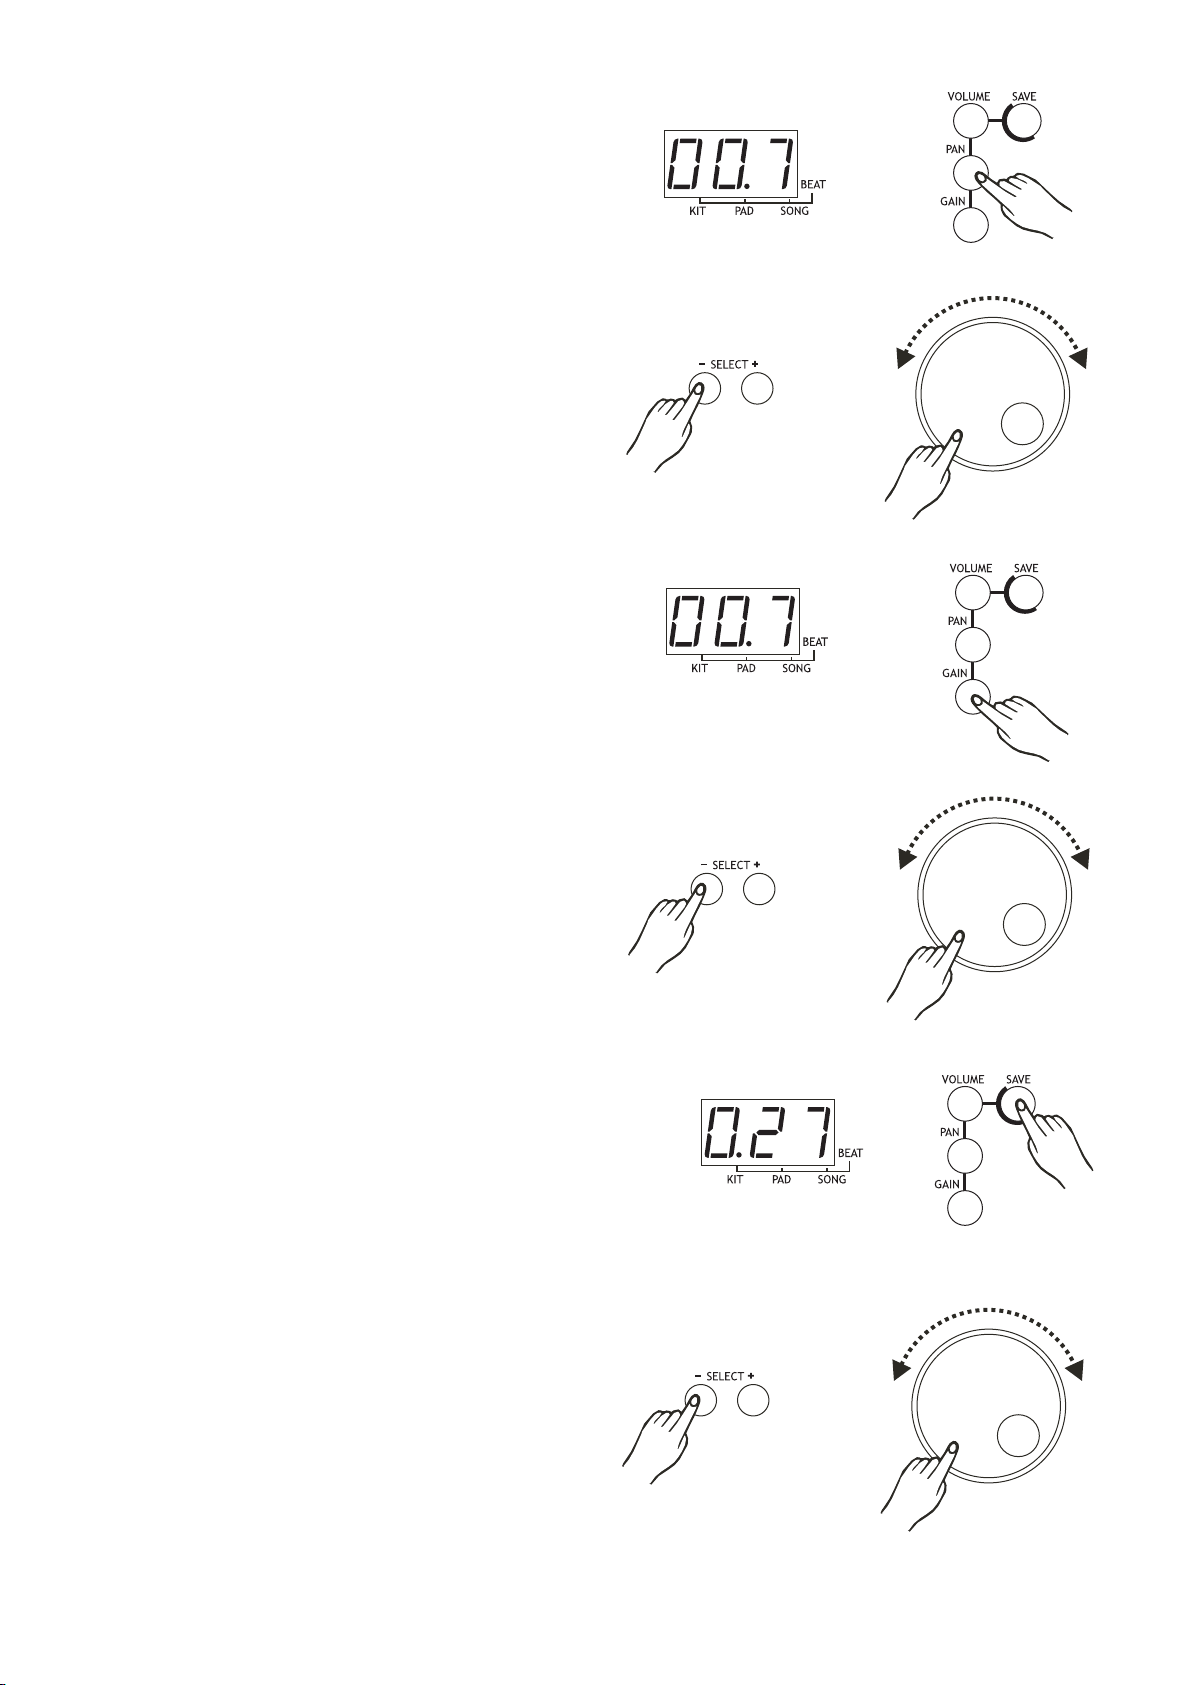
e) Einstellungen speichern
Die in den Abschnitten a) bis d) vorgenommenen Einstellungen lassen
sich speichern, und zwar in einem der 5 Drumkits „026“ bis „030“.
Drücken Sie kurz die Taste „SAVE“ (16).
Im Display blinkt nun z.B. das Drumkit „026“ auf.
Wählen Sie mit den Tasten „SELECT +“ bzw. „SELECT -“ (15) oder
dem Einstellrad (20) einen der Speicher aus (Drumkit 026 bis 030).
Speichern Sie das Drumkit, indem Sie die Taste „SAVE“ (16) nochmals
kurz drücken.
Falls beim Speichern ein Fehler auftritt, erscheint „Err“ im Display. Versuchen Sie dann, das Drumkit in einem anderen Speicher abzulegen.
13
Page 12
13. Begleitung
Das Gerät verfügt über 100 Songs, deren Schlagzeug abgeschaltet werden kann, damit Sie dieses selbst spielen können, z.B. für Übungszwecke.
Die Lautstärke der Songs kann unabhängig von der Schlagzeug-Lautstärke eingestellt werden; die Geschwindigkeit der Songs lässt sich
verändern und es kann auch ein Metronom (Taktsignal) aktiviert werden. Bitte beachten Sie folgende Abschnitte.
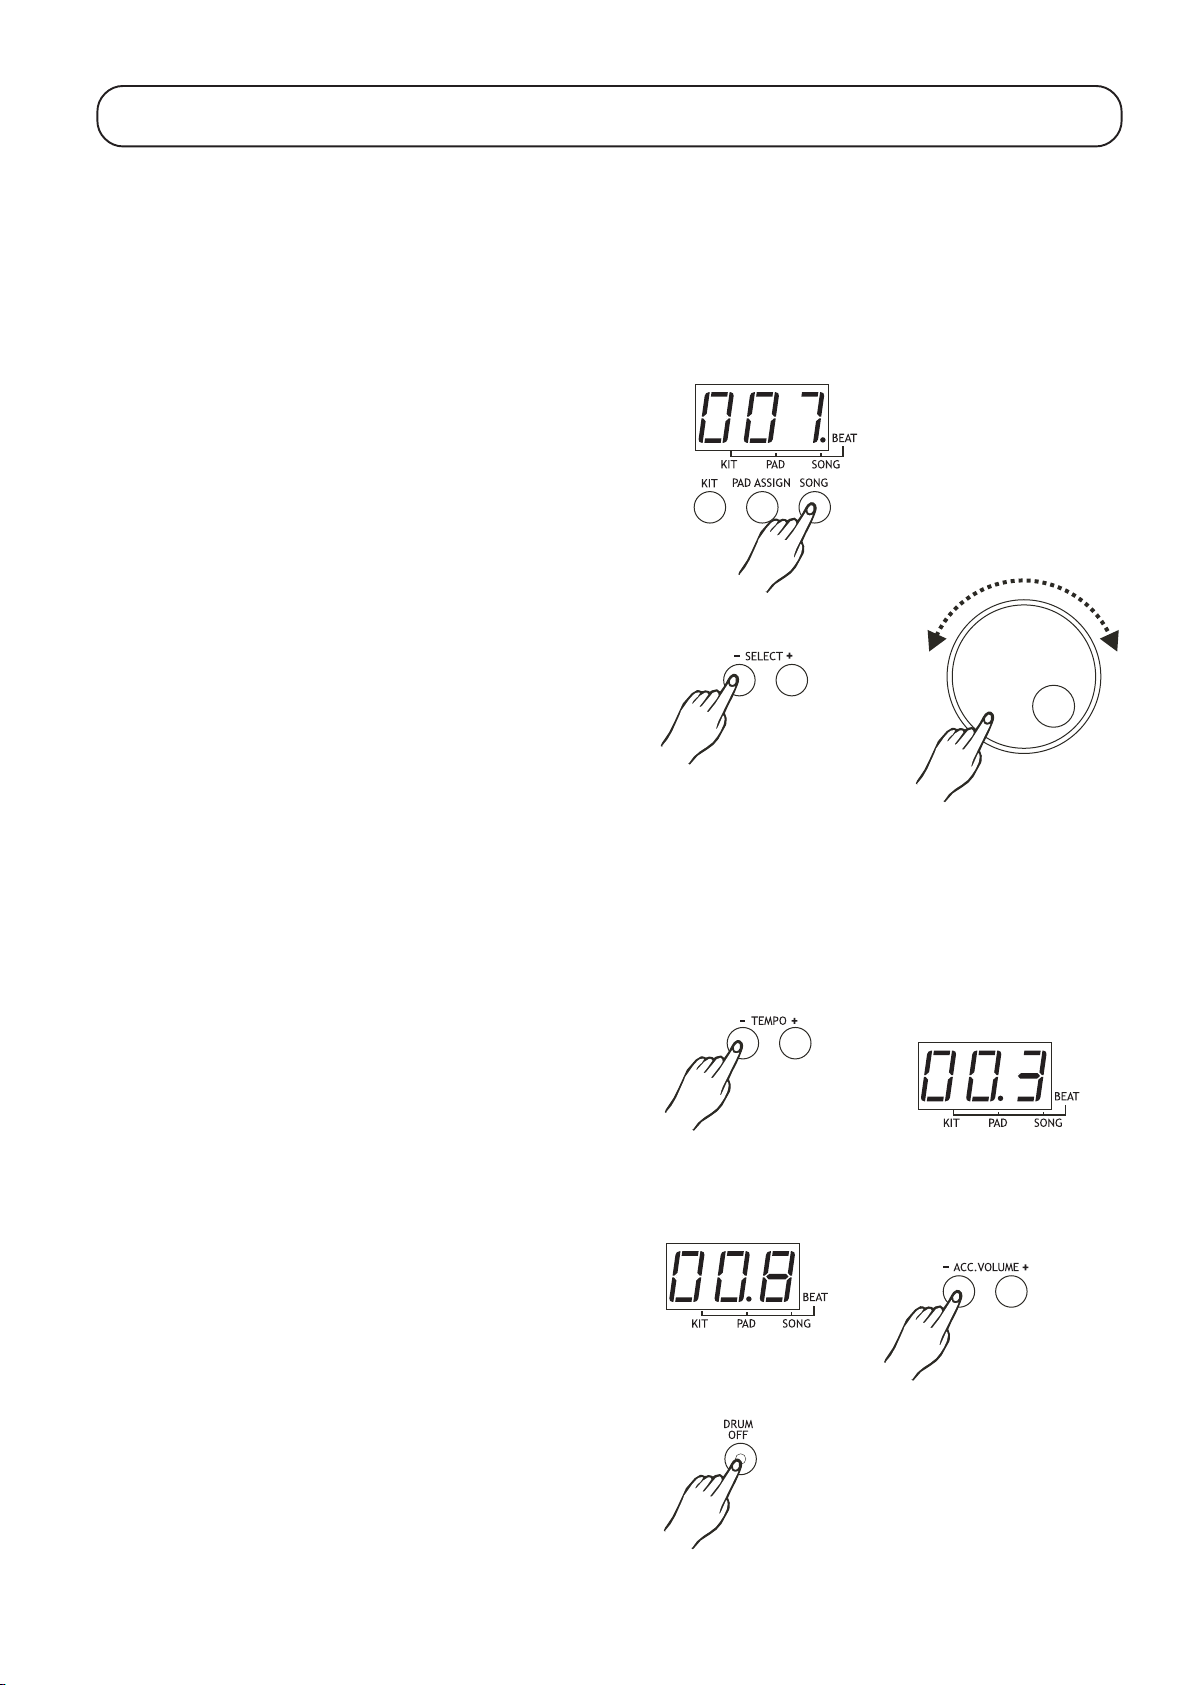
a) Song auswählen
Aktivieren Sie das Einstellmenü, indem Sie die Taste „SONG“ (12) kurz
drücken. Der Dezimalpunkt im Display leuchtet bei „SONG“ auf.
Anschließend kann mit den Tasten „SELECT +“ bzw. „SELECT -“ (15)
oder dem Einstellrad (20) einer der 100 Songs (001-100) ausgewählt
werden.
b) Wiedergabe eines Songs starten/beenden
Drücken Sie kurz die Taste „START/STOP“ (13), um die Wiedergabe eines Song zu starten bzw. zu beenden.
Sie können auch jederzeit während der Wiedergabe mit den Tasten „SELECT +“ bzw. „SELECT -“ (15) oder dem Einstellrad (20) einen anderen
Song auswählen.
c) Geschwindigkeit des Songs verändern
Mit den Tasten „TEMPO -“ und „TEMPO +“ (2) kann sowohl vor als
auch während der Wiedergabe eines Songs die Geschwindigkeit verändert werden. Halten Sie die jeweilige Taste länger gedrückt, um die
Schnellverstellung zu aktivieren.
d) Song-Lautstärke einstellen
Die Tasten „ACC. VOLUME -“ und „ACC. VOLUME +“ (4) dienen zur
Einstellung der Lautstärke der Song-Wiedergabe. Diese ist unabhängig von der Lautstärkeeinstellung der Pads einstellbar.
e) Schlagzeugsounds eines Songs abschalten
Mit der Taste „DRUM OFF“ (9) lassen sich die Schlagzeuggeräusche
eines Songs ausschalten (LED in der Taste leuchtet auf), damit Sie
diese selbst spielen können.
14
Page 13
f) Metronom, Taktsignal
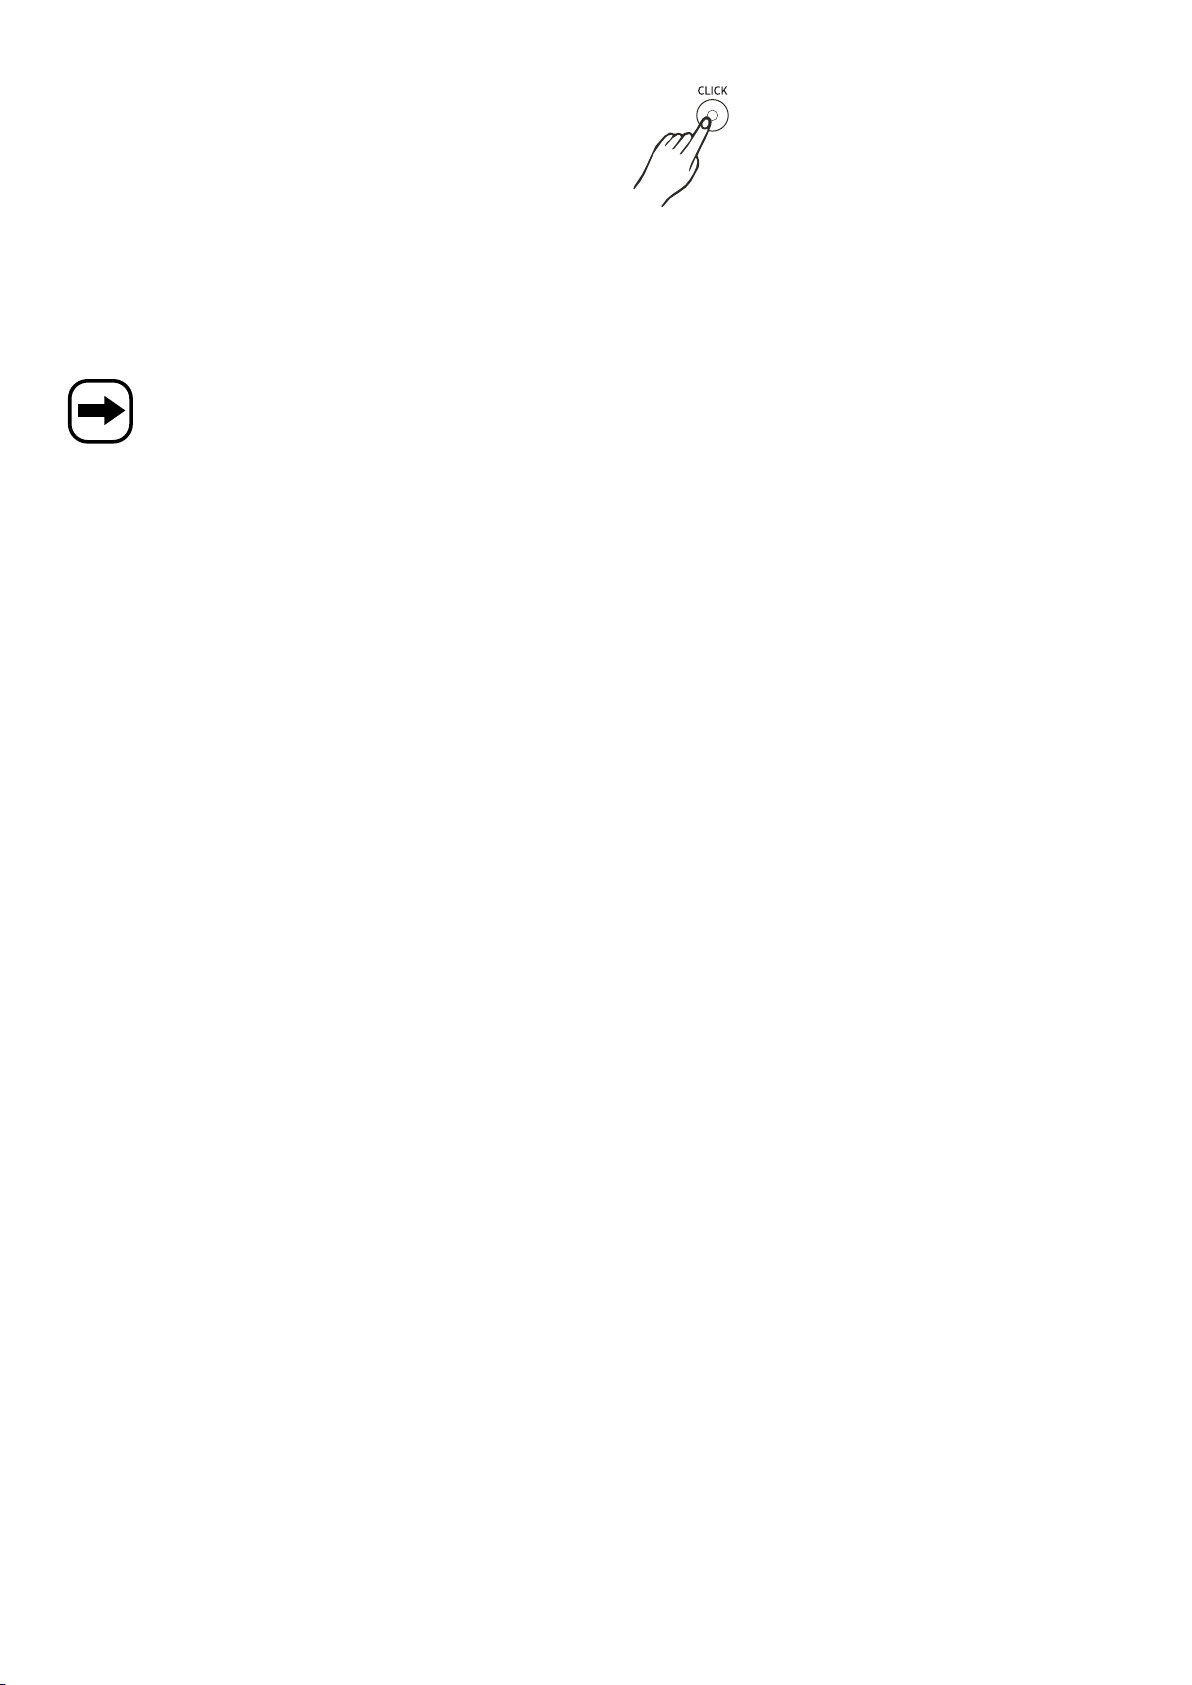
Mit der Taste „CLICK“ (6) kann ein Metronom aktiviert werden, die LED
in der Taste blinkt jeweils im Takt auf.
Beim ersten Tastendruck wird das Taktsignal des Metronoms als
Sprachausgabe aktiviert (z.B. „One - Two - Three - Four“, englisch für
„1 - 2 - 3 - 4“).
Beim zweiten Tastendruck wird als Taktsignal ein bestimmter Ton ausgegeben.
Beim dritten Tastendruck wird das Metronom ausgeschaltet.
Das Taktsignal des Metronoms wird abhängig vom momentan eingestellten Song ausgegeben.
Es ist auch möglich, das Taktsignal zu aktivieren, ohne dass nebenher der Song abgespielt wird. Wählen Sie dazu zuerst den
gewünschten Song aus bzw. halten Sie desssen Wiedergabe mit der Taste „START/STOP“ (13) an. Drücken Sie dann die Taste
„CLICK“ (6) einmal bzw. zweimal, um entweder die Sprachausgabe oder das Tonsignal des Metronoms zu aktivieren.
Wählen Sie anschließend die gewüschte Geschwindigkeit mit den Tasten „TEMPO -“ bzw. „TEMPO +“ (2).
15
Page 14
14. Aufnahme/Wiedergabe
a) Vorbereitungen
Stellen Sie den gewünschten Song, ein Drumkit, die Geschwindigkeit des Songs usw. ein.
b) Aufnahme starten
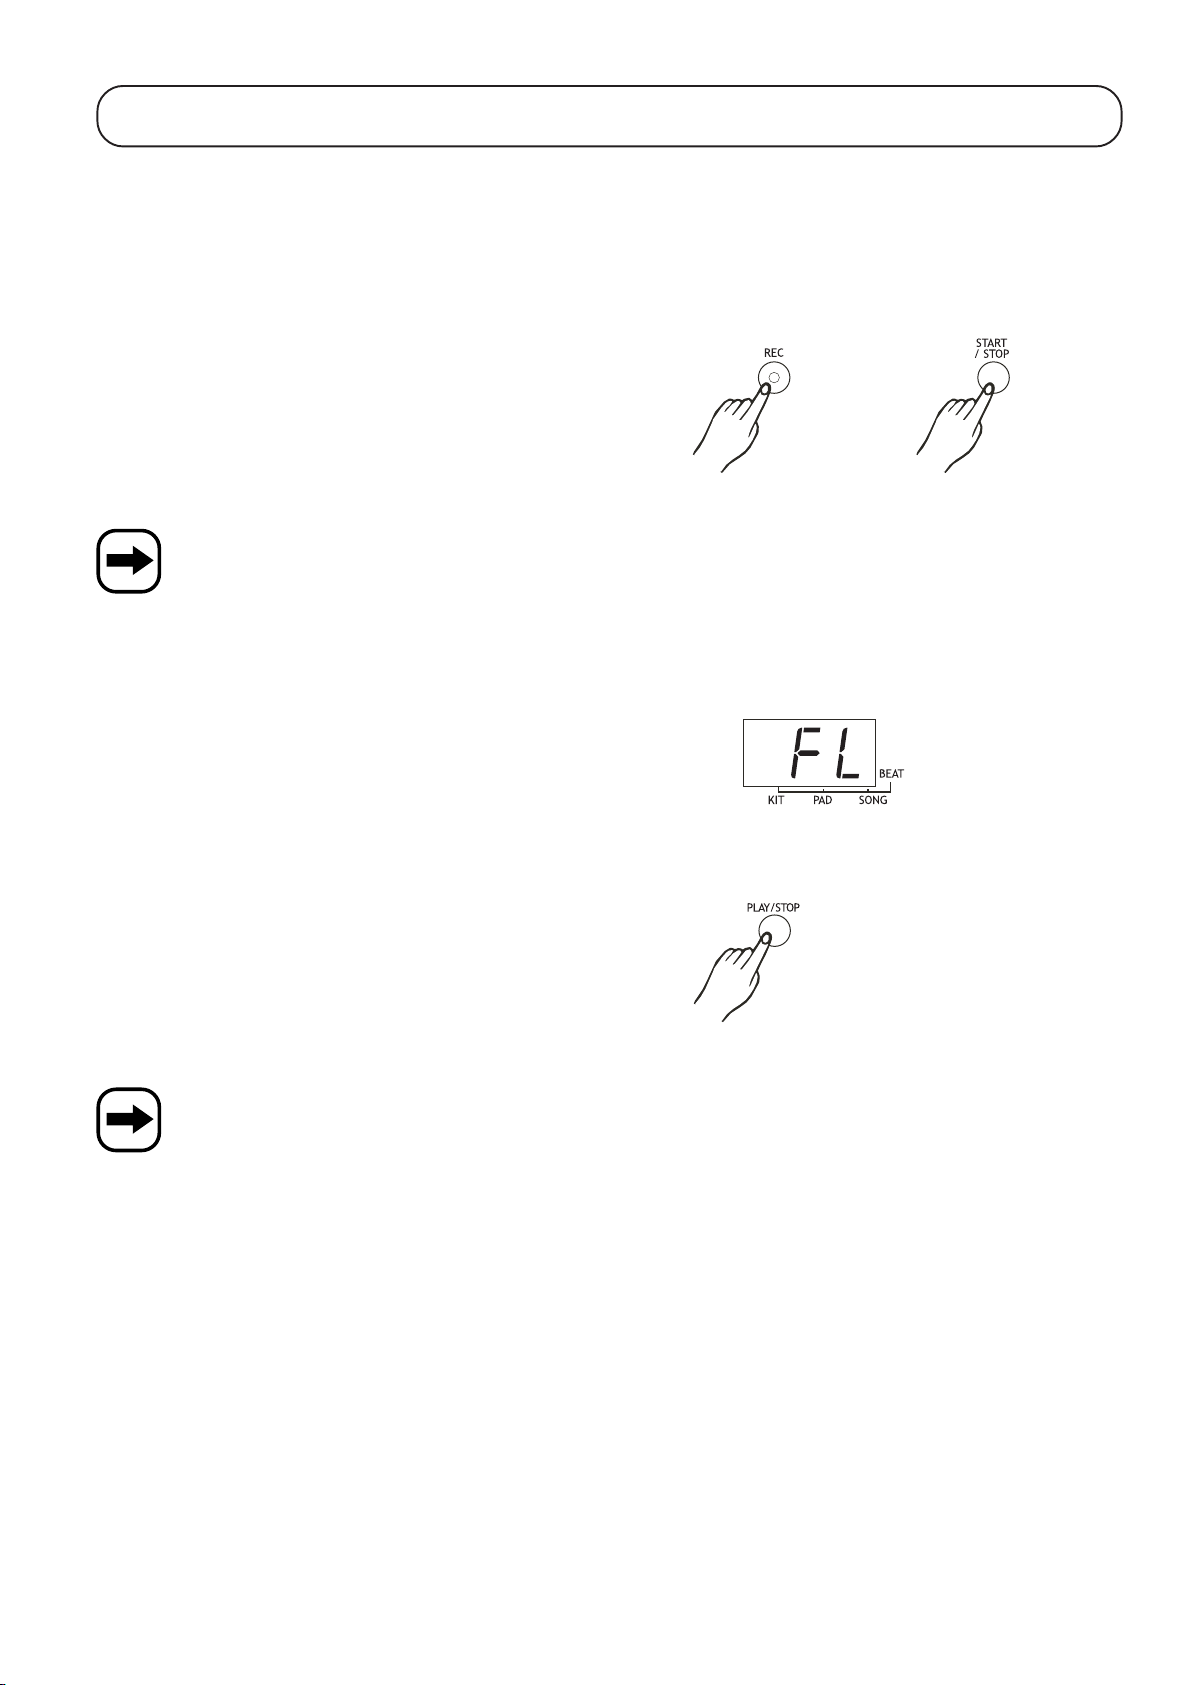
Drücken Sie die Taste „REC“ (5). Die LED in der Taste blinkt, um anzuzeigen, dass die Aufnahmefunktion bereit ist.
Um die Aufnahme zu starten, drücken Sie entweder kurz die Taste
„START/STOP“ (13) oder schlagen Sie eines der Pads an.
Nun beginnt die Wiedergabe des zu Beginn ausgewählten Songs. Alle
Pad-Berührungen werden ab jetzt aufgezeichnet.
Das Metronom wird automatisch gestartet (Sprachwiedergabe „One - Two - Three - Four“), kann jedoch mit der Taste „CLICK“ (6)
umgeschaltet werden auf ein Tonsignal.
Bei nochmaligem Betätigen der Taste wird das Metronom ausgeschaltet, siehe Kapitel 13. f).
c) Aufnahme beenden
Drücken Sie die Taste „REC“ (5) oder die Taste „START/STOP“ (13).
Die LED in der Taste „REC“ erlischt, die Aufnahme ist beendet.
Falls während einer Aufnahme im Display „FL“ erscheint, so ist der
Aufnahmespeicher voll und die Aufnahme wird automatisch beendet.
d) Wiedergabe
Durch Drücken der Taste „PLAY/STOP“ (18) kann eine vorhandene
Aufnahme abgespielt (bzw. angehalten) werden.
Wird eine neue Aufnahme durchgeführt, so überschreibt diese eine evtl. vorhandene Aufnahme.
Beim Ausschalten des Geräts geht eine Aufnahme verloren.
16
Page 15
15. Sonstige Funktionen
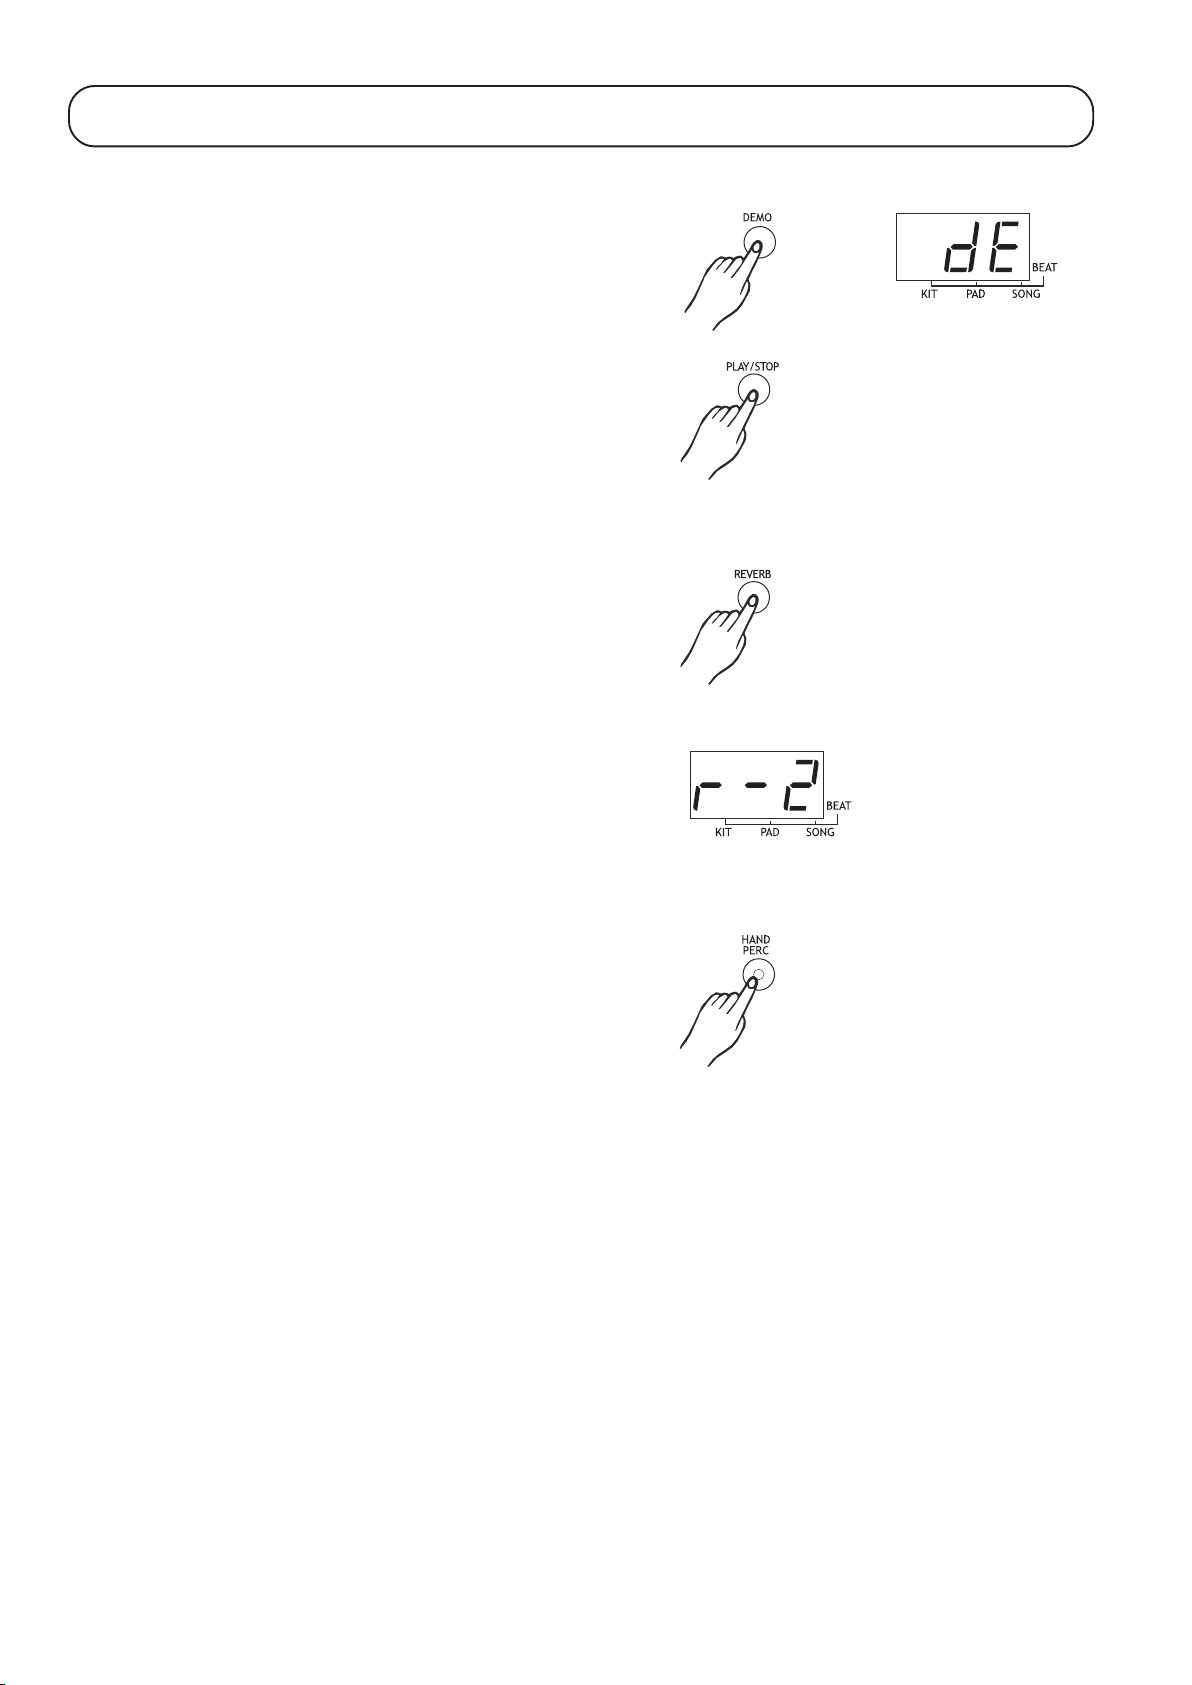
a) Demo-Modus
Mit der Taste „DEMO“ (21) wird ein im Gerät gespeicherter Demo-Song
abgespielt, der Ihnen die Möglichkeiten des Geräts zeigt. Die Wiedergabe wird beendet, indem die Taste „DEMO“ (21) nochmals gedrückt
wird, alternativ können Sie die Taste „PLAY/STOP“ (18) drücken.
b) Hall-Effekt
Mit der Taste „REVERB“ (19) kann der Hall-Effekt bei der Wiedergabe
der Schlagzeugsounds in 4 Stufen eingestellt werden.
In der Einstellung „r-0“ ist der Hall-Effekt ausgeschaltet.
c) Hand-Modus
Mit der Taste „HAND PERC“ (8) wird automatisch Drumkit 21 und Song
5 ausgewählt; außerdem die Empfindlichkeit verändert für das Schlagen des Keyboards mit der Hand anstelle den Drumsticks.
Die LED in der Taste „HAND PERC“ leuchtet auf.
Durch nochmaliges Drücken der Taste wird diese Betriebsart wieder
verlassen.
d) USB-Anschluss
Über die USB-Buchse (28) kann das Drumkit an einen Computer angeschlossen werden. Das Drumkit überträgt alle Midi-Daten beim Spielen
der Pads/Fußpedale, es kann auch Midi-Daten empfangen.
Dazu ist eine geeignete Midi-Software erforderlich, diese ist jedoch nicht im Lieferumfang.
17
Page 16

16. Handhabung
Beachten Sie die Sicherheitshinweise und alle anderen Informationen in dieser Bedienungsanleitung
Stellen Sie das Gerät auf eine ebene, stabile, ausreichend große Fläche. Stellen Sie das Gerät nicht auf wertvolle Möbeloberflächen,
da andernfalls Druckstellen oder Kratzer möglich sind. Verwenden Sie ggf. eine geeignete Unterlage.
Vermeiden Sie folgende widrige Umgebungsbedingungen am Aufstellungsort oder beim Transport:
- Direkte Sonneneinstrahlung
- Nässe oder zu hohe Luftfeuchtigkeit
- Extreme Kälte oder Hitze
- Staub oder brennbare Gase, Dämpfe oder Lösungsmittel
- starke Vibrationen
- starke Magnetfelder, wie in der Nähe von Maschinen oder Lautsprechern
Schalten Sie das Gerät niemals gleich dann ein, wenn es von einem kalten in einen warmen Raum gebracht wird. Das dabei
entstehende Kondenswasser kann unter Umständen das Gerät zerstören. Beim Steckernetzteil besteht außerdem Lebensgefahr
durch einen elektrischen Schlag!
Lassen Sie das Gerät zuerst uneingeschaltet auf Zimmertemperatur kommen. Dies kann u.U. mehrere Stunden dauern.
Achten Sie darauf, dass die Isolierung des gesamten Produkts weder beschädigt noch zerstört wird. Öffnen Sie das Gerät nicht.
Überprüfen Sie vor jedem Gebrauch das Produkt auf Beschädigungen!
Falls Sie Beschädigungen feststellen, so entfernen Sie die eingesetzen Batterien, verbinden Sie das Produkt NICHT über das
externe Netzteil mit der Netzspannung. Bringen Sie das Produkt in eine Fachwerkstatt oder entsorgen Sie es umweltgerecht.
Wenn das Gerät längere Zeit nicht in Betrieb genommen wird, so entnehmen Sie die eingelegten Batterien/Akkus, trennen Sie es
von einem extern angeschlossenen Netzteil.
Fassen Sie niemals mit spitzen Gegenständen (z.B. Kugelschreiber, Steck- und Stricknadeln, Büroklammern etc.) in die Lüftungsschlitze und Öffnungen des Geräts, das Gerät wird dadurch zerstört.
Achten Sie beim Aufstellen des Geräts darauf, dass keines der Verbindungskabel (z.B. das Kabel zu Ihrem Kopfhörer oder zu einem
Netzteil) geknickt oder gequetscht wird.
Verlegen Sie alle Kabel so, dass niemand darüber stolpern kann.
Überprüfen Sie regelmäßig die technische Sicherheit des Produkts, z.B. Beschädigung des Gehäuses.
Wenn anzunehmen ist, dass ein gefahrloser Betrieb nicht mehr möglich ist, so ist das Produkt außer Betrieb zu setzen und gegen
unbeabsichtigten Betrieb zu sichern. Schalten Sie das Drumkit aus, trennen Sie es von einem externen Netzteil, trennen Sie das
externe Netzteil von der Netzspannung. Entnehmen Sie auch evtl. eingesetzte Batterien.
Es ist anzunehmen, dass ein gefahrloser Betrieb nicht mehr möglich ist, wenn
- das Gerät sichtbare Beschädigungen aufweist,
- das Gerät nicht mehr funktioniert und
- nach längerer Lagerung unter ungünstigen Verhältnissen oder
- nach schweren Transportbeanspruchungen.
18
Page 17
17. Wartung und Reinigung
Das Produkt ist für Sie wartungsfrei, öffnen oder zerlegen Sie es niemals. Eine Reparatur darf nur von einer Fachkraft oder Fachwerkstatt
vorgenommen werden.
Zur Reinigung des Produkts reicht ein trockenes, weiches Tuch.
18. Entsorgung
a) Allgemein
Elektrische und elektronische Geräte dürfen nicht in den Hausmüll!
Entsorgen Sie das Produkt am Ende seiner Lebensdauer gemäß den geltenden gesetzlichen Vorschriften.
b) Batterien und Akkus
Sie als Endverbraucher sind gesetzlich (Batterieverordnung) zur Rückgabe aller gebrauchten Batterien und Akkus verpflichtet; eine
Entsorgung über den Hausmüll ist untersagt!
Schadstoffhaltige Batterien/Akkus sind mit nebenstehendem Symbol gekennzeichnet, das auf das Verbot der Entsorgung über den
Hausmüll hinweist. Die Bezeichnungen für das ausschlaggebende Schwermetall sind: Cd=Cadmium, Hg=Quecksilber, Pb=Blei
(Bezeichnung steht auf Batterie/Akku z.B. unter dem links abgebildeten Mülltonnen-Symbol).
Ihre verbrauchten Batterien/Akkus können Sie unentgeltlich bei den Sammelstellen Ihrer Gemeinde, unseren Filialen oder überall
dort abgeben, wo Batterien/Akkus verkauft werden.
Sie erfüllen damit die gesetzlichen Verpflichtungen und leisten Ihren Beitrag zum Umweltschutz.
19
Page 18

19. Technische Daten
Drumkits ..................................................... 30 (25 voreingestellt, 5 programmierbar)
Schlagzeug-Sounds ................................... 215
Songs ......................................................... 100
Aufnahmespeicher ..................................... 1
Pads ........................................................... 7
Fußpedale .................................................. 2
Anschlüsse ................................................. 1x Kopfhörerausgang 6.35mm, 1x USB-Buchse für Midi-Daten (In/Out)
Betriebsspannung ...................................... 12 V/DC, 2 A über externes Netzteil oder 6 Batterien vom Typ Baby/C
Abmessungen ............................................ 500 x 370 x 157mm (B x T x H)
Gewicht ...................................................... Ca. 3.3 kg
Sonstiges ................................................... Stereo-Lautsprecher integriert, Metronom mit Sprachausgabe oder Tonsignal zuschaltbar
20
Page 19
20. Anhang A: Schlagzeug-Sounds
.
NO.
1
2
3
4
5
6
7
8
9
10
11
12
13
14
15
16
17
18
19
20
21
22
23
24
25
26
27
28
29
30
31
32
33
34
NAME
Kick KIT
Rock Kick 001
Rock Kick 002
Rock Kick 003
Standard Kick 001
Standard Kick 002
Standard Kick 003
Standard Kick 004
Pop Kick 001
Pop Kick 002
Pop Kick 003
Acoustic Kick 001
Acoustic Kick 002
Acoustic Kick 003
Acoustic Kick 004
Acoustic Kick 005
Acoustic Kick 006
Acoustic Kick 007
Acoustic Kick 008
Acoustic Kick 009
Acoustic Kick 010
Acoustic Kick 011
Snare KIT
Standard Snare 001
Standard Snare 002
Standard Snare 003
Standard Snare 004
Standard Snare 005
Standard Snare 006
Brush Snare 001
Brush Snare 002
Standard Stick 001
Standard Stick 002
Rock Snare 001
Rock Snare 002
Rock Snare 003
NO.
35
36
37
38
39
40
41
42
43
44
45
46
47
48
49
50
51
52
53
54
55
56
57
58
59
60
61
62
63
64
65
66
67
68
69
NAME
.
Pop Snare 001
Pop Snare 002
Pop Snare 003
Acoustic Snare 001
Acoustic Snare 002
Acoustic Snare 003
Acoustic Snare 004
Acoustic Snare 005
Tom KIT
Standard Tom 001
Standard Tom 002
Standard Tom 003
Standard Tom 004
Standard Tom 005
Standard Tom 006
Room Tom 001
Room Tom 002
Room Tom 003
Room Tom 004
Room Tom 005
Room Tom 006
Electronic Tom 001
Electronic Tom 002
Electronic Tom 003
Electronic Tom 004
Electronic Tom 005
Electronic Tom 006
Analog Tom 001
Analog Tom 002
Analog Tom 003
Analog Tom 004
Analog Tom 005
Analog Tom 006
Acoustic Tom 001
Acoustic Tom 002
Acoustic Tom 003
NO.
70
71
72
73
74
75
76
77
78
79
80
81
82
83
84
85
86
87
88
89
90
91
92
93
94
95
96
97
98
99
100
101
102
NAME
.
Acoustic Tom 004
Acoustic Tom 005
Acoustic Tom 006
Hihat KIT
Standard Hihat Close
Standard Hihat Pad
Standard Hihat Open
Analog Hihat Close
Analog Hihat Pad
Analog Hihat Open
Shakable
Rock Hihat Close
Rock Hihat Pad
Rock Hihat Open
Acoustic Hihat Close
Acoustic Hihat Pad
Acoustic Hihat Open
Crash KIT
Standard Crash001
Standard Crash002
Standard Crash003
Analog Ride001
China Crash
Splash001
Standard Ride 001
Rock Crash
Standard Ride 002
Electronic Crash
Splash002
Ride Bell
Panel KIT
Vibraslap
Hand
Tambourine
Stcowb
Mutecowb
21
Page 20

NO.
.
NAME
NO.
NAME
.
NO.
NAME
.
103
104
105
106
107
108
109
110
111
112
113
114
115
116
117
118
119
Mute Hi Conga
Open Hi Conga
Low Conga
Hi Bongo
Low Bongo
High Timbale
Low Timbale
High Agogo
Low Agogo
Cabasa
Shaker
Claves
Mute Triangle
Open Triangle
Short Guiro
Long Guiro
Mute Cuica
141
142
143
144
145
146
147
148
149
150
151
152
153
154
155
156
Tambourine001
Tambourine002
Tambourine003
Tambourine004
Tambourine005
Sfx KIT
SFX001
SFX002
SFX003
SFX004
SFX005
SFX006
SFX007
SFX008
SFX009
SFX010
SFX011
178
179
180
181
182
183
184
185
186
187
188
189
190
191
192
193
194
SFX033
SFX034
SFX035
SFX036
SFX037
SFX038
SFX039
SFX040
SFX041
SFX042
SFX043
SFX044
SFX045
SFX046
SFX047
SFX048
SFX049
120
121
122
123
124
125
126
127
128
129
130
131
132
133
134
135
136
Open Cuica
Mute Surdo
Open Surdo
Maracas
HighQ
Slap
Scratch Push
Scral
One
Two
Three
Four
Cartoon001
Cartoon002
Cartoon003
Cartoon004
Cartoon005
157
158
159
160
161
162
163
164
165
166
167
168
169
170
171
172
173
SFX012
SFX013
SFX014
SFX015
SFX016
SFX017
SFX018
SFX019
SFX020
SFX021
SFX022
SFX023
SFX024
SFX025
SFX026
SFX027
SFX028
195
196
197
198
199
200
201
202
203
204
205
206
207
208
209
210
211
SFX050
SFX051
SFX052
SFX053
SFX054
SFX055
SFX056
SFX057
SFX058
SFX059
SFX060
SFX061
SFX062
SFX063
SFX064
SFX065
SFX066
22
137
138
139
140
Cartoon006
Laugh
Metronome1
Metronome2
174
175
176
177
SFX029
SFX030
SFX031
SFX032
212
213
214
215
SFX067
SFX068
SFX069
SFX070
Page 21
21. Anhang B: Drumkits
NO.
01 Pop1 16 Jazz2
02 Pop2 17 Funk
03 Standard 1 18 Clave
04 Room 19 Drum Bass
05 Rock 1 20 Hip Hop
06 Electronic 21 Conga1
07 Analog 22 Conga2
08 Jazz 1 23 Timbales
09 Brush 24 Latin
10 Standard 2 25 Funk
11 Rock2 26 User 1 (Pop 1)
12 Boss 27 User 2 (Pop 2)
13 Rock3 28 User 3 (Standard1)
14 Standard 3 29 User 4 (Room)
15 Rock4 30 User 5 (Rock 1)
NAME
NO.
NAME
22. Anhang C: Songs
NO.
01
02
03
04
05
06
07
08
09
10
11
12
13
.
01
03
02
05
21
21
21
01
03
04
05
03
01
NAMEKIT BEAT
Intro
Intro
8 Beat
8 Beat 2
8 Beat 3
8 Beat 4
8 Beat 5
8 Beat Ballad 1
8 Beat Ballad 2
8 Beat Ballad 3
Soft Rock
Rock 1
Rock 2
Rock 3
Rock 4
4/4
4/4
4/4
4/4
4/4
4/4
4/4
4/4
4/4
4/4
4/4
4/4
4/4
NO.
16
17
18
19
20
21
22
23
24
25
26
27
28
29
30
.
05
07
03
01
07
04
02
01
21
21
05
03
01
03
01
NAMEKIT BEAT
Hard Rock 2
16 Beat 1
16 Beat 2
16 Beat 3
16 Beat 4
16 Beat 5
16 Beat 6
16 Beat 7
16 Beat Ballad 1
16 Beat Ballad 2
16 Beat Ballad 3
16 Beat Ballad 4
16 Beat Ballad 5
16 Beat Funk 1
16 Beat Funk 2
4/4
4/4
4/4
4/4
4/4
4/4
4/4
4/4
4/4
4/4
4/4
4/4
4/4
4/4
4/4
14
15
02
05
Rock 5
Hard Rock 1
4/4
4/4
23
Page 22
NO.
31
32
33
34
35
36
37
38
39
40
41
42
43
44
45
46
47
48
49
50
51
52
53
54
55
56
57
58
59
60
61
62
63
64
65
66
.
07
07
01
06
04
07
03
01
03
04
03
01
03
02
03
01
05
04
03
03
04
01
04
03
23
12
12
03
01
03
03
12
12
12
12
01
NAME NAMEKIT KITBEAT BEAT
Dance
Dance 1
Dance 2
Dance 3
Dance 4
Dance 5
Dance 6
Rap
Rap 1
Rap 2
Rap 3
Bounce
Bounce 1
Bounce 2
Bounce 3
Shuffle
Shuffle 1
Shuffle 2
Shuffle 3
Shuffle 4
Shuffle 5
Shuffle 6
Shuffle 7
Slow Rock
Slow Rock 1
Slow Rock 2
Slow Rock 3
Slow Rock 4
Latin
Reggae 1
Reggae 2
Bossa Nova 1
Bossa Nova 2
Samba
Salsa
Latin Rock
Cha-Cha
Mambo
Rhumba 1
Rhumba 2
Rhumba 2
Tango
4/4
4/4
4/4
4/4
4/4
4/4
4/4
4/4
4/4
4/4
4/4
4/4
4/4
4/4
4/4
4/4
4/4
4/4
4/4
4/4
4/4
4/4
4/4
4/4
4/4
4/4
4/4
4/4
4/4
4/4
4/4
4/4
4/4
4/4
4/4
4/4
NO.
67
68
69
70
71
72
73
74
75
76
77
78
79
80
81
82
83
84
85
86
87
88
89
90
91
92
93
94
95
96
97
98
99
100
.
Swing
09
09
08
12
02
03
02
01
01
03
01
03
12
09
03
05
03
05
05
01
03
07
03
01
03
02
03
04
03
03
01
03
12
08
Swing 1
Swing 2
Swing 3
Others
Waltz
3/4 Ballad
Swing Blues
Blues
March 1
March 2
R&B
Hip-Hop
Funk
Country
Big Band
8 Beat
8 Beat 1
8 Beat 2
Ballad
Hard Rock 1
Hard Rock 2
Hard Rock 3
Pop Dance 1
Pop Dance 2
R&B
16 Beat
16 Beat
Fusion
Funk
Funk 1
Funk 2
Shuffle
Shuffle 1
Shuffle 2
16 Beat Shuffle
16 Beat Triplet
Others
Reggae
Bossa Nova
Big Band
4/4
4/4
4/4
4/4
4/4
4/4
4/4
4/4
4/4
4/4
4/4
4/4
4/4
4/4
4/4
4/4
4/4
4/4
4/4
4/4
4/4
4/4
4/4
4/4
4/4
4/4
4/4
4/4
4/4
4/4
4/4
4/4
4/4
4/4
24
Page 23

Table of Contents
1. Introduction ............................................................................................................................................................................................26
2. Intended Use .......................................................................................................................................................................................... 26
3. Included in Delivery ............................................................................................................................................................................... 27
4. Explanation of Symbols ........................................................................................................................................................................ 27
5. Safety Instructions ................................................................................................................................................................................. 28
6. General Information on Batteries and Rechargeable Batteries .........................................................................................................28
7. Controls .................................................................................................................................................................................................. 30
8. Battery and Mains Operation ................................................................................................................................................................ 31
a) Inserting batteries ................................................................................................................................................................................ 31
b) Connection of an external power supply ............................................................................................................................................. 31
9. Connecting Headphones....................................................................................................................................................................... 31
10. Connecting Foot Pedals ........................................................................................................................................................................32
11. Basic Functions ..................................................................................................................................................................................... 32
a) Turning device on/off ........................................................................................................................................................................... 32
b) Selecting drum kit................................................................................................................................................................................ 32
c) Setting volume ("Master Volume") ....................................................................................................................................................... 32
12. Setting Pads, Programming the Drum Kit ........................................................................................................................................... 33
a) Selecting the drum sound for a pad .................................................................................................................................................... 33
b) Setting the volume for a pad ...............................................................................................................................................................33
c) Setting the stereo effect ...................................................................................................................................................................... 34
d) Setting the pad sensitivity.................................................................................................................................................................... 34
e) Saving settings ....................................................................................................................................................................................34
13. Accompaniment ..................................................................................................................................................................................... 35
a) Selecting a song.................................................................................................................................................................................. 35
b) Starting/ending song playback ............................................................................................................................................................ 35
c) Changing the speed of the song ......................................................................................................................................................... 35
d) Changing the volume of the song ........................................................................................................................................................ 35
e) Deactivating the drum sounds in a song .............................................................................................................................................35
f) Metronome ..........................................................................................................................................................................................36
14. Record/Playback .................................................................................................................................................................................... 37
a) Preparation.......................................................................................................................................................................................... 37
b) Start recording..................................................................................................................................................................................... 37
c) End recording: ..................................................................................................................................................................................... 37
d) Playback.............................................................................................................................................................................................. 37
15. Other Functions ..................................................................................................................................................................................... 38
a) Demo mode......................................................................................................................................................................................... 38
b) Reverb effect ....................................................................................................................................................................................... 38
c) Hand mode..........................................................................................................................................................................................38
d) USB connection .................................................................................................................................................................................. 38
16. Handling .................................................................................................................................................................................................. 39
17. Maintenance and Cleaning ....................................................................................................................................................................40
18. Disposal .................................................................................................................................................................................................. 40
a) General information ............................................................................................................................................................................. 40
b) Batteries and rechargeable batteries .................................................................................................................................................. 40
19. Technical Data........................................................................................................................................................................................ 41
20. Appendix A: Drum Sounds ................................................................................................................................................................... 42
21. Appendix B: Drum Kits .......................................................................................................................................................................... 44
22. Appendix C: Songs ................................................................................................................................................................................44
Page
25
Page 24
1. Introduction
Dear Customer,
Thank you for purchasing this product.
The product meets the requirements of the current European and national guidelines.
These operating instructions are part of this product. They contain important information on how to put the product into
operation and its handling. Please take this into consideration when you pass on the product to third parties.
Please keep these instructions for further reference!
All names of companies and products are trademarks of the respective owner. All rights reserved.
For technical questions, please contact:
Tel. no.: +49 9604 / 40 88 80
Fax. no.: +49 9604 / 40 88 48
E-mail: tkb@conrad.de
Mon. to Thur. 8.00am to 4.30pm
Fri. 8.00am to 2.00pm
2. Intended Use
The digital drum kit is intended for use with stereo players in private and semi-professional areas. The device is intended for the production of
drum sounds/effects which can be played back via the integrated loud speakers.
The power supply of the digital drum kit is through 6 batteries of the type Baby/C. Alternatively, you can use an external power supply (not
included, available separately).
The entire product may only be used in enclosed, dry interior rooms. The product must not get damp or wet.
Any use other than that described above will damage the product and may involve other risks such as short circuits, fire and electric shock etc.
Do not change or modify any part of the product. The housing must not be opened.
This product is not a toy and is not suitable for children and young people under the age of 14.
Observe all safety instructions contained in these operating instructions. They contain important information regarding the handling
of the product.
26
Page 25

3. Included in Delivery
• Drum kit
• Two drum sticks
• Two foot pedals
• User's manual
4. Explanation of Symbols
The symbol with the lightning bolt in the triangle is used when your health is at risk, e.g. through an electric shock.
The symbol with the exclamation mark points out particular dangers associated with handling, function or operation.
The "arrow" symbol indicates special tips and operating information.
27
Page 26

5. Safety Instructions
The warranty/guarantee is rendered void in cases of damage resulting from failure to comply with these operating
instructions. We do not accept any liability for consequential damages!
We do not accept any liability for personal injury or damage to property caused by incorrect handling of the device or
failure to observe the safety instructions! In such cases the warranty/guarantee is rendered void.
• For safety and licensing (CE) reasons, unauthorised conversion and/or modification of the product are not permitted.
• All the persons who operate this drum kit, install it, assemble it, put it into operation or service it must be trained and qualified
correspondingly and must observe this operating manual.
• The product is not a toy and should be kept out of reach of children. Children cannot judge the dangers involved when handling
electrical devices.
• Never position vessels or containers containing liquids, such as glasses, buckets, vases or plants, in the direct vicinity of the
system. Liquids could seep into the casing and in doing so impair the electrical safety of the device. There is furthermore a high risk
of fire or of a life-threatening electric shock!
Disconnect all cables from the device. Afterwards, the entire product must no longer be used; take it to a specialist workshop.
• Do not expose the device either to high temperatures, dripping or splashing water, strong vibrations or high mechanic stress.
• Do not place any sources of open fire, such as burning candles, onto or next to the device.
• Do not operate the device when it is unattended.
• Use the device only in moderate climate regions and not in tropical ones.
• Do not leave packing material unattended. It can be dangerous to children who play with it.
• Consult an expert when in doubt about the mode of operation, safety or connection of the device.
• In industrial applications the accident prevention regulations of the association of the industrial workers' society for electrical
equipment and utilities must be followed.
• If you are not sure about the correct connection or if questions arise which are not covered by the operating instructions, please do
not hesitate to contact our technical support or another specialist.
28
Page 27

6. General Information on Batteries and Rechargeable Batteries
• Keep batteries/rechargeable batteries out of reach of children.
• Do not leave the batteries lying around in the open; there is a risk of their being swallowed by children or domestic animals. In such
a case, immediately call a doctor!
• Batteries/rechargeable batteries must never be short-circuited, taken apart or thrown into fire. There is a risk of explosion!
• Leaking or damaged batteries/rechargeable batteries can cause burning if they come into contact with the skin. For this reason
you should use suitable protective gloves.
• Do not recharge normal batteries. There is a risk of fire and explosion! Only recharge suitable, rechargeable batteries and use a
suitable charging device.
• Make sure that the polarity is correct when inserting the batteries/rechargeable batteries (pay attention to the negative and positive
terminals). There is a risk of fire and explosion!
• If the device is not used for a longer period of time (e.g. storage), take out the inserted batteries (or rechargeable batteries) to avoid
damage from leaking batteries/rechargeable batteries.
Recharge the rechargeable batteries about every 3 months, as otherwise they may become excessively discharged as a result of
self-discharge over time, this can make the rechargeable batteries useless.
• Always exchange the entire set of batteries or rechargeable batteries. Do not mix full batteries/rechargeable batteries with half-full
ones Always use batteries or rechargeable batteries of the same type and manufacturer.
• Never mix batteries and rechargeable batteries!! Either use 6 batteries or 6 rechargeable batteries.
It is possible to operate the drum kit with rechargeable batteries instead of disposable batteries.
However, the low voltage (batteries=1.5V, rechargeable batteries=1.2V) and the lower capacity of rechargeable batteries does lead
to a decrease in the operating time.
If you are using batteries to operate the drum kit, we recommend the use of high-quality alkaline batteries.
29
Page 28

7. Controls
A diagram of the controls is located on the front fold-out page.
1 On/off switch
2 "TEMPO -" und "TEMPO +" buttons for setting the speed of a song during playback (accompanying melody)
3 "-Master Volume +" rocker button for volume setting (base volume)
4 "ACC. VOLUME -" and "ACC. VOLUME +" buttons for setting the volume during song playback (accompanying melody)
5 "REC" button with LED for recording mode
6 "CLICK" button for switching metronome on/off, with LED
7 3-digit display, e.g. for sound numbers, song numbers etc.
8 "HAND PERC" button with LED for hand mode
9 "DRUM OFF" button for switching drum on/off while playing a song, with LED
10 "KIT" button to activate the selection function of a drum kit.
11 "PAD ASSIGN" button for assignment of a drum effect to a drum pad or foot pedal.
12 "SONG" button to select one of the 100 songs.
13 "START/STOP" button to play and stop a song.
14 "VOLUME +" button for setting the volume of the individual pads or foot pedals
15 "SELECT +" und "SELECT -" buttons e.g. for selecting a song, a drum kit etc.
16 "SAVE" button to save a drum kit.
17 "PAN" button to adjust the stereo effect (e.g. for sound playback via the internal speakers) for each pad.
18 "PLAY/STOP" button to play and stop the playback of a recording you have made.
19 "PLAY/STOP" button to set the reverb effect.
20 Jog-shuttle dial for quickly selecting a song, a drum kit etc.
21 "DEMO" button for switching on/off demo mode
22 "GAIN" button to set the pad sensitivity.
23 Drum pad (total of 7)
24 Control buttons (see 1-22)
25 "PHONES" jack for headphone connection
26 "KICK" jack for foot pedal connection
27 "HI HAT" jack for foot pedal connection
28 "USB" jack for connecting to a free USB1.1/2.0 port on a computer, for Midi In/Out
29 Low-voltage outlet for the connection to an external power supply (not included, available separately)
30
Page 29

8. Battery and Mains Operation
For the operation of the drum kit either 6 batteries of the type Baby/C, or an external power supply (not included, available separately) can be
used.
Because of the high power consumption, we recommend you use the mains power unit supplied to power the drum kit where
possible.
a) Inserting batteries
If you wish to use batteries, open the battery compartment cover on the
bottom of the drum kit and insert 6 baby/C type batteries ensuring that
you insert them in the correct polarity (note plus/+ and minus/-). Then
put the battery compartment cover back in place and click it into place.
If batteries are used, you should only use high quality alkaline batteries.
It is necessary to change the batteries if the display becomes very faint
or the sound output is distorted, or if the drum kit switches itself off
while in operation and the display switches off.
b) Connection of an external power supply
Connect the round low-voltage power plug of the power supply (not included, available separately) with the appropriate socket (29) on the rear
of the drum kit. Then connect the power supply to an AC outlet.
If an external power supply is used, the batteries can remain in the battery compartment, as the power supply is automatically taken
from the external power supply.
Don’t forget to remove the batteries if the product is operated only with a power supply for extended periods. Outdated batteries may
leak and cause damage to the battery compartment or the drum kit!
9. Connecting Headphones
Not everyone enjoys the sound of a beginner learning to play the drums.
To allow you to play undisturbed (and to be less disturbing!) the rear of
the drum kit is fitted with a headphone connection (25) (6.35mm stereo
audio jack)
Headphones with 3.5mm audio jack plugs can also be used, but they
require a suitable adapter, which you can obtain from an accessories
store if it is not provided with the headphones.
Do not set the volume too high, as this may cause hearing
damage!
PHONES KICK HI HAT USB 12V
31
Page 30

10. Connecting Foot Pedals
Connect the two foot pedals supplied with the product to the
connections "KICK" and "HI HAT".
11. Basic Functions
a) Turning device on/off
PHONES KICK HI HAT USB 12V
The "POWER ON/OFF" switch (1) can be used to switch the device on and off.
b) Selecting drum kit
Activate the settings menu by pressing the "KIT" button (10) once. The
decimal point in the display glows next to "KIT"
Then you can use the "SELECT +" and "SELECT -" buttons (15) or the
adjustment wheel (20) to select the drum kit (001-030).
c) Setting volume ("Master Volume")
The rocker button "- MASTER VOLUME +" (3) can be used to set the
volume for playback via the speaker or the headphones.
Please note that the rocker button (3) is used to set the base volume of
the device.
If the volume of the individual pads is altered (e.g. if a drum effect is
required to be played louder or quieter) this can be done using the
"VOLUME" button (14).
32
Page 31

12. Setting Pads, Programming the Drum Kit
After the device is switched on, drum kit "001" is automatically activated. The first 25 drum kits "001" to "025" contain specific pre-settings by the
manufacturer, see Appendix B (Chapter 21).
You can save your own combinations of allocated sounds for the 7 pads and 2 foot pedals in the drum kits "026" to "030"
The following settings can be made:
• Drum sound
• Pad volume
• Stereo effect
• Pad sensitivity (for the 7 pads only, not the foot pedals)
If another drum kit is selected (see Chapter 11. b) then all the previous settings you have made will be lost!
If you would like to save a specific setting, then please refer to Chapter 12. e).
a) Selecting the drum sound for a pad
If you are not satisfied with the 30 pre-installed drum kits (see Chapter
10. a) you can of course reconfigure the pads.
The settings in the following sections from c) to f) can be saved
later in one of the drum kits from 026 to 030.
Activate the settings menu by pressing the "PAD ASSIGN" button (11)
once. The decimal point in the display glows next to "PAD"
Hit the pad which you wish to change the sound of. The current sound
is played via the speakers or the headphones.
If the same pad is struck again, the next sound will be played.
Of course you can also use the "SELECT +" and "SELECT -" buttons
(15) or the adjustment wheel (20) to select a sound.
In Appendix A (Chapter 20) you will find a table with all the sounds.
b) Setting the volume for a pad
The volume of each pad can be independently adjusted.
Press the "VOLUME" button (14) once.
Hit the pad which you wish to adjust the volume of.
Then you can use the "SELECT +" and "SELECT -" buttons (15) or the
adjustment wheel (20) to alter the volume.
33
Page 32

c) Setting the stereo effect
You can set the balance for each pad, i.e. how loud the corresponding
sound effect of a pad is emitted on the left or right-hand speaker (similar
to the balance setting on a radio).
Press the "PAN" button (14) once.
Hit the pad which you wish to adjust.
Then you can use the "SELECT +" and "SELECT -" buttons (15) or the
adjustment wheel (20) to alter the balance.
d) Setting the pad sensitivity
The sensitivity of each pad can be adjusted, i.e. the strength of contact
by which the programmed sound is emitted can be adjusted.
Press the "GAIN" button (14) once.
Hit the pad which you wish to adjust.
Then you can use the "SELECT +" and "SELECT -" buttons (15) or the
adjustment wheel (20) to alter the sensitivity (E00-E09, a higher value
means that the pad will react more sensitively to contact/touch).
e) Saving settings
The settings made in the following sections from a) to d) can be saved
later in one of the 5 drum kits from "026" to "030".
Press the "SAVE" button (16) once.
The drum kit "026" now flashes in the display.
Now use the "SELECT +" and "SELECT -" buttons (15) or the adjustment
wheel (20) to select one of the programmable drum kits (026-030).
Save the drum kit by pressing the "SAVE" button (16) once again.
If an error occurs during saving, "Err" appears in the display. Then try to
save the drum kit under another programmable drum kit code.
34
Page 33

13. Accompaniment
The device has more than 100 songs. The drum sound in these songs can be switched off to allow you to play along yourself e.g. for practice.
The volume of the songs can be set independently of the drum kit volume; the speed of the song playback can be adjusted and a metronome can
also be activated (timing signal) can be activated. Please note the following sections:
a) Selecting a song
Activate the settings menu by pressing the "SONG" button (12) once.
The decimal point in the display glows next to "SONG"
Then you can use the "SELECT +" and "SELECT -" buttons (15) or the
adjustment wheel (20) to select one of the 100 songs (001-100).
b) Starting/ending song playback
Press the "START/STOP" button once to start the song playing or to stop it.
Then you can also use the "SELECT +" and "SELECT -" buttons (15) or the adjustment wheel (20) to select another song at any time.
c) Changing the speed of the song
The "TEMPO -" and "TEMPO +" (2) can be used to alter the speed of a
song both before and during playback. Hold the respective button down
for a longer period of time, to activate the fast adjustment.
d) Changing the volume of the song
The "ACC. VOLUME -" and "ACC. VOLUME +" (4) buttons are for
setting the volume during song playback. This can be adjusted
independently of the volume setting for the pads.
e) Deactivating the drum sounds in a song
The "DRUM OFF" button (9) can be used to switch off a song's drum
sounds (the LED in the button is lit), so that you can play the drum
sounds yourself.
35
Page 34

f) Metronome
You can use the "CLICK" button (6) to activate a metronome, the LED
in the button flashes in time with the beat.
When the button is pressed for the first time, the beat is counted as a
voice command (e.g. "One - Two - Three - Four").
The second time the button is pressed, a specific tone is emitted as
beat signal.
The third press of the button deactivates the metronome.
The beat signal of a metronome is emitted differently depending on the current song being played.
It is also possible to activate the beat signal without a song being played as accompaniment. First select the desired song or stop it
being played by pressing the "START/STOP" button (13). Then press the "CLICK" button (6) once or twice, in order to select either
the voice count or the tone signal metronome.
Then select the desired tempo using the "TEMPO +" or "TEMPO -" (2) buttons.
36
Page 35

14. Record/Playback
a) Preparation
Select the desired song, a drum kit, the speed of the song etc.
b) Start recording
Press the "REC" button (5). The LED in the button flashes to indicate
the record function is ready.
To start recording, press either the "START/STOP" key (13) or hit one
of the pads.
The song you selected now begins to play. All pad hits will be recorded
from now on.
The metronome starts automatically (speech count "One - Two - Three - Four"), it can however be switched to tone signal using the
"CLICK" button (6).
If the button is pressed again, the metronome is switched off, see Chapter 13. f).
c) End recording
Press the "REC" button (5) or the "START/STOP" button (13). The LED
in the "REC" button is no longer lit, this indicates that the record function
is deactivated.
If "FL" appears in the display during recording, then the recording
memory is full and the recording is automatically terminated.
d) Playback
Pressing the "PLAY/STOP" button (18) an existing recording can be
played (or stopped).
If a new recording is made, it overwrites any existing recording.
When the device is switched off the recording is lost.
37
Page 36

15. Other Functions
a) Demo mode
The "DEMO" button (21) starts the playback of a demo song saved in
the device, this demo shows you the device's capabilities. The playback
is ended by pressing the "DEMO" button (21) again, alternatively you
can press the "PLAY/STOP" button (18).
b) Reverb effect
Using the "REVERB" button (19) allows you to set the reverb effect to
4 different levels when playing drum sounds.
The setting "r-0" switches off the reverb effect.
c) Hand mode
The "HAND PERC" button (8) automatically selects drum kit 21 and
song 5; furthermore the sensitivity is altered to suit the keyboard to
hand contact with the pads.
The LED in the "HAND PERC" button is lit.
Pressing the button again exits this mode of operation.
d) USB connection
The drum kit can be connected to a computer via the USB jack (28). The drum kit transfers all midi data while the pads / foot pedals are being
played, midi data can also be received across the connection.
This requires suitable midi software, this is however not included with the product.
38
Page 37

16. Handling
Observe the safety instructions and all other information contained in these operating instructions.
Place the device on a level, stable and sufficiently large area. Do not place the device on valuable furniture surfaces, as otherwise
dents or scratches may occur. Use a suitable underlay if necessary.
Avoid the following adverse ambient conditions at the place of installation or during transport:
- direct sunlight
- moistness or excessive humidity
- extreme cold or heat
- dust or flammable gases, steams or solvents
- strong vibrations
- strong magnetic fields such as near machines or loudspeakers
Never switch the device on immediately after having taken it from a cold to a warm environment. Condensation water that forms as
a result, may destroy the device. The mains adapter also carries with it the risk of an electric shock!
First allow the device to reach room temperature before switching it on. This process may take several hours.
Make sure that the insulation of the entire product is intact and not damaged. Never open the device.
Always check the product for damage before it is used!
If you do find damage, then remove the batteries, do NOT connect the device to the mains supply. Bring it to a specialized workshop
or dispose of it in an environmentally friendly way.
If the device will not be used for a long period of time, remove the batteries/rechargeable batteries, remove the mains power supply
unit from the mains plug.
Never poke sharp or pointed objects (e.g. pens, pins or knitting needles, paper clips etc) in the device's ventilation and openings, the
device will be damaged if you do.
When installing the device ensure that none of the cables (e.g. the cable to your headphones or to your mains supply unit) are
jammed or squashed.
Install all cables in such a way that nobody may trip over them.
Regularly check the technical safety of the product e.g. for damage to the housing.
If it can be assumed that safe operation is no longer possible, the device must be turned off and precautions are to be taken to ensure
that it is not used unintentionally. Switch off the drum kit, disconnect it from any external power supply unit, disconnect the external
power supply unit from the mains voltage. Remove any batteries that may be in the device as well.
It must be assumed that safe operation will no longer be possible if
- the device shows visible damage,
- the device does not operate any longer and
- after it was stored under unfavourable conditions for a long period of time or
- after it was exposed to extraordinary stress caused by transport.
39
Page 38

17. Maintenance and Cleaning
The product does not require any maintenance. You should never open or disassemble it. Only a professional or professional repair shop should
attempt to repair the device.
A dry cloth is sufficient to clean the product.
18. Disposal
a) General information
Electronic devices must not be disposed of in the domestic waste.
Please dispose of the device, when it is no longer of use, according to the current statutory requirements.
b) Batteries and rechargeable batteries
You, as end user are under legal obligation (Battery Regulation) to take back all used batteries and rechargeable batteries, to
dispose of them via domestic waste is not permitted!
Batteries containing hazardous substances are labelled with the adjacent symbol. This symbol also indicate that disposal of these
batteries in the household waste is prohibited. The designations for the relevant heavy metals are: Cd=cadmium, Hg=mercury,
Pb=lead (the designation is written on the rechargeable battery e.g. under the rubbish can symbol depicted at the left).
You can hand in your used batteries/rechargeable batteries at your local official collection points at no cost, at our outlets or everywhere
where batteries/rechargeable batteries are sold.
You thus fulfil your statutory obligations and contribute to the protection of the environment.
40
Page 39

19. Technical Data
Drum kits .................................................... 30 (25 preset, 5 programmable)
Drum sounds .............................................. 215
Songs ......................................................... 100
Recording memory ..................................... 1
Pads ........................................................... 7
Foot Pedals ................................................ 2
Connections ............................................... 1x headphone 6.35mm, 1x USN jack for midi data (In/Out)
Supply voltage ............................................ 12 V/DC, 2 A supplied by mains power supply unit or 6 baby/C batteries
Dimensions ................................................ 500 x 370 x 157mm (H x W x D)
Weight ........................................................ Approx. 3.3 kg
Other features ............................................ Integrated stereo speaker, metronome can be activated with voice count or tone signal
41
Page 40

20. Appendix A: Drum Sounds
.
NO.
1
2
3
4
5
6
7
8
9
10
11
12
13
14
15
16
17
18
19
20
21
22
23
24
25
26
27
28
29
30
31
32
33
34
NAME
Kick KIT
Rock Kick 001
Rock Kick 002
Rock Kick 003
Standard Kick 001
Standard Kick 002
Standard Kick 003
Standard Kick 004
Pop Kick 001
Pop Kick 002
Pop Kick 003
Acoustic Kick 001
Acoustic Kick 002
Acoustic Kick 003
Acoustic Kick 004
Acoustic Kick 005
Acoustic Kick 006
Acoustic Kick 007
Acoustic Kick 008
Acoustic Kick 009
Acoustic Kick 010
Acoustic Kick 011
Snare KIT
Standard Snare 001
Standard Snare 002
Standard Snare 003
Standard Snare 004
Standard Snare 005
Standard Snare 006
Brush Snare 001
Brush Snare 002
Standard Stick 001
Standard Stick 002
Rock Snare 001
Rock Snare 002
Rock Snare 003
NO.
35
36
37
38
39
40
41
42
43
44
45
46
47
48
49
50
51
52
53
54
55
56
57
58
59
60
61
62
63
64
65
66
67
68
69
NAME
.
Pop Snare 001
Pop Snare 002
Pop Snare 003
Acoustic Snare 001
Acoustic Snare 002
Acoustic Snare 003
Acoustic Snare 004
Acoustic Snare 005
Tom KIT
Standard Tom 001
Standard Tom 002
Standard Tom 003
Standard Tom 004
Standard Tom 005
Standard Tom 006
Room Tom 001
Room Tom 002
Room Tom 003
Room Tom 004
Room Tom 005
Room Tom 006
Electronic Tom 001
Electronic Tom 002
Electronic Tom 003
Electronic Tom 004
Electronic Tom 005
Electronic Tom 006
Analog Tom 001
Analog Tom 002
Analog Tom 003
Analog Tom 004
Analog Tom 005
Analog Tom 006
Acoustic Tom 001
Acoustic Tom 002
Acoustic Tom 003
NO.
70
71
72
73
74
75
76
77
78
79
80
81
82
83
84
85
86
87
88
89
90
91
92
93
94
95
96
97
98
99
100
101
102
NAME
.
Acoustic Tom 004
Acoustic Tom 005
Acoustic Tom 006
Hihat KIT
Standard Hihat Close
Standard Hihat Pad
Standard Hihat Open
Analog Hihat Close
Analog Hihat Pad
Analog Hihat Open
Shakable
Rock Hihat Close
Rock Hihat Pad
Rock Hihat Open
Acoustic Hihat Close
Acoustic Hihat Pad
Acoustic Hihat Open
Crash KIT
Standard Crash001
Standard Crash002
Standard Crash003
Analog Ride001
China Crash
Splash001
Standard Ride 001
Rock Crash
Standard Ride 002
Electronic Crash
Splash002
Ride Bell
Panel KIT
Vibraslap
Hand
Tambourine
Stcowb
Mutecowb
42
Page 41

NO.
.
NAME
NO.
NAME
.
NO.
NAME
.
103
104
105
106
107
108
109
110
111
112
113
114
115
116
117
118
119
Mute Hi Conga
Open Hi Conga
Low Conga
Hi Bongo
Low Bongo
High Timbale
Low Timbale
High Agogo
Low Agogo
Cabasa
Shaker
Claves
Mute Triangle
Open Triangle
Short Guiro
Long Guiro
Mute Cuica
141
142
143
144
145
146
147
148
149
150
151
152
153
154
155
156
Tambourine001
Tambourine002
Tambourine003
Tambourine004
Tambourine005
Sfx KIT
SFX001
SFX002
SFX003
SFX004
SFX005
SFX006
SFX007
SFX008
SFX009
SFX010
SFX011
178
179
180
181
182
183
184
185
186
187
188
189
190
191
192
193
194
SFX033
SFX034
SFX035
SFX036
SFX037
SFX038
SFX039
SFX040
SFX041
SFX042
SFX043
SFX044
SFX045
SFX046
SFX047
SFX048
SFX049
120
121
122
123
124
125
126
127
128
129
130
131
132
133
134
135
136
Open Cuica
Mute Surdo
Open Surdo
Maracas
HighQ
Slap
Scratch Push
Scral
One
Two
Three
Four
Cartoon001
Cartoon002
Cartoon003
Cartoon004
Cartoon005
157
158
159
160
161
162
163
164
165
166
167
168
169
170
171
172
173
SFX012
SFX013
SFX014
SFX015
SFX016
SFX017
SFX018
SFX019
SFX020
SFX021
SFX022
SFX023
SFX024
SFX025
SFX026
SFX027
SFX028
195
196
197
198
199
200
201
202
203
204
205
206
207
208
209
210
211
SFX050
SFX051
SFX052
SFX053
SFX054
SFX055
SFX056
SFX057
SFX058
SFX059
SFX060
SFX061
SFX062
SFX063
SFX064
SFX065
SFX066
137
138
139
140
Cartoon006
Laugh
Metronome1
Metronome2
174
175
176
177
SFX029
SFX030
SFX031
SFX032
212
213
214
215
SFX067
SFX068
SFX069
SFX070
43
Page 42

21. Appendix B: Drum Kits
NO.
01 Pop1 16 Jazz2
02 Pop2 17 Funk
03 Standard 1 18 Clave
04 Room 19 Drum Bass
05 Rock 1 20 Hip Hop
06 Electronic 21 Conga1
07 Analog 22 Conga2
08 Jazz 1 23 Timbales
09 Brush 24 Latin
10 Standard 2 25 Funk
11 Rock2 26 User 1 (Pop 1)
12 Boss 27 User 2 (Pop 2)
13 Rock3 28 User 3 (Standard1)
14 Standard 3 29 User 4 (Room)
15 Rock4 30 User 5 (Rock 1)
NAME
NO.
NAME
22. Appendix C: Songs
NO.
01
02
03
04
05
06
07
08
09
10
11
12
13
.
01
03
02
05
21
21
21
01
03
04
05
03
01
NAMEKIT BEAT
Intro
Intro
8 Beat
8 Beat 2
8 Beat 3
8 Beat 4
8 Beat 5
8 Beat Ballad 1
8 Beat Ballad 2
8 Beat Ballad 3
Soft Rock
Rock 1
Rock 2
Rock 3
Rock 4
4/4
4/4
4/4
4/4
4/4
4/4
4/4
4/4
4/4
4/4
4/4
4/4
4/4
NO.
16
17
18
19
20
21
22
23
24
25
26
27
28
29
30
.
05
07
03
01
07
04
02
01
21
21
05
03
01
03
01
NAMEKIT BEAT
Hard Rock 2
16 Beat 1
16 Beat 2
16 Beat 3
16 Beat 4
16 Beat 5
16 Beat 6
16 Beat 7
16 Beat Ballad 1
16 Beat Ballad 2
16 Beat Ballad 3
16 Beat Ballad 4
16 Beat Ballad 5
16 Beat Funk 1
16 Beat Funk 2
4/4
4/4
4/4
4/4
4/4
4/4
4/4
4/4
4/4
4/4
4/4
4/4
4/4
4/4
4/4
44
14
15
02
05
Rock 5
Hard Rock 1
4/4
4/4
Page 43

NO.
31
32
33
34
35
36
37
38
39
40
41
42
43
44
45
46
47
48
49
50
51
52
53
54
55
56
57
58
59
60
61
62
63
64
65
66
.
07
07
01
06
04
07
03
01
03
04
03
01
03
02
03
01
05
04
03
03
04
01
04
03
23
12
12
03
01
03
03
12
12
12
12
01
NAME NAMEKIT KITBEAT BEAT
Dance
Dance 1
Dance 2
Dance 3
Dance 4
Dance 5
Dance 6
Rap
Rap 1
Rap 2
Rap 3
Bounce
Bounce 1
Bounce 2
Bounce 3
Shuffle
Shuffle 1
Shuffle 2
Shuffle 3
Shuffle 4
Shuffle 5
Shuffle 6
Shuffle 7
Slow Rock
Slow Rock 1
Slow Rock 2
Slow Rock 3
Slow Rock 4
Latin
Reggae 1
Reggae 2
Bossa Nova 1
Bossa Nova 2
Samba
Salsa
Latin Rock
Cha-Cha
Mambo
Rhumba 1
Rhumba 2
Rhumba 2
Tango
4/4
4/4
4/4
4/4
4/4
4/4
4/4
4/4
4/4
4/4
4/4
4/4
4/4
4/4
4/4
4/4
4/4
4/4
4/4
4/4
4/4
4/4
4/4
4/4
4/4
4/4
4/4
4/4
4/4
4/4
4/4
4/4
4/4
4/4
4/4
4/4
NO.
67
68
69
70
71
72
73
74
75
76
77
78
79
80
81
82
83
84
85
86
87
88
89
90
91
92
93
94
95
96
97
98
99
100
.
Swing
09
09
08
12
02
03
02
01
01
03
01
03
12
09
03
05
03
05
05
01
03
07
03
01
03
02
03
04
03
03
01
03
12
08
Swing 1
Swing 2
Swing 3
Others
Waltz
3/4 Ballad
Swing Blues
Blues
March 1
March 2
R&B
Hip-Hop
Funk
Country
Big Band
8 Beat
8 Beat 1
8 Beat 2
Ballad
Hard Rock 1
Hard Rock 2
Hard Rock 3
Pop Dance 1
Pop Dance 2
R&B
16 Beat
16 Beat
Fusion
Funk
Funk 1
Funk 2
Shuffle
Shuffle 1
Shuffle 2
16 Beat Shuffle
16 Beat Triplet
Others
Reggae
Bossa Nova
Big Band
4/4
4/4
4/4
4/4
4/4
4/4
4/4
4/4
4/4
4/4
4/4
4/4
4/4
4/4
4/4
4/4
4/4
4/4
4/4
4/4
4/4
4/4
4/4
4/4
4/4
4/4
4/4
4/4
4/4
4/4
4/4
4/4
4/4
4/4
45
Page 44

Table des matières
1. Introduction ............................................................................................................................................................................................47
2. Utilisation conforme .............................................................................................................................................................................. 47
3. Contenu de l’emballage ......................................................................................................................................................................... 48
4. Explication des symboles ..................................................................................................................................................................... 48
5. Consignes de sécurité ........................................................................................................................................................................... 49
6. Remarques générales concernant les piles et accus .........................................................................................................................49
7. Eléments de commande ........................................................................................................................................................................51
8. Fonctionnement sur piles ou avec le bloc secteur .............................................................................................................................52
a) Mise en place des piles .......................................................................................................................................................................52
b) Raccordement d’un bloc d’alimentation externe .................................................................................................................................. 52
9. Branchement d'un casque .................................................................................................................................................................... 52
10. Branchement des pédales..................................................................................................................................................................... 53
11. Fonctions de base ................................................................................................................................................................................. 53
a) Mise en marche/ à l'arrêt .....................................................................................................................................................................53
b) Sélection du kit de batterie ..................................................................................................................................................................53
c) Réglage du volume (« Master Volume ») ............................................................................................................................................ 53
12. Réglage des pads, programmation du kit de batteries....................................................................................................................... 54
a) Sélection d'un son de batterie d'un pad............................................................................................................................................... 54
b) Réglage du volume d'un pad ...............................................................................................................................................................54
c) Réglage du effet stéréo ....................................................................................................................................................................... 55
d) Réglage de la sensibilité des pads ......................................................................................................................................................55
e) Enregistrement des réglages ..............................................................................................................................................................55
13. Accompagnement ..................................................................................................................................................................................56
a) Sélectionner une chanson ...................................................................................................................................................................56
b) Lancer/arrêter la lecture d'une chanson .............................................................................................................................................. 56
c) Modifier la vitesse d'une chanson ....................................................................................................................................................... 56
d) Modifier le volume d'une chanson ....................................................................................................................................................... 56
e) Eteindre le son de batterie d'une chanson .......................................................................................................................................... 56
f) Métronome, signal de rhythme ............................................................................................................................................................57
14. Enregistrement/reproduction ............................................................................................................................................................... 58
a) Préparations ........................................................................................................................................................................................58
b) Démarrer l'enregistrement ................................................................................................................................................................... 58
c) Arrêter l'enregistrement ....................................................................................................................................................................... 58
d) Lecture ................................................................................................................................................................................................ 58
15. D'autres fonctions ................................................................................................................................................................................. 59
a) Mode démo ......................................................................................................................................................................................... 59
b) Effet résonnant .................................................................................................................................................................................... 59
c) Mode manuel ...................................................................................................................................................................................... 59
d) Branchement USB .............................................................................................................................................................................. 59
16. Manipulation ...........................................................................................................................................................................................60
17. Maintenance et nettoyage ..................................................................................................................................................................... 61
18. Elimination .............................................................................................................................................................................................. 61
a) Généralités .......................................................................................................................................................................................... 61
b) Piles et accumulateurs ........................................................................................................................................................................ 61
19. Caractéristiques techniques .................................................................................................................................................................62
20. Annexe A : Sons de batterie ................................................................................................................................................................. 63
21. Annexe B : Kits de batterie ...................................................................................................................................................................65
22. Annexe C : Chansons ............................................................................................................................................................................65
Page
46
Page 45

1. Introduction
Chère cliente, cher client,
Nous vous remercions de l'achat du présent produit.
Le produit est conforme aux exigences des directives européennes et nationales en vigueur.
Le mode d'emploi suivant correspond au produit mentionné ci-dessus. Il contient des consignes importantes pour la mise
en service et la manipulation du produit. Il faut respecter ces instructions, même si ce produit est transmis à tierce personne.
Conservez le présent mode d'emploi afin de pouvoir le consulter à tout moment !
Tous les noms d’entreprises et appellations de produits contenus dans ce mode d’emploi sont des marques déposées des propriétaires
correspondants. Tous droits réservés.
Pour toutes vos questions techniques, veuillez vous adresser à :
Tél. : 0892 897 777
Fax : 0892 896 002
e-mail : support@conrad.fr
Du lundi au vendredi de 8h00 à 18h00, le samedi de 8h00 à 12h00
Tél. : 0848/80 12 88
Fax : 0848/80 12 89
e-mail : support@conrad.ch
Du lundi au vendredi de 8h00 à 12h00 et de 13h00 à 17h00
2. Utilisation conforme
Le kit de batterie numérique est destiné à une utilisation domestique et semiprofessionnelle dans le domaine musical. Le produit sert à créer des
sons/effets de batterie qui peuvent être reproduits par les haut-parleurs incorporés.
L’alimentation électrique du kit de batterie numérique est assurée par 6 piles du type Baby/C. Alternativement, il est possible d’utiliser un bloc
d’alimentation externe (non compris dans l’étendue de la livraison, peut être commandé séparément).
L'intégralité du produit ne doit être utilisé que dans des locaux intérieurs secs. Il faut impérativement veiller à ce que le produit ne soit ni mouillé
ni humide.
Toute utilisation autre que celle décrite précédemment provoque l'endommagement de ce produit. De plus, elle peut occasionner des risques de
courts-circuits, d'incendie, d'électrocution, etc. Toute transformation ou modification de l'ensemble du produit est interdite. Il est interdit d'ouvrir
le boîtier.
Ce produit n’est pas un jouet et ne convient pas aux enfants de moins de 14 ans.
Tenez compte de toutes les consignes de sécurité du présent mode d'emploi ! Il contient des informations importantes relatives à
l'utilisation du produit.
47
Page 46

3. Contenu de l’emballage
• Kit de batterie
• Deux baguettes de batterie
• Deux pédales
• Notice d'emploi
4. Explication des symboles
Ce symbole est utilisé pour signaler un danger pour votre santé, par ex. par une décharge électrique.
Le symbole avec un point d'exclamation attire l'attention sur les risques spécifiques lors du maniement, de la mise en service et de
l´utilisation du produit.
Le symbole de la « flèche » renvoie à des conseils et consignes d'utilisation particuliers.
48
Page 47

5. Consignes de sécurité
Tout dommage résultant d'un non-respect du présent mode d'emploi a pour effet d'annuler la garantie. Nous déclinons
toute responsabilité pour les dommages consécutifs !
De même, nous n'assumons aucune responsabilité en cas de dommages matériels ou corporels résultant d'une utilisation
de l'appareil non conforme aux spécifications ou d'un non-respect des présentes consignes de sécurité ! De tels cas
entraînent l’annulation de la garantie.
• Pour des raisons de sécurité et d’homologation (CE), il est interdit de modifier la construction ou de transformer ce produit soimême.
• Toutes les personnes qui s'occupent de l'utilisation, l'installation, la mise en service, l'entretien de ce kit de batterie, doivent être
spécialisées et qualifiées conformément et doivent tenir compte de ce mode d'emploi.
• Ce produit n'est pas un jouet, maintenez-le hors de la portée des enfants. Les enfants ne sont pas en mesure d'évaluer les risques
résultant de la manipulation des appareils électriques.
• Ne placez pas de récipients comportant des liquides, p. ex. verres, seaux, vases ou plantes, sur ou à proximité immédiate de
l'appareil. Les liquides pourraient pénétrer à l'intérieur du boîtier et compromettre la sécurité électrique. Un tel geste pourrait en
outre engendrer des risques importants d'incendie ou d'électrocution !
Débranchez tous les câbles de l'appareil. L'intégralité du produit ne doit plus être remis en service. Confiez-le à un atelier spécialisé.
• N'exposez l'appareil ni à des températures extrêmes ni à des gouttes ou projections d'eau ni à de fortes vibrations ni à de fortes
contraintes mécaniques.
• Ne placez jamais, par exemple, une bougie allumée sur l'appareil ou à sa proximité, car cela peut constituer une source d'incendie.
• Ne laissez pas l'appareil en marche sans surveillance.
• N'utilisez l'appareil que dans des régions d'un climat modéré et non pas dans des régions d'un climat tropical.
• Ne laissez pas traîner négligemment le matériel d’emballage. Il pourrait constituer un jouet dangereux pour les enfants.
• Adressez-vous à un technicien, si vous avez des doutes concernant le mode de fonctionnement, la sécurité ou le branchement de
l'appareil.
• Dans les installations industrielles, il convient d'observer les prescriptions de prévention des accidents relatives aux installations
et aux matériels électriques des associations professionnelles.
• En cas de doute sur le branchement correct de l'appareil ou si vous aviez des questions auxquelles le mode d'emploi n'aurait pu
répondre, prenez contact avec notre service technique ou demandez l'avis d'un autre spécialiste.
49
Page 48

6. Remarques générales concernant les piles et accus
• Maintenez les piles et accus hors de la portée des enfants.
• Ne laissez pas traîner des piles ou accus. Ils risquent d´êre avalés par un enfant ou un animal domestique. Consultez dans ce cas
immédiatement un médecin !
• Faites attention de ne pas court-circuiter les piles, ni de les jeter dans le feu, ni de les ouvrir. Risque d'explosion !
• Des piles et accus corrodés ou endommagés peuvent, au toucher, causer des brûlures sur la peau ; mettez donc des gants de
protection appropriés pour retirer de telles piles.
• N’essayez jamais de recharger des piles conventionnelles. Ceci représente un danger d´incendie et d´explosion ! Ne rechargez
que les accus prévus pour, n´utilisez que des appareils de recharge d´accus appropriés.
• Lors de la mise en place des piles/accumulateurs, veillez à la polarité (respecter plus/+ et moins/-). Risque d'incendie et d'explosion!
• Si vous n'utilisez pas l'appareil pour une longue durée (par ex. lors d'un stockage) retirez les piles (ou les accus) du compartiment
car elles risquent de corroder et d'endommager ainsi l'appareil.
Rechargez les accus environ tous les 3 mois, autrement, l'autodécharge provoque une décharge complète, ce qui rend les accus
inutilisables.
• Remplacez toujours le jeu entier de piles ou d'accus. Ne mélangez pas des piles/accus complètement chargés avec des piles/
accus mi-chargés. N'utilisez que des piles ou des accus du même type et du même fabricant.
• N'insérez jamais piles et accumulateurs en même temps ! Utilisez soit 6 piles, soit 6 accumulateurs.
Le kit de batterie fonctionne aussi bien avec des accumulateurs qu'avec des piles.
La faible tension (piles = 1,5V, accus = 1,2V) et la faible capacité des accus cause une diminution de la durée d'utilisation.
Si vous souhaitez insérer des piles dans le kit de batterie, nous vous recommandons d'utiliser des piles alcalines de haute qualité.
50
Page 49

7. Eléments de commande
Vous trouverez les illustrations des éléments de commande sur le volet avant rabattable.
1 Interrupteur Marche/Arrêt (« ON » = marche, « OFF » = arrêt)
2 Touches « TEMPO - » et « TEMPO + » pour le réglage de vitesse pendant la lecture d'une chanson (mélodie d'accompagnement)
3 Touche à bascule « - MASTER VOLUME + » pour le réglage du volume (volume de base)
4 Touches « ACC. VOLUME - » et « ACC. VOLUME + » pour le réglage du volume pendant la lecture d'une chanson (mélodie
d'accompagnement)
5 Touche « REC » avec DEL pour le mode d'enregistrement
6 Touche « CLICK » pour la mise en marche/à l'arrêt du métronome, avec DEL
7 Affichage à 3 chiffres, par ex. pour le numéro de son, le numéro de chanson, etc.
8 Touche « HAND PERC » avec DEL pour le mode manuel
9 Touche « DRUM OFF » avec DEL, pour la mise en marche/à l'arrêt de la batterie pendant la lecture d'une chanson
10 Touche « KIT » pour activer la fonction de sélection d'un kit de batterie
11 Touche « PAD ASSIGN » pour assigner un effet de batterie à un pad de batterie ou à une pédale
12 Touche « SONG » pour sélectionner l'un des 100 chansons disponibles
13 Touche « START/STOP » pour la lancer ou interrompre la lecture d'une chanson
14 Touche « VOLUME » pour le réglage du volume des différents pads et pédales
15 Touches « SELECT + » et « SELECT - », p. ex. pour sélectionner une chanson, un kit de batterie, etc.
16 Touche « SAVE » pour sauvegarder un kit de batterie
17 Touche « PAN » pour le réglage du effet stéréo (par ex. pour la reproduction des sons par les haut-parleurs internes) des différents pads
18 Touche « PLAY/STOP » pour lancer/arrêter la lecture de l'un de vos enregistrements
19 Touche « REVERB » pour le réglage de l'effet résonnant
20 Bouton tournant pour la sélection rapide d'une chanson, d'un kit de batterie, etc.
21 Touche « DEMO » pour lancer/arrêtre le mode démo
22 Touche « GAIN » pour le réglage de la sensibilité des pads
23 Pads de batterie (7 pads disponibles dans l'ensemble)
24 Panneau de commande (voir 1 à 22)
25 Prise « PHONES » pour le branchement d'un casque
26 Prise « KICK » pour le branchement d'une pédale
27 Prise « HI HAT » pour le branchement d'une pédale
28 Prise « USB » pour la connexion à un port USB1.1/2.0 libre d'un ordinateur, pour Midi-In/-Out
29 Douille basse tension pour le raccordement à un bloc d’alimentation externe (non compris dans l’étendue de la livraison, peut être commandé
séparément)
51
Page 50

8. Fonctionnement sur piles ou avec le bloc secteur
Pour l’utilisation du kit de batterie, il est possible d’utiliser soit 6 piles du type Baby/C ou un bloc d’alimentation externe (non compris dans
l’étendue de la livraison, peut être commandé séparément).
En raison de la consommation de courant élevée du kit de batterie nous vous recommandons d'utiliser si possible le bloc secteur
fourni pour l'alimentation du kit de batterie.
a) Mise en place des piles
Si vous décidez d'utiliser des piles, ouvrez le couvercle du logement
des piles situé sur le dessous du kit de batterie et insérez 6 piles du
type Baby/C en respectant la polarité (respecter Plus/+ et Moins/-).
Replacez le couvercle du logement des piles de manière à ce qu'il
s'encliquette.
Si vous utilisez des piles, nous vous recommandons d'emploier
exclusivement des piles alcalines de haute gamme.
Un remplacement des piles est nécessaire lorsque l'affichage de l'écran
devient très faible ou que la reproduction des sons est distordue ou
que le kit de batterie et l'écran s'éteignent automatiquement lors de la
lecture de sons.
b) Raccordement d’un bloc d’alimentation externe
Brancher la fiche ronde basse tension du bloc d’alimentation (non compris dans l’étendue de la livraison, peut être commandé séparément) sur
la douille correspondante (29) sur la face arrière du kit de batterie. Brancher ensuite le bloc d’alimentation sur une prise de courant du réseau.
Lors de l’utilisation d’un bloc d’alimentation externe, les piles peuvent rester dans le compartiment à piles, parce que l’alimentation
en courant est assurée automatiquement par le bloc d’alimentation externe.
Ne pas oublier de retirer les piles dans le cas où le produit doit être utilisé pendant une période de temps prolongée uniquement avec
le bloc d’alimentation. Des batteries usées peuvent s’écouler et endommager le compartiment à piles ou le kit de batterie !
9. Branchement d'un casque
Tout le monde ne trouve pas les sons de batterie agréable lors des
premiers essais.
Pour pouvoir s'entrainer dans toute tranquillité, le kit de batterie est
équipé d'une prise pour casques (prise jack stéréo de 6.35mm) à la
face arrière (25).
Vous pouvez également utiliser des casques dotés d'une fiche jack
stéréo de 3.5mm, il faut cependant utiliser un adaptateur convenable
dans ce cas. Cet adaptateur se vend dans les magasins d'accessoires,
s'il n'est pas fourni avec la livraison.
PHONES KICK HI HAT USB 12V
52
Ne réglez pas un volume trop élevé sous risque de
provoquer des dommages auditifs !
Page 51

10. Branchement des pédales
Reliez les deux pédales fournies aux prises « KICK » et
« HI HAT ».
11. Fonctions de base
a) Mise en marche/à l'arrêt
PHONES KICK HI HAT USB 12V
L'interrupteur « POWER ON/OFF » (1) vous permet de mettre l'appareil en marche (position d'interrupteur « ON ») ou à l'arrêt (« OFF »).
b) Sélection du kit de batterie
Activez le menu de réglage en appuyant courtement sur la touche
« KIT » (10). Le point décimal s'allume à la position « KIT » dans l'écran.
Ensuite vous pouvez sélectionner le kit de batterie (001-030) à l'aide
des touches « SELECT + » ou « SELECT - » (15) ou en utilisant le
bouton tournant (20).
c) Réglage du volume (« Master Volume »)
La touche à bascule « - MASTER VOLUME + » (3) permet de régler le
volume de la reproduction par les haut-parleurs ou par le casque
Veuillez noter que la touche à bascule (3) règle le volume de base de
l'appareil.
Si vous souhaitez modifier le volume d'un pad individuel (par ex. si
vous souhaitez une reproduction plus forte ou plus basse d'un effet de
batterie), utilisez la touche « VOLUME » (14).
53
Page 52

12. Réglage des pads, programmation du kit de batterie
Après la mise en marche, le kit de batterie s'active « 001 » par défaut. Les 25 premiers kits de batterie « 001 » à « 025 » comprennent certains
préréglages effectués par le constructeur, voir à ce sujet annexe B (chapitre 21).
Les kits de batterie « 026 » à « 030 » vous permettent d'enregistrer de propres combinaisons d'occupation des 7 pads et des 2 pédales.
Vous pouvez effectuer les réglages suivants :
• son de batterie
• volume du pad
• effet stéréo
• sensibilité du pad (seulement valable pour les 7 pads, non pas pour les pédales)
Si vous sélectionnez un autre kit de batterie (voir chapitre 11.b), tous les réglages effectués préalablement seront perdus !
Pour enregister un réglage effectué, veuillez consulter le chapitre 12. e).
a) Sélection d'un son de batterie d'un pad
Si les configurations des 30 kits de batterie préréglés (voir chapitre
10. a) ne vous plaît pas vous pouvez les modifier à tout moment.
Les réglages décrits dans les paragraphes c) à f) suivantes peuvent
être sauvegardés ultérieurement dans l'un des kits de batteries
026 à 030.
Activez le menu de réglage en appuyant courtement sur la touche
« PAD ASSIGN » (11). Le point décimal s'allume à la position « PAD »
dans l'écran.
Tapez une fois courtement sur le pad dont vous souhaitez modifier le
son. Le son actuel sera reproduit par les haut-parleurs ou le casque.
Si vous tapez une nouvelle fois sur le même pad, le prochain son sera
reproduit.
Bien sûr vous pouvez également utiliser les touches « SELECT + » ou
« SELECT - » (15) ou le bouton tournant (20) pour sélectionner un son.
Dans l'annexe A (chapitre 20), vous trouvez un tableau qui liste tous les
sons.
b) Réglage du volume d'un pad
Le volume des différents pads peut être réglé individuellement.
Appuyez brièvement sur la touche « VOLUME » (14).
Tapez une fois courtement sur le pad dont vous souhaitez modifier le
volume.
Ensuite vous pouvez régler le volume souhaité à l'aide des touches
« SELECT + » ou « SELECT - » (15) ou en utilisant le bouton tournant
(20).
54
Page 53

c) Réglage du effet stéréo
L'appareil vous permet de régler la balance pour chacun des différents
pads, c'est-à-dire le volume dans lequel l'effet de son respectif d'un
pad est reproduit sur le haut-parleur gauche ou droit (semblable au
réglage de balance d'un radio).
Appuyez brièvement sur la touche « PAN » (14).
Tapez une fois courtement sur le pad que vous souhaitez ajuster.
Ensuite vous pouvez régler la balance à l'aide des touches
« SELECT + » ou « SELECT - » (15) ou en utilisant le bouton tournant
(20).
d) Réglage de la sensibilité des pads
Vous pouvez régler la sensibilité de chacun des différents pads, c'està-dire à partir de quel intensité de frappe le son réglé sera reproduit.
Appuyez brièvement sur la touche « GAIN » (14).
Tapez une fois courtement sur le pad que vous souhaitez ajuster.
Ensuite vous pouvez régler la sensibilité (E00 à E09, une valeur plus
élevée signifie que le pad réagit d'une sensibilité plus forte à un contact)
à l'aide des touches « SELECT + » ou « SELECT - » (15) ou en utilisant
le bouton tournant (20).
e) Enregistrer les réglages
Les réglages décrits dans les paragraphes a) à d) peuvent être
sauvegardés et ce dans l'un des cinq kits de batterie « 026 » à « 030 ».
Appuyez brièvement sur la touche « SAVE » (16).
A l'écran clignotera à présent par ex. le kit de batterie « 026 ».
Sélectionnez l'un des emplacements mémoire (kit de batterie 026 à
030) à l'aide des touches « SELECT + » ou « SELECT - » (15) ou en
utilisant le bouton tournant (20).
Sauvegarder le kit de batterie en appuyant encore une fois courtement
sur la touche « SAVE » (16).
Si une erreur se produit pendant l'enregistrement, l'écran affiche « Err ».
Essayez alors de placer le kit de batterie dans une autre mémoire.
55
Page 54

13. Accompagnement
L'appareil vous met à disposition 100 chansons dont les sons de batteries peuvent être éteints pour que vous puissiez les jouer vous-même, par
ex. pour vous entraîner.
Le volume des chansons peut être réglé indépendamment du volume de la batterie ; la vitesse des chansons peut être modifiée et un métronome
(signal de rhythme) peut être activé en plus. Veuillez tenir compte des paragraphes suivantes.
a) Sélectionner une chanson
Activez le menu de réglage en appuyant courtement sur la touche
« SONG » (12). Le point décimal s'allume à la position « KIT » dans
l'écran.
Ensuite vous pouvez sélectionner l'une des 100 chansons (001 à 100)
à l'aide des touches « SELECT + » ou « SELECT - » (15) ou en utilisant
le bouton tournant (20).
b) Lancer/arrêter la lecture d'une chanson
Appuyez courtement sur la touche « START/STOP » (13) pour lancer ou arrêter la lecture d'une chanson.
Pendant la lecture, vous pouvez passer à tout moment à une autre chanson à l'aide des touches « SELECT + » ou « SELECT - » (15) ou en
utilisant le bouton tournant (20).
c) Modifier la vitesse d'une chanson
Les touches « TEMPO - » et « TEMPO + » (2) permettent de modifier
la vitesse d'une chanson aussi bien avant que pendant sa lecture.
Maintenez enfoncée la touche correspondante de manière prolongée
afin d'activer le réglage rapide.
d) Modifier le volume d'une chanson
Les touches « ACC. VOLUME - » et « ACC. VOLUME + » (4) servent à
régler le volume de la lecture d'une chanson. Il se règle indépendamment
du réglage du volume des pads.
e) Eteindre le son de batterie d'une chanson
La touche « DRUM OFF » (9) permet d'éteindre les sons de batterie
d'une chanson (la DEL dans la touche s'allume), pour que vous puissiez
les jouer par vous-même.
56
Page 55

f) Métronome, signal de rhythme
La touche « CLICK » (6) permet d'activer un métronome, la DEL dans
la touche clignote dans le rhythme.
Le signal de rhythme du métronome s'active sous forme d'annonce
vocale au premier actionnement de la touche (par ex. « One - Two Three - Four », anglais pour « 1 - 2 - 3 - 4 »).
Si vous appuyez deux fois sur la touche, le signal de rhythme est émis
sous forme d'une certaine tonalité.
Si vous appuyez trois fois sur la touche, le métronome est éteint.
Le signal de rhythme du métronome est reproduit en fonction de la chanson actuellement réglée.
Il est également possible d'activer le signal de ryhthme sans que la chanson n'est lue. A cet effet, sélectionnez d'abord la chanson
souhaité ou interrompez sa lecture à l'aide de la touche « START/STOP » (13). Appuyez alors une ou deux fois sur la touche
« CLICK » (6) pour activer ou bien l'annonce vocale ou le signal sonore du métronome.
Sélectionnez ensuite la vitesse souhaitée à l'aide des touches « TEMPO - » ou « TEMPO + » (2).
57
Page 56

14. Enregistrement/reproduction
a) Préparations
Effectuez les réglages souhaités de la chanson, du kit de batterie, de la vitesse de la chanson, etc.
b) Démarrer l'enregistrement
Appuyez sur la touche « REC » (5). La DEL dans la touche clignote
pour vous signaler que la fonction d'enregistrement est prête.
Pour démarrer l'enregistrement, appuyez courtement sur la touche
« START/STOP » (13) ou bien tapez sur l'un des pads.
A présent démarre la lecture de la chanson préalablement sélectionnée.
Tous les contacts des pads seront enregistrés désormais.
Le métronome est automatiquement activé (annonce vocale « One - Two - Three - Four »), vous pouvez le commuter pourtant à un
signal sonore à l'aide de la touche « CLICK » (6).
Un nouvel actionnement de la touche fait éteindre le métronome, voir ici chapitre 13. f).
c) Arrêter l'enregistrement
Appuyez sur la touche « REC » (5) ou la touche « START/STOP » (13).
La DEL dans la touche « REC » s'éteint, l'enregistrement est terminé.
Si pendant un enregistrement l'écran affichera « FL », la mémoire
d'enregistrement est plein et l'enregistrement sera arrêté
automatiquement.
d) Lecture
En appuyant sur la touche « PLAY/STOP » (18), un enregistrement
existant peut être lu (ou arrêté).
Si un nouvel enregistrement est fait, celui-ci écrasera éventuellement l'un des enregistrements existants.
Un enregistrement se perd lorsque vous éteignez l'appareil.
58
Page 57

15. D'autres fonctions
a) Mode démo
La touche « DEMO » (21) sert à lire une chanson démo sauvegardée
pour vous montrer les possibilités de l'appareil. La lecture est arrêtée si
vous appuyez une nouvelle fois sur la touche « DEMO » (21). Comme
alternative, vous pouvez également appuyez sur la touche
« PLAY/STOP » (18).
b) Effet résonnant
La touche permet de régler l'effet résonnant pendant la reproduction
des sons de batterie par échelons de 4.
En réglage « r-0 » , l'effet résonnant est éteint.
c) Mode manuel
L'actionnement de la touche « HAND PERC » (8) fait sélectionner
automatiquement le kit de batterie 21 et la chanson 5 ; de plus, la
sensibilité est ajustée à la frappe par la main au lieu des baguettes de
batterie.
La DEL dans la touche « HAND PERC » s'allume.
Un nouvel appui sur la touche permet de quitter ce mode.
d) Branchement USB
La prise USB (28) permet de brancher un kit de batterie à un ordinateur. Le kit de batterie transmet toutes les données Midi pendant que les
pads/pédales sont actionnés et peut aussi recevoir des données Midi.
A cet effet, un logiciel spécial Midi est requis ; ce logiciel n'est pas compris dans la livraison.
59
Page 58

16. Manipulation
Tenez compte des consignes de sécurité et de toutes les autres informations du présent mode d'emploi !
Placez l´appareil sur une surface plane, stable et suffisamment grande. Ne placez pas l'appareil sur des meubles précieux sous
risque de provoquer des marques ou des rayures. Utilisez si nécessaire un support approprié.
Evitez les conditions environnementales défavorables suivantes sur le lieu d'utilisation ou lors du transport :
- rayons directs du soleil
- une humidité ou un taux d'hygrométrie trop élevé
- le froid ou la chaleur extrême,
- la poussière ou des gaz, vapeurs ou solvants inflammables,
- de fortes vibrations,
- les champs électromagnétiques puissants, par ex. près de machines ou de haut-parleurs
N'allumez jamais l'appareil immédiatement quand il vient d'être transféré d'une pièce froide à une pièce plus tempérée. L'eau de
condensation qui se forme risquerait de détruire l'appareil. Pour le bloc secteur, il y a de plus un danger de mort par électrocution !
Attendez jusqu’à ce que l’appareil ait atteint la température ambiante pour le brancher. Selon les cas, cela peut durer plusieurs
heures.
Veillez à ce que l'isolation de l'ensemble du produit ne soit ni endommagée ni détruite. N´ouvrez pas l´appareil.
Contrôlez l'appareil avant chaque mise en marche pour vérifier qu'il n'est pas endommagé !
En cas d´endommagements, retirez les piles insérées, NE branchez PAS le produit via le bloc secteur externe à la tension secteur
! Amenez le produit dans un atelier spécialisé ou éliminez-le conformément aux lois pour la protection de l'environnement.
Lorsque l'appareil reste hors service pendant une période prolongée, retirez les piles ou accumulateurs insérés, coupez-le d´un bloc
secteur branché à raccordement externe.
N´introduisez jamais d'objets pointus tels que stylos bille, épingles, aiguilles à tricoter, trombones etc. dans les ouïes d´aération ou
dans les ouvertures de l´appareil, ils entraînent la destruction de l´appareil.
Lors de l'installation de l´appareil, veillez à ce qu´aucun des câbles de connexion (par ex. le câble pour votre casque d´écoute ou
pour un bloc secteur) ne soit ni coudé ni écrasé.
Posez les câbles de façon à ce que personne ne trébuche dessus.
Vérifiez régulièrement le bon état technique du produit du point de vue sécurité, par ex. endommagement du boîtier.
S'il est probable qu'une utilisation sans danger n'est plus possible, l'appareil doit être mis hors service et protégé contre toute
utilisation involontaire. Débranchez le kit de batterie, coupez-le du bloc secteur externe, débranchez le bloc secteur externe de la
prise secteur. Retirez également toues les piles éventuellement insérées !
Un fonctionnement sans risque n'est plus assuré lorsque
- l'appareil présente des dommages visibles,
- l'appareil ne fonctionne plus,
- l'appareil a été stocké durant une période prolongée dans des conditions défavorables,
- l'appareil a subi de sévères contraintes liées au transport.
60
Page 59

17. Maintenance et nettoyage
Le produit n'a pas besoin d'entretien, ne jamais l'ouvrir ou le démonter. Une reparation ne doit être effectuée que par une personne qualifiée ou
un atelier spécialisé.
Un chiffon sec, doux suffit pour le nettoyage du produit.
18. Elimination
a) Généralités
Les appareils électriques et électroniques ne doivent pas être jetés dans les poubelles ordinaires !
Il convient de procéder à l'élimination du produit au terme de sa durée de vie conformément aux prescriptions légales en vigueur.
b) Piles et accumulateurs
Le consommateur final est légalement tenu (ordonnance relative à l´élimination des piles usagées) de rapporter toutes les piles et
accumulateurs usés, il est interdit de les jeter dans les ordures ménagères !
Les piles et accus qui contiennent des substances toxiques sont caractérisés par les symbol ci-contre, qui indiquent l'interdiction de
les jeter dans les ordures ménagères. Les désignations des métaux lourds obligeant au recyclage sont : Cd=cadmium, Hg=mercure,
Pb=plomb (vous trouverez la désignation sur la pile ou l'accu, par ex. au-dessous de symbol de poubelles figurant à gauche).
Vous pouvez rendre gratuitement vos piles/accus usés aux déchetteries communales, dans nos succursales ou partout où l'on vend
des piles/accus !
Vous répondez ainsi aux exigences légales et contribuez à la protection de l'environnement.
61
Page 60

19. Caractéristiques techniques
Kits de batterie ........................................... 30 (25 préréglés, 5 à programmer)
Sons de batterie ......................................... 215
Chansons ................................................... 100
Mémoire d'enregistrement .......................... 1
Pads ........................................................... 7
Pédales ...................................................... 2
Connexions ................................................ 1x sortie casque d'écoute 6.35mm, 1x prise USB pour données Midi (In/Out)
Tension de service ...................................... 12 V/DC, 2 A par bloc secteur externe ou avec 6 piles du type Baby/C
Dimensions ................................................ 500 x 370 x 157mm (larg. x prof. x haut.)
Poids .......................................................... env. 3,3 kg
Divers ......................................................... Haut-parleurs stéréo intégrés, métronome avec annonce vocale ou signal sonore activable
en supplément
62
Page 61

20. Annexe A : Sons de batterie
.
NO.
1
2
3
4
5
6
7
8
9
10
11
12
13
14
15
16
17
18
19
20
21
22
23
24
25
26
27
28
29
30
31
32
33
34
NAME
Kick KIT
Rock Kick 001
Rock Kick 002
Rock Kick 003
Standard Kick 001
Standard Kick 002
Standard Kick 003
Standard Kick 004
Pop Kick 001
Pop Kick 002
Pop Kick 003
Acoustic Kick 001
Acoustic Kick 002
Acoustic Kick 003
Acoustic Kick 004
Acoustic Kick 005
Acoustic Kick 006
Acoustic Kick 007
Acoustic Kick 008
Acoustic Kick 009
Acoustic Kick 010
Acoustic Kick 011
Snare KIT
Standard Snare 001
Standard Snare 002
Standard Snare 003
Standard Snare 004
Standard Snare 005
Standard Snare 006
Brush Snare 001
Brush Snare 002
Standard Stick 001
Standard Stick 002
Rock Snare 001
Rock Snare 002
Rock Snare 003
NO.
35
36
37
38
39
40
41
42
43
44
45
46
47
48
49
50
51
52
53
54
55
56
57
58
59
60
61
62
63
64
65
66
67
68
69
NAME
.
Pop Snare 001
Pop Snare 002
Pop Snare 003
Acoustic Snare 001
Acoustic Snare 002
Acoustic Snare 003
Acoustic Snare 004
Acoustic Snare 005
Tom KIT
Standard Tom 001
Standard Tom 002
Standard Tom 003
Standard Tom 004
Standard Tom 005
Standard Tom 006
Room Tom 001
Room Tom 002
Room Tom 003
Room Tom 004
Room Tom 005
Room Tom 006
Electronic Tom 001
Electronic Tom 002
Electronic Tom 003
Electronic Tom 004
Electronic Tom 005
Electronic Tom 006
Analog Tom 001
Analog Tom 002
Analog Tom 003
Analog Tom 004
Analog Tom 005
Analog Tom 006
Acoustic Tom 001
Acoustic Tom 002
Acoustic Tom 003
NO.
70
71
72
73
74
75
76
77
78
79
80
81
82
83
84
85
86
87
88
89
90
91
92
93
94
95
96
97
98
99
100
101
102
NAME
.
Acoustic Tom 004
Acoustic Tom 005
Acoustic Tom 006
Hihat KIT
Standard Hihat Close
Standard Hihat Pad
Standard Hihat Open
Analog Hihat Close
Analog Hihat Pad
Analog Hihat Open
Shakable
Rock Hihat Close
Rock Hihat Pad
Rock Hihat Open
Acoustic Hihat Close
Acoustic Hihat Pad
Acoustic Hihat Open
Crash KIT
Standard Crash001
Standard Crash002
Standard Crash003
Analog Ride001
China Crash
Splash001
Standard Ride 001
Rock Crash
Standard Ride 002
Electronic Crash
Splash002
Ride Bell
Panel KIT
Vibraslap
Hand
Tambourine
Stcowb
Mutecowb
63
Page 62

NO.
.
NAME
NO.
NAME
.
NO.
NAME
.
103
104
105
106
107
108
109
110
111
112
113
114
115
116
117
118
119
Mute Hi Conga
Open Hi Conga
Low Conga
Hi Bongo
Low Bongo
High Timbale
Low Timbale
High Agogo
Low Agogo
Cabasa
Shaker
Claves
Mute Triangle
Open Triangle
Short Guiro
Long Guiro
Mute Cuica
141
142
143
144
145
146
147
148
149
150
151
152
153
154
155
156
Tambourine001
Tambourine002
Tambourine003
Tambourine004
Tambourine005
Sfx KIT
SFX001
SFX002
SFX003
SFX004
SFX005
SFX006
SFX007
SFX008
SFX009
SFX010
SFX011
178
179
180
181
182
183
184
185
186
187
188
189
190
191
192
193
194
SFX033
SFX034
SFX035
SFX036
SFX037
SFX038
SFX039
SFX040
SFX041
SFX042
SFX043
SFX044
SFX045
SFX046
SFX047
SFX048
SFX049
120
121
122
123
124
125
126
127
128
129
130
131
132
133
134
135
136
Open Cuica
Mute Surdo
Open Surdo
Maracas
HighQ
Slap
Scratch Push
Scral
One
Two
Three
Four
Cartoon001
Cartoon002
Cartoon003
Cartoon004
Cartoon005
157
158
159
160
161
162
163
164
165
166
167
168
169
170
171
172
173
SFX012
SFX013
SFX014
SFX015
SFX016
SFX017
SFX018
SFX019
SFX020
SFX021
SFX022
SFX023
SFX024
SFX025
SFX026
SFX027
SFX028
195
196
197
198
199
200
201
202
203
204
205
206
207
208
209
210
211
SFX050
SFX051
SFX052
SFX053
SFX054
SFX055
SFX056
SFX057
SFX058
SFX059
SFX060
SFX061
SFX062
SFX063
SFX064
SFX065
SFX066
64
137
138
139
140
Cartoon006
Laugh
Metronome1
Metronome2
174
175
176
177
SFX029
SFX030
SFX031
SFX032
212
213
214
215
SFX067
SFX068
SFX069
SFX070
Page 63

21. Annexe B : Kits de batterie
NO.
01 Pop1 16 Jazz2
02 Pop2 17 Funk
03 Standard 1 18 Clave
04 Room 19 Drum Bass
05 Rock 1 20 Hip Hop
06 Electronic 21 Conga1
07 Analog 22 Conga2
08 Jazz 1 23 Timbales
09 Brush 24 Latin
10 Standard 2 25 Funk
11 Rock2 26 User 1 (Pop 1)
12 Boss 27 User 2 (Pop 2)
13 Rock3 28 User 3 (Standard1)
14 Standard 3 29 User 4 (Room)
15 Rock4 30 User 5 (Rock 1)
NAME
NO.
NAME
22. Annexe C : Chansons
NO.
01
02
03
04
05
06
07
08
09
10
11
12
13
.
01
03
02
05
21
21
21
01
03
04
05
03
01
NAMEKIT BEAT
Intro
Intro
8 Beat
8 Beat 2
8 Beat 3
8 Beat 4
8 Beat 5
8 Beat Ballad 1
8 Beat Ballad 2
8 Beat Ballad 3
Soft Rock
Rock 1
Rock 2
Rock 3
Rock 4
4/4
4/4
4/4
4/4
4/4
4/4
4/4
4/4
4/4
4/4
4/4
4/4
4/4
NO.
16
17
18
19
20
21
22
23
24
25
26
27
28
29
30
.
05
07
03
01
07
04
02
01
21
21
05
03
01
03
01
NAMEKIT BEAT
Hard Rock 2
16 Beat 1
16 Beat 2
16 Beat 3
16 Beat 4
16 Beat 5
16 Beat 6
16 Beat 7
16 Beat Ballad 1
16 Beat Ballad 2
16 Beat Ballad 3
16 Beat Ballad 4
16 Beat Ballad 5
16 Beat Funk 1
16 Beat Funk 2
4/4
4/4
4/4
4/4
4/4
4/4
4/4
4/4
4/4
4/4
4/4
4/4
4/4
4/4
4/4
14
15
02
05
Rock 5
Hard Rock 1
4/4
4/4
65
Page 64

NO.
31
32
33
34
35
36
37
38
39
40
41
42
43
44
45
46
47
48
49
50
51
52
53
54
55
56
57
58
59
60
61
62
63
64
65
66
.
07
07
01
06
04
07
03
01
03
04
03
01
03
02
03
01
05
04
03
03
04
01
04
03
23
12
12
03
01
03
03
12
12
12
12
01
NAME NAMEKIT KITBEAT BEAT
Dance
Dance 1
Dance 2
Dance 3
Dance 4
Dance 5
Dance 6
Rap
Rap 1
Rap 2
Rap 3
Bounce
Bounce 1
Bounce 2
Bounce 3
Shuffle
Shuffle 1
Shuffle 2
Shuffle 3
Shuffle 4
Shuffle 5
Shuffle 6
Shuffle 7
Slow Rock
Slow Rock 1
Slow Rock 2
Slow Rock 3
Slow Rock 4
Latin
Reggae 1
Reggae 2
Bossa Nova 1
Bossa Nova 2
Samba
Salsa
Latin Rock
Cha-Cha
Mambo
Rhumba 1
Rhumba 2
Rhumba 2
Tango
4/4
4/4
4/4
4/4
4/4
4/4
4/4
4/4
4/4
4/4
4/4
4/4
4/4
4/4
4/4
4/4
4/4
4/4
4/4
4/4
4/4
4/4
4/4
4/4
4/4
4/4
4/4
4/4
4/4
4/4
4/4
4/4
4/4
4/4
4/4
4/4
NO.
67
68
69
70
71
72
73
74
75
76
77
78
79
80
81
82
83
84
85
86
87
88
89
90
91
92
93
94
95
96
97
98
99
100
.
Swing
09
09
08
12
02
03
02
01
01
03
01
03
12
09
03
05
03
05
05
01
03
07
03
01
03
02
03
04
03
03
01
03
12
08
Swing 1
Swing 2
Swing 3
Others
Waltz
3/4 Ballad
Swing Blues
Blues
March 1
March 2
R&B
Hip-Hop
Funk
Country
Big Band
8 Beat
8 Beat 1
8 Beat 2
Ballad
Hard Rock 1
Hard Rock 2
Hard Rock 3
Pop Dance 1
Pop Dance 2
R&B
16 Beat
16 Beat
Fusion
Funk
Funk 1
Funk 2
Shuffle
Shuffle 1
Shuffle 2
16 Beat Shuffle
16 Beat Triplet
Others
Reggae
Bossa Nova
Big Band
4/4
4/4
4/4
4/4
4/4
4/4
4/4
4/4
4/4
4/4
4/4
4/4
4/4
4/4
4/4
4/4
4/4
4/4
4/4
4/4
4/4
4/4
4/4
4/4
4/4
4/4
4/4
4/4
4/4
4/4
4/4
4/4
4/4
4/4
66
Page 65

Inhoudsopgave
1. Inleiding .................................................................................................................................................................................................. 68
2. Beoogd gebruik ......................................................................................................................................................................................68
3. Omvang van de levering........................................................................................................................................................................ 69
4. Verklaring van symbolen....................................................................................................................................................................... 69
5. Veiligheidsinstructies ............................................................................................................................................................................70
6. Algemene batterij- en accu-aanwijzingen ............................................................................................................................................70
7. Bedieningselementen ............................................................................................................................................................................72
8. Gebruik op batterijen of netvoeding .................................................................................................................................................... 73
a) Plaatsen van batterijen ........................................................................................................................................................................ 73
b) Aansluiten van een externe netadapter ............................................................................................................................................... 73
9. Aansluiten van een hoofdtelefoon ....................................................................................................................................................... 73
10. Voetpedalen aansluiten .........................................................................................................................................................................74
11. Basisfuncties ..........................................................................................................................................................................................74
a) Het apparaat in-/uitschakelen.............................................................................................................................................................. 74
b) Drumkit selecteren .............................................................................................................................................................................. 74
c) Volume instellen ("Master Volume") .................................................................................................................................................... 74
12. Pads instellen, drumkit programmeren ............................................................................................................................................... 75
a) Slagwerksound van een pad selecteren.............................................................................................................................................. 75
b) Volume van een pad instellen ............................................................................................................................................................. 75
c) Stereo-effect instellen .......................................................................................................................................................................... 76
d) Pad-gevoeligheid instellen .................................................................................................................................................................. 76
e) Instellingen opslaan............................................................................................................................................................................. 76
13. Begeleiding .............................................................................................................................................................................................77
a) Song selecteren .................................................................................................................................................................................. 77
b) Weergave van een song starten/beëindigen ....................................................................................................................................... 77
c) Snelheid van een song wijzigen .......................................................................................................................................................... 77
d) Song-volume instellen .........................................................................................................................................................................77
e) Slagwerksound van een song uitschakelen ........................................................................................................................................ 77
f) Metronoom, maat-signaal.................................................................................................................................................................... 78
14. Opname/weergave ................................................................................................................................................................................. 79
a) Voorbereidingen ..................................................................................................................................................................................79
b) Opname starten .................................................................................................................................................................................. 79
c) Opname stopzetten ............................................................................................................................................................................. 79
d) Weergave ............................................................................................................................................................................................ 79
15. Overige functies ..................................................................................................................................................................................... 80
a) Demo-modus....................................................................................................................................................................................... 80
b) Echo-effect ..........................................................................................................................................................................................80
c) Hand-modus ........................................................................................................................................................................................80
d) USB-aansluiting .................................................................................................................................................................................. 80
16. Gebruik ................................................................................................................................................................................................... 81
17. Onderhoud en reiniging ........................................................................................................................................................................ 82
18. Verwijdering ........................................................................................................................................................................................... 82
a) Algemeen ............................................................................................................................................................................................82
b) Batterijen en accu´s ............................................................................................................................................................................ 82
19. Technische gegevens ............................................................................................................................................................................ 83
20. Bijlage A: Slaginstrument-sound ......................................................................................................................................................... 84
21. Bijlage B: Drumkits ................................................................................................................................................................................86
22. Bijlage C: Songs .................................................................................................................................................................................... 86
Pagina
67
Page 66

1. Inleiding
Geachte klant,
Hartelijk dank voor de aanschaf van dit product.
Het product voldoet aan de wettelijke nationale en Europese voorwaarden.
Deze gebruiksaanwijzing hoort bij dit product. Deze bevat belangrijke instructies voor de inbedrijfstelling en het gebruik.
Neem deze instructies in acht, ook wanneer u het product aan derden overhandigt.
Bewaart u dus deze handleiding voor gebruik achteraf!
Alle voorkomende bedrijfsnamen en productaanduidingen zijn handelsmerken van de betreffende eigenaren. Alle rechten voorbehouden.
Bij technische vragen kunt u zich wenden tot onze helpdesk.
Voor meer informatie kunt u kijken op www.conrad.nl of www.conrad.be.
2. Beoogd gebruik
Het toepassingsbereik van de digitale drumkit omvat het gebruik in thuis- en semi-professionele muziekinstallaties. Het apparaat dient voor het
opwekken van slagwerk-geluiden/-effecten, die kunnen worden weergegeven via de ingebouwde luidsprekers.
De stroomtoevoer van de digitale drumkit geschiedt via 6 batterijen, type Baby/C. Eventueel kan een externe netadapter worden gebruikt (niet
in de leveringsomvang, apart te bestellen).
U mag het volledige product alleen in droge en gesloten binnenruimtes gebruiken. Het product mag niet vochtig of nat worden.
Bij een ander gebruik dan hierboven beschreven kan het product beschadigd raken en kunnen er gevaarlijke situaties ontstaan (bijv. kortsluiting,
brand, elektrische schokken, enz.). Aan het product als zodanig mag niets worden veranderd, resp. omgebouwd. U mag de behuizing niet
openen.
Het product is geen speelgoed. Het is niet geschikt voor kinderen onder 14 jaar.
Volg alle veiligheidsinstructies in deze gebruiksaanwijzing op. Ze bevat belangrijke informatie voor het gebruik van het product.
68
Page 67

3. Omvang van de levering
• Drumkit
• Twee drumsticks
• Twee voetpedalen
• Gebruiksaanwijzing
4. Verklaring van symbolen
Dit symbool wordt gebruikt wanneer er gevaar bestaat voor uw gezondheid, bijv. door een elektrische schok.
Het symbool met het uitroepteken wijst op bijzondere gevaren bij de hantering, het gebruik en de bediening.
Het “pijl”-symbool wijst op speciale tips en bedieningsvoorschriften.
69
Page 68

5. Veiligheidsinstructies
Bij beschadigingen veroorzaakt door het niet opvolgen van deze gebruiksaanwijzing vervalt ieder recht op garantie! Voor
vervolgschade die hieruit ontstaat, zijn wij niet aansprakelijk!
Voor materiële schade of persoonlijk letsel veroorzaakt door ondeskundig gebruik of het niet in acht nemen van de
veiligheidsvoorschriften, zijn wij niet aansprakelijk! In zulke gevallen vervalt de garantie.
• Om veiligheids- en keuringsredenen (CE) is het eigenmachtig ombouwen en/of veranderen van het product niet toegestaan.
• Alle personen die deze drumkit bedienen, installeren, opstellen, in gebruik nemen en onderhouden, moeten een bijbehorende
opleiding gevolgd hebben, voldoende gekwalificeerd zijn en deze gebruiksaanwijzing in acht nemen.
• Houd het product buiten bereik van kinderen; het is geen speelgoed. Kinderen kunnen niet inschatten welke gevaren aan het
gebruik van elektrische apparatuur zijn verbonden.
• Zet geen vloeistof, b.v. glazen, emmers, vazen of planten op het apparaat of in de buurt ervan. Hierdoor kunnen er vloeistoffen in
het inwendige van de behuizing komen die de elektrische veiligheid benadelen. Dit kan daarenboven brandgevaar of
levensgevaarlijke elektrische schokken tot gevolg hebben!
Maak alle kabels los van het apparaat. Het volledige apparaat mag daarna niet meer in bedrijf gesteld worden. Breng het naar een
reparatiedienst.
• Stel het apparaat niet bloot aan hoge temperaturen, druip- of spatwater, sterke trillingen of hoge mechanische belastingen.
• Zet geen brandende voorwerpen, zoals kaarsen, op of naast het apparaat.
• Het apparaat mag nooit zonder toezicht in werking zijn.
• Gebruik de microfoon enkel in een gematigd klimaat, niet in een tropisch klimaat.
• Laat verpakkingsmateriaal niet achteloos slingeren. Dit kan voor kinderen gevaarlijk speelgoed zijn.
• Raadpleeg a.u.b. een vakman wanneer u vragen heeft over de werkwijze, veiligheid of aansluiting van het product.
• In industriële omgevingen dienen de Arbovoorschriften ter voorkoming van ongevallen met betrekking tot elektrische installaties
en bedrijfsmiddelen in acht te worden genomen.
• Gelieve u tot onze technische helpdesk of een andere vakman te wenden indien u vragen heeft omtrent de correcte aansluiting
van het apparaat of omtrent zaken die niet opgehelderd worden in deze gebruiksaanwijzing.
70
Page 69

6. Algemene batterij- en accu-aanwijzingen
• Houd batterijen/accu´s buiten bereik van kinderen.
• Laat batterijen/accu´s niet achteloos liggen; er bestaat het gevaar dat deze door kinderen of huisdieren worden ingeslikt. In zo´n
geval moet u onmiddellijk een geneesheer of een dierenarts raadplegen!
• U mag batterijen/accu´s nooit kortsluiten, demonteren of in het vuur werpen. Er bestaat explosiegevaar!
• Lekkende of beschadigde batterijen/accu´s kunnen bij huidcontact bijtende wonden veroorzaken; draag in dit geval beschermende
handschoenen.
• Batterijen mogen niet worden opgeladen! Er bestaat brand- en explosiegevaar! Alleen oplaadbare batterijen opladen; gebruik
hiervoor geschikte opladers.
• Let bij het plaatsen van de batterijen/accu´s op de juiste polariteit (plus/+ en min/-), er bestaat gevaar op brand en explosies!
• Als u het product langere tijd niet gebruikt (bv. als u het opbergt), moet u de geplaatste batterijen of accu´s verwijderen om
beschadigingen door lekkende batterijen/accu´s te voorkomen.
Laad de accu´s ongeveer om de 3 maanden op daar anders door de zelfontlading de zogeheten diepontlading zal optreden
waardoor de accu´s onbruikbaar zullen worden.
• Vervang steeds de volledige set batterijen of accu´s. Gebruik geen volle en halfvolle batterijen of accu´s door elkaar. Gebruik
steeds batterijen of accu´s van hetzelfde type en dezelfde fabrikant.
• U mag nooit batterijen en accu´s door elkaar gebruiken! Gebruik ofwel 6 batterijen ofwel 6 oplaadbare batterijen.
U kunt voor de werking van de drumkit ook accu´s in plaats van batterijen gebruiken.
Door de lagere capaciteit en lagere spanning van accu´s (accu = 1,2V, batterij = 1,5V) zal het product wel een kleinere bedrijfsduur
hebben.
Als u batterijen in de drumkit wilt gebruiken, raden wij aan om hoogwaardige alkaline batterijen te gebruiken.
71
Page 70

7. Bedieningselementen
De afbeeldingen van de bedieningselementen vindt u op de voorste uitklappagina.
1 Aan-/uitschakelaar ("ON" = aan, "OFF" = uit)
2 Toetsen "TEMPO -" en "TEMPO +" voor het instellen van de snelheid bij de weergave van een song (begeleidende melodie)
3 Wiptoets " - MASTER VOLUME +" voor het instellen van het volume (basisvolume)
4 Toetsen "ACC. VOLUME -" en "ACC. VOLUME +" voor het instellen van het volume bij de weergave van een song (begeleidende melodie)
5 Toets "REC" met LED voor de opnamemodus
6 Toets "CLICK" voor het in/uitschakelen van de metronoem, met LED
7 3-cijferig display, bijv. voor sound-nummer, song-nummer e.d.
8 Toets "HAND PERC" met LED voor hand-modus
9 Toets "DRUM OFF" met LED, voor het in/uitschakelen van het slagwerk tijdens de weergave van een song
10 Toets "KIT" voor eht activeren van de selectiefunctie van een drumkit
11 Toets "PAD ASSIGN" voor het toewijzen van slagwerkeffect aan een drumpad resp. voetpedaal
12 Toets "SONG" voor het selecteren van een van de 100 songs
13 Toets "START/STOP" voor het weergeven resp. stoppen van een song
14 Toets "VOLUME" voor het instellen van het volume van de afzonderlijke pads resp. voetpedalen
15 Toetsen "SELECT +" en "SELECT -", bijv. voor het selecteren van een song, een drumkits, e.a.
16 Toets "SAVE" voor het opslaan van een drumkit
17 Toets "PAN" voor het instellen van het stereo-effect (bijv. voor het weergeven van geluid via de interne speakers) voor elk pad
18 Toets "PLAY/STOP" voor het starten/stoppen van de weergave van een door u aangemaakte opname
19 Toets "REVERB" voor het instellen van het echo-effect
20 Draaiwiel voor het snel selecteren van bijv. een song, een drumkit e.a.
21 Toets "DEMO" voor starten/stoppen van de demo-modus
22 Toets "GAIN" voor het instellen van de pad-gevoeligheid
23 Drumpad (in het totaal 7 beschikbaar)
24 Bedieningsveld (zie 1-22)
25 Bus "PHONES" voor het aansluiten van een hoofdtelefoon
26 Bus "KICK" voor het aansluiten van een voetpedaal
27 Bus "HI HAT" voor het aansluiten van een voetpedaal
28 Bus "USB" voor de verbinding tussen een vrije USB1.1/2.0-poort van een computer, voor Midi In/-Out
29 Laagspanningsbus voor de aansluiting aan een externe netadapter (niet in de leveringsomvang, apart te bestellen)
72
Page 71

8. Gebruik op batterijen of netvoeding
Voor het gebruik van de drumkit kunnen 6 batterijen, type Baby/C of een externe netadapter (niet in de leveringsomvang, apart te bestellen)
worden gebruikt.
Omwille van het grote stroomverbruik adviseren we u, vindien mogelijk het meegeleverde netdeel te gebruiken.
a) Plaatsen van batterijen
Indien u batterijen wilt gebruiken, opent u het deksel van het batterijvak
aan de onderkant van de drumkit en plaatst 6 batterijen van het type
Baby/C met de juiste polariteit (letten op plus/+ en min/-). Plaats het
deksel weer op het batterijvak en zorg ervoor dat het vastklikt.
Indien u batterijen gebruikt, maak dan uitsluitend gebruik van
hoogwaardige alkaline-batterijen.
Het vervangen van de batterijen is noodzakelijk, als de indicatie op het
display zeer zwak wordt of als het geluid vervormd is resp. als de drumkit
bij het weergeven van geluid zichzelf uitschakelt, en het display dooft.
b) Aansluiten van een externe netadapter
Verbind de ronde laagspanningsstekker van de netadapter (niet in de leveringsomvang, apart te bestellen) met de betreffende bus (29) op de
achterkant van de drumkit. Verbind dan de netadapter met een stopcontact.
Als er een externe netadapter wordt gebruikt, kunnen de batterijen in het batterijvak blijven zitten, omdat de stroomtoevoer automatisch door de externe netadapter wordt overgenomen.
Vergeet echter niet, de batterijen er uit te halen, als het product langere tijd alleen met een netadapter wordt gebruikt. Verouderde
batterijen kunnen lekken en op die manier het batterijvak resp. de drumkit beschadigen!
9. Aansluiten van een hoofdtelefoon
Niet iederren ervaart het geluid van de eerste pogingen slagwerk te
spelen als aangenaam.
Om ongestoord te kunnen oefenen, staat er aan de achterzijde van de
drumkit een hoofdtelefoonaansluiting (6,35 mm stereojack) ter
beschikking (25).
Hoofdtelefoons met een 3,5mm-stereojack kunnen ook worden gebruikt,
maar daarvoor is een geschikte adapter nodig, die u -zo hij niet met de
hoofdtelefoon werd meegeleverd- ind e accessoirehandel kunt
aankopen.
PHONES KICK HI HAT USB 12V
Stel het volume niet te luid in, anders kan het komen tot
gehoorschade!
73
Page 72

10. Voetpedalen aansluiten
Sluit beide meegeleverde voetpedalen aan op de
aansluitingen "KICK" en "HI HAT".
11. Basisfuncties
a) Het apparaat in-/uitschakelen
PHONES KICK HI HAT USB 12V
Met de schakelaar "POWER ON/OFFe (1) kan het apparaat worden in- (schakelaar in de stand "ON") resp. uitgeschakeld ("OFF").
b) Drumkit selecteren
Schakel het instelmenu in, door kort te drukken op de toets "KIT" (10).
De decimale punt op het display bij "KIT" licht op.
Aansluitend kan met de toetsen "SELECT +" resp. "SELECT -" (15) of
met het instelwiel (20) de drumkit worden geselecteerd (001-030).
c) Volume instellen ("Master Volume")
Met de wiptoets "- MASTER VOLUME +" (3) kan het volume voor de
weergave via de luidsprekers resp. de hoofdtelefoon worden ingesteld.
Denk er om dat via de wiptoets (3) het basisvolume van het apparaat
wordt ingesteld.
Indien de volume van een individueel pad moet worden veranderd (bijv.
indien een slaginstrumenteffect luider of zachter moet worden
weergegeven), kan dit via de toets "VOLUME" (14).
74
Page 73

12. Pads instellen, drumkit programmeren
Na het inschakelen is automatisch drumkit "001" actief. De eerste 25 drumkits "001" tot "025" hebben bepaalde voorinstellingen vanuit de
fabriek, zie bijlage B (hoofdstuk 21).
In de drumkits "026" tot "030" kunt u eigen combinaties van de 7 pads en de 2 voetpedalen opslaan.
De volgende instellingen kunnen worden uitgevoerd:
• Slagwerksound
• Pad-volume
• Stereo-effect
• Pad-gevoeligheid (alleen voor de 7 pads, niet voor de voetpedalen)
Indien een andere drumkit wordt geselecteerd (zie hoofdstuk 11. b), dan gaan alle eerder uitgevoerde instellingen verloren!
Hou indien een bepaalde door u uitgevoerde instelling moet worden opgeslagen rekening met hoofdstuk 12. e).
a) Slagwerksound van een pad selecteren
Indien u niet tevreden bent met de 30 vooringestede drumkits (zie
hoofdstuk 10. a), dan kunt u vanzelfsprekend de pads anders
configureren.
De in de volgende delen c) tot f) uitgevoerde instellingen kunnen later
in één van de drumkits 026 tot 030 worden opgeslagen.
Schakel het instelmenu in, door kort te drukken op de toets "PAD
ASSIGN" (11). De decimale punt op het display bij "PAD" licht op.
Sla het pad waarvan u het geluid wilt veranderen kort aan. Het actuele
geluid wordt via luidspreker of hoofdtelefoon hoorbaar.
Als hetzelfde pad nogmaals wordt bediend, dan wordt het volgende
geluid hoorbaar.
Vanzelsprekend kunt u voor het kiezen van een sound ook gebruik
maken van de toetsen "SELECT +" resp. "SELECT -" (15) of van het
instelwiel (20).
In bijlage A (hoofdstuk 20) vindt u een tabel met alle sounds.
b) Het volume van een pad instellen
Het volume van elk pad is onafhankelijk van de andere instelbaar.
Druk kort op de toets "VOLUME" (14).
Sla het pad waarvan u het volume wilt instellen kort aan.
Aansluitend kan met de toetsen "SELECT +" resp. "SELECT -" (15) of
met het instelwiel (20) het volume worden veranderd.
75
Page 74

c) Stereo-effect instellen
Voor elk pad kunt u de balans instellen, d.w.z. hoe luid het betrokken
soundeffect van een pad via de linker resp. de rechter speaker hoorbaar
is (net als de balansinstelling bij een radio).
Druk kort op de toets "PAN" (14).
Sla het pad dat u wilt instellen kort aan.
Aansluitend kan met de toetsen "SELECT +" resp. "SELECT -" (15) of
met het instelwiel (20) de balans worden veranderd.
d) Pad-gevoeligheid instellen
De gevoeligheid van elk pad kan worden ingesteld, d.w.z. vanaf welke
slagkracht de ingestelde sound hoorbaar wordt.
Druk kort op de toets "GAIN" (14).
Sla het pad dat u wilt instellen kort aan.
Aansluitend kan met de toetsen "SELECT +" resp. "SELECT -" (15) of
met het instelwiel (20) de gevoeligheid worden ingesteld (E00-E09, een
hogere waarde betekent, dat het pad gevoeliger reageert op de
aanrakingen).
e) Instellingen opslaan
De in de delen a) tot d) voorgenomen instellingen kunnen worden
opgeslagen, en wel in een van de 5 drumkits "026" tot "030".
Druk kort op de toets "SAVE" (16).
Op het display licht nu bijv. drumkit "026" op.
Selecteer met de toetsen "SELECT +" resp. "SELECT -" (15) of met
het instelwiel (20) een van de geheugens (drumkit 026 tot 030).
Sla de drumkit op, door nogmaals kort te drukken op de toets "SAVE"
(16).
Indien er bij het opslaan een fout optreedt, verschijnt er "Err" op het
display. Probeer in dat geval de drumkit in een ander geheugen op te
slaan.
76
Page 75

13. Begeleiding
Het apparaat beschikt over 100 songs, waarvan het slagwerk kan worden uitgeschakeld, zodat u deze zelf kunt spelen, bijv. om te oefenen.
Het volume van de song kan onafhankelijk van het slagwerkvolume worden ingesteld; de snelheid van de song kan worden veranderd, en er kan
een metronoom (een maat-signaal) worden ingeschakeld. Denk om de volgende delen.
a) Song selecteren
Schakel het instelmenu in, door kort te drukken op de toets "SONG"
(12). De decimale punt op het display bij "SONG" licht op.
Aansluitend kan met de toetsen "SELECT +" resp. "SELECT -" (15) of
met het instelwiel (20) een van de 100 songs (001-100) worden
geselecteerd.
b) Weergave van een song starten/beëindigen
Druk kort op de toets "REC/STOP" (13) om de weergave van een song te starten of te stoppen.
U kunt ook op elk ogenblik tijdens de weergave met de toetsen "SELECT +" resp. "SELECT -" (15) of met het instelwiel (20) een andere song
selecteren.
c) Snelheid van een song wijzigen
Met de toetsen "TEMPO -" en "TEMPO +" (2) kan zowel voor als tijdens
de weergave van een song de snelheid worden veranderd. Houd de
betreffende toets telkens langer ingedrukt om de snelmodus te activeren.
d) Song-volume instellen
De toetsen "ACC. VOLUME -" en "ACC. VOLUME +“ (4) dienen voor
het instellen van het volule van de song-weergave. Deze is onafhankelijk
van de volume-instelling van de pads regelbaar.
e) Slagwerksound van een song uitschakelen
Met de toets "DRUM OFF" (9) kunnen de slagwerkgeluiden van een
song worden uitgeschakeld (de LED in de toets licht op), zodat u deze
zelf kunt spelen.
77
Page 76

f) Metronoom, maat-signaal
Met de toets "CLICK" (6) kan een metronoom worden ingeschakeld, de
LED in de toets knippert in de maat.
Bij de eerste druk op een toets wordt het maat-signaal van de metronoom
onder spraakvorm ingeschakeld (bijv. "one - two - three - four", Engels
voor "1 - 2 - 3 - 4").
Bij de tweede druk op een toets wordt als maat-signaal telkens een
bepaalde toon hoorbaar.
Bij een derde druk op een toets wordt de metronoom uitgeschakeld.
Het maat-signaal van de metronoom is afhankelijk van de actueel ingestelde song.
Het is evrder ook mogelijk het maat-signaal te activeren, zonder dat er tegelijkertijd een song wordt gespeeld. Selecteer eerst de
gewenste song resp. stop de weergave met de toets "START/STOP" (13). Druk nu één keer resp. twee keer op de toets "CLICK" (6),
om de spraakweergave of het toongeluid van de metronoom in te schakelen.
Selecteer aansluitend de gewenste snelheid met de toetsen "TEMPO -" resp. "TEMPO +" (2).
78
Page 77

14. Opname/weergave
a) Voorbereidingen
Stel de gewenste song, een drumkit, de snelheid van de song enz. in.
b) Opname starten
Druk op de toets "REC" (5). De LED in de toets gaat knipperen, om aan
te geven dat de opnamefunctie klaar is.
Om den opname te starten, drukt u kort op de toets "START/STOP"
(13) of slaat u een van de pads aan.
Nu begint de weergave van de eerder geselecteerde song. Alle padaanrakingen worden vanaf nu geregistreerd.
Het metronoom wordt automatisch gestart (spraakweergave "one - two - three - four"), maar kan met de toets "CLICK" (6) worden
overgeschakeld op een toonsignaal.
Bij nogmaals bedienen van de toets wordt de metronoom uitgeschakeld, zie hoofdstuk 13. f).
c) Opname stoppzetten
Druk op de toets "REC" (5) of de toets "START/STOP" (13). De LED in
de toets "REC" dooft, de opname is klaar.
Indien tijdens de opname op het display "FL" verschijnt, dan is het
opnamegeheugen vol, en wordt de opname automatisch beëindigd.
d) Weergave
Door indrukken van de toets "PLAY/STOP" (18) kan een beschikbare
opname worden weergegeven (resp. gestopt).
Als een nieuwe opname wordt uitgevoerd, dan wordt een ev. eerdere opname overschreven.
Bij het uitschakelen van het apparaat gaat een opname verloren.
79
Page 78

15. Overige functies
a) Demo-modus
Met de toets "DEMO" (21) wordt een in het apparaat opgeslagen demosong weergegeven, die u de mogelijkheden van het apparaat toont. De
weergave wordt beëindigd, indien nogmaals wordt gedrukt op de toets
"DEMO" (21); alternatief kunt u op de toets "PLAY/STOP" (18) drukken.
b) Echo-effect
Met de toets "REVERB" (19) kan het echo-effect bij de weergave van
het slagwerkgeluid in 4 stappen worden ingesteld.
In de instelling "r-0" is het echo-effect uitgeschakeld.
c) Hand-modus
Met de toets "HAND PERC" (8) worden automatisch drumkit 21 en
song 5 geselecteerd; bovendien verandert de gevoeligheid voor het
aanslaan van het toetsenbord met de hand in de plaats van de
drumsticks.
De LED in de toets "HAND PERC" licht op.
Door nogmaals indrukken van de toets wordt deze bedrijfswijze opnieuw
verlaten.
d) USB-aansluiting
Via de USB-bus (28) kan de drumkit op een computer worden aangesloten. De drumkit stuurt alle Midi-gegevens door bij het bespelen van de
pads/voetpedalen, hij kan ook Midi-gegevens ontvangen.
Daartoe is een geschikt Midi-programma nodig, dat echter neit wordt meegeleverd.
80
Page 79

16. Gebruik
Neem alle veiligheidsvoorschriften en andere informatie uit deze gebruiksaanwijzing in acht.
Plaats het apparaat op een stabiele, vlakke, voldoende grote oppervlakte. PLaats het apparaat niet op waardevolle
meubeloppervlakken, omdat anders drukplaatsen of krassen mogelijk zijn. Gebruik eventueel een geschikte onderlegger.
Vermijd de volgende ongunstige omstandigheden op de plaats van opstelling of tijdens het vervoer:
- Direct zonlicht
- vocht of een te hoge luchtvochtigheid
- extreme kou of hitte
- stof of brandbare gassen, dampen of oplosmiddelen
- Sterke trillingen
- sterke magnetische velden, bijv. in de buurt van machines of luidsprekers
Na het verplaatsen van het product van een koude naar een warme omgeving, mag u het apparaat nimmer onmiddellijk gebruiken.
Het condenswater dat wordt gevormd, kan onder bepaalde omstandigheden het apparaat beschadigen. Bij het netdeel bestaat
bovendien levensgevaar door elektrische schokken!
Laat het apparaat uitgeschakeld op kamertemperatuur komen. Dit kan onder omstandigheden meerdere uren duren.
Let erop dat de isolatie van de volledige stekkerlader niet beschadigd of vernield raakt. Open het apparaat nooit.
Het product voor elk gebruik op beschadigingen controleren!
Indien u beschadigingen vaststelt, evrwijder dan de geplaatste batterijen, en sluit het product NIET via het netdeel aan op de
netspanning. Breng het product naar een reparatiedienst of verwijder het op milieuvriendelijke wijze.
Indien u het apparaat gedurende langere tijd niet gebruikt, neem dan de geplaatste batterijen/accu's uit, en trek het extern aangesloten
netdeel uit.
Steek nooit puntige voorwerpen (balpen, naald, breipen, paperclips, enz.) door de ventilatiesleuven of openingen in de behuizing
van het apparaat, het kan daardoor beschadigd raken.
Let er bij het opstellen van het apparaat op, dat geen aansluitkabels (bijv. de kabel naar uw hoofdtelefoon of een netdeel) geknikt of
beschadigd worden.
Installeer de kabels zo dat niemand erover kan struikelen.
Controleer regelmatig de technische veiligheid van het product. Kijk de behuizing e.d. op beschadigingen na.
Indien kan worden aangenomen dat gebruik zonder gevaren niet meer mogelijk is, moet het product buiten bedrijf worden gesteld en
worden beveiligd tegen onopzettelijk gebruik. Schakel de drumkit uit, koppel hem los van het externe netdeel, en koppel dat externe
netdeel los van de netspanning. Neem ook ev. de geplaatste batterijen uit.
Er mag worden aangenomen dat gebruik zonder gevaar niet meer mogelijk is, wanneer
- het product zichtbaar is beschadigd,
- het product niet meer functioneert en
- het product gedurende langere tijd onder ongunstige omstandigheden is opgeslagen of
- het product tijdens transport zwaar is belast.
81
Page 80

17. Onderhoud en reiniging
Het product is voor u onderhoudsvrij. U mag het nooit openen of demonteren. Een herstelling mag alleen door een erkende vakman of een
bevoegde werkplaats worden uitgevoerd.
Gebruik voor het reinigen van het product een droge en pluisvrije doek.
18. Verwijdering
a) Algemeen
Elektrische en elektronische producten mogen niet via het normale huisvuil verwijderd worden!
Verwijder het onbruikbaar geworden product volgens de geldende wettelijke voorschriften.
b) Batterijen en accu's
U bent als eindverbruiker volgens de KCA-voorschriften wettelijk verplicht alle lege batterijen en accu's in te leveren; verwijdering via
het huisvuil is niet toegestaan!
Op batterijen/accu´s die schadelijke stoffen bevatten, vindt u de hiernaast vermelde symbol. Deze mogen niet via het huisvuil
worden verwijderd. De aanduidingen voor de gebruikte zware metalen zijn: Cd=cadmium, Hg=kwik, Pb=lood (aanduiding staat op
de batterij/accu bijv. onder de hiernaast afgebeelde containersymbol).
Uw lege batterijen en accu´s kunt u bij de verzamelpunten van uw gemeente, in onze vestigingen en op alle plaatsen waar batterijen
en accu´s verkocht worden kosteloos inleveren.
Zo voldoet u aan de wettelijke verplichtingen voor afvalscheiding en draagt u bij aan de bescherming van het milieu.
82
Page 81

19. Technische gegevens
Drumkits ..................................................... 30 (25 vooraf ingesteld, 5 programmeerbaar)
Slagwerk-sounds ........................................ 215
Songs ......................................................... 100
Opnamegeheugen...................................... 1
Pads ........................................................... 7
Voetpedalen ............................................... 2
Aansluitingen .............................................. 1x hoofdtelefoonuitgang 6,35mm, 1x USB-bus voor Midi-gegevens (in/out)
Voedingsspanning ...................................... 12 V/DC, 2 A via een extern netdeel of 6 batterijen van het type Baby/C
Afmetingen ................................................. 500 x 370 x 157mm (B x D x H)
Gewicht ...................................................... ca. 3,3 kg
Diverse ....................................................... Stereo-luidspreker geïntegreerd, metronoom met spraakuitvoer of toonsignaal naar keuze
83
Page 82

20. Bijlage A: Slaginstrument-sound
.
NO.
1
2
3
4
5
6
7
8
9
10
11
12
13
14
15
16
17
18
19
20
21
22
23
24
25
26
27
28
29
30
31
32
33
34
NAME
Kick KIT
Rock Kick 001
Rock Kick 002
Rock Kick 003
Standard Kick 001
Standard Kick 002
Standard Kick 003
Standard Kick 004
Pop Kick 001
Pop Kick 002
Pop Kick 003
Acoustic Kick 001
Acoustic Kick 002
Acoustic Kick 003
Acoustic Kick 004
Acoustic Kick 005
Acoustic Kick 006
Acoustic Kick 007
Acoustic Kick 008
Acoustic Kick 009
Acoustic Kick 010
Acoustic Kick 011
Snare KIT
Standard Snare 001
Standard Snare 002
Standard Snare 003
Standard Snare 004
Standard Snare 005
Standard Snare 006
Brush Snare 001
Brush Snare 002
Standard Stick 001
Standard Stick 002
Rock Snare 001
Rock Snare 002
Rock Snare 003
NO.
35
36
37
38
39
40
41
42
43
44
45
46
47
48
49
50
51
52
53
54
55
56
57
58
59
60
61
62
63
64
65
66
67
68
69
NAME
.
Pop Snare 001
Pop Snare 002
Pop Snare 003
Acoustic Snare 001
Acoustic Snare 002
Acoustic Snare 003
Acoustic Snare 004
Acoustic Snare 005
Tom KIT
Standard Tom 001
Standard Tom 002
Standard Tom 003
Standard Tom 004
Standard Tom 005
Standard Tom 006
Room Tom 001
Room Tom 002
Room Tom 003
Room Tom 004
Room Tom 005
Room Tom 006
Electronic Tom 001
Electronic Tom 002
Electronic Tom 003
Electronic Tom 004
Electronic Tom 005
Electronic Tom 006
Analog Tom 001
Analog Tom 002
Analog Tom 003
Analog Tom 004
Analog Tom 005
Analog Tom 006
Acoustic Tom 001
Acoustic Tom 002
Acoustic Tom 003
NO.
70
71
72
73
74
75
76
77
78
79
80
81
82
83
84
85
86
87
88
89
90
91
92
93
94
95
96
97
98
99
100
101
102
NAME
.
Acoustic Tom 004
Acoustic Tom 005
Acoustic Tom 006
Hihat KIT
Standard Hihat Close
Standard Hihat Pad
Standard Hihat Open
Analog Hihat Close
Analog Hihat Pad
Analog Hihat Open
Shakable
Rock Hihat Close
Rock Hihat Pad
Rock Hihat Open
Acoustic Hihat Close
Acoustic Hihat Pad
Acoustic Hihat Open
Crash KIT
Standard Crash001
Standard Crash002
Standard Crash003
Analog Ride001
China Crash
Splash001
Standard Ride 001
Rock Crash
Standard Ride 002
Electronic Crash
Splash002
Ride Bell
Panel KIT
Vibraslap
Hand
Tambourine
Stcowb
Mutecowb
84
Page 83

NO.
.
NAME
NO.
NAME
.
NO.
NAME
.
103
104
105
106
107
108
109
110
111
112
113
114
115
116
117
118
119
Mute Hi Conga
Open Hi Conga
Low Conga
Hi Bongo
Low Bongo
High Timbale
Low Timbale
High Agogo
Low Agogo
Cabasa
Shaker
Claves
Mute Triangle
Open Triangle
Short Guiro
Long Guiro
Mute Cuica
141
142
143
144
145
146
147
148
149
150
151
152
153
154
155
156
Tambourine001
Tambourine002
Tambourine003
Tambourine004
Tambourine005
Sfx KIT
SFX001
SFX002
SFX003
SFX004
SFX005
SFX006
SFX007
SFX008
SFX009
SFX010
SFX011
178
179
180
181
182
183
184
185
186
187
188
189
190
191
192
193
194
SFX033
SFX034
SFX035
SFX036
SFX037
SFX038
SFX039
SFX040
SFX041
SFX042
SFX043
SFX044
SFX045
SFX046
SFX047
SFX048
SFX049
120
121
122
123
124
125
126
127
128
129
130
131
132
133
134
135
136
Open Cuica
Mute Surdo
Open Surdo
Maracas
HighQ
Slap
Scratch Push
Scral
One
Two
Three
Four
Cartoon001
Cartoon002
Cartoon003
Cartoon004
Cartoon005
157
158
159
160
161
162
163
164
165
166
167
168
169
170
171
172
173
SFX012
SFX013
SFX014
SFX015
SFX016
SFX017
SFX018
SFX019
SFX020
SFX021
SFX022
SFX023
SFX024
SFX025
SFX026
SFX027
SFX028
195
196
197
198
199
200
201
202
203
204
205
206
207
208
209
210
211
SFX050
SFX051
SFX052
SFX053
SFX054
SFX055
SFX056
SFX057
SFX058
SFX059
SFX060
SFX061
SFX062
SFX063
SFX064
SFX065
SFX066
137
138
139
140
Cartoon006
Laugh
Metronome1
Metronome2
174
175
176
177
SFX029
SFX030
SFX031
SFX032
212
213
214
215
SFX067
SFX068
SFX069
SFX070
85
Page 84

21. Bijlage B: Drumkits
NO.
01 Pop1 16 Jazz2
02 Pop2 17 Funk
03 Standard 1 18 Clave
04 Room 19 Drum Bass
05 Rock 1 20 Hip Hop
06 Electronic 21 Conga1
07 Analog 22 Conga2
08 Jazz 1 23 Timbales
09 Brush 24 Latin
10 Standard 2 25 Funk
11 Rock2 26 User 1 (Pop 1)
12 Boss 27 User 2 (Pop 2)
13 Rock3 28 User 3 (Standard1)
14 Standard 3 29 User 4 (Room)
15 Rock4 30 User 5 (Rock 1)
NAME
NO.
NAME
22. Bijlage C: Songs
NO.
01
02
03
04
05
06
07
08
09
10
11
12
13
.
01
03
02
05
21
21
21
01
03
04
05
03
01
NAMEKIT BEAT
Intro
Intro
8 Beat
8 Beat 2
8 Beat 3
8 Beat 4
8 Beat 5
8 Beat Ballad 1
8 Beat Ballad 2
8 Beat Ballad 3
Soft Rock
Rock 1
Rock 2
Rock 3
Rock 4
4/4
4/4
4/4
4/4
4/4
4/4
4/4
4/4
4/4
4/4
4/4
4/4
4/4
NO.
16
17
18
19
20
21
22
23
24
25
26
27
28
29
30
.
05
07
03
01
07
04
02
01
21
21
05
03
01
03
01
NAMEKIT BEAT
Hard Rock 2
16 Beat 1
16 Beat 2
16 Beat 3
16 Beat 4
16 Beat 5
16 Beat 6
16 Beat 7
16 Beat Ballad 1
16 Beat Ballad 2
16 Beat Ballad 3
16 Beat Ballad 4
16 Beat Ballad 5
16 Beat Funk 1
16 Beat Funk 2
4/4
4/4
4/4
4/4
4/4
4/4
4/4
4/4
4/4
4/4
4/4
4/4
4/4
4/4
4/4
86
14
15
02
05
Rock 5
Hard Rock 1
4/4
4/4
Page 85

NO.
31
32
33
34
35
36
37
38
39
40
41
42
43
44
45
46
47
48
49
50
51
52
53
54
55
56
57
58
59
60
61
62
63
64
65
66
.
07
07
01
06
04
07
03
01
03
04
03
01
03
02
03
01
05
04
03
03
04
01
04
03
23
12
12
03
01
03
03
12
12
12
12
01
NAME NAMEKIT KITBEAT BEAT
Dance
Dance 1
Dance 2
Dance 3
Dance 4
Dance 5
Dance 6
Rap
Rap 1
Rap 2
Rap 3
Bounce
Bounce 1
Bounce 2
Bounce 3
Shuffle
Shuffle 1
Shuffle 2
Shuffle 3
Shuffle 4
Shuffle 5
Shuffle 6
Shuffle 7
Slow Rock
Slow Rock 1
Slow Rock 2
Slow Rock 3
Slow Rock 4
Latin
Reggae 1
Reggae 2
Bossa Nova 1
Bossa Nova 2
Samba
Salsa
Latin Rock
Cha-Cha
Mambo
Rhumba 1
Rhumba 2
Rhumba 2
Tango
4/4
4/4
4/4
4/4
4/4
4/4
4/4
4/4
4/4
4/4
4/4
4/4
4/4
4/4
4/4
4/4
4/4
4/4
4/4
4/4
4/4
4/4
4/4
4/4
4/4
4/4
4/4
4/4
4/4
4/4
4/4
4/4
4/4
4/4
4/4
4/4
NO.
67
68
69
70
71
72
73
74
75
76
77
78
79
80
81
82
83
84
85
86
87
88
89
90
91
92
93
94
95
96
97
98
99
100
.
Swing
09
09
08
12
02
03
02
01
01
03
01
03
12
09
03
05
03
05
05
01
03
07
03
01
03
02
03
04
03
03
01
03
12
08
Swing 1
Swing 2
Swing 3
Others
Waltz
3/4 Ballad
Swing Blues
Blues
March 1
March 2
R&B
Hip-Hop
Funk
Country
Big Band
8 Beat
8 Beat 1
8 Beat 2
Ballad
Hard Rock 1
Hard Rock 2
Hard Rock 3
Pop Dance 1
Pop Dance 2
R&B
16 Beat
16 Beat
Fusion
Funk
Funk 1
Funk 2
Shuffle
Shuffle 1
Shuffle 2
16 Beat Shuffle
16 Beat Triplet
Others
Reggae
Bossa Nova
Big Band
4/4
4/4
4/4
4/4
4/4
4/4
4/4
4/4
4/4
4/4
4/4
4/4
4/4
4/4
4/4
4/4
4/4
4/4
4/4
4/4
4/4
4/4
4/4
4/4
4/4
4/4
4/4
4/4
4/4
4/4
4/4
4/4
4/4
4/4
87
Page 86

88
 Loading...