

Page 1

INSTALLATION GUIDE
WebShield e500 Appliance
VERSION 2.5
English/Deutsch/Français/ ᣣᧄ⺆
ᣣᧄ⺆
ᣣᧄ⺆ᣣᧄ⺆
Page 2

NAI-525-0061-3
Issued MARCH 2002 / McAfee WebShield e500 Appliance version 2.5
Page 3

Contents
Ports and connectors . . . . . . . . . . . . . . . . . . . . . . . . . . . . . . . . . . . . . . . . . . . . .vii
Mounting kit instructions . . . . . . . . . . . . . . . . . . . . . . . . . . . . . . . . . . . . . . . . . viii
User interface . . . . . . . . . . . . . . . . . . . . . . . . . . . . . . . . . . . . . . . . . . . . . . . . . . . .x
Installation Guide — English . . . . . . . . . . . . . . . . . . . . . . . . . . . . . . . ENG-1
Overview . . . . . . . . . . . . . . . . . . . . . . . . . . . . . . . . . . . . . . . . . . . . . . . . . . . ENG-1
Copyright and trademark attributions . . . . . . . . . . . . . . . . . . . . . . . . . . . ENG-2
Power and safety information . . . . . . . . . . . . . . . . . . . . . . . . . . . . . . . . . . ENG-3
About the WebShield e500 Appliance . . . . . . . . . . . . . . . . . . . . . . . . . . . . ENG-5
Features . . . . . . . . . . . . . . . . . . . . . . . . . . . . . . . . . . . . . . . . . . . . . . . ENG-6
What comes with the appliance? . . . . . . . . . . . . . . . . . . . . . . . . . . ENG-10
Getting started with the appliance . . . . . . . . . . . . . . . . . . . . . . . . . . . . . ENG-13
Who should install the appliance? . . . . . . . . . . . . . . . . . . . . . . . . . ENG-13
Ports and connectors . . . . . . . . . . . . . . . . . . . . . . . . . . . . . . . . . . . ENG-14
Gathering the configuration information . . . . . . . . . . . . . . . . . . . . ENG-18
Installing the appliance . . . . . . . . . . . . . . . . . . . . . . . . . . . . . . . . . . . . . . ENG-28
Configuring the network settings . . . . . . . . . . . . . . . . . . . . . . . . . . . . . . ENG-32
Configuring the protocol settings . . . . . . . . . . . . . . . . . . . . . . . . . . . . . . ENG-40
Configuring the appliance’s protocols . . . . . . . . . . . . . . . . . . . . . . ENG-41
Configuring the automatic updating feature . . . . . . . . . . . . . . . . . ENG-47
Configuring your other equipment . . . . . . . . . . . . . . . . . . . . . . . . . ENG-48
Testing your configuration . . . . . . . . . . . . . . . . . . . . . . . . . . . . . . . ENG-50
Using the appliance . . . . . . . . . . . . . . . . . . . . . . . . . . . . . . . . . . . . . . . . . ENG-53
Backing up and restoring your settings . . . . . . . . . . . . . . . . . . . . ENG-55
Restoring and upgrading the appliance’s software . . . . . . . . . . . ENG-57
Troubleshooting . . . . . . . . . . . . . . . . . . . . . . . . . . . . . . . . . . . . . . . . . . . . ENG-60
Hardware problems . . . . . . . . . . . . . . . . . . . . . . . . . . . . . . . . . . . . . ENG-60
User interface problems . . . . . . . . . . . . . . . . . . . . . . . . . . . . . . . . . ENG-63
Installation Guide iii
Page 4

Contents
Installationshandbuch – Deutsch . . . . . . . . . . . . . . . . . . . . . . . . . . . DEU-1
Übersicht . . . . . . . . . . . . . . . . . . . . . . . . . . . . . . . . . . . . . . . . . . . . . . . . . . . DEU-1
Copyright und Marken . . . . . . . . . . . . . . . . . . . . . . . . . . . . . . . . . . . . . . . . DEU-2
Informationen zu Stromversorgung und Sicherheit . . . . . . . . . . . . . . . . DEU-3
Infos zu WebShield e500 . . . . . . . . . . . . . . . . . . . . . . . . . . . . . . . . . . . . . . DEU-5
Funktionen . . . . . . . . . . . . . . . . . . . . . . . . . . . . . . . . . . . . . . . . . . . . . DEU-6
Lieferumfang des WebShield e500 . . . . . . . . . . . . . . . . . . . . . . . . . DEU-11
Erste Schritte mit dem Gerät . . . . . . . . . . . . . . . . . . . . . . . . . . . . . . . . . . DEU-14
Wer das Gerät installieren sollte . . . . . . . . . . . . . . . . . . . . . . . . . . . DEU-14
Ports und Stecker . . . . . . . . . . . . . . . . . . . . . . . . . . . . . . . . . . . . . . . DEU-15
Zusammenfassen der Konfigurationsinformationen . . . . . . . . . . DEU-20
Installation des McAfee WebShield e500 . . . . . . . . . . . . . . . . . . . . . . . . DEU-32
Konfigurieren der Netzwerkeinstellungen . . . . . . . . . . . . . . . . . . . . . . . DEU-36
Konfigurieren der Protokolleinstellungen . . . . . . . . . . . . . . . . . . . . . . . DEU-45
Konfigurieren der Protokolle des WebShield e500 . . . . . . . . . . . . DEU-46
Konfigurieren der Funktion zum automatischen Aktualisieren . . DEU-52
Konfigurieren weiterer Geräte . . . . . . . . . . . . . . . . . . . . . . . . . . . . . DEU-53
Testen Ihrer Konfiguration . . . . . . . . . . . . . . . . . . . . . . . . . . . . . . . DEU-55
Verwenden des WebShield e250 . . . . . . . . . . . . . . . . . . . . . . . . . . . . . . . DEU-59
Sichern und Wiederherstellen der Einstellungen . . . . . . . . . . . . . DEU-61
Wiederherstellen und Aktualisieren der Gerätesoftware . . . . . . . DEU-64
Fehlerbehebung . . . . . . . . . . . . . . . . . . . . . . . . . . . . . . . . . . . . . . . . . . . . DEU-68
Hardwarefehler . . . . . . . . . . . . . . . . . . . . . . . . . . . . . . . . . . . . . . . . . DEU-68
Probleme mit der Benutzeroberfläche . . . . . . . . . . . . . . . . . . . . . . DEU-71
iv McAfee WebShield e500 Appliance version 2.5
Page 5

Contents
Guide d'installation – Français . . . . . . . . . . . . . . . . . . . . . . . . . . . . . .FRA-1
Présentation . . . . . . . . . . . . . . . . . . . . . . . . . . . . . . . . . . . . . . . . . . . . . . . . FRA-1
Copyright et attribution de marques commerciales . . . . . . . . . . . . . . . . FRA-2
Informations sur l'alimentation et la sécurité . . . . . . . . . . . . . . . . . . . . . . FRA-3
A propos de l'application WebShield e500 . . . . . . . . . . . . . . . . . . . . . . . . FRA-5
Fonctionnalités . . . . . . . . . . . . . . . . . . . . . . . . . . . . . . . . . . . . . . . . . . FRA-6
Contenu fourni avec l'application . . . . . . . . . . . . . . . . . . . . . . . . . . FRA-10
Mise en route de l'application . . . . . . . . . . . . . . . . . . . . . . . . . . . . . . . . . FRA-13
Installateur de l'application . . . . . . . . . . . . . . . . . . . . . . . . . . . . . . . FRA-13
Ports et connecteurs . . . . . . . . . . . . . . . . . . . . . . . . . . . . . . . . . . . . FRA-14
Collecter les informations de configuration . . . . . . . . . . . . . . . . . FRA-19
Installation de l'application . . . . . . . . . . . . . . . . . . . . . . . . . . . . . . . . . . . FRA-31
Configuration des paramètres réseau . . . . . . . . . . . . . . . . . . . . . . . . . . FRA-35
Configuration des paramètres de protocole . . . . . . . . . . . . . . . . . . . . . FRA-45
Configuration des protocoles de l'application . . . . . . . . . . . . . . . FRA-46
Configuration de la fonctionnalité de mise à jour automatique . FRA-52
Configuration des autres équipements . . . . . . . . . . . . . . . . . . . . . FRA-53
Tester votre configuration . . . . . . . . . . . . . . . . . . . . . . . . . . . . . . . . FRA-55
Utilisation de l'application . . . . . . . . . . . . . . . . . . . . . . . . . . . . . . . . . . . . FRA-59
Sauvegarde et restauration de vos paramètres . . . . . . . . . . . . . . FRA-61
Restauration et mise à niveau du logiciel de l'application . . . . . . FRA-63
Dépannage . . . . . . . . . . . . . . . . . . . . . . . . . . . . . . . . . . . . . . . . . . . . . . . . . FRA-67
Problèmes matériels . . . . . . . . . . . . . . . . . . . . . . . . . . . . . . . . . . . . FRA-67
Problèmes d'interface utilisateur . . . . . . . . . . . . . . . . . . . . . . . . . . FRA-70
Installation Guide v
Page 6

Contents
䉟䊮䉴䊃䊷䊦
䉟䊮䉴䊃䊷䊦 䉧䉟 䊄
䉟䊮䉴䊃䊷䊦䉟䊮䉴䊃䊷䊦
䉧䉟 䊄 䋭䋭䋭䋭 ᣣᧄ⺆
䉧䉟 䊄䉧䉟 䊄
ⷐ
ⷐ . . . . . . . . . . . . . . . . . . . . . . . . . . . . . . . . . . . . . . . . . . . . . . . . . . . . . ᣣᧄ⺆
ⷐⷐ
⪺ᮭ
⪺ᮭ 䈫䈫䈫䈫ᮡ
⪺ᮭ⪺ᮭ
㔚Ḯ
㔚Ḯ䈍 䉋䈶
㔚Ḯ㔚Ḯ
WebShield e500 䉝䊒䊤䉟䉝䊮䉴
䉝䊒䊤 䉟䉝䊮䉴
䉝䊒䊤 䉟䉝䊮䉴䈱䈱䈱䈱Ḱ
䉝䊒䊤 䉟䉝䊮䉴䉝䊒䊤 䉟䉝䊮䉴
䉝䊒䊤 䉟䉝䊮䉴
䉝䊒䊤 䉟䉝䊮䉴䈱䈱䈱䈱䉟䊮䉴 䊃䊷䊦
䉝䊒䊤 䉟䉝䊮䉴䉝䊒䊤 䉟䉝䊮䉴
䊈䉾 䊃䊪䊷䉪
䊈䉾 䊃䊪䊷䉪᭴ᚑ
䊈䉾 䊃䊪䊷䉪䊈䉾䊃䊪䊷䉪
䊒䊨䊃 䉮䊦
䊒䊨䊃 䉮䊦䈱䈱䈱䈱⸳ቯ
䊒䊨䊃 䉮䊦䊒䊨 䊃 䉮䊦
䉝䊒䊤 䉟䉝䊮䉴
䉝䊒䊤 䉟䉝䊮䉴䈱䈱䈱䈱↪ᣇᴺ
䉝䊒䊤 䉟䉝䊮䉴䉝䊒䊤 䉟䉝䊮䉴
䊃䊤䊑䊦䉲䊠䊷䊁䉞䊮䉫
䊃䊤䊑䊦䉲䊠䊷䊁䉞䊮䉫 . . . . . . . . . . . . . . . . . . . . . . . . . . . . . . . . . . . ᣣᧄ⺆
䊃䊤䊑䊦䉲䊠䊷䊁䉞䊮䉫䊃䊤䊑䊦䉲䊠䊷䊁䉞䊮䉫
ᮡ . . . . . . . . . . . . . . . . . . . . . . . . . . . . . . . . . . . . . . . . . . . . . ᣣᧄ⺆
ᮡᮡ
䈍䉋䈶ో
ో䈮䈮䈮䈮㑐㑐㑐㑐䈜䉎
䈍䉋䈶䈍䉋䈶
ోో
ຠ
ຠ䈱䈱䈱䈱․⦡
ຠຠ
䊌䉾䉬䊷䉳
䊌䉾䉬䊷䉳䈱䈱䈱䈱ౝኈ
䊌䉾䉬䊷䉳䊌䉾䉬䊷䉳
䉟䊮䉴䊃䊷䊦
䉟䊮䉴䊃䊷䊦䈮䈮䈮䈮ᔅⷐ
䉟䊮䉴䊃䊷䊦䉟䊮䉴䊃䊷䊦
䊘䊷 䊃
䊘䊷 䊃 䈫䈫䈫䈫䉮䊈䉪䉺
䊘䊷 䊃䊘䊷 䊃
⸳ቯᖱႎ
⸳ቯᖱႎ䈱䈱䈱䈱㓸
⸳ቯᖱႎ⸳ቯᖱႎ
䊒䊨䊃 䉮䊦
䊒䊨䊃 䉮䊦䈱䈱䈱䈱⸳ቯ
䊒䊨䊃 䉮䊦䊒䊨 䊃 䉮䊦
⥄േ
⥄േ䉝 䉾 䊒䊂䊷 䊃
䉝䉾䊒䊂䊷䊃䈱䈱䈱䈱⸳ቯ
⥄േ⥄േ
䉝䉾䊒䊂䊷䊃䉝䉾䊒䊂䊷䊃
ઁઁઁઁ䈱䈱䈱䈱ᯏེ
ᯏེ䈱䈱䈱䈱⸳ቯ
ᯏེᯏེ
⸳ቯ
⸳ቯ䈱䈱䈱䈱䊁䉴 䊃
⸳ቯ⸳ቯ
⸳ቯ
⸳ቯ䈱䈱䈱䈱䊋䉾 䉪 䉝 䉾 䊒
⸳ቯ⸳ቯ
䉸䊐䊃䉡䉢䉝
䉸䊐䊃䉡䉢䉝䈱䈱䈱䈱ᓳర
䉸䊐䊃䉡䉢䉝䉸䊐䊃䉡䉢䉝
䊊䊷 䊄 䉡 䉢 䉝
䊊䊷 䊄 䉡 䉢 䉝䈮䈮䈮䈮㑐㑐㑐㑐䈜䉎
䊊䊷 䊄 䉡 䉢 䉝䊊䊷 䊄 䉡 䉢 䉝
䊡䊷䉱
䊡䊷䉱 䉟䊮䉺䊷䊐䉢䊷䉴
䊡䊷䉱䊡䊷䉱
ᣣᧄ⺆ . . . . . . . . . . . . . . . . . . . . . . . . . . . ᣣᧄ⺆
ᣣᧄ⺆ᣣᧄ⺆
䈜䉎ᖱႎ
ᖱႎ . . . . . . . . . . . . . . . . . . . . . . . . . . . . . . . . . ᣣᧄ⺆
䈜䉎䈜䉎
ᖱႎᖱႎ
䉝䊒䊤 䉟䉝䊮䉴䈮䈧䈇䈩
䉝䊒䊤 䉟䉝䊮䉴䉝䊒䊤 䉟䉝䊮䉴
․⦡ . . . . . . . . . . . . . . . . . . . . . . . . . . . . . . . . . . . . . . . . . . . ᣣᧄ⺆
․⦡․⦡
ౝኈ . . . . . . . . . . . . . . . . . . . . . . . . . . . . . . . . . . . . . ᣣᧄ⺆
ౝኈౝኈ
Ḱ . . . . . . . . . . . . . . . . . . . . . . . . . . . . . . . . . . . . . ᣣᧄ⺆
ḰḰ
ᔅⷐ䈭䈭䈭䈭䉴䉨䊦
ᔅⷐᔅⷐ
䉮䊈䉪䉺 . . . . . . . . . . . . . . . . . . . . . . . . . . . . . . . . . . . . . ᣣᧄ⺆
䉮䊈䉪䉺䉮䊈䉪 䉺
㓸 . . . . . . . . . . . . . . . . . . . . . . . . . . . . . . . . . . . . . . ᣣᧄ⺆
㓸㓸
䉟䊮䉴䊃䊷䊦 . . . . . . . . . . . . . . . . . . . . . . . . . . . . . . ᣣᧄ⺆
䉟䊮䉴䊃䊷䊦䉟䊮䉴䊃䊷䊦
᭴ᚑ䈱䈱䈱䈱⸳ቯ
᭴ᚑ᭴ᚑ
⸳ቯ . . . . . . . . . . . . . . . . . . . . . . . . . . . . . . . . . . . . . . . . . ᣣᧄ⺆
⸳ቯ⸳ቯ
䊁䉴䊃 . . . . . . . . . . . . . . . . . . . . . . . . . . . . . . . . . . . . . . . . ᣣᧄ⺆
䊁䉴䊃䊁䉴䊃
䊋䉾䉪䉝䉾䊒䈫䈫䈫䈫ᓳర
䊋䉾䉪䉝䉾䊒䊋䉾䉪䉝䉾䊒
䉟䊮䉺䊷䊐䉢䊷䉴䈮䈮䈮䈮㑐㑐㑐㑐䈜䉎
䉟䊮䉺䊷䊐䉢䊷䉴䉟䊮䉺䊷䊐䉢䊷䉴
⸳ቯ . . . . . . . . . . . . . . . . . . . . . . . . . . . . . . . . . . . ᣣᧄ⺆
⸳ቯ⸳ቯ
⸳ቯ . . . . . . . . . . . . . . . . . . . . . . . . . . . . . . . . . . . . . ᣣᧄ⺆
⸳ቯ⸳ቯ
⸳ቯ . . . . . . . . . . . . . . . . . . . . . . . . . . . . . . . ᣣᧄ⺆
⸳ቯ⸳ቯ
⸳ቯ . . . . . . . . . . . . . . . . . . . . . . . . . . . . . . . . . . . . . . ᣣᧄ⺆
⸳ቯ⸳ቯ
↪ᣇᴺ . . . . . . . . . . . . . . . . . . . . . . . . . . . . . . . . . . ᣣᧄ⺆
↪ᣇᴺ↪ᣇᴺ
ᓳర 䈫䈫䈫䈫䉝䉾䊒䉫䊧䊷䊄
ᓳరᓳర
䈜䉎㗴
䈜䉎䈜䉎
䈮䈧䈇䈩 . . . . . . . . . . . . . . . . . . . . . . ᣣᧄ⺆
䈮䈧䈇䈩䈮䈧䈇䈩
䉴䉨䊦 . . . . . . . . . . . . . . . . . . . . . . . . . . . . ᣣᧄ⺆
䉴䉨䊦䉴䉨䊦
ᓳర . . . . . . . . . . . . . . . . . . . . . . . . . . . . . ᣣᧄ⺆
ᓳరᓳర
䉝䉾䊒䉫䊧䊷䊄 . . . . . . . . . . . . . . . . . . . . ᣣᧄ⺆
䉝䉾䊒䉫䊧䊷䊄䉝䉾䊒䉫䊧䊷䊄
㗴 . . . . . . . . . . . . . . . . . . . . . . . . . . . . . ᣣᧄ⺆
㗴㗴
䈜䉎㗴
㗴 . . . . . . . . . . . . . . . . . . . . ᣣᧄ⺆
䈜䉎䈜䉎
㗴㗴
ᣣᧄ⺆ - 1
ᣣᧄ⺆ᣣᧄ⺆
ᣣᧄ⺆ - 1
ᣣᧄ⺆ᣣᧄ⺆
ᣣᧄ⺆ - 2
ᣣᧄ⺆ᣣᧄ⺆
ᣣᧄ⺆ - 3
ᣣᧄ⺆ᣣᧄ⺆
ᣣᧄ⺆ - 5
ᣣᧄ⺆ᣣᧄ⺆
ᣣᧄ⺆ - 6
ᣣᧄ⺆ᣣᧄ⺆
ᣣᧄ⺆ - 10
ᣣᧄ⺆ᣣᧄ⺆
ᣣᧄ⺆ - 13
ᣣᧄ⺆ᣣᧄ⺆
ᣣᧄ⺆ - 13
ᣣᧄ⺆ᣣᧄ⺆
ᣣᧄ⺆ - 14
ᣣᧄ⺆ᣣᧄ⺆
ᣣᧄ⺆ - 19
ᣣᧄ⺆ᣣᧄ⺆
ᣣᧄ⺆ - 31
ᣣᧄ⺆ᣣᧄ⺆
ᣣᧄ⺆ - 35
ᣣᧄ⺆ᣣᧄ⺆
ᣣᧄ⺆ - 43
ᣣᧄ⺆ᣣᧄ⺆
ᣣᧄ⺆ - 44
ᣣᧄ⺆ᣣᧄ⺆
ᣣᧄ⺆ - 50
ᣣᧄ⺆ᣣᧄ⺆
ᣣᧄ⺆ - 51
ᣣᧄ⺆ᣣᧄ⺆
ᣣᧄ⺆ - 53
ᣣᧄ⺆ᣣᧄ⺆
ᣣᧄ⺆ - 57
ᣣᧄ⺆ᣣᧄ⺆
ᣣᧄ⺆ - 59
ᣣᧄ⺆ᣣᧄ⺆
ᣣᧄ⺆ - 61
ᣣᧄ⺆ᣣᧄ⺆
ᣣᧄ⺆ - 65
ᣣᧄ⺆ᣣᧄ⺆
ᣣᧄ⺆ - 65
ᣣᧄ⺆ᣣᧄ⺆
ᣣᧄ⺆ - 67
ᣣᧄ⺆ᣣᧄ⺆
vi McAfee WebShield e500 Appliance version 2.5
Page 7
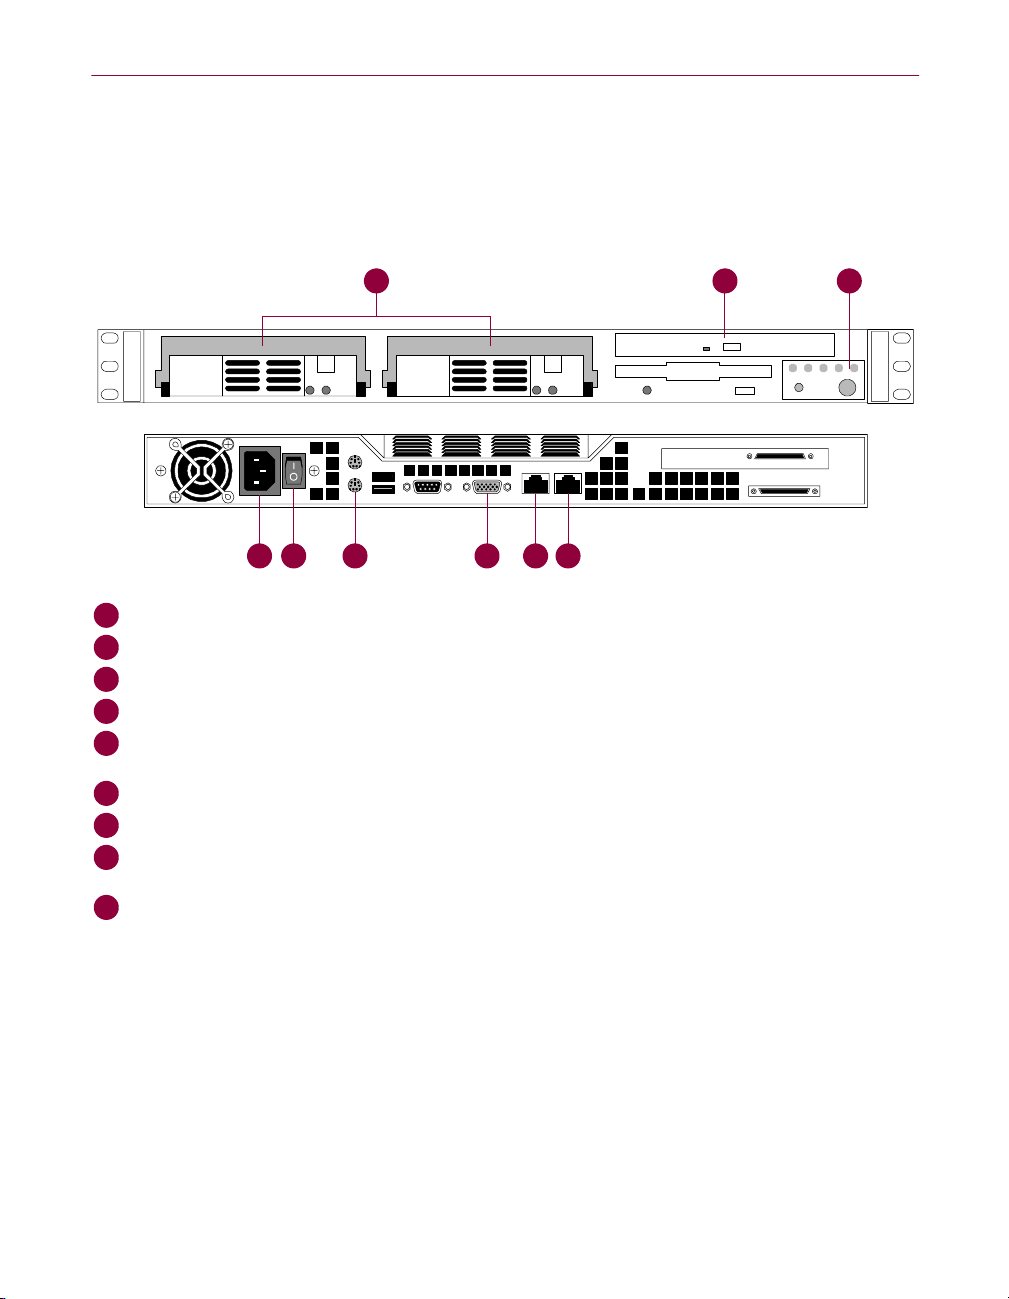
Ports and connectors
Ports und Stecker
Ports et connecteurs
䊘䊷 䊃
䊘䊷 䊃 䈫䈫䈫䈫䉮䊈䉪䉺
䊘䊷 䊃䊘䊷 䊃
A
Two hard disk drives Zwei Festplattenlaufwerke Deux unités de disque dur
B
CD-ROM drive CD-ROM-Laufwerk Lecteur CD-ROM
C
Control panel Bedienungsfeld Panneau de contrôle
D
Power socket Netzanschluß Prise d'alimentation
E
Power supply switch Stromversorgungsschalter Interrupteur d'alimentation
F
Keyboard port Tastatur-Port Port clavier
G
Monitor port Monitor-Port Port écran
H
LAN1 port (NIC 1) LAN1-Port (NIC 1) Port réseau local 1 (carte
I
LAN2 port (NIC 2) LAN2-Port (NIC 2) Port réseau local 1 (carte
䉮䊈䉪䉺
䉮䊈䉪䉺䉮䊈䉪䉺
D E G H IF
A B C
électrique
réseau 1)
réseau 2)
䊊䊷 䊄 䊂 䉞 䉴 䉪 2
CD-ROM 䊄䊤䉟䊑
䉮䊮䊃 䊨䊷䊦 䊌䊈䊦
㔚Ḯ䉸 䉬 䉾 䊃
㔚Ḯ䉴 䉟 䉾 䉼
䉨䊷䊗䊷 䊄 䊘䊷 䊃
䊝䊆䉺 䊘䊷 䊃
LAN1 䊘䊷 䊃 (NIC 1)
LAN2 䊘䊷 䊃 (NIC 2)
Installation Guide vii
Page 8
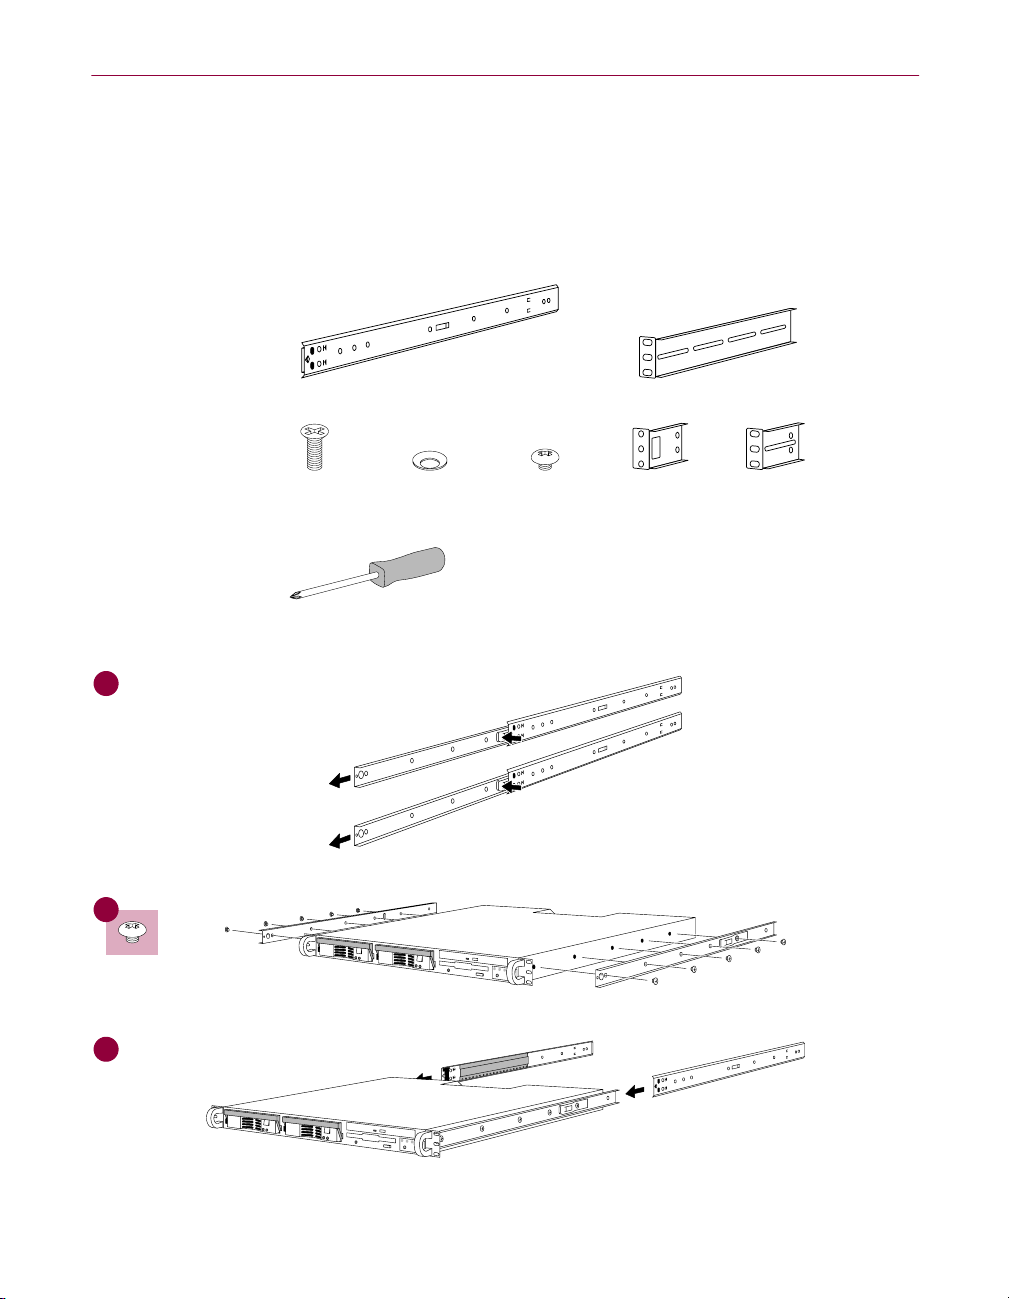
Mounting kit instructions
Anweisungen für den Montagerahmen
Instructions de montage
䊙䉡䊮 䊃䉨䉾 䊃
䊙䉡䊮 䊃䉨䉾 䊃䈱䈱䈱䈱⚵⚵⚵⚵䉂䉂䉂䉂┙┙┙┙䈩䈩䈩䈩ᣇᣇᣇᣇ
䊙䉡䊮 䊃䉨䉾 䊃䊙䉡䊮 䊃䉨䉾 䊃
Supplied:
Im Lieferumfang:
Fourni:
ห
ห 䈘 䉏䈩 䈇 䉎
䈘䉏䈩䈇䉎ㇱຠ
หห
䈘䉏䈩䈇䉎䈘䉏䈩䈇䉎
Required:
Zusätzlich
erforderlich:
Requis:
ᔅⷐ
ᔅⷐ䈭䈭䈭䈭Ꮏౕ
ᔅⷐᔅⷐ
1
Ꮏౕ :
ᎿౕᎿౕ
ㇱຠ :
ㇱຠㇱຠ
22
882222
2
3
viii McAfee WebShield e500 Appliance version 2.5
Page 9
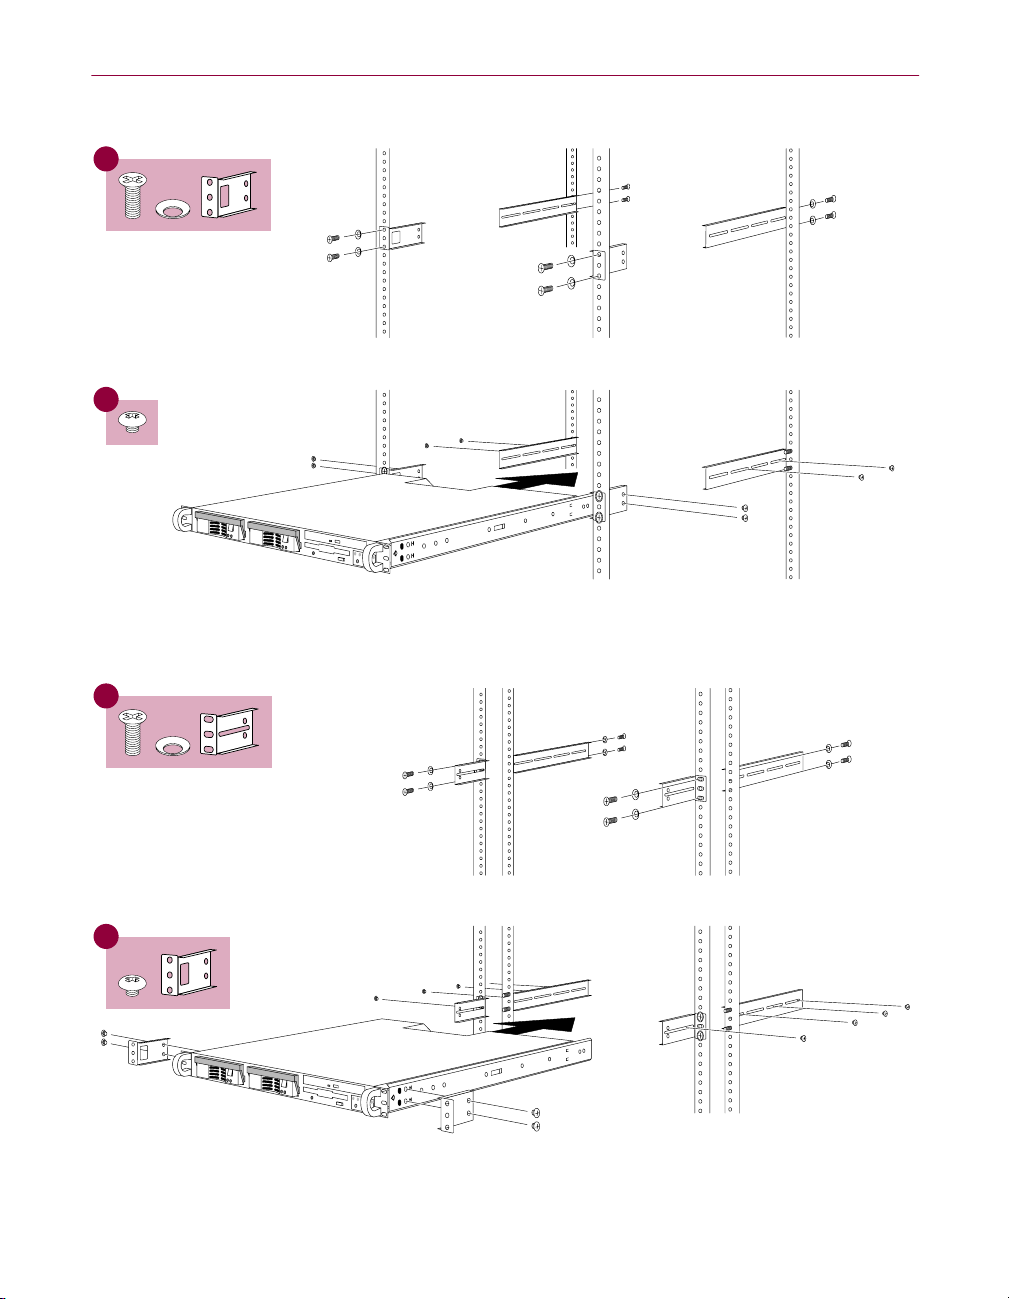
Standard rack / Standardgestell/Rack standard / ᮡḰ
4
5
ᮡḰ䊤 䉾 䉪
ᮡḰᮡḰ
䊤䉾䉪 :
䊤䉾䉪䊤䉾䉪
Telco rack / Telco-Gestell / Rack Telco/ Telco ␠
4
5
␠䊤 䉾 䉪
␠␠
䊤䉾䉪 :
䊤䉾䉪䊤䉾䉪
Installation Guide ix
Page 10
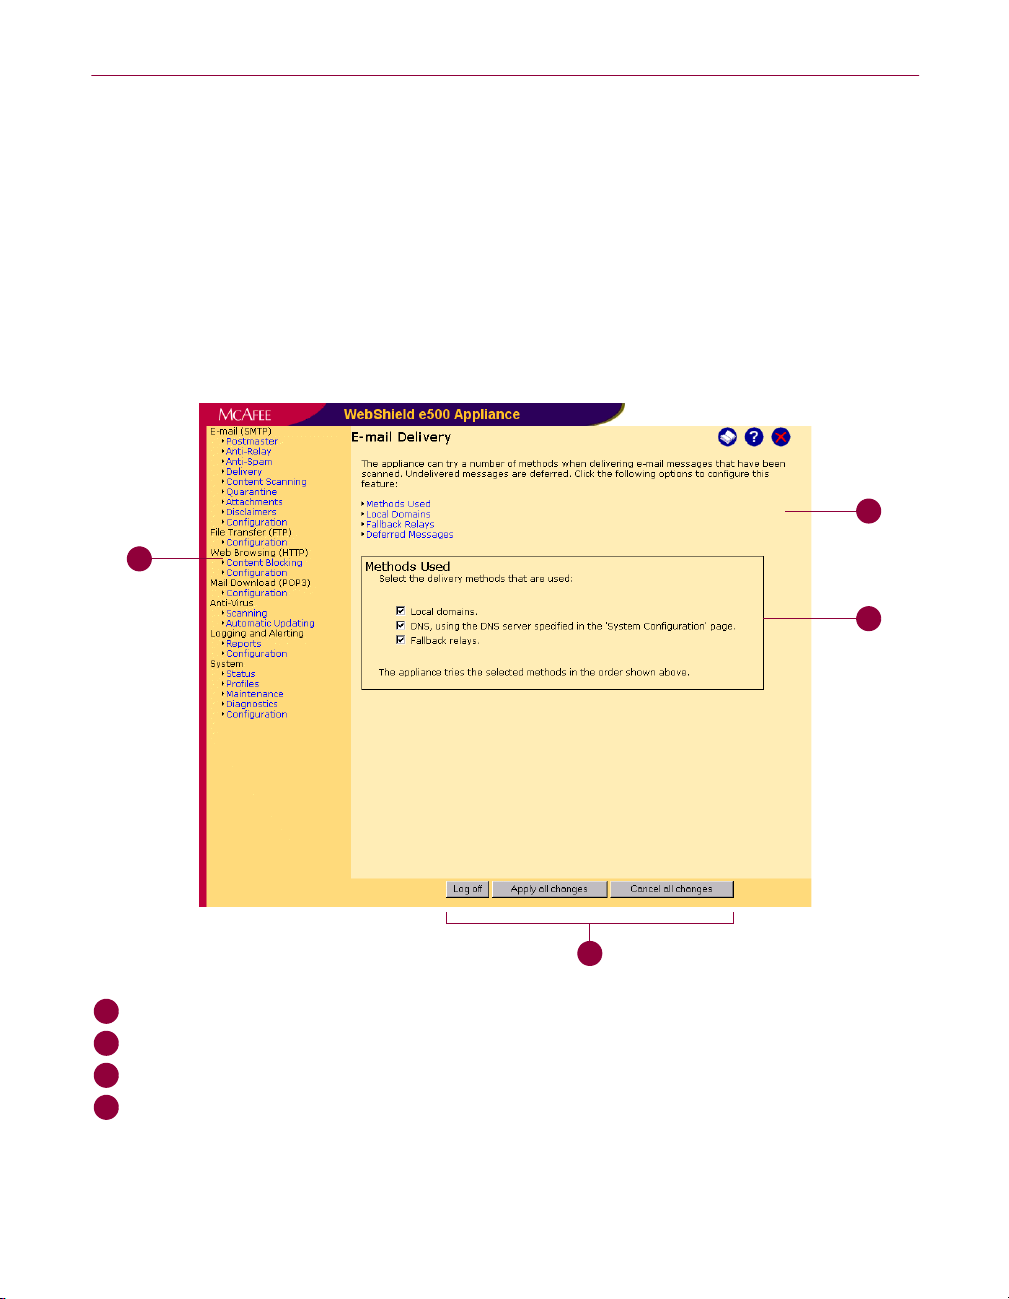
User interface
Benutzeroberfläche
Interface utilisateur
䊡䊷䉱
䊡䊷䉱 䉟䊮䉺䊷䊐䉢䊷䉴
䊡䊷䉱䊡䊷䉱
Your user interface might look slightly different depending on the version and language.
Ihre Benutzeroberfläche kann je nach Version und Sprache anders aussehen.
L'interface utilisateur peut présenter de légères différences selon la version et la langue
utilisées.
↪䈜䉎 ⸒⺆ 䈫 䊋䊷䉳 䊢 䊮䈮 䉋 䈦 䈩䇮 䉟 䊮 䉺 䊷䊐 䉢 䊷䉴 䈱ᄖⷰ䈏ᄙዋ⇣䈭 䉎 ႐ว䈏䈅 䉍 䉁䈜䇯
A
䉟䊮䉺䊷䊐䉢䊷䉴
䉟䊮䉺䊷䊐䉢䊷䉴䉟䊮䉺䊷䊐䉢䊷䉴
B
C
D
A
Navigation bar Navigationsleiste Barre de navigation
B
Page Seite Page
C
Panel Dialogfeld Panneau
D
Control buttons Steuerungsschaltflächen Boutons de contrôle
x McAfee WebShield e500 Appliance version 2.5
䊅䊎䉭䊷䉲 䊢 䊮 䊋䊷
䊕䊷䉳
䊕䉟䊮
䉮䊮䊃 䊨䊷䊦 䊗䉺䊮
Page 11

1Installation Guide — English
Overview
This Installation Guide provides the information you need to install and
configure your WebShield appliance. Please refer to the following sections for
specific information:
Copyright and trademark attributions Page 2
Power and safety information Page 3
About the WebShield e500 Appliance Page 5
• Features Page 6
• What comes with the appliance? Page 10
Getting started with the appliance Page 13
• Who should install the appliance? Page 13
• Ports and connectors Page 14
• Gathering the configuration information Page 18
Installing the appliance Page 28
Configuring the network settings Page 32
Configuring the protocol settings Page 40
• Configuring the appliance’s protocols Page 41
• Configuring the automatic updating feature Page 47
• Configuring your other equipment Page 48
• Testing your configuration Page 50
Using the appliance Page 53
• Backing up and restoring your settings Page 55
• Restoring and upgrading the appliance’s software Page 57
Troubleshooting Page 60
• Hardware problems Page 60
• User interface problems Page 63
Installation Guide ENG - 1
Page 12

Installation Guide — English
Copyright and trademark attributions
COPYRIGHT
© 2001–2002 Networks Associates Technology, Inc. All Rights Reserved. No part of this publication may
be reproduced, transmitted, transcribed, stored in a retrieval system, or translated into any language
in any form or by any means without the written permission of Networks Associates Technology,
Inc., or its suppliers or affiliate companies. To obtain this permission, write to the attention of
the Network Associates legal department at: 3965 Freedom Circle, Santa Clara, California 95054,
or call +1-972-308-9960.
TRADEMARK ATTRIBUTIONS
Active Security, Active Security (in Katakana), ActiveHelp, ActiveShield, AntiVirus Anyware and design, Bomb
Shelter, Certified Network Expert, Clean-Up, CleanUp Wizard, CNX, CNX Certification Certified Network Expert
and design, CyberCop, CyberCop (in Katakana), CyberMedia, CyberMedia UnInstaller, Design (stylized N), Disk
Minder, Distributed Sniffer System, Distributed Sniffer System (in Katakana), Dr Solomon’s, Dr Solomon’s label,
Enterprise SecureCast, Enterprise SecureCast (in Katakana), EZ SetUp, First Aid, ForceField, GMT, GroupShield,
GroupShield (in Katakana), Guard Dog, HelpDesk, HomeGuard, Hunter, ISDN TEL/SCOPE, LANGuru,
LANGuru (in Katakana), M and design, Magic Solutions, Magic Solutions (in Katakana), Magic University,
MagicSpy, MagicTree, McAfee, McAfee (in Katakana), McAfee and design, MultiMedia Cloaking, Net Tools, Net
Tools (in Katakana), NetCrypto, NetOctupus, NetScan, NetShield, NetStalker, Network Associates, NetXray,
NotesGuard, Nuts & Bolts, Oil Change, PC Medic, PC Medic 97, PCNotary, PGP, PGP (Pretty Good Privacy),
Pretty Good Privacy, PrimeSupport, Recoverkey, Recoverkey – International, Registry Wizard, ReportMagic,
RingFence, Router PM, SalesMagic, SecureCast, Service Level Manager, ServiceMagic, SmartDesk, Sniffer, Sniffer
(in Hangul), SniffMaster, SniffMaster (in Hangul), SniffMaster (in Katakana), SniffNet, Stalker, SupportMagic,
TIS, TMEG, TNV, TVD, TNS, Total Network Security, Total Network Visibility, Total Network Visibility (in
Katakana), Total Service Desk, Total Virus Defense, Trusted Mail, UnInstaller, Virex, Virus Forum, ViruScan,
VirusScan, WebScan, WebShield, WebShield (in Katakana), WebSniffer, WebStalker, WebWall, Who’s Watching
Your Network, WinGauge, Your E-Business Defender, ZAC 2000, Zip Manager are registered trademarks of
Network Associates, Inc. and/or its affiliates in the US and/or other countries. All other registered and
unregistered trademarks in this document are the sole property of their respective owners.
LICENSE AGREEMENT
NOTICE TO ALL USERS: CAREFULLY READ THE APPROPRIATE LEGAL AGREEMENT
CORRESPONDING TO THE LICENSE YOU PURCHASED, WHICH SETS FORTH THE GENERAL
TERMS AND CONDITIONS FOR THE USE OF THE LICENSED SOFTWARE. IF YOU DO NOT KNOW
WHICH TYPE OF LICENSE YOU HAVE ACQUIRED, PLEASE CONSULT THE SALES AND OTHER
RELATED LICENSE GRANT OR PURCHASE ORDER DOCUMENTS THAT ACCOMPANIES YOUR
SOFTWARE PACKAGING OR THAT YOU HAVE RECEIVED SEPARATELY AS PART OF THE
PURCHASE (AS A BOOKLET, A FILE ON THE PRODUCT CD, OR A FILE AVAILABLE ON THE WEB
SITE FROM WHICH YOU DOWNLOADED THE SOFTWARE PACKAGE). IF YOU DO NOT AGREE
TO ALL OF THE TERMS SET FORTH IN THE AGREEMENT, DO NOT INSTALL THE SOFTWARE. IF
APPLICABLE, YOU MAY RETURN THE PRODUCT TO NETWORK ASSOCIATES OR THE PLACE OF
PURCHASE FOR A FULL REFUND.
ENG - 2 McAfee WebShield e500 Appliance version 2.5
Page 13

Power and safety information
IMPORTANT: To ensure safe operation of the WebShield e500
Appliance, read all of the following information carefully before installing
the appliance.
Power requirements
• Ensure that the power cord is suitable for the country of use. If it is not
suitable, contact your supplier. Do not attempt to modify the power cord.
• The power outlet to which you connect the appliance must meet all
applicable electrical standards for the country of use.
• When connecting the appliance to the power outlet and other equipment,
ensure that the cables are stowed or grouped safely, so that no one will trip
over them.
Using the appliance
• Do not open the appliance’s case. There are no user-serviceable parts
inside.
Installation Guide — English
• The appliance is heavy. When you lift it, ensure that you have a firm grip
and carry it correctly, so that you do not injure yourself or damage the
appliance.
• Place the appliance on a flat sturdy surface, such as a desk, or secure it in a
rack, such as a 19” (inch) rack. Ensure that the surface or rack can support
the weight of the appliance, and that it cannot fall.
• Do not place any heavy objects on top of the appliance.
• The appliance’s network ports are only suitable for use with RJ-45
connectors. Do not use them with telephone equipment unless the socket
to which you are connecting is specifically intended for 10Mbps or
100Mbps Ethernet network use.
• In the unlikely event that the appliance encounters a hardware failure, turn
off the appliance and disconnect it from the power outlet. Contact your
supplier.
Installation Guide ENG - 3
Page 14

Installation Guide — English
Operating conditions
• Ensure that the environmental conditions surrounding the appliance are
suitable for standard computer use. Check that it is not damp, with
adequate ventilation. The operating temperature must remain within
10–40
appliance could fail to operate.
• When you use the appliance, ensure that there is a gap of at least 1” (25mm)
behind the case, so that the appliance can cool itself properly.
• Ensure that liquid and other objects do not enter the appliance through its
ventilation holes or fan grill.
°C, and the humidity within 0–90%. If these values are exceeded, the
ENG - 4 McAfee WebShield e500 Appliance version 2.5
Page 15
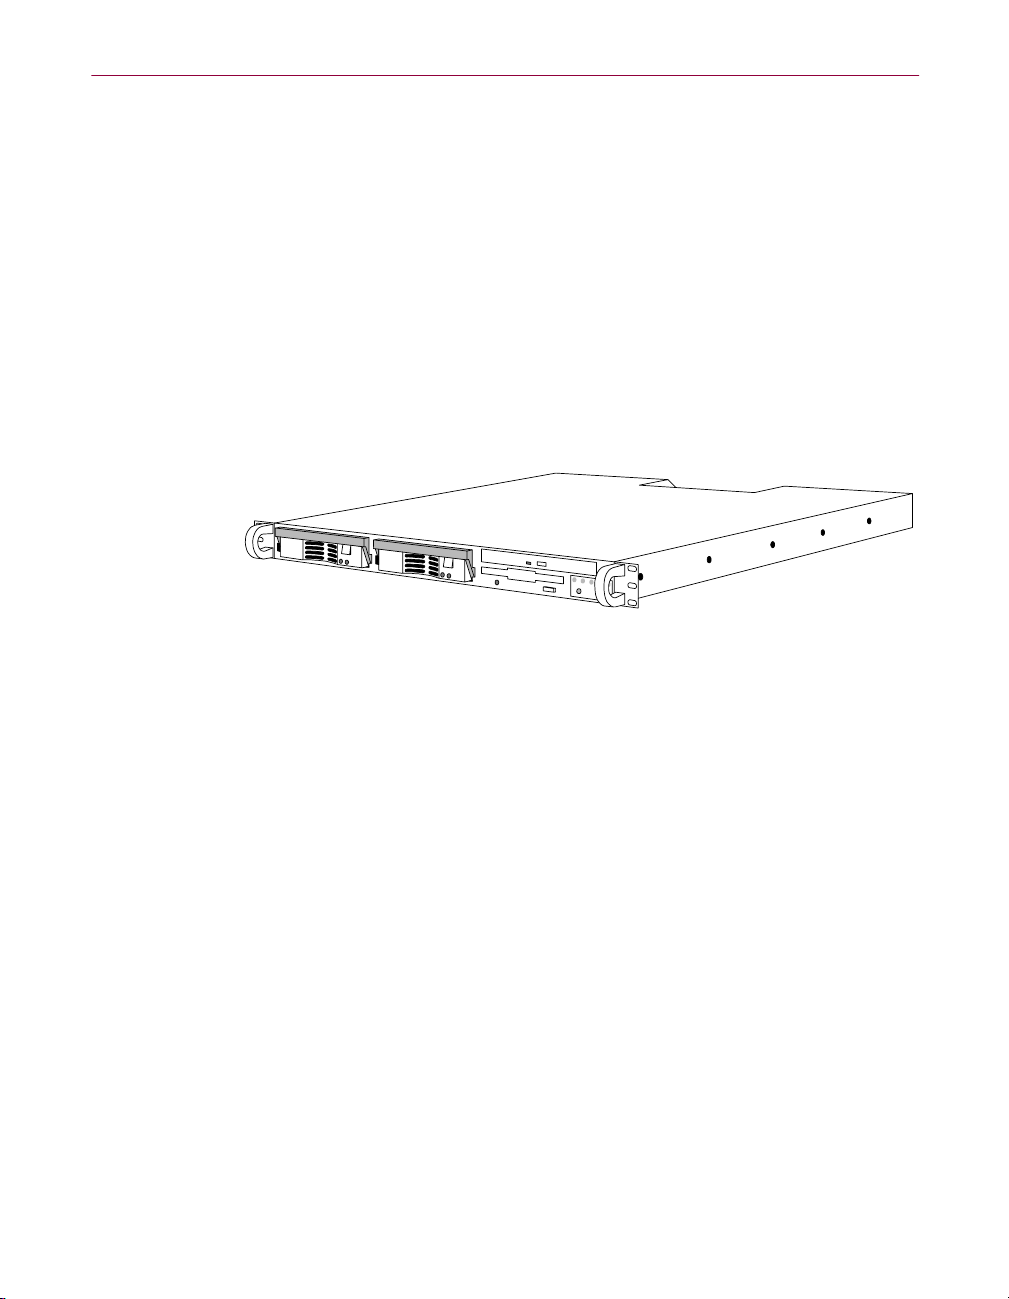
About the WebShield e500 Appliance
The WebShield e500 Appliance (Figure 1-1) is a purpose-built anti-virus and
content-scanning server containing powerful WebShield software. It is fully
configurable through a web browser, and it can be used in almost any network
topology. It provides virus scanning for the following protocols:
• Simple Mail Transfer Protocol (SMTP) e-mail messages
• File Transfer Protocol (FTP) exchanges
• Hypertext Transfer Protocol (HTTP) web browsing
• Post Office Protocol version 3 (POP3) Internet e-mail messages
Installation Guide — English
Figure 1-1. WebShield e500 Appliance
With additional features such as content scanning, anti-relay and anti-spam,
the appliance provides complete protection for your Internet gateway,
preventing undesirable material entering and leaving your organization.
The WebShield e500 Appliance shares its resources between the protocols that
it scans, checking inbound and outbound traffic as required. It can detect,
clean, log, and quarantine infected e-mail items, including compressed files
and macros, preventing them from reaching their intended recipients. It can
also block infected HTTP, FTP and POP3 items.
Using the appliance to perform your anti-virus scanning allows your mail
server to remain dedicated to mail activities. You can also use multiple
WebShield e500 Appliances together to increase scanning throughput and
provide fault tolerance.
For details of the different ways to use the appliance and some example
topologies, refer to Chapter 1 of the Product Guide.
Installation Guide ENG - 5
Page 16

Installation Guide — English
Features
Transparency — a new feature for version 2.5
If you have used a previous version of the WebShield appliance, be aware that
a new feature for version 2.5 is the addition of transparency. This means that
you can now use the appliance in either proxy mode or transparency mode:
• Proxy mode (explicit proxy) is suitable for networks where you can easily
configure your equipment to route its protocol traffic through the
appliance. Before transparency was introduced, the appliance only
operated in proxy mode.
In proxy mode, the appliance only handles traffic for the protocols that it
proxies.
• Transparency mode (transparent proxy) allows you to slot the appliance
into networks where it is difficult or time-consuming to reconfigure your
other equipment. The appliance then sits transparently on the network
using static and dynamic routing information to receive and pass on the
traffic that it scans.
NOTE: In transparency mode, the appliance must be connected to
two different subnets (through its LAN1 and LAN2 ports).
The appliance handles all IP traffic flowing between the two subnets.
For more details about these modes, see the “Proxy or transparency?” section
in the Product Guide.
IMPORTANT: Both modes are different so it is important that you
understand and decide which mode you want to use before you install
and configure the appliance.
For details on configuring the appliance with a configuration file taken from
an earlier version of the appliance, see “Restoring your settings” on page 56.
Some of the appliance’s other features are summarized in the remainder of this
section.
ENG - 6 McAfee WebShield e500 Appliance version 2.5
Page 17

Installation Guide — English
Hardware
The appliance has many features, including the following:
• 1U high 19” (inch) rack-mountable hardware.
• Dual Intel Pentium III 1
MB of PC133 SDRAM.
• 256
GHz processors.
• Two RJ-45 10/100Mbps auto-sensing Ethernet network ports, allowing
flexible connection to your existing network and a dedicated management
interface (only available in proxy mode).
• Two 17.4
GB “hot-pluggable” SCSI hard disk drives managed in a
hardware-based RAID 1 (mirror) configuration. This ensures seamless
processing in the unlikely event of a problem with one of the drives. When
you insert a replacement drive, the RAID controller re-mirrors the new
drive automatically.
For details on the appliance’s ports and connectors, see page 14.
Software
The software on the appliance has the following features:
• Web management through Secure Sockets Layer (SSL) encryption from a
web browser.
• An easy-to-configure user interface, allowing you to set up the appliance
quickly. The appliance then requires minimal user-intervention, making it
a configure-and-forget solution.
• Flexible proxies that are simple to configure even in complex
environments; see “Gathering the configuration information” on page 18.
• Virus scanning of SMTP e-mail messages, checking for infected items and
banned content. Other SMTP features include:
– Flexible SMTP e-mail delivery configurations, allowing you to set
up multiple e-mail delivery methods and introduce fault tolerance.
– Flexible content scanning of messages, allowing you to search for
banned content and block specific attachment types.
– Spam blocking (rejecting unwanted e-mail messages) by recipient,
sender, or server.
Installation Guide ENG - 7
Page 18

Installation Guide — English
• Virus scanning of FTP exchanges for infected items.
• Virus scanning of HTTP web browsing, blocking infected content. You can
also block Java, ActiveX and scripting.
• Virus scanning of POP3 e-mail messages, checking for infected items.
• Separate scanning for inbound and outbound traffic, allowing you to
configure different scanning options for each direction.
• Separate automatic updating schedules for the appliance’s McAfee virus
definition (.DAT) files and McAfee scanning engine, ensuring up-to-date
virus scanning at all times.
• Virus detection within common compressed file formats.
– Support for real-time Blackhole lists, which identify potential
sources of spam messages. The appliance can use these lists to block
spam messages. Blackhole lists are available from many
organizations, including the Mail Abuse Prevention System
(MAPS); see http://www.mailabuse.org.
– Message relay from a specified server or domain name to another
server. There is also an anti-relay feature to block unauthorized
senders from using the appliance to relay spam messages.
• Flexible scan actions that allow you to clean, delete, block or quarantine
(isolate) infected items.
• Separate quarantine storage, allowing you to inspect the following types of
quarantined e-mail messages:
– Inbound messages containing infected items.
– Outbound messages containing infected items.
– Inbound messages containing banned content.
– Outbound messages containing banned content.
• Notification upon detection of an infected item, using a variety of
configurable alerting methods, such as e-mail messaging, XML logging,
SNMP reporting and ePolicy Orchestrator reporting; see the Configuration
Guide.
• Advanced logging of scan activities and protocol streams, allowing you to
view past performance and delivery information. You can also generate
charts, reports and logs from the user interface.
ENG - 8 McAfee WebShield e500 Appliance version 2.5
Page 19

Installation Guide — English
• McAfee ePolicy Orchestrator support, allowing you to integrate the
appliance with an ePolicy Orchestrator server to produce advanced
statistical, historical, management and graphical reports for the
information recorded by the appliance; see the Configuration Guide.
• A quick backup process, allowing you to store and restore your appliance’s
settings quickly over the network; see page 55.
• A quick restoration process, allowing you to restore the appliance’s
software in the unlikely event of a problem; page 57.
What doesn’t it do?
The appliance has many features, but remember the following:
• It is not a firewall. You must use it within your organization, behind your
existing firewall.
• It is not a mail server. You might need to configure your firewall, mail
server, web cache and other equipment to route protocol traffic through the
appliance; see page 48.
• It is not a mail transfer agent, and does not keep copies of the e-mail
messages that pass through it, unless they are quarantined or deferred.
• It is not a general-purpose web server for storing web pages.
• It is not a general-purpose server for storing extra software and files. Do not
install any software on the appliance or add any extra files to it unless
specifically instructed by the appliance’s documentation or your support
representative.
• In proxy mode, it handles SMTP, FTP, HTTP and POP3 traffic only. Do not
attempt to route other traffic through the appliance.
Installation Guide ENG - 9
Page 20

Installation Guide — English
What comes with the appliance?
Ensure that you have all the items that accompany the appliance, checking the
product’s packaging for any hidden compartments. If any of the items are
missing or damaged, please contact your supplier.
Hardware and software
• Three Cat 5 (Category 5) UTP network cables with RJ-45 connectors:
– The two blue cables are straight-through (uncrossed).
– The orange cable is crossed.
“Installing the appliance” on page 28 describes how you use these cables
with the appliance.
• Mounting kit, for installing the appliance into a 19” (inch) rack.
• WebShield e500 Appliance recovery CD.
• Various power cords for different countries.
IMPORTANT: Ensure that you use the power cord that is suitable
for the country of use. If a suitable cable is not included, contact
your supplier. Do not connect the appliance to a power source until
you have read “Power and safety information” on page 3.
User documentation
This guide is just one of the documents that we have included with the
appliance, to help you use the product effectively. See the Release Notes for a
description of the other documentation components.
Supplementary documentation
• Warranty information and mail-back card.
• McAfee PrimeSupport information.
• Additional literature, such as special offers and third-party licenses.
ENG - 10 McAfee WebShield e500 Appliance version 2.5
Page 21

What additional items are required?
You can use the mounting kit to install the WebShield e500 Appliance into a
19” (inch) rack. To install it into an alternative location, you might need
addition equipment to prepare that location and secure the appliance in place.
Ensure that you follow all safety warnings at all times; see “Power and safety
information” on page 3.
To configure and manage the appliance, you must have a computer connected
either to the same network as the appliance or directly to the appliance; see
Step 4 on page 29. You can then use the computer’s web browser to access the
appliance’s user interface.
Configuration computer’s requirements
The appliance’s user interface is optimized for Microsoft Internet Explorer
v4.0, v5.0, v5.5 or v6.0, and supports Netscape Navigator v4.7.
When you access the appliance, it checks that your web browser contains the
correct components, and displays dialog boxes for any missing components.
Your web browser must have the following enabled:
• Secure Sockets Layer (SSL) v3.0 encryption
Installation Guide — English
• JavaScript
• ActiveX (for Microsoft Internet Explorer)
• Plug-ins (for Netscape Navigator)
The user interface displays best with the following screen settings:
• 65,536 colors (256 colors minimum)
• 1152x864 resolution
Installation Guide ENG - 11
Page 22

Installation Guide — English
Restoring or upgrading the appliance’s software
In addition to general management of the appliance, you might also need to
do the following:
• Restore the appliance’s software to both of the appliance’s drives, in the
unlikely event of a problem.
• Upgrade the appliance’s software with a WebShield e500 Appliance
upgrade CD.
To perform these tasks, you must connect a keyboard and monitor directly to
the appliance; see page 57 for more details.
Updating the appliance anti-virus definition (.DAT) files and
scanning engine
The appliance’s automatic updating feature keeps the .DAT file and scanning
engine up-to-date, maintaining full anti-virus protection. This feature is
configured through the appliance’s user interface (using a web browser); see
page 47. You can also initiate immediate updates at any time, using the same
set of user interface pages.
Installing Service Packs and HotFixes
You might receive Service Packs and HotFixes from
your support representative, which contain improved
software for the appliance. If this happens, you can
install them through the appliance’s user interface
(using a web browser). Refer to the information
that accompanies the Service Packs and HotFixes
for information on installing them.
ENG - 12 McAfee WebShield e500 Appliance version 2.5
Page 23

Getting started with the appliance
Installation Guide — English
When you have decided how you want to use the
appliance — see Chapter 1 of the Product Guide —
you must perform the following actions to integrate
the WebShield appliance with your current network:
1. Gather the required configuration information;
see page 18.
2. Install the appliance in the required location,
making the necessary connections; see page 28.
3. Configure the appliance’s network settings;
see page 32.
4. Configure the appliance’s protocol settings; see
page 40.
5. Back up your settings, so that you can
reconfigure the appliance quickly if you need to
restore its drives; see page 55.
When you have installed and configured the
appliance, access its user interface to tailor the
features that you require. For detailed information on
configuring a feature in the user interface, view its
Help topic by clicking the Help button; see page
54.
Who should install the appliance?
1
Gather the
configuration
information
2
Install the
appliance
3
Configure the
appliance’s
network settings
4
Configure the
appliance’s
protocol settings
5
Back up the
appliance’s
settings
We strongly recommend that the Information Technology administrator
responsible for your organization’s e-mail system and Internet gateway
installs and configures the appliance. The configuration process requires
information for the protocols that you want to scan, and it must be configured
correctly. Additionally, you might need to configure your other equipment to
route traffic to the appliance, depending on which mode the appliance is using
(proxy mode or transparency mode).
See page 18 for a summary of the required information.
Installation Guide ENG - 13
Page 24

Installation Guide — English
Ports and connectors
The appliance’s ports and connectors are shown on page vii (at the front of this
guide). The installation steps on page 28 describe how to connect your
equipment to the ports.
NOTE: We might change the physical appearance of the appliance at any
time during manufacture. For this reason, the locations and types of the
ports and connectors on your appliance might be different from those
shown in this guide. If the changes are substantial, refer to the
accompanying Release Notes for new information.
These ports and connectors are described below.
A
Two hard disk drives
Both drives are 17.4GB “hot-pluggable” SCSI hard disk drives, managed in a
RAID 1 (mirror) configuration. They mirror the appliance’s operating system
and data processing, ensuring seamless operation in the unlikely event of a
problem with one of the drives (indicated by a red LED on the drive).
The drives are in caddies, allowing you to replace a faulty drive while the
appliance is operational. The replacement drive is imaged automatically from
the existing drive; see “One hard disk drive LED is red” on page 61.
B
CD-ROM drive
The CD-ROM drive is used for restoring and upgrading the appliance’s
software, and must not be used at other times; see Step 4 on page 58.
ENG - 14 McAfee WebShield e500 Appliance version 2.5
Page 25

Installation Guide — English
C
Control panel
The control panel on the bottom right-hand corner of the appliance contains
LEDs that provide system information. There is also a reset button and power
button:
Reset button
Restarts the appliance, simulating it being turned on and off.
Power button
Turns on the appliance, so that it is operational (the power LED is lit).
If the power button is off, the appliance is in standby mode.
When the appliance is in standby mode, its network ports remain active
but no protocols or data intended for the appliance can pass through it,
maintaining your organization’s anti-virus protection.
NOTE: If the power supply switch (on the back of the appliance)
E
is in the OFF position, the appliance does not receive any power.
Overheat LED
Lights when the appliance has overheated. This can be caused by poor
airflow around the unit, or if room temperature exceeds normal
operating conditions. Listen for the noise of the appliance’s fan — in the
center of the unit — to check that it is still working. If it does not appear
to be working, turn off the appliance and contact your supplier.
Network activity LEDs
Flash when there is network activity on the network ports: NIC 1 is the
LAN1 port, NIC 2 is the LAN2 port. If these LEDs flash when the power
LED is off, the appliance is in standby mode.
CD-ROM drive activity LED
Flashes when the appliance is accessing the CD in the CD-ROM drive.
Power LED
Lights when the appliance is both switched on and operational.
D
Power socket
Use the supplied power cord to connect the appliance to a power outlet.
IMPORTANT: Ensure that the power cord is suitable for the country of
use. If it is not, contact your supplier.
Installation Guide ENG - 15
Page 26

Installation Guide — English
E
Power supply switch
Use this switch to turn on the appliance, so that it receives power from the
connected power outlet.
NOTE: If the power supply switch is in the ON position but the power
button (on the control panel on the front of the appliance) is in the
OFF position, the appliance is in standby mode.
F
Keyboard port
Connect a keyboard to this port (colored purple) only if you are going to
restore or upgrade the appliance’s software; see Step 1 on page 58.
G
Monitor port
Connect a monitor to this port only if you are going to restore or upgrade the
appliance’s software; see Step 2 on page 58.
H
LAN1 port (NIC 1)
The LAN1 port is an RJ-45 10/100Mbps auto-sensing Ethernet network port,
and is used to connect the appliance to your existing network. See Step 4 on
page 29 for connection information.
The LAN1 port receives and transmits the following traffic:
C
• Inbound and outbound protocol traffic.
• Management and log data, including the communication from the remote
web browser that you use to access the appliance’s user interface. If you use
ePolicy Orchestrator software with the appliance, its communication is also
transmitted through this port.
The LAN1 port has a default IP address of 10.1.1.108 (subnet mask
255.255.255.0) to allow you to access the appliance initially across the network.
When you configure the appliance, you can do the following:
• Add new IP addresses that are valid for your network.
• Modify or disable the default IP address.
• Delete the default IP address so that it cannot be used.
NOTE: For previous versions of the WebShield appliance, the LAN1 port
was known as the data port, so you might see such references in existing
documentation.
ENG - 16 McAfee WebShield e500 Appliance version 2.5
Page 27

Installation Guide — English
I
LAN2 port (NIC 2)
The LAN2 port is an RJ-45 10/100Mbps auto-sensing Ethernet network port,
and its operation depends on how you are using the appliance:
• Proxy mode — The LAN2 port can only be used for a direct local
management connection. It cannot receive and transmit inbound and
outbound protocol traffic.
You might use this port if you cannot achieve a remote management
connection through the LAN1 port, because of these reasons:
– The LAN1 port’s IP address belongs to a different subnet than your
remote computer.
– You have forgotten the LAN1 port’s IP address that you set, and
have disabled the default IP address of 10.1.1.108 for that port.
• Transparency mode — The LAN2 port is used (in conjunction with the
LAN1 port) to connect the appliance to your existing network. It receives
and transmits the same type of traffic as the LAN1 port.
See Step 4 on page 29 for connection information.
The LAN2 port has a default IP address of 10.1.2.108 (subnet mask
255.255.255.0). When you configure the appliance, you can do the following:
• Add new IP addresses that are valid for your network.
• Modify or disable the default IP address.
• Delete the default IP address so that it cannot be used.
• Disable the port so that it cannot be used.
IMPORTANT: If you are using transparency mode, do not disable the
LAN2 port.
For previous versions of the WebShield appliance, the LAN2 port was
known as the management port, so you might see such references in
existing documentation.
Installation Guide ENG - 17
Page 28
Installation Guide — English
Gathering the configuration information
When you have decided how you want to use the
appliance — see Chapter 1 of the Product Guide —
you are ready to gather the required configuration
information (step 1).
This section lists the information you must supply.
We recommend that you gather the information
before installation and configuration, so you can set
up the appliance quickly.
We have provided spaces so that you can record the
information on a printed copy of this section.
Chapter 11 of the Product Guide contains useful
details about the configuration information that
you can specify, and how it affects the operation of
the appliance.
Step 2 — installing the appliance — is described on
page 28.
Appliance host name
Supply the unique host name for the appliance:
Host name
Domain
1
Gather the
configuration
information
2
Install the
appliance
3
Configure the
appliance’s
network settings
4
Configure the
appliance’s
protocol settings
5
Back up the
appliance’s
settings
Supply the fully qualified domain or subdomain in
which the appliance is located:
Domain name
Examples: myorg.com, network1.myorg.com
ENG - 18 McAfee WebShield e500 Appliance version 2.5
Page 29

Network addresses
Supply the TCP/IP network address information for the appliance:
Installation Guide — English
TCP/IP address
LAN1 port IP address
and subnet mask
LAN2 port IP address
and subnet mask
Local DNS server IP address
Default gateway or router
IP address
NOTE: You can configure multiple IP addresses for the LAN1 and LAN2
. . .
. . .
. . .
. . .
. . .
. . .
ports.
For previous versions of the WebShield appliance, the LAN1 port was
known as the data port, and the LAN2 port was known as the management
port. Therefore, you might see such references in existing documentation.
Internal networks
Supply the domains or IP addresses for the internal networks (inside your
organization) with which the appliance communicates. You can identify as
many internal networks as you want (spaces for 10 networks are provided
below):
NOTE: Remember to include the domain in which the appliance is
located, unless you want that domain treated as an external network.
Network Domain, or IP address and subnet mask
Example 1
Example 2
myorg.com
192 . 168 . 1 . 0
255 . 255 . 255 . 0
Example 3
1
*.myorg.com
. . .
Installation Guide ENG - 19
Page 30

Installation Guide — English
2
3
4
5
6
. . .
. . .
. . .
. . .
. . .
. . .
. . .
. . .
. . .
. . .
7
8
9
10
. . .
. . .
. . .
. . .
. . .
. . .
. . .
. . .
. . .
ENG - 20 McAfee WebShield e500 Appliance version 2.5
Page 31

Installation Guide — English
External networks
Supply the domains or IP addresses for the external networks (outside your
organization) with which the appliance communicates. You can identify as
many as you want (spaces for 10 networks are provided below):
IMPORTANT: We recommend that you keep the * domain entry in your
external networks because it ensures that the appliance can proxy traffic
for the Internet.
Ensure that you include the IP address of your firewall.
Network Domain, or IP address and subnet mask
Example 1
Example 2
Example 3
1
2
3
4
5
testing.myorg.com
sales.myorg.com
*
. . .
. . .
. . .
. . .
. . .
. . .
. . .
. . .
. . .
. . .
6
. . .
. . .
7
Installation Guide ENG - 21
Page 32

Installation Guide — English
. . .
. . .
8
. . .
. . .
9
. . .
. . .
10
. . .
. . .
Proxy or transparency mode?
Decide which mode you want the appliance to use (it can use only one of these
modes):
Proxy mode (explicit proxy).
Transparency mode (transparent proxy).
For more details about these modes, see the “Proxy or transparency?” section
in the Product Guide.
IMPORTANT: Both modes are different so it is important that you
understand and decide which mode you want to use before you install and
configure the appliance.
Every network is different so the appliance must be configured with the
correct information for your network to ensure correct operation. If you
are unsure about of the information that you need to provide, consult
your organization’s networking expert.
ENG - 22 McAfee WebShield e500 Appliance version 2.5
Page 33

Installation Guide — English
Static routes and dynamic routing
When adding the appliance to your network, you need to ensure that all parts
of your network can still communicate both internally and externally through
the appliance. You can use static routes and dynamic routing at the appliance
to configure this information so that the appliance knows how to reach various
parts of your network:
• Proxy mode — There are circumstances where the appliance might need to
use more than one gateway or router to communicate with the entire
network. Specify these additional gateways and routers as static routes.
• Transparency mode — You might need to specify routing information for
some of the internal and external communications through the appliance.
Specify this routing information as static routes. Additionally, the
appliance supports the RIP (Routing Information Protocol) and OSPF
(Open Shortest Path First) routing protocols, so you can use dynamic
routing to gather the routing information from your network, if the
network uses these protocols.
For each static route, supply the IP address and subnet mask to identify the
network, and supply the IP address of the gateway or router used to reach that
network. You can configure as many static routes as you want (spaces for
4 routes are provided below):
Route Network IP address and subnet mask Gateway or router IP address
Exampl
e
192 . 168 . 40 . 0 192 . 168 . 50 . 3
255 . 255 . 255 . 0
1
. . . . . .
. . .
2
. . . . . .
. . .
3
. . . . . .
. . .
4
. . . . . .
. . .
If you want to use dynamic routing to obtain the routing information, check
the following box:
Enable dynamic routing.
Installation Guide ENG - 23
Page 34

Installation Guide — English
Protocols
Check the boxes for the proxies that you want to enable, and the virus
scanning that you want to enforce. Supply the ports on which your network
transmits the protocols’ traffic, if they are different from the defaults (provided
in parentheses):
Enable
proxy
E-mail (SMTP) (25)
File transfer (FTP) (21)
Web browsing (HTTP) (80)
Mail download (POP3) (110)
NOTE: The appliance scans mail download (POP3) traffic without
Scan
inbound
Scan
outbound
Port
distinguishing its direction (inbound or outbound); see “Mail download
(POP3)” on page 27. For this reason, there is just one checkbox.
Scanning profile
Check one of the following boxes to identify the expected usage profile:
High constant SMTP, some HTTP, minimal FTP.
Moderate constant SMTP, constant HTTP, minimal FTP.
Very variable SMTP, constant HTTP, minimal FTP.
User-selected values — The appliance uses the relevant settings in the
protocols’ configuration pages (in the user interface), allowing you to
specify the configuration settings that you want.
NOTE: The usage profiles do not mention the mail download
(POP3) protocol because it is typically used less frequently than the
other protocols. However, as with the other proxies, the exact
configuration settings for each protocol is available for modification
on the protocol configuration pages (in the user interface) so that
further adjustments can be made as required.
The following sections describe the additional required information for
setting up the various protocols: “E-mail (SMTP)” on page 25, “File transfer
(FTP)” on page 26 and “Mail download (POP3)” on page 27.
ENG - 24 McAfee WebShield e500 Appliance version 2.5
Page 35

Installation Guide — English
E-mail (SMTP)
Check the boxes for the required delivery methods:
Locally configured domains; see below.
DNS.
The appliance uses the DNS server that you specify when supplying the
TCP/IP network address information; see “Network addresses” on page
19.
Fallback relays; see page 26.
Locally configured domains
Supply the following information for the mail relays. You can create as many
relays as you want (spaces for 15 relays are provided below). Identify the most
common relays first because the appliance tries the relays in order:
Relay E-mail domain Fully-qualified hosts (mail servers)
Example 1 myorg.com mail.uk.myorg.com
Example 2 myorg.co.uk mail1.us.myorg.com mail2.us.myorg.com
Example 3 *.myorg2.com mail2.us.myorg.com
1
2
3
4
5
6
7
8
9
10
11
12
13
14
15
Installation Guide ENG - 25
Page 36

Installation Guide — English
Fallback relays
Supply the following information for the fallback relays. You can create as
many relays as you want (spaces for 15 relays are provided below). Identify
the most common relays first because the appliance tries the relays in order:
Relay E-mail domain Fully-qualified hosts
Example 1 myorg.org mail.externalorg1.com mail.externalorg2.com
Example 2 * outmail.myorg.com
1
2
3
4
5
6
7
8
9
10
11
12
13
14
15
File transfer (FTP)
If you want to block 8-bit ASCII transfers over FTP, check the following box:
Block 8-bit data transfer in ASCII mode.
NOTE: Some file transfer utilities use the 8-bit ASCII mode by default, so
you must remember to change your utilities to binary mode, if the
appliance is blocking the 8-bit ASCII mode.
For more information about FTP, refer to the Product Guide.
ENG - 26 McAfee WebShield e500 Appliance version 2.5
Page 37

Mail download (POP3)
Generic proxy
When a generic proxy connection is made through the appliance, the
appliance separates the user name, host name and port number with hash (#)
and colon (:) delimiter characters:
user#host:port
To use different delimiter characters, supply them here:
user host port
NOTE: As you configure the appliance with a port number for generic
connections, your POP3 clients (software) do not need to specify that
port number every time they make a generic POP3 connection through
the appliance.
Dedicated proxy
When a user makes a dedicated proxy connection through the appliance, the
appliance uses a specified port to reach the POP3 server.
Installation Guide — English
You can allow connections to as many servers as you want (spaces for
10 servers are provided below). Supply a unique port number and domain
name for each server:
Server Port POP3 server domain name
Example 1024 pop3server.externalorg.com
1
2
3
4
5
6
7
8
9
10
For more information about POP3, refer to the Product Guide.
Installation Guide ENG - 27
Page 38

Installation Guide — English
Installing the appliance
When you have gathered the required configuration
information (see page 18), you are ready to install the
appliance in the required location, making the
necessary connections (step 2).
This chapter describes the installation steps.
We recommend that you read them before
performing the actions, to ensure that you know what
is required.
See page 11 for a list of additional required items.
Step 3 — configuring the appliance’s network
settings — is described on page 32.
For details on the appliance’s ports and connectors,
see page 14.
To install the WebShield e500 Appliance:
1. Read the safety warnings in “Power and safety
information” on page 3 and ensure that you
follow them at all times.
2. Remove the WebShield e500 Appliance from
any protective packaging and place it on a flat
surface.
3. If you are going to install the appliance in a
specific place, such as a 19” (inch) rack, perform
the following steps ensuring that you follow all
safety warnings; see “Power and safety
information” on page 3:
1
Gather the
configuration
information
2
Install the
appliance
3
Configure the
appliance’s
network settings
4
Configure the
appliance’s
protocol settings
5
Back up the
appliance’s
settings
a. Prepare the intended location.
You can use the mounting kit to install the WebShield e500
Appliance into a 19” (inch) rack. Follow the instructions on page viii
(at the front of this guide).
Ensure that you allow for adequate ventilation and access to the
appliance’s ports and connectors when you put it in place.
b. Put the appliance in its intended location.
Ensure that the appliance is secured firmly in place, so that it cannot
fall.
ENG - 28 McAfee WebShield e500 Appliance version 2.5
Page 39

Installation Guide — English
4. Using the supplied network cables, connect the appliance to your
network. The ports and cables that you use depend on how you are going
to use the appliance:
• Proxy mode
LAN1 port: Using one of the supplied blue network cables — or an
equivalent Cat 5 Ethernet cable — connect the appliance’s LAN1
port (see on page 16) to your existing network (Figure 1-2). The
H
cable is a straight-through (uncrossed) cable, so you can connect the
appliance to a normal uncrossed (MDI) RJ-45 port on your network
equipment.
This connection also allows you to manage the appliance from a
remote computer, across the network.
LAN2 port: In proxy mode, the appliance’s LAN2 port becomes a
dedicated management port. If you intend to manage the appliance
locally, use the supplied orange network cable — or an equivalent
crossover Cat 5 Ethernet cable — to connect the LAN2 port (see
on page 17) to your local computer’s network card (Figure 1-2).
You need only make this connection if you intend to manage the
appliance locally.
I
Network
Local management
computer (if required)
Figure 1-2. Connecting your appliance (proxy mode)
Installation Guide ENG - 29
Page 40

Installation Guide — English
• Transparency mode
LAN1 and LAN2 ports: Using both of the supplied blue network
cables — or equivalent Cat 5 Ethernet cables — connect the
appliance’s LAN1 port (see on page 16) and LAN2 port (see
H I
on page 17) to your existing network (Figure 1-3) so that the
appliance is inserted into the data stream. The cables are
straight-through (uncrossed) cables, so you can connect the
appliance to a normal uncrossed (MDI) RJ-45 ports on your network
equipment.
NOTE: In transparency mode, the appliance must be
connected to two different subnets.
The appliance must be used inside your firewall. For example,
if your network is connected to the Internet through a hub and a
firewall, you could put the appliance between the hub and firewall
(connecting the hub to the LAN1 port and the firewall to the LAN2
port).
In transparency mode, you can manage the appliance from a remote
computer, across the network. However, you cannot obtain a local
management connection through the LAN2 port (a method
available with proxy mode) because that port is required for
receiving and transmitting traffic.
Network Network
Figure 1-3. Connecting your appliance (transparency mode)
ENG - 30 McAfee WebShield e500 Appliance version 2.5
Page 41

Installation Guide — English
5. Use the supplied power cord to connect the appliance’s power socket
D
(see on page 15) to a working power outlet.
IMPORTANT: Ensure that the power cord is suitable for the
country of use. If it is not, contact your supplier.
The appliance’s software is pre-installed so do not put a CD in the
appliance’s CD-ROM drive unless instructed to do so.
6. Turn on the appliance by pushing both the power supply switch and the
power button to their ON positions (Figure 1-4).
The power supply switch is on the back of the unit (see on page 16).
The power button is on the control panel on the front of the unit (see
E
C
on page 15).
Figure 1-4. Turning on the appliance
The appliance performs its startup sequence and is ready for use after
about two minutes. You can now configure the appliance’s network
settings; continue with page 32.
Installation Guide ENG - 31
Page 42

Installation Guide — English
Configuring the network settings
When you have installed the appliance in the
required location and made the necessary
connections (see page 28), you are ready to configure
the appliance’s network settings (step 3).
This section describes the steps for configuring the
network settings. We recommend that you read them
before performing the actions, to ensure that you
know what is required.
If you have already gathered the required
configuration information (see page 18), you can
configure the appliance more quickly.
To restore or upgrade the appliance’s software, see
page 57.
If you have previously created a set of configuration
files from which you want to restore the appliance’s
settings, see “Restoring your settings” on page 56.
Step 4 — configuring the appliance’s protocol
settings — is described on page 40.
For details on the appliance’s default settings, refer to
Appendix A of the Product Guide.
To configure the appliance’s network settings:
1. Open the web browser on the computer that
you want to use to manage the appliance.
1
Gather the
configuration
information
2
Install the
appliance
3
Configure the
appliance’s
network settings
4
Configure the
appliance’s
protocol settings
5
Back up the
appliance’s
settings
2. In the address field — where you can type a
Uniform Resource Locator (URL) to open a web
site — enter the following address:
https://<IP address>
NOTE: Ensure that you type https, not http.
ENG - 32 McAfee WebShield e500 Appliance version 2.5
Page 43

Installation Guide — English
The <IP address> that you use depends on how you are connected to
the appliance:
• Remotely (across the network), through the LAN1 port — Use the
LAN1 port IP address that you have configured for the appliance
(it is 10.1.1.108 by default).
• Remotely (across the network), through the LAN2 port (available
for transparency mode only) — Use the LAN2 port IP address that
you have configured for the appliance (it is 10.1.2.108 by
default).
• Locally, directly connected to the LAN2 port (available for proxy
mode only) — Use the LAN2 port IP address that you have
configured for the appliance (it is 10.1.2.108 by default).
NOTE: If you are using the appliance in transparency mode,
use the IP address for the port and subnet to which your
management computer is connected.
All management connections use Secure Sockets Layer (SSL)
encryption, so they are secure. The SSL connection closes when
you terminate the management session by clicking Log off.
To maintain security during long management sessions, the
SSL connection also closes after 15 minutes of inactivity.
When you configure new IP addresses for the LAN1 or LAN2
ports (Step 16 on page 36), the appliance adds the new address
to the ports; it does not replace the default IP addresses. If you
are using the appliance in proxy mode, the LAN2 port’s IP
address is a separate address, used solely for that port
(it cannot be seen by the LAN1 port), that you can disable.
You can use the LAN2 port for direct management access if
you are unable to access the LAN1 port.
You must ensure that the web browser on the management
computer (the computer you are using to manage the
appliance) does not have the appliance configured as its proxy.
If it is, the management connection does not work.
Additionally, if you have a proxy between the management
computer and the appliance, the proxy must be configured
with the appliance as its handoff host.
Installation Guide ENG - 33
Page 44

Installation Guide — English
3. When the web browser finds the appliance, a Security Alert message
might appear asking you to accept the appliance’s security certificate.
Click Yes to accept the certificate.
If you have just turned on the appliance, you must allow about two
minutes for the startup sequence to finish or else the web browser might
not find the appliance on the first attempt. If this happens, retry the URL.
If you still cannot access the “Log on” page, see page 63.
The appliance’s “Log on” page appears. The appliance checks the web
browser to ensure that it is supported and contains the required code to
run the appliance’s interface. For this reason, some security alerts and
download dialog boxes might appear. Complete the dialog boxes as
required.
TIP: The security alert message can appear at the start of each
browser session. To stop this happening, you can view and install
the certificate so that it is accepted automatically. To do this in
Internet Explorer, click View Certificate in the Security Alert
message, then click Install Certificate on the dialog box that
appears.
NOTE: The appliance’s user interface needs the Java 2 Runtime
Environment. If your web browser needs to install this, be aware
that it is 5–14
MB in size (depending on the components required by
your browser) and can take a long time to install if you have a slow
remote link to the appliance.
4. In Language, select the language in which you want to view the
appliance’s interface.
This does not affect the language in which the appliance operates; see
Step 14 on page 36.
5. If you chose English for the language, select the locale. This allows you
to use a non-English character set when using the interface.
6. Click Log on.
The Enter Network Password dialog box appears, asking you to supply
your user name and password. The user name is e500 and the default
password is e500changeme. If you recently restored the appliance’s
software without maintaining the previous settings, the password
reverts to the default password.
ENG - 34 McAfee WebShield e500 Appliance version 2.5
Page 45

Installation Guide — English
7. Type the user name and password, then click OK.
The appliance’s user interface appears, showing the System
Configuration page.
If you have configured the appliance before, the System Status page
appears with a navigation bar on the left. To display the System
Configuration page, select System Configuration in the navigation bar.
For details on the user interface, see “Using the appliance” on page 53.
For details on configuring a particular page, view the Help topic for that
page by clicking the Help button.
NOTE: If you have a configuration file taken from an earlier version
of the appliance, you can use the Restore Configuration panel to
restore those settings to the appliance; see “Restoring your settings”
on page 56.
8. In the Appliance name text box, type a unique host name for the
appliance of no more than 15 characters (see “Appliance host name” on
page 18).
9. In the DNS server text box, type the IP address of the local DNS server.
10. In the Domain name text box, type the domain or subdomain in which
the appliance is located, such as myorg.com (see “Domain” on page 18).
11. In the DNS server text box, type the IP address of the local DNS server
(see “Network addresses” on page 19).
12. If the appliance communicates with the network through a default
gateway or router (firewall), type the gateway or router’s IP address in
the Default gateway text box (see “Network addresses” on page 19).
There are circumstances where the appliance might need to use more
than one gateway or router to communicate with the entire network.
If this is required, you can specify these additional gateways and routers
as static routes; see Step 22 on page 38.
13. To use the appliance in transparency mode, select Enable
Transparency. Otherwise, leave the checkbox clear to use the appliance
in proxy mode (see “Proxy or transparency mode?” on page 22).
Installation Guide ENG - 35
Page 46

Installation Guide — English
14. In System Language, select the language in which you want the
appliance to operate.
This affects the reports and messages generated by the appliance,
excluding any text strings that you can specify or modify through the
interface. This is separate from the language used for viewing the
interface (chosen when logging on to the appliance, see Step 4 on page
34).
15. If the LAN IP Addresses panel is not shown, click LAN IP Addresses to
display the panel.
This panel lists the IP addresses configured for the LAN1 and LAN2
ports.
16. Use the Add buttons under the LAN1 and LAN2 lists to specify new
IP addresses for those ports (see “Network addresses” on page 19).
You can specify multiple IP addresses for each port. The appliance adds
them to the ports when you apply your changes (Step 27 on page 39).
The new IP addresses do not overwrite the existing IP addresses. If you
no longer want to use an IP address, you can either:
• Modify or disable the IP address — select it from the list then click
Modify. To disable it, select Disable network address.
• Delete the IP address — select it from the list then click Delete.
NOTE: We recommend that you access the appliance using
your new IP addresses (after initial configuration) before
removing the default IP addresses, to ensure that the new IP
addresses work.
If you are using the appliance in proxy mode, the LAN2 port becomes a
dedicated management port, allowing you to make a direct local
management connection.
ENG - 36 McAfee WebShield e500 Appliance version 2.5
Page 47

Installation Guide — English
17. To prevent any direct management connections to the appliance, you can
disable the LAN2 port. To do this, select Disable under the LAN2 list.
IMPORTANT: If you are using transparency mode, do not disable
the LAN2 port.
The appliance uses two lists (Inside Networks and Outside Networks)
to determine whether the traffic passing through it has comes from an
internal or external source.
TIP: If you have specific internal subdomains that you want to be
treated as external networks, such as testing.myorg.com,
you can use the Inside Networks and Outside Networks as follows:
Inside networks:
*.myorg.com
Outside networks:
testing.myorg.com
*
18. Click Inside Networks to display the Inside Networks panel.
19. Use this panel to specify the domains or IP subnets for the internal
networks within your organization (inside the firewall) that you want
the appliance to protect (see “Internal networks” on page 19). You can
specify as many networks as you want.
NOTE: If you want the appliance to protect the domain in which the
appliance is located (specified in Step 10 on page 35), you must add
this domain to the Inside Networks list.
To add a network, click Add, then specify either its domain or its IP
address and subnet mask in the Add dialog box that appears. Click OK
to add it to the Inside Networks list.
Installation Guide ENG - 37
Page 48

Installation Guide — English
20. Click Outside Networks to display the Outside Networks panel.
This panel shows the networks configured as being external to the
appliance. By default, the appliance uses the * wildcard symbol in its
Outside Networks list to identify that all networks (other than those
specified in the Inside Networks list) are external networks.
21. Use this panel to specify the domains or IP subnets for the external
networks outside your organization (outside the firewall). You can
specify as many networks as you want (see “External networks” on page
21).
To add a network, click Add, then specify either its domain or its IP
address and subnet mask in the Add dialog box that appears. Click OK
to add it to the Outside Networks list.
22. If you need to specify some static routes for various parts of your
network so that the appliance know how to reach them (see “Static routes
and dynamic routing” on page 23), click Static Routes and specify those
routes in the Static Routes panel.
IMPORTANT: We recommend that you keep the * domain entry in
your external networks because it ensures that the appliance can
proxy traffic for the Internet.
Ensure that you include the IP address of your firewall.
23. If you are using the appliance in transparency mode and want to use
dynamic routing, click Dynamic Routes then select Enable Dynamic
Routing.
Dynamic routing is a system that allows your network equipment
(including the appliance) to listen for the routing information that is
broadcasted by the routers on your network. Remember that the
appliance only supports the RIP (Routing Information Protocol) and
OSPF (Open Shortest Path First) routing protocols.
24. Click Time and Password Settings to display the Time and Password
Settings panel.
25. Change the Time zone, Date and Time values to reflect the current date
and time, then click Set now. The time is in 24-hour format.
The appliance changes its date and time. These values are used when
time-stamping the traffic that passes through the appliance, and when
logging and alerting.
ENG - 38 McAfee WebShield e500 Appliance version 2.5
Page 49

Installation Guide — English
26. To change the password, type the new password in the Password text
box, then retype it in the Confirm text box. Click Set now.
IMPORTANT: For security reasons, we strongly recommend that
you change the default password now (when configuring the
appliance for the first time).
27. Click Apply all changes.
The web browser sends your changes to the appliance. The user interface
asks you to restart the appliance’s software because you have made IP
configuration changes.
28. Click Restart now.
The appliance restarts its software and is ready for use after about two
minutes.
The user interface displays a new URL hotlink that you can use to
re-access the user interface with the new IP address.
29. When the appliance has restarted, click the URL hotlink or use one of the
other IP addresses that you have configured for the port through which
you are managing the appliance. If you were using the LAN2 port but
chose to disable its IP address (Step 17 on page 37), access the LAN1 port
across the network.
When you have logged on, the System Status page appears with a
navigation bar on the left. You can now configure the appliance’s
protocol settings; continue with “Configuring the protocol settings” on
page 40.
Installation Guide ENG - 39
Page 50

Installation Guide — English
Configuring the protocol settings
When you have configured the appliance’s network
settings (see page 32), you are ready to configure the
appliance’s protocol settings (step 4).
This section describes the steps for configuring the
protocol settings. We recommend that you read them
before performing the actions, to ensure that you
know what is required.
If you have already gathered the required
configuration information (see page 18), you can
configure the appliance more quickly.
Step 5 — backing up the appliance’s settings — is
described on page 55.
Tasks
This section is divided into the following tasks that
you must perform in order:
1. Configuring the appliance’s protocols; see page
41.
2. Configuring the automatic updating feature, so
that the appliance keeps its virus definition
(.DAT) file and scanning engine up-to-date,
maintaining full anti-virus protection; see page
47.
3. If necessary, configure your firewall, mail
server, web cache and other equipment to route
protocol traffic through the appliance; see page
48.
1
Gather the
configuration
information
2
Install the
appliance
3
Configure the
appliance’s
network settings
4
Configure the
appliance’s
protocol settings
5
Back up the
appliance’s
settings
4. Testing your configuration, to ensure that it
scans inbound and outbound traffic correctly
for infections; see page 50.
ENG - 40 McAfee WebShield e500 Appliance version 2.5
Page 51

Configuring the appliance’s protocols
The WebShield e500 Appliance provides proxies for the SMTP, FTP, HTTP
and POP3 protocols. It divides its resources between the proxies, virus
scanning each protocol’s inbound and outbound traffic (POP3 traffic
directions are not distinguished) by default. For details on the proxies and
protocols, see “Ports and connectors” on page 14.
To configure which protocols are enabled and virus scanned, and select the
appropriate usage profile:
1. To disable the proxies for any of the protocols — to prevent the protocol’s
traffic passing through the appliance — deselect the appropriate
checkboxes in the Protocols enabled section of the System
Configuration page.
NOTE: In transparency mode, this does not prevent traffic passing
through the appliance.
2. To disable inbound or outbound virus scanning for any of the enabled
protocols, select the appropriate Configuration page in the navigation
bar (E-mail Configuration, File Transfer Configuration, Web Browsing
Configuration or Mail Download Configuration), then deselect
Scan inbound traffic or Scan outbound traffic as required
(Scan POP3 traffic is used on the Mail Download Configuration page).
Installation Guide — English
WARNING: Do not disable virus scanning for any enabled
protocol unless you are scanning its traffic at another point in your
network. Allowing unscanned traffic to enter and leave your
organization leaves you open to virus infection.
Ensure that you have configured your other network equipment to
route the protocols through the appliance (if necessary), so nothing
can bypass the appliance; see page 48.
3. In the navigation bar, select System Profiles.
Installation Guide ENG - 41
Page 52

Installation Guide — English
4. Select the most appropriate usage profile (see “Scanning profile” on page
24).
The usage profiles do not mention the mail download (POP3) protocol
because it uses much less bandwidth than the other protocols. If you
have enabled scanning for the POP3 protocol, it is scanned regardless of
which profile you choose.
You can adjust any of the usage values (including the POP3 levels) in the
Configuration pages for the protocols. If you do this, the appliance
automatically selects User-selected values from the ‘Configuration’
pages of each protocol in the System Profiles page.
5. Click Apply all changes.
The web browser sends your changes to the appliance.
Configuring the ports used for the protocols
The appliance uses the following default ports for the protocols:
• E-mail (SMTP): 25
• File transfer (FTP): 21
• Web browsing (HTTP): 80
• Mail download (POP3): 110
If your organization’s network uses different ports for the protocols, you must
adjust the appliance’s port numbers accordingly.
To change the port used for a protocol:
1. Select the protocol’s Configuration page in the navigation bar.
2. In the Port on which to listen... text box, type the required port number
(see “Protocols” on page 24).
3. Click Apply all changes.
The web browser sends your changes to the appliance.
ENG - 42 McAfee WebShield e500 Appliance version 2.5
Page 53

Configuring the e-mail (SMTP) delivery methods
If the e-mail protocol is enabled (the default setting), you must configure the
delivery methods that it uses.
This section only provides the information necessary to set up the e-mail
delivery methods, so that the appliance can start scanning and delivering its
traffic. There are many pages of features associated with this protocol;
for details on configuring those pages, view their Help topics by clicking Help
buttons; see page 54.
To configure the e-mail delivery methods:
1. In the navigation bar, select E-mail Delivery.
2. In the Methods Used panel, select the required delivery methods
(see “E-mail (SMTP)” on page 25).
3. If you selected the Local domains delivery method, click Local
Domains, and specify the mail relays in the panel that appears. You can
specify as many mail relays as you want (see “Locally configured
domains” on page 25).
The mail relays route e-mail messages destined for specific domains
(such as myorg.com) to their relevant mail servers (such as
mail1.myorg.com). To add a mail relay, click Add, then specify the e-mail
domain and host (mail server) in the Add dialog box that appears. Click
OK to add it to the Local Domains list.
Installation Guide — English
TIP: The appliance tries the mail relays in order. If one of the relays
is successful for a message, the others are not attempted for that
message. Therefore, use the Move up and Move down buttons to
position the relays in the order that you want them. Put the most
frequently used relays at the top of the list.
Installation Guide ENG - 43
Page 54

Installation Guide — English
4. If you selected the Fallback relays delivery method, click Fallback
Relays and specify the fallback relays in the panel that appears. You can
specify as many fallback relays as you want (see “Fallback relays” on
page 26).
The fallback relays route e-mail messages that cannot be delivered using
the other delivery methods. To add a fallback relay, click Add, then
specify the e-mail domain and host (mail server) in the Add dialog box
that appears. Click OK to add it to the Fallback Relays list.
TIP: You can create one mail relay to route messages from all
domains, by using the * wildcard symbol for the domain. If the
wildcard entry is positioned beneath other entries in the Fallback
Relays list, the appliance tries the other entries before attempting
the wildcard entry.
The Fallback Relays list can contain relays for local hosts (mail
servers). This allows you the flexibility of having local domains
tried after a DNS server lookup, to route undeliverable messages
into the organization.
The appliance tries the mail relays in order. If one of the relays is
successful for a message, the others are not attempted for that
message. Therefore, use the Move up and Move down buttons to
position the relays in the order that you want them. Put the most
frequently used relays at the top of the list.
5. Click Apply all changes.
The web browser sends your changes to the appliance.
ENG - 44 McAfee WebShield e500 Appliance version 2.5
Page 55

Installation Guide — English
Configuring whether 8-bit data transfers are allowed
The file transfer protocol (FTP) allows data to be passed between computers in
two modes: binary and 8-bit ASCII (American Standard Code for Information
Interchange). Binary is consistent across computer platforms, so its data can be
scanned effectively.
NOTE: The appliance blocks the 8-bit ASCII transfer mode by default,
because its data can contain different characters codes and formatting
(depending on the computer systems in use), allowing viruses to be
concealed easily.
If the file transfer protocol is enabled (the default setting), you can enable 8-bit
data transfers.
To enable 8-bit data transfers:
1. In the navigation bar, select File Transfer Configuration.
2. Deselect Block 8-bit data transfer in ASCII mode (see “File transfer
(FTP)” on page 26).
3. Click Apply all changes.
The web browser sends your changes to the appliance.
NOTE: Some file transfer utilities use the 8-bit ASCII mode by
default, so you must remember to change your utilities to binary
mode.
Installation Guide ENG - 45
Page 56

Installation Guide — English
Configuring the mail download (POP3) proxies
If the mail download protocol is enabled (the default setting), you can
configure the delimiter characters (for generic proxy connections) and port
numbers (for dedicated proxy connections).
When a user makes a generic proxy connection through the appliance, the
appliance separates the user name, host name and port number with hash (#)
and colon (:) delimiter characters by default:
user#host:port
To change the delimiter characters for generic POP3 proxy connections:
1. In the navigation bar, select Mail Download Configuration.
2. Specify the new delimiter characters that you want to use (see “Generic
proxy” on page 27).
3. Click Apply all changes.
The web browser sends your changes to the appliance.
To specify the ports used for dedicated POP3 proxy connections:
1. In the Mail Download Configuration page, specify the port numbers and
POP3 servers in the Dedicated Proxy Connections list. You can specify as
many servers as you want, but their associated port numbers must be
unique (see “Dedicated proxy” on page 27).
To add a POP3 server, click Add, then specify the unique port number
(typically between 1024–32767) and server domain name (such as
pop3server.externalorg.com) in the Add dialog box that appears.
Click OK to add it to the Dedicated Proxy Connections list.
2. Click Apply all changes.
The web browser sends your changes to the appliance.
ENG - 46 McAfee WebShield e500 Appliance version 2.5
Page 57

Configuring the automatic updating feature
The automatic updating feature keeps the virus definition (.DAT) file and
scanning engine up-to-date, maintaining full anti-virus protection.
IMPORTANT: When the appliance scans for viruses (according to your
settings), it uses the virus scanning engine and current .DAT file to search
for and remove the viruses. Many new viruses are discovered daily, so
McAfee creates new definition files to provide protection from these
viruses. Additionally, new versions of the virus scan engine are created
occasionally.
To configure the automatic updating feature:
1. In the navigation bar, select Anti-Virus Automatic Updating.
2. In the FTP Download Site panel, specify the location from which the
.DAT file and scanning engine are copied. The appliance obtains the
.DAT file and scanning engine from the Network Associates FTP server
(ftp.nai.com) by default.
To use a different FTP server, change the following text boxes:
Installation Guide — English
• Server name
• Path to .DAT/engine files
• Server user name (if required)
• Password (if required)
If your connection must travel through a proxy server, provide
information about that server in the following text boxes:
• Proxy server
• Proxy port number
• Proxy user name (if required)
• Proxy password (if required)
For detailed information on configuring this page, view the Help topic by
clicking the Help button.
3. Click FTP Update Schedule, and select the days and times (in 24-hour
format) that you want the appliance to update its .DAT file and scanning
engine.
4. Click Apply all changes.
The web browser sends your changes to the appliance.
Installation Guide ENG - 47
Page 58

Installation Guide — English
Configuring your other equipment
This section provides an overview of the changes that you might need to make
to your other equipment, to fully integrate the appliance into your existing
network. The changes depend on whether you are using the appliance in
proxy mode or transparency mode:
• Proxy mode (explicit proxy) — You must configure your other network
equipment to route the protocols through the appliance, so nothing can
bypass the appliance. This includes configuring all your internal clients
(such as HTTP, FTP and POP3 software) to use the appliance as a proxy
server. In particular, ensure that your web clients’ HTTP, FTP and Gopher
settings are configured to use the HTTP port number. See “Routing
protocols through the appliance,” below.
• Transparency mode (transparent proxy) — By definition, transparency
mode allows you to slot the appliance into you network without requiring
much reconfiguration of your other equipment. However, you will still
need to configure your SMTP e-mail system to pass e-mail traffic through
the appliance. See “Modifying DNS server records” on page 49.
IMPORTANT: During the day-to-day use of your e-mail system, you
might need to take the mail server offline to perform configuration
changes or other maintenance tasks. Be aware that if you leave the
appliance running, it will still accept and scan incoming e-mail messages
but will be unable to pass them on (unless your e-mail setup includes a
backup mail server). If the appliance is allowed to fill up with messages,
it will run out of space. To avoid this problem, disable the SMTP proxy
at the appliance when the mail server is offline. Your firewall should then
return incoming messages as undeliverable.
ENG - 48 McAfee WebShield e500 Appliance version 2.5
Page 59

Installation Guide — English
Routing protocols through the appliance
Consult the documentation that accompanies your other equipment for
detailed information on configuring the required options. When you have
finished configuring the equipment, you can perform versions of the test on
page 50 to ensure that your mail setup is correct. The appliance uses the
following default ports for the protocols:
• E-mail (SMTP): 25
• File transfer (FTP): 21
• Web browsing (HTTP): 80
• Mail download (POP3): 110
If you have configured the appliance to use different ports for the protocols,
you must adjust your other equipment to use those ports accordingly.
We also recommend that you configure your firewall to only send and receive
internal traffic from the appliance (for the protocols proxied by the appliance).
Modifying DNS server records
Depending on your organization’s network topology and the protocols that
the appliance proxies, you might need to modify records for internal and
external DNS servers; see the scenarios presented by Chapter 1 of the Product
Guide.
In particular, if you have internal FTP, web or POP3 servers, you might need
to create records for external DNS servers that match the internal FTP, web and
POP3 servers to your firewall. For an internal web server, you also need to
create records for the internal DNS server that match the web server’s domain
name to its IP address.
The records that you include at the DNS server (and their order) also
determines whether you are implementing a fail-over, fail-closed or fail-safe
configuration (see Chapter 1 of the Product Guide), so you must ensure that
the records are listed correctly.
For details on modifying your DNS server software, refer to the information
that accompanies it.
Installation Guide ENG - 49
Page 60

Installation Guide — English
Testing your configuration
We recommend that you conduct the following tests (depending on the
proxies you have enabled) to verify that the WebShield e500 Appliance is
correctly integrated with your network:
• “Test 1: Verifying that e-mail messages (SMTP) are scanned and
delivered correctly” on page 51.
• “Test 2: Verifying that file transfers (FTP) are scanned correctly” on page
52.
• “Test 3: Verifying that web browsing (HTTP) is scanned correctly” on
page 52.
• “Test 4: Verifying that mail downloads (POP3) are scanned correctly” on
page 53.
These tests use a special test file that has been developed by the European
Institute of Computer Anti-virus Research (EICAR), a coalition of anti-virus
vendors headquartered in Europe.
IMPORTANT: The EICAR test file does not contain a virus — it cannot
spread or infect other files, or otherwise harm your system. Delete the file
when you have finished testing your installation to avoid alarming other
users.
Ensure that you disable the anti-virus software on the computer that you
are using to create the EICAR test file, so that the anti-virus software does
not remove the EICAR test file.
To create the EICAR test file:
1. Open a standard text editor, such as Microsoft Notepad.
2. Create a new text file, if necessary, and then type the following line:
X5O!P%@AP[4\PZX54(P^)7CC)7}$EICAR-STANDARDANTIVIRUS-TEST-FILE!$H+H*
NOTE: The line shown above should appear as a single line in your
text editor window.
3. Save the text file with the name EICAR.COM. The file size will be
approximately 70 bytes.
ENG - 50 McAfee WebShield e500 Appliance version 2.5
Page 61

Installation Guide — English
Test 1: Verifying that e-mail messages (SMTP) are scanned and
delivered correctly
You can test the appliance’s SMTP virus scanning and delivery by sending the
EICAR test file between internal and external (Internet) e-mail accounts.
To verify that SMTP virus scanning and delivery is working:
1. Log onto any computer in your network that has an e-mail account.
2. Create the EICAR test file.
3. Open your computer’s e-mail program and create a new message with
the following attributes: specify the intended recipient as an external
e-mail address on the Internet to which you have access, and attach the
EICAR file to the message.
4. Send the message.
If your e-mail system is configured correctly, and the appliance has the
default settings:
• The mail server receives the outbound message from the internal
computer, then delivers it to the appliance.
• The appliance scans the message for viruses, and detects and
removes the attached EICAR test file. It then returns the cleaned
message to the internal e-mail account.
5. Check that the message is returned and does not contain the EICAR test
file.
6. Access the external e-mail account on the Internet that you specified for
the first message, and send a similar message to the internal e-mail
account, attaching a new EICAR test file.
If your e-mail system is configured correctly, and the appliance has the
default settings, the appliance receives the reply message. It scans the
message for viruses, and detects and removes the attached EICAR test
file. It then returns the cleaned message to the external e-mail account.
7. Check that the message is returned and does not contain the EICAR test
file.
8. Delete the EICAR test files that you created.
Installation Guide ENG - 51
Page 62

Installation Guide — English
Test 2: Verifying that file transfers (FTP) are scanned correctly
You can test the appliance’s FTP virus scanning by placing the EICAR test file
on an FTP server, then trying to download it.
To verify that FTP virus scanning is working:
1. Log onto the FTP server.
2. Create the EICAR test file.
3. Log onto any computer in your network that has an FTP client (FTP
software).
4. Open your computer’s FTP client and connect to the FTP server.
5. Locate the EICAR test file and attempt to download it.
If your FTP system is configured correctly, the appliance detects the
EICAR test file and blocks the download.
6. Delete the EICAR test file that you created.
Test 3: Verifying that web browsing (HTTP) is scanned correctly
You can test the appliance’s HTTP virus scanning by referencing the EICAR
test file from a web page on a web server, then trying to download it.
To verify that HTTP virus scanning is working:
1. Log onto the web server.
2. Create the EICAR test file and reference it from a web page.
3. Log onto any computer in your network that has an HTTP client (web
browser software).
4. Open your computer’s HTTP client and access the web page with the
EICAR test file.
5. Attempt to download the EICAR test file.
If your HTTP system is configured correctly, the appliance detects the
EICAR test file and blocks the download.
6. Delete the EICAR test file that you created.
ENG - 52 McAfee WebShield e500 Appliance version 2.5
Page 63

Installation Guide — English
Test 4: Verifying that mail downloads (POP3) are scanned correctly
You can test the appliance’s POP3 virus scanning by sending the EICAR test
file in a message to a POP3 e-mail account, then trying to download the
message.
To verify that POP3 virus scanning is working:
1. Log onto any computer in your network that unscanned access to the
POP3 server.
2. Create the EICAR test file and send it to a e-mail account on the POP3
server.
3. Log onto any computer in your network that has a POP3 client
(POP3 mail download software).
4. Download the messages for the POP3 e-mail account that contains the
message with the EICAR test file.
If your POP3 system is configured correctly, the appliance detects the
EICAR test file and removes it from the message.
5. Check that the message does not contain the EICAR test file.
6. Delete the EICAR test file that you created.
Using the appliance
The appliance’s user interface (see page x at the front of this guide) has been
designed for ease of use, to help you configure the appliance’s settings quickly.
A
Navigation bar
The navigation bar lists the features that can be configured (each has an
arrow next to it). Click a feature to display its page of settings.
Installation Guide ENG - 53
Page 64

Installation Guide — English
B
Page
The page displays the settings for the feature that you selected in the
navigation bar, allowing you to view and change those settings.
NOTE: The changes that you make are not applied to the appliance until
you click Apply all changes.
Each page contains the following buttons:
Product guide — Displays a PDF (Portable Document Format) version
of the Product Guide.
Help — Opens the Help topic for the current page in a new browser
window. The Help topics contain detailed information, including some
tips on optimizing the appliance’s features.
Cancel — Cancels the changes that you have made to the current page
since you last applied changes to the appliance. If you move to another
page, the web browser stores the page changes, so you must use
Cancel all changes if you want to cancel the changes.
C
Panel
Some pages have panels that containing more fields. Select the options in the
page to view the panels.
D
Control buttons
The user interface contains the following control buttons:
• Log off — Terminates the current management session. You return to the
Log on page, and must log on again with your password to continue
managing the appliance.
• Apply all changes — Applies the changes that you have made to the
appliance.
• Cancel all changes — Cancels all the changes that you have made to all
pages since you last applied changes to the appliance. If you made
changes to multiple pages, all the changes are cancelled.
This guide does not provide detailed information for all of the user interface’s
pages. For that information, refer to the relevant Help topics.
ENG - 54 McAfee WebShield e500 Appliance version 2.5
Page 65

Backing up and restoring your settings
Installation Guide — English
When you have finished configuring the appliance’s
settings, we recommend that you back them up, so
that you can quickly restore them should you need to
restore the appliance’s software in the unlikely event
of a problem. Details on restoring the appliance’s
software are described in “Restoring and upgrading
the appliance’s software” on page 57.
Backing up your settings
To back up the appliance’s settings to a set of
configuration files:
1. Open the web browser on the computer on
which you want to create the backup
configuration files.
2. Access the appliance’s user interface using the
appropriate URL, and log on (see Step 2 on page
32 through Step 7 on page 35).
3. In the navigation bar, select System
Maintenance.
4. Click Save to file next to “Save system
settings.”
A File Download dialog box might appear for
your browser, to verify that you want to
download files from the appliance. If it does
appear, click OK.
1
Gather the
configuration
information
2
Install the
appliance
3
Configure the
appliance’s
network settings
4
Configure the
appliance’s
protocol settings
5
Back up the
appliance’s
settings
The Save As dialog box appears.
5. Select the required location for the configuration files, and change the
name of the .ZIP file as required. It is ws_cfg_backup.zip by default.
6. Click Save.
The web browser creates the configuration files. If there are no problems,
a confirmation dialog box appears.
7. Close the confirmation dialog box.
You can now continue managing the appliance.
Installation Guide ENG - 55
Page 66

Installation Guide — English
Restoring your settings
When you restore the appliance’s settings with a configuration file, you must
ensure that any other necessary changes are performed. For example, you can
use the same configuration file for multiple appliances but those appliances
cannot share IP addresses (IP addresses must be unique) so you would need
to modify the IP addresses accordingly.
The appliance can use configuration files that were generated by an earlier
version of the appliance. Therefore, if you generated such a file before
upgrading your appliance, you can simply use the configuration file to restore
your previous settings to the upgraded appliance.
To restore the appliance’s settings from a set of configuration files:
1. Open the web browser on the computer that contains the backup
configuration files, then access the appliance’s user interface using the
appropriate URL, and log on (see Step 2 on page 32 through Step 7 on
page 35).
If you are already accessing the appliance’s user interface but the
configuration files are on a different computer, transfer the files to the
computer that you are using.
2. Depending on how you are configuring the appliance, do one of the
following:
• If you recently upgraded the appliance’s software or you are
configuring the appliance for the first time, the System
Configuration page contains an extra Restore Configuration panel.
Click Restore Configuration (on the System Configuration page)
to access this panel.
NOTE: The Restore Configuration panel is only available on
the System Configuration panel when the appliance is first
configured.
• If you have configured the appliance before, select System
Maintenance (in the navigation bar) to display the System
Maintenance page. Focus on the File and URL text boxes next to
“Restore System Settings.”
ENG - 56 McAfee WebShield e500 Appliance version 2.5
Page 67

Installation Guide — English
3. In the File or URL text box, specify the full path or URL for the
configuration files. Examples:
c:\myfiles\ws_cfg_backup.zip
http://www.myorg.com/myfiles/ws_cfg_backup.zip
You can click Browse to locate the file.
4. Click Restore now.
The web browser opens the configuration files, and sends the settings to
the appliance. You can now continue managing the appliance.
Restoring and upgrading the appliance’s software
If there is a problem with one of the appliance’s hard disk drives, you can
replace it with another drive (of the same specification) while the appliance is
operational, and the appliance copies the image from the existing drive to the
replacement drive; see page 61.
However, there might be circumstances where you need to restore the
appliance’s software to both of the appliance’s drives. This is an unlikely
situation but it can occur if you remove both drives from the appliance at the
same time. The restoration process requires the WebShield e500 Appliance
recovery CD.
You might also receive a WebShield e500 Appliance upgrade CD from your
support representative, which contains improved software for the appliance.
You upgrade the appliance’s drives from this CD using a similar method to the
restoration process.
NOTE: You must connect to the appliance locally when restoring or
upgrading its software. You cannot perform the restoration or upgrade
remotely.
When restoring the appliance’s software, the restoration process removes
any additional software that you might have installed. If you are using
ePolicy Orchestrator with the appliance, you must reinstall the ePolicy
Orchestrator agent after the restoration process; see the Configuration
Guide.
Installation Guide ENG - 57
Page 68

Installation Guide — English
To restore or upgrade the appliance’s software:
1. Connect a keyboard to the appliance’s keyboard port (colored purple,
see on page 16).
F
2. Connect a monitor to the appliance’s monitor port (see on page 16).
G
3. Turn on the appliance, if it is off.
4. Insert the WebShield e500 Appliance recovery CD or upgrade CD into
the appliance’s CD-ROM drive (see on page 14). The CD that you use
B
depends on whether you are restoring or upgrading the software.
5. Push the reset button on the control panel on the front of the unit
C
(see on page 15).
The appliance performs its startup sequence. It then reads the CD and
displays a license agreement.
NOTE: The following steps are correct for the WebShield e500
Appliance recovery CD. However, if the screen prompts are
different for your CD, follow the screen prompts.
6. Read the license agreement carefully, then enter
If you do not accept the license agreement — entering
Y to accept it.
N to reject it — you
cannot use the software on the CD.
The following options are presented:
1: Perform a full installation removes all data from the appliance’s
hard disk drives and reinstalls the software.
2: Install software on this CD reinstalls the software while
attempting to preserve the areas containing the following items:
• Configuration data
• Log data
• Quarantined e-mail messages
• Deferred e-mail messages
If the restoration process cannot preserve these areas, it re-creates
them.
3: Perform a software upgrade performs the appropriate software
upgrades (if available) that are contained on the CD.
ENG - 58 McAfee WebShield e500 Appliance version 2.5
Page 69

4: Automatic operation determines which of the three options
above is suitable, and performs that option.
5: Perform a full installation and stop removes all data from the
appliance’s hard disk drives and reinstalls the software. After
installation, the appliance ejects the CD but does not restart. You can
then turn off the appliance.
6: Reset passwords to factory default returns the appliance’s
password to the default password e500changeme.
7: Do nothing and reboot leaves the appliance unchanged, and
ejects the CD. You might want to choose this option if you inserted
the CD by mistake, and do not want to restore or upgrade the
appliance’s software.
7. Enter the number for the required option.
You are asked if you want to continue.
Installation Guide — English
8. Enter
Y.
Unless you chose 7: Do nothing and reboot, the restoration or upgrade
process starts. A status screen shows the progress. Depending on the
option that you chose, the process can take up to 30 minutes.
WARNING: Depending on the option that you choose, the
appliance might revert to its default settings, losing the
configuration settings that you have made.
When the restoration or upgrade process has finished, the appliance
ejects the CD and restarts (unless you choose 5: Perform a full
installation and stop). When it has finished its startup sequence
(after about two minutes), it is ready for use. Depending on the option
that you chose, you might need to reconfigure the appliance’s settings;
see page 32.
NOTE: When you access the appliance and log on, be aware that the
following changes might have occurred if you chose not to maintain
the previous settings (or they could not be maintained):
• The password has reverted to the default password
e500changeme.
• The LAN1 port has reverted to the default IP address
10.1.1.108.
• The LAN2 port is enabled and has reverted to the default IP
address 10.1.2.108.
See Appendix A of the Product Guide for details on the appliance’s
default settings.
Installation Guide ENG - 59
Page 70

Installation Guide — English
Troubleshooting
Hardware problems
This section contains solutions to problems that you can encounter when
installing and running the appliance. See page 63 for solutions to user interface
problems.
The appliance is not receiving power
Check the following:
• The appliance is connected properly to a working power outlet, using the
supplied power cord.
• Both the power supply switch and the power button are in their ON
positions; see Step 6 on page 31.
The power supply switch is on the back of the unit (see on page 16).
The power button is on the control panel on the front of the unit (see on
page 15).
If the appliance is still not receiving power, check the power outlet by
connecting it to other equipment. If the power outlet is working, there is a
problem with the appliance or its power cord. Contact your supplier.
E
C
The appliance is not receiving traffic from my network
Check the following:
• The appliance is turned on and its software is running, indicated by the
power LED being lit (on the control panel, see on page 15) and the hard
disk drive LEDs being off (see on page 14).
• The network cables you are using are undamaged and connected properly
to the appliance’s ports and your existing network equipment. If you have
not used the blue cables supplied with the appliance, ensure that the cables
are Cat 5 (Category 5) UTP straight-through (uncrossed) network cables.
• You have connected the LAN2 port to your existing network equipment,
if you are using the appliance in transparency mode.
If the appliance is still not receiving network traffic, check the network cables
and the network ports on your exiting network equipment. If the cables and
ports are working, there is a problem with the appliance. Contact your
supplier.
A
C
ENG - 60 McAfee WebShield e500 Appliance version 2.5
Page 71

Installation Guide — English
One hard disk drive LED is red
The hard disk drive is faulty and must be replaced.
The drives are in caddies, allowing you to replace a faulty drive while the
appliance is operational. The replacement drive is imaged automatically from
the existing drive.
WARNING: When replacing the hard disk drives, ensure that you
follow this information:
• Do not remove both drives from the appliance at any time. At least
one drive must remain within the appliance at all times.
• Do not allow the appliance to be operational for more than a few
minutes with one of the drives missing, because this disturbs the
airflow and can result in the appliance overheating. Insert the
replacement drive immediately.
• Only use drives that have exactly the same specification as the
existing drives.
• When handling the drives, take care not to touch any static-sensitive
components. Observe reasonable anti-static precautions, and do not
insert your hand or any other object into the appliance’s empty
drive area.
To replace a faulty drive:
1. Push the faulty drive’s release button, then pull its handle down (Figure
1-5). Pull the drive out of the drive area.
Figure 1-5. Removing the drive
Installation Guide ENG - 61
Page 72

Installation Guide — English
2. Slide the replacement drive into the empty drive area, then push its
handle up to lock the drive in place (Figure 1-6).
The appliance copies the image from the existing drive to the
replacement drive. This can take 20–30 minutes. During this time, the
replacement drive’s green LED flashes.
Both hard disk drive LEDs are red
There is a problem with the appliance’s drives. Use the WebShield e500
Appliance recovery CD to restore the appliance’s software; see page 57. If this
does not work, contact your supplier.
Figure 1-6. Inserting the drive
ENG - 62 McAfee WebShield e500 Appliance version 2.5
Page 73

User interface problems
This section contains solutions to problems that you can encounter when
trying to configure the appliance through its user interface.
I cannot access the “Log on” page
Check the following:
• The appliance is turned on and its software is running, indicated by the
power LED being lit (on the control panel, see on page 15) and the hard
disk drive LEDs being off (see on page 14).
• You have used https (not http) in the URL field of your web browser.
Ensure that your browser supports Secure Sockets Layer (SSL) v3.0
encryption and that it is enabled.
• The management computer (the computer you are using to manage the
appliance) does not have the appliance configured as its proxy. If you have
a proxy between the management computer and the appliance, the proxy
must be configured with the appliance as its handoff host.
• If you are remotely connected to the appliance (across the network)
through the LAN1 port (see on page 16), ensure that:
Installation Guide — English
C
A
H
– The computer that you are using has a working connection to your
network, and that it can reach the same subnet to which the
appliance is connected.
– You have used the new IP address that you have configured for the
LAN1 port, in the URL field of your web browser. If you have not
disabled or deleted the default IP address 10.1.1.108, try using
that IP address (https://10.1.1.108).
The appliance’s IP address must be suitable for the subnet to which
the appliance is connected. If it is not, attempt to use the default IP
address and, if that fails, try a direct management connection; see
Step 4 on page 29.
NOTE: You can only obtain a direct management connection
through the LAN2 port if you are using the appliance in proxy
mode and you have not disabled the LAN2 port (Step 17 on
page 37).
Installation Guide ENG - 63
Page 74

Installation Guide — English
• If the appliance is operating in proxy mode and you have a direct local
management connection through its LAN2 port (see on page 17),
ensure that:
– The appliance has a working connection to your existing network,
indicated by the NIC 1 network activity LED flashing (on the control
panel, see on page 15).
C
If the LEDs are not flashing, ensure that the cable you are using is
undamaged and connected properly to the appliance’s LAN1 port
and your existing network equipment. If you have not used the blue
cable supplied with the appliance, ensure that the cable is a Cat 5
(Category 5) UTP straight-through (uncrossed) network cable.
I
– You have not disabled the LAN2 port. You must connect remotely
to check this.
– You have used the new IP address that you have configured for the
LAN2 port (the default IP address is 10.1.2.108), in the URL field
of your web browser.
– The appliance has a working connection to your computer,
indicated by the NIC 2 network activity LED flashing (on the control
panel, see on page 15).
C
If the LED is not flashing, ensure that the cable you are using is
undamaged and connected properly to the appliance’s LAN2 port
and your computer’s network port. If you have not used the orange
cable supplied with the appliance, ensure that the cable is a Cat 5
(Category 5) UTP crossed network cable.
The “Log on” page appears but the Log on button is labelled
“Initializing”
The appliance is checking your web browser for the components required by
the user interface.
The appliance is optimized for Internet Explorer v4.0, v5.0, v5.5 or v6.0, and
supports Netscape Navigator v4.7. If you are using a different web browser,
you might be unable to access the user interface and configure the appliance.
The appliance’s user interface needs the Java 2 Runtime Environment, so your
browser might be installing this software. The Java 2 Runtime Environment is
5–14
MB in size (depending on the components required by your browser) and
it can take a long time to install if you have a slow remote link to the appliance.
ENG - 64 McAfee WebShield e500 Appliance version 2.5
Page 75

Installation Guide — English
My password does not work
If you recently restored the appliance’s software without maintaining the
previous settings, the password reverts to the default password
e500changeme.
I have forgotten my password
You must use the WebShield e500 Appliance recovery CD to return the
appliance’s password to its default password e500changeme; see “Restoring
and upgrading the appliance’s software” on page 57. Use option
6: Reset passwords to factory default during the restoration process.
Some of the user interface does not display properly
The appliance’s user interface is optimized for Microsoft Internet Explorer
v4.0, v5.0, v5.5 or v6.0, and supports Netscape Navigator v4.7. Check the
accompanying release notes to see if there are known issues when using some
web browsers on particular operating systems.
My clients (software) cannot communicate through the appliance
Check the following:
• The required proxies are enabled for the appliance (all supported protocols
are enabled by default); see “Configuring the appliance’s protocols” on
page 41.
• The clients and other equipment are configured to route traffic to and from
the appliance; see “Configuring your other equipment” on page 48.
• There are no network problems, and your equipment is connected
correctly.
Web browsing does not work, or URL blocking is not enforced
The appliance must have access to a DNS server to verify web browsing
(HTTP) requests and determine which URLs to block, if URL blocking is
configured. Therefore, you must configure a DNS server in the System
Configuration page; see Step 9 on page 35.
Installation Guide ENG - 65
Page 76

Installation Guide — English
ENG - 66 McAfee WebShield e500 Appliance version 2.5
Page 77

1Installationshandbuch – Deutsch
Übersicht
In diesem Installationshandbuch finden Sie die zum Installieren oder
Konfigurieren Ihres WebShield-Geräts erforderlichen Informationen. In
folgenden Abschnitten finden Sie produktspezifische Informationen:
Copyright und Marken Seite 2
Informationen zu Stromversorgung und Sicherheit Seite 3
Infos zu WebShield e500 Seite 5
• Funktionen Seite 6
• Lieferumfang des WebShield e500 Seite 11
Erste Schritte mit dem GerätSeite 14
• Wer das Gerät installieren sollte Seite 14
• Ports und Stecker Seite 15
• Zusammenfassen der Konfigurationsinformationen Seite 20
Installation des McAfee WebShield e500 Seite 32
Konfigurieren der Netzwerkeinstellungen Seite 36
Konfigurieren der Protokolleinstellungen Seite 45
• Konfigurieren der Protokolle des WebShield e500 Seite 46
• Konfigurieren der Funktion zum automatischen Aktualisieren Seite 52
• Konfigurieren weiterer Geräte Seite 53
• Testen Ihrer Konfiguration Seite 55
Verwenden des WebShield e250 Seite 59
• Sichern und Wiederherstellen der Einstellungen Seite 61
• Wiederherstellen und Aktualisieren der Gerätesoftware Seite 64
Fehlerbehebung Seite 68
• Hardwarefehler Seite 68
• Probleme mit der Benutzeroberfläche Seite 71
Installationshandbuch DEU - 1
Page 78

Installationshandbuch – Deutsch
Copyright und Marken
COPYRIGHT
© 2001-2002 Networks Associates Technology, Inc. Alle Rechte vorbehalten. Kein Teil dieser
Veröffentlichung darf ohne schriftliche Erlaubnis von Network Associates Technology,
Inc., ihren Lieferanten oder zugehörigen Tochtergesellschaften in irgendeiner Form oder mit
irgendwelchen Mitteln vervielfältigt, übertragen, transkribiert, in einem Informationsabrufsystem
gespeichert oder in eine andere Sprache übersetzt werden. Diese Genehmigung können Sie schriftlich bei
der Rechtsabteilung von Network Associates unter der folgenden Adresse beantragen: 3965 Freedom
Circle, Santa Clara, California 95054, USA, oder rufen Sie unter (+1) -972-308-9960 an.
MARKEN
Active Security, Active Security (in Katakana), ActiveHelp, ActiveShield, AntiVirus Anyware and design, Bomb
Shelter, Certified Network Expert, Clean-Up, CleanUp Wizard, CNX, CNX Certification Certified Network Expert
and design, CyberCop, CyberCop (in Katakana), CyberMedia, CyberMedia UnInstaller, Design (stilisiertes N),
Disk Minder, Distributed Sniffer System, Distributed Sniffer System (in Katakana), Dr Solomon's, Dr Solomon's
label, Enterprise SecureCast, Enterprise SecureCast (in Katakana), EZ SetUp, First Aid, ForceField, GMT,
GroupShield, GroupShield (in Katakana), Guard Dog, HelpDesk, HomeGuard, Hunter, ISDN TEL/SCOPE,
LANGuru, LANGuru (in Katakana), M and design, Magic Solutions, Magic Solutions (in Katakana), Magic
University, MagicSpy, MagicTree, McAfee, McAfee (in Katakana), McAfee and design, MultiMedia Cloaking, Net
Tools, Net Tools (in Katakana), NetCrypto, NetOctupus, NetScan, NetShield, NetStalker, Network Associates,
NetXray, NotesGuard, Nuts & Bolts, Oil Change, PC Medic, PC Medic 97, PCNotary, PGP, PGP (Pretty Good
Privacy), Pretty Good Privacy, PrimeSupport, Recoverkey, Recoverkey – International, Registry Wizard,
ReportMagic, RingFence, Router PM, SalesMagic, SecureCast, Service Level Manager, ServiceMagic, SmartDesk,
Sniffer, Sniffer (in Hangul), SniffMaster, SniffMaster (in Hangul), SniffMaster (in Katakana), SniffNet, Stalker,
SupportMagic, TIS, TMEG, TNV, TVD, TNS, Total Network Security, Total Network Visibility, Total Network
Visibility (in Katakana), Total Service Desk, Total Virus Defense, Trusted Mail, UnInstaller, Virex, Virus Forum,
ViruScan, VirusScan, WebScan, WebShield, WebShield (in Katakana), WebSniffer, WebStalker, WebWall, Who’s
Watching Your Network, WinGauge, Your E-Business Defender, ZAC 2000, Zip Manager sind eingetragene
Marken von Network Associates, Inc. und der angeschlossenen Tochtergesellschaften in den USA und
anderen Ländern. Alle anderen eingetragenen und nicht eingetragenen Marken in diesem Dokument
sind das alleinige Eigentum der jeweiligen Inhaber.
LIZENZVERTRAG
HINWEIS FÜR ALLE BENUTZER: Lesen Sie den entsprechenden rechtlichen Vertrag für die von Ihnen
erworbene Lizenz sorgfältig durch. Er enthält die allgemeinen Bestimmungen und Bedingungen für die
Verwendung der lizenzierten Software. Wenn Sie nicht wissen, welchen Lizenztyp Sie erworben haben,
lesen Sie die Lieferdokumente und alle weiteren Lizenz- oder Bestellunterlagen, die der Software
beiliegen oder die Sie als Teil des erworbenen Produkts erhalten haben (eine Broschüre, eine Datei auf der
Produkt-CD oder eine Datei auf der Website, von der Sie das Softwarepaket heruntergeladen haben).
SOLLTEN SIE NICHT MIT ALLEN BESTIMMUNGEN, DIE IM LIZENZVERTRAG ENTHALTEN SIND,
EINVERSTANDEN SEIN, DÜRFEN SIE DIE SOFTWARE NICHT INSTALLIEREN. WENN DIESER
FALL ZUTRIFFT, KÖNNEN SIE DAS PRODUKT GEGEN RÜCKERSTATTUNG DES KAUFPREISES BEI
NETWORK ASSOCIATES ODER AN DER STELLE ZURÜCKGEBEN, AN DER SIE ES ERWORBEN
HABEN.
DEU - 2 McAfee WebShield e500 Version 2.5
Page 79

Installationshandbuch – Deutsch
Informationen zu Stromversorgung und Sicherheit
WICHTIG: Um einen sicheren Betrieb des WebShield e500-Geräts zu
gewährleisten, lesen Sie bitte folgende Informationen sorgfältig
durch,bevor Sie das Gerät installieren.
Anforderungen zur Stromversorgung
• Prüfen Sie, ob das im Lieferumfang enthaltene Netzkabel für die
Verwendung in Ihrem Land geeignet ist. Anderenfalls wenden Sie sich an
Ihren Händler. Versuchen Sie auf keinen Fall, das Netzkabel zu verändern.
• Die Steckdose, an die Sie das Gerät anschließen, muß den gültigen
elektrischen Standards des Landes, in dem sie das Gerät verwenden,
entsprechen.
• Wenn Sie das Gerät an eine Steckdose oder andere Geräte anschließen,
stellen Sie sicher, daß die Kabel so verlegt sind, daß keine Stolpergefahr für
andere Personen besteht.
Verwenden des WebShield e500
•Öffnen Sie das Gehäuse des Geräts nicht. Es befinden sich keine Bauteile
darin, zu denen der Benutzer Zugang benötigt.
• Das Gerät ist schwer. Wenn Sie es anheben oder an einen anderen Ort
tragen möchten, versichern Sie sich, daß sie das Gerät sicher und fest in der
Hand haben und es richtig tragen, um sich vor Verletzungen zu schützen
und um das Gerät nicht zu beschädigen.
• Stellen Sie das Gerät nur auf einer ebenen und stabilen Unterlage ab, z. B.
auf einem geeigneten Schreibtisch oder in einem 19-Zoll-Gestell.
Vergewissern Sie sich, daß die Abstellfläche bzw. das Gestell stabil genug
sind, um das Gewicht des Geräts auszuhalten und stellen Sie sicher, daß
das Gerät nicht herunterfallen kann.
• Stellen Sie keine schweren Gegenstände auf dem Gerät ab.
• Die Netzwerk-Ports des WebShield e500 sind ausschließlich für die
Verbindung mit einem RJ-45-Port geeignet. Verwenden Sie die
Netzwerk-Ports nicht, um das Gerät an eine Telefonanlage anzuschließen,
es sei denn, der Anschluß, den Sie verwenden, ist ausdrücklich für den
Anschluß an ein 10/100-MBit/s-Ethernet-Netzwerk ausgelegt.
• Sollte ausnahmsweise ein Hardwarefehler am WebShield e250 auftreten,
schalten Sie das Gerät aus und ziehen Sie den Netzstecker aus der
Steckdose. Wenden Sie sich an Ihren Händler.
Installationshandbuch DEU - 3
Page 80

Installationshandbuch – Deutsch
Betriebsbedingungen
• Versichern Sie sich, daß die Umgebungsbedingungen, unter denen das
Gerät zum Einsatz kommen soll, für den Betrieb handelsüblicher
Computer geeignet sind. Stellen Sie sicher, daß die Umgebung nicht feucht
ist, und sorgen Sie für ausreichende Belüftung. Der Temperaturbereich für
den Betrieb darf 10–40
Luftfeuchtigkeit muß zwischen 0% und 90% liegen. Werden diese Werte
über- bzw. unterschritten, kann dies zum Versagen des Geräts führen.
• Sorgen Sie dafür, daß während des Betriebs immer ein Abstand von
mindestens 25mm von der Rückseite des Geräts zur Wand bzw. zu
anderen Geräten oder Möbeln eingehalten wird, um eine ausreichende
Kühlung zu gewährleisten.
• Stellen Sie sicher, daß weder Flüssigkeiten noch Verunreinigungen oder
fremde Gegenstände durch die Belüftungsschlitze oder das
Belüftungsgitter in das Geräteinnere eindringen können.
°C nicht über- bzw. unterschreiten und die
DEU - 4 McAfee WebShield e500 Version 2.5
Page 81

Infos zu WebShield e500
Der WebShield e500 (Abbildung 2-1) ist ein spezieller Server zur Antivirenund Inhaltsprüfung mit einer leistungsstarken neuen WebShield-Software.
Der McAfee WebShield e500 kann mit Hilfe eines Web-Browsers vollständig
konfiguriert und in nahezu jeder Netzwerktopologie eingesetzt werden. Er
bietet eine Virenprüfung der folgenden Protokolle:
• Simple Mail Transfer Protocol (SMTP) E-Mail-Nachrichten
• File Transfer Protocol (FTP)-Austausch
• Hypertext Transfer Protocol (HTTP) für das Surfen im Internet
• Post Office Protocol Version 3 (POP3) Internet E-Mail-Nachrichten
Installationshandbuch – Deutsch
Abbildung 2-1. WebShield e500
Mit zusätzlichen Funktionen, wie beispielsweise Inhaltsüberwachung,
Anti-Relay und Anti-Spam, bietet der WebShield e500 vollständigen Schutz
für Ihr Internet Gateway. Es wird verhindert, daß unerwünschtes Material in
Ihr Unternehmen gelangt oder dieses verläßt.
WebShield e500 verwendet seine Ressourcen gemeinsam mit den von der
Anwendung verwendeten Protokollen. Eingehende und ausgehende Daten
werden bei Bedarf überprüft. Die Anwendung kann infizierte E-Mail-Objekte,
einschließlich komprimierter Dateien und Makros, erkennen, säubern,
protokollieren und in den Quarantänebereich verschieben und dadurch
verhindern, daß diese ihre vorgesehenen Empfänger erreichen. Außerdem
können infizierte HTTP-, FTP- und POP3-Objekte blockiert werden.
Wenn Sie die Virenprüfung mit dem Gerät durchführen, bleibt Ihr Mailserver
für Mailaktivitäten dediziert. Sie können auch mehrere WebShield e500
zusammen verwenden, um den Durchsatz beim Scannen zu erhöhen und eine
Fehlertoleranz bereitzustellen.
Ausführliche Informationen über die verschiedenen Einsatzmöglichkeiten des
Geräts sowie einige Beispieltopologien finden Sie in Kapitel 1 des
Produkthandbuchs.
Installationshandbuch DEU - 5
Page 82

Installationshandbuch – Deutsch
Funktionen
Transparenz – eine neue Funktion der Version 2.0
Benutzer früherer WebShield-Versionen sollten beachten, daß die Version 2.5
jetzt über eine zusätzliche Funktion verfügt, die sogenannte
Transparenz-Funktion. Das bedeutet, das Gerät kann jetzt entweder im
Proxymodus oder im Transparenzmodus betrieben werden:
• Der Proxymodus (expliziter Proxy) eignet sich für solche Netzwerke, bei
denen es relativ einfach ist, die Netzwerkgeräte so zu konfigurieren, daß
Protokollverkehr durch das Webshield-Gerät geleitet wird. Vor der
Einführung des Tranzparenzmodus, arbeitete das Webshield-Gerät
ausschließlich im Proxymodus.
Im Proxymodus verarbeitet WebShield e500 nur den Datenverkehr der von
ihm unterstützten Protokolle.
• Der Transparenzmodus (transparenter Proxy) ermöglicht die Einbindung
des Webshield e500 in solche Netzwerke, bei denen das Konfigurieren der
Netzwerkgeräte zu schwierig oder zu zeitaufwendig ist. In diesem Modus
ist das Gerät transparent in das Netzwerk eingebunden: Empfang und
Weiterleitung des gescannten Datenverkehrs erfolgen mittels statischer
und dynamischer Routing-Informationen.
HINWEIS: Im Transparenzmodus muß das Gerät über die Ports
LAN1 und LAN2 mit zwei getrennten Subnets verbunden sein.
Das Gerät verarbeitet den gesamten IP-Datenverkehr zwischen zwei
Subnets.
Ausführliche Informationen über diese Modi finden Sie im Abschnitt “Proxy
oder Transparenz?“ im Produkthandbuch.
WICHTIG: Beide Modi unterscheiden sich erheblich. Bevor Sie das Gerät
installieren und konfigurieren, sollten Sie sich daher unbedingt näher
mit der Funktionsweise beider Modi befassen und sich für denjenigen
Modus entscheiden, der für Ihren Anwendungsfall geeignet ist.
Ausführliche Informationen zur Konfiguration des Webshield e500 mit der
Konfigurationsdatei einer früheren Version des Geräts finden Sie unter
“Wiederherstellen der Einstellungen“ auf Seite 62.
In diesem Abschnitt finden Sie außerdem eine Zusammenfassung einiger
anderer Funktionen des Geräts.
DEU - 6 McAfee WebShield e500 Version 2.5
Page 83

Installationshandbuch – Deutsch
Hardware
Der WebShield e500 verfügt über viele Funktionen, einschließlich der
folgenden:
• 1U hoch 19” (Zoll) in einem Gestell installierbare Hardware.
• Duale Intel Pentium III 1
• 256
MB PC133 SDRAM.
GHz-Prozessoren.
• Zwei RJ-45 10/100 MBit/s automatisch erfassende
Ethernet-Netzwerk-Ports, die eine flexible Verbindung zu Ihrem
vorhandenen Netzwerk und einer eigenen Verwaltungsoberfläche
ermöglichen (nur im Proxymodus verfügbar).
• Zwei 17,4
GB während des Betriebs austauschbare
SCSI-Festplattenlaufwerke in einer hardwarebasierten RAID
1-Konfiguration (Spiegelung). Dadurch wird für den unwahrscheinlichen
Fall, daß bei einem der beiden Laufwerke Probleme auftreten, eine
nahtlose Verarbeitung sichergestellt. Wenn Sie ein Ersatzlaufwerk
einsetzen, wird das neue Laufwerk von dem RAID-Controller automatisch
neu gespiegelt.
Weitere Informationen zu den Ports und Steckern des McAfee WebShield e500
finden Sie auf Seite 15.
Software
Die Software auf dem Gerät hat folgende Funktionen:
• Webverwaltung durch Secure Sockets Layer (SSL)-Verschlüsselung mittels
eines Web-Browsers.
• Eine leicht konfigurierbare Benutzeroberfläche, mit der Sie das Gerät
schnell einrichten können. Das Gerät erfordert danach minimalen
Benutzereingriff und wird dadurch zu einer
Konfigurieren-und-Vergessen-Lösung.
• Flexible Proxys, die selbst in komplexen Umgebungen einfach zu
konfigurieren sind (siehe “Zusammenfassen der
Konfigurationsinformationen“ auf Seite 20).
Installationshandbuch DEU - 7
Page 84

Installationshandbuch – Deutsch
• Scannen von SMTP-E-Mail-Nachrichten, Überprüfen auf infizierte Objekte
und gesperrten Inhalt. Weitere SMTP-Funktionen umfassen:
– Flexible Zustellungskonfiguration von SMTP-E-Mail, mit der Sie
– Flexible Inhaltsüberwachung von Nachrichten, wodurch Sie nach
– Blockieren von Spam (Abweisen unerwünschter
– Unterstützung von Schwarzen Listen in Echtzeit, die mögliche
– Nachrichten-Relay von einem bestimmten Server oder
mehrere Zustellmethoden für E-Mail einrichten und eine
Fehlertoleranz einführen können.
gesperrtem Inhalt suchen und bestimmte Anhangtypen blockieren
können.
E-Mail-Nachrichten) nach Empfänger, Absender oder Server.
Quellen von Spam-Nachrichten identifizieren. Mit Hilfe dieser
Listen kann das Gerät Spam-Nachrichten blockieren. Schwarze
Listen werden von vielen Organisationen zur Verfügung gestellt,
einschließlich des Mail Abuse Prevention System (MAPS, siehe
http://www.mailabuse.org).
Domänennamen an einen anderen Server. Es steht auch eine
Anti-Relay-Funktion zur Verfügung, um unbefugte Absender
daran zu hindern, das Gerät als Relais für Spam-Nachrichten zu
verwenden.
• Scannen von FTP-Austausch nach infizierten Objekten.
• Scannen beim Surfen im Internet (HTTP), Sperren infizierter Inhalte.
Sie können außerdem Java, ActiveX und Scripting sperren.
• Virenprüfung von POP3-E-Mail-Nachrichten, Überprüfen auf infizierte
Objekte.
• Getrenntes Scannen für eingehende und ausgehende Daten mit der
Möglichkeit, für jede Richtung unterschiedliche Scan-Optionen zu
konfigurieren.
• Getrennte, automatische Aktualisierungspläne für die
McAfee-Virusdefinitionsdateien (DAT-Dateien) und das Scan-Modul von
McAfee für das Gerät, wodurch die Virenprüfung jederzeit auf dem
neuesten Stand ist.
• Virusentdeckung in üblichen komprimierten Dateiformaten.
• Flexible Scan-Aktionen, mit denen Sie infizierte Objekte säubern, löschen,
blockieren oder in den Quarantänebereich verschieben (isolieren) können.
DEU - 8 McAfee WebShield e500 Version 2.5
Page 85

Installationshandbuch – Deutsch
• Getrennte Speicherung des Quarantänebereichs; ermöglicht eine
Überprüfung der folgenden Typen von E-Mail-Nachrichten im
Quarantänebereich:
– Eingehende Nachrichten, die infizierte Objekte enthalten.
– Ausgehende Nachrichten, die infizierte Objekte enthalten.
– Eingehende Nachrichten, die gesperrte Inhalte enthalten.
– Ausgehende Nachrichten, die gesperrte Inhalte enthalten.
• Benachrichtigung bei Entdecken eines infizierten Objekts durch eine
Vielzahl konfigurierbarer Warnmeldungen, beispielsweise
E-Mail-Meldungen, XML-Protokollierung, SNMP-Berichterstellung und
ePolicy Orchestrator-Berichterstellung (siehe Konfigurationshandbuch ).
• Erweiterte Protokollierung von Scan-Aktivitäten und Protokollströmen,
mit der Sie Informationen zu vergangenen Nutzungen und
Übermittlungsinformationen anzeigen können. Von der
Benutzeroberfläche aus können Sie auch Diagramme, Berichte und
Protokolle erstellen.
• Unterstützung von McAfee ePolicy Orchestrator, mit der Sie das Gerät in
einen ePolicy Orchestrator-Server integrieren können, um erweiterte
statistische, chronologische, administrative und graphische Berichte für
die von der Anwendung aufgezeichneten Daten erstellen zu können (siehe
Konfigurationshandbuch).
• Ein schneller Sicherungsvorgang, durch den Sie die Einstellungen des
Geräts schnell über das Netzwerk speichern und wiederherstellen können
(siehe Seite 61).
• Ein schneller Wiederherstellungsvorgang zum Wiederherstellen der
Gerätesoftware für den unwahrscheinlichen Fall eines Problems; Seite 64.
Installationshandbuch DEU - 9
Page 86

Installationshandbuch – Deutsch
Was nicht möglich ist
Das Gerät verfügt über viele Funktionen, doch bedenken Sie folgendes:
• Es ist keine Firewall. Sie müssen das Gerät in Ihrem Unternehmen
verwenden, hinter Ihrer vorhandenen Firewall.
• Es ist kein Mailserver. Es kann u. U. erforderlich werden, Ihre Firewall,
Mailserver, Web-Cache und weitere Geräte so zu konfigurieren, daß
Protokollverkehr durch das Gerät geleitet wird (siehe Seite 53).
• Es ist kein Mailübertragungsagent und behält keine Kopien der
E-Mail-Nachrichten, die das Gerät durchlaufen, es sei denn, diese werden
in den Quarantänebereich verschoben oder zurückgestellt.
• Es ist kein vielseitiger Webserver zum Speichern von Webseiten.
• Es ist kein vielseitiger Server zum Speichern von zusätzlicher Software und
Dateien. Installieren Sie keine Software auf dem Gerät oder fügen Sie keine
zusätzlichen Dateien hinzu, es sei denn, Sie werden in der Dokumentation
zu dem Gerät oder von Ihrem Support-Mitarbeiter ausdrücklich dazu
aufgefordert.
• Das Gerät stellt nur Proxys für die Protokolle SMTP, FTP, HTTP und POP3
zur Verfügung. Sie dürfen nicht versuchen, anderen Datenverkehr durch
das Gerät zu leiten.
DEU - 10 McAfee WebShield e500 Version 2.5
Page 87

Lieferumfang des WebShield e500
Vergewissern Sie sich, daß alle Teile vorhanden sind, die mit dem Gerät
geliefert werden. Überprüfen Sie die Produktverpackung, um sicherzustellen,
daß Sie kein Teil übersehen haben. Falls eines der Teile fehlt oder beschädigt
ist, wenden Sie sich an Ihren Händler.
Hardware und Software
• Zwei UTP-Netzwerkkabel der Kategorie 5 mit RJ-45-Ports:
– Die beiden blauen Kabel sind durchgehende (ungekreuzte) Kabel.
– Das orangefarbene Kabel ist gekreuzt.
“Installation des McAfee WebShield e500“ auf Seite 32 beschreibt, wie die
Kabel zusammen mit dem Gerät verwendet werden.
• Montagesatz zum Einbau des Geräts in ein 19-Zoll-Gestell.
• WebShield e500-Wiederherstellungs-CD.
• Verschiedene Netzkabel für unterschiedliche Länder.
WICHTIG: Prüfen Sie, ob das verwendete Netzkabel für die
Verwendung in Ihrem Land geeignet ist. Falls kein geeignetes Kabel
mitgeliefert wurde, wenden Sie sich an Ihren Händler. Schließen Sie
das Gerät nicht an eine Stromquelle an, bevor Sie die Informationen
in “Informationen zu Stromversorgung und Sicherheit“ auf Seite 3
gelesen haben.
Installationshandbuch – Deutsch
Benutzerdokumentation
Dieses Handbuch ist nur eines der Dokumente, die dem Gerät beigelegt sind,
damit Sie das Produkt wirksam verwenden können. In den
Versionshinweisen finden Sie eine Beschreibung der weiteren
Dokumentationskomponenten.
Zusätzliche Dokumentation
• Garantie-Informationen und Rücksendepostkarte.
• McAfee PrimeSupport-Informationen.
• Zusätzliche Literatur, wie beispielsweise Sonderangebote und Lizenzen
anderer Hersteller.
Installationshandbuch DEU - 11
Page 88

Installationshandbuch – Deutsch
Zusätzlich erforderliche Teile
Sie können den Montagesatz verwenden, um WebShield e500 in einem
19-Zoll-Gestell zu installieren. Um das Gerät an einem anderen Standort
installieren zu können, benötigen Sie u. U. zusätzliche
Ausrüstungsgegenstände, um den Standort vorzubereiten und das Gerät zu
sichern. Stellen Sie sicher, daß Sie jederzeit alle Sicherheitshinweise beachten
(siehe “Informationen zu Stromversorgung und Sicherheit“ auf Seite 3).
Um das Gerät zu konfigurieren und zu verwalten, muß ein Computer
entweder mit demselben Netzwerk wie das Gerät oder direkt mit dem Gerät
verbunden sein (siehe Schritt 4 auf Seite 33). Mit dem Web-Browser des
Computers können Sie dann auf die Benutzeroberfläche des Geräts zugreifen.
Voraussetzungen für den Konfigurationscomputer
Die Benutzeroberfläche des Geräts wurde für Internet Explorer v4.0, v5.0, v5.5
oder v6.0 optimiert und unterstützt Netscape Navigator v4.7.
Wenn Sie auf das Gerät zugreifen, prüft dieses, ob Ihr Web-Browser die
richtigen Komponenten enthält, und zeigt für alle fehlenden Komponenten
Dialogfelder an.
In Ihrem Web-Browser muß folgendes aktiviert sein:
• Secure Sockets Layer (SSL) v3.0-Verschlüsselung
• JavaScript
• ActiveX (für Microsoft Internet Explorer)
• Plug-Ins (für Netscape Navigator)
Die Benutzeroberfläche wird mit den folgenden Bildschirmeinstellungen am
besten angezeigt:
• 65 536 Farben (mindestens 256 Farben)
• Auflösung 1152 x 864
DEU - 12 McAfee WebShield e500 Version 2.5
Page 89

Installationshandbuch – Deutsch
Wiederherstellen oder Aktualisieren der Gerätesoftware
Zusätzlich zur allgemeinen Verwaltung des Geräts müssen Sie u. U. auch
folgendes durchführen:
• Im unwahrscheinlichen Fall eines Problems die Gerätesoftware auf beiden
Laufwerken des Geräts wiederherstellen.
• Aktualisieren Sie die Gerätesoftware mit einer WebShield
e500-Aktualisierungs-CD.
Um diese Tasks durchführen zu können, müssen Sie eine Tastatur und einen
Monitor direkt an das Gerät anschließen, weitere Informationen finden Sie auf
Seite 64.
Aktualisieren der Virusdefinitionsdateien (DAT-Dateien) des
Geräts und des Scan-Moduls
Durch die automatische Aktualisierungsfunktion werden die DAT-Datei und
das Scan-Modul auf dem neuesten Stand gehalten, wodurch vollständiger
Virenschutz gewährleistet wird. Diese Funktion wird mit einem Web-Browser
über die Benutzeroberfläche des Geräts konfiguriert (siehe Seite 52). Sie
können auch jederzeit sofortige Aktualisierungen starten, indem Sie dieselbe
Benutzeroberfläche verwenden.
Installieren von Service Packs und HotFixes
U. U. erhalten Sie von Ihrem Support-Mitarbeiter Service Packs und HotFixes,
die verbesserte Software für das Gerät enthalten. In diesem Fall können Sie
diese mit einem Web-Browser über die Benutzeroberfläche des Geräts
installieren. Genauere Informationen zu deren Installation finden Sie in den
mit den Service Packs und HotFixes gelieferten Informationen.
Installationshandbuch DEU - 13
Page 90

Installationshandbuch – Deutsch
Erste Schritte mit dem Gerät
Sobald Sie sich für eine Verwendungsweise des Gerät
entschieden haben (siehe Kapitel 1 im
Produkthandbuch), müssen Sie die folgenden
Aktionen durchführen, um den WebShield e500 in
Ihr aktuelles Netzwerk zu integrieren:
1. Sammeln von erforderlichen
Konfigurationsdaten (siehe Seite 20).
2. Installieren des Geräts am erforderlichen
Standort und Herstellen der nötigen
Verbindungen (siehe Seite 32).
3. Konfigurieren der Netzwerkeinstellungen des
Geräts (siehe Seite 36).
4. Konfigurieren der Protokolleinstellungen des
Geräts (siehe Seite 45).
5. Erstellen einer Sicherungskopie Ihrer
Einstellungen, so daß Sie das Gerät schnell neu
konfigurieren können, falls Sie dessen
Laufwerke wiederherstellen müssen (siehe
Seite 61).
Sobald Sie das Gerät installiert und konfiguriert
haben, greifen Sie auf dessen Benutzeroberfläche zu,
um die benötigten Funktionen auf Ihre Bedürfnisse
abzustimmen. Weitere Informationen zum
Konfigurieren einer Funktion auf der
Benutzeroberfläche erhalten Sie, indem Sie auf die
Schaltfläche “Help“ (Hilfe) klicken und das
entsprechende Hilfethema anzeigen (siehe Seite 59).
1
Zusammentragen
der Konfigurations-
informationen
2
Installieren des
Geräts
3
Konfigurieren
der
Netzwerkeinstellungen
4
Konfigurieren
der
Protokolleinstellungen
5
Erstellen einer
Sicherungskopie der
Einstellungen
Wer das Gerät installieren sollte
Es wird dringend empfohlen, daß der IT-Administrator, der für das
E-Mail-System und das Internet Gateway des Unternehmens verantwortlich
ist, das Gerät installiert und konfiguriert. Für den Konfigurationsvorgang
werden Daten für die Protokolle benötigt, die gescannt werden sollen, und die
Konfiguration muß ordnungsgemäß ausgeführt werden. Außerdem kann es,
abhängig vom Modus, in welchem Sie das Gerät betreiben (Proxymodus oder
Transparenzmodus), erforderlich sein, die anderen Netzwerkgeräte so zu
konfigurieren, daß sie die Protokolle durch das Gerät leiten.
Eine Zusammenfassung der erforderlichen Informationen finden Sie auf Seite 20.
DEU - 14 McAfee WebShield e500 Version 2.5
Page 91

Ports und Stecker
Die Ports und Stecker des Geräts sind auf Seite vii dargestellt (am Anfang
dieses Handbuchs). Die Installationsschritte auf Seite 32 beschreiben, wie die
Geräte an die Ports angeschlossen werden.
HINWEIS: U. U. wird das Erscheinungsbild des Geräts zu einem
beliebigen Zeitpunkt während der Herstellung verändert. Aus diesem
Grund können sich die Positionen und Arten der Ports und Stecker an
Ihrem Gerät von denen unterscheiden, die in diesem Handbuch
dargestellt sind. Falls die Änderungen wesentlich sind, finden Sie in den
begleitenden Versionshinweisen neue Informationen.
Diese Ports und Stecker sind unten beschrieben.
A
Zwei Festplattenlaufwerke
Beide Laufwerke sind 17,4 GB große, während des Betriebs austauschbare
SCSI-Festplattenlaufwerke, die in einer hardwarebasierten RAID
1 -Konfiguration (Spiegelung) verwaltet werden. Auf den Festplatten wird
das Betriebssystem und die Datenverarbeitung des Geräts gespiegelt, um im
unwahrscheinlichen Fall eines Problems mit einem der beiden Laufwerke
(angezeigt durch die rot leuchtende LED des Laufwerks) einen nahtlosen
Betrieb sicherzustellen. Die Laufwerke sind in Caddies untergebracht, so daß
Sie ein fehlerhaftes Laufwerk ersetzen können, während das Gerät in Betrieb
ist. Das Ersatzlaufwerk wird automatisch von dem vorhandenen Laufwerk
abgebildet (siehe “Eine LED des Festplattenlaufwerks leuchtet rot“ auf Seite
69).
Installationshandbuch – Deutsch
B
CD-ROM-Laufwerk
Das CD-ROM-Laufwerk wird zum Wiederherstellen und Aktualisieren der
Gerätesoftware verwendet und darf sonst nicht verwendet werden (siehe
Schritt 4 auf Seite 64).
Installationshandbuch DEU - 15
Page 92

Installationshandbuch – Deutsch
C
Bedienungsfeld
Das Bedienungsfeld in der rechten unteren Ecke des Geräts enthält die LEDs,
die Systeminformationen bereitstellen. Außerdem sind eine
Zurücksetzen-Taste und ein Ein-Schalter vorhanden.
Zurücksetzen-Taste
Startet das Gerät neu, wobei ein Aus- und Wiedereinschalten simuliert
wird.
Ein-Schalter
Zum Einschalten des Geräts, so daß es betriebsbereit ist (die Strom-LED
leuchtet). Falls die Strom-LED nicht leuchtet, befindet sich das Gerät im
Bereitschaftsmodus (Standby-Modus).
Befindet sich das Gerät im Bereitschaftsmodus (Standby-Modus),
bleiben die Netzwerk-Ports aktiv, doch es können keine Protokolle oder
für das Gerät bestimmte Daten passieren, so daß der Virenschutz für Ihr
Unternehmen erhalten bleibt.
HINWEIS: Falls der Stromversorgungsschalter (an der
E
Rückseite des Geräts) sich in der AUS-Stellung befindet, bekommt
das Gerät keinen Strom.
Überhitzungs-LED
Leuchtet auf, wenn das Gerät überhitzt. Dies kann durch mangelhafte
Belüftung des Geräts verursacht werden, oder wenn die
Raumtemperatur die normalen Betriebsbedingungen überschreitet.
Hören Sie auf das Geräusch des Lüfters des Geräts (im Inneren des
Geräts), um zu überprüfen, ob dieser noch arbeitet. Falls der Lüfter nicht
mehr zu arbeiten scheint, schalten Sie das Gerät aus, und wenden Sie sich
an Ihren Händler.
Netzwerkaktivitäts-LEDs
Blinken, wenn an den Netzwerk-Ports Netzwerkaktivitäten stattfinden.
NIC 1 ist der LAN1-Port, NIC 2 ist der LAN2-Port. Ist die Strom-LED
ausgeschaltet und diese LEDs blinken, befindet sich das Gerät im
Bereitschaftsmodus (Standby-Modus).
CD-ROM-Laufwerkaktivitäts-LED
Blinkt, wenn das Gerät auf die CD im CD-ROM-Laufwerk zugreift.
Strom-LED
Leuchtet auf, wenn das Gerät eingeschaltet und betriebsbereit ist.
DEU - 16 McAfee WebShield e500 Version 2.5
Page 93

Installationshandbuch – Deutsch
D
Netzanschluß
Verwenden Sie das im Lieferumfang enthaltene Netzkabel, um das Gerät an
eine Steckdose anzuschließen.
WICHTIG: Prüfen Sie, ob das im Lieferumfang enthaltene Netzkabel für
die Verwendung in Ihrem Land geeignet ist. Anderenfalls wenden Sie
sich an Ihren Händler.
E
Stromversorgungsschalter
Schalten Sie das Gerät mit diesem Schalter ein, so daß es Strom von der
Steckdose erhält, an die es angeschlossen ist.
HINWEIS: Falls der Stromversorgungsschalter sich in der EIN-Stellung
befindet, doch der Ein-Schalter (im Bedienungsfeld an der
Vorderseite des Geräts) befindet sich in der AUS-Stellung, ist das Gerät
im Bereitschaftsmodus (Standby-Modus).
F
Tastatur-Port
Schließen Sie nur dann eine Tastatur an diesen Port an (violett markiert), wenn
Sie die Gerätesoftware wiederherstellen oder aktualisieren möchten (siehe
Schritt 1 auf Seite 64).
C
G
Monitor-Port
Schließen Sie nur dann einen Monitor an diesen Port an, wenn Sie die
Gerätesoftware wiederherstellen oder aktualisieren möchten (siehe Schritt 2
auf Seite 64).
Installationshandbuch DEU - 17
Page 94

Installationshandbuch – Deutsch
H
LAN1-Port (NIC 1)
Der LAN1-Port ist ein RJ-45 10/100 MBit/s automatisch erfassender
Ethernet-Netzwerk-Port, über den das Gerät mit Ihrem vorhandenen
Netzwerk verbunden wird. Weitere Verbindungsinformationen finden Sie
unter Schritt 4 auf Seite 33.
Der LAN1-Port empfängt und überträgt folgende Daten:
• Ein- und ausgehenden Protokollverkehr.
• Verwaltungs- und Protokollierungsdaten, einschließlich der
Kommunikation von dem Remote-Web-Browser, mit dem Sie auf die
Benutzeroberfläche des Geräts zugreifen. Falls Sie ePolicy
Orchestrator-Software auf dem Gerät verwenden, wird diese
Kommunikation ebenfalls durch diesen Port übertragen.
Der LAN1-Port hat die standardmäßige IP-Adresse 10.1.1.108 (Subnet-Maske
255.255.255.0), um Ihnen zunächst über das Netzwerk Zugriff auf das Gerät zu
ermöglichen. Wenn Sie das Gerät konfigurieren, können Sie folgendes tun:
• Neue (für Ihr Netzwerk gültige) IP-Adressen hinzufügen.
• Standard-IP-Adressen ändern oder deaktivieren.
• Löschen Sie die Standard-IP-Adresse, so daß sie nicht verwendet werden
kann.
HINWEIS: In früheren WebShield-Versionen wurde der LAN1-Port als
Daten-Port bezeichnet. Daher ist es möglich, daß Sie in vorhandenen
Dokumentationen Hinweise auf diesen Port finden.
DEU - 18 McAfee WebShield e500 Version 2.5
Page 95

Installationshandbuch – Deutsch
I
LAN2-Port (NIC 2)
Der LAN2-Port ist ein RJ-45 10/100 MBit/s automatisch erfassender
Ethernet-Netzwerk-Port. Seine Funktionsweise hängt davon ab, wie das Gerät
eingesetzt wird:
• Proxymodus – Der LAN2-Port kann nur für direkte lokale
Verwaltungsverbindungen verwendet werden. Dieser Port kann keine
eingehenden und ausgehenden Protokolldaten übertragen.
Sie können diesen Port verwenden, falls Sie aus folgenden Gründen keine
Remote-Verwaltungsverbindung über den Daten-Port herstellen können:
– Die IP-Adresse des LAN1-Ports gehört zu einem anderen Subnet als
Ihr Remote-Computer.
– Sie haben die IP-Adresse für den LAN1-Port vergessen, die Sie
eingestellt haben, und haben die standardmäßige IP-Adresse
10.1.1.108 für diesen Port deaktiviert.
• Transparenzmodus – Der LAN2-Port wird (gemeinsam mit dem
LAN1-Port) verwendet, um das Gerät mit einem vorhandenen Netzwerk
zu verbinden. Er empfängt und leitet denselben Datentyp weiter wie der
LAN1-Port.
Weitere Verbindungsinformationen finden Sie unter Schritt 4 auf Seite 33.
Der LAN2-Port hat die Standard-IP-Adresse 10.1.2.108 (Subnet-Maske
255.255.255.0). Wenn Sie das Gerät konfigurieren, können Sie folgendes tun:
• Neue (für Ihr Netzwerk gültige) IP-Adressen hinzufügen.
• Standard-IP-Adressen ändern oder deaktivieren.
• Löschen Sie die Standard-IP-Adresse, so daß sie nicht verwendet werden
kann.
• Deaktivieren Sie den Port, so daß er nicht verwendet werden kann.
WICHTIG: Deaktivieren Sie den LAN-Port nicht, wenn Sie den
Transparenzmodus eingestellt haben.
In früheren WebShield-Versionen wurde der LAN2-Port als
Verwaltungs-Port bezeichnet. Daher ist es möglich, daß Sie in
vorhandenen Dokumentationen Hinweise auf diesen Port finden.
Installationshandbuch DEU - 19
Page 96

Installationshandbuch – Deutsch
Zusammenfassen der Konfigurationsinformationen
Sobald Sie sich für eine Verwendungsweise für das
Gerät entschieden haben (siehe Kapitel 1 im
Produkthandbuch), können Sie die erforderlichen
Konfigurationsinformationen zusammentragen
(Schritt 1).
In diesem Abschnitt werden die Informationen
aufgelistet, die Sie bereithalten müssen. Es wird
empfohlen, diese Informationen vor der Installation
und Konfiguration zu sammeln, so daß Sie das Gerät
schnell einrichten können.
Es wurde Raum gelassen, damit Sie die
Informationen auf einer gedruckten Ausgabe
dieses Abschnitts aufzeichnen können.
In Kapitel 11 des Produkthandbuchs finden Sie
nützliche Einzelheiten über die
Konfigurationsinformationen, die von Ihnen
festgelegt werden können, sowie darüber, wie sich
diese Angaben auf die Funktionsweise des Geräts
auswirken.
Schritt 2, Installieren des Geräts, wird auf Seite 32
beschrieben.
Hostname des Geräts
Geben Sie einen eindeutigen Hostnamen für das Gerät an:
1
Zusammentragen
von Konfigurations-
informationen
2
Installieren des
Geräts
3
Konfigurieren
der
Netzwerkeinstellungen
4
Konfigurieren
der
Protokolleinstellungen
5
Erstellen einer
Sicherungskopie der
Einstellungen
Hostname
Domäne
Geben Sie die vollständig qualifizierte Domäne oder
Subdomäne an, in der sich das Gerät befindet.
Domänenname
Beispiele: meinefirma.com, netzwerk1.meinefirma.com
DEU - 20 McAfee WebShield e500 Version 2.5
Page 97

Netzwerkadressen
Geben Sie die TCP/IP-Netzwerk-Adreßinformationen für das Gerät an:
Installationshandbuch – Deutsch
TCP/IP-Adresse
IP-Adresse des LAN1-Port
und Subnet-Maske
IP-Adresse des LAN2-Port
und Subnet-Maske
IP-Adresse des lokalen
DNS-Servers
Standard-Gateway oder
IP -Adresse des Routers
HINWEIS: Sie können mehrere IP-Adressen für die Ports LAN1 und
. . .
. . .
. . .
. . .
. . .
. . .
LAN2 konfigurieren.
In früheren WebShield-Versionen wurde der LAN1-Port als Daten-Port
bezeichnet, und der LAN2-Port als Verwaltungs-Port. Daher ist es
möglich, daß Sie in vorhandenen Dokumentationen Hinweise auf diese
Ports finden.
Interne Netzwerke
Stellen Sie die Domänen oder IP-Adressen für die internen Netzwerke bereit
(innerhalb Ihres Unternehmens), mit denen das Gerät kommuniziert. Sie
können beliebig viele interne Netzwerke angeben (unten wurde Raum für
zehn Netzwerke gelassen).
HINWEIS: Schließen Sie die Domäne ein, in der sich das Gerät befindet,
es sei denn, diese Domäne soll als externes Netzwerk behandelt werden.
Netzwerk Domäne oder IP-Adresse und Subnet-Maske
Beispiel 1
Beispiel 2
meinefirma.com
192 . 168 . 1 . 0
255 . 255 . 255 . 0
Beispiel 3
1
*.meinefirma.com
. . .
Installationshandbuch DEU - 21
Page 98

Installationshandbuch – Deutsch
2
3
4
5
6
. . .
. . .
. . .
. . .
. . .
. . .
. . .
. . .
. . .
. . .
7
8
9
10
. . .
. . .
. . .
. . .
. . .
. . .
. . .
. . .
. . .
DEU - 22 McAfee WebShield e500 Version 2.5
Page 99

Installationshandbuch – Deutsch
Externe Netzwerke
Stellen Sie die Domänen oder IP-Adressen für die externen Netzwerke bereit
(außerhalb Ihres Unternehmens), mit denen das Gerät kommuniziert. Sie
können beliebig viele externe Netzwerke angeben (unten wurde Raum für
zehn Netzwerke gelassen).
WICHTIG: Es wird empfohlen, den * -Domäneneintrag in Ihren
externen Netzwerken zu behalten, weil dadurch sichergestellt wird, daß
das Gerät stellvertretend Datenverkehr für das Internet empfängt.
Vergessen Sie nicht, auch die IP-Adresse für Ihre Firewall anzugeben.
Netzwerk Domäne oder IP-Adresse und Subnet-Maske
Beispiel 1
Beispiel 2
Beispiel 3
1
2
3
4
5
test.meinefirma.com
vertrieb.meinefirma.com
*
. . .
. . .
. . .
. . .
. . .
. . .
. . .
. . .
. . .
. . .
6
. . .
. . .
Installationshandbuch DEU - 23
Page 100

Installationshandbuch – Deutsch
7
. . .
. . .
8
. . .
. . .
9
. . .
. . .
10
. . .
. . .
Proxy- oder Transparenzmodus?
Legen Sie den Betriebsmodus für das Gerät fest (es kann jeweils nur einer der
beiden Modi verwendet werden):
Proxymodus (expliziter Proxy).
Transparenzmodus (transparenter Proxy).
Ausführliche Informationen über diese Modi finden Sie im Abschnitt “Proxy
oder Transparenz?“ im Produkthandbuch.
WICHTIG: Beide Modi unterscheiden sich voneinander. Bevor Sie das
Gerät installieren und konfigurieren, sollten Sie sich daher unbedingt
näher mit der Funktionsweise beider Modi befassen und sich für
denjenigen Modus entscheiden, der für Ihren Anwendungsfall geeignet
ist.
Da jedes Netzwerk anders ist, muß das Gerät mit den richtigen Daten für
Ihr Netzwerk konfiguriert werden, um einen fehlerfreien Betrieb zu
gewährleisten. Wenn Sie nicht sicher sind, welche Daten Sie angeben
müssen, wenden Sie sich an den Netzwerkspezialisten Ihrer Firma.
DEU - 24 McAfee WebShield e500 Version 2.5
 Loading...