

Page 1

Product Guide
McAfee Email and Web Security
Appliances 5.6.0
Page 2

COPYRIGHT
Copyright © 2010 McAfee, Inc. All Rights Reserved.
No part of this publication may be reproduced, transmitted, transcribed, stored in a retrieval system, or translated into any language in any form or by
any means without the written permission of McAfee, Inc., or its suppliers or affiliate companies.
TRADEMARK ATTRIBUTIONS
AVERT, EPO, EPOLICY ORCHESTRATOR, FOUNDSTONE, GROUPSHIELD, INTRUSHIELD, LINUXSHIELD, MAX (MCAFEE SECURITYALLIANCE EXCHANGE),
MCAFEE, NETSHIELD, PORTALSHIELD, PREVENTSYS, SECURITYALLIANCE, SITEADVISOR, TOTAL PROTECTION, VIRUSSCAN, WEBSHIELD are registered
trademarks or trademarks of McAfee, Inc. and/or its affiliates in the US and/or other countries. McAfee Red in connection with security is distinctive of
McAfee brand products. All other registered and unregistered trademarks herein are the sole property of their respective owners.
LICENSE INFORMATION
License Agreement
NOTICE TO ALL USERS: CAREFULLY READ THE APPROPRIATE LEGAL AGREEMENT CORRESPONDING TO THE LICENSE YOU PURCHASED, WHICH SETS
FORTH THE GENERAL TERMS AND CONDITIONS FOR THE USE OF THE LICENSED SOFTWARE. IF YOU DO NOT KNOW WHICH TYPE OF LICENSE YOU
HAVE ACQUIRED, PLEASE CONSULT THE SALES AND OTHER RELATED LICENSE GRANT OR PURCHASE ORDER DOCUMENTS THAT ACCOMPANY YOUR
SOFTWARE PACKAGING OR THAT YOU HAVE RECEIVED SEPARATELY AS PART OF THE PURCHASE (AS A BOOKLET, A FILE ON THE PRODUCT CD, OR A
FILE AVAILABLE ON THE WEBSITE FROM WHICH YOU DOWNLOADED THE SOFTWARE PACKAGE). IF YOU DO NOT AGREE TO ALL OF THE TERMS SET
FORTH IN THE AGREEMENT, DO NOT INSTALL THE SOFTWARE. IF APPLICABLE, YOU MAY RETURN THE PRODUCT TO MCAFEE OR THE PLACE OF
PURCHASE FOR A FULL REFUND.
2
McAfee Email and Web Security Appliances 5.6.0 Product Guide
Page 3

Contents
Preface 7
About this guide ..................................7
Optional components and related products ........................8
Working with your McAfee Email and Web Security Appliances ................9
Overview of Dashboard features 21
Dashboard ....................................21
Audience ..................................7
Conventions .................................7
Finding product documentation .........................8
Contact information ..............................8
The interface ................................10
Common tasks within the interface ....................... 12
Ports used by Email and Web Security Appliances .................16
Resources .................................17
Edit Preferences ...............................25
Graphs Edit Preferences ............................27
Overview of Reports features 29
Types of reports ..................................29
Scheduled Reports .................................30
Email Reports overview ...............................33
Interactive Reporting — Total view ....................... 37
Interactive Reporting — Time view .......................38
Interactive Reporting — Itemized view ......................38
Interactive Reporting — Detail view .......................39
Selection — Favorites .............................40
Selection — Filter ..............................40
Web Reports overview ...............................43
Interactive Reporting — Total view ....................... 46
Interactive Reporting — Time view .......................47
Interactive Reporting — Itemized view ......................47
Interactive Reporting — Detail view .......................48
Selection — Favorites .............................49
Selection — Filter ..............................49
System Reports ..................................52
Interactive Reporting — Detail view .......................54
Selection — Favorites .............................54
Selection — Filter ..............................55
Overview of Email features 59
Life of an email message ..............................59
Message Search ..................................62
Email Overview ..................................70
Email Configuration ................................ 71
McAfee Email and Web Security Appliances 5.6.0 Product Guide
3
Page 4

Contents
Protocol Configuration ............................ 72
Receiving Email ...............................86
Sending Email ................................97
Email Policies ..................................101
Introduction to policies ............................101
Email Scanning Policies menu .........................103
About Protocol Presets ............................109
Email Scanning Policies ...........................109
Dictionaries ................................146
Registered Documents ............................155
Quarantine Configuration ..............................159
Quarantine Options .............................159
Quarantine Digest Options ..........................160
Digest Message Content ...........................161
Overview of Web features 163
Web Configuration ................................163
HTTP Connection Settings ...........................163
HTTP Protocol Settings ............................165
ICAP Connection Settings ...........................169
ICAP Authentication .............................171
ICAP Protocol Settings ............................172
FTP Connection Settings ...........................174
FTP Protocol Settings ............................175
Web Policies ...................................178
Introduction to policies ............................178
Web Scanning Policies ............................179
Dictionaries ................................197
Overview of System features 207
Appliance Management ..............................207
General ..................................207
DNS and Routing ..............................212
Time and Date ...............................214
Appliance Management — Remote Access ....................215
UPS Settings ................................219
Database Maintenance ............................222
Appliance Management — System Administration .................225
Default Server Settings ...........................232
Cluster Management ...............................233
Backup and Restore Configuration .......................233
Configuration Push .............................235
Load Balancing ...............................236
Resilient Mode ...............................239
Users, Groups and Services .............................240
Directory Services .............................240
Web User Authentication ...........................240
Policy Groups ...............................241
Role-Based User Accounts ..........................241
Virtual Hosting ..................................250
Virtual Hosts ................................250
Virtual Networks ..............................255
Certificate Management ..............................256
Certificates ................................256
Certificate Revocation lists (CRLs) .......................259
Logging, Alerting and SNMP .............................261
4
McAfee Email and Web Security Appliances 5.6.0 Product Guide
Page 5

Contents
Email Alerting ...............................261
SNMP Alert Settings .............................268
SNMP Monitor Settings ............................268
System Log Settings ............................269
WebReporter ................................275
Logging Configuration ............................275
Component Management ..............................276
Update Status ...............................276
Package Installer ..............................282
ePO ...................................283
Setup Wizard ..................................284
Welcome .................................285
Overview of Troubleshoot features 311
Troubleshooting Tools ...............................311
Ping and Trace Route ............................312
System Load ................................312
Route Information .............................313
Disk Space ................................314
Troubleshooting Reports ..............................314
Minimum Escalation Report ..........................314
Capture Network Traffic ...........................315
Save Quarantine ..............................316
Log Files .................................316
Error Reporting Tool .............................318
Tests ......................................318
System Tests ...............................318
How appliances work with ePolicy Orchestrator 321
Configuring your appliance for ePolicy Orchestrator management 323
Managing your appliances from within ePolicy Orchestrator 325
Index 327
McAfee Email and Web Security Appliances 5.6.0 Product Guide
5
Page 6

Page 7
Preface
This guide provides the information you need to configure, use, and maintain your McAfee product.
About this guide
This information describes the guide's target audience, the typographical conventions and icons used
in this guide, and how the guide is organized.
Audience
McAfee documentation is carefully researched and written for the target audience.
The information in this guide is intended primarily for:
• Administrators — People who implement and enforce the company's security program.
Conventions
This guide uses the following typographical conventions and icons.
Book title or Emphasis Title of a book, chapter, or topic; introduction of a new term; emphasis.
Bold Text that is strongly emphasized.
User input or Path Commands and other text that the user types; the path of a folder or program.
Code
User interface
Hypertext blue A live link to a topic or to a website.
A code sample.
Words in the user interface including options, menus, buttons, and dialog
boxes.
Note: Additional information, like an alternate method of accessing an option.
Tip: Suggestions and recommendations.
Important/Caution: Valuable advice to protect your computer system,
software installation, network, business, or data.
Warning: Critical advice to prevent bodily harm when using a hardware
product.
McAfee Email and Web Security Appliances 5.6.0 Product Guide
7
Page 8
Preface
Optional components and related products
Finding product documentation
McAfee provides the information you need during each phase of product implementation, from
installation to daily use and troubleshooting. After a product is released, information about the product
is entered into the McAfee online KnowledgeBase.
Task
1
Go to the McAfee Technical Support ServicePortal at http://mysupport.mcafee.com.
2
Under Self Service, access the type of information you need:
To access... Do this...
User documentation
1
Click Product Documentation.
2
Select a Product, then select a Version.
3
Select a product document.
KnowledgeBase
• Click Search the KnowledgeBase for answers to your product questions.
• Click Browse the KnowledgeBase for articles listed by product and version.
Contact information
Use this information to contact McAfee.
To contact McAfee, either contact your local representative, or visit http://www.mcafee.com.
Optional components and related products
The appliances have several components and related products. Some components can be fully
integrated into the appliances. Other products provide a central point for monitoring and managing
several McAfee® products, including the appliances. The next table describes the optional components
and related products. For more information, see the McAfee website.
Related products
The following McAfee products can be used with your McAfee® Email and Web Security Appliances
product.
Component/ Product Description Compatible with type of
McAfee Quarantine Manager Consolidates quarantine
management for many McAfee
products, including the
appliances.
McAfee ePolicy Orchestrator Provides a central control point
for reporting activity on several
appliances.
appliances
Email
Email+Web
All
8
McAfee Email and Web Security Appliances 5.6.0 Product Guide
Page 9

Working with your McAfee Email and Web Security Appliances
Auxiliary hardware
Some appliances include auxiliary hardware:
Auxiliary hardware Features Appliance
Accelerator card Higher throughput for HTTP
3400
protocol.
Fiber card Connection via optical fiber
3300, 3400
instead of copper wire.
Remote Access card Remote access and some
3300, 3400
management of the appliance.
For example, the card can
re-image the appliance remotely
using a CD in another computer.
Your appliance has all auxiliary hardware pre-installed for the hardware
and software combination that you have purchased.
Combinations of software and hardware
The following combinations of software and hardware are possible:
Preface
Appliance Combined Email and Web Email only Web only
3000 Yes No No
3100 Yes No No
3200 Yes No No
3300 Yes No No
3400 No Yes Yes
M3 Content
Yes Yes Yes
Security Blade
Server
M7 Content
Yes Yes Yes
Security Blade
Server
Virtual appliances
The McAfee® Email and Web Security Appliance software is also available as a virtual appliance,
running within a VMware environment. It is available as the combined Email and Web version of the
software.
Working with your McAfee Email and Web Security Appliances
This section describes important concepts to help you configure your McAfee® Email and Web Security
Appliance.
McAfee Email and Web Security Appliances 5.6.0 Product Guide
9
Page 10

Preface
Working with your McAfee Email and Web Security Appliances
The interface
Use this page to get to know your way around the user interface.
The interface you see might look slightly different from that shown here,
because it can vary depending on the appliance's hardware platform,
software version, and language.
Refer
Option
ence
A Navigation bar
B User information bar
C Section icons
D Tab bar
E Support control buttons
F View control
G Content area
A — Navigation bar
The navigation bar contains four areas: user information, section icons, tab bar, and support controls.
B — User information bar
C — Section icons
The number of section icons depends on the software version that you are using. Click an icon to
change the information in the content area and the tab bar. The icons include the following:
10
McAfee Email and Web Security Appliances 5.6.0 Product Guide
Page 11
Working with your McAfee Email and Web Security Appliances
Icon Menu Features
Dashboard
Use this page to see a summary of the appliance. From this page
you can access most of the pages that control the appliance.
Preface
Reports
Use the Reports pages to view events recorded on the appliance,
such as viruses detected in email messages or during web access,
and system activities such as details of recent updates and logins.
Email
Use the Email pages to manage threats to email messages,
quarantine of infected email, and other aspects of email
configuration.
Web
Use the Web pages to manage threats to web downloads, and to
manage other aspects of web configuration.
System
Troubleshoot
Use the System pages to configure various features on the appliance.
Use the Troubleshoot pages to diagnose any problems with the
appliance.
D — Tab bar
The contents of the tab bar are controlled by the selected section icon. The selected tab dictates what
is displayed in the content area.
E — Support control buttons
The support control buttons are actions that apply to the content area.
Icon Description
Refreshes or updates the content.
Returns you to the previously viewed page. We recommend that you click this button,
rather than your browser's Back button.
Appears when you configure something to allow you to apply your changes.
Appears when you configure something to allow you to cancel your changes.
Opens a window of Help information. Much of the information in this window also
appears in the Product Guide.
F — View control
The view control button shows or hides a status window.
The status window, which appears in the bottom right of the interface, shows recent activity. New
messages are added at the top of the window. If a message is blue and underlined, you can click the
link to visit another page. You can also manage the window with its own Clear and Close links.
McAfee Email and Web Security Appliances 5.6.0 Product Guide
11
Page 12

Preface
Working with your McAfee Email and Web Security Appliances
G — Content area
The content area contains the currently active content and is where most of your interaction will be.
The changes that you make take effect after you click the green
checkmark.
Common tasks within the interface
This section describes some common procedures for setting up, configuring, and managing your
appliance.
Tasks
• Enabling each feature on page 12
To ensure good detection and best performance, some features on the appliance are on
(enabled) by default, while others are off (disabled). Many dialog boxes and windows have
an Enabled checkbox. To use any feature, make sure you have selected this checkbox.
• Making changes to the appliance's configuration on page 12
Use this task to make changes to the operation of the appliance.
Enabling each feature
To ensure good detection and best performance, some features on the appliance are on (enabled) by
default, while others are off (disabled). Many dialog boxes and windows have an Enabled checkbox. To
use any feature, make sure you have selected this checkbox.
Making changes to the appliance's configuration
Use this task to make changes to the operation of the appliance.
Task
1
In the navigation bar, click an icon. The blue tabs below the icons change to show the available
features.
2
Click the tabs until you reach the page you need.
To locate any page, examine the tabs, or locate the subject in the Help index. The location of the
page is often described at the foot of the Help page. Example:
System | Appliance Management | Database Maintenance
3
On the page, select the options. Click the Help button (?) for information about each option.
4
Navigate to other pages as needed.
5
To save your configuration changes, click the green checkmark icon at the top right of the window.
6
In the Configuration change comment window, type a comment to describe your changes, then click OK.
Wait a few minutes while the configuration is updated.
7
To see all your comments, select System | Cluster Management | Backup and Restore Configuration [+] Review
Configuration Changes in the navigation bar.
12
McAfee Email and Web Security Appliances 5.6.0 Product Guide
Page 13
Working with your McAfee Email and Web Security Appliances
Preface
Using lists
The following information explains the use of lists within Email and Web Security Appliances.
Contents
Making and viewing lists
Adding information to a list
Removing single items from a list
Removing many items from a list
Changing information in a list
Viewing information in a long list
Ordering information in a list
Ordering information alphabetically in a list
Making and viewing lists
Lists specify information such as domains, addresses and port numbers on many pages in the
interface. You can add new items to a list, and delete existing items.
Although the number of rows and columns might vary, all lists behave in similar ways. In some lists,
you can also import items from a prepared file, and change the order of the items. Not all lists have
these actions. This section describes all the actions that are available in the interface.
Adding information to a list
Use this task to add information into a list within the user interface.
Task
1
Click Add below the list.
A new row appears in the table. If this is your first item, a column of checkboxes appears on the
left of the table. You might also see a Move column on the right of the table.
2
Type the details in the new row. Press Tab to move between fields.
3
For help with typing the correct information, move your cursor over the table cell, and wait for a
pop-up to appear. For more information, click
4
To save the new items immediately, click the green checkmark: .
.
Removing single items from a list
Some lists take a long time to create, and therefore you can delete only one entry at a time to prevent
the accidental deletion of a lot of information.
Click the trashcan icon .
If the item cannot be deleted, the icon is unavailable:
Alternatively, do the following:
Task
1
Click the item to select it. The row turns pale blue.
2
Click Delete at the bottom of the list.
Removing many items from a list
On some long lists, you can remove many items quickly.
McAfee Email and Web Security Appliances 5.6.0 Product Guide
13
Page 14

Preface
Working with your McAfee Email and Web Security Appliances
Task
1
In the column of checkboxes on the left of the table, select each item. To select many items, select
the checkbox in the table's heading row to select all the items, then deselect those that you want
to keep.
2
Click Delete at the bottom of the list.
3
To save the new changes immediately, click the green checkmark:
.
Changing information in a list
Use this task to change hte information contained within a list within the user interface.
If an item cannot be changed, the icon is unavailable: .
Task
1
Click the edit icon
2
Click on the text, then delete or retype it.
3
To save the new changes immediately, click the green checkmark:
4
To cancel any recent changes, click the close button at the top right of the window:
.
Viewing information in a long list
If the list has many items, you might not be able to see them all at the same time.
Task
1
To determine the position of an item in the list or the size of the list, view the text at the bottom of
the list, such as Items 20 to 29 of 40.
2
To move through the list or to move quickly to either end of the list, click the arrows at the bottom
right of the list. (
).
Ordering information in a list
Some lists display items in priority order. The first item in the list is the highest priority, the last item
is the lowest priority. To change the item's priority:
Task
1
Find the row that contains the item.
2
In the Move column (on the right of the table), click the upward or downward arrow:
14
McAfee Email and Web Security Appliances 5.6.0 Product Guide
Page 15
Working with your McAfee Email and Web Security Appliances
Preface
Ordering information alphabetically in a list
When information is given in a list, you can sort the list alphabetically.
Task
•
To change the order:
• To force items in a column into alphabetical order, click the column heading. Items in other
columns are automatically sorted accordingly. An icon appears in the column heading to indicate
that this column is sorted:
• To sort the information differently, click the other column headings.
• To reverse and restore the alphabetical order of the information within a single column, click the
icons in the column heading:
Importing and exporting information
Topics describing how to import and export information.
Contents
Importing prepared information
Exporting prepared information
Importing prepared information
From some pages, you can import information from other devices, appliances, or software for use on
the appliance, such as from a previously prepared comma-separated value (.csv).
Imported information normally overwrites the original information.
Table 1 Some formats for comma-separated value (.csv) files
Type of information Format Example
Domain D, domain, IP address D, www.example.com,
192.168.254.200
Network address N, IP address, IP subnet mask N, 192.168.254.200,
255.255.255.0
Email address E, email-address E, network_user@example.com
Each item in the file is on a single line.
Task
1
Click Import.
2
In the Import window, browse to the file.
If further options are displayed in the dialog box, make the relevant choices based on the type of
file or information you are importing.
3
Click Open to import the information from the file.
Exporting prepared information
From some pages, you can export information from the appliance for use on other devices, appliances,
or software.
The information is generated in various forms, such as a .zip file, a .pdf, or a .csv file.
McAfee Email and Web Security Appliances 5.6.0 Product Guide
15
Page 16
Preface
Working with your McAfee Email and Web Security Appliances
Table 2 Some formats for comma-separated value (.csv) files
Type of information Format Example
Domain D, domain, IP address D, www.example.com,
192.168.254.200
Network address N, IP address, IP subnet mask N, 192.168.254.200,
255.255.255.0
Email address E, email-address E, network_user@example.com
Each item in the file is on a single line.
Task
1
Click Export.
2
In the Export window, follow the instructions to create the file.
Ports used by Email and Web Security Appliances
Use this topic to review the ports used by your McAfee Email and Web Security Appliance.
The appliance uses various ports to communicate with your network and other devices.
Table 3 Ports used by Email and Web Security Appliances
Use Protocol Port Number
Software updates FTP 21
Anti-virus HTTP
FTP
McAfee Global Threat
DNS 53
80
21
Intelligence file reputation
Anti-spam rules and streaming
HTTP 80
updates
Anti-spam engine updates FTP 21
McAfee Global Threat
SSL 443
Intelligence message reputation
McAfee Global Threat
SSL 443
Intelligence web reputation
lookup
McAfee Global Threat
HTTP 80
Intelligence web reputation
database update
Domain Name System (DNS) DNS 53
McAfee Quarantine Manager HTTP 80
Active directory 389
McAfee Global Threat
SSL 443
Intelligence feedback
16
McAfee Email and Web Security Appliances 5.6.0 Product Guide
Page 17
Working with your McAfee Email and Web Security Appliances
Preface
Intercept ports
When operating in either of the transparent modes — transparent bridge mode or transparent router
mode — the appliance uses the following intercept ports to intercept traffic to be scanned.
Table 4 Intercept ports
Protocol Port number
FTP 21
HTTP 80 or 8080
ICAP 1344
POP3 110
SMTP 25
Listening ports
The appliance typically uses the following ports to listen for traffic on each protocol. The appliance
listens for traffic arriving on the designated ports. You can set up one or more listening ports for each
type of traffic being scanned by your appliance.
Table 5 Typical listening ports
Protocol Port number
FTP 21
HTTP 80
ICAP 1344
POP3 110
SMTP 25
Ports used for ePolicy Orchestrator communication
When you configure your Email and Web Security Appliances to be managed by ePolicy Orchestrator®,
or when you set ePolicy Orchestrator to monitor and report on your appliances, the following ports are
used by default for communication between ePolicy Orchestrator and your appliances.
Table 6 ePolicy Orchestrator communication ports
Port usage Port number
Agent-to-server communication port
Agent-to-server communication secure port
Agent wake-up communication port
Agent broadcast communication port
Console-to-application server communication port
Client-to-server authenticated communication port
80
443 (when enabled)
8081 (default)
8082 (default)
8443
8444
Resources
This topic describes the information, links, and supporting files that you can find from the Resources
dialog box.
Click Resources from the black information bar at the top of the Email and Web Security Appliance user
interface.
McAfee Email and Web Security Appliances 5.6.0 Product Guide
17
Page 18
Preface
Working with your McAfee Email and Web Security Appliances
The Resources dialog box contains links to different areas or to files that you might need when setting
up your appliance.
Link name Description
Technical
support
Clicking this link takes you to the McAfee Technical Support ServicePortal login page
(https://mysupport.mcafee.com/Eservices/Default.aspx).
From this page, you can search the KnowledgeBase, view product documentation and
video tutorials, as well as access other technical support services.
Submit a sample
Virus Information
Library
McAfee Spam
Submission Tool
ePO Extensions
If you have a file that you believe to be malicious, but that your McAfee systems are
not detecting, you can safely submit it to McAfee for further analysis.
Follow the Submit a sample link and either log on or register as a new user to access the
McAfee Labs Tool to submit suspicious files.
Viruses are continually evolving, with new malicious files being developed daily. To
find out more about particular viruses or other threats, follow the link to the McAfee
Threat Center.
This free tool integrates into Microsoft Outlook and allows users to submit missed
spam samples and email that was wrongly categorized as spam to McAfee Labs.
McAfee Spam Submission Tool (MSST) version 2.2 can also be used with McAfee
Secure Content Management appliances and McAfee Quarantine Manager to train the
Bayesian database.
The tool supports automated blacklisting and whitelisting, and has an installer that
supports automated script-based installations. Supported platforms: Windows 2000
and Windows XP with Microsoft Outlook 2000 or later.
The latest MSST and documents can be downloaded from the following location:
http://www.mcafee.com/us/enterprise/downloads/free_tools/index.html
Download the ePolicy Orchestrator extensions for Email and Web Security Appliances.
This file contains both the EWG and the EWS extensions.
The EWG extension allows reporting from within ePolicy Orchestrator for the following
products:
• Email and Web Security Appliances version 5.5
ePO 4.5 Help
SMI File
• Email and Web Security Appliances version 5.6
• McAfee Web Gateway
• McAfee Email Gateway
The EWS extension provides full ePolicy Orchestrator management for Email and Web
Security Appliances version 5.6.
For you to use ePolicy Orchestrator for either reporting or management, the ePO
extensions need to be installed on your ePolicy Orchestrator server.
Download the ePolicy Orchestrator Help extensions for the two ePO extensions listed
above.
This file installs the Help extensions relating to the ePolicy Orchestrator extensions for
Email and Web Security Appliances onto your ePolicy Orchestrator server.
Download the Structure of Managed Information (SMI) file for use with the Simple
Network Management Protocol (SNMP).
This file provides information about the syntax used by the SNMP Management
Information Base (MIB) file.
18
McAfee Email and Web Security Appliances 5.6.0 Product Guide
Page 19
Link name Description
MIB File
Download the MIB file for use with SNMP.
This file is used to define the information that your Email and Web Security Appliance
can transmit using SNMP.
Working with your McAfee Email and Web Security Appliances
Preface
HP OpenView
NNM Smart
Plug-in Installer
Download the HP OpenView installer file to enable you to configure your Email and
Web Security Appliance to communicate with HP OpenView.
McAfee Email and Web Security Appliances 5.6.0 Product Guide
19
Page 20

Page 21
Overview of Dashboard features
When you first open the browser, you see the Dashboard, which gives a summary of the activity of the
appliance.
From this page you can access most of the pages that control the appliance.
Dashboard
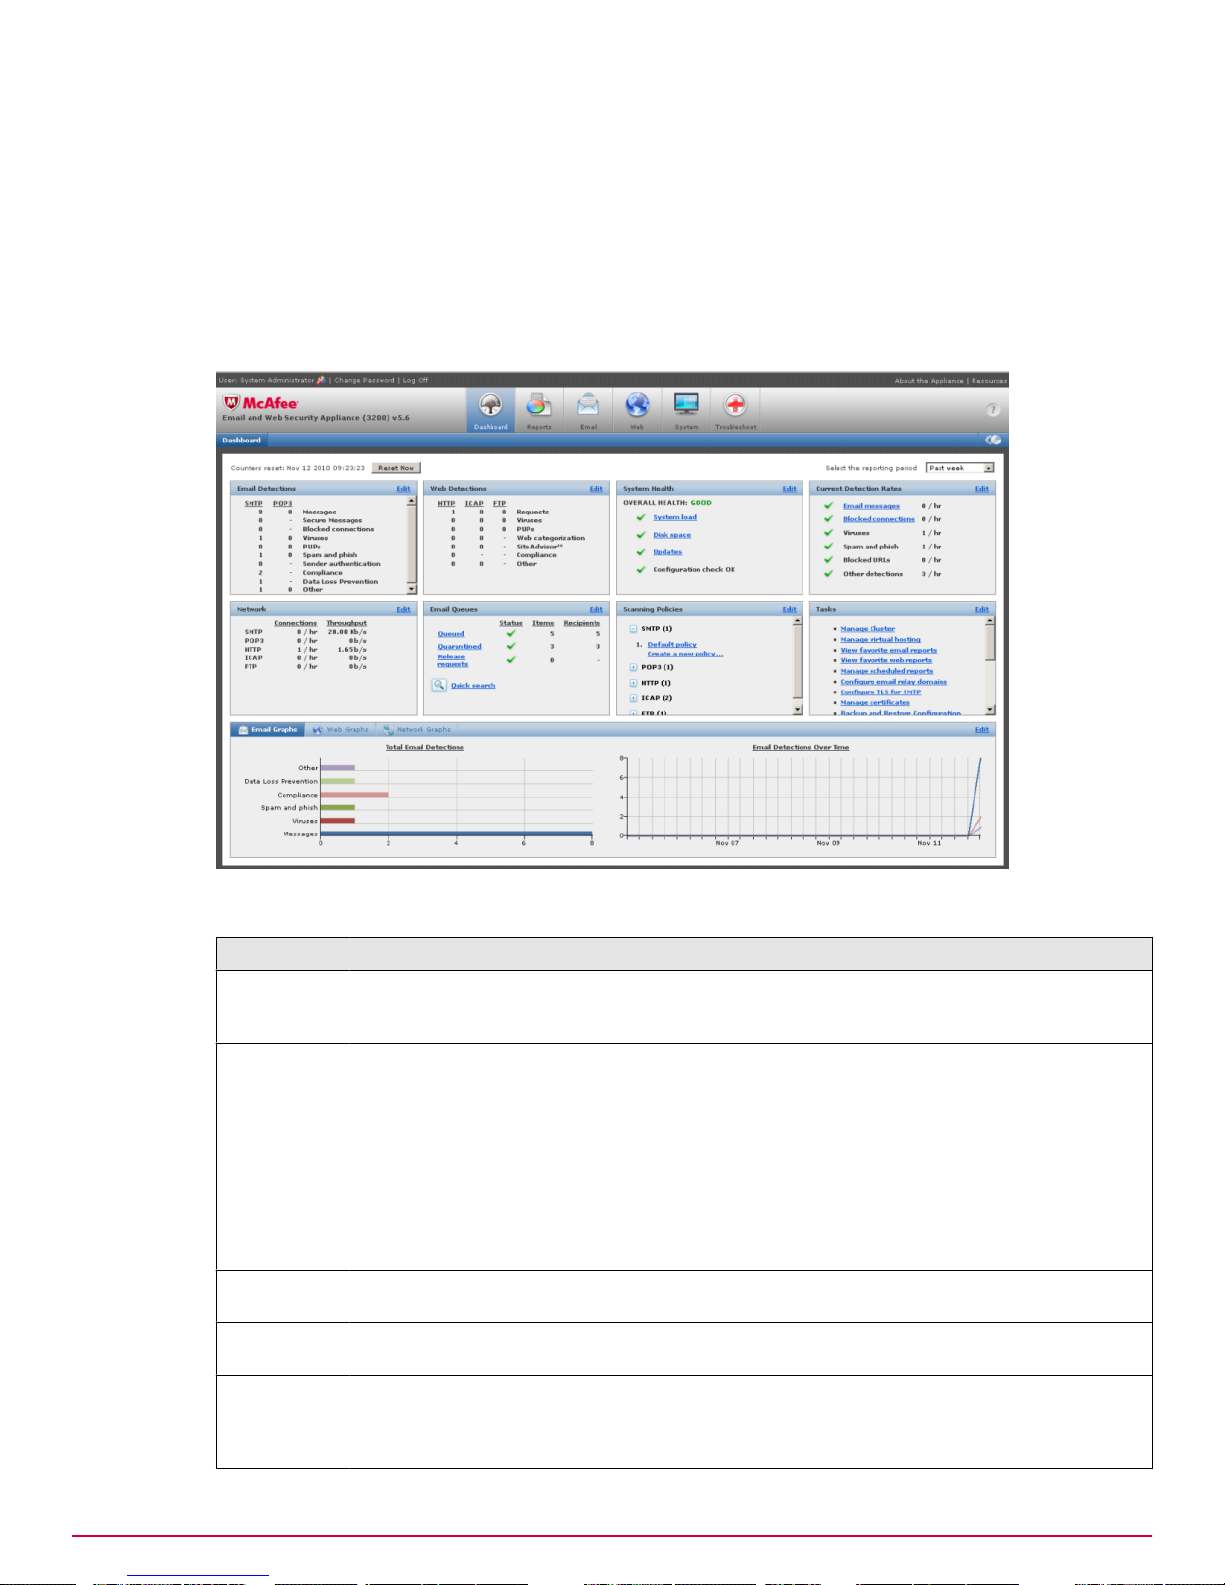
The Dashboard provides a summary of the activity of the appliance.
Dashboard
Dashboard
Use this page to access most of the pages that control the appliance. On a cluster master appliance,
use this page also to see a summary of activity on the cluster of appliances.
To change the view in any section, click Edit, which opens another window.
Benefits of using the Dashboard
The Dashboard provides a single location for you to view summaries of the activities of the appliance.
Depending on how you have your appliance configured, you can view information about:
• The email flowing through the appliance.
• The web traffic being scanned.
• The overall system health of the appliance.
• Current detection rates.
• The performance of your network.
• Email messages being queued by the appliance.
• The number of scanning policies that you have in place, separate by protocol.
You can also configure a list of links to tasks that you often use, providing you with a quick and easy
method of moving to the correct area of the user interface.
McAfee Email and Web Security Appliances 5.6.0 Product Guide
21
Page 22
Overview of Dashboard features
Dashboard
The lower pane of this page displays key graphic information about performance of the appliance.
Each of these dashboard panes can be customized to show the information that you need most often.
When you log on to the appliance, and as you work within its configuration pages, a dialog box
appears up in the bottom-right hand corner of the screen to inform you of any recommended
configuration changes, or give warning messages concerning the appliance operation or settings. For
example, when you first set up the appliance, it warns you that it is operating as an open-relay.
Dashboard page
Dashboard panes
Option Definition
Email Detections
and Web
Detections
System Health
Current
detection rates
Network
Email Queues
Displays the number of detections under each protocol. Click Edit to change the view in
this window. Although you can choose not to display information about a protocol, the
appliance continues to scan that traffic
Displays the status of important components and lets you change the settings of
recommended system configuration changes:
• For Updates, a green checkmark indicates that the components will update itself
automatically. To make a manual update, click the blue link
• For other components, a green checkmark indicates that the component is operating
within acceptable limits. For more information, click the blue links
• To adjust the levels at which the warning and alert icons appear, and to change what
the recommended configuration changes dialog box displays, click Edit
Displays the status of important detections by the appliance, using icons
Displays the number of connections under each protocol. Although you can deselect a
protocol after clicking Edit, the appliance continues to handle that traffic
Displays the number of items, and the number of recipients for each queued item in
the Queued, Quarantined, and Release requests queues maintained by the appliance,
using icons. To visit the pages that manage the queues, click the blue links. To quickly
search through email in the queues, click Quick search
22
McAfee Email and Web Security Appliances 5.6.0 Product Guide
Page 23

Option Definition
Scanning
Policies
Displays a list of the policies that the appliance is applying. Although you can deselect
a protocol after clicking Edit, the appliance continues to apply policies to that traffic. To
view the scanning policies or add more policies, click the blue links
Tasks
Load balancing
Displays a list of common tasks. To remove or reorganize the tasks, click Edit
On a master cluster appliance, displays the state of the cluster of appliances. To
change the settings of the meter, click Edit
Graphs ...
Displays graphs that show appliance activity over time. Although you can deselect a
protocol after clicking Edit, the appliance continues to monitor that traffic
Load balancing
This section is available only on a cluster master appliance or
management blade (on a Content Security Blade Server).
Option Definition
Email | Web
Message per hour
(Email)
Conversations per
hour (Web)
Status
When clicked, the meter displays Message per hour (Email) or Conversations per
hour (Web)
Displays the average throughput of the cluster, based on measurements taken
every few minutes. If the cluster has twice as many scanning appliances, its
throughput almost doubles too. Extra management activity consumes some of the
processing power
Displays the status of the device:
Overview of Dashboard features
Dashboard
Scanning Device Type
Name
— Operating normally
— Needs attention
— Needs immediate attention
Displays the type of scanning device:
— Cluster Master
— Cluster Failover
— Email and Web Security Appliance
— Email Security Appliance
— Web Security Appliance
— Web Gateway Appliance
Displays the name of the appliance as configured
McAfee Email and Web Security Appliances 5.6.0 Product Guide
23
Page 24

Overview of Dashboard features
Dashboard
Option Definition
State
Displays the current state of each appliance:
Network — Connected to the network
Redundant — The Cluster Failover device is not currently running but will take over if
the master cluster appliance fails
Install — Installing software
Synchronizing — Synchronizing with the cluster master
Boot — Booting
Shutdown — Shutting down
Malconfigured — Configuration file is faulty
Unconfigured — Not configured for load balancing
Disabled — Disabled by the user
Failed — No longer on the network. No heartbeat was detected
Fault — A fault has been detected on this appliance
Legacy — Not compatible for load balancing
Load
Active
Displays the average system load over a period of five minutes
Displays the number of active connections for each appliance. The row for the
cluster master shows the total for all appliance
Connections
Displays the number of connections handled by each appliance since the counters
were last reset
Component version
information
Displays the versions of anti-spam and anti-virus DAT files. The version numbers
are the same if the appliances are up-to-date. During updating, the values might
be different. To see more information, move the cursor over the text and wait for a
yellow box to appear
Counter behavior
All counters trigger once for every detection. For example, if a message contains two attachments that
both contain viral content, the Viruses counter increments by two. The information in the following table
applies to SMTP and POP3 statistics unless otherwise specified.
Table 7 Counter behavior
Counter Behavior
Messages
The SMTP counter increments once:
• When a TCP connection is made to the SMTP port on the appliance
• From the second <MAIL FROM> command if more than one email is received in
the same SMTP conversation
The POP3 counter increments once for every message that the appliance downloads
Secure Messages
Increments once:
• When a STARTTLS command is issued over the standard SMTP port
• When the appliance intercepts the TLS conversation, from the second <MAIL
• When messages are sent over SMTPS
24
McAfee Email and Web Security Appliances 5.6.0 Product Guide
FROM> command if more than one email is received in the same SMTP
conversation
Page 25
Table 7 Counter behavior (continued)
Counter Behavior
Blocked connections
Increments once for every SYN packet coming from an IP address that has
triggered a Reject, close and deny (Block) action. The Real-time blackhole list (RBL)
lookup feature is configured to perform this action by default for the next ten
minutes. See Sender Authentication Settings — RBL Configuration on page 123
Viruses, PUPs,
Compliance, and Data
Increment once for every detection, for example, if a message contains two
attachments that both contain viral content, the Viruses counter increments by two
Loss Prevention
Spam and phish and
Increment once for every message that triggers the scanner
Sender authentication
Other
Increment once for every detection. Applies to messages filtered because of their
size, those that fail anti-relay and directory harvest checks, and those that
contain corrupt content, protected content, encrypted content, or signed content
Due to the way that Dashboard counters are aggregated, there is a
slight difference between the information displayed in the dashboard and
that returned in a scheduled report.
Overview of Dashboard features
Dashboard
Information about statistics shown in the Email Queues list
This information applies to the Queued, Quarantined, and Release requests queues:
• If one message is sent to two recipients and is queued for delivery (for example, because the
onward MTA is down):
• The number of items in the queue will be 1 because the appliance received one message.
• The number of recipients will be 2 because the message has two recipients.
If you click on the Queued hyperlink, you see two items because there is
one message for each recipient.
• If two messages are sent to one recipient and are queued for delivery (for example, because the
onward MTA is down):
• The number of items in the queue will be 2 because the appliance received two messages.
• The number of recipients will be 2 because each message has one recipient.
If you click on the Queued hyperlink, you see two items.
Task — Turn off the McAfee Global Threat Intelligence feedback disabled warning
By default, the appliance displays a warning message if you have not enabled McAfee Global Threat
Intelligence (GTI) feedback because McAfee considers it best practice to enable this form of
communication.
1
On the appliance Dashboard, select Edit from the System Health area.
2
Deselect Show a warning if McAfee GTI feedback is not enabled.
3
Click OK.
Edit Preferences
Use this page to specify the type of status information, and tasks available from the Dashboard.
The information that you can specify using Edit on each dashboard area matches relates to the
selected area of the appliance.
McAfee Email and Web Security Appliances 5.6.0 Product Guide
25
Page 26
Overview of Dashboard features
Dashboard
Dashboard | Edit Preferences
Use this page to set the protocols for which you want statistics, the counters that you want to display,
and the reporting period. Choose from counters such as Messages, Secure Messages, Blocked
connections, Viruses, PUPs, Spam and phish, Sender authentication, Compliance, Data Loss Prevention
detections, and Other detections.
Dashboard | Web Detections | Edit
Use this page to select which protocols you want to report on, the counters you want to display on the
Dashboard, and the reporting period. Choose from counters such as Requests, Viruses, PUPs, URL
filtered, SiteAdvisor®, Compliance, and Other detections.
Dashboard | Current Detection Rates | Edit
Use this page to select the levels at which you want to receive a warning based on the number of
threat detections. Two levels of severity are available: yellow and red. Choose from Virus detection
rate, Blocked connection rate, Spam detection rate, Blocked URL rate, Other detection rate.
Dashboard | Network | Edit
Use this page to set the protocols for which you want to display connection and throughput information.
Dashboard | Email Queues | Edit
Use this page to select the levels at which you want to receive a warning based on the disk space
taken up by quarantined and queued messages, maximum capacity of the quarantine location, the
number of queued and quarantined messages, and the number of release from quarantine requests.
Two levels of severity are available: yellow and red.
Dashboard | Scanning Policies | Edit
Use this page to set the protocols for which you want policies to display, and whether you want to see
detailed policy information on the Dashboard.
On each page, you can reset the values to the default settings.
26
McAfee Email and Web Security Appliances 5.6.0 Product Guide
Page 27

Overview of Dashboard features
Dashboard
Dashboard | System Health | Edit
Use this page to select the levels at which you want to receive a warning based on load average,
memory swap rate, disk usage, attempts to use inefficient dictionary regex, the last anti-virus,
anti-spam, and URL filtering definition update. Two levels of severity are available: yellow and red.
To stop receiving notifications that the appliance is an open relay, if
web-based user authentication needs more setup or when you have not
configured McAfee Global Threat Intelligence feedback, click Edit in the
System Health area, and deselect the relevant warnings.
Dashboard | Tasks | Edit
Use this page to specify the tasks that you want to be available directly from the Dashboard, and
change their position in the list.
If you change the reporting period, that change is reflected across all
status sections.
Graphs Edit Preferences
Use this page to configure graphs to display on the Dashboard.
Dashboard | Graphs | Edit
Option Definition
Protocols By default, all the protocols are selected.
Counters By default, all the counters are selected. This option is not applicable to
Network Graphs.
Thresholds (Email timeline
graph only)
Reporting period By default, the period is the past week.
Display thresholds on the Email timeline graphs.
McAfee Email and Web Security Appliances 5.6.0 Product Guide
27
Page 28

Page 29
Overview of Reports features
This topic provides an overview of the features within the Email and Web Security Appliances that
relate to reporting the activities of the appliance.
Reports
Contents
Types of reports
Scheduled Reports
Email Reports overview
Web Reports overview
System Reports
Types of reports
You can generate reports either on your appliance, your ePolicy Orchestrator server, or externally.
System | Logging, Alerting and SNMP
Reports
Use the external methods to keep the reported events over a longer period of time than that offered
by the reporting options on the appliance itself. Use features available from System | Logging, Alerting and
SNMP, or McAfee ePolicy Orchestrator to send data to generate reports externally.
Table 8 External reporting options
External report
generation option
System log System | Logging, Alerting and SNMP. Supports the common event formats for
SNMP System | Logging, Alerting and SNMP. Supports the SNMP Alert Settings and SNMP Monitor
Email Alerting System | Logging, Alerting and SNMP | Email Alerting. You can configure Email Alerting
Definition
Splunk and ArcSight.
Settings options. The MIB file can be downloaded from the Resources tab
available from the appliances toolbar.
to alert specified people about different events that occur on your appliance.
McAfee Email and Web Security Appliances 5.6.0 Product Guide
29
Page 30
Overview of Reports features
Scheduled Reports
Table 8 External reporting options (continued)
External report
Definition
generation option
McAfee ePolicy
Orchestrator
Use ePolicy Orchestrator to generate reports about multiple appliances and
security software within your organization, such as information about the
total number of viruses detected within your organization.
McAfee Web Reporter System | Logging, Alerting and SNMP. Generates reports about Uniform Resource
Locator (URL) filtering activities. See the McAfee Web Reporter Product
Guide, available from the McAfee download site.
Use the appliance Dashboard to see high-level event statistics. Use the options in Reports to produce
regular and real-time reports on the following types of events on the appliance.
Table 9 Reporting options on the appliance
Report type Definition
Scheduled reports Reports — Set up regular activity overview (by protocol, threat type, and
detection), email detections, web detections, and system event reports and send
them to other administrators.
Email reports Reports — Create and view information about threats detected in the email passing
through your appliance, and the subsequent actions taken by the appliance.
Web reports Reports — Create and view information about threats detected in the web activity
on your appliance, and the subsequent actions taken by the appliance.
System reports Reports — Create and view information about threat detection updates, and
system events.
Scheduled Reports
Use this page to see a list of the available reports about threats that the appliance has detected.
Reports | Scheduled Reports
You can view the reports, send reports immediately to other people, or schedule reports to be sent at
regular intervals.
Benefits of creating Scheduled Reports
Keeping up-to-date with threat detection statistics and system activity, and sharing that information is
vital. The Scheduled Reports option has some default report types already set up for you, or you can
customize their content or frequency, or even create new report types as necessary. The resulting
reports can be sent by email immediately, or at regular intervals to other people in your organization
in a variety of formats, such as PDF, HTML, or text.
You must enable the default reports to run automatically. To do so, select
the report type from the list of available reports, and click Edit. On the
Edit Report dialog box, click Enable scheduled delivery.
30
McAfee Email and Web Security Appliances 5.6.0 Product Guide
Page 31

Table 10 Report types
Option Definition
Overview
Lists the number of detections by protocol, and type of threat, and provides details about
the types of detection made per protocol
Email
• Email security summary (inbound) shows the % and number of messages to internal users that
were delivered or blocked because a threat was detected
• Email security summary (outbound) shows the % and number of messages to external users that
were delivered or blocked because a threat was detected
• Email traffic flow provides information relating to the flow of messages in to, and out of the
organization
Email security trend
•
• Email volume trends (inbound and outbound) provides information relating to the amount of
messages coming in to, and going out of the organization
• Email size trends (inbound and outbound) provides information relating to the size of the messages
coming in to, and going out of the organization
• Average number of emails displays the average number of messages sent in to, or out of the
organization for one day, or more
Overview of Reports features
Scheduled Reports
Web
System
Favorite
• Users activity lists internal or external users who send or receive the most blocked or
monitored messages
• Top detections lists top virus, potentially unwanted programs, and spam, or phish detections,
and sender authentication failures
• Web security summary shows the % and number of web queries that were completed, or
blocked because a threat was detected
• Web traffic summary provides information relating to the number of protected, monitored, or
legitimate web query detections
• Top detections lists top virus or potentially unwanted program detections
• Users activity lists the users who visit the most blocked, or monitored web pages
Web traffic flow
•
Web security trend
•
• Disk utilization provides information relating to the used and available space on the disk for
items such as the log and quarantine partitions
• Disk utilization trends shows the % utilization of each partition in graph format
Click Edit to choose from a list of pre-defined report types for email, web and system reports,
and optionally send the report to other people in your organization daily, weekly, or monthly.
Any new favorite reports that you created in the Email Interactive Reports, or Web
Interactive Reports section are available from here too.
McAfee Email and Web Security Appliances 5.6.0 Product Guide
31
Page 32

Overview of Reports features
Scheduled Reports
User interface option definitions
Option Definition
Name
Displays the name of the report. By default, the list includes some standard reports,
which you cannot delete.
The icon indicates the type of content in that report:
— Overview, such as numbers of overall detections.
— Email activity
— Web activity
— System activity such as disk usage.
— A choice of popular reports.
Description
Displays the title that appears on the first page of the report, the scheduling
information, and a list of the recipients.
When clicked, generates the report, then allows you to download it for viewing in a
Download
browser or saving as a file.
When clicked, generates the report, then immediately sends it to the recipients. Any
Email Now
regular schedule is not affected.
— If the icon is disabled, the schedule has not been set. Double-click the icon,
then specify the details under Delivery Schedule.
New report
When clicked, lets you create a new report, which is an exact copy of an existing
report. A dialog box prompts you for further information:
• Report name, which appears under the Name column on this page.
• Report title, which appears at the top of the report.
When you click OK, you return to the main page. There you can select the new report,
click the icon under Edit, and design your own report.
When the icon is clicked, enables you to change the schedule, content, format and
Edit
delivery information of the selected report.
When the icon is clicked, deletes the selected report.
Delete
Task — See the number of detections by protocol and threat type over the last week
1
Select Reports | Scheduled Reports.
2
From the list of report types, select Overview, and click Edit.
3
In the Edit Report dialog box, set the Reporting period to 1 week.
4
Click OK, and apply the changes to the appliance.
5
Click Download to generate the report.
32
McAfee Email and Web Security Appliances 5.6.0 Product Guide
Page 33

Overview of Reports features
Email Reports overview
Task — Send your manager an email activity report in PDF format every Monday at
10.00am
1
Select Reports | Scheduled Reports.
2
From the list of report types, select Email, and click Edit.
3
In the Edit Report dialog box, click Enable scheduled delivery.
4
Set the Report sent option to Weekly and choose Monday from the drop-down menu.
5
Click New Recipient, type myboss@examplecompany.com.
6
Click OK, and apply the changes to the appliance.
Task — Send the web administrator a Web activity report in HTML format every
day at 5.00pm
1
Select Reports | Scheduled Reports.
2
From the list of report types, select Web, and click Edit.
3
In the Edit Report dialog box, click Enable scheduled delivery.
4
Set the Report sent option to Daily, and set the At option to 17:00.
5
In Sender and recipient details, type webadministrator@examplecompany.com.
6
Select Advanced options, and set the Document format option to HTML.
7
Click OK, and apply the changes.
Task — Send the email administrator a report that shows virus detections in email
messages over the last week
1
Select Reports | Scheduled Reports.
2
From the list of report types, select Favorite, and click Edit.
3
In Sender and recipient details, type emailadministrator@examplecompany.com.
4
Select Report content, and select the Top Viruses report.
5
Click OK, and apply the changes.
6
Click Email Now.
Email Reports overview
Use this page to create and view real-time reports about threats detected in the email passing through
your appliance, and the subsequent actions taken by the appliance.
Reports | Email Reports
You can generate a report based on a set of predefined filters, or edit the filters, test the results, and
save the report as a new report.
McAfee Email and Web Security Appliances 5.6.0 Product Guide
33
Page 34

Overview of Reports features
Email Reports overview
Benefits of creating email reports
To keep your email infrastructure running at optimal levels, you need access to up-to-date information
about threats detected in the email flowing through the appliance. Generate email reports to get
information such as:
• Ttypes of threats detected, such as viruses, or spam and phishing messages.
• Messages that had to have an action taken upon them.
• Messages that were prevented from entering or leaving your network.
• Individual sender activity.
Additionally, use the Email Reports feature with the Scheduled Reports feature to create regular
reports, and send them immediately to other people, or at regular intervals.
You can compile a list of, for example, blocked email messages using the
Message Search feature (Email | Message Search). Message Search cannot
locate messages if the appliance has not received the message body,
such as messages blocked by the Real-time Blackhole Lists (RBLs). In
this situation, use the Email Reports feature to find out about an
individual message.
Introduction to the Email Reports page
Email Reports contains several sub-pages, accessed from the tabs beneath Email Interactive Reporting and
Selection.
There are four tabs beneath Email Interactive Reporting that each provide different views on a report's
results. See View types:
Total view
•
Time view
•
Itemized view
•
Detail view
•
There are two pages beneath Selection:
• Favorites enables you to choose a report with pre-defined filters, and generate it immediately. See
Report types.
• Filter enables you to further define the data in each Favorite report using standard and advanced
filter settings, and set the period of time for which you want to retrieve data. See Filter types.
View types
Each report that you generate can be presented in one of the following views:
Type of View Definition
Total view
Time view
Itemized view
Detail view
Displays results in a bar chart and table format for each action
Displays results in a bar chart and table format over the time specified. Results are
shown in periods of ten minutes for hourly reports, by the hour for 24 hour reports,
every six hours for weekly reports, twelve hours for fortnightly reports, or daily for
monthly reports.
Displays results in a pie chart and table format for each filter criteria, or for all filters.
Displays all results in a table format. Results are shown for each detection in the
report results.
34
McAfee Email and Web Security Appliances 5.6.0 Product Guide
Page 35

Overview of Reports features
Email Reports overview
Report types
The appliance comes with a set of reports with pre-defined filters available from the Favorites tab. You
can run these reports immediately, or edit them using standard and advanced settings and save as a
new favorite report to run again in the future, then make it available in the Scheduled Reports feature.
To see the default settings in each report, hold your mouse cursor to the
left of a report name.
Table 11 Option definitions
Option Definition
Email Overview
Email Profile
Top Spam
Senders
Top Viruses
Legitimate
Monitored
Modified
Rerouted
Blocked
Displays results in Total view by default. Results show the number of legitimate,
monitored, modified, rerouted, or blocked messages processed over the previous day.
Displays results in Itemized view by default. Results show the number of items detected
for each filter selection over the previous week.
Displays results in Itemized view by default. Results are filtered using the Spam/Phish
category by default, and show the spam or phish (or both) messages by sender over
the previous 24 hours.
Displays results in Itemized view by default. Results are filtered using the Viruses
category by default, and show the viruses detected over the previous week, or results
for a specific threat that you specify.
Displays results in Time view by default. Results show the number of messages
categorized as Legitimate (that is, delivered with no detection or modification) for all
threat categories over the previous 24 hours.
Displays results in Time view by default. Results show the number of messages for all
threat categories over the previous 24 hours that triggered an event log but were
delivered with no modification.
Displays results in Time view by default. Results show the number of modified messages
(for example, cleaned or replaced with an alert message) for all threat categories
over the previous 24 hours.
Displays results in Time view by default. Results show the number of messages routed
to another server (for example, an encryption server) for all threat categories over
the previous 24 hours.
Displays results in Time view by default. Results show the number of inbound or
outbound messages stopped by the appliance for all threat categories over the
previous 24 hours.
Filter types
Each report allows you to filter the results by standard and advanced criteria.
Table 12 Option definitions — Email Reports filter options
Option Definition
Period and
Ending
Protocol
Traffic
Displays information for a period from one hour to one month, based on the selected
start date.
When clicked, the Previous and Next buttons adjust the From date, for example, moving
it to next week or the previous day.
Displays the protocols you want to view, such as SMTP.
Displays traffic, whether inbound or outbound.
In a simple network, you might see reports on compliancy for outbound traffic and
reports on spam for inbound traffic.
McAfee Email and Web Security Appliances 5.6.0 Product Guide
35
Page 36

Overview of Reports features
Email Reports overview
Table 12 Option definitions — Email Reports filter options (continued)
Option Definition
Sender
Displays information about one sender, such as user@example.com
When selected, the advanced options, Source domain and Source ID, further specify
the sender's domain or IP address, such as server1.example.com and
192.168.254.200.
Recipient
Action
Category
Detection
Virus/PuPs
Show Advanced
Displays information about one recipient, such as user@example.com
When selected, the advanced options, Destination domain and Destination ID,
further specify the recipient's domain or IP address, such as server1.example.com
and 192.168.254.200.
Enables you to filter reports on specific actions, such as Legitimate or Blocked. Examples:
To view information about one sender or recipient, type:
<user@example.com>
The name is wrapped with chevron characters.
To view information about all senders' names that begin with b or B, type:
<b*
To view information about all senders' names that begin with b, B, e, or E, type:
<b*, <e*
Displays information about a single type of detection, such as spam or virus. If the
selection is not All, you see further choices. For example, if you select Content, you
can further select Mail Size.
Extra categories appear here if you have installed any optional software.
Top Spam Senders report only. Choose whether the report should contain results for
spam senders, phish senders, or both.
Top Viruses report only. Type the name of the virus or potentially unwanted program to
get detection results for that specific threat.
When clicked, shows the options below.
To hide the options again, click Hide Advanced.
Source Domain
Source IP
Destination Domain
Destination IP
Audit ID
Filter traffic based on the domain that the messages are being sent from.
Filter traffic based on the IP address that the messages are being sent from.
Filter traffic based on the domain that the messages are being sent to.
Filter traffic based on the IP address that the messages are being sent to.
As traffic passes through the appliance it can have an Audit ID assigned. Use this
field to filter traffic with a specific Audit ID.
Policy
Provides a selection of policies.
Task — Generate an email activity overview for a particular sender
Use this task to:
• Create a report that shows global email activity in the previous 24 hours
• Filter those results to show the activity of a particular sender
• Save the report as a new favorite report to be run again in the future
• Set up a schedule to send the report regularly to the email administrator
Subtask — Run a standard email activity report
36
McAfee Email and Web Security Appliances 5.6.0 Product Guide
Page 37

1
Click Reports | Email Reports.
2
From the Favorites list, select the Email Overview (last 24h) report.
3
Click Run report to generate a report for all users.
Overview of Reports features
Email Reports overview
Subtask — Filter the data for a particular sender and save the report as a new favorite report
1
Click Filter.
2
In Sender, type sender@examplecompany.com and click Apply to filter the data for that sender.
3
Click Save, type a name for the report, and click OK.
The report appears in the list of Favorites.
Subtask — Set up a schedule to send the report regularly to the email administrator
1
Click Reports | Scheduled Reports.
2
In the list of available report documents, select Favorite, and click Edit.
3
Select Enable scheduled delivery, and set the report to run Daily at 17:00 hours.
4
Type the email administrator address.
5
Click Report content.
6
In the list of favorite reports, select the report that you created, click OK, and apply the changes to
the appliance.
Task — Show me the top viruses detected over the previous week
Use this task to show the total number of viruses detected in the previous week, and analyze the data
using different report views.
1
Click Reports | Email Reports.
2
From the Favorites list, select the Top Viruses report, and click Filter.
3
Click Apply to run the report.
4
Select Time view to see the action that was taken on each message broken down into eight hour periods.
5
Select Detail view to see further information such as policy details, and the source IP address for each
message.
Interactive Reporting — Total view
Use this page to see the actions that the appliance has taken against threats over the period specified
under Filter.
Reports | Email Reports | Email Interactive Reporting | Total View
Reports | Web Reports | Web Interactive Reporting | Total View
The information is displayed in a horizontal bar chart. If you see no information, click Apply on the Filter
tab, or change the period and click Apply.
McAfee Email and Web Security Appliances 5.6.0 Product Guide
37
Page 38

Overview of Reports features
Email Reports overview
For information about the Filter or Favorites section on the right, click its tab, then click the Help button
(?).
Table 13 Option definitions
Option Definition
Action
Displays the list of actions taken by the appliance’s policies against each email
message or web access.
Number of email messages
Displays the number of email messages or web accesses where this action was
applied.
Interactive Reporting — Time view
Use this page to see the actions that the appliance has taken against threats over the period specified
under Filter.
Reports | Email Reports | Email Interactive Reporting | Time View
Reports | Web Reports | Web Interactive Reporting | Time View
The information is displayed in a vertical bar chart, and organized into small intervals. For example, a
weekly report shows activity in whole 6-hour portions of each day. If you see no information, click
Apply on the Filter tab, or change the period and click Apply.
You might not be able to view some older data, because the appliance’s
log is regularly purged.
For information about the Filter or Favorites section on the right, click its tab, then click the Help button
(?).
Table 14 Option definitions
Option Definition
Start
Displays the start of the period, such as on the hour.
Legitimate to Blocked Displays the numbers of email messages or web accesses corresponding to each
action in that period. If Action is not set to All, most columns have values of 0.
Interactive Reporting — Itemized view
Use this page to see the details of every detected threat.
Reports | Email Reports | Email Interactive Reporting | Itemized View
Reports | Web Reports | Web Interactive Reporting | Itemized View
The information is displayed in a pie chart.
38
McAfee Email and Web Security Appliances 5.6.0 Product Guide
Page 39

Overview of Reports features
Email Reports overview
If you see no information, click Apply on the Filter tab, or change the period and click Apply.
For information about the Filter or Favorites section on the right, click its tab, then click the Help button
(?).
Table 15 Option definitions
Option Definition
Pie chart Displays the percentage of all email or web accesses that match the criteria
selected in the Filter tab.
The orange portion of the pie shows the portion of the data that matches the
criteria. The green portion shows the remainder. If no filtering is set, the whole pie
appears orange.
Filter criteria
Displays the list of categories taken against the email message or web access.
Click any blue link for more information represented as a bar chart.
To return to the pie chart, click List all criteria. To examine the information further,
click any blue links.
As you click each link, values in the Filter tab are updated. Click Apply to display the
pie chart again.
Number of distinct
Displays the number of email messages or web accesses where each criteria applies.
criteria items within
the selection
Interactive Reporting — Detail view
Use this page to see the details of every detected threat, such as the exact time and IP address of
each detection that the appliance has handled.
Reports | Email Reports | Email Interactive Reporting | Detail View
Reports | Web Reports | Web Interactive Reporting | Detail View
Reports | System Reports | System Interactive Reporting | Detail View
Information includes any threat in the email messages or IP addresses. The information is displayed in
a table.
If you see no information, click Apply on the Filter tab, or change the period and click Apply.
For information about the Filter or Favorites section on the right, click its tab, then click the Help button
(?).
McAfee Email and Web Security Appliances 5.6.0 Product Guide
39
Page 40

Overview of Reports features
Email Reports overview
Table 16 Option definitions
Option Definition
Date and other
headings
Displays the details of each email message or web access.
To see all columns, move the horizontal scroll bar.
To sort the data in any column, click the column heading. The most recently sorted
column is indicated by a red arrow in the column heading.
Data
Click the blue link to see further information about an email message — in a table
or as raw data (that is, in an XML-like format).
To move through the list or to move quickly to either end of the list, click the
arrows at the bottom right of the list.
Selection — Favorites
Use this page to run an existing favorite report immediately, or build a list of links to reports that you
have already saved.
Reports | Email Reports | Selection | Favorites
Reports | Web Reports | Selection | Favorites
Reports | System Reports | Selection | Favorites
Table 17 Option definitions
Option Definition
Name
Run report
Edit
Delete
Displays the name of each report that you have saved.
When clicked, opens the selected report and displays it to the left of the screen.
Opens the Filter page from where you can change the settings, test the report results, and
save the report criteria into a new favorite report.
Removes that Favorite report from the list, and from the reports available in Scheduled
Reports.
Selection — Filter
Use this section of the page to refine or “filter” the information in the report.
Reports | Email Reports | Selection | Filter
Reports | Web Reports | Selection | Filter
40
McAfee Email and Web Security Appliances 5.6.0 Product Guide
Page 41

Overview of Reports features
Email Reports overview
Reports | System Reports | Selection | Filter
For example, you can see information about one user’s visits to undesirable websites on Tuesday of
last week, or about viruses from all sources in the last month. Make your selections, then click Apply.
The new report might take a while to appear. You can save these selections to produce a similar report
at any time. or clear the selections you made.
Table 18 Option definitions — Email Reports filter options
Option Definition
Period and
Ending
Displays information for a period from one hour to one month, based on the selected
start date.
When clicked, the Previous and Next buttons adjust the From date, for example, moving
it to next week or the previous day.
Protocol
Traffic
Sender
Recipient
Action
Displays the protocols you want to view, such as SMTP.
Displays traffic, whether inbound or outbound.
In a simple network, you might see reports on compliancy for outbound traffic and
reports on spam for inbound traffic.
Displays information about one sender, such as user@example.com
When selected, the advanced options, Source domain and Source ID, further specify
the sender's domain or IP address, such as server1.example.com and
192.168.254.200.
Displays information about one recipient, such as user@example.com
When selected, the advanced options, Destination domain and Destination ID,
further specify the recipient's domain or IP address, such as server1.example.com
and 192.168.254.200.
Enables you to filter reports on specific actions, such as Legitimate or Blocked. Examples:
To view information about one sender or recipient, type:
<user@example.com>
The name is wrapped with chevron characters.
To view information about all senders' names that begin with b or B, type:
<b*
To view information about all senders' names that begin with b, B, e, or E, type:
<b*, <e*
Category
Displays information about a single type of detection, such as spam or virus. If the
selection is not All, you see further choices. For example, if you select Content, you
can further select Mail Size.
Extra categories appear here if you have installed any optional software.
Detection
Top Spam Senders report only. Choose whether the report should contain results for
spam senders, phish senders, or both.
Virus/PuPs
Top Viruses report only. Type the name of the virus or potentially unwanted program to
get detection results for that specific threat.
Show Advanced
When clicked, shows the options below.
To hide the options again, click Hide Advanced.
Source Domain
Filter traffic based on the domain that the messages are being sent from.
McAfee Email and Web Security Appliances 5.6.0 Product Guide
41
Page 42

Overview of Reports features
Email Reports overview
Table 18 Option definitions — Email Reports filter options (continued)
Option Definition
Source IP
Destination Domain
Destination IP
Audit ID
Filter traffic based on the IP address that the messages are being sent from.
Filter traffic based on the domain that the messages are being sent to.
Filter traffic based on the IP address that the messages are being sent to.
As traffic passes through the appliance it can have an Audit ID assigned. Use this
field to filter traffic with a specific Audit ID.
Policy
Provides a selection of policies.
Table 19 Option definitions — Web Reports filter options
Option Definition
Period and Ending Displays information for a period from one hour to one month, based on the
selected start date.
When clicked, the Previous and Next buttons adjust the From date, for example,
moving it to next week or the previous day.
Protocol
User login
URL
Action
Category
Show Advanced
Source domain
Source IP
Destination domain
Destination IP
Audit ID
Action
Policy
Category
Displays the protocols you want to view, such as HTTP.
Displays information about one user.
When selected, the advanced options, Source domain and Source IP, further specify the
domain or IP address, such as server1.example.com and 192.168.254.200.
Displays information about URL (web address), such as example.com.
When selected, the advanced options, Destination domain and Destination ID, further
specify the recipient's domain or IP address, such as server1.example.com and
192.168.254.200.
Displays information about the action taken against the threats, for example,
threats that were blocked or only monitored. The menu does not offer the choice of
legitimate web accesses because they are too numerous.
Displays information about specific categories of traffic, for example, Viruses or URL
Filtering. The menu does not offer the choice of legitimate web accesses because
they are too numerous.
When clicked, shows the options below.
To hide the options again, click Hide Advanced.
Filter traffic based on the domain that the traffic is being sent from.
Filter traffic based on the IP address that the traffic is being sent from.
Filter traffic based on the domain that the traffic is being sent to.
Filter traffic based on the IP address that the traffic is being sent to.
As traffic passes through the appliance it can have an Audit ID assigned. Use this
field to filter traffic with a specific Audit ID.
Enables you to filter reports on specific actions, such as Legitimate or Blocked.
Provides a selection of policies.
Displays information about a single type of detection, such as spam or virus. If the
selection is not All, you see further choices. For example, if you select Content, you
can further select Mail Size.
Extra categories appear here if you have installed any optional software.
42
McAfee Email and Web Security Appliances 5.6.0 Product Guide
Page 43

Overview of Reports features
Table 20 Option definitions — System Reports filter options
Option Definition
Period and Ending Displays information for a period from one hour to one month, based on the
selected start date.
When clicked, the Previous and Next buttons adjust the From date, for example,
moving it to next week or the previous day.
Web Reports overview
Event type
Event
Reason
Displays reports about particular event types. For example, issues concerning the
Network.
Select individual events based on the chosen Event type.
Select individual reasons based on the chosen Event.
Web Reports overview
Use this page to create and view real-time reports about threats detected in the web activity on your
appliance, and the subsequent actions taken by the appliance.
Reports | Email Reports
You can generate a report based on a set of pre-defined filters, or edit the filters, test the results, and
save the report as a new report.
Benefits of creating web reports
To keep your web infrastructure running at optimal levels, you need access to up-to-date information
about threats detected in the web traffic flowing through the appliance. Generate web reports to get
information such as:
• The types of threats detected, such as viruses, or packers
• Web requests that had to have an action taken upon them
• URLs that were blocked or monitored
• Individual employee activity
Additionally, use the Web Reports feature with the Scheduled Reports feature to create regular
reports, and send them immediately to other people, or at regular intervals.
Introduction to the Web Reports page
Web Reports contains several sub-pages, accessed from the tabs beneath Web Interactive Reporting and
Selection.
There are four tabs beneath Web Interactive Reporting that each provide different views on a reports
results. See View types:
Total view
•
Time view
•
Itemized view
•
Detail view
•
There are two pages beneath Selection:
McAfee Email and Web Security Appliances 5.6.0 Product Guide
43
Page 44

Overview of Reports features
Web Reports overview
• Favorites enables you to choose a report with pre-defined filters, and generate it immediately. See
Report types.
• Filter enables you to further define the data in each Favorite report using standard and advanced
filter settings, and set the period of time for which you want to retrieve data. See Filter types.
View types
Each report that you generate can be presented in one of the following views:
Type of View Definition
Total view
Time view
Itemized view
Detail view
Displays results in a bar chart and table format for each action
Displays results in a bar chart and table format over the time specified. Results are
shown in periods of ten minutes for hourly reports, by the hour for 24 hour reports,
every six hours for weekly reports, twelve hours for fortnightly reports, or daily for
monthly reports.
Displays results in a pie chart and table format for each filter criteria, or for all filters.
Displays all results in a table format. Results are shown for each detection in the
report results.
Report types
The appliance comes with a set of reports with pre-defined filters available from the Favorites tab. You
can run these reports immediately, or edit them using standard and advanced settings and save as a
new favorite report to run again in the future, then make it available in the Scheduled Reports feature.
To see the default settings in each report, hold your mouse cursor to the
left of a report name.
Table 21 Option definitions
Option Definition
Top URL List
Detail view
Monitored
Modified
Blocked
Blocked (SiteAdvisor)
Displays results in Itemized view by default. Results show top 15 blocked websites
processed over the previous 24 hours
Displays results in Detail view by default. Results show information about blocked
websites identified over the previous 24 hours
Displays results in Time view by default. Results show the web requests that
triggered an event log, but were allowed to continue over the previous 24 hours
Displays results in Time view by default. Results show the web requests from which
the appliance removed a threat before delivering it successfully over the previous
24 hours
Displays results in Time view by default. Results show the web requests that were
stopped and replaced by an alert because the appliance detected a threat such as
a virus or packer over the previous 24 hours
Displays results in Total view by default. Results show the web requests blocked by
the McAfee SiteAdvisor program due to a detected threat over the previous 24 hours
44
McAfee Email and Web Security Appliances 5.6.0 Product Guide
Page 45

Overview of Reports features
Web Reports overview
Filter types
Each report allows you to filter the results by standard and advanced criteria.
Table 22 Option definitions — Web Reports filter options
Option Definition
Period and Ending Displays information for a period from one hour to one month, based on the
selected start date.
When clicked, the Previous and Next buttons adjust the From date, for example,
moving it to next week or the previous day.
Protocol
User login
URL
Action
Category
Show Advanced
Source domain
Source IP
Destination domain
Destination IP
Audit ID
Action
Policy
Category
Displays the protocols you want to view, such as HTTP.
Displays information about one user.
When selected, the advanced options, Source domain and Source IP, further specify the
domain or IP address, such as server1.example.com and 192.168.254.200.
Displays information about URL (web address), such as example.com.
When selected, the advanced options, Destination domain and Destination ID, further
specify the recipient's domain or IP address, such as server1.example.com and
192.168.254.200.
Displays information about the action taken against the threats, for example,
threats that were blocked or only monitored. The menu does not offer the choice of
legitimate web accesses because they are too numerous.
Displays information about specific categories of traffic, for example, Viruses or URL
Filtering. The menu does not offer the choice of legitimate web accesses because
they are too numerous.
When clicked, shows the options below.
To hide the options again, click Hide Advanced.
Filter traffic based on the domain that the traffic is being sent from.
Filter traffic based on the IP address that the traffic is being sent from.
Filter traffic based on the domain that the traffic is being sent to.
Filter traffic based on the IP address that the traffic is being sent to.
As traffic passes through the appliance it can have an Audit ID assigned. Use this
field to filter traffic with a specific Audit ID.
Enables you to filter reports on specific actions, such as Legitimate or Blocked.
Provides a selection of policies.
Displays information about a single type of detection, such as spam or virus. If the
selection is not All, you see further choices. For example, if you select Content, you
can further select Mail Size.
Extra categories appear here if you have installed any optional software.
Task — Generate a web activity report for a particular user
Use this task to:
• create a report that shows global web activity in the previous 24 hours
• filter those results to show the activity of a particular user
• save the report as a new favorite report to be run again in the future
• set up a schedule to send the report regularly to the web administrator
Subtask — Run a standard web activity report
McAfee Email and Web Security Appliances 5.6.0 Product Guide
45
Page 46

Overview of Reports features
Web Reports overview
1
Click Reports | Web Reports.
2
From the Favorites list, select the Detail View (last 24h) report.
3
Click Run report to generate a report for all users.
Subtask — Filter the data for a particular user and save the report as a new favorite report
1
Click Filter.
2
In User login, type the system <username> for that user, and click Apply to filter the data accordingly.
3
Click Save, type a name for the report , and click OK.
The report appears in the list of Favorites.
Subtask — Set up a schedule to send the report regularly to the web administrator
1
Click Reports | Scheduled Reports.
2
In the list of available report documents, select Favorite, and click Edit.
3
Select Enable scheduled delivery, and set the report to run Daily at 17:00 hours.
4
Type the web administrator address.
5
Click Report content.
6
In the list of favorite reports, select the report that you created, click OK, and apply the changes to
the appliance.
Task — Show me the top URLs visited over the last 24 hours
Use this task to get information about each URL visited over the previous 24 hours, and analyze the
data using different report views:
1
Click Reports | Web Reports.
2
From the Favorites list, select the Top URL List report, and click Filter.
3
Click Apply to run the report.
4
Select Time view to see the action that was taken on each web request broken down into hourly periods.
5
Select Detail view to see further information about each web request.
Interactive Reporting — Total view
Use this page to see the actions that the appliance has taken against threats over the period specified
under Filter.
Reports | Email Reports | Email Interactive Reporting | Total View
Reports | Web Reports | Web Interactive Reporting | Total View
The information is displayed in a horizontal bar chart. If you see no information, click Apply on the Filter
tab, or change the period and click Apply.
46
McAfee Email and Web Security Appliances 5.6.0 Product Guide
Page 47

Overview of Reports features
Web Reports overview
For information about the Filter or Favorites section on the right, click its tab, then click the Help button
(?).
Table 23 Option definitions
Option Definition
Action
Displays the list of actions taken by the appliance’s policies against each email
message or web access.
Number of email messages
Displays the number of email messages or web accesses where this action was
applied.
Interactive Reporting — Time view
Use this page to see the actions that the appliance has taken against threats over the period specified
under Filter.
Reports | Email Reports | Email Interactive Reporting | Time View
Reports | Web Reports | Web Interactive Reporting | Time View
The information is displayed in a vertical bar chart, and organized into small intervals. For example, a
weekly report shows activity in whole 6-hour portions of each day. If you see no information, click
Apply on the Filter tab, or change the period and click Apply.
You might not be able to view some older data, because the appliance’s
log is regularly purged.
For information about the Filter or Favorites section on the right, click its tab, then click the Help button
(?).
Table 24 Option definitions
Option Definition
Start
Displays the start of the period, such as on the hour.
Legitimate to Blocked Displays the numbers of email messages or web accesses corresponding to each
action in that period. If Action is not set to All, most columns have values of 0.
Interactive Reporting — Itemized view
Use this page to see the details of every detected threat.
Reports | Email Reports | Email Interactive Reporting | Itemized View
Reports | Web Reports | Web Interactive Reporting | Itemized View
The information is displayed in a pie chart.
McAfee Email and Web Security Appliances 5.6.0 Product Guide
47
Page 48

Overview of Reports features
Web Reports overview
If you see no information, click Apply on the Filter tab, or change the period and click Apply.
For information about the Filter or Favorites section on the right, click its tab, then click the Help button
(?).
Table 25 Option definitions
Option Definition
Pie chart Displays the percentage of all email or web accesses that match the criteria
selected in the Filter tab.
The orange portion of the pie shows the portion of the data that matches the
criteria. The green portion shows the remainder. If no filtering is set, the whole pie
appears orange.
Filter criteria
Displays the list of categories taken against the email message or web access.
Click any blue link for more information represented as a bar chart.
To return to the pie chart, click List all criteria. To examine the information further,
click any blue links.
As you click each link, values in the Filter tab are updated. Click Apply to display the
pie chart again.
Number of distinct
Displays the number of email messages or web accesses where each criteria applies.
criteria items within
the selection
Interactive Reporting — Detail view
Use this page to see the details of every detected threat, such as the exact time and IP address of
each detection that the appliance has handled.
Reports | Email Reports | Email Interactive Reporting | Detail View
Reports | Web Reports | Web Interactive Reporting | Detail View
Reports | System Reports | System Interactive Reporting | Detail View
Information includes any threat in the email messages or IP addresses. The information is displayed in
a table.
If you see no information, click Apply on the Filter tab, or change the period and click Apply.
For information about the Filter or Favorites section on the right, click its tab, then click the Help button
(?).
48
McAfee Email and Web Security Appliances 5.6.0 Product Guide
Page 49

Table 26 Option definitions
Option Definition
Date and other
headings
Displays the details of each email message or web access.
To see all columns, move the horizontal scroll bar.
To sort the data in any column, click the column heading. The most recently sorted
column is indicated by a red arrow in the column heading.
Overview of Reports features
Web Reports overview
Data
Click the blue link to see further information about an email message — in a table
or as raw data (that is, in an XML-like format).
To move through the list or to move quickly to either end of the list, click the
arrows at the bottom right of the list.
Selection — Favorites
Use this page to run an existing favorite report immediately, or build a list of links to reports that you
have already saved.
Reports | Email Reports | Selection | Favorites
Reports | Web Reports | Selection | Favorites
Reports | System Reports | Selection | Favorites
Table 27 Option definitions
Option Definition
Name
Run report
Edit
Delete
Displays the name of each report that you have saved.
When clicked, opens the selected report and displays it to the left of the screen.
Opens the Filter page from where you can change the settings, test the report results, and
save the report criteria into a new favorite report.
Removes that Favorite report from the list, and from the reports available in Scheduled
Reports.
Selection — Filter
Use this section of the page to refine or “filter” the information in the report.
Reports | Email Reports | Selection | Filter
Reports | Web Reports | Selection | Filter
McAfee Email and Web Security Appliances 5.6.0 Product Guide
49
Page 50

Overview of Reports features
Web Reports overview
Reports | System Reports | Selection | Filter
For example, you can see information about one user’s visits to undesirable websites on Tuesday of
last week, or about viruses from all sources in the last month. Make your selections, then click Apply.
The new report might take a while to appear. You can save these selections to produce a similar report
at any time. or clear the selections you made.
Table 28 Option definitions — Email Reports filter options
Option Definition
Period and
Ending
Displays information for a period from one hour to one month, based on the selected
start date.
When clicked, the Previous and Next buttons adjust the From date, for example, moving
it to next week or the previous day.
Protocol
Traffic
Sender
Recipient
Action
Displays the protocols you want to view, such as SMTP.
Displays traffic, whether inbound or outbound.
In a simple network, you might see reports on compliancy for outbound traffic and
reports on spam for inbound traffic.
Displays information about one sender, such as user@example.com
When selected, the advanced options, Source domain and Source ID, further specify
the sender's domain or IP address, such as server1.example.com and
192.168.254.200.
Displays information about one recipient, such as user@example.com
When selected, the advanced options, Destination domain and Destination ID,
further specify the recipient's domain or IP address, such as server1.example.com
and 192.168.254.200.
Enables you to filter reports on specific actions, such as Legitimate or Blocked. Examples:
To view information about one sender or recipient, type:
<user@example.com>
The name is wrapped with chevron characters.
To view information about all senders' names that begin with b or B, type:
<b*
To view information about all senders' names that begin with b, B, e, or E, type:
<b*, <e*
Category
Displays information about a single type of detection, such as spam or virus. If the
selection is not All, you see further choices. For example, if you select Content, you
can further select Mail Size.
Extra categories appear here if you have installed any optional software.
Detection
Top Spam Senders report only. Choose whether the report should contain results for
spam senders, phish senders, or both.
Virus/PuPs
Top Viruses report only. Type the name of the virus or potentially unwanted program to
get detection results for that specific threat.
Show Advanced
When clicked, shows the options below.
To hide the options again, click Hide Advanced.
Source Domain
50
McAfee Email and Web Security Appliances 5.6.0 Product Guide
Filter traffic based on the domain that the messages are being sent from.
Page 51

Overview of Reports features
Web Reports overview
Table 28 Option definitions — Email Reports filter options (continued)
Option Definition
Source IP
Destination Domain
Destination IP
Audit ID
Filter traffic based on the IP address that the messages are being sent from.
Filter traffic based on the domain that the messages are being sent to.
Filter traffic based on the IP address that the messages are being sent to.
As traffic passes through the appliance it can have an Audit ID assigned. Use this
field to filter traffic with a specific Audit ID.
Policy
Provides a selection of policies.
Table 29 Option definitions — Web Reports filter options
Option Definition
Period and Ending Displays information for a period from one hour to one month, based on the
selected start date.
When clicked, the Previous and Next buttons adjust the From date, for example,
moving it to next week or the previous day.
Protocol
User login
URL
Action
Category
Show Advanced
Source domain
Source IP
Destination domain
Destination IP
Audit ID
Action
Policy
Category
Displays the protocols you want to view, such as HTTP.
Displays information about one user.
When selected, the advanced options, Source domain and Source IP, further specify the
domain or IP address, such as server1.example.com and 192.168.254.200.
Displays information about URL (web address), such as example.com.
When selected, the advanced options, Destination domain and Destination ID, further
specify the recipient's domain or IP address, such as server1.example.com and
192.168.254.200.
Displays information about the action taken against the threats, for example,
threats that were blocked or only monitored. The menu does not offer the choice of
legitimate web accesses because they are too numerous.
Displays information about specific categories of traffic, for example, Viruses or URL
Filtering. The menu does not offer the choice of legitimate web accesses because
they are too numerous.
When clicked, shows the options below.
To hide the options again, click Hide Advanced.
Filter traffic based on the domain that the traffic is being sent from.
Filter traffic based on the IP address that the traffic is being sent from.
Filter traffic based on the domain that the traffic is being sent to.
Filter traffic based on the IP address that the traffic is being sent to.
As traffic passes through the appliance it can have an Audit ID assigned. Use this
field to filter traffic with a specific Audit ID.
Enables you to filter reports on specific actions, such as Legitimate or Blocked.
Provides a selection of policies.
Displays information about a single type of detection, such as spam or virus. If the
selection is not All, you see further choices. For example, if you select Content, you
can further select Mail Size.
Extra categories appear here if you have installed any optional software.
McAfee Email and Web Security Appliances 5.6.0 Product Guide
51
Page 52

Overview of Reports features
System Reports
Table 30 Option definitions — System Reports filter options
Option Definition
Period and Ending Displays information for a period from one hour to one month, based on the
selected start date.
When clicked, the Previous and Next buttons adjust the From date, for example,
moving it to next week or the previous day.
Event type
Event
Reason
System Reports
Use this page to create and view real-time reports about threat detection updates, and system events.
Reports | System Reports
You can generate a report based on a set of pre-defined filters, or edit the filters, test the results, and
save the report as a new report.
Benefits of creating system reports
Keeping up-to-date with McAfee threat detection updates is vital to the continued and successful
running of your organization. Generate system reports to get information about threat detection files
update status, user logon statistics, and network and hardware status .
Additionally, use the System Reports feature with the Scheduled Reports feature to create regular
reports, and send them immediately to other people, or at regular intervals.
Displays reports about particular event types. For example, issues concerning the
Network.
Select individual events based on the chosen Event type.
Select individual reasons based on the chosen Event.
Introduction to the System Reports page
System Reports contains several sub-pages, accessed from the tabs beneath System Interactive Reporting and
Selection.
Under System Interactive Reporting is a detailed view of the report results that tells you the type of update
made, when it ran, and whether it was successful. Data shows the update number so you can check
with the McAfee website that you're running the most up-to-date threat detection files available.
There are two pages beneath Selection:
• Favorites enables you to choose a report with pre-defined filters, and generate it immediately. See
Report types.
• Filter enables you to further define the data in each Favorite report, and set the period of time for
which you want to retrieve data. See Filter types.
52
McAfee Email and Web Security Appliances 5.6.0 Product Guide
Page 53

Overview of Reports features
System Reports
Report types
The appliance comes with a set of reports with pre-defined filters available from the Favorites tab. You
can run these reports immediately, or edit them, and save as a new favorite report to run again in the
future, then make it available in the Scheduled Reports feature.
To see the default settings in each report, hold your mouse cursor to the
left of a report name.
Table 31 Option definitions
Option Definition
Anti-Virus Updates (last
24h)
Displays results in Detail view by default. Results show the type of update
(anti-virus, spam rules, or URL filtering definitions), when it was made, the
results, and reference number associated with the update file
Anti-Virus Updates (last
week)
Displays results in Detail view by default. Results show the type of update
(anti-virus, spam rules, or URL filtering definitions), when it was made, the
results, and reference number associated with the update file
Filter types
Each report allows you to filter the results.
Table 32 Option definitions — System Reports filter options
Option Definition
Period and Ending Displays information for a period from one hour to one month, based on the
selected start date.
When clicked, the Previous and Next buttons adjust the From date, for example,
moving it to next week or the previous day.
Event type
Displays reports about particular event types. For example, issues concerning the
Network.
Event
Reason
Select individual events based on the chosen Event type.
Select individual reasons based on the chosen Event.
Task — Generate a report that shows all threat detection updates
Use this task to:
• Run a report that shows all updates that took place in the last week
• Filter the results to show only the URL filter updates that failed
• Save the report as a new favorite report to be run again in the future
1
Click Reports | System Reports.
2
From the Favorites list, select the Anti-Virus Updates (last week) report.
3
Click Run report to generate a report for all updates.
4
Click Filter.
5
In Event, select URL filter update failed, and click Apply to filter the data accordingly.
6
Click Save, type a name for the report, and click OK.
The report appears in the list of Favorites.
McAfee Email and Web Security Appliances 5.6.0 Product Guide
53
Page 54

Overview of Reports features
System Reports
Interactive Reporting — Detail view
Use this page to see the details of every detected threat, such as the exact time and IP address of
each detection that the appliance has handled.
Reports | Email Reports | Email Interactive Reporting | Detail View
Reports | Web Reports | Web Interactive Reporting | Detail View
Reports | System Reports | System Interactive Reporting | Detail View
Information includes any threat in the email messages or IP addresses. The information is displayed in
a table.
If you see no information, click Apply on the Filter tab, or change the period and click Apply.
For information about the Filter or Favorites section on the right, click its tab, then click the Help button
(?).
Table 33 Option definitions
Option Definition
Date and other
headings
Data
Displays the details of each email message or web access.
To see all columns, move the horizontal scroll bar.
To sort the data in any column, click the column heading. The most recently sorted
column is indicated by a red arrow in the column heading.
Click the blue link to see further information about an email message — in a table
or as raw data (that is, in an XML-like format).
To move through the list or to move quickly to either end of the list, click the
arrows at the bottom right of the list.
Selection — Favorites
Use this page to run an existing favorite report immediately, or build a list of links to reports that you
have already saved.
Reports | Email Reports | Selection | Favorites
Reports | Web Reports | Selection | Favorites
54
McAfee Email and Web Security Appliances 5.6.0 Product Guide
Page 55

Overview of Reports features
Reports | System Reports | Selection | Favorites
Table 34 Option definitions
Option Definition
Name
Run report
Edit
Displays the name of each report that you have saved.
When clicked, opens the selected report and displays it to the left of the screen.
Opens the Filter page from where you can change the settings, test the report results, and
save the report criteria into a new favorite report.
Delete
Removes that Favorite report from the list, and from the reports available in Scheduled
Reports.
Selection — Filter
Use this section of the page to refine or “filter” the information in the report.
System Reports
Reports | Email Reports | Selection | Filter
Reports | Web Reports | Selection | Filter
Reports | System Reports | Selection | Filter
For example, you can see information about one user’s visits to undesirable websites on Tuesday of
last week, or about viruses from all sources in the last month. Make your selections, then click Apply.
The new report might take a while to appear. You can save these selections to produce a similar report
at any time. or clear the selections you made.
Table 35 Option definitions — Email Reports filter options
Option Definition
Period and
Ending
Displays information for a period from one hour to one month, based on the selected
start date.
When clicked, the Previous and Next buttons adjust the From date, for example, moving
it to next week or the previous day.
Protocol
Traffic
Displays the protocols you want to view, such as SMTP.
Displays traffic, whether inbound or outbound.
In a simple network, you might see reports on compliancy for outbound traffic and
reports on spam for inbound traffic.
Sender
Displays information about one sender, such as user@example.com
When selected, the advanced options, Source domain and Source ID, further specify
the sender's domain or IP address, such as server1.example.com and
192.168.254.200.
McAfee Email and Web Security Appliances 5.6.0 Product Guide
55
Page 56

Overview of Reports features
System Reports
Table 35 Option definitions — Email Reports filter options (continued)
Option Definition
Recipient
Displays information about one recipient, such as user@example.com
When selected, the advanced options, Destination domain and Destination ID,
further specify the recipient's domain or IP address, such as server1.example.com
and 192.168.254.200.
Action
Category
Detection
Virus/PuPs
Show Advanced
Source Domain
Source IP
Destination Domain
Destination IP
Audit ID
Policy
Enables you to filter reports on specific actions, such as Legitimate or Blocked. Examples:
To view information about one sender or recipient, type:
<user@example.com>
The name is wrapped with chevron characters.
To view information about all senders' names that begin with b or B, type:
<b*
To view information about all senders' names that begin with b, B, e, or E, type:
<b*, <e*
Displays information about a single type of detection, such as spam or virus. If the
selection is not All, you see further choices. For example, if you select Content, you
can further select Mail Size.
Extra categories appear here if you have installed any optional software.
Top Spam Senders report only. Choose whether the report should contain results for
spam senders, phish senders, or both.
Top Viruses report only. Type the name of the virus or potentially unwanted program to
get detection results for that specific threat.
When clicked, shows the options below.
To hide the options again, click Hide Advanced.
Filter traffic based on the domain that the messages are being sent from.
Filter traffic based on the IP address that the messages are being sent from.
Filter traffic based on the domain that the messages are being sent to.
Filter traffic based on the IP address that the messages are being sent to.
As traffic passes through the appliance it can have an Audit ID assigned. Use this
field to filter traffic with a specific Audit ID.
Provides a selection of policies.
Table 36 Option definitions — Web Reports filter options
Option Definition
Period and Ending Displays information for a period from one hour to one month, based on the
selected start date.
When clicked, the Previous and Next buttons adjust the From date, for example,
moving it to next week or the previous day.
Protocol
User login
Displays the protocols you want to view, such as HTTP.
Displays information about one user.
When selected, the advanced options, Source domain and Source IP, further specify the
domain or IP address, such as server1.example.com and 192.168.254.200.
56
McAfee Email and Web Security Appliances 5.6.0 Product Guide
Page 57

Overview of Reports features
Table 36 Option definitions — Web Reports filter options (continued)
Option Definition
URL
Displays information about URL (web address), such as example.com.
When selected, the advanced options, Destination domain and Destination ID, further
specify the recipient's domain or IP address, such as server1.example.com and
192.168.254.200.
System Reports
Action
Displays information about the action taken against the threats, for example,
threats that were blocked or only monitored. The menu does not offer the choice of
legitimate web accesses because they are too numerous.
Category
Displays information about specific categories of traffic, for example, Viruses or URL
Filtering. The menu does not offer the choice of legitimate web accesses because
they are too numerous.
Show Advanced
When clicked, shows the options below.
To hide the options again, click Hide Advanced.
Source domain
Source IP
Destination domain
Destination IP
Audit ID
Filter traffic based on the domain that the traffic is being sent from.
Filter traffic based on the IP address that the traffic is being sent from.
Filter traffic based on the domain that the traffic is being sent to.
Filter traffic based on the IP address that the traffic is being sent to.
As traffic passes through the appliance it can have an Audit ID assigned. Use this
field to filter traffic with a specific Audit ID.
Action
Policy
Category
Enables you to filter reports on specific actions, such as Legitimate or Blocked.
Provides a selection of policies.
Displays information about a single type of detection, such as spam or virus. If the
selection is not All, you see further choices. For example, if you select Content, you
can further select Mail Size.
Extra categories appear here if you have installed any optional software.
Table 37 Option definitions — System Reports filter options
Option Definition
Period and Ending Displays information for a period from one hour to one month, based on the
selected start date.
When clicked, the Previous and Next buttons adjust the From date, for example,
moving it to next week or the previous day.
Event type
Displays reports about particular event types. For example, issues concerning the
Network.
Event
Reason
Select individual events based on the chosen Event type.
Select individual reasons based on the chosen Event.
McAfee Email and Web Security Appliances 5.6.0 Product Guide
57
Page 58

Page 59

Overview of Email features
This topic provides an overview of the features within the Email and Web Security Appliances that
relate to Email traffic.
Email
Contents
Life of an email message
Message Search
Email Overview
Email Configuration
Email Policies
Quarantine Configuration
Life of an email message
Use this topic to understand how the appliance processes the email messages that it receives.
The appliance handles an email message according to:
• Who sent the email message.
• Who will receive the email message.
• The content of the email message.
On receiving an email message, the appliance processes it in the following order:
Email message processing order
CONNECT Permit Sender [Connection] Permit and Deny Lists on page
EHLO/MAIL FROM Permit Sender Permit and Deny Lists on page
Kernel mode blocking Permit and Deny Lists on page
86
86
Deny Sender [Connection] Permit and Deny Lists on page
86
Real-time Blackhole Lists (RBL) Sender Authentication Settings
— RBL Configuration on page
123
86
Deny Sender Permit and Deny Lists on page
86
McAfee Email and Web Security Appliances 5.6.0 Product Guide
59
Page 60

Overview of Email features
Life of an email message
Bounce Address Tag Validation Bounce Address Tag Validation
on page 96
Address Masquerading Address Masquerading (SMTP)
on page 79
SPF (Sender Policy Framework) Sender Authentication Settings
— SPF, Sender ID and DKIM on
page 124
RCPT TO Anti-Relay Anti-Relay Settings on page
89
Greylisting Recipient Authentication on
page 93
Address Aliasing (Masquerading) Address Masquerading (SMTP)
on page 79
Permitted Recipient list Recipient Authentication on
page 93
LDAP recipient check Recipient Authentication on
page 93
Directory Harvest Prevention Recipient Authentication on
page 93
DATA RBL Sender Authentication Settings
— RBL Configuration on page
123
If behind an MTA.
SPF Sender Authentication Settings
— SPF, Sender ID and DKIM on
page 124
If behind an MTA.
McAfee Global Threat
Intelligence message reputation
Sender Authentication Settings
— Message reputation on page
123
Sender ID Sender Authentication Settings
— SPF, Sender ID and DKIM on
page 124
Domain Keys Identified Mail
(DKIM)
Sender Authentication Settings
— SPF, Sender ID and DKIM on
page 124
Scanning
Anti-spam Anti-Spam Settings — Basic
Options on page 119
Anti-Spam Settings — Advanced
Options on page 120
Anti-Spam Settings — Blacklists
and Whitelists on page 120
60
McAfee Email and Web Security Appliances 5.6.0 Product Guide
Anti-phish Anti-Phish Settings on page
121
Page 61

Overview of Email features
Life of an email message
Mail size filter
Mail Size Filtering Settings —
Message Size on page 129
Mail Size Filtering Settings —
Attachment Size on page 129
Mail Size Filtering Settings —
Attachment Count on page 130
Corrupt content Content Handling Settings —
Corrupt or Unreadable Content
— Corrupt content on page 140
Signing check Content Handling Settings —
Corrupt or Unreadable Content
— Signed messages on page
142
File filter File Filtering Settings on page
125
Encrypted content Content Handling Settings —
Corrupt or Unreadable Content
— Encrypted content on page
140
HTML check Content Handling Settings —
HTML Options on page 139
Compliance Compliance Settings on page
130
DLP Data Loss Prevention Settings
on page 127
Anti-virus [Including McAfee
Global Threat Intelligence file
reputation, PUPs, Packers]
Anti-Virus Settings — Basic
options on page 116
The anti-virus scan always runs
even if some of the other scans
are not.
Anti-Virus Settings — McAfee
Anti-Spyware on page 117
Anti-Virus Settings — Packers
on page 117
Anti-Virus Settings — Custom
Malware Options on page 118
Delivery
Proxy Mode Domain Relay
Transparent Mode
When passing through the scanning stage, the next step that the email
message takes depends on the scanners that are triggered and the
primary actions defined for each scanner.
Primary actions are prioritized as follows:
• Deny connection
• Refuse
DNS
Fallback relay
McAfee Email and Web Security Appliances 5.6.0 Product Guide
61
Page 62

Overview of Email features
Message Search
• Accept and drop
• Replace
• Allow through
For example, consider the following circumstances:
• The appliance scans an email message and triggers against both a virus and spam. The anti-virus
scanner is configured to block on detection, whereas the anti-spam scanner is configured to block.
In this situation, the appliance will report the email message as containing viral content, as this is
the highest-priority primary action.
• The appliance scans an email message and again triggers against both a virus and spam. However,
this time, both the anti-virus and the anti-spam scanners have their primary actions set to block.
In this case, the appliance will report the anti-spam trigger — anti-spam scanning occurs before
the anti-virus scanning — but, as both scanners are configured with the same priority primary
action, this will also be reported as containing viral material.
Message Search
Use this page to search for email messages that have passed to the DATA phase on your appliance.
This feature is not available in ePolicy Orchestrator.
Email | Message Search
Message Search provides you with a convenient method to locate email messages on your appliance.
If the appliance has not received the message body, the message cannot
be found in Message Search. For example, if an email message is blocked
by the Real-time Blackhole Lists (RBLs), the appliance will not have
received the message body. In this situation, use Reports | Email Reports to
find out further information about this email message.
Benefits of using Message Search
A common request from users is "What happened to the email message I sent yesterday?", or "My
supplier emailed me on Monday, why haven't I received his message yet?"
From a single location within the user interface, Message Search allows you to confirm the status of
email messages that have passed through the appliance. It provides you with information about the
email, including:
• Was it delivered?
• Was it blocked?
• Did the message bounce?
• Was the message quarantined?
• Is the message queued pending further action?
You can use a wide range of different criteria to search on, including:
62
McAfee Email and Web Security Appliances 5.6.0 Product Guide
Page 63

Overview of Email features
Message Search
• The Message status • Source IP
• Sender, Recipient or Subject information • Email disposition
• Category • If the Email has been modified or not
• Date range • The Virtual host used
• Audit ID
If you have configured Sender address masquerading or Recipient address aliasing,
Message Search shows the masqueraded or aliased email addresses.
Table 39 Message Search parameters
Option Definition
Message
status
You can choose to search All email messages. If you suspect that a message is in a
certain state, you can also search only for messages that are:
Blocked
•
Bounced
•
Delivered
•
Quarantined
•
Sender,
Recipient,
Subject
This includes quarantined items that have pending release requests.
Queued
•
You can multi-select to search for messages in more than one status.
You can search for emails containing particular sender, recipient or subject text.
The appliance may modify the subject of some emails, typically by adding a [spam] or
[phish] prefix to the subject line. However, the subject displayed on the Message Search
page is the original subject line of the email message before the appliance makes any
changes.
You can use the * and ? wildcard characters in your searches.
To search for a literal *, ? or \ character within these fields, use the backslash (\) character
before the search term. For example, use: \* to search for the asterisk character.
McAfee Email and Web Security Appliances 5.6.0 Product Guide
63
Page 64

Overview of Email features
Message Search
Table 39 Message Search parameters (continued)
Option Definition
Category
When you search on Blocked or Quarantined items, you can further refine your search by
selecting the Category that the appliance used to block or quarantine the message.
When viewing messages that have been Blocked, the following Category options are available:
• Sender Auth - Trusted Source
• Sender Auth - Sender ID
• Sender Auth - Domain Keys
• Sender Auth - Threshold
• Anti Spam
• Anti Phish
• Mail Size
• Corrupt Content
• Signed Content
• File Filter
All Dates /
Date Range
• Encrypted Content
• Compliance
• DLP
• Anti-Virus - McAfee GTI file reputation, PuPs, packers
• Mail Filtering (external, partial message)
For messages that were Quarantined by the appliance, the following Category options are
available:
• Anti Spam • Encrypted Content
• Anti Phish • Compliance
• Mail Size • DLP
• Corrupt Content • Anti-Virus - Artemis, PuPs, packers
• Signed Content • Mail Filtering (external, partial message)
• File Filter
You can multi-select to search for messages in more than one category. See Quarantine
Options on page 159 to find out how the categories relate to those reported in McAfee
Quarantine Manager.
You can search on All Dates , or you can specify a Date Range , using From and To dates and
times.
64
McAfee Email and Web Security Appliances 5.6.0 Product Guide
Page 65

Table 39 Message Search parameters (continued)
Option Definition
Audit ID
When an email message passes through the appliance, a received header — containing
audit ID information — is added to the message header.
The received header will look similar to the following:
Received: from (mta1.example.com [192.168.254.200]) by ews_appliance1.example.com
with smtp
id 1448_0004_4d37a0e8_93e1_11df_b43f_00114336c271
Tue, 20 Jul 2010 09:29:31 +0000
This audit ID information can be used to track the message as it passes through the
appliance.
Overview of Email features
Message Search
Source IP
Disposition
Type
Virtual host
View
recipients
Search/
Refresh
Clear
Parameters
This is the source IP address of the originating email server. If your appliance is
configured behind one or more Mail Transfer Agents (MTAs), the email headers are used
to obtain the correct source IP.
If you know the IP address that is sending email messages to you, you can search using
this address.
You can use either a single address (for example, 192.168.0.1) or a network address/
netmask (for example, 192.168.0.0/255.255.255.0).
Allows you to select All or One or more of Inbound, Outbound and Internal messages in your search.
When dealing with quarantined email messages, this allows you to search for the all,
messages, original email or for messages that have been modified by the appliance.
It also allows you to search for messages that have their Release requested by your users.
If you have enabled the use of virtual hosts on your appliance, you can track or view
email messages that are processed by an individual virtual host on the appliance.
To do this, select the relevant host name from the Virtual host drop-down list.
Clicking on any of the highlighted links in the View recipients area shows you either All
messages, or a list of recipients and the number of items against each recipient
beginning with the selected character. For example, it may show that one recipient
currently has 4 queued messages, 1 quarantined message and 3 delivered messages.
By clicking on a particular recipient, you can then view all relevant items for that recipient.
To revert to the total view of messages, click Close.
Click to search the appliance for email messages that match your search parameters, or
to refresh the list if you have changed any of the parameters.
Resets all search parameters to their default states.
McAfee Email and Web Security Appliances 5.6.0 Product Guide
65
Page 66

Overview of Email features
Message Search
Table 40 Message Search results
Option Definition
Options
When you have searched for your required email types, you can perform actions based
on the type of message. These actions include:
Message status is All:
Delete selected
•
Delete all
•
• Forward selected — Only available if all selected messages are either queued or
quarantined.
Message status is Quarantined :
Delete selected
•
Delete all
•
• Forward selected — Only available if all selected messages are either queued or
quarantined.
• Release selected — Only available if all selected messages are quarantined "on-the-box",
and do not contain viral content.
Release all
•
Message status is Queued:
Delete selected
•
Delete all
•
Forward selected
•
Real-Time
retry
View Message
Download
Message
• Retry selected — Only available if all selected messages are queued.
Retry all
•
If you have configured your appliance to perform off-box quarantining using McAfee
Quarantine Manager, you cannot make release requests from within Message Search.
To retry the delivery of a queued item and to then show the results of the SMTP
conversation with the target MTA, click Real-Time Retry .
You can only use Real-Time Retry by selecting a single queued message.
If the message is still available to the appliance (for example, if the email message has
been queued or quarantined on the appliance) you can view the selected message.
From within the message view, you can:
• Delete the message from the appliance.
• Release the message from the appliance. (Quarantined messages only.)
• Retry to deliver the message from the appliance. (Queued messages only.)
• Forward the message to another email address.
• Download the message to your local file system in .eml format.
You can also use Show headers to view the information contained within the email header.
Downloads the selected queued or quarantined message to your local file system in .eml
format.
66
McAfee Email and Web Security Appliances 5.6.0 Product Guide
Page 67

Table 41 Icons used in the Properties field
Option Definition
Email message is Inbound.
Email message is Outbound.
Email message is Internal.
Internal email messages are Alert messages and Quarantine Digest messages.
This is the original version of the quarantined message.
This is the version of the quarantined message that has been modified by the appliance.
This email message is currently held in a queue, but the appliance is not actively trying to
deliver the message.
The appliance is trying to deliver this message.
The appliance has a release request pending for this message.
Queued for delivery to your McAfee Quarantine Manager server.
Overview of Email features
Message Search
Task — Find out which email messages are quarantined
To view a list of all messages that have been quarantined:
1
Click Email | Message Search.
2
Select Quarantined from the Message status drop-down list.
3
Click Search/Refresh.
All messages that have been quarantined are displayed in the lower part of the page.
Subtask — Refine the search to show which email messages are quarantined due to
compliancy issues
You can further refine your search for quarantined email messages to show only those that have been
quarantined due to specific triggers. In this example, to find those email messages quarantined due to
compliancy issues:
1
Complete the steps in Task — Find out which email messages are quarantined.
2
Select Compliancy from the Category drop-down list.
3
Click Search/Refresh.
The lower part of the screen is refreshed to show only the messages that have been quarantined due
to compliancy issues.
Subtask — Viewing the email message quarantined due to compliancy issues
1
Complete the steps in Task — Refine the search to show which email messages are quarantined
due to compliancy issues.
2
Select the relevant quarantined message using the check-box to the left of the page.
3
Click View Message.
McAfee Email and Web Security Appliances 5.6.0 Product Guide
67
Page 68

Overview of Email features
Message Search
The selected message is displayed in a new window. From this window, you can view the content of
the email message. You can also choose to view the detailed email header information. Once you have
viewed the message, by clicking the relevant buttons, you can choose further actions to perform on
the email message.
Subtask — Releasing the quarantined email message
1
Complete the steps in Task — Viewing the email message quarantined due to compliancy issues.
2
Click Release Selected.
The selected email message is released from quarantine.
Email messages that contain viral content cannot be released from
quarantine, as to do so would risk causing damage to your systems.
Task — Find out which email messages are queued
To view a list of all messages that have been queued on the appliance:
1
Click Email | Message Search.
2
Select Queued from the Message status drop-down list.
3
Click Search/Refresh.
All messages that have been queued are displayed in the lower part of the page.
Subtask — Find out which email messages are queued for inbound delivery
You can further refine your search for queued email messages to show only those messages that have
been queued for inbound or outbound delivery. To view the queued messages awaiting inbound delivery:
1
Complete the steps in Task — Find out which email messages are queued.
2
Select Inbound from the Disposition drop-down list.
3
Click Search/Refresh.
All messages that have been queued for inbound delivery are displayed in the lower part of the page.
Subtask — Delivering the queued email message
Having found the queued email messages, and investigated the reason for the messages to be
queued, you then need to force the appliance to try again to deliver the messages:
1
Complete the steps in Task — Find out which email messages are queued for inbound delivery.
2
Select the relevant queued messages using the check-boxes to the left of the page.
3
Choose one of the following:
• From the Options drop-down list, select Retry selected.
• For a single message, click View Message, and then select the Retry button.
• To retry the sending of the messages and then see the results within the page, click Real-Time
Retry.
68
McAfee Email and Web Security Appliances 5.6.0 Product Guide
Page 69

Overview of Email features
Message Search
Task — Find out which email messages are being blocked
To view a list of all messages that have been blocked on the appliance:
1
Click Email | Message Search.
2
Select Blocked from the Message status drop-down list.
3
Click Search/Refresh.
All messages that have been blocked are displayed in the lower part of the page. Email messages can
be blocked for a variety of reasons, and the table showing all blocked messages includes the reason
that each message was blocked within the Status/Category column.
Task — Find the emails that were successfully delivered
You may have a request from your users to verify that an email message has been successfully
delivered to its intended recipient. To verify this:
1
Click Email | Message Search.
2
Select Delivered from the Message status drop-down list.
3
Click Search/Refresh.
All messages that have been successfully delivered by the appliance are listed in the lower part of the
page.
Task — Find what happened to the email message from "user@domain" with the
subject "abc" sent yesterday
The search options within the Message Search page can be used in combination to refine your
searches for email messages. The following example shows how to search for a message using
multiple criteria:
1
Click Email | Message Search.
2
Enter 'user@domain' into the Sender field.
3
Enter 'abc' into the Subject field.
4
Select Date Range.
5
Click the calendar icon in the From area.
6
Select the required date.
7
Click OK.
8
In the From time field, enter '00:00'.
9
Click the calendar icon in the To area.
10
Select the required date.
11
Click OK.
12
In the To time field, enter '23:59'.
13
Click Search/Refresh.
Information about all messages sent on the selected date from "user@domain", with the subject
"abc", are displayed in the lower part of the page.
McAfee Email and Web Security Appliances 5.6.0 Product Guide
69
Page 70

Overview of Email features
Email Overview
Task — A user has requested that I release one of their quarantined email messages
When an email message is quarantined, your users may receive a digest message, giving them
options relating to the messages in quarantine. To view and then release an email message that a user
has requested be released:
1
Click Email | Message Search.
2
Select Quarantined from the Message status drop-down list.
3
Select Release requested from the Type drop-down list.
4
Click Search/Refresh.
5
Select the email message (or messages) to be released.
6
Click View Message.
7
If you are happy that the selected message is safe to release, select Release selected from the Options
drop-down list.
8
Click Go.
In the Dashboard | Email Queues area, you can see how many quarantine
release requests have been made by your users. Clicking the link on this
page opens the Message Search page, and auto-populates the fields
required to release these messages.
Email Overview
Use this page to see how well the appliance is handling email delivery and threats on incoming email.
This feature is not available in ePolicy Orchestrator.
Email | Email Overview
Table 42 Option definitions — Incoming Email Summary
Option Definition
Update Now
Mail Host
Total
Accepted
Blocked
Other columns Displays the number of detected threats such as spam and PUPs
Show the top [number] records
for the past [period]
When clicked, updates all the information on this table. The information is
not automatically updated.
Displays the name of the computer that sent the email.
Displays the total number of email messages handled. This is the sum of
Accepted and Blocked.
Displays the number of email message delivered.
Displays the total number of email messages blocked. The email scanning
policies determine whether an email is blocked.
(potentially unwanted programs).
When selected, changes your view of the information. For example, view
the top 20 records for the past week.
70
McAfee Email and Web Security Appliances 5.6.0 Product Guide
Page 71

Overview of Email features
Email Configuration
Table 43 Option definitions — Queued Email Summary
Option Definition
Update Now
When clicked, updates all the information on this table. The information is
not automatically updated.
Domain
Displays the destination of the email,which is a name such as
www.example.com.
Emails
Active Recipients
Displays the number of email messages awaiting delivery.
Displays the number of recipients who are part of this domain, who have mail
queued for delivery.
Soft Bounces
Displays the number of responses that ask the sender to try sending again.
These responses have SMTP reply codes of the form: 4nn.
Show the top [number]
records
When selected, changes your view of the information. For example, the
option shows the top 40 records.
Information about statistics shown in the Email Queues list
This information applies to the Queued, Quarantined, and Relese requests queues.
• If one message is sent to two recipients and is queued for delivery (for example, because the
onward MTA is down):
• The number of items in the queue will be 1 because the appliance received one message.
• The number of recipients will be 2 because the message has two recipients.
If you click on the Queued hyperlink, you see two items because there is
one message for each recipient.
• If two messsages are sent to one recipient and are queued for delivery (for example, because the
onward MTA is down):
• The number of items in the queue will be 2 because the appliance received two messages.
• The number of recipients will be 2 because each message has one recipient.
If you click on the Queued hyperlink, you see two items.
Email Configuration
Use this page to set your email protocol configuration, and for your receiving email and sending emails.
From the Email Configuration pages, you can configure features such as your protocol setting for SMTP
and POP3 email messages, Anti-relay settings, Recipient authentication, Permit and deny lists, as well
as other areas such as DKIM signing, delivering email domains and fallback relays.
Contents
Protocol Configuration
Receiving Email
Sending Email
McAfee Email and Web Security Appliances 5.6.0 Product Guide
71
Page 72

Overview of Email features
Email Configuration
Protocol Configuration
The Protocol Configuration tab within Email Configuration enables you to configure settings that are
protocol-dependant.
Further tabs enable you to configure connection and protocol settings for both SMTP and POP3
protocols, as well as to configure address masquerading and transport layer security for your SMTP
protocol.
Contents
Connection Settings (SMTP)
Protocol Settings (SMTP)
Address Masquerading (SMTP)
Transport Layer Security (SMTP)
Connection and Protocol Settings (POP3)
Connection Settings (SMTP)
The Connection Settings (SMTP) page links to configuration areas that set up settings for SMTP
connections on the appliance, such as ports, warning thresholds and timeouts.
Email | Email Configuration | Protocol Configuration | Connection Settings (SMTP)
Page area Summary
Basic SMTP settings on page 72 Use this area to specify basic connection settings for the SMTP
protocol, such as port numbers.
Message rate warning thresholds
on page 73
Use this area to specify thresholds above which you will be
alerted that your message rate has increased.
Timeouts on page 73 Use this area to specify the timeouts that apply to the SMTP
conversations.
Basic SMTP settings
Use this area to specify basic connection settings for the SMTP protocol, such as port numbers.
Email | Email Configuration | Protocol Configuration | Connection Settings (SMTP) | Basic SMTP settings
Changing these settings can affect scanning performance. If you are not
sure about the impact of making any changes, ask your network expert.
Table 44 Option definitions
Option Definition
Enable the SMTP protocol
Listening ports
When deselected, ignores any SMTP traffic. Other traffic is not affected.
Specifies a port number.
The default value is 25.
Transparent interception ports
Secure ports
72
McAfee Email and Web Security Appliances 5.6.0 Product Guide
Specifies a port number.
The default value is 25.
Specifies the type of port. The default value is 465.
SMTPS uses a secure port.
Page 73

Table 44 Option definitions (continued)
Option Definition
Click these icons and the port headings to reveal icons for managing the
port information:
Indicates the port number.
Indicates the traffic that will be intercepted.
Indicates a period when traffic is not scanned.
Overview of Email features
Email Configuration
Enable reverse DNS lookups
When selected, enables the appliance to perform lookups. Default value is Yes.
Take care if deselecting this setting. If you deny reverse DNS lookups, some
functions might fail.
Message rate warning thresholds
Use this area to specify thresholds above which you will be alerted that your message rate has increased.
Email | Email Configuration | Protocol Configuration | Connection Settings (SMTP) | Message rate warning thresholds
You can configure your appliance to issue an alert or a warning if the message rate increases.
Table 45 Option definitions
Option Definition
Warn if the message rate exceeds
Alert if the message rate exceeds
Default value = No limit
Default value = No limit
Timeouts
Use this area to specify the timeouts that apply to the SMTP conversations.
Email | Email Configuration | Protocol Configuration | Connection Settings (SMTP) | Timeouts
These settings are configured by default to provide the best SMTP
performance with most appliances and network configurations. Changing
these settings can affect performance. If you are not sure about the
impact of making any changes, ask your network expert.
McAfee Email and Web Security Appliances 5.6.0 Product Guide
73
Page 74

Overview of Email features
Email Configuration
Protocol preset
Select the required protocol preset, or create a new preset, using the drop-down list and button to the
right of the page.
Maximum wait times when receiving email
Specifies how long the appliance waits for responses from the mail server that sends the email message.
Table 46 Option definitions
Option Definition
Between commands
Between receiving chunks of data
Acknowledgment of all the data
The default value is 60 seconds.
The default value is 180 seconds.
The default value is 360 seconds.
Maximum wait times when sending email
Specifies how long the appliance waits for responses from the mail server that receives the email
message.
Table 47 Option definitions
Option Definition
Establishing a connection
Response to a MAIL command
Response to a RCPT command
Response to a DATA command
Between sending chunks of data
Acknowledgment of the final dot
The default value is 60 seconds.
The default value is 60 seconds.
The default value is 60 seconds.
The default value is 60 seconds.
The default value is 180 seconds.
The default value is 300 seconds.
Protocol Settings (SMTP)
The Protocol Settings (SMTP) page links to areas to allow you to configure settings for the SMTP
protocol on the appliance.
Email | Email Configuration | Protocol Configuration | Protocol Settings (SMTP)
Page area Summary
Data command options on page
75
Denial of service protection on page75Use this area to specify how the appliance prevents possible
Message processing on page 76 Use this area to configure message processing options within
Transparency options (router and
bridge mode only) on page 78
Address parsing options on page
79
Use this area to specify how the appliance responds during
the DATA phase when handling SMTP email.
denial-of-service attacks on your mail server.
the SMTP protocol.
Use this area to configure options applicable only in the
transparent operating modes — transparent router or
transparent bridge mode.
Use this area to configure options relating to the parsing of
email addresses.
74
McAfee Email and Web Security Appliances 5.6.0 Product Guide
Page 75

Overview of Email features
Email Configuration
Data command options
Use this area to specify how the appliance responds during the DATA phase when handling SMTP email.
Table 48 Option definitions
Option Definition
Maximum message data size
Prevents large messages.
Default value is No limit.
Maximum length of a single line
Prevents excessive line length.
Default value is No limit.
Maximum number of hops
Specifies the maximum number of hops allowed, that is, the
maximum number of Received lines allowed in the email header.
Default value is 100.
If these limits are exceeded
Specifies how the appliance responds. Default value is Close the
connection.
Maximum line length before the message is
Default value is No limit.
re-encoded
Denial of service protection
Use this area to specify how the appliance prevents possible denial-of-service attacks on your mail server.
Table 49 Option definitions
Option Definition
Minimum data throughput
Maximum number of trivial
commands
Prevents an average data throughput that is too low. An attacker might
deliberately handle parts of the SMTP conversation slowly.
Default value is No lower limit.
Prevents the appliance receiving too many trivial commands before a
successful DATA command. An attacker might repeatedly send commands
like HELO, EHLO, NOOP, VRFY, and EXPN.
Default value is 100.
Maximum number of AUTH
attempts
Maximum command length
Maximum duration of an SMTP
conversation
Allow null senders
Reject recipient if the domain is
not routable
Prevents too many AUTH conversation attempts. (Transparent Bridge
mode only). The SMTP AUTH command is a request to the email server for
an authentication mechanism.
Default value is No limit.
Prevents excessive command length. This might be a buffer-overflow
attack. According to RFC 2821, the maximum total length of a command
line including the command word and the CR-LF is 512 characters.
Default value is 999.
Limits the time between opening the connection and receiving the final
dot (.) command.
Default value is No limit.
Accepts an empty From address.
Default value is Yes.
Default value is No.
McAfee Email and Web Security Appliances 5.6.0 Product Guide
75
Page 76

Overview of Email features
Email Configuration
Table 49 Option definitions (continued)
Option Definition
Maximum number of recipients
before a failure response is given
Prevents an excessive number of recipients. During spam or
directory-harvest attacks, the number of recipients often exceeds the
number who typically receive company-wide messages. When setting a
number here, consider that typical maximum, then add some more to
allow for possible increases. Consider changing this number if the network
is reconfigured or the typical maximum changes.
Default value is No limit.
Maximum number of recipients
before a delay is imposed
Delay period
Prevents an excessive number of recipients.
Default value is No limit.
Specifies a period before connections may resume.
Default value is Not set.
Impose a lockout period
Specifies a delay to prevent an immediate reconnection.
Default value is 600 seconds.
Generate non-delivery reports
Default value is Yes.
for undeliverable email
Message processing
Use this area to configure message processing options within the SMTP protocol.
Table 50 Option definitions
Option Definition
Welcome message
Store and forward email if
Specifies the text that is seen by a host when connecting to the appliance in
Explicit Proxy mode. The default message is: [appliance name and domain]
[product number] / SMTP Ready
Specifies the response to messages that exceed certain limits.
Default values:
• The message size exceeds — No limit
• The number of recipients exceeds — No limit
Maximum number of MX
records used
Maximum number of A records
used
76
McAfee Email and Web Security Appliances 5.6.0 Product Guide
Specifies the response to messages that use MX (mail exchange) records
excessively.
Default value is 100.
Specifies the response to messages that use A (address) records excessively.
Default value is 100.
Page 77

Overview of Email features
Email Configuration
Advanced options
Use this section to specify further settings for message processing. You do not normally need to
change the settings.
Table 51 Option definitions
Option Definition
Port for SMTP communications
Specifies the usual port number.
The default port number is 25.
Maximum number of policies per email
Add the IP address of the connecting
server to the Received header
Add the domain name of the
connecting server to the Received
header
A HELO command implies a reset
A HELO or EHLO command is required
Dump input email to disk
Dump output email to disk
Limits the number of policies that can be applied to each email
message. A larger number can affect scanning performance.
Default number is 5.
If you prefer that the IP address of your server is not made available,
deselect this feature.
Default value is Yes.
If you prefer that the domain address of your server is not made
available, deselect this feature.
Default value is No.
Forces the HELO command to automatically perform a reset (RSET
command). The RSET command clears the buffers that store data
such as the sender, recipients, and the email message.
Default value is Yes.
Forces the use of the HELO or EHLO command in any SMTP
communication. Most SMTP conversations begin with these
commands. You need this feature only if the sender does not use the
command.
Default value is No.
Provides information for troubleshooting. Select only if instructed to
do so. Otherwise performance will be affected.
Default value is No.
Provides information for troubleshooting. Select only if instructed to
do so. Otherwise performance will be affected.
Default value is No.
McAfee Email and Web Security Appliances 5.6.0 Product Guide
77
Page 78

Overview of Email features
Email Configuration
Transparency options (router and bridge mode only)
Use this area to configure options applicable only in the transparent operating modes — transparent
router or transparent bridge mode.
Table 52 Option definitions
Option Definition
Use the welcome
message from the mail
server
Specifies the welcome message that appears when a host using SMTP connects
to an appliance operating in a transparent mode.
When selected, displays the welcome message of the mail server at the other
end of the connection. Prefixes extra text, if specified in the next option.
When not selected, displays the appliance's own welcome message (in the
Message processing section).
Default value is Yes.
Prepend the following
text
Send keepalives (NOOP
commands) during the
DATA phase and
Keepalive interval
Specifies text for the message.
Default value is to prefix no text.
Prevents the connection between the appliance and the onward email server
from timing-out when the appliance is scanning large email messages by
sending a keep-alive command to the destination server. This keeps the
connection alive until the DATA phase from the sending email server to the
appliance has completed. When the data has been transferred to the appliance,
the appliance stops sending the commands and starts the DATA phase between
the appliance and the destination email server. Default value is No.
Specify how often to send the keep-alive (NOOP) commands during the DATA
phase.
Default value of interval is 55 seconds
Advanced options
Use this section to specify further settings for transparency options. You do not normally need to
change these settings.
Table 53 Option definitions
Option Definition
Allow the appliance to
generate additional
scanning alerts
Generates additional scanning alerts to warn a network administrator or other
users when specific events occur.
Default value is Yes.
The actions that the appliance takes when one of these events occurs, depends on
which detection was triggered and how the policies have been set up for each
protocol. By default, most secondary actions are not available when the appliance
is operating in a transparent mode. Only the quarantine actions are available by
default.
Allow multiple
policies per email
Allows the use of multiple policies for email messages that have more than one
recipient.
Default value is No.
If an email message has more than one recipient, you can configure the appliance
to allow different policies to apply to each of the recipients. If you do not allow
multiple policies, the appliance applies only the highest priority policy, as defined
by the order of your policies.
Add a Received
header to email
78
McAfee Email and Web Security Appliances 5.6.0 Product Guide
Adds Received (RCPT) commands to the email headers.
Default value is Yes.
Page 79

Table 53 Option definitions (continued)
Option Definition
ESMTP extensions
Scans features of the Extended Simple Mail Transfer Protocol.
Default values:
• Enable ESMTP extensions — Yes
• DSN (Delivery Sender Notification), 8BITMIME (8-bit data transfer), AUTH
(Authentication) — Yes
• SIZE — No
Overview of Email features
Email Configuration
Microsoft Exchange
ESMTP extensions
Prevents scanning of some extensions.
Default values:
• X-EPS, X-LINK2STATE, XEXCH50, CHUNKING — No
If the appliance operates between two Microsoft Exchange servers, the appliance
must allow these email headers to be exchanged without scanning.
Address parsing options
Use this area to configure options relating to the parsing of email addresses.
You do not normally need to change these settings. Change the settings
only if you understand the possible effects, or you have consulted an
expert.
An email address such as user@example.com has two parts:
• The local part is before the @ character — user.
• The domain part is after the @ character — example.com.
Table 54 Option definitions
Option Definition
Maximum length of the local part
Maximum length of the domain part
Specifies how many characters can be used in the local part.
The RFC limit is 64 characters.
Specifies how many characters can be used in the domain part.
The RFC limit is 255 characters.
Allow non-RFC characters in the domain
part
Address Masquerading (SMTP)
Use the sections on this page to convert the addresses in the headers of incoming or outgoing email.
Email | Email Configuration | Protocol Configuration | Address Masquerading (SMTP)
For example:
• Send and receive email for general enquiries using an anonymous address such as
info@example.com, instead of one person’s specific address.
• Redirect email for several people to one person.
• Modify the email headers to hide information about your internal domains.
By default, characters outside the ASCII range are not allowed in
an email address.
McAfee Email and Web Security Appliances 5.6.0 Product Guide
79
Page 80

Overview of Email features
Email Configuration
Make modifications to the From address and sender headers of outgoing email under Sender address
masquerading.
Make modifications to the To address of incoming email under Recipient address aliasing.
Address masquerading affects all email. Take care that the search
pattern does not interfere with any policies that operate on the email
address.
Useful websites
Regular expressions: http://www.regular-expressions.info/reference.html
Page area Summary
Sender address masquerading Use this area to configure sender address masquerading.
Recipient address aliasing Use this area to configure recipient address aliasing.
Sender address masquerading
Use this area to configure sender address masquerading.
Table 55 Option definitions
Option Definition
Search pattern
Specifies a search pattern that uses regular expressions to convert the original email
address to a masqueraded email address.
Take care with the use of ^ and $ in a regular expression. If the email headers contain
extra characters such as chevrons (< >), the regular expression will not replace the
email address, as expected.
Replacement
Test
Displays the address you want to put in place of the original email address.
When clicked, opens a further window where you can test whether your regular
expression makes the correct replacement address. Type an email address as input,
click Check to see the resulting output address.
Search headers (advanced)
Use this area to specify how the appliance searches for email headers.
Table 56 Option definitions
Option Definition
Mail headers to search
Specifies any new mail headers for outgoing email.
You need only add new headers if your mail server attaches its own unique
headers, or extra headers are defined in new email specifications.
80
McAfee Email and Web Security Appliances 5.6.0 Product Guide
Page 81

Recipient address aliasing
Use this area to configure recipient address aliasing.
Table 57 Option definitions
Option Definition
Search pattern
Specifies a search pattern that uses regular expressions to convert the recipients email
address to an aliased email address.
Take care with the use of ^ and $ in a regular expression. If the email headers contain
extra characters such as chevrons (< >), the regular expression will not replace the
email address, as expected.
Overview of Email features
Email Configuration
Replacement
Test
Displays the address you want to put in place of the recipient email address.
When clicked, opens a further window where you can test whether your regular
expression makes the correct replacement address. Type an email address as input,
click Check to see the resulting output address.
Transport Layer Security (SMTP)
Use this page to specify how devices use encrypted communications and to manage their digital
certificates.
Email | Email Configuration | Protocol Configuration | Transport Layer Security (SMTP)
Import the trusted Certificates Authorities and certificates from the
participating organizations before you begin this configuration. RSA keys
can be used both for encryption and for signing. DSA keys can be used
for signing only.
Table 58 Option definitions
Page area Summary
TLS Connections on page 82 Use this area to define hosts that use TLS encryption.
Certificate management on page 82 Use this area to manage TLS digital certificates that are
needed for the secure transfer of email.
TLS options (advanced) on page 84 Use this area to specify the type of ciphers for TLS encryption.
McAfee Email and Web Security Appliances 5.6.0 Product Guide
81
Page 82

Overview of Email features
Email Configuration
TLS Connections
Use this area to define hosts that use TLS encryption.
Table 59 Option definitions
Option Definition
Source (appliance is acting as server) Displays the details, such as:
• 192.168.200.254/24
• 192.168.200.254/255.255.255.0
• server1.example.net
• *.example.net
Use TLS
Always — rejects email from participating
organizations if their communication does not try
to start encryption.
Never — configure connections to the source
server to never use TLS encryption.
When available — if available, the connection uses
TLS encryption.
Authenticate Client
Specifies whether the other device must also
authenticate.
Server Certificate
Selects the certificate to use for this TLS
Connection.
The name is one of the certificate IDs from the
Certificate Management section .
Source (appliance is acting as client) Displays the details, such as:
• 192.168.200.254/24
• 192.168.200.254/255.255.255.0
• server1.example.net
• *.example.net
Use TLS
Always — rejects email from participating
organizations if their communication does not try
to start encryption.
Never — configure connections to the source
server to never use TLS encryption.
When available — if available, the connection uses
TLS encryption.
Authenticate Self
Client Certificate
Certificate management
Use this area to manage TLS digital certificates that are needed for the secure transfer of email.
Certificates typically have a lifetime of several months or years, so they do not need to be managed
often.
82
McAfee Email and Web Security Appliances 5.6.0 Product Guide
Specifies whether the client must verify itself to
the recipient before sending email. The client
then needs its own certificate.
Selects the certificate to use for this TLS
Connection.
The name is one of the certificate IDs from the
Certificate Management section.
Page 83

Overview of Email features
Email Configuration
This information is also available by selecting System | Certificate Management | Certificate | TLS certificates and
keys on the navigation bar.
Table 60 Option definitions
Option Definition
Certificate ID
Subject
Issuer
Expires
Delete
View
Displays the name of the certificate.
Displays details about the certificate.
Displays the certificate-issuing authority such as Thawte or Verisign.
Displays the certificate's expiry date, such as May 05 2010 12:15:00.
When clicked, deletes the selected certificate.
When clicked, displays details of the selected certificate, such as its version, issuer,
and public key.
Export
When clicked, opens another window, where you can choose to export the certificate
or a complete certificate chain, and specify the certificate format. The file name
extension is typically CRT.
Import Certificate
and Key
When clicked, opens another window where you can select a file. The imported
certificate can be in one of these formats:
• Binary (or DER-encoded) certificate file
If a yellow exclamation point appears next to the certificate after you
click the green checkmark to apply the change, the certificate is not
currently trusted. Import the associated CA certificate before you use
the new certificate.
Import Certificate and Key
Use this topic to understand the fields found within the Import Certificate and Key dialog box for
Transport Layer Security.
Email | Email Configuration | Protocol Configuration | Transport Layer Security (SMTP) | Certificate management
When requesting that your TLS certificates be created, McAfee
recommends that you include the hostname and the IP address for the
appliance that will be decrypting the TLS-encrypted email. If your
appliance is part of a cluster, and is configured in Transparent Router or
Explicit Proxy mode, ensure that the you include the virtual hostname
and virtual IP address for your cluster, rather than one of the physical IP
addresses.
• PEM (Base64) encoded certificates
• Binary PKCS#12 file
• PEM-encoded PKCS#12 file
To import a password-protected certificate, type the passphrase to unlock the
private key. The appliance stores the decrypted certificate in a secure internal location.
The appliance verifies the certificate, making it available to use, after you click to
apply your changes:
McAfee Email and Web Security Appliances 5.6.0 Product Guide
83
Page 84

Overview of Email features
Email Configuration
Table 61 Option definitions
Option Definition
Browse
Use Browse to locate the file containing your Transport Layer Security
certificate and key.
Passphrase to unlock the
private key
Format
Enter the passphrase that you included when you requested the certificate
be created.
Select either Base-64 encoded certificates and private key, or PKCS#12 secure key file, as
applicable.
You can also choose to import any CA certificates contained within the file
that you import.
TLS options (advanced)
Use this area to specify the type of ciphers for TLS encryption.
Table 62 Option definitions
Option Definition
Cipher strength
Provides a choice of cipher strengths.
By default, ciphers with a full range of strengths are supported. If necessary, the
range of supported cipher strengths can be limited to 128-bit or greater.
Allow no encryption
If selected, ciphers without encryption are supported. McAfee does not
recommend using unencrypted TLS connections, so this setting is disabled by
default.
Allow anonymous key
exchange
If selected, ciphers without authentication are supported. McAfee does not
recommend using unauthenticated TLS connections, so this setting is disabled by
default.
When unauthenticated ciphers are supported, some destination servers might
choose these ciphers in preference to authenticated ciphers.
Connection and Protocol Settings (POP3)
Use this area to specify settings for the POP3 protocol such as port numbers and time-outs.
Email | Email Configuration | Protocol Configuration | Connection and Protocol Settings (POP3)
Optionally specify periods when some parts of the network will not be scanned.
Before turning off scanning of any traffic, consider the security risks. The
most secure option is to scan all traffic. If an appliance is operating in a
transparent mode, use this feature to exclude some parts of the network
from scanning traffic in a protocol during specific periods. You might
need to do this if you regularly move many large files through the
appliance.
Changing these settings can affect scanning performance. If you are not
sure about the impact of making any changes, ask your network expert.
84
McAfee Email and Web Security Appliances 5.6.0 Product Guide
Page 85

Overview of Email features
Email Configuration
Table 63 Option definitions
Page area Summary
Basic POP3 settings Use this area to configure the basic setting for using the POP3 protocol.
Timeouts Use this area to specify time-out values for the POP3 protocol.
POP3 protocol settings Use this area to specify settings that apply only to the POP3 protocol.
Basic POP3 settings
Use this area to configure the basic setting for using the POP3 protocol.
Table 64 Option definitions
Option Definition
Enable the POP3 protocol
Listening ports
Transparent interception
ports
Dedicated POP3 proxy ports
When deselected, ignores any POP3 traffic. Other traffic is not affected.
Specifies a port number. The default value is 110.
Specifies a port number. The default value is 110.
Specifies connections to dedicated POP servers.
Specify a unique port number for each server. Choose port numbers in the
range 1024 to 65535, because numbers below 1024 are generally assigned to
other protocols. The server must have an FQDN, for example
pop3server.example.com.
Click these icons and the port headings to reveal icons for managing the port
information:
Indicates the port number.
Indicates the traffic that will be intercepted.
Indicates a period when traffic is not scanned.
Indicates a dedicated port.
Enable reverse DNS
lookups.
When selected, enables the appliance to perform lookups. Default value is Yes.
Take care if deselecting this setting. If you deny reverse DNS lookups, some
functions might fail.
Timeouts
Use this area to specify time-out values for the POP3 protocol.
You do not need to change these values often.
Table 65 Option definitions
Option Definition
Maximum wait times when talking
to a POP3 client
Specifies how long the appliance waits for responses from the computer
that sends the email message. Default values:
• Between commands — 600 seconds
Maximum wait times when talking
to a POP3 server
• Completing data transfer — 60 seconds
Specifies how long the appliance waits for responses from the mail
server that receives the email message. Default values:
• Establishing a connection — 60 seconds
• Completing data transfer — 60 seconds
McAfee Email and Web Security Appliances 5.6.0 Product Guide
85
Page 86

Overview of Email features
Email Configuration
POP3 protocol settings
Use this section to specify settings that apply only to the POP3 protocol.
Table 66 Option definitions
Option Definition
Enable server
keepalives
Specifies values to keep the server connection open. The appliance can repeatedly
send a POP3 command to prevent the connection between the appliance and the
mail server timing-out.
Default values:
• Enable server keepalives — No
• Keepalive interval — 60 seconds
• Keepalive command — Not set
Enable client
keepalives
Specifies values to keep the client connection open. The appliance can repeatedly
send a POP3 command to prevent the connection between the appliance and the
POP3 mail client timing-out. Default values:
• Enable client keepalives — No
• Keepalive interval — 60 seconds
Address delimiters
Specifies the characters that identify each part of an email address. For example:
[user name]#[host name]:[port number]. Default values:
• # — User delimiter
• : — Host delimiter
You need only change the delimiter characters if your POP3 provider uses different
characters.
Respond to CAPA
requests
Responds to a POP3 CAPA command, which returns a list of capabilities supported
by the POP3 server. Default value is No.
For more information, see RFC 2449.
Receiving Email
The Receiving Email tab within Email Configuration enables you to configure settings that are
protocol-dependant.
Further tabs enable you to configure permit and deny lists and anti-relay settings as well as recipient
authentication and bounce address tag validation.
Contents
Permit and Deny Lists
Anti-Relay Settings
Recipient Authentication
Bounce Address Tag Validation
Permit and Deny Lists
Use this page to build a list of IP addresses, networks and users that are permitted, blocked or
temporarily blocked from connecting to the appliance.
Email | Email Configuration | Receiving Email | Permit and Deny Lists
The page has these sections:
86
McAfee Email and Web Security Appliances 5.6.0 Product Guide
Page 87

Overview of Email features
Email Configuration
• Permitted and blocked connections
• Permitted and blocked senders
Benefits of using the permit and deny lists
The permit and deny lists for connections and senders are located on a single page within the user
interface, allowing you to easily configure these settings.
Once set, the permit and deny lists help prevent your users from being swamped by unwanted email
messages, whilst helping ensure that email messages from trusted senders do not accidentally get
blocked.
Permitted and blocked connections
Use this section to specify IP addresses that are always permitted or blocked when connecting to the
appliance.
Table 67 Option definitions
Option Definition
IP address (Permitted
connections)
IP address (Blocked
connections)
The appliance accepts email from this address even if a detected threat caused a
"Deny connection" action. This setting ensures that the appliance does not delay
email from trusted senders.
Displays the IP addresses for connections that the appliance is currently blocking.
Addresses remain in this list for a specified period during which email is not
accepted.
Permitting a connection does not override any time constraints set up by the
policy that blocks the connection. For example, if a policy states that a
connection will be blocked for 600 seconds and you change the connection to
“permitted” within the 600 seconds, the connection continues to be blocked until
the 600 seconds have elapsed. This is why a connection can temporarily appear
in both the Blocked and Permitted connections list.
Port
VLAN ID
Seconds remaining
Refresh
Unblock
Store a maximum of
items in the blocked
connections list
Import List
Export List
Displays the number of the port on which the message was received. This is
typically port 25.
Displays the ID of the virtual LAN on which the message was received. This is
typically 1 to 4094.
Applicable to Transparent Bridge mode only.
Displays the time that must pass before the appliance again allows a connection
from this IP address.
When clicked, updates the list of connections. The list is not automatically updated.
When clicked, enables the selected IP address to try to reconnect.
If the limit is reached, the appliance can only add more IP addresses to the list
when an existing address expires or is removed manually by clicking Unblock.
Default value is 5000.
To prevent you having to enter the permitted connections individually onto each
of your appliances, you can import a list of permitted connections.
Once you have configured the permitted connections list for one of your
appliances, you can export the permitted connections list, to be imported onto
other appliances.
The file is created in comma separated variables (CSV) format.
McAfee Email and Web Security Appliances 5.6.0 Product Guide
87
Page 88

Overview of Email features
Email Configuration
Permitted and blocked senders
Use this section to specify senders, networks and domains that are always permitted or blocked when
connecting to the appliance.
Table 68 Option definitions
Option Definition
Value type (Permitted
senders)
Value (Permitted
senders)
If an email is from a permitted sender, Sender Authentication checks are
bypassed, and the sender is accepted.
Displays the details of the sender:
• Email address — For example, network_user@ example.com
• IP address — For example, 192.168.255.240
• Domain name — For example, www.example.com
Value type (Blocked
senders)
Value (Blocked senders)
Response if a sender is
in the block list
Resolve permitted /
blocked host names to
IP addresses
Reverse lookup sender
IP address
Import List
Export List
If an email is from a blocked sender, it will be refused unless there is a
corresponding entry in the permitted senders list.
Displays the details of the sender (email address, IP address and domain name).
Offers various actions, including:
• Allow through
• Accept and drop
• Reject
• Reject and close
• Reject, close and deny
When selected, causes the appliance to use DNS to resolve host names to IP
addresses from a domain name. These lookups take place when the SMTP proxy
is initialized. The default value is Yes.
When selected, causes the appliance to use DNS to do a reverse lookup of the
sending IP address to match domains in the list. Because this requires an extra
lookup for each connection, this can affect performance. The default value is No.
To prevent you having to enter the permitted or denied senders individually onto
each of your appliances, you can import lists of permitted or denied senders.
Once you have configured the permitted or denied senders list for one of your
appliances, you can export the information, to be imported onto other appliances.
The files are created in comma separated variables (CSV) format.
Task — How do I add a permitted connection?
To add a permitted connection:
1
Browse to Email | Email Configuration | Receiving Email | Permit and Deny Lists | Permitted and blocked connections |
Permitted connections.
2
Click Add.
3
Type the IP address and the netmask for the connection that you want listed as permitted.
4
Save the changes.
88
McAfee Email and Web Security Appliances 5.6.0 Product Guide
Page 89

Overview of Email features
Email Configuration
Task — How do I export my lists of permitted or denied settings?
Once you have configured your appliance with your permitted or denied settings, you can export a list
of these settings, either as a backup or to import into other appliances.
1
Browse to Email | Email Configuration | Receiving Email | Permit and Deny Lists.
2
Click Export List for the relevant area (Permitted connections, Permitted senders or Blocked senders).
3
Click the displayed link to download it to your local file system.
4
Click Close.
Task — How do I import a list that I exported from another appliance?
To prevent you having to repeatedly enter the same data into each of your appliances, Email and Web
Security Appliances enables you to import a list of permitted or denied senders or permitted
connections into your appliance.
1
Ensure that you have exported the required list, and that it is located where it can be accessed
from your user interface.
2
Browse to Email | Email Configuration | Receiving Email | Permit and Deny Lists.
3
From the relevant area (Permitted connections, Permitted senders or Blocked senders), click Import List.
4
Browse to the required file.
5
Click OK.
Anti-Relay Settings
Use this page to prevent the appliance from being used as an open relay.
Email | Email Configuration | Receiving Email | Anti-Relay Settings
Benefits of preventing the appliance from being used as an open relay
By default, the appliance is configured as an open relay so anyone can send messages through it. You
must specify the domains that can send and receive messages. Anti-relay settings are required to
ensure that the appliance only handles email for authorized users, and to prevent other people such as
spammers from using the appliance to forward their messages. When you first log on to the appliance,
a warning icon displays on the System Health areas of the dashboard, and a warning message displays
in the bottom-right corner of the dashboard to alert you that the appliance can be used as an open relay.
You must create at least one local domain to prevent the appliance from
being used as an open relay. Even if you have a list of domains
categorized as permitted domains or denied domains, the lack of a local
domain will still mean that the appliance can be used as an open relay.
The page has these sections:
• Relaying email
• Anti-relay options
A typical scenario is that the local domain, such as *.local.dom, accepts messages for delivery by
the appliance. You also have a network from which you accept messages, such as 192.168.0.0/24.
The anti-relay feature checks the contents of three lists to determine whether a recipient is acceptable.
McAfee Email and Web Security Appliances 5.6.0 Product Guide
89
Page 90

Overview of Email features
Email Configuration
The order in which anti-relay checks take place
The appliance makes anti-relay checks at the RCPT TO phase of the SMTP conversation. It is important
to understand the order in which the anti-relay checks take place:
• Is the local domain list empty?
• Yes. The appliance operates as an open relay and allows the recipient to receive the message.
• No. The appliance performs the next check.
• Is the recipient or connection in the permitted domains list?
• Yes. The appliance allows the recipient to receive the message.
• No. The appliance performs the next check.
• Is the recipient or connection in the denied domains list?
• Yes. The appliance rejects the recipient.
• No. The appliance performs the next check.
• Is the recipient or connection in the local domain list?
• Yes. The appliance checks whether the recipient matches on a permitted routing character.
• Yes. The appliance accepts the recipient.
• No. the appliance checks whether the recipient matches on a denied routing character.
• Yes. The appliance rejects the recipient.
• No. The appliance accepts the recipient.
• No. The appliance rejects the recipient.
Relaying email
Use this section to specify domains and networks that can use the appliance for handling their email.
Table 69 Option definitions
Option Definition
Add Domain
Click to specify the domains that can relay messages through the appliance to the
recipient. Choose from:
• Local domain — These are the domains or networks for which email is accepted for
delivery. For convenience, you can import a list of your local domain names using
the Import Lists and Export Lists options. McAfee recommends that you add all domains
or networks that are allowed to relay messages as local domains.
• Permitted domain — Email is accepted. Use permitted domains to manage exceptions.
• Denied domain — Email is refused. Use denied domains to manage exceptions.
Hold your mouse cursor over the field to see the recommended format.
You must set up at least one local domain.
Add MX Lookup
Click to specify a domain that the appliance will use to identify all mail server IP
addresses from which it will deliver messages.
Delete Selected
Items
Domain Name/
Network
Removes the selected item from the table. You must apply the changes before the
item is completely removed from the appliance configuration.
Displays the domain names, wildcard domain names, network addresses, and MX
lookups from which the appliance will accept or refuse email.
Address/MX
Record
90
McAfee Email and Web Security Appliances 5.6.0 Product Guide
Page 91

Table 69 Option definitions (continued)
Option Definition
Type
• Domain name — for example, example.dom. The appliance uses this to compare the
recipient's email address and compare the connection against an A record lookup.
• Network Address — for example, 192.168.0.2/32 or 192.168.0.0/24. The appliance
uses this to compare the recipient's IP literal email address such as
user@[192.168.0.2], or the connection.
• MX Record Lookup — for example, example.dom. The appliance uses this to compare
the connection against an MX record lookup.
• Wildcard domain name — for example, *.example.dom. The appliance only uses this
information to compare the recipients email address.
Overview of Email features
Email Configuration
Category
Resolve the
above domain
names to IP
addresses
If a sender or
recipient is
rejected
Import Lists/
Export Lists
Local domain
•
Permitted domain
•
Denied domain
•
If selected, allows the appliance to use DNS to resolve the IP addresses of the
domains. These lookups take place only when the SMTP proxy is initialized.
• Reject — sends an SMTP 550 (permanent failure) response and closes the connection.
• Reject the email and close the connection — sends a rejection code, SMTP 550 (permanent
failure) response code or a SMTP 421 (Temporarily unavailable service due to
potential threat message), then closes the connection.
• Accept and ignore the recipient — sends an acceptance code, SMTP 250 (OK). McAfee does
not recommend this option because it suggests to the sender that the message was
received as intended.
On an appliance from which you want to save a list of domains for anti-relay
specification, click Export Lists to create a comma-separated CSV file that contains
details of all the domains that you specified on this page, whether they are local,
permitted or denied. On an appliance onto which you wish to put the list of domains,
click Import Lists.
To create your own list, see Formats for export lists later on this page.
Anti-relay options
Using routing characters (such as %, !, and |) is a method of passing messages between computers.
With these characters, unauthorized users can relay email messages (often spam) by using computers
inside your network. To permit or block this form of relaying, you specify the routing characters, which
are in the part of an email address before the final @. By default, the appliance does not support
routing characters in email addresses.
Table 70 Option definitions
Option Definition
Permitted routing
characters
Use the default
(Permitted routing
characters)
Specifies permitted routing characters. Normally you do not need to type any
characters here.
When selected, prevents the use of the following routing characters: *!* *%* *|
*
McAfee Email and Web Security Appliances 5.6.0 Product Guide
91
Page 92

Overview of Email features
Email Configuration
Table 70 Option definitions (continued)
Option Definition
Denied routing characters
Accepts any of the following characters:
*%* - Right-binding routing character (%-exploit).
*!* — Local or mail gateway routing.
*|* — Pipe is used by some mail servers to execute commands.
*[*]* — Parentheses that encloses a dotted-decimal domain address such as
192.168.254.200.
*:* — Colon for multiple hops.
For example, to block the relaying of addresses of the type
“user@host”@relay.com, add *@* to the list of denied characters.
Use the default (Denied
routing characters)
Enable routing character
When selected, prevents the use of the following routing characters: *!* *%* *|
*
When selected, examines routing characters on outgoing mail.
checking for sender
Protocol preset
Lists any connection-based policies to which the routing characters setting
applies.
Click to open the Protocol Presets screen to assign additional policies, or create
new policies or network groups to which the routing characters setting applies.
Suggested simple configuration
To allow relaying of incoming messages to your domain, add a wildcard domain. To allow the relaying
of outgoing messages from your domain, add the IP address or network address of the Message
Transfer Agent (MTA):
1
Go to Email | Email Configuration | Receiving Email | Anti-Relay Settings.
2
Click Add Domain.
3
Type the domain name using a wildcard, such as *example.dom.
4
In Category, select Local domain, and click OK.
5
Click Add Domain, and type the network address or the IP address from which you expect to receive
messages (such as 192.168.0.2/32 or 192.168.0.0/24).
6
In Category, select Local domain, and click OK.
Create a permitted subdomain based on a larger denied domain
To create a small permitted subdomain within a larger denied domain, create the main domain as a
denied domain, and add the sub domain as a permitted domain.
1
Go to Email | Email Configuration | Receiving Email | Anti-Relay Settings.
2
Click Add Domain.
3
Type the domain name that you want to deny using a wildcard, such as *example.dom to reject all
messages sent to that domain.
4
In Category, select Denied domain, and click OK.
92
McAfee Email and Web Security Appliances 5.6.0 Product Guide
Page 93

Overview of Email features
5
Click Add Domain again, and type the name of the subdomain that you want to accept, such as
Email Configuration
sub.example.dom.
6
in Category, select Permitted domain, and click OK.
Task — Create a list of domains and export it to another appliance
1
On a master appliance, go to Email | Email Configuration | Receiving Email to set up the local domain, and
any permitted or denied domains.
2
Click Export Lists to create a CSV file that contains a list of all domains displayed in the Relaying
email list.
3
Click the link to download the file, and save it onto your network.
4
On a secondary appliance, go to Email | Email Configuration | Receiving Email and click Import Lists.
Formats for export lists
To create a list of domains for an export list, type the domains into a comma-separated values file
using the following formats:
• To add a local domain, type LD *<domain name>
• To add a local network address, type LN <IP address>/<CIDR>
• To add a permitted domain, type PD *<domain name>
• To add a denied domain, type DD *<domain name>
For example:
LD *inbri.bs.dom, LN 10.6.1.3/24, PD *qa.ext.bs.dom, DD *ext.bs.dom
Recipient Authentication
Use this page to prevent attacks from zombie networks, bogus recipient names, and directory
harvesting.
Email | Email Configuration | Receiving Email | Recipient Authentication
The page has these sections:
• Greylisting
• Recipient Checks
• Directory harvest prevention
McAfee Email and Web Security Appliances 5.6.0 Product Guide
93
Page 94

Overview of Email features
Email Configuration
Benefits of using Recipient Authentication
Greylisting email messages from unknown senders causes messages from these senders to be
rejected for a period of time. If the sending email system is legitimate, it will follow the correct
protocols for re-delivering previously rejected messages. However, most "zombie" networks that are
used to send spam messages do not comply with these protocols, and therefore messages from them
are blocked.
Recipient checks are useful tools in preventing directory-harvest attacks and flooding attacks (where
large volumes of email messages are directed at your email servers, in the hope that some will get
through to valid email addresses). Recipient checks work by you providing information about your
genuine recipients of email messages within your organization. This information may already be
available from your LDAP servers. You can also import lists of recipient email addresses from a file.
Directory harvest prevention compares the number of email messages being sent to known and
unknown email addresses within your organization. From this, the appliance can identify when a
directory harvest is taking place, and can take steps to minimize the impact of the attack.
Greylisting
Use this section to create a grey list, which is effective against attacks from unknown senders such as
zombie networks. Greylisting temporarily rejects email from new senders to resist spam attacks.
Table 71 Option definitions
Option Definition
Protocol preset
Accept SMTP
callback requests
Initial retry delay
Specifies the policy (and network group) to which these settings apply.
If selected, overcomes delays caused by devices that use SMTP callbacks to
prevent spam.
Specifies how long to reject any early attempt to resend the email. The default
value is 3600 seconds (1 hour). Many mail servers typically try to resend after one
hour. The range is up to 86400 seconds (1 day).
Unretried record
lifetime
Specifies how long to keep a record, where the sender has not tried to send
another message.
After this time, the appliance deletes the record of any triplet that has not be
retried. We recommend a value below 8 hours. The range is up to 96 hours (4
days). Default value is 4 hours.
Greylisted record
lifetime
Specifies how long to keep a greylisted record. The appliance deletes records of
triplets that have not been referenced for some time. The range is up to 2160
hours (90 days). Default value is 864 hours (36 days), which is suitable for
occasional mail like monthly newsletters.
Maximum number of
records
Specifies the maximum number of greylisted records. When the number of records
approaches this value, the appliance starts deleting old records. The range is
50,000 to 2,000,000. Default value is 2000000.
94
McAfee Email and Web Security Appliances 5.6.0 Product Guide
Page 95

Overview of Email features
Email Configuration
Recipient Checks
Use this section to prevent directory-harvest attacks and attacks that issue large numbers of email
messages (known as flooding). You can provide the appliance with a list of permitted recipients. Your
network might already have this information on its LDAP servers. Alternatively, you can import a list of
email addresses from a text file.
Table 72 Option definitions
Option Definition
Protocol preset
If the recipient is not in
the following list
Email address
Or if the recipient is not
listed in LDAP
Take the following action
Specifies the policy (and network group) to which these settings apply.
When selected, checks the recipient address against email addresses in the list.
Lists the acceptable email addresses. You can use wildcards, for example:
user*@example.com. We recommend that you do not overuse wildcards,
because you will defeat the intention.
When selected, checks the recipient address against email addresses in the
LDAP. To connect to an LDAP server, select System | Users, Groups and Services |
Directory Services on the navigation bar.
• Accept and ignore the recipient — Accepts the email message and ignores it. The
appliance sends an acceptance code (SMTP 250 OK). We do not recommend
this option because it suggests to the sender that the message was received
as intended.
• Reject — Sends a rejection code (SMTP 550 Fail). We recommend this option
because the sender is normally informed that the message was not accepted.
Directory harvest prevention
Use this section to prevent directory harvest attacks. The appliance examines the number of known
and unknown email addresses to determine whether an attack is taking place.
When used with some email servers, Directory Harvest Prevention might
not function as expected.
Table 73 Option definitions
Option Definition
Protocol preset
When the appliance is in
transparent mode
When the appliance is in
proxy mode
Specifies the policy (and network group) to which these settings apply.
• None — Takes no action.
• Tarpit — Delays a response to email that has several recipient addresses.
• Tarpit then deny connection — Delays a response to the email, then adds the
sender to the Denied Connections list.
• Deny connection — Adds the sender to the Denied Connections list.
Default value is Deny connection.
• None — takes no action.
• Deny connection — adds the sender to the Denied Connections list.
Default value is Deny connection.
McAfee Email and Web Security Appliances 5.6.0 Product Guide
95
Page 96

Overview of Email features
Email Configuration
Table 73 Option definitions (continued)
Option Definition
When an email has been
• None — Takes no action.
deferred and is being
retried
• Deny connection — Adds the sender to the Denied Connections list.
• Deny connection and quarantine email — Adds the sender to the Denied Connections
list, then forwards the email to a quarantine area.
Default value is Deny connection and quarantine email.
Response delay
When a tarpit action was selected, specifies the delay in responding to this email.
Default value is 5 seconds. This is often enough to deter an attack.
Maximum number of
recipients
When a tarpit action was selected, specifies how many recipient addresses each
email may have. Default value is 10.
Applies a delay if there are too many recipient addresses in the email message.
A directory harvesting
attack ...
Defines this type of attack. Default values are 5 failed recipients and 10%
accepted recipients.
Email that falls outside this specification is not considered to be an attack, so
no action is taken.
Bounce Address Tag Validation
Use this page to combat backscatter — bounced email that was not originally sent from your
organization.
Email | Email Configuration | Receiving Email | Bounce Address Tag Validation
If an Mail Transfer Agent (MTA) cannot deliver an email message, the MTA returns (or 'bounces') the
message to the sender using a return address in the message. Unfortunately, spam email messages
often have a forged (or spoofed) return address. The bounced email often goes to an innocent
organization. This type of email is known as backscatter. During a spam attack, your organization
might receive many such messages.
Benefits of using Bounce Address Tag Validation
Bounce Address Tag Validation (BATV) enables your organization to ignore any backscatter email
message by checking whether your organization was its original sender. The appliance can attach a
encrypted digital signature (or tag) to the SMTP MailFrom address on every outgoing email message.
When a bounced email arrives, the appliance searches for the digital signature, and rejects any
message that has no digital signature or has an invalid digital signature. Such a message cannot be a
genuine, bounced email message.
For more information about BATV, visit http://mipassoc.org/batv/draft-levine-batv-03.txt.
If email is handled by several appliances — for example, one appliance handles outgoing email, while
another appliance handles incoming email — all the appliances need information about the signature
seeds and signature lifetime. To distribute the information between your appliances, use the import
and export features in the interface.
96
McAfee Email and Web Security Appliances 5.6.0 Product Guide
Page 97

Table 74 Option definitions
Option Definition
When validation fails
Signature lifetime
Specifies how the appliance must handle each invalid bounced message.
Specifies how long the signature seed will be used to sign outgoing email. Mail
servers typically try to deliver mail for up to four days. McAfee recommend a value
of 4–7 days.
Signature seed
Specifies a seed for signing the sender's address.
Use only letters, numbers and space characters. The acceptable key length is 4–64
characters. Type a seed that is not easy to guess.
Overview of Email features
Email Configuration
Generate
When clicked, generates a signature seed that has 20 random letters and numbers.
You can use this method instead of typing your own signature seed.
Import settings
When clicked, opens a file browser to import a text file that contains BATV settings
from another appliance.
Export settings
When clicked, opens a file browser to create a text file that contains BATV settings
for use by another appliance.
Sending Email
Use this page to specify how the appliance delivers email messages.
Email | Email Configuration | Sending Email
The page has these sections:
• Delivering email
• Postmaster address
• DKIM signing
• Queued email delivery
Delivering email
Use this section to specify how the appliance tries to deliver email, based on the domain part of the
recipient's address. In a To field, the domain part of an address such as aaa@example.com is
example.com.
Using the recipient's domain, the appliance uses the following logic to decide how it will deliver
messages:
• If the recipient's domain matches those listed in Known Domains and relay hosts, it uses those relays to
deliver the message.
• If the recipient's domain does not match those listed in Known Domains and relay hosts, it can be
configured to use an MX record lookup to deliver using DNS. If no MX records are available, it
attempts to make the delivery using an A record lookup. MX delivery is attempted to hosts in the
order of priority that is returned by the DNS server.
• If it cannot deliver using one of the previous methods, it uses fallback relays to make the delivery
(providing the recipient's domain matches those listed in the Fallback relays field).
McAfee Email and Web Security Appliances 5.6.0 Product Guide
97
Page 98

Overview of Email features
Email Configuration
• If the domain does not exist, the appliance generates a non-delivery report and sends it to the
originator.
• If the receiving server cannot accept delivery, or there are no IP addresses to complete the
delivery, the message is queued.
Table 75 Option definitions
Option Definition
Import Lists
Export Lists
Known domains
and relay hosts
Click the link to open the Import Lists dialog box.
Click the link to open the Export Lists dialog box.
Displays a list of domains.
This list allows you to specify specific relays/sets of relays to be used to deliver
messages destined for specific domains. Domains can be identified using exact
matches, or using pattern matches such as *.example.com.
Click Add Relay List to populate the Known domains and relay hosts table with a list of host
names, or IP addresses for delivery. Delivery will be attempted in the order specified
unless you select the Round-robin the above hosts option which will distribute the load
between the specified hosts.
Host names/IP addresses may include a port number.
Enable DNS lookup
for domains not
listed above
Fallback relays for
unreachable
domains
Click Add MX Lookup to populate the Known domains and relay hosts table with an MX record
lookup to determine the IP addresses for delivery.
Delivery will be attempted to host names returned by the MX lookup in the order of
priority given by the DNS server.
Use an IP address with optional port number or a fully qualified domain name. For
example, 10.6.1.6 or 10.6.1.5:25 or mailrelay.mydomain1.dom. If you specify a
fully qualified domain name, the appliance does an A-record lookup to determine the
IP address.
To specify multiple relays for a single domain, separate each with a space.
If the first mail relay is accepting email, all email is delivered to the first relay. If
that relay stops accepting email, subsequent email is delivered to the next relay in
the list.
If selected, the appliance uses DNS to route email for other, unspecified domains.
DNS delivery attempts an MX-record lookup. If there are no MX records, it does an
A-record lookup.
If you deselect this checkbox, the appliance delivers email only to the domains that
are specified under Known domains and relay hosts.
Specifies the fallback relays. If delivery is unsuccessful by any other method, and
the domain matches an entry in this list, the appliance uses the information in this
list to determine a host to be used for delivery.
Click Add Relay List to populate the Known domains and relay hosts table with a list of host
names, or IP addresses for delivery. Delivery will be attempted using the hosts in
the order specified unless you select the Round-robin the above hosts option which will
distribute the load between the specified hosts.
Click Add MX Lookup to populate the Known domains and relay hosts table with an MX
record lookup to determine the IP addresses for delivery.
98
McAfee Email and Web Security Appliances 5.6.0 Product Guide
Host names/IP addresses may include a port number.
Delivery will be attempted to host names returned by the MX lookup in the order of
priority given by the DNS server.
Page 99

Overview of Email features
Email Configuration
Postmaster address
McAfee recommends that you assign a postmaster, so that queries from your users are handled
promptly. The postmaster must be someone who reads email regularly. You can use the name of a
single user or a distribution list.
Table 76 Option definitions
Option Definition
Postmaster address
Specifies an email address that the appliance uses to deliver email that has a
recipient of postmaster.
We recommend that you specify an email address here, so that any delivery
problems are handled promptly. You can specify a distribution list or a single user
who reads email regularly.
DKIM signing
The Domain Keys Identified Mail (DKIM) technique uses RSA private and public keys and DNS TXT
records to enable the recipient to verify the identity of an email sender.
The sender signs the email message with a private key, by adding an extra header - the
DKIM-Signature header. The header provides the email message with a cryptographic signature. The
signature is typically derived from the message body and email headers such as From and Subject,
then encrypted by the sender's private key.
Recipients can verify that the message is genuine by making a query on the signer's domain to
retrieve the signer's public key from a DNS TXT record. The recipient then verifies that the email and
its signature match. The recipient can therefore be confident that the email was sent from the stated
sender and was not altered during transit.
The appliance can verify signatures from incoming mail and attach signatures to outgoing mail.
For information about Domain Keys Identified Mail (DKIM), visit the Internet Engineering Task Force
website, http://www.ietf.org and http://www.dkim.org.
Use this section to create a Domain Keys Identified Mail (DKIM) key.
Table 77 Option definitions
Option Definition
Enable DKIM
signing
Domain name
and Selector
When selected, adds a DKIM header (like a digital signature) to each email message
as it is sent.
You must add a key before you can enable DKIM signing.
During verification, the recipient extracts your Domain Name and Selector from the
signature to retrieve the public key associated with the appliance’s private signing key.
For example, if your Selector is mail and your Domain Name is example.com, the
recipient must issue a DNS query for the TXT record of mail._domainkey.example.com.
Signing key
DKIM signing
Select the key to be used to sign the messages.
Allows you to create signing keys from numerous parameters.
keys
Export
When clicked, allows you to save the private key to a file, in case the original private
key is lost or erased.
View Public Key
Place the public key on your DNS server or give it to your Internet Service Provider, so
that recipients can verify email from your organization.
McAfee Email and Web Security Appliances 5.6.0 Product Guide
99
Page 100

Overview of Email features
Email Configuration
Table 77 Option definitions (continued)
Option Definition
Import Key
Advanced
options
Select this to import an existing DKIM key onto your system.
This section enables you to select specific advanced options that relate to the way your
appliance carries out DKIM checks.
From this area, you can choose:
• What to sign — either signing All headers or Selected headers. Click the linked text to select
the individual headers to sign.
• Header canonicalization — you can choose either Simple or Relaxed canonicalization for the
headers.
• Body canonicalization — you can choose either Simple or Relaxed canonicalization for the
body text.
• Key expiry — choose to either have a key that does not expire, or to set an expiry date
for the key.
• Signing identity — add an optional signing identity to your DKIM keys.
Queued email delivery
Use this section to specify how the appliance handles email if the first attempt to send is not
successful. You do not normally need to change these settings. To see queued email, select Message
Search in the navigation bar.
Use the Per-domain settings section to specify how the appliance delivers email intended for known
domains. The options outside this section apply to email for all other destinations.
Table 78 Option definitions
Option Definition
Maximum number of connections
open at any one time
Time before an NDR is issued
Domain
Retry Interval (success) and
Retry Interval (failure)
Default value is 500.
Specifies how long the appliance tries to deliver an email message
before sending a non-delivery report (NDR) to its sender. Default value
is 108 hours (4.5 days).
Specifies a domain to which the appliance delivers many email
messages during a single connection. To organize priority for delivery,
click the icons in the Move column.
An asterisk (*) indicates all domains.
Specifies how often to retry delivery to the specified domain.
By default, further email is sent every 1 minute if previous email was
sent successfully. If a previous attempt failed, the appliance waits 10
minutes before trying again.
Maximum open connections and
Emails per connection
Task — Deliver all email using MX record delivery
1
Use the default settings.
100
McAfee Email and Web Security Appliances 5.6.0 Product Guide
Specifies other options that control the rate for delivering email to this
domain.
 Loading...