

Page 1

McAfee VirusScan Enterprise 8.8 software
Product Guide
Page 2

COPYRIGHT
Copyright © 2010 McAfee, Inc. All Rights Reserved.
No part of this publication may be reproduced, transmitted, transcribed, stored in a retrieval system, or translated into any language in any form
or by any means without the written permission of McAfee, Inc., or its suppliers or affiliate companies.
TRADEMARK ATTRIBUTIONS
AVERT, EPO, EPOLICY ORCHESTRATOR, FOUNDSTONE, GROUPSHIELD, INTRUSHIELD, LINUXSHIELD, MAX (MCAFEE SECURITYALLIANCE
EXCHANGE), MCAFEE, NETSHIELD, PORTALSHIELD, PREVENTSYS, SECURITYALLIANCE, SITEADVISOR, TOTAL PROTECTION, VIRUSSCAN,
WEBSHIELD are registered trademarks or trademarks of McAfee, Inc. and/or its affiliates in the US and/or other countries. McAfee Red in
connection with security is distinctive of McAfee brand products. All other registered and unregistered trademarks herein are the sole property
of their respective owners.
LICENSE INFORMATION
License Agreement
NOTICE TO ALL USERS: CAREFULLY READ THE APPROPRIATE LEGAL AGREEMENT CORRESPONDING TO THE LICENSE YOU PURCHASED,
WHICH SETS FORTH THE GENERAL TERMS AND CONDITIONS FOR THE USE OF THE LICENSED SOFTWARE. IF YOU DO NOT KNOW WHICH
TYPE OF LICENSE YOU HAVE ACQUIRED, PLEASE CONSULT THE SALES AND OTHER RELATED LICENSE GRANT OR PURCHASE ORDER DOCUMENTS
THAT ACCOMPANY YOUR SOFTWARE PACKAGING OR THAT YOU HAVE RECEIVED SEPARATELY AS PART OF THE PURCHASE (AS A BOOKLET,
A FILE ON THE PRODUCT CD, OR A FILE AVAILABLE ON THE WEBSITE FROM WHICH YOU DOWNLOADED THE SOFTWARE PACKAGE). IF YOU
DO NOT AGREE TO ALL OF THE TERMS SET FORTH IN THE AGREEMENT, DO NOT INSTALL THE SOFTWARE. IF APPLICABLE, YOU MAY RETURN
THE PRODUCT TO MCAFEE OR THE PLACE OF PURCHASE FOR A FULL REFUND.
McAfee VirusScan Enterprise 8.8 Product Guide2
Page 3

Contents
Preface. . . . . . . . . . . . . . . . . . . . . . . . . . . . . . . . . . . . . . . . . . . . . . . . . . . . . . . . . . . . . . . . . . . . . . . . . . . . . . . . . . . . . . 6
Getting Started. . . . . . . . . . . . . . . . . . . . . . . . . . . . . . . . . . . . . . . . . . . . . . . . . . . . . . . . . . . . . . . . . . . . . . . . . . . . . 9
Part I - Prevention: Avoiding Threats. . . . . . . . . . . . . . . . . . . . . . . . . . . . . . . . . . . . . . . . . . . . . . . . . . 19
Audience. . . . . . . . . . . . . . . . . . . . . . . . . . . . . . . . . . . . . . . . . . . . . . . . . . . . . . . . . . . . . . . . . . . . . . . . . . . . . . . . . 6
Conventions. . . . . . . . . . . . . . . . . . . . . . . . . . . . . . . . . . . . . . . . . . . . . . . . . . . . . . . . . . . . . . . . . . . . . . . . . . . . . . . 6
How this guide is organized. . . . . . . . . . . . . . . . . . . . . . . . . . . . . . . . . . . . . . . . . . . . . . . . . . . . . . . . . . . . . . . . . . 7
Finding product documentation. . . . . . . . . . . . . . . . . . . . . . . . . . . . . . . . . . . . . . . . . . . . . . . . . . . . . . . . . . . . . . . 8
Introducing VirusScan Enterprise. . . . . . . . . . . . . . . . . . . . . . . . . . . . . . . . . . . . . . . . . . . . . . . . . . . . . . . . . . . . . . 9
Components and how they interact. . . . . . . . . . . . . . . . . . . . . . . . . . . . . . . . . . . . . . . . . . . . . . . . . . . . . . . . . . . 10
The importance of creating a security strategy. . . . . . . . . . . . . . . . . . . . . . . . . . . . . . . . . . . . . . . . . . . . . . . . . 11
VirusScan Console and ways to access it. . . . . . . . . . . . . . . . . . . . . . . . . . . . . . . . . . . . . . . . . . . . . . . . . . . . . . 13
VirusScan Console and how it works. . . . . . . . . . . . . . . . . . . . . . . . . . . . . . . . . . . . . . . . . . . . . . . . . . . 13
Using right-click features. . . . . . . . . . . . . . . . . . . . . . . . . . . . . . . . . . . . . . . . . . . . . . . . . . . . . . . . . . . . 14
System tray icons and how they work. . . . . . . . . . . . . . . . . . . . . . . . . . . . . . . . . . . . . . . . . . . . . . . . . . 14
What to do first. . . . . . . . . . . . . . . . . . . . . . . . . . . . . . . . . . . . . . . . . . . . . . . . . . . . . . . . . . . . . . . . . . . . . . . . . . . 17
Access protection. . . . . . . . . . . . . . . . . . . . . . . . . . . . . . . . . . . . . . . . . . . . . . . . . . . . . . . . . . . . . . . . . . . . . . . . . 19
How access threats are stopped. . . . . . . . . . . . . . . . . . . . . . . . . . . . . . . . . . . . . . . . . . . . . . . . . . . . . . 20
Control access to the user interface. . . . . . . . . . . . . . . . . . . . . . . . . . . . . . . . . . . . . . . . . . . . . . . . . . . 21
Protecting your system access points. . . . . . . . . . . . . . . . . . . . . . . . . . . . . . . . . . . . . . . . . . . . . . . . . . . . . . . . . 23
How access protection rules are defined. . . . . . . . . . . . . . . . . . . . . . . . . . . . . . . . . . . . . . . . . . . . . . . . 23
Access point violations and how VirusScan Enterprise responds. . . . . . . . . . . . . . . . . . . . . . . . . . . . . 25
Types of user-defined rules. . . . . . . . . . . . . . . . . . . . . . . . . . . . . . . . . . . . . . . . . . . . . . . . . . . . . . . . . . 25
Configuring access protection settings. . . . . . . . . . . . . . . . . . . . . . . . . . . . . . . . . . . . . . . . . . . . . . . . . 26
Blocking buffer overflow exploits. . . . . . . . . . . . . . . . . . . . . . . . . . . . . . . . . . . . . . . . . . . . . . . . . . . . . . . . . . . . . 34
How buffer overflow exploits occur. . . . . . . . . . . . . . . . . . . . . . . . . . . . . . . . . . . . . . . . . . . . . . . . . . . . 35
Configuring buffer overflow protection. . . . . . . . . . . . . . . . . . . . . . . . . . . . . . . . . . . . . . . . . . . . . . . . . 35
Restricting potentially unwanted programs. . . . . . . . . . . . . . . . . . . . . . . . . . . . . . . . . . . . . . . . . . . . . . . . . . . . . 38
Configuring unwanted programs. . . . . . . . . . . . . . . . . . . . . . . . . . . . . . . . . . . . . . . . . . . . . . . . . . . . . . 38
Updating detection definitions. . . . . . . . . . . . . . . . . . . . . . . . . . . . . . . . . . . . . . . . . . . . . . . . . . . . . . . . . . . . . . . 42
DAT files and how they work. . . . . . . . . . . . . . . . . . . . . . . . . . . . . . . . . . . . . . . . . . . . . . . . . . . . . . . . . 43
The importance of an update strategy. . . . . . . . . . . . . . . . . . . . . . . . . . . . . . . . . . . . . . . . . . . . . . . . . 43
3McAfee VirusScan Enterprise 8.8 Product Guide
Page 4

Contents
Update tasks and how they work. . . . . . . . . . . . . . . . . . . . . . . . . . . . . . . . . . . . . . . . . . . . . . . . . . . . . 44
Mirror tasks and how they work. . . . . . . . . . . . . . . . . . . . . . . . . . . . . . . . . . . . . . . . . . . . . . . . . . . . . . 45
How the AutoUpdate repository works. . . . . . . . . . . . . . . . . . . . . . . . . . . . . . . . . . . . . . . . . . . . . . . . . 47
How rolling back DAT files works. . . . . . . . . . . . . . . . . . . . . . . . . . . . . . . . . . . . . . . . . . . . . . . . . . . . . . 48
Excluding scan items. . . . . . . . . . . . . . . . . . . . . . . . . . . . . . . . . . . . . . . . . . . . . . . . . . . . . . . . . . . . . . . . . . . . . . . 48
Specifying exclusions. . . . . . . . . . . . . . . . . . . . . . . . . . . . . . . . . . . . . . . . . . . . . . . . . . . . . . . . . . . . . . . 49
How to use wildcards to specify scan items. . . . . . . . . . . . . . . . . . . . . . . . . . . . . . . . . . . . . . . . . . . . . 49
Using scheduled tasks. . . . . . . . . . . . . . . . . . . . . . . . . . . . . . . . . . . . . . . . . . . . . . . . . . . . . . . . . . . . . . . . . . . . . 49
Scheduling tasks. . . . . . . . . . . . . . . . . . . . . . . . . . . . . . . . . . . . . . . . . . . . . . . . . . . . . . . . . . . . . . . . . . . 50
Configuring the task schedule. . . . . . . . . . . . . . . . . . . . . . . . . . . . . . . . . . . . . . . . . . . . . . . . . . . . . . . . 50
Part II - Detection: Finding Threats. . . . . . . . . . . . . . . . . . . . . . . . . . . . . . . . . . . . . . . . . . . . . . . . . . . . 51
Scanning items on-access. . . . . . . . . . . . . . . . . . . . . . . . . . . . . . . . . . . . . . . . . . . . . . . . . . . . . . . . . . . . . . . . . . 51
On-access scanning and how it works. . . . . . . . . . . . . . . . . . . . . . . . . . . . . . . . . . . . . . . . . . . . . . . . . . 51
Scanning comparison: writing to disk vs. reading from disk. . . . . . . . . . . . . . . . . . . . . . . . . . . . . . . . 52
Scanning comparison: scanning all files vs. scanning default + additional file types. . . . . . . . . . . . . 52
Script scanning and how it works. . . . . . . . . . . . . . . . . . . . . . . . . . . . . . . . . . . . . . . . . . . . . . . . . . . . . 53
How Artemis works. . . . . . . . . . . . . . . . . . . . . . . . . . . . . . . . . . . . . . . . . . . . . . . . . . . . . . . . . . . . . . . . . 53
Determine the number of scanning policies. . . . . . . . . . . . . . . . . . . . . . . . . . . . . . . . . . . . . . . . . . . . . 54
How general and process settings are configured. . . . . . . . . . . . . . . . . . . . . . . . . . . . . . . . . . . . . . . . 54
Scanning items on-demand. . . . . . . . . . . . . . . . . . . . . . . . . . . . . . . . . . . . . . . . . . . . . . . . . . . . . . . . . . . . . . . . . 62
On-demand scanning and how it works. . . . . . . . . . . . . . . . . . . . . . . . . . . . . . . . . . . . . . . . . . . . . . . . 62
On-demand scanning methods and how they are defined. . . . . . . . . . . . . . . . . . . . . . . . . . . . . . . . . 63
How scanning of remote storage works. . . . . . . . . . . . . . . . . . . . . . . . . . . . . . . . . . . . . . . . . . . . . . . . 63
How scan deferral works. . . . . . . . . . . . . . . . . . . . . . . . . . . . . . . . . . . . . . . . . . . . . . . . . . . . . . . . . . . . 64
How system utilization works. . . . . . . . . . . . . . . . . . . . . . . . . . . . . . . . . . . . . . . . . . . . . . . . . . . . . . . . . 64
Configuring on-demand scan tasks. . . . . . . . . . . . . . . . . . . . . . . . . . . . . . . . . . . . . . . . . . . . . . . . . . . . 64
Configuring global system cache. . . . . . . . . . . . . . . . . . . . . . . . . . . . . . . . . . . . . . . . . . . . . . . . . . . . . . 67
Scanning email on-delivery and on-demand. . . . . . . . . . . . . . . . . . . . . . . . . . . . . . . . . . . . . . . . . . . . . . . . . . . . 69
ePolicy Orchestrator 4.5 or 4.6. . . . . . . . . . . . . . . . . . . . . . . . . . . . . . . . . . . . . . . . . . . . . . . . . . . . . . . 69
ePolicy Orchestrator 4.0. . . . . . . . . . . . . . . . . . . . . . . . . . . . . . . . . . . . . . . . . . . . . . . . . . . . . . . . . . . . . 70
VirusScan Console. . . . . . . . . . . . . . . . . . . . . . . . . . . . . . . . . . . . . . . . . . . . . . . . . . . . . . . . . . . . . . . . . . 71
On delivery email scan policies tab definitions. . . . . . . . . . . . . . . . . . . . . . . . . . . . . . . . . . . . . . . . . . . 71
Part III - Response: Handling Threats. . . . . . . . . . . . . . . . . . . . . . . . . . . . . . . . . . . . . . . . . . . . . . . . . 72
Detections and responses. . . . . . . . . . . . . . . . . . . . . . . . . . . . . . . . . . . . . . . . . . . . . . . . . . . . . . . . . . . . . . . . . . . 72
What happens when a detection occurs. . . . . . . . . . . . . . . . . . . . . . . . . . . . . . . . . . . . . . . . . . . . . . . . 72
System access point violations. . . . . . . . . . . . . . . . . . . . . . . . . . . . . . . . . . . . . . . . . . . . . . . . . . . . . . . . 73
Buffer overflow detections. . . . . . . . . . . . . . . . . . . . . . . . . . . . . . . . . . . . . . . . . . . . . . . . . . . . . . . . . . . 73
McAfee VirusScan Enterprise 8.8 Product Guide4
Page 5

Contents
Unwanted program detections. . . . . . . . . . . . . . . . . . . . . . . . . . . . . . . . . . . . . . . . . . . . . . . . . . . . . . . . 73
On-access scan detections. . . . . . . . . . . . . . . . . . . . . . . . . . . . . . . . . . . . . . . . . . . . . . . . . . . . . . . . . . . 74
On-demand scan detections. . . . . . . . . . . . . . . . . . . . . . . . . . . . . . . . . . . . . . . . . . . . . . . . . . . . . . . . . . 75
Email scan detections. . . . . . . . . . . . . . . . . . . . . . . . . . . . . . . . . . . . . . . . . . . . . . . . . . . . . . . . . . . . . . . 75
Quarantined items. . . . . . . . . . . . . . . . . . . . . . . . . . . . . . . . . . . . . . . . . . . . . . . . . . . . . . . . . . . . . . . . . 75
Configuring alerts and notifications. . . . . . . . . . . . . . . . . . . . . . . . . . . . . . . . . . . . . . . . . . . . . . . . . . . . . . . . . . . 78
Configuring alerts. . . . . . . . . . . . . . . . . . . . . . . . . . . . . . . . . . . . . . . . . . . . . . . . . . . . . . . . . . . . . . . . . . 78
Access queries and dashboards. . . . . . . . . . . . . . . . . . . . . . . . . . . . . . . . . . . . . . . . . . . . . . . . . . . . . . . . . . . . . . 80
Configuring emergency DATs. . . . . . . . . . . . . . . . . . . . . . . . . . . . . . . . . . . . . . . . . . . . . . . . . . . . . . . . . . . . . . . . 81
About emergency DATs. . . . . . . . . . . . . . . . . . . . . . . . . . . . . . . . . . . . . . . . . . . . . . . . . . . . . . . . . . . . . 81
Downloading a SuperDAT file . . . . . . . . . . . . . . . . . . . . . . . . . . . . . . . . . . . . . . . . . . . . . . . . . . . . . . . . 82
Installing the SuperDAT files on an ePolicy Orchestrator repository. . . . . . . . . . . . . . . . . . . . . . . . . . 82
Installing the EXTRA.DAT file on a client system. . . . . . . . . . . . . . . . . . . . . . . . . . . . . . . . . . . . . . . . . 83
Part IV - Monitoring, Analyzing, and Fine-Tuning Your Protection. . . . . . . . . . . . . . . . . 84
Monitoring activity in your environment. . . . . . . . . . . . . . . . . . . . . . . . . . . . . . . . . . . . . . . . . . . . . . . . . . . . . . . 84
Tools for monitoring activity. . . . . . . . . . . . . . . . . . . . . . . . . . . . . . . . . . . . . . . . . . . . . . . . . . . . . . . . . . 84
Analyzing your protection. . . . . . . . . . . . . . . . . . . . . . . . . . . . . . . . . . . . . . . . . . . . . . . . . . . . . . . . . . . . . . . . . . . 86
The importance of analysis. . . . . . . . . . . . . . . . . . . . . . . . . . . . . . . . . . . . . . . . . . . . . . . . . . . . . . . . . . 86
Analyzing protection examples. . . . . . . . . . . . . . . . . . . . . . . . . . . . . . . . . . . . . . . . . . . . . . . . . . . . . . . . 86
Appendix. . . . . . . . . . . . . . . . . . . . . . . . . . . . . . . . . . . . . . . . . . . . . . . . . . . . . . . . . . . . . . . . . . . . . . . . . . . . . . . . . . . 89
Configuring ePolicy Orchestrator server tasks. . . . . . . . . . . . . . . . . . . . . . . . . . . . . . . . . . . . . . . . . . . . . . . . . . . 89
Configuring example server task. . . . . . . . . . . . . . . . . . . . . . . . . . . . . . . . . . . . . . . . . . . . . . . . . . . . . . 89
Using the command line with VirusScan Enterprise. . . . . . . . . . . . . . . . . . . . . . . . . . . . . . . . . . . . . . . . . . . . . . 91
On-demand scanning command-line options. . . . . . . . . . . . . . . . . . . . . . . . . . . . . . . . . . . . . . . . . . . . 91
Update task command-line options. . . . . . . . . . . . . . . . . . . . . . . . . . . . . . . . . . . . . . . . . . . . . . . . . . . . 93
Connecting to remote systems. . . . . . . . . . . . . . . . . . . . . . . . . . . . . . . . . . . . . . . . . . . . . . . . . . . . . . . . . . . . . . . 94
Accessing remote systems with VirusScan Enterprise installed. . . . . . . . . . . . . . . . . . . . . . . . . . . . . . 94
Submit threat samples for analysis. . . . . . . . . . . . . . . . . . . . . . . . . . . . . . . . . . . . . . . . . . . . . . . . . . . . . . . . . . . 94
Access the McAfee Labs Threat Library. . . . . . . . . . . . . . . . . . . . . . . . . . . . . . . . . . . . . . . . . . . . . . . . . . . . . . . . 95
Troubleshooting. . . . . . . . . . . . . . . . . . . . . . . . . . . . . . . . . . . . . . . . . . . . . . . . . . . . . . . . . . . . . . . . . . . . . . . . . . . 95
Repairing the product installation. . . . . . . . . . . . . . . . . . . . . . . . . . . . . . . . . . . . . . . . . . . . . . . . . . . . . 95
Viewing the on-access activity log file. . . . . . . . . . . . . . . . . . . . . . . . . . . . . . . . . . . . . . . . . . . . . . . . . . 96
Using the MER tool during troubleshooting. . . . . . . . . . . . . . . . . . . . . . . . . . . . . . . . . . . . . . . . . . . . . . 97
Disabling VirusScan Enterprise during troubleshooting. . . . . . . . . . . . . . . . . . . . . . . . . . . . . . . . . . . . 98
Suggested support and troubleshooting tools. . . . . . . . . . . . . . . . . . . . . . . . . . . . . . . . . . . . . . . . . . 101
Frequently asked questions. . . . . . . . . . . . . . . . . . . . . . . . . . . . . . . . . . . . . . . . . . . . . . . . . . . . . . . . . 101
5McAfee VirusScan Enterprise 8.8 Product Guide
Page 6

Preface
To use this document effectively you should understand who this document is written for, the
conventions used, what's in it, and how to find other reference documentation.
Contents
Audience
Conventions
How this guide is organized
Finding product documentation
Audience
McAfee documentation is carefully researched and written for the target audience.
The information in this guide is intended primarily for:
• Administrators — People who implement and enforce the company's security program.
• Users — People who are responsible for configuring the product options on their systems,
or for updating their systems.
Conventions
This guide uses the following typographical conventions.
Book titleorEmphasis
User input or Path
Code
User interface
Note
Important/Caution
Warning
Title of a book, chapter, or topic; introduction of a new
term; emphasis.
Text that is strongly emphasized.Bold
Commands and other text that the user types; the path
of a folder or program.
A code sample.
Words in the user interface including options, menus,
buttons, and dialog boxes.
A live link to a topic or to a website.Hypertext blue
Additional information, like an alternate method of
accessing an option.
Suggestions and recommendations.Tip
Valuable advice to protect your computer system, software
installation, network, business, or data.
Critical advice to prevent bodily harm when using a
hardware product.
McAfee VirusScan Enterprise 8.8 Product Guide6
Page 7

Preface
How this guide is organized
How this guide is organized
This document is meant as a reference to use along with the VirusScan Console and ePolicy
Orchestrator user interfaces. It also describes, in order, how you should approach protecting
your system from malware using VirusScan Enterprise. To describe that process, this document
is separated into four major parts, plus an appendix:
• Part I — Prevention: Avoiding Threats — The best way to protect your system is to
keep any malware from ever gaining access to your system. This part of the document
describes the following:
• Protecting your systems' access points, memory from overflow errors, and unwanted
programs.
• Detection definitions and how they are used to protect your system and the importance
of updating these definitions on a regular basis.
• Excluding files, folders, and disks from scanning.
• Using scheduled task to periodically scan your system and update the files used by
VirusScan Enterprise.
• Part II — Detecting: Finding Threats — Files that are opened or copied from other file
systems or the Internet might provide access to your system. Also, application programming
interface (API) calls and scripts can pose a threat to your system. These threats are found
during the following VirusScan Enterprise scan processes:
• On-access scanning — Scans a file for malware when the file is read or written to disk,
it also protects boot sectors, scans memory of processes already running, detects cookies,
and protects against unwanted programs.
• On-demand scanning — Scans the entire system for threats on a scheduled basis or as
needed when started from the VirusScan Console.
• Email on-delivery and on-demand scanning — Protects against malware arriving through
email in Microsoft Outlook and Lotus Notes.
• Buffer overflow protection — Analyzes API calls made by certain processes, to confirm
they do not attempt to overwrite adjacent data in the memory buffer.
• ScriptScan — Finds threats from browsers or other applications accessed that use the
Windows Script Host.
• Part III — Response: Handling Threats — VirusScan Enterprise can be configured to
perform any of the following steps, when a threat is found:
• Deny Access to the threat or take no further action.
• Delete or Clean the threat. When either of these actions is taken a copy of the original
file is stored in the Quarantine folder.
NOTE: For any detection, you can configure VirusScan Enterprise to notify the user or not.
• Part IV — Monitoring, Analyzing, and Fine-Tuning Your Protection — Once your
protection is up and running, you should monitor your system using ePolicy Orchestrator
queries and reports. Then you could decide to make changes to your security settings in
order to increase or reduce the amount of system protection. Alternatively, you might also
use VirusScan Console logs and Simple Network Management Protocol (SNMP) traps to
monitor your systems.
• Appendix — Describes some additional features you should be aware of when using
VirusScan Enterprise. For example, VirusScan Enterprise command-line options, connecting
to remote systems through VirusScan Enterprise, and more.
7McAfee VirusScan Enterprise 8.8 Product Guide
Page 8
Preface
Finding product documentation
Finding product documentation
McAfee provides the information you need during each phase of product implementation, from
installing to using and troubleshooting. After a product is released, information about the product
is entered into the McAfee online KnowledgeBase.
1 Go to the McAfee Technical Support ServicePortal at http://mysupport.mcafee.com.
2 Under Self Service, access the type of information you need:
Do this...To access...
User documentation 1 Click Product Documentation.
2 Select a Product, then select a Version.
3 Select a product document.
KnowledgeBase • Click Search the KnowledgeBase for answers to your product questions.
• Click Browse the KnowledgeBase for articles listed by product and
version.
McAfee VirusScan Enterprise 8.8 Product Guide8
Page 9

Getting Started
Understanding the components of McAfee®VirusScan®Enterprise 8.8 software, and the order
you should use to configure the software helps you protect your system from threats.
Contents
Introducing VirusScan Enterprise
Components and how they interact
The importance of creating a security strategy
VirusScan Console and ways to access it
What to do first
Introducing VirusScan Enterprise
As soon as the VirusScan Enterprise software is installed, it begins protecting your system from
threats. You can increase your protection if you understand what the software does, what is
new in this release, and its major components.
What it is and does
VirusScan Enterprise offers easily scalable protection, fast performance, and a mobile design
to protect your environment from the following:
• Viruses, worms and Trojan horses
• Access point violations and exploited buffer overflows
• Potentially unwanted code and programs
It detects threats, then takes the actions you configured to protect your environment.
You can configure the software as a standalone product or you can use McAfee®ePolicy
Orchestrator®software version 4.0 and later, to manage and enforce VirusScan Enterprise
policies, then use queries and dashboards to track activity and detections.
NOTE: This document addresses using ePolicy Orchestrator 4.0, 4.5, and 4.6. For information
about using these versions of ePolicy Orchestrator, see that version's product documentation.
What is new
This release includes the following new features:
• Enhanced performance.
• Allows ePolicy Orchestrator 4.5 and 4.6 to manage your VirusScan Enterprise systems.
• A new ScriptScan URL exclusion feature allows you to configure exclusions instead of manually
editing the registry.
9McAfee VirusScan Enterprise 8.8 Product Guide
Page 10
Getting Started
Components and how they interact
• The AntiSpyware Enterprise Module has been fully integrated into the VirusScan Enterprise
8.8 software.
• Support for Outlook 2010 email scanning.
• Support for Lotus Notes 8.0x through 8.5.1 email scanning.
Components and how they interact
As an administrator and user of VirusScan Enterprise, you should be familiar with its components
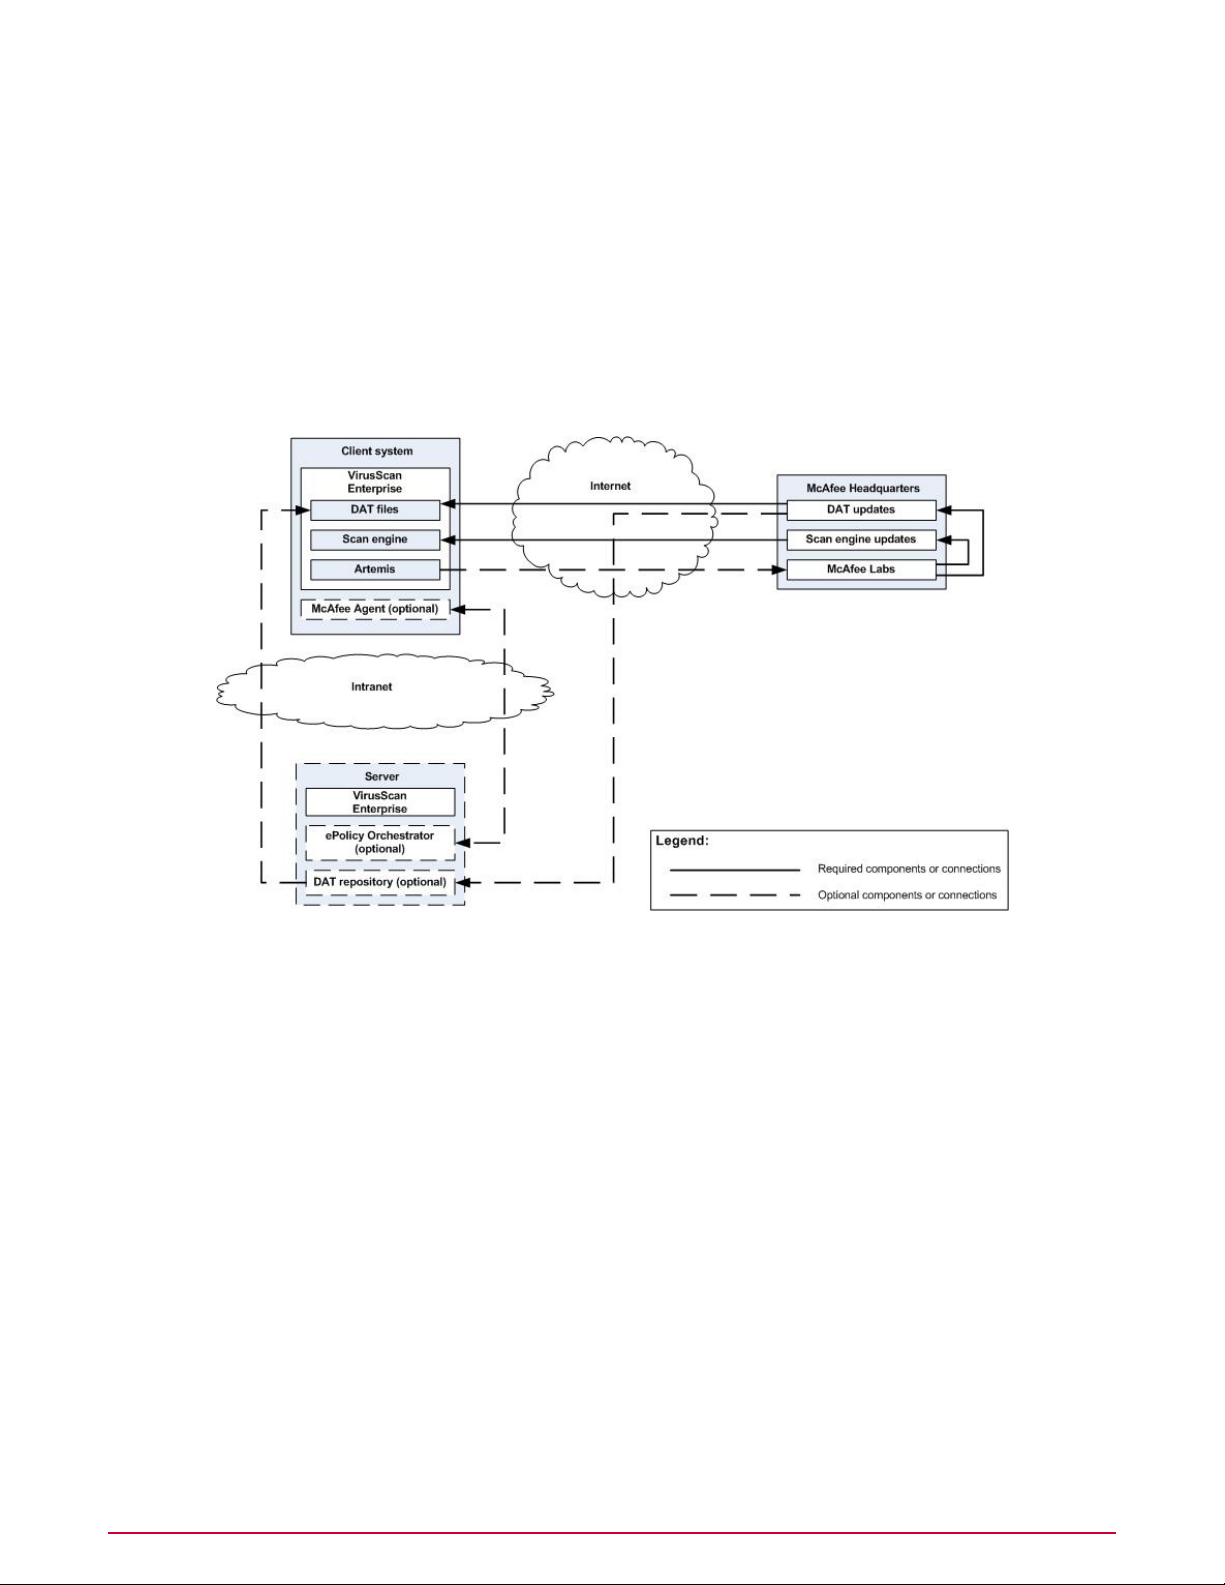
and connections. The following figure shows these components for a basic environment.
Figure 1: VirusScan Enterprise components
Client system
This is where VirusScan Enterprise and optional McAfee Agent are installed and configured.
• DAT files — Detection definition files, also called malware signatures, work with the scanning
engine to identify and take action on threats.
• Scan engine — Used to scan the files, folders, and disks on the client computer and
compares them to the information in the DAT files for known viruses.
NOTE: DAT files and scan engine are updated as needed using the Internet connection to
McAfee Headquarters, or using the optional connections over the Enterprise Intranet to a
designated server.
• Artemis (Heuristic network check for suspicious files) — Looks for suspicious programs
and DLLs running on client systems that are protected by VirusScan Enterprise. When the
real-time malware defense detects a suspicious program, it sends a DNS request containing
a fingerprint of the suspicious file to a central database server hosted by McAfee Labs.
• McAfee Agent (optional) — Provides secure communication between McAfee managed
products and McAfee ePolicy Orchestrator server. The agent also provides local services like
updating, logging, reporting events and properties, task scheduling, communication, and
policy storage.
McAfee VirusScan Enterprise 8.8 Product Guide10
Page 11

Getting Started
The importance of creating a security strategy
McAfee Headquarters
McAfee Headquarters, home to McAfee Labs and McAfee Technical Support, provides the
following VirusScan Enterprise services:
• DAT updates — Stored on a McAfee central database server, and using AutoUpdate, these
DAT update files are copied to the VirusScan Enterprise clients or optional DAT repositories
to provide information to fight known threats and new lists of known viruses as they are
found in real time.
• Scan engine updates — Stored on a central database server, scan engine updates are
downloaded as needed to keep the VirusScan Enterprise scan engine up-to-date.
• McAfee Labs — This threat library has detailed information on virus, Trojan, hoax, and
potentially unwanted program (PUP) threats — where they come from, how they infect your
system, and how to handle them. The Artemis feature sends the fingerprint of the suspicious
file to McAfee Labs, where they analyze the file and determine what action to take.
Server
The optional server uses the following components to manage and update many client systems
remotely:
• ePolicy Orchestrator — Centrally manages and enforces VirusScan Enterprise policies,
then uses queries and dashboards to track activity and detections.
NOTE: This document addresses using ePolicy Orchestrator 4.0, 4.5, and 4.6. For information
about ePolicy Orchestrator, see the product documentation for your version.
• DAT repository — Retrieves the DAT updates from the McAfee download site. From there,
DAT files can be replicated throughout your organization, providing access for all other
computers. This minimizes the amount of data transferred across your network by automating
the process of copying updated files to your share sites.
The importance of creating a security strategy
Protecting your client systems from viruses, worms, and Trojan files using VirusScan Enterprise
requires a well-planned strategy: defining threat prevention and detection, response to threats,
and ongoing analysis and tuning.
Prevention — avoiding threats
Define your security needs to ensure that all of your data sources are protected, then develop
an effective strategy to stop intrusions before they gain access to your environment. Configure
these features to prevent intrusions:
• User Interface Security — Set display and password protection to control access to the
VirusScan Enterprise user interface.
• Access Protection — Use access protection rules to protect your computer from undesirable
behavior with respect to files, registry, and ports.
• Buffer Overflow Protection — Prevent abnormal programs or threats from overrunning the
buffer's boundary and overwriting adjacent memory while writing data to a buffer. These
exploited buffer overflows can execute arbitrary code on your computer.
• Unwanted Program Protection— Eliminate potentially unwanted programs such as spyware
and adware from your computer.
11McAfee VirusScan Enterprise 8.8 Product Guide
Page 12

Getting Started
The importance of creating a security strategy
Detection — finding threats
Develop an effective strategy to detect intrusions when they occur. Configure these features
to detect threats:
• Update Task — Get automatic updates of DAT and scanning engine from the McAfee download
website.
• On-Access Scanner— Detect potential threats from any possible source as files are read
from or written to disk. You can also scan for potentially unwanted cookies in the cookies
folder.
• On-Demand Scan Tasks — Detect potential threats using immediate and scheduled scan
tasks. You can also scan for potentially unwanted cookies and spyware-related registry
entries that were not previously cleaned.
• On-Delivery and On-Demand Email Scanner — Detect potential threats on Microsoft Outlook
email clients using on-delivery scanning of messages, attachments, and public folders. Detect
potential threats on Lotus Notes email clients when messages are accessed.
• Quarantine Manager Policy — Specify the quarantine location and the length of time to keep
quarantined items. Restore quarantined items as necessary.
Response — handling threats
Use product log files, automatic actions, and other notification features to decide the best way
to handle detections.
• Actions — Configure features to take action on detections.
• Log files — Monitor product log files to view a history of detected items.
• Queries and dashboards — Use ePolicy Orchestrator queries and dashboards to monitor
scanning activity and detections.
Tuning — monitoring, analyzing, and fine-tuning your protection
After initially configuring VirusScan Enterprise, it is always a good practice to monitor and
analyze your configuration. This can improve your system and network performance, plus
enhance your level of virus protection, if needed. For example, the following VirusScan Enterprise
tools and features can be modified as part of your monitoring, analyzing, and fine-tuning
processes:
• Log files (VirusScan Console) — View a history of detected items. Analyzing this information
could tell you if you need to enhance your protection or change the configuration to improve
system performance.
• Queries and dashboards (ePolicy Orchestrator console) — Monitor scanning activity and
detections. Analyzing this information could tell you if you need to enhance your protection
or change the configuration to improve system performance.
• Scheduled tasks — Modify tasks (like AutoUpdate) and scan times to improve performance
by running them during off-peak times.
• DAT repositories — Reduce network traffic over the enterprise Internet or intranet by moving
these source files closer to the clients needing the updates.
• Modifying the scanning policies — Increase performance or virus protection depending on
your analysis of the log files or queries. For example, configuring exclusions, when to use
McAfee VirusScan Enterprise 8.8 Product Guide12
Page 13

Getting Started
VirusScan Console and ways to access it
high and low risk profile scanning, and when to disable scan on write can all improve
performance.
CAUTION: Failure to enable When reading from disk scanning leaves your system
unprotected from numerous malware attacks.
VirusScan Console and ways to access it
The VirusScan Console is the interface for the standalone version of the program's activities.
You use it to configure, monitor, and update the product.
NOTE: This information applies only to the standalone version of the product, not the managed
ePolicy Orchestrator version.
VirusScan Console and how it works
After you understand what VirusScan Enterprise does and its components, you need to
understand how to access its features. Use one of these methods to open the VirusScan
Enterprise 8.8 Console:
• From the Start menu, select Programs | McAfee | VirusScan Console.
• Right-click the VirusScan Enterprise shield icon in the system tray, then select VirusScan
Console.
Menu bar
Use the menu items to create tasks, configure properties, and access additional information.
• Task — Create and configure tasks such as scanning for threats or updating the DAT files.
• Edit — Copy, paste, delete, or rename the selected task.
• View — Display the Toolbar and Status bar and refresh the display.
• Tools — Configure interface options for users, lock or unlock user interface security, configure
alerts, access the event viewer, open a remote console if you have administrator rights,
import or edit the repository list, and roll back the DAT files.
• Help — Access online Help topics, the Threat Library on the McAfee Labs website, the Submit
a Sample website, and the Technical Support website. You can also repair the product
installation and view the About dialog box for copyright information and which versions of
the product, license, definition files, scanning engine, extra driver, and patch are installed.
NOTE: Each item on the menu has an associated shortcut key. On some operating systems,
these shortcut keys might not be available unless you use F10 or ALT to access the menus.
Toolbar
Use the icons to access these commonly used commands:
• Display properties of the selected task.
• Start the selected task.
• Stop the selected task.
• Copy the selected task.
• Paste the selected task.
13McAfee VirusScan Enterprise 8.8 Product Guide
Page 14

Getting Started
VirusScan Console and ways to access it
• Delete the selected task.
• Configure alerting properties.
• Launch the event viewer.
• Access the Information Library on the McAfee Labs website.
• Connect to a remote computer if you have administrator rights.
• Create a new on-demand scan.
Task list
Displays the default tasks and any new tasks that you create, as well as the status and last
result for each task.
Status bar
Displays the status of the current activity.
Using right-click features
Use right-click features for quick access to commonly used actions such as creating new tasks,
viewing task statistics and logs, opening task property pages, scanning a specific file or folder,
or performing an immediate update task.
Feature descriptions
ExamplesDescriptionLocation
The Console • In the console, right-click a task to
Windows
Explorer
Right-click the VirusScan Console to display right-click
features. These features vary depending on whether
you selected a task in the task list and which task you
select.
Right-click a selected file or folder to perform an
immediate Scan for threats. You can select an
action for the scan:
• Continue -— Report the detection and continue
scanning.
See
System tray icons and how they work
for VirusScan Enterprise icon right-click descriptions.The system tray
access its properties. Depending on
which task you select, you might also be
able to start, stop, enable or disable it,
and view statistics and the activity log.
In some cases, you can also rename or
delete a task.
• Right-click a blank area in the console
to create a new scan or update task.
Perform an immediate scan on a file or
folder that you suspect is threatened.
When you start the scan, the on-demand
scanner is invoked directly with all scan• Clean — Report and clean the detected item.
settings enabled. Select the action option.
You cannot customize any other scan
settings.
System tray icons and how they work
Once VirusScan Enterprise is installed, one of the following icons appears in the Windows system
tray, if you configured this feature during the installation process.
"M" in a shield icon
Appears on ePolicy Orchestrator managed systems using McAfee Agent version 4.5 or later. It
displays:
McAfee VirusScan Enterprise 8.8 Product Guide14
Page 15

Getting Started
VirusScan Console and ways to access it
• Status — This icon does not change to indicate access protection trigger alerts or if on-access
scanning is disabled on ePolicy Orchestrator managed clients with McTray version 2.x or
later (with McAfee Agent 4.5 or later). The status changes are shown as tool tips.
• Tool tips — The icon tool tips include:
• McAfee Status: OK — Normal. Options indicate:
• View Security Status — Displays a check mark.
• Quick Settings | On access Virus Scanning - On — Displays a check mark.
• McAfee Status: Issue Detected — On-access scan disabled. Options indicate:
• View Security Status — Displays an exclamation point.
NOTE: Click View Security Status to display the McAfee Security Status dialog box
with Issue — "On-Access Scan disabled" in the Status column.
• Quick Settings | On access Virus Scanning - Off — No check mark is displayed.
• McAfee Status: Issue Detected — Access protection event triggered. Options indicate:
• View Security Status — Displays an exclamation point.
NOTE: Click View Security Status to display the McAfee Security Status dialog box
with Issue — "Please see Access Protection Log" in the Status column.
• Quick Settings | On access Virus Scanning - On — Displays a check mark.
• Menu options — The right-click menu options include:
• Update Security — Updates the DAT files and any other changes.
• Quick settings — Displays:
• On-Access Scan Properties — Opens the on-access scanner properties.
• On-Access Scanning on or off — Toggles the on-access scanner.
• On-Access Scan Properties — Opens the on-access scanner properties.
• On-Access Scan Messages — Opens the on-access scan statistics or messages.
• Open On-Access Protection Log File — Opens the log file.
• Manage Features | VirusScan Enterprise — Opens the VirusScan Console.
• Scan Computer for | Threats — Starts an immediate scan.
• View Security Status — Displays the McAfee Security Status dialog box.
• McAfee Agent Status Monitor — Displays the McAfee Security Status Monitor dialog
box.
• About — Opens the About dialog box.
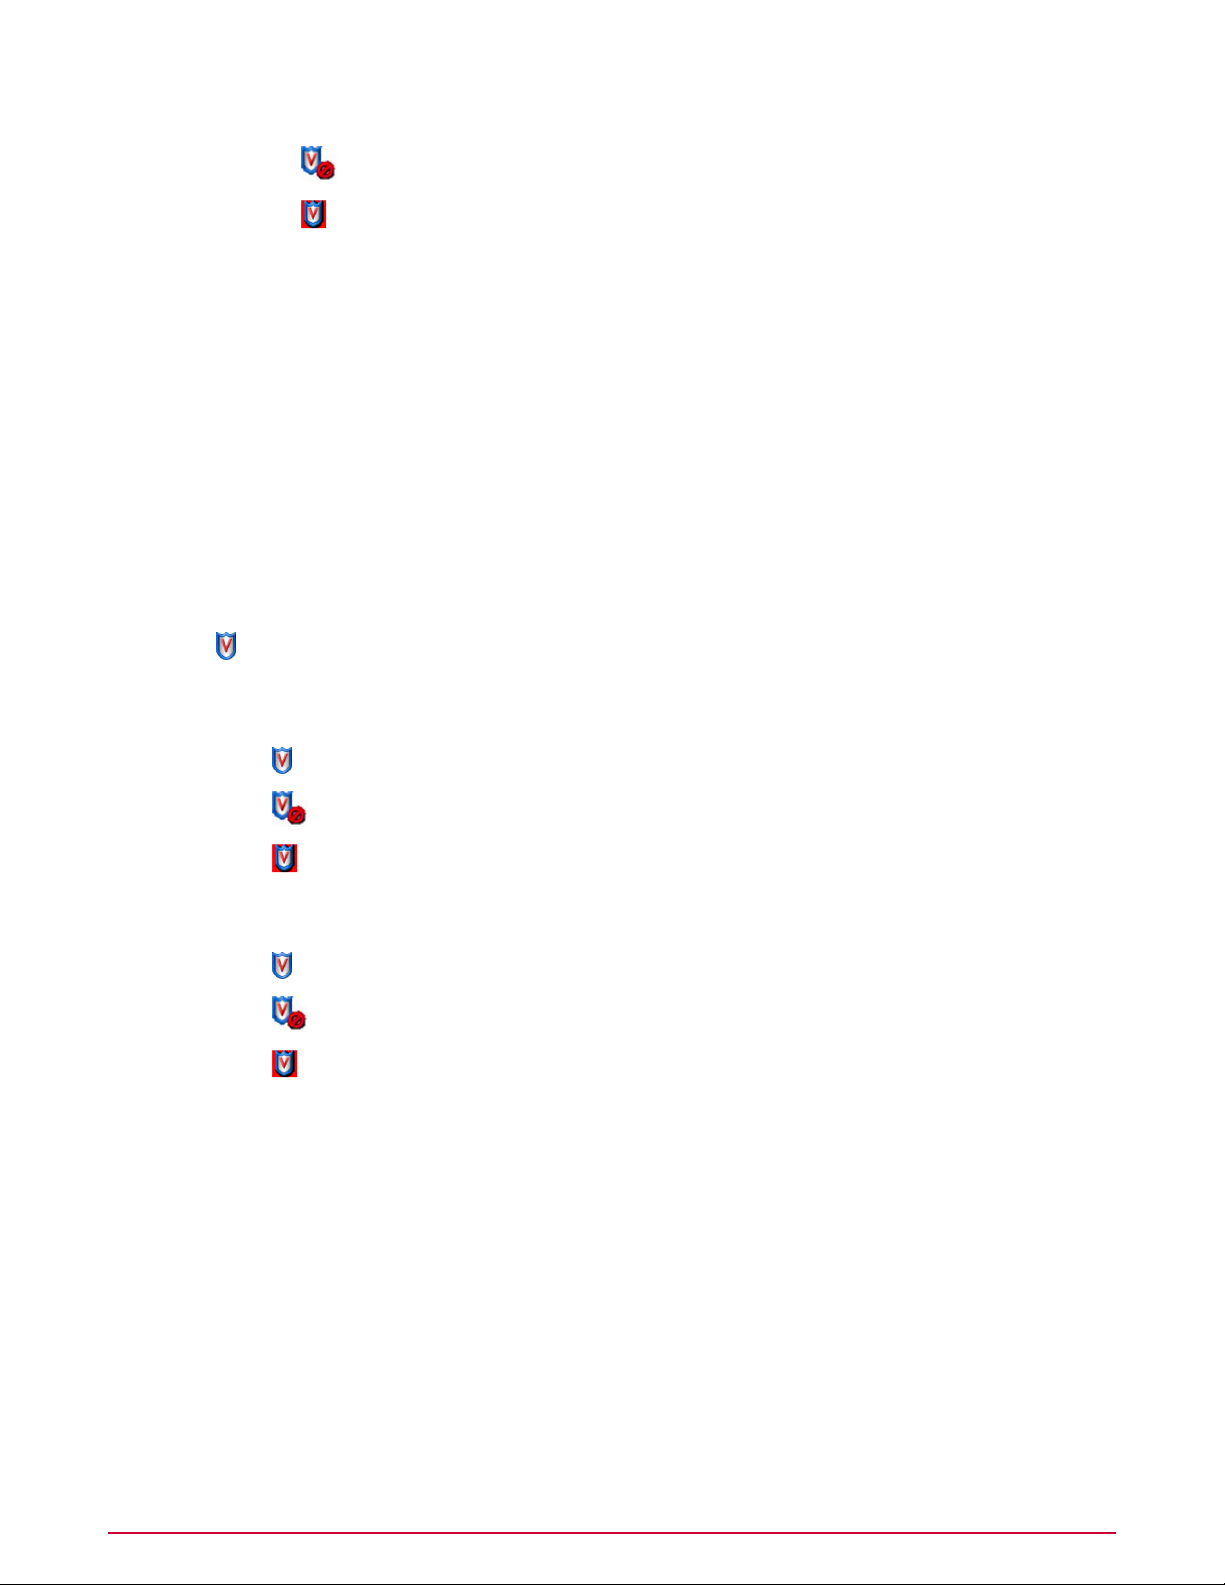
"M" in a box
Appears on standalone systems using McTray 1.0 and on ePolicy Orchestrator managed systems
using McAfee Agent version 4.0 that use McTray 1.0. It displays:
• Status — Displays include:
•
•
"M" in a box — Normal status.
"M" in a box with an exclamation point — Access protection violation event is triggered
or on-access scanning is disabled. Right-click menu options indicate:
15McAfee VirusScan Enterprise 8.8 Product Guide
Page 16
Getting Started
VirusScan Console and ways to access it
•
"V" in a shield with circle and line — Indicates on-access scanning is disabled.
•
"V" in a shield with red outline — Indicates on-access scanning is enabled, but
see the Access Protection log file.
• Tool tip — Displays "McAfee".
• Menu options — The right-click menu options include:
• VirusScan Console — Opens the VirusScan Console.
• Disable or Enable On-Access Scanner — Toggles the on-access scanner.
• On-Access Scan Properties — Opens the on-access scanner properties.
• On-Access Scan Statistics — Opens the on-access scan statistics.
• On-Access Scan Messages — Opens the on-access scan statistics or messages.
• On-Demand Scan — Creates a one-time configurable on-demand scan.
• Update Now — Performs an immediate update task.
• About VirusScan Enterprise — Opens the About dialog box.
"V" in a shield icon
Appears on standalone systems that do not have McTray 1.0. It displays:
• Status — Displays include:
•
"V" in a shield — Normal.
•
"V" in a shield with circle and line — Indicates on-access scanning is disabled.
•
A "V" in a shield with red outline — Indicates on-access scanning is enabled, but see
Access Protection log file.
• Tool tips — The tool tips include:
•
"V" in a shield — McAfee OAS: enabled, normal.
•
"V" in a shield with circle and line — McAfee OAS: disabled.
•
"V" in a shield with red outline — McAfee OAS: enabled, see the Access Protection
Log.
• Menu options — The right-click menu options include:
• Update Security — Updates DAT files and any other changes.
• Quick settings — Displays:
• On-Access Scan Properties — Opens the on-access scanner properties.
• On-Access Scanning on or off — Toggles the on-access scanner.
• On-Access Scan Messages — Opens the on-access scan statistics or messages.
• Open On-Access Protection Log File — Opens the log file.
• Manage Features | VirusScan Enterprise — Opens the VirusScan Console.
• Scan Computer for | Threats — Starts an immediate scan.
• View Security Status — Displays the McAfee Security Status dialog box.
McAfee VirusScan Enterprise 8.8 Product Guide16
Page 17

Getting Started
What to do first
• McAfee Agent Status Monitor — Displays the McAfee Security Status Monitor dialog
box.
• About — Opens the About dialog box.
What to do first
When the software is installed, it uses the DAT files packaged with the product, which provide
general security for your environment. McAfee recommends you get the latest DAT files and
customize the configuration to meet your requirements before you deploy the product to client
systems.
Take these actions immediately after installing the product.
1 Set user interface security. Configure the display and password options to prevent users
from accessing specific components or the entire VirusScan Enterprise user interface. See
Controlling Access to the User Interface
2 Update DAT files. Perform an Update Now task to ensure that you have the most current
DAT files. See
3 Prevent intrusions. Configure these features to prevent potential threats from accessing
your systems:
• Access Protection. Configure access protection rules to prevent unwanted changes
to your computer and enable the option to prevent McAfee processes from being
terminated. See
• Buffer Overflow Protection. Enable buffer overflow detection and specify exclusions.
See
Blocking buffer overflow exploits
• Unwanted Programs Policy. Configure the policy that the on-access, on-demand,
and email scanners use to detect potentially unwanted programs. Select unwanted
program categories to detect from a predefined list, then define additional programs to
detect or exclude. See
Updating detection definitions
for more information.
for more information.
Protecting your system access points
for more information.
Restricting potentially unwanted programs
for more information.
for more information.
4 Detect intrusions. Configure these features to detect potential threats on your systems,
then notify you and take action when detections occur:
• AutoUpdate. Configure update tasks to get the most current DAT files, scanning engine,
and product upgrades. See
• On-Access Scanner. Configure the scanner to detect and take action on potential
threats as the threats are accessed in your environment. Enable scanning of unwanted
programs and scan for cookies in the cookies folder. See
more information.
• On-Demand Scanner. Configure scan tasks to detect and take action on potential
threats in your environment. Enable scanning of unwanted programs and scan for
cookies in the cookies folder and potentially unwanted spyware-related registry entries
that were not previously cleaned. See
• Email Scanners. Configure the on-delivery and on-demand scanning of Microsoft
Outlook and Lotus Notes email clients. Enable scanning of unwanted programs. See
Scanning email on-delivery and on-demand
5 Send alerts and quarantine threats. Configure these features to alert you when
detections occur and manage quarantined items:
• Alerts and Notifications. Configure how and when you receive detection notifications
and alerts. See
Configuring alerts and notifications
Updating detection definitions
Scanning items on-demand
for more information.
for more information.
for more information.
Scanning items on-access
for more information.
for
17McAfee VirusScan Enterprise 8.8 Product Guide
Page 18

Getting Started
What to do first
• Quarantine Manager Policy. Configure the location of the quarantine folder and the
number of days to keep quarantined items before automatically deleting them. See
Quarantined items
for more information.
McAfee VirusScan Enterprise 8.8 Product Guide18
Page 19

Part I - Prevention: Avoiding Threats
Prevention is the first step in a protection strategy, to keep threats from gaining access to your
system.
Contents
Access protection
Protecting your system access points
Blocking buffer overflow exploits
Restricting potentially unwanted programs
Updating detection definitions
Excluding scan items
Using scheduled tasks
Access protection
Preventing threat access to your client system is your first line of defense against malware. The
Access Protection feature of VirusScan Enterprise compares an action being requested against
a list of configured rules. Each rule can be configured to block or report, or block
access violations when they occur.
Access protection prevents unwanted changes to your computer by restricting access to specified
ports, files, shares, registry keys, and registry values. It also protects McAfee processes by
preventing users from stopping them. This protection is critical before and during outbreaks.
This feature uses predefined rules and user-defined rules to specify which items can and cannot
be accessed. Each rule can be configured to block or report, or block and report access violations
when they occur. Predefined rules and categories can be updated from the McAfee update sites.
and
report
NOTE: The on-access scanner, which detects access violations, must be enabled to detect
attempts to access ports, files, shares, and registry keys and registry values.
How threats gain access
The most common ways threats gain access to your system include:
• Macros — As part of word processing documents and spreadsheet applications.
• Executable files — Seemingly benign programs can include viruses along with the expected
program. For example, some common file extensions are .EXE, .COM, .VBS, .BAT, .HLP and
.DLL.
• Email — Jokes, games, and images as part of email messages with attachments.
• Scripts — Associated with web pages and emails, scripts such as ActiveX and JavaScript,
if allowed to run, can include viruses.
19McAfee VirusScan Enterprise 8.8 Product Guide
Page 20

Part I - Prevention: Avoiding Threats
Access protection
• Internet Relay Chat (IRC) messages — Files sent along with these messages can easily
contain malware as part of the message. For example, automatic startup processes can
contain worms and Trojan threats.
• Browser and application Help files — Downloading these Help files exposes the system
to embedded viruses and executables.
• Combinations of all these — Sophisticated malware creators combine all of these delivery
methods and even embed one piece of malware within another to try and access your
computer.
Contents
How access threats are stopped
Control access to the user interface
How access threats are stopped
By enabling or changing the configuration of the Access Protection feature you can configure
anti-spyware protection, anti-virus protection, common protection, virtual machine protection,
and define your own rules of protection. Following is the basic process VirusScan Enterprise
uses to provide access protection.
Steps taken when a threat occurs
1 A user or process tries to take an action.
2 That action is examined by Access Protection according to the defined rules.
3 When a rule is broken, the action requested by the user or process is managed using the
information in the rules configured. For example, the action causes nothing to happen, it
is blocked, or it is blocked and a report is sent.
4 The Access Protection log file is updated, and an event is generated for the ePolicy
Orchestrator Global Administrator.
Example of an access threat
1 A user downloads a program, MyProgram.exe, from the Internet.
NOTE: For this example, MyProgram.exe is not malware.
2 The user launches the program and it seems to launch as expected.
3 MyProgram.exe then launches a child process called AnnoyMe.exe and it attempts to modify
the operating system to ensure it always loads on startup.
4 Access Protection processes the request and matches it against an existing rule that is
configured to block and report.
5 AnnoyMe.exe is denied access when it attempts to modify the operating system, Access
Protection logs the details of the attempt, and it generates an alert to the ePolicy
Orchestrator Global Administrator.
Log report and alerts generated
This is an example of an Access Protection log entry.
2/10/2010 11:00AM Blocked by Access Protection rule TestDomain\TestUser C:\Users\TestUser\Desktop\AnnoyMe.exe
\REGISTRY\MACHINE\SOFTWARE\Microsoft\Window\CurrentVersion\Run\ Prevent programs registering to autorun
This table describes the data in the previous Access Protection log entry:
McAfee VirusScan Enterprise 8.8 Product Guide20
Page 21

Part I - Prevention: Avoiding Threats
Access protection
DescriptionLog entry
Date2/10/2010
Time11:00AM
Action takenBlocked by Access Protection rule
CredentialsTestDomain\TestUser
Process name that breeched the ruleC:\Users\TestUser\Desktop\AnnoyMe.exe
Location the process tried to access\REGISTRY\MACHINE\SOFTWARE\Microsoft...
Access Protection rule that was triggeredPrevent programs registering to autorun
Similar information is available using ePolicy Orchestrator queries. For details, refer to
queries and dashboards
.
Control access to the user interface
Setting security for the interface on client computers is an important part of protecting your
environment.
As an administrator, you can:
• Control the access users have to the VirusScan Enterprise interface.
• Set a password to prevent users from accessing or changing selected features.
• Lock and unlock the user interface as necessary.
Contents
How setting a password affects users
Configuring user interface security settings
How setting a password affects users
Set a user interface password to deter users with malicious intent.
When you password-protect the user interface on client computers, the following users are
affected:
• Non-administrators —
VirusScan Enterprise applications in read-only mode. They can view some configuration
parameters, run saved scans, and run immediate scans and updates. They cannot change
any configuration parameters, create, delete, or modify saved scan or update tasks.
• Administrators —
to access the protected tabs and controls in read/write mode. If a password is not provided
for a protected item, they view it in read-only mode.
Users without administrator rights
Users with administrator rights
Access
. Non-administrators run all
. Administrators must type the password
Configuring user interface security settings
Use the General Options Policies user interface properties to configure the display and password
options available to the users.
CAUTION: Consider carefully the security ramifications before you make changes to these
properties. These options let you restrict or allow users to make changes to their security
configuration and could leave systems unprotected from numerous malware attacks.
21McAfee VirusScan Enterprise 8.8 Product Guide
Page 22

Part I - Prevention: Avoiding Threats
Access protection
Configure the General Options Policies user interface properties with these user interface
consoles.
ePolicy Orchestrator 4.5 or 4.6
Configure the General Options Policies user interface properties.
Task
For option definitions, click ? on each tab.
1 Click Menu | Policy | Policy Catalog, then from the Product list select VirusScan
Enterprise 8.8.0. The Category list displays the policy categories for VirusScan Enterprise
8.8.0.
2 Edit an existing policy or create a new policy:
Edit an existing policy
a From the Category list, select the policy category.
b From the Actions column, click Edit Setting to open the policy configuration page.
Create a new policy
a Click Actions | New Policy to open New Policy dialog box.
b From the Category list, select an existing policy.
c From the Create a new policy based on this existing policy list, select one of the
settings.
d Type a new policy name.
e Type any notes, if required.
f Click OK. The new policy appears in the list of existing policies.
g From the Actions column of the new policy, click Edit Setting to open the policy
configuration page.
3 From the Settings for list, select Workstation or Server.
4 On the Display Options tab, configure which VirusScan Enterprise system tray icons the
users see, if they can connect to remote systems, and the user's language option settings.
5 On the Password Options tab, configure which VirusScan Enterprise tasks and user
interface options the users can change with the correct password.
ePolicy Orchestrator 4.0
Configure the General Options Policies user interface properties.
Task
For option definitions, click ? on each tab.
1 Click Systems | Policy Catalog, then from the Product list select VirusScan Enterprise
8.8.0. The Category list displays the policy categories for VirusScan Enterprise 8.8.0.
2 Edit an existing policy or create a new policy:
Edit an existing policy
a From the Category list, select the policy category.
b From the Actions column, click Edit to open the policy configuration page.
Create a new policy
McAfee VirusScan Enterprise 8.8 Product Guide22
Page 23

Part I - Prevention: Avoiding Threats
Protecting your system access points
a Click New Policy to open New Policy dialog box.
b From the Create a new policy based on this existing policy list, select one of the
settings.
c Type a new policy name.
d Click OK. The new policy appears in the list of existing policies.
3 From the Settings for list, select Workstation or Server.
4 On the Display Options tab, configure which VirusScan Enterprise system tray icons the
users see, if they can connect to remote systems, and the user's language option settings.
5 On the Password Options tab, configure which VirusScan Enterprise tasks and user
interface options the users can change with the correct password.
VirusScan Console
Configure the General Options user interface properties.
Task
For option definitions, click Help on each tab.
1 Click Tools | General Options to open the General Options configuration dialog box.
2 On the Display Options tab, configure which VirusScan Enterprise system tray icons the
users see, if they can connect to remote systems, and the user's language option settings.
3 On the Password Options tab, configure which VirusScan Enterprise tasks and user
interface options the users can change with the correct password.
Protecting your system access points
Access protection prevents unwanted changes to your computer by restricting access to specified
ports, files, shares, registry keys, and registry values. It also protects McAfee processes by
preventing users from stopping them. This protection is critical before and during outbreaks.
This feature uses predefined rules and categories and user-defined rules to specify which items
can and cannot be accessed. Each rule can be configured to block and report access point
violations when they occur. Predefined rules and categories are subject to content updates via
the McAfee update sites.
Contents
How access protection rules are defined
Access point violations and how VirusScan Enterprise responds
Types of user-defined rules
Configuring access protection settings
How access protection rules are defined
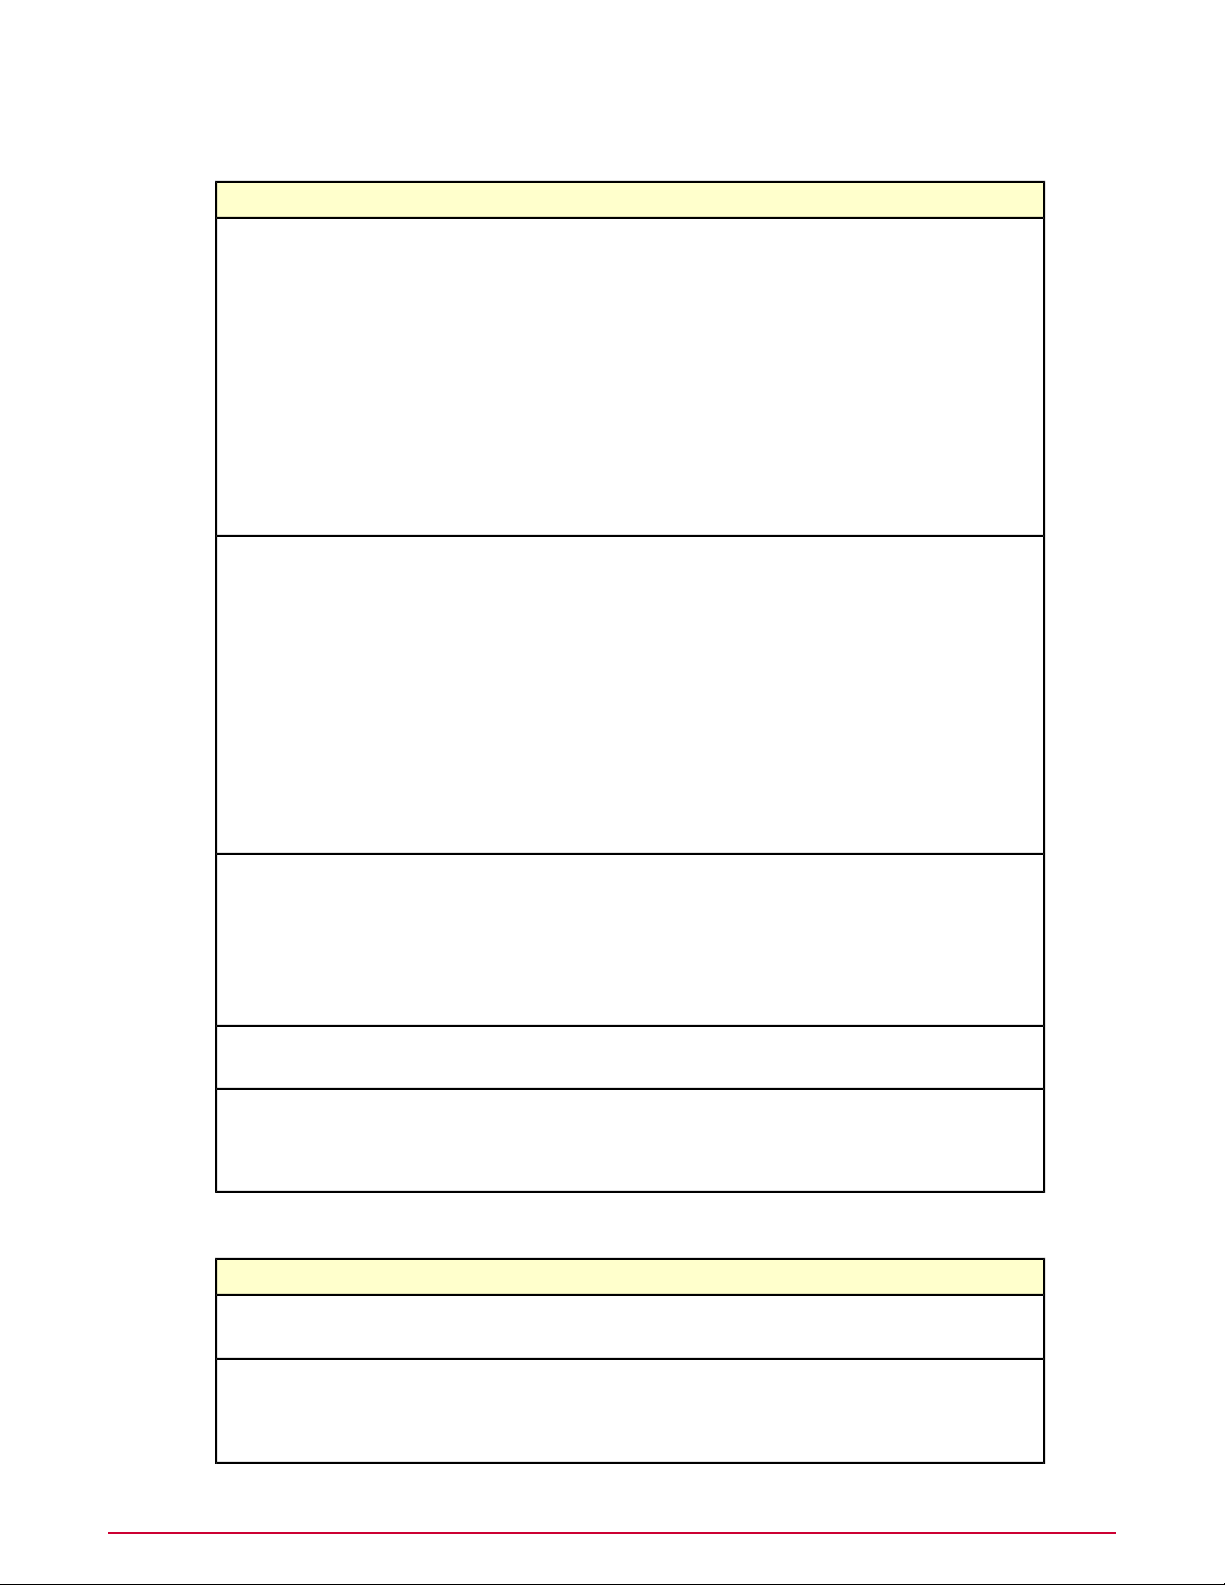
Rules are separated into these types and provide these levels of protection.
23McAfee VirusScan Enterprise 8.8 Product Guide
Page 24
Part I - Prevention: Avoiding Threats
Protecting your system access points
Rule type descriptions
DescriptionRule type
Anti-virus
Common
These preconfigured rules protect your computer from common behaviors of malware
threats. You can enable, disable, and change the configuration, but you cannot delete
these rules.
Two rule examples are:
• Prevent disabling or changing of critical processes, remote creation or modification
of executable files, hijacking of executable files, Windows Process spoofing, and
mass mailing worms from sending mail.
• Protect phone book files from password and email stealers.
These protection levels apply to anti-virus rules:
• Standard Protection
• Maximum Protection
• Outbreak Control
These preconfigured rules prevent modification of commonly used files and settings.
You can enable, disable, and change the configuration, but you cannot delete these
rules.
Three rule examples are:
• Prevent modification of McAfee files and settings.
• Protect Mozilla and Firefox files and settings, Internet Explorer settings, and network
settings.
• Prevent installation of Browser Helper Objects and automatically running programs
from the Temp folder.
These protection levels apply to the common rules:
• Standard Protection
• Maximum Protection
Virtual Machine
Protection
User-defined
These preconfigured rules prevent termination of VMWare processes and modification
of VMWare files. You can enable, disable, and change the configuration, but you cannot
delete these rules.
Rule examples are:
• Prevent termination of VMWare Processes.
• Prevent modification of VMWare workstation, server, or virtual machine files.
These custom rules supplement the protection provided by the Anti-virus and
Common rules.
Rule examples are:Anti-spyware
• Prevent Internet Explorer favorites and settings.
• Prevent programs from running and execution of scripts from the Temp folder.
Protection level descriptions
DescriptionProtection level
Standard
Maximum
Anti-virus and common rules that protect some critical settings and files from being
modified, but generally allow you to install and execute legitimate software.
Anti-virus and common rules that protect most critical settings and files from being
modified. This level provides more protection than Standard, but might prevent you
from installing legitimate software. If you cannot install software, we recommend that
you disable the Access Protection feature first, then enable it again after installation.
McAfee VirusScan Enterprise 8.8 Product Guide24
Page 25
Part I - Prevention: Avoiding Threats
Protecting your system access points
DescriptionProtection level
Outbreak control
Anti-virus rules that block destructive code from accessing the computer until a DAT
file is released. These rules are preconfigured to block access to shares during an
outbreak.
Access point violations and how VirusScan Enterprise responds
An access violation occurs when a restricted user or process tries to start, stop, or access
restricted components of your computer.
When an access point violation occurs:
• Information is recorded in the log file, if you selected the Report option for the rule that
detected the violation.
• The event is recorded in the local event log and to SNMP, if you configured Alert Properties
to do so.
• The event is reported to Alert Manager and ePolicy Orchestrator, if those products are
configured to do so.
• A Block and Report action for a rule determine what happens when a rule detects a
violation.
• On the standalone client system, a red frame surrounds the system tray icon and remains
visible for 30 minutes, unless you reset it.
NOTE: To reset the icon, open the Access Protection Log File from the system tray icon.
Opening the log file by any other method does not reset the icon to its normal state.
Types of user-defined rules
When you configure a new access protection user-defined rule you are allowed to create port
blocking, file and folder blocking, and registry blocking rules.
The following table describes these rules.
Rule descriptions
DescriptionRule
Port Blocking Rule
File/Folder Blocking Rule
Blocks incoming or outgoing network traffic on specific ports or ranges of ports.
NOTE: When you block a port, Transmission Control Protocol (TCP) and User Datagram
Protocol (UDP) accesses are blocked.
NOTE: When you block a port any protocol using that port or range of ports is blocked.
For example, Transmission Control Protocol (TCP) and User Datagram Protocol (UDP)
accesses are blocked.
Blocks write access to files and folders, file execution, plus new file creation and file
deletion.
NOTE: Once you restrict access to a file or folder, the restriction remains in place until
the administrator removes it. This helps prevent intrusions and stops them from spreading
during an outbreak.
Protects registry keys or values by blocking these actions: write to, create, or delete.Registry Blocking Rule
25McAfee VirusScan Enterprise 8.8 Product Guide
Page 26

Part I - Prevention: Avoiding Threats
Protecting your system access points
Configuring access protection settings
Use Access Protection Policies to protect your system’s access points and prevent termination
of McAfee processes.
CAUTION: Failure to enable access protection to prevent McAfee services from being stopped
leaves your system unprotected from numerous malware attacks.
There are two types of access-protection rules you can configure.
• Predefined rules — Allow you to:
• Open the access-protection rule category in one of the user interface consoles.
• Select the block and report action to take if the rule is broken.
• User-defined rules — Allow you to:
• Create the user-defined rule category with one of the user interface consoles.
• Choose which type of blocking the rule enforces: port blocking, file and folder blocking,
or registry blocking.
• Configure the rule details.
• Save the rule and modify it in the future, if needed.
Tasks
Configuring predefined rules
Configuring user-defined rules
Port blocking rule options
File and folder blocking rule options
Registry blocking rule options
Include or exclude specific process options
Removing user-defined rules
Configuring predefined rules
Use predefined rules to protect your computer from unwanted changes. These rules can be
enabled and edited, but they cannot be deleted.
The predefined access protection rules include:
• Anti-spyware Standard Protection
• Anti-spyware Maximum Protection
• Anti-virus Standard Protection
• Anti-virus Maximum Protection
• Anti-virus Outbreak Control
• Common Standard Protection
• Common Maximum Protection
• Virtual Machine Protection
Refer to
protection rules.
Configure the predefined access protection rules using one of these user interface consoles.
How access protection rules are defined
for details about these predefined access
McAfee VirusScan Enterprise 8.8 Product Guide26
Page 27

Part I - Prevention: Avoiding Threats
Protecting your system access points
ePolicy Orchestrator 4.5 or 4.6
From the Access Protection Policies, configure the predefined access-protection rules.
Task
For option definitions, click ? in the interface.
1 Click Menu | Policy | Policy Catalog, then from the Product list select VirusScan
Enterprise 8.8.0. The Category list displays the policy categories for VirusScan Enterprise
8.8.0.
2 Edit an existing policy or create a new policy:
Edit an existing policy
a From the Category list, select the policy category.
b From the Actions column, click Edit Setting to open the policy configuration page.
Create a new policy
a Click Actions | New Policy to open New Policy dialog box.
b From the Category list, select an existing policy.
c From the Create a new policy based on this existing policy list, select one of the
settings.
d Type a new policy name.
e Type any notes, if required.
f Click OK. The new policy appears in the list of existing policies.
g From the Actions column of the new policy, click Edit Setting to open the policy
configuration page.
3 From the Settings for list, select Workstation or Server.
4 From the Access Protection Policy page, click the Access Protection tab to display the
Access Protection Rules.
5 Select the one of the predefined rule categories in the left pane, then select the specific
rule in the right pane.
6 Configure the Block or Report options, or both Block and Report.
7 Click Edit to configure Rule Details.
ePolicy Orchestrator 4.0
From the Access Protection Policies, configure the predefined access-protection rules.
Task
For option definitions, click ? in the interface.
1 Click Systems | Policy Catalog, then from the Product list select VirusScan Enterprise
8.8.0. The Category list displays the policy categories for VirusScan Enterprise 8.8.0.
2 Edit an existing policy or create a new policy:
Edit an existing policy
a From the Category list, select the policy category.
b From the Actions column, click Edit to open the policy configuration page.
Create a new policy
a Click New Policy to open New Policy dialog box.
27McAfee VirusScan Enterprise 8.8 Product Guide
Page 28

Part I - Prevention: Avoiding Threats
Protecting your system access points
b From the Create a new policy based on this existing policy list, select one of the
settings.
c Type a new policy name.
d Click OK. The new policy appears in the list of existing policies.
3 From the Settings for list, select Workstation or Server.
4 From the Access Protection Policy page, click the Access Protection tab to display the
Access Protection Rules.
5 Select the one of the predefined rule categories in the left pane, then select the specific
rule in the right pane.
6 Configure the Block or Report options, or both Block and Report.
7 Click Edit to configure Rule Details.
VirusScan Console
From the Access Protection properties, configure the predefined access-protection rules.
Task
For option definitions, click Help in the interface.
1 From the Task list, right-click Access Protection, then click Properties to open the
dialog box.
2 From the Access Protection Policy dialog box, click the Access Protection tab to display
the Access Protection Rules.
3 Select the one of the predefined rule categories in the left pane, then select the specific
rule in the right pane.
4 Configure the Block or Report options, or both Block and Report.
5 Click Edit to configure Rule Details.
Configuring user-defined rules
Create and edit user-defined rules to supplement the protection provided by the predefined
rules.
Refer to
protection rules.
Create and edit the user-defined rules access protection rules using one of these user interface
consoles.
ePolicy Orchestrator 4.5 or 4.6
From the Access Protection Policies, configure the user-defined access-protection rules.
Task
For option definitions, click ? in the interface.
1 Click Menu | Policy | Policy Catalog, then from the Product list select VirusScan
2 Edit an existing policy or create a new policy:
How access protection rules are defined
Enterprise 8.8.0. The Category list displays the policy categories for VirusScan Enterprise
8.8.0.
for details about the predefined access
McAfee VirusScan Enterprise 8.8 Product Guide28
Page 29

Part I - Prevention: Avoiding Threats
Protecting your system access points
Edit an existing policy
a From the Category list, select the policy category.
b From the Actions column, click Edit Setting to open the policy configuration page.
Create a new policy
a Click Actions | New Policy to open New Policy dialog box.
b From the Category list, select an existing policy.
c From the Create a new policy based on this existing policy list, select one of the
settings.
d Type a new policy name.
e Type any notes, if required.
f Click OK. The new policy appears in the list of existing policies.
g From the Actions column of the new policy, click Edit Setting to open the policy
configuration page.
3 From the Settings for list, select Workstation or Server.
4 Select the User-defined Rules category in the left pane, then click New to open the
Select the new rule type dialog box.
5 Select the rule type and click OK. Refer to
Types of user-defined rules
for details.
The access rule dialog box that appears depends on the rule type selected.
6 Configure these access rule details.
• Network Port Access Protection Rule — Refer to the options table in
rule options
.
• File/Folder Access Protection Rule — Refer to the options table in
blocking rule options
.
• Registry Access Protection Rule — Refer to the options table in
rule options
.
Port blocking
File and folder
Registry blocking
NOTE: To configure which processes to include and exclude, refer to
specific process options
7 Click OK.
The new user-defined rule appears in the right-hand pane under Block/Report/Rules. To
modify the new rule, select it and click Edit.
ePolicy Orchestrator 4.0
From the Access Protection Policies, configure the user-defined access-protection rules.
Task
For option definitions, click ? in the interface.
1 Click Systems | Policy Catalog, then from the Product list select VirusScan Enterprise
8.8.0. The Category list displays the policy categories for VirusScan Enterprise 8.8.0.
2 Edit an existing policy or create a new policy:
Edit an existing policy
a From the Category list, select the policy category.
b From the Actions column, click Edit to open the policy configuration page.
Create a new policy
Include or exclude
.
29McAfee VirusScan Enterprise 8.8 Product Guide
Page 30

Part I - Prevention: Avoiding Threats
Protecting your system access points
a Click New Policy to open New Policy dialog box.
b From the Create a new policy based on this existing policy list, select one of the
settings.
c Type a new policy name.
d Click OK. The new policy appears in the list of existing policies.
3 From the Settings for list, select Workstation or Server.
4 Select the User-defined Rules category in the left pane, then click New to open the
Select the new rule type dialog box.
5 Select the rule type and click OK. Refer to
The access rule dialog box that appears depends on the rule type selected.
6 Configure these access rule details.
• Network Port Access Protection Rule — Refer to the options table in
rule options
• File/Folder Access Protection Rule — Refer to the options table in
blocking rule options
• Registry Access Protection Rule — Refer to the options table in
rule options
.
.
.
Types of user-defined rules
for details.
Port blocking
File and folder
Registry blocking
NOTE: To configure which processes to include and exclude, refer to
specific process options
7 Click OK.
The new user-defined rule appears in the right-hand pane under Block/Report/Rules. To
modify the new rule, select it and click Edit.
VirusScan Console
From the Access Protection properties, configure the user-defined access-protection rules.
Task
For option definitions, click ? in the interface.
1 From the Task list, right-click Access Protection, then click Properties to open the
dialog box.
2 Select the User-defined Rules category in the left pane, then click New to open the
Select New Type Rule dialog box.
3 Select the rule type and click OK. Refer to
The access rule dialog box that appears depends on the rule type selected.
4 Configure these access rule details.
• Network Port Access Protection Rule — Refer to the options table in
rule options
• File/Folder Access Protection Rule — Refer to the options table in
blocking rule options
• Registry Access Protection Rule — Refer to the options table in
rule options
Include or exclude
.
Types of user-defined rules
for details.
Port blocking
.
File and folder
.
Registry blocking
.
NOTE: To configure which processes to include and exclude, refer to
specific process options
McAfee VirusScan Enterprise 8.8 Product Guide30
.
Include or exclude
Page 31

Part I - Prevention: Avoiding Threats
Protecting your system access points
5 Click OK.
The new user-defined rule appears in the right-hand pane in the Rules column. To modify
the new rule, select it and click Edit.
Port blocking rule options
Port blocking rules stop users from accessing specified inbound and outbound ports, and they
prevent other computers from accessing the computer.
Option definitions
DefinitionOption
Type the name for this rule.Rule Name
Restrict access to the specified processes.Processes to include
Allow access to the specified processes.Processes to exclude
Starting Port
Specify the first port number. This can be a single port or the starting number of a range
of ports.
NOTE: If you block access to a port that is used by the McAfee Agent, or the Host
Intrusion Prevention Agent, the agent’s processes are trusted and are allowed to
communicate with the blocked port. All other traffic not related to these agent processes
is blocked.
Specify the last port number in a range of ports.Ending Port
Prevent systems on the network from accessing the specified ports.Inbound
Prevent local processes from accessing the specified ports on the network.Outbound
File and folder blocking rule options
File and folder blocking rules prevent unauthorized users from altering, opening or deleting
specified files or folders.
Option definitions
DefinitionOption
Type the name for this rule.Rule name
Restrict access to the specified processes.Processes to include
Allow access to the specified processes.Processes to exclude
block
Block access to the specified file or folder.File or folder name to
Navigate to the file.Browse file
Navigate to the folder.Browse folder
Block read access to the specified files.Read access to files
Block write access to the specified files.Write access to files
Block files from being executed in the specified folder.Files being executed
Block new files from being created in the specified folder.New files being created
31McAfee VirusScan Enterprise 8.8 Product Guide
Page 32

Part I - Prevention: Avoiding Threats
Protecting your system access points
DefinitionOption
Block files from being deleted from the specified folder.Files being deleted
Registry blocking rule options
Registry blocking rules prevent users and unauthorized programs from altering, opening, or
deleting specified registry keys and values.
NOTE: When creating a registry blocking rule, use the best matching hive registry subtree
abbreviation. For example, to block HKLM\System\CurrentControlSet\Services\MyService, choose
the HKCCS hive rather than HKLM.
Option definitions
DefinitionOption
Specify the name for this rule.Rule Name
Restrict access to the specified processes.Processes to include
Allow access to the specified processes.Processes to exclude
protect
Protect this registry key or value:Registry key or value to
• Select a root key or value from the drop-down list.
• Type a key or value in the text box.
Selecting the root key or value from the drop-down list is optional. Use either of these
methods to specify the key or value:
• Select the root key or value from the drop-down list, then type the remaining path
to the key or value in the text box.
• Type the full path to the key or value in the text box.
Select the type of rule:Rule type
• Key — This rule protects the specified key.
• Value — This rule protects the specified value.
Block writing to the specified key or value.Write to key or value
Block creating the specified key or value.Create key or value
Block deleting the specified key or value.Delete key or value
Include or exclude specific process options
To change the rule details, such as the name, and which process to include or exclude, use
Access Protection and click Edit.
Option definitions
Rule Name
Processes to include
McAfee VirusScan Enterprise 8.8 Product Guide32
DescriptionOption
The name of this rule. For example, Prevent registry editor and Task Manager from
being disabled.
Restrict access to these processes. Use the exact process name or use a wildcard to
specify a broad range of processes such as *.EXE, then add exclusions for specific
processes that are legitimate, such as SETUP.EXE. For example, specify * to include all
processes.
Page 33

Part I - Prevention: Avoiding Threats
Protecting your system access points
DescriptionOption
Processes to exclude
Allow access to these processes. Use the exact process name. For example, specify these
exclusions: avtask.exe, cfgwiz,exe, fssm32.exe, giantantispywar*, kavsvc.exe, mmc.exe,
navw32.exe, nmain.exe, rtvscan.exe.
Removing user-defined rules
Remove rules that you created but no longer use.
Remove the user-defined rules using one of these user interface consoles.
ePolicy Orchestrator 4.5 or 4.6
From the Access Protection Policies, remove rules that you created but no longer use.
Task
For option definitions, click ? or Help in the interface.
1 Click Menu | Policy | Policy Catalog, then from the Product list select VirusScan
Enterprise 8.8.0. The Category list displays the policy categories for VirusScan Enterprise
8.8.0.
2 Edit an existing policy or create a new policy:
Edit an existing policy
a From the Category list, select the policy category.
b From the Actions column, click Edit Setting to open the policy configuration page.
Create a new policy
a Click Actions | New Policy to open New Policy dialog box.
b From the Category list, select an existing policy.
c From the Create a new policy based on this existing policy list, select one of the
settings.
d Type a new policy name.
e Type any notes, if required.
f Click OK. The new policy appears in the list of existing policies.
g From the Actions column of the new policy, click Edit Setting to open the policy
configuration page.
3 From the Settings for list, select Workstation or Server.
4 Select the User-defined Rules category in the left pane, then select the rule you want
to remove in the right pane.
5 Click Delete.
NOTE: To disable a rule without deleting it, deselect the Block and Report actions. You
can enable the rule again if necessary.
ePolicy Orchestrator 4.0
From the Access Protection Policies, remove rules that you created but no longer use.
33McAfee VirusScan Enterprise 8.8 Product Guide
Page 34

Part I - Prevention: Avoiding Threats
Blocking buffer overflow exploits
Task
For option definitions, click ? or Help in the interface.
1 Click Systems | Policy Catalog, then from the Product list select VirusScan Enterprise
8.8.0. The Category list displays the policy categories for VirusScan Enterprise 8.8.0.
2 Edit an existing policy or create a new policy:
Edit an existing policy
a From the Category list, select the policy category.
b From the Actions column, click Edit to open the policy configuration page.
Create a new policy
a Click New Policy to open New Policy dialog box.
b From the Create a new policy based on this existing policy list, select one of the
settings.
c Type a new policy name.
d Click OK. The new policy appears in the list of existing policies.
3 From the Settings for list, select Workstation or Server.
4 Select the User-defined Rules category in the left pane, then select the rule you want
to remove in the right pane.
5 Click Delete.
NOTE: To disable a rule without deleting it, deselect the Block and Report actions. You
can enable the rule again if necessary.
VirusScan Console
From the Access Protection properties, remove rules that you created but no longer use.
Remove the user-defined rules using one of these user interface consoles.
Task
For option definitions, click ? or Help in the interface.
1 From the Task list, right-click Access Protection, then click Properties to open the
dialog box.
2 Select the User-defined Rules category in the left pane, then select the rule you want
to remove in the right pane.
3 Click Delete.
NOTE: To disable a rule without deleting it, deselect the Block and Report actions. You
can enable the rule again if necessary.
Blocking buffer overflow exploits
Buffer overflow protection prevents exploited buffer overflows from executing arbitrary code
on your computer. It monitors user-mode API calls and recognizes when they are called as a
result of a buffer overflow.
When a detection occurs, information is recorded in the activity log and displayed in the
On-Access Scan Messages dialog box, if you configured those options to do so.
McAfee VirusScan Enterprise 8.8 Product Guide34
Page 35

Part I - Prevention: Avoiding Threats
Blocking buffer overflow exploits
VirusScan Enterprise uses a Buffer Overflow and Access Protection DAT file to protect
approximately 30 applications, for example, Internet Explorer, Microsoft Outlook, Outlook
Express, Microsoft Word, and MSN Messenger.
Contents
How buffer overflow exploits occur
Configuring buffer overflow protection
How buffer overflow exploits occur
Attackers use buffer overflow exploits to run executable code by overflowing the fixed-size
memory buffers reserved for an input process. This code lets the attacker take over the target
computer or compromise its data.
There are two types of buffer overflow exploits:
• Heap based attacks — They flood the memory space reserved for a program, but they
are difficult to perform and rare.
• Stack based attacks — They use the stack memory objects to store user input and are
the most common.
The following process describes stack-based buffer overflow attacks:
1 Normal stack memory process — The fixed-size stack memory object is usually empty
and waiting for user input. When a program receives input from the user, such as their
name, the data is stored on top of the stack and assigned a return memory address. When
the stack is processed, the user's input is sent to the return address specified by the
program.
2 Overflowing the stack — When the program is written, a specific amount of memory
space is reserved for the data. The stack overflows if the data written is larger than the
space reserved for it within the memory stack. This is only a problem when combined with
malicious input.
3 Exploiting the overflow — If the program is waiting for a user to enter their name, but
the attacker enters an executable command that exceeds the stack size, that command is
saved outside of the reserved space.
4 Running the malicious code — The command is not automatically run just because it
exceeds the stack buffer space. But it could be if a return address that points to the malicious
command is provided by the attacker. Initially the program starts to crash because of the
buffer overflow, but the program tries to recover by using the return address provided by
the attacker. If the return address is a valid address, the malicious command is executed.
5 Exploiting the permissions — Since programs usually run either in kernel mode or with
permissions inherited from a service account, the malicious code is now running with the
same permissions as the application that was compromised. This could mean the attacker
can gain full control of the operating system.
Configuring buffer overflow protection
To prevent applications from executing arbitrary code on your computer you must configure
the Buffer Overflow Protection Policies.
Configure the Buffer Overflow Protection Policies with the following user interface consoles.
35McAfee VirusScan Enterprise 8.8 Product Guide
Page 36

Part I - Prevention: Avoiding Threats
Blocking buffer overflow exploits
ePolicy Orchestrator 4.5 or 4.6
Configure the Buffer Overflow Protection Policies with this user interface consoles.
Task
For option definitions, click ? in the interface.
1 Click Menu | Policy | Policy Catalog, then from the Product list select VirusScan
Enterprise 8.8.0. The Category list displays the policy categories for VirusScan Enterprise
8.8.0.
2 Edit an existing policy or create a new policy:
Edit an existing policy
a From the Category list, select the policy category.
b From the Actions column, click Edit Setting to open the policy configuration page.
Create a new policy
a Click Actions | New Policy to open New Policy dialog box.
b From the Category list, select an existing policy.
c From the Create a new policy based on this existing policy list, select one of the
settings.
d Type a new policy name.
e Type any notes, if required.
f Click OK. The new policy appears in the list of existing policies.
g From the Actions column of the new policy, click Edit Setting to open the policy
configuration page.
3 From the Settings for list, select Workstation or Server.
4 From the Buffer Overflow Protection Policies page, click the Buffer Overflow Protection
tab and configure the following:
a Enable Buffer overflow settings and the protection mode used. Configure the
protection mode to either block the exploit or simply send a message and log the event.
b Enable the Client system warnings that are sent when a buffer overflow exploit
occurs.
c Configure Buffer overflow exclusions for specific application programming interface
(API) values, plus the optional processes and module names to exclude.
5 Click the Reports tab, enable the scanning activity log files, where they are stored, their
size, and format.
NOTE: These log files are very helpful when you diagnose security threats and help
determine what actions to take against these threats.
ePolicy Orchestrator 4.0
Configure the Buffer Overflow Protection Policies with this user interface console.
Task
For option definitions, click ? in the interface.
1 Click Systems | Policy Catalog, then from the Product list select VirusScan Enterprise
8.8.0. The Category list displays the policy categories for VirusScan Enterprise 8.8.0.
McAfee VirusScan Enterprise 8.8 Product Guide36
Page 37

Part I - Prevention: Avoiding Threats
Blocking buffer overflow exploits
2 Edit an existing policy or create a new policy:
Edit an existing policy
a From the Category list, select the policy category.
b From the Actions column, click Edit to open the policy configuration page.
Create a new policy
a Click New Policy to open New Policy dialog box.
b From the Create a new policy based on this existing policy list, select one of the
settings.
c Type a new policy name.
d Click OK. The new policy appears in the list of existing policies.
3 From the Settings for list, select Workstation or Server.
4 From the Buffer Overflow Protection Policies page, click the Buffer Overflow Protection
tab and configure the following:
1 Enable Buffer overflow settings and the protection mode used. Configure the
protection mode to either block the exploit or simply send a message and log the
event.
2 Enable the Client system warnings that are sent when a buffer overflow exploit
occurs.
3 Configure Buffer overflow exclusions for specific application programming interface
(API) values, plus the optional processes and module names to exclude.
5 Click the Reports tab, enable the scanning activity log files, where they are stored, their
size, and format.
NOTE: These log files are very helpful when you diagnose security threats and help
determine what actions to take against these threats.
VirusScan Console
Configure the Buffer Overflow Protection Policies with this user interface console.
Task
For option definitions, click ? in the interface.
1 From the Task list, right-click Buffer Overflow Protection, then click Properties to
open the dialog box.
2 From the Buffer Overflow Protection Properties page, click the Buffer Overflow Protection
tab and configure the following:
a Enable Buffer overflow settings and the protection mode used. Configure the
protection mode to either block the exploit or simply send a message and log the event.
b Enable the Client system warnings that are sent when a buffer overflow exploit
occurs.
c Configure Buffer overflow exclusions for specific application programming interface
(API) values, plus the optional processes and module names to exclude.
3 Click the Reports tab, enable the scanning activity log files, where they are stored, their
size, and format.
NOTE: These log files are very helpful when you diagnose security threats, and help
determine what actions to take against these threats.
37McAfee VirusScan Enterprise 8.8 Product Guide
Page 38

Part I - Prevention: Avoiding Threats
Restricting potentially unwanted programs
Restricting potentially unwanted programs
VirusScan Enterprise protects your computer from potentially unwanted programs that are a
nuisance or present a security risk. One common unwanted program policy is configured, but
you can individually enable or disable the policy and specify actions for each of the VirusScan
Enterprise scanners.
Potentially unwanted programs (PUPs) are defined as software programs written by legitimate
companies that can alter the security state, or the privacy policy of the computer on which they
are installed. This software can, but does not necessarily, include spyware, adware, and dialers.
These embedded PUPs can be downloaded with a program that you actually want.
Security-minded users recognize such programs and, in some cases, remove them.
Configuring unwanted programs
To protect your computer from potentially unwanted programs you must configure categories
of unwanted programs to detect in your environment.
Configuration is a two-step process:
1 Configure the Unwanted Programs Policy to define which potentially unwanted programs
to detect and exclude:
• Select whole categories of programs or specific programs within a category from a
predefined list which comes from the current DAT file.
• Specify exclusions.
• Create a list of user-defined programs to detect.
2 Enable unwanted program detection in the on-access, email, and on-demand scanners,
then configure which actions to take when an unwanted program is detected.
NOTE: Detecting unwanted programs is enabled for the on-demand scanner differently because
the on-demand scan is a task not a policy. See
Tasks
Accessing the unwanted programs policies
Enabling unwanted program detection in the on-access and email scanners
Configuring on-demand scan tasks
Accessing the unwanted programs policies
Configure the unwanted program policies by selecting the categories of unwanted programs to
detect. For example, spyware and adware. You can also specify exclusions for programs not to
detect.
Access the unwanted programs policies using the following user interface consoles.
ePolicy Orchestrator 4.5 or 4.6
Configure the Unwanted Programs Policies with this user interface console.
Task
For option definitions, click ? in the interface.
for details.
McAfee VirusScan Enterprise 8.8 Product Guide38
Page 39

Part I - Prevention: Avoiding Threats
Restricting potentially unwanted programs
1 Click Menu | Policy | Policy Catalog, then from the Product list select VirusScan
Enterprise 8.8.0. The Category list displays the policy categories for VirusScan Enterprise
8.8.0.
2 Edit an existing policy or create a new policy:
Edit an existing policy
a From the Category list, select the policy category.
b From the Actions column, click Edit Setting to open the policy configuration page.
Create a new policy
a Click Actions | New Policy to open New Policy dialog box.
b From the Category list, select an existing policy.
c From the Create a new policy based on this existing policy list, select one of the
settings.
d Type a new policy name.
e Type any notes, if required.
f Click OK. The new policy appears in the list of existing policies.
g From the Actions column of the new policy, click Edit Setting to open the policy
configuration page.
3 From the Settings for list, select Workstation or Server.
4 From the Unwanted Programs Policy page, click the Scan Items tab to configure:
a Categories of unwanted programs to detect — For example, spyware and adware.
These categories are defined by the current DAT file.
b Exclusions — You must specify the exact detection name that you want to exclude,
not the file name.
5 Click the User-Defined Detections tab and specify the individual files or programs to
treat as unwanted programs. Specify each item by file name and provide a description for
each item.
ePolicy Orchestrator 4.0
Configure the Unwanted Programs Policies with this user interface console.
Task
For option definitions, click ? in the interface.
1 Click Systems | Policy Catalog, then from the Product list select VirusScan Enterprise
8.8.0. The Category list displays the policy categories for VirusScan Enterprise 8.8.0.
2 Edit an existing policy or create a new policy:
Edit an existing policy
a From the Category list, select the policy category.
b From the Actions column, click Edit to open the policy configuration page.
Create a new policy
a Click New Policy to open New Policy dialog box.
b From the Create a new policy based on this existing policy list, select one of the
settings.
c Type a new policy name.
d Click OK. The new policy appears in the list of existing policies.
39McAfee VirusScan Enterprise 8.8 Product Guide
Page 40

Part I - Prevention: Avoiding Threats
Restricting potentially unwanted programs
3 From the Settings for list, select Workstation or Server.
4 From the Unwanted Programs Policy page, click the Scan Items tab to configure:
a Categories of unwanted programs to detect — For example, spyware and adware.
These categories are defined by the current DAT file.
b Exclusions — You must specify the exact detection name that you want to exclude,
not the file name.
5 Click the User-Defined Detections tab and specify the individual files or programs to
treat as unwanted programs. Specify each item by file name and provide a description for
each item.
VirusScan Console
Configure the Unwanted Programs properties using this user interface console.
Task
For option definitions, click Help in the interface.
1 From the Task list, right-click Unwanted Programs Policy, then click Properties to
open the Unwanted Programs Policy dialog box.
2 From the Unwanted Programs Policy page, click the Scan Items tab to configure:
a Categories of unwanted programs to detect — For example, spyware and adware.
These categories are defined by the current DAT file.
b Exclusions — You must specify the exact detection name that you want to exclude,
not the file name.
3 Click the User-Defined Detections tab and specify the individual files or programs to
treat as unwanted programs. Specify each item by file name and provide a description for
each item.
Enabling unwanted program detection in the on-access and email scanners
For the on-access and email scanners to detect unwanted programs you must enable the feature
from the Scan Items tab.
Enable on-access and email scanners to detect unwanted programs using the following user
interface consoles.
NOTE: To enable the on-demand scanner to detect unwanted programs, refer to
on-demand scan tasks
.
ePolicy Orchestrator 4.5 or 4.6
Enable on-access and email scanners to detect unwanted programs using the ePolicy Orchestrator
4.5 or 4.6 console.
The process used to enable unwanted program detection for on-access and email scanners is
essentially the same. The only difference is which policy you select in the policy catalog for step
2. To enable unwanted program detection for:
• On-access scanning — Select On-Access Scan Policies.
• Email scanning — Select On-Delivery Email Policies.
Configuring
McAfee VirusScan Enterprise 8.8 Product Guide40
Page 41

Part I - Prevention: Avoiding Threats
Restricting potentially unwanted programs
Task
For option definitions, click ? in the interface.
1 Click Menu | Policy | Policy Catalog, then from the Product list select VirusScan
Enterprise 8.8.0. The Category list displays the policy categories for VirusScan Enterprise
8.8.0.
2 Edit an existing policy or create a new policy:
Edit an existing policy
a From the Category list, select the policy category.
b From the Actions column, click Edit Setting to open the policy configuration page.
Create a new policy
a Click Actions | New Policy to open New Policy dialog box.
b From the Category list, select an existing policy.
c From the Create a new policy based on this existing policy list, select one of the
settings.
d Type a new policy name.
e Type any notes, if required.
f Click OK. The new policy appears in the list of existing policies.
g From the Actions column of the new policy, click Edit Setting to open the policy
configuration page.
3 From the Settings for list, select Workstation or Server.
4 From the On-Access Scan Policies or On-Delivery Email Policies page, click the Scan
Items tab and select Detect unwanted programs.
ePolicy Orchestrator 4.0
Enable on-access and email scanners to detect unwanted programs using the ePolicy Orchestrator
4.0 console.
The process used to enable unwanted program detection for on-access and email scanners is
essentially the same. The only difference is which policy you select in the policy catalog for step
2. To enable unwanted program detection for:
• On-access scanning — Select On-Access Scan Policies.
• Email scanning — Select On-Delivery Email Policies.
Task
For option definitions, click ? in the interface.
1 Click Systems | Policy Catalog, then from the Product list select VirusScan Enterprise
8.8.0. The Category list displays the policy categories for VirusScan Enterprise 8.8.0.
2 Edit an existing policy or create a new policy:
Edit an existing policy
a From the Category list, select the policy category.
b From the Actions column, click Edit to open the policy configuration page.
Create a new policy
a Click New Policy to open New Policy dialog box.
b From the Create a new policy based on this existing policy list, select one of the
settings.
41McAfee VirusScan Enterprise 8.8 Product Guide
Page 42

Part I - Prevention: Avoiding Threats
Updating detection definitions
c Type a new policy name.
d Click OK. The new policy appears in the list of existing policies.
3 From the Settings for list, select Workstation or Server.
4 From the On-Access Scan Policies or On-Delivery Email Policies page, click the Scan
Items tab and select Detect unwanted programs.
VirusScan Console
Enable on-access and email scanners to detect unwanted programs using the VirusScan Console.
The process used to enable unwanted program detection for on-access and email scanners is
essentially the same. The only difference is which task you select in the VirusScan Console for
step 2. To enable unwanted program detection for:
• On-access scanning — Select On-Access Scan Policies.
• Email scanning — Select On-Delivery Email Scanner.
Task
For option definitions, click Help in the interface.
1 From the Task list, right-click one of the following, then click Properties to open its dialog
box:
• On-Access Scan Policies — For on-access scanning.
• On-Delivery Email Scanner — For email scanning.
2 From the On-Access Scan Policies or On-Delivery Email Policies page, click the Scan
Items tab and select Detect unwanted programs.
Updating detection definitions
The VirusScan Enterprise software depends on the scanning engine and the information in the
detection definition (DAT) files to identify and take action on threats. New threats appear on a
regular basis. To meet this challenge, McAfee releases new DAT files every day that incorporate
the results of its ongoing threat research. The update task retrieves the most current DAT files
from the external McAfee update site and installs them.
NOTE: An ePolicy Orchestrator-managed environment can also retrieve the most current DAT
files, EXTRA.DAT file, scanning engine, Service Packs, and Patches.
Contents
DAT files and how they work
The importance of an update strategy
Update tasks and how they work
Mirror tasks and how they work
How the AutoUpdate repository works
How rolling back DAT files works
McAfee VirusScan Enterprise 8.8 Product Guide42
Page 43

Part I - Prevention: Avoiding Threats
Updating detection definitions
DAT files and how they work
When the scanning engine searches through files looking for threats, it compares the contents
of the scanned files to
The known threat information, called
added to the DAT files.
Besides the signatures, the DAT files also includes how to clean and counteract the damage
created by the detected virus. That is why it is so important to download the most recent version
of DAT file used by VirusScan Enterprise.
CAUTION: If the signature of a certain virus is not contained in any of the DAT files you have
installed, that virus will not be detected by the scanning engine. Also, the scanning engine must
be the latest version to be able to fully utilize the latest DAT files.
VirusScan Enterprise also uses heuristics, called Artemis, to check for suspicious files along with
the DAT files. Refer to
The various DAT files are stored at the following path:
\Program Files\Common Files\McAfee\Engine
known threat information
signatures
How Artemis works
stored in the detection definition (DAT) files.
, is information McAfee Labs has found and
for more information.
The importance of an update strategy
The importance of an update strategy cannot be overstated. Without the latest DAT files and
scanning engine installed on your system, it is not fully protected from the latest viruses. There
has been an unprecedented rise in the number, propagation rate, and prevalence of new
malware. In addition, the growing amount of adware and spyware requires more consistent
and available detection and removal.
McAfee Labs releases DAT file updates at about 6:00 PM (GMT) almost every day. Naturally,
outbreaks will still occur at awkward times and require emergency releases. When a daily DAT
is released early, to pre-empt a potential outbreak, no second DAT is released that day at the
normally scheduled time, unless another emergency situation requires one.
How an update strategy is determined
You can update the DAT files and scanning engine, used by VirusScan Enterprise, using many
methods. You can use AutoUpdate tasks, manual updates, login scripts, or schedule updates
with management tools.
Using an update task allows you to:
• Schedule network-wide DAT file rollouts — You might stagger your update tasks, or
set a schedule that phases in DAT file updates to different parts of the network at convenient
times and with minimal intervention from administrators or network users.
• Split duties for rollout administration — To increase network bandwidth efficiency, use
different servers or domain controllers, among different regions of wide-area networks, or
across other network divisions to keep update traffic primarily internal. This can also reduce
the potential for network security breaches.
• Reduce the waiting time required to download new DAT or upgraded engine files
— Traffic on McAfee computers increases dramatically on regular DAT file publishing dates
and whenever new product versions are available. Avoiding the competition for network
bandwidth enables you to deploy your new software with minimal interruptions.
43McAfee VirusScan Enterprise 8.8 Product Guide
Page 44

Part I - Prevention: Avoiding Threats
Updating detection definitions
Requirements for an efficient update strategy
An efficient updating strategy generally requires at least one client or server in your organization
to retrieve updates from the McAfee download site. From there, the files can be replicated
throughout your organization, providing access for all other computers. Ideally, you should
minimize the amount of data transferred across your network by automating the process of
copying the updated files to your share sites.
The main factors to consider for efficient updating are the number of clients and the number
of sites. You might also consider the number of systems at each remote site and how remote
sites access the Internet. The basic concepts of using a central repository to retrieve updates
and scheduling update tasks to keep your environment up-to-date apply to any size organization.
For deploying software and update information, see the appropriate ePolicy Orchestrator product
guide.
Update tasks and how they work
Use the update task to get the most current DAT files, scanning engine, and service packs and
patches.
VirusScan Enterprise includes a default update task which runs every day at 5:00 p.m. with
one-hour randomization. You can create additional update tasks as needed.
Update task activities
These activities occur when you run an update task:
• A connection is made to the first
this repository is not available, the next site is contacted, and so on until a connection is
made, or until the end of the list is reached.
• An encrypted CATALOG.Z file downloads from the repository. The file contains the
fundamental data required to update. This data is used to determine which files and updates
are available.
• The software versions in the file are checked against the versions on the computer. If new
software updates are available, they are downloaded.
Update task interruption
If the update task is interrupted for any reason during the update:
• A task updating from an HTTP, UNC, or local site resumes where it left off the next time the
update task starts.
• A task updating from an FTP site does not resume if interrupted during a single file download.
However, if the task is downloading several files and is interrupted, the task resumes before
the file that was being downloaded at the time of the interruption.
Update using EXTRA.DAT
An EXTRA.DAT file can be used as a temporary measure in an emergency. The EXTRA.DAT is
downloaded from the repository on each update. This ensures that if you modify and re-check
in the EXTRA.DAT in as a package, all VirusScan Enterprise clients download and use the same
updated EXTRA.DAT package. For example, you may use the EXTRA.DAT as an improved
detector for the same potentially unwanted program or additional detection for other new
potentially unwanted programs. VirusScan Enterprise supports using only one EXTRA.DAT file.
enabled
repository (update site) in the repository list. If
TIP: When you have finished using the EXTRA.DAT file, you should remove it from the master
repository and run a replication task to ensure it is removed from all distributed repository sites.
This stops VirusScan Enterprise clients from attempting to download the EXTRA.DAT file during
McAfee VirusScan Enterprise 8.8 Product Guide44
Page 45

Part I - Prevention: Avoiding Threats
Updating detection definitions
an update. By default, detection for the new potentially unwanted program in the EXTRA.DAT
is ignored once the new detection definition is added to the daily DAT files.
Configuring the AutoUpdate task
To update DAT files and scan engines automatically for all McAfee products, you must configure
the AutoUpdate properties and schedule.
Task
For option definitions, click ? or Help on the tab.
1 To access the AutoUpdate properties use:
• ePolicy Orchestrator 4.5 or 4.6 — Click Menu | Systems | System Tree and
select Client Tasks.
NOTE: Refer to the
instructions on creating a new scheduled client task.
• ePolicy Orchestrator 4.0 — Click Systems | System Tree | Client Task and select
an existing update task or to create a new task, click New Task.
NOTE: Refer to the
instructions on creating a new scheduled client task.
• VirusScan Console — Select an existing update task (right-click and select Properties),
or create a new task (select Task | New Update Task, select the new task in the
list).
TIP: When you create a new client task, we recommend renaming the task with a
descriptive name.
2 Specify the log file location and format.
3 Configure whether to get newer DATs, newer engine, and other available updates such as
service packs, and product upgrades.
4 Specify which executable to run after the update task has completed and whether to run
it only after a successful update.
5 Click Schedule to configure when and how often the task should run. Refer to,
scheduled tasks
6 Click Update Now, the task runs immediately.
McAfee ePolicy Orchestrator 4.5 Product Guide
McAfee ePolicy Orchestrator 4.0 Product Guide
for details.
for detailed
for detailed
Using
Mirror tasks and how they work
The mirror task replicates the update files from the first accessible repository defined in the
repository list, to a mirror site on your network. The most common use of this task is to mirror
the contents of the McAfee download site to a local server.
After you replicate the McAfee site that contains the update files, computers on your network
can download the files from the mirror site. This approach is
update any computer on your network, whether or not it has Internet access; and
because your systems are communicating with a server that is probably closer than a McAfee
Internet site, economizing access and download time.
practical
because it allows you to
efficient
45McAfee VirusScan Enterprise 8.8 Product Guide
Page 46

Part I - Prevention: Avoiding Threats
Updating detection definitions
The VirusScan Enterprise software relies on a directory structure to update itself. When mirroring
a site, it is important to replicate the entire directory structure.
NOTE: This directory structure also supports previous versions of VirusScan Enterprise and
NetShield, as long as the entire directory structure is replicated in the same location that
VirusScan Enterprise 8.8 uses for updating.
Configuring the mirror task
To store DAT files and scan engines in a designated location for use by other computers,
configure the location and schedule using mirror task properties.
Task
For option definitions, click ? or Help on the tab.
1 To access the Mirror task properties use:
• ePolicy Orchestrator 4.5 or 4.6 — Click Menu | Systems | System Tree and
select Client Tasks.
NOTE: Refer to the
McAfee ePolicy Orchestrator 4.5 Product Guide
for detailed
instructions on creating a new scheduled client task.
• ePolicy Orchestrator 4.0 — Click Systems | System tree | Client Task and select
an existing update task or to create a new task, click New Task.
NOTE: Refer to the
McAfee ePolicy Orchestrator 4.0 Product Guide
for detailed
instructions on creating a new scheduled client task.
• VirusScan Console, perform one of the following:
• Select an existing mirror task, right-click and select Properties. The Mirror Task
dialog box appears.
• To create a new mirror task, select Task | New Mirror Task and a New Update
Task appears in the Task list. Click the new task to open the Mirror Task dialog box.
NOTE: Change the task name to something more descriptive by right-clicking the
task and selecting Rename.
2 VirusScan Console — Select an existing update task (right-click and select Properties),
or create a new task (select Task | New Mirror Task, select the new task in the list).
TIP: When you create a new client task, we recommend renaming the task with a descriptive
name.
3 Specify the log file location and format.
4 Configure whether to get newer detection definitions, newer engine and DATs, and other
available updates such as service packs, and product upgrades.
5 Specify which executable to run after the update task has completed and whether to run
it only after a successful update.
6 Click Mirror Location to configure the mirror server destination.
7 Click Schedule to configure when and how often the task should run. Refer to,
scheduled tasks
for details.
Using
8 Click Mirror Now to run the task immediately.
9 Configure the options on the tab. For option definitions, click ? or Help on the tab.
McAfee VirusScan Enterprise 8.8 Product Guide46
Page 47

Part I - Prevention: Avoiding Threats
Updating detection definitions
Tab definitions
DefinitionsTab
Mirror • Specify the log file location and format.
• Specify which executable to run after the mirror task has completed and whether to
run it only after a successful mirror.
How the AutoUpdate repository works
The AutoUpdate repository list (SITELIST.XML) specifies the configuration information necessary
to perform an AutoUpdate task.
The AutoUpdate repository list includes:
• Repository information and location
• Repository order preference
• Proxy settings, where required
• Encrypted credentials required to access each repository
When an AutoUpdate task is performed, a connection is made to the first enabled repository
(update site) in the repository list. If this repository is not available, the next repository is
contacted, and so on until a connection is made, or until the end of the list is reached.
If your network uses a proxy server, you can specify which proxy settings to use, the address
of the proxy server, and whether to use authentication. Proxy information is stored in the
AutoUpdate repository list. The proxy settings you configure apply to all repositories in the
repository list.
The location of the AutoUpdate repository list depends on your operating system.
• For Microsoft Windows XP, Microsoft Vista, Microsoft 2000 Server, Microsoft 2003 Server,
and Microsoft 2008 Server — C:\Documents and Settings\All Users\Application Data\McAfee\Common
Framework
• For Microsoft Windows 7 — C:\ProgramData\McAfee\Common Framework
Configuring the repository list
The repository list includes the repositories where you retrieve updates. Create and configure
as many repositories as you need. Some sites can be used all the time while others are used
only occasionally.
Task
For option definitions, click Help in the interface.
1 From the VirusScan Console, select Tools | Edit AutoUpdate Repository List to access
the AutoUpdate Repository List properties.
NOTE: To configure the repository feature using the ePolicy Orchestrator console navigate
to the Policy Catalog | McAfee Agent display and click the Repositories tab.
2 Configure the options on the tabs.
47McAfee VirusScan Enterprise 8.8 Product Guide
Page 48

Part I - Prevention: Avoiding Threats
Excluding scan items
Tab definitions
DefinitionsTab
Repositories • Specify the repositories where you get updates.
• Configure the order to access the repositories.
Specify which proxy settings to use when updating.Proxy settings
How rolling back DAT files works
If you find your current DAT files are corrupted or incompatible, you can roll back the DAT files
to the last backed up version.
When you update DAT files, the old version is stored in this location: <drive>:\Program
Files\Common Files\McAfee\Engine\OldDats.
When you rollback the DAT files, the current DAT files are replaced with the version in the
OldDats
HKEY_LOCAL_MACHINE\SOFTWARE\McAfee\DesktopProtection\szRolledbackDATS.
Once the rollback occurs, you cannot go back to the previous version again. The next time an
update occurs, the DAT version in the registry is compared with the DAT files in the update
repository. If the new DAT files are the same as those in the registry, no update occurs.
folder, and a flag is set in the registry at this location:
Rolling back DAT files
To revert your DAT files version back to the previous version use the Rollback DATs tool.
Task
For option definitions, click Help in the interface.
1 From the VirusScan Console, select Tools | Rollback DATs.
2 Click Yes to proceed with the DAT rollback.
NOTE: This feature is not available from the ePolicy Orchestrator console.
3 Configure the options on the tab.
Excluding scan items
Each of the VirusScan Enterprise scanners allows you to fine-tune the list of file types scanned.
For example, you can exclude from scanning individual files, folders, and disks. These exclusions
might be needed because the scanners could scan and lock a file when that file is being used
by a database or server. This could cause the database or server to fail or generate errors.
Contents
Specifying exclusions
How to use wildcards to specify scan items
McAfee VirusScan Enterprise 8.8 Product Guide48
Page 49

Part I - Prevention: Avoiding Threats
Using scheduled tasks
Specifying exclusions
Specify files, folders, and drives to exclude from scanning operations. You can also remove any
exclusions you specified previously.
Option definitions
DefinitionOption
Select the type of exclusion.What to exclude
• Exclude by file name/location — Specify the file name, location, and whether
• Exclude by file type — Specify a file type(s).
• Exclude by file age — Specify the access type and minimum age in days.
Select when to exclude the selected item:When to exclude
• On read
• On write
How to handle client
exclusions
Overwrite client exclusions — Only exclude items specified in this policy. If this
option is not selected, the client computer uses exclusions that were specified locally
and the exclusions specified in this policy.
NOTE: This option is only available via ePolicy Orchestrator.
to exclude subfolders.
NOTE: You must add a backslash (\) at the end of the string to apply to a folder.
Otherwise, it is considered a file exclusion and the Also exclude subfolders
checkbox is disabled by default.
How to use wildcards to specify scan items
You can use wildcards to exclude types of files by extension.
When using wildcards, these limitations apply.
• Valid wildcards are question mark (?) for excluding single characters and asterisk (*) for
excluding multiple characters.
• Wildcards can appear in front of a back slash (\) in a path. For example: C:\ABC\*\XYZ
matches C:\ABC\DEF\XYZ.
• An exclusion containing question mark (?) characters applies if the number of characters
matches the length of the file or folder name. For example: The exclusion W?? excludes
WWW, but does not exclude WW or WWWW.
• The syntax is extended to include a double asterisk (**), which means
characters including back slash
. This allows multiple-depth exclusions. For example:
C:\ABC\**\XYZ matches C:\ABC\DEF\XYZ and C:\ABC\DEF\DEF\XYZ, etc.
Using scheduled tasks
As part of configuring on-demand scan, AutoUpdate, or mirror tasks, you need to specify when,
how often, and for how long these tasks should run. You also need to configure user permissions
as part of the configuration process.
zero or more of any
49McAfee VirusScan Enterprise 8.8 Product Guide
Page 50

Part I - Prevention: Avoiding Threats
Using scheduled tasks
Contents
Scheduling tasks
Configuring the task schedule
Scheduling tasks
You have the option to schedule on-demand, AutoUpdate, and mirror tasks to run at specific
dates and times, or intervals. The way you schedule tasks depends on the user interface console
you use.
To schedule these tasks:
• ePolicy Orchestrator console — Use the Schedule tab to display the Schedule page.
• VirusScan Console — Use the Schedule button to display the Schedule dialog box.
Configuring the task schedule
To configure a task to run at a specified time or interval, use the Schedule Settings dialog box.
Before you begin
You must have administrator rights to schedule the task. Administrator rights provide the user
with write access to the scheduled task’s registry key.
To schedule a task, click Schedule in the task’s properties dialog box.
CAUTION: McAfee recommends scheduling on-demand scans at minimum intervals.
Recommended McAfee minimum intervals:
• Daily — Only if you have had a major malware outbreak.
• Weekly — Recommended.
• Monthly — Acceptable.
• Quarterly — The bare minimum.
Tab definitions
DefinitionsTab
Task • Enable scheduled task to run at specified times.
• Stop the task if it runs for the specified hours and minutes.
• Specify user account settings; user name, domain, and password.
Specify the schedule frequency and associated settings.Schedule
McAfee VirusScan Enterprise 8.8 Product Guide50
Page 51

Part II - Detection: Finding Threats
Finding threats is the second step in a protection strategy to detect malware attempting to gain
access to your system.
Contents
Scanning items on-access
Scanning items on-demand
Scanning email on-delivery and on-demand
Scanning items on-access
The on-access scanner examines files on your computer as they are accessed, which provides
continuous, real-time detection of threats. Both the Access Protection and Buffer Overflow
Protection features also use the on-access scanner to detect access violations and buffer overflow
exploits respectively.
Contents
On-access scanning and how it works
Scanning comparison: writing to disk vs. reading from disk
Scanning comparison: scanning all files vs. scanning default + additional file types
Script scanning and how it works
Determine the number of scanning policies
How Artemis works
How general and process settings are configured
On-access scanning and how it works
The on-access scanner hooks into the system at the lowest levels (File-System Filter Driver), it
scans files where they first enter your system. The on-access scanner acts as part of the system
(System Service), and delivers notifications via the interface when detections occur.
When an attempt is made to open, close, or rename a file, the scanner intercepts the operation
and takes these actions.
1 The scanner determines if the file should be scanned based on this criteria:
• The file’s extension matches the configuration.
• The file has not been cached.
• The file has not been excluded.
• The file has not been previously scanned.
51McAfee VirusScan Enterprise 8.8 Product Guide
Page 52

Part II - Detection: Finding Threats
Scanning items on-access
2 If the file meets the scanning criteria, it is scanned by comparing the information in the
file to the known malware signatures in the currently loaded DAT files.
• If the file is clean, the result is cached and read, write, or rename operation is granted.
• If the file contains a threat, the operation is denied and the configured action is taken.
For example:
• If the file needs to be cleaned, that cleaning process is determined by the currently
loaded DAT files.
• The results are recorded in the activity log, if the scanner was configured to do so.
• The On-Access Scan Messages alert appears describing the file name and the
action taken, if the scanner was configured to do so.
3 If the file does not meet the scanning requirements, it is not scanned. It is cached and the
operation is granted.
NOTE: The scan file cache is flushed and all files are rescanned whenever, for example,
the on-access scan configuration is changed, an EXTRA.DAT file is added, or when the
cache is full.
Scanning comparison: writing to disk vs. reading from disk
The on-access scanner performs scans differently, depending on whether the user is writing to
disk or reading from disk.
When files are being written to disk, the on-access scanner scans these items:
• Incoming files being written to the local hard drive.
• Files being created on the local hard drive or a mapped network drive (this includes new
files, modified files, or files being copied or moved from one drive to another).
NOTE: To scan mapped network drives, you must enable the On Network Drives option.
Refer to
These scans are only accessible by the same client where VirusScan Enterprise is installed.
It does not detect access to the mapped network drive by other systems.
When files are being read from disk, the on-access scanner scans these items:
• Outgoing files being read from the local hard drive or mapped network drives.
NOTE: To scan mapped network drives, select the On network drives option, described
in the previous bullets, to include remote network files.
• Any file attempting to execute a process on the local hard drive.
• Any file opened on the local hard drive.
• Any file being renamed on the local hard drive, if the file properties have changed.
Enabling on-network drives
.
Scanning comparison: scanning all files vs. scanning default + additional file types
The on-access scanner scans files differently depending on whether it is configured to scan all
files, or to scan default files plus additional file types.
When scanning All files, the scanner examines every file type for all possible threats.
McAfee VirusScan Enterprise 8.8 Product Guide52
Page 53

Part II - Detection: Finding Threats
Scanning items on-access
When scanning Default + additional file types, the scanner examines a list of specific files
based on the file types you select.
• Default file types: The on-access scanner examines the specified file type only for threats
that attack that file type.
• Additional file types: The on-access scanner examines the files with matching extensions
for all possible threats.
• Specified files types: The on-access scanner examines the user defined list of file extensions
for all possible threats.
Script scanning and how it works
The script scanner operates as a proxy component to the real Windows scripting host component.
It intercepts scripts, then scans them before they are executed.
For example, the script scanner confirms:
• If the script is clean, it is passed on to the real scripting host component.
• If the script contains a potential threat, the script is not executed.
Trusted processes and also websites that utilize scripts can be excluded from inspection.
NOTE: On Windows Server 2008 systems, Script Scan URL exclusions do not work with Windows
Internet Explorer unless you click the checkbox Enable third-party browser extensions to
enable the setting and restart Windows Server 2008. For details, see
https://kc.mcafee.com/corporate/index?page=content&id=KB69526.
How Artemis works
The Artemis feature uses heuristics to check for suspicious files. It provides users with
Windows-based McAfee anti-virus products that have the most up-to-date real-time detections
for certain malware.
Artemis does not provide protection for entire classes of malware; just for suspicious samples.
The benefit of protecting against specific threats is the capability to protect users with McAfee
security at virtually the same time that McAfee Labs determines a sample is malicious.
You can configure the administrator-configured sensitivity levels Artemis uses to look for
suspicious programs and DLLs running on client systems protected by VirusScan Enterprise.
When Artemis detects a suspicious program, it sends a DNS request containing a fingerprint of
the suspicious file to a central database server hosted by McAfee Labs.
NOTE: In this release, the Artemis feature is enabled by default, with the sensitivity level set
to very low.
53McAfee VirusScan Enterprise 8.8 Product Guide
Page 54

Part II - Detection: Finding Threats
Scanning items on-access
Determine the number of scanning policies
Follow this process to determine whether to configure more than one on-access scanning policy.
How general and process settings are configured
The on-access scanner’s general and process policies are configured separately.
• General Settings — Includes options that apply to all processes.
• Process Settings — Allow you to configure one scanning policy for all processes, or
configure different policies for processes that you define as default, low-risk, and high-risk.
Configuring general settings
General settings apply to the scanning of all processes and include parameters, such as maximum
scan time, scanning scripts, blocking unwanted threats from a remote computer, sending
messages when threats are detected, and reporting detections.
McAfee VirusScan Enterprise 8.8 Product Guide54
Page 55

Part II - Detection: Finding Threats
Scanning items on-access
Configure the on-access general settings using the following user interface consoles.
ePolicy Orchestrator 4.5 or 4.6
Configure the general settings that apply to scanning of all processes with this user interface
console.
Task
For option definitions, click ? in the interface.
1 Click Menu | Policy | Policy Catalog, then from the Product list select VirusScan
Enterprise 8.8.0. The Category list displays the policy categories for VirusScan Enterprise
8.8.0.
2 Edit an existing policy or create a new policy:
Edit an existing policy
a From the Category list, select the policy category.
b From the Actions column, click Edit Setting to open the policy configuration page.
Create a new policy
a Click Actions | New Policy to open New Policy dialog box.
b From the Category list, select an existing policy.
c From the Create a new policy based on this existing policy list, select one of the
settings.
d Type a new policy name.
e Type any notes, if required.
f Click OK. The new policy appears in the list of existing policies.
g From the Actions column of the new policy, click Edit Setting to open the policy
configuration page.
3 From the Settings for list, select Workstation or Server.
4 From the On-Access General Policies page, click the General tab to configure the
general policy that applies to all on-access scanning. For example, which on-access items
to scan, when to scan, the maximum scan time, and if cookies should be scanned.
You can configure scanning of all processes currently running on your system whenever
on-access scanning is enabled. This improves your system security, but it can impact your
system boot-time performance.
To configure the scan processes on enable feature, in the Scan group, click Processes on
enable to scan all processes currently running on your system whenever on-access scanning
is enabled.
NOTE: Enabling this feature can impact the time it takes for your system to boot up.
5 On the ScriptScan tab, enable ScriptScan and configure any processes or URLs to exclude
from scanning.
NOTE: With previous versions of VirusScan Enterprise disabling on-access scanning disabled
ScriptScan. With VirusScan Enterprise 8.8 disabling on-access scanning does not disable
ScriptScan. To disable ScriptScan deselect the Enable scanning of scripts checkbox.
55McAfee VirusScan Enterprise 8.8 Product Guide
Page 56

Part II - Detection: Finding Threats
Scanning items on-access
6 On the Blocking tab, configure blocking connections from remote computers that write
files with potential threats or unwanted programs.
NOTE: By default, when a remote system writes any malware to a system with VirusScan
Enterprise, VirusScan Enterprise blocks the connection to that remote system.
You can also configure a message that is sent to the system that has written the malware.
NOTE: To send this message requires Windows Messenger service.
7 On the Messages tab, configure messages to notify local users when detections occur
with a configured message, and specify which actions the user can take against the threat.
8 On the Reports tab, enable the scanning activity log files and define where they are stored,
their size, format, and any additional scan logging to help you diagnose this threat.
NOTE: These log files are very helpful when you diagnose security threats and help
determine which actions to take against these threats.
ePolicy Orchestrator 4.0
Configure the general settings that apply to scanning of all processes with this user interface
console.
Task
For option definitions, click ? in the interface.
1 Click Systems | Policy Catalog, then from the Product list select VirusScan Enterprise
8.8.0. The Category list displays the policy categories for VirusScan Enterprise 8.8.0.
2 Edit an existing policy or create a new policy:
Edit an existing policy
a From the Category list, select the policy category.
b From the Actions column, click Edit to open the policy configuration page.
Create a new policy
a Click New Policy to open New Policy dialog box.
b From the Create a new policy based on this existing policy list, select one of the
settings.
c Type a new policy name.
d Click OK. The new policy appears in the list of existing policies.
3 From the Settings for list, select Workstation or Server.
4 From the On-Access General Policies page, click the General tab to configure the
general policy that applies to all on-access scanning. For example, which on-access items
to scan, when to scan, the maximum scan time, and if cookies should be scanned.
You can configure scanning of all processes currently running on your system whenever
on-access scanning is enabled. This improves your system security, but it can impact your
system boot-time performance.
To configure the scan processes on enable feature, in the Scan group, click Processes on
enable to scan all processes currently running on your system whenever on-access scanning
is enabled.
NOTE: Enabling this feature can impact the time it takes for your system to boot up.
McAfee VirusScan Enterprise 8.8 Product Guide56
Page 57

Part II - Detection: Finding Threats
Scanning items on-access
5 On the ScriptScan tab, enable ScriptScan and configure any processes or URLs to exclude
from scanning.
NOTE: With previous versions of VirusScan Enterprise disabling on-access scanning disabled
ScriptScan. With VirusScan Enterprise 8.8 disabling on-access scanning does not disable
ScriptScan. To disable ScriptScan deselect the Enable scanning of scripts checkbox.
6 On the Blocking tab, configure blocking connections from remote computers that write
files with potential threats or unwanted programs.
NOTE: By default, when a remote system writes any malware to a system with VirusScan
Enterprise, VirusScan Enterprise blocks the connection to that remote system.
You can also configure a message that is sent to the system that has written the malware.
NOTE: To send this message requires Windows Messenger service.
7 On the Messages tab, configure messages to notify local users when detections occur
with a configured message, and specify which actions the user can take against the threat.
8 On the Reports tab, enable the scanning activity log files and define where they are stored,
their size, format, and any additional scan logging to help you diagnose this threat.
NOTE: These log files are very helpful when you diagnose security threats and help
determine which actions to take against these threats.
VirusScan Console
Configure the general settings that apply to scanning of all processes with this user interface
console.
Task
For option definitions, click Help in the interface.
1 From the Task list, right-click On-Access Scanner, then click Properties to open the
dialog box.
2 From the On-Access General Policies page, click the General tab to configure the
general policy that applies to all on-access scanning. For example, which on-access items
to scan, when to scan, the maximum scan time, and if cookies should be scanned.
You can configure scanning of all processes currently running on your system whenever
on-access scanning is enabled. This improves your system security, but it can impact your
system boot-time performance.
To configure the scan processes on enable feature, in the Scan group, click Processes on
enable to scan all processes currently running on your system whenever on-access scanning
is enabled.
NOTE: Enabling this feature can impact the time it takes for your system to boot up.
3 On the ScriptScan tab, enable ScriptScan and configure any scripts to exclude from
scanning.
NOTE: With previous versions of VirusScan Enterprise disabling on-access scanning disabled
ScriptScan. With VirusScan Enterprise 8.8 disabling on-access scanning does not disable
ScriptScan. To disable ScriptScan deselect the Enable scanning of scripts checkbox.
57McAfee VirusScan Enterprise 8.8 Product Guide
Page 58

Part II - Detection: Finding Threats
Scanning items on-access
4 On the Blocking tab, configure blocking connections from remote computers that write
files with potential threats or unwanted programs.
NOTE: By default, when a remote system writes any malware to a system with VirusScan
Enterprise, VirusScan Enterprise blocks the connection to that remote system.
You can also configure a message that is sent to the system that has written the malware.
NOTE: To send this message requires Windows Messenger service.
5 On the Messages tab, configure messages to notify local users when detections occur
with a configured message, and specify which actions the user can take against the threat.
6 On the Reports tab, enable the scanning activity log files and define where they are stored,
their size, format, and any additional scan logging to help you diagnose this threat.
NOTE: These log files are very helpful when you diagnose security threats and help
determine which actions to take against these threats.
Configuring process settings
On-access scan processes are configured based on the risk that you assign to each process.
You can configure one default scanning policy for all processes, or configure different policies
based on the risk assigned to each process. Parameters include assigning risk you assign to
processes, defining items to scan, performing Artemis scanning, scanning compressed files,
taking actions on detections, and scanning for potentially unwanted programs.
Configure the on-access process settings using the following user interface consoles.
ePolicy Orchestrator 4.5 or 4.6
Configure the On-Access Default Processes Policies with this user interface consoles.
Task
For option definitions, click ? in the interface.
1 Click Menu | Policy | Policy Catalog, then from the Product list select VirusScan
Enterprise 8.8.0. The Category list displays the policy categories for VirusScan Enterprise
8.8.0.
2 Edit an existing policy or create a new policy:
Edit an existing policy
a From the Category list, select the policy category.
b From the Actions column, click Edit Setting to open the policy configuration page.
Create a new policy
a Click Actions | New Policy to open New Policy dialog box.
b From the Category list, select an existing policy.
c From the Create a new policy based on this existing policy list, select one of the
settings.
d Type a new policy name.
e Type any notes, if required.
f Click OK. The new policy appears in the list of existing policies.
McAfee VirusScan Enterprise 8.8 Product Guide58
Page 59

Part II - Detection: Finding Threats
Scanning items on-access
g From the Actions column of the new policy, click Edit Setting to open the policy
configuration page.
3 From the Settings for list, select Workstation or Server.
4 From the Processes tab, click Configure different scanning policies for high-risk,
low-risk, and default process to display the on-access Default Processes, Low-Risk
Processes, or High-Risk Processes.
5 From the On-Access Default, Low-Risk, or High-Risk Processes Policies page, configure the
options on each tab. Refer to
ePolicy Orchestrator 4.0
Configure the On-Access Default Processes Policies with this user interface consoles.
Task
For option definitions, click ? in the interface.
1 Click Systems | Policy Catalog, then from the Product list select VirusScan Enterprise
8.8.0. The Category list displays the policy categories for VirusScan Enterprise 8.8.0.
2 Edit an existing policy or create a new policy:
Edit an existing policy
a From the Category list, select the policy category.
b From the Actions column, click Edit to open the policy configuration page.
Create a new policy
a Click New Policy to open New Policy dialog box.
b From the Create a new policy based on this existing policy list, select one of the
settings.
c Type a new policy name.
d Click OK. The new policy appears in the list of existing policies.
3 From the Settings for list, select Workstation or Server.
4 From the Processes tab, click Configure different scanning policies for high-risk,
low-risk, and default process to display the on-access Default Processes, Low-Risk
Processes, or High-Risk Processes.
5 From the On-Access Default, Low-Risk, or High-Risk Processes Policies page, configure the
options on each tab. Refer to
Process setting tab options
Process setting tab options
.
.
VirusScan Console
Configure the On-Access Scan Properties with this user interface consoles.
Task
For option definitions, click Help in the interface.
1 From the Task list, right-click On-Access Scanner, then click Properties to open the
dialog box.
2 From the left-hand pane, click All Processes.
3 From the Processes tab, click Configure different scanning policies for high-risk,
low-risk, and default process to display the on-access Default Processes, Low-Risk
Processes, or High-Risk Processes.
59McAfee VirusScan Enterprise 8.8 Product Guide
Page 60

Part II - Detection: Finding Threats
Scanning items on-access
4 From the On-Access Default, Low-Risk, or High-Risk Processes Policies page, configure the
options on each tab. Refer to
Process setting tab options
The following table describes the on-access scanner tab options.
Process setting tab options
DefinitionsTab
.
Processes • On-Access Default Processes — Choose to configure one scanning policy for
Scan Items • Configure whether to scan files on read, on write, on network drives and opened
all processes or configure different scanning policies for default processes, low-risk
processes, and high-risk processes.
NOTE: If you choose to configure one scanning policy, this policy applies to all
processes. If you choose to configure different scanning policies for low-risk and
high risk policies, this policy applies only to the processes that are not defined as
low-risk or high-risk.
• On-Access Low-Risk Processes — Specify the processes that you define as
low-risk.
• On-Access High-Risk Processes — Specify the processes that you define as
high-risk.
NOTE: The Configure different scanning policies for high-risk, low-risk, and
default processes option must be selected on the On-Access Default Processes
tab before you can configure individual policies for low-risk and high-risk processes.
for backup.
CAUTION: Failure to enable When writing to disk and When reading from
disk leaves your system unprotected from numerous malware attacks.
• Configure which files and file types to scan.
CAUTION: Failure to enable All files leaves your system unprotected from
numerous malware attacks.
• Scan for potential threats that resemble unwanted programs, Trojan horses and
macro viruses.
• Scan inside archives and decode MIME encoded files.
• Enable on-access scanning for unwanted programs.
Configure which disks, files, and folders to exclude from scanning.Exclusions
For threat detections:Actions
• Primary action to take when a threat is detected.
• Secondary action to take on a threat detection if the first action fails.
For unwanted program detections:
• Primary action to take when an unwanted program is detected.
• Secondary action to take on an unwanted program detection if the first action
fails.
Enabling on-network drives
To scan mapped network drives, you must enable the On Network Drives option.
Configure the on-access scanning of on-network drives from the On-Access Default Processes
Policies using one of the following user interface consoles.
McAfee VirusScan Enterprise 8.8 Product Guide60
Page 61

Part II - Detection: Finding Threats
Scanning items on-access
ePolicy Orchestrator 4.5 or 4.6
Enable on-network drives from the On-Access Default Processes Policies with this user interface
console.
Task
For option definitions, click ? in the interface.
1 Click Menu | Policy | Policy Catalog, then from the Product list select VirusScan
Enterprise 8.8.0. The Category list displays the policy categories for VirusScan Enterprise
8.8.0.
2 Edit an existing policy or create a new policy:
Edit an existing policy
a From the Category list, select the policy category.
b From the Actions column, click Edit Setting to open the policy configuration page.
Create a new policy
a Click Actions | New Policy to open New Policy dialog box.
b From the Category list, select an existing policy.
c From the Create a new policy based on this existing policy list, select one of the
settings.
d Type a new policy name.
e Type any notes, if required.
f Click OK. The new policy appears in the list of existing policies.
g From the Actions column of the new policy, click Edit Setting to open the policy
configuration page.
3 From the Settings for list, select Workstation or Server.
4 On the On-Access Default Processes Policies page, click Scan Items tab, and On
network drives next to Scan files.
5 Click Save.
ePolicy Orchestrator 4.0
Enable on-network drives with this user interface console.
Task
For option definitions, click ? in the interface.
1 Click Systems | Policy Catalog, then from the Product list select VirusScan Enterprise
8.8.0. The Category list displays the policy categories for VirusScan Enterprise 8.8.0.
2 Edit an existing policy or create a new policy:
Edit an existing policy
a From the Category list, select the policy category.
b From the Actions column, click Edit to open the policy configuration page.
Create a new policy
a Click New Policy to open New Policy dialog box.
b From the Create a new policy based on this existing policy list, select one of the
settings.
61McAfee VirusScan Enterprise 8.8 Product Guide
Page 62

Part II - Detection: Finding Threats
Scanning items on-demand
c Type a new policy name.
d Click OK. The new policy appears in the list of existing policies.
3 From the Settings for list, select Workstation or Server.
4 On the On-Access Default Processes Policies page, click Scan Items tab and On
network drives next to Scan files.
5 Click Save.
VirusScan Console
Enable on-network drives with this user interface console.
Task
For option definitions, click Help in the interface.
1 From the Task list, right-click On-Access Scanner, then click Properties to open the
On-Access Scanner Properties dialog box.
2 Click the Scan Items tab and On network drives next to Scan files.
3 Click Save.
Scanning items on-demand
The on-demand scanner examines all parts of your computer for potential threats, at convenient
times or at regular intervals. Use on-demand scans to supplement the continuous protection
that the on-access scanner offers, or to schedule regular scans at times that do not interfere
with your work.
Contents
On-demand scanning and how it works
On-demand scanning methods and how they are defined
How scanning of remote storage works
How scan deferral works
How system utilization works
Configuring on-demand scan tasks
Configuring global system cache
On-demand scanning and how it works
The on-demand scanner searches your system's files, folders, memory, registry, and more
looking for any malware that could have infected your system. You decide when and how the
on-demand scans occur. You can scan your system manually, at a scheduled time, or for
example, when your system boots.
When an attempts is made to open, close, or rename a file, the scanner intercepts the operation
and takes these actions.
1 The scanner determines if the file, folder, or disk should be scanned based on this criteria:
• The file’s extension matches the configuration.
McAfee VirusScan Enterprise 8.8 Product Guide62
Page 63

Part II - Detection: Finding Threats
Scanning items on-demand
• The file has not been cached.
• The file has not been excluded.
• The file has not been previously scanned.
NOTE: The on-demand scanner uses heuristics to check for suspicious files, if you
configure Artemis. For details, see
2 If the file, folder, or disk meets the scanning criteria, it is scanned by comparing the
information in the file to the known virus signatures in the currently loaded DAT files.
• If it is clean, the result is cached and the next item is checked.
• If it contains a threat, the configured action is taken. For example:
• If it needs to be cleaned, that process is determined by the currently loaded DAT
files.
• The results are recorded in the activity log if the scanner was configured to do so.
• In the On-Demand Scan Progress dialog, the information describing the memory,
file, folder, or disk name and the action taken is displayed.
3 If the memory, file, folder, or disk does not meet the scanning requirements, it is not
scanned and the scanner continues until all of the data is scanned.
How Artemis works
.
On-demand scanning methods and how they are defined
The on-demand scanner uses in-memory-process scanning and incremental or resumable
scanning.
In-memory-process scanning
This method examines all active processes prior to running the on-demand scan task. Any
detected potentially unwanted process is highlighted and the process is stopped. This means
that a single pass with the on-demand scanner removes all instances of a potentially unwanted
program.
Incremental or resumable scanning
This method allows you to limit when on-demand scan activity occurs, and still scan the entire
system in multiple sessions. Incremental scanning can be set by adding a time limit to the
scheduled scan. The scan stops when the time limit is reached. The next time this task starts,
it continues from the point in the file and folder structure where the previous scan stopped.
How scanning of remote storage works
Remote storage data is hierarchical, with two defined levels of storage.
The two levels of storage:
• Upper level, local storage — Includes the NTFS disk volumes of the computer running
Remote Storage on Windows 2000 Server.
• Lower level, remote storage — Located on the robotic tape library, or a standalone tape
drive connected to a server computer.
Remote storage automatically copies eligible files on your local volumes to a tape library, then
monitors space available on the local volumes. File data is cached locally so that it can be
accessed quickly as needed. When necessary, remote storage moves data from the remote
63McAfee VirusScan Enterprise 8.8 Product Guide
Page 64

Part II - Detection: Finding Threats
Scanning items on-demand
storage to local storage. When you need to access a file on a volume managed by remote
storage, open the file as usual. If the data for the file is no longer cached on your local volume,
remote storage recalls the data from a tape library.
How scan deferral works
To improve performance, you can defer on-demand scan tasks when battery power is low or
during full-screen presentations. You can also allow the user to defer scheduled scans in one-hour
increments. The increments can last one hour, 24 hours, or the on-demand scan can be deferred
forever.
Each user deferral can last one hour. For example, if the Defer at most option is set at 2, the
user can defer the scan task two times or two hours. When the maximum specified number of
hours elapses, the scan continues. If the administrator allows unlimited deferrals by setting the
option to zero, the user can continue deferring the scan forever.
How system utilization works
The on-demand scanner uses the Windows Set Priority setting for the scan process and threads
priority. This lets the operating system set the amount of CPU time that the on-demand scanner
receives at any point in the scan process. The system utilization setting in the On-Demand Scan
Properties maps to the Windows Set Priority control.
Setting the system utilization for the scan to low provides improved performance for other
running applications. The low setting is useful for systems with end user activity in progress.
Conversely, by setting the system utilization to normal the scan completes faster. The normal
setting is useful for systems that have large volumes and very little end user activity.
The following table shows the VirusScan Enterprise and ePolicy Orchestrator default process
settings.
Low
Below normal — The ePolicy Orchestrator default
Normal — The VirusScan Enterprise 8.8 default
Configuring on-demand scan tasks
Configuring on-demand tasks depends on the user interface console you are using. These tasks
describe that process for each user interface console.
Tasks
ePolicy Orchestrator 4.5 or 4.6
ePolicy Orchestrator 4.0
VirusScan Console
Configuring on-demand scan tasks tabs
ePolicy Orchestrator 4.5 or 4.6
Configure the on-demand scan tasks with this user interface console.
Windows Set Priority settingVirusScan Enterprise process setting
Low
Below normal
Normal
McAfee VirusScan Enterprise 8.8 Product Guide64
Page 65

Part II - Detection: Finding Threats
Scanning items on-demand
Task
For option definitions, click ? in the interface.
1 Click Menu | System | System Tree and select Client Task.
2 From the Client Task page that appears:
• To edit an existing on-demand scan task, click Edit Setting from the Actions column
of the task to open the Description page.
• To create a new on-demand scan task, click Actions | New task to open the
Description page.
3 From the Descriptions page:
• When editing an existing on-demand scan task, check the descriptions and click Next.
• When creating a new on-demand scan task, configure the following and click Next:
• Name and Notes.
• Type by selecting On-Demand Scan (VirusScan Enterprise 8.8) from the list.
• Tags that determine which computers receive the on-demand scan task.
4 From the Client Task Builder configuration page that appears, configure each of the tabs.
For details, refer to
Configuring on-demand scan tasks tabs
.
ePolicy Orchestrator 4.0
Configure the on-demand scan tasks with this user interface console.
Task
For option definitions, click ? in the interface.
1 Click Systems | System tree | Client Task.
2 From the Client Task page that appears:
• To edit an existing on-demand scan task, click Edit from the Actions column of the
task to open the Description page.
• To create a new on-demand scan task, click Actions | New task to open the
Description page.
3 Perform one of the following:
• When editing an existing on-demand scan task, check the descriptions and click Next.
• When creating a new on-demand scan task, configure the following and click Next:
• Name and Notes.
• Type by selecting On-Demand Scan (VirusScan Enterprise 8.8) from the list.
• Tags that determine which computers receive the on-demand scan task.
4 From the Client Task Builder configuration page that appears, configure each of the tabs.
For details, refer to
Configuring on-demand scan tasks tabs
.
VirusScan Console
Configure the on-demand scan tasks with this user interface console.
65McAfee VirusScan Enterprise 8.8 Product Guide
Page 66

Part II - Detection: Finding Threats
Scanning items on-demand
Task
For option definitions, click Help in the interface.
1 Open the On-Demand Scan Properties page for an existing or new task:
• Select and right-click an existing on-demand scan task, right-click, and select Properties.
• Create a new task, select Task | New On-Demand Scan Task, right-click the new
task, select Properties.
2 Configure each of the tabs in the On-Demand Scan Properties dialog box. Refer to the
section,
Configuring on-demand scan tasks tabs
Configuring on-demand scan tasks tabs
VirusScan Enterprise includes a default on-demand scan task. You can use the default task and
create new tasks.
Configure the options on each tab. For option definitions, click ? or Help on each tab.
Tab definitions
for details.
DefinitionsTab
Scan Locations • Specify which locations and items to scan.
• Include running processes.
• Include subfolders when scanning.
• Include boot sectors when scanning.
• Include registry keys and values when scanning.
• Include cookie files when scanning.
CAUTION: Failure to scan Memory for rootkits and Running processes leaves your
system unprotected from numerous malware attacks.
NOTE: When the On-Demand Scan Progress dialog appears, the locations to scan
appear as a comma-separated string following Scanning in. As the scan processes are
completed, they are removed from the string.
Scan Items • Configure which files and file types to scan.
• Enable on-demand scanning for unwanted programs.
• Scan inside archives and decode MIME encoded files.
• Scan files that have been migrated to storage.
• Scan for potential threats that resemble unwanted programs, Trojan horses, and
macro viruses.
Exclusions
Performance • Configure when to defer scans and for how long.
Configure which disks, files, and folders to exclude from scanning by Name or Location,
by File Type, or by File Age.
• Specify the system utilization percentage.
• Configure the sensitivity level for Artemis.
For threat detections:Actions
• Primary action to take when a threat is detected.
• Secondary action to take on a threat detection if the first action fails.
For unwanted program detections:
• Primary action to take when an unwanted program is detected.
McAfee VirusScan Enterprise 8.8 Product Guide66
Page 67

Part II - Detection: Finding Threats
Scanning items on-demand
DefinitionsTab
• Secondary action to take on an unwanted program detection if the first action
fails.
For allowed actions in the prompt dialog box, select the action.
Reports • Enable activity logging.
• Specify the log file name and location.
• Specify the log file size limit.
• Select the log file format.
• Specify what to log besides scanning activity.
• Specify which of the following to log in addition to scanning activity:
• Enable session settings
• Enable session summary
• Enable failure to scan encrypted files
• Enable alerts when cookies are detected.
Task
Specify where the on-demand scan task runs.
NOTE: This tab is only available via ePolicy Orchestrator.
Configuring global system cache
The VirusScan Enterprise scan cache saves a list of scanned files that are clean. You can improve
your system performance by saving this clean file scan cache information during a system
reboot. This allows the on-demand scanner to use this clean file cache information to reduce
duplicate file scanning.
Configure the scan cache features using the General Options Policies and the Global Scan
Settings tab using the following user interface consoles.
Tasks
ePolicy Orchestrator 4.5 or 4.6
ePolicy Orchestrator 4.0
VirusScan Console
ePolicy Orchestrator 4.5 or 4.6
Configure the scan cache feature from the General Options Policies with this user interface
console.
Task
For option definitions, click ? or Help in the interface.
1 Click Menu | Policy | Policy Catalog, then from the Product list select VirusScan
Enterprise 8.8.0. The Category list displays the policy categories for VirusScan Enterprise
8.8.0.
2 Edit an existing policy or create a new policy:
Edit an existing policy
a From the Category list, select the policy category.
b From the Actions column, click Edit to open the policy configuration page.
67McAfee VirusScan Enterprise 8.8 Product Guide
Page 68

Part II - Detection: Finding Threats
Scanning items on-demand
Create a new policy
a Click New Policy to open New Policy dialog box.
b From the Create a new policy based on this existing policy list, select one of the
settings.
c Type a new policy name.
d Click OK. The new policy appears in the list of existing policies.
3 From the Settings for list, select Workstation or Server.
4 From the General Options Policies, click the Global Scan Settings tab to configure the
VirusScan Enterprise scan cache option settings.
5 Configure the following global settings for the scan cache:
• Click Enable saving scan data across reboots — Saves the clean scan results when
you reboot the system.
• Click Allow On-Demand Scans to utilize the scan cache — Allows the on-demand
scanner to use the existing clean scan results to reduce duplicate scanning.
6 Click Save.
ePolicy Orchestrator 4.0
Configure the scan cache feature from the General Options Policies with this user interface
console.
Task
For option definitions, click ? or Help in the interface.
1 Click Systems | Policy Catalog, then from the Product list select VirusScan Enterprise
8.8.0. The Category list displays the policy categories for VirusScan Enterprise 8.8.0.
2 Edit an existing policy or create a new policy:
Edit an existing policy
a From the Category list, select the policy category.
b From the Actions column, click Edit to open the policy configuration page.
Create a new policy
a Click New Policy to open New Policy dialog box.
b From the Create a new policy based on this existing policy list, select one of the
settings.
c Type a new policy name.
d Click OK. The new policy appears in the list of existing policies.
3 From the Settings for list, select Workstation or Server.
4 From the General Options Policies, click the Global Scan Settings tab to configure the
VirusScan Enterprise scan cache option settings.
5 Configure the following global settings for the scan cache:
• Click Enable saving scan data across reboots — Saves the clean scan results when
you reboot the system.
• Click Allow On-Demand Scans to utilize the scan cache — Allows the on-demand
scanner to use the existing clean scan results to reduce duplicate scanning.
6 Click Save.
McAfee VirusScan Enterprise 8.8 Product Guide68
Page 69

Part II - Detection: Finding Threats
Scanning email on-delivery and on-demand
VirusScan Console
Configure the scan cache feature with this user interface console.
Task
For option definitions, click Help in the interface.
1 Click Tools | General Options and the Global Scan Settings tab to display the Global
Scan Settings dialog box.
2 Configure the following global settings for the scan cache:
• Click Enable saving scan data across reboots — Saves the clean scan results when
you reboot the system.
• Click Allow On-Demand Scans to utilize the scan cache — Allows the on-demand
scanner to use the existing clean scan results to reduce duplicate scanning.
3 Click OK.
Scanning email on-delivery and on-demand
The email scanner automatically examines email messages and attachments.
The email is scanned using:
• Microsoft Outlook — Email is scanned on-delivery, or you can invoke on-demand email
scans directly from Microsoft Outlook.
NOTE: If you configure Heuristics and Artemis features, the email on-delivery and on-demand
scanner uses heuristics to check for suspicious files. For details see,
• Lotus Notes — Allows you to configure:
• When accessed, email is scanned.
• When invoked, on-demand email scans directly from Lotus Notes.
• Which Notes databases to exclude.
Configure the On-Delivery Email Scan Policies using the following user interface consoles.
Tasks
ePolicy Orchestrator 4.5 or 4.6
ePolicy Orchestrator 4.0
VirusScan Console
On delivery email scan policies tab definitions
How Artemis works
.
ePolicy Orchestrator 4.5 or 4.6
Configure the On-Delivery Email Scan Policies using this user interface console.
Task
For option definitions, click ? in the interface.
69McAfee VirusScan Enterprise 8.8 Product Guide
Page 70

Part II - Detection: Finding Threats
Scanning email on-delivery and on-demand
1 Click Menu | Policy | Policy Catalog, then from the Product list select VirusScan
Enterprise 8.8.0. The Category list displays the policy categories for VirusScan Enterprise
8.8.0.
2 Edit an existing policy or create a new policy:
Edit an existing policy
a From the Category list, select the policy category.
b From the Actions column, click Edit Setting to open the policy configuration page.
Create a new policy
a Click Actions | New Policy to open New Policy dialog box.
b From the Category list, select an existing policy.
c From the Create a new policy based on this existing policy list, select one of the
settings.
d Type a new policy name.
e Type any notes, if required.
f Click OK. The new policy appears in the list of existing policies.
g From the Actions column of the new policy, click Edit Setting to open the policy
configuration page.
3 From the Settings for list, select Workstation or Server.
4 From the On-Delivery Email Scanner Policies configuration page, configure the options on
each tab. Refer to
On delivery email scan policies tab definitions
.
ePolicy Orchestrator 4.0
Configure the On-Delivery Email Scan Policies using this user interface console.
Task
For option definitions, click ? in the interface.
1 Click Systems | Policy Catalog, then from the Product list select VirusScan Enterprise
8.8.0. The Category list displays the policy categories for VirusScan Enterprise 8.8.0.
2 Edit an existing policy or create a new policy:
Edit an existing policy
a From the Category list, select the policy category.
b From the Actions column, click Edit to open the policy configuration page.
Create a new policy
a Click New Policy to open New Policy dialog box.
b From the Create a new policy based on this existing policy list, select one of the
settings.
c Type a new policy name.
d Click OK. The new policy appears in the list of existing policies.
3 From the Settings for list, select Workstation or Server.
4 From the On-Delivery Email Scanner Policies configuration page, configure the options on
each tab. Refer to
On delivery email scan policies tab definitions
.
McAfee VirusScan Enterprise 8.8 Product Guide70
Page 71

Part II - Detection: Finding Threats
Scanning email on-delivery and on-demand
VirusScan Console
Configure the On-Delivery Email Scan Policies using this user interface console.
Task
For option definitions, click ? in the interface.
1 From the Task list, right-click On-Delivery Email Scan Properties, then click Properties
to open the dialog box.
2 From the On-Delivery Email Scan Properties dialog box, configure the options on each tab.
Refer to
On delivery email scan policies tab definitions
.
On delivery email scan policies tab definitions
DefinitionsTab
Scan Items • Specify which attachments and messages to scan.
• Scan using heuristics for potential threats that resemble malware, unknown macro
viruses, and find attachments with multiple extensions.
• Scan compressed files inside archives and decode MIME encoded files.
• Enable the email scanner to scan for unwanted programs.
• Scan email message bodies.
• Configure the sensitivity level for Artemis.
NOTE: This option is available only for On-Delivery Email Scanning.
For threat detections:Actions
• Primary action to take when a threat is detected.
• Secondary action to take if the first action fails.
For unwanted program detections:
• Primary action to take when an unwanted program is detected.
• Secondary action to take if the first action fails.
For allowed actions in the prompt dialog box, select the action.
Alerts • Notify another user when a threatened email message is detected.
• Specify the message that displays to the user when prompting for action.
Reports • Enable activity logging.
• Specify the log file name and location.
• Specify the log file size limit.
• Select the log file format.
• Specify what to log besides scanning activity.
NOTE: This tab is available only for On-Delivery Email Scanning.Notes Scanner Settings
Configure Lotus Notes specific settings.
• Scan all server databases.
• Scan server mailboxes in the specified mailbox root folder.
• Notes applications to ignore.
71McAfee VirusScan Enterprise 8.8 Product Guide
Page 72

Part III - Response: Handling Threats
Responding to threats is the third step in a protection strategy to detect and clean malware
that attempts to gain access to your system.
Contents
Detections and responses
Configuring alerts and notifications
Access queries and dashboards
Configuring emergency DATs
Detections and responses
When a threat occurs and is detected, what happens next is determined by how VirusScan
Enterprise is configured to respond and which feature detects the threat. Understanding these
differences helps you to develop and implement an effective strategy.
Contents
What happens when a detection occurs
System access point violations
Buffer overflow detections
Unwanted program detections
On-access scan detections
On-demand scan detections
Email scan detections
Quarantined items
What happens when a detection occurs
When a detection occurs and is detected, the reaction depends on how VirusScan Enterprise
is configured.
If VirusScan Enterprise is configured to clean automatically (the suggested default setting), the
resulting action depends on the cleaning instruction from the DAT file. For example, if the
scanner cannot clean a file, or if the file has been damaged beyond repair, the scanner might
delete the file or take the secondary action, depending on the definition in the DAT file.
When the scanner denies access to files with potential threats, it adds an .mcm extension to
the file name when the file is saved.
McAfee VirusScan Enterprise 8.8 Product Guide72
Page 73

Part III - Response: Handling Threats
Detections and responses
System access point violations
When a system access point is violated, the action taken depends on how the rule was
configured.
If the rule was configured to:
• Report — Information is recorded in the log file.
• Block — Access is denied.
Review the log file to determine which system access points were violated and which rules
detected the violations, then configure the access protection rules to allow users access to
legitimate items and prevent users from accessing protected items.
Use these scenarios to decide which action to take as a response.
ScenariosDetection type
Unwanted processes • If the rule reported the violation in the log file, but did not block the violation, select
Legitimate processes • If the rule reported the violation in the log file, but did not block the violation,
the Block option for the rule.
• If the rule blocked the violation, but did not report the violation in the log file, select
the Report option for the rule.
• If the rule blocked the violation and reported it in the log file, no action is necessary.
• If you find an unwanted process that was not detected, edit the rule to include it
as blocked.
deselect the Report option for the rule.
• If the rule blocked the violation and reported it in the log file, edit the rule to exclude
the legitimate process from being blocked.
Buffer overflow detections
When a buffer overflow detection occurs, the scanner blocks the detection and a message is
recorded in the On-Access Scan Messages dialog box. You can view the dialog box, then
decide whether to take any additional actions.
The actions you can take include:
• Removing the message — Select the item in the list, then click Remove.
• Creating an exclusion — If the detected process is one that you legitimately use, or a
false positive, create an exclusion using the information in the On-Access Scan Messages
dialog box. Review the information in the Name column to determine the name of the
process that owns the writable memory that is making the call. Use the process name to
create an exclusion.
• Submitting a sample to McAfee Labs for analysis — If the scanner detects something
that you think it should not detect, or does not detect something that you think it should,
you can send a sample to McAfee Labs.
Unwanted program detections
The on-access, on-demand, and email scanners detect unwanted programs based on the
Unwanted Programs Policy you configured. When a detection occurs, the scanner that
detected the potentially unwanted program applies the action that you configured on the Actions
tab for that scanner.
73McAfee VirusScan Enterprise 8.8 Product Guide
Page 74

Part III - Response: Handling Threats
Detections and responses
Review the information in the log file, then decide whether to take any of these additional
actions:
• Fine-tune scanning items — This makes your scans more efficient.
• Exclude it from detection — If a legitimate program was detected, you can configure it
as an exclusion.
• Add it to the user-defined detection list — If an unwanted program was not detected,
you can add it to the user-defined detection list.
• Submit a sample to McAfee Labs for analysis — If the scanner detects something that
you think it should not detect or does not detect something that you think it should, you
can send a sample to McAfee Labs.
On-access scan detections
When the on-access scanner detects any malware it takes action according to how you configured
the On-Access Scan Properties, in the Actions tab. Also, a message is recorded in the On-Access
Scan Messages dialog box.
Review the information in the activity log and the On-Access Scan Messages dialog box,
then decide whether to take any of these additional actions.
• Fine-tune scanning items — To make scanning more efficient, exclude legitimate files
that VirusScan Enterprise might consider threats, and delete known threats that might be
saved in the quarantine.
• Right-click an item in the On-Access Scan Messages dialog box — To perform these
actions:
• Clean File — Attempts to clean the file referenced by the selected message.
• Delete File — Deletes the file referenced by the selected message. The file name is
recorded in the log so that you can restore it from the Quarantine Manager.
• Select All (ctrl+a) — Selects all messages in the list.
• Remove Message from List (ctrl+d) — Removes the selected message from the list.
Messages that have been removed from the list are still visible in the log file.
• Remove All Messages — Removes all message from the list. Messages that have been
removed from the list are still visible in the log file.
• Open On-Access Scanner Log File — Opens the on-access scanner activity log file.
This option is available only from the File menu.
• Open Access Protection Log File — Opens the access protection activity log file. This
option is available only from the File menu.
• If an action is not available for the current message, the corresponding icon, button, and
menu items are disabled. For example, Clean is not available if the file has already been
deleted, or Delete is not available if the administrator has suppressed the action.
• Clean File — A file cannot be cleaned if the DAT file has no cleaner or it has been
damaged beyond repair. If the file cannot be cleaned, the scanner appends an .mcm
extension to the file name and denies access to it. An entry is recorded in the log file. In
this case, we recommend that you delete the file and restore it from a clean backup copy.
• Submit a sample to McAfee Labs for analysis — If the scanner detects something that
you think it should not detect, or does not detect something that you think it should, you
can send a sample to McAfee Labs.
McAfee VirusScan Enterprise 8.8 Product Guide74
Page 75

Part III - Response: Handling Threats
Detections and responses
On-demand scan detections
When an on-demand detection occurs, the scanner takes action according to how you configured
the On-Demand Scan Properties, Actions tab.
Review the information in the log file, then decide whether to take any of these additional
actions:
• Fine-tune scanning items — This make your scans more efficient.
• Prompt for action — Configured the scanner to Prompt for action by selecting the action
from the On-Demand Scan Progress dialog box.
• Submit a sample to McAfee Labs for analysis — If the scanner detects something that
you think it should not detect, or does not detect something that you think it should, you
can send a sample to McAfee Labs.
Email scan detections
When an email scan detection occurs, the scanner takes action according to how you configured
the On-Delivery Email Scan Properties or On-Demand Email Scan Properties, Actions
tab.
Review the information in the log file, then decide whether to take any of these additional
actions:
• Fine-tune scanning items — This makes your scans more efficient.
• Submit a sample to McAfee Labs for analysis — If the scanner detects something that
you think it should not detect, or does not detect something that you think it should, you
can send a sample to McAfee Labs.
Quarantined items
Items that are detected as threats, are cleaned or deleted. Plus, a copy of the item is converted
to a non-executable format and saved in the Quarantine folder. This allows you to perform
processes on the quarantined items after downloading a later version of the DAT, that possibly
contains information that can clean the threat.
These additional processes include:
• Restore.
• Rescan.
• Delete.
• Check for false positive.
• View detection properties.
NOTE: Quarantined items can include multiple types of scanned objects. These objects include
files, cookies, registries, or anything VirusScan Enterprise scans for malware.
Configuring the quarantine policy
Access the Quarantine Manager Policies and configure the quarantine policy, if needed, or
accept the default settings.
Configure the Quarantine Manager Policies using the following user interface consoles.
75McAfee VirusScan Enterprise 8.8 Product Guide
Page 76

Part III - Response: Handling Threats
Detections and responses
Tasks
ePolicy Orchestrator 4.5 or 4.6
ePolicy Orchestrator 4.0
VirusScan Console
ePolicy Orchestrator 4.5 or 4.6
Configure the Quarantine Manager Policies using this user interface console.
Task
For option definitions, click ? in the interface.
1 Click Menu | Policy | Policy Catalog, then from the Product list select VirusScan
Enterprise 8.8.0. The Category list displays the policy categories for VirusScan Enterprise
8.8.0.
2 Edit an existing policy or create a new policy:
Edit an existing policy
a From the Category list, select the policy category.
b From the Actions column, click Edit Setting to open the policy configuration page.
Create a new policy
a Click Actions | New Policy to open New Policy dialog box.
b From the Category list, select an existing policy.
c From the Create a new policy based on this existing policy list, select one of the
settings.
d Type a new policy name.
e Type any notes, if required.
f Click OK. The new policy appears in the list of existing policies.
g From the Actions column of the new policy, click Edit Setting to open the policy
configuration page.
3 From the Settings for list, select Workstation or Server.
4 From the Quarantine page, accept the default quarantine directory, or select a different
directory.
5 To configure the days the quarantined items are saved, click Automatically delete
quarantined data after the specified number of days and type the Number of days
to keep backed-up data in the quarantine directory.
ePolicy Orchestrator 4.0
Configure the Quarantine Manager Policies using this user interface console.
Task
For option definitions, click ? in the interface.
1 Click Systems | Policy Catalog, then from the Product list select VirusScan Enterprise
8.8.0. The Category list displays the policy categories for VirusScan Enterprise 8.8.0.
2 Edit an existing policy or create a new policy:
Edit an existing policy
McAfee VirusScan Enterprise 8.8 Product Guide76
Page 77

Part III - Response: Handling Threats
Detections and responses
a From the Category list, select the policy category.
b From the Actions column, click Edit to open the policy configuration page.
Create a new policy
a Click New Policy to open New Policy dialog box.
b From the Create a new policy based on this existing policy list, select one of the
settings.
c Type a new policy name.
d Click OK. The new policy appears in the list of existing policies.
3 From the Settings for list, select Workstation or Server.
4 From the Quarantine page, accept the default quarantine directory, or select a different
directory.
5 To configure the days the quarantined items are saved, click Automatically delete
quarantined data after the specified number of days and type the Number of days
to keep backed-up data in the quarantine directory.
VirusScan Console
Configure the Quarantine Manager Policy using this user interface console.
Task
For option definitions, click ? in the interface.
1 From the Task list, right-click Quarantine Manager Policy, then click Properties to
open the Quarantine Manager Policy dialog box.
2 Accept the default quarantine directory, or select a different directory.
3 To configure the days the quarantined items are saved, click Automatically delete
quarantined data after the specified number of days and type the Number of days
to keep backed-up data in the quarantine directory.
Managing quarantined items
Process quarantined items to further check these items and manually delete or restore them
using the VirusScan Console.
NOTE: From the ePolicy Orchestrator console, use the Restore from Quarantine client task
to restore quarantined items.
Task
For option definitions, click ? in the interface.
1 From the VirusScan Console Task list, click Quarantine Manager Policy to open the
Quarantine Manager Policy dialog box.
2 Click the Manager tab, and right-click an item to access these advanced options:
• Restore.
• Rescan.
• Delete.
• Check for false positive.
77McAfee VirusScan Enterprise 8.8 Product Guide
Page 78

Part III - Response: Handling Threats
Configuring alerts and notifications
• View detection properties.
3 A dialog box appears and describes the affect of your attempt.
Configuring alerts and notifications
Being notified when a potential threat is detected is an important part of protecting your
environment. You can use the ePolicy Orchestrator console, or VirusScan Console, to configure
how you are notified when detections occur. Both consoles allow configuring alerting options,
filter alerts by severity to limit alert traffic, and configure local alerting options.
Configuring alerts
Configure the alerts and notification properties that appear when the various scanners detect
a threat.
Use the same process to configure alerts for these policies:
• Alert Policies
• Buffer Overflow Protection Policies
• On-Delivery Email Scan Policies
Configure the alert notification policies for all three policies using the following user interface
consoles.
Tasks
ePolicy Orchestrator 4.5 or 4.6
ePolicy Orchestrator 4.0
VirusScan Console
Alert policy tab configuration
ePolicy Orchestrator 4.5 or 4.6
Configure the Alert Policies with this user interface console.
Task
For option definitions, click ? in the interface.
1 Click Menu | Policy | Policy Catalog, then from the Product list select VirusScan
Enterprise 8.8.0. The Category list displays the policy categories for VirusScan Enterprise
8.8.0.
2 Edit an existing policy or create a new policy:
Edit an existing policy
a From the Category list, select the policy category.
b From the Actions column, click Edit Setting to open the policy configuration page.
Create a new policy
a Click Actions | New Policy to open New Policy dialog box.
b From the Category list, select an existing policy.
McAfee VirusScan Enterprise 8.8 Product Guide78
Page 79

Part III - Response: Handling Threats
Configuring alerts and notifications
c From the Create a new policy based on this existing policy list, select one of the
settings.
d Type a new policy name.
e Type any notes, if required.
f Click OK. The new policy appears in the list of existing policies.
g From the Actions column of the new policy, click Edit Setting to open the policy
configuration page.
3 From the Settings for list, select Workstation or Server.
4 Configure the alert policy tabs. Refer to
ePolicy Orchestrator 4.0
Configure the Alert Policies with this user interface console.
Task
For option definitions, click ? in the interface.
1 Click Systems | Policy Catalog, then from the Product list select VirusScan Enterprise
8.8.0. The Category list displays the policy categories for VirusScan Enterprise 8.8.0.
2 Edit an existing policy or create a new policy:
Edit an existing policy
a From the Category list, select the policy category.
b From the Actions column, click Edit to open the policy configuration page.
Create a new policy
a Click New Policy to open New Policy dialog box.
b From the Create a new policy based on this existing policy list, select one of the
settings.
c Type a new policy name.
d Click OK. The new policy appears in the list of existing policies.
3 From the Settings for list, select Workstation or Server.
4 Configure the alert policy tabs. Refer to
Alert policy tab configuration
Alert policy tab configuration
.
.
VirusScan Console
Configure the Alerts properties with this user interface console.
Task
For option definitions, click Help in the interface.
1 Open one of the following properties to configure the alerts:
• Alerts — Click Tools | Alerts to open the Alert Properties dialog box.
• Buffer Overflow Protection — Select the Buffer Overflow Protection task,
right-click Properties to open the Buffer Overflow Protection properties dialog box.
• On-Delivery Email Scanner — Select the On-Delivery Email Scanner task,
right-click Properties to open the On-Delivery Email Scanner properties dialog box.
Click Alerts tab.
79McAfee VirusScan Enterprise 8.8 Product Guide
Page 80

Part III - Response: Handling Threats
Access queries and dashboards
2 Configure the alert policy tabs. Refer to
Alert policy tab configuration
ConfigurationTask
Alerts Policies 1 From the Actions column, select Edit Settings to open the Alerts Policies
Buffer Overflow Protection
Policies
On-Delivery Email Scan
Policies
page.
2 Configure the Components that generate alerts and Alert Manager
options.
1 From the Actions column, select Edit Settings to open the Buffer Overflow
Protection page.
2 Next to Client system warning, click Show the messages dialog box
when a buffer overflow is detected.
1 From the Actions column, select Edit Settings to open the Buffer On-Delivery
Email Scan Policies page.
2 Click Alerts and configure Email alert for user and Prompt for action
message.
Alert policy tab configuration
.
Access queries and dashboards
Use queries and dashboards to monitor activity and help you determine which action to take
on detections. You can use the predefined queries and dashboards, and create additional ones
to meet your needs. For information about queries and dashboards, see the ePolicy Orchestrator
product documentation.
Queries
Depending on your ePolicy Orchestrator version, navigate to the Queries using:
ePolicy Orchestrator 4.5 and 4.6
1 Click Menu | Reporting | Queries and the Queries page appears.
2 In the Queries pane, type VSE: in Quick find and click Apply. Only the VirusScan Enterprise
queries appear in the list.
ePolicy Orchestrator 4.0
1 Click Reporting | Queries and the Queries page appears.
2 In the Queries list, in the right-hand pane, scroll down to find the queries beginning with
"VSE:".
These predefined queries are available:
VSE: Threats Detected Over the Previous 2 QuartersVSE: Compliance Over the Last 30 Days
VSE: Threats Detected per WeekVSE: Computers with Threats Detected per Week
VSE: Top 10 Access Protection Rules BrokenVSE: Current DAT Adoption
VSE: Top 10 Buffer Overflows DetectedVSE: DAT Adoption Over the Last 24 Hours
VSE: Top 10 Computers with the Most DetectionsVSE: DAT Deployment
VSE: Top 10 Detected ThreatsVSE: Detection Response Summary
VSE: Top 10 Threat SourcesVSE: Number of Detections by Tag
McAfee VirusScan Enterprise 8.8 Product Guide80
Page 81

Part III - Response: Handling Threats
Configuring emergency DATs
VSE: Top 10 Threats per Threat CategoryVSE: Spyware Detected in the Last 24 Hours
VSE: Top 10 Users with the Most DetectionsVSE: Spyware Detected in the Last 7 Days
VSE: Unwanted Programs Detected in the Last 24 HoursVSE: Summary of Threats Detected in the Last 24 Hours
VSE: Unwanted Programs Detected in the Last 7 DaysVSE: Summary of Threats Detected in the Last 7 Days
VSE: Version 8.5 ComplianceVSE: Threat Count by Severity
VSE: Version 8.7 ComplianceVSE: Threat Names Detected per Week
VSE: Version 8.8 ComplianceVSE: Threats Detected in the Last 24 Hours
VSE: Threats Detected in the Last 7 Days
Dashboards
To access dashboards in the ePolicy Orchestrator console, go to Dashboards.
These predefined dashboards are available:
• VSE: Version 8.8 Compliance
• VSE: Trending Data
• VSE: Current Detections
Configuring emergency DATs
Emergency DATs can be downloaded manually to protect your system against a major virus
until the normal VirusScan DAT update is released.
NOTE: These EXTRA.DAT files should be automatically downloaded as part of your client system
AutoUpdates, or ePolicy Orchestrator scheduled pull process. Refer to the section,
detection definitions
Configuring emergency DATs is a two-step process.
1 Download the emergency DAT file. This process is the same for both client systems and
ePolicy Orchestrator repositories.
2 Install the emergency DAT file. This process is different for client systems and ePolicy
Orchestrator 4.0, 4.5, and 4.6 servers.
Each of the these processes is described in this section.
Contents
About emergency DATs
Downloading a SuperDAT file
Installing the SuperDAT files on an ePolicy Orchestrator repository
Installing the EXTRA.DAT file on a client system
.
Updating
About emergency DATs
Emergency DATs, called EXTRA.DAT files, contain information used by VirusScan Enterprise to
detect a new virus. When new malware is discovered and extra detection is required, an
81McAfee VirusScan Enterprise 8.8 Product Guide
Page 82

Part III - Response: Handling Threats
Configuring emergency DATs
EXTRA.DAT file, packaged in a SuperDAT (SDAT) executable file, is made available by McAfee
Labs until the normal VirusScan Enterprise DAT update is released.
NOTE: McAfee no longer posts individual EXTRA.DAT files on the Security Updates download
site. To get an EXTRA.DAT file for a specific threat, go to the McAfee Avert Labs Extra.dat
Request Page at, https://www.webimmune.net/extra/getextra.aspx.
SuperDAT packages
The SuperDAT executable is a self-installing package. It might also include a new virus-scanning
engine and other program components. The file uses the name format sdatXXXX.exe, where
XXXX
is the four-digit DAT version number, for example sdat4321.exe.
When an EXTRA.DAT file is extracted from the SuperDAT executable and added to the Engine
folder on your hard drive, it is used by VirusScan Enterprise, in addition to its normal DAT files,
to detect the new virus. This enables VirusScan Enterprise to protect your computer from the
new malware code until the official DAT update is released that contains the malware detection
and removal information. Once the official DAT update is released and installed, the EXTRA.DAT
file is no longer needed.
NOTE: EXTRA.DAT files remain on your file system for 5 days, then they are automatically
deleted. You should keep your VirusScan Enterprise DAT files updated by automatically
downloading and installing the official daily updates.
Downloading a SuperDAT file
To download a SuperDAT (SDAT) file, you must connect to the McAfee Security Updates page.
Before you begin
• You must have a valid grant number to access the McAfee Security Updates page:
http://www.mcafee.com/apps/downloads/security_updates/dat.asp
• You must have Administrator privileges to update McAfee software.
Task
1 Go to the McAfee Security Updates page at the following URL:
http://www.mcafee.com/apps/downloads/security_updates/dat.asp
2 Click the SuperDATs tab, and double-click the sdatXXXX.exe file, where
of the most recent DAT update.
NOTE: Double-click the readme.txt file for additional information.
3 Save the executable file to a temporary location, using its default name.
XXXX
is the number
Installing the SuperDAT files on an ePolicy Orchestrator repository
After you download the SuperDAT file you must install it on ePolicy Orchestrator server.
Before you begin
You must have Administrator privileges to update the McAfee software.
McAfee VirusScan Enterprise 8.8 Product Guide82
Page 83

Part III - Response: Handling Threats
Configuring emergency DATs
Task
For option definitions, click ? in the interface.
1 To install the SuperDAT file on an ePolicy Orchestrator server, use one of the following:
Steps...Server
ePolicy Orchestrator 4.5 and 4.6 1
Click Menu | Software | Master Repository to open
the Packages in Master Repository page in the ePolicy
Orchestrator 4.5 and 4.6 console.
2
Click Actions | Check in Packages.
ePolicy Orchestrator 4.0 1
Click Software | Master Repository to open the
Packages in Master Repository page.
2
Click Check in Packages to open the Check in Packages
page.
2 Select Super DAT (EXE), browse to the location where you want to save the file, then
click Next.
3 Confirm your selection, then click Save. The Packages in Master Repository page displays
the new DAT package in the Name list.
Installing the EXTRA.DAT file on a client system
You can install the EXTRA.DAT file on a standalone client system after you have downloaded
the file from McAfee Labs. For EXTRA.DAT file downloading information, refer to
emergency DATs
Before you begin
You must have Administrator privileges to update the McAfee Security software.
.
About
Task
For option definitions, click Help in the interface.
1 Once the download is complete, locate the file you just saved, run the executable file, and
follow the instructions in the wizard.
The executable EXTRA.DAT file performs the following steps:
• Unloads McAfee memory-resident software or stops services that use your current DAT
files.
• Copies new DAT files to the appropriate program directories.
• Restarts the software components needed to continue scans with your new DAT files.
2 When the installer has finished updating your DAT files, you can delete the downloaded
file, or keep a copy available for further updates.
83McAfee VirusScan Enterprise 8.8 Product Guide
Page 84

Part IV - Monitoring, Analyzing, and Fine-Tuning Your Protection
After the initial configuration of your protection strategy, you should monitor, analyze, and
fine-tune your protection. By checking the activity log files and ePolicy Orchestrator queries,
you can improve the performance and the protection of VirusScan Enterprise systems.
Contents
Monitoring activity in your environment
Analyzing your protection
Monitoring activity in your environment
An important step in a protection strategy is monitoring the malware events that occur on your
systems. To do this you need to understand the tools to use and how to use them.
Tools for monitoring activity
VirusScan Enterprise provides many ways to monitor the threat events that occur on your
protected systems. The tools you use depend on whether you use the ePolicy Orchestrator
console or the VirusScan Console.
Query and dashboard uses
Use the ePolicy Orchestrator queries and dashboards to monitor activity on your McAfee managed
systems, and determine what action to take on detections.
For additional information about queries and dashboard see the following:
• Refer to
• Refer to the ePolicy Orchestrator product documentation for information about modifying
and creating queries and dashboards.
Access queries and dashboards
Activity log uses
The VirusScan Console activity logs store a record of events that occur on your VirusScan
Enterprise protected system. The following table describes the log files.
All activity log files are stored, by default, at one of the following locations, depending on your
operating system:
McAfee VirusScan Enterprise 8.8 Product Guide84
for a complete list of the predefined queries available.
Page 85

Part IV - Monitoring, Analyzing, and Fine-Tuning Your Protection
Monitoring activity in your environment
• For Microsoft Windows XP, Microsoft Vista, Microsoft 2000 Server, Microsoft 2003 Server,
and Microsoft 2008 Server — C:\Documents and Settings\All Users\Application
Data\McAfee\DesktopProtection
• For Microsoft Windows 7 — C:\ProgramData\McAfee\DesktopProtection
Table 1: Log files
DisplaysHow to accessFile name
AccessProtectionLog.txt
BufferOverflowProtectionLog.txt
MirrorLog.txt
OnAccessScanLog.txt
OnDemandScanLog.txt
UpdateLog.txt
In the Task column, click Access Protection |
Reports tab, and click View Log.
In the Task column, click Buffer Overflow
Protection | Reports tab, and click View Log.
• For Microsoft Windows XP, Microsoft Vista,
Microsoft 2000 Server, Microsoft 2003 Server,
and Microsoft 2008 Server — C:\Documents and
Settings\All Users\Application
Data\McAfee\DesktopProtection
• For Microsoft Windows 7 —
C:\ProgramData\McAfee\DesktopProtection
In the Task column, click On-Access Scanner |
General Settings | Reports tab, and click View
Log.
From the menu, click Task | View Log.
• For Microsoft Windows XP, Microsoft Vista,
Microsoft 2000 Server, Microsoft 2003 Server,
Settings\All Users\Application
Data\McAfee\DesktopProtection
• For Microsoft Windows 7 —
C:\ProgramData\McAfee\DesktopProtection
Date, time, event, user,
and name of file.
Date, time, what
executable caused the
overflow, and if it was a
stack or heap overflow.
Date, time, path to the
mirror files, and any
additional information.
Date, time, detected
malware, what action was
taken, and what was
found.
Date, time scan occurred,
any action performed, to
what file, and what was
found.
Date, time update
occurred, who initiated
the update, and anyand Microsoft 2008 Server — C:\Documents and
information about the
update.
Running an example query
Run a simple query to determine how many threats were detected per week on your managed
systems. This query is just an example. The queries you run or configure depend on the
information you want to retrieve from the ePolicy Orchestrator database.
Task
For option definitions, click ? in the interface.
1 Use one of the following to run a simple ePolicy Orchestrator query:
• ePolicy Orchestrator 4.5 or 4.6 — Click Menu | Reporting | Queries, scroll down to
the VSE: Threats Detected per Weeks query, and click Run.
• ePolicy Orchestrator 4.0 — Click Reporting | Queries, scroll down to the VSE: Threats
Detected per Weeks query, and click Run.
2 If any threats were detected, the query output display shows the following:
• A bar chart with the number of threats and in which weeks they occurred.
85McAfee VirusScan Enterprise 8.8 Product Guide
Page 86

Part IV - Monitoring, Analyzing, and Fine-Tuning Your Protection
Analyzing your protection
• A table with similar information and a total of the threats.
NOTE: You can click on the bar chart or table information to open the ePolicy Orchestrator
database data.
3 Click Close to return to the queries list.
There are many more default queries you can run, plus you can create your own queries. See
the ePolicy Orchestrator documentation for details.
Analyzing your protection
Analyzing the protection of your VirusScan Enterprise protected system should be an on-going
process and improves the protection and performance of your system.
Contents
The importance of analysis
Analyzing protection examples
The importance of analysis
Analyzing your protection allows you to determine which kind of threats you are facing, from
where, how often they are found, and which systems are being targeted. For example, if one
system is being continuously attacked, maybe that system should be moved to a more secure
part of your network and have increased security enabled to protect it.
This analysis is also helpful when:
• Creating reports for IT and managers.
• Capturing information used to create scripts and queries.
• Monitoring network access time and VirusScan Enterprise update network usage.
Analyzing protection examples
You can use the steps in these analysis examples as a framework for analyzing most VirusScan
Enterprise protection scenarios.
These examples describe seeing a spike of malware attacks and determining:
• Where and when the attacks occurred
• What malware was used in the attack
• How the attack affected the system
Tasks
ePolicy Orchestrator 4.5 or 4.6
ePolicy Orchestrator 4.0
VirusScan Console
McAfee VirusScan Enterprise 8.8 Product Guide86
Page 87

Part IV - Monitoring, Analyzing, and Fine-Tuning Your Protection
Analyzing your protection
ePolicy Orchestrator 4.5 or 4.6
This example analysis is used as a framework for analyzing most VirusScan Enterprise protection
scenarios with ePolicy Orchestrator 4.5 or 4.6.
Before you begin
You must have direct or remote access to a VirusScan Enterprise protected system to perform
this example analysis.
Task
For option definitions, click ? in the interface.
1 Determine where and when the attacks occurred:
a Click Menu | Reporting | Queries to open the Queries pane.
b Type Malware in the Quick find search and click Apply. The Malware Detection History
query appears in the Queries list.
c Select the query and click Actions | Run. The query returns the number of recent
attacks.
2 To determine which malware was used in the attack, click Menu | Reporting | Threat
Event Log to display the Threat Event Log.
3 Double-click the log event to display the details page in the pane. From the log event you
can determine:
• Threat Source IP Address and target are shown to help you determine what actions
to take.
• Threat Name and Threat Type describe what malware was used in the attack.
• Threat Event Descriptions describe how the attack affected the system and what
actions were taken on the threat.
ePolicy Orchestrator 4.0
This example analysis is used as a framework for analyzing most VirusScan Enterprise protection
scenarios with ePolicy Orchestrator 4.0.
Before you begin
You must have direct or remote access to a VirusScan Enterprise protected system to perform
this example analysis.
Task
For option definitions, click ? in the interface.
1 Determine where and when the attacks occurred:
a Click Reporting | Queries to open the Queries list.
b From the Public Queries list, select ePO: Malware Detection History and click More
Actions | Run. The Malware Detection History query appears in the Queries list.
2 To view the event that triggered the malware detection, click Reporting | Event Log,
the query returns the number of recent attacks.
3 Double-click the log event to display the details page in the pane. From the log event you
can determine:
87McAfee VirusScan Enterprise 8.8 Product Guide
Page 88

Part IV - Monitoring, Analyzing, and Fine-Tuning Your Protection
Analyzing your protection
Threat Source IP Address and target are shown to help you determine what actions
•
to take.
• Threat Name and Threat Type describe what malware was used in the attack.
• Threat Event Descriptions describe how the attack affected the system and what
actions were taken on the threat.
VirusScan Console
This example analysis is used as a framework for analyzing most VirusScan Enterprise protection
scenarios using VirusScan Console.
Before you begin
You must have direct or remote access to a VirusScan Enterprise protected system to perform
this example analysis.
Task
For option definitions, click Help in the interface.
1 From the Task list, right-click On-Access Scanner and select Statistics from the list.
The On-Access Scan Statistics dialog box appears.
2 In the Scanning Statistics group, note the number of Detected files that appears. If this is
any number other than zero, click Properties to open the On-Access Scan Properties
dialog box.
3 Click the Reports tab and View Log. The OnAccessScanLog.txt file appears in a NotePad
window.
4 From this output you can determine:
• What malware was used in the attack. For example,
C:\...\eicar.com EICAR test file
• How the attack affected the system. For example,
(Clean failed because the detection isn't cleanable)
• What actions were taken on the threat. For example,
Deleted
5 Use the information in the previous step to determine if the source, or target systems need
their virus protection settings modified, or if you want to take some other action.
McAfee VirusScan Enterprise 8.8 Product Guide88
Page 89

Appendix
There are more configuration and troubleshooting features you can use to improve the protection
provided by VirusScan Enterprise. These features use familiar tools, for example, the ePolicy
Orchestrator console, the command-line, and the Internet.
Contents
Configuring ePolicy Orchestrator server tasks
Using the command line with VirusScan Enterprise
Connecting to remote systems
Submit threat samples for analysis
Access the McAfee Labs Threat Library
Troubleshooting
Configuring ePolicy Orchestrator server tasks
Server tasks, configured in ePolicy Orchestrator, allow you to schedule and run automatic tasks
to manage your server and the VirusScan Enterprise software.
VirusScan Enterprise server tasks can be configured to automatically generate the following:
• Export Policies — Runs a policy report and stores the policy information in a file.
• Run Query — Runs a preconfigured query and, if configured, displays the output on the
ePolicy Orchestrator dashboard.
• Export Queries — Runs a preconfigured query and either emails the report to a configured
address or exports the report to a configured location.
NOTE: The Export Queries feature is only avalable using ePolicy Orchestrator 4.5 and 4.6.
The ePolicy Orchestrator server has the following VirusScan Enterprise server tasks already
installed:
• VSE: Compliance Over the Last 30 Days — Runs a query once a day, which stores
McAfee anti-virus software compliance status.
• VSE: DAT Adoption Over the Last 24 Hours — Runs a query every hour, which stores
McAfee anti-virus software DAT version status.
NOTE: To configure custom server tasks, see the appropriate ePolicy Orchestrator product guide
for detailed instruction.
Configuring example server task
To enable and configure the existing ePolicy Orchestrator VSE: Compliance Over the Last 30
Days server task.
89McAfee VirusScan Enterprise 8.8 Product Guide
Page 90

Appendix
Configuring ePolicy Orchestrator server tasks
Before you begin
You must have Administrator privileges to update the ePolicy Orchestrator configuration.
Task
For option definitions, click ? in the interface.
1 Open the existing Server Task page from ePolicy Orchestrator.
• ePolicy Orchestrator 4.5 or 4.6 — Click Menu | Automation | Server Tasks.
• ePolicy Orchestrator 4.0 — Click Automation | Server Tasks.
2 In the Name column, find the VSE: Compliance Over the Last 30 Days task and click
Edit in the Actions column. The Server Task Builder page appears.
3 Next to Schedule Status, click Enabled, then click Next. The Actions page appears.
Next to 1. Actions, Run Query is selected by default.
4 Next to Query, VSE: Version 8.8.0 Compliance is selected by default. If needed, change
the Language setting.
In the Sub-Actions group, confirm the following items are selected by default:
• Generate Compliance Event in the Sub-Actions list.
• Specific number of target systems is selected with 1 in the text-box.
5 Add VirusScan Enterprise, Version 8.7 and 8.5 compliance actions to the server task:
a In the 1. Actions row, click plus (+) to open an additional actions row.
b Configure the following in the new 2. Actions row:
• Next to 2. Actions, select Run Query from the list.
• Next to Query, select VSE: Version 8.7 Compliance from the list.
• If needed, change the Language setting.
• Confirm, in the Sub-Actions group, the Generate Compliance Event and Specific
number of target systems is selected with 1 in the text-box.
c In the 2. Actions row, click plus (+) to open an additional actions row.
d Configure the following in the new 3. Actions row:
• Next to 3. Actions, select Run Query from the list.
• Next to Query, select VSE: Version 8.5 Compliance from the list.
• If needed, change the Language setting.
• Confirm, in the Sub-Actions group, the Generate Compliance Event and Specific
number of target systems is selected with 1 in the text-box.
6 Click Next to open the Schedule page.
7 Select how often to run the server task from the Schedule type list.
• Set the Start date, or accept the current date as the default.
• Set theEnd date, or accept No end date as the default.
• Set theSchedule, accept the default, or set another start time for the query to run.
8 Click Next to open the Summary page. Confirm the information configured is correct.
9 Click Save, then the Server Task page reappears.
10 Confirm the VSE: Compliance Over the Last 30 Days server task has its Status enabled
and the Next Run date and time settings are correct.
McAfee VirusScan Enterprise 8.8 Product Guide90
Page 91

Appendix
Using the command line with VirusScan Enterprise
Using the command line with VirusScan Enterprise
You can use the Command Prompt to run some basic VirusScan Enterprise processes. You can
install, configure, and update VirusScan Enterprise from the command line. Command line
installation options are described in the
Command line scan example
To scan all files, update the log files with the results of the scan, and automatically close the
on-demand scan dialog box when completed, enter the following command:
scan32 /all /log /autoexit
Command line update example
To update the DAT files, scanning engine, and product quietly, or not display the McAfee Update
dialog box during the update, enter the following command
mcupdate /update /quiet
VirusScan Enterprise Installation Guide
.
On-demand scanning command-line options
VirusScan Enterprise uses the on-demand scanner
the same executable command, SCAN32, from the command line, or as part of a batch file, to
run scans.
The
SCAN32
syntax does not require any specific order on its elements, except that you cannot
separate a property and its value. This syntax consists of:
• File name — The name of the executable file:
• Options — The option is preceded by a forward slash (/) character and is not case-sensitive.
The command format is:
SCAN32 PROPERTY=VALUE [,VALUE] [/option].
Following is a scan32.exe command example:
scan32.exe PRIORITY /normal
In this example:
• "PRIORITY" is a command value.
• "/normal" is a value option.
On-demand scanning values and options
value
Definition with optionsCommand-line
SCAN32.EXE
SCAN32.EXE
to detect threats. You can use
.
APPLYNVP
Scans all files in the target folder.ALL
Scans default files plus all Microsoft Office documents.ALLOLE
Forces exit from on-demand scan, even if scan completed with error/failure.ALWAYSEXIT
Scans for the potentially unwanted programs that are defined in the Unwanted Programs
Policy.
Scans archive files such as .ZIP, .CAP. LZH, and .UUE files.ARCHIVE
Exits the on-demand scanner upon completion of a non-interactive scan.AUTOEXIT
91McAfee VirusScan Enterprise 8.8 Product Guide
Page 92

Appendix
Using the command line with VirusScan Enterprise
value
CONTINUE2
DEFEXT
DELETE2
DELETEA2
EXT
Definition with optionsCommand-line
Cleans the detected target file when a potentially unwanted program is found.CLEAN
Cleans the detected file when an unwanted program is found.CLEANA
Continues scanning after a potentially unwanted program is detected.CONTINUE
Continues scanning after a potentially unwanted program is detected and the primary action
has failed.
Continues scanning after an unwanted program is detected.CONTINUEA
Continues scanning after an unwanted program is detected and the primary action has failed.CONTINUEA2
Adds file extensions that you specify as parameters to the list of selected file types that are
included in scanning.
Deletes the detected file when a potentially unwanted program is found.DELETE
Deletes the detected file when a potentially unwanted program is found and the primary action
has failed.
Deletes the file when an unwanted program is detected.DELETEA
Deletes the file when a potentially unwanted program is detected and the primary action has
failed.
Displays the scan properties dialog box.EDIT
Replaces the extensions on the list of selected file types that are included in scanning with
the file extensions that you add, as parameters following this argument.
<value>
MIME
PRIORITY
Logs detection reports to a previously specified log file.LOG
Uses the specified format for the log file. Valid values are ANSI, UTF8, or UTF16.LOGFORMAT
Logs the configuration settings of a scan.LOGSETTINGS
Logs a summary of scan results.LOGSUMMARY
Logs identifying information about the user who executes a scan.LOGUSER
Enables Artemis detection of macro threats.MHEUR
Detects potentially unwanted programs in mime (Multipurpose Internet Mail Extensions)
encoded files.
Does not calculate scan size before beginning scanning of files. Progress bar does not display.NOESTIMATE
Enables Artemis detection of non-macro threats.PHEUR
Sets the priority of the scan relative to other CPU processes. Requires one of the following
options:
• LOW
• BELOWNORMAL —
• NORMAL —
NOTE: You can enter a numerical parameter of 1 to 100, where 10 equals LOW, 50 equals
BELOWNORMAL, and 100 equals NORMAL.
Prompts the user for action when a potentially unwanted program is detected.PROMPT
The ePolicy Orchestrator default.
The VirusScan Console default.
PROMPT2
McAfee VirusScan Enterprise 8.8 Product Guide92
Prompts the user for action when a potentially unwanted program is detected and the primary
action has failed.
Prompts the user for action when an unwanted program is detected.PROMPTA
Page 93

Appendix
Using the command line with VirusScan Enterprise
value
PROMPTA2
TASK
Definition with optionsCommand-line
Prompts the user for action when an unwanted program is detected and the primary action
has failed.
Sets the size of the alert log, in Megabytes.RPTSIZE
Runs the scan. Does not display the properties dialog box.START
Launches the on-demand scanner task specified in the VirusScan Console. Requires additional
parameter specifying the specified task ID as recorded in the registry at:
hkey_local_machine_\software\McAfee\Desktop\Protection\Tasks.
Launches the scanner without making the user interface dialog visible.UINONE
Update task command-line options
VirusScan Enterprise uses
executable command MCUPDATE from the command line, or as part of a batch file, to run update
tasks.
The
MCUPDATE
syntax does not require any specific order in its elements, except that you
cannot separate a property and its value. The syntax consists of:
• File name — The name of the executable file:
• Options — The option is preceded by a forward slash (/) character and is not case-sensitive.
The command format is:
MCUPDATE [/<type> [/TASK <guid>]] [/option].
MCUPDATE.EXE
to perform update tasks. You can use the same
MCUPDATE.EXE
.
NOTE: In the previous format, <type> can be ROLLBACKDATS or UPDATE.
The /TASK clause is optional. If you use it however, you must also specify an update task ID
(guid). The task ID you select must be for an update or a rollback DATs task. Do not select to
scan ID. If you do not specify a task ID, the default update task is used. Task IDs are located
at: hkey_local_machine\SOFTWARE\McAfee\DesktopProtection\Tasks\
The /option clause is not required. To perform a silent update task, use /QUIET.
NOTE: The /QUIET option is not supported for use with the rollback DATs task. This example
performs a silent update task: MCUPDATE /UPDATE /QUIET.
Update task options
option
/TASK
DefinitionCommand-line
Rolls the current DAT file back to the last backed up version.ROLLBACKDATS
Performs an update of the DAT file, scanning engine, product, or extra.dat.UPDATE
Launches the AutoUpdate or rollback DATs task specified in the VirusScan Console. Requires
an additional parameter to specify the task ID as recorded in the registry at:
hkey_local_machine\software\McAfee\DesktopProtection\Tasks
Performs the task silently./QUIET
93McAfee VirusScan Enterprise 8.8 Product Guide
Page 94

Appendix
Connecting to remote systems
Connecting to remote systems
You can connect to remote systems with VirusScan Enterprise installed to perform operations
such as modifying, scheduling scanning, update tasks, or enabling and disabling the on-access
scanner on a remote system.
NOTE: If you do not have administrator rights to connect to the remote system, you receive
an
Insufficient user rights access denied
When you start the VirusScan Remote Console, the name of the system you are connected
to appears in the console title bar. If you have not connected to a system elsewhere on the
network, the title bar does not show the name of your local system. When you open any task’s
properties dialog box from a remote console, the system name is displayed in the properties
dialog box title bar.
You can open multiple remote consoles. When you close the Connect to Remote Computer
dialog box, the connection to the remote system also closes.
Accessing remote systems with VirusScan Enterprise installed
message.
To connect to remote systems that you want to administer, with VirusScan Enterprise installed,
use Open Remote Console on the VirusScan Console.
Task
For option definitions, click Help in the interface.
1 From the Tools menu on the VirusScan Enterprise 8.8 Console, select Open Remote
Console.
2 Under Connect to computer, type the name of the system that you want to administer,
and select a system from the list, or click Browse to locate the system on the network.
NOTE: If environmental variables are used while configuring the path name of the file or
folder for a remote task, be sure that the environmental variable exists on the remote
system. The VirusScan Enterprise 8.8 Console cannot validate environmental variables on
the remote system.
3 Click OK to make a connection attempt to the destination system.
When you connect to the remote system:
• The title bar changes to display that system’s name.
• The console reads the remote system's registry and displays the tasks of the remote
system.
• You can add, delete, or reconfigure tasks for the remote system.
Submit threat samples for analysis
If you find a potential threat that is not being detected, or if the scanner detects something
that you think it should not detect as a threat, with the current DAT file, you can submit a
sample of the threat to McAfee Labs through the WebImmune. McAfee Labs analyzes the sample
and considers it for inclusion, or exclusion in the next DAT file.
You can submit a sample to McAfee Labs in three ways, by accessing the web site WebImmune,
by email, or by standard mail.
McAfee VirusScan Enterprise 8.8 Product Guide94
Page 95

Appendix
Access the McAfee Labs Threat Library
WebImmune
1 From the VirusScan Console, select Help | Submit a Sample to access the website. The
website is located at: https://www.webimmune.net/default.asp.
2 Log on to your free account, or create one.
3 Upload files directly to the McAfee Labs automated systems for review. Items are escalated
to the McAfee Labs analysts if additional research is required.
Email
Send emails directly to the McAfee Labs automated systems for review. Items are escalated to
the McAfee Labs analysts if additional research is required.
The global email address is virus_research@avertlabs.com.
NOTE: Get additional regional addresses from the WebImmune website.
Standard Mail
Get the address from the WebImmune website.
NOTE: This is the least preferred method and causes the longest turnaround time for review
of your sample.
Access the McAfee Labs Threat Library
To access the McAfee Labs Threat Library from the VirusScan Enterprise 8.8 Console, select
McAfee Labs Threat Library from the Help menu. Your internet browser opens with a
connection to http://vil.nai.com/vil/default.aspx.
Troubleshooting
Before you call McAfee Technical Support, read the information in this section. It contains
processes and tools you can use to troubleshoot your VirusScan Enterprise configuration, and
frequently asked questions.
Repairing the product installation
There may be times when you need to repair the installation of VirusScan Enterprise to restore
the default setting, reinstall the program files, or perform both steps. You can do this from the
VirusScan Console or the command-line.
Using the VirusScan Console
Using the Repair Installation utility, from the VirusScan Enterprise 8.8 Console, select Help
| Repair Installation.
NOTE: This feature is not available from the ePolicy Orchestrator console.
DefinitionOption
Restore all settings to installation
defaults
Restores the VirusScan Enterprise default installation settings.
CAUTION: Customized settings might be lost.
95McAfee VirusScan Enterprise 8.8 Product Guide
Page 96

Appendix
Troubleshooting
DefinitionOption
Reinstall all program files
Reinstalls the VirusScan Enterprise program files.
CAUTION: Hotfixes, Patches, and Service Packs might be overwritten.
Using SETUPVSE.exe at the command line
To repair or reinstall VirusScan Enterprise from the command line with the SETUPVSE.exe
command, use these commands.
NOTE: For REINSTALLMODE command line parameter options, refer to
Property
Install program files only
Install registry files only
Install both program and registry files
at http://msdn.microsoft.com/en-us/library/aa371182(VS.85).aspx.
CommandDescription
SETUPVSE.exe REINSTALLMODE=sec /q
SETUPVSE.exe REINSTALLMODE=secum /q
SETUPVSE.exe REINSTALLMODE=amus /q
REINSTALLMODE
Using msiexec.exe at the command line
To repair or reinstall VirusScan Enterprise from the command line with the msiexec.exe command,
use these commands.
NOTE: For msiexec.exe command line options, refer to
Microsoft Windows Installer Tool Msiexec.exe
CommandDescription
Install program files only
Install registry files only
Install both program and registry files
msiexec.exe /I VSE880.msi REINSTALL=ALL REINSTALLMODE=sa
/q REBOOT=R
msiexec.exe /I VSE880.msi REINSTALL=ALL REINSTALLMODE=mu
/q REBOOT=R
msiexec.exe /I VSE880.msi REINSTALL=ALL
REINSTALLMODE=samu /q REBOOT=R
at http://support.microsoft.com/kb/314881.
The Command-Line Options for the
Viewing the on-access activity log file
The VirusScan Console on-access activity log file shows you the history of updates, threat
activity, and how VirusScan Enterprise responded. This information can be useful when
troubleshooting automatic update activity and policy configurations.
Use one of the following process to access the on-access activity log files:
NOTE: You must have the on-access activity log file creation enabled. To enable the on-access
activity log file, refer to
Task
For option definitions, click Help on each tab.
1 From the Task list, right-click On-Access Scanner, then click Properties to open the
dialog box.
McAfee VirusScan Enterprise 8.8 Product Guide96
Configuring general settings
.
Page 97

Appendix
Troubleshooting
2 From the On-Access Scanner Properties dialog box, click the Reports tab and click View
Log. The OnAccessScanLog.txt file appears in a Notepad window. Following is an example
of the log file output.
3 The following table describes the data in the previous OnAccessScanLog.txt example:
DescriptionLog entry example
Date4/27/2010
Time1:35:47 PM
Action takenCleaned/Deleted/No Action Taken
Description of actionFile updated = version, or (Clean failed because...
CredentialsSRVR\user
C:\temp\eicar.com
Path and name of the threat fileC:\WINDOWS\system32\NOTEPAD.EXE
Description of the fileEICAR test file (Test)
Similar information is available using ePolicy Orchestrator queries. For details, refer to
queries and dashboards
.
Using the MER tool during troubleshooting
The Minimum Escalation Requirements (MER) tool collects McAfee VirusScan Enterprise, and
other McAfee product, data from your computer. Using this data allows McAfee Technical Support
to analyze and resolve your problem.
The WebMER tool can be downloaded using any of these file formats:
• EXE
• ZIP
• ProtectedZip
The information collected by the WebMER tool includes:
• Registry details
• File version details
• Files
• Event logs
• Process details
To use the WebMER tool, you must:
• View the
at: https://kc.mcafee.com/corporate/index?page=content&id=TU30146.
Obtaining Minimum Escalation Requirements using McAfee WebMER
Access
tutorial found
97McAfee VirusScan Enterprise 8.8 Product Guide
Page 98

Appendix
Troubleshooting
• Download and install the tool from: http://mer.mcafee.com.
NOTE: An ePolicy Orchestrator deployable version is also available. This version uses the
ePolicy Orchestrator console to run the MER on client computers for collecting logs and
information when diagnosing McAfee product problems. Download the McAfee MER for
ePolicy Orchestrator 4.x (v2.0) from: http://mer.mcafee.com/enduser/downloadepomer.aspx.
• Run the tool and send the output back to McAfee Technical Support.
Disabling VirusScan Enterprise during troubleshooting
If a system problem occurs that could be related to processes VirusScan Enterprise is running,
you can systematically disable VirusScan Enterprise functions until the system problem is
eliminated. Or, at least you can eliminate VirusScan Enterprise as the cause of the problem.
CAUTION: You must reconfigure or restore VirusScan Enterprise to have full malware protection
again after troubleshooting.
Systematically disabling the VirusScan Enterprise functionality is separated into the following
eight-step process:
1 Disabling Buffer Overflow protection
2 Disabling Access Protection
3 Disabling ScriptScan
4 Disabling On Access Scanning
5 Disabling On Access Scanning then reboot
6 Preventing MFEVTP from loading then reboot
7 Renaming mfehidk.sys then reboot
8 Removing the product then reboot
Each of these eight steps is described in the following sections. For option definitions in the
VirusScan Console, click Help in the interface.
Disabling buffer overflow protection
Follow these steps to disable Buffer Overflow protection.
1 From the VirusScan Console Task list, right-click Buffer Overflow Protection and click
Properties.
2 From the Properties dialog box, deselect Enable buffer overflow protection and click
OK.
3 Is the original system problem fixed by disabling Buffer Overflow protection:
• Yes — Go to the McAfee Technical Support ServicePortal at http://mysupport.mcafee.com
and search for a solution or contact McAfee Technical Support.
• No — The original system problem was probably not related to this feature.
Disabling access protection
Follow these steps to disable Access Protection.
1 From the VirusScan Console Task list, double-click Access Protection to open the Access
Protection Properties dialog box.
2 Click Access Protection tab, deselect Enable access protection and click OK.
McAfee VirusScan Enterprise 8.8 Product Guide98
Page 99

Appendix
Troubleshooting
3 Is the original system problem fixed by disabling Access Protection:
• Yes — Go to the McAfee Technical Support ServicePortal at http://mysupport.mcafee.com
and search for a solution or contact McAfee Technical Support.
• No — The original system problem was probably not related to VirusScan Enterprise.
Disabling ScriptScan
Follow these steps to disable ScriptScan.
1 From the VirusScan Console Task list, right-click On-Access Scanner to open the On-Access
Scan Properties dialog box.
2 Click ScriptScan tab, deselect Enable scanning of scripts and click OK.
3 Is the original system problem fixed by disabling ScriptScan:
• Yes — Go to the McAfee Technical Support ServicePortal at http://mysupport.mcafee.com
and search for a solution or contact McAfee Technical Support.
• No — The original system problem was probably not related to VirusScan Enterprise.
Disabling on-access scanning
Follow these steps to disable on access scanning.
1 Disable Access Protection. From the VirusScan Console in the Task list, right-click Access
Protection and select Disable.
2 Change the McShield Services applet Start type to Disabled using the following:
• Click Start | Control Panel | Administrative Tools | Services to open the Services
applet.
• In Services (Local), scroll down to McAfee McShield and right-click the name to open
the McAfee McShield Properties dialog box.
• Click the General tab, from the Startup type list, click Disabled, and click OK.
3 From the VirusScan Console Task list, right-click On-Access Scanner and click Disable
from the list that appears. The On-Access Scanner icon should change to include a circle
with a slash to indicate the function is disabled.
4 Is the original system problem fixed by disabling On Access scanning:
• Yes — Go to the McAfee Technical Support ServicePortal at http://mysupport.mcafee.com
and search for a solution or contact McAfee Technical Support.
• No — The original system problem was probably not related to this feature.
Disabling on-access scanning then reboot
Follow these steps to disable on access scanning and reboot.
NOTE: The following process assumes you have not re-enabled on access scanning after disabling
it in the previous section.
1 Perform a complete shut-down and reboot of the system.
2 Is the original system problem fixed by disabling On Access scanning then rebooting:
• Yes — Go to the McAfee Technical Support ServicePortal at http://mysupport.mcafee.com
and search for a solution or contact McAfee Technical Support.
• No — The original system problem was probably not related to this feature.
99McAfee VirusScan Enterprise 8.8 Product Guide
Page 100

Appendix
Troubleshooting
Preventing MFEVTP from loading then reboot
Follow these steps to prevent McAfee Validation Trust Protection Service (MFEVTP) from loading
and reboot the system:
CAUTION: This section contains information about opening or modifying the registry.
• The following information is intended for System Administrators. Registry modifications are
irreversible and could cause system failure if done incorrectly.
• Before proceeding, McAfee strongly recommends backing up your registry and understanding
the restore process. For more information, see: http://support.microsoft.com/kb/256986 .
• Do not run a .REG file that is not confirmed to be a genuine registry import file.
1 From the command line, type regedit to display the Registry Editor user interface.
2 Navigate to the following Registry:
[HKEY_LOCAL_MACHINE\System\ControlSet001\Services\mfevtp]
3 In the right-hand pane, right-click Start and click Modify to display the Edit DWORD Value
dialog box.
4 Enter 4 in Value data and click OK.
5 Is the original system problem fixed by preventing MFEVTP from loading then rebooting:
• Yes — Go to the McAfee Technical Support ServicePortal at http://mysupport.mcafee.com
and search for a solution or contact McAfee Technical Support.
• No — The original system problem was probably not related to this feature.
Renaming mfehidk.sys file then reboot
Follow these steps to rename the mfehidk.sys file and reboot the system.
1 Navigate to the mfehidk.sys file in the following folder, depending on your operating system:
• For 32-bit operating systems — %windir%\System32\drivers
• For 64-bit operating systems — %windir%\System64\drivers
2 Change the file name from mfehidk.sys to, for example, mfehidk.sys.saved.
3 Reboot the system to stop and restart VirusScan Enterprise without loading the mfehidk.sys
file.
4 Is the original system problem fixed by renaming the mfehidk.sys file then rebooting:
• Yes — Go to the McAfee Technical Support ServicePortal at http://mysupport.mcafee.com
and search for a solution or contact McAfee Technical Support.
• No — The original system problem was probably not related to VirusScan Enterprise.
Removing the product then reboot
Follow these steps to completely remove VirusScan Enterprise and reboot:.
1 Remove the VirusScan Enterprise program files. Refer to the
8.8, Installation Guide
for detailed instructions.
McAfee VirusScan Enterprise
2 Reboot the system to stop and restart the operating system without VirusScan Enterprise
installed.
3 Is the original system problem fixed by completely removing the VirusScan Enterprise
program files and rebooting:
• Yes — The original system problem was probably related to VirusScan Enterprise.
McAfee VirusScan Enterprise 8.8 Product Guide100
 Loading...