

Page 1
McAfee VirusScan
Getting Started Guide
Version 5.1
Page 2

COPYRIGHT
Copyright © 2000 Network Associates, Inc. and its Affiliated Companies. All Rights Reserved. No part
of this publication may be reproduced, transmitted, transcribed, stored in a retrieval system, or translated
into any language in any form or by any means without the written permissio n of Network A ssociates,
Inc.
TRADEMARK ATTRIBUTI ONS
* ActiveHelp, Bomb Shelter, Building a World of Trust, CipherLink, Clean-Up, Cloaking, CNX,
Compass 7, CyberCop, CyberMedia, Data Security Letter, Discover, Distributed Sn iffer System, Dr
Solomon’s, Enterprise Secure Cast, First Aid, ForceField, Gauntlet, GMT, GroupShield, HelpDesk,
Hunter, ISDN Tel/Scope, LM 1, LA NGuru, Leadin g Help Desk Technolo gy, Magic Solu tions, Magi cSpy,
MagicTree, Magic University, MagicWin, MagicWord, McAfee, McAfee Associates, MoneyMagic, More
Power To You, Multimedia Cloaking, NetCrypto, NetOctopus, NetRoom, NetSca n, Net Shield, NetShiel d,
NetStalker, Net Tools, Network Associates, Network General, Network Uptime!, NetXRay, Nuts & Bolts,
PC Medic, PCNotary, PGP, PGP (Pretty Good Privacy), PocketScope, Pop-Up, PowerTelnet, Pretty
Good Privacy, PrimeSupport, RecoverKey, RecoverKey-International, ReportMagic, RingFence, Router
PM, Safe & Sound, SalesMagic, SecureCast, Service Level Manager, ServiceMagic, Site Meter, Sniffer,
SniffMaster, SniffNet, Stalker, Statistical Information Retrieval (SIR), SupportMagic, Switch PM,
TeleSniffer, TIS, TMach, TMeg, Tota l Network Security, Total Network Vis ibility, Total Service Desk,
Total Virus Defense, T-POD, Trusted Ma ch, Trusted Ma il, Uninstall er, Virex, Vi rex-PC, Virus Fo rum,
ViruScan, VirusScan, VShi eld, WebScan , Web Shield, W ebS niffer , WebSt alker W ebW all , and ZAC 2000
are registered trademarks of Network Associates and/or its affiliates in the US and/or other countries. All
other registered and unregistered trademarks in this document are the sole property of their respective
owners.
LICENSE AGREEMENT
NOTICE TO ALL USERS: CAREFULLY READ THE FOLLOWING LEGAL AGREEMENT
("AGREEMENT"), FOR THE LICENSE OF SPECIFIED SOFTWARE ("SOFTWARE") BY
NETWORK ASSOCIATES, INC. ("McAfee"). BY CLICKING THE ACCEPT BUTTON OR
INSTALLING THE SOFTWARE, YOU (EITHER AN INDIVIDUAL OR A SINGLE ENTITY)
CONSENT TO BE BOUND BY AND BECOME A PARTY TO THIS AGREEMENT. IF YOU DO
NOT AGREE TO ALL OF THE TERMS OF THIS AGREEMENT, CLICK THE BUTTON THAT
INDICATES THAT YOU DO NOT ACCEPT THE TERMS OF THIS AGREEMENT AND DO NOT
INSTALL THE SOFTWARE. (IF APPLICABLE, YOU MAY RETURN THE PRODUCT TO THE
PLACE OF PURCHASE FOR A FULL REFUND.)
1. License Grant. Subject to the payment of the applicable license fees, and subject to the terms and
conditions of this Agreement, McAfee hereby grants to you a non-exclusive, non-transferable right
to use one copy of the specified version of the Software and the accompanying documentation (the
"Documentation"). You may install one copy of the Software on one computer, workstation,
personal digital assistant, pager, "smart phone" or other electronic device for which the Software
was designed (each, a "Client Device"). If the Software is licensed as a suite or bundle with more
than one specified Software product, this license applies to all such specified Software products,
subject to any restrictions or usage terms specified on the applicable price list or product packaging
that apply to any of such Software products individually.
Issued July 2000/VirusScan v5.1
Page 3

Table of Contents
Chapter 1. About VirusScan Software . . . . . . . . . . . . . . . . . . . . . . . . . . . .5
How does VirusScan software work? . . . . . . . . . . . . . . . . . . . . . . . . . . . . . . . . .5
What comes with VirusScan software? . . . . . . . . . . . . . . . . . . . . . . . . . . . . . . .5
What’s new in this release? . . . . . . . . . . . . . . . . . . . . . . . . . . . . . . . . . . . . . . . .10
Chapter 2. Installing VirusScan Software . . . . . . . . . . . . . . . . . . . . . . . . 13
Before you begin . . . . . . . . . . . . . . . . . . . . . . . . . . . . . . . . . . . . . . . . . . . . . . . . .13
System requirements . . . . . . . . . . . . . . . . . . . . . . . . . . . . . . . . . . . . . . . . .13
Other recommendations . . . . . . . . . . . . . . . . . . . . . . . . . . . . . . . . . . . . . .13
Preparing to install VirusScan software . . . . . . . . . . . . . . . . . . . . . . . . .14
Installation options . . . . . . . . . . . . . . . . . . . . . . . . . . . . . . . . . . . . . . . . . .14
Installation steps . . . . . . . . . . . . . . . . . . . . . . . . . . . . . . . . . . . . . . . . . . . .14
Chapter 3. Using the
VirusScan application . . . . . . . . . . . . . . . . . . . . . . . . . . . . . . . . .25
Starting the VirusScan application . . . . . . . . . . . . . . . . . . . . . . . . . . . . . . . . . .25
Displaying the VirusScan application main window . . . . . . . . . . . . . . . .25
Chapter 4. Removing Infections
From Your System . . . . . . . . . . . . . . . . . . . . . . . . . . . . . . . . . . . .29
If you suspect you have a virus... . . . . . . . . . . . . . . . . . . . . . . . . . . . . . . . . . . .29
Chapter 5. Using the VShield Scanner . . . . . . . . . . . . . . . . . . . . . . . . . . .33
What does the VShield scanner do? . . . . . . . . . . . . . . . . . . . . . . . . . . . . . . . . .33
Why use the VShield scanner? . . . . . . . . . . . . . . . . . . . . . . . . . . . . . . . . .34
Browser and e-mail client support . . . . . . . . . . . . . . . . . . . . . . . . . . . . . .35
Enabling or starting the VShield scanner . . . . . . . . . . . . . . . . . . . . . . . . . . . . .35
Using the VShield configuration wizard . . . . . . . . . . . . . . . . . . . . . . . . . . . . . .40
Using the VShield shortcut menu . . . . . . . . . . . . . . . . . . . . . . . . . . . . . . . . . . .44
Appendix A. Product Support . . . . . . . . . . . . . . . . . . . . . . . . . . . . . . . . . .45
Updates . . . . . . . . . . . . . . . . . . . . . . . . . . . . . . . . . . . . . . . . . . . . . . . . . . . . . . . .45
How to Contact McAfee . . . . . . . . . . . . . . . . . . . . . . . . . . . . . . . . . . . . . . . . . . .45
Getting Started Guide iii
Page 4

Table of Contents
Customer service . . . . . . . . . . . . . . . . . . . . . . . . . . . . . . . . . . . . . . . . . . . .46
Technical support . . . . . . . . . . . . . . . . . . . . . . . . . . . . . . . . . . . . . . . . . . .46
Appendix B. Download Information (License ID #: VSF500R) . . . . . . . .49
SecureCast™ (For Windows 95/98 Retail Version): . . . . . . . . . . . . . . . . . . . .49
Internet Access . . . . . . . . . . . . . . . . . . . . . . . . . . . . . . . . . . . . . . . . . . . . . . . . . .49
Index . . . . . . . . . . . . . . . . . . . . . . . . . . . . . . . . . . . . . . . . . . . . . . . . . . . . . . .51
iv McAfee VirusScan
Page 5

1About VirusScan Software
How does VirusScan software work?
VirusScan software combines the anti-virus industry’s most capable scan
engine with top-notch interface enhancements that give you complete access
to that engine’s power. The VirusScan graphical user interface unifies its
specialized program components, but without sacrificing the flexibility you
need to fit the software into your computing environment. The scan engine,
meanwhile, combines the best features of technologies that McAfee and
McAfee VirusScan researchers developed independently for more than a
decade.
What comes with VirusSca n softwa re?
VirusScan software consists of several components that combine one or more
related programs, each of which play a part in defending your computer
against viruses and other malicious software. The components are:
• The VirusScan Central. This is your main entry point in using all of the
available components of McAfee VirusScan. This home screen (see Figure
1-2) provides relevant information such as the last time a virus scan was
performed on your computer; what VShield settings are enabled or
disabled and available DAT information and when it was created.
1
Getting Started Guide 5
Page 6
About VirusScan Software
Figure 1-1. McAfee VirusScan Central screen
Through this user-friendly interface, you can access the main functions of
McAfee VirusScan. Click the appropriate buttons as displayed to start
performing a particular task within McAfee VirusScan (e.g., Scan, Schedule,
Quarantine, etc).
You can also click the Update button to start searching and downloading any
available updates to McAfee VirusScan installed on your computer. Make sure
that you are connected to the Internet prior to using this feature. For more
information and step-by-step instructions, click the Help icon on the upper
right-hand corner of the window. To view available options in customizing
how you want McAfee VirusScan components to work on your PC, click the
Options button.
• The VirusScan Console. This component allows you to create, configure
and run VirusScan tasks at times you specif y. A “task” can include
anything from running a scan operation on a set of disks at a specific time
or interval, to running an update o r upgrade operation. You can al so enable
or disable the VShield scanner from the Console window. The Console
comes with a preset list of tasks that ensures a minimal level of protection
for your system—you can, for example, immediately scan and clean your
C: drive or all disks on your computer. See “Creating and Configuring
Scheduled Tasks” on page 191 of the VirusScan User’s Guide for details.
6 McAfee VirusScan
Page 7

About VirusScan Software
• The VShield scanner. This component gives you continuous anti-virus
protection from viruses that arrive on floppy disks, from your network, or
from various sources on the Internet. The VShield scanner starts when you
start your computer, and stays in memory until you shut down. A flexible
set of property pages lets you tell the scanner which parts of your sys tem
to examine, what to look for, which parts to leave alone, and how to
respond to any infected files it finds. In addition, the scanner can alert you
when it finds a virus, and can summarize each of its actions.
The VShield scanner comes with three other specialized modules that
guard against hostile Java applets and ActiveX controls, that scan e-mail
messages and attachments that you receive from the Internet via Lotus
cc:Mail, Microsoft Mail or other mail clients that comply with Microsoft’s
Messaging Application Programming Interface (MAPI) standard, and that
block access to dangerous Internet sites. Secure password protection for
your configuration options prevents others from making unauthorized
changes. The same convenient dialog bo x controls configuration options
for all VShield modules. See “Using the VShield Scanner” on page 85 of the
VirusScan Us er’s Guide for details.
• Safe & Sound. This component allows you to create backup sets in
protected volume files, which is the safest and preferred type of backup. A
protected volume file is a sectioned-off area of the drive, sometimes called a
logical drive.
NOTE: Sa fe & Sound is on ly a vailabl e for Wi ndow s 95, 98 and
Windows ME. For more information, access the PDF formatted
file of the User’s Guide (i.e., vscan51_userguide.pdf) included
in the McAfee VirusScan CD-ROM and read Chapter 10
“About Safe & Sound”.
• Quarantine. This component allows you to move infected files to a
quarantine folder. This moves infected files from areas where they can be
accessed and enables you to clean or delete them at your convenience.
NOTE: For more information, access the PDF formatted file of
the User’s Guide (i.e., vscan51_userguide.pdf) included in the
McAfee VirusScan CD-ROM and read Chapter 11 “About
Quarantine”.
Getting Started Guide 7
Page 8

About VirusScan Software
• The E-Mail Scan extension. This component allows you to scan your
Microsoft Exchange or Outlook mailbox, or public folders to which you
have access, directly on the server. This invaluable “x-ray” peek into your
mailbox means that VirusScan software can find potential infections before
they make their way to your desktop, which can stop a Melissa-like virus
in its tracks. See “Scanning Microsoft Exchange and Outlook mail” on page
253 of the VirusScan User’s Guide for details.
• A cc:Mail scanner. This component includes technology optimized for
scanning Lotus cc:Mail mailboxes that do not use the MAPI standard.
Install and use this component if your workgroup or network uses cc:Mail
v7.x or earlier. See “Choosing Detection options” on page 116 of the
VirusScan User’s Guide for details.
• The Alert Manager Client configuration uti lity. Th is com pon ent le ts yo u
choose a destination for Alert Manager “events” that VirusScan software
generates when it detects a virus or takes other noteworthy actions. You
can also specify a destination directory for older-style Centralized Alerting
messages, or supplement either method with Desktop Management
Interface (DMI) alerts sent via your DMI client software. See “Using the
Alert Manager Client Configuration utility” on page 281 of the VirusScan
User’s Guide for details.
• The ScreenScan utility. This optional component scans your computer as
your screen saver runs during idle periods. See “Using the ScreenScan
utility” on page 269 of the VirusScan User’s Guid e for details.
• The SendVirus utility. This component gives you an easy and painless
• The Emergency Disk creation utility. This essential utility helps you to
• Command-line scanners. This component consists of a set of full-featured
8 McAfee VirusScan
way to submit files that you believe are infected directly to McAfee
anti-virus researchers. A simple wizard guides you as you choose files to
submit, include contact details and, if you prefer, strip out any personal or
confidential data from document files. See “Using the SendVirus utility to
submit a file sample” on page 76 of the VirusScan User’s Gu ide for details.
create a floppy disk that you can use to boot your computer int o a
virus-free environment, then scan essential system areas to remove any
viruses that could load at startup. See “Using the Emergency Disk Creation
utility” on page 49 of the VirusScan User’s Guide for details.
scanners you can use to run targeted scan operations from the MS-DOS
Prompt or Comma nd Prompt wi ndows, or fr om prot ected MS-DOS m ode.
The set includes:
Page 9

About VirusScan Software
– SCAN.EXE, a scanner for 32-bit environments only. This is the
primary command-line interface. When you run this file, it first
checks its environment to see whether it can run by itself. If your
computer is running in 16-bit or protected mode, it will transfer
control to one of the other scanners.
– SCANPM.EXE, a scanner for 16- and 32-bit environments. This
scanner provides you with a full set of scanning options for 16- and
32-bit protected-mode DOS environments. It also includes support
for extended memory and flexible memory allocations. SCAN.EXE
will transfer control to this scanner when its specialized capabilities
can enable your scan operation to run more efficiently.
– SCAN86.EXE, a scanner for 16-bit environments only. This scanner
includes a limited set of capabilities geared to 16-bit environments.
SCAN.EXE will transfer control to this scanner if your computer is
running in 16-bit mode, but without special memory configurations.
– BOOTSCAN.EXE, a smaller, specialized scanner for use primarily
with the Emergency Disk utility. This scanner ordinarily runs from
a floppy disk you create to provide you with a virus-free boot
environment.
All of the command-line scanners allow you to initiate targeted scan
operations from an MS-DOS Prompt or Command Prompt window, or
from protected MS-DOS mode. Ordinarily, you'll use the VirusScan
application's graphical user interface (GUI) to perform most scanning
operations, but if you have trouble starting Windows or if the VirusScan
GUI components will not run in your environment, yo u can use the
command-line scanners as a backup.
• Documentation. VirusScan software documentation includes:
– This Getting Started Guide, which in troduces the product, provides
installation instructions, outlines how to respond if you suspect
your computer has a virus, and provides a brief product overview.
The printed Getting Started Guide comes with the VirusScan software
copies distributed on CD-ROM discs.
– A complete user’s guide saved on the VirusScan software CD-ROM
or installed on your hard disk in Adobe Acrobat .PDF format. The
VirusScan Us er’s G uide describes in detail how to use VirusScan and
includes other information useful as background or as advanced
configuration options. Acrobat .PDF files are flexible online
documents that contain hyperlinks, outlines and other aids for easy
navigation and information retrieval.
Getting Started Guide 9
Page 10

About VirusScan Software
– An administrator’s guide saved on the VirusScan software
CD-ROM or installed on your hard disk in Adobe Acrobat .PDF
format. The VirusScan Administrator’s Guide describes in detail how
to manage and configure VirusScan software.
– An online help file. This file gives you quick access to a full range of
topics that describe VirusScan software. You can open this file either
by choosing Help Topics from the Help menu in the VirusScan
main window, or by c licking any of the He lp buttons displayed in
VirusScan dialog boxes.
The help file also includes extensive context-sensitive—or “What's
This”—help. To see these help topics, right-click buttons, lists, icons,
some text boxes, and other elements that you see within dialog
boxes. You can also click the ? symbol at the top-right corner in most
dialog boxes, then click the element you want to see described to
display the relevant topic. The dialog boxes with Help buttons open
the help file to the specific topic that describes the entire dialog box.
– A README.TXT file. This file contains last-minute additions or
changes to the documentation, lists any known behavior or other
issues with the product release, and often describes new product
features incorporated into incremental product updates. You’ll find
the README.TXT file at the root level of your VirusScan software
CD-ROM or in the VirusScan software program folder—you can
open and print it from Windows Notepad, or from nearly any
word-processing software.
What’s new in this release?
This VirusScan release introduces a number of innovative new features to the
product’s core functionality, to its range of coverage, and to the details of its
application architecture. The section “How does VirusScan software work?”
on page 25 of the VirusSc an User’s Guide, discusses many of these f eatures. The
single most significant change between previous VirusScan versions and this
release, however, is the integration of two separate VirusScan versions
optimized to run on separate Windows platforms in to a single product that
runs on both. This single product also takes full advantage of each platform’s
strengths.
The next sections discuss other changes that this VirusScan release introduces.
10 McAfee VirusScan
Page 11
About VirusScan Software
Installation and distribution features
McAfee anti-virus products, including VirusScan software, now use the
Microsoft Windows Installer (MSI) , which comes with all Windows 2000
Professional systems. This Setup utility offers a wealth of custom installation
and configuration features that make VirusScan software rollout across large
organizations much easier and more intuitive. To learn more about how to run
custom Setup operations with MSI, see Chapter 2, “Installing VirusScan
Software” in the VirusScan Administrator’s Guide.
Interface enhancements
This release moves the VirusScan interface for all supported platforms solidly
into the territory VirusScan anti-virus software for Windows 95, Wind ow s 98
and Windows ME pioneered with its v4.0.1 release. This adds extensive
VShield scanner configuration options for the Windows NT Workstation v4.0
and Windows 2000 Professional platforms, while reducing the complexity of
some previous configuration options. Alert Manager server configuration, f or
example, moves entirely over to the NetShield product line—VirusScan
software now acts strictly as a configurable client application.
This release also adds a new VirusScan control panel, which functions as a
central point from which you can enable and disable all VirusScan
components. This control panel also lets you set a ceiling for the number of
items you can scan in or exclude from a single operation, and can set the
VShield scanner and VirusScan control panel to run at startup. Other changes
include:
• New VShield system tray icon states tell you more about which VShield
modules are active. These states are:
– All VShield modules are active
– The System Scan module is active, but one or more of the other
VShield modules is inactive
– The System Scan module is inactive, but one or more of th e other
VShield modules is active
– All VShield modules are inactive
• New interface settings for task configuration allow you to tell the
VirusScan application how you want it to appear as your scheduled task
runs and what you want it to do when it finishes. You can also set a
password to protect individual task settings from changes, or to protect an
entire task configuration at once.
Getting Started Guide 11
Page 12

About VirusScan Software
• An updated randomization feature for sch eduled ta sks allows you to set a
time for the task to run, then set a randomization “window.” The
VirusScan Console then picks a random time within the window to
actually start the task.
• System Scan module action options now include a new Prompt Type
configuration option for Windows 95 and Windows 98 systems. This
option lets you determine how the Prompt for user action alert appears.
Changes in product functionality
• A new Alert Manager Client configuration utility allows you to choose an
Alert Manager server installed on your network as an alert message
destination, or to select a network share as a destination for Centralized
Alerting messages. You can also supplement either of these alert methods
with Desktop Management Interface alert messages.
• The Alert Manager server supports Intel Pentium III processor serial
numbers to identify individual machines for virus notification. For more
information about Intel processor serial numbers, consult the Intel FAQ at
http://support.intel.com/support/processors/pentiumiii/psqa.htm.
New update options for your VirusScan software
Even with the majority of the virus definitions it requires now incorporated
directly into its engine in generic routines, VirusScan software still requires
regular .DAT file updates to keep pace with the 200 to 300 new viruses that
appear each month. To meet this need, McAfee has incorporated updating
technology in VirusScan softwa re from its earliest incarnations. With this
release, that technology takes a quantum leap forward with incremental . DAT
file updating.
The Network Associates SecureCast service provides a convenient method
you can use to receive the latest virus definition (.DAT) file updates
automatically, as they become available, without your having to download
them.
12 McAfee VirusScan
NOTE: To update the McAfee VirusScan software installed on your
computer, click the update button in the McAfee VirusScan main
window. Make sure that your PC is connected to the internet prior to
performing this task.
Page 13

2 Installing VirusScan
Software
Before you begin
McAfee distributes VirusScan software in two ways: 1) as an archived file that
you can download from the McAfee website; and 2) on CD-ROM. Although
the method you use to transfer VirusScan files from an archive you download
differs from the method you use to transfer files from a CD-ROM you place in
your CD-ROM drive, the installation steps you follow after that are the same
for both distribution types. Review the system requirements shown below to
verify that VirusScan software will run on your s ystem, then move to
“Preparing to install VirusScan software” on page 14.
System requirements
VirusScan software will install and run on any IBM PC or PC-compatible
computer equipped with:
• A processor equivalent to at least an Intel Pentium- class or compatible
processor. McAfee recommends an Intel Pentium processor or Celeron
processor running at a minimum of 166 MHz.
• A CD-ROM drive. If you downloaded your copy of VirusScan software,
this is an optional item.
2
• At least 16MB of free hard disk space.
• At least 16MB of free random-access memory (RAM). McAfee recommends
at least 20MB.
• Microsoft Windows 95, Windows 98, Windows ME, Windo ws NT
Workstation v4.0 with Service Pack 4 or later, or Windows 2000
Professional. McAfee recommends that you also have Microsoft Internet
Explorer v4.0.1 or later installed, particularly if your system runs any
Windows 95 version.
Other recommendations
To take full advantage of VirusScan software’s automatic update features, you
should have an Internet connection, either thr ough your local-area network, or
via a high-speed modem and an Internet service provider.
Getting Started Guide 13
Page 14

Installing VirusScan Software
Preparing to install VirusScan software
After inserting the McAfee VirusScan on your CD-ROM drive , you should see
a VirusScan welcome image appear automatically. To install VirusScan
software immediately, click Install VirusScan, then skip to Step 4 on page 16
to continue with Setup. If the welcome image does not appear, or if you are
installing VirusScan software from files you downloaded, start with Step 2 on
page 15.
Ë IMPORTANT: Because Setup installs some VirusScan files as services on
Windows NT Workstation v4.0 and Windows 2000 Professional systems,
you must log in to your system with Administrator rights to install this
product. To run Setup on Windows 95 or Windows 98, you do not need
to log in with any particular profile or rights.
Installation options
The “Installation steps”section describes how to install VirusScan software
with its most common options on a single computer or workstation. You can
choose to do a Typical setup—which instal ls commonly used VirusScan
components but leaves out some VShield modules and the ScreenScan
utility—or you can choose to do a Custom setup, whi c h gives you the option
to install all VirusScan components.
Installation steps
McAfee recommends that you first quit all other applications you have
running on your system before you start Setup. Doing so reduces the
possibility that software conflicts wil l interfere with your installation.
To install VirusScan sof tware, follo w these step s:
1. If your computer runs Windows NT Workstation v4.0 or Windows 2000
Professional, log on to your sys tem as Administrator. You must have
administrative rights to install VirusScan software on your sys tem.
14 McAfee VirusScan
Page 15
Installing VirusScan Software
2. Choose Run from the Start menu in the Windows taskbar.
The Run dialog box will appear (Figure 2-1).
Figure 2-1. Run dialog box
3. Type <X>:\SETUP.EXE in the text box provided, then click OK.
Here, <X> represents the drive letter for your CD-ROM drive or the path
to the folder that contains your extracted VirusScan files. To search for
the correct files on your hard disk or CD-ROM, click Browse.
Before it continues with the installation, Setup first checks to see whether
your computer already has version 1.1 of the Microsoft Windows
Installer (MSI) utility running as part of your system software.
If your computer runs Windows 2000 Professional, this MSI version
already exists on your system. If your computer runs an earlier Windows
release, you might still have this MSI version on your system if you
previously installed other software that uses MSI. In e ither of these cases,
Setup will display its first wizard panel immedia tely. Skip to Step 4 to
continue.
If Setup does not find MSI v1.1 on your computer, it installs files it needs
to continue the installation, then prompts you to restart your computer.
Click Restart System. For a list of circumsta nces in which Setup or
system upgrades require you to reboot your system, see “Determining
when you must restart your computer” on page 44 of the VirusScan
User’s Guide.
When your computer restarts, Setup will continue from where it left off.
The Setup welcome panel will appear.
Getting Started Guide 15
Page 16
Installing VirusScan Software
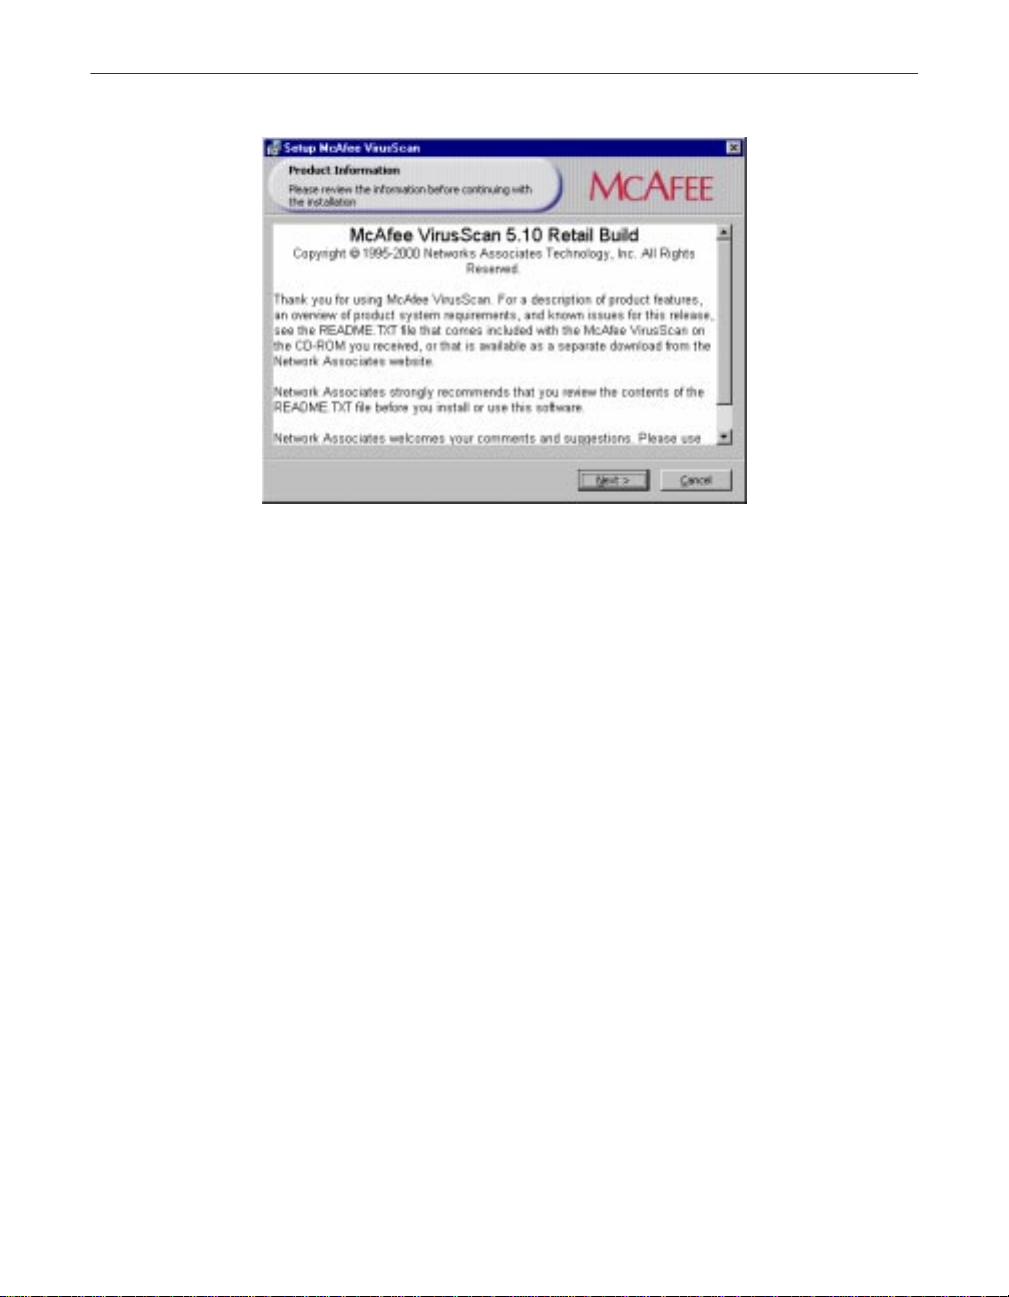
4. This first panel tells you where to locate the README.TXT file, which
describes product features, lists any known issues, and includes the latest
available product information for this VirusScan version. When you
have read the text, click Next> to continue.
Figure 2-2. Setup welcome panel
5. The next wizard panel displays the VirusScan software end-user license
16 McAfee VirusScan
agreement. Read this agreement carefully—if you install VirusScan
software, you agree to abide by the terms of the license.
If you do not agree to the license terms, select I do not agree to the
terms of the License Agreement, then click Cancel. Setup will quit
immediately. Otherwise, click I agree to the terms of the License
Agreement, then click Next> to continue.
Setup next checks to see whether previous VirusScan versions or
incompatible software exists on your computer. If you have no other
anti-virus software or any previous VirusScan versions on your system,
it will display either the Security Type or the Setup Type panel. Skip to
Step 8 on page 18.
If Setup discovers an earlier VirusScan version on your system, it will tell
you that it must remove that earlier version. If your computer runs
Windows 95 or Windows 98, Setup also gives you the option to preserve
the VShield configuration settings you chose for the earlier version. This
option is displayed via the Previous Version Detected panel.
Page 17
Installing VirusScan Software
If your computer runs Windows NT Workstation v4.0 or Windows 2000
Professional, Setup will remove the previous VirusScan version, but will
not preserve any previous VShield scanner settings.
6. Select Preserve On Access Settings, if the option is available, th en click
Next> to continue.
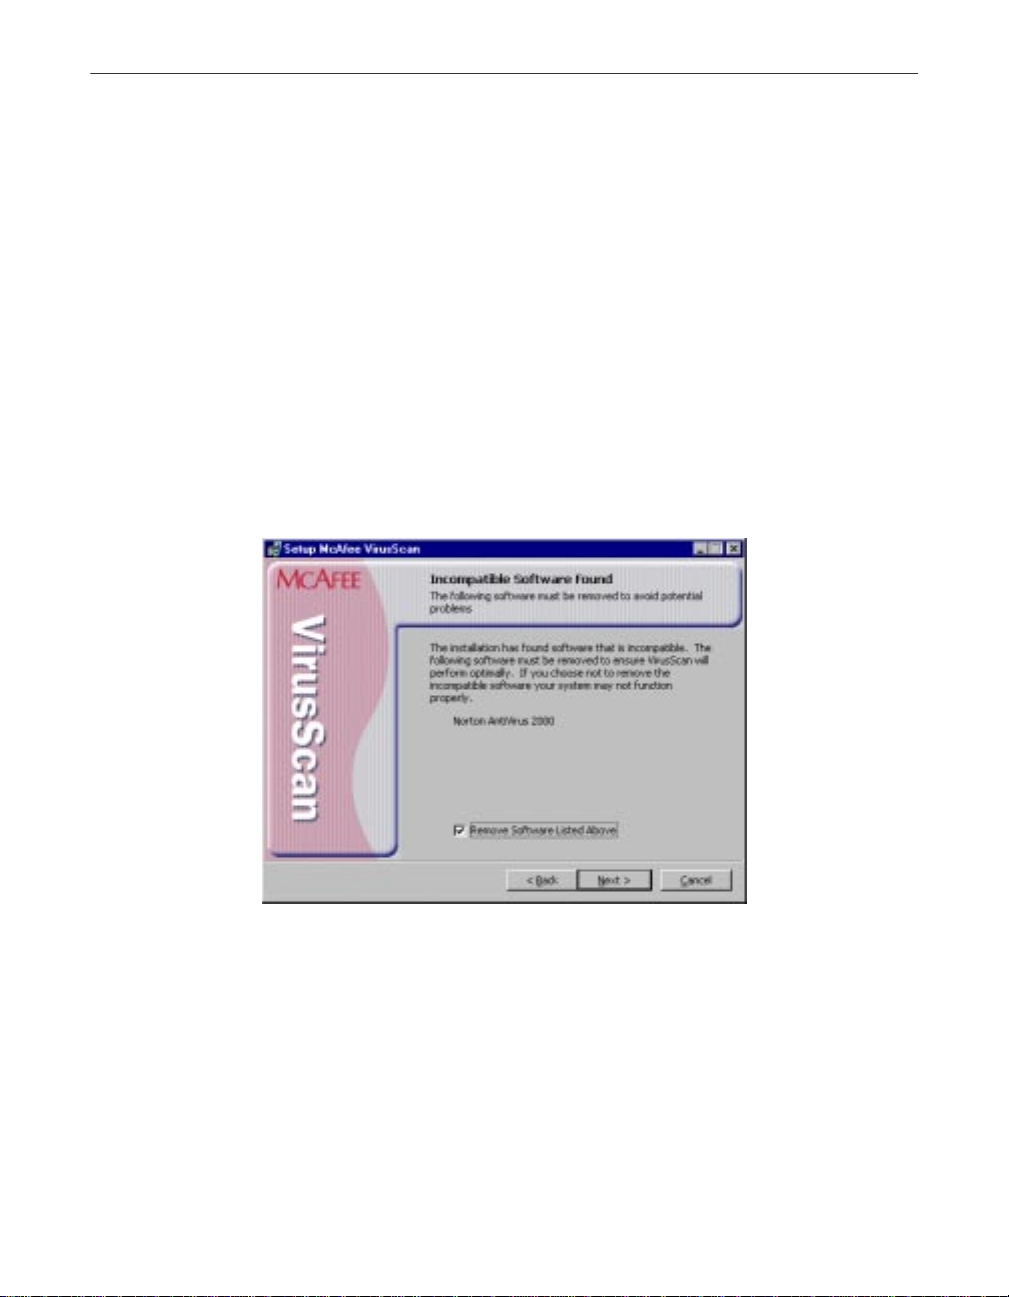
If Setup finds incompatible software, it will display the Incompatible
software panel wizard panel that gives you the option to remove the
conflicting software.
If you have no incompatible software on your system and your computer
runs Windows 95 or Windows 9 8, skip to Step 9 on page 19 to continue
with the installation. If you have no incompatible software and your
system runs Windows NT Workstation v4.0 or Windows 2000
Professional, skip to Step 8 on page 18 to continue. Otherwise, continue
with Step 7.
Figure 2-3. Incompatible software panel
7. Select the checkbox shown, then click Next>. Setup will start the
uninstallation utility that the conflicting software normally us es, and
allow it to remove the software. The uninstallation utility might tell you
that you need to restart your computer to completely remove the other
software. You do not need to do so to continue with your VirusScan
installation—so long as the other software is not active, Setup can
continue without conflicts.
Getting Started Guide 17
Page 18

Installing VirusScan Software
NOTE: McAfee strongly recommends that you remove
If your computer runs Windows NT Workstation v4.0 or Windows 2000
Professional, Setup next asks you which security mode you want to use
to run VirusScan software on your system.
The options in this panel govern whether others who use your computer
can make changes to the configuration options you choose, can schedule
and run tasks, or can enable and disable VirusScan components.
VirusScan software includes extensive security measures to ensure that
unauthorized users cannot make any changes to software configurations
in Maximum Security mode. The Standard Security mode allows all
users to have access to all configuration options . You can configure any
of these options via the Security Type panel window.
Either option you choose here will install the same VirusScan version,
with the same configuration options, and with the same scheduled tasks
for all system users.
incompatible software. Because most anti-virus software operates at
a very low level within your system, two anti-virus programs that
compete for access to the same files or that perform critical
operations can make your syst em very unstable.
8. Select the security mode you prefer. Your choices are:
18 McAfee VirusScan
Figure 2-4. Security Type panel
Page 19

Installing VirusScan Software
• Use Maximum Security. Select this option to require users to have
Administrator rights to your computer in order to change any
configuration options, to enable or disable any VirusScan
component, or to configure and run scheduled tasks.
Users who do not have administrative rights may still configure and
run their own scan operations with the VirusScan application and
save settings for those operations in a .VSC file, but they cannot
change default VirusScan application settings. To learn more about
how to configure and save VirusScan application sett ings, see
Chapter 3, “Using the VirusScan application.”
• Use Standard Security. Select this option to give any user who logs
into your computer the ability to change any configuration option,
enable or disable and VirusScan component, or schedule and run
any task.
Setup will then asks you to choose a Typical or a Custom setup for your
computer via the Setup Type panel.
Figure 2-5. Setup Type panel
9. Choose the Setup Type you prefer. Your choices are:
• Typical Installation. This option installs all available features
contained in the McAfee VirusScan product.
Getting Started Guide 19
Page 20

Installing VirusScan Software
• Custom In stallation. This option allows you to customized
10. Choose the option you prefer, then click Next> to continue.
If you chose Custom Setup, you’ll see the corresponding panel.
Otherwise, skip to Step 13 on page 21 to continue with your installation.
McAfee VirusScan by only selecting specific features of the product
to be installed on your computer.
11. Choose the VirusScan components you want to install. You can:
20 McAfee VirusScan
Figure 2-6. Custom Setup panel
• Add a component to the installation. Click beside a
component name, then choose This feature will be installed on
local hard drive from the menu that appears. To add a component
and any related modules within the component, choose
This feature, and all subfeatures, will be installed on local
hard drive instead. You can choose this option only if a component
has related modules.
• Remove a component from the installation. Click beside a
component name, then choose This feature will not be
available from the menu that appears.
Page 21

Installing VirusScan Software
NOTE: The VirusScan Setup utility does not support the other
options shown in this menu. You may not install Viru sScan
components to run from a network, and VirusScan software
has no components that you can install on an as-needed basis.
You can also specify a different disk and destination directory for the
installation. Click Change, then locate the drive or directory you want to
use in the dialog box that appears. To see a summary of VirusScan disk
usage requirements relative to your available hard disk space, click Disk
Usage. The wizard will highlight disks that have insufficient space.
12. When you have chosen the components you want to install, click Next>
to continue.
Setup will show you the Ready to Install wizard panel that confirms its
readiness to begin installing files.
Figure 2-7. Ready to Install panel
13. Click Install to begin copying files to your hard drive. Otherwise, click
<Back to change any of the Setup options you chose.
Setup first removes any previous VirusScan versions or incompatible
software from your system, then copies VirusScan program files to your
hard disk. When it has finished, it displays the Completing Setup panel
that asks if you want to configure the product you installed.
Getting Started Guide 21
Page 22

Installing VirusScan Software
14. From the VirusScan Configuration panel (Figure 2-8), you can skip
configuration to finish your installation, or you can select to configure the
available options displayed.
Figure 2-8. VirusScan Configuration panel
22 McAfee VirusScan
• Scan boot record at startup. Select this checkbox to have Setup
write these lines to your Windows AUTOEXE C.BAT f ile:
C:\PROGRA~1\COMMON~1\NETWOR~1\VIRUSS~1\40~1.XX\SCAN
.EXE C:\
@IF ERRORLEVEL 1 PAUSE
This tells your system to start the VirusScan Command Line scanner
when your system starts. The scanner, in turn, will pause if it detects
a virus on your system so that you can shut down and use the
VirusScan Emergency Disk to restart.
If your computer runs Windows NT Workstation v4.0, Windows
ME or Windows 2000 Professional, you may not choose Scan boot
record at startup, but you may choose either of the other o ptions.
Neither Windows NT Workstation, Windows ME, nor
Windows 2000 permit software to scan or make changes to hard
disk boot sectors or master boot records. Also, these operating
systems do not use an AUTOEXEC.BAT file for system startup.
Page 23

Installing VirusScan Software
15. The next set of screens will display options that will allow you to run
other components of McAfee VirusScan such as running the Safe &
Sound utility, the VirusScan update, and the Rescue Disk (Figure 2-9).
NOTE: Safe & Sound utility will not be available when installing in
Windows NT or Windows 2000.
Figure 2-9. Configuration panel
Choose configuration options for your installation. You can choose to scan
your system, create an emergency disk, or update your virus definition files
before you start the VShield scanner and the VirusScan Console.
NOTE: For more information on any of these options, you can refer to the
online Help of McAfee VirusScan.
16. In the next screen (Figure 2-10), select the Enable McAfee VirusScan
Protection checkbox, then click Finish. The VirusScan software “splash
screens” will appear, and the VShield scanner and VirusScan Console
icons will appear in the Windows system tray. Your software is ready for
use.
Getting Started Guide 23
Page 24

Installing VirusScan Software
17. After you click Finish, the McAfee VirusScan Installer Information dialog
box is displayed where you will be prompted to restart your computer
(Figure 2-11).
Figure 2-10. Successful Installation panel
24 McAfee VirusScan
Figure 2-11. McAfee VirusScan Installer Information dialog box
NOTE: If you had a previous VirusScan version installed on your
computer, you must restart your system in order to start the VShield
scanner. Click Yes to restart your computer.
Page 25

3Using the
VirusScan application
Starting the VirusScan application
You can start the Vir u sScan application in its own window, or as pa rt of a
scheduled scan task. The method you choose depends on what sort of scan
operation you want to run. When you first start it, the application window
opens so that you can make changes to its configuration. You must click Scan
Now or Run Now in a separate step to start an actual scan operation.
Displaying the VirusScan application main window
Follow these steps :
1. Click Start in the Windows taskbar, point to Programs, then to McAfee.
Next, choose McAfee VirusScan.
The VirusScan main window appear s (Figure 3-1).
3
Figure 3-1. VirusScan main window
Getting Started Guide 25
Page 26

Using the VirusScan application
From the McAfee VirusScan main window, you can:
• Start scanning immediately. Click Scan to have the application
scan your system with the last configuration options you set, or with
default options.
The followi ng scr een (F igure 3-2) al lows yo u to se lect wh ich are a of
your computer you want to scan. After selecting, click S can Now.
Following through the succeeding screens to complete the task.
26 McAfee VirusScan
Figure 3-2. Scan Now window
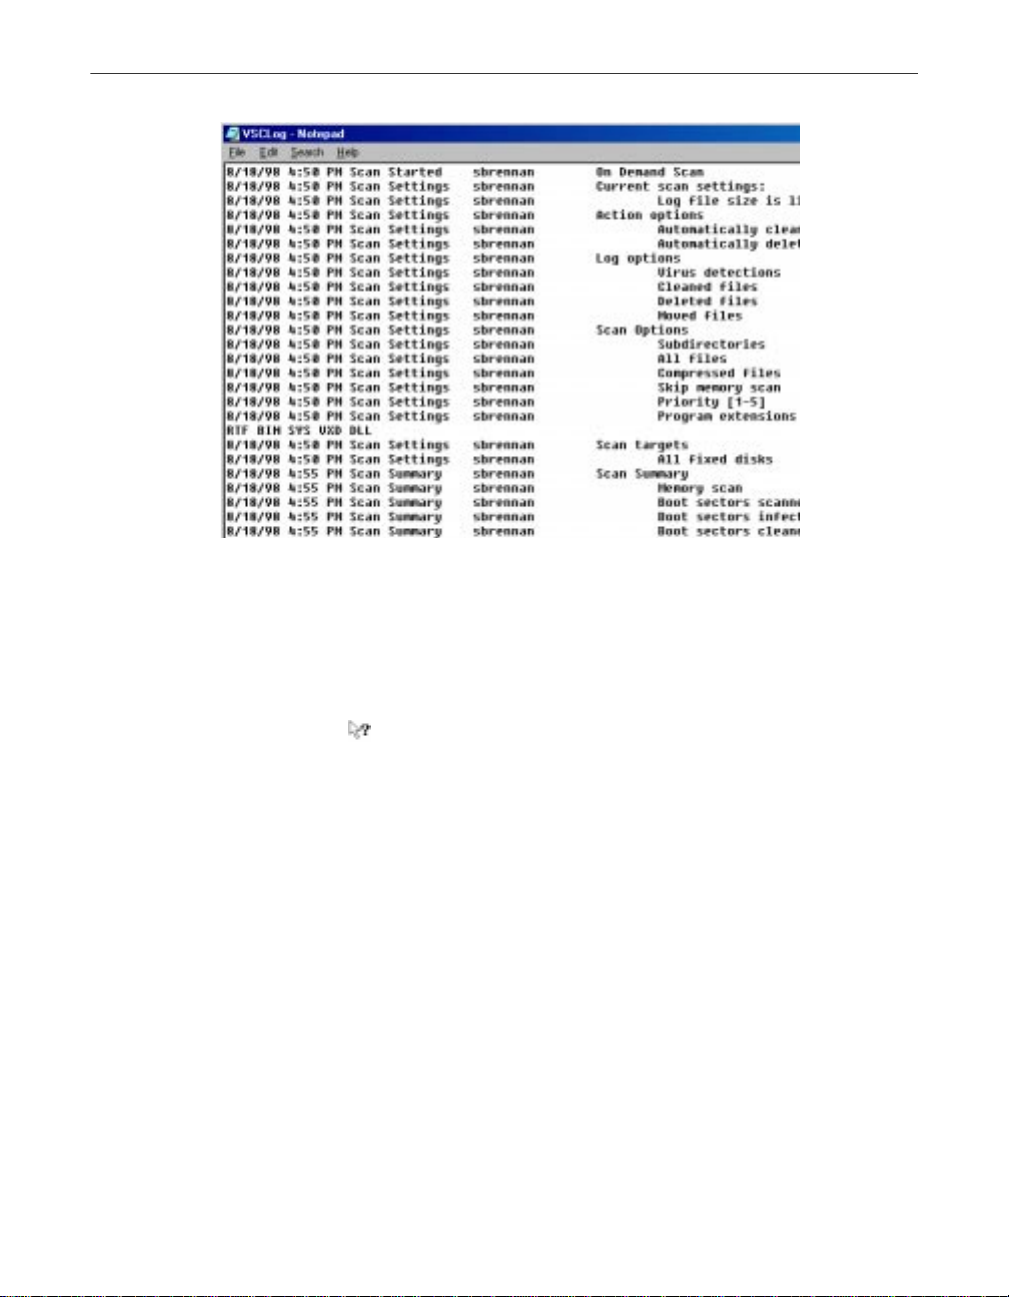
• View the VirusScan application ac tivity log. Through this window
you are able to view a log of VirusScan activities performed on your
your computer. You can also select to clear or print any of these
activity logs (see Figure 3-3).
Page 27
Using the VirusScan application
Figure 3-3. VirusScan Activity Log
• Open the online help file. Choose Help Topics from the Help
menu to see a list of VirusScan help topics. To see a context-sensitive
description of buttons, lists and other items in the VirusS can
window, choose What’s this? from the Help menu, then click an
item with your left mouse button after your mouse cursor changes
to .
• Set options. From the main window, the Options icon (see Figure
3-4) allows you to access and cus tomize settings of the other
components of McAfee VirusScan via a drop-down menu (e.g., S afe
& Sound, and Emergency Disk).
Getting Started Guide 27
Page 28

Using the VirusScan application
Figure 3-4. Options drop-down menu
2. Choose X from the File menu to quit the application.
NOTE: For more information on any of features, options and tools
available via the main screen, refer to the online Help or access the PDF
formatted file of the User’s Guide (i.e., vscan51_userguide.pdf) included
in the McAfee VirusScan CD-ROM.
28 McAfee VirusScan
Page 29

4Removing Infections
From Your System
If you suspect you have a virus...
First of all, don’t panic! Although far from harmless, most viruses that infect
your machine will not destroy data, play pranks, or render your computer
unusable. Even the comparatively rare viruses that do carry a destructive
payload usually produce their nasty effects in respon se to a trigger event. In
most cases, unless you actually see evidence of a payl oad that has activated,
you will have time to deal with the infection properly. The very presence of
these small snippets of unwanted computer code can, however, interfere w ith
your computer’s normal operation, consume system resources and have other
undesirable effects, so you should take them seriously and be sure to remove
them when you encounter them.
A second idea to keep in mind is that odd computer behavior, unexplained
system crashes, or other unpredictable events might have causes other than
virus infections. If you believe you have a virus on your computer because of
occurrences such as these, scanning for viruses might not produce the results
you expect, but it will help eliminate one potential cause of your computer
problems.
The safest course of action you can take is to install VirusScan software, then scan
your system immediately and thoroughly.
4
When you install VirusScan software, Setup starts the VirusScan application
to examine your computer’s memory and your hard disk boot sectors in order
to verify that it can safely copy its files to your hard disk without risking their
infection. If the application does not detect any infections, continue with the
installation, then scan your sy stem thoroughly as soon as you restart your
computer. File-infector viruses that don’t load into your computer’s memory
or hide in your hard disk boot blocks might still be lurking somewhere on your
system. See Chapter 2, “Installing VirusScan Software,” to learn about virus
scanning during setup. See Chapter 3, “Using the VirusScan application,” to
learn how to scan your system.
If the VirusScan application detects a virus during Setup, you’ll need to
remove it from your system before you install the program. To learn how to
do so, follow the steps that begin on page 30.
Ë IMPORTANT: To ensure maximum security, you should also follow
these same steps if a VirusScan component detects a virus in your
computer’s memory at some point after installation.
Getting Started Guide 29
Page 30

Removing Infections From Your System
If VirusScan software fou nd an infect ion duri ng instal lation , follow t hese
steps carefully:
1. Quit Setup immediately, then shut down your computer.
Be sure to turn the power to your system off completely. Do not press
CTRL+ALT+DEL
viruses can remain intact during this type of “warm” reboot.
2. If you created a VirusScan Emergency Disk during installation, or if your
VirusScan copy came with one, lock the disk, then insert it into your
floppy drive.
NOTE: If your VirusScan software copy did not come with an
Emergency Disk, or if you could not create an Emergency Disk
during Setup, you must create a disk on an uninfected computer.
Locate a computer that you know is virus-free, then follow the steps
outlined in “Using the Emergency Disk Creation utility” on page 49
of the VirusScan User’s Guide.
3. Wait at least 15 seconds, then start your computer again.
NOTE: If you have your computer’s BIOS configured to look for its
boot code first on your C: drive, you should change your BIOS
settings so that your computer looks first on your A: or B: drive.
Consult your hardware documentation to learn how to configure
your BIOS settings.
or reset your computer to restart your system—some
4. Type y to continue, then skip to Step 7. If you did not, type n, then turn
5. Read the notice shown on your screen, then press any key on your
30 McAfee VirusScan
After it starts your computer, the Emergency Disk runs a batch file that
leads you through an emergency scan operation. The batch file first asks
you whether you cycled the power on your computer.
your computer completely off and begin again.
The batch file next tells you that it will star t a scan operation.
keyboard to continue.
The Emergency Disk will load the files it needs into memory. If you have
extended memory on your computer, it will load its databa se f iles into
that memory for faster execution.
Page 31

Removing Infections From Your System
BOOTSCAN.EXE, the command-line scanner that comes with the
Emergency Disk, will make four scanning passes to examine your hard
disk boot sectors, your Master Boot Record (MBR), your system
directories, program files, and other likely points of infection on all of
your local computer’s hard disks.
NOTE: McAfee stron gly recommends that you do not interrupt the
BOOTSCAN.EXE scanner as it runs its scan operation. The
Emergency Disk will not detect macro viruses, script viruses, or
Trojan horse programs, but it will detect common file-infecting and
boot-sector viruses.
If BOOTSCAN.EXE finds a virus, it will try to clean the infected file. If it
fails, it will deny access to the file and continue the scan operation. After
it finishes all of its scanni ng passes, it shows a summary report the
actions it took for each hard disk on the screen. The report tells you:
• How many files the scanner examined
• How many files of that number are clean, or uninfected
• How many files contain potential infections
• How many files of that number the scanner cleaned
• How many boot sector and MBR files the scanner examined
• How many boot sector and MBR files contain potential infections
If the scanner detects a virus, it beeps and reports the name and location
of the virus on the screen.
6. When the scanner finishes examining your hard disk, remove the
Emergency Disk from your floppy drive, then shut your computer off
again.
7. When BOOTSCAN.EXE finishes examining your system, you can either:
• Return to working with your computer. If BOOTSCAN.EXE did
not find a virus, or if it cleaned any infected files it did find, remove
the Emergency Disk from your floppy drive, then restart your
computer normally. If you had planned to install VirusScan
software on your computer but stopped when Setup found an
infection, you can now continue with your installation.
• Try to clean or delete infected files yourself. If BOOTSCAN.EXE
found a virus that it could not remove, it will identify the infected
files and tell you that it could not clean them, or that it does not have
a current remover for the infecting virus.
Getting Started Guide 31
Page 32

Removing Infections From Your System
As your next step, locate and delete the infected file or files. You will
need to restore any files that you delete from backup files. Be sure to
check your backup files for infections also. Be sure also to use the
VirusScan application at your earliest o pportunity to scan your system
completely in order to ensure that your system is virus-free.
32 McAfee VirusScan
Page 33

5Using the VShield Scanner
What does the VShield scann er do?
McAfee desktop anti-virus products use two general methods to protect your
system. The first method, background scanning, operate s continuously,
watching for viruses as you use your computer for everyday tasks. In the
VirusScan product, the VShield scanner performs this function. A second
method allows you to initiate your own scan operations. The VirusSca n
application generally handles these tasks. To learn more about the application,
see Chapter 3, “Using the VirusScan application.”
Depending on how you configure it, the VShield scanner can monitor any file
that arrives on or leaves your system, whether on floppy disk, over your
network, in file attachments that accompany e-mail messages, or from the
Internet. The scanner looks for viruses as you open, save, copy, rename or
otherwise modify your files, and it probes your computer's memory during
any file activity. The scanner starts when you start your computer, and stays
in memory until you shut it or your system down. The scanner also includes
optional features that guard against hostile Java applets and ActiveX controls,
and that keep your computer from connecting to dangerous Internet sites.
The VShield scanner consists of five related modules, each of which has a
specialized function. You can configure settings for all of these modules in the
VShield Properties dialog box. The VShield modules are:
5
• System Scan. This module looks for viruses on your hard disk as you work
with your computer. It tracks files as your system or other computers read
files from your hard disk or write files to it. It can also scan floppy disks and
network drives mapped to your system.
• E-Mail Scan. This module scans e-mail messages and message attachments
that you receive via intraoffice e-mail systems, and via the Internet. It scans
your Microsoft Exchange or Outlook mailbox on your Microsoft Exchange
server, and older cc:Mail e-mail systems.
• Download Scan. This module scans files that you download to your
system from the Internet. If you have enabled the Internet mail option in
the E-Mail Scan module, this will include e-mail and file attachments that
arrive via SMTP or POP-3 e-mail systems.
• Internet Filter. This module looks for and blocks hostile Java classes and
ActiveX controls from downloading to and executing from your system as
you visit Internet sites. It can also block your browser from connecting to
potentially dangerous Internet sites that harbor malicious software.
Getting Started Guide 33
Page 34

Using the VShield Scanner
• Security. This module provides password protection for the remaining
VShield modules. You can protect any or all individual module property
pages and set a password to prevent unauthorized changes.
NOTE: Because the VShield scanner runs continuously, you should
not install or run more than one VShield scanner on the same
workstation. Doing so can cause the scanners to interfere with each
others' operations.
Why use the VShield scanner?
The VShield scanner has unique capabilities that make it an integral part of the
VirusScan comprehensive anti-virus software security package. These
capabilities include:
• On-access scanning. This means that the scanner looks for viruses i n f iles
that you open, copy, save, or otherwise modify, and files that you read
from or write to floppy disks and network drives. It therefore can detect
and stop viruses as soon as they appear on your system, including those
that arrive via e-mail or as downloads from the Internet. This means you
can make the VShield scanner both your first line of anti-virus defense, and
your backstop protection in between each scan operation that you perform .
The VShield scanner detects viruses in memory and as they attempt to
execute from within infected files.
• Malicious object detection and blocking. The VShield scanner can block
• Internet site filtering. The VSh ield scanner comes with a list of dangerous
• Automatic operation. The VShield scanner integrates with a range of
34 McAfee VirusScan
harmful ActiveX and Java objects from gaining access to your system,
before they pose a threat. The scanner does this by scanning the hundreds
of objects you download as you connect to the web o r to other Internet sites,
and the file attachments you receive with your e-mail. It compares these
items against a current list of harmful objects that it maintains, and blocks
those that could cause problems.
web- or Internet sites that pose a hazard to your system, usually in the form
of downloadable malicious software. You can add any other site that you
want to keep your browser software from connecting to, either by listing its
Internet Protocol (IP) address or its domain name.
browser software and e-mail client applications. This allows the scanner to
log on to and scan your e-mail attachments for viruses before they ever
reach your computer.
Page 35

Browser and e-mail client support
The VShield scanner works seamlessly with many of the mo st popular web
browsers and e-mail client software available for the Windows platform. To
work with your browser, the scanner requires no setup beyond what you have
already done to connect your computer to the Internet. You must configure the
scanner, however, to work correctly with your e-mail client software. See
“Using the VShield configuration wizard” on page 40 or “Setting VShield
scanner properties” on page 97 of the VirusScan User’s Guide to learn how to
do the required setup.
McAfee has tested these web browsers and verified that they work correctly
with the VShield scanner:
• Netscape Navigator v3.x
• Netscape Navigator v4.0.x (not including v4.0.6)
• Microsoft Internet Explorer v3.x, v4.x and v5.x
McAfee has also tested these e-mail clients and verified that they work with
the VShield Download Scan module:
• Microsoft Outlook Express
Using the VShield Scanner
• Qualcomm Eudora v3.x and v4.x
• Netscape Mail (included with most versions of Netscape Navigator and
Netscape Communicator)
• America Online mail v3.0, v4.0 and v5.0
In order to work with the VShield E-mail Scan module, your corporate e-mail
system must use Lotus cc:Mail, Microsoft Exchange, or Microsoft Outlook
client. McAfee has tested these clients and has verified that they work correctly
with the E-mail Scan module:
• Microsoft Exchange v4.0, v5.0 and v5.5
• Microsoft Outlook 97 and Outlook 98
• Lotus cc:Mail v6.x, v7.x, and v8.x (not MAPI-compliant)
McAfee does not certify VShield software compatibility with client software
not listed above.
Enabling or starting the VShield scanner
At the end of the VirusScan installation, Setup asks if you want to enable the
VShield scanner at that time. If you agree, the VShield scanner should load
into memory immediately and begin working with a default set of options that
give you basic anti-virus protection. If you do not agree, the VShield scanner
will load automatically the next time yo u restart your computer.
Getting Started Guide 35
Page 36

Using the VShield Scanner
When the VShield scanner first starts, it displays an icon in the Windows
system tray that indicates which of its modules are active. To learn what each
icon state means, see “Understanding the VShield system tray icon states” on
page 39.
At first, the scanner enables only its System Scan module, which scan s viruses
that arrive on your system from floppy disks and other removable media,
from local-area network connections, and similar areas. The System Scan
module also scans files that arrive via your e-mail system and from the
Internet, but to do so, it requires the aid of the other VShield modules: E-Mail
Scan, Download Scan, and Internet Filter.
Ë IMPORTANT: To use the E-Mail Scan, Download Scan or Internet Filter
If your computer runs Windows NT Workstation v4.0 or Windows 2000
Professional, the VShield scanner loads as a Windows NT service called
VShield, which you can see in the Windows Services control panel.
modules, you must install them from the Custom option in Setup. To
learn how to do so, see Chapter 2, “Installing VirusScan Software.”
NOTE: McAfee recommends that you do not start or stop the VShield
service from the Windows control panel. Instead, you can stop and
restart the scanner from the provided VirusScan control panel. To learn
more about how to use the VirusScan control panel, see “Understandin g
the VirusScan control panel” section of the VirusScan User’s Guide.
If your computer runs Wind ows 95 or Windows 98, the scanner loads in a way
that mimics a Windows service on that platform. This service is not visible in
the Windows user interface.
Starting the scanner automat ically
If the VShield scanner does not start automatically, you can set it to do so in
the VirusScan control panel.
Follow these steps :
1. Click Start in the Windows taskbar, point to Settings, then choose
2. Locate and double-click the VirusScan control panel to open it.
3. Click the Components tab (Figure 5-1).
36 McAfee VirusScan
Control Panel.
Page 37

Using the VShield Scanner
Figure 5-1. VirusScan control panel - Components page
4. Select the Load VShield on startup checkbox at the top of the
Components property page.
5. Click OK to close the control panel.
Enabling the VShield scanner and its modules
Once you have all VShield components installed, you can use any of four
methods to enable them, in various combinations. Three methods appear here.
See the VirusScan User’s Guide to learn about the fourth.
NOTE: Enabling a module means activating it and loading it into your
computer’s memory for use. The VShield scanner can start and remain
active in memory even with none of its modules enabled.
Method 1: Use the VShield shortcut menu
Follow these steps :
1. Right-click the VShield icon in the Windows system tray to display its
shortcut menu.
2. Point to Quick Enable.
3. Choose one of the module names shown without a check mark. Module
names that have a check mark beside them are active. Those without a
check mark are inactive. If you use this method to enable a module, it
remains enabled until you restart your VirusScan software or your
computer. At that point, its state will depend on whether you have
enabled or disabled the module in the VirusScan Properties dialog box.
Getting Started Guide 37
Page 38

Using the VShield Scanner
Depending on which combination of modules you enable, the VShi el d ic on
will display a different state. To learn what the different icon states mean, see
“Understanding the VShield system tray icon states” on page 39.
Method 2: Use the System Scan Status dialog box
Follow these steps :
1. Double-click the VShield icon in the Windows system tray to open the
System Scan Status dialog box (Figure 5-1).
Figure 5-1. System Scan Status dialog box
2. For each module that you want to enable, click the corresponding tab,
then click Enable. The same button in the property page for active
modules will read Disable.
3. Click Close to close the dialog box.
Method 3: Use the VShield Properties dialog bo x
Follow these steps :
1. Right-click the VShield icon in the Windows system tray to display the
VShield shortcut menu, point to Properties, then choose System Scan
to open the VShield Properties dialog box.
38 McAfee VirusScan
Page 39
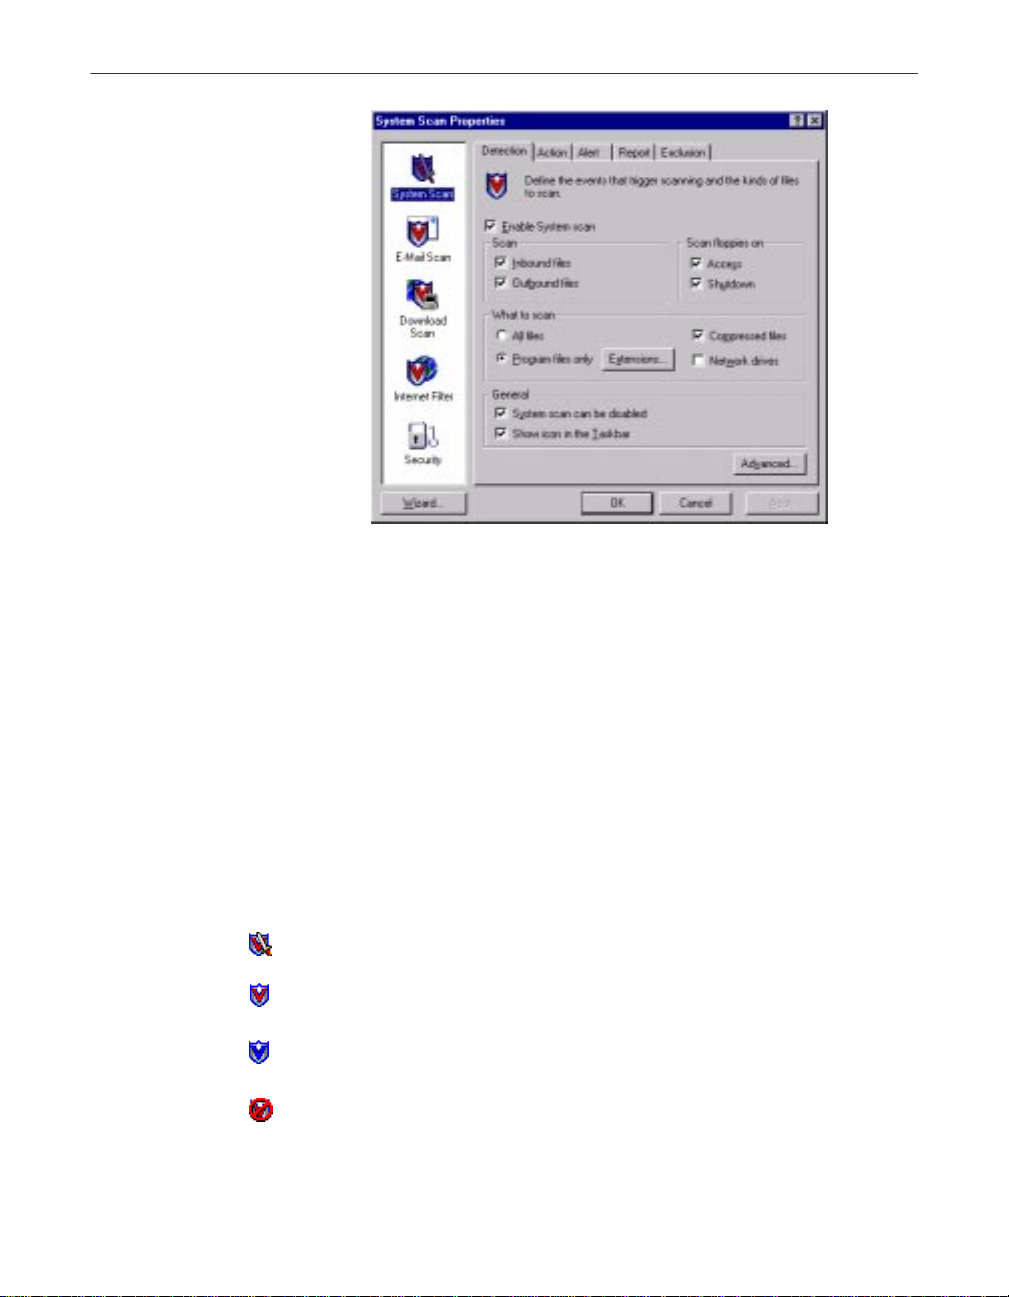
Using the VShield Scanner
Figure 5-2. VShield Properties dialog box
2. For each module that you want to enable, click the corresponding icon
along the left side of the dialog box, then click the Detection tab.
3. Select the Enable checkbox at the top of each page.
Understanding the VShield system tray icon states
The VShield scanner displays four different icon states in the Windows system
tray to indicate which, if any, of its modules are active. An active module is one
that the VShield scanner has enabled, or loaded in to memory, and that is ready
to scan inbound and outbound files. An inactive module is one that the
VShield scanner has disabled. Such modules do not scan files.
The following table shows and describes each icon state:
This icon means that the VShield scanner has started and all VShield
modules are active
This icon means th at the Syste m Sca n mo dule is activ e, bu t one or m ore
of the other VShield modules is in active
This icon means that the System Scan module is inactive, but one or
more of the other VShield modules is active
This icon means that all VShield modules are inactive
Getting Started Guide 39
Page 40

Using the VShield Scanner
Using the VShield configuration wizard
After you install VirusScan software and restart your computer, the VShield
scanner loads into memory immediately and begins working with a default set
of options that give you basic anti-virus protectio n. Unless you disable it or
one of its modules—or stop it entirely—you never have to worry about
starting the scanner or scheduling scan tasks for it.
To ensure more than a minimal level of security, however, you should
configure the scanner to work with your e-mail client software and have it
examine your Internet traffic closely for viruses and malicious software. The
VShield configu ratio n wizard can hel p you se t up ma ny of t hese opt ions r ight
away—you can then tailor the program to wor k better in your environment a s
you become more familiar with the scanner and your system’s susceptibility
to harmful software.
To start the VShield config uratio n wi zard:
1. Right-click the VShield icon in the Windows system tray to display the
VShield shortcut menu, point to Properties, then choose System Scan
to open the VShield Properties dialog box (see Figure 5-2 on page 39).
2. Click Wizard in the lower-left corner of the dialog box to display the
configuration wizard welcom e panel.
3. Click Next> to display the System Scan configuration panel (Figure 5-3).
40 McAfee VirusScan
Figure 5-3. VShield configuration wizard - System Scan panel
Here you can tell the VShield scanner to look for viruses in files
susceptible to infection whenever you open, run, copy, save or otherwise
modify them. Susceptible files include various types of executable files
and document files with embedded macros, such as Microsoft Office
files.
Page 41
Using the VShield Scanner
The System Scan module will also scan files stored on floppy disks
whenever you read from or write to them, or when you shut down your
computer.
If it finds a virus, the module will sound an alert and prompt you for a
response. The module will also record its actions and summarize its
current settings in a log file that you can review later.
4. To enable these functions, click Yes, then click Next>. Otherwise, click
No, then click Next> to continue.
The E-mail Scan wizard panel will appear (Figure 5-4).
Figure 5-4. VShield configuration wizard - E-mail Scan panel
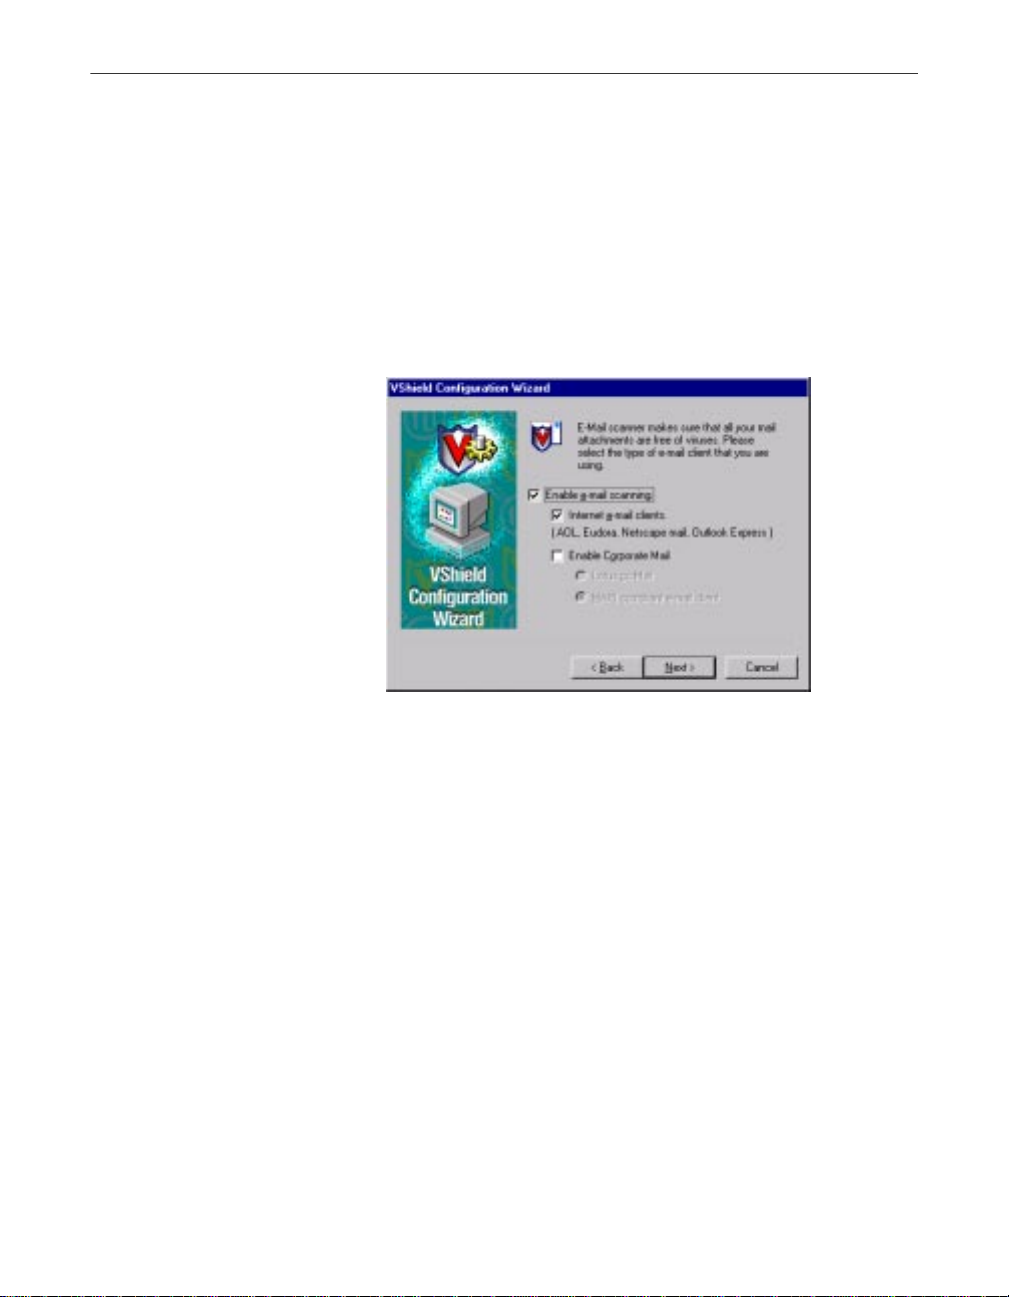
5. Select the Enable e-mail scanning checkbox, then select the checkbox
that corresponds to the type of e-mail client you use. Your choices are:
• Internet e-mail clients. Select this checkbox if you use a Post Office
Protocol (POP-3) or Simple Mail Transfer Protocol (SMTP) e-mail
client that sends and receives standard Internet mail directly or
through a dial-up connection. If you send and receive e-mail from
home and use Netscape Mail, America Online, or such popular
clients as Qualcomm’s Eudora or Microsoft’s Outlook Express, be
sure to select this option.
• Enable Corporate Mail. Select this checkbox if you use a
proprietary e-mail system at work or in a networked environment.
Most such systems use a central network server to receive and
distribute mail that individual users send to each other from client
applications. Such systems might send and receive mail f r om
outside the network or from the Internet, but they usually do so
through a “gateway” application run from the server.
The E-Mail Scan module supports corporate e-mail systems that fall
into two general categories:
Getting Started Guide 41
Page 42

Using the VShield Scanner
– Lotus cc:Mail. Select this button if you use cc:Mail versions 6.x
and later, which use a proprietary Lotus protocol for sending
and receiving mail.
– MAPI-compliant e-mail client. Select this button if you use
Microsoft Exchange or Microsoft Outlook, as your corp orate
e-mail system.
Specify which e-mail system you use, then click Next> to continue.
NOTE: If you use both types of mail systems, select both
checkboxes. Note that the E-Mail Scan module supports only
one type of corporate e-mail system at a time, however. If you
need to verify which e-mail system your office uses, check with
your network administrator.
Be sure to distinguish between Microsoft Outlook and
Microsoft Outlook Express. Although the two programs share
similar names, Outlook 97 and Outlook 98 are MAPIcompliant corporate e-mail systems, while Outlook Express
sends and receives e-mail through the POP-3 and SMTP
protocols. To learn more about these programs, consult your
Microsoft documentation.
6. To have the Download Scan module look for viruses in each file that you
42 McAfee VirusScan
The next wizard panel sets options for the VShield Download Scan
module (Figure 5-5).
Figure 5-5. VShield Configuration Wizard - Download Scan panel
download from the Internet, select the Yes, do scan my downloaded
files for viruses checkbox, then click Next> to co ntinue.
Page 43
Using the VShield Scanner
The module will look for viruses in those files most susceptible to
infection and will scan compressed files as you receive them.
Otherwise, select the No, do not enable download scanning checkbox,
then click Next> to continue.
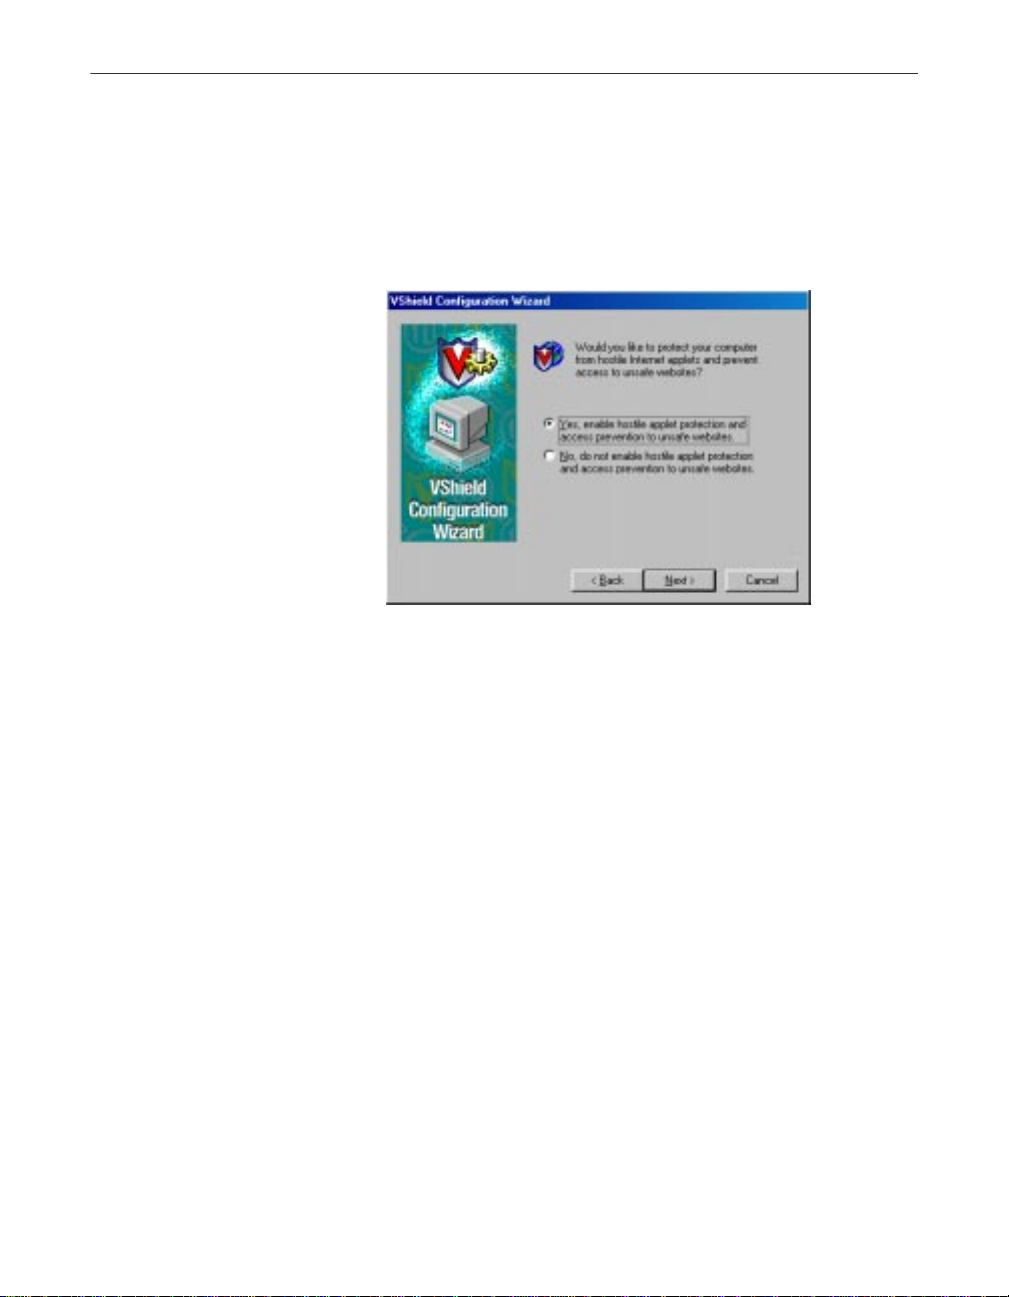
The next wizard panel sets options for the VShield Internet Filter module
(Figure 5-6).
Figure 5-6. VShield configuration wizard - Internet Filter panel
7. To have the Internet Filter module block hostile Java and ActiveX objects
or dangerous Internet sites that can cause your system harm, select Yes,
enable hostile applet protection and access prevention to unsafe
websites, then click Next>.
The Internet Filter module maintains a list of harmful objects and sites
that it uses to check the sites you visit and the objects you encounter. If it
finds a match, it can either block it automatically, or offer you the chance
to allow or deny access.
To disable this function, select No, do not enable hostile applet
protection and access prevention to unsafe websites, then click
Next> to continue.
The final wizard panel summarizes the options you chose (Figure 5-7).
Getting Started Guide 43
Page 44

Using the VShield Scanner
8. If the summary list accurately reflects your choices, click Finish to save
Figure 5-7. VShield configuration wizard - summary panel
your changes and return to the VShield Properties dialog box. Otherwise,
click <Back to change any options you chose, or Cancel to return to the
VShield Properties dialog box without saving any of your changes.
Using the VShield shortcut menu
The VShield scanner groups several of its common commands in a shortcut
menu associated with its system tray icon . Double-click this icon to display
the VShield Status dialog box. Right-click the icon to display these commands:
• Status. Choose this to open the VShield Status dialog box.
• Properties. Point to this, then choose one of the modules listed to open the
VShield Properties dialog box to the property page for that module.
• Quick Enable. Point to this, then choose one of the VShield modules listed
to activate or deactivate it. Those modules displayed in the menu with
check marks are active; those without are inactive. If you use this method
to disable a module, it stays disabled until you restart your computer.
• About. Choose this to display the VShield scanner’s version number and
serial number, the version number and creation date for the current .DAT
files in use, and a McAfee copyright notice.
• Exit. Choose this to stop all VShield modules and to unload the entire
VShield scanner from memory.
44 McAfee VirusScan
Page 45

AProduct Support
Updates
You will receive one free year of updates on new virus signature files.
Updating the virus signature files for McAfee VirusScan on a regular schedule
is essential in ensuring that all new viruses are detected for a completely
protected system.
To update your signature files, simply click on th e UPD ATE button in the
McAfee VirusScan home page. Make sure that your PC is connected to the
Internet as VirusScan will automatically update the files for you.
After one year from your purchase of this software, you can purch ase another
year of DAT signature files update for $4.95.
How to Contact McAfee
BEFORE YOU CONTACT McAfee Software for technical support, locate
yourself near the computer with McAfee VirusScan installed and verify the
information listed below:
• Have you sent in your product registration card?
A
• Version of McAfee VirusScan
• Customer number if registered
• Model name of hard disk (internal or external)
• Version of system software
• Amount of memory (RAM)
• Extra cards, boards or monitors
• Name and version of conflicting software
• EXACT error message as on screen
• What steps were performed prior to receiving error message?
• A complete description of problem
User’s Guide 45
Page 46

Product Support
Customer service
To order products or obtain product information, contact the McAfee
Customer Care department at (972) 308-9960 or write to the following address:
Network Associates
3965 Freedom Circle
Santa Clara, CA 95054
U.S.A.
If you need further assistance or have specific questions about our products,
send your questions via email to the appropriate address below:
• For general questions about ordering software: mcafeestore@beyond.com
• For help in downloading software: mcafeedownloadhelp@beyond.com
• For a status on an existing order: mcafeeorderstatus@beyond.com
To inquire about a promotion: mcafeepromotions@beyond.com
Technical support
Support via the web
McAfee is famous for its dedication to customer satisfaction. We have
continued this tradition by making our site on the World Wide Web
(http://www.mcafeehelp.com) a valuable resource for answers to technical
support issues.
We encourage you to make this your first stop for answers to frequently asked
questions, for updates to McAfee software, an d for access to McAfee news an d
virus information.
Take advantage of the McAfee Product KnowledgeCenter—your free online
product support center - 24 hours a day, 7 days a week
(http://www.mcafeehelp.com).
46 McAfee VirusScan
Page 47

Telephone support numbers
30-Day Free Telephone Support 972-855-7044
Per Minute Telephone Support 1-900-225-5624
Per Incident Telephone Support ($35) 1-800-950-1165
Disclaimer: Time and telephone numbers are subject to change without prior
notice.
Product Support
User’s Guide 47
Page 48

Product Support
48 McAfee VirusScan
Page 49

BDownload Information
(License ID #: VSF500R)
As a valued McAfee customer, we are committed to keeping your system
FREE from virus infection. To protect against the newest virus threats, keep
your VirusScan installation up to date!
Per your McAfee Software License Agreement, you are eligible for one (1)
FREE Upgrade within ninety (90) days of purchase. This document explains
the different ways you can access your FREE VirusScan upgrade.
If you have difficulties downloading or applying the upgrade files through
any of the methods listed below, you can call McAfee Technical Support at
972-855-7044.
B
SecureCast™ (For Windows 95/98 Retail Version):
SecureCast is the easiest way to Update & Upgrade your copy of VirusScan f or
Windows 95/98. With a click of a button, SecureCast will automatically
deliver your software Updates and your FREE product Upgrade to your
system. To update your copy of VirusScan, just click the Update button on the
VirusScan Central interface.
Internet Access
You will need a World Wide Web (WWW) browser, such as Internet Explorer,
Netscape or the AOL web browser to access the McAfee web site.
1. Enter the WWW address for the McAfee Home Page into the appropriate
area of your Internet browser. Type: http://www.mcafee.com
2. When the McAfee Home page is loaded, click the "download" tab
3. When the download centers page is loaded
(http://www.mcafee.com/centers/download/), look for the highlighted,
underlined "Upgrades" and click on this link.
4. On the Upgrade information page, click on the Upgrade McAfee An tivirus
link
5. On the McAfee Antivirus Upgrade page enter the Licensed ID#: identified
at the top of this card in the appropriate location. Press submit.
6. On the McAfee Antivirus customer identification page enter your email
address in location provided and press submit.
Getting Started Guide 49
Page 50

Download Information (License ID #: VSF500R)
7. If previously registered, the thank you page is displayed. To begin
download of product - click on the download button.
8. If not previously registered, the McAfee Product Registration page is
displayed. You will be asked to enter your Last Name, First Name, Postal
Code, Country, State and a password that you make up. Press submit.
Once submitted a thank you page is displayed. An access URL will be
emailed automatically to email address that you have entered.
9. When the email is opened you will be instructed to click on the url
enclosed. A thank you is displayed with a download button. Click on the
download button to begin downloading the upgrade.
10. After the file is downloaded and saved to your hard drive, extract or unzip
the file (if necessary), and run the setup program.
The information provided in this article is provided "as is" without warranty
of any kind. In no event shall McAfee be liable for any damages incurred by
use or misuse of the information contained in this article. Some states do not
allow the exclusion or limitation of liability for consequential or incidental
damages so the foregoing limitation may not apply.
50 McAfee VirusScan
Page 51

Index
A
America Online
mail client, supported in VShield
, 35
using
, 35, 40 to 44
corporate e-mail systems, choosing
in configuration wizard
, 41
B
background scan tasks, configurin g
in configuration wizard
BOOTSCAN.EXE
use of on Emergency Disk
browsers supported in VShield
, 40
, 30
, 35
C
cc:Mail
as e-mail client supported in VShield
choosing correct options for
in configuration wizard
components, included with
VirusScan
computer problems, attributing to
viruses
configuration
of VShield
configuration wizard
Download Scan module options , choosing
E-mail Scan module options, choosing
Internet Filter module options, choosin g
starting
System Scan module option s, choosing
, 5 to 10
, 29
using wizard
, 42
with
, 41
with
, 43
with
, 40
, 40
with
, 35, 40 to 44
, 42
D
descriptions, of VirusScan program
components
distribution of VirusScan
electronically and on CD-ROM disc
Download Scan module
set up
using configuration wizard
E
, 35
e-mail
client software
choosing in configuration wizard
supported in VShield
E-mail Scan module
set up
using configuration wizard
Emergency Disk
creating
on uninfected computer
use of BOOTSCAN.EXE on
use of to reboot system
Eudora and Eudora Pro
as e-mail clients supported in
VShield
Exchange
as e-mail client supported in VShield
, 5 to 10
, 35
, 13
, 42
, 41
, 35
, 41
, 30
, 30
, 30
, 35
Getting Started Guide 51
Page 52

Index
F
files
infected
cleaning by yourself when VirusScan
, 31
cannot
H
Help
opening from VirusScan Classic and
VirusScan Advanced
Help Topics
in Help menu
, 27
, 27
I
infected files
cleaning by yourself when VirusScan
, 31
cannot
removing viruses from
installation
aborting if virus detected during
Internet
e-mail clients, choosing
in configuration wiza rd
Internet Explorer
as browser supported in VShield
Internet Filter module
set up
using configuration wizard
, 29
, 41
L
Lotus cc:Mail
as e-mail client supported in VShield
choosing correct options for
in configuration wiza rd
, 42
, 29
, 35
, 43
M
MAPI (Messaging Application Programming
Interface) e-mail clients
choosing in configuration wizard
menus, shortc u t
use of from system tray
for VShield
Microsoft
Exchange, Outlook and Outlook Express,
as e-mail clients supported in
VShield
Internet Explorer
as browser supported in VShield
, 44
, 35
N
Netscape Navigator and Netscape Mail
as browser and e-mail client supported in
VShield
, 35
O
online help
opening from VirusScan Classic and
VirusScan Advanced
Outlook and Outlook Express
as e-mail clients supported in
VShield
distinguishing between
, 35
, 27
, 42
P
panic, avoiding when your system is
infected
POP-3 e-mail clients, choosing o p tions for
, 35
program components, included with
VirusScan
Properties
, 29
in configuration wizard
, 5 to 10
VShield
, 41
, 42
, 35
52 McAfee VirusScan
Page 53

Index
setting with configuration wizard, 35,
40 to 44
Q
Qualcomm Eudora and Eudora Pro
as e-mail clients supported in
VShield
, 35
quick start for VShield configuration
40 to 44
R
reasons to run VShield, 34
rebooting, with the Emergency Disk
remover
actions available when VirusScan has
, 31
none
responses, default, when infected by
viruses
, 29
restarting
with the Emergency Disk
, 30
right-clicking
use of to display shortcut menus for
VShield
, 44
S
settings
VShield, choosing with configuration
wizard
Setup
aborting if virus detected during
shortcut menus
use of with VShield
SMTP e-mail clients
choosing options for
system crashes, attributing to viruses
system requirements
, 35, 40 to 44
, 44
in configuration wizard
, 41
, 35,
, 30
, 29
, 29
for VirusScan
, 13
System Scan module
set up
using configuration wizard
, 40
U
uninfected computer, use of to create
Emergency Disk
, 30
V
viruses
effects of
removing
VirusScan
components included with
description of program
components
distribution methods
installation
VirusScan Command Line
use of when booting with Emergency
Disk
VShield
browsers and e-mail clients supported
in
components included with
VirusScan
configuration wizard
, 29
before installation, necessity of and
steps for
from infected files
, 29
, 29
, 5 to 10
, 5 to 10
, 13
as best protection against
infection
, 29
what to do when virus found
during
, 35
starting
using
, 29
, 30
, 5 to 10
, 40
, 35, 40 to 44
Getting Started Guide 53
Page 54

Index
Properties dialog box
Wizard button in
reasons to run
what it does
, 33
, 40
, 34
W
Wizard, button in VShield Properties dialog
, 40
box
54 McAfee VirusScan
 Loading...