

Page 1

McAfee Utilities
User’s Guide
Version 4.0
Page 2

COPYRIGHT
Copyright (c) 2 001 Netwo rks Ass ociate s Techno logy, In c. Al l Rights Reserved . No par t of th is public ation
may be reproduced, trans mitted, tr anscribed, stored i n a retr ieval system, or translat ed into an y language
in any form or by any means without the written permis sion of Networks Associa tes Technolog y, Inc., or
its suppliers or affiliate companies. To obtain this permission, write to the attention of the Network
Associates legal department at: 3965 Freedom Circle, Santa Clara, California 95054, or call (972) 308-9960.
TRADEMARK ATTRIBUTI ONS
ActiveSecurity, ActiveHelp, ActiveShield, Antivirus Anyware (and design), Bomb Shelter, Building a World of Trust,
Certified Network Expert, CipherLink, Clean-Up , Cleanup Wizard , Cloaking , CNX, CNX Certif ication Cer tifie d Network
Expert (and d esign), Compa ss 7, C yber Cop, Cyb erMed ia, Cyb erMed ia Un install er, Dat a Secu rity L etter (and de sign), N
Design (logo), Design (rabbit with hat), Discover (and design), Disk Minder, Distributed Sniffer System, Distributed
Sniffer System (i n Katakana ), Dr Solomo n’s, Dr Solomon’s (label), Ente rprise Se cure Cast, EZ Setu p, First Aid, ForceFi eld,
Gauntlet, GMT, GroupShield, Guard Dog, HelpDesk, Homeguard, Hunter, IC Expert, ISDN Tel/Scope, LAN
Administration Architecture (and design), LANGuru, LANGuru (in Katakana), LANWords, Leading Help Desk
Technology, L M 1, M (and design), Magic Solutions, Magic University, MagicS py, MagicTree, Magic Win, MagicWord,
McAfee, McAfee (in Katakana), McAfee (and design), McAfee Associates, MoneyMagic, More Power To You,
Multimedia Cloaking, NetCrypto, NetOctopus, NetRoom, NetScan, Net Shield, NetShield, NetStalker, Net Tools, Net
Tools (in Katakana), Network Associates, Network General, Network Uptime!, NetXRay, Notesguard, Nuts & Bolts, Oil
Change, PC Medic, PC Medic 97, PCNotary, PGP, PGP (Pretty Good Privacy), PocketScope, Pop-Up, PowerTelnet, Pretty
Good Privacy, PrimeSupport, RecoverKey, RecoverKey-International, ReportMagic, Registry Wizard, RingFence, Router
PM, Safe & Sound, SalesMagic, SecureCast, Service Level Manager, ServiceMagic, Site Meter, Smart Desk, Sniffer,
Sniffer (in Hang ul), SniffMaster, Sn iffMaster (in Hangul), Sniffmaster (in Kataka na), SniffNet, Stal ke r, Stalker (styliz ed),
Statistical Information Retrieval (SIR), SupportMagic, Switch PM, TeleSniffer, TIS, TMach, TMeg, Total Network
Security, Total Network Visibility, Total Service Desk, Total Virus Defense, T-POD, T-POD (stylized), Trusted Mach,
Trusted Mail, UnInstaller, Virex, Virex-PC, Virus Forum, ViruScan, VirusScan, VShield, WebScan, WebShield,
WebSniffer, WebStalker, WebWall, Who’s Watching your Network, Wingauge, ZAC 2000, and Zip Manager are
registered trademarks of Network Associates, Inc. and/or its affiliates in the US and/or other countries. All other registered
and unregistered trademarks in this document are the sole property of their respective owners.
LICENSE AGREEMENT
NOTICE TO ALL USERS: CARE FULL Y READ THE FOLLO WING LEGAL AGREEM ENT ("AG REEME NT"),
FOR THE LICENSE OF SPECIFIED SOFTWARE ("SOFTWARE") BY NETWORK ASSOCIATES, INC.
("McAfee"). BY CLICKING TH E ACCEPT BUT TON OR INSTALL ING THE SOFTW ARE, YO U (EIT HER AN
INDIVIDUAL OR A SINGLE ENTITY) CONSENT TO BE BOUND BY AND BECOME A PARTY TO THIS
AGREEMENT. IF YOU DO NOT AGREE TO ALL OF THE TE RMS OF THIS AGREEMENT, CLICK THE
BUTTON THAT IN DICA TES TH AT Y OU DO N OT A CC EPT T HE TER MS O F T HIS AG REE MENT A ND DO
NOT INSTALL THE SOFTWA RE. (I F APPLICAB LE, YOU MAY R ETURN THE P RODUCT TO THE PLACE
OF PURCHASE FOR A FULL REFUND .)
1. License Grant. Subject to the payment of the applicable license fees, and subject to the terms and conditions of
this Agreement, McAfee hereby grants to you a non-exclusive, non-transferable right to use one copy of the
specified ve rsio n of t he So ftwar e and t he ac compa nying docume ntati on ( the " Documen tat ion") . You may in stal l
one copy of the Software on one computer, workstation, personal digital assistant, pager, "smart phone" or other
electronic device for which the Software was designed (each, a "Client Device"). If the Software is licensed as a
suite or bundle with more than one specified Software product, this license applies to all such specified Software
products, subject to any restricti ons or usage term s specified on the applicab le price lis t or product pack aging
that apply to any of such Software products individually.
a. Use. The Software is licensed as a single product; it may not be used on more than one Client Device
or by more than one user at a time, except as set forth in this Section 1. The Software is "in use" on a
Client Device when it is loaded into the temporary memory (i.e., random-access memory or RAM) or
installed into the permanent memory (e.g., hard disk, C D-ROM, or other
Issued January 2001/ McAfee Utilities
storage device) of th at Clien t
Page 3

Device. This license authorizes you to make one copy of the Software solely for backup
or archival purposes, provided that the copy you make contains all of the Software’s
proprietary notices.
b. Server-Mode. You may use the Software on a Client Device as a server ("Server") within a
multi-user or networked environment ("Server-Mode") only if such use is permitted in the
applicable price list or pr oduct packaging for the Software. A s eparate license i s required for each
Client Device or "seat" that may connect to the Server at any time, regardless of whether such
licensed Client Devices or seats are concurrently connected to, accessing or using the Software.
Use of software or hardware t hat reduces t he number of Cli ent Devices or seats directly accessing
or utilizing the Software (e.g., "multiplexing " or "pooling" softw are or hardware) does n ot reduce
the number of licenses required (i .e., the requir ed n umber of licenses would equal the number of
distinct inputs to the multiplexing or pooling software or hardware "front end"). If the number
of Client Devices or seats that can connect to t he Softw are can exceed the numb er of licenses you
have obtained, then you must have a reasonable mechanism in place to ensure that your use of
the Software does not exceed the use limits specified for the licenses you have obtained. This
license authorizes you to make or download one copy of the Documentation for each Client
Device or seat that is licensed, provided that each such copy contains all of the Documentation’s
proprietary notices.(i.e., the required number of licenses would equal the number of distinct
inputs to the multiplexing or pooling software or hardware "front end"). If the number of Client
Devices or seats that can connect to the Software can exceed the number of licenses you have
obtained, then you must have a reasonable mechanism in place to ensure that your use of the
Software does not exceed the use limits specified for the licens es you ha ve obtained. This license
authorizes you to make or download one copy of the Documentation for each Client Device or
seat that is l icensed, p rovided th at each such copy contai ns all of the Doc umentation’s proprietary
notices.
c. Volume Licenses. If the Software is licensed wi th volume license terms specified in the applicable
price list or product packaging for the Software, you may make, use and install as many
additional copies of the Software on the number of Client Devices as the volume license
authorizes. You must have a reasonable mechanism in place to ensure that the number of Client
Devices on which the Software has been installed does not exceed the number of licenses you
have obtained. This license authorizes you to make or download one copy of the Documentat ion
for each additional copy authorized by the volume license, provided tha t each such copy contains
all of the Documentation’s proprietary notices.
2. Term. This Agreement is effective for an unlimited duration unless and until earlier terminated as
set forth herein. This Agreement will terminate automatically if you fail to comply with any of the
limitations or other requirements described herein. Upon any termination or expiration of this
Agreement, you must destroy all copies of the S oftware and the Documentation. You may terminate
this Agreement at any point by destroying all copies of the Software and the Documentation.
3. Updates. For the time period specified in the applicable price list or product packaging for the
Software you are entitled to download revisions or updates to the Software when and as McAfee
publishes them via its electronic bulletin board system, website or through other online services.
For a period of ninety (90) days from the date of the original purchase of the Software, you are
entitled to download one (1) revision or upgrade to the Software when and as McAfee publishes it
via its electronic bulletin bo ard system, websit e or thro ugh other online services. A fter the specified
time period, you have no further rights to receive any revisions or upgrades without purchase of a
new license or annu al up g rade plan to the Software.
4. Ownership Rights. The Software is protected by United States copyright laws and international
treaty provisions. McAfee and its suppliers own and retain all right, title and interest in and to the
Software, including all copyrights, patents, trade secret rights, trademarks and other intellectual
property rights therein. Your possess ion, installation , or use of the Software does not transfer to y ou
any title to the intellec tual property in the Software, and you will not acquire any rights to the
Software except as expressly set forth in this Agreement. All copies of the Software and
Documentation made hereunder must contain the same proprietary notices that appear on and in
the Software and Docu m ent at io n .
User’s Guide iii
Page 4

5. Restrictions. You may not rent, lease, loan or resell the Software. You may not permit
third parties to benefit from the use or functionality of the Software via a timesharing,
service bureau or other arrangement, except to the extent such use is specified in the
applicable list price or product packaging for the Software. You may not transfer any of
the rights granted to you under this Agreement. You may not reverse engineer,
decompile, or disassemble the Software, except to the extent the foregoing restriction is
expressly prohibited by applicable law. You may not modify, or create derivative works
based upon, the Software in whole or in part. You may not copy the Software or
Documentation except as expressly permitted in Section 1 above. You may not remove
any proprietary notices or labels on the Software. All rights not expressly set forth
hereunder are reserved by McAfee. McAfee reserves the right to periodically conduct
audits upon advance written notice to verify compliance with the terms of this
Agreement.
6. Warranty and Disclaimer
a. Limited Warranty. McAfee warrants that for sixty (60) days from the date of original
purchase the media (e.g., diskettes) on which the Software is contained will be free from
defects in materials and workmanship.
b. Customer Remedies. McAfee’s and its suppliers’ entire liability and your exclusive
remedy for any breach of the foregoing warranty shall be, at McA fee’s option, either (i)
return of the purchase price paid for the license, if any, or (ii) replacement of the
defective media in which the Software is contained. You must return the defective
media to McAfee at your expense with a copy of your receipt. Th is limited warra nty is
void if the defect has resulted from accident, abuse, or misapplication. Any replacement
media will be warranted for the remainder of the original warranty period. Outside the
United States, this remedy is not available to the extent McAfee is subject to restrictions
under United States export control laws and regulations.
c. Warranty Disclaimer. Except for the limited warranty set forth herein, THE
SOFTWARE IS PROVIDED "AS IS." TO THE MAXIMUM EXTENT PERMITTED BY
APPLICABLE LAW, MCAFEE DISCLAIMS ALL WARRANTIES, EITHER EXPRESS
OR IMPLIED, INCLUDING BUT NOT LIMITED TO IMPLIED WARRANTIES OF
MERCHANTABILITY, FITNESS FOR A PARTICULAR PURPOSE, AND
NONINFRINGEMENT WITH RESPECT TO THE SOFTWARE AND THE
ACCOMPANYING DOCUMENTATION. YOU ASSUME RESPONSIBILITY FOR
SELECTING THE SOFTWARE TO ACHIEVE YOUR INTENDED RESULTS, AND FOR
THE INSTALLATION OF, USE OF, AND RESULTS OBTAINED FROM THE
SOFTWARE. WITHOUT LIMITING THE FOREGOING PROVISIONS, MCAFEE
MAKES NO WARRANTY THAT THE SOFTWARE WILL BE ERROR-FREE OR FREE
FROM INTERRUPTIONS OR OTHER FAILURES OR THAT THE SOFTWARE W ILL
MEET YOUR REQUIREMENTS. SOME STATES AND JURISDICTIONS DO NOT
ALLOW LIMITATIONS ON IMPLIED WARRANTIES, SO THE ABOVE LIMITATION
MAY NOT APPLY TO YOU. The foregoing provisions shall be enforceable to the
maximum extent permitted by applicable law.
iv McAfee Utilities
Page 5

7. Limitation of Liability. UNDER NO CIRCUMSTANCES AND UNDER NO LEGAL
THEORY, WHETHER IN TORT, CONTRACT, OR OTHERWISE, SHALL MCAFEE OR
ITS SUPPLIERS BE LIABLE TO YOU OR TO ANY OTHER PERSON FOR ANY
INDIRECT, SPECIAL, INCIDENTAL, OR CONSEQUENTIAL DAMAGES OF ANY
CHARACTER INCLUDING, WITHOUT LIMITATION, DAMAGES FOR LOSS OF
GOODWILL, WORK STOPPAGE, COMPUTER FAILURE OR MALFUNCTION, OR FOR
ANY AND ALL OTHER DAMAGES OR LOSSES. IN NO EVENT WILL MCAFEE BE
LIABLE FOR ANY DAMAGES IN EXCESS OF THE LIST PRICE MCAFEE CHARGES
FOR A LICENSE TO THE SOFTWARE, EVEN IF MCAFEE SHALL HAVE BEEN
ADVISED OF THE POSSIBILITY OF SUCH DAMAGES. THIS LIMITATION OF
LIABILITY SHALL NOT APPLY TO LIABILITY FOR DEATH OR PERSONAL INJURY
TO THE EXTENT THAT APPLICABLE LAW PROHIBITS SUCH LIMITATION.
FURTHERMORE, SOME STATES AND JURISDICTIONS DO NOT ALLOW THE
EXCLUSION OR LIMITATION OF INCIDENTAL OR CONSEQUENTIAL DAMAGES,
SO THIS LIMITATION AND EXCLUSION MAY NOT APPLY TO YOU. The foregoing
provisions shall be enforceable to the maximum extent permitted by applicable law.
8. United States Government. The Software and accompanying Documentation are deemed
to be "commercial computer software" and "commercial computer software
documentation," respectively, pursuant to DFAR Section 227.7202 and FAR Section
12.212, as applicable. Any use, modification, reproduction, release, performance, display
or disclosure of the Software and accompanying Documentation by the United States
Government shall be governed solely by the terms of this Agreement and shall be
prohibited except to the extent expressly permitted by the terms of this Agreement.
9. Export Controls. Neither the Software nor the Documentation and underlying
information or technology may be downloaded or otherwise exported or re-exported (i)
into (or to a national or resident of ) Cuba, Iran, Iraq, Libya, North Korea, Sudan, Syria or
any other country to which the United States has embargoed goods; or (ii) to anyone on
the United States Treasury Department’s list of Specially Designated Nations or the
United States Commerce Department’s Table of Denial Orders. By downloading or using
the Software you are agreeing to the foregoing and you are certifying that you are not
located in, under the control of, or a national or resident of any such country or on any
such list.
IN ADDITION, YOU SHOULD BE AWARE OF THE FOLLOWING: EXPORT OF THE
SOFTWARE MAY BE SUBJECT TO COMPLIANCE WITH THE RULES AND
REGULATIONS PROMULGATED FROM TIME TO TIME BY THE BUREAU OF
EXPORT ADMINISTRATION, UNITED STATES DEPARTMENT OF COMMERCE,
WHICH RESTRICT THE EXPORT AND RE-EXPORT OF CERTAIN PRODUCTS AND
TECHNICAL DATA. IF THE EXPORT OF THE SOFTWARE IS CONTROLLED UNDER
SUCH RULES AND REGULATIONS, THEN THE SOFTWARE SHALL NOT BE
EXPORTED OR RE-EXPORTED, DIRECTLY OR INDIRECTLY, (A) WITHOUT ALL
EXPORT OR RE-EXPORT LICENSES AND UNITED STATES OR OTHER
GOVERNMENTAL APPROVALS REQUIRED BY ANY APPLICABLE LAWS, OR (B) IN
VIOLATION OF ANY APPLICABLE PROHIBITION AGAINST THE EXPORT OR
RE-EXPORT OF ANY PART OF THE SOFTWARE.
User’s Guide v
Page 6

SOME COUNTRIES HAVE RESTRICTIONS ON THE USE OF ENCRYPTION WITHIN
THEIR BORDERS, OR THE IMPORT OR EXPORT OF ENCRYPTION EVEN IF FOR
ONLY TEMPORARY PERSONAL OR BUSINESS USE. YOU ACKNOWLEDGE THAT
THE IMPLEMENTATION AND ENFORCEMENT OF THESE LAWS IS NOT ALWAYS
CONSISTENT AS TO SPECIFIC COUNTRIES. ALTHOUGH THE FOLLOWING
COUNTRIES ARE NOT AN EXHAUSTIVE LIST THERE MAY EXIST RESTRICTIONS
ON THE EXPORTATION TO, OR IMPORTATION OF, ENCRYPTION BY: BELGIUM,
CHINA (INCLUDING HONG KONG), FRANCE, INDIA, INDONESIA, ISRAEL,
RUSSIA, SAUDI ARABIA, SINGAPORE, AND SOUTH KOREA. YOU
ACKNOWLEDGE IT IS YOUR ULTIMATE RESPONSIBILITY TO COMPLY WITH ANY
AND ALL GOVERNMENT EXPORT AND OTHER APPLICABLE LAWS AND THAT
MCAFEE HAS NO FURTHER RESPONSIBILITY AFTER THE INITIAL SALE TO YOU
WITHIN THE ORIGINAL COUNTRY OF SALE.
10.High Risk Activities. The Software is not fault-tolerant and is not designed or intended
for use in hazardous environments requiring fail-safe performance, including without
limitation, in the operation of nuclear facilities, aircraft navigation or communication
systems, air traffic control, weapons systems, direct life-support machines, or any other
application in which the failure of the Software could lead directly to death, personal
injury, or severe physical or property damage (collectively, "High Risk Activities").
McAfee expressly disclaims any express or implied warranty of fitness for High Risk
Activities.
11. Miscellaneous. This Agreement is governed by the laws of the United States and the State
of California, without reference to conflict of laws principles. The application of the
United Nations Convention of Contracts for the International Sale of Goods is expressly
excluded. This Agreement sets forth all rights for the user of the Software and is the entire
agreement between the parties. This Agreement supersedes any other communications
with respect to the Software and Documentation. This Agreement may not be modified
except by a written addendum issued by a duly authorized representative of McAfee. No
provision hereof shall be deemed waived unless such waiver shall be in writing and
signed by McAfee or a duly authorized representative of McAfee. If any provision of this
Agreement is held invalid, the remainder of this Agreement shall continue in full force
and effect. The parties confirm that it is their wish that this Agreement has been written
in the English language only.
12.McAfee Customer Contact. If you have any questions concerning these terms and
conditions, or if you would like to contact McAfee for any other reason, please call (972)
308-9960, or write: Mcafee Software, 4099 McEwen Road, Suite 600, Dallas, TX 75244
http://www.mcafeehelp.com.
Statements made to you in the course of this sale are subject to the Year 2000 Information
and Readiness Disclosure Act (Public Law 105-271). In the case of a dispute, this Act may
reduce your legal rights regarding the use of any statements regarding Year 2000
readiness, unless otherwise specified in your contract or tariff.
vi McAfee Utilities
Page 7

Table of Contents
Preface . . . . . . . . . . . . . . . . . . . . . . . . . . . . . . . . . . . . . . . . . . . . . . . . . . . . . . . . . . . .11
About This Manual . . . . . . . . . . . . . . . . . . . . . . . . . . . . . . . . . . . . . . . . . . . . . . . . . . . . . .11
McAfee Utilities Overview . . . . . . . . . . . . . . . . . . . . . . . . . . . . . . . . . . . . . . . . . . . . . . . .11
Chapter 1. Getting Started . . . . . . . . . . . . . . . . . . . . . . . . . . . . . . . . . . . . . . . . . . .15
What You Need Before Starting . . . . . . . . . . . . . . . . . . . . . . . . . . . . . . . . . . . . . . . . . . .1 5
McAfee Utilities Quick Install . . . . . . . . . . . . . . . . . . . . . . . . . . . . . . . . . . . . . . . . . . . . .15
McAfee Utilities Quick Start . . . . . . . . . . . . . . . . . . . . . . . . . . . . . . . . . . . . . . . . . . . . . .15
McAfee Utilities Configuration Assistant . . . . . . . . . . . . . . . . . . . . . . . . . . . . . . . . . . . .16
McAfee Utilities Central . . . . . . . . . . . . . . . . . . . . . . . . . . . . . . . . . . . . . . . . . . . . . . . . .17
Chapter 2. Repair and Recover . . . . . . . . . . . . . . . . . . . . . . . . . . . . . . . . . . . . . . .19
Disk Minder . . . . . . . . . . . . . . . . . . . . . . . . . . . . . . . . . . . . . . . . . . . . . . . . . . . . . . . . . . . .19
Creating and Reverting to an Undo File . . . . . . . . . . . . . . . . . . . . . . . . . . . . . . . .21
Using Disk Minder to Auto Fix Errors . . . . . . . . . . . . . . . . . . . . . . . . . . . . . . . . .21
Using Disk Minder to Report Errors Only . . . . . . . . . . . . . . . . . . . . . . . . . . . . . .21
Disk Minder Summary Report . . . . . . . . . . . . . . . . . . . . . . . . . . . . . . . . . .22
Interactively Fixing Errors . . . . . . . . . . . . . . . . . . . . . . . . . . . . . . . . . . . . . .22
McAfee Image . . . . . . . . . . . . . . . . . . . . . . . . . . . . . . . . . . . . . . . . . . . . . . . . . . . . . . . . . .22
Creating an Image of Your Disks . . . . . . . . . . . . . . . . . . . . . . . . . . . . . . . . . . . . .23
Setting Image Properties . . . . . . . . . . . . . . . . . . . . . . . . . . . . . . . . . . . . . . . . . . . .23
Restoring Drives From an Image File . . . . . . . . . . . . . . . . . . . . . . . . . . . . . . . . . .23
Rescue Disk . . . . . . . . . . . . . . . . . . . . . . . . . . . . . . . . . . . . . . . . . . . . . . . . . . . . . . . . . . . .25
Using a Rescue Disk . . . . . . . . . . . . . . . . . . . . . . . . . . . . . . . . . . . . . . . . . . . . . . . .25
Disk Minder in DOS . . . . . . . . . . . . . . . . . . . . . . . . . . . . . . . . . . . . . . . . . . .26
Image/Restore in DOS . . . . . . . . . . . . . . . . . . . . . . . . . . . . . . . . . . . . . . . . . .27
SysRecover . . . . . . . . . . . . . . . . . . . . . . . . . . . . . . . . . . . . . . . . . . . . . . . . . . .27
Recover Backup . . . . . . . . . . . . . . . . . . . . . . . . . . . . . . . . . . . . . . . . . . . . . . .27
Unformat . . . . . . . . . . . . . . . . . . . . . . . . . . . . . . . . . . . . . . . . . . . . . . . . . . . .27
Undelete . . . . . . . . . . . . . . . . . . . . . . . . . . . . . . . . . . . . . . . . . . . . . . . . . . . . .27
First Aid . . . . . . . . . . . . . . . . . . . . . . . . . . . . . . . . . . . . . . . . . . . . . . . . . . . . . . . . . . . . . . .28
Using CheckUp . . . . . . . . . . . . . . . . . . . . . . . . . . . . . . . . . . . . . . . . . . . . . . .2 8
McAfee Utilities vii
Page 8

Table of Contents
Using Universal Undo . . . . . . . . . . . . . . . . . . . . . . . . . . . . . . . . . . . . . . . . . .29
Using Ask Advisor . . . . . . . . . . . . . . . . . . . . . . . . . . . . . . . . . . . . . . . . . . . . .30
Discover Pro . . . . . . . . . . . . . . . . . . . . . . . . . . . . . . . . . . . . . . . . . . . . . . . . . . . . . . . . . . .30
The Discover Pro Window . . . . . . . . . . . . . . . . . . . . . . . . . . . . . . . . . . . . . . . . . . .31
Undelete . . . . . . . . . . . . . . . . . . . . . . . . . . . . . . . . . . . . . . . . . . . . . . . . . . . . . . . . . . . . . . .32
Chapter 3. Clean and Optimize . . . . . . . . . . . . . . . . . . . . . . . . . . . . . . . . . . . . . . .33
QuickClean Lite . . . . . . . . . . . . . . . . . . . . . . . . . . . . . . . . . . . . . . . . . . . . . . . . . . . . . . . .33
DiskTune . . . . . . . . . . . . . . . . . . . . . . . . . . . . . . . . . . . . . . . . . . . . . . . . . . . . . . . . . . . . . .34
Using DiskTune to Defragment or Consolidate a Disk . . . . . . . . . . . . . . . . . . . .34
Active Tune . . . . . . . . . . . . . . . . . . . . . . . . . . . . . . . . . . . . . . . . . . . . . . . . . . . . . . . . . . . .35
Registry Wizard . . . . . . . . . . . . . . . . . . . . . . . . . . . . . . . . . . . . . . . . . . . . . . . . . . . . . . . .37
Chapter 4. Prevent and Protect . . . . . . . . . . . . . . . . . . . . . . . . . . . . . . . . . . . . . . .39
Crash Protector . . . . . . . . . . . . . . . . . . . . . . . . . . . . . . . . . . . . . . . . . . . . . . . . . . . . . . . . .39
Recovering from an Application Error . . . . . . . . . . . . . . . . . . . . . . . . . . . . . . . . .39
Recovering a crashed, locked-up, or hung application . . . . . . . . . . . . . . . . . . . .40
WinGauge . . . . . . . . . . . . . . . . . . . . . . . . . . . . . . . . . . . . . . . . . . . . . . . . . . . . . . . . . . . . .41
Working With Gauges . . . . . . . . . . . . . . . . . . . . . . . . . . . . . . . . . . . . . . . . . . . . . .42
Trash Guard . . . . . . . . . . . . . . . . . . . . . . . . . . . . . . . . . . . . . . . . . . . . . . . . . . . . . . . . . . .42
Specifying Trash Guard Properties . . . . . . . . . . . . . . . . . . . . . . . . . . . . . . . . . . .42
Safe & Sound . . . . . . . . . . . . . . . . . . . . . . . . . . . . . . . . . . . . . . . . . . . . . . . . . . . . . . . . . . .43
Protected Volume Files (The Ultimate Backup Protection) . . . . . . . . . . . . . . . .43
How Safe & Sound Creates Automatic Backups . . . . . . . . . . . . . . . . . . . . . . . . .44
Chapter 5. Secure and Manage . . . . . . . . . . . . . . . . . . . . . . . . . . . . . . . . . . . . . . .45
EZ Setup . . . . . . . . . . . . . . . . . . . . . . . . . . . . . . . . . . . . . . . . . . . . . . . . . . . . . . . . . . . . . .45
PGP . . . . . . . . . . . . . . . . . . . . . . . . . . . . . . . . . . . . . . . . . . . . . . . . . . . . . . . . . . . . . . . . . .46
McAfee Shredder . . . . . . . . . . . . . . . . . . . . . . . . . . . . . . . . . . . . . . . . . . . . . . . . . . . . . . .47
Shredding Selected Files . . . . . . . . . . . . . . . . . . . . . . . . . . . . . . . . . . . . . . . . . . . . .48
McAfee Zip Manager Wizard . . . . . . . . . . . . . . . . . . . . . . . . . . . . . . . . . . . . . . . . . . . . .48
McAfee Zip Manager Wizard . . . . . . . . . . . . . . . . . . . . . . . . . . . . . . . . . . . . . . . .49
Advanced McAfee Zip Manager . . . . . . . . . . . . . . . . . . . . . . . . . . . . . . . . . . . . . .49
Using Zip Manager Wizard . . . . . . . . . . . . . . . . . . . . . . . . . . . . . . . . . . . . . . . . . .49
Using Advanced McAfee Zip Manager . . . . . . . . . . . . . . . . . . . . . . . . . . . . . . . . .50
Registry Pro . . . . . . . . . . . . . . . . . . . . . . . . . . . . . . . . . . . . . . . . . . . . . . . . . . . . . . . . . . . .51
viii McAfee Utilities
Page 9

Table of Contents
McAfee Task Master . . . . . . . . . . . . . . . . . . . . . . . . . . . . . . . . . . . . . . . . . . . . . . . . . . . .51
Appendix A. Product Support . . . . . . . . . . . . . . . . . . . . . . . . . . . . . . . . . . . . . . . .55
Product information . . . . . . . . . . . . . . . . . . . . . . . . . . . . . . . . . . . . . . . . . . . . . . . .55
Customer service . . . . . . . . . . . . . . . . . . . . . . . . . . . . . . . . . . . . . . . . . . . . . . . . . . .55
Technical support . . . . . . . . . . . . . . . . . . . . . . . . . . . . . . . . . . . . . . . . . . . . . . . . . .56
Support via the Web . . . . . . . . . . . . . . . . . . . . . . . . . . . . . . . . . . . . . . . . . . .56
Telephone support numbers . . . . . . . . . . . . . . . . . . . . . . . . . . . . . . . . . . . . .56
Index . . . . . . . . . . . . . . . . . . . . . . . . . . . . . . . . . . . . . . . . . . . . . . . . . . . . . . . . . . . . . .57
McAfee Utilities ix
Page 10

Table of Contents
x McAfee Utilities
Page 11

Preface
About This Manual
Thank you for purchasing McAfee Utilities, a suite of very powerful yet
easy-to-use Windows software utilities. McAfee Utilities helps you keep your
PC working at optimum efficiency and speed. You can diagnose and repair
your system and application software; create a recovery disk and image
snapshots of critical sectors of your hard drives; avoid lost data during
application crashes; automatically or interactively create backup sets; back up
protected volume file which makes your data recoverable when it otherwise
would not be.
From the moment you install McAfee Utilities, it begins protecting your PC.
First, by guiding you to create a recovery disk that you can u se later if
problems arise; Second, by activating Crash Protector, which immediately
protects you against losing unsaved information in the event that an
application crashes; Next, you’ll want to use Safe & Sound to create a backup
set of your drives’ valuable data that you can restore in case any unrecoverable
problems arise.
After repairing and protecting your system, you’re ready to use other McA fee
utilities to clean and optimize, prevent and protect, as wel l as secure and
manage your information.
NOTE: This User’s Guide contains general information on the
components of McAfee Utilities and how it works. For more complete
step-by-step instructions on how to perform particular tasks on any of
the utilities, refer to the available online Help files. You can also refer to
the Readme.txt file for any additional information that may not have
been included in this manual.
McAfee Utilities Overview
McAfee Utilities is made up of these suites of utility programs:
Repair and Recover
• Disk Minder safely, easily, and quickly diagnoses and repairs existing or
potential disk problems.
• McAfee Image saves an “image” copy of critical dis k information in a
file, and restores the image later if your disk is corrupted.
User’s Guide 11
Page 12

Preface
• Rescue Disk creates a custom rescue disk that you can use to boot up the
PC and begin recovery if you can’t start from the system hard drive.
•First Aid quickly examines areas of your computer for any problems that
can be automatically fixed at the click of a butto n.
• Discover Pro shows a wealth of information about your hardware and
software. It also lets you run diagnostics and benchmark tests.
• Undelete lets you undelete files that you have recently deleted from your
hard drive.
Clean and Optimize
• QuickClean Lite enables you to get rid of unused files and invalid
shortcuts.
• Disk Tune improves your PC’s performance by defragmenting, or
rearranging, files or consolidating free disk space on the hard disk for
maximum efficiency.
• Registry Wizard guides you through easily maintaining,
troubleshooting or repairing the Registry database.
• Active Tune reduces drive fragmentation in real-time. It ensures your
drives are automatically defragmented.
Prevent and Protect
Secure and Manage
12 McAfee Utilities
• Crash Protector protects your Windows system from application failure
and crashes.
• WinGauge graphically tracks system memory, resources, drives, and
performance in real time, providing advance alerts and warnings.
• Trash Guard protects all the files you delete, even files deleted in DOS or
in 16-bit Windows applicatio ns, by sending them to the Recycle Bin.
• Safe & Sound lets you create automatic or interactive backups of
selected drives, directories, files or file types. You can back up to a
protected volume file (a separate area on the drive). A pro tected volume
file contains information about each file in every sector to ensure that
files can be recovered even if the hard drive’s directories and data are
severely damaged or lost. You can also create mirror backups that
instantly back up data as you save it, make backups after a time delay
when the PC is idle, or create manual backups.
• EZ Setup lets you customize the Windows desktop, startup programs,
icons, startup and close screens, and so on.
Page 13

Preface
• PGP encrypts sensitive files so unauthorized people cannot access them.
• McAfee Shredder permanently deletes files so they cannot be restored or
rebuilt, and “security wipes” free disk space.
• McAfee Zip Manager easily creates compressed ZIP files, or unzips
existing ZIP files.
• Registry Pro lets you manually troubleshoot, edit, and repair the
Registry database.
• McAfee Task Master allows you to monitor and handle programs and
processes that are running on your computer as well as keeping track of
your PC’s performance. It also allows you to customized your PC’s
startup configurations.
User’s Guide 13
Page 14

Preface
14 McAfee Utilities
Page 15

1Getting Started
What You Need Before Starting
To use McAfee Utilities, you need:
• CD-ROM drive
• 32 MB (megabytes) of RAM (random access memory)
• 100 MB of available hard drive space
• Microsoft Windows 95, Windows 98 or Windo ws ME
• Pentium or a higher CPU (Central Processing Unit)
TIP: This guide assumes you know the basics of us ing Microsoft
Ð
Windows. Yo u sh oul d k now h ow t o po in t, c lic k, d ou ble- c lick , an d dr ag.
You should also know how to choose commands from menus, select
options in dialog boxes, and enter, select, and edit text. See your Microsoft
Windows User’s Guide for details
1
McAfee Utilities Quick Install
To install McAfee Utilities:
1. Insert the McAfee Utilities CD into the CD-ROM drive. The McAfee Utilities installer should autoplay (go to step 3), but if it
doesn’t go to step 2.
2. Double-click the My Computer icon, the McAfee Utilities icon and the Setup.exe or Setup icon.
3. Follow the on-screen instructions to supply the requested information.
McAfee Utilities Quick Start
You can start any of the McAfee utilities from the McAfee Utilities Central.
User’s Guide 15
Page 16

Getting Started
To start McAfee Utilities Central:
Click the Start button on the taskbar; select Pro gra ms >McAfee Office
>McAfee Utilities.
The McAfee Utilities Central window appears.
NOTE: During the setup installation, you can create a McAfee Utilities
icon on your desktop. This will also enable you to quickly start McAfee
Utilities by double-clicking the icon.
McAfee Utilities Configuration Assistant
When using McAfee Utilities for the first time, you will be ask a series of
questions via the Configuration Assistant interview wizard. This will assist
you in customizing how you w an t some of its components to work on your
computer. Follow through the succeeding screens and indicate your
preference.
If at a later time, you would want to change settings that you have indicated
via this interview wizard, you can rerun Configuration Assistant again. Click
Options from McAfee Utilities Central and select Configuration Assistant to
launch the interview wizard again.
16 McAfee Utilities
Page 17
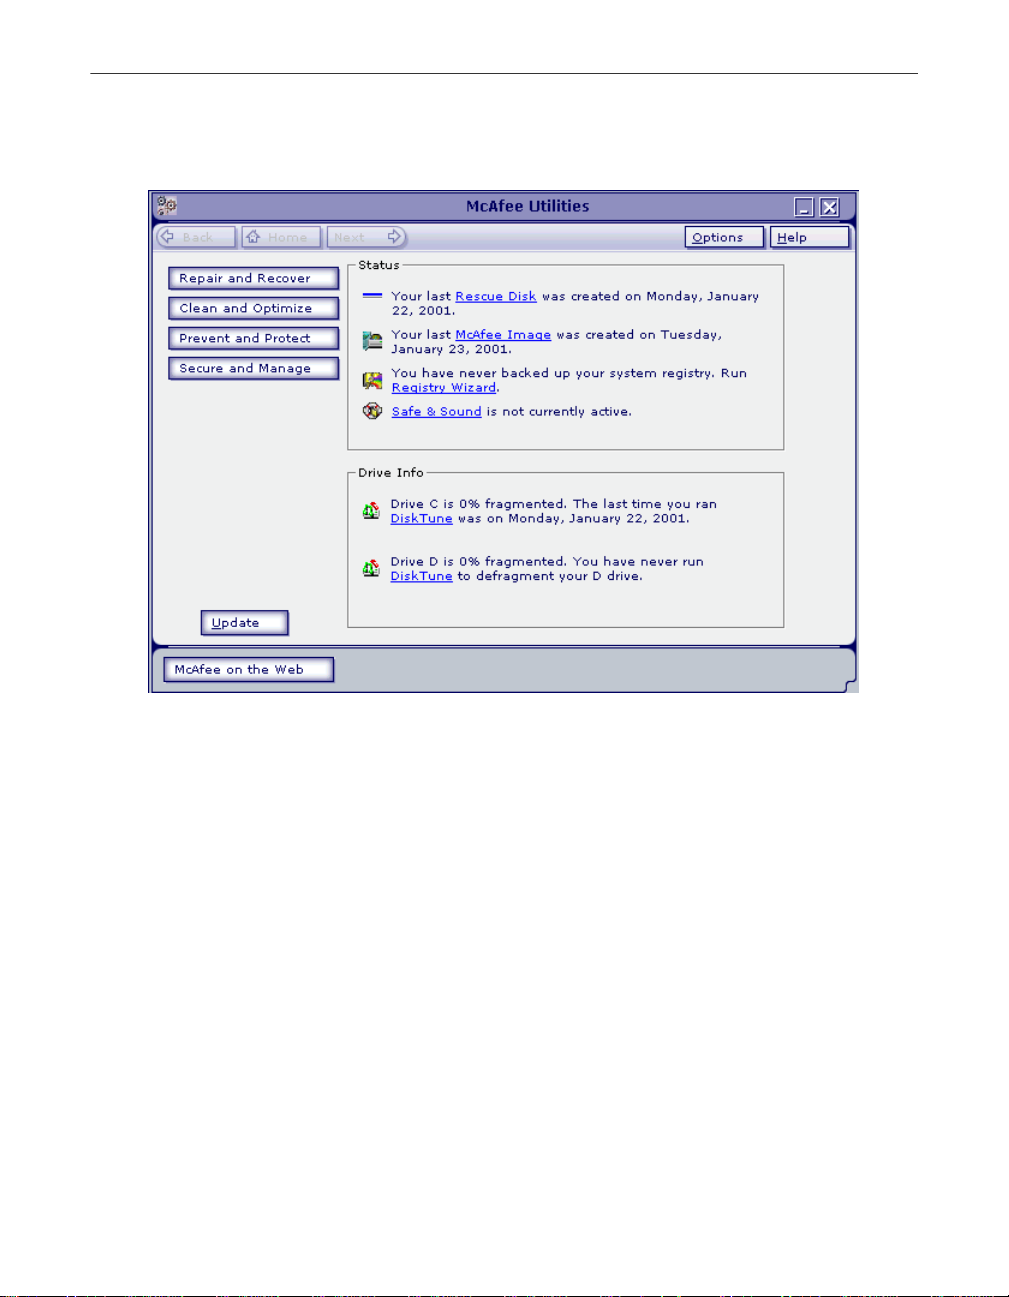
McAfee Utilities Central
Getting Started
Figure 1-1. McAfee Utilities central
The McAfee Utilies Central is your entry point to the various components of
McAfee Utilities.
The following features/buttons are displayed:
•Click Help to launch the McAfee Utilities online Help file from the
drop-down menu, or select About to display product information such as
version number.
•Click Update to do a one-step process of searching for software updates.
•Click McAfee on the Web to visit the McAfee Web site at
www.mcafee-at-home.com
•Click Options and from the drop-down menu: select Settings to display the
McAfee Utilities Properties window customize how you want McAfee
Utilities components to work on your computer; or Configuration
Assistant to run the interview wizard.
User’s Guide 17
Page 18

Getting Started
•Click Repair and Recover to work on the different utilities you can use to
protect PC’s system software and data.
•Click Clean and Opti mize to work on th e d ifferent utilities you can use to
optimize and maintain your PC to ensure you always get the maximum
performance.
•Click Prevent and Protect to work on the different utilities you can use to
monitor programs running on your PC as well as create backups of selected
drives, directories, files or file types.
•Click Secure and Manage to access the different utilities you can use to
customize the appearance and behavior of Windows; and how to quickly
and effectively archive information or exchange it with others.
18 McAfee Utilities
Page 19

2Repair and Recover
As you use your computer, the information stored on the hard drive changes.
This happens when you save, modify or move documents as well as when you
install, update or uninstall programs. As the information changes, there is a
chance that critical information can become damaged.
In perfect circumstances, all programs coexist peacefully, store their data
exactly where they should, and always play by the rules. This doesn’t always
happen. The result can be missing files; orphaned shortcuts, fonts or registry
entries; inefficient Windows settings; or even corrupted data that can prevent
you from starting Windows, or worse yet, from starting your PC at all.
Use McAfee Utilities’ Repair and Recover utilities to help you resolve
problems with your PC’s system software and data.
• Disk Minder lets you diagnose and repair existing or potential problems
with your data and the surface of recordable disk drives (any drive that
allows you to save or write data to it).
• McAfee Image lets you save an “image” copy of critical disk information
in a special file, and restore that image file later if you need to repair or
recover the disk’s information.
2
• Rescue Disk lets you make a Rescue disk for your computer that you can
use to boot up your PC—if you can’t start from the system hard drive—and
begin recovery of your system. Rescue Disk also suppo rts Zip100 and
Zip250 drives that enables you to create, system permitting, a Zip Rescue
Disk and boot with it.
• First Aid quickly examines areas of your computer for any problems tha t
can be automatically fixed at the click of a butto n.
• Discover Pro shows a wealth of information about your hardware and
software. It also lets you run diagnostics and benchmark tests.
• Undelete lets you recover files that you’ve recently deleted—even after
you’ve emptied the Recycle Bin.
Disk Minder
Disk Minder lets you safely, easily, and quickly diagnose and repair existin g
or potential problems with the disk drives where you save your valuable
application programs and data. With an increased support for large hard
drives, Disk Minder verifies, and can correct automatically or interactively,
problems with the partition tables, File Allocation Tables (FATs), boot sector,
User’s Guide 19
Page 20

Repair and Recover
extended boot sector, compression structure, directory structures, file dates
and times, file names, and clusters. A cluster, the smallest measurement unit of
disk storage space, is typically four or more sectors on a disk. Disk Minder also
checks for non-ANSI and duplicate file names, and can verify the integrity of
the sectors on a disk by performing read/write tests of the entire recordable
surface area of the disk.
Why should you use Disk Minder instead of ScanDisk, when ScanDisk comes
with DOS and Windows?
• ScanDisk cannot correct the most serious errors, such as those with the
hard drive’s partition table or boot sectors.
• ScanDisk corrects the second most serious problems—cross-linked files,
and size errors—improperly, never actually fixing the error.
• ScanDisk misses many minor problems that can interfere with Windows
operations, such as duplicate files or non-ANSI files.
• Disk Minder can scan your disk in less than half the time it takes ScanDisk,
making Disk Minder more convenient to use frequently.
When should you use Disk Minder? Immediately after a system crash or
whenever you receive a message telling you a file cannot be accessed for any
reason, you should use Disk Minder to verify the integrity of the disk
containing that file. The earlier you fix a disk problem, the less chance there is
of it causing a more serious problem down the road.
You can use Disk Minder in three main ways:
• Fix Errors Automatically Using Default Values–If you are just getting
20 McAfee Utilities
TIP: When you use Disk Minder, always creat e an Un do fi le. Then if the
Ð
repairs cause any unexpected or undesirable results, you can revert to the
Undo file so the disk returns to its state before you ran Disk Minder.
started using your PC, if you are uncertain about what errors you might
want to fix, or if you simply don’t have extra time to oversee the disk repair,
you can let Disk Minder fix any errors it finds for you. You can select either
the Fix Errors Automatically Using Default Values option in the Disk
Minder window, or the Auto Fix Errors option in the Disk Minder
Properties sheet. Both options make Disk Minder automatically fix errors.
During the repair, Disk Minder verifies data on the selected disks, and fixes
any problems it finds without asking your advice. If you decide to use this
option, you can start Disk Minder and leave it running while you’re away
from your PC, such as before you leave the office at night.
Page 21

Repair and Recover
• Report Errors Only–If you are a more advanced PC user, you may want to
see a report showing any errors on a disk before you decide what to do to
resolve these errors. You can easily get a detailed report about the state of
a disk using the Report Errors Only option in the Di sk Minder Properties
sheet. When you select this option and click Start, Disk Minder verifies the
information on your disk, and produces a summary and detail report. It
does not make any changes to the disk. You can print the detail report of
the test results on your printer or save it as a text file. This gives you the
facts you need to decide whether and how to fix disk problems.
• Fix Errors Interactively–If you deselect the Fix Errors Automatically Using
Default Values check box in the Disk Minder window, Disk M inder runs
an interactive disk repair process by displaying a message about any errors
it finds. Disk Minder lets you decide whether to fix each error or not, and
how to fix the error. Each message describes the error situation and offers
a suggested solution (the default choices in the message).
No matter which disk repair method you use, you can specify Disk Minder
properties to specify the kinds of data it checks, whether Disk Minder
performs read/write tests to verify the integrity of the disk surface, and if so,
how many times it repeats the read/write tests.
Creating and Reverting to an Undo File
If Disk Minder finds a problem, it asks if you want to create an Undo file before
making any changes to the disk.
To create an Undo file, click Yes and pick a destination for the Undo file.
To revert to an Undo file, click Undo in the Disk Minder window. Select the
drive with an Undo file you want to use. Then click OK.
Using Disk Minder to Auto Fix Errors
Using Disk Minder for Windows to autom at ically fix errors is very easy. Just
start Disk Minder, select the disk drives to check, select whether you want to
check the disk surface for read errors, select the Fix Errors Automatically
Using Default Values check box, and click the Start button. Until the process is
complete, you can walk away from your PC because no further interaction
from you is required.
Using Disk Minder to Report Errors Only
Before interactively fixing errors, you can run Disk Minder with the Report
Errors Only option selected to examine or print reports describing a disk’s
problems.
User’s Guide 21
Page 22

Repair and Recover
To use Disk Minder to report errors only, start Disk Minder, click Properties,
select the Report Errors Only check box and click OK. Then select the disks to
check, whether to scan the disk surface and click Start. Disk Minder checks the
disk and displays the Summary report.
Disk Minder Summary Report
The Summary report tells you how many errors were found on the scanned
drive. It also gives you complete information about the status of clusters (the
smallest storage units of information on a PC drive) on the drive.
Interactively Fixing Errors
Disk Minder defaults to informing you when it finds an error and letting you
interactively decide whether or not you want to fix the problem. When Disk
Minder finds a problem while checking a drive interactively, it displays a
message that asks you what to do to resolve it. The suggested response is
indicated by the default settings, including which button is the default (in the
illustration, the Fix button is the default, which means that pressing E
like clicking the Fix button).
NOTE: Disable the option, Check for Non-Ansi File Names when
running under an international version of Windows that uses extended
ASCII characters.
NTER, is
McAfee Image
Although it happens rarely, data stored on a hard drive can become damaged
in several ways. An important step in preventing disaster is using McAfee
Image to make a “snapshot” of the most critical areas on your hard drives.
Since even a recent backup copy is still not as good as recovering yo ur current
data, you’ll want to try to recover the latest data first if anything goes wrong.
McAfee Image saves information that you’ll need if your hard disk ever fails,
including the boot record, partition tables and FAT information. It’s a good
idea to run McAfee Image daily, as well as whenever you’ve reorganized a
disk’s files using a defragmenter. This ensures that you can use Image’s
Restore option to restore the latest states of your files and folders (or
directories). Image stores its information in a file on your hard drive. This file
is stored using a special, patent-pending method that allows the file to be
recovered even if the hardware is severely damaged.
22 McAfee Utilities
Page 23

NOTE: McAfee Image now has more user defined options to create
custom image files such as setting the properties sheet option to run it
automatically each time you star t Windows. Image will examine your
system and update the image only if needed. Doing this ensures you
always have the latest data saved for your disks.
Creating an Image of Your Disks
Repair and Recover
Creating an image copy of your hard disks as a file (
a moment. You should create a new image file any time you’ve rearranged
files or added many new files to your hard drive.
To create an image of your hard drives, select the Create a New Image Backup
option and click Finish. Image saves the
hard drive, and displays a message letting you know the process is complete.
Click OK.
Be sure to create a Rescue disk using McAfee Utilities’ Re scue Disk. Rescue
Disk places some Image informa tion on your 3.5-inch disk.
mcimage.dat
Setting Image Properties
You can set Image Properties to specify whether Image saves the File Allocation
Tables (FAT), which is a roadmap or index to where all the pieces of files on a
disk drive are located. Most likely, you’ll want to keep this check box selected.
You can also have Image create a new image copy of your hard disks each time
you start Windows (recommended).
Restoring Drives From an Image File
When all else fails, you can restore the critical information on one or more
drives from an image file. Restoring an image file does NOT recover deleted
files. If you have deleted data files that you need, you can restore a copy of
them from your last backup set (protected volume file or directory) created
with Safe & Sound.
mcimage.dat
file on your system
) only takes
WARNING: Do not restore an image, except as a last resort. The Image
+
file does not contain your data files, those are located in your Safe &
Sound backup set.
User’s Guide 23
Page 24

Repair and Recover
To restore one or more drives from an image file:
1. Start Image, select the Restore Drive(s) From Saved Image radio button,
and click Next >.
2. Do one of the following an d click the Next > button:
• Select an image file to use for restoring your drives from the list of
those found on your system hard drive.
• Click the Scan >> button to look for additional image files if you
don’t see the one you want to use. Image scans your hard drives for
image files. Select one of them and click Next >.
3. Select the hard drives you want to restore and click Next >.
4. Select the kinds of information you want to restore. Image defaults to restoring the master boot sector, partitions and the File
Allocation Tables. In most cases, you should use the Image default
settings. If you are an advanced user, you may want to only restore one
or two of the options:
• Master boot sector–Select this option if you cannot start the PC from
your system hard drive. The master boot sector is the sector on your
system hard disk that contains boot information with instructions
for starting up your PC.
24 McAfee Utilities
• Partitions–Select this option if you ca nnot find a logical drive on
your PC. Partitions subdivide a physical drive into multiple logical
drives. Each partition has its own drive letter.
• File allocation tables–Select this option if your files are corrupted
and you have been unable to repair them using Disk Minder. Often
much or all of your data may be intact on the disk, but the file
allocation tables (FATs) may be damaged. By restoring the most
current copy of a disk’s FAT, you can often recover files that would
otherwise be lost.
5. Click Finish to restore the drives with the specified kinds of data.
NOTE: If your Image file is more than a day or two old, or if you have
optimized your hard disk and have not run Image, try using Disk Minder
to repair the hard drive first.
Page 25

Rescue Disk
Rescue Disk lets you create an emergency boot disk that you can use to boot up
your PC if you encounter a problem that prevents you from starting the
computer from the system hard drive. The system hard drive is the hard drive
that contains your Windows directory or folder. It now also supports Zip250
drives that enables you to create, system permitting, a Zi p Rescue Disk and
boot with it
You can use the Rescue disk that is created by default.
A rescue disk is created via the Rescue Disk wizard. After the wizard window
is displayed:
1. Click the Next > button in the Res c ue Disk Wizard.
2. Select the drive.
3. Click Next >; then select component.
4. Click Finish .
5. Insert the floppy or zip disk that you will use.
Rescue Disk formats the disk and copies critical startup files to it, as well as
any files you added. When the process is complete, Rescue Disk exits and
returns to the desktop.
Repair and Recover
Using a Rescue Disk
IMPORTANT: You can use a Rescue disk on a different system other
than the one that created it. But to examine your system properly using
a Rescue disk created by another system, you need to provide this
information via a prompt after your PC is rebooted.
Insert your Rescue disk into drive A, reboot your computer (or turn on the
power). If your system doesn’t boot, access the CMOS and make sure the
Booting From Floppy option is enabled.
On the following screen, the system will prompt you to indicate whether the
Rescue Disk you are using was created on a different system. Select either YES
or NO.
Select from the suceeding screens via the available tabs the options/features
you want to work on (e.g., Disk Minder, Image/Restore, SysRecover, etc).
The following topics below briefly discuss the available option tabs and how
it can work on your computer.
User’s Guide 25
Page 26

Repair and Recover
Disk Minder in DOS
Disk Minder in DOS lets you repair disks even if you cannot start Windows. It
resolves most disk-related problems such as missing drives, inability to access
drives, or errors accessing drives.
To use Disk Minder in DOS:
1. After booting up your PC, select Disk Minder for DOS from the Rescue Disk menu.
2. Press the T
AB key to change the drives that are currently selected to be
scanned. Selected drives have an x beside them in the list.
3. Press the U
press E
4. Press the R
P ARROW and DOWN ARRO W keys to highlight a drive and
NTER to select it.
IGHT ARROW key to move the cursor back to the buttons.
You can select Disk Minder options if you like. Your options are:
• Fix Errors Automatically–fixes any data or disk errors
automatically. This is the same as selecting the Fix Errors
Automatically Using Default Values check box in the Disk Minder
window. If you deselect this check box, Disk Minder will let you fix
errors interactively.
• Test Drive Surface–performs read/write tests of the recordable
surface media on a disk. This process may take some time because
the entire disk is read and then rewritten. If a sector is damaged,
Disk Minder relocates the information, saving it elsewhere on the
disk so you can try to recover the information later. Then it maps out
the bad sector so it won’t be used for storing data in the future.
• Check DxSpace Host Drive First–checks the physical drive where
DriveSpace or DoubleSpace compressed volume files are stored.
Then it checks compressed volume files, or logical di sks.
26 McAfee Utilities
• Check for Valid File Names–verifies that filenames use acceptable
characters. Valid characters for filenames are numbers 0-9, letters
A-Z, and basic symbols excluding the backslash ( \ ) , greater than
( > ), less than ( < ), colon ( : ), double quotations ( “ ), and bar or
pipe ( | ). Disk Minder also checks long filenames as well as short
filenames that follow the 8.3 filename convention.
• Check for Duplicate File Names–checks the selected drives for
duplicate filenames (files with the same name in the same
directory).
Page 27

Repair and Recover
• Check Reserved Attribute Bits–flags files that have any of the
unused (by Windows/DOS) file attribute bits set. These bits may be
set on a drive that is shared by OS/2, but otherwise you should most
likely leave this option deselected.
• Display Summary for Each Drive–The Summary report tells you
how many errors were found on the scanned drive. It also gives you
complete information about the status of clusters (the smallest
storage units of information on a PC drive) on the drive.
5. Select Start and press E
Disk Minder displays a screen showing the kind of data it is checking and the
options in effect. If the Display Summary for Each Drive option is set, Disk
Minder displays a summary message showing the total number of errors
found on each drive, if any. It also shows information about the clusters on the
drive.
Image/Restore in DOS
Image/Restore can recover from drives that have been accidentally formatted
or completely erased, if Image was recently run.
SysRecover
SysRecover can restore several of the Windows 95/98 startup files, such as
SYSTEM.INI and the Windows Registry. You should choose this option only
if Disk Minder finds no problems on your drives and you cannot start
Windows even in Safe mode.
Recover Backup
Recover Backup can restore files from Safe & Sound protected volumes file
backup sets on drives that have been damaged, erased or accidentally
formatted.
NTER to start checking the drives.
Unformat
Undelete
Unformat can restore entire drives that have been recently formatted.
Undelete lets you undelete recently deleted files from your hard drive.
User’s Guide 27
Page 28

Repair and Recover
First Aid
First Aid detects common computer problems ranging from hardware,
software, to configuration problems. It examines your entire computer and
display options that you can select such as: fixing problems automatically,
undoing previous configuration s ettings, and accessing a database of
information to assist in troubleshooting common computer problems.
It now also has added hardware checking capabilities covering serial port,
parallel port, memory, and system hardware checks as well as increased
support for Windows ME.
There are three main buttons to select in the main window to start using First
Aid:
• CheckUp provides a systematic method of quickly identifying and fixing
PC problems automatically.
• Universal Undo allows you to return your PC to its previous settings by
reversing changes that have been made to your computer.
• Ask Advisor allows you to access sources of informat ion about your
computer which can assist you i n troubleshooting problems or simply
learn more about your computer.
Using CheckUp
First Aid’s CheckUp examines your entire PC at once, or if you are having
trouble with just one component, you can perform a rigorous CheckUp on that
component only.
To perform a complete CheckUp
1. To perform a CheckUp on your entire PC, click the CheckUp button at
2. During CheckUp, the component currently under examination is
To perform a specific CheckUp
1. If you are having a specific hardware problem, click the appropriate
2. Click the check for the selected component. First Aid will perform a
28 McAfee Utilities
the bottom center of the CheckUp desktop. The CheckUp process begins.
highlighted. Status information at the bottom of the screen lets you know
exactly what CheckUp is doing.
component in the CheckUp desktop. A pop-up menu appears.
CheckUp on that component only.
Page 29

NOTE: For more information as as well as guide in fixing problems
detected by First Aid, refer to the online Help file.
Using Universal Undo
First Aid helps you undo mistakes you make with your PC’s settings. Quite
often, seemingly innocent changes such as upgr ading software or making a
change in the Windows control panel can lead to unintended consequences.
Universal Undo offers a suite of undos that automatically monitor changes in
your PC, and allow you to quickly restore your previous settings when things
go wrong.
Universal Undo allows you to undo:
• Monitored events
• Changes to Windows settings
• Changes to document files
• Changes to Internet or network settings
Repair and Recover
•Most
First Aid
fixes
Undoing a monitored change:
1. Click Universal Undo on the main First Aid screen. The Universal Undo screen appears.
2. Click Undo an Installation. The Undo an Installation screen appears.
3. Select an installation to undo, a nd th en click Next. Installation Undo
analyzes your PC and determines the components to remove a nd restore.
Click Next to complete the installation undo. (Installations that took
place before First Aid was installed cannot be undone, and do not appear
in the list).
NOTE: From the Analyze screen you can click Details to view
details about the installation, as well as select individual items to
restore.
4. When Installation Undo is finished, a summary screen appears, displaying the results of the undo.
User’s Guide 29
Page 30

Repair and Recover
To undo a Control Panel setting:
1. Click Undo a Windows Settings Change on the Universal Undo screen.
The Undo a Windows Setting dialog box appears.
2. Follow the screen instructions.
Using Ask Advisor
Ask Advisor allows you to access sources of information about your computer
which can assist you in troubleshooting problems or simply learn more about
your computer. These sources of information include:
• KnowledgeBase which contain thousands of soluti ons to PC problems.
• Glossary which list terms and acronyms.
• Technical Support Yellow Pages provides names, addresses and technical
support contact numbers of hardware and software companies; Videos
displays presentation about Windows and your PC.
• System Info runs the Discover Pro (For more information, see “Discover
Pro” on page 30.
To display any of these information:
1. Click Ask Advisor from the First Aid main screen.
2. Select the source you want to view.
3. Click Back if you want to return to the previous screen and select another source.
Discover Pro
Discover Pro is your complete system analysis tool. It can help you understand
PC hardware and software configurations, and is designed to help you use,
analyze, and configure your PC. It provides all the information you need to
make optimum use of all available memory.
Unlike other system information tools, Discover Pro doesn’t simply display
information that it obtained from Windows. Discover actually tests and
measures the hardware and software in your system.
30 McAfee Utilities
Page 31

The Discover Pro Window
Discover Pro is easy to use and most windows are self-explanatory. Click the
Help button for context-sensitive help from any window.
Repair and Recover
Click Print to display
the Print dialog
box where you can
decide which
screens to print to
your printer or save
in a text file
Click Edit to
edit an INI file
Click a tab
to bring it
to the front,
making it
active
Click Advanced
to view the
Advanced
window for the
active tab,
which shows
details about
that aspect of
your system
Figure 2-1. Discover Pro main window
Discover Pro lets you view information about your hardware and software.
Each tab in the Discover Pro window covers a specific aspect of your PC,
ranging from a general overview of your system configuration through
software to benchmark and diagnostic tests. You can click the Advanced
button at any time to obtain a far more detailed analysis of the current tab’s
topic.
• System tab–shows information about the most critical hardware
components of your system, including your CPU, RAM, video, hard
drives, BIOS ROM and PCI Bus.
• Memory tab–gives you information on Window’s usage of your PC’s
memory, via easy-to-understand charts and tables.
• Software tab–provides you with information about the software you are
currently running, and the software components of Windows.
• Drives tab–gives you a complete summary of any drive installed on your
system and of all the directories, folders and files on that drive.
User’s Guide 31
Page 32

Repair and Recover
Undelete
• I/O Device s ta b –shows information on the secondary and optional
hardware devices installed on your PC, such as sound devices, serial and
parallel ports, printers (including fax/modems) and network data
including network type, driver, specification, version and user name.
• Benchmarks tab–an easy-to-use method to benchmark the performance of
your CPU and compare it to average benchmarks for three other
“commonly configured” PCs.
• Diagnostics tab–a diagnostics center that lets you run diagnostic tests on
various aspects of your PC, including serial, parallel, hard drive, RAM and
DMA tests.
NOTE: For more information on Discover Pro, refer to the online Help
file.
McAfee Utilities’ Undelete lets you recover files that you’ve deleted even after
you’ve emptied the Recycle Bin. Your best chances of successfully undeleting
a file is immediately after you perform the deletion. Once you save additional
files after deleting one you’d like to undelete, parts of it may have been written
over.
The Undelete program displays a Windows Explorer-like view at the top and
a list of the files you can currently undelete at the bottom. It sh ows the
probability of recovery for each file that it can undelete. To undelete a file,
select it in the list at the bottom and click the Undelete button.
McAfee Utilities provides both a Windows and DOS version of the Undelete
program. The DOS version of Undelete is also included on the McAfee Utilities
Rescue disk when you create it.
32 McAfee Utilities
NOTE: Check your Recycle Bin to see if your deleted files are there, prior
to running Undelete.
Page 33

3Clean and Optimize
This chapter tells you how to use McAfee Utilities to optimize and maintain
your PC to ensure you always get the maximum performance. The McAfee
Utilities’ Clean and Optimize suite consists of:
• QuickClean Lite enables you to delete various kinds of junk files and
unconnected items on various folders such as your PC’s Internet Cache,
Recycle Bin, Temporary Files, Shortcut and Windows R e gistry.
• DiskTune allows you to clean up your files, remove or zip those you don’t
need, and free up space on your hard disk. It reorganizes your hard disk. It
makes sure that individual files are stored in one contiguous location and
are not broken up, so you can access them quickly.
• Active Tune reduces drive fragmentation in real-time. It makes use of
patent-pending technology that directs Windows to intelligently write files
to the drive to prevent fragmentation.
• Registry Wizard allows you to troubleshoot and maintain the registry,
ensuring that it is optimized for the maximum performance of your
system.
3
QuickClean Lite
You can run QuickClean Lite whenever you need it, or you can set up
QuickClean to get rid of unnecessary files and junk on your computer at
regular intervals while you work.
In setting up QuickClean Lite, make sure that the QuickClean Lite options are
set the way you want them. The defaults in the QuickClean Lite page of the
Options dialog box specify what kind of files and settings can be removed.
You can also click Schedule to specify the schedule for running QuickClean
Lite automatically.
For step-by-step instructions on how to perform any of these tasks, refer to the
online Help file.
User’s Guide 33
Page 34

Clean and Optimize
DiskTune
As you modify files, or add them to or delete them from your hard disk, they
become fragmented. That is, they are not stored in one contiguous place, but
are scattered across the disk. Similarly, as you add and delete information, the
free space on your disk also becomes fragmented, further causing your
computer to save data in a fragmented pattern. B ecause of this fragm entation,
it takes your computer longer to find all of the segments that make up the file,
and this slows down your computer’s performance.
DiskTune also defragments your Window s S wa p File—the file used by
Windows to store information temporarily so that memory can be freed for
other applications. A fragmented Swap File also af fects the performance of
your system.
You should run DiskTune whenever your drive becomes fragmented by more
than 2 or 3 percent. When you start DiskTune, it reviews your drive and
recommends the type of defragmentation and optimization process that you
should use.
TIP: You can monitor the fragmentation levels of your hard disk using
Ð
WinGauge’s Disk Fragmentation gauge. See “WinGauge” on pa ge 41 for
more information.
DiskTune lets you use the application log file that Windows creates to
determine how applications and their related files will be optimally stored on
your drive.
Using DiskTune to Defragment or Consolidate a Disk
NOTE: McAfee Utilities uses McAfee Active Tune reduces drive
fragmentation in real-time. It uses patent-pending technology that
directs Windows to intelligently write files to the drive to prevent
fragmentation. For more information, see “Active Tune” on page 35.
After you specify one or more drives to tune and click Next >, DiskTune
analyzes the drive to determine the most suitable levels of optimization. Once
the analysis is complete, depending upon the degree of fragmentation,
DiskTune recommends one of four methods:
• Reorder and Unfragment–defragments your files and arranges them on
the hard disk according to all the criteria specified in the Advanced
options.
34 McAfee Utilities
Page 35

• Full Unfragment–defragments your files and writes them to the hard disk
so that all free space is grouped separately from used space, without regard
to the File Placement criteria specified in the Defragmentation Options
dialog box (click the Advanced button).
• Quick Unfragment–defragments your fragmented files and rewrites these
to the disk without rearranging other files, and without regard to the File
Placement criteria. Free space remains fragmented.
• Consolidate Free Space–moves files and file segments to the beginning of
the disk without regard to the File Placement criteria, so that all free space
appears at the end. Files remain fragmented.
DiskTune displays a map of your hard drive with blocks that are color coded
by status. You can watch the map change as DiskTune analyzes the disk, and
you can customize the colors codes and click a block in the hard drive map to
identify its contents.
For more information, click the Help button while working with DiskTune.
Active Tune
McAfee Active Tune is a new feature of McAfee Utilities that reduces drive
fragmentation in real-time. It makes use of patent-pending technology that
directs Windows to intelligently write files to the drive to prevent
fragmentation.
Clean and Optimize
To use Active Tune, click Options >Settings in the McAfee Utilities home
screen; or right-click the McAfee Guardian icon from the Windows task bar;
click McAfee Utilities; then McAfee Utilities Properties. The McAfee Utilities
Properties dialog box is displayed.
User’s Guide 35
Page 36

Clean and Optimize
Frag Now column
displays the current
fragmentation level.
Frag Before column displays the fragmentation level prior to using Active Tune
To enable Active Tune:
1. Click the Active Tune tab in the McAfee Util ities Properties dialog box.
2. Check Enable McAfee Active Tune.
3. Select the drive you want Active Tune to work on.
4. Click Apply when finished. Active Tune can be enable or disabled using any combination of hard drives
or partitions on your computer system.
36 McAfee Utilities
Figure 3-1. Active Tune dialog box
NOTE: After using Disk Tune to perform defragmentation, your PC’s
defragmentation level will not increase. For more information, see
“DiskTune” on page 34.
Page 37

TIP: Use McAfee DiskTune to defragment your drive prior to using
Active Tune regularly. For more information, see “DiskTune” on page
34.
Registry Wizard
Registry Wizard makes maintenance, troubleshooting, and repair of the
Windows Registry database a quick and easy process. The Windows Registry is
a database that replaces many functions of AUTOEXEC.BAT, CONFIG.SYS
and Windows system configuration file s (e.g. win.ini, system.ini). This
registry contains all the information about the hardware, system, programs,
and network user settings on your PC.
Each time you add new hardware or software, the registry is updated. Some
of these changes can occasionally leave other components inoperable, or create
problems with other aspects of your system.
Registry Wizard lets you troubl es hoot and maintain the Windows Registry,
ensuring that it is optimized for the maximum performance of your system.
You can perform any of these tasks using the Registry Wizard: Backup &
Restore, Clean, Repair, Tune-up.
Clean and Optimize
Your overall objectives are to remove unnec essary items, ensure that all items
point to actual files, sort the registry so that associated items are grouped
together, and reduce the size of your registry so it can be accessed more
quickly. In fact, there are many similarities between optimizing your hard
disk, and optimizing your registry.
• Backup & Restore. Backup your existing registry or restore an old version
of your registry.
• Clean. Locate items that you can safely delete from the registry, such as
your Recent Doc list, the Tip of The Day, your Run List, and so on.
• Repair. Identify all of the registry items that point to files that have moved
or to nonexistent items, and repair or delete them.
• Tune-up. After you remove unneeded items and repair the rest, you need
to tune up your registry. That is, close the gaps and group associated items
together.
Registry Wizard will walk you through, and perform, all these tasks for you.
Select the task you want Registry Wizard to perform and click the Next >
button. Then go to the corresponding procedure:
User’s Guide 37
Page 38

Clean and Optimize
• Backup & Restore
The Registry Wizard -Backup & Restore dialog box appears after you select
the Backup & Restore option and click Next> in the Registry Wizard.
From this dialog box, select whether you want to Backup or Restore your
registry; then click Next>.
If you are backing up a registry, enter a comment in the text box. If you are
restoring a registry, select which backup registry you want to restore.
After selecting the appropriate task you want to perform , clic k Finish to
complete the backup or restore process.
•Clean
The Registry Wizard - Clean dialog box appears after you select the Clean
option and click Next > in the Registry Wizard.
Select the items to clean up and click Finish.
Registry Wizard removes selected items from the registry and exits.
• Repair
After you select the Repair option and click Next > in the Registry Wizard,
it scans the registry and displays the Registry Wiz ard - Repa ir dialog box,
which lists all invalid entries in the registry.
38 McAfee Utilities
Most likely, you’ll start by clic king the Repair All button to let registry
Wizard repair all the entries that it can. After you do this, Registry Wizard
displays the Registry Wizard - Repair Report dialog box.
This Repair Report lists the registry key entries that Registry Wizard can fix
along with a description of the file (and its location) that will be used to
repair each registry key entry.
Select any key entries that you want to fix or not fix, then click either the Fix
or Don’t Fix button. The selected key entries are fixed or not fixed, and the
Repair Report dialog box closes. The Registry Wizard - Repair dialog box
reappears, displaying the remaining key entries that still need to be fixed.
You can select a key entry and click the Repair button to manually change
the value for that key. Or, you can click the Advanced button to go to
Registry Pro and edit the orphan entries using that McAfee utility instead
of Registry Wizard.
Page 39

4Prevent and Protect
Sooner or later, everyone using Windows will encounter error messages, most
often caused by misbehaved programs. What you must do to resume your
work depends upon an error’s cause and degree of seriousness. Normally,
errors force a program to close. So if an error is minor, you may be able to
recover and continue working just by closing and restarting the program. Very
rarely, these errors can be serious enough to prevent you from restarting the
program, or even worse, from restarting the PC. The McAfee Utilities’ Prevent
and Protect suite of utilities take you step-by-step through the process of
protecting your system against such eventualities before they happen:
• Crash Protector - monitors your system and detects faulty application
performance as well as provide recovery methods in the event that an
application on your computer crashes.
• WinGauge–monitors your use of Windows and yo ur programs.
• Trash Guard–provides delete protection of all the files you delete. It even
protects files deleted in DOS or 16-bit Windows programs
• Safe & Sound–lets you create automatic or interactive backups of selected
drives, directories, files or file types. You can back up to a protected volume
file (a separate area on the drive). A protected volume file contains
information about each file in every sector to ensure that files can be
recovered even if the hard drive’s directories and data are severely
damaged or lost. You can also create mirror backups that instantly back up
data as you save it, make backups after a time delay when the PC is idle, or
create manual backups.
4
Crash Protector
Recovering from an Application Error
Crash Protector continuously monitors your system to detect when an
application performs an invalid operation or damages any critical part of your
system. When such "Fault" conditions occur, Crash Protector suspends the
application and displays the following dialog box.
User’s Guide 39
Page 40

Prevent and Protect
Figure 4-1. Crash Protector dialog box
When you see this dialog box, the application has caused an error which
usually means it has gone astray. Therefore your data may already be lost or
damaged. This dialog box lets you choose what to do with the faulty progra m.
The following options are available:
• Close Application - closes the application that caused the error and allows
you to continue working.
• AutoFix - reactivates the faulty program at a point that should let you save
your data. This procedure has some inherent risks and you should follow
the steps in the procedure below when trying to AutoFix a crashed
program.
• Report - allows you to view a log containing additional information
regarding the application where you encountered a problem with.
Recovering a crashed, locked-up, or hung application
Sometimes application errors cause programs to stop responding to the
keyboard or mouse. Computer Program Reactivator (CPR) can "unlock"
programs and allow you to try to recover any previously unsaved information
in documents you had open in the application when it stopped responding.
To unlock a locked program:
1. Hold down the CTRL and ALT Keys and simultaneously press the DELETE key (sometimes labeled DEL).
40 McAfee Utilities
Page 41

Prevent and Protect
CPR displays the Close Program dialog box.
2. Select the application tha t has stopped responding. CPR tries to recognize the program and pre-select it for you.
3. Click End Task to have CPR close the program, or click Reactivate to
have CPR try to reactivate the program.
IMPORTANT: An application that has stopped responding may
Ë
have other problems as well. Therefore your data may already be
lost or damaged. If you need to recover your work, follow the
instructions in the following procedure.
To attempt to recover your work:
1. Use Explorer to make a backup copy of the open document you were working with in the application.
2. Click the Reactivate button in the Crash Protector box.
3. Attempt to save your work in the application.
WinGauge
WinGauge is a dynamic reporting tool that constantly monitors your use of
Windows and your applications, to alert you to potential problems before they
become serious.
Information about your system is displayed using gauges. You can select what
to monitor and the type of gauge to use. Most importantly, you can choose
when you want to be notified in the event that your specified limits have been
reached.
WinGauge allows you to get into the habit of constantly monitoring your
system so you can take actions to prevent situations where errors could occur.
4. Exit the application immediately and restart Windows.
NOTE: For more information on Crash Protector such as testing and
deactivating options, refer to the online Help file.
User’s Guide 41
Page 42

Prevent and Protect
You can choose to have one, two, or more gauges to be active at any one
time—with each gauge reporting on the status of your system. The more
advanced you are, or the more demanding your projects, the more gauges you
may want to keep active to monitor particular aspects of your computer and
applications.
By using WinGauge, and by customizing the gauges to your own specific
needs, you will be warned about potential problems in time to take the
necessary preventative steps.
WinGauge alerts you so that you can save your data, close programs, or take
other actions to prevent your system from slowing down, crashing, or
locking-up. As an added bonus, you can also drag application icons and
folders into WinGauge so that the program becomes your one-stop system
monitoring and application launch pad.
Working With Gauges
In WinGauge, you can set global gauge commands or set specific commands
for each gauge. You can also add, update, or remove gauges.
Refer to the online Help file for instructions on how to use any of the available
features of WinGauge.
Trash Guard
When you enable Trash Guard, all deleted files, even the ones you deleted in
DOS or in 16-bit applications, are moved to the Recycle Bin. Keeping Trash
Guard enabled ensures that you can recover files you've deleted later if you
discover that you need them.
Specifying Trash Guard Properties
Trash Guard’s Properties sheet lets you decide if the Trash Guard Properties
tab appears in the Recycle Bin’s Properties sheet dialo g box. You can also
specify any files to exclude from delete protection.
To add files to exclude from delete protection, click the Add New button. Then
locate the files to exclude or the path to a folder or directory of files to exclude.
You can use standard wildcard characters to exclude all files that have the
same file extension or similar names. The wildcard characters you can use are:
• Asterisk ( * )–a multiple-character placeholder. For example if you enter
*.BAK, all files that have the .BAK file extension would be excluded from
delete protection. Or if you enter ~*.*, all files that start with a tilde ( ~ )
and have any file extension would be excluded from delete protection.
42 McAfee Utilities
Page 43

• Question Mark ( ? )–a single-character placeholder. For example, you
could enter
through
Trash Guard also lets you select files in the Files To Exclude list and click
Modify to modify the definition of these files, or click the Remove button to
remove them from the list of files to exclude.
Safe & Sound
The most important asset on your computer is the info rmation, or data, you
create and store there. Over time, this data grows in size and value. The
storage devices where you keep this information are vulnerable to a wide
range of environmental and human factors that can damage or destroy all or
part of the data stored there.
Valuable and vulnerable disk organizational structure information is also
stored in various places on a hard drive. This includes th e boot sector, partition
tables, directories, the FAT (file allocation table), and other structural
components. These structural components are used by Windows to find data
on the drive, organize it, and so on. If any one of these components is damaged
or destroyed, you will not be able to access the data you’ve stored on the drive.
map??.bmp
map99.bmp
to exclude a range of files named
.
Prevent and Protect
map01.bmp
Protected Volume Files (The Ultimate Backup Protection)
McAfee Utilities’ Safe & Sound lets you create backup sets in protected
volume files, which is the safest and preferred type of backup, and is unique
to McAfee Utilities. A protected volume file is a sectioned-off area of the drive,
sometimes called a logical drive. Safe & Sound’s protected volume files have
some very special characteristics that let Safe & Sound reconstruct backup files
sector by sector, even if the drive’s standard FAT is damaged or completely
lost. In fact, files can be largely reconstructed even if large parts of the drive
are unreadable or erased.
The protected volume file also includes enough information in each directory
entry to completely reconstruct a file’s entire directory tree even if all its parent
nodes are erased.
NOTE: A rescue disk can restore files from Safe & Sound protected
volumes file backup sets on drives that have been damaged, erased or
accidentally formatted.
User’s Guide 43
Page 44

Prevent and Protect
How Safe & Sound Creates Automatic Backups
When you select to have Safe & Sound automatically create a backup set for
you, it creates the first backup set while you are stepping through the Safe &
Sound Wizard. Thereafter, while the Enable Automatic Backup option is
selected, it continues to update your backup set at the time delay you’ve
specified. If you chose to make Mirror backups, Safe & Sound updates your
backup set at the same time that you resave the original source files.
If you select a write-behind delay longer than zero secon ds (a Mirror backup),
Safe & Sound updates the backup set at any time after the specified time delay
when your PC is idle. This allows Safe & Sound to work in the background so
that it does not interrupt the work you are doing. This is a good option to use
with the protected volume file backup type since it eliminates any speed loss
due to more frequent disk accesses and larger file sizes associated with the
protected volume file backup type.
NOTE: For more information on Safe & Sound such as how to create a
backup set, restore files from a backup set and modify backup sets, refer
to the online Help file.
44 McAfee Utilities
Page 45

5Secure and Manage
This chapter explains how to use McAfee Utiliti e s to secure your valuable
information so it remains private from unauthorized access. It also describes
how to manage your system to customize the appearance and behavior of
Windows; and how to quickly and effectively archive information or exchange
it with others.
The McAfee Utilities Secure and Manage suite consists of six utilities:
• EZ Setup–lets you customize the appearance of Windows, including the
desktop, startup programs, icons, startup and close screens.
• PGP–lets you encrypt and decrypt files, and allows you to digitally sign
information to ensure authenticity.
• McAfee Shredder–lets you permanently erase selected files or non-file
data on your hard drives.
• McAfee Zip Manager–lets you create Zip files, expand Zip files, and build
self-expanding executable Zip files.
• Registry Pro– lets you manually troubleshoot, edit, and repair the registry
database.
5
EZ Setup
• McAfee Task Manager–allows you to have better control on any
application running on your computer. You can simply reactivate an
application that appears to be inactive or end the application at the click of
a button.
EZ Setup lets you customize the appearance of Windows (the Windows
desktop, startup programs, icons, startup and close screens, and so on).
Although you can perform some cu stomization using the Control Panel, EZ
Setup lets you change the appearance of these objects more fully a nd easily
than in the Control Panel.
• System tab allows you to view or enter: owner information; startup and
shutdown bitmap options; as well product identification.
• Privacy and Security tab enables you disable Boot-time keys (e.g., F4, F5
and shift F6); disable registry editing; show, hide or clear at logon, History
list containing information such as documents you worked on and searches
you made via your PC’s browser.
User’s Guide 45
Page 46

Secure and Manage
• Explorer tab lets you specify settings that affect the Windows Explorer's
menu speed, shortcuts, history and other settings.
• Desktop tab lets you add, hide and rename desktop icons. You can change
a program's icon image and its properties.
• Run/Add/Remove tab lets you add, remove, edit, and set properties for
programs that automaticall y run when you start Windows
• Send To/New tab allows you add, remove, edit, and set properties for the
commands that appear on the File > Send To menu in My Computer.
• Context menu tab lets you customize the commands that appear in the
Windows Context menu.
• MS Office (only if Microsoft Office 2000 is installed) enables you to add or
remove open file dialog shortcuts for easy access to your most
commonly-used files.
EZ Setup now also has a customizable Microsoft Office con fi gura tion tab
where you can customize features such as the Open/Save Dialog place bar in
MS Office 2000.
Click the Help button while working with any of the EZ Setup tabs to display
additional information and instructions on how to perform a particular task.
PGP
PGP is a security software application that enables you and your co-workers
to exchange or store information securely, so that no one else can read it. It is
based on a widely accepted encryption technology known as public key
cryptography in which two complementary keys—a key pair—are used to
maintain secure communications. To send som e one a private email message,
you use a copy of that person’s public key to encrypt the information, which
only they can decipher by using their private key. Co nversely, when someone
wants to send you encrypted mail, they use a copy of your public key to
encrypt the data, which only you can decipher by using a copy of your private
key.
PGP’s main features include:
• Email plugins. One of the most convenient ways to use PGP is through one
46 McAfee Utilities
of the popular email applications supported by the PGP plug-ins. With
these applications, you can encrypt and sign as well as decrypt and verify
your messages while you are composing and readin g your mail with a
simple click of a button.
Page 47

• PGPtray. PGPtray is a convenient means for launching the various PGP
utilities. Located in the System Tray, PGPtray en ables you to open the
PGPkeys window, the Preferences dialog, or PGPtools. In addition, if you
need to encrypt or decrypt files, you can do so directly from the Wind ow s
clipboard by right clicking on the desktop and choosing the appropriate
PGP menu option.
• PGPtools. If you are using an email application that is not supported by the
plug-ins, you can easily encrypt the text of the message usin g PGPtools.
PGPtools enables you to encrypt and sign files on th e hard disk of your
computer for secure storage, and to securely wipe files from your hard disk
so that sensitive data can’t be retrieved with disk recovery software.
• PGPdisk. PGPdisk enables you to create secure volumes of information,
such as floppy disks or areas of your hard drive.
NOTE: For information on PGP and how to use its features, refer to the
online Help or the PGP portable document format (PDF) file included in
the McAfee Utilities CD.
McAfee Shredder
Secure and Manage
When you save a file in Windows, it is stored in multiple pieces (in clusters
made up of multiple sectors) on the disk. Windows also saves a roadmap, or
index, that points to these clusters in two copies of the FAT (File Allocation
Table). The FAT contains the directions to all the pieces of your files, so that
applications can find them again later.
When you delete a file, all the information stored in that file is not actually
erased from your disk. Instead, Windows simply frees the clusters where the
file was stored, making those locations available in the FAT. Thereafter,
applications can write new info rm ation to those clusters. This means that all
or part of your files can be reconstructed even afte r you delete them. Undelete
programs can reconstruct a deleted file very easily, especially immediately
after you delete the file and before you save any new information that might
be written over the deleted file’s contents.
For privacy and security reasons, you may want to be po sitive that the
information stored in files you delete is permanently erased from your
computer. McAfee Shredder does this for you by “security wiping” deleted
files so they cannot be restored or rebuilt using undelete utilities. Unlike other
file security erase programs, McAfee Shredder erases even the filename and
the compressed data on DriveSpace drives. Note that it is not possible to shred
network files, or files compressed with compression other than DriveSpace in
an absolutely secure manner.
User’s Guide 47
Page 48

Secure and Manage
Ð TIP: You can select McAfee Shredder properties to specify the shredding
level to perform. You can select: Quick to shred the information once;
U.S. Government Multipass to make seven passes of repeatedly erasing
the data; or Custom to indicate how many passes to make which allows
up to 99 passes.
Shredding Selected Files
NOTE: If your computer is running on Windows ME, some files even if
shred, may be retained on your PC since these are protected by the
Windows ME System Restore.
You can shred files using drag and drop, which is a fast w ay if all th e f iles are
centrally located. Or if the files are in several places, you can shred them by
starting McAfee Shredder and selecting the files to erase.
McAfee Shredder allows you to shred files on your PC’s Recycle Bin,
Temporary Internet, as well as Web site history folder. You can also specify the
number of shredding passes (1-99) and can now have the option to shred an
entire drive.
Refer to the online Help file to display step-by-step instructions on how to
shred selected files and non-file data.
Ë IMPORTANT: After you shred non-file data, you will not be able to
undelete any deleted files that utilized this information.
McAfee Zip Manager Wizard
A zip file is a file that has been compressed and which, therefore, takes up less
space than it did in its original, decompressed form. A zip file can contain one
or more files. That is, you can group together several files and zip them to form
a single, zipped file.
The McAfee Utilities’ McAfee Zip Manager is a complete zip management
utility that you can use in two ways: via ZipMa n Wizard or the advanced
McAfee Zip Manager.
48 McAfee Utilities
Page 49

NOTE: Zip Manager makes use of the industry standard method of
compressing files most commonly known as “zip.” This allows other
decompression programs using this standard to decompress zip files
created via Zip Manager. However, note that PKZIP’s inflate and deflate
algorithms is incompatible with Zip Manager.
McAfee Zip Manager Wizard
McAfee Zip Manager Wizard provides an easy way to use a Wizard-style
interface to perform the most common tasks. If you do not regard yourself as
an advanced user of Windows utilities, you will find that McAfee Zip
Manager Wizard lets you perform almost all the zip file management tasks
you ever need, including creating zipped archives, creating self-extracting zip
archives, adding to zip archive files, unzipping files, and so on. McAfee Zip
Manager Wizard also lets you make a default association with Windows
Explorer. That is, you can simply double-click any zipped file in Explorer to
have McAfee Zip Manager Wizard auto maticall y unzip th at file and place the
extracted file in any directory you specify.
And, you can drag files from any location into the McAfee Zip Manager
Wizard icon on your desktop, just like you drag files that you no longer want
into the Windows Recycle Bin. After you drag zipped or unzipped files into
theMcAfee Zip Manager Wizard icon, McAfee Zip Manager Wizard
automatically opens with those files ready for you to zip or unzip them.
Secure and Manage
Advanced McAfee Zip Manager
If you are an advanced Windows utilities user, you may want to use the
advanced McAfee Zip Manager. The advanced McAfee Zip Mana ger provides
a file manager-like interface that lets you perform more advanced tasks, such
as deleting a file from a zip archive, verifying the integrit y of a zip archive,
adding zip archive comments to files, and so on.
Using Zip Manager Wizard
You can use the Zip Manager Wizard to perform four separate zip file
management tasks:
• Extract Files from archive–lets you unzip files (either fro m your zip
archives or from another source) and save them to your specified
directories.
• Create archive–lets you create zip archives in any directories and specify
which files you want to zip and place in these archives.
User’s Guide 49
Page 50

Secure and Manage
• Add files to existing archive–lets you zip files and place them in existing
archives.
• Build self-extracting archive–lets you convert an existing archive,
containing one or more zipped files, into an unzipping program that can
decompress the files without the use of McAfee Zip Manager or another
unzip program.
Refer to the online Help file for specific instructions of how to perform any of
these tasks.
Using Advanced McAfee Zip Manager
Advanced McAfee Zip Manager provides all the capabilities of Zip Manager
Wizard, plus other, more advanced zip file maintenance fe atures. Yo u would
use advanced McAfee Zip Manager if you are a more advanced user, are
familiar with archiving and extracting files, and if you want to perform many
complex archiving and extraction tasks.
McAfee Zip Manager Tool Buttons
TIP: Point to a McAfee Zip Manager tool button and the status bar at the
Ð
bottom of the window displays a brief description of the to ol button’s
purpose.
The McAfee Zip Manager tool buttons on the toolbar allow you to quickly:
• Create a new archive
• Open an existing archive
• Delete an existing archive
• Obtain information about your current zip archive
• Add files to a zip archive
• Remove files from an archive
• Delete files from the archive
• Switch to McAfee Zip Manager Wizard
50 McAfee Utilities
Page 51

Registry Pro
Registry Pro lets you perform advanced editing of the value entries for key
handles (the top level folders) and their subordinate child keys in the
Windows registry database. With Registry Pro, you can troubleshoot and
repair start-up files defined as entries in the registry. You can import and
export registry files, find entries containing specified text, or find orphans
(entries for programs that have moved or no longer exist). Registry Pro is easy
to use with its new browser-like interface, plus added feature such as drag and
drop when working with registry entry.
Ð
Registry Pro enables you t o:
• Find a registry entry
•Find Orphans
• Edit a registry entry
Secure and Manage
TIP: Choose Key Info from the Help menu to get information on any
selected key.
• Import a registry file
• Export a registry file
• Refresh the registry database
Refer to the online Help for step-by-step instructions on how to perform any
of these tasks.
McAfee Task Master
Task Master allows you to easily handle and control any appli cation running
on your computer. Through an easy-to-use dialog box, you are provided with
options on how to handle applications you may want to reactivate, end, or
shut down.
It allows you to create or customize various startup configurations where you
can control what programs will run automatically everytime Windows starts.
This utility is also useful in cases where an application may appear to be
inactive and you are not sure whether to shut it down without having to lose
any data.
User’s Guide 51
Page 52

Secure and Manage
To use Task Master
1. Press Ctrl +Alt +Delete from your keyboard and the McAfee Task Master dialog box is displayed.
52 McAfee Utilities
Figure 5-1. McAfee Task Master dialog box
WARNING: Pressing the Ctrl +Alt +Delete again will automatically
restart your computer which may cause you to lose any unsaved
data in applications that are running.
2. Through the text box, it displays all the applications currently running on your computer.
3. Select the application and click the button corresponding to the
appropriate action you want to take (i.e., Reactivate, Shut Down, End
Task).
Page 53

Secure and Manage
TIP: If you want more information, select an application, then click the
Properties button. A dialog box will display product name,
manufacturer, program type, as well as version information.
To activate or create configura tions
McAfee Task Master also allow you to either create or set active an existing
Windows Startup configuration. This is particularly useful if you often use
game-related programs that require high-performance on your computer.
This feature allows you to preset what programs you want Windows to load
automatically during startup and save resources for just the applications you
selected to run. Your customized configurations can be saved and loaded on
demand, but Task Master will keep your previous configurations in case you
encounter a problem when loading.
After launching McAfee Task Master; click the Configurations tab:
• If creating a new configuration, click New. Fo llow the screen instructions
of the dialog box that will display.
• If activating an existing configuration, select from the drop-down menu;
then click Set Active.
• If you want to delete, remove or add, select from the text box; then click the
appropriate button displayed in the dialog box.
• Click Apply when finished.
User’s Guide 53
Page 54

Secure and Manage
54 McAfee Utilities
Page 55

AProduct Support
BEFORE YOU CONTACT McAfee Software for technical support, locate
yourself near the computer with McAfee Utilities installed and verify the
information listed below:
• Have you sent in your product registration card?
• Version of McAfee Utilities
• Customer number if registered
• Model name of hard disk (internal or external)
• Version of system software
• Amount of memory (RAM)
• Extra cards, boards or monitors
• Name and version of conflicting software
• EXACT error message as displayed on screen
• What steps were performed prior to receiving error message?
A
• A complete description of the problem
Product information
For more information on McAf ee products, you can visit us online at:
www.mcafee-at-home.com
Customer service
To order products or obtain product information, contact the McAfee
Customer Service department at (972) 308-9960 or write to the following
address:
Mcafee Software
4099 McEwen Road, Suite 600
Dallas, TX 75244
U.S.A.
User’s Guide 55
Page 56

Product Support
Technical support
Support via the Web
McAfee is famous for its dedication to customer satisfaction. We have
continued this tradition by making our site on the World Wide Web
(http://www.mcafeehelp.com) a valuable resource for answers to technical
support issues.
We encourage you to make this your first stop for answers to frequently asked
questions, for updates to McAfee software, an d for access to McAfee news an d
virus information.
Take advantage of McAfee’s online support including chat, e-mail express and
call-me-back assistance av ailable 24 hours a day, 7 days a week at
http://www.mcafeehelp.com.
Telephone support numbers
30-Day Free Telephone Support
Available Mon-Fri, 8:30am to 4:30 pm local time
Per Minute Telephone Support
Available 24 hrs a day, 7 days a week at $2.50 per
min with the first 2 minutes free
Per Incident Telephone Support
Available 24 hrs a day, 7 days a week at $25 per
incident
972-855-7044
1-900-225-5624 or
(900) CALL-NAI
1-800-950-1165
Disclaimer: Time and telephone numbers are subject to change without prior
notice.
56 McAfee Utilities
Page 57

Index
A
Active Tune 12, 33
B
Backing up & Restoring the Registry 38
Backup
Backups
43
automatic
44
C
Check-Up
28
global
Clean and Optimize
Configuration Assistant
Crash Protector
18, 33
16 to 17
12, 39
D
defragment files 34
Discover Pro
Disk Minder
Disk Repair
Disk Tune
Utilities
DiskTune
12, 19
19
11
Disk Tune
33
12
E
EZ Setup 12, 45
F
FAT (File Allocation Table) 47 File
management in Windows
47
First Aid
fragmentation
12, 19, 28
34
H
Help 17
M
McAfee Image 11, 19, 22
McAfee Shredder
McAfee Task Master
McAfee Utilities Central
McAfee Utilities central
McAfee Zip Manager
mcafee-at-home.com
13, 47
13
13, 48
17
P
PGP 13
Prevent and Protect
Protected Volume
43
Files
18, 39
Q
QuickClean Lite 12, 33
R
Registry Pro 13
Registry Wizard
Repair and Recover
Rescue Disk
12, 33, 37
18 to 19
19
S
Safe & Sound 39, 43
12
utility
17
17
QuickStart Guide 57
Page 58

Secure and Manage 18, 45
T
Task 51
Task Master
Trash Guard
13, 51
12, 39, 42 to 43
U
Undelete 12, 32 Utilities
Discover Pro
Disk Repair
EZ Setup
McAfee Image
McAfee Shredder
McAfee Zip Manager
Registry Pro
Registry Wizard
Safe & Sound
Trash Guard
Undelete
WinGauge
12
11
12, 45
11
13, 47
13
12, 37
12, 43
12, 42 to 43
12
12, 41
Index
13, 48
W
Windows
file management
WinGauge
Z
zip files 48
47
12, 39, 41
QuickStart Guide 58
Page 59

Index
QuickStart Guide 59
Page 60

Index
QuickStart Guide 60
 Loading...