

Page 1
uf_SG720_qig_700-2240A00_en-us.fm Page 1 Monday, October 12, 2009 11:56 AM
McAfee UTM Firewall
Quick Installation Guide
Rack Mount Model SG720
Page 2

uf_SG720_qig_700-2240A00_en-us.fm Page 2 Monday, October 12, 2009 11:56 AM
COPYRIGHT
Copyright © 2009 McAfee, Inc. All Rights Reserved.
No part of this publication may be reproduced, transmitted, transcribed, stored in a
retrieval system, or translated into any language in any form or by any means without
the written permission of McAfee, Inc., or its suppliers or affiliate companies.
TRADEMARK ATTRIBUTIONS
AVERT, EPO, EPOLICY ORCHESTRATOR, FLASHBOX, FOUNDSTONE, GROUPSHIELD,
HERCULES, INTRUSHIELD, INTRUSION INTELLIGENCE, LINUXSHIELD, MANAGED MAIL
PROTECTION, MAX (MCAFEE SECURITYALLIANCE EXCHANGE), MCAFEE, MCAFEE.COM,
NETSHIELD, PORTALSHIELD, PREVENTSYS, PROTECTION-IN-DEPTH STRATEGY,
PROTECTIONPILOT, SECURE MESSAGING SERVICE, SECURITYALLIANCE,
SITEADVISOR, THREATSCAN, TOTAL PROTECTION, VIREX, VIRUSSCAN, WEBSHIELD
are registered trademarks or trademarks of McAfee, Inc. and/or its affiliates in the US
and/or other countries. McAfee Red in connection with security is distinctive of McAfee
brand products. All other registered and unregistered trademarks herein are the sole
property of their respective owners.
LICENSE INFORMATION
License Agreement
NOTICE TO ALL USERS: CAREFULLY READ THE APPROPRIATE LEGAL AGREEMENT
CORRESPONDING TO THE LICENSE YOU PURCHASED,
GENERAL TERMS AND CONDITIONS FOR THE USE OF THE LICENSED SOFTWARE. IF
YOU DO NOT KNOW WHICH TYPE OF LICENSE YOU HAVE ACQUIRED, PLEASE CONSULT
THE SALES AND OTHER RELATED LICENSE GRANT OR PURCHASE ORDER DOCUMENTS
THAT ACCOMPANY YOUR SOFTWARE PACKAGING OR THAT YOU HAVE RECEIVED
SEPARATELY AS PART OF THE PURCHASE (AS A BOOKLET, A FILE ON THE PRODUCT CD,
OR A FILE AVAILABLE ON THE WEBSITE FROM WHICH YOU DOWNLOADED THE
SOFTWARE PACKAGE). IF YOU DO NOT AGREE TO ALL OF THE TERMS SET FORTH IN
THE AGREEMENT, DO NOT INSTALL THE SOFTWARE. IF APPLICABLE, YOU MAY RETURN
THE PRODUCT TO MCAFEE OR THE PLACE OF PURCHASE FOR A FULL REFUND.
See
the SOFTWARE LICENSE AGREEMENT on page 25.
WHICH SETS FORTH THE
License Attributions
Some software programs that are licensed (or sublicensed) to the user under the GNU
General Public License (GPL) or other similar Free Software licenses which, among other
rights, permit the user to copy, modify and redistribute certain programs, or portions
thereof, and have access to the source code. The GPL requires that for any software
covered under the GPL which is distributed to someone in an executable binary format,
that the source code also be made available to those users. For any such software
covered under the GPL, the source code is available from the my.securecomputing.com
website. If any Free Software licenses require that McAfee provide rights to use, copy
or modify a software program that are broader than the rights granted in this
agreement, then such rights shall take precedence over the rights and restrictions
herein.
PRODUCT COMPLIANCE
For product compliance information, refer to Compliance.pdf on the UTM Firewall CD in
the /docs directory.
2
Page 3
uf_SG720_qig_700-2240A00_en-us.fm Page 3 Monday, October 12, 2009 11:56 AM
Introduction
This Quick Installation Guide walks you through the installation of
your UTM Firewall device.
This guide is intended for anyone who needs to set up an SG720
McAfee UTM Firewall device.
You can find additional information at the following locations:
• Help – Help is built into the UTM Firewall Management Console.
Click the Help icon in the upper right corner.
• Support – Visit mysupport.mcafee.com to find product
documentation, announcements, and support.
• Firmware updates – Your device has been pre-programmed
with firmware current at the time of manufacture. Should you
want to upgrade the firmware, you can obtain the latest version
for your device from my.securecomputing.com.
Product specifications
• Power: 100–240 V, 50–60 Hz, 0.52–0.21 A
• Operating temperature: 0º C to 40º C
• Storage temperature: –20º C to 70º C
• Humidity: 0 to 95%, non-condensing
3
Page 4
uf_SG720_qig_700-2240A00_en-us.fm Page 4 Monday, October 12, 2009 11:56 AM
Installation overview
Installing the UTM Firewall device into a well-planned network is
quick and easy; however, network planning is outside the scope of
this guide. Take some time to plan your network prior to installing
your UTM Firewall device. To add your UTM Firewall device to your
LAN (Local Area Network), follow these steps:
1 Unpack the UTM Firewall device (page 5)
2 Set up a single computer connection (page 6)
3 Set your password (page 8)
4 Set LAN connection settings (page 10)
5 Select a security level (page 16)
6 Connect to your LAN (page 18)
7 Set up computers on your LAN (page 19)
8 Set up the Internet connection (page 23)
9 Register your UTM Firewall device (page 24)
Before you begin this setup process, make sure you have a computer
running Microsoft Windows (2000 or later) with an Ethernet network
interface card installed. You should be logged in with administrator
privileges.
4
Page 5
SG720
Secure Network Gateway
Erase
Online
H/B H/A
PWRFailover
A
B
C
DE
10/100/1000
10/100
Serial
uf_SG720_qig_700-2240A00_en-us.fm Page 5 Monday, October 12, 2009 11:56 AM
Unpack the UTM Firewall device
In addition to this document, check that you have the following
items included with your UTM Firewall device:
•Power cable
• UTM Firewall CD
•Network cable
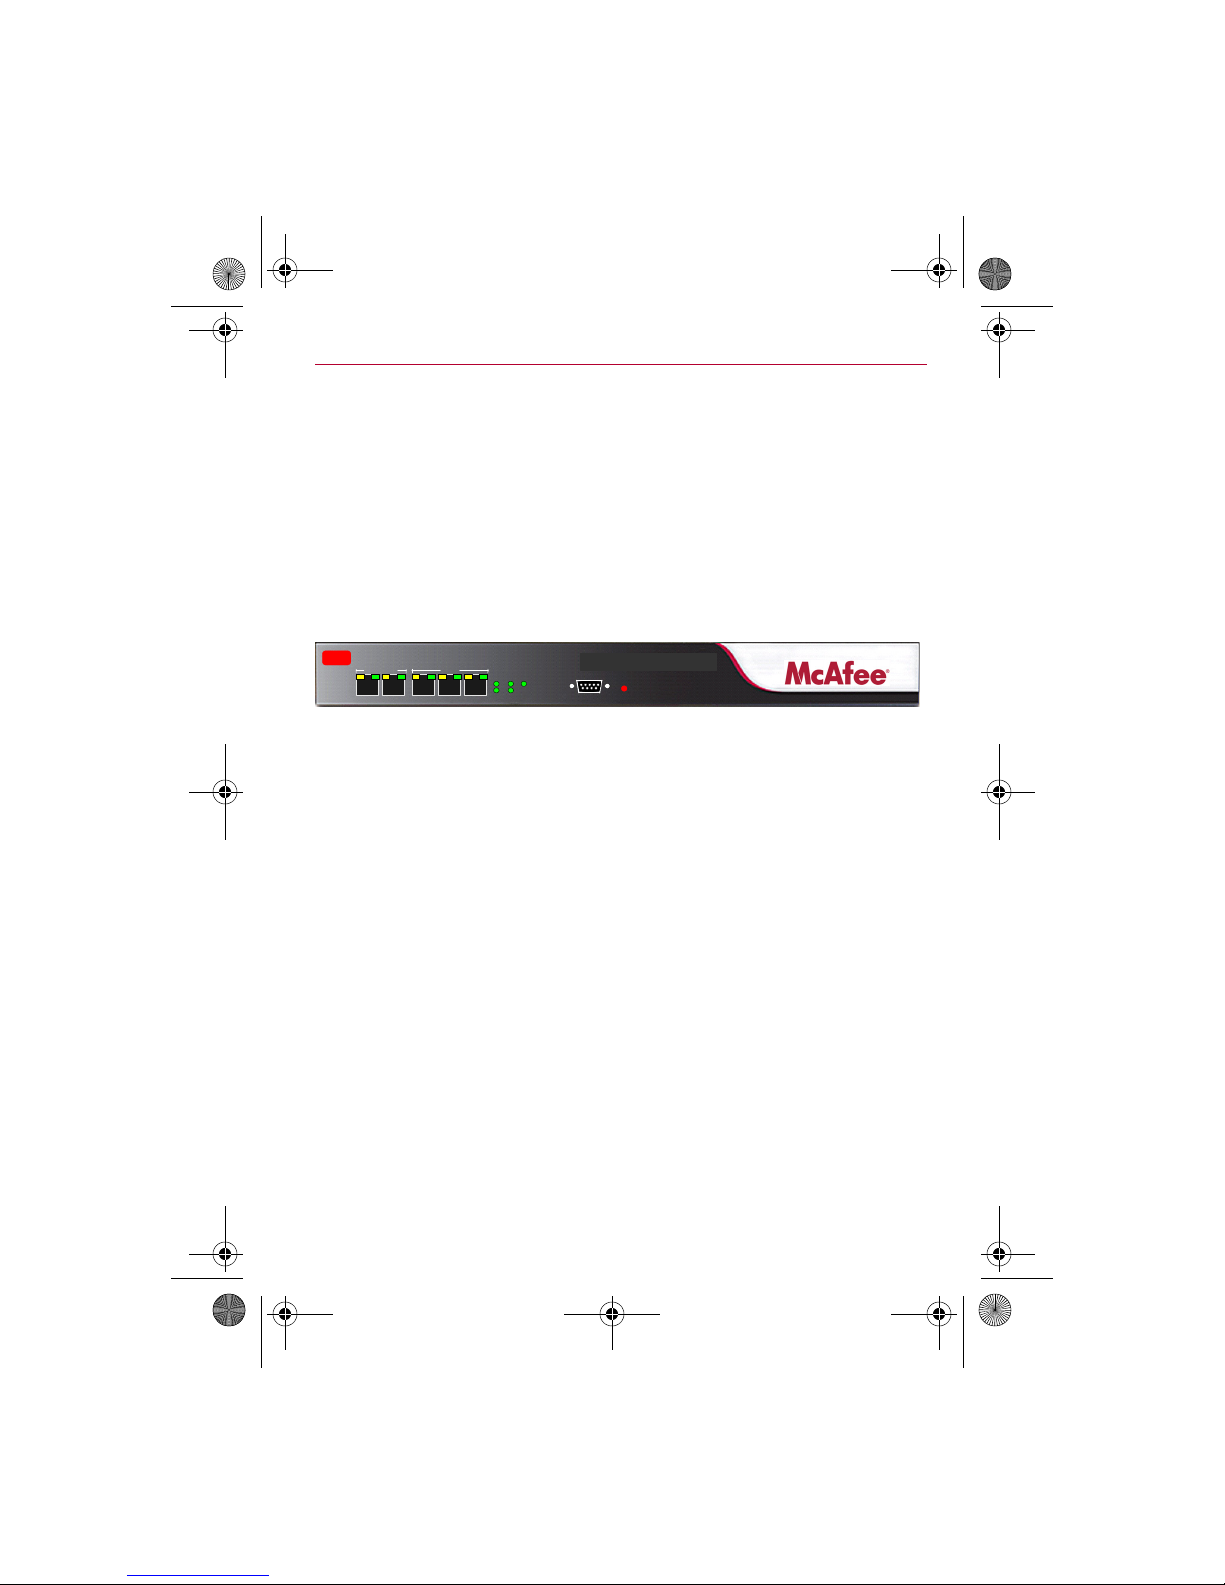
The front panel of the UTM Firewall device has 2 10/100/1000 ports
(A and B), 3 10/100 ports (C, D, and E), a serial port, status LEDs,
and an Erase button (Appendix 1).
Figure 1 SG720 front panel
The status LEDs on the front panel provide information on the
operating status of the UTM Firewall device.
• The heart beat LED flashes when the UTM Firewall device is
running.
• Each of the network ports has two LEDs indicating link status and
activity.
• The four status LEDs flash when the device is in the factory
default state.
NOTE: If these LEDs do not behave in this manner before your UTM
Firewall device is attached to the network, perform a factory reset.
1 Press the erase button on rear panel twice within three seconds, 1
second apart to restore factory default settings.
2 If the LEDs are still not flashing after 30 seconds, contact customer
support.
5
Page 6

uf_SG720_qig_700-2240A00_en-us.fm Page 6 Monday, October 12, 2009 11:56 AM
Set up a single computer connection
The UTM Firewall device ships with initial network settings of:
• LAN IP address – 192.168.0.1
• LAN subnet mask – 255.255.255.0
The UTM Firewall device needs an IP address suitable for your LAN
before it is connected. You can choose to use the UTM Firewall device
initial network settings as a basis for your LAN settings.
NOTE: Initial configuration is performed through port A. McAfee
strongly recommends you do not connect the UTM Firewall device to
your LAN until this guide instructs you to. If you attach port A directly
to a LAN with an existing DHCP server, or a computer running a DHCP
service, the UTM Firewall device automatically obtains an additional
address. The UTM Firewall device is still reachable at
192.168.0.1.
All other network ports are by default inactive; that is, they are not
running any network services such as DHCP, and they are not
configured with an IP address.
1 Connect the power cable to the power inlet on the rear panel of
the UTM Firewall device.
2 Turn on the rear panel power switch. The power light turns on.
3 Connect port A directly to your computer network interface card
(NIC) using the supplied network cable.
4 Modify your computer's network settings to enable
communication with the UTM Firewall device.
a Click Start | (Settings |) Control Panel and double-click
Network Connections.
b Right-click Local Area Connection, then select Properties.
NOTE: If there is more than one existing network connection, select
the connection corresponding to the NIC that the UTM Firewall
device is attached to.
5 Select Internet Protocol (TCP/IP), then click Properties. The
Internet Protocol (TCP/IP) Properties dialog box appears
(Figure 2).
6
Page 7

uf_SG720_qig_700-2240A00_en-us.fm Page 7 Monday, October 12, 2009 11:56 AM
Figure 2 Internet Protocol (TCP/IP) Properties
6
Select Use the following IP address, and type:
• IP address – 192.168.0.100
• Subnet mask – 255.255.255.0
• Default gateway – 192.168.0.1
7 Select Use the following DNS server addresses.
8 In the Preferred DNS Server field, enter 192.168.0.1.
9 [Optional] If you want to retain your existing IP settings for this
network connection, click Advanced and add the secondary IP
address of 192.168.0.100, subnet mask 255.255.255.0.
7
Page 8
uf_SG720_qig_700-2240A00_en-us.fm Page 8 Monday, October 12, 2009 11:56 AM
Set your password
1 Launch your Web browser. The UTM Firewall Management
Console window appears.
NOTE: If the UTM Firewall Management Console window does not
appear, navigate to 192.168.0.1. If you are unable to browse to
the UTM Firewall device at 192.168.0.1, or if the initial username
and password are not accepted:
a Press the erase button on the UTM Firewall device's rear panel
twice within 3 seconds, 1 second apart. This resets the UTM
Firewall device to its factory default settings.
b Wait 20–30 seconds, and then try browsing to 192.168.0.1
again.
2 A logon prompt appears. Enter the initial user name and
password:
•User name – root
• Password – default
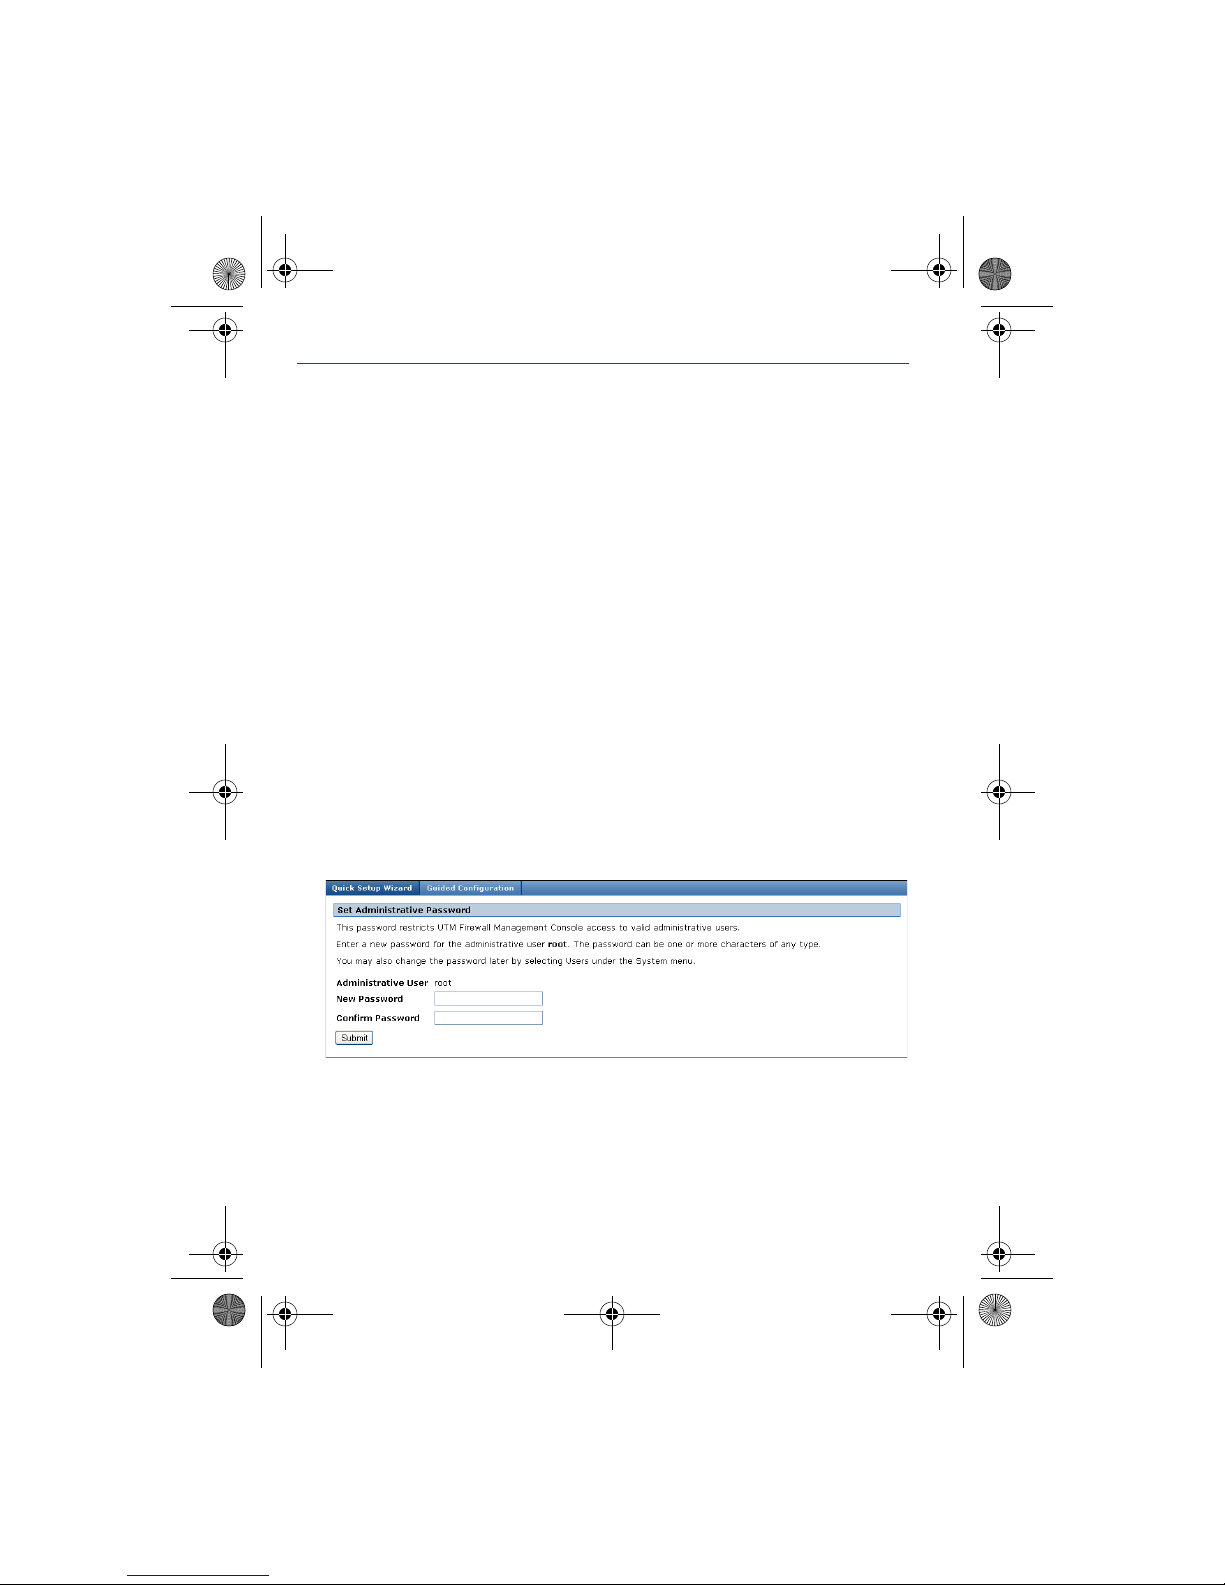
3 Click OK. The Set Administrative Password window appears
(Figure 3).
Figure 3 Set Administrative Password window
.
8
Page 9
uf_SG720_qig_700-2240A00_en-us.fm Page 9 Monday, October 12, 2009 11:56 AM
4
Enter and confirm a new password for your UTM Firewall device.
The new password takes effect immediately. You are prompted
to enter the new password when completing the next step.
NOTE: This is the password for the main administrative user (root)
account on the UTM Firewall device. It is important you choose a
password hard that is hard to guess, and keep it safe.
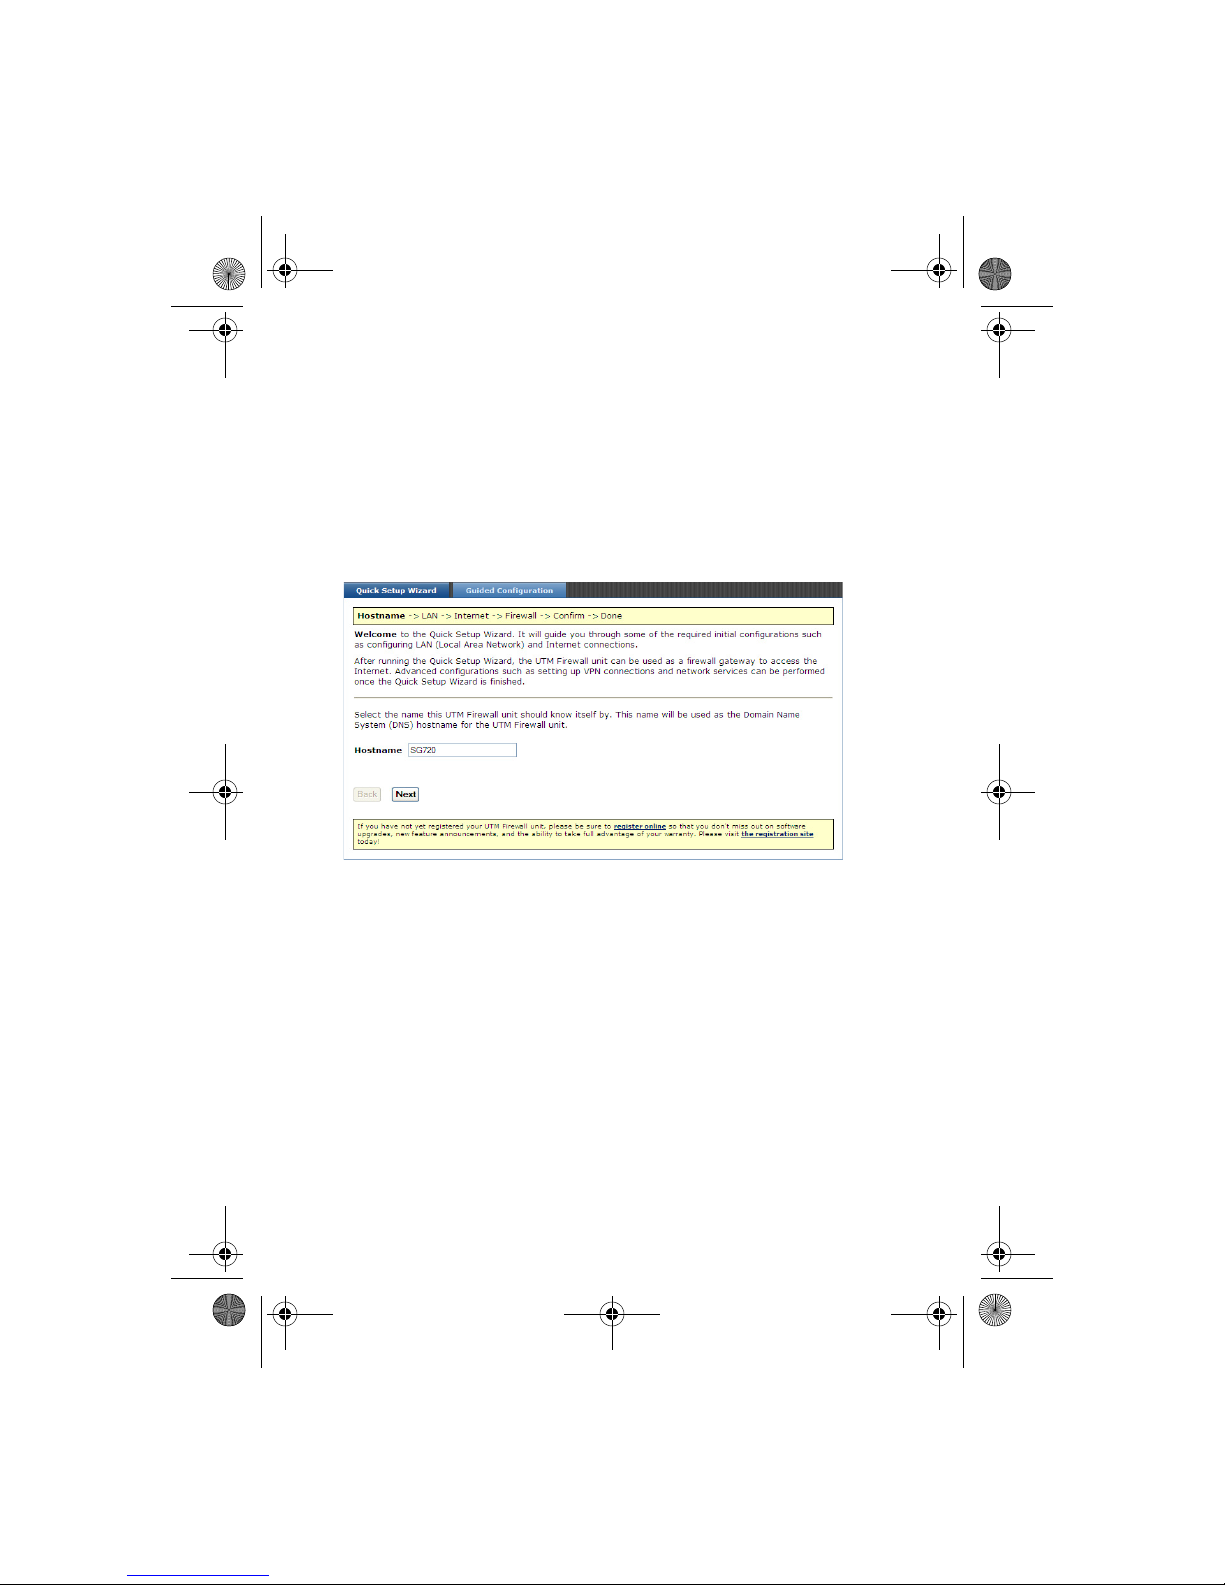
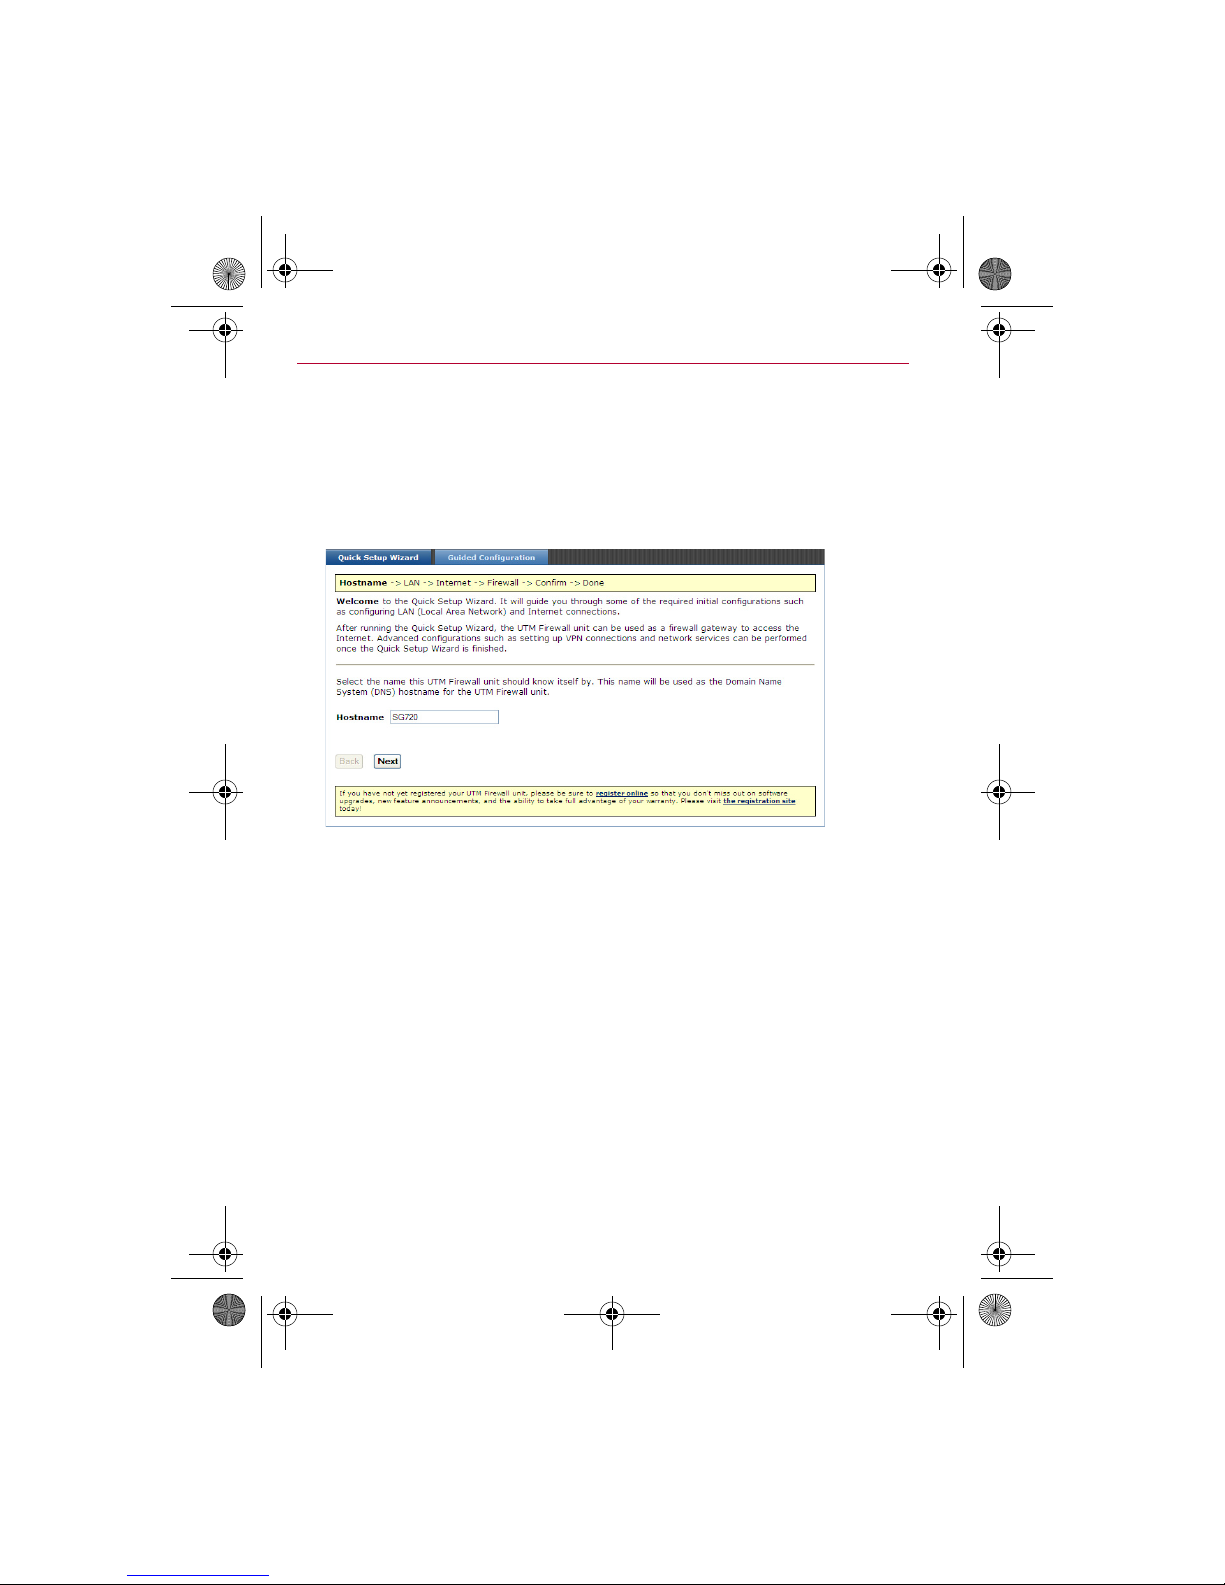
5 Click Submit. The Quick Setup Wizard Hostname window
appears (Figure 4).
Figure 4 Hostname window
9
Page 10
uf_SG720_qig_700-2240A00_en-us.fm Page 10 Monday, October 12, 2009 11:56 AM
Set LAN connection settings
1 [Optional] The host name defaults to the model number. If you
want to use a different host name, type the new name in the
Hostname field. The name must begin with an alpha character.
2 Click Next. The LAN window appears (Figure 5).
Figure 5 LAN window
10
Page 11

uf_SG720_qig_700-2240A00_en-us.fm Page 11 Monday, October 12, 2009 11:56 AM
3
Select an option for your LAN configuration:
• [Recommended] To manually configure your LAN and
enable the built-in DHCP server option which
automatically configures the network settings of
computers and other hosts on your LAN, select Use a
Fixed IP.
• To use the initial network settings (page 6) as a basis for
your LAN settings and not use the built-in DHCP server,
select Skip.
• [Not recommended] If you have an existing DHCP server
and want to rely on the DHCP server to automatically
configure the UTM Firewall device LAN connection setting,
select Use an IP address obtained from a server on
the LAN (DHCP).
NOTE: Changes to the UTM Firewall device LAN configuration do not
take effect until you complete the Quick Setup Wizard.
4 Click Next. Continue based on the option you selected in Step 3.
• Use a Fixed IP – Go to step Step 5 on page 11.
• Skip – Go to step Step 6 on page 13.
• Use an IP address obtained from a server on the
LAN (DHCP) – Go to step Step 6 on page 13.
5 [Conditional] If you selected the Use a Fixed IP option,
manually configure your LAN settings:
a In the LAN Configuration window (Figure 5), enter an IP
address and Subnet Mask for the UTM Firewall device LAN
connection. Take note of the IP address and subnet mask; you
will need them later on.
11
Page 12

uf_SG720_qig_700-2240A00_en-us.fm Page 12 Monday, October 12, 2009 11:56 AM
Figure 6 LAN Configuration window
.
b [Optional] To enable the UTM Firewall device's built-in DHCP
server, enter a range of addresses in the DHCP Server Start
Address and DHCP Server End Address fields. Computers
and other hosts on your LAN set to automatically obtain
network settings are assigned an address from this range, and
use the UTM Firewall device as their gateway to the Internet,
and as their DNS server for Internet domain name resolution.
If you plan to use a DHCP server already on your LAN, leave
the field blank to leave the UTM Firewall device’s DHCP
server disabled.
c Click Next. The ISP connection window appears (Figure 7).
12
Page 13

uf_SG720_qig_700-2240A00_en-us.fm Page 13 Monday, October 12, 2009 11:56 AM
Figure 7 ISP connection window
.
6 Select an option for your Internet Port Configuration:
• Cable Modem – Connect using a cable modem.
• Modem – Connect using a regular analog modem.
• ADSL – Connect using an ADSL modem. Selecting ADSL
will attempt automatic detection of your ADSL connection
type.
• Direct Connection – Connect directly to the Internet (for
example, over a leased line).
• Skip – Select this option to defer configuration or if your
connection is already configured.
13
Page 14

uf_SG720_qig_700-2240A00_en-us.fm Page 14 Monday, October 12, 2009 11:56 AM
Click Next. Continue based on the option you selected.
• Cable Modem, Modem, or ADSL – Configuration
windows for those options are presented for you to
complete.
i Refer to the on-screen instructions, the Help, and the UTM
Firewall Administration Guide for more details.
ii When you finish entering your details, go to Select a
security level on page 16.
• Skip – Go to Select a security level on page 16.
• Direct Connection – Go to Step 7 on page 14.
7 [Conditional] If you selected Direct Connection in Step 6 on
page 13, select an option for ISP connection (Figure 7).
Figure 8 ISP connection (WAN) window
.
• Use an IP address obtained from a server on the
Internet (DHCP) – Select this option if you plan to use a
DHCP server already in use on your LAN.
• [Recommended] Use a fixed IP – Select this option to
manually configure the WAN address using static
parameters.
14
Page 15

uf_SG720_qig_700-2240A00_en-us.fm Page 15 Monday, October 12, 2009 11:56 AM
Click Next. Continue based on the option you selected.
• Use an IP address obtained from a server on the
Internet (DHCP) – Go to Select a security level on
page 16.
• Use a Fixed IP – Go to Step 8 on page 15.
8 [Conditional] If you selected Use a Fixed IP in Step 7 on
page 14, manually configure your WAN settings (Figure 9).
Figure 9 Internet (WAN) interface window
.
a In the IP Address field, enter the static IP address you want
to apply to the WAN port of the appliance.
b Enter the Subnet Mask, which defaults to 24 bits.
c [Optional] Set the default Gateway address.
d [Optional] Set the IP address of the DNS server.
e Click Next.
15
Page 16

uf_SG720_qig_700-2240A00_en-us.fm Page 16 Monday, October 12, 2009 11:56 AM
Select a security level
UTM Firewalls support packet filtering rules that can be used to
restrict access between different parts of your network. Use the
Firewall security level window to select a security level that will
activate one or more packet filtering rules (Figure 10).
Figure 10 Firewall security level window
16
Page 17

uf_SG720_qig_700-2240A00_en-us.fm Page 17 Monday, October 12, 2009 11:56 AM
1
Select a Firewall Configuration option:
• Block Everything – Blocks all traffic that is not expressly
allowed by a packet filtering rule.
• Ultra / VPN access – Allows VPN, Dialin and LAN traffic
to move through the firewall. Denies all Internet traffic
• High / Web and VPN access – Allows VPN, Dialin, LAN,
HTTP, and HTTPS traffic to move through the firewall.
Denies other common traffic types.
• Medium / Common Internet access – Allows VPN,
Dialin, LAN, HTTP, HTTPS, and most common types of
traffic to move through the firewall. Denies peer-to-peer
(P2P) traffic unless that traffic is tunneled through
another protocol (such as P2P over HTTP).
• Low / All Internet access – Allows all Internet traffic to
pass through the firewall.
2 Click Next. The Confirm selections window appears.
17
Page 18

uf_SG720_qig_700-2240A00_en-us.fm Page 18 Monday, October 12, 2009 11:56 AM
Connect to your LAN
1 Review your configuration selections (Figure 11).
Figure 11 Confirm selections window
.
2 If you are satisfied with your settings, click Finish to activate the
new configuration.
NOTE: Depending on how you configured your LAN settings, you
may have to navigate to the UTM Firewall’s new LAN IP address to
access the Management Console.
3 Connect computers and your LAN hub to port A on the UTM
Firewall device.
18
Page 19

uf_SG720_qig_700-2240A00_en-us.fm Page 19 Monday, October 12, 2009 11:56 AM
Set up computers on your LAN
Each computer on your LAN must now be assigned an appropriate
IP address, and have the UTM Firewall device LAN IP address
designated as its gateway and DNS server. A DHCP server allows
computers to automatically obtain these network settings when they
start up. If your network does not have a DHCP server, you can
manually set up each computer on your network or set up the UTM
Firewall device DHCP server.
• [Recommended] To use the built-in DHCP server, proceed to Use
the UTM Firewall DHCP server on page 19.
• If yo u a r e u s i n g a n e xis ting DHCP server on your LAN , p r o c e e d t o
Use an existing DHCP server on page 21.
• If you do not want to use a DHCP server, proceed to Manually
configure LAN properties on page 22.
Use the UTM Firewall DHCP server
When you select Use a Fixed IP for the UTM Firewall LAN
connection and supply the DHCP Server Address Range, the UTM
Firewall DHCP server is set up and running. Each computer on your
LAN must now be set up to automatically obtain network the
settings.
1 Click Start | (Settings |) Control Panel, and double-click
Network Connections.
2 Right-click Local Area Connection (or appropriate network
connection), then click Properties.
3 Select Internet Protocol (TCP/IP), then select Properties.
The Properties window appears (Figure 12).
19
Page 20

uf_SG720_qig_700-2240A00_en-us.fm Page 20 Monday, October 12, 2009 11:56 AM
Figure 12 IP Properties window
4
Select the following options:
• Obtain an IP address automatically
• Obtain DNS server address automatically
5 Click OK.
6 Repeat steps 1-5 for each computer in your network.
20
Page 21

uf_SG720_qig_700-2240A00_en-us.fm Page 21 Monday, October 12, 2009 11:56 AM
Use an existing DHCP server
NOTE: If you are setting the UTM Firewall device LAN using the Use
an IP address obtained from a server on the LAN (DHCP)
option (Step 3 on page 11), McAfee recommends you add a lease to
your existing DHCP server to reserve the IP address you chose for the
UTM Firewall device LAN connection.
1 [Conditional] If you are setting the UTM Firewall device LAN using
the Use a Fixed IP option (Step 3 on page 11), remove the UTM
Firewall device LAN IP address from the pool of available
addresses.
2 On the existing DHCP server:
a Enter the UTM Firewall device LAN IP address as the Gateway
IP address for the existing DHCP server to hand out.
a Enter the UTM Firewall device LAN IP address as the DNS
server IP address for the DHCP server to hand out.
3 Make sure all computers on the network are set up to
automatically obtain network configuration (see Use the UTM
Firewall DHCP server on page 19), then restart them.
Restarting the computers forces an update of their
automatically configured network settings.
Alternately, you can:
a Click Start | (Settings |) Control Panel, then double-click
Network Connections.
b Right-click Local Area Connection (or appropriate network
connection), and select Disable.
c Right-click Local Area Connection (or appropriate network
connection), and select Enable.
d Repeat steps a-c for each computer on your network.
21
Page 22

uf_SG720_qig_700-2240A00_en-us.fm Page 22 Monday, October 12, 2009 11:56 AM
Manually configure LAN properties
1 Click Start | (Settings |) Control Panel, then double-click
Network Connections.
2 Right-click Local Area Connection (or appropriate network
connection), and select Properties.
3 Select Internet Protocol (TCP/IP), and click Properties.
Type the following:
• IP address – An IP address that is part of the same
subnet range as the UTM Firewall device LAN connection
(for example, if you are using the default settings,
192.168.0.2 - 192.168.0.254).
• Subnet mask – Subnet mask of the UTM Firewall device
LAN connection (if using the default settings,
255.255.255.0).
• Default gateway – IP address of the UTM Firewall device
LAN connection (if you are using the default settings,
192.168.0.1).
• Preferred DNS server – IP address of the UTM Firewall
device LAN connection (if you are using the default
settings, 192.168.0.1).
4 Click OK.
5 Repeat steps 1–4 for each computer on your network.
22
Page 23

uf_SG720_qig_700-2240A00_en-us.fm Page 23 Monday, October 12, 2009 11:56 AM
Set up the Internet connection
If you skipped configuring connection settings, or have additional
port connections to configure, continue with this procedure.
Otherwise, go to Register your UTM Firewall device on page 24.
NOTE: If you changed the UTM Firewall device’s LAN connection
settings (Set LAN connection settings on page 10), browse to the new
LAN IP address.
1 Choose a port on the UTM Firewall device for your primary
Internet connection.
2 For example, attach Port D to your modem device or Internet
connection medium.
3 From the Network Setup menu, select Network Setup. The
Connections window appears (Figure 13).
Figure 13 Connections window
In the row labeled Port D, go to the Change Type column and
4
use the drop-down list to select your Internet connection type.
5 Refer to the Help and the UTM Firewall Administration Guide for
complete procedures on configuring connections.
6 Click Finish.
23
Page 24

uf_SG720_qig_700-2240A00_en-us.fm Page 24 Monday, October 12, 2009 11:56 AM
Register your UTM Firewall device
You must register your UTM Firewall in order to receive technical
support. A current email address is required to register your
product. For prompt product registration, go to
my.securecomputing.com.
Step-by-step procedures for registering your device and activating
add-on features are provided in the McAfee UTM Firewall
Administration Guide.
This completes the setup of your UTM Firewall.
Advanced configurations
Use the menu in the UTM Firewall Web Management Console to
configure more sophisticated security settings and networking
features such as VPN. Refer to the McAfee UTM Firewall
Administration Guide, the Help, and the KnowledgeBase for further
configuration information.
24
Page 25

uf_SG720_qig_700-2240A00_en-us.fm Page 25 Monday, October 12, 2009 11:56 AM
SOFTWARE LICENSE AGREEMENT
NOTICE TO ALL USERS: PLEASE READ THIS CONTRACT CAREFULLY. BY CLICKING THE
ACCEPT BUTTON OR INSTALLING THE SOFTWARE, YOU (EITHER AN INDIVIDUAL OR A
SINGLE ENTITY) AGREE THAT THIS AGREEMENT IS ENFORCEABLE LIKE ANY WRITTEN
CONTRACT SIGNED BY YOU. IF YOU DO NOT AGREE TO ALL THE TERMS OF THIS
AGREEMENT, CLICK ON THE BUTTON THAT INDICATES THAT YOU DO NOT ACCEPT THE
TERMS OF THIS CONTRACT AND DO NOT INSTALL THE SOFTWARE.
1 Definitions.
a Software” means (a) all of the contents of the files, disk(s), CD-ROM(s) or other
media (including electronic media) with which this Agreement is provided or
such contents as are hosted by McAfee or its distributors, resellers, OEM/MSP
partners, or other business partners (collectively “Authorized Partner(s)”),
including but not limited to (i) McAfee or third party computer information or
software; (ii) related explanatory materials in printed, electronic, or online form
(“Documentation”); and (b) upgrades, modified or subsequent versions and
updates including any virus or vulnerability updates (collectively “Updates”),
and Software, if any, licensed to you by McAfee or an Authorized Partner as part
of a maintenance contract or service subscription.
b “Use” or “Using” means to access, install, download, copy or otherwise benefit
from using the Software.
c “Permitted Number” means one (1) unless otherwise indicated under a valid
license (e.g., volume license) granted by McAfee.
d “Computer” means a device that accepts information in digital or similar form
and manipulates it for a specific result based upon a sequence of instructions.
e “McAfee” means (a) McAfee, Inc., a Delaware corporation, with offices located
at 3965 Freedom Circle, Santa Clara, California 95054, USA if the Software is
purchased in the United States, Mexico, Central America, South America, or the
Caribbean; (b) McAfee Ireland Limited, with offices located at 11 Eastgate
Business Park, Little Island, Cork, Ireland if the Software is purchased in
Canada, Europe, the Middle East, Africa, Asia, or the Pacific Rim; and (c) McAfee
Co., Ltd. with offices located at Shibuya Mark City West Building 12-1,
Dogenzaka 1-Chrome, Shibuya-ku, Tokyo 150-0043, Japan if the Software is
purchased in Japan.
2 License Grant. Subject to the payment of the applicable license fees (where
applicable), and subject to the terms and conditions of this Agreement, McAfee
hereby grants to you a non-exclusive, non-transferable license to Use the Software
subject to any restrictions or usage terms specified on the applicable price list,
purchase agreement, and product packaging included as part of the Documentation.
Some third party materials included in the Software may be subject to other terms
and conditions, which are typically found in a “Read Me” file or “About” file in the
Software.
3Term. This Agreement is effective for the term set forth in the purchase order
issued by you and which is accepted by McAfee or, alternatively, as set forth in the
product order form issued by McAfee (the “Term”). If you issue a purchase order
to an Authorized Partner and the terms and conditions as set forth in the license
grant letter issued by McAfee or included in the Documentation conflicts with the
terms and conditions included in the purchase order, then the terms and conditions
specified in the grant letter or Documentation shall control. Except for Evaluation
Software, Beta Software or freeware which is subject to Section 7 below, if no Term
25
Page 26

uf_SG720_qig_700-2240A00_en-us.fm Page 26 Monday, October 12, 2009 11:56 AM
is included in the above described materials, then the Term shall be for one (1) year
from the date of purchase unless earlier terminated as set forth herein. This
Agreement will terminate automatically if you fail to comply with any of the
limitations or other requirements described herein. Upon any termination or
expiration of this Agreement, you must cease use of the Software and destroy all
copies of the Software and the Documentation.
4Updates. This license is limited to the version of the Software delivered by McAfee
and does not include Updates, unless a separate maintenance contract is purchased
or, alternatively, you have purchased a service subscription that entitles you to
Updates as described in the Documentation. After the specified maintenance period
or service subscription period has expired, you have no further rights to receive any
Updates without purchase of a new license to the Software.
5 Ownership Rights. The Software is protected by United States’ and other
copyright laws, international treaty provisions and other applicable laws in the
country in which it is being used. McAfee and its suppliers own and retain all right,
title and interest in and to the Software, including all copyrights, patents, trade
secret rights, trademarks and other intellectual property rights therein. Your
possession, installation, or use of the Software does not transfer to you any title to
the intellectual property in the Software, and you will not acquire any rights to the
So ftw are exc ept as e xpr ess ly s et f ort h in thi s Ag ree men t. A ny c opy of t he S oft war e
and Documentation authorized to be made hereunder must contain the same
proprietary notices that appear on and in the Software and Documentation.
6 Multiple Environment Software/Multiple Language Software/Dual Media
Software/Multiple Copies/Bundles/Updates. If the Software supports
multiple platforms or languages, if you receive the Software on multiple media, if
you otherwise receive multiple copies of the Software, or if you receive the Software
bundled with other software, the total number of your Computers on which all
versions of the Software is installed may not exceed the Permitted Number. If the
Software is an Update to a previous version of the Software, you must possess a
valid license to such previous version in order to Use the Update. You may continue
to Use the previous version of the Software on your Computer after you receive the
Update to assist you in the transition to the Update, provided that the Update and
the previous version are installed on the same Computer; the previous version or
copies thereof are not transferred to another Computer unless all copies of the
Update are also transferred to such Computer, and you acknowledge that any
obligation McAfee may have to support the previous version of the Software ends
upon availability of the Update.
7 Evaluation Product Additional Terms. If the product you have received with this
license has been identified as “Evaluation” Software, “Beta” Software or freeware,
then the provisions of this section apply. To the extent that any provision in this
section is in conflict with any other term or condition in this Agreement, this section
shall supercede such other term(s) and condition(s) with respect to the Evaluation
Software, Beta Software, or freeware, but only to the extent necessary to resolve
the conflict. You acknowledge that the Evaluation Software, Beta Software or
freeware may contain bugs, errors and other problems that could cause system or
other failures and data loss. Consequently, Evaluation Software, Beta Software, or
freeware is provided to you "AS-IS", and McAfee disclaims any warranty or liability
obligations to you of any kind. WHERE LEGAL LIABILITY CANNOT BE EXCLUDED,
BUT MAY BE LIMITED, MCAFEE’S LIABILITY AND THAT OF ITS SUPPLIERS AND
AUTHORIZED PARTNERS SHALL BE LIMITED TO THE SUM OF FIFTY DOLLARS (U.S.
$50) IN TOTAL. You acknowledge that McAfee has not promised or guaranteed to
you that freeware or Beta Software will be announced or made available to anyone
in the future that McAfee has no express or implied obligation to you to announce
26
Page 27

uf_SG720_qig_700-2240A00_en-us.fm Page 27 Monday, October 12, 2009 11:56 AM
or introduce the Beta Software, and that McAfee may not introduce a product similar
to or compatible with the Beta Software. Accordingly, you acknowledge that any
research or development that you perform regarding the Beta Software or any
product associated with the Beta Software is done entirely at your own risk. During
the term of this Agreement, if requested by McAfee, you will provide feedback to
McAfee regarding testing and use of the Beta Software, including error or bug
reports; you agree to grant McAfee a perpetual, non-exclusive, royalty-free,
worldwide license to use, copy, distribute, make derivative works and incorporate
the feedback into any McAfee product at McAfee’s sole discretion. If you have been
provided the Beta Software pursuant to a separate written agreement, your use of
the Beta Software is also governed by such agreement. Upon receipt of a later
unreleased version of the Beta Software or release by McAfee of a publicly released
commercial version of the Beta Software, whether as a stand-alone product or as
part of a larger product, you agree to return or destroy all earlier Beta Software
received from McAfee and to abide by the terms of the End User License Agreement
for any such later versions of the Beta Software. Your Use of the Evaluation or Beta
Software is limited to 30 days and use of freeware is available for only so long as
McAfee makes the freeware available unless otherwise agreed to in writing by
McAfee. McAfee is under no obligation to continue providing freeware or to update
such freeware.
8 Restrictions. You may not sell, lease, license, rent, loan, resell or otherwise
transfer, with or without consideration, the Software. If you enter into a contract
with a third party in which the third party manages your information technology
resources (“Managing Party”), you may transfer all your rights to Use the Software
to such Managing Party, provided that (a) the Managing Party only Uses the
Software for your internal operations and not for the benefit of another third party;
(b) the Managing Party agrees to comply with the terms and conditions of this
Agreement, and (c) you provide McAfee with written notice that a Managing Party
will be Using the Software on your behalf. You may not permit third parties to
benefit from the use or functionality of the Software via a timesharing, service
bureau or other arrangement. You may not reverse engineer, decompile, or
disassemble the Software, except to the extent the foregoing restriction is expressly
prohibited by applicable law. You may not modify, or create derivative works based
upon, the Software in whole or in part. You may not copy the Software or
Documentation except as expressly permitted in Section 1 above. You may not
remove any proprietary notices or labels on the Software. All rights not expressly
set forth hereunder are reserved by McAfee.
9 Warranty and Disclaimer.
a Limited Warranty. McAfee warrants that for sixty (60) days from the date of
original purchase the media (e.g., CD ROM), if any, on which the Software is
contained and provided to you will be free from defects in materials and
workmanship.
b Customer Remedies. McAfee’s and its suppliers' entire liability and your
exclusive remedy for any breach of the foregoing warranty shall be, at McAfee’s
option, either (i) return of the purchase price you paid for the license, or (ii)
replacement of the defective media in which the Software is contained. You
must return the defective medi a to McA fe e a t y ou r e xp en se wi th a c op y of you r
receipt. This limited warranty is void if the defect has resulted from accident,
abuse, or misapplication. Any replacement media will be warranted for the
27
Page 28

uf_SG720_qig_700-2240A00_en-us.fm Page 28 Monday, October 12, 2009 11:56 AM
remainder of the original warranty period. Outside the United States, this
remedy is not available to the extent McAfee is subject to restrictions under
United States export control laws and regulations.
c Warranty Disclaimer. Except for the limited warranty set forth herein, THE
SOFTWARE IS PROVIDED "AS IS" AND MCAFEE MAKES NO WARRANTY AS TO
ITS USE OR PERFORMANCE. EXCEPT FOR ANY WARRANTY, CONDITION,
REPRESENTATION OR TERM THE EXTENT TO WHICH CANNOT BE EXCLUDED OR
LIMITED BY APPLICABLE LAW. MCAFEE, ITS SUPPLIERS AND AUTHORIZED
PATNERS MAKE NO WARRANTY, CONDITION, REPRESENTATION, OR TERM
(EXPRESS OR IMPLIED, WHETHER BY STATUTE, COMMON LAW, CUSTOM,
USAGE OR OTHERWISE) AS TO ANY MATTER INCLUDING, WITHOUT
LIMITATION, NONINFRINGEMENT OF THIRD PARTY RIGHTS,
MERCHANTABILITY, SATISFACTORY QUALITY, INTEGRATION, OR FITNESS FOR
A PARTICULAR PURPOSE. YOU ASSUME RESPONSIBILITY FOR SELECTING THE
SOFTWARE TO ACHIEVE YOUR INTENDED RESULTS, AND FOR THE
INSTALLATION OF, USE OF, AND RESULTS OBTAINED FROM THE SOFTWARE.
WITHOUT LIMITING THE FOREGOING PROVISIONS, MCAFEE MAKES NO
WARRANTY THAT THE SOFTWARE WILL BE ERROR-FREE OR FREE FROM
INTERRUPTIONS OR OTHER FAILURES OR THAT THE SOFTWARE WILL MEET
YOUR REQUIREMENTS.
10 Limitation of Liability. UNDER NO CIRCUMSTANCES AND UNDER NO LEGAL
THEORY, WHETHER IN TORT, CONTRACT, OR OTHERWISE, SHALL MCAFEE OR ITS
AUTHORIZED PARTNERS OR SUPPLIERS BE LIABLE TO YOU OR TO ANY OTHER
PERSON FOR LOSS OF PROFITS, LOSS OF GOODWILL OR ANY INDIRECT, SPECIAL,
INCIDENTAL, OR CONSEQUENTIAL DAMAGES OR DAMAGES FOR GROSS
NEGLIGENCE OF ANY CHARACTER INCLUDING, WITHOUT LIMITATION, DAMAGES
FOR LOSS OF GOODWILL, WORK STOPPAGE, COMPUTER FAILURE OR
MALFUNCTION, OR FOR ANY OTHER DAMAGE OR LOSS. IN NO EVENT SHALL
MCAFEE OR ITS AUTHORIZED PARTNERS OR SUPPLIERS BE LIABLE FOR ANY
DAMAGE IN EXCESS OF THE PRICE PAID FOR THE SOFTWARE, IF ANY, EVEN IF
MCAFEE OR ITS AUTHORIZED PARTNERS OR SUPPLIERS SHALL HAVE BEEN
ADVISED OF THE POSSIBILITY OF SUCH DAMAGES. This limitation shall not apply
to liability for death or personal injury to the extent that applicable law prohibits
such limitation. Furthermore, some jurisdictions do not allow the exclusion or
limitation of incidental or consequential damages, so this limitation and exclusion
may not apply to you. Nothing contained in this Agreement limits McAfee’s liability
to you for McAfee’s negligence or for the tort of fraud. McAfee is acting on behalf
of its suppliers and Authorized Partners for the purpose of disclaiming, excluding
and/or limiting obligations, warranties and liability as provided in this Agreement,
but in no other respects and for no other purpose. The foregoing provisions shall
be enforceable to the maximum extent permitted by applicable law.
11 Notice to United States Government End Users. The Software and
accompanying Documentation are deemed to be "commercial computer software"
and "commercial computer software documentation," respectively, pursuant to
DFAR Section 227.7202 and FAR Section 12.212, as applicable. Any use,
modification, reproduction, release, performance, display or disclosure of the
Software and accompanying Documentation by the United States Government shall
be governed solely by the terms of this Agreement and shall be prohibited except
to the extent expressly permitted by the terms of this Agreement.
28
Page 29

uf_SG720_qig_700-2240A00_en-us.fm Page 29 Monday, October 12, 2009 11:56 AM
12 Export Controls. You acknowledge that the Software is subject to the export
control laws and regulations of the United State of America (“US”), and any
amendments thereof. You shall not export or re-export the Software, directly or
indirectly, to (i) any countries that are subject to US export restrictions (currently
including, but not necessarily limited to, Cuba, Iran, Libya, North Korea, Sudan, and
Syria); (ii) any end user known, or having reason to be known, will utilize them in
the design, development or production of nuclear, chemical or biological weapons;
or (iii) any end user who has been prohibited from participating in the US export
transactions by any federal agency of the US government. You further acknowledge
that Software may include technical data subject to export and re-export
restrictions imposed by US law.
13 High Risk Activities. The Software is not fault-tolerant and is not designed or
intended for use in hazardous environments requiring fail-safe performance,
including without limitation, in the operation of nuclear facilities, aircraft navigation
or communication systems, air traffic control, weapons systems, direct life-support
machines, or any other application in which the failure of the Software could lead
directly to death, personal injury, or severe physical or property damage
(collectively, "High Risk Activities"). MCAFEE EXPRESSLY DISCLAIMS ANY EXPRESS
OR IMPLIED WARRANTY OF FITNESS FOR HIGH RISK ACTIVITIES.
14 Governing Law. This Agreement will be governed by and construed in accordance
with the substantive laws in force: (a) in the State of New York, if you purchased
the Software in the United States, Mexico, Central America, South America, or the
Caribbean; (b) in the Republic of Ireland, if you purchased the Software in Canada,
Europe, Middle East, Africa, Asia, or the region commonly referred to as the Pacific
Rim; and (c) in Japan if you purchased the Software in Japan. If you purchased the
Software in any other country, then the substantive laws of the Republic of Ireland
shall apply, unless another local law is required to be applied. This Agreement will
not be governed by the conflict of laws rules of any jurisdiction or the United Nations
Convention on Contracts for the International Sale of Goods, the application of
which is expressly excluded. The United States District Court for the Southern
District of New York, and the Courts of New York County, New York, when New York
law applies, the courts of the Republic of Ireland, when the law of Ireland applies,
and the courts of Japan when Japanese law applies, shall each have non-exclusive
jurisdiction over all disputes relating to this Agreement.
15 Free Software. This product includes or may include some software programs that
are licensed (or sublicensed) to the user under the GNU General Public License
(GPL) or other similar software licenses which, among other rights, permit the user
to copy, modify and redistribute certain programs, or portions thereof, and have
access to the source code. The GPL requires that for any software covered under
the GPL, which is distributed to someone in an executable binary format that the
source code also be made available to those users. For any such software, the
source code is made available in a designated directory created by installation of
the Software or designated internet page. If any Free Software licenses require that
McAfee provide rights to use, copy or modify a software program that are broader
than the rights granted in this agreement, then such rights shall take precedence
over the rights and restrictions herein.
16 Privacy. By entering into this Agreement, you agree that McAfee may collect,
retain and use your personal information, including your name, address, e-mail
address, and payment details. Your personal information will be used primarily to
provide services and product functionality to you. McAfee may also use your
personal information for additional communication with you, subject to your
decision not to accept such communications from McAfee and subject to applicable
laws. McAfee engages other companies and individuals (“subcontractors”) to
29
Page 30

uf_SG720_qig_700-2240A00_en-us.fm Page 30 Monday, October 12, 2009 11:56 AM
perform functions on its behalf, such as payment processing, order fulfillment,
marketing programs and customer service. McAfee may share your information
with such subcontractors in order to perform these and other functions, but such
subcontractors may not use your personal information for other purposes, unless
you agree. By entering into this Agreement, you agree to the transfer of your
personal information to McAfee offices in the United States, for the purposes stated
above. For more detailed information on the collection, use and transfer of your
personal information, and for information on how to opt out of or unsubscribe from
the communications described above, please read the McAfee privacy policy on the
McAfee web site (www.mcafee.com).
17 Audit. McAfee may, at its expense and upon reasonable notice to customer during
standard business hours audit customer with respect to its compliance with the
terms of this Agreement. Customer understands and acknowledges that McAfee
utilizes a number of methods to verify and support software use by its customers.
These methods may include technological features of the McAfee software that
prevent unauthorized use and provide software deployment verification. Upon
reasonable request, customer will provide a system generated report verifying
customer’s software deployment, such request to occur no more than four (4) times
per year. In the event that McAfee requires a physical audit, such audit shall be
preceded by thirty (30) days written notice and shall occur no more than once per
year unless otherwise required for compliance with the Sarbanes-Oxley Act.
18 Auto-Boot /Post Boot Mode. McAfee shall have no liability to you for any
damages resulting from the use of the Software in the “auto-boot” or “post-boot”
mode. You are advised that such tools are designed for product deployment
purposes only, and any other use does not provide adequate data security. Any
such contrary use shall be at your sole risk. Moreover, in the event of a data breach
resulting from such contrary use, you shall not publicize McAfee’s name in
connection with such breach, nor make any statements that unfairly disparage the
reputation of McAfee products.
19 Miscellaneous. This Agreement sets forth all rights for the user of the Software
and is the entire Agreement between the parties. This Agreement supersedes any
other communications, representations or advertising relating to the Software and
Documentation. This Agreement may not be modified except by a written
addendum issued by a duly authorized representative of McAfee. No provision
hereof shall be deemed waived unless such waiver shall be in writing and signed by
McAfee. If any provision of this Agreement is held invalid, the remainder of this
Agreement shall continue in full force and effect.
20 McAfee Customer Contact. If you have any questions concerning these terms
and conditions, or if you would like to contact McAfee for any other reason, please
call (866) 736-3971 or (800) 338-8754, or write: McAfee, Inc., Attention: Customer
Service, 5000 Headquarters Drive, Plano, TX 75024, or e-mail us by visiting
service.mcafee.com.
30
Page 31

uf_SG720_qig_700-2240A00_en-us.fm Page 31 Monday, October 12, 2009 11:56 AM
31
Page 32

uf_SG720_qig_700-2240A00_en-us.fm Page 32 Monday, October 12, 2009 11:56 AM
700-2240A00
 Loading...