

Page 1

McAfee SaaS Email
Protection Administrator
Guide
Updated: November 2012
Proprietary and Confidential
Page 2

Email Protection Administrator Guide
RESTRICTION ON USE, PUBLICATION,
OR DISCLOSURE OF PROPRIETARY
INFORMATION.
Copyright © 2012 McAfee, Inc.
This document contains information that is
proprietary and confidential to McAfee. No
part of this document may be reproduced,
stored in a retrieval system, or transmitted, in
any form or by any means (electronic,
mechanical, photocopying, recording, or otherwise) without prior written permission
from McAfee. All copies of this document
are the sole property of McAfee and must be
returned promptly upon request.
McAfee, Inc.
9781 South Meridian Blvd., Suite 400
Englewood, CO 80112 USA
Direct +1 720-895-5700
Fax +1 720-895-5757
November 2012 Proprietary: Not for use or disclosure outside McAfee without written permission 2
Page 3

Email Protection Administrator Guide
Contents
Overview..................................................................................................................... 1
Differences in Administration for Service Providers ............................................ 1
Account Management Necessary for Email Protection ........................................ 1
MX Record Validation ...........................................................................................2
Alias Domain Names ............................................................................................2
Auto-creation of Users .............................................................................................2
Email Filtering Policies ............................................................................................ 2
Types of Inbound Email Filtering ..........................................................................3
Types of Outbound Email Filtering ....................................................................... 8
Configurable Actions for Filtered Email ................................................................8
User-level Policy Configurations ..........................................................................10
Quarantine ...............................................................................................................10
Customizing the Interface ......................................................................................11
Licensed Branding ..............................................................................................11
Language Localization ........................................................................................12
Outbound Disclaimer ..........................................................................................12
Notifications ........................................................................................................ 13
Monitoring and Reporting ......................................................................................13
Optional Utilities ..................................................................................................... 13
Spam Control for Outlook® ............................................................................... 13
Disaster Recovery Services ...................................................................................14
Fail Safe ............................................................................................................. 14
Email Continuity ..................................................................................................14
Access Email Protection Administration 15
November 2012 Proprietary: Not for use or disclosure outside McAfee without written permission iii
Page 4

Email Protection Administrator Guide
Who Can Access Email Protection Administration windows ............................. 15
Other Documents You Might Need .......................................................................19
Email Protection Documents ..............................................................................19
Web Protection Service Documents ................................................................... 20
Message Archiving Documents ..........................................................................20
User Guides ........................................................................................................20
Ensure You Can Receive Email from Your Service Provider .............................20
Log on to the Control Console ..............................................................................20
Reset Your Password from the log on window ................................................... 21
Check the Status of Email Protection on the Overview 25
Set up Your Servers 29
Confirm Your Inbound Servers Setup .................................................................29
Set up Additional Inbound Servers .......................................................................29
Delete an Inbound Server ...................................................................................30
Add IP Address of Outbound Server, If Necessary .............................................31
Delete an Outbound Server ................................................................................32
Set up a Smart Host (If Outbound Mail Defense is Turned on) .......................... 32
Add an Outbound Email Disclaimer ....................................................................32
Redirect Your MX Records .................................................................................... 33
Check Your MX Record ..........................................................................................34
Set up User Creation Mode — SMTP Discovery or Explicit ................................36
Customize Inbound Mail Filters 39
November 2012 Proprietary: Not for use or disclosure outside McAfee without written permission iv
Page 5

Email Protection Administrator Guide
Enterprise or Service Provider Customer ............................................................ 39
Create a Custom Policy (Enterprise Customer Only) ..........................................41
Configure a Virus Filter ..........................................................................................43
Set Email Protection to Notify Users about Emails with Viruses ........................44
Configure a Spam Filter .........................................................................................45
Define the Action to Take on Spam ....................................................................46
Define Additional Words That Indicate Spam .....................................................47
Set up Spam Quarantine Reports ......................................................................50
Configure a Content Filter .....................................................................................53
Turn Off a Default Content Filter ........................................................................55
Custom Content Group .......................................................................................56
Notify Users about Spam Content ......................................................................57
Configure a Filter for HTML, Java Script, ActiveX, and Spam Beacons .............58
Configure Web Hyperlink Filters (ClickProtect) .................................................. 60
Define an Attachment Filter ...................................................................................62
Filter by Attachment File Types ......................................................................... 62
Filter by Attachment File Name ..........................................................................65
Filter Zip File Attachments ..................................................................................66
Notify Users about Attachment Violations ..........................................................67
Allow or Deny Email to or from Specific Addresses ...........................................68
Allow Email from a Specific Address .................................................................. 69
Deny Email from a Specific Address ................................................................. 70
Deny Email to a Specific Recipient ....................................................................72
Save a Copy of an Allow, Deny, or Recipient Shield List ...................................73
Add Allow, Deny, or Recipient Shield Addresses with a Batch File .................... 73
Email Authentication ..............................................................................................73
Transport Layer Security ....................................................................................73
Enforced SPF ..................................................................................................... 75
Define the Format and Text of Notifications to Users .........................................80
Variables within a Notification .............................................................................80
Define the Format and Text of Virus Notifications ..............................................81
Define the Format and Text of Content Violation Notifications ...........................83
November 2012 Proprietary: Not for use or disclosure outside McAfee without written permission v
Page 6

Email Protection Administrator Guide
Define the Format and Text of Attachment Violation Notifications ..................... 84
Email Authentication ...........................................................................................85
Disaster Recovery .................................................................................................. 87
Assign a Group to the Custom Policy .................................................................. 88
Customize Outbound Mail Filters 89
Create a Custom Outbound Policy .......................................................................89
Configure a Virus Filter ..........................................................................................90
Configure a Content Filter .....................................................................................90
Email Encryption for Content Groups .................................................................91
Define an Attachment Filter ...................................................................................92
Define the Format and Text of Notifications to Users .........................................92
Assign a Group to the Custom Policy .................................................................. 92
Managing Quarantine Reports 93
Set up Quarantine Reports .................................................................................... 93
Monitor Users’ Quarantined Email ........................................................................93
Primary Email Addresses, Aliases, and Public Domain Addresses ....................94
Search for Quarantined Email ............................................................................ 94
Interpret the Search Results ...............................................................................95
Sort the Search Results ......................................................................................96
Delete Quarantined Messages ...........................................................................97
Release Quarantined Messages ........................................................................97
View Quarantines Messages ..............................................................................97
Monitor Your Own Quarantine ............................................................................99
Set up Disaster Recovery Services 101
Administer Disaster Recovery Services .............................................................101
Set up Spooling for Disaster Recovery ............................................................. 101
Set up Notifications of Disaster Recovery ........................................................102
User-Level Policy Configuration 103
System Reports 105
November 2012 Proprietary: Not for use or disclosure outside McAfee without written permission vi
Page 7

Email Protection Administrator Guide
Email Protection Reports .....................................................................................105
View an Email Protection Report ........................................................................106
Traffic Overview ................................................................................................107
Traffic: Enforced TLS Report ............................................................................109
Traffic: Encryption ................................................................................................110
Threats: Overview ............................................................................................111
Threats: Viruses ............................................................................................... 113
Threats: Spam ....................................................................................................... 115
Threats: Content ...................................................................................................117
Threats: Attachments ...........................................................................................119
Enforced TLS: Details .......................................................................................... 121
Enforced SPF Report ............................................................................................122
ClickProtect: Overview .........................................................................................123
ClickProtect: Click Log ........................................................................................ 125
Quarantine: Release Overview ............................................................................126
Quarantine: Release Log .....................................................................................128
View Details of Log Items ....................................................................................130
User Activity ..........................................................................................................131
Event Log .............................................................................................................. 133
Audit Trail .............................................................................................................. 134
Inbound Server Connections ...............................................................................135
Disaster Recovery: Overview ..............................................................................137
Disaster Recovery: Event Log .............................................................................138
November 2012 Proprietary: Not for use or disclosure outside McAfee without written permission vii
Page 8

Email Protection Administrator Guide
Administer MSP Connector ................................................................................. 139
Configure the MSP Connection ........................................................................139
Add Domains to the MSP Connection .............................................................. 141
Turn on Exception Notifications for the MSP Connection .................................142
View an MSP Connector Audit Report .............................................................143
Administer Performance Reports .......................................................................147
Performance Report Descriptions ....................................................................148
Tips and Frequently Asked Questions 153
FAQs ................................................................................................................153
Tips/Techniques ............................................................................................... 159
November 2012 Proprietary: Not for use or disclosure outside McAfee without written permission viii
Page 9

Email Protection Administrator Guide Differences in Administration for Service
1. Overview
McAfee® Saas Email Protection provides security services that safeguard corporations
from unsolicited spam email (junk mail), viruses, worms, and unwanted content at the
network perimeter before they can enter the internal network.
Multiple layers of McAfee Saas Email Protection provide secure and complete email
filtering to protect your users. You can enable or disable specific layers by changing the
licensed packages of features and/or through configuring the specific email policies in the
Control Console, the comprehensive graphical interface into McAfee Saas Email
Protection.
This document describes the tasks necessary to configure and maintain your McAfee Saas
Email Protection.
Differences in Administration for
Service Providers
This document is for use by Enterprise customers only. Service Provider customers do not
administer groups for Email Protection and therefore, do not assign groups to email
filtering policies. Instead, Service Provider customers assign policies directly to domains.
The capabilities for managing policies and groups, as described in this document, apply
only to Enterprise customers.
Account Management Necessary for
Email Protection
Account Management is a set of administrative windows you use to configure and manage
the entities that use or are affected by Email Protection (Email Protection), as well as the
Web Protection Service (WDS) and Message Archiving products. These entities include:
• Domains
•Users
• Other administrators, including other Customer Administrators, Domain
Administrators, Quarantine Managers, and Reports Managers
In addition, for Email Protection only, you use Account Management to administer groups
of users that share a common email filtering policy.
For more information, see Account Management Administrator Guide.
November 2012 Proprietary: Not for use or disclosure outside McAfee without written permission 1
Page 10

Auto-creation of Users Email Protection Administrator Guide
MX Record Validation
You can validate that the MX Records that are configured for your domain are properly
redirected by entering the specific DNS and/or IP address for your MTA server. The
Control Console displays the MX Record configuration as reported by the authoritative
DNS server.
See Check Your MX Record.
Alias Domain Names
You can configure alias domain names that act as virtual domains using the configurations
and email addresses defined in the primary Domain name. Email addresses are created
automatically for alias domains (for example, jsmith@yourcompanyalias.com is
automatically created for jsmith@yourcompany.com), allowing the single user to receive
email for both addresses.
For more information, see Account Management Administrator Guide.
Auto-creation of Users
The Email Protection automatically creates new user accounts if all the following is true:
• SMTP Discovery is enabled. SMTP Discovery, which is enabled by default, is a
convenient way to add users to your service. However, this capability might also add
users who are not real users at your company and not add users who are real.
• SMTP discovery creates users that receive eight valid emails within a 24 hour period.
• A user account does not exist for the email address in the designated Domain.
• The emails were not addressed to an alias domain name.
For more information, see Set up User Creation Mode — SMTP Discovery or Explicit.
Email Filtering Policies
Email Protection has default inbound and outbound mail filters to block and clean
malicious email and to quarantine email that might be malicious. The filters are
configured by using policies, which are the parameters for the filters default policies are
automatically assigned to each of your domains.
You can customize the default inbound policy for any and each domain, or any and each
group, to fit your business Email Protection.
For more information, see Customize Inbound Mail Filters.
2 Proprietary: Not for use or disclosure outside McAfee without written permission. November 2012
Page 11
Email Protection Administrator Guide Email Filtering Policies
Types of Inbound Email Filtering
Email Protection can filter both inbound and outbound email. Inbound filtering that is
available to be configured is as follows:
• Anti-Spam Filtering
• Real-time Blackhole List
• Anti-Virus Filter
• Content Filtering and ClickProtect
• Attachment Filtering
• Multi-Level Allow and Deny Lists
Anti-Spam Filtering
Spam is usually defined as unsolicited (and usually unwanted) and commercial email sent
to a large number of addresses. However, what one recipient may consider as spam,
another recipient would consider as legitimate email.
In addition, spam has become a tool of hackers and electronic terrorists who deliberately
attempt to gather proprietary information from computer systems and/or attempt to cause
harm to a company’s email system. Typically, these types of spammers deliberately use
naming standards, hijacked From: addresses, scrambled content, etc., to bypass spam
filters such as blacklists and keyword lists.
Using Stacked Classification Framework®, Email Protection provides the most
comprehensive and effective spam-blocking product on the market today—blocking 98%
of spam and providing an industry-leading low false positive rate (legitimate email
marked as spam).
The Stacked Classification Framework aggregates the most effective spam filters and
techniques in the industry into a spam likelihood. As appropriate, email is assigned a high
or medium likelihood of being spam. A separate email action can be assigned to each
likelihood.
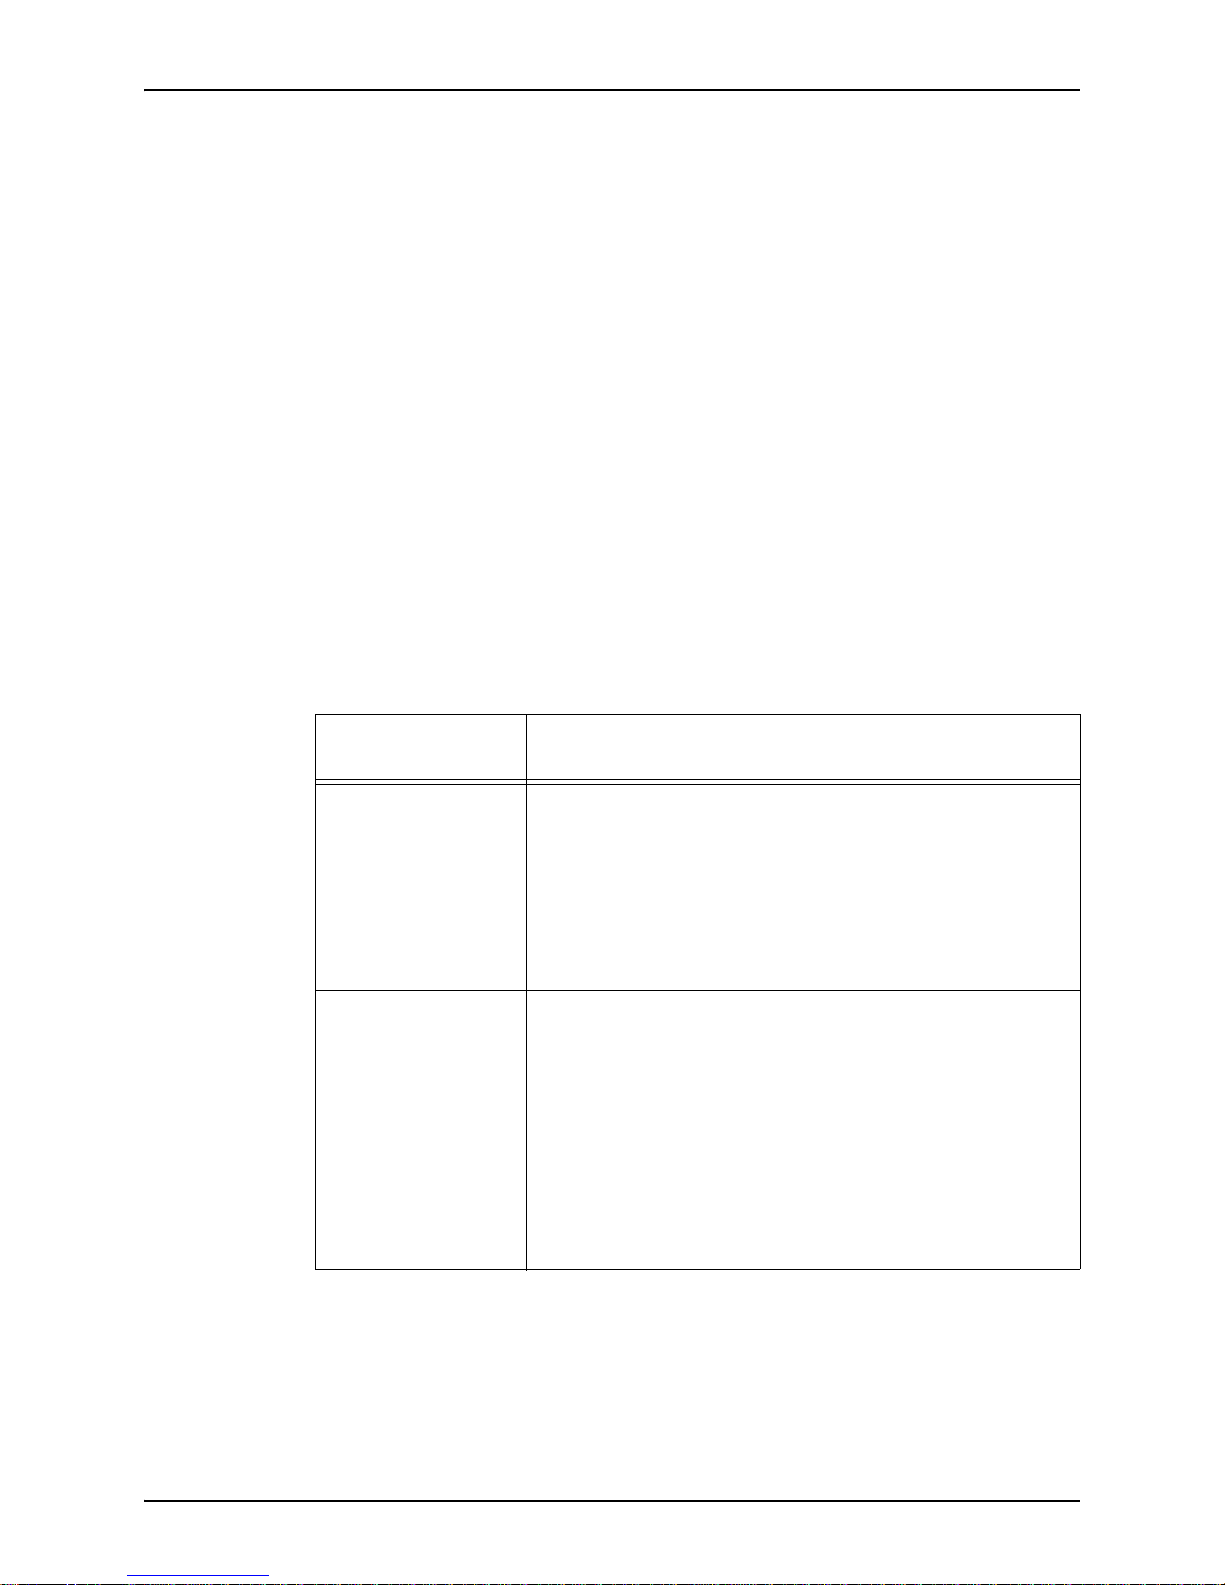
The spam classification techniques include the following:
Spam FilterType Description
IP Reputation
Connection Manager
Bayesian Statistical
Filtering
This filter operates at the front of the Stacked Classification
Framework. It rates the reputation of every incoming email, based
on IP reputation data collected by your Email Protection provider
on an on-going basis. Connections are dropped for all messages
which originate from IP addresses that are determined to carry a
reputation for sending spam.
Statistical algorithms built by your Email Protection provider
identify and quantify the possibility that an email is spam based on
how often elements in that email have appeared in identified spam
emails.
November 2012 Proprietary: Not for use or disclosure outside McAfee without written permission 3
Page 12
Email Filtering Policies Email Protection Administrator Guide
Spam FilterType Description
Industry Heuristics Email Protection incorporates thousands of successful industry-
wide spam-fighting rules to recognize characteristics of spam.
Proprietary Heuristics Email Protection experts write and update thousands of proprietary
rules to block spam, including fraudulent phishing spam, using
real-time data from your service provider’s Threat Center.
URL Filtering URL filtering works by comparing embedded links found in emails
with URLs associated with identified spam.
Reputation Analysis Email Protection constantly monitors inbound email to build a list
of IP addresses and domain names to rate the reputation of the
sender based upon the percentage of spam emails received from
that address in the past.
Reputation-Based RBL
Filtering
Sender Policy
Framework (SPF)
Using up to 31 real-time blackhole lists (RBLs) of known
spammers provided by the industry, Email Protection creates a
single RBL indicator to help gauge the likelihood of an email being
sent by a known spammer. By using multiple black lists to create a
single vote and by rating the reputation of each RBL based on its
accuracy at distinguishing spammers from senders of legitimate
email helps to minimize the possibility of a non-spammer being
blocked by mistake.
The SPF classifier helps identify and block fraudulent spoofing
emails – those sent by spammers with forged “From” addresses –
from entering your email network. For each inbound email, the SPF
classifier will look up the sending domain’s Domain Naming
System (DNS) record and its list of authorized IP addresses.
Emails that carry an IP address not found on the authorized list will
be included within the Stacked Framework Classification System
for the detection of spam. By determining whether or not the
relationship between the DNS record and the IP address is
legitimate, Email Protection is able to more accurately filter out
fraudulent spoofed emails. As a result, Email Protection reduces
risk for users who might be duped by the email into divulging
confidential personal information.
Real-time Blackhole List
The Real-time Blackhole List (RBL) is a system for creating intentional network outages
(blackholes) for the purpose of limiting the transport of known-to-be-unwanted mass
email. The RBL is a database of IP addresses that are reported to be spam sources.
4 Proprietary: Not for use or disclosure outside McAfee without written permission. November 2012
Page 13
Email Protection Administrator Guide Email Filtering Policies
Anti-Virus Filter
Email Protection provides highly effective, organization-wide virus and worm protection.
By identifying viruses and worms at your network perimeter—before they enter or leave
your messaging infrastructure— Email Protection minimizes outbreak and infection risks
to your enterprise messaging infrastructure. You can configure whether infected emails are
quarantined, denied, or stripped of infection.
• Provides maximum protection using multiple, industry-leading anti-virus engines to
allow Email Protection to customize the protection to meet the latest threats.
• Virus definition updates every 5 minutes provide up-to-the-minute defense against the
latest threats.
• Provides safe, external virus scanning and quarantine management for protection
against viruses before they reach your network. Protects your users, networks, and
data from harm
Content Filtering and ClickProtect
Email Protection protects your organization and reduces liability and risk by automatically
identifying unwanted and malicious content before it enters or leaves your network.
You can enable any of the following types of content filtering:
Content Filter Type Description
Predefined Content
Keyword Groups
Customized Content
Keyword Groups
Multiple Levels of
HTML Filtering
Graphic Image
Replacement
You can enable or disable predefined content keyword groups
provided by Email Protection:
•Profanity
• Sexual Overtones
• Racially Insensitive
You can define customized content keyword groups containing
terms and phrases to satisfy the business and security Email
Protection of your organization.
You can designate the level of HTML filtering to be used (low,
medium, or high), with predefined actions for each level.
Depending on the level, malicious HTML tags and scripting
options embedded in email are stripped.
You can enable or disable the automatic replacement of images
with a transparent 1x1 pixel GIF within HTML emails.
November 2012 Proprietary: Not for use or disclosure outside McAfee without written permission 5
Page 14
Email Filtering Policies Email Protection Administrator Guide
Content Filter Type Description
Stripping of Spam
Beacons or
Web bugs
Spam beacons and web bugs are typically transparent, 1x1 pixel
graphics embedded in HTML content that send information about
your system to the source (usually a URL) of the spam beacon or
web bug. Typically, web bugs are used on Web sites to monitor
surfing behavior, but now spammers are hiding them in their mass
mailings as spam beacons. If the graphic is not removed before an
email is opened, the spam beacon sends a signal back to the
spammer’s URL that lets the spammer know whether the email
was opened and if the recipient’s email address is valid. If the
spammer gets this signal, the recipient is marked as a valid email
address and is guaranteed to receive more spam in the future.
You can enable or disable the auto
matic stripping of spam beacons
or Web bugs within HTML emails.
Disabling hyperlinks
within email
ClickProtect
with
SM
ClickProtect allows you to monitor and disable or enable whether
Web hyperlinks received in emails can be clicked and followed by
the user. With multiple levels of ClickProtect policy control,
Administrators can customize the desired level of protection. This
feature supports blocking phishing sites and accidental downloads
of viruses and worms.
Attachment Filtering
Email Protection provides you the ability to control the types and sizes of allowed
attachments entering your email network. You can control attachment filtering using any
of the following:
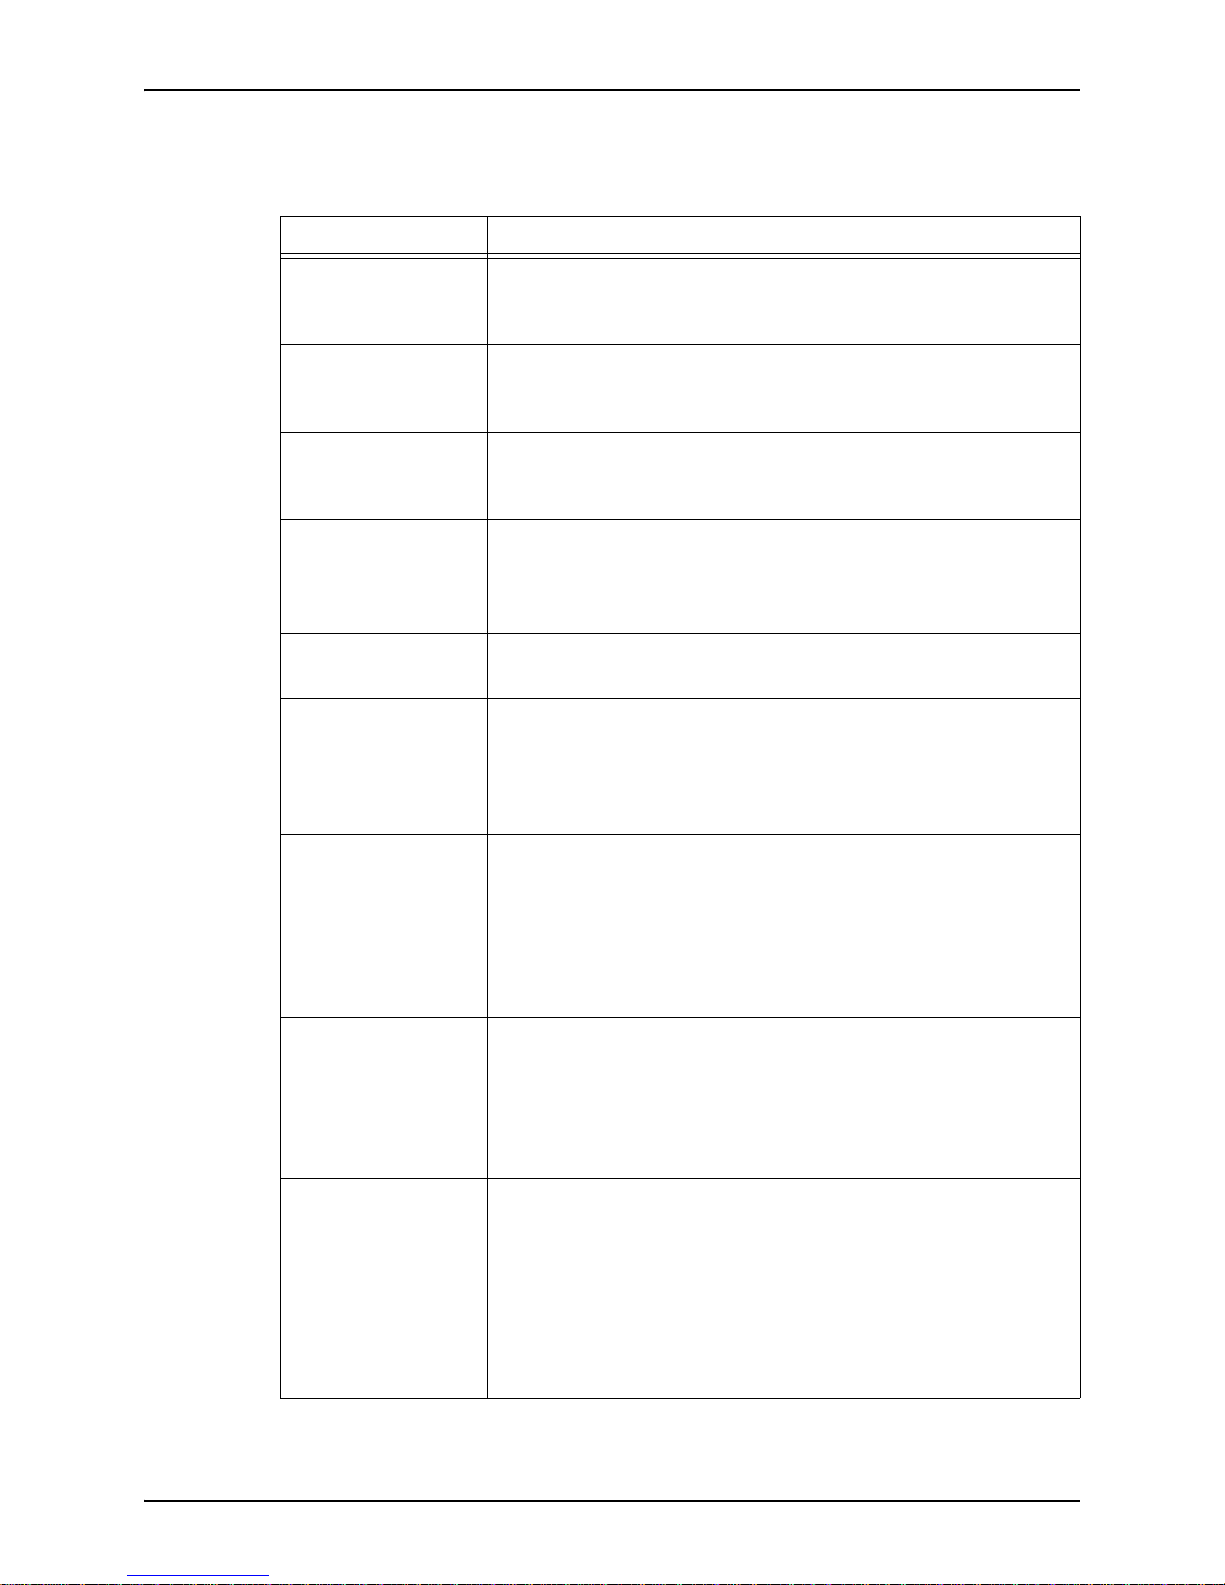
Attachment Filter
Type
Attachment Filtering
File Type
by
Attachment Filtering
Size
by
Custom Attachment
Rules by
Filename
Filtering for Files
ained within a Zip
Cont
File Attachment
Encrypted or “High
Risk” Zip
File
Attachment Rules
Description
You can enable or disable filtering of attachments by file type. File
type is determined using the file extension, MIME content type,
and binary composition.
You can designate a maximum allowed size for each enabled
attachment type.
You can configure custom rules using filenames that override the
global settings for an attachment file type. You can designate that
the rule use the entire filename or any part of the filename.
You can configure custom rules to cause Email Protection to
analyze the files within a zip file attachment, if possible, to
determine if a file in the zip file violates attachment policies. If the
zip file cannot be analyzed, you can designate the email action to
be applied.
You can configure custom rules for emails with encrypted zip files
and/or zip files that are considered high risk (too large, too many
nested levels, etc.).
6 Proprietary: Not for use or disclosure outside McAfee without written permission. November 2012
Page 15
Email Protection Administrator Guide Email Filtering Policies
Multi-Level Allow and Deny Lists
Email Protection allows you to define lists of emails that will always be denied (blacklists)
or will always be accepted (whitelists) at multiple levels. In addition, you can enable thirdparty Real-time Blackhole List to be used to filter unwanted emails.
The administrator-level lists override the user-level lists in a top-down manner: global lists
first, policy set lists next, and lastly user-level lists. For example, if the same address is
added to a user-level Allow list and the policy set Deny list, the address is always denied.
At the same level, the Allow list overrides the Deny list. For example, if you designate a
range of email addresses (for example, by designating an entire domain) in the Deny list,
but then designate a single email address from that domain in the Allow list, the email
from that single address will be always accepted while the email from any other address in
the domain in the Deny list will be always denied.
The same address string cannot be added multiple times in the same list or added to both
the Allow and Deny lists.
Be aware that emails that have been quarantined by Email Protection may not need to be
added to Deny lists because they are already being blocked from entering your email
network.
Following are the types of Allow and Deny lists that are available in Email Protection:
Allow/Deny List
Type
Global Deny List If your Email Protection provider determines that a Sending
SMTP has sent too many invalid incoming emails within a
specified time period, it will add the IP address for that Sending
SMTP to a Global Deny List for a designated time period (default
is 2 hours). During the denial period, all emails received from that
Sending SMTP will be automatically denied. This process helps to
protect against dictionary harvest and Denial of Service attacks.
This process can be disabled at the system level.
Policy set-level
Sender Deny Lists
and Sender Allow
Lists
Sender Deny lists indicate sender addresses from which email is
denied automatically. Sender Allow lists indicate sender addresses
from which email is allowed without spam, content, or attachment
filtering (virus filtering is always enabled unless specifically
disabled).
You can designate a single email address, entire domains or IPs, or
use wildcards to designate ranges of addresses. Optionally, you
can save these lists to a spreadsheet file.
Each policy set affects the email filtering for all user accounts in
the groups that are subscribed to that policy set.
Description
November 2012 Proprietary: Not for use or disclosure outside McAfee without written permission 7
Page 16
Email Filtering Policies Email Protection Administrator Guide
Allow/Deny List
pe
Ty
User-level Deny Lists
and Allow Lists
Recipient Shield List You can define a list of recipient em
Maintained by you and/or the user, Deny lists indicate sender
addresses from which email is denied automatically. Allow lists
indicate sender addresses from which email is allowed without
spam filtering (all other enabled filtering will be applied).
You can designate a single email address, entire domains or IPs, or
se wildcards to designate ranges of addresses. Optionally, you
u
can save these lists to a spreadsheet file.
These lists affect only the emails received for the designated user
account
want to specify special email actions (for example, you want to
deny all emails for a user who is an ex-employee). You can also
specify the email action to take if the recipient email address is
invalid in your system (permfailed by your email server as an
invalid recipient).
and its alias addresses (user-level lists).
Description
ail addresses for which you
Types of Outbound Email Filtering
You can add outbound filtering to each package, helping to ensure the safety and
appropriateness of information being sent from your corporate email system to valued
customers or business partners.
Filter Type Description
Content
Filtering
Attachment
Filtering
Virus
canning
S
This feature automatically prevents inappropriate,
confidential content from leaving your corporate email system,
allowing you to monitor and enforce your corporate email
policies.
Outbound attachments can be filtered by size, by MIME content
type, or by
policies.
Outbound virus scanning stops viruses and worms from leaving
your corporate email system, preventing your enterprise from
being the source of email-borne viruses to customers, suppliers,
and partners.
binary content, according to your corporate email
malicious, or
Configurable Actions for Filtered Email
In Email Protection, email filtering policies control how emails are filtered within a
specific Domain and how Email Protection will respond during email filtering and
reporting. Depending on the feature package that is licensed for a domain, specific email
filters will be available to be enabled and configured. Also, depending on the enabled
email filter, various actions must be configured that define how Email Protection will
respond if an email violates the specific filter policy.
8 Proprietary: Not for use or disclosure outside McAfee without written permission. November 2012
Page 17
Email Protection Administrator Guide Email Filtering Policies
Based on the defined policy configuration, each email that violated the specified policy
can have any of the following actions taken, depending on the type of policy:
Action Description
Quarantine The email is added to the respective quara
ntine area and is not sent to
the recipient email address. If the email violated a spam policy, the
email is reported in the user’s Spam Quarantine Report.
Tag The subject line of the email has a descri
ptive phrase (for example,
“[SPAM]”) added to the beginning of the subject text and the email is
sent to the recipient email address.
Deny Delivery The email is blocked automatically. Depending on the sending system’s
nfiguration, the email sender may or may not be notified with a 5xx
co
Deny email.
Do Nothing or Allow
elivery
D
The email is forwarded to the recipient email address with no
processing applied. The values in the reports and the
Overview
window will be incremented for the relevant email policy to indicate
that an email did trigger the specific policy.
Silent Copy A copy of the email is forwarded to a list of designated email address
es
with no notification to the sender or recipient.
Strip Attachment If the email had an attachment that vi
olated configured policies, this
action causes that attachment to be removed from the email and the
email is be sent to the recipient email address. Text is inserted into the
email notifying the recipient that an attachment has been stripped. Only
the attachment that violated the policy is stripped.
Clean If the email had an attachment that
contained a virus or worm, this
action attempts to remove the virus or worm and preserve the
attachment. If the clean is successful, text is inserted into the email
notifying the recipient that an attachment had contained a virus and
was cleaned. If this action is selected, a second fall-back action also
must be designated in case the Clean action fails. This action is specific
to the virus filtering policies.
Custom X-Header If the email was determined to have a high or medium likelihood of
Disable Filter A non-administrator user cannot disable virus filtering if it is licensed
November 2012 Proprietary: Not for use or disclosure outside McAfee without written permission 9
spam, you can configure that a custom X-header be inserted into
being
the email. This X-header can be used by your email servers to perform
additional actions within your network, such as redirecting the email.
Each spam likelihood can have a different custom X-header. This
action is specific to the spam filtering policies.
and enabled
for a specific Domain or policy set. Only Administrators
can enable or disable virus filtering for a specific Domain or policy set.
You can designate that Email Protection first attempts to remove the
from an infected attachment, and if the clean fails, perform
virus
another action. You can designate that only the infected attachment is
stripped. and the remaining email contents and attachments are sent to
the recipient.
Page 18

User-level Policy Configurations Email Protection Administrator Guide
Notifications for Filtered Email
You can enable or disable email notifications to the sender and/or recipient email
addresses of email that was filtered because of virus, content keywords, or attachment.
For more information, see one of the following:
• Set Email Protection to Notify Users about Emails with Viruses
• Notify Users about Spam Content
• Notify Users about Attachment Violations
User-level Policy Configurations
By default, policy configurations are defined for each domain and group. All emails
received for all user accounts within a domain or group are processed using the same
policy configurations.
Optionally, user-level policy configurations can be defined for individual users that
override the Domain/Group policies. Thus, if there is a conflict between a user-level
policy and any of the other types of policy configurations, the user-level policy setting will
be used. These user-level policy configurations allow customization of email actions for
each user.
User-level policies are confined to the following policies:
• Enable or disable email processing for spam, virus, content keyword, attachments,
and/or HTML content.
• Specify actions to take for emails if they are determined to have a high or medium
likelihood of being spam.
• Configure the spam quarantine reporting
To manage the policy for an individual user, see User-Level Policy Configuration.
To establish user control of policies, see Set up Spam Quarantine Reports.
User also can have some control over their policies.
Quarantine
Email Protection provides multiple quarantine areas with different security accesses to
store and support review of suspect email outside of your email network.
Emails that violate configured policies and that have the Quarantine action applied are
sorted into multiple quarantines to ease email management and support security levels:
• Spam Quarantined Messages – Accessible to all users, with users with role of User or
Reports Manager allowed to access only their own personal spam quarantine
10 Proprietary: Not for use or disclosure outside McAfee without written permission. November 2012
Page 19

Email Protection Administrator Guide Customizing the Interface
• Virus Quarantined Messages – Accessible to only Administrators and Quarantine
Managers
• Attachment Quarantined Messages – Accessible to only Administrators and
Quarantine Managers
• Content Keyword Quarantined Messages – Accessible to only Administrators and
Quarantine Managers
Within each quarantine, you can do any of the following:
• Delete selected emails or all emails
• Release selected emails or all emails for delivery to the recipient
• View selected email in a Safe View window
• Add the sender email addresses to the recipients’ user-level Allow list and release the
emails (available only for quarantined spam emails)
Emailed Reports of Quarantined Spam Emails
Optionally, emails are sent to users to indicate that spam emails that have been
quarantined, using either of the following types of emails:
• Spam Quarantine Report
Spam Quarantine Reports are HTML-based email notifications of quarantined spam
emails that sent to users. Multiple links in the Reports allow management of
quarantined spam email based on policy set-level and user-level configurable control
settings. When the user clicks a link, the designated action is performed and the user is
automatically logged into the Control Console.
• Spam Quarantine Summary
Spam Quarantine Summaries are optional text-based email notifications of
quarantined spam email sent to users, to support email applications that are not
HTML-compatible. The user clicks the link provided in the email and is automatically
logged into the Control Console. Once logged in, the user can navigate to the relevant
window to manage the spam quarantine and modify personal settings.
Customizing the Interface
Licensed Branding
There are multiple branding levels that control the appearance and URL addresses used
within the Control Console and Spam Quarantine Reports and Summaries:
• Standard – Branding uses images and addresses provided by your service provider.
• Private – You control the images and addresses.
• Cobrand – Branding uses images provided by you and your service provider., and
addresses provided by you.
• White Label – Branding uses no identifying images and uses addresses provided by
you.
November 2012 Proprietary: Not for use or disclosure outside McAfee without written permission 11
Page 20

Customizing the Interface Email Protection Administrator Guide
Branding levels other than Standard must be licensed separately.
For more information, see Rebrand Your User Interface in Account Management
Administrator Guide.
Language Localization
Within the Control Console, windows and features available to the non-administrative
user (whose role is User) can be provided in translated form supporting multiple
languages. When the user logs in via the log on window, he or she can select the desired
language in the Language field. Thereafter, all spam quarantine reporting emails and
window and field labels will be provided in the designated language.
The following languages are supported:
• Brazilian Portuguese
• Chinese Simplified
• Chinese Traditional
•Danish
•Dutch
• English
•Finnish
•French
•German
• Italian
• Japanese
• Korean
• Norwegian
• Portuguese
• Russian
• Spanish
•Swedish
•Turkish
This feature is available only to non-administrative user accounts. This feature must be
enabled at the system level to be available.
As a Customer Administrator, you can set the language for a user on the user’s Preferences
window. See Set User Display Preferences, Including Your Own in Account Management
Administrator Guide.
Outbound Disclaimer
You can define text that will be appended to the email content to support liability or legal
requirements for your organization. Every email that was sent from your organization to
Email Protection for email filtering will have the designated text added to the end of the
email content. This feature requires that outbound filtering be licensed.
12 Proprietary: Not for use or disclosure outside McAfee without written permission. November 2012
Page 21

Email Protection Administrator Guide Monitoring and Reporting
See Add an Outbound Email Disclaimer.
Notifications
You can customize the content of the notification email for each combination of the type
of filter and each type of email action (quarantine, deny, or strip).
See Define the Format and Text of Notifications to Users.
Monitoring and Reporting
Email Protection provides near-real-time monitoring for most reports of system usage,
email filtering, etc., for the designated Domain and date or date range. Report data is
available to be downloaded to Microsoft Excel spreadsheet file (*.csv).
There are multiple reports available for viewing in the Control Console:
For more information, see System Reports.
Optional Utilities
Your service provider provides additional, free tools that provide additional support for
your email network.
Spam Control for Outlook®
If you receive email that you feel should have been filtered as spam, you can use the Spam
®
Control for Outlook
packages the email data, forwards it to your service provider’s Threat Center, and then
deletes it from your Microsoft Outlook mailbox. This utility only works for the Outlook
mail client.
You can download this utility at the following location:
http://www.mxlogic.com/services/spam_blocking/spam_control.html
plug-in. The Spam Control for Outlook plug-in automatically
November 2012 Proprietary: Not for use or disclosure outside McAfee without written permission 13
Page 22

Disaster Recovery Services Email Protection Administrator Guide
Disaster Recovery Services
Fail Safe
The Fail Safe Disaster Recovery Service provides protection against lost emails in the case
when your inbound email server (a.k.a. Customer MTA server) may be unavailable to
receive email. If you have multiple inbound servers configured in Email Protection, all of
these servers must be unavailable before Fail Safe is invoked.
When your inbound servers becomes unavailable, Fail Safe begins spooling email, which
means Fail Safe stores your emails in a temporary location until your inbound server
becomes available. Once any of your inbound servers become available, Fail Safe begins
unspooling the emails. That is, Fail Safe restores these stored emails to the inbound server
using the first in, first out order.
The messages Fail Safe stores are not available until the messages have been unspooled.
Fail Safe has an unlimited amount of storage capacity but removes messages that have
been in Fail Safe storage for more than 5 days.
For more information, see Administer Disaster Recovery Services.
Email Continuity
Email Continuity saves messages for later delivery if your mail server becomes
unavailable. When your mail server becomes available, Email Continuity delivers the
messages. Users can access their messages through a Web-based interface while messages
are in Email Continuity only.
Email Continuity also has unlimited storage capacity and removes messages that have
been in Email Continuity storage for more than 60 days.
For more information, see Administer Disaster Recovery Services.
14 Proprietary: Not for use or disclosure outside McAfee without written permission. November 2012
Page 23
Email Protection Administrator Guide Who Can Access Email Protection Admin-
2. Access Email Protection
Administration
As a customer of Email Protection, you can have administrators who access the Control
Console with different levels of privileges within Account Management and Email
Protection.
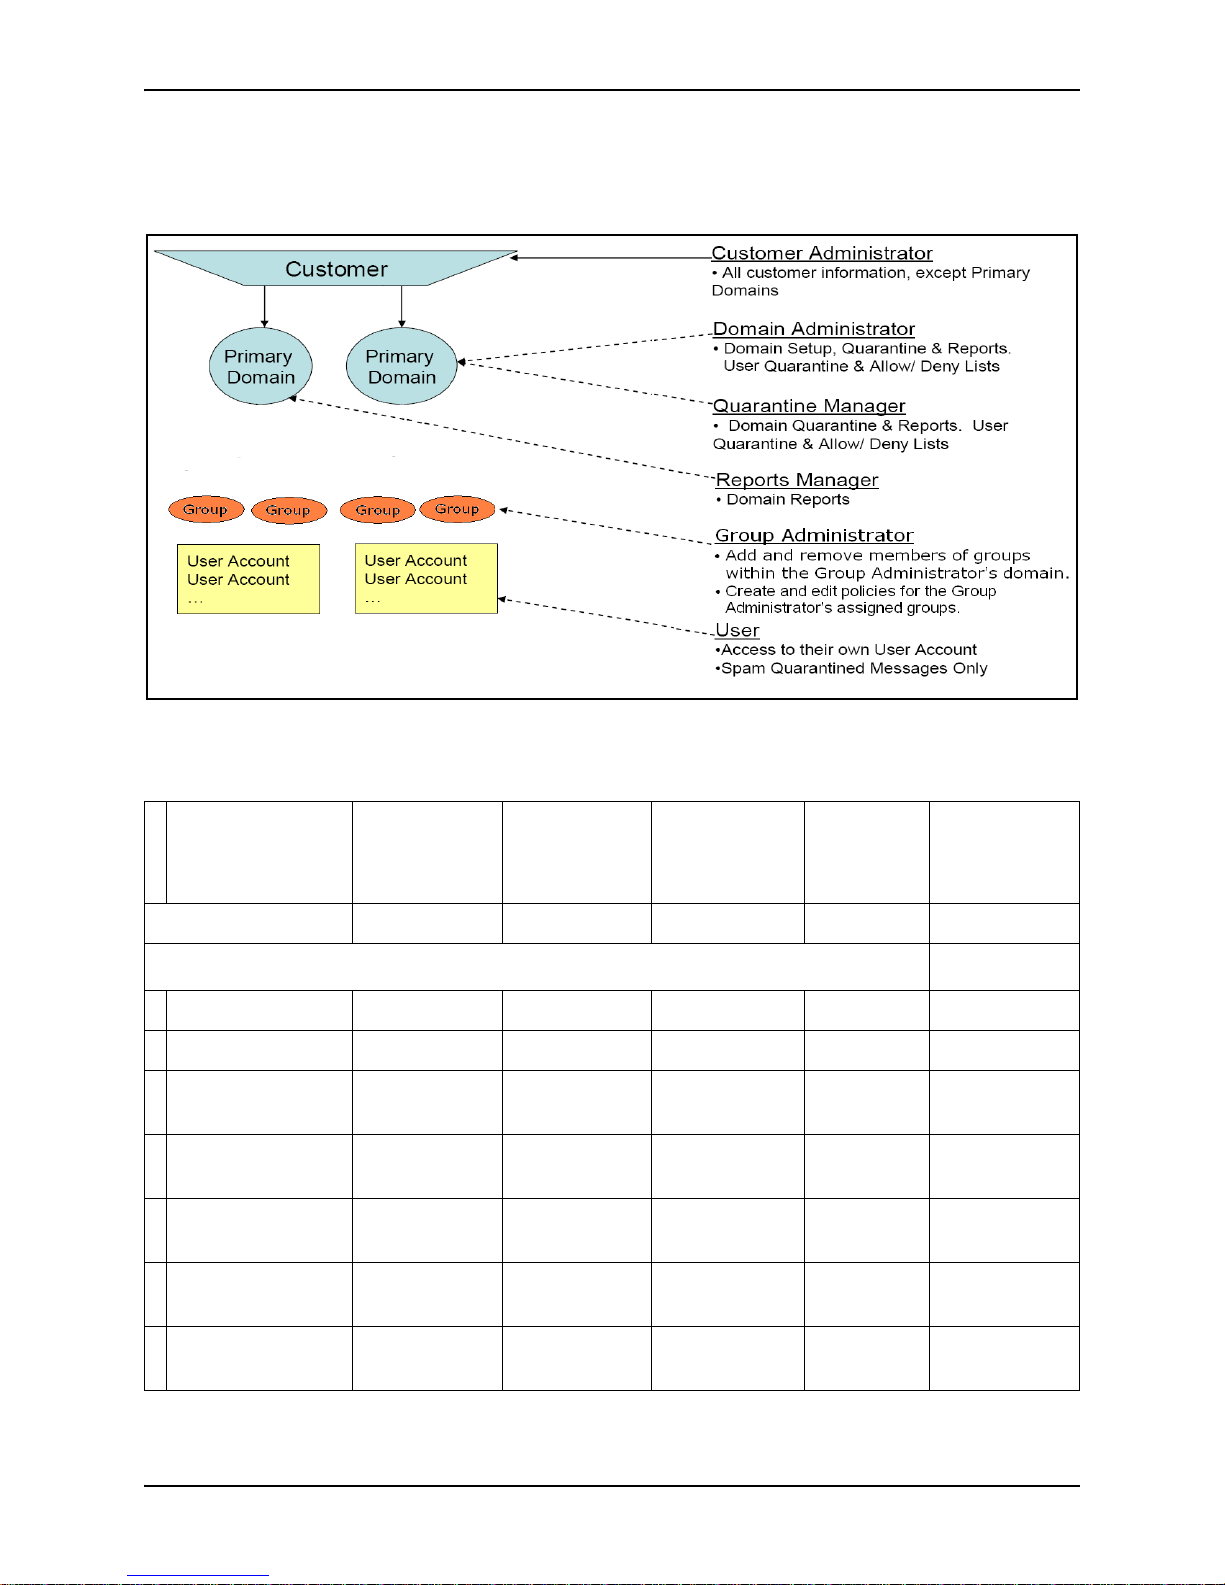
Who Can Access Email Protection
Administration windows
The levels of administrative users you can add are as follows:
Administrative level Description
Reports Manager The Reports Manager can view, for an assigned domain, reports
available with Email Protection. The Reports Manager can also
manage his or her own user preferences and all other tasks a user
can perform.
Group Administrator The Group Administrator can add and remove members from one
re groups if assigned to those groups. A Group Administrator
or mo
can also create, edit, and modify Email Protection policies for the
assigned groups. Finally, a Group Administrator can view user lists
and user details. A Group Administrator does not need to be a
member of a group in order to have these capabilities.
Note: A Group
edit user information
Quarantine Manager The Quarantine Manager, for an assigned domain, can manage the
same areas as
domain, all users’ Quarantine for spam and other problematic
messages, only if Email Protection is enabled.
Domain Administrator The Domain Administrator, for an assigned domain, can manage
same areas as a Quarantine Manager, plus manage server setup
the
and authentication rules for the domain.
Customer Administrator The Customer Administrator can manage
customer’s Account Management for all domains.
Group Adsministrator The Group Administrator can, within the Group Administrator’s
assigned
groups if assigned to those groups. A Group Administrator can also
create and modify Email Protection policies for the assigned
groups. A Group Administrator does not need to be a member of a
group in order to have these capabilities.
Administrator cannot add or remove a group nor
a Report Manager, plus manage, for the assigned
all aspects of the
domain, add and remove members from one or more
November 2012 Proprietary: Not for use or disclosure outside McAfee without written permission 15
Page 24
Who Can Access Email Protection Administration windows Email Protection Administrator Guide
The following figure summarizes the levels of administrators, plus users, in an
Email Protection configuration.
Table 1: Email Protection Window Access Privileges
Window Access Feature
Enablement
Required
Overview No Ye s Ye s No No
Policies tab
Policy Sets No Ye s No No Ye s
Anti-virus: Action No Ye s No No Ye s
Anti-virus:
N
otifications
Anti-SPAM:
Classification
Anti-SPAM:
ent Groups
Cont
Anti-SPAM:
orting
Rep
No Ye s No No Ye s
No Ye s No No Ye s
No Ye s No No Ye s
No Ye s No No Ye s
Customer
Administrator
Domain
Administrator
Quarantine
Manager
Admnistrator
Group
Content: Content
oups
Gr
16 Proprietary: Not for use or disclosure outside McAfee without written permission. November 2012
No Ye s No No Ye s
Page 25
Email Protection Administrator Guide Who Can Access Email Protection Admin-
Window Access Feature
Enablement
Required
Content: Custom
Content Groups
Content:
Notifications
Content: HTML
Shield
Content: Click
Protect
Attachments: File
Types
Attachments: File
Name Policies
Attachments:
Additional Policies
Attachments:
Additional
Notifications
No Ye s No No Ye s
No Ye s No No Ye s
No Ye s No No Ye s
No Ye s No No Ye s
No Ye s No No Ye s
No Ye s No No Ye s
No Ye s No No Ye s
Customer
Administrator
Ye s No No Ye s
Domain
Administrator
Quarantine
Manager
Admnistrator
Group
Allow/Deny:
Sender Allow
Allow/Deny:
Sender Deny
Allow/Deny:
Recipient Shield
Enforced TLS:
Actions
Enforced TLS:
Notifications
Notifications:
Content
Notifications:
Attachment
Group
Subscriptions
Disaster Recovery Ye s No No Ye s
Quarantine Tab No Ye s Ye s Yes No
No Ye s No No Ye s
No Ye s No No Ye s
No Ye s No No Ye s
No Ye s No No Ye s
No Ye s No No Ye s
No Ye s No No Ye s
No Ye s No No Ye s
No Ye s No No Ye s
SetupTab No
November 2012 Proprietary: Not for use or disclosure outside McAfee without written permission 17
Page 26

Who Can Access Email Protection Administration windows Email Protection Administrator Guide
Window Access Feature
Enablement
Required
Inbound Servers
Setup
Outbound Servers
Setup
Outbound
Disclaimer
Disaster Recovery
Setup
No Ye s Ye s No No
Ye s.
Depending on
your purchased
package, this
service might
need to be
enabled.
Ye s.
Depending on
your purchased
package, this
service might
need to be
enabled.
Yes. Either
FailSafe or
Email
Continuity
must be
enabled or
included in
your package.
Customer
Administrator
Ye s Ye s No No
Ye s Ye s No No
Ye s Ye s No No
Domain
Administrator
Quarantine
Manager
Admnistrator
Group
MX Records Setup No Yes Ye s No No
User Creation
Settings
Reports tab
Traffic Overview No Ye s Ye s Ye s No
Threats Overview No Ye s Ye s Ye s No
Threats: Viruses No Ye s Ye s Ye s No
Threats: Spam No Ye s Ye s Ye s No
Threats: Content No Ye s Ye s Ye s No
Threats:
Attachments
ClickProtect:Over
view
ClickProtect:
Click Log
No Ye s No No No
No Ye s Ye s Ye s No
No Ye s Ye s Ye s No
No Ye s Ye s Ye s No
18 Proprietary: Not for use or disclosure outside McAfee without written permission. November 2012
Page 27

Email Protection Administrator Guide Other Documents You Might Need
Window Access Feature
Enablement
Customer
Administrator
Domain
Administrator
Quarantine
Manager
Admnistrator
Required
Quarantine:
Release Overview
Quarantine:
Release Log
User Activity No Ye s Ye s Ye s No
Event Log No Ye s Ye s Ye s No
Audit Trail No Ye s Ye s Yes No
Inbound Server
Connections
Disaster Recovery:
Overview
Disaster Recovery:
Event Log
No Ye s Ye s Ye s No
No Ye s Ye s Ye s No
No Ye s Ye s Ye s No
Yes. Either
FailSafe or
Email
Continuity
must be
enabled.
Yes. Either
FailSafe or
Email
Continuity
must be
enabled.
Ye s Ye s Ye s No
Ye s Ye s Ye s No
Group
Other Documents You Might Need
Account Management is a self-contained subset of windows you access on the Control
Console. You use it in conjunction with the administration windows for the previouslymentioned products. For information on administering these products, see the online help
in the Control Console or the documentation as listed below.
Email Protection Documents
• Email Protection Concepts Guide
• Email Protection Quick Start
• Intelligent Routing User Guide
• Email Continuity Administrator Quick Start Guide
November 2012 Proprietary: Not for use or disclosure outside McAfee without written permission 19
Page 28

Ensure You Can Receive Email from Your Service Provider Email Protection Administrator Guide
Web Protection Service Documents
• Web Protection Service Quick Start
• WDS Connector Installation Guide
Message Archiving Documents
• Message Archiving Administrator Guide
• Message Archiving Quick Setup Guide for Microsoft® Exchange® Server 2000
• Message Archiving Quick Setup Guide for Microsoft® Exchange® Server 2003
• Message Archiving Quick Setup Guide for Microsoft® Exchange® Server 2007
User Guides
In addition, a variety of guides for your users are available. These are:
• Email Protection User Guide
• Message Archiving User Guide
• Spam Control for Outlook
• Email Continuity User Quick Start Guide
Ensure You Can Receive Email from
Your Service Provider
If you had or still have a different email security or filtering service and your network is
administered so that you can receive email only from IP addresses associated with that
security service, you must administer your network to allow incoming email from the
Control Console servers. For example, a port in your company’s firewall may need to be
enabled to receive email from the IP addresses of the Control Console servers.
This enablement is necessary in order for you and your users to set the initial password for
access to the Control Console.
Log on to the Control Console
To manage your account, you must log on to the Control Console with the following steps.
Note: The first time you log on, you might need to create your password. If so, see Reset
Your Password from the log on window.
1 Open a browser on your computer and enter the URL for the Control Console.
20 Proprietary: Not for use or disclosure outside McAfee without written permission. November 2012
Page 29

Email Protection Administrator Guide Log on to the Control Console
The URL should be identified in the Service Activation Guide you received from your
provisioner. If you don’t have the URL, contact your sales representative or Customer
Support.
2 At the Control Console log on window, enter your email address and password.
3 Click Sign in.
If you have not previously entered an answer to a security question, the Security
Question window pops up.
The answer to the security question is used is used to validate you, the user, if you
forget your password.
You can later change your security question and/or security answer on the Preferences
window of your user account. See Set User Display Preferences, Including Your Own
in Account Management Administrator Guide.
4 Select a security question and type the answer. Your answer is not case-sensitive.
Note: If
from a Spam Quarantine Report.
you also use the Email Protection, you can also log onto the Control Console
Reset Your Password from the log on
window
Note: This capability may not be available if the user authentication method is set to
LDAP, POP3, or IMAP or if the ability to change passwords has been disabled at the
system level.
If you forget your password or want to rese
1 On the log on window, click the
The following window is displayed.
t it, perform the following steps:
Forgot your password or need to create a password? link.
2In the Username field, type your email address.
3 Do one of the following:
November 2012 Proprietary: Not for use or disclosure outside McAfee without written permission 21
Page 30
Log on to the Control Console Email Protection Administrator Guide
• If your email address is working and you are already receiving email, select
Email password information to me.
• If your email address is not working, select Email password information to my
Domain Contact.
Your Domain Contact might be your administrator or another person your
administrator defined for your domain within the Control Console. Check with
your administrator on who that person is.
4 Click Next.
If you selected the option for your email, your email application receives an email
momentarily with further instructions. Continue with Step 5.
If you selected the option to email a Domain Contact, that person receives an email
from which the person can reset your password. The person can also forward the
message to an alternative email address you might have. Contact that person for the
password, then try to log on again. You are finished with this procedure.
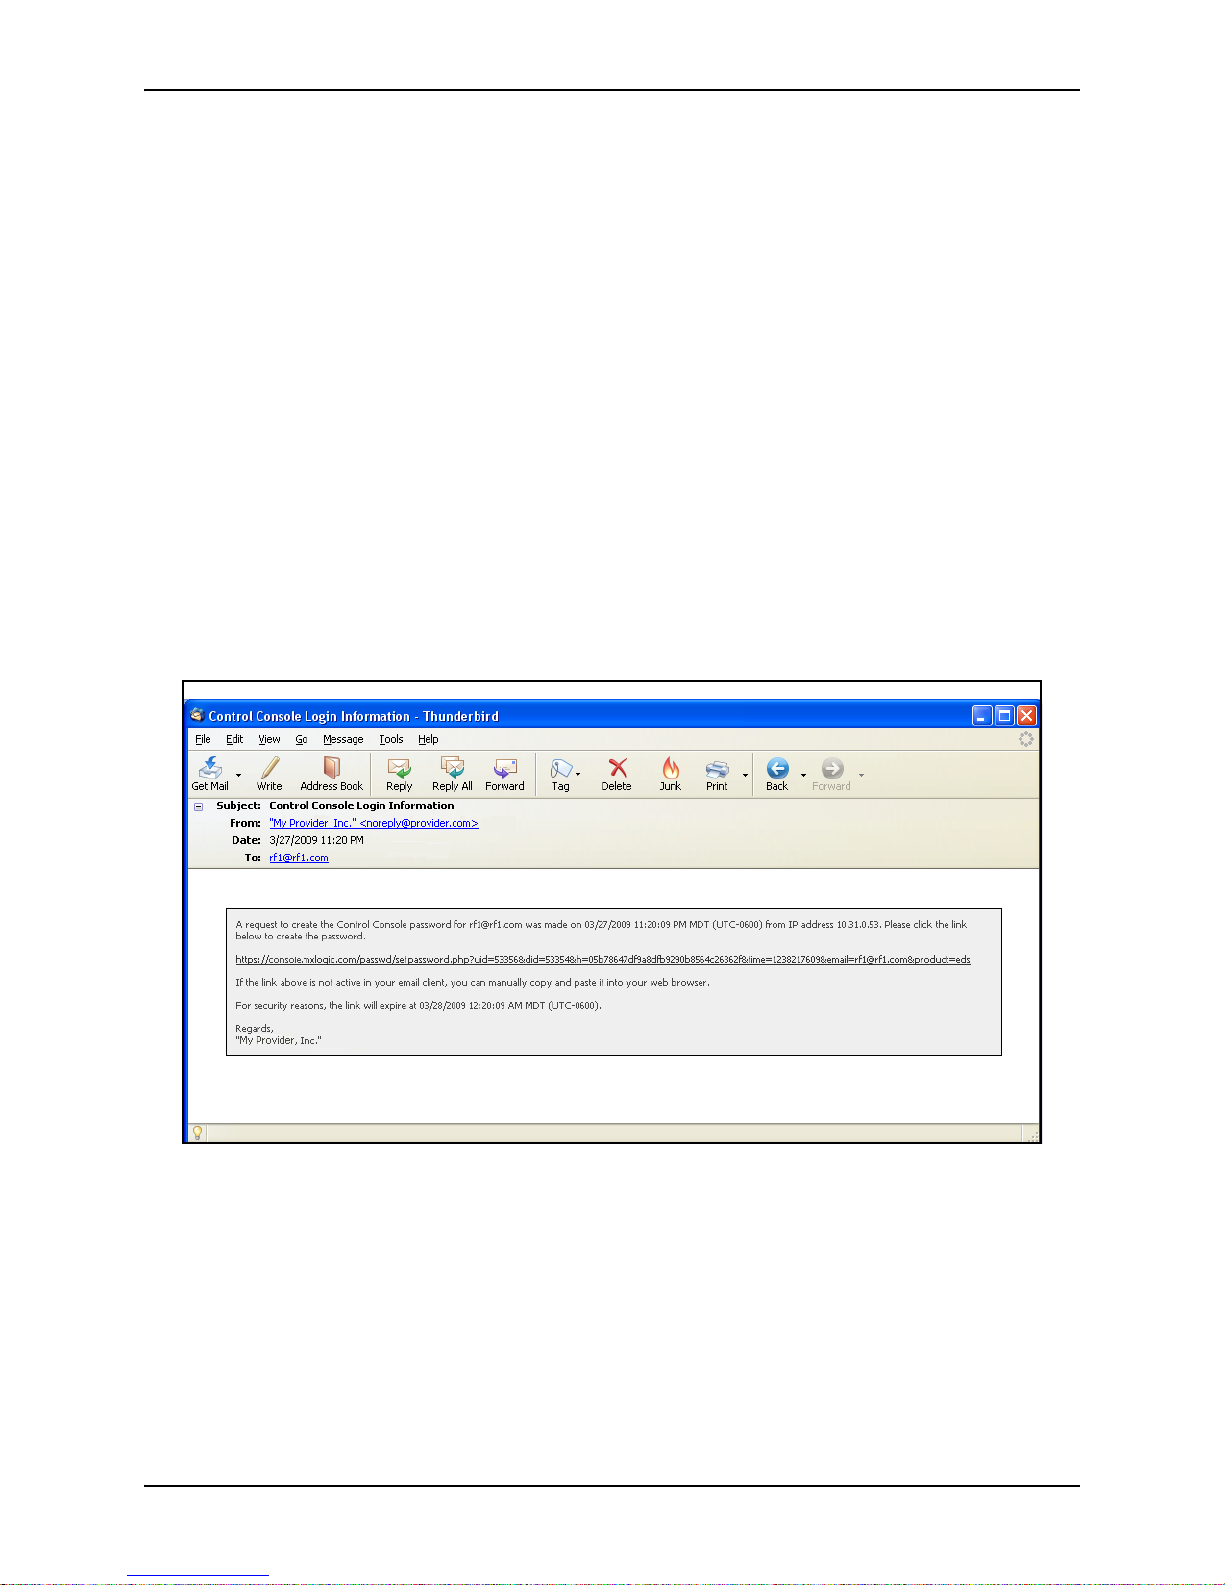
5 If you selected the option to email information to you, open the email in your email
application. The email subject line says Control Console Sign in Information.
The email is similar to the following:
6 Click the link in the email. The link is active for only a limited time after the email is
sent (typically, 60 minutes).
22 Proprietary: Not for use or disclosure outside McAfee without written permission. November 2012
Page 31

Email Protection Administrator Guide Log on to the Control Console
7 If you previously had selected a security question, the security question is displayed.
If you had not previously selected a security question, select a question from the
Security Question drop-down menu.
8 Type the answer to the question in the Security Answer field.
9For the Security Question field, click Change if you need to change the security
question or answer. You must answer this question when you forget your password or
need to reset it.
The Security Question and Security Answer fields are displayed. Select a question
from the Security Question drop-down menu, then type an answer.
10 In the Password field, type a password. The password must comply with the
following rules:
• Length must be a minimum of 8 characters.
• Alphabetical, numeric, and special character types are allowed.
• There must be at least one character that differs in character type (alphabetical,
numeric, or special) from the majority of characters. Thus, if the password
contains mostly alphabetical characters, then at least one character must be either
a special character or numeric. For example, majordude is invalid, but
majordude9 is valid.
November 2012 Proprietary: Not for use or disclosure outside McAfee without written permission 23
Page 32

Log on to the Control Console Email Protection Administrator Guide
• Allowed special characters are:
left parenthesis ( ( ) ampersand ( & ) right bracket ( ] )
right parenthesis ( ) ) asterisk ( * ) colon ( : )
apostrophe ( `) hyphen ( - ) semicolon ( ; )
tilde ( ~ ) plus sign ( + ) double quotes ( " )
exclamation ( ! ) equals sign ( = ) single quotes ( ' )
@ bar ( | ) less than sign ( < )
hash ( # ) backslash ( \ ) greater than sign ( > )
dollar sign ( $ ) left curly bracket ( { ) period ( . )
percentage sign ( % ) right curly bracket ( }) question mark ( ? )
caret ( ^ ) left bracket ( [ )
• Spaces are not allowed.
• Passwords are case-sensitive (for example, Password, password, and PASSword
would be different passwords).
Make sure you can remember your password, but do not use obvious passwords (for
example, password, your name, or a family member’s name). Keep your password
safe and private.
11 Retype your password in the Confirm Password field.
12 Click Save.
24 Proprietary: Not for use or disclosure outside McAfee without written permission. November 2012
Page 33

Email Protection Administrator Guide
3. Check the Status of Email
Protection on the Overview
The Overview window provides the following high-level information about the email
traffic to your domain over the previous 24 hours:
• Disaster recovery information
• News and update information
Customer Administrators will see the information for all the domains in the customer
where the role was defined. Domain Administrators will see the information for only the
domain where the role was defined.
1 Select Email Protection | Overview.
The Overview window is displayed with the initial view.
2 Click Display Statistics.
The Overview window is displayed with the complete view.
November 2012 Proprietary: Not for use or disclosure outside McAfee without written permission 25
Page 34

Email Protection Administrator Guide
The sections on the window provide the following information:
Section Description
Inbound 24-Hour Snap Shot Displays a 24-hour snapshot of inbound email
Messages
Avg Size – A
– Number of inbound messages processed
verage size of inbound messages, including
attachments
Bandwidth
Viruses – Num
Spam
– Average bandwidth used by inbound messages
ber of inbound emails that contained viruses
– Number of inbound emails that were potentially
spam
Quarantined
– Total number of inbound emails that were
quarantined for any reason, including spam, virus, etc.
26 Proprietary: Not for use or disclosure outside McAfee without written permission. November 2012
traffic:
Page 35

Email Protection Administrator Guide
Section Description
Outbound 24-Hour Snap
Shot
Traffic (Last 24 Hours –
{timezone})
Policy Enforcement (Last 24
Hours – {timezone})
Displays a 24-hour snapshot of the domain’s or Customer’s
outbound email traffic:
Messages – Number of outbound messages processed
Avg Size – Average size of outbound messages, including
attachments
Bandwidth – Average bandwidth used by outbound
messages
Avg Size – Average size of outbound messages, including
attachments
Viruses – Number of outbound emails that contained viruses
Quarantined – Total number of outbound emails that were
quarantined for any reason, including viruses.
Displays a graph of traffic volume for the last 24 hours of the
designated time zone.
Optionally, select one of the graphic display type icons to
change the appearance of the graph.
Displays the percentage of messages that had the different
email actions applied (for example, stripped, blocked, tagged,
quarantined, cleaned, or normally delivered) over the past 24
hours of the designated time zone.
Optionally, select one of the graphic display type icons to
change the appearance of the graph.
Disaster Recovery Current
Status
Displays domains that are currently in Disaster Recovery. The
Email Protection is currently spooling the specified domain's
email
Disaster Recovery Activity
(Last 24 Hours)
Displays how many emails were spooled and unspooled by
Fail Safe for all domains in the indicated Customer during the
last 24 hours of the designated time zone.
Spooled Messages – Indicates the number of emails that were
spooled by Fail Safe in the last 24 hours and how much spool
storage was used by them.
Unspooled Messages – Indicates the number of emails that
were spooled by Fail Safe in the last 24 hours and how much
spool storage was used by them.
What’s New Displays a list of new information available about Email
Protection. Depending on the configuration, this section may
be blank or may contain different information.
News Displays any updates on current email threats and other
important email security news (links). Click the desired link
to view the complete information. Depending on the
configuration, this section may be blank or may contain
different information.
November 2012 Proprietary: Not for use or disclosure outside McAfee without written permission 27
Page 36

Email Protection Administrator Guide
28 Proprietary: Not for use or disclosure outside McAfee without written permission. November 2012
Page 37

Email Protection Administrator Guide Confirm Your Inbound Servers Setup
4. Set up Your Servers
This section describes how to ensure your inbound and outbound servers are set up
correctly for Email Protection.
Confirm Your Inbound Servers Setup
Email Protection filters email destined for your inbound Simple Mail Transfer Protocol
(SMTP) email server or servers. Your provisioner should have already defined one or
more SMTP servers in the Control Console. To confirm that these servers are defined,
perform the following steps:
1 Click Email Protection | Setup.
2 From the domain drop-down menu on the Setup window, select the domain whose
SMTP server you want to check.
The SMTP Host Address field displays the domain name(s) or IP address(es) for the
domain’s SMTP server. In our example, domain denver.acme.com has an SMTP
server with a domain name of mail1.denver.acme.com.
The Inbound Servers Setup window is displayed.
3 Ensure the SMTP server listed are valid and correct.
4 Ensure that all other information on the window is correct, and select Save.
5 Repeat steps 2 through 4 for any other domains in your network.
Set up Additional Inbound Servers
You can configure additional inbound servers to receive inbound email from Email
Protection for the designated domain. All servers for a domain that receive inbound email
from Email Protection must be configured on the Inbound Servers Setup window.
November 2012 Proprietary: Not for use or disclosure outside McAfee without written permission 29
Page 38

Set up Additional Inbound Servers Email Protection Administrator Guide
Any server addresses designated here must be valid and available to connection from
Email Protection. After the Save Changes button is clicked, the Email Protection
immediately routes email to the active servers.
1 Click Email Protection | Setup.
2From the domain drop-down menu, select the domain whose SMTP server you want
to add.
3 Click Add New Host.
A new set of fields appears for the server
4In the SMTP Host Address field, type the fully qualified DNS or IP address of the
server host being configured. CIDR notation is not allowed.
If you do not have a registered and valid DNS name for your email servers, you must
enter the IP addresses of each server.
5In the Port field, type the port on the server to which the Email Protection will
connect. The default value is 25.
6In the Preference field, type the number indicating order of connection preference
between multiple servers. Email Protection attempts to connect first to the server with
the lowest preference number. If that server is not available (either down or too busy),
Email Protection tries the server with the next lowest preference number, and so on. If
multiple servers have the same preference number, Email Protection will randomly
route the email delivery between them.
7 Click the Active checkbox to allow the server is immediately start accepting email
traffic.
Caution: If all servers are set to inactive, all emails received for this domain will
be tempfailed.
8 Click Save.
Delete an Inbound Server
To delete an inbound server, perform the following steps:
1 Access the appropriate domain on the Inbound Server Setup window
2 Click the Delete checkbox next to the server you want to delete.
3 Click Save.
30 Proprietary: Not for use or disclosure outside McAfee without written permission. November 2012
Page 39

Email Protection Administrator Guide Add IP Address of Outbound Server, If
Add IP Address of Outbound Server, If
Necessary
If your service includes Outbound Message filtering, you must identify one or more
outbound mail servers through which your users send outgoing mail. While your outbound
server might use a Domain Name Server (DNS) name within your network (for example,
lewisoutbound.acme.com), you identify the outbound sever within Email Protection with
an IP address (for example,
Inter-domain Routing (CIDR) address for a range of outbound servers (for example,
111.222.111.0/27) only. The address must be a public address.
Any server addresses designated here must be valid and available for a connection. After
the Save Changes button is clicked, Email Protection immediately accepts email traffic
from the active servers.
Note: If email is received from an outbound server that is not configured in the Email
Protection system, it will be refused. If no outbound package has been designated for the
selected domain, this window is unavailable.
1 Click Email Protection | Setup| Outbound Servers.
111.222.111.0). Alternatively, you can specify a Classless
The Outbound Server Setup window is displayed.
2 Click Add New Address, and add the address of the outbound server.
3 Click Save Changes.
4 Record the address listed under Recommended Smart Host Server Settings. You
should use this address to perform the next task,
Defense is Turned on).
Important: You or your network administrator should also do the following before or
immediately after adding your outbound server(s):
• Update Sender Policy Framework (SPF) records on your mail server(s) to ensure
only authorized sources are sending outbound email.
• Scan your network for open relays, viruses and malware.
• Refer to the Accepted Use Policy (AUP) at http://www.mxlogic.com/terms/aup/
index.cfm for information on bulk mail.
Set up a Smart Host (If Outbound Mail
November 2012 Proprietary: Not for use or disclosure outside McAfee without written permission 31
Page 40

Add IP Address of Outbound Server, If Necessary Email Protection Administrator Guide
Delete an Outbound Server
To delete an outbound server, perform the following steps:
1 Access the appropriate domain on the Outbound Server Setup window
2 Click the Delete checkbox next to the server you want to delete.
3 Click Save Changes.
Set up a Smart Host (If Outbound Mail
Defense is Turned on)
To ensure that your outbound email is filtered, you must designate, for each of your
outbound mail servers, an Email Protection server as your Smart Host. Your outbound
email is then relayed through Email Protection before continuing to its final destinations.
The outbound Smart Host address is listed at the bottom of the Outbound Server Setup
window, or you can refer to your Service Activation Guide for more details.
Note: This task is performed on your outbound email server or servers, on your network
router, or on some other server, depending on your network’s configuration.
Add an Outbound Email Disclaimer
You can create and assign text that will be appended to all outgoing emails that are filtered
by Email Protection for the designated domain. For example, you might want to specify
that the email sent from your company is the property of your company with all right
reserved.
Note: If no outbound package has been designated for the selected Domain, this window
is unavailable.
1 Click Email Protection | Setup | Outbound Servers.
32 Proprietary: Not for use or disclosure outside McAfee without written permission. November 2012
Page 41

Email Protection Administrator Guide Redirect Your MX Records
The Outbound Server Setup window is displayed.
2 Click Display disclaimer in outbound email messages.
3In the Disclaimer Text field, type the text of the disclaimer. A maximum of 1000
characters is allowed.
4 Click Save.
Redirect Your MX Records
The Mail Exchange (MX) record for each of your mail servers is a specification within a
Domain Name Server (DNS Server) operated by your Internet Service Provider (ISP).
Each MX record specifies a host name and preference that determines where and how
your ISP routes your company’s email.
Your MX record or records at your ISP must be changed to fully-qualified domain names
(for example, denver.acme.com) within the Email Protection network. These changes
allow Email Protection to filter your email before it arrives at your company’s mail
servers.
Your Network Administrator or Domain Registrar is typically the individual responsible
for making these changes.
The information necessary for your company to make these changes is provided in your
Email Protection Activation Guide, which you receive when you first sign up for service.
November 2012 Proprietary: Not for use or disclosure outside McAfee without written permission 33
Page 42

Check Your MX Record Email Protection Administrator Guide
Check Your MX Record
Be aware that because of the nature of the Internet, it may take several days for your MX
record redirect to propagate to all the email servers that may be sending email to your
email server. During that time, your email server may still receive email directly from
those email servers until they are updated with your latest MX record information.
The MX Record Analysis window allows you to query Email Protection or your
company’s Authoritative DNS Name Server for the MX Records that are recognized for
the SMTP server names for a domain. You can then confirm that all the IP records that are
configured for your domain’s MX Records are correctly redirected to Email Protection.
The analysis indicates the following:
• All Authoritative Name Servers for the entered DNS name
• All MX Records that are recognized by the Authoritative Name Servers – this process
retrieves all the MX Records for a given domain
• Whether the hostname for each MX Record is a valid hostname, an outdated hostname
that will work but should be updated, or an unrecognized hostname which may be
allowing email to be routed around Email Protection
This window also indicates the recommended values (using the default values configured
at the system level for Email Protection) to assist you in determining whether your MX
Records are redirected correctly. For example, if all the SMTP servers defined for a
domain do not show the same information, this can indicate that your MX Records are not
defined correctly.
Note: This feature must be enabled at the system level to be available in Email Protection.
1 Click Email Protection | Setup| MX Records.
The MX Record Analysis window is displayed.
34 Proprietary: Not for use or disclosure outside McAfee without written permission. November 2012
Page 43

Email Protection Administrator Guide Check Your MX Record
By default, the window shows the results of a DNS lookup by Email Protection on the
IP addresses you submitted to your Internet Service Provider. The column headings
show the following:
Field Description
MX Record Analysis Results
for
MX Records returned by
The domain for which a DNS lookup was performed.
The name of the DNS server, which can be the DNS
server of your Email Protection provider or a DNS
server from your company, if selected.
Under each MX
by your Internet Service Provider, along with the priority preference of the record, and the
status of the MX record.
• Valid –
• V
alid – recommend update – MX Record uses an older hostname standard. It still
works, but it is recommended that you update to the current hostname standard.
• Unrec
enter your system bypassing Email Protection. This situation, if occurring within 72
hours of the MX Record change, may indicated the changes are not yet complete.
Records returned by heading, MX records should be listed that were set
MX Record is current and fully authenticated.
ognized – MX Record could not be authenticated and may be allowing email to
November 2012 Proprietary: Not for use or disclosure outside McAfee without written permission 35
Page 44

Set up User Creation Mode — SMTP Discovery or Explicit Email Protection Administrator Guide
2 Check the Recommended MX Record Settings. This section indicates a list of
typical MX Record configurations using the system-defined default values and the
currently selected domain name. Note that this list may not match your actual MX
Record configurations. These values are configured at the system level.
You can alternatively enter a fully-qualified DNS Server name at your company in the
Target Authoritative Name Server field, then click Analyze. This capability is helpful if
the default display of MX records appears to be incomplete or in error.
Similar results to those returned by Email Protection provider’s DNS Server might occur.
Note: You can also select the View only this name server link to reduce the number of
DNS server lists of MX Records. Click the View all name servers link list all DNS
servers again.
Set up User Creation Mode — SMTP
Discovery or Explicit
Note: This procedure applies only if your service includes Email Protection.
Explicit user creation means that you must add user email addresses using one of the
methods that are described later. SMTP Discovery means that users are created
automatically based on SMTP transactions. That is, several incoming email messages to a
user indicate that the user exists for the customer. As a result, Email Protection creates that
user in the Control Console.
SMTP Discovery is the default setting for a new customer, such that at initial startup of
service, users might be created in the Control Console without any administration by you,
the Customer Administrator.
Note: Only messages delivered to recipient email addresses in a primary domain are
counted for the purpose of user creation. Messages sent to recipient email addresses in
alias domains are not counted. When the action is deny, the email is rejected and an error
message is displayed to the sender.
If you use Directory Integration, explicit user creation is highly-recommended.
To turn on Explicit User Creation, perform the following steps:
1 Click Email Protection | Setup.
2 Click User Creation Settings.
36 Proprietary: Not for use or disclosure outside McAfee without written permission. November 2012
Page 45

Email Protection Administrator Guide Set up User Creation Mode — SMTP Dis-
3 Under the User Creation Mode heading, select Explicit.
4 Click Save.
November 2012 Proprietary: Not for use or disclosure outside McAfee without written permission 37
Page 46

Set up User Creation Mode — SMTP Discovery or Explicit Email Protection Administrator Guide
38 Proprietary: Not for use or disclosure outside McAfee without written permission. November 2012
Page 47

Email Protection Administrator Guide Enterprise or Service Provider Customer
5. Customize Inbound Mail
Filters
Email Protection has default inbound and outbound mail filters to block and clean
malicious email and to quarantine email that might be malicious. The filters are
configured by using policies, which are the parameters for the filters Default policies are
automatically assigned to each of your domains.
You can customize the default inbound policy for any and each domain, or any and each
group, to fit your business needs.
To change customers, select the link in the upper right of the opened window. In the Select
window, begin entering the name of the entity you want and select that entity when a list
of entities appears.
Enterprise or Service Provider
Customer
Important: This document is for use by Enterprise customers only.
The way in which custom policies are applied to your users varies depending on whether
you are classified as a service provider or enterprise customer. If you are a service
provider customer, each domain can have one custom policy (see Figure 7). If you are an
enterprise customer, a single default policy applies to all domains. Thus, for an enterprise
customer, you must create a group or groups of users, and for each group, you can create a
custom policy. A group can be created according to domain membership (see Figure
according to any other user characteristics that may apply across multiple domains (see
Figure
Guide.
Note: Because a group defined by an enterprise customer can contain users from different
domains, a group policy does not apply to a domain, but rather to the group of users to
which it is defined. A custom group policy supersedes the default policy that is assigned to
all domains.
9). For procedures, see Create a Group in Account Management Administrator
8) or
November 2012 Proprietary: Not for use or disclosure outside McAfee without written permission 39
Page 48

Enterprise or Service Provider Customer Email Protection Administrator Guide
Figure 6: Service Provider Custom Policy Assignment
Figure 7: Enterprise Custom Policy Assignment (Groups by Domain)
40 Proprietary: Not for use or disclosure outside McAfee without written permission. November 2012
Page 49

Email Protection Administrator Guide Create a Custom Policy (Enterprise Cus-
Figure 8: Enterprise Custom Policy Assignment (Groups by Other Attributes)
Create a Custom Policy (Enterprise
Customer Only)
Important Note: It is assumed that all domains within an Enterprise Customer will have
the same package assigned to them. If some domains have different packages, unexpected
results may occur. when a policy is applied to a group in which members reside within
different domains.
1 Click Email
2 Click Ne
The New Policy Set fields are displayed.
Protection | Policies | Inbound Policies link.
w to launch the New Policy window.
November 2012 Proprietary: Not for use or disclosure outside McAfee without written permission 41
Page 50

Create a Custom Policy (Enterprise Customer Only) Email Protection Administrator Guide
Field Description
Name Enter a name for the policy set you are creating. The
name should reflect
the name or purpose for the group or groups that you will assign to the
policy.
Owner The Owner heading indicates who can edit the policy
. If the owner is
Customer, only Customer Administrators can edit the policy. If the owner
is Group, then Group Administrators assigned to that group, as well as
Customer Administrators, can view or edit the policy.
Description Enter a description of the new policy set.
Direction From the drop-down menu, select the direction of email, in
bound SMTP
or outbound SMTP, for which this policy will be configured.
Copy From From the drop-down menu, select an existing policy set whose settings
want to copy to the new policy set. Most settings are copied based on
you
this selection. However, you must choose to copy some settings from the
existing policy separately by selecting the following fields.
Copy Sender
Allow List
Copy Sender Deny
List
Copy Recipient
ield List
Sh
Select to copy the Sender Allow list
Copy From field.
Selectto copy the Sender Deny list from the policy set selected in the
Copy Fr
om field.
Select to copy the Recipient Shield list from the policy set selected in the
Copy From field.
from the policy set selected in the
Copy ClickProtect
Allow List
3 Click Save.
The Policy Sets list is updated
policy to meet your business needs.
42 Proprietary: Not for use or disclosure outside McAfee without written permission. November 2012
Select to copy the ClickProtect Allow list
the Copy From field.
with the new policy. You can now modify the new
from the policy set selected in
Page 51

Email Protection Administrator Guide Configure a Virus Filter
Configure a Virus Filter
Email Protection uses multiple virus scanning applications to analyze email to determine
if a virus may be present. In your custom policy, you can configure how Email Protection
handles an email that contains a known virus.
Important Note: If an email is detected that contains a wide-spread worm or virus (for
example, SoBig or MyDoom), Email Protection may automatically block that email,
regardless of the settings in your custom policy.
To create a new policy content filter, perform the following steps:
1 Click Email Protection | Policies.
2 Select the policy you want to change.
3 Click Virus.
The Actions window is displayed.
4 Complete the fields as described in the following table.
Field Description
November 2012 Proprietary: Not for use or disclosure outside McAfee without written permission 43
Page 52

Configure a Virus Filter Email Protection Administrator Guide
If a Message
Contains a Virus
If a Message
Cannot be Cleaned
Select an action Email Protection should take if an email contains a virus:
• Do nothing – Email Protection sends the email to the recipient with
no filtering or notification.
— Caution: This action is potentially hazardous because the email
will still contain the virus.
• Quarantine the message after attachment is stripped – Email
Protection strips an infected attachment from the email and sends the
email to quarantine with the message that an attachment had been
stripped. Email Protection does not send a separate notification to the
recipient.
• Strip the attachment – Email Protection strips the infected
attachment from the email and sends the email to the recipient. Email
Protection inserts text into the email to notify the recipient that an
attachment has been stripped.
• Deny delivery – Email Protection denies delivery of the email.
• Clean the message – Email Protection attempts to remove the virus
content and save the remainder of the message. If successful, Email
Protection sends the email to the recipient with the message that the
email had been cleaned of a virus. If you select this action, you must
also select an action for the If a Message Cannot be Cleaned field.
If you previously selected Clean the message, select an action Email
Protection should take if Email Protection fails to clean an infected email:
• Quarantine the message after attachment is stripped – The
infected attachment is stripped from the email and the email is sent to
the recipient’s virus quarantine area without notification to the
recipient. Text is inserted into the email indicating that an attachment
has been stripped.
• Strip the attachment – The infected attachment is stripped from the
email and the email is sent to the recipient. Text is inserted into the
email notifying the recipient that an attachment has been stripped.
• Deny delivery – The email is denied delivery.
5 Click Save or click on the Notifications under the Virus tab.
Set Email Protection to Notify Users about
Emails with Viruses
You can direct Email Protection to send notification emails to the recipient and/or sender
when an email is filtered because it contained a known virus. You can see the content of
notifications and change it in the Notifications tabs. See Define the Format and Text of
Notifications to Users.
Note: Virus notifications will not be sent out for emails that are infected with widespread
viruses or worms (for example, SoBig or MyDoom). These notifications will be
automatically disabled by the Email Protection.
1 Click Email Protection | Policies.
2 Select the policy you want to change.
3 Click Virus.
44 Proprietary: Not for use or disclosure outside McAfee without written permission. November 2012
Page 53

Email Protection Administrator Guide Configure a Spam Filter
4 Click Notifications.
5 Complete the following fields:
Field Description
To the sender when
a message is … due
to a virus infection
To the recipient
when a message is
… due to a virus
infection
Select one or more conditions that will cause Email Protection to send a
notification email to the sender.
• Quarantined – The infected email was quarantined.
• Denied delivery – The infected email was denied delivery.
• Stripped – The infected attachment was stripped and the email sent
to the recipient.
Select one or more conditions that will cause Email Protection to send a
notification email to the recipient.
• Quarantined – The infected email was quarantined.
• Denied delivery – The infected email was denied delivery.
• Stripped – The infected attachment was stripped and the email sent
to the recipient.
Configure a Spam Filter
Email Protection spam filtering uses a large number of filtering processes, as well as
sophisticated statistical classification techniques, as part of its Stacked Classification
Framework® to determine if email is spam. Based on this analysis, Email Protection give
each email a score.
There are three scores are used to determine the likelihood
should be taken. Those scores are:
• Medi
um likelihood if default settings are used. This email is normally quarantined for
review.
November 2012 Proprietary: Not for use or disclosure outside McAfee without written permission 45
of spam and what actions
Page 54

Configure a Spam Filter Email Protection Administrator Guide
• High likelihood if default settings are used. This email is normally quarantined for
review.
• Critical likelihood. This spam is blocked.
If you specified an additional Realtime Blackhole List (RBL) in the Spam window of the
assigned policy, the RBL can influence the spam score as well.
Note: Occasionally, some emails might be marked as spam when in fact they are
legitimate emails. For these “false positive” email messages, you can help Email
Protection “tune” the spam thresholds and rules by sending a forwarded copy of the email
with all content and attachments to falsepositive@mxlogic.com
To configure a spam filter, you can perform the following tasks
• Define the Action to Take on Spam
• Spam – Content Groups Subtab
• Spam – Reporting Subtab
Define the Action to Take on Spam
1 Click Email Protection | Policies.
2 Select the policy you want to change.
3 Click Spam.
The Classification window is displayed.
4 Complete the following fields:
Field Description
46 Proprietary: Not for use or disclosure outside McAfee without written permission. November 2012
Page 55

Email Protection Administrator Guide Configure a Spam Filter
If a Message is
Probably Spam
(Medium
likelihood) area
If a Message is
Probably Spam
(High likelihood)
area
Select an action Email Protection should take if an email has a spam score
of 90% or higher:
• Tag the message subject with “[SPAM]” – Email Protection adds
the phrase “[SPAM]” to the beginning of the email’s subject text and
sends the email to the recipient.
• Quarantine the message – Email Protection sends the email to
quarantine.
• Deny delivery – Email Protection denies delivery of the email.
Note: Emails that have the following actions applied will be
reported as Other in the Threats: Spam report.
• Do nothing – Email Protection sends the email to the recipient with
no filtering or notification.
Select an action Email Protection should take if an email has a spam score
of 99.9% or higher. These actions are the same as those for Medium
likelihood.
5 Click More Options if you want to enable a Real-time Black Hole List. Otherwise, go
to step 8.
Multiple real-time blackhole lists (RBLs) of known spammers are provided by the
industry, from which Email Protection creates a single RBL indicator to assess the risk
of an email originating from a known spammer. The use of multiple blackhole lists to
create a single vote and rate the reputation of each RBL for accuracy helps to
minimize the possibility of blocking a non-spammer by mistake.
6 If you clicked More Options, click the Enable Real Time Blackhole List (RBL)
checkbox.
Note: You can also block spammers by completing a Sender Deny List under the
policy’s Allow/Deny option.
7 Click Save or click on Content Groups under Virus.
Define Additional Words That Indicate
Spam
Email Protection spam content filtering controls spam by comparing the content (subject
and body) of an email against predefined lists of keywords or phrases (spam content
groups).
You can define a custom spam content group that contains additional lists of keywords
that are used to filter email as spam. For each content group, you also define the action to
take on email that contains a keyword. If the action is to send spam matches to quarantine,
users who receive Spam Quarantine Reports can view the matching messages in the
quarantine.
Note: A spam content group does not analyze the content within attachments.
November 2012 Proprietary: Not for use or disclosure outside McAfee without written permission 47
Page 56

Configure a Spam Filter Email Protection Administrator Guide
The action for a content group you define overrides spam actions for Email Protection
default spam filters. For example, if Email Protection determines that an email has a
medium likelihood of being spam and also contains a keyword that is in your spam content
group, the action defined for your spam content group is applied.
However, if you also define content filtering
on the Content – Content Groups window
(see Configure a Content Filter, that content filter overrides the keyword filtering you
define on the following Spam – Content Groups window. In addition, spam identified by
the Content – Content Groups filter is accessible only by Quarantine Managers or higher
level administrators. Users cannot view this spam.
1 Click Email
Protection | Policies.
2 Select the policy you want to change.
3 Click the Spam.
4 Click Content Groups.
5 Double-click the Content Group you wish to modify.
6In the Group Name field, type the name of your spam content group.
This name should summarize the kind of keywords you want Email Protection to look
for. For example, you might want to identify musical terms, such as concert, music,
rock, jazz, and so on, as spam. In this case, your group name might be music.
7From the Action drop-down menu, select an action to take if an email matches a
keyword:
• None – The email is forwarded to the recipient email address.
• Quarantine the message – The email is sent to the recipient's domain content
quarantine area.
• Deny Delivery – The email is denied delivery.
• Allow – The email is sent to the recipient email address.
Note: The Allow option is useful if you want to override standard Email Protection spam content
filtering for particular keywords.
48 Proprietary: Not for use or disclosure outside McAfee without written permission. November 2012
Page 57

Email Protection Administrator Guide Configure a Spam Filter
Note: Emails that match keywords but are allowed will be reported as Other in the Threats: Spam
report.
• Tag the message subject with "[SPAM]"– The phrase "[SPAM]" is added to the
subject line of the email at the beginning of the subject text and the email is sent to the
recipient email address.
• Encrypt Message– is also available for Outbound content groups, if the Customer
has subscribed to Encryption.
• Silent Copy – allows you to forward a copy of the original message. To send a copy,
select a predefined distribution list from the drop-down.
8 Content List the content keywords needed to define your Custome Content Group.In
the Content field, type any keywords you want to search for in email. Use the
following rules for entering keywords.
• Each entry must be on its own line (separated by a hard return).
• If an entry contains multiple words, the entire phrase is used as a literal string (as
is).
• If individual words are desired, each word must be on its own line.
• Letter-case (for example, upper case or lower case) is ignored.
• The wildcards question mark (?) and asterisk (*) can be used to designate the
following:
— ? – designates any single character, including white space characters (for
example, menu, space, line break, etc.).
— For example, w?y would catch way, why, and w y.
— * – at the end of the string designates multiple characters until a white space
character is encountered.
For example, refi* would catch refinance, refinancing and refine.
— * – followed by a literal character designates multiple characters, including
white space characters, until the designated character is encountered.
For example, refi*d would catch refinanced, but would also catch refinishing
is a great way to save d.
— If the literal asterisk or question mark is desired, it must be preceded by a
backslash (for example, \* or \?).
9 For example, why\? (without quotes) would catch the string why? and the question
mark would not be used as a wildcard.Click the Enable checkbox to turn on the spam
content group.
10 Click Save for the new spam content group.
11 Click Save for the policy or continue to the Reporting tab.
To change a policy’s existing spam content group, click Edit.
November 2012 Proprietary: Not for use or disclosure outside McAfee without written permission 49
Page 58

Configure a Spam Filter Email Protection Administrator Guide
Set up Spam Quarantine Reports
When Email Protection scores email and determines that email might be problematic, but
the email is not clearly a security risk, Email Protection place the email into quarantine.
You can set up quarantine reports so that users can see which of their messages were
filtered and placed in quarantine. You can also determine how much control users have
over these reports, including:
• How reports are formatted.
• How often reports are sent
•
How Spam is filtered
• What actions users can take on quarantined email
See the E
To set up quarantine reports for use
1 Click Email
mail Protection User Guide on how users might manage quarantine reports.
rs, perform the following steps:
Protection | Policies.
2 Select a policy set for which the quarantine reports will apply.
3 Click Spam | Reporting.
4 Under the Enable Spam
Quarantine Reporting for heading, select one of the
following options:
• All users –
Quarantine Reports.
Note: Users
quarantine areas.
• Selected users – Only those user accounts configured for Spam Quarantine
Reports on the User Management windows receive the reports.
• No use
Reports.
50 Proprietary: Not for use or disclosure outside McAfee without written permission. November 2012
All user accounts associated with the policy set receive Spam
must be able to log into the Control Console to manage their spam
rs – No users associated with this policy set receive Spam Quarantine
Page 59

Email Protection Administrator Guide Configure a Spam Filter
5 Under the Default Settings heading, complete the following field:
Field Description
Frequency
From the Frequency drop-down menu, select
how often users
receive Spam Quarantine Reports if they have email in spam
quarantine.
Report Type From the Report Type drop-down menu, select the content that
each Spam Quarantine Report should contain:
HTML – All Quarantined – All emails in your spam quarantine
area are listed in the Spam Quarantine Report.
HTML – New Items Since Last Report – Only those emails
received since the previous Spam Quarantine Report are listed in
the Spam Quarantine Report.
Text – Summary – A text-only email notification is sent to you
with a link to your spam quarantine, instead of the Spam
Quarantine Report. This option supports users with email
applications that do not support HTML content.
Text – New Items Since Last Report – A text-only email report is
sent to you that indicates how many new emails have been
quarantined as spam since the last report and the total number of
spam emails in your spam quarantine. The report also lists the
email messages that have been quarantined since the last report.
HTML Format From the HTML Format drop-down menu, select one of the
following:
HTML with Actions – The links Allow, Deny, and Release are
enabled in the Spam Quarantine Reports.
HTML without Actions – The links Allow, Deny, and Release are
disabled in the Spam Quarantine Reports. Users must log into the
Control Console to perform these actions.
Note: This field is ignored if the Report Type field is set to Textonly Summary.
6 Under the Spam Quarantine Report Security Settings heading, complete the
following fields:
Field Description
Report Links From the Report Links drop-down menu, select the number of days
after which the links in the Spam Quarantine Report become
inactive.
A low value may not give the users enough time to review their
Spam Quarantine Report and perform any spam management. A
high value might increase the security risk of unauthorized access
into the Control Console using an old Spam Quarantine Report.
November 2012 Proprietary: Not for use or disclosure outside McAfee without written permission 51
Page 60

Configure a Spam Filter Email Protection Administrator Guide
Field Description
Restrict user rights
when accessing
quarantine from spam
quarantine report
Select this field Selectso that administrator-level users will be
logged in with role of User when accessing the Spam Quarantine
Reports. If you leave the checkbox blank, administrator-level users
will be logged as their administrative role.
Note: Selecting this option is recommended to provide additional
security for the Control Console. This option applies to all
administrative levels, including Reseller Administrators, Customer
Administrators, Domain Administrators, Quarantine Managers,
and Reports Managers.
7 Under the Other Options heading, select any or all of the following options:
Field Description
Allow users to
personalize
spam filtering
actions
Allow users to
personalize
delivery
frequency
Select to allow users to customize actions that Email Protection takes on
email that is likely to be spam. Users actually select the actions on spam
from the Preferences window on the Control Console.
Select to allow users to change the frequency with which they receive
Spam Quarantine Reports. Users select the frequency of reports from the
Preferences window on the Control Console.
Allow users to
personalize
report type
Allow users to
“opt out” of
spam filtering
Enable “Always
Deny” shortcut
from spam
quarantine
report
Show spam
score on spam
quarantine
report
Allow users to
download Spam
Control For
Outlook®
Select to allow users to change the default settings you set in the Report
Type field on this window. Users can change the Report Type from the
Preferences windowwindow on the Control Console.
Select to allow users to turn filters for spam on or off. Users can turn off
spam filtering from the Preferences window on the Control Console.
Select to enable the Always Deny link in user’s Spam Quarantine
Reports, the Message Quarantine windows, and the Safe Message View
window.
If you leave the checkbox blank, users must go to the Allow/Deny Sender
Lists window to change their Allow or Deny lists.
Select to display the spam likelihood score for each quarantined message
in the Spam Quarantine Reports.
Select to display a link in Spam Quarantine Reports, from which users can
download the Spam Control For Outlook utility. The location from which
the utility is downloaded is configured in the Branding Settings window.
Note: This feature can be enabled or disabled at the system level.
52 Proprietary: Not for use or disclosure outside McAfee without written permission. November 2012
Page 61

Email Protection Administrator Guide Configure a Content Filter
Field Description
Allow nonadmin users to
sign in directly
to the Control
Console
Display message
content in Safe
Message View
Display user
email addresses
in spam
quarantine
report
Allow users to
configure
alternate email
address for
spam report
delivery
Select to allow users to log into the Control Console using the Sign in
window.
Note: This feature does not affect the ability of users to log in by clicking
a link in a Spam Quarantine Report. If Control Console access is not
enabled and users do not receive the Spam Quarantine Report, the
Quarantine Manager or higher level roles must perform any changes to
the user settings, maintenance of the users’ spam quarantine, etc.
Select to allow users to view the body content of an email in the Safe
Message View window.
If you leave the checkbox blank, the user must release the email to see
what it contains in the body content.
Select to enable the view of user addresses in the HTML SQR report so
that users do not have to scroll through multiple addresses before they get
to the quarantine items.
Select to allow users to choose an alternate email address to reroute their
Spam Quarantine Report if needed. Users may go to Account
Management | User | Preferences to add their email alternate.
Alert! – Please be advised that redirecting a user's SQR allows the chosen
alternate recipient to have full access to their Control Console account,
including access to that user's Preferences. Therefore; please encourage
the user to choose their alternate email address carefully.
8 Click Save.
Configure a Content Filter
You can create a custom content filter. The content filter does the following:
• Blocks or quarantines the email that contains prohibited keywords.
• Notifies the sender or recipient when an email has been quarantined or blocked.
• Blocks HTML malicious tags or prohibited images.
• Manages the ability for users to click on links in email.
Note: Content filtering does not analyze the content within attachments.
Note: You also define content filtering on the Spam – Content Groups window (see
Configure a Spam Filter, the Content – Content Groups overrides the keyword filtering
you define on the following Spam – Content Groups window. In addition, spam
identified by the Content – Content Groups filter is accessible only by Quarantine
Managers or higher level administrators. Users cannot view this spam.
November 2012 Proprietary: Not for use or disclosure outside McAfee without written permission 53
Page 62

Configure a Content Filter Email Protection Administrator Guide
Note: Due to the nature of the content filtering, the window images may contain offensive
material.
To create a new policy content filter, perform the following steps:
1 Click Email Protection | Policies.
2 Select the policy you want to change.
3 Click Content.
The Content Groups window is displayed, showing the default content groups.
• Profanity
• Racially Insensitive
• Sexual Overtones
You cannot change the keywords in these groups.
The Content Group Policy fields are displayed.
Email Protection also provides predefined content groups that contain valid and
acceptable personal identifiable information that is allowed in email messages due to
specific policies. You cannot edit these content groups, but can designate whether or not
they are used. Following are the two types of predefined content groups:
• Credit Card Number
• Social Security Number
The Credit Cards that are supported include AMEX, VISA, MC, and DISC.
Note: Credit Card Numbers and Social Security Numbers can be represented or formatted in
various ways and Email Protection may not be able to capture all messages that contain
this information.
More Options
If a Customer or Domain subscribes to Email Encryption, then selecting this option can be
used to enforce Email Encryption if the outbound message contains the word [encrypt].
The word, [encrypt] can reside in the message subject line or the body of the outbound
message.
54 Proprietary: Not for use or disclosure outside McAfee without written permission. November 2012
Page 63

Email Protection Administrator Guide Configure a Content Filter
Note: This option is only available on the Outbound Policy Content Group window.
1 Click Edit or double-click on your selected Content Group, you may perform the
following:
• Group Name This defaults to the name of your selected group.
• Content This field is disabled for Content Groups
2 From the drop-down Action list, the following actions may be applied to a Content
Group
• None – The email is forwarded to the recipient email address.
• Quarantine the message – The email is sent to the recipient's domain content
quarantine area.
• Deny Delivery – The email is denied delivery.
• Allow – The email is sent to the recipient email address.
• Tag the message subject with "[SPAM]" – The phrase "[SPAM]" is added to the
subject line of the email at the beginning of the subject text and the email is sent to
the recipient email address.
• Encrypt Message is also available for Outbound content groups, if the Customer
has subscribed to Encryption.
3 Silent Copy allows you to forward a copy of the original message. To send a copy,
select a predefined distribution list from the drop-down.
4 Click Save
Turn Off a Default Content Filter
You can deactivate any of the Email Protection default content filters if you want to allow
email containing those keywords to be delivered or you want to replace the list of
keywords with your own list.
Note: Instead of turning off the content filter, you can also choose the action None for the
filter. In this case, Email Protection filters email, but delivers matching email to users with
no other notifications or marking.
1 Click Email Protection | Policies.
2 Select the policy you want to change.
3 Click Content.
The Content Groups window is displayed, showing the default content groups.
• Profanity
• Racially Insensitive
• Sexual Overtones
4 Double-click one of the default content groups.
5 Uncheck the Enable checkbox.
6 Click Save.
November 2012 Proprietary: Not for use or disclosure outside McAfee without written permission 55
Page 64

Configure a Content Filter Email Protection Administrator Guide
Custom Content Group
The Custom Content Groups subtab allows customers to define their own custom
content keyword group and assist in monitoring their email. By configuring a Content
Group, the customer can determine how the system reacts if it receives an email that
contains text that violated that content policy. Customers can also define a different action
for each content group.
Note: If the content group is enabled, then email will be filtered for that content.
1 Click New or double-click your selected Custom Content Group,and perform the
following:
2 Gr
oup Name: select and type of your Custom Content Group.
3 Content List the content keywords needed to define your Custome Content Group.In
the Content field, type any keywords you want to search for in email. Use the
following rules for entering keywords.
• Each entry must be on its own line (separated by a ha
• If an entry contains multiple words, the entire phrase
rd return).
is used as a literal string (“as
is”).
• If individual words are desired, each word must be on its own line.
• Letter-case (for example, upper case or lower case) is ignored.
• The wildcards question mark (?) and asterisk (*) can be used to designate the
following:
— ? – designates any single character,
including white space characters (for
example, menu, space, line break, etc.).
— For example, w?y wou
— * (without quotes) at the end of the string designates multi
ld catch way, why, and w y.
ple characters until
a white space character is encountered.
For example, r
— * – followed by a literal character designates multiple
efi* would catch refinance, refinancing and refine.
characters, including
white space characters, until the designated character is encountered.
56 Proprietary: Not for use or disclosure outside McAfee without written permission. November 2012
Page 65

Email Protection Administrator Guide Configure a Content Filter
For example, refi*d would catch refinanced, but would also catch refinishing
is a great way to save d.
— If the literal asterisk or question mark is desired, it must be preceded by a
backslash (for example, \* or \?).
For example, why\? (without quotes) would catch the string why? and the
question mark would not be used as a wildcard.
Caution: It is possible to create wildcard combinations that will filter valid email,
including all email, and/or will substantially slow email processing. Be very careful if you
use wildcards to ensure that only the desired content is filtered.
4From the Action drop-down menu, select an action to take if an email matches a
keyword:
• None – The email is forwarded to the recipient email address.
• Quarantine the message – The email is sent to the recipient's domain content
quarantine area.
• Deny Delivery – The email is denied delivery.
• Allow – The email is sent to the recipient email address.
Note: The Allow option is useful if you want to override standard Email Protection spam content
filtering for particular keywords.
Note: Emails that match keywords but are allowed will be reported as Other in the Threats: Spam
report.
• Tag the message subject with "[SPAM]"– The phrase "[SPAM]" is added to the
subject line of the email at the beginning of the subject text and the email is sent to the
recipient email address.
• Encrypt Message– is also available for Outbound content groups, if the Customer
has subscribed to Encryption.
• Silent Copy – allows you to forward a copy of the original message. To send a copy,
select a predefined distribution list from the drop-down.
5 Click the Enable checkbox to turn on the spam content group.
6 Click Save for the new spam content group.
7 Click Save for the policy or continue to the Notifications tab.
Notify Users about Spam Content
You can direct Email Protection to send notification emails to the recipient and/or sender
when an email is filtered because it contained spam content. You can see the content of
notifications and change it in the Notifications tabs. See Define the Format and Text of
Notifications to Users.
Note: Virus notifications will not be sent out for emails that are infected with widespread
viruses or worms (for example, SoBig or MyDoom). These notifications will be
automatically disabled by the Email Protection.
November 2012 Proprietary: Not for use or disclosure outside McAfee without written permission 57
Page 66

Configure a Content Filter Email Protection Administrator Guide
1 Click Email Protection | Policies.
2 Select the policy you want to change.
3 Click Content.
4 Click Notifications.
Complete the following fields:
Field Description
To the sender
when a
is … due to a
content group
violation
To the recipient
when a
is … due to a
content group
violation
message
message
Select one or more conditions that will
notification email to the sender.
• Q
uarantined – The infected email was quarantined.
• Denied delivery – The
Select one or more conditions that will
notification email to the recipient.
• Q
uarantined – The infected email was quarantined.
• Denied delivery – The
infected email was denied delivery.
infected email was denied delivery.
cause Email Protection to send a
cause Email Protection to send a
Configure a Filter for HTML, Java Script,
ActiveX, and Spam Beacons
You can configure how Email Protection filters email for HTML attachments or various
forms of HTML coding within email.
1 Click Em
ail Protection | Policies.
2 Select the policy you want to change.
3
Click Content.
4 Click HTML Shield.
58 Proprietary: Not for use or disclosure outside McAfee without written permission. November 2012
Page 67

Email Protection Administrator Guide Configure a Content Filter
5Under HTML Shield Protection, select one of the following options:
Field Description
Low Select this option to remove only malicious HTML tags from the email
and forward the email to the recipient. Text is added to the email to
indicate that HTML content was removed.
Medium Select this option to remove the following HTML content from the email
and forward the email to the recipient:
• Malicious HTML tags
• HTML comments and attributes
• All Java, Javascript, and ActiveX code
Text is added to the email to indicate that HTML content was removed.
High Select this option to remove all HTML content, including scripts as in the
Medium option, from the email and to forward the email to the recipient.
Text is added to the email to indicate that HTML content was removed.
None Select this option to not perform HTML filtering on email.
6Under Options for Low and Medium Setting
, sSelectelect Enable spam “beacon”
and web bug blocking to block spam beacons and web bugs.
A spam beacon can reveal user activity to spammers while flagging the recipient’s
address as active. A Web bug is any one of a number of techniques used to track who
is reading a Web window or e-mail, when, and from what computer. A Web bug can
also be used to see if an e-mail was read or forwarded to someone else, or if a Web
window was copied to another Website.
Note: This option is available only if you picked the Low or Medium options for
HTML filtering.
7 Select Replace all image links with a default transparent image to eliminate
objectionable images in email.
This option replaces
pixel.
November 2012 Proprietary: Not for use or disclosure outside McAfee without written permission 59
links to images in email with links to an image with one transparent
Page 68

Configure a Content Filter Email Protection Administrator Guide
Note: This option is available only if you picked the Low or Medium options for
HTML filtering.
8 Click Save or continue to ClickProtect.
Configure Web Hyperlink Filters
(ClickProtect)
You can configure whether Web hyperlinks in email are blocked or can be clicked and
followed by the user. You can also designate a ClickProtect Allow List of URL addresses
that are excluded from the ClickProtect processing (for example, your corporate URLs).
As another option, you can set tracking of links that are clicked so that they are reported in
the ClickProtect: Click Log Report.
Caution:
which include HTML or Rich Text
1 Click Email
2 Select the policy you want to change.
3 Click Content.
4 Click ClickProtect.
ClickProtect only processes links in emails with accepted message formats,
Protection | Policies.
5 Click one of the following options:
• Disabl
click and access Web hyperlinks in the emails without logging information in the
system.
• Display warning me
customizable warning message. Users can then either stop the click-through
process or continue to the Web site.
• Display warnin
with a customizable warning message and does not allow users to continue with
the click-through process.
60 Proprietary: Not for use or disclosure outside McAfee without written permission. November 2012
e ClickProtect — Disables this feature completely and allows users to
ssage before redirecting — Displays a dialog box with a
g message and deny click-throughs — Displays a dialog box
Page 69

Email Protection Administrator Guide Configure a Content Filter
6 If you clicked one of the last two options above, overtype the text in the Warning
Message text box. You can also leave the default text if desired
7In the Allow URL or IP field, type URL or IP addresses that you want to allow users
to access and bypass ClickProtect processing.
The following values are allowed:
• IP Address — Complete address (for example, 10.10.10.1) or partial address with
wild cards (for example, 10.10.10.*).
• Domain Name — Qualified domain name (for example, xyz.com) or subdomains
(for example, *@*.xyz.com denies emails from any subdomain of the XYZ
domain, such as user@abc.xyz.com). If you know you want to allow all emails
from this domain, then use this option instead of typing in each email address
associated with the domain. The following list provides some examples of
allowable URLs.
— www.domainname.com
— www.domainname.n*
— www.domainname.*
— www.domainname.example.com
— www.domainname.*.com
— www.domainname.xxx.xxx.xxx.xxx.com
— domainname.com
The following are not accepted in domain names:
— http://
—slashes
— IP addresses.
8 Click Add.
The value is added to the list box.
Note: (This step is only available to certain user roles, when a user-defined policy set
is selected.) If you want to include the values listed for the Default Inbound policy set,
select the check box located beneath the list.
Upload a List of Allowed URLs
You can create a list of allowed URLs and upload that list to the Control Console. To
upload a list, perform the following steps:
1 Create a file with a predefined list of URLs. The predefined list must be in the
following format:
• Must be a text file
• One entry per line
• File must be available for your browser to access
2 On the ClickProtect window, go to the More Options section.
November 2012 Proprietary: Not for use or disclosure outside McAfee without written permission 61
Page 70

Define an Attachment Filter Email Protection Administrator Guide
Additional fields are displayed.
3 To upload the file, click Browse next to the Upload List field and locate the file.
4 Click Upload Allow List.
The contents are added to the ClickProtect Allow List box.
5 Click Save.
Download a List of Allowed URLs from the
Control Console
If you want to download the list of allowed URLs to your local drive, click Download
ClickProtect Allow List. The downloaded list is a file in CSV format. You can open it in
Microsoft Excel.
Define an Attachment Filter
You can create a customer attachment filter. You can filter email for attachments based on
the following criteria:
• Filter by Attachment File Types, including file size.
• Filter by Attachment File Name
• Filter Zip File Attachments
Filter by Attachment File Types
To filter email by file type, you must define the following:
• What file types are allowed to be received
• File size restrictions on the allowed file types
62 Proprietary: Not for use or disclosure outside McAfee without written permission. November 2012
Page 71

Email Protection Administrator Guide Define an Attachment Filter
• The email action that will be used if an email violates any of the file type attachment
policies
To create a new policy content filter, perform the following steps:
1 Click Email Protection | Policies.
2 Select the policy you want to change.
3 Click Attachments.
The Attachments: File Types window is displayed.
4 For each file type in the Allowed Attachment Types section, select one of the
following options from the drop-down menu:
• Disallow — All email containing this file type are blocked.
• A file size, such that an email with a file of this file type that exceeds the file size
is blocked.
— Max 500 KB
— Max 1 MB
—2 MB
—5 MB
—10 MB
—15 MB
• Any size — Email with this file type is allowed and delivered.
Note: By default, each listed attachment file type is allowed unless you specifically
select it to be disallowed, except for the types Executables and Scripts. These two
file types are relatively easy to self-invoke from an email, and thus increase the
security risk of a self-running virus or worm.
The following table lists the file extensions associated with each file type:
File Type Example File Extensions
Microsoft Word
Documents
*.doc, *.dot, *.rtf, *.wiz
November 2012 Proprietary: Not for use or disclosure outside McAfee without written permission 63
Page 72

Define an Attachment Filter Email Protection Administrator Guide
File Type Example File Extensions
Microsoft Powerpoint
*.pot, *.ppa, *.pps, *.ppt, *.pwz
Documents
Microsoft Excel
*.xla, *.xlb, *.xlc, *.xlk, *.xls, *.xlt, *.xlw
Documents
Microsoft Access Files *.adp, *.ldb, *.mad, *.mda, *.mdb, *.mdz, *.snp
Other Microsoft Office
Files
Adobe Acrobat (PDF)
*.cal, *.frm, *.mbx, *.mif, *.mpc, *.mpd, *.mpp, *.mpt,
*.mpv, *.win, *.wmf
*.abf, *.atm, *.awe, *.fdf, *.ofm, *.p65, *.pdd, *.pdf
Files
Macintosh Files *.a3m, *.a4m, *.bin, *.hqx, *.rs_
Compressed or Archived
Files
*.arj, *.bz2, *.cab, *.gz, *.gzip, *.jar, *.lah, *.lzh, *.rar,
*.rpm, *.tar, *.tgz, *.z, *.zip
Audio Files *.aff, *.affc, *.aif, *.aiff, *.au, *.m3u, *.mid, *.mod,
*.mp3, *.ra, *.rmi, *.snd, *.voc, *.wav
Video/Movie Files *.asf, *.asx, *.avi, *.lsf, *.lsx, *.m1v, *.mmm, *.mov,
*.movie, *.mp2, *.mp4, *.mpa, *.mpe, *.mpeg, *.mpg,
*.mpv2, *.qt, *.vdo
Image Files *.art, *.bmp, *.dib, *.gif, *.ico, *.jfif, *.jpe, *.jpeg,
*.jpg, *.png, *.tif, *.tiff, *.xbm
Executables Note: This file type defaults to Disallow.
*.bat, *.chm, *.class, *.cmd, *.com, *.dll, *.dmg, *.drv,
*.exe, *.grp, *.hlp, *.lnk, *.ocx, *ovl, *.pif, *.reg, *.scr,
*.shs, *.sys, *.vdl, *.vxd
Scripts Note: This file type defaults to Disallow.
*.acc, *.asp, *.css, *.hta, *.htx, *.je, *.js, *.jse, *.php,
*.php3, *.sbs, *.sct, *.shb, *.shd, *.vb, *.vba, *.vbe,
*.vbs, *.ws, *.wsc, *.wsf, *.wsh, *.wst
ASCII Text Files *.cfm, *.css, *.htc, *.htm, *.html, *.htt, *.htx, *.idc,
*.jsp, *.nsf, *.plg, *.txt, *ulx, *.vcf, *.xml, *.xsf
Postscript Files *.cmp, *.eps, *.prn, *.ps
All Other Files Any file extensions that are not included in the other
file types
5In the Action to take for Disallowed Attachments section, select one of the
following options:
• Do nothing – Email Protection sends the email to the recipient with no filtering or
notification.
• Deny delivery – Email Protection denies delivery of the email.
64 Proprietary: Not for use or disclosure outside McAfee without written permission. November 2012
Page 73

Email Protection Administrator Guide Define an Attachment Filter
• Strip the attachment – Email Protection strips the attachment from the email and
the email is sent to the recipient. Text is inserted into the email notifying the
recipient that an attachment has been stripped.
• Quarantine the message – Email Protection sends
the email to quarantine.
6 Click Save
or continue to the Filename tab.
Filter by Attachment File Name
You can create custom filter to filter email for specific file names. This filter overrides any
conflicting file type policies you may have defined.
To define a filter for attachment file name, perform the following steps:
1 Click Email
2 Select the policy you want to change.
3 Click Attachments.
The Attachments: File Types window is displayed.
4 Click Filename Policies.
The Filename Policies window is displayed.
5 Click New.
The New Attachment Filename Policy section is displayed.
Protection | Policies.
6 From the Filter drop-down menu, select one of t
• Is –
Email Protection filters for file names that have an exact match to the text in
the Val ue field. For example, if you want to filter for the file name config.exe and
no others, you must select Is and then type config.exe in the Value field. For this
example,, the Is option has the meaning “File name IS config.exe.”
• Contains – Email
Va lu e description anywhere within the filename string. For example, if you want
to filter for any file that contains config in its name, like postconfig or config.ini,
select this option.
November 2012 Proprietary: Not for use or disclosure outside McAfee without written permission 65
he following:
Protection filters for file names that contain the text in the
Page 74

Define an Attachment Filter Email Protection Administrator Guide
• Ends with – Email Protection filters for file names that end with the text in the
Va lu e description. For example, if you want to filter for any executable files
ending with .exe, select this option.
7 In the Value field, type the name or partial name with
which Email Protection should
search incoming email. For example, if you want Email Protection to search for any
file containing the text config, type config.
8 From the Action drop-down menu, select one of the following options:
•Do nothing – Email Protection sends the email to the recipient with no filtering or
notification.
• Deny delivery – Email Protection denies delivery of the email.
• S
trip the attachment – Email Protection strips the attachment from the email and
the email is sent to the recipient. Text is inserted into the email notifying the
recipient that an attachment has been stripped.
• Quarantine the message – Email Protection sends
9 Ignore the Silent Copy drop-down list.
10 Click Save
11 Click Save for the
to save the new filename filter.
policy or continue to the Additional Policies tab to filter for zip file
No silent copy will be sent.
the email to quarantine.
attachments.
Filter Zip File Attachments
You can create a custom filter for zipped file or compressed file attachments. These
policies are ignored unless the Compressed or Archived Files filetype is allowed in the
Attachments: File Types window.
To define a filter for attachment file name, perform the following steps:
1 Click Email
Protection Policies.
2 Select the policy you want to change.
3 Click Attachments.
The Attachments: File Types window is displayed.
4 Click Additional Policies.
The Additional Attachment Policies window is displayed.
66 Proprietary: Not for use or disclosure outside McAfee without written permission. November 2012
Page 75

Email Protection Administrator Guide Define an Attachment Filter
5From the Message contains high-risk attachment drop-down menu, select one of the
following options:
• Allow delivery – Email Protection sends the email to the recipient with no
filtering or notification.
• Quarantine the message – Email Protection sends the email to quarantine.
• Deny delivery – Email Protection denies delivery of the email.
This action applies if an email has an attachment that is a zipped file and that violates
any of the following rules:
• The zip file itself is too large ( > 500MB).
• A file contained in the zip file is too large ( > 100MB).
• The zip file contains too many files ( > 1500 files).
• The compression rate is too high ( > 95% compressed).
• The zip file contains too many levels of nesting ( > 3 levels).
6From the Message contains an encrypted zip attachment drop-down menu, select
one of the following options:
• Allow delivery – Email Protection sends the email to the recipient with no
filtering or notification.
• Quarantine the message – Email Protection sends the email to quarantine.
• Deny delivery – Email Protection denies delivery of the email.
The action applies if an email message has an attachment that is a zipped file and is
encrypted and password-protected. This format is commonly used to prevent scanning
for viruses in zipped files.
7From the File in zip attachment violates attachment policy drop-down menu, select
one of the following options.
• Attachment policy action – The action for the specific policy that was violated
will be performed on the entire attachment. If multiple policies were violated, the
policies defined in the Attachment – Filename Policies subtab override the
policies defined in this subtab.
• Do nothing – The email is sent to the recipient with no filtering applied.
The action applies if an email that has an attachment that is a zipped file and the
zipped file contains files that violate the previously-defined filters for attachments.
Notify Users about Attachment Violations
You can direct Email Protection to send notification emails to the recipient and/or sender
when an email is filtered because it contained an attachment violation. You can see the
content of notifications and change it in the Notifications tabs. See
Text of Notifications to Users.
1 Click Email Protection | Policies.
2 Select the policy you want to change.
3 Click Attachments.
Define the Format and
4 Click Notifications.
November 2012 Proprietary: Not for use or disclosure outside McAfee without written permission 67
Page 76

Allow or Deny Email to or from Specific Addresses Email Protection Administrator Guide
5 Complete the following fields:
Field Description
To the sender
when a message
is … due to an
attachment
policy violation
To the recipient
when a message
is … due to an
attachment
policy violation
Select one or more conditions that will cause Email Protection to send a
notification email to the sender.
• Quarantined – The email that contained an attachment violation was
quarantined.
• Denied delivery – The email that contained an attachment violation
was denied delivery.
• Stripped – The infected attachment was stripped and the email sent to
the recipient.
Select one or more conditions that will cause Email Protection to send a
notification email to the recipient.
• Quarantined – The email that contained an attachment violation was
quarantined.
• Denied delivery – The email that contained an attachment violation
was denied delivery.
• Stripped – The violating attachment was stripped and the email sent to
the recipient.
6 Click Save.
Allow or Deny Email to or from
Specific Addresses
You can define lists of sender email addresses, domain names, or IP addresses whose
email is always delivered to your users, or conversely, whose email is always denied
delivery. In addition, you can define lists of recipient email addresses that are always
denied receiving email.
68 Proprietary: Not for use or disclosure outside McAfee without written permission. November 2012
Page 77

Email Protection Administrator Guide Allow or Deny Email to or from Specific
The Sender Allow and Sender Deny lists are used in combination with the user-level
Allow and Deny lists that can be defined for specific user accounts. In the case of a
conflicting entry (for example, the same email address is in the user-level Allow list and
the Sender Deny list at the policy set level), the lists defined in these tabs override the
user-level lists.
The allowed maximum of items for each list is defined at the system level and may vary
for different installations of Email Protection.
Allow Email from a Specific Address
You can define a list of sender addresses whose email will always be accepted without
email filtering. The exception is that virus filtering is always applied if licensed for that
policy set, unless overridden by the user-level policy configurations. In addition, the userlevel Deny list will override the policy set-level Sender Allow list.
You can add individual addresses one a time or you can add them with a batch file. See
Add Allow, Deny, or Recipient Shield Addresses with a Batch File.
1 Click Email Protection | Policies.
2 Select the policy you want to change.
3 Click Allow/Deny.
The Sender Allow window is displayed.
4In the Add Address field, type the address of a sender whose email should be
delivered without filtering.
The following values are allowed in the list entries:
• Email addresses – Complete sender email address or partial address with
wildcards (for example, gsmith@domain.com or g*@domain.com)
• Domain names – Complete domain name or partial name with wildcards (for
example, “domain.com”)
• IP addresses – Complete IP address or partial address with wildcards (for
example, 123.123.12.3 or 123.123.12.*)
Note: CIDR notation is not allowed. Each IP address must be designated separately.
November 2012 Proprietary: Not for use or disclosure outside McAfee without written permission 69
Page 78

Allow or Deny Email to or from Specific Addresses Email Protection Administrator Guide
5 Click Add.
The address is added to the allowed address box on the right.
6 Repeat steps 4 and 5 for each address you want to add.
7 Click Save.
You can save a copy of the list you created. See
Shield List.
Save a Copy of an Allow, Deny, or Recipient
Sender Policy Framework (SPF)
You are able to whitelist a specific email addess or domain and assign an SPF check to that
address. Subsequent mail coming from the whitelisted domain is then checked against
SPF records. Should the SPF check fail, the mail is denied.
The following conditions apply to an SPF verification:
• If the record can be verified, then content and spam filtering is skipped for the
sender’s inbound messages.
• If the record cannot be verified, then filtering is not skipped for the sender’s inbound
messages.
Note: If a sender on the allow list does not have an SPF record the inbound message is still
allowed.
Deny Email from a Specific Address
You can define a list of sender addresses whose email will always be denied regardless of
email filtering. This Deny list overrides the user-level Allow list.
You can add individual addresses one a time or you ca
Add Allow, Deny, or Recipient Shield Addresses with a Batch File.
1 Click Email
Protection | Policies.
2 Select the policy you want to change.
Click Allow/Deny.
3
n add them with a batch file. See
70 Proprietary: Not for use or disclosure outside McAfee without written permission. November 2012
Page 79

Email Protection Administrator Guide Allow or Deny Email to or from Specific
The Sender Allow window is displayed.
4 Click Sender Deny.
The Sender Deny window is displayed.
5In the Add Address field, type the address of a sender whose email should be denied
without filtering.
The following values are allowed in the list entries:
• Email addresses – Complete sender email address or partial address with
wildc
ards (for example, gsmith@domain.com or g*@domain.com)
• Domain names – Complete domain name or partial
name with wildcards (for
example, domain.com)
• IP addresses – Complete IP address or partial address with wildcards (for
example, 12
Note: CIDR notation is not allow
3.123.12.3 or 123.123.12.*)
ed. Each IP address must be designated separately.
6 Click Add.
The address is added to the denied address box on the right.
7 Repeat steps 4 and 5 for each address you want to add.
8
In the If the Sender is on the Sender Deny List section, select one of the following
options:
• Accept and silently discard th
e message – The email is accepted, but is
discarded without notification.
• Deny de
livery – The email is denied delivery.
9 Click Save.
You can save a copy of the list you created. See
Shield List.
Save a Copy of an Allow, Deny, or Recipient
November 2012 Proprietary: Not for use or disclosure outside McAfee without written permission 71
Page 80

Allow or Deny Email to or from Specific Addresses Email Protection Administrator Guide
Deny Email to a Specific Recipient
You can define a list of recipient user addresses whose incoming email will always be
denied, regardless of email filtering. For example, you can designate that emails received
to an ex-employee’s user account are always denied. Email received for all alias email
addresses for the designated user account is also included in the Recipient Shield
processing.
You can add individual addresses one a time or you can add them with a batch file. See
Add Allow, Deny, or Recipient Shield Addresses with a Batch File.
1 Click Email Protection | Policies.
2 Select the policy you want to change.
3 Click Allow/Deny.
The Sender Allow window is displayed.
4 Click Recipient Shield.
The Recipient Shield window is displayed.
5In the Add Address field, type the address of a recipient whose email should be
denied.
You can type a complete recipient email address or partial address with wildcards (for
example, “gsmith@domain.com” or “g*@domain.com”).
Note: The email addresses must be defined in the primary Domain. Alias domain
names are not allowed.
6 Click Add.
The address is added to the recipient address box on the right.
7 Repeat steps 4 and 5 for each address you want to add.
8 In the If the Recipient is on the Recipient Shield List section, select one of the
following options:
• Accept and silently discard the message – The email is accepted, but is
discarded without notification.
72 Proprietary: Not for use or disclosure outside McAfee without written permission. November 2012
Page 81

Email Protection Administrator Guide Email Authentication
• Deny delivery – The email is denied delivery.
• Do nothing – The email is forwarded to the recipient email address with no
processing applied.
9 Click Save.
You can save a copy of the list you created. See Save a Copy of an Allow, Deny, or Recipient
Shield List.
Save a Copy of an Allow, Deny, or Recipient
Shield List
You can download the allow or deny list you have created so you can store a copy. To
download a copy, perform the following steps.
1 On the Allow, Deny, or Recipient Shield window, click More Options.
2 Click Download [] List.
A download window is displayed. Email Protection automatically creates a Microsoft
Excel spreadsheet (*.csv file) containing the address list. You can choose to save the
file or open it directly.
Add Allow, Deny, or Recipient Shield
Addresses with a Batch File
1 Using a text editor, create a text file that contains one email address per line, and save
it to your computer.
2 On the Allow, Deny, or Recipient Shield window, click More Options.
Additional fields are displayed.
3 Click Browse and search for the text file you created.
4 Click Upload [] List.
5 Click Save.
Email Authentication
Transport Layer Security
Transport Layer Security (TLS) has routinely been supported and is still supported by our
Email Protection system. If a TLS connection can be negotiated between the sender and
the recipient MTAs, then the system delivers the email over TLS. If a TLS connection
CANNOT be established between the sender or the recipient MTA, then the mail transfer
November 2012 Proprietary: Not for use or disclosure outside McAfee without written permission 73
Page 82

Email Authentication Email Protection Administrator Guide
agent delivers, via SMTP, without encryption. Therefore, it is recommended that you
specify a Sender’s domain and/or sub-domain for this policy so that TLS is enforced.
Thus, if TLS cannot be established, then the message will not be delivered and a bounce
message will be generated to the sender, recipient, or both depending on the Notifications.
Note: Enforced TLS requires a negotiation between our mail transfer agent and yours
to be successful. You must have TLS turned on at your end to accomodate this
transaction. Refer to your MTA software manual on “How to enable/turn-on TLS”
to ensure TLS is implemented in your system prior to setting up your domain lists.
From the Policy Set window select Email Authentication | Enforce TLS tab and complete
the following steps.
Add Domain
6 To enter values into the TLS domain list enter the full address of the Sender/
Recipient’s domain and/or sub-domain.
NOTE: To enter values into the TLS domain list enter the full address of the Sender/
Recipient's domain and/or sub-domain. Any Sender/Recipient's domain or
subdomain must be explicitly specified for enforced TLS. Specifying a Sender/
Recipient's domain doesn't automatically include any sub-domains of that domain.
7 Click the Add » button. The value is added to the list box.
NOTE: The maximum number of values allowed in the Add Domain list is specified. This
limit is defined at the system level (see the online help for the specific count). Any
duplicate or invalid values are discarded automatically.
74 Proprietary: Not for use or disclosure outside McAfee without written permission. November 2012
Page 83

Email Protection Administrator Guide Email Authentication
More Options
• Upload Enforced TLS List (appends to existing list): To Upload a file with a
predefined list, click the Browse button. After you select the file and it's path appears
in the text field, click the Upload button. The contents are added to the Add Domain
box above.
• Download Enforced TLS List (be sure to save changes first): To Download a domain
list in a csv file, click the Download button, select the list you wish to download and
click Save.
8 Subscribe to Default TLS List By checking the subscription to the TLS default list you
will be adding the appropriate Inbound/Outbound Default domain policy to your
customized Enforced TLS domain list. The default list can be viewed by clicking the
corresponding Inbound/Outbound Default selection under the Policies tab. This option
is only available in custom (non-default) policy sets.
NOTE: If the default list changes, your subscription to the default is updated to reflect
those changes.
Save
9 Click the Save button to save your information.
Download
To Download a domain list in a csv file, click the Download button, select the list you
wish to download and click Save.
Enforced SPF
Sender Policy Framework (SPF) can be used by email recipients to determine if the
messages they receive were sent from someone authorized by the domain owner, which
can help detect spoofing. SPF only works when domain owners implement and maintain it
voluntarily.
To implement SPF, domain owners must create special DNS entries which list the IP
addresses that are authorized to send email from their domain. Email recipients must
compare an email's source IP address to the IP address in the domain owner's DNS SPF
records. If they match, it is reasonable to assume that the message was sent by the domain
owner or an authorized third party.
Important SPF information:
• SPF implementation is voluntary and many domain owners have not implemented
DNS SPF records, including many well-known commercially used domains.
• Even those that have implemented SPF might have outdated or inaccurate records,
resulting in false positives. The only way to resolve this is to contact the domain
owner and ask them to correct the issue.
November 2012 Proprietary: Not for use or disclosure outside McAfee without written permission 75
Page 84

Email Authentication Email Protection Administrator Guide
• Nothing prevents spammers and hackers from implementing SPF, so it is not a
reliable spam indicator - Many organizations allow third parties to send mail on behalf
of their domain (authorized spoofing). These third parties must be authorized by the
domain owner as part of their SPF records in order for recipients to successfully
validate the third party messages.
• Hosted email providers often give the same SPF records to all their customers, making
it impossible to distinguish one customer from the another, thus reducing usefulness
of the technology.
• Even when SPF is implemented and enforced, it is still possible for spammers to
create very convincing spoofed emails; therefore, continued user training and caution
is advised.
Create an Enforced SPF Domain
Go to the Email Authentication | Enforced SPF tab and complete the following
information to implement an SPF domain.
To enter values for the SPF domain list, enter the full address of the Sender domain and/or
sub-domain, or use part of the domain using wildcards. Any Sender domain or subdomain
must be explicitly specified for enforced SPF. Specifying a Sender domain doesn't
automatically include any sub-domains of that domain. Examples of Wildcard use include
any of the following:
•*.example.com
•e
xample.*
• mysubdomain.*.*
• subdomain.*.example.com
1 Click the Add » button. T
Note: The maximum number of values allowed in the Add Domain list is 1500. This limit is defined
at the system level. Any duplicate or invalid values are discarded automatically.
he value is added to the list box.
2 To remove a value from the list, select it in the list box and click the « Remove button.
Note: To select more than one value from the list, press Ctrl on your keyboard, click each entry
you want to remove, and then click the « Remove button.
76 Proprietary: Not for use or disclosure outside McAfee without written permission. November 2012
Page 85

Email Protection Administrator Guide Email Authentication
Note: All entries are removed when clicking the button Remove All.
More Options
• Regardless of Sender Domain – From the drop-down lists, select the appropriate
SPF action (Deliver, Deny, Tag Subject) for the following criteria:
• when SPF is available but validation fails
• when SPF is not available
• when SPF is available and validation succeeds
Note: When the action is tag subject, tags are applied to the end of the subject. The tags are:
WARNING: SPF validation failed, SPF verified, WARNING: SPF validation unavailable .
• Upload Enforced SPF List (appends to existing list): – To Upload a file with a
predefined list, click the Upload Browse button. After you select the file and it's path
appears in the text field, click the Upload button. The contents are added to the Add
Domain box above.
• Download Enforced SPF List (be sure to save changes first): – To Download a
domain list in a csv file, click the Download button, select the list you wish to
download and click Save.
NOTE: If the default list changes, your subscription to the default is updated to reflect
those changes.
Enforced DKIM
DomainKeys Identified Mail (DKIM) is part of the Email Authentication suite designed to
verify the email sender and the message integrity. The DomainKeys specification has
adopted aspects of Identified Internet Mail to create an enhanced protocol called
DomainKeys Identified Mail.
November 2012 Proprietary: Not for use or disclosure outside McAfee without written permission 77
Page 86

Email Authentication Email Protection Administrator Guide
Create a DKIM Domain
Complete the following information to implement a DKIM domain.
Add Domain To enter values for the DKIM domain li
st, enter the full address of the sender
domain and/or sub-domain, or use part of the domain using wildcards. Specifying a sender
domain does not automatically include any sub-domains of that domain. The following list
demonstrates different examples of entries using a wildcard (*).
•*.example.com
xample.*
•e
• mysubdomain.*.*
• subdomain.*.example.com
If the sub-domain is not going to be entered usi
ng the wildcard character, the sub-domain
must be explicitly defined.
1 Click the Add » button. The value is added to the list box.
Note: The maximum number of values allowed in the Add Domain list is 1500. This limit is
defined at the system level. Any duplicate or invalid values are discarded automatically.
2 To remove a value from the list, select it in the list box and click the « Remove button.
Note: To select more than one value from the list, press Ctrl on your keyboard, click each entry
you want to remove, and then click the « Remove button.
Note: All entries are removed when clicking the button Remove All
More Options
Regardless of Sender Domain From the drop-down lists, select the appropriate DKIM
action (Deliver, Deny, Tag Subject) for the following criteria:
78 Proprietary: Not for use or disclosure outside McAfee without written permission. November 2012
Page 87

Email Protection Administrator Guide Email Authentication
• when a DKIM signature is present but is not valid.
• when no DKIM signature is present.
• when a valid DKIM signature is present.
NOTE: When the action is tag subject, tags are applied to the end of the subject. The tags are:
WARNING: DKIM validation failed, DKIM verified, WARNING: DKIM validation unavailable.
Upload Enforced DKIM List (appends to existing list):
3 To Upload a file with a predefined list, click t
he Upload Browse button. After you
select the file and it's path appears in the text field, click the Upload button. The
contents are added to the Add Domain box above.
Download Enforced DKIM List (be
4 To Download a domain list in a csv file, click the Download
sure to save changes first):
button, select the list you
wish to download and click Save.
5 Click the Save button to save your information.
By checking the Subscribe to Default Inbound
policy Enforced DKIM list subscription,
you will be adding the appropriate Inbound/Outbound Default domain policy to your
customized Enforced DKIM domain list. The default list can be viewed by clicking the
corresponding Inbound Default selection under the Policies tab. This option is only
available in custom (non-default) policy sets.
NOTE: If the default list changes, your subscription to the default is updated to reflect those
changes.
Email Authentication Notifications tab
November 2012 Proprietary: Not for use or disclosure outside McAfee without written permission 79
Page 88

Define the Format and Text of Notifications to Users Email Protection Administrator Guide
Send Email Notifications
6 Check the box “Denied Delivery “regarding the heading “To the sender when a
message is” to notify the sender is unable to send their message due to an Email
Authentication violation.
7 Click Save
8 Check the box “Denied Delivery “regarding the heading “To the recipient when a
message is” to notify the recipient is unable to receive their message due to a Email
Authentication violation
9 Click Save
View your selection Click the Notifications Tab in the Policy Set window.
Define the Format and Text of
Notifications to Users
You can configure templates for the notification emails that are sent to the sender and/or
recipient when an email message is filtered for:
• Viruses
• Content
• Attachments
Default notification templates are provided for all the notification scenarios. You can
change these templates if you wish.
One notification email template is defined for each combination of the following:
• Filtering type — For viruses, content, or attachments
• Destination of the notification — Sender or recipient
• Email Action — Deny, strip, or quarantine
Variables within a Notification
Within the notification emails, variables automatically insert content from the system. For
example, the variable $(DATE) inserts the date when the notification email was sent.
Default variables already exist for the default notifications. If you want to use a different
variable, you must manually type the variable as shown below and the variables are casesensitive.
$(SUBJECT)
$(FROM)
80 Proprietary: Not for use or disclosure outside McAfee without written permission. November 2012
Inserts a variable that automatically indicates the subject of the email that
violated the policy.
Inserts a variable that automatically indicates the sender’s email address
(From: address) from the email that violated the policy. This variable
inserts the From: address that is displayed in the email.
Page 89

Email Protection Administrator Guide Define the Format and Text of Notifica-
$(SENDER)
$(TO)
$(DATE)
$(REASON)
$(ACTION)
$(DOMAIN)
$(MSG_HEAD
ER)
$(SIZE)
$(POSTMAST
ER)
Inserts a variable that automatically indicates the sender’s email address
(From: address) from the email that violated the policy. This variable
inserts the SMTP envelope From: address received from the sending email
server.
Inserts a variable that automatically indicates the recipient’s email address
(To: address) from the email that violated the policy.
Inserts a variable that automatically indicates the date when the email was
received that violated the policy.
Inserts a variable that automatically indicates the reason why the email
violated the policy.
Inserts a variable that automatically indicates the action that was applied
to the email that violated the policy.
Inserts a variable that automatically indicates the domain that received the
email that violated the policy.
Inserts a variable that automatically indicates the email header information
from the email that violated the policy.
Inserts a variable that automatically indicates the size, including
attachments, of the email that violated the policy.
Inserts the contact email address configured for the domain.
The set of Notifications tabs includes the following subtabs:
• Notifications – Virus Notifications subtab (see window 1)
• Notifications – Content Notifications subtab
• Notifications – Attachment Notifications subtab
In addition, each subtab will have a separate Edit area for each of its notification
templates.
Because all the individual notification templates offer the same functionality, only one set
of subtabs in the Notifications tabs will be described to reduce redundancy. Be aware that
the same features are used to modify the remaining notification templates, the only
difference being the combinations of filter type, destinations, and email actions. Be sure to
modify the navigation and information accordingly.
Define the Format and Text of Virus
Notifications
1 Click Email Protection | Policies.
2 Select the policy you want to change.
3 Click Notifications.
The Notifications: Virus window is displayed.
November 2012 Proprietary: Not for use or disclosure outside McAfee without written permission 81
Page 90

Define the Format and Text of Notifications to Users Email Protection Administrator Guide
4 Click on a notification in the Virus Notifications box.
5 Either double-click on a subject or highlight a subject and click Edit.
The Edit section of the window is displayed.
6 Change, if desired, the text or variables in any or all of the following fields:
From Designates what email address is listed as the From: address in the
notification email. Optionally, you can type variables that insert system
information into this content.
Reply-To Designates what email address is used
email clicks the Reply button in his/her email application. Optionally, you
can type variables that insert system information into this content.
Subject Type the text to be used as the subject
Optionally, you can type variables that insert system information into this
content.
Body Type the text to be used as the body text for the notification email
plate. Optionally, you can type variables that insert system information
tem
into this content.
82 Proprietary: Not for use or disclosure outside McAfee without written permission. November 2012
if the recipient of the notification
for the notification email template.
Page 91

Email Protection Administrator Guide Define the Format and Text of Notifica-
7 Click Save.
Define the Format and Text of Content
Violation Notifications
1 Click Email Protection | Policies.
2 Select the policy you want to change.
3 Click Notifications.
The Virus Notifications window is displayed.
4 Click Content.
The Content Notifications window is displayed.
5 Click on a notification in the Content Notifications box.
6 Either double-click on a subject or highlight a subject and click Edit.
The Edit section of the window is displayed.
7 Change, if desired, the text or variables in any or all of the following fields:
From Designates what email address is listed as the From: address in the
Reply-To Designates what email address is used if the recipient of the notification
Subject Type the text to be used as the subject for the notification email template.
November 2012 Proprietary: Not for use or disclosure outside McAfee without written permission 83
notification email. Optionally, you can type variables that insert system
information into this content.
email clicks the Reply button in his/her email application. Optionally, you
can type variables that insert system information into this content.
Optionally, you can type variables that insert system information into this
content.
Page 92

Define the Format and Text of Notifications to Users Email Protection Administrator Guide
Body Type the text to be used as the body text for the notification email
template. Optionally, you can type variables that insert system information
into this content.
8 Click Save.
Define the Format and Text of Attachment
Violation Notifications
1 Click Email Protection | Policies.
2 Select the policy you want to change.
3 Click Notifications.
The Virus Notifications window is displayed.
4 Click Attachment.
The Attachment Notifications window is displayed.
5 Click on a notification in the Attachment Notifications box.
6 Either double-click on a subject or highlight a subject and click Edit.
The Edit section of the window is displayed.
7 Change, if desired, the text or variables in any or all of the following fields:
From Designates what email address is listed as the From: address in the
notification email. Optionally, you can type variables that insert system
information into this content.
Reply-To Designates what email address is used if the recipient of the notification
84 Proprietary: Not for use or disclosure outside McAfee without written permission. November 2012
email clicks the Reply button in his/her email application. Optionally, you
can type variables that insert system information into this content.
Page 93

Email Protection Administrator Guide Define the Format and Text of Notifica-
Subject Type the text to be used as the subject for the notification email template.
Optionally, you can type variables that insert system information into this
content.
Body Type the text to be used as the body text for the notification email
plate. Optionally, you can type variables that insert system information
tem
into this content.
8 Click Save.
Email Authentication
The Notifications | Email Authentication subtab allows you to configure a template of
how the notification email will appear that is sent to the sender and/or recipient.
Within the notification emails, there
are available variables that will automatically insert
content from the system. For example, the variable $(DATE) will insert the date when the
notification email was sent. You must manually type the variables as shown below and the
variables are case-sensitive.
9 Highlight the message you wish to review and Click Edit to launch the edit template.
Variables within the template include:
$(SUBJECT) – The Subject field is blank because the message was blocked before the
email content
message, edit the Subject: field, otherwise the Subject appears as: 'Delivery Notification
had been sent. If you wish to have a Subject value for the Notification
'.
$(FROM) – Inserts a variable that automatic
(From: address) from the email that violated the policy. This variable inserts the From:
address that is displayed in the email.
$(SENDER) – Inserts a variable that automatically
(From: address) from the email that violated the policy. This variable inserts the SMTP
envelope From: address received from the sending email server.
$(TO) – Inserts a variable that automatically indica
address) from the email that violated the policy.
November 2012 Proprietary: Not for use or disclosure outside McAfee without written permission 85
ally indicates the sender's email address
indicates the sender's email address
tes the recipient's email address (To:
Page 94

Define the Format and Text of Notifications to Users Email Protection Administrator Guide
$(DATE) – Inserts a variable that automatically indicates the date when the email was
received that violated the policy.
$(REASON) – Inserts a variable that automatically indicates
the reason why the email
violated the policy.
$(ACTION) – Inserts a variable that automatically
indicates the action that was applied to
the email that violated the policy.
$(DOMAIN) – Inserts a variable
that automatically indicates the Domain that received
the email that violated the policy.
$(POSTMASTER) – Inserts postmaster (ex. postmaster@domain.com) email address
for
the Domain.
Variable syntax requires $({name_of_variable
}), where {name_of_variable} is replaced
with the predefined variable name (without the curly brackets).
Email Authentication Subject Headers
As mentioned, the Subject field in the Email Authentication Email Subject Line, the Email
Authentication Email Header, and the Email Authentication Notification Message Body
will not contain Subject data since the email was denied and no data was retrieved.
The following examples demonstrate the Subject Field
displaying Delivery Notification. Again, this is because the $(SUBJECT) variable is an
empty variable.
Email Subject Line
or Subject Notification only
86 Proprietary: Not for use or disclosure outside McAfee without written permission. November 2012
Page 95

Email Protection Administrator Guide Disaster Recovery
Email Subject Header
Email Authentication Notification Subject Header Response
Disaster Recovery
Disaster Recovery allows you to specify what actions to take when email cannot be
delivered. There are three available options:
• Defer to domain-based Email Continuity access control configured under Disaster
Recovery Setup
Select this option to use the configuration settings from the Disaster Recovery Setup
window.
• Allow users to use the Email Continuity webmail client
Select this option to allow users to use the Email Continuity webmail client when
email cannot be delivered.
• Do not allow users to use the Email Continuity webmail client
Select this option if you do not wish to allow users to use the Email Continuity
webmail client when email cannot be delivered.
November 2012 Proprietary: Not for use or disclosure outside McAfee without written permission 87
Page 96

Assign a Group to the Custom Policy Email Protection Administrator Guide
Assign a Group to the Custom Policy
To perform this task, you must first create the group of users who are to be assigned to the
policy. See “Managing Groups” in Account Management Administrator Guide.
1 Click Email Protection |
2 Select the custom policy to which
3 Click Group Subscriptions.
The Policy Configuration Groups window is displayed.
4 Select the group you want to assign.
5 Click Ad
d.
Policies.
you want to assign a group.
88 Proprietary: Not for use or disclosure outside McAfee without written permission. November 2012
Page 97

Email Protection Administrator Guide Create a Custom Outbound Policy
6. Customize Outbound Mail
Filters
You can customize the default outbound policy for any and each domain, or any and each
group, to fit your business needs.
Note: Outbound email i
lists for outbound email. You can, however, copy allow or deny lists from an existing
inbound policy.
s not filtered for spam. You also can not customize allow or deny
Create a Custom Outbound Policy
Important Note: It is assumed that all domains within an Enterprise Customer will have
the same package assigned to them. If some domains have different packages, unexpected
results may occur. when a policy is applied to a group in which members reside within
different domains.
1 Click Email
2 Click New.
The New Policy Set fields are displayed.
Protection | Policies | Outbound Policies link.
Field Description
Name Enter a name for the policy set you are creating. The
Description Enter a description of the new policy set.
November 2012 Proprietary: Not for use or disclosure outside McAfee without written permission 89
name should reflect
the name or purpose for the group or groups that you will assign to the
policy.
Page 98

Configure a Virus Filter Email Protection Administrator Guide
Direction From the drop-down menu, select the direction of email, outbound
SMTP, for which this policy will be configured.
Copy From From the drop-down menu, select an existing policy set whose settings
you want to copy to the new policy set. Most settings are copied based on
this selection. However, you must choose to copy some settings from the
existing policy separately by selecting the following fields.
Copy Sender
Allow List
Copy Sender Deny
List
Copy Recipient
Shield List
Copy ClickProtect
Allow List
Select to copy the Sender Allow list from the policy set selected in the
Copy From field.
Select to copy the Sender Deny list from the policy set selected in the
Copy From field.
Select to copy the Recipient Shield list from the policy set selected in the
Copy From field.
Select to copy the ClickProtect Allow list from the policy set selected in
the Copy From field.
3 Click Save.
The Policy Sets list is updated with the new policy. You can now modify the new
policy to meet your business needs.
Configure a Virus Filter
You configure a virus filter for outbound email in the same way as that for inbound email.
For more information, see
Configure a Virus Filter Policy
Configure a Content Filter
You can create a custom content filter for outbound email. You can only set up Content
Groups and Notifications. HTML Shield and ClickProtect are not available for outbound
email. You set up content groups and notifications in the same way as that for inbound
email. For more information, see
90 Proprietary: Not for use or disclosure outside McAfee without written permission. November 2012
Create a Custom Policy.
Page 99

Email Protection Administrator Guide Configure a Content Filter
Email Encryption for Content Groups
Group Names
You are able to send regular email based on your selected policies but, you may also
encrypt messages for a specific Group Name under Content Groups if desired. Select the
group name you wish to encrypt, from the Action drop-down list select to have that Group
encrypted.
More Options
If a Customer or Domain subscribes to Email Encryption, t
used to enforce Email Encryption if the outbound message contains the word ‘[encrypt]’.
This word, [encrypt] can reside in the message Subject line or the body of the outbound
message.
This option can be found under Emai
Content |Content Groups.
l Protection | Policies | Outbound (default) |
hen selecting this option can be
November 2012 Proprietary: Not for use or disclosure outside McAfee without written permission 91
Page 100

Define an Attachment Filter Email Protection Administrator Guide
Define an Attachment Filter
You configure an attachment filter for outbound email in the same way as that for inbound
email. For more information, see
Define an Attachment Filter Policy.
Define the Format and Text of
Notifications to Users
You configure notifications for outbound email in the same way as that for inbound email.
For more information, see
Define the Format and Text of Notifications to Users Policy.
Assign a Group to the Custom Policy
You assign a group to a policy for outbound email in the same way as that for inbound
email. For more information, see
Disaster Recovery.
92 Proprietary: Not for use or disclosure outside McAfee without written permission. November 2012
 Loading...