

Page 1

McAfee Security for Microsoft SharePoint 2.5.0
User Guide
Page 2

COPYRIGHT
Copyright © 2010 McAfee, Inc. All Rights Reserved.
No part of this publication may be reproduced, transmitted, transcribed, stored in a retrieval system, or translated into any language in any form
or by any means without the written permission of McAfee, Inc., or its suppliers or affiliate companies.
TRADEMARK ATTRIBUTIONS
AVERT, EPO, EPOLICY ORCHESTRATOR, FOUNDSTONE, GROUPSHIELD, INTRUSHIELD, LINUXSHIELD, MAX (MCAFEE SECURITYALLIANCE
EXCHANGE), MCAFEE, NETSHIELD, PORTALSHIELD, PREVENTSYS, SECURITYALLIANCE, SITEADVISOR, TOTAL PROTECTION, VIRUSSCAN,
WEBSHIELD are registered trademarks or trademarks of McAfee, Inc. and/or its affiliates in the US and/or other countries. McAfee Red in
connection with security is distinctive of McAfee brand products. All other registered and unregistered trademarks herein are the sole property
of their respective owners.
LICENSE INFORMATION
License Agreement
NOTICE TO ALL USERS: CAREFULLY READ THE APPROPRIATE LEGAL AGREEMENT CORRESPONDING TO THE LICENSE YOU PURCHASED,
WHICH SETS FORTH THE GENERAL TERMS AND CONDITIONS FOR THE USE OF THE LICENSED SOFTWARE. IF YOU DO NOT KNOW WHICH
TYPE OF LICENSE YOU HAVE ACQUIRED, PLEASE CONSULT THE SALES AND OTHER RELATED LICENSE GRANT OR PURCHASE ORDER DOCUMENTS
THAT ACCOMPANY YOUR SOFTWARE PACKAGING OR THAT YOU HAVE RECEIVED SEPARATELY AS PART OF THE PURCHASE (AS A BOOKLET,
A FILE ON THE PRODUCT CD, OR A FILE AVAILABLE ON THE WEBSITE FROM WHICH YOU DOWNLOADED THE SOFTWARE PACKAGE). IF YOU
DO NOT AGREE TO ALL OF THE TERMS SET FORTH IN THE AGREEMENT, DO NOT INSTALL THE SOFTWARE. IF APPLICABLE, YOU MAY RETURN
THE PRODUCT TO MCAFEE OR THE PLACE OF PURCHASE FOR A FULL REFUND.
McAfee Security for Microsoft SharePoint version 2.5 User Guide2
Page 3

Contents
Introducing McAfee Security for Microsoft SharePoint. . . . . . . . . . . . . . . . . . . . . . . . . . . . . . . . 6
Installation. . . . . . . . . . . . . . . . . . . . . . . . . . . . . . . . . . . . . . . . . . . . . . . . . . . . . . . . . . . . . . . . . . . . . . . . . . . . . . . . . . 9
Getting Started with the User Interface. . . . . . . . . . . . . . . . . . . . . . . . . . . . . . . . . . . . . . . . . . . . . . . 18
Overview. . . . . . . . . . . . . . . . . . . . . . . . . . . . . . . . . . . . . . . . . . . . . . . . . . . . . . . . . . . . . . . . . . . . . . . . . . . . . . . . . 6
New Features. . . . . . . . . . . . . . . . . . . . . . . . . . . . . . . . . . . . . . . . . . . . . . . . . . . . . . . . . . . . . . . . . . . . . . . . . . . . . 6
How McAfee Security for Microsoft SharePoint Works. . . . . . . . . . . . . . . . . . . . . . . . . . . . . . . . . . . . . . . . . . . . . 8
Prerequisites. . . . . . . . . . . . . . . . . . . . . . . . . . . . . . . . . . . . . . . . . . . . . . . . . . . . . . . . . . . . . . . . . . . . . . . . . . . . . . 9
Hardware and Software Requirements. . . . . . . . . . . . . . . . . . . . . . . . . . . . . . . . . . . . . . . . . . . . . . . . . . 9
Pre-installation Configuration. . . . . . . . . . . . . . . . . . . . . . . . . . . . . . . . . . . . . . . . . . . . . . . . . . . . . . . . . 10
Microsoft SharePoint Server Credentials for Installing McAfee Security for Microsoft SharePoint. . . . . . . . . . 10
Installing McAfee Security for Microsoft SharePoint. . . . . . . . . . . . . . . . . . . . . . . . . . . . . . . . . . . . . . . . . . . . . . 11
Post-installation Tasks and Maintenance. . . . . . . . . . . . . . . . . . . . . . . . . . . . . . . . . . . . . . . . . . . . . . . . . . . . . . . 14
Testing Your Installation. . . . . . . . . . . . . . . . . . . . . . . . . . . . . . . . . . . . . . . . . . . . . . . . . . . . . . . . . . . . . 14
Maintaining Your Installation. . . . . . . . . . . . . . . . . . . . . . . . . . . . . . . . . . . . . . . . . . . . . . . . . . . . . . . . . 15
Dashboard. . . . . . . . . . . . . . . . . . . . . . . . . . . . . . . . . . . . . . . . . . . . . . . . . . . . . . . . . . . . . . . . . . . . . . . . . . . . . . . 18
Statistics and Information. . . . . . . . . . . . . . . . . . . . . . . . . . . . . . . . . . . . . . . . . . . . . . . . . . . . . . . . . . . 19
Scheduling a New On-demand Scan. . . . . . . . . . . . . . . . . . . . . . . . . . . . . . . . . . . . . . . . . . . . . . . . . . . 20
Graphical Reports. . . . . . . . . . . . . . . . . . . . . . . . . . . . . . . . . . . . . . . . . . . . . . . . . . . . . . . . . . . . . . . . . . 21
Detected Items. . . . . . . . . . . . . . . . . . . . . . . . . . . . . . . . . . . . . . . . . . . . . . . . . . . . . . . . . . . . . . . . . . . . . . . . . . . 22
Viruses. . . . . . . . . . . . . . . . . . . . . . . . . . . . . . . . . . . . . . . . . . . . . . . . . . . . . . . . . . . . . . . . . . . . . . . . . . . 22
Potentially Unwanted Programs. . . . . . . . . . . . . . . . . . . . . . . . . . . . . . . . . . . . . . . . . . . . . . . . . . . . . . . 23
Banned File Types or Messages. . . . . . . . . . . . . . . . . . . . . . . . . . . . . . . . . . . . . . . . . . . . . . . . . . . . . . . 23
Unwanted Content. . . . . . . . . . . . . . . . . . . . . . . . . . . . . . . . . . . . . . . . . . . . . . . . . . . . . . . . . . . . . . . . . 24
All Items. . . . . . . . . . . . . . . . . . . . . . . . . . . . . . . . . . . . . . . . . . . . . . . . . . . . . . . . . . . . . . . . . . . . . . . . . 24
View Results Pane. . . . . . . . . . . . . . . . . . . . . . . . . . . . . . . . . . . . . . . . . . . . . . . . . . . . . . . . . . . . . . . . . . 24
Policy Manager. . . . . . . . . . . . . . . . . . . . . . . . . . . . . . . . . . . . . . . . . . . . . . . . . . . . . . . . . . . . . . . . . . . . . . . . . . . 25
Policy Manager Views. . . . . . . . . . . . . . . . . . . . . . . . . . . . . . . . . . . . . . . . . . . . . . . . . . . . . . . . . . . . . . . 25
Creating a Subpolicy. . . . . . . . . . . . . . . . . . . . . . . . . . . . . . . . . . . . . . . . . . . . . . . . . . . . . . . . . . . . . . . . 26
Policy Settings. . . . . . . . . . . . . . . . . . . . . . . . . . . . . . . . . . . . . . . . . . . . . . . . . . . . . . . . . . . . . . . . . . . . . 27
Scanners and Filters. . . . . . . . . . . . . . . . . . . . . . . . . . . . . . . . . . . . . . . . . . . . . . . . . . . . . . . . . . . . . . . . 29
Shared Resource. . . . . . . . . . . . . . . . . . . . . . . . . . . . . . . . . . . . . . . . . . . . . . . . . . . . . . . . . . . . . . . . . . . 41
3McAfee Security for Microsoft SharePoint version 2.5 User Guide
Page 4

Contents
Settings and Diagnostics. . . . . . . . . . . . . . . . . . . . . . . . . . . . . . . . . . . . . . . . . . . . . . . . . . . . . . . . . . . . . . . . . . . 45
Detected Items. . . . . . . . . . . . . . . . . . . . . . . . . . . . . . . . . . . . . . . . . . . . . . . . . . . . . . . . . . . . . . . . . . . . 45
User Interface Preferences. . . . . . . . . . . . . . . . . . . . . . . . . . . . . . . . . . . . . . . . . . . . . . . . . . . . . . . . . . . 46
Diagnostics. . . . . . . . . . . . . . . . . . . . . . . . . . . . . . . . . . . . . . . . . . . . . . . . . . . . . . . . . . . . . . . . . . . . . . . 47
Product Log. . . . . . . . . . . . . . . . . . . . . . . . . . . . . . . . . . . . . . . . . . . . . . . . . . . . . . . . . . . . . . . . . . . . . . . 48
Import and Export Configuration. . . . . . . . . . . . . . . . . . . . . . . . . . . . . . . . . . . . . . . . . . . . . . . . . . . . . . 49
DAT Settings. . . . . . . . . . . . . . . . . . . . . . . . . . . . . . . . . . . . . . . . . . . . . . . . . . . . . . . . . . . . . . . . . . . . . . 50
User Settings. . . . . . . . . . . . . . . . . . . . . . . . . . . . . . . . . . . . . . . . . . . . . . . . . . . . . . . . . . . . . . . . . . . . . . 50
Integration with McAfee ePolicy Orchestrator 4.0. . . . . . . . . . . . . . . . . . . . . . . . . . . . . . . . . . . . 52
Prerequisites. . . . . . . . . . . . . . . . . . . . . . . . . . . . . . . . . . . . . . . . . . . . . . . . . . . . . . . . . . . . . . . . . . . . . . . . . . . . . 52
Deploying McAfee Security for Microsoft SharePoint using ePolicy Orchestrator 4.0. . . . . . . . . . . . . . . . . . . . 52
Checking in the McAfee Security for Microsoft SharePoint Package to ePolicy
Orchestrator 4.0. . . . . . . . . . . . . . . . . . . . . . . . . . . . . . . . . . . . . . . . . . . . . . . . . . . . . . . . . . . . . . . 53
Installing Extensions. . . . . . . . . . . . . . . . . . . . . . . . . . . . . . . . . . . . . . . . . . . . . . . . . . . . . . . . . . . . . . . . 53
Installing McAfee Security for Microsoft SharePoint on Managed Nodes. . . . . . . . . . . . . . . . . . . . . . 53
Sending an Agent Wake-up Call. . . . . . . . . . . . . . . . . . . . . . . . . . . . . . . . . . . . . . . . . . . . . . . . . . . . . . . . . . . . . . 54
Setting Policies using ePolicy Orchestrator 4.0. . . . . . . . . . . . . . . . . . . . . . . . . . . . . . . . . . . . . . . . . . . . . . . . . . 54
Creating Policies. . . . . . . . . . . . . . . . . . . . . . . . . . . . . . . . . . . . . . . . . . . . . . . . . . . . . . . . . . . . . . . . . . . 55
Enforcing Policies. . . . . . . . . . . . . . . . . . . . . . . . . . . . . . . . . . . . . . . . . . . . . . . . . . . . . . . . . . . . . . . . . . 55
Scheduling an On-Demand Scan Task. . . . . . . . . . . . . . . . . . . . . . . . . . . . . . . . . . . . . . . . . . . . . . . . . . . . . . . . . 55
Configuring Reports. . . . . . . . . . . . . . . . . . . . . . . . . . . . . . . . . . . . . . . . . . . . . . . . . . . . . . . . . . . . . . . . . . . . . . . 57
Creating a New Query. . . . . . . . . . . . . . . . . . . . . . . . . . . . . . . . . . . . . . . . . . . . . . . . . . . . . . . . . . . . . . 57
Running a Query. . . . . . . . . . . . . . . . . . . . . . . . . . . . . . . . . . . . . . . . . . . . . . . . . . . . . . . . . . . . . . . . . . . 57
Uninstalling McAfee Security using ePolicy Orchestrator 4.0. . . . . . . . . . . . . . . . . . . . . . . . . . . . . . . . . . . . . . . 57
Removing the McAfee Security for Microsoft SharePoint Package from ePolicy
Orchestrator 4.0. . . . . . . . . . . . . . . . . . . . . . . . . . . . . . . . . . . . . . . . . . . . . . . . . . . . . . . . . . . . . . . 58
Removing Extensions from the ePolicy Orchestrator Server 4.0. . . . . . . . . . . . . . . . . . . . . . . . . . . . . 58
Uninstalling McAfee Security for Microsoft SharePoint from Managed Nodes. . . . . . . . . . . . . . . . . . . 58
Integration with McAfee ePolicy Orchestrator 4.5. . . . . . . . . . . . . . . . . . . . . . . . . . . . . . . . . . . . 59
Prerequisites. . . . . . . . . . . . . . . . . . . . . . . . . . . . . . . . . . . . . . . . . . . . . . . . . . . . . . . . . . . . . . . . . . . . . . . . . . . . . 59
Deploying McAfee Security for Microsoft SharePoint using ePolicy Orchestrator 4.5. . . . . . . . . . . . . . . . . . . . 59
Checking in the McAfee Security for Microsoft SharePoint Package to ePolicy
Orchestrator 4.5. . . . . . . . . . . . . . . . . . . . . . . . . . . . . . . . . . . . . . . . . . . . . . . . . . . . . . . . . . . . . . . 60
Installing Extensions. . . . . . . . . . . . . . . . . . . . . . . . . . . . . . . . . . . . . . . . . . . . . . . . . . . . . . . . . . . . . . . . 60
Installing McAfee Security for Microsoft SharePoint on Managed Nodes. . . . . . . . . . . . . . . . . . . . . . 60
Sending an Agent Wake-up Call. . . . . . . . . . . . . . . . . . . . . . . . . . . . . . . . . . . . . . . . . . . . . . . . . . . . . . . . . . . . . . 61
Setting Policies using ePolicy Orchestrator 4.5. . . . . . . . . . . . . . . . . . . . . . . . . . . . . . . . . . . . . . . . . . . . . . . . . . 62
McAfee Security for Microsoft SharePoint version 2.5 User Guide4
Page 5

Contents
Creating Policies. . . . . . . . . . . . . . . . . . . . . . . . . . . . . . . . . . . . . . . . . . . . . . . . . . . . . . . . . . . . . . . . . . . 62
Enforcing Policies. . . . . . . . . . . . . . . . . . . . . . . . . . . . . . . . . . . . . . . . . . . . . . . . . . . . . . . . . . . . . . . . . . 63
Scheduling an On-Demand Scan Task. . . . . . . . . . . . . . . . . . . . . . . . . . . . . . . . . . . . . . . . . . . . . . . . . . . . . . . . . 63
Configuring Reports. . . . . . . . . . . . . . . . . . . . . . . . . . . . . . . . . . . . . . . . . . . . . . . . . . . . . . . . . . . . . . . . . . . . . . . 65
Creating a New Query. . . . . . . . . . . . . . . . . . . . . . . . . . . . . . . . . . . . . . . . . . . . . . . . . . . . . . . . . . . . . . 66
Running a Query. . . . . . . . . . . . . . . . . . . . . . . . . . . . . . . . . . . . . . . . . . . . . . . . . . . . . . . . . . . . . . . . . . . 66
Uninstalling McAfee Security for Microsoft SharePoint using ePolicy Orchestrator 4.5. . . . . . . . . . . . . . . . . . . 67
Removing the McAfee Security for Microsoft SharePoint Package from ePolicy
Orchestrator 4.5. . . . . . . . . . . . . . . . . . . . . . . . . . . . . . . . . . . . . . . . . . . . . . . . . . . . . . . . . . . . . . . 67
Removing Extensions from the ePolicy Orchestrator Server 4.5. . . . . . . . . . . . . . . . . . . . . . . . . . . . . 67
Uninstalling McAfee Security for Microsoft SharePoint from Managed Nodes. . . . . . . . . . . . . . . . . . . 67
Appendix A — A Typical Scenario of Creating and Using File Filtering
Rule and Actions. . . . . . . . . . . . . . . . . . . . . . . . . . . . . . . . . . . . . . . . . . . . . . . . . . . . . . . . . . . . . . . . . . . . . . 69
Appendix B — Recommended Configurations. . . . . . . . . . . . . . . . . . . . . . . . . . . . . . . . . . . . . . . . . 71
5McAfee Security for Microsoft SharePoint version 2.5 User Guide
Page 6

Introducing McAfee Security for Microsoft
SharePoint
McAfee Security for Microsoft SharePoint 2.5 (previously known as McAfee PortalShield) provides
comprehensive security for data stored on the following Microsoft SharePoint products:
• Microsoft SharePoint Server 2003/Windows SharePoint Services 2.0
• Microsoft Office SharePoint Server 2007/Windows SharePoint Services 3.0
• Microsoft SharePoint Server 2010/Windows SharePoint Foundation 2010
Contents
Overview
New Features
How McAfee Security for Microsoft SharePoint Works
Overview
Microsoft SharePoint is the business collaboration platform that provides comprehensive content
management and facilitates shared business processes. With Microsoft SharePoint, you can
combine content from different areas of an organization into a single search portal site and
allow users to find information they need in the course of their daily businesses; despite the
physical location of the information on your network.
However, any system that is designed to create, save, open, and store information can be
vulnerable to virus attacks.
McAfee Security for Microsoft SharePoint protects your SharePoint server by:
• Blocking viruses and other malicious code in real-time using McAfee's latest Artemis
technology.
• Removing banned file types and unwanted content from your server using the file
filtering/content scanning rules and actions you configure.
New Features
McAfee Security for Microsoft SharePoint 2.5 offers the following new features:
Support for Microsoft SharePoint
Server 2010/SharePoint
Foundation 2010
McAfee Security for Microsoft SharePoint version 2.5 User Guide6
DescriptionFeatures
This release provides support for Microsoft SharePoint Server 2010/SharePoint
Foundation 2010.
Page 7
Introducing McAfee Security for Microsoft SharePoint
New Features
DescriptionFeatures
Consolidated support for Microsoft
SharePoint Server 2003, 2007,
and 2010
Integration with McAfee Artemis
Support for incremental and
resumable on-demand scans
Support for Microsoft SharePoint Server versions 2003, 2007, and 2010 through
a single installer.
McAfee's latest Artemis Technology safeguards your SharePoint Server by
providing real-time security from the ever-evolving threats.
It enables the leverage of threat intelligence gathered by McAfee Labs to prevent
damage and data theft even before a signature or DAT update is available.
When a suspicious file is detected on a managed node protected by a McAfee
anti-malware product with Artemis, it connects to McAfee servers in real-time
and checks against the database. With real-time input from McAfee protected
systems, Artemis provides an "up to the minute" repository of malware samples
and information. If the suspicious file is found to be malicious, the managed node
will be notified and protected. The Artemis query and response happens in
milliseconds. Artemis does not replace signature files; it adds to the signature
files. The signature or DAT files are required for further actions such as cleaning
and repair.
McAfee Artemis protection is available only if your system is connected to the
Internet. Without network connectivity, managed nodes are protected by the
locally stored signatures or DAT files. The traffic generated by Artemis is low and
protection is available on a low speed connection too.
Refer to the McAfee KnowledgeBase article at
https://kc.mcafee.com/corporate/index?page=content&id=KB68631
information on Artemis technology.
Incremental on-demand scans saves time by scanning only the newly added
documents in the SharePoint server without re-scanning the entire server.
In resumable on-demand scan, while a scan in progress is stopped, McAfee
Security for Microsoft SharePoint saves the current state of the scan task. When
the same task is started later, scan will resume from the last scanned folder. In
the event of a signature update while a scan is paused, McAfee Security for
Microsoft SharePoint provides an option to restart the scan with the updated
signature (DATs). A regular on-demand scan task can be scheduled by selecting
the Off option on the Configuration tab of the OnDemand Task wizard.
for more
Support for specifying file
extension based exclusions
Centralized manageability through
ePolicy orchestrator
later
Support for virtualized
environment
Upgrade support from McAfee
PortalShield 2.0 SP1
Automatic addition of user groups
to McAfee Access Control List
You can specify file extensions to be excluded from on-demand scanning.
CAUTION: Use this feature cautiously in case a file extension might be tampered
or changed.
You can deploy and manage McAfee Security for Microsoft SharePoint installation
across multiple managed nodes using McAfee ePolicy Orchestrator 4.0 or later.
ePolicy Orchestrator offers email notifications in case of a product event.
This release integrates with McAfee Agent 4.x or later.Support for McAfee Agent 4.x or
This release is supported in virtualized environment such as VMware Workstation,
VMware Server, vSphere 4.X (VMware ESX 4.X), and Hyper-V environment. For
details on the supported environments for McAfee Security for Microsoft
SharePoint, refer to the McAfee KnowledgeBase article at
https://kc.mcafee.com/corporate/index?page=content&id=KB68141
From McAfee PortalShield 2.0 SP1, you can upgrade to McAfee Security for
Microsoft SharePoint 2.5 (both standalone and through ePolicy Orchestrator).
This version automatically adds Farm Administrator, Internet Information Services
and Windows SharePoint Services User Groups to McAfee Access Control List
(SdEdit.exe) during installation.
.
7McAfee Security for Microsoft SharePoint version 2.5 User Guide
Page 8
Introducing McAfee Security for Microsoft SharePoint
How McAfee Security for Microsoft SharePoint Works
DescriptionFeatures
Support for custom port
Support for customizing the Internet Information Services port during installation,
where the web interface must be hosted.
You can magnify the graphical reports of your detected items on your dashboard.Support for magnifying graph
How McAfee Security for Microsoft SharePoint
Works
McAfee Security for Microsoft SharePoint integrates with your SharePoint server and scans data
in real-time for:
• Viruses and potentially unwanted programs (PUPs) — by comparing data with a list of known
viruses and suspected virus-like behavior.
• Banned file types/messages and unwanted content — based on the file filtering/content
scanning rules you configure.
Scanning takes place each time you create, save, or modify data on the SharePoint server. You
can also schedule scans to run immediately, at a particular time, or at regular intervals.
McAfee Security for Microsoft SharePoint version 2.5 User Guide8
Page 9

Installation
Installing McAfee Security for Microsoft SharePoint is very simple. Following sections include
important information to be considered before installation, detailed installation instructions, and
post installation tasks.
Contents
Prerequisites
Microsoft SharePoint Server Credentials for Installing McAfee Security for Microsoft SharePoint
Installing McAfee Security for Microsoft SharePoint
Post-installation Tasks and Maintenance
Prerequisites
Before installing McAfee Security for Microsoft SharePoint, your system must have the following
minimum system requirements and configurations.
Hardware and Software Requirements
Pre-installation Configuration
Hardware and Software Requirements
Before installing McAfee Security for Microsoft SharePoint, ensure you have the following
minimum hardware and software requirements:
Processor • Processor speed of 2.5 Gigahertz (GHz) or higher, dual processor, 3GHz or higher
Server operating system • Windows 2003 Standard/Enterprise Server SP2 (32-bit or 64-bit).
Microsoft SharePoint Server • SharePoint Server 2003/Windows SharePoint Services 2.0 (32-bit).
recommended.
• Intel x64 architecture-based processor that supports Intel Extended Memory 64-bit
Technology (Intel EM64T).
Minimum 4 Gigabyte (GB) RAM.Memory
Minimum 500MB of free hard disk space where Microsoft SharePoint is installed.Available hard disk space
• Windows 2003 Standard/Enterprise Server R2 (32-bit or 64-bit).
• Windows 2008 Standard/Enterprise Server (32-bit or 64-bit).
• Windows 2008 Standard/Enterprise Server R2 (64-bit).
• Microsoft Office SharePoint Server 2007/Windows SharePoint Services version 3.0
(32-bit or 64-bit).
• Microsoft Office SharePoint Server 2007 SP2/Windows SharePoint Services version
3.0 SP2 (32-bit or 64-bit).
9McAfee Security for Microsoft SharePoint version 2.5 User Guide
Page 10

Installation
Microsoft SharePoint Server Credentials for Installing McAfee Security for Microsoft SharePoint
• SharePoint Server 2010/SharePoint Foundation 2010 (64-bit).
General • A CD-ROM drive (if installing from a CD).
• Internet Explorer 7.0 browser or later.
• 1024X768 resolution or higher (recommended).
Pre-installation Configuration
To install McAfee Security for Microsoft SharePoint, you MUST log on to Microsoft Windows
operating system as an administrator.
Before installing McAfee Security for Microsoft SharePoint:
• Ensure Microsoft SharePoint Server is installed on your system and functions properly.
• Other than McAfee PortalShield 2.0 SP1, uninstall any earlier versions of McAfee Security
for Microsoft SharePoint from your SharePoint Server.
Microsoft SharePoint Server Credentials for
Installing McAfee Security for Microsoft SharePoint
Please refer to the Microsoft SharePoint Server product documentation for instructions on
installing Microsoft SharePoint Server.
Local installation
This method involves installing SharePoint Server and SQL server on the same system.
NOTE:
• If you are using SharePoint Server 2003, you will not be prompted to type your account
credentials while installing McAfee Security for Microsoft SharePoint.
• If you are using Microsoft Office SharePoint Server 2007 or SharePoint server 2010, you will
be prompted to type your account credentials while installing McAfee Security for Microsoft
SharePoint.
NOTE: You can use "SetSQLAct.exe" to modify your credentials in case of an incorrect entry
while installing McAfee Security for Microsoft SharePoint. This utility is located in the following
location:
<Installation folder>\bin
TIP: Usage is as follows:
SetSqlAct.exe /USER=<username> /PASSWORD=<password> /DOMAIN=<domain>
Remote installation
This method involves installing SharePoint Server and SQL server on different systems of the
same domain.
NOTE: If you are using SharePoint Server 2003, Microsoft Office SharePoint Server 2007 or
SharePoint server 2010, you will be prompted to type your account credentials while installing
McAfee Security for Microsoft SharePoint.
McAfee Security for Microsoft SharePoint version 2.5 User Guide10
Page 11

Installation
Installing McAfee Security for Microsoft SharePoint
You can use "SetSQLAct.exe" to modify your credentials in case of an incorrect entry while
installing McAfee Security for Microsoft SharePoint. This utility is located in the following location:
<Installation folder>\bin
TIP: Usage is as follows:
SetSqlAct.exe /USER=<username> /PASSWORD=<password> /DOMAIN=<domain>
Installing McAfee Security for Microsoft SharePoint
McAfee distributes the McAfee Security for Microsoft SharePoint software in any of the following
ways:
• As an archived file that you can download from the McAfee website.
• On a CD.
Before you begin
Please refer to the "Prerequisites" section.
1 To install the McAfee Security for Microsoft SharePoint, perform one of the following steps,
depending on how you obtained the software installation package:
• Insert the CD into the computer's CD-ROM drive and copy the installation files to your
system.
• Download the .ZIP archive and extract the files to a temporary location on your system.
2 Double-click setup.exe. If the software is a licensed version, the McAfee End User
License Agreement dialog box appears.
3 From the drop-down lists, select the license expiry type and the location from where you
purchased the software.
4 Accept the terms in the license agreement, then click OK. The software installation wizard
appears leading the installation process through a series of instructions you must follow.
5 Click Next. The following window appears.
11McAfee Security for Microsoft SharePoint version 2.5 User Guide
Page 12
Installation
Installing McAfee Security for Microsoft SharePoint
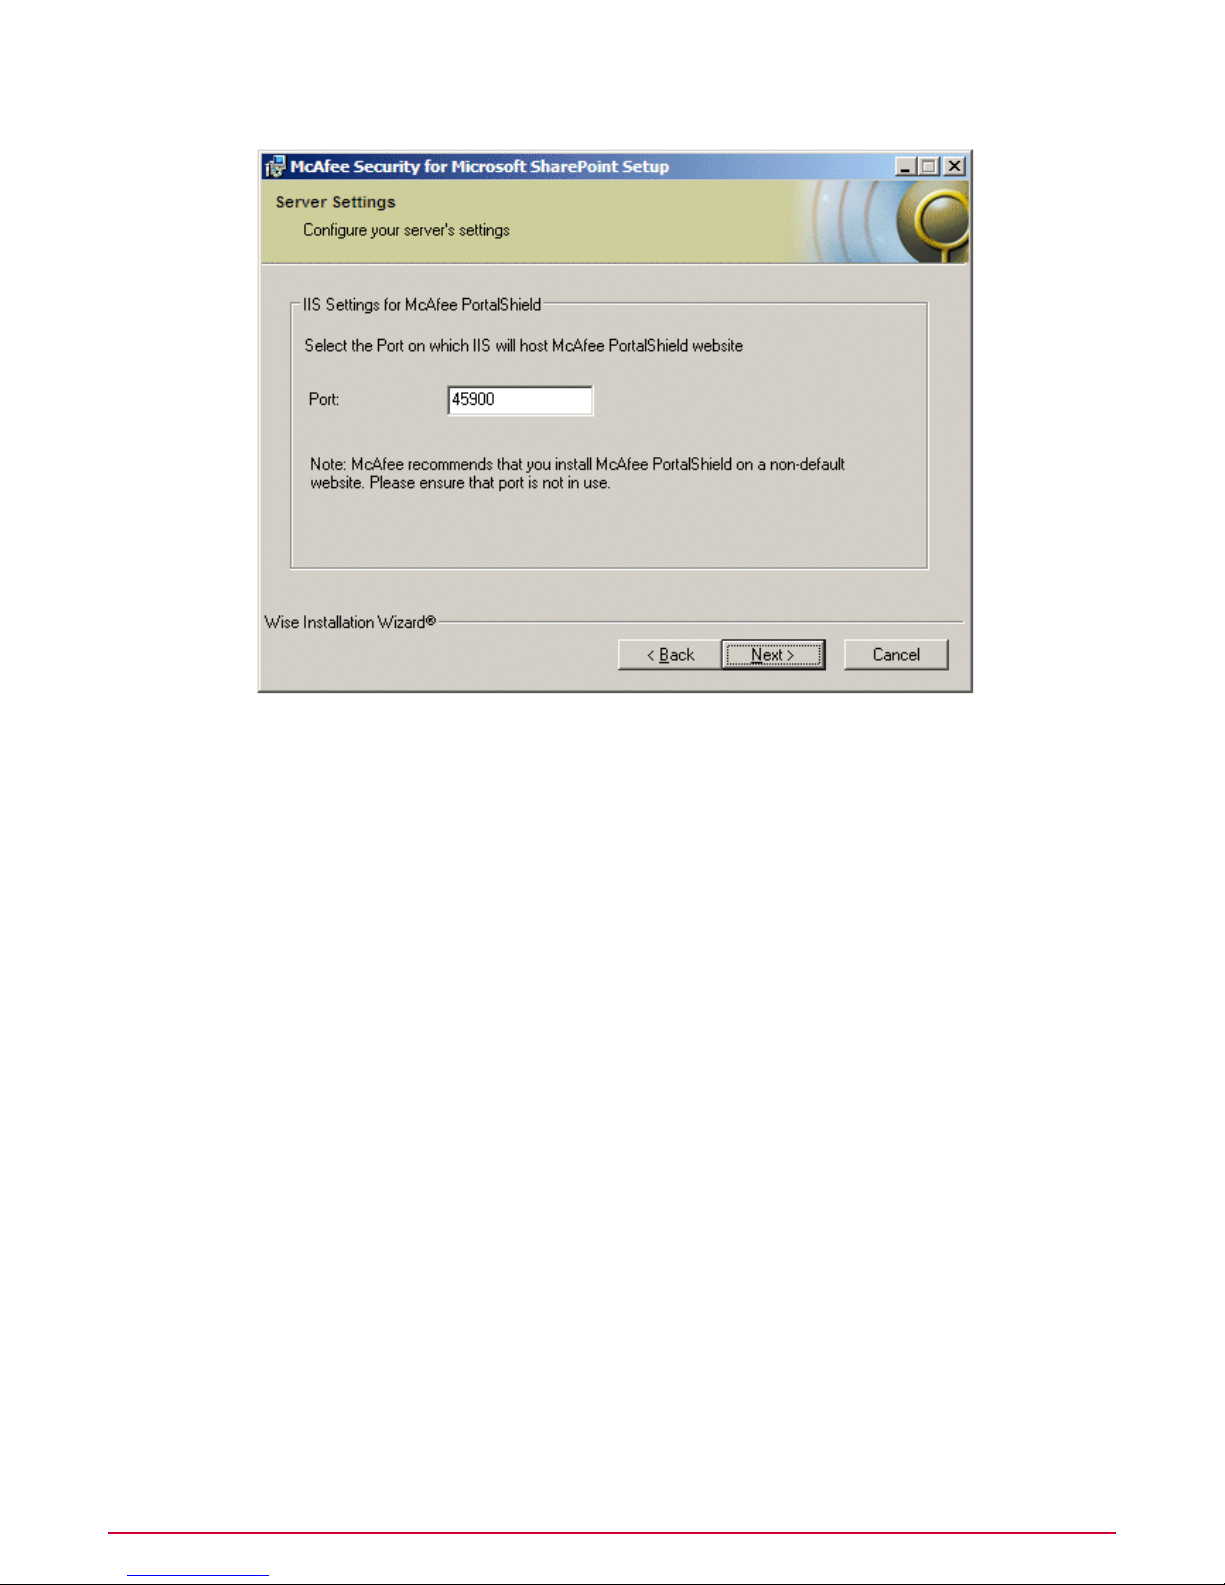
6 McAfee Security for Microsoft SharePoint is installed on the default port 45900. Specify a
custom port on which the Microsoft Internet Information Server must host McAfee Security
for Microsoft SharePoint, then click Next. The Destination Folder dialog box appears.
7 Click Next to install McAfee Security for Microsoft SharePoint in the default location.
TIP: You can select a different location for installing McAfee Security for Microsoft SharePoint
by clicking Browse. Select another location, click OK to return to the installation wizard,
then click Next.
The Database Account dialog box appears.
McAfee Security for Microsoft SharePoint version 2.5 User Guide12
Page 13

Installation
Installing McAfee Security for Microsoft SharePoint
NOTE: Setting database account information applies only to:
• Microsoft SharePoint Server 2003 and Windows SharePoint Services installations that
use a remote SQL database server.
• Microsoft Office SharePoint Server 2007 (Local and Remote SQL installation).
• Microsoft SharePoint Server 2010 (Local and Remote SQL installation).
8 Type your account name (domain or workgroup\username) and password, then click Next.
NOTE:
• For Remote SharePoint 2003 installations (where SQL Server is installed on a Remote
system), type the credentials of the system where SQL Server is installed.
• For Microsoft Office SharePoint 2007 installations and SharePoint 2010 installations
(both Local and Remote SQL installation), type the credentials of the system where
SharePoint is installed.
For example: Domain\UserName or Workgroup\UserName.
NOTE: The account credentials are validated by the server. The account must be a member
of the local Administrator’s group on the server on which you are installing McAfee Security
for Microsoft SharePoint. If the user credentials cannot be resolved by the server, a warning
dialog box appears prompting you to check your credentials.
Verify if you have entered correct credentials. If you are sure that the user credentials are
correct, click OK, then click Next to override the warning and proceed with the installation
process with unresolved account information.
TIP: You can use "SetSQLAct.exe" to modify your credentials in case of an incorrect entry
while installing McAfee Security for Microsoft SharePoint. This utility is located in the
following location:
<Installation folder>\bin
13McAfee Security for Microsoft SharePoint version 2.5 User Guide
Page 14

Installation
Post-installation Tasks and Maintenance
Usage is as follows:
SetSqlAct.exe /USER=<username> /PASSWORD=<password> /DOMAIN=<domain>
The Ready to Install the Application dialog box appears.
9 Click Next. The installation process begins. A progress bar appears indicating the status
of the installation process.
TIP: After the installation is complete, before clicking Finish, you can select or deselect
the following options as required:
• View Readme — To read the McAfee Security for Microsoft SharePoint release notes
that describes the product features, last-minute changes to the documentation, and
any known behavior or other issues with the product.
• Launch User Interface — To launch the graphical user interface of McAfee Security
for Microsoft SharePoint. This will launch the product in standalone mode.
• Update Now — To download the latest product updates to ensure you are running
the most current security to combat the ever-evolving threats. Your system must be
connected to the Internet to receive automatic updates regularly.
10 Click Finish. McAfee Security for Microsoft SharePoint is ready to use.
NOTE: You can use McAfee Security for Microsoft SharePoint as a standalone product or
as a web-based user interface.
Post-installation Tasks and Maintenance
McAfee Security for Microsoft SharePoint provides utilities to maintain your installation.
Contents
Testing Your Installation
Maintaining Your Installation
Testing Your Installation
After installing McAfee Security for Microsoft SharePoint, we recommend that you test the
installation to ensure that the software is installed properly and can detect viruses and other
unwanted content in a document.
You can test the operation of the McAfee Security for Microsoft SharePoint software by running
the EICAR Standard Anti-virus Test File on any computer where you have installed the software.
NOTE: The EICAR Standard Anti-virus Test File is a combined effort by anti-virus vendors
throughout the world to implement one standard by which customers can verify their anti-virus
installations.
Contents
Testing the On-Access Scanner
Testing the On-Demand Scanner Configuration from McAfee Security for Microsoft SharePoint
Dashboard
Testing the On-Demand Scanner from McAfee Security for Microsoft SharePoint
McAfee Security for Microsoft SharePoint version 2.5 User Guide14
Page 15

Installation
Post-installation Tasks and Maintenance
Testing the On-Access Scanner
1 Launch the Microsoft SharePoint server.
2 Copy the following line into its own file, then save the file with the name EICAR.TXT:
X5O!P%@AP[4\PZX54(P^)7CC)7}$EICAR-STANDARD-ANTIVIRUS-TEST-FILE!$H+H*
The file size will be 68 or 70 bytes.
NOTE: If you have any other security software installed on your server (such as McAfee
VirusScan Enterprise), you must disable its scanner during this process. This is to prevent
the file being identified by another security software.
3 Start the McAfee Security for Microsoft SharePoint software and add the EICAR.TXT file to
your Microsoft SharePoint SharePoint server. The McAfee Security for Microsoft SharePoint
on-access scanner action is configured to Prevent Upload/Download of the Item and
hence the file is not saved on your SharePoint server.
Testing the On-Demand Scanner Configuration from McAfee Security for
Microsoft SharePoint Dashboard
1 From the McAfee Security for Microsoft SharePoint dashboard, click On-Access Settings.
NOTE: By default, the On-Access Settings for McAfee Security for Microsoft SharePoint
is enabled.
2 Click On-Access Settings to disable it.
3 Deselect Scan documents on upload and Scan documents on download, then click
OK.
Testing the On-Demand Scanner from McAfee Security for Microsoft
SharePoint
1 Launch the Microsoft SharePoint administration interface by clicking Start | Programs |
SharePoint Portal Server | SharePoint Central Administration.
2 Click Configure anti-virus settings under Security Configuration.
3 Deselect Scan documents on upload and Scan documents on download.
4 Delete the previous copy of EICAR.TXT from the document store.
5 Add EICAR.TXT back into the document store. Schedule an on-demand scan for that
document store. The McAfee Security for Microsoft SharePoint software reports finding the
EICAR test file as per the default on-demand policy setting Replace item with an alert.
6 Delete the file when you have finished testing your installation to avoid alarming
unsuspecting users.
7 Ensure that you re-enable on-access scanning to provide real-time protection against viruses
and unwanted files and content within your SharePoint computer.
NOTE: This EICAR test file is NOT A VIRUS. If you have disabled any other anti-virus
software during these tests, remember to re-enable them.
Maintaining Your Installation
You can repair or remove McAfee Security for Microsoft SharePoint.
15McAfee Security for Microsoft SharePoint version 2.5 User Guide
Page 16
Installation
Post-installation Tasks and Maintenance
Contents
Repairing the McAfee Security for Microsoft SharePoint Installation
Uninstalling McAfee Security for Microsoft SharePoint
Repairing the McAfee Security for Microsoft SharePoint Installation
Repairing the McAfee Security for Microsoft SharePoint installation detects the presence of
McAfee Security for Microsoft SharePoint on your system, replaces all binaries and configuration
file settings with the original files without changing the McAfee Security for Microsoft SharePoint
database.
Prerequisite
You must have McAfee Security for Microsoft SharePoint installed on your system.
1 Click Start | Settings | Control Panel.
2 Double-click Add/Remove Programs. The Add/Remove Program window appears.
3 Click McAfee Security for Microsoft SharePoint from the list.
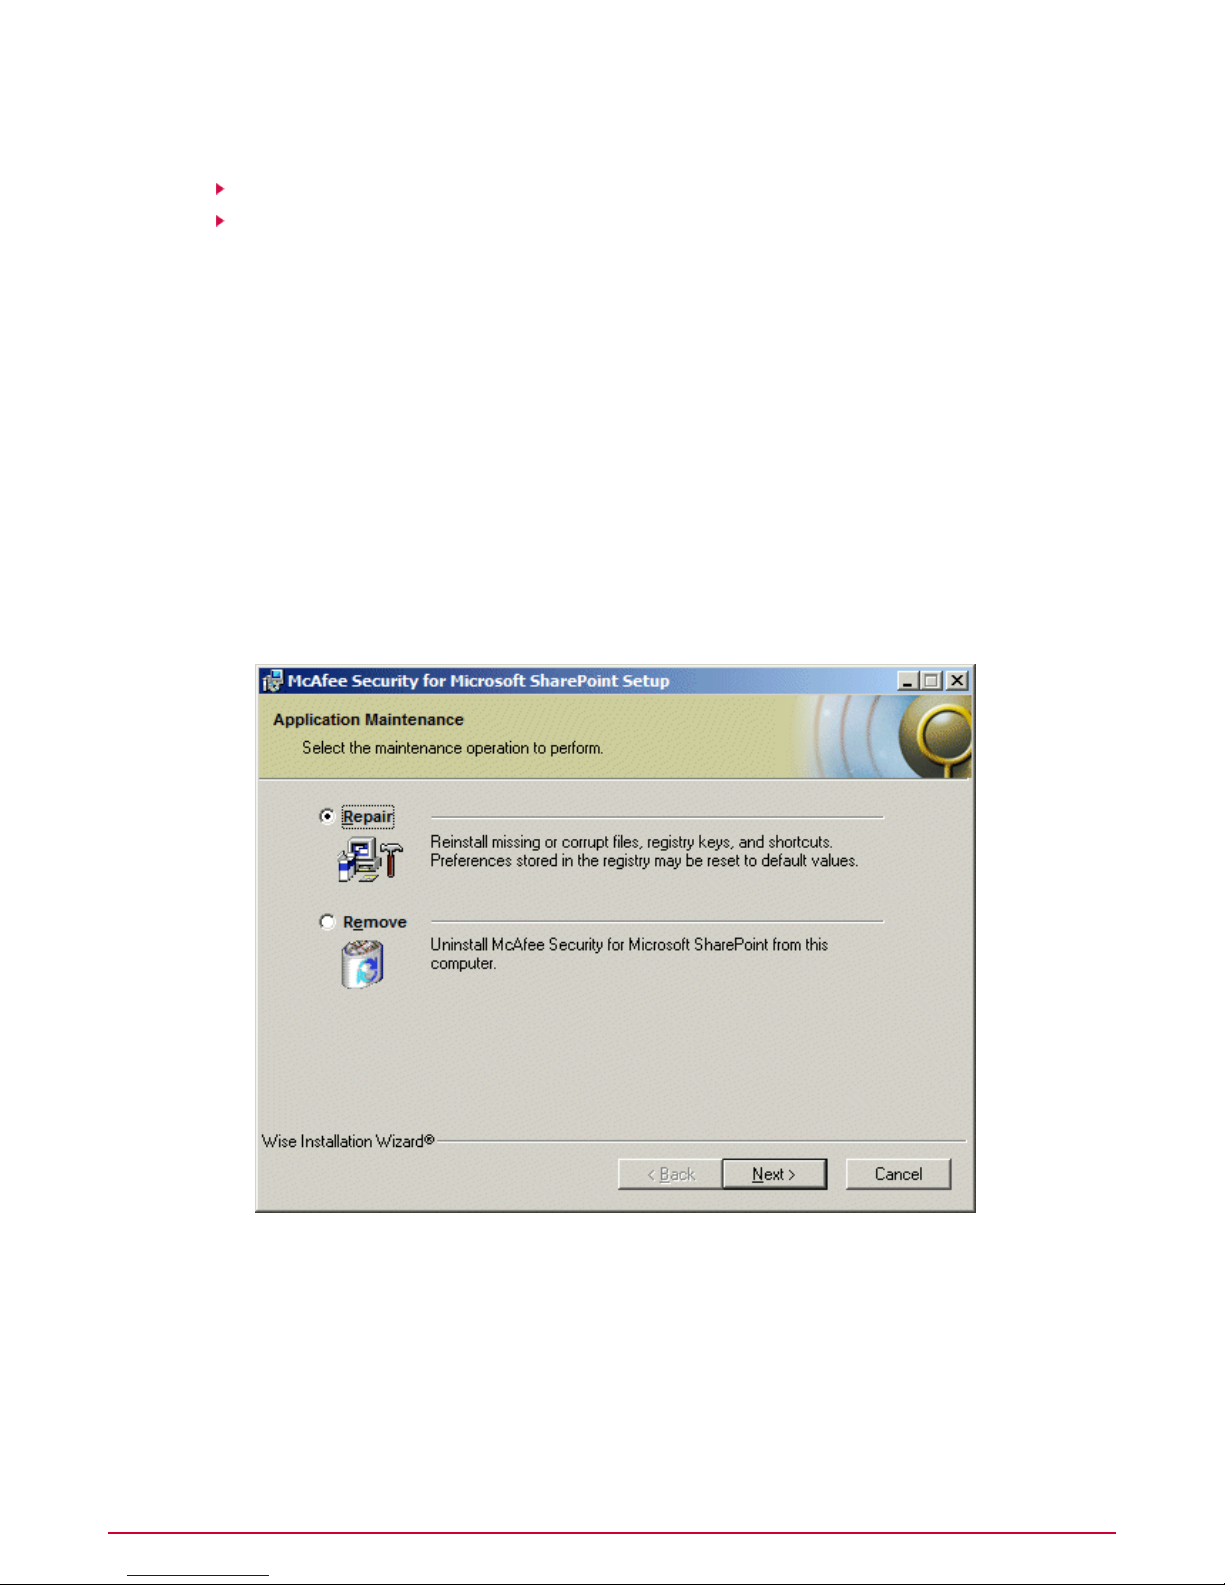
4 Click Change. The installation wizard appears followed by the Application Maintenance
dialog box.
5 The Repair option is selected by default. Click Next. The Database Account dialog box
appears.
NOTE: Setting database account information applies only to:
• Microsoft SharePoint Portal Server 2003 and Windows SharePoint Services installations
that use a remote SQL database server.
• Microsoft Office SharePoint Server 2007 (Local and Remote SQL installation).
• Microsoft SharePoint Server 2010 (Local and Remote SQL installation).
McAfee Security for Microsoft SharePoint version 2.5 User Guide16
Page 17

Installation
Post-installation Tasks and Maintenance
6 Modify the Account Information as required. If the user credentials cannot be resolved
by the server, a warning dialog box appears prompting you to check your credentials.
Verify if you have entered correct credentials. If you are sure that the user credentials are
correct, click OK, then click Next to override the warning and proceed with the repair
process with unresolved account information.
The Ready to repair the Application dialog box appears.
NOTE: A repair installation will reset the DAT and engine files to the version originally
installed by the product. It is recommended to run an update after installation.
7 Click Next. The Updating System window appears. After McAfee Security for Microsoft
SharePoint is updated, a confirmation message is displayed.
TIP: Before clicking Finish, you can select or deselect the following options as required:
• Launch User Interface — To launch the graphical user interface of McAfee Security
for Microsoft SharePoint.
• Update Now — To download the latest product updates to ensure you are running
the most current security to combat the ever-evolving threats.
8 Click Finish.
Uninstalling McAfee Security for Microsoft SharePoint
You can uninstall PortalShield for Microsoft SharePoint by using the Add/Remove Programs
feature of Windows.
1 Click Start | Settings | Control Panel.
2 Double-click Add/Remove Programs. The Add/Remove Program window appears.
3 Click McAfee Security for Microsoft SharePoint from the list, then click Uninstall.
TIP: Alternatively, you can double-click McAfee Security for Microsoft SharePoint
from the list.
4 Click Yes. A progress bar appears displaying the uninstallation status.
After uninstallation completes, the product name is removed from the Add/Remove Programs
list.
17McAfee Security for Microsoft SharePoint version 2.5 User Guide
Page 18

Getting Started with the User Interface
It is important for administrators to know how well their data on the SharePoint Server is being
protected in real-time from viruses and banned content. The McAfee Security for Microsoft
SharePoint user interface has an integrated dashboard that provides administrators with the
latest statistics of detected items, scan and update event items, and the product version and
license information.
The left pane of the user interface displays items namely Dashboard, Detected Items, Policy
Manager, and Settings & Diagnostics. The right pane shows information depending on the
item selected in the left pane.
Contents
Dashboard
Detected Items
Policy Manager
Settings and Diagnostics
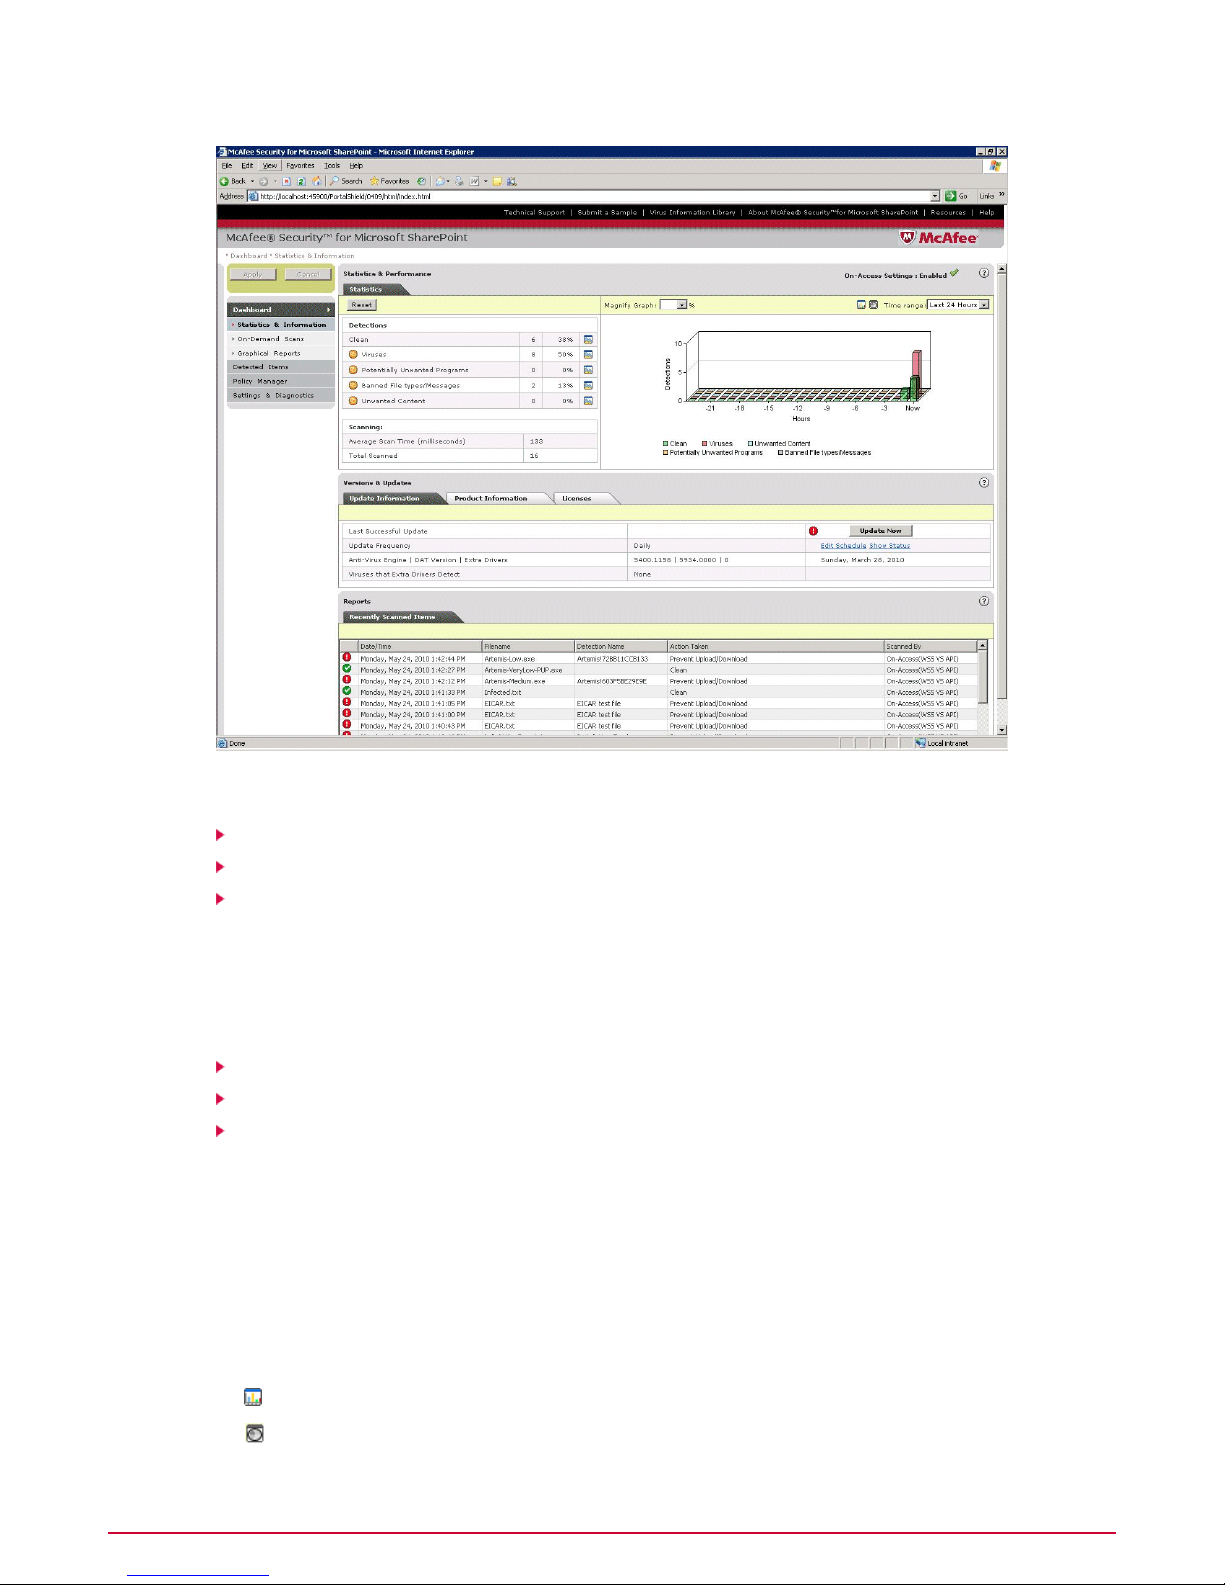
Dashboard
Dashboard gives an overview of the latest detections, graphical view of these detections, product
updates, version and license information, and reports of the recently scanned items.
McAfee Security for Microsoft SharePoint version 2.5 User Guide18
Page 19
Getting Started with the User Interface
Dashboard
Contents
Statistics and Information
Scheduling a New On-demand Scan
Graphical Reports
Statistics and Information
This is the default section that appears on launching the user interface. The Statistics &
Information screen is further divided into three sections namely:
Statistics
Versions and Updates
Reports
Statistics
Statistics displays the number and percentage of:
• Items that are clean (not infected).
• Items infected with viruses, potentially unwanted programs, banned file types/messages
and unwanted content.
You can view the statistics of these items in a graph. Click the following options:
•
— To view statistics as a bar graph.
•
— To view statistics as a pie chart.
19McAfee Security for Microsoft SharePoint version 2.5 User Guide
Page 20

Getting Started with the User Interface
Dashboard
You can also use the following options:
• Reset — Click to reset the statistics of all detected items on your dashboard.
•
— Click the icon of the corresponding detected item to see its statistics in the graph.
Clicking it again hides the statistics in the graph.
• Magnify Graph — Select an option from the drop-down list to view the magnified graph.
• Time Range — Select a time range from the drop-down list from the time you want to view
the statistics.
• Average Scan Time (milliseconds) — You can view the average time that was taken to
scan an item on your SharePoint server.
• Total Scanned — You can view the total number of items that were scanned.
Versions and Updates
This section has three tabs namely:
• Update Information — This tab displays the instant of the last successful product update,
frequency of the downloading of updates, anti-virus engine and DATs versions, extra drivers,
and the virus information detected by these extra drivers.
McAfee regularly provides DAT files to detect and clean the latest threats. Click Update
Now to update the most up-to-date virus protection available.
TIP: Click Show Status to view the status of the last update or Edit Schedule to schedule
a new frequency for downloading product updates.
• Product Information — This tab displays the product name and version, service pack and
the hotfix details.
• Licenses — This tab displays the product name and the type of the license of the product.
Reports
The Recently Scanned Items tab displays a list of items that were recently scanned on your
SharePoint server. It also shows the date and time of the scan, name of the item and detection,
action taken after the scan, type of scan, task name, and the policy that was specified for the
scan.
TIP: You can configure this section using the
Diagnostics
.
Dashboard Settings
Scheduling a New On-demand Scan
On-demand scan allows you to schedule scan tasks at convenient times to scan all items on
your SharePoint server for threats. You can create multiple on-demand scan tasks; each running
automatically at pre-determined intervals.
TIP: To improve scan time and performance, you can create multiple scan tasks to run parallelly
for various repositories.
section in
Settings &
1 On the left pane of the user interface, click Dashboard | On-Demand Scans. The
On-Demand Scans page appears.
2 Click New Scan. The Schedule an on-demand scan page appears.
3 Schedule the scan as required, then click Next.
McAfee Security for Microsoft SharePoint version 2.5 User Guide20
Page 21

Getting Started with the User Interface
Dashboard
4 Select the desired folder(s) and click >> to move the folder(s) from Available folders to
Folders to scan.
5 Select one of the following options:
• Scan all folders — All folders in Folders to scan will be scanned.
• Scan selected folders — Selected folders in Folders to scan will be scanned.
• Scan all except selected folders — Folders except the selected ones in Folders to
scan will be scanned.
6 Click Next.
7 In Excluded file extension(s), specify the extensions of files that must be excluded from
the scan, then click Next.
8 In Advanced, select one of the following options:
• Off — To schedule a normal on-demand scan task without resumable and incremental
scan options.
• Resumable Scanning — To save the last scan so that it can resume from where it
has stopped, when started later. You can also select the option Restart scan if DAT
changed so that, in the event of a DAT update, the scan can be restarted with the
updated DATs.
• Incremental Scanning — To scan only the newly added items of your SharePoint
server. You can select to scan from the last scanned date or even scan by specifying
the date and time of the last scan.
9 Click Next.
10 Type a name for the task.
11 Click Finish, then Apply.
TIP: Apply is located at the top left corner of the user interface.
NOTE: To modify this scan task, click Modify, then repeat instructions from step 3 to step
11. To delete the scan task, click Delete. To run the scan immediately, click Run Now.
Graphical Reports
Use Graphical Reports to get an explicit view of a graph of detected items.
This screen has two tabs:
• Simple
• Advanced
Viewing simple reports
1 Click Dashboard | Graphical Reports. The Graphical Reports page displays the Simple
tab by default.
2 From Time Span, select Today or This Week as required.
3 From Filter, select an option as required, then click Search.
Viewing advanced reports
You can set filters to narrow your search criteria in the Advanced tab.
1 Click Dashboard | Graphical Reports. The Graphical Reports page appears.
2 Click Advanced.
21McAfee Security for Microsoft SharePoint version 2.5 User Guide
Page 22

Getting Started with the User Interface
Detected Items
3 Select at least one filter; you can select up to three of the following filters:
• Subject
• Recipient
• Reason
• Ticket Number
• Deleted Items
4 Select All Dates to include all the dates, else select Date Range and select the required
date range from the drop-down menus.
5 Select Bar Graph or Pie Chart as required.
6 Click Search.
NOTE: Click Clear Filter to return to the default filter values.
Detected Items
Viruses
Detected Items displays information about items that contain viruses, potentially unwanted
programs, banned file types or messages, unwanted contents and all items. You should select
at least one search filter; however you can use up to three search filters to narrow your search.
Contents
Viruses
Potentially Unwanted Programs
Banned File Types or Messages
Unwanted Content
All Items
Virus is a program that replicates itself, multiplies and destroys another useful programs, boot
sectors, partition sectors or documents supporting macros by inserting or attaching itself to
that medium.
1 Click Detected Items | Viruses.
2 From the Virus Detections screen, select up to three search filters from the following:
• Filename
• Action Taken
• Folder
• Detection Name
• Ticket Number
• Scanned By
• Policy Name
3 Select All Dates to include all entries or select Date Range and the required date range
from the drop-down lists.
McAfee Security for Microsoft SharePoint version 2.5 User Guide22
Page 23

Getting Started with the User Interface
Detected Items
4 Click Search. A list of viruses matching your search criteria is displayed in the View Results
pane.
NOTE: Click Clear Filter to return to the default search filter settings.
Potentially Unwanted Programs
Potentially Unwanted Programs are the software programs written by legitimate companies
which, if installed, may alter the security state or the privacy posture of your system.
1 Click Detected Items | Potentially Unwanted Programs.
2 From the Potentially Unwanted Programs screen, select up to three search filters:
• Filename
• Action Taken
• Folder
• Detection Name
• Ticket Number
• Scanned By
• Policy Name
3 Select All Dates to include all entries or select Date Range and the required date range
from the drop-down lists.
4 Click Search. A list of potentially unwanted programs matching your search criteria is
displayed in the View Results pane.
NOTE: Click Clear Filter to return to the default search filter settings.
Banned File Types or Messages
Banned file types are the file formats that are banned by a network administrator.
1 Click Detected Items | Banned File types/Messages.
2 From the Banned File types/Messages screen, select up to three search filters from the
following:
• Filename
• Action Taken
• Folder
• Detection Name
• Ticket Number
• Scanned By
• Policy Name
3 Select All Dates to include all entries or select Date Range and the required date range
from the drop-down lists.
4 Click Search. A list of banned file types matching your search criteria is displayed in the
View Results pane.
NOTE: Click Clear Filter to return to the default search filter settings.
23McAfee Security for Microsoft SharePoint version 2.5 User Guide
Page 24

Getting Started with the User Interface
Detected Items
Unwanted Content
1 Click Detected Items | Unwanted Content.
2 From the Unwanted Content screen, select up to three search filters:
• Filename
• Folder
• Detection Name
• Ticket Number
• Scanned By
• Policy Name
3 Select All Dates to include all entries or select Date Range and the desired date range
from the drop-down lists.
4 Click Search. A list of files containing unwanted content is displayed in the View Results
pane.
NOTE: Click Clear Filter to return to the default search filter settings.
All Items
1 Click Detected Items | All Items .
2 From the All Items screen, select up to three search filters:
• Filename
• Folder
• Detection Name
• Reason
• Ticket Number
• Scanned By
• Policy Name
3 Select All Dates to include all entries or select Date Range and the desired date range
from the drop-down lists.
4 Click Search. A list of all items matching your search criteria is displayed in the View Results
pane.
NOTE: Click Clear Filter to return to the default search filter settings.
View Results Pane
From the View Results pane of all the detected items, you can:
• Download a quarantined document. Select a record from the View Results pane and click
Download.
• Export and save records in .CSV format. Select a record from the View Results pane and
click Export to CSV File.
McAfee Security for Microsoft SharePoint version 2.5 User Guide24
Page 25

Getting Started with the User Interface
Policy Manager
• Submit a quarantined item to Avert if the option is enabled. Select a record from the View
Results pane, then click Submit to Avert.
NOTE: All quarantined items are stored in a new database called PostgreSQL.
Policy Manager
You can use Policy Manager to specify policies that determine actions taken on different types
of threats when detected.
Master policy is the default policy for both on-access and on-demand policies. It is configured
to cover most of the situations. You can create subpolicies for any exceptional situations that
are not covered by the Master policy.
NOTE: Master policy cannot be deleted because there must always be a policy from which
others can be created. You can specify the order in which subpolicies are applied. Subpolicies
take priority over the Master policy.
Contents
Policy Manager Views
Creating a Subpolicy
Policy Settings
Scanners and Filters
Shared Resource
Policy Manager Views
Policy Manager has the following two views:
Inheritance View
Advanced View
Inheritance View
Inheritance View enables you to view policies that have inherited settings from another policy.
The policy that inherits the settings is known as the “child policy”, and the policy from which it
inherits those settings is known as the “parent policy”. A child policy is indented below its parent
policy.
For example, a policy might inherit the anti-virus settings but not the file filtering settings.
You can use:
• The Name of the policy — to edit its settings.
• Priority column — to view the order in which policies are applied.
• Create Sub-Policy — to create a subpolicy.
• Delete — to delete a subpolicy that is no longer required.
• Enabled — to enable or disable a subpolicy. If you select this option, the subpolicy is
enabled.
• Apply — to apply the settings/changes you configure.
25McAfee Security for Microsoft SharePoint version 2.5 User Guide
Page 26

Getting Started with the User Interface
Policy Manager
Advanced View
Advanced View enables you to use the arrows in the Move column to change the order in which
any subpolicies are applied.
You can use:
• The Name of the policy — to edit its settings.
• Create Sub-Policy — to create a subpolicy.
• Enabled — to enable or disable a subpolicy. If you select this option, the subpolicy is
enabled.
• Delete — to delete a subpolicy that is no longer required.
• Details — to view the description of the policy and its parentage.
• Apply — to apply the settings/changes you configure.
Creating a Subpolicy
1 From Policy Manager, select a submenu item On-Access or On-Demand for which you
want to create a subpolicy.
2 Click Create Sub-Policy. The Create a sub-policy page appears.
3 In Initial configuration, type a name for the subpolicy that identifies the policy.
4 Type a description (optional) for the policy.
5 From the drop-down menu, select the Parent Policy for the subpolicy.
6 Click Next. The Trigger rules page appears.
7 Click New Rule.
You can select from the following policy rule templates and specify the file names
accordingly:
• The file name is file name
• The file name is not the file name
TIP: If you do not want to perform instructions in step 7, you can just copy rules from an
existing policy by selecting it in the drop-down list.
8 Click Add.
NOTE: You can add multiple rules as required by repeating instructions in step 7 and step
8.
9 Specify a condition when the policy must be triggered. Select Any of the rules apply,
All rules apply or None of the rules apply.
10 Click Next. The Scanners and filters page appears.
11 In the Policy scanners and Filters initialization page, select one of these options as required:
• Inherit all settings from the parent policy
• Initialize selected settings with values copied from another policy
In this case, select the required scanners and filters.
12 Click Finish, then Apply. The subpolicy is displayed on the submenu item page of the
Policy Manager selected in step 1.
McAfee Security for Microsoft SharePoint version 2.5 User Guide26
Page 27

Getting Started with the User Interface
Policy Manager
Policy Settings
You can set up policies that determine how different types of threats are treated for different
groups of users or databases stored on the server. Each policy specifies the settings and actions
that are used by the policy and the actions taken when a detection is triggered in the SharePoint
environment. The settings are given names and can be used by many policies at the same time.
However the actions are specific to a particular policy.
1 From Policy Manager, select a submenu item On-Access or On-Demand.
2 Click on a policy for which you want to specify the settings and actions. The policy page
displays three tabs:
List All Scanners
View Settings
Specify Users
List All Scanners
The List All Scanners tab lists the core scanners, filters, and miscellaneous options. The type
of settings that are available depend on the scanner/filter being selected.
• Core Scanners — You can configure settings for each scanner. Core scanners include:
• Anti-Virus Scanner
• Content Scanning
• File Filtering
NOTE: For detailed description of the Core Scanners mentioned above, refer to the
and filters
• Filters — You can configure settings for each filter. Filters include:
• Corrupt Content
• Protected Content
• Encrypted Content
• Signed Content
• Password-Protected Files
• Scanner Control
NOTE: For detailed description of the Filters mentioned above, refer to the
• Miscellaneous — This option is available only for on-demand policy. You can configure
settings for alert messages. Miscellaneous settings include:
• Alert Settings
NOTE: For information on miscellaneous option, refer to the
Selecting a core scanner, filter or miscellaneous option takes you to the View Settings tab.
View Settings
section.
Miscellaneous
Filters
section.
Scanners
section.
The View Settings tab displays a summary of the settings configured for a selected policy and
a selected scanner/filter/miscellaneous options. It also allows you to change those settings.
The following figure shows the View Settings tab for Anti-Virus Scanner of on-access policy.
27McAfee Security for Microsoft SharePoint version 2.5 User Guide
Page 28

Getting Started with the User Interface
Policy Manager
Specify Users
The Specify Users tab allows you to specify policy rules for specific users.
To create a new rule for a specific user:
1 In Specify Users tab, click New Rule.
You can select from the following policy rule templates:
• The file name is file name
• The file name is not the file name
TIP: If you do not want to perform instructions in step 7, you can just copy rules from an
existing policy by selecting it in the drop-down list.
2 Click Add.
NOTE: You can add multiple rules as required by repeating instructions in step 2 and step
3.
3 In the Specify who this policy applies to pane, specify the conditions where the policy will
trigger. Select Any of the rules apply, All rules apply, or None of the rules apply
for the specific user.
4 Click Apply.
Adding Scanner/Filter
1 From Policy Manager, select a submenu item On-Access or On-Demand. The policy
page for the selected submenu item appears.
2 Click on a policy.
3 Click Add Scanner/Filter. The Create time-constrained configuration page appears.
4 Specify the required scanner/filter category from the drop-down menu.
5 In When to use this instance, specify whether you want to use an existing time slot or
create a new one for this time-constrained policy.
6 If you select Select existing time slot, select one of the following from the drop-down
list:
McAfee Security for Microsoft SharePoint version 2.5 User Guide28
Page 29

Getting Started with the User Interface
Policy Manager
Weekdays•
• Weekends
• Working hours
7 If you select Create a new time slot, specify a name for the new time slot and select
the desired day(s) and time.
8 Click Save, then Apply.
Scanners and Filters
Policy Manager has core scanners, filters and miscellaneous options. Each of them are explained
in detail below.
Core Scanners
Filters
Miscellaneous
Core Scanners
Core scanners include:
Anti-Virus Scanner
Content Scanning
File Filtering
Anti-Virus Scanner
Anti-Virus Scanner consists of computer programs that attempt to identify, thwart, and eliminate
computer viruses and other malicious software.
1 From Policy Manager, select a submenu item On-Access or On-Demand. The policy
page for the selected submenu item appears.
2 Click on a policy.
3 Click Anti-Virus Scanner. The View Settings tab for the anti-virus scanner appears.
4 In Activation, select Enable to enable the anti-virus scanner settings for this policy.
5 In Options, select one of the following anti-virus option set that you want to view or
configure:
• High Protection — to view and configure settings that are applied when a high level
of protection is required.
• Medium Protection — to view and configure settings that are applied when a medium
level of protection is required.
• Lower Protection — to view and configure the settings that are applied when a low
level of protection is required.
• Create new set of options — to create a new set of anti-virus options for this policy.
NOTE: For step-by-step instructions to create new set of options, refer to the
set of options in Anti-Virus Scanner
Creating new
section.
29McAfee Security for Microsoft SharePoint version 2.5 User Guide
Page 30

Getting Started with the User Interface
Policy Manager
6 In Actions to take, you can view/edit a summary of the actions that will be taken in different
circumstances. To change those actions, click Edit.
NOTE: For information on editing anti-virus scanner actions, refer to the
scanner actions
section.
Tasks
Creating New Set of Options in Anti-virus Scanner
Editing Anti-virus Scanner Actions
Primary and Secondary Actions
Creating New Set of Options in Anti-virus Scanner
1 From Policy Manager, select a submenu item On-Access or On-Demand. The policy
page for the selected submenu item appears.
2 Click on a policy.
3 Click Anti-Virus Scanner. The View Settings tab for the anti-virus scanner appears.
4 In the Options drop-down list, click Create new set of options. The Anti-Virus Scanner
Settings page displays four tabs as shown in the following figure.
Editing anti-virus
5 In Basic Options, under Specify which files to scan, select one of the following options:
• Scan all files — to specify that all files must be scanned, regardless of their type.
• Default file types — to specify that only the default file types should be scanned.
• Defined file types — to define the file types to be scanned.
6 In Scanner Options, select the scanner options you require. You can select:
• Scan archive files (ZIP, ARJ, RAR,...) — to scan inside archive files, such as ZIP
files.
• Find unknown file viruses — to use heuristic analysis techniques to search for
unknown viruses.
McAfee Security for Microsoft SharePoint version 2.5 User Guide30
Page 31

Getting Started with the User Interface
Policy Manager
• Find unknown macro viruses — to find unknown viruses in macros.
• Enable Artemis technology — to enable McAfee's Artemis technology for safeguarding
your SharePoint server from the ever-evolving threats. You can select a sensitivity level
from the drop-down list.
DescriptionSensitivity Level
Artemis technology is turned off.Disabled
Very Low
Medium
Equivalent to next days DATs. Get tomorrow's protection today. Recommended
initial configuration.
Protection in addition to DATs.Low
Used when the risk of regular exposure to malware is greater than the risk of a
false positive.
Recommended for use in SharePoint Repositories which are regularly infected.High
Recommended for use in On-Demand Scans on SharePoint Repositories.Very High
TIP: Refer to the McAfee KnowledgeBase article at
https://kc.mcafee.com/corporate/index?page=content&id=KB68631
for more information
on Artemis technology.
• Scan all files for macros — to scan all files for macros.
• Find all macros and treat as infected — to find macros in files and treat them as
infected items.
• Remove all macros from document files — to remove all macros from the document
files.
7 In Advanced tab, under Custom malware categories, specify the items that must be treated
as malware. There are two ways to select malware types:
• Select the malware types from the list of options in Custom malware categories.
• Select Specify detection names, then click Add.
NOTE: When adding a malware name, you can use wildcards for pattern matching.
8 Select or deselect the option Do not perform custom malware check if the object
has already been cleaned to specify if items that have already been cleaned successfully
must be re-subject to the custom malware check or not.
9 In Clean Options, specify what happens to files that are reduced to zero bytes after being
cleaned. Select any one of the following:
• Keep zero byte file — to keep files that have been cleaned and is of zero bytes.
• Remove zero byte file — to remove any file that is of zero bytes after being cleaned.
• Treat as a failure to clean — to treat zero byte files as if they cannot be cleaned,
and apply the failure to clean action.
10 In Packers, use:
• Enable detection — to enable or disable the detection of packers.
• Exclude specified names — to specify which packers can be ignored.
• Include only specified names — to specify the packers you want the software to
detect.
• Add — to add packer names to a list.
• Delete — to remove packer names from a list.
31McAfee Security for Microsoft SharePoint version 2.5 User Guide
Page 32

Getting Started with the User Interface
Policy Manager
11 In PUPs, you can enable the PUP detection. Click on the disclaimer link and read the
disclaimer before enabling PUP detection option. You can also enable detection for the
following PUPs:
• Spyware
• Adware
• Remote Administration Tools
• Dialers
• Password Crackers
• Joke programs
• Cookies
• Other potentially unwanted programs not included in the above categories.
12 You can also use:
• Exclude specified names — to list the PUPs that you want the software to exclude.
For example, if you have enabled spyware detection, you can create a list of spyware
programs that you want the software to exclude.
• Include only specified names — to list the PUPs that you want the software to
detect. For example, if you enable spyware detection, and specify only specific spyware
programs to be detected, all other spyware programs are ignored.
• Add — to add PUP names to a list. You can use wildcards to match names.
• Delete — to remove PUP names from a list.
NOTE: The McAfee website
Use the Search in Category option to select Potentially Unwanted Programs.
13 Click Save, then Apply.
Editing Anti-virus Scanner Actions
1 From Policy Manager, select a submenu item On-Access or On-Demand. The policy
page for the selected submenu item appears.
2 Click on the desired policy.
3 Click Anti-Virus Scanner. The View Settings tab for the anti-virus scanner appears.
4 In Actions to take, click the Edit link. The Anti-Virus Scanner Actions page appears.
5 In Cleaning tab, under Virus and Trojans cleaning, select the option Attempt to clean
any detected virus or trojan.
6 Under If cleaning succeeds, take the following action, select the following options if cleaning
succeeds:
• Log to Detected Items — to record the detection in a log.
• Quarantine — to take a copy of the item and store it in the quarantine database.
7 Select a primary action and one or more secondary actions in the remaining tabs that are:
• Default Actions
• Custom Malware
• Packers
http://vil.nai.com/vil/default.aspx
contains a list of PUP names.
McAfee Security for Microsoft SharePoint version 2.5 User Guide32
Page 33

Getting Started with the User Interface
Policy Manager
• PUPs
NOTE: If you select the primary action as Replace item with an alert, you get an option
to create your Alert message.
Primary and Secondary Actions
Primary actions for on-access scan
• Allow through — Allows the item to continue to the next scanning phase or to its final
destination.
• Prevent Upload/Download of the Item — Prevents the item from being uploaded to
or downloaded from the server.
Primary actions for on-demand scan
• Allow through — Allows the item to continue to the next scanning phase or to its final
destination.
• Replace item with an alert — Replaces the item with an alert message.
• Remove embedded item — Removes the item from the document library.
Secondary actions for both on-access and on-demand scan
• Log to Detected Items — Records the detection in a log.
• Quarantine — Takes a copy of the item and stores it in the quarantine database.
NOTE: We recommend you to always select the Quarantine option. This will help you
acquire a quarantined item later if required.
Content Scanning
McAfee Security for Microsoft SharePoint can identify the textual data in a document for scanning.
You can create content rules to specify banned content and assign them to the policies.
1 From Policy Manager, select a submenu item On-Access or On-Demand. The policy
page for the selected submenu item appears.
2 Click on a policy.
3 Click Content Scanning. The View Settings tab for the content scanner appears.
4 In Activation, select Enable to enable the content scanner settings for this policy.
5 In Options, select or deselect the following as required:
• Include document and database formats in content scanning
• Scan the text of all attachments
6 Select an existing alert from the drop-down list or click Create to create a new alert.
NOTE: For more information about creating a new alert, refer to the
section.
If the alert text is not shown and you would like to review it, click View/Hide to display
the text. If the alert text is displayed, click View/Hide to hide it.
NOTE: You cannot customize default alert messages because they are read-only.
7 In Content Scanner rules and associated actions, click:
Creating a new alert
33McAfee Security for Microsoft SharePoint version 2.5 User Guide
Page 34

Getting Started with the User Interface
Policy Manager
Add rule — to create a new content rule for this policy.
•
NOTE: For more information about creating a new content rule, refer to the
new content rule
• Edit — to change the action associated with a content rule.
• Delete — to delete the content rule.
Tasks
Creating a New Alert
Adding a New Content Rule
Creating a New Alert
1 From Policy Manager, select a submenu item On-Access or On-Demand. The policy
page for the selected submenu item appears.
2 Click on a policy.
3 Click Content Scanning. The View Settings tab for the content scanner appears.
4 In Options, click Create. The Alert Editor page appears.
5 Type an alert name.
6 In Content Scanning Alert, select the required Style, Font, Size, and Tokens from the
respective drop-down lists.
7 Select any of the following tools:
Adding a
section.
• Bold — to make the selected text bold.
• Italic — to make the selected text italic.
• Underline — to underline the selected text.
• Align Left — to left align the selected paragraph.
• Center — to center the selected paragraph.
• Align Right — to right align the selected paragraph.
• Justify — to adjust the selected paragraph so that the lines within the paragraph fill a
given width, with straight left and right edges.
• Ordered List — to make the selected text into a numbered list.
• Unordered List — to make the selected text into a bulleted list.
• Outdent — to move the selected text a set distance to the right.
• Indent — to move the selected text a set distance to the left.
• Text Color — to change the color of the selected text.
• Background Color — change the background color of the selected text.
• Horizontal Rule — to insert a horizontal line.
• Insert Link — to insert a hyperlink where the cursor is currently positioned. In URL,
type the URL. In Text, type the name of the hyperlink as you want it to appear in the
alert message. If you want the link to open a new window, select Open link in new
window, then click Insert Link.
McAfee Security for Microsoft SharePoint version 2.5 User Guide34
Page 35

Getting Started with the User Interface
Policy Manager
• Insert Image — to insert an image where the cursor is currently positioned. In Image
URL, type the location of the image. In Alternative text, type the text you want to
use in place of the image when images are suppressed, or the alert message is displayed
in a text-only browser. If you want to give the image a title, type the title name in Use
this text as the image title. Click Insert Image.
• Insert Table — to insert a table at the current cursor position. Use the table settings
to configure the table, and then click Insert Table.
8 From the Show drop-down menu, specify how the alert message should be displayed
within the user interface. You can select:
• HTML content (WYSIWYG) — to hide the underlying HTML code and display only
the content of the alert message.
• HTML content (source) — to display the HTML code as it appears before it has been
compiled.
• Plain-text content — to view the text as plain text.
9 Click Save, then Apply.
NOTE: Click Reset to undo all changes you have made since you last saved the alert
message.
Adding a New Content Rule
1 From Policy Manager, select a submenu item On-Access or On-Demand. The policy
page for the selected submenu item appears.
2 Click on a policy.
3 Click Content Scanning. The View Settings tab for the content scanner appears.
4 In Content Scanner rules and associated actions, click Add rule. The Content Rules page
appears.
5 In Specify actions for a selection of content rules:
• Select a rule group from the drop-down menu that will trigger an action if one or more
of its rules are broken.
• In Select rules from this group, specify if all rules or only rules with a specific severity
rating should be included. The options are:
• Severity - Low
• Severity - Medium
• Severity - High
6 Select the required primary and secondary filtering actions.
NOTE: See
Primary and Secondary Actions
.
File Filtering
You can configure the file filtering settings for a selected policy.
1 From Policy Manager, select a submenu item On-Access or On-Demand. The policy
page for the selected submenu item appears.
2 Click on a policy.
3 Click File Filtering. The View Settings tab for the file filtering scanner appears.
35McAfee Security for Microsoft SharePoint version 2.5 User Guide
Page 36

Getting Started with the User Interface
Policy Manager
4 In Activation, select Enable to enable the file filtering scanner settings for the policy.
TIP: For a true file type filtering, enable Content Scanning too.
5 In Alert selection, specify which alert will be used when an infected document triggers a
filtering rule. You can also select an existing alert or click Create to create a new alert.
NOTE: For more information about creating a new alert, refer to the
section.
If the alert text is not shown and you would like to review it, click View/Hide to display
the text. If the alert text is displayed, click View/Hide to hide it.
6 From File filtering rules and associated actions, use the following:
• Available rules — to select an existing file filtering rule or create new file filtering rules
for the policy.
NOTE: For more information about Create a new rule, refer to the
filtering rule
section.
• Change — to change the primary and secondary actions associated with a file filtering
rule.
NOTE: For more information on changing the primary and secondary actions associated
with a file filtering rule, refer to the
• Delete — to delete the file filtering rule.
Creating a new file filtering rule
1 From Policy Manager, select a submenu item On-Access or On-Demand. The policy
page for the selected submenu item appears.
2 Click on a policy.
3 Click File Filtering. The View Settings tab for the file filtering scanner appears.
4 From the Available rules drop-down list, select Create new rule.
5 Enter a unique Rule name. Give the rule, a meaningful name, so that you can easily
identify it and what it does.
For example, FilesOver5MB.
Creating a New Alert
Creating a new file
Primary and Secondary File Filtering Actions
section.
6 In Filename filtering, select Enable file name filtering to enable file filtering according
to the file names.
For example, if you type *.exe, this file filtering rule is applied to any file that has a .exe
file name extension.
7 In Take action when the file name matches, specify the names of the files that are affected
by this rule.
You can use the * and ? wildcard characters to match multiple filenames. For example, if
you want to filter out executable files, type *.exe.
8 Click Add to add the file names to the filtering list or Delete to remove file names from
the filtering list.
9 In File category filtering, select Enable file category filtering to enable file filtering
according to their file type.
McAfee Security for Microsoft SharePoint version 2.5 User Guide36
Page 37

Getting Started with the User Interface
Policy Manager
10 In Take action when the file category is, specify the type of files that are affected by this
rule.
NOTE: File types are divided into categories and subcategories.
11 In File Categories, click on a file type. An asterisk appears next to the file type to indicate
that the selected file type will be filtered.
12 In Subcategories, click on the subcategory you want filtered.
NOTE: To select more than one subcategory, use Ctrl+Click, or Shift+Click.
To select all of the subcategories, click All.
13 Repeat steps 1 and 2 for each file category you want to add to the file filtering list.
NOTE: Click Clear selections to undo the last selection. Click on the required File category
you have chosen (where the asterisk appears) and click Clear Selections to deselect it.
14 Select Extend this rule to unrecognized file categories to apply this rule to any other
file categories and subcategories that are not specifically mentioned in the categories and
subcategories lists.
15 In File size filtering, select Enable file size filtering to filter files according to their file
size.
16 In Take action when the file size is, select Greater than to specify that the action should
only be applied if the file is larger than the size specified.
17 Select Less than to specify that the action should only be applied if the file is smaller than
the size specified.
18 Click Save, then Apply.
Filters
Filters include:
Corrupt Content
Protected Content
Encrypted Content
Signed Content
Password-Protected Files
Scanner Control
Corrupt Content
If the content in a file is corrupt, it cannot be scanned. You can configure corrupt content
policies to specify the action taken when files with corrupt content are detected.
1 From Policy Manager, select a submenu item On-Access or On-Demand. The policy
page for the selected submenu item appears.
2 Click on a policy.
3 Click Corrupt Content. The View Settings tab for the corrupt content filter appears.
4 In Activation, select Enable to enable the corrupt content filter settings for the policy.
37McAfee Security for Microsoft SharePoint version 2.5 User Guide
Page 38

Getting Started with the User Interface
Policy Manager
5 In Actions, click Edit to configure the actions that must be taken when corrupt content is
detected.
TIP: For information on the available actions that can be taken when corrupt content is
detected, refer to the
Protected Content
The content of some documents can designated to be protected, which means such content
cannot be scanned. You can configure protected content policies to specify the action taken
when files with protected content are detected.
1 From Policy Manager, select a submenu item On-Access or On-Demand. The policy
page for the selected submenu item appears.
2 Click on a policy.
3 Click Protected Content. The View Settings tab for the protected content filter appears.
4 In Activation, select Enable to enable the protected content filter settings for the policy.
5 In Actions, click Edit to configure the actions that must be taken when protected content
is detected.
Primary and Secondary Actions
section.
TIP: For information on the available actions that can taken when protected content is
detected, refer to the
Encrypted Content
Content in some documents might be encoded to avoid unauthorized access. For example, any
file encrypted with a key. You can configure encrypted content policies to specify the action
taken when files with encrypted content are detected.
1 From Policy Manager, select a submenu item On-Access or On-Demand. The policy
page for the selected submenu item appears.
2 Click on a policy.
3 Click Encrypted Content. The View Settings tab for the encrypted content filter appears.
4 In Activation, select Enable to enable the encrypted content filter settings for the policy.
5 In Actions, click Edit to configure the actions that must be taken when encrypted content
is detected.
TIP: For information on the available actions that can be taken when encrypted content is
detected, refer to the
Signed Content
Primary and Secondary Actions
Primary and Secondary Actions
section.
section.
Whenever information is transferred/uploaded electronically, it can accidentally or willfully be
altered. To overcome this, some software use a digital signature — the electronic form of a
handwritten signature.
A digital signature is extra information added to a document that identifies and authenticates
information in the document. It is signed and acts like a unique summary of the information
that is signed with a message digest in the document.
If the document contains a virus, bad content, or is too large, the software might clean or
remove some part of the message. The document is still valid, and can be read, but the original
McAfee Security for Microsoft SharePoint version 2.5 User Guide38
Page 39

Getting Started with the User Interface
Policy Manager
digital signature is 'broken'. You cannot rely on the contents of the document because the
contents might have also been altered in other ways. Signed content policy specifies how
documents with digital signatures are handled.
1 From Policy Manager, select a submenu item On-Access or On-Demand. The policy
page for the selected submenu item appears.
2 Click on a policy.
3 Click Signed Content. The View Settings tab for the signed content filter appears.
4 In Activation, select Enable to enable the signed content filter settings for the policy.
5 In Actions, click Edit to configure the actions that must be taken when signed content is
detected.
TIP: For information on the available actions that can be taken when signed content is
detected, refer to the
Primary and Secondary Actions
section.
For Signed Content filter, there will be an additional primary action involved for both
On-Access and On-Demand scans. It is called Allow changes to break the signature.
If this option is chosen, then the signature of the signed content will be broken which leads
to the change of the content before being uploaded.
Password-Protected Files
Password-protected files cannot be scanned. For example, RIR or ZIP files. You can configure
password-protected files policies to specify the action taken when files protected with a password
are detected.
1 From Policy Manager, select a submenu item On-Access or On-Demand. The policy
page for the selected submenu item appears.
2 Click on a policy.
3 Click Password-Protected Files. The View Settings tab for the password-protected file
filter appears.
4 In Activation, select Enable to enable the password-protected file filter settings for the
policy.
5 In Actions, click Edit to configure the actions that must be taken when password-protected
files are detected.
TIP: For information on the available actions that can be taken when password-protected
files are detected, refer to the
Scanner Control
You can configure scanner control policies to limit the nesting level, file size, and scan time that
is allowed when scanning files/documents.
1 From Policy Manager, select a submenu item On-Access or On-Demand. The policy
page for the selected submenu item appears.
2 Click on a policy.
3 Click Scanner Control. The View Settings tab for the scanner control filter appears.
4 In Activation, select Enable to enable the scanner control filter settings for the policy.
5 In Options, select:
Primary and Secondary Actions
section.
39McAfee Security for Microsoft SharePoint version 2.5 User Guide
Page 40

Getting Started with the User Interface
Policy Manager
Core Scanner Control Settings — to view a summary of the scanner control option
•
set that is used by default when no alternative scanner control option sets are available.
• Create new set of options — to create a new option set for this policy.
6 If you select Create new set of options, type a unique name for the scanner control
filter setting instance.
7 In Maximum nesting level, specify the level to which the scanner must scan, when an
attachment contains compressed files within compressed files.
8 In Maximum expanded file size (MB), specify the maximum number of megabytes a file
can be when expanded for scanning. We recommend a maximum size of 100MB.
9 In Maximum scan time (minutes), specify the maximum number of minutes that must be
spent scanning any file.
NOTE: The scan time we specify here must not be greater than the time we specify in
Microsoft SharePoint.
10 Click Save to return to the policy page.
11 In Alert selection, when a scanner control option is triggered, select an alert from the
drop-down list or click Create to create a new alert.
NOTE: For more information about creating a new alert, refer to the
section.
If the alert text is not shown and you would like to review it, you can click View/Hide to
display the text. If the alert text is displayed, click View/Hide to hide it.
12 In Actions, view the action that will be taken when the level of nesting, file size, or scan
time is exceeded. To change this action, select Edit.
NOTE: For more information on editing the actions, refer to the
Actions
Miscellaneous
Miscellaneous options include the Alert settings that enables you to configure an alert message.
Alert Settings
An alert is a notification message that is sent to the McAfee Security for Microsoft SharePoint
administrators when a scanner/filter has detected an infection with the scanned item.
You can use Alert Settings to set up additional information about these alerts.
1 From Policy Manager, select a submenu item On-Access or On-Demand. The policy
page for the selected submenu item appears.
2 Click on a policy.
3 Click Alert Settings. The View Settings tab for alert settings appears.
4 In Activation, select Enable to enable the use of alert headers and footers for the selected
policy.
5 In Options, select the alert message option set that you want to view or configure. You
can select:
• An existing alert message option set.
• Create new set of options — to create a new option set for this policy.
Creating a new alert
Primary and Secondary
section.
McAfee Security for Microsoft SharePoint version 2.5 User Guide40
Page 41

Getting Started with the User Interface
Policy Manager
6 If you select Create new set of options, enter a unique instance name. This field is
mandatory.
7 In Alert Options, use:
• Alert format — to specify whether the alert must be in HTML format or plain text
format.
• Character encoding — to specify which type of character encoding is required.
• Alert filename — to specify the file name for this alert, including the appropriate HTML
(.htm) or plain text (.txt) file extension.
• Enable alert headers — to enable or disable the use of an alert header.
• Alert header — text entry box to enter the alert header in plain text or HTML code.
• Show — to specify whether HTML text should be shown as source or compiled code.
This option is only available if you have selected HTML as the alert message format and
only applies to the way the HTML code is displayed within this user interface.
• Enable alert footers — to enable the use of an alert footer.
• Alert footer — text entry box to enter the alert footer in plain text or HTML code.
NOTE: You can click Edit to edit the selected option set.
8 Click Save, then Apply.
Shared Resource
When setting up policies, you might want the same resource to be used by more than one
policy. For example, you might want to use the same alert message in two policies. The alert
message can be used as a resource that can shared by more than one policy.
You can use Shared Resource to:
• View shared resource settings.
• Create new resources.
• Change the resource settings, so that the changes are picked up by all policies using the
shared resources.
• Delete shared resources that are no longer in use.
NOTE: Some resources cannot be deleted.
Shared Resources page has three tabs:
Scanners and Alerts
Filter Rules
Time Slots
Scanners and Alerts
Scanners
In Scanners, you can configure the scanner-related settings that a policy can apply when
scanning the items. You can use:
• Category — to select the type of settings you want to configure. The options are Anti-Virus
Scanner, Scanner Control, and Alert Settings.
41McAfee Security for Microsoft SharePoint version 2.5 User Guide
Page 42

Getting Started with the User Interface
Policy Manager
• Create New — to create a new shared resource for a selected category.
NOTE: For detailed information on Create New, refer to the sections
resource for Anti-Virus Scanner,Creating a new shared resource for Scanner Control
Creating a new shared resource for Alert Settings
.
Creating a new shared
, and
• Delete — to delete a resource that is no longer used by any of the policies. Some resources
cannot be deleted.
• Edit — to change the resource settings.
Alerts
In Alerts, you can use:
• Category — to select the type of alert message you want to configure.
• Create New — to create an alert message. The default alert message text is displayed and
you can edit it to create a new alert message.
NOTE: For more information about creating a new alert message, refer to the
new alert
section.
Creating a
• Delete — to delete an alert message that is no longer used by any of the policies.
• Edit — to change the alert message.
• Rename — to rename the alert category.
• View — to view an alert message.
NOTE: Default alert messages cannot be edited or deleted.
Tasks
Creating a New Shared Resource for Anti-Virus Scanner
Creating a New Shared Resource for Scanner Control
Creating a New Shared Resource for Alert Settings
Creating a New Shared Resource for Anti-Virus Scanner
1 In Policy Manager, click Shared Resource. The Shared Resources page appears.
2 In Scanners & Alerts tab, select Anti-Virus Scanner from the Category drop-down menu.
3 In the Scanners pane, click Create New and perform step 5 — 9 of the
of options in Anti-Virus Scanner
section.
4 In the Alerts pane, select a Category.
5 Click Create New and perform steps 5 - 9 of the
Creating a new alert
Creating a New Shared Resource for Scanner Control
1 In Policy Manager, click Shared Resource. The Shared Resources page appears.
2 In Scanners & Alerts tab, select Scanner Control from the Category drop-down menu.
3 In the Scanners pane, click Create New. The Scanner Control page appears.
4 Type an Instance name.
5 Specify the Maximum Nesting level.
6 Enter the Maximum expanded file size (MB).
Creating new set
section.
McAfee Security for Microsoft SharePoint version 2.5 User Guide42
Page 43

Getting Started with the User Interface
Policy Manager
7 Enter the Maximum scan time (minutes).
8 Click Save.
9 In the Alerts pane, select a Category.
10 Click Create New and perform steps 5 - 9 of the
Creating a new alert
Creating a New Shared Resource for Alert Settings
1 In Policy Manager, click Shared Resource. The Shared Resources page appears.
2 In Scanners & Alerts tab, select Alert Settings from the Category drop-down menu.
3 In the Scanners pane, click Create New. The Alert Settings page appears.
4 Perform step 6 — 8 of the
Alert Settings
section.
Filter Rules
Content Scanner Rules
In Content Scanner Rules, you can configure rules that a policy can apply to the content of
documents. You can use:
• Category — to select the type of rules you want to configure.
• New Category — to create a new category of rules.
• Rename — to rename a category.
• Delete — to delete a category that you no longer require.
• Create New — to create a new rule.
section.
NOTE: For more information on Create New, refer to the
rule
section.
Creating a new content scanner
• Edit — to change the rule settings.
• Delete -to delete a rule that is no longer used by any of the policies.
NOTE: There are two Delete links. One link is to delete a category present in the drop-down
list and the other one is to delete a rule that you have created.
You should give each new rule a unique and meaningful name. Avoid using names and
descriptions that might be offensive, because the they can be included in notifications sent to
administrators when a rule is triggered. You may not want notifications to be blocked because
they contain banned content.
File Filtering Rules
In File Filtering Rules, you can set up rules that apply to a file name, file type, and file size. You
can use:
• Create New — to create a new file filtering rule.
NOTE: For more information on Create New, refer to the
Creating new file filtering rule
section.
• Delete — to delete a rule that is no longer used by any of the policies.
• Edit — to change the rule settings.
NOTE: When configuring policies, you can select the file filtering rules that must be used and
the order in which they must be applied when scanning files.
43McAfee Security for Microsoft SharePoint version 2.5 User Guide
Page 44

Getting Started with the User Interface
Policy Manager
Tasks
Creating a New Content Scanner Rule
Creating New File Filtering Rule
Creating a New Content Scanner Rule
1 In Policy Manager, click Shared Resource. The Shared Resources page appears.
2 Click Filter Rules tab.
3 In Content Scanner Rules pane, click Create New. The New Content Scanner Rule page
appears.
4 Type a unique rule name.
5 In Details, type a brief description for the rule.
6 In Word or Phrase tab, specify the words or phrases to look for.
7 Select the required options from the following:
• Ignore case — If enabled, the rule is triggered for specified word or phrase that is not
case-sensitive.
• Starts a longer word or phrase — If enabled, the rule is triggered for specified text
that begins with a longer word or phrase.
• Use Wildcards — If enabled, the rule is triggered for the specified word or phrase that
contain wildcard characters.
• Ends a longer word or phrase — If enabled, the rule is triggered for specified text
that ends with a longer word or phrase.
8 In File Format tab, select Everything to select all the file categories and its subcategories.
You can select multiple categories and file types within the selected categories to be
matched. Selecting All in the subcategory overrides any other selections that might have
already been made.
9 Select the Specify additional contextual words or phrases option.
10 Select one of these options from the drop-down menu:
• Trigger if ALL of the phrases are present
• Trigger if ANY of the phrases are present
• Trigger if NONE of the phrases are present
11 Select within a block of and specify the number of characters for a block to be scanned.
12 Click Save, then Apply.
Creating New File Filtering Rule
1 In Policy Manager, click Shared Resource. The Shared Resources page appears.
2 Click Filter Rules tab.
3 In File Filtering Rules pane, click Create New. The File Filtering Rule page appears.
4 Perform steps 5 to 18 of the
Creating a new file filtering rule
section.
Time Slots
In Time Slots, you can set up different time slots that can be applied to policies. You can use:
McAfee Security for Microsoft SharePoint version 2.5 User Guide44
Page 45

Getting Started with the User Interface
Settings and Diagnostics
• View — to view the time slot of All the time.
• Delete — to delete a time slot that is not used by any of the policies.
• Edit — to change the name or times associated with a specific time slot.
• Create New — to create a new time slot.
Creating a New Time Slot
1 In Policy Manager, click Shared Resource. The Shared Resources page appears.
2 Click Time Slots tab.
3 Click Create New. The Time Slot page appears.
4 Type a unique time slot name.
5 Select the required day and time.
6 Click Save , then Apply.
NOTE: Master policies use the All the time slot. If you want a policy to be active during
a different time slot, you must create a subpolicy and specify a different time slot.
Settings and Diagnostics
This section describes the settings and diagnostics you could perform on McAfee Security for
Microsoft SharePoint. Topics covered are:
Contents
Detected Items
User Interface Preferences
Diagnostics
Product Log
Import and Export Configuration
DAT Settings
User Settings
Detected Items
You can configure settings for the local database to quarantine infected items.
1 Click Settings & Diagnostics | Detected Items. The Detected Items page appears.
2 Select Specify location of database to a database location. If deselected, the default
location is used. If selected, choose one of the following options from the drop-down list
and specify a location accordingly:
• <Install Folder>\
• <System Drive>\
• <Program Files>\
• <Windows Folder>\
• (Full Path)
45McAfee Security for Microsoft SharePoint version 2.5 User Guide
Page 46

Getting Started with the User Interface
Settings and Diagnostics
3 In Maximum item size (MB), specify the maximum size in megabytes an item stored in the
database can be.
4 In Maximum query size (records), specify the maximum number of records that can be
returned when the local quarantine database receives a query.
5 In Maximum item age (days), specify the maximum number of days an item will be held
in the local quarantine database before being marked for deletion.
6 In Purge of old items frequency, specify how frequently old items being marked for deletion
are removed from the database. You can click Edit Schedule and schedule a time to do
so.
7 In Optimization Frequency, specify how frequently the database is optimized. Click Edit
Schedule and schedule a time to do so.
CAUTION: Purge of old items and Optimization Frequency are database operations. You
must not schedule these operations to run at the same time because one of the operations
will be locked by the database.
User Interface Preferences
You can use User Interface Preferences to configure user interface refresh, report, metric,
graph and chart settings.
Tasks
Dashboard Settings
Graph and Chart Settings
Dashboard Settings
1 Click Settings & Diagnostics | User Interface Preferences. The User Interface
Preferences screen appears with the Dashboard Settings tab by default.
2 Select Automatic refresh to specify whether the information shown on the Dashboard
should be refreshed automatically.
3 In Refresh rate (seconds), type the duration in seconds after which the information on the
dashboard must be refreshed.
4 Select Enable reports to enable or disable reporting.
5 Select Show recently scanned items to specify whether the Recently Scanned Items
tab must be included in Reports section of the dashboard.
6 In Maximum recently scanned items, specify the maximum number of recently scanned
items that must be included in Reports section of the dashboard.
7 In Graph scale (units), type the measurement units for the scale of the graph that is
generated.
8 In Number of hours to report for, type the report generation interval (in hours) to generate
a report.
Graph and Chart Settings
1 Click Settings & Diagnostics | User Interface Preferences. The User Interface
Preferences screen appears.
McAfee Security for Microsoft SharePoint version 2.5 User Guide46
Page 47

Getting Started with the User Interface
Settings and Diagnostics
2 Click the Graph and Chart Settings tab.
3 Select 3D to specify whether you want the graph on the dashboard to be displayed as a
three-dimensional graph.
4 Select or deselect Draw transparent to specify whether the bars in a three-dimensional
bar graph must appear transparent or solid.
NOTE: A solid bar will hide part of any bar behind it. A transparent bar allows you to look
through it and see other transparent bars behind it.
5 Select Anti-alias to specify whether you want to use anti-aliasing techniques while
displaying pie charts. If anti-aliasing is used, you will see smoother curves in pie charts. If
anti-aliasing is not used, pie chart curves appear jagged.
6 Select Explode pie to specify whether the segments must remain within the circle of the
pie chart or be displayed with some distance between each segment.
7 In Pie angle (degrees), specify the angle to use when drawing pie charts.
Diagnostics
You can use Diagnostics to specify the level of debug logging required, the maximum size of
debug files, and where they should be saved. You can configure the error reporting service
settings and specify which events should be captured in the product log and event log by
specifying the product log's location, name, size limits, and time-out settings.
1 Click Settings & Diagnostics | Diagnostics. The Diagnostics page displays the Debug
Logging tab by default.
2 From the Level drop-down menu, specify the type of information that must be captured in
the Debug log. You can select:
• High — to collect detailed level of log entries.
• Medium — to collect adequate logs.
• Low — to collect minimum set of logs.
• None — to disable debug logging.
3 Select Limit size of debug log files to specify if you want a size limit for debug log files,
then specify how large (in megabytes or kilobytes) the debug log files can be.
NOTE: Selecting this option consumes your hard disk space.
4 Select Specify location for debug log files to specify a location for debug files. Select
any of the following options from the drop-down list and specify the location accordingly:
• <Desktop>\
• <Install Folder>\
• <System Drive>\
• <Program Files>\
• <Windows Folder>\
• (Full Path)
5 Click the Error Reporting Service tab.
6 Select Enable to turn on the error reporting service.
7 Select Catch exceptions to capture information about exceptional events such as system
crashes.
47McAfee Security for Microsoft SharePoint version 2.5 User Guide
Page 48

Getting Started with the User Interface
Settings and Diagnostics
8 Select Report exceptions to user to specify that the exceptions should be reported to
the administrator.
9 Click the Event Logging tab.
10 In Product Log, select Write information events, Write warning events, and Write
error events to include these events in the product log.
11 In Event Log, select Write information events, Write warning events, and Write
error events to include these events in the event log.
12 Click the Product Log tab.
13 In Locations, select Specify location of database to specify a location for the product
log. If deselected, the default location is used. If selected, select one of the following from
the drop-down list and specify the location accordingly:
• <Desktop>\
• <Install Folder>\
• <System Drive>\
• <Program Files>\
• <Windows Folder>\
• (Full Path)
14 Select Specify filename of database to specify a file name of the database. If deselected,
the default file name is used. The default database filename is productlog.bin.
NOTE: Whenever you change the database location, the old quarantine database and
statistics are not displayed on the user interface. However, this data will be present in the
previous location.
15 In Size Limits:
• Select Limit database size to limit the size of the product log database.
• Type the maximum database size that the product log database can be. You can specify
the size in either megabytes or kilobytes.
• Select Limit age of entries to specify a time after which you want the product log
entries to be deleted.
• Type the maximum age of entry to specify how many days an entry should remain in
the database before it is deleted.
16 In Advanced:
• Select Specify a query timeout to limit the time allowed for answering a product log
query.
• Type the query timeout (in seconds) to specify the maximum number of seconds allowed
when answering a product log query.
Product Log
You can use Product Log to set up search filters that help you find information in the product
log and view the results of the search.
1 Click Settings & Diagnostics | Product Log. The Product Log screen appears.
McAfee Security for Microsoft SharePoint version 2.5 User Guide48
Page 49

Getting Started with the User Interface
Settings and Diagnostics
2 From the Product Log section, select at least one of the following filters:
• ID — Enter the ticket id which identifies a specific product log entry.
• Level — Select Information, Warning or Error from the drop-down in the second
field depending on the type of log you want to see.
• Description — Select the relevant description.
NOTE: You can select up to three search filters.
3 Select All Dates to include all entries or select Date Range and the required date range
from the drop-down lists.
4 Click Search. A list of viruses matching your search criteria is displayed in the View Results
pane.
NOTE: Click Clear Filter to return to the default search filter settings.
Import and Export Configuration
You can use Import and Export Configurations to:
• Copy the configuration of a SharePoint server to an area from where it can be imported to
another SharePoint server.
• Apply the configuration of a different SharePoint server.
• Specify the location from which automatic updates are downloaded. Location information is
stored in a site list and you can specify which site list to use.
Importing Configuration
Importing Site List
Importing Configuration
You can import the configuration of McAfee Security for Microsoft SharePoint.
1 Click Settings & Diagnostics | Import and Export Configuration. The Import and
Export Configurations page displays the Configuration tab by default.
49McAfee Security for Microsoft SharePoint version 2.5 User Guide
Page 50

Getting Started with the User Interface
Settings and Diagnostics
2 Click Export.
3 Specify the location where the configuration file McAfeeConfigXML.cgf must be stored.
4 Click Save.
5 To import this configuration, browse to locate the configuration file, then click Open.
6 Click Import.
NOTE: Click Restore Default if you are not sure of the configuration changes you made
and want to restore to the default configuration of your McAfee Security for Microsoft
SharePoint software.
Importing Site List
A site list specifies from where automatic updates are downloaded.
By default, SharePoint server uses a site list that points to a McAfee site for automatic updates,
but you can use a site list that points to a different location.
NOTE: Alternative site lists can be created using the McAfee Update Architecture software, or
through use of McAfee ePolicy Orchestrator.
1 After creating an alternative site list, click Settings & Diagnostics | Import and Export
Configuration. The Import and Export Configurations screen appears.
2 Select the Site List tab.
3 Browse to locate the site list you want to use , then click Open.
4 Click Import. The new site list will overwrite the existing site list.
DAT Settings
Use this screen to specify the maximum number of old DATS that must be retained.
User Settings
You can use User Settings to prevent or allow the upload of a document which failed to scan,
retrieve the anti-virus settings when required, specify the maximum size of quarantined items
and scanner counts, and add/remove the application pools.
1 Click Settings & Diagnostics | User Settings. The User Settings screen appears.
McAfee Security for Microsoft SharePoint version 2.5 User Guide50
Page 51

Getting Started with the User Interface
Settings and Diagnostics
2 From the On Scan Failure drop-down menu, choose Allow Through to allow the documents
to get uploaded to the server or Prevent Upload to prevent the uploading of the documents
which failed to get scanned.
3 In Retrieve SharePoint AV Settings Every (minutes), enter the time (in minutes) to retrieve
the anti-virus settings as and when required.
NOTE: We recommend you to provide a lesser time so that your dashboard synchronizes
with your SharePoint server anti-virus settings. This time setting reflects on the dashboard.
4 In Maximum Quarantine Size, enter the maximum size of the quarantined items (in MB or
KB).
5 In Maximum Scanner Count, enter the maximum number of scanner counts. We recommend
a maximum value of 5.
6 In Add ApplicationPool(s) to be Recycled, type a name for an application pool.
7 Click Add to add the application pool.
CAUTION: Add all application pools where SharePoint sites are running.
TIP: To remove an application pool, click on a desired application pool in Existing
ApplicationPool to be Recycled, click Remove. To select more than one application pool,
use Ctrl+click or Shift+click.
51McAfee Security for Microsoft SharePoint version 2.5 User Guide
Page 52

Integration with McAfee ePolicy Orchestrator
4.0
This chapter describes how to configure and manage McAfee Security for Microsoft SharePoint
using McAfee ePolicy Orchestrator management software version 4.0. To use this chapter
effectively, you need to be familiar with ePolicy Orchestrator 4.0.
McAfee ePolicy Orchestrator 4.0 provides a scalable platform for centralized policy management
and enforcement on your McAfee security products and systems on which they reside. It also
provides comprehensive reporting and product deployment capabilities; all through a single
point of control.
NOTE: See the McAfee ePolicy Orchestrator 4.0 product documentation for detailed information
on installing or using ePolicy Orchestrator software.
Prerequisites
Deploying McAfee Security for Microsoft SharePoint using ePolicy Orchestrator 4.0
Setting Policies using ePolicy Orchestrator 4.0
Scheduling an On-Demand Scan Task
Uninstalling McAfee Security using ePolicy Orchestrator 4.0
Prerequisites
Before using the ePolicy Orchestrator 4.0 software to manage McAfee Security for Microsoft
SharePoint, install the McAfee Agent version 4.0 or later on your managed node running Microsoft
SharePoint. Refer to the McAfee Agent product documentation for installation instructions.
McAfee Agent is a component of ePolicy Orchestrator that must be installed on each managed
node on the network. The Agent collects and sends information between the ePolicy Orchestrator
server and manages McAfee Security for Microsoft SharePoint installations across the network.
Deploying McAfee Security for Microsoft SharePoint
using ePolicy Orchestrator 4.0
Topics covered in this section are:
Tasks
Checking in the McAfee Security for Microsoft SharePoint Package to ePolicy Orchestrator 4.0
Installing Extensions
Installing McAfee Security for Microsoft SharePoint on Managed Nodes
McAfee Security for Microsoft SharePoint version 2.5 User Guide52
Page 53

Integration with McAfee ePolicy Orchestrator 4.0
Deploying McAfee Security for Microsoft SharePoint using ePolicy Orchestrator 4.0
Checking in the McAfee Security for Microsoft SharePoint
Package to ePolicy Orchestrator 4.0
You can check in the McAfee Security for Microsoft SharePoint package from the Repository
page of ePolicy Orchestrator 4.0. Repository is the central location for all McAfee updates residing
on the ePolicy Orchestrator server. It retrieves user-specified updates from the McAfee site or
user-defined source sites.
1 Copy the software package PS11EN_L.zip to a temporary location of your system that
has ePolicy Orchestrator.
2 Log on to the ePolicy Orchestrator server as an administrator.
3 Click Software | Check in Package. The Check In Package page appears.
4 Select the Package type as Product or Update (.ZIP). Browse in File path to locate and
check-in the package file.
5 Click Next. The Package Options page appears with the package information.
6 Click Save.
Installing Extensions
1 Copy the product extension PRTLSHLD2000_0409.zip to a temporary location of your
system that has ePolicy Orchestrator.
2 Log on to the ePolicy Orchestrator server as an administrator.
3 Click Configuration | Extensions | Install Extension. The Install Extension dialog
box appears.
4 Click Browse to install the product extension PRTLSHLD2000_0409.zip, then click OK.
5 Click OK.
NOTE: Repeat the same steps to install the report extension PSH20Reports.zip.
Installing McAfee Security for Microsoft SharePoint on Managed
Nodes
1 Log on to the ePolicy Orchestrator server as an administrator.
2 Click Systems, select the required system(s) on which you want to install McAfee Security
for Microsoft SharePoint.
3 Click Client Tasks tab, then New Task. The Client Task Builder page appears.
4 In Description, type a name, notes (optional) for the task.
5 Select the Type as Product Deployment (McAfee Agent), then click Next.
6 In Configuration, select Windows as Target Platforms, McAfee Security for Microsoft
SharePoint 2.5.0 as Products and components, and Install as Action, then click Next.
NOTE: If you are using Microsoft Office SharePoint Server 2007 or SharePoint 2010, please
type the credentials for the system that has the SharePoint server installed in ePolicy
Orchestrator command line.
Example
• REMOTESQLUSER="DomainName\UserName or HostName\UserName"
53McAfee Security for Microsoft SharePoint version 2.5 User Guide
Page 54

Integration with McAfee ePolicy Orchestrator 4.0
Sending an Agent Wake-up Call
• REMOTESQLPWD="password"
• IISPORT=45900 (Optional)
7 Schedule the task to run immediately or as required, then click Next to view a summary
of the task.
8 Click Save, then send an agent wake-up call.
TIP: Refer to the
Sending an Agent Wake-up Call
section for instructions.
Sending an Agent Wake-up Call
All systems in the network are managed in the Systems tab. The System Tree contains all
systems that are managed by the ePolicy Orchestrator server. It is the primary interface for
managing policies and tasks on these systems. You can organize or sort these systems into
logical groups in the System Tree.
My Organization is the root of the System Tree. It includes a Lost&Found group that stores
systems whose locations cannot be determined by the server. Depending on the methods you
use to create and maintain the System Tree segments (systems), the server uses different
characteristics to place the systems in the System Tree.
NOTE: For information on adding a new system, refer to the
Product Guide
Task
1 Log on to the ePolicy Orchestrator server as an administrator.
2 Click Systems.
3 Select a group in the System Tree.
4 Select the Computer Name(s) of that group.
5 Click More Actions | Wake Up Agent. The Wake Up Agents page appears.
6 Select a Wake-up call type and a Randomization period (0-60 minutes) by which the
system(s) respond to the wake-up call sent by the ePolicy Orchestrator server.
7 Select Get full product properties for the agent(s) to send complete properties instead
of sending only those that have changed since the last agent-to-server communication.
8 Click OK.
.
McAfee ePolicy Orchestrator 4.0
NOTE: Navigate to Server Task Log to see the status of the agent wake-up call.
Setting Policies using ePolicy Orchestrator 4.0
ePolicy Orchestrator 4.0 allows you to enforce policies across multiple managed nodes. These
policies override configurations set individually on nodes. For information regarding policies and
how they are enforced, see the McAfee ePolicy Orchestrator product documentation.
You can create, edit, delete, or assign a policy to a specific group/system.
Tasks
Creating Policies
McAfee Security for Microsoft SharePoint version 2.5 User Guide54
Page 55

Integration with McAfee ePolicy Orchestrator 4.0
Scheduling an On-Demand Scan Task
Enforcing Policies
Creating Policies
Using ePolicy Orchestrator 4.0, you can create, edit, delete, or assign a policy to specific group(s)
or system(s) in the System Tree.
1 Log on to the ePolicy Orchestrator server as an administrator.
2 Click Systems | System Tree and select the required group(s)/system(s).
3 Select Product as McAfee Security for Microsoft SharePoint 2.5.0. A list of product
policies appear in the lower pane.
4 Locate the required policy, then click Edit Assignment.
5 Click New Policy. The Create a new policy dialog box appears. Choose McAfee Default
or My Default as required.
NOTE: The McAfee Default policy is read-only and cannot be edited, renamed, or deleted.
6 Type a policy name, notes (optional), then click OK.
7 Configure settings for detected items, user interface preferences, diagnostics, DAT, and
user (on-access scanner), then click Save.
TIP: For option definitions, click ? in the ePolicy Orchestrator user interface.
8 Click Save.
Enforcing Policies
Using ePolicy Orchestrator 4.0, you can enforce a policy to multiple managed nodes within a
group.
1 Log on to the ePolicy Orchestrator server as an administrator.
2 Click Systems. In System Tree, select the required system(s).
3 Click Modify Policies on a Single System.
4 Select McAfee Security for Microsoft SharePoint 2.5.0, click the link of the required
policy, and configure the appropriate policy as required.
5 Click Save, then Close.
6 Send an agent wake-up call.
TIP: Refer to the
Sending an Agent Wake-up Call
section for instructions.
Scheduling an On-Demand Scan Task
Using ePolicy Orchestrator 4.0, you can schedule multiple on-demand scan tasks to run
immediately, at specific times, or at regularly-scheduled intervals across managed nodes.
1 Log on to the ePolicy Orchestrator server as an administrator.
2 Click Systems | System Tree | Client Tasks.
3 Select the required system(s) or group(s) in the System Tree for which you want to create
the on-demand scan task.
55McAfee Security for Microsoft SharePoint version 2.5 User Guide
Page 56

Integration with McAfee ePolicy Orchestrator 4.0
Scheduling an On-Demand Scan Task
4 Click New Task. The Client Task Builder page appears.
5 In Description, type a name, notes (optional) for the on-demand scan task.
6 Select On Demand Scan (McAfee Security for Microsoft SharePoint 2.5.0) as the
Type of the task, then click Next.
7 In Choose what to scan, type the Web Application Name and Target Folder Path and click
>> to move the folder(s) to Folders to scan.
Example 1:
Web Application Name — SharePoint - 80
Target Folder Path — http://hostname/default/foldername
Example 2:
Web Application Name — STS_WFESPS2003
Target Folder Path — <folder name>/<subfolder name>
NOTE: Select SharePoint 2003 to specify the scan target folder path.
8 Select one of the following options:
• Scan all folders — All folders in Folders to scan will be scanned.
• Scan selected folders — Selected folders in Folders to scan will be scanned.
• Scan all except selected folders — Folders except the selected ones in Folders to
scan will be scanned.
NOTE: Click >>> for recursive scanning. Click << to exclude folder(s) from scanning.
9 In Configure Settings, specify the extensions of files that must be excluded from the scan.
10 Select one of the following options:
• Off — To schedule a normal on-demand scan task without resumable and incremental
scan options.
• Resumable Scanning — To save the last scan so that it can resume from where it
has stopped, when started later. You can also select the option Restart scan if DAT
changed so that, in the event of a DAT update, the scan can be restarted with the
updated DATs.
• Incremental Scanning — To scan only the newly added items of your SharePoint
server. You can select to scan from the last scanned date or even scan by specifying
the date and time of the last scan.
NOTE: Resumable scanning, incremental scanning and file extension exclusion is not
supported if you are using SharePoint Server 2003.
11 Click Next and schedule the task as required.
12 Click Next to view the summary of the on-demand scan task.
13 Click Save, then send an agent wake-up call.
TIP: Refer to the
Sending an Agent Wake-up Call
section for instructions.
McAfee Security for Microsoft SharePoint version 2.5 User Guide56
Page 57

Integration with McAfee ePolicy Orchestrator 4.0
Configuring Reports
Configuring Reports
Reports are pre-defined queries which query the ePolicy Orchestrator database and generate
a graphical output. McAfee ePolicy Orchestrator 4.0 includes a set of default queries on the left
pane. However, you can create a new query, edit, and manage all the queries related to McAfee
Security for Microsoft SharePoint.
Tasks
Creating a New Query
Running a Query
Creating a New Query
1 Log on to the ePolicy Orchestrator server as an administrator.
NOTE: If the pre-defined queries on the left side do not serve your purpose, ePolicy
Orchestrator enables you to create your own queries.
2 Click Reporting | New Query. The Result Type page appears.
3 On the left pane, select a data type that the query should retrieve, then click Next. The
Chart page appears.
4 Select and accordingly configure a display chart/table, then click Next. The Columns page
appears allowing you to select columns for the chart/table.
5 Select column(s) from the Available Columns pane, then click Next. The Filter page appears.
6 Specify criteria by selecting properties and operators to limit the data retrieved by the
query.
7 Click Run, then Save. The Save Query page appears.
8 Type a name, notes (optional) for the query, then click Save.
Running a Query
1 Log on to the ePolicy Orchestrator server as an administrator.
2 Click Reporting. A list of queries appear on the left pane.
3 Select a McAfee Security for Microsoft SharePoint related query from the list, then click
Run. The graphical output is displayed.
Uninstalling McAfee Security using ePolicy
Orchestrator 4.0
You can remove the product package and extensions from ePolicy Orchestrator 4.5 and uninstall
McAfee Security for Microsoft SharePoint from the managed nodes.
Tasks
Removing the McAfee Security for Microsoft SharePoint Package from ePolicy Orchestrator
4.0
Removing Extensions from the ePolicy Orchestrator Server 4.0
57McAfee Security for Microsoft SharePoint version 2.5 User Guide
Page 58

Integration with McAfee ePolicy Orchestrator 4.0
Uninstalling McAfee Security using ePolicy Orchestrator 4.0
Uninstalling McAfee Security for Microsoft SharePoint from Managed Nodes
Removing the McAfee Security for Microsoft SharePoint Package
from ePolicy Orchestrator 4.0
You can remove the McAfee Security for Microsoft SharePoint package using the Master
Repository page.
1 Log on to the ePolicy Orchestrator server as an administrator.
2 Click Menu | Software | Master Repository. The Packages in Master Repository page
appears.
3 Click the Delete link of McAfee Security for Microsoft SharePoint, then click OK.
Removing Extensions from the ePolicy Orchestrator Server 4.0
1 Log on to the ePolicy Orchestrator server as an administrator.
2 Click Configuration | Extensions.
3 Select the product extension, then click Remove.
NOTE: Select the report extension, then click Remove to remove the report extensions.
4 Select the option Force removal, bypassing any checks or errors.
NOTE: This step is not mandatory, but recommended.
5 Click OK.
Uninstalling McAfee Security for Microsoft SharePoint from
Managed Nodes
1 Log on to the ePolicy Orchestrator server as an administrator.
2 Click Systems, select the required system(s) from which you want to uninstall McAfee
Security for Microsoft SharePoint.
3 Click Client Tasks tab, then New Task. The Client Task Builder page appears.
4 In Description, type a name, notes (optional) for the task.
5 Select the Type as Product Deployment (McAfee Agent), then click Next.
6 In Configuration, select Windows as Target Platforms, McAfee Security for Microsoft
SharePoint 2.5.0 as Products and components, and Remove as Action, then click Next.
7 Schedule the task to run immediately or as required, then click Next to view a summary
of the task.
8 Click Save, then send an agent wake-up call.
TIP: Refer to the
McAfee Security for Microsoft SharePoint version 2.5 User Guide58
Sending an Agent Wake-up Call
section for instructions.
Page 59

Integration with McAfee ePolicy Orchestrator
4.5
This chapter describes how to configure and manage McAfee Security for Microsoft SharePoint
using McAfee ePolicy Orchestrator management software version 4.5. To use this chapter
effectively, you need to be familiar with ePolicy Orchestrator 4.5.
McAfee ePolicy Orchestrator 4.5 provides a scalable platform for centralized policy management
and enforcement on your McAfee security products and systems on which they reside. It also
provides comprehensive reporting and product deployment capabilities; all through a single
point of control.
NOTE: See the McAfee ePolicy Orchestrator 4.5 product documentation for detailed information
on installing or using ePolicy Orchestrator software.
Contents
Prerequisites
Deploying McAfee Security for Microsoft SharePoint using ePolicy Orchestrator 4.5
Setting Policies using ePolicy Orchestrator 4.5
Scheduling an On-Demand Scan Task
Uninstalling McAfee Security for Microsoft SharePoint using ePolicy Orchestrator 4.5
Prerequisites
Before using the ePolicy Orchestrator 4.5 software to manage McAfee Security for Microsoft
SharePoint, install the McAfee Agent version 4.0 or later on your managed node running Microsoft
SharePoint. Refer to the McAfee Agent product documentation for installation instructions.
McAfee Agent is a component of ePolicy Orchestrator that must be installed on each managed
node on the network. The Agent collects and sends information between the ePolicy Orchestrator
server and manages McAfee Security for Microsoft SharePoint installations across the network.
Deploying McAfee Security for Microsoft SharePoint
using ePolicy Orchestrator 4.5
Topics covered in this section are:
Tasks
Checking in the McAfee Security for Microsoft SharePoint Package to ePolicy Orchestrator 4.5
59McAfee Security for Microsoft SharePoint version 2.5 User Guide
Page 60

Integration with McAfee ePolicy Orchestrator 4.5
Deploying McAfee Security for Microsoft SharePoint using ePolicy Orchestrator 4.5
Installing Extensions
Installing McAfee Security for Microsoft SharePoint on Managed Nodes
Checking in the McAfee Security for Microsoft SharePoint
Package to ePolicy Orchestrator 4.5
You can check in McAfee Security for Microsoft SharePoint package using the Master
Repository page of ePolicy Orchestrator 4.5. Repository is the central location for all McAfee
updates residing on the ePolicy Orchestrator server. It retrieves user-specified updates from
the McAfee site or user-defined source sites.
1 Copy the PS11EN_L.zip file to a temporary location of your system that has ePolicy
Orchestrator.
2 Log on to the ePolicy Orchestrator server as an administrator.
3 Click Menu | Software | Master Repository. The Packages in Master Repository page
appears.
4 Click Actions | Check In Package. The Package page appears.
5 Select the Package type as Product or Update (.ZIP). Browse in File path to locate
and check in the PS11EN_L.zip file.
6 Click Next. The Package Options page appears with the package information.
7 Click Save.
Installing Extensions
1 Copy the product extension PRTLSHLD2000_0409.zip to a temporary location of your
system that has ePolicy Orchestrator.
2 Log on to the ePolicy Orchestrator server as an administrator.
3 Click Menu | Software | Extensions | Install Extension. The Install Extension dialog
box appears.
4 Click Browse to install the product extension PRTLSHLD2000_0409.zip, then click OK.
5 Click OK.
NOTE: Repeat the same steps to install the report extension PSH20Reports.zip.
Installing McAfee Security for Microsoft SharePoint on Managed
Nodes
1 Log on to the ePolicy Orchestrator server as an administrator.
2 Click Menu | Systems | System Tree, then select the system(s) on which you want to
install McAfee Security for Microsoft SharePoint.
3 Click Client Tasks | Actions | New Task. The Client Task Builder page appears.
4 In Description, type a name, notes (optional) for the task.
5 Select the Type as Product Deployment, then click Next.
McAfee Security for Microsoft SharePoint version 2.5 User Guide60
Page 61

Integration with McAfee ePolicy Orchestrator 4.5
Sending an Agent Wake-up Call
6 In Configuration, select Windows as Target Platforms, McAfee Security for Microsoft
SharePoint 2.5.0 as Products and components, and Install as Action, then click Next.
NOTE: If you are using Microsoft Office SharePoint Server 2007 or SharePoint 2010, please
type the credentials for the system that has the SharePoint server installed in ePolicy
Orchestrator command line.
Example
• REMOTESQLUSER="DomainName\UserName or HostName\UserName"
• REMOTESQLPWD="password"
• IISPORT=45900 (Optional)
7 Schedule the task to run immediately or as required, then click Next to view a summary
of the task.
8 Click Save, then send an agent wake-up call.
TIP: Refer to the
Sending an Agent Wake-up Call
section for instructions.
Sending an Agent Wake-up Call
All systems in the network are managed in the Systems tab. The System Tree contains all
systems that are managed by the ePolicy Orchestrator server. It is the primary interface for
managing policies and tasks on these systems. You can organize or sort these systems into
logical groups in the System Tree.
My Organization is the root of the System Tree. It includes a Lost&Found group that stores
systems whose locations cannot be determined by the server. Depending on the methods you
use to create and maintain the System Tree segments (systems), the server uses different
characteristics to place the systems in the System Tree.
NOTE: For information on adding a new system, refer to the
Product Guide
Task
1 Log on to the ePolicy Orchestrator server as an administrator.
2 Click Menu | Systems | System Tree.
3 Select a group in the System Tree.
4 Select the Computer Name(s) of that group.
5 Click Actions | Agent | Wake Up Agents. The Wake Up Agents page appears.
6 Select a Wake-up call type and a Randomization period (0-60 minutes) by which the
system(s) respond to the wake-up call sent by the ePolicy Orchestrator server.
7 Select Get full product properties for the agent(s) to send complete properties instead
of sending only those that have changed since the last agent-to-server communication.
8 Click OK.
.
McAfee ePolicy Orchestrator 4.5
NOTE: Navigate to Server Task Log to see the status of the agent wake-up call.
61McAfee Security for Microsoft SharePoint version 2.5 User Guide
Page 62

Integration with McAfee ePolicy Orchestrator 4.5
Setting Policies using ePolicy Orchestrator 4.5
Setting Policies using ePolicy Orchestrator 4.5
ePolicy Orchestrator 4.5 allows you to enforce policies across multiple managed nodes. These
policies override configurations set individually on nodes. For information regarding policies and
how they are enforced, see the McAfee ePolicy Orchestrator product documentation.
You can create, edit, delete, or assign a policy to a specific group/system.
Tasks
Creating Policies
Enforcing Policies
Creating Policies
Using ePolicy Orchestrator 4.5, you can create, edit, delete, or assign a policy to specific group(s)
or system(s) in the System Tree.
1 Log on to the ePolicy Orchestrator server as an administrator.
2 Click Menu | Systems | System Tree | Assigned Policies.
3 Select Product as McAfee Security for Microsoft SharePoint 2.5.0. A list of product
policies appear in the lower pane.
4 Locate the required policy, then click Edit Assignment.
5 Click New Policy. The Create a new policy dialog box appears. Choose McAfee Default
or My Default as required.
NOTE: The McAfee Default policy is read-only and cannot be edited, renamed, or deleted.
6 Type a policy name, notes (optional), then click OK. The following screen appears.
McAfee Security for Microsoft SharePoint version 2.5 User Guide62
Page 63

Integration with McAfee ePolicy Orchestrator 4.5
Scheduling an On-Demand Scan Task
7 Configure settings for detected items, user interface preferences, diagnostics, DAT, and
user (on-access scanner), then click Save.
TIP: For option definitions, click ? in the ePolicy Orchestrator user interface.
8 Click Save.
Enforcing Policies
Using ePolicy Orchestrator 4.5, you can enforce a policy to multiple managed nodes within a
group.
1 Log on to the ePolicy Orchestrator server as an administrator.
2 Click Menu | Systems | System Tree and select the required system(s) or group(s).
3 Click Actions | Agent | Modify Policies on a Single System.
4 Select McAfee Security for Microsoft SharePoint 2.5.0, click the link of the required
policy, and configure the appropriate policy as required.
5 Click Save, then Close.
6 Send an agent wake-up call.
TIP: Refer to the
Sending an Agent Wake-up Call
section for instructions.
Scheduling an On-Demand Scan Task
Using ePolicy Orchestrator 4.5, you can schedule multiple on-demand scan tasks to run
immediately, at specific times, or at regularly-scheduled intervals across managed nodes.
1 Log on to the ePolicy Orchestrator server as an administrator.
2 Click Menu | Systems | System Tree and select a required group or system(s).
3 Click Client Tasks | Actions | New Task. The Client Task Builder page appears.
4 In Description, type a name, notes (optional) for the on-demand scan task.
5 Select On Demand Scan (McAfee Security for Microsoft SharePoint 2.5.0) as the
Type of the task, then click Next. The following page appears.
63McAfee Security for Microsoft SharePoint version 2.5 User Guide
Page 64

Integration with McAfee ePolicy Orchestrator 4.5
Scheduling an On-Demand Scan Task
6 In Choose what to scan, type the Web Application Name and Target Folder Path and click
>> to move the folder(s) to Folders to scan.
Example 1:
Web Application Name — SharePoint - 80
Target Folder Path — http://hostname/default/foldername
Example 2:
Web Application Name — STS_WFESPS2003
Target Folder Path — <folder name>/<subfolder name>
NOTE: Select SharePoint 2003 to specify the scan target folder path.
7 Select one of the following options:
• Scan all folders — All folders in Folders to scan will be scanned.
• Scan selected folders — Selected folders in Folders to scan will be scanned.
• Scan all except selected folders — Folders except the selected ones in Folders to
scan will be scanned.
NOTE: Click >>> for recursive scanning. Click << to exclude folder(s) from scanning.
8 In Configure Settings, specify the extensions of files that must be excluded from the scan.
McAfee Security for Microsoft SharePoint version 2.5 User Guide64
Page 65

Integration with McAfee ePolicy Orchestrator 4.5
Configuring Reports
9 Select one of the following options:
• Off — To schedule a normal on-demand scan task without resumable and incremental
scan options.
• Resumable Scanning — To save the last scan so that it can resume from where it
has stopped, when started later. You can also select the option Restart scan if DAT
changed so that, in the event of a DAT update, the scan can be restarted with the
updated DATs.
• Incremental Scanning — To scan only the newly added items of your SharePoint
server. You can select to scan from the last scanned date or even scan by specifying
the date and time of the last scan.
NOTE: Resumable scanning, incremental scanning and file extension exclusion is not
supported if you are using SharePoint Server 2003.
10 Click Next and schedule the task as required.
11 Click Next to view the summary of the on-demand scan task.
12 Click Save, then send an agent wake-up call.
TIP: Refer to the
Sending an Agent Wake-up Call
Configuring Reports
section for instructions.
Reports are pre-defined queries which query the ePolicy Orchestrator database and generate
a graphical output. McAfee ePolicy Orchestrator 4.5 includes a set of default queries on the left
pane. However, you can create a new query, edit, and manage all the queries related to McAfee
Security for Microsoft SharePoint.
Tasks
Creating a New Query
65McAfee Security for Microsoft SharePoint version 2.5 User Guide
Page 66

Integration with McAfee ePolicy Orchestrator 4.5
Configuring Reports
Running a Query
Creating a New Query
1 Log on to the ePolicy Orchestrator server as an administrator.
NOTE: If the pre-defined queries on the left side do not serve your purpose, ePolicy
Orchestrator enables you to create your own queries.
2 Click Reporting | New Query. The Result Type page appears.
3 On the left pane, select a data type that the query should retrieve, then click Next. The
Chart page appears.
4 Select and accordingly configure a display chart/table, then click Next. The Columns page
appears allowing you to select columns for the chart/table.
5 Select column(s) from the Available Columns pane and click Next. The Filter page appears.
6 Specify criteria by selecting properties and operators to limit the data retrieved by the
query.
7 Click Run, then Save. The Save Query page appears.
8 Type a name, notes (optional) for the query, then click Save.
Running a Query
1 Log on to the ePolicy Orchestrator server as an administrator.
2 Click Reporting. A list of queries appear on the left pane.
3 Select a McAfee Security for Microsoft SharePoint related query from the list, then click
Run. The graphical output is displayed. A typical graphical output is as follows.
McAfee Security for Microsoft SharePoint version 2.5 User Guide66
Page 67

Integration with McAfee ePolicy Orchestrator 4.5
Uninstalling McAfee Security for Microsoft SharePoint using ePolicy Orchestrator 4.5
Uninstalling McAfee Security for Microsoft
SharePoint using ePolicy Orchestrator 4.5
You can remove the product package and extensions from ePolicy Orchestrator 4.5 and uninstall
McAfee Security for Microsoft SharePoint from the managed nodes.
Tasks
Removing the McAfee Security for Microsoft SharePoint Package from ePolicy Orchestrator
4.5
Removing Extensions from the ePolicy Orchestrator Server 4.5
Uninstalling McAfee Security for Microsoft SharePoint from Managed Nodes
Removing the McAfee Security for Microsoft SharePoint Package
from ePolicy Orchestrator 4.5
You can check in McAfee Security for Microsoft SharePoint package using the Master Repository
page.
1 Log on to the ePolicy Orchestrator server as an administrator.
2 Click Menu | Software | Master Repository. The Packages in Master Repository page
appears.
3 Click the Delete link of McAfee Security for Microsoft SharePoint, then click OK.
Removing Extensions from the ePolicy Orchestrator Server 4.5
1 Log on to the ePolicy Orchestrator server as an administrator.
2 Click Menu | Software | Extensions.
3 Click McAfee Security for Microsoft SharePoint on the left pane.
4 Click the Remove links of the product and report extensions, one at a time.
5 Select the option Force removal, bypassing any checks or errors.
NOTE: This step is not mandatory, but recommended.
6 Click OK.
Uninstalling McAfee Security for Microsoft SharePoint from
Managed Nodes
1 Log on to the ePolicy Orchestrator server as an administrator.
2 Click Menu | Systems | System Tree, then select the system(s) from which you want
to uninstall McAfee Security for Microsoft SharePoint.
3 Click Client Tasks | Actions | New Task. The Client Task Builder page appears.
4 In Description, type a name, notes (optional) for the task.
5 Select the Type as Product Deployment, then click Next.
6 In Configuration, select Windows as Target Platforms, McAfee Security for Microsoft
SharePoint 2.5.0 as Products and components, and Remove as Action, then click Next.
67McAfee Security for Microsoft SharePoint version 2.5 User Guide
Page 68

Integration with McAfee ePolicy Orchestrator 4.5
Uninstalling McAfee Security for Microsoft SharePoint using ePolicy Orchestrator 4.5
7 Schedule the task to run immediately or as required, then click Next to view a summary
of the task.
8 Click Save, then send an agent wake-up call.
TIP: Refer to the
Sending an Agent Wake-up Call
section for instructions.
McAfee Security for Microsoft SharePoint version 2.5 User Guide68
Page 69

Appendix A — A Typical Scenario of Creating
and Using File Filtering Rule and Actions
This section provides a real-time scenario where you might want to create a file filtering rule
in Shared Resource and use this rule to specify actions such as notify the administrator, log,
and quarantine all Microsoft PowerPoint files being uploaded to your SharePoint server.
Task
1 From Policy Manager, click Shared Resource. The Shared Resources page appears.
2 Click the Filter Rules tab.
3 In File Filtering Rules, click Create New. The File Filtering Rule page appears.
NOTE: Alternatively, you can create a file filtering rule by performing the following steps:
1 From Policy Manager, select a submenu item On-Access or On-Demand.
2 Click on a policy.
3 Click File Filtering, then select Create new rule from the Available rules drop-down
list.
4 Type a unique Rule name. Give the rule a meaningful name, so that you can easily identify
it and what it does. For example, PPT_Block.
5 Select Enable file name filtering to filter files based on their file names.
6 In Take action when the file name matches, specify the names of the files that must be
quarantined, then click Add.
TIP: You can use the * and ? wildcard characters to match multiple filenames. In this case,
to filter any Microsoft PowerPoint files, type *.ppt.
7 In File category filtering, select Enable file category filtering to enable file filtering
according to their file type.
8 In Take action when the file category is, specify the file types that must be quarantined.
NOTE: File types are divided into categories and subcategories.
9 In File categories, select Graphics/Presentation. An asterisk symbol (*) appears next
to the file type.
10 In Subcategories, click the following:
• Microsoft PowerPoint 2007
• Microsoft PowerPoint 2007 (Encrypted)
• Microsoft PowerPoint 97-2002
• Microsoft PowerPoint Dual 95/97
TIP:
69McAfee Security for Microsoft SharePoint version 2.5 User Guide
Page 70

Appendix A — A Typical Scenario of Creating and Using File Filtering Rule and Actions
• To select more than one subcategory, use Ctrl+Click or Shift+Click.
• To select all of the subcategories, select All.
• To undo selections in subcategories, click Clear selections.
11 Click Save, then Apply to return to the Shared Resources page.
12 From Policy Manager, a submenu item On-Access or On-Demand. The policy page
for the selected submenu item appears.
13 Click on a policy, then click File Filtering.
14 From the Available rules drop-down list, select the rule you created in step 3 (PPT_Block).
15 Click the Change link of the rule to specify actions that must be taken when a PowerPoint
file is uploaded to the SharePoint server. The File Filtering Actions page appears. In this
case, select the action as Replace item with an alert and also select Log to Detected
Items and Quarantine.
16 Click Save, then Apply.
17 Upload a Microsoft PowerPoint file to your SharePoint server. The file filtering rule is
triggered and the specified actions (of step 15) take place.
McAfee Security for Microsoft SharePoint version 2.5 User Guide70
Page 71

Appendix B — Recommended Configurations
This section gives some recommendations you can follow to configure and use your McAfee
Security for Microsoft SharePoint software effectively.
• Enable the anti-virus settings for on-access policy.
• Select the Quarantine option always so that you can retrieve your files later when required.
• Time for retrieving the SharePoint anti-virus settings on McAfee Security for Microsoft
SharePoint dashboard must be less. Default value is 5.
• In User Settings, add all application pools where SharePoint sites are running.
• If you enable file filtering, enable content scanning also. This results in true file type filtering.
• Do not schedule the Purge and Optimization operations at the same time.
71McAfee Security for Microsoft SharePoint version 2.5 User Guide
Page 72

Index
A
action taken 22
activation 29, 33, 39, 40
add application pools 50
add scanner/filter 28
Add/Remove Programs 16
advanced 30
advanced view 25, 26
adware 30
agent wake-up call 54, 61
send 54, 61
alert editor 34
alert name 34
alert selection 35
alert settings 27, 40, 43
alerts 41, 42
all dates 22, 24, 48
all items 24
allow through 50
anti-alias 46
anti-virus scanner 29
appendix
file filter rule 69
arent policy 26
Artemis technology 6
av settings 50
B
banned file types 8, 22
banned file types/messages 23
bar-graph 19
basic options 30
bold 34
C
category 42
centralized manageability 6
change 35
child policy 25
clear filter 22, 48
clear selections 36
content scanning 27, 29, 33, 35
cookies 30
core scanners 29
corrupt content 27, 37
create
new content scanner rule 44
new file flitering rule 44
time slot 45
create new 43
create new policy 55
create policies
ePolicy Orchestrator 4.5 62
create query
ePolicy Orchestrator 4.0 57
create query ePolicy Orchestrator 4.5 66
custom malware 32
D
dashboard 18, 20
dashboard settings 46
DAT settings 50
date range 23, 24, 48
days 20
debug log files 47
debug logging 47
deploy McAfee Security for Microsoft SharePoint
using ePolicy Orchestrator 4.0 52
using ePolicy Orchestrator 4.5 59
detected items 18, 22, 45
detection name 23
diagnostics 18, 47
dialers 30
draw transparent 46
E
edit schedule 20
eicar 15
enable 29, 40
enable reports 46
enabled 25
encrypted content 27, 37, 38
enforce policies
ePolicy Orchestrator 4.0 55
ePO 4.0
install McAfee Security for Microsoft SharePoint 52
ePO 4.5
install McAfee Security for Microsoft SharePoint 59
ePolicy Orchestrator 4.0
check in McAfee Security for Microsoft SharePoint package 53
configure reports 57
enforce policies 55
install extensions 53
install product extension 53
install report extension 53
remove extensions 58
remove product from client 58
schedule scan 55
setting up policies 54
uninstall McAfee Security for Microsoft SharePoint 57
ePolicy Orchestrator 4.5
check in McAfee Security for Microsoft SharePoint package 60
configure reports 65
create policies 62
install extensions 60
install product extension 60
install report extension 60
policy enforcement 63
McAfee Security for Microsoft SharePoint version 2.5 User Guide72
Page 73

Index
ePolicy Orchestrator 4.5
remove extensions 67
schedule scan 63
setting up policies 62
uninstall McAfee Security for Microsoft SharePoint 67
uninstall McAfee Security for Microsoft SharePoint from client 67
explode pie 46
(continued)
F
file categories 36
file extension based exclusions 6
file filter rule
appendix 69
file filtering 27, 29
file size filtering 36
filter rules 41, 43
filtering rule 36
filters initialization 26
G
graph and chart settings 46
graph scale 46
graphical reports 18, 21
advanced 21
simple 21
greater than 36
H
hardware and software requirements 9
high 35
high-protection 29
hours 20
I
ignore case 44
import and export configuration 49
import configuration 49
incremental and resumable on-demand scans 6
indent 34
inheritance view 25
insert image 34
insert link 34
install
extensions on ePolicy Orchestrator 4.0 53
extensions on ePolicy Orchestrator 4.5 60
install McAfee Security for Microsoft SharePoint on client
using ePO 4.5 60
install SharePoint 10
installation 9, 14, 15
maintain 15
test 14
installation instructions 11
instance name 42
integration with ePO 4.0
prerequisites 52
integration with ePO 4.5
prerequisites 59
introduction 6
italic 34
J
joke programs 30
L
less than 36
licenses 20
low 35
lower protection 29
M
macro viruses 30
magnify graph 19
maintenance 14
master policy 25
maximum expanded file size 42
maximum item age 45
maximum item size 45
maximum nesting level 42
maximum quarantine size 50
maximum query size 45
maximum scan time 42
maximum scanner count 50
McAfee Security for Microsoft SharePoint
how it works 8
install instructions 11
install on managed nodes 53
integrating with ePO 4.0 52, 59
introduction 6
new features 6
overview 6
uninstall instructions 17
McAfee Security for Microsoft SharePoint extensions
install 53, 60
medium 35
medium protection 29
Microsoft SharePoint 6
miscellaneous 40
months 20
N
new features 6
new on-demand scan
schedule 20
new policy
create using ePolicy Orchestrator 4.0 55
new scan 20
not-scheduled 20
O
on scan failure 50
on-demand scan
enhanced 6
schedule using ePolicy Orchestrator 4.0 55
schedule using ePolicy Orchestrator 4.5 63
on-demand scans 18
once 20
optimization frequency 45
ordered list 34
outdent 34
overview 6
P
packers 30, 32
parent policy 25
password crackers 30
password protected files 37, 39
73McAfee Security for Microsoft SharePoint version 2.5 User Guide
Page 74

Index
pie angle 46
pie-chart 19
policies
ePolicy Orchestrator 4.0 54
ePolicy Orchestrator 4.5 62
policy enforcement
ePolicy Orchestrator 4.5 63
policy manager 18, 25, 26, 27, 28, 29, 33
policy name 22, 24
policy scanners 26
post-installation tasks 14
potentially unwanted programs 8
pre-installation scenarios 10
prerequisites 9
primary and secondary actions 33
priority 25
product
install 11
uninstall 17
product features 6
product information 20
product log 48
product overview 6
protected content 27, 37, 38
PUPs 8, 23, 30, 32
purge 45
Q
quarantine 32
queries 57, 66
query
run 57, 66
shared resource 41
SharePoint
installation types 10
show status 20
signed content 27, 37, 38
single installer 6
site list 50
import 50
specify users 28
spyware 30
statistics 19
statistics and information 18
sub-policy 25, 26
system requirements 9
general 9
hard disk space 9
memory 9
operating system 9
processor 9
T
test
installation 14
on-access scanner 15
on-demand scanner 15
on-demand scanner from dashboard 15
on-demand scanner from SharePoint server 15
ticket number 22
time slots 41, 44
tokens 34
trigger rules 26
trojans 32
R
reason 24
recently scanned items 20
recommendations 71
recycled 50
refresh 19
refresh rate 46
remove extension
ePolicy Orchestrator 4.0 58
ePolicy Orchestrator 4.5 67
remove product package
ePolicy Orchestrator 4.0 58
ePolicy Orchestrator 4.5 67
rename 43
repair installation 16
reports 19, 57, 65
rule name 36
run query
ePolicy Orchestrator 4.0 57
ePolicy Orchestrator 4.5 66
S
scanned by 23
scanner control 27, 37, 39
scanners 41
scans 20
send
agent wake-up call 54, 61
settings 18
settings and diagnostics 45
severity 35
U
uninstall
product 17
product using ePolicy Orchestrator 4.0 57
product using ePolicy Orchestrator 4.5 67
uninstall McAfee Security for Microsoft SharePoint
from client 58
uninstall McAfee Security for Microsoft SharePoint from client
ePolicy Orchestrator 4.5 67
unordered list 34
unwanted content 8, 22, 24
unwanted programs 22
update information 20
user groups addition to McAfee Access Control List 6
user interface preferences 46
V
versions and updates 19
view results 24
view settings 27
virtual environment 6
virtualized server support 6
viruses 22
W
warning 48
weekdays 28
weekends 28
weeks 20
wildcards 44
McAfee Security for Microsoft SharePoint version 2.5 User Guide74
 Loading...