

Page 1

Upgrade Guide
McAfee® Network Security Platform 6.1
Page 2

COPYRIGHT
Copyright © 2011 McAfee, Inc. All Rights Reserved.
No part of this publication may be reproduced, transmitted, transcribed, stored in a retrieval system, or translated into any language in any form or by
any means without the written permission of McAfee, Inc., or its suppliers or affiliate companies.
TRADEMARK ATTRIBUTIONS
AVERT, EPO, EPOLICY ORCHESTRATOR, FOUNDSTONE, GROUPSHIELD, INTRUSHIELD, LINUXSHIELD, MAX (MCAFEE SECURITYALLIANCE EXCHANGE),
MCAFEE, NETSHIELD, PORTALSHIELD, PREVENTSYS, SECURITYALLIANCE, SITEADVISOR, TOTAL PROTECTION, VIRUSSCAN, WEBSHIELD are registered
trademarks or trademarks of McAfee, Inc. and/or its affiliates in the US and/or other countries. McAfee Red in connection with security is distinctive of
McAfee brand products. All other registered and unregistered trademarks herein are the sole property of their respective owners.
LICENSE INFORMATION
License Agreement
NOTICE TO ALL USERS: CAREFULLY READ THE APPROPRIATE LEGAL AGREEMENT CORRESPONDING TO THE LICENSE YOU PURCHASED, WHICH SETS
FORTH THE GENERAL TERMS AND CONDITIONS FOR THE USE OF THE LICENSED SOFTWARE. IF YOU DO NOT KNOW WHICH TYPE OF LICENSE YOU
HAVE ACQUIRED, PLEASE CONSULT THE SALES AND OTHER RELATED LICENSE GRANT OR PURCHASE ORDER DOCUMENTS THAT ACCOMPANY YOUR
SOFTWARE PACKAGING OR THAT YOU HAVE RECEIVED SEPARATELY AS PART OF THE PURCHASE (AS A BOOKLET, A FILE ON THE PRODUCT CD, OR A
FILE AVAILABLE ON THE WEBSITE FROM WHICH YOU DOWNLOADED THE SOFTWARE PACKAGE). IF YOU DO NOT AGREE TO ALL OF THE TERMS SET
FORTH IN THE AGREEMENT, DO NOT INSTALL THE SOFTWARE. IF APPLICABLE, YOU MAY RETURN THE PRODUCT TO MCAFEE OR THE PLACE OF
PURCHASE FOR A FULL REFUND.
2
McAfee® Network Security Platform 6.1 Upgrade Guide
Page 3

Contents
1 Preface 5
About this guide ..................................5
Finding product documentation ............................6
1 Overview 7
2 Managing a Heterogeneous Environment 9
What are heterogeneous environments .........................9
When would you need a heterogeneous environment? ...................10
Upgrade paths to a heterogeneous environment .....................10
Feature-support matrix for heterogeneous environments ..................18
3 Upgrading the Central Manager 23
Reviewing the upgrade requirements ..........................23
Preparing for the upgrade ..............................24
Central Manager and OS upgrade ...........................26
MDR Central Manager upgrade ............................27
Stand-alone Central Manager upgrade .........................28
Audience ..................................5
Conventions .................................5
Sample Scenarios .............................. 11
Minimum required Central Manager version ....................23
Central Manager system requirements ......................23
Central Manager license file requirement .....................24
Backing up Network Security Platform data ....................25
Reviewing the Upgrade Considerations ......................25
Approach 2: Using a new hardware .......................27
Upgrading the Signature Set for the Central Manager ................30
4 Upgrading the Manager 31
Reviewing the upgrade requirements ..........................31
Minimum required Manager version .......................31
Manager system requirements .........................31
Manager license file requirement ........................ 32
Preparing for the upgrade ..............................32
Reviewing the Upgrade Considerations ......................33
Backing up Network Security Platform data ....................35
MDR Manager upgrade ............................... 36
Manager and OS upgrade ..............................37
Approach 2: Using a new hardware .......................38
Stand-alone Manager upgrade ............................ 39
Running additional scripts ...........................40
5 Performing Signature Set and Sensor Software upgrade 43
Difference between an update and an upgrade ......................43
McAfee® Network Security Platform 6.1 Upgrade Guide
3
Page 4

Contents
Sensor upgrade requirements .............................43
Reviewing the upgrade considerations .........................44
Updating Sensor software image ........................... 44
Sensor software upgrade: Manager vs. TFTP server .................46
Sensor Software and Signature Set Upgrade using Manager 6.0 ............46
Sensor software upgrade using a TFTP server ...................48
Updating Sensor software in a failover pair ....................50
6 Performing NTBA Appliance software upgrade 53
7 Information on downgrade 55
Index 57
4
McAfee® Network Security Platform 6.1 Upgrade Guide
Page 5

Preface
Contents
About this guide
Finding product documentation
About this guide
This information describes the guide's target audience, the typographical conventions and icons used
in this guide, and how the guide is organized.
Audience
McAfee documentation is carefully researched and written for the target audience.
The information in this guide is intended primarily for:
• Administrators — People who implement and enforce the company's security program.
Conventions
This guide uses the following typographical conventions and icons.
Book title or Emphasis Title of a book, chapter, or topic; introduction of a new term; emphasis.
Bold Text that is strongly emphasized.
User input or Path Commands and other text that the user types; the path of a folder or program.
Code
User interface
Hypertext blue A live link to a topic or to a website.
A code sample.
Words in the user interface including options, menus, buttons, and dialog
boxes.
Note: Additional information, like an alternate method of accessing an option.
Tip: Suggestions and recommendations.
Important/Caution: Valuable advice to protect your computer system,
software installation, network, business, or data.
Warning: Critical advice to prevent bodily harm when using a hardware
product.
McAfee® Network Security Platform 6.1 Upgrade Guide
5
Page 6
Preface
Finding product documentation
Finding product documentation
McAfee provides the information you need during each phase of product implementation, from
installation to daily use and troubleshooting. After a product is released, information about the product
is entered into the McAfee online KnowledgeBase.
Task
1
Go to the McAfee Technical Support ServicePortal at http://mysupport.mcafee.com.
2
Under Self Service, access the type of information you need:
To access... Do this...
User documentation
1
Click Product Documentation.
2
Select a product, then select a version.
3
Select a product document.
KnowledgeBase
• Click Search the KnowledgeBase for answers to your product questions.
• Click Browse the KnowledgeBase for articles listed by product and version.
6
McAfee® Network Security Platform 6.1 Upgrade Guide
Page 7
1
1
Overview
This guide provides information on how to upgrade your McAfee® Network Security Platform setup
[formerly McAfee® IntruShield® Network Intrusion Prevention System] from 5.1 or an earlier version of
6.0 to the latest 6.0 version. To upgrade to an earlier version of 6.0, also see the corresponding
Release Notes. The upgrade involves the following three phases that you need to complete in the
same order:
1
If applicable, McAfee® Network Security Central Manager upgrade
2
McAfee® Network Security Manager upgrade
3
McAfee® Network Security Sensor software upgrade
4
If applicable, Network Threat Behavior Analysis Appliance upgrade from an earlier 6.0 version to
the latest
As with any upgrade, McAfee strongly recommends that you always first try the upgrade on a test
environment.
You would need to refer to the following documents during the upgrade process:
• Manager Installation Guide
• Manager Server Configuration Guide
• Troubleshooting Guide
• Custom Attack Definitions Guide
• IPS Configuration Guide
• System Status Monitoring Guide
• Addendum II to 6.0 Documentation
An upgrade from 6.1 Beta to 6.0 is not supported. To use Network Security Platform 6.0 in your 6.1
Beta setup, uninstall 6.1 and then install 6.0.
McAfee® Network Security Platform 6.1 Upgrade Guide
7
Page 8

1
Overview
8
McAfee® Network Security Platform 6.1 Upgrade Guide
Page 9
Managing a Heterogeneous Environment
2
2
The latest 6.0 version of Network Security Platform, enables you to manage a heterogeneous
environment of Managers and Sensors. If you do not require to manage a heterogeneous
environment, you can skip this chapter. To know more about heterogeneous environments, see What
are heterogeneous environments.
Contents
What are heterogeneous environments
When would you need a heterogeneous environment?
Upgrade paths to a heterogeneous environment
Feature-support matrix for heterogeneous environments
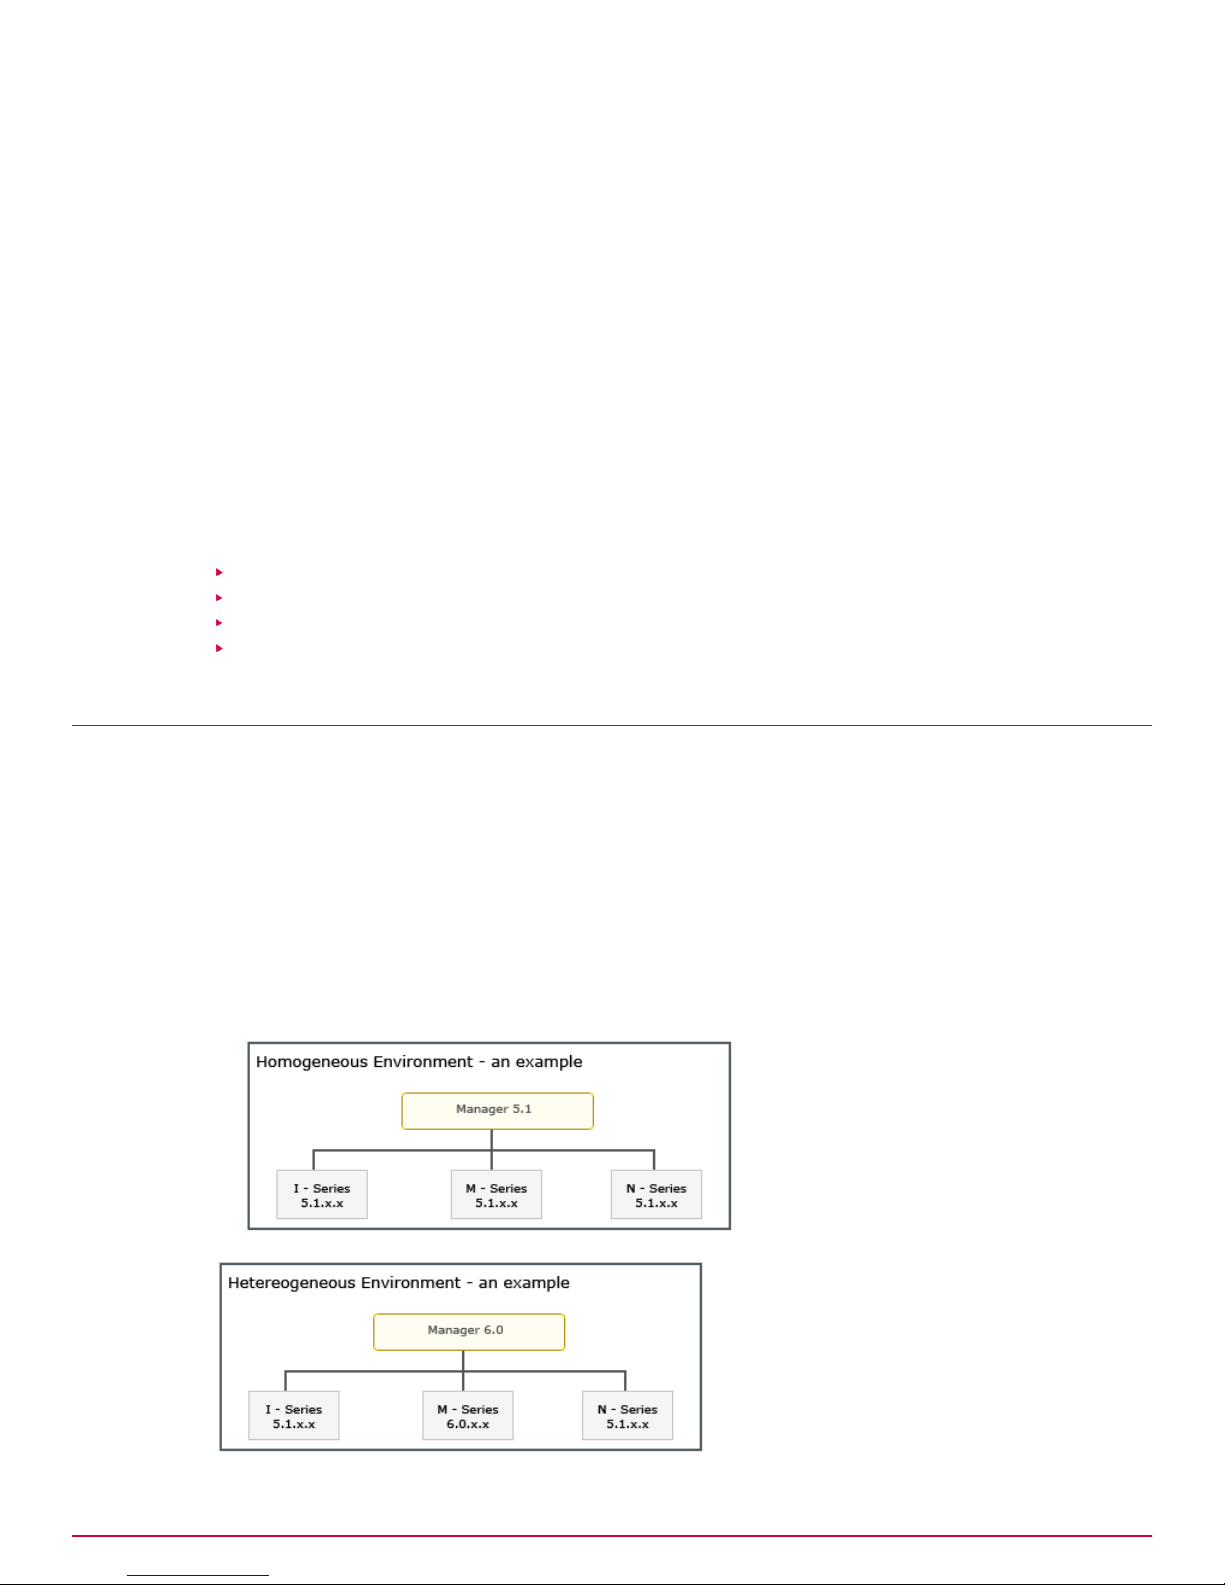
What are heterogeneous environments
Typically, the Manager and the Sensors that it Managers are of the same major version. For example,
a 6.0 Manager manages Sensors running on Sensor software 6.0.x.x. Similarly, a Central Manager and
the corresponding Managers are all of the same major version. This document refers to these as
homogeneous environments.
This document refers to the following as heterogeneous environments:
• The Central Manager and the corresponding Managers are of different successive major versions.
For example, a 6.0 Central Manager manages 6.0 Managers and 5.1 Managers.
• The Manager and the corresponding Sensors are of different successive major versions. For
example, some Sensors are on 5.1.x.x and the rest are on 6.0.x.x, all managed by a 6.0 Manager.
McAfee® Network Security Platform 6.1 Upgrade Guide
9
Page 10

2
Managing a Heterogeneous Environment
When would you need a heterogeneous environment?
Notes:
• A Manager must always be of the same or higher version than the corresponding Sensors.
Therefore, a 5.1 Manager managing 6.0 Sensors is not a valid scenario. Similarly, the Central
Manager must be of the same or higher version than the corresponding Managers.
• Heterogeneous environments are supported only across two successive major versions. For
example, a 6.0 Manager can manage Sensors on 5.1.x.x and 6.0.x.x but not Sensors on 4.1.x.x.
Similarly, Central Manager 6.0 can manage 6.0 and 5.1 Managers but not 4.1 Managers.
• In Network Security Platform 6.0, Central Managers and Managers support heterogeneous
environments only from version 6.0.7.x and above.
To use the information in this section, familiarize yourself with the following terms:
• Homogeneous Manager environment: The Central Manager and all the Managers are of the same
major version.
• Heterogeneous Manager environment: At least one Manager is of a lesser major version than the
Central Manager. For example, a 6.0 Central Manager that manages 6.0 and 5.1 Managers.
• Homogeneous Sensor environment: The Manager and all the Sensors are of the same major version.
• Heterogeneous Sensor environment: At least one Sensor is of a lesser major version than the
Manager. For example, a 6.0 Manager managing 5.1 and 6.0 Sensors. Recall that a 6.0 Manager
managing 4.1 Sensors is not a valid scenario.
When would you need a heterogeneous environment?
Support for managing a heterogeneous environment is typically for large deployments where upgrade
of the Managers or the Sensors happens in phases. Consider a deployment of over a hundred Sensors
that are on 5.1.x.x. As part of the upgrade process, you first upgrade the Manager as well as a few of
the Sensors to 6.0. However, you may still need to make configuration changes and manage the 5.1
Sensors using the upgraded 6.0 Manager. You may also want to add some new 5.1 Sensors to the
upgraded 6.0 Manager. These are possible with a Manager version that supports a heterogeneous
Sensor environment.
McAfee strongly advises that you use the heterogeneous support feature only as an interim
arrangement until you upgrade all your Managers and Sensors to the latest version. This enables you
to make use of the latest features in Network Security Platform. For example, in case of M-series
Sensors, the SSL Decryption feature is available only from 6.0.x.x. So, in your heterogeneous Sensor
environment, you can configure and manage the 5.1 and 6.0 M-series Sensors alike but only the 6.0
M-series Sensors can decrypt SSL traffic for inspection.
In release 6.0, the names of some of the features have been changed for a better user-experience.
Before you proceed further, familiarize yourself with these changes. See Reviewing the upgrade
requirements, Upgrade Guide.
See also
Reviewing the upgrade requirements on page 31
Upgrade paths to a heterogeneous environment
This section provides some example scenarios to help you understand the possible upgrade paths to a
heterogeneous environment. Correlate these scenarios with yours to derive an upgrade path for your
deployment.
10
McAfee® Network Security Platform 6.1 Upgrade Guide
Page 11
Managing a Heterogeneous Environment
Upgrade paths to a heterogeneous environment
Sample Scenarios
The following are the list of sample scenarios. Proceed to the one that matches your deployment.
Though the sample scenarios predominantly feature only the I-series and M-series Sensors, a 6.0
Manager can manage the N-450 and Network Threat Behavior Analysis (NTBA) appliances as well.
Scenarios involving the Central Manager
The following scenarios involve the Central Manager. If you do not have a Central Manager deployed,
you can proceed to Scenarios involving the Manager.
• Upgrade from a homogeneous 5.1 Manager environment to a heterogeneous 6.0 Manager
environment:
• Scenario 1: MDR setup
• Scenario 2: Standalone setup
• Upgrade from a heterogeneous 5.1 Manager environment to a heterogeneous 6.0 Manager
environment:
• Scenario 3: MDR setup
2
• Scenario 4: Standalone setup
Upgrade requirements for the scenarios listed above
• The Central Manager must be of version 5.1.11.22 or above. See the 4.1 to 5.1 Upgrade Guide for
information on how to upgrade the Central Manager to a 5.1 version.
• As a best practice, upgrade any 4.1 Managers to 5.1.11.22 or a higher 5.1 version. Also, upgrade
the 4.1 Sensors to the corresponding 5.1 version. So, before you begin your 6.0 upgrade, ensure
there are no 4.1 Managers or Sensors in your deployment.
See also
Scenarios involving the Manager on page 15
Scenario 2 on page 12
Scenario 3 on page 13
Scenario 4 on page 14
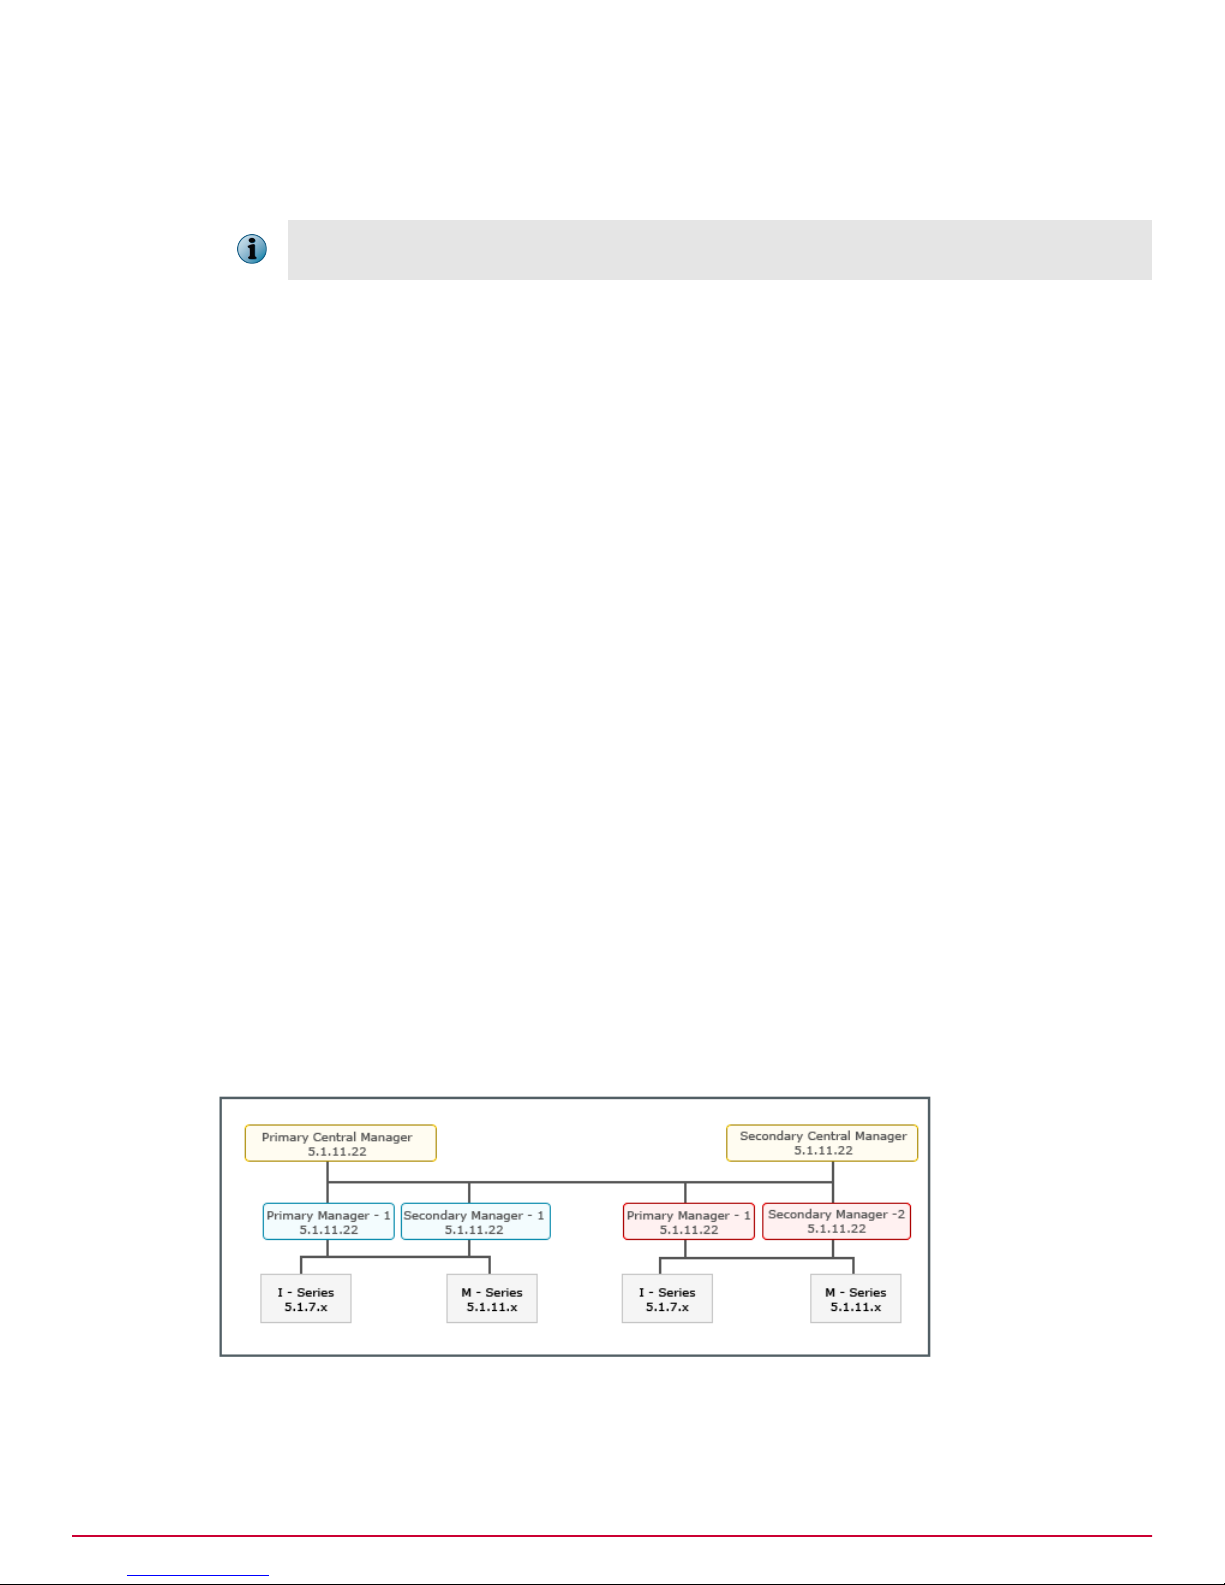
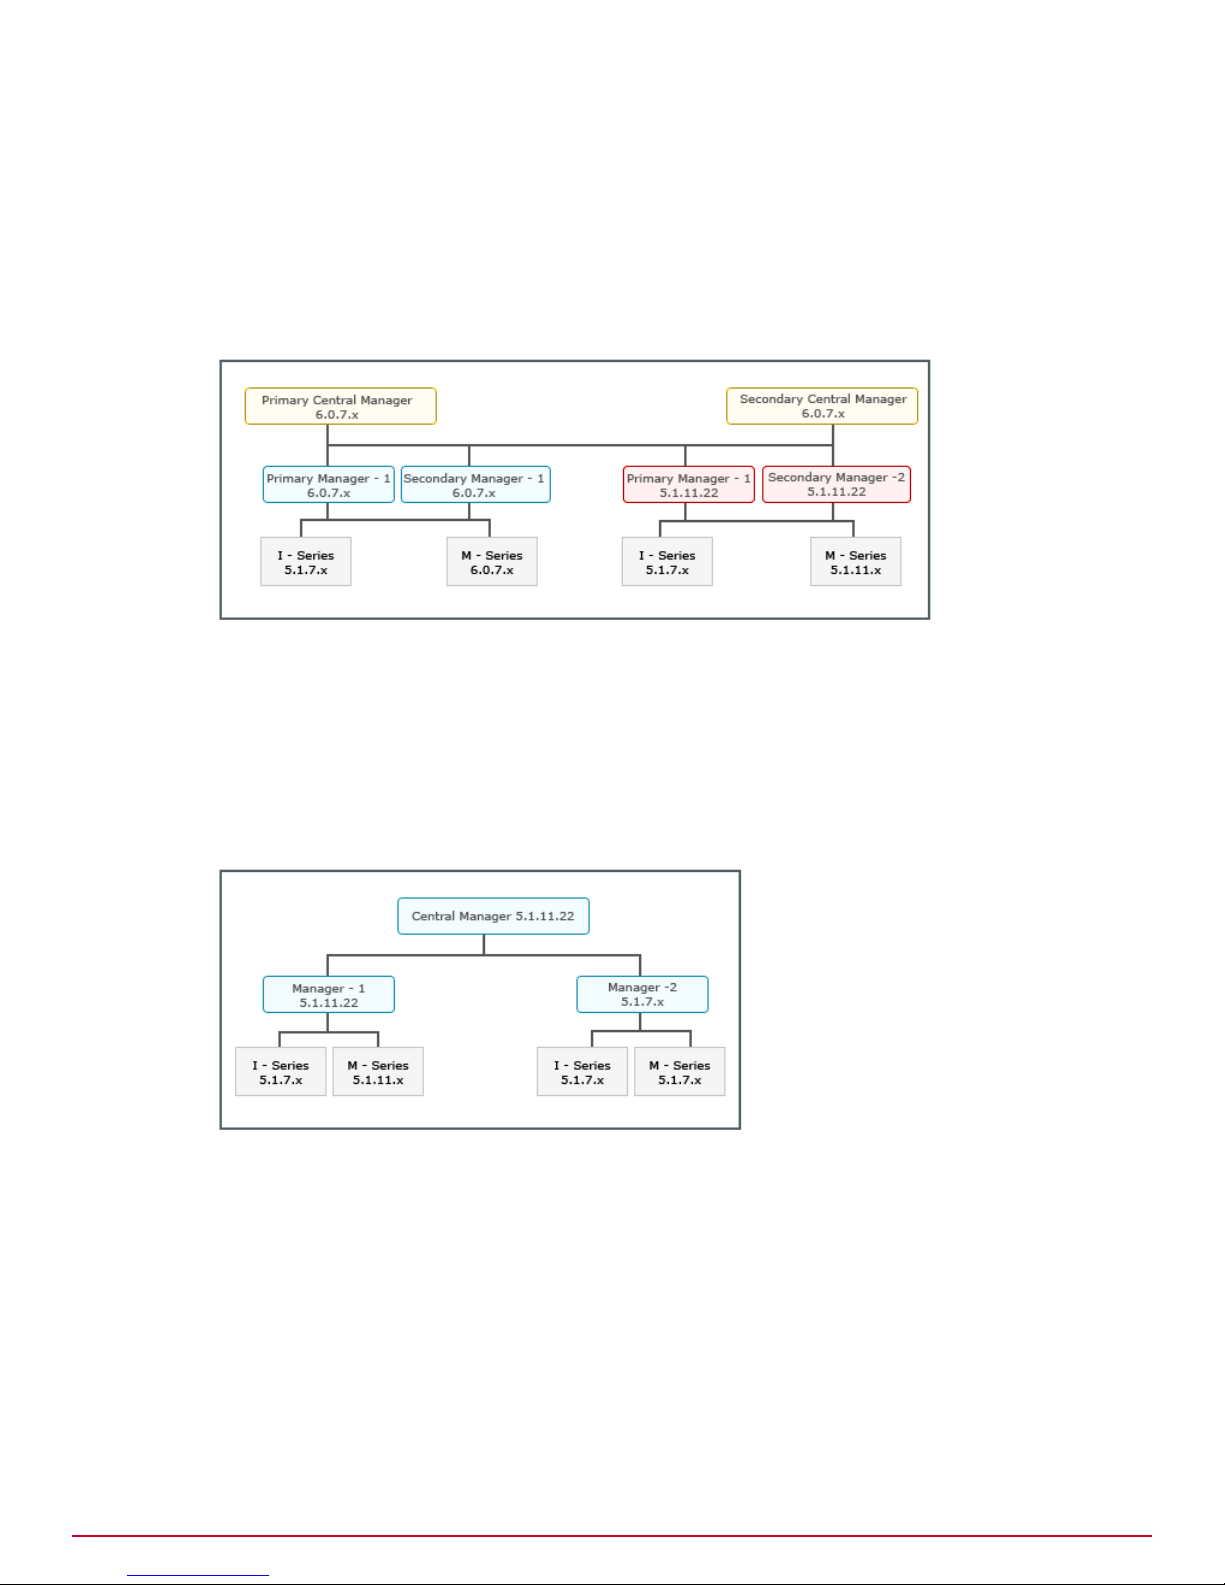
Scenario 1
This scenario is about an upgrade from a homogeneous 5.1 Manager environment to a heterogeneous
6.0 Manager environment managed by an MDR pair of Central Managers.
McAfee® Network Security Platform 6.1 Upgrade Guide
11
Page 12
2
Managing a Heterogeneous Environment
Upgrade paths to a heterogeneous environment
The upgrade path for this scenario is as follows:
1
Upgrade the Central Manager MDR pair to the latest 6.0 version. See Upgrading the Central
Manager.
2
Upgrade the required Manager MDR pairs to the latest 6.0 version. See Upgrading the Manager.
3
Upgrade the required Sensors to the latest 6.0 version. See Performing Signature Set and Sensor
Software Upgrade.
See also
Upgrading the Central Manager on page 3
Upgrading the Manager on page 3
Performing Signature Set and Sensor Software upgrade on page 3
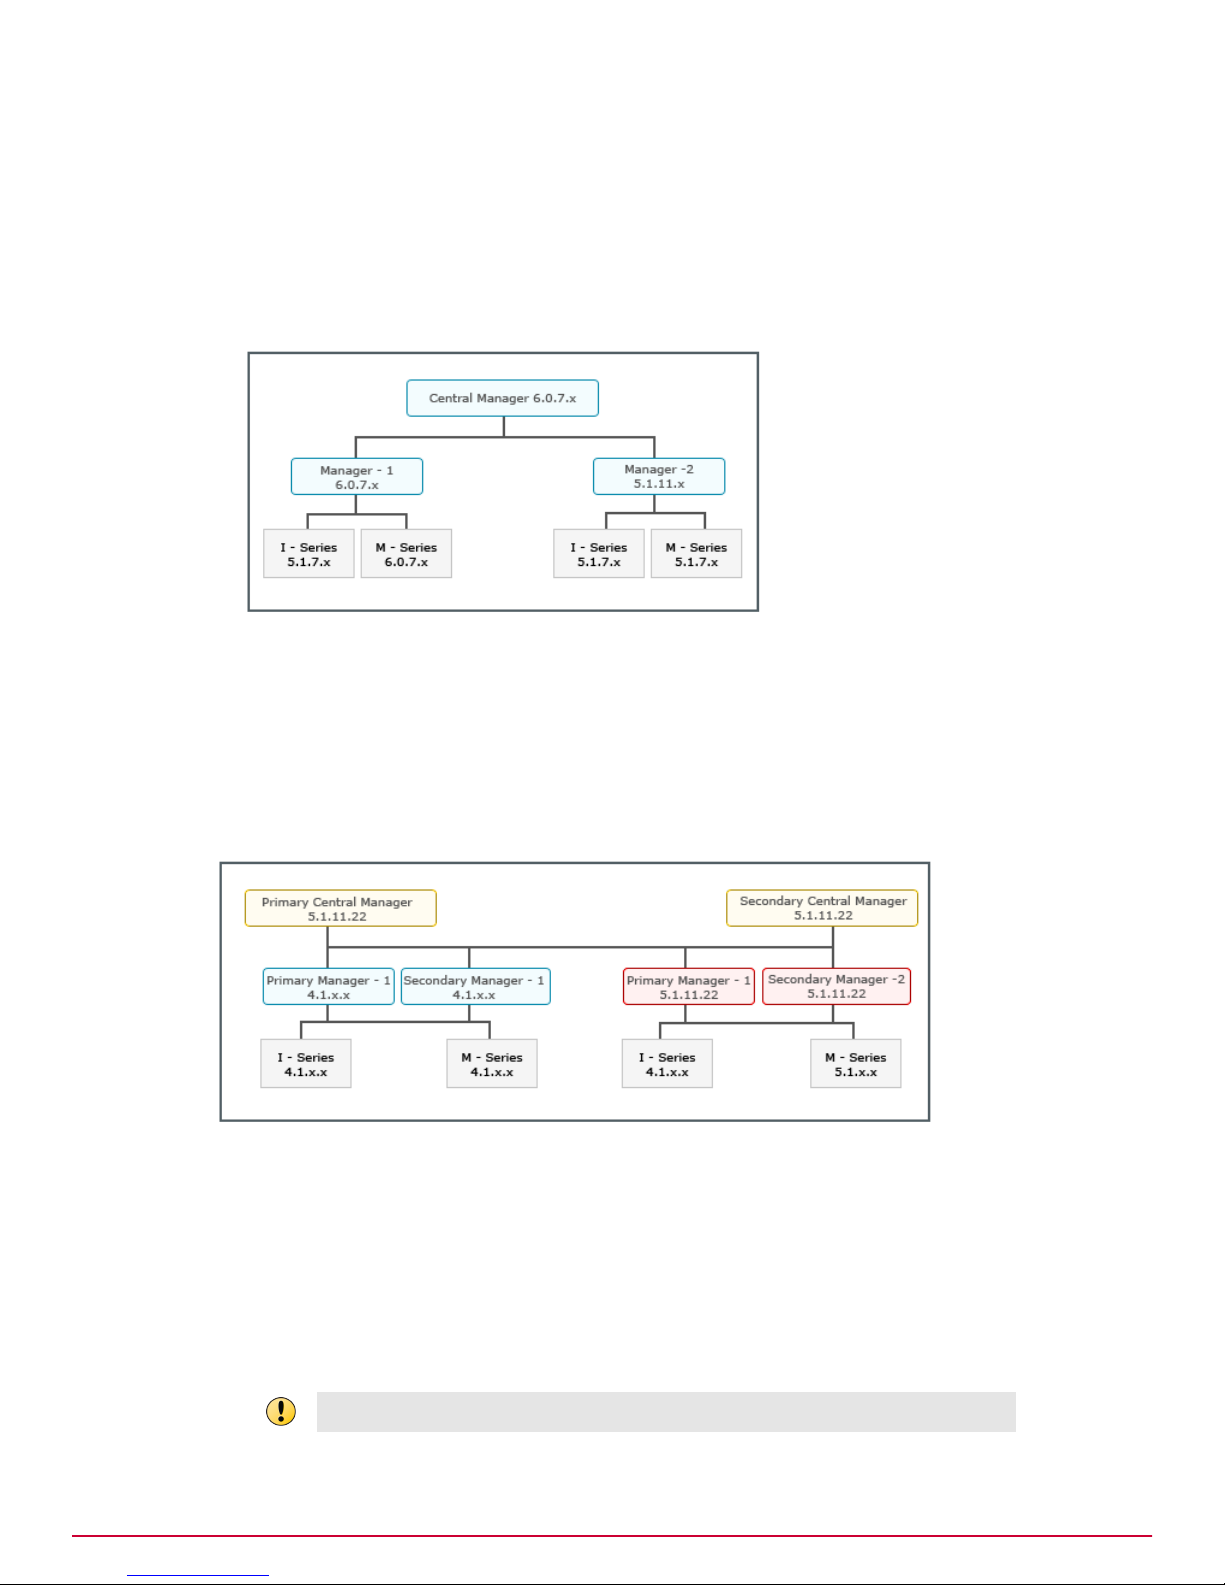
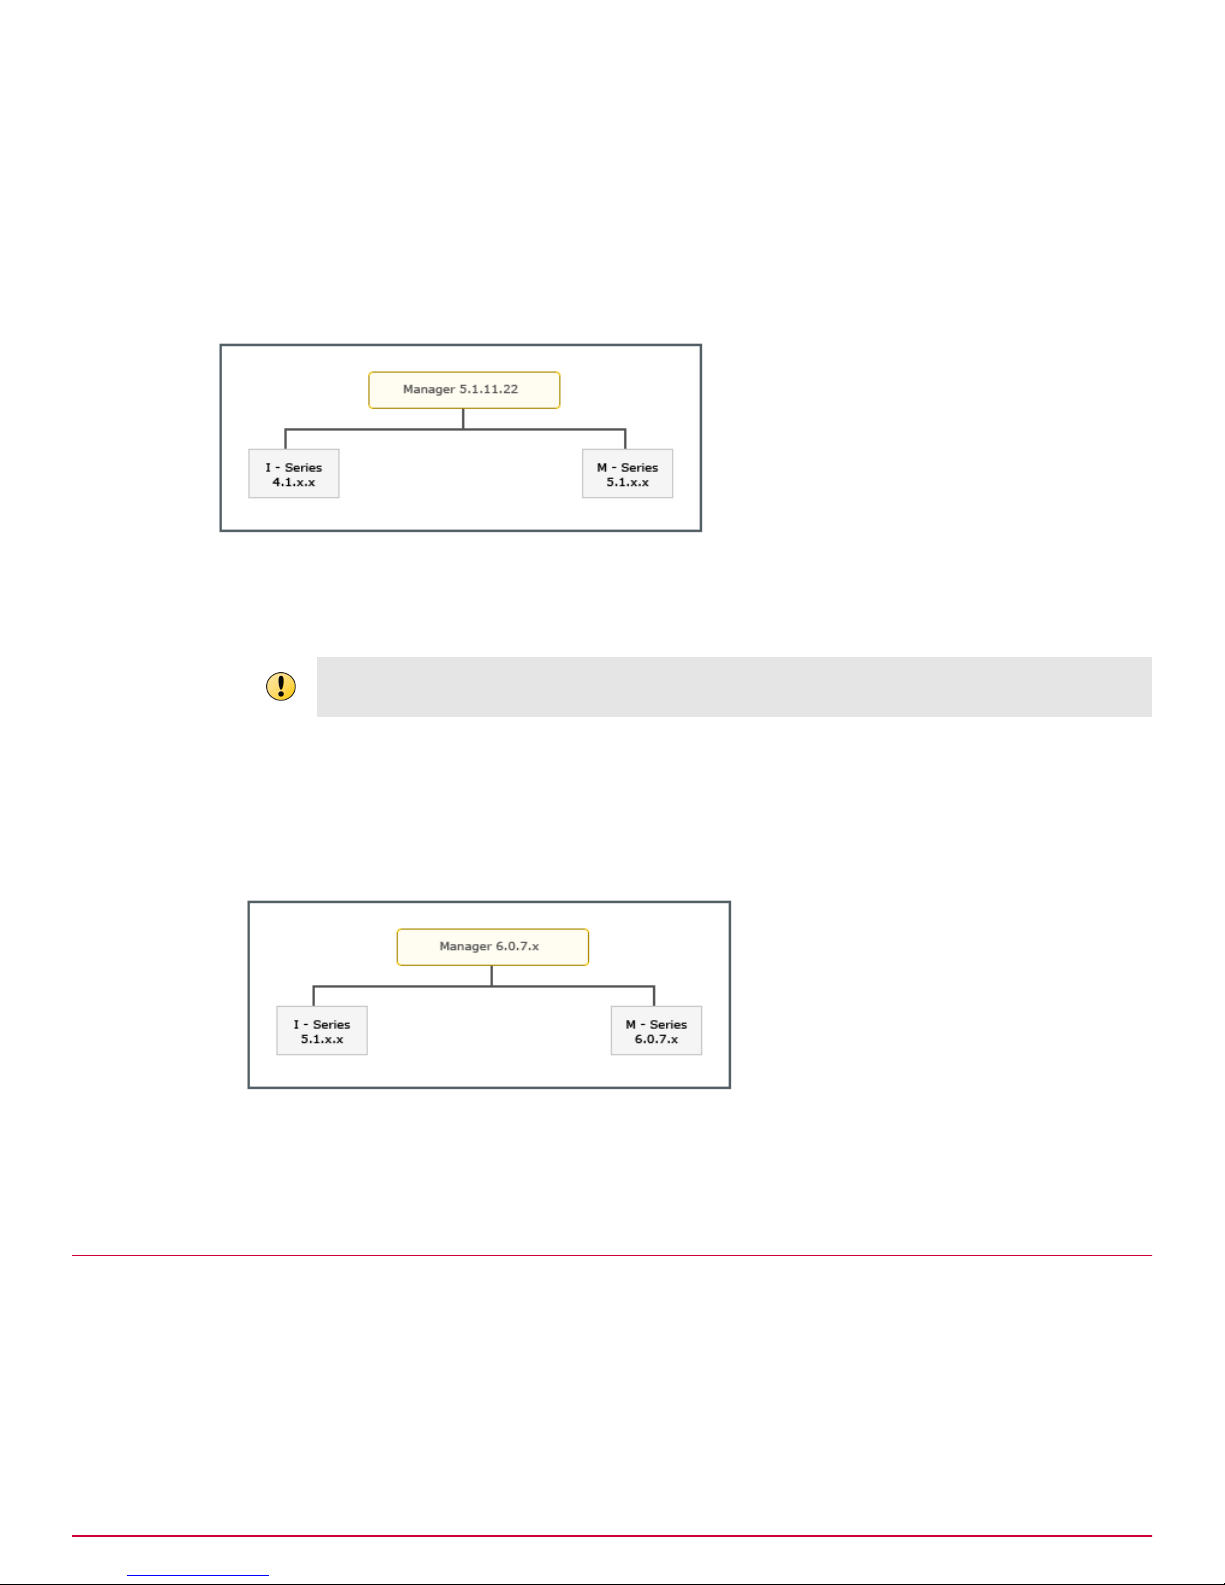
Scenario 2
This scenario is about an upgrade from a homogeneous 5.1 Manager environment to a heterogeneous
6.0 Manager environment managed by a standalone Central Manager.
12
McAfee® Network Security Platform 6.1 Upgrade Guide
Page 13
Managing a Heterogeneous Environment
Upgrade paths to a heterogeneous environment
The upgrade path for this scenario is as follows:
1
Upgrade the standalone Central Manager to the latest 6.0 version. See Upgrading the Central
Manager.
2
Upgrade the required Managers to the latest 6.0 version. See Upgrading the Manager.
3
Upgrade the required Sensors managed by the 6.0 Managers. See Performing Signature Set and
Sensor Software Upgrade.
2
See also
Upgrading the Central Manager on page 3
Upgrading the Manager on page 3
Performing Signature Set and Sensor Software upgrade on page 3
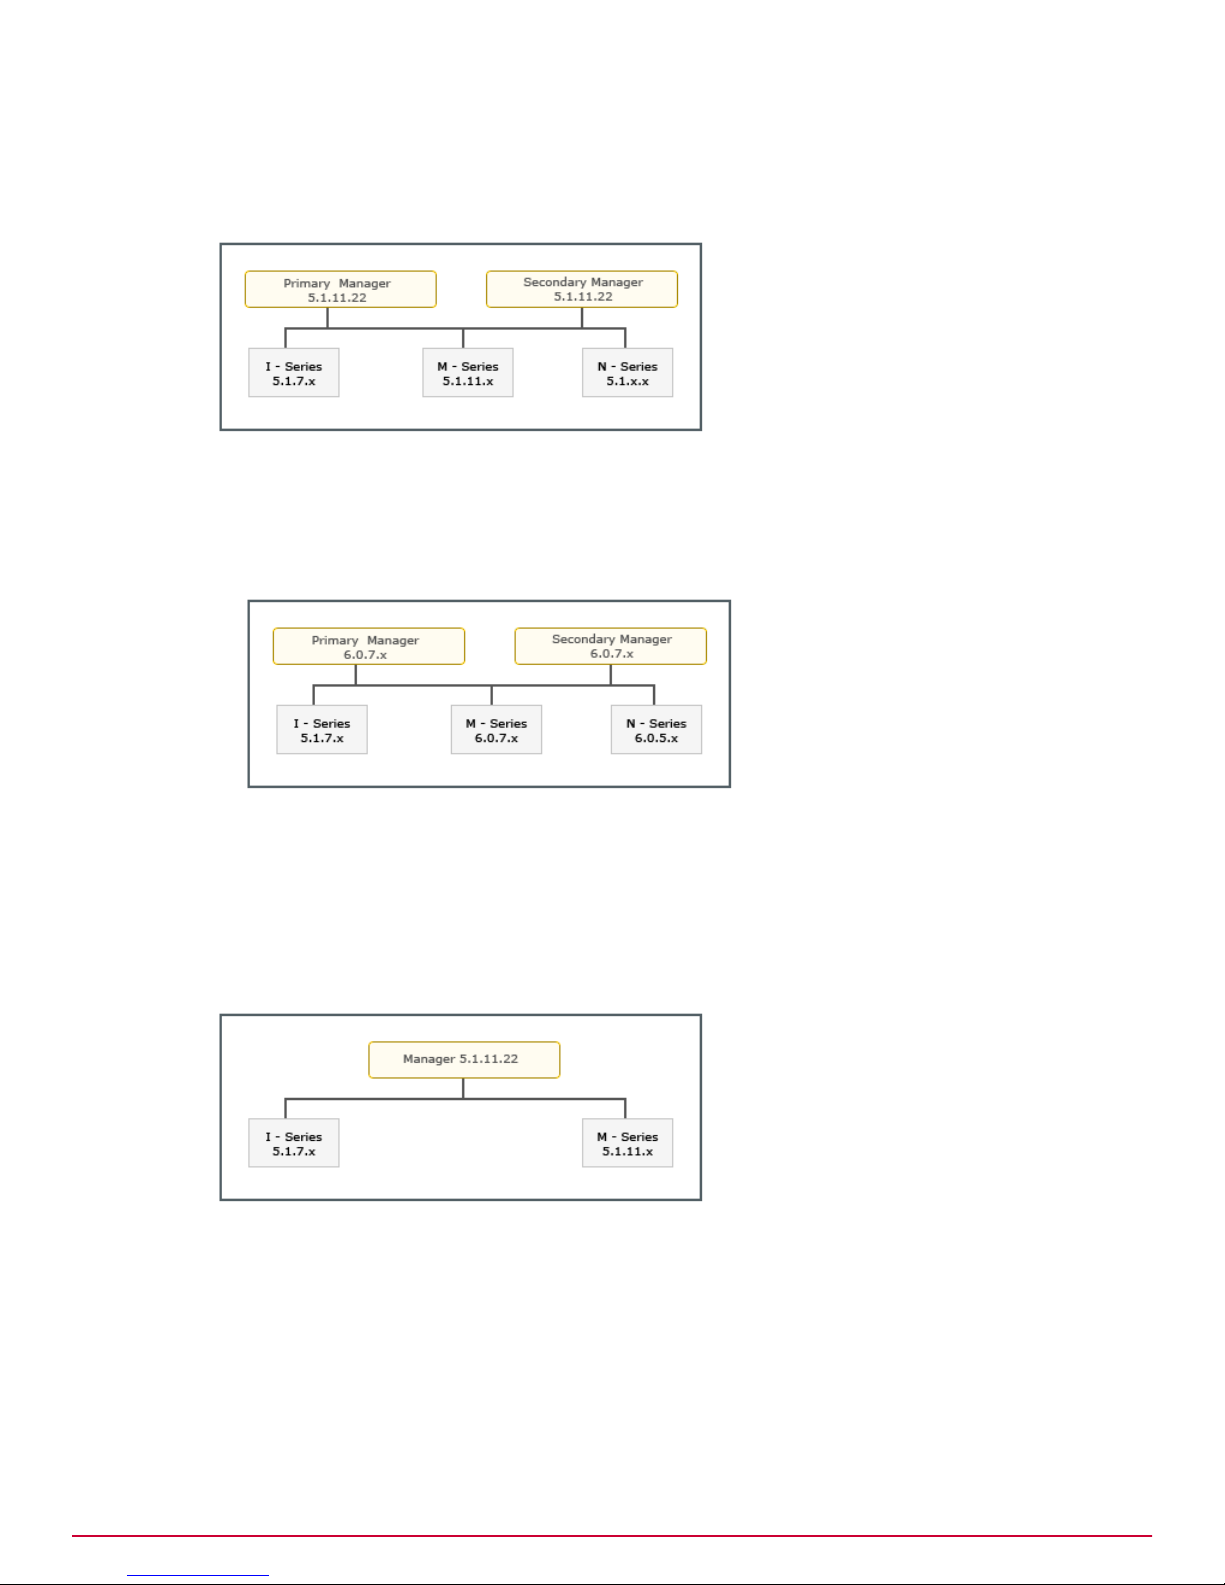
Scenario 3
This scenario is about an upgrade from a heterogeneous 5.1 Manager environment to a heterogeneous
6.0 Manager environment managed by an MDR pair of Central Managers.
The upgrade path for this scenario is as follows:
1
Upgrade all the 4.1 Managers to 5.1.11.22 or above. However, note that the Central Manager must
be of the same or higher version than the Managers. See the 4.1 to 5.1 Upgrade Guide for the details.
2
After you upgrade the 4.1 Managers to 5.1, ensure they are up and functioning as configured.
3
Upgrade the 4.1 Sensors to the relevant 5.1 version. See the 4.1 to 5.1 Upgrade Guide for details.
4
After you upgrade the 4.1 Sensors to a 5.1 version, do a manual synchronization. Then, ensure the
Sensors are up and functioning as configured.
Make sure there are no 4.1 Managers or Sensors when you begin to upgrade to 6.0.
McAfee® Network Security Platform 6.1 Upgrade Guide
13
Page 14

2
Managing a Heterogeneous Environment
Upgrade paths to a heterogeneous environment
5
Upgrade the Central Manager MDR pair to the latest 6.0 version. See Upgrading the Central
Manager.
6
Upgrade the required Manager MDR pairs to the latest 6.0 version. See Upgrading the Manager.
7
Upgrade the required Sensors to the latest 6.0 version. See Performing Signature Set and Sensor
Software Upgrade.
See also
Upgrading the Central Manager on page 3
Upgrading the Manager on page 3
Performing Signature Set and Sensor Software upgrade on page 3
Scenario 4
This scenario is about an upgrade from a heterogeneous Manager environment in 5.1 to a
heterogeneous Manager environment in 6.0, managed by a standalone Central Manager.
The upgrade path for this scenario is as follows:
1
Upgrade all the 4.1 Managers to 5.1.11.22 or above. However, note that the Central Manager must
be of the same or higher version than the Managers. See the 4.1 to 5.1 Upgrade Guide for the details.
2
After you upgrade the 4.1 Managers to 5.1, ensure they are up and functioning as configured.
3
Upgrade the 4.1 Sensors to the relevant 5.1 version. See the 4.1 to 5.1 Upgrade Guide for details.
4
After you upgrade the 4.1 Sensors to a 5.1 version, do a manual synchronization. Then, ensure the
Sensors are up and functioning as configured.
Make sure there are no 4.1 Managers or Sensors when you begin to upgrade to 6.0.
14
McAfee® Network Security Platform 6.1 Upgrade Guide
Page 15

Managing a Heterogeneous Environment
Upgrade paths to a heterogeneous environment
5
Upgrade the standalone Central Manager to the latest 6.0 version. See Upgrading the Central
Manager.
6
Upgrade the required Managers to the latest 6.0 version. See Upgrading the Manager.
7
Upgrade the required Sensors to the latest 6.0 version. See Performing Signature Set and Sensor
Software Upgrade.
See also
Upgrading the Central Manager on page 3
Upgrading the Manager on page 3
Performing Signature Set and Sensor Software upgrade on page 3
2
Scenarios involving the Manager
Upgrade requirements for the scenarios listed in this section
• The Manager must be of version 5.1.11.22 or above. See the 4.1 to 5.1 Upgrade Guide for
information on how to upgrade the Manager to a 5.1 version.
• As a best practice, upgrade any 4.1 Sensors to the corresponding 5.1 version. So, before you begin
your upgrade to 6.0, ensure there are no 4.1 Sensors in your deployment.
The following are the scenarios in this section:
• Upgrade from a homogeneous Sensor environment in 5.1 to a heterogeneous Sensor environment
in 6.0:
• Scenario 5: MDR setup
• Scenario 6: Standalone Manager setup
• Upgrade from a heterogeneous Sensor environment in 5.1 to a heterogeneous Sensor environment
in 6.0:
• Scenario 7: MDR setup
• Scenario 8: Standalone Manager setup
If the Manager is of version 6.0.7.x or above, then I-series Sensors do not support NAC regardless of
the Sensor software version.
See also
Scenario 5 on page 16
Scenario 8 on page 18
Scenario 6 on page 16
McAfee® Network Security Platform 6.1 Upgrade Guide
15
Page 16
2
Managing a Heterogeneous Environment
Upgrade paths to a heterogeneous environment
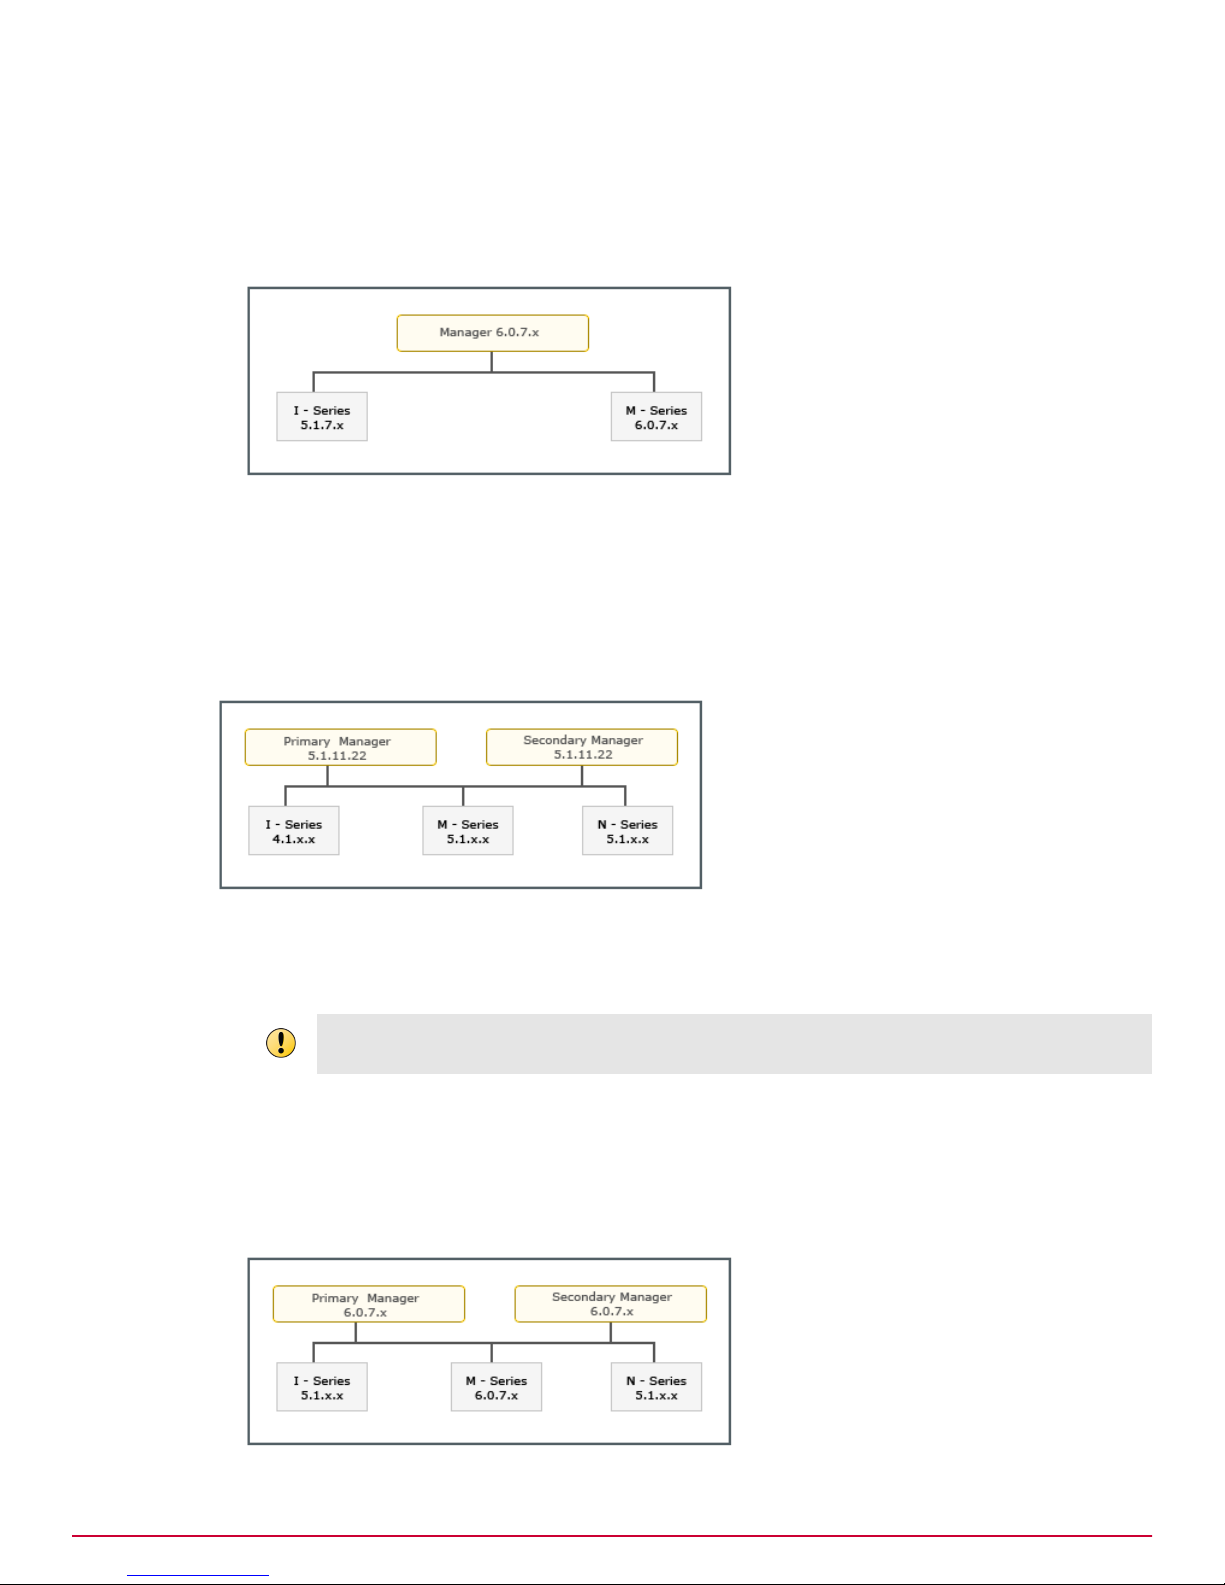
Scenario 5
This scenario is about an upgrade from a homogeneous Sensor environment in 5.1 to a heterogeneous
Sensor environment in 6.0, managed by an MDR pair of Managers.
The upgrade path for this scenario is as follows:
1
Upgrade the Manager MDR pair to the latest 6.0 version. See Upgrading the Manager.
2
Upgrade the required Sensors to the latest 6.0 version. See Performing Signature Set and Sensor
Software Upgrade.
See also
Upgrading the Manager on page 3
Performing Signature Set and Sensor Software upgrade on page 3
Scenario 6
This scenario is about an upgrade from a homogeneous Sensor environment in 5.1 to a heterogeneous
Sensor environment in 6.0, managed by a standalone Manager.
16
McAfee® Network Security Platform 6.1 Upgrade Guide
Page 17
Managing a Heterogeneous Environment
Upgrade paths to a heterogeneous environment
The upgrade path for this scenario is as follows:
1
Upgrade the standalone Manager to the latest 6.0 version. See Upgrading the Manager.
2
Upgrade the required Sensors to the relevant 6.0 version. See Performing Signature Set and
Sensor Software Upgrade.
See also
Upgrading the Manager on page 3
Performing Signature Set and Sensor Software upgrade on page 3
Scenario 7
This is about an upgrade from a heterogeneous Sensor environment in 5.1 to a heterogeneous Sensor
environment in 6.0, managed by an MDR pair of Managers.
2
The upgrade path for this scenario is as follows:
1
Upgrade all the 4.1 Sensors to a relevant 5.1 software version. See the 4.1 to 5.1 Upgrade Guide
for details.
Make sure there are no 4.1 Sensors added to the Managers when you begin to upgrade to 6.0; else,
the Manager upgrade will fail.
2
After you upgrade the 4.1 Sensors to a 5.1 version, do a manual synchronization. Then, ensure the
Sensors are up and functioning as configured.
3
Upgrade the Manager MDR pair to the latest 6.0 version. See Upgrading the Manager.
4
Upgrade the required Sensors to the latest 6.0 version. See Performing Signature Set and Sensor
Software Upgrade.
McAfee® Network Security Platform 6.1 Upgrade Guide
17
Page 18
2
Managing a Heterogeneous Environment
Feature-support matrix for heterogeneous environments
See also
Upgrading the Manager on page 3
Performing Signature Set and Sensor Software upgrade on page 3
Scenario 8
This is about an upgrade from a heterogeneous Sensor environment in 5.1 to a heterogeneous Sensor
environment in 6.0, managed by a standalone Manager.
The upgrade path for this scenario is as follows:
1
Upgrade all the 4.1 Sensors to a relevant 5.1 software version. See the 4.1 to 5.1 Upgrade Guide
for details.
Make sure there are no 4.1 Sensors added to the Manager when you begin to upgrade to 6.0; else,
the Manager upgrade will fail.
2
After you upgrade the 4.1 Sensors to a 5.1 version, do a manual synchronization. Then, ensure the
Sensors are up and functioning as configured.
3
Upgrade the standalone Manager to the latest 6.0 version. See Upgrading the Manager.
4
Upgrade the required Sensors to the latest 6.0 version. See Performing Signature Set and Sensor
Software Upgrade.
See also
Upgrading the Manager on page 3
Performing Signature Set and Sensor Software upgrade on page 3
Feature-support matrix for heterogeneous environments
This section provides the feature-support matrix and the points that you should note when you work in
a heterogeneous environment in Network Security Platform 6.0. The following table contains the
major feature x Sensor software version x Sensor model matrix:
18
McAfee® Network Security Platform 6.1 Upgrade Guide
Page 19

Feature-support matrix for heterogeneous environments
Managing a Heterogeneous Environment
2
Feature Name Latest 5.1 Sensor
software
Latest 6.0 Sensor
software
Additional Information
I-series M-series I-series M-series
Integration with
No No No Yes See the Integration Guide.
Artemis
SSL Decryption Yes No Yes Yes Not supported by I-1200,
I-1400, M-1250, and M-1450.
See the IPS Configuration
Guide.
Configuring a
Sensor as an
No No No Yes See the NTBA Appliance
Administrator's Guide.
NTBA Exporter
Port-based
Attack Filter
No No Yes Yes See the note below this table.
Also, see the IPS Configuration
Guide.
Custom Attacks
No No Yes Yes See the Custom Attacks Guide.
in Snort format
Smart Blocking No No Yes Yes See the IPS Configuration
Guide.
Parsing of jumbo
frames
No No No Yes Not supported by M-1250,
M-1450, and M-2750. See the
IPS Configuration Guide.
Attack
Compilation
Scanning
Exceptions
No No Yes Yes See the IPS Configuration
Guide.
No No No Yes Not supported by M-1250 and
M-1450. See the IPS
Configuration Guide.
Attack Scanning No No No Yes See the IPS Configuration
Guide.
Active FO kit No Yes No Yes See the Active FO Kit Guides.
Not applicable to M-1250 and
M-1450.
Data packet
capture by a
No No No Yes See the IPS Configuration
Guide.
Sensor port
Stateless
inspection
No No No Yes Option available in the TCP
Flow Violation drop-down in
the TCP Settings page. See the
IPS Configuration Guide.
DHCP Inline NAC No Yes No Yes I-series Sensors do not support
NAC if the Manager is
upgraded to 6.0.7.x or above.
See the NAC Configuration
Guide.
Standard Inline
NAC
No Yes No Yes I-series Sensors do not support
NAC if the Manager is
upgraded to 6.0.7.x or above.
See the NAC Configuration
Guide.
OOB NAC No No No No You need Manager 6.0.3.x or
above with N-450 6.0.3.x.
See the NAC Configuration
Guide.
McAfee® Network Security Platform 6.1 Upgrade Guide
19
Page 20

2
Managing a Heterogeneous Environment
Feature-support matrix for heterogeneous environments
Notes
• IPS Quarantine: You can configure a Sensor to quarantine an attacking host perpetually until you
explicitly release it from quarantine. This feature is available for the I-series and M-series Sensors
that are on the latest 6.0 Sensor software. For more information, see the discussion on Release
Logic in the IPS Configuration Guide.
• Attack Filters: In Network Security Platform 6.0, Alert Filter is renamed as Attack Filter with no
functional difference. However, only the latest 6.0 Sensor software for both I and M-series support
port-based Attack Filters. That is, you can assign Attack Filters to the all Sensors in your
deployment. But, the port-based Attack Filters, if any, are not applied on the 5.1 Sensors when you
do a configuration update.
The port-based Attack Filters created in Central Manager 6.0 are viewable only in 6.0 Managers.
• Snort-based Custom Attacks: Custom Attacks converted from the Snort format are not applied on
the 5.1 Sensors when you do a configuration update.
• Blocking Option: You can customize the blocking setting for every attack in the Sensor Actions
section of the Edit Attack Detail for Attack page. You must explicitly set the blocking option for
Sensors on 5.1 and 6.0 software. Therefore, for a heterogeneous Sensor environment, you must
specify the blocking option for both 5.1 and 6.0 Sensors. Note that 6.0 Sensors support Smart
Blocking as well. Suppose you have only 5.1 Sensors in your deployment. So, you specify only
blocking option only for the 5.1 Sensors and disabled blocking for 6.0 Sensors. However, when you
upgrade a Sensor to 6.0, that Sensor will not block the attacks.
Note that 6.0 Sensors support Smart Blocking. In this case, the attacks are blocked based on their
Benign Trigger Probability. That is, the attack is blocked if the chances for it to be a false-positive
are less.
For information on the Blocking Option, Smart Blocking, and the Edit Attack for Attack page, see the
IPS Configuration Guide.
Scanning Exception:
This note is applicable only for M-2750, M-3050, M-4050, M-6050, and M-8000 Sensors.
Prior to release 6.0.7.x, you use the following CLI commands to configure Layer 2 forward settings:
• layer2 forward tcp
• layer2 forward udp
• layer2 forward vlan
• layer2 forward clear
20
McAfee® Network Security Platform 6.1 Upgrade Guide
Page 21

Feature-support matrix for heterogeneous environments
Managing a Heterogeneous Environment
When you upgrade the Sensor to 6.0.7.x or above, the Manager captures these settings from the
Sensor and displays them in the Scanning Exceptions node. From then on you can modify these
settings only from the Scanning Exception node.
In an heterogeneous Sensor environment, you need to use the CLI commands for 5.1 Sensors, and
the Manager for 6.0 Sensors. For more information see Addendum II to 6.0 Documentation.
2
McAfee® Network Security Platform 6.1 Upgrade Guide
21
Page 22

2
Managing a Heterogeneous Environment
Feature-support matrix for heterogeneous environments
22
McAfee® Network Security Platform 6.1 Upgrade Guide
Page 23

3
3
Upgrading the Central Manager
If you have McAfee Network Security Central Manager (Central Manager) deployed, you need to
upgrade it to 6.0 before you upgrade the corresponding (Managers). That is, the Central Manager
must be of the same or a higher version than the corresponding Managers.
This chapter provides detailed explanation on how to upgrade the Central Manager from 5.1, or an
earlier version of 6.0, to the latest 6.0 version. To upgrade to an earlier version of 6.0, also review the
corresponding Release Notes. If you have not deployed a Central Manager, proceed to Upgrading the
ManagerManager.
Contents
Reviewing the upgrade requirements
Preparing for the upgrade
Central Manager and OS upgrade
MDR Central Manager upgrade
Stand-alone Central Manager upgrade
Reviewing the upgrade requirements
This chapter discusses the requirements for a successful Central Manager upgrade.
Minimum required Central Manager version
To be able to upgrade to 6.0, the current version of the Central Manager must be 5.1.11.22 or above.
Central Manager system requirements
Underpowered and/or undersized machines can lead to performance issues and storage problems. We
strongly recommend the use of server-class hardware that exceeds the minimum system
requirements outlined below.
These suggestions do not take into account the amount of disk space you will require for alert and
packet log storage. See the Manager Server Configuration Guide for suggestions on calculating your
database capacity requirements. This section discusses the minimum hardware and software
requirements that the Central Manager server should meet.
The following are the system requirements for the Central Manager 6.0 server.
McAfee® Network Security Platform 6.1 Upgrade Guide
23
Page 24

3
Upgrading the Central Manager
Preparing for the upgrade
Minimum Recommended
OS
Any of the following:
• Windows Server 2003 Standard Edition, SP2, English
OS, (32 or 64 bit)
• Windows Server 2008 R2 Standard Edition, English
OS, SP1 (64 bit)
• Windows Server 2003 R2 Standard Edition, Japanese
OS (32 or 64 bit)
• Windows Server 2008 R2 Standard Edition, Japanese
OS, SP1 (64 bit)
Note: For 64-bit, only X64 architecture is supported.
Windows Server 2008 R2
Standard Edition, English or
JapaneseOS, (64 bit)
Memory
• 2GB or higher for 32-bit
4GB
• 4GB or higher for 64-bit
CPU Server model processor such as Intel Xeon Same
Disk space 40GB 80GB disk with 8MB memory
cache
Network 100Mbps card 10/100/1000Mbps card
Monitor 32-bit color, 1024 x 768 display setting 1280 x 1024
There could be numerous releases of Windows Server 2003 and Windows Server 2008, for various
languages. The Central Manager is supported only on the English and Japanese versions of Standard
Edition (SE).
You need to have Windows Administrator permission for the server machine.
The Troubleshooting Guide provides a number of pre-installation tips and suggestions with which
McAfee recommends you familiarize yourself before you begin your upgrade. If you run into any issues,
we suggest you to check the Troubleshooting Guide for a possible solution.
Central Manager license file requirement
From version 6.0.7.5, you do not require a license file to use the Central Manager or Manager.
However, you may want to make a copy of the license file used prior to the upgrade. You can find the
license file at: \Network Security <Manager> or <Central Manager> install directory>\App
\config\
Preparing for the upgrade
After you make sure you meet the requirements, prepare for the upgrade.
Before you begin the upgrade, make sure that no processes related to McAfee® Network Security
Platform (such as automated database archival) are scheduled during the upgrade time frame. Any such
concurrent activity will cause conflicts and result in upgrade failure.
24
McAfee® Network Security Platform 6.1 Upgrade Guide
Page 25

Upgrading the Central Manager
Preparing for the upgrade
3
Backing up Network Security Platform data
Before you upgrade, back up your tables and save any McAfee Custom Attacks (formerly UDS) that
you have created. If you have a very large number of alerts and packet logs to upgrade, first consider
archiving and deleting any alert and packet log data that you do not need prior to creating your
database backup files.
Save your entire backup in a different location than the current Central Manager or Manager to prevent
data loss.
Performing a database backup
Back up your database BEFORE you upgrade. McAfee strongly recommends backing up All Tables and
archiving the alerts and packet logs.
Performing an All-Tables backup
The All Tables backup process is time consuming (based upon the size of your database); however, it
ensures the integrity of your existing data should you encounter any difficulties at any point during the
upgrade, or should you wish to return to your current version of the Central Manager/Manager. Note
that an All-Tables backup includes all Custom Attacks as well.
To perform an All-Tables backup:
Task
1
Navigate to <Central Manager/Manager install directory>\bin.
2
Execute the dbadmin.bat file.
The standalone tool opens.
3
Select All Tables as the Backup Type:
4
Type a Backup Filename. You can use alphanumeric characters including hyphens and underscores (for
example, backup_01-10-10).
5
Optionally type the Backup Directory where you want the backup to be stored. You can specify the
full-path to the Backup Directory or just the directory name.
If you do not specify a backup directory, then the backup is stored in the default backup directory
at <Central Manager/Manager install directory>\App\Backups.
6
Optionally type a description of your backup in Comments.
7
Click Backup. After a few moments, the following message appears: "Database backup successful."
You can see the backup information by clicking the DB Restore tab. In the backup directory, you will
find an XML file (JAR format) with the backup file name that you specified.
Reviewing the Upgrade Considerations
Review this section carefully before you commence the upgrade process:
• Central Manager upgrade downtime window: How long the upgrade takes depends on the size of your
deployment and the size of your database. The Central Manager upgrade process alone can take an
hour to complete.
• OS upgrade downtime: Central Manager 6.0 is supported on Windows Server 2008 R2 (Standard
Edition) 64-bit English and Japanese. If you plan to upgrade the OS, then factor this in when
you estimate the Central Manager downtime.
McAfee® Network Security Platform 6.1 Upgrade Guide
25
Page 26

3
Upgrading the Central Manager
Central Manager and OS upgrade
• Database backup before and after upgrade: It is critical that you perform a full backup of your database using
the All Tables option both before and after the upgrade. Backing up prior to upgrade enables you to
roll back to your 5.1 version should you encounter problems during upgrade. Backing up
immediately following upgrade preserves your upgraded tables and provides a baseline of the 6.0
database that you upgraded to. Importantly, when you are backing up the database, there should
not be any scheduled task running in the background. See Backing up Network Security Platform
data.
You cannot restore the database from a lower version Central Manager on a higher version.
• OS upgrade: As mentioned above, the 6.0 Central Manager server is supported on Windows Server
2008 R2 Standard Edition. However, the server should be a 64-bit (X64 architecture) system. If
you are currently using a 64-bit system, then you can upgrade the server OS as well during the
Central Manager 5.1 to 6.0 upgrade window. In case of 32-bit systems, a hardware upgrade may
be required. Two approaches to an OS upgrade are discussed in Central Manager and OS upgrade.
See also
Backing up Network Security Platform data on page 25
Central Manager and OS upgrade on page 26
Central Manager and OS upgrade
You can run the 6.0 Central Manager server on Windows Server 2008 R2 (Standard Edition) English or
Japanese or continue to use Windows Server 2003 (Standard Edition). However, to run the 6.0 Central
Manager on Windows Server 2008 R2 Standard Edition, the server must be a 64-bit system. Proceed
further only if you are planning to upgrade the OS as well; else, you can skip this section.
If you are planning for an OS upgrade, then consider the two approaches discussed in this section.
These are based on whether you want to continue with your current hardware for 6.0. For example, if
your 5.1 Central Manager server is a 64-bit system, then you may continue with the same hardware
but upgrade the OS and the Central Manager.
For information on how to upgrade the OS, refer to Microsoft's documentation.
Approach 1: Continuing with the 5.1 hardware
Important points regarding this approach are as follows:
• It assumes that your 5.1 Central Manager server is a 64-bit system, and that it meets the
requirements for Windows Server 2008 R2 Standard Edition.
• A typical upgrade from Windows Server 2003 to Windows Server 2008 R2 Standard Edition can
take around an hour. So the Central Manager upgrade downtime window would extend by that much.
The high-level steps involved in this approach are:
Task
1
Back up the 5.1 database.
See Backing up Network Security Platform data.
2
Upgrade the Central Manager to 6.0.
See Stand-alone Central Manager upgrade.
26
McAfee® Network Security Platform 6.1 Upgrade Guide
Page 27

Upgrading the Central Manager
MDR Central Manager upgrade
3
Log on to the 6.0 Central Manager and check the Status page to ensure that the Manager is
working fine.
If everything is working fine, it means that the Manager upgrade was successful.
4
Back up the 6.0 Central Manager database.
5
Upgrade the OS to Windows Server 2008 R2 Standard Edition.
6
After OS upgrade, log on to the Manager and check the Status page to ensure everything is
working fine.
Tasks
• Approach 2: Using a new hardware on page 27
See also
Backing up Network Security Platform data on page 25
Stand-alone Central Manager upgrade on page 28
Approach 2: Using a new hardware
Important points regarding this approach are as follows:
3
• It assumes that you have a 64-bit system with Windows Server 2008 R2 Standard Edition installed.
• It assumes that your existing Central Manager server and the new machine meet the other
requirements discussed in Reviewing the upgrade requirements.
The high-level steps involved in this approach are:
Task
1
Upgrade the existing Central Manager server to 6.0. See Stand-alone Central Manager upgrade.
2
Post-upgrade, back up the 6.0 database of the Central Manager server. See Performing a database
backup.
3
On the network, replace the existing Central Manager server with the new one.
Make sure that the IP address of the new Central Manager is the same as that of the existing one.
If the IP is different, then the Managers cannot communicate with the new Central Manager
machine. Then you need to re-establish this communication from each Manager.
4
On the new machine, install Central Manager 6.0. See the Installation Guide for information.
5
Restore the 6.0 database backup from the existing Central Manager on the new machine. For
information on how to restore a database, see the Manager Server Configuration Guide.
6
Log on to the new Central Manager server and check the Status page to ensure everything is
working fine.
See also
Reviewing the upgrade requirements on page 23
Stand-alone Central Manager upgrade on page 28
Performing a database backup on page 25
MDR Central Manager upgrade
To upgrade the primary and secondary Central Managers configured for Manager Disaster Recovery
(MDR):
McAfee® Network Security Platform 6.1 Upgrade Guide
27
Page 28

3
Upgrading the Central Manager
Stand-alone Central Manager upgrade
Task
1
Using the Switch Over command, make the secondary Central Manager active.
2
Upgrade the primary to 6.0.
For information, see Stand-alone Central Manager upgrade/xref.
3
Bring up the upgraded primary Central Manager.
The primary is up in standby mode.
4
Stop the secondary Central Manager.
5
Using the Switchback command, make the primary the active Central Manager.
6
Upgrade the secondary to 6.0.
For information, see Stand-alone Central Manager upgrade.
7
Bring up the upgraded secondary Central Manager. The secondary is up in standby mode.If not
done already, upgrade the Signature Set for both the Central Managers. See Upgrading the
Signature Set for the Central Manager.
See also
Stand-alone Central Manager upgrade on page 28
Upgrading the Signature Set for the Central Manager on page 30
Stand-alone Central Manager upgrade
Before you upgrade the Central Manager to 6.0, ensure that:
• Your current Network Security Platform infrastructure meets all the requirements discussed in
Reviewing the upgrade requirements.
• You have reviewed and understood the implications of the upgrade considerations discussed in
Reviewing the Upgrade Considerations.
• You have backed up your 5.1 Central Manager data. See Backing up Network Security Platform data.
• You have the required 6.0 Central Manager installable file at hand. You can download it from the
McAfee Update Server. See Downloading the Manager/Central Manager executable, Installation
Guide.
• You have your Central Manager MySQL root password available. You set this password when
installing the Central Manager.
• You stop all third-party applications. It is especially important that you stop any third-party
application, such as the arcSight agent, that communicates with the MySQL database. The Manager
or the Central Manager cannot upgrade the database if MySQL is actively communicating with
another application.
If this is an upgrade of a Central Manager in an MDR pair, then you should switch it to standby mode
before you proceed. Make sure you are following the steps in MDR Central Manager upgrade.
To upgrade a stand-alone Central Manager:
28
McAfee® Network Security Platform 6.1 Upgrade Guide
Page 29

Upgrading the Central Manager
Stand-alone Central Manager upgrade
Task
1
Stop the McAfee® Network Security Central Manager service.
Right-click on the Central Manager icon at the bottom-right corner of your server and stop the
service. Alternatively, go to Windows Control Panel Administrative ToolsServices. Then right-click on McAfee
Network Security Central Manager, and select Stop.
2
Stop the McAfee® Network Security Central Manager User Interface service using the same method as described
in step 1.
3
Stop the McAfee® Network Security Central Manager Watchdog service using the same method as described in
step 1.
Make sure the Database service remains started.
4
Exit the Central Manager tray from the Windows Task Bar.
5
Close all open applications. (If any application is interacting with Network Security Platform, your
installation may be unsuccessful.)
6
Move any 5.1 saved report files from the server to some other location.
The reports are saved at <Central Manager install directory>\REPORTS folder.
3
®
7
Run the 6.0 Central Manager executable.
8
Install the Central Manager as described in the Manager Installation Guide.
9
Open the Central Manager.
You may be requested to download the required version of Java Runtime Environment (JRE) if the
same or higher version is not present already.
10
Log on to the Central Manager.
You can verify the version on the Log on page.
11
Check the Status page to ensure that the Central Manager database and the Managers are up.
To complete the Central Manager upgrade, you need to upgrade the Signature Set. See Upgrading
the Signature Set for Central Manager.
Tasks
• Upgrading the Signature Set for the Central Manager on page 30
See also
Reviewing the upgrade requirements on page 23
Reviewing the Upgrade Considerations on page 25
Backing up Network Security Platform data on page 25
MDR Central Manager upgrade on page 27
Upgrading the Signature Set for the Central Manager on page 30
McAfee® Network Security Platform 6.1 Upgrade Guide
29
Page 30

3
Upgrading the Central Manager
Stand-alone Central Manager upgrade
Upgrading the Signature Set for the Central Manager
Task
1
If you have not already done so, download the most recent 6.0 signature set from the McAfee
Network Security Update Server. From the Resource Tree, go to Root_admin_domain | Central Manager |
Update Server | Signature Sets.
See the Central Manager Administrator's Guide for details.
You must complete this process or the update will fail.
2
If you had created McAfee Custom Attacks in the 5.1 Central Manager, make sure the required
attack definitions are included in the IPS policies of the 6.0 Central Manager.
• From the Resource Tree, go to root_admin_domain | IPS Settings | Policies.
• Select All-Inclusive With Audit and click View/Edit.
• In the Exploit Attacks tab of the IPS Policy Editor, select All Protocols and verify that the attack
definitions are present.
3
Go to My Company | Central Manager | Summary to check the Central Manager version and Signature version.
Signature Set upgrade is now complete for the Central Manager.
For a list of currently supported protocols, see KB61036 at mysupport.mcafee.com.
What next?
®
The upgrade for the current Central Manager is complete. The next step is to upgrade the
corresponding Managers. See Upgrading the Manager. In case of Central Manager MDR, you can
upgrade the Central Managers before you upgrade the Managers.
See also
Upgrading the Manager on page 3
30
McAfee® Network Security Platform 6.1 Upgrade Guide
Page 31

Upgrading the Manager
4
4
This chapter provides detailed explanation on how to upgrade the ManagerManager from 5.1, or an
earlier version of 6.0, to the latest 6.0 version. To upgrade to an earlier version of 6.0, also review the
corresponding Release Notes. You need to upgrade the Manager before you can upgrade the Sensors.
Contents
Reviewing the upgrade requirements
Preparing for the upgrade
MDR Manager upgrade
Manager and OS upgrade
Stand-alone Manager upgrade
Reviewing the upgrade requirements
This chapter discusses the requirements for a successful ManagerManager upgrade.
Minimum required Manager version
To be able to upgrade to 6.0, the current version of the Manager must be 5.1.11.22 or above.
Manager system requirements
Underpowered and/or undersized machines can lead to performance issues and storage problems. We
strongly recommend the use of server-class hardware that exceeds the minimum system
requirements outlined below.
These suggestions do not take into account the amount of disk space you will require for alert and
packet log storage. See the Manager Server Configuration Guide for suggestions on calculating your
database capacity requirements. This section discusses the minimum and recommended hardware and
software requirements that the Manager server should meet.
The following are the system requirements for the Manager 6.0 server.
McAfee® Network Security Platform 6.1 Upgrade Guide
31
Page 32

4
Upgrading the Manager
Preparing for the upgrade
Minimum Recommended
OS Any of the following:
• Windows Server 2003 Standard Edition, SP2, English
OS, (32 or 64 bit)
• Windows Server 2008 R2 Standard Edition, English
OS, SP1 (64 bit)
• Windows Server 2003 R2 Standard Edition, Japanese
OS (32 or 64 bit)
• Windows Server 2008 R2 Standard Edition, Japanese
OS, SP1 (64 bit)
For 64-bit, only X64 architecture is supported.
Windows Server 2008 R2
Standard Edition, English or
JapaneseOS, (64 bit)
Memory
• 2GB or higher for 32-bit
4GB
• 4GB or higher for 64-bit
CPU Server model processor such as Intel Xeon Same
Disk space 40GB 80GB disk with 8MB memory
cache
Network 100Mbps card 10/100/1000Mbps card
Monitor 32-bit color, 1024 x 768 display setting 1280 x 1024
There could be numerous releases of Windows Server 2003 and Windows Server 2008, for various
languages. The Central Manager and Manager are supported only on the English and Japanese versions
of Standard Edition (SE).
You need to have Windows Administrator permission for the server machine.
The Troubleshooting Guide provides a number of pre-installation tips and suggestions with which
McAfee recommends you familiarize yourself before you begin your upgrade. If you run into any issues,
we suggest you to check the Troubleshooting Guide for a solution.
Manager license file requirement
From version 6.0.7.5, you do not require a license file to use the Central Manager or Manager.
However, you may want to make a copy of the license file used prior to the upgrade. You can find the
license file at: \Network Security <Manager> or <Central Manager> install directory>\App
\config\
Preparing for the upgrade
After you make sure you meet the requirements, prepare for the upgrade.
Before you begin the upgrade, make sure that no processes related to McAfee® Network Security
Platform (such as automated database archival) are scheduled during the upgrade time frame. Any such
concurrent activity will cause conflicts and result in upgrade failure.
32
McAfee® Network Security Platform 6.1 Upgrade Guide
Page 33

Upgrading the Manager
Preparing for the upgrade
Reviewing the Upgrade Considerations
Review this section carefully before you commence the upgrade process:
Manager upgrade downtime window
The time required to upgrade the Manager depends on the size of your deployment and the size of
your database. The Manager upgrade process alone can take an hour to complete.
• OS upgrade downtime: Manager 6.0 is supported on Windows Server 2008 R2 (Standard Edition) 64-bit
English and Japanese. If you plan to upgrade the OS, then factor this in when you estimate the
downtime. After you upgrade the Manager, you need to upgrade the Sensor software to 6.0 as well.
• How a Sensor functions during the upgrade downtime: While the Manager upgrades to 6.0, the Sensor (which
has not yet been upgraded, and which loses connectivity to the Manager during the Manager
upgrade) continues to inspect traffic and accumulate the latest alerts (up to 100,000 alerts) while
the Manager is offline during upgrade. Note that the Sensor sends these alerts to the Manager
when it re-establishes connectivity with the Manager.
• Additional downtime for NAC: If you use the NAC feature, then note that post-upgrade you might have to
re-configure some of your NAC settings. This could result in extended downtime for NAC.
4
Database backup (before and after upgrade)
It is critical that you perform a full backup of your database using the All Tables option both before
and after the upgrade. Backing up prior to upgrade enables you to roll back to your 5.1 version should
you encounter problems during upgrade. Backing up immediately following upgrade preserves your
upgraded tables and provides a baseline of the 6.0 database that you upgraded to. Importantly, when
you are backing up the database, there should not be any scheduled task running in the background.
See Backing up Network Security Platform data.
You cannot restore the database from a lower version Manager on a higher version Manager.
See also
Backing up Network Security Platform data on page 25
OS upgrade
As mentioned above, the 6.0 Manager server can be hosted on a Windows Server 2008 R2 Standard
Edition machine. However, it needs to be a 64-bit system. If you are currently using a 64-bit (X64
architecture) system, then you can upgrade the server OS as well during the 5.1 to 6.0 upgrade
window. In case of 32-bit systems, a hardware upgrade may be required. Two approaches to an OS
upgrade are discussed in Manager and OS upgrade.
See also
Manager and OS upgrade on page 37
Important note regarding I-series Sensors with NAC license
For I-series Sensors, the NAC feature is not supported in 6.0. Therefore, an I-series Sensor configured
for NAC in 5.1, does not enforce NAC when you upgrade the Manager to 6.0 and push the
configuration update to the Sensor. If you have I-series Sensors configured for NAC, and you want to
upgrade to 6.0, contact McAfee Support.
McAfee® Network Security Platform 6.1 Upgrade Guide
33
Page 34

4
Upgrading the Manager
Preparing for the upgrade
Changes in the NAC feature
In release 6.0, there are many enhancements to the NAC feature. Depending on your NAC
configuration, there could be a difference in NAC enforcement after you upgrade to 6.0. For example, a
host denied access as per your 5.1 configuration may be granted full access after you upgrade. So, it is
critical that you review the latest version of the NAC Configuration Guide to understand the effects of
these enhancements on your NAC implementation.
Note on Global Threat Intelligence and TrustedSource Intelligence
When you upgrade to or install Manager 6.0.7.x or above, it is automatically integrated with McAfee
Global Threat Intelligence to send your alert, general setup, and feature usage data to McAfee for
optimized protection. If you do not wish to send these data, then disable the integration with Global
Threat Intelligence. However, note that to be able to query TrustedSource for information on the
source or target host of an attack, you need to send at least your alert data summary to McAfee. For
details, see the Integration Guide.
Notes regarding User-defined signature
• Changes to the UDS feature: In 6.0, UDS is referred to as McAfee Custom Attacks. The UDS Editor is
called as Custom Attack Editor. The Editor interfaces are extensively changed in 6.0. However, the
UDS from 5.1 continue to function in the same way in 6.0.
Important points to note:
• In 6.0, you can create custom attacks in McAfee's format (same way you created UDS in 5.1) or
using the Snort Rules syntax.
• You can include or exclude a UDS (from now on, referred to as the McAfee Custom Attack) in
the policies. That is, you can retain a McAfee Custom Attack in the database but not include it in
the policies.
• At a Sensor level, you can choose to compile attacks from any of the following sets: McAfee
signature set, McAfee Custom Attacks, or Snort Custom Attacks.
For detailed information on Custom Attacks and the Custom Attack Editor, refer to the Custom
Attack Definitions Guide.
• In case of a heterogeneous Sensor environment, the Snort Rules custom attacks are applied
only to IPS Sensors that are on 6.0 software.
• McAfee Custom Attack verification: Previous versions of your McAfee Custom Attacks are "test compiled"
during upgrade to ensure there are no incompatibilities between your 5.1 McAfee Custom Attacks
(including the McAfee-supplied ones) and the current 6.0 McAfee signature set. If any such
incompatibilities exist, a fault is raised, which is visible in Operational Status. If you encounter
problems with a particular McAfee Custom Attack, you need to recreate it.
Changes regarding Alert Filter
Alert Filter is called Attack Filter in Network Security Platform 6.0, but the functionality is same.
Post-upgrade of the Sensor and the Manager, you can also specify the source and destination port
numbers for the filter. For details, see the IPS Configuration Guide.
Note regarding Network Security Platform extension on McAfee ePO
This note is relevant only if you have integrated the Manager with McAfee ePolicy Orchestrator
(McAfee ePO™).
If you have the Network Security Platform 5.1.x extension installed on McAfee ePO™, then note that a
direct upgrade of this extension to 6.0.x is not supported. Follow the steps below:
34
McAfee® Network Security Platform 6.1 Upgrade Guide
™
®
Page 35

Upgrading the Manager
Preparing for the upgrade
Task
1
Uninstall the 5.1.x extension installed on McAfee ePO™.
2
Download the Network Security Platform extension file (NSPExtension.zip) from the Manager and
install it on McAfee ePO™. For information, see the Integration Guide.
3
If you have the Host Intrusion Prevention extension installed on McAfee ePO™, you can configure
the integration between Network Security Platform and Host Intrusion Prevention. For information,
see the Integration Guide.
4
Note regarding Active Fail-Open Bypass Kits
This note is applicable only if you have Active Fail-Open Bypass Kits configured in your 5.1 setup.
Notes:
• In Network Security Platform 5.1, Active Fail-Open Bypass Kits are supported from release 5.1.11.38.
• In Network Security Platform 6.0, you can use Active Fail-Open Bypass Kits on M-2750, M-3050,
M-4050, M-6050, and M-8000 running on 6.0.7.x or above.
Note on Policy Editor
In release 6.0, the Policy Editor has been extensively enhanced. For details, see Addendum II to 6.0
Documentation.
Note on CLI commands
This note is applicable only for M-2750, M-3050, M-4050, M-6050, and M-8000 Sensors.
Prior to release 6.0.7.x, you use the following CLI commands to configure Layer 2 forward settings:
• layer2 forward tcp
• layer2 forward udp
• layer2 forward vlan
• layer2 forward clear
When you upgrade the Sensor to 6.0.7.x or above, the Manager captures these settings from the
Sensor and displays them in the Scanning Exceptions node. From then on you can modify these
settings only from the Scanning Exception node.
In an heterogeneous Sensor environment, you need to use the CLI commands for 5.1 Sensors, and
the Manager for 6.0 Sensors. For more information see Addendum II to 6.0 Documentation.
Also note that in release 6.0, some new CLI commands are available and some old ones have been
enhanced. For details, see Addendum II to 6.0 Documentation.
Backing up Network Security Platform data
Before you upgrade, back up your tables and save any McAfee Custom Attacks (formerly UDS) that
you have created. If you have a very large number of alerts and packet logs to upgrade, first consider
archiving and deleting any alert and packet log data that you do not need prior to creating your
database backup files.
Save your entire backup in a different location than the current Central Manager or Manager to prevent
data loss.
McAfee® Network Security Platform 6.1 Upgrade Guide
35
Page 36

4
Upgrading the Manager
MDR Manager upgrade
Performing a database backup
Back up your database BEFORE you upgrade. McAfee strongly recommends backing up All Tables and
archiving the alerts and packet logs.
Performing an All-Tables backup
The All Tables backup process is time consuming (based upon the size of your database); however, it
ensures the integrity of your existing data should you encounter any difficulties at any point during the
upgrade, or should you wish to return to your current version of the Central Manager/Manager. Note
that an All-Tables backup includes all Custom Attacks as well.
To perform an All-Tables backup:
Task
1
Navigate to <Central Manager/Manager install directory>\bin.
2
Execute the dbadmin.bat file.
The standalone tool opens.
3
Select All Tables as the Backup Type:
4
Type a Backup Filename. You can use alphanumeric characters including hyphens and underscores (for
example, backup_01-10-10).
5
Optionally type the Backup Directory where you want the backup to be stored. You can specify the
full-path to the Backup Directory or just the directory name.
If you do not specify a backup directory, then the backup is stored in the default backup directory
at <Central Manager/Manager install directory>\App\Backups.
6
Optionally type a description of your backup in Comments.
7
Click Backup. After a few moments, the following message appears: "Database backup successful."
You can see the backup information by clicking the DB Restore tab. In the backup directory, you will
find an XML file (JAR format) with the backup file name that you specified.
Backing up McAfee Custom Attacks
If you have McAfee Custom Attacks (that is, UDS), back them up prior to upgrade. The steps are
common for Central Manager and Manager. So, the term "Manager" in this section could refer to the
Central Manager or the Manager.
To back up the 5.1 UDS, execute the following from the Central Manager or Manager accordingly. For
example, if you are backing up the UDS from the Central Manager database, execute the following
from the Central Manager.
Task
1
Launch the User-Defined Signature Editor.
Go to root_admin_domain | IPS Settings | Advanced Policies | UDS Editor | Edit Signatures.
2
Select File | Save to File to save the UDS backup file at the required location.
MDR Manager upgrade
To upgrade the primary and secondary Managers configured for Manager Disaster Recovery (MDR):
36
McAfee® Network Security Platform 6.1 Upgrade Guide
Page 37

Upgrading the Manager
Manager and OS upgrade
Task
1
Using the Switch Over command, make the secondary Manager active.
2
Upgrade the primary to 6.0. See Stand-alone Manager upgrade for the steps.
3
Bring up the upgraded primary Manager.
The primary is up in standby mode.
4
Stop the secondary Manager.
5
Using the Switchback command, make the primary the active Manager.
6
Upgrade the secondary to 6.0.
7
Bring up the upgraded secondary Manager.
The secondary is up in standby mode.
If not done already, upgrade the signature set and the Sensor software. See Performing Signature
Set and Sensor Software Upgrade.
See also
Stand-alone Manager upgrade on page 39
Performing Signature Set and Sensor Software upgrade on page 3
4
Manager and OS upgrade
You can run the 6.0 Manager server on Windows Server 2008 R2 Standard Edition English or Japanese
or continue to use Windows Server 2003 (Standard Edition). However, to run the 6.0 Manager on
Windows Server 2008 R2 Standard Edition, the server must be a 64-bit system. Proceed further only if
you are planning to upgrade the OS as well, if not you can skip this section.
If you are planning an OS upgrade, then consider the two approaches discussed in this section. These
are based on whether you want to continue with your current hardware for 6.0. For example, if your
5.1 Manager server is a 64-bit system, then you may want to continue with the same hardware but
upgrade the OS and the Manager.
For information on how to upgrade the OS, refer to Microsoft's documentation.
Approach 1: Continuing with the 5.1 hardware
Important points regarding this approach are:
• It assumes that your 5.1 Manager server is a 64-bit system, and that it meets the requirements for
Windows Server 2008 R2 Standard Edition.
• A typical upgrade from Windows Server 2003 to Windows Server 2008 R2 Standard Edition can
take around an hour. So the Manager upgrade downtime window would extend by that much time.
The high-level steps involved in this approach are:
Task
1
Back up the 5.1 database. See Backing up Network Security Platform data.
2
Upgrade the Manager to 6.0. See Stand-alone Central Manager upgrade or Stand-alone Manager
upgrade as applicable.
McAfee® Network Security Platform 6.1 Upgrade Guide
37
Page 38

4
Upgrading the Manager
Manager and OS upgrade
3
Log on to the 6.0 Manager and check the Status page to ensure that the Manager is working fine.
If everything is working fine, it means that the Manager upgrade was successful.
4
Back up the 6.0 Manager database.
5
Upgrade the OS to Windows Server 2008 R2 Standard Edition.
6
After OS upgrade, log on to the Manager and check the Status page to ensure everything is
working fine.
Tasks
• Approach 2: Using a new hardware on page 38
See also
Backing up Network Security Platform data on page 25
Stand-alone Central Manager upgrade on page 28
Stand-alone Manager upgrade on page 39
Approach 2: Using a new hardware
Important points regarding this approach are:
• It assumes that you have a 64-bit system with Windows Server 2008 R2 Standard Edition installed.
• It assumes that your existing Manager server and the new machine meet the other requirements
discussed in Reviewing the upgrade requirements.
The high-level steps involved in this approach are:
Task
1
Upgrade the existing Manager to 6.0. See Stand-alone Manager upgrade.
2
Post-upgrade, back up the 6.0 database of the Manager. See Performing a database backup.
3
On the network, replace the existing Manager server with the new one.
Make sure that the IP address of the new Manager is the same as that of the existing one. If the IP
is different, then the Sensors cannot communicate with the new Manager machine. Then you need
to re-establish this communication from each Sensor.
4
On the new machine, install Manager 6.0. See the Installation Guide for information.
5
Restore the 6.0 database backup from the existing Manager on the new machine. For information
on how to restore a database, see the Manager Server Configuration Guide.
6
Install the Manager license file at <Network Security Manager installation directory\App\config>.
You should have copied the license file as described in Manager license file requirement.
From version 6.0.7.5, you do not require a license file to use the Manager.
7
Log on to the new Manager server and check the Status page to ensure everything is working fine.
See also
Reviewing the upgrade requirements on page 23
Stand-alone Manager upgrade on page 39
Performing a database backup on page 25
Manager license file requirement on page 32
38
McAfee® Network Security Platform 6.1 Upgrade Guide
Page 39

Stand-alone Manager upgrade
Before you upgrade the Manager to 6.0, make sure of the following:
• If you are using Central Manager, it must be upgraded to 6.0 before you upgrade the Manager.
• Your current Network Security Platform infrastructure meets all the requirements discussed in
Reviewing the upgrade requirements.
• You have reviewed and understood the implications of the upgrade considerations discussed in
Reviewing the upgrade considerations for the Manager.
• You have backed up your 5.1 Manager data. See Backing up Network Security Platform data.
• You have the 6.0 Manager installable file at hand. You can download it from the McAfee Update
Server. See Downloading the Manager/Central Manager executable, Installation Guide.
• You have your Manager MySQL root password available. You set this password when installing the
Manager.
• Stop all third-party applications. It is especially important that you stop any third-party application,
such as the arcSight agent, that communicates with the MySQL database. The Manager cannot
upgrade the database if MySQL is actively communicating with another application.
Upgrading the Manager
Stand-alone Manager upgrade
4
If this is an upgrade of a Manager in an MDR pair, then you should switch it to standby mode before
you upgrade. Make sure you are following the steps in MDR Manager upgrade.
To upgrade a stand-alone Manager:
Task
1
Stop the Manager service. Right-click on the Manager icon at the bottom-right corner of your
server and stop the service. Alternatively, go to Windows Control Panel | Administrative Tools | Services. Then
right-click on , and select Stop.
2
Stop the User Interface service using the same method as described in step 1.
3
Stop the Watchdog service using the same method as described in step 1.
Make sure the Database service remains started.
4
Exit the Manager tray from the Windows Task Bar.
5
Close all open applications. (If any application is interacting with Network Security Platform, your
installation may be unsuccessful.)
6
Move any 5.1 saved report files and alert archives from the server to some other location.
The reports are saved at <Manager install directory>\REPORTS folder. The alert archives are saved
at <Manager install directory>\alertarchival folder.
7
Run the 6.0 Manager executable.
8
Install the software as described in the Manager Installation Guide.
9
Run the two SQL scripts only if you are prompted to do so. See Running Additional Scripts.
The system prompts you only if there are 1 million or more, alerts or host events, in your Manager.
10
Open the Manager.
You may be requested to download the required version of Java Runtime Environment (JRE) if the
same or higher version is not present already.
McAfee® Network Security Platform 6.1 Upgrade Guide
39
Page 40

4
Upgrading the Manager
Stand-alone Manager upgrade
11
Log on to the Manager.
You can verify the version on the Log on page.
12
Check the Status page to ensure that the Manager database and the Sensors are up.
Now upgrade the signature set and the Sensor software. See Performing Signature Set and Sensor
Software Upgrade.
Tasks
• Running additional scripts on page 40
See also
Reviewing the upgrade requirements on page 31
Reviewing the Upgrade Considerations on page 33
Backing up Network Security Platform data on page 25
MDR Manager upgrade on page 36
Running additional scripts on page 40
Performing Signature Set and Sensor Software upgrade on page 3
Running additional scripts
When you install the 6.0 Manager, if there are 1 million or more, alerts or host events, in your current
Manager setup, you will be prompted to run two SQL scripts as described below.
Run alertproc_offline_1.sql and alertproc_offline_2.sql only if prompted to do so. The system prompts
you only when there are 1 million or more, alerts or host events, in the Manager database. If you run
these scripts when not prompted, you will receive SQL errors. In this case, contact McAfee Technical
Support with the details of the message.
Ensure that you run the sql scripts soon after the Manager upgrade is complete. McAfee recommends
that you select a relatively idle time to run the scripts to minimize the impact on performance.
Task
1
After a successful upgrade of the Manager to 6.0, check that it is up, Sensors are connected, and
alerts are generated.
2
Log in to MySQL by running:
\mysql\bin\mysql -u usr -ppwd -D db_name
3
In the MySQL shell, run:
mysql>source <manager install directory>/db/mysql/migrate/alertproc_offline_1.sql
If an SQL error message is displayed, stop proceeding further and contact McAfee Technical
Support with the details of the message.
4
Shut down the Manager.
40
McAfee® Network Security Platform 6.1 Upgrade Guide
Page 41

Upgrading the Manager
Stand-alone Manager upgrade
5
In the MySQL shell, run:
mysql>source <manager install directory>/db/mysql/migrate/alertproc_offline_2.sql
If an SQL error message is displayed, stop proceeding further and contact McAfee Technical
Support with the details of the message.
Utilities like db backup/restore/archival/purge cannot be run on your database before completing
step 5. This is because your Manager database will still be in transition at this stage of the upgrade.
6
Start the Manager.
Only after running the alertproc_offline_2.sql script, the Manager database upgrade is complete.
4
McAfee® Network Security Platform 6.1 Upgrade Guide
41
Page 42

4
Upgrading the Manager
Stand-alone Manager upgrade
42
McAfee® Network Security Platform 6.1 Upgrade Guide
Page 43

5
5
Performing Signature Set and Sensor
Software upgrade
This section contains information on how to upgrade the Sensors from 5.1 to 6.0.
Before you proceed with the Sensor software upgrade, you must upgrade the Manager to 6.0. See
Upgrading the Manager.
For I-series Sensors, the NAC feature is not supported in 6.0. So, an I-series Sensor configured for NAC
in 5.1, does not enforce NAC when you upgrade it to 6.0. If you have I-series Sensors configured for
NAC, and if you want to upgrade to 6.0, contact McAfee Support.
Contents
Difference between an update and an upgrade
Sensor upgrade requirements
Reviewing the upgrade considerations
Updating Sensor software image
Difference between an update and an upgrade
A software update is a minor release of device software. A device refers to a Sensor or an NTBA
Appliance as applicable. An upgrade indicates a major release and new feature set. These processes
are identical, and thus this section makes references to update and upgrade in an interchangeable
manner.
Any change to device software—whether update or upgrade—requires you to reboot the device.
Sensor upgrade requirements
This section details the requirements to upgrade the software of a Sensor from 5.1 to 6.0.
Minimum required Sensor software versions
To upgrade a Sensor to 6.0, its current software must be of the version below:
Sensor type Required software version
I-series Sensors 5.1.5.90 or above
M-1250 and M-1450 5.1.7.73 or above
McAfee® Network Security Platform 6.1 Upgrade Guide
43
Page 44

Performing Signature Set and Sensor Software upgrade
5
Reviewing the upgrade considerations
Sensor type Required software version
All M-series models except M-1250 and M-1450 5.1.7.74 or above
N-450 5.1.7.135 or above
License file requirement
If you plan to configure NAC on your M-series Sensors, then you need an add-on NAC license for each
Sensor that is used for NAC. This requirement does not apply to I-series because from release 6.0,
I-series Sensors do not support NAC. The N-450 does not require any license because it is exclusive
for NAC, which is its native functionality. Similarly, I-series Sensors do not need any licenses for IPS.
Reviewing the upgrade considerations
Review this section carefully before you commence the upgrade process:
Sensor downtime window
It could take around 15 minutes to upgrade a Sensor. Note that this could vary between deployments.
If you have a fail-open setup, then to minimize the downtime, perform the following steps, after the
Sensor software image is downloaded successfully and before a reboot is initiated:
• If you have gigabit ports connected for fail-open, disable the ports to force fail-open.
• If you have fiber ports configured for fail-open, disable the ports to force fail-open.
Miscellaneous important notes
It is very important that you review and understand the following before you proceed:
• Important note regarding I-series Sensors with NAC license
• Changes in the NAC feature
• Changes regarding Alert Filter
• Note on CLI commands
See also
Important note regarding I-series Sensors with NAC license on page 33
Changes regarding Alert Filter on page 34
Changes in the NAC feature on page 34
Note on CLI commands on page 35
Updating Sensor software image
Before you begin the Sensor software upgrade, make sure:
1
You have upgraded the corresponding Manager to release 6.0.
For information on Manager upgrade see, Upgrading the Manager.
2
Your Sensors meet the requirements mentioned in Sensor upgrade requirements.
3
You have read and understood the upgrade considerations discussed in Reviewing the upgrade
considerations (sensor).
44
McAfee® Network Security Platform 6.1 Upgrade Guide
Page 45

Performing Signature Set and Sensor Software upgrade
Updating Sensor software image
5
New Sensor software images are released periodically by McAfee and are available on McAfee
®
Network Security Platform Update Server to registered support customers.
You can update a Sensor image using any of the four methods illustrated below. These methods
include updating the signature sets as well.
Three of the methods involve updating your image using the Manager server:
1
You can use the Manager interface to download the Sensor image from the Network Security
Platform Update Server to the Manager server, and then upload the Sensor image to the Sensor.
2
If your Manager server is not connected to the Internet, you can download the Sensor image from
the Network Security Platform Update Server to any host, then import the Sensor image to the
Manager server. You can then download the Sensor image to the Sensor.
3
A variation on option 2: you can download the Sensor image from McAfee Network Security
Platform Update Server to any host, put it on a disk, take the disk to the Manager server, and then
import the image and download it to the Sensor.
4
However, you may prefer not to update Sensor software through the Manager, or you may
encounter a situation wherein you cannot do so. An alternate method is to download the software
image from the Update Server onto a TFTP server, and then download the image directly to the
Sensor using Sensor CLI commands. This process is described in this chapter as well.
Field Description
1 McAfee Update Server
2 Internet
3 Manager Server
4 PC/tftp server
5 Import/disk
6 Sensor
McAfee® Network Security Platform 6.1 Upgrade Guide
45
Page 46

5
Performing Signature Set and Sensor Software upgrade
Updating Sensor software image
See also
Upgrading the Manager on page 3
Sensor upgrade requirements on page 43
Reviewing the upgrade considerations on page 44
Sensor software upgrade: Manager vs. TFTP server
As indicated in the previous section, the Sensor software can be updated either from the Manager or
via a TFTP server. While both the methods are supported, if the Sensors are deployed inline in your
production network, McAfee recommends updating the Sensor software using the Manager interface for a major upgrade (for
example, from 5.1 to 6.0)
A Sensor reboot is required whether you do an upgrade using TFTP or from the Manager.
When updating a Sensor from the Manager interface, both the Sensor software and the signature set
are bundled together and transferred to the Sensor. The Sensor updates its Sensor software image,
and saves the bundled signature set. When the sensor is rebooted, it deletes the old signature set,
and applies the saved signature set that was received along with the Sensor software image.
When updating a Sensor via TFTP, only the Sensor software is transferred to the Sensor. Once the
Sensor software update is complete, reboot the sensor. On reboot, the Sensor deletes the currently
loaded signature set, and contacts the Manager for the latest signature set. Until the sensor receives
the signature set from the Manager, the Sensor cannot process traffic and raise alerts.
There will be a Sensor downtime during the Sensor software upgrade process. The downtime is longer
in case of an upgrade using TFTP [vs. when upgraded using the Manager] due to the additional time
required to download the signature set.
Fail-open kits reduce the downtime impact of reboot considerably.
See the following sections:
• Sensor Software and Signature Set Upgrade using the Manager
• Sensor software upgrade using a TFTP server
See also
Sensor Software and Signature Set Upgrade using Manager 6.0 on page 46
Sensor software upgrade using a TFTP server on page 48
Sensor Software and Signature Set Upgrade using Manager 6.0
Task
1
If you have not already done so, download the latest signature set from the McAfee Network
Security Update Server (Update Server). From the Resource Tree, go to Manager | Update Server |
Signature Sets. See the Manager Server Configuration Guide for details. For a list of currently
supported protocols, see KB61036 at mysupport.mcafee.com.
Do not push the signature set to your Sensors at this point; it will be sent with the Sensor software
in Step 4.
46
McAfee® Network Security Platform 6.1 Upgrade Guide
Page 47

Performing Signature Set and Sensor Software upgrade
2
If you had created McAfee Custom Attacks in the 5.1 Manager, make sure the required attack
Updating Sensor software image
definitions are included in the IPS policies in the 6.0 Manager.
• From the Resource Tree, go to root_admin_domain | IPS Settings | Policies.
• Select All-Inclusive With Audit and click View/Edit.
• In the Exploit Attacks tab of the IPS Policy Editor, select All Protocols and verify that the attack
definitions are present.
3
Download the most recent 6.0 Sensor software images from the Update Server onto the Manager.
• Go to Manager | Update Server | Software | Download Software.
• Select the applicable Sensor software version from the Software Available for Download section
and click Download.
4
To push the Sensor software to your Sensors, select Device List | Software Upgrade.
Software Upgrade window is displayed.
5
In the Download Software to Devices table, select the downloaded 6.0.x.x Sensor software image.
On the right-hand side, the Sensors to which the Sensor software version is relevant are selected.
Assume that the Sensor software that you selected on the left-hand side is applicable only to
M-1250 and M-1450 Sensors. Now, on the right-hand side, all active M-1250 and M-1450 Sensors
in your deployment are selected. You can now choose the specific M-1250 and M-1450 Sensors that
you want to upgrade.
5
6
Click Update.
Note that this will push the signature set as well as the software to the Sensors.
7
Wait for the push to complete. This process takes at least 5 minutes. To know when the process is
complete, log on to the Sensor and look for the following status by using the downloadstatus CLI
command:
Last Upgrade Status: Good
Last Update Time: (Time should reflect when the push is complete)
You will be prompted to reboot the Sensor upon completion of the Sensor software upgrade.
8
Reboot the Sensors by going to Device List | Sensor_Name | Reboot.
9
Once the reboot process is complete, verify the Sensor's operational status is Up; and that it comes
up with the latest software version as well as latest signature set by going to Device List | Sensor_Name
| Physical Device | Summary.
1
Use the Threat Analyzer to verify the performance of the Sensors.
This is to make sure the upgrade was successful. For information on how to check Sensor
performance from the Threat Analyzer, see Viewing Sensor performance statistics, System
Status Monitoring Guide.
If you have a failover pair configured, then both the Sensors forming the pair should be running on
the same Sensor software version. See Updating Sensor software in a failover pair.
See also
Updating Sensor software in a failover pair on page 50
McAfee® Network Security Platform 6.1 Upgrade Guide
47
Page 48

5
Performing Signature Set and Sensor Software upgrade
Updating Sensor software image
Sensor software upgrade using a TFTP server
To download a software image directly to the Sensor via a TFTP server, you must first download the
software image to your TFTP server.
See your TFTP server documentation for specific instructions on how to download the image to your
TFTP server.
Task
1
Download the software image from the Update Server to your TFTP server. This file is compressed
in a .jar file.
2
Rename the .jar file to .zip file.
3
Unzip the file using Winzip.
4
Extract the files to your TFTP boot folder [/tftpboot].
5
Once the image is on your TFTP server, upload the image from the TFTP server to the Sensor.
From your Sensor Console, perform the following steps:
1
Log on to the Sensor. The default username is admin and default password admin123.
McAfee strongly recommends you change the default password, in case you haven't done so
already.
2
Specify the IPv4 or IPv6 address of the TFTP server to identify it to the Sensor. At the prompt,
type: set tftpserver ip <A.B.C.D> For example, set tftpserver ip 192.34.2.8 where
<A.B.C.D> represents an IPv4 address. Or Specify an IPv6 address as given below: set
tftpserver ip <A:B:C:D:E:F:G:H> where <A:B:C:D:E:F:G:H> represents a 128-bit address
written as octet (eight groups) of four hexadecimal numbers, separated by colons. Each group (
A,B,C,D, etc.) represents a group of hexadecimal numbers between 0000-FFFF. For example,
set tftpserver ip 2001:0db8:8a2e:0000:0000:0000:0000:0111. If one or more four-digit
group(s) is 0000, the zeros may be omitted and replaced with two colons (::) For example, set
tftpserver ip 2001:0db8:8a2e::0111
3
Load the image file on the Sensor. At the prompt, type: loadimage <filename> For example,
loadimage sensorsw_2700_xxxx
4
A message appears when the image is loaded. To use the new software image, you must reboot
the Sensor. At the prompt, type: reboot You must confirm that you want to reboot.
After the reboot process is complete, the Sensor deletes the old signature set. Because the
signature set is incompatible with the current Manager version, the Sensor's System Health Status
on the CLI is displayed as "uninitialiazed."
48
McAfee® Network Security Platform 6.1 Upgrade Guide
Page 49

Performing Signature Set and Sensor Software upgrade
Updating Sensor software image
5
Then, the Sensor contacts the Manager for the latest signature set. After the signature set is
downloaded to the Sensor, its System Health Status is displayed as "good."
McAfee® Network Security Platform 6.1 Upgrade Guide
49
Page 50

5
Performing Signature Set and Sensor Software upgrade
Updating Sensor software image
6
Verify the Sensor's System Health Status is "good"; check the Sensor status from CLI by typing the
status command.
You can also check whether the Sensor is updated with the latest software version as well as latest
signature set by going to Device List | Sensor_Name | Summary.
1
Use the Threat Analyzer to verify the performance of the Sensors.
This is to make sure the upgrade was successful. For information on how to check Sensor
performance from the Threat Analyzer, see Viewing Sensor performance statistics, System
Status Monitoring Guide.
Updating Sensor software in a failover pair
Because each Sensor in a failover pair must be rebooted after the software update, it is important to
update the software in the correct order.
Task
1
Push the software to each of the Sensors that are in the failover pair. You can follow one of these
methods:
• Sensor Software and Signature Set Upgrade using the Manager.
• Sensor software upgrade using a TFTP server.
50
McAfee® Network Security Platform 6.1 Upgrade Guide
Page 51

Performing Signature Set and Sensor Software upgrade
2
Reboot the primary Sensor.
3
Wait for the primary Sensor to come back up.
4
Reboot the other Sensor in the pair.
1
Use the Threat Analyzer to verify the performance of the Sensors.
Updating Sensor software image
This is to make sure the upgrade was successful. For information on how to check Sensor
performance from the Threat Analyzer, see Viewing Sensor performance statistics, System
Status Monitoring Guide.
See also
Sensor Software and Signature Set Upgrade using Manager 6.0 on page 46
Sensor software upgrade using a TFTP server on page 48
5
McAfee® Network Security Platform 6.1 Upgrade Guide
51
Page 52

5
Performing Signature Set and Sensor Software upgrade
Updating Sensor software image
52
McAfee® Network Security Platform 6.1 Upgrade Guide
Page 53

6
6
Performing NTBA Appliance software
upgrade
You can upgrade your NTBA Appliances from an earlier version of 6.0 to the latest.
Before you begin:
• Make sure you have upgraded the Manager to the latest 6.0 version. See Upgrading the Manager.
• Make sure the NTBA Appliances are on 6.0.1.52 or above.
The upgraded process for an NTBA Appliance is very similar to that of a Sensor. So review Sensor
software upgrade: Manager vs. TFTP server and then choose one of the following methods:
• Sensor Software and Signature Set Upgrade using the Manager:
• In this section, read "Sensor" as "NTBA Appliance".
• Ignore the step related to McAfee Custom Attacks.
• The downloadstatus CLI command is not applicable to NTBA.
• Failover is not applicable to NTBA.
• Sensor Software and Signature Set Upgrade using the Manager:
• In this section, read "Sensor" as "NTBA Appliance".
McAfee® Network Security Platform 6.1 Upgrade Guide
53
Page 54

6
Performing NTBA Appliance software upgrade
54
McAfee® Network Security Platform 6.1 Upgrade Guide
Page 55

7
7
Information on downgrade
This chapter describes the task performed for downgrading. McAfee recommends that you read
through this chapter before you start to downgrade.
Task
1
Stop the Manager service.
Right-click on the Manager icon at the bottom-right corner of your server and stop the service.
Alternatively, go to Windows Control PanelAdministrative ToolsServices. Then right-click on , and select Stop.
2
Stop the User Interface service using the same method as described in step 1.
3
Stop the Watchdog service using the same method as described in step 1.
4
Stop the Database service.
5
Uninstall the 6.1 software that you upgraded to.
6
Copy the Manager license file from the <Network Security Platform install directory>\config folder
to a different location.
7
Delete the Network Security Platform install directory (including the MySQL install directory).
8
Re-install the earlier version of your choice (for example, 5.1).
9
In the Manager, place they the license file at <Network Security Platform install directory>\config
folder.
10
Restore the corresponding database backup. For example, if you had downgraded from 6.0 to 5.1,
then restore your 5.1 database backup.
Downgrade all the Managers prior to the Central Manager downgrade.
To downgrade Sensor software, see the relevant McAfee KnowledgeBase articles.
McAfee® Network Security Platform 6.1 Upgrade Guide
55
Page 56

7
Information on downgrade
56
McAfee® Network Security Platform 6.1 Upgrade Guide
Page 57

Index
0 10, 11, 17, 24, 32, 39
A
about this guide 5
C
conventions and icons used in this guide 5
D
documentation
audience for this guide 5
product-specific, finding 6
documentation (continued)
typographical conventions and icons 5
M
McAfee ServicePortal, accessing 6
S
ServicePortal, finding product documentation 6
T
Technical Support, finding product information 6
McAfee® Network Security Platform 6.1 Upgrade Guide
57
Page 58

700-2364-00
 Loading...