

Page 1

VirusScan® for NetApp
®
for use with ePolicy Orchestrator™ 3.0 Service Pack 1
version 7.1.0
Configuration Guide
Revision 1.0
Page 2

COPYRIGHT
Copyright © 2003 Networks Associates Technology, Inc. All Rights Reserved. No part of this publication may be reproduced, transmitted, transcribed, stored in a
retrieval system, or translated into any language in any form or by any means without the written permission of Networks Associates Technology, Inc., or its
suppliers or affiliate companies. To obtain this permission, write to the attention of the Network Associates legal department at: 5000 Headquarters Drive, Plano,
Texas 75024, or call +1-972-963-8000.
TRADEMARK ATTRIBUTIONS
Active Firewall, Active Security, Active Security (in Katakana), ActiveHelp, ActiveShield, AntiVirus Anyware and design, Appera, AVERT, Bomb Shelter, Certified Network
Expert, Clean-Up, CleanUp Wizard, ClickNet, CNX, CNX Certification Certified Network Expert and design, Covert, Design (stylized N), Disk Minder, Distributed Sniffer System,
Distributed Sniffer System (in Katakana), Dr Solomon’s, Dr Solomon’s label, E and Design, Entercept, Enterprise SecureCast, Enterprise SecureCast (in Katakana), ePolicy
Orchestrator, Event Orchestrator (in Katakana), EZ SetUp, First Aid, ForceField, GMT, GroupShield, GroupShield (in Katakana), Guard Dog, HelpDesk, HelpDesk IQ,
HomeGuard, Hunter, Impermia, InfiniStream, Intrusion Prevention Through Innovation, IntruShield, IntruVert Networks, LANGuru, LANGuru (in Katakana), M and design,
Magic Solutions, Magic Solutions (in Katakana), Magic University, MagicSpy, MagicTree, McAfee, McAfee (in Katakana), McAfee and design, McAfee.com, MultiMedia Cloaking,
NA Network Associates, Net Tools, Net Tools (in Katakana), NetAsyst, NetCrypto, NetOctopus, NetScan, NetShield, NetStalker, Network Associates, Network Performance
Orchestrator, NetXray, NotesGuard, nPO, Nuts & Bolts, Oil Change, PC Medic, PCNotary, PortalShield, Powered by SpamAssassin, PrimeSupport, Recoverkey, Recoverkey –
International, Registry Wizard, Remote Desktop, ReportMagic, RingFence, Router PM, Safe & Sound, SalesMagic, SecureCast, SecureSelect, SecurityShield, Service Level
Manager, ServiceMagic, SmartDesk, Sniffer, Sniffer (in Hangul), SpamKiller, SpamAssassin, Stalker, SupportMagic, ThreatScan, TIS, TMEG, Total Network Security, Total
Network Visibility, Total Network Visibility (in Katakan a), Total Service Desk, Total Virus D efense, Trusted Mail , UnInstal ler, VIDS, Virex, Virus Forum, ViruScan, VirusScan,
WebScan, WebShield, WebShield (in Katakana), WebSniffer, WebStalker, WebWall, What's The State Of Your IDS?, Who’s Watching Your Network, WinGauge, Your E-Business
Defender, ZAC 2000, Zip Manager are registered trademarks or trademarks of Network Associates, Inc. and/or its affiliates in the US and/or other countries. Sniffer®
brand products are made only by Network Associates, Inc. All other registered and unregistered trademarks herein are the sole property of their re spectiv e o wne rs.
LICENSE INFORMATION
License Agreement
NOTICE TO ALL USERS: CAREFULLY READ THE APPROPRIATE LEGAL AGREEMENT CORRESPONDING TO THE LICENSE YOU PURCHASED, WHICH SETS FORTH
THE GENERAL TERMS AND CONDITIONS FOR THE USE OF THE LICENSED SOFTWARE. IF YOU DO NOT KNOW WHICH TYPE OF LICENSE YOU HAVE ACQUIRED,
PLEASE CONSULT THE SALES AND OTHER RELATED LICENSE GRANT OR PURCHASE ORDER DOCUMENTS THAT ACCOMPANIES YOUR SOFTWARE PACKAGING
OR THAT YOU HAVE RECEIVED SEPARATELY AS PART OF THE PURCHASE (AS A BOOKLET, A FILE ON THE PRODUCT CD, OR A FILE AVAILABLE ON THE WEB SITE
FROM WHICH YOU DOWNLOADED THE SOFTWARE PACKAGE). IF YOU DO NOT AGREE TO ALL OF THE TERMS SET FORTH IN THE AGREEMENT, DO NOT INSTALL
THE SOFTWARE. IF APPLICABLE, YOU MAY RETURN THE PRODUCT TO NETWORK ASSOCIATES OR THE PLACE OF PURCHASE FOR A FULL REFUND.
Attributions
This product includes or may include:
Software developed by the OpenSSL Project for use in the OpenSSL Toolkit (http://www.openssl.org/).
Cryptographic software written by Eric A. Young and software written by Tim J. Hudson.
Some software programs that are licensed (or sublicensed) to the user under the GNU General Public License (GPL) or other similar Free Software licenses which, among other
rights, permit the user to copy, modify and redistribute certain programs, or portions thereof, and have access t o the source code. The GPL requires that f or any software covered
under the GPL which is distributed to someone in an executable binary format, that the source code also be made available to those users. For any such software covered under
the GPL, the source code is made available on this CD. If any Free Software licenses require that Network Associates provide rights to use, copy or modify a software program
that are broader than the rights granted in this agreement, then such rights shall take precedence over the rights and restrictions herein.
Software originally written by Henry Spencer, Copyright 1992, 1993, 1994, 1997 Henry Spencer.
Software originally written by Robert Nordier, Copyright © 1996-7 Robert Nordier. All rights reserved.
Software written by Douglas W. Sauder.
Software developed by the Apache Software Foundation (http://www.apache.org/).
International Components for Unicode (“ICU”) Copyright © 1995-2002 International Business Machines Corporation and others. All rights reserved.
Software developed by CrystalClear Software, Inc., Copyright © 2000 CrystalClear Software, Inc.
FEAD® Optimizer® technology, Copyright Netopsystems AG, Berlin, Germany.
Outside In® Viewer Technology © 1992-2001 Stellent Chicago, Inc. and/or Outside In® HTML Export, © 2001 Stellent Chicago, Inc.
Software copyrighted by Thai Open Source Software Center Ltd. and Clark Cooper, © 1998, 1999, 2000.
Software copyrighted by Expat maintainers.
Software copyrighted by The Regents of the University of California, © 1989.
Software copyrighted by Gunnar Ritter.
Software copyrighted by Sun Microsystems®, Inc.
Software copyrighted by Gisle Aas. All rights reserved, © 1995-2003.
Software copyrighted by Michael A. Chase, © 1999-2000.
Software copyrighted by Neil Winton, © 1995-1996.
Software copyrighted by RSA Data Security, Inc., © 1990-1992.
Software copyrighted by Sean M. Burke, © 1999, 2000.
Software copyrighted by Martijn Koster, © 1995.
Software copyrighted by Brad Appleton, © 1996-1999.
Software copyrighted by Michael G. Schwern, © 2001.
Software copyrighted by Graham Barr, © 1998.
Software copyrighted by Larry Wall and Clark Cooper, © 1998-2000.
Software copyrighted by Frodo Looijaard, © 1997.
Issued DECEMBER 2003 / VirusScan® for NetApp® software version 7.1.0
DOCUMENT BUILD 003-EN
Page 3

Contents
Preface . . . . . . . . . . . . . . . . . . . . . . . . . . . . . . . . . . . . . . . . . . . . . . . 5
Audience . . . . . . . . . . . . . . . . . . . . . . . . . . . . . . . . . . . . . . . . . . . . . . . . . . . . . . . . . . . . . . . 5
Conventions . . . . . . . . . . . . . . . . . . . . . . . . . . . . . . . . . . . . . . . . . . . . . . . . . . . . . . . . . . . . 6
Getting information . . . . . . . . . . . . . . . . . . . . . . . . . . . . . . . . . . . . . . . . . . . . . . . . . . . . . . . 7
Contacting McAfee Security & Network Associates . . . . . . . . . . . . . . . . . . . . . . . . . . . . . . . 8
1 Configuring VirusScan for NetApp 7.1.0 . . . . . . . . . . . . . . . . . . . . 9
Adding the VirusScan for NetApp .NAP file . . . . . . . . . . . . . . . . . . . . . . . . . . . . . . . . . . . . 10
Accessing the VirusScan for NetApp policy pages . . . . . . . . . . . . . . . . . . . . . . . . . . . . . . 12
Setting policies for the product . . . . . . . . . . . . . . . . . . . . . . . . . . . . . . . . . . . . . . . . . . . . . 13
Setting general policies . . . . . . . . . . . . . . . . . . . . . . . . . . . . . . . . . . . . . . . . . . . . . . . 14
General tab . . . . . . . . . . . . . . . . . . . . . . . . . . . . . . . . . . . . . . . . . . . . . . . . . . . . 15
Messages tab . . . . . . . . . . . . . . . . . . . . . . . . . . . . . . . . . . . . . . . . . . . . . . . . . . 16
Reports tab . . . . . . . . . . . . . . . . . . . . . . . . . . . . . . . . . . . . . . . . . . . . . . . . . . . . 17
Setting policies for default processes . . . . . . . . . . . . . . . . . . . . . . . . . . . . . . . . . . . . 18
Processes tab . . . . . . . . . . . . . . . . . . . . . . . . . . . . . . . . . . . . . . . . . . . . . . . . . . 19
Detection tab . . . . . . . . . . . . . . . . . . . . . . . . . . . . . . . . . . . . . . . . . . . . . . . . . . . 20
Advanced tab . . . . . . . . . . . . . . . . . . . . . . . . . . . . . . . . . . . . . . . . . . . . . . . . . . 21
Actions tab . . . . . . . . . . . . . . . . . . . . . . . . . . . . . . . . . . . . . . . . . . . . . . . . . . . . 22
Setting policies for low-risk processes . . . . . . . . . . . . . . . . . . . . . . . . . . . . . . . . . . . . 23
Use different settings for low-risk processes . . . . . . . . . . . . . . . . . . . . . . . . . . . 24
Processes tab for low-risk processes . . . . . . . . . . . . . . . . . . . . . . . . . . . . . . . . 25
Detection tab . . . . . . . . . . . . . . . . . . . . . . . . . . . . . . . . . . . . . . . . . . . . . . . . . . . 26
Advanced tab . . . . . . . . . . . . . . . . . . . . . . . . . . . . . . . . . . . . . . . . . . . . . . . . . . 27
Actions tab . . . . . . . . . . . . . . . . . . . . . . . . . . . . . . . . . . . . . . . . . . . . . . . . . . . . 27
Setting policies for high-risk processes . . . . . . . . . . . . . . . . . . . . . . . . . . . . . . . . . . . 28
Use different settings for high-risk processes . . . . . . . . . . . . . . . . . . . . . . . . . . 29
Processes tab for high-risk processes . . . . . . . . . . . . . . . . . . . . . . . . . . . . . . . 30
Detection tab . . . . . . . . . . . . . . . . . . . . . . . . . . . . . . . . . . . . . . . . . . . . . . . . . . . 31
Advanced tab . . . . . . . . . . . . . . . . . . . . . . . . . . . . . . . . . . . . . . . . . . . . . . . . . . 32
Actions tab . . . . . . . . . . . . . . . . . . . . . . . . . . . . . . . . . . . . . . . . . . . . . . . . . . . . 32
Setting user interface policies . . . . . . . . . . . . . . . . . . . . . . . . . . . . . . . . . . . . . . . . . . 33
Configuration Guide iii
Page 4

Contents
Display Options tab . . . . . . . . . . . . . . . . . . . . . . . . . . . . . . . . . . . . . . . . . . . . . . 34
Password Options tab . . . . . . . . . . . . . . . . . . . . . . . . . . . . . . . . . . . . . . . . . . . . 36
Setting policies for Alert Manager Alerts . . . . . . . . . . . . . . . . . . . . . . . . . . . . . . . . . . 37
Alert Manager Alerts tab . . . . . . . . . . . . . . . . . . . . . . . . . . . . . . . . . . . . . . . . . . 37
Setting NetApp policies . . . . . . . . . . . . . . . . . . . . . . . . . . . . . . . . . . . . . . . . . . . . . . . 38
Enforcing policies . . . . . . . . . . . . . . . . . . . . . . . . . . . . . . . . . . . . . . . . . . . . . . . . . . . . . . . 40
Creating and configuring tasks . . . . . . . . . . . . . . . . . . . . . . . . . . . . . . . . . . . . . . . . . . . . . 40
On-demand scan tasks . . . . . . . . . . . . . . . . . . . . . . . . . . . . . . . . . . . . . . . . . . . . . . . 41
Creating a new on-demand scan task . . . . . . . . . . . . . . . . . . . . . . . . . . . . . . . . 41
Configuring the on-demand scan task settings . . . . . . . . . . . . . . . . . . . . . . . . . 42
Where tab . . . . . . . . . . . . . . . . . . . . . . . . . . . . . . . . . . . . . . . . . . . . . . . . . 43
Detection tab . . . . . . . . . . . . . . . . . . . . . . . . . . . . . . . . . . . . . . . . . . . . . . 44
Advanced tab . . . . . . . . . . . . . . . . . . . . . . . . . . . . . . . . . . . . . . . . . . . . . . 45
Actions tab . . . . . . . . . . . . . . . . . . . . . . . . . . . . . . . . . . . . . . . . . . . . . . . . 46
Reports tab . . . . . . . . . . . . . . . . . . . . . . . . . . . . . . . . . . . . . . . . . . . . . . . . 47
Task tab . . . . . . . . . . . . . . . . . . . . . . . . . . . . . . . . . . . . . . . . . . . . . . . . . . 48
Update tasks . . . . . . . . . . . . . . . . . . . . . . . . . . . . . . . . . . . . . . . . . . . . . . . . . . . . . . . 49
Creating a new update task . . . . . . . . . . . . . . . . . . . . . . . . . . . . . . . . . . . . . . . 49
Configuring the update task settings . . . . . . . . . . . . . . . . . . . . . . . . . . . . . . . . . 50
Mirror tasks . . . . . . . . . . . . . . . . . . . . . . . . . . . . . . . . . . . . . . . . . . . . . . . . . . . . . . . . 51
Creating a new mirror task . . . . . . . . . . . . . . . . . . . . . . . . . . . . . . . . . . . . . . . . 51
Configuring the mirror task settings . . . . . . . . . . . . . . . . . . . . . . . . . . . . . . . . . 52
Scheduling tasks . . . . . . . . . . . . . . . . . . . . . . . . . . . . . . . . . . . . . . . . . . . . . . . . . . . . . . . . 52
Task tab . . . . . . . . . . . . . . . . . . . . . . . . . . . . . . . . . . . . . . . . . . . . . . . . . . . . . . 53
Schedule tab . . . . . . . . . . . . . . . . . . . . . . . . . . . . . . . . . . . . . . . . . . . . . . . . . . . 54
iv VirusScan® for NetApp® software version 7.1.0
Page 5

Preface
Audience
This guide provides you with the information that you need to configure McAfee®
VirusScan
version 3.0 Service Pack 1.
VirusScan for NetApp 7.1.0 installs on scanner-servers. We do not support
deploying the product using ePolicy Orchestrator.
The following information is provided in this guide:
Installing the VirusScan for NetApp 7.1.0 Network Associates Package (.NAP)
files.
Configuring VirusScan for NetApp policies.
Creating, configuring, and scheduling tasks from the ePolicy Orchestrator
console.
This information is intended primarily for network administrators who are
responsible for their company’s anti-virus and security program in an
environment that includes one or more NetApp
®
for NetApp® software version 7.1.0 with ePolicy Orchestrator™
®
filers.
Configuration Guide 5
Page 6

Preface
Conventions
This guide uses the following conventions:
Bold
All words from the user interface, including options, menus,
buttons, and dialog box names.
Example
Type the User name and Password of the desired account.
Courier
The path of a folder or program; a web address (URL); text that
represents something the user types exactly (for example, a
command at the system prompt).
Examples
The default location for the program is:
C:\Program Files\Network Associates\VirusScan
Visit the Network Associates web site at:
http://www.networkassociates.com
Run this command on the client computer:
C:\SETUP.EXE
Italic For emphasis or when introducing a new term; for names of
product manuals and topics (headings) within the manuals.
Example
Refer to the VirusScan Enterprise Product Guide for more
information.
<
TERM> Angle brackets enclose a generic term.
Example
In the console tree under ePolicy Orchestrator, right-click
SERVER>.
<
NOTE Supplemental information; for example, an alternate method of
executing the same command.
WARNING
Important advice to protect a user, computer system, enterprise,
software installation, or data.
6 VirusScan® for NetApp® software version 7.1.0
Page 7

Getting information
Getting information
Installation Guide *^
Product Guide *
Help §
Release Guide *
Configuration Guide *
Implementation Guide *
Release Notes ‡
System requirements and instructions for installing and starting the software.
VirusScan for NetApp 7.1.0 Installation Guide
ePolicy Orchestrator 3.0. Installation Guide
Product introduction and features, detailed instructions for configuring the
software, information on deployment, recurring tasks, and operating procedures.
VirusScan for NetApp 7.1.0 Product Guide
ePolicy Orchestrator 3.0. Product Guide
Alert Manager
™
Product Guide
High-level and detailed information on configuring and using the software.
What’s This? field-level help.
High-level description of new a nd changed features f or this versio n of th e product.
For use with ePolicy Orchestrator™. Procedures for configuring, deploying, and
managing your McAfee Security product through ePolicy Orchestrator
management software.
Supplemental information for product features, tools, and components.
ReadMe. Product information, resolved issues, any known issues, and
last-minute additions or changes to the product or its documentation.
Contacts ‡
Contact information for McAfee Security and Network Associates services and
resources: technical support, customer service, AVERT (Anti-Virus Emergency
Response Team), beta program, and training. This file also includes phone
numbers, street addresses, web addresses, and fax numbers for Network
Associates offices in the United States and around the world.
* An Adobe Acrobat .PDF file on the product CD or the McAfee Security download site.
^ A printed manual that accompanies the product CD. Note: Some language manuals may be available only as a .PDF file.
‡ Text files included with the software application and on the product CD.
§ Help accessed from the software application: Help menu and/or Help button for page-level help; right-click option for What’s
This? help.
Configuration Guide 7
Page 8

Preface
Contacting McAfee Security & Network Associates
Technical Support
Home Page http://www.networkassociates.com/us/support/
KnowledgeBase Search https://knowledgemap.nai.com/phpclient/homepage.aspx
PrimeSupport Service Portal * https://mysupport.nai.com
McAfee Security Beta Program http://www.networkassociates.com/us/downloads/beta/
Security Headquarters — AVERT (Anti-Virus Emergency Response Team)
Home Page http://www.networkassociates.com/us/security/home.asp
Virus Information Library http://vil.nai.com
Submit a Sample —
AVERT WebImmune
AVERT DAT Notification
Service
Download Site
Home Page http://www.networkassociates.com/us/downloads/
DAT File and Engine Updates http://www.networkassociates.com/us/downloads/updates/
Product Upgrades * https://secure.nai.com/us/forms/downloads/upgrades/login.asp
Training
McAfee Security University http://www.networkassociates.com/us/services/education/mcafee/univer
Network Associates Customer Service
E-mail services_corporate_division@nai.com
Web http://www.networkassociates.com/us/index.asp
US, Canada, and Latin America toll-free:
https://www.webimmune.net/default.asp
http://vil.nai.com/vil/join-DAT-list.asp
ftp://ftp.nai.com/pub/antivirus/datfiles/4.x
sity.htm
Phone +1-888-VIRUS NO or +1-888-847-8766
For additional information on contacting Network Associates and McAfee Security— including toll-free
numbers for other geographic areas — see the Contact file that accompanies this product release.
*
Logon credentials required.
8 VirusScan® for NetApp® software version 7.1.0
Monday – Friday, 8 a.m. – 8 p.m., Central Time
Page 9

Configuring VirusScan for
NetApp 7.1.0
You can configure VirusScan for NetApp policies, create tasks, and schedule tasks
from the ePolicy Orchestrator console.
These topics are included in this section:
Adding the VirusScan for NetApp .NAP file on page 10.
Accessing the VirusScan for NetApp policy pages on page 12.
Setting policies for the product on page 13.
Enforcing policies on page 40.
Creating and configuring tasks on page 40.
Scheduling tasks on page 52.
1
Configuration Guide 9
Page 10

Configuring VirusScan for NetApp 7.1.0
Adding the VirusScan for NetApp .NAP file
Before configuring VirusScan for NetApp, you must add the VirusScan for
NetApp .
1 Log on to the ePolicy Orchestrator server with administrator rights.
2 Open the Configuration Wizard using one of these methods:
NAP file to the Repository.
In the console tree under ePolicy Orchestrator, right-click Repository, then
select
Configure Repository.
In the right pane under AutoUpdate Tasks, select Check in NAP.
Figure 1-1. Configure Repository
10 VirusScan® for NetApp® software version 7.1.0
Page 11
Adding the VirusScan for NetApp .NAP file
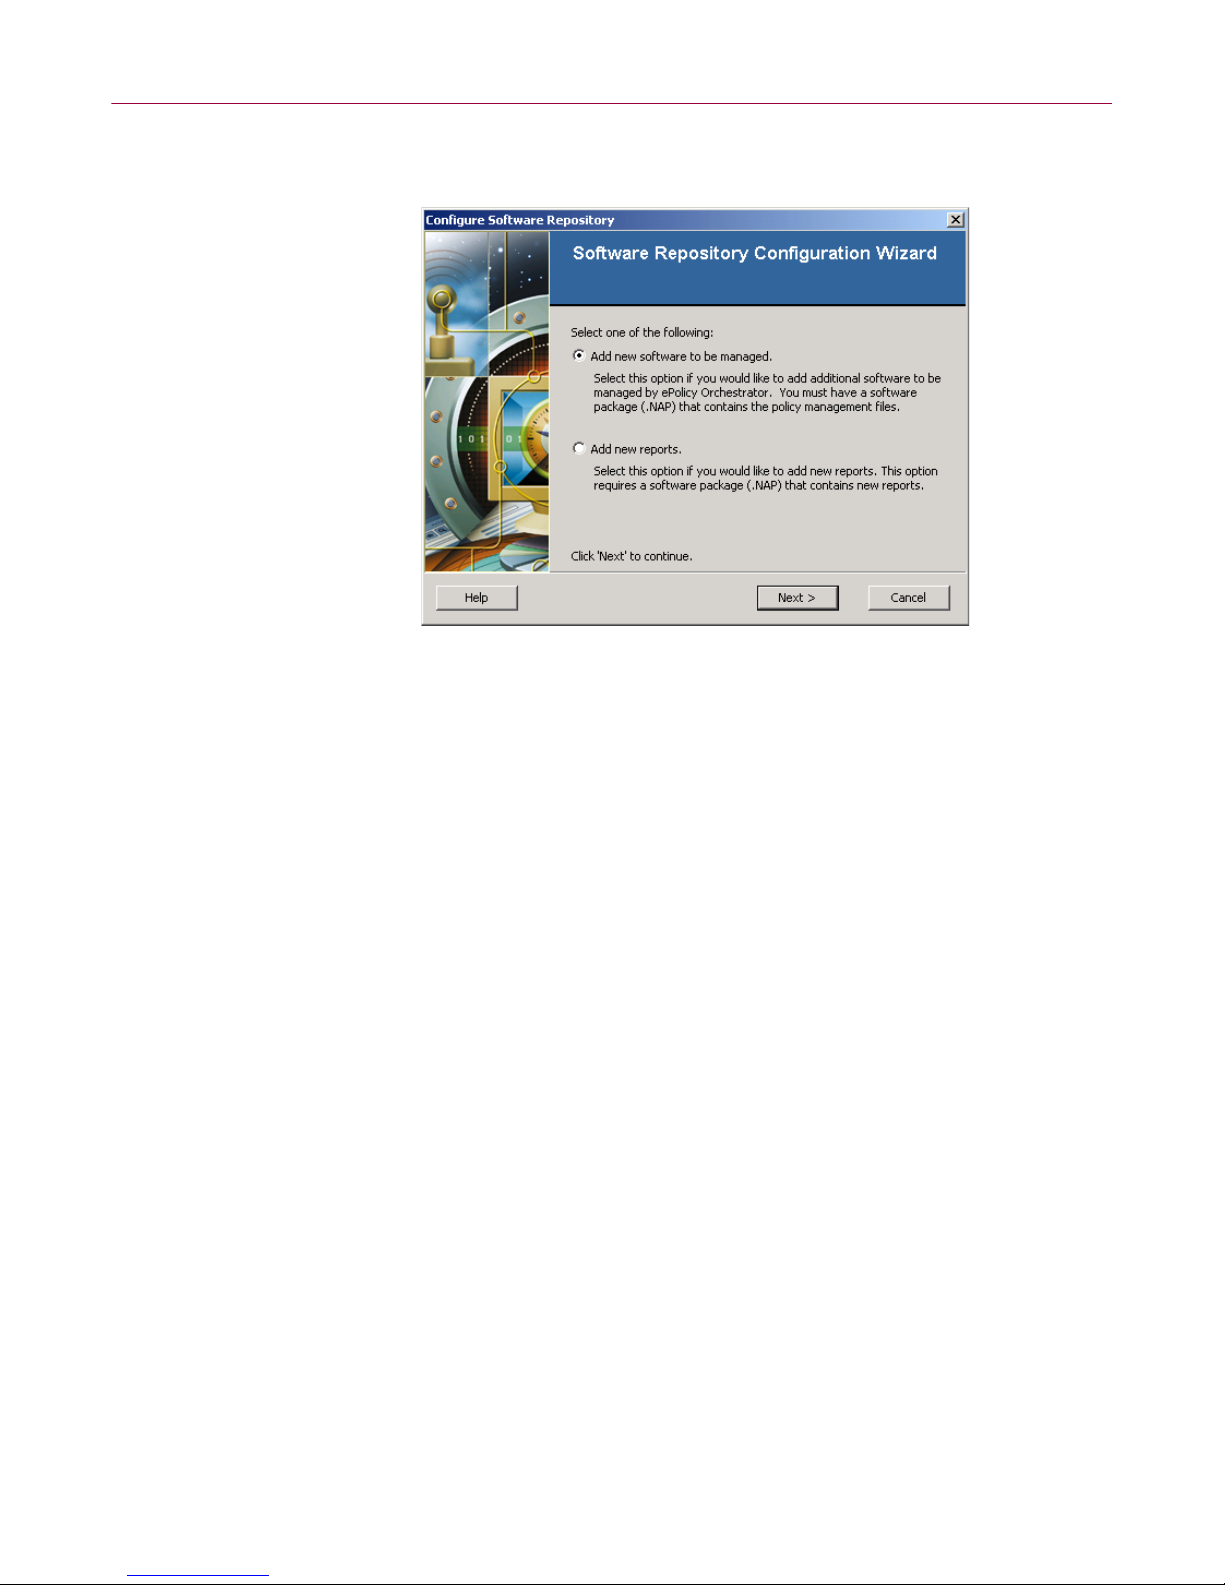
The Software Repository Configura tio n W izar d dialog box appears.
Figure 1-2. Configure Software Repository
3 Select Add new software to be managed, then click Next to open the Select a
Software Package
4 Locate and select the VNA710.NAP file.
5 Click Open to add the file to the Repository.
6 Click OK when complete.
dialog box.
Configuration Guide 11
Page 12
Configuring VirusScan for NetApp 7.1.0
Accessing the VirusScan for NetApp policy pages
To locate policies for VirusScan for NetApp:
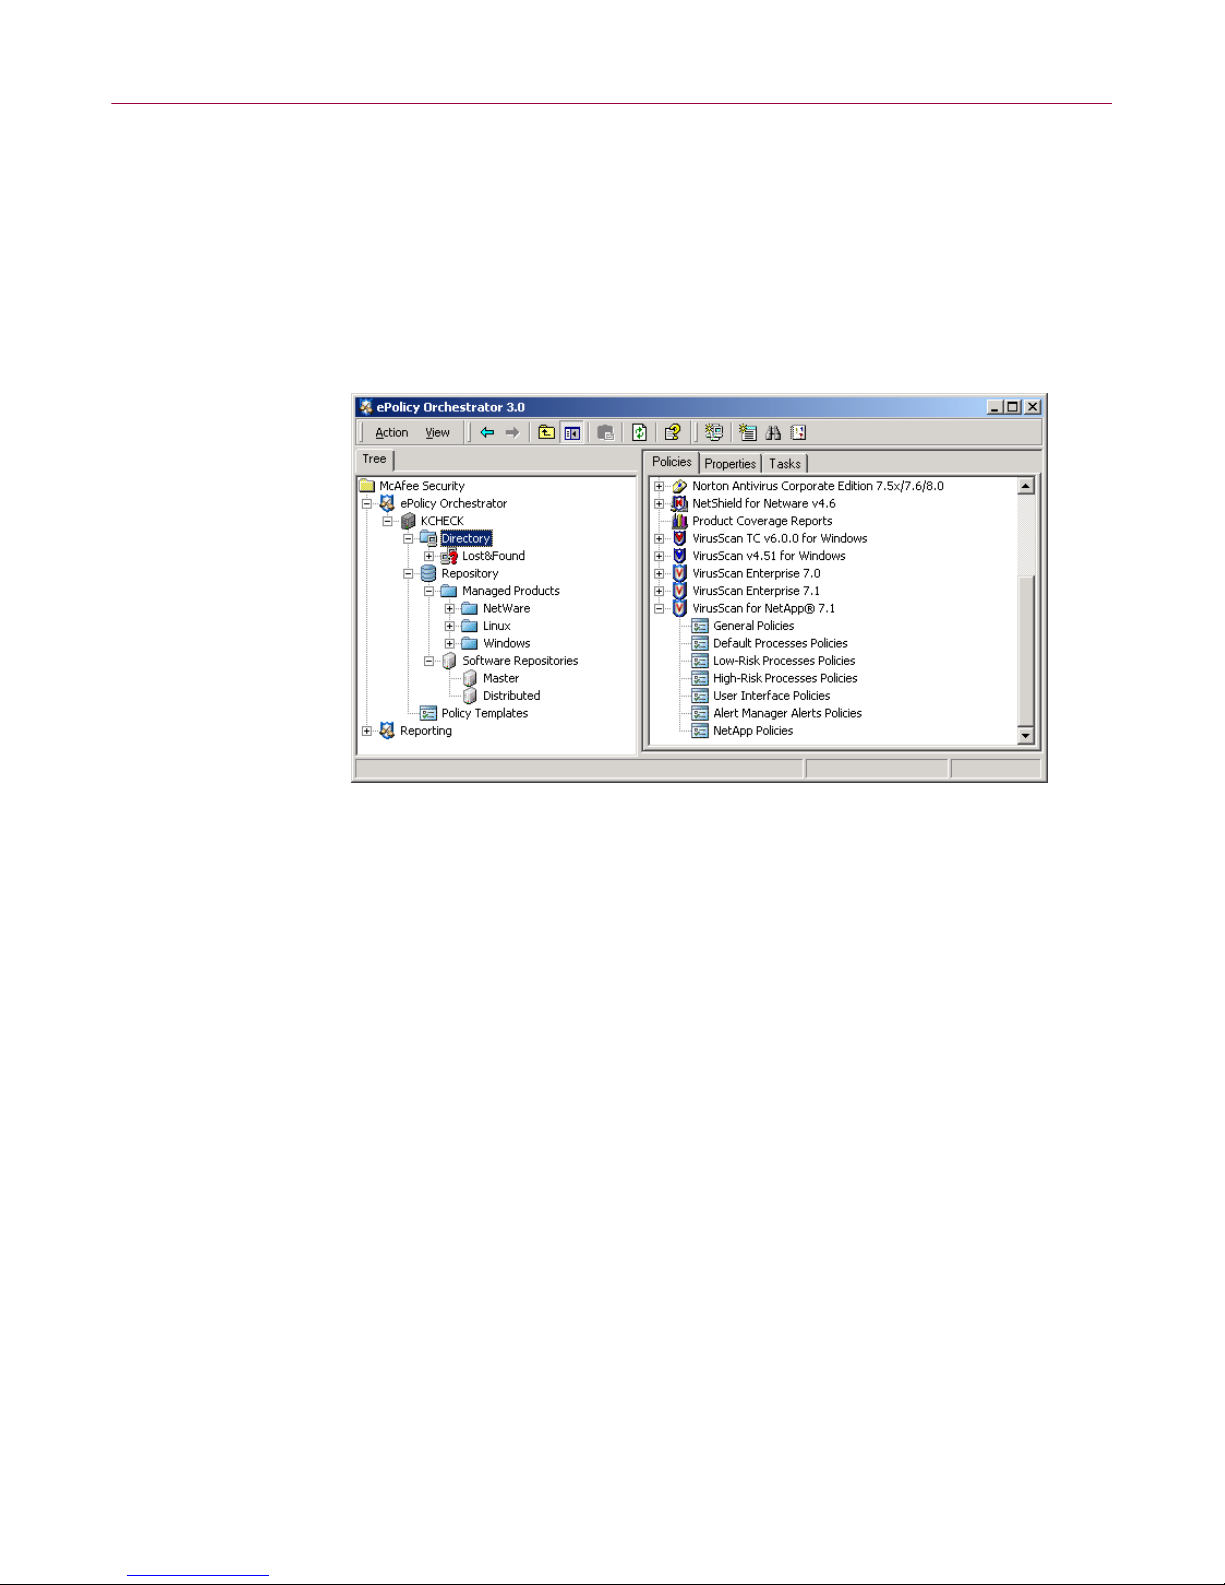
1 Log on to the ePolicy Orchestrator server with administrator rights.
2 In the console tree under ePolicy Orchestrator | Directory, select the site, group,
single computer, or the entire
Directory.
Figure 1-3. VirusScan for NetApp — Policies tab
Policies, Properties, and Tasks tabs appear in the upper details pane.
The
3 Select the Policies tab in the upper details pane, then expand VirusScan for
NetApp 7.1
4 Select an item under VirusScan for NetApp 7.1 to display its policy pages.
.
12 VirusScan® for NetApp® software version 7.1.0
Page 13

Setting policies for the product
Configuring VirusScan for NetApp policies from the ePolicy Orchestrator console
allows you to enforce, across groups of computers, the options that define how all
tasks and permissions are configured.
For information regarding policies and how they are enforced, see the ePolicy
Orchestrator 3.0 product documentation.
Before configuring any policies, select the group of computers in the console tree
for which you want to set policies.
The VirusScan for NetApp 7.1.0 policy tabs, on which you can set VirusScan for
NetApp policies, are nearly identical to the dialog boxes and their tabs in the
VirusScan Console. For complete information about the options that you can set for
VirusScan for NetApp, refer to the VirusScan for NetApp 7.1.0 Product Guide.
Once you have configured and saved the desired policy options, you must enforce
the policies to make them available to the ePolicy Orchestrator agent. For more
information, see Enforcing policies on page 40.
Setting policies for the product
These topics are included in this section:
Setting general policies on page 14.
Setting policies for default processes on page 18.
Setting policies for low-risk processes on page 23.
Setting policies for high-risk processes on page 28.
Setting user interface policies on page 33.
Setting policies for Alert Manager Alerts on page 37.
Setting NetApp policies on page 38.
Configuration Guide 13
Page 14

Configuring VirusScan for NetApp 7.1.0
Setting general policies
The options on the General Policies tabs apply to default, low-risk, and high-risk
processes for on-access scanning. See the VirusScan for NetApp 7.1.0 Product Guide
for more information about low-risk and high-risk processes.
Policies can be configured on these tabs:
General tab on page 15.
Messages tab on page 16.
Reports tab on page 17.
14 VirusScan® for NetApp® software version 7.1.0
Page 15
Setting policies for the product
General tab
Specify the general policies.
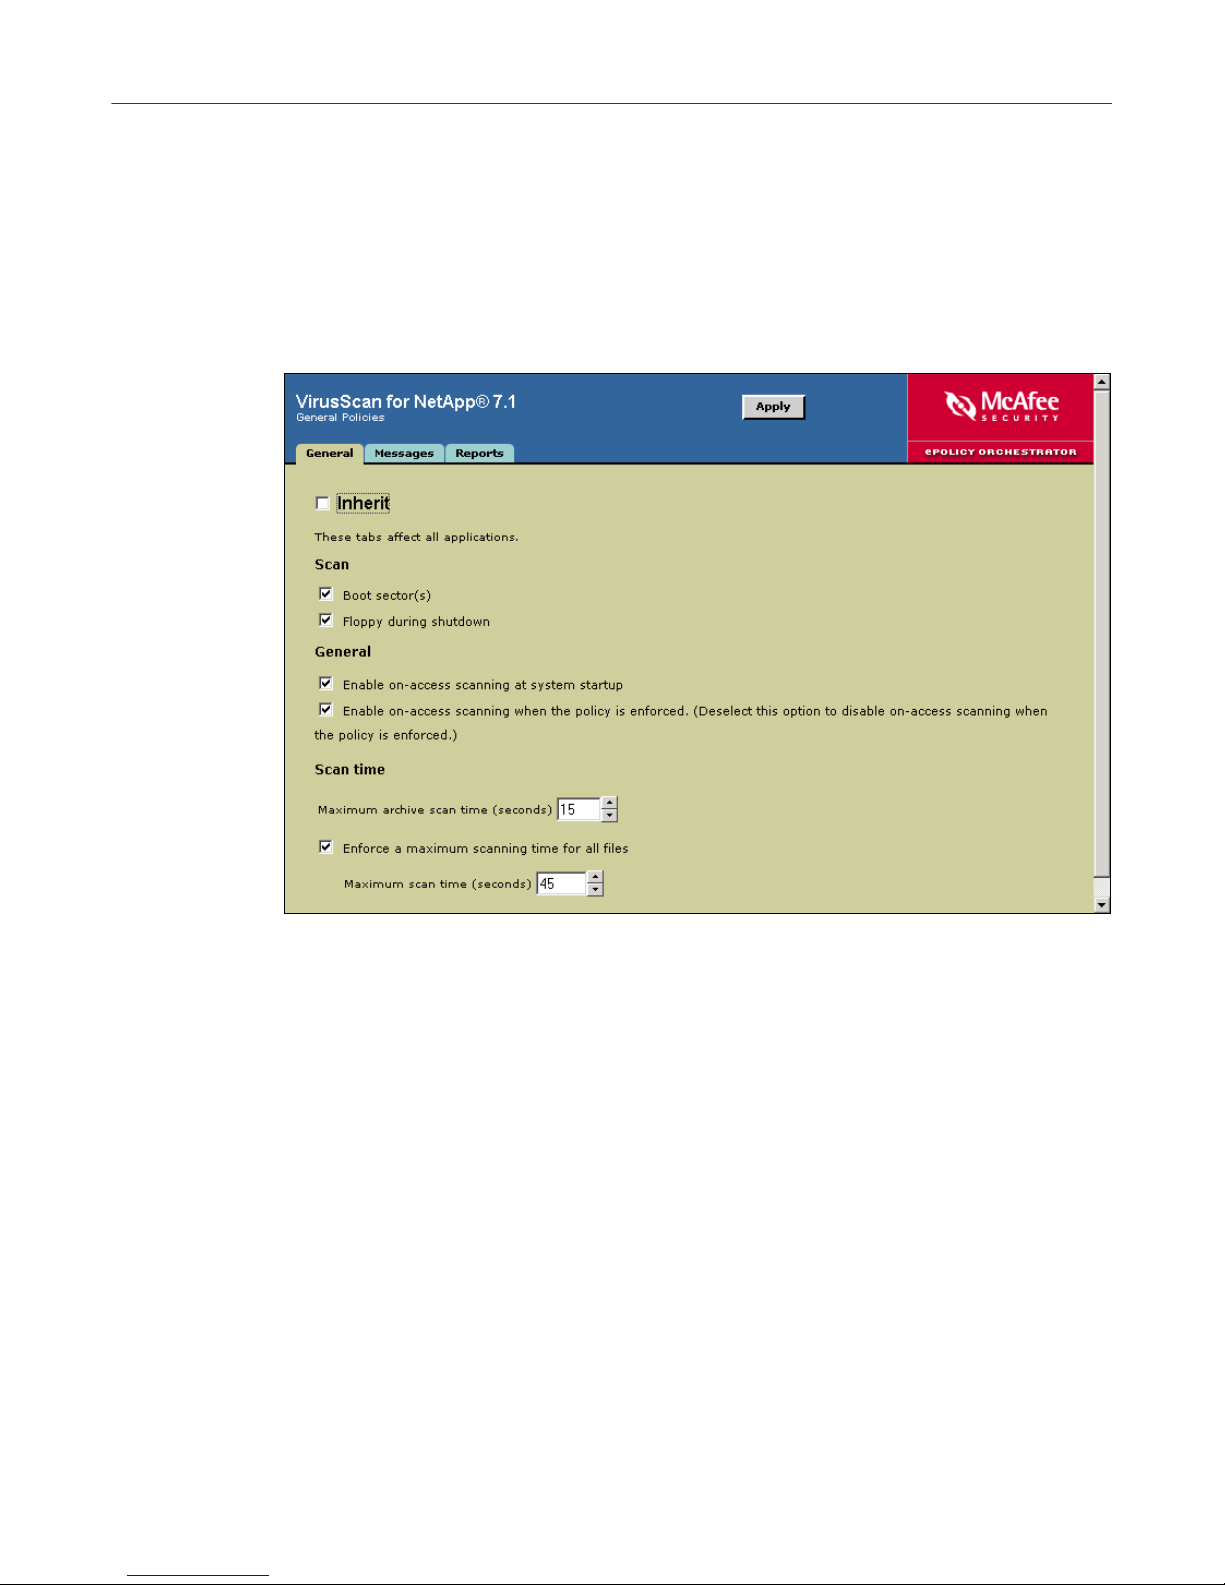
1 Select Genera l Po lic ie s under VirusScan for NetApp 7.1 in the upper details
pane.
2 In the lower details pane, select the General tab.
Figure 1-4. General Policies — General tab
3 Deselect Inherit.
4 Configure these policy options:
a Under Scan, choose whether to scan boot sectors and/or floppy disks
during shutdown.
b Under General, choose whether to enable or disable on-access scanning at
startup.
c Under Scan time, type the maximum scan time in seconds for archives and
the maximum scan time for all files. You can also enforce the scan time
limit for all files.
5 Click Apply to save these settings.
Configuration Guide 15
Page 16
Configuring VirusScan for NetApp 7.1.0
Messages tab
Specify the user message policies.
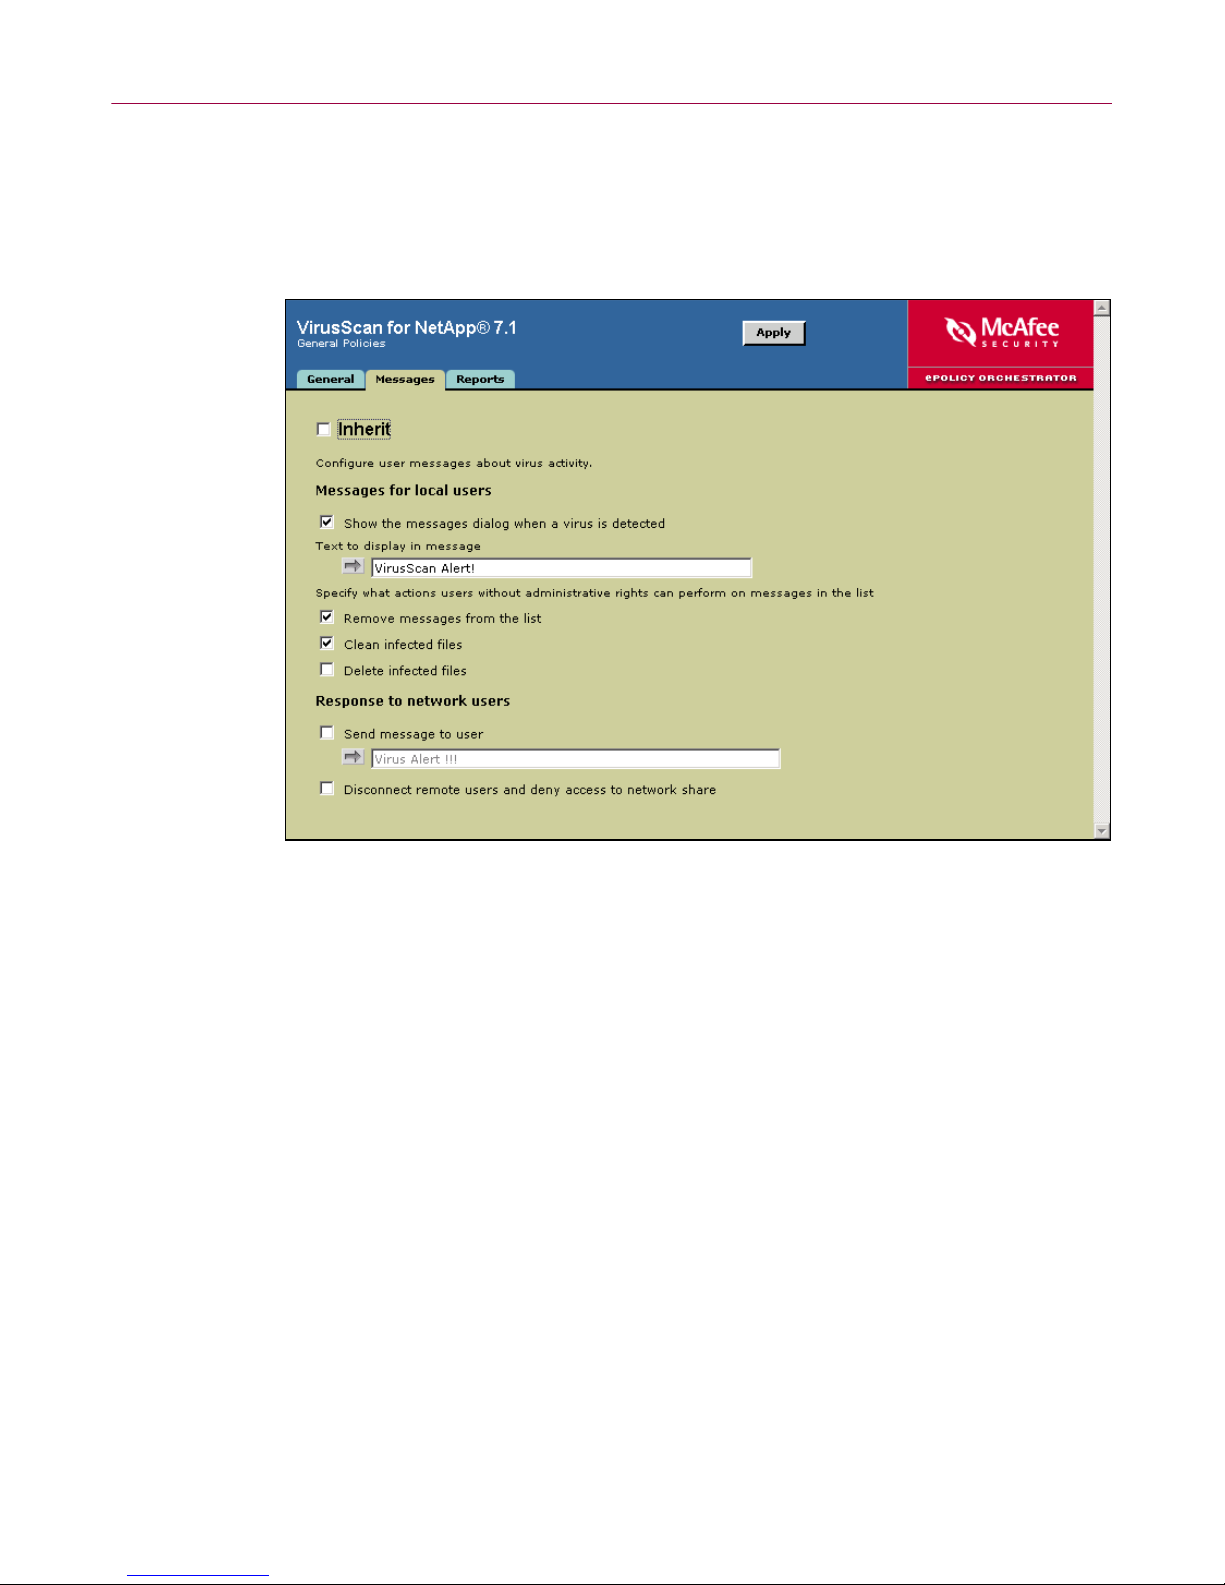
1 In the lower details pane, select the Messages tab.
Figure 1-5. General Policies — Messages tab
2 Deselect Inherit.
3 Configure which messages are sent to local and network users:
a Under Messages for local users, choose whether to display the On-Access
Scan Messages
dialog box for local users, and which actions local users
without administrator rights can take on infected files.
b Under Response to network users, choose whether to send network users
a message in the event of an outbreak, and whether to disconnect remote
users and deny access to the network share in the event of an outbreak.
4 Click Apply to save these se tt ings.
16 VirusScan® for NetApp® software version 7.1.0
Page 17
Setting policies for the product
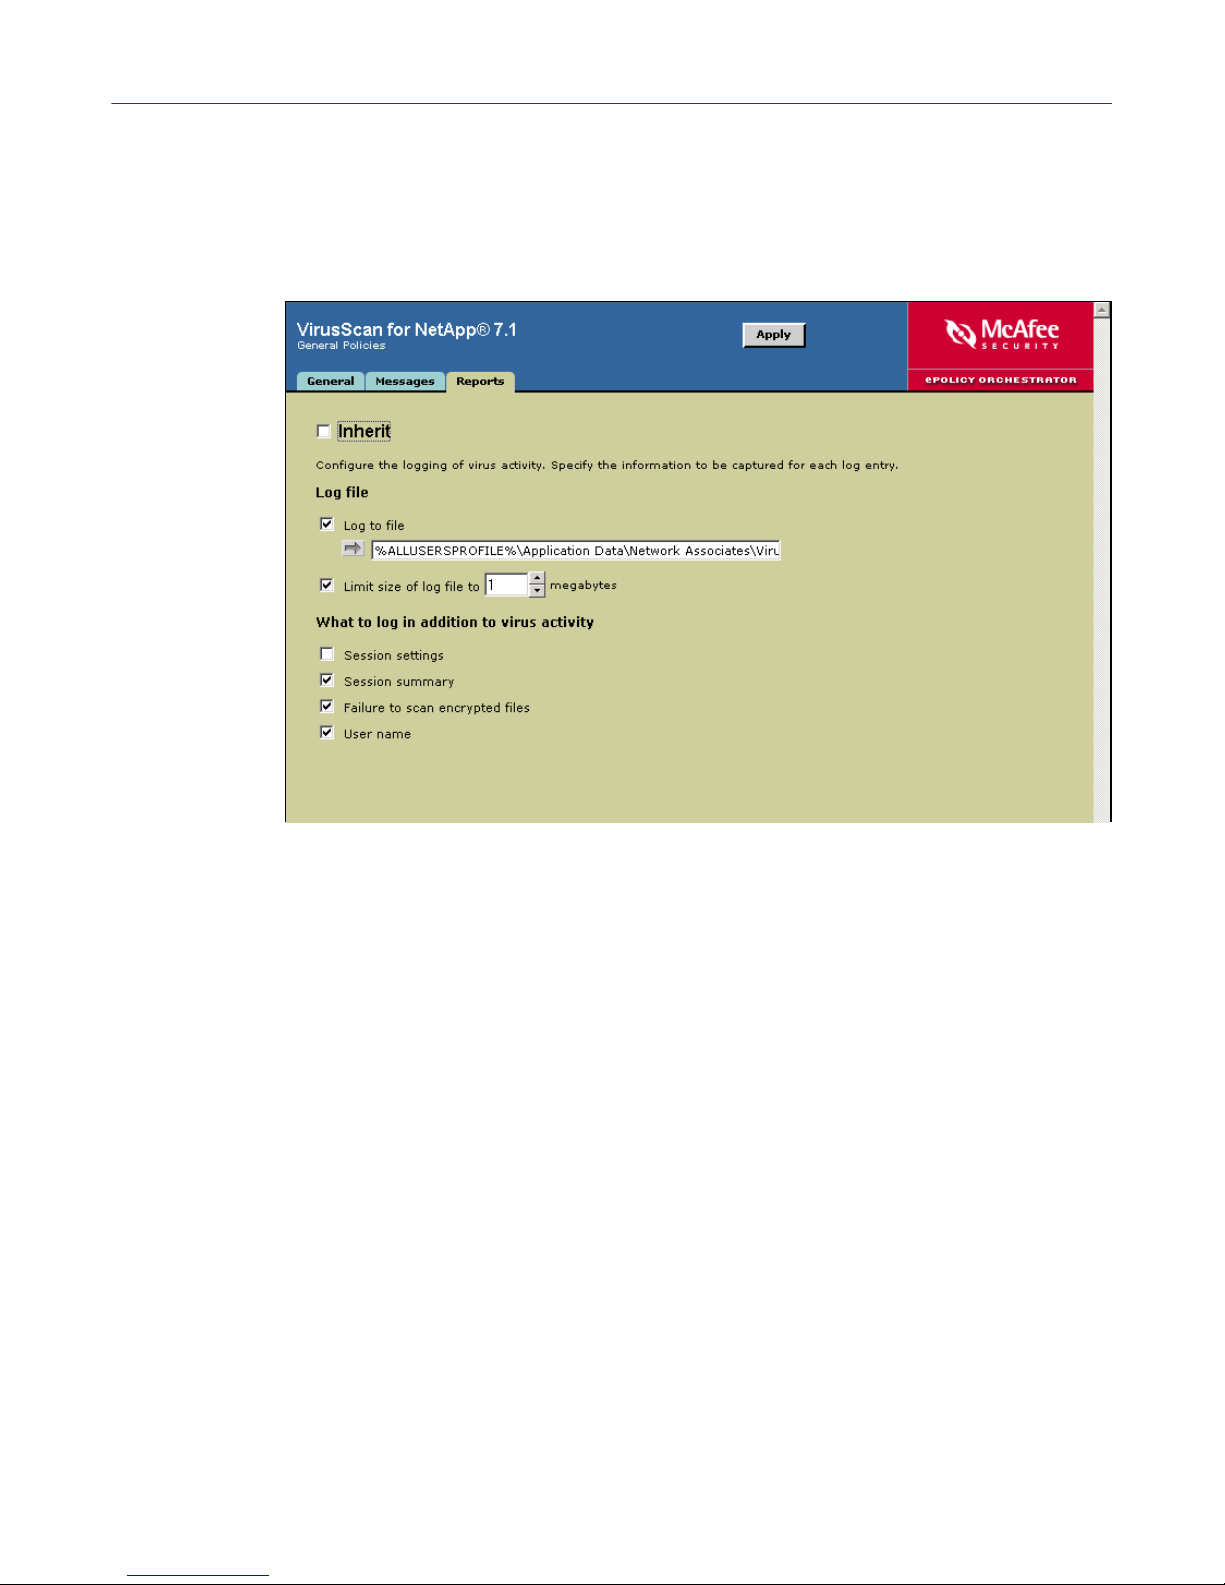
Reports tab
Configure logging activity and specify what information to log.
1 In the lower details pane, select the Reports tab.
Figure 1-6. General Policies — Reports tab
2 Deselect Inherit.
3 Configure the logging policies:
a Under Log file, choose whether to log virus activity data to a log file,
whether to limit the size of the log file, and specify the location of the log
file.
b Under What to log in addition to virus activity, choose what types of
information you want logged.
4 Click Apply to save these settings.
Configuration Guide 17
Page 18

Configuring VirusScan for NetApp 7.1.0
Setting policies for default processes
These are the default processes for on-access scanning which are defined as any
processes that are not specified as low-risk or high-risk. See the VirusScan for
NetApp 7.1.0 Product Guide for information about assigning risk to a process.
Policies can be configured on these tabs:
Processes tab on page 19.
Detection tab on page 20.
Advanced tab on page 21.
Actions tab on page 22.
18 VirusScan® for NetApp® software version 7.1.0
Page 19

Setting policies for the product
Processes tab
Specify whether to configure the same policies for all processes or to configure
different policies for default, low-risk, and high-risk processes.
1 In the upper details pane under VirusScan for NetApp 7.1, select Default
Processes Policies
2 In the lower details pane, select the Processes tab.
.
Figure 1-7. Default Processes Policies — Processes tab
3 Deselect Inherit.
4 Choose from these options:
Use the settings on these tabs for all processes.
Use different settings for high-risk and low-risk processes.
5 Click Apply to save th ese se tt ings.
Configuration Guide 19
Page 20

Configuring VirusScan for NetApp 7.1.0
Detection tab
Specify what is scanned and not scanned during an on-access scan.
1 In the lower details pane, select the Detection tab.
Figure 1-8. Default Processes Policies — Detection tab
2 Deselect Inherit.
3 Configure the following options:
a Under Scan files, choose when to scan files and whether files on network
drives are scanned.
b Under What to scan, choose which file types to scan. Use the Additions
button to add file types to the list of default file types, or the
Specified
button to define a custom list of file types to scan.
c Under What not t o sc a n , use the Exclusions button to define a custom list
of specific files, folders, and drives to exclude from scanning.
d Select Overwrite client exclusio ns to use only the exclusions that have been
added in the policy. If
Overwrite client exclusions is not selected, the client
computer uses the exclusions that were set locally and the exclusions set
here.
4 Click Apply to save these se tt ings.
20 VirusScan® for NetApp® software version 7.1.0
Page 21

Setting policies for the product
Advanced tab
Specify advanced scan options to be used during an on-access scan.
1 In the lower details pane, select the Advanced tab.
Figure 1-9. Default Processes Policies — Advanced tab
2 Deselect Inherit.
3 Configure these policy options:
a Under Heuristics, choose whether to scan for unknown program viruses
and/or unknown macro viruses.
b Under Non-viruses, choose whether to scan for potentially unwanted
programs and joke programs.
c Under Compressed files, choose whether to scan packed executables,
inside multiple-file archives, and MIME-encoded files.
4 Click Apply to save these settings.
Configuration Guide 21
Page 22

Configuring VirusScan for NetApp 7.1.0
Actions tab
Define the primary and secondary actions to perform on infected files during an
on-access scan.
1 In the lower details pane, select the Actions tab.
Figure 1-10. Default Processes Policies — Actions tab
2 Deselect Inherit.
3 Use the drop-down lists to select the primary action for When a virus is found
and the secondary action If the above Action fails.
4 Click Apply to save these se tt ings.
22 VirusScan® for NetApp® software version 7.1.0
Page 23

Setting policies for low-risk processes
These policies apply to processes specified as having a lower risk of infection, and
are used during an on-access scan. For information about assigning risk to a
process, see the VirusScan for NetApp 7.1.0 Product Guide.
Setting policies for the product
The options on these tabs affect processes specified as low-risk on the
tab. The
names under
Detection, Advanced, and Actions tabs are identical to the tabs of the same
Default Processes Policies.
Processes
For more information about configuring these options, see the VirusScan for
NetApp 7.1.0 Product Guide.
Policies can be configured on these tabs:
Use different settings for low-risk processes on page 24.
Processes tab for low-risk processes on page 25.
Detection tab on page 26.
Advanced tab on page 27.
Actions tab on page 27.
Configuration Guide 23
Page 24

Configuring VirusScan for NetApp 7.1.0
Use different settings for low-risk processes
Before you can define low-risk processes, you must specify that you want to use
different settings for low-risk and high-risk processes:
1 In the upper details pane under VirusScan for NetApp 7.1, select Default
Processes Policies
1 In the lower details pane, select the Processes tab.
.
Figure 1-11. Default Processes Policies — Processes tab
2 Deselect Inherit.
3 Select Use different settings for high-risk and low-risk processes.
4 Click Apply to save t h ese settings.
24 VirusScan® for NetApp® software version 7.1.0
Page 25

Setting policies for the product
Processes tab for low-risk processes
Specify which processes have a low risk of spreading infection.
1 In the upper details pane under VirusScan for NetApp 7.1, select Low-Risk
Processes Policies
2 In the lower details pane, select the Processes tab.
.
Figure 1-12. Low-Risk Processes Policies — Processes tab
3 Deselect Inherit.
4 Use the Add and Remove buttons to define the list of low-risk processes.
5 Click Apply to save these settings.
Configuration Guide 25
Page 26

Configuring VirusScan for NetApp 7.1.0
Detection tab
Specify what is scanned and not scanned during an on-access scan.
1 In the lower details pane, select the Detection tab.
2 Deselect Inherit.
3 Configure these policy options:
a Under Scan files, choose when to scan files and whether files on network
drives are scanned.
b Under What to scan, choose which file types to scan. Use the Additions
button to add file types to the list of default file types, or the
button to define a custom list of file types to scan.
c Under What not t o sc a n , use the Exclusions button to define a custom list
of specific files, folders, and drives to exclude from scanning.
d Select Overwrite client exclusio ns to use only the exclusions that have been
added in the policy. If
computer uses the exclusions that were set locally and the exclusions set
here.
Specified
Overwrite client exclusions is not selected, the client
4 Click Apply to save these se tt ings.
26 VirusScan® for NetApp® software version 7.1.0
Page 27

Setting policies for the product
Advanced tab
Specify advanced scan options to be used during an on-access scan.
1 In the lower details pane, select the Advanced tab.
2 Deselect Inherit.
3 Configure these policy options:
a Under Heuristics, choose whether to scan for unknown program viruses
and/or unknown macro viruses.
b Under Non-viruses, choose whether to scan for potentially unwanted
programs and joke programs.
c Under Compressed files, choose whether to scan packed executables,
inside multiple-file archives, and MIME-encoded files.
4 Click Apply to save these settings.
Actions tab
Define the primary and secondary actions to perform on infected files during an
on-access scan.
1 In the lower details pane, select the Actions tab.
2 Deselect Inherit.
3 Use the drop-down lists to select the primary action for When a virus is found
and the secondary action If the above Action fails.
4 Click Apply to save these settings.
Configuration Guide 27
Page 28

Configuring VirusScan for NetApp 7.1.0
Setting policies for high-risk processes
Specify processes that you consider to have a higher risk of infection. For
information about assigning risk to a process, see the VirusScan for NetApp 7.1.0
Product Guide.
The options on these tabs affect processes specified as high-risk on the
tab. The
names under
Detection, Advanced, and Actions tabs are identical to the tabs of the same
Default Processes Policies.
Processes
For more information about configuring these options, see the VirusScan for
NetApp 7.1.0 Product Guide.
Policies can be configured on these tabs:
Use different settings for high-risk processes on page 29.
Processes tab for high-risk processes on page 30.
Detection tab on page 31.
Advanced tab on page 32.
Actions tab on page 32.
28 VirusScan® for NetApp® software version 7.1.0
Page 29

Setting policies for the product
Use different settings for high-risk processes
Before you can define high-risk processes, you must specify that you want to use
different settings for low-risk and high-risk processes:
1 In the upper details pane under VirusScan for NetApp 7.1, select Default
Processes Policies
1 In the lower details pane, select the Processes tab.
.
Figure 1-13. Default Processes Policies — Processes tab
2 Deselect Inherit.
3 Select Use different settings for high-risk and low-risk processes.
4 Click Apply to save th ese se tt ings.
Configuration Guide 29
Page 30

Configuring VirusScan for NetApp 7.1.0
Processes tab for high-risk processes
Specify which processes have a high risk of spreading infection.
1 In the upper details pane under VirusScan for NetApp 7.1, select High-Risk
Processes Policies
2 In the lower details pane, select the Processes tab.
.
Figure 1-14. High-Risk Processes Policies — Processes tab
3 Deselect Inherit.
4 Use the Add and Remove buttons to define the list of high-risk processes.
5 Click Apply to save these se tt ings.
30 VirusScan® for NetApp® software version 7.1.0
Page 31

Setting policies for the product
Detection tab
Specify what is scanned and not scanned during an on-access scan.
1 In the lower details pane, select the Detection tab.
2 Deselect Inherit.
3 Configure these policy options:
a Under Scan files, choose when to scan files and whether files on network
drives are scanned.
b Under What to scan, choose which file types to scan. Use the Additions
button to add file types to the list of default file types, or the
button to define a custom list of file types to scan.
c Under What not to scan, use the Exclusions button to define a custom list
of specific files, folders, and drives to exclude from scanning.
d Select Overwrite client excl usions to use only the exclusions that have been
added in the policy. If
Overwrite client exclusions is not selected, the client
computer uses the exclusions that were set locally and the exclusions set
here.
Specified
4 Click Apply to save these settings.
Configuration Guide 31
Page 32

Configuring VirusScan for NetApp 7.1.0
Advanced tab
Specify advanced scan options to be used during an on-access scan.
1 In the lower details pane, select the Advanced tab.
2 Deselect Inherit.
3 Configure these policy options:
a Under Heuristics, choose whether to scan for unknown program viruses
and/or unknown macro viruses.
b Under Non-viruses, choose whether to scan for potentially unwanted
programs and joke programs.
c Under Compressed files, choose whether to scan packed executables,
inside multiple-file archives, and MIME-encoded files.
4 Click Apply to save these se tt ings.
Actions tab
Define the primary and secondary actions to perform on infected files during an
on-access scan.
1 In the lower details pane, select the Actions tab.
2 Deselect Inherit.
3 Use the drop-down lists to select the primary action for When a virus is found
and the secondary action If the above Action fails.
4 Click Apply to save these se tt ings.
32 VirusScan® for NetApp® software version 7.1.0
Page 33

Setting user interface policies
These policies apply to display and password options.
Policies can be configured on these tabs:
Display Options tab on page 34.
Password Options tab on page 36.
For complete information about these options, see the VirusScan for NetApp 7.1.0
Product Guide.
Setting policies for the product
Configuration Guide 33
Page 34

Configuring VirusScan for NetApp 7.1.0
Display Options tab
Configure security-related display settings.
1 In the upper details pane under VirusScan for NetApp 7.1, select User Interface
Policies
2 Select the Display Options tab in the lower details pane.
.
Figure 1-15. User Interface Policies — Display Options
3 Deselect Inherit.
34 VirusScan® for NetApp® software version 7.1.0
Page 35

Setting policies for the product
Configure these policy options:
4
a Under System tray icon, choose which, if any, menu options are available
to users from the system tray icon. You can choose all menu options,
minimal menu options, or no options.
b Under VirusScan console options choose from these console options:
Refresh the VirusScan console screen every __ seconds . Select the
frequency in seconds, for which you want to refresh the console.
Display ePO’s tasks in the VirusScan console. This option requires
ePolicy Orchestrator 3.0 or later and allows you to display ePolicy
Orchestrator update, mirror , and on-demand scan tasks in the
VirusScan Console.
Disable default AutoUpdate task schedule. Select this option to
disable the schedule for the default AutoUpdate task in VirusScan
for NetApp. The schedule is disabled when the policy is enforced.
This policy depends on the Task Manager service, which must be
running in order for the task’s schedule to be disabled.
When this option is not selected, the task schedule does not
change. For example, if the task is not scheduled, it remains
unscheduled. If the task is scheduled, it remains scheduled.
Enable VirusScan splash screen (Default). The VirusScan splash
screen appears when the
launched.
Deselect this option if you do not want the VirusScan splash
screen to appear when the
launched.
5 Click Apply to save these settings.
VirusScan Console or SHSTAT.EXE is
VirusScan Console or SHSTAT.EXE is
Configuration Guide 35
Page 36

Configuring VirusScan for NetApp 7.1.0
Password Options tab
Define a password, and the policy pages and tabs that the password protects.
1 Select the Password Options tab in the lower details pane.
Figure 1-16. User Interface Policies — Password Options
2 Deselect Inherit.
3 Under User interface password, select the desired level of password protection :
No password
Password protection for all items listed below
Password protection for the selected items below
4 If you selected password protection in Step 3, type and confirm the password
in the boxes provided.
5 If you selected the Password protection for the selected items below in Step 3,
select the items for which you want protection.
6 Click Apply to save t h ese settings.
36 VirusScan® for NetApp® software version 7.1.0
Page 37

Setting policies for Alert Manager Alerts
These policies apply to the VirusScan for NetApp features that generate alerts and
the destination for alerts.
NOTE
For complete information about configuring these options, see
the Alert Manager Product Guide.
Alert Manager Alerts tab
Configure alert policies.
1 In the upper details pane under VirusScan for NetApp 7.1, select Alert Manager
Alerts Policies
.
Setting policies for the product
2 On the Alert Manager Alerts tab in the lower details pane, deselect Inherit.
Figure 1-17. Alert Manager Alerts
Configuration Guide 37
Page 38

Configuring VirusScan for NetApp 7.1.0
Configure these policy options:
3
a Under Which components will generate alerts, select the VirusScan for
NetApp components for which you want to generate alerts when
infections are detected.
b Under Alert Manager destination selection, choose to enable or disable
alerting. If you enable alerting, you must select whether to enable
centralized alerting or Alert Manager alerting, and the location of the
folder or server to receive the alerts.
4 Click Apply to save these se tt ings.
Setting NetApp policies
Configure these policies to add filers, ensure communications between the
scanner-server and the filer, and clear the clean file cache.
1 In the upper details pane under VirusScan for NetApp 7.1, select NetApp
Policies
.
2 On the General tab in the lower details pane, deselect Inherit.
38 VirusScan® for NetApp® software version 7.1.0
Figure 1-18. NetApp Policies
Page 39

Add or remove NetApp filers from the list.
3
Setting policies for the product
Under
Filers, choose whether to use the locally-configured filer list or
overwrite it by adding filers here.
a Click Add to create a new list of filers which will be enforced on the
scanner-servers.
WARNING
The list you create here overwrites the locally-configured filer
list.
b After you have added filers here, click Remove to delete any filers for
which you do not want to process scans.
4 Enable “keep-alive” probes — Select this option to ensure that the filer and
scanner are in communication.
5 Reset filer clean file cache after each DAT or Engine update — Select this option
to clear the cache of files already scanned, after the scanner-server sends the
filer a
6 Click Apply to save these settings.
DAT or engine an update notification.
Configuration Guide 39
Page 40

Configuring VirusScan for NetApp 7.1.0
Enforcing policies
To enforce the policies that you have configured:
1 In the console tree under Directory, select the desired site, group, single
computer, or the entire
2 In the upper details pane on the Policies tab, select VirusScan for NetApp 7.1.
The VirusScan for NetApp 7.1 page appears in the lower details pane.
Directory for which you want to enforce polices.
Figure 1-19. Enforce Policies
3 Deselect Inherit.
4 Select Enforce policies for VirusScan for NetApp 7.1 when you want this
installation policy to be available to the ePolicy Orchestrator agent.
5 Click Apply to save t h ese settings.
Creating and configuring tasks
You can create VirusScan for NetApp tasks and configure them to meet your
needs.
These topics are included in this section:
On-demand scan tasks on page 41.
Update tasks on page 49.
Mirror tasks on page 51.
40 VirusScan® for NetApp® software version 7.1.0
Page 41

On-demand scan tasks
Create and configure as many tasks as you require.
These topics are included in this section:
Creating a new on-demand scan task on page 41.
Configuring the on-demand scan task settings on page 42.
Creating a new on-demand scan task
1 In the console tree under ePolicy Orchestrator, right-click Directory or the
desired site, group, or computer, then select
The
Schedule Task dialog box appears.
Creating and configuring tasks
Schedule Task.
Figure 1-20. New On-Demand Scan Task
2 Type a New Task Name.
3 Select VirusScan for NetApp 7.1 — On-Demand Scan from the Software/Task
list.
Type
4 Click OK to create the task.
Configuration Guide 41
Page 42

Configuring VirusScan for NetApp 7.1.0
Configuring the on-demand scan task settings
1 On the Tasks tab in the upper details pane, right-click the task, then select Edit
.
Task
The
ePolicy Orchestrator Scheduler dialog box appears.
Figure 1-21. ePolicy Orchestrator Scheduler
2 Click Settings to open the On-Demand Scan Task dialog box, then configure the
task.
Policies can be configured on these tabs:
Where tab on page 43.
Detection tab on page 44.
Advanced tab on page 45.
Actions tab on page 46.
Reports tab on page 47.
Task tab on page 48.
For complete information about these options, see the VirusScan for NetApp 7.1.0
Product Guide.
42 VirusScan® for NetApp® software version 7.1.0
Page 43

Where tab
Specify where scanning takes place.
1 Select the Where tab.
Creating and configuring tasks
2 Deselect Inherit.
3 Use the Add, Remove, and Edit buttons to define the locations to scan.
4 Under Scan Options, choose whether to include subfolders, and whether to
scan boot sectors.
Figure 1-22. On-Demand Scan Task — Where tab
Configuration Guide 43
Page 44

Configuring VirusScan for NetApp 7.1.0
Detection tab
Specify the file types to scan.
1 Select the Detection tab.
2 Deselect Inherit.
3 Configure these policy options:
a Under What to scan, select All files, Default + additional types, or Specified
file types
button to add file types to the list of default file types, or the
button to define a custom list of file types to scan.
44 VirusScan® for NetApp® software version 7.1.0
Figure 1-23. On-Demand Scan Task — Detection tab
(you can select only one of these options). Use the Additions
Specified
Page 45
Creating and configuring tasks
Under What not to scan, use the Exclusions button to define a list of specific
b
file types, folders, and drives to exclude from scanning.
c Select Overwrite client exclusions to use only the exclusions that have been
added to this policy. If
Overwrite client exclusions is not selected, the
exclusions that are set for the client’s default on-demand scanning are
appended to the exclusions that were set for the task on the ePolicy
Orchestrator server.
d Under Compressed files, choose whether to scan inside packed
executables, whether to scan inside multiple-file archives, and whether to
scan MIME-encoded files.
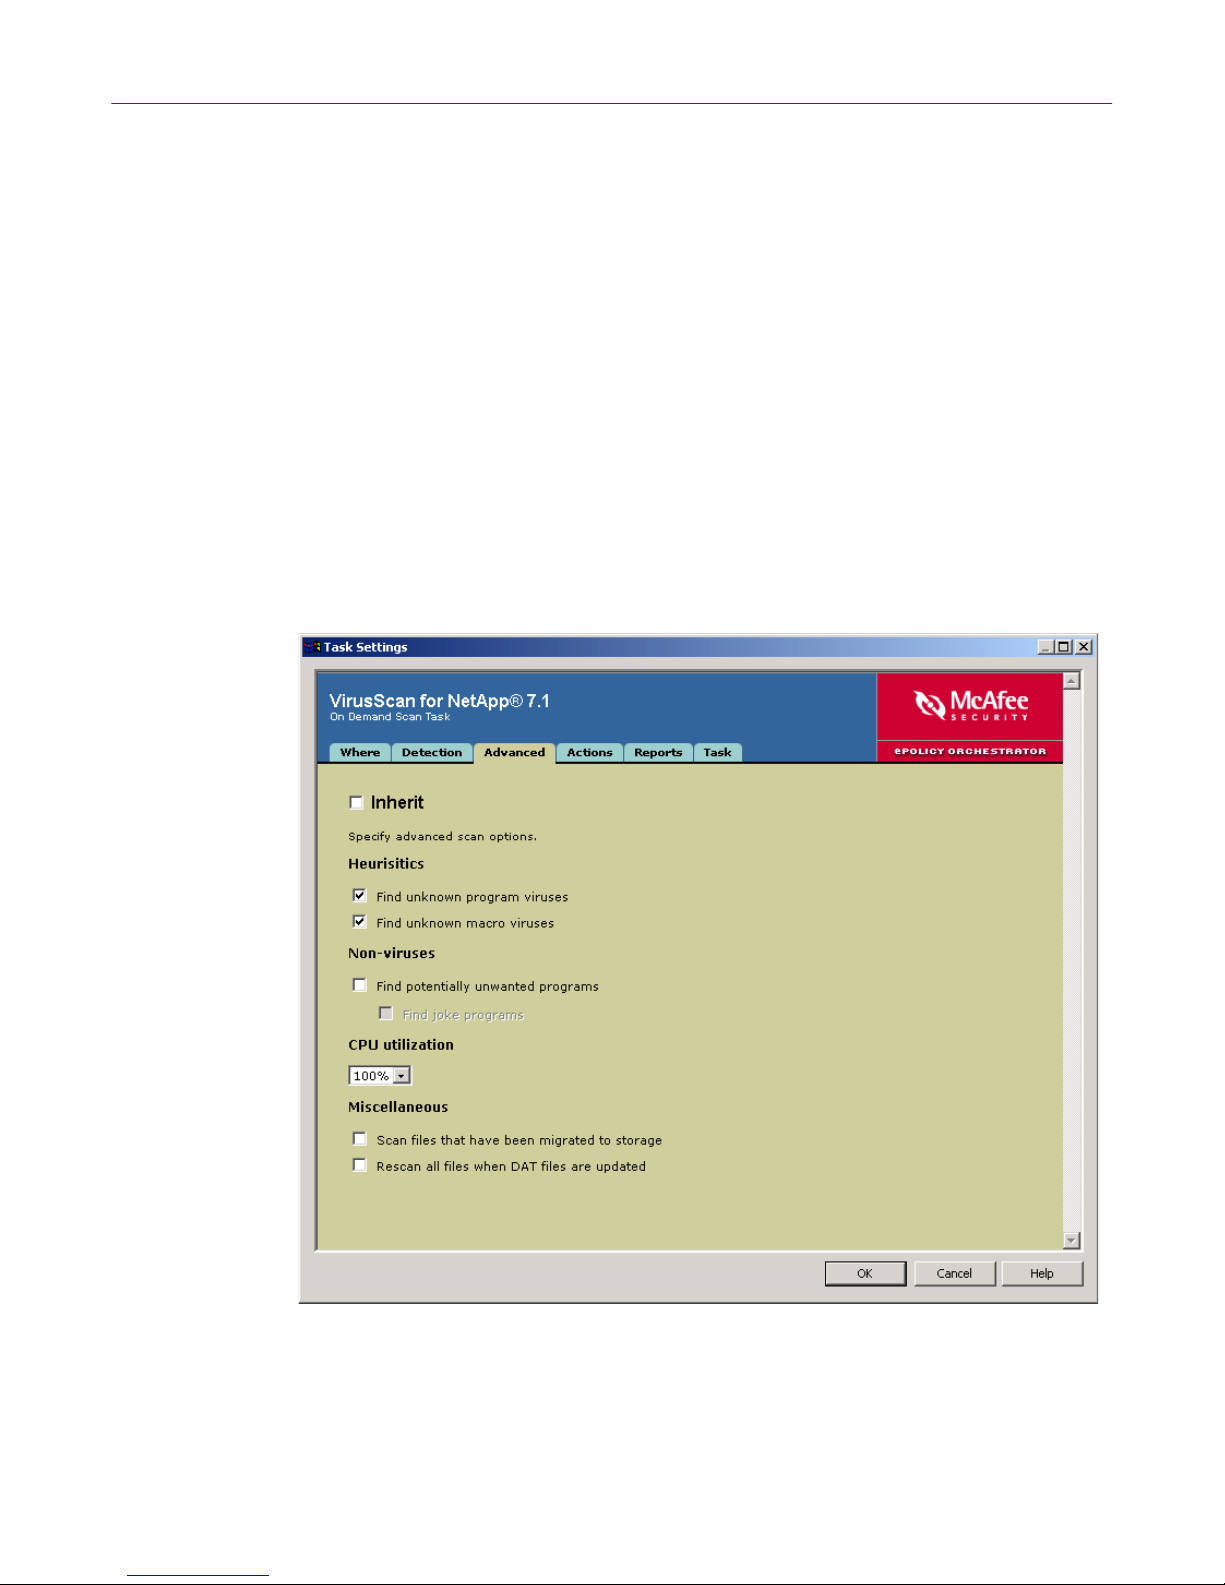
Advanced tab
Define additional settings.
1 Select the Advanced tab.
2 Deselect Inherit.
Figure 1-24. On-Demand Scan Task — Advanced tab
Configuration Guide 45
Page 46

Configuring VirusScan for NetApp 7.1.0
Configure these policy options:
3
a Under Heuristics, choose whether to scan for unknown program viruses
and/or unknown macro viruses.
b Under Non-viruses, choose whether to scan for potentially unwanted
programs, and whether to scan for joke programs.
c Under CPU utilization, choose the maximum percentage of CPU usage for
the scan task.
d Under Miscellaneous, choose whether to scan files that have been migrated
to storage, and whether to rescan all files when
Actions tab
Specify the actions to take on infected files.
1 Select the Actions tab.
DAT files are updated.
46 VirusScan® for NetApp® software version 7.1.0
Figure 1-25. On-Demand Scan Task — Actions tab
Page 47

Creating and configuring tasks
Deselect Inherit.
2
3 Use the drop-down lists to select the primary action for When a virus is found
and the secondary action If the above Action fails.
4 If you select Move infected files to a folder, choose a destination folder.
Reports tab
Configure logging activity and specify what information to log.
1 Select the Reports tab.
2 Deselect Inherit.
3 Configure these policy options:
a Under Log file, choose whether to log virus activity, whether to limit the
size of the log file, and the location of the log file.
b Under What to log in addition to virus activity, choose what types of
information to log.
Figure 1-26. On-Demand Scan Task — Reports tab
Configuration Guide 47
Page 48

Configuring VirusScan for NetApp 7.1.0
Task tab
Specify user account settings.
1 Select the Task tab.
2 Deselect Inherit.
3 Under User account settings, type the user name, password, and domain name
in the appropriate fields if you want the task to run under a specific account. If
no account is entered, the task runs under the system account.
4 When finished editing all the desired options on all tabs, click OK to return to
the
ePolicy Orchestrator Scheduler dialog box.
48 VirusScan® for NetApp® software version 7.1.0
Figure 1-27. On-Demand Scan Task — Task tab
Page 49

Update tasks
Update tasks can be used to perform immediate or scheduled upd ates of the virus
definition (
These topics are included in this section:
Creating a new update task on page 49.
Configuring the update task settings on page 50.
Creating a new update task
1 In the console tree under ePolicy Orchestrator, right-click Directory or the
DAT) files, the scanning engine, or the EXTRA.DAT file.
NOTE
For information about scheduling a task, see Scheduling tasks
on page 52.
desired site, group, or computer, then select
The
Schedule Task dialog box appears.
Creating and configuring tasks
Schedule Task.
2 Type a New Task Name.
3 Select ePolicy Orchestrator Agent — Update from the Software/Task Type list.
4 Click OK to create the task.
Figure 1-28. New Update Task
Configuration Guide 49
Page 50

Configuring VirusScan for NetApp 7.1.0
Configuring the update task settings
1 On the Tasks tab in the details pane, right-click the VirusScan for NetApp
update task that you created, then select
The
ePolicy Orchestrator Scheduler dialog box appears.
2 Click Settings to display the Update Task dialog box.
Edit Task.
Figure 1-29. Configure Update Task
3 Deselect Inherit.
4 Under General, choose whether to show the update progress dialog box on the
client computer.
Show update progress dialog — Allows display of the update progress
dialog box on the client computer. Deselecting this option prevents display
of the progress dialog on client computers.
Allow users to postpone this update — Gives users the opportunity to
postpone this task.
Maximum number of postpones allowed — Type a number, or select a
number from the drop-down list, for the maximum number of times a user
can postpone this task.
Postpone timeout interval — Type a number, or select a number from the
drop-down list, for the time, in seconds, during which the user can cancel
this update before execution.
50 VirusScan® for NetApp® software version 7.1.0
Page 51

Mirror tasks
Creating and configuring tasks
A mirror task replicates the contents of the Repository to a site, group of
computers, a single computer, or to the entire
Directory.
These topics are included in this section:
Creating a new mirror task on page 51.
Configuring the mirror task settings on page 52.
NOTE
For information about scheduling a task, see Scheduling tasks
on page 52.
Creating a new mirror task
1 In the console tree under ePolicy Orchestrator, right-click Directory or the
desired site, group, or computer, then select
The
Schedule Task dialog box appears.
Schedule Task.
2 Type a New Task Name.
3 Select ePolicy Orchestrator Agent — Mirror from the Software/Task Type list.
4 Click OK to create the task.
Figure 1-30. New Mirror Task
Configuration Guide 51
Page 52

Configuring VirusScan for NetApp 7.1.0
Configuring the mirror task settings
On the Tasks tab in the upper details pane, right-click the VirusScan for NetApp
task that you created, then select
The
ePolicy Orchestrator Scheduler dialog box appears.
5 Click Settings to display the Mirror task dialog box.
Edit Task.
6 Deselect Inherit.
7 Under Destination options, type the location to which to copy the contents of
the
Repository.
8 Click OK when finished editing the desired options, to return to the ePolicy
Orchestrator Scheduler
Scheduling tasks
You can schedule a task to run at specific dates and time, or specific intervals.
Policies can be configured for these tabs:
Task tab on page 53.
Schedule tab on page 54.
Figure 1-31. Configure Mirror Task
dialog box.
52 VirusScan® for NetApp® software version 7.1.0
Page 53

Scheduling tasks
Task tab
Enable the schedule for this task.
1 On the Tasks tab in the upper details pane, right-click the task that you created,
then select
The
ePolicy Orchestrator Scheduler dialog box appears.
2 Select the Task tab.
Edit Task.
Figure 1-32. ePolicy Orchestrator Scheduler — Task tab
3 Deselect Inherit.
4 Select Enable to allow this task to be scheduled.
NOTE
If you do not select Enable, the task does not start, regardless
of the other options you select in this dialog box.
5 Select Stop the task if it runs for to specify a time limit, in hours and minutes,
for which the task can run before it is automatically cancelled.
NOTE
If you choose to stop the task after a defined amount of time,
the task resumes from the point it was interrupted the next
time it runs.
Configuration Guide 53
Page 54

Configuring VirusScan for NetApp 7.1.0
Schedule tab
Specify when the task runs.
1 Select the Schedule tab.
Figure 1-33. ePolicy Orchestrator Scheduler — Schedule tab
2 Deselect Inherit.
NOTE
Enable
tab to enable the options on the
3 Select the opt ions on this tab to schedule the task.
NOTE
must be selected under Schedule Settings on the Task
Schedule tab.
For more information about scheduling tasks, see the
VirusScan for NetApp 7.1.0 Product Guide.
4 Click OK when you are through configuring and scheduling the task.
54 VirusScan® for NetApp® software version 7.1.0
 Loading...