

Page 1

Management Edition
Administrator’s Guide
Version 2.5
Page 2

COPYRIGHT
Copyright © 1998–1999 Networks Associates Technology, Inc. All Rights Reserved. No part of
this publication may be reproduced, transmitted, transcribed, stored in a retrieval system, or
translated into any language in any form or by any means without the written permission of
Networks Associates Technology, Inc., or its suppliers or affiliate companies.
TRADEMARK ATTRIBUTIONS
* ActiveHelp, Bomb Shelter, Building a World of Trust, CipherLink, Clean-Up, Cloaking, CNX,
Compass 7, CyberCop, CyberMedia, Data Security Letter, Discover, Distributed Sniffer System, Dr
Solomon’s, Enterprise Secure Cast, First Aid, ForceField, Gauntlet, GMT, GroupShield, HelpDesk,
Hunter, ISDN Tel/Scope, LM 1, LANGuru, Leading Help Desk Technology, Magic Solutions,
MagicSpy, MagicTree, Magic University, MagicWin, MagicWord, McAfee, McAfee Associates,
MoneyMagic, More Power To You, Multimedia Cloaking, NetCrypto, NetOctopus, NetRoom,
NetScan, Net Shield, NetShield, NetStalker, Net Tools, Network Associates, Network General, Network
Uptime!, NetXRay, Nuts & Bolts, PC Medic, PCNotary, PGP, PGP (Pretty Good Privacy),
PocketScope, Pop-Up, PowerTelnet, Pretty Good Privacy, PrimeSupport, RecoverKey,
RecoverKey-International, ReportMagic, RingFence, Router PM, Safe & Sound, SalesMagic,
SecureCast, Service Level Manager, ServiceMagic, Site Meter, Sniffer, SniffMaster, SniffNet, Stalker,
Statistical Information Retrieval (SIR), SupportMagic, Switch PM, TeleSniffer, TIS, TMach, TMeg,
Total Network Security, Total Network Visibility, Total Service Desk, Total Virus Defense, T-POD,
Trusted Mach, Trusted Mail, Uninstaller, Virex, Virex-PC, Virus Forum, ViruScan, VirusScan,
VShield, WebScan, WebShield, WebSniffer, WebStalker WebWall, and ZAC 2000 are registered
trademarks of Network Associates and/or its affiliates in the US and/or other countries. All
other registered and unregistered trademarks in this document are the sole property of their
respective owners.
LICENSE AGREEMENT
NOTICE TO ALL USERS: FOR THE SPECIFIC TERMS OF YOUR LICENSE TO USE THE
SOFTWARE THAT THIS DOCUMENTATION DESCRIBES, CONSULT THE README.1ST,
LICENSE.TXT, OR OTHER LICENSE DOCUMENT THAT ACCOMPANIES YOUR
SOFTWARE, EITHER AS A TEXT FILE OR AS PART OF THE SOFTWARE PACKAGING. IF
YOU DO NOT AGREE TO ALL OF THE TERMS SET FORTH THEREIN, DO NOT INSTALL
THE SOFTWARE. IF APPLICABLE, YOU MAY RETURN THE PRODUCT TO THE PLACE OF
PURCHASE FOR A FULL REFUND.
Issued September 1999/Management Edition v2.5.0
Page 3

Table of Contents
Chapter 1. Introducing the Management Edition Program . . . . . . . . . . 11
Introduction . . . . . . . . . . . . . . . . . . . . . . . . . . . . . . . . . . . . . . . . . . . . . . . . . . . . .11
What is the Management Edition program? . . . . . . . . . . . . . . . . . . . . . . . . . . .11
How does the Management Edition program work? . . . . . . . . . . . . . . . . . . . .11
What comes with the Management Edition program? . . . . . . . . . . . . . . . . . .13
Management Edition program features . . . . . . . . . . . . . . . . . . . . . . . . . . . . . .16
New functionality . . . . . . . . . . . . . . . . . . . . . . . . . . . . . . . . . . . . . . . . . . . .16
Seamlessly interactive management tools . . . . . . . . . . . . . . . . . . . . . . .17
Automated software distribution . . . . . . . . . . . . . . . . . . . . . . . . . . . . . . .17
Real-time virus detection and notification . . . . . . . . . . . . . . . . . . . . . . . .18
Conventions used in this guide . . . . . . . . . . . . . . . . . . . . . . . . . . . . . . . . . . . . .18
How to contact Network Associates . . . . . . . . . . . . . . . . . . . . . . . . . . . . . . . . .19
Customer service . . . . . . . . . . . . . . . . . . . . . . . . . . . . . . . . . . . . . . . . . . . .19
Technical support . . . . . . . . . . . . . . . . . . . . . . . . . . . . . . . . . . . . . . . . . . .19
Network Associates training . . . . . . . . . . . . . . . . . . . . . . . . . . . . . . . . . . .20
Comments and feedback . . . . . . . . . . . . . . . . . . . . . . . . . . . . . . . . . . . . . .20
Reporting new items for anti-virus data file updates . . . . . . . . . . . . . . .21
International contact information . . . . . . . . . . . . . . . . . . . . . . . . . . . . . . .22
Chapter 2. Installing the Management Edition Program . . . . . . . . . . . .25
System requirements . . . . . . . . . . . . . . . . . . . . . . . . . . . . . . . . . . . . . . . . . . . . .25
Hardware recommended . . . . . . . . . . . . . . . . . . . . . . . . . . . . . . . . . . . . . .25
Software supported . . . . . . . . . . . . . . . . . . . . . . . . . . . . . . . . . . . . . . . . . .25
Defining anti-virus domains . . . . . . . . . . . . . . . . . . . . . . . . . . . . . . . . . . . . . . . .26
Installing the Management Console . . . . . . . . . . . . . . . . . . . . . . . . . . . . . . . . .26
Installation scenarios . . . . . . . . . . . . . . . . . . . . . . . . . . . . . . . . . . . . . . . . .27
Installation steps . . . . . . . . . . . . . . . . . . . . . . . . . . . . . . . . . . . . . . . . . . . .30
Running the Management Console (initial use) . . . . . . . . . . . . . . . . . . . . . . . .36
Installing the master repository . . . . . . . . . . . . . . . . . . . . . . . . . . . . . . . .36
Installing anti-virus components in the Repository . . . . . . . . . . . . . . . .42
Understanding the Management Console . . . . . . . . . . . . . . . . . . . . . . . . . . . .54
Upgrading the Management Edition program . . . . . . . . . . . . . . . . . . . . . . . . .62
Administrator’s Guide iii
Page 4

Table of Contents
Chapter 3. Creating Anti-virus Domains . . . . . . . . . . . . . . . . . . . . . . . . . 63
Preparing member machines . . . . . . . . . . . . . . . . . . . . . . . . . . . . . . . . . . . . . . .63
Determining initial setup of machines . . . . . . . . . . . . . . . . . . . . . . . . . . .63
Finding machines in the network view . . . . . . . . . . . . . . . . . . . . . . . . . . .66
Preparing machines with peer networking . . . . . . . . . . . . . . . . . . . . . . . . . . . .68
Windows NT machines (trust relationships) . . . . . . . . . . . . . . . . . . . . . .68
Windows 95 and Windows 98 machines (user-level access) . . . . . . . . .70
Windows 95 and Windows 98 machines (share-level access) . . . . . . . .72
Windows for Workgroups 3.11 machines . . . . . . . . . . . . . . . . . . . . . . . .74
Preparing machines without peer networking . . . . . . . . . . . . . . . . . . . . . . . . .75
Windows 3.1 machines . . . . . . . . . . . . . . . . . . . . . . . . . . . . . . . . . . . . . . .76
Windows NT, Windows 95, or Windows 98 machines . . . . . . . . . . . . . .79
Automating setup via NetWare login scripts . . . . . . . . . . . . . . . . . . . . . .81
Preparing NetWare servers . . . . . . . . . . . . . . . . . . . . . . . . . . . . . . . . . . . . . . . .83
SECURE CONSOLE command . . . . . . . . . . . . . . . . . . . . . . . . . . . . . . . . .83
AUTOEXEC.NCF . . . . . . . . . . . . . . . . . . . . . . . . . . . . . . . . . . . . . . . . . . . . .83
Installation method . . . . . . . . . . . . . . . . . . . . . . . . . . . . . . . . . . . . . . . . . .84
Checking rights for Microsoft network domain members . . . . . . . . . . . . . . .84
Assigning a Management Server . . . . . . . . . . . . . . . . . . . . . . . . . . . . . . . . . . .85
Adding member machines to an anti-virus domain . . . . . . . . . . . . . . . . . . . .87
Using the drag-and-drop method . . . . . . . . . . . . . . . . . . . . . . . . . . . . . . .88
Using the Discover method . . . . . . . . . . . . . . . . . . . . . . . . . . . . . . . . . . . .89
Choosing your anti-virus software . . . . . . . . . . . . . . . . . . . . . . . . . . . . . . . . . .91
Selecting anti-virus domain components . . . . . . . . . . . . . . . . . . . . . . . . . . . . .92
Adding or removing components for all anti-virus domains . . . . . . . . .93
Adding or removing components for non-standard machines . . . . . . .95
Chapter 4. Creating Schedules . . . . . . . . . . . . . . . . . . . . . . . . . . . . . . . . . 97
Scheduling scans . . . . . . . . . . . . . . . . . . . . . . . . . . . . . . . . . . . . . . . . . . . . . . . .97
Scheduling similar scans . . . . . . . . . . . . . . . . . . . . . . . . . . . . . . . . . . . . . . . . .103
Running on-demand scans . . . . . . . . . . . . . . . . . . . . . . . . . . . . . . . . . . . . . . .105
Viewing results of on-demand scans . . . . . . . . . . . . . . . . . . . . . . . . . . . . . . .107
iv Management Edition
Page 5

Table of Contents
Checking virus scan status . . . . . . . . . . . . . . . . . . . . . . . . . . . . . . . . . . . . . . .108
Acknowledging virus scan status . . . . . . . . . . . . . . . . . . . . . . . . . . . . .109
Rescanning the machines . . . . . . . . . . . . . . . . . . . . . . . . . . . . . . . . . . . .111
Viewing the virus scan status report . . . . . . . . . . . . . . . . . . . . . . . . . . .111
Refreshing the display . . . . . . . . . . . . . . . . . . . . . . . . . . . . . . . . . . . . . . .115
Setting a warning period . . . . . . . . . . . . . . . . . . . . . . . . . . . . . . . . . . . . .117
Logging scheduled events . . . . . . . . . . . . . . . . . . . . . . . . . . . . . . . . . . . . . . . .118
Enabling logging . . . . . . . . . . . . . . . . . . . . . . . . . . . . . . . . . . . . . . . . . . .118
Filtering the log . . . . . . . . . . . . . . . . . . . . . . . . . . . . . . . . . . . . . . . . . . . .118
Refreshing the log . . . . . . . . . . . . . . . . . . . . . . . . . . . . . . . . . . . . . . . . . .119
Saving the log . . . . . . . . . . . . . . . . . . . . . . . . . . . . . . . . . . . . . . . . . . . . . .120
Changing the log appearance . . . . . . . . . . . . . . . . . . . . . . . . . . . . . . . . .121
Chapter 5. Updating Your Anti-virus Software . . . . . . . . . . . . . . . . . . . 123
Installing .DAT and program file updates . . . . . . . . . . . . . . . . . . . . . . . . . . . .123
Installing extra .DAT files . . . . . . . . . . . . . . . . . . . . . . . . . . . . . . . . . . . . . . . . .126
Installing .DAT updates and .ZIP files . . . . . . . . . . . . . . . . . . . . . . . . . . . . . . .129
Installing script, extension .DLL, or setup file updates . . . . . . . . . . . . . . . .132
Forcing updates of invalid external mirrors . . . . . . . . . . . . . . . . . . . . . . . . . .133
Changing anti-virus software versions . . . . . . . . . . . . . . . . . . . . . . . . . . . . . .134
Changing the version for all anti-virus domains . . . . . . . . . . . . . . . . . .134
Changing the version for individual domains . . . . . . . . . . . . . . . . . . . .135
Changing the version for individual machines . . . . . . . . . . . . . . . . . . .135
Viewing component properties in the Repository . . . . . . . . . . . . . . . . . . . . .136
Removing old versions from the Repository . . . . . . . . . . . . . . . . . . . . . . . . .137
Marking shares as null session shares . . . . . . . . . . . . . . . . . . . . . . . . . . . . .138
Choosing an update method . . . . . . . . . . . . . . . . . . . . . . . . . . . . . . . . . . . . .139
Using the Push On Install . . . . . . . . . . . . . . . . . . . . . . . . . . . . . . . . . . .139
Using the Pull Off Install . . . . . . . . . . . . . . . . . . . . . . . . . . . . . . . . . . . . .140
Using the Batch Install . . . . . . . . . . . . . . . . . . . . . . . . . . . . . . . . . . . . . . .141
Globally applying configuration . . . . . . . . . . . . . . . . . . . . . . . . . . . . . . .153
Configuring reboot options . . . . . . . . . . . . . . . . . . . . . . . . . . . . . . . . . . . . . . .153
Configuring custom update message options . . . . . . . . . . . . . . . . . . . . . . . .155
Configuring custom tools . . . . . . . . . . . . . . . . . . . . . . . . . . . . . . . . . . . . . . . .157
Administrator’s Guide v
Page 6

Table of Contents
Chapter 6. Using the Alert Manager . . . . . . . . . . . . . . . . . . . . . . . . . . . . 161
Enabling centralized alerting . . . . . . . . . . . . . . . . . . . . . . . . . . . . . . . . . . . . . .161
Enabling centralized alerting for the NetShield program . . . . . . . . . . .161
Enabling centralized alerting for the VirusScan program . . . . . . . . . .162
Configuring alerts . . . . . . . . . . . . . . . . . . . . . . . . . . . . . . . . . . . . . . . . . . . . . . .165
Viewing the Summary page . . . . . . . . . . . . . . . . . . . . . . . . . . . . . . . . . . .166
Forwarding an alert to a networked computer . . . . . . . . . . . . . . . . . . .167
Sending an alert as a network message . . . . . . . . . . . . . . . . . . . . . . . .170
Sending an alert as an SMTP e-mail message . . . . . . . . . . . . . . . . . . .173
Sending an alert to a pager . . . . . . . . . . . . . . . . . . . . . . . . . . . . . . . . . . .176
Sending an alert to a network printer . . . . . . . . . . . . . . . . . . . . . . . . . . .180
Sending an alert as an SNMP network message . . . . . . . . . . . . . . . . . .183
Sending an alert to a DMI console . . . . . . . . . . . . . . . . . . . . . . . . . . . . .186
Launching a program on alert . . . . . . . . . . . . . . . . . . . . . . . . . . . . . . . . .188
Sending an alert as an audible .WAV file . . . . . . . . . . . . . . . . . . . . . . . .190
Logging alerts . . . . . . . . . . . . . . . . . . . . . . . . . . . . . . . . . . . . . . . . . . . . . .192
Chapter 7. Configuring Complex Domains . . . . . . . . . . . . . . . . . . . . . . 195
Designing anti-virus domains . . . . . . . . . . . . . . . . . . . . . . . . . . . . . . . . . . . . .195
Single office . . . . . . . . . . . . . . . . . . . . . . . . . . . . . . . . . . . . . . . . . . . . . . .196
Multiple office, one site . . . . . . . . . . . . . . . . . . . . . . . . . . . . . . . . . . . . . .196
Multiple site, one country . . . . . . . . . . . . . . . . . . . . . . . . . . . . . . . . . . . .197
Multiple site, international . . . . . . . . . . . . . . . . . . . . . . . . . . . . . . . . . . . .197
Adding anti-virus domains . . . . . . . . . . . . . . . . . . . . . . . . . . . . . . . . . . . . . . . .198
Moving machines between anti-virus domains . . . . . . . . . . . . . . . . . . . . . . .199
Deleting machines from anti-virus domains . . . . . . . . . . . . . . . . . . . . . . . . .200
Deleting anti-virus domains . . . . . . . . . . . . . . . . . . . . . . . . . . . . . . . . . . . . . . .202
Renaming anti-virus domains . . . . . . . . . . . . . . . . . . . . . . . . . . . . . . . . . . . . .203
Adding hidden machines . . . . . . . . . . . . . . . . . . . . . . . . . . . . . . . . . . . . . . . . .204
Adding multiple hidden machines . . . . . . . . . . . . . . . . . . . . . . . . . . . . . . . . .206
Formatting imported browse lists . . . . . . . . . . . . . . . . . . . . . . . . . . . . .207
Importing browse lists . . . . . . . . . . . . . . . . . . . . . . . . . . . . . . . . . . . . . . .210
Viewing machine properties . . . . . . . . . . . . . . . . . . . . . . . . . . . . . . . . . . . . . .211
Organizing machines in an anti-virus domain . . . . . . . . . . . . . . . . . . . . . . . .212
vi Management Edition
Page 7

Table of Contents
Chapter 8. Using Mirror and Linked Repositories . . . . . . . . . . . . . . . . 213
Creating mirror repositories . . . . . . . . . . . . . . . . . . . . . . . . . . . . . . . . . . . . . .213
Creating Windows NT mirrors . . . . . . . . . . . . . . . . . . . . . . . . . . . . . . . . .215
Creating NetWare mirrors . . . . . . . . . . . . . . . . . . . . . . . . . . . . . . . . . . . .219
Assigning different repositories . . . . . . . . . . . . . . . . . . . . . . . . . . . . . . .221
Configuring mirror repositories . . . . . . . . . . . . . . . . . . . . . . . . . . . . . . . . . . .222
Configuring Windows NT mirrors . . . . . . . . . . . . . . . . . . . . . . . . . . . . . .222
Configuring NetWare mirrors . . . . . . . . . . . . . . . . . . . . . . . . . . . . . . . . .223
Manually logging in to the server . . . . . . . . . . . . . . . . . . . . . . . . . . . . . .227
Promoting mirror repositories . . . . . . . . . . . . . . . . . . . . . . . . . . . . . . . . . . . . .229
Granting access rights . . . . . . . . . . . . . . . . . . . . . . . . . . . . . . . . . . . . . . . . . . .229
Configuring access to Windows NT mirrors . . . . . . . . . . . . . . . . . . . . .229
Configuring access to NetWare mirrors . . . . . . . . . . . . . . . . . . . . . . . .234
Reducing WAN traffic . . . . . . . . . . . . . . . . . . . . . . . . . . . . . . . . . . . . . . . . . . . .235
Using linked repositories . . . . . . . . . . . . . . . . . . . . . . . . . . . . . . . . . . . . . . . . .237
Linking repositories . . . . . . . . . . . . . . . . . . . . . . . . . . . . . . . . . . . . . . . . . . . . .238
Listing the Repository contents . . . . . . . . . . . . . . . . . . . . . . . . . . . . . . . . . . .239
Filtering the report . . . . . . . . . . . . . . . . . . . . . . . . . . . . . . . . . . . . . . . . . .239
Formatting the Repository report . . . . . . . . . . . . . . . . . . . . . . . . . . . . . .241
Reporting on the installation . . . . . . . . . . . . . . . . . . . . . . . . . . . . . . . . . . . . . .242
Formatting the Installation Log report . . . . . . . . . . . . . . . . . . . . . . . . . .243
Chapter 9. Advanced Configuration and Troubleshooting . . . . . . . . . 245
Managing domains . . . . . . . . . . . . . . . . . . . . . . . . . . . . . . . . . . . . . . . . . . . . . .245
Managing machines in a non-trusted Windows NT domain . . . . . . . .245
Changing the Management Server . . . . . . . . . . . . . . . . . . . . . . . . . . . . .246
Running Management Console from another workstation . . . . . . . . .248
Securing anti-virus domains . . . . . . . . . . . . . . . . . . . . . . . . . . . . . . . . . .249
Collecting diagnostic information . . . . . . . . . . . . . . . . . . . . . . . . . . . . .252
Viewing items in the console . . . . . . . . . . . . . . . . . . . . . . . . . . . . . . . . . . . . . .253
Discovering machines . . . . . . . . . . . . . . . . . . . . . . . . . . . . . . . . . . . . . . .253
Viewing machine comments . . . . . . . . . . . . . . . . . . . . . . . . . . . . . . . . . .254
Expanding and collapsing the member machines view . . . . . . . . . . .255
Removing managed machines from the network view . . . . . . . . . . . . .255
Finding machines . . . . . . . . . . . . . . . . . . . . . . . . . . . . . . . . . . . . . . . . . . .255
Refreshing the Name Provider view . . . . . . . . . . . . . . . . . . . . . . . . . . . .257
Administrator’s Guide vii
Page 8

Table of Contents
Installing components . . . . . . . . . . . . . . . . . . . . . . . . . . . . . . . . . . . . . . . . . . .258
Diagnosing installation problems . . . . . . . . . . . . . . . . . . . . . . . . . . . . . .258
Submitting batch updates . . . . . . . . . . . . . . . . . . . . . . . . . . . . . . . . . . . .259
Installing anti-virus components to different directories . . . . . . . . . . .261
Customizing installation options . . . . . . . . . . . . . . . . . . . . . . . . . . . . . .263
Removing the Management Edition program . . . . . . . . . . . . . . . . . . . .264
Changing machine configurations . . . . . . . . . . . . . . . . . . . . . . . . . . . . . . . . .266
Making machines non-standard . . . . . . . . . . . . . . . . . . . . . . . . . . . . . . .266
Making non-standard machines standard . . . . . . . . . . . . . . . . . . . . . . .268
Recovering deleted items . . . . . . . . . . . . . . . . . . . . . . . . . . . . . . . . . . . . . . . .268
Recovering deleted machines . . . . . . . . . . . . . . . . . . . . . . . . . . . . . . . . .268
Recovering the Name Provider database . . . . . . . . . . . . . . . . . . . . . . .269
Appendix A. Using the AUTOINST Utility . . . . . . . . . . . . . . . . . . . . . . . 271
Appendix B. Using MCScript to Update Your Script Files . . . . . . . . . . 273
Determining when to edit your MCSCRIPT.INI files . . . . . . . . . . . . . . . . . . . .273
Defining MCScript files . . . . . . . . . . . . . . . . . . . . . . . . . . . . . . . . . . . . . . . . . . .273
Specifying [ID] keys . . . . . . . . . . . . . . . . . . . . . . . . . . . . . . . . . . . . . . . . .275
Specifying [Inclusions] keys . . . . . . . . . . . . . . . . . . . . . . . . . . . . . . . . . .277
Specifying [ExcludedComponents] keys . . . . . . . . . . . . . . . . . . . . . . . .277
Specifying [ParentComponents] keys . . . . . . . . . . . . . . . . . . . . . . . . . .278
Specifying [ExtensionDLLs] keys . . . . . . . . . . . . . . . . . . . . . . . . . . . . . .278
Specifying [Commands] keys . . . . . . . . . . . . . . . . . . . . . . . . . . . . . . . . .279
Editing MCScript files for versions or languages . . . . . . . . . . . . . . . . . . . . .281
Understanding MCScript commands . . . . . . . . . . . . . . . . . . . . . . . . . . . . . . .282
File system commands . . . . . . . . . . . . . . . . . . . . . . . . . . . . . . . . . . . . . .282
Program Manager commands . . . . . . . . . . . . . . . . . . . . . . . . . . . . . . . . .284
Private profile commands . . . . . . . . . . . . . . . . . . . . . . . . . . . . . . . . . . . .286
Miscellaneous commands . . . . . . . . . . . . . . . . . . . . . . . . . . . . . . . . . . . .288
Registry commands . . . . . . . . . . . . . . . . . . . . . . . . . . . . . . . . . . . . . . . . .293
Service control commands . . . . . . . . . . . . . . . . . . . . . . . . . . . . . . . . . . .295
Flow control statements . . . . . . . . . . . . . . . . . . . . . . . . . . . . . . . . . . . . .296
NetWare file manipulation commands . . . . . . . . . . . . . . . . . . . . . . . . . .297
NetWare operating system commands . . . . . . . . . . . . . . . . . . . . . . . . .298
NetWare miscellaneous commands . . . . . . . . . . . . . . . . . . . . . . . . . . . .298
viii Management Edition
Page 9

Table of Contents
Understanding Management Edition macros . . . . . . . . . . . . . . . . . . . . . . . . .299
Directory macros . . . . . . . . . . . . . . . . . . . . . . . . . . . . . . . . . . . . . . . . . . .299
File transfer macros . . . . . . . . . . . . . . . . . . . . . . . . . . . . . . . . . . . . . . . . .299
Miscellaneous macros . . . . . . . . . . . . . . . . . . . . . . . . . . . . . . . . . . . . . . .300
Embedding AutoRepo scriptlets in MCSCRIPT.INI . . . . . . . . . . . . . . . . . . . .300
Understanding AutoRepo commands . . . . . . . . . . . . . . . . . . . . . . . . . .301
Getting support for customized scripts . . . . . . . . . . . . . . . . . . . . . . . . . . . . .302
Appendix C. Network Associates Support Services . . . . . . . . . . . . . . 303
Adding value to your Network Associates product . . . . . . . . . . . . . . . . . . . .303
PrimeSupport options for corporate customers . . . . . . . . . . . . . . . . . .303
Ordering a corporate PrimeSupport plan . . . . . . . . . . . . . . . . . . . . . . .306
PrimeSupport options for home users . . . . . . . . . . . . . . . . . . . . . . . . . . . . . .308
How to reach international home user support . . . . . . . . . . . . . . . . . . .309
Ordering a PrimeSupport plan for home users . . . . . . . . . . . . . . . . . . .310
Network Associates consulting and training . . . . . . . . . . . . . . . . . . . . . . . . .311
Professional Services . . . . . . . . . . . . . . . . . . . . . . . . . . . . . . . . . . . . . . .311
Total Education Services . . . . . . . . . . . . . . . . . . . . . . . . . . . . . . . . . . . . .312
Glossary . . . . . . . . . . . . . . . . . . . . . . . . . . . . . . . . . . . . . . . . . . . . . . . . . . . 313
Index . . . . . . . . . . . . . . . . . . . . . . . . . . . . . . . . . . . . . . . . . . . . . . . . . . . . . . 319
Administrator’s Guide ix
Page 10

Table of Contents
x Management Edition
Page 11

1
Introducing the Management
Edition Program
Introduction
As a network administrator, your time is valuable. You’re responsible for
maintaining your corporate network at its optimum. The Management Edition
program solves your need for timely, efficient, and cost-effective
enterprise-wide anti-virus software distribution. With it, you can seamlessly
install, configure, and manage anti-virus software for remote networked
machines within anti-virus domains that you create.
What is the Management Edition program?
The Management Edition program is Network Associates* real-time software
distribution system, which installs, configures, upgrades, and removes
anti-virus software for remote machines on a network. The Management
Edition software helps protect your network from attacks by enabling
centralized upgrading of your network’s anti-virus software, as well as
centralized alerting of detected attacks. It reduces the time you must spend
installing and managing anti-virus software, particularly on large networks,
ensuring uninterrupted network security.
1
The Management Edition software helps you safeguard one of your most
important assets—your data—by delivering timely upgrades of VirusScan*
(for Windows95, Windows98, WindowsNT, and Windows3.1x) and
NetShield* for Windows NT. Anti-virus software distribution is an important
element in a comprehensive security program that includes a variety of safety
measures, such as regular use of encryption and intrusion detection software,
backups, meaningful password protection, training, and security awareness.
Network Associates urges you to set up and comply with such a security
program.
How does the Management Edition program work?
The Management Edition program installs software to member machines in
the anti-virus domains that you create, from software repositories (master,
mirror, and linked) that you create. You control these activities from the
Management Console, a drag-and-drop application that runs on Microsoft
Windows NT.
Administrator’s Guide 11
Page 12

Introducing the Management Edition Program
You can install the Management Edition program on the local hard disk drive
of the administrator’s workstation. You will need a Microsoft Windows NT
Domain Administrator account.
NOTE: You must install the Management Console and the Management
Server only on a Windows NT system. (The Management Console runs
only on Windows NT 4.0, and the Management Server runs on Windo ws
NT 3.51 or later.) Both applications, however, handle all tasks in the same
way across all Management Agent workstation platforms (Windows NT,
Windows 95, Windows 98, Windows 3.x, and Novell NetWare 3.12 or
later), which means less time spent learning new systems.
Most of the program’s functionality is built into these integrated services:
• Management Console. Use the Management Console to configure and
install anti-virus software on any machines in the anti-virus domain. For
details, see Chapter 3, “Creating Anti-virus Domains” and Chapter 5,
“Updating Your Anti-virus Software.”
• Management Server. Use the Management Server to coordinate the
scheduling of scans, receive alerts, and generate reports for the entire
anti-virus domain. For details, see Chapter 4, “Creating Schedules.”
• Management Agent. Use the Management Agent to initiate on-demand
scans via the Scheduler, and to send virus alerts from on-demand and
on-access scans back to the Management Server. For details, see Chapter
4, “Creating Schedules.”
• Alert Manager. Use the Alert Manager to configure alert notification
settings. When the anti-virus software managed by the Management
Edition program detects malicious activity on your servers, you can be
notified immediately by one or more of a wide variety of notification
methods. For details, see Chapter 6, “Using the Alert Manager.”
These services work together to provide easy management of machines in
your anti-virus domain. Each service is configurable through a console. To
access the Alert Manager settings from the Management Console, click
Anti-Virus Domain(s)
individual machine, and then click the
, an individual domain, a members group, or an
Component Configuration
toolbar button.
12 Management Edition
Page 13

Introducing the Management Edition Program
What comes with the Management Edition program?
The Management Edition program consists of several component sets that
combine one or more related programs, each of which play a part in defending
your computer against viruses and other malicious software. The component
sets are:
• Management Console. This component gives you exceptional control over
your anti-virus software distribution and scanning operations. You can
specify one of three methods for updating member machines. You can also
initiate a scan operation at any time (a feature known as “on-demand”
scanning), configure continuous on-access scanning to monitor network
traffic, choose how your anti-virus software will respond to any infections
it finds, and see reports on its actions.
• Management Components. This set consists of the Management Agent,
Scheduler, Response Manager (which runs in the background and is not
configurable), Update Agent, and Update Manager.
• Management Agent. This component helps you manage the member
machines. It is installed automatically on the Management Server and on
all the machines in the anti-virus domain when you apply a configuration.
The Management Agent receives an instruction from the Scheduler to start
an on-demand scan, and sends virus alerts from on-demand and on-access
scans back to the Management Server.
• Scheduler. This component lets you schedule an on-demand scan to occur
at a specific time. It then sends a command to all selected member machines
that are running, telling them to scan themselves using their on-demand
scanner. The Scheduler can schedule scans for a single machine, a group of
machines or all machines within the anti-virus domain. Do not confuse this
with the local Scheduler, which can only schedule scans for the individual
machine on which it is present. See Chapter 4, “Creating Schedules,” for
details.
• Update Agent. This component processes changes to the configuration of
installed components. The Management Console automatically produces a
script to control these changes, and to control component installation and
uninstallation. The Update Agent then processes this script. Unlike the
other components, which run in the background, the Update Agent is
launched by the Management Agent.
• Update Manager. This component runs on the Management Server and
provides one of three methods for updating member machines. It can retry
updates to machines that are powered off. You can configure the number of
retries and specify the maximum number of machines to simultaneously
update, using traffic limitation. This limits traffic to and from the
Management Server, preventing it from running out of connections or from
flooding it with file-copy requests when updating many machines.
Administrator’s Guide 13
Page 14

Introducing the Management Edition Program
• Documentation. The Management Edition program documentation
includes:
– A printed Getting Started Guide, which introduces the product,
provides installation instructions, outlines how to respond if you
suspect your computer has a virus, and provides a brief product
overview. The Getting Started Guide comes with the copies of the
Management Edition program distributed on CD-ROM discs. You
can also download it from Network Associates website or from
other electronic services.
– This administrator’s guide saved on the Management Edition
CD-ROM or installed on your hard disk in Adobe Acrobat .PDF
format. The Management Edition Administrator’s Guide describes in
detail how to use the Management Edition program and includes
other information useful as background or as advanced
configuration options. Acrobat .PDF files are flexible online
documents that contain hyperlinks, outlines and other aids for easy
navigation and information retrieval.
For best results when opening and printing the Administrator’s
Guide, Network Associates recommends using Acrobat Reader 4.0
—Reader version 3.0.1 has difficulty correctly printing graphics
included in the .PDF file.
14 Management Edition
– An online help file. This file gives you quick access to hints and tips
about how to use the Management Edition program. To open the
help file from within the Management Console, choose
from the
Help
menu.
Contents
The Management Edition program also includes context-sensitive
online help. You can right-click buttons, lists or other elements
within dialog boxes to see brief, descriptive help topics. Click
Help
buttons where you see them to open the main help file to a relevant
topic.
– A README.1ST or LICENSE.TXT file. This file outlines the terms of
your license to use the Management Edition program. Read it
carefully—by installing the Management Edition program you
agree to its terms.
– A WHATSNEW.TXT file. This file contains last-minute additions or
changes to the documentation, lists any known behavior or other
issues with the product release, and often describes new product
features incorporated into incremental product updates. You’ll find
the WHATSNEW.TXT file at the root level of your Management
Edition CD-ROM disc or in the Management Edition program
folder—you can open and print it from Windows Notepad, or from
nearly any word-processing software.
Page 15

Introducing the Management Edition Program
Once you’ve installed the Management Edition components, you must install
the anti-virus components that you want to manage:
• Anti-virus Components. This set consists of the on-access (VShield*) and
on-demand scanners used by NetShield or VirusScan. These components
include virus definition (.DAT) files, default configuration files, validation
files, and other files.
• VShield. This component gives you continuous anti-virus protection from
viruses borne on floppy disks, brought in from your network, or loaded
into memory. VShield starts when you start your computer, and stays in
memory until you shut down. A flexible set of property pages allows you
to tell VShield which parts of your system to scan, when to scan them,
which parts to leave alone, and how to respond to any infected files it finds.
In addition, VShield can alert you when it finds a virus, and can generate
reports that summarize each of its actions.
The latest VShield version includes technology that guards against hostile
Java applets and ActiveX controls. With this new capability, VShield can
automatically scan e-mail messages and attachments that you receive from
the Internet via Lotus cc:Mail, Microsoft Mail or other mail clients that
comply with Microsoft’s Messaging Application Programming Interface
(MAPI). It can also filter out hostile Java classes and ActiveX controls by
comparing those that it encounters with a database of classes and controls
known to cause harm. When it detects a match, VShield can alert you, or it
can automatically deny harmful objects access to your system. VShield can
also keep your computer from connecting to dangerous Internet sites.
Simply designate the sites your browser software should not visit, and
VShield automatically prevents access. Secure password protection for
your configuration options prevents others from making unauthorized
changes. The same convenient dialog box controls configuration options
for all VShield modules.
• NetShield or VirusScan. This component gives you unmatched control
over your scanning operations. You can initiate a scan operation at any
time (a feature known as “on-demand” scanning), specify local and
network disks as scan targets, choose how your anti-virus software will
respond to any infections it finds, and see reports on its actions. You can
start with its basic configuration mode, then move to its advanced mode for
maximum flexibility. Consult your NetShield or VirusScan User’s Guide for
details.
• Alert Manager. This component runs on the Management Server and
receives alerts from the Management Agents when centralized alerting is
enabled. There is only one Alert Manager component for each anti-virus
domain. Using the Management Console, you can define who to alert and
how to alert them. See Chapter 6, “Using the Alert Manager,” for details.
Administrator’s Guide 15
Page 16

Introducing the Management Edition Program
• Command-line Scanner. The VirusScan set consists of SCANPM.EXE, a
powerful scanning agent for 32-bit environments, and BOOTSCAN.EXE, a
smaller, specialized scanner. The NetShield command-line scanner is
SCAN32.EXE. These programs allow you to initiate targeted scan
operations from the MS-DOS prompt window or from protected MS-DOS
mode. Ordinarily, you’ll use your anti-virus software’s graphical user
interface (GUI) to perform most scanning operations, but if you have
trouble starting Windows or if the GUI components will not run in your
environment, you can use the command-line scanners as a backup.
SCANPM.EXE provides you with a full-featured scanner for 16- and 32-bit
protected-mode DOS environments and includes support for extended
memory and flexible memory allocations. SCAN32.EXE is for only 32-bit
environments. To use the scanner, open an MS-DOS prompt window or
restart your computer in MS-DOS mode, then run SCANPM.EXE or
SCAN32.EXE from the command line, together with the scan options you
want. See the appendix in your anti-virus software User’s Guide for a list
and description of available command-line options.
VirusScan uses BOOTSCAN.EXE on its Emergency Disk in order to
provide you with a virus-free boot environment. When you run the
Emergency Disk creation wizard, VirusScan copies BOOTSCAN.EXE, a
specialized set of .DAT files, and boot files to a single fl oppy disk. With this
disk, you can start your computer, then scan its memory and the Master
Boot Record, the boot sector, and the system files on your hard disk.
BOOTSCAN.EXE will not detect or clean macro viruses, but it will detect
or clean other viruses that can jeopardize your VirusScan installation or
infect files at system startup. Once you identify and respond to those
viruses, you can safely run VirusScan to clean the rest of your system,
provided you don’t run any other programs in the meantime.
Management Edition program features
This version of the Management Edition program builds on the strengths of
previous versions, extending the established functionality and providing new
features to help you manage your network anti-virus solutions. See the
WHATSN EW.TXT file inc luded with the software for a ful l list of new features
and information on the latest changes.
New functionality
• The Management Edition program now supports NetShield for NetWare
v4.1.1 anti-virus software.
• Forced updates of invalid external mirrors give you more control over how
and when mirror repositories are updated.
16 Management Edition
Page 17

Introducing the Management Edition Program
• This release includes the ability to configure custom tools—such as the
additional console required to configure remote NetShield for NetWare
servers—that can be launched from the
Console.
• You can now use the Repository’s Products page to update product files
such as SETUP.EXE or SETUP.ISS in addition to script (MCSCRIPT.INI)
and extension .DLL files.
• You can now define custom messages that can be appear immediately
before or after a client update.
• This release features enhanced control over Name Provider-installed
machines.
Tools
menu in the Management
Seamlessly interactive management tools
• The Management Console lets you configure and install anti-virus
software on any machines in the anti-virus domain from any Windows NT
machine on which it is installed.
• The Management Server coordinates the scheduling of scans, receives
alerts, and generates reports for the entire anti-virus domain from the
Windows NT machine on which it is installed.
• The Management Agent provides client installers for Windows 95 and
Windows NT machines that have peer networking disabled or removed, so
that you can add them to the network without need for file sharing.
• The diagnostics wizard gathers information in an e-mailable format and
helps our technical support staff solve your problems faster.
Automated software distribution
• The Management Console enables enhanced distribution speeds to a large
number of machines and efficiently stores domain and machine
information as registry entries (not .INI files).
• An enhanced Batch Install method lets desktop and laptop users initiate an
update upon login for fast installation of anti-virus software and updates.
• Linked repositories reduce WAN traffic by allowing you to distribute
software between repositories without having to install software from
separate CD-ROM discs.
• Different language versions of the same anti-virus software can co-exist in
a single repository. You specify the language version to be distributed for
each machine, group, or domain.
• Software installation reports show which anti-virus software is installed on
which machines, which machines are in which anti-virus domain, and
which machines have a non-standard configuration.
Administrator’s Guide 17
Page 18

Introducing the Management Edition Program
Real-time virus detection and notification
• On-access (inbound and outbound) anti-virus scanning provides real-time
identification of both known and unknown viruses upon file access, create,
copy, rename, and run; disk access; system startup; and system shutdown.
• On-demand anti-virus scanning offers user-initiated detection of known
boot, file, macro, multi-partite, stealth, encrypted, and polymorphic
viruses located within files, drives (local and network), and diskettes.
• The Alert Manager offers centralized virus notification via alphanumeric
pager, SMTP e-mail, SNMP messaging, DMI alerting, audible alerting,
network broadcast, program execution, and Windows NT event logging.
(See Chapter 6, “Using the Alert Manager,” for details.)
• At-a-glance scan status via the anti-virus domain view reveals whether a
machine is all clear, infected, or overdue for a scan.
• Scans can be scheduled for entire member groups, as well as individual
machines or the whole domain.
• Virus-scan reports display how many virus alerts have occurred over a
specified period of time on specified machines.
Conventions used in this guide
The following describes the typeface conventions used in this guide:
Bold
Sans-serif font
Keystrokes
Variables
Menu names, commands, buttons, and dialog box options
are shown in a bold sans-serif font.
Folder, icon, and computer key names, as well as screen text
on the software, are shown in a sans-serif font.
Text that the user must type in as a command or as a text
box entry (e.g., a pathname) is shown in a monospaced font.
Command-line text for which you must supply a value is
shown in an italic sans-serif font.
18 Management Edition
Page 19

Introducing the Management Edition Program
How to contact Network Associates
Customer service
To order products or obtain product information, contact the Network
Associates Customer Care department at (408) 988-3832 or write to the
following address:
Network Associates, Inc.
McCandless Towers
3965 Freedom Circle
Santa Clara, CA 95054-1203
U.S.A.
Technical support
Network Associates is famous for its dedication to customer satisfaction. We
have continued this tradition by making our site on the World Wide Web a
valuable resource for answers to technical support issues. We encourage you
to make this your first stop for answers to frequently asked questions, for
updates to Network Associates software, and for access to Network Associates
news and virus information
.
World Wide Web http://support.nai.com
If you do not find what you need or do not have web access, try one of our
automated services.
Internet support@nai.com
CompuServe GO NAI
America Online keyword MCAFEE
If the automated services do not have the answers you need, contact Network
Associates at one of the following numbers Monday through Friday between
6:00
For corporate-licensed customers:
. and 6:00 P.M. Pacific time.
A.M
Phone (408) 988-3832
Fax (408) 970-9727
Administrator’s Guide 19
Page 20

Introducing the Management Edition Program
For retail-licensed customers:
Phone (972) 855-7044
Fax (408) 970-9727
To provide the answers you need quickly and efficiently, the Network
Associates technical support staff needs some information about your
computer and your software. Please have this information ready before you
call:
• Product name and version number
• Computer brand and model
• Any additional hardware or peripherals connected to your computer
• Operating system type and version numbers
• Network type and version, if applicable
• Contents of your AUTOEXEC.BAT, CONFIG.SYS, and system LOGIN
script
• Specific steps to reproduce the problem
Network Associates training
For information about scheduling on-site training for any Network Associates
product, call (800) 338-8754.
Comments and feedback
Network Associates appreciates your comments and reserves the right to use
any information you supply in any way it believes appropriate without
incurring any obligation whatsoever. Please address your comments about
Network Associates anti-virus product documentation to: Network
Associates, Inc., 15220 NW Greenbrier Parkway, Suite 100, Beaverton, OR
97006-5762, U.S.A. You can also send faxed comments to (503) 531-7655 or
e-mail to tvd_documentation@nai.com.
20 Management Edition
Page 21

Introducing the Management Edition Program
Reporting new items for anti-virus data file updates
Network Associates anti-virus software offers you the best available detection
and removal capabilities, including advanced heuristic scanning that can
detect new and unnamed viruses as they emerge. Occasionally, however, an
entirely new type of virus that is not a variation on an older type can appear
on your system and escape detection.
Because Network Associates researchers are committed to providing you with
effective and up-to-date tools you can use to protect your system, please tell
them about any new Java classes, ActiveX controls, dangerous websites, or
viruses that your software does not now detect. Note that Network Associates
reserves the right to use any information you supply as it deems appropriate,
without incurring any obligations whatsoever. Send your questions or virus
samples to:
virus_research@nai.com Use this address to send questions or
virus samples to our North America
and South America offices
vsample@nai.com Use this address to send questions or
virus samples gathered with Dr
Solomon’s Anti-Virus Toolkit* software
to our offices in the United Kingdom
To report items to our European research office, use these e-mail addresses:
virus_research_europe@nai.com Use this address to send questions or
virus samples to our offices in Western
Europe
virus_research_de@nai.com Use this address to send questions or
virus samples gathered with Dr
Solomon’s Anti-Virus Toolkit software
to our offices in Germany
To report items to our Asia-Pacific research office, or our office in Japan, use
one of these e-mail addresses:
virus_research_japan@nai.com Use this address to send questions or
virus samples to our offices in Japan
and East Asia
virus_research_apac@nai.com Use this address to send questions or
virus samples to our offices in Australia
and South East Asia
Administrator’s Guide 21
Page 22

Introducing the Management Edition Program
International contact information
To contact Network Associates outside the United States, use the addresses,
phone numbers and fax numbers below.
Network Associates
Australia
Level 1, 500 Pacific Highway
St. Leonards, NSW
Sydney, Australia 2065
Phone: 61-2-8425-4200
Fax: 61-2-9439-5166
Network Associates
Belgique
BDC Heyzel Esplanade, boîte 43
1020 Bruxelles
Belgique
Phone: 0032-2 478.10.29
Fax: 0032-2 478.66.21
Network Associates
Canada
139 Main Street, Suite 201
Unionville, Ontario
Canada L3R 2G6
Phone: (905) 479-4189
Fax: (905) 479-4540
Network Associates
Austria
Pulvermuehlstrasse 17
Linz, Austria
Postal Code A-4040
Phone: 43-732-757-244
Fax: 43-732-757-244-20
Network Associates
do Brasil
Rua Geraldo Flausino Gomez 78
Cj. - 51 Brooklin Novo - São Paulo
SP - 04575-060 - Brasil
Phone: (55 11) 5505 1009
Fax: (55 11) 5505 1006
Network Associates
People’s Republic of China
New Century Office Tower, Room 1557
No. 6 Southern Road Capitol Gym
Beijing
People’s Republic of China 100044
Phone: 8610-6849-2650
Fax: 8610-6849-2069
Network Associates Denmark
Lautruphoej 1-3
2750 Ballerup
Danmark
Phone: 45 70 277 277
Fax: 45 44 209 910
22 Management Edition
NA Network Associates Oy
Sinikalliontie 9, 3rd Floor
02630 Espoo
Finland
Phone: 358 9 5270 70
Fax: 358 9 5270 7100
Page 23

Introducing the Management Edition Program
Network Associates
France S.A.
50 Rue de Londres
75008 Paris
France
Phone: 33 1 44 908 737
Fax: 33 1 45 227 554
Network Associates Hong Kong
19th Floor, Matheson Centre
3 Matheson Way
Causeway Bay
Hong Kong 63225
Phone: 852-2832-9525
Fax: 852-2832-9530
Network Associates Japan, Inc.
Toranomon 33 Mori Bldg.
3-8-21 Toranomon Minato-Ku
Tokyo 105-0001 Japan
Phone: 81 3 5408 0700
Fax: 81 3 5408 0780
Network Associates
Deutschland GmbH
Ohmstraße 1
D-85716 Unterschleißheim
Deutschland
Phone: 49 (0)89/3707-0
Fax: 49 (0)89/3707-1199
Network Associates Srl
Centro Direzionale Summit
Palazzo D/1
Via Brescia, 28
20063 - Cernusco sul Naviglio (MI)
Italy
Phone: 39 02 92 65 01
Fax: 39 02 92 14 16 44
Network Associates Latin America
1200 S. Pine Island Road, Suite 375
Plantation, Florida 33324
United States
Phone: (954) 452-1731
Fax: (954) 236-8031
Network Associates
de Mexico
Andres Bello No. 10, 4 Piso
4th Floor
Col. Polanco
Mexico City, Mexico D.F. 11560
Phone: (525) 282-9180
Fax: (525) 282-9183
Network Associates
International B.V.
Gatwickstraat 25
1043 GL Amsterdam
The Netherlands
Phone: 31 20 586 6100
Fax: 31 20 586 6101
Administrator’s Guide 23
Page 24

Introducing the Management Edition Program
Network Associates
Portugal
Av. da Liberdade, 114
1269-046 Lisboa
Portugal
Phone: 351 1 340 4543
Fax: 351 1 340 4575
Network Associates
South East Asia
78 Shenton Way
#29-02
Singapore 079120
Phone: 65-222-7555
Fax: 65-220-7255
Network Associates Sweden
Datavägen 3A
Box 596
S-175 26 Järfälla
Sweden
Phone: 46 (0) 8 580 88 400
Fax: 46 (0) 8 580 88 405
Net Tools Network Associates
South Africa
Bardev House, St. Andrews
Meadowbrook Lane
Epson Downs, P.O. Box 7062
Bryanston, Johannesburg
South Africa 2021
Phone: 27 11 706-1629
Fax: 27 11 706-1569
Network Associates
Spain
a
Orense 4, 4
Planta.
Edificio Trieste
28020 Madrid, Spain
Phone: 34 9141 88 500
Fax: 34 9155 61 404
Network Associates AG
Baeulerwisenstrasse 3
8152 Glattbrugg
Switzerland
Phone: 0041 1 808 99 66
Fax: 0041 1 808 99 77
Network Associates
Taiwan
Suite 6, 11F, No. 188, Sec. 5
Nan King E. Rd.
Taipei, Taiwan, Republic of China
Phone: 886-2-27-474-8800
Fax: 886-2-27-635-5864
24 Management Edition
Network Associates
International Ltd.
Minton Place, Victoria Street
Windsor, Berkshire
SL4 1EG
United Kingdom
Phone: 44 (0)1753 827 500
Fax: 44 (0)1753 827 520
Page 25

2
Installing the Management
Edition Program
System requirements
Before installing the Management Edition program, verify that your system
has the features shown below, then consider the installation scenarios on
page 26.
Hardware recommended
The Management Edition program will install and run on any IBM PC or
PC-compatible computer equipped with:
• A Pentium processor-class CPU (central processing unit)
• At least 17
Management Console; at least 1
• At least 15
• At least 15
you add more anti-virus software
NOTE: In order to optimize performance, Network Associates
recommends that you not install the Management Console and the
Repository on the same machine; however, you may prefer to do this for
simplicity.
MB of RAM:
MB
of free hard disk space for the Management Console
MB
of free hard disk space for the Repository, which increases as
16MB of RAM (random-access memory) for the
MB
of RAM for the anti-virus components
2
• A NIC (network interface card) suitable for your network speed
Software supported
È
IMPORTANT: Neither the Management Server nor the Management
Console has been tested with Windows 2000 Professional or Server.
Network Associates does not currently certify or support running on
these platforms.
• For the Management Console: Windows NT Server or Workstation, v4.0
(with domain administrator rights)
• For the Management Server: Windows NT Server or Workstation, v3.51
and v4.0 (with domain administrator rights), running one or more TCP/IP,
Novell IPX, and NetBIOS protocols
Administrator’s Guide 25
Page 26

Installing the Management Edition Program
• For anti-virus domain member machines: Windows NT Server or
Workstation, v3.51 or later; Windows 95; Windows 98; Windows for
Workgroups 3.11; Windows 3.1; and Novell NetWare v3.12 or later
• For most machines: a Microsoft peer networking client (except Windows
3.1 or Windows 95 machines with a NetWare client and Name Provider
service, and NetWare servers that do not require a network client)
Defining anti-virus domains
An anti-virus domain is a col lection of machines that are running Windows NT,
Windows 95, Windows 98, Windows 3.1, Windows for Workgroups 3.11, or
NetWare. It allows you to manage your anti-virus strategy, by grouping large
numbers of machines logically.
Any number of machines are allowed in an anti-virus domain. Before
installing the Management Console software, consider how you want to
divide your organization into management units, or anti-virus domains. You
can manage your whole network as one anti-virus domain, divide it into
several anti-virus domains, or follow the structure of the Microsoft network
domains you've already set up.
The Management Console allows you to create one or more anti-virus
domains, based on how you want to group machines on the network. You can
then install, update, and configure the anti-virus software for all anti-virus
domains, a single anti-virus domain, or a single machine.
Each anti-virus domain must contain a Management Server to provide central
communications, and this must be a Windows NT machine. All other
members of the anti-virus domain will have a Management Agent installed
automatically, with one or more anti-virus components.
Installing the Management Console
The Management Console is the program that controls the configuration and
installation of anti-virus software on machines in the anti-virus domain.
È
IMPORTANT: The Management Console for version 2.5 of the
Management Edition program runs only on Windows NT 4.0.
The Management Console does not have to run on the Management Server,
and it does not have to run continuously. You use it to install and configure
anti-virus software for Windows NT Workstation, Windows 95, Windows 98,
Windows for Workgroups 3.11, Windows 3.1, and for NetWare. We
recommend that you run the Management Console from the network
administrator’s machine.
26 Management Edition
Page 27

Installing the Management Edition Program
You can install the Management Console program on a machine’s local hard
disk drive, or on a shared directory on a file server. Installing it to a file server
allows you to run it from different machines that have access to the shared
directory. However, only one machine may run the software at any one time.
Installation scenarios
When you are installing the Management Edition program, consider these
three key items:
• the location of the program files for the Management Console,
• the location of the Repository,
• and the selection of the Management Server.
You can specify each of these as a user’s Windows NT Workstation (referred
to as “local machine”) or a Windows NT Server (referred to as “server”).
Some installation options are more viable than others. We discuss them in the
next section.
Option 1: Local machine/server – one anti-virus domain manager
This is the first of the two main recommended installation options. If a single
person is responsible for the maintenance of your anti-virus solution, we
recommend this configuration.
Program Files location: Local machine
Repository location: Server
Management Server location: Server
Installing the program files to a local machine provides the best performance
for the Management Console user on the same machine.
As long as the Windows NT Server is left powered on, this arrangement
allows member machines to update at any time, send on-access alerts back to
the Management Server and scheduled scans can always be initiated by the
Management Server, regardless of when they are set to start.
Administrator’s Guide 27
Page 28

Installing the Management Edition Program
Option 2: Server/server – more than one anti-virus domain manager
We recommend this configuration for sites that have more than one person
administering the anti-virus solution.
Program Files location: Server
Repository location: Server
Management Server location: Server
The program files in this option are stored on a server rather than a local
machine. This allows easy access to the Management Console from any
machine/user that has sufficient access rights to the share/directory on the
server containing the files. However, the performance is slower than Option 1,
because the program and its configuration files are being accessed across the
network.
Option 3: Local machine/local machine – ten machines or fewer
We do not recommend this configuration, but it is usable in small locations
consisting of ten machines or fewer.
Program Files location: Local machine
Storing the program files on the local machine provides optimal performance
for the Management Console user on the same machine, but restricts its usage
to a single machine unless the local installation directory is shared by that user.
This may be useful when one person has primary responsibility for use of the
Management Console and wants the best performance. Other users who use it
occasionally will have slower access across the network.
È
28 Management Edition
Repository location: Local machine
Management Server location: Local machine
IMPORTANT: A Windows NT Workstation has a limit of ten concurrent
connections with other machines; if the Repository is installed on a local
machine, simultaneous updates are limited to no more than ten
machines. With this configuration, sites with more than ten machines
using the Batch Install method will experience poor performance or
possible update failures. To avoid this, such sites can place a repository
on a NetWare server (with sufficient spare connections) and configure
their anti-virus domain members to update from this repository.
Page 29

Installing the Management Edition Program
The local machine serving as the Management Server should not be powered
off. If it is, it may miss on-access virus alerts that are generated by other
machines and the scheduler may miss sending scheduled events to member
machines while the machine is powered off.
Option 4: Local machine/server – ten machines or fewer
This option, although similar to the previous one, does not rely on the local
workstation being continuously powered on.
Program Files location: Local machine
Repository location: Local machine
Management Server location: Server
As long as the server is continuously powered on, on-access alerts and
scheduled events will not be missed.
However, when the local machine holding the repository is powered off, Batch
installations will fail. Because of the connection restriction for Windows NT
workstations, the limit of ten concurrent updates still applies.
Administrator’s Guide 29
Page 30

Installing the Management Edition Program
Installation steps
È
IMPORTANT: If you are upgrading from version 2.0 to version 2.5 of the
Management Edition program, you must install your new version to the
same folder as your previous version to preserve your anti-virus domain
configuration.
If you are upgrading from version 1.5 to version 2.0 or later, you must
install the new version to a different folder than the previous version;
otherwise, you cannot proceed with the installation until you remove
previous versions of the Management Edition program from your hard
drive. However, before you remove previous versions of the
Management Edition program, be sure to preserve your anti-virus
domain structure by using the
menu.
The Management Console for version 2.5 of the Management Edition
program runs only on Windows NT 4.0.
Once you have selected one of the four installation options discussed above,
complete the following installation procedure.
Import Domain
command on the
File
Follow these steps to install the Management Console:
1. Before installation, make sure that the machine you are running is
2. Start your PC and log on with a user name in the Domain Administrator
3. Insert the Management Edition CD-ROM into the drive.
4. Click
5. Enter
30 Management Edition
virus-free. Refer to the relevant anti-virus product manual.
group.
Start
on your Windows taskbar, and then click
SETUP.EXE
in the text box, and then click OK.
Run
.
Page 31

Installing the Management Edition Program
The Setup program prepares the InstallShield Wizard, which guides you
through the installation process, and then the first Welcome dialog box
appears (Figure 2-1).
Figure 2-1. Welcome dialog box
6. Click
Next.
A second Welcome dialog box appears (Figure 2-2).
Figure 2-2. Welcome (#2) dialog box
7. Close any programs you may have running, and click
the installation.
The Software License Agreement appears.
Next
to continue
Administrator’s Guide 31
Page 32

Installing the Management Edition Program
8. Read the license carefully. Click
Yes
to accept the terms of the software
license and continue the installation.
The User Information dialog box appears (Figure 2-3).
Figure 2-3. User Information dialog box
9. Enter your name and company (both details are required) in the text
boxes, and then click
Next
to continue the installation.
10. By default, the wizard installs program files in directory
32 Management Edition
The Choose Destination Location dialog box appears (Figure 2-4).
Figure 2-4. Choose Destination Location dialog box
C:\Program Files\Network Associates\Management Console.
Page 33

Installing the Management Edition Program
• You can accept the default directory.
or
• You can select a different folder, by clicking
Browse
The Browse for Folder dialog box appears (Figure 2-5).
Figure 2-5. Browse for Folder dialog box
Select a folder, and click OK.
NOTE: If the Management Edition program is installed on a
server, you can run the Management Console on other
machines that have access to its program folder.
.
11. Click
Next
to continue the installation.
Administrator’s Guide 33
Page 34

Installing the Management Edition Program
Setup checks that there is enough hard disk space for the installation, and
then the Select Program Folder dialog box appears (Figure 2-6).
Figure 2-6. Select Program Folder dialog box
12. To add program icons to a folder, you can accept the default, or you can
specify a different program folder than the one shown in the
Folder
the
text box, either by typing its name in the text box or selecting it in
Existing Folders
Program
list box.
13. Click
34 Management Edition
Next
to continue the installation.
Setup now has all the information needed for the installation. The Start
Copying Files dialog box appears (Figure 2-7).
Figure 2-7. Start Copying Files dialog box
Page 35

Installing the Management Edition Program
14. To review or change the information, click
installation, click
If you click
Next
.
Next
, the Setup Complete dialog box appears (Figure 2-8).
Back
. To begin the
Figure 2-8. Setup Complete dialog box
15. Once the installation is complete, you can do one of the following:
• Select
Yes, launch the program file
, and then click
Finish
to start
the Management Console.
or
• Select
Yes, I want to view the README file
to display the file.
, and then click
Administrator’s Guide 35
Finish
Page 36

Installing the Management Edition Program
Running the Management Console (initial use)
The first time you run the Management Console, it prompts for a location to
install the master repository (also known as “the Repository,” as distinguished
from mirror repositories, which occur in multiples).
Installing the master repository
The master repository (i.e., the Repository) is a set of sub-directories that contain
all the Management and anti-virus software for distribution around the
network. Member machines have read-only access to it. Updates to member
machines can be scheduled to occur at any time.
NOTE: The master repository must be permanently available to allow
software updates to occur and must be located on a Windows NT server
or workstation. This may be the Management Server or a different
machine.
You must install your master repository on a Windows NT server that is
permanently available.
Installing the master repository on a Windows NT server means that the
necessary directories and shares are set up automatically as a part of the
installation process. This is the default option. It is the only available option for
installing the master repository.
Follow these steps to install the master repository:
1. First, launch the Management Edition program.
36 Management Edition
Page 37

Installing the Management Edition Program
The Repository Setup dialog box appears (Figure 2-9).
Figure 2-9. Repository Setup dialog box
2. Enter the server name in the
Machine
box.
or
Click the browse (
...
) button next to the
Machine
server in the Network Browser dialog box (Figure 2-10).
Figure 2-10. Network Browser dialog box
box to select a different
Administrator’s Guide 37
Page 38

Installing the Management Edition Program
Select a suitable server, and click OK. Your selection appears in the
Repository Setup dialog box (Figure 2-11).
3. Accept the default location for the master repository, C:\Program Files\
Network Associates\Management Console\Disks on the local machine,
Repository Path
in the
or
Figure 2-11. Repository Setup dialog box
box.
38 Management Edition
Click the browse (
...
) button to select a different path in the Browse for
Folder dialog box (Figure 2-12).
Figure 2-12. Browse for Folder dialog box
NOTE: You must use the machine name and the full path—not the
UNC path or share name. For example, Machine:
Repository Path:
E:\APPS\PROGRAMS
.
ADMIN_MACHINE
Page 39

Installing the Management Edition Program
Select a suitable path, and click OK. Your selection appears in the
Repository Setup dialog box.
4. If the share directory is to be hidden, select the
Hide Shares
checkbox.
5. Click OK to begin installing the master repository.
The master repository initially needs about 15MB of disk space.
However, it will need more space as you upgrade your version of the
Management Edition program and add more Management Edition
components, and if you want to keep more than one version of anti-virus
software in the Repository. Use Windows Explorer or File Manager to
check that you have enough disk space.
A confirmation dialog box appears.
6. Click
Yes
to confirm that you are installing the master repository on a
server that is always running.
The Management Console copies the Management components into the
master repository, as shown in the Repository dialog box on the
Maintenance page (Figure 2-13).
Figure 2-13. Repository dialog box
(Maintenance page)
Administrator’s Guide 39
Page 40

Installing the Management Edition Program
Refer also to the Repository diagram (Figure 2-14).
The following table lists the Management components:
Figure 2-14. Repository diagram
Management Agent
Lets you manage each member machine in the anti-virus
domain. (It is automatically installed on every Management
Edition machine.)
40 Management Edition
Scheduler
Helps you schedule on-demand scans for specific times.
(no icon)
(no icon)
Update Manager
Runs on the Management Server and provides one of the
three methods for updating member machines.
Update Agent
Processes changes to the configuration of installed
components. (It is part of the Management Agent.)
Name Provider
Automatically generates a unique machine name for each
Windows 3.1 machine. Provides a list of names of Windows
95 and Windows 98 machines that have no peer
networking.
You can now install the anti-virus components into the Repository, or
choose to finish installing the Repository and Management components.
Page 41

Installing the Management Edition Program
• To install anti-virus components after completing the installation of
the Management Console, click
Cancel
when the Browse for Folder
dialog box appears. See “Installing anti-virus components in the
Repository” on page 42.
or
• To install the anti-virus components now, follow these steps when
the Browse for Folder dialog box appears:
a. Click the drive letter where the anti-virus components are
located; this is usually the CD-ROM drive or the A:\ drive.
b. To install from CD-ROM, select the relevant folder and click
OK
. To install from diskette, select the relevant drive letter and
click OK. The anti-virus components are installed.
The New Anti-Virus Domain dialog box appears (Figure 2-15).
Figure 2-15. New Anti-Virus Domain dialog box
7. Enter a name for the anti-virus domain, such as the name of the office,
city, or country. Click OK.
The Management Console main screen is updated. Items in bold type in
the anti-virus domain view are configured and installed. Items in plain
type are configured but not installed; you can configure them locally,
before installing them on the target machine.
Administrator’s Guide 41
Page 42

Installing the Management Edition Program
Installing anti-virus components in the Repository
You have now installed the management components into the master
repository. You must now install the anti-virus software into the Repository.
Follow these steps to install anti-virus components in the Repository:
1. In the Management Console’s main menu, click
Repository
The Repository dialog box appears, with the Products page showing the
management components that are currently in the Repository (Figure
2-16).
.
Tools
, and then click
2. Click
42 Management Edition
Install
Figure 2-16. Repository dialog box
(Products page)
.
Page 43

Installing the Management Edition Program
The Install New Software dialog box appears (Figure 2-17).
Figure 2-17. Install New Software dialog box
3. Click
Product
to install a new version of the software.
The other types of software that you can install via this dialog box are as
follows:
Extra Dat.
Click this to install emergency detection driver files
(EXTRA.DAT or EXTRA.DRV) that are sent to you by an AVERT lab.
Dat Update.
Click this to install the periodic .DAT updates that are
posted to the Network Associates FTP site.
Zipped.
Click this to install a .ZIP file containing a complete product, a
downloaded .DAT update that hasn’t been unzipped yet, or a Repository
or a portion of one that has been zipped. If you are adding a portion of
someone else’s Repository to your own as a .ZIP file, click
Filters
to select
which platforms and languages from the .ZIP to add.
4. Insert your anti-virus software CD into your CD-ROM drive or Disk 1
into your diskette drive.
Administrator’s Guide 43
Page 44

Installing the Management Edition Program
The Browse for Folder dialog box appears (Figure 2-18).
Figure 2-18. Browse for Folder dialog box
5. Click the appropriate drive letter, and click OK.
The anti-virus software files are copied into the Repository, as shown in
the Repository dialog box on the Maintenance page (Figure 2-19).
6. If you are using diskettes, repeat step 4 for each disk in the set. Repeat for
44 Management Edition
Figure 2-19. Repository dialog box
(Maintenance page)
each Windows platform or version for the software that you want to
store in the Repository.
Page 45
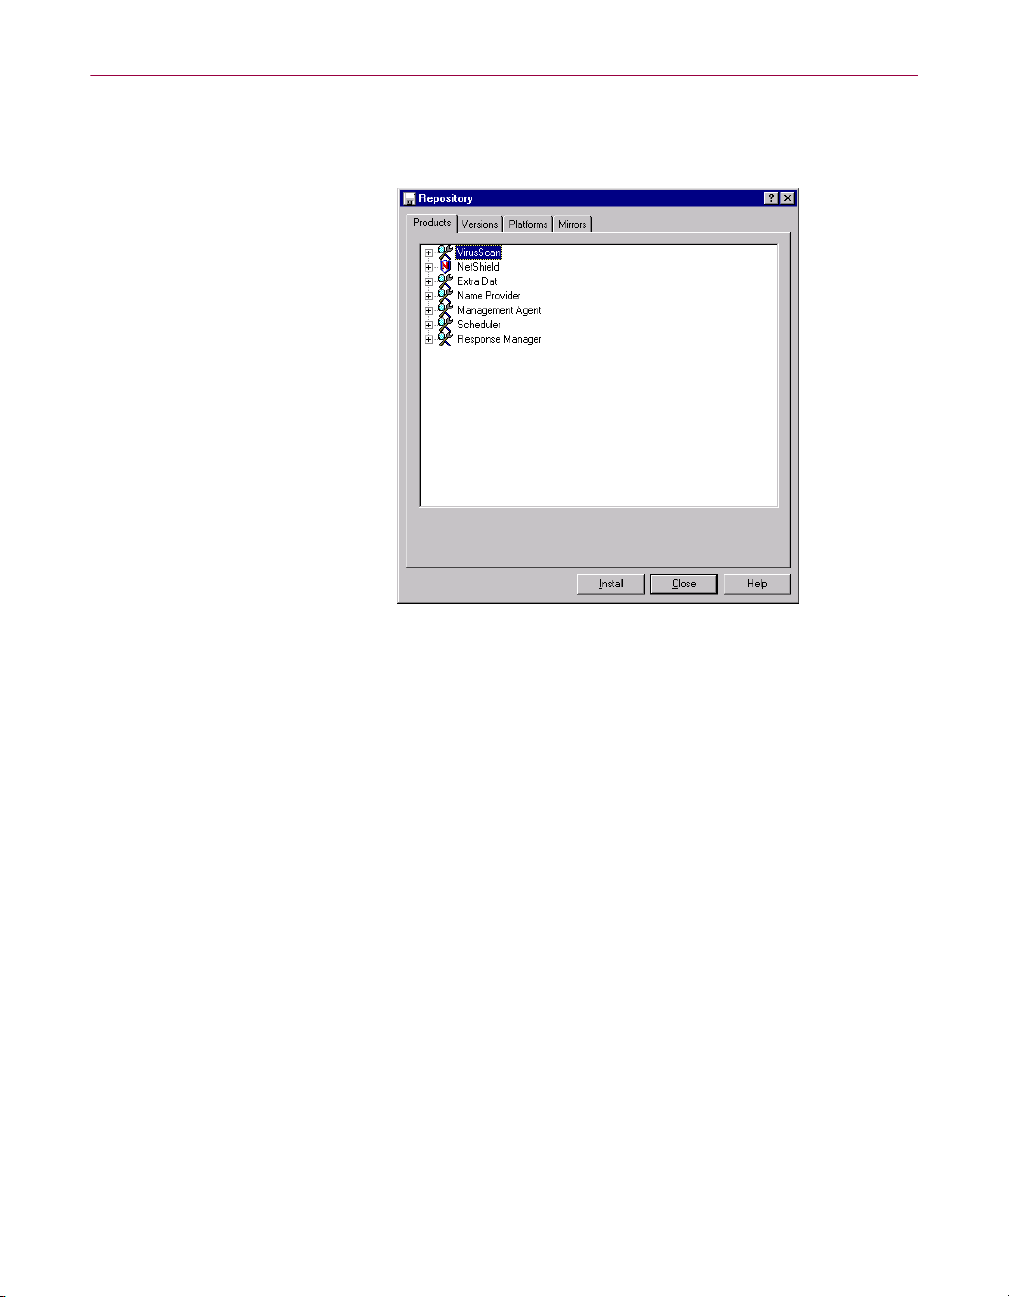
Installing the Management Edition Program
Once the files are copied, the anti-virus components you installed are
added to the list, as shown in the Repository dialog box on the Products
page (Figure 2-20).
Figure 2-20. Repository dialog box
(Products page)
7. If you have member machines running Windows for Workgroups 3.11,
Windows 95, Windows 98, and Windows NT, you must install anti-virus
software into the Repository for each operating system. Repeat steps 4
through 6 until you have installed all the necessary versions.
8. Click
Close
to complete the installation.
For full details about the contents of the Repository, see “Listing the
Repository contents” on page 239.
Administrator’s Guide 45
Page 46

Installing the Management Edition Program
Installing NetShield NetWare in the Repository
NOTE: The Management Edition 2.5 software supports NetShield for
NetWare v4.1.1 anti-virus software. Management Edition 2.5 software
does not work with NetShield for NetWare v4.1.0 or earlier.
When you install NetShield NetWare in the Repository, the NetShield installer
runs in a special mode to generate the following two packages in your
Repository:
• NetShield NetWare Console. This is the NetShield NT Console that you
must install on a Windows NT Workstation in order to configure the
NetShield program remotely on NetWare servers. This is required because
the Management Edition configuration .DLL does not provide the ability to
configure the on-demand scanner schedules and to initiate on-demand
scans. If you install this console on the same Windows NT workstation
where you have the Management Console installed, the Management
Edition program adds a custom tool to the Management Console’s
menu to launch the NetShield Console.
• NetShield (NetWare). This is the server component of the NetShield
program that you must install to the NetWare servers.
Tool
In order to import the NetShield NetWare package into the Repository, you
must first add the following files to the NetShield NetWare installation set, if
they are not included already:
• MENSHNW.DLL: This is the Management Edition configuration .DLL for
the NetShield NetWare server component.
• MCSCRIPT.INI: This is the Management Edition script containing
commands to install the package into the Repository.
• MCNWSCRI.INI: This is the Management Edition script that becomes the
MCSCRIPT.INI for the NetShield NetWare server component during the
Repository install.
These files can be found in the NS4
Console installation directory.
xx
_NW subdirectory of the Management
Configuring NetShield NetWare server package
The configuration .DLL for the NetShield NetWare server package provides a
dialog box to configure the following (see Figure 2-21 on page 47):
• The Management Edition settings required for the installation of the
NetShield program onto NetWare servers
• The NetShield program’s on-access scanner settings
46 Management Edition
Page 47

Installing the Management Edition Program
Figure 2-21. Component Configuration dialog box
(NetShield NetWare page)
If you click
Configure ME
, a dialog box with two pages appears. From here,
you can configure the following settings:
NetShield NDS user object. The NDS (Novell Directory Services) object is
required by the NetShield program for authentication on NetWare servers.
The object is actually created on the server by a utility called NSHINST.NLM,
which is run on the server by the Management Edition install script. To create
the user, NSHINST needs to be passed some NDS authentication details: an
admin user name and password. The context in which the NDS user object is
to be created is also required. If you are rolling out to NetWare 3.x servers or
you know that the NetShield user object has already been created, you can
turn off this option.
ME Configuration Options. Two options are here: (1) whether to auto-load
the NetShield program on the server at startup using the NAIAV.NCF file, and
(2) whether alerts from the NetShield program to the local Management Agent
on the server are to be forwarded directly to the Management Server. If you
are using the NetShield program’s Alert Manager to forward alerts, you can
turn off this second option.
If you click
Configure Scanner
, a dialog box appears from which you can
configure the on-access scanner with the same interface and settings that are
available in the NetShield NT Console. To configure the other settings, you
must use the NetShield NT Console from a Windows NT workstation.
Administrator’s Guide 47
Page 48

Installing the Management Edition Program
Preparing for the NetShield program rollout on NetWare servers
Management Edition configures only the on-access scanner settings and sets
the other settings to the defaults; you will need to configure these settings with
the NetShield NetWare NT Console by connecting to the NetWare servers
individually, prior to rollout. The settings are stored in a file called
NETSHLD.REG, in which you can customize settings that were not configured
by the Management Edition program (see “Customizing the NetShield
program install options and on-access scanner settings on NetWare servers”).
È
IMPORTANT: After the initial rollout of the Management Edition
program, if you change settings with the NetShield NT Console, the
Management Edition program will not know about these changes. The
next time you roll out new settings with the Management Edition
program, the settings will be lost (they will revert to defaults). Either use
the Management Edition program for the initial rollout only, or use a
customized NETSHLD.REG with the settings you want for all of the
servers (see “Customizing the NetShield program install options and
on-access scanner settings on NetWare servers”).
After the initial installation of the NetShield program to the NetWare server,
the NetShield NetWare NT Console password required to connect to the
NetWare server is set to "NetShield." You must change this password from the
NetShield NetWare NT Console. The Management Edition configuration
.DLL cannot do this at present; however, the password is stored in a file called
PASSWORD.PWD, a customized version of which can be place in the
Repository.
Customizing the NetShield program install options and on-access scanner settings on NetWare servers
The Management Edition configuration .DLL starts off with a version of the
NETHSHLD.REG file that has the defaults for the settings that it does not set.
It then applies its settings for the on-access scanner and the NetShield
NetWare installation directory before rolling out to individual servers. The file
is in binary format, so it cannot be edited by hand. However, you can
customize the NETSHLD.REG file with the default settings you want by using
the following method.
Follow these steps:
1. Roll out the NetShield program to the NetWare server using the default
2. Start the NetShield NetWare NT Console on a Windows NT workstation
48 Management Edition
settings.
and connect to the NetWare server.
Page 49

Installing the Management Edition Program
3. Configure the NetShield NetWare on-demand scanner and Alert
Manager settings. For example, you can schedule a nightly on-demand
scan of all volumes.
4. To use a different password when connecting to the servers using the
NetShield NetWare NT Console, go to the NetWare server console and
unload NETSHLD.NLM.
If you are worried about the server being unprotected, you can force
users to log off and disable connections to the server, or do this outside
normal working hours at your location.
5. Locate the NETSHLD.REG and PASSWORD.PWD files in the NetShield
installation directory (default is SYS:NETA\NETSHLD) and make
backup copies of these files.
6. Reload NETSHLD.NLM from the NetWare server so that your server
remains protected.
7. Locate the NetShield Netware product directory containing the
NETSHLD.REG and PASSWORD.PWD files in the Repository or mirror
that you will be using for the NetWare servers.
8. Rename the NETSHLD.REG from your server to CUSTOM.REG and
place it in this directory.
9. Replace the existing PASSWORD.PWD file if you wanted a different
password.
10. Be sure to also place these files in the master repository.
You should now be able to roll out the NetShield program to all your NetWare
servers with the settings you just configured.
NOTE: Remember, the customized .REG file must be named
CUSTOM.REG when you place it in the Repository. When the NetShield
installer creates the server installation set at Repository install time, it
creates an empty NETSHLD.REG that does not contain the default
settings; the defaults are provided by the Management Edition
configuration .DLL, which looks for a CUSTOM.REG file in the
Repository first.
Administrator’s Guide 49
Page 50

Installing the Management Edition Program
Performing a “silent” installation for rollout of the VirusScan program
If you manage a network and want to deploy the VirusScan program as your
standard anti-virus security application, you can use the program’s “silent”
installation feature to set up the VirusScan program on each network node
with little or no interaction from end users. During a silent installation, Setup
does not display any of its usual wizard panels or windows, or offer the end
user any configuration options. Instead, you preset these choices and run
Setup in the background on each target workstation. If you like, you can even
install the VirusScan program on any unattended workstations or without the
end user’s knowledge, provided you have all the necessary administrative
privileges.
A silent installation consists of two major steps. First, you must install the
same VirusScan components on your administrative computer or server that
you want Setup to install on each target workstation. A special Setup mode
records the choices you make during installation and preserves them in a
configuration file called SETUP.ISS. Next, you must use a different Setup
mode to install an identical VirusScan configuration on each target system.
Setup will use the SETUP.ISS file you create in the first step to guide each
subsequent installation you perform.
SETUP.ISS is simply a specially formatted text file similar to configuration files
such as WIN.INI or SYSTEM.INI. You can open it in any text editor and change
any of its entries to suit your needs.
NOTE: Network Associates recommends that you make only limited
changes to the SETUP.ISS file. If you want complete control over the
installation process, or if you want to specify the configuration options
for each copy of the VirusScan program in advance, you can use
ISeamless, a powerful Network Associates scripting tool designed for
this purpose. Contact Network Associates Technical Support for details.
Recording your preferences
To record your installation preferences, follow these steps:
1. Look for an existing SETUP.ISS file inside the \WINDOWS folder on
your administrative computer or server. If you find a file with that name
in the WINDOWS folder, rename it or delete it.
As you record your installation preferences, Setup will save them into a
new SETUP.ISS file in the same location.
2. Choose
The Run dialog box will appear.
3. Type
Run
from the
<X>:\SETUP.EXE -R
Start
menu in the Windows taskbar.
in the text box provided, then click OK.
50 Management Edition
Page 51

Installing the Management Edition Program
<X>
Here,
to the folder that contains your extracted VirusScan files. The
represents the drive letter for your CD-ROM drive or the path
-R
tells
Setup to run in its “record” mode.
NOTE: If your VirusScan copy came on a VirusScan Security Suite
or a Total Virus Defense* CD-ROM disc, you must also specify
which folder contains the VirusScan program for Windows 95 and
Windows 98. See the CONTENTS.TXT file included with either
product suite for details.
To search for SETUP.EXE on your hard disk or CD-ROM disc, click
Browse
. Be sure to add -R to the run statement if you use this option.
4. Follow the installation steps outlined in your VirusScan program User’s
Guide to choose the components and the settings you want each of the
target workstations to have.
Setup notes the choices you make at each step and records them as
entries in SETUP.ISS.
È
IMPORTANT: Take particular care during this initial installation to
respond to any questions that appear in the wizard panels and to
follow the installation steps in the sequence presented, or the silent
installation you run later will abort. You may not backtrack during
the installation to change your settings.
To specify different options, you will need to begin the installation
again in order for Setup to record your choices correctly. If you plan
to install the VirusScan program on unattended workstations, be
sure to specify options that do not require user interaction—don’t
ask Setup to create an Emergency Disk during installation, for
example.
The installation will also abort if the VirusScan program detects a
virus on your computer or server.
Setup creates a unique SETUP.ISS file for each Network Associates
product on each platform. You must use the file that corresponds to
the operating system running on the target workstation. You may
not, for example, use a SETUP.ISS file created during a VirusScan
program installation for Windows 95 to control a VirusScan
program installation for Windows NT.
5. Once you’ve completed the installation, click
Finish
to quit Setup.
Administrator’s Guide 51
Page 52

Installing the Management Edition Program
Specifying an installation directory
To install the VirusScan program in a particular directory, do not edit the
SETUP.ISS file you created when you installed the VirusScan program on your
administrative computer or server. Instead, in the Add/Remove Components
dialog box, click the text of the pathname shown in the
and enter the pathname to a different installation directory. The installation
directory you specify here will override the settings in SETUP.ISS and the
default installation directory on each target system. See “Installing anti-virus
components to different directories” on page 261 to learn more about changing
default installation directories.
Running a silent installation
Once you have a SETUP.ISS file that lists all of the components and settings
you want each workstation on your network to have, you can replicate these
settings exactly for every copy of the VirusScan program that you install. See
“Recording your preferences” on page 50 to learn how to create the SETUP.ISS
file.
You can run a silent installation in a variety of ways, and with different levels
of interaction with network users. You can, for example, create a script for
your users that runs a silent installation of the VirusScan program as soon as
they connect to an authentication server, with no further interaction beyond
that needed to log in. You can also ask your users to run the installation from
a designated server. Still other options include deploying the VirusScan
program through a network management application such as the
Management Edition program or the Zero Administration Client (ZAC)
program from Network Associates, System Management Server (SMS) from
Microsoft, or similar packages.
Install Directory
list,
Whichever method you choose, you must first prepare the VirusScan package
for installation, then run Setup in its silent mode.
Follow these steps:
1. Copy the VirusScan installation files from the VirusScan CD-ROM disc
2. Locate the SETUP.ISS file stored in the VirusScan directory on the central
52 Management Edition
or the folder on your administrative computer in which your store them
to a VirusScan directory on a central server. Your users or your network
management application will install the VirusScan program from this
server.
server. Rename or delete this file.
Page 53

Installing the Management Edition Program
3. Copy the SETUP.ISS file you created when you ran the recorded
installation on your administrative computer to the VirusScan directory
on the central server. You’ll find the file you need to copy in the
WINDOWS directory on your administrative computer. See “Recording
your preferences” on page 50 to learn how to record your installation.
Once you finish this step, your users or your network management
application can run Setup in its silent mode to replicate the installation
you recorded.
È
IMPORTANT: Network Associates recommends that you use the
SETUP.ISS file you created to perform a test installation on a single
workstation before you use it to deploy the VirusScan program
across your network.
To run Setup in silent mode, include the line
<X>:\SETUP.EXE -S
in any
login script you write or any instructions to your users that describe how to
run Setup. In this line,
<X>
represents the path to the folder on the server that
contains the VirusScan installation files and the SETUP.ISS file you created.
-S
The
tells Setup to run in silent mode. By default, Setup restarts the
workstation when it has finished installing files.
If you do not want Setup to reboot each target workstation, you must edit the
SETUP.ISS file you created during your recorded installation. Here, you
would change the value in the BootOption entry beneath the heading
[sdFinishReboot - 0] from its current value to zero (0). This tells Setup not to
force the target workstation to reboot.
As a further step toward enforcing a consistent anti-virus security policy
across your network, you can also copy a configuration file with the options
you want your users to have, into the installation directory on each
workstation. You can also use password protection to prevent unauthorized
changes to the configuration settings you chose. To learn how to save your
settings in a configuration file, see “Using VirusScan menus” in your
VirusScan User’s Guide. To learn how to protect your settings with a password,
see “Enabling password protection” in your VirusScan User’s Guide.
NOTE: To preset your configuration options so that the VirusScan
program installs with them already in place, use the Network Associates
ISeamless scripting utility. This utility gives you complete control over
installation and configuration options. Contact your sales representative
or Network Associates Technical Support for details.
Administrator’s Guide 53
Page 54

Installing the Management Edition Program
Understanding the Management Console
You can consult the following sections for details about the main areas of the
Management Console (Figure 2-22):
• “Menu bar” on page 55,
• “Toolbar” on page 57,
• “Font bar” on page 58,
• “Left pane” on page 58,
• “Right pane” on page 59, and
• “Status bar” on page 61.
54 Management Edition
Figure 2-22. Management Console
(Installation Log)
Page 55

Menu bar
Installing the Management Edition Program
Consult the following table for explanations of Management Console’s main
menu commands:
Menu name Menu commands
File
Edit
New Domain / Machine / Members Group / Scheduler Event.
Click this to add one of these types to the anti-virus domain.
Click this to print reports and logs currently displayed in the
Print.
right-hand pane.
Import Domain(s).
structure from a previous version of the Management Edition
program.
Click this to exit the Management Edition Console.
Exit.
Find Machine.
Click this to add the anti-virus domain
Click this to locate machines in a large network.
View Large Toolbar.
containing both icons and text names.
Small Toolbar.
containing only icons.
Hide Toolbar.
from view.
Status Bar.
default is to show.
Machine Comments
machines.
Non-Standard Objects.
machines with non-standard configurations.
Refresh.
in the right-hand pane.
Click this to remove the status bar from view. The
Click this to refresh the information currently displayed
Click this to view the toolbar with large buttons
Click this to view the toolbar with small buttons
Click this to remove the toolbar and the font bar
. Click this to display comments about the
Click this to show [N/S] next to
Administrator’s Guide 55
Page 56

Installing the Management Edition Program
Menu name Menu commands
Tools
Repository.
Click this to view the Repository and install software
to it.
Push On Install.
Click this to enable a first-time or upgrade
installation of selected Management and anti-virus components
from the Repository. (Recommended for upgrading only small
numbers of member machines simultaneously, after the initial
installation has been performed.)
Push Off Install.
Click this to enable a first-time or upgrade
installation of selected Management and anti-virus components
from the Repository. (Recommended for simultaneous upgrading
of 100 or fewer member machines, after the initial installation has
been performed.)
Batch Install.
Click this to enable background installation of
software. (Recommended for simultaneous upgrading of 100 or
more member machines. However, Batch Install cannot be used
to perform the initial installation; the Management Console will
default to Pull Off installation for machines requiring an initial
installation.)
Collect Diagnostics.
Click this to launch the data-collection
utility, which creates an e-mailable file for enhanced technical
support.
Customize Tools.
Click this to configure a custom tool to be
launched from this menu.
Options.
Click this to configure additional installation and
virus-scanning options.
Help Contents.
56 Management Edition
Click this to view the online help topics using a table of
contents or searchable index.
Click this to view version and copyright information about
About.
the Management Edition program.
Page 57

Toolbar
Installing the Management Edition Program
The toolbar is displayed across the top of the application window, below the
menu bar. The toolbar provides quick mouse access to many functions used in
the Management Console.
Follow these steps to display or hide the toolbar:
1. Click
View
on the Management Console’s main menu.
2. Do one of the following:
• To display the default small toolbar, choose
The small toolbar appears (Figure 2-23).
Figure 2-23. Small toolbar
• To display the large toolbar, choose
The large toolbar appears (Figure 2-24).
Figure 2-24. Large toolbar
or
• To hide the toolbar, choose
Hide Toolbar
Small Toolbar
Large Toolbar
.
.
.
Administrator’s Guide 57
Page 58

Installing the Management Edition Program
Consult the following table for an explanation of the toolbar icons.
Click... Command To...
Font bar
New
Apply
Configuration
Print
Add/Remove
Components
Change
Component
Configuration
About
Create a new anti-virus domain.
Apply the configuration to all machines in the
current domain, automatically repeating failed
updates until they succeed.
Print the report currently displayed in the
right-hand pane.
Add or remove components, specifying languages
and versions.
Change the configuration of the components to be
distributed.
View the
and version information about the Management
Edition program.
dialog box containing copyright
About
The font bar (Figure 2-25) is below the toolbar. You can use it to change the
appearance of the report in the right pane by modifying the font style and size.
Left pane
The left pane shows the view of the entire anti-virus domain. Symbols to the
left of the machines show the status of the latest virus scan, or the status of the
updates to the anti-virus software.
58 Management Edition
Figure 2-25. Font bar
Page 59

Right pane
Installing the Management Edition Program
The right pane provides information about your entire Microsoft network, and
more specific information about the machines, group of machines, or whole
anti-virus domains shown in the left pane. The tabs that appear at the bottom
of the right-hand pane will vary depending on your selection of items in the
left-hand pane. You can click on each tab to view its corresponding page and
options:
Left-pane
selection
Anti-Virus
Domain(s)
Individual domain
Right-pane view options
Network.
network.
Properties.
information for the selected domain.
Scan Results.
previous virus scans for the whole anti-virus domain.
Repository.
version and licensing information.
Network.
network.
Properties.
information for the selected domain.
Scan Results.
previous virus scans for the selected domain you’ve
created within the main Anti-Virus Domain(s).
Domain Log.
in the selected domain.
Click this tab to view a list of machines in your
Click this tab to view platform and domain
Click this tab to view historical results of
Click this tab to view anti-virus product
Click this tab to view a list of machines in your
Click this tab to view platform and domain
Click this tab to view historical results of
Click this tab to view the status of machines
Administrator’s Guide 59
Page 60

Installing the Management Edition Program
Left-pane
selection
Management
Server
Scheduler
Right-pane view options
Network.
Click this tab to view a list of machines in your
network.
Properties.
Click this tab to view platform and domain
information for the selected domain.
Scan Results.
Click this tab to view historical results of
previous virus scans for the selected domain you’ve
created within the main Anti-Virus Domain(s).
Domain Log.
Click this tab to view the status of machines
in the selected domain.
Installation Log.
Click this tab to view the history and
status of component installation on the selected machine.
Scan Report.
Click this tab to view historical results of
previous virus scans for the selected machine.
Pending Updates.
Click this tab to view a list of
outstanding Batch Install updates.
Completed Updates.
Click this tab to view a list of
completed, cancelled, and failed Batch Install updates.
Network.
Click this tab to view a list of machines in your
network.
Scheduler Events.
Click this tab to view a list of pending
virus scans.
Scheduler Log.
Click this tab to view a list of successful
and failed virus scans.
60 Management Edition
Page 61

Installing the Management Edition Program
Left-pane
selection
Members group
Individual member
machine
Right-pane view options
Network.
network.
Properties.
information for machines in the selected Members group.
Scan Results.
previous virus scans for machines in the selected
Members group within an anti-virus domain.
Domain Log.
in the selected Members group.
Network.
network.
Properties.
information for the selected machine.
Scan Results.
previous virus scans for the selected machine you’ve
added to a Member group within an anti-virus domain.
Domain Log.
selected machine.
Installation Log.
status of component installation on the selected machine.
Scan Report.
previous virus scans for the selected machine.
Click this tab to view a list of machines in your
Click this tab to view platform and domain
Click this tab to view historical results of
Click this tab to view the status of machines
Click this tab to view a list of machines in your
Click this tab to view platform and domain
Click this tab to view historical results of
Click this tab to view the status of the
Click this tab to view the history and
Click this tab to view historical results of
Status bar
The status bar (Figure 2-26) is at the bottom of the Management Console
window.
To hide or display the status bar, click
main menu, and then click
Status Bar
View
on the Management Console’s
.
Figure 2-26. Status bar
The status bar describes the following:
• The action of a specified menu command or toolbar button. As you pass
the mouse pointer over menu options, toolbar buttons and icons, messages
appear on the left side of the status bar to describe them.
Administrator’s Guide 61
Page 62

Installing the Management Edition Program
• The keyboard latch state. When the following keys are latched down, they
are indicated on the right side of the status bar:
– NUM. The
– CAP. The
– SCRL. The
• The spinning gold coin indicates that a network access is in progress.
Num Lock
Caps Lock
Scroll Lock
key is latched down.
key is latched down.
key is latched down.
Upgrading the Management Edition program
When upgraded versions of the Management Edition program are released
with new features, you can change your current version for the newly released
version. Upgrading to a new version does not affect your current anti-virus
domain configuration, the schedules for the anti-virus scans, or the responses
to any virus alerts.
To upgrade your Management Edition software to a newer version:
1. Exit from the Management Console, if it is running.
2. Insert your new Management Edition CD into your CD-ROM drive.
3. Run
SETUP.EXE
instructions. For detailed information, see “Installing the Management
Console” on page 26.
from your CD-ROM drive and follow the on-screen
4. Click
5. For the updates of the outstanding changes on your Management Servers
62 Management Edition
È
.
IMPORTANT: If you are upgrading from version 2.0 to version 2.5
of the Management Edition program, you must install your new
version to the same folder as your previous version to preserve your
anti-virus domain configuration.
If you are upgrading from version 1.5 to versions 2.0 or later, you
must install the new version to a different folder than the previous
version; otherwise, you cannot proceed with the installation until
you remove previous versions of the Management Edition program
from your hard drive. However, before you remove previous
versions of the Management Edition program, be sure to preserve
your anti-virus domain structure by using the
command on the
The Management Console for Management Edition version 2.5 runs
only on Windows NT 4.0. When you launch the program file, the
Management Console checks that your files are up-to-date. A dialog
box prompts you if the files need updating.
Yes
. The Management Console checks and updates all domain
Management Servers.
to take effect, right-click the Management Server, and choose
Configuration
.
File
menu.
Import Domain(s)
Apply
Page 63

3
Creating Anti-virus Domains
The Management Console lets you group machines into anti-virus domains.
Each anti-virus domain contains a Management Server and one or more
member machines.
The Management Console can create any number of anti-virus domains, but
each machine must reside in only one anti-virus domain. You can use this
grouping to match the physical layout of machines within your organization
or departments, and thus simplify their management.
The machines that you put into anti-virus domains will have their software
automatically updated. So, before running the Management Console, you
must log on to the network with an account that has Domain Administrator’s
access rights.
For details about working with a complex network, see Chapter 7,
“Configuring Complex Domains.”
Preparing member machines
To enable the Management Console to manage your machines easily, you
must install a Management Agent on each machine. Next, you must create
trust relationships between all domains and the administrator’s domain, in
order to bypass having to enter a username and password for each machine
you attempt to access.
3
Determining initial setup of machines
For the Management Edition software to fully control machines in the
domains, you must install a Management Agent on each machine. All
software updates can then be performed remotely from the Management
Console.
The method for installing the Management Agent depends on the
configuration of the machine (as shown in the following table):
OS platform File sharing is enabled Installation method
Windows NT Yes
No
Windows 95 and
Windows 98
Yes (also requires
remote administration to
be set)
No
Drag and drop
Client installer
Drag and drop
Client installer
Administrator’s Guide 63
Page 64

Creating Anti-virus Domains
OS platform File sharing is enabled Installation method
Windows for
Workgroups 3.11
Windows 3.1 Not available Client installer
NetWare Not applicable Drag and drop
If “File sharing is enabled” on a machine, then the Microsoft network client has
previously been installed and file sharing has been activated.
Installation methods
For a diagrammed overview of the following install options, see Figure 3-1 on
page 65.
Management Console Install (drag and drop )
The Management Console Install is the drag and drop method. Locate the
machine in the network view of the Management Console, drag and drop it
into an anti-virus domain, and choose
Management Console remotely installs the Management Agent on the target
machine.
Client Install
The Client Install method is useful for when you create machines from
images—i.e., when you copy a machine’s hard disk that has a standard, fixed
installation and then restore the image onto a new machine's hard disk when
creating a new machine.
Yes
No
Drag and drop
Client installer
Apply Configuration
. The
Copy the set of client installer files (the same set of files used for the Name
Provider Install) onto this standard machine, but don't run them. Then, when
you create the new machine and start the machine running, change its
machine name (otherwise, all machines would have the same computer
name), and restart the machine so that it starts using its new name.
Run the client installer program (SETUP.EXE or SETUP32.EXE if the
machine’s operating system is 16-bit or 32-bit, respectively) on the target
machine to install the Management Agent on it. Use the command-line switch
/FORCENP to force the client to use Name Provider regardless of whether or
not filesharing is enabled. Then, to add the machine to an anti-virus domain,
right-click the machine in the network view under
choose
“Automating setup via NetWare login scripts” on page 81.
64 Management Edition
Discover
Name Provider
. For more information about the client installer, see
, and
Page 65

Creating Anti-virus Domains
Figure 3-1. Management Edition Install Options Flowchart
Administrator’s Guide 65
Page 66

Creating Anti-virus Domains
NP Install
"NP Install" is the Name Provider installation method. Run the client installer
program (SETUP.EXE or SETUP32.EXE if the machine’s operating system is
16-bit or 32-bit, respectively) on the target machine to install the Management
Agent on it. Use the command-line switch /FORCENP to force the client to use
Name Provider regardless of whether or not filesharing is enabled. Then, fill
in some details in the NAMEPROV.INI file, and run the Management Agent.
The machine should appear in the Name Provider database.
NOTE: You must have a Management Server installed (and applied, so
its name is bold) before installing the Management Agent using the
Name Provider method. Once the agent has been installed, you must
drag the machine into a domain and apply the configuration. If you don't
do this, updates won't occur.
NP Override Install
"NP Override Install" is used for machines that wouldn't normally require the
use of the Name Provider, but you’ve decided that you’d rather use that
method than the standard one. Run the client installer program (SETUP.EXE
or SETUP32.EXE if the machine’s operating system is 16-bit or 32-bit,
respectively) on the target machine to install the Management Agent on it. Use
the command-line switch /FORCENP to force the client to use Name Provider
regardless of whether or not filesharing is enabled.
Finding machines in the network view
Machines appear in different locations in the Management Console network
view (Figure 3-2 and the following table) depending on the network client
software and whether the machine has been hidden from the Microsoft
browser. For more details, see “Finding machines” on page 255.
Figure 3-2. Management Console
(network view)
66 Management Edition
Page 67

Creating Anti-virus Domains
OS platform
Windows NT Yes Yes Microsoft Windows
Windows 95 and
Windows 98
Windows for
Workgroups 3.11
Windows 3.1 Not applicable No Name Provider
NetWare Not applicable Yes NetWare
Microsoft Windows
Client is installed
Yes No (Note 1) Imported Browse List/
No (Note 2) No Name Provider
Yes Yes Microsoft Windows
Yes No (Note 3) Name Provider
No No Name Provider
Yes Yes Microsoft Windows
Yes No (Note 3) Name Provider
No No Name Provider
Visible on
browser list
Location in the
Management Console
Network
Manual Add Machine
Network
Network
(Windows 3
(Windows 3
)
.x
)
.x
For explanations of table notes, see “Notes” on page 68.
Console locations
Imported Browse List
The machine appears under the file that has been imported. See “Adding
hidden machines” on page 204 for more information on the Imported Browse
List function.
Microsoft Windows Network
The machine appears within its correct Windows NT domain name, under the
Microsoft Windows Network
NetWare or compatible Network
The machine appears under the
network view. It requires Microsoft’s Client Services for NetWare or Novell’s
Client 32 to be installed on the Management Console machine.
icon in the network view.
NetWare or compatible Network
icon in the
Administrator’s Guide 67
Page 68

Creating Anti-virus Domains
Name Provider
The machine appears under the
under its Microsoft computer name. For more information about the Name
Provider, see the table of Management components on page 40.
Name Provider
icon in the network view,
Name Provider (Windows 3.x)
The machine appears under the
the unique name generated by the Name Provider service on the Management
Server.
Name Provider
icon in network view, under
Notes
1. The machine has been removed from the Microsoft browse list by using the
command NET CONFIG SERVER /HIDDEN:YES.
2. Although the client is still present, the server service has been disabled.
3. File and print sharing have been disabled.
Preparing machines with peer networking
In this section, you’ll learn how to prepare machines that use peer networking:
• “Windows NT machines (trust relationships)” on this page,
• “Windows 95 and Windows 98 machines (user-level access)” on page 70,
• “Windows 95 and Windows 98 machines (share-level access)” on page 72,
and
• “Windows for Workgroups 3.11 machines” on page 74.
For Windows 3.1 machines, see “Preparing machines without peer
networking” on page 75.
Windows NT machines (trust relationships)
If the Management Console is in a different Microsoft network domain from
the Management Server, you can set up a trust relationship between the two
domains.
You should set up a trust relationship between all domains and the
administrator’s domain. This allows your Domain Administrator account to
access machines in other domains without requiring you to specify a
username and password for each machine.
68 Management Edition
Page 69

Creating Anti-virus Domains
Small organizations can store accounts and resources in one domain.
However, large organizations usually establish multiple domains. They can
then store accounts in one domain and resources in another. A trust
relationship is a link between two Windows NT Server domains, providing
security across multiple domains. It combines two or more domains into one
administrative unit, allowing a user access to resources on the entire network
through a single user account and password. Users browsing the network for
available resources see the network grouped into domains, rather than as
individual servers and printers on the whole network.
Trust relationships let you use global groups and user accounts in domains
other than the domain where they are located. Therefore, the account can have
access to any computer on the network, not just the computers in one domain.
You can use trust relationships to specify trusting and trusted domains: A
trusting domain trusts network security to a trusted domain.
A trusting domain is the resource domain: It allows the users of a trusted
domain access to its resources. Only Windows NT Server domains can be
trusting domains.
A trusted domain is an account domain: It lists the domains that it trusts to use
its resources. Only Windows NT Server domains can be trusted domains.
Trusted-domain users and groups are allowed to hold user rights, resource
permissions and local group memberships in the trusting domains.
You can manage a machine in a non-trusted domain. For details, see
“Managing machines in a non-trusted Windows NT domain” on page 245.
Follow these steps to create a trust relationship between two domains:
1. Obtain a password from the administrator of the domain that will be
trusted.
2. Start the User Manager for Domains.
3. If necessary, on the
User
menu, click
Select Domain
and complete the
Select Domain dialog box, specifying the name of your domain that will
be configured to trust the other domain.
4. On the
Policies
menu, click
Trust Relationships
.
Administrator’s Guide 69
Page 70

Creating Anti-virus Domains
The Trust Relationships dialog box appears (Figure 3-3).
Figure 3-3. Trust Relationships dialog box
5. Click
6. In the
7. Repeat Step 1 through Step 5 for the trusting domain.
The first time you use the trust relationship, the password used for setting up
the relationship is verified and then changed.
Add
and type the name of the Windows NT Server domain that is
to be trusted in the
Password
Passwords are case-sensitive.
Trusted Domains
box, type the password required by that domain.
box.
Windows 95 and Windows 98 machines (user-level access)
(If you do not want to allow user-level access on Windows 95 and Windows 98
machines, see “Preparing machines without peer networking” on page 75.)
Follow these steps to set up user-level access in Windows 95 or Windows 98:
1. Start Control Panel.
2. Double-click the
File and Print Sharing
Network
.
icon, then select the Configuration tab. Click
70 Management Edition
Page 71

Creating Anti-virus Domains
The File and Print Sharing dialog box appears (Figure 3-4).
Figure 3-4. File and Print Sharing dialog box
3. Select the
I want to be able to give others access to my files
and then click OK.
4. In the Network dialog box, click the Access Control tab.
The Access Control page appears (Figure 3-5).
checkbox,
Figure 3-5. Network dialog box
(Access Control page)
5. Select the
User-level access control
option.
6. Type the name of the Microsoft network domain or computer where the
master list of users is stored (normally your Windows NT primary
domain controller).
7. Click OK to close the window, and reboot the machine for user-level
access to take effect.
Administrator’s Guide 71
Page 72

Creating Anti-virus Domains
8. Start Control Panel again.
9. Double-click
The Remote Administration page appears (Figure 3-6).
10. Select the
Passwords
Figure 3-6. Passwords Properties dialog box
Enable Remote Administration of this server
, then select the Remote Administration tab.
(Remote Administration page)
checkbox.
11. In the
Administrators
list box, make sure
Admin
is present.
Windows 95 and Windows 98 machines (share-level access)
On Windows 95 and Windows 98 machines, you can keep
backward-compatibility with Windows for Workgroups 3.11 machines by
sharing the Windows 95 and Windows 98 directory. This share-level access
uses peer networking in the same way as Windows for Workgroups 3.11
machines.
Follow these steps to set up share-level access in Windows 95 or
Windows 98:
1. Start Control Panel.
2. Double-click the
72 Management Edition
Network
icon, then select the Access Control tab.
Page 73

The Access Control page appears (Figure 3-7).
Figure 3-7. Network dialog box
(Access Control page)
Creating Anti-virus Domains
3. Select the
Share-level access control
option. This lets you supply a
password for each shared resource.
4. Click OK and reboot the machine for share-level access to take effect.
5. Start Control Panel again.
6. Double-click the
7. Click
File and Print Sharing
Network
icon, then select the Configuration tab.
.
The File and Print Sharing dialog box appears (Figure 3-8).
Figure 3-8. File and Print Sharing dialog box
8. Select the
Click
I want to be able to give others access to my files
OK,
and then click OK again.
Administrator’s Guide 73
checkbox.
Page 74

Creating Anti-virus Domains
9. Go to Control panel, double-click
Administration tab.
The Remote Administration page appears (Figure 3-6 on page 72).
10. Select the
11. Type and confirm a share-level password. The administrator must use
this password to create, change, or monitor shared resources on the
machine. For simplicity, use the same password on all machines in the
anti-virus domain.
12. Click OK.
Enable Remote Administration of this server
Passwords
Windows for Workgroups 3.11 machines
Follow these steps to enable filesharing in Windows for Workgroups 3.11:
1. Start File Manager. Select the Windows directory, click the
and then choose
The Share Directory dialog box appears (Figure 3-9).
Share As
.
and select the Remote
checkbox.
Disk
menu,
2. In the Access Type options, select
74 Management Edition
Figure 3-9. Share Directory dialog box
Full
, ignore the password options, and
then click OK.
È
IMPORTANT: Do not enter a password. If you enter a password,
you must also specify the same password on the Management
Console. Therefore, all Windows for Workgroups member machines
must have the same password.
Page 75

Creating Anti-virus Domains
3. If you have specified a password on your Windows for Workgroups 3.11
machine, then on the Management Console’s main menu, click
and then click
password.
Options
. Click the Remote Installation tab, and enter the
Preparing machines without peer networking
Your site might not use peer networking, or you might have a number of
machines that do not. Windows 3.1 machines do not have this capability at all.
For Windows NT, Windows 95, or Windows 98 machines, you might be
concerned about security or the time required to set up a large number of
machines.
NOTE: To prepare machines with peer networking, see page 68.
To let the Management Server start virus scans and receive alerts, all machines
within the anti-virus domain require a computer name. Otherwise, such
machines will not be visible in the network view of the Management Console,
and therefore cannot be added to anti-virus domains.
Windows for Workgroups 3.11, Windows 95, Windows 98, and Windows NT
machines are assigned a computer name when the network administrator
installs the operating system. However, Windows 3.1 machines do not
support peer networking, so they do not follow this process and thus do not
have computer names.
Tools
,
To ensure that the Management Console can communicate with all these types
of machines, you must install a Management Agent. When the Management
Agent first runs, it requests a name from the Name Provider. For Windows 3.1
machines, the Name Provider generates a unique name. For other types of
machines, the Name Provider simply uses the machine’s own name.
Every anti-virus domain has a Management Server, which runs a Name
Provider. To start the Name Provider service, you must click
Configuration
During the initial CD installation of the Management Edition program, a
default subdirectory is created, which contains a copy of all the files needed to
install the Management Agent.
• For Windows 3.x machines:
C:\Program Files\Network Associates\NP250\16\Client
• For Windows 95, Windows 98, and Windows NT machines:
C:\Program Files\Network Associates\NP250\32\Client
after adding the Management Server.
Administrator’s Guide 75
Apply
Page 76

Creating Anti-virus Domains
If you are installing a large number of machines to the same anti-virus domain
from a shared location, often a directory on a server, you can pre-configure the
file so that the installation is completely automatic; no input will be required
on the target machine. This also applies when running the AUTOINST utility
to allow execution and installation (software upgrades only) from a NetWare
login script.
The installation process is normally completely silent. If an error occurs, a
message is displayed.
• For details, see “Windows 3.1 machines” on this page.
• For details, see “Windows NT, Windows 95, or Windows 98 machines” on
page 79.
Windows 3.1 machines
To provide Windows 3.1 machines with unique names, you must first install a
Management Agent on each machine. If you have a large number of machines,
you can do this with a login script.
When the Management Agent first runs, it determines that it is running on a
Windows 3.1 machine and that the machine doesn’t have a computer name.
The Windows 3.1 machine requests a computer name from a Name Provider.
This is a Windows NT service, which resides on every Management Server.
(Each Management Server manages a single anti-virus domain.) You need to
provide the Management Agent with the name of the anti-virus domain so
that it can find the correct Name Provider. The Management Agent then sends
a request to that one. The Name Provider generates a name that has two parts:
1. The first part (the partial name) remains unchanged from machine to
machine.
2. The second part, a number, is incremented when the Name Provider
replies to each new request.
By default, the partial name is made from the first ten characters of the
anti-virus domain name, but you may change this before a name is assigned.
For examples, see the table on page 78. The Management Agent uses the
assigned name for the lifetime of the Windows 3.1 machine, or until the
Management Edition software is removed. The Name Provider records the
assigned name in a database on its Management Server.
È
The Management Console reads the databases and holds all the names in the
Name Provider in the network view. By double-clicking the icon, you can then
see all the named machines.
76 Management Edition
IMPORTANT: The database is in W31NAMES.DAT. Do not manually
edit or alter this file.
Page 77

Creating Anti-virus Domains
Before the Management Agent can locate a Name Provider to request a
comp uter name, it must b e given the name of th e anti-virus dom ain it is to join.
You can configure this within the NAMEPROV.INI file before the installer
runs, or afterwards, when the Management Agent will request it.
The installation process is normally completely silent. If an error occurs, a
message appears.
This is the basic template NAMEPROV.INI file, as supplied with the installer:
; This is the section header that needs to be used. This
; is mandatory.
[NameProv]
; NP_DOMAIN is the name of the AV domain that this name
; provider is located in.
; This entry is mandatory.
;NP_DOMAIN=A_DOMAIN
; NP_PARTIAL can be used to allocate a given prefix to new
; computers that need the services of the name provider.
; The text entered will prefix a number generated by the
; name provider e.g. SALES_000042.
; NP_PARTIAL has a maximum length of ten characters.
; This entry is optional.
;NP_PARTIAL=SALES
; NP_ADDR1 and NP_ADDR2 hold the addresses of the machine
; that the name provider is located on. Specify either IP
; or IPX. If you only want to specify a single address,
; then you must use NP_ADDR1.
; These entries are optional. The format is #IP#<address>,
; where <address> is an IP address in decimal notation
; (a.b.c.d), or #IPX#<network>:<node>, where <network> is
; the IPX network segment address that the machine resides
; on and <node> is the machine’s IPX node address.
;NP_ADDR1=#IP#192.168.1.2
;NP_ADDR2=#IPX#10a2:0020AFB4B76B
; NP_COMMENT is the comment associated with the machine.
; This entry is optional.
;NP_COMMENT=Machine comment
Administrator’s Guide 77
Page 78

Creating Anti-virus Domains
To pre-configure this file, you must indicate the domain name in the
NP_DOMAIN parameter. Do not enclose the domain name in quotes, even if
it contains spaces. If you alter the currently supplied line, remove the
semicolon prefixing NP_DOMAIN so that the line is no longer treated as a
comment.
NP_DOMAIN is the only mandatory parameter. If you supply only this
parameter, the Management Agent sends out a broadcast around your
network to locate the Management Server for this domain. This only occurs the
first time the Management Agent starts up. Once it has a computer name from
the Name Provider, the Management Agent does not repeat this process.
We recommend that you also supply an IP or IPX address. If you supply the
IP or IPX address of the network card in the Management Server via the
NP_ADDR1 or NP_ADDR2 parameter, the Management Agent can contact
the machine directly without sending a broadcast. This will reduce network
traffic and is useful when installing to a large number of new machines
because it will prevent a broadcast storm.
By default, the Name Provider generates a name of the form:
<
Domain name><Number
<
Domain name
that the machine is joining.
<
Number
automatically by the Name Provider.
>
>
is the first 10 or fewer characters of the anti-virus domain
>
is a five-digit number from 00001 to 99999 assigned
To substitute a different text string for the fixed portion of the name instead of
using the first ten characters of the domain name, enter the fixed portion in the
NP_PARTIAL parameter before the Management Agent runs. If you enter
more than 10 characters, the string is truncated. As shown in the following
table, each different text string will have machines numbered from 00001. So,
if you use text strings, MIS and Sales, you will have machines named
MIS00001, MIS00002 and so on, along with machines names Sales00001,
Sales00002 and so on.
Domain name
MIS Empty. (Not given.) MIS00001
MIS MIS_Win31_ MIS_Win31_00001
78 Management Edition
Contents of
NP_PARTIAL
Generated names
MIS00002
MIS00003 through
MIS99999
MIS_Win31_00002
MIS_Win31_00003
through
MIS_Win31_99999
Page 79

Creating Anti-virus Domains
È
IMPORTANT: You must ensure that all of your anti-virus domain
names are different within the first ten characters to prevent Name
Providers from using the same partial names. Otherwise, duplicate
names will be generated.
For example, two domains named Sales_Bld1 and Sales_Bld2 are acceptable
because they are different within the first ten characters, but Sales_Building1
and Sales_Building2 are not acceptable. If necessary, rename one or more
domains. To rename an anti-virus domain, see “Renaming anti-virus
domains” on page 203.
If you do not pre-configure the NAMEPROV.INI file, the Management Agent
will prompt for the anti-virus domain name upon start up.
È
IMPORTANT: If you do not pre-configure the name of the anti-virus
domain, the Management Agent prompts for the name at each machine.
If you have a large number of machines, setup can become a
time-consuming task.
Continue with “Adding member machines to an anti-virus domain” on page
87.
Windows NT, Windows 95, or Windows 98 machines
Normally to manage Windows NT, Windows 95, and Windows 98 machines
from the Management Console, you need the following prerequisites.
• A Microsoft networking client installed on the machine
• For share-level access, a share on the Windows directory
• For user-level access, remote administration enabled
To manage machines that have no peer networking, you must first install a
Management Agent to each machine. If you have a large number of machines,
you can use a login script.
When the Management Agent first runs, it determines that it is running on a
Windows NT, Windows 95, or Windows 98 machine and sends the machine’s
name to a Name Provider. The Name Provider is a Windows NT service,
which resides on every Management Server. (Each Management Server
manages a single anti-virus domain.) You must provide the Management
Agent with the name of the anti-virus domain so that it can find the correct
Name Provider.
Administrator’s Guide 79
Page 80

Creating Anti-virus Domains
This information can be configured within the NAMEPROV.INI file prior to
running the installer, or afterwards, when the Management Agent will request
it.
This is the basic template NAMEPROV.INI file as supplied with the installer:
; This is the section header that needs to be used. This
; is mandatory.
[NameProv]
; NP_DOMAIN is the name of the AV domain that this name
; provider is located in.
; This entry is mandatory.
;NP_DOMAIN=A_DOMAIN
; NP_ADDR1 and NP_ADDR2 hold the addresses of the machine
; that the name provider is located on. Specify either IP
; or IPX. If you only want to specify a single address,
; then you must use NP_ADDR1.
; These entries are optional. The format is #IP#<address>,
; where <address> is an IP address in decimal notation
; (a.b.c.d), or #IPX#<network>:<node>, where <network> is
; the IPX network segment address that the machine resides
; on and <node> is the machine’s IPX node address.
;NP_ADDR1=#IP#192.168.1.2
;NP_ADDR2=#IPX#10a2:0020AFB4B76B
; NP_COMMENT is the comment associated with the machine.
; This entry is optional.
;NP_COMMENT=Machine comments
To pre-configure this file, you must indicate the domain name in the
NP_DOMAIN parameter. Do not enclose the domain name in quotes, even if
it contains spaces. If you alter the currently supplied line, remove the
semicolon prefixing NP_DOMAIN so that the line is no longer treated as a
comment.
NP_DOMAIN is the only mandatory parameter. If you supply only this
parameter, the Management Agent sends out a broadcast around your
network to locate the Management Server for this domain. This only occurs the
first time the Management Agent starts up. Once it has a computer name from
the Name Provider, it does not repeat this process.
80 Management Edition
Page 81

We recommend that you also supply an IP or IPX address. If you supply the
IP or IPX address of the network card in the Management Server via the
NP_ADDR1 or NP_ADDR2 parameter, then the Management Agent can
contact the machine directly without sending a broadcast. This reduces
network traffic and is useful when installing to a large number of new
machines because it prevents a broadcast storm.
If you do not pre-configure the NAMEPROV.INI file, the Management Agent
prompts for the anti-virus domain name upon startup.
È
IMPORTANT: If you do not pre-configure the name of the anti-virus
domain, the Management Agent prompts for it at each machine. If you
have a large number of machines, setting up will become a
time-consuming task.
Continue with “Adding member machines to an anti-virus domain” on page
87.
Automating setup via NetWare login scripts
Manually installing software to large numbers of machines that have no peer
networking (such as Windows 3.1 machines) soon becomes a labor-intensive
task. Automating this process with a NetWare login script reduces the
administrative work.
Creating Anti-virus Domains
NOTE: The option to update software using a NetWare login script and
the AUTOINST.EXE utility is only applicable if you’re performing
software upgrades (not first-time installs).
However, many of the DOS/Windows 3.x NetWare clients can process login
scripts only while running in DOS, which means that the Windows-based
installer cannot run directly from a login script. AUTOINST.EXE is a
DOS-based utility that may be run from a NetWare login script. It alters the
WIN.INI file of a Windows 3.1 machine so that installer SETUP.EXE can run
automatically the next time Windows is started. AUTOINST.EXE is in the
NP250\16\Utils directory in your Management Console installation
directory.
Usage
AUTOINST
Thus, if WIN.INI is in C:\WINDOWS, and the Windows 3.1 Management
Agent is in SYS:PUBLIC\ME_CLNT, add the following to a NetWare system
login script:
<WIN.INI file location> <Path to installer executable>
Administrator’s Guide 81
Page 82

Creating Anti-virus Domains
MAP ROOT F:=SYS:PUBLIC\ME_CLNT
#AUTOINST C:\WINDOWS F:\SETUP.EXE
The login script changes an example WIN.INI file as follows:
Old WIN.INI New WIN. INI
[WINDOWS] [WINDOWS]
RUN=NWPOPUP.EXE RUN=NWPOPUP.EXE F:\SETUP.EXE
AUTOINST.EXE also adds the following section and key to WIN.INI:
[NetworkAssociates]
NetworkAssociatesInstalled=Yes
This prevents AUTOINST from adding the installer’s executable path to the
RUN= line more than once. If, on a subsequent server login AUTOINST runs,
it will not alter the RUN= line if it finds the NAIAVInstalled key. Without this,
users run the installer SETUP.EXE each time they log in.
NOTE: If you copy the contents of the \NP250\16\Client directory to a
server directory for all network-based installations, copy the
AUTOINST.EXE utility to the same directory to simplify the automated
installation procedure.
Once the installer SETUP.EXE has installed the Management Agent on the
machine, it removes its reference from the RUN= line. This means that the
installer will run only once, no matter how many times the user logs into the
server or starts/stops Windows.
You might not want all your machines that login to a specific server to be
updated immediately. You can control this through the use of NetWare’s user
groups and group membership.
Example
IF MEMBER OF ‘’CLIENT_INSTALL’’ THEN BEGIN
MAP ROOT F:=SYS:PUBLIC\ME_CLNT
#F:AUTOINST C:\WINDOWS F:SETUP.EXE
END
Now, only users who are a member of the user group CLIENT_INSTALL will
be updated. To install additional machines, add each user ID to the user
group.
82 Management Edition
Page 83

NOTE: If you create a new drive mapping that points to the directory
where the installer resides, do not remove this drive mapping until after
the installer has been run.
For more details about AUTOINST, see Appendix A, “Using the AUTOINST
Utility.”
Preparing NetWare servers
Several NetWare configuration settings affect the installation of the
Management Agent and anti-virus components. Determine whether these
affect your servers before installation.
SECURE CONSOLE command
During installation, edit the server’s AUTOEXEC.NCF (or MSAUTO.NCF for
NetWare 4.x SFTIII servers), to add a call to NAIAV.NCF, which causes the
Management Agent to load.
If you see the SECURE CONSOLE command in AUTOEXEC.NCF, add the call
before it. This is necessary because the Management Agent is loaded from
SYS:SYSTEM\NTME\NAIAV.NCF and adds a server search mapping to this
directory, so that we can still load the agent after SECURE CONSOLE has been
issued.
Creating Anti-virus Domains
However, on a first-time installation, if the server is already secured, NetWare
does not let you add a server search path, so you will be unable to load.
Because there is no way to “unsecure” the console, the server must be restarted
before successful loading.
AUTOEXEC.NCF
With NetWare 3.x, under certain situations, it is necessary to move the
AUTOEXEC.NCF from SYS:SYSTEM to the server’s DOS partition. This is
often the case when needing to mount large hard disks when the
REGISTER MEMORY command must also be used.
NetWare does not provide any remote access to files on the DOS partition. If
during install, the Management Console is unable to find AUTOEXEC.NCF,
you must manually add a call to NAIAV.NCF to the AUTOEXEC.NCF file to
automatically load the Management Agent when the server starts up.
Administrator’s Guide 83
Page 84

Creating Anti-virus Domains
Installation method
You can only perform an installation via the Push On install method, unless
you have placed a mirror repository onto a NetWare server. This restriction
occurs because NetWare servers cannot directly access files on Windows NT
machines.
If you want to place a mirror repository onto a NetWare server to remove this
installation restriction, see “Creating NetWare mirrors” on page 219.
Checking rights for Microsoft network domain members
You can verify your network configuration and the privileges of your account
from the Management Console.
Follow these steps to check rights:
1. Log on as a Domain Administrator.
2. In the Management Console’s network view, select a machine in a
Microsoft network domain. Right-click the machine and choose
Rights
.
Check
If you do not have sufficient rights, check the security setup of your network
and the Microsoft networking account that you are using. Refer to your
network’s operating-system manual for details.
84 Management Edition
The Rights Summary dialog box shows whether you have sufficient
rights to manage the machine (Figure 3-10).
Figure 3-10. Rights Summary dialog box
Page 85

If the machine is in a different domain from your own, you can set up a trust
relationship between the two domains. For more details, see “Windows NT
machines (trust relationships)” on page 68.
If the Management Console cannot gain access to a member machine, it
prompts the Domain Administrator for a user account and password that does
have sufficient rights.
Assigning a Management Server
A Management Server does the following tasks:
• Coordinates the scheduling of anti-virus scans, by sending commands to
member machines to perform scans at user-determined times.
• Receives (virus) alerts from member machines.
• Generates reports for the anti-virus domain.
• Runs the Management Agent, Update Manager, and Name Provider.
The Management Server must therefore be a Windows NT server that is
running continuously. Choose a server with spare capacity so that it is not
over-burdened. If you have fewer than ten machines within your anti-virus
domain, you can use a Windows NT workstation.
Creating Anti-virus Domains
The Management Server, the Repository, and the Management Console are
three separate components. However, for simplicity, the Repository and the
Management Server normally reside on one machine and the Management
Console on another. Equally, they may all be installed on one machine, or all
on different machines. Figure 3-11 on page 86 shows two anti-virus domains
controlled by a single Management Console and joined by a WAN link. To
reduce network traffic across the WAN link, domain B has a mirror repository.
For more details, see “Reducing WAN traffic” on page 235.
Administrator’s Guide 85
Page 86

Creating Anti-virus Domains
Follow these steps to select the Management Server:
1. In the Management Console’s network view, select a Windows NT
2. Drag the machine onto the
86 Management Edition
Figure 3-11. Two anti-virus domains with WAN link
server that is running continuously. To check the machine’s operating
system, right-click the machine and choose
Management Server Unassigned
Discover
.
icon in the
anti-virus domain view.
Otherwise, if you have already assigned a Management Server but you
want to select another instead, hold the mouse pointer over each machine
Members
in
Right-click the machine and choose
, and use the ToolTip help to find a Windows NT server.
Promote
.
Page 87

Creating Anti-virus Domains
The Management Server is assigned.
NOTE: To enable adding machines via the Name Provider, you must
click
to the following machines:
- All Windows 3.x machines,
- Windows 95 and Windows 98 machines with file sharing disabled,
- Windows NT machines with the server service disabled (or the machine
name hidden from the browse list via
NET CONFIG SERVER /HIDDEN:YES), and
- Any Windows machines that do not have the Microsoft peer networking
client installed.
Apply Configuration
for the Management Server. This applies
Adding member machines to an anti-virus domain
Member machines are all the machines in the anti-virus domain, excluding the
Management Server.
Member machines can do the following tasks:
• They can receive commands to start an on-demand scan.
• They can send alerts back to the Management Server when on-demand or
on-access scans find viruses.
• In addition to the Management Server, Windows NT member machines
can also generate e-mail, pager, or SNMP messages when they receive an
alert via Alert Manager.
You can assign any number of member machines to an anti-virus domain.
However, if you have many member machines, they are easier to configure
and maintain if you create several anti-virus domains, or multiple Members
groups. For details, see “Organizing machines in an anti-virus domain” on
page 212.
The Management Console’s network view shows all the machines in your
network. Some might be inside unexpanded containers such as the Name
Provider. Previous sections on page 63 through page 75 explained how to
prepare the machines so that they are visible to the Management Console. To
install the anti-virus software on the machines, you must add them to their
anti-virus domain. The two methods are Drag and Drop, and Discover:
Administrator’s Guide 87
Page 88

Creating Anti-virus Domains
• Drag-and-drop method.
Drag the machine from the network view of the Management Console into
an anti-virus domain. For details, see “Using the drag-and-drop method”
on this page.
• Discover method.
Right-click the machine in the network view of the Management Console
and choose
page 89.
The method you use depends on the machine’s configuration as summarized
in the table under “Determining initial setup of machines” on page 63.
Discover
. For details, see “Using the Discover method” on
Using the drag-and-drop method
Follow these steps to add one or more machines to an anti-virus domain:
1. In the Management Console, click the Network tab at the bottom of the
right-hand pane to see the network view.
2. Double-click the icon for the item you want to view—the
Windows Network
Name Provider
expands to show individual machines.
For more details on the Name Provider, see “Using the Discover
method” on page 89. For more details on the Imported Browse List, see
“Adding multiple hidden machines” on page 206.
3. Click a machine in the network view and drag it onto
anti-virus domain view. (To select several consecutive machines, hold
Shift
the
non-consecutive machines, hold the
them.)
The Management Console checks the operating system of the machines
you selected (Figure 3-12). At least one machine in your domain must be
a Windows NT server; this will become the domain’s Management
Server.
key down while clicking on them. To select several
domain, the
, or one of the Imported Browse List items. The container
NetWare (or compatible) network
Control
key down while clicking on
Microsoft
Members
, the
in the
88 Management Edition
Figure 3-12. Determining OS for selected machines dialog box
Page 89

Creating Anti-virus Domains
Next, a dialog box appears, asking you whether you want to add the
machines you’ve selected to the anti-virus domain (Figure 3-13).
Figure 3-13. Add selected machines dialog box
4. Click
Yes
to add the selected machines to the anti-virus domain.
The machines then appear under
domain, in the anti-virus domain view.
Items in normal type still need to be updated. To see the operating
system and whether the machine needs updating, hold the mouse
pointer over a machine and wait for the ToolTip help.
Using the Discover method
Follow these steps to add a single machine to its anti-virus domain:
1. In the Management Console, click the Network tab at the bottom of the
right-hand pane to see the network view.
Members
of the selected anti-virus
2. Right-click the machine, and choose
Discover
.
Follow these steps to add a large group of machines to their anti-virus
domains:
1. In the Management Console, click the Network tab at the bottom of the
right-hand pane to see the network view.
2. Right-click the container (the Windows NT domain name, Microsoft
Windows network, or the Name Provider), and choose
Discover
.
This automatically adds each machine to its specified anti-virus domain.
Administrator’s Guide 89
Page 90

Creating Anti-virus Domains
Adding newly installed machines
If you already have a large number of configured machines in the Name
Provider’s list, new machines will be hard to identify.
Follow these steps to view a newly installed machine if it is not displayed
under the Name Provider:
In the Management Console, do one of the following:
• Click the Network tab at the bottom of the right-hand pane to see the
network view. Right-click
or
• In the anti-virus domain view, right-click the Management Server for the
domain where you are adding this machine, and choose
database
When you select the Name Provider in the network view, you refresh all
databases. When you select the Management Server, you refresh only the
database stored on that Management Server.
.
Name Provider
and choose
Refresh
.
Refresh name
Follow these steps to identify new machines that still need to be added
to an anti-virus domain:
1. In the Management Console, click the Network tab at the bottom of the
2. Right-click
Follow these steps to automatically add all new machines to their correct
anti-virus domains:
1. In the Management Console, click the Network tab at the bottom of the
2. Right-click
90 Management Edition
right-hand pane to see the network view.
Name Provider
and choose
Hide Managed
.
The display then shows only those machines that still need to be added
to an anti-virus domain. To redisplay all machines, right-click
Provider
and choose
Refresh
.
Name
right-hand pane to see the network view.
Name Provider
and choose
Discover
.
The machines are added to their selected anti-virus domains.
Page 91

Choosing your anti-virus software
Anti-virus software (the scan engine) is updated approximately every six
months. The virus-detection database is updated approximately every six
weeks. Because hundreds of new viruses appear each month, frequent
updating is necessary to ensure that the anti-virus software can detect them
all. The Repository can store different versions of the anti-virus software
components. When you add newer versions, you need to select which version
to use on machines within your anti-virus domains.
Follow these steps to choose your anti-virus software for distribution:
Creating Anti-virus Domains
1. In the anti-virus domain view, right-click
anti-virus domain, a
machine, and choose
If you choose
appears (Figure 3-14). Otherwise, a similar Components for ... dialog box
appears, with a name corresponding to your selection.
2. Double-click the anti-virus software that you want to use in all anti-virus
domains.
The name of the software you selected moves from the
Selected
the
Anti-Virus Domain(s)
Figure 3-14. Global Components dialog box
list.
Add/Remove Components
Members
group, or an individual
, the Global Components dialog box
Anti-Virus Domain(s)
.
Available
, an
list to
3. Click OK.
Every anti-virus domain will now use all and only the anti-virus
software shown in the
that you have individually set to distribute different anti-virus software
versions remain unchanged. Also, the Update Agent will not attempt to
install the same software to machines that already have it.
Selected
list for distribution. However, machines
Administrator’s Guide 91
Page 92

Creating Anti-virus Domains
NOTE: For more information about adding .DAT updates, see
“Installing anti-virus components in the Repository” on page 42.
For more information about managing anti-virus software, see “Changing
anti-virus software versions” on page 134. For more information about
managing large networks, see Chapter 7, “Configuring Complex Domains.”
You have selected the software to be installed. Next, continue with “Selecting
anti-virus domain components” on this page.
Selecting anti-virus domain components
You must select which anti-virus components are to be installed onto
machines within your anti-virus domain.
Remember the following when selecting which machines will have the
anti-virus components installed:
• Right-clicking an individual machine affects only that machine,
• Right-clicking a
Members
group affects all machines in that group,
• Right-clicking a domain name affects all machines in the domain, except
the Management Server,
• Right-clicking
Anti-Virus Domain(s)
affects all domains, except their
Management Servers.
The components are distributable modules except for the Management Agent,
which is automatically installed onto all managed machines and runs in the
background (see Figure 3-15).
.
Figure 3-15. Management components diagram
92 Management Edition
Page 93

Creating Anti-virus Domains
Adding or removing components for all anti-virus domains
Follow these steps to select anti-virus components for all anti-virus domains:
1. In the anti-virus domain view, right-click
Add/Remove Components
select
The Global Components dialog box appears (Figure 3-16).
Figure 3-16. Global Components dialog box
2. Add components to the
double-click components in either list to move them to the opposite list;
select the components, and click
to the other list.
3. Click OK to set the components required for every machine in the
anti-virus domain.
Selected
.
list from the
Add
or
Anti-Virus Domain(s)
Available
Remove
; or click and drag them
list. You can
and
In the anti-virus domain view, the components appear in normal type
(rather than bold type) to show that you have configured them but you
have not yet installed them. This feature allows you to adjust the
configuration before you eventually install the components.
4. Right-click the anti-virus domain name and choose
Configuration
5. When you are prompted by the dialog box, click
installation of components to the member machines.
.
Apply
Yes
to start the
Administrator’s Guide 93
Page 94

Creating Anti-virus Domains
The Installing Entire Domain Model dialog box appears (Figure 3-17). A
bar indicates the progress of the Management Console, which may take
some time.
In the anti-virus domain view, the component names appear in bold type
as they are installed.
Figure 3-17. Installing Entire Domain Model dialog box
NOTE: If, while installing, Management Console cannot access a
machine using its Administration share, the Network Login dialog
box appears, prompting you to enter a different user name and
password (Figure 3-18). Enter one that has sufficient rights to access
the machine using its Administration share.
For more information about installing anti-virus software components, see the
section “Choosing an update method” on page 139.
94 Management Edition
Figure 3-18. Network Login dialog box
The appearance of this dialog box can also indicate that the machine
was not powered on when you attempted to access it.
If the machine is in a different Windows networking domain and
you have not established a trust relationship between the two
domains, you must enter a domain name and username, in the form
Domain\Username
.
Page 95

Creating Anti-virus Domains
Adding or removing components for non-standard machines
You can add more or remove existing anti-virus components for individual
machines, groups of machines, or domains. The number of machines you
affect depends on your selection in the anti-virus domain view.
• Selecting an individual machine affects only that machine.
• Selecting a
• Selecting a domain name affects all machines in the domain, except the
Management Server.
• Selecting
Management Servers.
Follow these steps to add or remove components for non-standard
machines:
1. Right-click the machine you want to configure, point to
Components
The Components on Machine ... dialog box appears (Figure 3-19).
Members
Anti-Virus Domain(s)
group affects all machines in that group.
, and then click
affects all domains, except their
Manage
Add/Remove Components
.
Figure 3-19. Components on Machine ... dialog box
2. Add components to the
double-click components in either list to move them to the opposite list;
select the components, and click
to the other list.
3. Click OK. In the anti-virus domain view, the components are shown in
normal rather than bold type because they are to be altered but not yet
installed or removed.
Selected
list from the
Add
Remove
or
Available
; or click and drag them
Administrator’s Guide 95
list. You can
Page 96

Creating Anti-virus Domains
4. Right-click the machine name and choose
Apply Configuration
. This
installs the components to, or removes them from, the individual
machine only, without affecting the rest of the anti-virus domain.
Similarly, the settings for the anti-virus domain no longer affect it. The
machine is now considered non-standard.
5. To identify all non-standard machines, member groups, and anti-virus
domains, click
Non Standard Objects
click
N/S
before their names, as in this example:
View
on the Management Console menu bar, and then
. The non-standard items are indicated by
96 Management Edition
Page 97

4
Creating Schedules
The Scheduler is a Management component that lets you schedule on-demand
scans to occur at specific times. It sends a command to all member machines
you specify, to scan themselves. Although the on-access component scans files
every time you access a file, a virus might reside in a file you have not accessed
for a while. The Scheduler can schedule scans for a single machine, a group of
machines, or all machines within the anti-virus domain.
Your machine settings determine the format for the dates and times that you
enter for the scans, and their format in any log file. To change the format, use
the Regional settings in the Control Panel.
Scheduling scans
You can schedule a scan on a member machine only if that machine has the
VirusScan or NetShield programs installed.
Follow these steps to schedule scans:
1. Under the Management Server for the anti-virus domain, right-click
Schedule
and click
Edit
4
.
The Scheduler Events page appears in the right pane (Figure 4-1).
Figure 4-1. Scheduler Events page
2. Right-click anywhere in the Scheduler Events page and choose
Scheduler Event
Event
Delete Event
or
. (To modify or delete an existing event, select
.)
Administrator’s Guide 97
New
Edit
Page 98

Creating Schedules
The New Event dialog box appears, with the Event page showing (Figure
4-2).
Figure 4-2. New Event dialog box
(Event page)
3. In the
Name
choose the default,
box, type a name (e.g.,
Scan for Viruses
Midday Scan)
. (If you select
. In the
Run an Application
Type
you can run another program instead of running an anti-virus program.)
4. In the
Description
box, type a fuller explanation (e.g.,
all machines in anti-virus domain)
. In the
Midday scan,
Window Type
you can select whether the on-demand scanner window opens as normal
size, maximized, or minimized (as an icon) on users’ machines when the
scan starts.
5. Select a
Write to Log
option. The log file lets you keep a list of all
attempted scans that occur when you are not present.
• Always. Select this option to display all logged alerts.
• Only on Failure. Select this option to display only critical alerts.
• Never. Select this option to prevent writing alerts to the log file.
6. Deselect the
Enabled
checkbox to temporarily disable a scheduled scan,
without losing its settings. (The default is for the checkbox to be selected.)
box,
,
box,
98 Management Edition
Page 99

Creating Schedules
When you have finished scheduling a scan and returned to the Scheduler
Events page, you’ll notice an icon to the left of the scan event name,
which indicates whether it is enabled:
The scan event is enabled.
The scan event is disabled.
7. Click the Frequency tab.
The Frequency page appears (Figure 4-3).
Figure 4-3. New Event dialog box
(Frequency page)
8. In the
Execute Event
section, select
At Regular Intervals
to regulate the
cycle for the scan event that you’re creating.
9. In the
Periodic
section, use the up/down buttons and the drop-down
lists to set how often you want the scan to occur (e.g., every x
Minutes/Hours/Days/Weeks/Months). You can also specify the dates
and times that the cycle of scans starts and ends.
10. Select the
Disable at Weekends
checkbox to disable scans over
weekends if you’re system usage is low enough to warrant it.
Administrator’s Guide 99
Page 100

Creating Schedules
NOTE: If most machines are powered off during weekends, the
scan will fail on those machines. Also, if the machines were scanned
after work on Friday, they do not need scanning again until the next
work week begins on Monday.
11. Click the Targets tab.
The Targets page appears (Figure 4-4).
12. Select the machines that you want to scan for viruses.
100 Management Edition
Figure 4-4. New Event dialog box
(Targets page)
The left-hand box shows the target machines for the scan. It is initially
empty. The right-hand box shows the other machines in the anti-virus
domain. The Scheduler lists only the machines that have the VirusScan
or NetShield programs installed.
To select individual member machines or a group of member machines
in the anti-virus domain, select them in the right box and click
Add
, or
drag them across to the left-hand box.
 Loading...