

Page 1

Evader
User’s Guide
Page 2

USING EVADER
Evader allows you to test the effectiveness of security devices in your network environment
against advanced evasion techniques.
The following sections are included:
Getting Started With Evader (page 2)
Installing the Evader Test Environment (page 3)
Using the New Evader Web Interface (page 7)
Using the Old Evader Web Interface (page 19)
Evader Command Syntax (page 20)
Mongbat Command Syntax (page 24)
Supported Evasions (page 28)
1
Page 3
Getting Started With Evader
Security Device(s)
1 2
An evasion is an attempt to disguise attacks in order to avoid detection and blocking by network
security systems. Evasions can be applied to normal traffic as well as to attacks. An attack
consists of a delivery mechanism (for example, a buffer overflow) and a malicious payload (for
example, code that is executed by the victim computer). The attack is considered successful if
the delivery mechanism succeeds in gaining access to the victim computer, regardless of
whether the security device detects or responds to the attack.
Evasion techniques can be divided into the following categories:
• Defined in a specification and used according to the specification (example:
IPFragmentation).
• Defined in a specification but never actually used according to the specification (example:
MSRPC BigEndian).
• Defined in a specification for some other component, but not defined for the way it is used in
the evasion technique (example: MSRPC NDR Flags).
• Forbidden by a specification, but accepted by the victim system (example: TCP overlap).
The well-known exploits available in Evader are used for evasion testing only.
Installation Environment
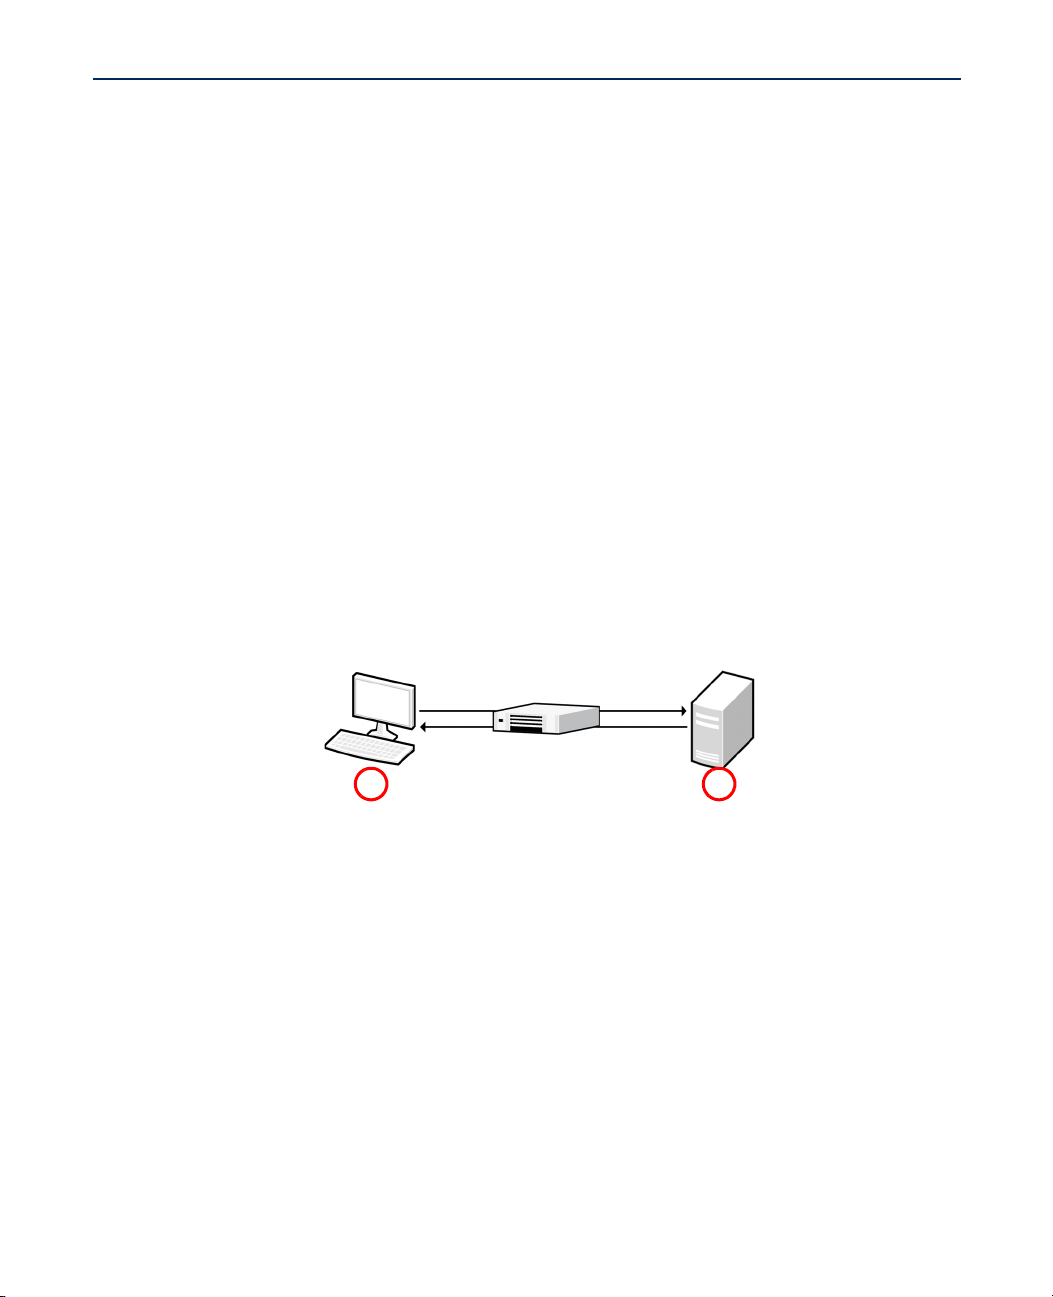
The installation environment consists of an attacker computer that runs the Evader software
and one or more victim computers. The examples in this document are based on the following
example installation. Your installation may vary according to your environment.
Illustration 1.1 Example Installation
1. Attacker computer
•IPv4 Address: 172.16.120.1
•Netmask: 255.255.255.128 (25)
•Attacker source IPv4 address range: 172.16.120.30 - 172.16.120.126
2. Linux victim computer
•IPv4 Address: 172.16.120.21
•Netmask: 255.255.255.128 (25)
The following credentials are used to log in to the Linux operating system on both computers:
• User:
• Password: password
root
2
Using Evader
Page 4

Installing the Evader Test Environment
Installation Files
The attacker software and the victim software are distributed as one live DVD. The attacker
software includes the Evader software. The Linux victim software includes the following
vulnerable software:
• Apache HTTP Server version 2.0.64
• MySQL 4.1.22
• PHP 4.2.2
• phpBB 2.0.10 (CVE-2004-1315)
System Requirements
The live DVD can be deployed on the PC platform of your choice. It can also be deployed on a
virtual platform. Promiscuous mode must be enabled on the virtual switches to get Evader and
your security device(s) to work correctly. On virtual platforms, e1000 network adapters are
recommended.
Additional Targets
Additional targets can be installed on the victim computer using virtualization (for example,
vmware Workstation or Oracle VirtualBox). Virtualization is not part of the live DVD.
If you want use a Windows XP victim computer as the target for testing evasions with the
conficker (CVE-2008-4250) attack, you must install the operating system and configure the
vulnerable services according to the requirements below:
• Windows XP (en-US) SP2 without patches
• MSRPC Server Service configured to allow unauthenticated MSRPC binds
Example IP addresses for a Windows XP victim computer:
• IPv4 Address: 172.16.120.20
• Netmask: 255.255.255.128 (25)
If you want use a Windows 7 victim computer as the target for testing evasions with the rdp_dos
(CVE-2012-0002) attack, you must install the operating system and configure the vulnerable
services according to the requirements below:
• Windows 7 (en-US) without the MS12-020 patch installed
• Remote Desktop Services started with Allow Connections From Computers Running Any
Version Of Remote Desktop selected. See http://technet.microsoft.com/en-us/magazine/
ff404238.aspx for configuration instructions.
Example IP addresses for a Windows 7 victim computer:
• IPv4 Address: 172.16.120.22
• Netmask: 255.255.255.128 (25)
Installing the Evader Test Environment
3
Page 5

Deploying the Attacker and Victim Machines
These instructions explain how to deploy the live DVD for the attacker and the victim machines.
If you want to run the attacker and the victim machines from a live DVD, you need two copies of
the Evader live DVD.
To run the attacker and the victim machines on two separate PCs
1. Insert the live DVD in the DVD drive of the PC.
2. Reboot the PC.
•Make sure that the PC is able to boot from the DVD drive. Change the BIOS settings of the
PC if needed. In some PCs, the function key F12 allows you to select a temporary boot
device during the BIOS boot.
3. Select the first option on the menu of the live DVD: live - boot the Live system. Xubuntu
starts.
4. Start the terminal emulator from the command prompt icon in the bottom left corner of the
screen.
5. Run the command
6. Enter the password for the Evader:
You have now root access.
The live DVD runs its own operating system on the PC hardware. It does not affect the existing
operating system on the PC’s hard drive.
Remember that all changes are temporary when you run the Evader from the live DVD. If you
want to create a permanent Evader environment, you must install the Evader from the live DVD.
The installation overwrites the existing hard drive and its operating system. If you want to install
Evader from the live DVD, you can use the desktop icon Install Evader Live CD.
sudo su -.
password.
What’s Next?
Repeat these steps to deploy the other machine. Then continue by Configuring the
Attacker Computer (page 5).
4
Using Evader
Page 6

Configuring the Attacker Computer
To configure the attacker computer with the live DVD
Enter the following command:
ip addr add 172.16.120.1/25 dev eth0
To configure the attacker computer when making a permanent installation
1. If you are making a permanent installation, edit the /etc/network/interfaces file and
configure the following settings according to your network environment:
auto eth0
iface eth0 inet static
address 172.16.120.1
netmask 255.255.255.128
2. Enter the following command to restart networking and apply your network settings:
/etc/init.d/networking restart
What’s Next?
Continue by Configuring the Linux Victim Computer.
Configuring the Linux Victim Computer
To configure the Linux victim computer with the live DVD
1. Enter the following command:
ip addr add 172.16.120.21/25 dev eth0
Note – If you get the message “Operation not permitted”, run the command sudo su -
and retry the ip command.
2. Enter the following command to start the vulnerable services:
./start_victim_services.sh
To configure the Linux victim computer when making a permanent installation
1. Log in to the Linux victim computer with the following credentials:
•User:
root
•Password: password
2. Edit the /etc/network/interfaces file and configure the following settings according to your
network environment:
auto eth0
iface eth0 inet static
address 172.16.120.21
netmask 255.255.255.128
3. Enter the following command to restart networking and apply your network settings:
/etc/init.d/networking restart
4. Enter the following command to start the vulnerable services:
./start_victim_services.sh
Installing the Evader Test Environment
5
Page 7

Testing Connectivity
To ping from the attacker host to the victim host
1. Enter the following command:
ping 172.16.120.21
2. If you do not get a response from the victim host, make sure that:
•The cabling is ok.
•Both hosts have an IP address. You can use the command
interfaces on the host and their IP addresses.
3. Once you get the ping response, open a web browser and browse to
http://172.16.120.21/. If the victim services are running correctly, an Apache web page
should open.
What’s Next?
If you want to use the old Evader user interface, proceed to Using the Old Evader Web
Interface (page 19).
Otherwise, continue by Using the New Evader Web Interface (page 7).
ip addr show to show the
6
Using Evader
Page 8
Using the New Evader Web Interface
4
5
To use the new Evader web interface
1. Change to the
Note – If you get the message “Permission denied”, run the command sudo su - and
retry the cd command.
cd /root/evader directory.
2. Enter the following command:
3. Open a web browser and browse to
ruby webgui2.rb.
http://localhost:8000. The Evader web interface
opens.
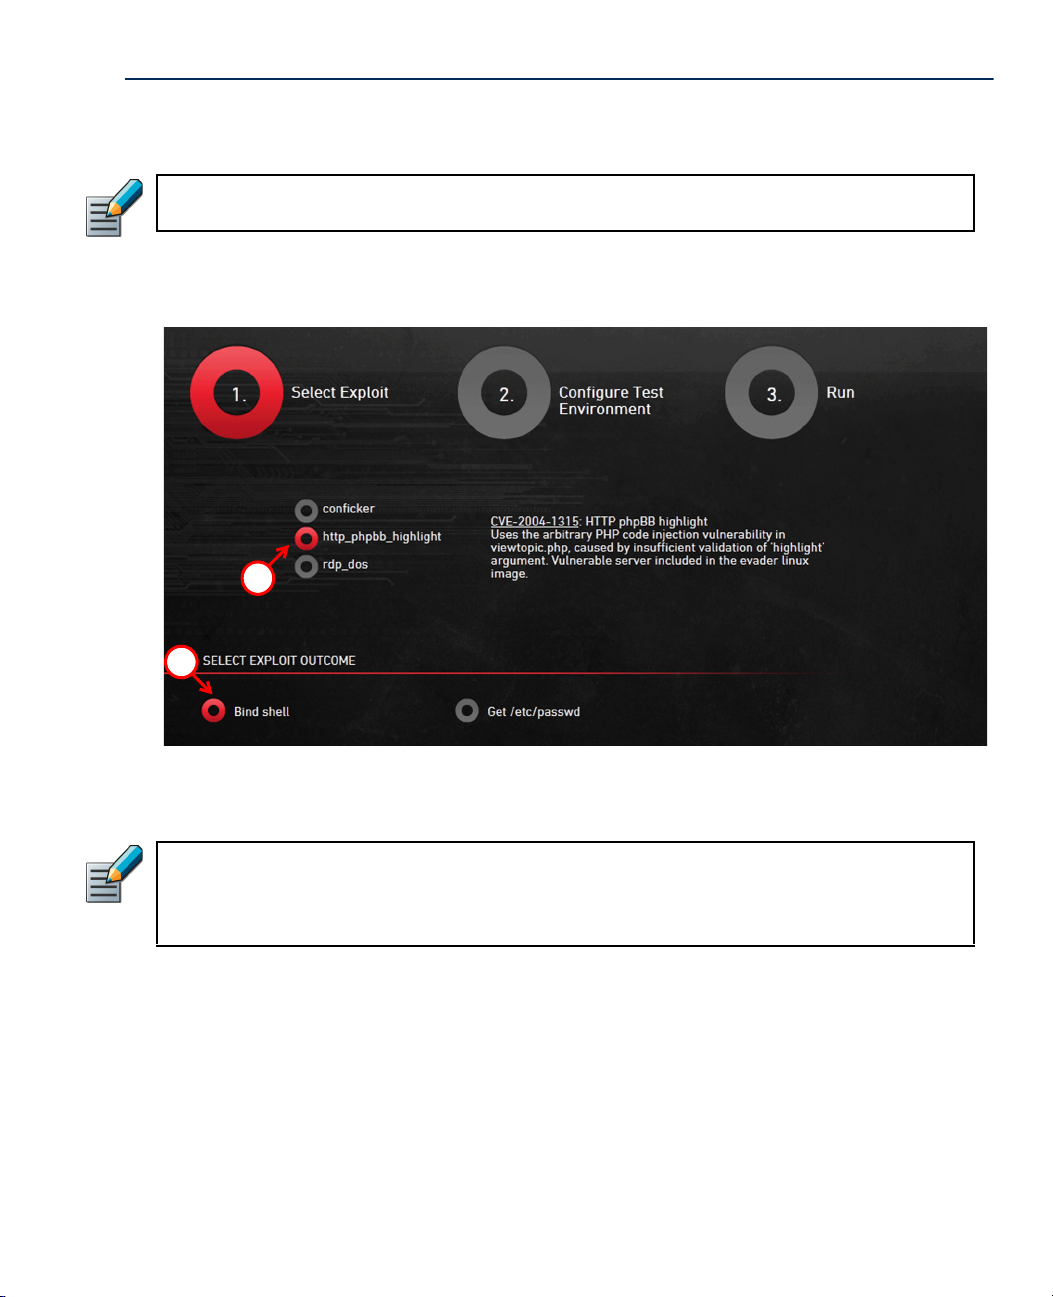
4. Select the attack module for testing the evasions. Select the http_phpbb_highlight exploit,
because it works against the Linux victim software that is delivered with the Evader live
DVD.
Note – If you want to test evasions against a Windows XP victim computer with the
Conficker module, or against a Windows 7 victim computer with the Windows RDP Denial
of Service, you must install the operating system and configure the vulnerable services.
See the System Requirements (page 3) for more information.
5. Select the exploit outcome:
•Bind shell (default)
•Get /etc/password
Using the New Evader Web Interface
7
Page 9

6. Click Configure Test Environment.
7
9
8
6
7. Select Intrusion Prevention System Layer 2.
8. Select the Strength that defines the maximum number of stacked evasions.
•The default setting is 2.
8
Using Evader
Page 10
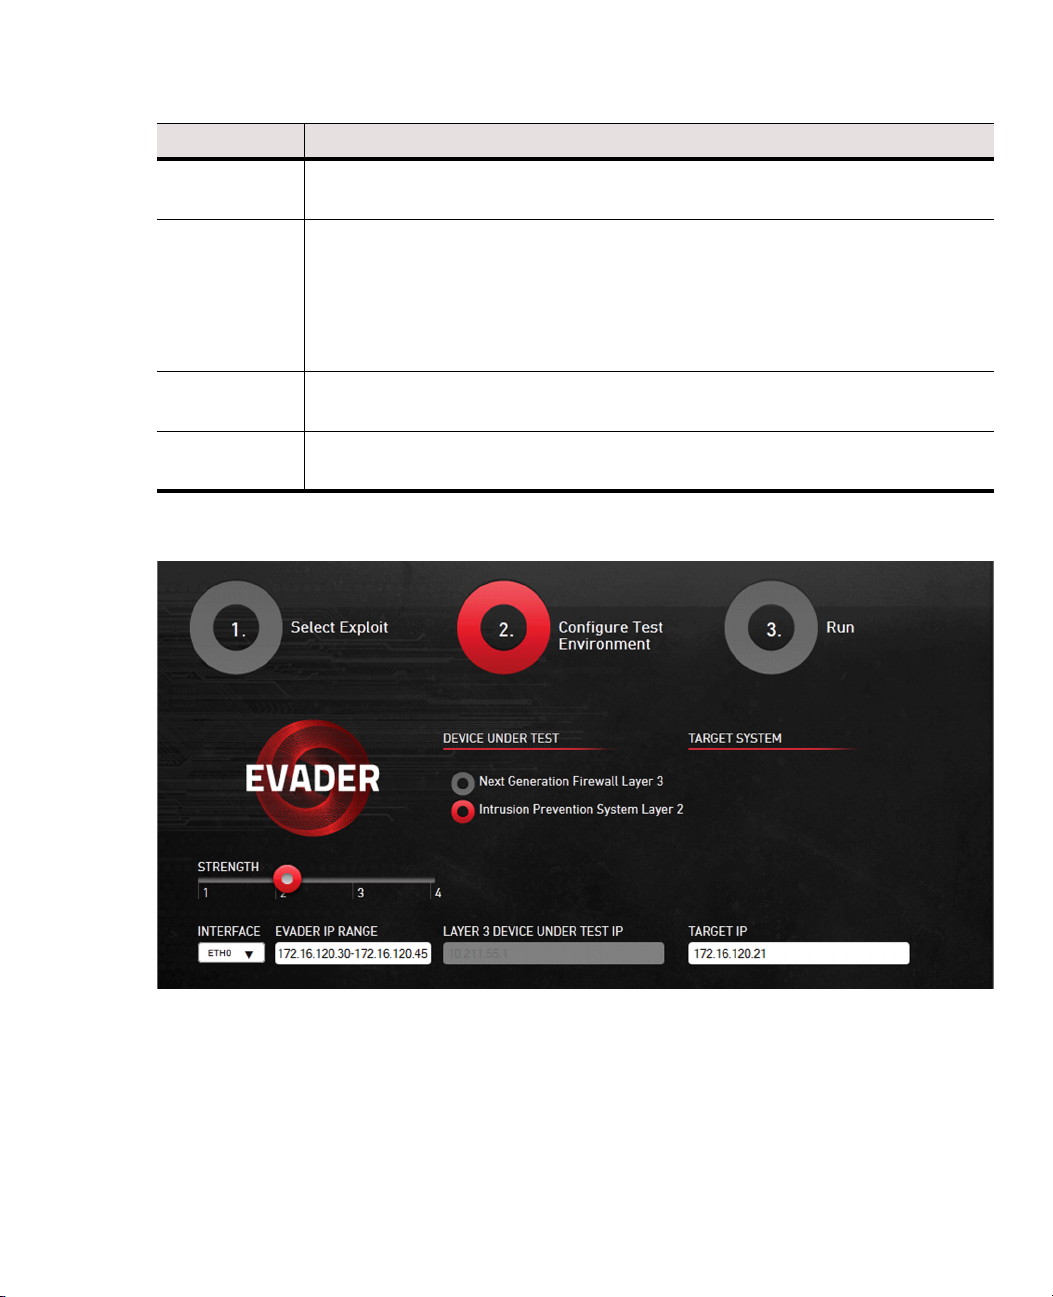
9. Define the network options for the Evader command as instructed in the table below.
Table 1.1 Network Options for Evader Command
Setting Description
Interface
Evader IP range
Layer 3 device
under test IP
Target IP
Enter the name of the interface on the attacker computer from which the attacks
originate.
Enter the IP range of the addresses for the attacks. These addresses must be
unique IP addresses from the same subnet as the IP address of the target (victim)
computer. In this setup, the Evader IP address range should be 172.16.120.30 -
172.16.120.45
Note! The Evader tool implements its own TCP/IP stack. Do not use the attacker
computer’s IP address as part of the Evader IP address range.
Not needed in this case. Both the attacker and the victim are in the same network.
Enter the IP address of the victim. In this setup, the target IP address should be
172.16.120.21
The finished Configure Test Environment screen (step 2 screen) should look like the
illustration below.
Using the New Evader Web Interface
9
Page 11

10.Click Run. The following Evader screen appears.
10
11
10
Using Evader
Page 12

11.Click Execute to test evasions. The Execute button changes to Stop.
15
12
13
14
•By default, the Evader runs automatic evasions. This is a good way to start experimenting
with evasions.
12.Click Stop when the Evader has run long enough. By default, the Evader runs for 24 hours.
Using the New Evader Web Interface
11
Page 13

13.Click Log to view logs either during or after the Evader run.
The following error codes are used in the logs. Lower case letters indicate errors while
checking whether the target is up (using clean calls). If the clean call fails, the actual
attack is not attempted. It is normal to have some errors in the logs even when Evader
runs successfully.
12
Table 1.2 Error Code Explanations
Error Code Explanation
. Attack failed (terminated).
A/a
T/t
E/e
L/l Late termination (Exploit sent).
K/k Killed due to timeout.
C Clean call failed.
ARP failed (Ethernet layer problem). A log consisting of only lower case a indicates
that there is no connectivity between the attacker computer and the target computer.
TCP failed (Transport layer problem). A log consisting of only lower case t indicates
that no TCP connections were established.
Early termination (No exploit sent). A large number of E/e indicates that the
inspection policy on the security device is too strict and blocks the attempts before
the actual attack is sent.
Using Evader
Page 14

14.After the Evader run, click Download report to download an Evader report.
15.(Optional) If you want to re-run one of the successful evasions that are shown on the right
side of the screen, click a successful evasion. The selected evasion will run again.
16.Once the run has been completed, click Log to see the Evader log.
•If you selected “bind shell” as the exploit outcome, the following log entry is displayed:
Exploit succeeded! Open shell | Close shell. Clicking Open shell opens a shell to the
Linux victim computer.
17.Click Close shell.
Using the New Evader Web Interface
13
Page 15

18.Click Download traffic capture.
17
14
Using Evader
Page 16

The traffic capture opens in Wireshark. This enables you to study the details of the
evasion.
What’s Next?
If you want to run single evasions or evasion combinations manually, continue by
Running Manual Evasions (page 16).
Using the New Evader Web Interface
15
Page 17

Running Manual Evasions
1
The Run screen (step 3) allows you to manually select and run single evasions or evasion
combinations.
To run manual evasions
1. Select Manual Evasions.
16
2. Select an evasion from the tree structure. Make sure that you expand the tree fully so that
you can see all options for the evasion.
Using Evader
Page 18

3. Once you have selected all the evasions that you want to use, click Execute. The Evader
will now run your evasions against the Linux victim computer. You can see the results on
the right side of the Evader screen.
•You can find more details about the run in the Evader log.
Using the New Evader Web Interface
17
Page 19

Running Evader in a Layer 3 Setup
2
1
If you are testing next generation firewall or if the victim machine is in a different network, you
must provide a next step router address for the attacker.
To run Evader in a layer 3 setup
1. Select Configure Test Environment in the Evader web interface.
2. Select Next Generation Firewall Layer 3. The Layer 3 device under test IP field is no
longer grayed-out.
3. Enter the IP address of the next step router or the next generation firewall. This IP address
has to be in the same network as the attacker host. Now the attacker routes its traffic
through this address.
4. Make sure that the Evader IP Range and Layer 3 Device Under Test IP do not overlap. In
this example the router has two interfaces:
•The interface facing the attacker has the IP address 172.16.120.126.
•The interface facing the victim has the IP address 172.16.140.1. Enter the IP address of
the victim host. Notice that in this case the attacker and the victim are in different
networks. In this example the IP address of the victim host is 172.16.140.140.
Note – Remember to change the victim IP address to a correct one at the installation time.
Remember to also re-start the victim service after the IP address change.
5. Add the default router information to the victim host so that it knows where to send return
packets:
route add default gw 172.16.140.1
6. Test with ping from the attacker host that you have connectivity between the attacker and
the victim:
ping 172.16.140.140
Otherwise running the Evader is similar to a layer 2 setup.
18
Using Evader
Page 20

Using the Old Evader Web Interface
4
5
7
6
8
The old Evader web interface requires a graphical user interface with a web browser, which are
not included in the attacker virtual machine.
To use the old Evader web interface
1. Change to the
2. Enter the following command:
3. Open a web browser and browse to
opens.
/root/evader directory.
ruby webgui.rb.
http://localhost:8000. The Evader web interface
4. Select the attack Module for testing the evasions.
Note – If you want to test evasions against a Windows XP victim computer with the
Conficker module, you must install the operating system and configure the vulnerable
services. See the System Requirements (page 3) for more information.
5. Define the module-specific Options according to your environment.
6. Define the network options for the Evader command as instructed below:
Table 1.3 Network Options for Evader Command
Setting Description
Interface
Source IP
Destination IP Enter the IP address of the victim computer.
Gateway IP Enter IP address of the default gateway if needed.
Enter the name of the interface on the attacker computer from which the attacks
originate.
Enter the source IP address for the attacks. This address must be a unique IP
address from the same subnet as the IP address of the attacker computer.
Note! The Evader tool implements its own TCP/IP stack. Do not use the attacker
computer’s IP address as the source IP address.
7. Select the evasions to use and configure evasion-specific options.
Using the Old Evader Web Interface
19
Page 21

8. Click Execute. The Evader command is executed and the output is shown in the text box at
the bottom of the page.
Evader Command Syntax
Evader can be used directly to test single evasions. Testing single evasions is recommended
before beginning automated tests of combined evasions to identify any single evasions that are
not detected by the security device. Any successful single evasions can be excluded from
automatic testing. To use automatic testing, see Mongbat Command Syntax (page 24).
To give Evader commands
1. (Optional) If you want to use a different keyboard layout than the default (UK), enter the
following command to change the keyboard layout: loadkeys <key map>
Example loadkeys fi
2. Change to the /root/evader directory.
3. Enter the following command to verify connectivity to the victim computer before testing
evasions:
./evader --attack=http_phpbb_highlight --if=eth0
--src_ip=172.16.120.30 --dst_ip=172.16.120.21
--verifydelay=1000 --payload=clean
4. Enter commands in the following format: ./evader [options].
Example ./evader --attack=http_phbb_highlight --if=eth0
--src_ip=172.16.120.30 --dst_ip=172.16.120.21
--evasion=tcp_overlap,345,old,random --autoclose
The options for the evader command are explained in the tables below.
20
Table 1.4 Options for Network Configuration
Option Description
--if=<name> Interface from which the attacks originate.
The source IP address for the attacks. This address must be a
unique IP address from the same subnet as the IP address of the
--src_ip=<IP address>(/
mask)
--src_port=<port number>
--mac_vendor=<mask> First three octets of MAC address. Defaults to DE:AD:01.
--gw=<IP address> The IP address of the default gateway if needed.
--dst_ip=<IP address> The IP address of the victim computer.
--dst_port=<port number> The port number of a vulnerable service on the victim computer.
Using Evader
attacker computer. Optionally you can add the netmask in CIDR
notation.
Note! The Evader tool implements its own TCP/IP stack. Do not
use the attacker computer’s IP address as the source IP address.
The source port number for the attacks. By default, a random port
number is used.
Page 22

Table 1.5 Options for Attack Configuration
Option Description
--attacks | -a Lists the supported attacks.
--info=<attack name>
--attack=<attack name> Specifies the attack to use.
--payload=<payload
name>
--obfuscate Set all obfuscation flags in the attack.
--extra=<option=value>
(,<option=value>)*
Table 1.6 Options for Evasion Configuration
Shows detailed information about the specified attack and the
options that can be used with the attack.
Selects attack payload. Defaults to the first malicious payload.
Specifies additional options that configure the behavior of the attack
used with the evasion. Separate multiple options with a comma. The
extra exploit options for each attack are listed when you use
--info=<attack name> to display detailed information about the
attack.
Example: --extra=bindport=4567,obfuscate_enc=true
Option Description
Lists the supported evasion techniques for a specific attack
and the evasion-specific options. Not all evasions can be used
--evasions | -e
-–evasion=
[<start stage>,<end stage>]
<evasion_name>,
<evasion_option=value>
(,<evasion_option=value>)*
with all attacks. An attack must be selected using the -attack=<attack name> option.
Example: --attack=conficker --evasions.
Specifies the evasion to use and the evasion-specific options.
Separate multiple options with a comma. An attack must be
selected using the --attack=<attack name> option.
Stages are different points in the progression of an attack. You
can optionally specify that the evasion is only applied during a
particular time period in the attack. The supported stages for
an attack are listed in the attack description. The stages at
which a particular evasion can be applied are listed in the
evasion description.
Each evasion has its own set of options that are specific to that evasion. Use the following
options to show detailed information about the options for a specific evasion:
--info=<evasion_name>
Each evasion-specific option accepts one of the following three types of values (the evasion
description indicates what type of value each option accepts):
• Integer: An integer value. The evasion description indicates the range of valid integers and
how to use them with the evasion.
Evader Command Syntax
21
Page 23

• Probability: Indicates how often the evasion is applied to the traffic. Probability values can be
entered in three ways:
•As a percentage. For example, 75%. The evasion is applied with a probability of 75% to
each packet, so on average at the end of the attack, 75% of packets will have received
the evasion.
•As a number. For example, 3. The evasion is applied to exactly every third packet.
•As a list of iterations each preceded by '#'. For example, #3#6#13. The evasion is
applied exactly at the third, sixth and thirteenth iterations.
• Multiple Choice: A specific named option. The evasion description specifies whether single
or multiple options can be used with the evasion. The syntax for the option depends on
whether single options or multiple options can be used:
•Single Valid: A single named option. Quotes are optional.
•Multiple Valid: A single named option or a list of named options separated with a pipe
(|). The entire list of options must be enclosed in quotes to prevent the pipe from being
interpreted as part of the Linux shell command.
Table 1.7 Other Options
Option Description
--version | -v Shows the Evader software version.
--cfg_file=<file name> Reads the configuration from a configuration file.
--autoclose
--shell_tcp
--summary | -s Prints a summary before exiting.
--verifydelay=<length
of delay>
--randseed=<string>
--force_randseed
--record=<file name> Records all generated traffic in PCAP format to the specified file.
--enable_mmap Enables MMAPed raw sockets.
Automatically close shells without interaction after a successful
attack.
Opens the shell control channel to a TCP socket instead of standard
IO.
The length of time (in milliseconds) to wait before verifying the
attack result. The default is 100.
Sets the seed to use for random number generation. The random
number generator generates random data for the payload of certain
attacks.
Forces a random seed to be used for everything, including source
ports.
22
Using Evader
Page 24

Example Evader Output
The following examples show the output when using Evader with the conficker attack.
Table 1.8 Example Evader Command
./evader --if=eth2 --src_ip=172.16.120.30 --dst_ip=172.16.120.20
--autoclose --attack=conficker --verifydelay=200 --obfuscate
--randseed=+wIBtcAUUS4 --evasion=msrpc_bigendian
Info: Using random seed +wIBtcAUUSI
The following evasions are applied from stage msrpc_bind to end:
- MSRPC messages are sent in the big endian byte order
Table 1.9 Successful Attack
Info: NetBIOS connection 172.16.120.30:54263 -> 172.16.120.20:445
Info: SMB Native OS is "Windows 5.1", targeting Windows XP SP2
Info: Sending MSRPC request with exploit
Info: Shell found, attack succeeded
Info: Shell closed
0: Success.
Table 1.10 Successful Attack With Late IPS Termination
Info: NetBIOS connection 172.16.120.30:59220 -> 172.16.120.20:445
Info: SMB Native OS is "Windows 5.1", targeting Windows XP SP2
Info: Sending MSRPC request with exploit
Info: Failed to send MSRPC request containing the exploit.
Info: TCP socket closed due to the maximum number of retransmits sent - probable IPS
termination.
Info: Shell found, attack succeeded
Info: Shell closed
0: Success.
Table 1.11 Failed Attack With IPS Termination
Info: NetBIOS connection 172.16.120.30:59220 -> 172.16.120.20:445
Info: SMB Native OS is "Windows 5.1", targeting Windows XP SP2
Info: Sending MSRPC request with exploit
Info: Failed to send MSRPC request containing the exploit.
Info: TCP socket closed due to the maximum number of retransmits sent - probable IPS
termination.
Info: No shell, attack failed
200: Connection terminated.
Table 1.12 Connection Failed
Info: NetBIOS connection 172.16.120.30:64609 -> 172.16.120.20:445
Info: MSRPCServerExploit::MSRPCBind() - Failed to connect to 172.16.120.20:445
Error: Exploit running failed
300: TCP connection failed.
Evader Command Syntax
23
Page 25

Mongbat Command Syntax
Mongbat is a testing automation tool that combines evasions to attack the target host. Mongbat
can run multiple instances of the Evader tool with the specified parameters.
To give Mongbat commands
1. Change to the
2. Enter commands in the following format:
Example ruby mongbat.rb --iface=eth1 --attack=http_phpbb_highlight
--attacker=172.16.120.30 --victim=172.16.120.21 --workers=16 --time=3600
The options for the mongbat command are explained in the table below.
Table 1.13 Mongbat Options
Option Description
--mode=(solo|dual|random)
--attack=<attack name> The attack to use. Default: conficker.
/root/evader directory.
ruby mongbat.rb [options].
The mode of attack:
Solo mode uses individual evasions with some options.
Dual mode combines two evasions from the list of enabled evasions.
Random mode uses random evasions from the list of enabled evasions
with random options.
The default is random.
--iface=<interface> Interface from which the attacks originate.
The starting source IP address for the attacks. This address must be a
unique IP address from the same subnet as the IP address of the
attacker computer. The first worker uses this address, and any additional
--attacker=<src ip>(/mask)
--victim=<dst ip> The IP address of the victim computer.
--gw=<IP address>
--time=<time in seconds>
--workers=<worker count>
--use_evasions=<evasion>
(,evasion)*
workers use the next sequential IP addresses. There must be a sufficient
range of free IP addresses to provide a unique IP address for each
worker. Optionally you can add the netmask in CIDR notation.
Note! The Evader tool implements its own TCP/IP stack. Do not use the
attacker computer’s IP address as the source IP address.
The gateway address if the victim is not in the local network. Default:
empty.
The duration of the attack in seconds when random mode is used. The
default is 60 seconds.
The number of workers to use for the attacks. Each worker is a separate
instance of the Evader program. There must be a sufficient range of free
IP addresses to provide a unique IP address for each worker.
The default is 1 worker.
Use only the specified evasion(s).
24
Using Evader
Page 26

Table 1.13 Mongbat Options (Continued)
Option Description
--disable_evasions=
<evasion> (,evasion)*
Exclude the specified evasions from testing. Disabling evasions is
recommended when dual mode or random mode is used for attacks.
Disabling single evasions that are successful against the security device
is also recommended.
--check_victim=(true|false)
Check that the victim allows legal traffic without evasions before
attacking. Default: true.
--record=<directory name> Records the attacks to the specified directory in pcap format.
--min_evasions=<number> The minimum number of evasions to try in random mode. Default: 1.
--max_evasions=<number>
The maximum number of evasions to try in random mode. A value of 0
means an unlimited number of evasions will be tried. Default: 0.
--index=<begin(-end)?> The start index and optional stop index for solo and dual mode.
--stop_on_success Stop if an attack is successful.
--payload=<shell|..>
disable_payload_obfuscation Disable payload obfuscation - use with caution.
--
Payload types. Defaults to “shell”. Some payload cannot be checked for
success.
--use_stages=<true|false> Use stages when available. Defaults to true.
--all_options=<true|false> Enable use of all options (dangerous). Defaults to false.
-validator=<validator>(,vali
dator)*
Use this ruby code validator to evaluate whether the combination is valid
(dangerous).
--randseed=<randseed> This sets the base64 randseed to allow for some repeatability.
--passthrough Pass remaining unknown arguments directly to Evader.
Mongbat Command Syntax
25
Page 27

Example Mongbat Output
The following example shows the Mongbat output for a 60 second run with one successful
attack, 21 clean check failures (indicated by 'C') and 135 failed attack attempts (indicated by
'.'). By default, Mongbat first checks that a non-malicious connection to the victim computer
works, and then attacks with evasions. A log file is written to
where the Mongbat command is run.
Table 1.14 Example Mongbat Output
ruby mongbat.rb --mode=random --attack=conficker --victim=172.16.120.20
--iface=eth2 --attacker=172.16.120.30 --mask=25 --validator=externals/
conficker_validator.rb --workers=4 --time=60
2012-07-09 11:21:57 INFO Using binary /root/evader_0_9_8_556/evader version Evader
2012-07-09 11:21:57 INFO Using rand seed IyQlyTgzma4=
2012-07-09 11:21:57 INFO loading externals/conficker_validator.rb
2012-07-09 11:21:57 INFO External Validator:
/root/evader_0_9_8_556/externals/conficker_validator.rb: Validate Conficker against
Windows XP SP2 Starting evasions generator: Random evasions generator (Evasion adding
percentage is 0.003278688524590164)
0 runs averaging 0.00 runs / second ; progress: 1/60....C.....
10 runs averaging 1.26 runs / second ; progress: 8/60...C......C...
24 runs averaging 1.85 runs / second ; progress: 13/60...C......C...
38 runs averaging 2.12 runs / second ; progress: 18/60...C......C.
50 runs averaging 2.18 runs / second ; progress: 23/60......C......
63 runs averaging 2.25 runs / second ; progress: 28/60C......C......
77 runs averaging 2.34 runs / second ; progress: 33/60..C......C....
mongbat.rb.log in the directory
26
Using Evader
Page 28

Table 1.15 Example Mongbat Output (Continued)
evader --if=eth2 --src_ip=172.16.120.33 --dst_ip=172.16.120.20 --src_mask=25 -autoclose --attack=conficker --verifydelay=200 --obfuscate --randseed=u5MBrg3jsSU=
--evasion=msrpc_bigendian
Info: Using random seed +wIBtcAUUSI
The following evasions are applied from stage msrpc_bind to end:
- MSRPC messages are sent in the big endian byte order
Info: NetBIOS connection 172.16.120.33:54263 -> 172.16.120.20:445
Info: SMB Native OS is "Windows 5.1", targeting Windows XP SP2
Info: Sending MSRPC request with exploit
Info: Shell found, attack succeeded
Info: Shell closed
0: Success.
91 runs averaging 2.40 runs / second ; progress: 38/60...C.......C..
105 runs averaging 2.44 runs / second ; progress: 43/60.....C.......C
119 runs averaging 2.48 runs / second ; progress: 48/60........C....
132 runs averaging 2.49 runs / second ; progress: 53/60..C......C.....
147 runs averaging 2.53 runs / second ; progress: 58/60..C.....C
2012-07-09 11:22:59 INFO Done.
Printing test result
2012-07-09 11:22:59 INFO Mongbat test report
Using /root/evader_0_9_8_556/evader version Evader licensed to
Started : 2012-07-09 11:21:57 +0300
Finished: 2012-07-09 11:22:59 +0300
Attack : conficker
Network setup:
Attackers: 172.16.120.30-172.16.120.34
Victim : 172.16.120.20
Number summary
Total Clean Exploit
Attempts 156 156 134
Failures 156 21 134
Success 1 135 1
Mongbat Command Syntax
27
Page 29

Supported Evasions
The evasions available depend on the selected attack. For example, HTTP evasions can only be
used with HTTP attacks. Use the following command to list the supported evasion techniques
for a specific attack:
./evader --attack=<attack name> --evasions
Table 1.16 Supported Evasions
Evasion Description Attack(s)
ipv4_frag IPv4 fragmentation
ipv4_opt IPv4 options
ipv4_order IPv4 fragment order
msrpc_bigendian MSRPC big endian conficker
msrpc_groupsends Group MSRPC fragments into a single send conficker
msrpc_ndrflag MSRPC NDR modifications conficker
msrpc_seg MSRPC request segmentation conficker
netbios_chaff NetBIOS chaff conficker
netbios_init_chaff NetBIOS initial chaff conficker
smb_chaff SMB chaff conficker
smb_decoytrees SMB decoy trees conficker
smb_fnameobf SMB filename obfuscation conficker
smb_seg SMB write segmentation conficker
smb_writeandxpad SMB WriteAndX padding conficker
conficker, http_phpbb_highlight,
rdp_dos
conficker, http_phpbb_highlight,
rdp_dos
conficker, http_phpbb_highlight,
rdp_dos
tcp_chaff TCP Chaff
tcp_initialseq TCP initial sequence number
tcp_inittsopt TCP timestamp option settings
tcp_nocwnd Disable TCP congestion avoidance
tcp_nofastretrans Disable TCP fast retransmit
28
Using Evader
conficker, http_phpbb_highlight,
rdp_dos
conficker, http_phpbb_highlight,
rdp_dos
conficker, http_phpbb_highlight,
rdp_dos
conficker, http_phpbb_highlight,
rdp_dos
conficker, http_phpbb_highlight,
rdp_dos
Page 30

Table 1.16 Supported Evasions (Continued)
Evasion Description Attack(s)
tcp_order TCP segment order
tcp_osspoof TCP OS spoofing
tcp_overlap TCP segment overlap
tcp_paws TCP PAWS elimination
tcp_recv_window TCP receive window
tcp_seg TCP segmentation
tcp_segvar TCP variable segmentation
tcp_timewait TCP TIME-WAIT decoys
tcp_tsoptreply TCP timestamp echo reply modifications
tcp_urgent TCP urgent data
conficker, http_phpbb_highlight,
rdp_dos
conficker, http_phpbb_highlight,
rdp_dos
conficker, http_phpbb_highlight,
rdp_dos
conficker, http_phpbb_highlight,
rdp_dos
conficker, http_phpbb_highlight,
rdp_dos
conficker, http_phpbb_highlight,
rdp_dos
conficker, http_phpbb_highlight,
rdp_dos
conficker, http_phpbb_highlight,
rdp_dos
conficker, http_phpbb_highlight,
rdp_dos
conficker, http_phpbb_highlight,
rdp_dos
http_header_lws HTTP header linear whitespace http_phpbb_highlight
http_known_user_agent HTTP known user agent http_phpbb_highlight
http_request_line_separator HTTP request line separator http_phpbb_highlight
http_request_method HTTP request method http_phpbb_highlight
http_request_pipelined HTTP request pipelined http_phpbb_highlight
http_url_absolute HTTP URL absolute http_phpbb_highlight
http_url_dummypath HTTP dummy paths http_phpbb_highlight
http_url_encoding HTTP URL encoding http_phpbb_highlight
http_version HTTP request version http_phpbb_highlight
Supported Evasions
29
Page 31

Copyright © 2014 McAfee, Inc. Do not copy without permission.
McAfee and the McAfee logo are trademarks or registered trademarks of McAfee, Inc. or its subsidiaries in the United
States and other countries. Other names and brands may be claimed as the property of others.
 Loading...