

Page 1

®
ePolicy Orchestrator
A product overview and quick set up in a test environment
version 3.6
Walkthrough Guide
revision 2.0
McAfee®
System Protection
Industry-leading intrusion prevention solutions
Page 2

Page 3

®
ePolicy Orchestrator
A product overview and quick set up in a test environment
version 3.6
Walkthrough Guide
revision 2.0
McAfee®
System Protection
Industry-leading intrusion prevention solutions
Page 4

COPYRIGHT
Copyright © 2005 McAfee, Inc. All Rights Reserved.
No part of this publication may be reproduced, transmitted, transcribed, stored in a retrieval system, or translated into any language in any form
or by any means without the written permission of McAfee, Inc., or its suppliers or affiliate companies.
TRADEMARK ATTRIBUTIONS
ACTIVE FIREWALL, ACTIVE SECURITY, ACTIVESECURITY (AND IN KATAKANA), ACTIVESHIELD, CLEAN-UP, DESIGN (STYLIZED E), DESIGN
(STYLIZED N), ENTERCEPT, EPOLICY ORCHESTRATOR, FIRST AID, FOUNDSTONE, GROUPSHIELD, GROUPSHIELD (AND IN KATAKANA),
INTRUSHIELD, INTRUSION PREVENTION THROUGH INNOVATION, MCAFEE, MCAFEE (AND IN KATAKANA), MCAFEE AND DESIGN,
MCAFEE.COM, MCAFEE VIRUSSCAN, NET TOOLS, NET TOOLS (AND IN KATAKANA), NETSCAN, NETSHIELD, NUTS & BOLTS, OIL CHANGE,
PRIMESUPPORT, SPAMKILLER, THREATSCAN, TOTAL VIRUS DEFENSE, VIREX, VIRUS FORUM, VIRUSCAN, VIRUSSCAN, VIRUSSCAN (AND IN
KATAKANA), WEBSCAN, WEBSHIELD, WEBSHIELD (AND IN KATAKANA) are registered trademarks or trademarks of McAfee, Inc. and/or its
affiliates in the US and/or other countries. The color red in connection with security is distinctive of McAfee brand products. All other registered
and unregistered trademarks herein are the sole property of their respective owners.
LICENSE INFORMATION
License Agreement
NOTICE TO ALL USERS: CAREFULLY READ THE APPROPRIATE LEGAL AGREEMENT CORRESPONDING TO THE LICENSE YOU PURCHASED, WHICH SETS FORTH THE
GENERAL TERMS AND CONDITIONS FOR THE USE OF THE LICENSED SOFTWARE. IF YOU DO NOT KNOW WHICH TYPE OF LICENSE YOU HAVE ACQUIRED, PLEASE
CONSULT THE SALES AND OTHER RELATED LICENSE GRANT OR PURCHASE ORDER DOCUMENTS THAT ACCOMPANIES YOUR SOFTWARE PACKAGING OR THAT YOU
HAVE RECEIVED SEPARATELY AS PART OF THE PURCHASE (AS A BOOKLET, A FILE ON THE PRODUCT CD, OR A FILE AVAILABLE ON THE WEB SITE FROM WHICH YOU
DOWNLOADED THE SOFTWARE PACKAGE). IF YOU DO NOT AGREE TO ALL OF THE TERMS SET FORTH IN THE AGREEMENT, DO NOT INSTALL THE SOFTWARE. IF
APPLICABLE, YOU MAY RETURN THE PRODUCT TO MCAFEE OR THE PLACE OF PURCHASE FOR A FULL REFUND.
Attributions
This product includes or may include:
• Software developed by the OpenSSL Project for use in the OpenSSL Toolkit (http://www.openssl.org/). • Cryptographic software written by Eric
A. Young and software written by Tim J. Hudson. • Some software programs that are licensed (or sublicensed) to the user under the GNU
General Public License (GPL) or other similar Free Software licenses which, among other rights, permit the user to copy, modify and redistribute
certain programs, or portions thereof, and have access to the source code. The GPL requires that for any software covered under the GPL which
is distributed to someone in an executable binary format, that the source code also be made available to those users. For any such software
covered under the GPL, the source code is made available on this CD. If any Free Software licenses require that McAfee pro-+34vide rights to
use, copy or modify a software program that are broader than the rights granted in this agreement, then such rights shall take precedence over
the rights and restrictions herein. • Software originally written by Henry Spencer, Copyright 1992, 1993, 1994, 1997 Henry Spencer. • Software
originally written by Robert Nordier, Copyright © 1996-7 Robert Nordier. • Software written by Douglas W. Sauder. • Software developed by the
Apache Software Foundation (http://www.apache.org/). A copy of the license agreement for this software can be found at
www.apache.org/licenses/LICENSE-2.0.txt. • International Components for Unicode ("ICU") Copyright ©1995-2002 International Business
Machines Corporation and others. • Software developed by CrystalClear Software, Inc., Copyright ©2000 CrystalClear Software, Inc. • FEADÆ
OptimizerÆ technology, Copyright Netopsystems AG, Berlin, Germany. • Outside InÆ Viewer Technology ©1992-2001 Stellent Chicago, Inc.
and/or Outside InÆ HTML Export, © 2001 Stellent Chicago, Inc. • Software copyrighted by Thai Open Source Software Center Ltd. and Clark
Cooper, © 1998, 1999, 20 00. • Software copyrighted by Expat maintainers. • Software copyrighted by The Regents of the University of California,
© 1996, 1989, 1998-2000. • Software copyrighted by Gunnar Ritter. • Software copyrighted by Sun Microsystems, Inc., 4150 Network Circle,
Santa Clara, California 95054, U.S.A., © 2003. • Software copyrighted by Gisle Aas. © 1995-2003. • Software copyrighted by Michael A. Chase,
© 1999-2000. • Software copyrighted by Neil Winton, ©1995-1996. • Software copyrighted by RSA Data Security, Inc., © 1990-1992. • Software
copyrighted by Sean M. Burke, © 1999, 2000. • Software copyrighted by Martijn Koster, © 1995. • Software copyrighted by Brad Appleton,
© 1996-1999. • Software copyrighted by Michael G. Schwern, ©2001. • Software copyrighted by Graham Barr, © 1998. • Software copyrighted
by Larry Wall and Clark Cooper, © 1998-2000. • Software copyrighted by Frodo Looijaard, © 1997. • Software copyrighted by the Python Software
Foundation, Copyright © 2001, 2002, 2003. A copy of the license agreement for this software can be found at www.python.org. • Software
copyrighted by Beman Dawes, © 1994-1999, 2002. • Software written by Andrew Lumsdaine, Lie-Quan Lee, Jeremy G. Siek © 1997-2000
University of Notre Dame. • Software copyrighted by Simone Bordet & Marco Cravero, © 2002. • Software copyrighted by Stephen Purcell,
© 2001. • Software developed by the Indiana University Extreme! Lab (http://www.extreme.indiana.edu/). • Software copyrighted by
International Business Machines Corporation and others, © 1995-2003. • Software developed by the University of California, Berkeley and its
contributors. • Software developed by Ralf S. Engelschall <rse@engelschall.com> for use in the mod_ssl project (http:// www.modssl.org/).
• Software copyrighted by Kevlin Henney, © 2000-2002. • Software copyrighted by Peter Dimov and Multi Media Ltd. © 2001, 2002. • Software
copyrighted by David Abrahams, © 2001, 2002. See http://www.boost.org/libs/bind/bind.html for documentation. • Software copyrighted by
Steve Cleary, Beman Dawes, Howard Hinnant & John Maddock, © 2000. • Software copyrighted by Boost.org, © 1999-2002. • Software
copyrighted by Nicolai M. Josuttis, © 1999. • Software copyrighted by Jeremy Siek, © 1999-2001. • Software copyrighted by Daryle Walk er,
© 2001. • Software copyrighted by Chuck Allison and Jeremy Siek, © 2001, 2002. • Software copyrighted by Samuel Krempp, © 2001. See
http://www.boost.org for updates, documentation, and revision history. • Software copyrighted by Doug Gregor (gregod@cs.rpi.edu), © 2001,
2002. • Software copyrighted by Cadenza New Zealand Ltd., © 2000. • Software copyrighted by Jens Maurer, ©2000, 2001. • Software
copyrighted by Jaakko Järvi (jaakko.jarvi@cs.utu.fi), ©1999, 200 0. • Software copyrighted by Ronald Garcia, © 2002. • Software copyrighted by
David Abrahams, Jeremy Siek, and Daryle Walker, ©1999-20 01. • Software copyrighted by Stephen Cleary (shammah@voyager.net), ©2000.
• Software copyrighted by Housemarque Oy <http://www.housemarque.com>, © 2001. • Software copyrighted by Paul Moore, © 1999.
• Software copyrighted by Dr. John Maddock, © 1998-2002. • Software copyrighted by Greg Colvin and Beman Dawes, © 1998, 1999. • Software
copyrighted by Peter Dimov, © 2001, 2002. • Software copyrighted by Jeremy Siek and John R. Bandela, © 2001. • Software copyright
Joerg Walter and Mathias Koch, © 2000-2002. • Software copyrighted by Carnegie Mellon University © 1989, 1991, 1992. • Software copyrighted
by Cambridge Broadband Ltd., © 2001-2003. • Software copyrighted by Sparta, Inc., © 2003-2004. • Software copyrighted by Cisco, Inc and
Information Network Center of Beijing University of Posts and Telecommunications, © 2004. • Software copyrighted by Simon Josefsson,
© 2003. • Software copyrighted by Thomas Jacob, © 2003-2004. • Software copyrighted by Advanced Software Engineering Limited, © 2004.
• Software copyrighted by Todd C. Miller, © 1998. • Software copyrighted by The Regents of the University of California, © 1990, 1993, with code
derived from software contributed to Berkeley by Chris Torek.
ed by
PATENT INFORMATION
Protected by US Patents 6,470,384; 6,493,756; 6,496,875; 6,553,377; 6,553,378.
Issued September 2005 / ePolicy Orchestrator® software version 3.6
DBN-002-<EN>
Page 5

Contents
Walkthrough
1 Introduction 6
2 Installing or Upgrading the Server 12
Components of ePolicy Orchestrator. . . . . . . . . . . . . . . . . . . . . . . . . . . . . . . . . . 6
Policy, properties, and events . . . . . . . . . . . . . . . . . . . . . . . . . . . . . . . . . . . . . . . 9
Policies. . . . . . . . . . . . . . . . . . . . . . . . . . . . . . . . . . . . . . . . . . . . . . . . . . . . . . . 9
Properties . . . . . . . . . . . . . . . . . . . . . . . . . . . . . . . . . . . . . . . . . . . . . . . . . . . . 9
Events . . . . . . . . . . . . . . . . . . . . . . . . . . . . . . . . . . . . . . . . . . . . . . . . . . . . . . . 9
Tasks, services, and accounts. . . . . . . . . . . . . . . . . . . . . . . . . . . . . . . . . . . . . . . .10
Other times when credentials are needed . . . . . . . . . . . . . . . . . . . . . . . . . . 11
Minimum requirements . . . . . . . . . . . . . . . . . . . . . . . . . . . . . . . . . . . . . . . . . . . . 11
Installing for the first time . . . . . . . . . . . . . . . . . . . . . . . . . . . . . . . . . . . . . . . . . 12
Pre-installation preparation . . . . . . . . . . . . . . . . . . . . . . . . . . . . . . . . . . . . . 13
Information to have during installation . . . . . . . . . . . . . . . . . . . . . . . . . . . 13
Upgrading from a previous version . . . . . . . . . . . . . . . . . . . . . . . . . . . . . . . . . 15
Preparation . . . . . . . . . . . . . . . . . . . . . . . . . . . . . . . . . . . . . . . . . . . . . . . . . . 15
Information to have during the upgrade . . . . . . . . . . . . . . . . . . . . . . . . . . 16
Upgrading issues . . . . . . . . . . . . . . . . . . . . . . . . . . . . . . . . . . . . . . . . . . . . . 17
3 Organizing the Directory and Repositories 18
ePolicy Orchestrator Directory: concepts and roles . . . . . . . . . . . . . . . . . . . . . 18
About ePolicy Orchestrator roles. . . . . . . . . . . . . . . . . . . . . . . . . . . . . . . . . .19
Organizing the Directory . . . . . . . . . . . . . . . . . . . . . . . . . . . . . . . . . . . . . . . 21
Environmental borders. . . . . . . . . . . . . . . . . . . . . . . . . . . . . . . . . . . . . . . . . 22
IP address filters and sorting . . . . . . . . . . . . . . . . . . . . . . . . . . . . . . . . . . . . 23
Repositories . . . . . . . . . . . . . . . . . . . . . . . . . . . . . . . . . . . . . . . . . . . . . . . . . . . . . 25
Source repository . . . . . . . . . . . . . . . . . . . . . . . . . . . . . . . . . . . . . . . . . . . . . 25
Fallback repository . . . . . . . . . . . . . . . . . . . . . . . . . . . . . . . . . . . . . . . . . . . . 25
Master repository . . . . . . . . . . . . . . . . . . . . . . . . . . . . . . . . . . . . . . . . . . . . . 25
Distributed repository. . . . . . . . . . . . . . . . . . . . . . . . . . . . . . . . . . . . . . . . . . 26
4 Deploying the Agent and Products 28
ePolicy Orchestrator agent . . . . . . . . . . . . . . . . . . . . . . . . . . . . . . . . . . . . . . . . . 28
About the ePolicy Orchestrator agent. . . . . . . . . . . . . . . . . . . . . . . . . . . . . 28
Agent installation folder. . . . . . . . . . . . . . . . . . . . . . . . . . . . . . . . . . . . . . . . 28
Agent language packages . . . . . . . . . . . . . . . . . . . . . . . . . . . . . . . . . . . . . . 29
The agent installation package . . . . . . . . . . . . . . . . . . . . . . . . . . . . . . . . . . 29
Agent-server communication . . . . . . . . . . . . . . . . . . . . . . . . . . . . . . . . . . . 31
SuperAgents and broadcast wakeup calls . . . . . . . . . . . . . . . . . . . . . . . . . 32
Agent activity logs . . . . . . . . . . . . . . . . . . . . . . . . . . . . . . . . . . . . . . . . . . . . 34
Distributing agents . . . . . . . . . . . . . . . . . . . . . . . . . . . . . . . . . . . . . . . . . . . . . . . 34
Deploying the agent from ePolicy Orchestrator. . . . . . . . . . . . . . . . . . . . . 35
Installing the agent with login scripts . . . . . . . . . . . . . . . . . . . . . . . . . . . . . 37
Installing the agent manually . . . . . . . . . . . . . . . . . . . . . . . . . . . . . . . . . . . 38
Enabling the agent on unmanaged McAfee products . . . . . . . . . . . . . . . . 38
Including the agent on an image. . . . . . . . . . . . . . . . . . . . . . . . . . . . . . . . . 39
iii
Page 6

ePolicy Orchestrator®3.6 Walkthrough Guide Contents
Distributing the agent using other deployment products . . . . . . . . . . . . . 39
Distributing the agent to WebShield appliances and Novell NetWare servers
39
About deploying packages . . . . . . . . . . . . . . . . . . . . . . . . . . . . . . . . . . . . . . . . . 40
Package signing and security. . . . . . . . . . . . . . . . . . . . . . . . . . . . . . . . . . . . 41
Legacy product support . . . . . . . . . . . . . . . . . . . . . . . . . . . . . . . . . . . . . . . . 42
Package ordering and dependencies . . . . . . . . . . . . . . . . . . . . . . . . . . . . . 42
About deploying and updating products . . . . . . . . . . . . . . . . . . . . . . . . . . . . . 42
Product deployment and updating process . . . . . . . . . . . . . . . . . . . . . . . . 42
Deployment task . . . . . . . . . . . . . . . . . . . . . . . . . . . . . . . . . . . . . . . . . . . . . . 43
Update tasks . . . . . . . . . . . . . . . . . . . . . . . . . . . . . . . . . . . . . . . . . . . . . . . . . 43
Global updating . . . . . . . . . . . . . . . . . . . . . . . . . . . . . . . . . . . . . . . . . . . . . . 44
Pull tasks . . . . . . . . . . . . . . . . . . . . . . . . . . . . . . . . . . . . . . . . . . . . . . . . . . . . 45
Replication tasks . . . . . . . . . . . . . . . . . . . . . . . . . . . . . . . . . . . . . . . . . . . . . . 46
Repository selection . . . . . . . . . . . . . . . . . . . . . . . . . . . . . . . . . . . . . . . . . . . 46
Repository selection by agents . . . . . . . . . . . . . . . . . . . . . . . . . . . . . . . . . . 47
Selective updating . . . . . . . . . . . . . . . . . . . . . . . . . . . . . . . . . . . . . . . . . . . . 47
About the SITELIST.XML repository list . . . . . . . . . . . . . . . . . . . . . . . . . . . 47
Checking in product deployment packages manually . . . . . . . . . . . . . . . . . . . 48
Configuring the deployment task to install products on client systems . . . . 49
5 Rogue System Detection 52
The Rogue System sensor . . . . . . . . . . . . . . . . . . . . . . . . . . . . . . . . . . . . . . 52
Machine status and rogue type . . . . . . . . . . . . . . . . . . . . . . . . . . . . . . . . . . 55
Subnet status . . . . . . . . . . . . . . . . . . . . . . . . . . . . . . . . . . . . . . . . . . . . . . . . 56
Distributing Rogue System sensors . . . . . . . . . . . . . . . . . . . . . . . . . . . . . . . . . 57
Deploying Rogue System sensors . . . . . . . . . . . . . . . . . . . . . . . . . . . . . . . 57
Installing the sensor manually. . . . . . . . . . . . . . . . . . . . . . . . . . . . . . . . . . . 58
Taking actions on detected rogue systems manually . . . . . . . . . . . . . . . . . . . 58
Configuring automatic responses for specific events . . . . . . . . . . . . . . . . . . . 59
6 ePolicy Orchestrator Notifications 61
About Notifications . . . . . . . . . . . . . . . . . . . . . . . . . . . . . . . . . . . . . . . . . . . . . . . 61
Throttling and aggregation . . . . . . . . . . . . . . . . . . . . . . . . . . . . . . . . . . . . . 62
Notification rules and Directory scenarios . . . . . . . . . . . . . . . . . . . . . . . . . 63
Determining when events are forwarded . . . . . . . . . . . . . . . . . . . . . . . . . . . . . 64
Determining which events are forwarded. . . . . . . . . . . . . . . . . . . . . . . . . . . . . 65
Planning . . . . . . . . . . . . . . . . . . . . . . . . . . . . . . . . . . . . . . . . . . . . . . . . . . . . . . . . 65
Rules. . . . . . . . . . . . . . . . . . . . . . . . . . . . . . . . . . . . . . . . . . . . . . . . . . . . . . . . . . . 66
Configuring ePolicy Orchestrator Notifications . . . . . . . . . . . . . . . . . . . . . 66
Default rules . . . . . . . . . . . . . . . . . . . . . . . . . . . . . . . . . . . . . . . . . . . . . . . . . 66
Creating rules . . . . . . . . . . . . . . . . . . . . . . . . . . . . . . . . . . . . . . . . . . . . . . . . 67
Viewing the history of Notifications . . . . . . . . . . . . . . . . . . . . . . . . . . . . . . . . . 67
Notification summary. . . . . . . . . . . . . . . . . . . . . . . . . . . . . . . . . . . . . . . . . . 68
Notification list . . . . . . . . . . . . . . . . . . . . . . . . . . . . . . . . . . . . . . . . . . . . . . . 68
Product and component list. . . . . . . . . . . . . . . . . . . . . . . . . . . . . . . . . . . . . 70
7 Outbreaks 72
Tasks to do on a daily or weekly basis to stay prepared . . . . . . . . . . . . . . . . . 72
Server and client tasks you should schedule to run regularly . . . . . . . . . 72
Checklist — Are you prepared for an outbreak? . . . . . . . . . . . . . . . . . . . . . . . . .74
Other methods to recognize an outbreak . . . . . . . . . . . . . . . . . . . . . . . . . . . . . .74
Network utilization key indicators . . . . . . . . . . . . . . . . . . . . . . . . . . . . . . . . .74
E-mail utilization key indicators. . . . . . . . . . . . . . . . . . . . . . . . . . . . . . . . . . 75
Virus detection events . . . . . . . . . . . . . . . . . . . . . . . . . . . . . . . . . . . . . . . . . 75
Checklist — You think an outbreak is occurring . . . . . . . . . . . . . . . . . . . . . . . . 75
iv
Page 7

ePolicy Orchestrator®3.6 Walkthrough Guide Contents
Lab Evaluation
8 Installing and setting up 78
Setting up a lab environment . . . . . . . . . . . . . . . . . . . . . . . . . . . . . . . . . . . 79
Add systems to your Directory . . . . . . . . . . . . . . . . . . . . . . . . . . . . . . . . . . . . . 85
Organize systems into groups for servers and workstations . . . . . . . . . . . . . 89
Configure the agent policy settings before deployment . . . . . . . . . . . . . . . . . 91
Deploy agents . . . . . . . . . . . . . . . . . . . . . . . . . . . . . . . . . . . . . . . . . . . . . . . . . . . 92
Installing agent manually on client systems. . . . . . . . . . . . . . . . . . . . . . . . . . . 94
Add VirusScan Enterprise to the master repositor. . . . . . . . . . . . . . . . . . . . . y 95
Pull updates from McAfee source repository . . . . . . . . . . . . . . . . . . . . . . . . . . 96
Create a distributed repository . . . . . . . . . . . . . . . . . . . . . . . . . . . . . . . . . . . . . 98
Create a shared folder on the system to use as a repository . . . . . . . . . . 98
Add the distributed repository to the ePolicy Orchestrator server. . . . . . 99
Replicate master repository data to distributed repository . . . . . . . . . . 101
Configure remote sites to use the distributed repository . . . . . . . . . . . . 101
Schedule a pull task to update master repository daily. . . . . . . . . . . . . . . . . 109
Schedule a replication task to update your distributed repository . . . . . . . . 110
Schedule a client update task to update DATs daily . . . . . . . . . . . . . . . . . . . 110
Use SuperAgents to wake up all agents on the network . . . . . . . . . . . . . . . . . 111
Convert an agent on each subnet into a SuperAgent . . . . . . . . . . . . . . . . . . .112
Enable global updating on ePolicy Orchestrator server . . . . . . . . . . . . . . . . 113
9 Advanced Feature Evaluations 114
ePolicy Orchestrator Notification. . . . . . . . . . . . . . . . . . . . . . . . . . . . . . . . . . . . 114
Rogue System Detection . . . . . . . . . . . . . . . . . . . . . . . . . . . . . . . . . . . . . . . . . .118
v
Page 8

SECTION 1
Walkthrough
This section provides a walkthrough of conceptual and best practices information.
Introduction
Installing or Upgrading the Server
Organizing the Directory and Repositories
Deploying the Agent and Products
Rogue System Detection
ePolicy Orchestrator Notifications
Outbreaks
Page 9

Introduction
1
ePolicy Orchestrator 3.6 is a powerful tool that allows you to manage security policy,
assess and enforce policy, identify and take actions on rogue systems, and notify you
of certain events that occur, all across your entire network.
Components of ePolicy Orchestrator.
Policy, properties, and events
Tasks, services, and accounts
Components of ePolicy Orchestrator
ePolicy Orchestrator is made up of several components that can reside on systems
across your network:
ePolicy Orchestrator server.
Database server.
ePolicy Orchestrator consoles.
ePolicy Orchestrator agent.
Rogue System Detection (RSD) sensor.
Master repository.
6
Page 10
ePolicy Orchestrator®3.6 Walkthrough Guide Introduction
Components of ePolicy Orchestrator
Update repositories.
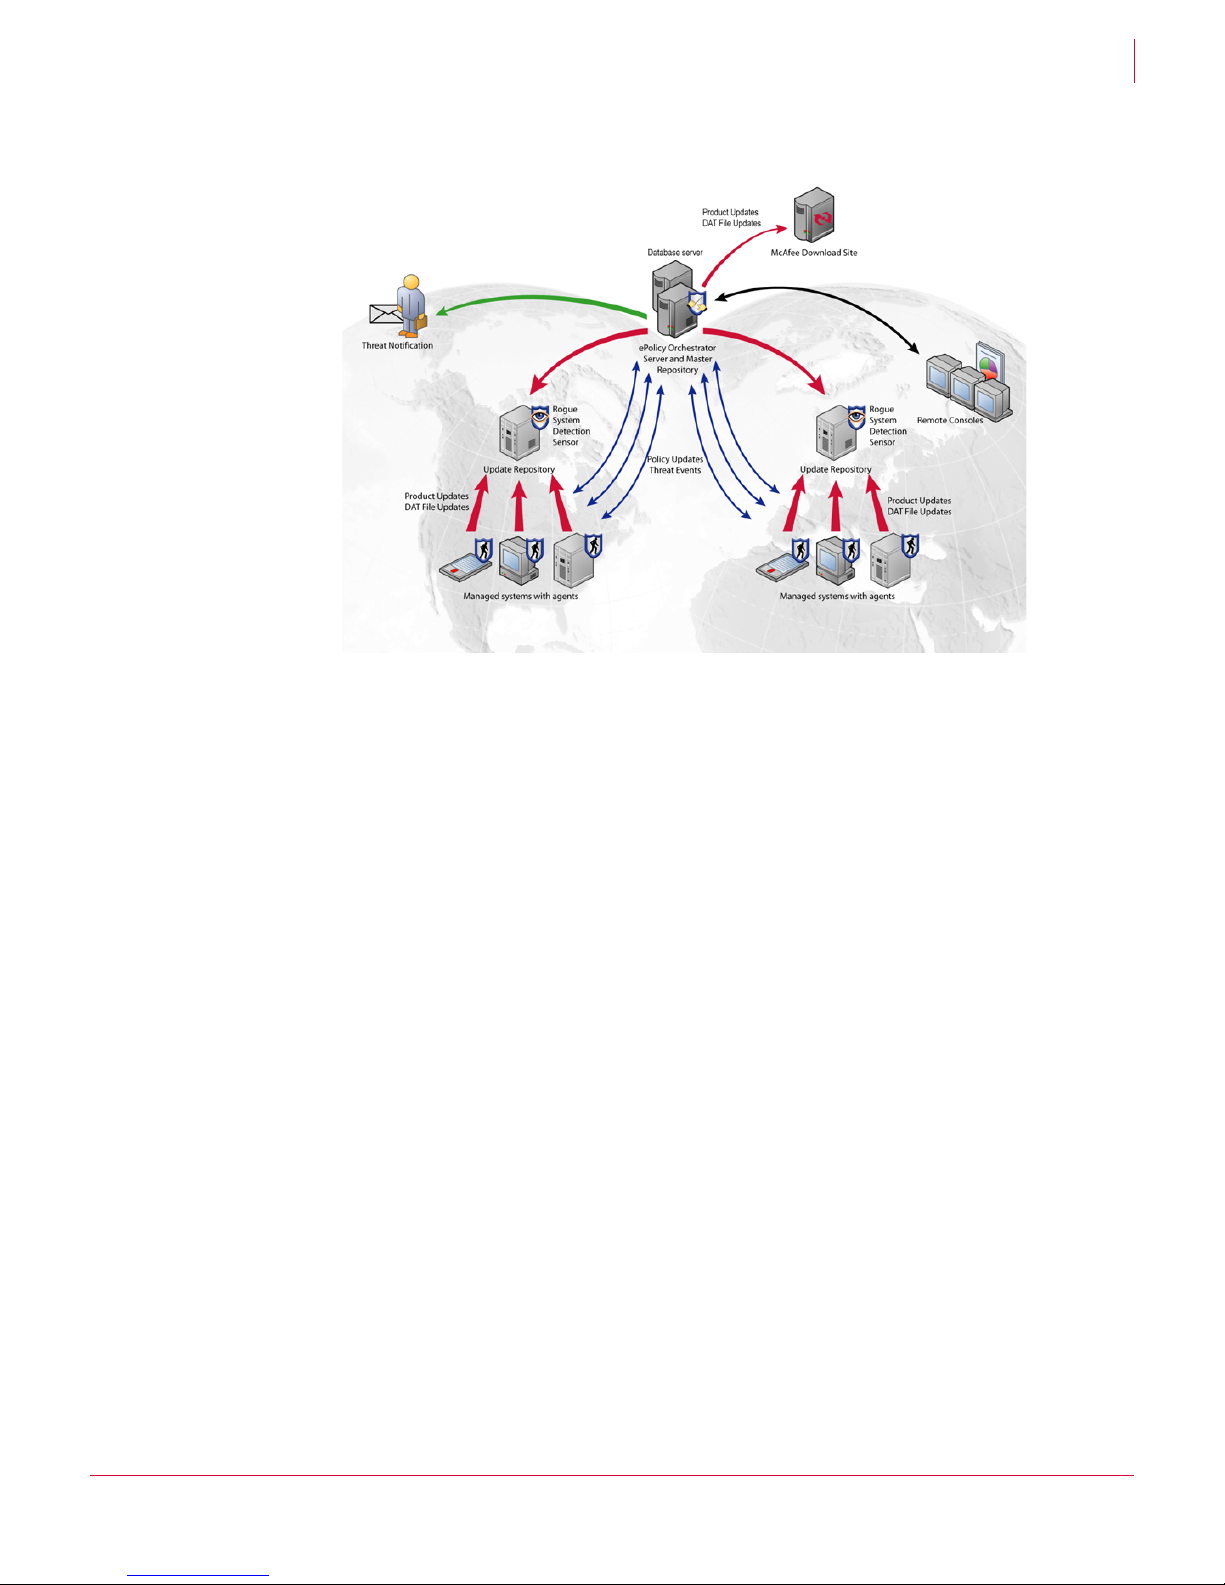
Figure 1-1 ePolicy Orchestrator on your network
1
ePolicy Orchestrator server
The center of your managed environment. One server can manage up to 250,000
systems, but you may be restricted by your bandwidth and other considerations. For
example, network obstacles like firewalls and proxy servers, geographic locations of
sites, and security divisions within your organization.
The server:
Delivers security policies.
Controls product and DAT file updates.
Processes events and serves tasks for all managed systems.
Provides the mechanism for agent communication.
Controls data access to and from the ePolicy Orchestrator database.
The ePolicy Orchestrator server should be hosted on a dedicated server. Typically, the
ePolicy Orchestrator server is accessed via remote ePolicy Orchestrator consoles
(installed on other systems), although it can be accessed from a local console as well.
For information on server sizing, see the ePolicy Orchestrator 3.6 Hardware Sizing and
Bandwidth Usage White Paper.
Database server
ePolicy Orchestrator uses a back-end database to store data, which is represented in
the console tree of the user interface. The database contains information from each
managed system.
The reporting and query features of ePolicy Orchestrator (accessed through the
consoles) allow you to view this data in ways you can customize.
7
Page 11

ePolicy Orchestrator®3.6 Walkthrough Guide Introduction
Components of ePolicy Orchestrator
ePolicy Orchestrator consoles
You can have multiple consoles installed on your network. One resides on the ePolicy
Orchestrator server itself as a local console, and you can install as many as you like
remotely throughout your network.
Typically, you will want one that is accessible to anyone in your environment who needs
to access the ePolicy Orchestrator server. For example, you would want all
administrators to be able to access the ePolicy Orchestrator server from a console to
perform their management tasks. You can assign roles with different rights and
permissions to users.
ePolicy Orchestrator agent
The agent is a vehicle of information and enforcement between the ePolicy
Orchestrator and each managed system. For each of the managed systems, the agent:
Retrieves updates.
Executes scheduled tasks.
Enforces policies.
Forwards properties and events to the server.
Every system you want to manage must have this component installed.
1
Rogue System Detection (RSD) sensor
Sensors can reside on one or more systems per subnet. The active sensor notifies you
when a rogue system (a system without an ePolicy Orchestrator agent) enters the
environment, and can then initiate a user-defined automatic response on that system,
such as deploying an agent to it.
Sensors “listen” to all broadcast layer 2 communications on the subnets. Although you
can deploy multiple sensors to a subnet, only one is listening at a time. This allows a
minimum of network activity, and ensures one sensor is always listening per subnet.
Master repository
The master repository exists on the ePolicy Orchestrator server and is the central
location for all McAfee product updates. The master repository goes to the McAfee
Download Site (source repository) at defined times to retrieve all available updates and
signatures. The master repository contains a copy of the contents of the McAfee
Download Site that can be accessed by the various update repositories in your
organization.
Update repositories
Update repositories are distributed throughout your environment, providing easy
access for managed systems to pull DAT files, product updates, and product
installations. Depending on how your network is configured, you may want to set up
different types of repositories. You can create HTTP, FTP, and UNC share distributed
repositories anywhere on your network, or you can create an update repository per
subnet by converting an agent on each subnet into a SuperAgent repository.
8
Page 12

ePolicy Orchestrator®3.6 Walkthrough Guide Introduction
Policy, properties, and events
Policy, properties, and events
Two main purposes of ePolicy Orchestrator are to enforce policies on the managed
systems, and to receive and process properties and events from all of the managed
systems.
Policies
A policy is a set of software configurations. The set of options differs depending on the
product and system you are managing. For example, a policy for VirusScan Enterprise
includes the configuration options for the On-Access Scanner and the On-Demand
Scanner. You can set these configuration options differently for different systems.
Policies are the security product configurations that you want to ensure each site,
group, or individual systems have. Policies are enforced during the policy enforcement
interval. This interval is set to five minutes by default. Therefore, anytime an end user
changes the settings on the system, the settings are returned to those set in the policy
within five minutes.
New to version 3.6 is the ability to create named policies, that you can assign to
independent locations of the Directory.
1
Properties
Events
Properties are collected from each system by the installed agent. These include:
System information (system name, memory available, etc.).
Information from installed ePolicy Orchestrator-managed security products (for
example, VirusScan Enterprise).
When a threat or compliance issue on a system is recognized by an installed and
managed security product, an event file is created by the product that the agent
delivers to the server to be processed. These events are processed and stored in the
database.
Events are processed by event parser and applied to the notification rules or ePolicy
Orchestrator Notifications. Notifications is a feature that allows you to configure rules
to alert you to events in your network.
If the event triggers a notification rule, any of the following can happen depending on
the rule’s configurations:
Notification messages are sent to specified recipients.
Actions, such as agent deployment, can be taken against the system.
Specified registered executables can be launched.
9
Page 13
ePolicy Orchestrator®3.6 Walkthrough Guide Introduction
Tasks, services, and accounts
Tasks, services, and accounts
Several tasks and services of ePolicy Orchestrator require authentication with specific
accounts to complete.
This information is useful if you encounter issues with the following tasks.
Task Service Account
Logging onto the
server
Deploying agents McAfee ePolicy Orchestrator 3.6.0
Upgrading agents McAfee ePolicy Orchestrator 3.6.0
Replicating UNC share
distributed repositories
Replicating FTP
distributed repositories
Replicating HTTP
distributed repositories
Replicating SuperAgent
repositories
Accessing ePolicy
Orchestrator
Notification
Reporting (with an
Authentication Type of
ePO Authentication)
Reporting (with an
Authentication Type of
SQL authentication)
Reporting (with an
Authentication Type of
NT Authentication)
Reporting (with an
Authentication Type of
Currently logged on
user)
Parsing events McAfee ePolicy Orchestrator 3.6.0
McAfee ePolicy Orchestrator 3.6.0
Server (
NAIMSRV.DLL)
ePolicy Orchestrator server
account.
Local system account.
Server (
NAIMSRV.DLL)
Local system account on
Server (
NAIMSRV.DLL)
McAfee ePolicy Orchestrator 3.6.0
Application Server (
TOMCAT.EXE)
McAfee ePolicy Orchestrator 3.6.0
Application Server (
TOMCAT.EXE)
McAfee ePolicy Orchestrator 3.6.0
Application Server (
TOMCAT.EXE)
client system.
Local system account.
Local system account.
Local system account.
McAfee Framework Service ePolicy Orchestrator server
account. (Then the local
system account installs
them.)
McAfee ePolicy Orchestrator 3.6.0
Application Server (
TOMCAT.EXE)
McAfee ePolicy Orchestrator 3.6.0
Server (
NAIMSRV.DLL)
Local system account.
ePolicy Orchestrator server
account. (This account is
used to validate the user,
then the NT or SQL
account is used.)
McAfee ePolicy Orchestrator 3.6.0
Server (
NAIMSRV.DLL)
McAfee ePolicy Orchestrator 3.6.0
Server (
NAIMSRV.DLL)
McAfee ePolicy Orchestrator 3.6.0
Server (
NAIMSRV.DLL)
SQL account.
NT account.
Account of the currently
logged in user. (This
account is used to validate
the user, then the NT or
SQL account is used.)
Local system account.
Event Parser (
EVENTPARSER.EXE)
1
Note
If the local system account’s rights are diminished, installations on client systems of
the agent or security products may fail on client systems.
10
Page 14
ePolicy Orchestrator®3.6 Walkthrough Guide Introduction
Minimum requirements
Other times when credentials are needed
While performing various tasks in ePolicy Orchestrator, you may be required to provide
user credentials.
Table 1-1 Tasks and credentials
Task Credentials Location stored
Logging on to Active
Directory containers
(set in
Active Directory
Import
wizard)
Deploying agents from
the ePolicy
Orchestrator console
by manually specifying
the user name and
password.
Active Directory administrator
credentials (for each container that is
mapped to the ePolicy Orchestrator
Directory). These credentials are
stored to run as a task.
Credentials with administrator rights
to the desired systems.
If the Active Directory
Discovery task is launched
manually, it runs as the
Microsoft Management
Console.
If the task runs as
scheduled, it runs as
adi.exe using the stored
credentials from an
encrypted file.
Stored in the encrypted
CONSOLE.INI file.
1
Minimum requirements
The following are minimum hardware and software requirements for the ePolicy
Orchestrator 3.6 server.
These are the minimum requirements. The number of systems you plan to manage
Note
Table 1-2 Hardware and software minimum requirements
Hardware Software and Network
500MB free disk space (first-time
installation); 1
recommended.
512
Intel Pentium II-class processor or higher;
450
1024x768, 256-color, VGA monitor User must have administrator rights on the
100MHZ or higher NIC Static IP address recommended
NTFS partition (recommended)
as well as network considerations impact the hardware specifications your solution
requires. For more information on hardware sizing, see the ePolicy Orchestrator 3.6
Hardware Sizing and Bandwidth Usage White Paper.
GB (upgrade); 2GB
MB RAM Microsoft Internet Explorer version 6.0 or
MHZ or higher
Windows 2000 Advanced Server with SP 3 or
later, Windows 2000 Server with SP 3 or later,
Windows Server 2003 Enterprise, Windows
Server 2003 Standard, or Windows Server
2003 Web operating systems.
later.
Trust relationship with the primary domain
controller (PDC).
server.
11
Page 15
Installing or Upgrading the Server
2
Whether you are installing ePolicy Orchestrator 3.6 as a new installation or upgrading
from prior versions you must understand the minimum system requirements,
preparation tasks on your network, and which pieces of information to take to the
installation or upgrade.
Information on hardware sizing and bandwidth usage are located in the Hardware
Sizing and Bandwidth Usage White Paper.
Installing for the first time
Installing or upgrading the ePolicy Orchestrator server is straight forward, using a
standard installation wizard. However, before running the installation wizard it is
important that you perform certain tasks and have certain pieces of information at hand.
Complete instructions on installing ePolicy Orchestrator are located in the ePolicy
Note
This section covers:
Pre-installation preparation.
Information to have during installation.
Orchestrator 3.6 Installation Guide.
12
Page 16

ePolicy Orchestrator®3.6 Walkthrough Guide Installing or Upgrading the Server
Installing for the first time
Pre-installation preparation
Before installing ePolicy Orchestrator 3.6, complete the following tasks:
Determine what database you are going to use. ePolicy Orchestrator includes the
Microsoft SQL Database Engine (MSDE) 2000 (Service Pack 3) database which can
be used for all of the reporting and data storage needs. This database has a storage
limit of 2
Orchestrator 3.6 can record approximately 12 months of data for 10,000 client
systems.
If the standard database does not meet your needs, utilize a Microsoft SQL Server
2000 database.
Note
Update both the ePolicy Orchestrator server system and the ePolicy Orchestrator
database server system with the latest Microsoft security updates.
Install and/or update the anti-virus software on the ePolicy Orchestrator server and
database server systems and scan for viruses.
Install and/or update firewall software on the ePolicy Orchestrator server system.
(For example, Desktop Firewall 8.5.)
GB. This means that a standard installation and configuration of ePolicy
McAfee recommends that a dedicated server is used for the database if you are
managing more than 2,000 client systems.
2
Notify the network staff of the ports you intend to use for HTTP communications via
ePolicy Orchestrator.
Information to have during installation
Have the following information with you during installation, some of which may take
some careful planning:
Server password.
Database server.
Ports you want to use.
E-mail address for Notifications.
Server password
During the installation wizard, you are asked to provide a password for the
Administrator account to access the ePolicy Orchestrator server. Use a password that
is memorable and contains a combination of alpha- and numeric-characters.
Note
Database server
During the installation wizard, you are asked to select the MSDE 2000 database, or use
an already installed database server on the local system or remote (MSDE 2000, or
SQL Server 2000).
Special characters (for example, %, <,>, and &) are not supported in passwords.
Consider before installing:
13
Page 17

ePolicy Orchestrator®3.6 Walkthrough Guide Installing or Upgrading the Server
If you are going to use a database other than the MSDE 2000 provided with ePolicy
Installing for the first time
Orchestrator, you should install the database software before installing ePolicy
Orchestrator.
If you are planning on managing more than 2,000 systems, use a dedicated server
with Microsoft SQL Server 2000 with Service Pack 3 for the database.
Ports you want to use
As ePolicy Orchestrator runs, there is considerable communication between the server
and the other components. During the installation wizard, you must designate the ports
that the server uses for this communication. Although defaults are provided, we
recommend that you consider strongly the ports that you will assign to the different
types of communication.
Once ePolicy Orchestrator is installed, you cannot change some of these assignments
through the ePolicy Orchestrator console without uninstalling the software.
Make sure that the ports you assign are not already assigned to other products.
Agent-to-Server communication port — This is the port the agent uses to
communicate with the server. The default port is
after installation.
80. This port cannot be changed
2
McAfee strongly recommends that you change this to another port due to potential
conflicts in many environments. For example, to
Note
Console-to-Server communication port — This is the port the console uses to
82.
communicate with the server. The default port is 81. This port can be changed after
installation.
McAfee strongly recommends that you change this to another port due to potential
conflicts in some environments. For example, to
Note
installation.
Agent Wake-Up communication port — This is the port used to send agent
wakeup calls. The default port is
Agent Broadcast communication port — This is the port used to send
8081. This port can be changed after installation.
SuperAgent wakeup calls. The default port is
83. This port cannot be changed after
8082. This port can be changed after
installation.
Event Parser-to-Server communication port — This is the port used by Rogue
System Detection and ePolicy Orchestrator Notifications for non-SSL user interface
communication and non-SSL sensor communication. The default port is
8080. This
port cannot be changed after installation.
Console-to-Application Server communication port — This is the port used by
Rogue System Detection and ePolicy Orchestrator Notifications for SSL user
interface communication and SSL sensor communication. The default port is
8443.
This port cannot be changed after installation.
Sensor-to-Server communication port — The port used by the Rogue System
Detection sensor to report host-detected messages to the Rogue System Detection
server using SSL. The default port is
installation.
8444. This port cannot be changed after
14
Page 18

ePolicy Orchestrator®3.6 Walkthrough Guide Installing or Upgrading the Server
Upgrading from a previous version
E-mail address for Notifications
If you want to use the default rules of the ePolicy Orchestrator Notifications feature, you
can provide an e-mail address on the
which you want to receive notification messages when you enable any of the default
rules.
This allows you to use the feature upon implementation, while you are still learning
about it.
Set E-mail Address panel of the installation wizard to
2
Note
The e-mail address can be added or changed after installation.
For complete information and procedures to install ePolicy Orchestrator 3.6, see the
ePolicy Orchestrator 3.6 Installation Guide.
Upgrading from a previous version
You can upgrade or migrate to ePolicy Orchestrator 3.6 if you are currently using:
ePolicy Orchestrator 3.0.2 or later.
Protection Pilot 1.0 or later.
Evaluation versions of ePolicy Orchestrator 3.6.
Note
This section provides information on:
Preparation.
Information to have during the upgrade.
You cannot upgrade from beta versions of the software.
Preparation
Upgrading issues.
Before upgrading to ePolicy Orchestrator 3.6 complete the following tasks:
Upgrade the database software if it does not meet the minimum requirements.
Update both the ePolicy Orchestrator server system and the ePolicy Orchestrator
database server system with the latest Microsoft security updates. (Specifically, be
sure to install Service Pack 3 on all MSDE and SQL Server 2000 databases.)
Install and/or update the anti-virus software on the ePolicy Orchestrator server
system and scan for viruses.
Install and/or update firewall software on the server system. (For example, Desktop
Firewall 8.5.)
Notify the network staff of the ports you intend to use for HTTP communications via
ePolicy Orchestrator.
15
Page 19

ePolicy Orchestrator®3.6 Walkthrough Guide Installing or Upgrading the Server
Upgrading from a previous version
Information to have during the upgrade
Have the following information with you during the upgrade, some of which may take
some careful planning:
Ports you want to use.
E-mail address for Notifications.
Ports you want to use
As ePolicy Orchestrator runs, there is considerable communication between the server
and the other components. During the installation wizard, you must designate the ports
that the server uses for this communication. Although defaults are provided, we
recommend that you consider strongly the ports that you will assign to the different
types of communication.
Once ePolicy Orchestrator is installed, you cannot change some of these assignments
through the ePolicy Orchestrator console without uninstalling the software.
Make sure that the ports you assign are not already assigned to other products.
Agent-to-Server communication port — This is the port the agent uses to
communicate with the server. The default port is
after installation.
80. This port cannot be changed
2
McAfee strongly recommends that you change this to another port due to potential
conflicts in many environments. For example, to
Note
Console-to-Server communication port — This is the port the console uses to
82.
communicate with the server. The default port is 81. This port can be changed after
installation.
McAfee strongly recommends that you change this to another port due to potential
conflicts in some environments. For example, to
Note
installation.
Agent Wake-Up communication port — This is the port used to send agent
wakeup calls. The default port is
Agent Broadcast communication port — This is the port used to send
8081. This port can be changed after installation.
83. this port cannot be changed after
SuperAgent wakeup calls. The default port is 8082. This port can be changed after
installation.
Event Parser-to-Server communication port — This is the port used by Rogue
System Detection and ePolicy Orchestrator Notifications for non-SSL user interface
communication and non-SSL sensor communication. The default port is
8080. This
port cannot be changed after installation.
Console-to-Application Server communication port — This is the port used by
Rogue System Detection and ePolicy Orchestrator Notifications for SSL user
interface communication and SSL sensor communication. The default port is
8443.
This port cannot be changed after installation.
Sensor-to-Server communication port — The port used by the Rogue System
sensor to report host-detected messages to the Rogue System Detection server
using SSL. The default port is
8444. This port cannot be changed after installation.
16
Page 20

ePolicy Orchestrator®3.6 Walkthrough Guide Installing or Upgrading the Server
Upgrading from a previous version
E-mail address for Notifications
To use the default rules of the ePolicy Orchestrator Notifications feature, you can
provide an e-mail address on the
which you want to receive notification messages when you enable any of the default
rules.
This allows you to use the feature upon implementation, while you are still learning
about it.
Set E-mail Address panel of the installation wizard to
2
Note
For complete information and procedures to upgrade to ePolicy Orchestrator 3.6, see
the ePolicy Orchestrator 3.6 Installation Guide.
Upgrading issues
If your agents are not upgrading to version 3.5 agents, and you’re running VirusScan
7.0.0 on those systems, you may need to physically go to these systems and perform
the following steps:
1 Stop any of the following processes that are running:
FRMWORKSERVICE.EXE, or UPDATERUI.EXE.
2 Force uninstall the agent by running
command line. (
directory.)
3 Go back to the ePolicy Orchestrator server and deploy an agent to the system.
The e-mail address can be added or changed after installation.
NAPRDMGR.EXE,
FRMINST.EXE /FORCEUNINSTALL from the
FRMINST.EXE is located in the Common Framework installation
17
Page 21

Organizing the Directory and
3
Repositories
The ePolicy Orchestrator software requires you to configure and set up several
components. Although extensive, the configurations allow you to customize the
product specifically for your environment. Carefully planning the implementation of
your ePolicy Orchestrator solution is essential before installing the software.
You should consider how your:
Directory should be organized.
The client systems should receive their updates.
This chapter contains the following sections:
ePolicy Orchestrator Directory: concepts and roles.
Repositories.
ePolicy Orchestrator Directory: concepts and roles
The Directory allows you to combine systems into sites and groups. Combining
systems with similar properties or requirements allows you to manage policies for
these groupings in one place, rather than having to set policies for individual systems.
It can also make visually browsing your Directory much easier.
Before discussing Directory organization further, it is important to define some terms:
Directory
The Directory contains all your managed network systems that you are managing with
ePolicy Orchestrator. It is possible to add all the systems to be managed by ePolicy
Orchestrator into one site in the Directory. However, this flat unorganized list makes
setting specific policies for different systems very difficult. Therefore, organizing the
systems in smaller units within the Directory is essential.
Sites
A site is a first-level group immediately under the Directory root of the console tree.
Systems contained within a site can be organized into groups. Sites can contain groups
and individual systems.
Groups
A group is a secondary grouping beneath a site. It can contain more groups
(sub-groups) and individual systems, but a group cannot contain a site.
18
Page 22

ePolicy Orchestrator®3.6 Walkthrough Guide Organizing the Directory and Repositories
ePolicy Orchestrator Directory: concepts and roles
Lost&Found groups
Lost&Found groups store system names whose locations could not be determined by
the ePolicy Orchestrator server. The administrator (with appropriate rights) must move
the systems in Lost&Found groups to the appropriate place in the Directory to manage
them. Each site has a Lost&Found group, and the Directory has a global Lost&Found
group.
Inheritance
Inheritance is an important property that makes policy administration simpler. Because
of inheritance, child nodes in the Directory hierarchy inherit policies that have been set
at their parent nodes. For example:
Policies set at the Directory level are inherited by sites.
Site policies are inherited by groups and individual systems within that site.
Group policies are inherited by sub-groups or individual systems within that group.
Inheritance is enabled by default for all sites, groups and individual systems that you
add to your Directory. This allows you to set policies and schedule scan tasks in fewer
places.
However, inheritance can be turned off at any location of the Directory to allow for
customization.
3
Let inheritance do the work for you. While you can assign security policies and
Note
schedule client on-demand scans or DAT file update tasks at any node of the
Directory, consider setting policies at the highest-level node possible. If you do, you’ll
have fewer changes to make. Avoid setting policies at the individual system level if
possible.
About ePolicy Orchestrator roles
If you plan to have multiple people administer ePolicy Orchestrator in your environment,
you can create multiple user accounts in the console. Fellow administrators can use
these accounts to log onto the server.
The different types of user accounts include:
Global administrator.
Site administrators on page 20.
Global reviewers on page 21.
Site reviewers on page 21.
Global administrator
Global administrators have read and write permissions and rights to all operations.
When you install the server and console, a global administrator account with the user
name
admin is created.
You can create additional global administrator accounts for other people who need
global administrative rights to all aspects of the console.
19
Page 23

ePolicy Orchestrator®3.6 Walkthrough Guide Organizing the Directory and Repositories
ePolicy Orchestrator Directory: concepts and roles
Global administrators can use the console to deploy agents and security products,
change agent or product policies, create and run client tasks for updating DAT files or
performing on-demand scans for any node in any site in the Directory. In addition, only
global administrators can perform certain server-based functions.
Only global administrators can perform the following repository management
functions:
Define, edit, or remove source and fallback repositories.
Create, change, or delete global distributed repositories.
Export or import the repository list from the server.
Schedule or perform pull tasks to update the Master Repository
Schedule or perform replication tasks to update distributed repositories
Check packages into the master repository, move packages between branches, or
delete packages from the master repository.
Only global administrators can perform the following server management functions:
Change server settings and work with server events.
Schedule Synchronize Domains server tasks.
3
Verify the integrity of IP management settings, or change site-level IP subnet masks.
Add and delete user accounts.
View and change all options on all tabs in the Events dialog box, if using ePolicy
Orchestrator authentication.
Import events into ePolicy Orchestrator databases and limit events that are stored
there.
Create, rename, or delete sites.
Site administrators
Site administrators have read, write, and delete permissions and rights to all operations
(except those restricted to global administrator user accounts) for one or more
products, and one or more sites in the Directory.
Site administrators can use the console to deploy agents and security products, change
agent or product policies, create and run client tasks for all groups or systems within
their sites in the Directory (for products to which they have permissions). Site
administrators can also run reports, but the reports show only data on systems located
within their sites. The site administrator is able to see, but not change, other sites in
the Directory.
Best practices information
Create site administrator accounts if you have a very decentralized network with no
single global administrator account or where different local administrators have local
control over their parts of the network. For example, your organization may have sites
located in different cities or countries, and these sites may have local IT or network
administrators with rights to install and manage software on systems in that part of the
network.
You can also create site administrator accounts if you have administrators who you
want to only have ePolicy Orchestrator permissions to specific products.
20
Page 24

ePolicy Orchestrator®3.6 Walkthrough Guide Organizing the Directory and Repositories
ePolicy Orchestrator Directory: concepts and roles
Global reviewers
Global reviewers can view, but not edit, all settings in the console (except for Rogue
System Detection), including property settings, policy, and task settings for all nodes in
the Directory. Global reviewers can also run enterprise-wide and site-specific reports.
Site reviewers
Site reviewers can only view settings and run reports for specified products within
specified sites of the Directory.
Organizing the Directory
The Directory is a hierarchical tree structure that allows you to group your systems
within units called sites and groups. Grouping systems with similar properties or
requirements into these units allows you to manage policies for collections of systems
in one place, rather than having to set policies for each system separately.
As part of the planning process, consider the best way to divide systems into sites and
groups prior to building the Directory.
3
Sites
A site is a primary-level unit immediately under the Directory root in the console tree.
Traits of sites include:
Sites can only be created by global administrators.
A site can include both groups and systems.
Sites (and their groups and systems) are administered by a global administrator or
by a site administrator who has ownership of the specific site. (Site administrators
have administrative rights only over the sites to which ownership has been
assigned.)
Each site contains a Lost&Found group; a temporary container for systems for
which ePolicy Orchestrator wasn’t able to automatically place in the correct location
within the site.
Groups
A group is a secondary-level (or subsequent level) unit of the Directory. Traits of groups
include:
Groups can be created by global administrators, or the site administrator of the site
to which the group belongs.
A group can include both groups and systems.
Groups are administered by a global administrator or by the site administrator of the
site to which the group belongs.
Groups do not contain a Lost&Found group.
21
Page 25

ePolicy Orchestrator®3.6 Walkthrough Guide Organizing the Directory and Repositories
ePolicy Orchestrator Directory: concepts and roles
Lost&Found groups
The Directory root and each site includes a Lost&Found group. Depending on the
methods you use to create and maintain Directory segments, the server uses different
characteristics to determine where to place systems within the Directory. Lost&Found
groups store systems whose locations could not be determined by the server.
Best practices information
If you delete systems from the Directory, you also need to uninstall the agent from
these systems. Otherwise, these systems continue to appear in the Lost&Found group
because the agent continues to communicate to the server.
Environmental borders
How you implement ePolicy Orchestrator and organize the systems for management
depends significantly on the borders that exist in your network. Borders influence the
organization of the Directory differently than the organization of your network topology.
McAfee recommends evaluating the following borders in your network and
organization, and whether they must be taken into consideration when defining the
organization of your Directory.
3
Topological
Your network is already defined by domains or Active Directory containers. The better
organized your network environment, the easier it is to create and use the Directory.
Geographical
If your organization includes facilities in multiple geographic locations, even on multiple
continents, this must be taken into consideration when building your Directory.
Available bandwidth and administrative roles must be considered when your
organization has multiple locations.
Managing security is a constant balance between protection and performance.
Organize your Directory to make the best use of limited network bandwidth. Consider
how the server connects to all the parts of your network, especially remote locations
that are often connected by slower WAN or VPN connections, instead of faster LAN
connections. You may want to set updating and agent-to-server communication policies
differently for these remote sites to minimize network traffic over slower WAN or VPN
connections.
Grouping systems first by geography provides several advantages for setting policies:
You can set update policies for the site or group so that all systems update from one
or more distributed software repositories located nearby.
If sites are located in other countries, you can deploy language-specific versions of
the agent or security software to these systems at once.
You can configure the update and product deployment policies for these systems
once.
You can schedule tasks to run at off-peak hours.
22
Page 26

ePolicy Orchestrator®3.6 Walkthrough Guide Organizing the Directory and Repositories
ePolicy Orchestrator Directory: concepts and roles
Political
Many large networks are divided because different individuals or groups are
responsible for managing various portions of the network. Sometimes these borders
do not coincide with the topological or geographical borders. Who you want to access
and manage the various segments of the Directory can affect how you structure it.
Functional
Some networks are divided by the roles of the groups and individuals using the
network; for example, Sales and Engineering. Even if the network is not divided by
functional borders, you may need to organize the Directory by functionality if different
groups of users require different policies.
Different business groups may run different kinds of software that require special
anti-virus or security policies. For example, you may want to arrange your e-mail
exchange servers or SQL database servers into a group and set specific exclusions for
VirusScan Enterprise on-access scanning.
When planning, focus on the access individuals require or have to the ePolicy
Orchestrator server or nodes, and the borders you must accommodate.
3
IP address filters and sorting
In many networks, subnets and IP address information reflect organizational
distinctions, such as geographical location or job function. If these organizational units
reflect your needs to organize systems for policy management, consider using them to
create your Directory structure by setting IP address filters for sites and groups. ePolicy
Orchestrator provides tools, such as an IP sorting task that can automatically place
systems in the correct site or group according to IP address. This can be a very
powerful tool for automatically populating your Directory and making sure systems stay
in the intended locations.
If you use IP filters, you must set the IP filtering properties at each level of the Directory
properly. Know that:
To set an IP filter for a group, you must also set IP filters in parent groups or sites.
The IP ranges specified in lower-level groups must be a subset of the IP range of the
parent.
IP filters cannot overlap between different groups. Each IP range or subnet mask in
a given site or group must cover a unique set of IP addresses that cannot be
contained in other filter settings in other sites or groups.
After creating groups and setting your IP filters, run an IP integrity check task to make
sure your IP filter hierarchy is valid. This task alerts you if there are any conflicts or
overlaps between IP filters for different sites or groups.
You can assign IP ranges or IP subnet mask values to sites and groups as you create
them, or add or edit them at any time later.
IP filtering for the first time
When the agent calls into the server for the first time, the system is placed in the
Directory location to which it has been assigned. The server searches for the
appropriate site whose IP mask or range matches the agent’s IP address.
23
Page 27

ePolicy Orchestrator®3.6 Walkthrough Guide Organizing the Directory and Repositories
ePolicy Orchestrator Directory: concepts and roles
Automatically populating the Directory with this method is the result of an algorithm
that uses both IP filters you create and domain information for the NT domain to which
the new system belongs.
Be careful if you have sites or groups in your Directory with the same name as NT
Tip
domains. The domain name search rule takes precedence over the IP group rule.
If you want the system to populate the appropriate location, create the IP group under
the site or group associated with the domain, or do not create the domain group under
the site.
The server uses the following search algorithm to place systems in the Directory based
on the criteria in this order:
1 Site IP filter — If a site with a matching IP filter is found, the system is placed in
that site based on the criteria in this order:
a In a group named the same as the NT domain to which the system belongs.
b In a group with a matching IP filter.
If no group match for IP address or domain name is found, the system is placed in the
Note
Lost&Found group of the site.
3
2 Site Domain name — If no site is found with a matching IP filter, the server
searches for a site with the same name as the NT domain to which the system
belongs. If such a site is found, the server searches for a group with a matching IP
filter and places the system within. If no group is found, the system is placed in the
Lost&Found group of the site.
3 No site IP filter or domain name match is found — If the server cannot find an IP
or domain name match in any site, the server adds the system to the global
Lost&Found.
Best practices information
This feature is useful when not using ePolicy Orchestrator to deploy agents to systems
on your network. If you use another distribution method, the agent is installed on the
system before the system is added to the Directory. After the agent installs and calls
into the server for the first time, ePolicy Orchestrator adds it to the Directory. If you set
IP filters for the sites and groups, the system is added to the appropriate location.
Otherwise, it is added to the
Lost&Found group and you must move it manually to the
appropriate group. Especially in a large network, using IP filters to get the system in the
right location can save time.
Automatic IP address sorting does not apply to systems that you add to the Directory
Note
using Active Directory integration.
24
Page 28

ePolicy Orchestrator®3.6 Walkthrough Guide Organizing the Directory and Repositories
Repositories
Repositories
Before implementing the ePolicy Orchestrator software, you should decide the type of
update repositories to use, and how they should be organized.
Source repository
The source repository provides all updates for your master repository. The default
source repository for clean installations is the McAfee FTP update site (FtpSite), but
you can change the source repository or even configure multiple source repositories if
you require. McAfee recommends using the McAfee HTTP (HttpSite) or FTP (FTPSite)
update sites as your source repository.
You can download updates manually and check them into your master repository.
Note
McAfee posts software updates to these sites regularly. For example, DAT files are
posted daily. Update your master repository with updates as they are available.
Use pull tasks to copy source repository contents to the master repository.
However, using a source repository automates this process.
3
The McAfee update sites provide virus definition (DAT) and scanning engine file
updates (SCP templates and Spam rules are also available if the corresponding
managed products are in the master repository as well). All other packages and updates
must be checked into the master repository manually.
Fallback repository
The fallback repository is a repository from which managed systems can retrieve
updates when their usual repositories are not accessible. For example, when network
outages or virus outbreaks occur, accessing your established update infrastructure may
be difficult. Therefore, managed systems can remain up-to-date in such situations. The
default fallback repository is the McAfee HTTP download site (HTTPSite) for clean
installations, upgrades keep the designated repository. You can only define one fallback
repository.
Source repositories can be used as a fallback repository, but fallback repositories
cannot be created manually.
Master repository
The master software repository maintains the latest versions of security software and
updates for your environment. This repository is the source of software and updates for
the rest of your environment. There is only one master repository for each ePolicy
Orchestrator server.
The master repository is configured when installed. However, you must ensure that
proxy server settings are configured correctly. By default, ePolicy Orchestrator uses
Microsoft Internet Explorer proxy settings.
25
Page 29

ePolicy Orchestrator®3.6 Walkthrough Guide Organizing the Directory and Repositories
Repositories
Distributed repository
Distributed repositories host copies of your master repository contents (although you
can restrict which files get copied from the master repository to each of the distributed
repository). Consider using distributed repositories and placing them throughout your
network strategically to ensure managed systems are updated while network traffic is
minimized, especially across slow connections.
As you update your master repository, ePolicy Orchestrator replicates the contents to
the distributed repositories, instead of to each system.
A large organization can have multiple locations with limited bandwidth connections
between them. Distributed repositories limit updating traffic across low-bandwidth
connections. If you create a distributed repository in the remote location and configure
the systems within the remote location to update from this distributed repository, the
updates are copied across the slow connection only once — to the distributed
repository — instead of once to each system in the remote location.
Systems to use for distributed repositories
Use an existing server to host the distributed repository. Although you do not need to
use a dedicated server, the server should be large enough for the desired systems to
connect for updates. Servers are better than workstations because they are more likely
to be running all the time.
3
Types of distributed repositories
ePolicy Orchestrator supports four different types of distributed repositories. Consider
your environment and needs when determining which type of distributed repository to
use. You are not limited to using one type, and may have the need to use several,
depending on the nature of your network.
SuperAgent repositories
Use systems hosting SuperAgents as distributed repositories. If global updating is
enabled, SuperAgent repositories update managed systems automatically as soon as
selected updates and packages are checked into the master repository. You do not need
to spend additional time creating and configuring repositories or the update tasks.
McAfee recommends using SuperAgent repositories and global updating together to
Note
SuperAgent repositories have several advantages over other types of distributed
repositories:
Folder locations are created automatically on the host system before adding the
File sharing is enabled automatically on the SuperAgent repository folder.
SuperAgent repositories don’t require replication or updating credentials.
ensure your managed environment is up-to-date.
repository to the repository list.
Note
Although SuperAgent broadcast wakeup call functionality requires a SuperAgent in
each broadcast segment which contains managed systems, this is not a requirement
for SuperAgent repository functionality. Managed systems only need to “see” the
system hosting the repository.
26
Page 30

ePolicy Orchestrator®3.6 Walkthrough Guide Organizing the Directory and Repositories
Repositories
SuperAgents and global updating use a proprietary protocol, SPIPE.
FTP repositories
If you are unable to use SuperAgent repositories, you can use an existing FTP server to
host a distributed repository. Use your existing FTP server software such as Microsoft
Internet Information Services (IIS) to create a new folder and site location for the
distributed repository. See your web server documentation for details to create a site.
HTTP repositories
If you are unable to use SuperAgent repositories, you can use an existing HTTP server
to host a distributed repository. Use your existing HTTP server software such as
Microsoft Internet Information Services (IIS) to create a new folder and site location for
the distributed repository. See your web server documentation for details to create a
site.
UNC share repositories
If you are unable to utilize SuperAgent repositories, create a UNC shared folder to host
a distributed repository on an existing server. Be sure to enable sharing across the
network for the folder so that the ePolicy Orchestrator server can copy files to it.
3
Unmanaged repositories
If you are unable to use managed distributed repositories, ePolicy Orchestrator
administrators can create and maintain distributed repositories that are not managed
by ePolicy Orchestrator.
If a distributed repository is not managed, a local administrator must keep the
repository up-to-date manually.
Once the distributed repository is created, you can use ePolicy Orchestrator to
configure managed systems of a specific Directory site or group to update from it.
McAfee recommends that you manage all distributed repositories through ePolicy
Tip
Orchestrator. Managing distributed repositories with
global updating, or scheduled replication tasks frequently ensures your managed
environment is up-to-date. Only use non-managed distributed repositories if your
network or organizational policy do not allow managed repositories.
ePolicy Orchestrator and using
27
Page 31

Deploying the Agent and Products
4
Once the ePolicy Orchestrator server and consoles are installed, you must deploy
certain core components and security products in order to manage your systems.
ePolicy Orchestrator agent
The agent is the distributed component of ePolicy Orchestrator that must be installed
on each system in your network that you want to manage. SuperAgents are agents that
have been enabled to distribute broadcast wakeup calls. SuperAgents can also be used
as repositories from which to distribute products and product updates.
The agent collects and sends information among the server, update repositories,
managed systems, and products. Systems cannot be managed without an installed
agent.
Due to the variety of network environments, McAfee provides several methods for you
to get the agent on to the systems you want to manage.
About the ePolicy Orchestrator agent
Consider the following topics when planning to distribute agents:
Agent installation folder on page 28.
Agent language packages on page 29.
The agent installation package on page 29.
Agent-server communication on page 31.
SuperAgents and broadcast wakeup calls on page 32.
Agent installation folder
The location of the agent installation folder depends on whether the agent is located
on managed systems or the server.
On the server, the agent is installed in this location:
<system_drive>\program files\common files\mcafee\common framework
On the client system, if the agent was installed as part of another product
installation or deployed from the console to the system, it is installed by default in
this location:
28
Page 32

ePolicy Orchestrator®3.6 Walkthrough Guide Deploying the Agent and Products
<system_drive>\program files\mcafee\common framework
On the client system, if you are upgrading the agent from version 2.5.1, the new
ePolicy Orchestrator agent
agent is also installed after the existing agent is uninstalled, by default in this
location:
<system_drive>\program files\network associates\common framework
Once the agent has been installed, you cannot change its installation directory
Caution
without first uninstalling it.
Agent language packages
Agent installation packages, both default and custom, install in English. To use other
language versions of the agent on the systems you want to manage, you must check
the desired agent language packages into the master repository.
Each agent language package includes only those files needed to display the user
interface for that language. Agent language packages can be replicated to distributed
repositories.
After the initial ASCI, the agent retrieves the new package that corresponds to the
in-use locale and applies it. In this way, the agent retrieves only language packages for
the locales being used on each managed system.
4
The agent software continues to appear in the current language until the new
Note
language package has been applied.
Multiple language packages can be stored on managed systems at the same time to
allow users to switch between available languages by changing the locale. If a locale is
selected for which a language package is not available locally, the agent software
appears in English.
Agent language packages are available for these languages:
Brazilian Portuguese Italian
Chinese (Simplified) Japanese
Chinese (Traditional) Korean
Dutch Polish
English Spanish (Traditional Sort)
French (Standard) Swedish
German (Standard)
The agent installation package
The FRAMEPKG.EXE file is created when you install the server. It is a customized
installation package for agents that report to your server. The agent installation package
contains the server name, its IP address, ASCI port number, and other information that
allows the agent to communicate with the server.
29
Page 33

ePolicy Orchestrator®3.6 Walkthrough Guide Deploying the Agent and Products
ePolicy Orchestrator agent
By default, the agent installation package is installed in this location:
C:\PROGRAM FILES\MCAFEE\EPO\3.6.0\DB\SOFTWARE\CURRENT\
ePOAGENT3000\INSTALL\0409\FRAMEPKG.EXE
This is the installation package that the ePolicy Orchestrator server uses to deploy
agents.
The default agent installation package contains no embedded user credentials. When
executed on the system, the installation uses the account of the currently logged-on
user.
Custom agent installation packages
If you use a distribution method other than ePolicy Orchestrator software’s own
deployment capabilities (such as login scripts or third-party deployment software), you
must create a custom agent installation package (
administrator credentials if users do not have local administrator permissions. The user
account credentials you embed are used to install the agent.
Microsoft Windows XP Service Pack 2 and later operating systems do not allow
Note
embedded administrator credentials until the package file name has been added to
the exception list of the Windows firewall.
FRAMEPKG.EXE) with embedded
4
To create a custom agent installation package:
1 In the console tree, select the server.
2 In the details pane, select the
Wizard
.
3 Click
Next. The User Credentials dialog box appears.
Figure 4-1 Agent Installation Package Creation wizard — User Credentials
General tab, then click Agent Installation Package Creation
4 Type the
package, then click
5 On the
want to save the custom agent installation package.
User Name (<DOMAIN>\<USER>) and Password you want to embed in the
Next.
Install Directory dialog box, click Browse and select the location to which you
30
Page 34

ePolicy Orchestrator®3.6 Walkthrough Guide Deploying the Agent and Products
ePolicy Orchestrator agent
6 Click Next. The Create Package dialog box appears, showing the progress of the
creation.
7 Click Next, then Finish.
You can distribute the custom installation package file as needed.
If you plan to deploy the custom installation package with ePolicy Orchestrator, check
the package into your master repository.
Agent-server communication
During agent-server communication, the agent and server exchange information using
SPIPE, a proprietary network protocol used by ePolicy Orchestrator for secure network
transmissions. At each communication, the agent collects its current system properties
and events, then sends them to the server. The server sends any new or changed
policies, tasks, and repository list to the agent. The agent then enforces the new
policies locally on the managed system.
Agent and server communication can be initiated in three ways:
Agent-to-server-communication interval.
Agent-server communication after agent startup on page 32.
4
Wakeup calls on page 32.
Agent-to-server-communication interval
The agent-to-server-communication interval (ASCI) is set on the General tab of the ePO
Agent 3.5.0
server for data exchange and updated instructions. By default, the ASCI is set to 60
minutes. With this setting, the agent checks into the server once every hour. This is a
configurable setting on the agent policy pages.
Best practices information
When considering whether to leave this policy setting at the default, or to modify it, you
must consider your organization’s threat response requirements, available bandwidth,
and the hardware hosting the server. Be aware that ASCI communication can generate
significant network traffic, especially in a large network. In such a case, you probably
have agents in remote sites connecting to the server over slower network connections.
For these agents, you may want to set a less frequent ASCI. The following table lists
general ASCI recommendations for several common network connection speeds.
Table 4-1 General recommended ASCI settings
Network Size Recommended ASCI
Gigabit LAN 60 minutes
100
WAN 360 minutes
* Dial-up or RAS 360 minutes
10MB LAN 180 minutes
Wireless LAN 150 minutes
* When you connect to a corporate intranet via dial-up or RAS, the agent communicates to the
ePolicy Orchestrator server when the connection is detected.
policy pages. This setting determines how often the agent calls into the
MB LAN 60 minutes
31
Page 35

ePolicy Orchestrator®3.6 Walkthrough Guide Deploying the Agent and Products
For complete information on balancing bandwidth, server hardware, and ASCI, see
Note
the ePolicy Orchestrator 3.6 Hardware Sizing and Bandwidth Usage white paper.
ePolicy Orchestrator agent
Agent-server communication after agent startup
After the installation, or if the agent service is stopped and restarted, the agent calls
into the server at a randomized interval within ten minutes. The second and
subsequent ASCI after startup occurs with the ASCI set in the agent policy (60 minutes
by default).
You can force the agent to communicate to the server immediately after the installation
by running the
CMDAGENT.EXE with the /P command-line option.
Wakeup calls
When you send a wakeup call from the server to agents in your environment, the
agents are prompted to call into the server. Wakeup calls can be sent manually or
scheduled as a task and are useful when you have made policy changes or checked in
updates to the master repository that you want to be applied to the managed systems
sooner than when the ASCI may occur.
4
SuperAgents and broadcast wakeup calls
If you plan to use agent wakeup calls in your network to initiate agent-server
communication, consider converting an agent on each network broadcast segment into
a SuperAgent. SuperAgents distribute the agent wakeup call’s bandwidth impact,
minimizing network traffic. Depending on your network environment, you may find
SuperAgent wakeup calls to be a more resource-efficient method of prompting agents
to call in, than relying on the server to send wakeup calls to all agents.
32
Page 36

ePolicy Orchestrator®3.6 Walkthrough Guide Deploying the Agent and Products
ePolicy Orchestrator agent
Instead of sending agent wakeup calls from the server to every agent, the server sends
the SuperAgent wakeup call to SuperAgents in the selected Directory segment. When
SuperAgents receive this wakeup call, they send broadcast wakeup calls to all the
agents in their network broadcast segments. This reduces network traffic, which is
beneficial in large networks where ePolicy Orchestrator may manage agents in remote
sites over lower-speed WAN or VPN connections.
Figure 4-2 Broadcast wakeup calls
Server
1
1
— Broadcast Segment—
SuperAgent
2
2
4
4
Agent Agent Agent
Agent
4
3
3
Server sends a wakeup call to all SuperAgents.
1
SuperAgents send a broadcast wakeup call to all agents in the same broadcast segment.
2
3
All agents (regular agents and SuperAgents) exchange data with the server.
Any agents without an operating SuperAgent on its subnet are not be prompted to
4
communicate with the server.
Best practices information
To deploy the right number of SuperAgents to the right locations, first analyze the
divisions of broadcast segments in your environment and select a system (preferably a
server) to host the SuperAgent. Any agents that do not have a SuperAgent in the local
broadcast segment do not receive the broadcast wakeup call.Similar to the regular
agent wakeup call, the SuperAgent wakeup call utilizes the SPIPE protocol.
Ensure that the agent wakeup port (8081 by default) is not blocked by your firewall.
33
Page 37

ePolicy Orchestrator®3.6 Walkthrough Guide Deploying the Agent and Products
Distributing agents
Agent activity logs
The agent log files are useful when determining agent status or troubleshooting
problems. There are two log files that record agent activity, both are located in the
agent installation folders on the managed system running Windows 95, Windows 98,
or Windows NT systems. On managed systems running Windows 2000, Windows
2003, and Windows XP, these files are located in the
Documents and Settings):
Agent activity log
The agent activity log is an XML file named AGENT_<SYSTEM>.XML where <SYSTEM>
is the NetBIOS name of the system on which the agent is installed. This log file
records agent activity related to such things as policy enforcement, agent-to-server
communication, and event forwarding. You can define a size limit of this log file.
Common Framework folder (within
4
You can configure the level of logging of agent activity on the
Agent 3.5.0 | Configuration
Detailed agent activity log
The detailed agent activity log (AGENT_<SYSTEM>.LOG) file contains troubleshooting
message in addition to the content of the agent activity log. This file has a 1MB size
limit. When this log file reaches 1MB, a backup copy is made
(
AGENT_<COMPUTER>_BACKUP.LOG).
Distributing agents
Due to the variety of scenarios and requirements of different environments, there are
several methods you can use to distribute the agent to the systems you want to
manage. Before using any of these methods, you should consider each.
The following table details the advantages and disadvantages of the different methods
to distribute the agent.
Table 4-2 Advantages and disadvantages of agent distribution methods
Method Advantages Disadvantages
Deploying agents
while creating
Directory
Deploying agents
from ePolicy
Orchestrator
Using login scripts This is an efficient method for an
policy pages.
By deploying the agent
automatically while creating the
sites and groups of the Directory,
you don’t have to complete any
additional steps.
This is an efficient method for
distributing the agent.
environment where systems log
onto the network frequently. You
do the work once, and the agent
is deployed automatically.
Logging tab of the ePO
If you are creating sites by importing
large NT domains or Active Directory
containers, too much network traffic
may be generated for your network
resources.
You must embed user credentials
with administrator rights to the
desired systems. Also, you must
ensure that systems running
Microsoft XP Service Pack 2, have
File and Printer sharing added to the
firewall exceptions list.
Systems that don’t log onto the
network frequently, may not be
running the most up-to-date agent.
34
Page 38

ePolicy Orchestrator®3.6 Walkthrough Guide Deploying the Agent and Products
Distributing agents
Table 4-2 Advantages and disadvantages of agent distribution methods
Method Advantages Disadvantages
Installing manually This is an efficient method if you
are not using ePolicy
Orchestrator to deploy the agent,
or if you have many Windows 95
and Windows 98 systems and do
not want to enable file and print
sharing on them.
Including the
agent on an image
Enabling the agent
on unmanaged
McAfee products
Installing the agent as part of an
image prevents the bandwidth
impact that other forms of
distribution can incur. This
method also reduces the
overhead by integrating the task
into another one that must occur.
Enabling an agent that is already
on the client system rather than
deploying the 1.5MB package,
can save significant bandwidth
and time.
This is not a time-efficient method if
you have many systems.
If you do not use images
consistently, this method would not
be efficient to ensure coverage.
The disabled agent may be
out-of-date and require you run the
deployment task to upgrade the
agent to the current release.
You cannot change the agent
installation folder without uninstalling
and reinstalling the agent — agents
that you enable may be located in a
different folder than agents that you
deploy in your network by some
other method.
4
Deploying the agent from ePolicy Orchestrator
Installing the agent with login scripts
Installing the agent manually
Enabling the agent on unmanaged McAfee products
Including the agent on an image
Distributing the agent using other deployment products
Distributing the agent to WebShield appliances and Novell NetWare servers
Deploying the agent from ePolicy Orchestrator
You can use ePolicy Orchestrator to deploy agents to your systems. This method uses
Windows NT push technology.
When to use this method
This is a desirable method to install agents if you already have large sections of your
Directory populated. This is an efficient method if you were able to build Directory
segments by importing domains or Active Directory containers.
Requirements
To use this method, several requirements must be met, including:
Systems to which you want to deploy the agent must already be added to the
Directory.
35
Page 39

ePolicy Orchestrator®3.6 Walkthrough Guide Deploying the Agent and Products
Distributing agents
For information and instruction, see Chapter 3, Creating a Directory of Managed
Systems in the product guide.
If you have not yet created the Directory, you can send the agent installation package
Note
Specify domain administrator credentials.
to systems at the same time that you are adding sites, groups, and systems to the
Directory.
However, McAfee does not recommend this procedure if you are creating your
Directory by importing large NT domains or Active Directory containers. This can
generate too much network traffic.
Domain administrator rights are required to access the default Admin$ shared folder
on the desired systems. The ePolicy Orchestrator server service requires access to
this shared folder in order to install agents and other software.
Verify the ePolicy Orchestrator server can communicate with the desired systems.
Before beginning a large agent deployment, use ping commands to verify that the
server can communicate with a few systems in each segment of your network to
which you want to deploy agents.
If the targeted systems respond to the ping, then ePolicy Orchestrator can
communicate with them.
4
The ability to successfully use ping commands from the ePolicy Orchestrator to the
Note
Verify that the Admin$ share folders on the desired systems are accessible from the
managed systems is not required for the agent to communicate with the server after
the agent is installed. This is only a useful test for determining if you can deploy
agents from the server to them.
server.
This test also confirms your administrator credentials, because you cannot access
remote Admin$ shares without administrator rights.
To access Admin$ shares on desired systems from the ePolicy Orchestrator server:
a Select Start | Run.
b Type the path to the client
Admin$ share by specifying either the system name or
IP address.
If the systems are properly connected over the network, your credentials have
sufficient rights, and the
Explorer
dialog box.
Ensure file and print sharing is enabled. (This is disabled by default on Windows 95,
Admin$ shared folder is present, you should see a Windows
Windows 98, and Windows ME systems.)
In addition, if you have systems in your network running these operating systems,
you must make sure they can be managed by ePolicy Orchestrator. By default,
these systems do not allow ePolicy Orchestrator administration. To enable these
systems for ePolicy Orchestrator administration, download
VCREDIST.EXE and DCOM
1.3 updates from the Microsoft web site and install them on each client as required.
Ensure network access is enabled on Windows XP Home systems.
36
Page 40

ePolicy Orchestrator®3.6 Walkthrough Guide Deploying the Agent and Products
Distributing agents
To deploy the agent from the ePolicy Orchestrator console or install a custom agent
installation package on systems running Windows XP Home, you must enable
network access.
To enable network access on systems running Windows XP Home:
4
a Select
b Click
c Click
Start | Control Panel.
Performance and Maintenance.
Administrative Tools.
d Select Local Security Policy. The Local Security Settings application window appears.
e In the console tree under Security Settings | Local Policies, select Security Options. The
available policies appear in the details pane.
f Select Network access: Sharing and security model for local accounts to open the Network
access
dialog box.
g Select Classic - local user authenticate as themselves, then click OK. Local users are
able to authenticate and access resources on the system from the network.
Installing the agent with login scripts
Using network login scripts is a very reliable and popular way to make sure that every
system logging onto your network is running an agent. You can create a login script to
call a batch file that checks if the agent is installed on systems attempting to log onto
the network. If no agent is present, the batch file can install the agent before allowing
the system to log on. Within ten minutes of being installed, the agent calls into the
server for updated policies, and the system is added to the Directory.
When to use this method
This is a desirable method to use when:
You assigned IP sorting filters or NT domain names when creating the segments of
your Directory.
You already have a managed environment and you want to ensure that new systems
logging onto the network become managed as a result.
You already have a managed environment and you want to ensure systems are
running a current version of the agent.
Best practices information
McAfee recommends that you first create segments of your Directory that use either
network domain names or IP address filters that add the expected systems to the
desired sites and groups when the agents call into the server for the first time
automatically. If you don’t, all systems are added to the Lost&Found group and you
must move them later manually.
Especially when distributing agents to systems in a very large network, creating a
Directory that uses some automated sorting method before installing agents with login
script can save valuable time.
The details of the login script used to install the agent can vary, depending on your
needs. Consult your operating system documentation for more details on how to write
login scripts.
37
Page 41

ePolicy Orchestrator®3.6 Walkthrough Guide Deploying the Agent and Products
Distributing agents
Installing the agent manually
A simple way to install the agent is to run the installer directly from the desired system.
When to use this method
This is a desirable method to install agents in the following circumstances:
Your organization requires that software is installed on systems manually.
You intend to use ePolicy Orchestrator for policy management only.
You have systems running Windows 95, Windows 98, or Windows ME and do not
want to enable file and print sharing on them.
You assigned IP sorting filters or NT domain names when creating the segments of
your Directory.
You can install the agent on the system, or distribute the FRAMEPKG.EXE installer to users
in your organization and have them run the installation program themselves.
After the agent is installed, it calls into the server and adds the new system to the
Directory.
Having assigned IP sorting filters or NT domain names to the desired Directory
segments saves valuable time.
4
Enabling the agent on unmanaged McAfee products
Before purchasing ePolicy Orchestrator, you may have already been using McAfee
products in your network. Some of the more recent McAfee products that use the
AutoUpdate updater, such as VirusScan Enterprise, install with the agent in a disabled
state. When you want to start managing these products with ePolicy Orchestrator, you
do not need to install the agent on these systems. Instead, you can simply enable the
agent that is already on the system.
Enabling the agent in this way, rather than re-deploying the 1.5MB agent installation
package to each system, can save significant network bandwidth when you have many
systems with disabled agents on the network.
You cannot change the agent installation folder without uninstalling and reinstalling
Note
Having assigned IP sorting filters or NT domain names to the desired Directory
segments saves valuable time.
You must copy the
to the desired systems. The repository list contains network address information the
agent requires to call into the server after installing.
To enable the agent on unmanaged systems running a McAfee product with a disabled
agent:
the agent. Agents that you enable may be in a different folder location than agents that
you deploy in your network using another method.
SITELIST.XML repository list file from the ePolicy Orchestrator server
1 Export the repository list (
copy it to a temporary folder on the system, such as
2 Run the following command line on the desired system:
FRMINST.EXE /INSTALL=AGENT /SITEINFO=C:\TEMP\SITELIST.XML
SITELIST.XML) from the ePolicy Orchestrator server and
C:\TEMP.
38
Page 42
ePolicy Orchestrator®3.6 Walkthrough Guide Deploying the Agent and Products
Distributing agents
/SITEINFO is the location of the SITELIST.XML file that you exported.
4
Reference the
SITELIST.XML file in the temporary folder. By default, the FRMINST.EXE
file is installed in the following location:
c:\program files\mcafee\common framework
Such products were most likely installed with an older version of the agent. These
Note
agents are not automatically upgraded to the latest agent version that is on the ePolicy
Orchestrator server. To upgrade the agent, you should also enable and run the
deployment task to install the new agent on the managed system.
Including the agent on an image
You can install the ePolicy Orchestrator agent on systems used to create common
images for your environment. The first time the user logs into a system built using a
common image that includes the agent, the system is assigned a unique ID called a
global unique identifier (GUID).
Before creating an image for this purpose, remove the agent GUID registry value from
Note
When to use this method
The is a desirable method to use when:
Your organization uses standard installation images for new systems.
the agent registry key. A GUID is regenerated on the first ASCI with the ePolicy
Orchestrator server.
You may not have access to systems in some portions of your environment except
when they are brought in for repair.
For instructions, see the documentation for your preferred image-creation product.
Distributing the agent using other deployment products
You may already use other network deployment products in your organization to deploy
software. You can use many of these tools, such as Microsoft Systems Management
Server (SMS), IBM Tivoli, or Novell ZENworks, to deploy agents. Configure your
deployment tool of choice to distribute the
FRAMEPKG.EXE agent installation package
located on your ePolicy Orchestrator server.
For instructions, see the documentation of the desired deployment tool.
Distributing the agent to WebShield appliances and Novell
NetWare servers
You cannot use ePolicy Orchestrator to deploy agents to WebShield appliances or
Novell NetWare servers. Instead, use a method such as a login script or manual
installation.
These systems require different agents, which can be downloaded from the McAfee
Note
web site. These agent installation packages are not installed on the ePolicy
Orchestrator server by default.
See your product documentation for specific details.
39
Page 43

ePolicy Orchestrator®3.6 Walkthrough Guide Deploying the Agent and Products
About deploying packages
About deploying packages
The ePolicy Orchestrator deployment infrastructure supports deploying products and
ePolicy Orchestrator components.
Each McAfee product that ePolicy Orchestrator can deploy provides a product
deployment package (
packages to any of your managed systems, once they are checked into the master
repository. The package catalog file contains the product installation files, which are
compressed in a secure format.
PKGCATALOG.Z files are used for both virus definition (DAT) and engine update packages.
You can configure product policy settings before or after deployment. McAfee
recommends configuring policy settings before deploying the product to network
systems, this can save time and ensure that your systems as protected as desired as
soon as possible.
Global administrators can check these package types into the master repository with
pull tasks, or manually:
Table 4-3 Supported packaged types
Package type Description Origination
Virus definition (DAT) files.
File type:
Scanning engine.
File type:
SuperDAT (SDAT.EXE) files.
File type:
PKGCATALOG.Z
PKGCATALOG.Z
SDAT.EXE
PKGCATALOG.z) file. ePolicy Orchestrator can deploy these
The regular, daily DAT files
released by McAfee.
The updated scanning engine
for McAfee anti-virus products,
such as VirusScan Enterprise.
Engines are usually updated
once or twice a year.
The SuperDAT files contain
both
DAT and engine files in
one update package.
If bandwidth is a concern,
McAfee recommends
updating
separately.
DAT and engine files
FTPSite and HttpSite update
sites, and the McAfee web site.
Use a pull task to download DAT
files directly into the master
repository, or download and
check them into the master
repository manually.
FTPSite and HttpSite update
sites, and the McAfee web site.
Use a pull task to download
engine files directly into the
master repository, or download
and check them into the master
repository manually.
McAfee web site.
Download and check SuperDAT
files into the master repository
manually.
4
40
Page 44

ePolicy Orchestrator®3.6 Walkthrough Guide Deploying the Agent and Products
About deploying packages
Table 4-3 Supported packaged types
Package type Description Origination
Supplemental virus
definition (
files.
File type:
Product deployment
packages.
File type:
Agent installation
package.
File type:
Agent language
packages.
File type:
EXTRA.DAT)
EXTRA.DAT
PKGCATALOG.Z
PKGCATALOG.Z
PKGCATALOG.Z
The EXTRA.DAT files address
one or a few specific viruses
that have appeared since the
last
DAT file was posted. If the
threat has a high severity,
distribute the
immediately, rather than wait
until that signature is added to
the next
EXTRA.DAT files are from the
McAfee web site. You can
distribute them through
ePolicy Orchestrator.
Pull tasks do not retrieve
EXTRA.DAT files.
A product deployment package
contains the installation
software of a McAfee product.
An agent installation package
contains the installation
software for the ePolicy
Orchestrator agent.
An agent language package
contains files necessary to
display agent information in a
local language.
EXTRA.DAT
DAT file.
McAfee web site.
Download and check
supplemental virus definition
files into the master repository
manually.
Product CD or downloaded
product ZIP file.
Check product deployment
packages into the master
repository manually. For a
specific location, see the
Configuration Guide for the
product.
Only the
agent and System Compliance
Profiler deployment packages
are checked into the master
repository as part of the ePolicy
Orchestrator server installation.
Master repository — checked in
at installation.
For future versions of the agent,
you must check agent
installation packages into the
master repository manually.
Master repository — checked in
at installation.
For future versions of the agent,
you must check agent language
packages into the master
repository manually.
ePolicy Orchestrator
4
Package signing and security
All packages created and distributed by McAfee are signed with a key pair using the
DSA (Digital Signature Algorithm) signature verification system, and are encrypted
using 168-bit 3DES encryption. A key is used to encrypt or decrypt sensitive data.
You are notified when you check in packages that are not signed by McAfee. If you are
confident of the content and validity of the package, continue with the check-in. These
packages are secured in the same manner described above, but are signed by ePolicy
Orchestrator when they are checked in.
41
Page 45

ePolicy Orchestrator®3.6 Walkthrough Guide Deploying the Agent and Products
About deploying and updating products
Using digital signatures guarantees that packages originated from McAfee or were
checked in by you, and that they have not been tampered with or corrupted. The agent
only trusts package catalog files signed by ePolicy Orchestrator or McAfee. This
protects your network from receiving packages from unsigned or untrusted sources.
Legacy product support
Older products use a flat directory structure in conjunction with the AutoUpdate and
AutoUpgrade client tasks to install product updates. New products that take advantage
of AutoUpdate 7.0 use a hierarchal directory structure and the update task to install
product updates.
If the update location you specify in the AutoUpdate or AutoUpgrade task settings is a
distributed repository managed by ePolicy Orchestrator, you must enable legacy
product support when you check the corresponding package into the master repository.
Doing so copies the packages into both directory structures, enabling you to support
legacy products.
Package ordering and dependencies
If one product update is dependent on another, you must check their packages into the
master repository in the required order. For example, if Patch 2 requires Patch 1, you
must check in Patch 1 before Patch 2. Packages cannot be reordered once they are
checked in. You must remove them and check them back in, in the proper order. If you
check in a package that supersedes an existing package, the existing package is
removed automatically.
4
About deploying and updating products
The ePolicy Orchestrator repository infrastructure allows you to deploy products and
update packages to your managed systems from a central location. Although the same
repositories are used, there are differences.
Table 4-4 Comparison of product deployment and update packages
Product deployment packages Update packages
Must be manually checked into the master
repository.
Can be replicated to the distributed
repositories and installed on managed
systems with global updating.
If not implementing global updating for
product deployment, a deployment task must
be configured and scheduled for managed
systems to retrieve the package.
Product deployment and updating process
The high-level process for distributing DAT and engine update packages follows:
1 Check the update package into the master repository with a pull task or manually.
DAT and engine update packages can be
copied from the source repository
automatically with a pull task.
Most other update packages must be
checked into the master repository manually.
Can be replicated to the distributed
repositories and installed on managed
systems automatically with global updating.
If not implementing global updating for
product updating, an Update task must be
configured and scheduled for managed
systems to retrieve the package.
42
Page 46

ePolicy Orchestrator®3.6 Walkthrough Guide Deploying the Agent and Products
About deploying and updating products
2 If using global updating, nothing else is necessary provided global updating has
been configured and enabled.
If not using global updating, use a replication task to copy the contents of the master
repository to the distributed repositories.
3 If not using global updating, create and schedule an update or deployment task for
agents to retrieve and install the update on managed systems.
Deployment task
Once you have checked in the product deployment package, you can use the
deployment task to install the product on managed systems. The deployment task is a
unique client task created automatically when ePolicy Orchestrator installs. It installs
any product that is deployable through ePolicy Orchestrator and has been checked into
the master repository.
Best practices information
You can run the product deployment task at any site, group, or individual system. When
deciding how to stage your product deployment, McAfee recommends considering the
size of the package and the available bandwidth between the master or distributed
repositories and the managed systems. In addition to potentially overwhelming the
ePolicy Orchestrator server or your network, deploying products to many systems can
make troubleshooting problems complicated.
4
Consider a phased roll-out to install products to groups of systems at a time. If your
network links are fast, try deploying to several hundred client systems at a time. If you
have slower or less reliable network connections, try smaller groups. As you deploy to
each group, monitor the deployment, run reports to confirm successful installations,
and troubleshoot any problems with individual systems.
If you chose to deploy server-based McAfee products, deploy them to specific systems,
rather than groups or sites.
Update tasks
Once an update package has been checked into the master repository and replicated
to the distributed repositories, the agents on the managed systems still need to know
when to go to the distributed repositories for updates. This is unnecessary if you are
using global updating.
You can create and configure client update tasks to control when and how managed
systems receive update packages. If you are not using global updating, creating these
client update tasks are the only way you can control client updating with ePolicy
Orchestrator.
If you are using global updating, a client update task is unnecessary, although you can
create a daily client update task for redundancy.
43
Page 47

ePolicy Orchestrator®3.6 Walkthrough Guide Deploying the Agent and Products
About deploying and updating products
Considerations when creating client update tasks
Consider the following when scheduling client update tasks:
Create a task to update DAT and engine files daily at the highest level of the
Directory that is inherited by all systems. If your organization is large, you can use
randomization intervals to mitigate the bandwidth impact of all systems updating at
the same time. Also, for large networks with offices in different time zones, running
the task at the local system time on the managed system, rather than at the same
time for all systems, helps balance network load.
Schedule the update task at least an hour after the scheduled replication task, if you
are using scheduled replication tasks.
Run update tasks for DAT and engine files at least once a day. Managed systems
can be logged off from the network and miss the scheduled task; running the task
frequently ensures these systems receive the update.
Maximize bandwidth efficiency and create several scheduled client update tasks
that update separate components and run at different times. For example, you can
create one update task to update only DAT files, then create another to update both
DAT and engine files weekly or monthly — engine packages are released less
frequently.
Create and schedule additional update tasks for products that do not use the agent
for Windows.
4
Use the Run missed task option. This can be useful if systems are logged off from the
network at the scheduled update time, ensuring they update after logging onto the
network.
Global updating
McAfee recommends using global updating with your updating strategy. Global
updating automates replication to your distributed repositories and updating managed
systems. Replication and update tasks are not required. Checking contents into your
master repository initiates a global update. The entire process should complete within
an hour in most environments.
Additionally, you can specify which packages and updates initiate a global update.
However, when you only specify that certain content initiates a global update, ensure
that you create a replication task to distribute content that was not selected to initiate
a global update.
Note
Global updating process
Global updating updates your environment within an hour in most environments using
the following steps:
When using global updating, McAfee recommends scheduling a regular pull task (to
update the master repository) at a time when network traffic is minimal. Although
global updating is much faster than other methods, network traffic over the updating
time period is increased.
1 Contents are checked into the master repository.
2 Contents of the master repository are replicated automatically to the distributed
repositories.
44
Page 48

ePolicy Orchestrator®3.6 Walkthrough Guide Deploying the Agent and Products
About deploying and updating products
3 A SuperAgent wakeup call with the SITESTAT.XML file is broadcast to all agents. This
file lists the contents of the master repository. If a package the managed systems
requires is in the list, the agent goes to a distributed repository to get the package.
4 All agents go to their local distributed repositories for new updates.
Requirements
The following requirements must be met to implement global updating:
A SuperAgent is installed on each broadcast segment. Managed systems cannot
receive a SuperAgent wakeup call if there is no SuperAgent on the same broadcast
segment. Global updating utilizes the SuperAgent wakeup call to alert agents that
new updates are available.
Distributed repositories are set up and configured throughout your environment.
McAfee recommends SuperAgent repositories, but they are not required — global
updating functions with all types of distributed repositories.
If using SuperAgent repositories, managed systems must be able to “see” the
repository from which it updates. Although, a SuperAgent is required on each
broadcast segment for systems to receive the wakeup call, SuperAgent repositories
are not required on each broadcast segment, but the managed systems must “see”
the SuperAgent repository from which to update.
4
Pull tasks
Use pull tasks to update your master repository with DAT and engine update packages
from the source repository. DAT and engine files must be updated often. McAfee
releases new DAT files daily and engine files less frequently. Deploy these packages to
managed systems as soon as possible to protect them against the latest threats.
EXTRA.DAT files must be checked into the master repository manually. They are
Note
available from the McAfee web site.
A scheduled pull task runs automatically and regularly at times and days you specify.
For example, you can schedule a daily repository pull task at 5:00 AM.
You can also use the Pull now task to check updates into the master repository
immediately. For example, when McAfee alerts you to a fast-spreading virus and
releases a new DAT file to protect against it.
If a pull task fails you must check the packages into the master repository manually.
Once you have updated your master repository, you can distribute these updates to
your systems automatically with global updating or with replication tasks.
Considerations when scheduling a pull task
Consider the following when scheduling pull tasks:
Bandwidth and network usage. If you are using global updating, as recommended,
schedule a pull task to run when bandwidth usage by other resources is low. With
global updating, the update files are distributed automatically after the pull task
completes.
Frequency of the task. DAT files are released daily, but you may not want to use your
resources daily for updating.
45
Page 49

ePolicy Orchestrator®3.6 Walkthrough Guide Deploying the Agent and Products
Replication and update tasks. Schedule replication tasks and client update tasks to
About deploying and updating products
ensure the update files are distributed throughout your environment.
Replication tasks
Use replication tasks to copy the contents of the master repository to distributed
repositories. Unless you have replicated master repository updates to all your
distributed repositories, some systems do not receive them. Ensure all your distributed
repositories are up-to-date.
If you are using global updating, replication occurs automatically — replication tasks
Note
Scheduling regular replication tasks is the best way to ensure that your FTP, HTTP, and
UNC distributed repositories are up-to-date. Scheduling daily replication tasks ensures
that managed systems stay up-to-date.
Creating scheduled replication tasks automates replication to your distributed
repositories. Occasionally, you may add files to your master repository that you want to
replicate to distributed repositories immediately, rather than wait for the next
scheduled replication. Run a Replicate now task to update your distributed repositories
manually.
are not necessary.
4
With version 3.6, you can now specify which content gets replicated from the master
Note
repository to the distributed repositories (defined by the distributed repository), and
specify to which distributed repositories are replicated (defined in the task).
Full vs. incremental replication
When creating a replication task, select incremental or full replication. Incremental
replication uses less bandwidth and copies only the new updates in the master
repository that are not yet in the distributed repository. Full replication copies the entire
contents of the master repository.
McAfee recommends scheduling a daily incremental replication task and a weekly full
Tip
replication task. This maximizes network bandwidth efficiency by updating only
essential, incremental changes during the week and guarantees completeness.
Repository selection
New distributed repositories are added to the repository list (SITELIST.XML) file
containing all available distributed repositories. The agent of a managed system
updates its repository list each time it communicates with the ePolicy Orchestrator
server. The agent performs repository selection each time the agent (McAfee
Framework Service) service starts and when the repository list changes.
Selective replication provides more control over the updating of individual repositories.
When scheduling replication tasks, you can choose:
Specific distributed repositories to which the task applies. Replicating to different
distributed repositories at different times lessens the impact on bandwidth
resources. These repositories can be specified when you create or edit the
replication task.
46
Page 50
ePolicy Orchestrator®3.6 Walkthrough Guide Deploying the Agent and Products
Specific files and signatures that are replicated to the distributed repositories.
About deploying and updating products
Selecting only those types of files that are necessary to each system that checks
into the distributed repository lessens the impact on bandwidth resources. When
you define or edit your distributed repositories, you can choose which packages you
want to replicate to the distributed repository.
This functionality is intended for updating products that are installed on several
Note
systems only in your environment, like GroupShield and Webshield. The functionality
allows you to distribute such updates only to the distributed repositories these
systems check into.
Repository selection by agents
By default, agents can attempt to update from any repository in the repository list
(
SITELIST.XML) file. The agent can use a network ICMP ping or a subnet address compare
algorithm to find the distributed repository with the quickest response time. Usually,
this is the closest distributed repository to the system on the network.
You can also tightly control which distributed repositories agents use for updating by
enabling or disabling distributed repositories in the agent policy settings. McAfee does
not recommend disabling repositories in the policy settings. Allowing agents to update
from any distributed repository ensures they receive the updates.
4
Selective updating
ePolicy Orchestrator allows you to select which updates (DAT file, engine, and
product-specific updates) you want client systems to receive, so that valuable
bandwidth isn’t wasted transferring unnecessary files. You can use selective updating
with both global updating and update tasks.
You can also use this feature to selectively update only those components that you will
want updated as soon as possible once an update is released. For example, DAT files
and VirusScan Enterprise updates.
Due to the challenges customers face, ePolicy Orchestrator 3.6 provides different types
of update repositories and several methods for implementing them:
About the SITELIST.XML repository list
The SITELIST.XML file is a repository list containing all of the update repositories you are
managing through ePolicy Orchestrator. These include any source repositories, the
master repository, and any repositories you have created. The repository list contains
the location and network credential information that client systems use to select the
nearest repository and retrieve updates.
When a new update repository is created, the SITELIST.XML file is updated and the
Note
The ePolicy Orchestrator server sends the repository list to the agent during
agent-to-server communication. You can also export it to a file, manually deploy it, then
apply it to client systems using command-line options.
locations to which agents point for updates are adjusted.
47
Page 51
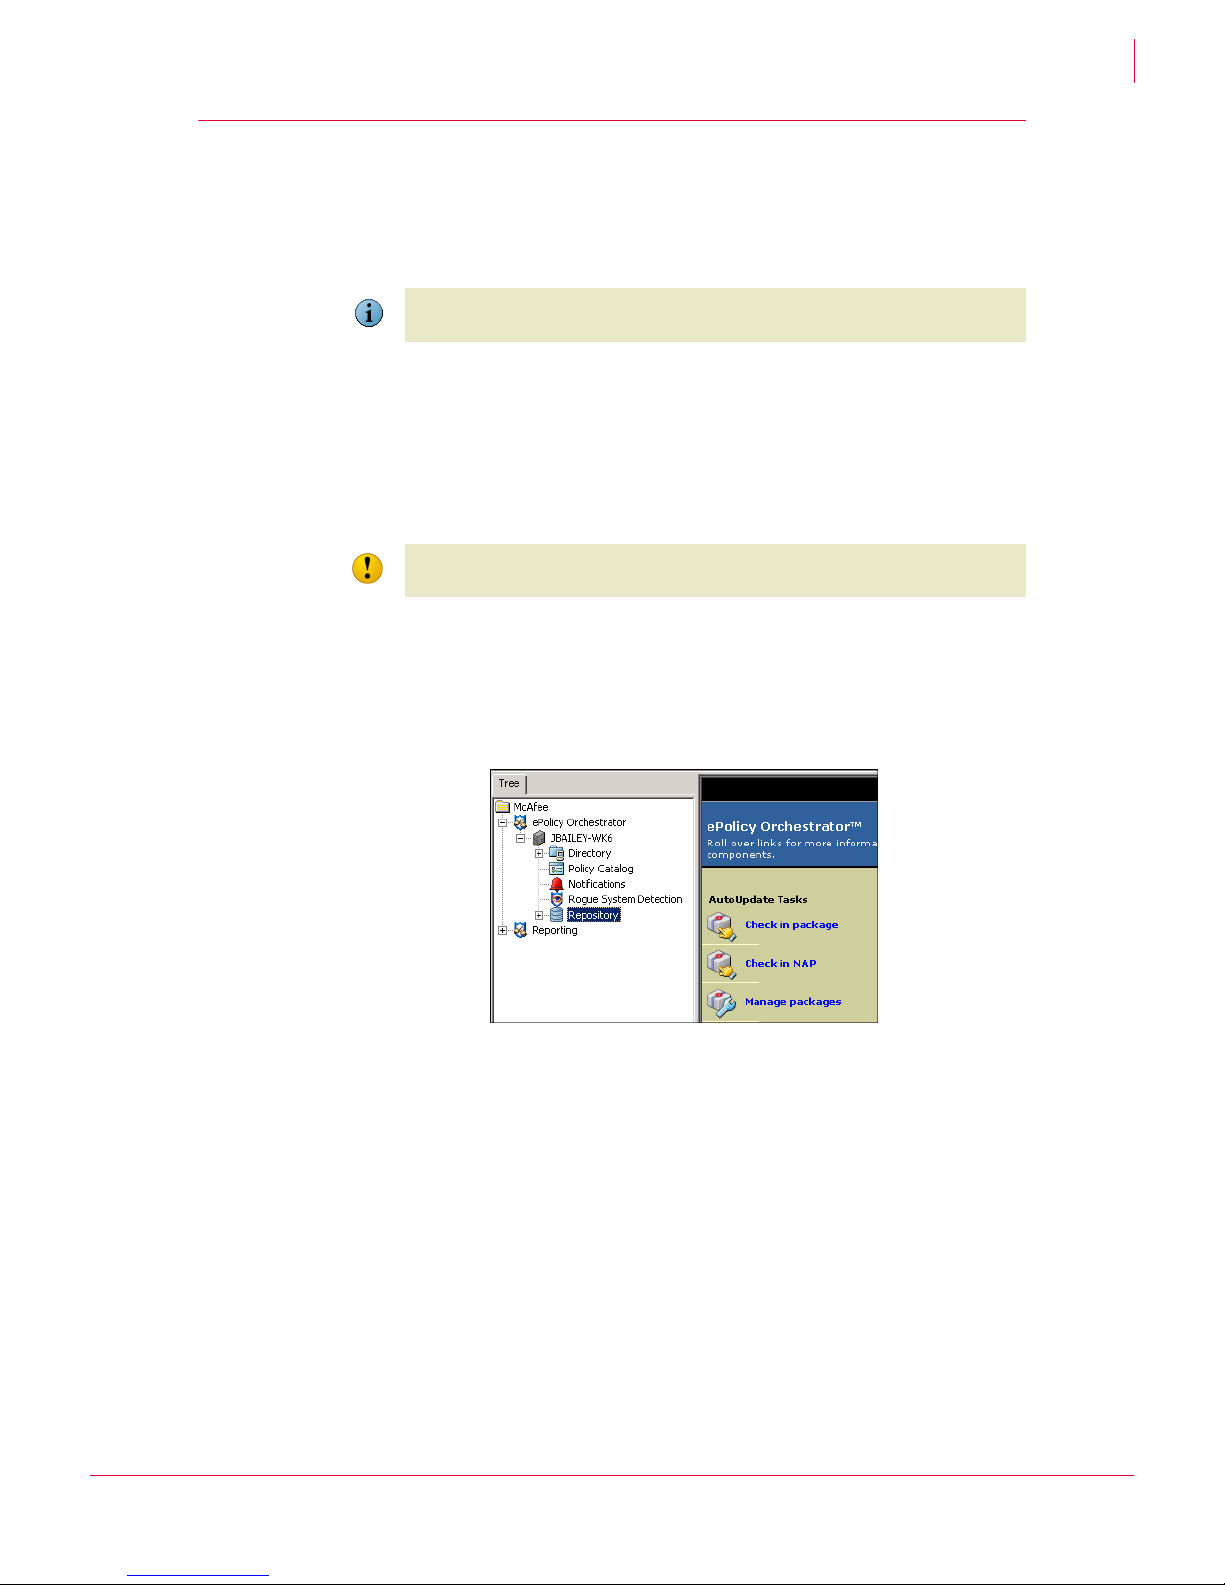
ePolicy Orchestrator®3.6 Walkthrough Guide Deploying the Agent and Products
Checking in product deployment packages manually
Checking in product deployment packages manually
Check in the PKGCATALOG.Z product deployment package files to the master repository
to be able to deploy them using ePolicy Orchestrator.
You must be a global administrator to check in product deployment packages.
You cannot check in packages to your master repository while pull or replication tasks
Note
To check in a product deployment package:
are executing.
4
1 Locate the
PKGCATALOG.Z file you want to check in. See the product’s configuration
guide for details on the location.
2 Copy the entire contents of the folder containing the package, then save it to a
temporary folder on your ePolicy Orchestrator server.
Caution
3 In the console tree, select
You must copy all the files in the PKGCATALOG.Z folder, or the package check-in fails.
Repository.
4 In the details pane, under AutoUpdate Tasks, click Check in package. The Check-in package
wizard appears.
Figure 4-3 Check-in package wizard
5 Click
Next to open the Package Type dialog box.
6 Select
7 Browse to the
8 Click Next to view the package check-in summary information.
9 Click
Finish to begin checking in the package. Wait a few minutes while the package
checks into the repository.
10 Click
Close when complete.
Products or updates as the package type, then click Next.
PKGCATALOG.Z file that you saved in a temporary folder.
48
Page 52

ePolicy Orchestrator®3.6 Walkthrough Guide Deploying the Agent and Products
Configuring the deployment task to install products on client systems
11 In the console tree, select Repository | Software Repositories | Master.
Figure 4-4 Packages list
12 In the details pane, scroll through the list and locate the product and version of the
deployment package to verify the action was successful.
13 If you are using distributed repositories in your environment, be sure to replicate the
package to them.
4
Configuring the deployment task to install products on
client systems
To deploy products using the product deployment task:
1 In the console tree, select the site, group, or individual system to which to deploy
the product.
2 In the details pane, select the Task tab, then double-click Deployment in the task list.
the
ePolicy Orchestrator Scheduler dialog box appears.
Figure 4-5 Deployment task for the selected node in the Directory
49
Page 53

ePolicy Orchestrator®3.6 Walkthrough Guide Deploying the Agent and Products
Configuring the deployment task to install products on client systems
3 Select the Task tab and deselect Inherit under Schedule Settings.
Figure 4-6 ePolicy Orchestrator Scheduler dialog box
4
4 Under
Schedule Settings, select Enable (scheduled task runs at specified time). The task
does not run unless you enable it here.
5 Click
6 On the
Settings.
Deployment tab, deselect Inherit to enable product deployment options.
The Product deployment options list shows which products are available to deploy
through ePolicy Orchestrator. The products listed are those for which you have
already checked in a
PKGCATALOG.Z file to the master repository. If you do not see
the product you want to deploy listed here, you must first check in that product’s
PKGCATALOG.Z file.
7 Set the Action to Install for the product you want to deploy.
Figure 4-7 Task Settings dialog box
8 To specify command-line install options, click for each item and type the desired
command-line options in the
documentation for information on command-line options.
9 Click
OK to save the product deployment options and return to the ePolicy Orchestrator
Scheduler
Command line text field. See your product
dialog box.
50
Page 54

ePolicy Orchestrator®3.6 Walkthrough Guide Deploying the Agent and Products
Configuring the deployment task to install products on client systems
10 In the ePolicy Orchestrator Scheduler dialog box, select the Schedule tab.
4
11 Deselect
Inherit to enable scheduling options.
12 Schedule as desired.
13 Click
In the task list on the
task is set to
OK to save your changes.
Tasks tab of the details pane, the Enabled status for the deployment
True.
Once configured, the agents receive the deployment instruction when they call into the
ePolicy Orchestrator server.
51
Page 55

5
Rogue System Detection
Even though you already use ePolicy Orchestrator to manage your security products,
your protection is only as good as your coverage. Deploying agents to the systems you
know about in your network and keeping them up-to-date is only part of a
comprehensive strategy. The next step is ensuring you cover each system that
connects to your network.
In any managed network, there are inevitably a small number of systems that do not
have an agent on them at any given time. These can be systems that frequently log
onto and off from the network, including test servers, laptop systems, or wireless
devices. Unprotected systems are often the weak spot of any security strategy,
creating entry points by which viruses and other potentially harmful programs can
access to your network.
Rogue System Detection helps you monitor all the systems on your network — not only
the ones ePolicy Orchestrator manages already, but the rogue systems as well. A rogue
system is any system that is not currently managed by an ePolicy Orchestrator agent,
but should be.
Rogue System Detection provides real-time detection of rogue systems by means of a
sensor placed on at least one system within each network broadcast segment (typically
a subnet). The sensor listens to network broadcast messages and spots when a new
system has connected to the network.
When the sensor detects a new system on the network, it sends a message to the
ePolicy Orchestrator server. The server then checks whether the newly-identified
system has an active agent installed and managed. If the new system is unknown to
the ePolicy Orchestrator server, Rogue System Detection allows you to take
remediation steps including alerting network and anti-virus administrators or
automatically deploying an ePolicy Orchestrator agent to the system.
The Rogue System sensor
The sensor is the distributed portion of the Rogue System Detection architecture.
Sensors detect systems, routers, printers, and other network devices connected to
your network. The sensor gathers information about the devices it detects, and
forwards the information to the epolicy Orchestrator server.
The sensor is a small Win32 native executable application. Similarly with an ePolicy
Orchestrator SuperAgent, you must have at least one sensor in each broadcast
segment, usually the same as a network subnet, in your network. The sensor runs on
any NT-based Windows operating system, such as Windows 2000, Windows XP, or
Windows 2003.
52
Page 56

ePolicy Orchestrator®3.6 Walkthrough Guide Rogue System Detection
Passive listening to layer-2 traffic
To detect systems on the network, the sensor utilizes WinPCap, an open source packet
capture library. Using WinPCap, the Rogue System sensor captures layer-2 broadcast
packets sent by systems connected to the same network broadcast segment. The
sensor listens passively to all layer-2 traffic for Address Resolution Protocol (ARP),
Reverse Address Resolution Protocol (RARP), and IP traffic. The sensor is able to listen
to the broadcast traffic of all devices on its broadcast segment.
The sensor does not actively probe the network to search for which devices are
connected.
The sensor does not determine whether the system is a rogue system. It detects
Note
systems connected to the network and reports these detections back to the ePolicy
Orchestrator server.
Intelligent filtering of network traffic
The sensor implements intelligent filtering of network traffic to ignore unnecessary
messages and capture only what it needs: Ethernet and IP broadcast traffic. By filtering
out unicast traffic, which may contain non-local IP addresses, the sensor focuses only
on devices that are part of the local network. For example, if a system on the network
happens to be browsing McAfee, packets appear on the local network with the IP
address belonging to mcafee.com. The sensor detects systems on your local network
only, so it ignores all such unicast packets because their sources cannot be guaranteed
to be a local system.
5
To optimize performance and minimize network traffic, the sensor is designed to limit
its communication to the server by only relaying new system detections, and to ignore
any re-detected systems for a user-configurable time. For example, the Rogue System
sensor detects itself among the list of detected systems. If the sensor sent a message
every time it detected a packet from itself, the result would be a network overloaded
with sensor detection messages.
The sensor further filters on systems already detected:
The sensor always reports any system the first time it is detected on the network.
The sensor adds the MAC address of each detected system to the packet filter, so
that it is not detected again until removed from the filter.
The sensor implements aging on the MAC filter so that after a time period, MAC
addresses for systems that have already been detected are removed from the filter,
causing those systems to be re-detected and reported to the server.
Data gathering and communications to the server
Once the sensor detects a system located on the local network, it attempts to gather
as much information about that system from the information contained in the network
packet. The information gathered includes DNS name, operating system version, and
NetBIOS information such as domain membership, system name, and the list of
currently logged-in users.
All of the NetBIOS-related information gathered is subject to standard limitations of
authorization and other limitations, as documented in the Microsoft management API.
53
Page 57

ePolicy Orchestrator®3.6 Walkthrough Guide Rogue System Detection
The sensor packages the gathered information about the detected system into an XML
message. It sends this message via secure HTTPS to the ePolicy Orchestrator server
for processing. The server then queries the ePolicy Orchestrator database to determine
whether the system is a rogue system.
To save bandwidth in large deployments, you can configure how often the sensors send
detection messages to the server. You can configure the sensor to cache detection
events for a given time period, such as one hour, and then send a single message
containing all the events from that time period.
Choosing systems to host sensors
Systems on which the sensor is installed should be likely to remain on and connected
to the network all the time, such as a server. If you don’t have a server running in a given
broadcast segment, deploy several sensors to several workstations to ensure that at
least one of them is connected to the network at any time.
Best practices information
To guarantee that your Rogue System Detection coverage is complete, you must install
at least one sensor in each broadcast segment of your network. Installing more than
one sensor in a broadcast segment does not create issues around duplicate messages
— the server filters any duplicate detection messages. However, additional active
sensors in each subnet results in traffic sent from each sensor to the server. While
maintaining as many as five or ten sensors in a broadcast segment should not cause
any bandwidth issues, you should not maintain more sensors in a broadcast segment
than is necessary to guarantee that the broadcast segment is covered.
5
Primary and inactive sensors
When deploying multiple sensors to the same subnet, you can configure how many are
actively reporting to the server at any one time (three by default). These are the primary
sensors. Any additional sensors you deploy are backups that remain inactive until the
ePolicy Orchestrator server makes them become active.
At regular intervals, the ePolicy Orchestrator server changes primary sensors so that it
is not dependant on any one sensor for too long. Also, if the primary sensor is disabled
or stops responding, the ePolicy Orchestrator server automatically assigns a different
sensor on that broadcast segment the role of primary sensor.
The
Subnet List table on the Subnets tab of the Rogue System Detection interface allows
you to view the subnets in your network where you already have ePolicy Orchestrator
agents. From here you can deploy sensors to systems.
Configure sensor policy settings before deploying
Before you deploy sensors, you should configure the sensor policy settings to suit your
needs. These needs are probably the same for all sensors in your environment. Most
likely, you can configure sensor policy settings at the Directory root of the console tree
and let them inherit throughout the Directory.
54
Page 58
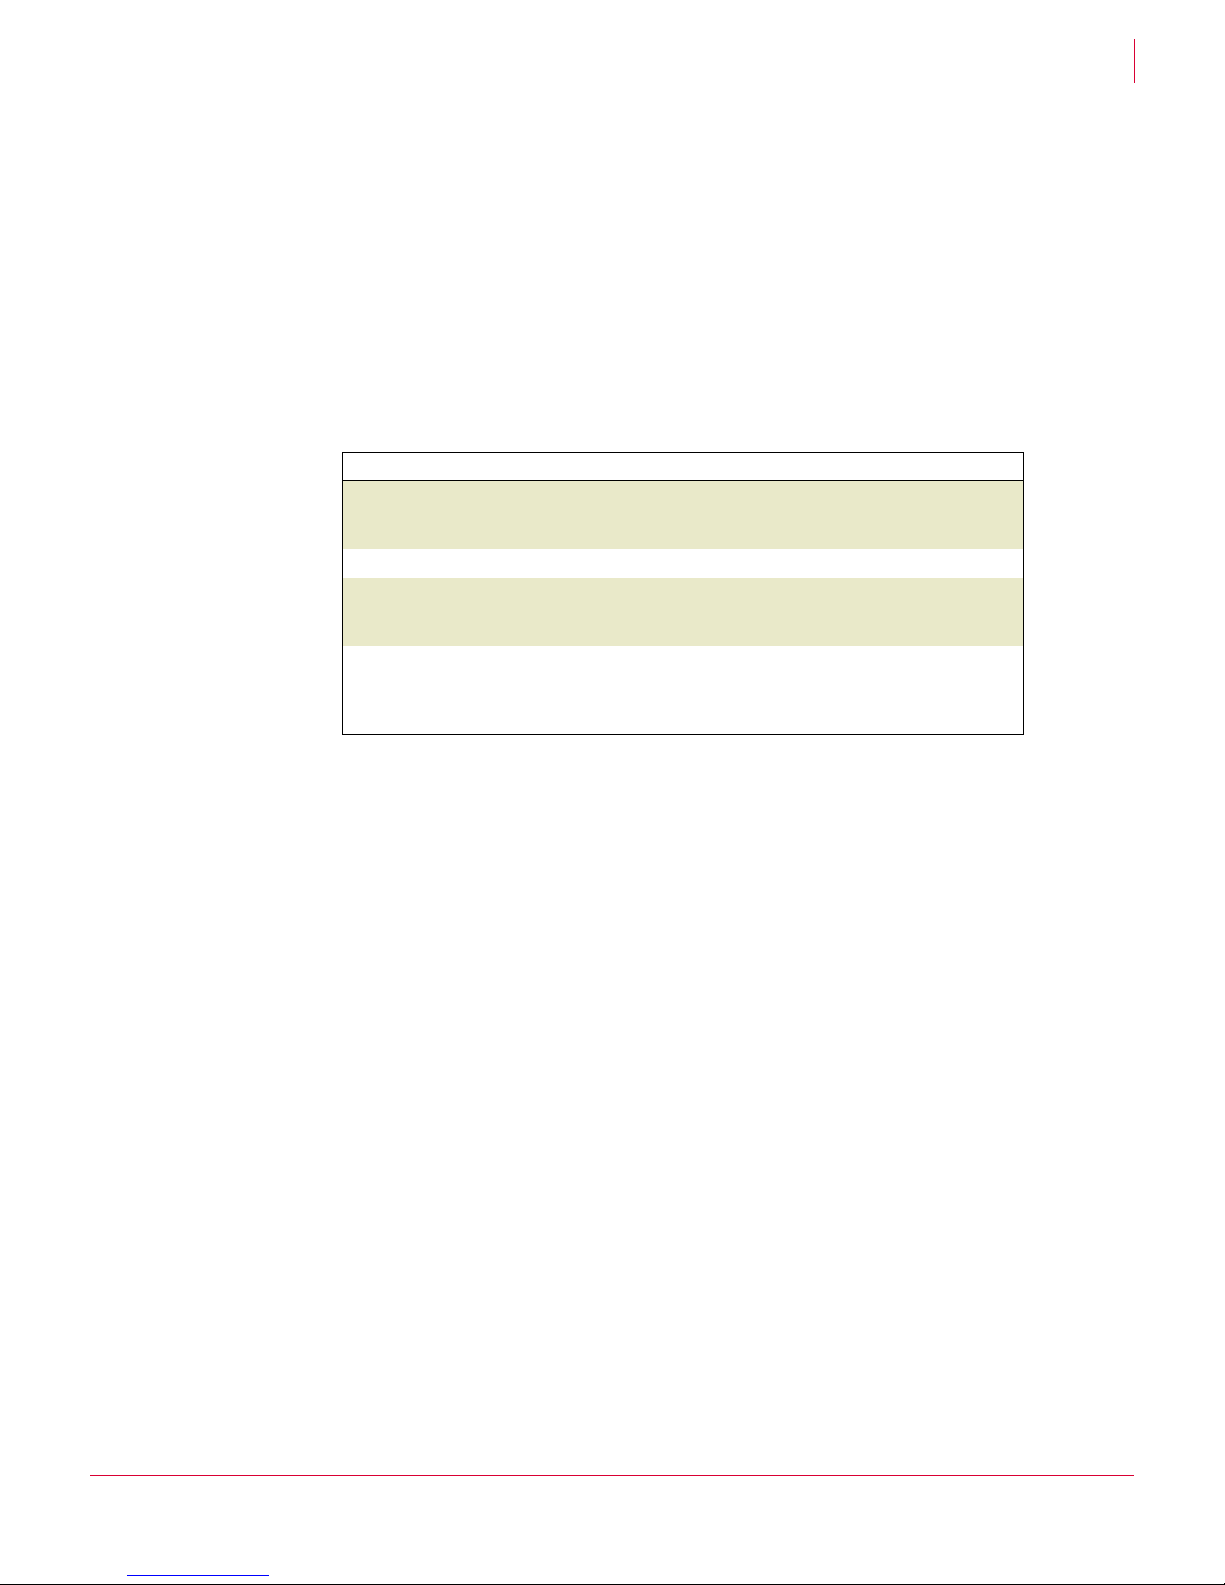
ePolicy Orchestrator®3.6 Walkthrough Guide Rogue System Detection
Machine status and rogue type
Machine status and rogue type are classifications ePolicy Orchestrator uses to
determine which systems are rogue systems. Each detected system is listed in the
Machine List table with a status and, if classified as a rogue system, a rogue type. These
classifications are very useful for grouping systems in the
also use status and rogue type as criteria for automatic responses.
Machine status for detected systems
Each detected system has a basic status of Managed, Rogue, Exception, or Inactive. This
status is displayed in the
Table 5-1 Types of machine status
Machine Status Description
Managed
Rogue
Exception
Inactive
Status column of the Machine List table.
A system that has an active agent installed and running. The vast
majority of systems in the
status.
A system that does not have an agent on it.
A system you have identified as an exception. An exception is a
piece of network equipment, such as a network router, switch, or
printer, that you know does not require an agent.
A system that is listed in the ePolicy Orchestrator database but has
not been detected by a rogue system sensor in a configurable time
period. These are mostly likely systems that are shut down or
disconnected from the network.
Machine List table should have this
Machine List table. You can
5
Types of rogue systems
Systems with a status of Rogue or Inactive also are assigned a rogue type. These may be
systems that are not listed in the database, but are also not necessarily true rogue
systems at a given point in time. Rogue types allow you to define what exactly is a
rogue system in your network.
For example, a new system may have just logged onto the network. This system had
an agent installed with a network login script at its initial logon. Since the initial agent
call to the server may take up to ten minutes, the rogue system sensor detects the
system before the agent communicates with the server and is added to the database
as a managed system. The system is classified as a rogue system, even though it is not
really a rogue system because it already has an agent. If you configure automatic
responses or automatic e-mail alerts for rogue detections, specifying a reasonable
grace period using the
positive detections.
Rogue (Grace Period) rogue type can help you minimize false
55
Page 59

ePolicy Orchestrator®3.6 Walkthrough Guide Rogue System Detection
The following table lists and describes each rogue type and its description:
Table 5-2 Types of rogue systems
Rogue Type Description
No Agent
Grace Period
Inactive Agent
Alien Agent
The detected system has no agent installed. This is the most
common rogue type.
The detected system has no agent installed, but was detected
within a user-configured time period, or grace period. This is useful
if you have many systems that join and leave the network. It is also
useful if you use login scripts to install the agent when new
systems log onto the network. Using the grace period allows you to
create a time buffer to avoid false positive rogue detections for
systems that are not really rogue systems.
The grace period is disabled by default, so all systems without
agents are classified as
enabling the grace period if you are configuring automatic
responses for the rogue detection event.
The detected system has an agent installed, but it has not called
into the server for some configurable period of days.
The detected system has an agent installed, but the agent does not
report into your server. This can occur if your organization is large
and you use multiple ePolicy Orchestrator servers to manage
different parts of your network. Laptop users who may travel and
log onto your network could have an alien agent. This rogue type is
distinct as you probably would not want to take action on these
systems as they are already managed. But since they are not
managed by your server, you don’t want them to be classified as
managed either.
To reduce false positive rogue detections, you can fine-tune
automated responses to avoid deploying agents or sending e-mail
alerts when alien agents are detected.
Rogue (No Agent). You might consider
Managed For systems with a status of Inactive only. The system has not been
detected by a sensor within a configured length of time, but when
last detected it did have an agent.
5
Subnet status
Each subnet listed in the Subnet List table on the Subnets tab receives a status of Covered
if there is an active rogue system sensor is installed on a system in that subnet. A
subnet has an
subnet to view a list of all systems in the subnet that have an active agent installed.
Uncovered status if there are no sensors present. You can click each
56
Page 60
ePolicy Orchestrator®3.6 Walkthrough Guide Rogue System Detection
Distributing Rogue System sensors
Distributing Rogue System sensors
The sensor reports only on detections occurring within its local broadcast segment. You
must install at least one sensor per broadcast segment in your network for coverage.
Depending on your network configuration, a broadcast segment may or may not be
Note
If your organization is large, installing sensors manually on individual systems
throughout your network could require more of your time than you can afford. Although
you can install sensors manually on managed systems, consider using ePolicy
Orchestrator to deploy sensors to appropriate systems throughout your network.
the same as a subnet.
5
Before distributing sensors, configure the settings on the
pages.
Deploying Rogue System sensors
You deploy (send and install) Rogue System sensors from the Subnet List. You can only
install sensors to managed systems (systems that are running an ePolicy Orchestrator
agent).
Note
You can allow sensor host systems to be selected automatically based on specific
criteria, or you can manually select them. As part of the sensor deployment, a
System Sensor Install
uninstall the sensor or upgrade it to a newer version.
If you allow Rogue system Detection to pick systems automatically on the subnet, you
can specify criteria for choosing systems. You can specify any or all of the criteria listed
here when configuring automatic sensor deployment:
Table 5-3 Automatic sensor deployment criteria
Criteria Description
Most Recent ePO Agent
Communication
Server OS
Hostname
Most Memory
Fastest CPU
In the future, network access sensors will be deployed from the Subnet List.
client task is created for the host systems. This task allows you to
Most recent agent-server communications indicates a
system is more likely to be connected and up-to-date at any
given time.
Servers are more likely than workstations to remain on and
connected to the network at all times. Selecting this criterion
can help ensure continuous coverage.
ePolicy Orchestrator can select systems based on a text
string you use in the DNS name. For example, if you add an
“SRV” prefix to the names of your server systems, you could
deploy a sensor to a system with “SRV” in its DNS name.
If you add
string that appears in your server DNS names in the
Hostname text box.
Although the sensor is not a memory-intensive application,
you can ensure resource efficiency by choosing the criterion.
Although the sensor is not a processor-intensive application,
you can ensure resource efficiency by choosing the criterion.
Rogue System Sensor policy
Rogue
Hostname to the Selected criteria list, type the text
57
Page 61

ePolicy Orchestrator®3.6 Walkthrough Guide Rogue System Detection
Taking actions on detected rogue systems manually
For instructions, see the ePolicy Orchestrator 3.6 Product Guide.
Installing the sensor manually
If you do not want to deploy sensors from the ePolicy Orchestrator console, you can
perform the installation manually. To do so, you must be at the system you want to host
the sensor. You must also be using an account that has administrative privileges on the
system.
5
You can install the sensor either via a
SETUP.EXE installation wizard or via the command
line.
For specific instructions, see the ePolicy Orchestrator 3.6 Product Guide.
Taking actions on detected rogue systems manually
You can perform actions on one or more systems listed in the Machine List table. For
example, you may want to deploy an agent to a detected rogue system or mark
systems for later action. In addition to these manual actions, you can configure
automatic responses that can be initiated by a detection event.
The following table lists the manual actions you can take on selected systems in the
Machine List table. Some of these are covered in greater detail in following sections.
Table 5-4 Available manual actions
Action Description
Add to ePO tree Adds a system node to a Rogue System site in the Directory. You
can place the systems into an appropriate site or group manually
after it is added to this site.
Mark for Action
Mark as Exception
Push ePO Agent
Query ePO agent
Remove Host Hides the detected system in the Machine List table but does not
Unmark for Action
Unmark as Exception
Marks the detected system as a system still needing action.
Marks selected system as a machine that does not require an
agent. For example, routers and printers.
Instructs the server to deploy an agent to the selected system.
Queries the detected system to ascertain whether there is an
agent installed on it. This query is required for systems to appear
as the
Alien Agent rogue type.
Consider creating an automatic response that uses this action if
you have multiple ePolicy Orchestrator servers in your network.
If travellers from other parts of your organization frequently log
onto your network, they appear as rogue systems even if they
have an agent from another server.
delete it from the database.
Unmarks systems that you have already marked for action.
Unmarks systems that you have already marked as exceptions.
58
Page 62

ePolicy Orchestrator®3.6 Walkthrough Guide Rogue System Detection
Configuring automatic responses for specific events
Configuring automatic responses for specific events
You can configure automatic responses so that ePolicy Orchestrator responds
automatically to the Rogue System Detection events. There are two specific Rogue
System Detection events for which you can configure automatic responses:
Rogue Machine Detected. A new system is found that had not already found in the
ePolicy Orchestrator database.
Subnet Uncovered. A subnet in your network, that does not have a rogue system
sensor installed, is discovered.
You can also configure responses for any event.
An automatic response can contain one or more of the actions described in the
following table. For example, if you configure a response to deploy an ePolicy
Orchestrator agent to newly-detected systems, you may also want to send an e-mail to
administrators to follow up on the agent installation.
Table 5-5 Actions available for automatic responses
Action Description
Add to ePO tree Adds the system to a Rogue System site within the Directory.
After the system is added to this site, you can move the system
to an appropriate location manually.
Mark for Action
Mark as Exception
Push ePO Agent
Query ePO agent
Remove Host Hides the detected system in the Machine List table but does not
Send E-mail
Send ePO Server Event
Selects the detected system as a system still needing action.
Marks selected system as a machine that does not require an
agent. For example, routers and printers.
For example, in your organization you may reserve a range of IP
addresses within each subnet for network equipment such as
routers, switches, and printers. You can create an automatic
response to mark such equipment as exceptions and add a
condition to initiate the response only if the detected system’s IP
address falls within a certain range. Or, maybe you use certain
vendors for network equipment that are always different from
your vendors for server or workstation systems. In this case, you
can use the
to mark systems as exceptions if the system’s MAC address
contains a specific vendor code.
Instructs the server to deploy an agent to the selected system.
Queries the detected system to ascertain whether there is an
agent installed on it. This query is required when using the
Agent
Consider creating an automatic response that uses this action if
you have multiple servers in your network. If travellers from
other parts of your organization frequently log onto your
network, they appear as rogue systems even if they have an
agent from another server installed.
delete it from the database.
Sends a pre-configured e-mail message to pre-configured
recipients.
Forwards Rogue System Detection and Subnet Uncovered
events to the server. This is required if you plan to use
Notifications to automatically send e-mail alerts for Rogue
System Detection events.
OUI Org condition to initiate an automatic response
Alien
rogue type.
5
59
Page 63

ePolicy Orchestrator®3.6 Walkthrough Guide Rogue System Detection
Table 5-5 Actions available for automatic responses
Action Description
Unmark for Action
Unmark as Exception
Deselects systems that you have already marked for action.
Deselects systems that you have already marked as exceptions.
Configuring automatic responses for specific events
Import and export exceptions from and to an XML file
To prevent having to identify systems as exceptions again if you need to reinstall the
ePolicy Orchestrator server, you can easily save your exceptions list to an XML file. This
XML exceptions list preserves your exceptions information so you can re-import it if
needed.
For instructions see the ePolicy Orchestrator 3.6 Product Guide.
5
60
Page 64

6
ePolicy Orchestrator Notifications
The ePolicy Orchestrator Notifications feature can alert you to any events that occur on
the managed systems in your environment or on the ePolicy Orchestrator server itself.
You can configure rules in ePolicy Orchestrator to send e-mail, SMS, or text pager
messages (or SNMP traps), as well as run external commands, when specific events
are received and processed by the ePolicy Orchestrator server. The ability to specify the
event categories that generate a notification message and the frequencies with which
notifications are sent are highly configurable.
This feature notifies specified individuals when the conditions of a rule are met. These
can include:
Detection of a virus or other potentially unwanted program by your anti-virus
software product. Although almost any anti-virus software product is supported,
events from VirusScan Enterprise 8.0i include the IP address of the source attacker
so that you can isolate the system infecting the rest of your environment.
Outbreak situations. For example, 1000 virus detected events are received within
five minutes.
Compliance events from McAfee System Compliance Profiler. For example,
systems are found that are not current with the latest Microsoft patches.
High-level compliance of ePolicy Orchestrator server events. For example, a
replication task did not complete.
Detection of rogue systems.
This feature also allows you to configure notification rules to execute command lines
and launch registered executables when the specified conditions are met.
About Notifications
Before you plan the implementation of Notifications, you should understand how this
feature works with ePolicy Orchestrator and its Directory.
Note
This feature does not follow the inheritance model of policy enforcement.
61
Page 65

ePolicy Orchestrator®3.6 Walkthrough Guide ePolicy Orchestrator Notifications
About Notifications
When events occur on systems in your environment, they are delivered to the ePolicy
Orchestrator server, and the notification rules (associated with the group or site that
contains the affected systems and each parent above it) are applied to the events. If the
conditions of any such rule are met, a notification message is sent, or an external
command is run, per the rule’s configurations.
This design allows you to configure independent rules at the different levels of the
Directory. These rules can have different:
Thresholds used to send a notification message. For example, a site administrator
wants to be notified if viruses are detected on 100 systems within 10 minutes on
the site, but a global administrator does not want to be notified unless viruses are
detected on 1000 systems within the same amount of time within the entire
environment.
Recipients for the notification message. For example, a site administrator wants to
receive a notification message only if a specified number of virus detection events
occur within the site. Or, a global administrator wants each site administrator to
receive a notification message if a specified number of virus detection events occur
within the entire Directory.
Throttling and aggregation
You can configure when notification messages are sent by setting thresholds based on
aggregation and throttling.
6
Aggregation
Use aggregation to determine the thresholds of events at which the rule sends a
notification message. For example, you can configure the same rule to send a
notification message when the ePolicy Orchestrator server receives 100 virus detection
events from different systems within an hour or whenever it has received 1000 virus
detection events altogether from any system.
Throttling
Once you have configured the rule to notify you of a possible outbreak situation, you
may want to use throttling to ensure you do not get too many notification messages. If
you are administering a large network, then you may be receiving tens of thousands of
events during an hour, creating thousands of notification messages based on such a
rule. ePolicy Orchestrator Notifications allows you to throttle the number of notification
messages you receive based on a single rule. For example, you can specify in this same
rule that you don’t want to receive more than one notification message in an hour.
When using throttling, the notification message received contains a summary of events
that occurred within the throttling period that would have triggered the rule otherwise.
62
Page 66

ePolicy Orchestrator®3.6 Walkthrough Guide ePolicy Orchestrator Notifications
About Notifications
Notification rules and Directory scenarios
To show how this feature functions with the Directory, two scenarios are used.
For both scenarios, we can assume that each group, site, and the Directory root of the
console tree has a similar rule configured. Each rule is configured to send a notification
message when 100 virus infection events have been received from any product within
60 minutes. For reference purposes, each rule is named
where <nodename> is the name of the node as it appears in the Directory (for
example,
VirusDetected_Group2c).
Scenario one
For this scenario, 100 virus infections are detected in Goup2C within 60 minutes in a
single day.
VirusDetected_<node name>,
6
Conditions of the rules
VirusDetected_Directory are met, sending notification messages (or launching registered
executables) per the rules’ configurations.
VirusDetected_Group2C, VirusDetected_Site2, and
Figure 6-1 Console tree
63
Page 67

ePolicy Orchestrator®3.6 Walkthrough Guide ePolicy Orchestrator Notifications
Determining when events are forwarded
Scenario two
For this scenario, 50 virus infections are detected in Group2C and 50 virus infections are
detected in
Conditions of the VirusDetected_Directory rule are met, sending notification messages (or
launching registered executables) per the rules’ configurations. This the only rule that
can be applied to all 100 events.
Group3B within 60 minutes in a single day.
Figure 6-2 Console tree
6
Determining when events are forwarded
The ePolicy Orchestrator server receives notifications from the Common Management
Agent (
CMA). You must configure its policy pages to forward events either immediately
to the ePolicy Orchestrator server or only at agent-to-server communication intervals.
If you choose to have events sent immediately (as set by default in ePolicy Orchestrator
Agent 3.5.0 McAfee Default policy), the agent forwards all events as soon as they are
received. If you want all events sent to the ePolicy Orchestrator server immediately so
that they can be processed by Notifications when the events occur, configure the agent
to send them immediately.
If you choose not to have events sent immediately, the agent only forwards events
immediately that are designated by the issuing product as high priority. Other events
are only sent at the agent-to-server communication intervals.
If the currently applied named policy is not set for immediate uploading of events,
either edit the currently applied named policy or create a new named policy for the
Agent 3.5.0 | Configuration
these policy pages.
policy pages. This setting is configured on the Events tab of
ePO
64
Page 68

ePolicy Orchestrator®3.6 Walkthrough Guide ePolicy Orchestrator Notifications
Determining which events are forwarded
Determining which events are forwarded
Along with being able to determine when events are forwarded to the server, you can
also select which events are forwarded.
If you choose not to select which events are forwarded, all events are forwarded. This
Note
To select which events are forwarded immediately:
1 In the console tree, select the desired ePolicy Orchestrator database server under
is the default setting.
Reporting and log onto it with ePolicy Orchestrator authentication.
6
Planning
2 Select
3 Select the
Note
Events in the console tree under the database server.
Filtering tab in the details pane.
You must be a global administrator to make any changes to the Filtering tab.
4 Select Send only the selected events to ePO on the Filtering tab.
5 Select the desired events in the list and click Apply.
Before creating rules that send notifications, you can save time by planning:
The types of events (both product and server) that could generate and send a
notification message in your environment.
Who should receive which notifications. For example, it may not be necessary to
notify the site administrator of site B about a failed replication in site A, but you may
want all site administrators to know that an infected file was discovered in site A.
Which types and levels of thresholds you want to set for each rule. For example, you
may not want to receive an e-mail message every time an infected file is detected
during an outbreak. Instead, you can choose to have such an e-mail message sent
— at most — once every five minutes, regardless of how often that server is
receiving the event.
Which command lines or registered executables you want to run when the
conditions of a rule are met.
65
Page 69

ePolicy Orchestrator®3.6 Walkthrough Guide ePolicy Orchestrator Notifications
Rules
Rules
Rules allow you to define when, how, and to whom, notifications are sent, as well as
any executables you want to run when the rule is triggered. You can create or edit rules
once you have made some specific configurations to the feature.
But until all of your configurations are complete and you’ve familiarized yourself with
the abilities of ePolicy Orchestrator, you can use the default rules provided with the
product.
6
Note
Notification rules do not have a dependency order.
Configuring ePolicy Orchestrator Notifications
To create and use rules, you need to configure the following in Notifications:
E-mail server from which to send notification messages.
E-mail contacts list from which you select recipients for notification messages.
List of SNMP servers to use while creating rules. You can configure rules to send
SNMP traps to SNMP servers when the conditions are met for a rule.
List of external commands to run when the conditions of a rule are met.
These are all configured through the interface of Notifications. For instructions, see the
ePolicy Orchestrator 3.6 Product Guide.
Default rules
ePolicy Orchestrator provides six default rules that you can enable for immediate use
while you learn more about the feature.
Once enabled, the default rules send notification e-mail messages to the e-mail
Note
address you provided on the
is also the
Detection contact lists.
You can edit any of the default rules as necessary.
Administrator address in both the Notifications and Rogue System
Set E-mail Address panel of the installation wizard. This
Before enabling any of the default rules:
Specify the e-mail server from which the notification messages are sent.
Ensure the recipient e-mail address is the one you want to receive e-mail messages.
Send a test e-mail from the Basic Configuration section of the Configuration tab.
The default rules are described in Table 6-1:
Table 6-1 Default notification rules
Rule name Associated events Configurations
Daily unknown
product notification
Daily unknown
category notification
Any events from any
unknown products.
Any event of an
unknown category.
66
Sends a notification message at most, once
a day.
Sends a notification message at most, once
a day.
Page 70

ePolicy Orchestrator®3.6 Walkthrough Guide ePolicy Orchestrator Notifications
Viewing the history of Notifications
Table 6-1 Default notification rules
Rule name Associated events Configurations
Virus detected and
not removed
Virus detected
heuristics and not
removed
Repository Update or
Replication Failed
Non-compliant
computer detected
Virus Detected and Not
Removed
any product.
events from
Virus Detected
(Heuristics) and Not
Removed
any product.
events from
Repository update or
replication failed
events.
Non-compliant
Computer Detected
events.
Sends a notification message:
When the number of events exceeds
1000 within an hour.
At most, once every two hours.
With the source system IP address,
actual threat names, and actual product
information, if available.
Sends a notification message:
When the number of events exceeds
1000 within an hour.
At most, once every two hours.
With the source system IP address,
actual threat names, and actual product
information, if available.
Sends a notification message when any
events are received.
Sends a notification message:
When any events are received.
Once per each rule of the Compliance
Check server task. (This task sends one
event per each of the four rules
associated with the Compliance Check
server task.)
6
Creating rules
Creating a rule is a four-step process:
1 Describe the rule — Naming the rule and defining the level of the Directory to which
it applies.
2 Set filters for the rule — Specifying the products, event categories, and any threat
names that apply to the rule.
3 Set thresholds of the rule — Defining the aggregation and throttling of the rule.
4 Configure the notifications for the rule — Defining the messages you want sent,
their delivery type, and any executables you want to run when the rules conditions
are met.
For complete instructions, see the ePolicy Orchestrator 3.6 Product Guide.
Viewing the history of Notifications
This feature allows you to view the history of notifications sent. You can view a
collective summary of all notifications sent, by product or category, or a list of all the
specific notifications sent.
67
Page 71

ePolicy Orchestrator®3.6 Walkthrough Guide ePolicy Orchestrator Notifications
Viewing the history of Notifications
Notification summary
The Notification Summary page allows you to view a summary of the number of
notifications sent by product, category, priority, or rule name:
6
1 In the console tree, select
2 Select the
Log tab, then click Summary.
Notifications.
3 Select the Time by which you want to limit the Notification Summary data. These
include:
All Times
Last Hour
Last 8 Hours
Last Day
Last Week
4 Select the Site for which you want to limit the Notification Summary data. You can select
individual sites or
If the global administrator has not allowed reviewers and site administrators to view
Note
5 In
Directory notifications and rules, site administrators and site reviewers are limited to
viewing only notifications and rules for their sites. Site administrators and site
reviewers can never view notifications and rules specific only to other sites.
Group by, select Product, Category, Priority, or Rule name from the drop-down list, and
the quantity of notifications sent for the
All sites.
Group by selection.
Notification list
The Notification List page allows you to view a list of all notifications sent. This list can be
sorted by the data of any column by clicking the column title.
1 In the console tree, select
2 Select the
3 Click any column title (for example, Notification Type) to sort the list by that column.
Note
Notification details
Click any notification from the Notification List page to view its details, including:
Time notification sent Notification rule name
Rule priority Rule site
First event time Rule defined at
Notifications under the desired Directory in the console tree.
Log tab, then click List.
If the global administrator has not selected to allow reviewers and site administrators
to view Directory notifications and rules, site administrators and reviewers are limited
to viewing only notifications and rules for their sites. Site administrators and site
reviewers can never view notifications and rules specific only to other sites.
68
Page 72

ePolicy Orchestrator®3.6 Walkthrough Guide ePolicy Orchestrator Notifications
Viewing the history of Notifications
Actual number of events Actual products
Number of computers Selected products
6
Affected computer IP
Actual categories
addresses
Affected computer names Selected categories
Source computers Actual threat or rule names
Notification status Selected threat or rule names
Notification type Message subject
Event IDs Event descriptions
Affected objects Additional information
Using custom filters
Custom filters provide flexibility to view the notification list. By defining a filter, you can
choose to have specific notification log items included or excluded from those
displayed.
ePolicy Orchestrator Notifications allows you to create multiple conditions on which to
filter the
You can filter notification log items based on:
Sites.
Notification List.
Received products.
Actual event categories.
Priority of the notification message.
Rule names.
69
Page 73

ePolicy Orchestrator®3.6 Walkthrough Guide ePolicy Orchestrator Notifications
Viewing the history of Notifications
Product and component list
You can configure rules to generate notification messages for specific event categories
for specific products and components. This is a list of products and components for
which you can configure rules and a list of all possible event categories.
6
Dr. Ahn
Desktop Firewall
Entercept
ePO Server
ePO Agent
GroupShield Domino
GroupShield Exchange
System Compliance
Profiler
Symantec NAV
NetShield
Note
Checking in additional NAP files can add products to this list.
NetShield for NetWare
PortalShield
Stinger
ThreatScan
Unknown product
Virex
VirusScan
VirusScan PDA
WebShield
LinuxShield
70
Page 74

ePolicy Orchestrator®3.6 Walkthrough Guide ePolicy Orchestrator Notifications
Viewing the history of Notifications
Event categories for which rules can be configured:
6
Access Protection rule violation
detected and blocked
Access Protection rule violation
detected and NOT blocked
Banned content or file detected
and NOT removed
Banned content or file detected
and removed
Computer placed in quarantine
mode
E-mail content filtered or
blocked
Encrypted/corrupted file
detected and removed
Firewall rule triggered
Virus detected (heuristic) and
NOT removed
Virus detected (heuristic) and
removed
Unwanted program detected
(heuristic) and NOT removed
Unwanted program detected
(heuristic) and removed
Intrusion detected
System Compliance Profiler rule violation
Non-compliant computer detected
Normal operation
On-access scan disabled
Policy enforcement failed
Repository update or replication failed
Virus detected and removed
Scan cancelled
Scan line item results
Software deployment failed
Software deployment succeeded
Software failure or error
Spam detected and handled
Unknown category
Unwanted program detected and NOT
removed
Unwanted program detected and removed
Update/upgrade failed
Update/upgrade succeeded
Virus detected and NOT removed
Note
Checking in additional NAP files can add event categories to this list.
71
Page 75

7
Outbreaks
The most effective response to viruses is to know your system, have current anti-virus
software installed, detect outbreaks early, then respond quickly and efficiently. An
effective strategy includes both prevention as well as response.
The ePolicy Orchestrator software can help reduce the costs of managing an outbreak.
When you use ePolicy Orchestrator, you can manage all of your sites from a central
location, which makes management easier, more efficient, and ensures consistently
applied policies across your enterprise.
This section contains the following topics:
Tasks to do on a daily or weekly basis to stay prepared
Checklist — Are you prepared for an outbreak?
Other methods to recognize an outbreak
Checklist — You think an outbreak is occurring
Tasks to do on a daily or weekly basis to stay prepared
You can use features of the software to help prepare your site or company before an
outbreak occurs. Use the Are you prepared for an outbreak? checklist to determine your
level of preparedness.
Server and client tasks you should schedule to run regularly
Create and schedule these server tasks and client tasks to run scans and keep client
software up to date with the latest updates. It takes some time to configure and
schedule these tasks initially, but after that they should run regularly and automatically.
72
Page 76

ePolicy Orchestrator®3.6 Walkthrough Guide Outbreaks
Tasks to do on a daily or weekly basis to stay prepared
You can also re-configure any of these scheduled tasks to Run Immediately should you
need to run a particular task manually.
Table 7-1 Suggested server tasks
Server task Description
Daily DAT & engine pull
task
Daily incremental
repository replication
Performs a repository pull for updated weekly DATs or engine
files from the default source repository on the McAfee FTP
site. The task is scheduled as
Replicates only changes to the master repository to all
distributed repositories. The task is scheduled as
Hourly, every 6 hours.
Hourly, every
6 hours.
Weekly full repository
replication
Daily inactive agent task
A weekly task runs once each Sunday to perform a full
replication to all distributed repositories. This extra layer of
redundancy is a good way to ensure that all distributed
repositories are fully up-to-date at least once a week.
Daily task scans the
have not communicated with the server and places them in an
“Inactive Agents” group.
Directory for systems with agents that
To keep anti-virus and security software on client systems up-to-date, make sure you
have the right client tasks created and scheduled for the appropriate parts of your
Directory. The following describes a sample of what your client task configuration
might look like in a typical deployment.
7
Table 7-2 Suggested client tasks
Client task Task type Description
Daily DAT-only
client update
task
agent Update Update DATs every day for products using the CMA
common updater, such as VirusScan Enterprise.
The task is scheduled to run 4 times every day, starting
at 3 am, one hour after your replication server task.
Repeat task is selected to repeat the task every 6 hours,
so it occurs 4 times a day.
Task Settings, select only DAT and EXTRA.DAT.
In the
These are updated the most often.
Weekly
engine-only
client update
task
Weekly agent
patch and
service pack
update
Daily VirusScan
4.5.1 update
Daily VirusScan
4.5.1
On-Demand
Scan
Daily update
task for Novell
NetWare
servers
agent Update Update anti-virus engines once a week. McAfee
releases new engines only about once every 2-3
months, so save network bandwidth by updating them
less frequently than DATs.
In the
Task Settings, select only Engine.
agent Update Update the agent and security products like VirusScan
Enterprise or Desktop Firewall with patches and service
packs. Run the task once per week.
In the
Task Settings, select all the Service Pack and Patch
types. These are updated the most often.
VirusScan 4.5.1
for Windows
AutoUpdate
VirusScan 4.5.1
for Windows
ODS
NetShield for
NetWare 4.6
On-Demand
Scan
Update DATs daily for Windows 9X client systems using
VSC 451. Schedule it to run several times a day, similar
to the DAT update task for CMA products.
Daily ODS scan for VirusScan 4.5.1.
Daily update for NetShield for NetWare on Novell
NetWare servers.
73
Page 77

ePolicy Orchestrator®3.6 Walkthrough Guide Outbreaks
Checklist — Are you prepared for an outbreak?
Checklist — Are you prepared for an outbreak?
Know your network and specifically what creates traffic, and how much, on it.
The ePolicy Orchestrator software has been fully installed and implemented.
An anti-virus software product has been installed and configured on your systems.
For example, McAfee VirusScan Enterprise 8.0i.
Your anti-virus software is up-to-date with the latest virus definition (DAT) files. You
are performing regular, scheduled updates of the virus scanning engine and virus
definition (DAT) files for each of the anti-virus products that you manage through
ePolicy Orchestrator. You can also use reports to determine coverage. For more
information and instructions, see the reporting guide.
Turn off all network appliances and services you are not using.
Examine which services need inbound and outbound traffic, and which ports they
use. (Specifically, which of the first 1024 ports are used. On your gateway firewall,
disallow traffic on ports not used by your appliances and services.
Examine what types of e-mail attachments are acceptable in your environment, and
disallow others.
Your Microsoft products running on managed systems are up-to-date with the latest
patches and Service Packs. (Generally, Microsoft releases these on a monthy basis.)
You can use McAfee System Compliance Profiler to ensure all of your systems are
compliant to the latest Microsoft patches and Service Packs.
7
You have configured Notifications to send a message to you or others when
specified events (like a virus detection) are received and processed by the server.
The Rogue System Detection feature is implemented to recognize and deploy
agents to rogue systems and devices coming on to your network.
You are performing regular, scheduled updates of products through ePolicy
Orchestrator to ensure your security products are running the latest patch or Service
Pack.
You have enabled the agent wakeup call and tested the agent’s communication with
the systems on your network.
Other methods to recognize an outbreak
There are several key indicators that you can use to determine if your network is
experiencing an outbreak. The following key indicators are covered in this section:
Network utilization key indicators.
E-mail utilization key indicators.
Virus detection events.
Network utilization key indicators
The following are indicators that network utilization may be affected by an outbreak:
Users complain of slowness. Users are often the first to notice when a full-scale
outbreak is taking place. Systems slow down, network systems stop responding,
and applications start displaying messages.
74
Page 78

ePolicy Orchestrator®3.6 Walkthrough Guide Outbreaks
Checklist — You think an outbreak is occurring
Monitoring tools (for example, tools from Sniffer Technologies) detect a change in
the network utilization levels.
E-mail utilization key indicators
The following are indicators that e-mail utilization may be affected by an outbreak:
Users complain of slowness. Users are often the first to notice when a full-scale
outbreak is taking place. E-mail slows down or does not work at all.
CPU utilization of Microsoft Exchange servers goes up significantly.
Monitoring tools (for example, tools from Sniffer Technologies) detect a change in
the e-mail utilization levels.
Microsoft Exchange Performance Monitor counters register a change in the e-mail
utilization levels.
McAfee Outbreak Manager notifies you via e-mail that a potential outbreak may be
indicated. McAfee Outbreak Manager analyzes incoming e-mail messages and
identifies behaviors that are indicative of an outbreak.
The McAfee WebShield e500 appliance collects data that can help identify if an
outbreak is occurring.
7
Virus detection events
The following events are indicators that a virus has been detected:
A notification message is received from the ePolicy Orchestrator server, indicating
a virus has been detected.
An ePolicy Orchestrator report identifies that a virus has been detected.
McAfee Outbreak Manager notifies you via e-mail that a potential outbreak may be
indicated.
McAfee Alert Manager notifies you that a virus has been detected.
When an outbreak occurs, you can respond in many ways. Use the You think an
outbreak is occurring checklist to respond to an outbreak.
Checklist — You think an outbreak is occurring
If you think an outbreak might be occurring, perform the following in your environment:
Visit the AVERT home page to get the latest virus information.
Submit samples of potentially infected files to WebImmune for testing.
Modify the firewall and network security settings to block viral activity. To help you
determine what to block and how the virus behaves, visit the Virus Information
Library on the AVERT web site.
Increase detection settings for all anti-virus products to meet the threat. Visit the
Virus Information Library for an analysis of the threat.
75
Page 79

ePolicy Orchestrator®3.6 Walkthrough Guide Outbreaks
Checklist — You think an outbreak is occurring
Regularly enforce agents with an agent wakeup call, and run coverage reports to
determine that protection is in place.
To ensure full coverage, you must have the ePolicy Orchestrator agent installed on
Caution
Search for traffic on unexpected ports, then disallow the traffic.
Use the global updating feature to perform the following:
Perform an on-demand scan of infected systems.
Run anti-virus coverage reports to ensure that anti-virus coverage on infected
each system.
Download supplemental (EXTRA.DAT) and full virus definition (DAT) files.
Update the virus scanning engine.
systems is complete.
If you do not have a McAfee anti-virus product installed or do not have the ePolicy
Orchestrator agent deployed to each system, you must manually scan the system
or system using the command-line scanner, or use another anti-virus product.
7
76
Page 80

SECTION 2
Lab Evaluation
This section provides instructions for setting up a simple ePolicy Orchestrator implementation in a lab environment.
Installing and setting up
Advanced Feature Evaluations
Page 81

8
Installing and setting up
This section describes how to install and deploy ePolicy Orchestrator in a test
environment. It provides easy steps to get ePolicy Orchestrator 3.6 up and running
quickly, and presents important features of the product.
The steps, divided into two sections, are:
Installation and Setup
1 Install the ePolicy Orchestrator server and console.
2 Create your Directory of managed systems.
3 Deploy agents to the systems in your Directory.
4 Set up master and distributed repositories.
5 Set VirusScan Enterprise 8.0i policies before deploying.
Maintaining and Monitoring your Environment
6 Deploy VirusScan Enterprise to client systems.
7 Run a report to confirm your coverage.
8 Update DAT files with a client update task.
9 Schedule automatic repository synchronization.
10 Test global updating with SuperAgents.
78
Page 82
ePolicy Orchestrator®3.6 Walkthrough Guide Installing and setting up
What is covered and what is not covered
This section of the guide does not cover everything that ePolicy Orchestrator can do,
for example, many advanced features and installation scenarios typical in real-world
deployments. For your live deployment, you can follow many of these basic steps, but
you may need more information. For complete information on all aspects of the
product, refer to the ePolicy Orchestrator 3.6 Product Guide.
What is covered What is not covered Comments
Setting up a single
ePolicy Orchestrator
server and console.
Running MSDE
database on the same
server as ePolicy
Orchestrator.
Using ePolicy
Orchestrator to deploy
agents and VirusScan
Enterprise.
Setting up a simple
network environment
with NT domains and
Active Directory.
Setting up multiple ePolicy
Orchestrator servers and
remote consoles.
Running SQL Server
databases or remote
database servers.
Using login scripts or
third-party tools to deploy
agents and VirusScan
Enterprise.
Setting up UNIX, Linux, or
NetWare environments
In a small test environment, one
server is enough.
Using the MSDE database packaged
with ePolicy Orchestrator is simpler
for testing in a small lab network.
Manually installing the agent is also
covered.
These examples use NT domains and
Active Directory to illustrate key
product features.
8
Setting up a lab environment
Before you install and test ePolicy Orchestrator, you must first create a safe test
network. Planning and testing a live deployment is an involved process, especially in a
large organization. However, you can create a small test environment in a matter of
hours, and if you identify existing systems in your network for testing, the process
takes even less time.
A test environment should contain:
One server system to host the ePolicy Orchestrator server.
One or more client systems (servers or workstations) to which you deploy agents
and VirusScan Enterprise 8.0i.
See the ePolicy Orchestrator 3.6 Installation Guide and VirusScan Enterprise 8.0i
Note
Configure your network?
Before setting up your test environment, ensure your network is correctly configured
for ePolicy Orchestrator:
1 Create trusted domain connections to any remote NT domains.
Installation Guide for complete software and hardware requirements for the ePolicy
Orchestrator server, the agent, and VirusScan Enterprise 8.0i.
To deploy the agent to systems outside the local NT domain (where the ePolicy
Orchestrator server resides), you must create a trusted connection between the
domains. This connection is required for the server to deploy agents and install
software on remote systems. See your Microsoft Windows documentation for
instructions. You must also have a user account with administrator rights in the
remote domain.
79
Page 83

ePolicy Orchestrator®3.6 Walkthrough Guide Installing and setting up
2 Test network connectivity.
From the system where you plan to install the ePolicy Orchestrator server, ping
client systems where you plan to deploy agents.
On the server, open a command window (Start | Run) and type cmd at the prompt.
Type ping commands to test the system name and IP address:
ping MyComputer
ping 192.168.14.52
3 Confirm that client NT Admin$ share folders are accessible from the server.
From the system on which you plan to install the ePolicy Orchestrator server, test
access to the default
Admin$ share folder on each client system. This access is
required for the ePolicy Orchestrator server to install agents and other software, and
testing confirms your administrator credentials.
On the ePolicy Orchestrator server, open a command window (Start | Run).
Type the path to the client Admin$ share (use system name or IP address):
\\MyComputer\Admin$
\\192.168.14.52\Admin$
8
If systems are properly connected over the network, your credentials have sufficient
rights, the
Admin$ share folder is present, and you see a Windows Explorer dialog
box.
4 Install Microsoft updates on Windows 95, Windows 98, or Windows Me client
systems.
If your test systems are running Windows 95, Windows 98, or Windows Me,
download and install
VCREDIST.EXE and DCOM 1.3 updates from the Microsoft web
site, as required. ePolicy Orchestrator agents will not run on these systems without
the update. See the ePolicy Orchestrator 3.6 Installation Guide or the following links
for information:
support.microsoft.com/directory/article.asp?ID=KB;EN-US;Q259403&
www.microsoft.com/com/dcom/dcom95/dcom1_3.asp
5 Enable File and Print Sharing on Windows 95, Windows 98, or Windows Me
client systems.
To deploy the agent to systems running Windows 95, Windows 98, or
Windows Me, you must first enable
you can disable
File and Print Sharing and still be able to manage agent policies on
File and Print Sharing. After the agent is deployed,
those systems.
If you install the agent manually or through another method such as login scripts, this
Note
step is not required.
About the sample lab environment
The lab environment used in these examples consists of one NT domain and one Active
Directory container, each with several servers and several workstations.
80
Page 84

ePolicy Orchestrator®3.6 Walkthrough Guide Installing and setting up
Having multiple NT domains or Active Directory containers in your lab environment is
not required to test ePolicy Orchestrator.
Table 8-1 Systems in Domain1 (IP addresses 192.168.14.1-255)
System Details
ePO Server Windows 2000 Server SP 4 running SQL Server 2000 SP 3. This
system hosts the ePolicy Orchestrator server, console, database,
and master software repository.
4 clients Running Windows 2000 Professional.
Table 8-2 Systems in Domain2 (IP addresses 192.168.15.1-255)
System Details
2 servers Windows 2000 Server SP 4.
3 clients Running Windows 2000 Professional.
Get installation files from McAfee
Before you start installing, get the installation files for ePolicy Orchestrator and
VirusScan Enterprise from the McAfee web site or your product CD, if you have one. If
you want to use the 30-day evaluation versions for your tests, download them from the
McAfee web site. The files you need are:
8
EPO360EML.ZIP. The installation files necessary for installing the ePolicy
Orchestrator 3.1 server, console, and database.
VSE800EEN.ZIP. The VirusScan Enterprise 8.0i installation files, including the
PkgCatalog.z package file required to deploy VirusScan Enterprise through ePolicy
Orchestrator.
VSC451Lens1.ZIP. The VirusScan 4.5.1 installation files and PkgCatalog.z file. You
only need VirusScan 4.5.1 if you have client systems running Windows 95, Windows
98, or Windows ME, because VirusScan Enterprise 8.0i does not run on these
operating systems.
To download the files from the McAfee web site:
1 From the system on which you plan to install the ePolicy Orchestrator server and
console, open a web browser and go to:
http://www.mcafeesecurity.com/us/downloads/evals/
2 Select ePolicy Orchestrator Enterprise Edition 3.6 from the list and click the TRY link.
3 Fill out the form and follow directions to download the EPO360EML.ZIP file.
4 Extract the contents of the EPO360EML.ZIP to a temporary folder, such as
C:\ePOTemp.
5 Repeat these steps to download the VSE80iEVAL.ZIP evaluation version of
VirusScan Enterprise 8.0i and the VSC451Lens1.ZIP of VirusScan 4.5.1.
6 Extract the contents of the downloaded .ZIP files into a temporary folder on the
system you plan to use as your test ePolicy Orchestrator server.
You need to access files in these folders at various times during the deployment
process covered in this guide.
81
Page 85

ePolicy Orchestrator®3.6 Walkthrough Guide Installing and setting up
S
T E P
8
1
Install the ePolicy Orchestrator server and console
Install the ePolicy Orchestrator server, console, and database on the system you plan
to use as your ePolicy Orchestrator server. In the examples used in this guide, we install
the ePolicy Orchestrator server to the system called ePOServer that is running the
Windows 2000 Server operating system.
To install the ePolicy Orchestrator console and server:
1 Locate and start the
extracted the
2 Click
3 If you are installing an evaluation version, click
4 Read the license agreement. If you agree to the terms select I accept the terms in the
5 On
6 If you see a message box stating that your server does not have a static IP address,
Next at the initial page of the ePolicy Orchestrator 3.6.0 Setup wizard.
license agreement
product evaluation.)
Installation Options, select Install Server and Console and click Next. You can also
change the installation folder if desired.
ignore it by clicking
While McAfee recommends installing ePolicy Orchestrator on a system with a static
IP address in your production environment, a DHCP-assigned IP address can be
used for testing purposes.
SETUP.EXE file located in the root of the folder where you
EPO360EML.ZIP.
OK at the Evaluation page.
, then click OK. (If you don’t agree, then click Cancel and quit the
OK.
7 On the
8 On the Select Database Server dialog box, select Install a server on this computer and use it.
9 Click
10 On the Database Server Account dialog box, deselect Use the same account as the Server
11 Click Next to save the database account information.
Set Administrator Password dialog box, enter the password you would like to use
for the ePolicy Orchestrator server. You cannot leave this blank.
This option installs the free MSDE database included with ePolicy Orchestrator.
Next.
service
, then select This is a SQL Server account. Type in and verify a secure password.
This is the
the MSDE database.
SA account that your ePolicy Orchestrator server service uses to access
82
Page 86

ePolicy Orchestrator®3.6 Walkthrough Guide Installing and setting up
12 On the HTTP Configuration dialog box, change the Agent-to-Server communication port to
82 and the Console-to-Server communication port to 83.
Figure 8-1 HTTP Configuration dialog box
8
Some HTTP ports (ports 80 and 81 in particular), are commonly used by many HTTP
applications and services. Because of this, port 80 may already be in use and not
available. McAfee recommends changing the port number to avoid any conflicts.
13 Click
Next to save the port information.
If you do see a warning message saying that one or more HTTP ports are in use,
click
OK and repeat Step 12, this time specifying unused HTTP ports.
14 On the
Set E-mail Address dialog box, type the e-mail address to which the default
notification rules send messages once they are enabled.
This e-mail address is used by the ePolicy Orchestrator Notifications feature. This
feature is covered in this guide, so enter an e-mail address that receives messages
you can view.
15 On the
Ready to Install dialog box, click Install to begin the installation.
The installation takes approximately 20 minutes to complete and may prompt you
to reboot the system during the installation.
16 Click
OK when prompted to reboot and be sure to log back in when the system
reboots to allow the installation to continue.
17 When the installation is finished, click
Finish.
Once the installation is complete, you can open the ePolicy Orchestrator console to
begin deploying agents and anti-virus products to the client systems in your network.
83
Page 87

ePolicy Orchestrator®3.6 Walkthrough Guide Installing and setting up
S
Start the ePolicy Orchestrator console for the first time
Now your server is installed and running. Open the ePolicy Orchestrator console to
begin using ePolicy Orchestrator to manage policies on your network.
To open the console from your ePolicy Orchestrator server:
8
T E P
2
1 Click the
2 On the
3 When the
name of your ePolicy Orchestrator server and that the
Password you set during the installation wizard, then click OK.
4 If you have installed an evaluation version, click OK at the Evaluation splash screen.
Wait a few moments while the ePolicy Orchestrator server initializes. You are now
ready to use the ePolicy Orchestrator console.
Start button, then select Programs | McAfee | ePolicy Orchestrator 3.6.0 Console.
Start Page, click Log on to server.
Log on to Server dialog box appears, make sure the Server name displays the
User name is admin, type the
Create your Directory of managed systems
The Directory is in the console tree of the ePolicy Orchestrator console. The Directory
lists all the systems in your network that are managed by ePolicy Orchestrator — all
systems that are running active ePolicy Orchestrator agents that are reporting to this
server.
Before you start managing anti-virus policies for client systems on your network, you
must add those systems to your ePolicy Orchestrator Directory. After installing the
server, you initially have one system in the Directory — the ePolicy Orchestrator server
itself.
To organize your systems, you can group them into logical collections called sites and
groups. You can create a hierarchy of sites and groups, much like you would create a
hierarchy of folders in Windows Explorer. Grouping is useful for assigning policies and
tasks. You can group systems according to any criteria that makes sense for your
organization.
This guide uses three common types of grouping:
NT Domain. Using your existing NT network domains as sites makes creating your
Directory fast and easy. Having your Directory structure mirror your network
structure can also mean you only have to remember one hierarchy, not two.
Active Directory containers. Using your existing Active Directory network
containers as sites makes creating your Directory fast and easy. Having your
Directory structure mirror your network structure also means you only have to
remember one hierarchy.
Servers and workstations. You may want to configure separate policies for
products like VirusScan Enterprise 8.0i, depending on whether the software is
running on a server or a workstation. Dividing your Directory into groups is not
required, especially for testing in a small lab environment. However, you can use
groups to experiment with setting policies for groups of systems or for how you
might want to organize your Directory.
84
Page 88

ePolicy Orchestrator®3.6 Walkthrough Guide Installing and setting up
Other typical methods of grouping include, but are not limited to:
Geographical divisions. If you have locations in various portions of the world, or in
multiple time zones, you may want to divide your ePolicy Orchestrator Directory
according to those divisions. Some of your policy or task coordination is much easier
across multiple time zones if you place these systems in such sites.
Security divisions. If users have various levels of security access in your
environment, creating your Directory structure to mirror those levels may make
enforcing policy much easier.
1 Add systems to your Directory
The first step in creating your Directory is to add systems from your network. Try one
of these three methods:
Option A: Automatically add entire existing NT domains to your Directory. Very easy
and fast. Useful if you plan to deploy agents to every system in that domain. Use
this method if you organized your test client systems into domains in your lab
network, as in the examples in this guide.
Option B: Automatically add entire Active Directory containers to your Directory.
Very easy and fast. Useful if all or part of your environment is controlled by Active
Directory and if you want portions of your ePolicy Orchestrator Directory to mirror
portions of your Active Directory.
8
Option C: Manually add individual systems to your Directory. While this may be too
slow when deploying ePolicy Orchestrator in a live network, it is fast enough for
adding a handful of systems in your test network.
Option A: Automatically add entire existing NT domains to
your Directory
ePolicy Orchestrator allows you to import all systems in an NT domain into your Directory
with just a few clicks. Use this feature if you organized your test client systems into
domains in your lab network.
The examples in this guide use this method to create
on the test network,
Domain1.
To add entire NT domains to your Directory:
1 Right-click the
Directory and select New | Site.
2 In the Add Sites dialog box, click Add.
3 In the
New Site dialog box, type a name for the site. Make sure the name you type
matches exactly the name of your NT domain.
4 Under
5 Click
Type, select Domain and Include computers as child nodes.
Add under IP Management to specify an IP address range for the site.
Directory sites from an NT domain
6 In the IP Management dialog box, type an IP subnet mask or IP range to specify the IP
address ranges of systems that belong to this site.
7 Click OK to save the IP settings.
8 Click
OK to save the new site and close the New Site dialog box.
85
Page 89

ePolicy Orchestrator®3.6 Walkthrough Guide Installing and setting up
9 In the Add Sites dialog box, make sure that Send agent package is NOT selected and
click
OK to create and populate the sites in the Directory. Although you can deploy
agents at this point, you will do that in a later step once we have modified the agent
policy settings.
Figure 8-2 Add Sites dialog box
8
After a few moments, the systems are added to your Directory. When completed, you
can see that ePolicy Orchestrator first created a site in the Directory with the name of
your network test domain and added all the systems in that domain as children of that
domain.
Option B: Automatically add entire Active Directory
containers to your Directory
ePolicy Orchestrator allows you to import all systems in an Active Directory container,
and its sub-containers, into your Directory with just a few clicks. Use this feature if you
organized your test client systems into Active Directory containers in your lab
environment.
The examples in this guide use this method to create Directory sites from an Active
Directory container, with two sub-containers.
To use ePolicy Orchestrator software’s Active Directory tools, it is important that both
Note
The
time, while you create the entire Directory, or only a specific site of the Directory. Use
the
any new systems.
the ePolicy Orchestrator server and the system running the console (if different) can
reach the Active Directory server.
Active Directory Import wizard is a tool to import Active Directory systems for the first
Active Directory Discovery task to poll these Active Directory containers regularly for
86
Page 90
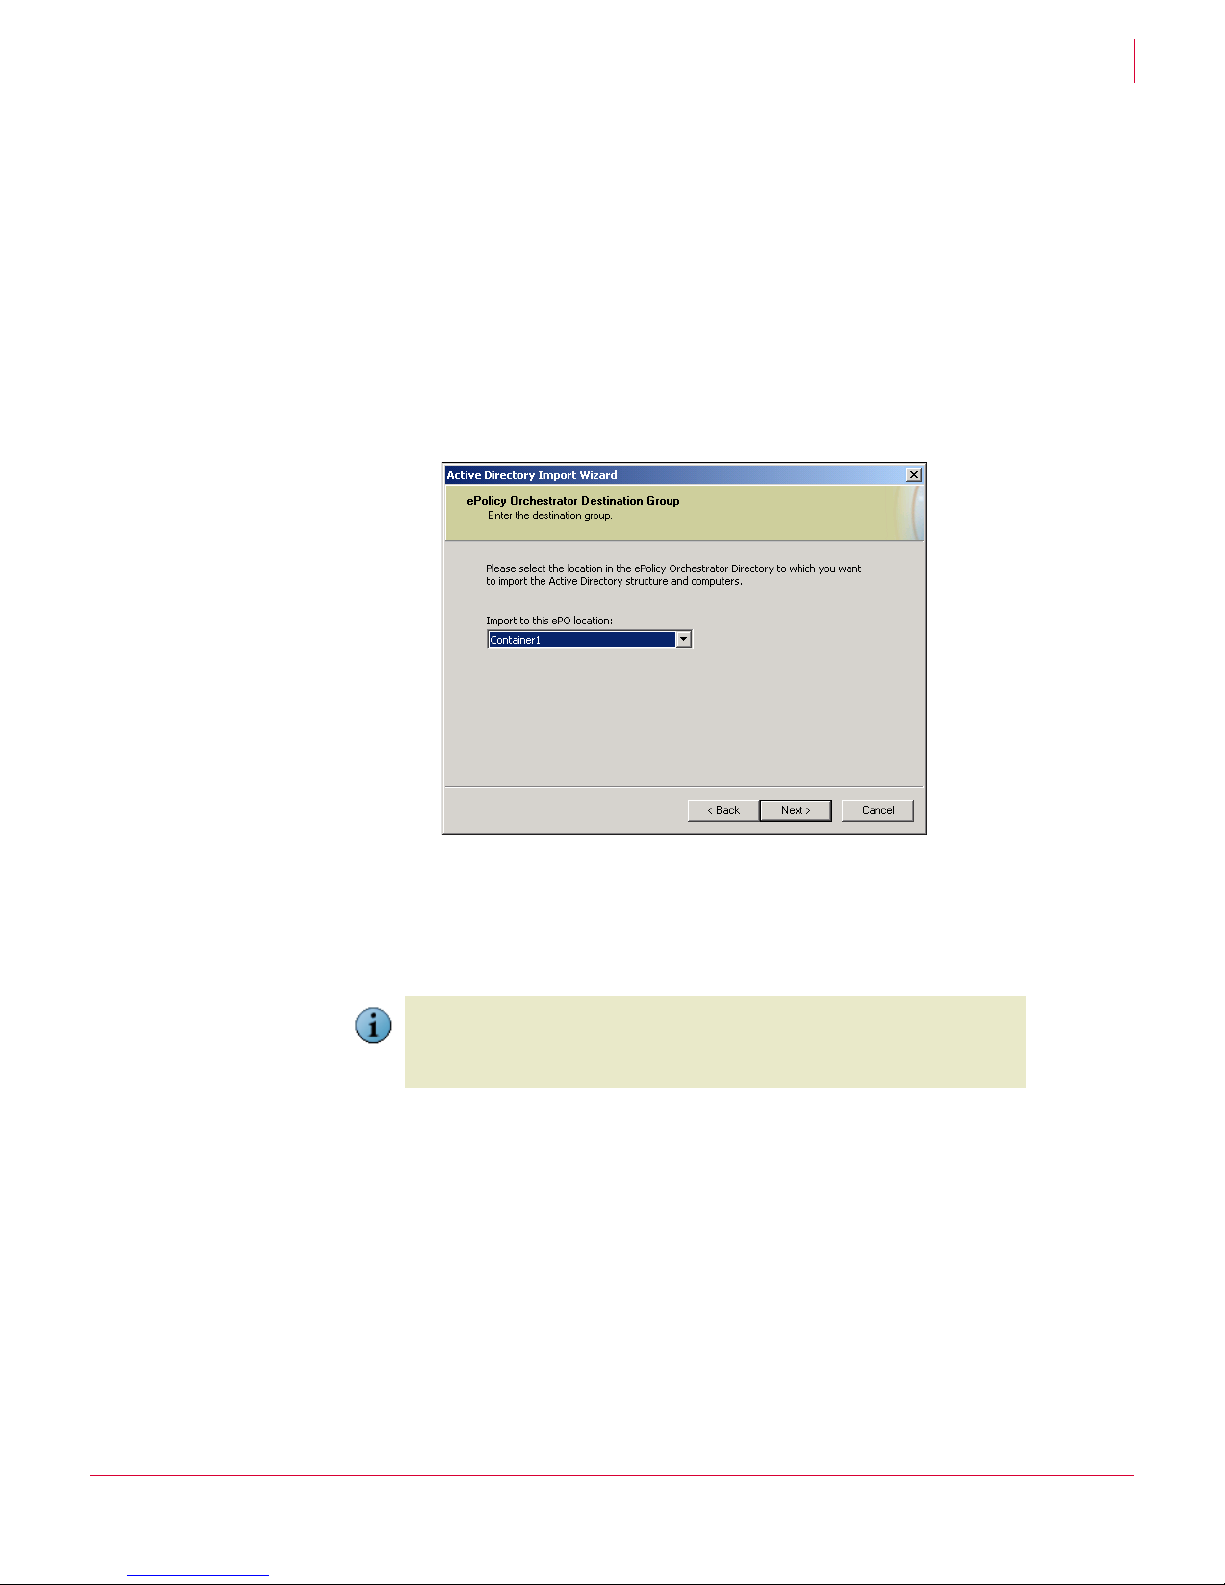
ePolicy Orchestrator®3.6 Walkthrough Guide Installing and setting up
To add Active Directory containers and sub-containers to your Directory:
8
1 Right-click
Directory, and select New | Site.
2 In the Add Sites dialog box, click Add.
3 In the
4 Make sure that
New Site dialog box, type a name for the site, for example Container1, then click
OK.
Send agent package is NOT selected, then click OK.
5 Right-click Directory, and select All Tasks | Import Active Directory Computers.
6 Click Next when the Active Directory Import wizard appears.
Figure 8-3 Active Directory Import wizard
7 On the
ePolicy Orchestrator Destination Group panel of the wizard you can select the root
or a site of the Directory to import the Active Directory systems.
For the purposes of this guide, select the site you just created from the
ePO location
Note
8 On the
drop-down list, then click Next.
If you want to import your entire Active Directory structure, minus exceptions, to use
as your ePolicy Orchestrator
Active Directory structure, minus exceptions, being imported into the Lost&Found of
the
Directory root.
Active Directory Authentication panel, type Active Directory user credentials with
Directory, select Root from this list. This results in the
Import to this
administrative rights for the Active Directory server.
9 In the
Active Directory Source Container dialog box, click Browse to select the desired
source container in the
Active Directory Browser dialog box, then click OK.
10 If you wish to exclude a specific sub-container of the selected container, click
under
Exclude the following sub-containers, then select the desired sub-container to
exclude and click
11 Click
Next, and view the active log for any new systems that have been imported.
OK.
Verify in the console tree that these systems were imported.
Add
87
Page 91

ePolicy Orchestrator®3.6 Walkthrough Guide Installing and setting up
12 Click Finish.
8
The Active Directory systems have been imported into the Lost&Found
group of the
site to which you imported them. If your Active Directory container included
sub-containers, the Lost&Found
group retains the Active Directory hierarchy.
13 Click and drag the top of this structure from the Lost&Found group, to the site above
it. (The site you selected in the wizard. For example
Container1.)
Congratulations. You have imported your Active Directory systems into a site in the
ePolicy Orchestrator
Directory.
In a production environment, once Active Directory containers have been imported, you
should create an Active Directory Discovery task. This task regularly polls
administrator-specified Active Directory containers for any new systems, and for
systems that have been removed. See the ePolicy Orchestrator 3.6 Product Guide for
instructions. This task is beyond the scope of this guide.
Option C: Manually add individual systems to your Directory
When you deploy ePolicy Orchestrator in your production network, consider populating
the Directory automatically by importing your NT domains or Acitve Directory
containers as shown in the previous sections. However, for testing purposes in a small
lab environment, you can also add sites, groups to your Directory manually, then add
systems to them manually.
To create a new site manually:
1 Right-click
2 In the
Directory node in the console tree and select New | Site.
Add Sites dialog box, click Add.
3 Type a name for the site, such as Domain1 in our example, into the Name field of the
New Site dialog box.
4 Specify an IP mask or address range for the site if needed. See the previous section
for details.
5 Click OK. The Domain1 site is added to the Sites to be added list on the Add Sites dialog
box.
6 Repeat the previous steps to create additional sites, if desired.
7 Click
OK. ePolicy Orchestrator adds the new, empty sites to the Directory.
To add new systems to your site:
1 In the console tree, right-click the site you added and select
New | Computer.
2 In the Add Computers dialog box, add new systems either by clicking Browse to locate
them in your NT Network Neighborhood, or by clicking
Add and typing the system’s
NetBIOS name.
3 Click
OK once you have added the names of all the systems.
ePolicy Orchestrator adds the new systems to the Directory beneath the site.
88
Page 92
ePolicy Orchestrator®3.6 Walkthrough Guide Installing and setting up
2 Organize systems into groups for servers and workstations
Depending on how you’ve created your sites, and populated the Directory, you may
need to create additional groups and to further levels of organization in your Directory.
For example, by operating system.
The example in this guide creates groups in each site for servers and workstations. Use
these groups later when setting different VirusScan Enterprise policies for servers and
workstations.
The VirusScan Enterprise 8.0i policy pages for ePolicy Orchestrator 3.6.0 allow you to
Note
To add groups to sites in your Directory and add systems to them:
set separate policy settings for servers and workstations without creating these
groups. However, grouping systems by operating system is a conceptually simple way
to illustrate how using Directory groups can make managing policies easier. If needed,
create other kinds of groups that better fit your test network or policy management
needs.
8
1 Right-click a site that you added to the
2 In the
Add Groups dialog box, click Add.
Directory and select New | Group.
3 On the New Group dialog box, type the name Workstations into the Name text box.
4 If your network is designed to allow you to assign specific IP addresses to servers
and workstations, create an IP range for the group. For example, in the test network
shown in this guide, servers in Domain1 have IP addresses between
192.168.14.200 - 255; workstations in Domain1 have addresses 192.168.14.1 - 199.
You must also set an IP mask at the parent site. The IP mask or IP range that you set
Note
for the group must be consistent with the IP range specified at the site level. In the
examples used in this guide, the workstations and servers in Domain1 all fit within the
192.168.14.0/24 subnet.
Also note that IP management is not necessary for Active Directory systems.
To set an IP range for a group:
a Under
b In the
IP Management on the New Group dialog box, click Add.
IP Management dialog box, type an IP subnet mask or IP range to specify the
IP address ranges of systems that belong to this site.
c Click
5 Click
added
OK to save the IP settings and close the IP Management dialog box.
OK to close the New Group dialog box. The group is added to the Groups to be
list.
6 Click
OK on the Add Groups dialog box to add the group to your Directory.
To add systems to the new groups you created:
Once the new groups appear in the Directory, drag systems from that site into the
appropriate group as you would drag files in Windows Explorer. You must drag systems
in the Directory one at a time; you cannot select multiple systems. Alternatively, you
can use the Directory search feature (right-click
multiple systems at one time.
Directory and select Search) to move
89
Page 93

ePolicy Orchestrator®3.6 Walkthrough Guide Installing and setting up
S
While dragging systems into groups, ignore the IP Integrity warning message if you see it
by clicking
To create additional groups and subgroups as needed:
Repeat all these steps to create a server group for your site, as well as additional server
and workstation groups for other sites, if you have them. You can also make groups
within groups. For example, the test network shown in this guide has systems running
both Windows 2000 and Windows 98. Due to limitations with older versions of
Windows, we need to set different policies for systems running Windows 98. Creating
Win98 and Win2K subgroups within our Workstation group makes setting these
different policies easier.
Now your test Directory is finished. You have created sites and added systems, either
manually or by importing existing NT domains on your network. And you have
separated the systems in each site into separate groups for servers and different types
of workstation operating systems. You’re ready for the next step—deploying agents.
OK.
T E P
8
3
Deploy agents to the systems in your Directory
Before you can manage the client systems in your Directory, you must install an ePolicy
Orchestrator agent on each client system. The agent is a small application that resides
on the client system and periodically checks in with the ePolicy Orchestrator server for
updates and new instructions.
Deploying the agent from the ePolicy Orchestrator server requires the following:
A network account with administrator privileges. You must specify administrator
credentials when you deploy agents.
Domain trusts to other NT domains, if necessary. To deploy agents outside the
local NT domain that hosts your ePolicy Orchestrator server, you must have a
domain trust relationship configured between the local and target domains.
For Windows 95 and Windows 98 systems, install extra Microsoft updates.
Windows 95 and Windows 98 first edition require that you install additional
Microsoft updates to be able to run the ePolicy Orchestrator agent. See the ePolicy
Orchestrator 3.6 Installation Guide for information on finding and installing these
updates. You must install these updates to run the agent on these systems at all,
even if you do not use ePolicy Orchestrator to deploy it.
For Windows 95 and Windows 98 systems, turn on file and print sharing.
Enable file and print sharing on each client to which you plan to deploy the agent.
Note that this is only a requirement to deploy the agent from the ePolicy
Orchestrator server, not to manage policies. Once you have deployed the agent to
a Windows 95 or Windows 98 system, you can disable file and print sharing.
For Windows 95 and Windows 98 systems, agent installation completes at
next logon. After deploying the agent installation package to systems running these
operating systems, the installation does not complete until the next time the system
logs on to the network.
90
Page 94

ePolicy Orchestrator®3.6 Walkthrough Guide Installing and setting up
From the Directory in the console tree, you can install the agent on each system in a
site at once. To do this, send an agent install command to the site. Because of
inheritance, you can specify an agent installation at the parent site (or group) level and
all child nodes inherit the command.
Initiate separate agent installations to separate sites of your Directory. These two agent
installation commands install the agent to all systems in these sites.
To deploy agents to a site:
1 Configure the agent policy settings before deployment.
2 Deploy agents.
Alternatively, if you do not plan to use ePolicy Orchestrator to deploy the agent, you can
install the agent manually from the client system. See Installing agent manually on
client systems on page 94.
1 Configure the agent policy settings before deployment
You can deploy agents with the default policy settings. However, for testing purposes,
modify the policy settings to allow the agent tray icon to display in the Windows system
tray on the client system. Not only will this expose you to setting agent policies, it also
makes it easier to see when the agent has installed on your client systems. When you
make this policy change at the site level, it applies to all test systems within this site.
This allows you to configure the policy settings once then deploy it to all your systems
within a site.
8
To change the agent policy settings so that the agent icon appears in the system
tray after installation:
1 In the console tree, select the desired site.
2 In the details pane, select the
products.
3 Click Edit at the right end of the Configuration row.
4 Select New Policy from the Policy Name drop-down list. The Create new policy dialog box
appears.
5 Provide a
OK. The Policy Settings dialog box appears.
New policy name for the policy (for example, New Agent Policy), then click
Policies tab, then open ePO Agent 3.5.0 from the list of
91
Page 95
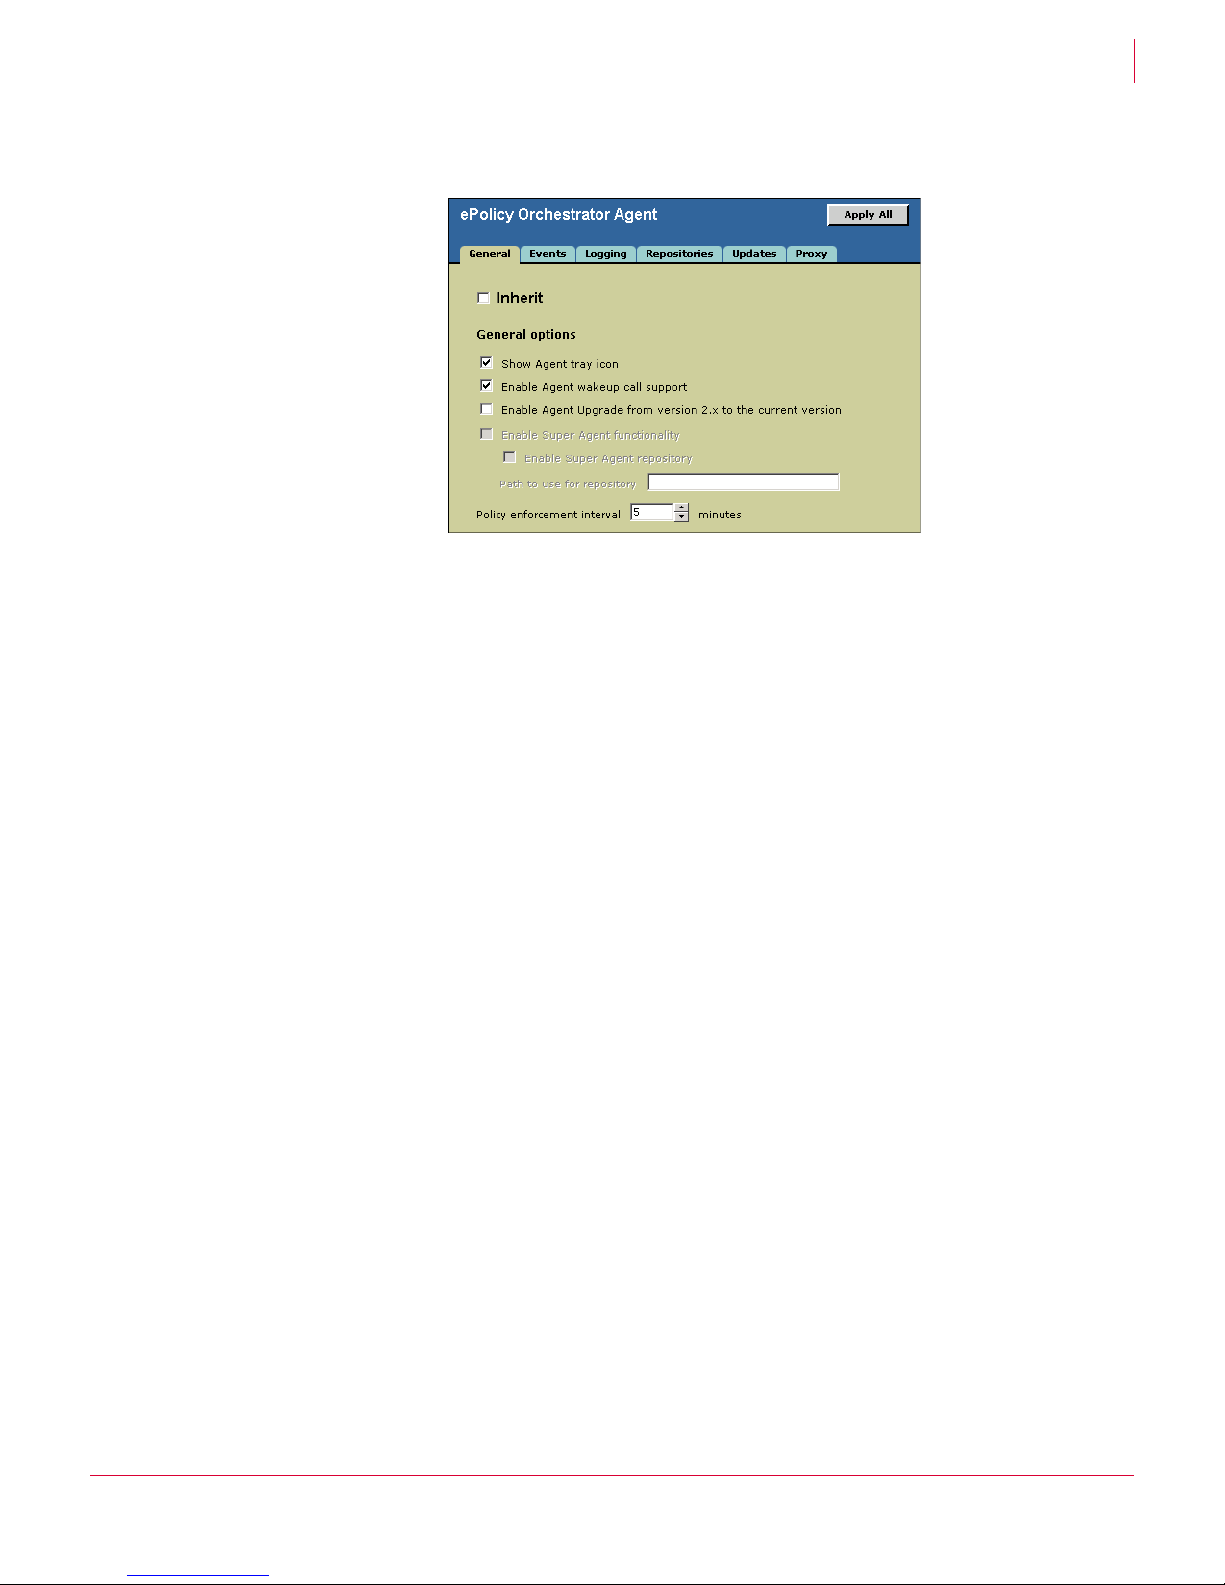
ePolicy Orchestrator®3.6 Walkthrough Guide Installing and setting up
6 On the General tab, select Show Agent tray icon.
Figure 8-4 General tab
8
7 Click
Catalog
8 Click
new policy to the site selected in the console tree.
To assign the new policy to another Directory node:
1 In the console tree, select the desired Directory node to which you want to assign
the new policy.
2 In the details pane, select the
products.
3 Click Edit at the right end of the Configuration row.
4 Select the name of the new policy (for example, New Agent Policy) from the Policy
Name
5 Click
Now your policies are set and your agents are ready to deploy. The next step is to begin
an agent install.
2 Deploy agents
Use the Send Agent Install feature to deploy agents to your client systems. Deploy agents
to all your test systems in a site at once by initiating the agent installation at your site
level in the Directory.
Apply All, then click Close. The new policy is created and added to the Policy
page.
Apply at the end of the Configuration row on the Assign Policies page to assign the
Policies tab, then open ePO Agent 3.5.0 from the list of
drop-down list.
Apply.
To initiate an agent installation for all systems in a site:
1 In the console tree, right-click the desired site, then select
2 Provide credentials with administrator rights on the target systems for the agent
installation.
3 Click OK on the Install Agent dialog box to accept all default settings and begin the
agent installation.
Send Agent Install.
92
Page 96

ePolicy Orchestrator®3.6 Walkthrough Guide Installing and setting up
4 Repeat these steps for other sites.
The agent installations begin immediately.
Deploying agents to systems running Windows 95, Windows
98, or Windows Me
When deploying agents to systems running Windows 95, Windows 98, or Windows
Me remember that the installation does not complete until the next time the system
logs back onto the network. If, after logging off and back into the Windows 95,
Windows 98, or Windows ME client systems, the agent still does not appear, wait 10
minutes, then try deploying it again. If that still does not work, you can install the agent
manually at the client system (see Installing agent manually on client systems on
page 94).
Deploying to systems outside the local NT domain
If the other site(s) contain systems residing in a different NT domain than your ePolicy
Orchestrator server, you may need to specify other domain administrator credentials
for the target domain.
8
Before deploying the agent, deselect
box, and type an appropriate user name and password with domain administrator rights
in the target domain.
Use ePO server credentials on the Install Agent dialog
Monitoring the agent installations
It may take up to 20 minutes for all the agents to be installed on all systems in your test
sites, and for the console tree to update with the new covered status. In the meantime,
you can check the ePolicy Orchestrator server for events, which can alert you of failed
agent installations. To view server events:
1 In the console tree of the ePolicy Orchestrator console, right-click your server and
select
Server Events.
2 Skim the
displayed here, but failed installs are.
When agent deployment is complete and the agents have called back to the server for
the first time, the systems in your Directory are marked with green checks.
If the agents have installed and the Directory does not reflect this, manually refresh the
Directory by right-clicking Directory and selecting
not show the systems as managed until they call back to the server, usually within 10
minutes. This is true even though the agent is installed and running on the client
systems.
Server Event Viewer for events. Successful agent installations are not
Refresh. Note that the Directory does
You can also watch the installation from any of your client systems. The default policy
suppresses the installation interface (which we did not change when we set agent
policies in this example). So you cannot see the installation interface. However, you can
open the Task Manager on the client system and watch the CPU usage spike briefly as
the installation begins. Once the agent is installed and running, two new services
appear in the
because of how we modified the agent policies before deploying, the agent icon
appears in the system tray after installing and reporting back to the server.
Processes window: UPDATERUI.EXE and FRAMEWORKSERVICE.EXE. Also,
93
Page 97

ePolicy Orchestrator®3.6 Walkthrough Guide Installing and setting up
Installing agent manually on client systems
Installing agent manually on client systems
Rather than use ePolicy Orchestrator to deploy the agent, you may want to install it
manually at the client system. Some administrators may want to install software on
client systems manually and use ePolicy Orchestrator to manage policies only. Or,
maybe you have many Windows 95 or Windows 98 client systems and do not want to
enable print and file sharing on them. In these cases, you can install the agent at the
client instead.
8
Use the
agent. The
FRAMEPKG.EXE file located on your ePolicy Orchestrator server to install the
FRAMEPKG.EXE file is automatically created when you install the ePolicy
Orchestrator server. It contains address information for your ePolicy Orchestrator
server to allow the new agent to communicate with the server immediately.
By default,
FRAMEPKG.EXE is located in the following folder on your ePolicy Orchestrator
server:
C:\Program Files\Mcafee\ePO\3.6.0\DB\Software\Current\
EPOAGENT3000\Install\0409
To install the agent manually:
1 Copy the FRAMEPKG.EXE file to the local client or network folder accessible from the
client.
2 Run
FRAMEPKG.EXE by double-clicking it. Wait a few moments while the agent
installs.
At some random interval within ten minutes, the agent reports back to the ePolicy
Orchestrator server for the first time. At this point, the system is added to the Directory
as a managed system. If you specified IP address filtering for your Directory sites and
groups, the client is added to the appropriate site or group for its IP address. Otherwise,
the system is added to the Lost&Found group. Once the system is added to the
Directory, you can manage its policies through the ePolicy Orchestrator console.
You can bypass the ten-minute callback interval and force the new agent to call back to
the server immediately. You do this from any system on which an agent has just been
installed.
To manually force the initial agent callback:
1 From the client system where you just installed the agent, open a DOS command
window by selecting
2 In the command window, navigate to the agent installation folder containing the
CMDAGENT.EXE file.
3 Type the following command (note the spaces between command line options):
CMDAGENT /p /e /c
4 Press ENTER. The agent calls into the ePolicy Orchestrator server immediately.
5 From the ePolicy Orchestrator console on your server, refresh the Directory by
pressing F5. The new client system on which you installed the agent should now
appear in your Directory.
Start | Run, type command, and press Enter.
94
Page 98

ePolicy Orchestrator®3.6 Walkthrough Guide Installing and setting up
S
Installing agent manually on client systems
T E P
8
4
Set up master and distributed repositories
Now you have agents installed on your client systems, but what can they do? The
purpose of an agent is to allow you to manage client security software policies centrally
through ePolicy Orchestrator. But until you have security software installed on the client
systems, your agents have nothing to do. The next step is to use ePolicy Orchestrator
to deploy VirusScan Enterprise 8.0i anti-virus software to your client systems.
Software deployed with ePolicy Orchestrator is stored in software repositories. There
are many ways to set up your repositories. This guide demonstrates a typical example
that you can use in your test environment.
About using master and distributed repositories in your test network
ePolicy Orchestrator uses repositories to store the software that it deploys. This section
illustrates using both master and distributed repositories for deploying software and
updating. Repositories store the software, such as the agent or VirusScan installation
files, and updates, such as new virus definition (DAT) files, that you plan to deploy to
client systems. The master repository is located on the ePolicy Orchestrator server, and
is the primary storehouse for your software and updates. Distributed repositories are
copies of the master that reside in other parts of your network. Systems in those other
parts of your network can update more quickly from local servers than across a WAN
to your ePolicy Orchestrator server.
Domains and Active Directory containers can be geographically separated and
connected via a WAN. In this case, create a distributed repository, which is simply a
copy of the master repository, on a system in the remote location. Systems in that
location,
of having to copy updates across the WAN.
Container1 in our example, can update from the distributed repository instead
Systems in the Domain1 site receive updates and product deployments directly from the
master repository, located on the ePolicy Orchestrator server. Systems located in the
Container1 site, however, receive them from a distributed repository.
Use the following procedure for using and setting up repositories in your test
environment:
1 Add VirusScan Enterprise to the master repository.
2 Pull updates from McAfee source repository.
3 Create a distributed repository.
1 Add VirusScan Enterprise to the master repository
The VirusScan Enterprise 8.0i NAP file, allows you to manage VirusScan Enterprise 8.0i
policies once it has been installed on client systems in your network. However, to be
able to first use ePolicy Orchestrator to deploy VirusScan Enterprise 8.0i to those client
systems, you must also check in the VirusScan Enterprise deployment, or installation,
package to the master software repository. The deployment package file is called
P
KGCATALOG.Z and is contained in the VSE80IEVAL.ZIP you downloaded from McAfee
(see Get installation files from McAfee on page 81).
To check in the VirusScan Enterprise 8.0i package to your master repository:
1 In the console tree, select Repository.
2 In the details pane, select Check in Package. The Check in package wizard appears.
95
Page 99

ePolicy Orchestrator®3.6 Walkthrough Guide Installing and setting up
Installing agent manually on client systems
3 Click Next.
8
4 On the second page of the wizard, select
Figure 8-5 Check in Package wizard
Products or updates, then click Next.
5 Browse to your temporary folder containing your VirusScan Enterprise 8.0i
installation files.
6 Locate and select the P
KGCATALOG.Z package file, then click Next.
7 At the final wizard page, click Finish to begin the package check-in.
Wait a few moments while ePolicy Orchestrator uploads the package to the repository.
To check in the VirusScan 4.5.1 package (for Windows 95, Windows 98, or
Windows ME client systems):
VirusScan Enterprise 8.0i does not run on Windows 95, Windows 98, or Windows ME.
If you have client systems in your test network running these versions of Windows,
deploy VirusScan 4.5.1 to these systems. To do this, repeat the same procedure above
to check in the VirusScan 4.5.1 deployment package to the software repository. The
4.5.1 package is also called
PkgCatalog.z and is located in your temporary folder to
which you have extracted the VirusScan 4.5.1 installation files.
2 Pull updates from McAfee source repository
Use the McAfee HTTP or FTP site as your source repository, from which you can update
your master repository with the latest DAT and engine files. Initiate a pull from the
source repository to your master repository to:
Test that your ePolicy Orchestrator server can connect over the Internet to the
source repository.
Update your master repository with the latest DAT files.
DAT files are updated often, and the DAT files included in your VirusScan Enterprise
installation files are not the latest. Pull the latest DAT files from the source repository
before deploying VirusScan Enterprise to your network.
96
Page 100

ePolicy Orchestrator®3.6 Walkthrough Guide Installing and setting up
Installing agent manually on client systems
To configure proxy settings:
Your ePolicy Orchestrator server must be able to access the Internet to pull updates
from the McAfee source repository.
ePolicy Orchestrator by default uses your Internet Explorer proxy settings. If you have
not yet done so, configure your LAN connection for Internet Explorer. Be sure to select
the
Use proxy for all protocols (both FTP and HTTP) and select Bypass proxy for local addresses
options.
8
Alternatively, you can manually specify proxy server information using the
proxy settings
option. Refer to the ePolicy Orchestrator 3.6 Product Guide for information
on how to do this.
To initiate manual pull from the McAfee source repository:
1 In the console tree, select Repository.
2 In the details pane, select
3 Click
Next.
Pull now. The Pull Now wizard appears.
4 Select McAfeeFtp, then click Next.
Figure 8-6 Pull Now wizard
Configure
5 If you are managing older products, such as VirusScan 4.5.1 for Windows 95 or 98
systems, be sure to select
6 Click
Finish to accept all defaults on this page and begin the pull task. The Server Task
Log appears.
7 Monitor the task status until it completes.
Now you have checked in VirusScan Enterprise to your master repository and also
updated the master repository with the latest DAT and engine files from the McAfee
source repository. The systems located in the same domain as your ePolicy
Orchestrator server, those systems in your
get VirusScan Enterprise from the master repository.
Support legacy product update.
Domain1 site in the Directory in this example,
97
 Loading...