

Page 1

McAfee ePolicy Orchestrator 4.5
Product Guide
Page 2

COPYRIGHT
Copyright © 2009 McAfee, Inc. All Rights Reserved.
No part of this publication may be reproduced, transmitted, transcribed, stored in a retrieval system, or translated into any language in any form
or by any means without the written permission of McAfee, Inc., or its suppliers or affiliate companies.
TRADEMARK ATTRIBUTIONS
AVERT, EPO, EPOLICY ORCHESTRATOR, FOUNDSTONE, GROUPSHIELD, INTRUSHIELD, LINUXSHIELD, MAX (MCAFEE SECURITYALLIANCE
EXCHANGE), MCAFEE, NETSHIELD, PORTALSHIELD, PREVENTSYS, SECURITYALLIANCE, SITEADVISOR, TOTAL PROTECTION, VIRUSSCAN,
WEBSHIELD are registered trademarks or trademarks of McAfee, Inc. and/or its affiliates in the US and/or other countries. McAfee Red in
connection with security is distinctive of McAfee brand products. All other registered and unregistered trademarks herein are the sole property
of their respective owners.
LICENSE INFORMATION
License Agreement
NOTICE TO ALL USERS: CAREFULLY READ THE APPROPRIATE LEGAL AGREEMENT CORRESPONDING TO THE LICENSE YOU PURCHASED,
WHICH SETS FORTH THE GENERAL TERMS AND CONDITIONS FOR THE USE OF THE LICENSED SOFTWARE. IF YOU DO NOT KNOW WHICH
TYPE OF LICENSE YOU HAVE ACQUIRED, PLEASE CONSULT THE SALES AND OTHER RELATED LICENSE GRANT OR PURCHASE ORDER DOCUMENTS
THAT ACCOMPANY YOUR SOFTWARE PACKAGING OR THAT YOU HAVE RECEIVED SEPARATELY AS PART OF THE PURCHASE (AS A BOOKLET,
A FILE ON THE PRODUCT CD, OR A FILE AVAILABLE ON THE WEBSITE FROM WHICH YOU DOWNLOADED THE SOFTWARE PACKAGE). IF YOU
DO NOT AGREE TO ALL OF THE TERMS SET FORTH IN THE AGREEMENT, DO NOT INSTALL THE SOFTWARE. IF APPLICABLE, YOU MAY RETURN
THE PRODUCT TO MCAFEE OR THE PLACE OF PURCHASE FOR A FULL REFUND.
License Attributions
Refer to the product Release Notes.
McAfee ePolicy Orchestrator 4.5 Product Guide2
Page 3

Contents
Introducing ePolicy Orchestrator 4.5. . . . . . . . . . . . . . . . . . . . . . . . . . . . . . . . . . . . . . . . . . . . . . . . . . . 14
Getting Started with ePolicy Orchestrator 4.5. . . . . . . . . . . . . . . . . . . . . . . . . . . . . . . . . . . . . . . . 17
Components and what they do. . . . . . . . . . . . . . . . . . . . . . . . . . . . . . . . . . . . . . . . . . . . . . . . . . . . . . . . . . . . . . 14
Using this guide. . . . . . . . . . . . . . . . . . . . . . . . . . . . . . . . . . . . . . . . . . . . . . . . . . . . . . . . . . . . . . . . . . . . . . . . . . . 15
Audience. . . . . . . . . . . . . . . . . . . . . . . . . . . . . . . . . . . . . . . . . . . . . . . . . . . . . . . . . . . . . . . . . . . . . . . . . 15
Finding documentation for McAfee enterprise products. . . . . . . . . . . . . . . . . . . . . . . . . . . . . . . . . . . . . . . . . . . 15
Logging on and off ePO servers. . . . . . . . . . . . . . . . . . . . . . . . . . . . . . . . . . . . . . . . . . . . . . . . . . . . . . . . . . . . . . 17
Logging on to ePO servers. . . . . . . . . . . . . . . . . . . . . . . . . . . . . . . . . . . . . . . . . . . . . . . . . . . . . . . . . . . 17
Logging off ePO servers. . . . . . . . . . . . . . . . . . . . . . . . . . . . . . . . . . . . . . . . . . . . . . . . . . . . . . . . . . . . . 17
Viewing the server version number . . . . . . . . . . . . . . . . . . . . . . . . . . . . . . . . . . . . . . . . . . . . . . . . . . . . . . . . . . 18
How to navigate the ePO interface. . . . . . . . . . . . . . . . . . . . . . . . . . . . . . . . . . . . . . . . . . . . . . . . . . . . . . . . . . . 18
The Menu. . . . . . . . . . . . . . . . . . . . . . . . . . . . . . . . . . . . . . . . . . . . . . . . . . . . . . . . . . . . . . . . . . . . . . . . 18
The navigation bar. . . . . . . . . . . . . . . . . . . . . . . . . . . . . . . . . . . . . . . . . . . . . . . . . . . . . . . . . . . . . . . . . 19
Setting up ePolicy Orchestrator. . . . . . . . . . . . . . . . . . . . . . . . . . . . . . . . . . . . . . . . . . . . . . . . . . . . . . . . . . . . . . 19
Configure your ePO server. . . . . . . . . . . . . . . . . . . . . . . . . . . . . . . . . . . . . . . . . . . . . . . . . . . . . . . . . . . 20
Add systems to the System Tree. . . . . . . . . . . . . . . . . . . . . . . . . . . . . . . . . . . . . . . . . . . . . . . . . . . . . . 20
Distribute agents to your systems. . . . . . . . . . . . . . . . . . . . . . . . . . . . . . . . . . . . . . . . . . . . . . . . . . . . . 21
Create repositories. . . . . . . . . . . . . . . . . . . . . . . . . . . . . . . . . . . . . . . . . . . . . . . . . . . . . . . . . . . . . . . . . 21
Configure your policies and client tasks. . . . . . . . . . . . . . . . . . . . . . . . . . . . . . . . . . . . . . . . . . . . . . . . 22
Deploy your products and software. . . . . . . . . . . . . . . . . . . . . . . . . . . . . . . . . . . . . . . . . . . . . . . . . . . . 22
Configure advanced features. . . . . . . . . . . . . . . . . . . . . . . . . . . . . . . . . . . . . . . . . . . . . . . . . . . . . . . . . 22
Configuring ePolicy Orchestrator. . . . . . . . . . . . . . . . . . . . . . . . . . . . . . . . . . . . . . . . . . . . . . . . . . . . . . . 23
ePO user accounts. . . . . . . . . . . . . . . . . . . . . . . . . . . . . . . . . . . . . . . . . . . . . . . . . . . . . . . . . . . . . . . . . . . . . . . . 24
Global administrators. . . . . . . . . . . . . . . . . . . . . . . . . . . . . . . . . . . . . . . . . . . . . . . . . . . . . . . . . . . . . . . 24
Working with user accounts. . . . . . . . . . . . . . . . . . . . . . . . . . . . . . . . . . . . . . . . . . . . . . . . . . . . . . . . . . 24
How permission sets work. . . . . . . . . . . . . . . . . . . . . . . . . . . . . . . . . . . . . . . . . . . . . . . . . . . . . . . . . . . . . . . . . . 25
Working with permission sets. . . . . . . . . . . . . . . . . . . . . . . . . . . . . . . . . . . . . . . . . . . . . . . . . . . . . . . . 26
Contacts. . . . . . . . . . . . . . . . . . . . . . . . . . . . . . . . . . . . . . . . . . . . . . . . . . . . . . . . . . . . . . . . . . . . . . . . . . . . . . . . . 28
Working with contacts. . . . . . . . . . . . . . . . . . . . . . . . . . . . . . . . . . . . . . . . . . . . . . . . . . . . . . . . . . . . . . 28
Server settings and the behaviors they control. . . . . . . . . . . . . . . . . . . . . . . . . . . . . . . . . . . . . . . . . . . . . . . . . . 29
Working with server settings. . . . . . . . . . . . . . . . . . . . . . . . . . . . . . . . . . . . . . . . . . . . . . . . . . . . . . . . . 30
3McAfee ePolicy Orchestrator 4.5 Product Guide
Page 4

Contents
Managing ePolicy Orchestrator users with Active Directory. . . . . . . . . . . . . . . . . . . . . . . . . . . . . . . . . . . . . . . . 36
Configuring Windows authentication and authorization. . . . . . . . . . . . . . . . . . . . . . . . . . . . . . . . . . . . 37
Registering servers for use with ePolicy Orchestrator. . . . . . . . . . . . . . . . . . . . . . . . . . . . . . . . . . . . . . . . . . . . 39
What are registered servers. . . . . . . . . . . . . . . . . . . . . . . . . . . . . . . . . . . . . . . . . . . . . . . . . . . . . . . . . . 39
Registering servers. . . . . . . . . . . . . . . . . . . . . . . . . . . . . . . . . . . . . . . . . . . . . . . . . . . . . . . . . . . . . . . . . 39
Security keys and how they work. . . . . . . . . . . . . . . . . . . . . . . . . . . . . . . . . . . . . . . . . . . . . . . . . . . . . . . . . . . . 41
Backing up and restoring keys. . . . . . . . . . . . . . . . . . . . . . . . . . . . . . . . . . . . . . . . . . . . . . . . . . . . . . . . 42
Master repository key pair. . . . . . . . . . . . . . . . . . . . . . . . . . . . . . . . . . . . . . . . . . . . . . . . . . . . . . . . . . . 44
Agent-server secure communication (ASSC) keys. . . . . . . . . . . . . . . . . . . . . . . . . . . . . . . . . . . . . . . . 46
MyAvert Security Threats . . . . . . . . . . . . . . . . . . . . . . . . . . . . . . . . . . . . . . . . . . . . . . . . . . . . . . . . . . . . . . . . . . 50
Working with MyAvert Security Threats. . . . . . . . . . . . . . . . . . . . . . . . . . . . . . . . . . . . . . . . . . . . . . . . . 50
Agent Handlers and what they do. . . . . . . . . . . . . . . . . . . . . . . . . . . . . . . . . . . . . . . . . . . . . . . . . . . . . . . . . . . . 52
How Agent Handlers work. . . . . . . . . . . . . . . . . . . . . . . . . . . . . . . . . . . . . . . . . . . . . . . . . . . . . . . . . . . 52
Handler groups and priority. . . . . . . . . . . . . . . . . . . . . . . . . . . . . . . . . . . . . . . . . . . . . . . . . . . . . . . . . . 52
Working with Agent Handlers. . . . . . . . . . . . . . . . . . . . . . . . . . . . . . . . . . . . . . . . . . . . . . . . . . . . . . . . . 53
IPv6. . . . . . . . . . . . . . . . . . . . . . . . . . . . . . . . . . . . . . . . . . . . . . . . . . . . . . . . . . . . . . . . . . . . . . . . . . . . . . . . . . . . 58
Exporting tables and charts to other formats. . . . . . . . . . . . . . . . . . . . . . . . . . . . . . . . . . . . . . . . . . . . . . . . . . . 59
Distributing Agents to Manage Systems. . . . . . . . . . . . . . . . . . . . . . . . . . . . . . . . . . . . . . . . . . . . . . . 60
About the McAfee Agent. . . . . . . . . . . . . . . . . . . . . . . . . . . . . . . . . . . . . . . . . . . . . . . . . . . . . . . . . . . . . . . . . . . . 60
Agent-server communication . . . . . . . . . . . . . . . . . . . . . . . . . . . . . . . . . . . . . . . . . . . . . . . . . . . . . . . . 61
Wake-up calls and wake-up tasks. . . . . . . . . . . . . . . . . . . . . . . . . . . . . . . . . . . . . . . . . . . . . . . . . . . . . 62
SuperAgents and broadcast wake-up calls. . . . . . . . . . . . . . . . . . . . . . . . . . . . . . . . . . . . . . . . . . . . . . 63
System requirements and supported operating systems and processors. . . . . . . . . . . . . . . . . . . . . . 63
Installing the McAfee Agent. . . . . . . . . . . . . . . . . . . . . . . . . . . . . . . . . . . . . . . . . . . . . . . . . . . . . . . . . . . . . . . . . 65
Methods of agent deployment and installation. . . . . . . . . . . . . . . . . . . . . . . . . . . . . . . . . . . . . . . . . . . 65
Agent installation folder — Windows. . . . . . . . . . . . . . . . . . . . . . . . . . . . . . . . . . . . . . . . . . . . . . . . . . . 78
Agent installation folder — UNIX-based systems. . . . . . . . . . . . . . . . . . . . . . . . . . . . . . . . . . . . . . . . . 78
The agent installation package. . . . . . . . . . . . . . . . . . . . . . . . . . . . . . . . . . . . . . . . . . . . . . . . . . . . . . . 79
Agent installation command-line options. . . . . . . . . . . . . . . . . . . . . . . . . . . . . . . . . . . . . . . . . . . . . . . 80
Assigning values to custom properties. . . . . . . . . . . . . . . . . . . . . . . . . . . . . . . . . . . . . . . . . . . . . . . . . 81
Upgrading and Restoring Agents. . . . . . . . . . . . . . . . . . . . . . . . . . . . . . . . . . . . . . . . . . . . . . . . . . . . . . . . . . . . . 81
Upgrading agents using product deployment task. . . . . . . . . . . . . . . . . . . . . . . . . . . . . . . . . . . . . . . . 82
Upgrading agents manually or with login scripts. . . . . . . . . . . . . . . . . . . . . . . . . . . . . . . . . . . . . . . . . 83
Restoring a previous version of the agent (Windows). . . . . . . . . . . . . . . . . . . . . . . . . . . . . . . . . . . . . 83
Restoring a previous version of the agent (UNIX). . . . . . . . . . . . . . . . . . . . . . . . . . . . . . . . . . . . . . . . 83
Configuring Agent Policies. . . . . . . . . . . . . . . . . . . . . . . . . . . . . . . . . . . . . . . . . . . . . . . . . . . . . . . . . . . . . . . . . . 83
About agent policy settings. . . . . . . . . . . . . . . . . . . . . . . . . . . . . . . . . . . . . . . . . . . . . . . . . . . . . . . . . . 84
McAfee ePolicy Orchestrator 4.5 Product Guide4
Page 5

Contents
Proxy settings for the agent. . . . . . . . . . . . . . . . . . . . . . . . . . . . . . . . . . . . . . . . . . . . . . . . . . . . . . . . . . 86
Retrieving system properties. . . . . . . . . . . . . . . . . . . . . . . . . . . . . . . . . . . . . . . . . . . . . . . . . . . . . . . . . 87
Scheduling a client task for a group. . . . . . . . . . . . . . . . . . . . . . . . . . . . . . . . . . . . . . . . . . . . . . . . . . . 87
Creating a new scheduled client task. . . . . . . . . . . . . . . . . . . . . . . . . . . . . . . . . . . . . . . . . . . . . . . . . . 88
Configuring selected systems for updating. . . . . . . . . . . . . . . . . . . . . . . . . . . . . . . . . . . . . . . . . . . . . . 89
Working with the agent from the ePO server. . . . . . . . . . . . . . . . . . . . . . . . . . . . . . . . . . . . . . . . . . . . . . . . . . . 89
Viewing agent and product properties. . . . . . . . . . . . . . . . . . . . . . . . . . . . . . . . . . . . . . . . . . . . . . . . . . 89
Viewing system information. . . . . . . . . . . . . . . . . . . . . . . . . . . . . . . . . . . . . . . . . . . . . . . . . . . . . . . . . . 90
Accessing settings to retrieve properties. . . . . . . . . . . . . . . . . . . . . . . . . . . . . . . . . . . . . . . . . . . . . . . . 90
Windows system and product properties reported by the agent. . . . . . . . . . . . . . . . . . . . . . . . . . . . . 91
Sending manual wake-up calls to systems. . . . . . . . . . . . . . . . . . . . . . . . . . . . . . . . . . . . . . . . . . . . . . 92
Sending manual wake-up calls to a group. . . . . . . . . . . . . . . . . . . . . . . . . . . . . . . . . . . . . . . . . . . . . . 92
Making the system tray icon visible. . . . . . . . . . . . . . . . . . . . . . . . . . . . . . . . . . . . . . . . . . . . . . . . . . . . 93
Locating inactive agents . . . . . . . . . . . . . . . . . . . . . . . . . . . . . . . . . . . . . . . . . . . . . . . . . . . . . . . . . . . . 93
Running agent tasks from the managed system. . . . . . . . . . . . . . . . . . . . . . . . . . . . . . . . . . . . . . . . . . . . . . . . . 93
Running a manual update. . . . . . . . . . . . . . . . . . . . . . . . . . . . . . . . . . . . . . . . . . . . . . . . . . . . . . . . . . . 94
Enforcing policies. . . . . . . . . . . . . . . . . . . . . . . . . . . . . . . . . . . . . . . . . . . . . . . . . . . . . . . . . . . . . . . . . . 94
Updating policies. . . . . . . . . . . . . . . . . . . . . . . . . . . . . . . . . . . . . . . . . . . . . . . . . . . . . . . . . . . . . . . . . . . 95
Sending properties to the ePO server. . . . . . . . . . . . . . . . . . . . . . . . . . . . . . . . . . . . . . . . . . . . . . . . . . 95
Sending events to the ePO server immediately. . . . . . . . . . . . . . . . . . . . . . . . . . . . . . . . . . . . . . . . . . 95
Using the icon option to update. . . . . . . . . . . . . . . . . . . . . . . . . . . . . . . . . . . . . . . . . . . . . . . . . . . . . . . 95
Forcing the agent to call in to the server. . . . . . . . . . . . . . . . . . . . . . . . . . . . . . . . . . . . . . . . . . . . . . . 96
Viewing version numbers and settings. . . . . . . . . . . . . . . . . . . . . . . . . . . . . . . . . . . . . . . . . . . . . . . . . 96
Agent command-line options. . . . . . . . . . . . . . . . . . . . . . . . . . . . . . . . . . . . . . . . . . . . . . . . . . . . . . . . . 97
Using the system tray icon. . . . . . . . . . . . . . . . . . . . . . . . . . . . . . . . . . . . . . . . . . . . . . . . . . . . . . . . . . . . . . . . . . 97
What the system tray icon does. . . . . . . . . . . . . . . . . . . . . . . . . . . . . . . . . . . . . . . . . . . . . . . . . . . . . . 97
Making the system tray icon visible. . . . . . . . . . . . . . . . . . . . . . . . . . . . . . . . . . . . . . . . . . . . . . . . . . . . 98
Enabling user access to updating functionality. . . . . . . . . . . . . . . . . . . . . . . . . . . . . . . . . . . . . . . . . . . 98
Removing the McAfee Agent. . . . . . . . . . . . . . . . . . . . . . . . . . . . . . . . . . . . . . . . . . . . . . . . . . . . . . . . . . . . . . . . 98
Running FrmInst.exe from the command line. . . . . . . . . . . . . . . . . . . . . . . . . . . . . . . . . . . . . . . . . . . . 99
Removing agents when deleting systems from the System Tree. . . . . . . . . . . . . . . . . . . . . . . . . . . . . 99
Removing agents when deleting groups from the System Tree. . . . . . . . . . . . . . . . . . . . . . . . . . . . . . 99
Removing agents from systems in query results. . . . . . . . . . . . . . . . . . . . . . . . . . . . . . . . . . . . . . . . 100
Uninstalling from non-Windows operating systems. . . . . . . . . . . . . . . . . . . . . . . . . . . . . . . . . . . . . . 100
Agent Activity Logs. . . . . . . . . . . . . . . . . . . . . . . . . . . . . . . . . . . . . . . . . . . . . . . . . . . . . . . . . . . . . . . . . . . . . . . 101
Viewing the agent activity log. . . . . . . . . . . . . . . . . . . . . . . . . . . . . . . . . . . . . . . . . . . . . . . . . . . . . . . 101
5McAfee ePolicy Orchestrator 4.5 Product Guide
Page 6

Contents
Organizing the System Tree. . . . . . . . . . . . . . . . . . . . . . . . . . . . . . . . . . . . . . . . . . . . . . . . . . . . . . . . . . . . 103
The System Tree. . . . . . . . . . . . . . . . . . . . . . . . . . . . . . . . . . . . . . . . . . . . . . . . . . . . . . . . . . . . . . . . . . . . . . . . . 104
Considerations when planning your System Tree. . . . . . . . . . . . . . . . . . . . . . . . . . . . . . . . . . . . . . . . . . . . . . . 105
Administrator access. . . . . . . . . . . . . . . . . . . . . . . . . . . . . . . . . . . . . . . . . . . . . . . . . . . . . . . . . . . . . . . 105
Environmental borders and their impact on system organization. . . . . . . . . . . . . . . . . . . . . . . . . . . 106
Subnets and IP address ranges. . . . . . . . . . . . . . . . . . . . . . . . . . . . . . . . . . . . . . . . . . . . . . . . . . . . . . 106
Tags and systems with similar characteristics. . . . . . . . . . . . . . . . . . . . . . . . . . . . . . . . . . . . . . . . . . . 107
Operating systems and software. . . . . . . . . . . . . . . . . . . . . . . . . . . . . . . . . . . . . . . . . . . . . . . . . . . . . 107
Tags and how they work. . . . . . . . . . . . . . . . . . . . . . . . . . . . . . . . . . . . . . . . . . . . . . . . . . . . . . . . . . . . . . . . . . 107
Active Directory and NT domain synchronization. . . . . . . . . . . . . . . . . . . . . . . . . . . . . . . . . . . . . . . . . . . . . . . 108
Active Directory synchronization. . . . . . . . . . . . . . . . . . . . . . . . . . . . . . . . . . . . . . . . . . . . . . . . . . . . . 108
NT domain synchronization. . . . . . . . . . . . . . . . . . . . . . . . . . . . . . . . . . . . . . . . . . . . . . . . . . . . . . . . . 110
Criteria-based sorting. . . . . . . . . . . . . . . . . . . . . . . . . . . . . . . . . . . . . . . . . . . . . . . . . . . . . . . . . . . . . . . . . . . . . 110
How settings affect sorting. . . . . . . . . . . . . . . . . . . . . . . . . . . . . . . . . . . . . . . . . . . . . . . . . . . . . . . . . 111
IP address sorting criteria. . . . . . . . . . . . . . . . . . . . . . . . . . . . . . . . . . . . . . . . . . . . . . . . . . . . . . . . . . 111
Tag-based sorting criteria. . . . . . . . . . . . . . . . . . . . . . . . . . . . . . . . . . . . . . . . . . . . . . . . . . . . . . . . . . . 111
Group order and sorting. . . . . . . . . . . . . . . . . . . . . . . . . . . . . . . . . . . . . . . . . . . . . . . . . . . . . . . . . . . . 112
Catch-all groups. . . . . . . . . . . . . . . . . . . . . . . . . . . . . . . . . . . . . . . . . . . . . . . . . . . . . . . . . . . . . . . . . . 112
How a system is first placed in the System Tree. . . . . . . . . . . . . . . . . . . . . . . . . . . . . . . . . . . . . . . . . . . . . . . 112
Working with tags. . . . . . . . . . . . . . . . . . . . . . . . . . . . . . . . . . . . . . . . . . . . . . . . . . . . . . . . . . . . . . . . . . . . . . . . 113
Creating tags with the Tag Builder. . . . . . . . . . . . . . . . . . . . . . . . . . . . . . . . . . . . . . . . . . . . . . . . . . . . 113
Excluding systems from automatic tagging. . . . . . . . . . . . . . . . . . . . . . . . . . . . . . . . . . . . . . . . . . . . . 114
Applying tags to selected systems. . . . . . . . . . . . . . . . . . . . . . . . . . . . . . . . . . . . . . . . . . . . . . . . . . . . 115
Applying criteria-based tags automatically to all matching systems. . . . . . . . . . . . . . . . . . . . . . . . . 115
Creating and populating groups. . . . . . . . . . . . . . . . . . . . . . . . . . . . . . . . . . . . . . . . . . . . . . . . . . . . . . . . . . . . . 116
Creating groups manually. . . . . . . . . . . . . . . . . . . . . . . . . . . . . . . . . . . . . . . . . . . . . . . . . . . . . . . . . . 118
Adding systems manually to an existing group. . . . . . . . . . . . . . . . . . . . . . . . . . . . . . . . . . . . . . . . . . 118
Importing systems from a text file. . . . . . . . . . . . . . . . . . . . . . . . . . . . . . . . . . . . . . . . . . . . . . . . . . . 119
Sorting systems into criteria-based groups. . . . . . . . . . . . . . . . . . . . . . . . . . . . . . . . . . . . . . . . . . . . . 121
Importing Active Directory containers. . . . . . . . . . . . . . . . . . . . . . . . . . . . . . . . . . . . . . . . . . . . . . . . . 123
Importing NT domains to an existing group. . . . . . . . . . . . . . . . . . . . . . . . . . . . . . . . . . . . . . . . . . . . 125
Synchronizing the System Tree on a schedule. . . . . . . . . . . . . . . . . . . . . . . . . . . . . . . . . . . . . . . . . . 127
Updating the synchronized group with an NT domain manually. . . . . . . . . . . . . . . . . . . . . . . . . . . . 128
Moving systems manually within the System Tree. . . . . . . . . . . . . . . . . . . . . . . . . . . . . . . . . . . . . . . . . . . . . . 128
Transferring systems between ePO servers. . . . . . . . . . . . . . . . . . . . . . . . . . . . . . . . . . . . . . . . . . . . . . . . . . . 129
Creating Repositories. . . . . . . . . . . . . . . . . . . . . . . . . . . . . . . . . . . . . . . . . . . . . . . . . . . . . . . . . . . . . . . . . . . 130
Repository types and what they do. . . . . . . . . . . . . . . . . . . . . . . . . . . . . . . . . . . . . . . . . . . . . . . . . . . . . . . . . . 130
McAfee ePolicy Orchestrator 4.5 Product Guide6
Page 7

Contents
Types of distributed repositories. . . . . . . . . . . . . . . . . . . . . . . . . . . . . . . . . . . . . . . . . . . . . . . . . . . . . 132
Repository branches and their purposes. . . . . . . . . . . . . . . . . . . . . . . . . . . . . . . . . . . . . . . . . . . . . . . 133
Repository list file and its uses. . . . . . . . . . . . . . . . . . . . . . . . . . . . . . . . . . . . . . . . . . . . . . . . . . . . . . . 134
How repositories work together. . . . . . . . . . . . . . . . . . . . . . . . . . . . . . . . . . . . . . . . . . . . . . . . . . . . . . . . . . . . . 134
Ensuring access to the source site. . . . . . . . . . . . . . . . . . . . . . . . . . . . . . . . . . . . . . . . . . . . . . . . . . . . . . . . . . . 135
Configuring proxy settings. . . . . . . . . . . . . . . . . . . . . . . . . . . . . . . . . . . . . . . . . . . . . . . . . . . . . . . . . . 135
Configuring proxy settings for the McAfee Agent. . . . . . . . . . . . . . . . . . . . . . . . . . . . . . . . . . . . . . . . 135
Configuring proxy settings for MyAvert Security Threats. . . . . . . . . . . . . . . . . . . . . . . . . . . . . . . . . . 136
Working with source and fallback sites. . . . . . . . . . . . . . . . . . . . . . . . . . . . . . . . . . . . . . . . . . . . . . . . . . . . . . . 137
Switching source and fallback sites. . . . . . . . . . . . . . . . . . . . . . . . . . . . . . . . . . . . . . . . . . . . . . . . . . . 137
Creating source sites. . . . . . . . . . . . . . . . . . . . . . . . . . . . . . . . . . . . . . . . . . . . . . . . . . . . . . . . . . . . . . 137
Editing source and fallback sites. . . . . . . . . . . . . . . . . . . . . . . . . . . . . . . . . . . . . . . . . . . . . . . . . . . . . 138
Deleting source sites or disabling fallback sites. . . . . . . . . . . . . . . . . . . . . . . . . . . . . . . . . . . . . . . . . 139
Using SuperAgents as distributed repositories. . . . . . . . . . . . . . . . . . . . . . . . . . . . . . . . . . . . . . . . . . . . . . . . . 139
Creating SuperAgent repositories. . . . . . . . . . . . . . . . . . . . . . . . . . . . . . . . . . . . . . . . . . . . . . . . . . . . 139
Selecting which packages are replicated to SuperAgent repositories. . . . . . . . . . . . . . . . . . . . . . . . 140
Deleting SuperAgent distributed repositories. . . . . . . . . . . . . . . . . . . . . . . . . . . . . . . . . . . . . . . . . . . 141
Creating and configuring FTP, HTTP, and UNC repositories. . . . . . . . . . . . . . . . . . . . . . . . . . . . . . . . . . . . . . . 141
Creating a folder location on an FTP, HTTP server or UNC share. . . . . . . . . . . . . . . . . . . . . . . . . . . 141
Adding the distributed repository to ePolicy Orchestrator. . . . . . . . . . . . . . . . . . . . . . . . . . . . . . . . . 142
Avoiding replication of selected packages. . . . . . . . . . . . . . . . . . . . . . . . . . . . . . . . . . . . . . . . . . . . . . 143
Disabling replication of selected packages. . . . . . . . . . . . . . . . . . . . . . . . . . . . . . . . . . . . . . . . . . . . . 144
Enabling folder sharing for UNC and HTTP repositories. . . . . . . . . . . . . . . . . . . . . . . . . . . . . . . . . . . 144
Editing distributed repositories . . . . . . . . . . . . . . . . . . . . . . . . . . . . . . . . . . . . . . . . . . . . . . . . . . . . . . 144
Deleting distributed repositories. . . . . . . . . . . . . . . . . . . . . . . . . . . . . . . . . . . . . . . . . . . . . . . . . . . . . 145
Working with the repository list files. . . . . . . . . . . . . . . . . . . . . . . . . . . . . . . . . . . . . . . . . . . . . . . . . . . . . . . . . 145
Exporting the repository list SiteList.xml file. . . . . . . . . . . . . . . . . . . . . . . . . . . . . . . . . . . . . . . . . . . . 145
Exporting the repository list SiteMgr.xml file for backup or use by other servers. . . . . . . . . . . . . . . 146
Importing distributed repositories from the SiteMgr.xml file. . . . . . . . . . . . . . . . . . . . . . . . . . . . . . . 146
Importing source sites from the SiteMgr.xml file. . . . . . . . . . . . . . . . . . . . . . . . . . . . . . . . . . . . . . . . 147
Changing credentials on multiple distributed repositories. . . . . . . . . . . . . . . . . . . . . . . . . . . . . . . . . . . . . . . . 147
Managing your Network with Policies and Client Tasks. . . . . . . . . . . . . . . . . . . . . . . . . . . . 148
Product extensions and what they do. . . . . . . . . . . . . . . . . . . . . . . . . . . . . . . . . . . . . . . . . . . . . . . . . . . . . . . . 148
Policy management. . . . . . . . . . . . . . . . . . . . . . . . . . . . . . . . . . . . . . . . . . . . . . . . . . . . . . . . . . . . . . . . . . . . . . . 149
Policy application. . . . . . . . . . . . . . . . . . . . . . . . . . . . . . . . . . . . . . . . . . . . . . . . . . . . . . . . . . . . . . . . . . . . . . . . . 150
Creating Policy Management queries. . . . . . . . . . . . . . . . . . . . . . . . . . . . . . . . . . . . . . . . . . . . . . . . . . . . . . . . . 151
Client tasks and what they do. . . . . . . . . . . . . . . . . . . . . . . . . . . . . . . . . . . . . . . . . . . . . . . . . . . . . . . . . . . . . . 152
7McAfee ePolicy Orchestrator 4.5 Product Guide
Page 8

Contents
Bringing products under management. . . . . . . . . . . . . . . . . . . . . . . . . . . . . . . . . . . . . . . . . . . . . . . . . . . . . . . 153
Viewing policy information. . . . . . . . . . . . . . . . . . . . . . . . . . . . . . . . . . . . . . . . . . . . . . . . . . . . . . . . . . . . . . . . . 153
Viewing groups and systems where a policy is assigned. . . . . . . . . . . . . . . . . . . . . . . . . . . . . . . . . . 153
Viewing the settings of a policy. . . . . . . . . . . . . . . . . . . . . . . . . . . . . . . . . . . . . . . . . . . . . . . . . . . . . . 154
Viewing policy ownership. . . . . . . . . . . . . . . . . . . . . . . . . . . . . . . . . . . . . . . . . . . . . . . . . . . . . . . . . . . 154
Viewing assignments where policy enforcement is disabled. . . . . . . . . . . . . . . . . . . . . . . . . . . . . . . 154
Viewing policies assigned to a group. . . . . . . . . . . . . . . . . . . . . . . . . . . . . . . . . . . . . . . . . . . . . . . . . . 155
Viewing policies assigned to a specific system. . . . . . . . . . . . . . . . . . . . . . . . . . . . . . . . . . . . . . . . . . 155
Viewing a group’s policy inheritance. . . . . . . . . . . . . . . . . . . . . . . . . . . . . . . . . . . . . . . . . . . . . . . . . . 155
Viewing and resetting broken inheritance. . . . . . . . . . . . . . . . . . . . . . . . . . . . . . . . . . . . . . . . . . . . . . 155
Working with the Policy Catalog. . . . . . . . . . . . . . . . . . . . . . . . . . . . . . . . . . . . . . . . . . . . . . . . . . . . . . . . . . . . . 156
Creating a policy from the Policy Catalog page . . . . . . . . . . . . . . . . . . . . . . . . . . . . . . . . . . . . . . . . . 156
Duplicating a policy on the Policy Catalog page. . . . . . . . . . . . . . . . . . . . . . . . . . . . . . . . . . . . . . . . . 157
Editing a policy’s settings from the Policy Catalog. . . . . . . . . . . . . . . . . . . . . . . . . . . . . . . . . . . . . . . 157
Renaming a policy from the Policy Catalog. . . . . . . . . . . . . . . . . . . . . . . . . . . . . . . . . . . . . . . . . . . . . 158
Deleting a policy from the Policy Catalog. . . . . . . . . . . . . . . . . . . . . . . . . . . . . . . . . . . . . . . . . . . . . . 158
Working with policies. . . . . . . . . . . . . . . . . . . . . . . . . . . . . . . . . . . . . . . . . . . . . . . . . . . . . . . . . . . . . . . . . . . . . 158
Changing the owners of a policy. . . . . . . . . . . . . . . . . . . . . . . . . . . . . . . . . . . . . . . . . . . . . . . . . . . . . 159
Moving policies between ePO servers. . . . . . . . . . . . . . . . . . . . . . . . . . . . . . . . . . . . . . . . . . . . . . . . . 159
Assigning a policy to a group of the System Tree. . . . . . . . . . . . . . . . . . . . . . . . . . . . . . . . . . . . . . . . 160
Assigning a policy to a managed system. . . . . . . . . . . . . . . . . . . . . . . . . . . . . . . . . . . . . . . . . . . . . . . 160
Assigning a policy to multiple managed systems within a group. . . . . . . . . . . . . . . . . . . . . . . . . . . . 161
Enforcing policies for a product on a group. . . . . . . . . . . . . . . . . . . . . . . . . . . . . . . . . . . . . . . . . . . . 161
Enforcing policies for a product on a system. . . . . . . . . . . . . . . . . . . . . . . . . . . . . . . . . . . . . . . . . . . 162
Copying and pasting assignments. . . . . . . . . . . . . . . . . . . . . . . . . . . . . . . . . . . . . . . . . . . . . . . . . . . . 162
Working with client tasks. . . . . . . . . . . . . . . . . . . . . . . . . . . . . . . . . . . . . . . . . . . . . . . . . . . . . . . . . . . . . . . . . . 164
Creating and scheduling client tasks. . . . . . . . . . . . . . . . . . . . . . . . . . . . . . . . . . . . . . . . . . . . . . . . . . 164
Editing client tasks. . . . . . . . . . . . . . . . . . . . . . . . . . . . . . . . . . . . . . . . . . . . . . . . . . . . . . . . . . . . . . . . 164
Deleting client tasks. . . . . . . . . . . . . . . . . . . . . . . . . . . . . . . . . . . . . . . . . . . . . . . . . . . . . . . . . . . . . . . 165
Frequently asked questions. . . . . . . . . . . . . . . . . . . . . . . . . . . . . . . . . . . . . . . . . . . . . . . . . . . . . . . . . . . . . . . . 165
Sharing policies among ePO servers. . . . . . . . . . . . . . . . . . . . . . . . . . . . . . . . . . . . . . . . . . . . . . . . . . . . . . . . . 166
Setting up policy sharing for multiple ePO servers. . . . . . . . . . . . . . . . . . . . . . . . . . . . . . . . . . . . . . . 166
How policy assignment rules work. . . . . . . . . . . . . . . . . . . . . . . . . . . . . . . . . . . . . . . . . . . . . . . . . . . . . . . . . . . 167
Policy assignment rule priority. . . . . . . . . . . . . . . . . . . . . . . . . . . . . . . . . . . . . . . . . . . . . . . . . . . . . . . 168
Working with policy assignment rules. . . . . . . . . . . . . . . . . . . . . . . . . . . . . . . . . . . . . . . . . . . . . . . . . 168
Deploying Software and Updates. . . . . . . . . . . . . . . . . . . . . . . . . . . . . . . . . . . . . . . . . . . . . . . . . . . . . . 171
Deployment packages for products and updates. . . . . . . . . . . . . . . . . . . . . . . . . . . . . . . . . . . . . . . . . . . . . . . 171
McAfee ePolicy Orchestrator 4.5 Product Guide8
Page 9

Contents
Product and update deployment. . . . . . . . . . . . . . . . . . . . . . . . . . . . . . . . . . . . . . . . . . . . . . . . . . . . . . . . . . . . 173
Deployment tasks. . . . . . . . . . . . . . . . . . . . . . . . . . . . . . . . . . . . . . . . . . . . . . . . . . . . . . . . . . . . . . . . . 173
Update tasks. . . . . . . . . . . . . . . . . . . . . . . . . . . . . . . . . . . . . . . . . . . . . . . . . . . . . . . . . . . . . . . . . . . . . 174
Global updating. . . . . . . . . . . . . . . . . . . . . . . . . . . . . . . . . . . . . . . . . . . . . . . . . . . . . . . . . . . . . . . . . . . 174
Pull tasks. . . . . . . . . . . . . . . . . . . . . . . . . . . . . . . . . . . . . . . . . . . . . . . . . . . . . . . . . . . . . . . . . . . . . . . . 175
Replication tasks. . . . . . . . . . . . . . . . . . . . . . . . . . . . . . . . . . . . . . . . . . . . . . . . . . . . . . . . . . . . . . . . . . 176
Repository selection. . . . . . . . . . . . . . . . . . . . . . . . . . . . . . . . . . . . . . . . . . . . . . . . . . . . . . . . . . . . . . . 177
Server task log. . . . . . . . . . . . . . . . . . . . . . . . . . . . . . . . . . . . . . . . . . . . . . . . . . . . . . . . . . . . . . . . . . . 177
Checking in packages manually. . . . . . . . . . . . . . . . . . . . . . . . . . . . . . . . . . . . . . . . . . . . . . . . . . . . . . . . . . . . . 178
Using the Product Deployment task to deploy products to managed systems. . . . . . . . . . . . . . . . . . . . . . . . 179
Configuring the Deployment task for groups of managed systems. . . . . . . . . . . . . . . . . . . . . . . . . . 179
Configuring the Deployment task to install products on a managed system. . . . . . . . . . . . . . . . . . 180
Deploying update packages automatically with global updating. . . . . . . . . . . . . . . . . . . . . . . . . . . . . . . . . . . 181
Deploying update packages with pull and replication tasks. . . . . . . . . . . . . . . . . . . . . . . . . . . . . . . . . . . . . . . 183
Using pull tasks to update the master repository. . . . . . . . . . . . . . . . . . . . . . . . . . . . . . . . . . . . . . . . 183
Replicating packages from the master repository to distributed repositories. . . . . . . . . . . . . . . . . . 185
Configuring agent policies to use a distributed repository. . . . . . . . . . . . . . . . . . . . . . . . . . . . . . . . . . . . . . . . 187
Using local distributed repositories that are not managed. . . . . . . . . . . . . . . . . . . . . . . . . . . . . . . . . . . . . . . . 188
Checking in engine, DAT and ExtraDAT update packages manually. . . . . . . . . . . . . . . . . . . . . . . . . . . . . . . . 189
Updating managed systems regularly with a scheduled update task. . . . . . . . . . . . . . . . . . . . . . . . . . . . . . . 190
Confirming that clients are using the latest DAT files. . . . . . . . . . . . . . . . . . . . . . . . . . . . . . . . . . . . . . . . . . . . 190
Evaluating new DATs and engines before distribution. . . . . . . . . . . . . . . . . . . . . . . . . . . . . . . . . . . . . . . . . . . 191
Manually moving DAT and engine packages between branches. . . . . . . . . . . . . . . . . . . . . . . . . . . . . . . . . . . 192
Deleting DAT or engine packages from the master repository. . . . . . . . . . . . . . . . . . . . . . . . . . . . . . . . . . . . 192
Reporting On System Status. . . . . . . . . . . . . . . . . . . . . . . . . . . . . . . . . . . . . . . . . . . . . . . . . . . . . . . . . . . 193
Queries. . . . . . . . . . . . . . . . . . . . . . . . . . . . . . . . . . . . . . . . . . . . . . . . . . . . . . . . . . . . . . . . . . . . . . . . . . . . . . . . 193
Public and personal queries. . . . . . . . . . . . . . . . . . . . . . . . . . . . . . . . . . . . . . . . . . . . . . . . . . . . . . . . . 194
Query permissions. . . . . . . . . . . . . . . . . . . . . . . . . . . . . . . . . . . . . . . . . . . . . . . . . . . . . . . . . . . . . . . . 194
Query Builder. . . . . . . . . . . . . . . . . . . . . . . . . . . . . . . . . . . . . . . . . . . . . . . . . . . . . . . . . . . . . . . . . . . . . . . . . . . 195
Working with queries. . . . . . . . . . . . . . . . . . . . . . . . . . . . . . . . . . . . . . . . . . . . . . . . . . . . . . . . . . . . . . . . . . . . . 196
Creating custom queries. . . . . . . . . . . . . . . . . . . . . . . . . . . . . . . . . . . . . . . . . . . . . . . . . . . . . . . . . . . . 196
Running an existing query. . . . . . . . . . . . . . . . . . . . . . . . . . . . . . . . . . . . . . . . . . . . . . . . . . . . . . . . . . 197
Running a query on a schedule. . . . . . . . . . . . . . . . . . . . . . . . . . . . . . . . . . . . . . . . . . . . . . . . . . . . . . 197
Making a personal query group. . . . . . . . . . . . . . . . . . . . . . . . . . . . . . . . . . . . . . . . . . . . . . . . . . . . . . 199
Making existing personal queries public. . . . . . . . . . . . . . . . . . . . . . . . . . . . . . . . . . . . . . . . . . . . . . . 200
Duplicating queries. . . . . . . . . . . . . . . . . . . . . . . . . . . . . . . . . . . . . . . . . . . . . . . . . . . . . . . . . . . . . . . . 200
Sharing a query between ePO servers. . . . . . . . . . . . . . . . . . . . . . . . . . . . . . . . . . . . . . . . . . . . . . . . 200
9McAfee ePolicy Orchestrator 4.5 Product Guide
Page 10

Contents
Exporting query results to other formats. . . . . . . . . . . . . . . . . . . . . . . . . . . . . . . . . . . . . . . . . . . . . . 201
Multi-server rollup querying. . . . . . . . . . . . . . . . . . . . . . . . . . . . . . . . . . . . . . . . . . . . . . . . . . . . . . . . . . . . . . . . 202
Preparing for rollup querying. . . . . . . . . . . . . . . . . . . . . . . . . . . . . . . . . . . . . . . . . . . . . . . . . . . . . . . . 202
Creating a query to define compliance. . . . . . . . . . . . . . . . . . . . . . . . . . . . . . . . . . . . . . . . . . . . . . . . 204
Generating compliance events. . . . . . . . . . . . . . . . . . . . . . . . . . . . . . . . . . . . . . . . . . . . . . . . . . . . . . . 204
The Audit Log. . . . . . . . . . . . . . . . . . . . . . . . . . . . . . . . . . . . . . . . . . . . . . . . . . . . . . . . . . . . . . . . . . . . . . . . . . . 205
Working with the Audit Log. . . . . . . . . . . . . . . . . . . . . . . . . . . . . . . . . . . . . . . . . . . . . . . . . . . . . . . . . 205
The Server Task log. . . . . . . . . . . . . . . . . . . . . . . . . . . . . . . . . . . . . . . . . . . . . . . . . . . . . . . . . . . . . . . . . . . . . . 207
Working with the Server Task Log. . . . . . . . . . . . . . . . . . . . . . . . . . . . . . . . . . . . . . . . . . . . . . . . . . . . 210
Allowed Cron syntax when scheduling a server task. . . . . . . . . . . . . . . . . . . . . . . . . . . . . . . . . . . . . 211
The Threat Event Log. . . . . . . . . . . . . . . . . . . . . . . . . . . . . . . . . . . . . . . . . . . . . . . . . . . . . . . . . . . . . . . . . . . . . 212
Working with the Threat Event Log. . . . . . . . . . . . . . . . . . . . . . . . . . . . . . . . . . . . . . . . . . . . . . . . . . . 213
Data exports from any table or chart. . . . . . . . . . . . . . . . . . . . . . . . . . . . . . . . . . . . . . . . . . . . . . . . . . . . . . . . 214
Monitoring with Dashboards. . . . . . . . . . . . . . . . . . . . . . . . . . . . . . . . . . . . . . . . . . . . . . . . . . . . . . . . . . . 216
Default dashboards and their monitors. . . . . . . . . . . . . . . . . . . . . . . . . . . . . . . . . . . . . . . . . . . . . . . . . . . . . . . 216
Queries as dashboard monitors. . . . . . . . . . . . . . . . . . . . . . . . . . . . . . . . . . . . . . . . . . . . . . . . . . . . . . 216
Default dashboards and their monitors. . . . . . . . . . . . . . . . . . . . . . . . . . . . . . . . . . . . . . . . . . . . . . . . 216
Setting up dashboard access and behavior. . . . . . . . . . . . . . . . . . . . . . . . . . . . . . . . . . . . . . . . . . . . . . . . . . . . 218
Giving users permissions to dashboards. . . . . . . . . . . . . . . . . . . . . . . . . . . . . . . . . . . . . . . . . . . . . . . 219
Configuring the refresh frequency of dashboards. . . . . . . . . . . . . . . . . . . . . . . . . . . . . . . . . . . . . . . 219
Working with Dashboards. . . . . . . . . . . . . . . . . . . . . . . . . . . . . . . . . . . . . . . . . . . . . . . . . . . . . . . . . . . . . . . . . . 219
Creating dashboards. . . . . . . . . . . . . . . . . . . . . . . . . . . . . . . . . . . . . . . . . . . . . . . . . . . . . . . . . . . . . . . 220
Making a dashboard active. . . . . . . . . . . . . . . . . . . . . . . . . . . . . . . . . . . . . . . . . . . . . . . . . . . . . . . . . . 220
Selecting all active dashboards. . . . . . . . . . . . . . . . . . . . . . . . . . . . . . . . . . . . . . . . . . . . . . . . . . . . . . 220
Making a dashboard public. . . . . . . . . . . . . . . . . . . . . . . . . . . . . . . . . . . . . . . . . . . . . . . . . . . . . . . . . . 221
Detecting Rogue Systems. . . . . . . . . . . . . . . . . . . . . . . . . . . . . . . . . . . . . . . . . . . . . . . . . . . . . . . . . . . . . . 222
What are rogue systems. . . . . . . . . . . . . . . . . . . . . . . . . . . . . . . . . . . . . . . . . . . . . . . . . . . . . . . . . . . . . . . . . . . 223
How the Rogue System Sensor works. . . . . . . . . . . . . . . . . . . . . . . . . . . . . . . . . . . . . . . . . . . . . . . . . . . . . . . . 223
Passive listening to layer-2 traffic. . . . . . . . . . . . . . . . . . . . . . . . . . . . . . . . . . . . . . . . . . . . . . . . . . . . 223
Intelligent filtering of network traffic. . . . . . . . . . . . . . . . . . . . . . . . . . . . . . . . . . . . . . . . . . . . . . . . . . 224
Data gathering and communications to the server. . . . . . . . . . . . . . . . . . . . . . . . . . . . . . . . . . . . . . . 224
Systems that host sensors. . . . . . . . . . . . . . . . . . . . . . . . . . . . . . . . . . . . . . . . . . . . . . . . . . . . . . . . . . 225
How detected systems are matched and merged. . . . . . . . . . . . . . . . . . . . . . . . . . . . . . . . . . . . . . . . . . . . . . . 225
Rogue System Detection states. . . . . . . . . . . . . . . . . . . . . . . . . . . . . . . . . . . . . . . . . . . . . . . . . . . . . . . . . . . . . 226
Overall system status. . . . . . . . . . . . . . . . . . . . . . . . . . . . . . . . . . . . . . . . . . . . . . . . . . . . . . . . . . . . . . 226
Rogue System Sensor status. . . . . . . . . . . . . . . . . . . . . . . . . . . . . . . . . . . . . . . . . . . . . . . . . . . . . . . . 227
Subnet status. . . . . . . . . . . . . . . . . . . . . . . . . . . . . . . . . . . . . . . . . . . . . . . . . . . . . . . . . . . . . . . . . . . . 228
McAfee ePolicy Orchestrator 4.5 Product Guide10
Page 11

Contents
Top 25 Subnets. . . . . . . . . . . . . . . . . . . . . . . . . . . . . . . . . . . . . . . . . . . . . . . . . . . . . . . . . . . . . . . . . . . 228
Rogue Sensor Blacklist. . . . . . . . . . . . . . . . . . . . . . . . . . . . . . . . . . . . . . . . . . . . . . . . . . . . . . . . . . . . . . . . . . . . 229
Rogue System Detection policy settings. . . . . . . . . . . . . . . . . . . . . . . . . . . . . . . . . . . . . . . . . . . . . . . . . . . . . . 229
Considerations for policy settings. . . . . . . . . . . . . . . . . . . . . . . . . . . . . . . . . . . . . . . . . . . . . . . . . . . . 229
Rogue System Detection permission sets. . . . . . . . . . . . . . . . . . . . . . . . . . . . . . . . . . . . . . . . . . . . . . . . . . . . . 231
Setting up Rogue System Detection. . . . . . . . . . . . . . . . . . . . . . . . . . . . . . . . . . . . . . . . . . . . . . . . . . . . . . . . . 231
Configuring Rogue System Detection policy settings. . . . . . . . . . . . . . . . . . . . . . . . . . . . . . . . . . . . . . . . . . . . 232
Configuring server settings for Rogue System Detection. . . . . . . . . . . . . . . . . . . . . . . . . . . . . . . . . . . . . . . . . 232
Editing Detected System Compliance . . . . . . . . . . . . . . . . . . . . . . . . . . . . . . . . . . . . . . . . . . . . . . . . . 232
Editing Detected Systems Matching. . . . . . . . . . . . . . . . . . . . . . . . . . . . . . . . . . . . . . . . . . . . . . . . . . . 233
Editing Rogue System Sensor settings. . . . . . . . . . . . . . . . . . . . . . . . . . . . . . . . . . . . . . . . . . . . . . . . 234
Editing Detected System Exception Categories. . . . . . . . . . . . . . . . . . . . . . . . . . . . . . . . . . . . . . . . . . 234
Editing Detected System OUIs. . . . . . . . . . . . . . . . . . . . . . . . . . . . . . . . . . . . . . . . . . . . . . . . . . . . . . . 235
Working with detected systems. . . . . . . . . . . . . . . . . . . . . . . . . . . . . . . . . . . . . . . . . . . . . . . . . . . . . . . . . . . . . 235
Adding systems to the Exceptions list. . . . . . . . . . . . . . . . . . . . . . . . . . . . . . . . . . . . . . . . . . . . . . . . . 235
Adding systems to the Rogue Sensor Blacklist. . . . . . . . . . . . . . . . . . . . . . . . . . . . . . . . . . . . . . . . . . 236
Adding detected systems to the System Tree. . . . . . . . . . . . . . . . . . . . . . . . . . . . . . . . . . . . . . . . . . . 236
Editing system comments. . . . . . . . . . . . . . . . . . . . . . . . . . . . . . . . . . . . . . . . . . . . . . . . . . . . . . . . . . 237
Exporting the Exceptions list. . . . . . . . . . . . . . . . . . . . . . . . . . . . . . . . . . . . . . . . . . . . . . . . . . . . . . . . 237
Importing systems to the Exceptions list. . . . . . . . . . . . . . . . . . . . . . . . . . . . . . . . . . . . . . . . . . . . . . 238
Merging detected systems. . . . . . . . . . . . . . . . . . . . . . . . . . . . . . . . . . . . . . . . . . . . . . . . . . . . . . . . . . 238
Pinging a detected system. . . . . . . . . . . . . . . . . . . . . . . . . . . . . . . . . . . . . . . . . . . . . . . . . . . . . . . . . . 238
Querying detected system Agents. . . . . . . . . . . . . . . . . . . . . . . . . . . . . . . . . . . . . . . . . . . . . . . . . . . . 239
Removing systems from the Detected Systems list. . . . . . . . . . . . . . . . . . . . . . . . . . . . . . . . . . . . . . 239
Removing systems from the Exceptions list. . . . . . . . . . . . . . . . . . . . . . . . . . . . . . . . . . . . . . . . . . . . 239
Removing systems from the Rogue Sensor Blacklist. . . . . . . . . . . . . . . . . . . . . . . . . . . . . . . . . . . . . 240
Viewing detected systems and their details. . . . . . . . . . . . . . . . . . . . . . . . . . . . . . . . . . . . . . . . . . . . 240
Working with sensors. . . . . . . . . . . . . . . . . . . . . . . . . . . . . . . . . . . . . . . . . . . . . . . . . . . . . . . . . . . . . . . . . . . . . 240
Changing the sensor-to-server port number. . . . . . . . . . . . . . . . . . . . . . . . . . . . . . . . . . . . . . . . . . . . 241
Installing sensors. . . . . . . . . . . . . . . . . . . . . . . . . . . . . . . . . . . . . . . . . . . . . . . . . . . . . . . . . . . . . . . . . 241
Editing sensor descriptions. . . . . . . . . . . . . . . . . . . . . . . . . . . . . . . . . . . . . . . . . . . . . . . . . . . . . . . . . . 243
Removing sensors. . . . . . . . . . . . . . . . . . . . . . . . . . . . . . . . . . . . . . . . . . . . . . . . . . . . . . . . . . . . . . . . . 243
Working with subnets. . . . . . . . . . . . . . . . . . . . . . . . . . . . . . . . . . . . . . . . . . . . . . . . . . . . . . . . . . . . . . . . . . . . . 244
Adding subnets. . . . . . . . . . . . . . . . . . . . . . . . . . . . . . . . . . . . . . . . . . . . . . . . . . . . . . . . . . . . . . . . . . . 244
Deleting subnets. . . . . . . . . . . . . . . . . . . . . . . . . . . . . . . . . . . . . . . . . . . . . . . . . . . . . . . . . . . . . . . . . . 244
Ignoring subnets. . . . . . . . . . . . . . . . . . . . . . . . . . . . . . . . . . . . . . . . . . . . . . . . . . . . . . . . . . . . . . . . . . 245
Including subnets. . . . . . . . . . . . . . . . . . . . . . . . . . . . . . . . . . . . . . . . . . . . . . . . . . . . . . . . . . . . . . . . . 245
11McAfee ePolicy Orchestrator 4.5 Product Guide
Page 12

Contents
Renaming subnets. . . . . . . . . . . . . . . . . . . . . . . . . . . . . . . . . . . . . . . . . . . . . . . . . . . . . . . . . . . . . . . . 245
Viewing detected subnets and their details. . . . . . . . . . . . . . . . . . . . . . . . . . . . . . . . . . . . . . . . . . . . . 246
Rogue System Detection command-line options. . . . . . . . . . . . . . . . . . . . . . . . . . . . . . . . . . . . . . . . . . . . . . . . 246
Default Rogue System Detection queries. . . . . . . . . . . . . . . . . . . . . . . . . . . . . . . . . . . . . . . . . . . . . . . . . . . . . 247
Setting Up Automatic Responses. . . . . . . . . . . . . . . . . . . . . . . . . . . . . . . . . . . . . . . . . . . . . . . . . . . . . . 248
Automatic Responses and how it works. . . . . . . . . . . . . . . . . . . . . . . . . . . . . . . . . . . . . . . . . . . . . . . . . . . . . . 249
Throttling, aggregation, and grouping. . . . . . . . . . . . . . . . . . . . . . . . . . . . . . . . . . . . . . . . . . . . . . . . 249
Default rules. . . . . . . . . . . . . . . . . . . . . . . . . . . . . . . . . . . . . . . . . . . . . . . . . . . . . . . . . . . . . . . . . . . . . 250
Planning. . . . . . . . . . . . . . . . . . . . . . . . . . . . . . . . . . . . . . . . . . . . . . . . . . . . . . . . . . . . . . . . . . . . . . . . . . . . . . . . 251
Determining how events are forwarded. . . . . . . . . . . . . . . . . . . . . . . . . . . . . . . . . . . . . . . . . . . . . . . . . . . . . . 251
Determining which events are forwarded immediately. . . . . . . . . . . . . . . . . . . . . . . . . . . . . . . . . . . 251
Determining which events are forwarded. . . . . . . . . . . . . . . . . . . . . . . . . . . . . . . . . . . . . . . . . . . . . . 252
Configuring Automatic Responses. . . . . . . . . . . . . . . . . . . . . . . . . . . . . . . . . . . . . . . . . . . . . . . . . . . . . . . . . . . 252
Assigning permission sets to access Automatic Responses. . . . . . . . . . . . . . . . . . . . . . . . . . . . . . . . 252
Working with SNMP servers. . . . . . . . . . . . . . . . . . . . . . . . . . . . . . . . . . . . . . . . . . . . . . . . . . . . . . . . . 254
Working with registered executables and external commands. . . . . . . . . . . . . . . . . . . . . . . . . . . . . 256
Creating and editing Automatic Response rules. . . . . . . . . . . . . . . . . . . . . . . . . . . . . . . . . . . . . . . . . . . . . . . . 258
Describing the rule. . . . . . . . . . . . . . . . . . . . . . . . . . . . . . . . . . . . . . . . . . . . . . . . . . . . . . . . . . . . . . . . 258
Setting filters for the rule. . . . . . . . . . . . . . . . . . . . . . . . . . . . . . . . . . . . . . . . . . . . . . . . . . . . . . . . . . . 259
Setting thresholds of the rule. . . . . . . . . . . . . . . . . . . . . . . . . . . . . . . . . . . . . . . . . . . . . . . . . . . . . . . . 259
Configuring the action for Automatic Response rules. . . . . . . . . . . . . . . . . . . . . . . . . . . . . . . . . . . . . 260
Frequently asked questions. . . . . . . . . . . . . . . . . . . . . . . . . . . . . . . . . . . . . . . . . . . . . . . . . . . . . . . . . . . . . . . . 261
Managing Issues and Tickets. . . . . . . . . . . . . . . . . . . . . . . . . . . . . . . . . . . . . . . . . . . . . . . . . . . . . . . . . . 263
Ways to manage issues. . . . . . . . . . . . . . . . . . . . . . . . . . . . . . . . . . . . . . . . . . . . . . . . . . . . . . . . . . . . . . . . . . . 263
Creating, configuring, and managing issues. . . . . . . . . . . . . . . . . . . . . . . . . . . . . . . . . . . . . . . . . . . . . . . . . . . 264
Creating basic issues manually. . . . . . . . . . . . . . . . . . . . . . . . . . . . . . . . . . . . . . . . . . . . . . . . . . . . . . 264
Configuring responses to automatically create issues. . . . . . . . . . . . . . . . . . . . . . . . . . . . . . . . . . . . 265
Managing issues. . . . . . . . . . . . . . . . . . . . . . . . . . . . . . . . . . . . . . . . . . . . . . . . . . . . . . . . . . . . . . . . . . 269
Purging closed issues. . . . . . . . . . . . . . . . . . . . . . . . . . . . . . . . . . . . . . . . . . . . . . . . . . . . . . . . . . . . . . . . . . . . . 270
Purging closed issues manually. . . . . . . . . . . . . . . . . . . . . . . . . . . . . . . . . . . . . . . . . . . . . . . . . . . . . . 270
Purging closed issues on a schedule. . . . . . . . . . . . . . . . . . . . . . . . . . . . . . . . . . . . . . . . . . . . . . . . . . 270
Tickets and how they work. . . . . . . . . . . . . . . . . . . . . . . . . . . . . . . . . . . . . . . . . . . . . . . . . . . . . . . . . . . . . . . . 271
Ways to add tickets to issues. . . . . . . . . . . . . . . . . . . . . . . . . . . . . . . . . . . . . . . . . . . . . . . . . . . . . . . . 271
Assignment of ticketed issues to users. . . . . . . . . . . . . . . . . . . . . . . . . . . . . . . . . . . . . . . . . . . . . . . . 271
How tickets and ticketed issues are closed. . . . . . . . . . . . . . . . . . . . . . . . . . . . . . . . . . . . . . . . . . . . . 271
Benefits of adding comments to ticketed issues. . . . . . . . . . . . . . . . . . . . . . . . . . . . . . . . . . . . . . . . . 271
How tickets are reopened. . . . . . . . . . . . . . . . . . . . . . . . . . . . . . . . . . . . . . . . . . . . . . . . . . . . . . . . . . . 272
McAfee ePolicy Orchestrator 4.5 Product Guide12
Page 13

Contents
Synchronization of ticketed issues. . . . . . . . . . . . . . . . . . . . . . . . . . . . . . . . . . . . . . . . . . . . . . . . . . . . 272
Integration with ticketing servers. . . . . . . . . . . . . . . . . . . . . . . . . . . . . . . . . . . . . . . . . . . . . . . . . . . . . . . . . . . 272
Considerations when deleting a registered ticketing server. . . . . . . . . . . . . . . . . . . . . . . . . . . . . . . . 273
Required fields for mapping. . . . . . . . . . . . . . . . . . . . . . . . . . . . . . . . . . . . . . . . . . . . . . . . . . . . . . . . . 273
Sample mappings. . . . . . . . . . . . . . . . . . . . . . . . . . . . . . . . . . . . . . . . . . . . . . . . . . . . . . . . . . . . . . . . . 273
Working with tickets. . . . . . . . . . . . . . . . . . . . . . . . . . . . . . . . . . . . . . . . . . . . . . . . . . . . . . . . . . . . . . . . . . . . . . 276
Adding tickets to issues. . . . . . . . . . . . . . . . . . . . . . . . . . . . . . . . . . . . . . . . . . . . . . . . . . . . . . . . . . . . 276
Synchronizing ticketed issues. . . . . . . . . . . . . . . . . . . . . . . . . . . . . . . . . . . . . . . . . . . . . . . . . . . . . . . . 276
Synchronizing ticketed issues on a schedule. . . . . . . . . . . . . . . . . . . . . . . . . . . . . . . . . . . . . . . . . . . . 277
Working with ticketing servers. . . . . . . . . . . . . . . . . . . . . . . . . . . . . . . . . . . . . . . . . . . . . . . . . . . . . . . . . . . . . . 277
Installing extensions for ticketing server. . . . . . . . . . . . . . . . . . . . . . . . . . . . . . . . . . . . . . . . . . . . . . . 278
Registering and mapping a ticketing server. . . . . . . . . . . . . . . . . . . . . . . . . . . . . . . . . . . . . . . . . . . . 281
Configuring the field mappings. . . . . . . . . . . . . . . . . . . . . . . . . . . . . . . . . . . . . . . . . . . . . . . . . . . . . . 282
Upgrading a registered ticketing server. . . . . . . . . . . . . . . . . . . . . . . . . . . . . . . . . . . . . . . . . . . . . . . . . . . . . . . 284
Appendix: Maintaining ePolicy Orchestrator Databases. . . . . . . . . . . . . . . . . . . . . . . . . . . . 285
Perform regular maintenance of SQL Server databases. . . . . . . . . . . . . . . . . . . . . . . . . . . . . . . . . . . . . . . . . . 285
Backup and restore ePolicy Orchestrator databases . . . . . . . . . . . . . . . . . . . . . . . . . . . . . . . . . . . . . . . . . . . . 286
Changing SQL Server information. . . . . . . . . . . . . . . . . . . . . . . . . . . . . . . . . . . . . . . . . . . . . . . . . . . . . . . . . . . 286
13McAfee ePolicy Orchestrator 4.5 Product Guide
Page 14

Introducing ePolicy Orchestrator 4.5
ePolicy Orchestrator 4.5 provides a scalable platform for centralized policy management and
enforcement of your security products and the systems on which they reside. It also provides
comprehensive reporting and product deployment capabilities, all through a single point of
control.
Contents
Components and what they do
Using this guide
Finding documentation for McAfee enterprise products
Components and what they do
The ePolicy Orchestrator software is comprised of these components:
• ePO server — The center of your managed environment. The server delivers security
policies and tasks, controls updates, and processes events for all managed systems. The
ePO server includes these subcomponents:
• Application server — Auto Response, Registered Servers, and user interface
• Agent Handler — Policies, tasks, and properties
• Event parser — Threat events and client events
• RSD server and data channel listener
• Registered servers — Used to register the ePO server with other servers. Registered
server types include:
• LDAP server — Used for Policy Assignment Rules and to enable automatic user account
creation.
• SNMP server — Used to receive an SNMP trap. You must add the SNMP server’s
information so that ePolicy Orchestrator knows where to send the trap.
• Ticketing server — Before tickets can be associated with issues, you must have a registered
Ticketing server configured. The system running the ticketing extension must be able to
resolve the address of the Service Desk system.
• Database — The central storage component for all data created and used by ePolicy
Orchestrator. You can choose whether to house the database on your ePO server or on a
separate system, depending on the specific needs of your organization.
• Master repository — The central location for all McAfee updates and signatures, residing
on the ePO server. Master repository retrieves user-specified updates and signatures from
McAfee or from user-defined source sites.
• Distributed repositories — Placed strategically throughout your environment to provide
managed systems access to receive signatures, product updates, and product installations
McAfee ePolicy Orchestrator 4.5 Product Guide14
Page 15

Introducing ePolicy Orchestrator 4.5
Using this guide
with minimal bandwidth impact. Depending on how your network is configured, you can set
up SuperAgent, HTTP, FTP, or UNC share distributed repositories.
• McAfee Agent — A vehicle of information and enforcement between the ePO server and
each managed system. The agent retrieves updates, ensures task implementation, enforces
policies, and forwards events for each managed system. It uses a separate secure data
channel to transfer data to the ePO server. A McAfee Agent can also be configured as a
SuperAgent with the addition of a repository.
• Remote Agent Handlers — A server that you can install in various network locations to
help manage agent communication, load balancing, and product updates. Remote Agent
Handlers can help you manage the needs of large or complex network infrastructures by
allowing you more control over agent-server communication.
NOTE: Depending on the needs of your organization and the complexity of your network, you
might not need to use all of these components.
Using this guide
This guide provides information on configuring and using your product. For system requirements
and installation instructions, see the
This material is organized in the order that McAfee recommends you set up ePolicy Orchestrator
in a production environment for the first time, and is also accessible to anyone seeking specific
topics.
This guide serves as a tool to help administrators set up their ePolicy Orchestrator environment
for the first time, and as a reference tool for more experienced users.
ePolicy Orchestrator Installation Guide
.
Audience
This information is intended primarily for network administrators who are responsible for their
company’s security program, and assumes the customer has installed and used ePolicy
Orchestrator in a lab environment.
Finding documentation for McAfee enterprise products
To access the documentation for your McAfee products, use the McAfee ServicePortal.
1 Go to the McAfee ServicePortal (http://mysupport.mcafee.com) and, under Self Service,
click Read Product Documentation.
2 Select a Product.
3 Select a Version.
4 Select a product document
Product documentation by phase
McAfee documentation provides the information you need during each phase of product
implementation, from installing a new product to maintaining existing ones. Depending on the
product, additional documents might also be available. After a product is released, information
15McAfee ePolicy Orchestrator 4.5 Product Guide
Page 16

Introducing ePolicy Orchestrator 4.5
Finding documentation for McAfee enterprise products
regarding the product is entered into the online KnowledgeBase, available through the McAfee
ServicePortal.
Installation phase — Before, during, and after installation
•
Release Notes
•
Installation Guide
Setup phase — Using the product
•
Product Guide
•
Online Help
Maintenance phase — Maintaining the software
•
KnowledgeBase
(http://mysupport.mcafee.com)
McAfee ePolicy Orchestrator 4.5 Product Guide16
Page 17

Getting Started with ePolicy Orchestrator 4.5
This chapter provides a high-level overview of ePolicy Orchestrator and how it works. All of the
concepts included here, along with their associated tasks, are discussed in greater detail in the
chapters that comprise the rest of this guide.
Contents
Logging on and off ePO servers
Viewing the server version number
How to navigate the ePO interface
Setting up ePolicy Orchestrator
Logging on and off ePO servers
Use these tasks to log on to and off from ePO servers. Before using ePolicy Orchestrator, you
must be logged on to the ePO server with valid account credentials.
Tasks
Logging on to ePO servers
Logging off ePO servers
Logging on to ePO servers
Use this task to log on to the ePO server. You must have valid credentials to do this. You can
log on to multiple ePO servers by opening a new browser session for each ePO server.
Task
1 Open an Internet browser and go to the URL of the server to open the Log On to ePolicy
Orchestrator dialog box.
2 Type the User name and Password of a valid account.
NOTE: Passwords are case-sensitive.
3 Select the Language you want the software to display.
4 Click Log On.
Logging off ePO servers
Use this task to log off from ePO servers. Log off from the ePO server whenever you finish
using the software.
17McAfee ePolicy Orchestrator 4.5 Product Guide
Page 18
Getting Started with ePolicy Orchestrator 4.5
Viewing the server version number
Task
• To log off from the server, click Log Off at the top of any page, or close the browser.
Viewing the server version number
You can view the version number, edition, and license information of the ePolicy Orchestrator
server.
• To view the version number and edition of an ePO server, log on to the desired ePolicy
Orchestrator server. This information appears in the title bar.
NOTE: For more specific information about the version of ePolicy Orchestrator:
1 Click Menu | Software | Extensions, then click Server in the McAfee category of
the Extensions list.
2 Scroll through the server extension to ePO Core.
• To view license information, go to the logon page.
• To view detailed information about the extensions installed on your ePO server, click Menu
| Software | Extension. Select a category from the Extensions list to view details.
How to navigate the ePO interface
Navigation in ePolicy Orchestrator 4.5 has been redesigned to make it faster and easier to find
the features and functionality you need. The interface now uses a single menu for all top-level
features of ePolicy Orchestrator, and a customizable navigation bar. Top-level features were
previously displayed as tabs when selecting a section.
For example, in ePolicy Orchestrator 4.0, when the Reporting section was selected, the top-level
features that were displayed included: Queries, Server Task Log, Audit Log, Event Log, and
MyAvert.
In version 4.5, all of these top-level features are accessed from the Menu. The following table
provides some examples of the change in navigation steps to arrive at a desired page.
in version 4.5in version 4.0To get to...
Click Menu | Audit Log tab.The Audit Log
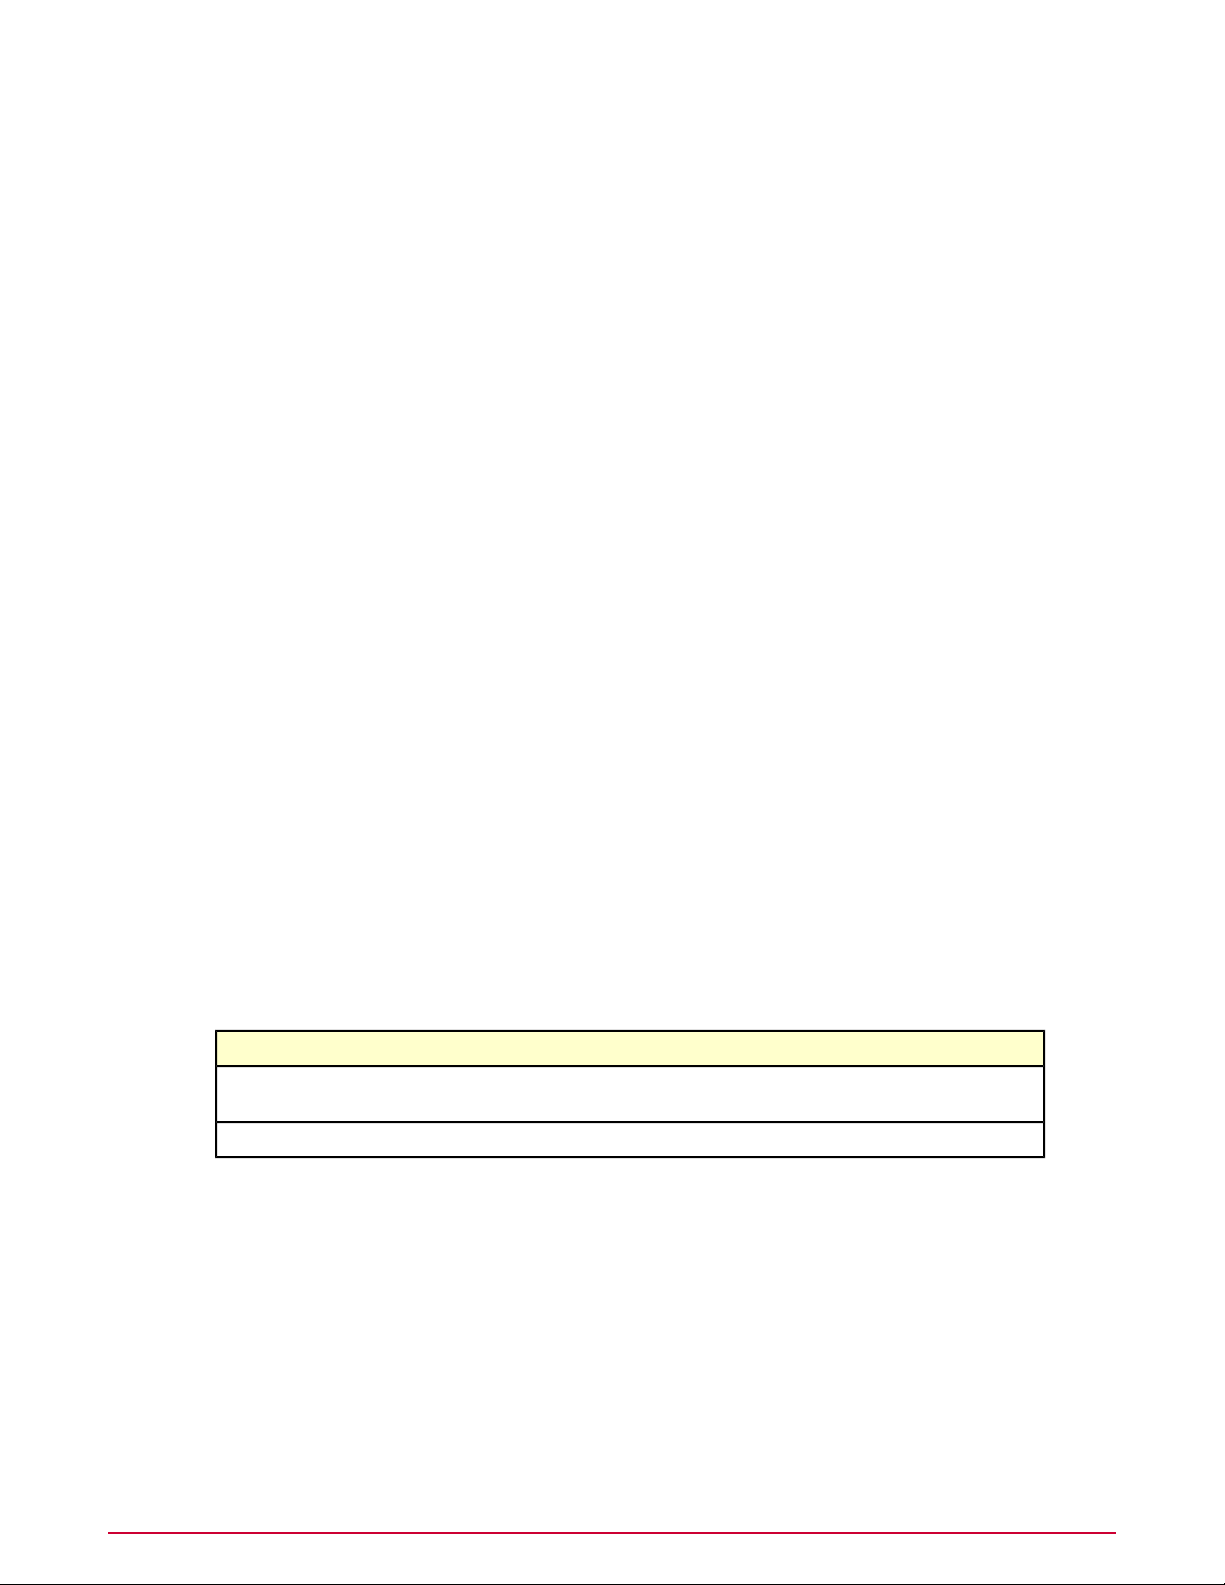
The Menu
Click Menu and select User Management |
Audit Log.
Click Menu and select Policy | Policy Catalog.Click Menu | Policy Catalog page.The Policy Catalog
McAfee ePolicy Orchestrator 4.5 Product Guide18
Page 19
Getting Started with ePolicy Orchestrator 4.5
Setting up ePolicy Orchestrator
The Menu is new in version 4.5 of ePolicy Orchestrator software. The Menu uses categories
that comprise the various ePO features and functionalities. Each category contains a list of
primary feature pages associated with a unique icon. The Menu and its categories replace static
group of section icons used to navigate the 4.0 version of the interface. For example, in the
4.5 version, the Reporting category includes all of the pages included in the 4.0 version Reporting
section, plus other commonly used reporting tools such as the Dashboards page. When an item
in the Menu is highlighted, its choices appear in the details pane of the interface.
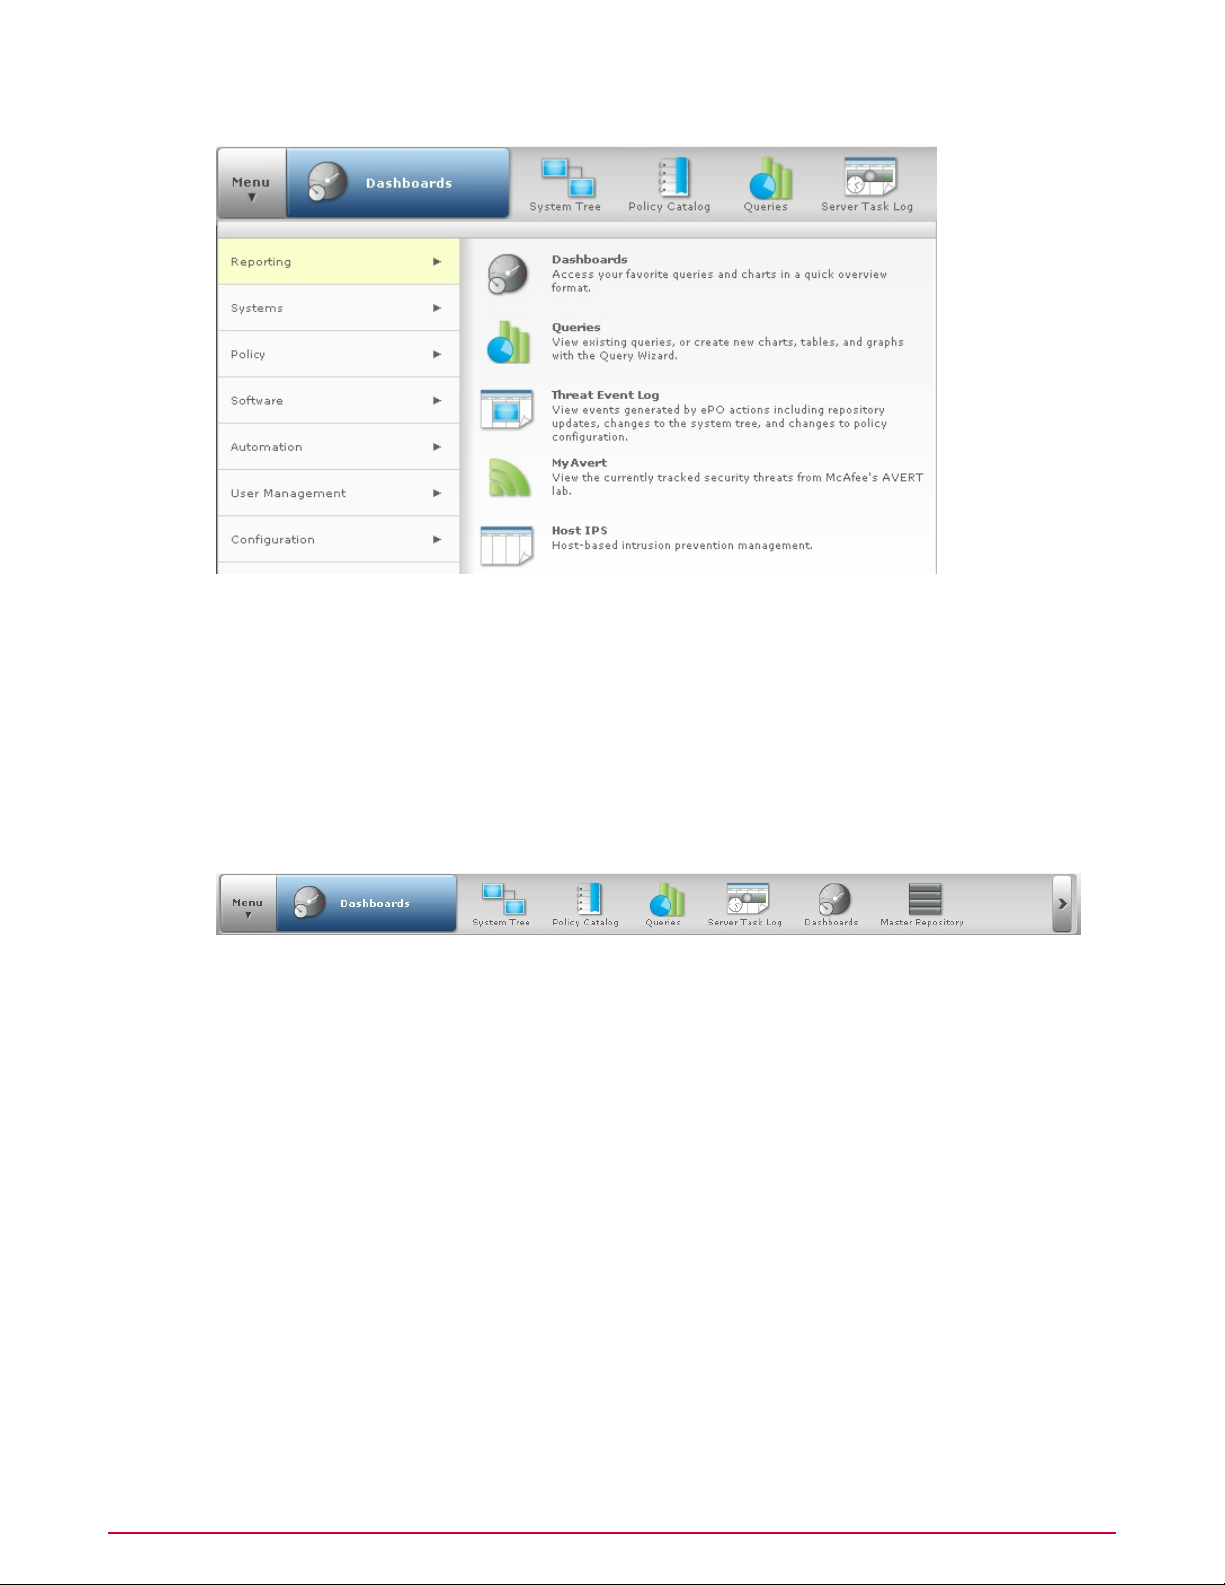
The navigation bar
In ePolicy Orchestrator 4.5, the navigation bar is customizable. In the 4.0 version of the interface,
the navigation bar was comprised of a fixed group of section icons that organized functionality
into categories. Now you can decide which icons are displayed on the navigation bar by dragging
any Menu item on or off the navigation bar. When you navigate to a page in the Menu, or click
an icon in the navigation bar, the name of that page is displayed in the blue box next to the
Menu.
On systems with 1024x768 screen resolution, the navigation bar can display six icons. When
you place more than six icons on the navigation bar, an overflow menu is created on the right
side of the bar. Click > to access the Menu items not displayed in the navigation bar. The icons
displayed in the navigation bar are stored as user preferences, so each user's customized
navigation bar is displayed regardless of which console they log on to.
Setting up ePolicy Orchestrator
How you set up ePolicy Orchestrator depends on the unique needs of your environment. This
process overview highlights the major set up and configuration required to use ePolicy
Orchestrator. Each of the steps represents a chapter in this product guide, where you can find
the detailed information you need to understand the features and functionalities of ePolicy
Orchestrator, along with the tasks needed to implement and use them.
19McAfee ePolicy Orchestrator 4.5 Product Guide
Page 20

Getting Started with ePolicy Orchestrator 4.5
Setting up ePolicy Orchestrator
Process overview
Configure your ePO server
Add systems to the System Tree
Distribute agents to your systems
Create repositories
Configure your policies and client tasks
Deploy your products and software
Configure advanced features
Configure your ePO server
To configure your ePO server, you'll need to:
• Set up user accounts
• Assign permission sets
• Configure ePO server settings
Set up user accounts
Set up user accounts for all of the users in your network who need to access and use the ePolicy
Orchestrator software. You need to set up these accounts before assigning permission sets.
For more information on setting up user accounts, see
Orchestrator
To set up user accounts, click Menu | User Management | Users.
.
Assign permission sets
Assign permission sets for your ePO users. Permission sets allow you to define what users are
allowed to do with the software. You can assign permission sets to individuals or to groups. For
more information on assigning permission sets, see
User Roles and Permissions
To assign permission sets, click Menu | User Management | Permissions Sets.
Configure server settings
Configure server settings for your specific environment. You can change the server settings at
any time. For more information on configuring server settings, see
behaviors they controlinManaging User Roles and Permissions
To configure server settings, click Menu | Configuration | Server Settings.
ePO user accountsinConfiguring ePolicy
How permission sets workinManaging
.
Server settings and the
.
Add systems to the System Tree
The System Tree allows you to organize and act on all systems you manage with ePolicy
Orchestrator. Before setting up other features, you must create your System Tree. There are
several ways you can add systems to the System Tree, including:
• Synchronize ePolicy Orchestrator with your Active Directory server.
• Browse to systems on your network individually.
McAfee ePolicy Orchestrator 4.5 Product Guide20
Page 21

Getting Started with ePolicy Orchestrator 4.5
Setting up ePolicy Orchestrator
• Add individual and groups of systems by importing a text (.txt) file containing a list of systems.
For more information on all of the methods you can use to add systems, including detailed
steps for each method, see
To begin adding systems to the System Tree, click Menu | Systems | System Tree.
Organizing the System Tree
Distribute agents to your systems
Each system you want to manage must have the McAfee Agent installed. You can install agents
on Windows-based systems manually, or by using the ePO interface. You must install agents
on non-Windows systems manually.
Once agents are installed on all of your systems, you can use ePolicy Orchestrator to manage,
update, and report on these systems. For more information on distributing agents, see
Distributing Agents
To begin distributing agents to your systems, click Menu | Systems | System Tree.
.
Create repositories
.
Before deploying any products, components, or updates to your managed systems with ePolicy
Orchestrator, you must configure repositories. There are two types of repositories you can use
in your environment, master and distributed.
Master repository
The master repository is located on your ePO server. It is the location where products and
updates that are pulled from the Source Site are saved. For more information about the master
repository, see
To start working with the master repository, click Menu | Software | Master Repository.
Repository types and what they doinCreating Repositories
Distributed repositories
Distributed repositories are those that you place throughout your network. The placement and
type of distributed repositories you use depend on the unique needs of your organization and
environment. There are several ePO components and types you can use for distributed
repositories, including:
• SuperAgents
• FTP
• HTTP
• UNC share
• Unmanaged
The complexity and size of your network are determining factors in which type and how many
distributed repositories you use. For more information about distributed repositories, see
Repository types and what they doinCreating Repositories
To start working with distributed repositories, click Menu | Software | Distributed
Repository.
.
.
21McAfee ePolicy Orchestrator 4.5 Product Guide
Page 22

Getting Started with ePolicy Orchestrator 4.5
Setting up ePolicy Orchestrator
Configure your policies and client tasks
McAfee recommends that you configure policy settings before deploying the respective product,
component, or update to your managed systems. By doing so you can ensure that products
and components have the desired settings as soon as possible.
Policies
A policy is a collection of settings that you create and configure. These policies are enforced
by McAfee products. Policies ensure that the managed security products are configured and
perform according to that collection of settings.
Once configured, policies can be enforced at any level of the System Tree, as well as on specific
groups of users. System policies are inherited from their parent group in the System Tree.
However, you can break inheritance at any location in the tree in order to enforce specific
policies at a particular location. For more information about policies, see
and
Policy applicationinConfiguring Policies and Client Tasks
To start configuring policies for systems in the System Tree, click Menu | Policy | Policy
Catalog, then select a product from the Product menu and click Actions | New Policy.
Policy management
.
Client tasks
Client tasks are scheduled actions that run on managed systems that host any client-side
software. You can define tasks for the entire System Tree, a specific group, or an individual
system. Like policy settings, client tasks are inherited from parent groups in the System Tree.
For more information about client tasks, see
and Client Tasks
To start scheduling client tasks, click Menu | Systems | System Tree | Client Tasks, then
click Actions | New Task.
.
Client tasks and what they doinConfiguring Policies
Deploy your products and software
Once your repositories, policy settings, and client tasks are created and configured, you can
deploy products, components, and updates to the desired systems with ePolicy Orchestrator.
You can perform these actions as needed, or you can schedule them using server tasks. For
more information, see
To schedule these actions, click Menu | Automation | Server Tasks, then click Actions |
New Task.
Deploying Software and Updates
Configure advanced features
Once your managed environment is up and running, you can configure and implement the
advanced features of ePolicy Orchestrator, including:
• Remote Agent Handlers
• Automatic Responses
• Issues and Ticketing
More information on these and all ePolicy Orchestrator features is available in the following
chapters of this guide.
.
McAfee ePolicy Orchestrator 4.5 Product Guide22
Page 23

Configuring ePolicy Orchestrator
The ePO server is the center of your managed environment, providing a single location from
which to administer system security throughout your network.
If your organization is very large or divided into multiple large sites, ePolicy Orchestrator 4.5
is scalable to allow you to customize how you set up your managed environment. You can:
• Install a separate ePO server at each site.
• Install remote Agent Handlers at each site, provided an ePO server is installed that you want
to communicate with.
The option you choose depends on the needs of your environment. Using remote agent handlers
allows you to reduce network traffic when managing agents and sending updates. Agent handlers
can also serve as distributed repositories. Remote agent handlers help to load balance your
network and increase fallback security, while passing all agent-server communication back to
your ePO server and its database.
Using multiple ePO servers differs from using remote agent handlers because each ePO server
maintains a separate database from which you can roll up information to your main ePO server
and database. Both choices can help to limit the amount of network traffic created within a
local LAN. Network traffic has a larger impact on your resources when this communication takes
place across WAN, VPN, or other slower network connections typically found between remote
sites.
Are you configuring the ePO server for the first time?
When configuring the ePO server for the first time:
1 Decide how to implement the flexibility of permission sets.
2 Create user accounts and permission sets, and assign the permission sets to the user
accounts as needed.
3 Set up your contacts list and email server settings.
Contents
ePO user accounts
How permission sets work
Contacts
Server settings and the behaviors they control
Managing ePolicy Orchestrator users with Active Directory
Registering servers for use with ePolicy Orchestrator
Security keys and how they work
MyAvert Security Threats
Agent Handlers and what they do
IPv6
23McAfee ePolicy Orchestrator 4.5 Product Guide
Page 24

Configuring ePolicy Orchestrator
ePO user accounts
Exporting tables and charts to other formats
ePO user accounts
User accounts provide a means for users to access and use the software. They are associated
with permission sets, which define what users are allowed to do with the software.
You must create user accounts and permission sets to accommodate the needs of each user
that logs on to the ePO server. You can create accounts for individual users, or you can create
a permission set that maps to users or groups in your Active Directory/NT server.
There are two types of users, global administrators and users with limited permissions.
Global administrators
Global administrators have read and write permissions and rights to all operations. When you
install the server, a global administrator account is created with the user name admin.
You can create additional global administrator accounts for people who require global
administrator rights.
Permissions exclusive to global administrators include:
• Create, edit, and delete source and fallback sites.
• Change server settings.
• Add and delete user accounts.
• Add, delete, and assign permission sets.
• Import events into ePolicy Orchestrator databases and limit events that are stored there.
Working with user accounts
Use these tasks to create and maintain user accounts.
Tasks
Creating user accounts
Editing user accounts
Deleting user accounts
Creating user accounts
Use this task to create a user account. You must be a global administrator to add, edit, or delete
user accounts.
Task
For option definitions, click ? in the interface.
1 Click Menu | User Management | Users, then click New User. The New User page
appears.
2 Type a user name.
McAfee ePolicy Orchestrator 4.5 Product Guide24
Page 25

Configuring ePolicy Orchestrator
How permission sets work
3 Select whether to enable or disable the logon status of this account. If this account is for
someone who is not yet a part of the organization, you might want to disable it.
4 Select whether the new account uses ePO authentication or Windows authentication,
and provide the required credentials.
5 Optionally, provide the user’s full name, email address, phone number, and a description
in the Notes text box.
6 Choose to make the user a global administrator, or select the appropriate permission sets
for the user.
7 Click Save to save the current entries and return to the Users tab. The new user should
appear in the Users list.
Editing user accounts
Use this task to edit a user account. Global administrators can change passwords on any user
account. Other users can only change passwords on their own accounts.
Task
For option definitions, click ? in the interface.
1 Click Menu | User Management | Users.
2 From the Users list, select the user you want to edit, then click Actions | Edit.
3 Edit the account as needed.
4 Click Save.
Deleting user accounts
Use this task to delete a user account. You must be a global administrator to delete user
accounts.
NOTE: McAfee recommends disabling the Login status of an account instead of deleting it,
until you are sure all valuable information associated with the account has been moved to other
users.
Task
For option definitions, click ? in the interface.
1 Click Menu | User Management | Users.
2 From the Users list, select the user you want to delete, then click Actions | Delete.
3 Click OK.
How permission sets work
A permission set is a group of permissions that can be granted to users or Active Directory (AD)
groups by assigning it to those users’ accounts. One or more permission sets can be assigned
to users who are not global administrators (global administrators have all permissions to all
products and features).
Permission sets only grant rights and access — no permission ever removes rights or access.
When multiple permission sets are applied to a user account, they aggregate. For example, if
25McAfee ePolicy Orchestrator 4.5 Product Guide
Page 26

Configuring ePolicy Orchestrator
How permission sets work
one permission set does not provide any permissions to server tasks, but another permission
set applied to the same account grants all permissions to server tasks, that account has all
permissions to server tasks. Consider this as you plan your strategy for granting permissions
to the users in your environment.
When are permission sets assigned?
Global administrators can assign existing permission sets when they create or edit user accounts
and when they create or edit permission sets.
What happens when I install new products?
When a new product extension is installed, it can add one or more groups of permissions to
the permission sets. For example, when you install a VirusScan Enterprise extension, a VirusScan
Enterprise section is added to each permission set. Initially, the newly added section is listed
in each permission set with no permissions yet granted. The global administrators can then
grant permissions to users through existing or new permission sets.
Default permission sets
ePolicy Orchestrator 4.5 ships with four default permission sets that provide permissions to
ePolicy Orchestrator functionality. These are:
• Executive Reviewer — Provides view permissions to dashboards, events, contacts, and
can view information that relates to the entire System Tree.
• Global Reviewer — Provides view access globally across functionality, products, and the
System Tree, except for extensions, multi-server roll-up data, registered servers, and software.
• Group Admin — Provides view and change permissions across ePolicy Orchestrator features.
Users that are assigned this permission set each need at least one more permission set that
grants access to needed products and groups of the System Tree.
• Group Reviewer — Provides view permissions across ePolicy Orchestrator features. Users
that are assigned this permission set each need at least one more permission set that grants
access to needed products and groups of the System Tree.
Working with permission sets
Use these tasks to create and maintain permission sets.
Tasks
Creating permission sets for user accounts
Duplicating permission sets
Editing permission sets
Deleting permission sets
Creating permission sets for user accounts
Use this task to create a permission set.
Before you begin
You must be a global administrator to perform this task.
McAfee ePolicy Orchestrator 4.5 Product Guide26
Page 27

Configuring ePolicy Orchestrator
How permission sets work
Task
For option definitions, click ? in the interface.
1 Click Menu | User Management | Permission Sets, then click New Permission Set.
2 Type a name for the permission set and select the users to which the set is assigned.
3 Select a server name from the drop-down list, or click Add if the server name you need
does not appear in the server list.
4 Click Save. The Permission Sets page appears.
5 Select the new permission set from the Permission Sets list. Its details appear to the right.
6 Click Edit next to any section where you want to grant permissions.
7 On the Edit Permission Set page that appears, select the appropriate options, then click
Save.
8 Repeat for all appropriate sections of the permission set.
Duplicating permission sets
Use this task to duplicate a permission set. Duplicating a permission set is useful when you
want to change only a few of the settings for a new permission set. Only global administrators
can duplicate permission sets.
Task
For option definitions, click ? in the interface.
1 Click Menu | User Management | Permission Sets, then select the permission set
you want to edit in the Permission Sets list. Its details appear to the right.
2 Click Actions | Duplicate, type a New name in the Duplicate dialog box, then click OK.
3 Select the new duplicate in the Permission Sets list. Its details appear to the right.
4 Click edit next to any section where you want to change permissions.
5 On the Edit Permission Set page that appears, select the appropriate options, then click
Save.
6 Repeat for all sections of the permission set where you want to grant permissions.
Editing permission sets
Use this task to edit a permission set. Only global administrators can edit permission sets.
Task
For option definitions, click ? in the interface.
1 Click Menu | User Management | Permission Sets, then select the permission set
you want to edit in the Permission Sets list. Its details appear to the right.
2 Click Edit next to any section where you want to grant permissions.
3 On the Edit Permission Set page that appears, select the appropriate options, then click
Save.
4 Repeat for all appropriate sections of the permission set.
27McAfee ePolicy Orchestrator 4.5 Product Guide
Page 28

Configuring ePolicy Orchestrator
Contacts
Deleting permission sets
Use this task to delete a permission set. Only global administrators can delete permission sets.
Task
For option definitions, click ? in the interface.
1 Click Menu | User Management | Permission Sets, then select the permission set
you want to delete in the Permission Sets list. Its details appear to the right.
2 Click Actions | Delete, then click OK in the Action pane. The permission set no longer
appears in the Permission Sets list.
Contacts
The ePolicy Orchestrator software maintains a list of email addresses that it uses to send email
messages to specified users in response to events. Currently this list is used by Automatic
Responses, Queries, and export functionality.
Working with contacts
Use these tasks to create and maintain email address information of individuals who might
receive email messages from ePolicy Orchestrator.
Tasks
Creating contacts
Editing contacts
Deleting contacts
Creating contacts
Use this task to add email addresses to Contacts.
Task
For option definitions, click ? in the interface.
1 Click Menu | User Management | Contacts, then click Actions | New Contact.
2 Type a first name, last name, and email address for the contact.
3 Click Save. The new contact appears on the Contacts page.
Editing contacts
Use this task to edit information in an existing entry on the Contacts page.
Task
For option definitions, click ? in the interface.
1 Click Menu | User Management | Contacts, then select a contact.
2 Click Actions | Edit. The Edit Contact page appears.
McAfee ePolicy Orchestrator 4.5 Product Guide28
Page 29

Configuring ePolicy Orchestrator
Server settings and the behaviors they control
3 Edit the information as desired.
4 Click Save.
Deleting contacts
Use this task to delete entries from the Contacts page.
Task
For option definitions, click ? in the interface.
1 Click Menu | User Management | Contacts, then select a contact.
2 Click Actions | Delete, then click OK in the Action pane. The contact no longer appears
in the list.
Server settings and the behaviors they control
Various settings control how the ePO server behaves. You can change most settings at any
time. But, only global administrators can access the server settings.
Types of ePO server settings are:
• Dashboards — Specifies the default active dashboard that is assigned to new users’ accounts
at the time of account creation, if one has been defined.
• Detected System Compliance — Specifies the settings that affect how rogue systems in
your network are identified and treated.
• Detected System Exception Categories — Specifies the categories that can be used to
mark systems in your environment as exceptions.
• Detected System Matching — Specifies the settings used to match detected systems and
system interfaces.
• Detected System OUIs — Specifies how your OUI (Organizationally Unique Identifier) list
is updated, and when the last update occurred.
• Email Server — Specifies the email server that is used when ePolicy Orchestrator sends
email messages.
• Event Filtering — Specifies which events are forwarded by the agent.
• Event Notification — Specifies the interval at which you want ePO Notification Events to
be sent to Automatic Responses.
• Global Updating — Specifies whether and how global updating is enabled.
• License Key — Specifies the 25 digit license key you provide while installing ePolicy
Orchestrator, via the hyperlink from the Log On to ePO page to an Enter License Key page,
or via this Server Settings page. McAfee introduced license keys to help customers with
license usage tracking needs and to be compliant with McAfee licensing terms.
• MyAvert Security Threats — Specifies the update frequency for the MyAvert Security
Threats service. If proxy settings are entered in Proxy Settings, they are used while collecting
MyAvert security threats.
• Policy Maintenance — Specifies whether policies for unsupported products are visible or
hidden. This is needed only after ePolicy Orchestrator is upgraded to 4.5 from a previous
version.
29McAfee ePolicy Orchestrator 4.5 Product Guide
Page 30

Configuring ePolicy Orchestrator
Server settings and the behaviors they control
• Ports — Specifies the ports used by the server when it communicates with agents and the
database.
• Printing and exporting — Specifies how information is exported to other formats, and
the template for PDF exports. It also specifies the default location where the exported files
are stored.
• Proxy Settings — Specifies the type of proxy settings configured for your ePO server.
• Repository Packages — Specifies whether any package can be checked in to any branch.
Only agents later then version 3.6 can retrieve packages other than updates from branches
other than Current.
• Rogue System Sensor — Specifies the settings that define behavior for Rogue System
Sensors in your network.
• Security Keys — Specifies and manages the agent-server secure communication keys, and
repository keys.
• Server Certificate — Specifies the server certificate that your ePO server uses for HTTPS
communication with browsers.
• System Tree Sorting — Specifies whether and how System Tree sorting is enabled in your
environment.
• User Auto Creation — Specifies whether ePO users are automatically created upon logon,
based on AD (Active Directory) user profiles.
• Windows Authentication — Specifies the domain name and Active Directory servers
configured. This is also used for user authentication. For example, Windows Authentication
is used to determine if the password entered should allow the user to log on to ePolicy
Orchestrator.
• Windows Authorization — Specifies the domain name and Active Directory servers
configured for use with this ePO server. This is used while dynamically assigning permissions
to the users who have logged on to ePolicy Orchestrator.
Working with server settings
Use these tasks to configure and maintain the server. Only general server settings are covered
here. Feature-specific server settings are covered in the sections for those features. For example,
System Tree sorting server settings are covered in
Tasks
Specifying an email server
Replacing the server certificate
Configuring the template and location for exported reports
Determining which events are forwarded to the server
Viewing and changing communication ports
Specifying an email server
Use this task to specify an email server that ePolicy Orchestrator uses to send email messages.
Task
For option definitions, click ? in the interface.
Organizing the Systems Tree
.
McAfee ePolicy Orchestrator 4.5 Product Guide30
Page 31

Configuring ePolicy Orchestrator
Server settings and the behaviors they control
1 Click Menu | Configuration | Server Settings, then click Email Server in the Settings
Categories list.
2 Click Edit. The Edit Email Server page appears.
3 Type the SMTP server name and SMTP server port.
4 Select whether to authenticate to the email server, and provide credentials if Authenticate
is selected.
5 Type the email address that appears as the return address on messages sent from ePolicy
Orchestrator.
6 Click Save, then select Email Server.
7 In the content area next to Test email, type a valid email address for receiving email
messages, then click Test to validate the settings.
Replacing the server certificate
Use this task to specify the server certificate and private key used by ePolicy Orchestrator.
Task
For option definitions, click ? in the interface.
1 Click Menu | Configuration | Server Settings, then click Server Certificate in the
Settings Categories list.
2 Click Edit. The Edit Server Certificate page appears.
3 Browse to the server certificate file and click Open.
4 Browse to the private key file and click Open.
5 If needed, type the private key password.
6 Click Save.
NOTE: After applying the new certificate and private key, you need to restart ePolicy
Orchestrator for the change to take effect.
Configuring the template and location for exported reports
Use this task to define the appearance and storage location for tables and dashboards you
export as documents. You can configure:
• Headers and footers, including a custom logo, name, page numbering, etc.
• Page size and orientation for printing.
• Directory where exported tables and dashboards are stored.
Task
For option definitions, click ? in the interface.
1 Click Menu | Configuration | Server Settings, then select Printing and Exporting
in the Settings list.
2 Click Edit. The Edit Printing and Exporting page appears.
3 In the Headers and footers for exported documents section, click Edit Logo to open
the Edit Logo page.
31McAfee ePolicy Orchestrator 4.5 Product Guide
Page 32

Configuring ePolicy Orchestrator
Server settings and the behaviors they control
Select Text and type the text you want included in the document header, or do one of
a
the following r:
• Select Image and browse to the image file, such as your company logo.
• Select the default McAfee logo.
b Click OK to return to the Edit Printing and Exporting page.
4 From the drop-down lists, select any metadata that you want displayed in the header and
footer.
5 Select a Page size and Page orientation.
6 Type a new location or except the default location where exported documents will be saved.
7 Click Save.
Determining which events are forwarded to the server
Use this task to determine which events are forwarded to the server. This selection impacts the
bandwidth used in your environment, as well as the results of event-based queries.
Before you begin
You must be a global administrator to perform this task.
Task
For option definitions, click ? in the interface.
1 Click Menu | Configuration | Server Settings, select Event Filtering, then click Edit
at the bottom of the page. The Edit Event Filtering page appears.
2 Select the events you want the agent to forward to the server, then click Save.
Changes to these settings take effect after all agents have communicated with the ePO server.
Enabling user autocreation
Use this task to enable user autocreation, which creates ePO user account records for Active
Directory users when they first log on.
Before you begin
Configure the following prerequisites before enabling User Auto Creation,
1 Register the LDAP server containing the user accounts with your ePO server.
NOTE: ePO 4.5 supports only Windows LDAP servers.
2 Edit Windows Authorization settings to map the corresponding domain and the registered
LDAP server.
NOTE: If the LDAP server is on a different domain, then specify the corresponding domain
controller on the Windows Authentication settings. For more information on editing windows
authentication settings, see
3 Create a new permission set and map the Active Directory groups.
NOTE: Permission sets are assigned to users based on the Active Directory groups mapped
to it. For example, User1 is a member of Group1 and Group2. P1 and P2 are permission
McAfee ePolicy Orchestrator 4.5 Product Guide32
Configuring Windows authentication
section.
Page 33

Configuring ePolicy Orchestrator
Server settings and the behaviors they control
sets mapped to Group1 and Group2 respectively. In this case, User1 will have a combined
permissions of P1 and P2 to the ePO server.
4 Add users to be created to the Active Directory group.
Task
For option definitions, click ? in the interface.
1 Click Menu | Configuration | Server Settings, then select User Auto Creation from
the Settings Categories list.
2 Click Edit. The Edit User Auto Creation page opens.
3 Select Automatically create ePO user records for Active Directory users at logon,
then click Save.
NOTE:
• Users are not automatically created if they do not belong to a group with at least one
mapped permission set.
• You cannot create a global administrator using user autocreation.
4 The user can log on to ePO server with Active Directory credentials.
Viewing and changing communication ports
Use this task to view the ports that ePolicy Orchestrator uses for communication with distributed
components. These ports were originally configured during installation. After installation you
can change only the two ports used for agent communication. If you need to change other
ports, you must reinstall the server and reconfigure the ports in the installation wizard.
Task
For option definitions, click ? in the interface.
1 Click Menu | Configuration | Server Settings, select Ports, then click Edit. The Edit
Ports page appears.
2 Change the agent-server communication port or agent broadcast communication port as
necessary, then click Save.
NOTE: The agent-server communication port is used for agent-server communication; the
agent broadcast port is used for SuperAgent wake-up calls. Any changes take effect during
the next agent-server communication.
SSL certificates
The browsers supported by ePO show a warning about a server’s SSL certificate if it cannot
verify that the certificate is valid or signed by a source that the browser trusts. By default, the
ePO server uses a self-signed certificate for SSL communication with the web browser, which,
by default, the browser will not trust. This causes a warning message to display every time you
visit the ePO console. To stop this warning message from appearing you must do one of the
following:
33McAfee ePolicy Orchestrator 4.5 Product Guide
Page 34

Configuring ePolicy Orchestrator
Server settings and the behaviors they control
• Add the ePO server certificate to the collection of trusted certificates used by the browser.
NOTE: This must be done for every browser that interacts with ePO. If the browser certificate
changes, you must add the ePO server certificate again since the certificate sent by the
server no longer matches the one that the browser is configured to use.
• Replace the default ePO server certificate with a valid certificate that has been signed by a
certificate authority (CA) that the browser trusts. This is the best option. Because the
certificate is signed by a trusted CA, you do not need to add the certificate to all web browsers
within your organization.
NOTE: If the server host name changes, you can replace the server certificate with a different
one that has also been signed by a trusted CA.
To replace the ePO server certificate, you must first obtain the certificate — preferably a
certificate that has been signed by a trusted CA. You must also obtain the certificate’s private
key and its password (if it has one). Then you can use all of these files to replace the server’s
certificate. For more information on replacing server certificates, see
they work
.
Security keys and how
The ePO browser expects the linked files to use the following format:
• Server certificate — P7B or PEM
• Private key — PEM
If the server certificate or private key are not in these formats, they must be converted to one
of the supported formats before they can be used to replace the server certificate.
Installing a trusted security certificate for the ePO browser
Use these tasks to install a trusted security certificate for your ePO browser, to stop the server
certificate warning from appearing every time you log on.
Tasks
Installing the security certificate when using Internet Explorer 7
Installing the security certificate when using Internet Explorer 8
Installing the security certificate when using Firefox 3.0
Installing the security certificate when using Internet Explorer 7
Use this task to install the security certificate when using Internet Explorer 7, so that the
Certificate Error warning won’t appear every time you log on.
Task
1 From your browser, start ePolicy Orchestrator. The Certificate Error: Navigation Blocked
page appears.
2 Click Continue to this website (not recommended) to open the logon page. The
address bar is red, indicating the browser cannot verify the security certificate.
3 To the right of the address bar, click Certificate Error to display the certificate warning.
4 At the bottom of the warning, click View certificates to open the Certificate dialog box.
CAUTION: Do not click Install Certificate on the General tab. If you do, the process fails.
McAfee ePolicy Orchestrator 4.5 Product Guide34
Page 35

Configuring ePolicy Orchestrator
Server settings and the behaviors they control
5 Select the Certification Path tab, then select Orion_CA_<servername>, and click View
Certificate. Another Certificate dialog box opens to the General tab, displaying the
Certificate Information.
6 Click Install certificate to open the Certificate Import Wizard.
7 Click Next to specify where the certificate is stored.
8 Select Place all certificates in the following store, then click Browse to select a
location.
9 Select the Trusted Root Certificate Authorities folder from the list, click OK, then click
Next.
10 Click Finish. In the Security Warning that appears, click Yes.
11 Close the browser and restart ePolicy Orchestrator.
Now when you log on to ePolicy Orchestrator, you are no longer prompted to accept the
certificate.
Installing the security certificate when using Internet Explorer 8
Use this task to install the security certificate when using Internet Explorer 8, so that the warning
dialog box won’t appear every time you log on.
Task
1 From your browser, start ePolicy Orchestrator. The Certificate Error: Navigation Blocked
page appears.
2 Click Continue to this website (not recommended) to open the logon page. The
address bar is red, indicating the browser cannot verify the security certificate.
3 To the right of the address bar, click Certificate Error to display the Certificate Invalid
warning.
4 At the bottom of the warning, click View certificates to open the Certificate dialog box.
CAUTION: Do not click Install Certificate on the General tab. If you do, the process fails.
5 Select the Certification Path tab, then select Orion_CA_<servername>, and click View
Certificate. Another Certificate dialog box opens to the General tab, displaying the
Certificate Information.
6 Click Install certificate to open the Certificate Import Wizard.
7 Click Next to specify where the certificate is stored.
8 Select Place all certificates in the following store, then click Browse to select a
location.
9 Select the Trusted Root Certificate Authorities folder from the list, click OK, then click
Next.
10 Click Finish. In the Security Warning that appears, click Yes.
11 Close the browser and restart ePolicy Orchestrator.
Now when you log on to ePolicy Orchestrator, you are no longer prompted to accept the
certificate.
Installing the security certificate when using Firefox 3.0
Use this task to install the security certificate when using Firefox 3.0, so that the warning dialog
box won’t appear every time you log on.
35McAfee ePolicy Orchestrator 4.5 Product Guide
Page 36

Configuring ePolicy Orchestrator
Managing ePolicy Orchestrator users with Active Directory
Task
1 From your browser, start ePolicy Orchestrator. The Secure Connection Failed page appears.
2 Click Or you can add an exception at the bottom of the page. The page now displays
the Add Exception button.
3 Click Add Exception. The Add Security Exception dialog appears.
4 Click Get Certificate. The Certification Status information is populated and the Confirm
Security Exception button is enabled.
5 Make sure that Permanently store this exception is selected, then click Confirm
Security Exception.
Now when you log on to ePolicy Orchestrator, you are no longer prompted to accept the
certificate.
Managing ePolicy Orchestrator users with Active Directory
ePolicy Orchestrator 4.5 offers the ability to dynamically create ePO users and assign permission
sets to them by automatically creating users based on Windows authenticated user credentials.
This process is accomplished by mapping ePO permission sets to Active Directory groups in
your environment. This feature can reduce the management overhead when you have a large
number of ePO users in your organization. To complete the configuration, you must work though
the following process:
1 Configure user authentication.
2 Register LDAP servers.
3 Configure Windows authorization.
4 Assign permission sets to the Active Directory group.
5 Enable user autocreation.
User authentication
ePolicy Orchestrator users can be authenticated with ePO password authentication or Windows
authentication. If you use Windows authentication, you can specify whether users authenticate:
• Against the domain that your ePO server is joined to (default).
• Against a list of one or more domain controllers.
• Using a WINS server to look up the appropriate domain controller.
If you use domain controllers or a WINS server, you must configure the Windows authentication
server setting.
Registered LDAP servers
It is necessary to register LDAP servers with your ePO server to permit dynamically assigned
permission sets for Windows users. Dynamically assigned permission sets are permission sets
assigned to users based on their Active Directory group memberships.
NOTE: Users trusted via one-way external trusts are not supported. Active Directory is the only
LDAP server type supported at this time.
McAfee ePolicy Orchestrator 4.5 Product Guide36
Page 37

Configuring ePolicy Orchestrator
Managing ePolicy Orchestrator users with Active Directory
The user account used to register the LDAP server with ePolicy Orchestrator must be trusted
via a bi-directional transitive trust, or must physically exist on the domain where the LDAP
server belongs.
Windows authorization
The server setting for Windows authorization specifies which Active Directory (AD) server ePolicy
Orchestrator uses to gather user and group information for a particular domain. You can specify
multiple domain controllers and AD servers. this server setting supports the ability to dynamically
assign permission sets to users that supply Windows credentials at login.
NOTE: ePolicy Orchestrator can dynamically assign permission sets Windows Authenticated
users even if user autocreation is not enabled.
Assign permissions
You must assign at least one permission set to an AD group other than a user's Primary Group.
Dynamically assigning permission sets to a user's Primary Group is not supported, and results
in application of only those permissions manually assigned to the individual user.
User autocreation
When you have configured the previously discussed sections, you can enable the User
autocreation server setting. User autocreation allows user records to be automatically created
when the following conditions are met:
• Users provide valid credentials, using the <domain\name> format. For example, a user with
Windows credentials jsmith1, who is a member of the Windows domain named eng, would
supply the following credentials: eng\jsmith1, along with the appropriate password.
• The domain used in the logon attempt maps to a domain listed in the windows authorization
server setting.
• The Active Directory server mapped to the domain contains a record for the user.
• The user is a member of at least one group that maps to an ePO permission set.
Configuring Windows authentication and authorization
Use these tasks to set up automatic user creation.
Tasks
Configuring Windows authentication
Registering LDAP servers
Configuring Windows authorization
Enabling user autocreation
Configuring Windows authentication
Use this task to configure Windows authentication. How you configure these settings depends
on several variables:
• Do you want to use a WINS server to look up which domain your users are authenticating
against?
• Do you want to use multiple domain controllers?
37McAfee ePolicy Orchestrator 4.5 Product Guide
Page 38

Configuring ePolicy Orchestrator
Managing ePolicy Orchestrator users with Active Directory
By default, users can authenticate using Windows credentials for the domain that the ePO server
is joined to. If you have multiple domains, or your ePO server is not located in the same domain
as your users, you must configure Windows authentication
Before you begin
To access the Windows Authentication page in the server settings, you must stop the ePolicy
Orchestrator application service using these steps:
1 From the server console, click Start | Settings | Control Panel | Administrative
Tools | Services. The Services window opens.
2 Right-click McAfee ePolicy Orchestrator Applications Server and select Stop.
3 Rename the WinAuth.dll file to WinAuth.bak.
NOTE: In default installations, this file's location is C:\Program Files\McAfee\ePolicy
Orchestrator\Server\bin.
4 Restart the server.
Task
For option definitions, click ? in the interface.
1 Click Menu | Configuration | Server Settings, then select Windows Authentication
from the Settings Categories list.
2 Click Edit. The Edit Windows Authentication page opens.
3 Specify whether to use Domain controllers or WINS server, using the DNS host name.
NOTE: You can specify multiple domain controllers, but only one WINS server. Click + to
add additional domain controllers to the list.
4 Click Save.
Configuring Windows authorization
Use this task to configure the Windows authorization settings that are used with your Active
Directory servers. This is required to enable:
• Dynamic assignment of permission sets
• Automatic user account creation
Before you begin
You must register an LDAP server with your ePO server.
Task
For option definitions, click ? in the interface.
1 Click Menu | Configuration | Server Settings, click Windows Authorization, then
click Edit. The Edit Windows Authorization page opens.
2 Select the Default Active Directory Server from the list.
3 Specify the NetBIOS Domain Name for your LDAP server, and select your Active
Directory Server from the list, then click Save.
NOTE: You can add or remove multiple domains using + or -.
McAfee ePolicy Orchestrator 4.5 Product Guide38
Page 39

Configuring ePolicy Orchestrator
Registering servers for use with ePolicy Orchestrator
Registering servers for use with ePolicy Orchestrator
ePolicy Orchestrator 4.5 can be set up to work with a variety of servers that you might use in
your network. Different types of servers are needed to support various functionalities of ePolicy
Orchestrator and other McAfee and third-party products.
Contents
What are registered servers
Registering servers
What are registered servers
Registered servers are servers that work with your ePO server to support or add functionality.
When you install ePolicy Orchestrator for the first time, no other servers are registered with
your ePO server.
You can register several types of servers with your main ePO server, including:
• ePolicy Orchestrator servers — You can register additional ePO servers to use with your
main ePO server.
• LDAP servers — Lightweight Directory Access Protocol (LDAP) servers can use ePO
functionality, such as automatic user creation and Policy Assignment Rules.
• SNMP servers — Simple Network Management Protocol (SNMP) servers can enable the
use of SNMP traps as Automatic Response actions.
Registering servers
Use these tasks to register additional servers to work with ePolicy Orchestrator.
Tasks
Registering ePO servers
Registering LDAP servers
Registering SNMP servers
Registering ePO servers
Use this task to register additional ePO servers for use with your main ePO server.
Task
For option definitions, click ? in the interface.
1 Click Menu | Configuration | Registered Servers and click New Server. The
Registered Server Builder wizard opens.
2 From the Server type menu on the Description page, select ePO 4.5, specify a unique
name and any notes, then click Next. The Details page opens.
3 Specify the following options to configure the server:
39McAfee ePolicy Orchestrator 4.5 Product Guide
Page 40

Configuring ePolicy Orchestrator
Registering servers for use with ePolicy Orchestrator
DefinitionOption
Authentication type
Database server
Policy sharing
SQL Server instance
SSL communication with database server
Specifies the type of authentication to use for this
database, including:
• Windows authentication
• SQL authentication
Specifies the name for this database.Database name
Specifies the port for this database.Database port
Specifies the name of the database for this server. You
can specify a database using DNS Name or IP address
(IPv4 or IPv6).
Specifies the password for this server.Password
Specifies whether to enable or disable policy sharing
for this server.
Allows you to specify whether this is the default server
or a specific instance, by providing the Instance name.
Specifies whether ePolicy Orchestrator uses SSL (Secure
Socket Layer) communication with this database server
including:
• Try to use SSL
• Always use SSL
• Never use SSL
Verifies the connection for the detailed server.Test connection
Transfer systems
Use NTLMv2
4 Click Save.
Registering LDAP servers
Use this task to register an LDAP (Lightweight Directory Access Protocol) server. You must have
a registered LDAP server to use Policy Assignment Rules, to enable dynamically assigned
permission sets, and to enable automatic user account creation.
Before you begin
Make sure you have the appropriate rights to modify server settings, permission sets, users,
and registered servers.
Task
For option definitions, click ? in the interface.
1 Click Menu | Configuration | Registered Servers, then click New Server. The
Registered Server Builder wizard opens.
Specifies whether to enable or disable the ability to
transfer systems for this server. When enabled, select
Automatic sitelist import or Manual sitelist
import.
Optionally choose to use NT LAN Manager
authentication protocol. Select this option when the
server you are registering employs this protocol.
Specifies the user name for this server.User name
McAfee ePolicy Orchestrator 4.5 Product Guide40
Page 41

Configuring ePolicy Orchestrator
Security keys and how they work
2 From the Server type menu on the Description page, select LDAP Server, specify a unique
name and any details, then click Next. The Details page appears.
3 Specify the Server name, Username, Password, then click Save.
NOTE: Default settings for the Username Attribute, Group name Attribute, and
Unique ID Attribute are provided automatically. These default settings support standard
Active Directory configurations. You should change these settings only if you have a custom
configuration, and can verify that the correct settings are different than those provided.
Registering SNMP servers
Use this task to add an SNMP server. To receive an SNMP trap, you must add the SNMP server’s
information, so that ePolicy Orchestrator knows where to send the trap.
Task
For option definitions click ? in the interface.
1 Click Menu | Configuration | Registered Servers, then click New Server. The
Registered Server Builder wizard opens.
2 From the Server type menu on the Description page, select SNMP Server, provide the
name and any additional information about the server, then click Next. The Details page
appears.
3 From the URL drop-down list, select one of these types of server address, then enter the
address:
DefinitionOption
Specifies the DNS name of the registered server.DNS Name
Specifies the IPv4 address of the registered server.IPv4
Specifies the DNS name of the registered server which has an IPv6 address.IPv6
4 Select the SNMP version that your server uses:
• If you select SNMPv1 or SNMPv2c as the SNMP server version, type the community
string of the server under Security.
• If you select SNMPv3, provide the SNMPv3 Security details.
5 Click Send Test Trap to test your configuration.
6 Click Save.
The added SNMP server appears on the Registered Server page.
Security keys and how they work
ePolicy Orchestrator relies on three security key pairs to:
• Authenticate agent-server communication.
• Verify the contents of local repositories.
• Verify the contents of remote repositories.
Each pair's secret key signs messages or packages at their source, while the pair's public key
verifies the messages or packages at their target.
41McAfee ePolicy Orchestrator 4.5 Product Guide
Page 42

Configuring ePolicy Orchestrator
Security keys and how they work
Agent-server secure communication (ASSC) keys
• The first time the agent communicates with the server, it sends its public key to the server.
• From then on, the server uses the agent public key to verify messages signed with the
agent's secret key.
• The server uses its own secret key to sign its message to the agent.
• The agent uses the server's public key to verify the agent's message.
• You can have multiple secure communication key pairs,
the master key
• When the client agent key updater task runs (ePO Agent Key Updater 3.5.5), agents
using different public keys receive the current public key.
• If you are upgrading from ePolicy Orchestrator 3.6 or earlier, a legacy key is retained. If
you are upgrading from ePolicy Orchestrator 3.6.1, the legacy key is the master key by
default. If you are upgrading from ePolicy Orchestrator 4.0, the master key is unchanged.
Whether or not you upgrade from version 3.6.1 or 4.0, the existing keys are migrated to
your ePO 4.5 server.
Local master repository key pairs
.
but only one can be designated as
• The repository secret key signs the package before it is checked in to the repository.
• The repository public key verifies the contents of packages in the master repository and
distributed repository.
• The agent retrieves available new content each time the client update task runs.
• This key pair is unique to each server.
• By exporting and importing keys among servers, you can use the same key pair in a
multi-server environment.
Other repository key pairs
• The secret key of a trusted source signs its content when posting that content to its remote
repository. Trusted sources include the McAfee download site and the McAfee Security
Innovation Alliance (SIA) repository.
CAUTION: If this key is deleted, you cannot perform a pull, even if you import a key from
another server. Before you overwrite or delete this key, make sure to back it up in a secure
location.
• The agent public key verifies content that is retrieved from the remote repository.
Backing up and restoring keys
Use these tasks to back up and restore security keys.
Tasks
Backing up all security keys
Restoring security keys
Restoring security keys from a backup file
McAfee ePolicy Orchestrator 4.5 Product Guide42
Page 43

Configuring ePolicy Orchestrator
Security keys and how they work
Backing up all security keys
McAfee recommends periodically backing up all security keys, and always creating a backup
before making any changes to the key management settings. Store the backup in a secure
network location, so that the keys can be restored easily in the unexpected event any are lost
from the ePO server.
Use this task to back up all security keys that are currently managed on this ePO server.
Task
For option definitions, click ? in the interface.
1 Click Menu | Configuration | Server Settings, select Security Keys from the Setting
Categories list, then click Edit. The Edit Security Keys page appears.
2 Click Back Up All near the bottom of the page. The File Download dialog box appears.
3 Click Save to create a zip file of all security keys. The Save As dialog box appears.
4 Browse to a secure network location to store the zip file, then click Save.
Restoring security keys
McAfee recommends periodically backing up all security keys. In the unexpected event any
security keys are lost from the ePO server, you can restore them from the backup that you
have stored in a secure network location.
Use this task to restore the security keys on the ePO server.
Task
For option definitions, click ? in the interface.
1 Click Menu | Configuration | Server Settings, select Security Keys from the Setting
Categories list, then click Edit. The Edit Security Keys page appears.
2 Click Restore All near the bottom of the page. The Restore Security Keys page appears.
3 Browse to the zip file containing the security keys, select it, and click Next. The Restore
Security Keys wizard opens to the Summary page.
4 Browse to the keys you want to replace your existing key with, then click Next.
5 Click Restore. The Edit Security Keys page reappears.
6 Browse to a secure network location to store the zip file, then click Save.
Restoring security keys from a backup file
Use this task to restore all security keys from a backup file.
Before you begin
You must have already created a backup zip file of all of your keys.
CAUTION: When you restore security keys, all existing keys are removed and replaced by the
keys in the backup file. Ensure that the needed keys are in the backup file before overwriting
all existing keys.
Task
For option definitions, click ? in the interface.
43McAfee ePolicy Orchestrator 4.5 Product Guide
Page 44

Configuring ePolicy Orchestrator
Security keys and how they work
1 Click Menu | Configuration | Server Settings, select Security Keys from the Setting
Categories list, then click Edit. The Edit Security Keys page appears.
2 Click Restore All at the bottom of the page. The Restore Security Keys wizard opens.
3 Browse to and select the backup zip file, then click Next.
4 Verify that the keys in this file are the ones you want to overwrite your existing keys, then
click Restore All.
Master repository key pair
The master repository private key signs all unsigned content in the master repository. This key
is a feature of agents 4.0 and later.
Agents 4.0 and later use the public key to verify the repository content that originates from the
master repository on this ePO server. If the content is unsigned, or signed with an unknown
repository private key, the downloaded content is considered invalid and deleted.
This key pair is unique to each server installation. However, by exporting and importing keys,
you can use the same key pair in a multi-server environment. This is a fallback measure that
can help to ensure that agents can always connect to one of your master repositories, even
when another repository is down.
Other repository public keys
Keys other than the master key pair are the public keys that agents use to verify content from
other master repositories in your environment or from McAfee source sites. Each agent reporting
to this server uses the keys in the Other repository public keys list to verify content that
originates from other ePO servers in your organization, or from McAfee-owned sources.
If an agent downloads content that originated from a source where the agent does not have
the appropriate public key, the agent discards the content.
These keys are a new feature, and only agents 4.0 and later are able to use the new protocols.
Working with repository keys
Use these tasks to work with and manage repository keys.
Tasks
Using one master repository key pair for all servers
Using master repository keys in multi-server environments
Using one master repository key pair for all servers
Use this task to ensure that all ePO servers and agents use the same master repository key
pair in a multi-server environment. This consists of first exporting the key pair you want all
servers to use, then importing the key pair into all other servers in your environment.
Task
For option definitions, click ? in the interface.
1 Click Menu | Configuration | Server Settings, select Security Keys from the Setting
Categories list, then click Edit. The Edit Security Keys page appears.
McAfee ePolicy Orchestrator 4.5 Product Guide44
Page 45

Configuring ePolicy Orchestrator
Security keys and how they work
2 Next to Local master repository key pair, click Export Key Pair. The Export Master
Repository Key Pair dialog box appears.
3 Click OK. The File Download dialog box appears.
4 Click Save, browse to a location that is accessible by the other servers, where you want
to save the zip file containing the secure-communication key files, then click Save.
5 Next to Import and back up keys, click Import . The Import Keys wizard opens.
6 Browse to the zip file containing the exported master repository key files, then click Next.
7 Verify that these are the keys you want to import, then click Save.
The imported master repository key pair replaces the existing key pair on this server. Agents
begin using the new key pair after the next agent update task runs. Once the master repository
key pair is changed, an ASSC must be performed before the agent can use the new key.
Using master repository keys in multi-server environments
Use this task to ensure that agents 3.6 and later can use content originating from any ePO
server in your environment.
The server signs all unsigned content that is checked in to the repository with the master
repository private key. Agents use repository public keys to validate content that is retrieved
from repositories in your organization or from McAfee source sites.
The master repository key pair is unique for each installation of ePolicy Orchestrator. If you use
multiple servers, each uses a different key. If your agents can download content that originates
from different master repositories, you must ensure that agents (version 4.0 and later) recognize
the content as valid.
You can ensure this in two ways:
• Use the same master repository key pair for all servers and agents.
• Ensure agents are configured to recognize any repository public key that is used in your
environment.
The following process exports the key pair from one ePO server to a target ePO server, then,
at the target ePO server, imports and overwrites the existing key pair.
Before you begin
McAfee recommends that you back up the existing master repository key pair on the target
ePO server before overwriting it with an imported master repository key pair.
You must have permission to access and write to the target ePO server before starting this
process.
Task
For option definitions, click ? in the interface.
1 On the ePO server with the master repository key pair, click Menu | Configuration |
Server Settings, select Security Keys from the Setting Categories list, then click Edit.
The Edit Security Keys page appears.
2 Next to Local master repository key pair, click Export Key Pair. The Export
Agent-Server Communication Keys dialog box appears.
3 Click OK. The File Download dialog box appears.
4 Click Save, then browse to a location on the target ePO server to save the zip file.
45McAfee ePolicy Orchestrator 4.5 Product Guide
Page 46

Configuring ePolicy Orchestrator
Security keys and how they work
5 Change the name of the file if needed, then click Save.
6 On the target ePO server where you want to load the master repository key pair, click
Menu | Configuration | Server Settings, select Security Keys from the Setting
Categories list, then click Edit. The Edit Security Keys page appears.
7 Next to Import and back up keys, click Import. The Import Keys dialog box appears.
8 Next to Select file, browse to and select the master key pair file you saved, then click
Next. The summary dialog box appears.
9 If the summary information appears correct, click Save. The new master key pair appears
in the list next to Agent-server secure communication keys.
10 From the list, select the file you imported in the previous steps and click Make Master.
This changes the existing master key pair to the new key pair you just imported.
11 Click Save to complete the process.
Agent-server secure communication (ASSC) keys
Agent-server secure communication (ASSC) keys are used by the agents to communicate
securely with the server. You can make any ASSC key pair the master, which is the key pair
currently assigned to all deployed agents. Existing agents that use other keys in the
Agent-server secure communication keys list do not change to the new master key unless
there is a client agent key updater task scheduled and run.
CAUTION: Be sure to wait until all agents have updated to the new master before deleting older
keys.
NOTE: Windows agents older than version 3.6 are not supported.
Working with ASSC keys
Use these tasks to work with and manage ASSC keys in your environment.
Tasks
Deleting agent-server secure communication (ASSC) keys
Generating and using new ASSC key pairs
Designating an ASSC key pair as the master
Exporting ASSC keys
Importing ASSC keys
Using the same ASSC key pair for all servers and agents
Using a different ASSC key pair for each ePO server
Viewing systems that use an ASSC key pair
Deleting agent-server secure communication (ASSC) keys
Use this task to delete unused keys in the Agent-server secure communication keys list.
Make sure that the selected key is not being used by any agent that is managed by this ePO
server.
CAUTION: Do not delete any keys that are currently in use by any agents. If you do, those
agents cannot communicate with the server.
McAfee ePolicy Orchestrator 4.5 Product Guide46
Page 47

Configuring ePolicy Orchestrator
Security keys and how they work
Before you begin
McAfee recommends backing up all keys before making any changes to the key management
settings.
Task
For option definitions, click ? in the interface.
1 Click Menu | Configuration | Server Settings, select Security Keys from the Setting
Categories list, then click Edit. The Edit Security Keys page appears.
2 From the Agent-server secure communication keys list, select the key you want to
remove, then click Delete. The Delete Key dialog box appears.
3 Click OK to delete the key pair from this server.
Exporting ASSC keys
Use this task to export agent-server secure communication keys from one ePO server to a
different ePO server, to allow agents to access that new ePO server.
Task
For option definitions, click ? in the interface.
1 Click Menu | Configuration | Server Settings, select Security Keys from the Setting
Categories list, then click Edit. The Edit Security Keys page appears.
2 In the Agent-server secure communication keys list, select a key, then click Export.
The Export Agent-Server Communication Keys dialog box appears.
3 Click OK. Your browser prompts you to for action to download the sr<ServerName>.zip
file to the specified location.
NOTE: Depending on the internet browser you are using, If you have specified a default
location for all downloads this file might be automatically saved to that location.
Importing ASSC keys
Use this task to import agent-server secure communication keys that were exported from a
different ePO server. This procedure allows agents from that server to access this ePO server.
Task
For option definitions, click ? in the interface.
1 Click Menu | Configuration | Server Settings, select Security Keys from the Setting
Categories list, then click Edit. The Edit Security Keys page appears.
2 Click Import. The Import Keys page appears.
3 Browse to and select the key from the location where you saved it (by default, on the
desktop), then click Open.
4 Click Next and review the information on the Import Keys page.
5 Click Save.
Generating and using new ASSC key pairs
Use this task to generate new agent-server secure communication key pairs.
47McAfee ePolicy Orchestrator 4.5 Product Guide
Page 48

Configuring ePolicy Orchestrator
Security keys and how they work
Task
For option definitions, click ? in the interface.
1 Click Menu | Configuration | Server Settings, select Security Keys from the Setting
Categories list, then click Edit. The Edit Security Keys page appears.
2 Next to the Agent-server secure communication keys list, click New Key. In the
dialog box, type the name of the security key.
3 If you want existing agents to use the new key, select the key in the list, then click Make
Master.
Agents 3.6 and later begin using the new key at the first agent-server communication after
their next update task is complete. For earlier versions of the agent, you must run a client
product update task to push down the new key, using the agent updater 3.5.5 that is in
the master repository.
CAUTION: In large installations, generating and using new master key pairs should be
performed only when you have specific reason to do so. McAfee recommends performing
this procedure in phases so you can more closely monitor progress.
4 After all agents have stopped using the old key, delete it.
In the list of keys, the number of agents currently using that key is displayed to the right
of every key.
5 Back up all keys.
Designating an ASSC key pair as the master
Use this task to change which key pair, listed in the Agent-server secure communication
keys list, is specified as the master. Do this after importing or generating a new key pair.
Task
For option definitions, click ? in the interface.
1 Click Menu | Configuration | Server Settings, select Security Keys from the Setting
Categories list, then click Edit. The Edit Security Keys page appears.
2 From the Agent-server secure communication keys list, select a key , then click Make
Master.
3 Create an update task for the agents to run immediately, so that agents update after the
next agent-server communication.
NOTE: Ensure that the agent key updater package is checked in to the master repository
and has been replicated to all distributed repositories that are managed by ePolicy
Orchestrator. Agents begin using the new key pair after the next update task for the agent
is complete. At any time, you can see which agents are using any of the agent-server
secure communication key pairs in the list.
4 Back up all keys.
Using the same ASSC key pair for all servers and agents
Follow this process to ensure that all ePO servers and agents use the same agent-server secure
communication (ASSC) key pair.
McAfee ePolicy Orchestrator 4.5 Product Guide48
Page 49

Configuring ePolicy Orchestrator
Security keys and how they work
Process overview
TIP: If you have a large number of managed systems in your environment, McAfee recommends
performing this process in phases so you can monitor agent updates.
1 Create an agent update task.
2 Export the keys chosen from the selected ePO server.
3 Import the exported keys to all other servers.
4 Designate the imported key as the master on all servers.
5 Perform two agent wake-up calls
6 When all agents are using the new keys, delete any unused keys.
7 Back up all keys.
NOTE: Ensure that the agent key updater package is checked in to the master repository and
has been replicated to all distributed repositories that are managed by ePolicy Orchestrator.
Agents begin using the new key pair after the next update task for the agent is complete. At
any time, you can see which agents are using any of the agent-server secure communication
key pairs in the list.
Using a different ASSC key pair for each ePO server
Use this task to ensure that all agents can communicate with the required ePO servers in an
environment where each ePO server must have a unique agent-server secure communication
key pair.
NOTE: Agents can communicate with only one server at a time. The ePO server can have
multiple keys to communicate with different agents, but the opposite is not true. Agents cannot
have multiple keys to communicate with multiple ePO servers.
Task
For option definitions, click ? in the interface.
1 From each ePO server in your environment, export the master agent-server secure
communication key pair to a temporary location to where? a location? a zip file?.
2 Import each of these key pairs into every ePO server.
Viewing systems that use an ASSC key pair
Use this task to view the systems whose agents use a specific agent-server secure communication
key pair, which appears in the Agent-server secure communication keys list. After making
a specific key pair the master, you might want to view the systems that are still using the
previous key pair. Do not delete a key pair until you know that no agents are still using it.
Task
For option definitions, click ? in the interface.
1 Click Menu | Configuration | Server Settings, select Security Keys from the Setting
Categories list, then click Edit. The Edit Security Keys page appears.
2 In the Agent-server secure communication keys list, select a key, then click View
Agents. The Systems using this key page appears.
This page lists all systems whose agents are using the selected key.
49McAfee ePolicy Orchestrator 4.5 Product Guide
Page 50

Configuring ePolicy Orchestrator
MyAvert Security Threats
MyAvert Security Threats
The MyAvert Security Threats page informs you of the top ten medium-to-high-risk threats for
corporate users. You no longer need to manually search for this information from the press
(TV, radio, newspapers), informational websites, mailing lists, or your peers. You are
automatically notified of these threats from McAfee Avert Labs.
Protection status and risk assessment
You can easily determine whether the DAT and engine files in the Current branch of the master
repository provide protection against the top 10 threats and, if not, the highest risk level of any
new threats.
Protection available
The DAT and engine files in the repository already provide protection against all threats that
are known to Avert. To determine whether each managed system is protected, run a query
against DAT and engine file coverage.
Protection pending on Medium-to-Low Risk Threats
The updated DAT file for threats assessed by Avert as medium risk is pending. However, updated
protection is available in a supplemental virus definition (ExtraDAT) file, which you can manually
download if you need protection before the next full DAT file is available, such as in an outbreak
scenario.
Protection Pending on High-Risk Threats
The updated DAT file for threats assessed by Avert as high risk is pending. However, updated
protection is available in a supplemental virus definition (ExtraDAT) file, which you can manually
download if you need protection before the next full DAT file is available, such as in an outbreak
scenario.
Working with MyAvert Security Threats
Use these task to mark threat notifications as read or unread or to delete them. Data is sorted
by the date the threat was discovered. In addition, you can click the threat name to go to the
McAfee Avert website to view information about each threat.
NOTE: Each user views a MyAvert page that is unique to their account. When one user deletes
or marks threat notifications as read or unread, these actions are not represented in the table
when another user account logs on.
Tasks
Configuring MyAvert update frequency
Viewing threat notifications
Deleting threat notifications
Configuring MyAvert update frequency
Use this task to configure the update frequency for MyAvert Security Threats.
McAfee ePolicy Orchestrator 4.5 Product Guide50
Page 51

Configuring ePolicy Orchestrator
MyAvert Security Threats
Task
For option definitions, click ? in the interface.
1 Click Menu | Configuration | Server Settings, select MyAvert Security Threats,
then click Edit.
2 In the Updating option, chose one of the following:
• Update MyAvert Security Threats every — Select, type a number, and select a unit
of time from the list for the updates to occur.
• Do not update MyAvert Security Threats — Select to stop updates.
3 Click Save.
Viewing threat notifications
Use this task to view threat notifications and mark threats as read or unread. You can filter
threats by their importance, or whether they’ve been marked read, or unread.
Task
For option definitions, click ? in the interface.
1 Click Menu | Reporting | MyAvert.
Figure 1: MyAvert Security Threats page
2 To narrow the viewable notifications, select an option from the Filter Options drop-down
list.
3 To mark notifications as read or unread, select the desired threats, then click Actions |
Mark Read or Mark Unread, as needed. You might need to select Read or Unread
from the Filter drop-down list to view the notifications you want to mark.
Deleting threat notifications
Use this task to delete threat notifications from the MyAvert page. You cannot delete any threat
notifications for which protection is still pending.
Task
For option definitions, click ? in the interface.
1 Click Menu | Reporting | MyAvert.
2 Select threat notifications for which protection is available, then click Actions and select
Delete.
51McAfee ePolicy Orchestrator 4.5 Product Guide
Page 52

Configuring ePolicy Orchestrator
Agent Handlers and what they do
Agent Handlers and what they do
An Agent Handler is the component of ePolicy Orchestrator that handles communication between
the agent and the ePO server. Each installation of ePolicy Orchestrator includes an Agent
Handler. Beginning with version 4.5 of ePolicy Orchestrator, Agent Handlers can be installed
independently of your main ePO server on systems throughout your network. Multiple remote
handlers can help you address scalability and topology issues in your network. In some cases,
using multiple Agent Handlers can limit or reduce the number of ePO servers you need in your
environment. They can provide fault tolerant and load-balanced communication with a large
number of agents, including geographically distributed agents.
How Agent Handlers work
Agent Handlers distribute network traffic, which is generated by an agent-to-server
communication interval (ASCI), by assigning managed systems or groups of systems to report
to a specific Agent Handler. Once assigned, a managed system performs regular agent-server
communication to its Agent Handler instead of to the main ePO server.
The handler provides updated sitelists, policies, and policy assignment rules, just as the ePO
server does. The handler also caches the contents of the master repository, so that agents can
pull product update packages, DATs, and other necessary information.
NOTE: When an agent checks in with its handler, if the handler does not have the updates
needed, the handler retrieves them from the assigned repository and caches them, while passing
the update through to the agent.
Multiple Agent Handlers
You can have more than one Agent Handler in you network. You might have a large number
of managed systems spread across multiple geographic areas or political boundaries. Whatever
the case, you can add an organization to your managed systems by assigning distinct groups
to different handlers.
Handler groups and priority
When using multiple Agent Handlers in your network, you can group and prioritize them to help
ensure network connectivity. Configure your handler groups to meet the specific needs of your
environment. For example, you might choose to create a group of handlers in which the handlers
are dispersed over a wide geographic area. With handlers dispersed, you can configure the
handler priority so that agents first communicate to the handler nearest them. However, if the
system in that handler area fails, the next priority handler takes over to ensure that agents can
communicate.
Handler groups
With multiple Agent Handlers in your network, you can create handler groups. You can also
apply priority to handlers in a group. Handler priority tells the agents which handler to
communicate with first. If the handler with the highest priority is unavailable, the agent falls
back to the next handler in the list. This priority information is contained in the repository list
(sitelist.xml file) in each agent. When you change handler assignments, this file is updated as
part of the agent-server commutation process. Once the assignments are received, the agent
waits until the next regularly scheduled communication to implement them. You can perform
an immediate agent wake-up call to update the agent immediately.
McAfee ePolicy Orchestrator 4.5 Product Guide52
Page 53

Configuring ePolicy Orchestrator
Agent Handlers and what they do
Grouping handlers and assigning priority is customizable, so you can meet the needs of your
specific environment. Two common scenarios for grouping handlers are:
• Using multiple handlers for load balancing
You might have a large number of managed systems in your network, for which you want
to distribute the workload of agent-server communications and policy enforcement. You can
configure the handler list so that agents randomly pick the handler communicate with.
• Setting up a fallback plan to ensure agent-server communication
You might have systems distributed over a wide geographic area. By assigning a priority to
each handler dispersed throughout this area, you can specify which handler the agents
communicate with, and in what order. This can help ensure that managed systems on your
network stay up-to-date by creating a fallback agent communication, much the same as
fallback repositories ensure that new updates are available to your agents. If the handler
with the highest priority is unavailable, the agent will fall back to the handler with the next
highest priority.
In addition to assigning handler priority within a group of handlers, you can also set handler
assignment priority across several groups of handlers. This adds an additional layer of redundancy
to your environment to further ensure that your agents can always receive the information they
need.
Sitelist files
The agent uses the sitelist.xml and sitelist.info files to decide which handler to communicate
with. Each time handler assignments and priorities are updated, these files are updated on the
managed system. Once these files are updated, the agent implements the new assignment or
priority on the next scheduled agent-server communication.
Working with Agent Handlers
Use these tasks to configure and manage Agent Handlers.
Before you begin
You must have Agent Handlers installed in your network to complete these tasks. For information
on Agent Handler installation, see the
Tasks
Assigning agents to Agent Handlers
Managing Agent Handler assignments
Setting up Agent Handler groups
Managing Agent Handler groups
McAfee ePolicy Orchestrator 4.5 Installation Guide
.
Assigning agents to Agent Handlers
Use this task to assign agents to specific handlers. You can assign systems individually, by
group, and by subnet. Handler assignments can specify an individual handler or a list of handlers
to use. The list that you specify can be made up of individual handlers or groups of handlers.
Task
For option definitions, click ? in the interface.
53McAfee ePolicy Orchestrator 4.5 Product Guide
Page 54

Configuring ePolicy Orchestrator
Agent Handlers and what they do
1 Click Menu | Configuration | Agent Handlers, then click Actions | New Assignment.
2 Specify a unique name for this assignment.
3 Specify the agents for this assignment using one or both of the following Agent Criteria
options:
• Browse to a System Tree location.
• Type the IP address, IP range, or subnet mask of managed systems in the Agent
Subnet field.
4 Specify Handler Priority by deciding whether to:
• Use all Agent Handlers — Agents randomly select which handler to communicate
with.
• Use custom handler list — When using a custom handler list, select the handler or
handler group from the drop-down menu.
NOTE: When using a custom handler list, use + and – to add and remove additional Agent
Handlers to the list (an Agent Handler can be included in more than one group). Use the
drag-and-drop handle to change the priority of handlers. Priority determines which handler
the agents try to communicate with first.
Managing Agent Handler assignments
Use this table to complete common management tasks for Agent Handler assignments. To
perform these actions, click Menu | Configuration | Agent Handlers, then in Handler
Assignment Rules, click Actions.
Task
For option definitions, click ? in the interface.
Do this...To do this...
assignment
Edit a handler assignment
Export handler
assignments
Import handler
assignments
Edit the priority of handler
assignments
handler assignments
details
Click Delete in the selected assignment row.Delete a handler
Click Edit for the selected assignment. The Agent Handler Assignment page opens, where
you can specify:
• Assignment name — The unique name that identifies this handler assignment.
• Agent criteria — The systems that are included in this assignment. You can add and
remove System Tree groups, or modify the list of systems in the text box.
• Handler priority — Choose whether to use all Agent Handlers or a custom handler
list. Agents randomly select which handler to communicate with when Use all Agent
Handlers is selected.
TIP: Use the drag-and-drop handle to quickly change the priority of handlers in your
custom handler list.
Click Export. The Download Agent Handler Assignments page opens, where you can view
or download the AgentHandlerAssignments.xml file.
Click Import. The Import Agent Handler Assignments dialog box opens, where you can
browse to a previously downloaded AgentHandlerAssignments.xml file.
Click Edit Priority. The Agent Handler Assignment | Edit Priority page opens, where you
change the priority of handler assignments using the drag-and-drop handle.
Click > in the selected assignment row.View the summary of a
McAfee ePolicy Orchestrator 4.5 Product Guide54
Page 55

Configuring ePolicy Orchestrator
Agent Handlers and what they do
Setting up Agent Handler groups
Use this task to set up Agent Handler groups. Handler groups can make it easier to manage
multiple handlers throughout your network, and can play a role in your fallback strategy.
Task
For option definitions, click ? in the interface.
1 Click Menu | Configuration | Agent Handlers, then in Handler Groups, click New
Group. The Add/Edit Group page appears.
2 Specify the group name and the Included Handlers details, including:
• Click Use load balancer to use a third-party load balancer, then fill in the Virtual
DNS Name and Virtual IP address fields (both are required).
• Click Use custom handler list to specify which Agent Handlers are included in this
group.
NOTE: When using a custom handler list, select the handlers from the Included Handlers
drop-down list. Use + and – to add and remove additional Agent Handlers to the list
(an Agent Handler can be included in more than one group). Use the drag-and-drop
handle to change the priority of handlers. Priority determines which handler the agents
try to communicate with first.
3 Click Save.
Managing Agent Handler groups
Use this table to complete common management tasks for Agent Handler groups. To perform
these actions, click Menu | Configuration | Agent Handlers, then click the Handler Groups
monitor .
Figure 2: Handler Groups monitor
Task
For option definitions, click ? in the interface.
55McAfee ePolicy Orchestrator 4.5 Product Guide
Page 56

Configuring ePolicy Orchestrator
Agent Handlers and what they do
Do this...To do this...
Click Actions | Delete in the selected group row.Delete a handler group
Edit a handler group
Click Actions | Edit for the selected group. The Agent Handler Group Settings page
opens, where you can specify:
• Virtual DNS Name — The unique name that identifies this handler group.
• Virtual IP address — The IP address associated with this group.
• Included handlers — Choose whether to use a third-party load balancer or a custom
handler list.
NOTE: Use a custom handler list to specify which handlers, and in what order, agents
assigned to this group communicate with.
handler group
Click Actions | Enable or Disable in the selected group row.Enable or disable a
Moving agents between handlers
Use these tasks to assign agents to specific handlers. You can assign systems using Agent
Handler assignment rules, Agent Handler assignment priority, or individually using the System
Tree. Handler assignments can specify an individual handler or a list of handlers to use. The
list that you specify can be made up of individual handlers or groups of handlers.
Tasks
Grouping agents by assignment rules
Grouping agents by assignment priority
Grouping agents using the System Tree
Grouping agents by assignment rules
Use this task to assign agents to handlers using Agent Handler assignment rules. Handler
assignments can specify an individual handler or a list of handlers to use. The list that you
specify can be made up of individual handlers or groups of handlers.
NOTE: When assigning systems to Agent Handlers, consider geographic proximity to reduce
unnecessary network traffic.
Task
For option definitions, click ? in the interface.
1 Click Menu | Configuration | Agent Handlers, then click Edit in the Actions column
of the Handler Assignment Rules table . The Agent Handler Assignment page appears.
NOTE: If the Default Assignment Rules is the only assignment in the list, you must create
a new assignment. Refer to,
Assigning agents to Agent Handlers
.
2 Type a name for the Assignment Name.
3 You can configure Agent Criteria by System Tree locations, by agent subnet, or individually
using the following:
• System Tree Locations — Select the group from the System Tree location.
NOTE: You can browse to select other groups from the Select System Tree and use +
and – to add and remove System Tree groups that are displayed.
McAfee ePolicy Orchestrator 4.5 Product Guide56
Page 57

Configuring ePolicy Orchestrator
Agent Handlers and what they do
• Agent Subnet — In the text field, type IP addresses, IP ranges, or subnet masks in the
text box.
• Individually — In the text field, type the IPv4/IPv6 address for a specific system.
4 You can configure Handler Priority to Use all Agent Handlers or Use custom handler
list. Click Use custom handler list, then change the handler in one of these ways:
• Change the associated handler by adding another handler to the list and deleting the
previously associated handler.
• Add additional handlers to the list and set the priority that the agent uses to communicate
with the handlers.
NOTE: When using a custom handler list, use + and – to add and remove additional
Agent Handlers from the list (an Agent Handler can be included in more than one group).
Use the drag-and-drop handle to change the priority of handlers. Priority determines
which handler the agents try to communicate with first.
5 Click Save.
Grouping agents by assignment priority
Use this task to assign agents to handlers using Agent Handler assignment priority. Handler
assignments can specify an individual handler or a list of handlers to use. The list that you
specify can be made up of individual handlers or groups of handlers.
NOTE: When assigning systems to Agent Handlers, consider geographic proximity to reduce
unnecessary network traffic.
Task
For option definitions, click ? in the interface.
1 Click Menu | Configuration | Agent Handlers. The Agent Handler page appears.
NOTE: If the Default Assignment Rules is the only assignment in the list, you must create
a new assignment.
2 Edit assignments using the steps in the task
Grouping agents by assignment rules
.
3 As needed, modify the priority or hierarchy of the assignments by clicking Actions | Edit
Priority. The Edit Priority page appears.
NOTE: Moving one assignment to a priority lower than another assignment creates a
hierarchy where the lower assignment is actually part of the higher assignment.
4 To change the priority of an assignment, which is shown in the Priority column on the left,
do one of the following:
• Use drag-and-drop — Use the drag-and-drop handle to drag the assignment row up or
down to another position in the Priority column.
• Click Move to Top — In the Quick Actions, click Move to Top to automatically move
the selected assignment to the top priority.
5 When the priorities of the assignments are configured correctly, click Save.
57McAfee ePolicy Orchestrator 4.5 Product Guide
Page 58

Configuring ePolicy Orchestrator
IPv6
Grouping agents using the System Tree
Use this task to assign agents to handlers using the System Tree. Handler assignments can
specify an individual handler or a list of handlers to use. The list that you specify can be made
up of individual handlers or groups of handlers.
NOTE: When assigning systems to Agent Handlers, consider geographic proximity to reduce
unnecessary network traffic.
Task
For option definitions, click ? in the interface.
1 Click Menu | Systems | System Tree | Systems.
2 In the System Tree column, navigate to the system or group you want to move.
3 Use the drag-and-drop handle to move systems from the currently configured system group
to the target system group.
4 Click OK.
IPv6
Internet Protocol version 6 (IPv6) is an Internet Layer protocol for packet-switched
inter-networks. IPv6 has a much larger address space than IPv4. The larger address space
provides flexibility in allocating addresses and routing traffic. The extended address length (128
bits) is intended to eliminate the need for network address translation, to prevent exhausting
the number of unique IP addresses in your network. This also simplifies aspects of address
assignment and renumbering when you change Internet connectivity providers.
McAfee ePolicy Orchestrator 4.5 is fully compatible with IPv6. The changeover from IPv4 to
IPv6 will be gradual, and some organizations might use both protocols. To accommodate all
instances, ePolicy Orchestrator 4.5 works in three different modes:
• Only IPv4 — Supports only IPv4 address format
• Only IPv6 — Supports only IPv6 address format
• Mixed mode — Supports both IPv4 and IPv6 address formats
The mode in which ePolicy Orchestrator works depends on the client network configuration.
For example, if the client network is configured to use only IPv4 addresses, ePolicy Orchestrator
works in Only IPv4 mode. Similarly, if the client network is configured to use both IPv4 and
IPv6 addresses, ePolicy Orchestrator works in Mixed mode.
Until IPv6 is installed and enabled, ePolicy Orchestrator listens only on IPv4 addresses . When
IPv6 is enabled, ePolicy Orchestrator works in the mode in which it is configured.
When the ePO server communicates with an Agent Handler or Rogue System Sensor on IPv6,
address-related properties such as IP address, subnet address, and subnet mask are reported
in IPv6 format. When transmitted between client and ePO server, or when displayed in the user
interface or log file, IPv6-related properties are displayed in the expanded form and are enclosed
in brackets.
For example, 3FFE:85B:1F1F::A9:1234 is displayed as
[3FFE:085B:1F1F:0000:0000:0000:00A9:1234].
When setting an IPv6 address for FTP or HTTP sources, no modifications to the address are
needed. However, when setting a Literal IPv6 address for a UNC source, you must use the
Microsoft Literal IPv6 format. See Microsoft documentation for additional information.
McAfee ePolicy Orchestrator 4.5 Product Guide58
Page 59

Configuring ePolicy Orchestrator
Exporting tables and charts to other formats
Exporting tables and charts to other formats
Use this task to export data various formats for uses such as reporting, importing into other
ePO servers, backing up, etc.. You can export to HTML and PDF files for viewing formats, or to
CSV or XML files for using and transforming the data in other applications.
Task
For option definitions, click ? in the interface.
1 From the page displaying the data (tables or charts), select Export Table or Export Data
from the Options menu. The Export page appears.
2 Select whether the data files are exported individually or in a single archive (zip) file.
3 Select the format of the exported file. If exporting to a PDF file, select the page size and
orientation.
4 Select whether the files are emailed as attachments to selected recipients, or they are
saved to a location on the server where a link is provided. You can open or save the file
to another location by right-clicking it.
NOTE: When typing multiple email addresses for recipients, you must separate entries with
a comma or semi-colon.
5 Click Export.
The files are created and either emailed as attachments to the recipients, or you are taken to
a page where you can access the files from links.
59McAfee ePolicy Orchestrator 4.5 Product Guide
Page 60

Distributing Agents to Manage Systems
Managing your network systems effectively is dependent on each system running an active,
up-to-date agent.
There are several methods to distribute the agent. The ones you use depend on:
• Environmental settings and controls, such as the network configuration; the configuration
of ePolicy Orchestrator; the requirements of third-party tools.
• Whether you are upgrading agents or distributing them for the first time.
Are you distributing agents for the first time?
When deploying agents throughout your environment for the first time:
1 Review the information in this chapter to understand the agent, its policies and tasks, and
the methods to distribute it.
2 Configure agent policy settings for the systems where you are distributing agents.
3 Distribute agents with the chosen methods to the desired locations.
Contents
About the McAfee Agent
Installing the McAfee Agent
Upgrading and Restoring Agents
Configuring Agent Policies
Working with the agent from the ePO server
Running agent tasks from the managed system
Using the system tray icon
Removing the McAfee Agent
Agent Activity Logs
About the McAfee Agent
The term
• McAfee Agent
• SuperAgent
• Agent Handler
McAfee Agent
The McAfee Agent is the client-side component that provides secure communication between
McAfee managed products and ePolicy Orchestrator. The agent also provides local services to
McAfee ePolicy Orchestrator 4.5 Product Guide60
agent
is used in three different contexts:
Page 61

Distributing Agents to Manage Systems
About the McAfee Agent
these products and to products developed by McAfee's Security Innovation Alliance partners.
While enabling products to focus on enforcing their policies, the McAfee Agent delivers services
that include updating, logging, reporting events and properties, task scheduling, communication
and policy storage.
The agent is installed on the systems you intend to manage with ePolicy Orchestrator. Systems
can only be managed by ePolicy Orchestrator with an agent installed.
While running silently in the background, the agent:
• Gathers information and events from managed systems and sends them to the ePO server.
• Installs products and upgrades on managed systems.
• Enforces policies and schedules tasks on managed systems and sends events back to the
ePO server.
• Updates security content such as the DAT files associated with McAfee VirusScan.
SuperAgent
A SuperAgent is an agent that can broadcast wake-up calls to other ePO agents located on the
same network broadcast segment (usually identical with a network subnet). Each SuperAgent
then pings the agents in its subnet. Agents located in a segment with no SuperAgent do not
receive the wake-up call. This is an alternative to sending ordinary agent wake-up calls to each
agent in the network, and the advantage is that it can distribute network traffic.
SuperAgents can also serve as the repository of distributable software and updates for those
agents in its broadcast segment. Additionally, the agent's global updating feature relies entirely
upon SuperAgent wake-up calls to perform its function.
Agent Handler
An Agent Handler is the ePO component responsible for managing communication between
agent and server. Beginning with ePolicy Orchestrator 4.5, Agent Handlers can be installed on
other computers to provide fault tolerant and load-balanced communication to many agents,
including geographically distributed agents.
Agent-server communication
During agent-server communication, the agent and server exchange information using a
proprietary network protocol that ePolicy Orchestrator uses for secure network transmissions.
At each communication, the agent collects its current system properties, as well as events that
have not yet been sent, and sends them to the server. The server sends new or changed policies
and tasks to the agent, and the repository list if it has changed since the last agent-server
communication. The agent enforces the new policies locally on the managed system and applies
any task or repository changes.
Agent-server communication can be initiated in these ways:
• Agent-to-server communication interval (ASCI) lapses.
• Agent-initiated communication upon agent startup.
• Agent wake-up calls from ePO or Agent Handlers.
• Communication initiated manually from the managed system (Windows only).
61McAfee ePolicy Orchestrator 4.5 Product Guide
Page 62

Distributing Agents to Manage Systems
About the McAfee Agent
Agent-server communication interval
The agent-server communication interval (ASCI) is set on the General tab of the McAfee Agent
policy page. This setting determines how often the agent calls in to the server. The default
setting of 60 minutes means that the agent contacts the server once every hour.
When deciding whether to modify the interval, consider the following:
• At each ASCI, the following actions occur:
• The agent collects and sends its properties to the server or Agent Handler.
• The agent sends the events that have occurred since the last agent-server communication.
• The server or Agent Handler sends new policies and tasks to the client. This action might
dictate other resource-consuming actions, such as an immediate DAT download.
• The agent enforces policies.
• Although these activities do not burden any one computer, the cumulative demand on the
network, on ePO servers, or on Agent Handlers can be significant, considering these variables:
• The number of systems being managed by ePolicy Orchestrator.
• Your organization’s threat response requirements.
• The network or physical location of clients in relation to servers or Agent Handlers.
• Available bandwidth.
In general, the more these variables reflect conditions that are likely to burden or slow down
your network, the less frequently you want to perform an agent-server communication. For
clients with critical functions, you might want to set a more frequent interval.
Agent-initiated communication after agent installation
After the agent is installed, it calls in to the server at a randomized interval within ten minutes.
Thereafter, the agent calls in at each agent-server communication interval (ASCI). By default,
agent-server communication occurs every 60 minutes.
You can force the agent to communicate with the server at any time after installation by clicking
the McAfee system tray icon, (if it has been enabled), and selecting McAfee Agent Status
Monitor. When the Monitor appears, clicking Collect and Send Props sends full or minimal
properties as defined on the General page of the McAfee Agent Policy Catalog. Clicking Send
Events transmits events to the server but does not transmit policies and tasks from the server.
NOTE: For information on enabling the system tray icon see
If the system tray icon has not been enabled, you can access the status monitor at the command
prompt. Set the working directory to the McAfee Common Framework folder (the default location
is C:\Program Files\McAfee\Common Framework), then type this command:
CmdAgent.exe /s
Using the system tray icon
Wake-up calls and wake-up tasks
.
Communication between the ePO server and the agent takes place at regular intervals set by
the ePO administrator. The purpose of an agent wake-up call is to trigger an immediate
agent-server communication rather than wait for the next agent-server communication, which
is set at 60 minutes by default. There are two ways to issue a wake-up call:
• Directly from the server — This is the most common approach and requires the presence
of an open port on the client.
McAfee ePolicy Orchestrator 4.5 Product Guide62
Page 63

Distributing Agents to Manage Systems
About the McAfee Agent
• On a schedule set by the administrator — This approach is useful when agent-server
communication has been disabled on the General tab of the McAfee Agent policy catalog.
The administrator can create and deploy a wake-up
a schedule.
Some reasons for issuing an agent wake-up call are:
• There has been a change in policy that you want the agent to adopt immediately, without
waiting for the next ASCI.
• You have created a new task that you want the agent to run immediately.
• A query has generated a report indicating that a client is out of compliance, and you want
to test its status as part of a troubleshooting procedure.
If you are running Microsoft Windows and have converted a particular system to use as a
SuperAgent, it can issue wake-up calls to designated network broadcast segments. SuperAgents
distribute the bandwidth impact of the agent wake-up call, and help distribute network traffic.
task
, which triggers a wake-up
SuperAgents and broadcast wake-up calls
If you operate in a Windows environment and plan to use agent wake-up calls to initiate
agent-server communication, consider converting an agent on each network broadcast segment
into a SuperAgent.
SuperAgents distribute the bandwidth load of concurrent wake-up calls. Instead of sending
agent wake-up calls from the server to every agent, the server sends the SuperAgent wake-up
call to SuperAgents in the selected System Tree segment. When SuperAgents receive this
wake-up call, they send broadcast wake-up calls to all agents in their network broadcast
segments.
The process is:
1 Server sends a wake-up call to all SuperAgents.
2 SuperAgents broadcast a wake-up call to all agents in the same broadcast segment.
3 All agents (regular agents and SuperAgents) exchange data with the server.
4 An agent without an operating SuperAgent on its broadcast segment is not prompted to
communicate with the server.
To deploy enough SuperAgents to the appropriate locations, first determine the broadcast
segments in your environment and select a system (preferably a server) in each segment to
host a SuperAgent. Be aware that agents in broadcast segments without SuperAgents do not
receive the broadcast wake-up call, so they do not call in to the server in response to a wake-up
call.
Agent and SuperAgent wake-up calls use the same secure channels. Ensure that:
• The agent wake-up communication port (8081 by default) is not blocked.
• The agent broadcast communication port (8082 by default) is not blocked.
call
on
NOTE: Client firewalls might block communication from the ePO server. Ensure that the ports
required for communication from the ePO server are not block by a firewall on the client.
System requirements and supported operating systems and processors
This section specifies the system requirements for McAfee Agent 4.5 and the operating systems
and processors it supports.
63McAfee ePolicy Orchestrator 4.5 Product Guide
Page 64

Distributing Agents to Manage Systems
About the McAfee Agent
System requirements
• Installed disk space — 14–19 MB, excluding log files
• Memory — 256 MB RAM
• Processor speed — 500 MHz minimum
Supported operating systems and processors
ProcessorOperating systems
Apple Macintosh OS X Tiger
HP-UX 11i v1 (build 11.11)
HP-UX 11i v2 (build 11.23)
McAfee Email and Web Security 3100
McAfee Email and Web Security 3200
Red Hat Linux Enterprise 4
Red Hat Linux Enterprise 5
Solaris 8; 32-bit or 64-bit
Solaris 9; 32- bit or 64-bit
Solaris 10; 64-bit
SuSE Linux 8.2
SuSE Enterprise Server 9
SuSE Enterprise Server 10
Windows 2003 Server R2; Enterprise Edition; 32-bit or 64-bit;
SP 1 or 2
Windows 2003 Server R2; Standard Edition; 32-bit or 64-bit;
SP1 or 2
Windows 2003 Server R2; Web Edition; 32-bit or 64-bit; SP1
or 2
• Intel
• PowerPC
PA-RISC
Power 5IBM AIX 5.3 (TL8 or later)
Power 5IBM AIX 6.1
Not applicable
x86, x64 or compatible
SPARC
x86, x64 or compatible
• Itanium 2
• Intel Pentium
• Intel Celeron (recommended) or compatible
• x86, x64 or compatible
Windows Vista Home Premium; 32-bit or 64-bit; GA or SP1
Windows Vista Home Basic; 32-bit or 64-bit; GA or SP1
Windows Vista Business; 32-bit or 64-bit; GA or SP1
Windows Vista Enterprise; 32-bit or 64-bit; GA or SP1
Windows Vista Ultimate; 32-bit or 64-bit; GA or SP1
Windows 2008 Server; Standard; 32-bit or 64-bit; GA
Windows 2008 Server Enterprise; 32-bit or 64-bit; GA
Windows 2008 Server Datacenter; 32-bit or 64-bit; GA
Windows 2008 Server, Web; 32-bit or 64-bit; GA
Windows 2008 Server, Core; 32-bit or 64-bit; GA
Windows XP Home Edition; 32-bit or 64-bit; SP2 or 3
McAfee ePolicy Orchestrator 4.5 Product Guide64
• Intel Pentium
• Intel Celeron (recommended) or compatible
• x86, x64 or compatible
Page 65

Distributing Agents to Manage Systems
Installing the McAfee Agent
Windows XP Professional; 32-bit or 64-bit; SP2 or 3
Windows XP Tablet PC Edition; 32-bit or 64-bit; SP3
NOTE: The agent is compatible with Windows operating systems that provide Data Execution
Prevention (DEP).
Installing the McAfee Agent
The installation procedure for the McAfee Agent varies depending on:
• The operating system in use — Windows, Solaris, HB-UX, Macintosh, or Linux.
• The type of installation — First-time installation or upgrade on a system already hosting an
agent.
• The tools used to install — ePolicy Orchestrator native tools, login scripts, images, or none.
This section provides instructions on installing the agent in a variety of environments.
ProcessorOperating systems
Methods of agent deployment and installation
The terms
computers with the McAfee Agent. However, there is a difference:
•
Installation
privileges are required to install the agent.
•
Deployment
more computers where an agent is already present.
If you are operating in a Windows environment, you can push install or update the agent directly
from the ePO console. Alternatively, you can copy the agent installation package onto removable
media or into a network share for manual or login script installation on your Windows systems.
However, you cannot push the installation package to UNIX-based systems. Here, the agent
must be installed manually using an installation script (install.sh) that ePO creates when you
check in the agent to the ePO master repository and indicate the operating system in use. Once
the agent is in place on the client computers, you can run an agent deployment task to schedule
updates to the agent as well as deploy products for management by ePO.
NOTE: The procedure described for agent installation on UNIX-based systems can be used in
Windows environments as well, if preferred
This table lists methods for installing and deploying the agent. The first three methods are
installing the agent and might require the use of embedded credentials. The remaining five
methods are deploying the agent and do not require embedded credentials.
deployment
and
installation
both describe the process of equipping one or more
means placing the agent on a computer where no agent is present. Administrator
means placing the agent, or managed products and their upgrades, on one or
Installing the agent
Manually
The network administrator installs the
agent on each managed system
individually.
NotesActionMethod
• Aside from using third-party
deployment products, this is the
only method available for the
initial installation on UNIX
systems.
• Once the agent is installed, you
can use ePolicy Orchestrator to
65McAfee ePolicy Orchestrator 4.5 Product Guide
Page 66

Distributing Agents to Manage Systems
Installing the McAfee Agent
NotesActionMethod
upgrade products and update
product content..
Using third-party software such as
Microsoft Systems Management Server
(SMS) or IBM Tivoli
Using login scripts (Windows only) • The user must log on to the
Deploying the agent: A deployment task is created in ePolicy Orchestrator and is sent to the client where it runs.
If the repository contains a newer version of the agent, the deployment task pull down the newer version and installs
it over the existing version.
Using ePolicy Orchestrator • Selecting a large number of
Upgrading agents using the
deployment task
Deploying an image containing the
agent (Windows)
Configure your third-party software to
distribute the agent installation
server.
The network administrator creates an
installation or upgrade script, which
runs at each logon to a system.
The ePO administrator specifies the
systems and selects Install Agent
when adding a new system.
Use the ePO System Tree to upgrade
the agent on selected target systems.
Administrator creates an image that
contains the agent and deploys the
administrator removes the agent GUID
and MAC address from the agent
section of the registry.
• The agent installation package
contains necessary security keys
and the site list.package, which is located on your ePO
• See third-party instructions.
system to trigger the installation
or upgrade.
• The installation package must be
in a location accessible to the
system.
systems can temporarily affect
network throughput.
• You must specify credentials with
administrator rights to the target
systems.
• Requires that an agent is already
present on the target system.
• Removing the GUID and MAC
address allows the agent to
generate a new GUID and MACimage. Before creating the image, the
address upon the first
agent-server communication.
• Failure to remove the GUID and
MAC address results in
"sequencing errors" from the
multiple identical systems
Enabling the agent on unmanaged
McAfee products (Windows)
Enabling the agent on unmanaged
McAfee products (UNIX-based
platforms)
Using the System Tree, the ePO
administrator selects the systems to
be converted from unmanaged status
to managed status and selects Install
agents.
Type the following command on the
system containing the agent you want
to enable:
/opt/McAfee/cma/bin/msaconfig
• Requires an agent on the target
• You must have root privileges to
• You must use the srpubkey.bin,
-m -d <Path of location containing
srpubkey.bin , reqseckey.bin and
SiteList.xml> [-nostart]
Installing on Windows from ePolicy Orchestrator
You must have administrator privileges on the Windows system to perform this task. The agent
extension must be installed on the ePolicy Orchestrator server before the agent is installed on
any clients.
McAfee ePolicy Orchestrator 4.5 Product Guide66
system in unmanaged mode.
perform this action.
reqseckey.bin and SiteList.xml
files from the ePO server.
Page 67

Distributing Agents to Manage Systems
Installing the McAfee Agent
1 Download both the agent extension, ePOAgentMeta.zip and the agent package,
MA450Win.zip to the system containing the ePO server.
2 Install the agent extension:
a Click Menu | Software | Extensions. The Extensions page opens.
b Click Install Extension.
c Browse to the location containing ePOAgentMeta.zip, select it and click OK. The
Install Extensions summary page appears.
d Click OK to complete the installation of the extension.
3 Check in the agent package to the ePolicy Orchestrator repository.
NOTE: If installing on a computer running Common Management Agent 3.6, the package
must be checked in to the Current repository branch.
a In ePolicy Orchestrator, click Software.
b Click Check In Package.
c Browse to MA450Win.zip, select it and click Next.
d If Allow package check-in for any repository branch has been enabled, place the
package any branch. To enable this feature, click Menu | Configuration | Server
Settings, then select Repository Packages from the list of Setting Categories. Click
Edit to toggle from No to Yes.
e Click Save.
4 Push the agent to client systems by following these steps:
a Click Menu | Systems | System Tree.
b Select the target systems or groups.
c Click Actions, select Agent from the pop-up menu, then select Deploy Agents from
the submenu. The Deploy McAfee Agent page appears.
d Select the version of the agent to be deployed.
e If needed, select installation options:
• Install only on systems that do not already have an agent managed by this
ePO server
• Force installation over existing version(Not recommended)
f Define the installation path for the agent: select a prefix from the drop-down menu,
then accept the folder name that appears or type a new one.
g Type valid credentials in the Domain, User name, and Password fields.
h Click OK.
Installing on Windows using third-party deployment methods
The agent extension must be installed on the ePO server before the agent is installed on any
target systems. McAfee recommends that you refer to the release notes to verify that you are
using the most current package and extension.
TIP: This task requires the creation of an agent installation package, FramePkg.exe (see Step
4). Installation of the package requires administrator credentials.
Task
For option definitions, click ? in the interface.
67McAfee ePolicy Orchestrator 4.5 Product Guide
Page 68

Distributing Agents to Manage Systems
Installing the McAfee Agent
1 Download both the agent extension, ePOAgentMeta.zip, and the agent package,
MA450Win.zip, to the system containing the ePO server.
2 Install the agent extension:
a Click Menu | Software | Extensions. The Extensions page opens.
b Click Install Extensions.
c Browse to the location containing ePOAgentMeta.zip, select it and click OK. The
Install Extensions summary page appears.
d Click OK to complete the installation of the extension.
3 Check in the agent package to one of the repository branches, Current (default), Previous,
or Evaluation.
4 Create an installation package:
a Click Menu | Systems | System Tree. The System Tree page opens.
b Click System Tree Actions, then select New Systems from the drop-down menu.
c Select Create and download agent installation package.
d Deselect Use Credentials.
NOTE: If deselected, you receive the default package. If selected you can specify
required credentials.
e Click OK. The Download file dialog box opens.
f Select FramePkg.exe and save it to the desktop.
5 To embed credentials, modify the local security policy on the target systems:
a Log on to the target system using an account with local administrator permissions.
b From the command line, run SECPOL.MSC to open the Local Security Settings dialog box.
c In the System Tree under Security Settings | Local Policies, select User Rights
Assignment.
d In the Policy column of the details pane, double-click Impersonate a client after
authentication to open the Local Security Policy Setting dialog box.
e Click Add to open the Select Users or Groups dialog box.
f Select the user or group that the user is likely to run as (for example, Everyone or
Users), then click Add.
g Click OK. You are now ready to use your third-party software to distribute
FramePkg.exe.
Installing the agent manually
Use these instructions to install agents manually.
Tasks
Installing on Windows manually
Installing on UNIX-based operating systems
Installing on Windows manually
This method is appropriate if your organization requires that software is installed on systems
manually. You can install the agent on the system, or distribute the FramePkg.exe installer for
McAfee ePolicy Orchestrator 4.5 Product Guide68
Page 69

Distributing Agents to Manage Systems
Installing the McAfee Agent
users to run the installation program themselves. If you want users (who have local administrator
rights) to install the agent on their own systems, distribute the agent installation package file
to them. You can attach it to an email message, copy it to media, or save it to a shared network
folder.
After the agent is installed, it calls in to the server and adds the new system to the System
Tree.
Task
For option definitions, click ? in the interface.
1 Distribute the agent installation package to the target system.
2 Double-click FramePkg.exe and wait a few moments while the agent is installed. Within
ten minutes, the agent calls in to the ePO server for the first time.
3 As needed, bypass the ten-minute interval by forcing the agent to call. Use this command:
CMDAGENT /p
Installing on UNIX-based operating systems
Use this task to install the agent on AIX, HP-UX, Linux, Macintosh, and Solaris systems. The
agent extension must be installed on the ePO server before the agent is installed on any target
systems.
Before you begin
• You must have root privileges on the UNIX-based system to complete this task
Task
1 Download ePOAgentMeta.zip to a temporary location on the ePO server.
2 Open the ePOAgentMeta.zip and extract the agent package for the target operating system.
File nameOperating system
MA450HPX.zipHP-UX
MA450LNX.zipLinux
MA450MAC.zipMacintosh
MA450SLR.zipSolaris
MA450AIX.zipAIX
3 Install the agent extension on the ePO server.
a Click Menu | Software | Extensions, then click Install extension.
b Browse to the location containing ePOAgentMeta.zip, select it and click OK. The
Install Extensions summary page appears.
c Click OK to complete the installation of the extension.
4 Check in the agent package to one of the repository branches, Current (default), Previous,
or Evaluation.
TIP: The path includes the name of the selected repository. For example, if checked in to
the Current branch of the ePO software repository, the path of the required files is:
69McAfee ePolicy Orchestrator 4.5 Product Guide
Page 70

Distributing Agents to Manage Systems
Installing the McAfee Agent
System
AIX
HPUX
Linux
Macintosh
Solaris
LocationOperating
C:\Program Files\McAfee\ePolicy
Orchestrator\DB\Software\Current\EPOAGENT4000AIXX\Install\0409
C:\Program Files\McAfee\ePolicy
Orchestrator\DB\Software\Current\EPOAGENT4000HPUX\Install\0409
C:\Program Files\McAfee\ePolicy
Orchestrator\DB\Software\Current\EPOAGENT3700LYNX\Install\0409
C:\Program Files\McAfee\ePolicy
Orchestrator\DB\Software\Current\EPOAGENT3700MACX\Install\0409
C:\Program Files\McAfee\ePolicy
Orchestrator\DB\Software\Current\EPOAGENT3700SLRS\Install\0409
5 From the selected repository branch, copy the install.sh file to the target systems.
6 Log on to the target system as “root.”
7 Open Terminal, then switch to the location where you copied the install.sh file.
8 Run these commands:
chmod +x install.sh
./install.sh -i
Creating custom agent installation packages
Use this task to create a custom agent installation package.
If you use a distribution method other than ePolicy Orchestrator deployment capabilities (such
as login scripts or third-party deployment software), you can create a custom agent installation
package (FramePkg.exe) with embedded administrator credentials. This is necessary in a
Windows environment if users do not have local administrator permissions. The user account
credentials you embed are used to install the agent.
NOTE: Microsoft Windows XP Service Pack 2 and later do not allow embedded administrator
credentials until the package file name has been added to the exception list of the Windows
firewall.
Task
For option definitions, click ? in the interface.
1 Click Menu | Systems | System Tree, then from the System Tree Actions drop-down
menu, click New Systems. The New Systems page appears.
2 Next to How to add systems, select Create and download agent installation
package.
3 Select the appropriate operating system.
4 Type the appropriate Credentials for agent installation, then click OK.
5 When prompted, select the file to be downloaded. Click to open the file. Right-click to save
the file.
6 Distribute the custom installation package file as needed.
McAfee ePolicy Orchestrator 4.5 Product Guide70
Page 71

Distributing Agents to Manage Systems
Installing the McAfee Agent
Installing the agent with login scripts
Use this Windows only task to set up and use network login scripts to install the agent on
Windows systems as they log on to the network.
Using network login scripts is a reliable method to make sure that every system logging on to
your network is running an agent. You can create a login script to call a batch file that checks
if the agent is installed on systems attempting to log on to the network. If no agent is present,
the batch file installs the agent before allowing the system to log on. Within 10 minutes of being
installed, the agent calls in to the server for updated policies and ePO tasks, and the system is
added to the System Tree.
This method is appropriate when:
• Domain names or sorting filters are assigned to the segments of your System Tree.
• You already have a managed environment and want to ensure that new systems logging
on to the network become managed as a result.
• You already have a managed environment and want to ensure that systems are running a
current version of the agent.
Before you begin
• McAfee recommends first creating segments of your System Tree that use either network
domain names or sorting filters that add the expected systems to the desired groups. If you
don’t, all systems are added to the Lost&Found group, and you must move them manually.
• Consult your operating system documentation for writing login scripts. The details of the
login script depend on your needs. This task uses a basic example.
• Create a batch file (ePO.bat) that contains commands you want to execute on systems when
they log on to the network. The content of the batch file depends on your needs, but its
purpose is to check whether the agent has been installed in the expected location and, if
not, run FramePkg.exe to install the agent. Below is a sample batch file that does this.
IF EXIST “C:\Program Files\McAfee\Common Framework\FRAMEWORKSERVICE.EXE” GOTO END_BATCH
\\MyServer\Agent\UPDATE$\FRAMEPKG.EXE /INSTALL=AGENT
:END_BATCH
NOTE: The installation folders for your distribution might be different than in this example,
depending on where you have specified to install the agent.
This example checks:
• The default installation folder for an agent file and, if not present, installs the new agent.
Task
For option definitions, click ? in the interface.
1 Copy the agent installation package, FramePkg.exe, from your ePO server to a shared
folder on a network server, where all systems have permissions.
Systems logging on to the network are automatically directed to this folder, to run the
agent installation package and install the agent. The default location for the agent installation
packages for Windows is: C:\Program Files\McAfee\ePolicy
Orchestrator\DB\Software\Current\EPOAGENT3000\Install\0409\FramePkg.exe
2 Create a custom agent installation package with embedded administrator credentials, which
are required to install the agent on the system.
71McAfee ePolicy Orchestrator 4.5 Product Guide
Page 72

Distributing Agents to Manage Systems
Installing the McAfee Agent
3 Save the batch file you created, ePO.bat, to the NETLOGON$ folder of your primary domain
controller (PDC) server. The batch file runs from the PDC every time a system logs on to
the network.
4 Add a line to your login script that calls the batch file on your PDC server. The line would
look similar to this example:
CALL \\PDC\NETLOGON$\EPO.BAT
Each system runs the script when it logs on to the network and, if necessary, installs the
agent.
Including the agent on an image
When you include the McAfee Agent on an image, you must remove its GUID from the registry.
This allows subsequently installed agent images to generate their own GUID at their first
agent-server communication.
CAUTION: If you don't follow this step, all deployed agent images have the same GUID, and
must be changed manually. In a large organization, this is impractical. Although you can configure
the ePO server to identify replicated GUIDs and assign a new GUID at the next agent-server
communication, the action consumes considerable processing bandwidth. For information, see
Identifying and correcting a duplicate GUID
.
Task
On the imaged system, locate the registry key for the agent and remove it. The registry keys
are located at:
HKEY_LOCAL_MACHINE\SOFTWARE\Network Associates\ePolicy Orchestrator\Agent\AgentGUID
Identifying and correcting a duplicate GUID
If you deployed the agent on an image without first removing its GUID from the registry, multiple
systems in your environment will have duplicate GUIDs. When these systems fail to communicate
with the Agent Handler, they generate sequencing errors, which indicate a GUID problem. The
Managed Systems query result type tracks the following information about these errors:
• The number of sequence errors for each system in the Managed Systems Sequence Errors
property.
• The date and time of the last sequence error in the Managed Systems Last Sequence Error
property.
The tracked information is incorporated into one or the other of the available pre-defined queries:
• Systems with High Sequence Errors
• Systems with no Recent Sequence Errors
Two predefined tasks help manage GUID problems.
• Duplicate Agent GUID - remove systems with potentially duplicated GUIDs
This task deletes the systems that have a large number of sequencing errors and classifies
the agent GUID as problematic. As a result, the agent is forced to generate a new GUID.
The threshold number of sequencing errors is set in the query Systems with High Sequence
Errors.
• Duplicate Agent GUID - Clear error count
Sequencing errors can occur occasionally for inconsequential reasons. This task clears the
count of sequencing errors in systems that have not had any recent sequencing errors. This
McAfee ePolicy Orchestrator 4.5 Product Guide72
Page 73

Distributing Agents to Manage Systems
Installing the McAfee Agent
cleanup task does not remove any problematic GUIDs. The threshold value for defining
recent
is set in the query Systems with no Recent Sequence Errors
Use this task to identify computers with GUID problems and take corrective action.
Task
For option definitions, click ? in the interface.
1 Click Menu | Automation | Server Tasks to open the Server Tasks Builder.
2 Click Edit for one or the other of the following tasks.
• Duplicate Agent GUID - Clear error count
• Duplicate Agent GUID - remove systems with potentially duplicated GUIDs
3 In the Description page, select Enabled, then click either Save or Next.
• If you click Save, the task runs with the default configuration displayed on the Actions
and Schedule tabs. If you want to configure a schedule for this task, click Next. This
allows you to review the Action settings and then set a schedule.
• If you click Next, the Actions page appears. This page has been preconfigured to
correspond to the requirements of the Duplicate Agent GUID task that you selected in
Step 2. Ensure that the following settings are displayed:
Duplicate Agent GUID - Clear error
count
Query
Sub-Actions
Errors
Clear Agent GUID Sequence Error
Count
• Click Next again to display the Schedule page. Specify the frequency, start and end
dates, and time for running this query.
4 Click Save.
TIP: You can run either of the tasks immediately by selecting Run in the Actions column
on the Server Tasks page.
Scheduling corrective action for a duplicate GUID
If you have deployed the agent on an image without first having removed its GUID from the
registry, multiple systems in your environment will have duplicate GUIDs. When these systems
fail to communicate with the Agent Handler, they generate sequencing errors, indicating a GUID
problem.
Use this task to automatically identify duplicate agent GUIDs, and schedule their removal.
Duplicate Agent GUID - remove systems
with potentially duplicated GUIDs
Run QueryRun QueryActions
Systems with High Sequence ErrorsSystems with no Recent Sequence
Move Agent GUID to Duplicate List and Delete
Systems
Task
For option definitions, click ? in the interface.
1 Click Menu | Automation | Server Tasks, then click Edit in the row labeled Duplicate
Agent GUID - remove systems. The Server Task Builder wizard opens.
2 On the Description page, select Enabled.
73McAfee ePolicy Orchestrator 4.5 Product Guide
Page 74

Distributing Agents to Manage Systems
Installing the McAfee Agent
To run the task with the default configuration displayed on the Actions and Schedule
•
tabs, click Save.
• To configure the Actions and Schedule tabs, click Next. The Actions page appears.
3 From the Actions drop-down menu, select Run Query.
4 From the Query drop-down menu, select one of these options, then click OK.
• System with high Sequence errors
• Systems with no recent Sequence errors
5 From the Sub-Actions drop-down menu, select one of these options, then click Next.
• Clear Agent GUID Sequence Error Count
• Move Agent GUID to Duplicate List and Delete systems
6 Set a schedule for running the task, then click Next.
7 Review your settings, then click Save.
Deploying the agent via push technology
Use this task to deploy agents to your Windows systems using ePolicy Orchestrator.
This method is recommended if large segments of your System Tree are already populated.
For example, if you created System Tree segments by importing domains or Active Directory
containers, and you chose not to deploy the agent during the import.
Before you begin
To use this method, these requirements must be met:
• Systems must already be added to the System Tree.
NOTE: If you have not yet created the System Tree, you can deploy the agent installation
package to systems at the same time that you add groups and systems to the System Tree.
However, McAfee does not recommend this procedure if you are importing large domains
or Active Directory containers. Those activities generate significant network traffic.
• The account specified must have local administrator privileges on all target systems. Domain
administrator rights are required on a system to access the default Admin$ shared folder.
The ePO server service requires access to this shared folder in order to install agents.
• The ePO server must be able to communicate with the desired systems.
Before beginning a large agent deployment, ping some targets by machine name to verify
that the server can communicate with a few systems in each segment of your network. If
the targeted systems respond to the ping, ePolicy Orchestrator can reach the segments.
NOTE: The ability to successfully use ping commands from the ePO server to managed
systems is not required for the agent to communicate with the server. It is, however, a
useful test to determine if you can deploy agents from the server.
• The Admin$ share folder on target systems must be accessible from the ePO server. Verify
that this is true on a sample of target systems. This test also validates your administrator
credentials, because you cannot access remote Admin$ shares without administrator rights.
From the ePO server, click Start | Run, then type the path to the target system's Admin$
share, specifying either system name or IP address.
If the systems are properly connected over the network, and your credentials have sufficient
rights, and the Admin$ share folder is present, a Windows Explorer dialog box appears.
McAfee ePolicy Orchestrator 4.5 Product Guide74
Page 75

Distributing Agents to Manage Systems
Installing the McAfee Agent
• Network access must be enabled on Windows XP Home systems. Deploy the agent from
ePolicy Orchestrator or install a custom agent installation package on systems running
Windows XP Home.
To enable network access on Windows XP Home systems, click Start | Control Panel |
Performance and Maintenance | Administrative Tools | Local Security Policy |
Security Settings | Local Policies | Security Options | Network access: Sharing
and security model for local accounts, then select Classic - local users authenticate
as themselves.
Task
For option definitions, click ? in the interface.
1 Download the agent extension, ePOAgentMeta.zip, and the agent package,
MA450Win.zip, to the system containing the ePO server.
2 Install the agent extension:
a Click Menu | Software | Extensions. The Extensions page opens.
b Click Install Extensions.
c Browse to the location containing ePOAgentMeta.zip, select it, then click OK. The
Install Extensions summary page appears.
d Click OK to complete the installation of the extension.
3 Check in the agent package to the ePolicy Orchestrator repository.
NOTE: If installing on a computer running Common Management Agent 3.6, the package
must be checked in to the Current repository branch.
a Click Menu | Software | Master Repository. A list of packages in the repository
appears.
b Click Actions, then select Check In Package from the drop-down menu.
c Browse to MA450Win.zip, select it, then click Next.
d Ensure that Current is selected in the Branch field, then click Save.
4 Push the agent to target systems:
a Click Menu | Systems | System Tree, then select the groups or systems where you
want to deploy the agent.
b Click Actions.
c Select Agent from the first pop-up menu, then select Deploy Agents from the second
drop-down menu.
d From the drop-down list, select an Agent version.
e Type valid credentials in the Domain, User name, and Password fields.
f Click OK.
5 If you are deploying agents to a group, select whether to include systems from its
subgroups.
6 If desired, select one of these options:
• Install only on systems that do not already have an agent managed by this
ePO server
• Force installation over existing version
75McAfee ePolicy Orchestrator 4.5 Product Guide
Page 76

Distributing Agents to Manage Systems
Installing the McAfee Agent
The force installation option is not available if Install only on systems... is selected.
NOTE: If you use the force installation option, the agent is removed in its entirety,
including policies, tasks, events, and logs before the new agent is installed.
Enabling and disabling the agent on unmanaged McAfee products
Before acquiring ePolicy Orchestrator, you might have already been using McAfee products in
your network. Some of the more recent McAfee products that use AutoUpdate, such as VirusScan
Enterprise, are installed with the agent in
with ePolicy Orchestrator, you can enable the agent that is already on the system.
Enabling the agent on each system saves significant network bandwidth over deploying the
agent installation package. However, existing McAfee products were probably installed with an
older version of the agent, and these agents are
version on the ePO server.
In some situations, you may want to convert a system that has been managed by ePolicy
Orchestrator to updater (unmanaged) mode. Information is provided for converting from
managed mode to unmanaged mode.
Use these tasks to enable agents on existing McAfee products in your environment so that they
work with ePolicy Orchestrator or to disable management of systems by ePolicy Orchestrator.
updater
mode. To start managing these products
not
automatically upgraded to the latest
Tasks
Converting the agent mode from unmanaged to managed mode in Windows
Converting the agent mode from unmanaged to managed on UNIX-based platforms
Converting the agent mode from managed to unmanaged mode in Windows
Converting the agent mode from managed to unmanaged on UNIX-based platforms
Converting the agent mode from unmanaged to managed mode in Windows
Use this task to convert the agent from unmanaged (updater) mode to managed mode in a
Windows environment.
Before you begin
Before converting the agent mode, consider the following:
• By default, the FrmInst.exe file is installed in this location: C:\PROGRAM FILES\MCAFEE\COMMON
FRAMEWORK.
• You should not change the agent installation folder without removing and reinstalling the
agent. Agents that you enable might be in a different folder than agents that you deploy in
your network by another method.
• Assigning sorting filters or domain names to specific System Tree segments saves time.
Without such designations, systems are placed in Lost&Found and you will have to move
them from that location.
• You must copy the SiteList.xml (repository list file) from the ePO server to the target systems.
The repository list contains network address and other information that the agent requires
to call in to the server after being installed.
• SiteList.xml must be in the same location as srpubkey.bin and reqseseckey.bin.
McAfee ePolicy Orchestrator 4.5 Product Guide76
Page 77

Distributing Agents to Manage Systems
Installing the McAfee Agent
Two methods for performing this task are provided.
Method A
This method, although simple and fast, involves sending a 5 MB file across the network.
1 Export Framepkg.exe to a temporary location on the target system, (that is, the system to
be converted from unmanaged to managed mode.)
2 Run Framepkg.exe.
Method B
This method is complex and time consuming but involves using only 400 KB of network
bandwidth.
1 Copy sitelist.xml, srpubkey.bin and reqseckey.bin to a temporary location on the target system.
2 Run frminst.exe on the target system.
Converting the agent mode from unmanaged to managed on UNIX-based platforms
Use this task to convert the agent from unmanaged (updater) mode to managed mode on a
UNIX-based platform.
NOTE: This procedure can be used to change which ePO server or Agent Handler an agent
communicates with.
Task
1 On the target system, locate the msaconfig file in the binaries subfolder of the cma folder.
For example, on HP-UX, Linux, and Solaris systems, the location is /opt/McAfee/cma/bin. On
Macintosh systems, the location is /Library/McAfee/cma/bin.
2 Run /opt/McAfee/cma/bin/msaconfig -m -d <path of location containing srpubkey.bin, reqseckey.bin
and SiteList.xml> [-nostart].
NOTE: Optional -nostart indicates that the agent does not restart after changing mode.
Converting the agent mode from managed to unmanaged mode in Windows
Use this task to convert the agent from managed mode to unmanaged (updater) mode in a
Windows environment.
Task
1 Click Menu | Systems | System Tree.
2 Select the systems to convert.
3 From the Actions pop-up menu, select Directory Management, then select Delete.
4 Confirm the deletion. The selected system is no longer managed by ePolicy Orchestrator
and now functions only as an updater.
Converting the agent mode from managed to unmanaged on UNIX-based platforms
Use this task to convert the agent from managed mode to unmanaged (updater) mode on a
UNIX-based platform.
77McAfee ePolicy Orchestrator 4.5 Product Guide
Page 78

Distributing Agents to Manage Systems
Installing the McAfee Agent
Task
1 On the target system, locate the msaconfig file in the binaries subfolder of the cma folder.
For example, on HP-UX, Linux, and Solaris systems, the default location is
/opt/McAfee/cma/bin. On Macintosh systems, the default location is /Library/McAfee/cma/bin.
2 Run /opt/McAfee/cma/bin/msaconfig -u [-nostart].
NOTE: Optional [-nostart] indicates that the agent does not restart after changing mode.
Agent installation folder — Windows
The default location of the agent installation folder is the same on managed systems and on
the ePO server.
• <System_Drive>\Program Files\McAfee\Common Framework
Agent installation folder — UNIX-based systems
Installation of the agent on UNIX-based operating systems generates files in these locations:
system
AIX
HP-UX
ContentsLocationOperating
All binaries, logs, agent working area/opt/McAfee/cma/
/etc/cma.d/
/etc/cma.d/
/etc/ Configuration and management information in xml
/sbin/init.d/cma Script for starting and stopping the agent, manually and
Configuration and management information (including
GUID and agent version) needed to manage
point-products.
cma.conf/etc/
Configuration and management information in xml
format, allowing point-products to read.
cma/usr/sbin/
Script for starting and stopping the agent, manually and
when called by the system.
All binaries, logs, agent working area./opt/McAfee/cma/
Configuration and management information (including
GUID and agent version) needed to manage
point-products.
cma.conf
format, allowing point-products to read.
cma
when called by the system.
Linux
McAfee ePolicy Orchestrator 4.5 Product Guide78
/etc/cma.d/
/etc/
All binaries, logs, agent working area./opt/McAfee/cma/
Configuration and management information (including
GUID and agent version) needed to manage
point-products.
cma.conf
Page 79

Distributing Agents to Manage Systems
Installing the McAfee Agent
system
Macintosh
ContentsLocationOperating
Configuration and management information in xml
format, allowing point-products to read.
cma
/etc/init.d/ Script for starting and stopping the agent, manually and
/etc/cma.d/
/etc/ Configuration and management information in xml
/Library/StartupItems/cma/ Script for starting and stopping the agent, manually and
/etc/cma.d/
when called by the system.
All binaries, logs, agent working area./Library/McAfee/cma
Configuration and management information (including
GUID and agent version) needed to manage
point-products.
cma.conf
format, allowing point-products to read.
cma
when called by the system.
All binaries, logs, agent working area./opt/McAfee/cma/
Configuration and management information (including
GUID and agent version) needed to manage
point-products.
Solaris
/etc/ Configuration and management information in xml
/etc/init.d/ Script for starting and stopping the agent, manually and
The agent installation package
A FramePkg.exe file is created when you install ePolicy Orchestrator and whenever you check
in an agent package. It is a customized installation package for agents that report to your
server. The package contains information necessary for the agent to communicate with the
server. Specifically, this package includes:
• The agent installer
• SiteList.xml file
• srpubkey.bin (the server public key)
• reqseckey.bin (the initial request key)
By default, the path of the agent installation package on the server is:
C:\Program Files\McAfee\ePolicy
Orchestrator\DB\Software\Current\EPOAGENT3000\Install\0409\FramePkg.exe
This is the installation package that the server uses to distribute and install agents. Other
FramePkg.exe files are created when:
• Agent packages are checked in to any branch of the repository (Previous, Current, or
Evaluation)
cma.conf
format, allowing point-products to read.
cma
when called by the system.
79McAfee ePolicy Orchestrator 4.5 Product Guide
Page 80

Distributing Agents to Manage Systems
Installing the McAfee Agent
• Encryption key changes
The default agent installation package contains no embedded user credentials. When executed
on the targeted system, the installation uses the account of the currently logged-on user.
Agent installation command-line options
Depending on whether the agent is already installed, you can use command-line options when
you run the agent installation package (FramePkg.exe) or the agent framework installation
(FrmInst.exe) program.
You can employ these command-line options when using the deployment task to upgrade to a
new version of the agent.
This table describes all of the agent installation command-line options. These options are
case-sensitive, but their values are.
FramePkg.exe and FrmInst.exe command-line options
DescriptionCommand
not
/DATADIR
/DOMAIN/ USERNAME/
PASSWORD
/FORCEINSTALL
/INSTALL=AGENT
/INSTALL=UPDATER
Specifies the folder on the system to store agent data files. The default location is:
<Documents and Settings>\All Users\Application Data\McAfee\Common
Framework. If the operating system does not have a Documents and Settings
folder, the default location is the Data folder within the agent installation folder.
Sample: FRAMEPKG /INSTALL=AGENT /DATADIR=<AGENT DATA PATH>
Specifies a domain, and account credentials used to install the agent. The account
must have rights to create and start services on the desired system. If left
unspecified, the credentials of the currently logged-on account are used. If you
want to use an account that is local to the desired system, use the system’s name
as the domain.
Sample: FRAMEPKG /INSTALL=AGENT /DOMAIN=Domain1
/USERNAME=jdoe /PASSWORD=password
Specifies that the existing agent is uninstalled, then the new agent is installed. Use
this option only to change the installation directory or to downgrade the agent.
When using this option, McAfee recommends specifying a different directory for
the new installation (/INSTDIR).
Sample: FRAMEPKG /INSTALL=AGENT /FORCEINSTALL
/INSTDIR=c:\newagentdirectory
Installs and enables the agent.
Sample: FRAMEPKG /INSTALL=AGENT
Enables the AutoUpdate 7.0 component if it has already been installed, and does
not change whether the agent is enabled. This command-line option upgrades the
agent.
Sample: FRAMEPKG /INSTALL=UPDATER
/INSTDIR
/REMOVE=AGENT
McAfee ePolicy Orchestrator 4.5 Product Guide80
Specifies the installation folder on the desired system. You can use Windows system
variables, such as <SYSTEM_DRIVE>. If not specified, the default location is:
<DRIVE>:\program files\mcafee\common framework
Sample: FRAMEPKG /INSTALL=AGENT /INSTDIR=C:\ePOAgent
Removes the agent if not in use. If in use, the agent changes to
Sample: FRMINST /REMOVE=AGENT
updater
mode.
Page 81

Distributing Agents to Manage Systems
Upgrading and Restoring Agents
DescriptionCommand
/SILENT or /S
/SITEINFO
/USELANGUAGE
Installs the agent in silent mode, hiding the installation from the end user.
Sample: FRAMEPKG /INSTALL=AGENT /SILENT
Specifies the folder path to a specific repository list (SiteList.xml) file.
Sample: FRAMEPKG /INSTALL=AGENT /SITEINFO=C:\TMP\SITELIST.XML
Specifies the language version of the agent that you want to install. If you select
0409 or a locale other than the 12 languages with locale IDs, the software appears
in English. If you install multiple language versions, the locale selected in operating
system determines the language version that displays.
Sample: FRAMEPKG /INSTALL=AGENT /USELANGUAGE 0404
Assigning values to custom properties
Use this task to specify up to four custom properties during installation of the agent at the
command line. These values override values set by the ePO administrator.
Task
• At the command line, type the string that is appropriate for your operating system:
• Windows operating systems: FrmInst.exe /CustomProp1="Property 1"
/CustomProp2="Property 2" /CustomProp3="Property 3" /CustomProp4="Property 4"
NOTE: In Windows, custom property values are stored in the registry at
HKLM\SOFTWARE\Network Associates\ePolicy Orchestrator\Agent\CustomProps\
• UNIX-based operating systems: msaconfig -CustomProp1 "Property 1" -CustomProp2
"Property 2" -CustomProp3 "Property 3" -CustomProp4 "Property 4"
NOTE: Custom property values are stored in CustomProps.xml, an editable file located
at /McAfee/cma/scratch/.
Upgrading and Restoring Agents
Use these tasks to upgrade or restore existing agents in your environment.
If you have been using an older version of ePolicy Orchestrator and have previous agent versions
in your environment, you can upgrade those agents once you’ve installed your new ePO server.
The procedure for upgrading the agent depends on which agent version is running on your
managed systems.
NOTE: Some previous agent versions do not support all functions in ePolicy Orchestrator 4.5.
For full ePolicy Orchestrator functionality, upgrade to agent version 4.5 or later.
Tasks
Upgrading agents using product deployment task
Upgrading agents manually or with login scripts
Restoring a previous version of the agent (Windows)
Restoring a previous version of the agent (UNIX)
81McAfee ePolicy Orchestrator 4.5 Product Guide
Page 82

Distributing Agents to Manage Systems
Upgrading and Restoring Agents
Upgrading agents using product deployment task
Use this task to deploy a newer version of the agent with the Product Deployment client task.
This is the same task that is used to deploy products, such as VirusScan Enterprise, to systems
that are already running agents.
Periodically, McAfee releases newer versions of the agent, which can be deployed and managed
using ePolicy Orchestrator. When the agent installation package is available, you can download
it from the McAfee download site, check it in to the master repository, then use the deployment
task to upgrade the agent.
NOTE: The term
a newer version of the agent over an older version, for example, replacing McAfee Agent 4.0
with McAfee Agent 4.5.
products use to identify and disarm threats.
Before you begin
• If you use ePolicy Orchestrator to deploy agents in your network, the procedure differs
slightly depending which previous version of the agent you are upgrading.
• If you are upgrading your agents and your network is very large, consider the size of the
agent installation package file and your available bandwidth before deciding how many
agents to upgrade at once. Consider using a phased approach. For example, upgrade one
group in your System Tree at a time. In addition to balancing network traffic, this approach
makes tracking progress and troubleshooting any issues easier.
• If you use a product deployment client task to upgrade agents, consider scheduling the task
to run at different times for different groups in the System Tree.
Task
For option definitions, click ? in the interface.
1 Ensure that the desired agent installation package is checked in to the desired branch of
the master repository.
2 Click Menu | Systems | System Tree.
3 Click the Client Tasks tab.
4 Click Actions, then select New Task from the drop-down menu. The Client Task Builder
wizard opens to the Description page.
5 Name the task, then select Product Deployment from the drop-down list and select
whether the task should be sent to all computers or to tagged computers.
6 Click Next. The Configuration page appears.
7 Select the target platform.
8 Use the drop-down lists in the Products and Components area to specify the version of the
agent to deploy and, if needed, additional command-line parameters.
9 If you are working in a Windows environment, select whether to run the task at each policy
enforcement interval.
10 Click Next to open the Schedule page.
11 Schedule the task as needed, then click Next. The Summary page appears.
12 Verify the task’s details, then click Save. The new deployment task is sent to the client
computers at the next agent-server communication. Thereafter, every time the task
executes, it checks to determine whether it should install the specified agent.
upgrading
Updating
is not the same as
means getting the most up-to-date DATs and signatures that
updating.Upgrading
the agent means installing
McAfee ePolicy Orchestrator 4.5 Product Guide82
Page 83

Distributing Agents to Manage Systems
Configuring Agent Policies
Upgrading agents manually or with login scripts
If you don’t use ePolicy Orchestrator to deploy agents to managed systems, you can use your
preferred agent distribution method to upgrade existing agents. Upgrading agents without using
ePolicy Orchestrator, such as upgrading manually or using network login scripts, is the same
as installing agents for the first time. You must distribute the FramePkg.exe installation file and
launch it on the system using your preferred method.
Restoring a previous version of the agent (Windows)
Use this task to restore a previous version of the agent in a Windows environment. You might
do this to test a new version of the agent.
Task
For option definitions, click ? in the interface.
1 Click Menu | Systems | System Tree, then select the systems you want to downgrade.
2 From the Actions drop-down menu, select Agent, then select Deploy Agents. The Deploy
Agent page appears.
3 From the drop-down list, select the agent you want to restore.
4 Select Force installation over existing version.
5 Specify the target location for the forced installation.
6 Enter user credentials for agent installation.
7 Provide the Number of attempts; Retry interval; and Abort after information.
8 Select whether the connection used for the deployment is to use a selected Agent Handler
or all Agent Handlers.
9 Click OK to send the agent installation package to the selected systems.
Restoring a previous version of the agent (UNIX)
Use this task to restore a previous version of the agent in a UNIX environment. You might do
this to test a new version of the agent.
Task
For option definitions, click ? in the interface.
1 Uninstall the currently installed version of the agent. For details, see
UNIX-based operating systems
2 Install the earlier version of the agent. For details, see
NOTE: Tasks, policies and other data are restored at the first agent-server communication
following reinstallation.
.
Installing the agent manually
Uninstalling from
Configuring Agent Policies
Agent policy general settings are specified on the Policy Catalog pages of the ePolicy Orchestrator
console, including policies for events, logging, repositories, updates, and proxy.
.
83McAfee ePolicy Orchestrator 4.5 Product Guide
Page 84

Distributing Agents to Manage Systems
Configuring Agent Policies
About agent policy settings
Proxy settings for the agent
Retrieving system properties
Scheduling a client task for a group
Creating a new scheduled client task
Configuring selected systems for updating
About agent policy settings
Agent policy settings determine the performance and behavior of an agent in your environment.
The interface provides 6 configuration pages for setting policy options:
• General, where the following policies are set:
• Policy enforcement interval
• Use of system tray icon
• Agent wake-up call support in Windows environments
• Where the agent goes for product and update packages
• Creation of SuperAgents
• Rebooting options
• Agent-server communication
• Sending full or minimal system properties and product properties
• Events, where priority event forwarding is set. (See topic entitled Priority event forwarding).
• Logging, where the following policies are set:
• Enabling/disabling of logging
• Level of logging detail
• Setting remote access to logging
• Repositories, where repository selection variables are set. (See topic entitled Selecting a
repository).
• Updates, where the following policies are set:
• Identifying log file information
• Specifying post-updating executables
• Downgrading DAT files
• Defining repository branches
• Proxy, where proxy settings are specified. (See topic Proxy settings for the agent).
Before distributing a large number of agents throughout your network, consider carefully how
you want the agent to behave in the segments of your environment. Although you can configure
agent policy settings after agents are distributed, McAfee recommends setting them prior to
the distribution, to prevent unnecessary impact on your resources.
For complete descriptions of all options on the agent policy pages, click ? on the page displaying
the options.
McAfee ePolicy Orchestrator 4.5 Product Guide84
Page 85

Distributing Agents to Manage Systems
Configuring Agent Policies
Priority event forwarding
During normal operation, the agent and security software on the managed system generate
software events regularly. These events can range from information about regular operation,
such as when the agent enforces policies locally, to critical events, such as when a virus is
detected and not cleaned. These events are uploaded to the server at each agent-server
communication and are stored in the database. A typical deployment of agents in a large network
can generate thousands of these events an hour.
You can configure the agent to forward events on a priority basis if they are equal to or greater
than a specified severity. Specific event severities are determined by the product generating
the events. If you plan to use Automatic Responses, McAfee recommends that you enable
priority uploading of higher severity events for those features to function as intended.
You can enable priority uploading of events on the Events tab of the McAfee Agent policy pages.
Selecting a repository
Use this task to set the policy for repository selection. The agent can update from any repository
in its repository list based on the policy setting. This repository management tool allows you to
specify the most efficient means for designating a source repository for updates.
Task
For option definitions, click ? in the interface.
1 Click Menu | Policy Catalog.
2 Select McAfee Agent from the Product drop-down menu and ensure that General is
selected in the Category drop-down menu.
3 Click Actions, then select New Policy to create a new policy or My Default policy to
edit your policy.
4 Type a name for the policy, then click OK.
5 On the Repositories tab, select whether to Use this repository list (the ePO-managed
repository list, SiteList.xml), or Use other repository list (a locally controlled repository
list that is not managed by ePolicy Orchestrator).
6 Choose a basis for selecting a repository:
DefinitionSelection Method
Ping time
Subnet distance
The shortest round-trip elapsed time between sending an echo request to
a remote ICMP-enabled system and receiving a response from that system.
Ping timeout can be used to control the maximum time taken. Minimum =
5 seconds; maximum = 60 seconds. The default is 30 seconds.
The fewest hops an ICMP packet makes while traversing the network from
a local system to a remote system. The maximum number of hops can be
used to control the packet traversal.
Use order in repository list
A user-defined list of repositories based on locally determined preferences.
You can sequence and enable or disable specific distributed repositories on
the Repositories tab of the McAfee Agent policy pages. Allowing agents to
update from any distributed repository ensures that they get the update
from some location.
NOTE: The agent selects a repository each time a change occurs in the repository list, IP
address, or policy option.
85McAfee ePolicy Orchestrator 4.5 Product Guide
Page 86

Distributing Agents to Manage Systems
Configuring Agent Policies
Proxy settings for the agent
To access the McAfee update sites, the agent must be able to access the Internet. Use the
agent policy settings to configure proxy server settings for managed systems. The Proxy tab
of the McAfee Agent policy pages includes these settings:
• Do not use a proxy (default setting)
• Use Internet Explorer proxy settings — This setting allows an agent in a Windows
environment to use the proxy server and credential information currently configured for
Internet Explorer. There are several methods to configure Internet Explorer for use with
proxies. For information, see Internet Explorer Help.
NOTE: When this setting is selected, the fields for specifying user authentication for HTTP
and FTP proxies become available, as well as the option Allow user to configure proxy
settings. By selecting this option, the administrator grants permission to the user of a
managed product to access additional update repositories that are configured behind the
proxy server.
• Configure the proxy settings manually — When this setting is selected, the fields for
specifying user authentication for HTTP and FTP proxies become available. This selection
also allows the administrator to specify the HTTP and FTP locations using DNS name, IPv4
address, or IPv6 address.
Configuring proxy settings for the agent
Use this task to specify whether to use proxies.
Task
For option definitions, click ? in the interface.
1 Click Menu | Policy | Policy Catalog, then from the Product drop-down menu, select
McAfee Agent, and from the Category drop-down menu, select General.
2 From the list of policies select the Edit Settings link on the row labeled My Default, .
3 Click Proxy. The proxy settings page appears.
4 Select your preferred option:
• If your agent does not require a proxy to access the Internet, select Do not use a
proxy. This is the default selection.
• On Windows systems you can select Use Internet Explorer proxy settings and if
appropriate, select Allow user to configure proxy settings.
• If you need a proxy other than Internet Explorer, select Configure the proxy settings
manually.
5 Select a form for the address of the source HTTP or FTP location where the agent is to pull
updates. The DNS Name drop-down menu includes the address options DNS Name (the
fully-qualified domain name), IPv4 and IPv6 notation.
6 Type the DNS name or IP address and Port numbers of the HTTP and/or FTP source. If
appropriate, select Use these settings for all proxy types.
7 Select Specify exceptions to designate systems that do not require access to the proxy.
8 Select Use HTTP proxy authentication and/or Use FTP proxy authentication, then
provide a user name and credentials.
9 Click Save.
McAfee ePolicy Orchestrator 4.5 Product Guide86
Page 87

Distributing Agents to Manage Systems
Configuring Agent Policies
Retrieving system properties
Use this task to retrieve system properties from managed systems.
At each agent-server communication, the agent sends information to the ePO server about the
managed computer, including information about the software products that are installed. The
scope of the information depends on how you have configured:
• The agent policy that specifies whether to retrieve a full set of information about installed
programs, or only a minimal set.
• The task setting that specifies whether to retrieve all properties defined by the agent policy,
or only properties that have changed since the last agent-server communication. This setting
is available when configuring an immediate or scheduled wake-up call.
For detailed information on how to access the configuration settings for retrieving properties
of the managed system and of the products installed, see
properties, see topic entitled
Task
NOTE: Use the agent General policy page to set minimal or full product properties
Windows system and product properties reported by the agent
Retrieving properties
. For a list of
.
plus
…
Minimal product properties that have changed since the
last agent-server communication
Full product properties that have changed since the last
agent-server communication
Minimal product properties whether or not they have
changed since the last agent-server communication
Full product properties whether or not they have changed. 1
Do this. . .To retrieve system properties
1
Set the agent policy to send minimal
product properties.
2
Set the wake-up task to send only
properties that have changed since the
last communication.
1
Set the agent policy to send full product
properties.
2
Set the wake-up task to send only
properties that have changed since the
last communication.
1
Set the agent policy to send minimal
product properties.
2
Set the wake-up task to send all
properties, as defined by the agent policy.
Set the agent policy to send full
properties.
2
Set the wake-up task to send all
properties, as defined by the agent policy.
Scheduling a client task for a group
Use this task to schedule a client task for a group.
Task
For option definitions, click ? in the interface.
1 Click Menu | Systems | System Tree | Client Tasks.
2 In the System Tree, select the group to be configured.
87McAfee ePolicy Orchestrator 4.5 Product Guide
Page 88

Distributing Agents to Manage Systems
Configuring Agent Policies
3 In the Actions field, click Edit Settings for the task to be configured. The Client Task
Builder wizard opens.
4 Break inheritance.
5 On the Schedule page:
a Enable the task.
b Set the schedule, frequency, and options for the task.
c Click Next to review your settings.
6 Click Save. At the next agent-server communication, the task is sent to the group's
members.
Creating a new scheduled client task
Use this task to create a new client task that runs on a schedule, such as a mirror task, update
task, and McAfee Agent wake-up task.
Task
For option definitions, click ? in the interface.
1 Click Menu | Systems | System Tree.
2 Select Client Tasks, then click Actions and select New Task from the drop-down menu.
The Client Task Builder wizard opens.
3 On the Description page:
a Type a name for the task and any notes that might be useful.
b From the drop-down menu, select the kind of task you are creating.
c Indicate whether to send the task to all systems or to only systems that have certain
tags or have no tags.
d Click Next.
4 On the Configuration page:
• For a mirror task, type the location on the managed systems where you want to replicate
contents from the repository. The repository is selected based on policy selections on
the Repositories tab of the agent policy pages.
• For an update task, indicate if the update progress dialog box is visible on managed
systems and if users can postpone the update. You can also indicate if all packages in
the repository are included or only selected packages.
• For an agent wake-up task, indicate whether to send only properties that have changed
since the last agent-server communication, or all properties defined by the agent policy.
5 Click Next.
6 On the Schedule page:
a Enable the task.
b Set the schedule, frequency, and options for the task.
c Click Next to review your settings.
7 Click Save.
McAfee ePolicy Orchestrator 4.5 Product Guide88
Page 89

Distributing Agents to Manage Systems
Working with the agent from the ePO server
Configuring selected systems for updating
Use this task to specify which update packages are updated immediately when Update Now is
selected. Typical reasons for using this functionality include:
• Updating selected systems when troubleshooting
• Distributing new DATs or signatures to a large number of systems, or all systems, immediately
• Updating selected products that have been deployed previously
Task
For option definitions, click ? in the interface.
1 Click Menu | Systems | System Tree | Systems, then select the systems to be updated.
2 From the Actions menu, select Agent, then select Update Now.
• Select All packages to deploy all update packages in the repository.
• Select Selected packages to specify which update packages to deploy. Deselect the
packages that you do not want to deploy.
3 Click OK.
Working with the agent from the ePO server
The ePO interface includes pages where agent tasks and policies can be configured, and where
agent properties can be viewed.
Use these tasks when working with the agent from the ePO server.
Tasks
Viewing agent and product properties
Viewing system information
Accessing settings to retrieve properties
Windows system and product properties reported by the agent
Sending manual wake-up calls to systems
Sending manual wake-up calls to a group
Making the system tray icon visible
Locating inactive agents
Viewing agent and product properties
Use this task to verify that the properties match the policy changes you have made. This is
useful for troubleshooting. The available properties depend on whether you configured the
agent to send full or minimal properties on the McAfee Agent policy pages.
Task
For option definitions, click ? in the interface.
1 Click Menu | Systems | System Tree.
2 Select a system. Information about the system's properties, installed products, and agent
appear.
89McAfee ePolicy Orchestrator 4.5 Product Guide
Page 90

Distributing Agents to Manage Systems
Working with the agent from the ePO server
Viewing system information
Use this task to view information about a selected system, including a list of its managed
products.
Task
For option definitions, click ? in the interface.
1 Click Menu | Systems | System Tree.
2 Click the system whose information you want to view. The System Details page appears.
3 Scroll through the list of available information, including a field labeled Installed Products.
4 Click the More link to see detailed properties for each installed product.
Accessing settings to retrieve properties
Use these tasks to access the settings used for retrieving properties.
Task
For option definitions, click ? in the interface.
Set agent policy 1
Send an immediate agent wake-up call 1
Set the scheduled wake-up call 1
Do this...To do this...
Click Menu | Systems | System Tree |
Assigned Policies | <Product = McAfee
Agent> | Edit Assignment | Edit Policy.
2
Select or deselect Send full product properties
in addition to system properties. If deselected,
only minimal product properties are sent in addition
to system properties.
Click Menu | Systems | System Tree | <select
target systems> | Actions | Agent | Wake
Up Agents.
2
Select Get full product properties in addition
to system properties if you need them.
Click Menu | Systems | System Tree | Client
Tasks | <select a wake-up task or create a
New Task> | Type = McAfee Agent Wakeup
| Next.
2
Select Send all properties defined by the agent
policy or Send only properties that have
changed since the last agent-server
communication.
3
Set the Schedule.
McAfee ePolicy Orchestrator 4.5 Product Guide90
Page 91

Distributing Agents to Manage Systems
Working with the agent from the ePO server
Windows system and product properties reported by the agent
The lists below show the data reported to ePolicy Orchestrator from its managed systems. The
properties reported vary by operating system. Those listed here are properties reported by
Windows.
System properties
This list shows the system data reported to ePolicy Orchestrator by your nodes' operating
systems. Review the details on your system before concluding that system properties are
incorrectly reported.
Agent Version
CPU Serial Number
Product properties
Each McAfee product designates the properties it reports to ePolicy Orchestrator and, of those,
which are included in a set of minimal properties. This list shows the kinds of product data that
are reported to ePolicy Orchestrator by the McAfee software installed on your system. If you
find errors in the reported values, review the details of your products before concluding that
they are incorrectly reported.
IPX Address
Is 64 Bit OS
Last CommunicationCPU Speed (MHz)
MAC AddressCPU Type
Managed StateCustom Props 1-4
Number Of CPUsDefault Language
Operating SystemDescription
OS Build NumberDNS Name
OS OEM IdentifierDomain Name
OS PlatformFree Disk Space
OS Service Pack VersionFree Memory
OS TypeInstalled Products
OS VersionIP Address
Subnet Address
Subnet Mask
System Description
System Location
System Name
System Tree Sorting
Tags
Time Zone
Total Disk Space
Total Physical Memory
User Name
Agent Wake-Up Communication Port
Agent-to-Server Communication Interval
DAT Version
Engine Version
HotFix/Patch Version
Language
License Status
Policy Enforcement Interval
Product Version
Service Pack
91McAfee ePolicy Orchestrator 4.5 Product Guide
Page 92

Distributing Agents to Manage Systems
Working with the agent from the ePO server
Sending manual wake-up calls to systems
Use this task to manually send an agent or SuperAgent wake-up call to systems in the System
Tree. This is useful when you make policy changes and you want agents to call in for an update
before the next agent-server communication.
Before you begin
Before sending the agent wake-up call to systems, make sure that Enable agent wake-up
call support is enabled and applied on the General tab of the McAfee Agent policy pages. It
is enabled by default.
Task
For option definitions, click ? in the interface.
1 Click Menu | Systems | System Tree, then select the group that contains the target
systems.
2 Select the systems from the list, then from the Actions drop-down menu, select Agent,
then select Wake Up Agents from the submenu. The Wake Up McAfee Agent page
appears.
3 Ensure that the systems you selected appear in the Target section.
4 Next to Wake-up call type, select whether to send an Agent Wake-Up Call or
SuperAgent Wake-Up Call.
5 Accept the default Randomization (0 - 60 minutes) or type a different value. Consider
the number of systems that are receiving the wake-up call, and how much bandwidth is
available. If you type 0, agents respond immediately.
6 During regular communication, the agent sends only properties that have changed since
the last agent-server communication. This task is set by default to Get full product
properties. To send the complete properties as a result of this wake-up call, ensure that
this is option selected.
7 Click OK to send the agent or SuperAgent wake-up call.
Sending manual wake-up calls to a group
Use this task to manually send an agent or SuperAgent wake-up call to a System Tree group.
This is useful when you have made policy changes and want agents to call in for an update.
Before you begin
Make sure that wake-up support for the targeted group is enabled and applied on the General
tab of the McAfee Agent policy pages. It is enabled by default.
Task
For option definitions, click ? in the interface.
1 Click Menu | Systems | System Tree.
2 Click Group Details, then select the target group from the System Tree.
3 From the Actions drop-down menu, select Wake Up Agents. The Wake Up McAfee Agent
page appears.
4 Verify that the group appears next to Target group.
McAfee ePolicy Orchestrator 4.5 Product Guide92
Page 93

Distributing Agents to Manage Systems
Running agent tasks from the managed system
5 Select whether to send the agent wake-up call to All systems in this group or to All
systems in this group and subgroups.
6 Next to Type, select whether to send an Agent wake-up call or SuperAgent wake-up
call.
7 Accept the default Randomization (0 - 60 minutes), or type a different value. If you type
0, agents awaken immediately.
8 During regular communication, the agent sends only properties that the point-products
designate as important. This task is set by default to Get full product properties. To
send the complete properties as a result of this wake-up call, ensure that this is option
selected.
9 Click OK to send the agent or SuperAgent wake-up call.
Making the system tray icon visible
Use this task to make the McAfee system tray icon visible on managed computers.
Task
1 Click Menu | Systems | System Tree | Assigned Policies | <Product = McAfee
Agent>.
2 Click a policy, for example McAfee Default. The McAfee Agent General tab for the selected
policy opens.
3 Select Show the McAfee system tray icon (Windows only).
You can also select Allow end users to update security from the McAfee system
tray menu. When selected, users who are running McAfee Agent 4.5 can choose Update
Security from the McAfee system tray icon to update all products for which an update
package is present in the repository.
4 When you have completed your changes to the default configuration, click Save.
Locating inactive agents
An inactive agent is one that has not communicated with the ePO server within a user-specified
time period. Some agents might become disabled or be uninstalled by users. In other cases,
the system hosting the agent might have been removed from the network. McAfee recommends
performing regular weekly searches for systems with these inactive agents.
To perform the search, run the ePolicy Orchestrator query named Managed Inactive Agents.
(For information on queries, see
configuration of this query reports systems that have not communicated with the ePO server
in the last month. You can specify hours, days, weeks, quarters or years.
When you find inactive agents, review their activity logs for problems that might interfere with
agent-server communication. The query results allow you take a variety of actions with respect
to the systems identified, including ping, delete, wake up, re-deploy an agent, etc.
CAUTION: If you force install a new agent, all previous policies and settings are lost.
Queries
in the ePolicy Orchestrator Product Guide.) The default
Running agent tasks from the managed system
Use these tasks to perform selected procedures from the system where the agent is installed.
93McAfee ePolicy Orchestrator 4.5 Product Guide
Page 94

Distributing Agents to Manage Systems
Running agent tasks from the managed system
If you can access the managed system where the agent is installed, you can view and manage
some features of the agent.
NOTE: The agent interface is available on the managed system only if you selected Show
McAfee system tray icon on the General tab of the McAfee Agent policy pages.
Tasks
Running a manual update
Enforcing policies
Updating policies
Sending properties to the ePO server
Sending events to the ePO server immediately
Using the icon option to update
Forcing the agent to call in to the server
Viewing version numbers and settings
Agent command-line options
Running a manual update
Use this Windows-only task to run an update manually from the managed system.
Task
1 On the managed system, right-click the McAfee system tray icon.
2 Select Update Security. The agent performs an update from the repository defined in
the agent policy.
Product updates can include:
• Patch releases
• Legacy product plug-in (.DLL) files
• Service pack releases
• SuperDAT (SDAT*.EXE) packages
• Supplemental detection definition (ExtraDAT) files
• Detection definition (DAT) files
• Anti-virus engines
• Managed-product signatures
Enforcing policies
Use this Windows-only task to prompt an agent to enforce all configured policies on the managed
system.
Task
1 On the managed system, right-click the McAfee system tray icon, then select McAfee
Agent | Status Monitor.
2 Click Enforce Policies. The policy enforcement activity is displayed in the Agent Status
Monitor.
McAfee ePolicy Orchestrator 4.5 Product Guide94
Page 95

Distributing Agents to Manage Systems
Running agent tasks from the managed system
Updating policies
Use this Windows-only task to prompt the agent on the managed system to call in to the server
to update policy settings.
Task
1 On the managed system, right-click the McAfee system tray icon, then select McAfee
Agent | Status Monitor.
2 Click Check New Policies. The policy-checking activity is displayed in the Agent Status
Monitor.
Sending properties to the ePO server
Use this Windows-only task to send properties to the ePO server from the managed system.
Task
1 On the managed system, right-click the McAfee system tray icon, then select McAfee
Agent | Status Monitor.
2 Click Collect and Send Props. A record of the property collection activity is added to the
list of activities in the Agent Status Monitor.
NOTE: The agent policy controls whether full or incremental properties are sent.
Sending events to the ePO server immediately
Use this Windows-only task to send events to the server immediately from the managed system.
Task
1 On the managed system, right-click the McAfee system tray icon, then select McAfee
Agent | Status Monitor.
2 Click Send Events. A record of the sending-events activity is added to the list of activities
in the Agent Status Monitor.
NOTE: This action sends all events to ePolicy Orchestrator irrespective of their severity.
Using the icon option to update
For the administrator to control what is updated and when, the Windows-only option for users
to Update Security is disabled by default. If you want to allow Windows users to update all
McAfee products on their managed systems, you must enable this functionality. See
selected systems for updating
applications selectively. The user can update all the items in the repository, or none of them.
When the user selects Update Security, all of the following items are updated with the contents
of the designated repository:
• Patch releases
• Legacy product plug-in (.DLL) files
• Service pack releases
for more information. The icon cannot be used to update
Configuring
95McAfee ePolicy Orchestrator 4.5 Product Guide
Page 96

Distributing Agents to Manage Systems
Running agent tasks from the managed system
• SuperDAT (SDAT*.EXE) packages
• Supplemental detection definition (ExtraDAT) files
• Detection definition (DAT) files
• Anti-virus engines
• Managed-product signatures
Forcing the agent to call in to the server
Use this Windows-only task to force the new agent to call in to the ePO server immediately.
You can do this from any system on which an agent has just been installed. This is useful after
installing the agent manually.
Task
1 On the system where you installed the agent, open a DOS command window by selecting
Start | Run, type cmd, and press Enter.
2 In the command window, navigate to the agent installation folder containing the
CmdAgent.exe file.
3 Type this command:
CMDAGENT /p
4 Press Enter. The agent calls into the server immediately.
When the agent calls in to the server for the first time, the system is added to the System Tree
as a managed system. If you configured criteria-based sorting for the System Tree, the system
is added to the location appropriate for its IP address or tags. Otherwise, the system is added
to the Lost&Found group. Once the system is added to the System Tree, you can manage its
policies through ePolicy Orchestrator.
Viewing version numbers and settings
Use this task to view the agent settings from the managed system and to look up the version
numbers of the agent and product from the managed system. This is useful for troubleshooting
when installing new agent versions, or to confirm that the installed agent is the same version
as the one displayed in the agent properties on the server.
Task
1 On the managed system, right-click the McAfee system tray icon.
2 Select About to view information about the agent:
• Computer name
• Agent version number
• DNS Name
• IP Address
• Port Number
• Agent ID (GUID)
• Date and time of last security update
• Time lapse since last agent-to-server communication
• Agent-to-server communication interval
McAfee ePolicy Orchestrator 4.5 Product Guide96
Page 97

Distributing Agents to Manage Systems
Using the system tray icon
• Policy enforcement interval
• Management state (managed or unmanaged)
In addition, information identifies the McAfee products installed and under management
by ePolicy Orchestrator.
Agent command-line options
Use the Windows-only Command Agent (CmdAgent.exe) tool to perform selected agent tasks
from the managed system. CmdAgent.exe is installed on the managed system at the time of
agent installation. Perform this task locally on managed systems using this program or the
McAfee system tray icon.
The CmdAgent.exe file is located in the agent installation folder. By default, this location is:
C:\PROGRAM FILES\MCAFEE\COMMON FRAMEWORK
Command-line parameters
DescriptionParameter
/C
Checks for new policies. The agent contacts the ePO server for new or updated policies, then enforces
them immediately upon receipt.
Prompts the agent to enforce policies locally./E
Sends properties and events to the ePO server./P
Displays the Agent Monitor and its options./S
Using the system tray icon
In a Windows environment, if the agent policy has been set to show the McAfee icon in the
system tray of the managed system, the user can access shortcuts to information and
functionality of managed products.
What the system tray icon does
Making the system tray icon visible
Enabling user access to updating functionality
What the system tray icon does
FunctionOption
About...
Displays system and product information for products installed on the system,
including the agent, the ePO server with which the agent communicates, and
the software products being managed.
Update Security
Links to product menu items that are frequently used.Quick Settings
Displays links to the administrative console of managed products.Manage Features
Triggers immediate updating of all installed McAfee software products. This
includes application of patches and hotfixes, as well as DAT and signature
updates.
NOTE: This feature is available only if specifically enabled in the agent policy.
97McAfee ePolicy Orchestrator 4.5 Product Guide
Page 98

Distributing Agents to Manage Systems
Removing the McAfee Agent
FunctionOption
Scan Computer for
View Security Status
Launches McAfee programs, such as VirusScan, that scan systems on-demand
and detect unwanted malicious software.
Displays the current system status of managed McAfee products, including
current events.
Triggers the Agent Status Monitor, which:McAfee Agent Status Monitor
• Displays information on the collection and transmission of properties.
• Sends events.
• Downloads and enforces policies.
Making the system tray icon visible
Use this task to make the McAfee system tray icon visible on managed computers.
Task
1 Click Menu | Systems | System Tree | Assigned Policies | <Product = McAfee
Agent>.
2 Click a policy, for example McAfee Default. The McAfee Agent General tab for the selected
policy opens.
3 Select Show the McAfee system tray icon (Windows only).
You can also select Allow end users to update security from the McAfee system
tray menu. When selected, users who are running McAfee Agent 4.5 can choose Update
Security from the McAfee system tray icon to update all products for which an update
package is present in the repository.
4 When you have completed your changes to the default configuration, click Save.
Enabling user access to updating functionality
Use this task to allow users to update through the system tray icon.
Task
For option definitions, click ? in the interface.
1 Click Menu | Policy | Policy Catalog | <Product = McAfee Agent>.
2 Click Edit Settings in the row containing the policy to be modified. The McAfee Agent
General tab for the selected policy opens.
3 Select Allow end users to run update security from the McAfee system tray menu.
4 When you have completed your changes to the default configuration, click Save.
Removing the McAfee Agent
Use these tasks to remove agents from systems.
NOTE: You cannot remove the agent using the Product Deployment task, which can remove
products such as VirusScan Enterprise.
McAfee ePolicy Orchestrator 4.5 Product Guide98
Page 99

Distributing Agents to Manage Systems
Removing the McAfee Agent
Tasks
Running FrmInst.exe from the command line
Removing agents when deleting systems from the System Tree
Removing agents when deleting groups from the System Tree
Removing agents from systems in query results
Uninstalling from non-Windows operating systems
Running FrmInst.exe from the command line
Use this task to remove the agent from a system by running the agent installation program,
FrmInst.exe, from the command line.
NOTE: If there are point-products installed on a system from which the agent has been removed,
the now unmanaged agent continues in updater mode.
Task
• Run the agent installation program, FrmInst.exe, from the command line with the
/REMOVE=AGENT option. The default location of this file is:
C:\PROGRAM FILES\MCAFEE\COMMON FRAMEWORK
Removing agents when deleting systems from the System Tree
Use this task to remove agents from systems when you delete those systems from the System
Tree.
Task
For option definitions, click ? in the interface.
1 Click Menu | Systems | System Tree, then select the group with the systems you want
to delete.
2 Select the systems from the list, then click Actions.
3 Select Directory Management from the drop-down menu, then select Delete from the
submenu.
4 Confirm the deletion, then click OK.
The selected systems are deleted from the System Tree and their agents are removed at their
next agent-server communication, unless point products continue to reside on those systems.
Removing agents when deleting groups from the System Tree
Use this task to remove agents from all systems in a group when you delete that group from
the System Tree.
CAUTION: When you delete a group, all of its child groups and systems are also deleted.
Task
For option definitions, click ? in the interface.
1 Click Menu | Systems | System Tree, then select a group to be deleted.
99McAfee ePolicy Orchestrator 4.5 Product Guide
Page 100

Distributing Agents to Manage Systems
Removing the McAfee Agent
2 At the bottom of the System Tree panel, click System Tree Actions then select Delete
Group.
3 Select Remove agent from all systems, then click OK.
The systems in the selected group are deleted from the System Tree, and their agents are
removed at their next agent-server communication, unless point-products reside on those
systems.
Removing agents from systems in query results
Use this Windows-only task to remove agents from systems listed in the results of a query (for
example, the Agent Versions Summary query).
Task
For option definitions, click ? in the interface.
1 Run the desired query, then, from the results page, select the systems to be deleted.
2 Select Directory Management from the drop-down menu, then select Delete from the
submenu.
3 Confirm the deletion, then click OK.
The agents are uninstalled after the next agent-server communication.
Uninstalling from non-Windows operating systems
Use this task to remove the agent from HP-UX, Linux, Macintosh, and Solaris systems. The task
involves:
• Removing the agent from the system.
• Removing the system name from the ePO System Tree.
Task
1 Log on as "root" to the system where you want to remove the agent.
2 Run the command appropriate for your operating system.
CommandsOperating System
AIX
HP-UX
Linux
rpm -e MFEcma
swremove MFEcma
rpm -e MFEcma
rpm -e MFErt
NOTE: Be certain to follow the order listed here.
Macintosh
Solaris
/Library/McAfee/cma/uninstall.sh
pkgrm MFEcma
3 Click Menu | Systems | System Tree, then select the systems you have uninstalled.
McAfee ePolicy Orchestrator 4.5 Product Guide100
 Loading...