

MC 501, 601, 701, 801 Owner's Manual
Dedication to Performance
ELECTRONIC
Made in Germany
Owner‘s Manual
Important Information!
Attention: Keep the unit away from high humidity, vibration, excessive dust and direct sunlight.
Excessive heat or cold will affect the unit´s functionality. The permitted operating temperature
is 10°C up to 50°C. Avoid extreme variations in temperature. Do not operate the unit near other
electric appliances (for instance neon light and motors). The unit should not be opened without
the assistance of a qualified technician.
KETI, CE-Marking
This product is in conformity with the EMC directive and low-voltage directive. Your MC component
complies with the household power and safety requirements in your area.
Warranty
MC affords a full warranty. Please pay attention to the details given in the warranty card which accompanies the unit. Warranty is only issued, if you send back the warranty card.

1
Contents
Page
2 A. General
2 1. Accessoires
2 2. Placement
2 3. Maintenance
3 B. mc 501 CD Player
3 1. mc 501 Views
3 1.2 Rear view
3 2. Basic functions
5 3. Remote control functions
8 C. mc 601 Preamplifier
8 1. mc 601 Views
9 2. Volume
9 3. Input selectors
9 4. On / Standby / Off
9 5. Display
10 6. Connections
11 D. mc 701 Integrated Amplifier
11 1. mc 701 Views
12 2. Volume
12 3. Input selectors
12 4. On / Standby / Off
12 5. Display
13 6. Connections
13 7. Connecting the amplifier to the speakers
14 E. mc 801 Power Amplifier
14 1. mc 801 Views
15 2. Connecting the power amplifier to the speakers
15 3. Connecting the power amplifier to the preamplifier
16 F. Operating the remote control
16 1. Replacement of the batteries
16 2. CD player controls
17 3. Pre / Integrated amplifier controls
17 G. Troubleshooting
17
17
18 H. Specifications
18 1. mc 501 CD Player
19 2. mc 601 Preamplifier
20 3. mc 701 Integrated Amplifier
21 4. mc 801 Power Amplifier
Contents

2
A. General
1. Accessories
Your new MC Elegance Line component comes with a multi-usable system remote control for your convenience. It can be used to control any or all of the MC product range including the preamplifier, CD player,
power amplifier and integrated amplifier.
The system remote control is not included in the delivery of the MC power amplifier.
2. Placement
Please ensure that there is sufficient ventilation and flow of air on all sides of the unit. There must be a minimum
space of 2 cm (approx. 1”) above all MC amplifiers to allow for excessive heat to escape.
In case you wish to operate two or more amps, you can stack them, place them on shelves, or fit them under
a cabinet.
Notice: Never completely cover or operate the amp in a place with insufficient flow of air. If you do, the amp
may overheat.
3. Maintenance
Unplug the unit before cleaning!
To clean the exterior surfaces of your MC unit use a dry, soft cloth. To wipe off finger prints and other grease
spots, use a soft, wet cloth moistened with a mild detergent dissolved in water.
Caution: The cloth must never be dripping wet! If water or other fluids enter the cabinet, you risk to damage
the unit.
Never use scouring pads, steel wool, scouring powders or harsh chemical agents, alcohol, thinners, benzine,
insecticide or other volatile substances, as these will destroy the finish of the cabinet.
General
3
B. mc 501 CD Player
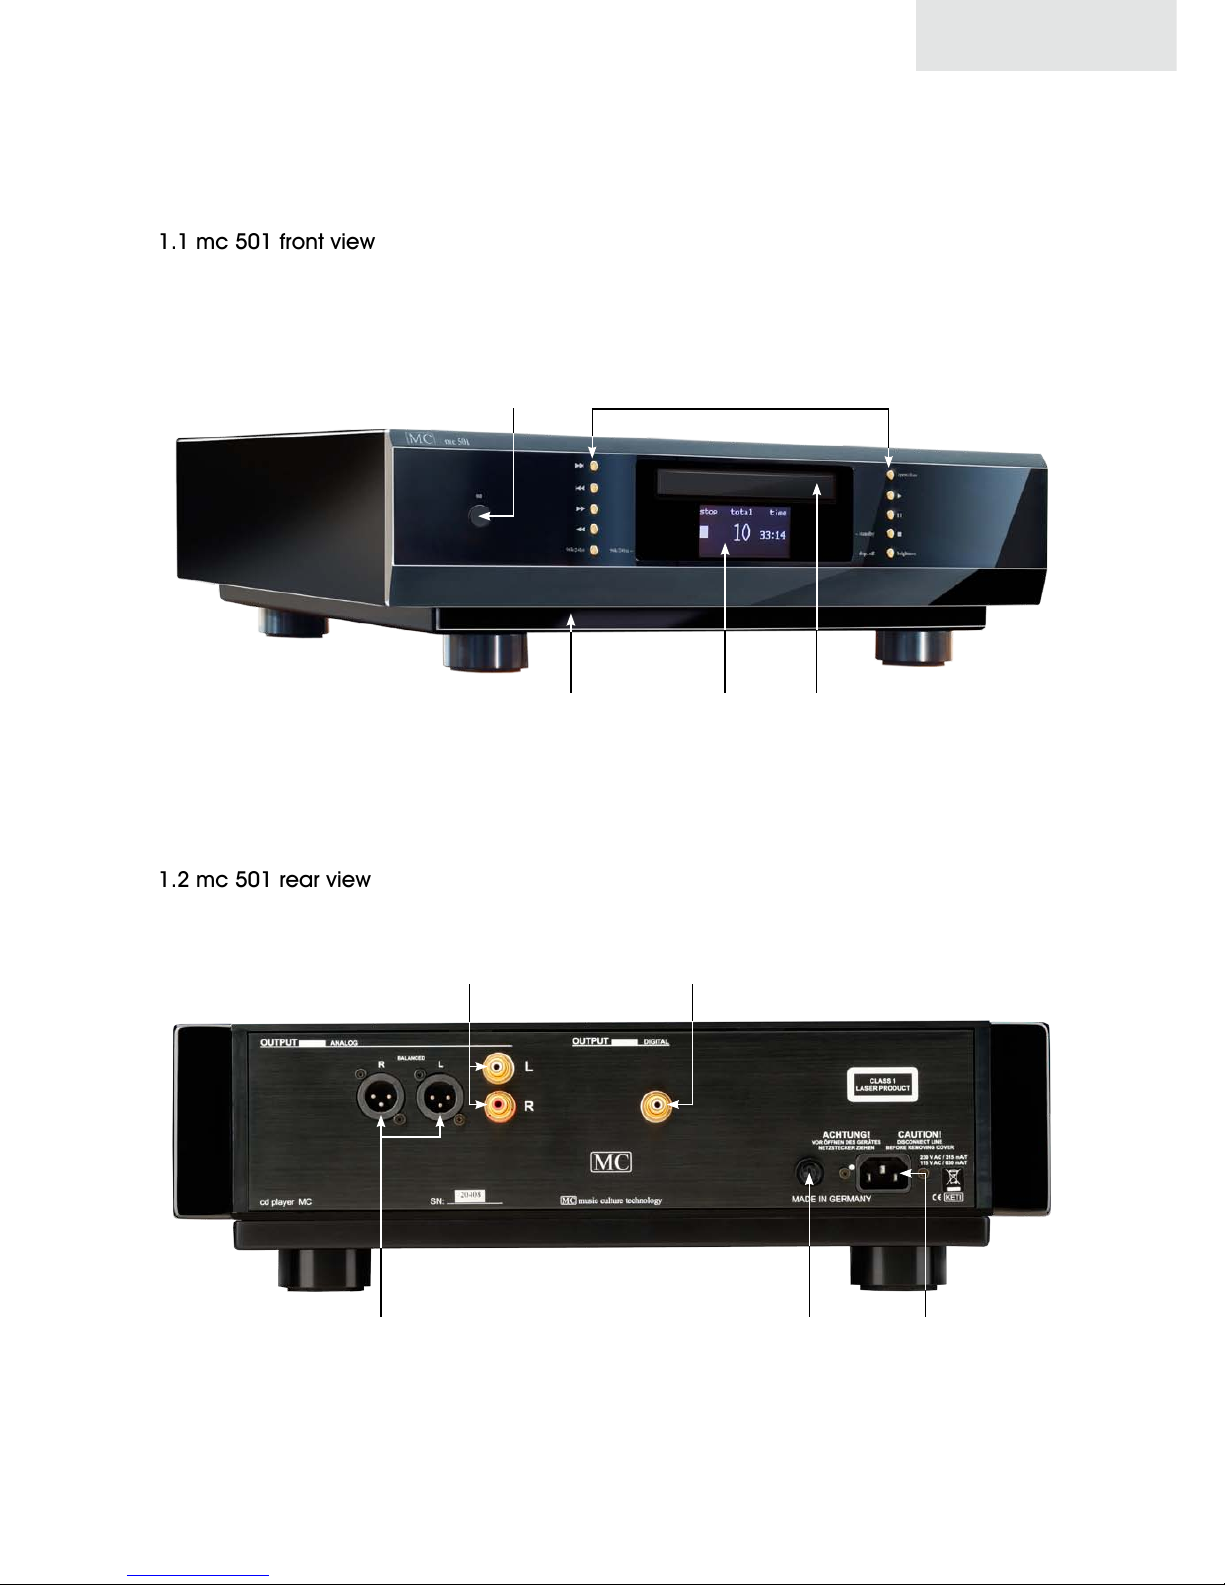
1.1 mc 501 front view
1.2 mc 501 rear view
resonance trap* display
function buttons
CD tray
power button
fuse holder connector for
power cord
XLR output
RCA output
digital output
* made of 20 mm special material to absorb mechanical resonances and signal distortion.
mc 501

4
2. Basic functions
2.1 Turning the power on and inserting a CD
Turn the power on with the power button.
For about 2 seconds, the display flashes a signal. If no CD is in the player,
the signal “no disc” will light up.
To insert a CD, press the “open/close” button to open the CD tray. The
display will now show the word “open”.
Now insert the CD into the player with its printed surface upwards.
Never put more than one disc in the tray.
After that, press the “open/close” button again to close the CD tray.
When the disc begins to play, the display will show “reading“. This indicates that the player is scanning the disc’s table of contents.
When this is over the display will show stop mode, the number of tracks
and the total playing time of the CD.
The CD player is now ready for playback.
2.2 Play a CD
To play the inserted CD, press the play button.
The display will show the number of the track that is playing, the symbol
for playback and the elapsed playing time of the track. The player counts
minutes and seconds upwards, beginning with 0:00 of each track.
If you have properly connected the MC 501 CD player to the other components of your home stereo system, you will now hear the music.
2.3 Pause
If you intend to interrupt your listening pleasure for a moment, but want
to carry on from the same position, press the pause button: The time
counter stops.
To resume playback from the same position, press the pause button
again. The player returns to playback mode.
2.4 Skipping tracks
To skip one or more tracks of the CD, press the skip forward button once (1
x) for each track you want to skip until you have skip reached the desired
track.
To skip to any previous track, press the skip back button. If the skip back
duration of the current track is less than 5 seconds, the player will skip to
the previous track.
mc 501
no disc inserted
CD tray open
scanning CD data
stop mode
play
pause
skip forward
skip back
5
If the duration of the current track is more than 5 seconds, the player will
go back to the starting point of the current track.
To skip further back, press the skip back button several times consecutively until the required track number is shown on the display.
While pressing the skip buttons, you will hear no music.
2.5 Stop playback
To stop playback press the stop button.
2.6 Removing the CD
If you wish to remove a CD from your MC 501 CD player, simply press the
“open/close“ button to open the CD tray. If you open the CD tray during
playback, the player stops automatically.
If there is no disc in the CD tray, “no disc” will appear on the display.
2.7 Upsampling
With the “24 bit/ 96kHz” button you can change the sample rate. When
“24 bit/ 96kHz” is activated, the blue LED indicator on the left site of the
display is on.
Note: The upsampling function will not work with emphasis tracks. If your
CD contains emphasis tracks, the display will show “emphasis”.
2.8 Display brightness
With the disp. off (“display off”) button you can change the display’s
brightness within 5 steps from maximum to off. If the display is switched
off, the “disp. off” indicator LED on the right site of the display is on.
3. Remote control functions
The following functions can only be utilized from the remote control.
3.1 Numeric buttons
The 10 numeric buttons on the remote control unit enable you to choose
individual titles on your CD directly. For track numbers 1-9, you simply
press the corresponding button.
For tracks with a number higher than 9, press the button for the first digit
and then for the second.
Example: If you want to play the track with number “14” on your CD, press
the “1” first and then the “4”.
mc 501
stop mode
no disc inserted
emphasis
6
3.2 Programming
Apart from playing the complete CD or any number of its tracks in their
chronological order, you may easily draw up your own programs. To do
this, you simply enter the track numbers of the pieces you want to play in
the order in which they should be played. You can program a maximum
of 15 tracks.
With the player in stop mode press the program button (PROG). The display will show “prog”.
Use the numeric buttons to enter the numbers of the tracks in the order
you want to program them.
To start your program, press the play button.
During the play mode, the display will show the number and the elapsed
time of the current track.
To display the remaining time left of the current track, press the “time” button on your remote control once (1 x). By pressing the time button again,
you will get the remaining time of the program.
During program playback, you can skip titles by pressing the skip forward
and skip back buttons, just as you would during normal playback.
• If you accidentally entered a wrong track, simply press the stop button.
• To cancel the program play, press the stop button and then the
PROG button twice.
• If you want to interrupt the program playback, press the stop button
once. If you want to resume the program, re-press the play button.
3.3 Time display modes
In the stop mode, the display shows the number of tracks on the CD as
well as the total playing time. During normal playback, the number of the
current track and the elapsed time for this track will appear.
You can change the time display mode by pressing the “time” button on
your remote control:
• One press will show the remaining time of the current track.
• Two presses will show the total remaining time of the CD; the time
counter will now count down the remaining minutes and seconds.
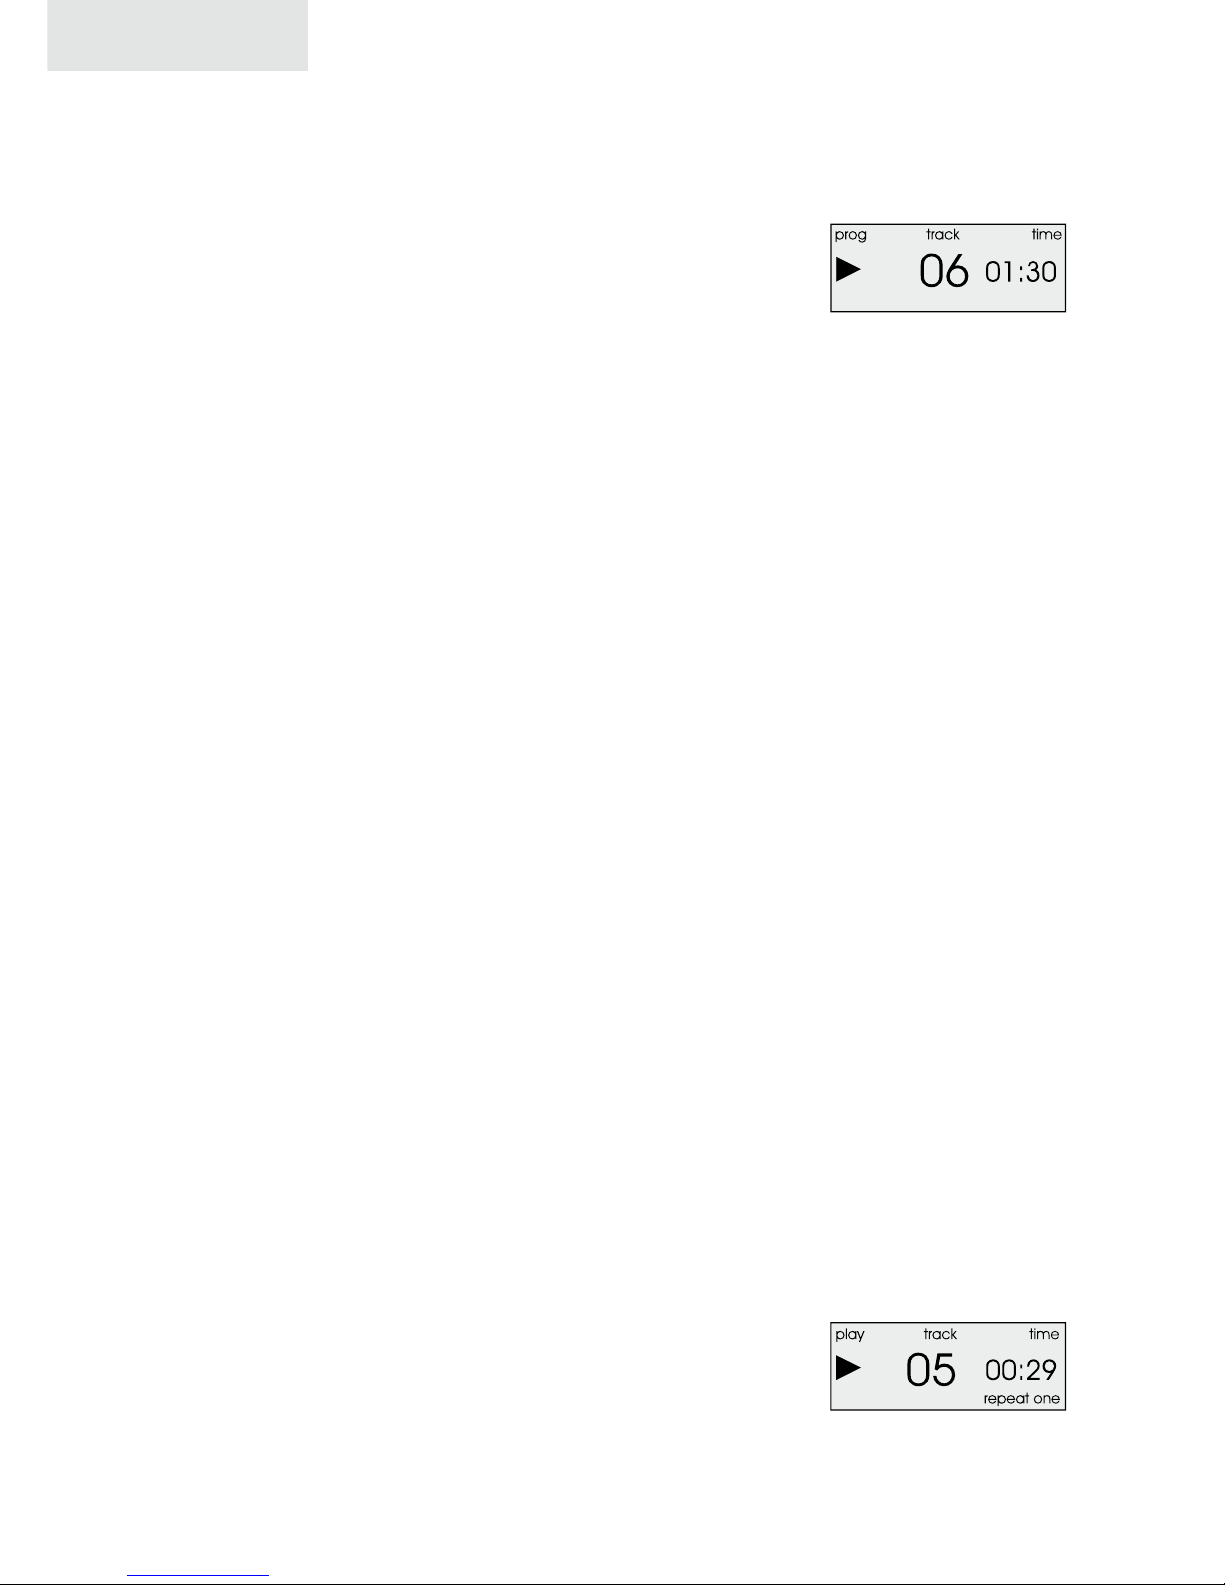
3.4 Repeat play (single track or all)
To repeat the current track, press the repeat button once. The display will
now show “repeat one” to specify that only one track (namely the current
one) will be repeated.
mc 501
program play
repeat current track
 Loading...