

Page 1
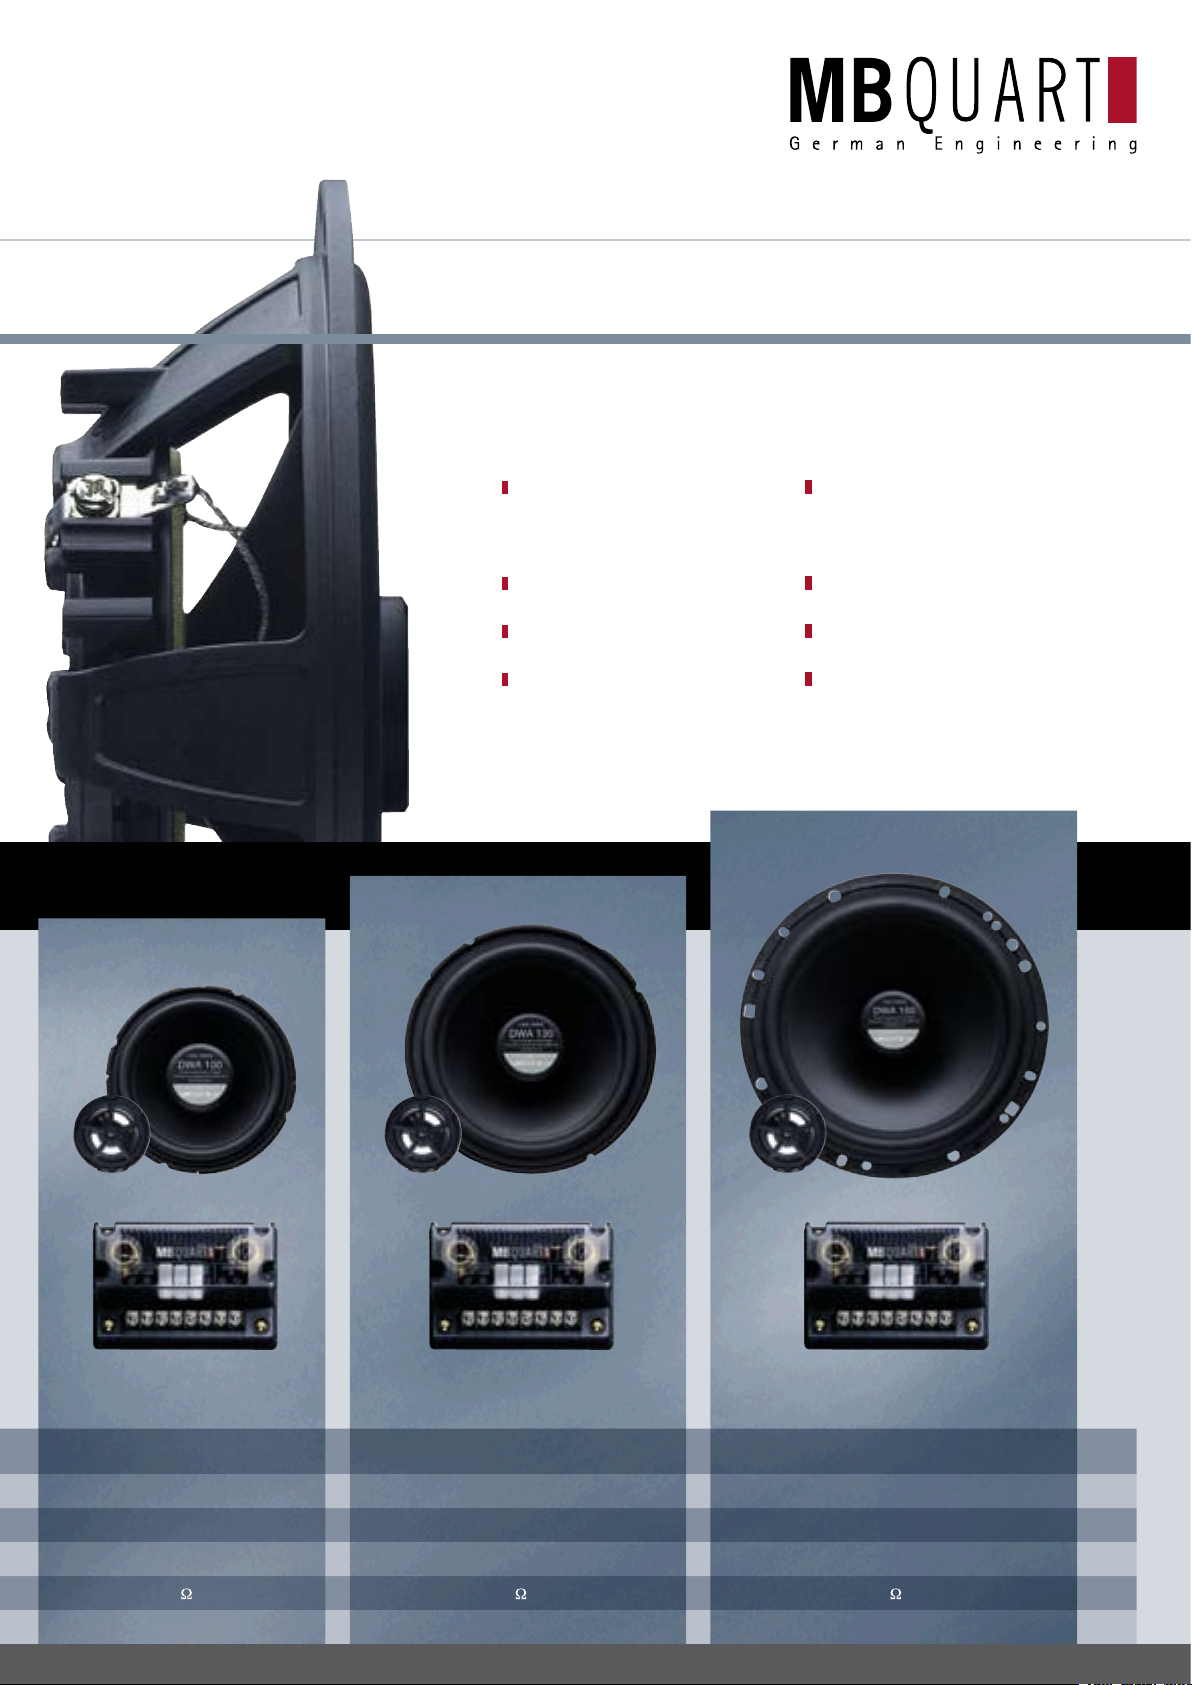
Der Flache mit dem satten SoundThe oval
The shallow one with the great soundReference
REFERENCE RUA
Woofers with extremely shallow
plastic chassis for optimized
installation in stock locations
with limited mounting depths
Encapsulated, front-mounted
neodymium magnet system
1” tweeters with titanium dome
in plastic housing
Reference crossovers with
variable two-level tweeter
output
REFERENCE RUA
Tieftöner mit extrem flachem
Kunststoffchassis für optimale
Verbaubarkeit in Fahrzeugschächten
mit geringer Einbautiefe
Gekapseltes, frontseitig aufgesetztes
Neodym-Magnetsystem
25 mm Hochtöner mit Titankalotte
im Kunststoffgehäuse
Reference-Frequenzweichen mit
variabler Hochtonabsenkung in
zwei Stufen
13 /14
2-Way Component System
2-Wege-Komponenten-System
RUA 213 RUA 216
2-Way Component System
2-Wege-Komponenten-System
2-Way Component System
2-Wege-Komponenten-System
Page 2

Allgemeines
General
Généralités
Indicaciones generales
Informazioni generali
Obwie rekomendacii
Wenn Sie den Einbau nicht durch eine Fachwerkstatt vornehmen lassen, lesen Sie bitte nachstehende Einbau- und
Montagehinweise sorgfältig durch. Beachten Sie bei Einbau und
Betrieb des Lautsprechers die Sicherheitsbestimmungen über
tragende Karosserieteile, die Bestimmungen der StVZO sowie
Vorschriften der Fahrzeughersteller. Informieren Sie sich, ob Sie
evtl. fahrzeugspezifische MB QUART Einbauadapter benötigen.
Schützen Sie Ihre Lautsprecher bei Einbau und Betrieb vor
Beschädigung, Spritzwasser und Überlastung. Klemmen Sie
während der Montage die Minusklemme der Fahrzeugbatterie
ab, um mögliche Kurzschlüsse zu vermeiden. Berühren Sie
bitte nicht die empfindliche Oberfläche der Hoch- und Tieftonmembrane. Verwenden Sie niemals die Lautsprecherchassis als
Schneid- oder Bohrvorlage.
If you do not have a specialized workshop do the installation,
please read the following installations and assembly instructions carefully. Please consider the safety requirements concerning supporting parts of the car body, the provisions of the
respective Road Traffic Licensing Regulations, and the directives of the respective car manufacturers for the installation and
operation of the loudspeakers. Your vehicle may require vehiclespecific MB QUART installation adapters. We suggest consulting
our web site www.mbquart.de/mbtech prior to attempting the
installation of your new speaker system. Take care to protect
your loudspeakers from damage and overload during installation
and operation. We suggest that you disconnect the negative pole
clamp of your car battery during installation to avoid possible
short circuits. Do not touch the tweeter or woofer membrane.
We also strongly recommend that you never use the loudspeaker
chassis as a template for cutting or drilling.
Si vous préférez vous charger vous-même du montage au lieu
d’en laisser le soin à un atelier spécialisé, veuillez lire soi–
gneusement la notice d’installation et de montage ci-dessous.
Respectez lors du montage et de l’utilisation du haut-parleur
les directives de sécurité concernant les pièces de carrosserie
porteuses, les prescriptions du StVZO (concernant l’homologation des véhicules) ainsi que les consignes du constructeur
automobile. Renseignez-vous pour savoir si vous avez besoin
éventuellement d’adaptateurs MB QUART pour votre véhicule.
Protégez vos haut-parleurs lors du montage et de l’utilisation
de toute dégradation, projection d’eau et surcharge.
Débranchez pendant le montage la borne négative de la batterie du véhicule afin d’éviter tout court-circuit éventuel. Veuillez
ne pas toucher la surface sensible de la membrane des aiguës
et des graves. N’utilisez jamais le châssis du haut-parleur pour
couper ou percer dessus.
Si no quiere encargar el montaje a un taller profesional, por
favor lea atentamente las instrucciones de instalación y montaje que se muestran a continuación. Durante el montaje y
funcionamiento de los altavoces, siga las normas de seguridad
respecto a las piezas de soporte de la carrocería, las normas
del Código de Circulación y las especificaciones del fabricante del vehículo. Infórmese de si en su caso es necesario un
adaptador MB QUART específico para vehículos. Durante el
montaje y funcionamiento de los altavoces, evite que sufran
cualquier desperfecto, presérvelos del agua y no ponga elementos pesados sobre ellos. Durante el montaje de los altavoces asegúrese de desconectar el borne negativo de la batería
del automóvil para evitar posibles cortocircuitos. No tocar la
superficie sensible del altavoz de graves ni del altavoz de agudos. No utilice en ningún caso el chasis de los altavoces para
cortar o perforar.
Se il montaggio non viene eseguito da un’installatore specializzato, seguite con attenzione le istruzioni fornite con il prodotto. Durante l’installazione degli altoparlanti, evitate di
modificare zone portanti della carrozzeria ed osservate scrupolosamente le disposizioni fornite dal costruttore dell’autoveicolo. Verificate la disponibilità di adattatori di montaggio
MB QUART specifici per il Vostro autoveicolo. Proteggete gli
altoparlanti da acqua, urti, e sovraccarichi durante e dopo l’installazione. Durante il montaggio, scollegate il morsetto negativo
della batteria onde evitare possibili corto-circuiti. Non toccate
le delicate membrane degli altoparlanti. Non utilizzate gli altoparlanti come dime di taglio o foratura. Durante il funzionamento
degli altoparlanti, osservate scrupolosamente le norme previste
dal Codice della Strada.
Esli Vy xotite ustanovit´ reproduktory samostoåtel´no, vnimatel´no prohitajte sleduüwuü instrukciü po sborke. Vo vremå ustanovki i
ispol´zovaniå komplekta reproduktorov, soblüdajte texniheskie trebo vaniå vo izbeΩanii
povreΩdeniå neobxodimyx dlå statiki detalej
kuzova avtomobilå, a takΩe pravila qkspluatacii
transportnyx sredstv i rekomendacii zavodaizgotovitelå avtomobilå. Prokonsul´tirujtes´
u specialista, vozmoΩno, Vam ponadobitså ustanovohnyj adaptor firmy MB QUART, neobxodimyj
dlå dannogo tipa avtomobilå. Bud´te ostoroΩny
htoby ne povredit´ reproduktory pri ustanovke
i ispol´zovanii, naprimer, v rezul´tate popadaniå vody ili v sluhae peregruzki. Vo izbeΩanii
korotkogo zamykaniå, otsoedinite vo vremå montaΩa
klemmy so znakom (-). Ne povredite huvstvitel´nye
poverxnosti membran vysokix i nizkix hastot! Ne
upotreblåjte poverxnosti korpusov reproduktorov
dlå rezki i sverleniå!
Herzlichen Glückwunsch!
Mit dem Kauf eines Car-HiFi Lautsprechersets aus dem Hause
MB QUART haben Sie sich für ein technisch und qualitativ
hochwertiges Produkt entschieden. MB QUART wünscht Ihnen
viel Spaß mit Ihrem Reference System. Sollten Sie Fragen zu
Reference oder anderen MB QUART Produkten haben, freuen
wir uns über eine E-Mail oder Ihren persönlichen Anruf.
Congratulations!
With the purchase of a MB QUART car hi-fi loudspeaker
set, you have purchased a technically sophisticated, highquality product. MB QUART feels confident that you will
enjoy your new Reference system. Should you have any
questions about Reference or any other MB QUART products, please feel free to send us an email or give us a call.
Félicitations!
Vous venez d’acquérir en achetant un lot de haut-parleurs hi-fi
pour voitures de la maison MB QUART un produit de grande
valeur sur le plan technique et qualitatif. MB QUART vous
souhaite beaucoup de plaisir avec votre système Reference.
Envoyez-nous un mail ou téléphonez-nous si vous avez
des questions à propos du Reference ou de tout autre produit
MB QUART.
¡Enhorabuena!
Con la compra de un set de altavoces Car-HiFi de MB QUART,
ha adquirido usted un producto de alta calidad técnica.
MB QUART le desea que disfrute con su Reference System. Si
tiene alguna pregunta acerca de Reference u otro producto
MB QUART, la contestaremos gustosamente por mail o por
teléfono.
Congratulazioni!
Acquistando un’altoparlante Hi-Fi Car MB QUART, avete scelto un prodotto di massimo livello tecnologico e qualitativo.
MB QUART Vi augura un buon ascolto con il Vostro, nuovo,
sistema Reference. Qualora desideriate porgere quesiti riguardanti i modelli della Linea Reference od altri prodotti della
MB QUART, saremo lieti di risponderVi per posta elettronica
o telefonicamente.
Pozdravlåem Vas!
S nailuh‚imi poΩelaniami Vas privetstvuet
firma MB QUART! UvaΩaemyj pokupatel´! Vy sdelali otlihnyj vybor, kupiv komplekt reproduktorov dlå avtomobilå, prevosxodnoe po texniheskim dannym i kahestvu izdelie. Firma MB QUART
Ωelaet Vam priåtnogo vremåprovoΩdeniå pod
muzyku iz na‚ix reproduktorov. Esli u Vas
poåvåtså voprosy po montaΩu i qkspluatacii
sistemy Reference ili drugoj produkcii na‚ej
firmy, my vsegda s udovol´stviem pomoΩem
Vam herez qlektronnuü pohtu ili po telefonu.
R E F E R E N C E
R U A 2 1 0 / 2 1 3 / 2 1 6
Einbauhinweise
Installation Instructions
Instructions de montage
Indicaciones de instalación
Istruzioni per il montaggio
Instrukciå po sborke
Achten Sie vor der Montage der Lautsprecherkomponenten
darauf, dass beim Einbau hinter der Auflage keine Hindernisse
wie z.B. Fenstermechanik vorhanden sind. Ebenso ist darauf
zu achten, dass die Frontgitter genügend Abstand zu Funktionsteilen wie Fensterkurbel oder Türgriff haben. Der
Hochtonpegel der Frequenzweiche ist werkseitig auf 0 dB
– das heißt auf maximal Pegel – eingestellt. Sie können den
Pegel über die Anschlussleiste in 2 Stufen bis zu –6 dB
absenken. Nach Feststellung der Funktion können Sie bei abgeschalteter Anlage die Polung der Hochtöner einmal ändern
(Plus und Minus vertauschen). Dies kann je nach Einbausituation
zu einer besseren räumlichen Abbildung führen.
Before installing any loudspeaker components, please make
sure that there are no obstacles to the installation. Check
behind the supporting surface to insure proper clearance to
the window mechanism or door lock assembly. When choosing to surface mount your speakers, take care to ensure
enough clearance exists between the mounting grilles and
door handle or window crank prior to cutting the door panel.
Tweeter adjustment: The tweeter frequency level is set during
manufacture to 0 dB, i.e. to the maximum level. You can
reduce the level in stages of 2 dB as far as –6 dB. To reduce the level simply move the tweeter cable by one position.
Then carry out a listening test. After establishing that the
loudspeakers work properly, you can switch the system off
and again reverse the polarity of the tweeters (by reversing the plus and minus leads). Depending the installation
conditions you may have a better staging.
Veillez, avant de monter les composants des haut-parleurs, à
ce qu’il n’y ait rien derrière le support, comme par exemple le
mécanisme de vitre. Veillez également à ce que la distance entre
la grille frontale et les éléments fonctionnels comme par exemple
le lèvre-vitre ou la poignée de portière soit suffisante. Le niveau
des aiguës du circuit diviseur de fréquence est réglé en usine
sur 0 dB – donc sur maximum. Vous pouvez baisser ce niveau
jusqu‘à –6 dB en deux étapes via la réglette de raccordement.
Dès que vous avez constaté le bon fonctionnement, vous pouvez
modifier une fois la polarité des aiguës après avoir déconnecté
l‘installation (intervertir positif et négatif). Cela peut, en fonction
du site de montage, contribuer à une meilleure reproduction
tridimensionnelle.
Antes del montaje de las piezas de los altavoces asegúrese
de que no hay impedimentos detrás del soporte (p.ej. la
mecánica de las ventanas). Igualmente, es importante vigilar
que la rejilla frontal esté a distancia suficiente de piezas de
uso habitual como son las manivelas de las ventanas o las
manecillas de las puertas. El nivel de tono agudo del diplexor
está ajustado de fábrica a 0 dB, es decir, al nivel máximo.
El nivel se puede bajar 2 escalones hasta –6 dB a través de
la regleta de terminales. Después de la determinación de la
función se puede modificar la polaridad del tono agudo con
la instalación desconectada (intercambiar más y menos).
Esto puede conllevar a una mejor reproducción espacial de
acuerdo a la situación de montaje.
Prima di procedere al montaggio degli altoparlanti, verificate che gli equipaggiamenti magnetici non ostacolino parti
meccaniche di portiere ed alzacristalli. Verificate che le reti di
protezione degli altoparlanti non impediscano il movimento
dei comandi porta e finestrino. L‘intensità del tono alto del
divisore di frequenza è impostato in fabbrica su 0 dB - ciò
significa la massima intensità. È possibile ridurla in due fasi
fino a -6 dB sulla morsettiera di allacciamento. Dopo aver
determinato la funzione è possibile, ad impianto spento,
modificare una volta la polarità dei toni alti (scambiare
più e meno). A seconda della situazione di montaggio ciò
può permettere una migliore riproduzione ambientale.
Pri sborke komponentov reproduktorov, neobxodimo
obratit´ vnimanie na to, htoby za avtomobil´noj
panel´ü, na kotoruü montiruetså reproduktor, ne
naxodilis´ kakie-libo prepåtstviå, t.e. detali
avtomobilå (naprimer steklopodßömniki), rabota
kotoryx povlehöt za soboj polomku reproduktora. A
takΩe prosledite za tem, htoby perednåå kry‚ka
reproduktora naxodilas´ na dostatohnom rasstoånii ot dviΩuwix-så detalej avtomobilå (dvernyx
ruhek, rukoåtok steklopodßömnikov). Urovenæ vysokix hastot hastotnogo razdelitelænogo filætra na
zavode-izgotovitele ustanovlen na 0 dB, to estæ
na maksimalænyj urovenæ. Vy moøete umenæπitæ
urovenæ posredstvom prisoedinitelænoj planki
v 2 stupeni do -6 dB. Ubediv‚isæ v funkcionirovanii, pri otklœçennoj sisteme Vy moøete
ewe raz izmenitæ polärnostæ vysokoçastotnyx
gromkogovoritelej (pomenåtæ mestami "plüs" i
"minus"). V zavisimosti ot poloøeniä pri montaΩe
qto moΩet sposobstvovatæ bolee qffektivnomu
prostranstvennomu otobraΩeniü.
R E F E R E N C E
R U A 2 1 0 / 2 1 3 / 2 1 6
Art.-Nr. 90-8041
Einbauanleitung
Installation Manual
Directiones de installation
Instrucciones de instalación
Istruzioni di montaggio
Instrukciå po ustanovke
R E F E R E N C E
R U A 2 1 0 / 2 1 3 / 2 1 6
M A X X S ON I C S EU R O P E GM BH
Neckarstraße 20
74847 Obrigheim, Germany
Phone +49 (0) 62 61 - 6 38-0
FAXX +49 (0) 62 61 - 6 38-129
E-Mail [email protected]
Website www.mbquart.de
M AX XS ON I CS US A , I NC .
1290 Ensell Road
Lake Zurich, Illinois 60047 USA
Phone +1 847 - 540 - 7700
FAXX +1 847 - 540 - 9776
E-Mail [email protected]
Website www.maxxsonics.com
Page 3
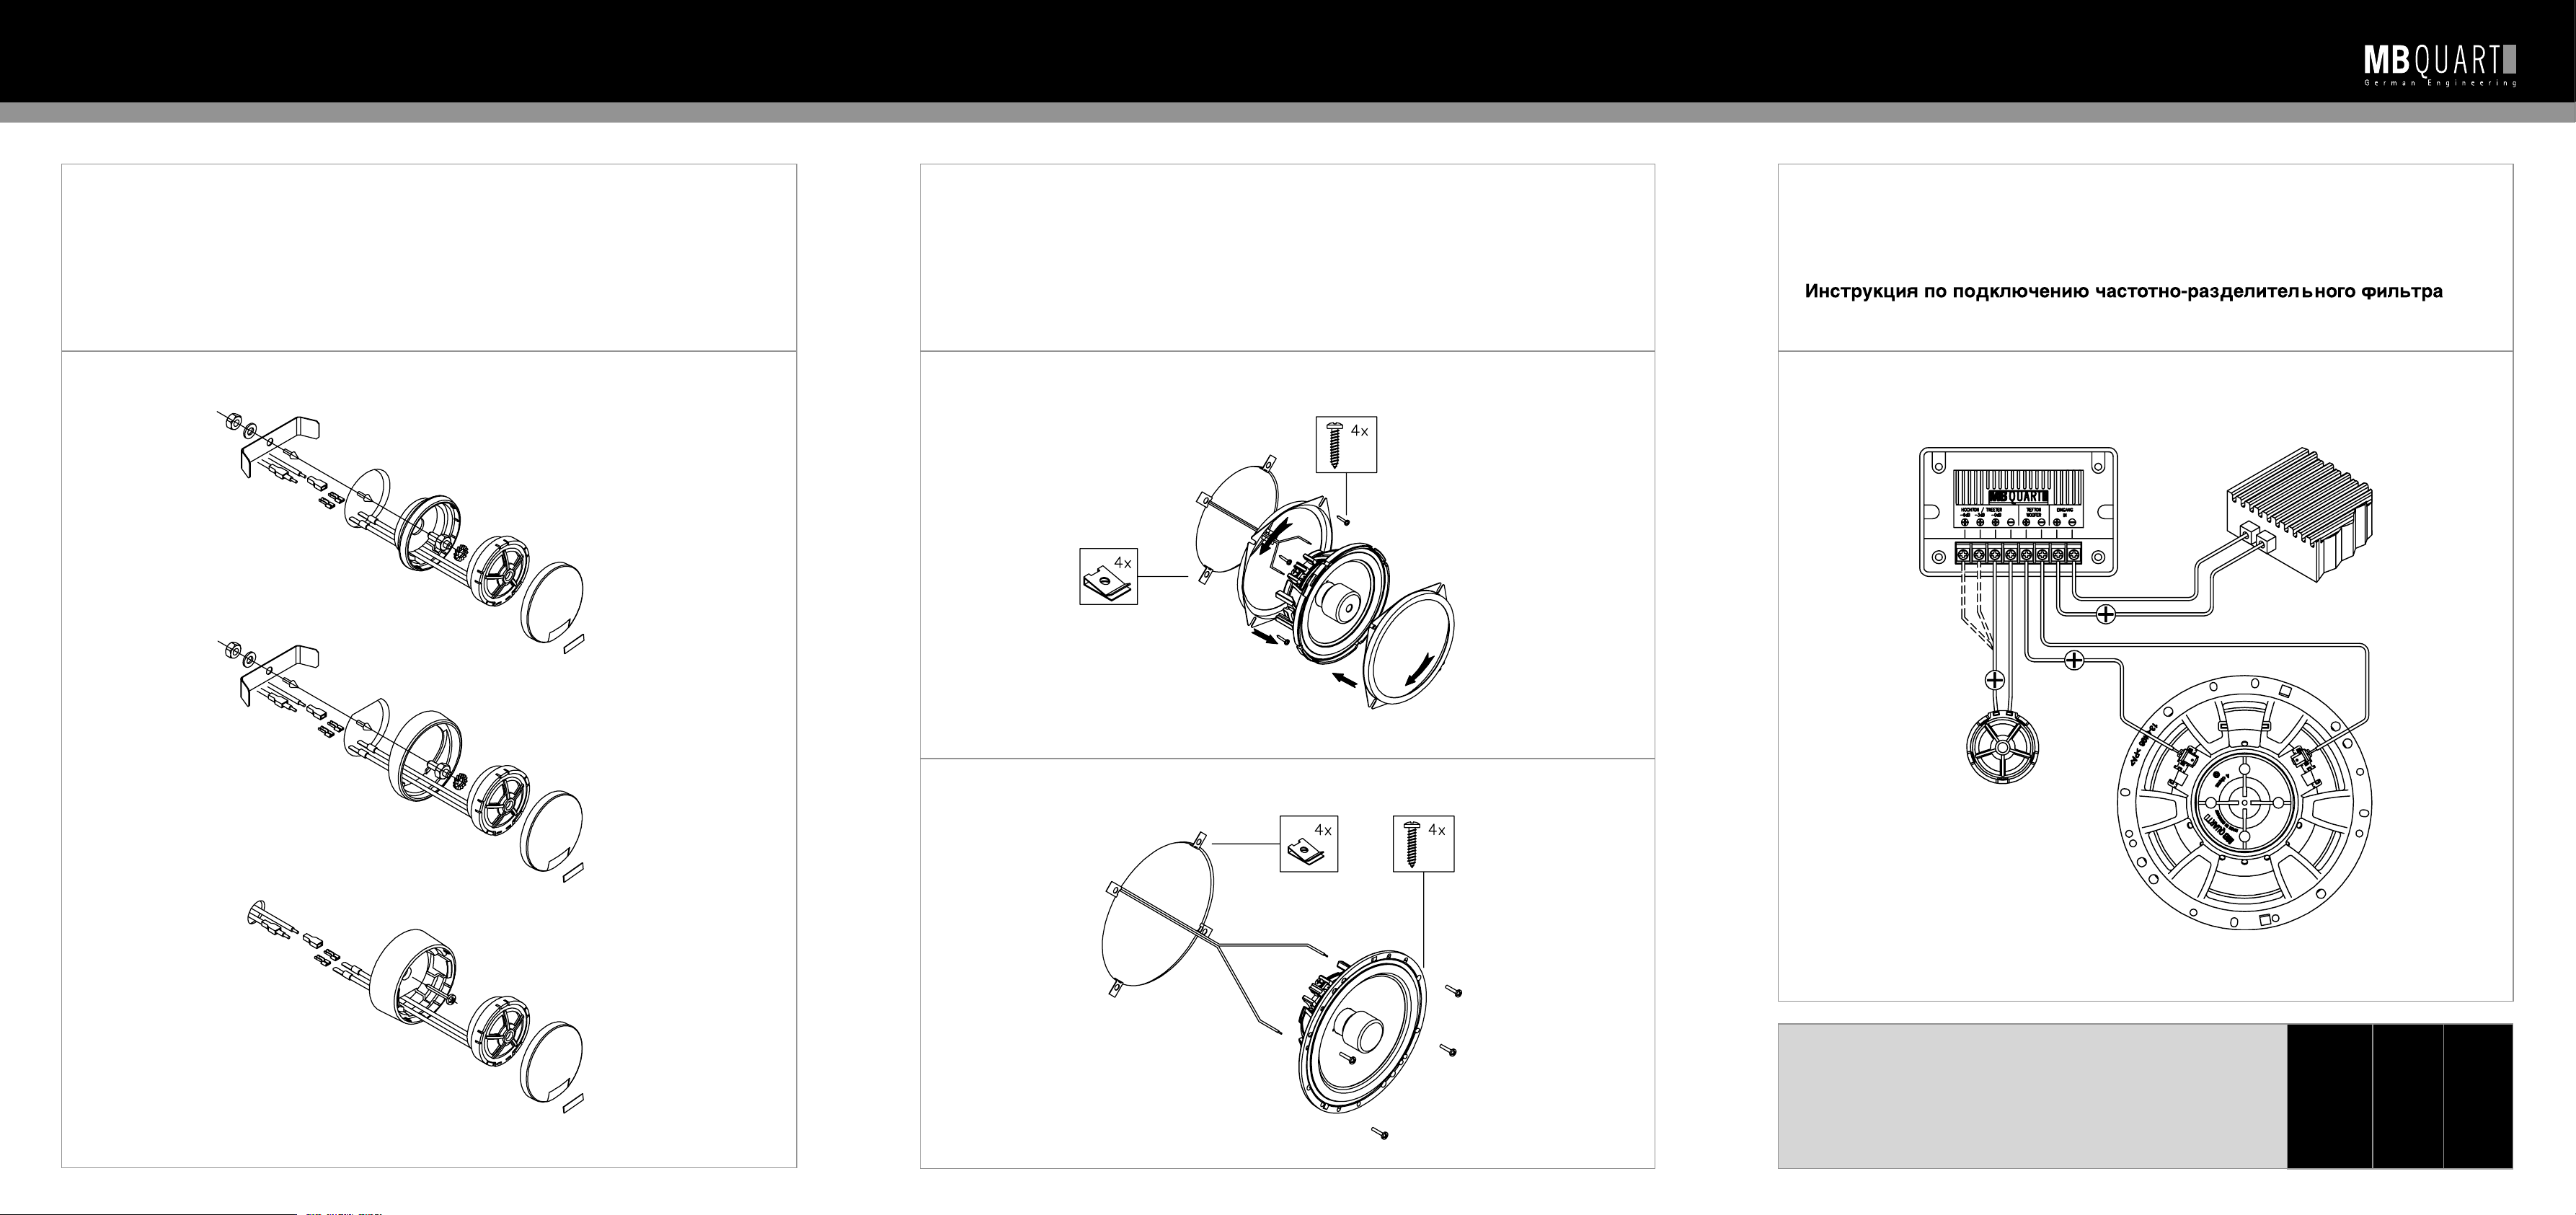
Montagemöglichkeiten Hochtöner
Assembly options – tweeter
Possibilités de montage des aiguës
Posibilidades de montaje del altavoz de agudos
Istruzioni di montaggio di un altoparlante per alte frequenze
Sposoby sborki vysokohastotnyx reproduktorov
1
Einbauhinweise Tieftöner in Originalschacht
Mounting instructions – woofer in original cut-out
Instructions de montage des graves dans le compartiment prévu à cet effet
Indicaciones de montaje del altavoz de graves en caja original
Istruzioni di montaggio di un altoparlante per basse frequenze
nell’alloggiamento originale
Instrukciå po sborke nizkohastotnyx reproduktorov¢ vmontirovannyx
v panel´ avtomobilä (skrytaä ustanovka)
2
RUA 210 / RUA 213
RUA 216
3
RUA 210 / RUA 213 / RUA 216
Anschlusshinweise Frequenzweiche
Connecting instructions – crossover
Consignes de branchement du filtrage de fréquence
Indicaciones de conexión del diplexor
Istruzioni di collegamento del filtro passivo
Ja hre
ye ars
an s
añ os
an ni
goda
Garantie
Warranty
Garantie
Garantía
Garanzia
Srok Garantii
3
Bitte bewahren Sie Ihren Kaufbeleg für Garantiezwecke auf.
Please keep your purchasing slip for warranty reasons.
Veuillez conserver le reçu de caisse pour la garantie.
Por favor conserve su comprobante de compra a efectos de garantía.
Conservate la ricevuta di acquisto ai fini della garanzia.
Soxranite, poøalujsta hek dlå sluhaev, trebuœwix
predostavleniå garantii.
R E F E R E N C E
R U A 2 1 0 / 2 1 3 / 2 1 6
Page 4
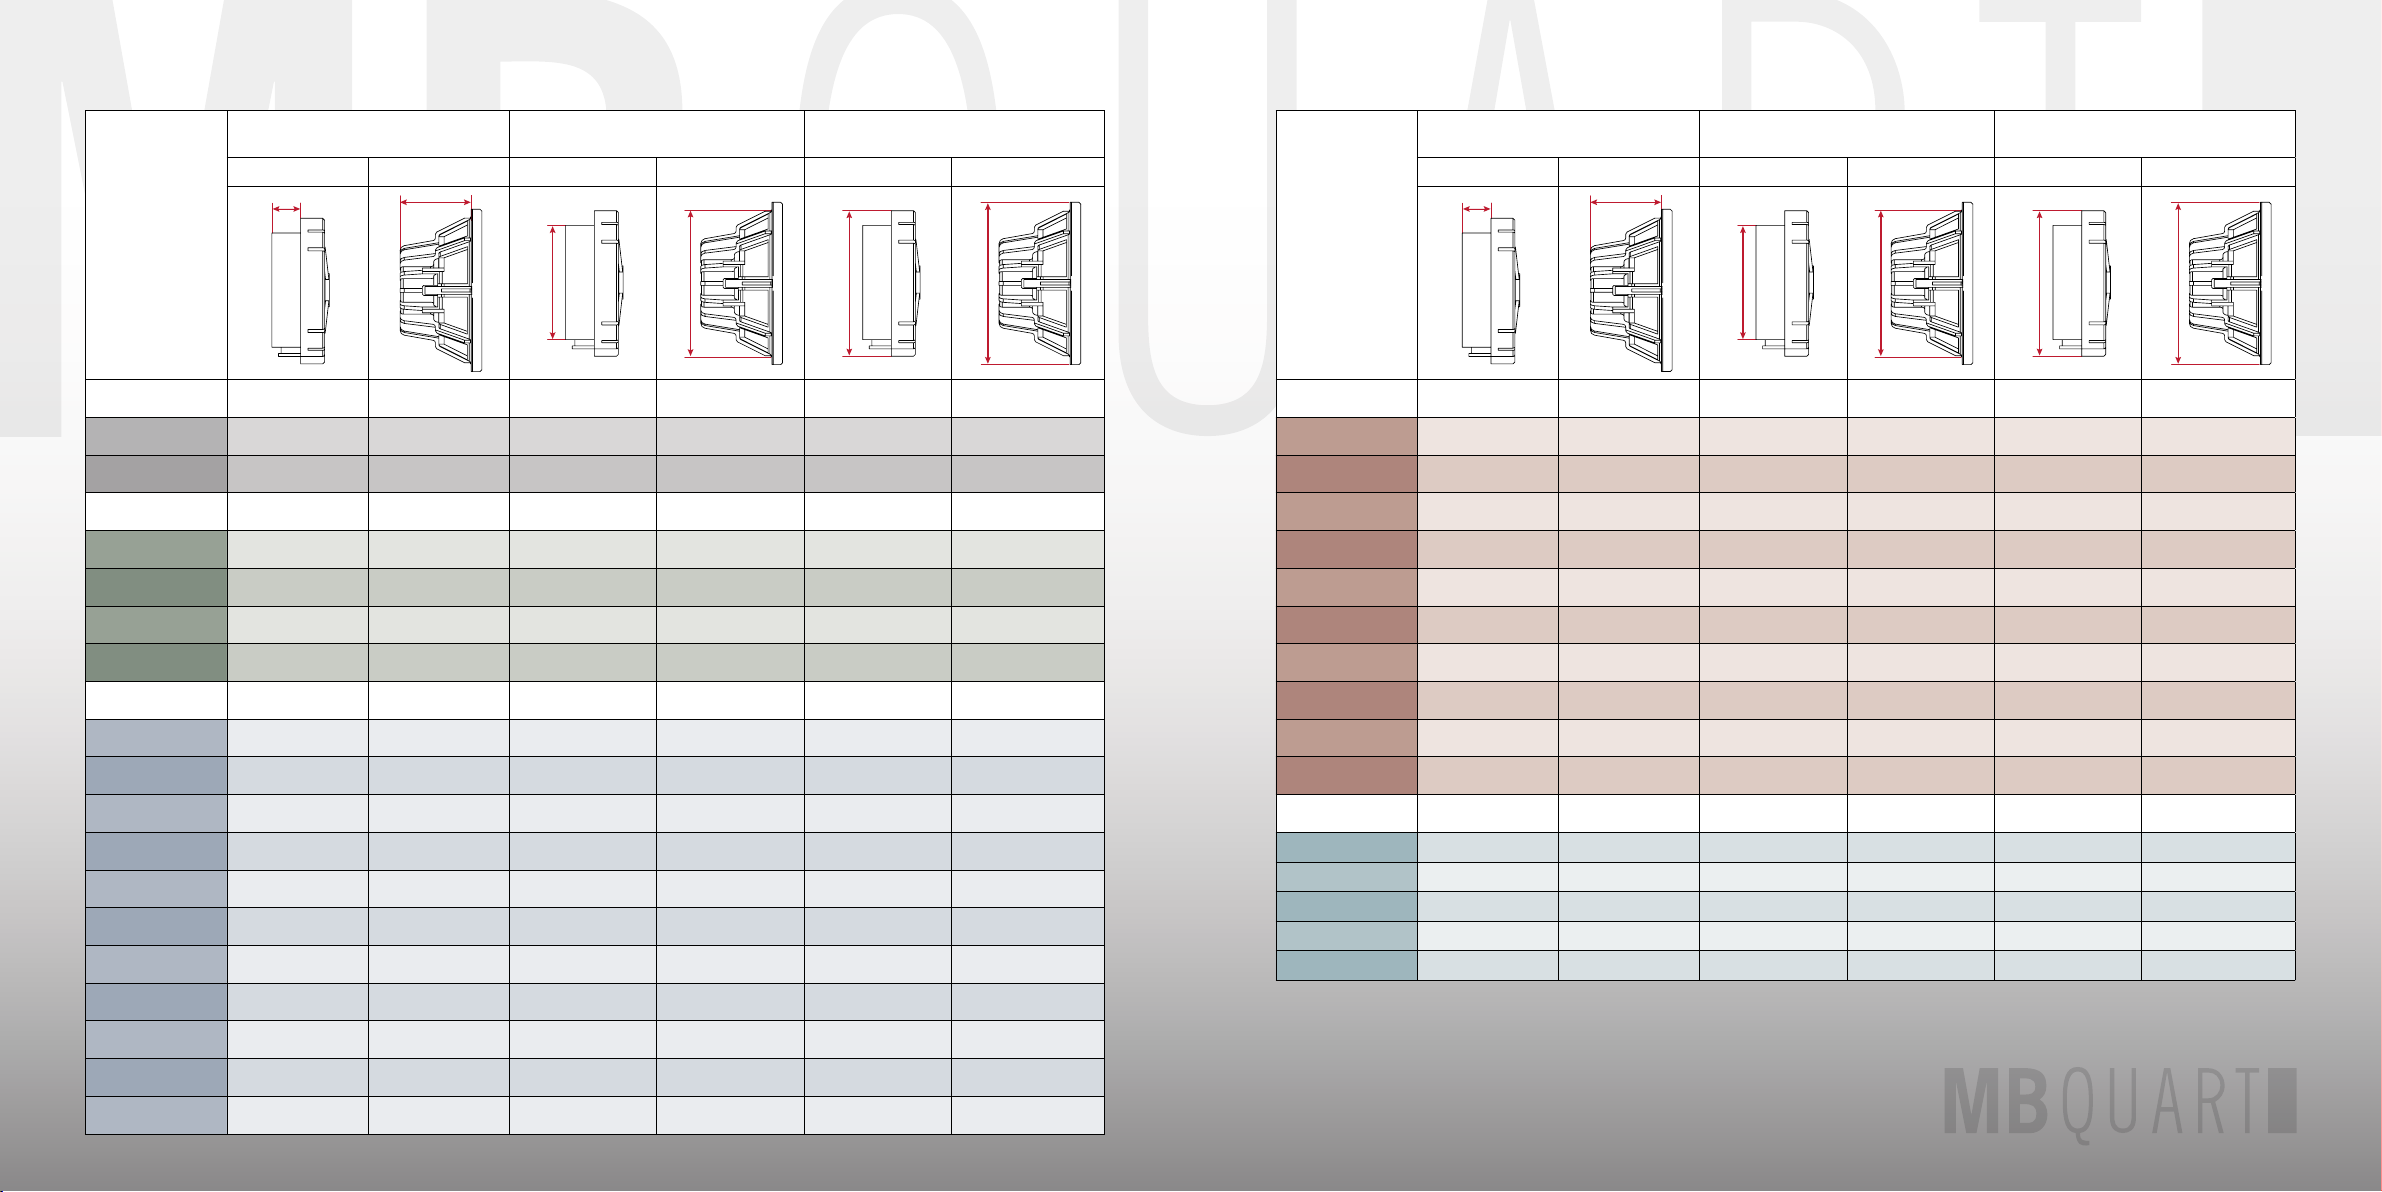
MOUNTING DEPTH
EINBAUTIEFE
INSTALLATION Ø
AUSSCHNITT Ø
EXTERNAL Ø
AUSSEN Ø
Tweeter Hochtöner Woofer Tieftöner Tweeter Hochtöner Woofer Tieftöner Tweeter Hochtöner Woofer Tieftöner
Q - L I N E
inch
mm
inch
mm
inch
mm
inch
mm
inch
mm
inch
mm
QSF 213 Nano
0.39 10 2.19 55,5 1.77 45 4.49 114 1.93 49 5.12 130
QSF 216 Nano
0.39 10 2.50 63,5 1.77 45 5.61 142,5 1.93 49 6.54 166
P R E M I U M
inch
mm
inch
mm
inch
mm
inch
mm
inch
mm
inch
mm
PVF 210
0.39 10 1.81 45,5 1.77 45 3.39 86 1.93 49 3.96 100,5
PVF 213
0.39 10 2.40 61 1.77 45 4.49 114 1.93 49 5.12 130
PVF 216
0.39 10 2.50 63,5 1.77 45 5.61 142,5 1.93 49 6.54 166
PWH 302/204
-
7.10 180,4
-
11.26 286
-
12.72 323
R E F E R E N C E
inch
mm
inch
mm
inch
mm
inch
mm
inch
mm
inch
mm
RVF 210
0.24 6 1.81 45,5 1.16 29,5 3.39 86 1.38 35 3.96 100,5
RVF 213
0.24 6 2.40 61 1.16 29,5 4.49 114 1.38 35 5.12 130
RVF 216
0.24 6 2.50 63,5 1.16 29,5 5.61 142,5 1.38 35 6.54 166
RVF 164
-
2.50 63,5
-
5.61 142,5
-
6.54 166
RVF 268
0.24 6 2.52 64 1.16 29,5
6“ x 8“ oval
*
1.38 35
-
RVF 269
0.24 6 3.25 83 1.16 29,5
6“ x 9“ oval
**
1.38 35
-
RUA 210
0.28 7 1.27 32,25 1.46 37 3.39 86 1.77 44,5 3.96 100,5
RUA 213
0.28 7 1.66 42,25 1.46 37 4.49 114 1.77 44,5 5.12 130
RUA 216
0.28 7 1.78 45,25 1.46 37 5.61 142,5 1.77 44,5 6.54 166
RSH 252/254
-
3.74 95
-
9.49 241
-
10.67 271
RSH 302/304
-
3.74 95
-
11.50 292
-
12.72 323
INSTALLATION DIAMETER EINBAUMASSE
MOUNTING DEPTH
EINBAUTIEFE
INSTALLATION Ø
AUSSCHNITT Ø
EXTERNAL Ø
AUSSEN Ø
Tweeter Hochtöner Woofer Tieftöner Tweeter Hochtöner Woofer Tieftöner Tweeter Hochtöner Woofer Tieftöner
D I S C U S
inch
mm
inch
mm
inch
mm
inch
mm
inch
mm
inch
mm
DKG 110
-
1.71 43,5
-
3.39 86
-
3.96 100,5
DKG 113
-
2.32 59
-
4.49 114
-
5.12 130
DKG 116
-
2.42 61,5
-
5.61 142,5
-
6.54 166
DSG 213
0.31 8 2.32 59 1.22 31 4.49 114 1.59 40,5 5.12 130
DSG 216
0.31 8 2.42 61,5 1.22 31 5.61 142,5 1.59 40,5 6.54 166
DKG 168
-
2.36 60
-
6“ x 8“ oval
*
- -
DKG 169
-
3.11 79
-
6“ x 9“ oval
**
- -
DTG 169
-
3.11 79
-
6“ x 9“ oval
**
- -
DWH 252/254
-
4.69 119
-
9.09 231
-
10.67 271
DWH 302/304
-
4.84 123
-
11.14 283
-
12.72 323
N A U T I C
inch
mm
inch
mm
inch
mm
inch
mm
inch
mm
inch
mm
NKA 116
-
2.99 76
-
5.16 131
-
7.07 179,5
NKD 116
-
2.50 63,5
-
5.79 147
-
6.73 171
NKA 169
-
3.25 83
-
5.9x8.7 150x220
-
6.71x9.56 170,5x243
NWD 254
-
4.61 117
-
8.94 227
-
10.71 272
NKD 254 TT
-
4.61 117
-
8.94 227
-
10.71 272
* Only for original installation slots.
Nur für original Einbauschächte.
**
External diameter and Installation diameter only as on Installation template.
Außendurchmesser und Ausschnittsdurchmesser bitte nur nach Original-Einbauschablone.
Subject to technical changes. Technische Änderungen vorbehalten.
 Loading...